Hand to machine, symbols 2

The symbol below usually represents a single increase. In hand knitting such increases may be achieved anywhere in any one row. In machine knitting however,  this may only be done with any ease at garment edges. Machine knitters may be familiar with calling what is depicted below a full fashioned increase. To achieve the latter,  a multiple prong tool is used to move the chosen stitches a number over to the right or to the left. On the machine, the resulting empty needle then needs to be “filled” unless lace holes created without doing so are part of the design; this may be done by picking up the purl bar from the row below. The blue dots represents the HK symbol, the pink the same symbol as it might be represented for MK to achieve the same result. The machine knit illustrations in this series do not factor in automatic patterning: rather,  they show how the stitches would be hand tooled on the machine to achieve similar fabrics.

single increase

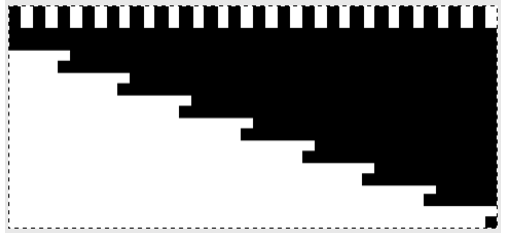
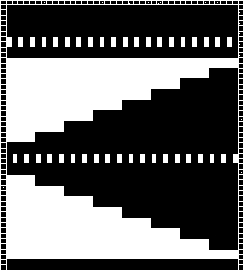
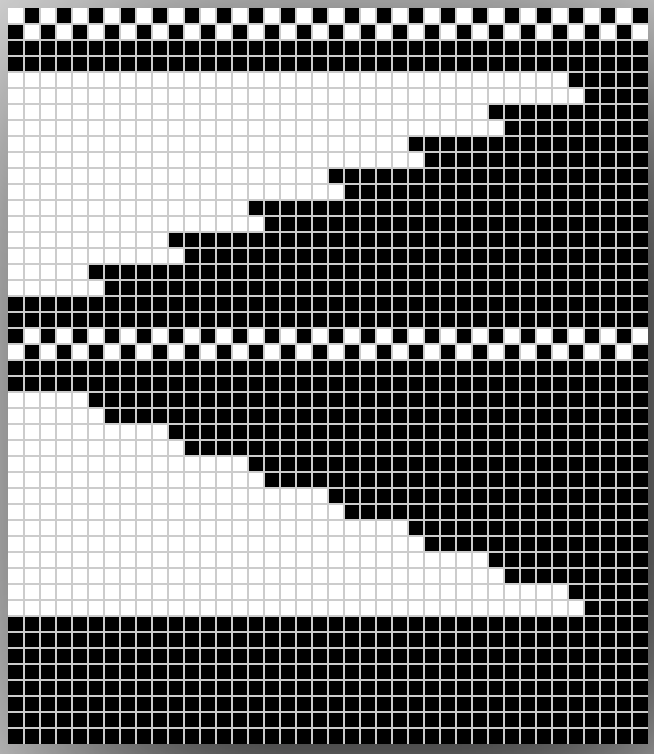
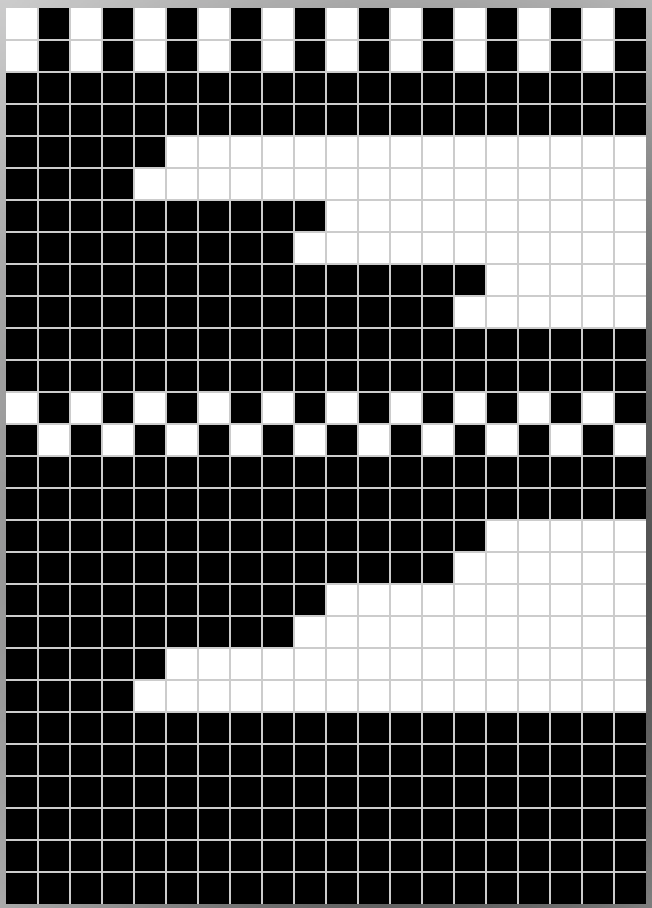
brioche/tuck stitch: the first 2 image series show “normal” orientation, the  3rd and 4th series the twisted in front of knit version. In MK the elongated stitch is twisted and returned to its needle; similar fabric may be created  purely through hand technique by using holding on single needles in desired locations. Tucked rows in KM programming are unpunched squares in card, white “squares” in mylars or computer downloads. Using the repeat below, in electronics it is possible to “draw” only the 3 tucked squares, and use color reverse.

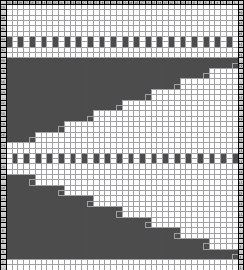
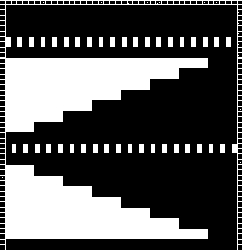
slip stitch: the first 2 image series show “normal” orientation. In machine knitting the slipped, elongated stitch is created on knit side, with the remaining “floats/bars” remaining on the purl. In the 3rd and 4th image series the elongated stitch moves to the back of the work, while the “floats/bars” move to knit side of the fabric and form a pattern on it. As with tuck stitches,  rows for slip in KM programming are unpunched squares in card, white “squares” in mylars or computer downloads. Using the repeat below, in electronics it is possible to “draw” only the 2 slipped squares, and use color reverse. Because in this fabric the needles are skipped, not filled with loops, multiple punched holes or white squares may occur side by side. If the goal is to achieve the skip stitch floats appearing on the knit side, retooling by hand is required on all skipped needles prior to the next all knit row.

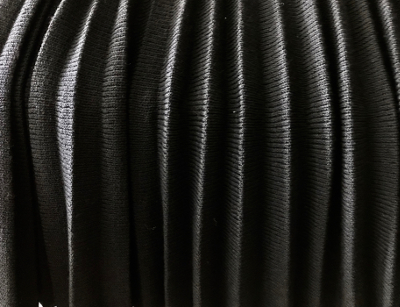
stitches woven through stitches: because of the fixed width stitches must travel with any crossings on the machine there are limits as to how far they are able to move across the bed within any one row. Cables come to mind immediately in terms of stitches crossing; another type of cross weaves stitches through others singly or in sets, which may also be done within rows of long stitches. In the illustration below, one stitch crosses through the center of another. If one is trying to match the hand knit fabric version, then the direction of the “weaving” is reversed as it would be in the case of cabling. Light colors and thick yarn help make the results more visible. This is strictly a hand technique; however, for greater accuracy and speed one may program card or electronics to select either the needle that comes off first, or the pair of needles involved involved with the cross.

an alternative symbol sometimes seem for this stitch

a simply repeat illustrated for KM: since the whole ground is purl, symbols for purl need not be used

.

November 2015 PS: the charts such as the one immediately above were created using Intwined Pattern Studio and my own custom made stitch symbols. The program on Mac not long after became unusable due to the presence of custom made stitches in library, took multiple efforts to restore without their presence, and there have been no updates since then to address this, or any of the other issues. More information and reviews may be found on ravelry.

Hand to machine knitting, symbols 1

One of the critical differences in viewing work as it progresses on the knitting machine is that the “front” view of the fabric unless the work is removed from the needles through a variety of techniques and turned over on the needle bed, is the purl side. Early machine manufacturer punchcard book publications made an effort to help hand knitters make the transition. A chart from brother publishing knit_sym96 illustrates one such effort. Here the middle icon in the how to work column is the stitch formation one would need to achieve on the MK to get the same “look” as the HK samples. Some symbols apply to both types of knitting, some should be mirrored horizontally to make sense, and in the case of the crossing stitches at the top right of the second column, there is a bit of confused identity.

Over the years there has been an interesting transition from handwritten stitch by stitch instructions to the introduction of symbols ranging from homegrown on graph paper, to simple word processing and later software generated ones. Some international differences occurred in published works, and internationally agreed-upon symbols for both knit and crochet eventually evolved. There are many design programs on the market now, I have linked to some in past posts. As knitters have venues for publishing their own repeats and patterns and tools have multiplied, symbols do not always necessarily have the same meaning, and stitch codes are no longer universal.

I have been wanting to find a way other than using excel to build a stitch library usable for machine knitters in an easily accessible program that would do some of the “work” for me. I have experimented with 2 programs. One was knitbird, which I would not recommend for this purpose, the other Intwined Studio which is proving far more flexible and worth the modest investment for me. I work on MacOS10.8, the Intwined version for this OS is beta. There are some small glitches, but this is a tool worth exploring. The option is there to add one’s own symbols to the stitch library. I have begun working on a machine knitting set with icons created in a combination of other programs and Inkscape, the one suggested in the tutorial by the developer. Some charts created with Intwined may be seen in my previous post on sideways pleated skirts. Below is a chart including some MK symbols in my personal library, also using the option to the color background for them in the program itself rather than editing the chart image after the fact.

To download Inkscape: site. The workaround to get the program to work in Mac OS10.8 may be found here.

The combination of color with symbols in published patterns for both hand-knit and crochet is beginning to proliferate. I find the visual color cues help track patterns more easily, have done it in HK in the past, one such example is my chain cable experiment in my January 3rd post.

Some illustrations for lace symbols HK vs MK may be found in my post from February 25, 2012 “back to lace”.

Pleats: automating “pleating”, single bed

This post was originally written in 2013. I found myself reviewing it in 2018, and editing it with the intent to attempt a pleat sample using the Ayab interface. In those days I was using Intwined for some of my charts. The program has since been unsupported for Mac, without upgrades and a series of problems that led to my switching over to excel completely for my charts, and now to Numbers in the latest Mac OS.

I work primarily on multiple model Brother machines, in this instance the 910. Some of the information provided below may need tweaking for use in other brands KMs. “Automation” of some holding functions may be achieved using slip setting to knit required stitches. Below is the mylar sheet repeat used for my sample swatches. The setup is on working needles 21L, 19R, program for color reverse and twice the height; KCII (cancel end needle selection); first-row needle selection from left to right, and with carriage ending on the right the first set of needles selected will be those that knit, the remaining bed will slip. This is opposite to the configuration familiar in holding, where needles out to E are held, those in B or D will knit (Brother needle position jumped the letter C, they are  A, B, D, E). In this type of knitting, all needles in use on the bed should be cleared with each pass of the carriage.

I have gotten used to keeping programming numbers for  locations on mylar around a square to correspond to the lights surrounding the house icon on the 910 and worked with the following 2 options for my test swatches

In the samples below the first set of every other stitch/ black square in the increasing/decreasing angles were slipped on the non-selected needles to create/mark the inner purl fold, the second set in the area that does straight knitting tucked on non-selected needles to create/mark the knit outer fold. For the latter to occur, the cam buttons need to be switched to tuck <-> for 2 rows, and then back to slip <-> for the remaining knit repeat. Small holes are created at edges of slipped areas as miters are created, as would appear were the fabric created through holding.

A: the alternate fold areas as they appear on the machine during knitting

the fabric after some casual steaming shown on the knit side, the pleating just about doubling on itself

B: with the added knit rows, the swatch before steaming

here is the purl side after some steaming showing the change in overlap

its knit side

both fabrics allowed to “hang”

The look may be varied considerably by changing the sequencing of the number of knit stitches, and the number of plain knit rows between the EON slipped or tucked ones. Electronics facilitate that, and with machines capable of accepting programming of the whole needle bed, there is even greater freedom. The sample above was knit loosely in acrylic, the holes would be less apparent in a tighter knit. If bothersome, they may in theory be “avoided” by factoring in “wrapping” if every row of the repeat is drawn rather than every other. With only 60 squares available on the mylar it is possible to go twice as wide and produce fabric width that may suffice for a skirt’s length. With software that allows for programming the width of the needle bed, possibilities expand even more. When going double wide with a repeat such as the one above, some problems result not so much in the inner fold slipped rows, but in the outer fold of the tuck ones. As in nearly any knitting when needles have 2 side by side loops resting on them, these loops will create a float/ ladder, so the tuck rows will essentially behave like the slipped ones as the double loops are dropped rather than anchored on the subsequent pass of the carriage. In the configuration here if the double-wide button is used, one way to solve that issue would be to bring consistently the same of either of the 2 non selected needles out to D or E position (still faster than hand-selecting repeats by hand for holding), resulting in knit stitches and single tuck loops.

5/18/18  Working out the kinks: the same repeat is redrawn to factor in the reduction of the eyelets at edges of slipped areas: a partial graph showing “automatic wrap”. However, the “wrap” will fail with color reverse, and that first row would have only one stitch knitting. If double wide is used, then the wrap will happen around 2 needles, creating yet another “float”. 

its color reverse 

Plain knit rows (blanks on mylar) may be added at the bottom or top of the repeat to change pleat depth. Here is an amended repeat, discarding the “automatic wrap” idea, first prior to color reverse, then after

 
Those all blank rows would result in no stitches being knit, essentially a 2 row “free” carriage pass, and are removed. The repeat is  now also capable of being knit twice as wide if desired, adding the hand technique on tuck folds

Below the edited repeat begins design using one pixel per stitch and per row. “Automatic” wrap happens as one row is knit, while the next preselects an extra needle. The yarn travels under the extra needle prior to its being knit on the next pass from the opposite side. There will still be an eyelet, a bit larger than hand wrapping, but smaller than without any wrap at all. The EON pixels in the center of the shape are tucked. For that to happen the knit carriage needs to have the cam buttons switched from slip to tuck, and back to slip after the 2-row sequence. The fabric folds out to the knit side. The EON (every other needle) set at the top of the shape is knit in the slip stitch setting, resulting in the fabric folding into the purl side. The process could be reversed to have each fold to the opposite side of the knit.

The carriage needs to be on the opposite side of increases in the number of stitches worked. Here the first preselection row should be from left to right, with carriage traveling to and from the right for the subsequent pairs of rows. 

More variations: the slip stitch configuration below is changed to the same EON selection for 2 rows. The same could be done for the tuck fold. For this repeat, the first preselection row should be from right to the left, making that the side the knit carriage returns to after each pair of rows knit. The sample was knit in a too thin acrylic. Both eyelets and their “wraps are visible, as well as the direction of folds.

These are pleats in a skirt made eons ago, that have retained the fold over the course of many a year 

An added alternative for fold lines: create outside crease transferring EON to make a row of eyelets, create inside crease by knitting the desired row double row with 2 strands of garment yarn. “Automatic” repeat must be adjusted accordingly, whether by redrawing or punching, or using cam settings for the correct stitch formation.

Seaming should be planned on the inner fold of the fabric, depending on whether the purl or knit side is used as the “public” side, the least visible join being one that is grafted ie with Kitchener stitch.

The same principles may be applied to punchcard knitting but because the repeat size is 24 stitches the resulting fabric is one suitable for portions of garments/ accessories, in details such as ruffles and edgings. Punched holes would match the black squares in the color reversed repeats.  “Air” knitting helps determine the exact needle location required, and to decide which side the first row must be selected prior to actual knitting. The image below shows the start of only one possible partial repeat based on the last one above

I usually sample my repeats by using hand selection and holding before committing to drawing on mylar or punching holes. An even number of rows is required in this technique.

Chain cable HK experiment

Several months ago menswear began to appear featuring versions of chained cables. There are some published sources for such patterns, some available for purchase online ie in Ravelry,  while others may be found in the Barbara Walker Treasury Books. One HK version from the latter may be found here. I decided to play with excel and experiment further. I used Aire River Design font (no longer available) on my Mac to generate the symbols used. Columns and rows may be easily edited to adjust the height and width of repeat to suit the design process. I charted only knit “right side rows”. On purl rows, one simply reverses the previous row’s purl/knit sequences

the first linear repeat (outlined in orange)

I tend to prefer brick repeats in odd numbers across the piece: this instance adds reverse knit rows in the center of the cables as well for more surface texture, seed stitch may be another consideration

a quick swatch testing the repeat in random cotton from my stash

.

Knitting continues

I have been working on a series of tuck reversible chenille scarves. Color changing occurs every 2 rows. I do use 2 carriages. IMO the brother 2 color single bed changer was one of the worst designed accessories ever. The chenille is cranky, knitting is slow, and one is looking at the back of the knit so the pattern is not immediately obvious to the eye. These are a few colorways

thinking I had the knitting down, got to # 12 scarf, realized I needed to knit 10 more rows after canceling needle selection, “corrected” for row count, finished knitting the pattern, completed the edging, and realized the “corrected” rows were off and that this whole scarf has a mystery repeat. Here is an image of the front of the piece after unraveling edging and back to a row ready for rehanging next to a previously knit “how it should look”

it is an interesting variation of the pattern repeat, but without fiddling with starting rows, I have no clear idea how to duplicate it should I want to. Knitting rooms seem to have days when they are full of goblins.

I have some issues with my back and right arm was looking for an easier way to manage the knitting of these things and the reach required to get the carriages off the beds while knitting with the opposing one and had forgotten about this particular “stand”. A few years ago I broke my right shoulder, and as I began to regain use of the arm I went looking for an adjustable height, stable KM “stand”. A friend found this for me. It is what I can only be described as an ancient, asylum quality hospital bedside stand. It is probably at least part iron since magnets stick to its metal parts, are very heavy, has a huge adjustable height range, and does not budge during knitting in spite of the fact it is on wheels, while it is easily moved when one wants to do so. It was “free” as well, an added bonus.

When knitting fabrics single bed I do not work with the ribber engaged, have no idea if the added weight would be an issue or if the clearance is adequate for attaching it to the “stand”, but using the ribber clamps with the main bed at an angle seems to make crankier fabrics easier to knit. The crank for raising/lowering the height easily stores lace extension rails.

A kitchen timer is handy to get an accurate gauge as to how long the items actually take to knit from beginning to completion in helping set retail prices for new items, and kitchen scales to weigh cones before and after (grams or ounces) aid not just to gauge the cost of materials, but also to be certain that yarn quantity is adequate to finish the piece.

In static season some of the problems with yarn management or electronic KM pattern shifts can be resolved by both having a grounding wire, and using a humidifier. One such model may be seen in the lower left of the photo, is very inexpensive, designed for use in nurseries, on the noisy side, but requires no special care other than occasionally cleaning out the water container, and uses tap water.

Canned air can help remove fiber dust during knitting so it does not become part of the finished piece when using a brush or small vacuum is impractical, it is best not to use it in places where the fuzz is likely to get blown into springs and electronic parts, however.

Paper towel holders can serve as yarn cone holders for ones that tip over easily, and the extra straight arm they sometimes have in models similar to the one below can help hold upright yarn wounds on tubes of various sizes, an alternative to the usual horizontal ways of managing such.

Craft ribbon holders can serve the same purpose if one wants to feed tubes horizontally in addition to the old super low tech tricks of HK needles poked through a variety of holders with caps to help secure them in place

.

Slip/ tuck stitch experiments

These scarves were designed using the same method as described for mazes and mosaics, they are knit in rayon chenille, fringes are composed of  i_cords applied to cast on and bound off edges. The smaller shape/repeat allows for more control over fabric width while retaining full repeats

blue ovals: 11X58 inches excluding 3 inch fringe

BW: 9.5 X 58 inches excluding 4.5 inch fringe

time to stop playing and get back to winter inventory production!

hot off the presses 11/10: tuck stitch 11 X 60 rayon chenille

an unplanned “mutation”

scarves measure and average 9(+) inches in width, 60(+) in length after blocking

11/17/2012: some colorways

.

More play with dropped stitches

I am interested in trying to introduce designs into drop stitch grounds, and my leaf obsession is at least temporarily back. In working with a vine shape, I found having the vine create the dropped stitches created a too loosely knit, unrecognizable fabric, so on to color reverse. The resulting swatch is a bit of a brain teaser : “find the vine”

the companion ruffle: these blocking pins are great for blocking, may be pressed over

both were a lesson in gauge; using same tension etc. as in blue shawl this scarf is inches narrower, and the ruffles were not wide enough , will have to be re knit; only difference in fabrics was the change in yarn color, not its composition. “Back to the drawing board”

the finished piece measuring 14 X 74: 2 ways to wear it

Mosaics and mazes: machine knits_ from design to pattern

Maze patterns have long vertical and horizontal lines broken by regular gaps and the pattern lines change course from the vertical to horizontal, and vice versa. Maze cards can be identified by completely punched sections, some alternating with every other square marked for two rows, usually geometrically shaped. Areas of stocking stitch produce horizontal colored stripes, and alternating pattern stitches that slip or tuck cause the vertical stripes, which are sometimes pulled nearly diagonal by the influence of tuck or slip. The fabric will be unbalanced because the number of needles slipping or tucking will not be the same on every row. Odd rows form 2 color horizontal stripes, even rows vertical stripes, with color changes occurring every 2 rows.

Mosaics have a brick arrangement (tessellae), with clear perimeters and cores, and stepped diagonals (frets) that are partially formed bricks, their positive and negative spaces are created by the use of contrasting colors. The stripe sequence is not as obvious. The punchcard looks even less like the original design.

In single bed work, the reverse of the fabric will show the original design in the texture of its slip or tuck stitches. There usually will be no floats longer than one or two stitches.

The knit side may look like a fair isle but the back lacks the usual long floats, hence the name “float-less fair isle”

The row gauge is compressed. Tuck fabrics are short and fat, slip ones tend to be short and thin. Some patterns elongate in washing. The tension used is usually one number higher or more than that used for stocking stitch for slip patterns to reduce their narrowing, tuck patterns may also have to be adjusted to suit. Smooth yarns in contrasting colors are the easiest to establish and test the pattern, then the choices can be far more personal.

Designing your own: traditional “rules”

  1. if scale matters consider that the height of 2 rows may equal the width of one stitch
  2. start small, let each square on your graph whether on graph paper, in a design program or spreadsheet/vector program cell equal one stitch, each line on the graph represents 2 rows of knitting, when knitting the pattern double-length specific to KM may be used. The unfilled squares represent the lighter color/color1, the colored squares represent the dark/color2
  3. no more than one stitch to tuck, two to slip at a time
  4. row 1 and all odd-numbered rows (most stitches knit) can have any number of squares marked, the slipped (tuck, or slip/part tuck in alternating directions) are represented by blank grids (no more than 2 side by side for slip, single for tuck), they are generally knit in the lighter color/color1
  5. even-numbered rows must have single squares marked, they are generally knit in the darker color/color 2, there should be no more than 2 “light squares”/ unpunched holes side by side, the slipped (tuck or part/slip tuck in alternating directions) are represented by marked grids
  6. vertical lines must begin and end on odd-numbered rows
  7. vertical lines must always consist of an odd number of rows in total
  8. the finished design must be an even number of rows to allow for traveling back and forth to the color changer for picking up and carrying the subsequent color
  9. if the design is not to be elongated check to see that every light square to be worked in the dark color is present in the row below, that every dark square in the row to be worked in the light color is also present in the row below

Susanna’s chapter on mosaics has information on fabrics where “rules” get broken. Changing the order of the colors or introducing a third color may yield pleasant surprises. Knitting is started on a non-patterning row with first-row selection toward the color changer in Japanese machines. If you have a machine that preselects needles: color must always change when the needle selection changes. Four movements of the carriage are required to produce two rows of knitting.

One approach with a design that breaks rules:

masking alternate rows and “separating them”: odd rows knitting in color 1

dark squares get punched out/ drawn, light ones tuck or slip depending on cam settings

color 2 knitting even rows:

light squares are punched out/drawn and will knit, dark squares ones tuck or slip depending on cam settings

colored areas below are those to be punched overall

I used Excel to eliminate yellow fill on odd rows, darker fill on even. Many articles on this subject date back to graph paper, pencil, and eraser days. Quick color fills including empty make the process quicker with software. Still finding the image above confusing, it may be easier to decide what to draw on the card/mylar if all areas to be punched are dark, blank squares can then be more easily identified and marked, punching everything else or coloring them in and using color reverse if your machine has that ability. In the image below the lighter color is replaced by a darker one

the resulting card, which needs to be elongated X2

The swatches were knit using both the slip and tuck settings (also breaking the usual rule). Some of the tuck rows have a bit of color scrambling likely due to the amount of side by side tuck loops in the repeat not knitting off properly in those spots

slip stitch front

the back

tuck front shows the repeating trouble spots

tuck back

point grids for developing designs are of 2 types

in turn, the pattern may be drawn over them

staggered units may require some cleanup and “erasing”, as represented by pink squares

when the shape is what one desires, color separation follows as for the design at beginning of the post

Susanna Lewis at one time did publish a technique that could be entered in the E6000 that essentially did the separation; wincrea does not presently download techniques, there are other programs that can, and/or a combination of card reader sheet and computer download may be used, but that is for another day.

Mosaics and mazes from “FI” “universal” patterns

Many punchcards that obey the usual restrictions for tuck, in particular, may be used to create “random” mazes and mosaics, with color changes happening every two rows. Test swatches will show differences in surface texture, patterning, width, and height of the knit. It is useful to use clearly contrasting colors to study how the structure of the fabric is affected by different techniques. This test series explores the quality of the stitches created, along with using different knit carriage cam settings, although this repeat does not produce designs typical of either mosaics or mazes.
The swatches were knit during a class demo, for easy visibility, not as studies for finished garments or accessories. They were produced on Brother punchcard KM, using a single bed color changer. Electronic KMs advance a row for each pass of the carriage regardless of its beginning position/side. As noted in later blog post shares, such fabrics are produced more quickly and easily if an electronic is available with  2 compatible carriages for use.
Yet another single color variation, missing here, would be to use opposing buttons for tuck/slip.
The first preselection row is toward the color changer.  The FI pattern front with a bit of bleed-through where floats were hung up on the purl side

tuck 1 color slip 1 color  tuck 2 colors slip 2 colors  last but not least, slip stitch adding a third color front, still changing colors every 2 rows

This is a factory punchcard design, a smaller repeat. 
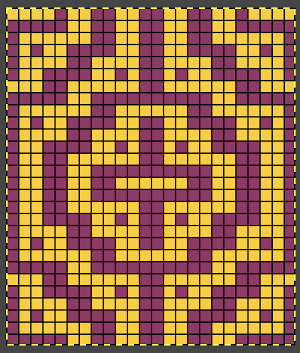
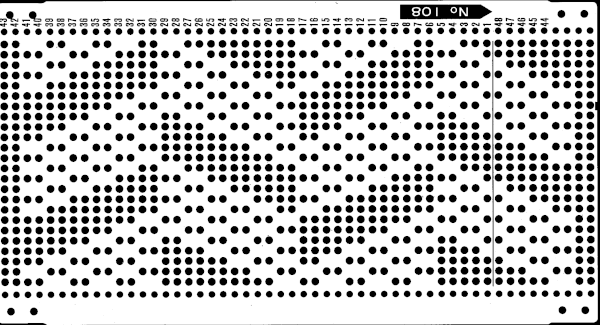
The repeat enlarged and punched for use in the pictured samples
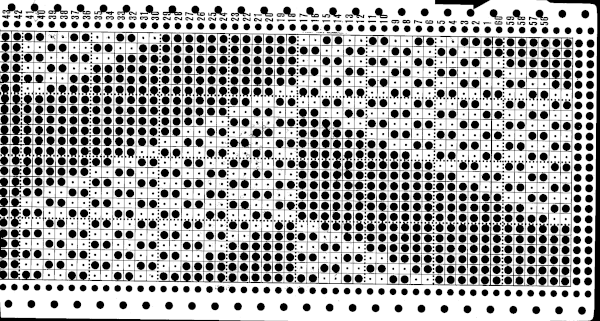