This post was originally written in 2013. I found myself reviewing it in 2018, and editing it with the intent to attempt a pleat sample using the Ayab interface. In those days I was using Intwined for some of my charts. The program has since been unsupported for Mac, without upgrades and a series of problems that led to my switching over to excel completely for my charts, and now to Numbers in the latest Mac OS.
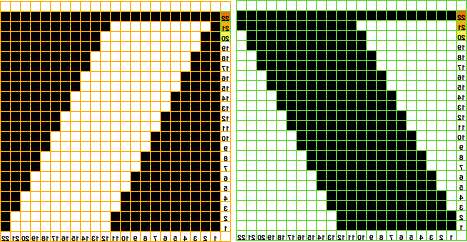
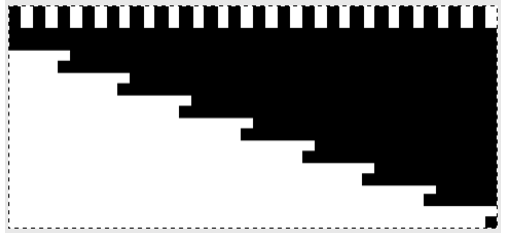
I work primarily on multiple model Brother machines, in this instance the 910. Some of the information provided below may need tweaking for use in other brands KMs. “Automation” of some holding functions may be achieved using slip setting to knit required stitches. Below is the mylar sheet repeat used for my sample swatches. The setup is on working needles 21L, 19R, program for color reverse and twice the height; KCII (cancel end needle selection); first-row needle selection from left to right, and with carriage ending on the right the first set of needles selected will be those that knit, the remaining bed will slip. This is opposite to the configuration familiar in holding, where needles out to E are held, those in B or D will knit (Brother needle position jumped the letter C, they are A, B, D, E). In this type of knitting, all needles in use on the bed should be cleared with each pass of the carriage.

I have gotten used to keeping programming numbers for locations on mylar around a square to correspond to the lights surrounding the house icon on the 910 and worked with the following 2 options for my test swatches

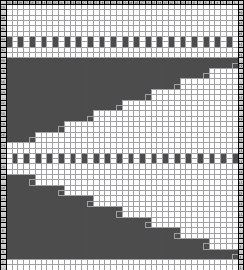
In the samples below the first set of every other stitch/ black square in the increasing/decreasing angles were slipped on the non-selected needles to create/mark the inner purl fold, the second set in the area that does straight knitting tucked on non-selected needles to create/mark the knit outer fold. For the latter to occur, the cam buttons need to be switched to tuck <-> for 2 rows, and then back to slip <-> for the remaining knit repeat. Small holes are created at edges of slipped areas as miters are created, as would appear were the fabric created through holding.
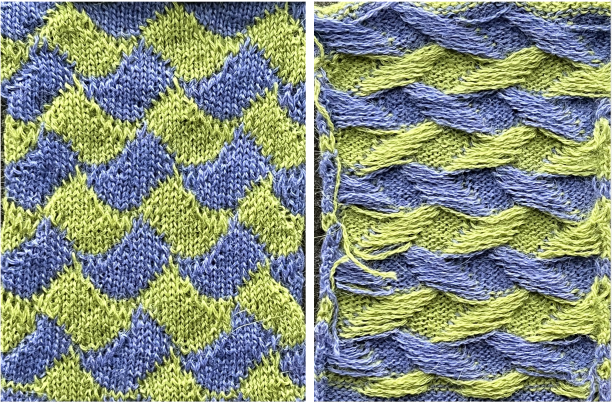
A: the alternate fold areas as they appear on the machine during knitting

the fabric after some casual steaming shown on the knit side, the pleating just about doubling on itself

B: with the added knit rows, the swatch before steaming

here is the purl side after some steaming showing the change in overlap

its knit side

both fabrics allowed to “hang”

The look may be varied considerably by changing the sequencing of the number of knit stitches, and the number of plain knit rows between the EON slipped or tucked ones. Electronics facilitate that, and with machines capable of accepting programming of the whole needle bed, there is even greater freedom. The sample above was knit loosely in acrylic, the holes would be less apparent in a tighter knit. If bothersome, they may in theory be “avoided” by factoring in “wrapping” if every row of the repeat is drawn rather than every other. With only 60 squares available on the mylar it is possible to go twice as wide and produce fabric width that may suffice for a skirt’s length. With software that allows for programming the width of the needle bed, possibilities expand even more. When going double wide with a repeat such as the one above, some problems result not so much in the inner fold slipped rows, but in the outer fold of the tuck ones. As in nearly any knitting when needles have 2 side by side loops resting on them, these loops will create a float/ ladder, so the tuck rows will essentially behave like the slipped ones as the double loops are dropped rather than anchored on the subsequent pass of the carriage. In the configuration here if the double-wide button is used, one way to solve that issue would be to bring consistently the same of either of the 2 non selected needles out to D or E position (still faster than hand-selecting repeats by hand for holding), resulting in knit stitches and single tuck loops.
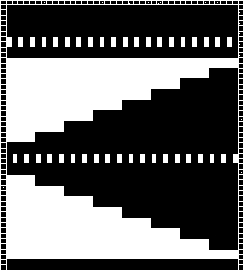
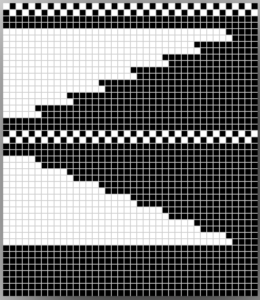
5/18/18 Working out the kinks: the same repeat is redrawn to factor in the reduction of the eyelets at edges of slipped areas: a partial graph showing “automatic wrap”. However, the “wrap” will fail with color reverse, and that first row would have only one stitch knitting. If double wide is used, then the wrap will happen around 2 needles, creating yet another “float”.
 its color reverse
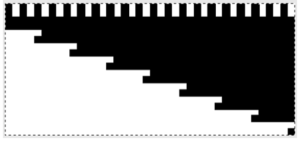
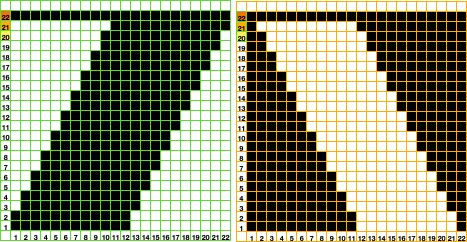
Plain knit rows (blanks on mylar) may be added at the bottom or top of the repeat to change pleat depth. Here is an amended repeat, discarding the “automatic wrap” idea, first prior to color reverse, then after
 Those all blank rows would result in no stitches being knit, essentially a 2 row “free” carriage pass, and are removed. The repeat is now also capable of being knit twice as wide if desired, adding the hand technique on tuck folds
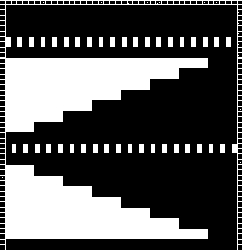
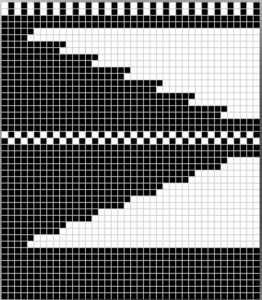
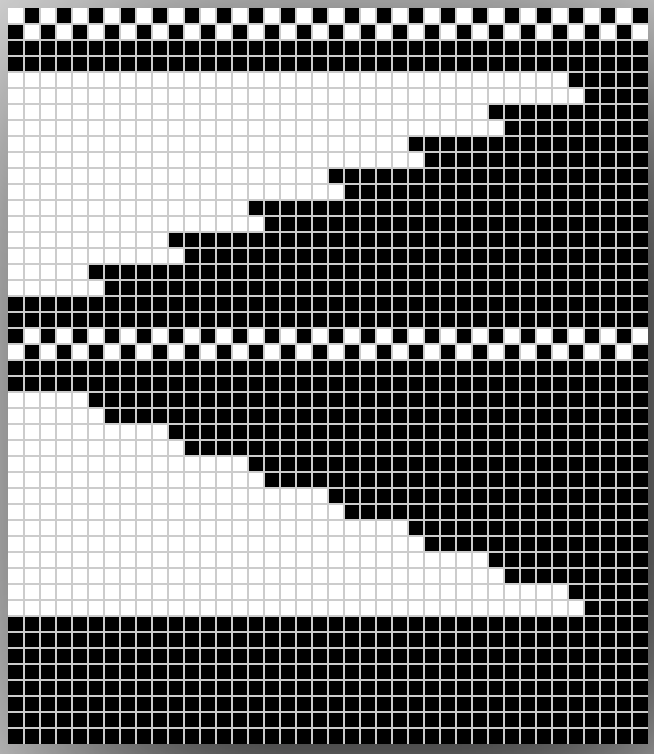
Below the edited repeat begins design using one pixel per stitch and per row. “Automatic” wrap happens as one row is knit, while the next preselects an extra needle. The yarn travels under the extra needle prior to its being knit on the next pass from the opposite side. There will still be an eyelet, a bit larger than hand wrapping, but smaller than without any wrap at all. The EON pixels in the center of the shape are tucked. For that to happen the knit carriage needs to have the cam buttons switched from slip to tuck, and back to slip after the 2-row sequence. The fabric folds out to the knit side. The EON (every other needle) set at the top of the shape is knit in the slip stitch setting, resulting in the fabric folding into the purl side. The process could be reversed to have each fold to the opposite side of the knit.
The carriage needs to be on the opposite side of increases in the number of stitches worked. Here the first preselection row should be from left to right, with carriage traveling to and from the right for the subsequent pairs of rows.
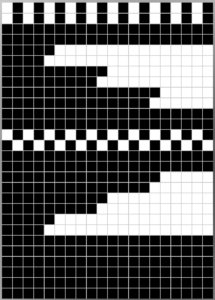
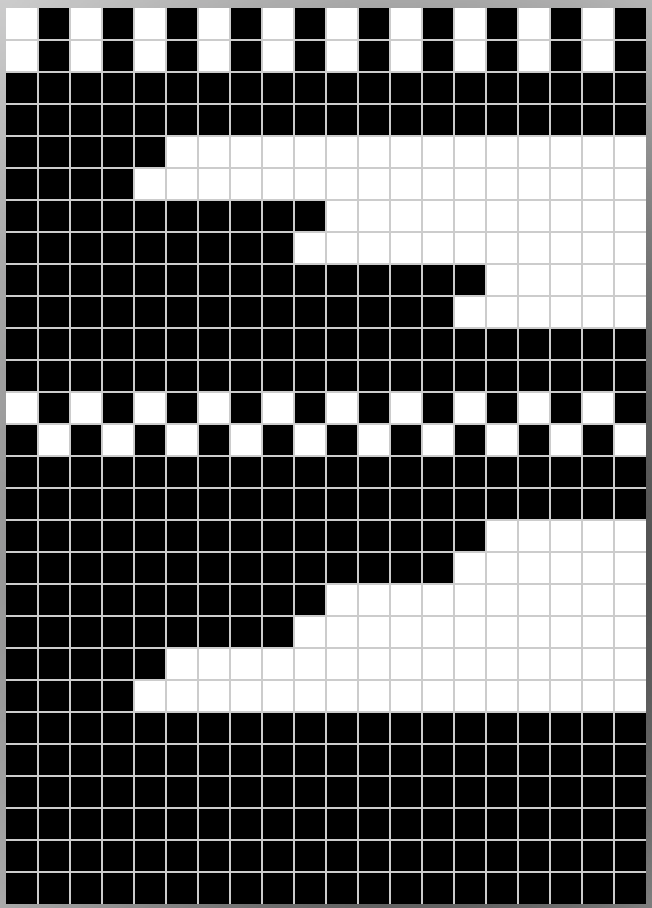
More variations: the slip stitch configuration below is changed to the same EON selection for 2 rows. The same could be done for the tuck fold. For this repeat, the first preselection row should be from right to the left, making that the side the knit carriage returns to after each pair of rows knit. The sample was knit in a too thin acrylic. Both eyelets and their “wraps are visible, as well as the direction of folds.

These are pleats in a skirt made eons ago, that have retained the fold over the course of many a year 
An added alternative for fold lines: create outside crease transferring EON to make a row of eyelets, create inside crease by knitting the desired row double row with 2 strands of garment yarn. “Automatic” repeat must be adjusted accordingly, whether by redrawing or punching, or using cam settings for the correct stitch formation.
Seaming should be planned on the inner fold of the fabric, depending on whether the purl or knit side is used as the “public” side, the least visible join being one that is grafted ie with Kitchener stitch.
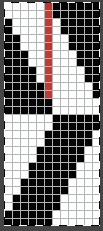
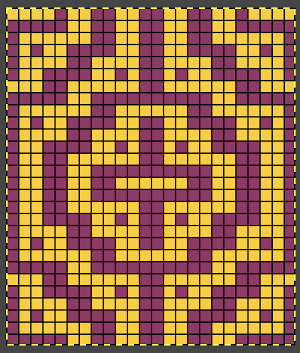
The same principles may be applied to punchcard knitting but because the repeat size is 24 stitches the resulting fabric is one suitable for portions of garments/ accessories, in details such as ruffles and edgings. Punched holes would match the black squares in the color reversed repeats. “Air” knitting helps determine the exact needle location required, and to decide which side the first row must be selected prior to actual knitting. The image below shows the start of only one possible partial repeat based on the last one above
I usually sample my repeats by using hand selection and holding before committing to drawing on mylar or punching holes. An even number of rows is required in this technique.
 The needle bed markings to help track motif placement (red for the red card, which corresponds to needle tape factory markings for repeats, black marks are halfway in between for the opposing shapes)
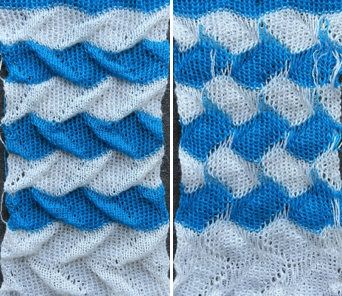
 As each set of repeats for each card is completed the punchcards are exchanged. KC direction is marked on them, with knitting beginning on the opposite side. I found the fabric more manageable when I completed and began each design sequence and color change by beginning and ending with an all-knit row in that color. The bottom of the swatch shows the difference in the side edges if half repeats are not planned for. If this were a production item it would actually be possible to work out the repeat on enough cards so they could be used as a continuous roll rather than having to so frequently reinsert and rejoin them. This sample was knit in Jaggerspun wool, and since wool has memory, the resulting 3D texture remains after steaming, resulting in a noticeable difference from the previously knit acrylic swatches.
 and the knit side


 The execution was in a brick configuration


