Charting knits in Excel.

I began using the program for this purpose in 2009 and continued to in nearly all the colored charts in my color separations for knits posts since then. Gimp offers a whole other series of options for knitters in BW with magnification as seen in more recent posts here. I thought I would revisit some of the tutorials written by several other knitters prior to more posts of my own on using Numbers for anyone having Excel available to them. They are in no particular order. Marnie’s and Fleegle’s blogs offer tips, techniques, and how-tos in a series that I found extremely helpful when I began my own spreadsheet journey.

http://fibremuse.blogspot.com/2009/02/charting-patterns-with-excel-part-1.html

http://marniemaclean.com/blog/tutorials.html#.Um_-wpFQY7I

http://www.chemknits.com/2010/01/how-to-make-knitting-chart-in-excel_9394.html

http://fleeglesblog.blogspot.com/search?q=charting+with+excel

http://anniebeeknits.wordpress.com/2011/06/06/charting-in-excel/

http://www.youtube.com/watch?v=T9dwuarghqE

Online Pattern generators, hacks, free KM manuals, and more

I welcome being contacted re any problem links
generators that require color changing every 2 rows using a color changer (or 2 carriages)
mazes on gridded output, easily adaptable to knit http://www.ludiculus.com/maker/mazes.html
more mazes  http://www.billsgames.com/mazegenerator/
maze pattern http://www.unikatissima.de/e/?page_id=2062 blog closed 
cellular automaton http://www.unikatissima.de/e/?page_id=2148 blog closed  
Some unikatissima blog content may be found here, but generators fail as they relied on Flash Player, now defunct 
other generators that can help with shaping garments, or some basic knit motif design
Truchet tiles generator https://dmackinnon1.github.io/truchet/gen.html
knitting pattern http://kpg.sourceforge.net
top-down circular raglan calculator http://kpg.sourceforge.net
Icelandic round yoke design does not work any longer in later version browsers, on Mac even with the installation of Silverlight, on Ravelry, it was noted the program does operate in internet explorer  http://knittingpatterns.is/#/Design
random square patterns http://www.unikatissima.de/e/?page_id=3638  blog closed
punchcard generator and how to use videos
https://patternpunchknit.com/
 beta online tool 11/2022 
math calculators for knitting
free online manuals, magazines
machineknittingetc.com now https://mkmanuals.com/
hacking
a hacking history https://www.beautifulseams.com/2014/10/29/tricodeur-writeup/
only the intro is in German: a nearly hour-long presentation by Fabienne
another approach for Brother models KH”‘930, 940, 950i, and 970: http://daviworks.com/knitting/ and the associated group on Ravelry 
970 how to hack instructable 
for additional cumulative information, software compatibility and hardware specs see Claire Williams’ website
GitHub
PatternUploader
color reductions/ conversions for large, nonrepetitive images Mac
online dither generators
https://ditherit.com 9 dithering types
https://app.dithermark.com  a huge range of possibilities
Hand knitting websites worth a browse:
https://www.knittingfool.com/Pages/Reference.aspx
pattern generators/ web design
open-source charting program http://sourceforge.net/projects/sconcho/
quick screenshot

1/21/2016: Online weaving program by Andrew Glassner ; associated blogpost 

11/26/17 a simple, user-friendly free motif design paint program for Mac, last updated April 2019: Paint Brush

Hand to machine, symbols 5: lace

The beginning of this thread explores how lace may be interpreted from hand knitting patterns and charts, and when hand techniques might be used to make the transfers and create the fabrics on the knitting machine. Going from charts to punchcards will be addressed in later posts.

In hand knitting (unless knitting circular), because the work is turned every row, stocking stitch is formed by knitting one row, purling the next, and repeating the 2. Knit rows are often referred to as “right side” ones, purl as “wrong side” ones. On the machine, stocking stitch is produced as the knit carriage knits every row. In hand knitting, eyelets are created by use of yarn overs (whether single or multiple), and a decrease may in turn be formed ( if the number of total stitches is to remain constant) by knitting multiple stitches together to compensate for the increase created by the yarn over. Often the patterning occurs on knit side rows, the purl side rows are frequently simple purls. Instructions, depending on the author or even the time of publication, may read purl odd rows or even rows depending on how the pattern is begun.

Lace is created on the machine by placing 2 stitches on the same needle to be knit together, leaving the empty needle in the work position. The empty needle is filled with a loop when the knit carriage is passed across the work for the first row, then formed into a complete stitch as the direction of the knitting is reversed. Paired decreases with 2 yarn overs may be created by moving 2 stitches onto a center needle, resulting in the needles on either side being emptied, in turn picking up a loop and forming a stitch with the 2 subsequent rows of knitting with the main carriage.

When selecting hand knitting repeats or charts for working on the machine, it is good to begin with a pattern that has a background of stocking stitch only. It is possible to add ribbed stitches, turn the work over with a garter bar or use a G carriage to add purl stitches on the “right” side in place of the simple knit rows, but that may be considered later and will require marking and punching the cards used in a different manner. Many hand knit lace charts are abbreviated if the whole row is intended to be purled, and those rows may be omitted from the chart. If that is so, then when charting for the machine, the chart will be expanded to twice its length.

There are software programs that will now produce symbol charts for text, and vice versa. To start with it, it may be easier to begin with an existing simple chart to explore the process. As with other fabrics, sorting out the correct repeat remains important.

Hand knitting: a brief list of symbols, and a few of their associated directions on the machine:

O generally represents the eyelet  created by transferring the selected stitch onto the adjacent needle, in hand-knitting, it would be a yarn over and creates an increase

/ represents needle O on left transferred to the right, this needle will now have 2 stitches on it creating in effect a decrease, keeping the number of stitches on the machine constant

\  needle O on right is transferred to the needle on its left, and this needle will now have 2 stitches on it

/\ both needles O at left and right are transferred onto a single needle, which will now hold 3 stitches, again keeping the total number of stitches constant.

In machine knitting, all stitches must be transferred for that row before knitting subsequent rows. Transferring the stitches creates a slant on the knit side. For hand knit patterns that include charts to follow, the knitting key should be checked to the interpretation of the symbols provided.

Working with lace transfers is a bit like working with cables crossed on the knit side in hand knitting.

Symbols will need to be interpreted for the purl side of the fabric (reversed for machine knit). There is a “trick” used for lettering on punchcard machines: if graph paper is used, flip it over a light source, and look at the reverse for punching (or punch the back of the card with text in normal orientation).  This method may make it easier when there are slants to track. If the chart is flipped over, the knit squares become purls facing the knitter, and the purl stitches become knits on the front side.

Mark  Os first for eyelets, count over any in-between stitches, if the slant created is to the right (SSK) in machine knitting this would be a left-leaning stitch on the knit side, so the mark would need to be changed accordingly. Sometimes the direction of the transfers does not need to be changed, but the actual placement for the empty needle may have to be shifted over 1. In summary: charts in hand knitting books will need to be reversed to retain the same look on the knit side for machine knitting. Charts provided for machine knitting already take that into account, are usable as they are for hand transfers, and then the question arises as to how to translate them for use with automatic patterning and the lace carriage.

These graphics represent some of the possible elements and symbols in charts; blue is associated with hand knitting, pink is the same element, for use on the machine. Each is accompanied by a sketch illustrating the appearance of the knit on the knit, face side, and on the purl.

With a little software help: I have been using Intwined for the Mac, which has some issues, the latest being its crashing if there is a library of personal custom-built symbols in the stitch library. For now, I have a clean install, minus my machine knitting symbols. This is a chart for a simple lace pattern created with the program

preferences used

the generated hand “long hand” knitting instructions

the chart saved as jpg and “flipped” for knitting on the machine

if the charts are  MK ready, the transfers are made as you see them, multiple pronged tools speed things up

Illusion /shadow knitting DIY designs_HK

I have played with excel (and Numbers) before to create charts for various fabrics requiring color separations. My latest efforts relating to this knit group have gone in a different direction; I have also attempted to simplify the technique in terms of following the instructions for knitting them. This sample began with the use of Intwined to create the document and graphs. The first chart is set up with alternate row color striping, color 1=dark, color 2 = light. Blank-colored squares are used as knit symbols, and horizontal dash for the symbol for purl stitches. Beginning on light-colored, even-numbered rows, the design is marked in purl stitches. On odd-numbered rows beginning with row 1, mark all empty squares in the even-numbered light-colored row immediately above it with purl symbols. All unmarked stitches throughout the design are knit, whether, on the “wrong/right” sides, all dashes are purled, patterning occurs on the second row of each color. To visualize the full pattern one may use the add row below feature to expand the graph (the chart below is missing the very first row). Now add the second row of each color and grounding stripe (s) at bottom of the repeat. Most patterns will start the illusion immediately after casting on with dark color, row 1 above. I was interested in my sample having a border of sorts on its top and bottom. The resulting knit swatch shadow sideIntwinded had the capacity for building row by row written instructions for patterns, but there were discrepancies on some rows for these charts, and I opted not to include them.
Note: the program quickly became buggy, unsupported, and unusable on the Mac during the remainder of 2013.

Another program I have just acquired and begun to use is GIMP; it is free, and now also available for use in Mac OS Mountain Lion. Both Gimp and Photoshop make it possible to design using single-pixel pencil and grids to build motifs from scratch as well as gridding of preexisting images. I have a different method for these fabrics using GIMP, which is easier for more complex, overall shapes. The same series of steps may be used for mosaic knitting (the color inversion sequence is different). Below are images generated for a different illusion pattern, I will share my “how-to” for designing the motifs later, referencing mosaics and mazes. To achieve such motifs one is drawing in magnification of multiple hundreds and more, there is no way to number within a one-pixel space, so these charts as generated are lacking numbers for stitches and rows, one drawback. Another is that this color inversion works only in black and white. One advantage: the proper repeat may be cropped and saved with the grid removed in various formats that may be used to import to various machine knitting download programs, and gridded may be used to establish punchcards or mylar repeats.  Screengrabs of magnified charts were saved, and are shown below. Black squares represent purl stitches in the second row of each color. The first row of each color is always knit, not represented in these charts
The red squares are guidelines for no color inversion rows, the yellow ones isolate the repeat the actual repeat color inversion begins on row 1 and follows every other row (if numbered these would be odd rows)  testing the repeat through filter/ map/ tile a working chart that can be printed to suit with dark/light row markings and blank squares for tracking knitting rows in the execution of the pattern 
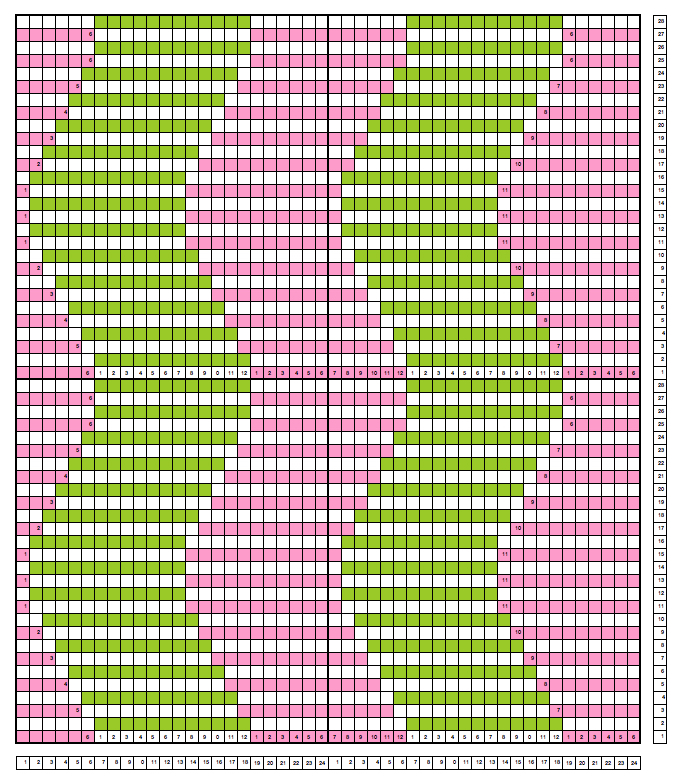
A larger version with stitch and row counts marked. The chart represents half the rows in the actual knit. The cast on row counts as knit row 1, color 1, and following the chart beginning with row 2 knit the black squares and purl the white squares. *Change color, knit one row (odd#), on the next row follow the chart, knitting the black squares and purling the white (even#).** Repeat from * to **. 
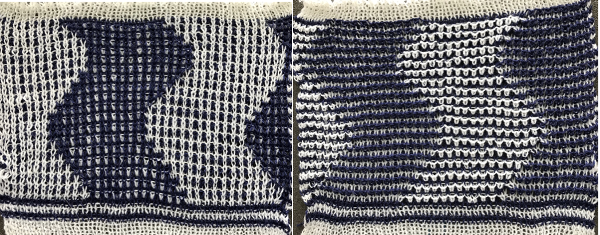
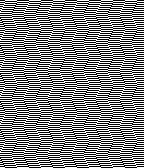
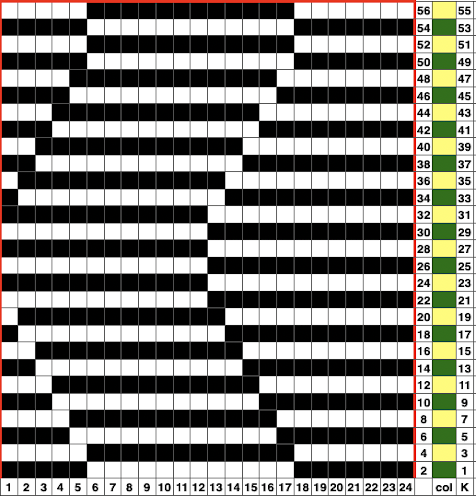
the knit swatch: “shadow side” its reverse side for online tutorials, patterns, and inspiration see Woolly Thoughts

Feb 18, 2017, I have recently become curious about creating illusions such as these in crochet, am developing ideas, and returned to this chart. The image below is intended to have symbols and notes superimposed on it. It shows the tiling in a different way, so I thought I would add it to this post as well. Repeats are highlighted with darker borders. The repeat on the right needs to be trimmed if the goal is to achieve matching edges. Row counts on the right would differ in knitting, the plan is to execute this pattern in Tunisian crochet, which handles rows in a very different manner than knitting or standard crochet. Follow up: 2017/03/06/illusion-DIY-patterns-in-crochet/

2/2019 from the first in a series of posts on geometric shapes on ribber fabrics using tuck settings, a mock variation with the ribber set for knitting in both directions throughout, and the main bed set to tuck in both directions:

Multiple downloadable pngs for optical illusion designs may be found in the 2023 post on Developing tiled repeats suitable for multiple stitch types, including tuck

Knit topological shapes

It is possible to construct topological shapes via knitting. In HK this may be done on circulars. One out of many tutorials may be found here, and the mathematical knitting is a very good, extensive resource.

A recent forum post on knitting such shapes on the machine led me to dig out an old sample of mine knit with brass wire and holding on the km flatbed; since I never actually determined an end-use, the donut hole inner seam was never joined.
In this view, the piece is about 3 inches in height, and 8 inches across
 
a side view

Hand to machine, symbols 4: cables

The following begins to address cable translations. I posted some content on cables in January 2012, but this content follows the present vein.
Blue dots continue to represent the hand-knit symbol, below them the fabric is illustrated as viewed on the knit side.
The pink dots and the images on either side of them the machine knit, or fabric as viewed from the purl side.
In the column on the far right, the green dots and the images below them represent the opposing twist in HK and are illustrated only on their knit side.

To execute combinations in knit-purl on the same side of the knit on the machine, a ribber is required (or a Brother G carriage). Purl stitches are on the main bed, and knit stitches are created by the opposing bed. To match the hand-knit here, crossings are actually made in the same direction in both HK and MK


HK pattern, software charting.

I have reached the point where decades old (89 and earlier) magazines that got “saved” are now being peeked at, and if not given away, then recycled. There may be some bleed through here from pages I have “saved” once again. Browsing through I found some designs not appropriate for machine knitting for one reason or another, but still creating interesting surfaces and the chance to explore using intwined’s other features. The program will create text from a chart, or chart from typed text with some limitations. One of the latter is a very large cable as seen in the attached document. PDF exports can happen within the program if one is specific in the sequencing of creating its documents. The 1989 pattern had only text for the repeat; I typed it, and had the chart pretty much created for me except for the problem row 5. Here is the resulting Intwined created PDF with some of my comments: cable_diamond. The following is the graph I edited, with my illustration for the execution of row 5

the blue line separates the slip stitch section, which can serve as a border on each side of the cable panels, the red lines the edges of the 12 stitches involved in the cable. The green stitches are put on a cable needle and brought to the front of the work, the next 6 stitches are knit first, then the ones from the cable needle to complete the crossing.

the swatch: knit side

the purl side

Hand to machine, symbols 3

In the following series the blue dots and accompanying diagrams continue to represent the fabric as it would appear on the knit side if hand knit, or after the work is removed from the machine. The pink dots and accompanying graphics represent the matching stitch on the purl side and as it may be executed on the knitting machine to match the original fabric.

A/B revisit increases within the row. The same motion may be used on the KM to increase single stitches at the garment edge, allowing for increases on both sides at the same time (if they always occur mostly on the same side however, one side will have consistently tighter end stitches, and be shorter). C/D revisit slipped stitches. In D the image on the far right shows the position for the needle about to be skipped/slipped. If working slip stitch through hand selection, the needles that are out to 3rd position, or out to “holding” will knit. E/F revisit twisted stitches within any one row.


Revisiting tuck stitch, and ruching: in the tuck stitch formation in A/B, B has the added illustration showing bringing out to “holding”, (D, or E position depending on machine brand) any needle that has multiple loops on it prior to the next row of knitting all stitches. C/D are variants: in addition to combining loops, the top stitch is reformed to show as purl on the knit side, knit on the purl. E/F illustrate ruching where single or multiple stitches are pulled up to gather fabric and create texture, for any desired/varying number of rows

Below the first row illustrates ladders resulting from a few methods in hand-knitting to emptying needles and leaving them out of work (A position) on the KM. The second row represents a wrapped increase on the edge of the knit, on the KM this is known as e wrapping.

Cable crossings may be represented in a variety of ways, below are just a couple; the grayed-out areas after the first chart IMO help define forward-facing stitches on completion of the transfer for the cable, whether on front of the knit or on purl side facing the knitter on the machine.

Other fabrics such as ribs and more on lace will be explored at a later date.

Hand to machine, symbols 2

The symbol below usually represents a single increase. In hand knitting such increases may be achieved anywhere in any one row. In machine knitting however,  this may only be done with any ease at garment edges. Machine knitters may be familiar with calling what is depicted below a full fashioned increase. To achieve the latter,  a multiple prong tool is used to move the chosen stitches a number over to the right or to the left. On the machine, the resulting empty needle then needs to be “filled” unless lace holes created without doing so are part of the design; this may be done by picking up the purl bar from the row below. The blue dots represents the HK symbol, the pink the same symbol as it might be represented for MK to achieve the same result. The machine knit illustrations in this series do not factor in automatic patterning: rather,  they show how the stitches would be hand tooled on the machine to achieve similar fabrics.

single increase

brioche/tuck stitch: the first 2 image series show “normal” orientation, the  3rd and 4th series the twisted in front of knit version. In MK the elongated stitch is twisted and returned to its needle; similar fabric may be created  purely through hand technique by using holding on single needles in desired locations. Tucked rows in KM programming are unpunched squares in card, white “squares” in mylars or computer downloads. Using the repeat below, in electronics it is possible to “draw” only the 3 tucked squares, and use color reverse.

slip stitch: the first 2 image series show “normal” orientation. In machine knitting the slipped, elongated stitch is created on knit side, with the remaining “floats/bars” remaining on the purl. In the 3rd and 4th image series the elongated stitch moves to the back of the work, while the “floats/bars” move to knit side of the fabric and form a pattern on it. As with tuck stitches,  rows for slip in KM programming are unpunched squares in card, white “squares” in mylars or computer downloads. Using the repeat below, in electronics it is possible to “draw” only the 2 slipped squares, and use color reverse. Because in this fabric the needles are skipped, not filled with loops, multiple punched holes or white squares may occur side by side. If the goal is to achieve the skip stitch floats appearing on the knit side, retooling by hand is required on all skipped needles prior to the next all knit row.

stitches woven through stitches: because of the fixed width stitches must travel with any crossings on the machine there are limits as to how far they are able to move across the bed within any one row. Cables come to mind immediately in terms of stitches crossing; another type of cross weaves stitches through others singly or in sets, which may also be done within rows of long stitches. In the illustration below, one stitch crosses through the center of another. If one is trying to match the hand knit fabric version, then the direction of the “weaving” is reversed as it would be in the case of cabling. Light colors and thick yarn help make the results more visible. This is strictly a hand technique; however, for greater accuracy and speed one may program card or electronics to select either the needle that comes off first, or the pair of needles involved involved with the cross.

an alternative symbol sometimes seem for this stitch

a simply repeat illustrated for KM: since the whole ground is purl, symbols for purl need not be used

.

November 2015 PS: the charts such as the one immediately above were created using Intwined Pattern Studio and my own custom made stitch symbols. The program on Mac not long after became unusable due to the presence of custom made stitches in library, took multiple efforts to restore without their presence, and there have been no updates since then to address this, or any of the other issues. More information and reviews may be found on ravelry.

Hand to machine knitting, symbols 1

One of the critical differences in viewing work as it progresses on the knitting machine is that the “front” view of the fabric unless the work is removed from the needles through a variety of techniques and turned over on the needle bed, is the purl side. Early machine manufacturer punchcard book publications made an effort to help hand knitters make the transition. A chart from brother publishing knit_sym96 illustrates one such effort. Here the middle icon in the how to work column is the stitch formation one would need to achieve on the MK to get the same “look” as the HK samples. Some symbols apply to both types of knitting, some should be mirrored horizontally to make sense, and in the case of the crossing stitches at the top right of the second column, there is a bit of confused identity.

Over the years there has been an interesting transition from handwritten stitch by stitch instructions to the introduction of symbols ranging from homegrown on graph paper, to simple word processing and later software generated ones. Some international differences occurred in published works, and internationally agreed-upon symbols for both knit and crochet eventually evolved. There are many design programs on the market now, I have linked to some in past posts. As knitters have venues for publishing their own repeats and patterns and tools have multiplied, symbols do not always necessarily have the same meaning, and stitch codes are no longer universal.

I have been wanting to find a way other than using excel to build a stitch library usable for machine knitters in an easily accessible program that would do some of the “work” for me. I have experimented with 2 programs. One was knitbird, which I would not recommend for this purpose, the other Intwined Studio which is proving far more flexible and worth the modest investment for me. I work on MacOS10.8, the Intwined version for this OS is beta. There are some small glitches, but this is a tool worth exploring. The option is there to add one’s own symbols to the stitch library. I have begun working on a machine knitting set with icons created in a combination of other programs and Inkscape, the one suggested in the tutorial by the developer. Some charts created with Intwined may be seen in my previous post on sideways pleated skirts. Below is a chart including some MK symbols in my personal library, also using the option to the color background for them in the program itself rather than editing the chart image after the fact.

To download Inkscape: site. The workaround to get the program to work in Mac OS10.8 may be found here.

The combination of color with symbols in published patterns for both hand-knit and crochet is beginning to proliferate. I find the visual color cues help track patterns more easily, have done it in HK in the past, one such example is my chain cable experiment in my January 3rd post.

Some illustrations for lace symbols HK vs MK may be found in my post from February 25, 2012 “back to lace”.