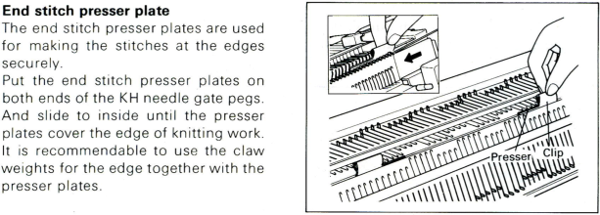
Any repeat suitable for a 2 color 24 stitch DBJ separation published or self-drawn for a 4.5mm machine is suitable for DBJ on the bulky.
At times yarns ie 2/8 to 3/8 wools that knit stocking stitch at tension 8-10 on the main bed and are too thick for every needle rib on the standard may produce a fabric that is not too dense, and still has some drape at the lower tension settings on both beds on the bulky.
Electronic standard knitters can double the size of the repeat prior to separating the 2 colors and then work on every other needle on both beds, proceeding as usual for DBJ.
Thicker yarns begin to make too thick a fabric for wearables but may work well for other uses.
If some drape is required, the ladder-back method becomes the preferred one in bulky KM DBJ.
I no longer have available the bulky dbj samples from my teaching days, my 260 KM is not set up, so, for now, this post will not include swatch photos.
As always swatching is a necessity to determine whether the resulting knit is one that meets our expectations, preferences, and often, patience.
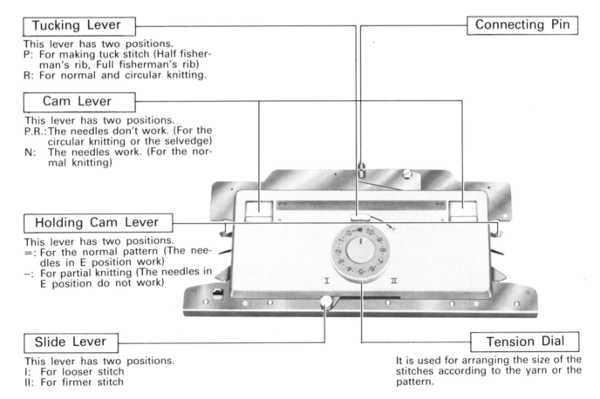
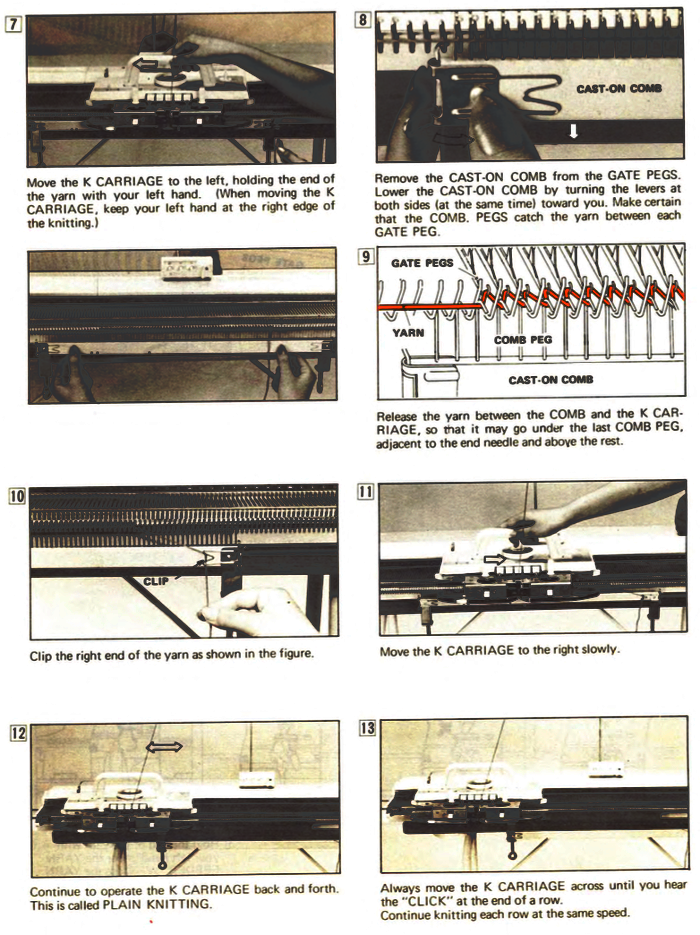
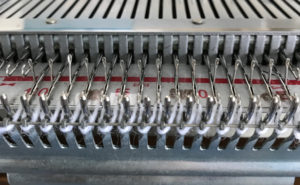
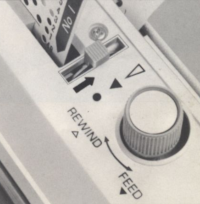
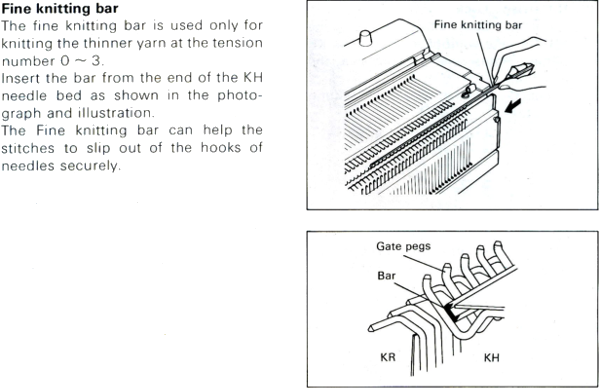
To review: the 260 KH carriage will be familiar to Brother punchcard 4.5 mm machine users and has the option for creating thread lace (“split” cam button in center position), which is not commonly available in Brother models. 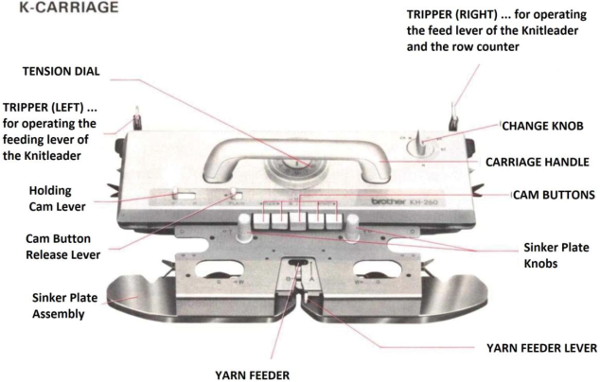
The Brother 270 electronic knit carriage offers similar settings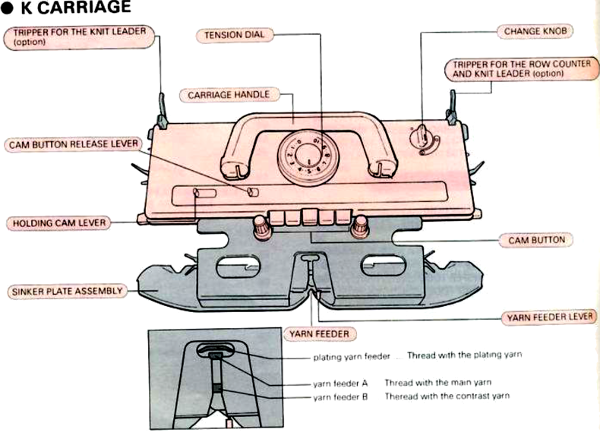
There is no automatic method for eliminating end needle selection ie KCII, rather, adjustments for it are made on the underside of the carriage, as in other punchcard machines 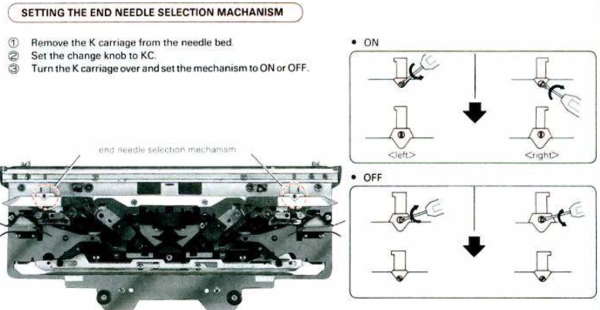 in terms of DBJ, the electronics allow for the familiar KRC 2 color separation
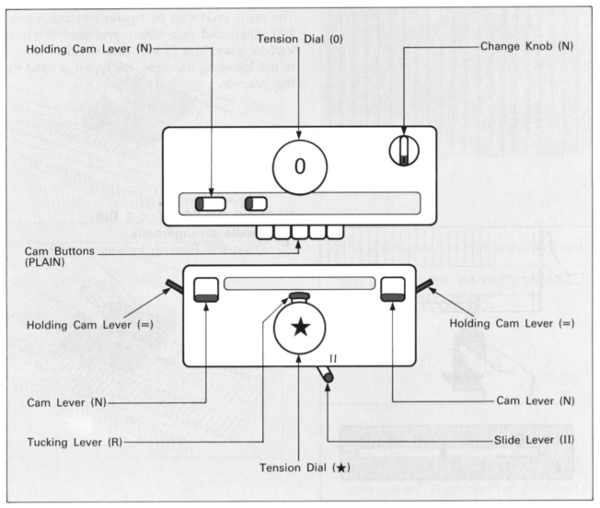
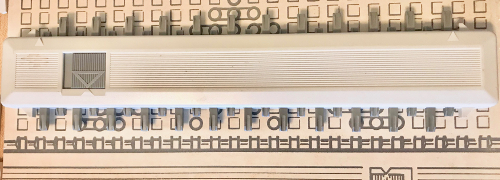
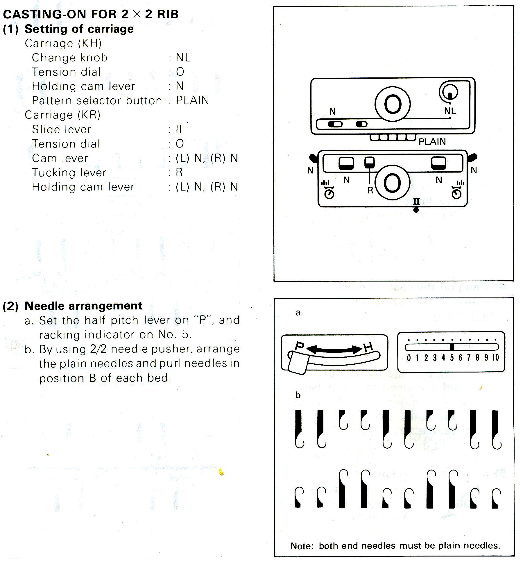
 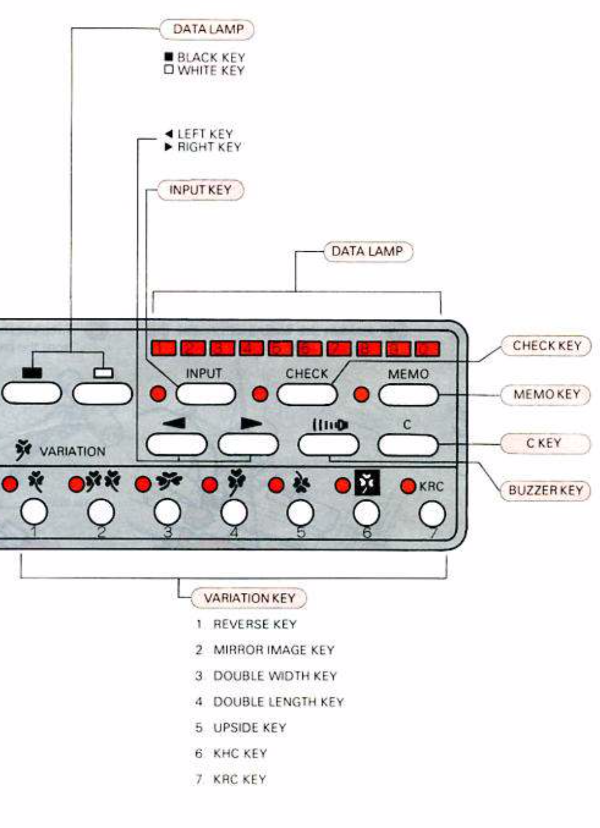 KR 260 parts as described in the ribber manual, followed by possible settings for cam levers are illustrated below. The absence of lili buttons is immediately noticeable. There is no automatic every-other needle selection on the bulky ribber carriage shown, as opposed to that choice being available on the standard KM.
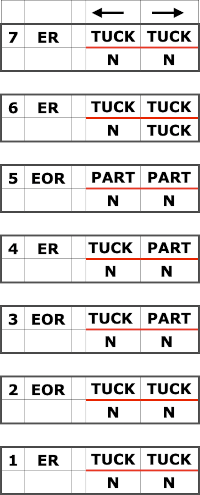
slip to right 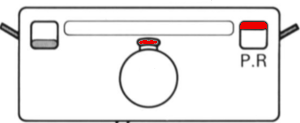 slip to left
 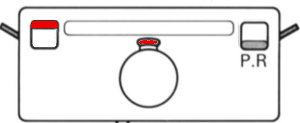 slip both directions
 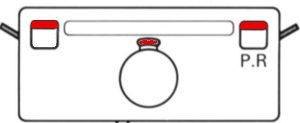 tuck to right
 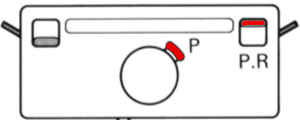 tuck to left
 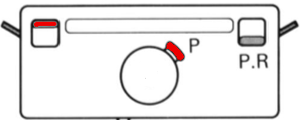 tuck both directions
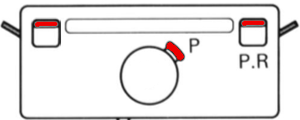
hand selection tools for either bed, 4.5mm on top, sometimes interchangeable 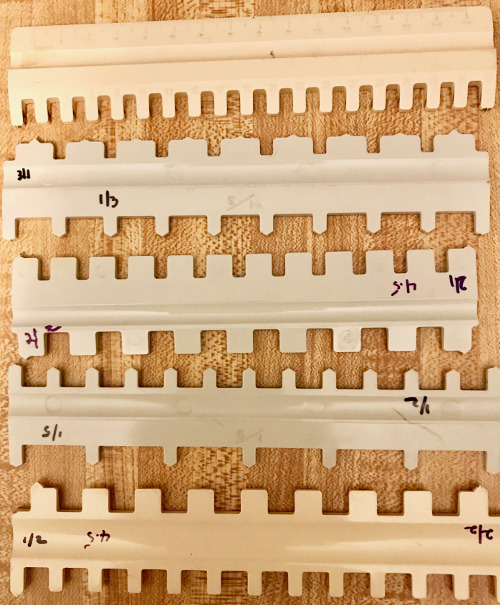
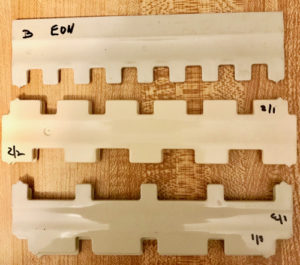 every needle selector for standard, operates similar to Jac 40, EON here for use bulky, adjustable
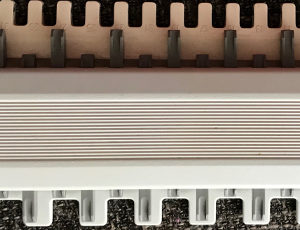 17.5-inch workshop cut model in plastic for 2X2 selection on bulky
  nowadays 3D printed custom options are also beginning to be available
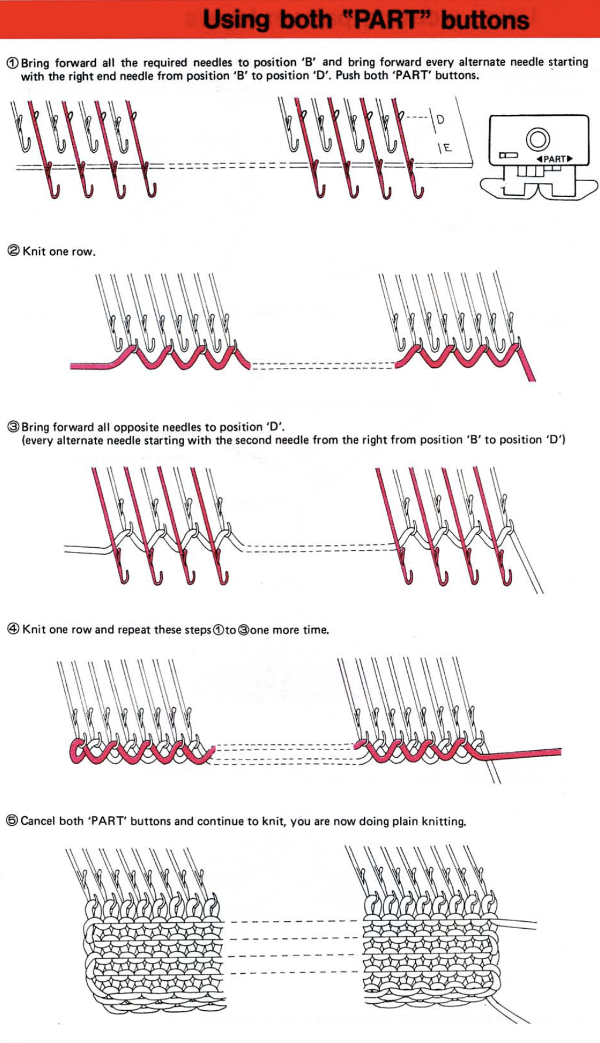
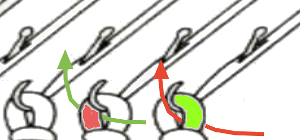
The DBJ setting that requires the least intervention on either standard or bulky machines is the one produced with the separated motif being knit with the ribber set to slip all needles in one direction, and to knit every needle in the other. Reproducing the lili effect is accomplished on the KR 260 is achieved with hand needle selection. For birdseye, where every needle is in use on an even number of needles in work on the ribber, select every other needle on the ribber beginning with the second needle on the right for the preselection row, and push up to the holding position. The ribber carriage is set to slip both ways and will knit hand-selected needles as it makes its way to the opposite side. Now select every other needle on the ribber beginning with the first needle on the right, bringing those needles up to hold. Stitches on those needles will knit on the ribber as the carriage makes its way back to the left and to the color changer. Colors continue to be changed every 2 rows as in any standard 2 colors birdseye fabric.
Ladderback or modified Jacquard is at times used on standard machines specifically for the effect created on the fabric reverse side, and most often used with bulkier yarns to be able to make a garment with more drape than it may have in regular jacquard, or to knit large designs with no long floats.
This technique on the KR 260 ribber involves hand manipulation of the ribber stitches to reduce the number of stitches formed on the ribber as well.
Ribbing is often set up to produce a band that is not hugely different in stretch and width than the body of a garment, with further transfers for the ladder back configuration when it is completed.
No more than one needle is usually in work on the main bed beyond needles in work on the ribber bed. If an additional needle on the main bed is required, it should be on the left-hand side.
The rib is knit as tightly as possible, tension is loosened as one progresses into the jacquard portion of the piece.
Common arrangements are 1X1, 1X3, 2X2, etc.
When needles are arranged in “even groups” ie 2X2, 2X4, 4X2, etc, the lili setting or manual needle selection to emulate it on the 260 may be used.
Tuck settings may be experimented with as well, but tend to create a more noticeable vertical line between ribbed repeats on the knit face.
The larger the number of needles in work on the main bed between ribber needles in work, the more the main bed tension needs to approach that used for the yarn when it is knit single bed.
In the EON ladder back tension increases are usually necessary to accommodate the number of stitches knitting plain on either or both beds.
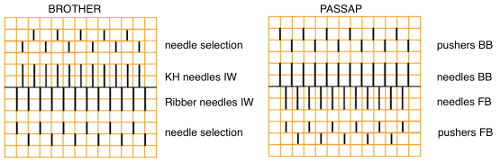
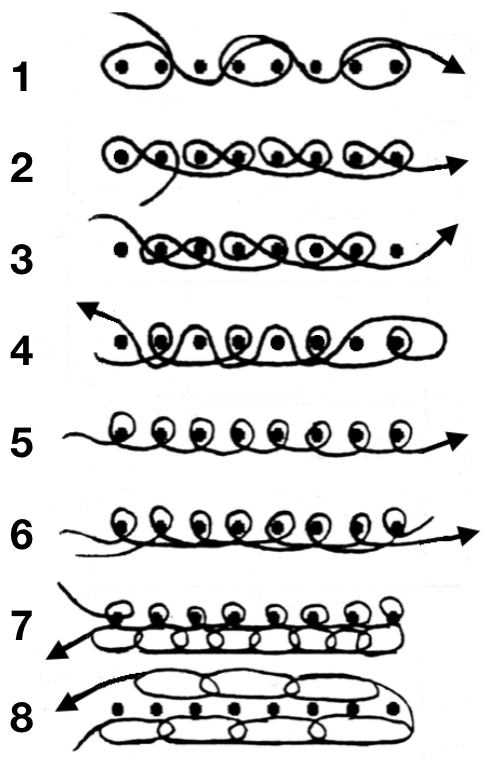
The hand needle selection must remain constant throughout the piece to maintain the birdseye backing or any of its variants, which are based on pairs of needles alternating functions every 2 rows. This is the illustration for the lili actions from one of the Brother ribber manuals: 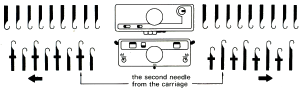 The second needle on the carriage side knits with each pass, and the last needle away from the carriage knits. When hand-selecting the rule may be reversed.
Striper backing is achieved by selecting the same needle for each of the 2 colors used, slipping the opposite color needle locations. The first needle selection on the right is easier to track by marking the location of the first needle used on that side on the needle tape or needle bed as a guide for subsequent rows.
The row counter will show double the number of rows than if the fabric were produced in Fair Isle. Four passes of the carriages complete one design row. The motif will appear elongated to a degree depending on the yarn and techniques used. Ladderback and vertical stripe backings may produce vertical separation lines in the fabric that may be quite noticeable depending on color, tension, and yarn used. Watch closely for dropped stitches or split ones. Splices and knots in yarn may tend to break due to the use of added weights and tension. Plan on adding new yarn at the sides and using the yarn ends to seam up, or use Russian join before the point at which a new yarn end is required, and continue knitting. The latter has become my favorite even in lace knitting on the standard machine. A recent tutorial on the technique may be found here https://www.mybluprint.com/article/this-method-of-joining-yarn-ends-is-pure-magic
Check the alignment and oiling requirements of machines frequently.
Other backings: one color backing. The main bed is set as normal for DBJ, but the ribber is set to knit for 2 rows of one color and to slip for 2 rows with the other color. This means on any machine (unless using 2 electronic carriages as described in another post) the operator has to change ribber settings every 2 rows. It will now take 4 carriage passes to complete 2 rows of knitting. Floats will be formed in the non-backing color and may be caught on the ribber on slip rows, so check frequently, begin with small repeats, and always test new yarns, or even a different color or dye lot in the same yarn on swatches before committing to larger pieces.
Patterned backing: selection of ribber needles in blocks of alternate colors, or selecting ribber needles in between those selected on the main bed applies here as well. Yarn thickness and end product serve as guides as to whether the fabric serves one’s purpose or preference.
In large areas of solid color on the garment face, if bleed-through is noticeable, a pattern of 2 black rows alternating 2 white ones may need to be programmed, with color changes continuing as in pattern areas. If the goal is simply to match density or drape, then continue in settings used for the design area without color changing. Most punchcard double jacquard separations and “rules” apply to both standard and bulky machines.
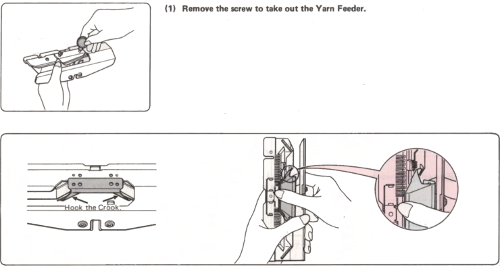
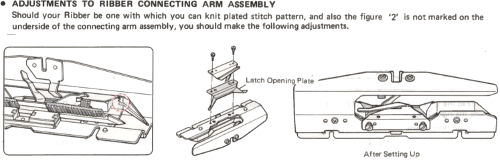
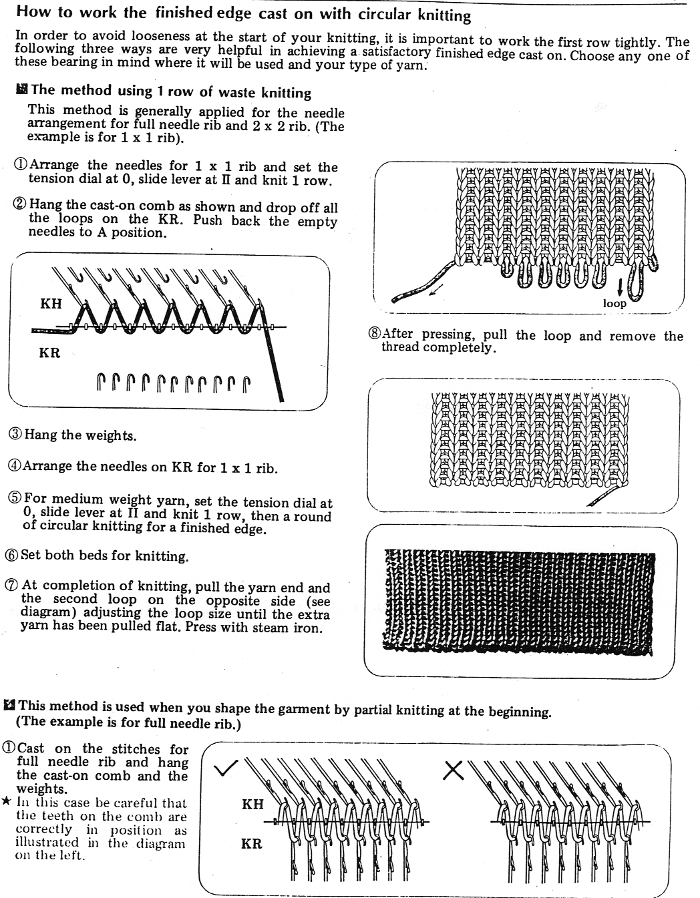
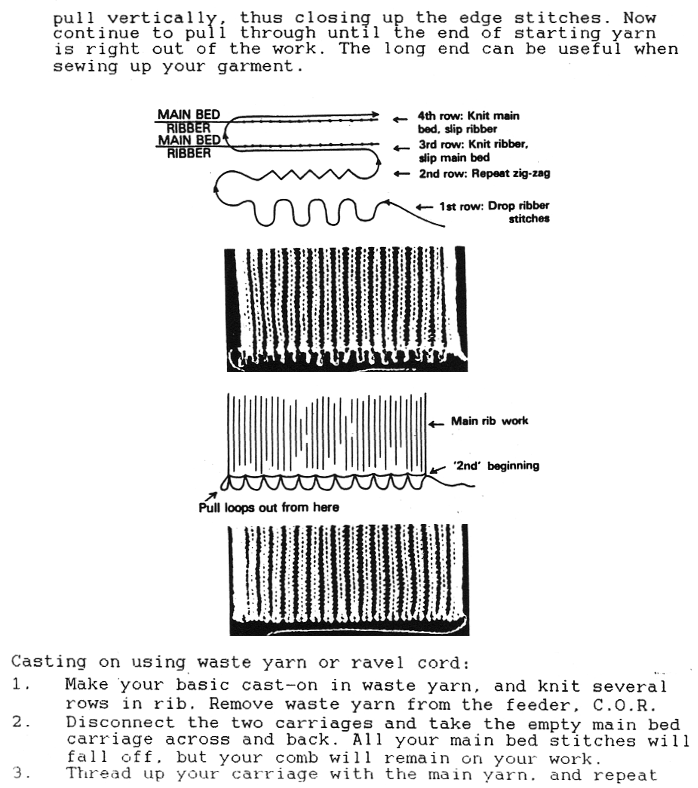
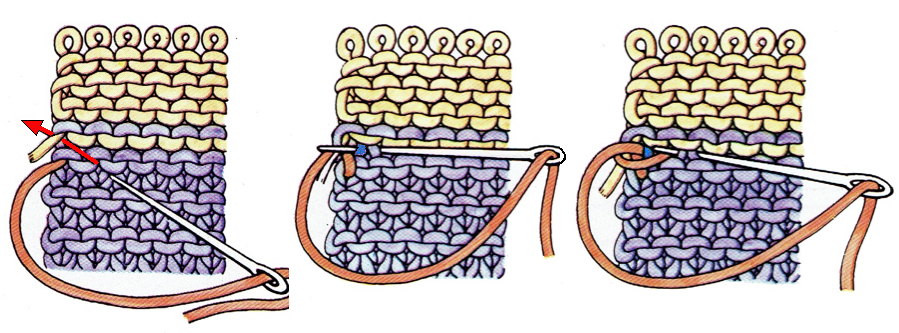
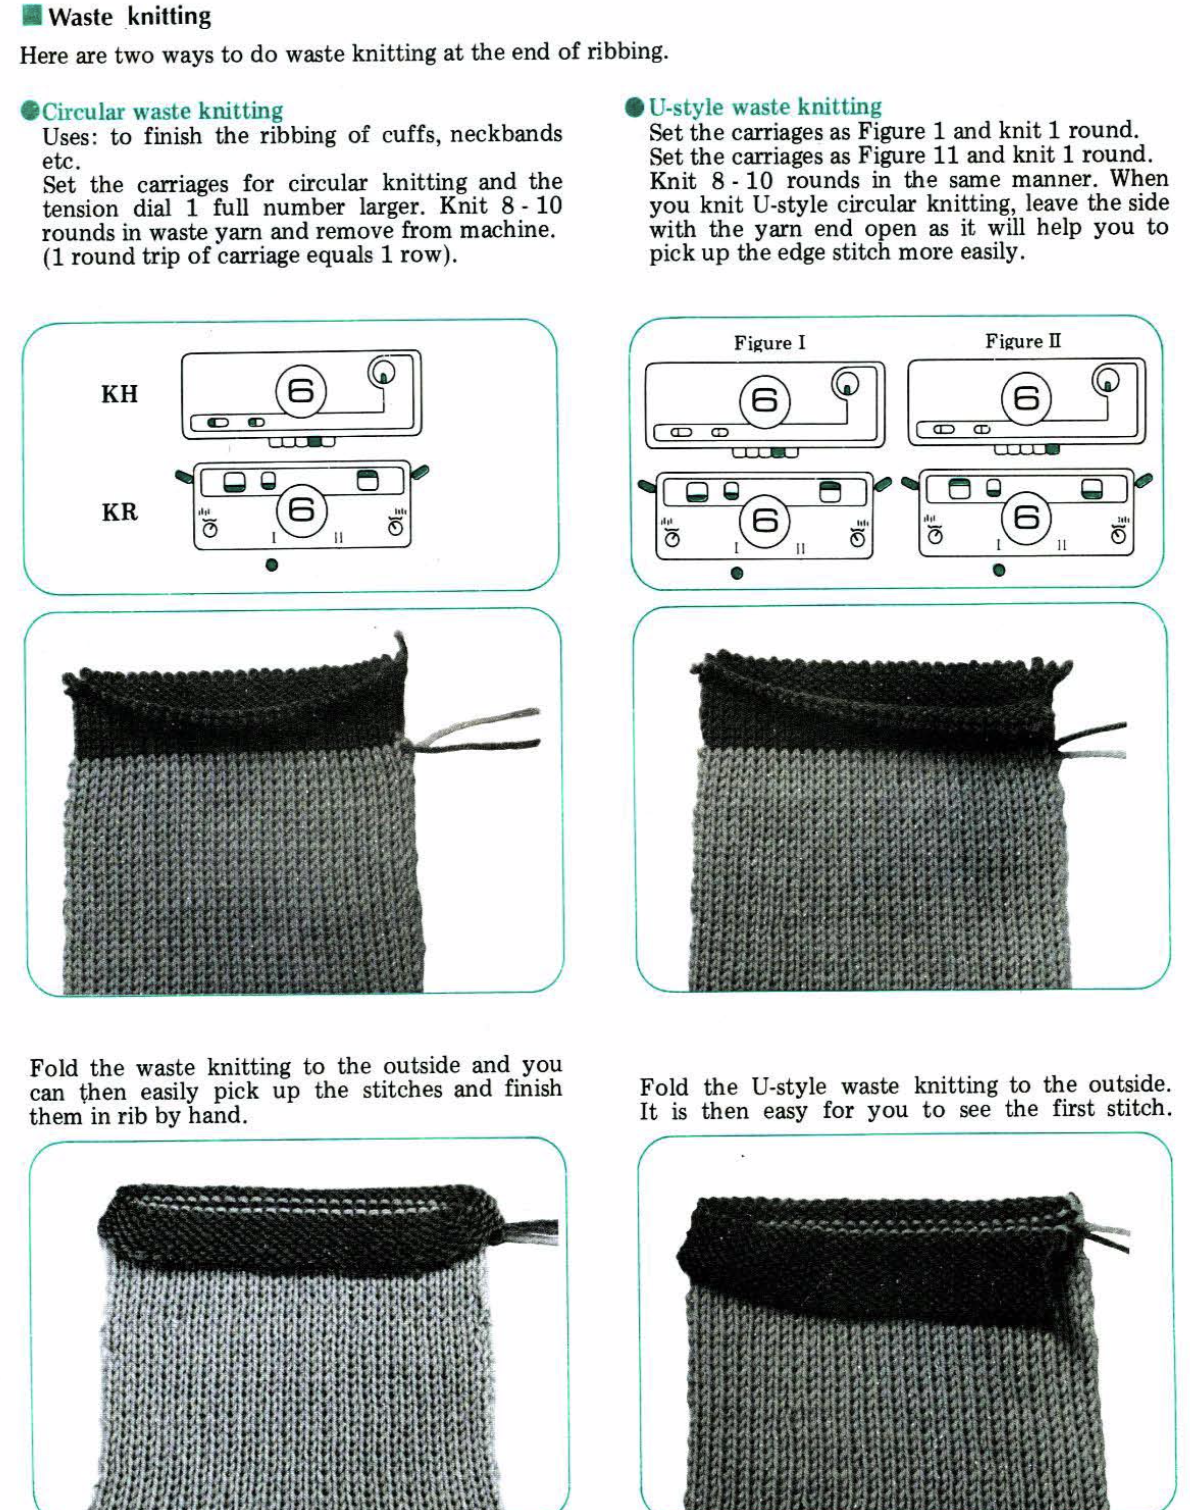
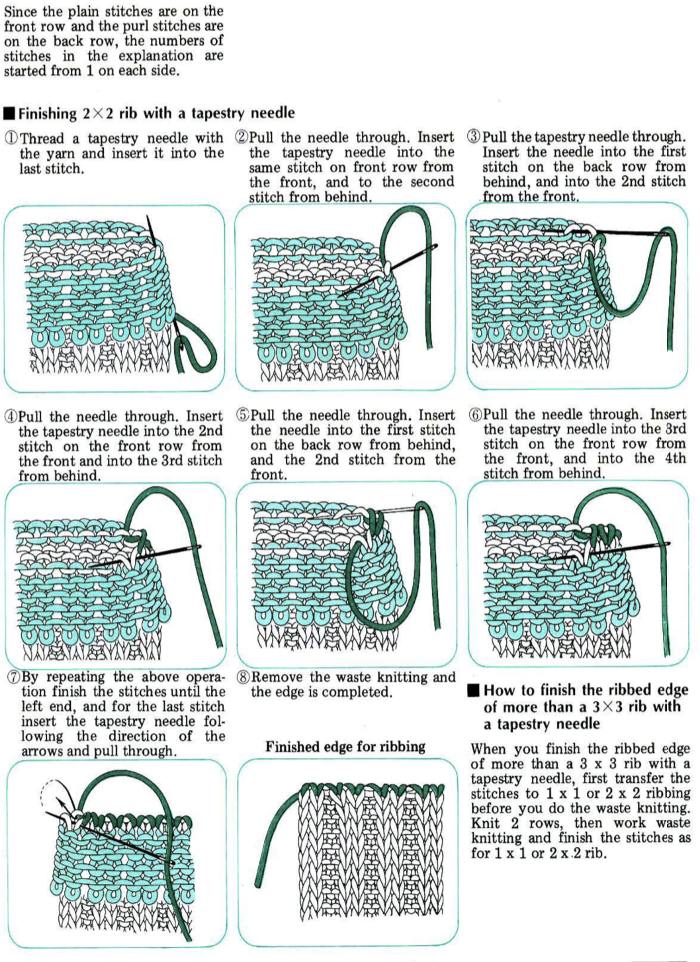
Later posts: ribber bind-offs at first, and casting on. I was never quite content with ribbed edgings on my bulky knits. There are always several options for achieving a look that pleases us more, or a technique that will alter the unwanted results. In this instance, one is to knit a row on the main bed after several rows of waste yarn, continue with the body of the garment piece, rehang that first knit row, knit the rib upside down, and bind off. The latter can happen on the machine, by hand, off on waste yarn with a “sewing” needle, or removing the work onto hand knitting needles and going that route. The 260 ribber manual recommends the following method. 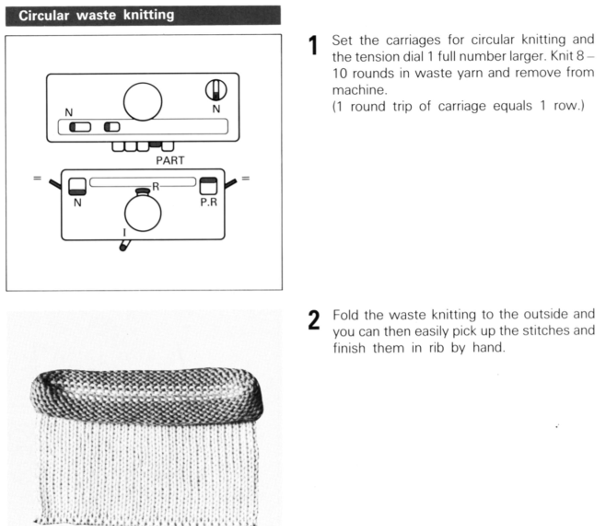
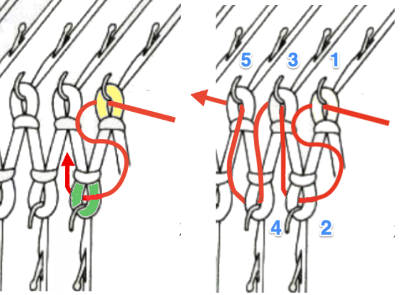
Having the waste yarn U style with an opening on the right with the bind-off beginning on that side, or finding a way to mark the first needle on the ribber in the sequence may make finding that needle position easier when the knit is off the machine.
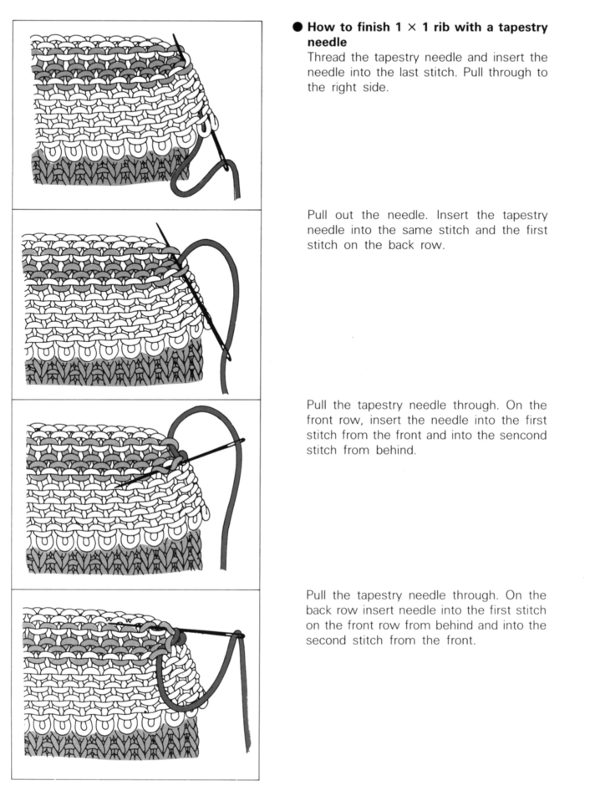
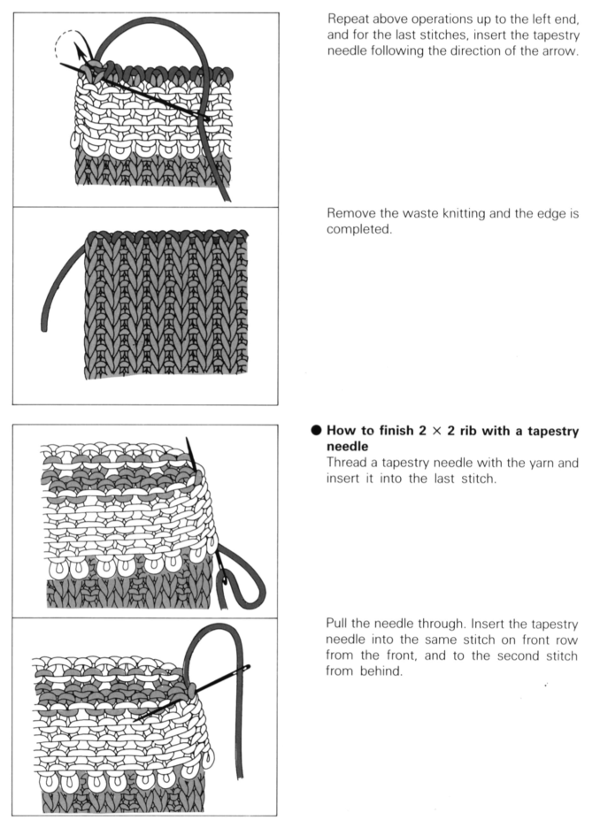
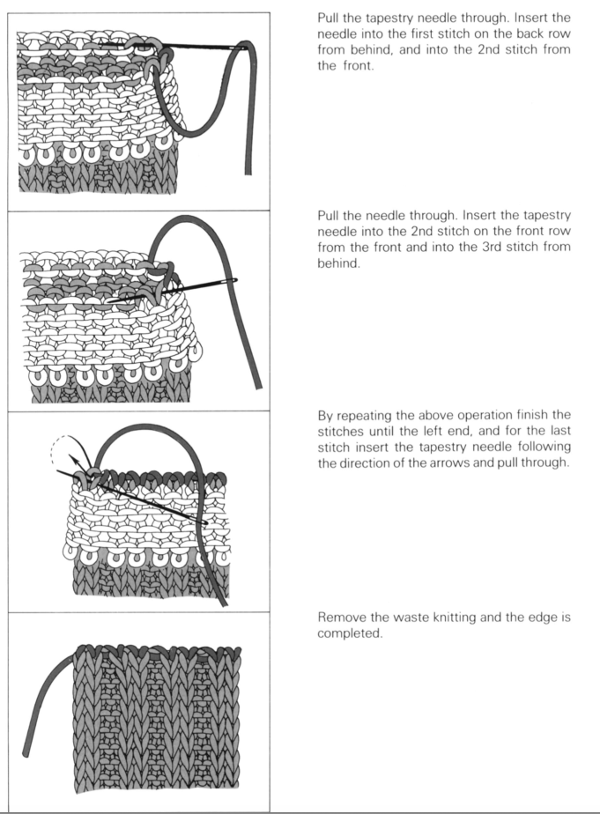
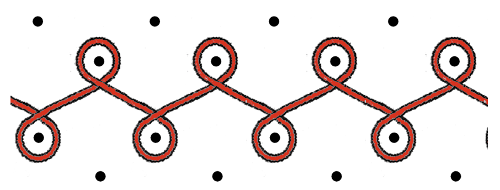
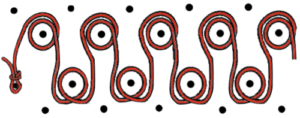
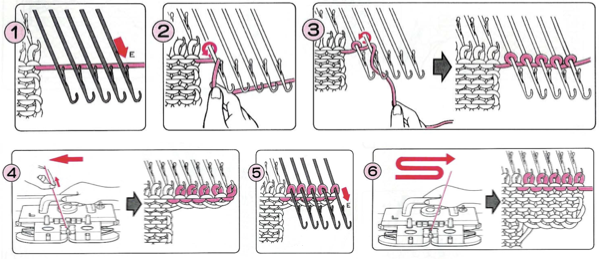
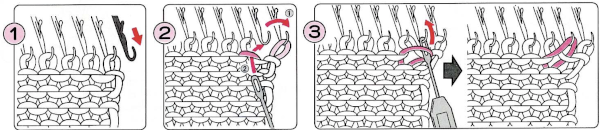
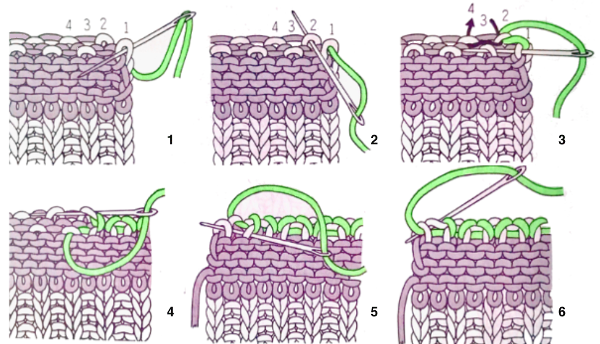
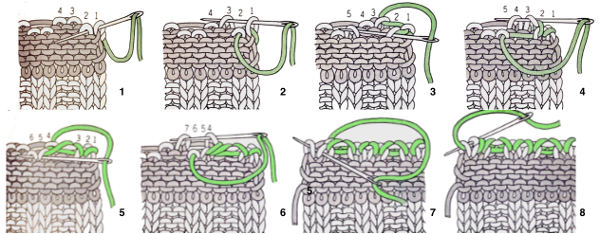
This illustration, also from a Brother manual, slightly edited, shows the sequence for how the yarn is threaded through the stitches in numbered sequence according to stitch configuration for the ribbed fabric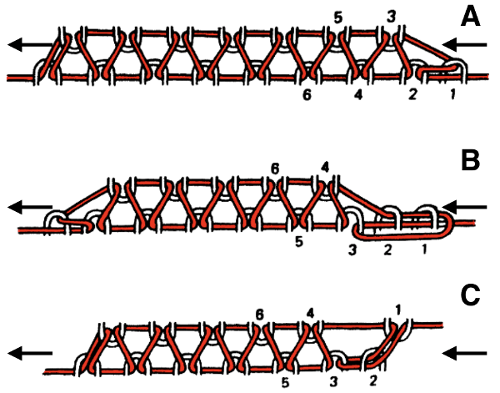
 2. knit second zigzag row to right
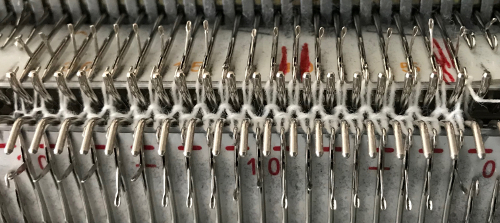 3. transfer stitches as shown
 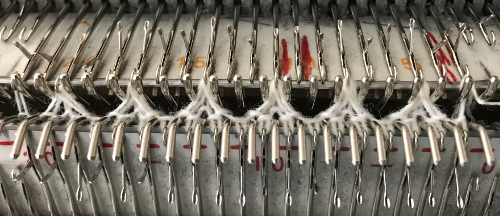 4. knit to left
 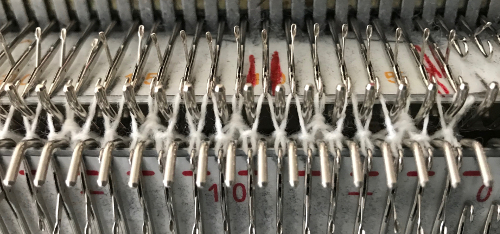 5. knit back to the right
  repeat steps 3-5 to the desired height
 In theory, it is possible to knit lace transfers in Brother by dropping the ribber bed enough for the lace carriage to move across the beds while clearing the gate pegs. This remains on my “try someday” list. To my mind, hand transferring remains the best way to deal with lace/ ribber stitches combined.
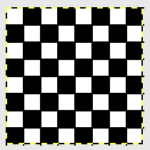
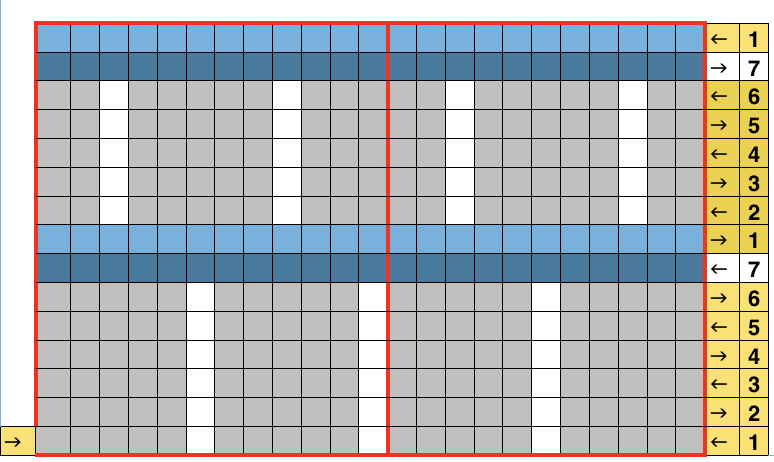
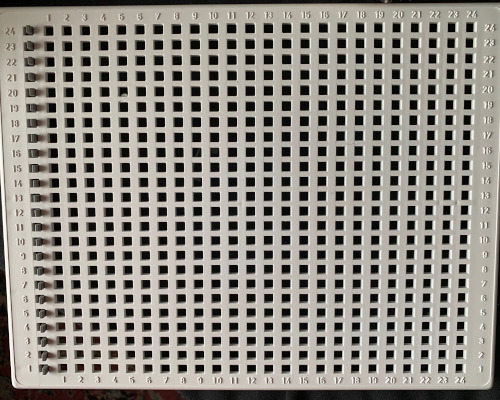
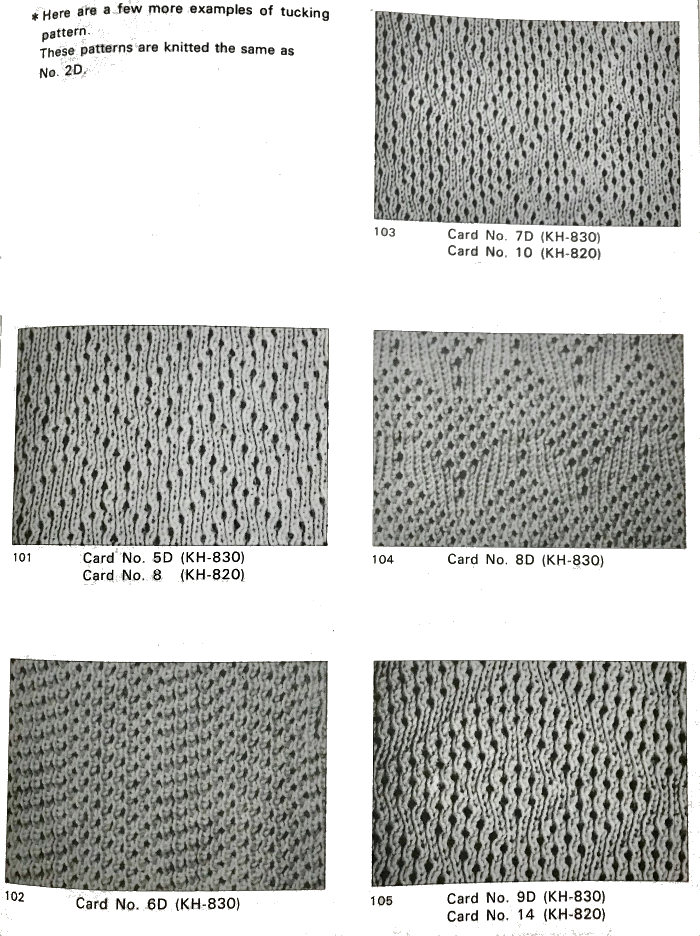
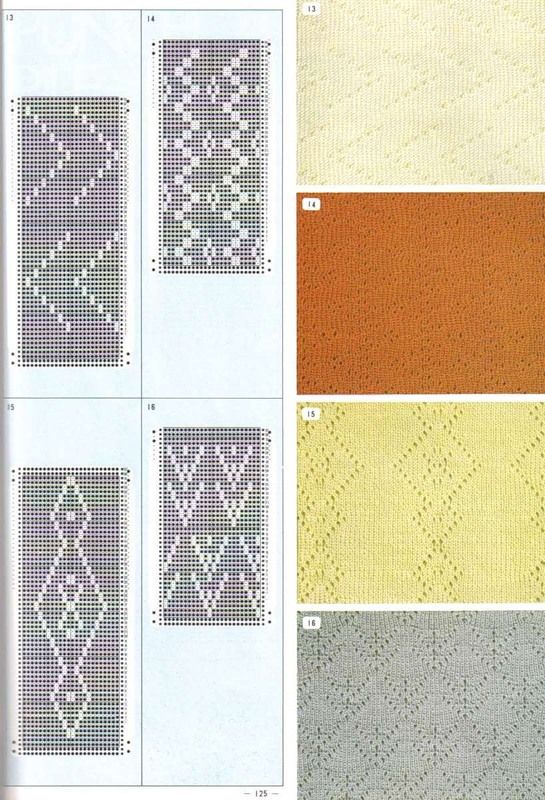
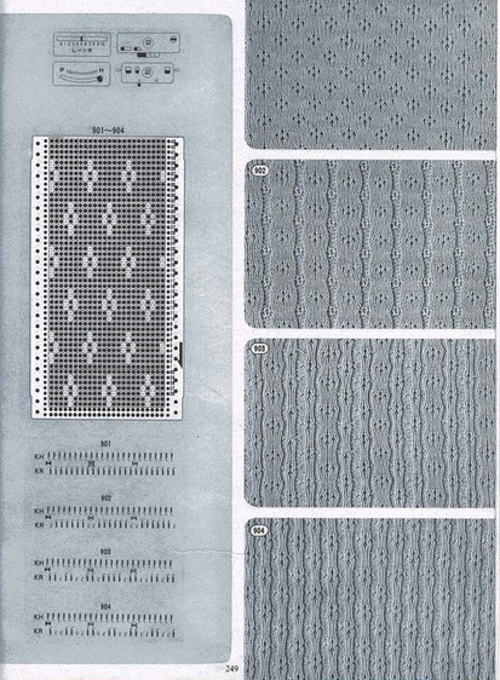
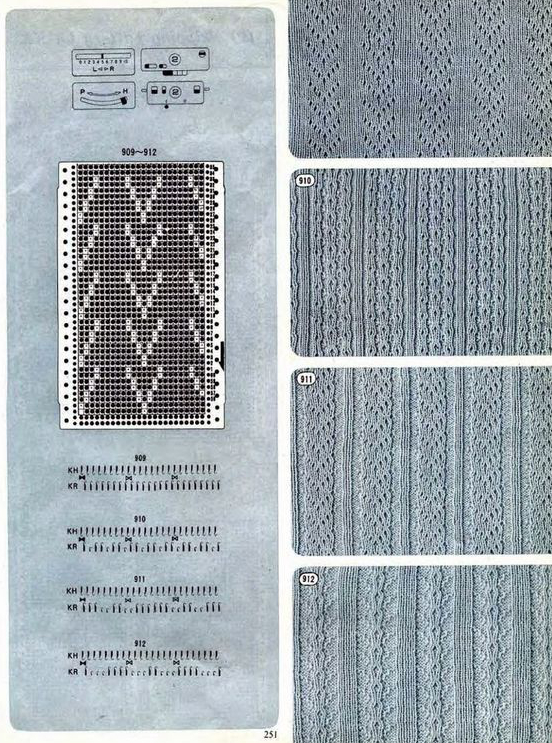
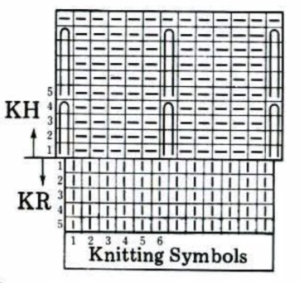 For a punchcard machine, the repeat must be a factor of 24 in width ie. 6 or 8, or 12 stitches wide. Electronic knitters can draw a single repeat, either the one on the left also using color reverse or the one on the right. Punchcard knitters need to punch the grey squares on the right across the card and repeat it in height. An extra all-knit row needs to be added at the top of each series of 4 rows tucked for the loops to be knit off automatically by the machine. Step 4 in the techniques book, resetting the main bed to N to knit a row after every 4 rows in a holding pattern is missing in their illustration above.
 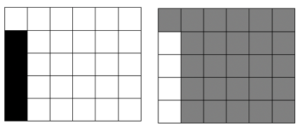 The punchcard repeat: punch each grey square to match the illustration
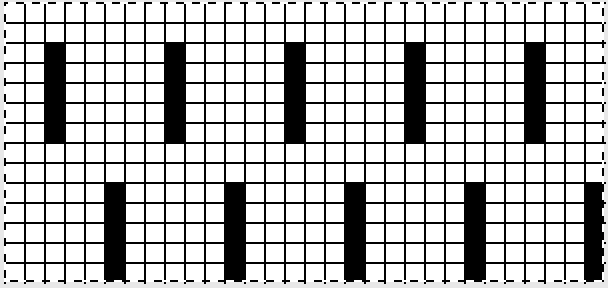
 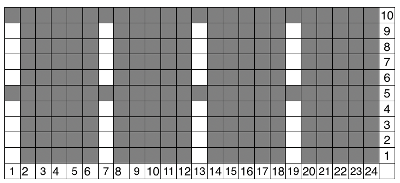 A few to try, shown in repeat X2, as BW gridded .bmps, and with the color reversed for knitting. All but one are 12 stitches in width, suitable for punchcard machines as well
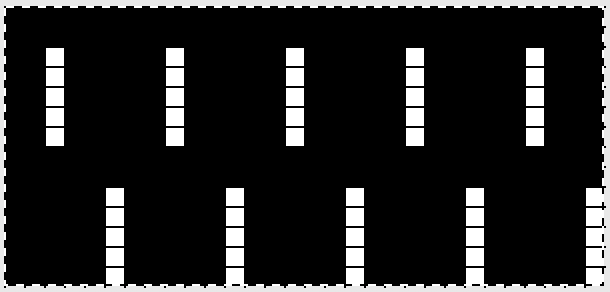
 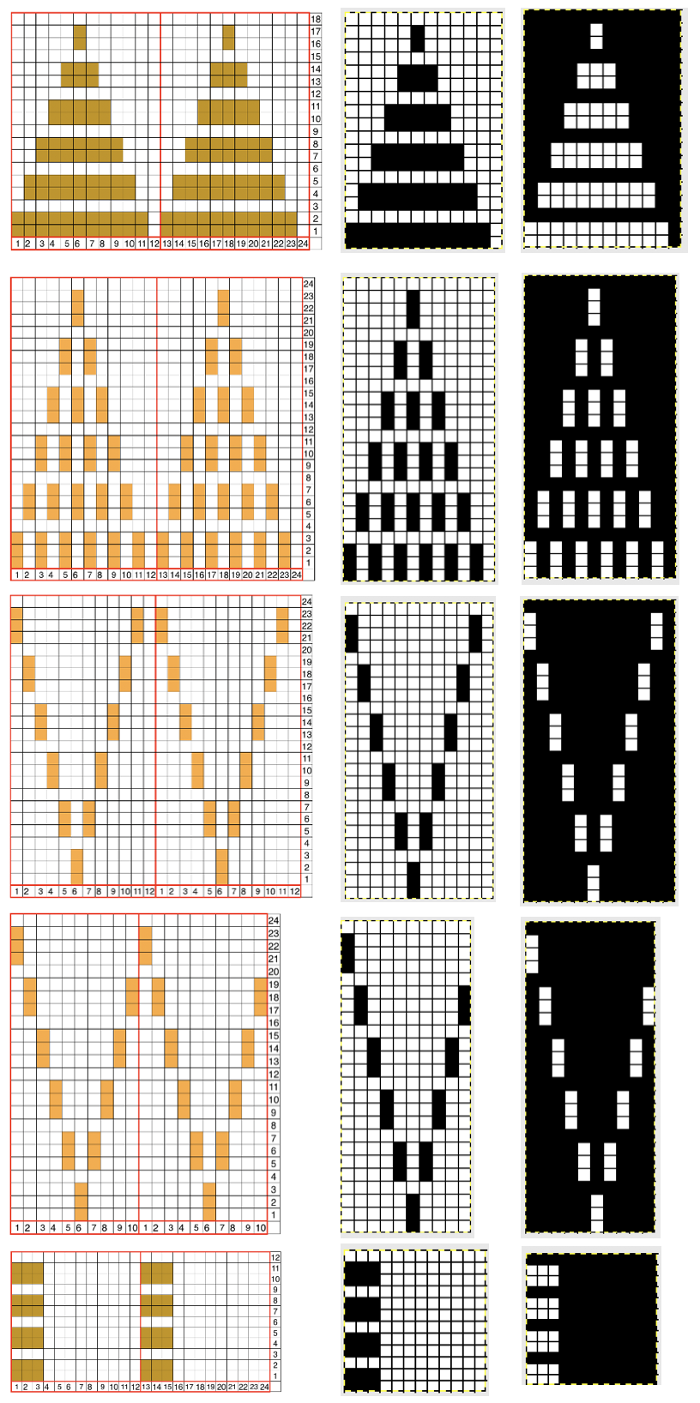 Too much black? want to count those black squares more easily? pick your preferred grid color, it will disappear when the image is saved
 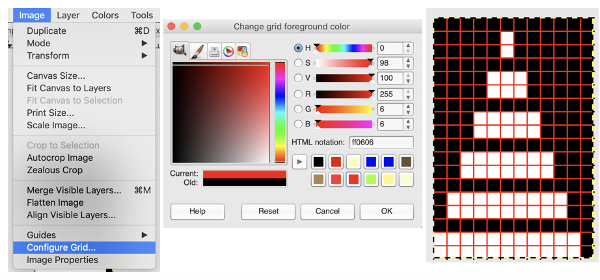 A screen grab from my iMac shows the original charts and the resulting single repeat .bmps after working in GIMP, ready for download with color reverse option and use on the electronic machines. Ayab knitters, in addition, would need to program the repeat in width to match the number of needles planned for use in the piece
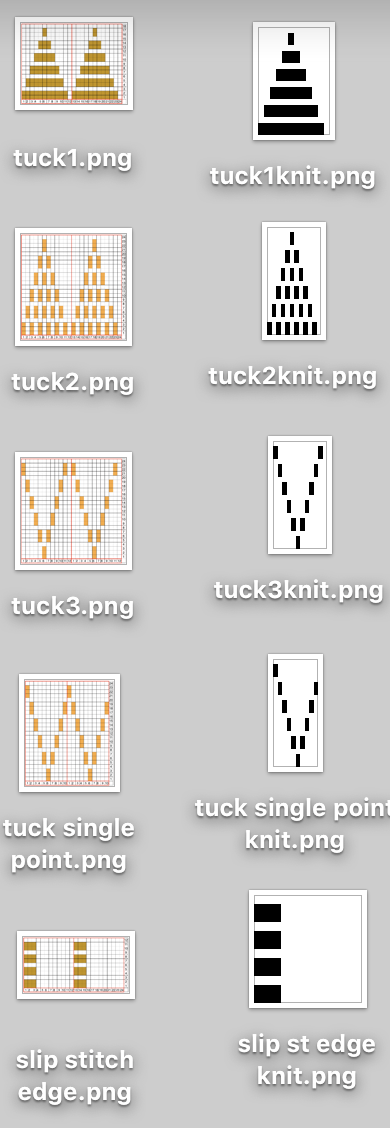

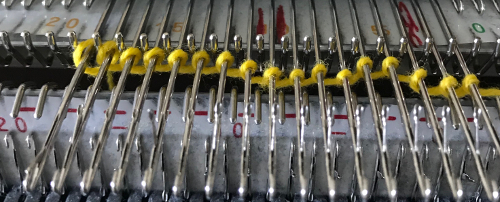
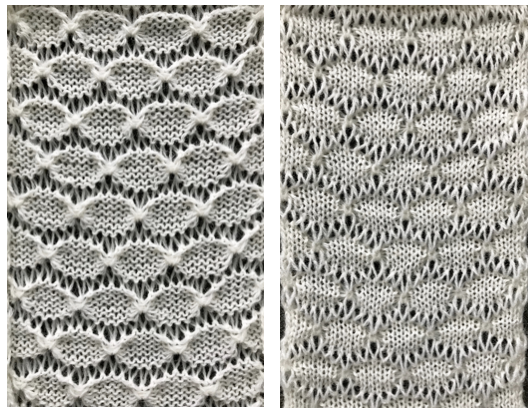
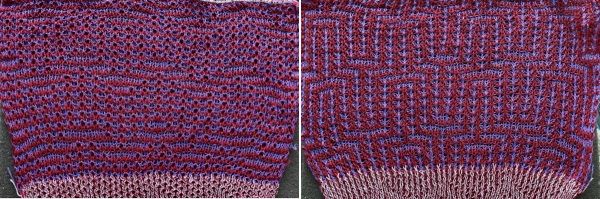
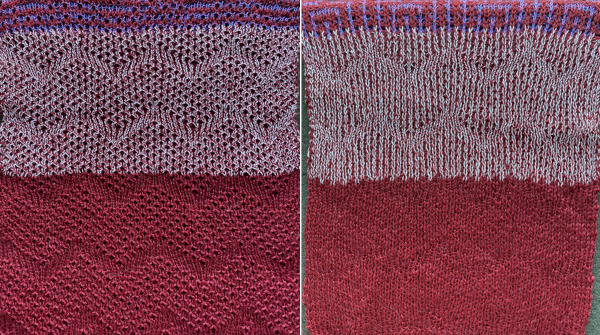
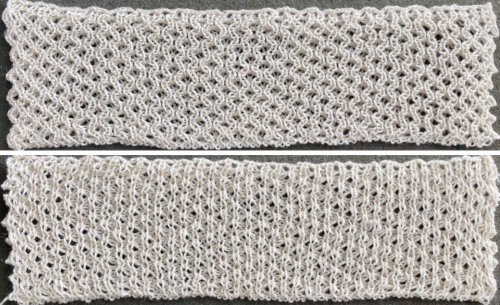
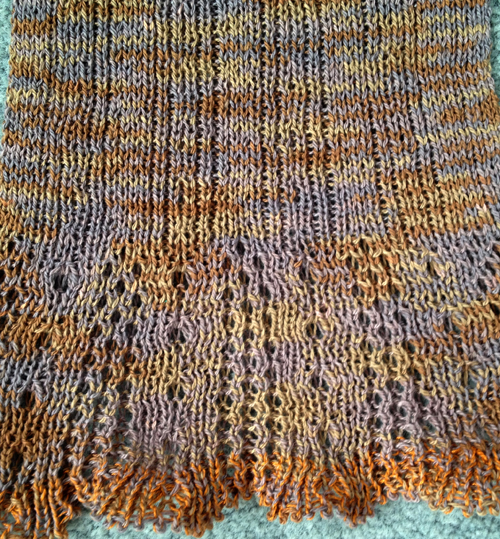
 Working it on Brother becomes a bit fiddly. Whether working on a punchcard or electronic KM, it is possible to introduce patterning on either or both beds as seen below. I preferred the look obtained with the racked cast on at the start. Setting up the Brother machine: program the repeat, half pitch for every needle rib, air knit to place the pattern on the bed so that the first needle on the left (or right if you prefer) is preselected forward and will produce a knit stitch on the first row knit. The yarn used is a 2/24 acrylic
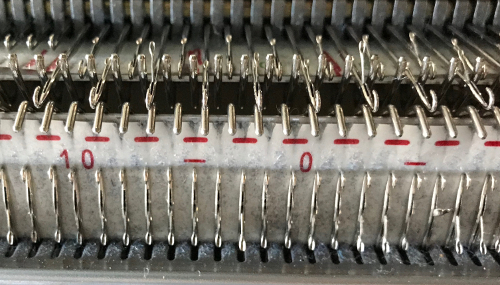
 now another needle on the ribber is brought in to work on the far left, it will tuck with lili selection when moving from left to right
  remember the ribber rule with lili buttons: an even number of needles must be in work, this shows the start and end of selection on the ribber on alternate needle tape markings, as required
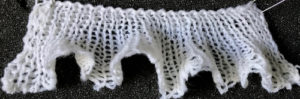


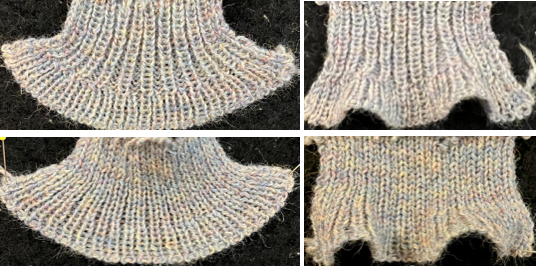
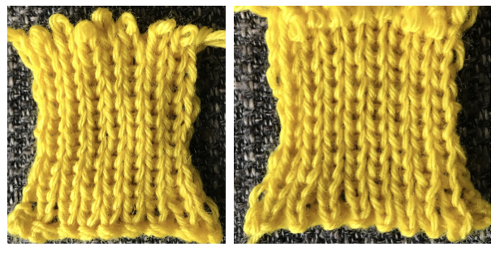
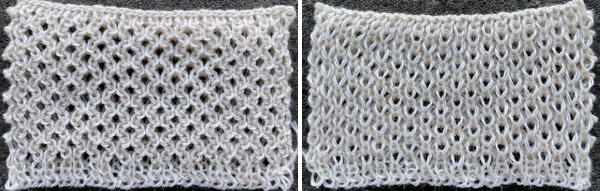
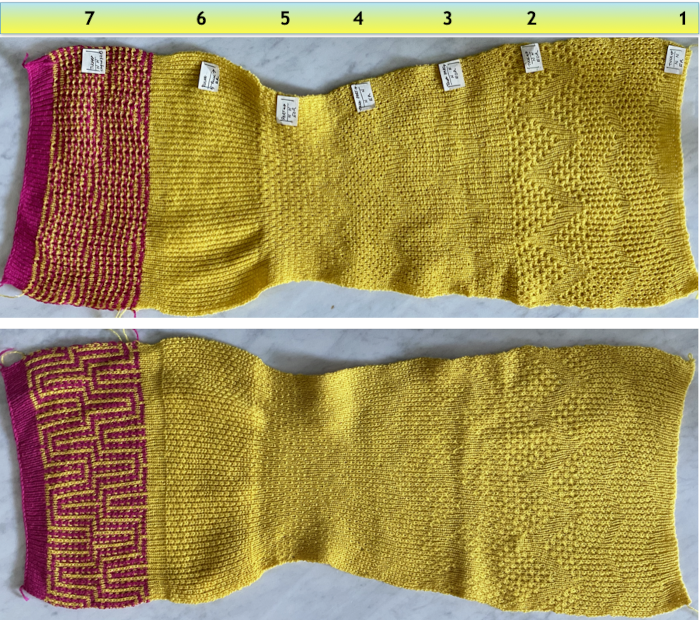
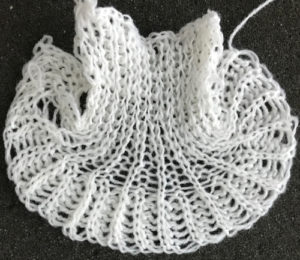 Both pieces compared for width and rippling
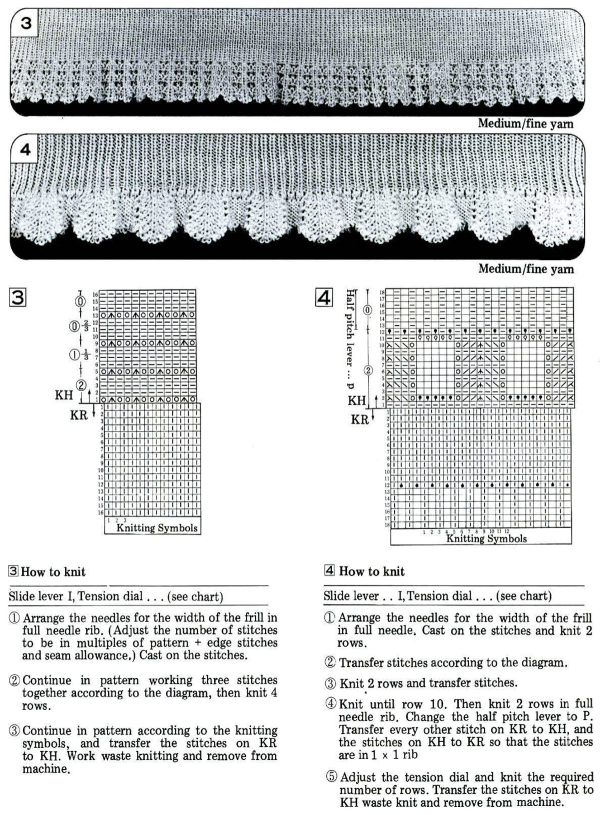
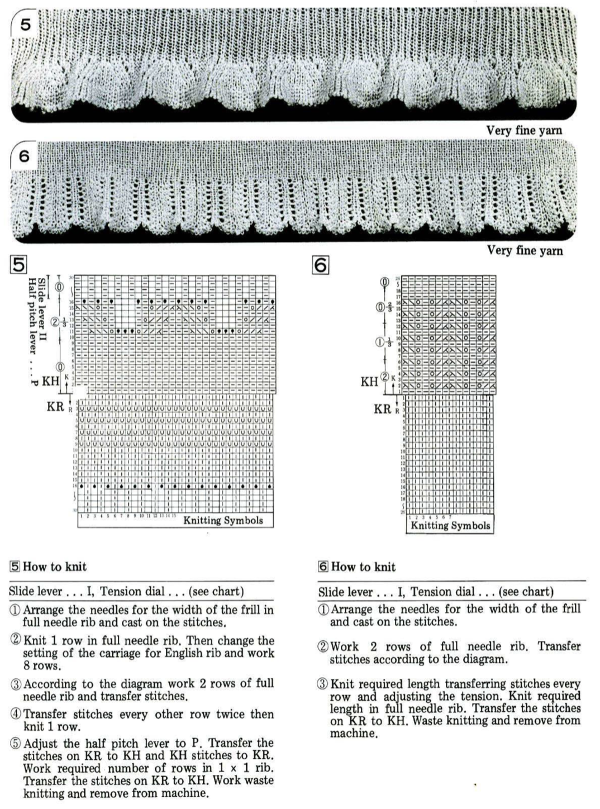 An intro to scallops: p.120
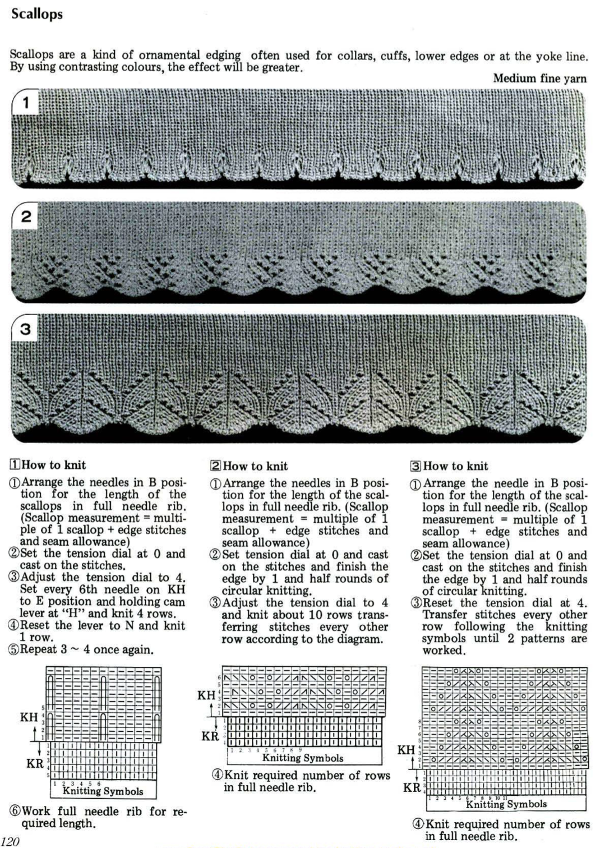

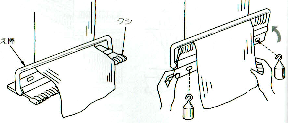
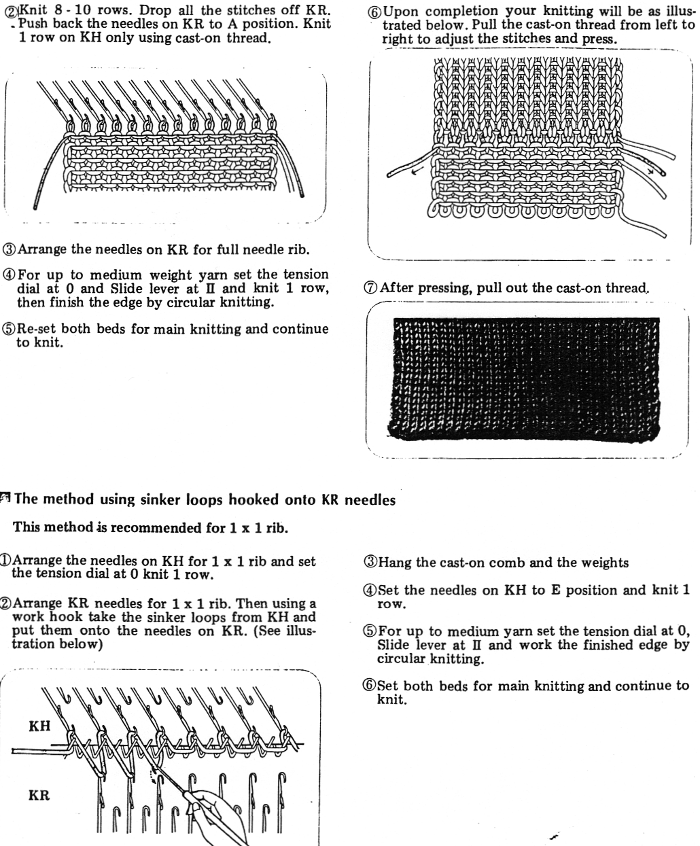

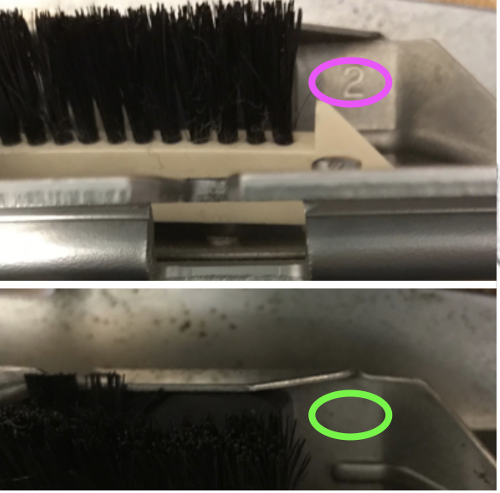
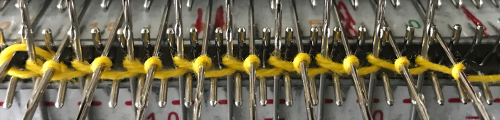
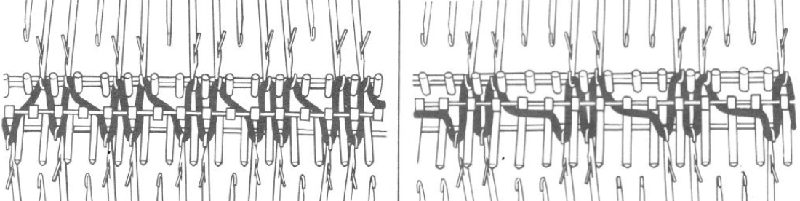
 before the next pass, make certain there are no needles in work on the ribber, they will pick unwanted loops, also, give a tug at the yarn on the carriage side as you begin to knit the next row in order to avoid loops as seen on the right below. Knit to the opposite side.
 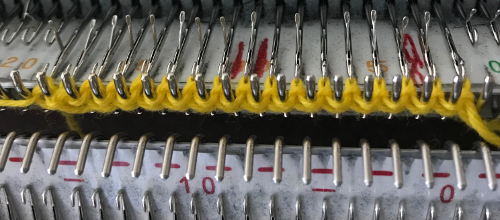 Transfer stitches in the desired needle setup. With waste yarn, ravel cord, and weights prior to its start this cast-on may be used for wider flat ribs ie 2X2, 3X3, etc. Here the comb is in place, ready for 1X1 rib
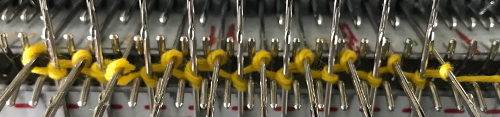
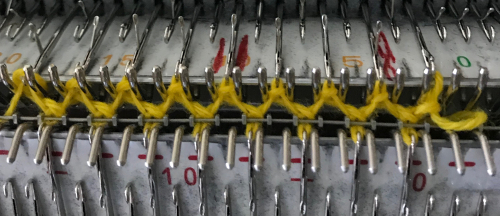
 working from the right to the left side
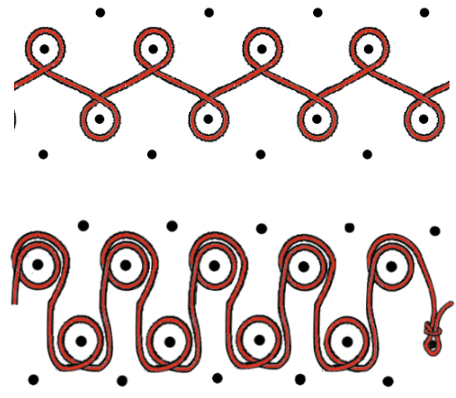
 which is knit carefully to the opposite side
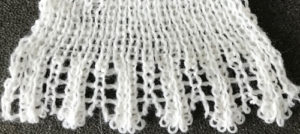
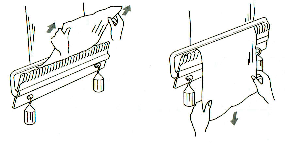
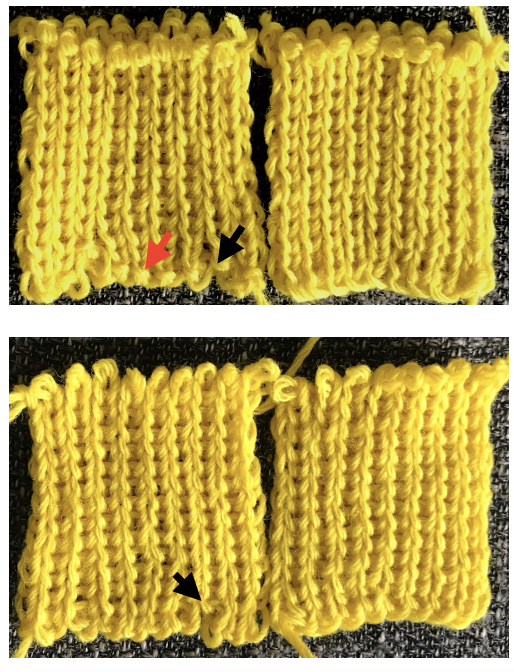
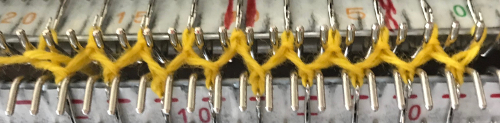 the comb is then hung. Make certain its teeth are placed properly across the row holding stitches down. Here they are not on the right, resulting in the issue marked with black arrows at the bottom of the corresponding swatch
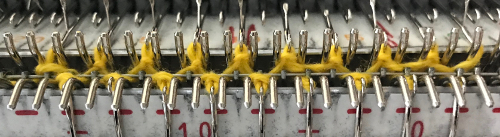
 If working in fine yarns, 2 tubular rows may be needed after the wrapped cast-on.
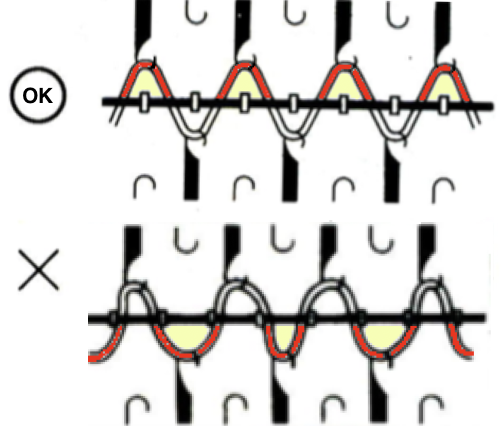
 Decorative cast-ons and beginnings
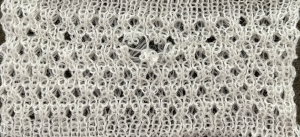
 I would classify the results as ruching, a different knit category
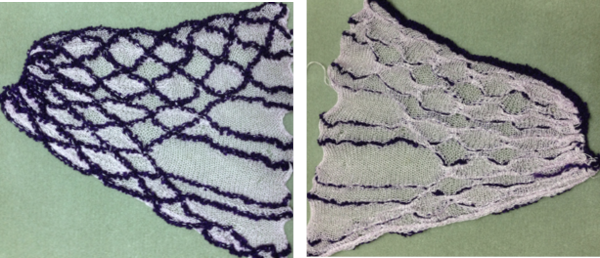
 Some samples: fishing line and wire
 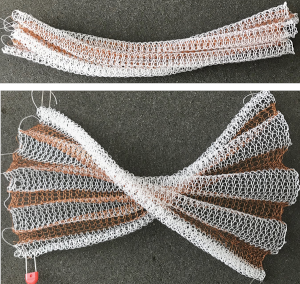 wool and cotton
 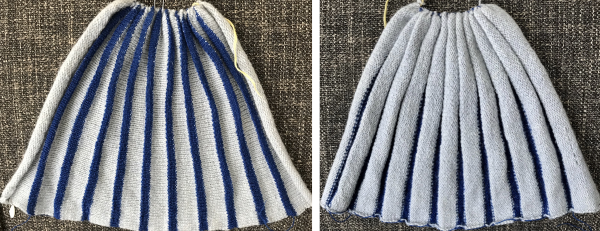 thin cotton and boucle
 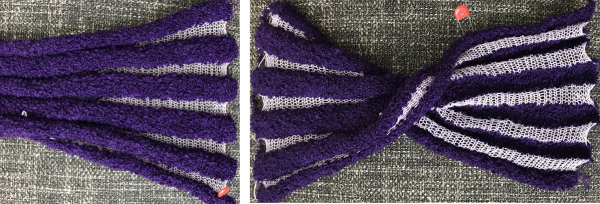 the same cotton and chenille
 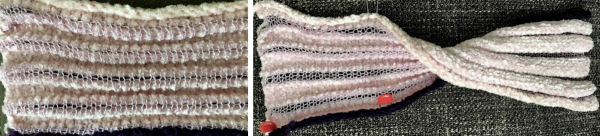 wool and raffia
 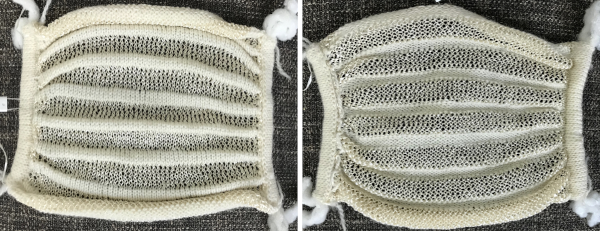 wire and vinyl
 combined with fair isle patterning
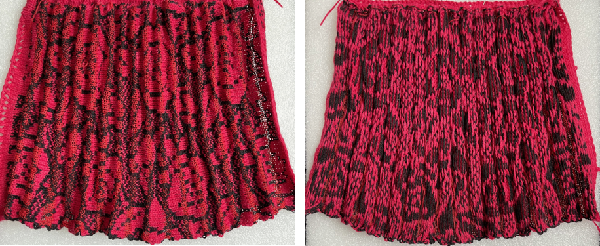


 Weaving cast-on only works on machines with weaving brushes ie Brother. I tend to knit with weaving brushes down no matter what the fabric is unless using them results in problems ie the particular yarn being used has a tendency to get caught up in them.
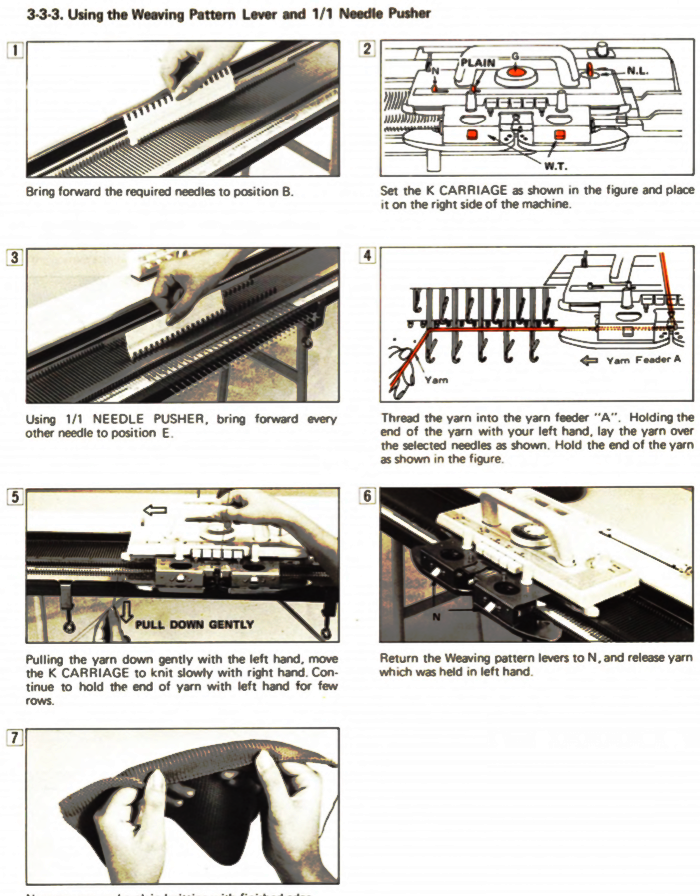
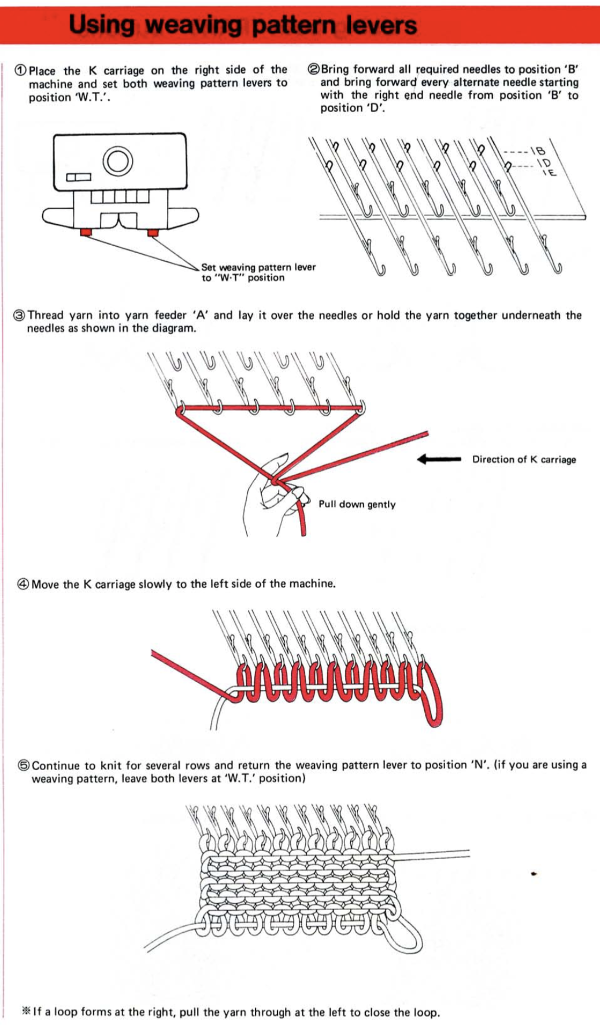


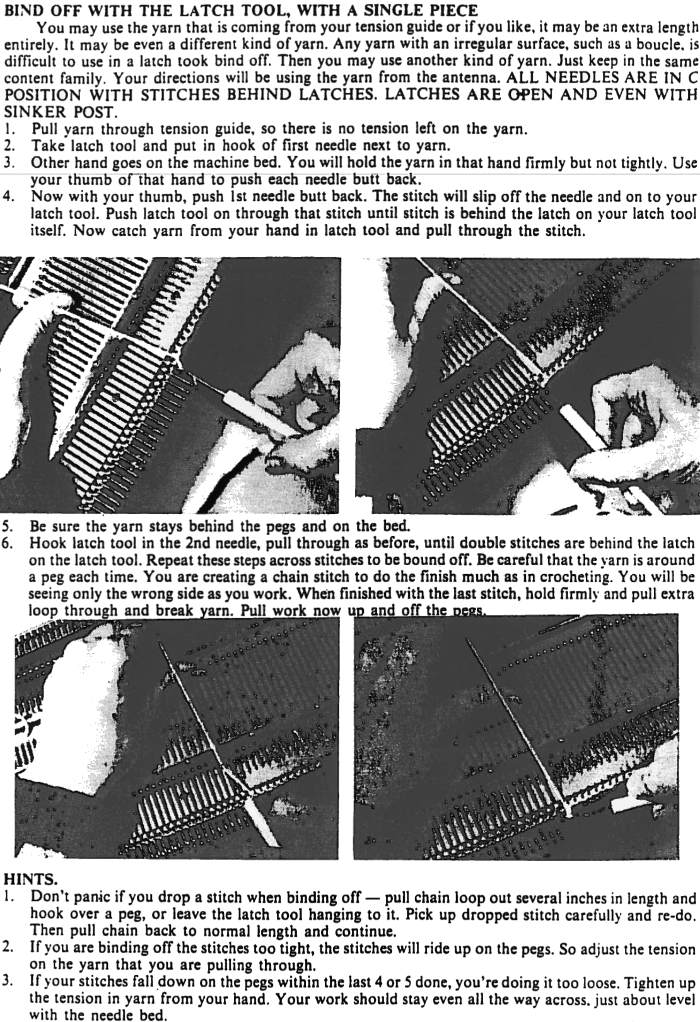
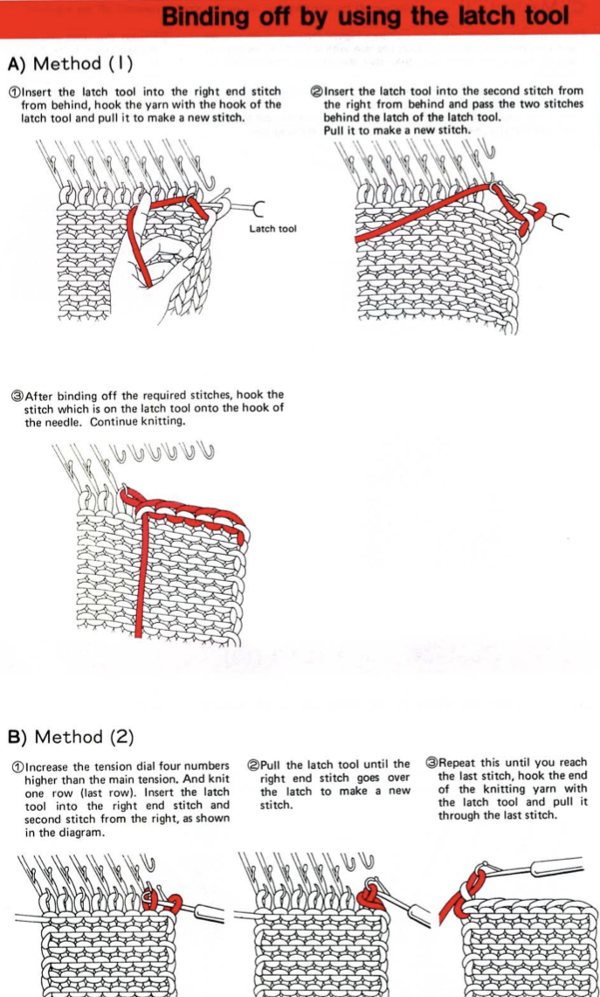
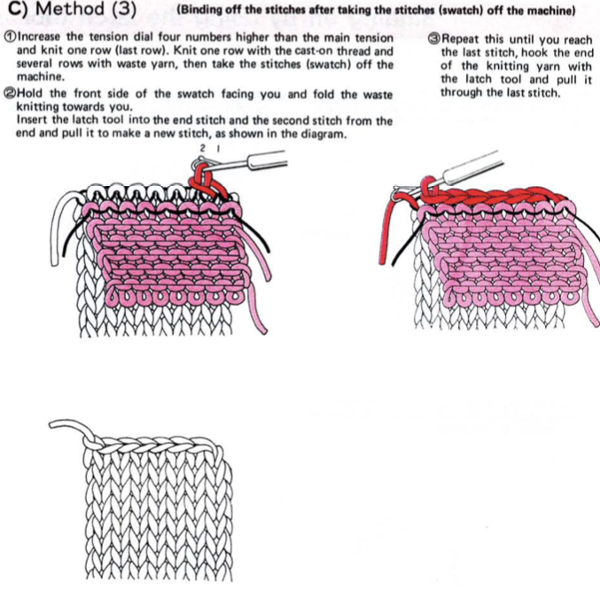 A crochet hook could be used in place of the latch tool.


 For mock rib executed on the single bed, for double rib as well, see
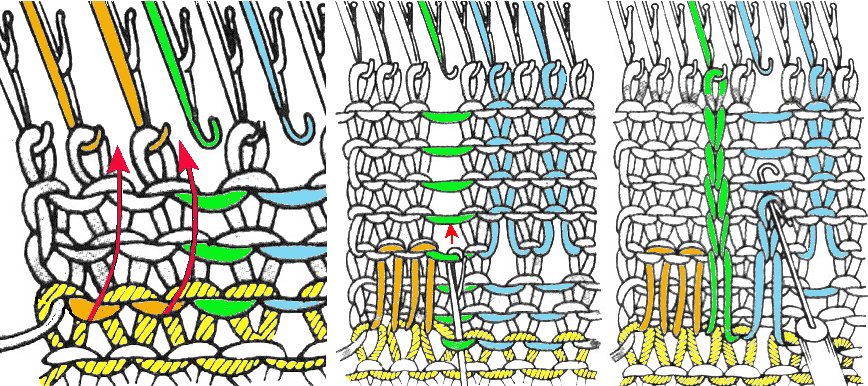
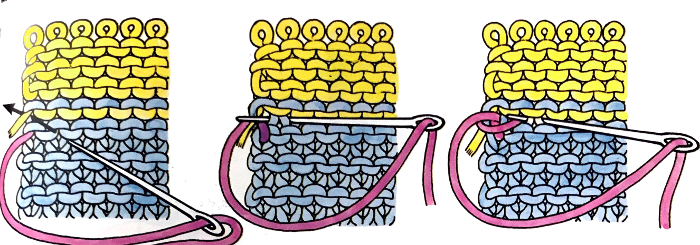
 Reviewing approaches to binding off with needle and yarn: working single bed is sometimes performed on the machine and is illustrated below working from left to right. It is referred to as back or stem stitch and “sew off” method, and is shared in many of the old machine knitting manuals. It is easier to achieve if after knitting the last row one knits at least 2 or 3 more rows in waste yarn to make the stitches more accessible. The knit side shows single loops in view upon completion. Dropping small groups of stitches off as one makes progress across the row may make the technique easier, helping with the placement of the other hand to hold the work. On the machine, the fixed distances between needles and gate pegs help to keep the tension even. The backstitching may be done off the machine, but maintaining even tension there may be a bit harder.
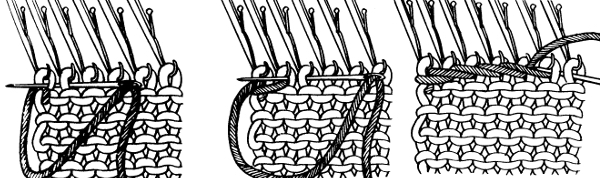

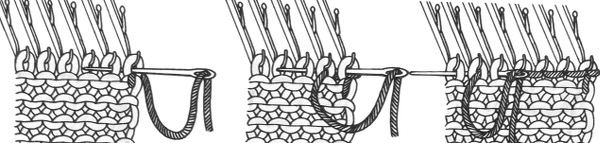
 or the needle and yarn sewing method may be used. There is a limit as to the length of yarn used so as not to pose problems. Very wide pieces may prove to be a challenge, requiring more than a single yarn end to complete the bind-off. My own yarn end max limit for sewing up or off is about 18 inches


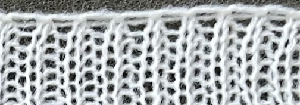

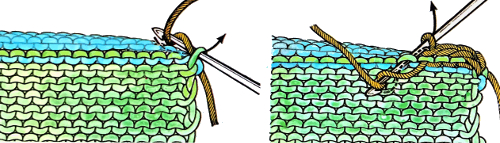
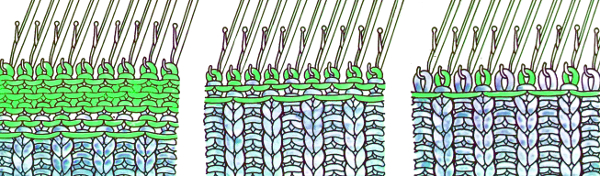
 I prefer an alternative method for waste yarn scrap off, ending in place of circular or U knitting: knit the last row in garment yarn. Thread up waste yarn, and knit it at single-bed tension. Knit 4 rows on one bed, with a separate strand or even a second contrasting color of equal weight, and knit 4 rows on the opposite bed. Repeat alternating until there are more than 12 rows on each bed and scrap off. This will allow you to press the waste knitting only, and the flaps are opened up to reveal the tops of the stitches created on each bed. Finishing can then be executed as below.
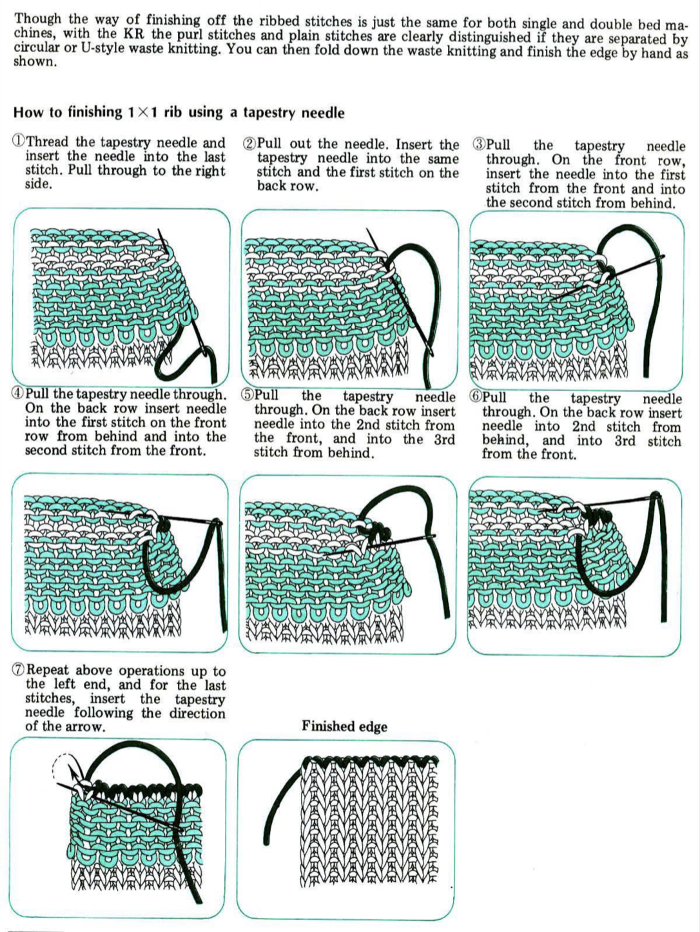

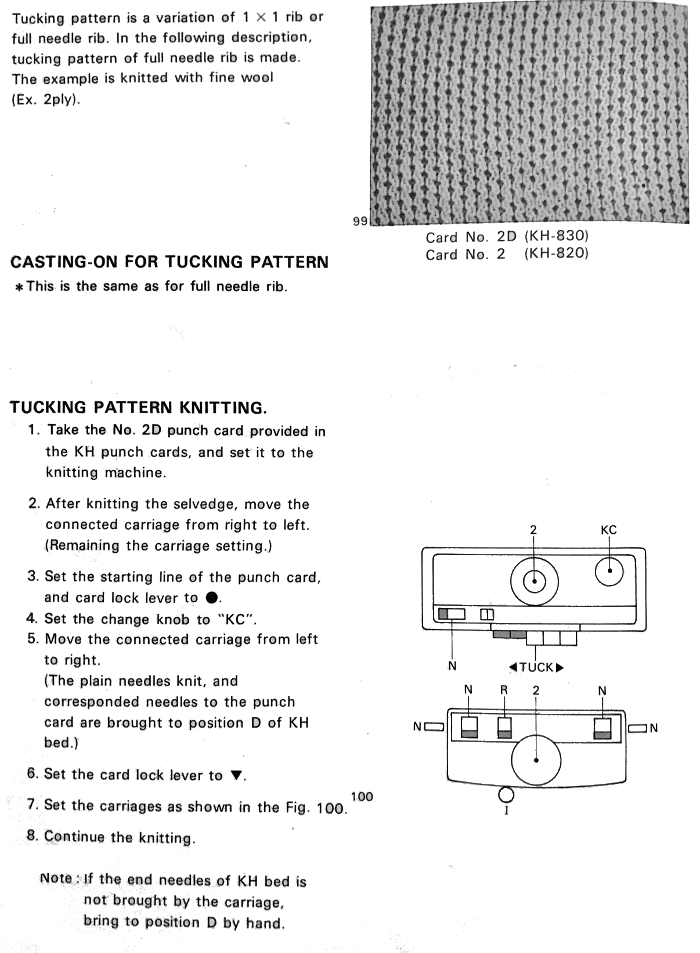
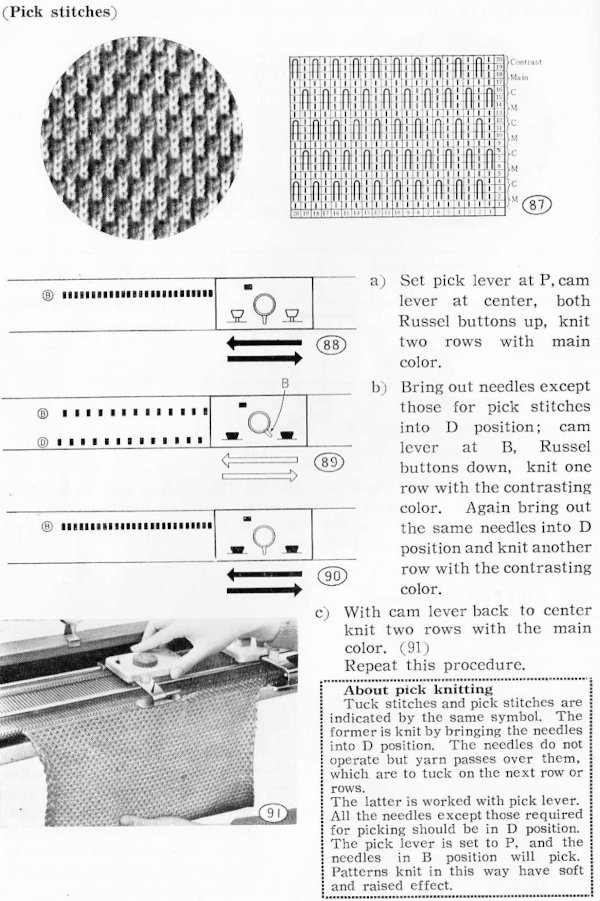 The identical pattern in later model machines may be produced by using the tuck setting. The image below shows the punchcard partial repeat and the isolated electronic repeat for use with the tuck setting.
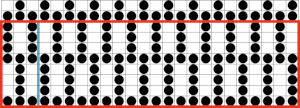
 The knit carriage appears to use “pick” as the name for what is now more commonly knows as the tuck setting.
 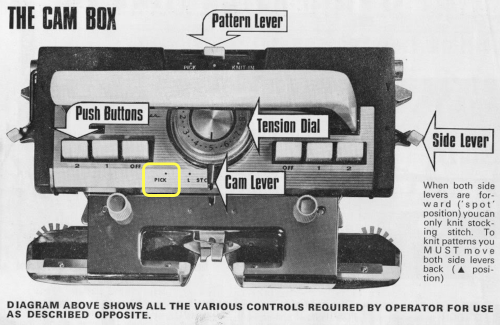 A downloadable
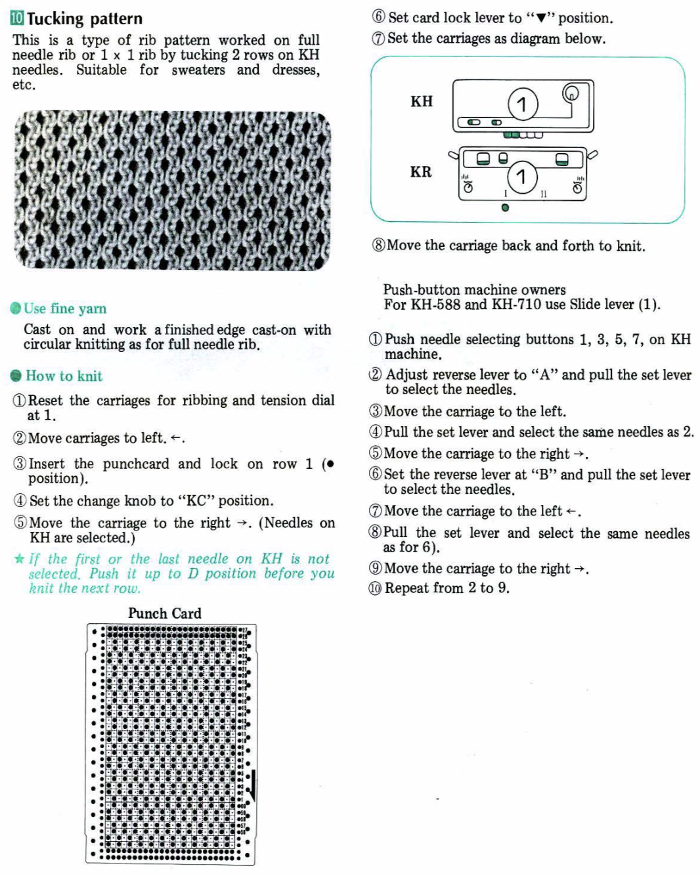
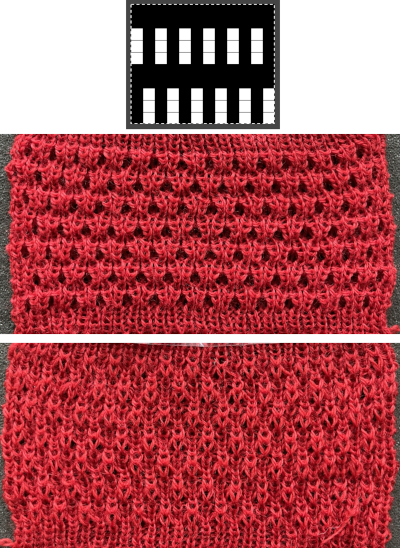
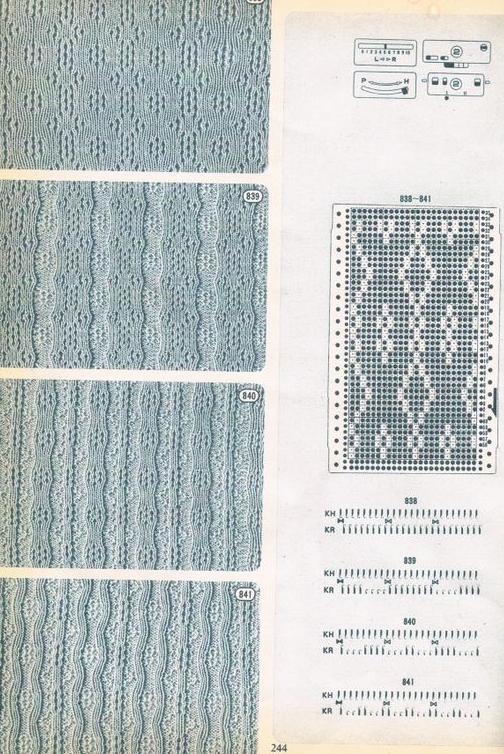
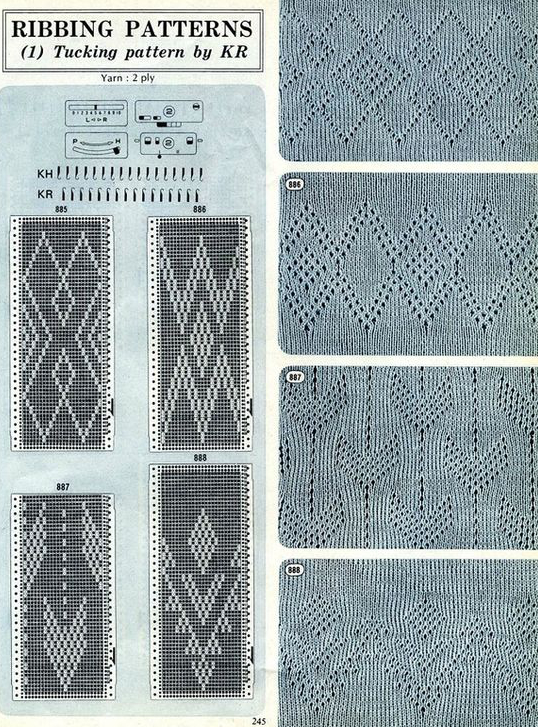


 Because, in most instances, the ribber is set to knit there are stitches on the ribber holding down tuck loops on the main bed, and typical tuck configuration rules may be broken. One such pattern to try: the punchcard repeat and the electronic one are identical
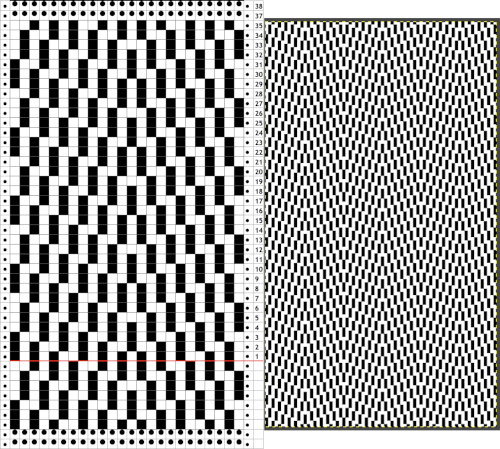
 Adding color striping
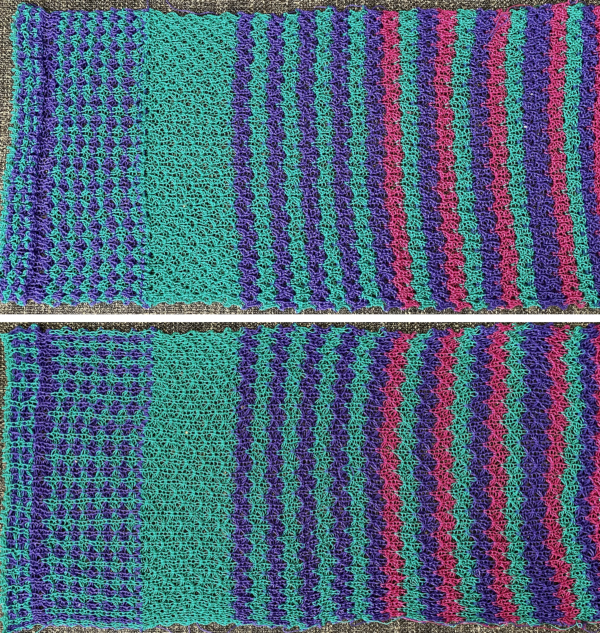
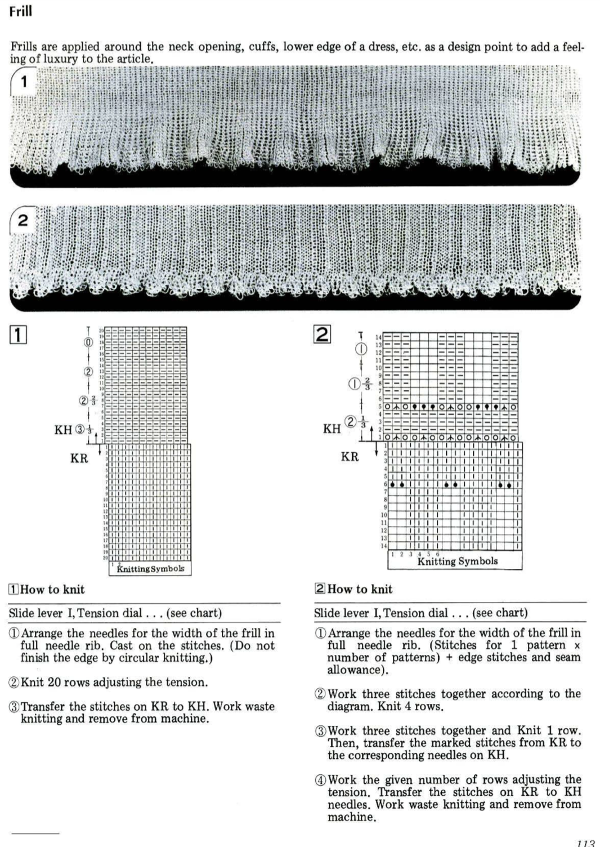
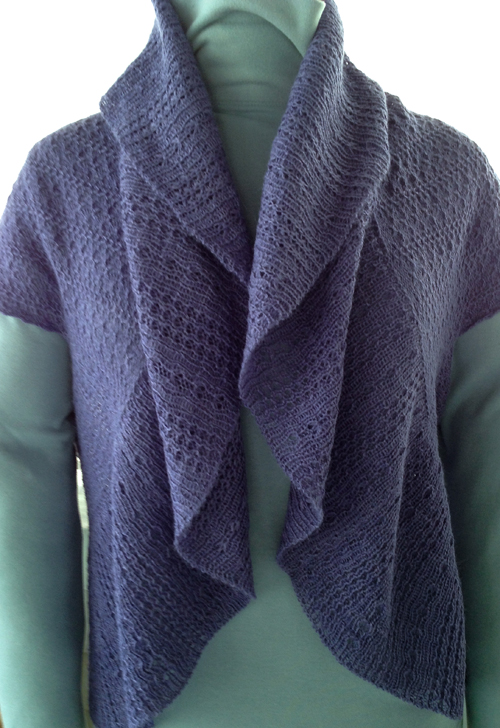
 Using the stitch type to create edgings or ruffles
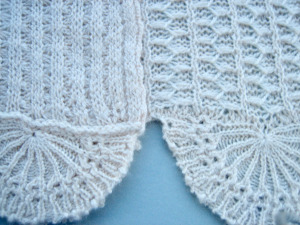


 See “tuck lace” fabrics for some variations with top bed patterning also using sporadic needle transfers to ribber.
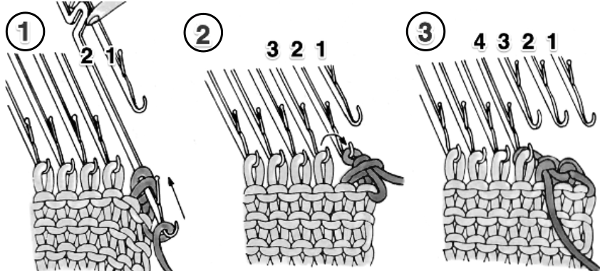