Vertical racking 3: automating half fisherman in pattern (2)

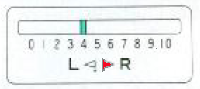
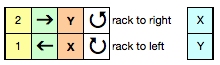
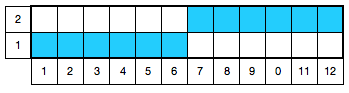
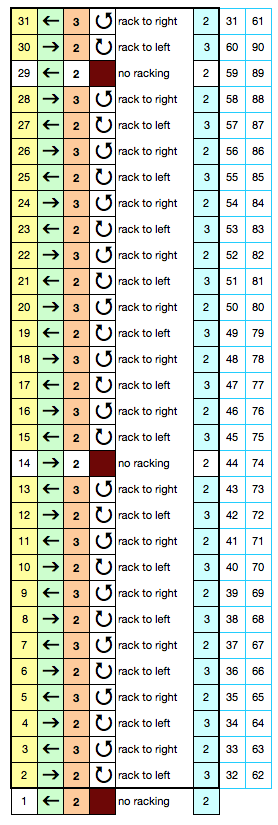
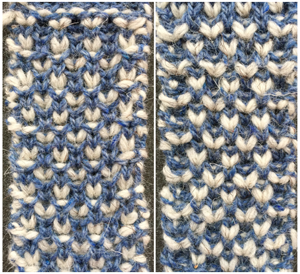
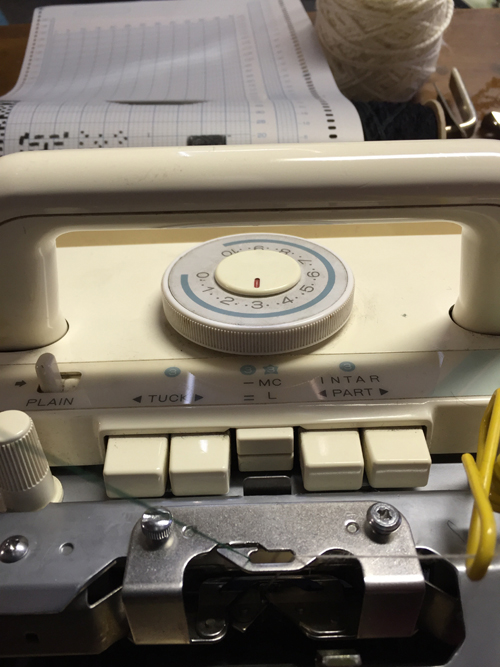
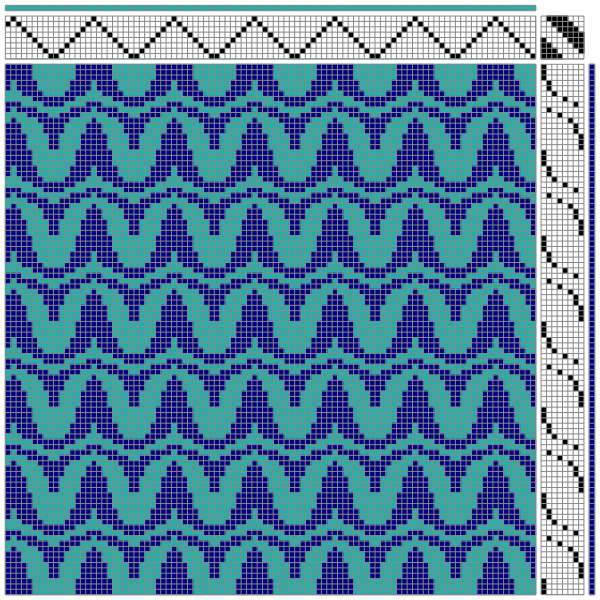
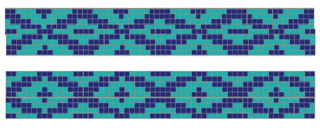
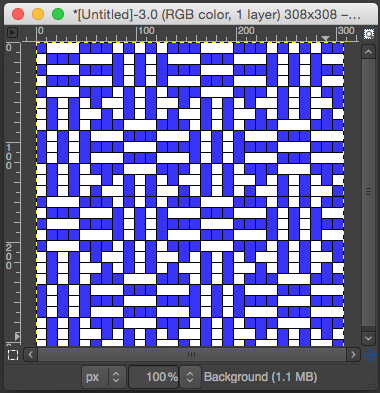
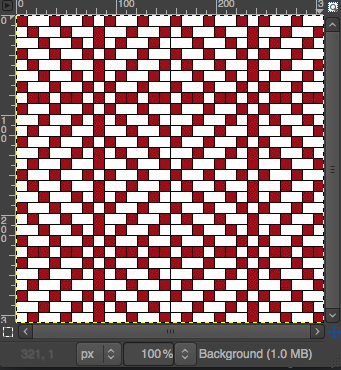
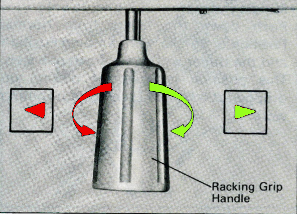
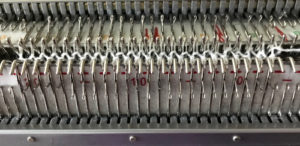
Working with the half fisherman racking discussed in the last post, here is an approach to interpreting the fabric seen below for knitting on a Brother model knitting machine.  500_557For the sample chart, I chose a 12 stitch repeat, making it executable on any knitting machine. The ribber is set to half-pitch. An often-overlooked clue as to what is happening or is about to be found in the arrows just below the racking position indicator. With the latter at 5, the red triangle appears pointing to L. As the bed is racked to position 4, the red arrow now points to the letter R. This is a simple racking pattern involving only the 2 positions, either to R or L

pitch_rack

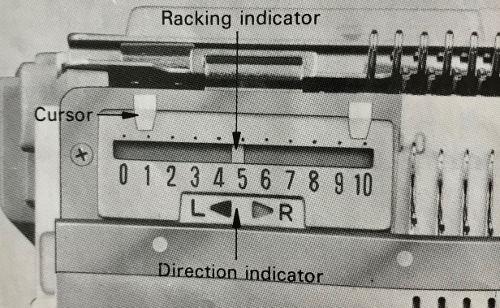
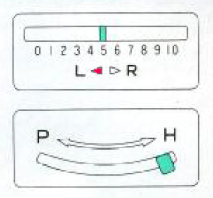
Once on position 4, the red arrow indicates the direction in which the bed was racked on the last move (R), the “empty” arrow the direction for the next move (L), bringing the position back to 5. More complex patterns require a bit more planning and tracking to avoid errors.

rack2

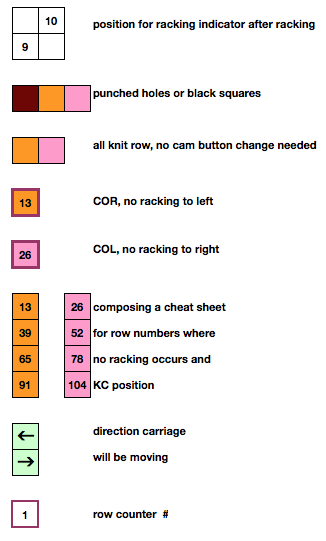
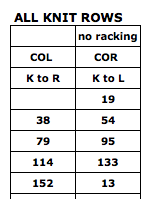
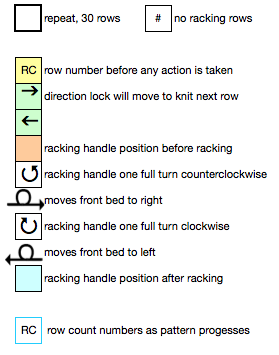
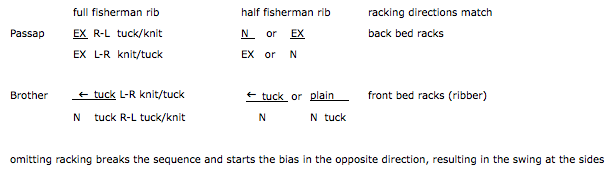
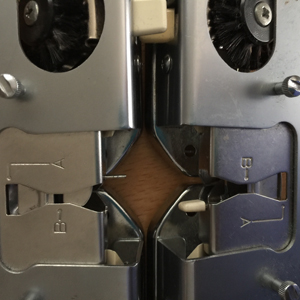
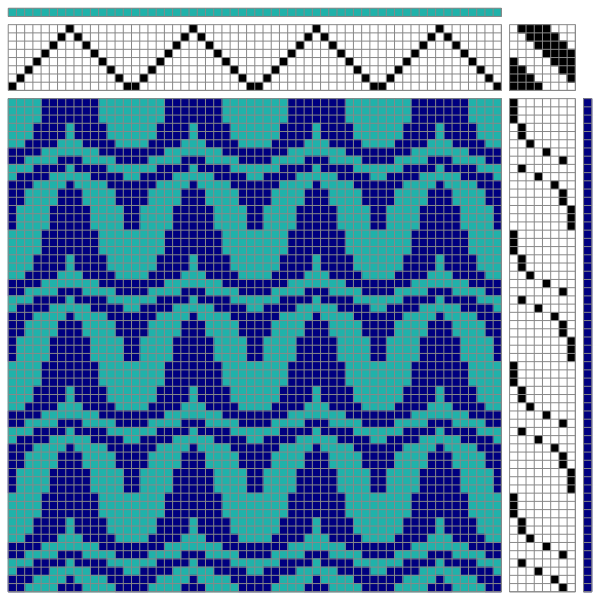
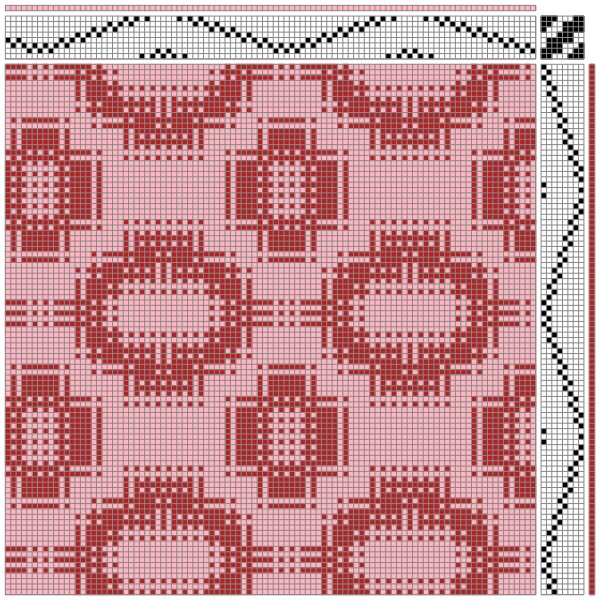
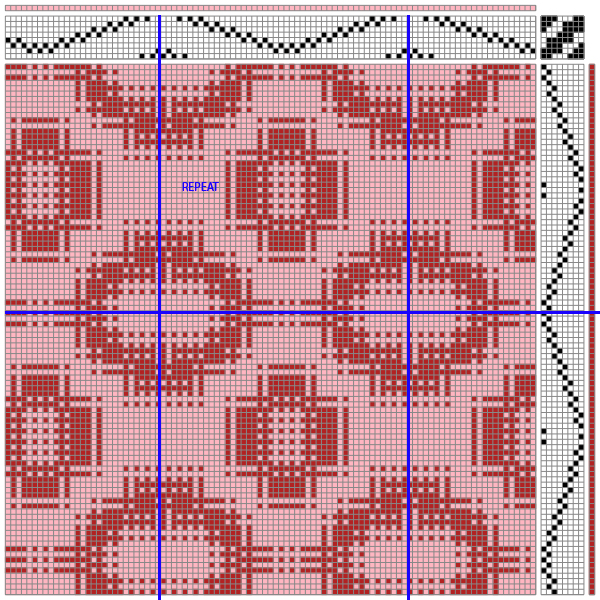
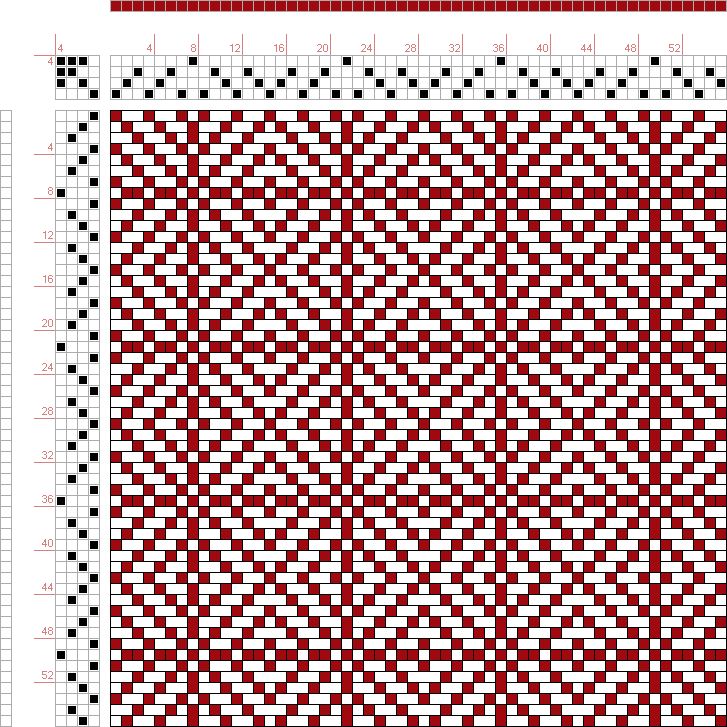
Racking patterns in books often recommend beginning the fabric with the setting on 5, or the center position for the machine in question.  Doing so allows for balanced edges in patterns that swing by multiple positions in both directions. In this instance, for the sake of avoiding mistakes in as many ways as possible, I would start the pattern on racking position 10. Racking cannot go any further to the right, so no chance for example of racking to 6 rather than 4 in the knitting because of inattention. Having a “cheat sheet” with row numbers where no racking occurs, and the position of the carriage to R or L at their start and or after the knitting is also helpful. I had to lower the tension on both beds considerably to avoid forming loops that in turn got hung up on gate pegs. Especially at the start make certain that the comb and weights drop properly. Using KCI will ensure that the first and last stitch on the main bed always knit. In the patterning used on the Passap back bed (previous post), the groups of needles in each half of the repeat will change to the alternate position with each pass of the lock. On the rows where the back lock is changed to N, selection continues in pattern, but no tucking occurs. In this chart, the pattern is maintained continuously throughout, while blank “remaining” squares are filled in on rows where no tucking or racking occurs = N, every needle knits. In Brother machines, both tuck buttons are pushed in. Selected needles knit, non selected tuck across the row. new program 2symbols

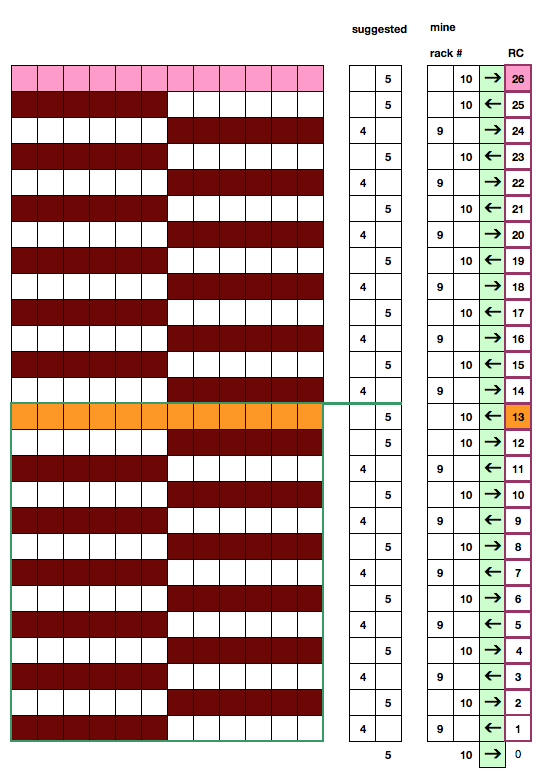
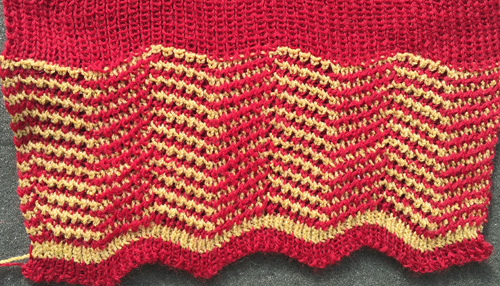
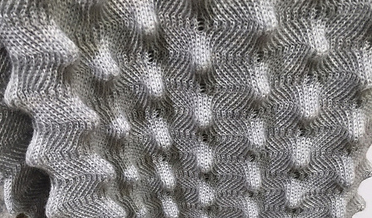
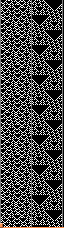
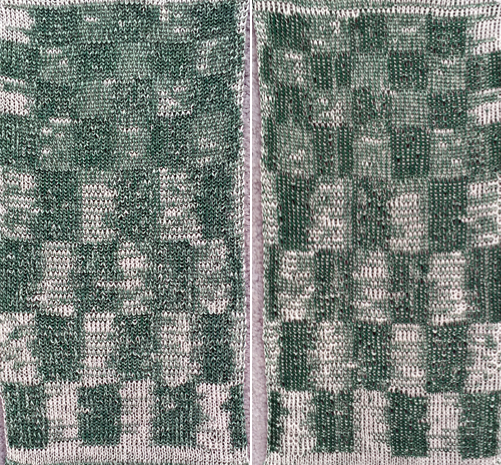
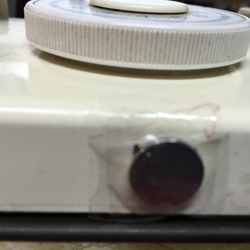
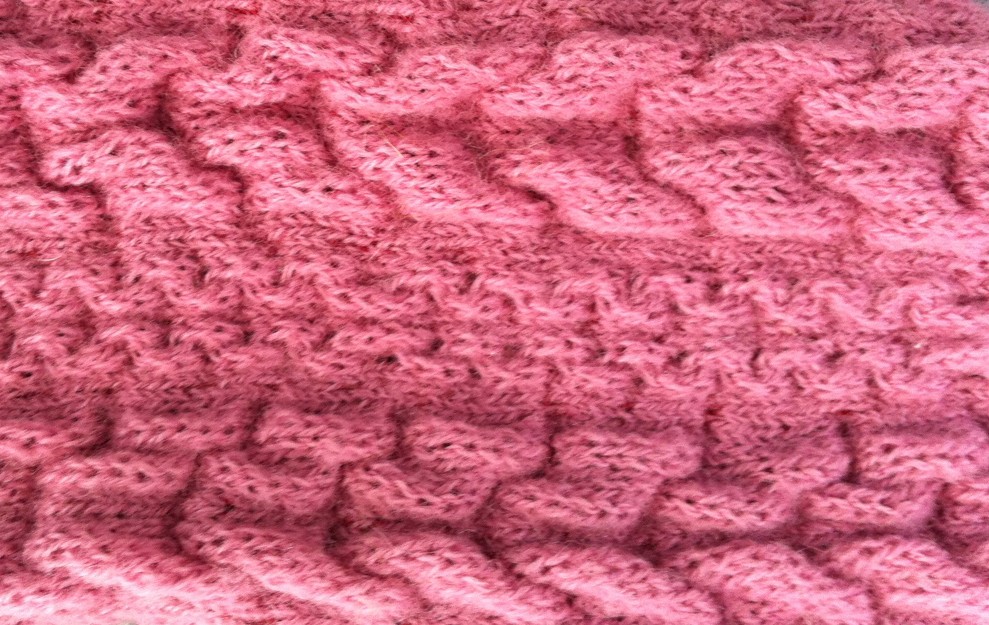
I tested the pattern approach on my 910, with a 38 row, 20 stitch repeat in a random acrylic. I had some issue with some needles not selecting properly, for whatever reason. The repeat was not planned so a full 10 stitches were at each side of the knit, resulting in the difference on the right side of the swatch photo from its left.

larger repeat

half the repeat with color change on a single plain knit row (use of color changer only possible with even row change sequences), the top stripe of the swatch in plain rib

half repeatN1

1rowN1_584

back to scales and knitting them

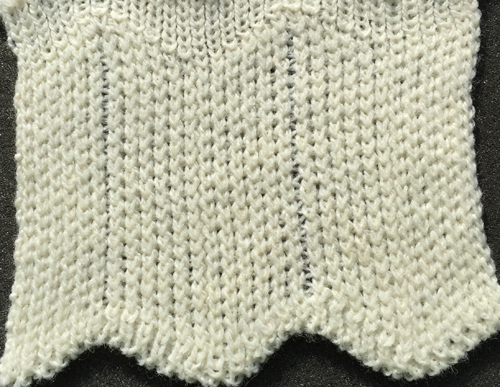
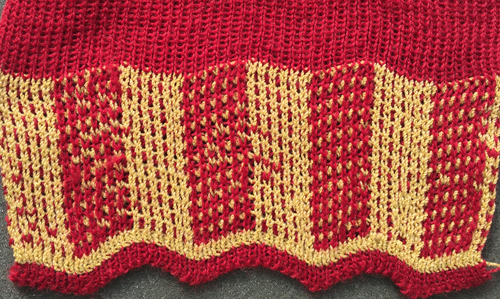
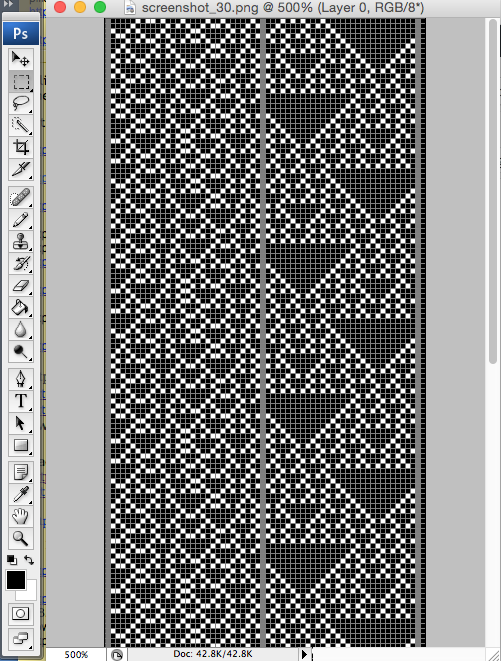
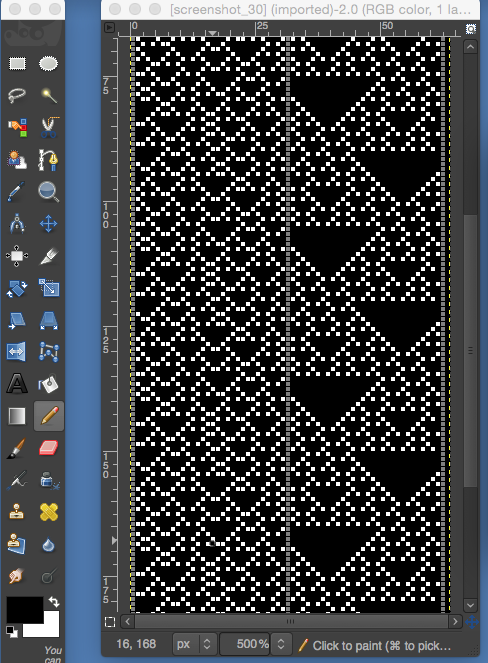
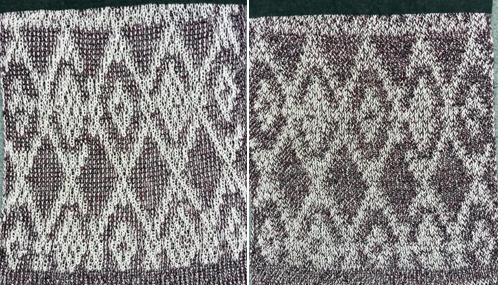
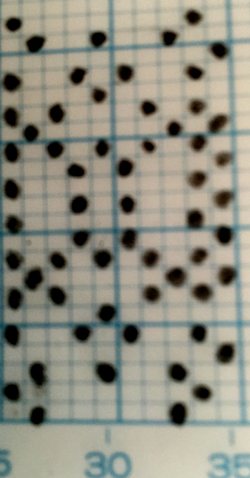
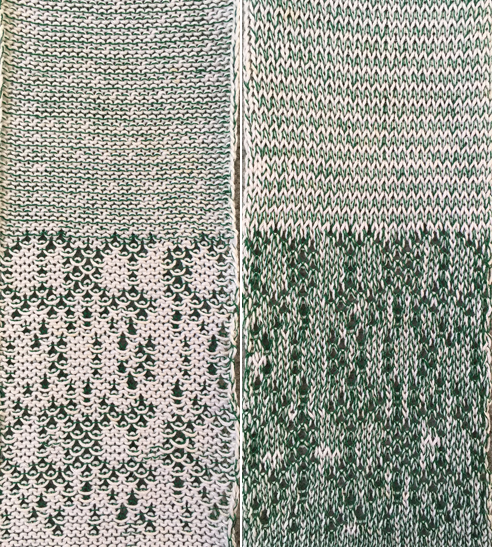
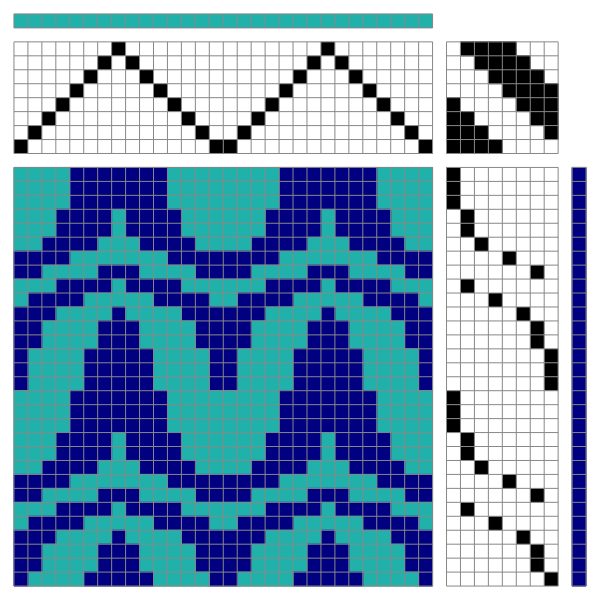
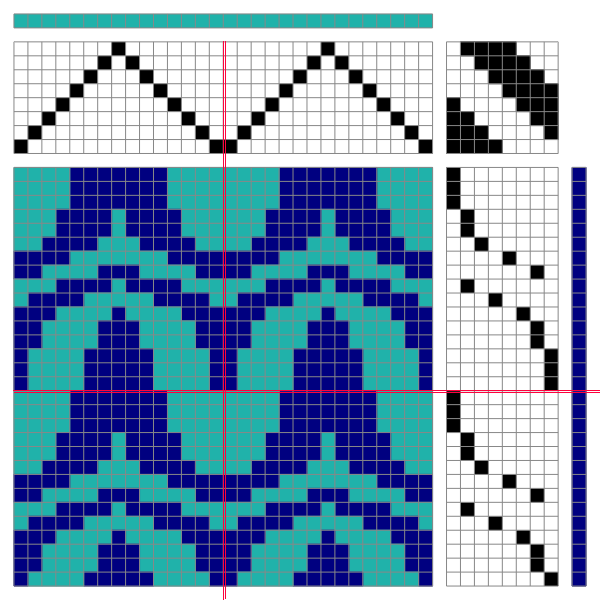
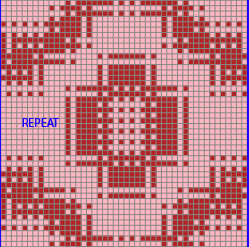
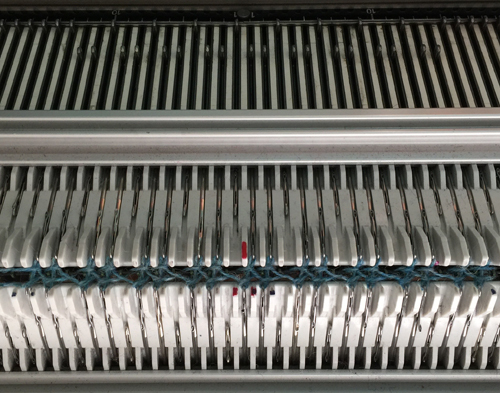
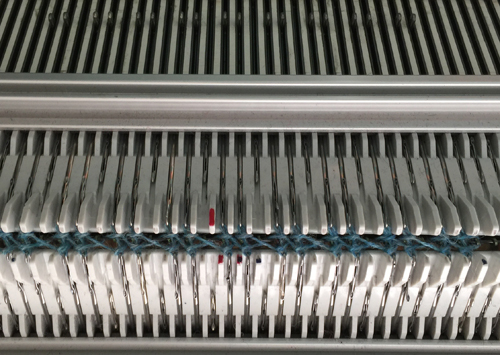
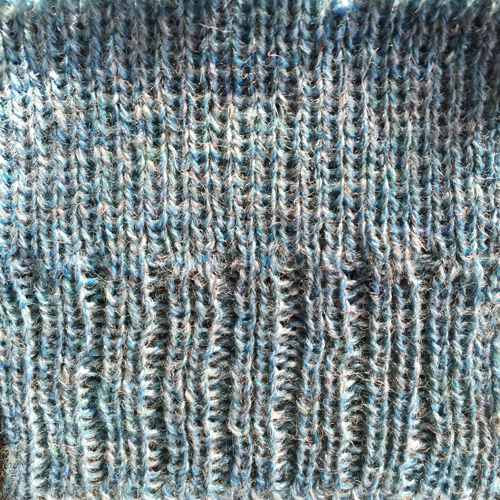
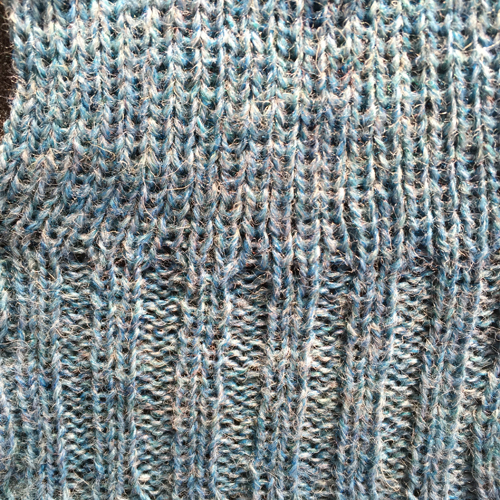
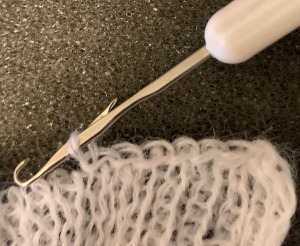
Overall,  wider repeats and thicker yarns gave me harder to knit fabric, with less noticeable pockets and lack of stretch and “bounce”;  ultimately I went back to a 6X6, 12 stitch 2-row sequences illustrated in the chart above. The thinner yarn needs to be with a bit of stretch, and enough strength not to break when ribbed and racked at the tightest possible tension. This is a fabric that requires concentration, having as many clues as possible to help stay on track is useful. If errors are made close enough to the all knit row, it is possible to unravel carefully to that point and continue on. Mylars or punchcards may be marked to reflect racking position. Here the mark on the right = 10, the one on the left = 9. Marks take into consideration that the card reader’ design row and knitter’s eye level row views are not the same.

mylar_marks

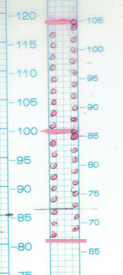
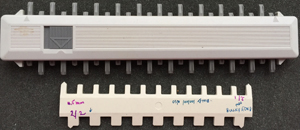
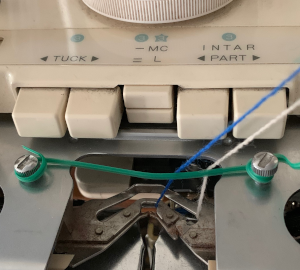
A row cheat sheet can help track carriage location for all knit rows. Pictured below is part of mine. Wording for clues or description of sequences should make sense to the person knitting, not necessarily follow a specific formula.

screenshot_34

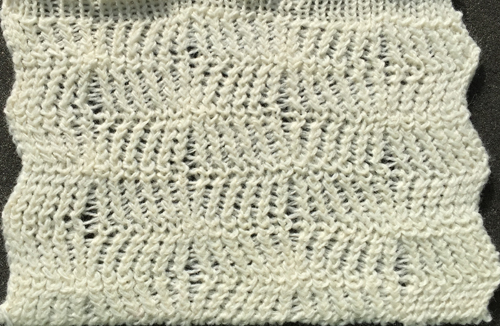
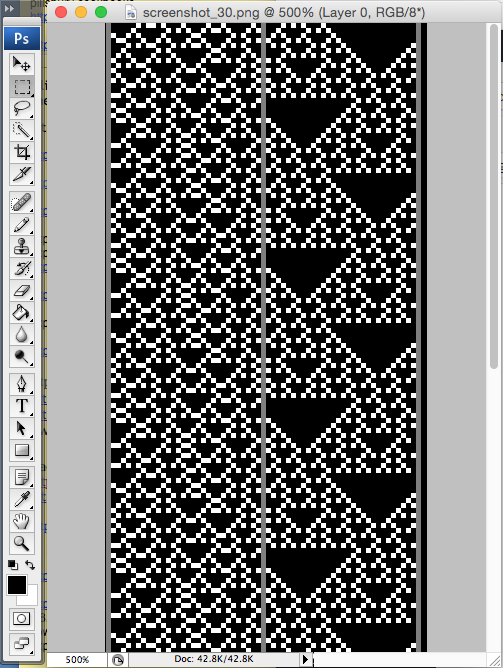
some of what “did not work”, including a very long swatch with a confusing pattern due to creative operator error

500_591
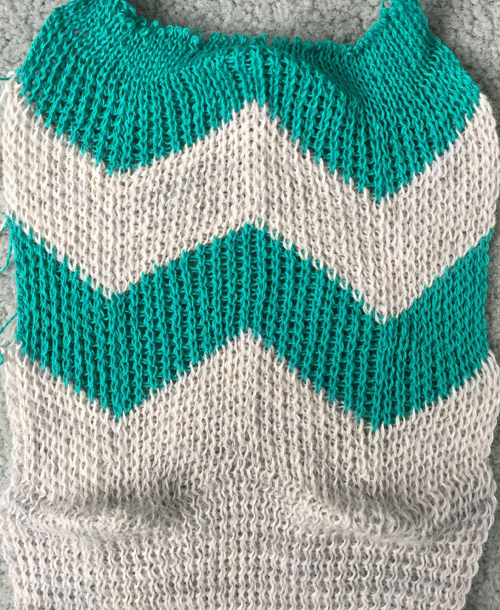
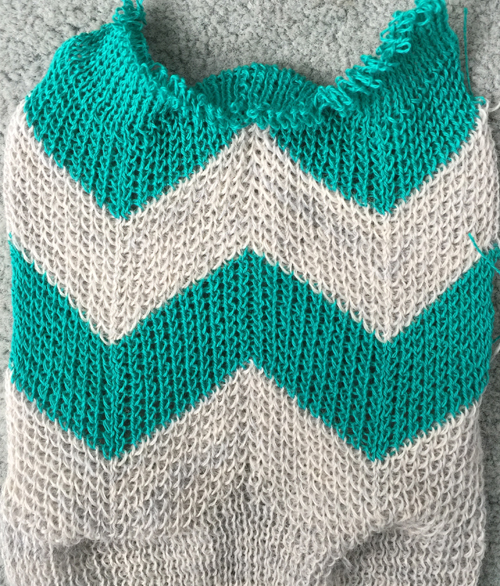
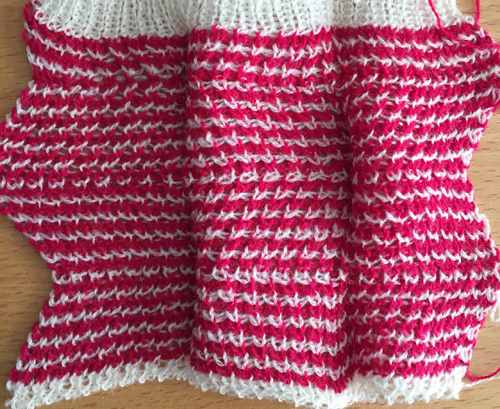
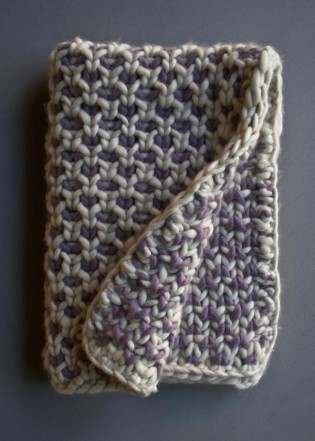
a finished piece with yarn ends not yet woven in500_590

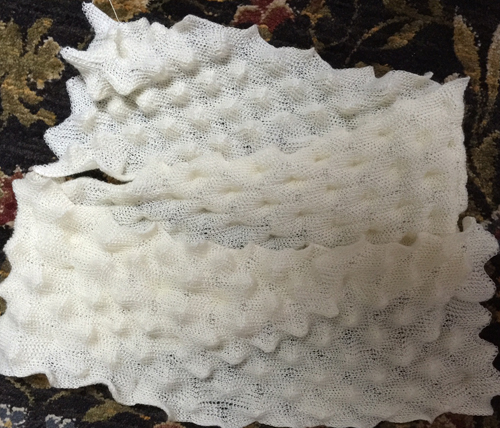
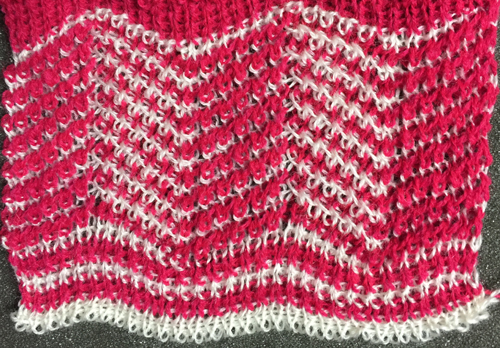
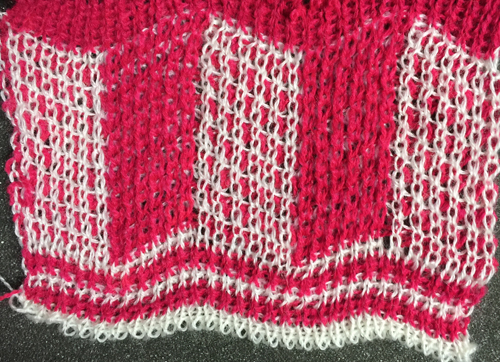
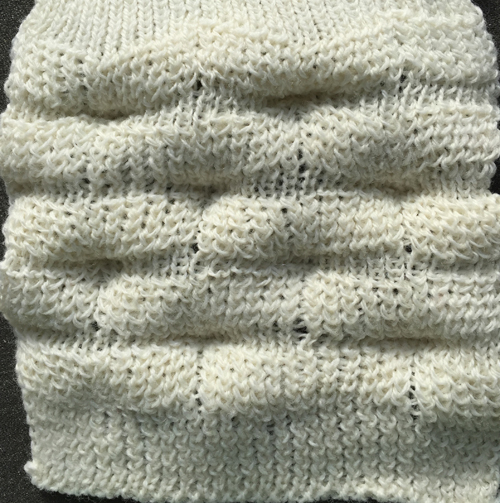
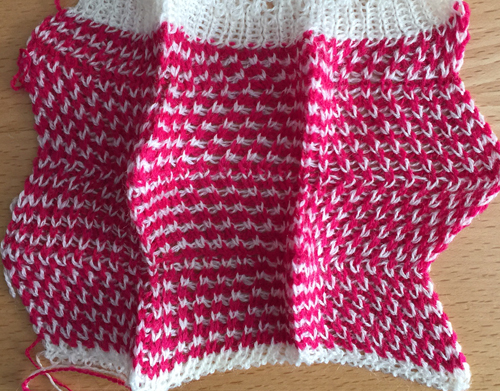
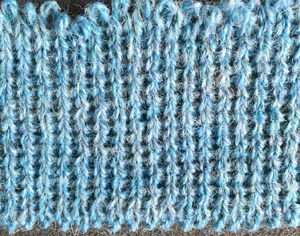
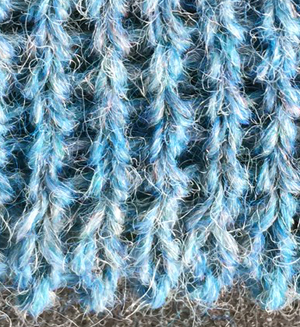
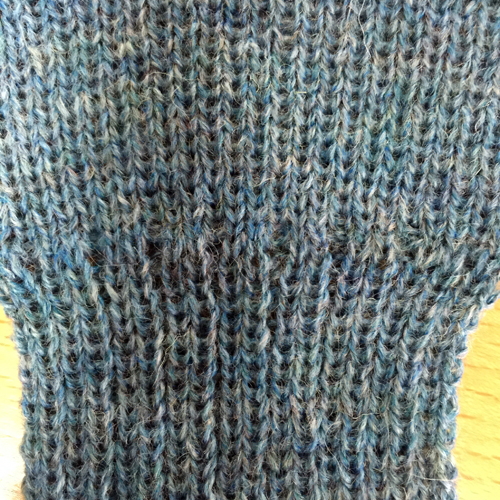
The fabric is tugged lengthwise, left unblocked, and pockets may pop on either side of it, with the majority on one side of the knit as opposed to the other

the start of a series in varied colors and fibers500_604

Racking 2: vertical chevrons/ herringbone +

Here again, half fisherman or full fisherman rib is be used. The zig-zag happens at the top and bottom of the fabric. In half fisherman, the setup is once again for full needle rib. If knitting in one color the sequence is: knit one row, rack a space, knit one row, rack back again (X and Y below represent the 2 racking positions involved screenshot_39

for 2 color fisherman, the sequence is knit 2 rows with col 1, rack one space, knit 2 rows with color 2, rack one space back again

screenshot_41 this fabric is produced in conjunction with a pattern repeat using the principle that black squares knit (pushers up, needles preselected), white squares tuck (pushers down, needles not selected), the repeat is 12 stitches wide, 2 rows high; it is possible to have 6 stitches tucking side by side because this is an every needle rib, and there will be a knit stitch on the opposite bed anchoring down each tuck loop

screenshot_42

screenshot_02

one color half fisherman side one   500_528one color half fisherman side 2500_5292 color setting, color changes every 2 rows, side 1, thinner yarn
500_542
side 2

500_543

2 color version, changing color every 20 rows; racking interrupted with plain knit rows at top and bottom creating horizontal pockets20rows_plain

20rows_plain1

This type of repeat became popular in Passap clubs for use in their Passap ripple afghan. The racking first to the left and knit a row, knit to the right and knit a row, was interrupted after 36 rows, followed by a color change and a no-racking knit row before resuming the previous racking sequences.
When single or multiple odd # of rows with no racking are introduced at intervals the zigzags once again happen at sides rather than top or bottom, with the knitting after the no racking row(s) reversing direction. The yarn used in these swatches is a random acrylic, presses flat, not the best if aiming for any 3D textures; the color difference is due to photos being taken at different times of day

side one 500_530side two500_541

what happens when multiple odd numbers of rows are knit changing back lock set to N (all knit), no tuck stitches. The fabric still swings in opposite directions, and in addition, the all knit rows produce areas that “poke out”, beginning to create scales of sorts

side one 50537side two 500_538back to vertical: full fisherman with color changes every 2 rows, side one 500_539side 2, with a few stitches knit off issues  500_540

it is a matter of personal preference whether the extra effort with full fisherman rib is worth any difference in appearance or result in the final fabrics. Changes in tension, yarn fiber content, and machines used add to the variables. Good notes in trials help one determine predictable results and to choose whether the effort may be worth it or not. Using laborious techniques for borders rather than whole items is always an option.

1/22/2016: half fisherman racked rib knit in thinner yarn, wider # of stitches and more rows in pattern group before single N/N row, no blocking

500_557

500_558same fabric with color change every 2 rows 500_561

500_566

Ribber pitch, a bit on racking 1: chevrons/ horizontal herringbone

A “how might this be done challenge” of late re this fabric brought to mind racked patterns for chevrons, both vertical and horizontal, and the possibility of producing them on home knitting machines. racked_scarf_mediumTo review some of the principles in racking in both Brother and Passap knitting machines: the pitch is the distance between each needle groove along the needle bed is sometimes also referred to as gauge. The size varies between machine brands and types of machines. For example, the Brother bulky has a 9 mm pitch, the Passap a 5 mm one; the larger the pitch number, the thicker the yarn that may be used.

Full pitch lines up needles and gate pegs (or channels) on both beds directly opposite each other. To knit patterns in full pitch, the rule is that for every needle in the working position on the main bed, the corresponding needle on the opposite bed must be out of work, and vice versa. This setting is never used when groups of all needles are in work on both beds. Stitch patterns using this setting are designed to have opposite needles in work on either bed at any one time, but not both at once. The number of maximum needles in use for ribs on both beds will usually total 200 (4.5 mm machines), and the setting accommodates yarns thicker than when every needle is in use.

In half-pitch both bed needles are now offset by half a position, centering them between each other. The full complement of needles for possible use now is potentially 400 (4.5 mm machines); the setting accommodates thinner yarns than one might use on the single bed.

The half pitch lever on Brother may be moved from P to H to change alignments. In Passap the racking handle may be used in an up or down position to do so. The racking or swing lever allows the ribber bed to be swung one full pitch to the right or to the left in a series of stepped moves. The racking handle on Brother machines is located on the left-hand side of the ribber bed. Racking swing indicator positions are numbered 0-10. When the racking indicator has been moved over to the next number, this means the ribber has moved by one full pitch. With the swing indicator at 5, both beds will be centered opposite each other, the usual position. Starting points may vary when racking is used in patterns. Beds cannot be racked with needles in holding, as needles will then crash into each other. It is always a good idea to check ribber alignment before tackling more complex, double bed fabrics. In Passap the racking indicator is situated above the racking handle, and arrows indicate the direction of the last movement. The scale at the top of the front bed shows the possible racking movements from a center point of 0 to 3 to either to right or left of center. I chose to place numbers below the factory ones on the machine from 0 to 7, finding that method easier to follow, since I do not rely on built-in patterns and racking prompts from the console. For the purposes of these swatches, I am reverting to the factory indicators.

In the Passap system, the racking handle has 2 main positions: up, and down. When the racking handle is up needles are directly opposite each other (P pitch in Brother), when it is down the needles are between each other on opposing beds (H on Brother). There are some racking handle positions at different parts of the “clock” that are recommended when using some of the Passap accessories.

Regardless of machine brand needles have 3 basic functions: knit, slip (do not knit), tuck (gather loops). Passap pushers have 3 positions: work, rest, and out of work. When a pusher is in the up position the corresponding needle will knit no matter what the setting on the pattern dial. This is the equivalent of having needle pre-selection on Brother, but forgetting to change cam buttons from the normal knit setting. When a pusher is at rest it will slip or tuck depending on lock setting to AX, DX, or FX (in Brother these would be needles not selected, in B position). If locks are set to C, E, or G, the pushers have no effect on the needles. Pusher positions may be changed manually, automatically by arrow keys (back lock Passap, lili buttons, and lever Brother ribber), automatically by readers whether electronic or punchcard on both brands in the Brother main bed or front bed Passap are in use.  NO pushers are used in N (double or single bed plain knit), CX (tubular), EX (double bed, tuck).

I personally find racking easier in terms of the numbering in Brother brand machines. For these samples, however, I chose to work on my E 6000. Adding tuck to the mix creates more textured surfaces, and a half or full fisherman’s rib where every needle tucks, then knits as the carriage reverses direction on either single or both beds, is a place to start. I have written previously on tracking brother racking sequences using a punchcard numbering system. If no other pattern is used on the main or front beds, needle and pusher selection might be used to track the racking position there as well. These fabrics require concentration. In terms of chevrons, both horizontal and vertical may be produced. Some published sources include a youtube video by Diana Sullivan, knit on a Japanese machine, and a baby blanket in full fisherman rib knit on the Duo 80. The version below is my half fisherman adaptation of the latter. The photos illustrate both sides of the fabric. The racking is done by moving a single of each of only 2 positions to the right or to the left. Single (or multiple, odd-numbered) rows at the end of each sequence place the carriage at its start on the opposite side, rather than altering the numbered sequences as in the Diana video. I began my fabric on Passap racking position 2, to the right of 0, locks set at KX, N, first and last needle in work on the front bed. The back bed tucks every needle right to left, knits them left to right. There is a slight difference in texture between the 2 sides of the fabric.

300_514300_515

activate row counter after CX rows in the cast on, with locks on left, so knitting the racked pattern begins with locks on Right, RC on 1. Below is my working “cheat sheet”

symbols

cheat sheetsettings

For scales and chevrons on Brother machines please see 2018/07/19/more-scales-and-chevrons-in-ribbed-racked-4-fabrics/

Tuck and garter stitch: from hand knit to machine knit hand tech pattern

A Ravelry question on the possibility of executing a particular fabric on the machine has led to the experiments in this post. The pattern that led to the discussion is a free hand knit one,  shared and published on the Purl SOHO website and on Ravelry. The gauge for their project is 4.75 stitches = 4 inches in stitch pattern, it includes garter rows. Such rows may be executable on home knitting machines by transferring from ribber (Passap front bed) to main bed, alternating with reversing the process at a predetermined frequency, depending on stitch type. K1b is the hand knit equivalent of tuck for that stitch on that row, adding to the mix.  Not practical for G carriage use, as the latter does not form tuck loops, and hand retooling would be required for all k1b stitches.

Using holding to create tuck stitches in non-auto patterning days was commonly used, and I chose to do so here. As machine knitters, we are conditioned to believe that single color rows are impractical to execute and that the yarn would need to be cut on each side after the one row. Color changers are on one side or the other, making striping with frequent color changes is practical if executed in even multiples of rows. Transfer carriages are available that will help move stitches from one bed to the other, I personally have never had the patience to work with them enough to get good at using them without dropping stitches, so I went back to even lower tech than usual, using the garter bar on the bulky, and beginning pattern row 1 with COR.

Before attempting nearly every row turns, it is helpful to have some practice with turning work over using a garter bar, develop a sequence of repetitive actions, keeping careful notes as to what works for you, and using contrasting yarns in tests to better understand stitch structure. In my sample the white yarn was thicker than the blue, reversing colors or balancing yarn thickness would change the visual look of the fabric.  Beginning on small samples helps work out issues and the making of the decision to try on a larger project or simply as a border.

Analyzing the pattern repeat:

screenshot_43tools to help with EON needle selection tools

the results of rows beginning with k1 sequence after the row is knit, note the “tuck” loops on top of E position needles, which will be knit off on the next row knit K1_after knit

a row that begins with a k2 sequence, before it is knit; the needles holding the single, blue stitch will form the loops on top of the needles as the yarn moves across to the opposite sidek2_before knit

E position prior to transferring stitches onto garter bar, also for a free pass to the opposite side to pick up yarn after stitches are removed on bar free pass473

1            begins and ends with K 1; COR select needles, col A * knit row, COL, bring all needles out to hold, remove on garter bar, free pass carriage to theopposite side, COR, flip garter bar over, replace stitches onto needles push all stitches against gate pegs *

2            begins and ends with k 2; COR select needles for row 2, col A repeat * to* end COR

3            begins and ends with k1; COR select needles for row 3, change to col B, knit one row, do not turn, do not cut yarn; COL bring all needles out to hold, a free pass to the right to pick up col A on next knit row, end COR

4            begins and ends with k 2; col A, COR select needles for row 4, repeat from * to *

5             begins and ends with k 1; COR select needles for row 5, col A, repeat from * to * do not turn

6            begins and ends with k 2; COR select needles for row 6, change to col B, repeat from * to *

publisher’s project photo

beautyberry-blanket-600-12-315x441

my swatch, knit on a whopping 9 stitchesrav blanket 300


Cellular automata charts for knitting, etc.

I have written before on the fact that since my knitting is done primarily on a Brother 910 and a Brother punchcard models, I am ever curious re and exploring ways to produce chart images that will allow me to knit patterns via mylars or punchcards, with an occasional wincrea download to my Passap via an ancient laptop. My eternal wish list to date has included the option to download to a hacked Brother model I already own, or to my Passap, directly from my Mac (presently Mavericks OS). Mathematical knits via hacked or commercial knitting machine use have been explored by some, including Claire Williams  and Fabienne. With the help of online generators, even with a lack of understanding of the math involved, one can produce charts for knitting or other textile applications.

The Wolfram site is a resource for both Mac and Windows platform users who are interested in math, computation, and its visual results. There is a downloadable CDF player that allows exploration of documents and provides for download, CDF format explained, demonstrations projects, search for cellular automata. Below are some samples obtained through browsing the site. In some instances show mesh option will provide a gridded motif, show scale will indicate “stitch counts”
screenshot_28

screenshot_29

then there is this

screenshot_31an isolated segment
screenshot_30the image  in Photoshop (CS3) photoshop no gridas it appears with the program’s self-color-adjusted grid photoshop gridGIMPGIMP_cellular2creating a colored grid grid for easier countsgimp color grid

see previous blogposts on isolating repeats, drawing additional markings, and other uses for GIMP.

A visual guide to  automata “rules”

Thread lace and punchcard knit carriage use on Brother 910_2

A short while ago there was a Ravelry thread discussing reversible, double bed knits. I recalled a demo from eons ago that I saw at a machine knitting seminar and decided to explore my memories and share them. The result approaches a “reversible” fabric, with imperfect results depending on the yarns used and other factors. There is a group of knitters that are presently experimenting with “glitch knits”, where the intent is to purposely create patterns with what some people might consider “mistakes” as purposeful parts of the design. For one example see a video of the technique. The “imperfections” in the fabric below may be seen as a positive by some. It is not the result of any aberrations in the programmed pattern, but rather a result of the way the threads get pulled through each other as the carriage moves across each row knit.

My samples were knit using equal-weight yarns. The fabric may be better served by using different weights, approaching the usual recommendation for plaiting. See the manufacturer’s directions for plaiting feeder use.

Cancel the end needle selection on your knit carriage.
Cast on for full needle rib with both yarns in place.
Hang comb.
Knit 2 circular rows followed by one more all-knit row.
Change to a rib tension that has been tested for yarn combination.
Several rows may be knit for a “solid” color edging.

When the first pattern row is selected, one need not set the KC carriage to slip. N is king in Brother, regardless of pattern/ needle selection as long as no cam buttons or levers are pushed in/ selected, everything knits, whether single or double bed.
After the first row of the pattern is preselected on the main bed, use a tool to push both buttons in as seen below, and proceed in the pattern. Even though end needle selection has been canceled, if the end needles on the main bed are selected, they need to be pushed back to the B position or those stitches will be dropped.
Plenty of weight is required.

my punchcard carriage with the added magnet set up on one of my 910:
setup_50

when testing motifs it is always good to begin to do so using a simple pattern, making needle pre-selection easy to view and check. I began with “checkers”. They can be viewed at the bottom of the image below with the machine set for double length, at the top as drawn on the mylar; most such fabrics are well served by double-length on any machine, electronic machines could easily vary the repeat size or color reverse at the flip of a button, using lili buttons on ribber may add to the mix of results as well.
screenshot_22a familiar stock Brother punchcard, knit on my 892, double-length screenshot_23Review of the use of plaiting feeder from Brother ribber manual 


Thread lace and punchcard knit carriage use on Brother 910_1

Yes, the 910 has no thread lace setting. I happen to also own a punchcard machine model # 892E (no idea why Brother chose to add the E to a punchcard model name). I remembered eons ago reading about someone on an Australian list actually getting a punchcard model carriage to work on an electronic machine. It is good to beware that not all carriages may be interchanged between different models, especially if the latter were manufactured several years apart.

The magnet on the back of the electronic carriage is what trips the reader in the 910. With the 892 and 910 carriages side by side, I marked the approximate spot I wished the magnet to be. It is presently in place with cellophane tape for my tests. I believe it to be a “rare earth magnet”, 12 mm in diameter, part of a jewelry piece from days gone by, with a deep attraction to all KM metal parts.

spot39the first location was too high, the pattern did not read properly place40what turned out to be a much better spot  better placea random mylar repeat mylar45the resulting fabric, on both purl and knit sides both sides

I used two cotton yarns, with a slight difference in weight. With the exception of when knitting transfer lace, the first instinct may be to use the color reverse option when the mylar repeats show lots of “white squares”. However, in this type of fabric blank squares knit both yarns; black squares or punched holes knit only the thinner yarn, while the heavier one floats behind it. The KC tension used needs to accommodate both yarns easily knitting together. When only the thin yarn knits on selected needles, the stitches formed will actually be larger in size than those where both yarns knit together, giving the “illusion” of holes.

This fabric was also at times referred to as punch lace. It is only possible in Brother machines that have 2 cam buttons in the center position, both center buttons under the MC/L mark are depressed. The punched holes/ black squares in mylar select needles that will knit in the fine yarn only. If you are using a very fine yarn for the second yarn, you may have to wrap it twice around the dial on the mast tension unit to control its feeding. Better edges are produced by canceling end needle selection or manually pushing any selected end needles back to B. If KCII is an option on later electronic models, some of the work is done for you. End needle selection may also happen as part of the design repeat, so in those instances, unless you are happy with the thin yarn only knitting on the very edge of the fabric, those needles need pushing back to B by hand as well.

selected needle

end needle camsset camsBTW: end needle selection must also be canceled whenever patterning with needles out of work is used, or needles on both sides of out of work ones will produce knit stitches regardless of programmed pattern.

If a contrasting color is used as the thin yarn in the B feeder, the results may be seen below. Note: the colors appear reversed to their position in feeders, so A (thick) color is seen more on the purl side, the B (thin) is more evident on the knit side of the fabric. The top of the swatch shows the result when blank rows are programmed into the reader. Sometimes this setting is used as an alternative to replacing the standard A/B feeder with the machine’s plating feeder (if available for your model km). Reversing yarn position can produce some interesting stripes

combo colornot all A/B yarn feeders are created equal 
sinker plates

I have always found the extra B gate on left more a nuisance than a necessity, particularly if the B yarn needs frequent changing.

Another unconventional use for this setting to produce “pretend cables”

thread_lace

It is possible to knit thread lace with the plaiting feeder in place on the single bed as well. The effect approaches glitched versions of the pattern, Stitchworld #407. This is a quick hack to keep the front yarn from slipping out of the yarn feeder The blue and white yarns are equal in weight, the orange replaced it and  is thinner

Weaving drafts as inspiration for other textile techniques

July 2021: since this post was published I have written on using a combination of Mac Numbers and Gimp to modify repeats from punchcard and electronic published sources including:
Numbers and GIMP: online punchcard patterns to electronics
Numbers and GIMP: online punchcard patterns to electronics 2
Numbers to GIMP to create images for electronic download
I am now adding a shorthand version for those with some familiarity with both programs using an online draft from Luminescence to obtain a knitting repeat. Images saved from the site even if drawn in black and white do not convert easily and cleanly to black or even 2 colors indexed images in Gimp, are workable using this combination software method.     

As previously published:
Weaving drafts can be a source of inspiration for other textile mediums as well. Luminescence is an online weaving program developed by Andrew Glassner. There are ample instructions and help files on site with regards to weaving. My first instinct, however, is often to interpret images of all sorts for knits (I abandoned weaving many a year ago). I am sharing some very quick first experiments with the software with that possible intention. The same charts might be used for other counted stitch unit textiles.
The first draft I chose to load from the app’s pull-down menu was called High Seas. The numbers indicate “Fabric Size”, stitch and row counts in knits

120High Seas120

Quoting from the help files: “Show grids: This is another cosmetic choice. Turning this on draws the internal grid lines for all 6 grids (warp pattern, warp colors, weft pattern, weft colors, tie-up, and fabric). These let you easily count the cells, which can make it easier to match a published draft. As with Show threads, this checkbox and its effect are disabled if the Fabric size is 100 or more.” “

“To save an image of the fabric, just right-click on it. You should get a pop-up menu that offers you a few options. One of these will be Save Image As… (or something close to that). Choose that, and you’ll get a standard dialog box that lets you put the image where you want it. Using Firefox on the Mac allows the image to be saved in the standard PNG format, which offers the highest quality. You can change that to JPG or anything else using almost any image editing program.” Safari is problematic with saves, allowing only for a web archive or screen capture.

99 Hi seas99easier to see and/ or count units, clear tiling: 60hig seas 60enough to easily sort out repeats: 30hi seas30

your preferred paint program may be used to draw lines that isolate single “knit” repeats; threading and tie-up sequence repeats are used as guides, making the process fairly straightforward

hi seas30 repeatimagining possible related borders screenshot_51a more complicated draft kiss me you fool 99isolating the much larger repeat kiss me you fool REPEAT

kiss me REPEAT

always double-check tiling prior to knitting for accuracy, any “surprises”, and the possible pattern placement on the knitting machine’s needle bedtile check

got a draft from an online pub? always good to start with a recognizable,  simple design screenshot_01isolate the repeat (GIMP):  crop tool and size control154crop

in this instance, the result is a 154X 154 pixel square image, with 14 X 14 unit desired subdivision, making my grid preferences setting 11 X 11 pixels

200_11_11gridtiling test: looks like a match!tiled_04

line width, colors, etc. may all be set and changed to suit individual needs and preferences. Please note superimposed grid lines are lost when the image is tiled or exported from GIMP, some version of screen grab or snap must be used to capture and save gridded images

an additional draft, the same process

3ae712f7a512a61537a3983aff9d98b2

second sample

screenshot_07

screenshot_08

A bit on the charting: after launching the program and loading an image, the GIMP windows options will become available. I leave my toolbox always active. Tool Options give the opportunity for controlling crop size, pencil line width, etc. As you click on/ select any tool, the options windows will change and offer selections for managing that particular tool

windowscrop croppencil brushpencil

notes from a  previous post on charting for straight-line drawing on Mac: “first select color and pencil tool. Place a pencil dot where you want the line to start. If you press the shift key, a crosshair will appear, press the command key in turn as well for straight-line mode, click where you want the line to end. Consecutive clicks will continue drawing straight lines that originate from the end of the last line. Pressing both the shift and the command one at once after the initial pencil mark will call up the color picker and require a color selection and an “OK”

Picot cast on for every needle rib

Depending on the sort of rib, the beds need to be aligned in most instances so that the needles on opposing beds line up between each other. For this ribber cast on the beds start at full pitch, as you would for EON knitting. Every other needle is brought in to work. A first “zigzag” row is created at the tightest tension possible. On the second row, the alternative needles need to be worked. On Passap E6000 BX, LX with pushers under new needles only will help do the job. On Japanese machines: bring the new needles out to hold, set both carriages to slip. This will result in only those “new” needles knitting on the next pass. The outcome will be one zigzag crossing over the other (red over blue in the photo). Prior to the third knit row, reset the carriages or locks for circular settings (CX/CX, opposite part buttons). Because all stitches will be knitting on each bed, loosen the tension to about three-quarters of the rib stitch size, knit two rows, change racking handle/lever and needle positions to half pitch at their completion. Adjust tension to desired rib stitch size, knit a closing “zigzag” all knit row at tension used for the remaining knit, and proceed in rib
The method may be used both for every needle and for every other needle rib.
The configurations for each, colors are in reverse order from photos that follow

first zigzag rowzig zag onesecond zigzag row (contrast color for illustration purposes)zig zag 2hang comb, knit 2 circular rows circ_combchange racking position and needles alignment rackchange tension, continue in rib, knitting all sts both beds 300_2423detail close up detail

Racked ribber cast on and rib configuration tips

This cast-on (on any ribber) is capable of giving a softer, looser start and is good for fabrics that stretch. It is described in most machine knitting manuals.
When experimenting, check the alignment of needles physically before proceeding for knitting ribs on all needles. In Brother machines, the racking grip handle is used in creating “racking patterns”. By turning the grip handle the ribber bed is moved to the right or to the left. The racking position is indicated on the racking indicator. Usually casting on is begun with the indicator in the center position, #5. As indicator numbers rise the ribber moves to the left, and as they decrease the ribber moves to the right. The two cursors can be moved and set to use as an index of the racking range. I prefer to track racking positions in other ways ie. with punchcard markings when possible. The arrows L and R indicate the racking movement and will change position after each handle turn reversing direction is completed. The pitch is set to accommodate rib configurations. In the P position needles on each bed “plain and purl” are directly opposite each other and in a collision course. If EON (every other needle) on each bed is in use, then this position is used to center needles on opposite beds between each other. In position H the ribber needles are centered between two main bed needles.
If observing a suggested needle rule, set up needles using it.
Rack one full number to put the needles out of the rule, and knit one row at about 2 numbers tighter than the final setting.
Hang the comb and wights, and rack again to the original position. Add any edge stitches that may be needed for the specific knit fabric. Knit one row across stitches using the final tension setting.
For every needle rib cast on in my sample I began with the racking indicator on 6, COR, knit zigzag row to Left. Note: at the start of the process, on the left side,  the first needle is in work on the top bed.  The ribber is then racked to position 7. The first needle on the left is now in work on the ribber.  A row is knit from left to the right. 
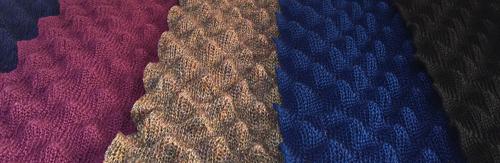
The ribber is then racked back to its original position (6). The first needle on the left will once again be on the top bed, and the first needle on the ribber to its right Continue in the planned rib.
Often manuals give suggestions as to the “needle rule” for each type of rib. The sequence below is knit on a Passap. It, in theory, would produce a 2X1 “industrial rib that could transition to every needle or main bed knitting without any holes at the transition point. Note here there is a needle in work between each pair of needles on the opposing bed.

IMG_2390
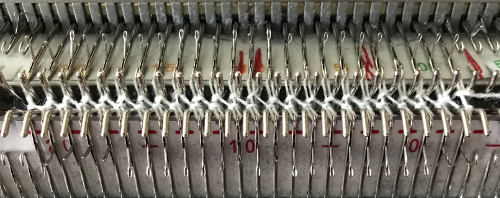
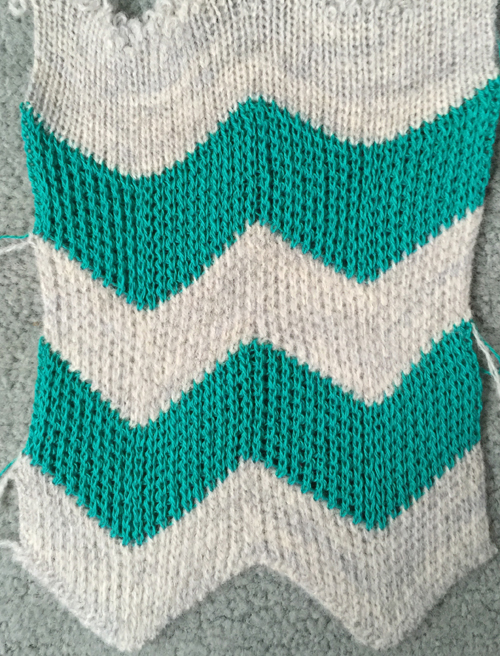
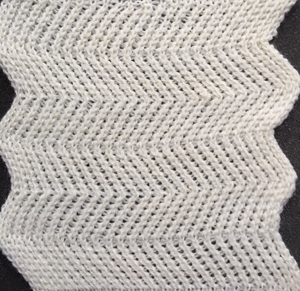
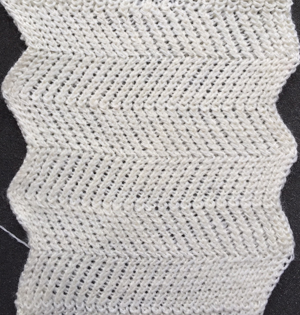
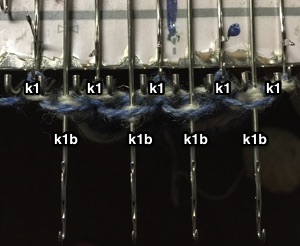
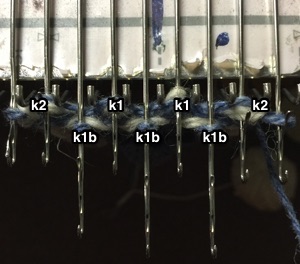
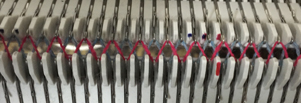
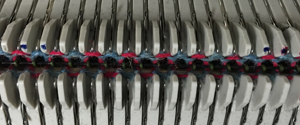
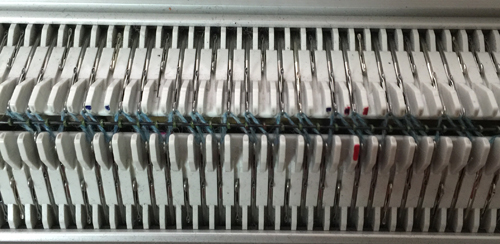
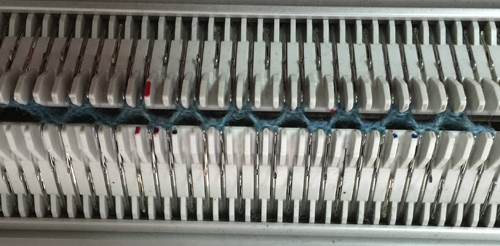
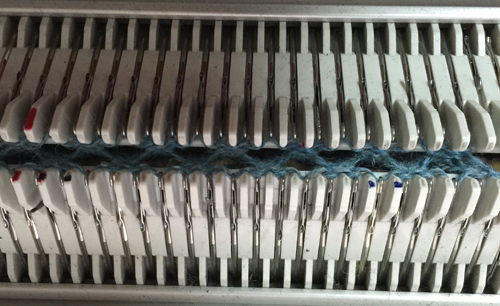
“zigzag” row, normal needle position: work slowly, make certain all needles have picked up yarn
1hang comb: the first needle is in work on the back bed on the far left 2rack one full turn to the right: the first needle in work on the front bed is now on the far leftIMG_2382knit one row  4rack back to the original position, and continue plain rib  5There are sources online including videos that recommend circular rows at this point, they are actually unnecessary. The other recommendation made by many after any ribber cast-on is for 3 circular rows. There is no need for the third circular row. It will actually create a visible line across one side of the rib, that is noticeable, and may not be wanted if it is on the “public” side of the finished garment.
To fill in potential holes produced when empty needles are brought back into work, bring all empty needles into work, and tuck one row across both beds, making certain loops are formed on each needle IMG_2391knit 2 rows circular slowly, some needles hold 3 loops of yarn, switch to ENR rib
the result at rest
rib1rib stretchedfirst rib stretchGoing for a rib with more of a 2X2 look: set up needles for rib pattern, there are still 2 needles in work, one not, on each bed. The empty needle space is now at the center of each pair of needles on the opposite bed

IMG_2392rack one full turn to the right, and knit one row IMG_2393hang comb and weights IMG_2396rack back again to “needle rule” position Knit one row at final setting, proceed for ribIMG_2397at the top of the rib knit 2 rows circular, proceed on EN ribIMG_2399

tension adjustments may make a big difference, my samples have been knit at the same tension throughout, and single-ply throughout

the first rib at rest rib2stretched second rib stretchBoth instances produce a reversible rib
Some experimenting is required to achieve cast-on rows in the rib that is not too loose or too tight. In this instance there has to be enough slack in the loops so that there is room for racking one full turn, too much will leave loops. Loops created by cast-ons with deliberately large stitch sizes may, in turn, be chained off with a latch tool. The stretch factor and weight of the resulting rib also need to be in balance with the remaining knit fabric. If “improvising” it is always advisable to keep good notes. Most publications and how-tos are really guidelines, starting points for investigating what may be the best method to use in any one piece.

A variation: a racking cast on at a large stitch size can be chained with a latch tool after the work is off the machine to make an edge that nearly matches a chained-off bind-off. It is useful, especially in rib tuck fabrics.
Set up needles in the needle rule and rack out of the needle rule.
Knit one row at a large stitch size, moving slowly to the opposite side. Testing will determine the tension the specific machine will tolerate with the yarn being used.
Check that all needles have picked up loops.
Hang the comb and weights and rack back to the needle rule.
When off the machine, use the method described in the post Ribber cast ons: breaking the “rules”