Seaming, joining, picking up stitches on knits 1

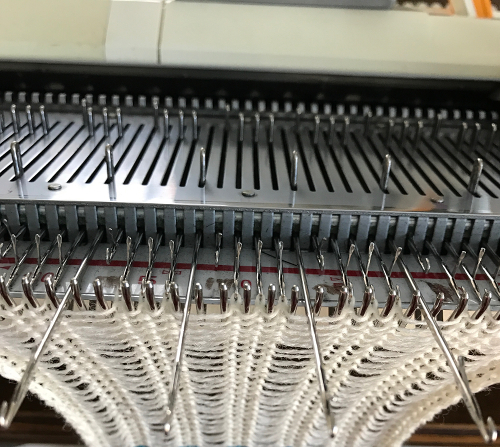
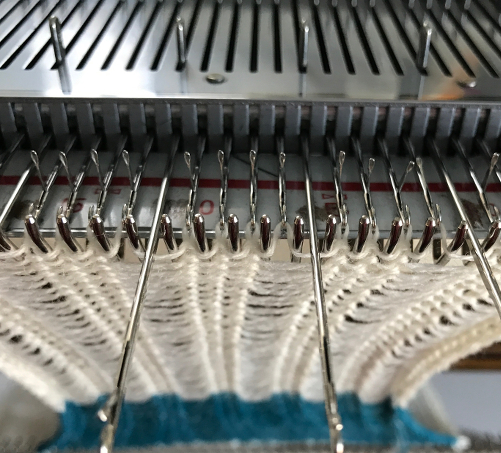
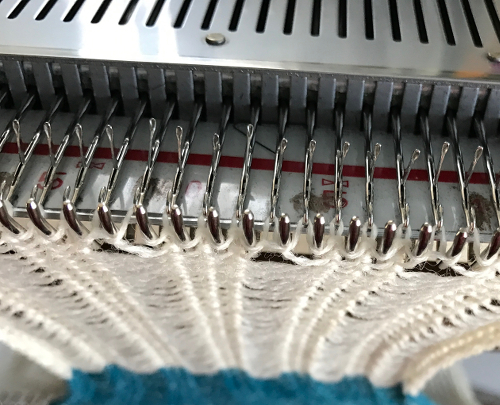
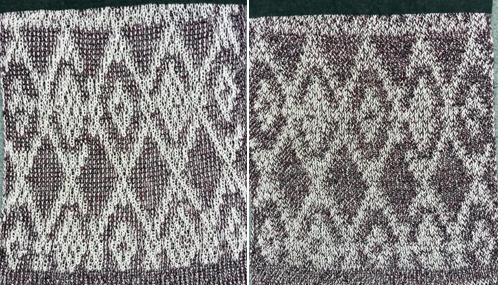
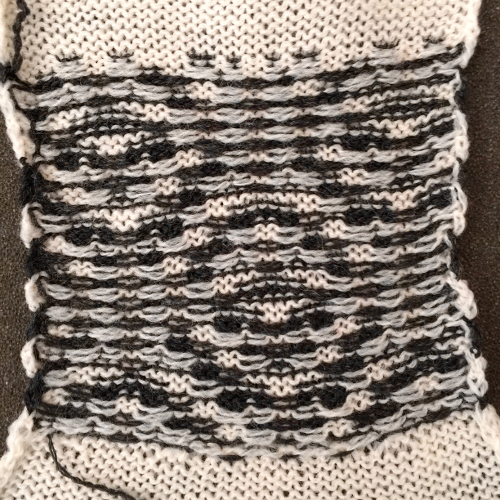
This time of year I am usually producing machine knit felt hats for sale, on my 260 Brother bulky KM. They are knit sideways and require seaming on their completion. Photos of some steps in the process, taken a previous year: screenshot_80screenshot_81screenshot_82
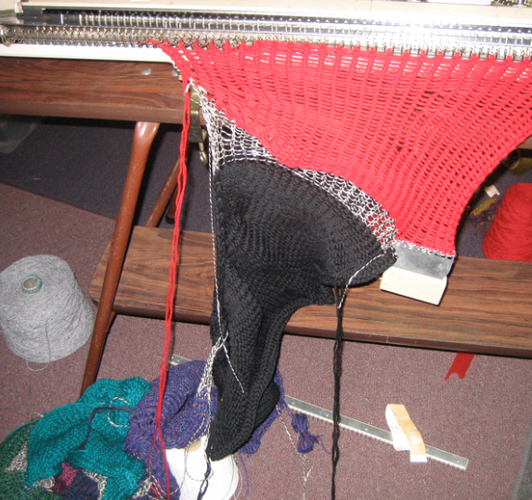
for a sense of scale before felting 
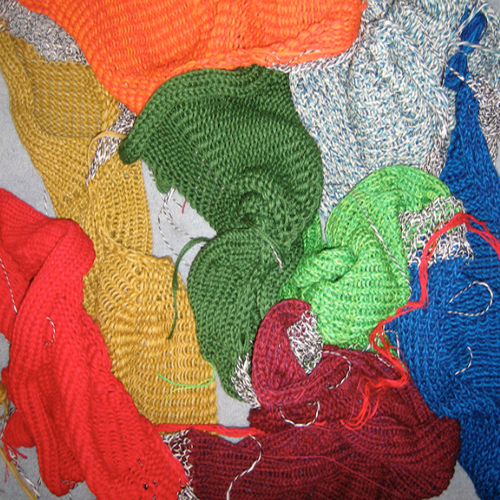
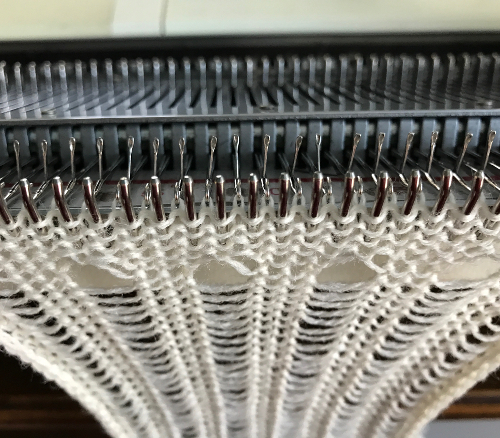
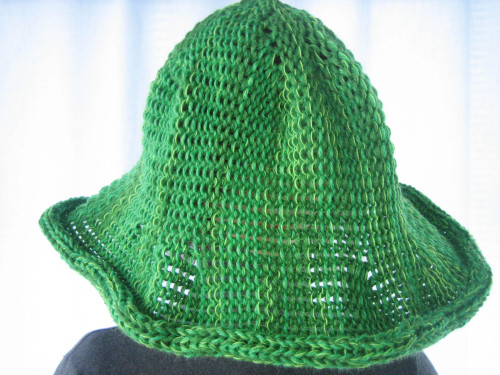
after blocking and drying
screenshot_84
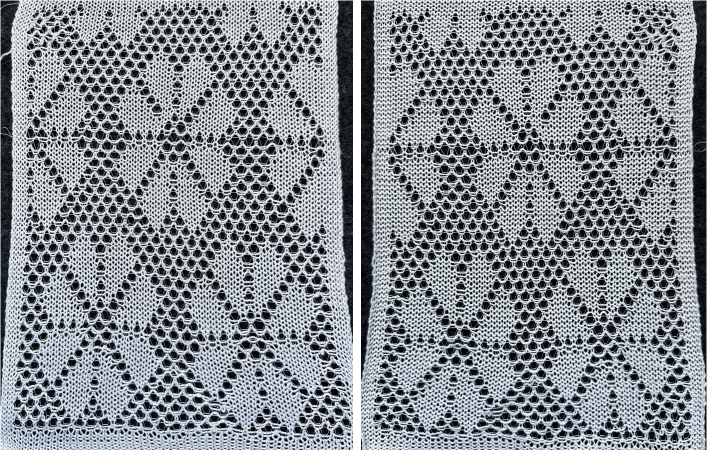
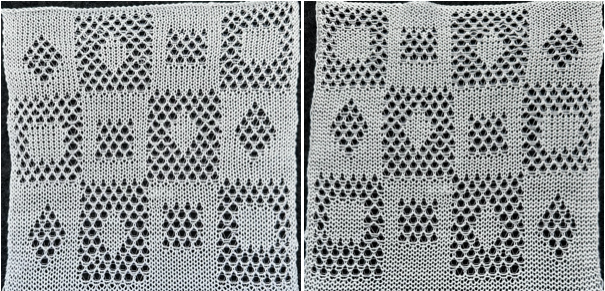
My customer handout:
Knitting has traditionally been felted to make it weatherproof, warm, and long-lasting. Examples include Scandinavian mittens, caps, and jerseys, Estonian multicolored jackets, closely-knit felted jackets worn around the North Sea Coast from the 17th century onwards, and knitted and felted Tudor caps.
Wool and hair fibers have microscopic scales, which all point in the same direction, and when such fibers are subjected to heat, moisture, movement, and friction, the fibers will become swollen and soft, and will move against each other in the direction of least resistance. Adjacent scaly surfaces cannot move against one another if the scales on each surface are opposed, and if they are forced to, the scales will lock. Felting is a progressive process that cannot be reversed, only halted.
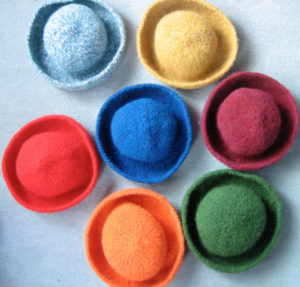
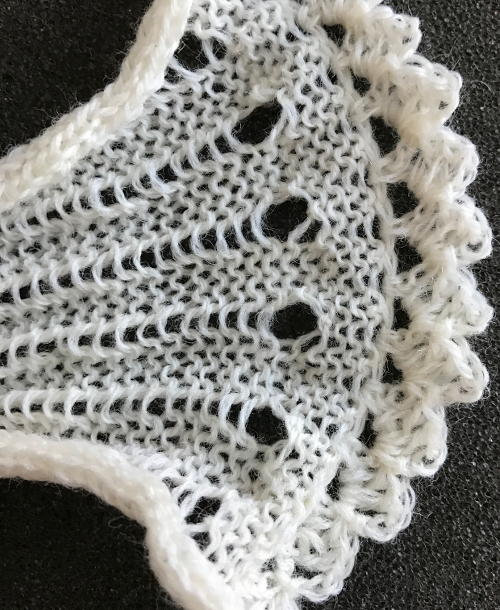
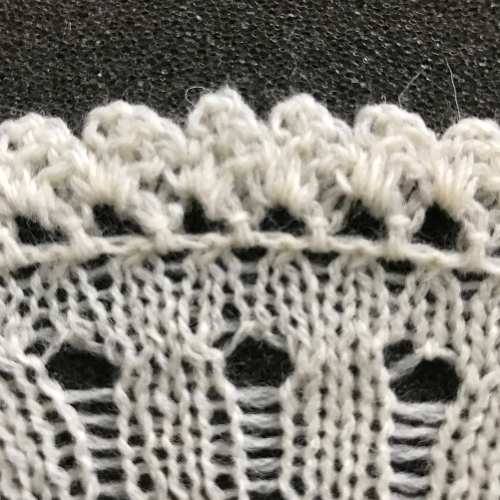
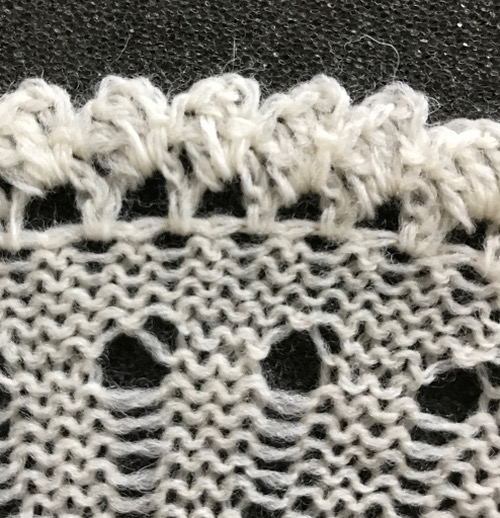
These hats are knit (or crocheted) in very large, loose stitches. Their shape comes from varying the number of stitches along the surface of the hat, with many more rows on the brim area than on the crown. Most are reversible. In making them, I like to blend many shades of woolen yarn, sometimes adding boucles or mohair. The coloration and stitch structure varies whether viewing the purl or the knit side. The shaping is in the knit.
The large, loosely knit forms are felted by agitation and washing in hot and cold water until the desired shrinkage is obtained. The brim will fold and mold differently depending on whether the hat’s knit or purl side is worn on the outside. No two hats are exactly alike in size or color. They will retain their shape if folded flat and may be cared for as one would care for any fine, washable fabric.
If hand washing: use cool water only, mild soap, do not soak, some molding or blocking may be required.

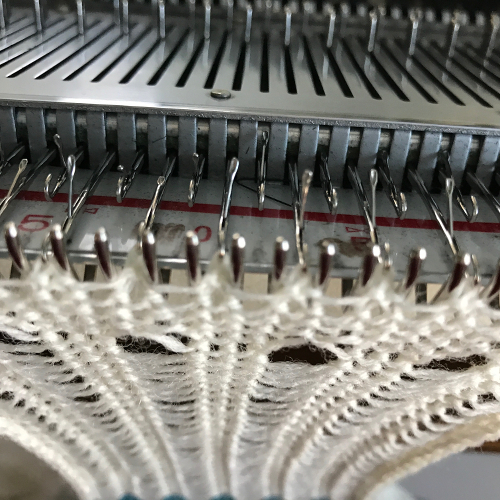
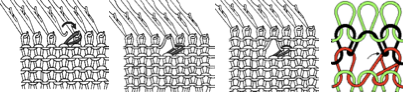
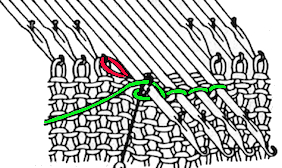
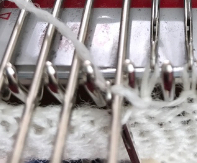
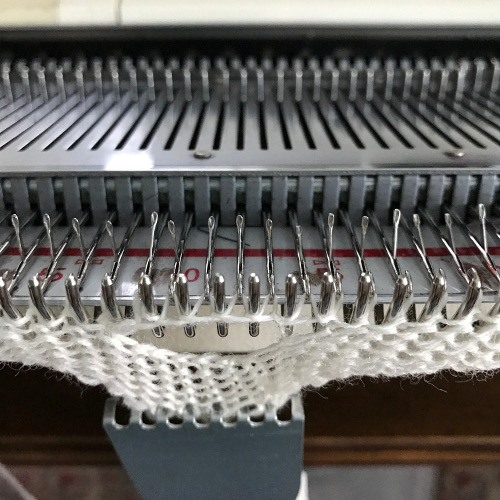
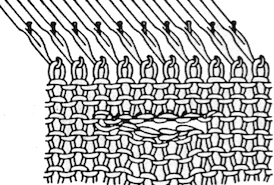
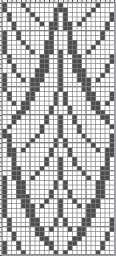
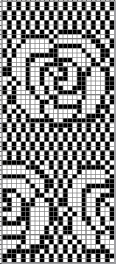
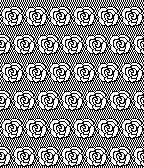
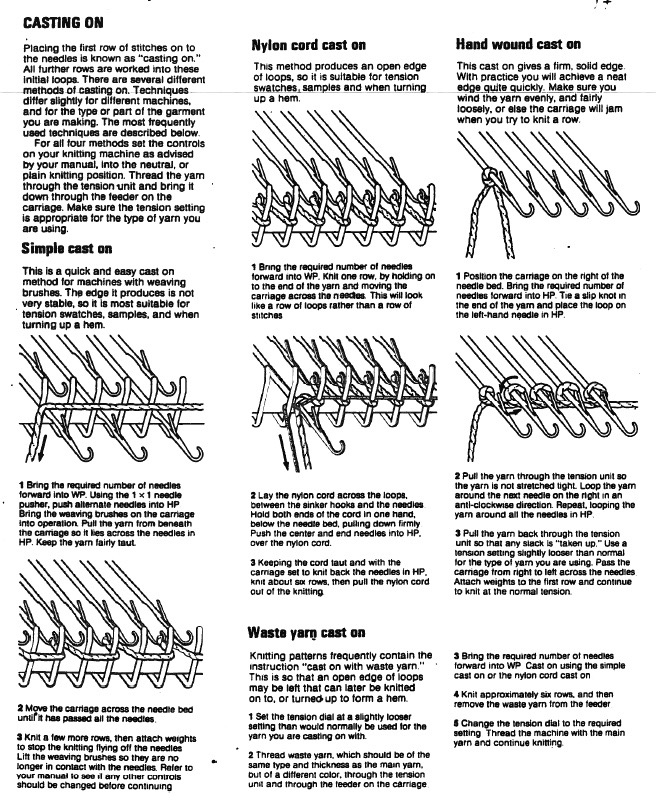
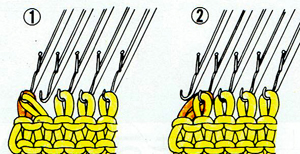
There is a lot published on methods to graft open stitches using Kitchener. Hand-knit magazines both in Britain and here have begun to present joining a variety of pattern stitches with charts that visually clarify the process. A small portion of such a chart: kitchener
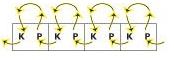
With bulky knits such as my hats, I like to take open stitches onto circulars and sew them together by hand as shown below, beginning on right, and with the knit side facing me.

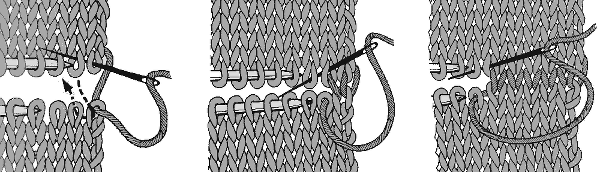
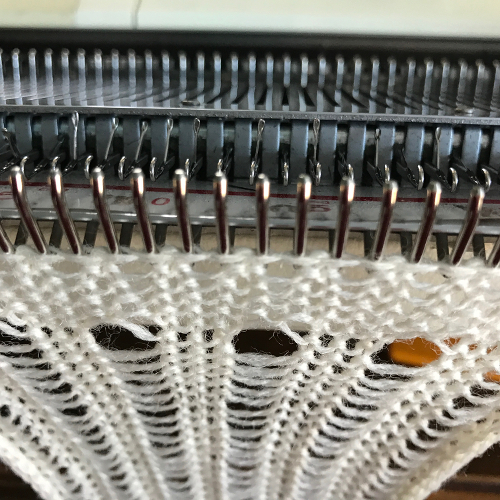
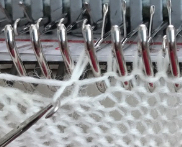
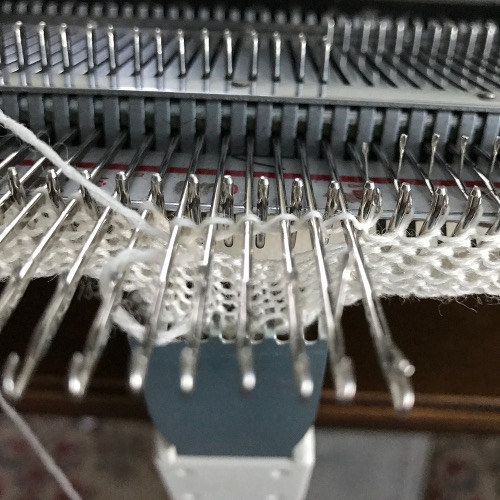
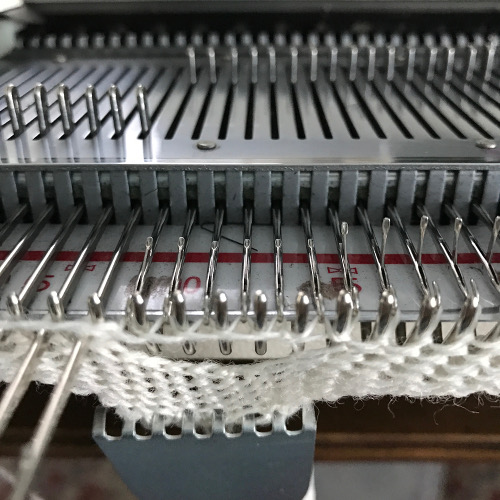
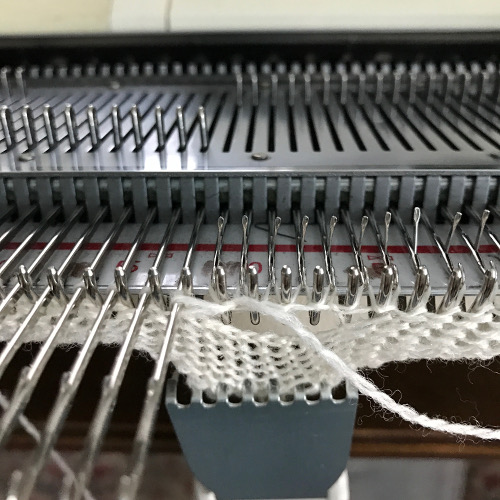
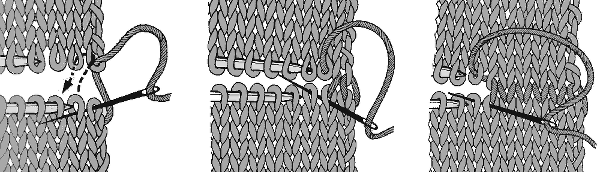
joining knit ending on waste yarn, purl side facing 
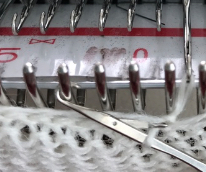
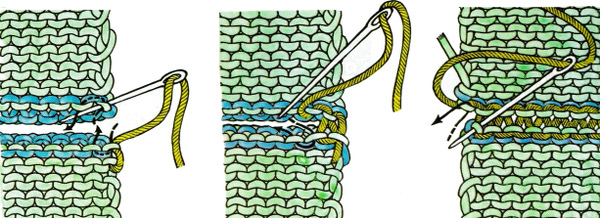
joining knit ending on waste yarn, knit side facing 
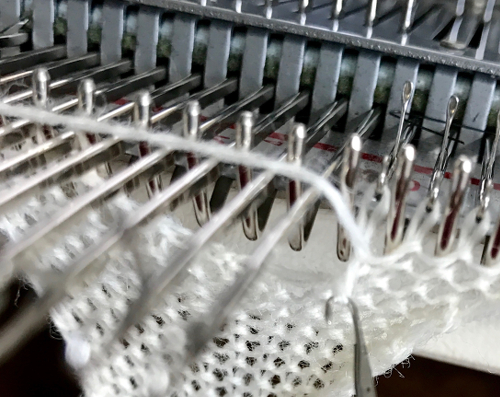
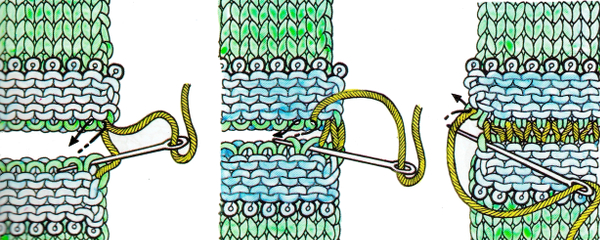
joining garter stitch ending in waste yarn 
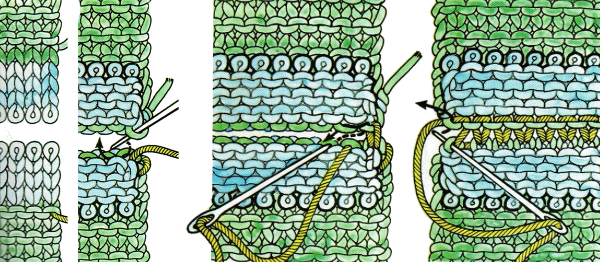
Diana Sullivan offers youtube videos showing how to join pieces with waste yarn endings with their purl side or knit side facing respectively.

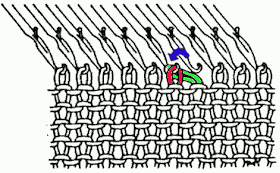
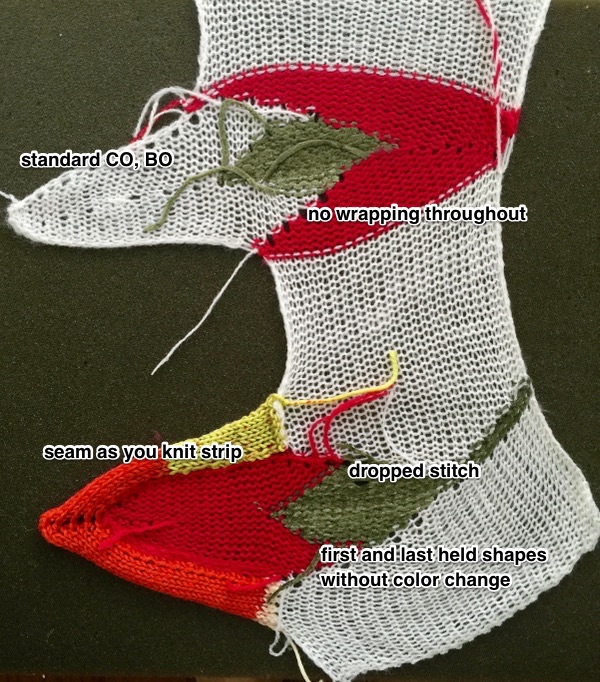
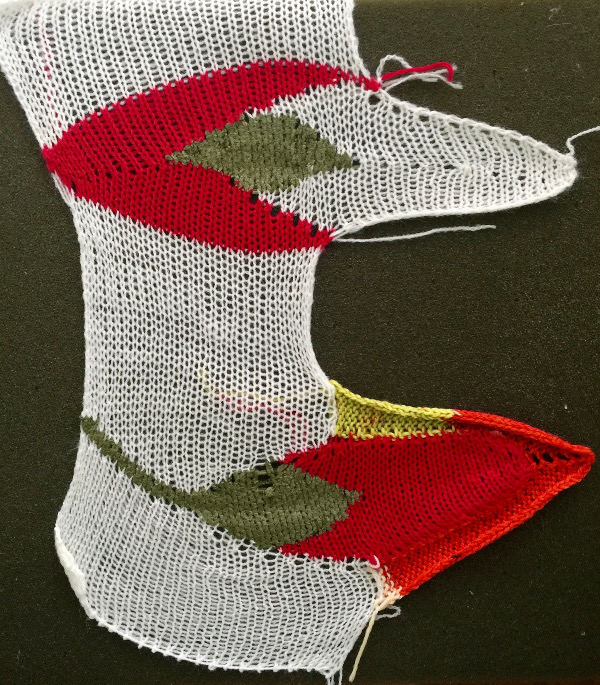
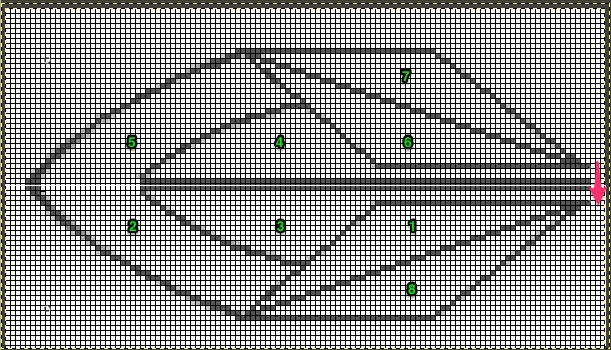
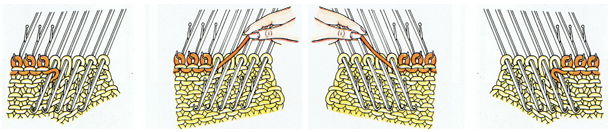
Seam-as-you-knit is an option for joining vertically. It is a technique that may be used to attach bands, parts of a sweater, or strips of knitting, whether for the sake of additional width, changes in color, or attached with purl side facing the knit side if that is the goal.  The piece on the machine is always purl side facing. With each row knit, a “loop” is created on the carriage side, while a “knot” is formed on the opposite side as the row is completed. The process then reverses as the carriage returns to its original position.  The technique may be done on either, or even both sides at once. The first piece(s) is (are) completed and taken off the machine. Begin the join to piece with the cast on row or waste yarn. For a test, with COR: pick up the first knot or loop on the completed piece. Hang it on the left end needle/ stitch on the cast on work (opposite the carriage). Knit 2 rows. Go to the next knot or loop on the completed piece, place it on the same left side needle/ stitch. You are hanging on the far needle opposite the carriage every 2 rows.

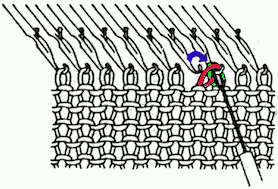
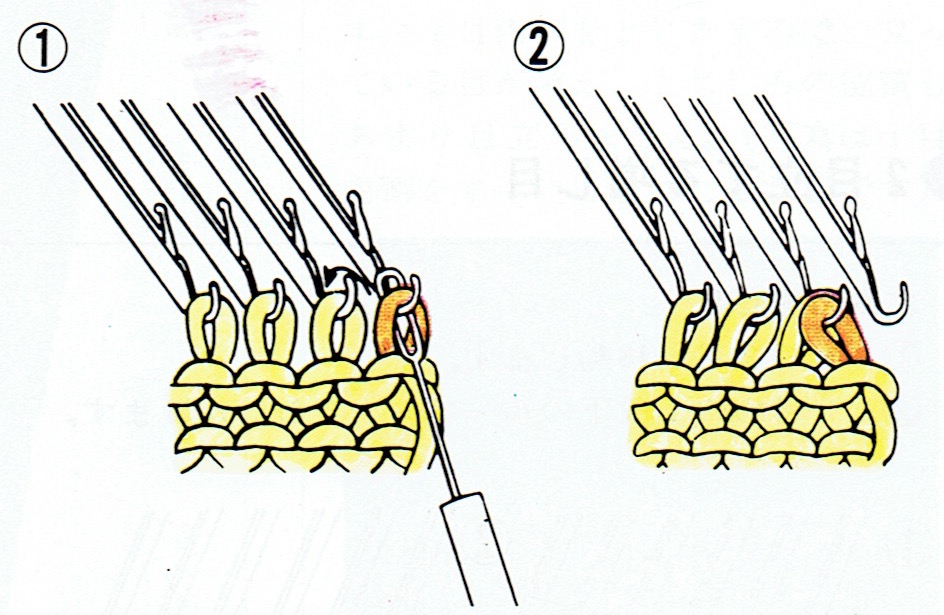
The knit fabric, purl side facing   knot_loop
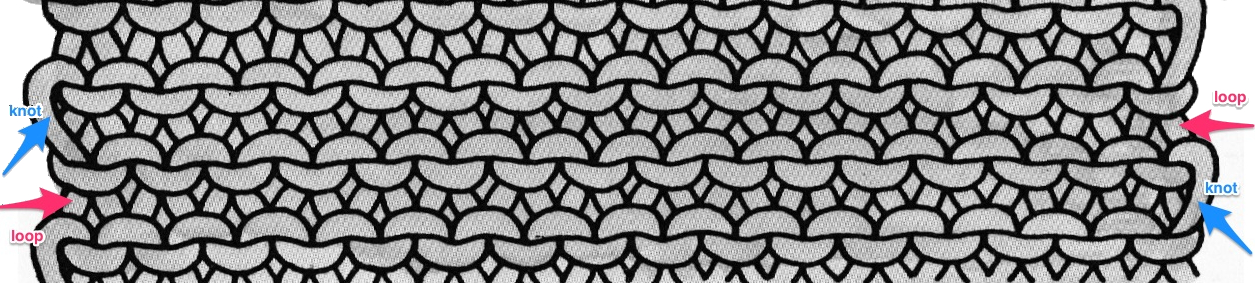
A one-eyed tool is inserted from front to back through either a loop or a knot, and hung on the first needle hook/stitch on the right, left, or even both sides of the piece every 2 rows.    knot_loop2bknot_loop2a
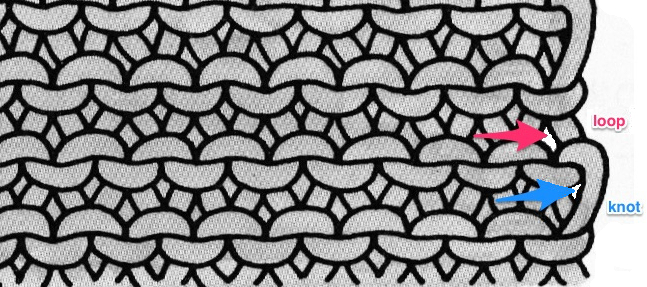
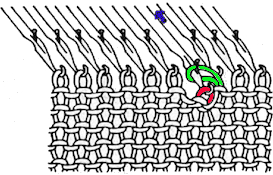
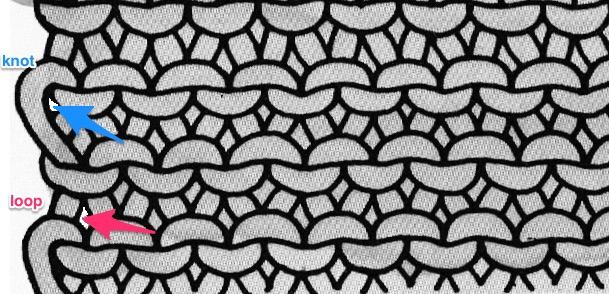
Joining “loops” generally works well in standard gauge knitting. On the bulky, or where a “tighter” seam line is needed, join “knots”.
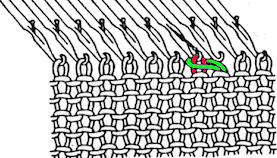
The same method may be used to join the side edge of any piece of knitting to any portion or location on the one in progress.
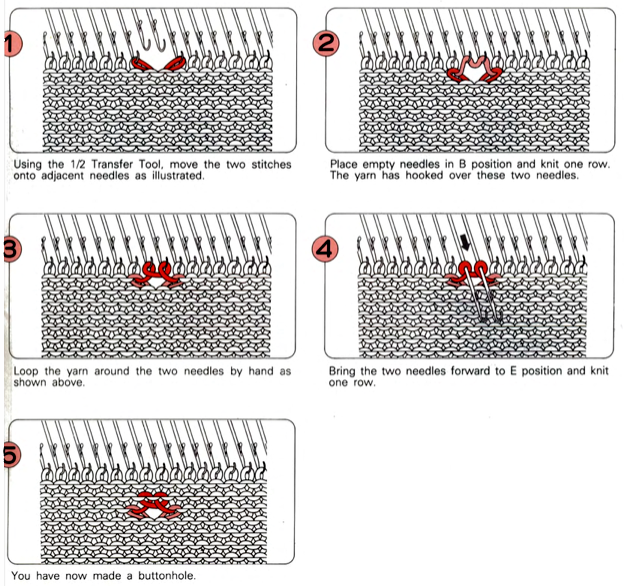
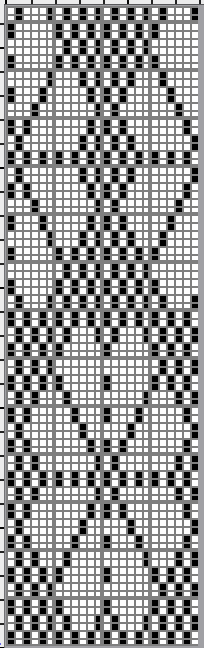
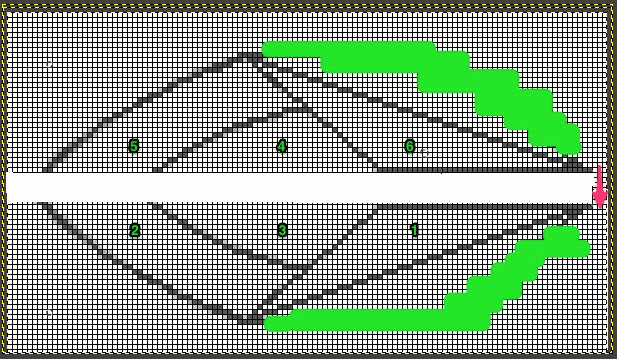
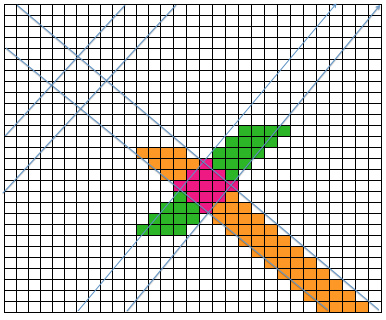
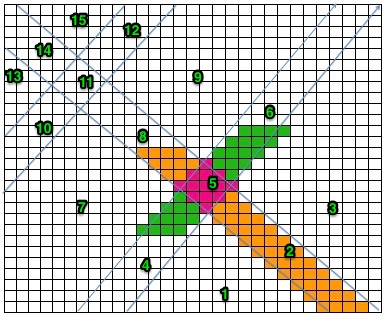
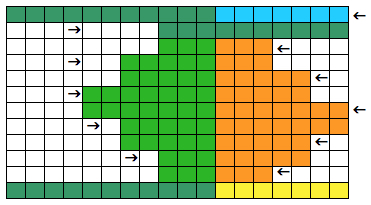
When hems need to be hung at the top of a knit or within its body if only one color is used, if long seams are to be joined, or a width needs to be rehung for joining to match its mate, it is helpful to have yarn markers across the row, or periodically along the sides of the pieces at fixed intervals. These illustrations are from the Brother Knitting techniques Book

MK ladders, and a bit of crochet

I have recently been thinking about collars and edgings again, this time adding crochet detailing to help cut the edge curl and add interest. In a previous post, I showed an edging done in drop stitch (double bed lace). Here to simplify things, I decided to work with ladder spaces to create the fabric. If a large width of this fabric is required, multiple bands would need to be joined to achieve it, crochet is then applied in turn to the finished knit piece. Seam as you knit can make the joining nearly invisible. Using Excel, I tried to also create crochet symbols using its shapes menu. The number of rows knit in open pattern or all knit prior to binding off is at your discretion, depending on your needs and planned final product. For my sample I began knitting with COR, and to end with COR for bind off row, I chose to work with even numbered groups of rows. Consider fiber content if the intent is to permanently block as flat as possible, or not.

my chart symbols symbols_70

whole_69

needle set up, waste yarn cast on, knit for the desired length  setup_62img_4095bring one empty needle into work transfer_63img_4096knit one row, bring remaining empty needle into work plain-knit_64img_4097knit one row img_4099knit rows desired for top band img_4100transfer eon from L to the right allk-transfer_65img_4101latch tool bind off around gate pegs for all needles/stitches img_4102

img_4103do not cut yarn, lift work off the machine; turn work over (knit side facing)
chain 5, slip stitch into eyelet created by transfers, repeat across the knit, end with a slip stitch into last eyelet space detail_4121
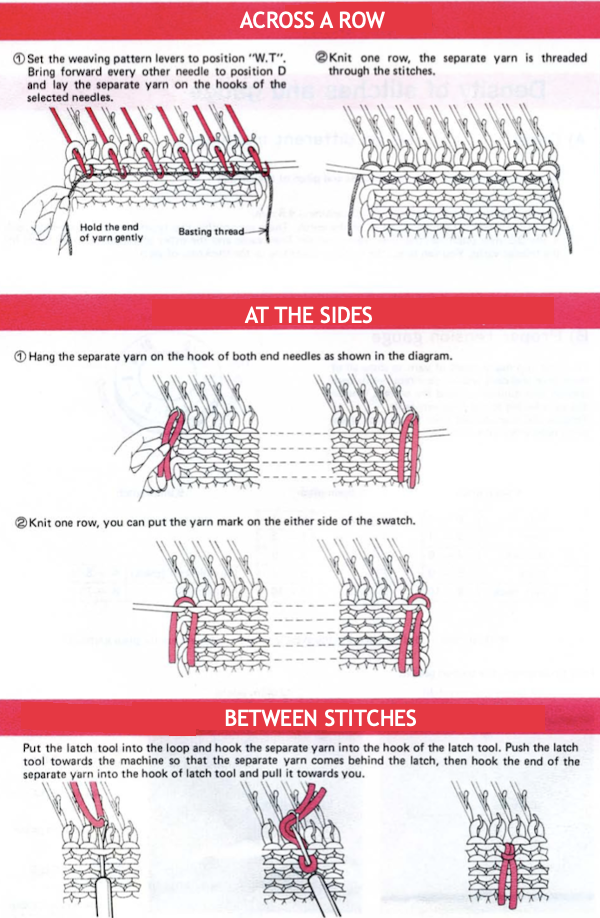
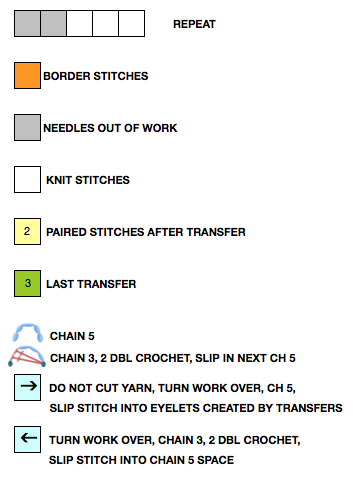
turn work over (purl side facing once again), chain 3, 2 double crochet, slip stitch into the center of chain 5 space, repeat across the knit, end with a slip stitch into last chain 5 space detail_4120unblocked trim, 2/15 acrylic yarn img_4104

img_4105detail after steaming, the trim is side leaning img_4119

img_4118

To use: rehang open stitches on every needle (or other arrangements) eliminating ladder spaces and bind off,  join to another piece of knitting, etc.

Single bed slits aka horizontal “button holes”

Related blog posts:
2022  More buttonholes and slits with illustrations including ribber variations.
I have previously shared posts exploring assorted meshes including some with large eyelets.
The formation of eyelets is sometimes offered as a buttonhole option in publications, a review of the stitch movements involved and the associated symbols:  The first knit row will form a loop on the empty needle, while the second row knit with the next carriage pass completes the stitch
A larger eyelet, with directions found in most manuals, is not really the best option if used as a buttonhole. That said, these 2 methods render round, clean-edge larger eyelets   This version is from the Brother Knitting Techniques Book, begins to address wider openings in knits

screenshot_42Many hand-knitting patterns are published, often in garter stitch, using slits that one may think of as larger “buttonholes” to create a range of interesting fabrics. Trying to produce such slits single bed, without the use of additional strands of yarn and in turn, having yarn ends to weave in, leaves few options.
This method may also be used when creating multiple slits across a row. Holding is used to break the knitting into segments. The drawn illustrations show steps are taken, not needle positions.
COR, for the bottom of the slit:
1. transfer the first stitch in the buttonhole group onto the adjacent needle to its right bhole_012. transfer the pair of stitches together onto the now empty needle to their left. The knit carriage, holding the yarn, will be on the rightbhole_023. push the needle forward until the first stitch (green) passes over the needle’s latch bhole_044. push the needle back to the work positionbhole_045. the forward stitch (red) is now knit through the one behind the latch  bhole_05This essentially binds off a stitch.
Repeat steps 1-5 until the number of bound-off stitches required is met; the last stitch in the group is then transferred onto the adjacent needle to its left. The bottom edge of the “buttonhole” is now complete. bhole_06aTo make the top edge of the buttonhole/ slit bring its corresponding needles out to hold, and cast on the desired number of stitches with the latch tool from right to left. bhole_07aIn order to best accomplish this with COR set KM for holding, push empty needles back to A position, knit up to now empty “buttonhole” needles img_4069bring empty needles out to hold img_4070insert latch hook from back to front through below the last stitch now knit on the right screenshot_36twist tool clockwise screenshot_37bring empty needles out to hold img_3966come up between the first 2 needles on the group’s right screenshot_38continue with latch tool bind off, the last loop in the chain is hung on needle already holding 2 stitches from the last bind off transfer img_4071tighten up the loop 
img_4072
return “buttonhole”  stitches into needle hooks, back to B position
img_4073COL: set KM to slip in both directions and move to right img_4074COR: cancel holding, adjust tension, knit across remaining stitches to Limg_4075COL: cancel slip <–>, continue knitting screenshot_08img_4077img_4078
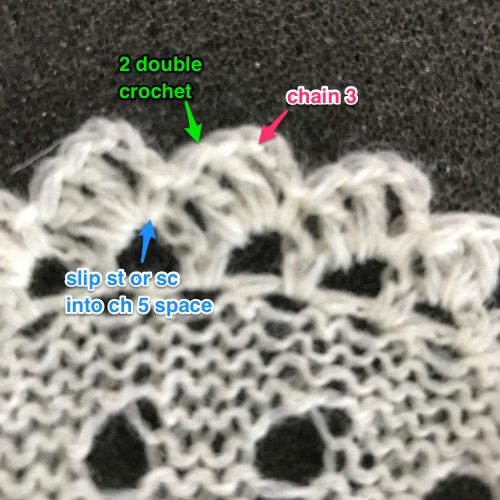
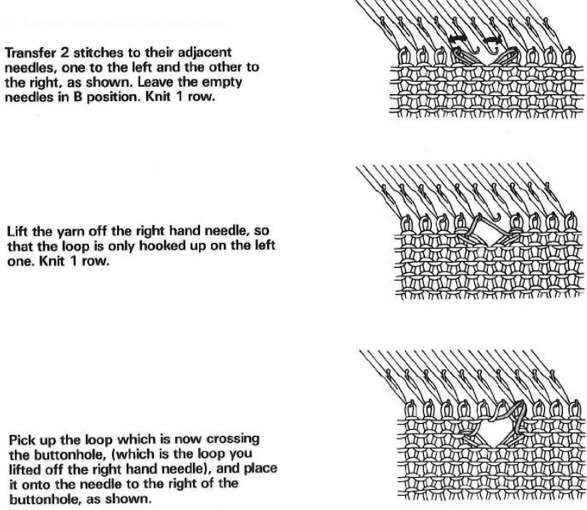
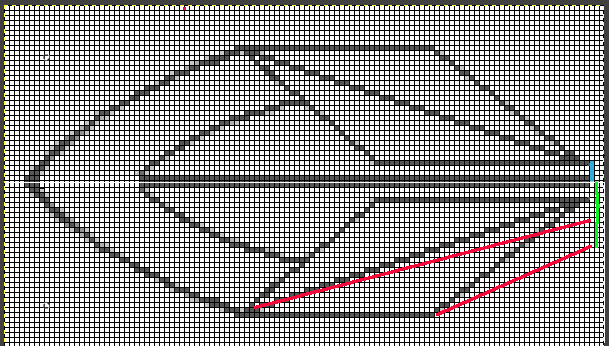
This version is from an ancient Brother manual, always test techniques on swatches using the yarns intended for the final piece

A hand-knit response to a Pinterest request: variations in rib with holes

Thread Lace on Brother KM

This post originally did not offer repeats for the design, they are presented here in a 2024 review of content.

Thread lace has also been called punch lace over the years. The “lace holes” are formed by knitting a fine thread with a significantly thicker yarn as the “second color”. When the fine yarn knits (B), a larger stitch in it alone is formed, with the thicker yarn floating behind it. The thicker yarn goes in Brother’s A feeder, the thinner in B.  In FI patterning, the unpunched holes/ blank squares/ no pixels are knit in the yarn in feeder A, and punched holes/ black squares/ pixels are knit in B feeder yarn. In thread lace both yarns knit the unselected needles, corresponding to blanks in the card or blank squares/ unmarked pixels. The tension may need to be adjusted due to this fact.
Test swatches for tolerance to pressing/ steaming to make certain the final garment will bear blocking and cleaning. I had a sweater front finished using an industry “clear” thread, thankfully tried to iron it before finishing starting other pieces, and discovered a lovely melting quality to the clear “thread”. In theory, clear serger thread should be safe to use, there are 2 easily available manufacturers. YLI brand (nylon) is stocked at most chain stores that carry sewing supplies.  One “light / clear” is “whiter” than others; there is a “smoke” version as well, sold on cones. Both produce a bit of a sheen on the surface of the knit fabric. Sulky (polyester) clear is sold on spools and is superior for sewing pieces together, zippers, etc with no “sharp” when the cut ends poking at the skin, but at a different price point and quantity.
This was my garment’s test swatch, the black is a wool rayon yarn.img_3850-1punchcard repeat:the associated 24X72 pngThe fabric is much quicker to produce than traditional transfer lace.
Cards can easily be drawn by filling in solid shapes over a mesh ie the repeat seen in the 1X1 card.
Double length may produce an interesting fabric as well.
End needle selection needs to be canceled. If end needles are selected because of the pattern repeat, push those needles back to the B position manually before knitting the next row. The latter step ensures that both yarns will knit together. On electronic models one can program the number of repeats planned and add blank rows on either side of the repeat prior to downloading for all knit borders on both sides of the piece.
Either side may be used as the “public side”, depending on personal preference. The thread lace option is also available in the 260 bulky machines. Here a very thin acrylic was used as the “thin” at the start of the swatch, monofilament for the remainder (bulky KM)  img_3851punchcard: 24X54 png  A floral repeat card

the 24X80 png The thin rayon is noticed especially over a dark ground in the finished piece, not as much as in this view. The fabric will lie flat when pressed, here it was steamed lightly  A closer look The old sample, knit with monofilament as color 2, the repeat is suitable only for an electronic, even if only half is used  img_3852Uncertain as to the repeat in the present time, here it is reconstructed to a 52X48 png.  A new proof of concept swatch, knit in rayon yarn and a shiny sewing cotton Taking it to a garment (standard KM): color 1 = wool/rayon blend, color 2 = sewing thread. Note the difference in color where there is no needle selection for pattern, and how one color is more prominent on one side than the other. Sometimes the latter may be used to advantage when the goal is a plaited fabric, but no plaiting feeder is available. Simply program in a blank row, and position threads using the thread lace setting to produce the knit.img_3855img_3854The card: the 24X56 png some needle selection was eliminated in the knit piece to allow for a transition to the new, smaller design repeat  The chart for the small repeat used in the upper body A larger, electronic repeat found on an ancient 560 mylar of mine to play with
32X40  32X80
64X40 I knit on a 910 electronic, with no option for such fabrics built into the knit carriage. I was able, however, to modify and use my punchcard carriage with the intent of producing yet another “unconventional”, ribbed fabric. screenshot_23Added tips: the tension dial usually ends to be a bit tighter than stocking stitch. The fabric produced is also thinner and shorter than stocking stitch, as is fair isle.  The finished fabric tends to elongate with rest after blocking.
The setting may be used instead of plating. A plated, solid fabric is produced by non-selected needles. The thread lace thread tends to appear on the knit side, as opposed to the plating yarn, which appears on the purl side. The color mix may appear less even than in traditional plating. Simply lock the card or needle selection on an all “blank” row.
If the “lace” thread is too thick or too contrasting in color, the eyelet pattern may be lost.
Simple geometric shapes are best.
Some knit weaving patterns may also work well.
In terms of altering the repeats using the buttons on the electronic models, double length or sometimes double wide as well as vertical mirroring may produce interesting results.
Sewing or serger threads may serve as the thin yarn and match yarn color well if that is desired. A sort of “sock” may help with more even feeding, the mesh used here was from a florist, netting from supermarket products ie unusual fruit can come in handy as well  On the select/memorize row both yarns are fed into the same feeder (A) as the thick yarn, and the “lace” yarn is then removed and placed in the second feeder (B).
An option for drawing your own patterns: shapes can be superimposed on mesh designs as described in “filet crochet” posts, with no elongation of the motif.
A sample of a floral on a transfer lace mesh, one of my one-off scarves from eons ago Punchcard machine owners may use tape over sections of card number 2, or card 1 which in turn gives the option of testing the design elongation X 2 for both eyelets and motif as well. The tape may be moved to suit, and once the pattern is satisfactory, the final pattern design card may be punched.
Both Brother and Studio offer the cards in their standard  punchcard assortment with the purchase of respective machines. 
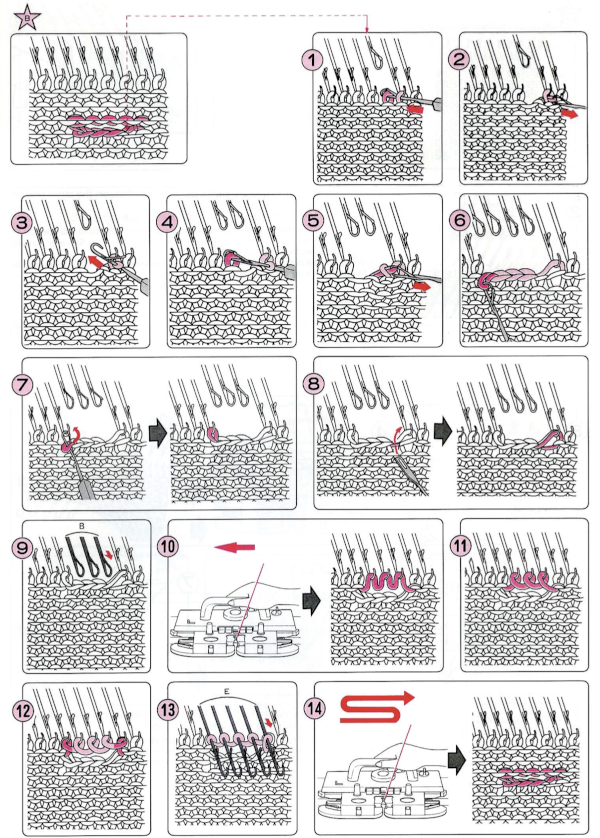
A later blog post on the topic with additional information on yarn placement, settings, and more: 2019/02/25/tuck-stitch-meets-thread-lace-repeats-and-vice-versa/


Knitting in pattern with 2 carriages, Brother punchcard KMs 1

I touched on knitting with 2 carriages in some previous posts:
2011/03/30/knitting-with-2-carriages/
2011/03/29/lace-meets-hold-and-goes-round/
2015/03/31/combining-tuck-stitches-with-lace-2-automating-them/

If 2 carriages are in use for patterning extension rails are a must. For this discussion we are excluding the lace carriage as the #2, the intent is to use 2 knit carriages with each set to desired cam functions. As one carriage is put to rest and the other one is set to move from the opposite side, the card does not advance, so the last row selected is repeated one more time. In one of those lightbulb moments today (any excuse not to do laundry) it occurred to me that starting out with an odd number repeat pre-punched card, coming from the opposite direction at the end of each odd row repeat, an even-numbered repeat would actually be knit. The card below is a Brother issue with all standard knitting machines. Card number (2 in this instance) may vary, depending on the year of purchase. Color changes here as well would have to be planned for every even number of rows, so respective carriages can travel to and from each side.

punchcard

The swatch below begins with locked selection row on punchcard row marked #1 (standard location); tuck setting is used in first 2 segments, FI on third; pattern produced is “OK”, but not actually tucking for 4 consecutive rows; note how much narrower FI is than tuck. Tuck tends to be short and fat, slip and fair isle short and skinny when compared to plain knit in same yarns 500_326

500_327

Since Brother preselects for the next row of knitting, setting the first selection row one locked below the usual spot on in this case #48 got me what I wanted, each color now tucking for 4 rows

500_325

500_324

Then something a bit more exciting occurred to me; one is an odd number, so any card where single rows are punched could be executed in theory, changing color every 2 rows (remembering to start with first selection row one row below # 1-row mark on the card). This sample was knit with 2 carriages, using a maze card, illustrated in a previous post, in which each row had been punched only one time, requiring for the repeat to be elongated X2 500_319500_320

the image from the previous postgrey_slip

Using 2 carriages allows for combining yarns using different tensions, cam settings, fiber content, or sometimes using materials that the single bed color changer is not “friendly” with. Also, there is no pushing the wrong button, causing errors in sequence, or dropped knitting if no yarn is picked up.

A punchcard carriage may be used on electronic machines. I work on a KH892, and a 910. The 910 is from a much earlier model year than the punchcard machine. The back rail for the KH to travel on, is a different shape, with slits as opposed to smooth, and a bit more raised. The electronic carriage set on KC locks on the belt and advances the card appropriately, but the fit is quite snug, making it hard to push, while the 892 behaved well on the 910. If borrowing carriages and sinker plates from different model years or one type of machine to use on another, proceed with caution and listen to your machine. Sometimes the span of time between model issues is irrelevant, even if model years are only a year apart, and the swap is not the best for successful knitting, may “work” in one direction, but not as well in the other.

sample back rails: 910 910892rail2

 Dec 7, 2018 Knitting studio simple lace with 2 lace carriages transferring stitches 


A bit of holding 5: intarsia and more 2

So you have some shapes you love and know: wanting to go large, mixing them up, requires thinking things through. Testing on small swatches will help determine holding sequences and whether the results are predictable or even liked. I no longer have access to Adobe Photoshop or Illustrator, so some of my image editing is now achieved in Gimp. Labeling below is with Skitch, and charting is with Excel.

A starting freehand swatch experiment and some observations: shape variations in red areas occur by altering sequence for knitting first and last 2 shapes in the holding position

tulip_knit

tulip_purl

Planning possible sequences out in charting can be confusing. The image direction will be reversed on the knit side. Approaching the technique like intarsia with individual yarns or bobbins eliminates the need for some of the concerns where 2-row sequences or specific starting sides are necessary to keep yarns continuous or for the execution of the desired shape. Trying to imagine the shapes that create the larger one together in a simple 2D drawing can get one started, but then shapes need to be rearranged. I usually began by “playing”, trying to figure out steps needed, and follow that by trying to produce an executable chart. Making the process as easy as possible to track is always a consideration.

screenshot_09possible stitch counts and adding a center-line “stem”/ stripescreenshot_10its knitting sequence tulip_numbereda resulting swatch, stitch counts not consistent with the chart
labeled_075

600_076

In the chart below the design is worked with 2 needles brought out to work or pushed back into work at any one time, making tracking changing numbers in hold unnecessary. Pink rows indicate starting and ending knit rows, orange “stitches” are cast on and bound off in turn, creating a shape extending out from the edge of the knit. Arrows indicate where shapes meet to create forms.knittable_marked

Holding sequence for each shape may be worked begin with carriage on either side; with experience, this may be planned at times to eliminate some of those cut yarn ends that later must be woven in. Getting back to arrows indicating carriage moves, using the center shape for illustration purposes and beginning with CORdirection
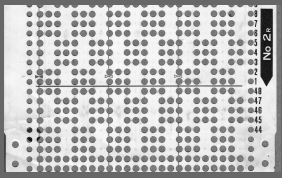
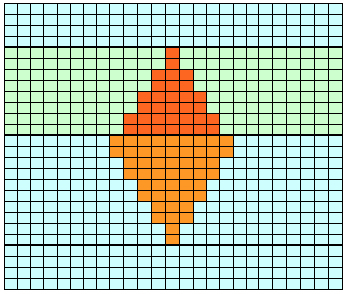
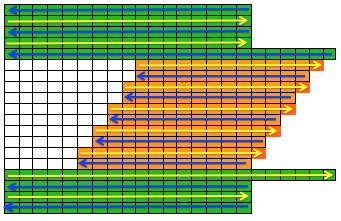
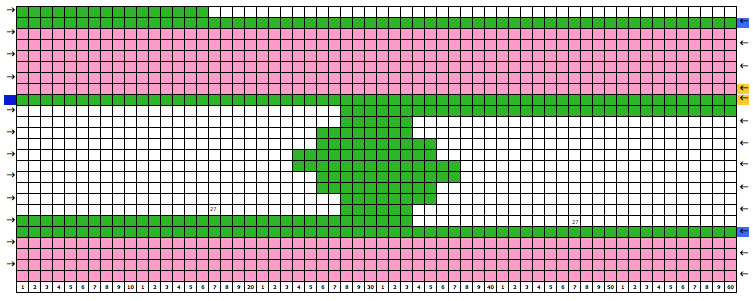
if beginning with COL, simply flip the image horizontally
direction flip

labelled_077600_078
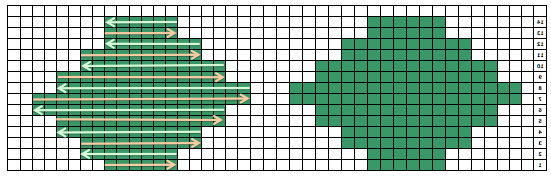
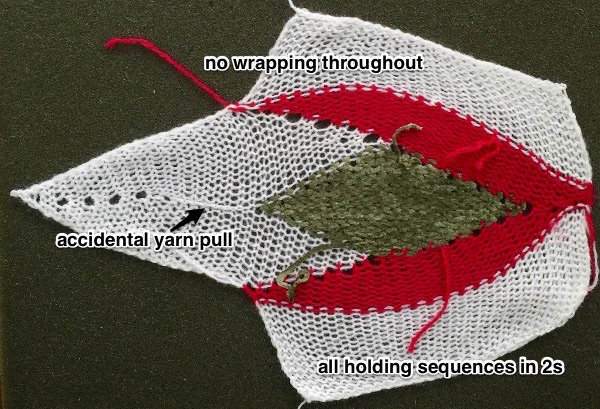
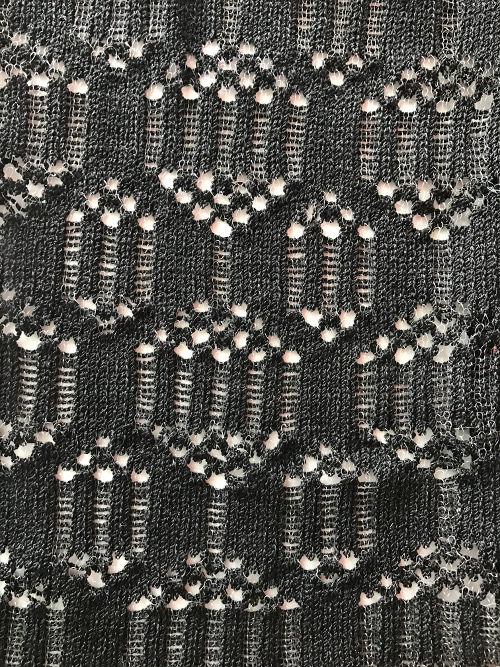
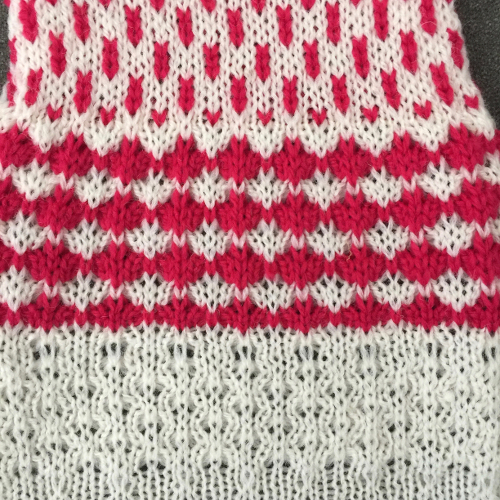
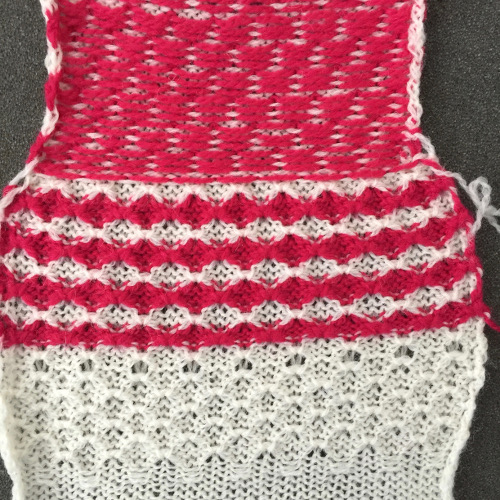
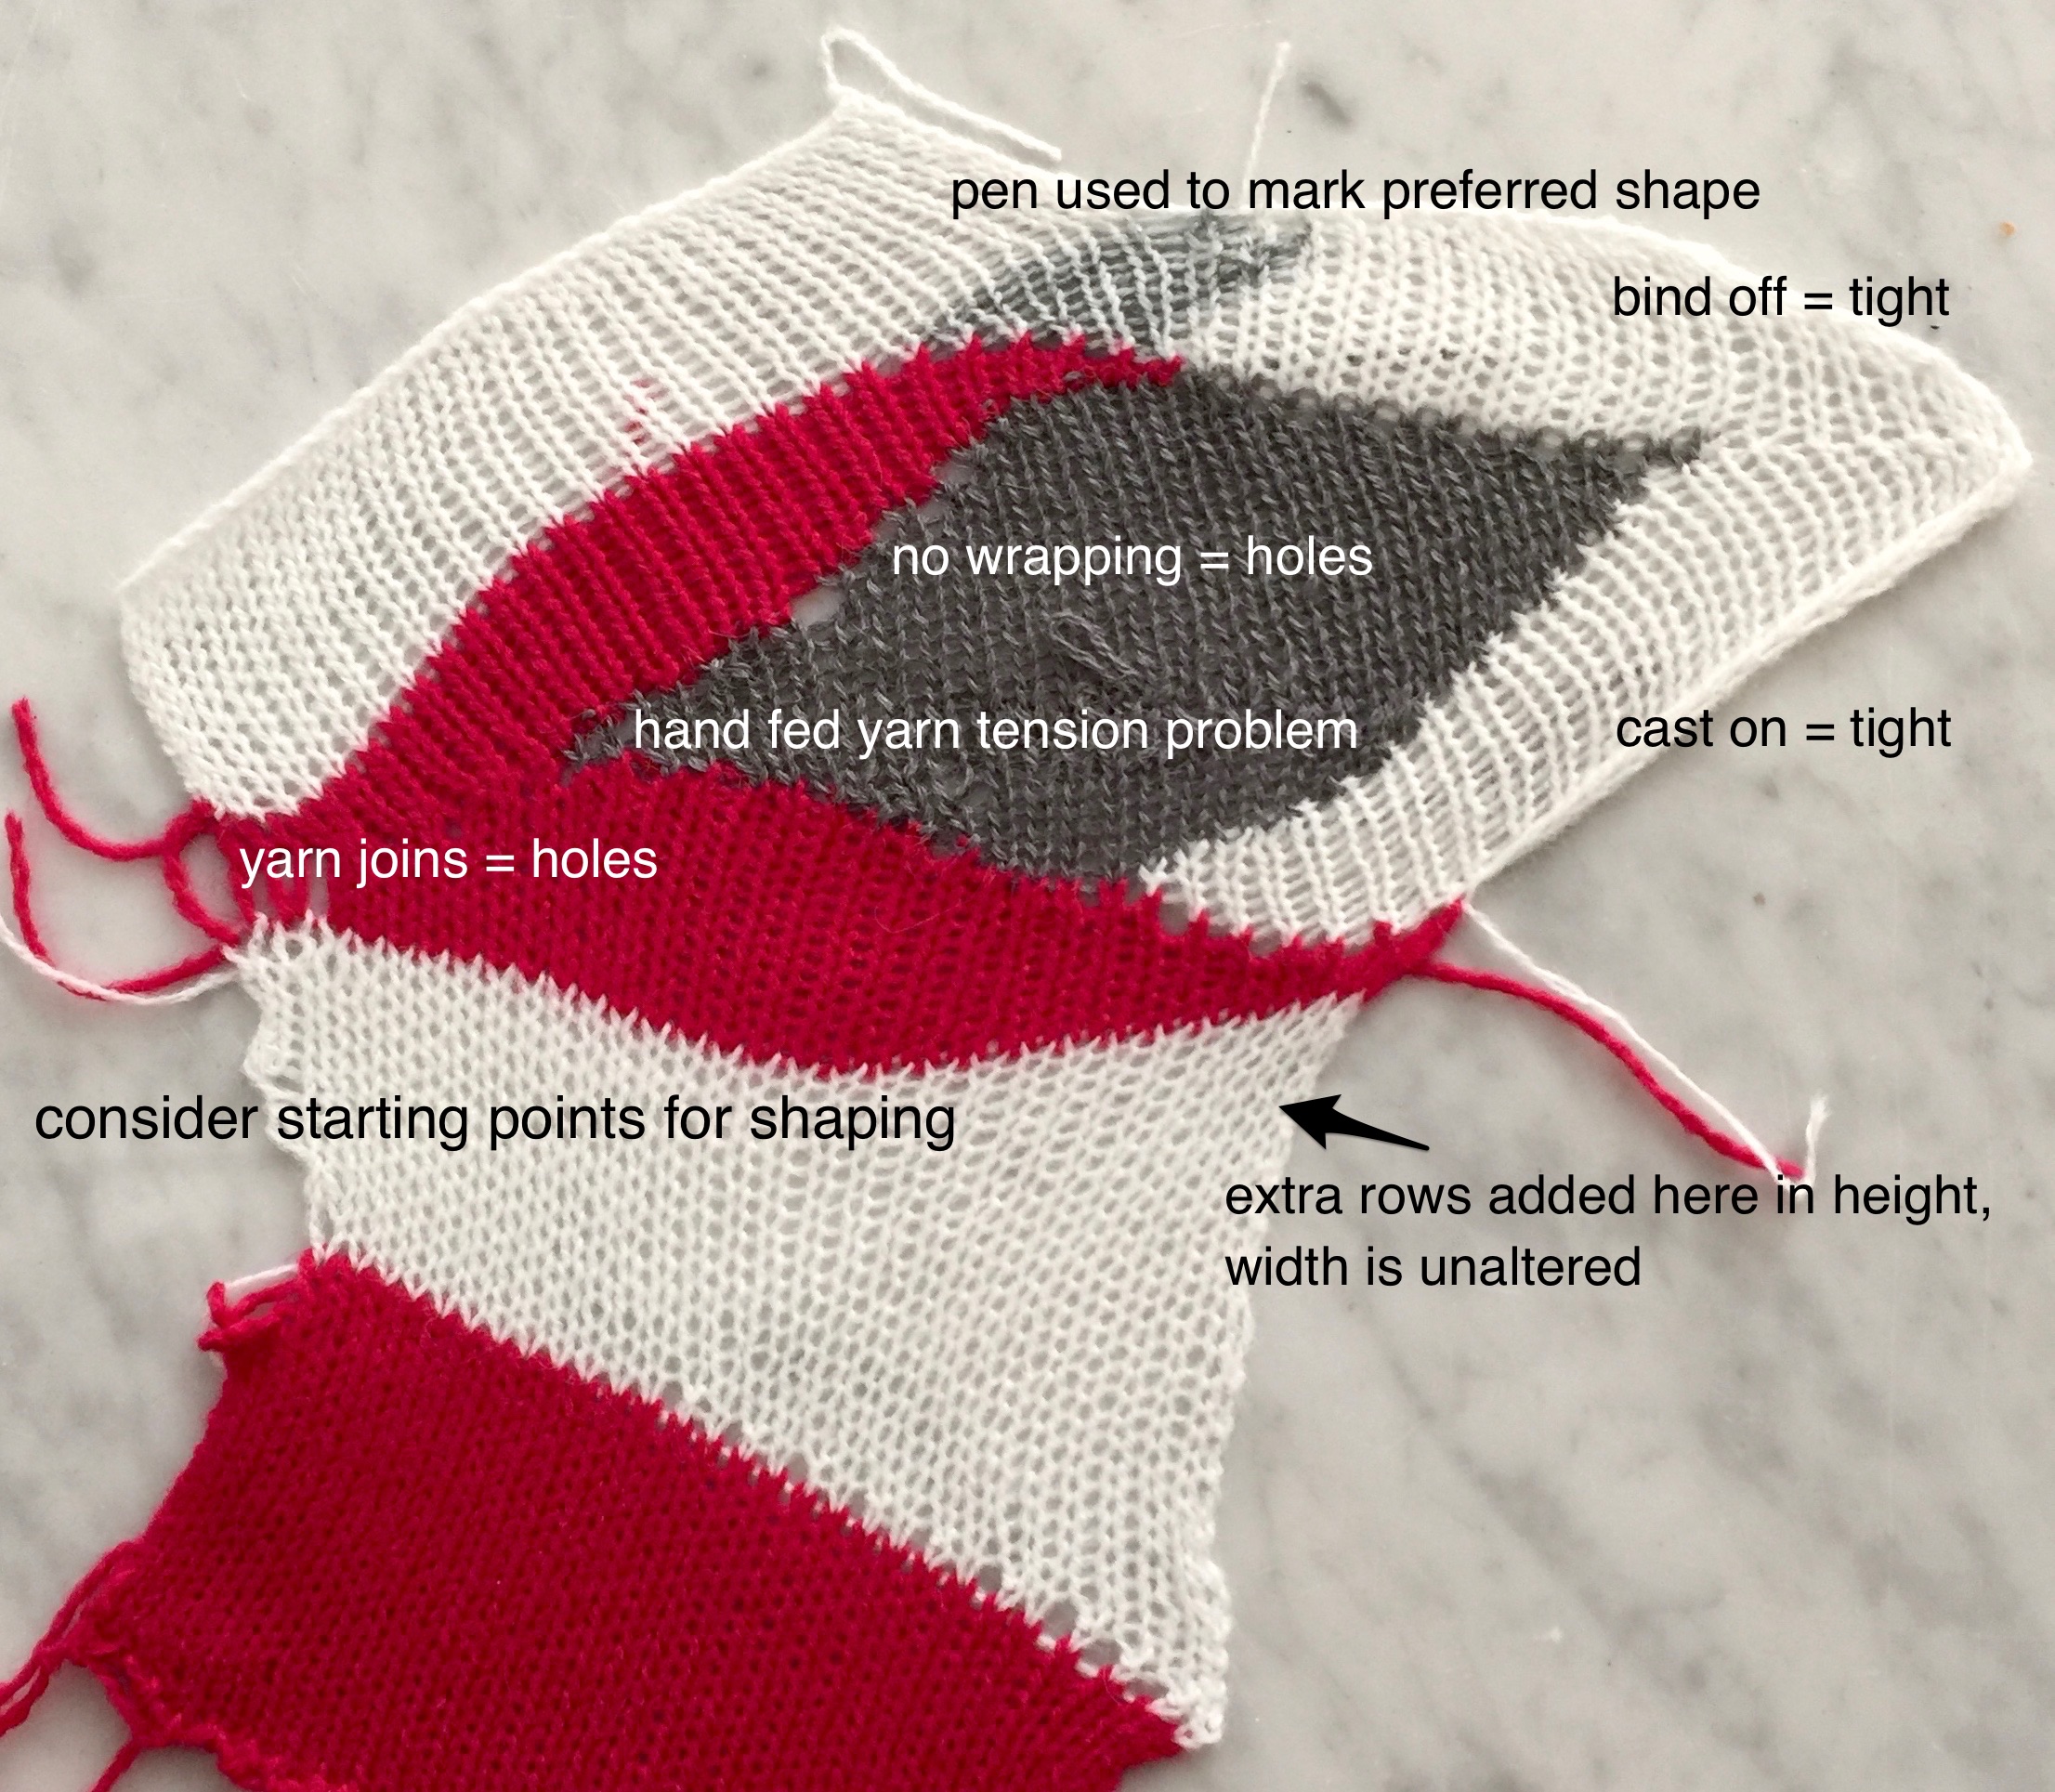
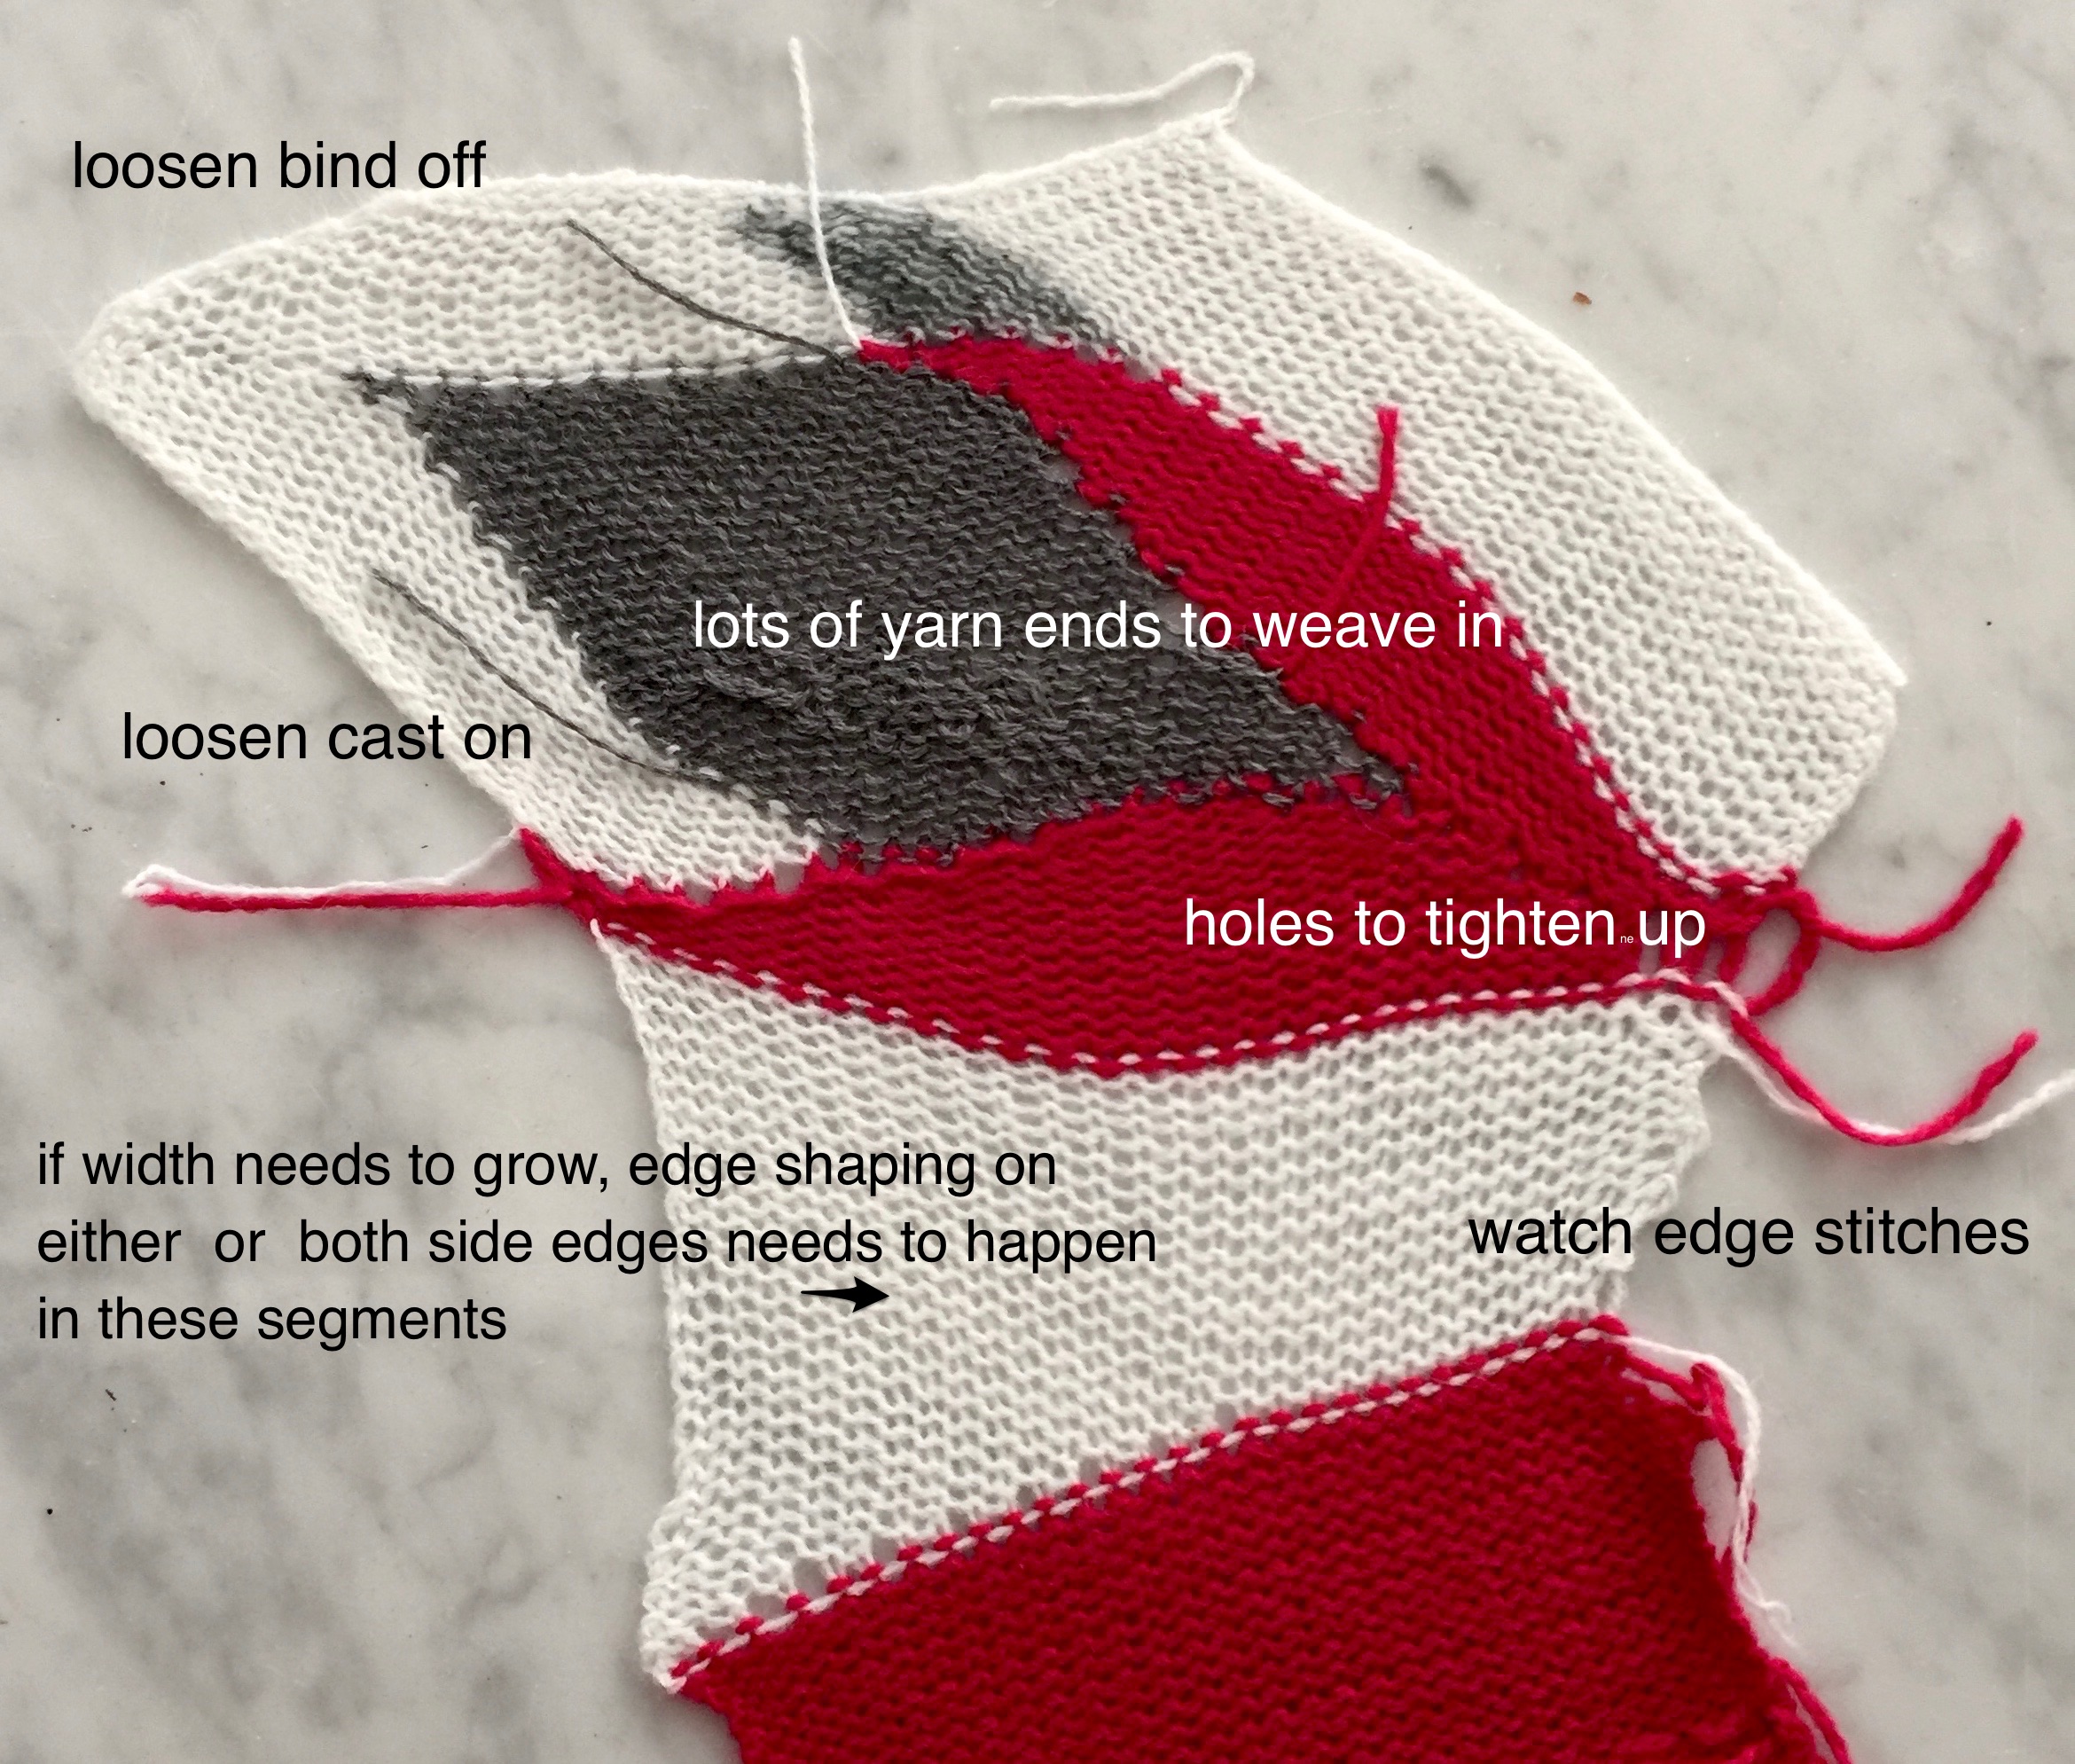
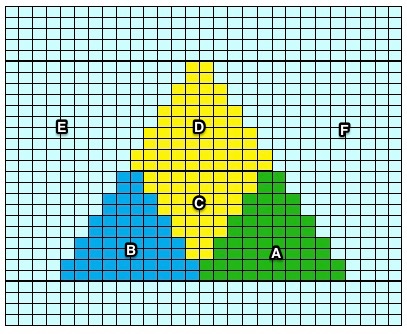
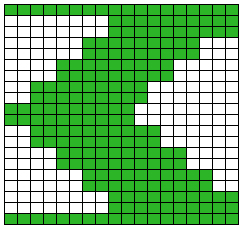
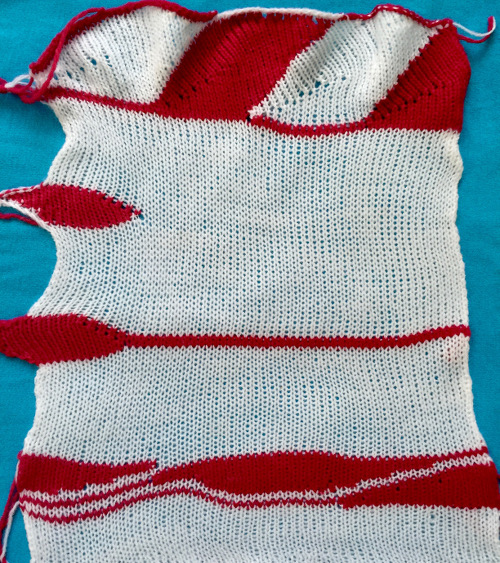
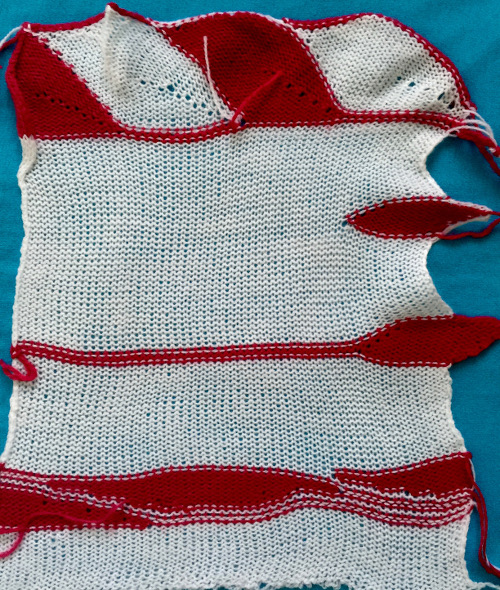
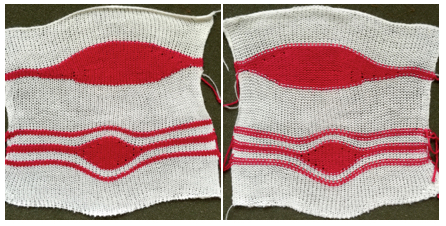
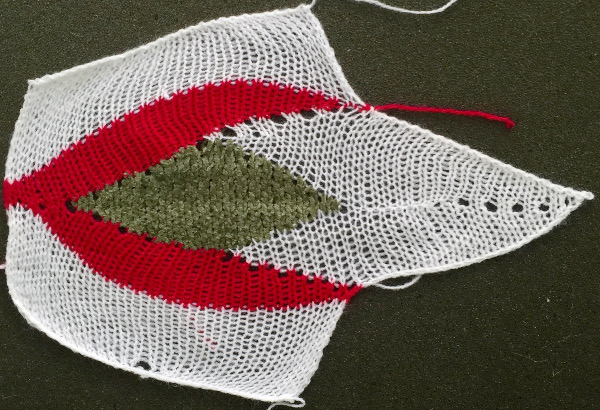
The yarns used were “throw away acrylics” in white and red. The green is a rayon chenille, which required a looser tension, resulting in the other colors looser than I would want in a piece of the final fabric.
An idea for a larger image in the process of being editedscreenshot_07A possible sequence in knitting if it is to be executed as shown. The arrow marks rows that knit all needles across the width of the piece. The piece segments are numbered to create a starting line for later joining.
numbered1If the goal is knitting as close to a flat circle as possible, eliminating rows will create a smaller center hole as well after the form is completed and seamed. Knitting segments 1-6 should be adequatecircle2Larger pieces ie shawls, adding knit rows without adding stitches can be done by altering #8, 1, 6, 7. The red line indicates changing angles. Blue and green lines below indicate increasing rows knit at the center of shapes as a result. extededKnitting and cast on sequences flow around left purl edge, straight or diagonal edges on a chart such as above may become foundation rows that are later seamed. Sort out your sequence and preferences on smaller swatches, keeping notes as you go. Additional shaping can happen along the edges of any plain knit rows between shapes by increasing or decreasing on either or both sides to create crescent shapes or triangle variants.

Now a quandary if gauge matters: knit stitches are not square. One option is to generate a grid appropriate graph paper. In holding sequences happen in 2-row sequences. Graph paper cells may be created at twice the height desired. Each rectangle will represent a single stitch, 2-row sequence. To create your own knitting graph paper in excel please see post as a place to start. A common knit ratio is 4W X 6H. An editable workbook in 2W X 6H ratio that takes into account the following outline in 2 row holding sequences: landscape2X6. Links for designing knit graph papers online:
http://www.tata-tatao.to/knit/matrix/e-index.html
http://www.theknittingsite.com/knitting-graph-paper/
http://sweaterscapes.com/lcharts3.htm
http://www.thedietdiary.com/knittingfiend/KnittersGraph.html
http://incompetech.com/graphpaper/asymmetric/

Using the 4X6 model reduced to 2X3 this is a sample generated using excel, with borders in a 2X6 ratio, so in execution, every single cell represents one stitch and 2 rows knit. The shape is one from the shape menu in the program, easily resized. The yellow bars show the gradations in holding. These cells are too small for adding text within the program itself. The math can be double-checked: there are 70 stitches, 34 rows in the rectangle at the center of the shape. Holding happens over 5 chart units (10 rows actual knitting) at the top and bottom of the center shape; 70/5 = 14 X5, matching the drawing shape on gridThe accompanying, editable workbook Excel 2008  landscape2X6

So the goal is a shawl or garment, graph paper is becoming impractical to follow? Time to pull out your knit leader. Draw out each wedge or piece full size, number segments breaking sections into knitting sequences, and let the KL guide you. For consistency, if the same shape is to be repeated many times and accuracy matters, it may be worth “air knitting” it while noting shaping as you go, keeping a row by row flow chart. An editable workbook to help track holding patterns, increases, decreases, etc. as a starting point for your own preferences: tracking knit.

Gauge or shape does not matter? time to scrumble it all and be surprised!


A bit of holding 4: intarsia and more

Picture knitting/intarsia may at times be achieved using holding techniques. As in any such knitting, supplies include extras such as bobbins, clothespins, or weighted clips, but no separate carriage. If the ribber is in use and one is working on a large piece, ribber covers allow the yarns to hang in front of the ribber bed.

Some of the rules for accomplishing this using short rows: it is helpful to work from a chart. Two-row sequences are required, so having the working chart double-length makes the process easier to visualize. “Follow” knitting directions with any tool to determine that the pattern is executable, with no long floats or slits.

The bottom of any diagonal line is always knit first.

Needles are brought out to hold on the carriage side, and pushed back into work opposite the carriage; one exception to this rule is if “automatic wrapping” is used. In the latter one, fewer needles are brought into hold than needed opposite the carriage, the row is knit, then with the carriage on the alternate side the first needle in hold next to stitches just knit is brought out to hold, resulting in a “wrap” and correcting the count to the desired number. Any number of needles may be pushed back into work at any time. More than single stitches brought to hold on the carriage side will produce floats.

When knitting shapes the only needles in work are those being worked to create that shape.

Base rows of knitting, whether in waste yarn or as part of the pattern, are needed prior to working in the holding position.

Remember that you are working on the purl side, so any image will be flipped horizontally on the knit side. Reverse the chart horizontally before working it if direction matters.

Begin with a simple shape. Letters indicate the knitting sequence for short-rowed sections. Patterning in these charts begins with COR, bold lines separate areas of plain knitting, letters indicate the order for executing short row segments. The fabric produced lies flat, with no noticeable 3D protrusions.

screenshot_08

screenshot_09

screenshot_07marking sequences with numbers is easier for me to follow; color changes help define segments, but do not reflect final colors in the design diamond_29

diamond_sequencea supermini swatch: holes are typical both in intarsia and in short rows if no wrapping occurs  IMG_2439be prepared to weave in a lot of yarn ends  IMG_2901going larger, note the wider “steps” created 500_717stripes500_716more complex geometry:  line drawing on “graph paper”complex_30the start of color placement screenshot_01sequence for executing segments at the completion of the design  complex_number_01in actual knitting the pattern must be elongated X2

I find it helpful to use familiar yarn and to work variations of a familiar shape prior to taking on more complex patterns. Below is a cousin of the first shape illustrated in this post, with a pattern worked beginning COL, repeated across the row, increments in the number of stitches worked in short rows but mirrored on both shape sides (shown in the first swatch segment).

screenshot_01filling in to produce a flat fabric, with straight sides: the bottom segment  screenshot_02the top segment  screenshot_04the amended chartscreenshot_05

Some of the same shapes may be placed on a shaped edge. The repeat will likely need some editing; arrows indicate the direction of knitting for that row. If the background color is used for casting on and binding off, then the isolated shape floats on the ground, and the horizontal line of contrast color is eliminated.

screenshot_18edge 1creating an outline of shape with Color 1screenshot_23edge_21horizontal rotation to achieve “leaf” shape screenshot_05melding shapes no wrap_28don’t like wrapping? for smaller holes offset the return to work position upper half of the shape by one less needle at the start, added at the end.
A first look at  knitting direction leaf_25and at stacking shapes, with bound-off stitchesstacking leaves

combo_2934

combo_2935
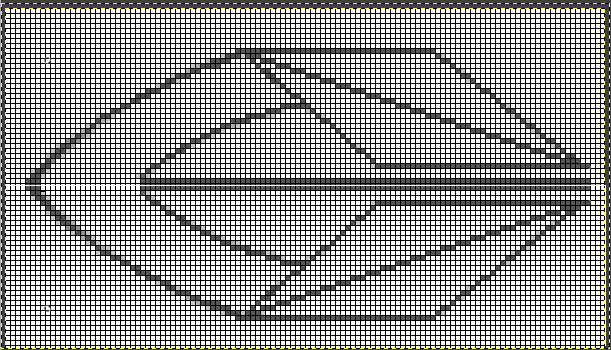
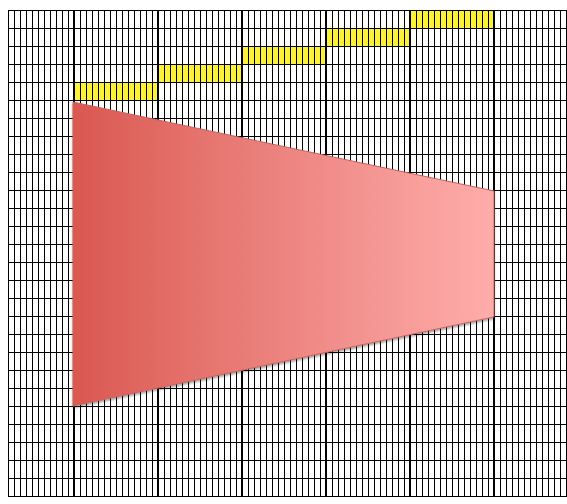
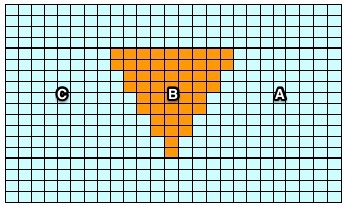
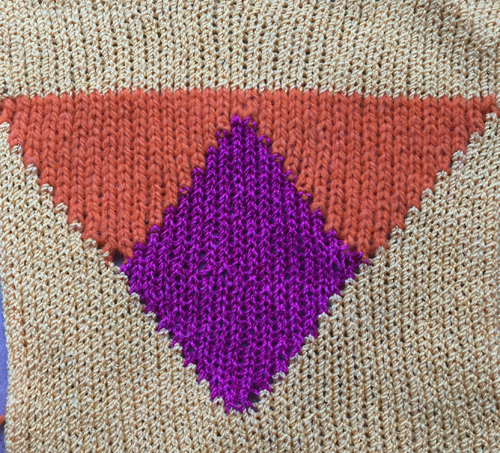
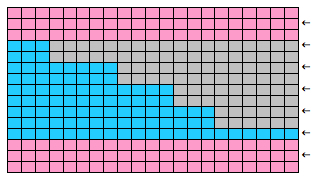
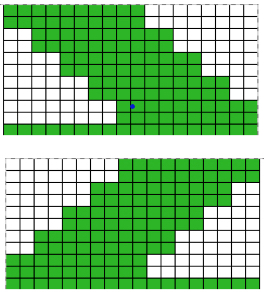
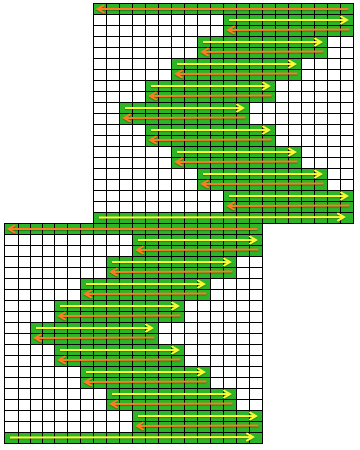
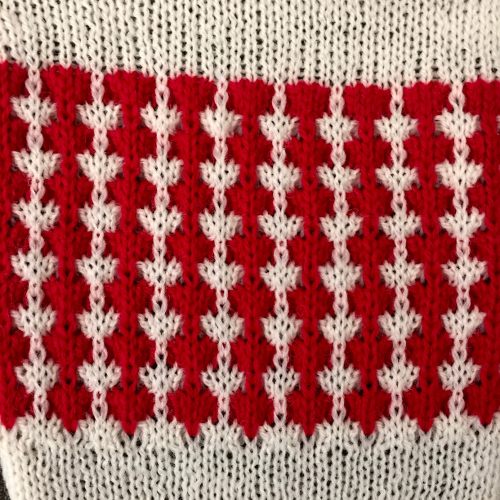
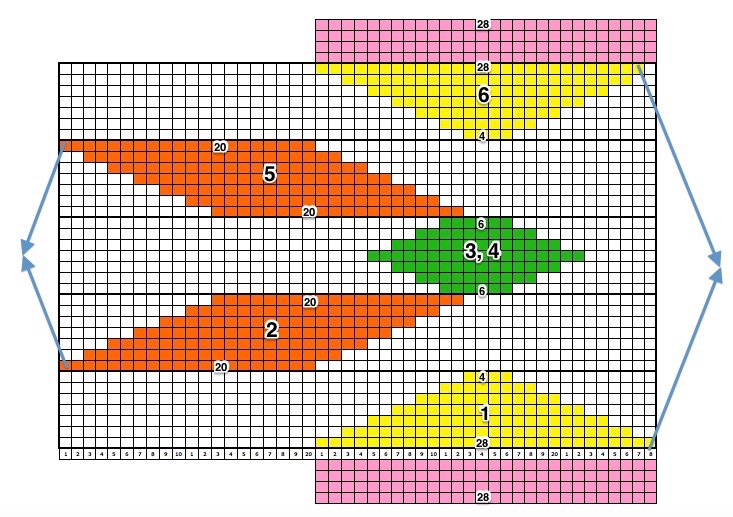
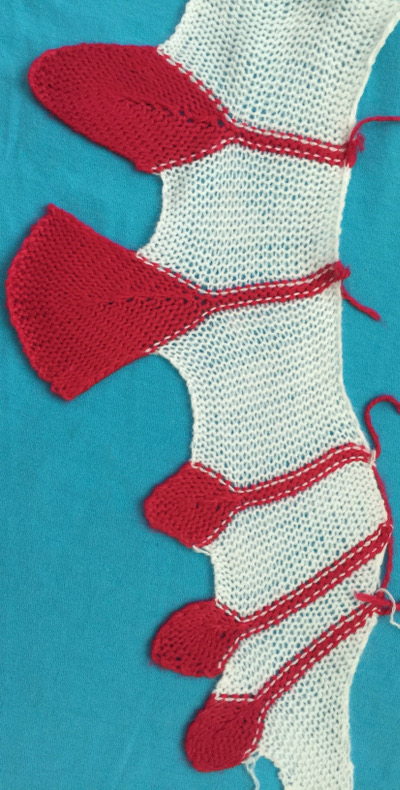
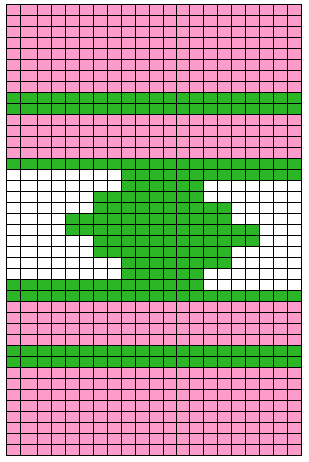
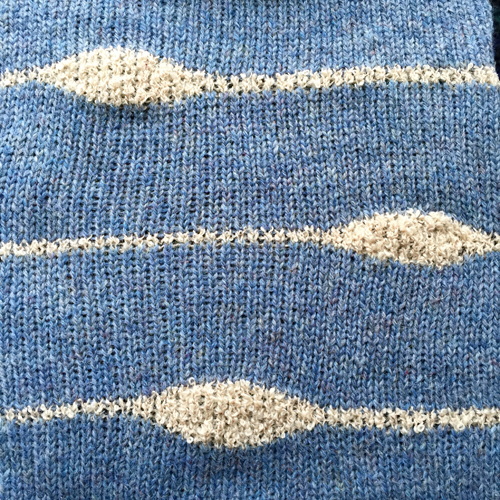
The start of a smooth shaping sequence for those “leaf shapes” on the machine

The yarn used is acrylic, so pressing helps to make the shapes lie flat. Once again, using wool or any other yarn with “memory” will result in considerable curl at the side and at the top and bottom of the knit piece, so that is a consideration in putting in the effort. The more striping, the more yarn ends to weave in and row counts to watch. Using space-dyed or sock yarns may produce pleasing though unplanned stripe patterns in any of the shapes. My samples are not resolved final fabrics. There are many inspiring patterns available for purchase or at times free on the internet for hand knitting, usually in garter stitch as well as holding, resulting in a nearly square gauge, flat-lying knit.

Taking it to garments: accessories are easiest, since the gauge may not be significant. Shawl shapes in HK are often knit on circular needles, without the constraint of the fixed number of needles on any particular model KM. Sometimes, with adjustments, the same shapes may be rotated sideways on the KM. Segment sizes may differ due to the resulting change in gauge. Sampling techniques and shapes in smaller versions help work out the kinks.

Sources for inspiration: large-scale shapes

http://www.garnstudio.com/pattern.php?id=7365&cid=17
http://www.garnstudio.com/pattern.php?id=7543&cid=17
http://www.garnstudio.com/pattern.php?id=7375&cid=17
http://www.garnstudio.com/pattern.php?id=7099&cid=17
http://www.garnstudio.com/pattern.php?id=6729&cid=17
http://www.garnstudio.com/pattern.php?id=6333&cid=17
http://www.garnstudio.com/pattern.php?id=6001&cid=17

more details, varying concentration, and placement: free pattern
http://www.garnstudio.com/pattern.php?id=7606&cid=17

for purchase on Ravelry
http://www.ravelry.com/patterns/library/endless-rainbow
http://www.ravelry.com/patterns/library/rigoles
http://www.ravelry.com/patterns/library/dreambird-kal
http://www.ravelry.com/patterns/library/scarf-with-flames
http://www.ravelry.com/patterns/library/phoenix-wing—phoenix-flugel
http://www.ravelry.com/patterns/library/spring-plumage
http://www.ravelry.com/patterns/library/hundertwasser-neptunia
http://www.ravelry.com/patterns/library/swingtrelac

A bit of holding 3: shape variations and more

Hand-knit spiraling shawls and shawlettes often involve shaping on every row. Increasing essentially requires casting on one or more stitches. Below are cast on illustrations from varied sources I used in handouts in my intro to knitting classesscreenshot_19 (1)

screenshot_20

A simple decrease occurs when the last stitch on either side is transferred moving away from the carriage, the empty needle is placed out of work, and the row is knit.

edge increaseThis illustration shows a fully fashioned version, which gives an edge that makes seaming easier and more attractive, and eliminates the small bumps usually seen along decrease edges, the process adds to knitting time involved in finishing the piece. Decreases may be made on every row.ff_decrease2

Simple increases: a factor that is often first noticed when approaching seaming is that the carriage side creates loops, while opposite the carriage one gets what looks like a knot, both alternate as starting position of the carriage swaps sides. To speed things up for single increases, one alternative is to bring an empty needle into work on the carriage side. This creates an elongated loop rather than a full stitch. Unless intended as a design feature, the edge is not the best one for seaming. A better-looking increase is created by putting a needle into work opposite the carriage. For a “good edge”  two rows minimum of knitting need to occur prior to the next increase. Continuing on the thread begun in the last 2 posts, I experimented with every row increases and came up with what I consider a reasonable compromise. The method for increases on the right edge:
*COR: bring an empty needle into work on the carriage side, knit a row. Insert transfer tool into the loop created as shown, turn toward carriage (in this case clockwise), essentially creating an e wrap, hang on adjacent empty needle hook.

increase every row

COL knit to right*, repeat *  *
In the previous 2 posts’ samples I did not wrap any needles. Wrapping in both directions can create an interesting line along the center of the “leaf” or “other” shapes, seen in the photo below

experiment smallInterpreting hand knit patterns for use on the machine requires translations of some of the vocabulary and directions are given. If an edge stitch is made in garter or slip stitch variations, disregard and simply add it to the total number of stitches on the segment of the needle bed that is being worked on. Wrap and turn is executed by wrapping the yarn around the adjacent needle in hold prior to knitting back to the opposite side

2: knit <-                  1: wrap COR            1: wrap COL                2: knit -> both

pw2: picking up wraps and knitting them together happens when needles with wrapped loop and stitch behind it are brought back into work.
The terminology may vary in self-published patterns, some are accompanied by very good tutorials. Ravelry HK searches can provide inspiration for many holding technique variations. Other terms to look for in image and pattern searches include swing knitting, and on occasion, tapestry knitting.


A bit of holding 2 / moving shapes around

There are many handknit patterns floating around the internet, placing shapes similar to these, with many variations, along with a variety of locations in accessories and sweaters. The same shape discussed in the previous post is shown here placed near and then at the edge of the knit. There are many things to consider in addition to the choice of shape. In hand knitting these patterns are usually knit in garter stitch, a fabric that does a good job of lying flat when completed. Short rows are used in both hand and machine knitting; the Brother G carriage produces it “automatically”, but is not short row friendly. The more practical solution is to try a plain knit version. Edges of the knit are still going to curl toward the purls side. Some of this can be averted by using acrylic or other fiber yarn that responds to being “killed” with ironing/ steaming, and will lie as close to flat as possible after the fact. Section A shows the shape knit with no color change and close to the side of the knit, note the vertical edge remains fairly straight. In section B stitches were cast on, and at the end of the holding sequence all stitches are knit moving from right to left. An increase in the number of stitches cast on is now reflected in the total width of the fabric. The result of multiple repeats would appear as a sort of “ruffle”. In section C the same number of stitches are bound off as cast on. The bind off is critical for shape retention. I prefer a latch tool cast off for most knits, here I used the *transfer over one, knit one* method, note: the turning point sharpness is lost and the bound-off edge is very different from the cast on one. In this instance, because the number of stitches increased and decreased stitches are identical, if repeats were executed and no other increases were made anywhere, the width of the final piece would remain constant. If the goal was to achieve a triangular shape such as in a shawl, increases would have to be made along the edges of the plain knit sections, prior to the color change for section C. In testing repeats I do not wrap any needles. Evaluate whether the extra step is needed when swatching in your final yarn choice.

the swatch 0n_the_edge

planning the shapes, arrows indicate the direction of carriage moves

co_bo

cast on stitches are knit as part of the last row

screenshot_06

cast on stitches are bound off prior to last row

screenshot_07

The last sample was also knit using the same yarn, followed by pressing. Again, I did not do any wrapping, and holes created along the edges of the holding sequences are more visible. The swatch was knit from the bottom edge up. The cast on used was a weaving cast on. Both the bottom and the top edges show some of the distortions in the knit caused by the extra rows of knitting that occur in the shapes. Striping is added to the now-familiar sequence, additional colors could be used, with shapes and stripes varied in the placement along with a wider, longer piece of knitting to create interesting repeats. The top shows the start of a larger shape that could be altered to resemble leaves, etc.

for a larger shape  going large

for a striped surroundstriped surroundknit side                                       purl side variations

A bit of holding 1

At a seminar during a visit to California in mid-April just prior to the joys of downsizing and moving I showed this swatch and was asked for instructions for duplicating it.

26141860401_aedba24177_oI have moved, and I finally have a machine set up to prove my ideas. The images below show plotting out repeats in excel odd number of rows knit between shapesodd rows between

legend

movements of carriage to create each shape pretend knit2If an even number of rows of color 1 is knit between shapes, the yarn is cut at the end of the holding sequence with color 2 (which is made up of an odd number of rows, begins on right, ends on left), a free pass is then made to return carriage to the right, there picking up color 1 for the plain knit sections.even rows between
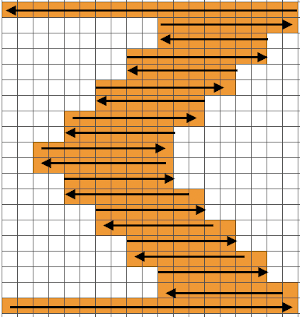
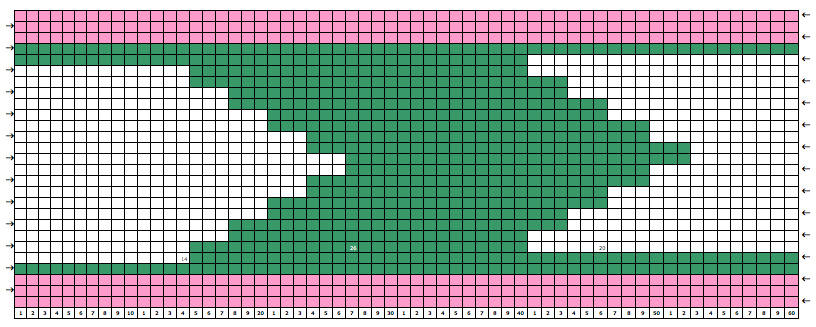
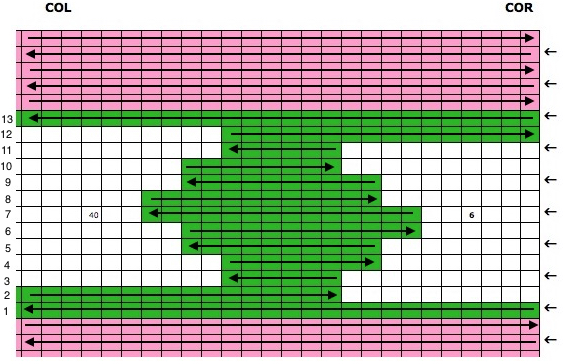
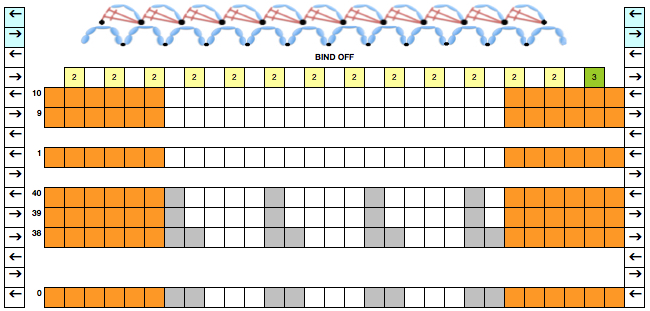
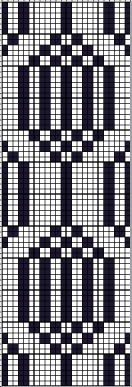
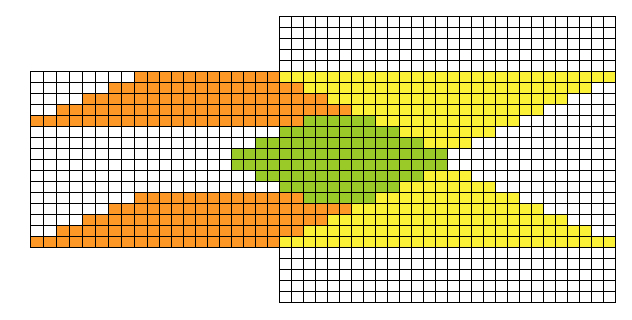
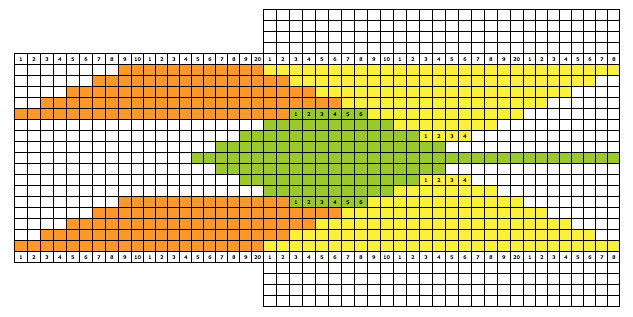
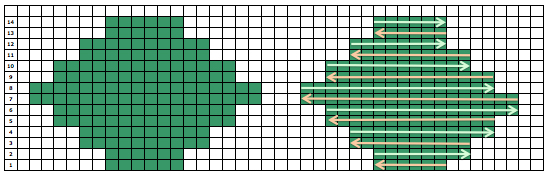
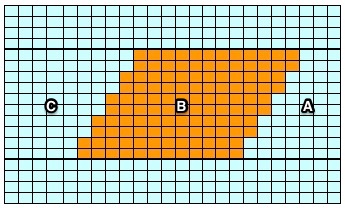
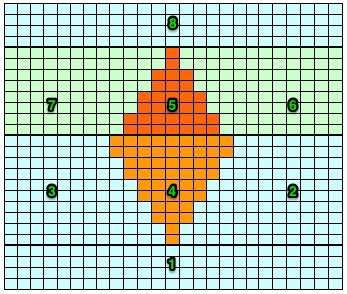
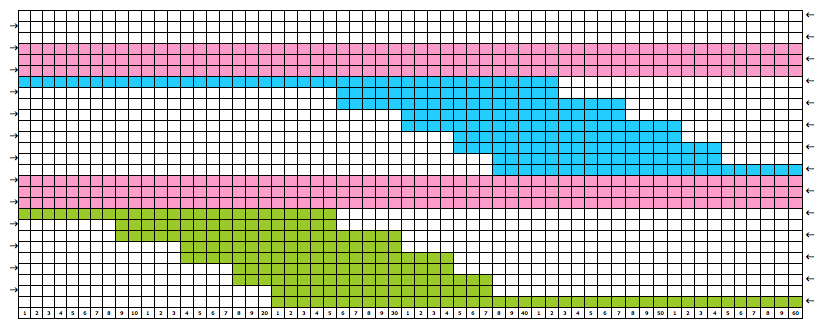
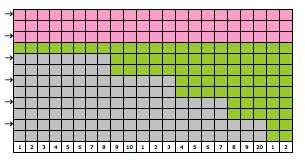
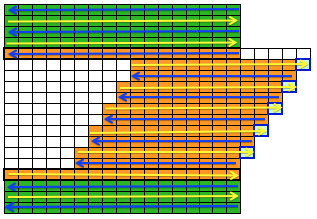
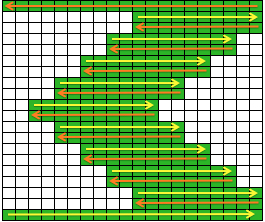
Some cut and paste following the direction of the arrows to work out knitting several shapes in any one row: in this instance the first row knit with color 2 is from left to right, as is the last row. Even-numbered rows in color 1 would start and end on the same side, COL. If changes of any 2 colors in any technique are for an even number of rows, yarn ends will occur on the same side.cut and paste
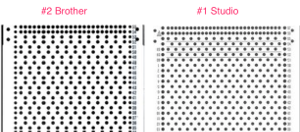
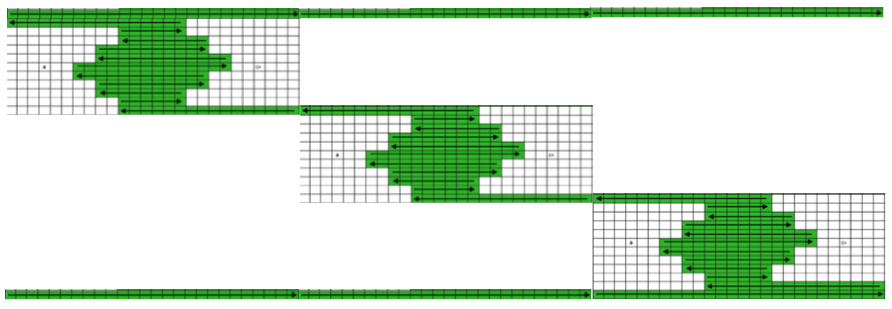
My original sample was made knitting single shapes with an even number of knit rows between them. A reminder: Studio needle positions are A,B,C,D,  Brother needle positions  are A,B,D,E.  Holding position for Studio = D, for Brother = E. Upper work position for Studio = C, for Brother D. Settings for both are indicated below, for Studio, then (Brother)

color 1 cast on 60 stitches, knit 20 (or X) rows, end COR
first shape:  COR color 2 knit one row, end COL
COL on the right, bring 27 stitches to hold D (E) position. The rule is usually to always wrap taking yarn around the first needle in hold D (E) position, then to knit one row. I found in my samples the holes created were so small they could hardly be seen, so I did not wrap.
COR on the left, bring 27 stitches to hold D (E) position (6 stitches now in work), knit one row
holding sequence for each “shape”
COL at right, push 2 needles to work position C (D), knit one row
COR at left push 2 needles to work position C (D), knit one row
COL at right, push 2 needles to work position C (D), knit one row
COR at left push 2 needles to work position C (D), knit one row
COL at right return 2 needles to hold D (E) position, knit one row
COR at left return 2 needles to hold D (E) position, knit one row
COL at right return 2 needles to hold D (E) position, knit one row
COR at left return 2 needles to hold D (E) position, knit one row
COL return needles to right of shape to work position C (D), knit one row
COR return needles to left of shape to work position C (D), knit one row
COL  cut color 2, make free carriage pass carriage to the right
COR change to color 1, knit the desired number of rows (20) end COR
COR for the second shape with color 2 knit one row, end COL
COL at right bring 40 needles to hold D (E) position, knit one row
COR on the left, bring 14 stitches to hold D (E) position, knit one row
“Always wrap taking yarn around the first needle in D (E) position, knit one row”, repeat shaping as directed above
COR change color 1, knit the desired number of rows (20) end COR
for the third shape
COR with color 2 knit one row, end COL
COL at right bring 14 needles to hold D (E) position, knit one row
COR on the left, bring 40 stitches to hold D (E) position, knit one row
repeat shaping and /or wrapping as directed above
change to color 1, knit the desired number of rows (20), bind off