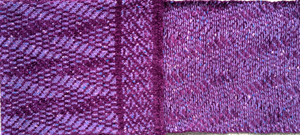
Studio simple lace on Brother electronics

this method works for studio simple lace patterns, wherein a single pass the stitches are both transferred and knit. There has been information published on using Studio punchcards on Brother punchcard machines using the KC to select, followed the LC, each making single passes. My two previous posts on the topic: 2011/05/18/lace-cards-use-on-the-brother-260-bulky/ and  2013/03/17/studio-simple-lace-punchcards-used-on-brother/.
While working out yet another HK to MK lace pattern, I sorted out the following method for using Studio simple lace on the electronic KM. It is a method that does not work on the Brother punchcard to produce the same fabric, however; on punchcard machines, as either carriage is moved to select from the opposite side of the bed, the card will not advance on the first pass, interrupting selection. I tried a swatch and got a very different lace design; depending on the starting pattern the results may be interesting (do not use elongation), but not the ones intended to match any original.

The knitting samples shown below were knit on a Brother 910. On electronic machines, as seen in previous posts on knitting with 2 carriages, the mylar (or otherwise programmed) repeat advances a row with each pass of the carriage, no matter on which side of the bed the pass originates. Dropped stitches are harder to repair in these fabrics than in patterns for multiple transfer lace (there knitting can be unraveled to the start of a sequence where 2 or more knit rows usually occur), so checking transfers, gate pegs, and adjusting stitch size and weights matter even more. There is no need to mirror the image horizontally; draw repeat as is on punchcard onto mylar

start knitting with KC (knit carriage) on left, Lace Carriage (LC) on Right

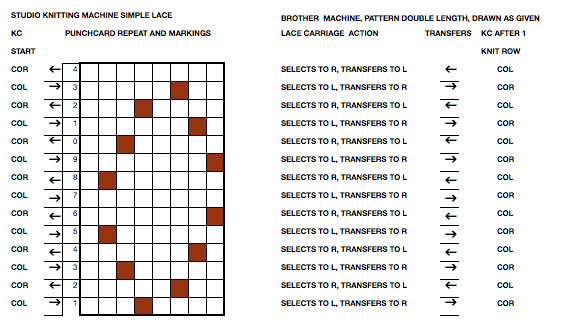
program pattern double length
on the first row the LC selects, the next row it will transfer; LC always makes 2 passes toward the KC, even if those 2 rows in repeat have no needle selection, and is removed from bed to be returned to the bed on the opposite side after the knit row with KC that follows
KC knits a single row to the opposite side
LC is placed back onto the machine opposite the KC to make 2 passes
KC follows with a single knit row, and the last 2 steps are repeated
3 total carriage passes complete one row of knit
the chart below shows the actions and placement of carriages

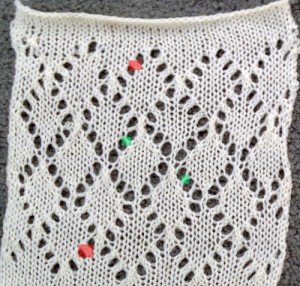
this sample was knit beginning with lace carriage on left, as can be seen in marked areas, the alternating repeats have a different quality in the sets of transfers marked red vs green

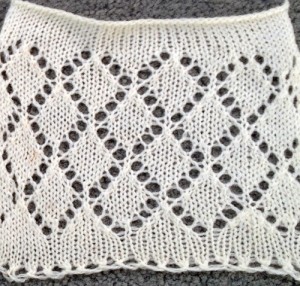
the “successful” swatch knit beginning with KC on left, LC on right in the method described above

December 7, 2018: an interesting method using 2 lace carriages found on youtube


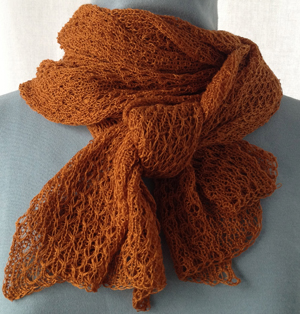
Large eyelet lace, hand transferred (or not)

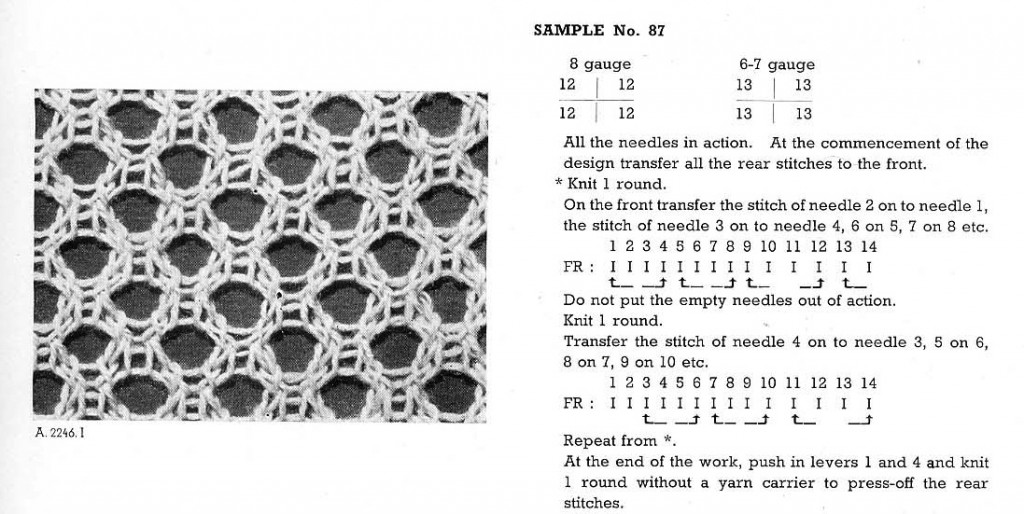
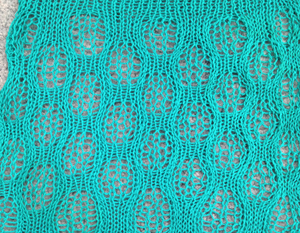
This is a lace sample created on a dubied industrial knitting machine

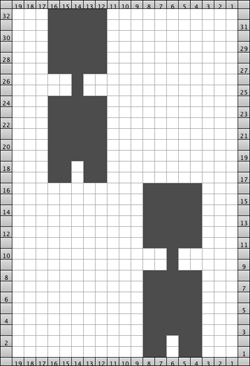
I became curious as to how to duplicate it and decided to use needle selection to help track the transfers rather than counting needles by hand. The repeat is a small one, suitable for both electronics and punchcards. Below is its configuration on my 910, punchcard knitters may want to flip the repeat to match the directions for knitting as written.

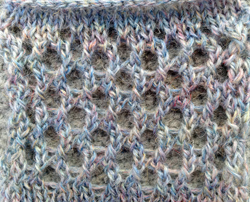
the sample’s knit side

its purl side

yarn: 2/8wool

end needle selection (KCII here) must be used any time there are needles out of work in the pattern

transfers are always made toward the carriage

single empty needled are put OOW after transfers across row

pairs of empty needles after they are created are returned to work before the next row of knitting to create side-by-side loops

in  my case, odd rows transfers were —>, even <—

single rows are knit after each set of transfers

1.KCII <—, transfer selected needles <—, move empty needles OOW

2. select row 2 as carriage knits —>, transfer selected needles —>, there will be two empty needles, side by side; bring all needles in work across the row

3. knit <—here there will be 2 loops side by side on adjoining emptied needles; check that no loops have dropped off, rehang and adjust tension if needed; transfer selected needles toward the carriage _ move single now emptied needles OOW

as this row and the next row are knit and transferred, side-by-side loops will become stitches, and another 2-loop set will be created

4. knit —>, transfer selected needles —> onto the adjoining loop, there will be 2 empty needles side by side, bring all/pairs needles in work across the row

repeat steps 3 and 4 for the remainder of the fabric

my previous posts on large eyelet lace were created using the lace carriage
large eyelets, and diagonal large eyelets

a cousin of sorts may be achieved by using the following punchcard lace repeat; the lace carriage selects and transfers for 4 passes, the knit carriage follows with 2 rows of knitting throughout; stitches are transferred, doubled up, and transferred again, so yarn choice, weight, and tension may need a lot of editing.

the resulting fabric

There is an added post on automating such large meshes published in July 2020 

Online Pattern generators, hacks, free KM manuals, and more

I welcome being contacted re any problem links
generators that require color changing every 2 rows using a color changer (or 2 carriages)
mazes on gridded output, easily adaptable to knit http://www.ludiculus.com/maker/mazes.html
more mazes  http://www.billsgames.com/mazegenerator/
maze pattern http://www.unikatissima.de/e/?page_id=2062 blog closed 
cellular automaton http://www.unikatissima.de/e/?page_id=2148 blog closed  
Some unikatissima blog content may be found here, but generators fail as they relied on Flash Player, now defunct 
other generators that can help with shaping garments, or some basic knit motif design
Truchet tiles generator https://dmackinnon1.github.io/truchet/gen.html
knitting pattern http://kpg.sourceforge.net
top-down circular raglan calculator http://kpg.sourceforge.net
Icelandic round yoke design does not work any longer in later version browsers, on Mac even with the installation of Silverlight, on Ravelry, it was noted the program does operate in internet explorer  http://knittingpatterns.is/#/Design
random square patterns http://www.unikatissima.de/e/?page_id=3638  blog closed
punchcard generator and how to use videos
https://patternpunchknit.com/
 beta online tool 11/2022 
math calculators for knitting
free online manuals, magazines
machineknittingetc.com now https://mkmanuals.com/
hacking
a hacking history https://www.beautifulseams.com/2014/10/29/tricodeur-writeup/
only the intro is in German: a nearly hour-long presentation by Fabienne
another approach for Brother models KH”‘930, 940, 950i, and 970: http://daviworks.com/knitting/ and the associated group on Ravelry 
970 how to hack instructable 
for additional cumulative information, software compatibility and hardware specs see Claire Williams’ website
GitHub
PatternUploader
color reductions/ conversions for large, nonrepetitive images Mac
online dither generators
https://ditherit.com 9 dithering types
https://app.dithermark.com  a huge range of possibilities
Hand knitting websites worth a browse:
https://www.knittingfool.com/Pages/Reference.aspx
pattern generators/ web design
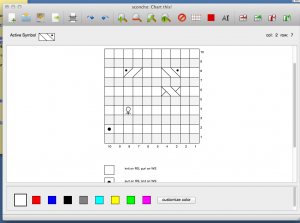
open-source charting program http://sourceforge.net/projects/sconcho/
quick screenshot

1/21/2016: Online weaving program by Andrew Glassner ; associated blogpost 

11/26/17 a simple, user-friendly free motif design paint program for Mac, last updated April 2019: Paint Brush

A bubbles cousin

This is a Superba drop stitch fabric, using the same principles as those in the last post, with a rib stitch outlining the alternating drop stitch shapes on the purl side

directions from the manual

In my knit sample the ribber does all the knitting every row and patterning is accomplished on the main bed, reversing the recommendation in the Superba manual

the new repeat

Set up is so that needle selection position once again begins with 5 stitches on the left, occurs in a multiple of 5, with extra needles in work on ribber on either side

Transfer all stitches to ribber, begin needle selection with first five stitches on left in work, 3 OOW, 5 in work, 3 OOW across the bed as seen in the illustration above, reversing the beds.

The first needle, then every 4th, and last on right on the main bed will never be dropped, are always in work.

When needle selection changes to block number 2 from left, the center 3 sts of every group of 5 every needle rib sections are dropped, the empty 3 needles beginning with the second group from left are brought into work, repeating the process across the bed.

Knitting continues until needle selection changes, *the middle 3 stitches of each 5 stitch EON rib group are dropped, the previously 3 empty needles in the opposing sets are returned to work. Knitting continues until the needle selection changes* and the * * process is repeated.

Cast on and bind off methods are determined by end-use and personal preference

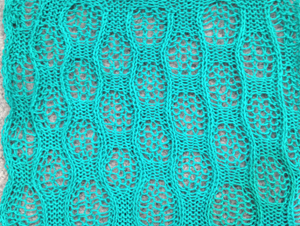
the resulting fabric, purl side

the knit side (not truly reversible as  the swatch in the last post)

a not so bubbly bubble end

More knit bubbles

The topic of “those bubbles” has recently turned up again on Ravelry, where another forum member (Tanya /It makesyousmile) had come across a Russian video by Anna Kovin, with results that closely resembled those in the blue sweater and blankets pictured in my previous post, and poses a great solution for knitting the alternating, the same side knit and purl variants of the stitch. I knit my samples on my Passap, simply because I tend not to keep my ribber on my Brother machine. My production is on a single bed for most pieces in that gauge, and I find it easier to both see and work without the ribber on. That said, the method can work on any machine.

Drop stitch makes for a very loose, wide fabric, so casting on and binding off needs to accommodate that. I often will start with waste yarn, a loose first row, end the piece with a loose row. My bind-off is often around 2 gate pegs or more if needed, and rehanging the bottom and binding off, in the same manner, has top and bottom match. I did not do this in my swatch, and it is easy to see where some of the problems may be.

For swatching I chose to hang the comb with the first knit pass (open cast on trick) on the back bed (would be the main bed on Brother), using a multiple of 5 stitches, knit several rows, and then transferred in a 5/5 rib configuration, sorting out the proper tension for my yarn. I began with 5 stitches on the back bed (main bed in Japanese KM), transferred the next 5 to ribber, and repeated the process across the width of my fabric. The front bed/ ribber was set at half pitch when the pattern was about to start, with an extra needle on left. The portions of the bed that create the long stitches will essentially be knitting an every needle rib, so if point to point is used to make transfers easier, it needs to be changed back to proper pitch for the remainder of the knitting. The swatch does not address the best beginning and end of the fabric for any possible end-use

1. set up 5X5 rib, begin by leaving the first five needles on the main bed (passap back bed)

2. bring all main bed needles into work (ribber needles at this point will be 5 out of work, 5 in across bed)

3. knit 8 rows

4. drop off groups of 5 stitches on the main bed, begin with the second group of 5 from the left, moving across the bed (every needle rib section), pushing groups of needles out of work as they are emptied

5. bring all the ribber needles into work (main bed needles at this point will be 5 out of work, 5 in across bed)

6. knit 8 rows

7. now drop ribber stitches, 5 at a time, begin with first 5 on the left, and continue across the bed, pushing all the needles out of work as they are emptied

repeat the process, beginning with step 2, through 7

the relaxed fabric, the knit blocks alternating knit and purl

the same swatch, illustrating what happens when you press acrylic, and some of the problems to be sorted out in terms of the start and end of any piece in this type of fabric

my previous post

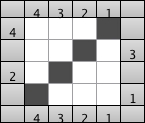
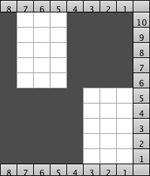
The Brother version, with aid of patterning for needle selection: this particular version of the fabric is actually created by rectangular blocks of every needle rib, with straight side edges. If one wanted recognizable shapes other than this circle illusion, then more hand manipulation would be needed. The chart below illustrates the repeats for my swatch (4 sts X 6 rs or 6 X 6 would be suitable for punchcard KMs). The solid squares represent every needle rib sections, where stitches will be dropped to create the larger ones.

With the machine set to KC and no cam buttons in work, needles are selected, but no patterning occurs. “Air knitting” can help establish where on the needle bed the pattern repeats, and how to set up the needles and stitches to be in sync with selection as the work progresses.

An alternative approach using this method begins with all needles on the main bed in use as opposed to ribber ones as in my Passap test. Once the sequence is understood starting points for creating full needle rib can be varied, as can selecting the first row from either side. For these swatches, I used a thinner yarn, in a bright color, which can help identify any issues in stitch formation, and I began the swatch in rib, to see the effect that might have as well.

my amended repeat
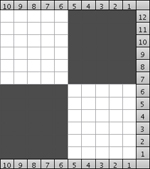
Begin by checking needle selection, set up rib as described at top of the post, beginning the first group of 5 stitches on left with selected needles, next group not selected, etc. If all the steps are repeated beginning on the same side of the KM it does not matter which block of needles are at the opposite end,  allowing for width/gauge adjustment. I like to mark my needle bed with a water-soluble pen so I will be certain to have proper needles in work, not relying on memory or my sometimes “creative note keeping”.

CO ENR (every needle rib) set up with first needle on left in work on ribber, last on right on the main bed, racking at half-pitch: knit 1-row N/N, hang comb and weights, 2 rows circular (using opposite part buttons), follow with one row N/N

rack slightly to the right to make needle transfer easier, set up a multiple of 5 X 5 rib; begin with transferring first 5 on left down to ribber, pushing any empty ribber needles OOW; after the transfer, rack back to the original position so first ribber needle in work will once again be on left

bring all main bed needles into work (ribber needles at this point will be 5 in work, 5 out of work across the bed)

select your first pattern row, KC II (no end needle selection), continue to knit until needle selection changes so the second block from the left on the main bed is selected; nonselected needles on the main bed will now be dropped off, and those same emptied needles will be pushed completely out of work (the first group from left is the starting point here as well)

bring all needles into work on the ribber, knit until needle selection changes with all in main bed needles in B position, at that point I brought all remaining main bed empty needles between them out to hold/ D position in order to drop stitches on ribber between them, using the main bed as a guide, pushing any newly emptied ribber needles completely out of work as stitches were dropped (beginning with the second group of “5” from left)

as one physically looks at the stitches, there will actually be a count of six between MB needles, in my first sample, I dropped in series of 5, always beginning on the same left side.

This swatch shows the resulting fabric. Of note is that one side (marked with red) is holding together along dropped stitches far better than on the right (marked in black), a desirable trait, and not as noticeable in the previous swatch knit on Passap, perhaps because of the difference in the weight of the yarn and stitch size

the result was much improved when only the center 4 of the 6 ribber stitches were dropped, producing a bit of a chain stitch on each side and with a better definition of dropped stitch areas; both sides of the fabric are shown below

at this point all main bed needles are in work, needle selection will once more begin on left; knit until needle selection changes, continue the sequence.

Cast on ENR rib edge has obvious width, bind off is around 2 gate pegs after transferring any remaining ribber stitches up to main bed.

The version of the stitch as worked out by Tanya Cunningham with her shared instructions for what she refers to as “bubble pops” may be found on Ravelry.
A random slip stitch

During my early morning surfing, I recently came across a pattern knit as fair isle that I thought might work well in slip stitch

the repeat

the first sample knit side

its purl side, showing the typical slip “floats”

The light color is a 2/8 wool, the green a rayon/nylon blend, thinner in weight; the rayon flattened considerably after steaming (something to consider if the maximum texture is the desired aim); the first wide band of green is 32 rows high (full repeat), the narrower stripes occur with changes every 16 rows. Slip stitch striping can vary a pattern greatly, sometimes more successfully than others. My sample was knit on a 910, using color reverse. In the first repeat chart the white squares are intended to be what knits, the dark grey the slipped areas (Passap use same repeat, tech 129, each black square is a slipped stitch with lock set to LX rather than KX). This repeat is too wide as-is for use on a punchcard but was it usable, all but the dark squares would be punched.

The obvious color changes may take place every 32 rows, every 16, every 8, every 4, 2 followed by 6, and more. The pattern may also be knit with the same color rotation, but beginning striping sequences on a different row. The purl side of this particular pattern helps make it easy to track the location of color changes, but with many slip patterns the same may not be so obvious, and good note keeping of sequences and starting rows for the design can be a time saver when one wants to reproduce particular pleasing or successful “random” segments.

more variations

the top section here begins with the first design row KC–>

these are done with beginning the pattern on row 2, KC<–

swatch is not pressed, resulting in a more pronounced texture

Re_editing the repeat can help change/ plan the areas for solid color blocks to occur on the knit side. Slipped stitches become elongated ones on the front, knit side of the fabric, and the color they assume has to do with the last row knit before the needles with that color yarn. If a color changer is in use, the repeats must be an even number of rows in height. The repeat below is a variation of the one above. The slipped stitches are numbered, with the assumption that in this case, the fabric will be all one color, or with changes at the start and end of each repeat (now 16 rows)

Below are some of the options for color changes, with slip stitch areas renumbered as any of the colors create knit stitches on the face of the fabric, the bar at bottom of the chart indicates starting color prior to the first needle selection row toward color changer. Only 2 colors are in use in the actual knitting, the other color blocks in slipped areas are to help visualize what stitches are being slipped and for how many rows, in each color

Personal fabric and surface preferences may vary greatly between individuals. The swatch below shows variations in the above, including some dropped stitches that were “missed”

My personal preference is for the top of the swatch, where the difference in yarn weight also results in an interesting dimensional effect

a couple of the many sources on this particular stitch type

A bit of fair isle

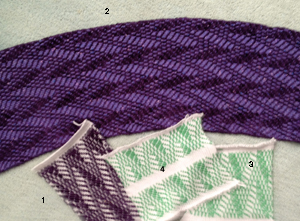
Fair isle accessories, scarves in particular, can be problematic. I tend to make most of my scarves in the 64-72 inch length after blocking, lining them would result in a very heavy scarf. Knit has a tendency to curl to the purl side in length, and toward the knit top and bottom. Rayon chenille is a customer favorite, knitting it double bed in any DBJ variant is nearly impossible on my E 6000 because of shedding and electronic eye reading errors (I would consider ladder DBJ), and I was left with finding a short float pattern that might look acceptable on its reverse, and lie flat. Weaving draft charts can be a great source for repeats for geometric FI knitting. The pattern used below is an adaptation of one. The first swatch (1) looked fine. The long one followed it. When I ironed it, however, I noticed not only a missing black square or 2 in my mylar repeat (hidden by the fuzz of the chenille in the first swatch) but how lovely for it to have a totally curved, far longer edge (if only that was what I wanted)! On analyzing the possible cause I noticed the repeat had many more stitches knit in the chenille than the wool along that edge. Back to the drawing board: the repeat was sorted out using high contrast, smooth yarns (3 and 4), and the pattern was adjusted to a different location on the needle bed. 

Then, I thought I might introduce a border. The chenille is thicker than the wool, so any hem or stocking stitch edge was too wide. I would have preferred to chain behind the knit to help flatten the bottom and top edges and ran into yarn breakage galore. The final piece was made using 1X1 FI in the chenille “solid” color stripe to keep a balanced width and fabric thickness, and cast on and bound off edges were rehung and “bound off” again, to help cut down on their rolling toward the knit. The finished scarf measures 8″X69″, both knit and purl sides are shown below, side edge lengths now match.Assuming one uses a crochet cast on and binds off around gate pegs at the top, a chain is created at both ends, akin to that created in crochet, and one can identify a front loop, a back loop, and the whole chain. Any of the 3 may be “rehung” onto the KM, and the options are to knit a row and bind off again, or simply bind off again, for different looks that start to emulate single crochet a bit and can help stabilize edges or decorate them. It is helpful to keep notes as to the sequence used and which side is facing with each re-hanging.  Audrey Palmer at one point authored the Empisal book of linked edgings ISBN 0969485905. Intended for use with the Empisal (later = Studio) linker, there are lots of interesting uses for combinations of essentially find off techniques, and some resurfaced when she published her books on knit weaving.
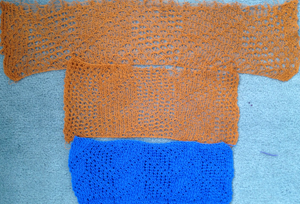
The same pattern knit on Passap, using tech 129 and 138; there is a noticeable difference in width and openness of fabric with yarn weight change, and at the top with tucking for twice as many rows. 
A scarf knit in pattern, using tech 138, double bed on Passap KM; lightweight and drape allow it to be wrapped and worn in multiple ways; knit in 16/2 cotton, measures 11 X 76 inches partially blocked