Combining tuck stitches with lace 2 (automating them)

Working with 2 carriages when both are selecting needles brings up some interesting issues. Studio machines are able in most instances to select and knit in the same row. Brother preselects needles for the subsequent row, and on that row, while knitting the preselection, once again, the preselection is made for the next pattern row to be knit.

A couple of my earlier posts on the topic: knitting with 2 carriages and a lace round doily which combines lace with slip stitch selection to emulate holding for creating the needed spiral.

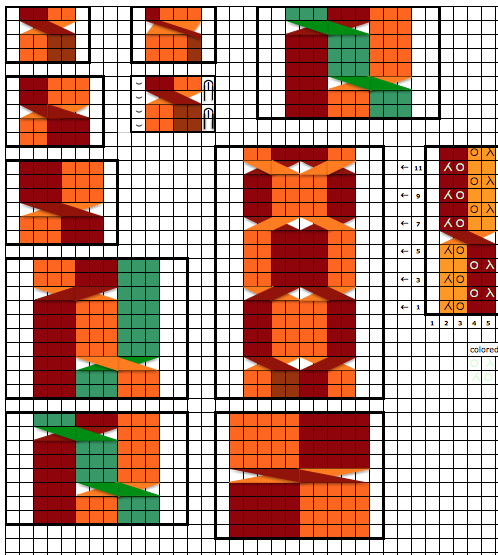
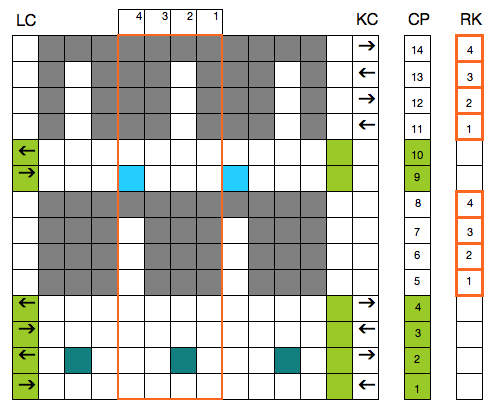
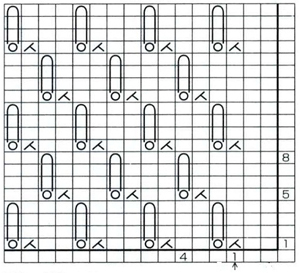
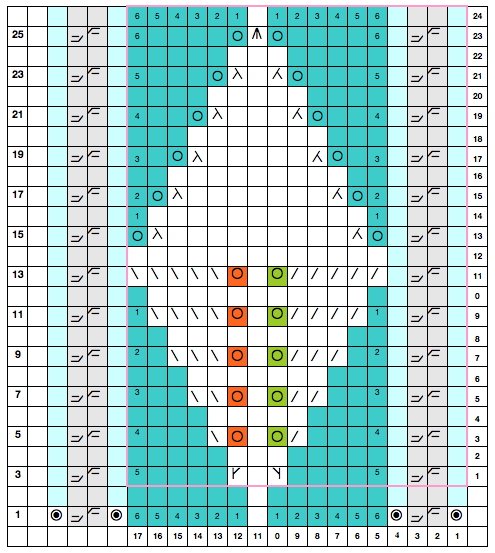
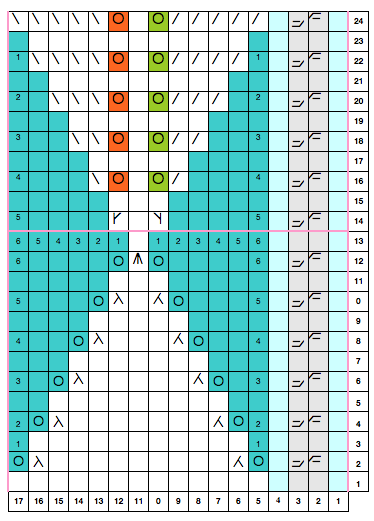
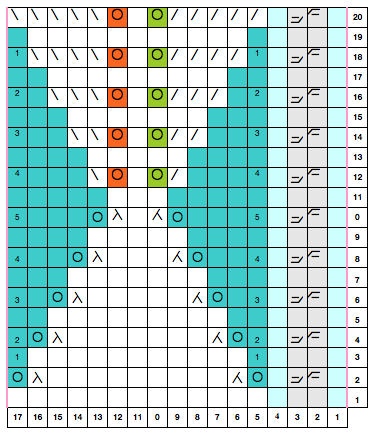
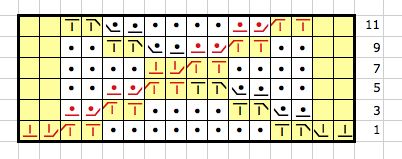
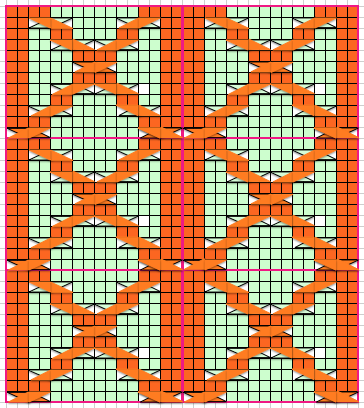
Following up on the previous post, now attempting to automate the stitch, some of the logic in needle selection needs to be explored. The chart as drawn below simply addresses functions that may create the desired fabric. It is incorrect in terms of accuracy in actual knitting it
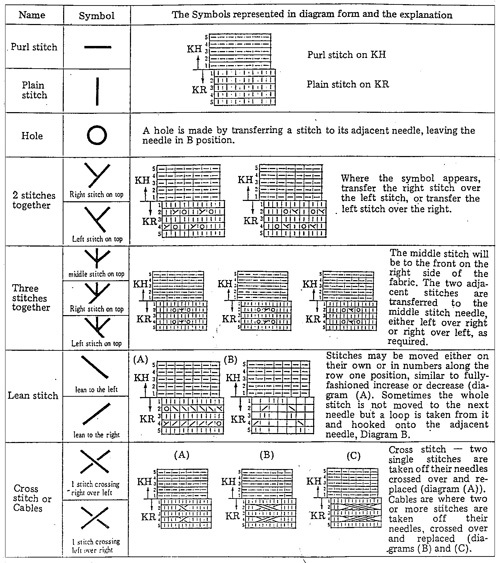
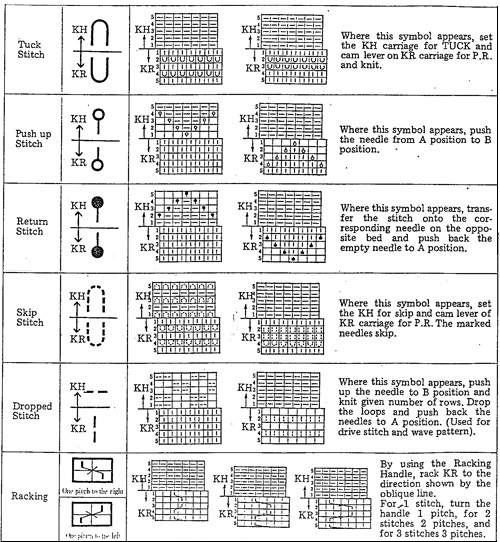
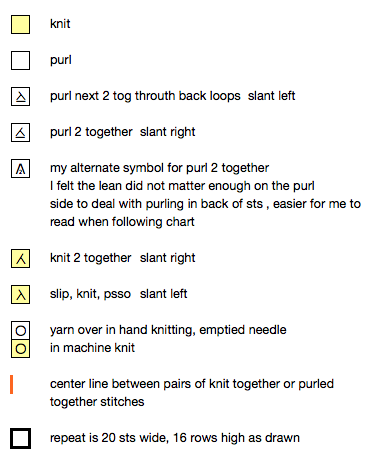
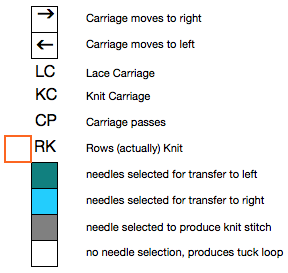
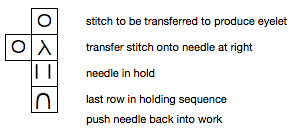
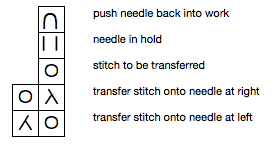
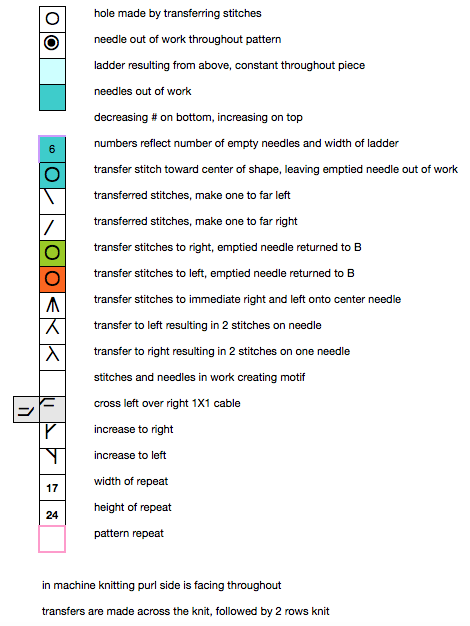
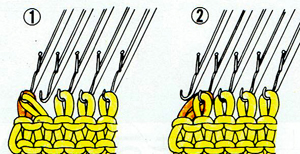
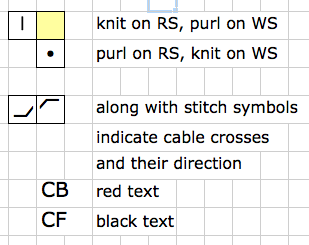
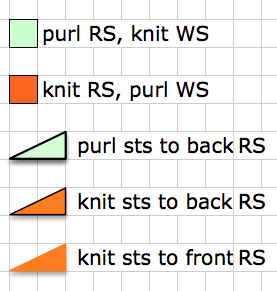
theory

 symbols used

theory symbols

reworking the repeat for use with mylar

mylar selection

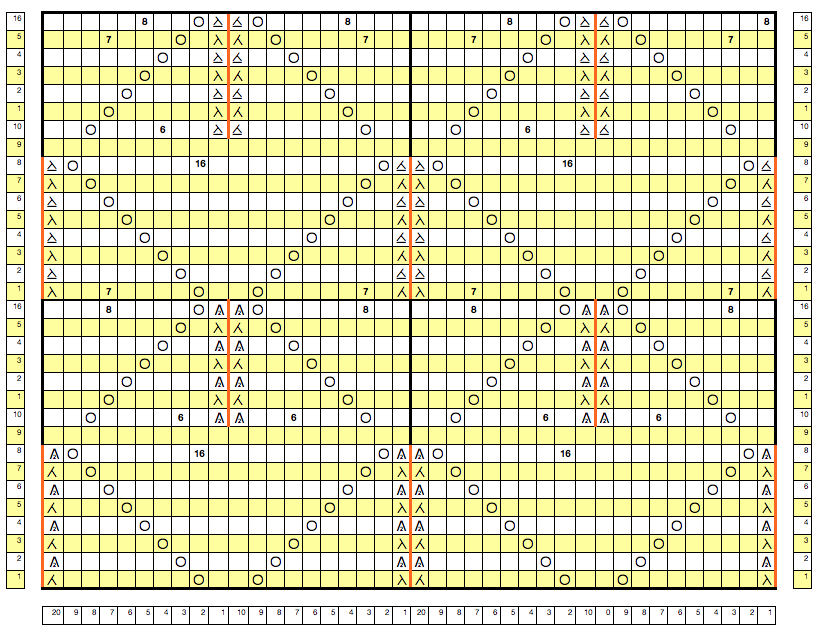
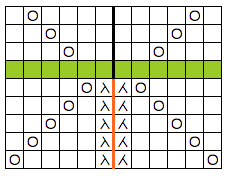
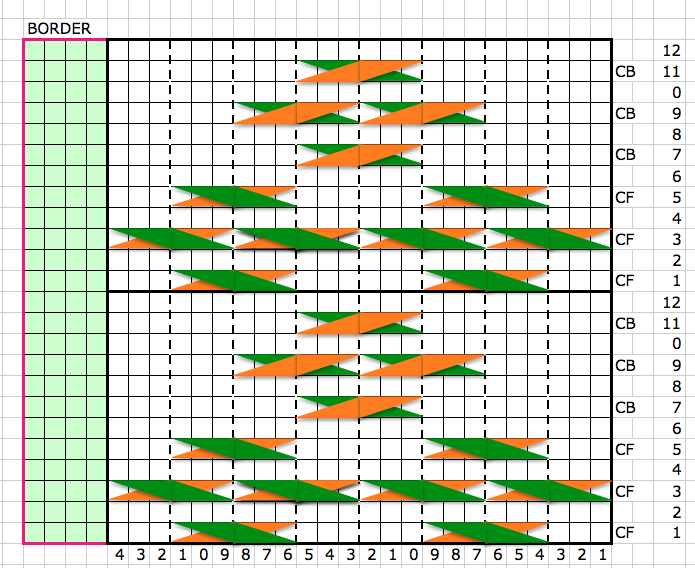
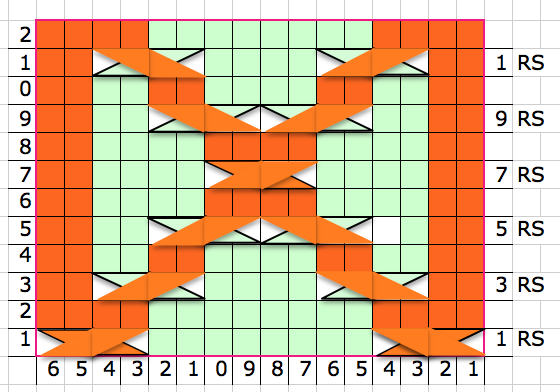
 the drawn mylar repeat, numbers reflect placement on my sheet

mylar repeat

mylar symbols2

When both carriages are in use for pattern selection, they will both engage the belt. While either carriage is in use, the alternate one needs to be off the needle bed, or the belt may actually break as one carriage holds it in a fixed position, while the other tugs at it toward the fixed spot from the opposite side of the machine. Lace extension rails are used on both sides. There were variations over the years, including a pair to fit the bulky 260 KM. They are not always exchangeable between models, need to sit properly on the machine for carriages to be stable while stored to the side, and also for moving them off and onto the machine easily.

Pre-punched standard Brother lace cards usually begin with the lace carriage selecting the first pattern row moving from the left side to the right. As with any lace or tuck fabric, knitting begins with waste yarn that is weighted evenly and any edge treatment of choice. On the 910, because of the preselection factor, and to keep the pattern continuous in proper order, the knit carriage is removed from the right side of the machine, and the lace carriage does a preselection row from right to left. That will be its start and return position for the remainder of the fabric. The knit carriage is returned in turn to its home on the right end of the machine, on the extension rail.

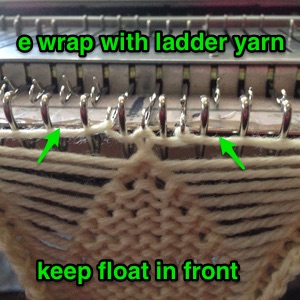
Two types of fabric are being created. The goal is to have the edge stitches knitting throughout. To accomplish this, if the LC is in use, eliminate any end needle selection by pushing needles back to B; when the KC is in use, if the end needle is not selected, to get it to knit, it needs to be pushed out to E. The pattern sequence is an easy one when up and running, with 2 passes of the LC, and 4 of the KC, as seen in the charts above.

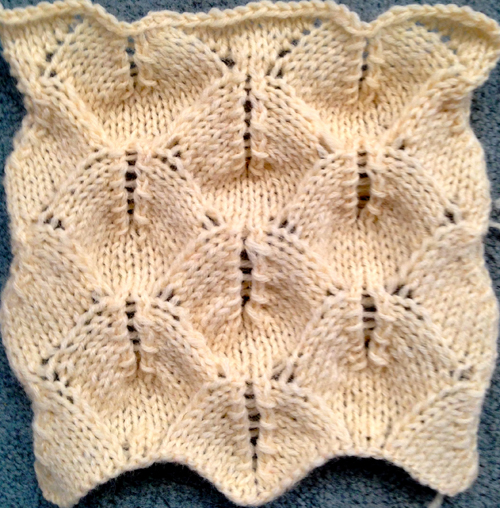
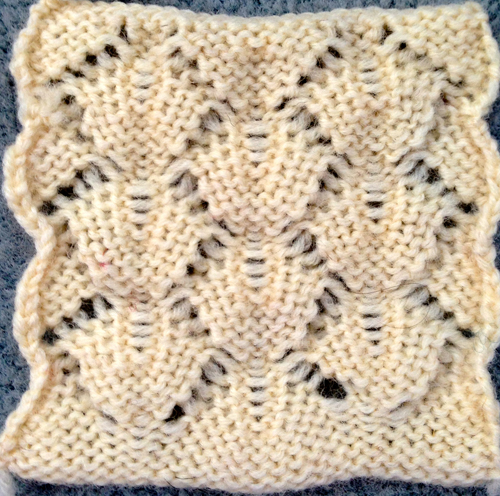
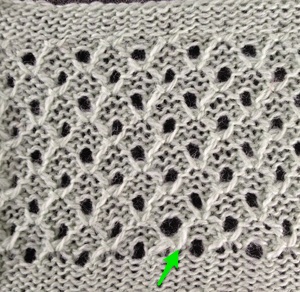
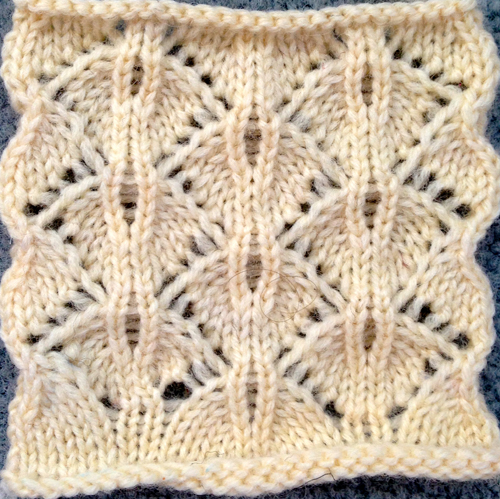
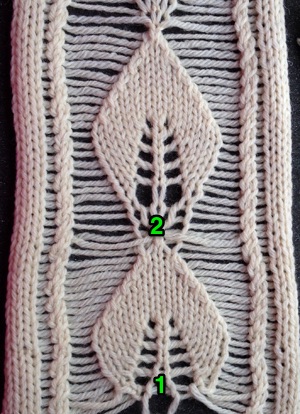
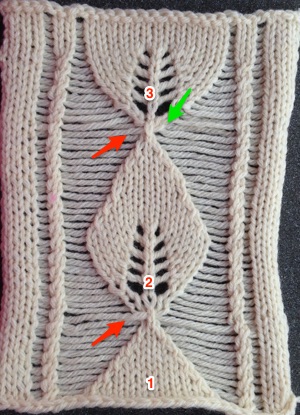
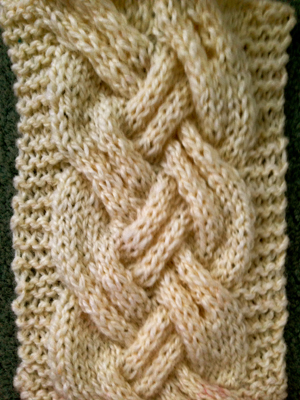
The knit side is shown below, the arrow locating the larger eyelet points to operator error: I had a stitch caught on a gate peg, and was not aware of the problem for several rows. The extra loop of yarn can actually be seen. Tuck fabrics are often far more interesting on the purl than on the knit side

mylar_knit1

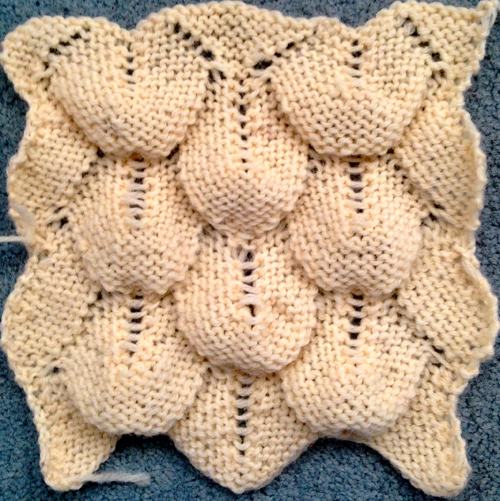
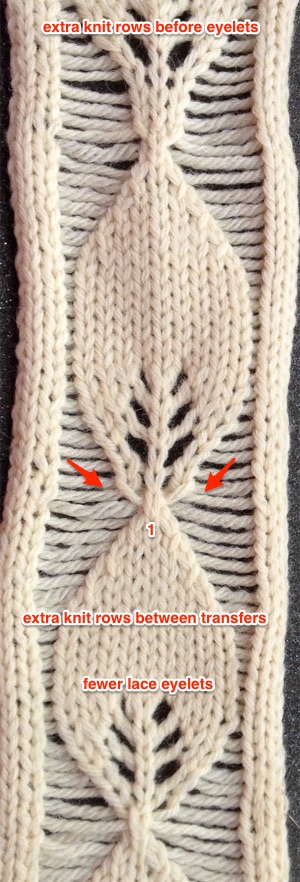
the purl side, with an arrow indicating the same problem spot

mylar_purl1

The question that follows is how to program the same design for use with a punchcard machine. Here things get a bit more confusing. The electronic machines advance the program or card a single row for each carriage pass, no matter their direction or sequence. When the punchcard carriage is at rest on either side and the alternate carriage moves toward it, the card does not advance, so the needle selection stays the same, is repeated for a second time. A bit more planning is required and the repeat needs to be shortened to accommodate for this fact.

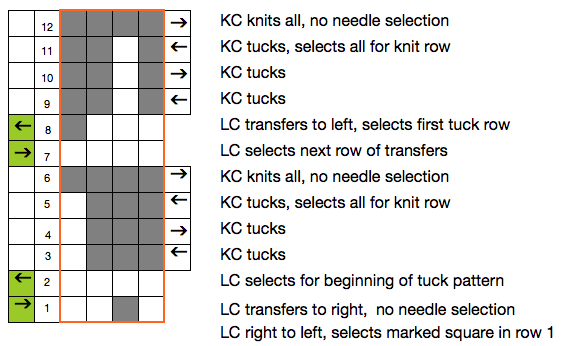
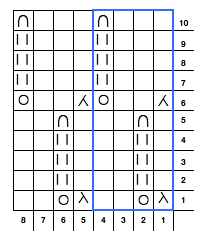
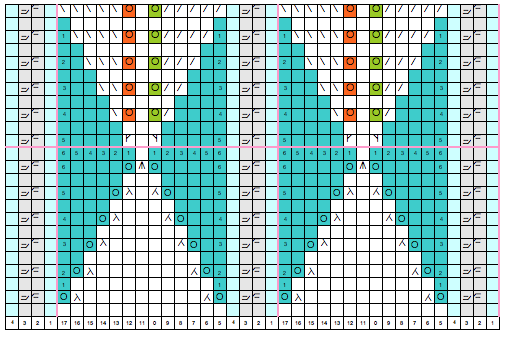
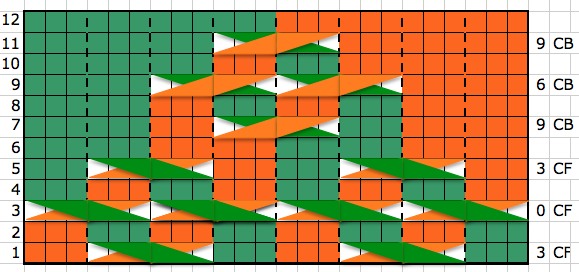
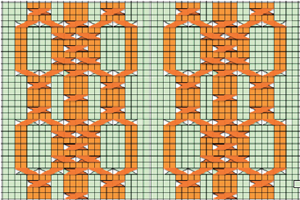
The chart below shows the amended repeat for punching a card. The first selection row is made with the card locked, and the LC moving from left to right. The card is then released, LC moves to the left, transferring stitches selected from the previous row to the left while selecting those for the first row of tuck. The next row, using the alternate carriage, begins the ongoing sequence

punchcard chartA

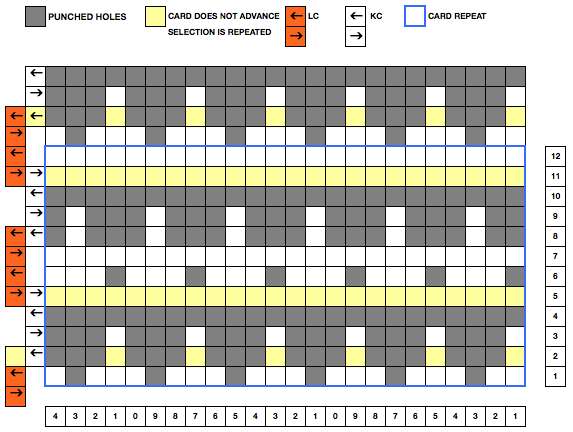
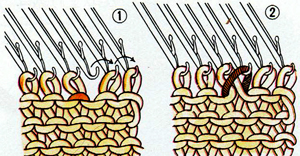
the actions of the carriages with each pass

what carriages do

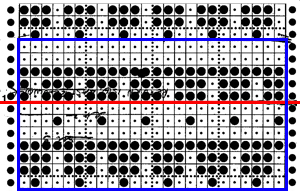
The actual punched holes are shown below. The writing on the card is a ghost from a previous experiment. The red line marks starting row 1 for Brother knitting, blue border outlines a single repeat. A minimum of 3 repeats are needed for continuous reading by the KM

punchcardFabrics with color change every 2 rows such as mazes and mosaics are easily knit on the electronic with 2 carriages. If worked on a punchcard machine, they would have to be executed using a yarn changer and only the knit carriage, unless the design motif is redrawn to factor in the issue discussed above. A previous post, part of a thread on mazes and mosaics, with a punchcard swatch photo.

The first preselection row in any patterning that involves color or carriage changes every 2 rows, is usually done toward the side of the machine that holds either the color changer or the carriage next in use. As seen above, there are exceptions to that “rule” as well.

Machine knit “dragon scales” update

I had previously posted on an Armani-inspired knit scale-like pattern that sometimes was described online as a machine knit “crocodile stitch”. A fellow Raveler just shared on her project page an interesting variation that includes variations in the scale of the scales themselves. All her transfers are made onto a single center point, eliminating the vertical separation that appears at the center of my version.

my previous smaller, machine-knit sample

IMG_1648

a hand-knit lace cousin to try with full repeat and directions, chart, and text generated in Intwined, border stitches not shown

armani hk

armani hk how

Combining tuck stitches with lace 1

A simple chart, from a random Japanese publication

tuck and lacethe isolated repeat outlined

tuck and lace2

symbols used

symbols1

of note: in the above pattern, all transfers are in the same direction. My test swatches were knit on bulky 260 KM. Held stitches form loops on top of needles brought out to E position. The original stitch formerly in the needle hook grows in length, behind the newly formed loops. When patterning is automated using the tuck cam setting, the non selected needle will not be worked. The original stitch gets longer here as well, while the loops that in the hand technique rest on top of the needles, will now be held in the hook of the needle along with the last knit stitch. The latter fact is the limiting factor determining the number of rows that may actually be tucked, especially on Japanese machines. Yarn used and needle gauge also matter. Tucked fabrics, like lace, need to be weighted evenly for loops formed to knit off properly.

How to for my swatches:

knit base row (s), set up repeat so some stitches knit every row on each side creating a border, set machine to hold stitches

row 1: transfer every 4th stitch to the right. If you are in the habit of pulling needles holding multiples stitches to D before knitting the next row after transferring multiple stitches onto a single needle, this is ruled out when the carriage is set for holding, as those stitches would then not knit as intended on the next pass. To produce an eyelet, emptied needles are returned to B position after each transfer sequence

rows 2, 3, 4 bring alternate every 4th needle as shown in chart into hold, knit 3 rows

row 5: push held needles back into work (D on brother km),  knit one row across all needles. Held stitches will knit off as a group, check that they have done so uniformly

rows 6, 7, 8: transfer alternate every 4th needle out to hold, knit 3 rows

row 9: begin sequence again, repeating rows 1-8

When transfers are made in a single direction, the fabric will bias in the direction of those transfers. In the bottom section of the photo below, the resulting lean to the left is easily seen. If a bias leaning fabric is desired, this is an easy way to get there. However, if the goal is to achieve a balanced fabric, then the transfers need to happen in opposite directions as seen in the top segment of the swatch.

knit swatchthe new working repeat

new_repeat

directions

the number of held/tuck stitch rows has been changed to 4 rather than 3. When the row that knits off the loops occurs, the total number of knit rows for the sequence will be an odd one, resulting in the carriage being at opposite sides of the needle bed at the end of each pattern repeat. Transferring stitches may then be made toward the carriage: COR – transfer to right, COL transfer to left. This makes it easier to track direction when working the fabric as a hand technique.

Next up: automating the pattern for standard gauge machines using the lace carriage, and tuck patterning in the knit carriage as well.

Ladders with lace, “making things work” 1

Just about 2 years ago, I had an obsession with leaf shapes in lace and wrote a series of posts on approaches to both designing them and rendering them in knit on more than one machine.
From a ladder and lace early post.
Recent publications reflect the increasing interest in bulkier knits and combining ladder “lace (created by needles remaining out of work) with shapes floating within the resulting open spaces. I thought I would address some issues in such fabrics while returning to a leaf as the focus “shape”. My samples are knit on a Brother 260, using hand techniques that require only the basic set of transfer tools.

Long verticals in knit may have problems with the edge stitches separating from the rest of the knit, i.e. in FI vertical stripes. In plain knit, the edge stitches may stretch, become distorted, and may encroach on the ladder space. A series of actions taken on the edge stitches of ladders will help prevent that, here I am choosing to use a simple 1 X 1 cable cross every 2 rows to stabilize them. Having the cables coincide with the rows on which transfers are made to create the chosen shape makes tracking them easier.

my first schematic (Excel chart)

screenshot_14

symbols used

symbols2

imagining in repeat

in repeat

my first swatch

for decreasing stitches in work on the right or left at the top of the chart I used a simple decrease

edge_decrease

using the “fully fashioned” option to provide a different look along that edge

ff_decrease2

For my test swatch I used a crochet cast on across 17 + 4 for single full pattern repeat, + 4 edge stitches on either side = a total of 29 stitches. To create the transition  from 1 to 3 stitches in the center of the leaf,  I e-wrapped an additional 2  empty needles

e_wrap0-2

#1 reflects the e-wrapped increase just above the cast-on, and #2 shows the results of the same technique at the top of the established “leaf” pattern

e_wrap1_2

the chart repeat was amended for a different start

screenshot_15for the second swatch, trying a different way of adding stitches

#1 shows a pattern beginning on a group of knit stitches, as opposed to a single center one for leaf

#2 shows a full “leaf” repeat as charted, the red arrow points to e-wrapped yarn traveling in front of the shaping

#3  the red arrow indicates the same is happening with the float, while the green shows my desired twist, with stitch to the front

300_92_2

Sorting it out: a third swatch, with an amended way of e-wrapping. To make sampling quicker, I modified the repeat, eliminating cables, and decreasing the number of stitches at the widest part of the leaf, making fewer eyelet transfers.  The results show how much the shape of the “leaf” may be varied with just a few changes. Note the twist and location of floats in relationship to stitches just above #1

e_wrap4_2

I will document the 1X3 increase method I liked best out of several trials in my next post.

If having a single pivot stitch for the repeat is not important, the chart below is amended again to accommodate that

screenshot_16

if eyelets are eliminated to create a geometric pattern and/or for the sake of speed, increases may be created on both sides beginning on row 12 of the above chart by picking up from the row below

make_one

Some cables to try, hand knit

The first repeat below is for a vertical cable panel 24 stitches wide, 12 rows high (2 repeats shown); within the repeat, odd rows are all knit, even rows are all purl. Colors are indicative of cable crossings.

Borders in the swatch, or area in between multiple vertical panels, may be worked as 1. purl on even-numbered rows, knit on odd-numbered rows to create a purl ground behind the cables on the “right side”, or 2. knit every row for garter stitch in same areas.

Abbreviations : RS: right side, WS: wrong side. CF and CB indicate where the cable needle (CN) is held during the process.

CF: CN to front | LC: Left Cross, cable leans toward left

CB: CN to back | RC: Right Cross, cable leans toward the right

Dotted borders in chart outline columns 3 stitches wide; all cables in the sample are 3X3 crosses.

An alternative way to picture things: numbers on the left of the chart below indicate row numbers; on the right, they indicate the number of stitches knit before crossing cable stitches begins on that row

the hand knit swatch

IMG_1656Adding a purl stitch ground: a shortened chart using Aire River Design font, odd rows only shown

screenshot_02

screenshot_03

using color in Excel, showing every row

screenshot_04A

screenshot_03Avisualizing multiple repeats

in repeat

a very quick, hand-knit test swatch, knit with needles a bit too large for yarn used

300_1658

another possible charted in Excel, multiple repeats shown

screenshot_13

If patterns are for publication in specific venues, conventions in symbols may, or should have to be observed. To keep track of personal projects we often differ in what format or shorthand makes the most sense to us. If the like of the above result appeals to you, I am sharing a workbook with pertaining puzzle pieces. I find working at 200% magnification is the easiest for me, which may be easily changed to suit.

cable_purl_share

PS: My working palette in the original document was as seen in the images above. You may find some of the colors will be different in your download, depending on your computer. I have read on other sites in the past that the color change can be an issue in excel knit charting downloads. The image below reflects such a change. It is a quick capture of part of the chart when I tested the download myself. The large color blocks are the ones affected and may be easily changed to match the cable crossing colors.

color change

A bit on ribbers: Japanese KMs, alignment, and symbols 1

Before approaching using ribbers in relationship to cables I thought I would mention a bit on alignment. An online source reviewing the topic with downloadable PDF: http://machineknittingetc.com/brother-kr120-kr710-kr830-kr850-kr230-kr260-service-manual.html. Studio machines’ how to may be found on a youtube video by Roberta Rose Kelley. Before making any adjustments check that the clamps that hold the ribber in place are flush with the table and securely clamped; that the screws in the setting plate are not loose, and that they, in turn, are installed at the same depth.  As adjustments are being made, and the thumbscrew is tightened, the setting plate may actually slide toward the main bed, narrowing the gap. To prevent that from happening I had to use a metal spacer between the stopper and the main bed.

Make any adjustments based on needles at each end. Ribbers tend to bow in the center with wear and age. To check how needles in both beds line up in relationship to each other: with the racking lever on 5, the pitch lever on P, pull forward at least 10 needles on each end of both the main bed and the ribber, they should line up point to point. If any of the needles do not touch or line up, loosen the 2 screws to the left end of the ribber just a bit (a quarter turn is usually enough), tap the end of the ribber with your hand just enough to the right, or left to line up needle positions. Recheck the alignment on several spots across both beds, tighten screws, check again.

Another visual option for checking alignment is offered by Studio machines in their manual for the RT1 transfer carriage  
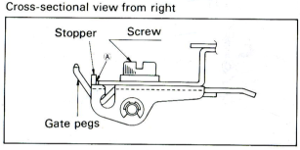
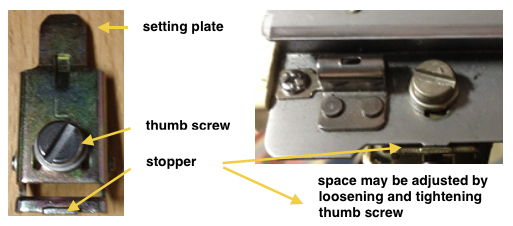
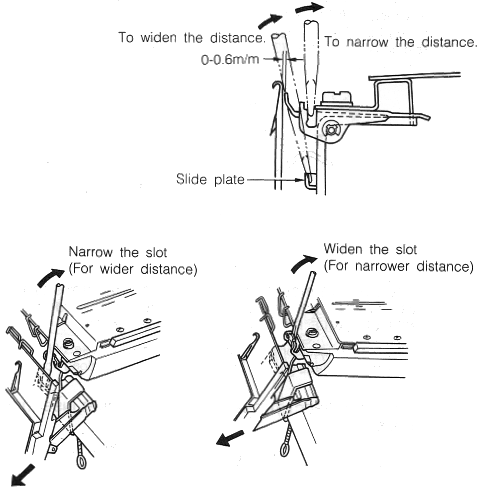
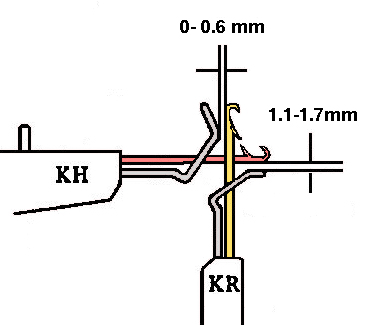
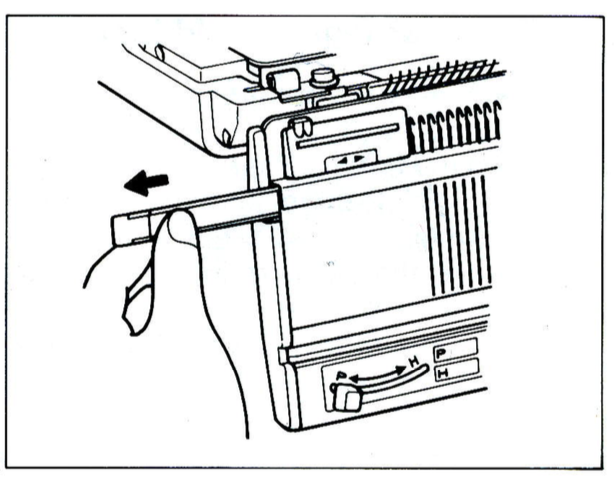
To check the height of the ribber: pitch lever on H, bring it to the full up position (Brother has 2 up positions), and bring forward at least 10 needles at each end of the main bed. Use spacers ie. a credit card, or claw weight hangers that came with ribber as measuring aides; they should slip easily between main bed needles and ribber gate pegs, the recommended distance between the back of the KR needles and the KH gate pegs is 0-0.6 mm.

The online PDF has additional photographs of the nut that needs to be loosened in order to change the height. To loosen it, the ribber needs to be brought to its down position. Use the spacer tool, start with a quarter turn, to begin with, (lefty loosey, righty tighty). Lift the ribber into place. By moving the thin metal lever (adjuster plate) up and down the height may be adjusted, one side at a time. Bring the ribber down to tighten the bolt, up again for a final check.

Lastly, with main bed needles out of work bring groups of ribber needles out to E. A single claw weight should slip behind the ribber needles and in front of the main bed gate pegs. Repeat adjustments if needed so the space between the beds is as equal as possible. The space between the bottom of the main bed and the top of the ribber gate pegs should be between 1.1 and 1.7 mm.

To adjust the distance between the 2 beds: bring at least 10 needles out at each end of the ribber. Use the spanner to loosen the thumbscrews, and a screwdriver to loosen the flat clamps.

If the nut should become completely loose for any reason: the part in question I believe, is #24 in the service manual, the “slide plate guide stud”. In the image below b= the bolt that became completely loose on one of my brackets. I discovered after getting things back together that a, which secures the ribber bracket, is actually directional with a barely perceptible change/ difference in shape. If it is accidentally rotated 180, it will keep the ribber bracket from changing height positions and working properly. Rotating it restored expected actions for me. 

Yarn thickness and needle arrangements may also require some tweaking of height and other adjustments. Listening for changes in machine sounds as the fabric is knit, and visual checks over time are a great help in avoiding problems. Here are positions for bracket lever as indicated in the service manual 

A reminder: if the needle presser bar on the ribber (all plastic) is to be removed, it is reinserted back in with ridges facing, and flat side down I have several sinker plates. An accessory that began to appear with ribbers at some point, seen here in this illustration:

below is a close up showing markings on the right side of upturned connecting arms in 2 different model year ribbers
and here the latch opening plate has been secured into place in the connecting arm without the #2 marking, where it makes a noticeable change, bringing the unit closer to needles when on the machine during knitting And,  speaking of ribbers and clamps, not all clamps are created equal though they may appear to be doing their job until some attachments cause problems.
Studio (shorter) vs Brother in place 
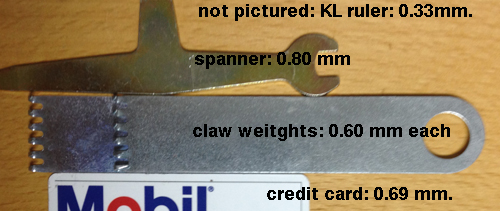
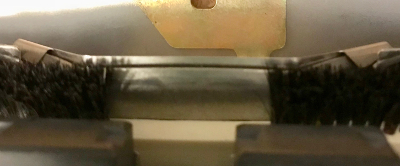
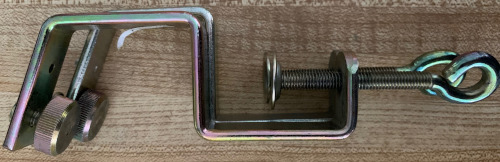
Brother bulky on top of the standard clamp, its shorter cousin Knitting symbols used for the ribbing attachment show what the stitches would look like on the “wrong” side of the knit. In the Brother system, KR refers to the ribber bed, KH  to the knit one: typical illustration of symbols as found in Brother punchcard pattern and technique books:

rib set up

ribber_5

ribber_4

A brother publication on Japanese symbols for knitting available in English, French, and German, may be downloaded from http://machineknittingetc.com/japanese-symbols-for-knitting-machine.html  ; page 15 is missing from the document. Another resource: http://tata-tatao.to/knit/japanese/e-index.html


A swatch experiment

A while ago the image of a sweater attributed to Armani caught my attention on Pinterest, and I became obsessed with creating a variant.

13f255bf1c030f6b7f6d5710caf2d860

Lace is actually an interesting 3D fabric until it is blocked and made to lie flat. I went the lace route to work out my “scales”. The swatch I created below is hand-knit knit, and could be reproduced as a machine-knit hand technique with the aid of multiple transfer tools. I would recommend a yarn with “memory”, such as wool. The bottom of 3 sets of “shells” were knit on #  7 needles and the remainder on #5. I found I preferred to control the lean of knit-together stitches on the knit side but did not deem it necessary on the purl.

the knit side

IMG_1646

and purl side!

IMG_1645

my working notes  (Excel) showing multiple repeats

scales_in_repeat

symbols used symbolsa printable PDF  scales_all_info

A mini-me version knit on a 4.5 mm. machine, using the same yarn as in the hand-knit sample above, at tension 10+. Repeats are worked out around 2 center needles, on which stitches are doubled as transfers are made. When the pairs of doubled-up stitches are reached with loops on either side of them after the last transfer/knit one row in sequence, and knit one additional row across all stitches before reversing the direction of transfers. That row is represented in green in the chart below. Symbols used are minimal since the same side of the knit is in constant view (incomplete full pattern repeat)

KM_repeat

knit side

IMG_1648

purl side

IMG_1647

see update3/28/2015

Visualizing knit cables in color_ Excel

In the past, I have suggested methods for working in Excel and provided links to excellent material shared by others online. Of late I became interested in using the program to produce simple color graphics for cable illustrations. It is helpful to have prior experience in using Excel for knit charting. This is not intended as a complete tutorial. I am providing a document for experimentation. I would suggest copying and pasting the individual shapes to a different part of the document before playing with color changes, resizing, etc. This may be done within the chart in progress, or separately, and then copying /pasting or moving the final result into place.

The resulting charts may be used in both hand and machine knitting. My illustrations here are intended for machine knits, so they do not combine purls and knits on their ground. Images represent single side view: as they would appear on the knit side facing hand knitters, or the purl side facing the machine knitter. Stitch, row marking, and text may be added as wanted.

Chosen from the view menu, the object palette allows the selection of built-in available shapes. Once a shape is drawn into the workbook, the formatting palette allows access to image size, rotation (including flipping both vertically and horizontally, and alignment (moving front to back and reverse).

object_format_palette

Color fill – unless standard colors are chosen, there will be issues matching colors combined when using with bucket fill from the toolbar to add color to cell(s)

toolbar

toolbar

formatting options: fill

shape_fill

shape border: line, color (or not)

shape_line

one of the ways to access size, rotation, aspect ratio

shape_size

sample results

screenshot_33

an in-progress document for experimentation: blog_color_cables. Adjust zoom to personal preference for either viewing or working, grab portions of working screen for images of sections of the workbook to save, or save as, and explore PDF options.

More on charting, foreign symbols, and cables

This topic has come up as part of previous posts. I recently reviewed links and thought I would re-group them a bit differently here, adding some new.  Please click on continue reading to have the list appear as active links if they do not immediately do so in your browser. The latest additions are at the post bottom.

http://www.stitchmastery.com

https://www.myfonts.com/fonts/adriprints/stitchin-knit/

https://www.softbyte.co.uk/designaknit.htm

http://www.envisioknit.com/features/

https://stitch-maps.com/about/key/

pixelated lettering

http://www.fontpalace.com/font-download/Notice+3+Std/

http://www.fonts2u.com/munro-small.font

http://www.fontspace.com/ten-by-twenty/munro

letters in knit stitches

http://www.fonts2u.com/knitfonta.font

http://www.fonts2u.com/knitfontb.font

http://www.fontspace.com/honey-and-death/knitfont

care labels

http://www.fontpalace.com/font-download/Notice+3+Std/

I have been trying to navigate Mac Numbers again, but in playing at my own latest charting with software after the Yosemite update, I find I am drifting back to using Excel once more as my primary “graph paper”. Charts published in foreign languages and magazines, and particularly those in Russian (where the same symbols appear to have different functions depending on the publisher) provide challenges in translating for using charts provided in hand or machine knitting.

Some sources from/for different countries that may help with interpretations:

http://www.knittingfool.com/Reference/KF_Symbols.aspx

http://www.garnstudio.com/glossary.php?langf=it&langt=en

Anna Burda magazine symbols PDF includes HK how-to illustrations:  ab2  2/1/15

 Verena chart from older pubs easily found on Pinterest

A partial volume of an out of print book on Japanese symbols 

4/24/15: Sconcho is a GUI for creating knitting charts that come with a built-in stitch library. A manual is available. Custom stitch symbols may be created in Inkscape to form personal vector shapes.  X11 may be required to run Inkscape on your computer as well, all are free.

6/14/2020 a free for iPhone and iPad app Knitting Chart  also includes crochet symbols