Full automation of “held” shapes using slip stitch alone is possible, involves careful planning of the design repeat, an understanding of necessary sequences in “holding” techniques, and results in large, long repeats for recurring shapes.
The starting side for preselection rows varies depending on the design.
Pattern knitting is worked with both cam buttons set to slip; end needle selection must be canceled.
All stitches on the knitting bed must be cleared with each pass of the carriage from side to side.
As shapes grow, test periodically for any yarn loops accidentally caught on the gate pegs.
The overall downloaded program needs to include repeats planned for the number of stitches in work on the needle bed. This is the standard requirement for Ayab. On my 930, the default img2track programming is for a single motif.
If working on an odd number of needles, whether the needle selection is pushed to the right or left of center varies depending on the brand of machine used and changes if horizontal mirroring of the design is added.
It is helpful to begin with small, narrow repeats for practice. Assorted samples from previous posts:
a ruffle also using the garter bar 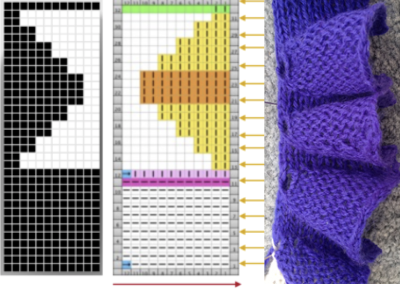 a couple of zig-zags
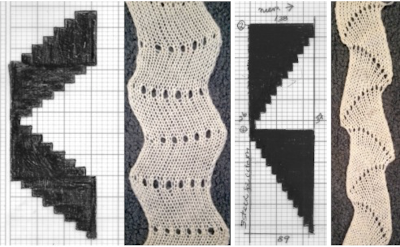 only one of many pleat variations that may be enlarged and planned for the width of the bed in knitting items such as sideways skirts
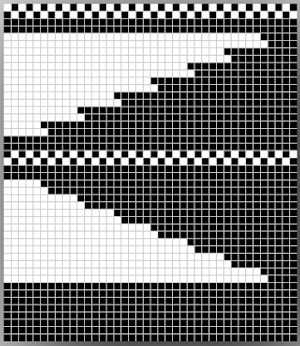 repeats planned for texture
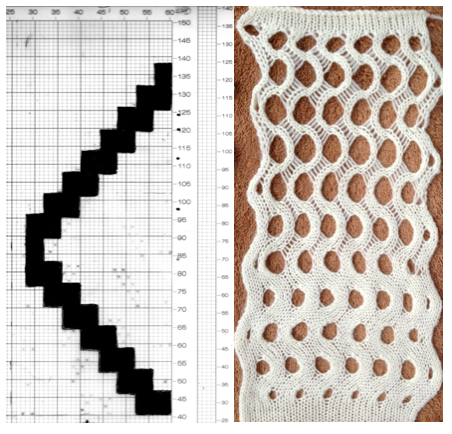 bumps and slits
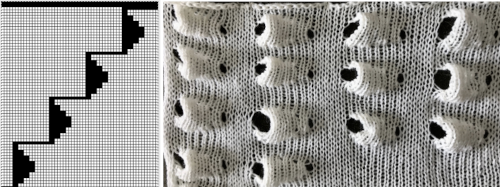 shell shapes
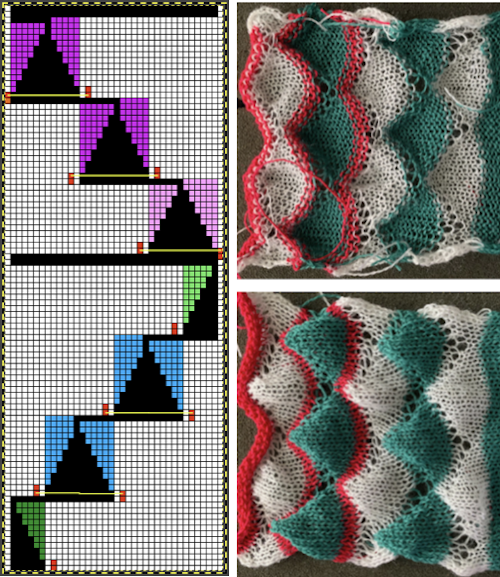 Testing the idea on a limited width with small intended shapes helps one iron out errors in logic or knitting sequences, I prefer to start with a colored chart, making it easier to follow movements of the yarn, carriages, and color changes
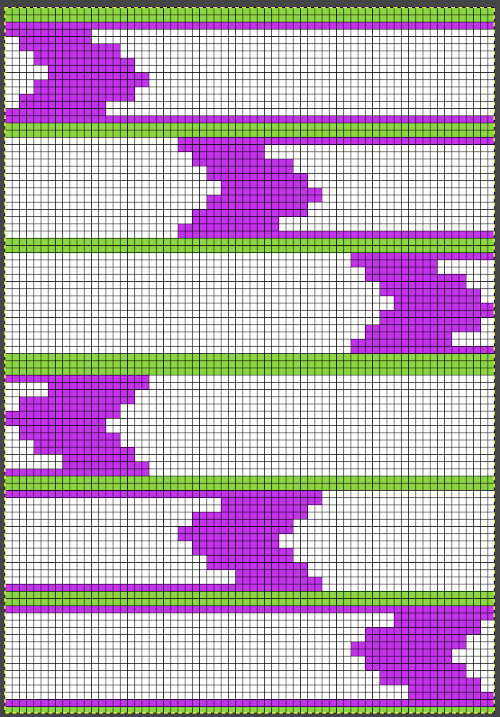 The chart was then loaded in Gimp, the Mode changed to bitmapped B/W, and the image then scaled to the final width of 74 X 96. For this exercise, I chose to keep the shapes equal distances apart (marked in green), mirrored the image on my 930 to produce the shapes in the same direction. In this instance, as is often encountered in lace knitting, an odd number of rows between repeat segments will allow for the carriage to start from the opposite side in order to reverse the direction of the shaps. The first preselection row may start from either side depending on whether the downloaded image is mirrored or not, whether by intention or automatically by the machine model’s auto settings. The default isolation in img2track is fine, ayab knitters are required to program the repeat in width to match the number of needles in use, so this would work for both
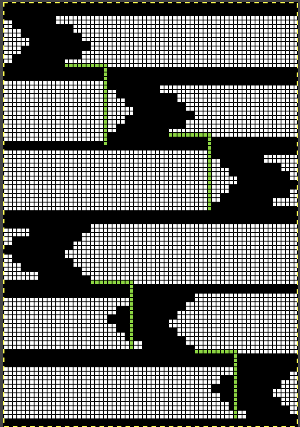 I did run into an operator problem: had managed to save the repeat so rather than being all B/W there was a single row of color at its base, which caused mispatterning only when that #1 design row was knit.
 With that amended, the selection problem was eliminated.
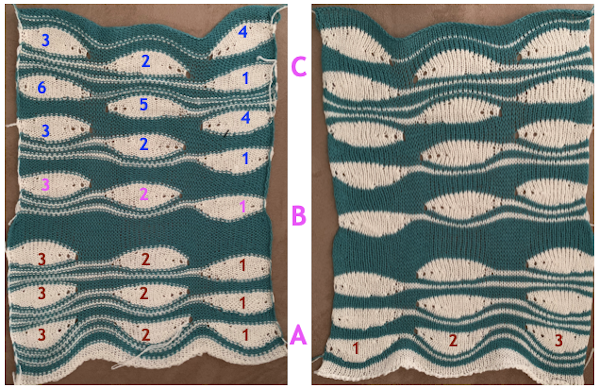 A return to short row shapings: bumps and slits meet entrelac.
 The same shapes, always starting on the same edge A, will distort that edge. Extra rows of the alternate color can vary in the shapes of the striping between them. Single shape rows could be floated much farther apart on solid ground, or one to which other colors or techniques are added, and finally, the reversed shapes produce a more balanced height at both sides.
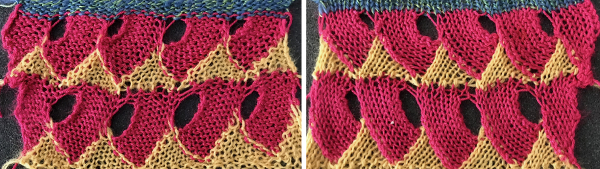
Revisiting 3D scales and shells, automated and not. 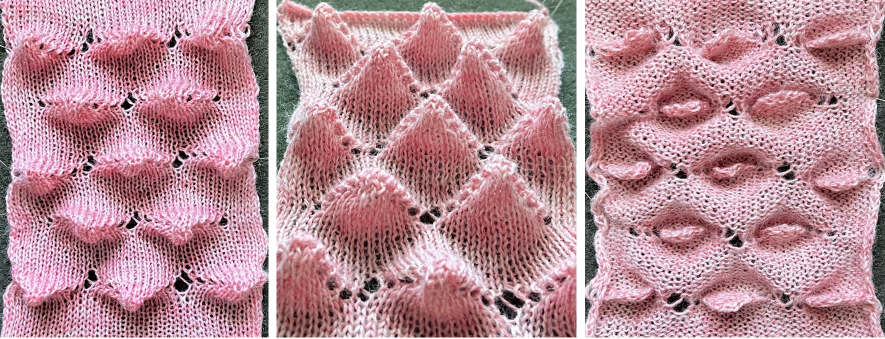 “Intarsia” without an intarsia carriage on Brother machines, 2, 2026, reviews some possibilities using color separations and img 2 track for results such as this.

Category: Uncategorized
Beginner’s corner
WORK IN PROGRESS
Copyright can be a touchy, sometimes murky subject. In my teaching days at a design school, each instructor was responsible for accumulating what amounted to a “textbook” with any expected readings and required information for students attending the classes. There was an arrangement with a single copy center that actually paid a fee set by the government in order to be allowed to provide a service. Teachers supplied boxed material on a single-sided copy per page sheets, withdrew it at the end of the term. The copy center would make double-sided copies from each sheet in the original, bind them, making them available for purchase for only the cost of what it may have been to customers using copiers to make their own per sheet. My intro to knitting “book” evolved into 330 pages, costing students as far as I can recall about $30. An overall bibliography and often credit in sections were included. This all was happening pre-internet browser searches and easy downloads.
I have often not included a definition for some of the terms used in my posts. Also, I did not share information from manuals and company publications until they, in turn, became easily available online, long after the companies that published them went out of business.
A list of common abbreviations: 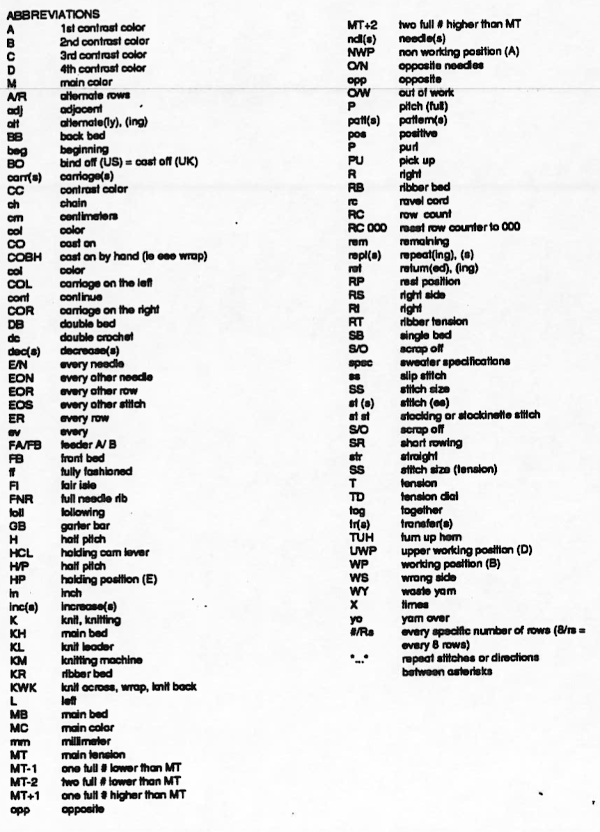 Test and gauge swatches
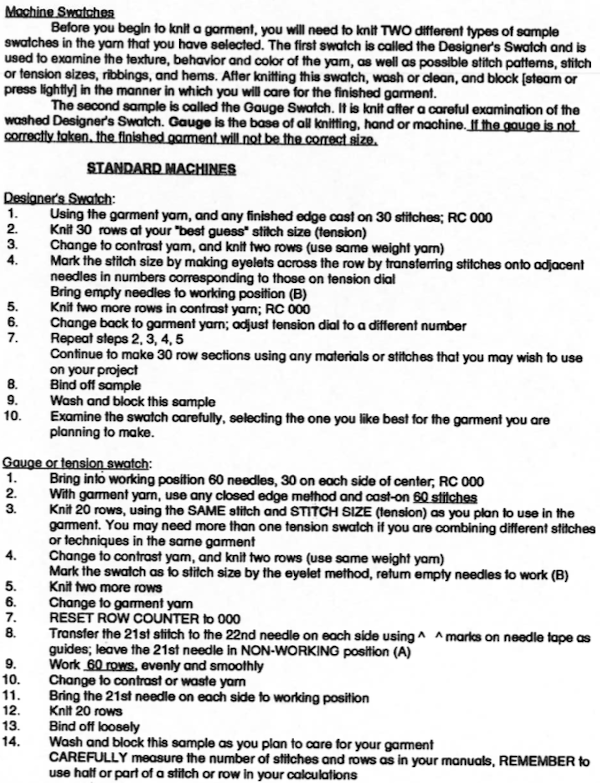
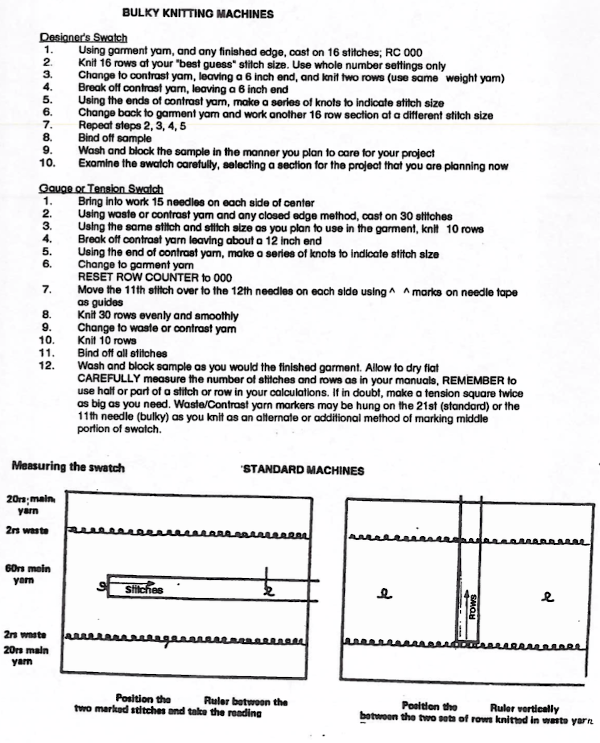 From the Brother Knitting Techniques Book
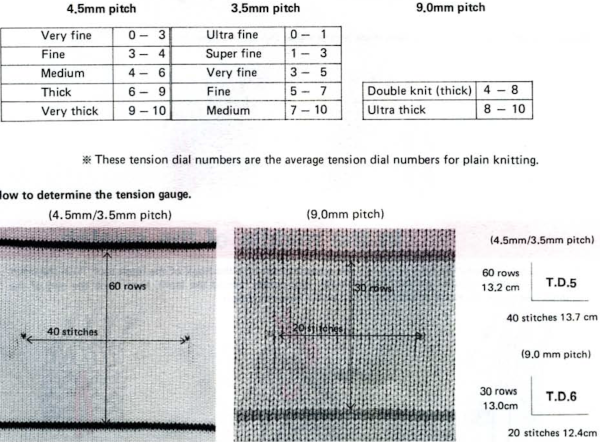
I personally prefer to measure gauge on the purl side, where to my eye the start and end of the color transitions appear clearer.
The Passap advice was quite different. This is from the Duomatic 80 manual 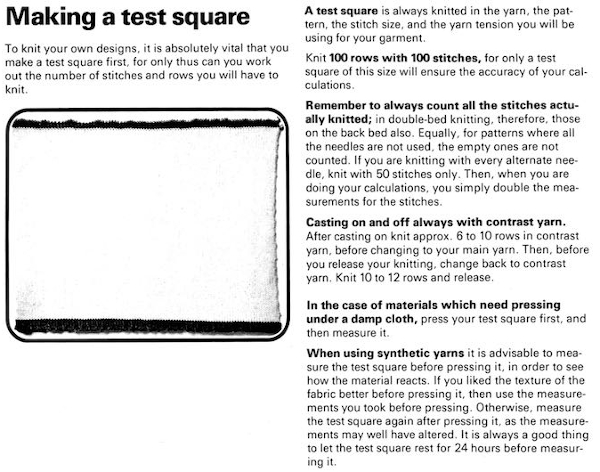
and it was followed by tables that helped with calculation conversions based on measurements. When using Japanese machines while executing some DBJ or highly textured stitches, a larger swatch should become the go-to when measuring gauge for garments by default. Using 100X100 combined with the use of metric measurements facilitates the maths and use of devices such as the knitleader, where measurements in millimeters are required.
A “long swatch” exploring a card from a “censored” selection from the factory-supplied punchcard packet in as many techniques as possible became a required assignment 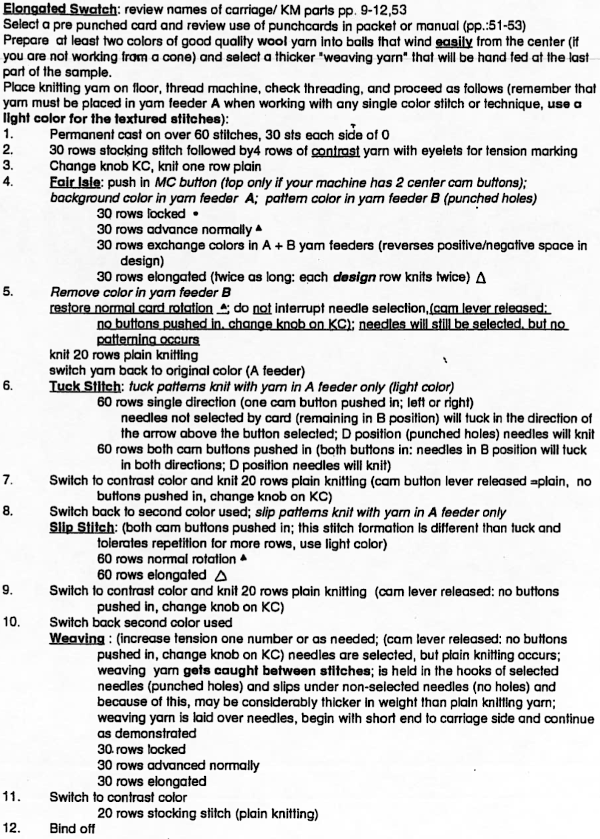 In KM model manuals a list was sometimes provided suggesting what cam settings might be suitable for each card
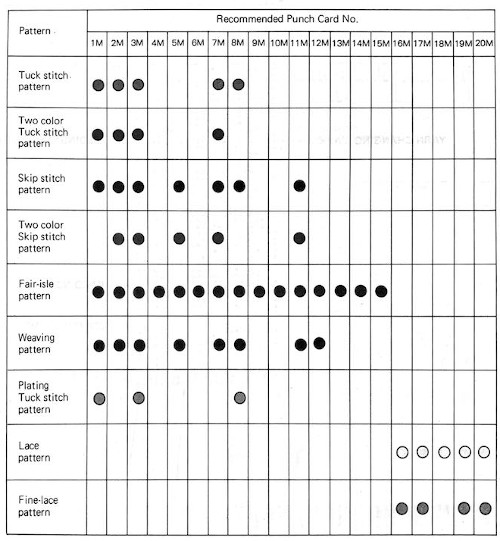
Factory supplied cards were usually marked with a number and letter as seen above, but oddly as model numbers changed, sometimes either or both of the latter would change as well. A table of my own after a quick review of my stash:
1S, 2R,3J/S, 3P, 4D, 5J, 6P, 7G, 8S/J, 9G, 10D, 13G, 101, 102, 103, 107, 108, 109
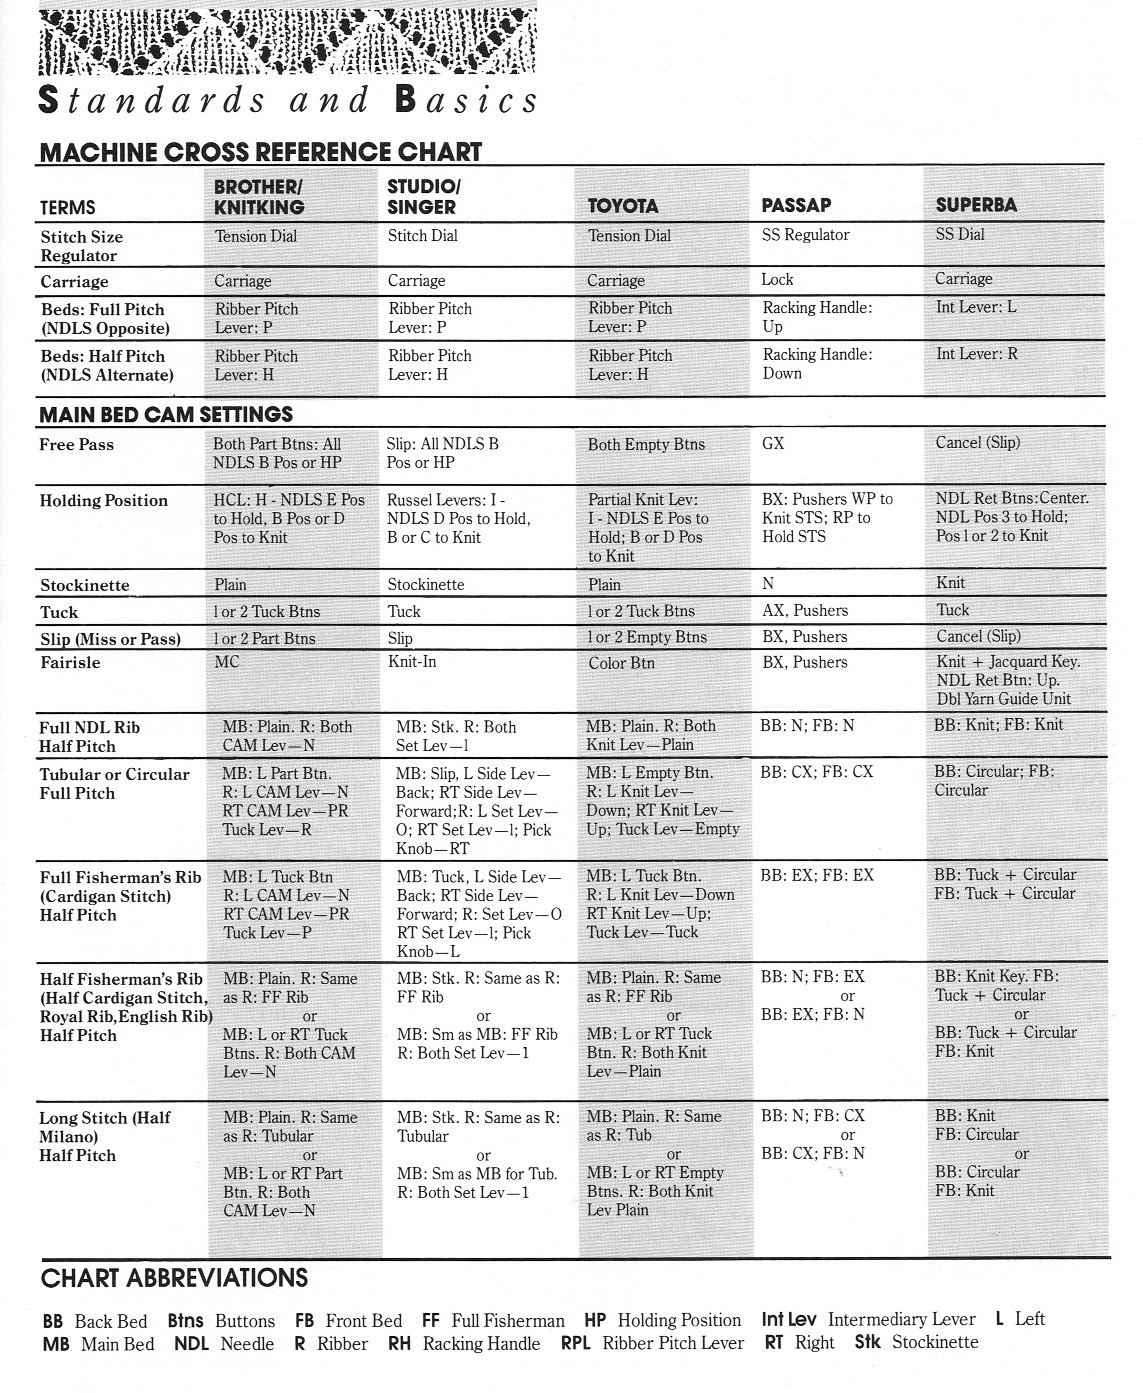
Machine cross reference chart
Macknit was a short lived magazine published for a few issues in the 1980s. This was published in their spring/summer issue 1986, p.7
Carpet or pile stitch knitting on Passap and Brother KMs 2
Trial swatches do not necessarily require a permanent edge. The main bed cast on with all open stitches is familiar to knitters accustomed to using a single bed Brother cast on comb. A quick version of the same type of cast-on is also doable when both beds are in use, and the goal is to knit all stitches only on one bed or the other. The broken toe cast on for ribbing is so-called because if the comb and weights are hung in the wrong location on the needle bed when stitches on the opposite bed are dropped, so will the comb be, along with weights, heading for your feet. If the ribber is going to be the bed doing the knitting that anchors dropped stitches or pile in Brother kms, please note prongs of ribber comb line up directly in front of main bed needles (blue arrow) and to each side of the loops on ribber bed needles (red arrow). The ribber comb wires will anchor down loops on the needle bed, where plain knit rows will be formed. As mentioned above, this method will result in stitches all being open, does not produce a permanent edge, and is suitable for quick swatching or for waste yarn at the bottom of the weighted fabric. It is possible to perform this cast on with a ribber comb with wire already inserted in both brands, but the broken toe method is potentially less hazardous to needle health. 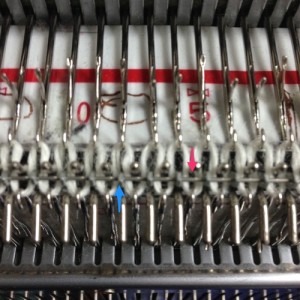 Analyzing what is required to move between km brands to achieve 2 color or isolated pile motifs: in Passap with the back bed set to FX, one arrow key, EON pusher/ needle selection changes every 2 rows. In Brother, this may be achieved on the main bed by pushing in one tuck button and programming a repeat. The alternate, adjacent cam button, left in its normal position, will knit every stitch when the knitting direction is reversed, regardless of whether any needle selection is happening. On the ribber, lili buttons may be used for alternate needle selection. Its levers determine whether tucking or slipping, in one direction or both, occur. The number of stitches on the ribber must be even. An easy visual check is to check markings on needle tape, which consists of what I refer to as dashes and blanks. For an even number, begin with one, end with the other. Passap will automatically revert to the alternate pusher for patterning on the subsequent 2 rows. In using lilis this is not an automatic function, and some handwork is required to obtain the same effect by changing the first needle selection every third row, as seen in this post.
If the ribber is chosen as the loop making the bed, the needle selection on it needs to be manual for any pattern other than across whole rows. In my swatch, to knit across all needles, the ribber carriage is set to slip in one direction, knit in the other. The all-knit rows in pile knitting need to follow the ones with tuck loops on the opposite bed. Extra needles are on the main bed, which creates the fabric backing. The ribber carriage can be disengaged and used to drop stitches after all knit rows on the main bed.
In the actual knitting, if a plain one-color pile with plain color backing is the goal, some rules may be broken. The thickest, most stable pile is achieved when the yarn anchoring the loops is as dense as possible. If the goal is to knit every stitch across each row to create loops and in turn drop them, one is, in fact, working an every needle rib. This makes it possible to create tuck loops on either bed, creating the backing across the whole row, because in fact there are stitches on each side of the tuck loop on the opposing bed, anchoring it in place. Normally, when 2 or more needles are tucked side by side, rather than the stitch formation usually seen in tuck patterning, the loops do not get anchored, drop off, and create a float like those seen in slip stitch patterns.
In my first sample, the fabric is cast on the main bed, and the loops are formed on the ribber. The carriages are set for the main bed to tuck when traveling to the right, knitting to the left. The ribber is set to slip to the left, knit to the right. The ribber is used to drop the stitches, simply by disengaging it from the main bed and running it across from one side to the other. Dropping stitches occurs (on either bed) after all stitches have been slipped there for one row (no needle selection if patterning). The starting side for my swatches was on the left of the machine. It is helpful to have a ruler or tool to help push loops down between the beds after dropping each row of loops, and also to occasionally drop the ribber to check whether any loops may be caught on gate pegs.
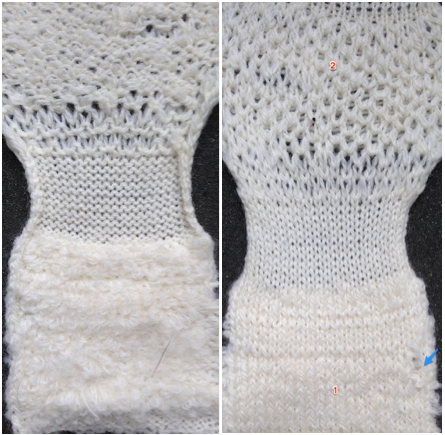
In this swatch, I had some problems (blue arrow) on the right side related to changes in tension while determining what might be the best. Section 1 has every needle tucked on the main bed. Section (2) begins to try to emulate the Passap pusher selection using an EON 2 row tuck repeat on the main bed, resulting in things going awol and loose, even at the tightest tension possible on the main bed. Any time patterning is used on the main bed, end needle selection is canceled (KCII). The tuck repeat
The settings (here, lili buttons are not in use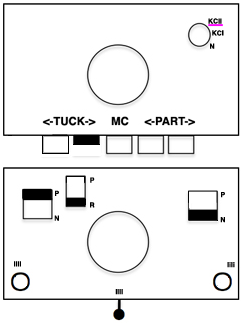
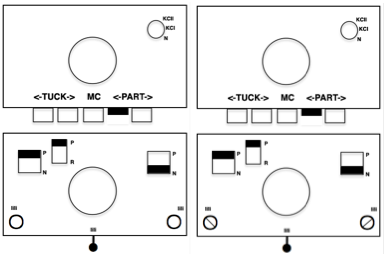
 To create every needle loops for the pile on the main bed: CO is on the ribber. With settings on the image below left (no lili buttons in use), the ribber tucks loops on every needle traveling to the right, knit all stitches moving to the left. Moving to the right, the main bed knits on every needle, slips the whole row moving to the left, giving the opportunity to drop stitches off. With settings on below right, the lili buttons are in use, and the ribber now produces an EON needle selection, every row. Left alone, the selection is what would be seen using the 1X1 card on the main bed, its repeat.

 The yellow yarn is a 2/8 good quality wool knit at 4.2 on the main bed, 3.2 on the ribber. Switching to a rayon twist of similar thickness created instant havoc. The dark grey was a mill end, tighter twist 2/8 wool. Red arrows show what happens when loops are caught up on gate pegs and not immediately noticed. The green arrow indicates longer loops that can happen when knit stitches on either side of the opposite bed do not knit off properly. The result is a dense wool fabric, so the tendency to roll at the top and bottom of each piece toward the “knit” side of the fabric needs to be considered at the top and bottom edges of finished pieces.
knit with no lili buttons in use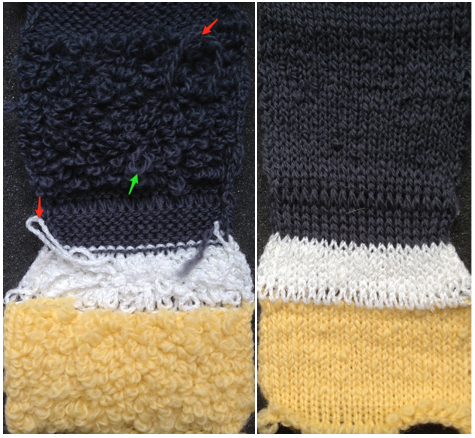
In 2 color knitting, or creating isolated motifs, whether on one color or striped ground, anchoring loops by tucking on every needle is no longer possible, making reverting to EON needle selection on ribber a necessity. The results are dramatically different. These swatches were made using lili buttons or hand selection on ribber, loops on the main bed. If things don’t work in one color, they will not in 2, so one color, every needle pile is a place to start evaluating the results
1X1 lili selection left me with “where are the loops?”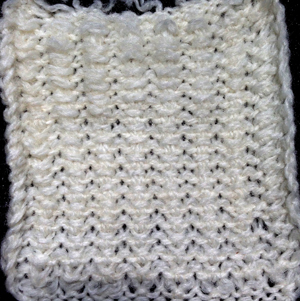
In the bottom section here I tried 1X1 hand selection for 2 consecutive rows, the narrow band in center back was back to 1X1 to separate areas using lilis, at the top I used lili buttons and brought an extra needle into work on ribber before traveling to the right every third row (making needles in work on ribber an odd number), returning it to out of work before knitting back to right. Dropping stitches every 4 rows makes tracking the sequence easier. The resulting pile is far more “subtle” than samples worked with every needle tucking on the bed creating the backing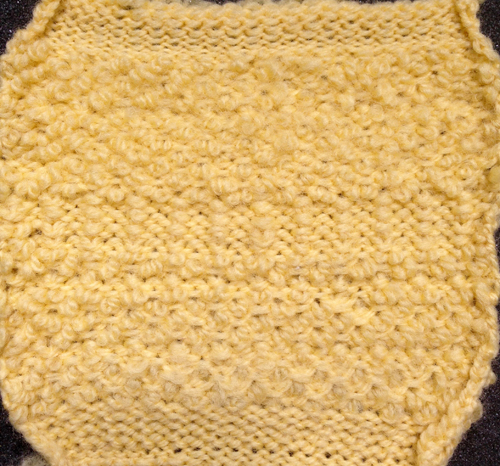
So far, I still have had no luck with getting anything that does not look like a variant of drop stitch lace when attempting patterns separated for 2 color knitting, either in embossed one color, or in striped 2 color versions.
For stitch dropping tools for different machine brands, see Brother KMs “pile knitting”/ ribber stitch dropping tools
Zig Zag ladder lace 2: hand knit
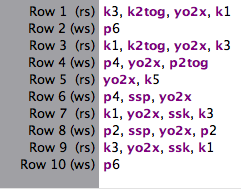
I work primarily on a Mac, Maverick OS. Intwined software has had some issues operating in Mac consistently in the latest OS versions. The chart to text can be a really nice feature. The repeat, drawn here with symbols in the built in stitch library, shows errors in row 2 and 4 of the accompanying text.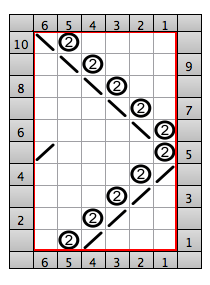
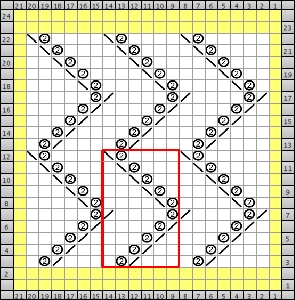
On a larger canvas, the original repeat is outlined below in red. Yellow indicates knit border stitches around ladder lace pattern repeats; row 22 is absent from the text that accompanied the larger chart.
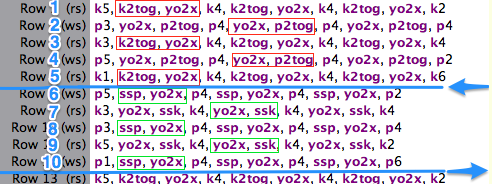
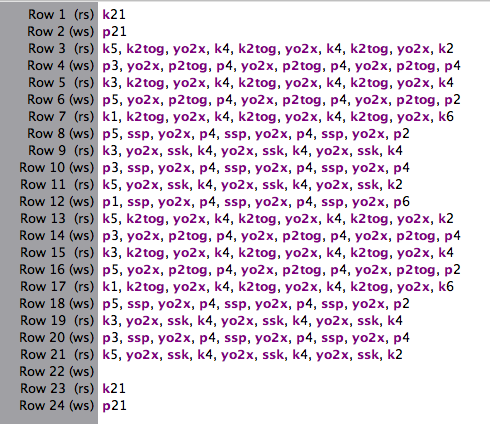 Skitch is a free program, available for both Mac and Windows, that allows the opportunity for of highlighting or further editing a graphic. Taking the information above, here I added numbers that reflect actual repeat rows, used the arrows as a reminder of change in direction of zig zag, and the red outlines vs green indicate changes in type of knit decrease. It is easy to add as much or as little additional information as one feels helpful. There are controls for line thickness, shadows, etc.
JKnit is another program that may be of interest to anyone who prefers to track their projects, progress, and much more on their iPad or iPhone. The Lite version is free for both devices.
Below is an image of the hand knit swatch, unblocked, which appears three dimensional; transfer lace has traditionally been blocked to lie flat and maximize eyelets. The fabric may be very interesting without blocking. If a slightly thicker yarn with “memory” is used, the piece may be steamed lightly, and the pattern segments will tend to shift in and out from the flat surface, whether the piece is hand or machine knit.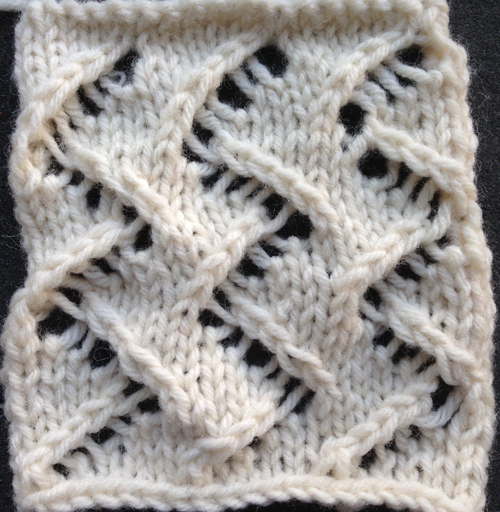
The yarn used was a “throw away” swatch testing acrylic. A very quick, light press and a bit of steam and here it is in the resulting killed, forever flattened version
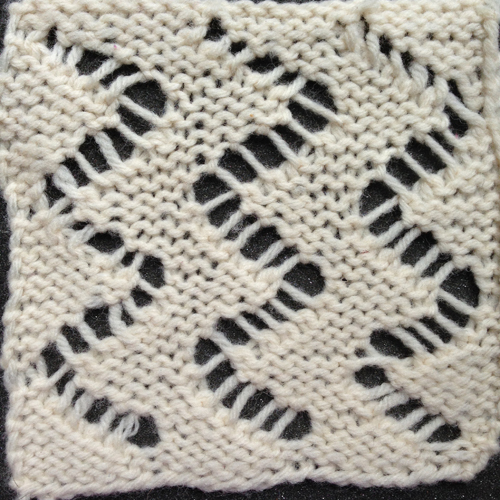
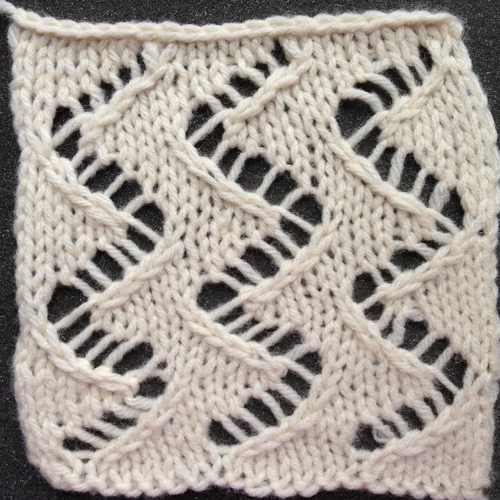 and it reverse side
Transitions
Going for it with a transition to a new hosting provider. If all goes well it should be invisible and painless.
Frome lace chart to punchcard 4: a border tale
A forum post inquired on adapting the following border repeat for use on a punchcard Brother KM, using the lace carriage: the repeat is 14 stitches wide as was given below
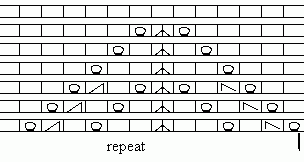
Because of repeat restriction in punchcard knitting, the best way to match the above chart is through the use of hand techniques. The image below shows needle bed markings (in water-soluble pen) to help in tracking hand transfers; the long line is the location for the center triple stitch after stitch transfers, the dots place the first single transfers made toward the center long line on the KM, away from the single needle space between them
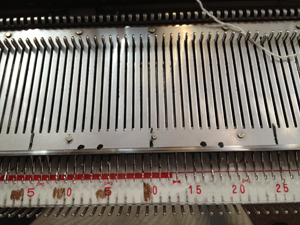
this is the result of the hand transfers; the fuzz on the left is a manufacturer’s yarn knot
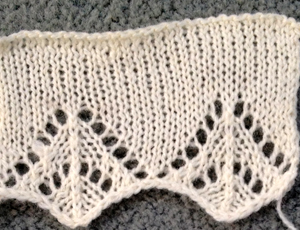
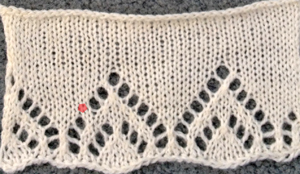
a simplified repeat keeping some of the elements, but missing that center ridge, adjusted to a 12 stitch repeat for use with punchcard; the missing lace hole was an error in punching out the card
the card for it, showing the correction also marked in red
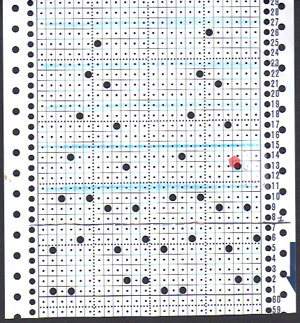
since the intended use is for a border, it is not necessary to punch more than above; the first row for selecting to right with the lace carriage is marked, blue shows location for knitting 2 rows with knit carriage; the sequence is an easy 4 passes with the lace carriage, followed by 2 with the knit carriage
another option’s results, creating the center ridge as in the hand-knit: not identical, but related
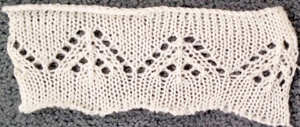
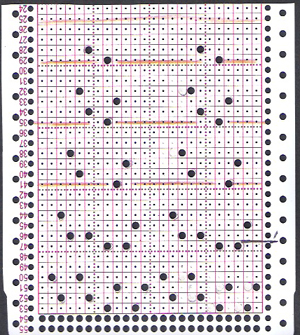
the corresponding card: knit 2 rows after every 6 passes with LC, except for the last repeat segment, where LC makes 4 passes prior to continuing with KC and knitting beyond the border
If using cards I would recommend knitting several rows with waste yarn before casting on (as loosely as possible) and continuing in lace. The very bottom will want to curl toward the knit side of the garment, so cast on the edge may require additional treatment to keep it from doing so.
for one more repeat please see next post
Yes, I am still making “spider shawls”
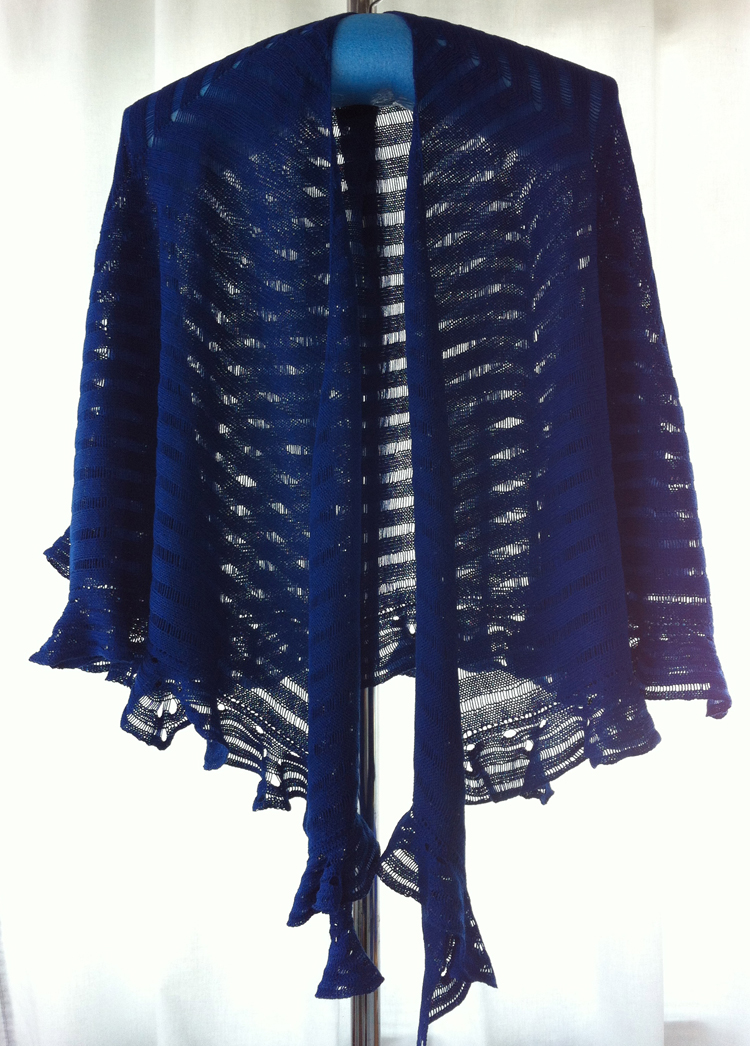
The 2 latest measure 28 inches in length, and 170-180 inches in diameter above the ruffled edge.
brick/black crepe twist

royal blue diamante