More knit bubbles

The topic of “those bubbles” has recently turned up again on Ravelry, where another forum member (Tanya /It makesyousmile) had come across a Russian video by Anna Kovin, with results that closely resembled those in the blue sweater and blankets pictured in my previous post, and poses a great solution for knitting the alternating, the same side knit and purl variants of the stitch. I knit my samples on my Passap, simply because I tend not to keep my ribber on my Brother machine. My production is on a single bed for most pieces in that gauge, and I find it easier to both see and work without the ribber on. That said, the method can work on any machine.

Drop stitch makes for a very loose, wide fabric, so casting on and binding off needs to accommodate that. I often will start with waste yarn, a loose first row, end the piece with a loose row. My bind-off is often around 2 gate pegs or more if needed, and rehanging the bottom and binding off, in the same manner, has top and bottom match. I did not do this in my swatch, and it is easy to see where some of the problems may be.

For swatching I chose to hang the comb with the first knit pass (open cast on trick) on the back bed (would be the main bed on Brother), using a multiple of 5 stitches, knit several rows, and then transferred in a 5/5 rib configuration, sorting out the proper tension for my yarn. I began with 5 stitches on the back bed (main bed in Japanese KM), transferred the next 5 to ribber, and repeated the process across the width of my fabric. The front bed/ ribber was set at half pitch when the pattern was about to start, with an extra needle on left. The portions of the bed that create the long stitches will essentially be knitting an every needle rib, so if point to point is used to make transfers easier, it needs to be changed back to proper pitch for the remainder of the knitting. The swatch does not address the best beginning and end of the fabric for any possible end-use

1. set up 5X5 rib, begin by leaving the first five needles on the main bed (passap back bed)

2. bring all main bed needles into work (ribber needles at this point will be 5 out of work, 5 in across bed)

3. knit 8 rows

4. drop off groups of 5 stitches on the main bed, begin with the second group of 5 from the left, moving across the bed (every needle rib section), pushing groups of needles out of work as they are emptied

5. bring all the ribber needles into work (main bed needles at this point will be 5 out of work, 5 in across bed)

6. knit 8 rows

7. now drop ribber stitches, 5 at a time, begin with first 5 on the left, and continue across the bed, pushing all the needles out of work as they are emptied

repeat the process, beginning with step 2, through 7

the relaxed fabric, the knit blocks alternating knit and purl

the same swatch, illustrating what happens when you press acrylic, and some of the problems to be sorted out in terms of the start and end of any piece in this type of fabric

my previous post

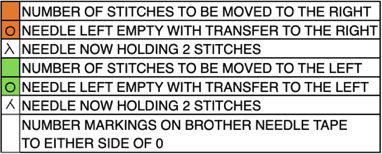
The Brother version, with aid of patterning for needle selection: this particular version of the fabric is actually created by rectangular blocks of every needle rib, with straight side edges. If one wanted recognizable shapes other than this circle illusion, then more hand manipulation would be needed. The chart below illustrates the repeats for my swatch (4 sts X 6 rs or 6 X 6 would be suitable for punchcard KMs). The solid squares represent every needle rib sections, where stitches will be dropped to create the larger ones.

With the machine set to KC and no cam buttons in work, needles are selected, but no patterning occurs. “Air knitting” can help establish where on the needle bed the pattern repeats, and how to set up the needles and stitches to be in sync with selection as the work progresses.

An alternative approach using this method begins with all needles on the main bed in use as opposed to ribber ones as in my Passap test. Once the sequence is understood starting points for creating full needle rib can be varied, as can selecting the first row from either side. For these swatches, I used a thinner yarn, in a bright color, which can help identify any issues in stitch formation, and I began the swatch in rib, to see the effect that might have as well.

my amended repeat

Begin by checking needle selection, set up rib as described at top of the post, beginning the first group of 5 stitches on left with selected needles, next group not selected, etc. If all the steps are repeated beginning on the same side of the KM it does not matter which block of needles are at the opposite end,  allowing for width/gauge adjustment. I like to mark my needle bed with a water-soluble pen so I will be certain to have proper needles in work, not relying on memory or my sometimes “creative note keeping”.

CO ENR (every needle rib) set up with first needle on left in work on ribber, last on right on the main bed, racking at half-pitch: knit 1-row N/N, hang comb and weights, 2 rows circular (using opposite part buttons), follow with one row N/N

rack slightly to the right to make needle transfer easier, set up a multiple of 5 X 5 rib; begin with transferring first 5 on left down to ribber, pushing any empty ribber needles OOW; after the transfer, rack back to the original position so first ribber needle in work will once again be on left

bring all main bed needles into work (ribber needles at this point will be 5 in work, 5 out of work across the bed)

select your first pattern row, KC II (no end needle selection), continue to knit until needle selection changes so the second block from the left on the main bed is selected; nonselected needles on the main bed will now be dropped off, and those same emptied needles will be pushed completely out of work (the first group from left is the starting point here as well)

bring all needles into work on the ribber, knit until needle selection changes with all in main bed needles in B position, at that point I brought all remaining main bed empty needles between them out to hold/ D position in order to drop stitches on ribber between them, using the main bed as a guide, pushing any newly emptied ribber needles completely out of work as stitches were dropped (beginning with the second group of “5” from left)

as one physically looks at the stitches, there will actually be a count of six between MB needles, in my first sample, I dropped in series of 5, always beginning on the same left side.

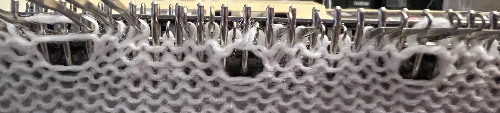
This swatch shows the resulting fabric. Of note is that one side (marked with red) is holding together along dropped stitches far better than on the right (marked in black), a desirable trait, and not as noticeable in the previous swatch knit on Passap, perhaps because of the difference in the weight of the yarn and stitch size

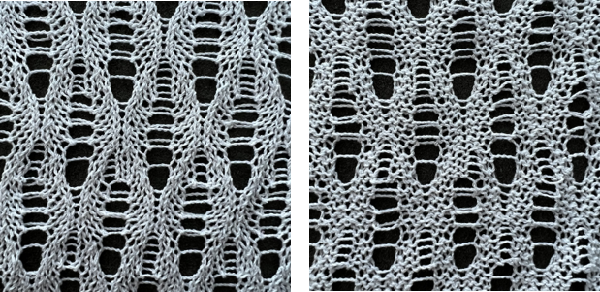
the result was much improved when only the center 4 of the 6 ribber stitches were dropped, producing a bit of a chain stitch on each side and with a better definition of dropped stitch areas; both sides of the fabric are shown below

at this point all main bed needles are in work, needle selection will once more begin on left; knit until needle selection changes, continue the sequence.

Cast on ENR rib edge has obvious width, bind off is around 2 gate pegs after transferring any remaining ribber stitches up to main bed.

The version of the stitch as worked out by Tanya Cunningham with her shared instructions for what she refers to as “bubble pops” may be found on Ravelry.

A random slip stitch

During my early morning surfing, I recently came across a pattern knit as fair isle that I thought might work well in slip stitch

the repeat

the first sample knit side

its purl side, showing the typical slip “floats”

The light color is a 2/8 wool, the green a rayon/nylon blend, thinner in weight; the rayon flattened considerably after steaming (something to consider if the maximum texture is the desired aim); the first wide band of green is 32 rows high (full repeat), the narrower stripes occur with changes every 16 rows. Slip stitch striping can vary a pattern greatly, sometimes more successfully than others. My sample was knit on a 910, using color reverse. In the first repeat chart the white squares are intended to be what knits, the dark grey the slipped areas (Passap use same repeat, tech 129, each black square is a slipped stitch with lock set to LX rather than KX). This repeat is too wide as-is for use on a punchcard but was it usable, all but the dark squares would be punched.

The obvious color changes may take place every 32 rows, every 16, every 8, every 4, 2 followed by 6, and more. The pattern may also be knit with the same color rotation, but beginning striping sequences on a different row. The purl side of this particular pattern helps make it easy to track the location of color changes, but with many slip patterns the same may not be so obvious, and good note keeping of sequences and starting rows for the design can be a time saver when one wants to reproduce particular pleasing or successful “random” segments.

more variations

the top section here begins with the first design row KC–>

these are done with beginning the pattern on row 2, KC<–

swatch is not pressed, resulting in a more pronounced texture

Re_editing the repeat can help change/ plan the areas for solid color blocks to occur on the knit side. Slipped stitches become elongated ones on the front, knit side of the fabric, and the color they assume has to do with the last row knit before the needles with that color yarn. If a color changer is in use, the repeats must be an even number of rows in height. The repeat below is a variation of the one above. The slipped stitches are numbered, with the assumption that in this case, the fabric will be all one color, or with changes at the start and end of each repeat (now 16 rows)

Below are some of the options for color changes, with slip stitch areas renumbered as any of the colors create knit stitches on the face of the fabric, the bar at bottom of the chart indicates starting color prior to the first needle selection row toward color changer. Only 2 colors are in use in the actual knitting, the other color blocks in slipped areas are to help visualize what stitches are being slipped and for how many rows, in each color

Personal fabric and surface preferences may vary greatly between individuals. The swatch below shows variations in the above, including some dropped stitches that were “missed”

My personal preference is for the top of the swatch, where the difference in yarn weight also results in an interesting dimensional effect

a couple of the many sources on this particular stitch type

A bit of fair isle

Fair isle accessories, scarves in particular, can be problematic. I tend to make most of my scarves in the 64-72 inch length after blocking, lining them would result in a very heavy scarf. Knit has a tendency to curl to the purl side in length, and toward the knit top and bottom. Rayon chenille is a customer favorite, knitting it double bed in any DBJ variant is nearly impossible on my E 6000 because of shedding and electronic eye reading errors (I would consider ladder DBJ), and I was left with finding a short float pattern that might look acceptable on its reverse, and lie flat. Weaving draft charts can be a great source for repeats for geometric FI knitting. The pattern used below is an adaptation of one. The first swatch (1) looked fine. The long one followed it. When I ironed it, however, I noticed not only a missing black square or 2 in my mylar repeat (hidden by the fuzz of the chenille in the first swatch) but how lovely for it to have a totally curved, far longer edge (if only that was what I wanted)! On analyzing the possible cause I noticed the repeat had many more stitches knit in the chenille than the wool along that edge. Back to the drawing board: the repeat was sorted out using high contrast, smooth yarns (3 and 4), and the pattern was adjusted to a different location on the needle bed. 

Then, I thought I might introduce a border. The chenille is thicker than the wool, so any hem or stocking stitch edge was too wide. I would have preferred to chain behind the knit to help flatten the bottom and top edges and ran into yarn breakage galore. The final piece was made using 1X1 FI in the chenille “solid” color stripe to keep a balanced width and fabric thickness, and cast on and bound off edges were rehung and “bound off” again, to help cut down on their rolling toward the knit. The finished scarf measures 8″X69″, both knit and purl sides are shown below, side edge lengths now match.Assuming one uses a crochet cast on and binds off around gate pegs at the top, a chain is created at both ends, akin to that created in crochet, and one can identify a front loop, a back loop, and the whole chain. Any of the 3 may be “rehung” onto the KM, and the options are to knit a row and bind off again, or simply bind off again, for different looks that start to emulate single crochet a bit and can help stabilize edges or decorate them. It is helpful to keep notes as to the sequence used and which side is facing with each re-hanging.  Audrey Palmer at one point authored the Empisal book of linked edgings ISBN 0969485905. Intended for use with the Empisal (later = Studio) linker, there are lots of interesting uses for combinations of essentially find off techniques, and some resurfaced when she published her books on knit weaving.

The same pattern knit on Passap, using tech 129 and 138; there is a noticeable difference in width and openness of fabric with yarn weight change, and at the top with tucking for twice as many rows. 
A scarf knit in pattern, using tech 138, double bed on Passap KM; lightweight and drape allow it to be wrapped and worn in multiple ways; knit in 16/2 cotton, measures 11 X 76 inches partially blocked

From lace chart to punchcard 6, to electronic

The chart here is simpler than those previously explored, appeared in a Japanese publication, was suggested for use in MK as a hand technique

The lace transfers are in pairs, alternating in direction; this excel chart assigns symbols and colors to them. The repeat is 8 stitches wide, 10 rows tall, which make it suitable for punchcard machines as well as electronic ones

Below is the expanded graph, with alternating transfers for each row, and 2 knit rows completing each sequence. I am now using Studio mylars on the 910, so the additional border markings are to help orient the black squares on the mylar’s markings (6X5 as opposed to Brother’s 5X5). The expanded chart, now 40 rows in height:

On cards, orange and green may be punched as shown. Below is the resulting swatch, knit on 910 with #2 button up (flipped horizontally). 1: dropped stitch joy, which could actually be easily repaired at this point. 2: a partial repeat creating an interesting edge, more successful than the opposite side, a result that bears testing in swatches. 3: bind off around 2 gate pegs for maximum stretch in any blocking.

Machine knitting symbols

Brother early “home study”  images and explanations relating to machine knitting symbols, a bit clearer than some of the explanations that were published with the later punchcard books

anyone trying to work from charts such as these in hand knitting would need to consider the appearance of the resulting fabric on the reverse, knit side,  and mirror techniques where needed (see previous post series on hand to machine symbol interpretations

Tuck and slip color striping

There is a very early Brother “how-to” publication, which can now be found available for free online

The diagrams accompanying some of the tuck and slip patterns illustrating how the color changes combined with the stitch type affect the knit presented the information in an interesting manner. With both tuck and slip the unworked needles’ stitches get longer (unpunched holes, white squares), carrying up the last color knit in them until they are knit off again. If the subsequent color change is in the same color as at the start of the sequence, the in-between color (dark in diagrams) travels behind the longer stitches in slip, or is caught in with interim loops in tuck. The swatch photos show the knit side, the charts the purl side in symbols and  color change sequences

slip stitch

tuck stitch

More stitch types and techniques are represented as well in the publication as well.

Ladder lace

The inspiration: part of a magazine photo  A slightly different approach than in the last post. The tale begins with a hand-knit graph:  expanded to include alternate rows the “graph” paper version   If a punch card is to be used, all colored squares represent punched holes. I used my 910, Studio mylar for my swatch. The mylar repeat and programmed numbers: A png for a single repeat used in the later postThe approach in the execution is a bit different from the previous samples. In this instance, colored squares represent the number of stitches to be moved/the number of prongs on the transfer tool to be used.
The pairs of transfers in the chart are made away from each other, orange to the right, and green to the left.
The transfers produce 2 empty needles side by side, they are left in work, as the next row is knit they will produce loops on each needle.
Side-by-side loops do not make stitches, so subsequent rows will continue the ladder.
It is helpful to use yarn that does not split and get caught in hooks, as that may partially knit on the next pass, creating a knit stitch and disrupting the ladder. Also, rows with loops should be checked to make certain they are in the pairs of needle hooks, not off either or both, before the next row of knitting.
Do not release the loops; when the next set of transfers is reached, treat the loop (where circles occur in the graph) as you would a stitch, moving it over on its own prong.
As with transfer lace, it bears taking the time to knit slowly and prevent errors rather than having to attempt “fixing” errors such as runs due to dropped stitches.
The resulting swatch on the standard KM (2/8 wool)The punchcard:  The related swatch knit on the 260 bulky KM The yarn is an alpaca too thick for the standard.  I liked it at tension 1 for stocking stitch, but I had to increase the tension to  3.. to be able to manage the transfers, especially the ones over by 3 stitches X2.
for a sense of the scale difference between the 2 swatches. The punchcard was made from a roll purchased directly from Hong Kong, advertised specifically for Brother. The roll is continuous, with separations as seen in the image below. Numbering, however, is for Studio KM systems, so adjustments need to be made for using them on Brother KMs (ie. the first selection row will be row 3 as marked in the punchcard used in the swatch above).  2022: Sometimes what works well on a small swatch does not in a larger one, or may simply require a different yarn, more attention, and slower knitting speed. The first trial at other yarn content included a yarn perhaps too thin for the effect (green), and one requiring maximum tension making the transfers with loops difficult. Once the initial transfers are made, this loop formation will appear in locations indicated in the chart. A visual check should be made as to whether there is a loop on each needle. If one is skipped, simply lift the yarn onto the hook of the empty needle. As the fabric progresses, the loops will appear on the top of the shafts of the selected needles and are treated as one would handle stitches in multiple-stitch lace transfers Shown again in the white knit  After the transfers are made A yarn split on the machine may be seen in the center of this image.  Yarn splits and dropped loops are quite visible in these tests.  A return to a different 2/8 wool brought better results, again, splits can be identified in the fuzzy spots even if the ladders are formed correctly  This last swatch was knit in wool rayon. The problem of splitting was eliminated, while dropped stitches were easier to miss 


Ladders and Lace

The patterning resulting from creating and manipulating ladders with needles out of work can create interesting openwork fabrics. I like to use punchcards or mylars for “automatic” patterning in selecting needles, with carriage set to plain knit,  to help keep track of where to introduce transfers when possible. Microsoft Excel or Mac Numbers remain my favorite “graph papers” for working out repeats at various stages of developing the trial swatches.

A work in progress sketch: 2 side by side repeats, my first “drawing”. Empty circles indicate where I think I want to produce holes, green transfers and orange ones are toward each other, colored squares (orange and green) indicate the number of prongs on the tool used for transfers: orange transfers are made with a single eye tool, green with a triple eye one. Needles in the greyed-out area are left out of work after each transfer to create ladders. Where a lace hole is desired the empty needle is returned to work after its stitch is transferred. The yellow line is the knit of every row’s center stitch of the pattern. The chart does not match the card, which was further edited

the punchcard repeat for the edited final version, including markings showing directions of transfers and ” row 1″

the resulting swatch

I have a brick repeat sorted out, not certain about its end-use

another card, 2 prong tool was used for transfers, arrows on the right indicate the direction of those transfers, and color change indicates its reversal

the resulting fabric: A_ empty needles left in work throughout, B_ as the direction of transfers is reversed, the empty needle on top portion is “filled” in by lifting purl bar from the row below onto its adjacent side, C_ 2 adjacent needles are constantly left empty to create ladders, with one needle brought in to work for every one taken completely out of work as needed. There are more possibilities. When experimenting it is helpful to keep good notes to ensure the ability to reproduce the desired effects.

previous post on leaf-shaped lace


Studio mylar use on brother machines 2

In a previous post I addressed some of the issues involved in using the studio mylars in Brother KMs. I have an enormous store of them from back in the day when it was only possible to have single patterns occupy a fixed number of rows, while the remaining surface for those rows was unusable. This fact changed when the company produced the EC1. I revisited this topic after a forum question on the subject. It would be convenient to produce consistent results with the Studio brand, and be able to use my stash of them as well.
It is interesting when one is trying to figure something out how sometimes the obvious may be missed. Instinctively this time, I simply lined up the bottom design row of both mylars before drawing the set line, disregarding the difference in length between the 2 mylars below it. This bypasses the 3-row difference in programming rows suggested in my previous post completely, while the shorter distance below the set line to the reader did not prove to be a problem I had tested template markers on Brother mylars when ink pens were discontinued and I had no luck with permanent markers, found they shed a bit and pencils tips broke easily, while I could not be as neat in rendering small markings as simply by going the route of using a number 2 pencil on the mylar’s back ( I prefer the Mirado Warrior HB 2). Drawing with enough density “within the lines” on mylars is rendered far easier with one of these templates, at one point made available from Brother. Similar ones may sometimes be found in stationary or art/ drafting supply stores. The images below show my first “new” tests: on the left, I drew with the template marker over previous pencil markings, the squares repeat over # 36 was made with multiple layers of a sharpie (which smeared even after what would seem like adequate drying time), the ones over #42 are made with the template marker. The sharpie did not get scanned properly by the reader, all other marks did. There is a guiding pencil line placed where the set line familiar to Brother users would be. In the first narrow column to the right, the pencil marking corresponds to the first visible row (design row 1 in reader). The column on the far right (absent from Brother) could be used for additional cues in knitting ie. color changes, knit rows between lace transfers, etc.

the template markers are easily available here in the US, for a little over $ 4 now; frequently they are found in quilting departments of fabric stores. I am not certain which specific brand mine is, but this is what it looks like

the “pencil” that appeared to work when used on the back of both mylars is the Pentech rubberwriter, which seems to no longer be available (rubber coating is on pencil exterior; results  were random on Studio mylar)

When used on the respective brand machines, the Brother reader scans 13 rows below eye level outside the machine, while Studio scans 10 rows below This explains why the columns intended for memos extend up and beyond the last row which can have cells marked for pattern in each brand.

2021_ some FB knitters have mentioned having success with using whiteboard markers to make readable and removable if needed marks on Brother mylars

I had some erratic results as seen in the last post. Here a small success led to a bigger trial (template marker over motif previously drawn with studio electronic pencil) and I ran into a different problem: bands of rows on the mylar did not select; this may be seen in the image below (testing repeats for any stitch in FI makes drawing or punching errors easier to visualize), and recurred in a different area of the card, while at its very top nothing got read ->needles selected

———-

a couple of times over the decades of my knitting with Brother mylars I ran into this specific problem for no apparent reason, so I tested a different Studio mylar sheet, toward the top, and both the template marker and the rubber writer got to read/knit correctly

“going bigger” again, the pencil did not get read, while the template marker did

playing with a slip stitch on another part of the sheet (marker)

the “patterning errors ” in the image above (extra brown stitches third white stripe from the bottom of the swatch) were actually due to a bit of eraser left after its use on the mylar in the blank area of the card.

——-

In summary: there have been good results in my trials in using the template marker both on top of already rendered electronic pencil drawings or on previously blank sections of Studio mylars and subsequently having them read by my Brother 910, with limited results in having small repeats read when drawn on the back of the mylar in pencil, but not with larger motifs. There have also been some problems that are not immediately explainable.

From lace chart to punchcard 5 to electronic

Continuing with the “relatives” of the proposed border chart in the previous post, this gets us even closet to the hand-knit. So, I have a punchcard, a 12 stitch repeat, really want to go 14 wide for the repeat, and now several other issues are encountered. If one thinks about lettering and controlling horizontal direction with a card, one is reminded that the card “knits” the image ie a letter as punched on the purl, back of the fabric, so when the knit side is viewed, letters are mirrored. One solution is to flip the card over horizontally. If when knitting from a hand-knit lace chart the transfers need to be “flipped” to match results, the punchcard does that for you. With the 910 what you see on the mylar is what you get, so if the repeat is drawn for lace as for a punchcard, it will need to be flipped horizontally. Punchcards are sectioned in blocks of 6, mylars in blocks of 5, so if copying a card it may be worth printing it out large scale, and outlining new blocks 5X5 so as to be able to orient lace markings correctly within them.  With electronics one may have built-in functions for mirroring in either direction, I went another route:

This is a section of my mylar with markings for repeats, the blue outline for the 14 st, the red for the 12, suitable for punching on a card.  The first K2Rs reminder may be seen  in the column on the far right, the colored squares and numbers indicate the programmed repeats for each sample

I chose to knit the test swatches using the lace carriage on the right, the knit carriage on the left. First selection row is made with the LC from right to left

the 12 stitch repeat

the wider and longer repeat (with an unintended dropped stitch),  which would create more of a curved edge if used as a border

“putting this one to bed”