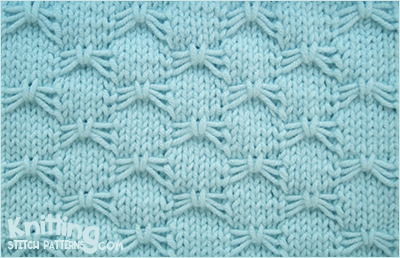
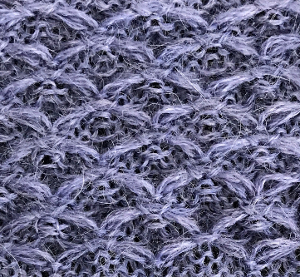
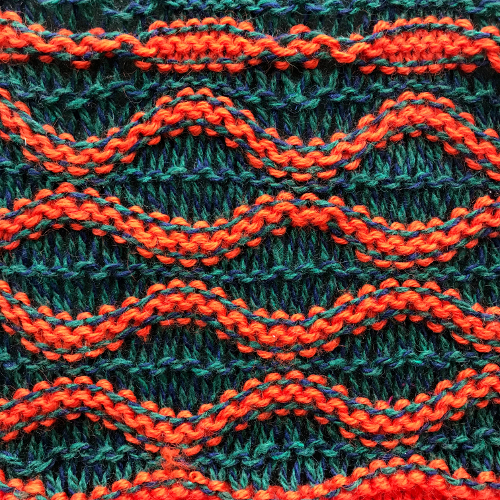
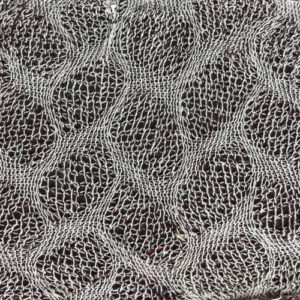
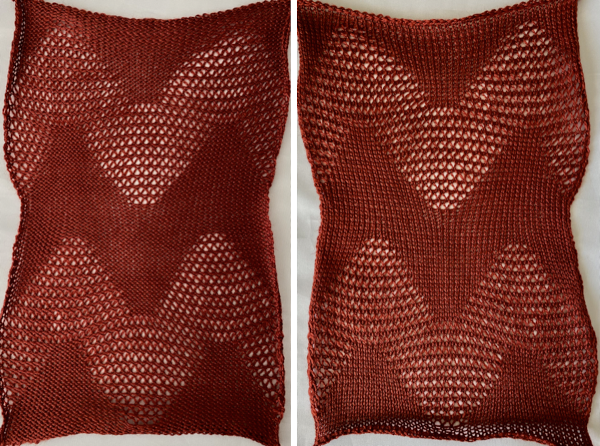
4/23/18: inspiration source is from a Russian pin, bottom left #198
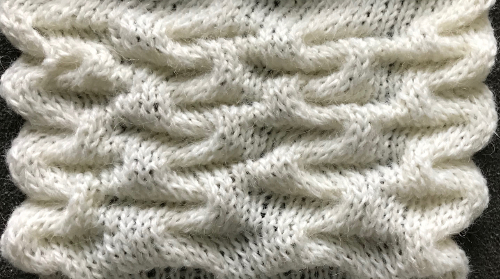
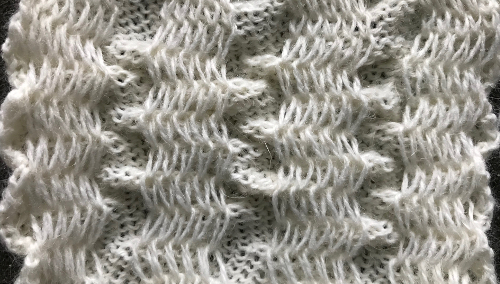
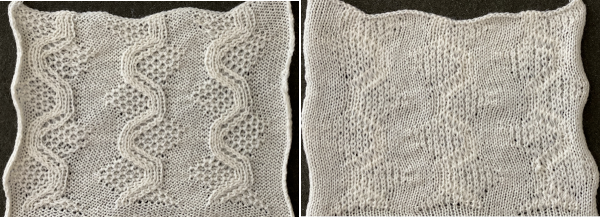
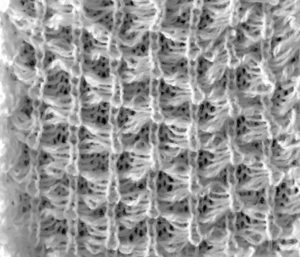
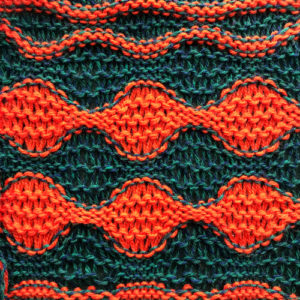
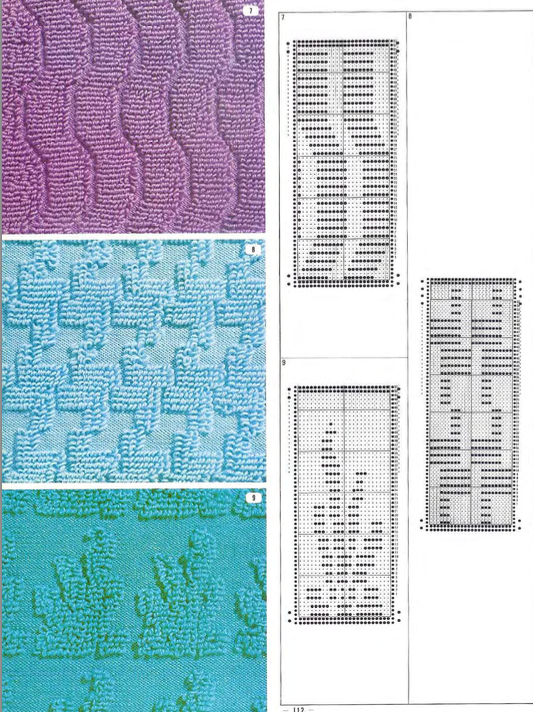
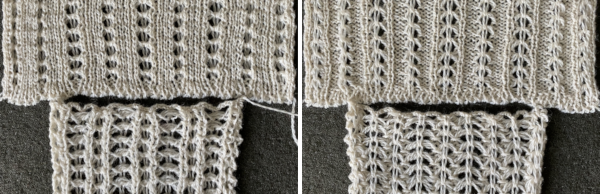
The first swatch, produced with manual selection, and varying the number of rows between racking to establish yarn tolerance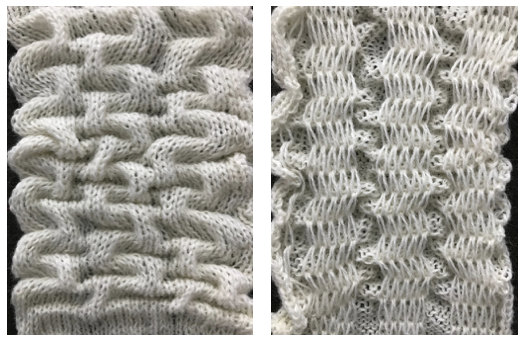
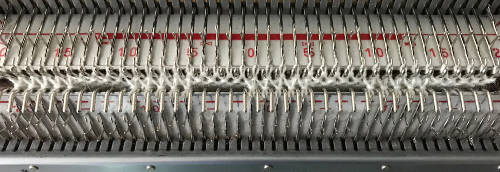
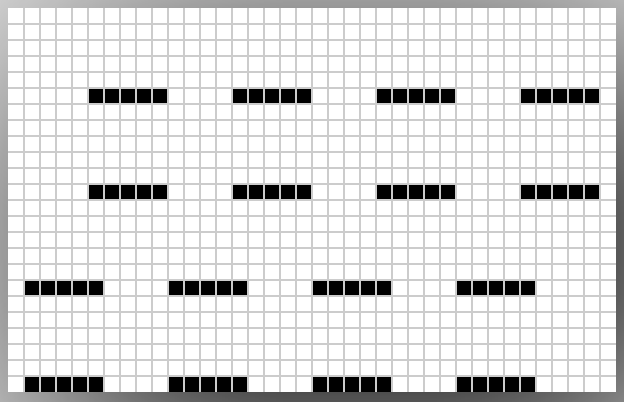
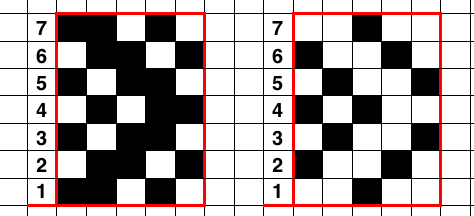
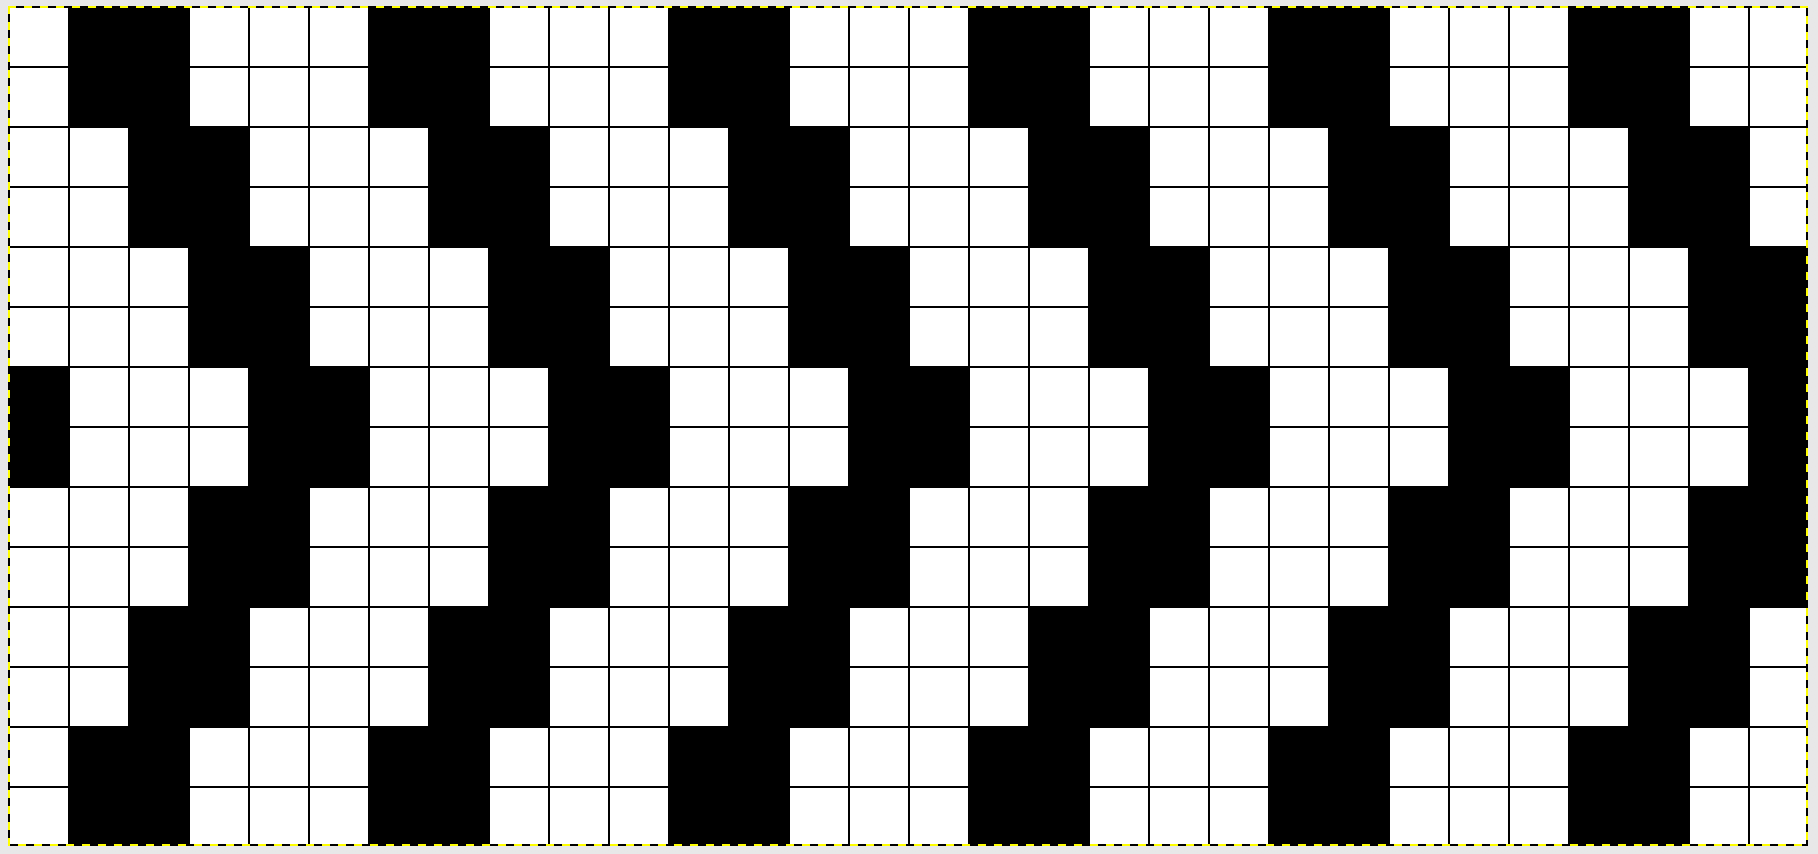
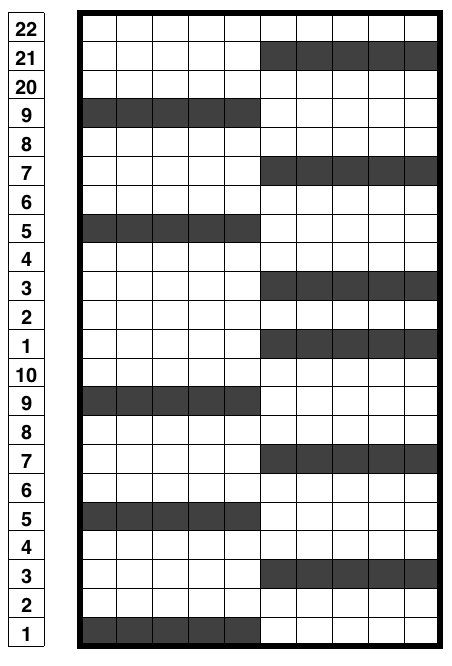
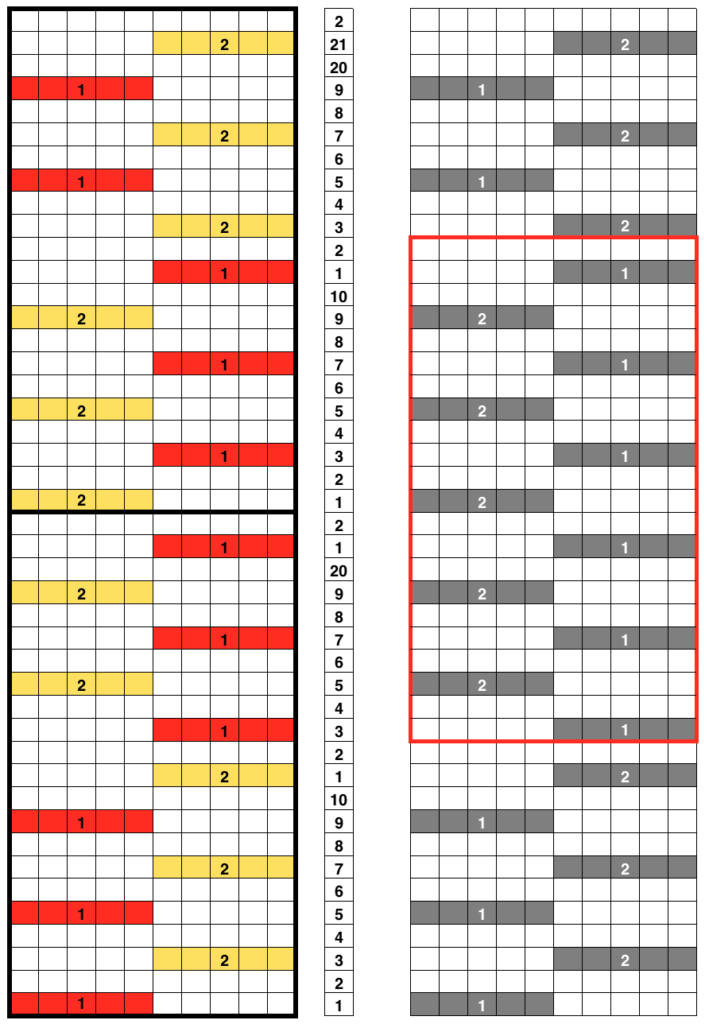
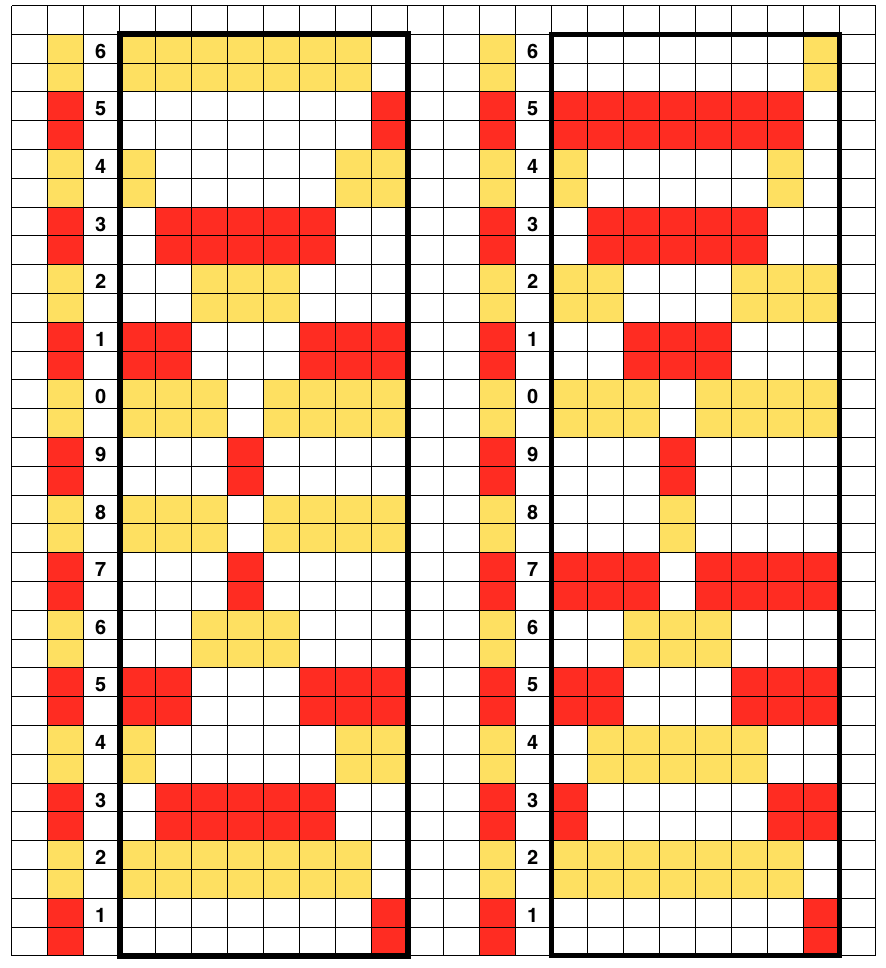
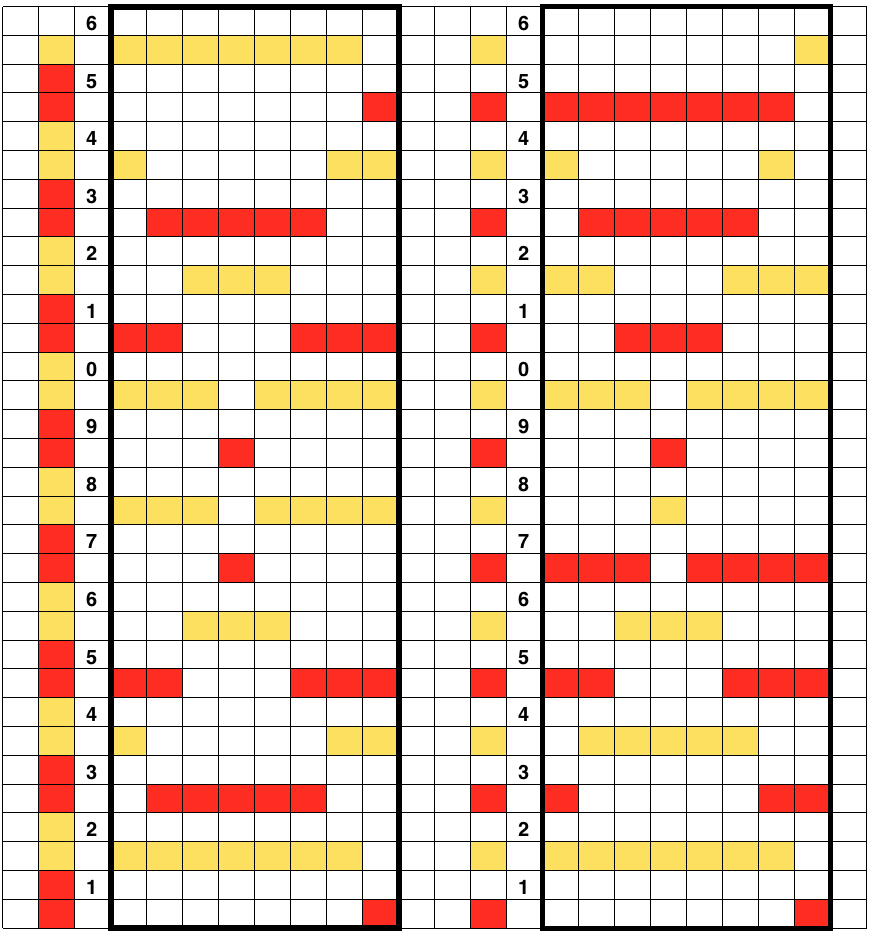
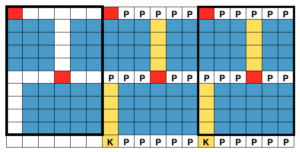
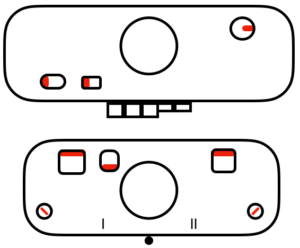
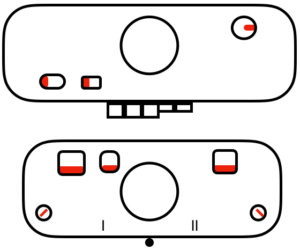
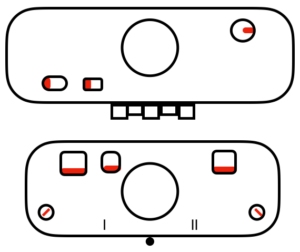
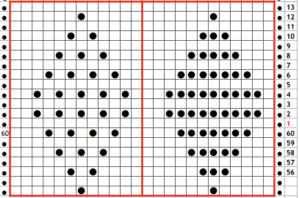
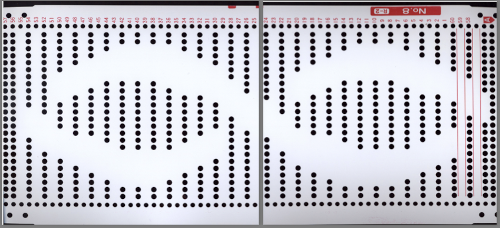
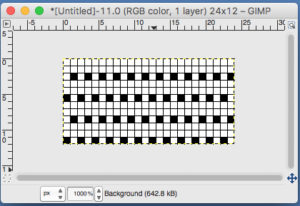
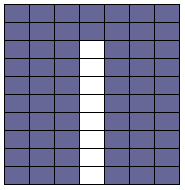
There are single rows of knitting on both beds, so the option of using 2 knit carriages is out of the running. My test swatch had the main bed doing all the knitting, the ribber knitting the joining segments with manual changes in its buttons from slip to knit and back when appropriate. The staring needle arrangement, on “graph paper”, and the subsequent racking positions: the top illustration is for racking position 4, the bottom for racking position 0.
 A tentative plan of attack: the combined knit and ribber carriages are to be used throughout. The main bed KC is set to knit, but the change knob is set to KCII. The blank squares will actually knit thanks to the setting, the selected needles will indicate the direction in which racking is due to take place prior to knitting the next row.
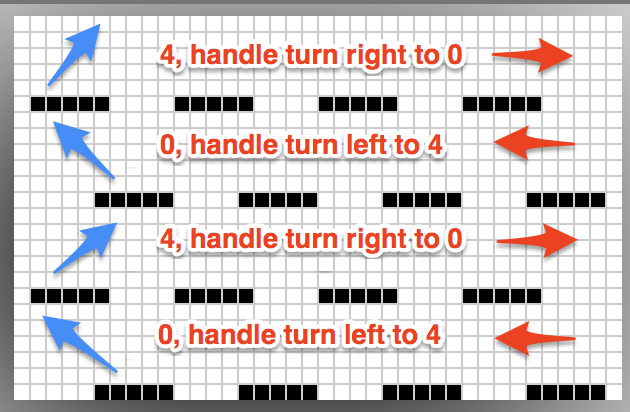
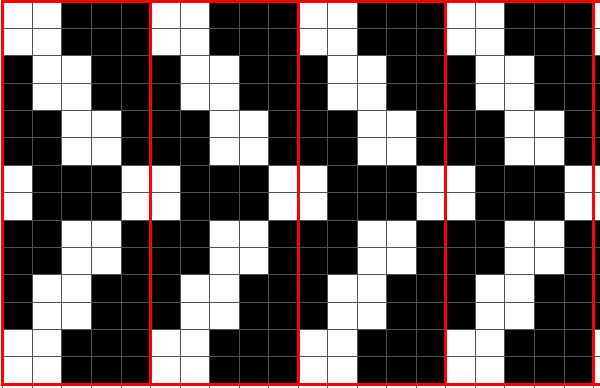
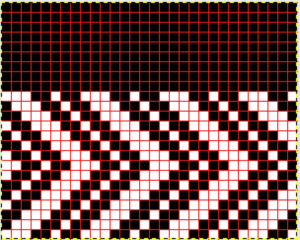
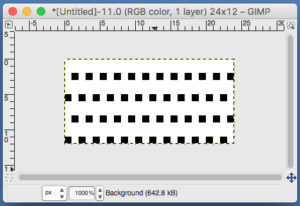
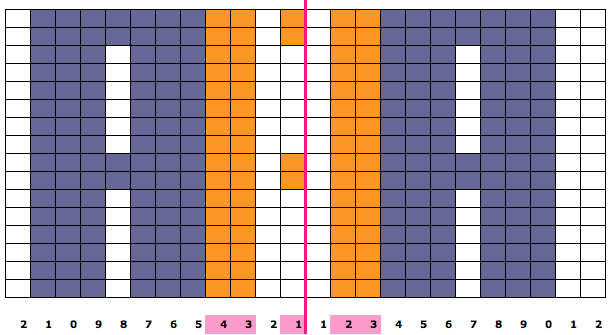
This is the starting ayab repeat, with single repeat segments highlighted (one alone would be adequate for most other electronics). 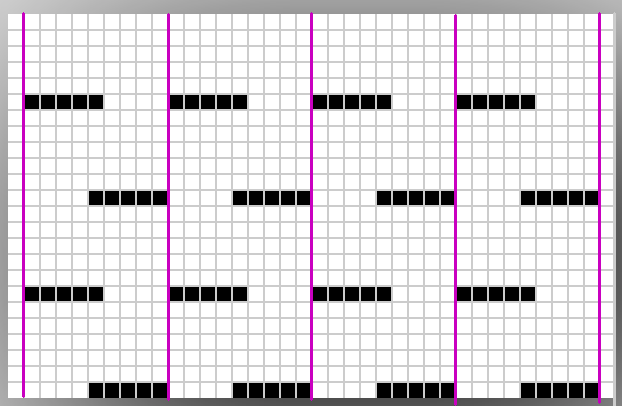
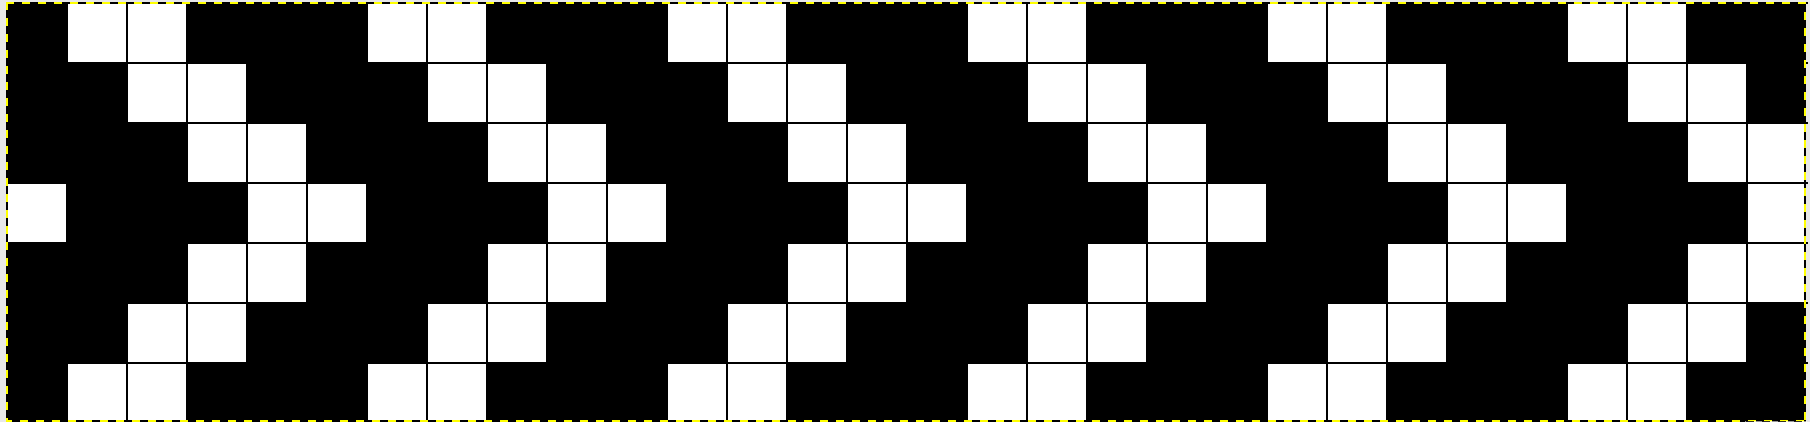
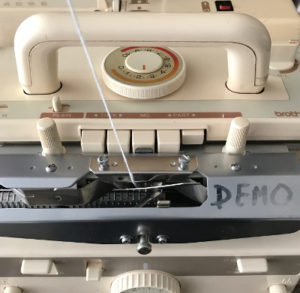
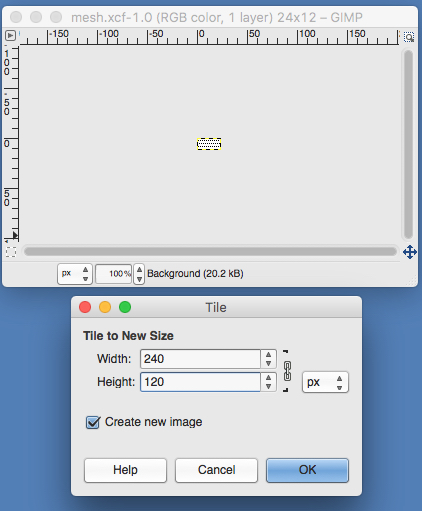
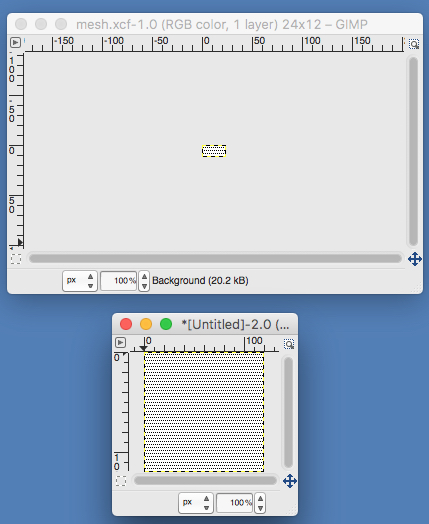
You will be working on the purl side of the knit. In what is an increasingly irksome feature to me, Ayab will automatically mirror horizontally any loaded image, so to get the above, you need to actually be either mirroring the image prior to loading it (my preference), or remember to do so through Ayab’s actions after. Enter this,  the ayab screen shows this
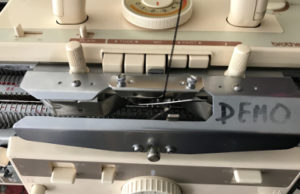
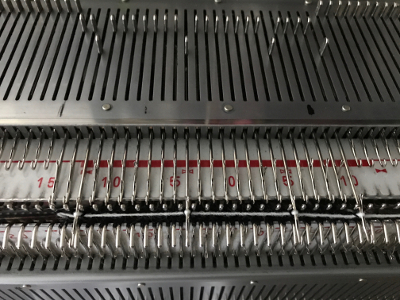
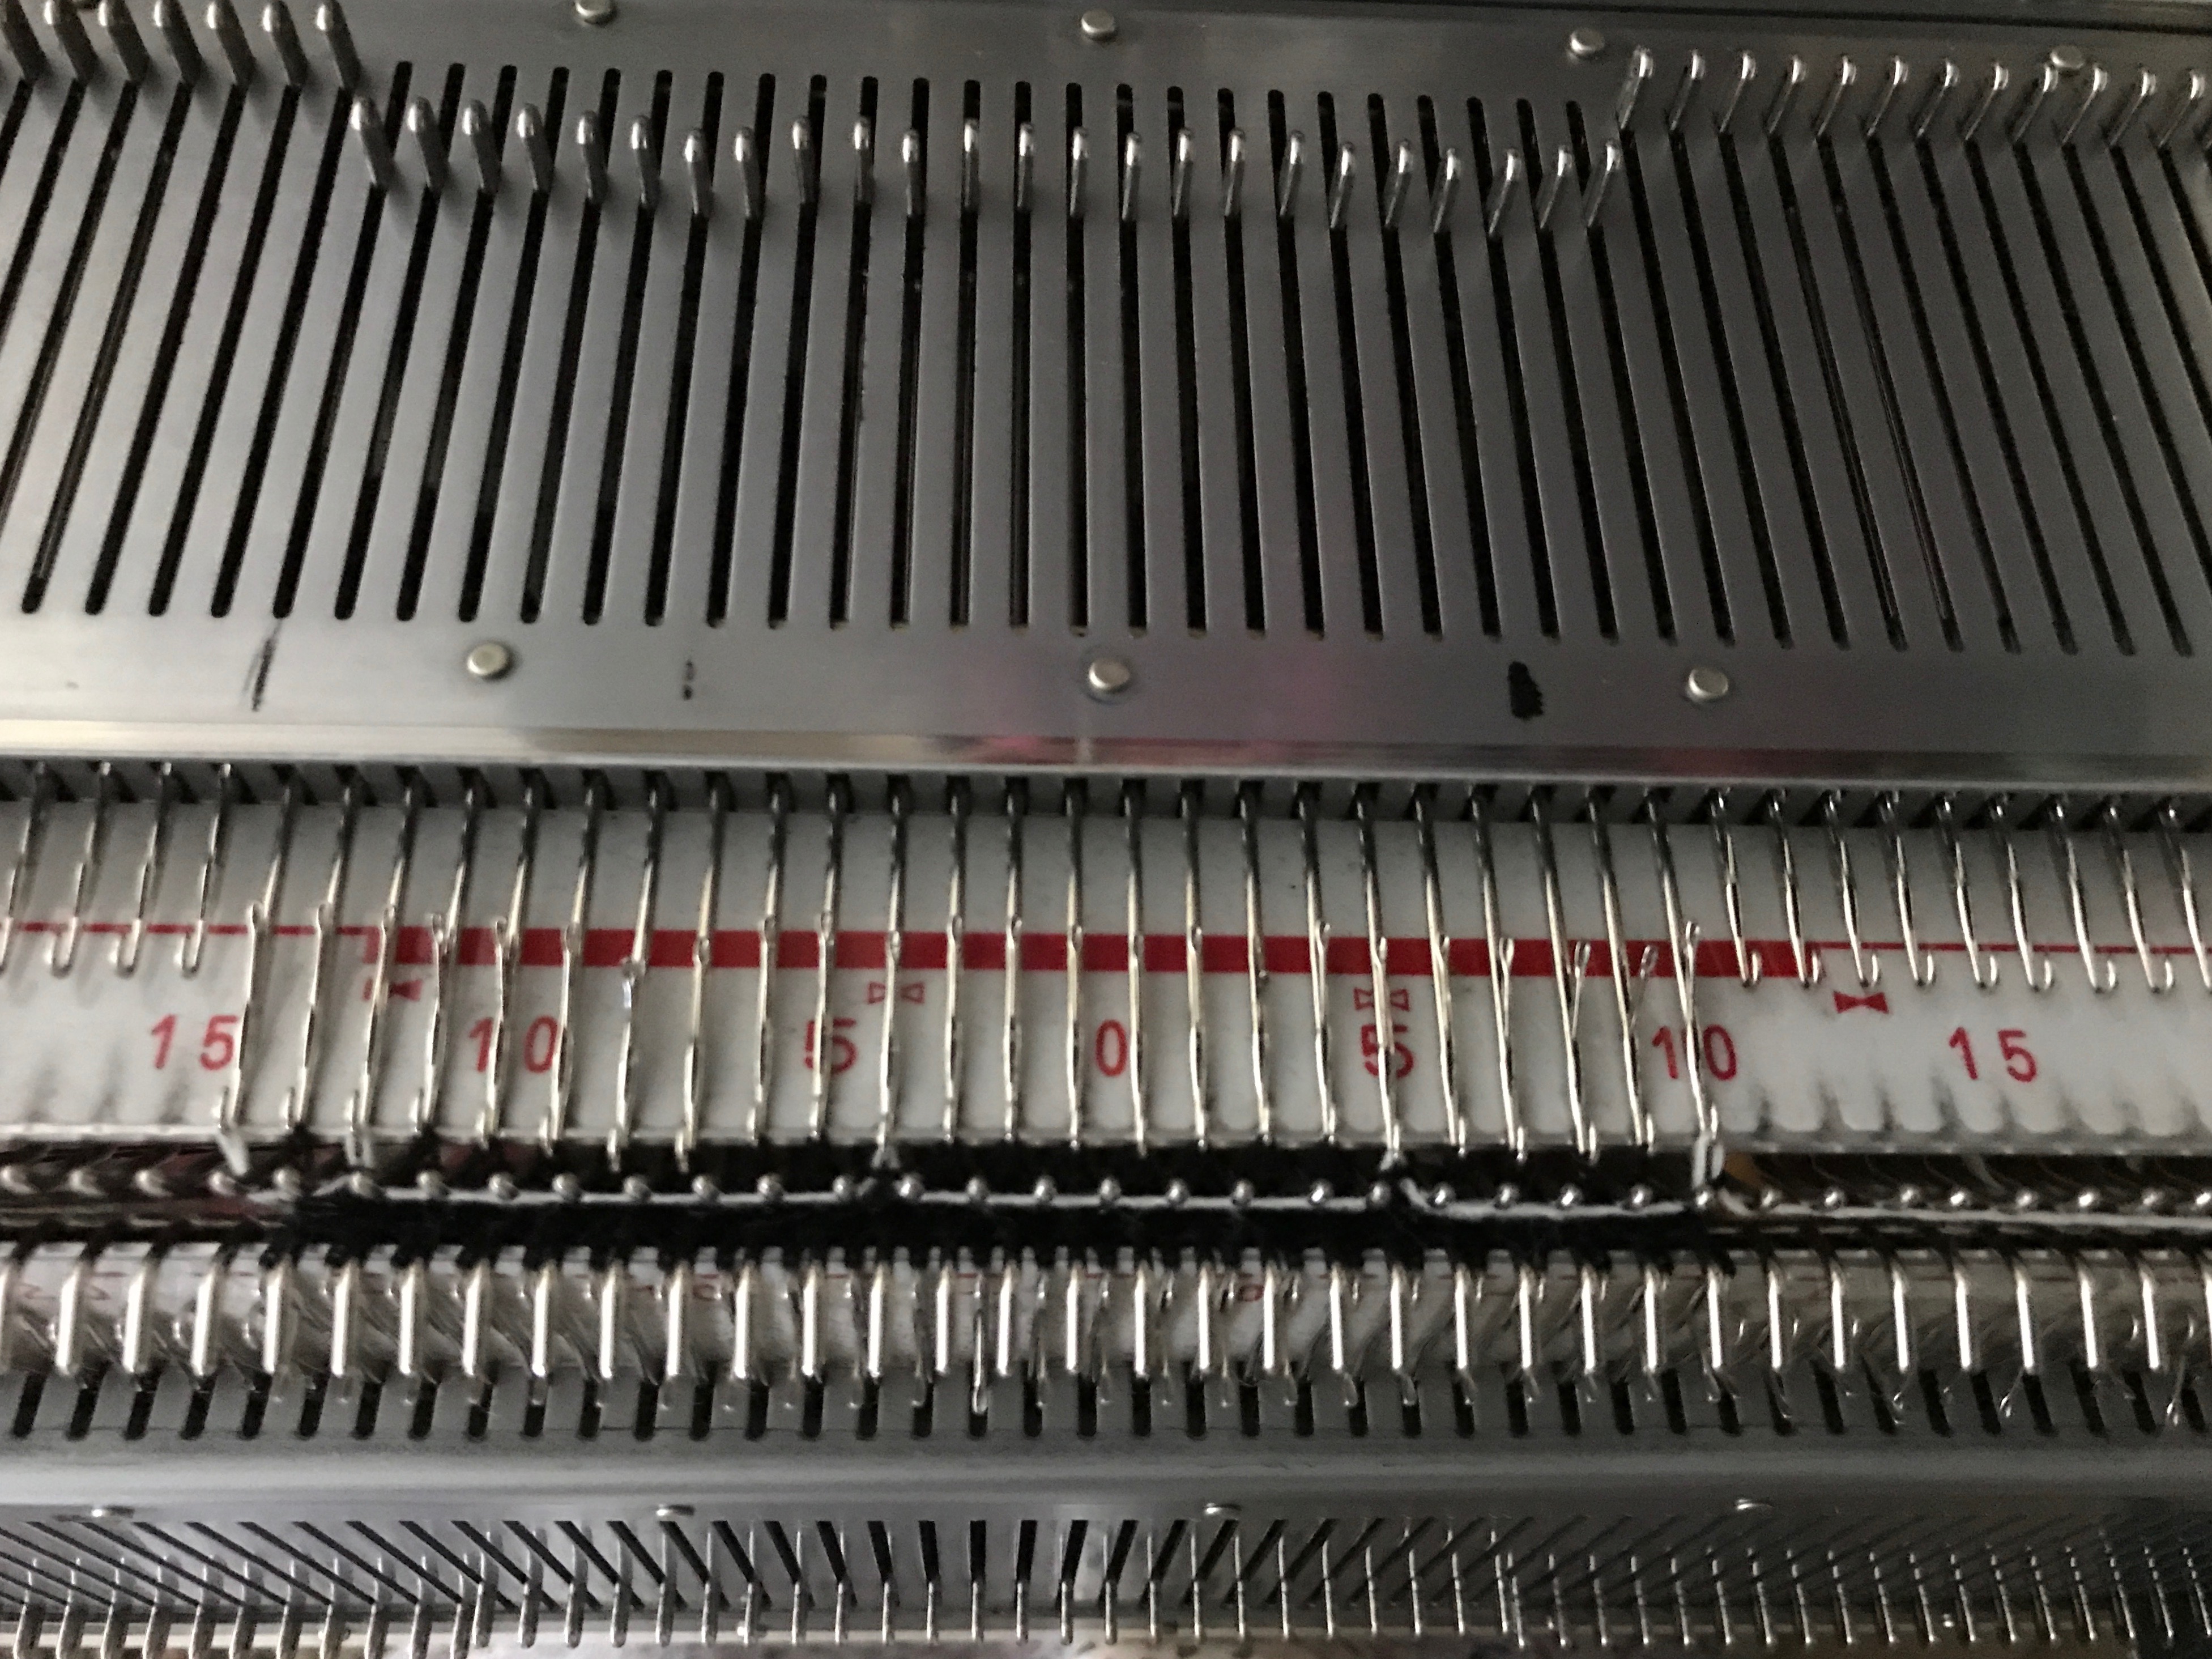
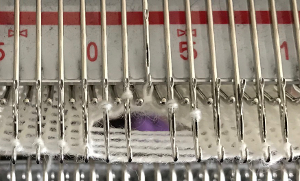
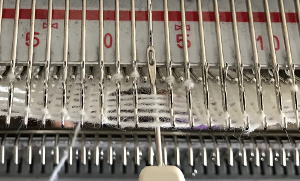
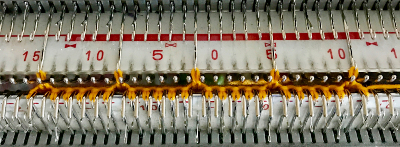
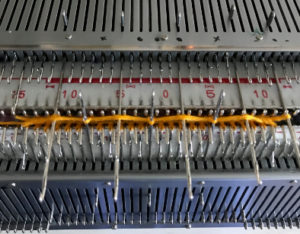
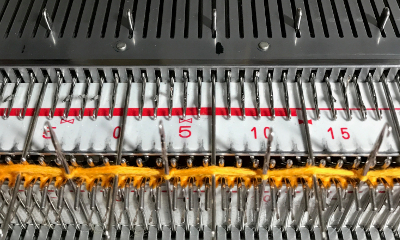
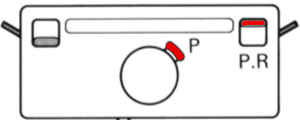
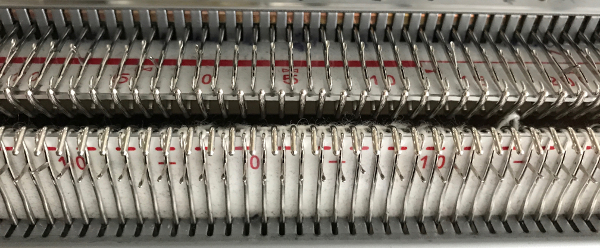
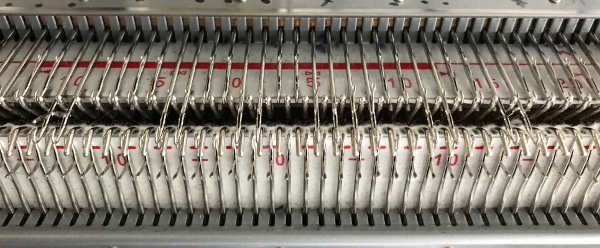
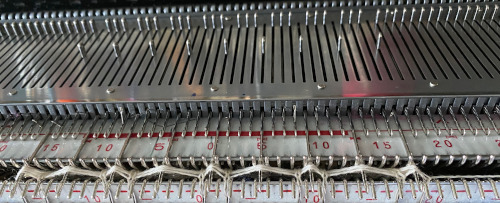
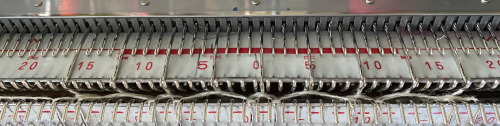
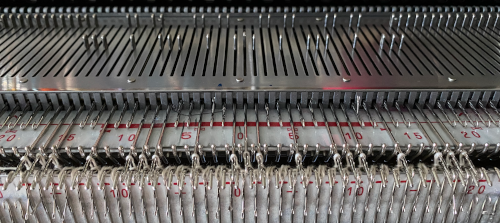
This is what appears on the left side of the Brother ribber. I prefer to rely on other methods to track directions and numbers of positions in racking, but the ribber itself provides some clues. My pitch lever will not move all the way to H, but that is made up for in the ribber adjustments, so it is not a problem. A reminder: turning the racking handle to the left is toward increasing numbers on the indicator, to the right is toward decreasing numbers 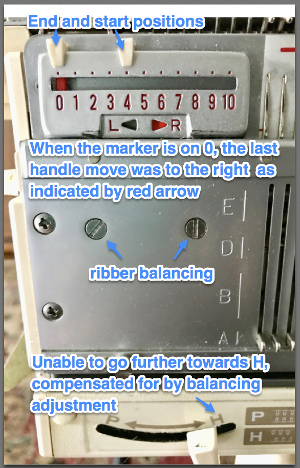 The set up for my swatches, and the first row knit on racking position 0.
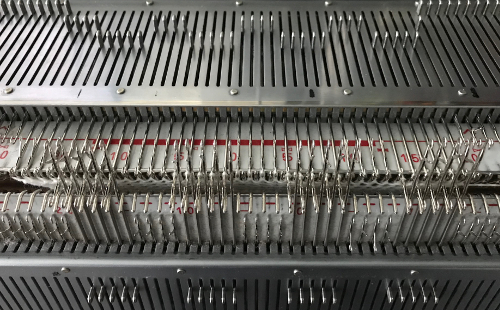
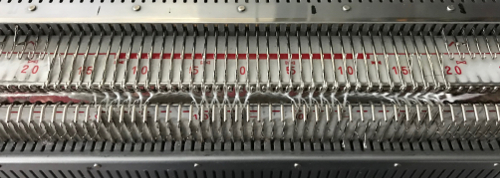
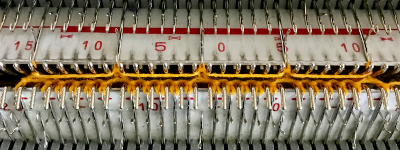
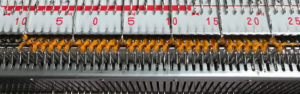
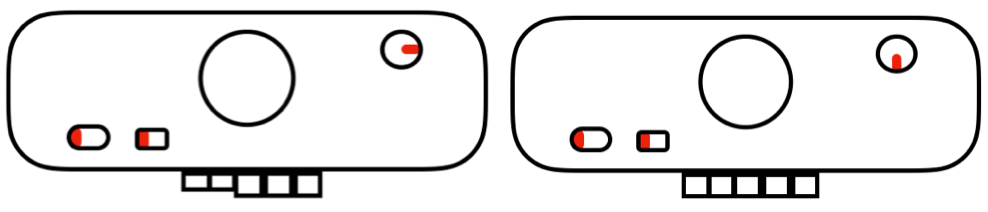
The first preselection row in Ayab knits above needles on both beds. With carriage on the right, set the ribber to slip <– –>, and knit up to the next row where needle pre-selection appears. *Change the ribber button on the side to match the direction in which you will be moving the carriage (left if knitting to left, right if knitting to right) to knit from the slip setting, knit to the opposite side (no more needle selection), change ribber lever back to slip again prior to any more knitting.** Repeat * to **. Position 4:
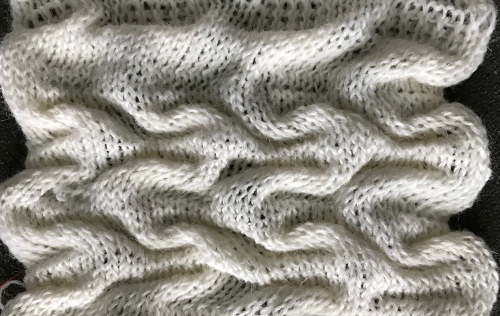
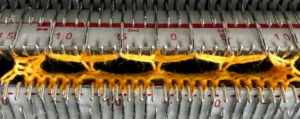
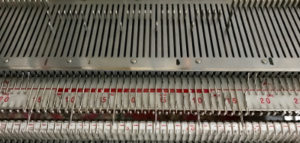
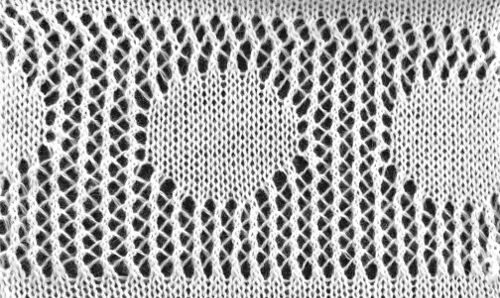
 I began to run into issues with ribber stitches being too tight, this was knit with a tension adjustment, resulting in a less defined texture
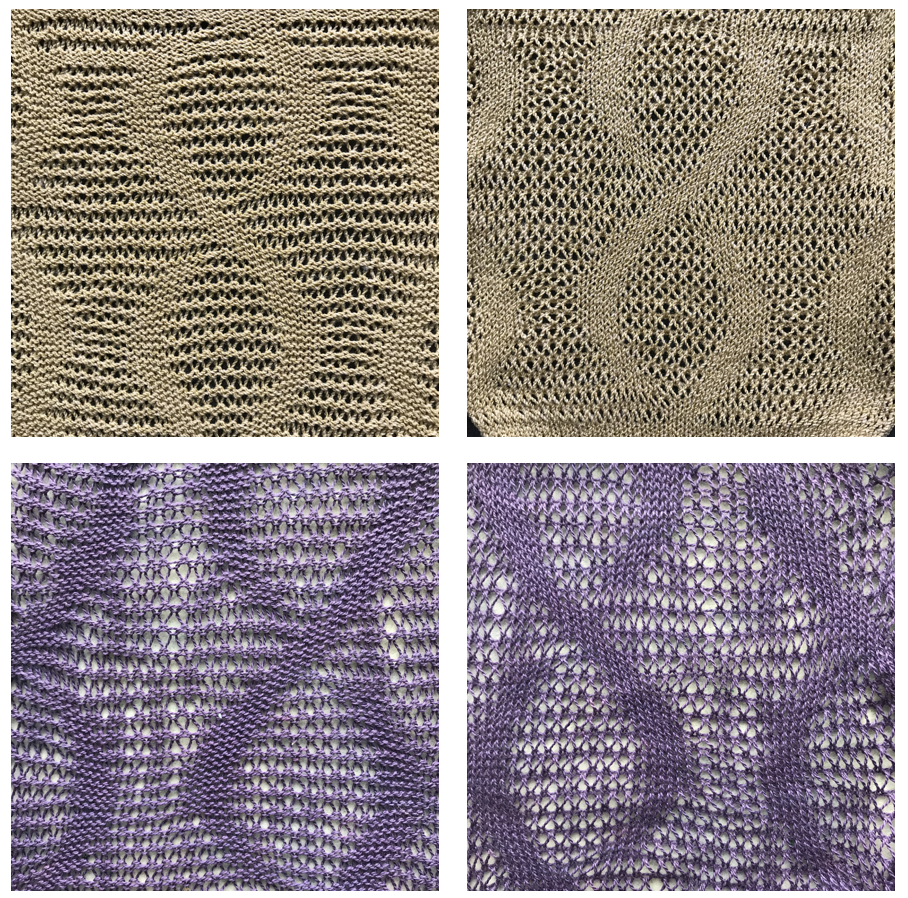
Going a different route: another repeat, with each position, repeated once, repeat is pre mirrored
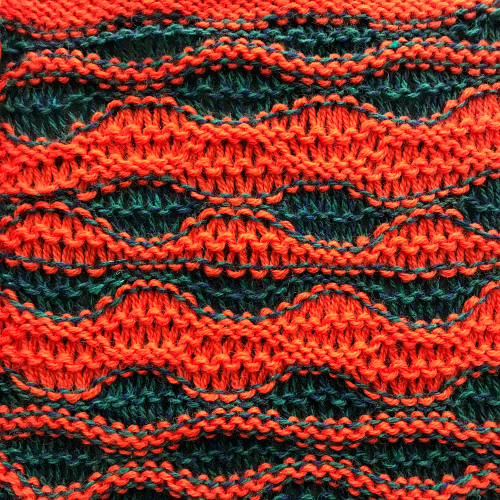
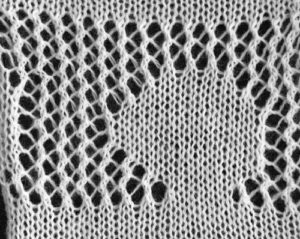
 a swatch with the racking happening only in the center of needles in work
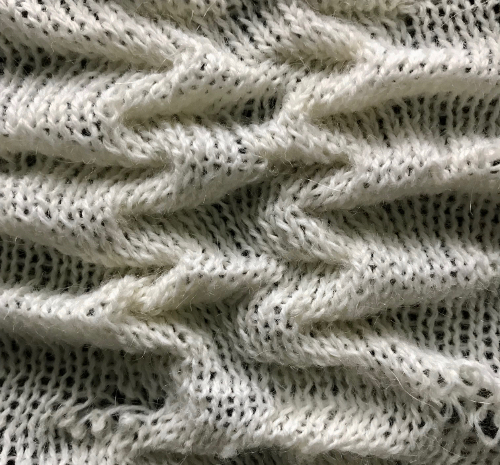
Starting position can be variable. With more stitches cast on, while keeping the same ribber configuration, racking can happen further to the right or to the left. There need to be enough stitches on the main bed so ribber needles do not travel beyond them when racked. The knit bed uses tension close to that used for stocking stitch. The ribber stitch size may need to be adjusted to allow for a wider move toward either side. A looser ribber tension results in a less sculptural surface on the knit side. I have seldom been able to knit more than 6 rows on the main bed with ribber combination stitches on Brother, often maxing out at 4 depending on the yarn. Consistent habits help develop one’s own most meaningful reminders for taking action.
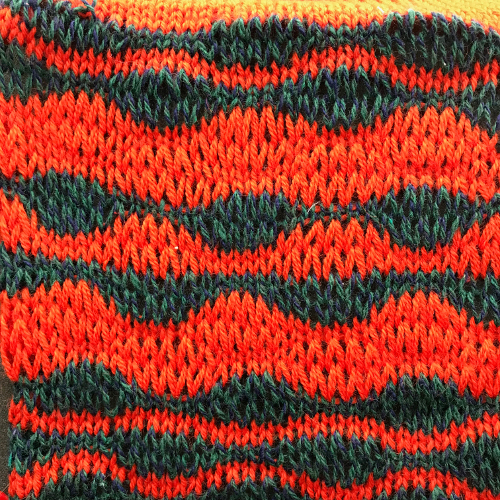
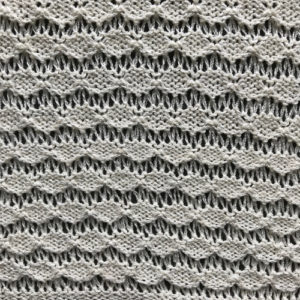
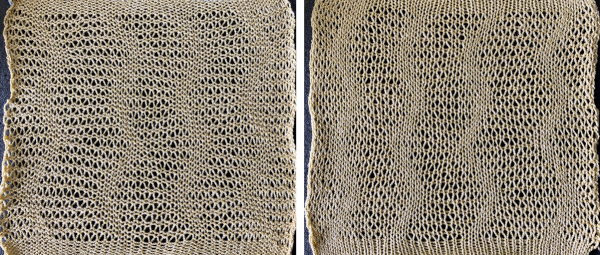
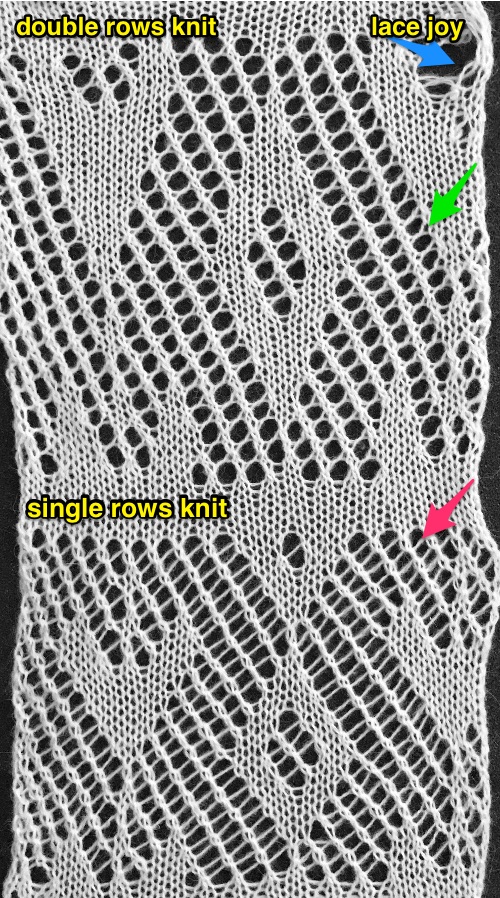
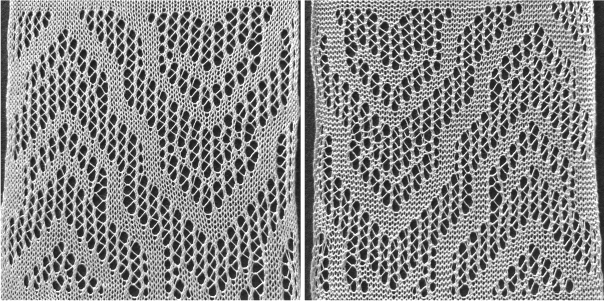
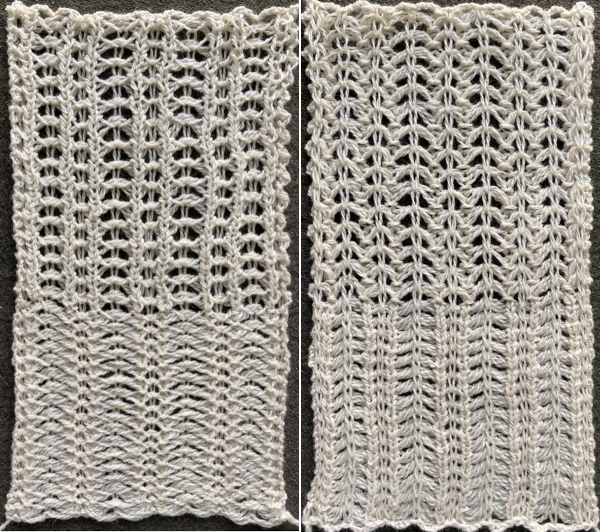
5/12/18 2 more samples. This time racking is done by 3 positions, the ribber setup is with 3 needles out of work, and 5 in work. Set up is with the racking handle on 3, move to and from positions 0 to 3. Knit 4 rows single bed. Rack to the next position. Use ribber set to knit for 2 rows for the sample on left, for a single row for the sample on the right 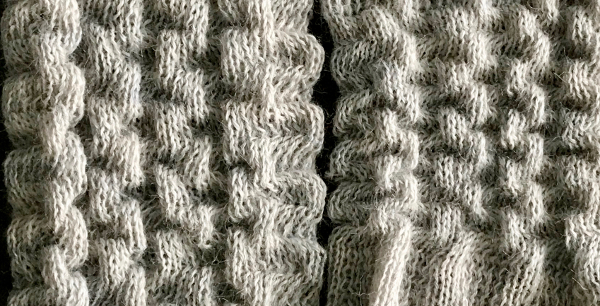
A printable “rib setup” to aid in charting P and H needle configurations, with some space for notes and carriage settings
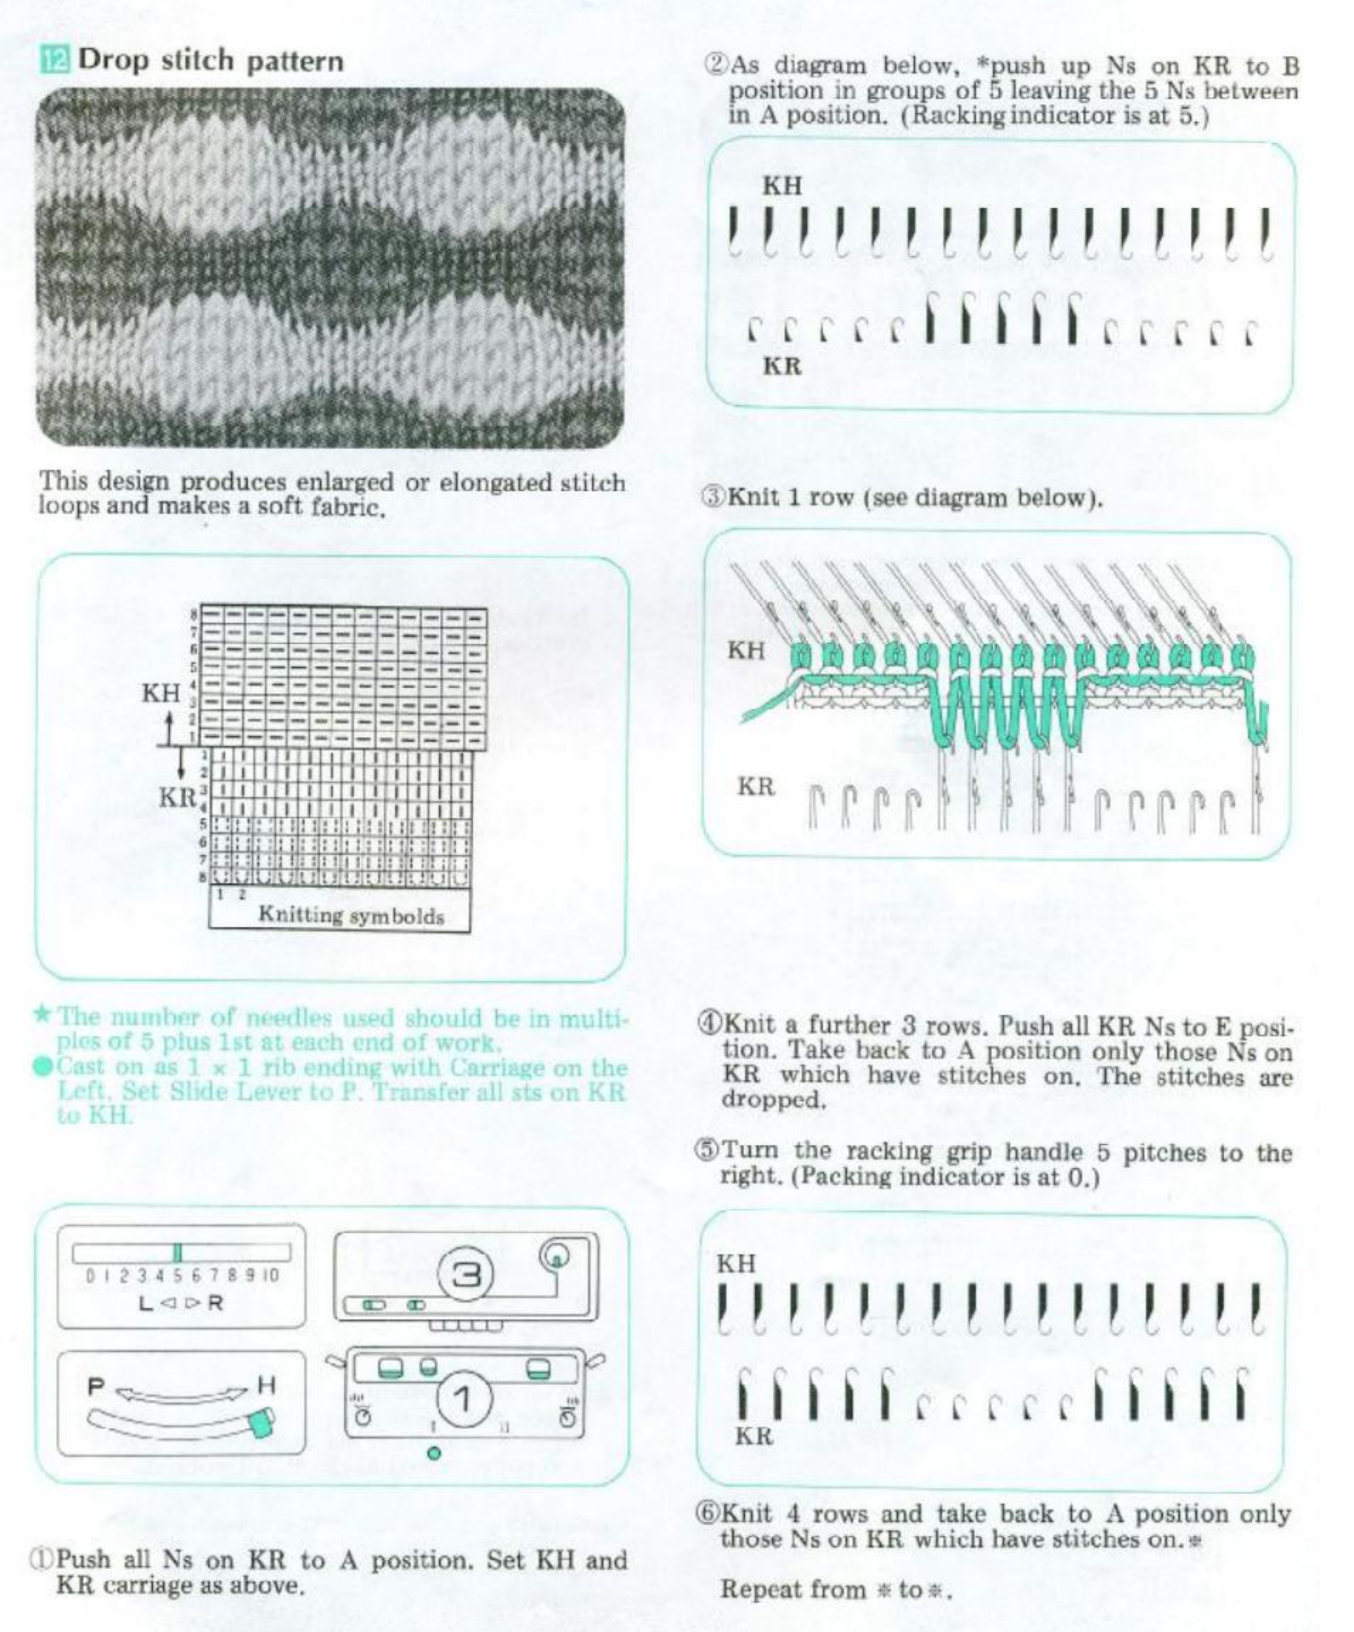
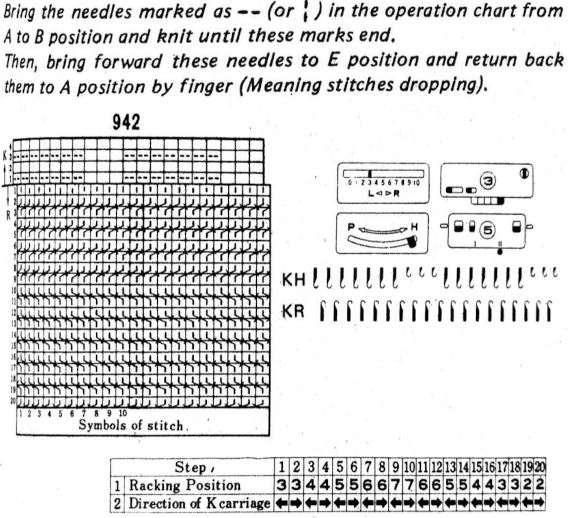
5/8/18 This is from the dubied knitting machine pattern book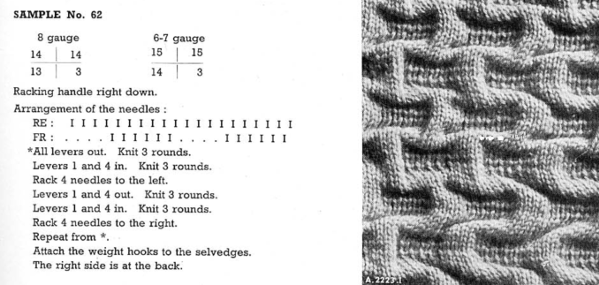
My step-by-step interpretation, which may be worked as a hand technique on any machine
1. racking handle on 0, cast on for every needle rib
2. transfer stitches to the main bed to match the needle arrangement above, and knit 3 rounds
3. set the ribber to slip in both directions, knit 3 rounds
4. rack 4 to the left, set the ribber to knit, knit 3 rounds
5. set the ribber to slip in both directions, knit 3 rounds
6. rack 4 to the right, set the ribber to knit, knit 3 rounds*
repeat steps 3-6
The resulting swatch 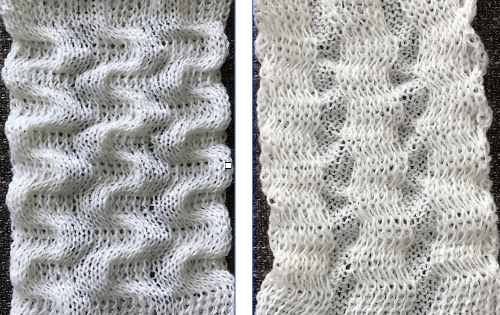 For a different method of knitting this same fabric, please see Combining knit carriage needle selection with racking 2017
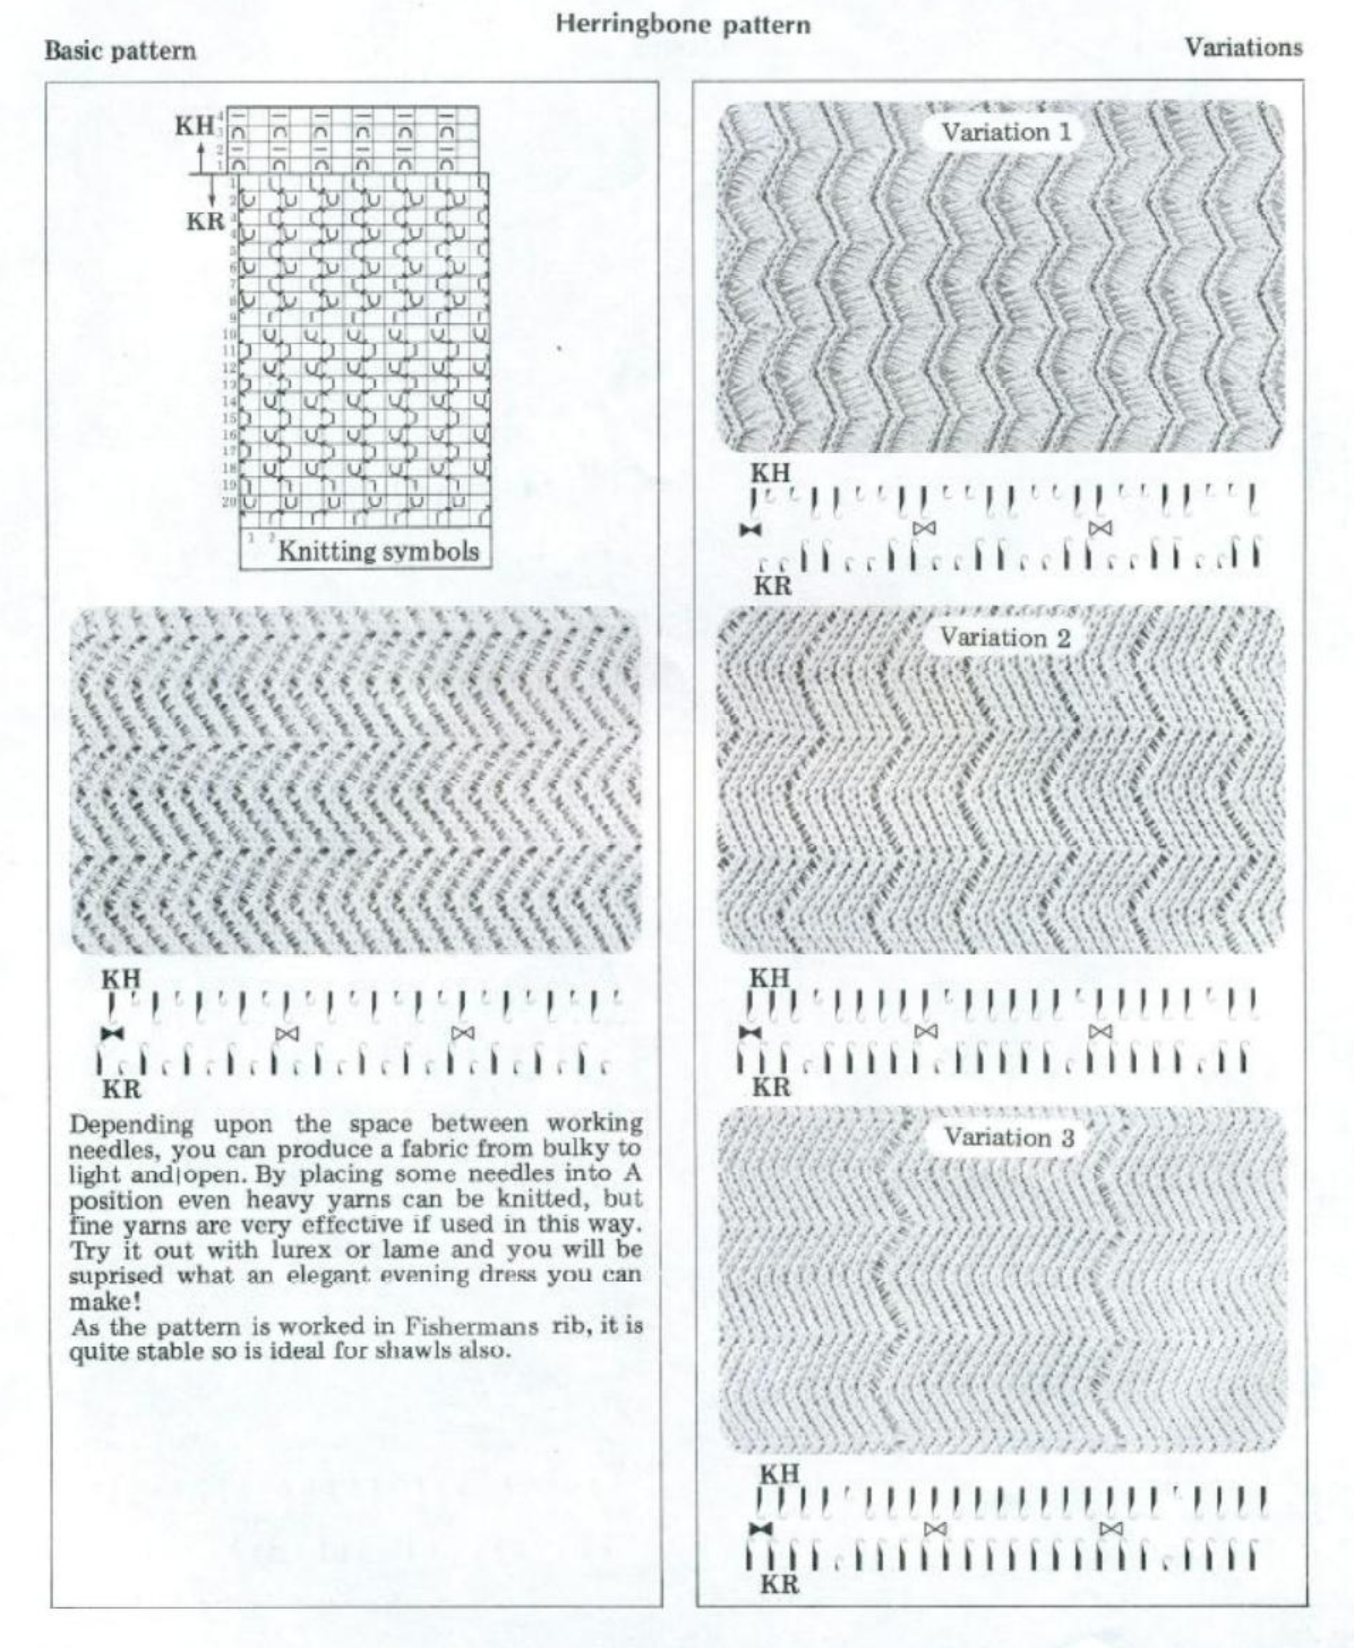
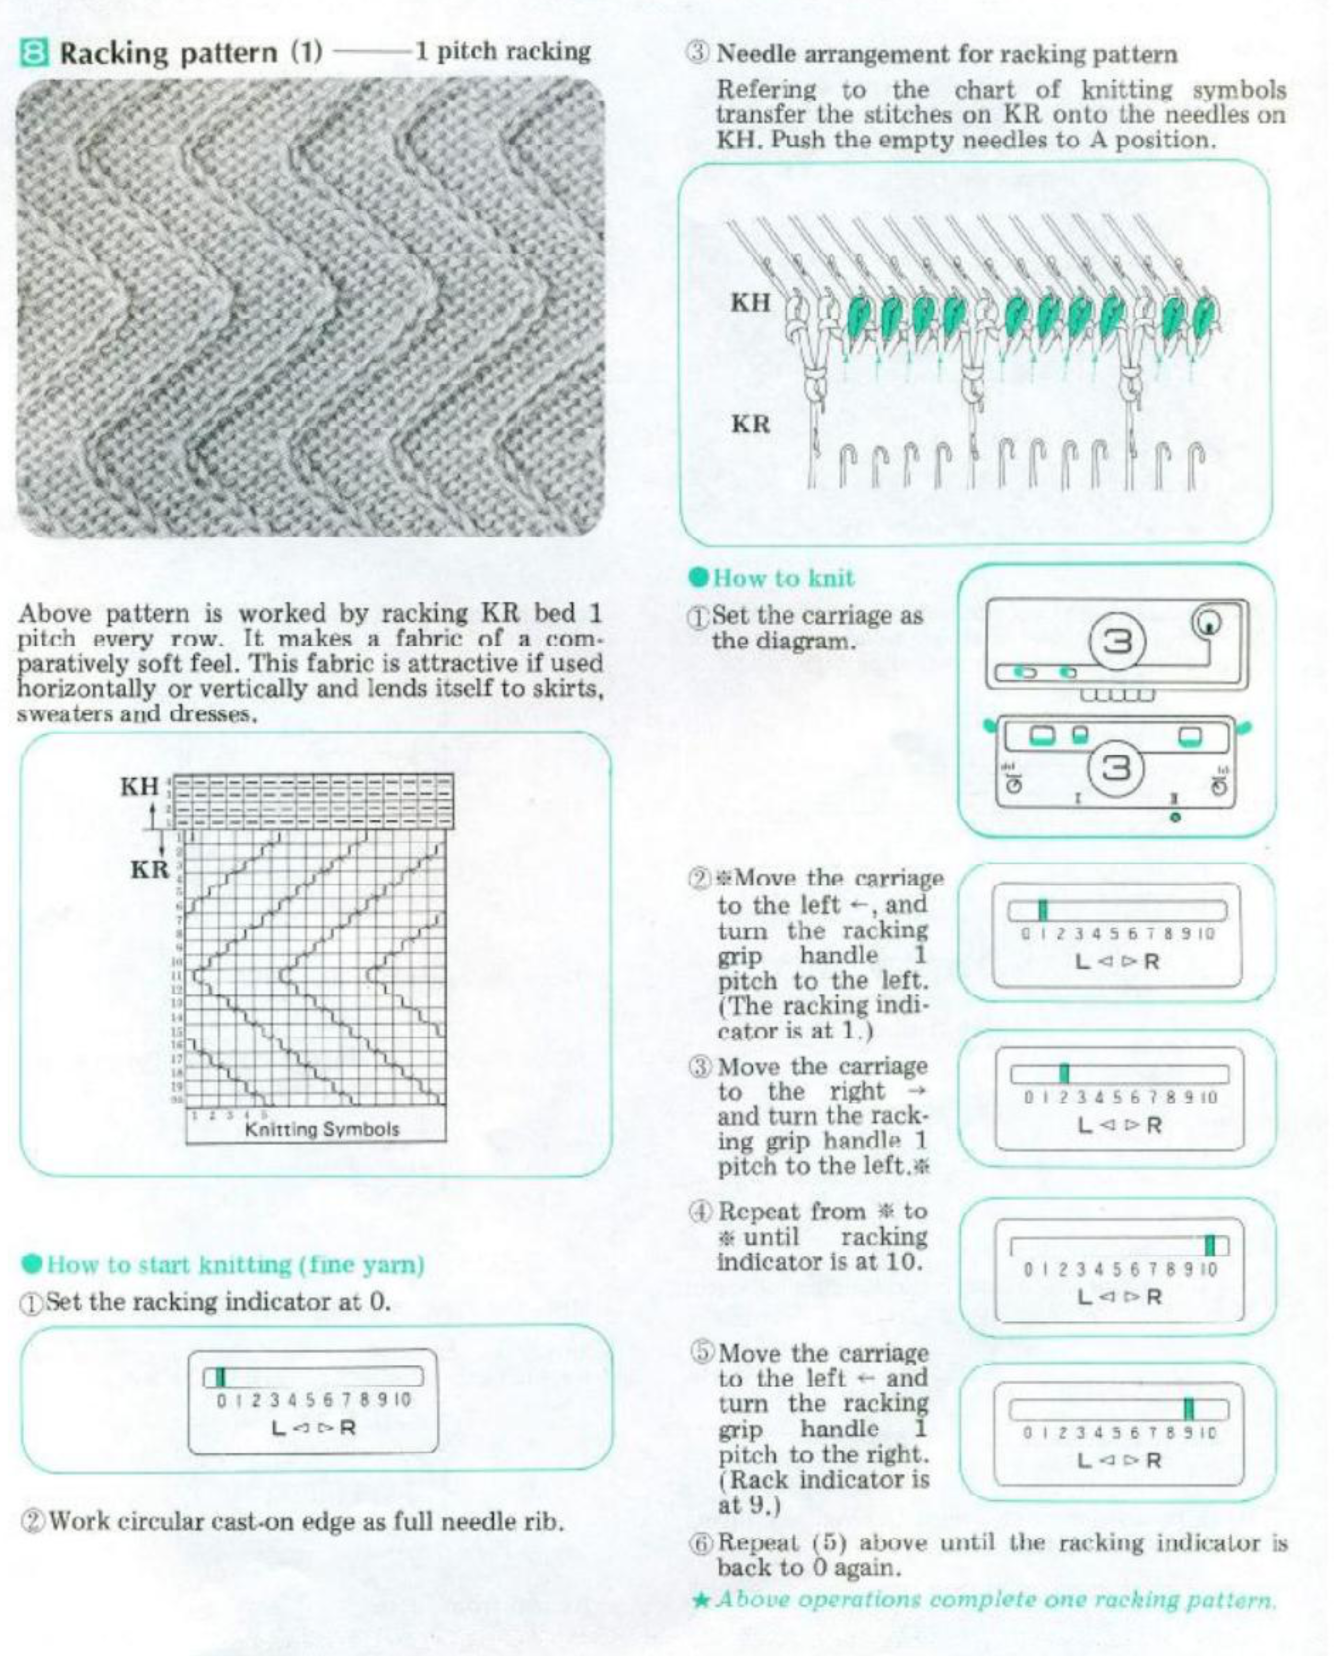
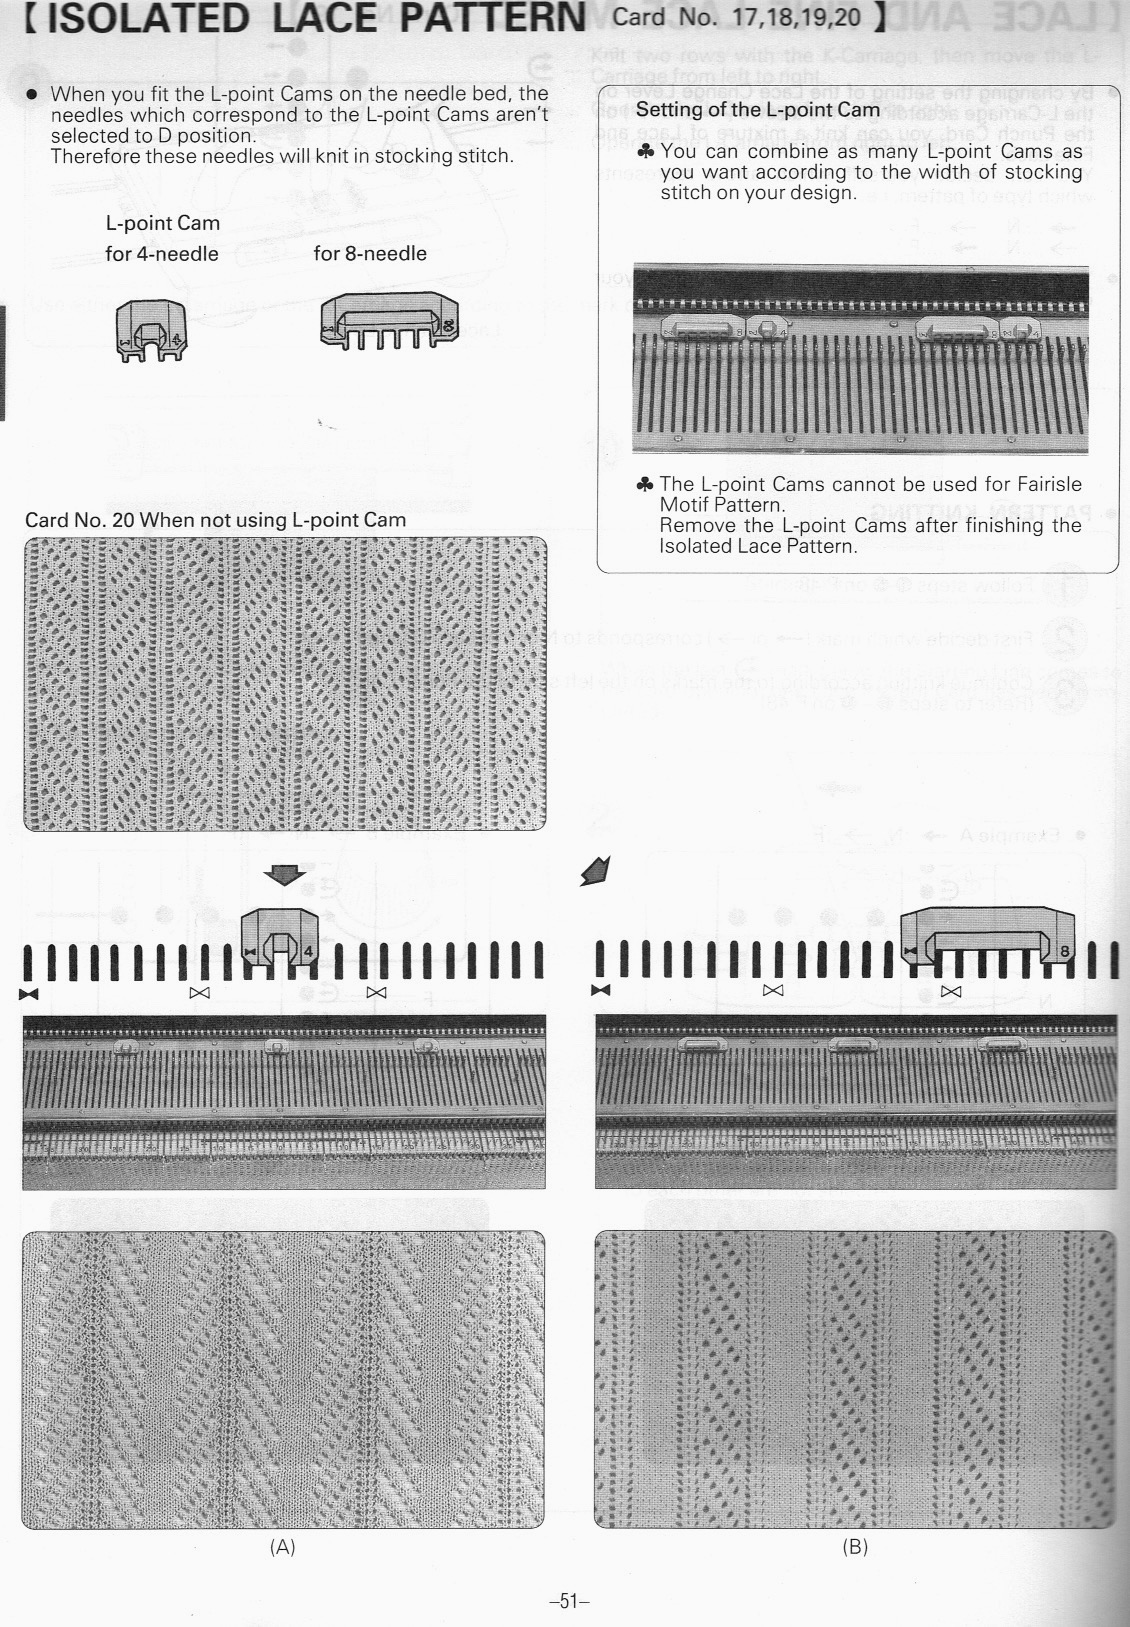
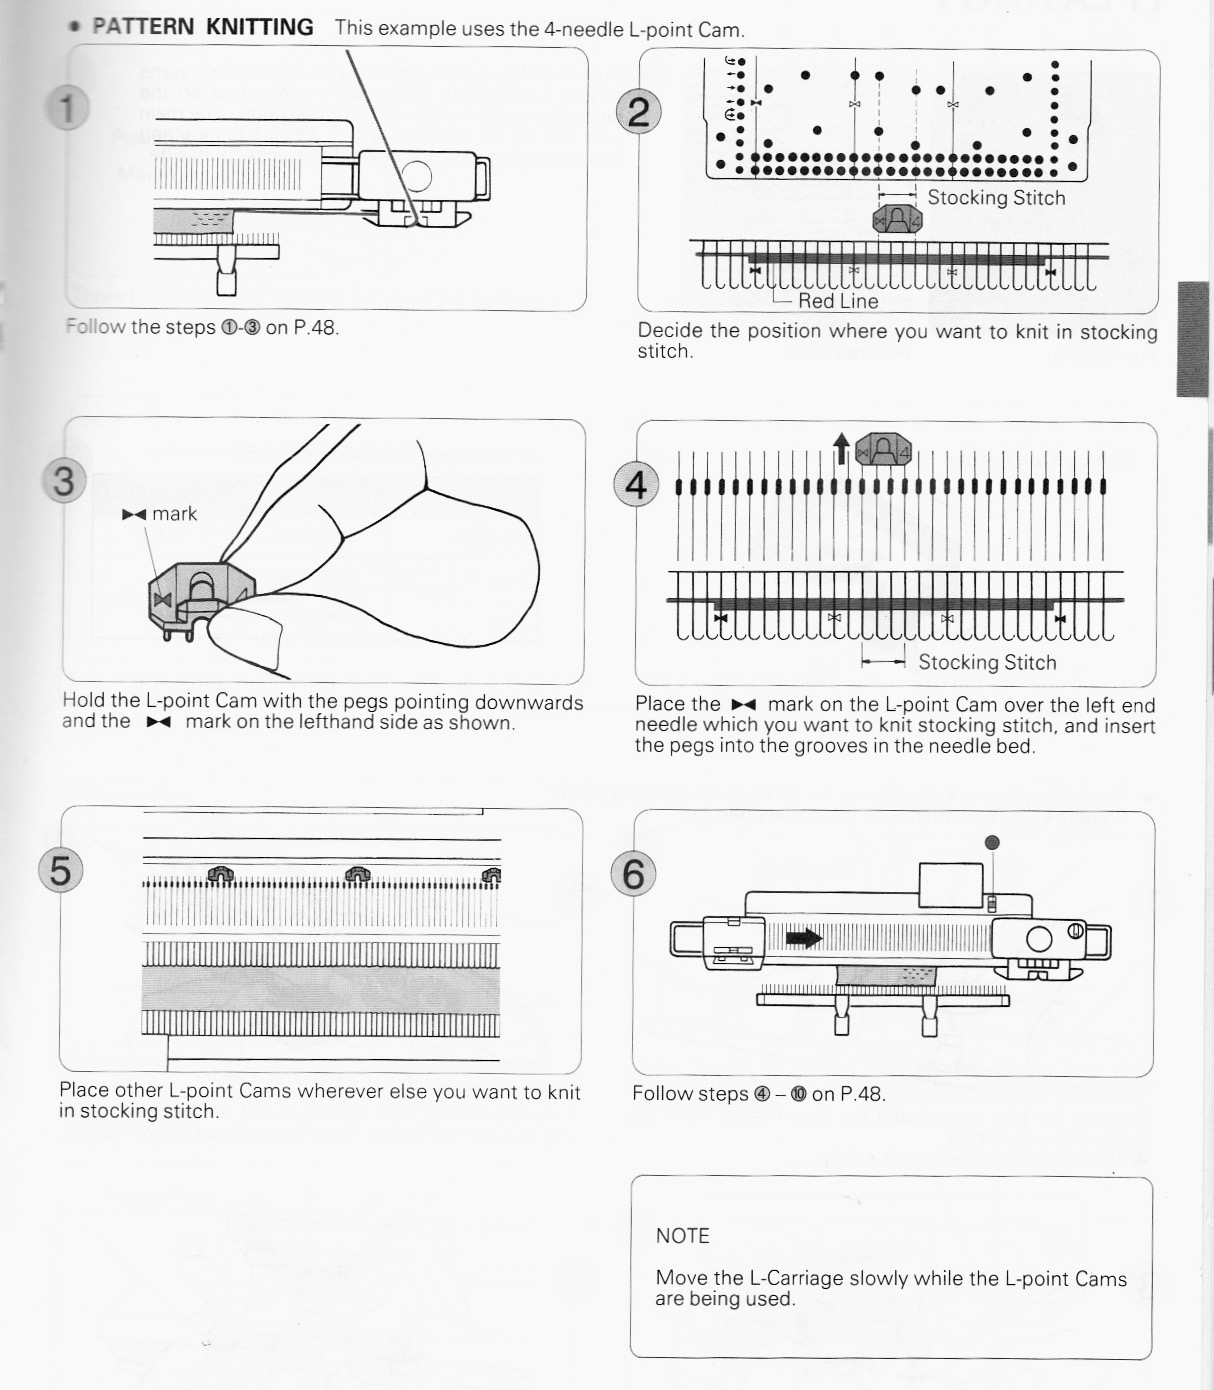
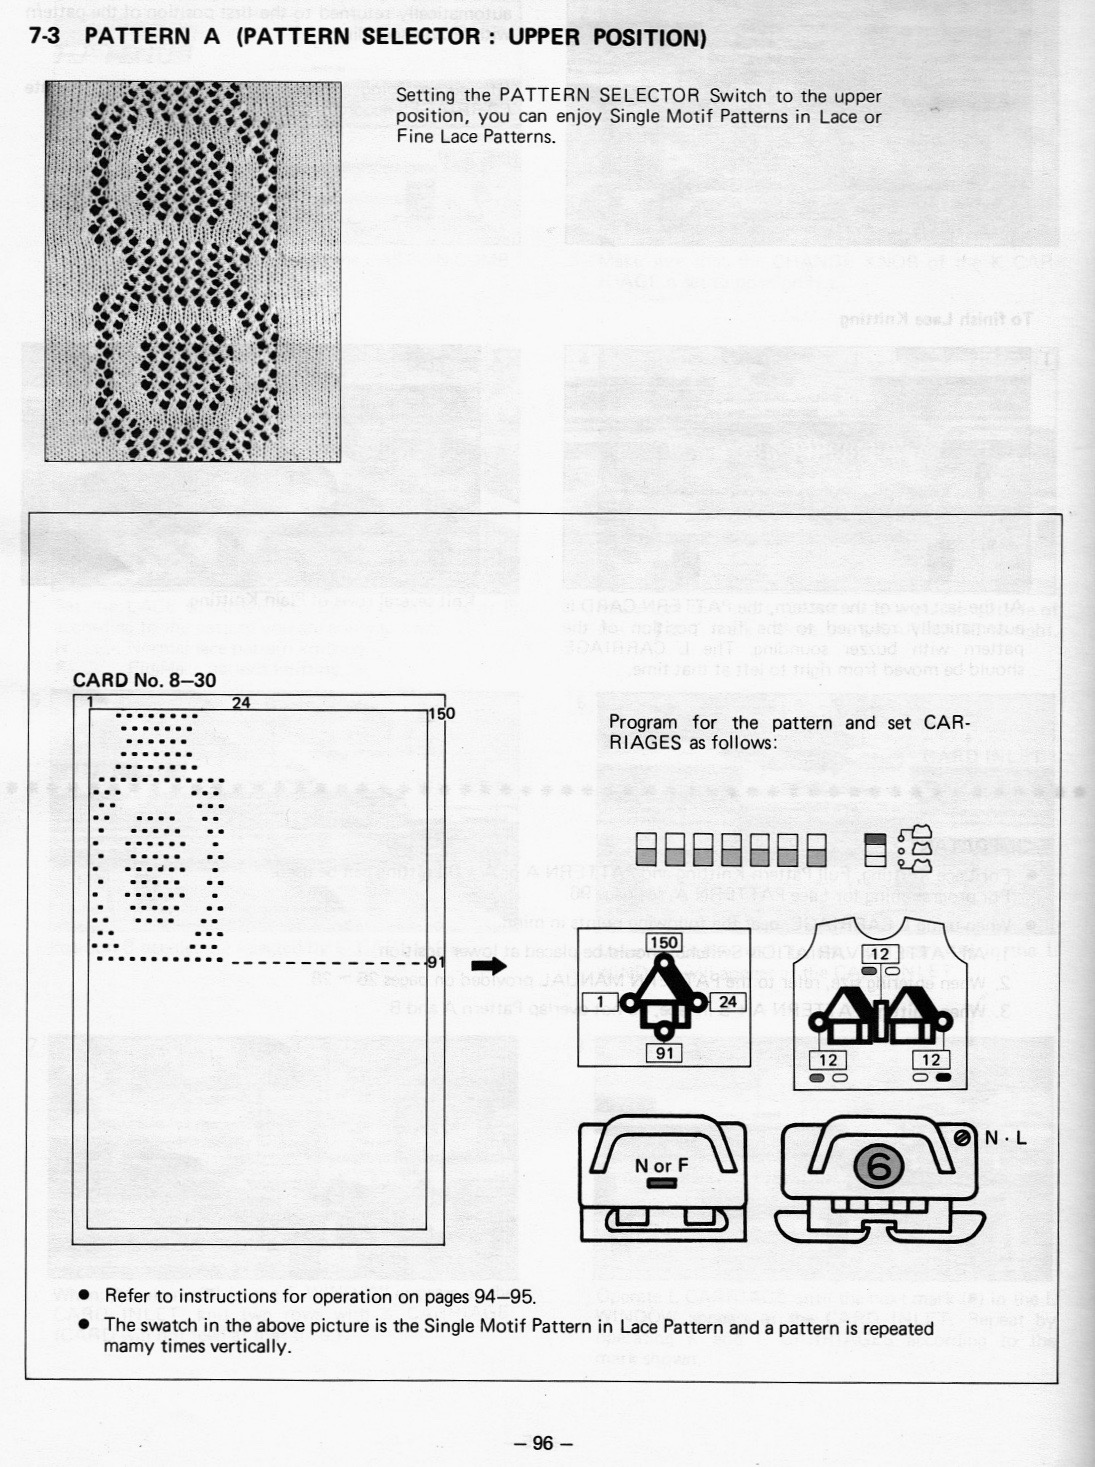
The Brother Ribber Techniques book provides guidelines for variations on this stitch type, the following among them. It is available for free download online from various sites and is an excellent resource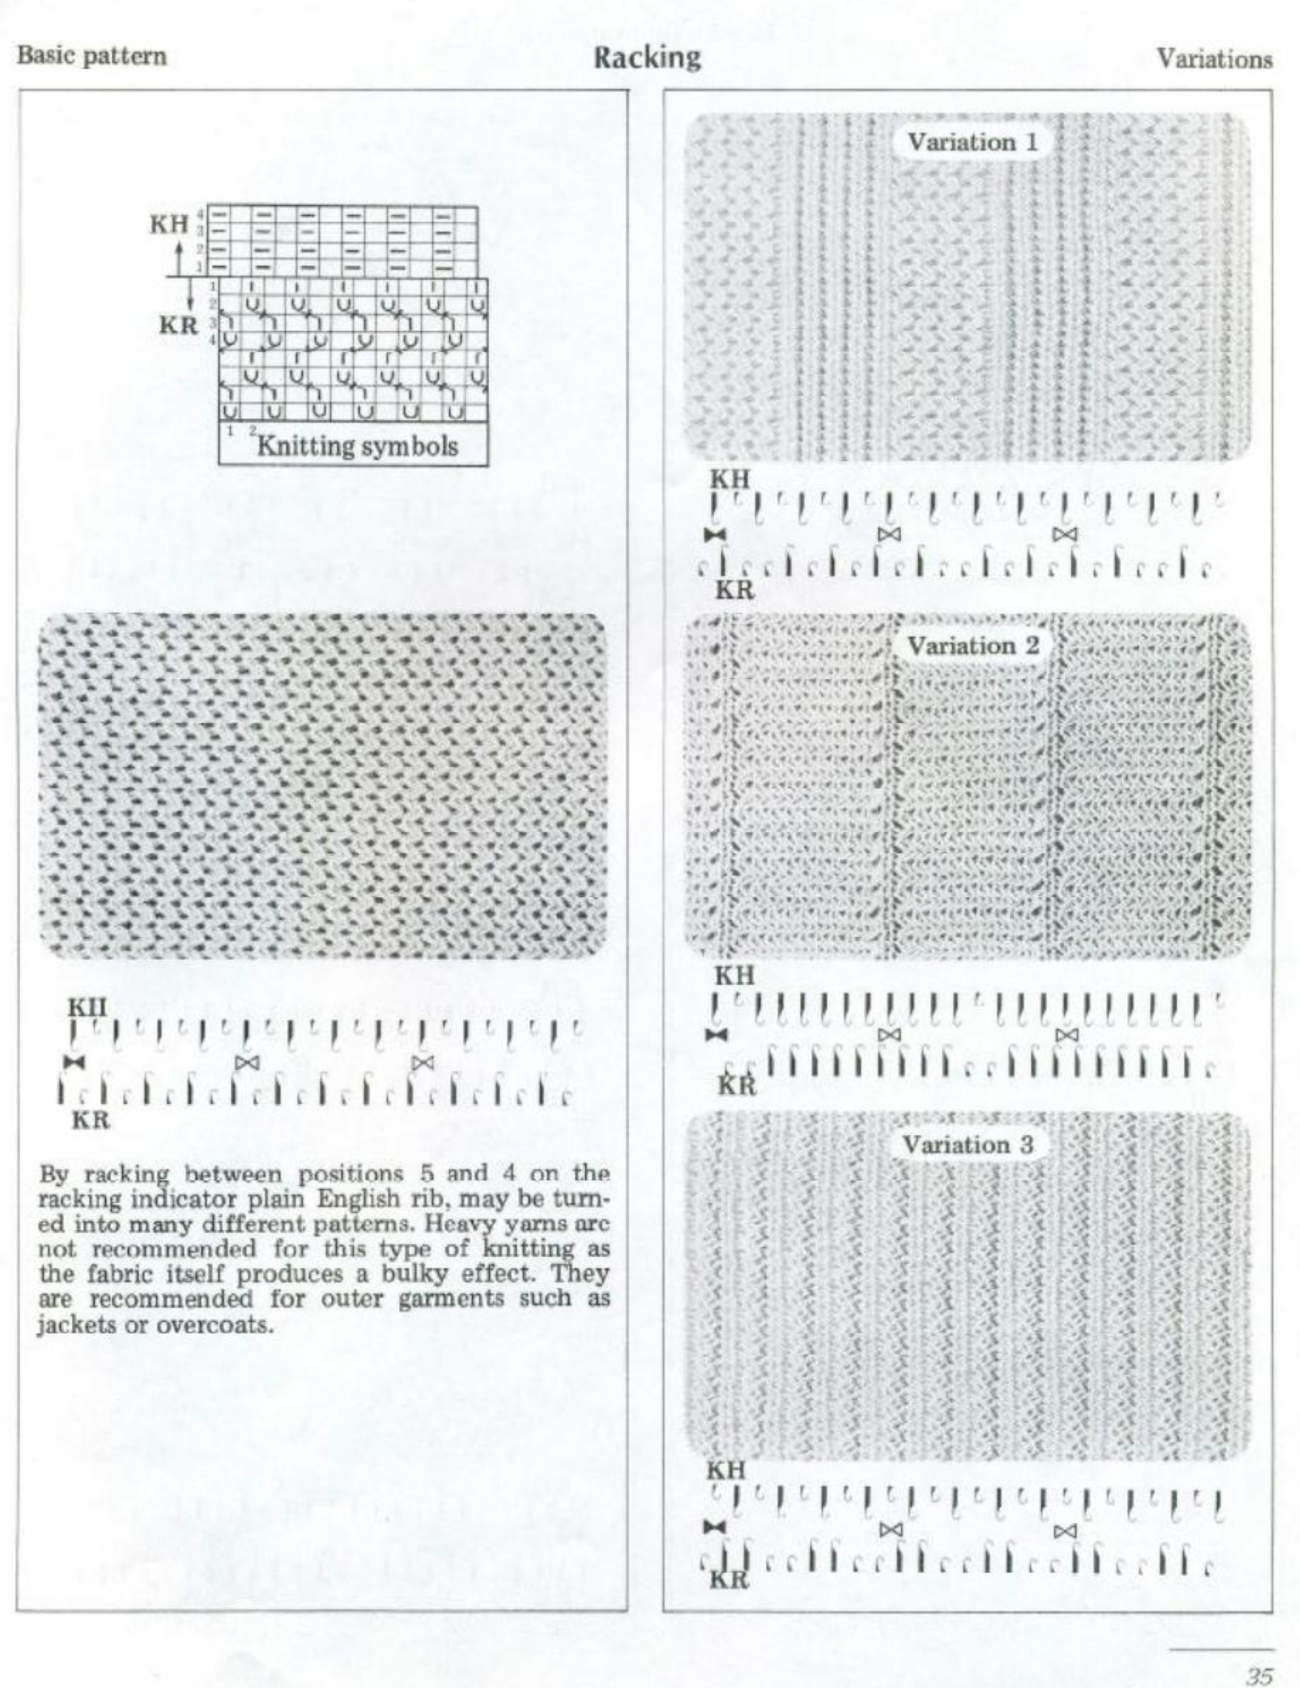
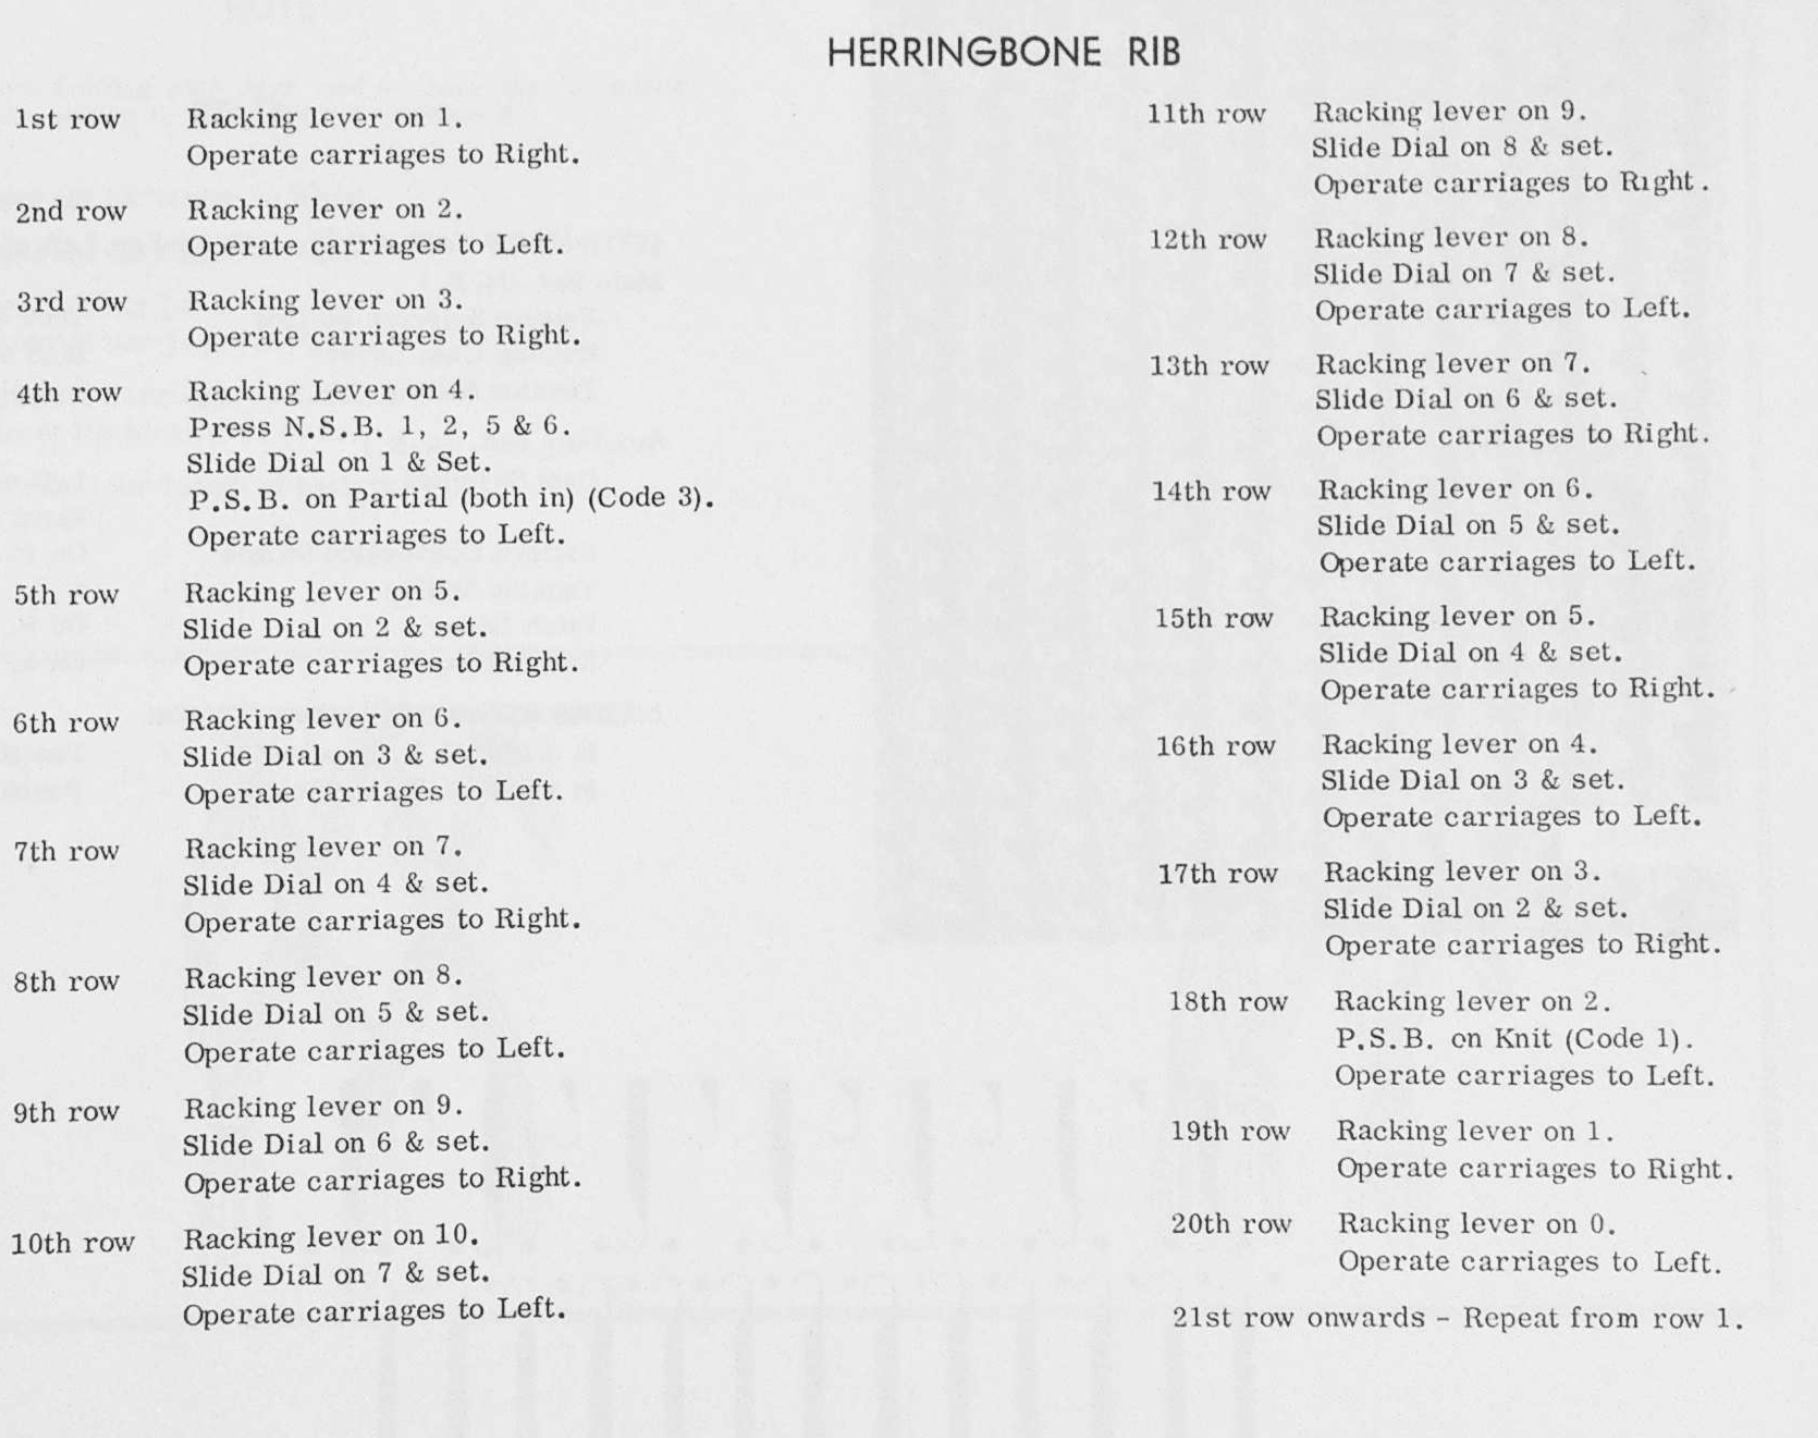
These images were shared on Facebook, they are from the Empisal ribber stitch book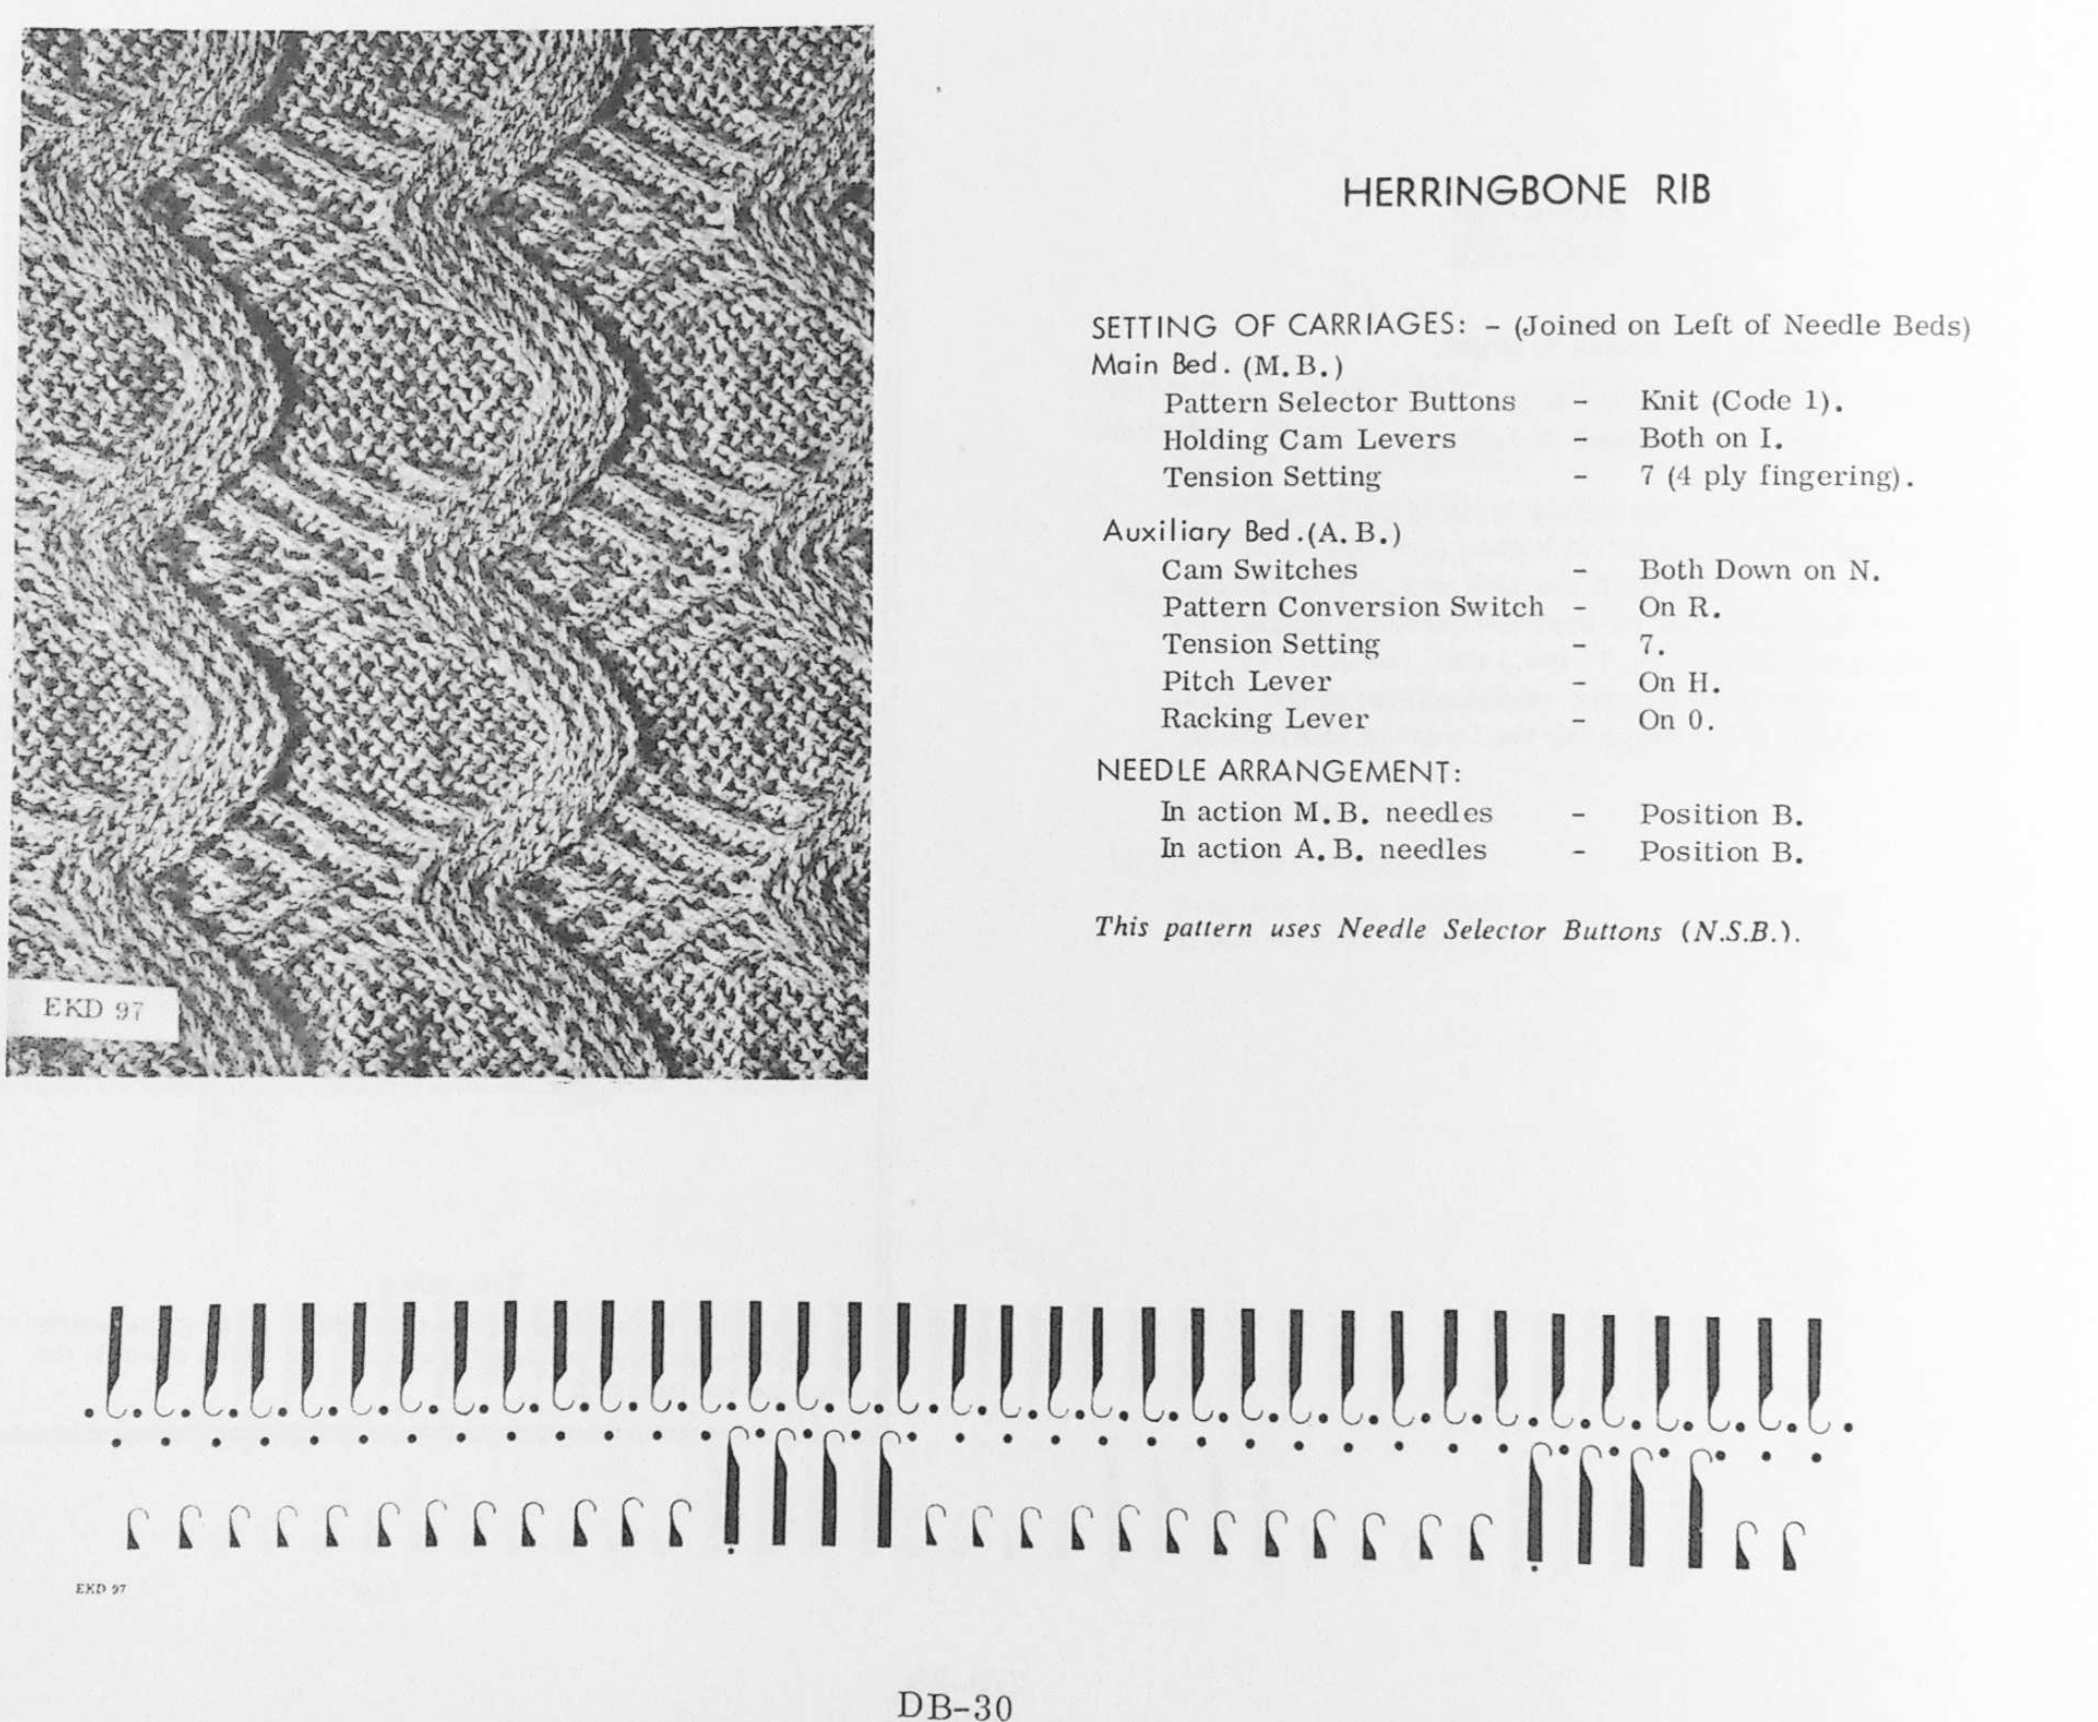
 I have worked with racking in the past but never attempted to have racked shapes interacting with single bed patterning across the width of the piece on the KM. My 910 is presently connected to a Mac via the EMS Ayab kit. Sampling is quick and easy, replacing the mylar. One critical difference is that the repeat used must match the pattern in width numbering the same as the needles in use for the piece, so at least for testing my initial repeats were 30 stitches wide.
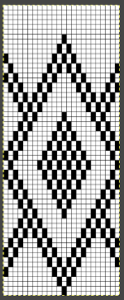
I find trying to chart things out before I actually knit helps me plan and understand what actions I need to take. Mac Numbers is my go-to for charts for the moment. Here a random slip stitch pattern is put on a knit ground that takes into consideration possible racking positions, with the ideal position for reversing the bend at the center of the chevron pattern. With a bit of planning, punchcard markings or even mylar ones may be used to help with tracking racking numbers for accuracy, but that appears lost using Ayab software
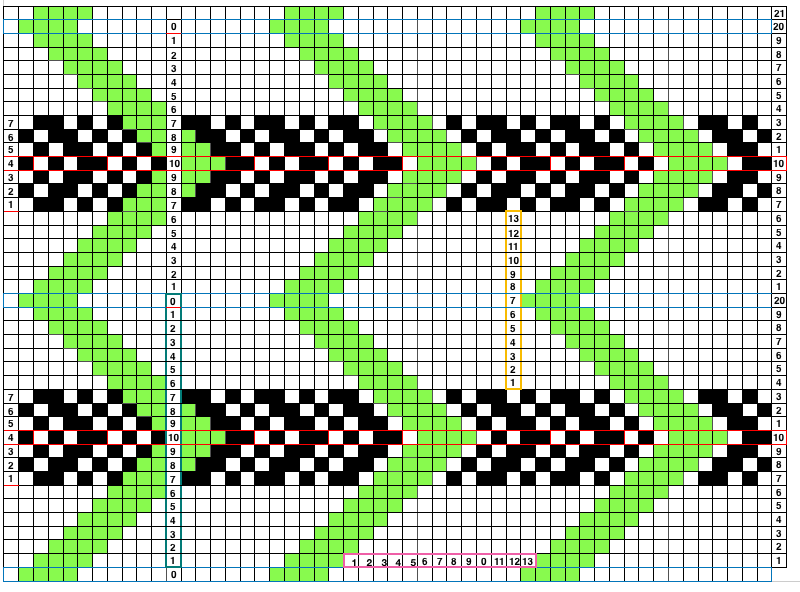 When planning for racking within the width of a piece, the racked columns will extend beyond the vertical edges of the knit. Since this is not about having zigzag edges but keeping the design within the body of the knit, the starting point and spacing for your ribbed stitches matter. Brother racking handle is numbered from 0 to 10. The numbering and direction of movement vary between KM brands. If you begin at 0, you are only allowed to move the ribber to the left, if at 10 the ribber only moves to the right. So that said, the racking sequence in the above illustration should be reversed, traveling from 10 to 0, and back. The green squares represent the direction in which the ribber stitches are moving, and the numbers in the column on the right represent racking handle positions.
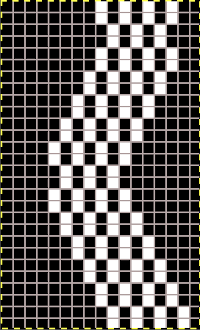
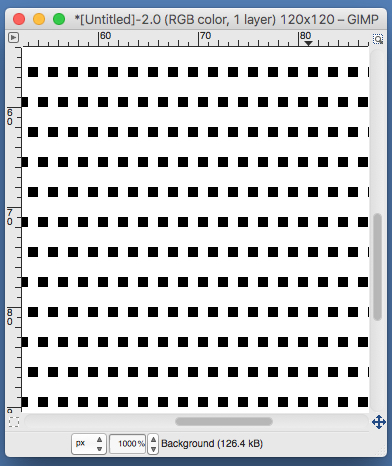
I found this slip stitch repeat produced too little detail in my swatches, but were it reduced for mylar use, it would remain 7 stitches high. It was taken from a punchcard book, so black squares/punched holes represent knit stitches. To match the fabric, in mylar use, the color reverse would do the job. The Ayab kit bypasses both the mylar reader and the programming capacity of the buttons on the left, so double height, double width, color reverse, etc. including the DBJ setting are planned for in the file import into the software. In some instances, Ayab settings (ribber for DBJ, and “circular”) do the work for you. I am using GIMP to create my BMPs. Paintbrush is a free program, still available for Mac, and functional including in High Sierra. It is the program used by some forum members to create their repeats, providing an easy alternative for people who not be used to working with image editing programs.
the slip stitch repeat in its original state: because slipped stitches create their texture on the purl side of the fabric, images do not need to be mirrored for the direction of the texture to be matched using electronic machines
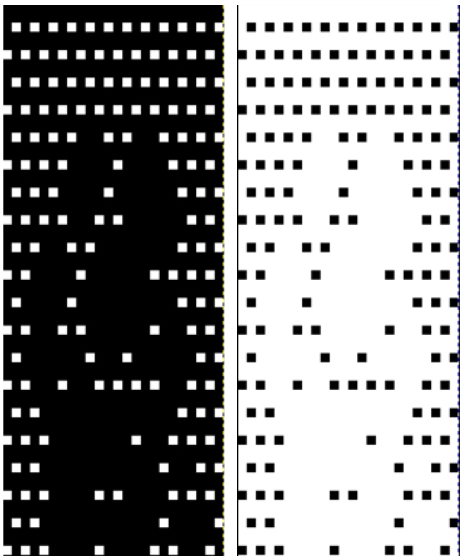
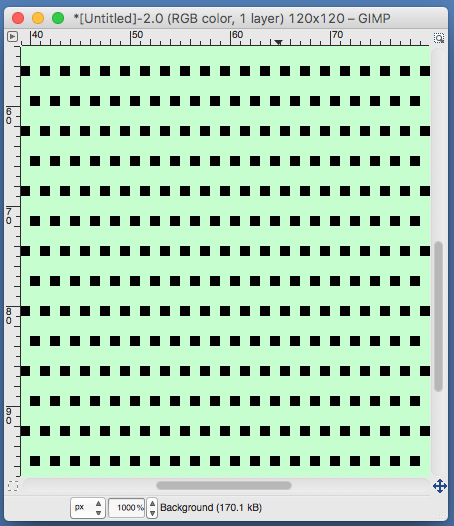
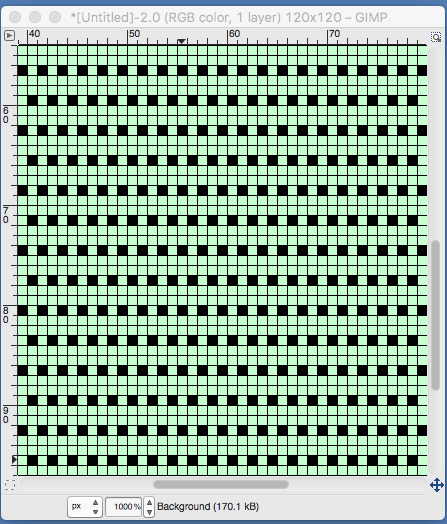
 If the goal is to have the machine take care of keeping track of knit rows for you, without having to make changes in cam buttons, in the mylar a single repeat with blank squares programmed at the top and/or bottom of the repeat could then be knit using color reverse. Here the situation is similar to that of punchcard users who need to punch a hole for every knit stitch but considerably faster. If the original pattern is satisfactory, planning for all knit rows as automatic needle selection can be done by color reversing the pattern in the software and adding all black rows in the image for download.
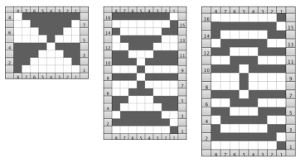
 some other all-over variations to try, individually, or even sequentially for slip stitch all-over texture
 the first tests, for the various slip stitches, nothing quite “there” yet
 this is getting closer to the goal
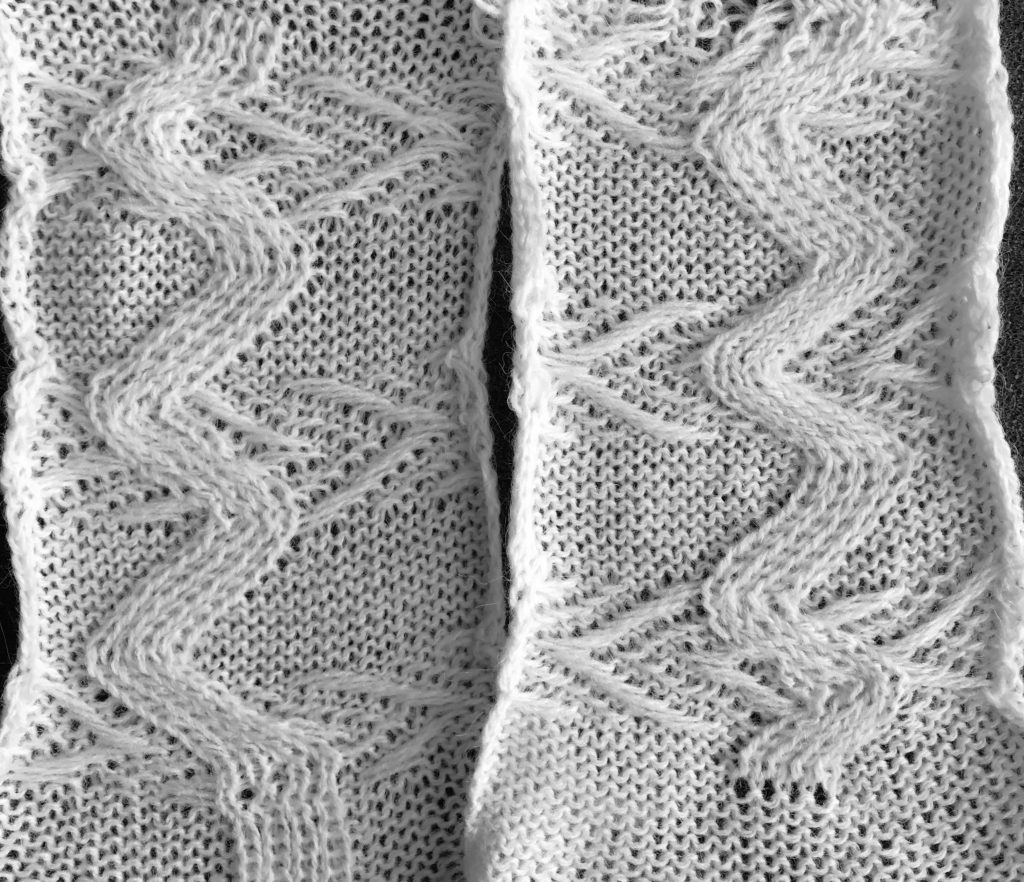
The above working repeat and all above swatches were knit with the first preselection row from right to left, not left to right. For these stitches, the starting side does not make a difference. If the pattern, however, was in blocks that were even-numbered in height (2, 4, 6, 8), and the color changer needs to come into play for striping using it, accommodations need to be made so that preselection for row 1 happens from the right side to the left, toward the changer. The programming needs to be set to begin on the very last row, so the repeat returns to row one for preselection from right to left, and knitting rows 1, 2, etc begin with the KC set to appropriate cam buttons, to and from the left side of the KM.
The racking sequence needs to be adjusted to have the points of the zigzag land in the center of both the slip stitch areas and those in plain knit if that is the goal. I am encountering needle selection issues with my hack, so this fabric is getting put to bed for the moment. In principle, the black squares in the illustration represent knit rows, and their number is easily enough adjusted in height. Punchcard users would need to punch holes for each black square, mylar users can fill in the white squares for a single repeat, add blank rows at the top or bottom, and color reverse when programming. In Ayab software, the repeat has to be drawn for the width of the piece but will repeat “infinitely” in length.
This is a possible punchcard template, with a shorter racking sequence. The Numbered column on left indicates the racking position. Pattern rows are preselected, so racking occurs prior to knitting across each row. I am also in need of purchasing more punchcards or another roll, so there is no test swatch at this moment. The top and bottom rows of punched holes on the colored ground are not part of the repeat, they overlap the first and last 2 rows of design in the punchcard, allowing the pattern to repeat in length. Ascending numbers swing to the left, descending to the right. Rows may be added at the level of #7 (7, 8, 9, 8, 7), so that the center of the swing may then occur on #9 positions in the racking handle, lengthen the card accordingly.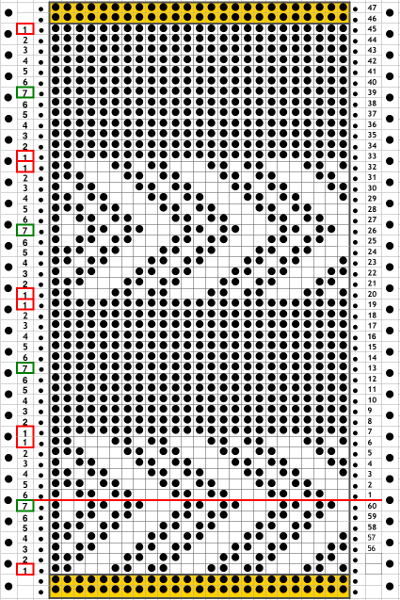 5/14/20
Electronic machine models make experimenting easy and quick. Here an all-over tuck stitch is programmed for the base fabric, and racking variations are considered with the goal to cross the base fabric at various points in the patterned areas, or within the knit space alone. With increasing racking indicator numbers the ribber moves to the right, the shape its stitches create on the main bed moves to the left. With decreased racking indicator numbers the ribber moves to the left, the shape its stitches create on the main bed moves to the right. 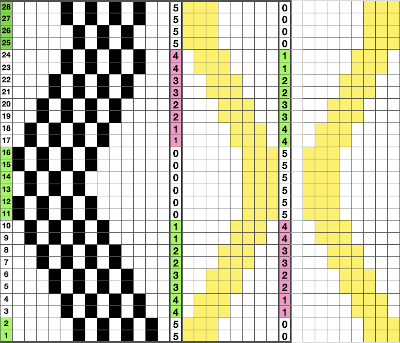
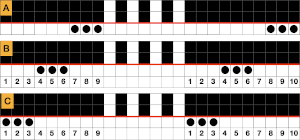
 The repeat required mirroring for use in my electronic 930. Experimenting with racking intersecting tuck stitch on multiple repeat png, stitches were picked up on the ribber aside from the first tuck stitch on the right, A, on the center, B, and on the left, C, of the knit stitch groups.
![]() The tuck pattern tested, racking placed in the center position
The tuck pattern tested, racking placed in the center position 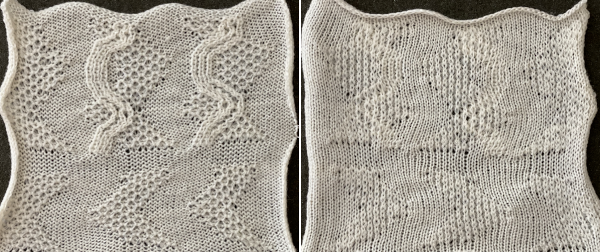 changing ribber needle positions
 moving toward positioning the racked pattern further into the knit columns.
 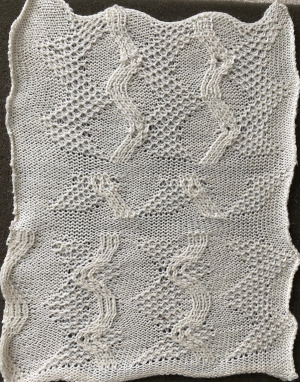 Making the knit columns wider, placing repeats differently.
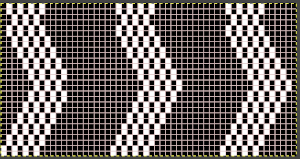
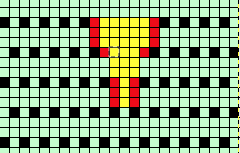
![]() The intended placement of the racked pattern is shown in yellow.
The intended placement of the racked pattern is shown in yellow. 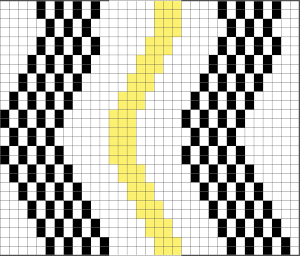 Good notes and documentation of the final needle arrangement will make the technique easily reproducible. The needles involved on the top bed always need to be returned to the patterning position after any shares.
 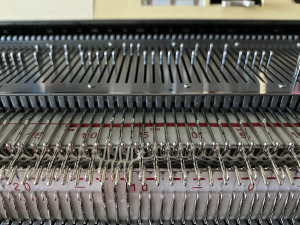 At any point in the knitting, it is easy enough to transfer stitches on the ribber up to the main bed, drop the ribber down, and check on the placement of the racked pattern. If the place is satisfactory, the moved stitches can be returned to the ribber and the work is continued. If not, transferred stitches can be left on the main bed, other stitches can be shared with the ribber and patterning can continue with racking in the new location. One such adjustment is seen toward the bottom of this swatch.
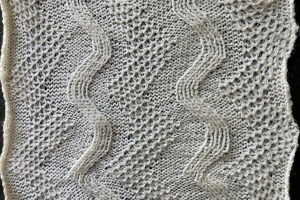
 the start of the tube, needle selection for first pattern row
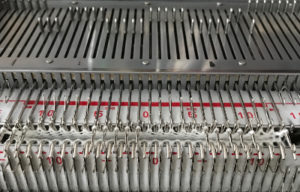
 the start of a tube is evident if the ribber is dropped a bit
 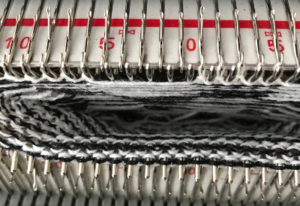 the tube dropped off the machine
 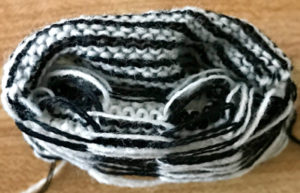 the FI created on the main bed
 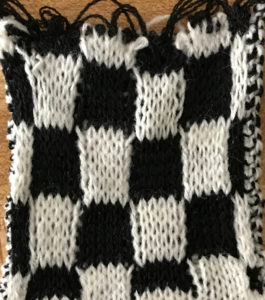 the pattern on the reverse, created by ribber
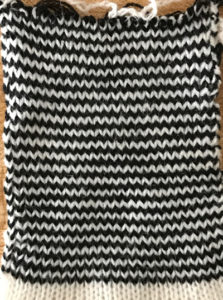


 this shows what happens when the first separation is collapsed into what actually gets knit by the carriages in this technique
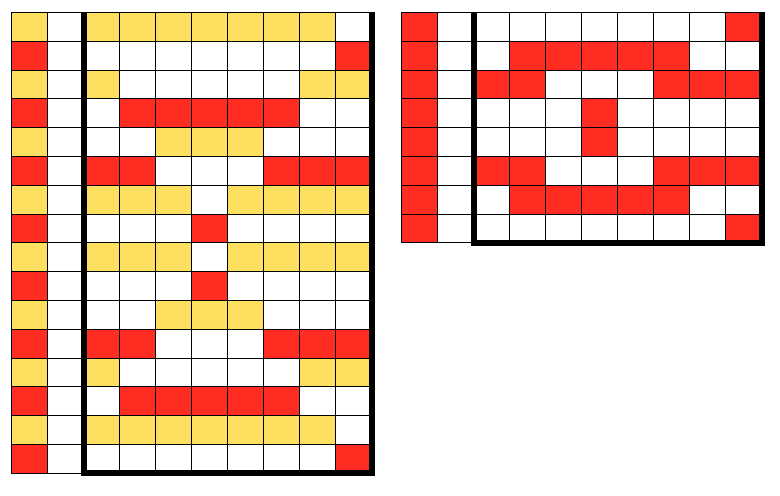 and the result in repeat in B/W like my swatch
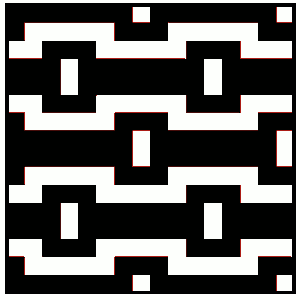
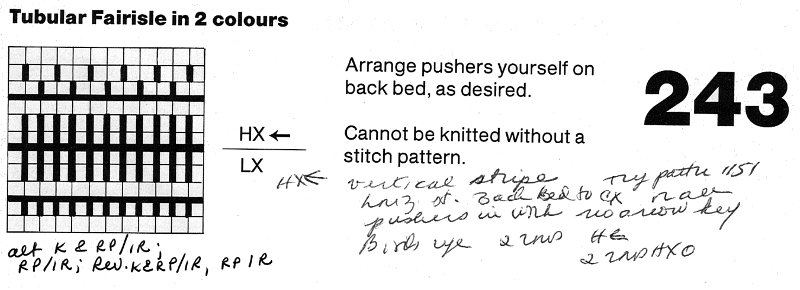
 For tucked 2 colors fair isle use technique 185 with lock set on N/OX.
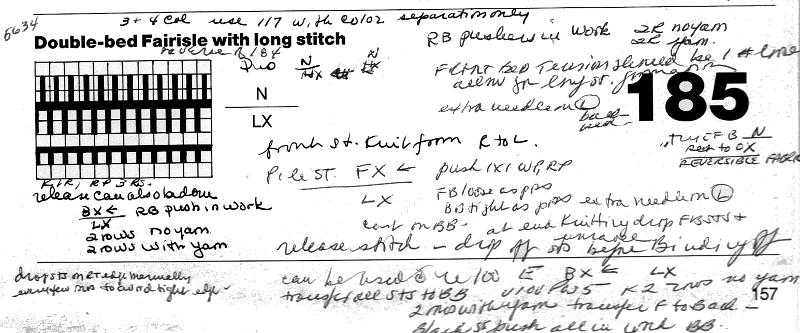
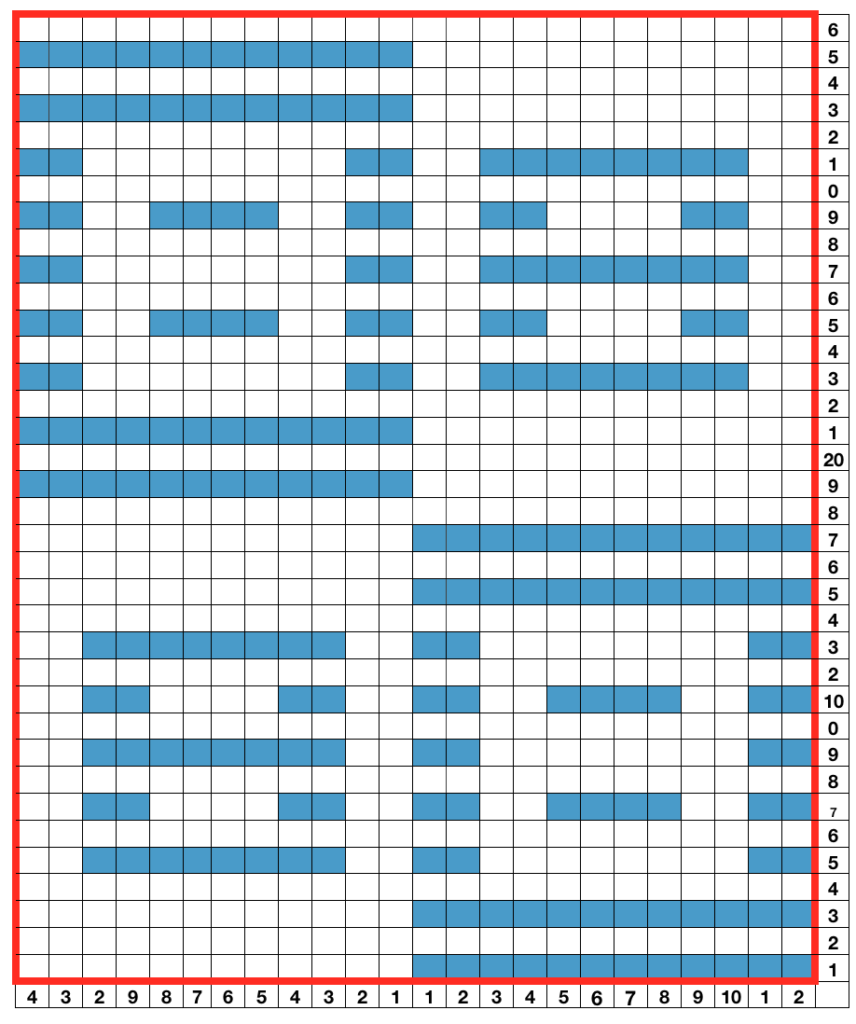
 This is my first experiment with gathered slip stitch floats on the purl side of the knit. To begin, this chart indicates one punchcard pattern’s full repeat in width. Four repeats in length would be required (the punchcard minimum repeat in length to achieve smooth continuous card feeding is 36 rows). Punch out blue squares, leaving white ones unpunched. A single repeat (outlined in black, 8 stitches by 12 rows) is for use in electronic patterning, where one may alternately draw or program white squares, then use color reverse. The red line represents 0 needle position in Brother KM
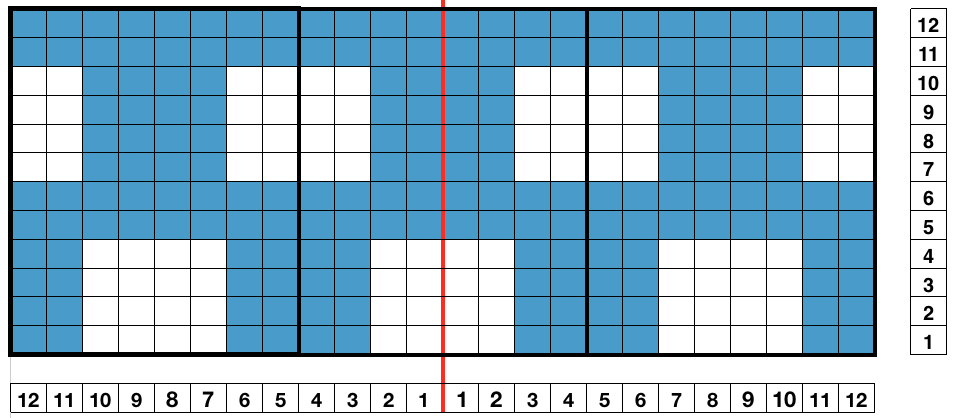

 result with color reverse
 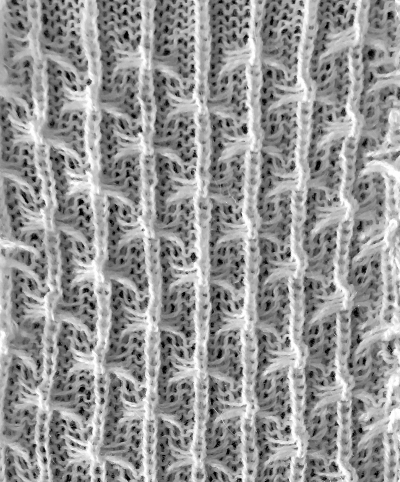 working out a mylar, electronic (unless DM 80 40 stitch width is in use) repeat for a variation of the fabric knit single bed. The stitch count is odd, allowing for a center stitch manipulation. KCI is used to make certain the first and last needles knit on each side. Floats created close to edges may be left without hooking them up. The fabric separates slightly along the “bowknot” edges
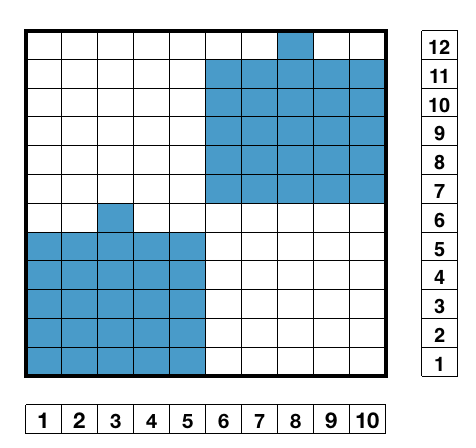
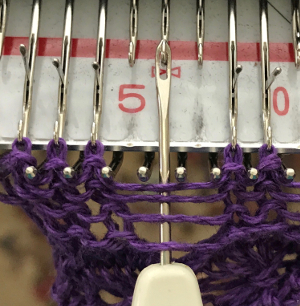
 lift them up and onto that single non selected needle, push that needle out to hold
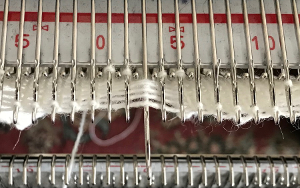 with the next pass the single needle and loops knit off together and become part of the alternating all knit block in the design
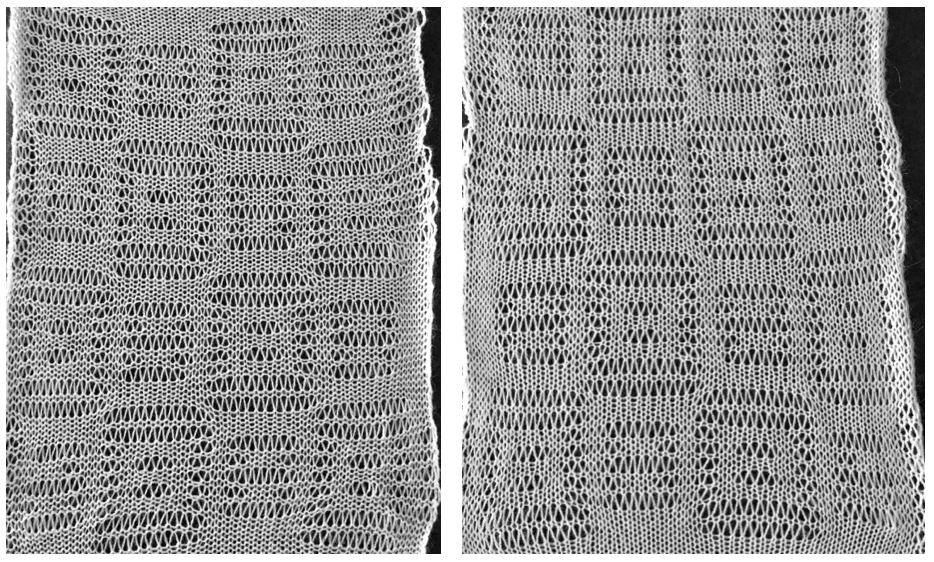
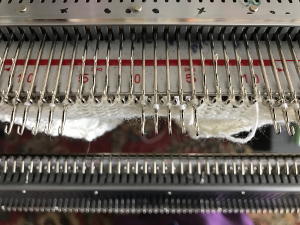 the swatches are knit in a 2/15 wool, the fabric might be better served using a thicker yarn. Here the “blocks” creating “floats” are side by side
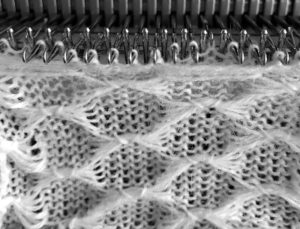
 adding border stitches, and more theory on the placement of stitch type
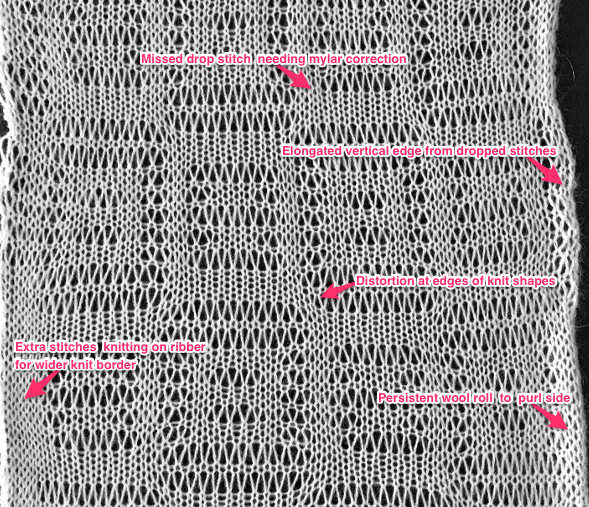
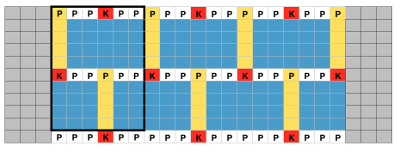 the result places “knit” stitches in the center of butterfly (magenta arrow), not at its sides, and I see and extra purl stitch (green arrow). Multiple stitch-wide borders create unwanted floats on one side
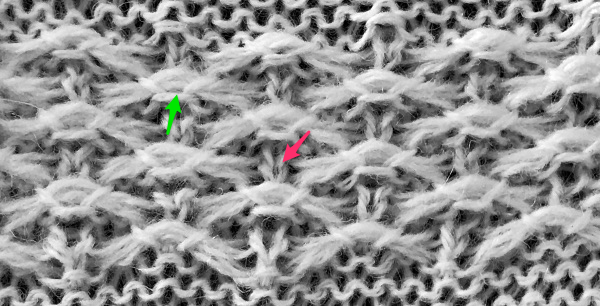 back to the drawing board and working things out first as a hand technique
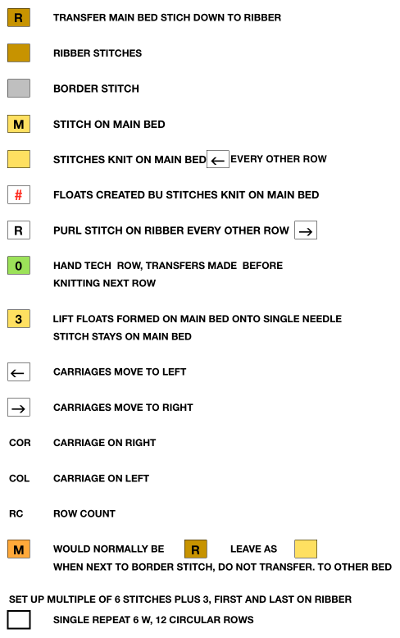
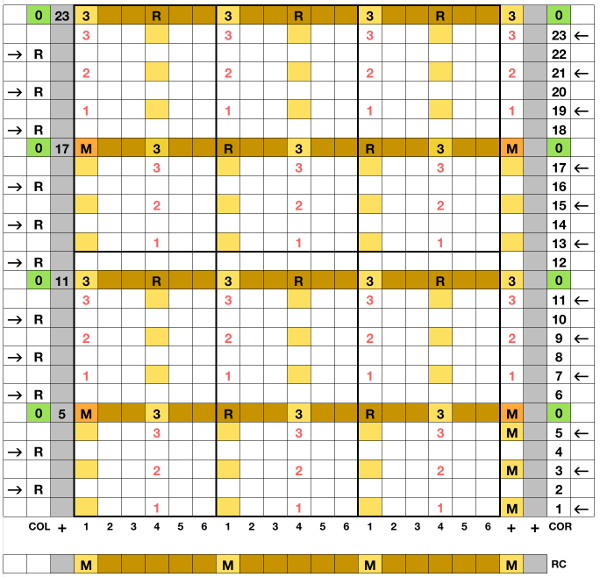 I began with my carriage on the right (COR), after setting up the repeat on a multiple of 6 stitches +3 as indicated above. The last stitch on either side on both beds is never transferred, and the short loops of every other set (rows 5 and 17 in the chart) are not hooked up. This will produce a slightly rolled edge on each side. The larger number of border stitches becomes problematic. The photos were taken while knitting 2 different swatches, so needle tape markings are not the same in all photos. To produce the circular knit, opposite part buttons are pushed in so with carriage on the right (COR), the settings would be
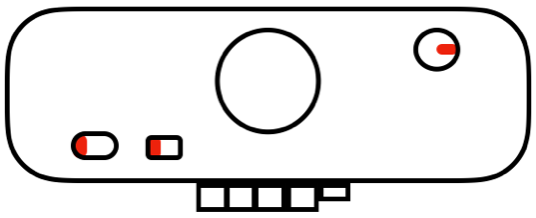

 after the three floats have been hooked up, with COL each time, the in-between main bed stitches are transferred back down to ribber
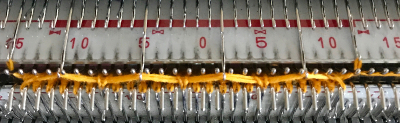

 reducing main bed count so only one needle is left on either side of a selected one
 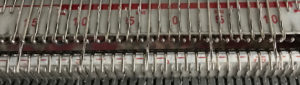 that needle (green arrow, gets transferred down to ribber
  now the number of needles involved on both beds is evident on both beds
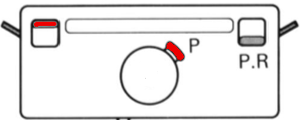
 While knitting in the pattern the ribber pitch is set on P (point to point) to keep stitches on opposing beds centered (P pitch also makes it easier to transfer directly from one bed to the other). If the cast-on is for every other needle rib with stitches then transferred between beds for pattern knitting set up, the cast-on and all rib rows need to be knit in H pitch, with a switch to P for transfers and knitting in pattern to be completed. With the first row set up on the selected segment of the needle bed, there are additional steps to take.
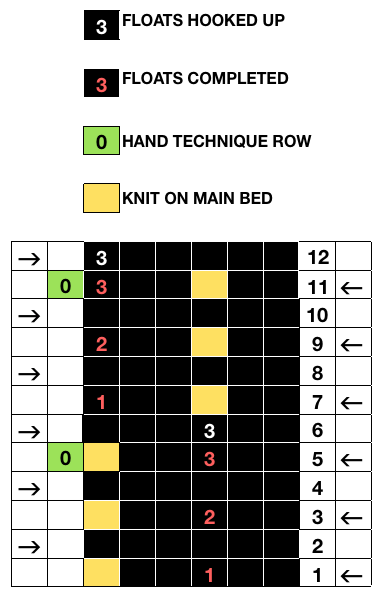
 Hand techniques will now also occur when carriages are on the left, on RC 5, 11, etc as described in the hand technique chart, on rows with no needle selection. As in hand tech, transfers and multiple loops containing needles are brought out to hold before moving the carriages from left to right and selecting the needles for the next set of floats with that same pass.
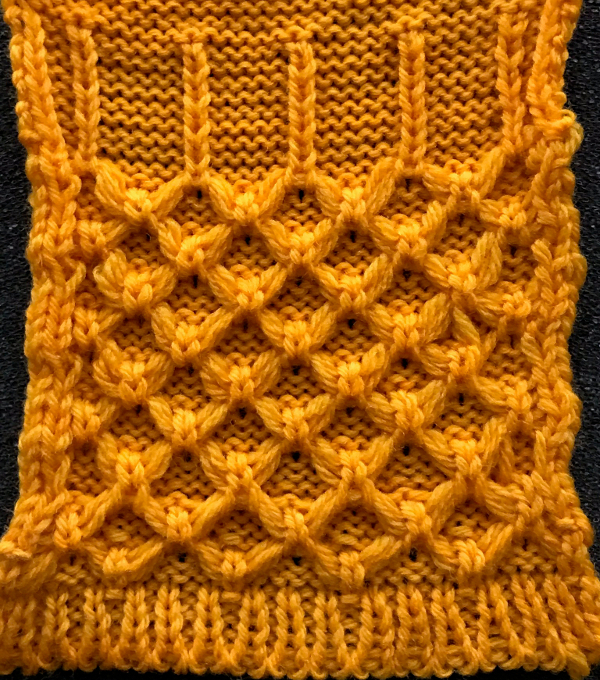
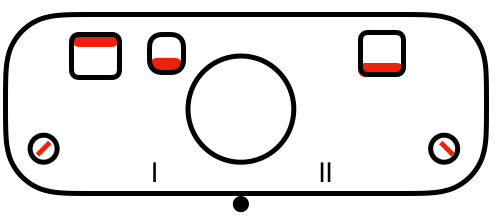
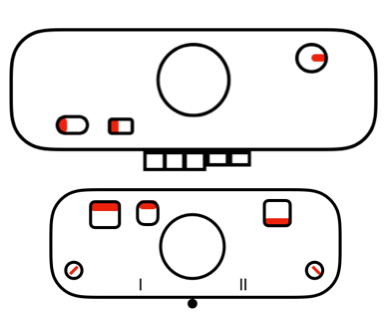
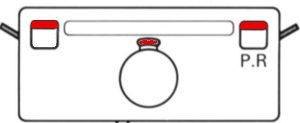
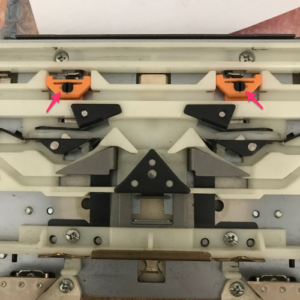
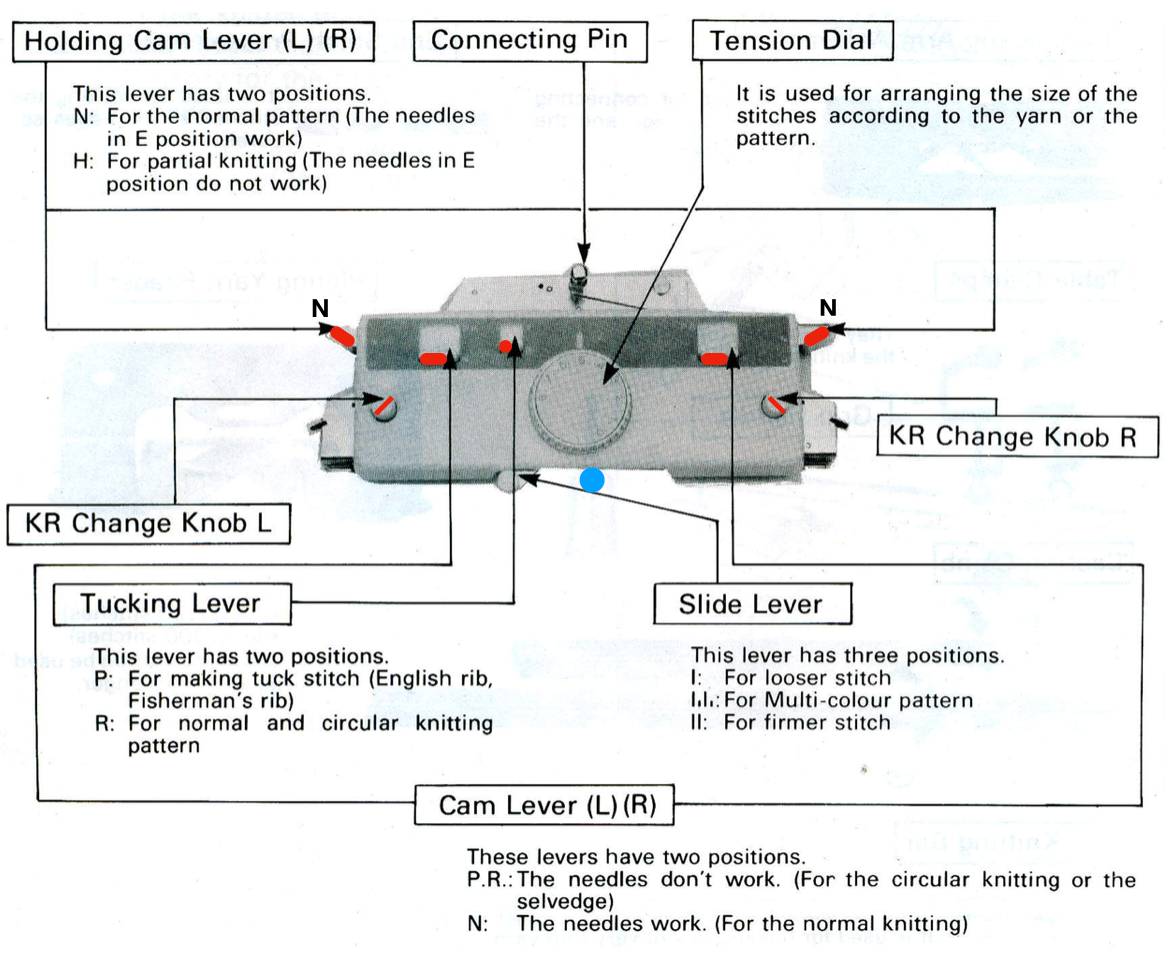 Back in 2015, I wrote on quilting on the machine, using the carriage representation below. Here lili buttons are positioned for use
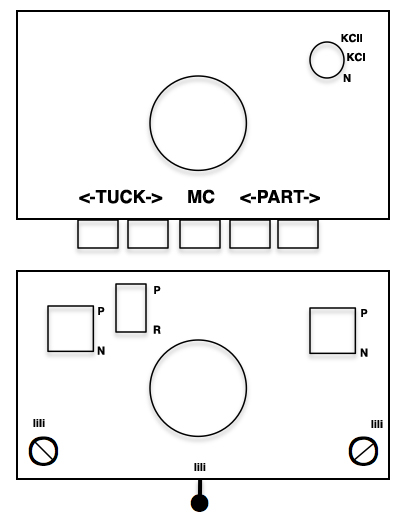
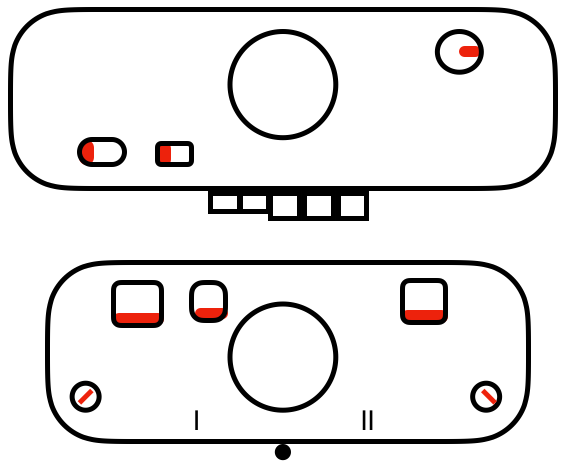
 slip to left
  slip in both directions
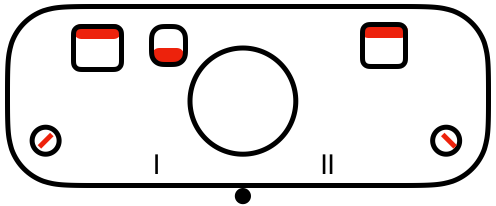
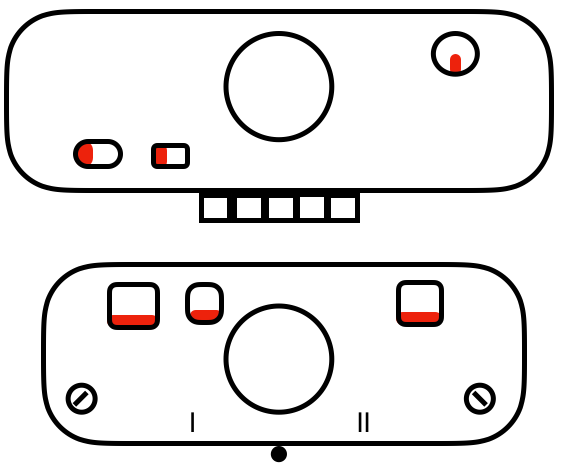
 tuck to right
 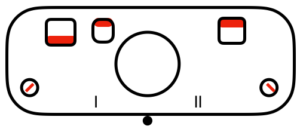 tuck in both directions
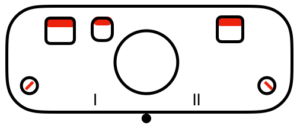


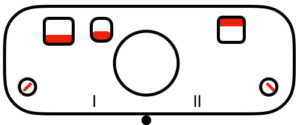
 tubular: either pair of opposite part buttons used
 main bed <–> tucked jacquard: each needle on the ribber knits every row. Needles on the main bed knit in pattern according to punched holes, black squares on mylar, or programmed pixels. Non selected needles tuck. The patterns produced on the backside of the fabric are almost the reverse images of the front. Because so many tuck loops are formed the fabric is “short” and very wide, so cast ons and bind offs need to be planned accordingly
 variation: tucking the main color, knitting the contrast, manual cam button reset every 2 rows
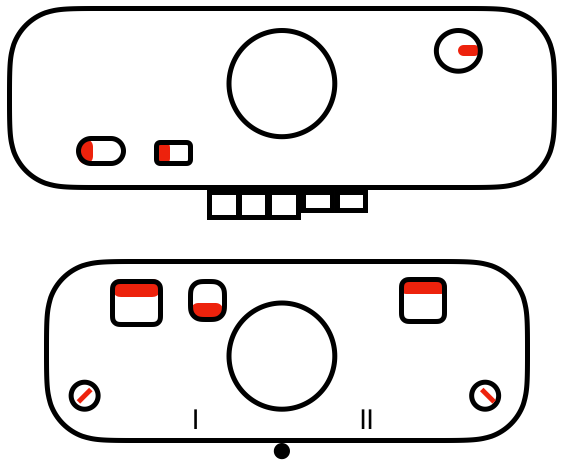

 full fisherman rib: tuck every needle alternately on both beds, in opposite carriage directions (below = L/R, or use R/L)
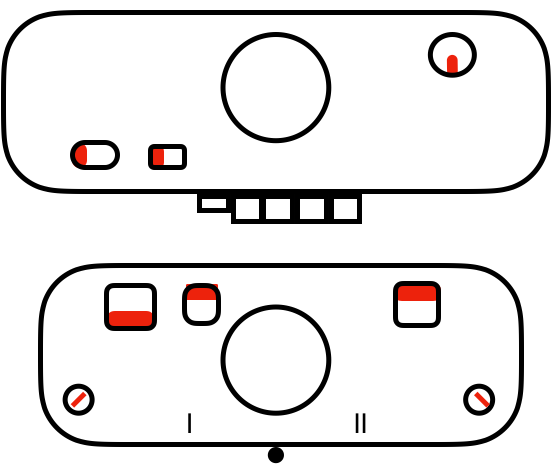
 revised with fewer single dots, and solid lines in the ground
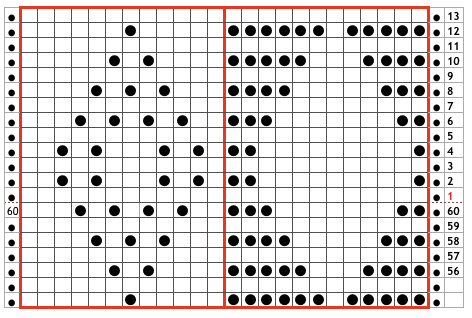
 using any method you prefer, set up knitting so all stitches are on the ribber. If you prefer to set up complete repeats prior to watching, “air knitting” prior to ribber set up or using the position option on the main bed if that is available, will help achieve that
  set knit carriage to KC II (used when patterning does not occur on every needle across the needle bed), both part buttons pushed in for free pass to the opposite side of km, no knitting occurs but the first row of pattern knitting is selected. Ribber is set to N<–> throughout
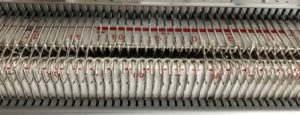 the carriages now move to the opposite side, selected needles on the main bed pick up loops, and nonselected needles stay empty. Ribber knits every stitch
 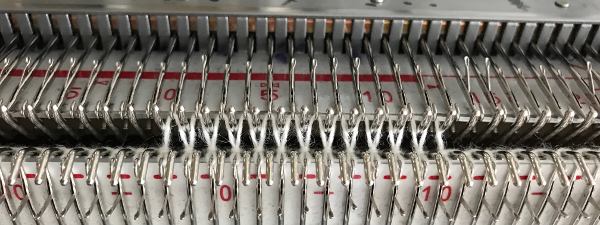 using a ribber cast on comb, stitch “dumper”, or another tool, move needles holding stitches forward to drop loops, and return empty needles to work position (B)
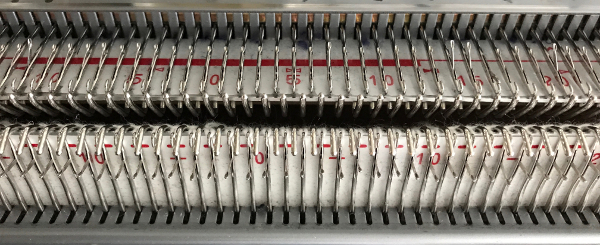 as carriages move to the opposite side, needles are selected for next row of knit stitches to be knit on main bed
 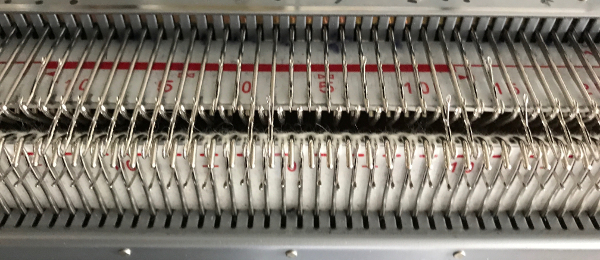 carriages now move to the opposite side, loops are picked up on selected needles
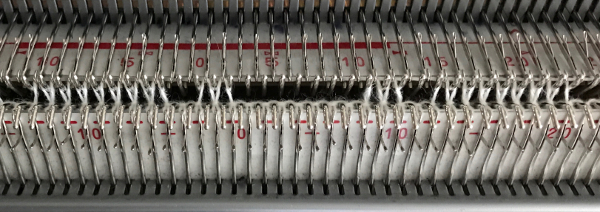
 carriages move to the opposite side, picking up loops
 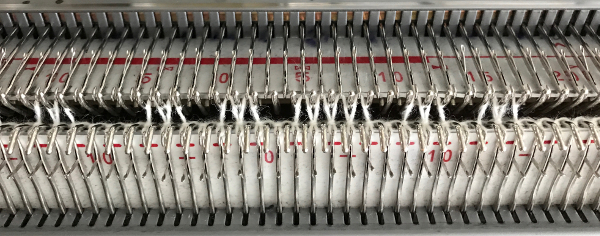 before carriages move again, drop stitches formed. Watch loops after they are dropped, if tugging knitting it is not enough to pull them out of the way of needles returning to patterning, take a tool, or something like a credit card. Slide it from one side to the other between the beds, thus keeping loops clear away from the main bed
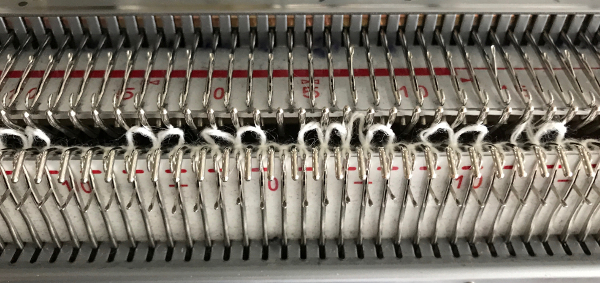
 purl side is shown first for each segment, followed by its knit
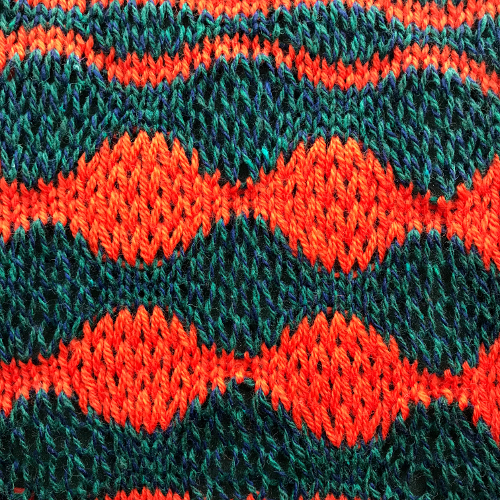

 If using punchcard machines, factory issue punch cards provided with the KM may be used
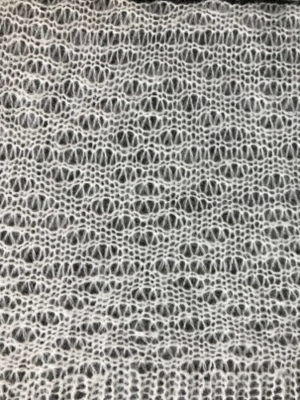
 A slip stitch edge may be planned to keep edges of items such as scarves from rolling
  consider top and bottom edgings that include the technique (illustrated in the
 An alternative way to produce this fabric on Brother is to use the knit carriage with no yarn to do the “stitch ditching”. The basic design programmed into any brother machine, electronic or punchcard will need to be altered. The intended design in my sample is a 4 X 4 square, colors represent what would be punched holes, black squares, or pixels. Simple block patterns such as these may be released upon completion of each “square” series, in this case, after 4-row segments.
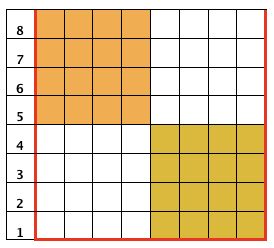
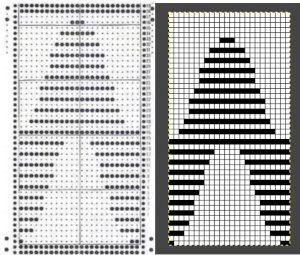
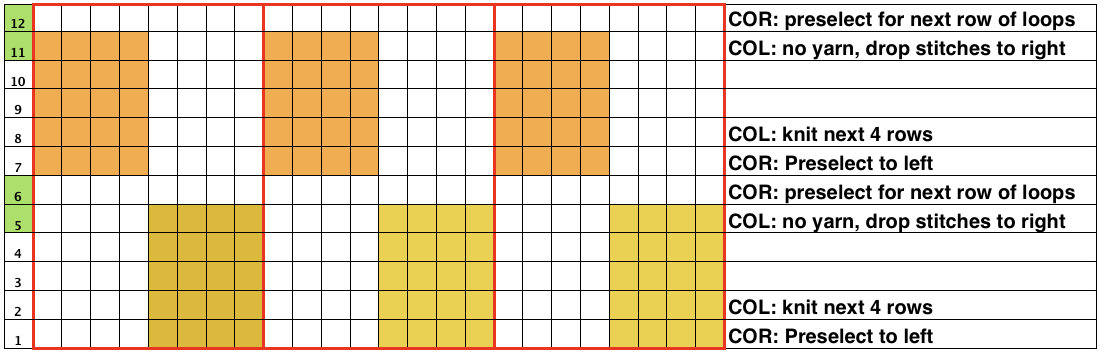 Rows 5 and 6, 11, and 12 are not part of the original repeat. The 5th design row provides needle selection, traveling from right to left. When the carriage passes in turn from left to right with no yarn, those preselected needles will drop while preselecting a blank design row (6) that allows the carriage to return to the left-hand side. As it moves back to the left, the carriage will preselect the first row of the design. With COL yarn is picked up in order to knit the next set of dropped stitches. A color change may be made while the carriage is on the left.
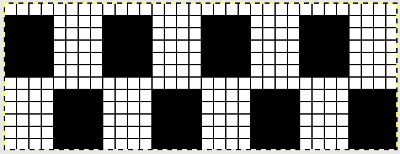
 More to try: the typical appearance to look for in the source inspiration is that of single-row horizontal geometric designs with all blank rows separating them from each other.
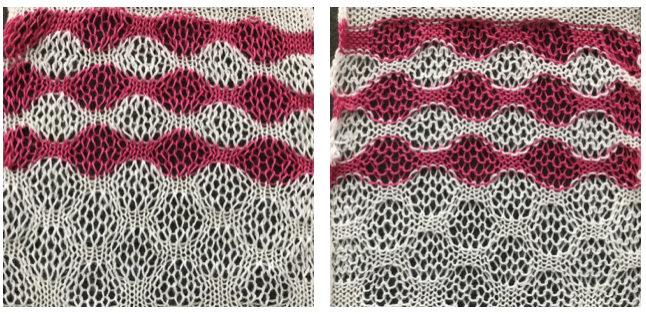
 The yarn used here was a softly spun rayon that began eventually to split, and get partially caught up on gate pegs, leading to the ending of the swatch
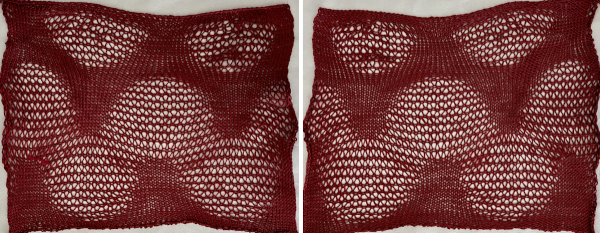
 Fair Isle
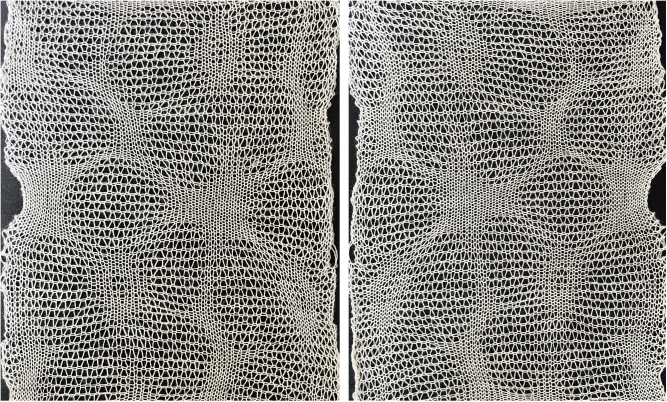
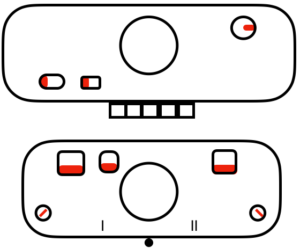
 over the years color varied, but the function remains the same
 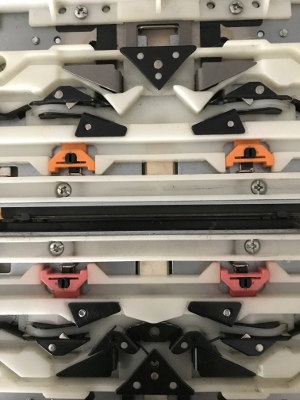 When using extension rails for lace or whenever using 2 carriages, beware not all rails are the same and that may make a difference with some KM model years
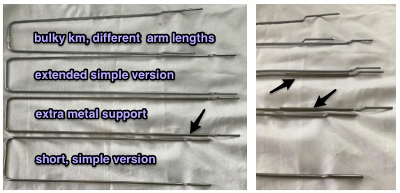
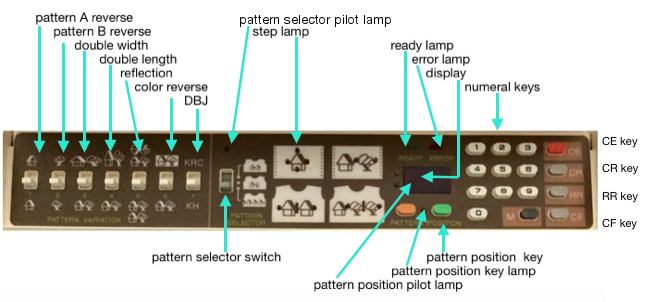 M= Memory: each of the tiny red spots on the garment representations lights up, as specs on motif are entered or reviewed. CE= cancel entry: corrects programmed numbers or cancels the red error light when it flashes. CR= cancel row: press in a number, say 2 on the panel, and the card moves back 2 rows. If you press the button and no number is entered, the error light flashes and the card stops advancing. This is the same as locking the punchcard to repeat a pattern row. RR= row return brings the card back to the set line. This is routinely done before shutting off the machine when knitting is complete or to remove the mylar for editing. CF= card forward. The mylar returns to programmed design row 1. Numbers pressed in using CR or CF do not change those programmed using the M button.
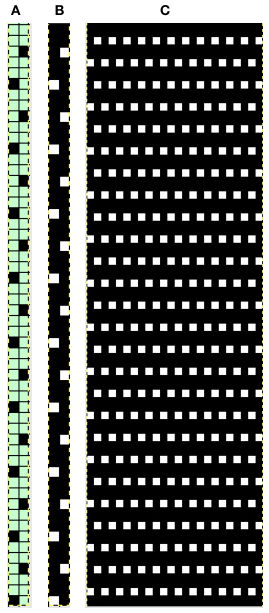
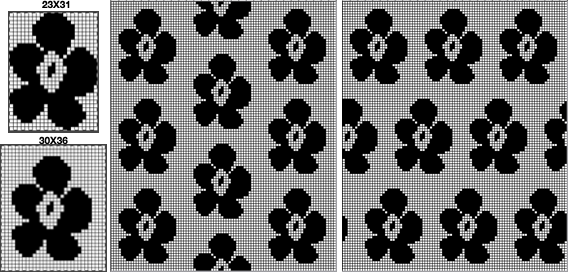
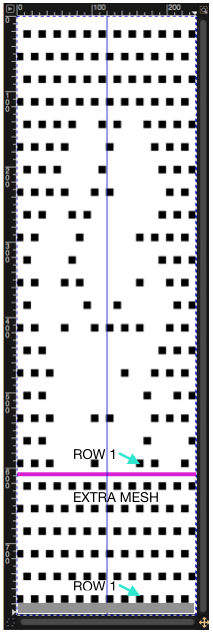
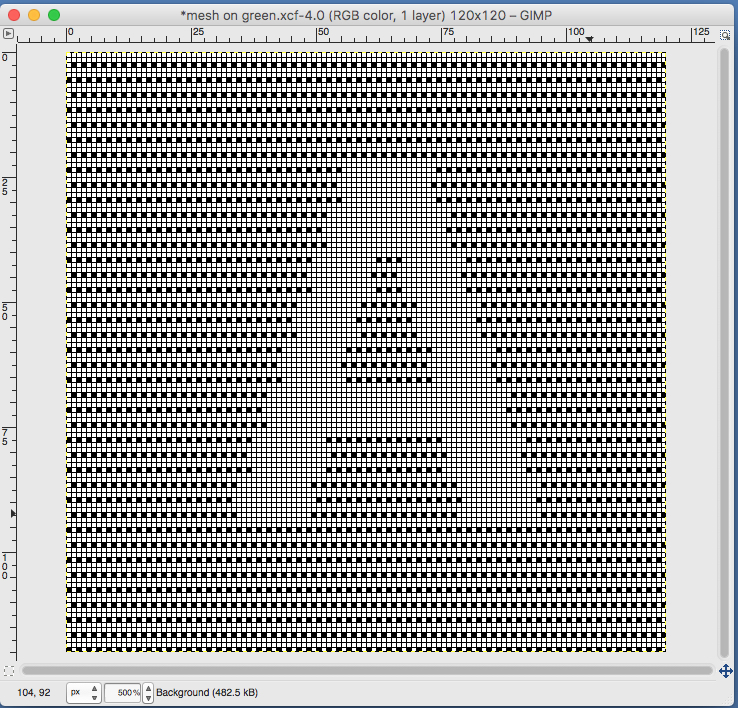
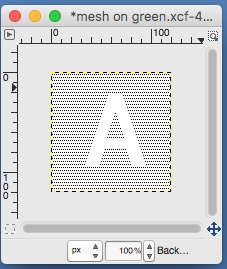
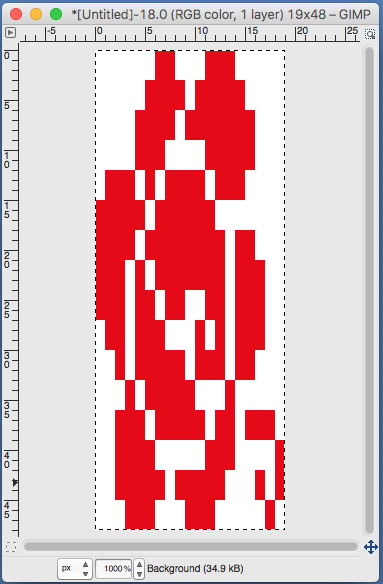
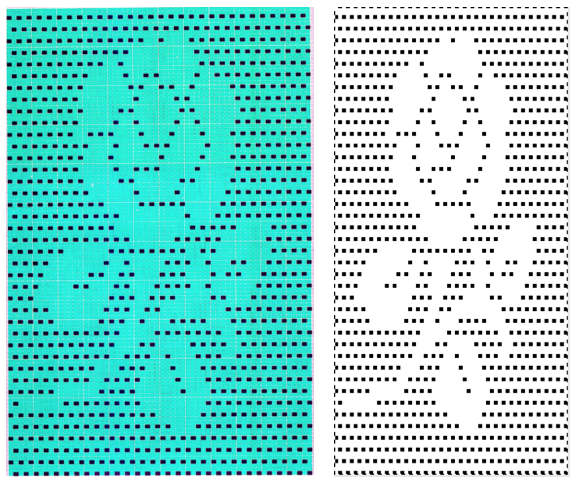
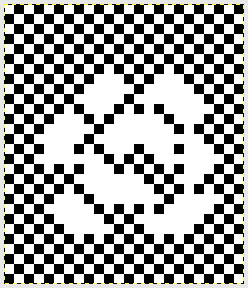
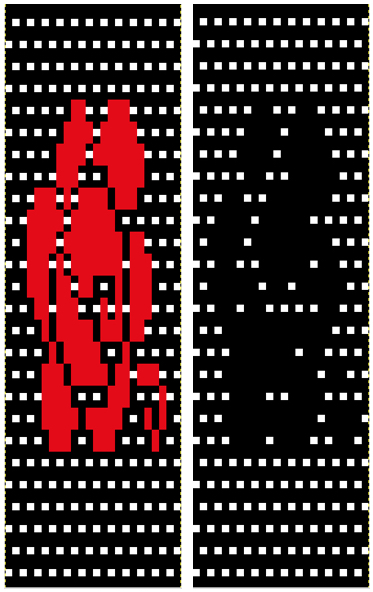 In terms of placement: if the all-over mesh is programmed centered on G1, and the motif is positioned with FNP other than G1, any simple, extra rows of mesh prior to starting the all-over pattern (below green line), will need to be programmed separately with adjustments also in FNP to match the superimposed segment. The programmed repeat for the mesh “rose” below would begin immediately above the blue line, and the extra mesh rows at the top would provide the transition to the start of the rose once again. The height of the pattern seen in the B column in the first illustration may be adjusted accordingly.
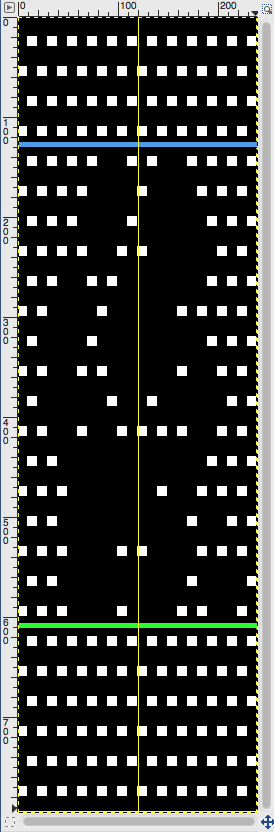

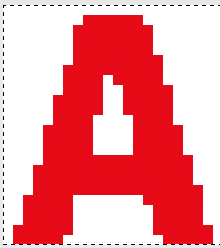
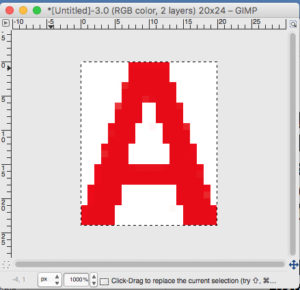
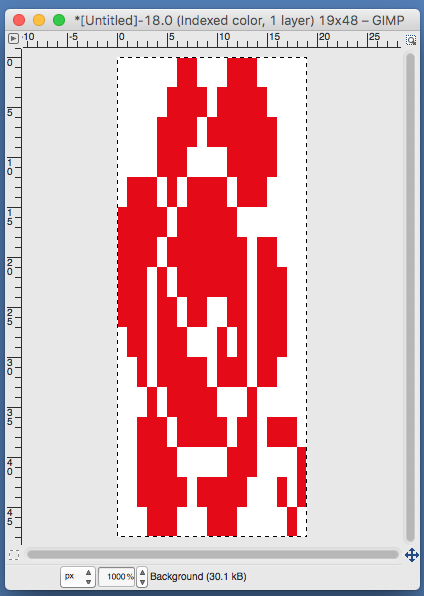
 the A pasted in place
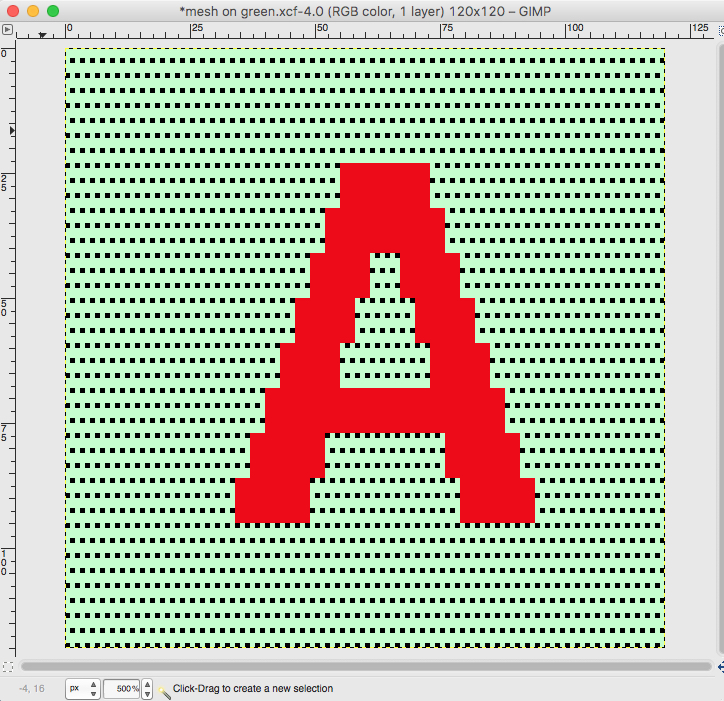
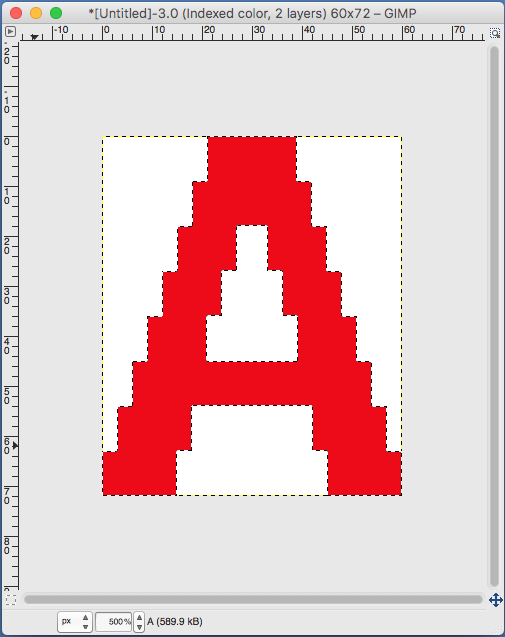
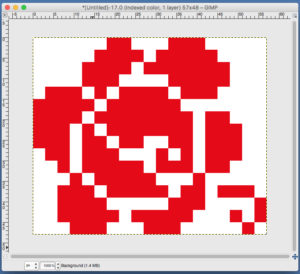
 feeling better, with the exception of the left side bottom of right leg of A
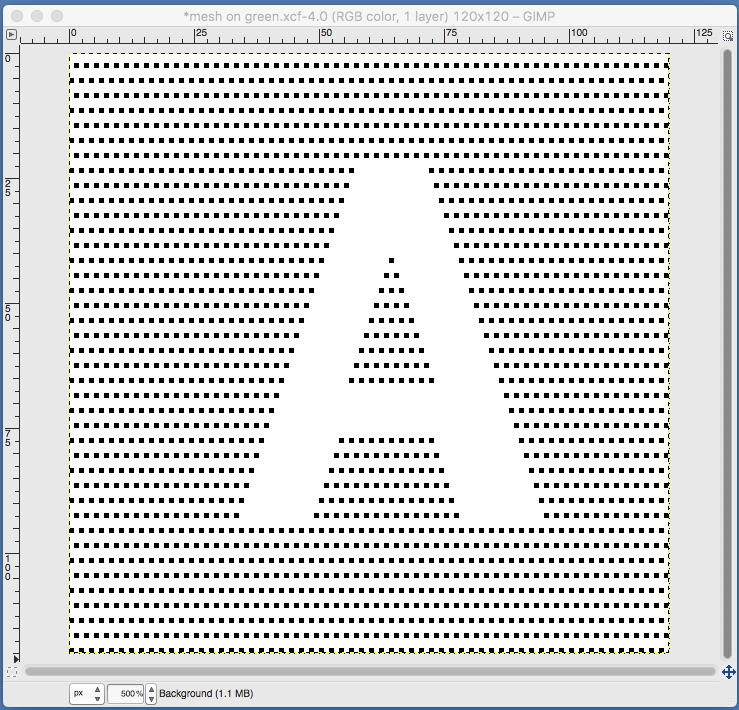 one last bit of clean up, switching between magnification as needed
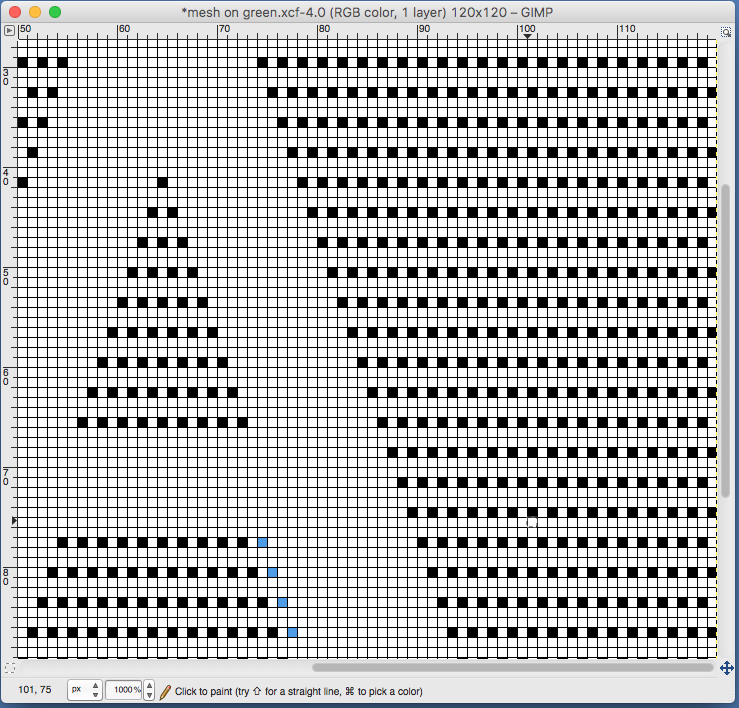

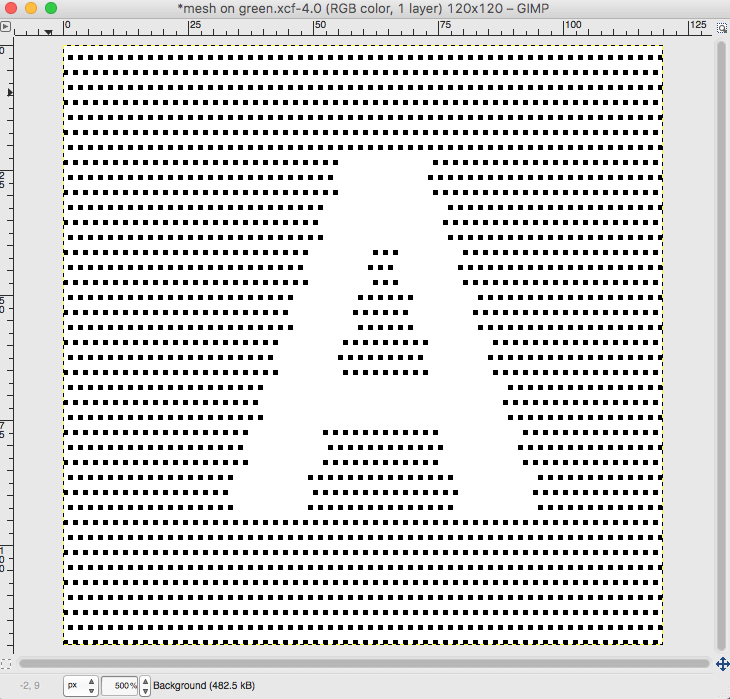
 use selection editor or fuzzy select
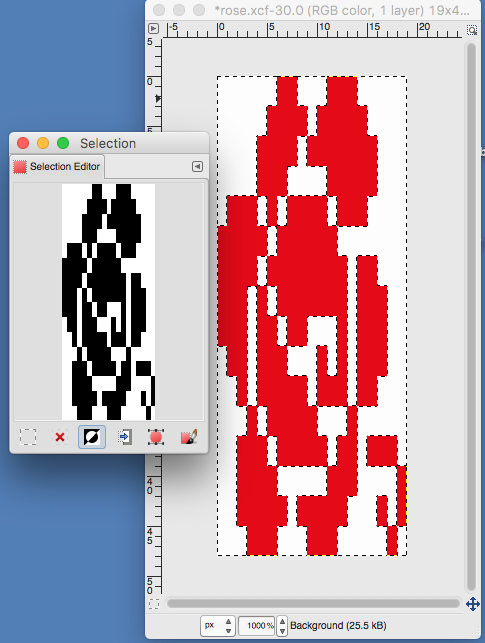 paste and move to “best” spot
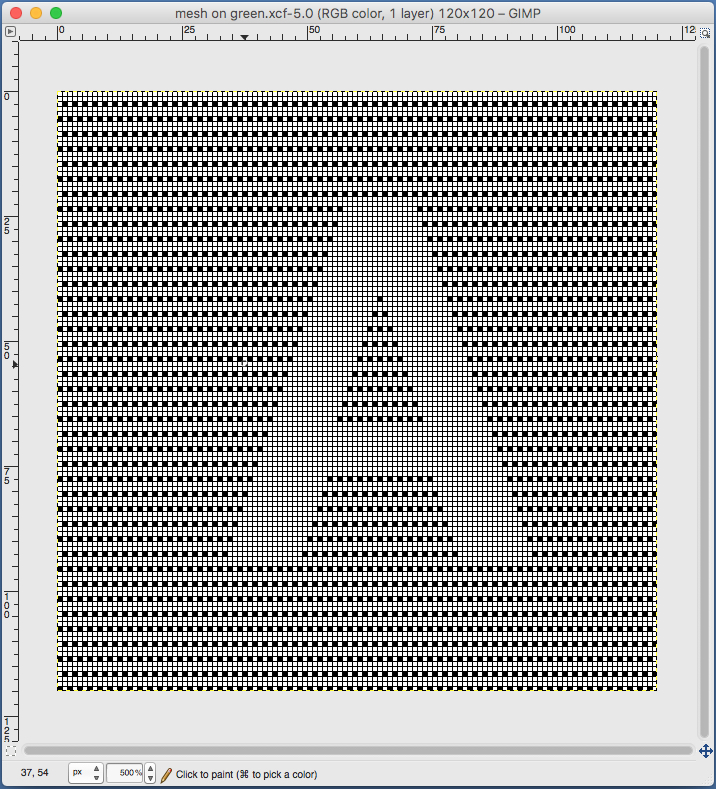
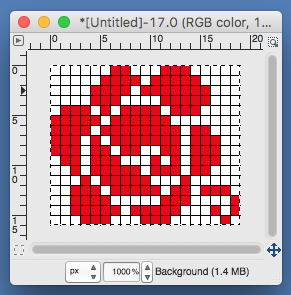
 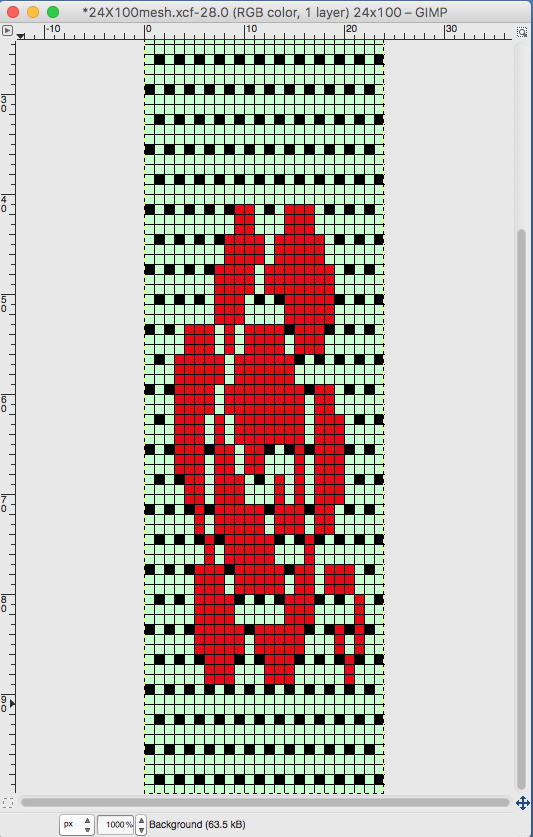 not quite a rose
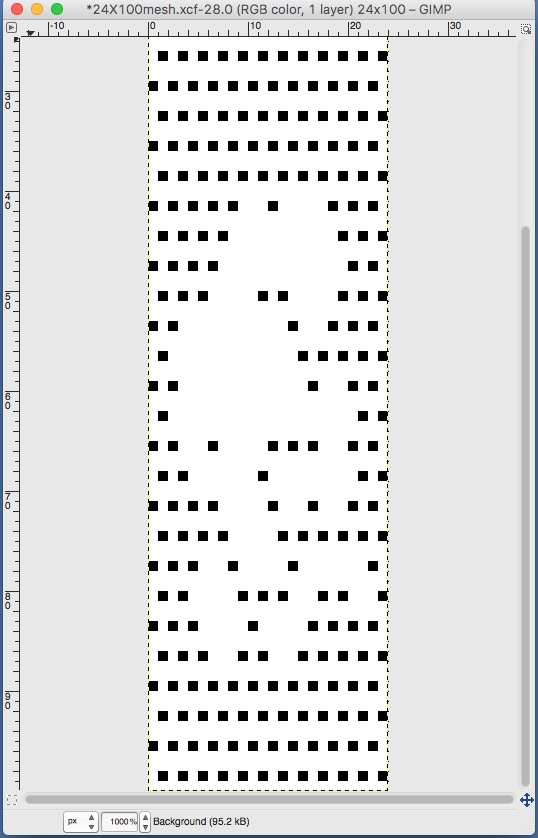
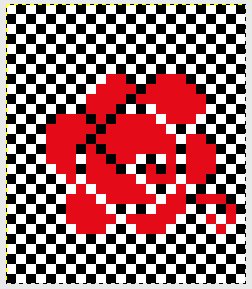
 When satisfied, export in format for download.
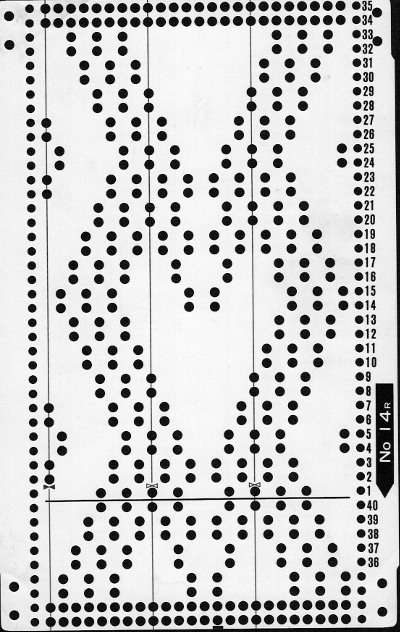
 Three more candidates for experimenting with the technique.
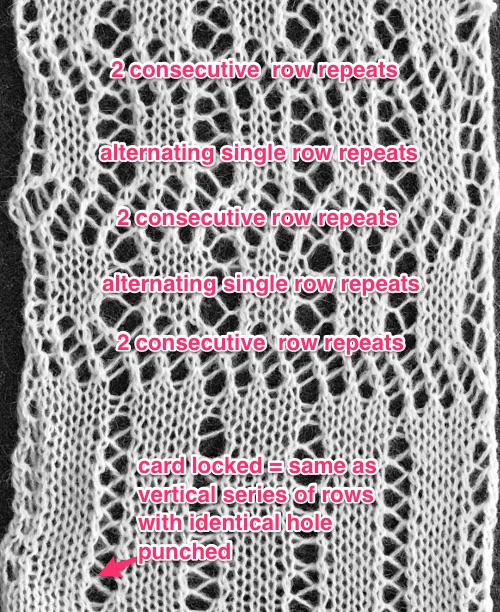
 The single knit row between repeats is fairly easy and rhythmic to produce. The first preselection row is made with the lace carriage, beginning on the left, the design is used as given in the punchcard.
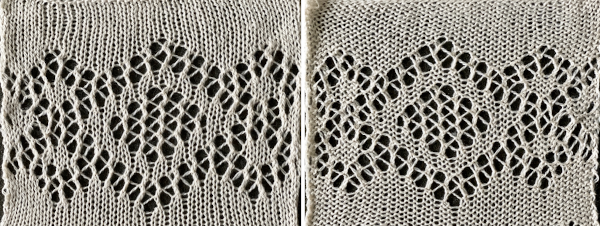
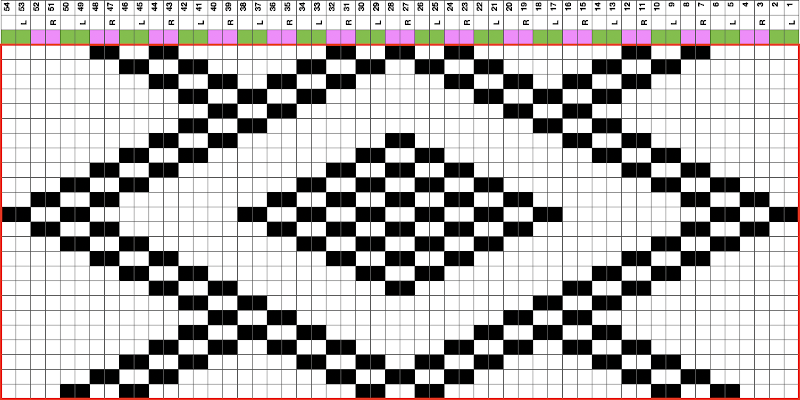
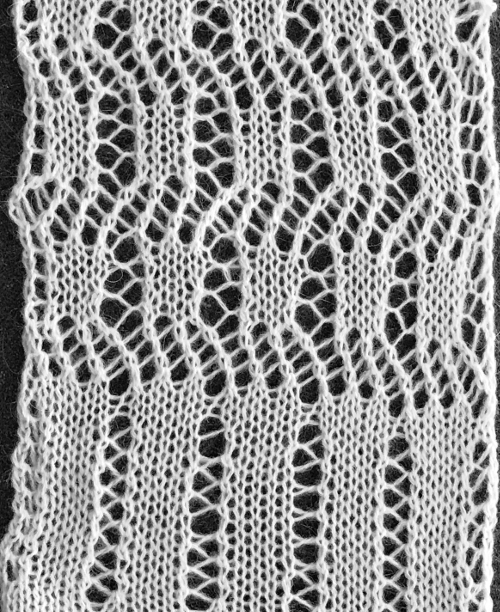 The above shows long vertical lines of transfers are possible in design motifs (punched holes).
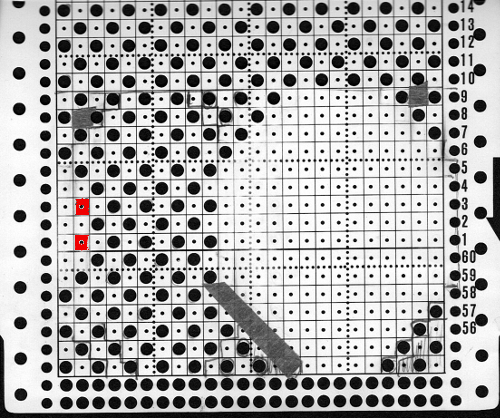
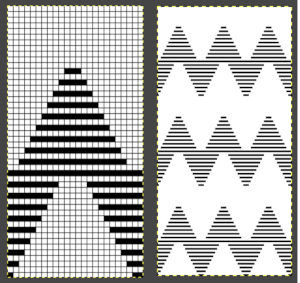
 Since the above is seven stitches wide, if punched accordingly it would occupy 21 out of 24 stitch units on a punchcard. As is unless those extra needles on the far right or left are left out of work for ladders or transferred down to the ribber, it would not be suitable for an all-over fabric. It can, however, be used for a trim. If the latter is the intent, only one series of vertical repeats as seen in the chart needs to be punched. The numbers below the image indicate Brother needle tape markings. The Brother needled tape has a center O position marking, with numbers beginning count with one and radiating out marked in groups of 5 in both directions.

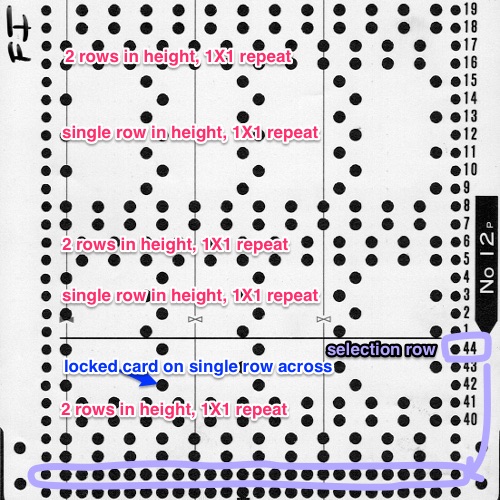
 The single-width repeat may be programmed as pixels, on left, or punched holes on right. In electronics a single 8-row repeat is adequate, punchcard knitters repeat 5 times to 40 pattern rows punched.
 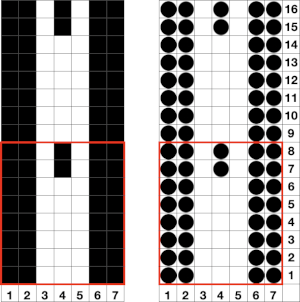 I prefer starting such designs on a knit row. To do that, the design repeat start may be shifted
 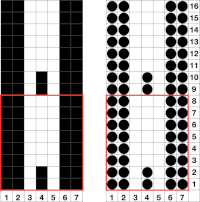 Using the trim as the cast on edge for a garment: determine the length required after a technique test. Knit a bit extra and remove on waste yarn, so more may be added or some be unraveled if needed or you wish to change the configuration using it as your cast on. Rehang and cast on later when it is completed. The flared-out portions of the trim will be used to “cast on” the edge of the piece, continuing with some needles out of work. An attempt at a line drawing of the “trim” sideways
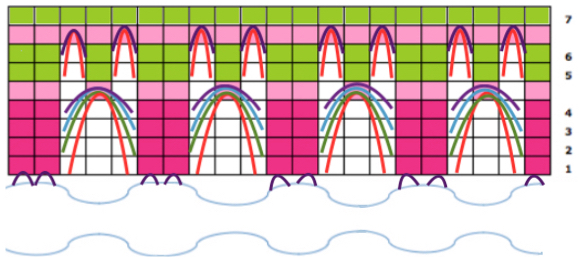
  Using the curved out edge of the trim, hang half stitches if possible, or one full stitch away from its edge as illustrated below. Knit 4 rows. With a tool pick up all ladder loops created by NOOW (RC 1-4) and hang them on the center empty needle. Knit rows (RC 5, 6), hang ladder loops on still empty needles, knit across all needles, continue with garment
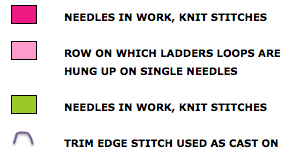

 The yarn used is cotton and appears to have a tendency toward biasing on knit rows as seen in the tendency to lean in one direction in the above photos. It has no stretch, so stitches that knit off several tuck loops remain elongated. A look at the structure on the purl side:
 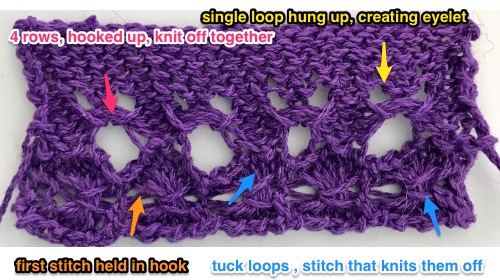 For more trims in this family, please see later post
 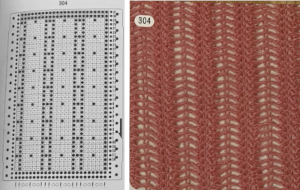 If using the pattern on electronic machines, the needle selection needs to match on the top bed. Depending on the model electronic, the pattern may have to be reversed for accurate needle selection.
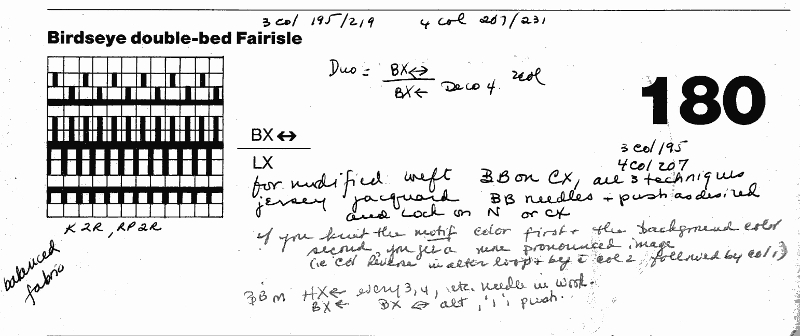
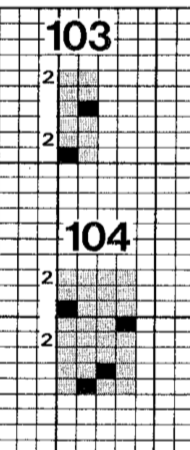
 When using card 304, tucking happens for 3 rows forming loops that span across needles out of work, then all stitches on needles on rows with numbered markings on blue cells knit for one row. Orange gradient-filled cells represent rows on which tuck loops are being formed on the held single stitches, which in turn grow in length.
  The full 24 stitch repeat, shifted for my preference, with the smallest electronic 8 stitch repeats outlined with red border
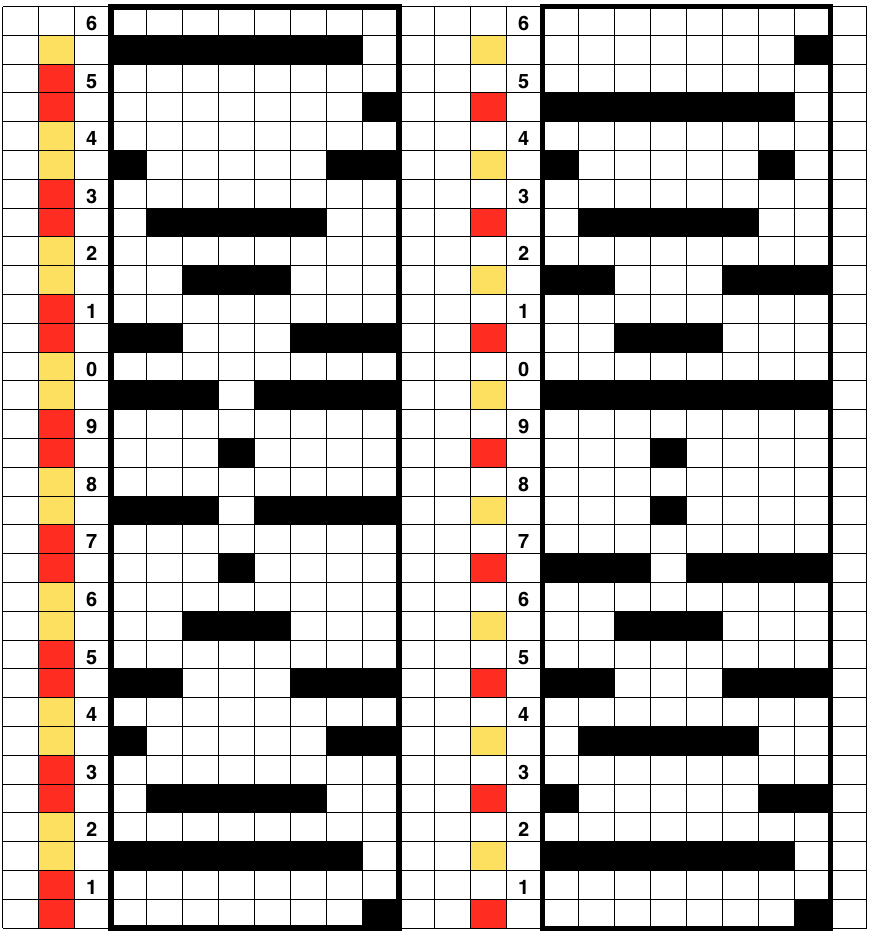
 On the 930: the odd number of needles are automatically placed on the left, with the pattern used in the isolated design setting.

 the tuck loops still form on the main bed, the ribber is set to knit every needle in both directions.
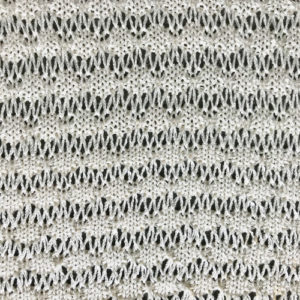
 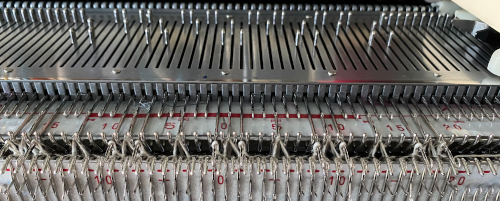 The resulting knit, very different in appearance and in width than the previous sample, using the same tensions
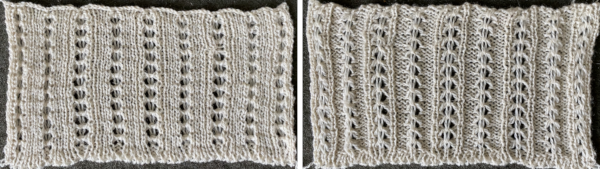