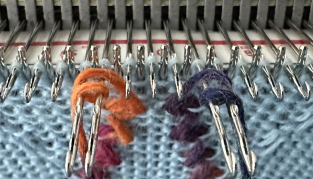
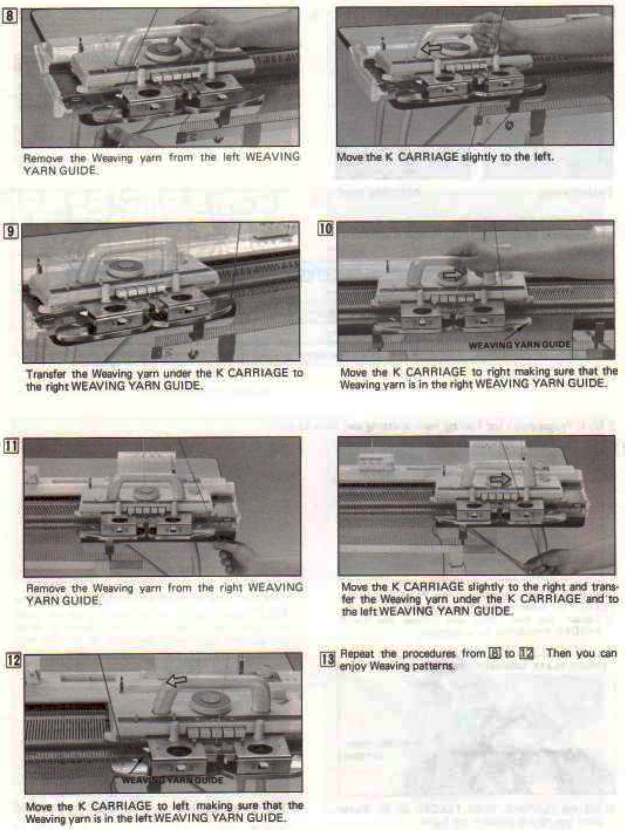
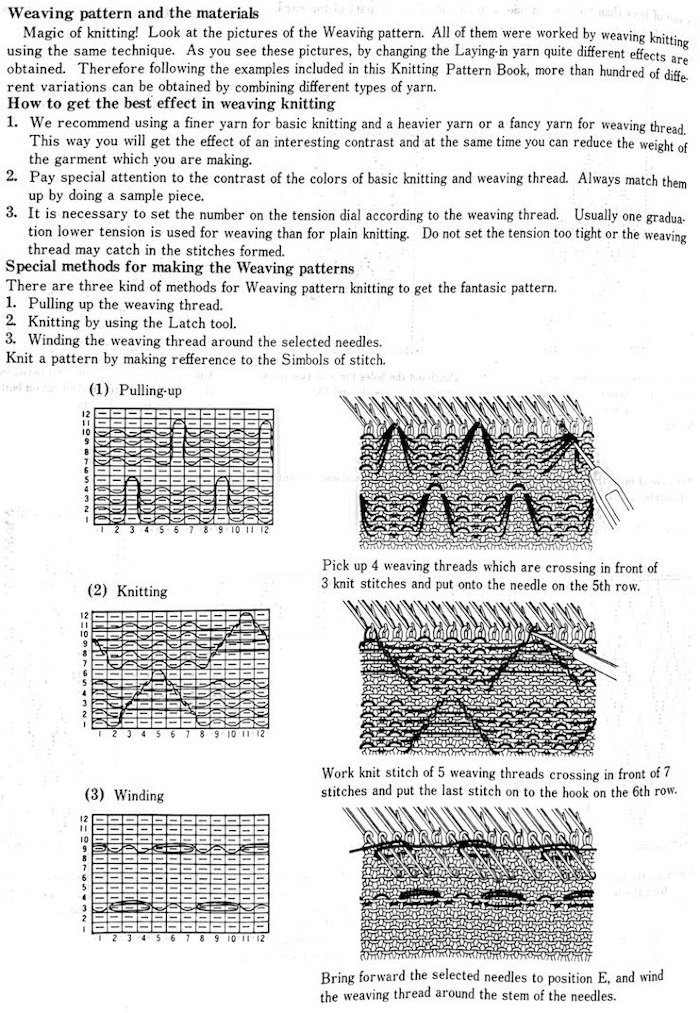
In knit weaving, the knit carriage is threaded with the main yarn as usual. The choice of pattern is determined by needle selection. The most basic technique involves pulling the desired weaving needles forward manually or by using needle pushers which are available in a range of selection options. Automatic needle selection makes the process faster, consistent, and capable of more variations.
The weaving yarn, according to instructions in manuals, may be threaded through the tension mast and guided through the weaving yarn guide. Feeding thicker yarn smoothly through the standard mast may become problematic. Moving yarn from the groove on one side to that on the other is cumbersome. The punchcard machine manual for the 860 machines has some clear illustrations and directions 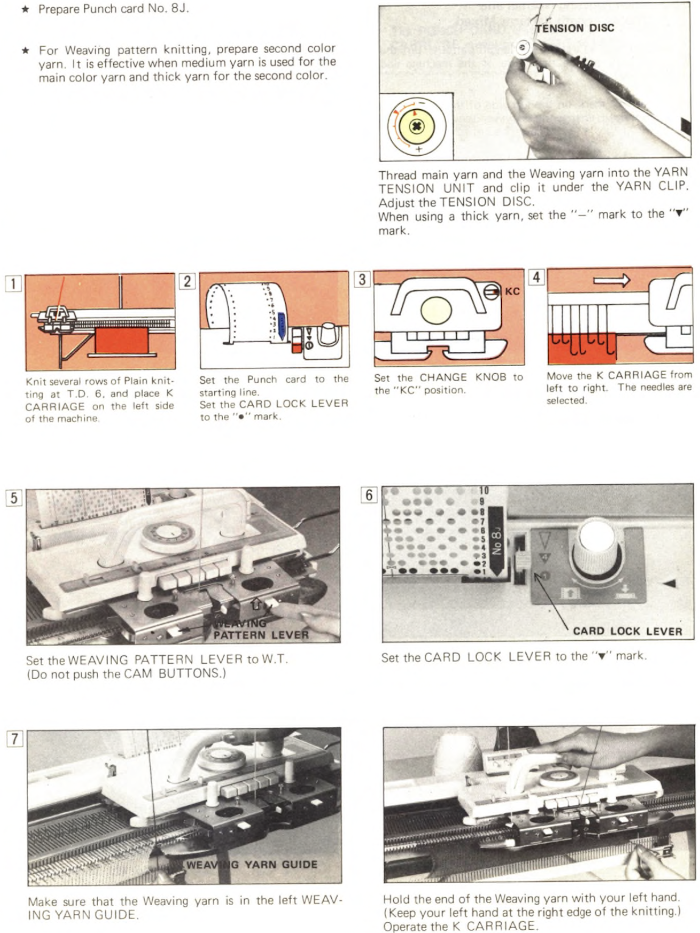
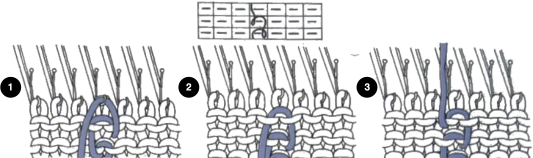
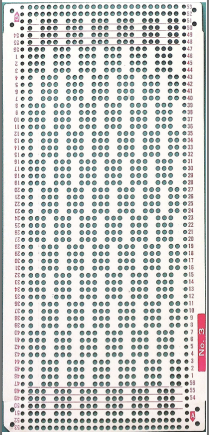
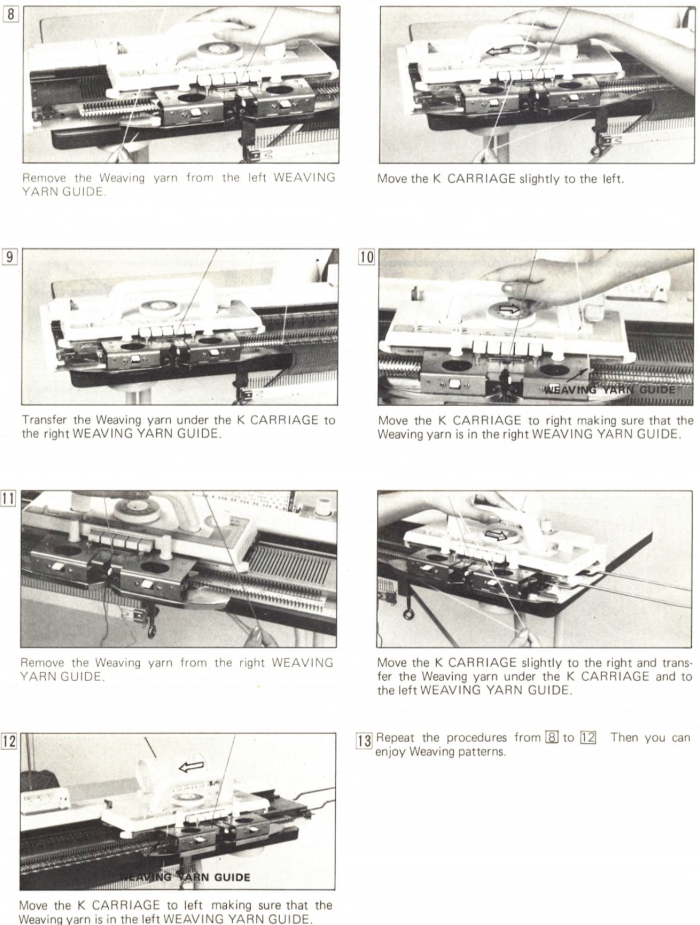 From the 260 manual:
 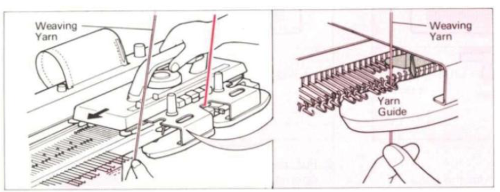 The “yarn guide” is that mysterious notch in each arm of the sinker plate. In the Studio accessory, the AW1 weaving arm, the yarn is also fed through the yarn mast, and moved physically from side to side after each pass of the carriage.
 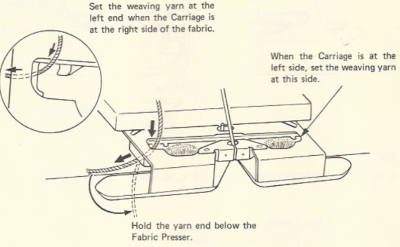 Start the piece with waste yarn and some evenly distributed weight based on fabric width. Make sure the weaving brushes are activated. In Brother standard, their position is changed using the corresponding lever, in the bulky 260 the L and R wheel brushes need to be placed in their corresponding slots.
 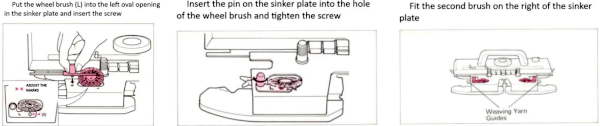 A good repeat, to begin with, is one that selects every other needle, every other row. The card is a standard factory issue with punchcard machines.
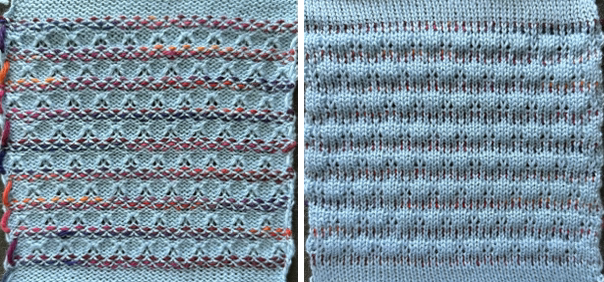
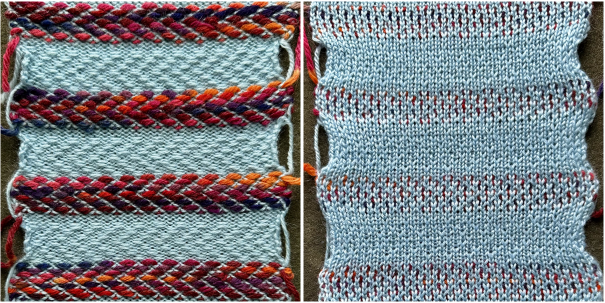
 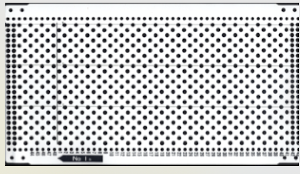 In general, the knitting yarn is thinner than the weaving one. The tension needs to be adjusted to accommodate the surface yarn, not the background one. The tighter the tension the firmer and narrower the weave. It is also possible to create soft knits with a lot of drape ie by using sewing thread for the ground and fine mohair for the weft, there is a huge range for exploration.
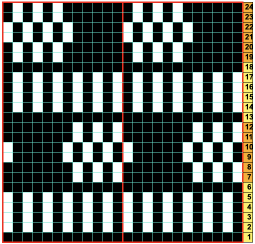
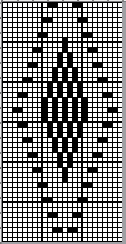
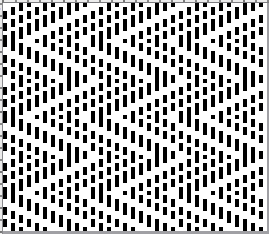
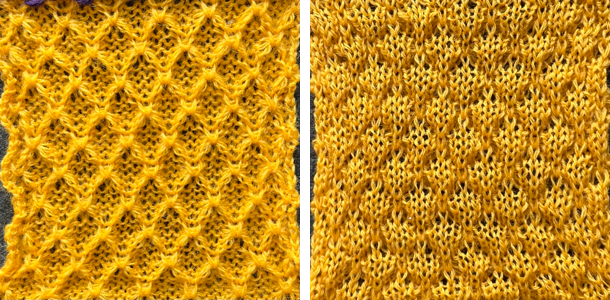
The “weft” precedes the base knitting yarn which knits the stitch. It is laid over the top loop of the old stitch on a needle selected by a hole in the card and goes underneath the top loop of a previous stitch on a needle not selected by a blank on the card. When card 1, above, is in use, the weaving yarn is caught in a series of two loops, one above, and one below forming a honeycomb effect. The structure is typically illustrated in these ways in Japanese reference books and magazines in particular. 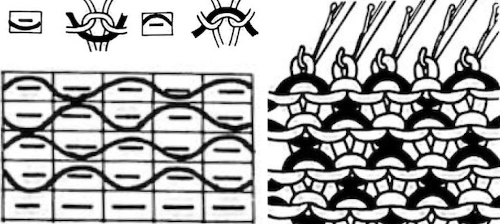
 Early Brother punchcard volumes have illustrations of the over_under structures and in-between floats along with providing the pattern repeats.
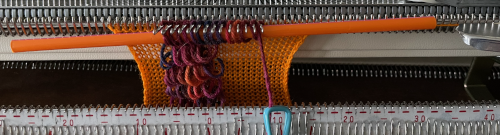
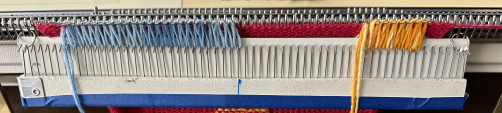
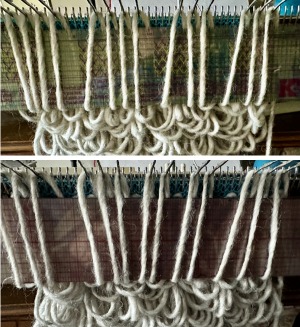
 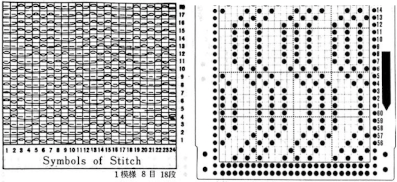 Setting things up: the weaving yarn is in front of the machine, fed from the floor. The short end goes to the carriage side, the long end is away from it. It is laid in front of the gatepegs, atop selected needles. A clothespin can provide enough weight on the short end to keep it from riding up and having to be managed with one’s hand. “Weaving” can begin from either side, here it starts on the left. Knitting in 2-row sequences will return the yarn ends to the starting position.
 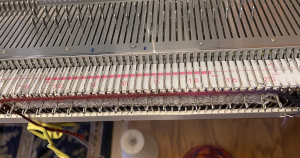 Locking the card, as with any other pattern, will repeat the same needle selection, creating vertical repeats that resemble twill weaving on a loom.
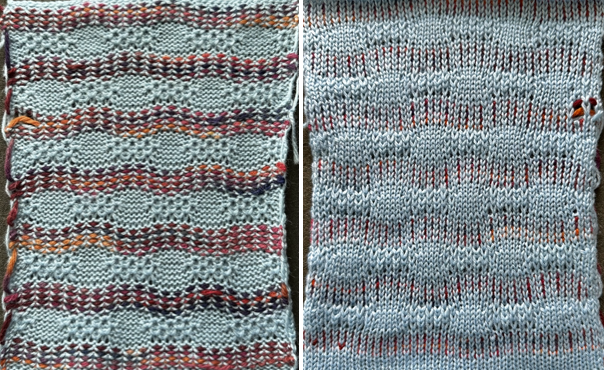
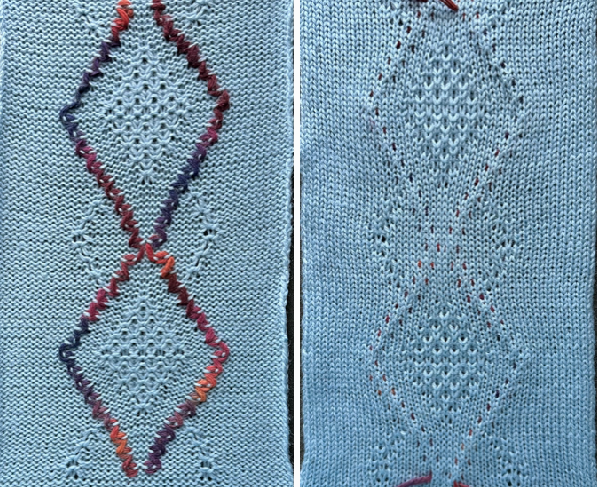
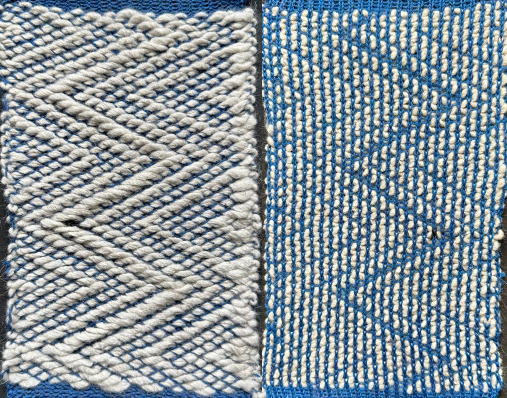
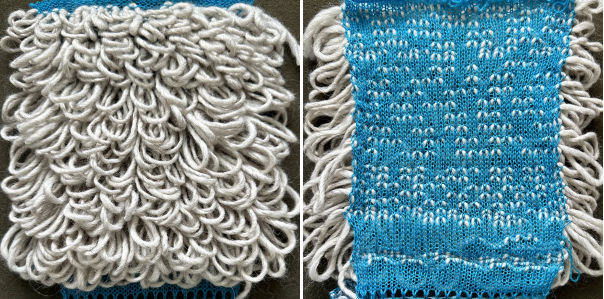
a: card set to advance normally, b: card locked 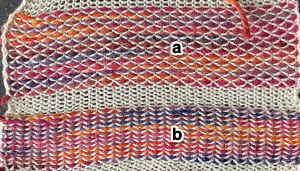 a: because stitches are actually knitting every other row, slipping while the needles on each side of them knit, they will alternately be a bit elongated; b: same needles knit every row, so their appearance is consistent.
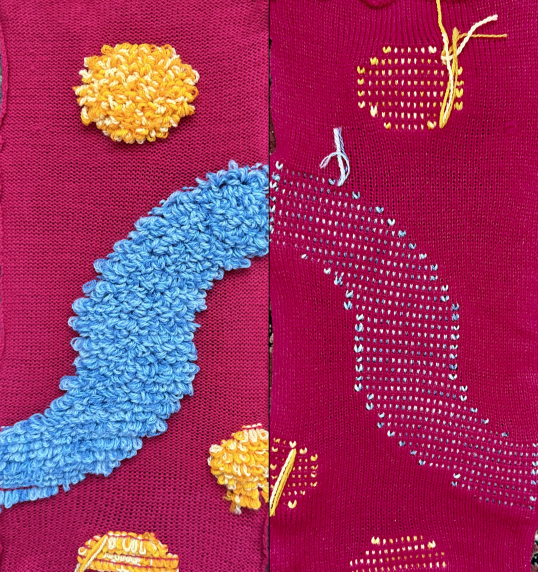
 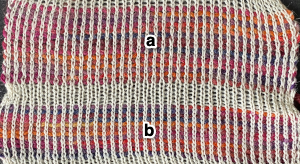 Depending on the difference in yarn thickness, the knit stitches in the ground become forced apart with what can be significant “bleed-through” on the reverse of the weaving to make that a really interesting fabric feature as well.
Some weaving patterns with variable floats will produce better edges if the end needles are brought out to E in every row if not selected to that position by the reader.
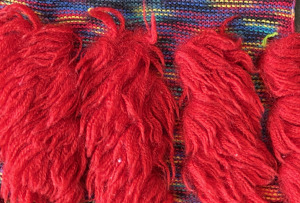
If a hairy or fuzzy yarn such as mohair is used the fabric may start to bunch up, it may be necessary to reach up from behind the knitting and gently pull to release the little hairs from the gate pegs.
Most punchcards designed for weaving aim for short floats formed by unpunched areas, longer ones on occasion are planned for added manipulation.
Moving the yarn from the groove on one side to that on the other is cumbersome. Another way of working: the main yarn is threaded as usual and the weaving yarn sits on the floor. The method is often referred to as intarsia weaving. The shapes may be created using various punchcard designs ie diamonds, squares, etc, free-forming, or even through following planned drawings on knitleader mylar garment shapes.
The knitter guides the yarn. If the yarn is held too loosely it may jump off the knitting while weaving and thus create long loops. It should be guided and held just enough to slip through the hand as the carriage is passed.
Preselect for the first row of knitting. Lay the weaving yarn across selected needles in the direction in which the carriage will be moving.
If using yarns of different yarn weights within the piece, multiple strands of the thinner yarn may be used together, but test how the strands feed and if plying might lead to problems. Using wrapping methods on some rows or even creating floats and hooking them up periodically can produce added interest.
If using more than one yarn per row, the approach is similar to intarsia. In true intarsia, every needle is in use. These illustrations are from an intarsia carriage manual; positioning the yarns for a first row from right to left, 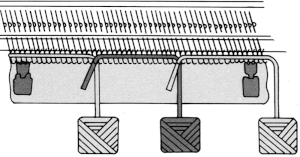 the “wraps” needed in each direction
  In knit weaving, assuming the first pattern row is preselected from left to right, with COR, the short end of the yarn of the carriage side, bring the first weaving yarn up from the floor, and lay it to the left across the selected needles, bringing it down between the last selected needle for A, and the first selected needle for B.
 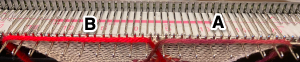 In one method, bring the long end of the second yarn, B, up on the right side of the needle over which A just crossed, and lay it over the remaining selected needles and down to the floor.
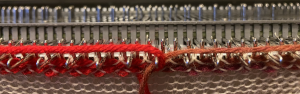 Small clothespins may be used to hold the short ends in place. When all the yarns have been laid in, grasp the ends loosely, pass the carriage to the left, and the first woven row will have been completed. The carriage will now be on the left, COL. For the next row begin on the right, bring A up and between the two needles directly above it, take it over selected needles to the end of selected needles, and down to the floor. Then take yarn B and bring it up around the left-hand needle, over and to between the two needles that served as the starting position for A. The yarns do not overlap the same needle going to the right, but they do to the left.
The more traditional intarsia crossings may also be used, with the new yarn passing under and over the old between needles, as seen here with the next row to be knit from left to right. 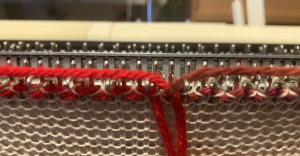 a: crossings made using the traditional intarsia method, b: wrapping over the adjacent needle moving from left to right, c: no crossing at all also revealing single knit stitches between weaving yarns. In some spots, my weaving yarn split and got knit along with the ground yarn.
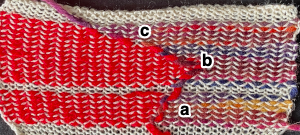
 To create isolated shapes: lay the yarn in any chosen area
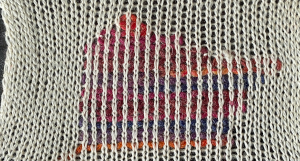
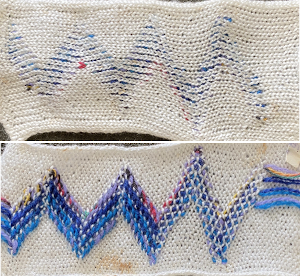
  Shaping may happen in a straight vertical, a, there may be a slight separation along that edge. Increases are possible on both sides at the same time, and are best done by adding single new selected needles to the pattern, b. Moving further out crossing over more weaving needles will cause floats, as seen in c and d. The woven segment forces the knit stitches apart, so the stocking stitch on either side of the shapes, e, appears to be formed by smaller stitches, and pulls in toward the shape
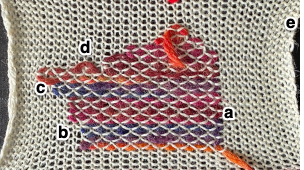
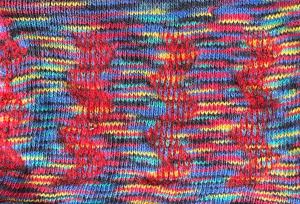
 The ground yarn and color may be changed for added striping and color interest. Sharp angles are created by crossing over two weaving needles, and more gradual ones by crossing over more needles. Blank areas of ground may be left as well.
The intarsia approach may also be used with other cards designed for all-over patterning.
Using far thicker yarns may be made manageable when changing the card repeat or using weaving repeats with 12-stitch wide repeats, working on specific needles on a punchcard machine, or simply programmed twice as wide on electronic ones. The expanded version of every other needle set up for the punchcard models. 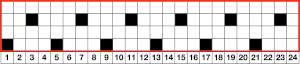 Sometimes plain knit rows need to be added between lines of weaving to help manage thicker yarns in any configuration or to add color interest and width changes to the piece.
Woven rows may be used to create folds in pleats.
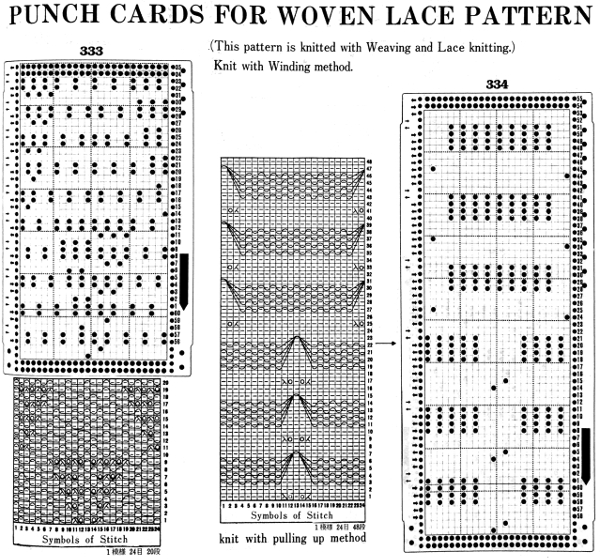
Other weaving techniques include the pulling-up method, as a stand-alone or combined with lace patterning: from a Brother punchcard volume 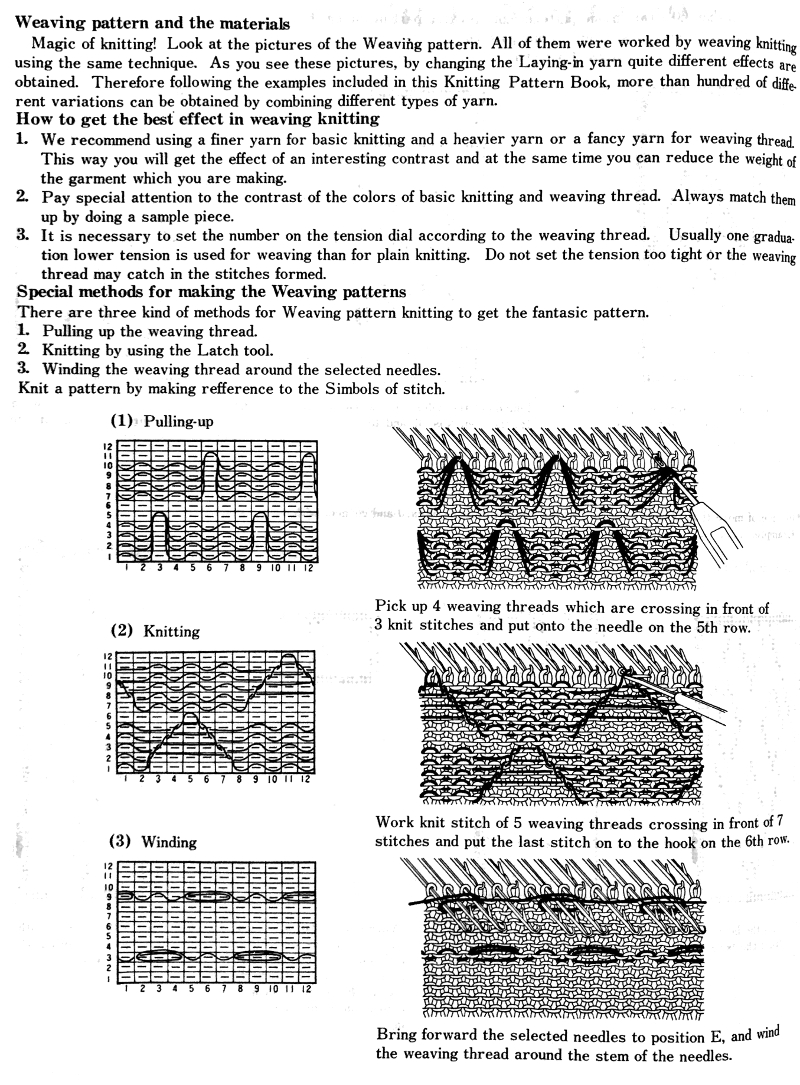 Three more hooking-up variations, including latching graduated-size floats
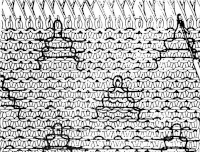
 A later experiment combining weaving with tuck patterning
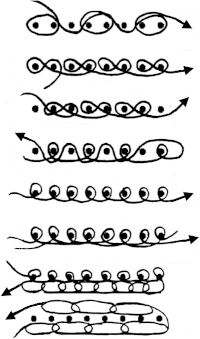
 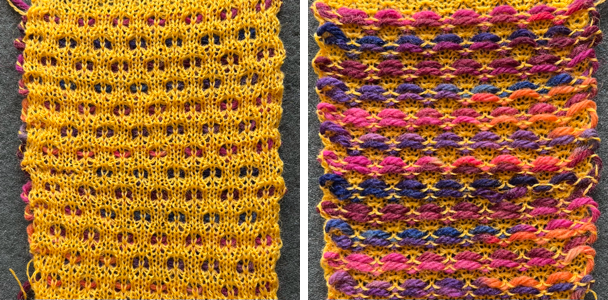 Hand techniques: e-wrap rows may also be incorporated with any of the above or used alone, sketches of some varieties may be used around every needle or every other depending on the thickness of the yarn: a sketch eons ago
  Commercial warp knit structures are often represented as in this illustration.
  On domestic knitting machine models, a knit ground is needed to anchor the moving loops, which in turn are added on as a hand technique, referred to as vertical weaving, sometimes simply as embroidery.
Japanese instructions that came with the purchase of the standard garter bar had schematics for a variety of surface treatments. The accessory came with foam-backed strips intended to be clipped onto the width of the garter bar segment being used, useful in maintaining even spacing between yarn threads when working on wide areas of vertical weaving, as well as providing helpful weight. Any weight used to help handle the long ends of the weaving yarn on any number of threads will need to be moved down periodically. 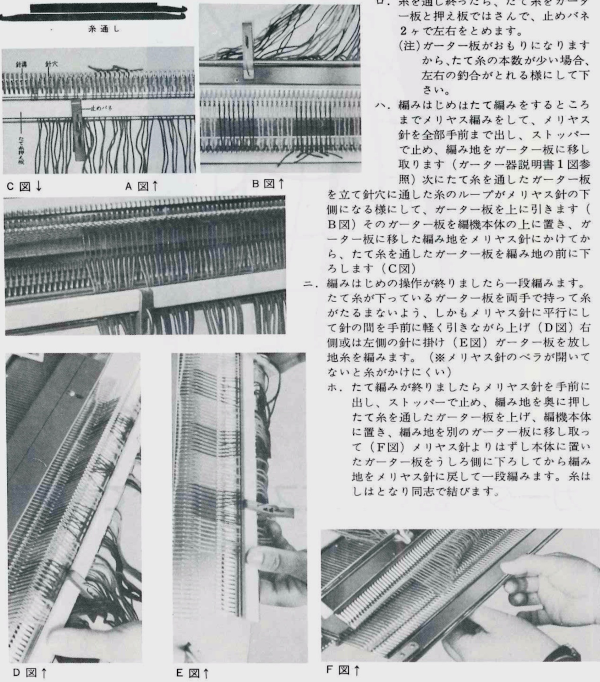
 More wrap ideas
 Variations can happen by changing the spacing between wrapped stitches, the number of rows between the moves, spacing threads apart, and using yarns in different thicknesses and colors.
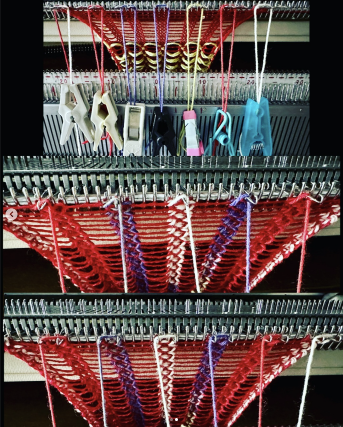
In terms of tools to hold the weaving yarns, in addition to the garter bar, multiple transfer tools may be used, even bobbins. That said, the most efficient way is to have a guide suitable for the overall fabric, especially when creating wider pieces with spaced weaving repeats. It is possible to create cardboard guides with holes based on gauge, whether on the standard or the bulky and with 3D printing nowadays a whole other world for custom tools is open. Matching the gauge with guides has some leeway, but the closer the match, the faster and easier the process. When using thicker yarns for the warp knit, spacing in both stitches and rows becomes a necessity.
A half-hearted attempt at a template. Markings were generated to be point/mm specific. If working in narrow panels, individual segments may be more effective to manage if a bit slower to use than a wider tool.
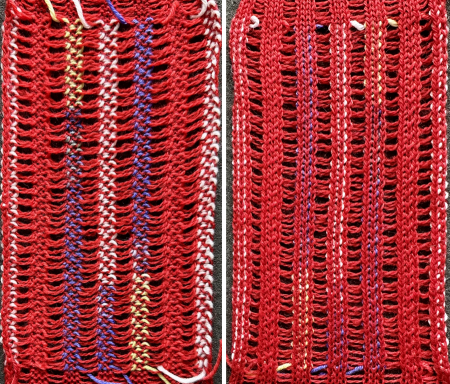
 This is the wrong way to feed the yarn, as the row gets knit woven in, the yarn will be locked in place and cannot be advanced to proceed up the knit
 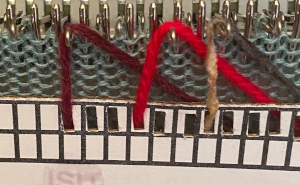 The way to have continuously available yarn
 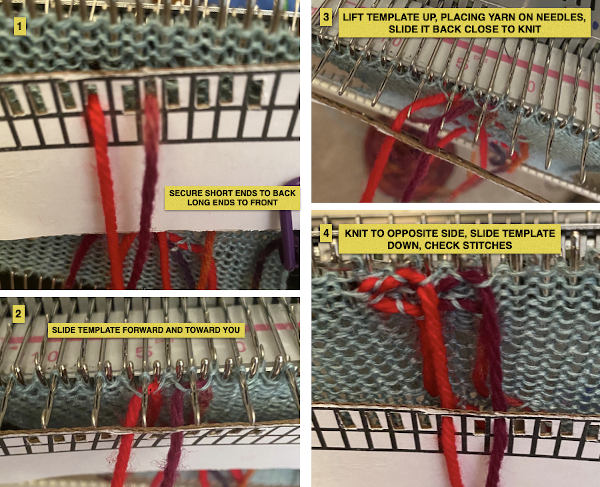 Adding a second set of holes for the yarn stabilize the short yarn ends and maintain even spacing throughout, some tape could be used in addition to secure the ends on wider widths of vertical weave
 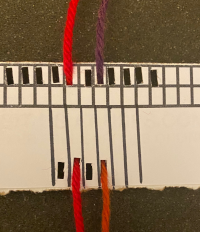 A spreadsheet or graph paper may be used to plan the configuration of the weaves including double wraps, this was executed using Numbers, individual bobbins might be a practical consideration
 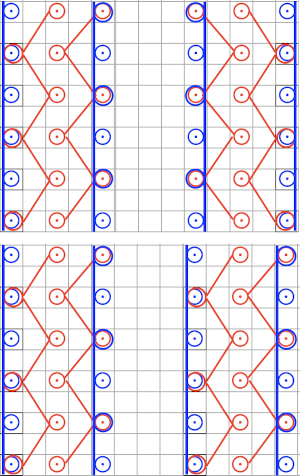 In my own experience most hand techniques and single bed textures are far easier to execute with the ribber removed. It is easier to view progress, move up weights, and correct mistakes. That said, my machines are all set up with the ribber brackets, not flat, I feel it helps slide the knit down toward the gate pegs, and in my opinion that makes textures and even lace easier to produce. I have ribber covers, they can be improvised if needed with paper or cloth, never use them since I see no reason for moving the knit on the top bed in front of the ribber. If the ribber is removed, it is worth checking its balance once more prior to returning to any rib knit. Ultimately this sort of thing is about personal preference, no steps are ever universally applicable and correct.
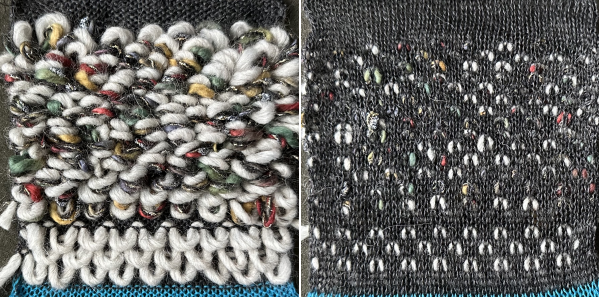
Tufting may be created with the help of a sewing machine.
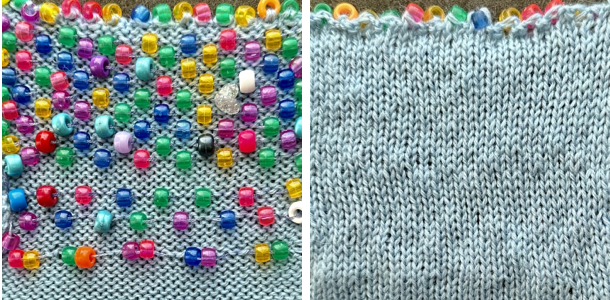
“Weaving” foreign objects can be achieved by picking up loops from other knits, woven, trims, crochet chains, etc. Beads may be threaded onto weaving yarn as well.
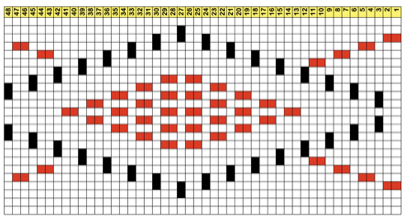
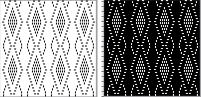
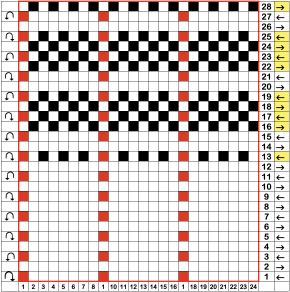
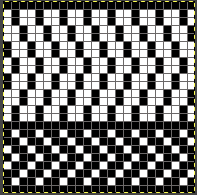
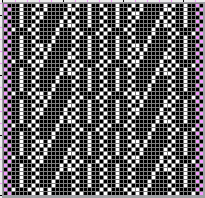
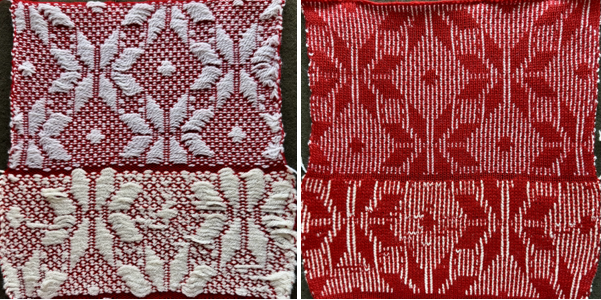
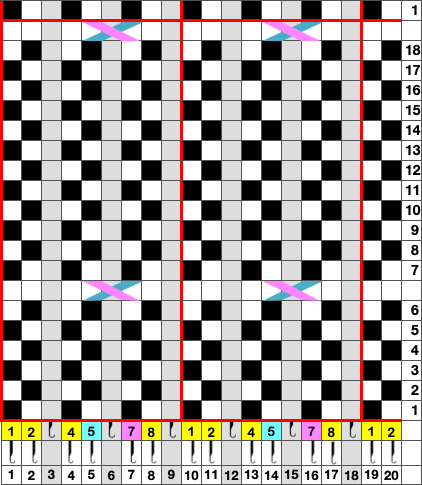
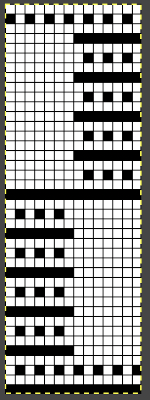
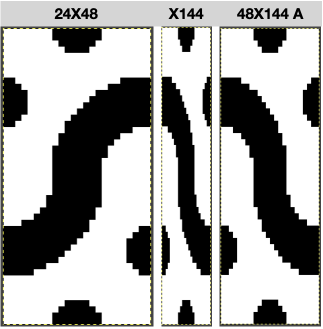
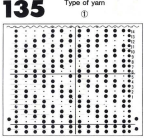
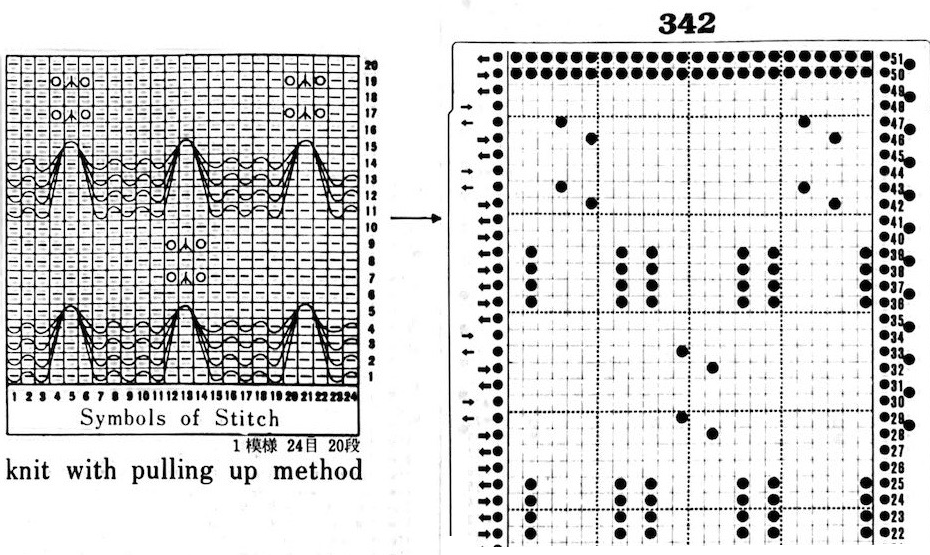
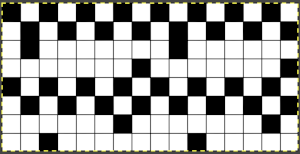
 This chart visualizing the process for a specific repeat was generated using Mac Numbers.
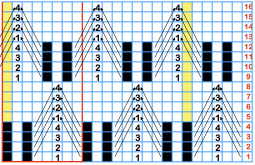 A minimum punchcard repeat is 24stitches X32 rows
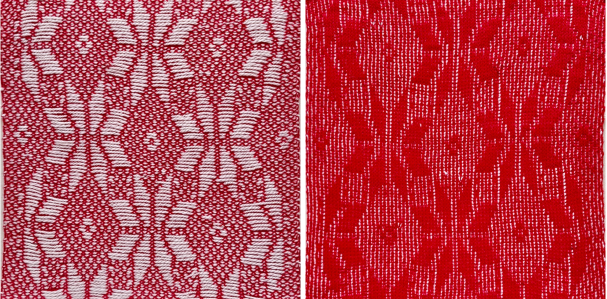
 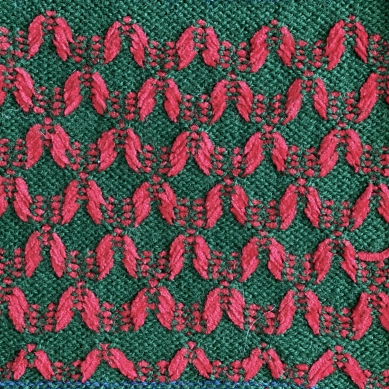 Translating published patterns sometimes requires testing the process by hand-selecting needles to develop programmable DIY designs. The Brother cassette knitting pattern book
  includes a series of samples utilizing the technique, and these illustrations
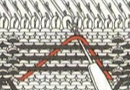
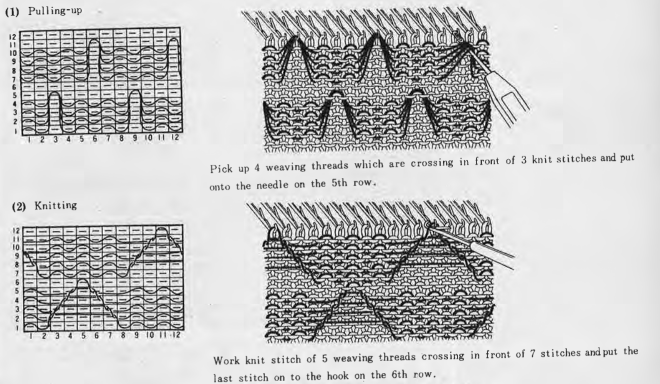 In fabrics such as these, the latch hook is inserted under floats from the first formed up, the last float is caught in the hook of the tool, pulled down behind them, brought forward, up, and lifted onto specific needle locations before further weaving or plain knitting resumes on all needles in work.
  A random selection:
 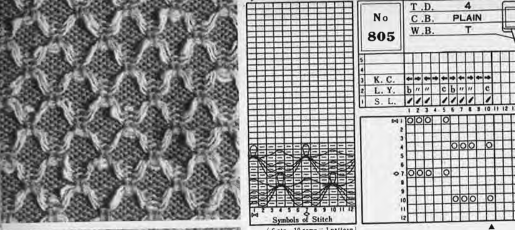 The repeats are represented in a clockwise rotation,
  the first swatch however, disregarded that fact and was a best guess at DIY based on hand-selection of needles.
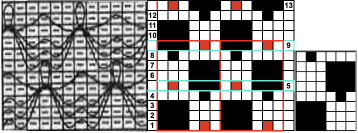 the 6X8 repeat
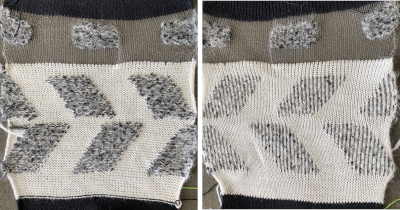
 As a general principle when multiple colors are used, if they are planned for color changes occurring for odd numbers of passes, the yarn may need to be cut and brought to the opposite side regularly, or 2 different ends starting from opposite sides may in some cases make the process easier and reduce yarn ends.
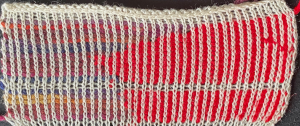
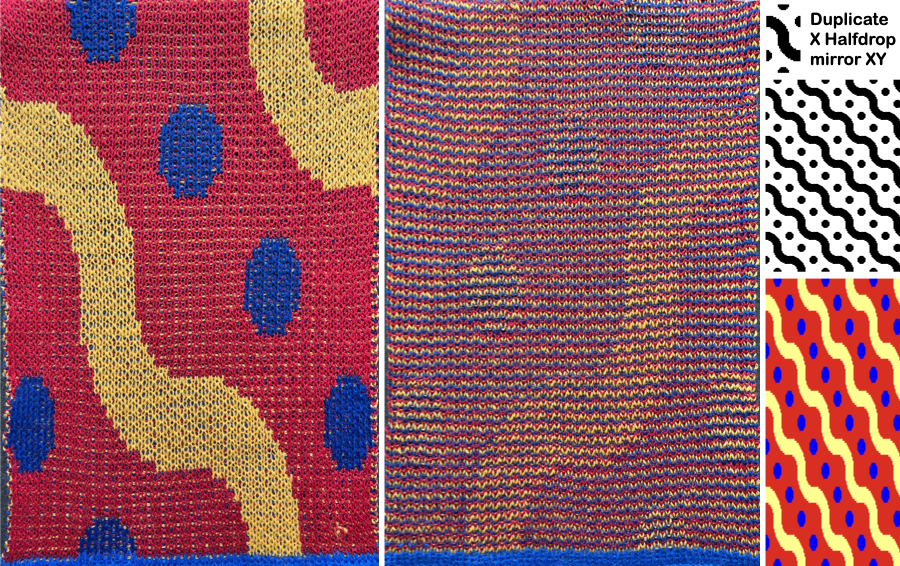
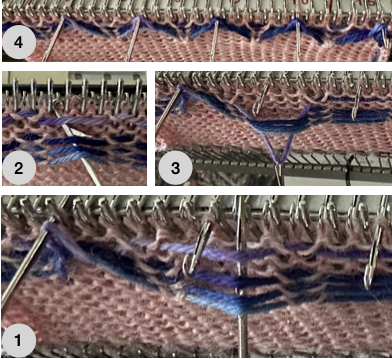 The 930 automatically mirrors any design horizontally. When an odd-numbered design is downloaded and centered with no subsequent changes, the odd-number half of the repeat occurs on the right of 0.
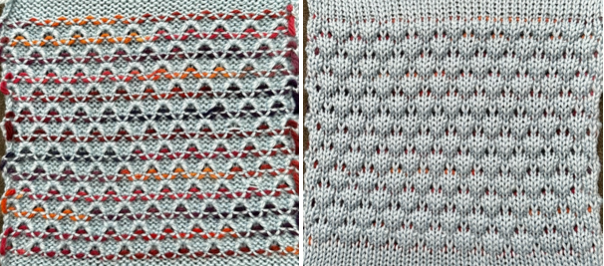
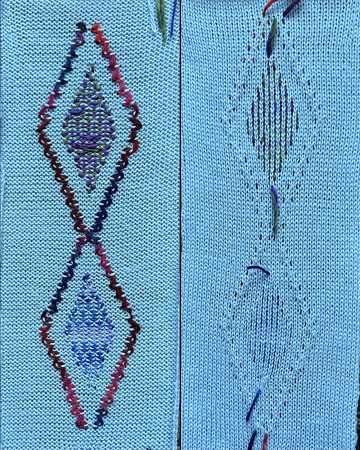
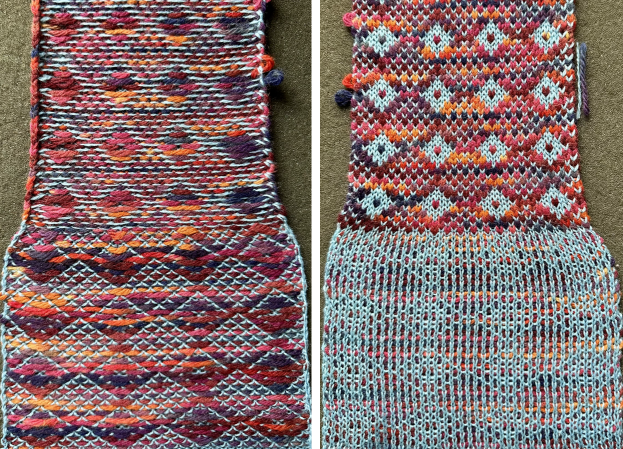
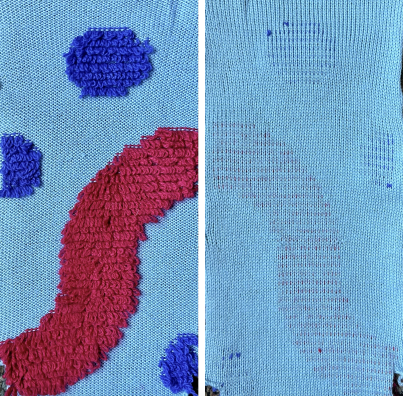
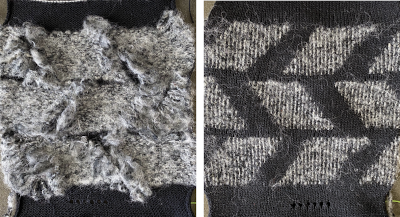
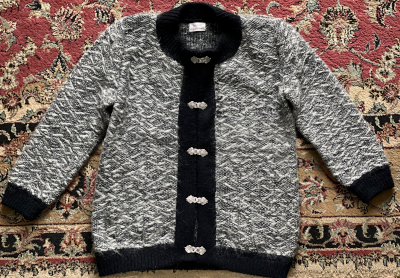
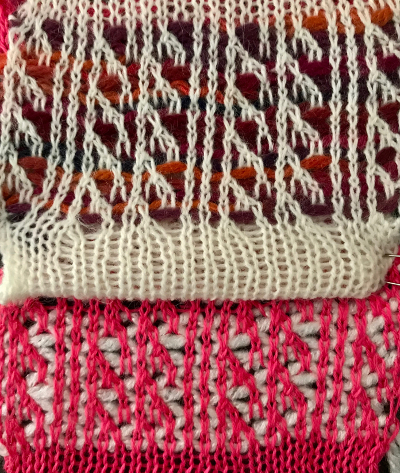
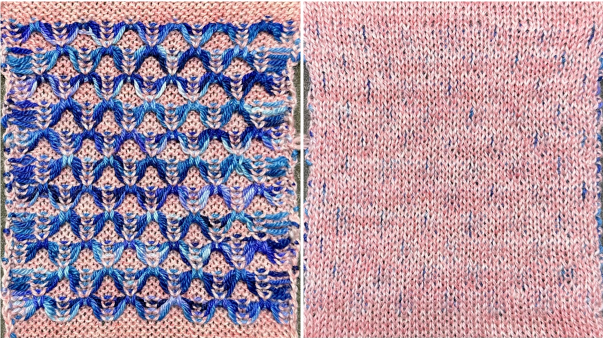 Here the background yarn is switched to a far thinner cotton, making the woven threads and their bleed-through on the knit side more prominent. In a final piece planned for this effect, side borders could be planned for better edges.
 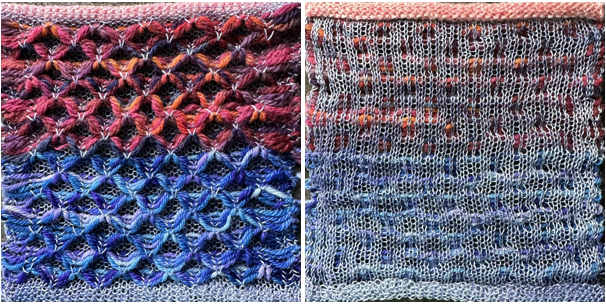 From a Brother electronic pub, an illustration of hooking up multiple loops at once
 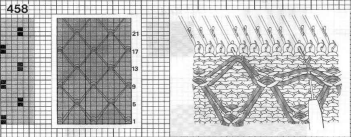 If the needle onto which the floats are transferred is left in work, it will pick up the weaving yarn on the next pass as part of the design and should remain in D or be pulled to E position if preferred. If that is not the goal, that same needle is pushed back to the B position.
  Just as in managing long floats in FI, in this fabric, they may be latched up as well
 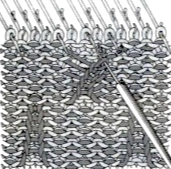 Lifting the stitch in the latch hook onto a needle other than in the center of the space between needle selection or one of the preselected needles, will result in the chain moving permanently in different directions.
 offered this version along with advice on how to knit it. Such translations are not always understandable.
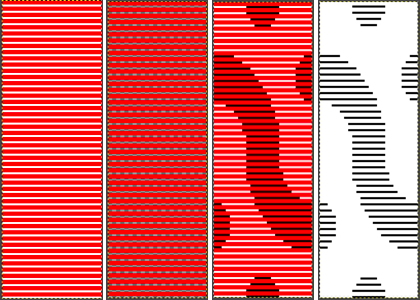
 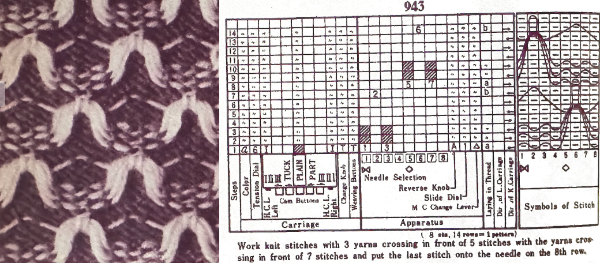 Based on row counts of patterning in the accompanying swatch it is possible to develop a repeat by assigning black pixel locations to specific squares in the stitch symbol chart rather than using the repeat provided.
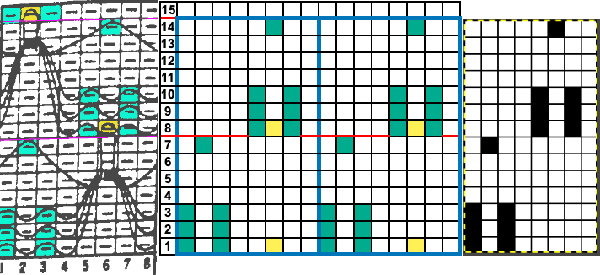 The 8X14 smallest repeat
 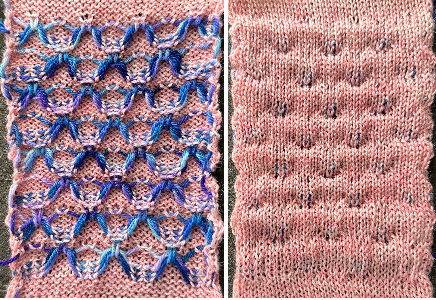 Working in vertical columns, a 9X12 design
 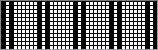 the floats are lifted in pairs every 2 rows, in alternate directions onto preselected needles, which can be brought out to the E position after the transfer. Those needles are marked with red dots.
 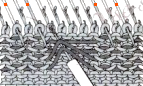 The swatch was knit in wool yarns of equal weight. The weaving yarn split easily. Each row should be checked for any errors after hooking before continuing to knit to avoid permanent errors. The result of both is marked with red dots in the photo on the left
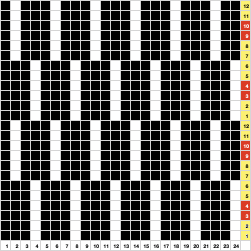
 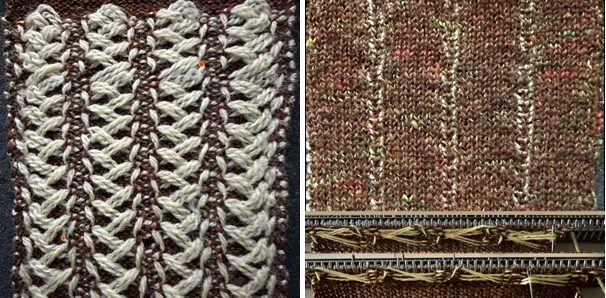 In summary, black squares indicate yarn over selected needles, and white squares the yarn slipping under non-selected needles, represented in this chart for a 2X2 design repeat/ paintbrush in DIY.
 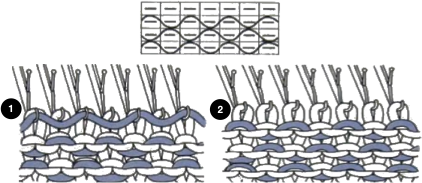 Side by side punched holes or black pixels produce floats in a corresponding stitch width. Blocks of either color can be planned in any direction, with the floats left alone as color blocks or manipulated to echo their movement ie in this illustration
 Altering the repeat while planning on cam settings to be changed every even number of rows also brings the possibility of using 2 carriages in electronic models, with one set to tuck in both directions, the other to normal knit (no cam buttons) but with needle selection for weaving rows, KCII
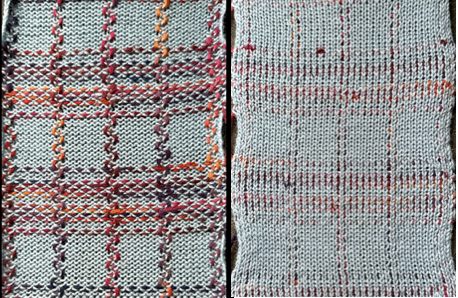
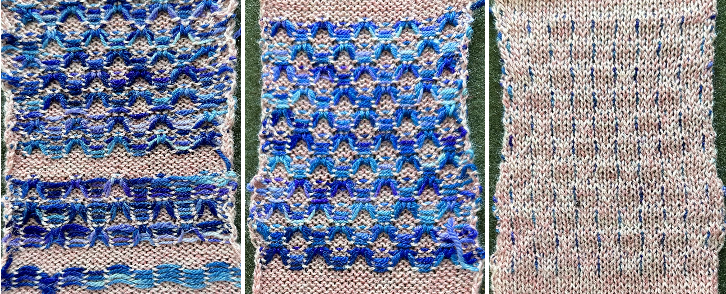
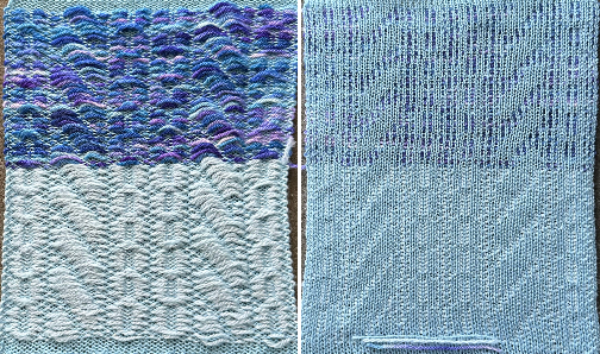
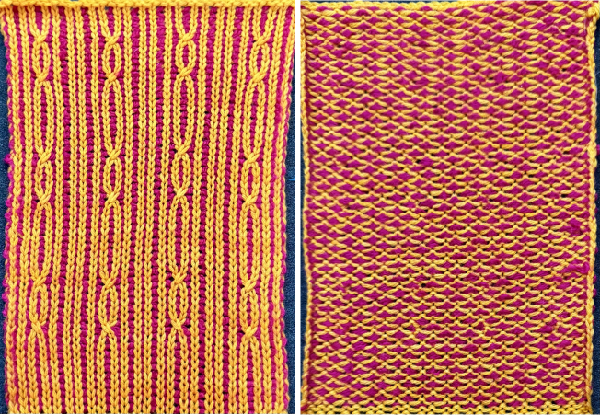
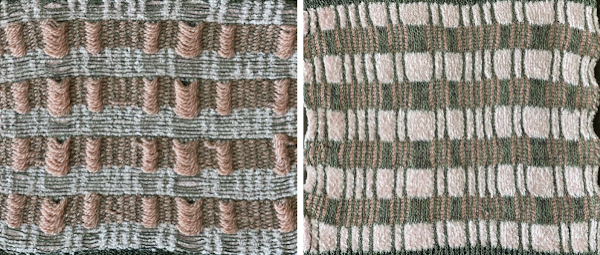
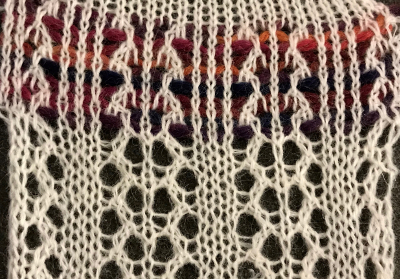
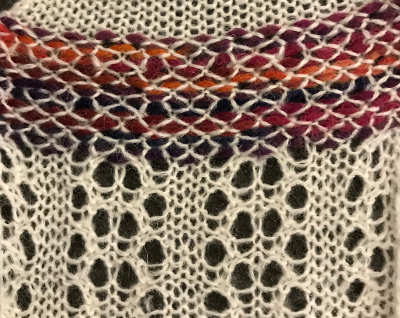
 In this sample with horizontally woven rows, the ground yarn is a 2/20 wool, the weaving yarn a space dyed sock yarn resulting in random color blocking. Relaxed the knit resembled shadow pleating, here it is shown after pressing and steaming
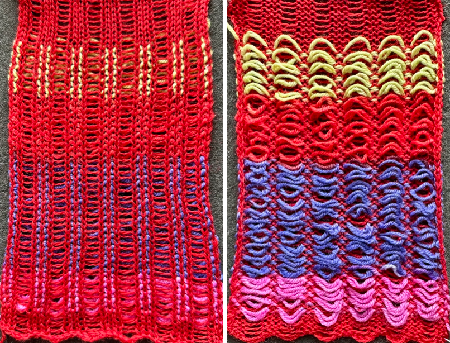


 chenille over cotton, tests for a pillow

 hooked up floats
 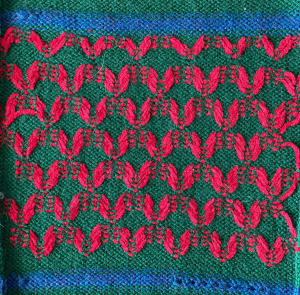 vertical weave, the second with a scorched spot from an iron, experimenting with direction of wraps,
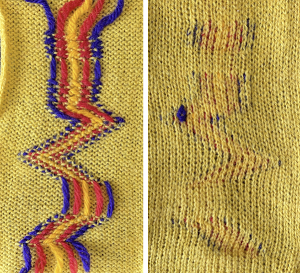
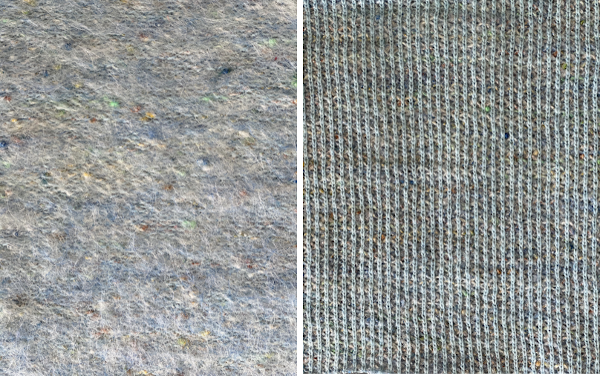
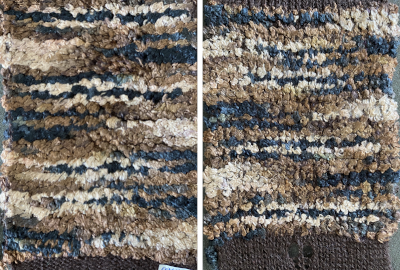
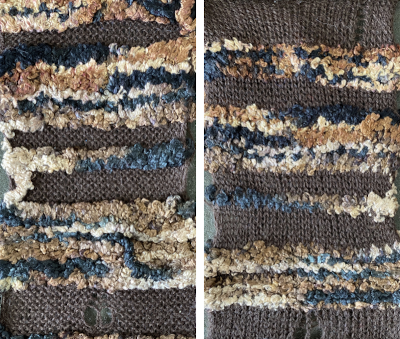
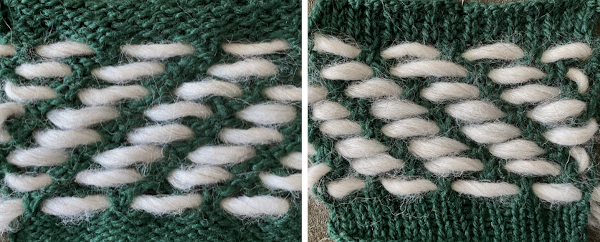
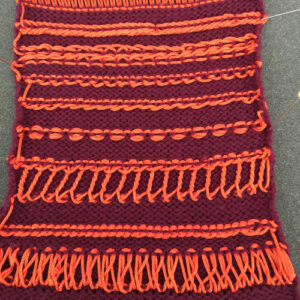
 wool ground, felted, monochrome acrylic weft, cut floats
 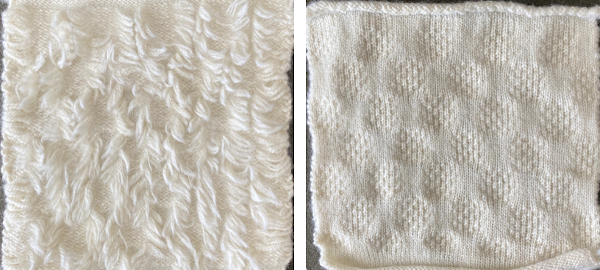 wool weft over cotton, cut floats, further trimmed in the top photo
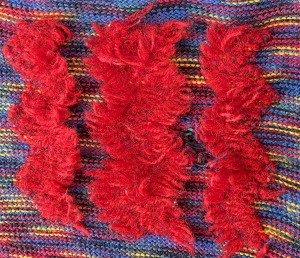
 The same card 3 ways: the weft is too soft, the effect is lost in monochromatic version, cut floats become muddied with wear
 crochet start as cast on
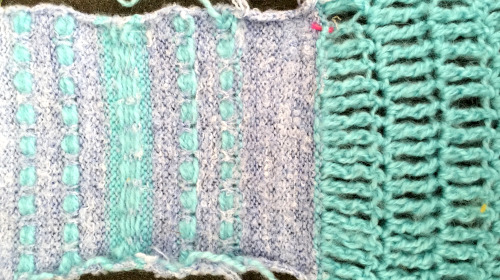

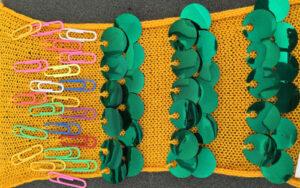
 beads strung through dental floss hooked on periodically, horizontal wraps;
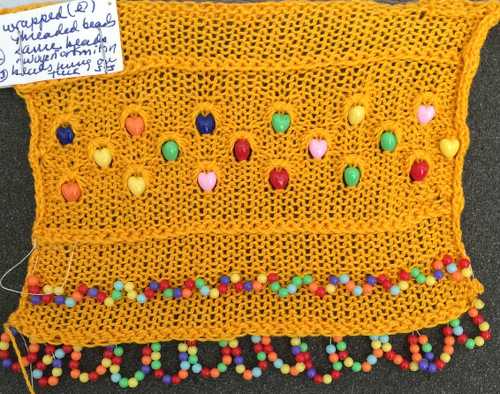
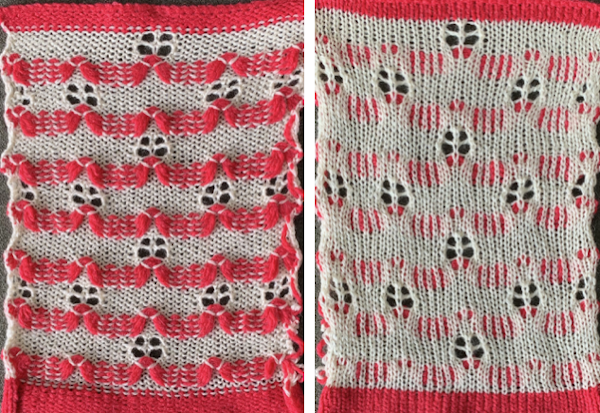
 automated pattern with added weaving through ladders
  “loop embossing”, separate threads were worked in and out vertically through ladder spaces
 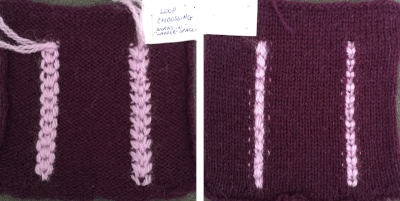 worked on bulky 260, tension 2, using card 1
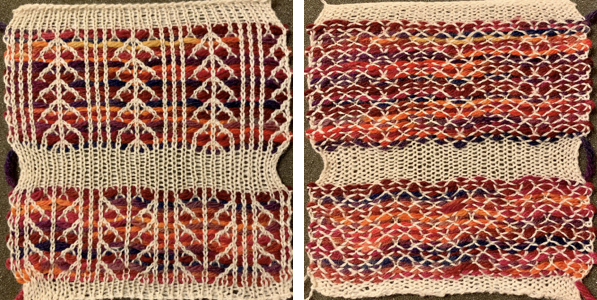
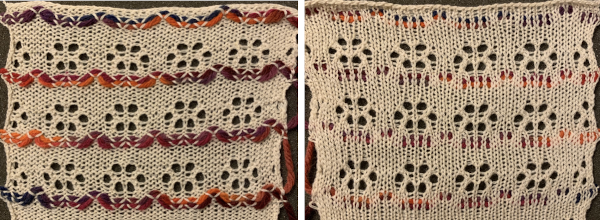
 weaving and lace combinations.
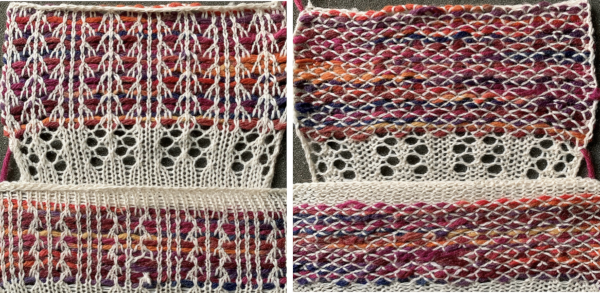
 Weaving yarns may be laid in between the beds with the ribber in use. This is the option for “weaving” on the Passap. 1: shows the rib needle configuration, 2: racking is added, 3: floats are teased out. In the latter, a sewing machine could always be used to anchor added float arrangements.
 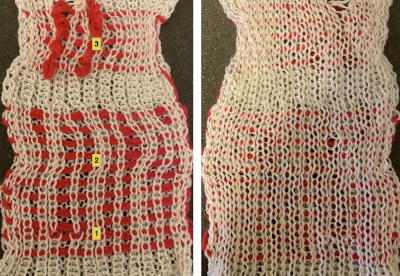 In this swatch, a waffle weave effect of sorts was intended between EON rib columns. The horizontal pairs of treads are an easy guide for feeding the yarn across rows with the work off the machine. Here the chenille was “woven in” off the machine using a tapestry needle, double-strand at the top 2 rows, single below them. Beads can also be threaded and laid in one at a time between the rib columns,
 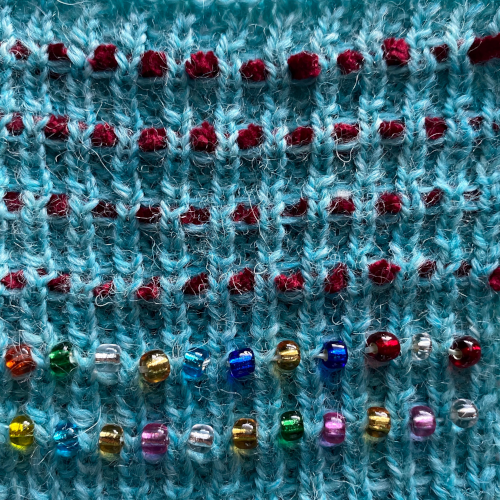 Any fabric with eyelets may be used as a ground for inserting fabric strips, very thick yarns, even hard objects such as rods or twigs. A quick grab of random studio bits resulted in these: torn fabric has frayed edges that can be used to create secondary patterns depending on the fabric, and the way the strips behave depends on the width of the cut. A bodkin is useful in the threading process. Bodkins measure about 3 inches, and cost about $3 in US sewing supply stores
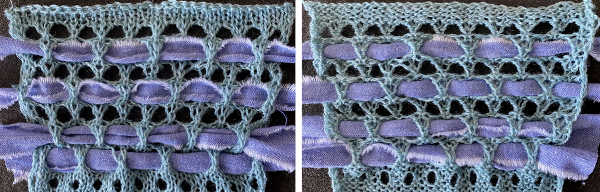
 used in a wearable made during my student days for a “recycling” art day.
 roving
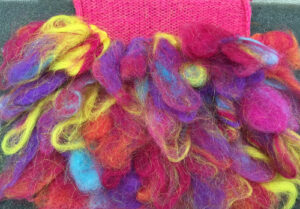 strips of torn silk individually placed
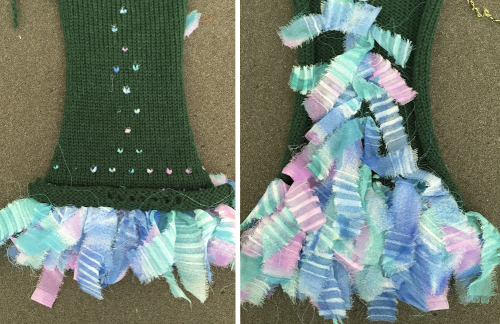
 hair decor and kite string

 It has the added data on how each of the fabrics might look visualized in a chart prior to its expansion as a card in full repeat. This is the top half repeat of a card for pull up weaving combined with lace along with the directions for execiting the knit
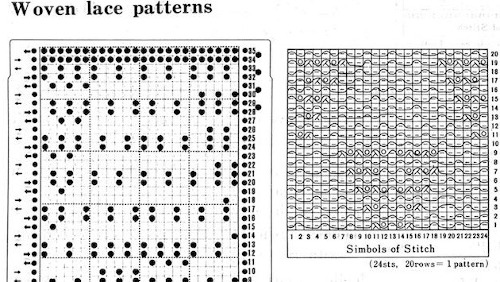

 My experience with trying to knit
 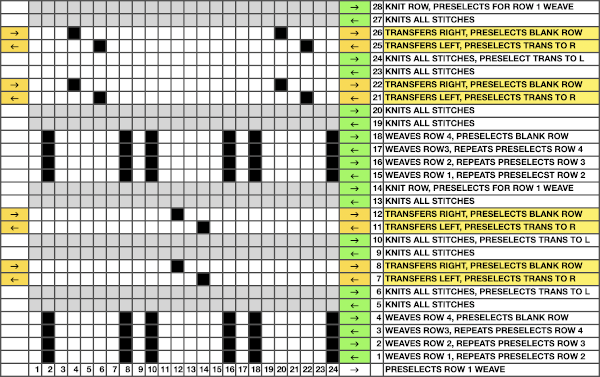 Taking carriages on and off the same side of the machine is nothing I would be inclined to do for any length on any machine. In theory, the identical repeat above could be used on an electronic KM in that way, but I did not get very far with that method before giving up.

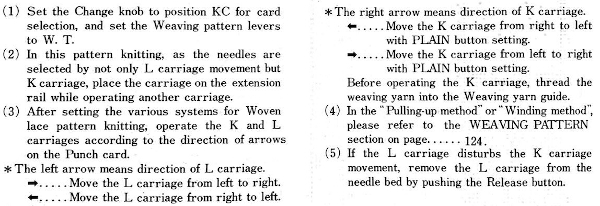
 Volume 4 offers only this advice: “the empty needles are selected at the second lace pattern, but this is not a trouble, and you may pass the L carriage to the side which is indicated on the punchcard”. I take that to mean that after a transfer if the same needle is selected again, don’t be concerned, keep moving the carriage in the direction of the arrows.
 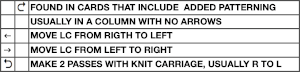 Because the weaving is for only 2 rows, the use of laid in, thicker yarn is well tolerated. The punchcard repeat amended for use on electronic, shown prior to mirroring
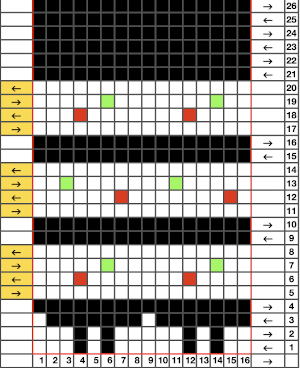

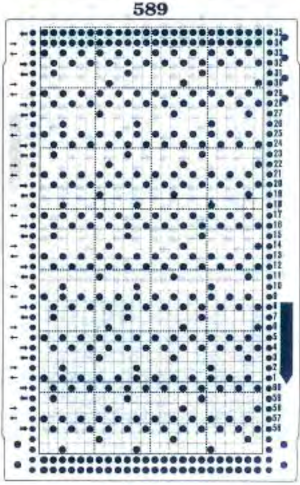
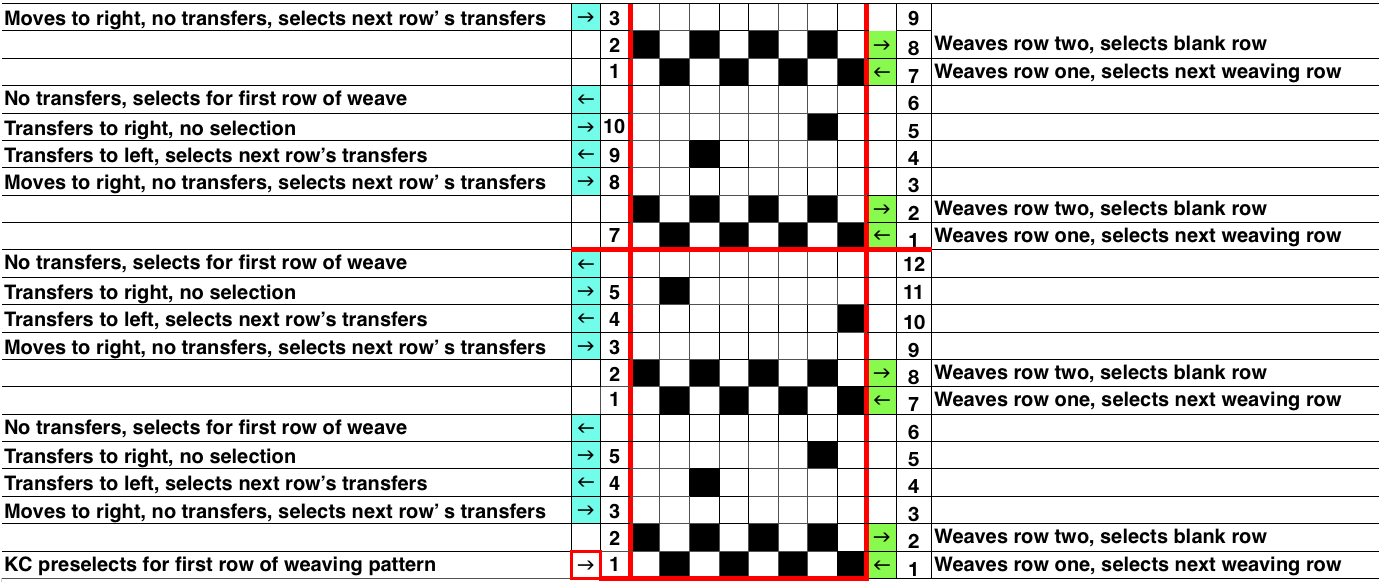
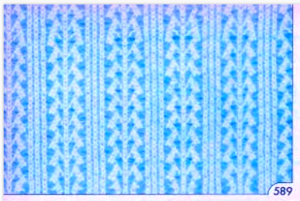 At the time, I made a long, convoluted effort to produce the fabric. I am returning to the topic and comparing 2 cards in this post, the original 589, and a new-found cousin, 259. Looking to the published cards for clues, remember that markings for carriage movements related to the first design row at the bottom of the card begin on the left of the card, above the Brother line numbered 1 on the right. The start of both cards:
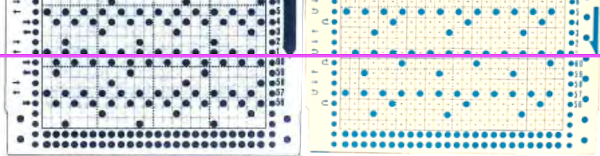
 As the carriage moves to the right, the card will advance a row.
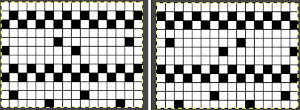
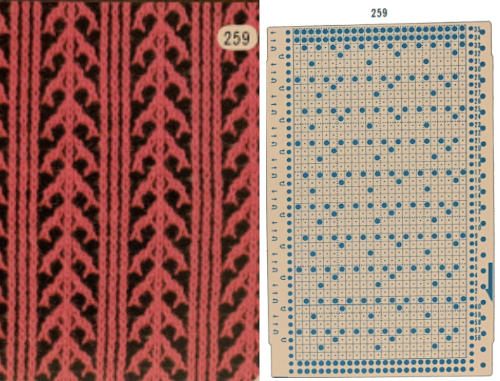 259 shows the traditional approach combining the two techniques that take into account the fact that when the second selecting carriage starts to move from the opposite side, the punchcard does not advance, repeating the same preselection. Added discussion of the differences in repeats for both machine types may be found in the post: Doilies:
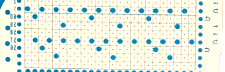
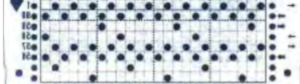

 The pattern is simply not workable as given using both carriages selecting needles from opposite sides of a punchcard machine, each moving for 2 rows.
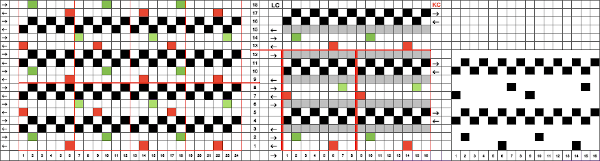 the smallest, single repeated in width X 2 for use on my 930
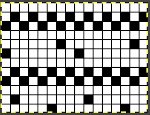 its .png
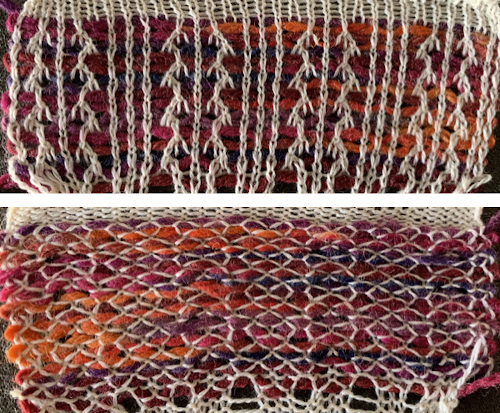
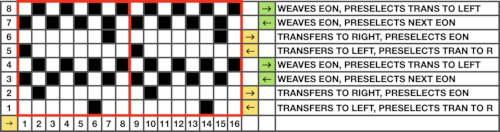
 comparing the sequences for both starts, weaving on left, lace on the right
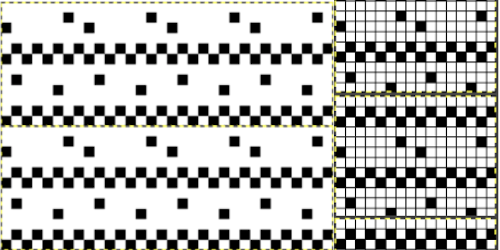
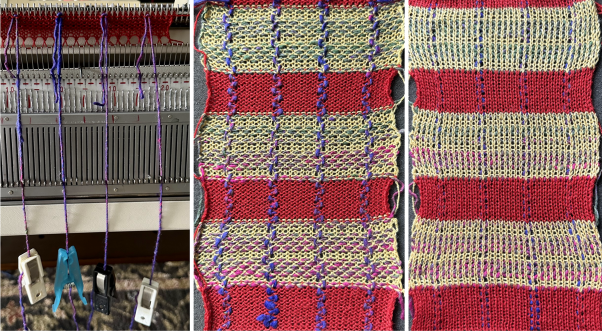
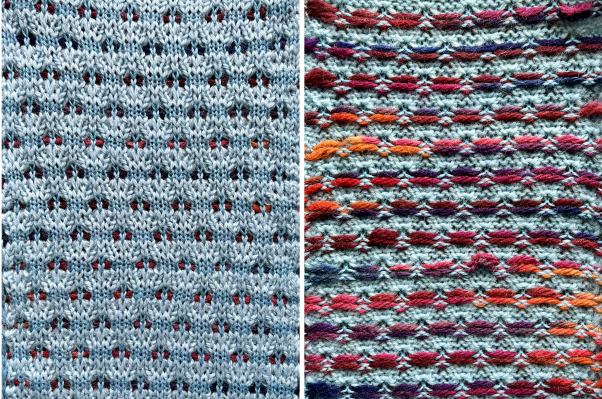
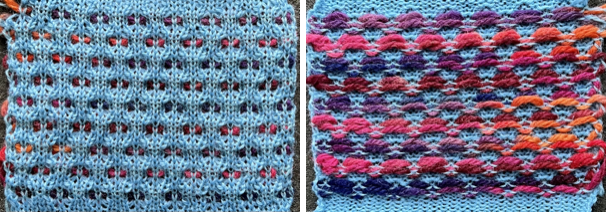
 a sample using 2 different weight yarns; irregular weaving may require changing the yarn, or adjusting the tension used for the background yarn
 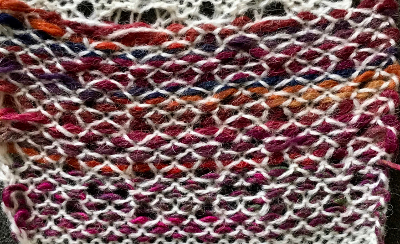 I like to test these repeats first in transfer lace, to sort out the best tension and yarn to use, errors in programming,
 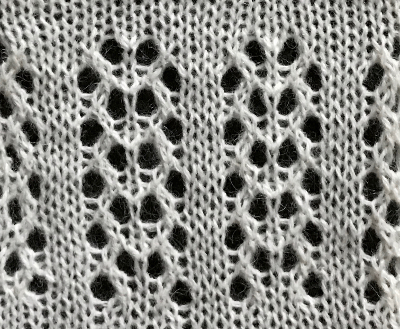 Taking another look at the original punchcard and those arrows on the left-hand side, a detail I had originally missed, they all start from and return to the right, the line thickness changing marking the alternate carriage
 As I was trying to understand what was happening, I was also able to produce a swatch using the original #589 card, using a method that, however, produced all lace transfers to the right, and differed from the desired effect:
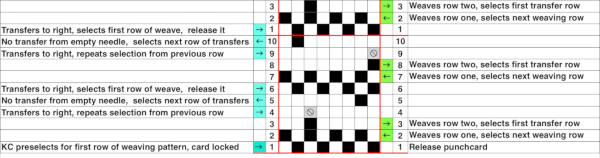 the knit, produced at the time on both my punchcard machine and with my 910 also requiring an LC release on its third pass,
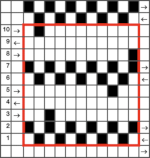