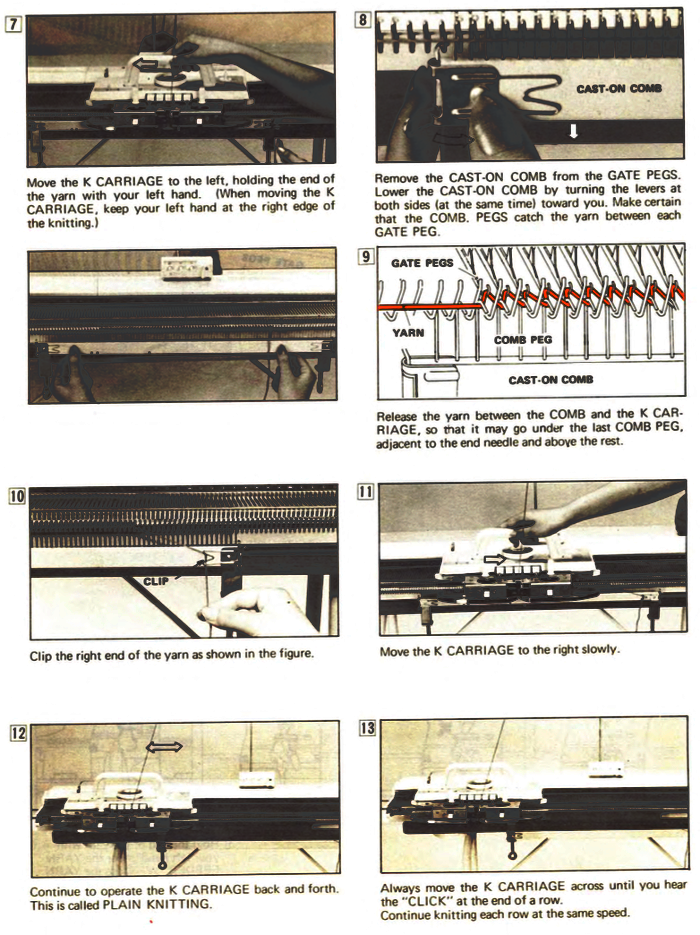
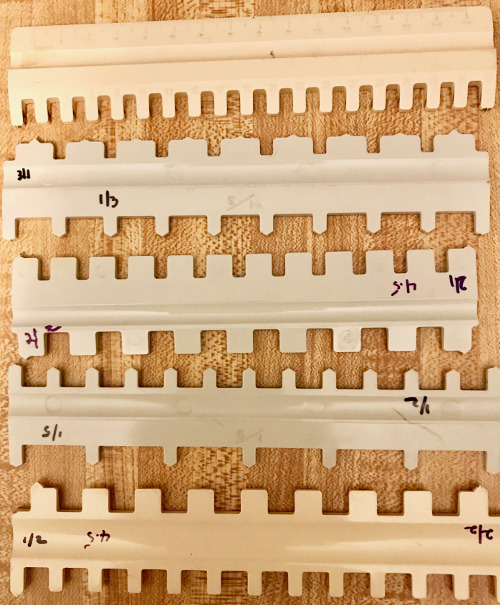
The very early machine manuals had illustrations not often shared in later ones. This is on combs whose wires had looped ends  This cast-on comb is favored by many, but not by me. I find it heavy to start with on small pieces, and if long pieces of knitting are rolled up as some do rather than moving the comb up as shown here, the proportional weight changes as the knitting lengthens, which can affect the gauge.
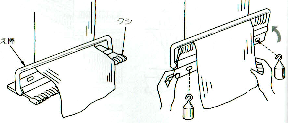
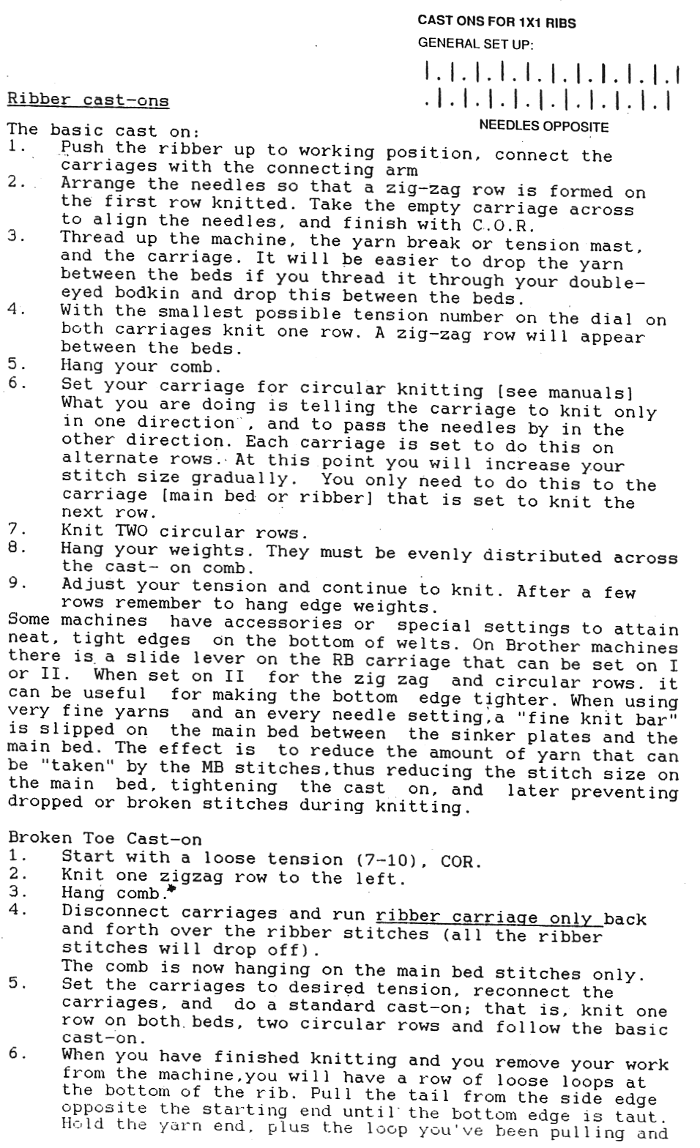
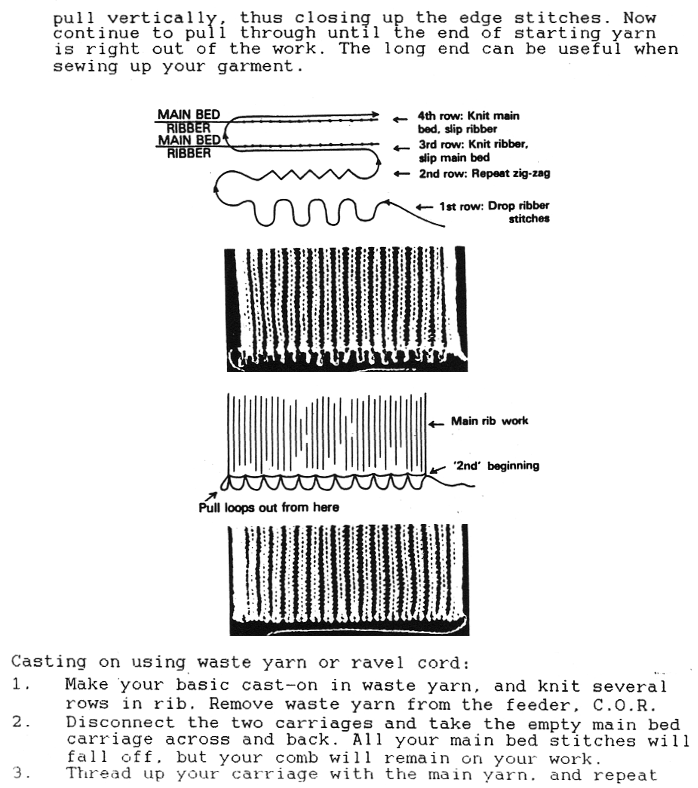
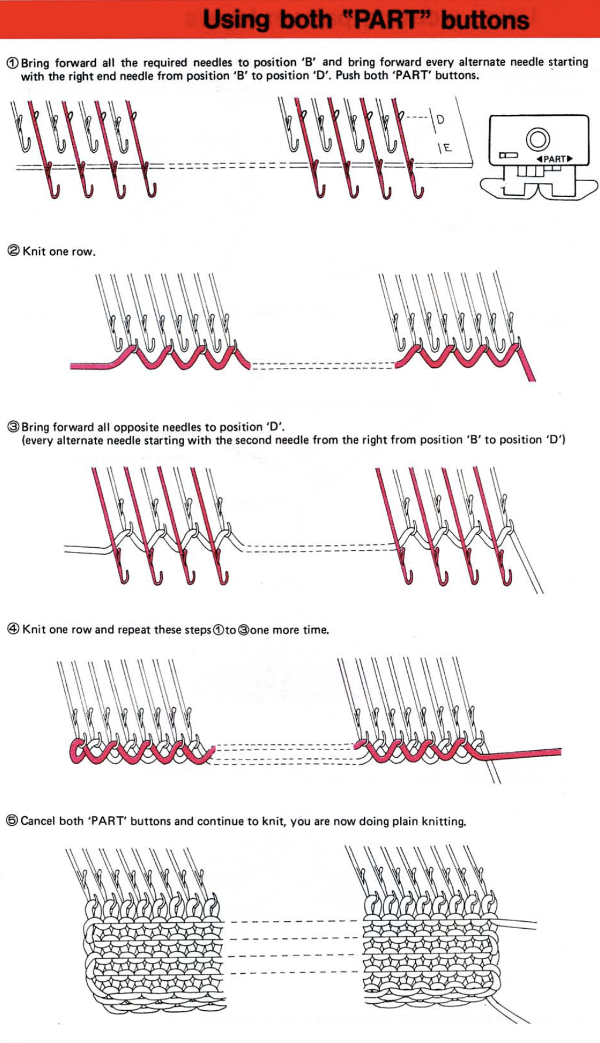
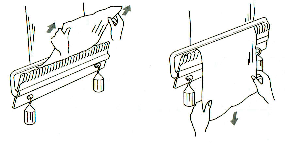 The Brother KR850 manual, pp 19-29 has clearly illustrated how-tos for this process. Old manuals often have a translation from other languages that may be found to be from amusing to confusing or even incomprehensible. Method 2 below illustrates the “broken toe” cast on. The term partial knitting has nothing to do with its more familiar application to holding techniques.
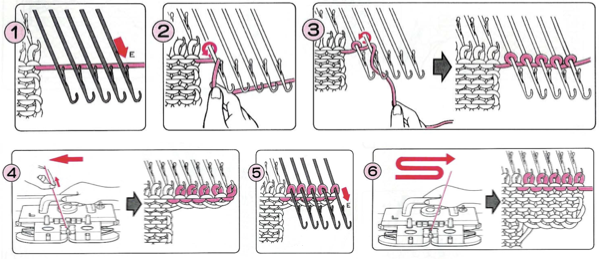
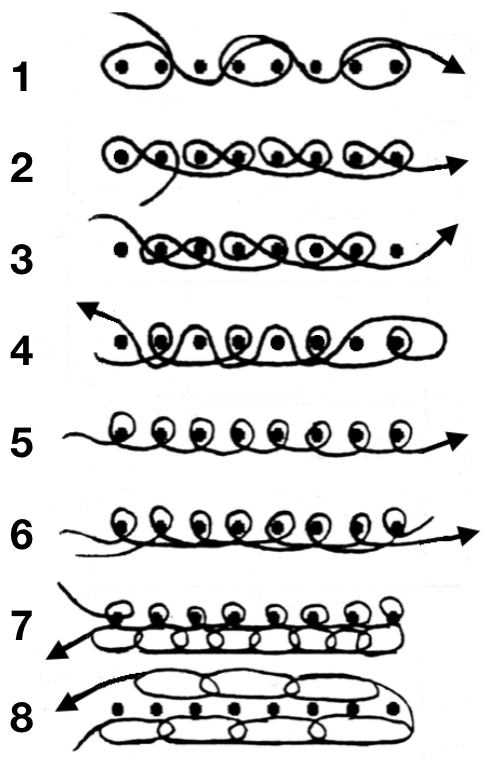
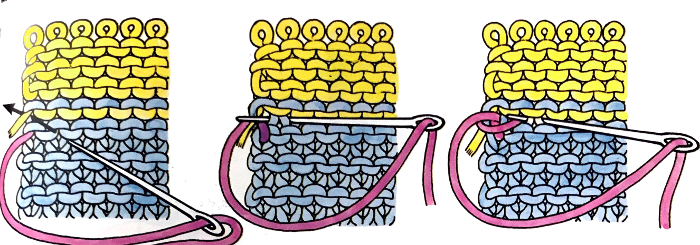
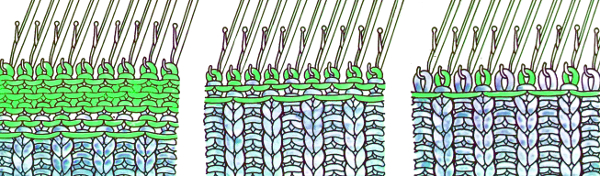
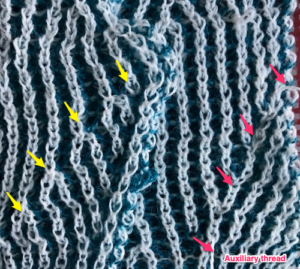
 The tubular cast-on is probably the most commonly used and published one. It tends to have an uneven edge, but steps can be taken to compensate for this. In every case, on the first row, the yarn travels from a needle on one bed to a needle on the other. Remove the single bed sinker plate. Push the ribber up to the work position, and connect both carriages with the connecting arm. Make a couple of passes with the coupled carriages to ensure the needles are aligned properly. To drop the yarn between the beds prior to threading it into the carriage threading it through a double-eyed bodkin will make it easier for it to be dropped between the beds. It is commonly advised that the cast on the zigzag row be done on the tightest tension possible. That also varies depending on the yarn, whether the cast-on is to be decorative, or if the loops that are commonly considered undesirable are in turn to be chained through to match a latch tool bind off at the top of the piece. It is often recommended that for the circular cast- ons 3 circular rows be used. That produces one side of the rib with small “floats” with an appearance that differs from the reverse side. Arrows in this illustration point to that third row.
  Only two circular rows do the job and avert that problem. Conversely, 4 tubular rows may give extra firmness and strength when using very thin yarns. For the final row set both carriages to close the zigzag, increase the stitch size to rib setting, and knit one row. At that point, stitches can be rearranged on the needles if needed.
For a tighter cast-on row sometimes a thin elastic is threaded with the main yarn and used for only the first zigzag row. Do not hang ribber weights until the cast-on is completed.
Other variations: set up knitting on a single bed only with waste yarn and ravel cord and cast on comb and weights, ending with a row of ravel cord. Using both beds, begin with garment yarn, and follow instructions for tubular cast-on. When knitting is complete tug waste yarn lengthwise to set stitches before removing the ravel cord.
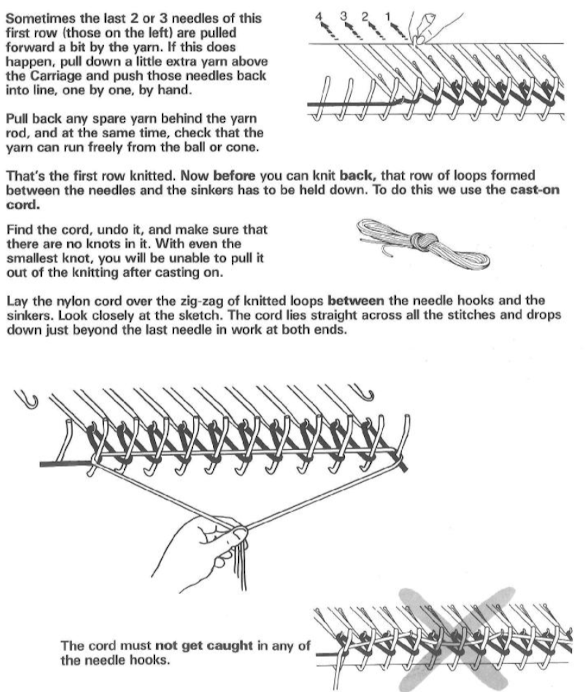
On the double bed, after the zigzag row, lay a piece of ravel cord right on top of the zigzags, dropping the ends between the beds and anchoring the ends with a clothespin or other small clip. It will be enclosed in the knit as you continue to work. Upon completion of the piece, pull lengthwise on both ends of the cord to set stitches before removing it.
Cast on using an e-wrap single bed: knit several rows in waste yarn, either in EON rib or single bed. If single-bed knitting is used, poke the ribber cast-on comb through the waste knit or use it to cast on a single bed, making it the future home for weights. If a rib start is used, the stitches then would need to be transferred to the main bed. A row is then knit with a ravel cord. Proceed with a single bed e-wrap cast on, dropping the ribber if needed. When the e-wrap is completed, bring the ribber bed back up if it had been lowered. Knit a row to the opposite side. Transfer stitches to your desired arrangement. Thread the yarn, and proceed in rib.
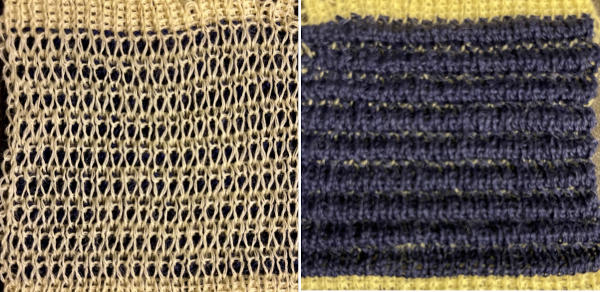
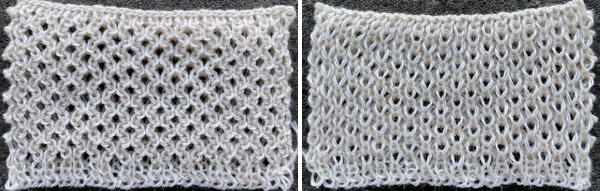
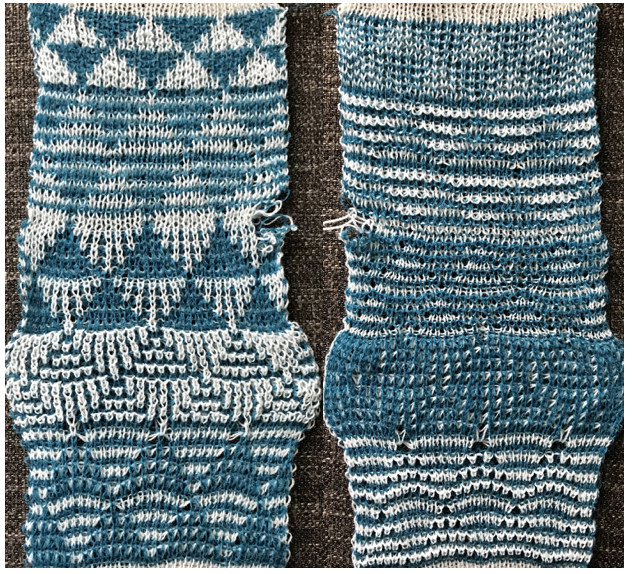
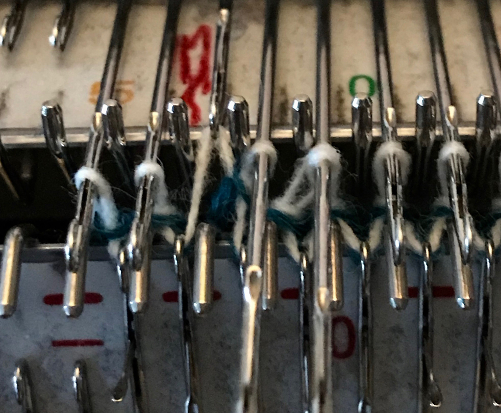
Since my trial swatch was quite narrow, I opted to skip the waste yarn or rib cast-on and transfer to the top bed prior to e-wrapping; the yarn used is a 2/8 wool 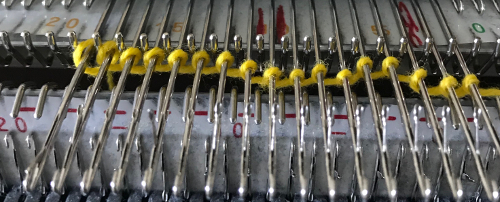 before the next pass, make certain there are no needles in work on the ribber, they will pick unwanted loops, also, give a tug at the yarn on the carriage side as you begin to knit the next row in order to avoid loops as seen on the right below. Knit to the opposite side.
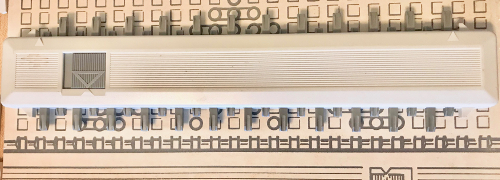
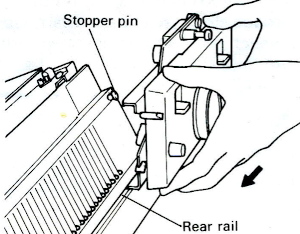
 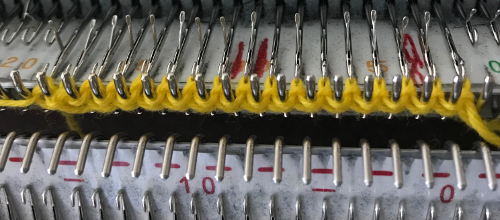 Transfer stitches in the desired needle setup. With waste yarn, ravel cord, and weights prior to its start this cast-on may be used for wider flat ribs ie 2X2, 3X3, etc. Here the comb is in place, ready for 1X1 rib
 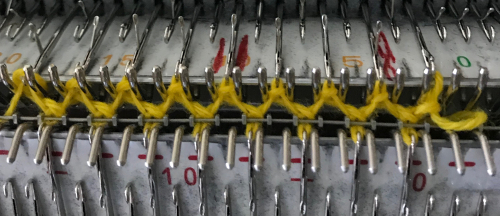 the results
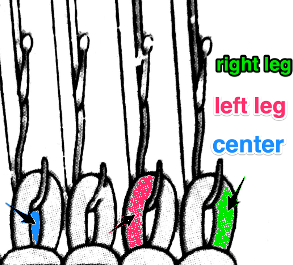
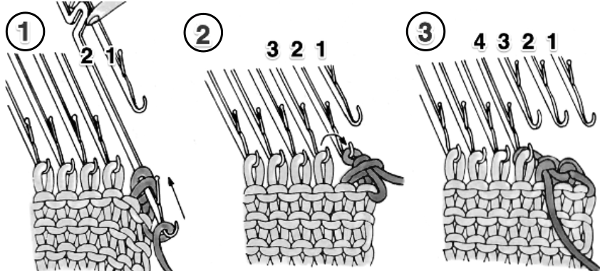
 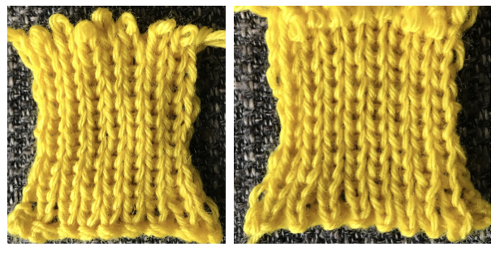 It is also possible to e-wrap on empty needles set up for rib on both beds. The first pair of diagrams show movement from the left toward the right. Loops are wound in alternating clockwise or counterclockwise directions as seen below, being careful not to make the loops too tight.
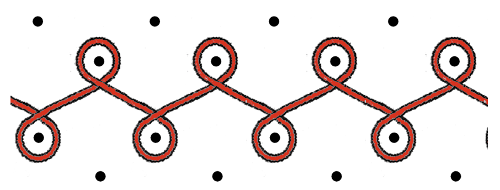
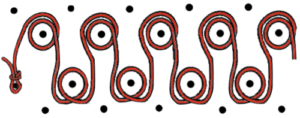 working from the right to the left side
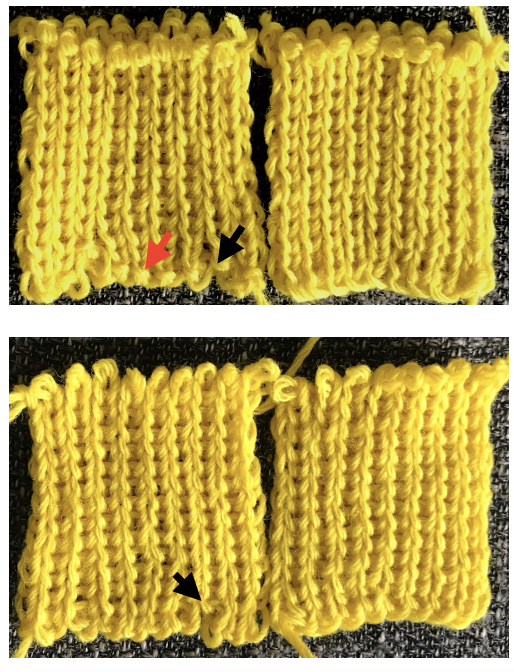
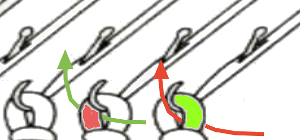
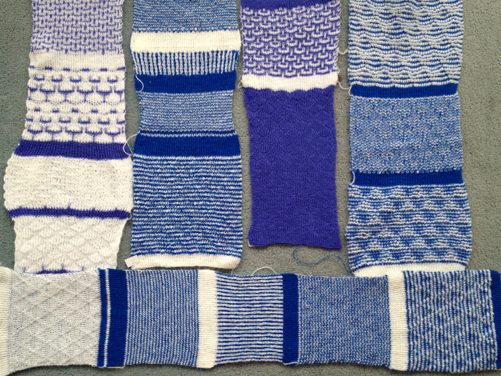
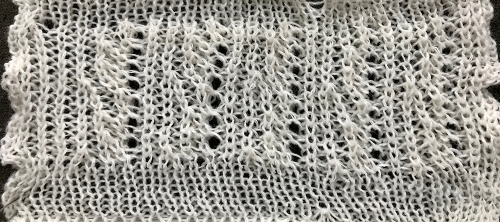
 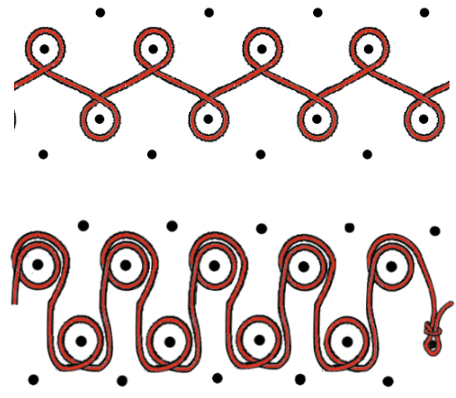 The e-wraps may be made with variations of movements that are counterclockwise or clockwise. Depending on the variations there can then be two distinct sides, requiring a choice to be made as to whether the purl or knit sides of the final fabric will be facing out. With a clockwise wrap a row of purl loops (red arrow in swatches)) will show at the bottom of the “wrong”, purl side. To reverse them, wrap all stitches counterclockwise.
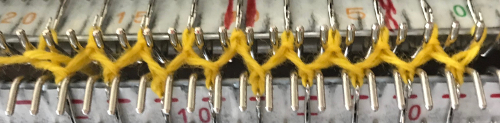
Here all needles are wrapped clockwise, a slip knot on the first needle on left would steady the yarn, needles are brought to hold-position on both beds for easier knitting on the next row, 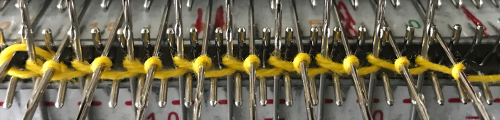 which is knit carefully to the opposite side
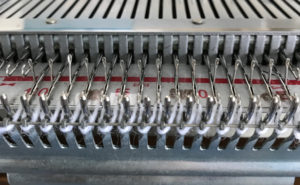
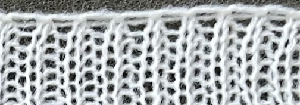
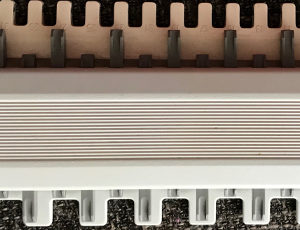
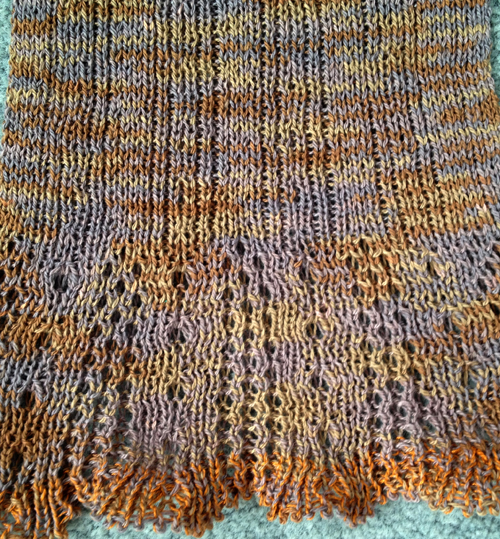
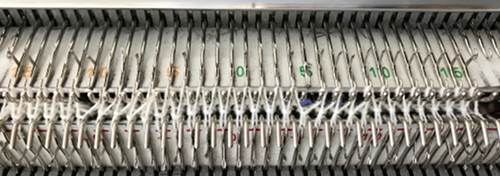
 the comb is then hung. Make certain its teeth are placed properly across the row holding stitches down. Here they are not on the right, resulting in the issue marked with black arrows at the bottom of the corresponding swatch
 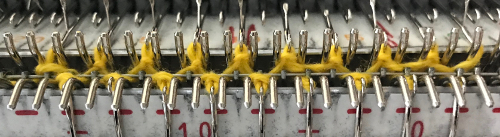 tension adjustments may be required. Knit slowly and check that the stitches are properly knitting off. Bringing needles to hold on both beds for a few rows prior to knitting them may help prevent random dropped stitches.
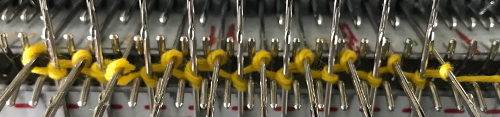
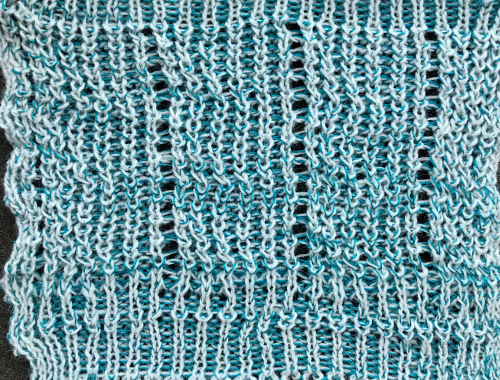
This is the setup with alternating clockwise and counterclockwise wraps on both needle beds. This cast-on has a good deal of stretch and looks the same on both sides, its test swatch is shown on the right.
 If working in fine yarns, 2 tubular rows may be needed after the wrapped cast-on.
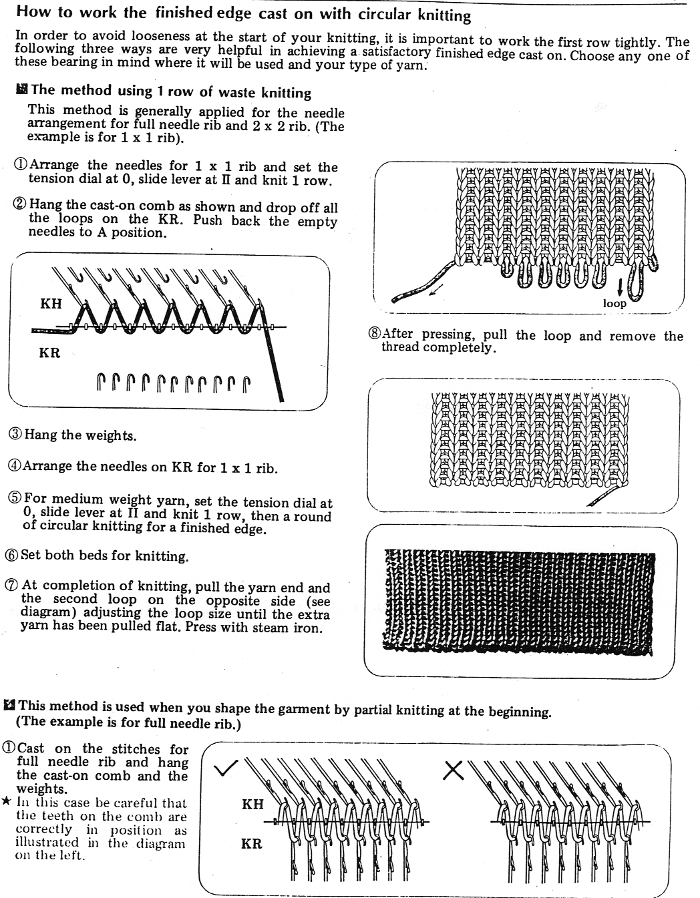
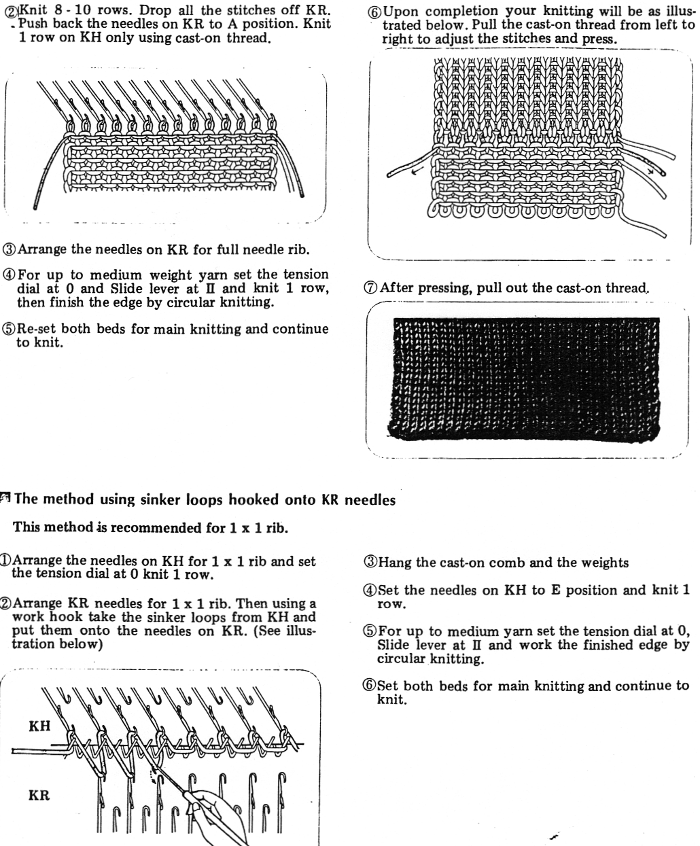
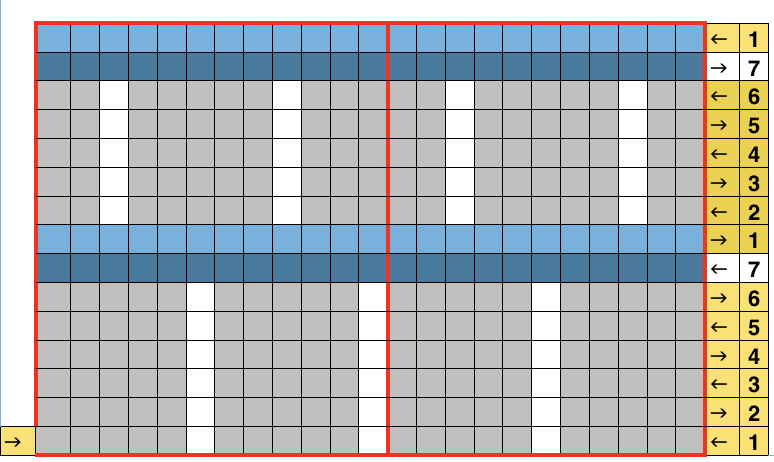
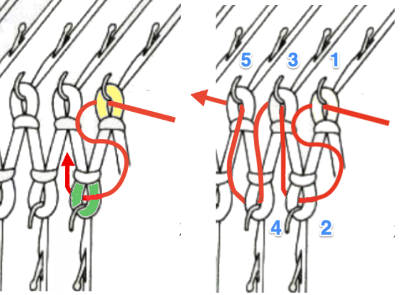
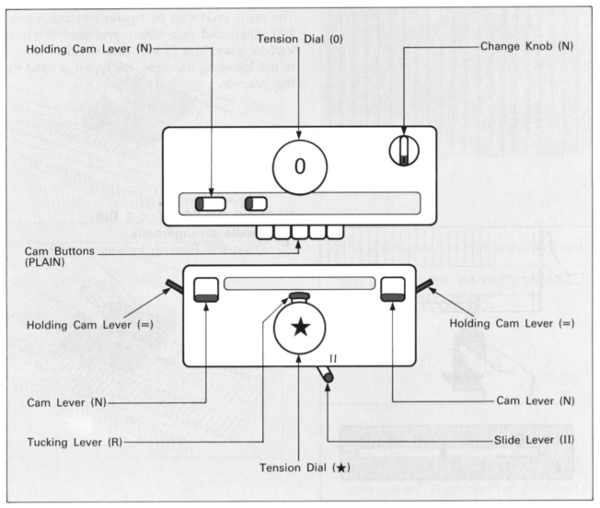
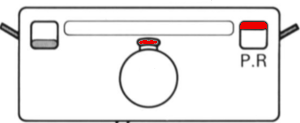
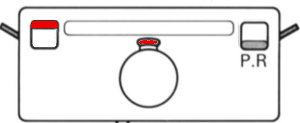
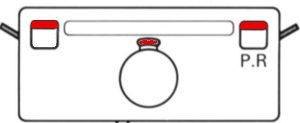
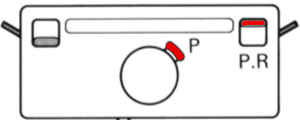
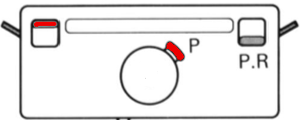
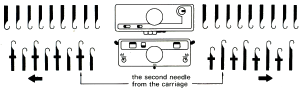
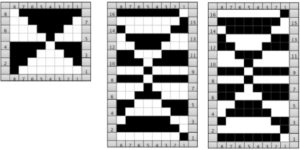
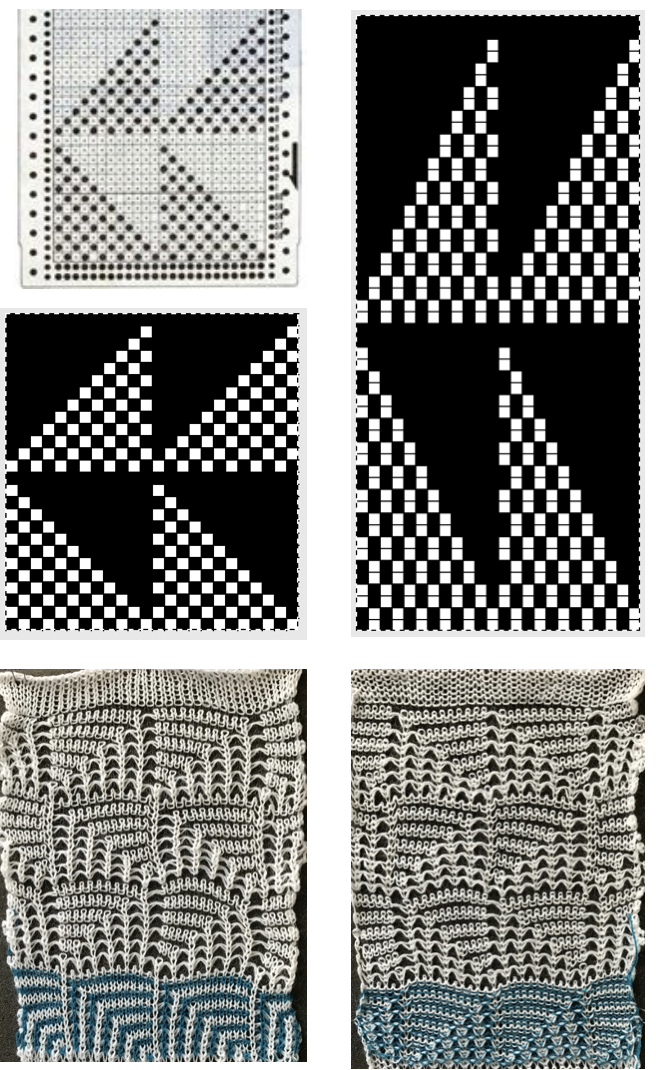
Another handout from eons ago follows below. The broken toe cast-on is often used whenever both the knit carriage and the ribber are used to create the fabric but stitches are dropped off one bed or the other, such as in drop stitch lace. The placement for the comb if the ribber stitches are to be dropped is illustrated below. Red and yellow show the areas held down by the comb’s wire that will remain on the main bed when the ribber stitches are dropped. Below it, the wrong placement of the comb for this purpose is shown. The reverse would be true if the main bed stitches were going to be the ones to be dropped. 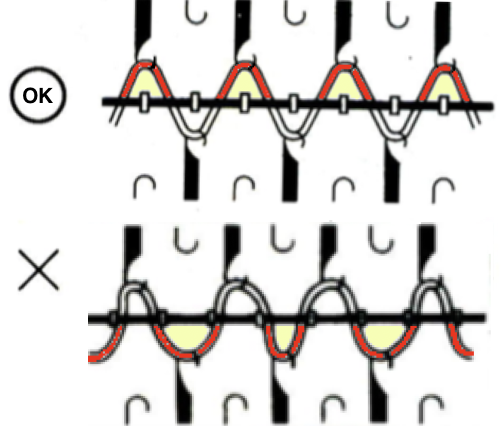
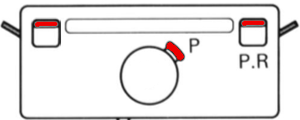
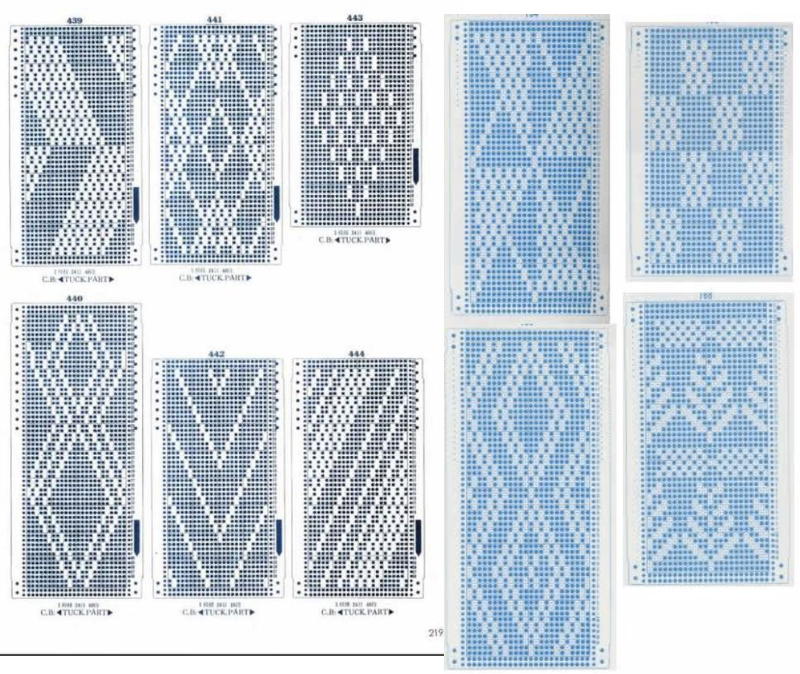
 These illustrations for the comb setups in other rib configurations were published in a Toyota ribber manual
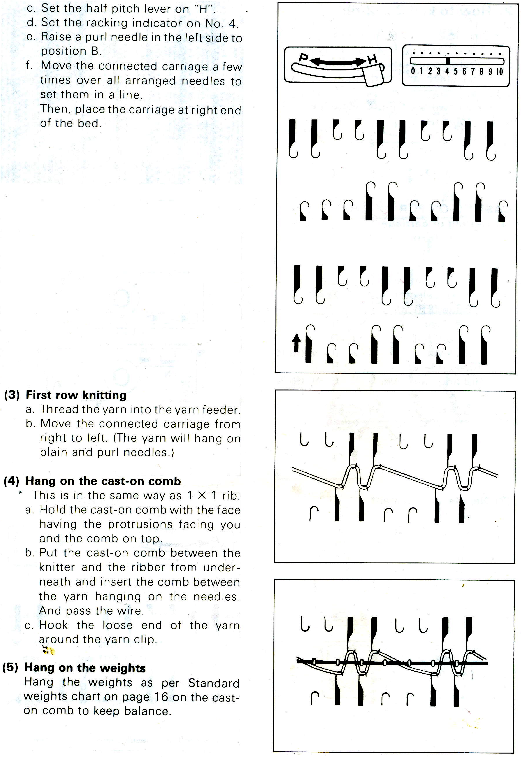
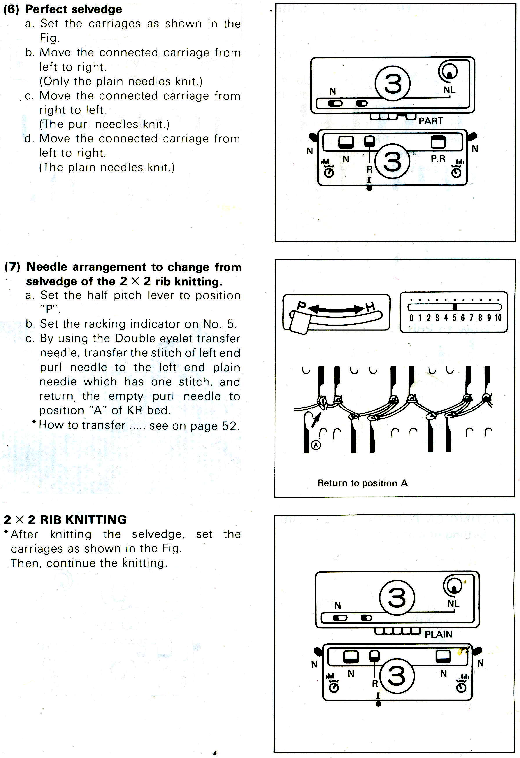
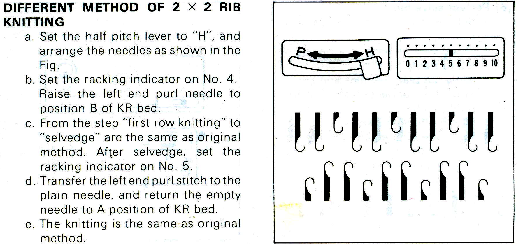
 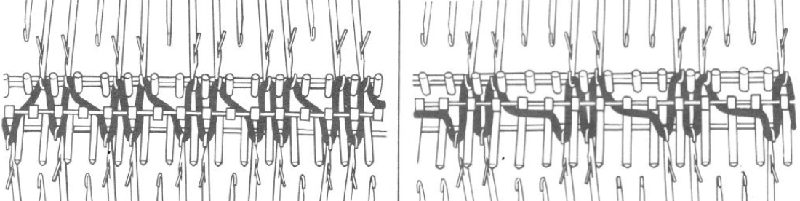 From the Brother KR850 manual Casting-on for 2X2 rib
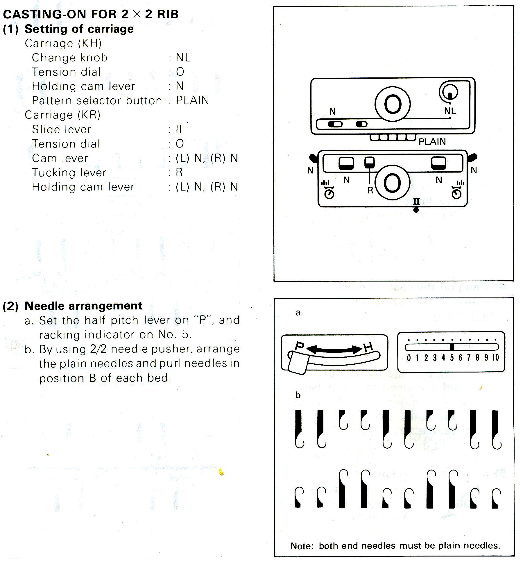
 For more configurations see the 2022 post: More on standard and modified 1X1 and 2X2 ribs
Casting on the double bed info shared in previous blog posts
Racked ribber cast on and tips included racked cast for every needle rib, and samples knit on Passap, for 2X1 and 2X2 commercial ribs
Picot cast on for every needle rib
Transitions from EON (every other needle) to FNR (full needle rib)
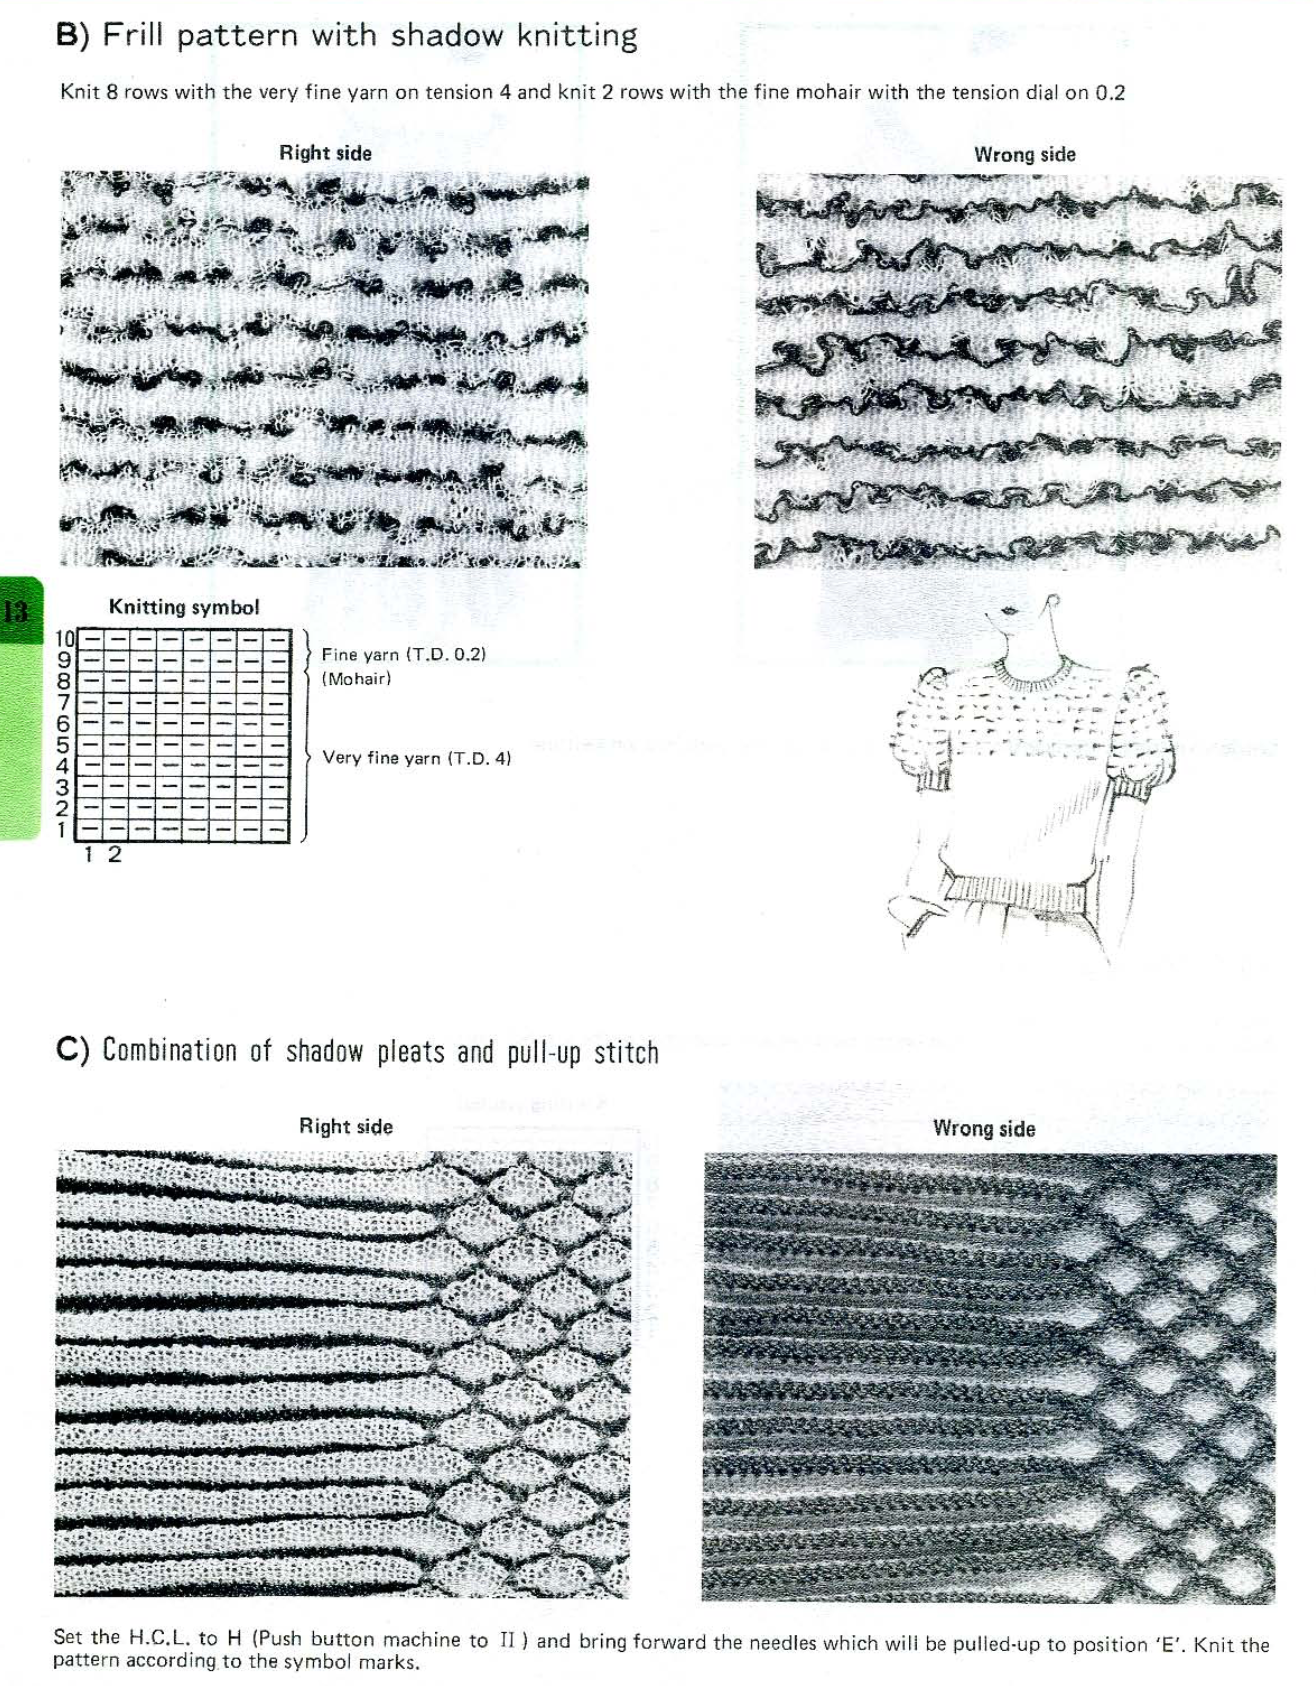
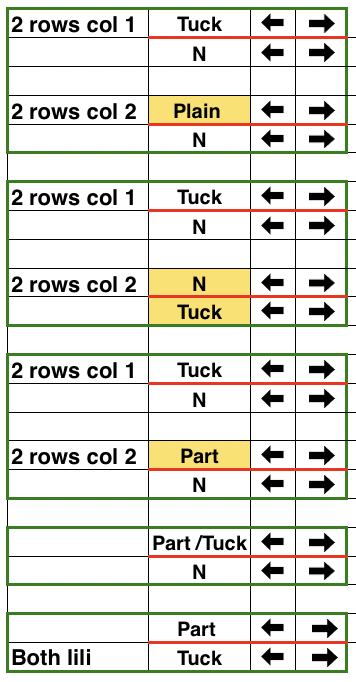
Taking advantage of the “wavy” first row to produce a ruffled effect: zigzag row at rib tension or one number less than rib. Set one carriage to tuck, and the other to knit. Make one pass with both carriages to the opposite side. Reverse carriage settings, and make a second pass to the opposite side. Repeat one more pair of rows, reversing carriage settings with each pass (as in the fisherman rib setting). One may also experiment with more tucking variations or a greater number of rows in a pattern before proceeding in the rib. Before the closing row, depending on the configuration chosen, slipping on one bed and knitting on the other may make for a more pleasing transition.
The start of playing with needle/pusher arrangements, with both beds knitting in pattern. Instructions will follow in a future post on ribbed trims. 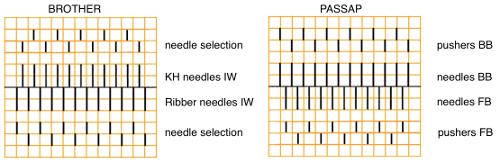 Decorative cast-ons and beginnings
Ribber trims 2
Ribber trims/edgings 1
Online resources:
Ribber e wrap cast on video by Roberta Rose Kelly
A decorative cast-on with lots of hand transfers on the ribber bed by Emanuela Mammarella.
Studio tips and techniques #13

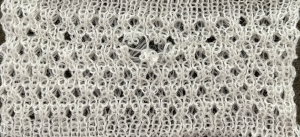
 I would classify the results as ruching, a different knit category
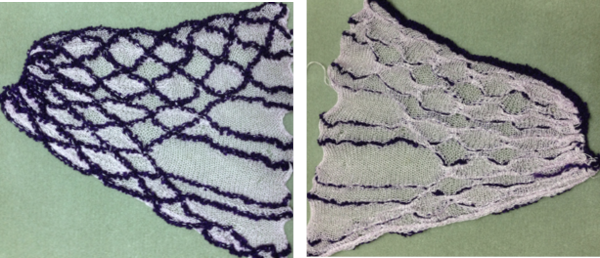
 Some samples: fishing line and wire
 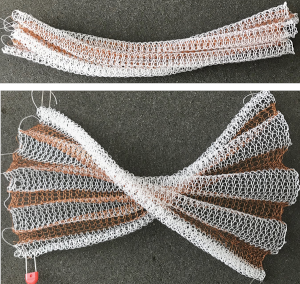 wool and cotton
 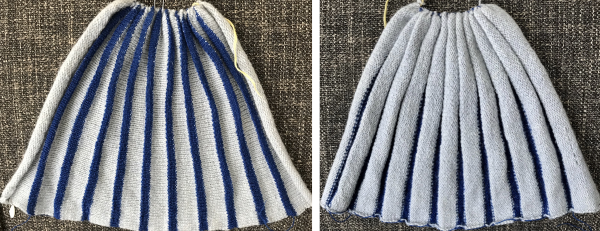 thin cotton and boucle
 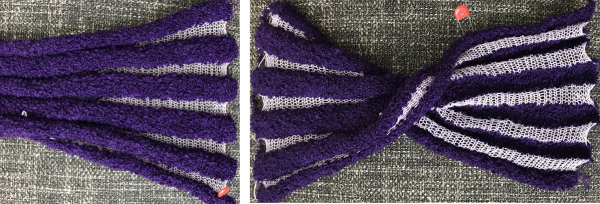 the same cotton and chenille
 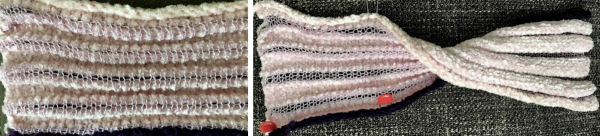 wool and raffia
 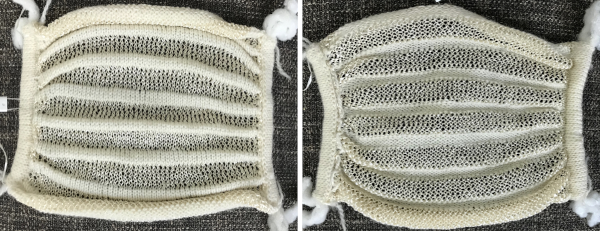 wire and vinyl
 combined with fair isle patterning
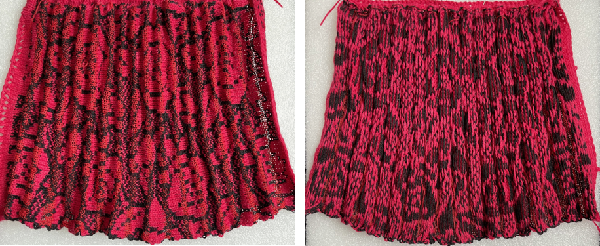


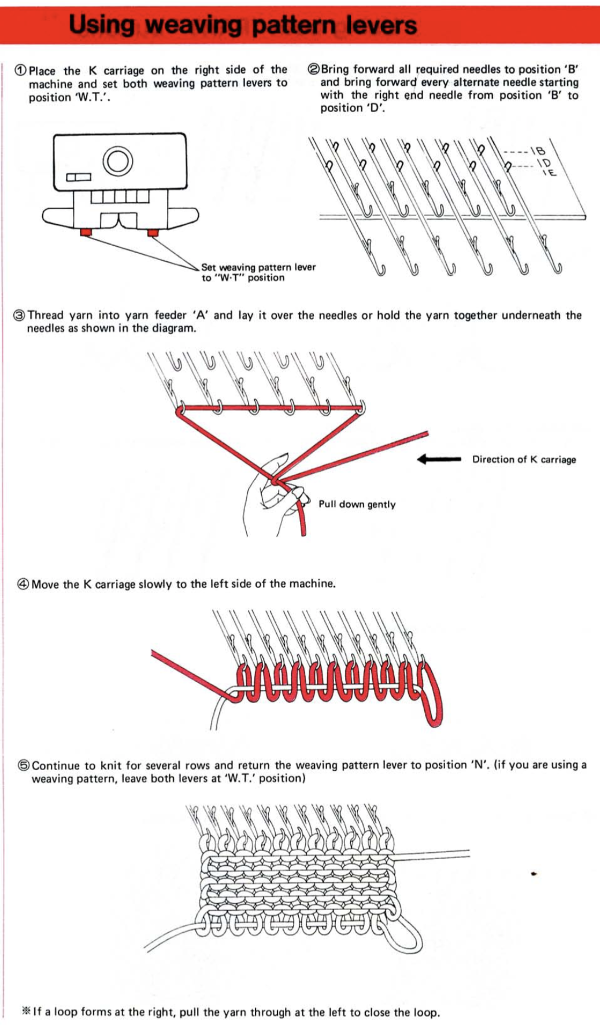
 Weaving cast-on only works on machines with weaving brushes ie Brother. I tend to knit with weaving brushes down no matter what the fabric is unless using them results in problems ie the particular yarn being used has a tendency to get caught up in them.
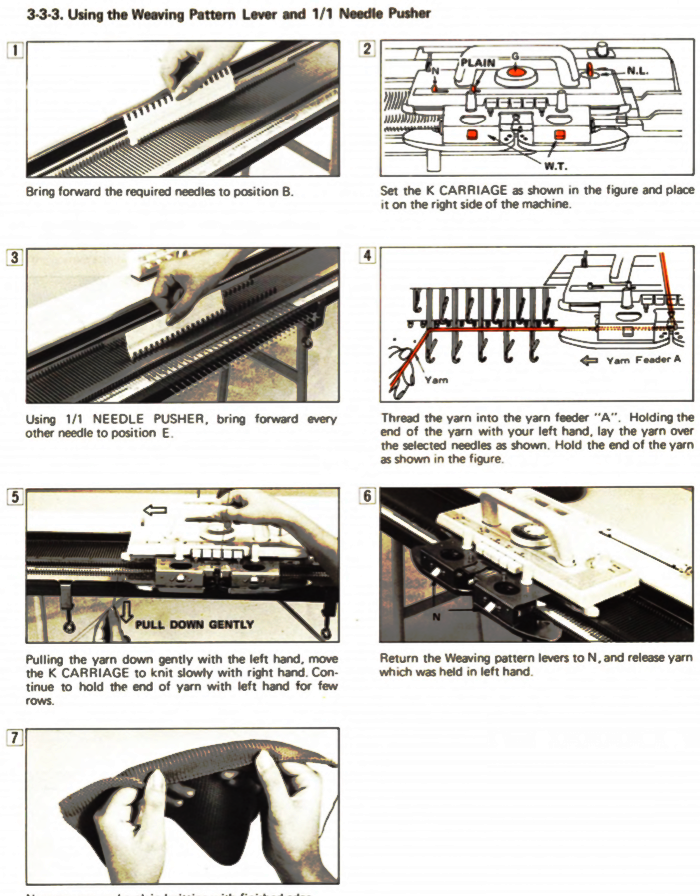


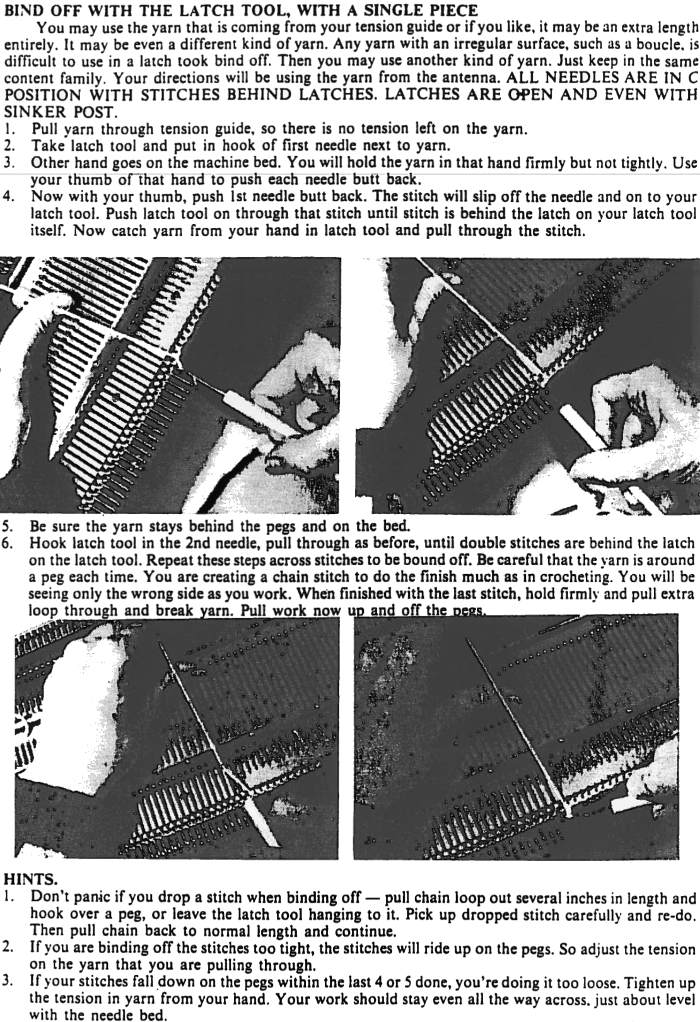
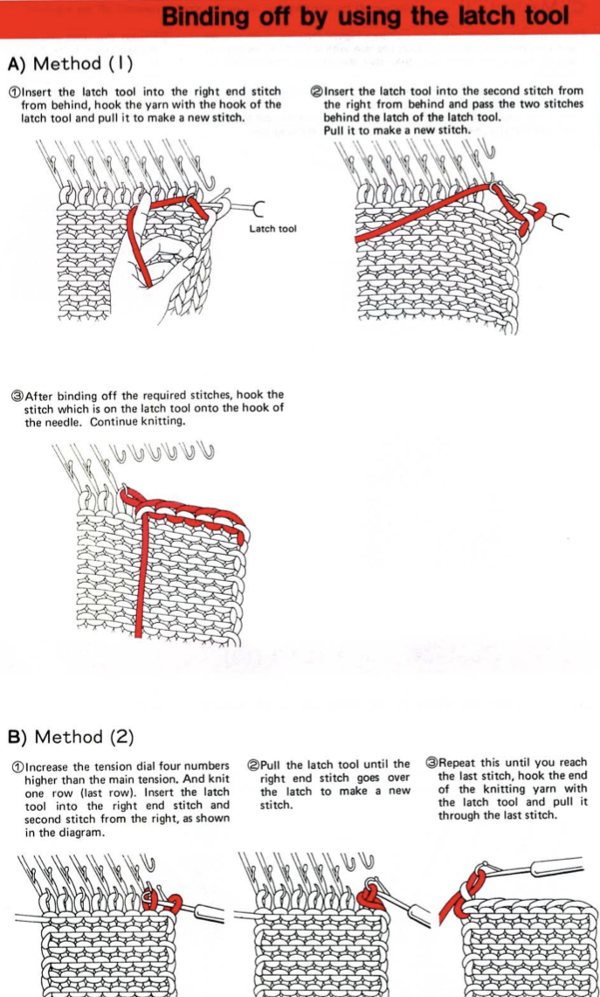
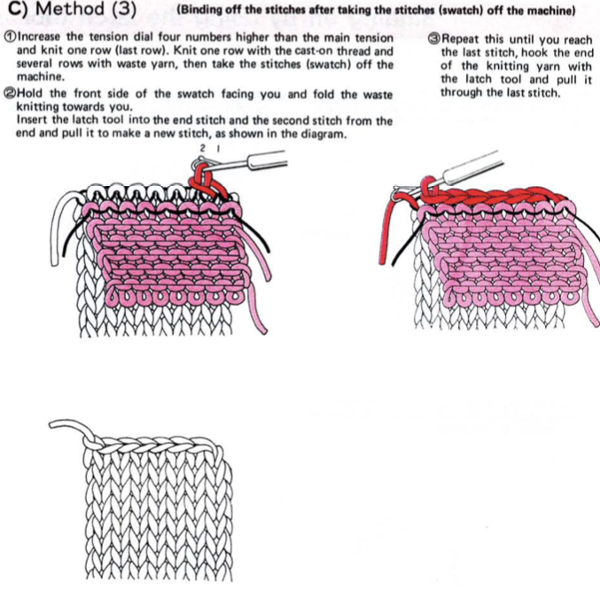 A crochet hook could be used in place of the latch tool.


 For mock rib executed on the single bed, for double rib as well, see
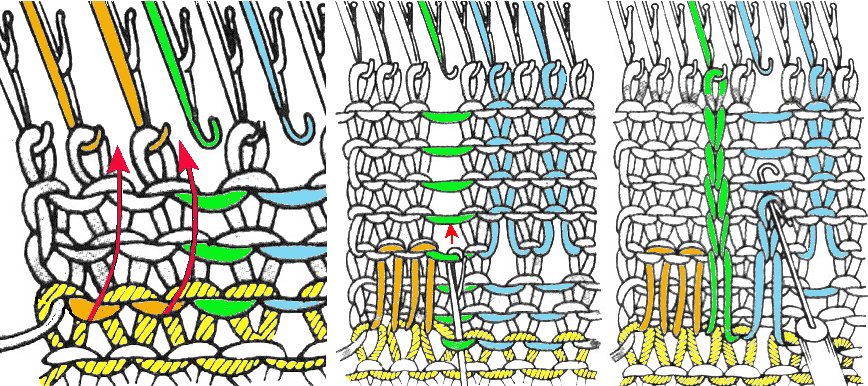
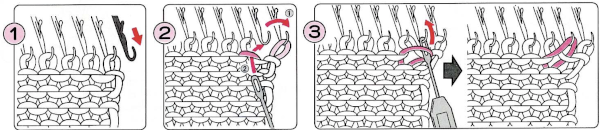
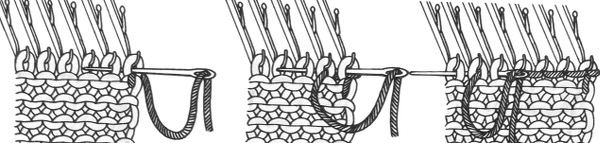
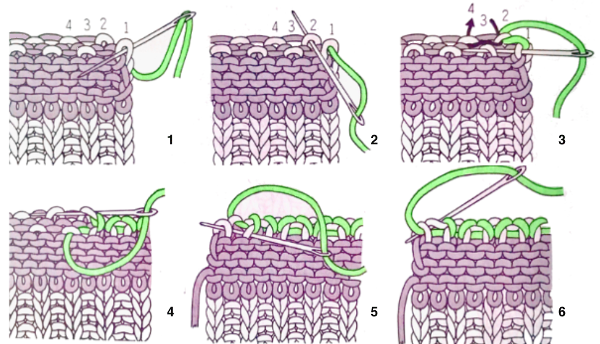
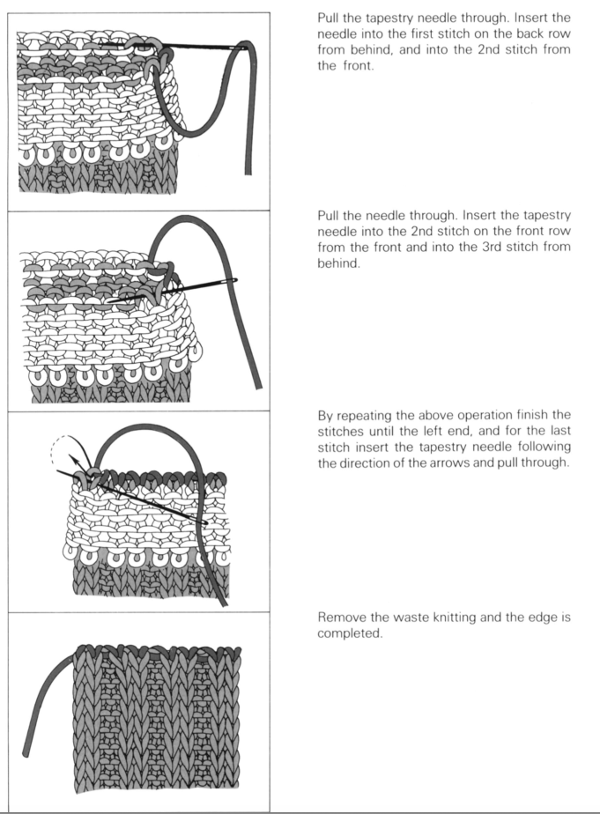
 Reviewing approaches to binding off with needle and yarn: working single bed is sometimes performed on the machine and is illustrated below working from left to right. It is referred to as back or stem stitch and “sew off” method, and is shared in many of the old machine knitting manuals. It is easier to achieve if after knitting the last row one knits at least 2 or 3 more rows in waste yarn to make the stitches more accessible. The knit side shows single loops in view upon completion. Dropping small groups of stitches off as one makes progress across the row may make the technique easier, helping with the placement of the other hand to hold the work. On the machine, the fixed distances between needles and gate pegs help to keep the tension even. The backstitching may be done off the machine, but maintaining even tension there may be a bit harder.
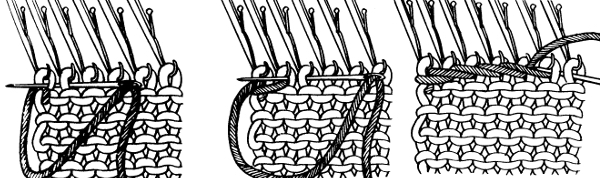

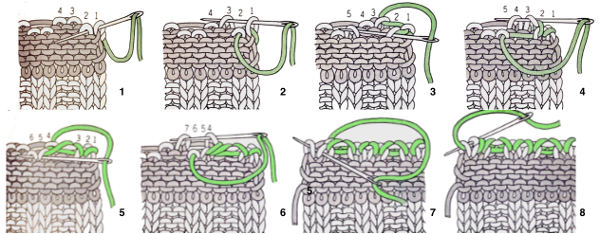
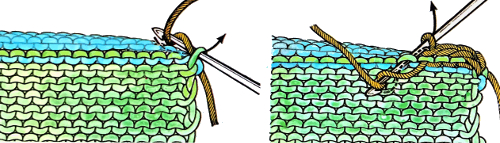 or the needle and yarn sewing method may be used. There is a limit as to the length of yarn used so as not to pose problems. Very wide pieces may prove to be a challenge, requiring more than a single yarn end to complete the bind-off. My own yarn end max limit for sewing up or off is about 18 inches


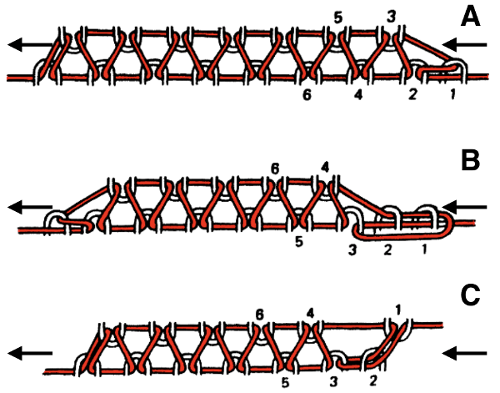
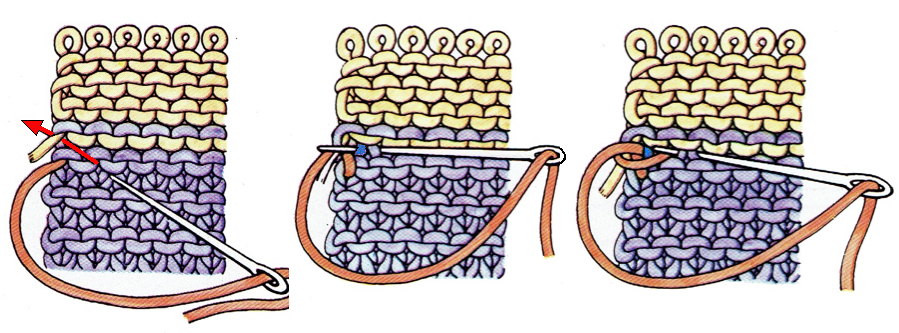
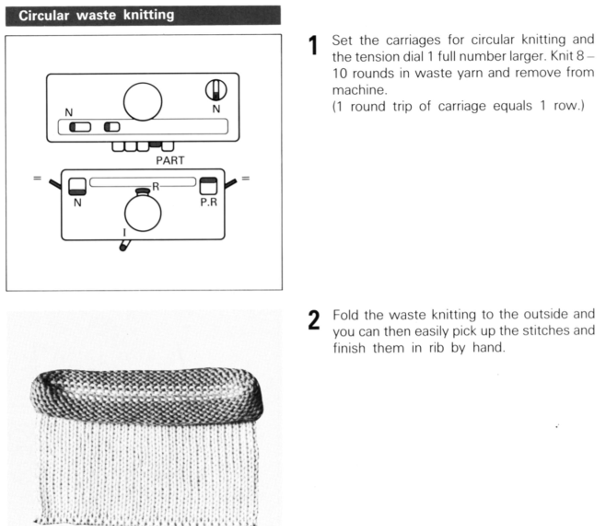
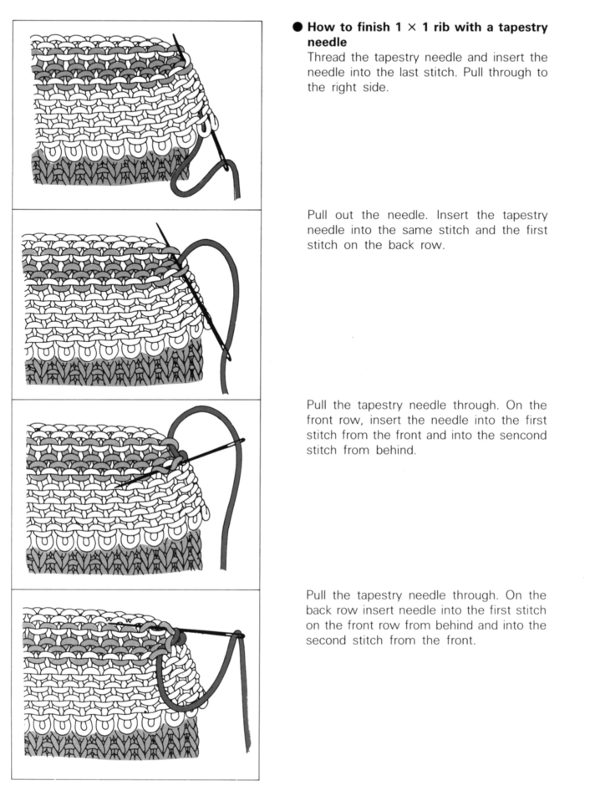
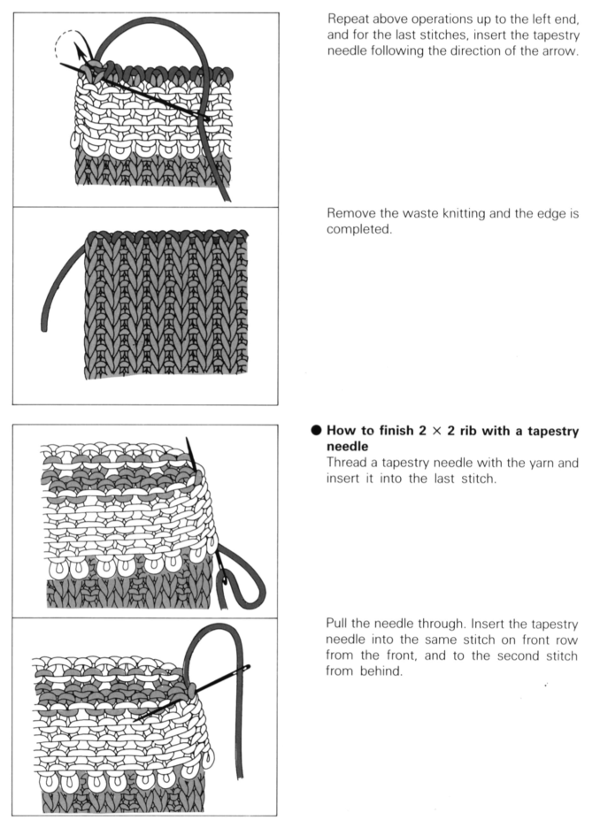
 I prefer an alternative method for waste yarn scrap off, ending in place of circular or U knitting: knit the last row in garment yarn. Thread up waste yarn, and knit it at single-bed tension. Knit 4 rows on one bed, with a separate strand or even a second contrasting color of equal weight, and knit 4 rows on the opposite bed. Repeat alternating until there are more than 12 rows on each bed and scrap off. This will allow you to press the waste knitting only, and the flaps are opened up to reveal the tops of the stitches created on each bed. Finishing can then be executed as below.


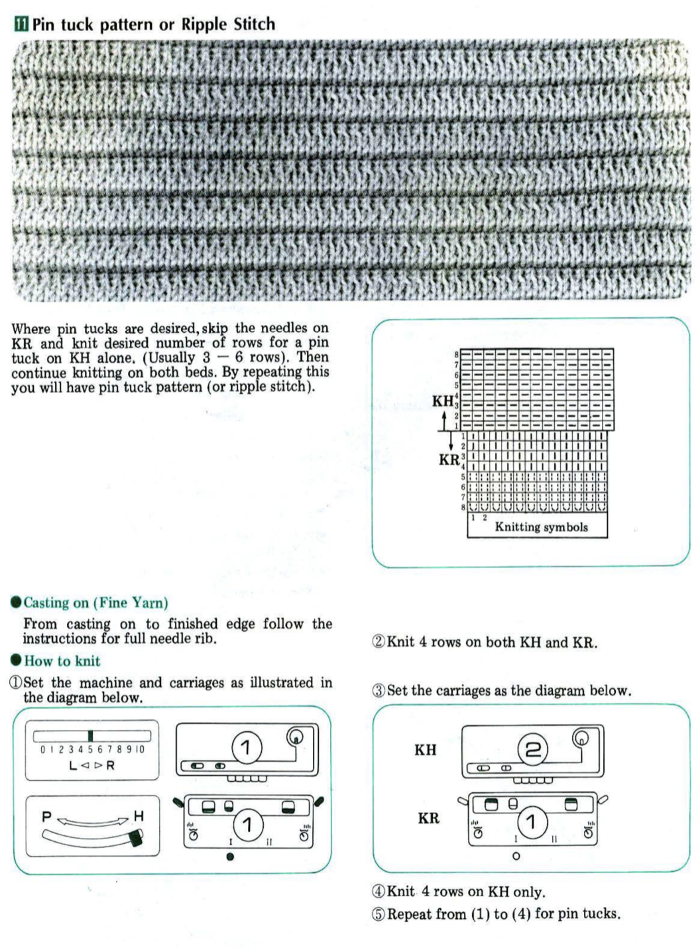
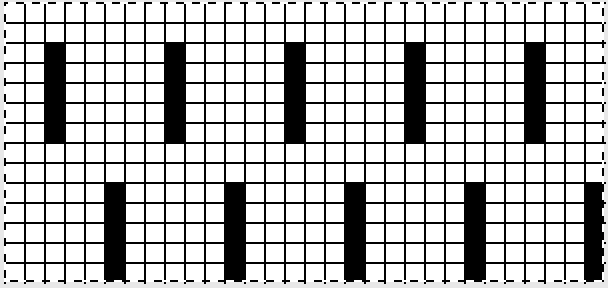
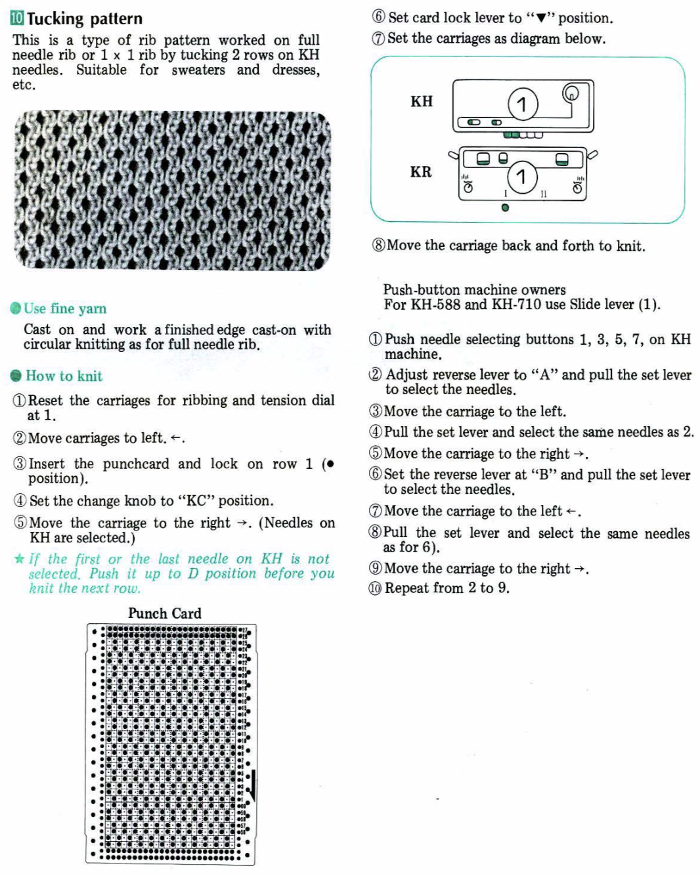
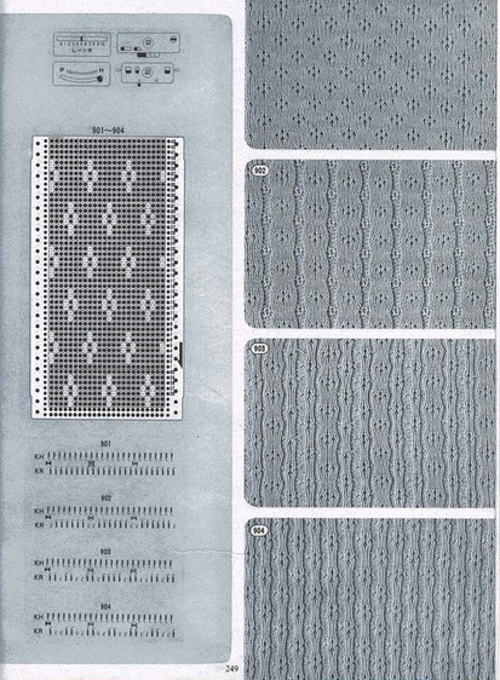
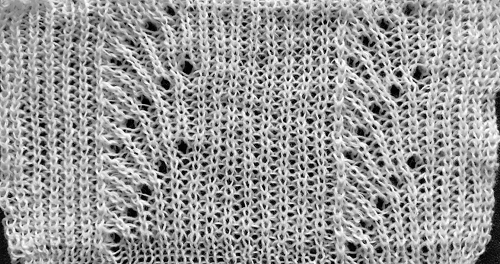
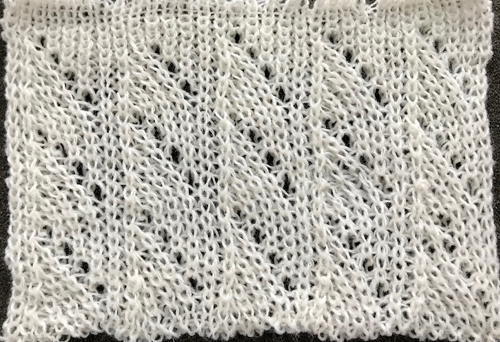
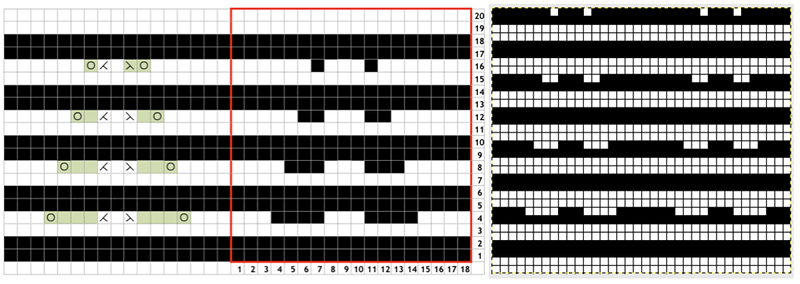
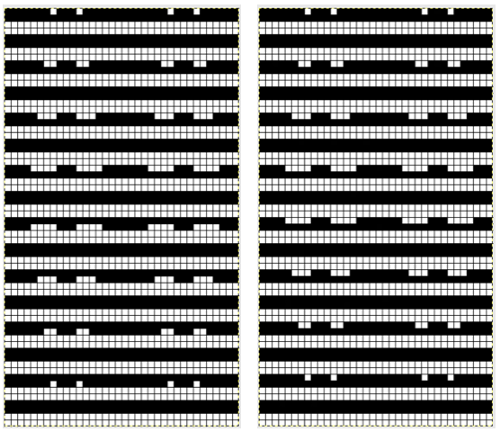
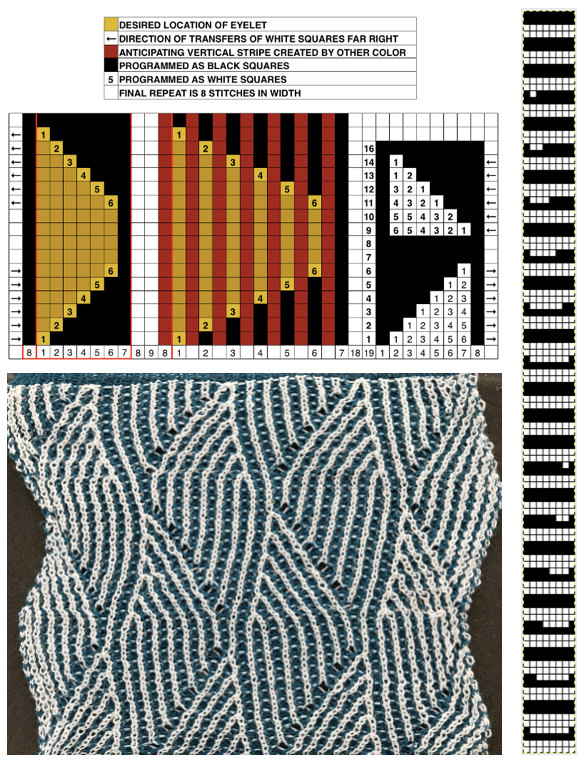
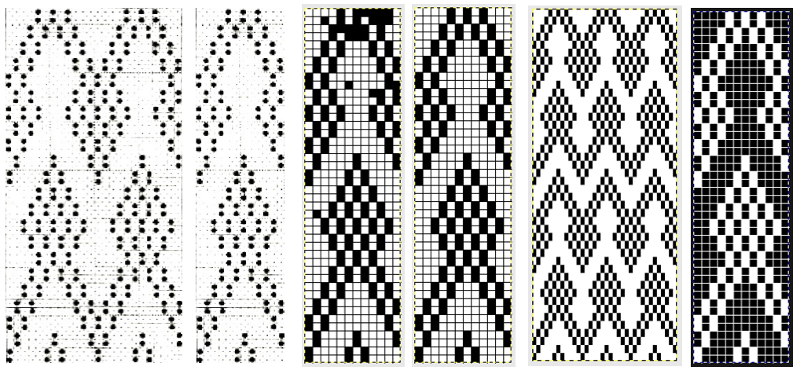
 The identical pattern in later model machines may be produced by using the tuck setting. The image below shows the punchcard partial repeat and the isolated electronic repeat for use with the tuck setting.
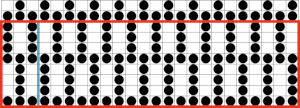
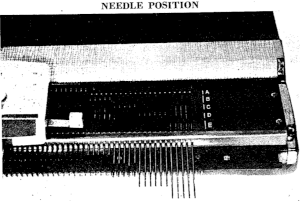
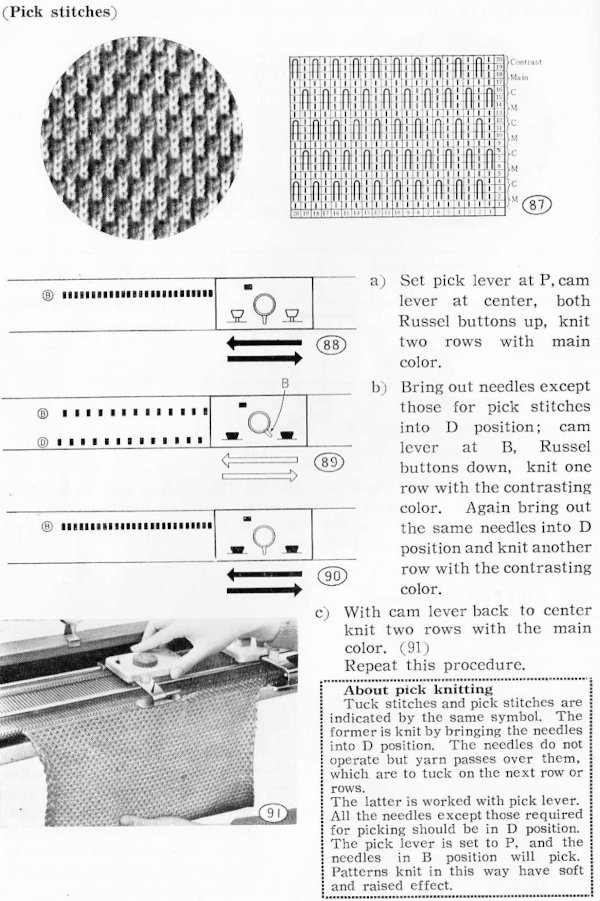
 The knit carriage appears to use “pick” as the name for what is now more commonly knows as the tuck setting.
 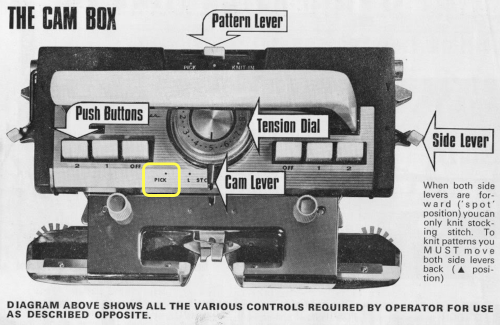 A downloadable
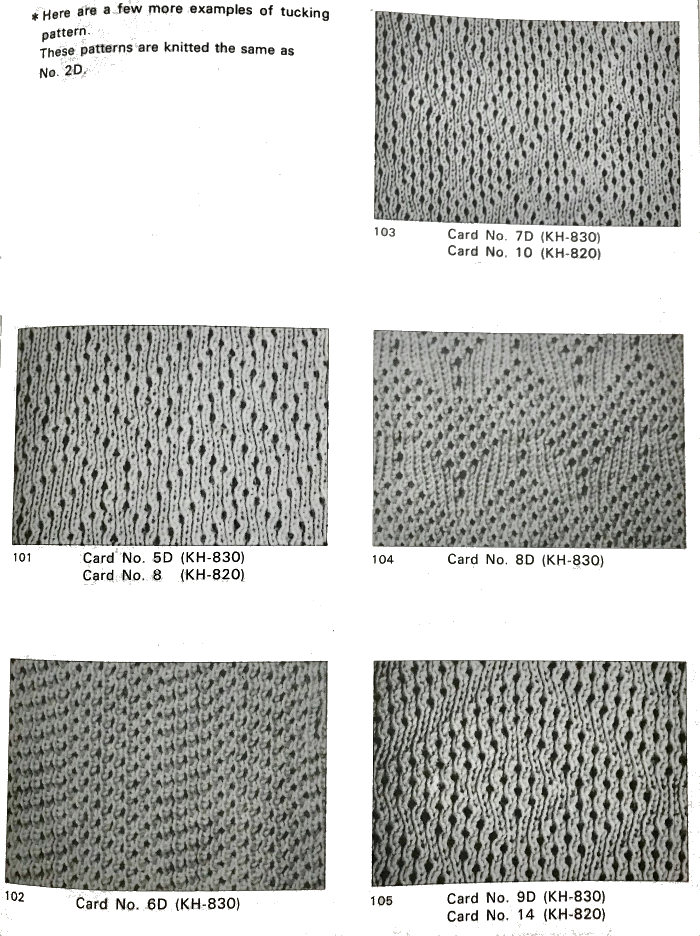
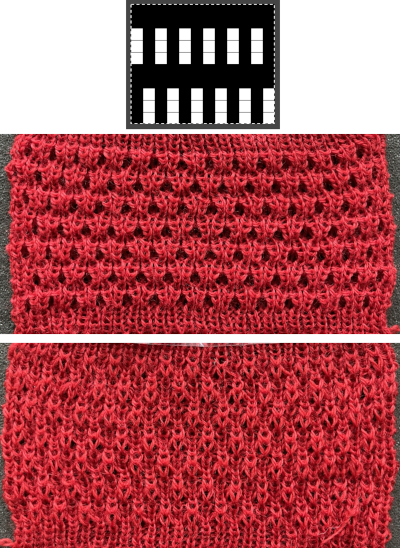
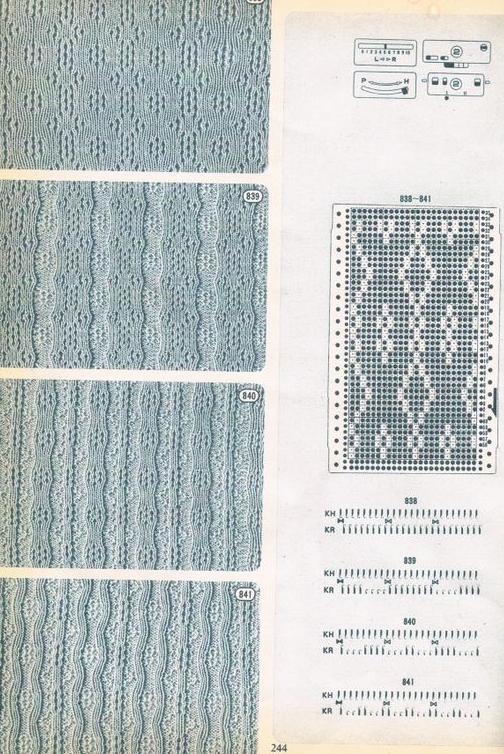
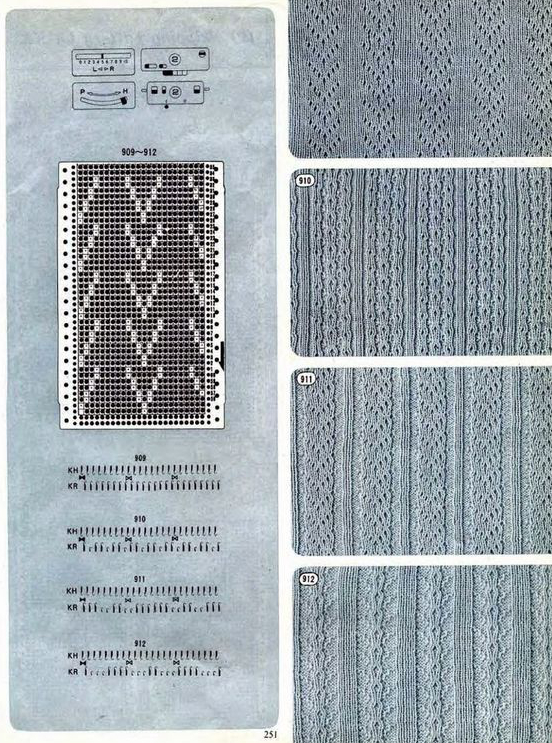


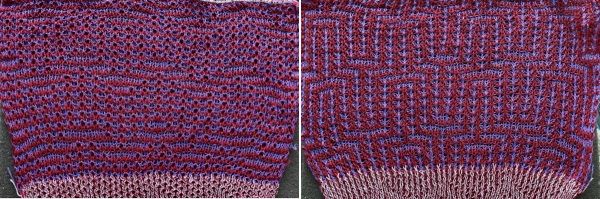
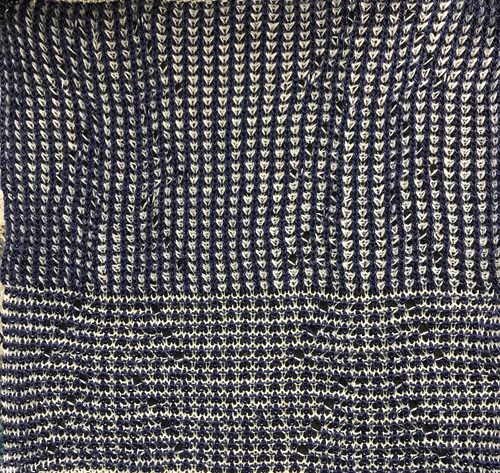
 Because, in most instances, the ribber is set to knit there are stitches on the ribber holding down tuck loops on the main bed, and typical tuck configuration rules may be broken. One such pattern to try: the punchcard repeat and the electronic one are identical
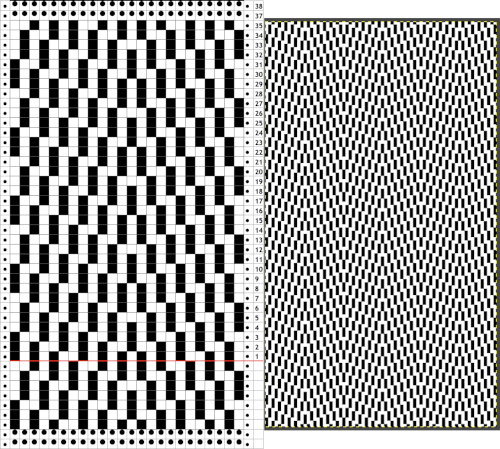
 Adding color striping
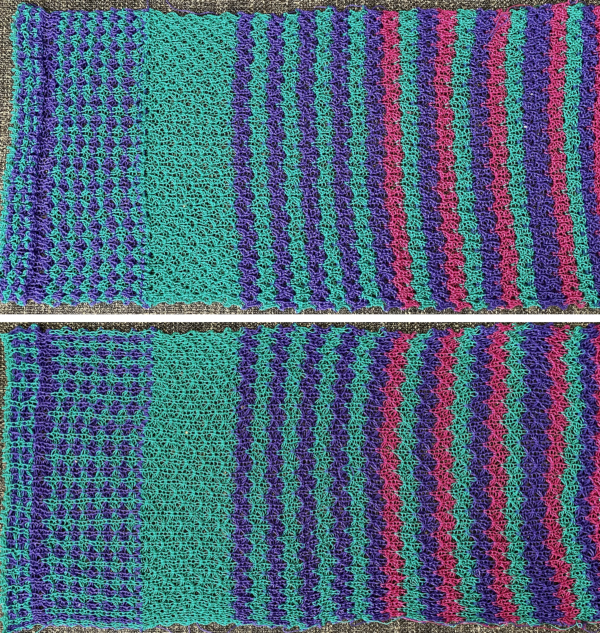
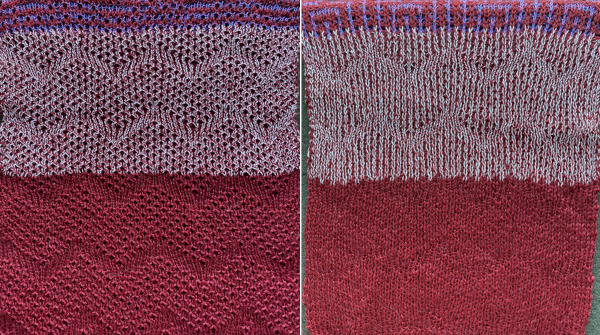
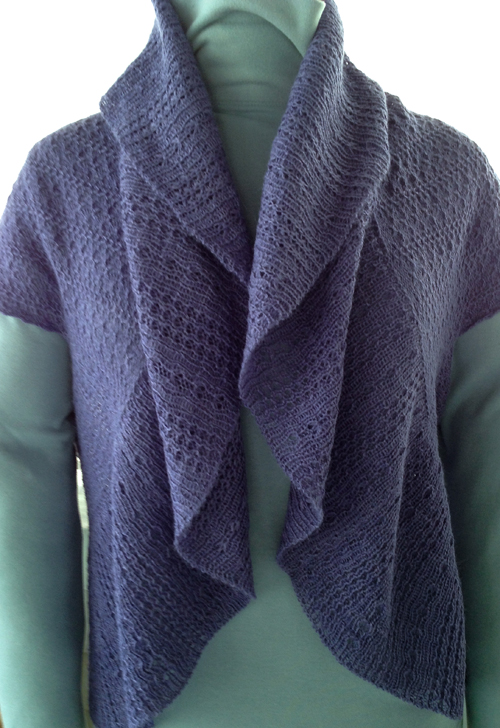
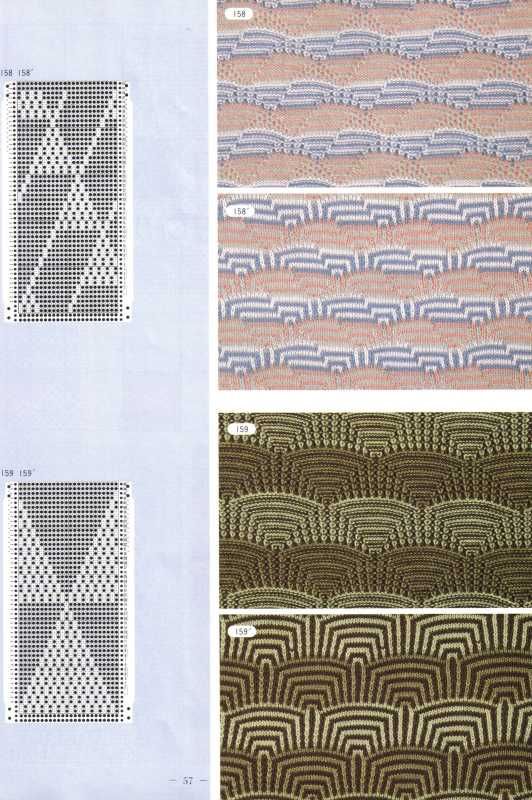
 Using the stitch type to create edgings or ruffles
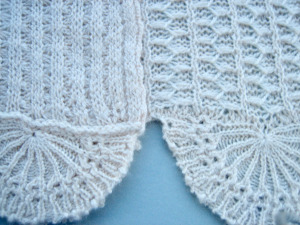


 See “
See “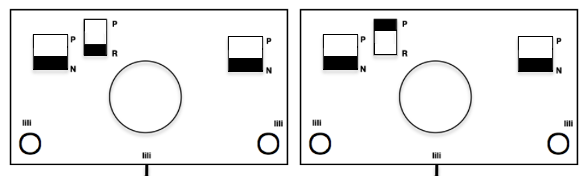


 Susanna classifies the subsequent separations as C1 and C2. Because each color in each row knits twice, there may be an odd number of rows in the initial design repeat.
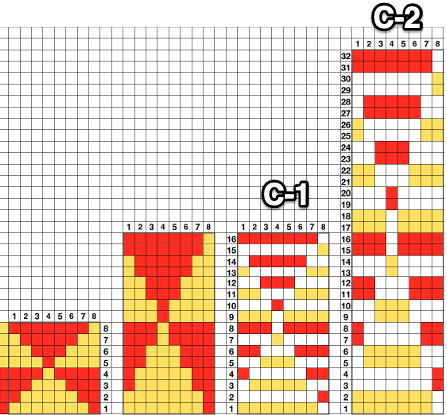
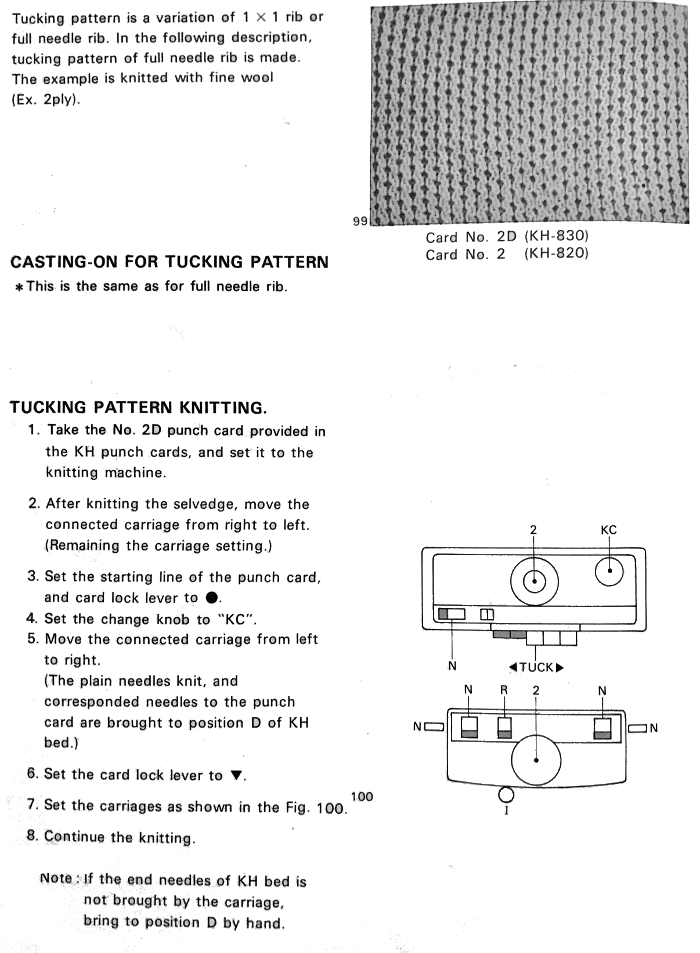
 Fisherman, aka full fisherman rib, is a tubular tuck with each bed tucking in one direction, knitting in the other

 Can plaiting give me 2 colors the “easy” way?
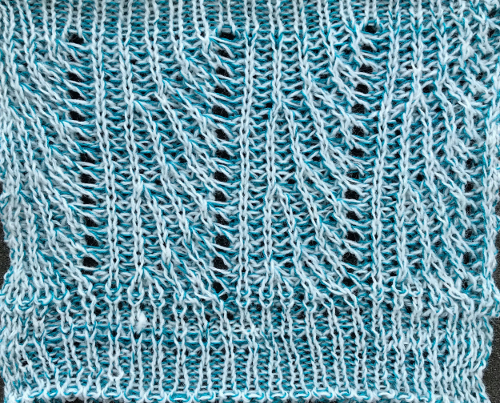

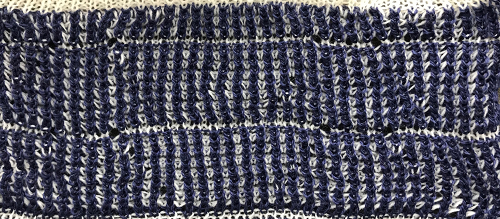


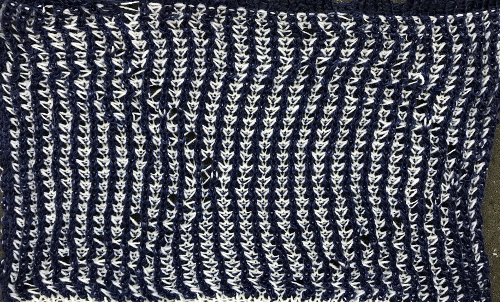
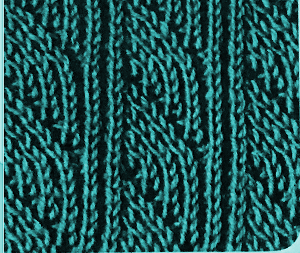
 its reverse side :
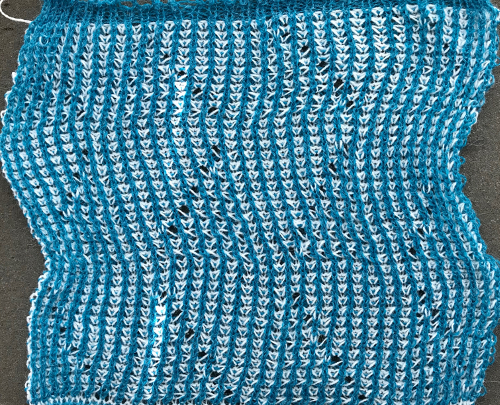


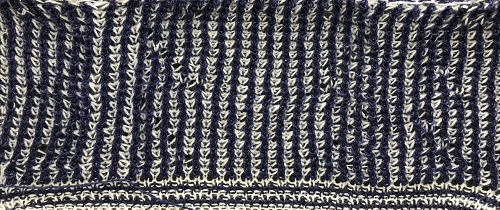
 This is what happens when a new design is being tested, and the lili buttons “accidentally” happen to be engaged on the ribber
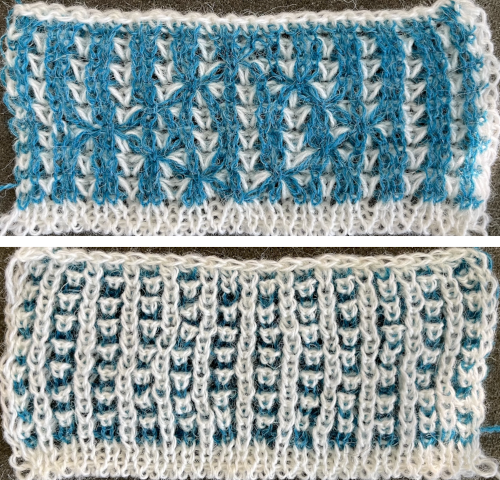

 A quick “hack” to help keep the B position yarn from jumping out during knitting, taken during a different experiment
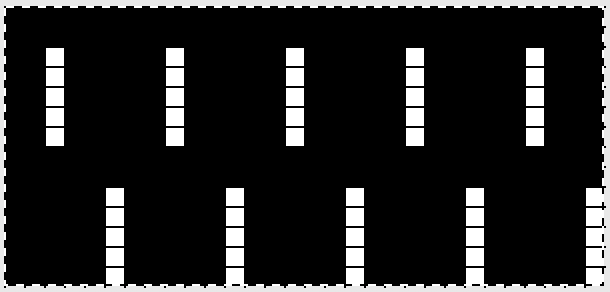
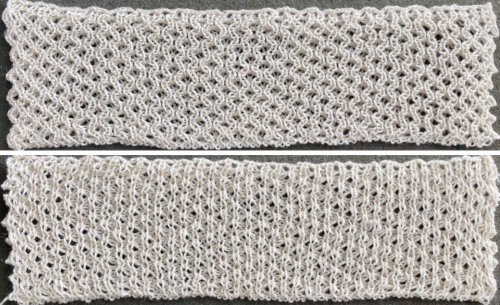
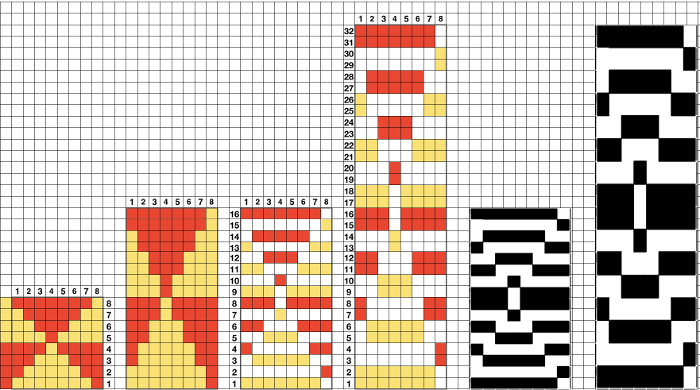
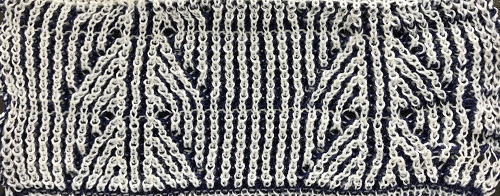
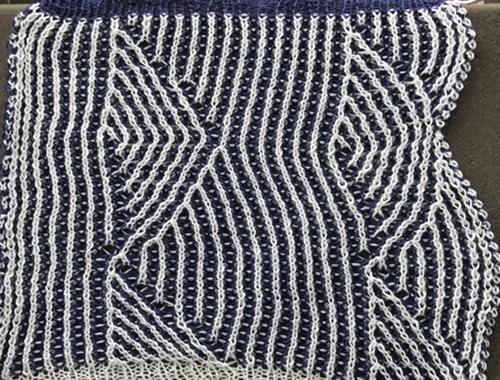
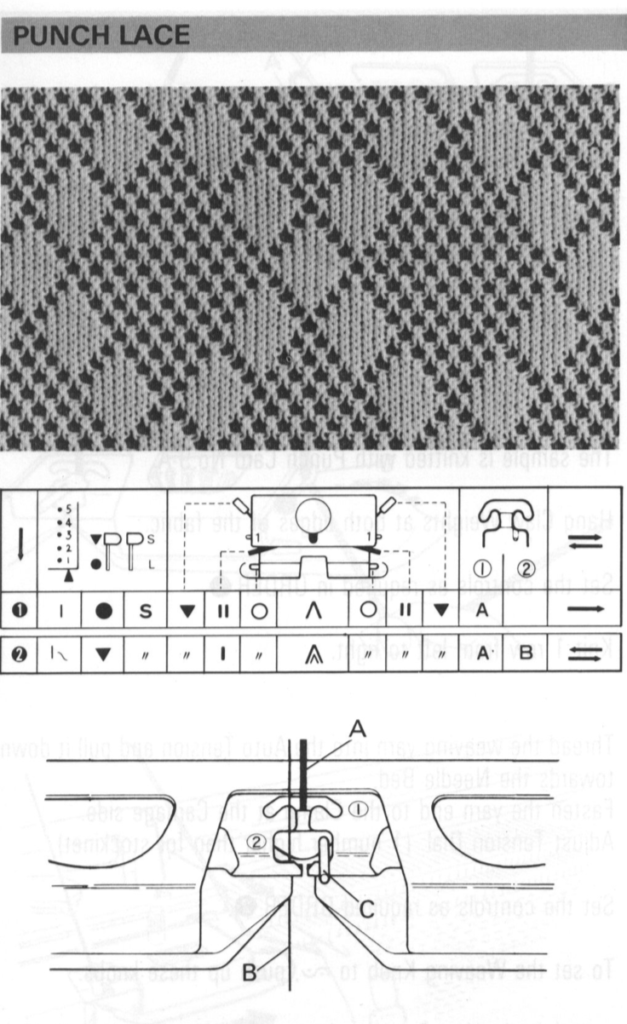
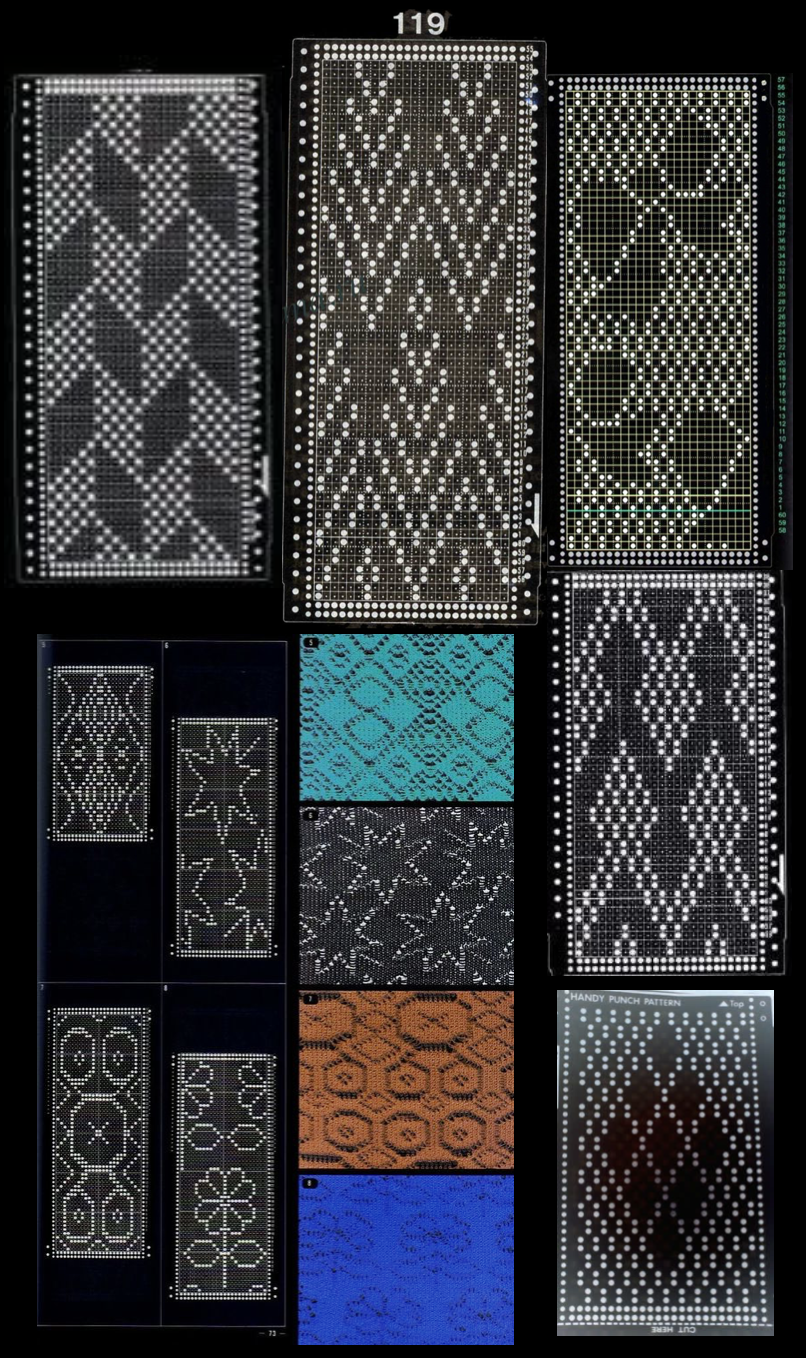
 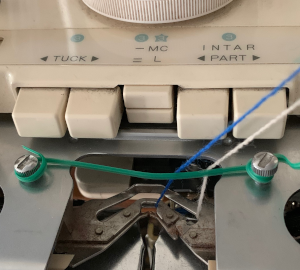 In tuck stitch, the unpunched areas, white squares, or pixels represent loops created on non-selected needles, punched holes / black squares, or pixels represent knit stitches. In punch/ thread lace those white areas knit both thick and thin yarns together, while in punched holes/black square or pixel areas the thin yarn knits on the stocking stitch side of the fabric, with the thicker yarn floating behind it. Depending on fiber content, gauge, etc. the illusion of eyelets can be created.

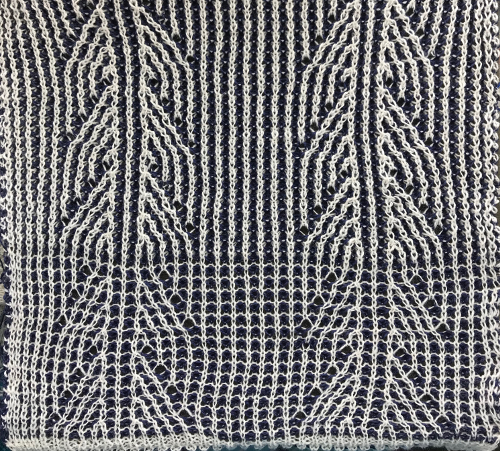
 2023: using StitchWorld # 545, 56X40 pixels
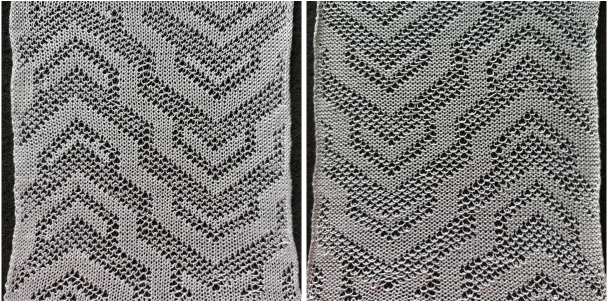

