Pleats: ribbed , folding fabrics

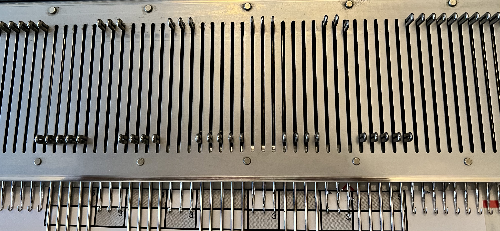
RIBBED, FOLDING PLEATS result from varying the needle arrangement on both beds, usually in every needle rib. As with any knit fabric, the knit piece will fold toward the purl side along the length of the piece, not away from it. The bend can be put permanently into the fabric by leaving one or more consecutive needles on the same bed out of work. The non-working needle(s) will create a narrow vertical column of stocking stitch on the opposite bed which will roll itself toward its purl surface. By spacing the groups of non-working needles alternately between the beds, the fabric will immediately fold into pleats when taken off the machine. The same principle could be applied to hand knitting. The symbols: black dots indicate needles out of work, purple arrows the direction of the fold in the resulting fabric, and the needles in work on either bed, or any machine.

Sharp angles occur when there are enough needles in work on both beds to allow the fabric to fold over itself crisply before it is forced by the next group of out-of-work needles to fold once again in the opposite direction

needle arrangement
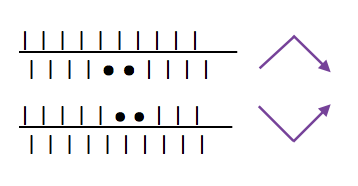
alternating direction of folds to create sharp or knife pleats

folds up as

repeat the above configuration across the needle bed, going as narrow or as wide as desired, the series of pleats will face in one direction. Crystal pleats are very fine knife pleats often seen in sewing tuxedo shirts

double sharp or box pleats are a variation where the direction of every other pleat is reversed, extra stitch groups may be added between pleats to vary their spacing. The pleats are folded away from each other on the outside of the garment. Inverted box pleats are the same as a box pleat, but face inside the garment

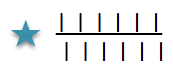
added stitch group represented by a star, stitch count varied to suit

star

stars add

fold up as

box_sharp

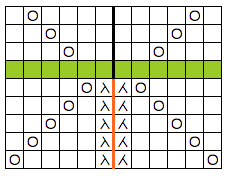
accordion sharp pleats out of work needles evenly staggered on both beds

accordion

 fold up as

accordion sharp

Putting out-of-work needles on one bed close to out-of-work needles on the other will not allow the fabric to fold over completely before reversing direction, and will result in rounded or rolled, rather than sharp pleats. There should be one full needle rib stitch between needles out of work, highlighted below in red. Repeating the same selection results in rolled single pleats 

rolled

fold up as
curved knife

double rolled pleats mirror needle groups

double rolled

fold up ascurve1

in accordion rolled OOW needles are spaced evenly on both beds

accordion rolled

fold up as
sunray round

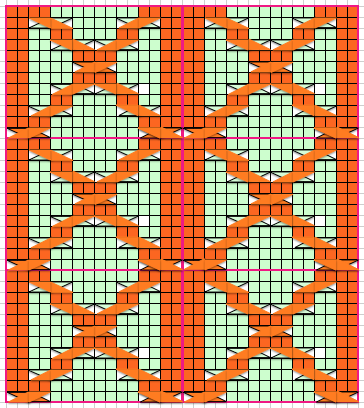
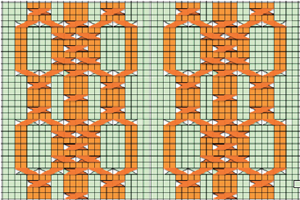
Types of pleats, their width, spacing, and mixing with stretches of every needle rib, may be used in whole garments or garment details ie cuffs, peplums, single-fold large pleats in skirts and jackets, etc.

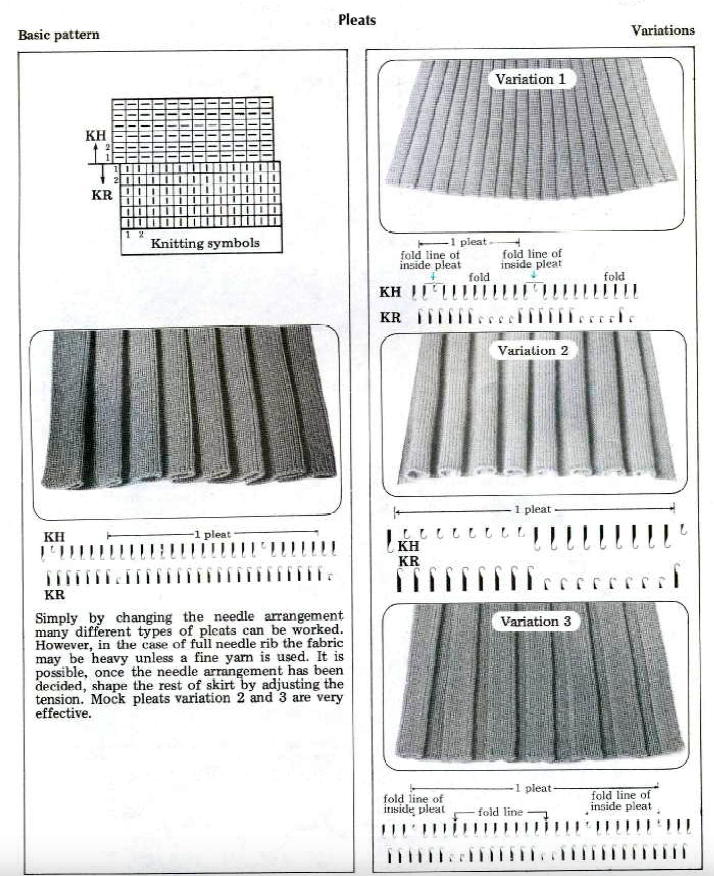
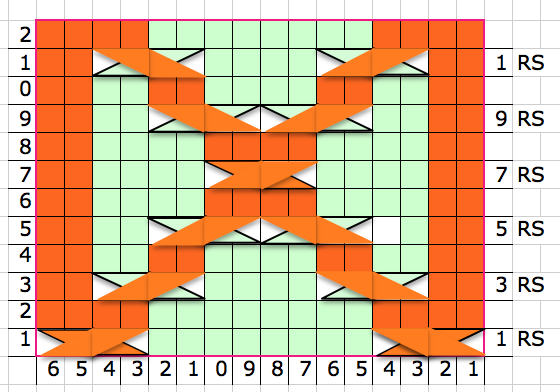
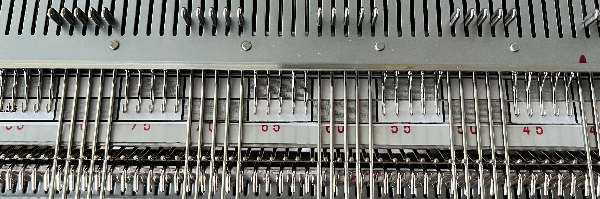
Brother Ribber Techniques Book page 37 illustration

page37

Some considerations:

Normal shaping procedures are not practical in these fabrics. Tension changes are used from loose to tight to achieve shaping from wider at the bottom to narrower at the top, requiring extended swatches. The larger the finished items, such as skirts, produce more predictable results if the test swatch is a large one. A minimum of 100 rows for gauging is recommended. A test segment is made for each tension change. Swatches should be allowed to rest after being treated like the finished garment will be: blocked, pressed, washed, etc., then hung vertically and allowed to rest. After deciding the length, 2-4 inches need to be subtracted from the desired measurement to allow for the “drop” that is likely in the finished piece over time.

The fabric may look a bit different on one side than the other, either works as the exterior of the piece and is a matter of preference.

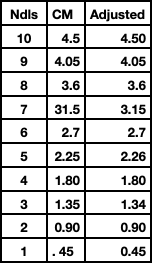
These are knits where the clicks between numbers on tension dials on machines come into use. In addition to the usual gauge calculations for knitting garments, a bit more math is needed.

The number of needles used needs to be divisible by the number of stitches used for any pleat.

Joining on inner folds rather than outer ones produces better results. Having an extra stitch at joining edges, with seaming using half a stitch on each side, will keep pleat widths constant.

The larger the pleat, the more bulk is created. Most skirts will require 3 panels with one seam worn on the center back. Yokes may be added to decrease bulk rather than having pleats meet at the waistline.

Ribbers on Japanese machines tend to knit tighter than main beds. At times an increase of 2 tension numbers may be required to get stitch sizes created by both beds to approach being equal. The other factor to consider is that the wider the plain knit vertical portion of the pleats, for stitches to knit off properly, the more tension needs to approach the # used to knit the same yarn in stocking stitch on the respective single bed. Tolerance varies between machines.

Experimentation is needed even before knitting the large swatches. It pays to be familiar with both your ribber and your yarn before trying these fabrics and to keep good notes.

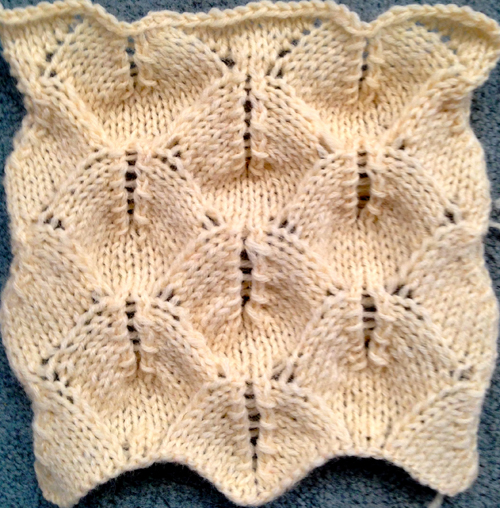
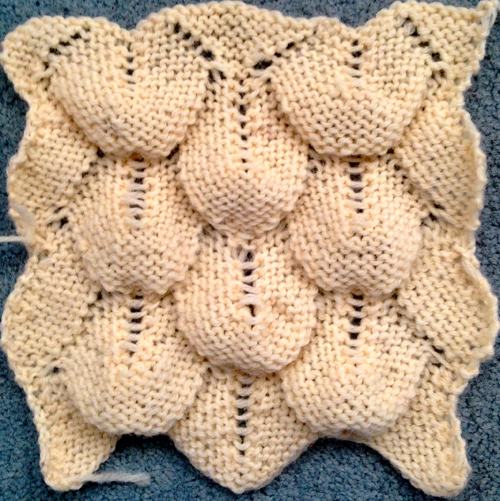
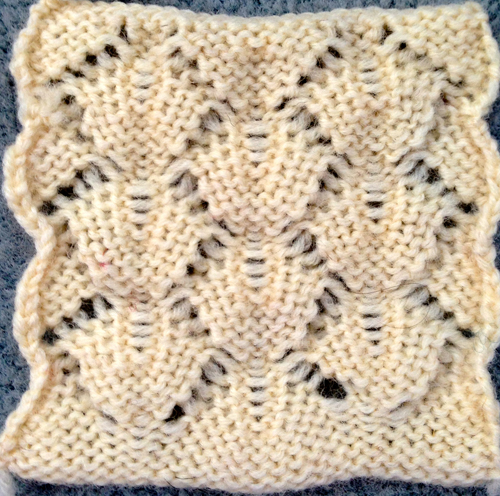
Folded / true pleats occur when the groups of NOOW (needles out of work) that make the fold lines are spaced far enough apart so that the underlap of the pleat is quite wide. Rolled/ mock pleats occur when the groups of NOOW that form the fold lines are fairly close together.  Stockinette/rib combinations: vertical columns of stocking stitches are created, sometimes combined with ribbed ones. The fabric lies flat and does not fold.

Double jacquard is usually an every-needle rib fabric, so pleats can be created in conjunction with it, even planned to occur within specific areas of the design repeat. Consider yarn weight and backing technique in planning for drape.

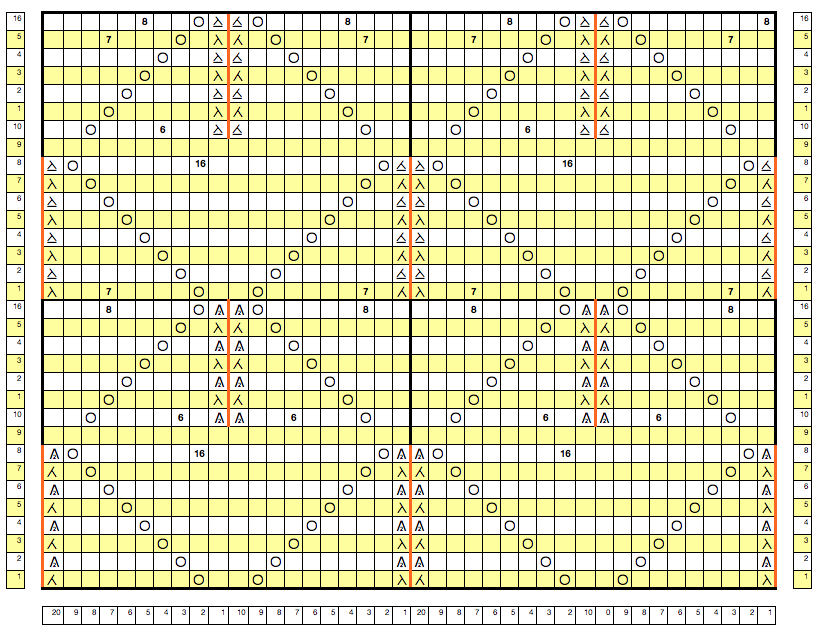
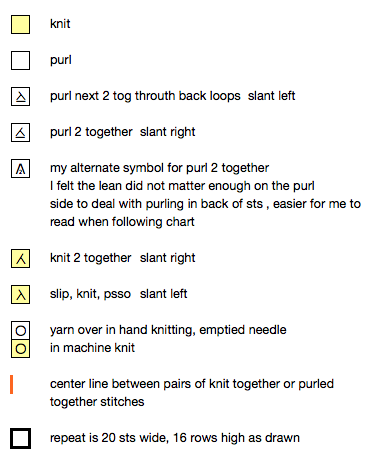
A series of needle arrangements to try, including one worked on every other needle, which requires the pitch change from P to H. Charts were created as combined tables using Mac Numbers 5/2018

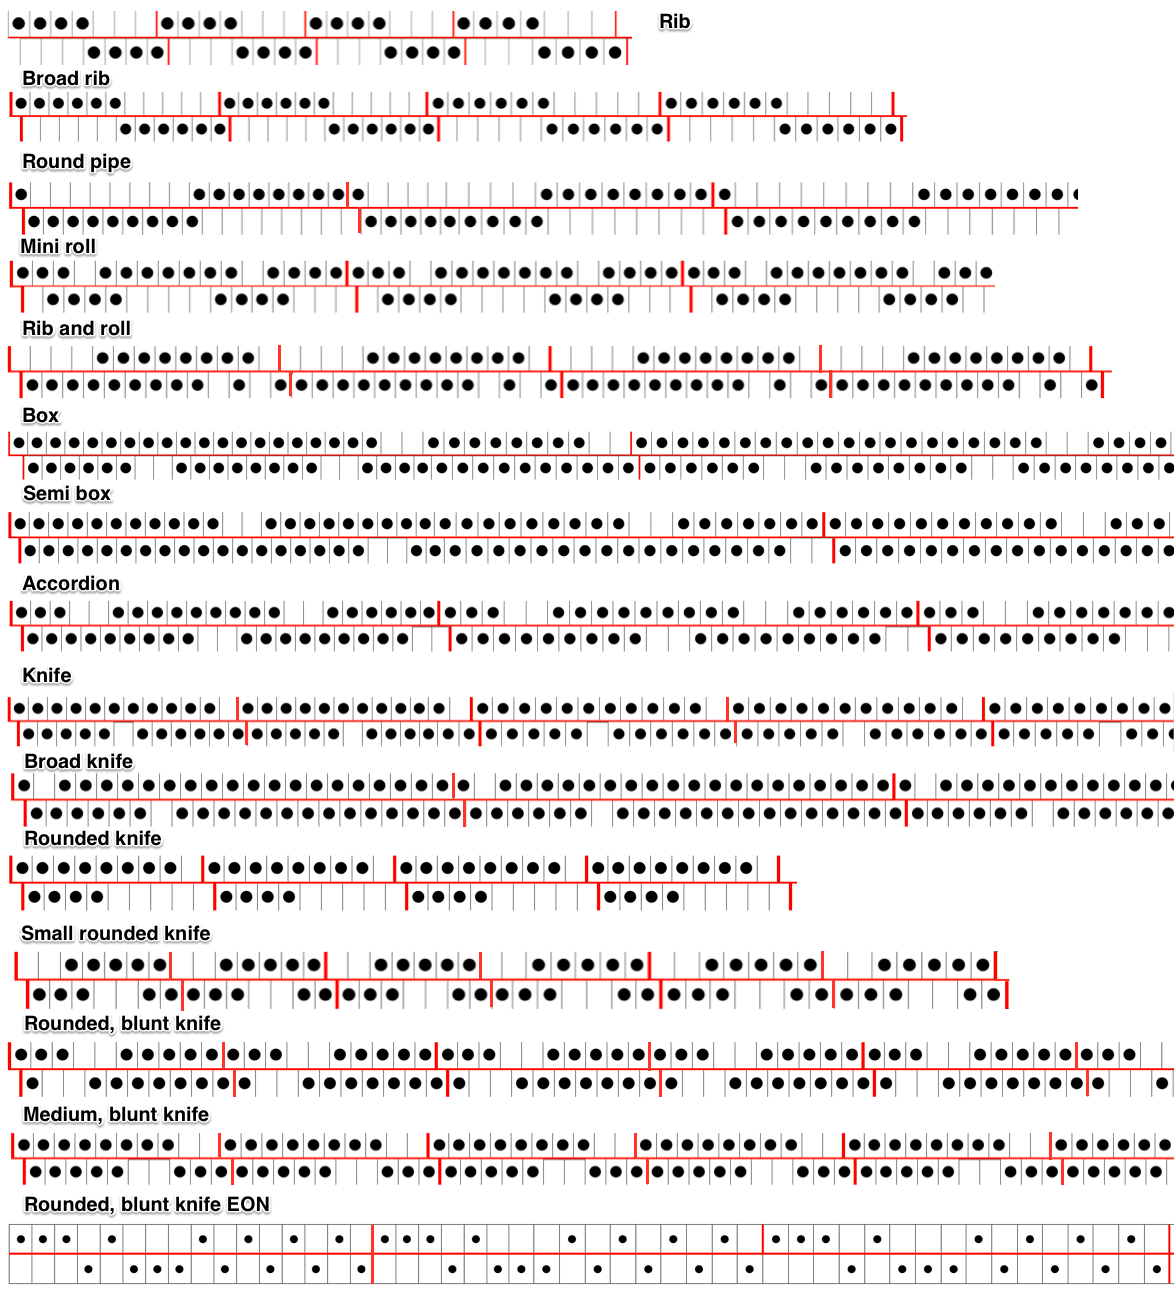
More from the Brother Ribber Techniques Book pp 108-112

Review of terms often used: full pitch = the needles of one bed are exactly opposite the needles of the other bed. Passap = racking handle up. Half pitch = the needles of one bed are directly opposite the gate pegs of the opposite bed. Passap = racking handle down. FNR: full needle rib = within the working area all needles on both beds are in working position, with the beds set at half-pitch. 1X1 rib set up= within the work area every other needle on both beds is in work in alternating positions, ribber set to full pitch. Tubular cast-on is often used for fabrics of this type, in both FNR and 1X1 rib setups.

“True” pleats have three components: the face, the fold-over or turn back, and the underside; they are formed by folding a piece of knitted fabric over. “Mock pleats”  are produced by varying stitch patterns. Sometimes the terms S and Z are used in reference to how the pleat folds, with S pleats pointing the right and Z pointing to the left. The fold-over bulk is something that needs to be planned or even compensated for when creating garments ie such as skirts, where yokes are often added to minimize bulk at the waist and hips.

Studio tips and techniques #36, by Terry Burns, is now available for free download online and begins to cover Double bed pleated skirts  tt-36-double_bed_skirts

Machine knit “dragon scales” update

I had previously posted on an Armani-inspired knit scale-like pattern that sometimes was described online as a machine knit “crocodile stitch”. A fellow Raveler just shared on her project page an interesting variation that includes variations in the scale of the scales themselves. All her transfers are made onto a single center point, eliminating the vertical separation that appears at the center of my version.

my previous smaller, machine-knit sample

IMG_1648

a hand-knit lace cousin to try with full repeat and directions, chart, and text generated in Intwined, border stitches not shown

armani hk

armani hk how

Some cables to try, hand knit

The first repeat below is for a vertical cable panel 24 stitches wide, 12 rows high (2 repeats shown); within the repeat, odd rows are all knit, even rows are all purl. Colors are indicative of cable crossings.

Borders in the swatch, or area in between multiple vertical panels, may be worked as 1. purl on even-numbered rows, knit on odd-numbered rows to create a purl ground behind the cables on the “right side”, or 2. knit every row for garter stitch in same areas.

Abbreviations : RS: right side, WS: wrong side. CF and CB indicate where the cable needle (CN) is held during the process.

CF: CN to front | LC: Left Cross, cable leans toward left

CB: CN to back | RC: Right Cross, cable leans toward the right

Dotted borders in chart outline columns 3 stitches wide; all cables in the sample are 3X3 crosses.

An alternative way to picture things: numbers on the left of the chart below indicate row numbers; on the right, they indicate the number of stitches knit before crossing cable stitches begins on that row

the hand knit swatch

IMG_1656Adding a purl stitch ground: a shortened chart using Aire River Design font, odd rows only shown

screenshot_02

screenshot_03

using color in Excel, showing every row

screenshot_04A

screenshot_03Avisualizing multiple repeats

in repeat

a very quick, hand-knit test swatch, knit with needles a bit too large for yarn used

300_1658

another possible charted in Excel, multiple repeats shown

screenshot_13

If patterns are for publication in specific venues, conventions in symbols may, or should have to be observed. To keep track of personal projects we often differ in what format or shorthand makes the most sense to us. If the like of the above result appeals to you, I am sharing a workbook with pertaining puzzle pieces. I find working at 200% magnification is the easiest for me, which may be easily changed to suit.

cable_purl_share

PS: My working palette in the original document was as seen in the images above. You may find some of the colors will be different in your download, depending on your computer. I have read on other sites in the past that the color change can be an issue in excel knit charting downloads. The image below reflects such a change. It is a quick capture of part of the chart when I tested the download myself. The large color blocks are the ones affected and may be easily changed to match the cable crossing colors.

color change

A swatch experiment

A while ago the image of a sweater attributed to Armani caught my attention on Pinterest, and I became obsessed with creating a variant.

13f255bf1c030f6b7f6d5710caf2d860

Lace is actually an interesting 3D fabric until it is blocked and made to lie flat. I went the lace route to work out my “scales”. The swatch I created below is hand-knit knit, and could be reproduced as a machine-knit hand technique with the aid of multiple transfer tools. I would recommend a yarn with “memory”, such as wool. The bottom of 3 sets of “shells” were knit on #  7 needles and the remainder on #5. I found I preferred to control the lean of knit-together stitches on the knit side but did not deem it necessary on the purl.

the knit side

IMG_1646

and purl side!

IMG_1645

my working notes  (Excel) showing multiple repeats

scales_in_repeat

symbols used symbolsa printable PDF  scales_all_info

A mini-me version knit on a 4.5 mm. machine, using the same yarn as in the hand-knit sample above, at tension 10+. Repeats are worked out around 2 center needles, on which stitches are doubled as transfers are made. When the pairs of doubled-up stitches are reached with loops on either side of them after the last transfer/knit one row in sequence, and knit one additional row across all stitches before reversing the direction of transfers. That row is represented in green in the chart below. Symbols used are minimal since the same side of the knit is in constant view (incomplete full pattern repeat)

KM_repeat

knit side

IMG_1648

purl side

IMG_1647

see update3/28/2015

Visualizing knit cables in color_ Excel

In the past, I have suggested methods for working in Excel and provided links to excellent material shared by others online. Of late I became interested in using the program to produce simple color graphics for cable illustrations. It is helpful to have prior experience in using Excel for knit charting. This is not intended as a complete tutorial. I am providing a document for experimentation. I would suggest copying and pasting the individual shapes to a different part of the document before playing with color changes, resizing, etc. This may be done within the chart in progress, or separately, and then copying /pasting or moving the final result into place.

The resulting charts may be used in both hand and machine knitting. My illustrations here are intended for machine knits, so they do not combine purls and knits on their ground. Images represent single side view: as they would appear on the knit side facing hand knitters, or the purl side facing the machine knitter. Stitch, row marking, and text may be added as wanted.

Chosen from the view menu, the object palette allows the selection of built-in available shapes. Once a shape is drawn into the workbook, the formatting palette allows access to image size, rotation (including flipping both vertically and horizontally, and alignment (moving front to back and reverse).

object_format_palette

Color fill – unless standard colors are chosen, there will be issues matching colors combined when using with bucket fill from the toolbar to add color to cell(s)

toolbar

toolbar

formatting options: fill

shape_fill

shape border: line, color (or not)

shape_line

one of the ways to access size, rotation, aspect ratio

shape_size

sample results

screenshot_33

an in-progress document for experimentation: blog_color_cables. Adjust zoom to personal preference for either viewing or working, grab portions of working screen for images of sections of the workbook to save, or save as, and explore PDF options.

More on charting, foreign symbols, and cables

This topic has come up as part of previous posts. I recently reviewed links and thought I would re-group them a bit differently here, adding some new.  Please click on continue reading to have the list appear as active links if they do not immediately do so in your browser. The latest additions are at the post bottom.

http://www.stitchmastery.com

https://www.myfonts.com/fonts/adriprints/stitchin-knit/

https://www.softbyte.co.uk/designaknit.htm

http://www.envisioknit.com/features/

https://stitch-maps.com/about/key/

pixelated lettering

http://www.fontpalace.com/font-download/Notice+3+Std/

http://www.fonts2u.com/munro-small.font

http://www.fontspace.com/ten-by-twenty/munro

letters in knit stitches

http://www.fonts2u.com/knitfonta.font

http://www.fonts2u.com/knitfontb.font

http://www.fontspace.com/honey-and-death/knitfont

care labels

http://www.fontpalace.com/font-download/Notice+3+Std/

I have been trying to navigate Mac Numbers again, but in playing at my own latest charting with software after the Yosemite update, I find I am drifting back to using Excel once more as my primary “graph paper”. Charts published in foreign languages and magazines, and particularly those in Russian (where the same symbols appear to have different functions depending on the publisher) provide challenges in translating for using charts provided in hand or machine knitting.

Some sources from/for different countries that may help with interpretations:

http://www.knittingfool.com/Reference/KF_Symbols.aspx

http://www.garnstudio.com/glossary.php?langf=it&langt=en

Anna Burda magazine symbols PDF includes HK how-to illustrations:  ab2  2/1/15

 Verena chart from older pubs easily found on Pinterest

A partial volume of an out of print book on Japanese symbols 

4/24/15: Sconcho is a GUI for creating knitting charts that come with a built-in stitch library. A manual is available. Custom stitch symbols may be created in Inkscape to form personal vector shapes.  X11 may be required to run Inkscape on your computer as well, all are free.

6/14/2020 a free for iPhone and iPad app Knitting Chart  also includes crochet symbols


Knit charting in Mac Yosemite; visualizing knit cables

Some previous blog posts on topic

2013/01/03/chain-cable-hk-experiment/

2013/02/07/hand-to-machine-symbols-4-cables/

2014/07/07/a-bit-of-cables-and-lace-charting-hk-to-mk/

2012/01/28/a-few-to-try/

Updating to Yosemite has provided some interesting issues for me. The first was Safari pretty much becoming unusable. It took a Mac expert and a chunk of his time to resolve the issue. There are still hiccups in other apps. I thought I would revisit some of the methods I have mentioned as usable in knitting charting on Mac via a bit of discussion on cables and visualizing them.

Intwined began having issues in Macs with any custom-built stitch libraries in mid-year 2013. The last update offered and installed in September 2013 has continued to have some functionality issues in later Mac OS versions (Mavericks, and now Yosemite), stripped of any custom stitches built previously, not allowing for their addition. It has become only an occasional go-to for me now. Charts created in the program are easily recognizable.

Inkscape (recommended for creating icons for use in Intwined, a free vector program) will require XQuartz update for Yosemite. Their previous release allowed for its use in Mavericks.

http://xquartz.macosforge.org/landing/

http://xquartz.macosforge.org/trac/wiki/X112.7.8

http://sourceforge.net/projects/sconcho/ is an open-source, free charting software with built-in stitch libraries that may meet many of your charting needs in any OS version

Excel behaves as in the past (my version: Office 08)

Mac Number has once again deleted some familiar menu options, added new ones. My primary font for knit symbols is no longer available, and some of my accumulated knit symbols from other font sources continue to work on the mac, but are unsupported if using the iPad version of the program, where they appear as the original  keyboard strokes, rather than the assigned symbols

GIMP 2.8.4 (2.8.8 did not), HyperDither, appear functional as in past.

Tracking and visualizing custom cables outside the parameters of built-in libraries or fonts/symbols in alternative software, using Numbers 3.5: one of the problems that can be encountered in charting cables is that programs with built-in stitch libraries may not provide for cable crossings specific to your pattern. The charts below have not been proofed executable in a swatch at this point in time, are simply a way of exploring drawing methods, my working notes from some quick experiments, not a step by step tutorial. I have no way of confirming results in previous versions of the software or OS.

available “shapes”

To make them editable, click on the shape, go to format menu, highlight shapes and lines-> make editable. Click on the shape and in turn on the format symbol below in the image below, and windows become available for style and arrangement choices

The knit and purl symbols on the left of my first chart utilizing line with arrow shapes are standard ones. The right side uses a dot for purl stitches instead of a line, and that began to make the whole more readable to me. One drawback is “shapes” do not seem to respond to any copy and paste demands and I had to draw each individually. I preferred to place them outside my chart. Guidelines then appear to suit for easy resizing and the resulting edit may then be dragged and dropped into the appropriate location in the chart, readjusted as/if needed. Color palettes for drawing appear limited to the built-in shades; toggling between available colors may be accessed by clicking on the dots below the pen tool in the first illustration above.  In the chart, purple lines indicate stitches brought forward, yellow the stitches brought to back when working the cables. The number 10 in the left-hand column should be a one.

Cleaning up lines and adding color if needed may be done in Photoshop or GIMP; this makes forward stitches a bit clearer

bucket fill provides an added way to follow the movement of stitches

Utilizing the pen tool in shapes menu to draw custom cable crosses and filling them using the option within the numbers program moves toward an all color chart_ far quicker than using lines and bucket fills. The red segment indicates knit stitches traveling in the back for the cable cross

A lot of information is available on creating reversible cable fabrics using ribbed configurations. I thought I would play with knit/ purl blocks rather than vertical rib lines. The initial chart was begun in Intwined, with bucket tool filled in Photoshop to extend colors within cable crosses. The red border outlines the pattern repeats. Alternate right side rows are shown; all wrong side rows are worked as the stitches appear (knit stitches are knit, and purl stitches are purled). Here the cell colors happen to be reversed from their use in the above, the yellow is used for knit stitches, the green the purls. I opted to indicate knit stitches by color only, no symbol.

This is the resulting swatch, in random acrylic yarn, with varying numbers of rows in between cable crossings my plan is to create a scarf in significantly thicker alpaca yarn, a strictly HK fabric. The photo shows both sides of the fabric.

Creating knit graph paper on Mac, using Excel and Numbers

Working in Excel 2008 and Mac Numbers 3.2, edits added 2022, 2024 

My blog is a living document. I tend to keep old posts as they were originally written, which can help reflect the evolution in the resources from those available at the time and my changing and at times growing skill in using them.
There have been many interim posts on using Numbers in knit design, whether as a stand-alone or in conjunction with other programs ie Gimp.
At times I revisit topics as separate posts, or I correct or expand the information in ones previously published, true here, at the bottom of the post.
2014
On a worksheet, columns are usually standardized to accommodate approximately 9 font characters. Width and height are measured in points and units such as inches or centimeters: 1 point equals approximately 1/72 inch or 0.035 cm. The default row height is app. 13 points. In developing knitting charts smaller units of measurement are preferred. Preferences (general) may be changed from the default (inches) to cm, or the smaller unit mm, and saving.
Online conversion between units of measurement and PostScript points may be calculated (if needed) using calculators ie.
http://www.unitconversion.org/unit_converter/typography.html
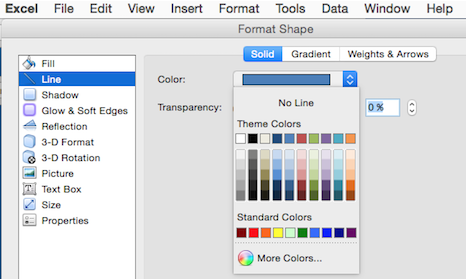
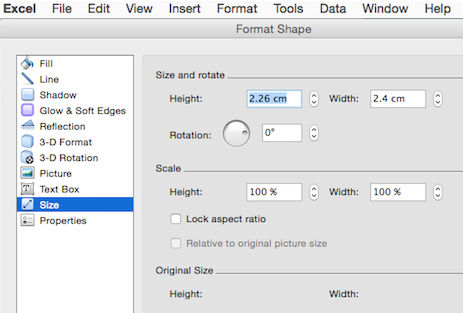
default cell measurements in mm and points When opening an Excel document, to view only one page: on the bar at the top of your spreadsheet click the View menu and then in turn choose the Customize Toolbars and Menus. The window below will appear, click on the commands tab. Scroll down to “Zoom to One Page” on the list, “click and drag” it to your toolbar, releasing your mouse button to place it using the vertical line that appears as your guide to determine its placement.
the chart toolbar with the icon (to the right of the red line, click on the image for magnification)on the standard toolbar

If the chart toolbar is in use, left-click on the arrow at the right, where Customize toolbars and menu are the second option offered; a right-click will allow you to modify toolbars as a first choice and offer the commands as an option.
Clicking on the icon now in the toolbar will show one worksheet, and adjustments may be made as follows for producing your graph paper or knit chart, clicking again will show multiple sheets once more.
Click on the diamond upper left-hand corner to select the whole sheet, now that the whole sheet is selected apply your unit choice to the whole document: place your mouse on and hold it between the cells indicated by any 2 of the letters (separator will appear), drag the boundary on the right side to define the desired width, repeat the process between any 2 numbered rows to define the height. The format menu may also be used; first, select the whole sheet, then on the home tab, click on format, and select format row height or format column width alternately to specify desired measurements The latter method may give better control over unit specs in some instances.
If the intent is to use the program as virtual graph paper on which to add color, symbols, etc one may continue editing,  and working with borders and border drawing options line thickness most suitable for printing may be selected, along with types of lines and colors. Common ratios for knitting are 4:5, and 2:3 (height to width) with stitches being usually wider than tall. Single-page workbooks to start your chart editing created in Excel to save for printing were deleted in 2024 because of failure to open in usable form in Windows 10 OS. A 2024 PDF for developing a punchcard repeat on a rectangular 4:5 grid punchcard red lines
Since this post was first written I have moved away from using Excel completely to working with Mac Numbers.
If the goal is to have graph paper that approximates stitch and row gauge, that is achievable by using Numbers with the rulers set to centimeters.
Selecting the initial document for printing by using the select all command in a variety of ways did not print the whole document for me or even recognize the content. Whether printing the whole document or part, the print area needs to be hand-selected. Click on the cell upper left where you want to begin, drag the mouse, and release on the last cell at the bottom right on which you wish to stop. The selected area will now appear colored blue and outlined by a broken line. In the file menu, choose the print area, and in turn to its right “select print area”. File print should in turn be operable now, along with a preview of the selected area to be printed. If you wish to have the graph paper as a permanent file, proceed as above, but from your printer screen select PDF, then save as

An online PDF generator for printing graph paper for knits (including shadow knitting) in 2 ratios and orientations may be found at
http://www.theknittingsite.com/knitting-graph-paper/

Previously posted links and more on using Excel for the virtual designing of knit charts and motifs
2013/10/29/charting-knits-in-excel/

Numbers 3.2.2,  updated to version 12.2.1 in December 2022
I chose to change my preference for rulers to point units (options are for centimeter inches and points)

default cell size in cm and points

Click on the table at top of your document screen, to the right of the function icon; select the first choice on the left, the second row a place to start Uncheck alternating rows on menus on the right, revise options
Click anywhere on the screen, and use the command all to select all table cells. Choose row and column size, type in your desired values, or using the arrows provided, hit return. Click anywhere on the sheet to get additional markings to appear again. With your mouse, grab and drag the _| symbol on the bottom right and you will also have the benefit of viewing the number of rows and columns in your document. Click on the circular target icon on the upper left, drag the _| symbol on the bottom right, and all units on the sheet will be resized to display measurements. For thicker, darker, or even in different colors and types of lines changes are easily made when working with the borders menus. Clicking on any cell leaves only your graph; selecting print from your file menu prints exactly what appears as the sheet number chosen, and /or saved; additional adjustment options are offered on the right

Click on the white part of your sheet, only your chart will be viewable and ready for printing. If a PDF is desired, choose Export to -> PDF from the file menu.
PUNCHCARD TEMPLATES
I had a Ravelry request for a punchcard template. In a previous 2011/12/14/more-low-tech/, I shared a method that got me in the ballpark using a Word document, for having a printable, near-scale graph. Here is an editable Excel workbook resulting in as near as I could get to printing the punch card at scale; included are beginning added markings for Brother machines that could easily be altered to suit other makes; lines at the side can serve for comments or notes.
Going about printing differently: I captured an image from my Excel template 
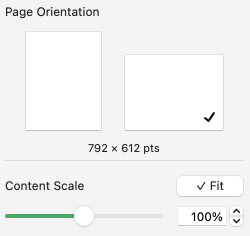
saved it, opened the image in Photoshop, adjusted the image size as below, and when printed the output was nearly dead-on in terms of size and would make tracing motifs from it onto a punchcard over a lightbox super easy 
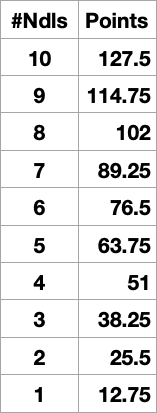
Using Numbers the closest I could get to punchcard cell size at that point was using point values, 19 for rows, 18 for columns, and printing aspect ratio remained off.
December  2022
In the initial try, the repeat used is a part of an electronic one, adjusted to a random 24-stitch segment, and it is 30 rows in height.
It is placed over a hacked lightbox of sorts, with a Brother blank punchcard taped over it to hold it in place. As can be seen, marking the card in the location of future punched holes would be fairly easy. Longer repeats may require the card to be shifted up very slightly at some point, which may work well, and avoid adjusting the original file height dimensions by very small point values and printing again.  
I have created all my numbers tables for charts up to now using the ruler units set to points. Matching the results of those experiments to a printed template for marking the card in punched hole locations was slightly off and required a bit of shifting to the card during the process.
Creating the spreadsheet using cm ruler units rather than points I came up with a template I am sharing, measuring 24 cells in width, and 60 rows in height as most standard factory-supplied blank cards.
The program will separate the design into more than one page if needed when File Print is chosen.
On the left, the 60-row table is divided into 2 sheets/pages.
The center shares the settings for the size of the table, the row and column size, and the print settings with Fit unchecked.
Punchcards design bodies are marked with a square grid. Using a ruler measuring in mm, they are fixed at 108 mm in width by 300 mm in height.
On the far right, a blank punch card is laid over the printout of page 1 of my document on an improvised lightbox, with what appeared to be accurate placement results: New downloadable documents should open with the corresponding points ruler setting unless you have already been using the program with the centimeter ruler setting. I cannot test the Exel documents.
For designing:
punchcard blank_excel
punchcard blank_numbers
I have had consistent success in maintaining the aspect ratio with ruler units set to centimeters, 2024, Numbers 13.2 :
punchcard-blank 35 09  meets the maximum content of 44 rows
print-card 60 rows will split the card into 2 default segments, the template is editable if operating in a later Mac OS, these options will be offered when the numbers spreadsheets are first opened print card_Excel
A PDF: punchcard-blank 35. To print to scale using Acrobat Reader, select:  Changing rulers in Numbers, from the program’s manual: Added info and results in the post Numbers and GIMP: online punchcard patterns to electronics 2 7/21

CUSTOM NEEDLE TAPES may be used as guides to track actions such as sequences in short rows or hooking up stitches (standard KM needles are 4.5mm apart). My color printer is defunct, so this is the grey version. Color coding or notes may be easily added to blocks for more complex fabric manipulations. A reference for some conversions of mm to points based on needle spacing, each 4.5 mm unit = 12.75 points, rulers may be set to centimeters, see the bottom of the post.  Print the results at 100% in landscape orientation with fit checked Some tables to test, editable to suit your needs. Keep in mind the size of the print area in the document is indicated immediately beneath the page orientation illustration, in points.
tapes_numbers
The last table in the document is designed for use on 35 stitches arranged in mixed-width segments. It has been printed and is shown here on the machine, placed under a random needle group, with corresponding needle selections in and out of work. The topic was revisited here. A variety of printable tapes for multiple gauge knitting machines is offered by Claudia Scarpa in her blog post.
Working in cm, taking into account that needles are 4.5 mm, 0.45cm apart eliminated the conversion to points.
The program alters a couple of the values for the width of the table cells slightly, as seen here for 1-10 cm needle spacings To maximize the available printing space, under print setup change all margin values from any preset default to 0.54 Although the print setup shows page numbers in cm, the page orientation measures are given in mm, the width in landscape orientation is 279mm=27.9cm, with 26.8mm available drawing space when page margins are set to 0.54  The 2.26 mm cell unit tape in place on the machine  2024
To change rulers in Numbers 13.2 to Centimeter setting, and avoid the need for any conversions to points from the Numbers Menu at the top of the screen Choose Numbers >Settings then click rulers at the top of the settings window. Click the Ruler Units from the pop-up menu, then choose an increment, in this case, centimeters.  The math in calculating table cell size is simple. This export is a revised copy for use in Numbers 09 using cm rulers: needle-tapes-only.
The later versions appear to ask if you wish to upgrade the document.
The file created in version 13.2:
needle tapes only_numbers 2


Miters and spirals: visualizing, charting (and more) 3

SPLITTING THINGS UP leads to a series of quite different fabrics, sometimes creating interesting secondary solid color shapes when striping is added to any of the forms; repeats will need editing to avoid extra rows to keep the designs balanced, or have them added across their width for extending shapes, such as in creating ruffled effects. I have worked on these charts using Numbers, image capture, and resizing and editing again in photoshop if needed. The images below are not intended as a “sit and knit” tutorial, but rather as a start for creating your own designs, on the desired number of stitches, I randomly picked 22

some possibilities on method: SPIRAL original shape

splitting in 2 parts

changing positions and stacking, all knit row edited to bottom of repeat

a mirrored segment

added to first repeat, center line double row edited out for knitting

MITER: original repeat

split repeat

moving parts around

areas for adding plain knit rows in desired numbers across the knit (yellow), keeping in mind how this will affect color changing sequences if striping is used to create secondary patterns; repeat usable for machines with color changer on right

mirroring the whole repeat horizontally for use with color changer on left

Changing colors at regular intervals including every 2 rows will yield secondary, geometric patterns; all knit rows may be added to the right or left of the shapes maintaining color changes, for different effects; if these are planned in extended “white areas”, the holding sequence needs to be maintained every other row; slip stitch setting may be used to automate, with repeats reworked for use on 24 stitch punchcard machines. I find when exploring any of this initially, working repeats as hand techniques helps me understand necessary sequences and editing before committing to punching holes, filling mylar squares, or programming pixels. Swatches and notes, swatches, and notes…

Miters and spirals: visualizing, charting (and more) 2

Visualizing the shapes (using charts in Mac Numbers)
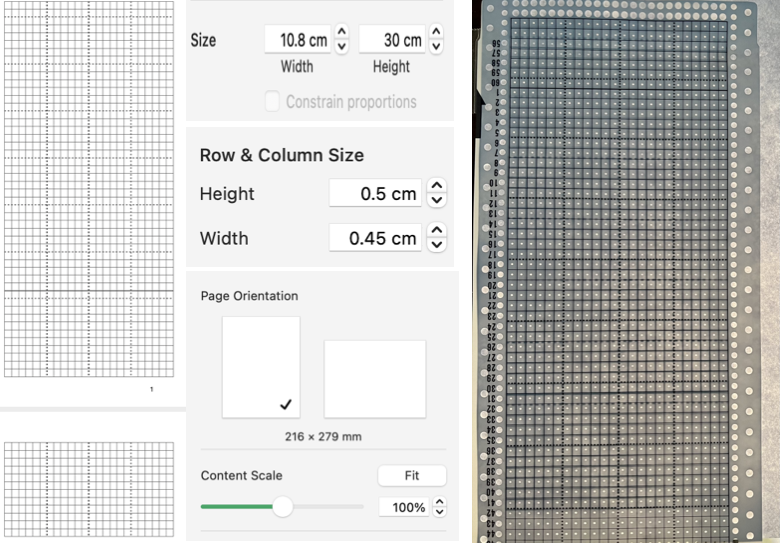
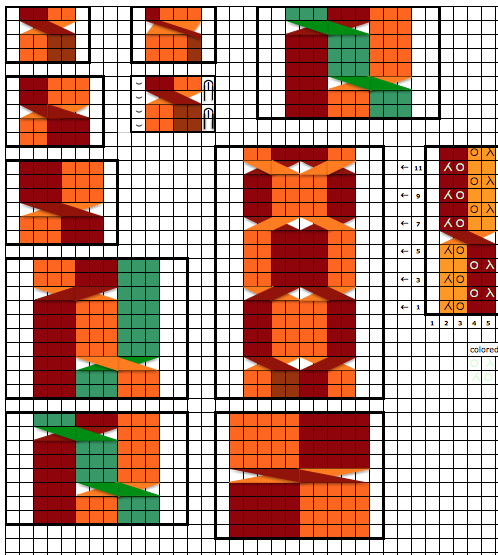
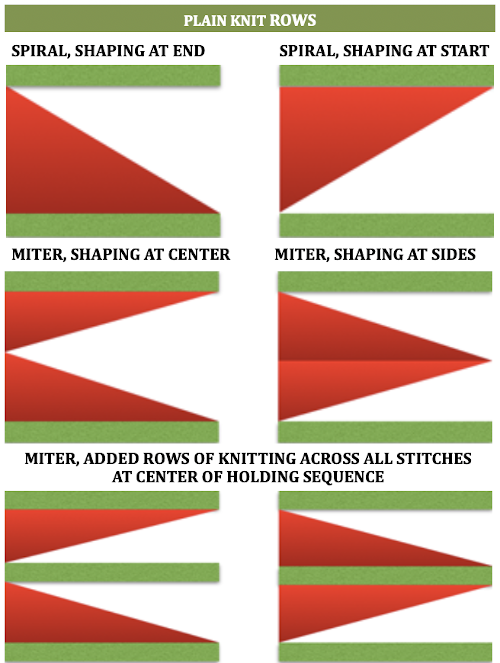
A spiral gore is the first or second half of a miter gore, conversely, a miter gore has 2 consecutive spiral gores, knit in a mirror image. GOING ROUND: numbers 1-12 represent knitting sequence for wedges, thicker lines at segment edges = rows across knit width at end of each sequence, 2 rows or many more depending on planned design shape

Previous posts on related topics:
2011/06/18/knitting-math-and-pies1/
2011/06/24/taking-it-to-a-garment/
2011/03/29/the-doilies/
2013/12/28/short-rows_-balls-tams-3d-rounds/