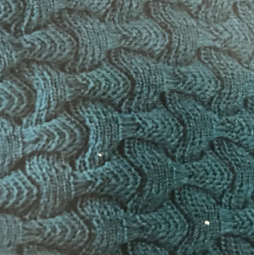
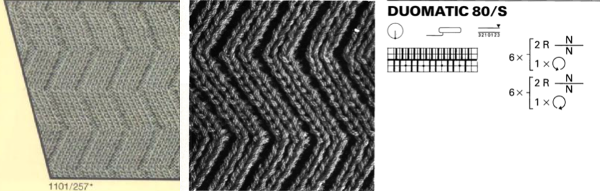
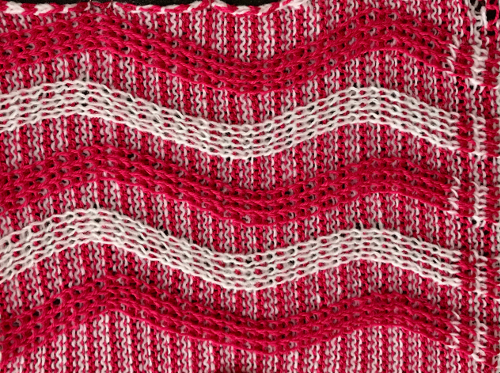
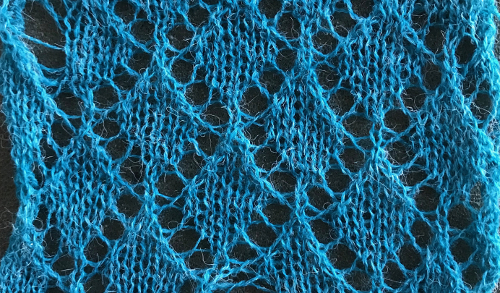
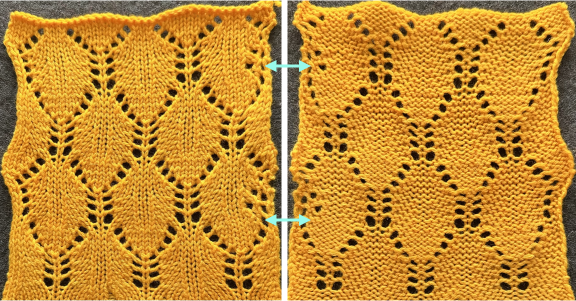
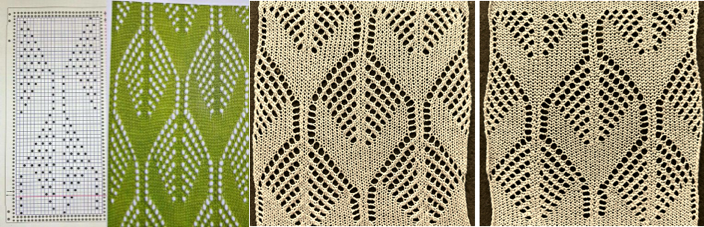
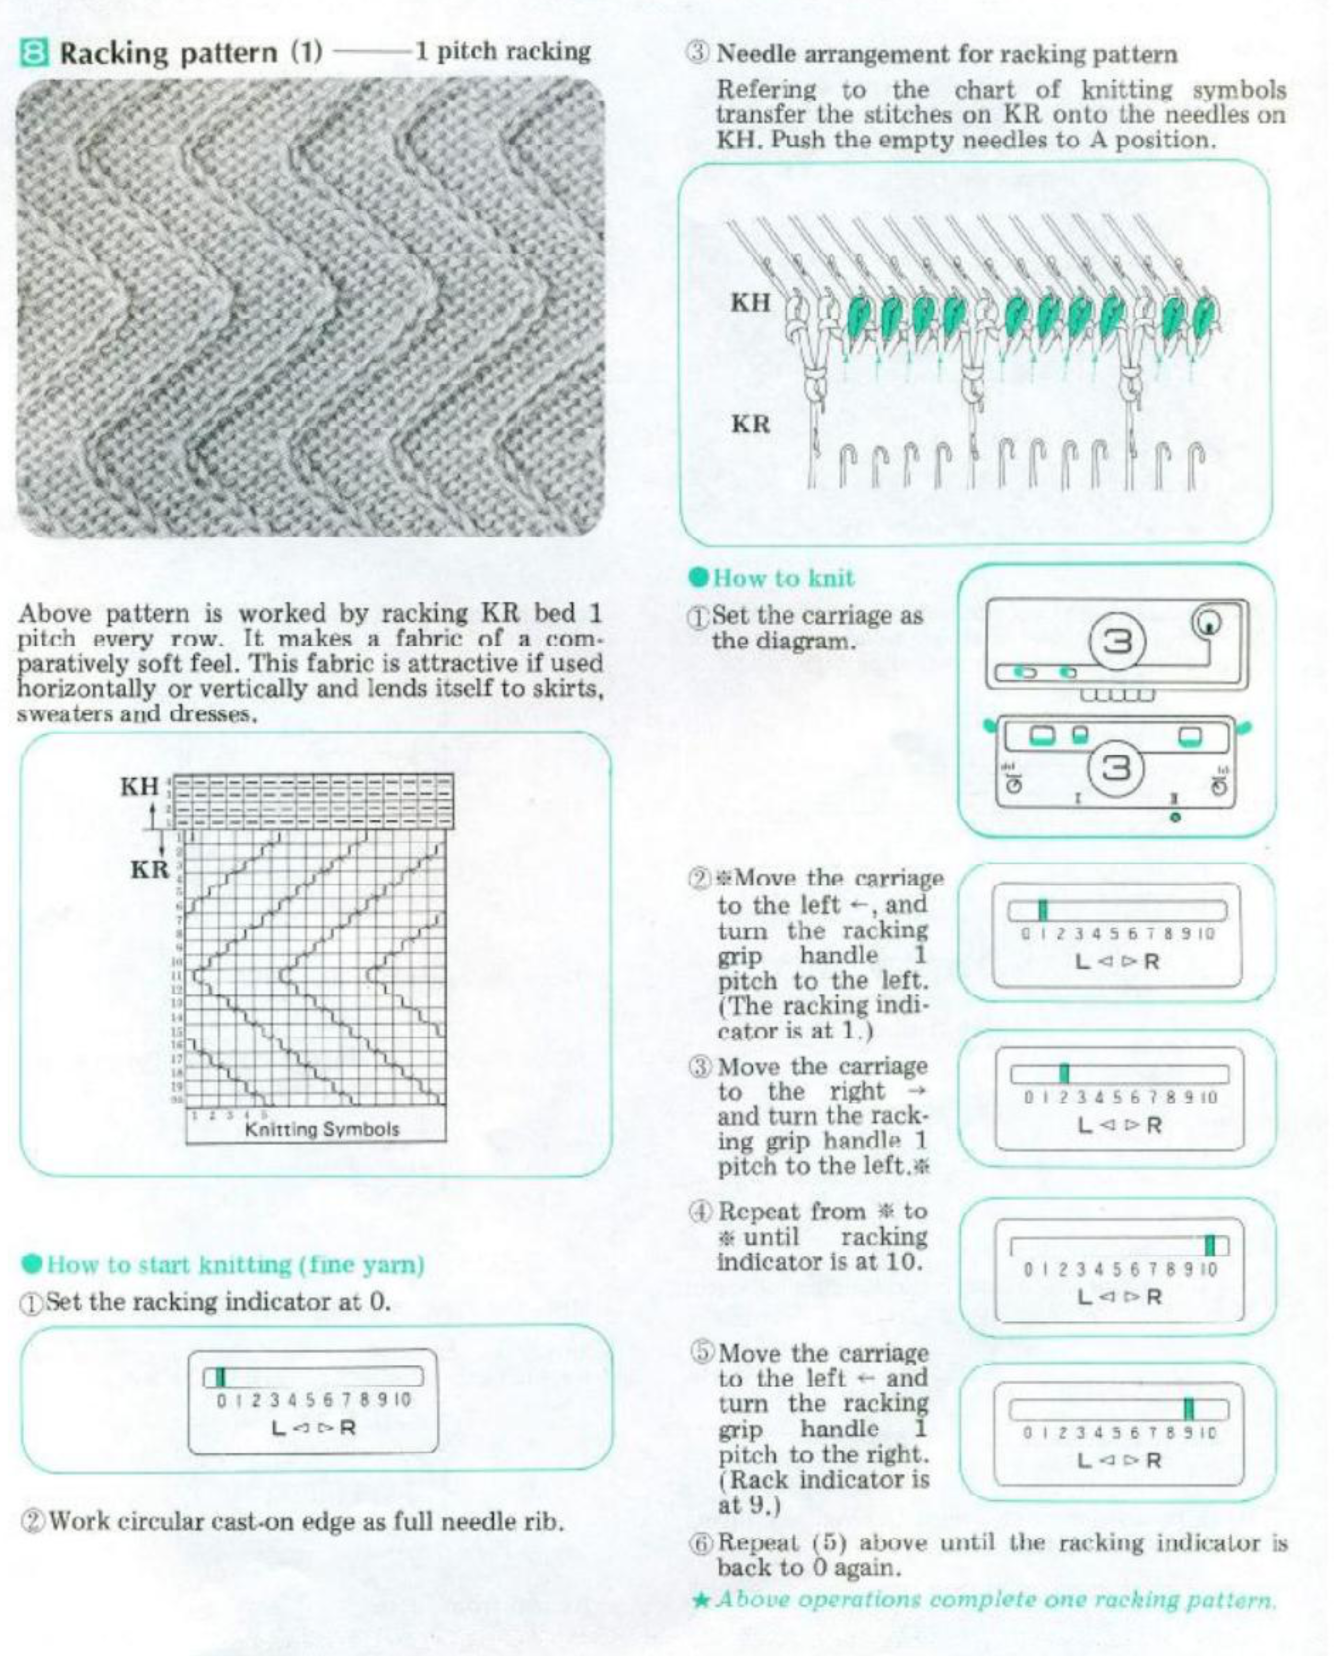
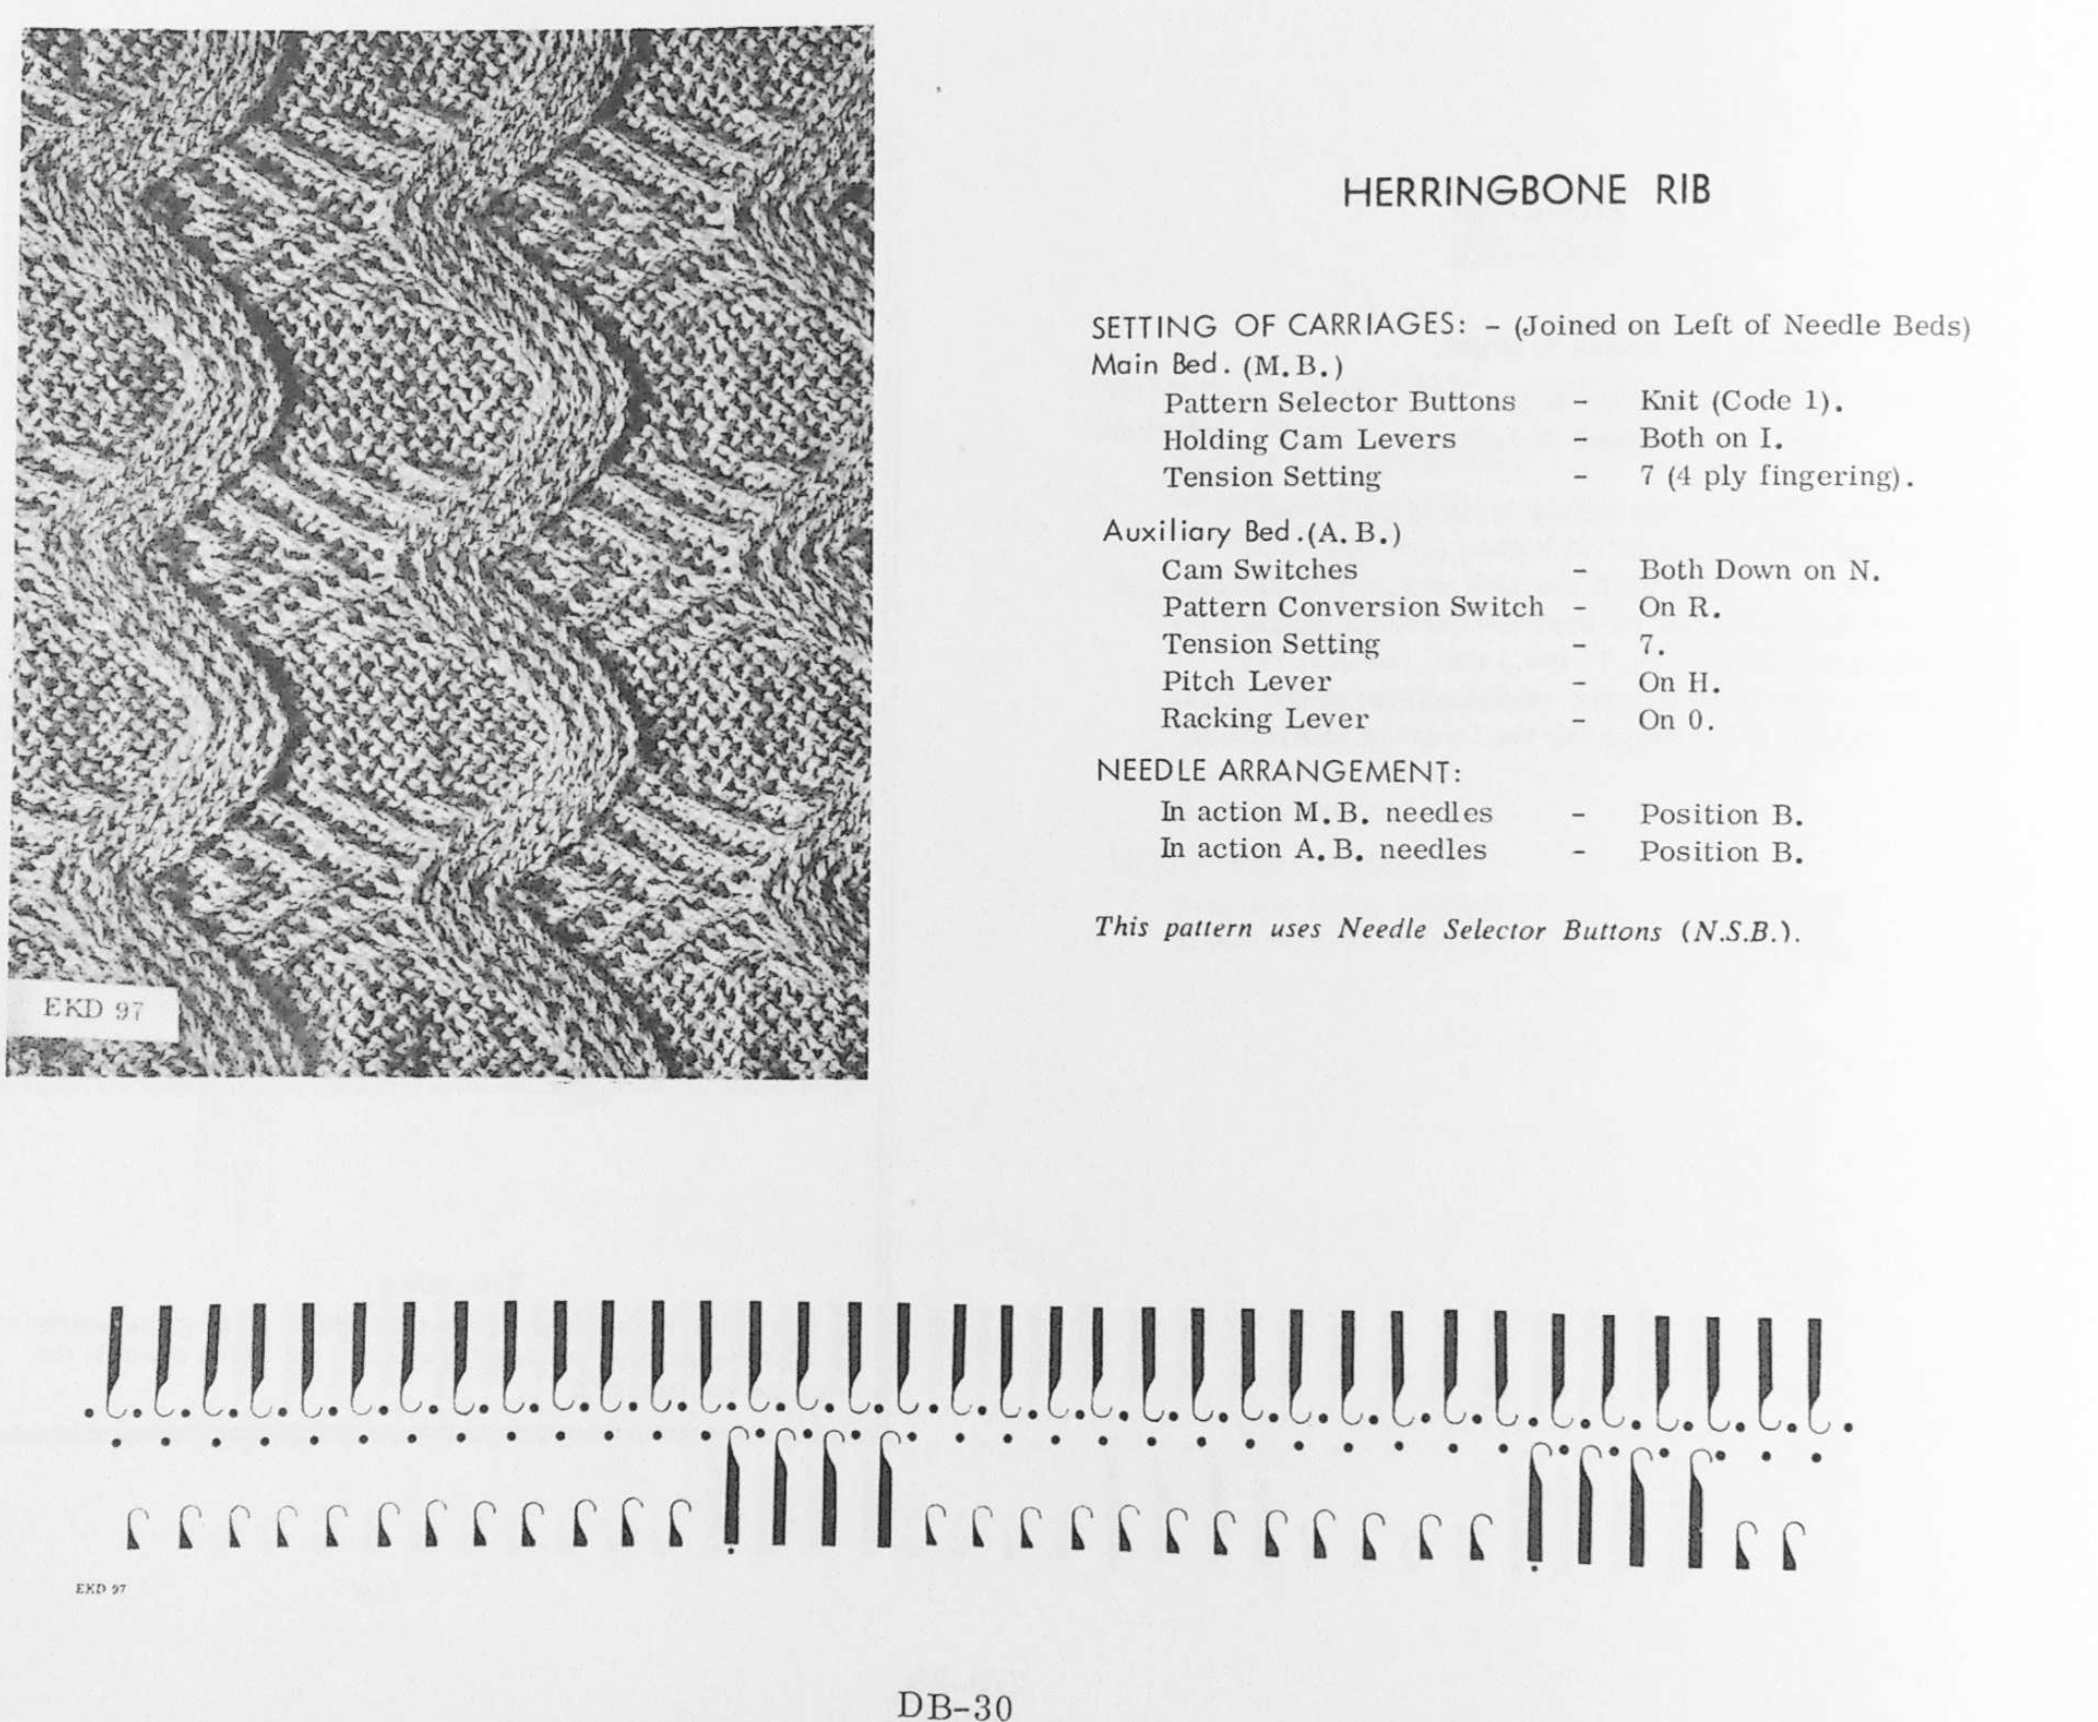
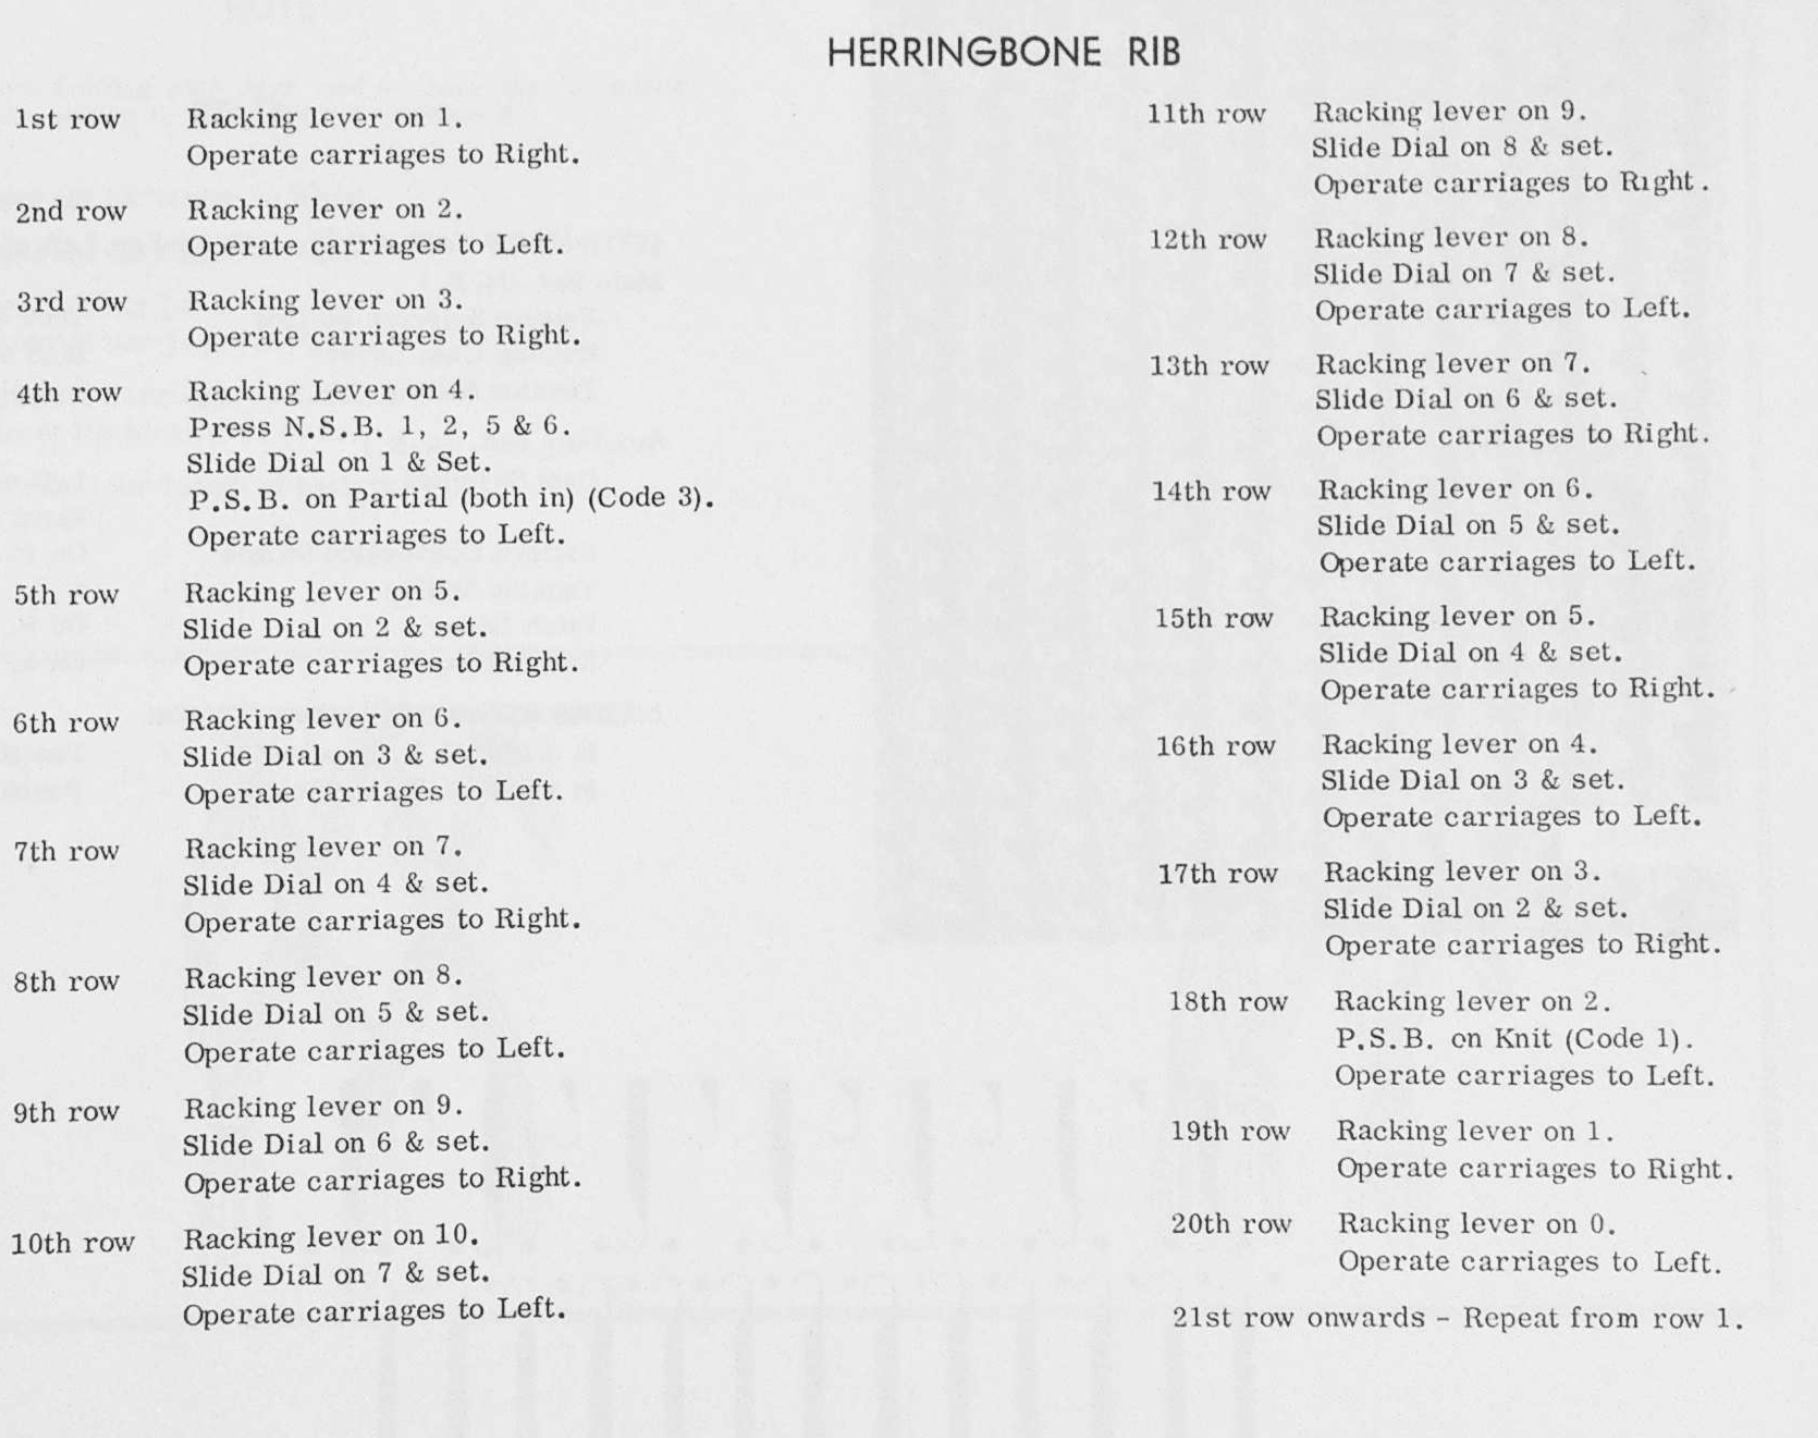
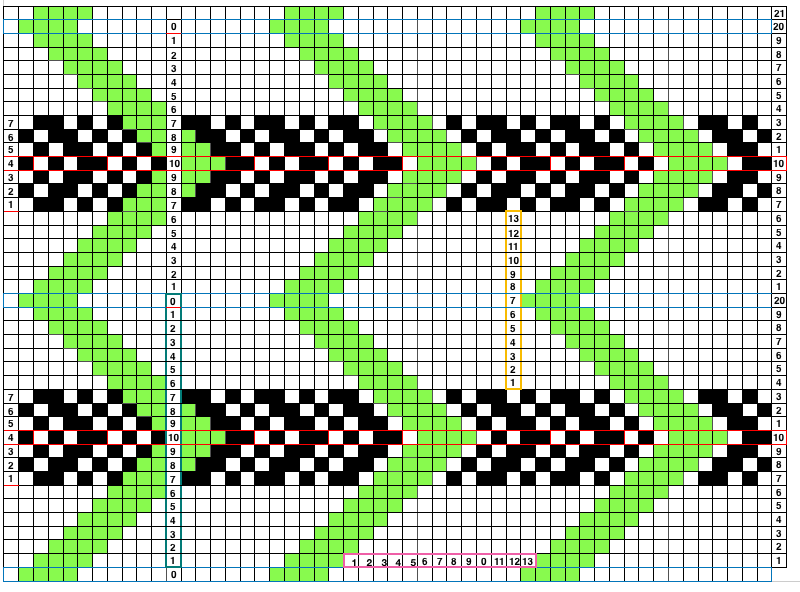
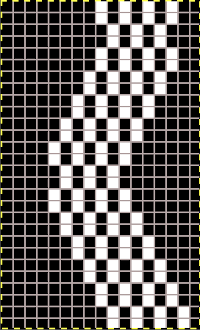
There has been a resurgence of interest in this stitch in the FB machine knitting group and discussion exploring a variety of methods for creating it. The inspiration, taken from a commercial sweater-knit: 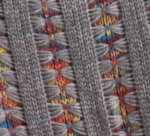 For some single-color variations see Bowknot/ Butterfly stitch on the machine and No longer a mystery pattern.
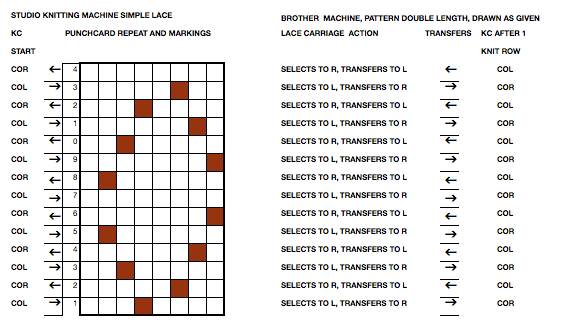
I program repeats whenever possible, and find it useful in eliminating errors, particularly in longer pieces. My first experiments for this fabric were conducted using the fair isle setting, which is essentially a slip stitch automatically working 2 colors with each pass of the knit carriage single bed.
Slip stitch patterns with hand-transferred stitches, single bed explores some of the methods for bringing slip stitch floats to the knit side of these fabrics, which is part of the hand techniques necessary to achieve the colored versions. As with any knit fabric yarn qualities, color contrasts, and tolerance for proper stitch formation are all variables.
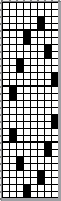
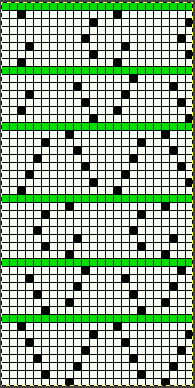
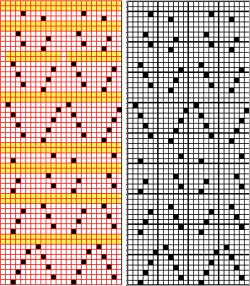
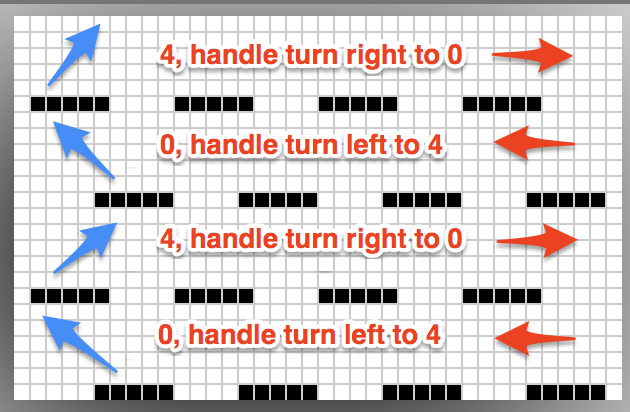
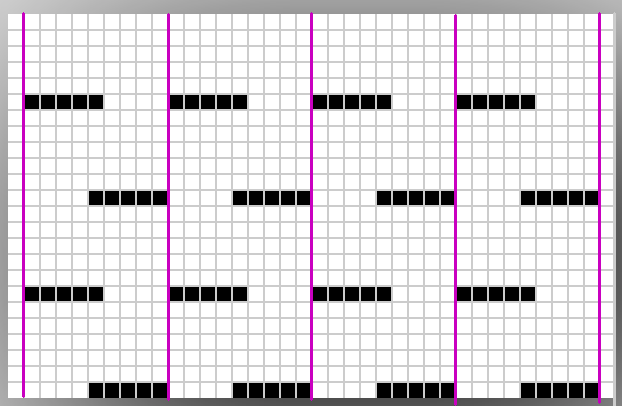
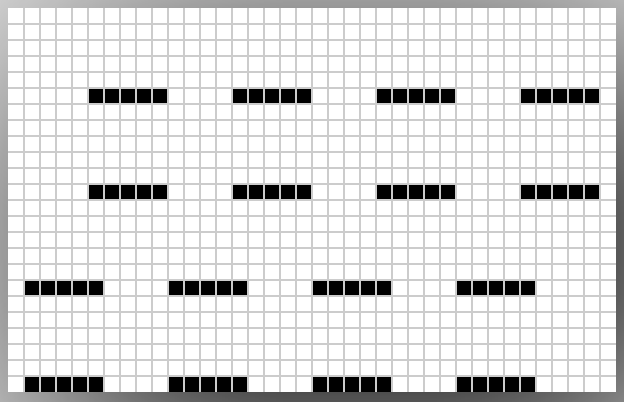
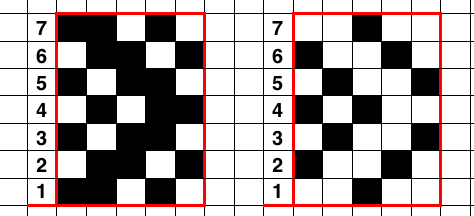
For vertical columns in 2 colors, it is only necessary to program a single, fixed row with a punchcard or electronic, or choose any pixel-based repeat akin to this with full pairs of alternating stripes. I like to plan with selected needles at each end of the sample 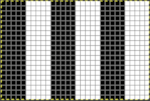
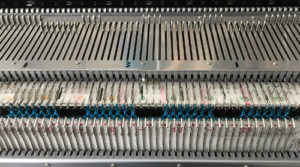
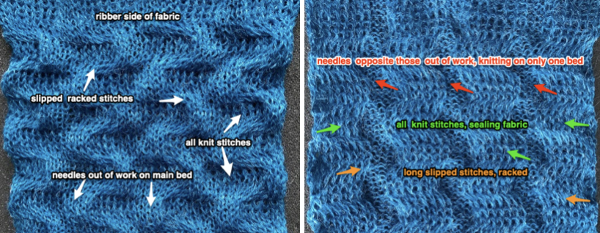
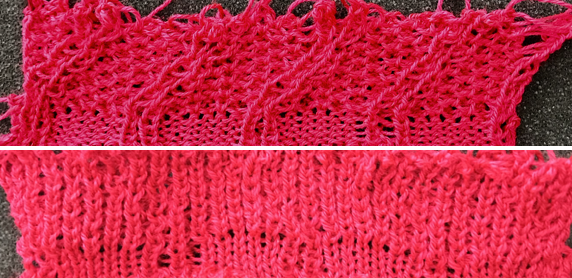
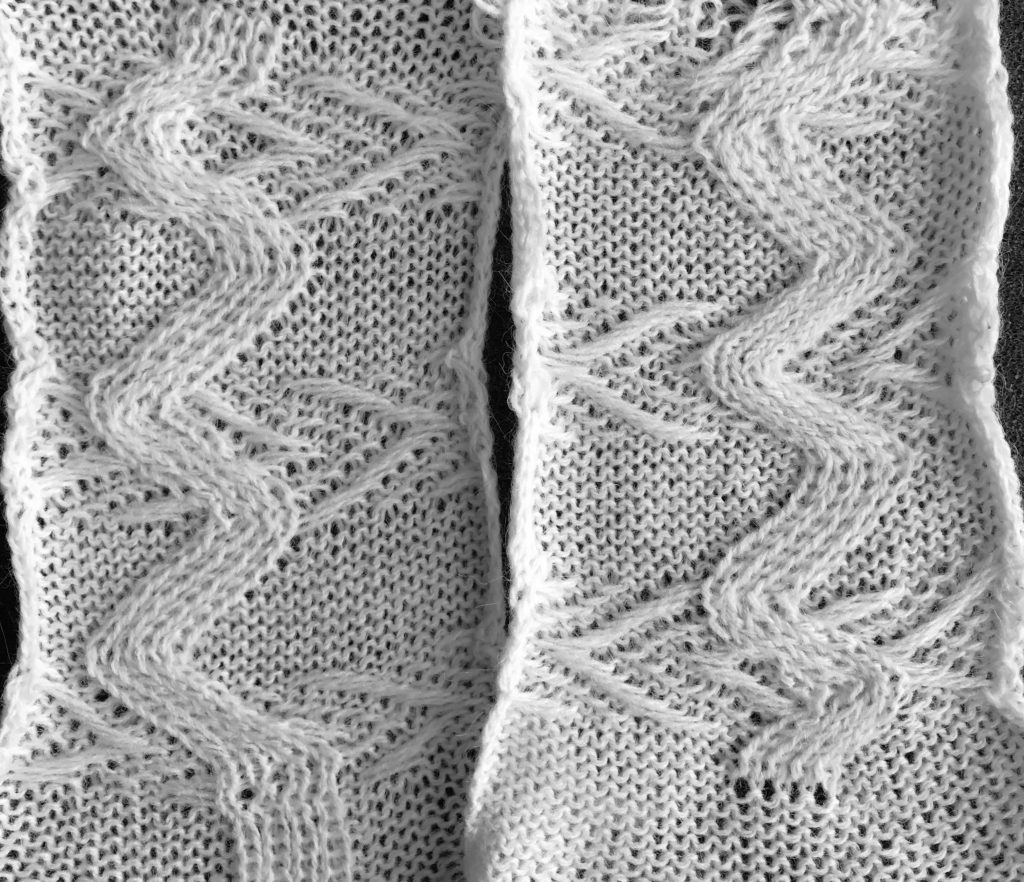
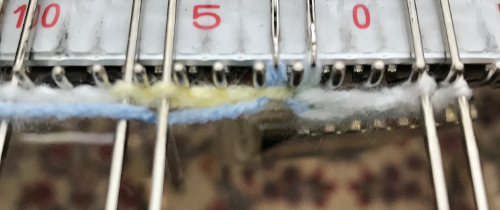
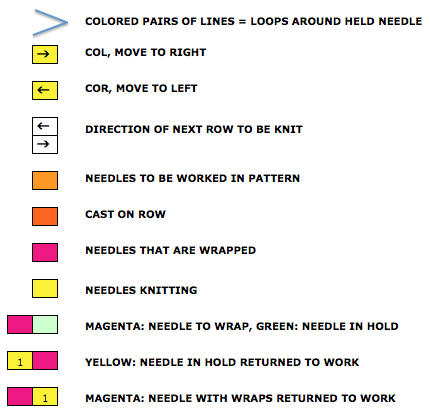
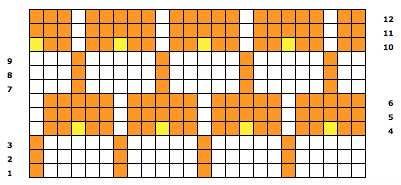
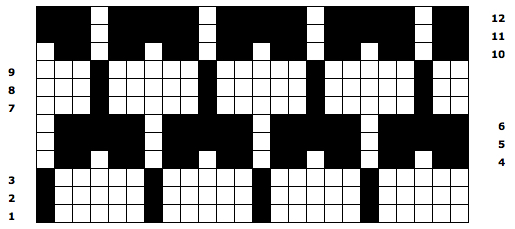
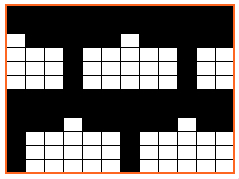
![]() With the machine set to FI, needles not selected will knit a ground color, while selected needles will knit the color in the B feeder. It is easier to manipulate the slip stitch floats from purl to knit side if working in the non-selected groups of needles. Having the columns in odd numbers of stitches makes it easier to handle steps that require finding the center needle in each group if one is wanting to maintain symmetry. In my first test, I manipulated only the selected groups of needles to work the float movements, leaving the floats from the other color undisturbed, which makes the process far more convoluted than it needs to be. In this and the subsequent sample, I manipulated the left and right-hand pairs of floats moving them to the front of the knit, leaving the choice of what to do with the remaining center floats. In A they were brought up on top of the center needle in E position before knitting the next row. In B they are lifted into the hook of the needle and brought out to the B position so that the stitch is knit in color 1, while in C the remaining single stitch floats are simply left alone. In a couple of spots the yarn split, getting hooked up creating bleed-through, and what would result in an issue if that happened on the group of floats that were to be moved.
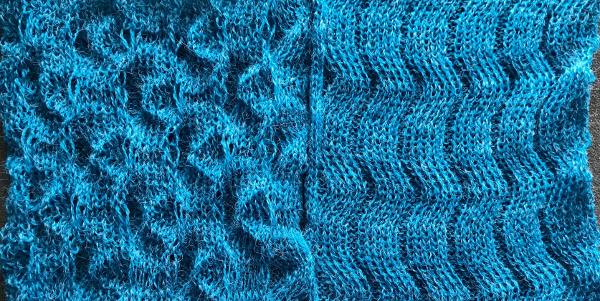
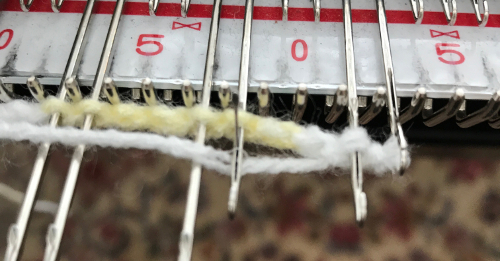
With the machine set to FI, needles not selected will knit a ground color, while selected needles will knit the color in the B feeder. It is easier to manipulate the slip stitch floats from purl to knit side if working in the non-selected groups of needles. Having the columns in odd numbers of stitches makes it easier to handle steps that require finding the center needle in each group if one is wanting to maintain symmetry. In my first test, I manipulated only the selected groups of needles to work the float movements, leaving the floats from the other color undisturbed, which makes the process far more convoluted than it needs to be. In this and the subsequent sample, I manipulated the left and right-hand pairs of floats moving them to the front of the knit, leaving the choice of what to do with the remaining center floats. In A they were brought up on top of the center needle in E position before knitting the next row. In B they are lifted into the hook of the needle and brought out to the B position so that the stitch is knit in color 1, while in C the remaining single stitch floats are simply left alone. In a couple of spots the yarn split, getting hooked up creating bleed-through, and what would result in an issue if that happened on the group of floats that were to be moved. 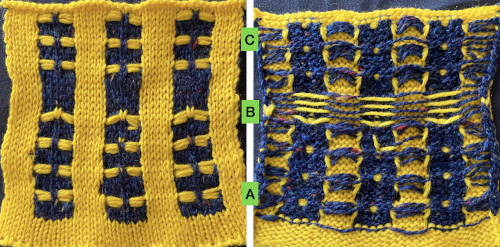 As stated, the process is easier and quicker working on non-selected groups. Above, the yellow yarn was thicker than the blue. To maintain proper color selection in the non-selected column, the center needle needs to remain in the B position, with the slipped stitch forming floats below it before the next row knits. If the needle is brought out to E, it will knit in the contrast color, forming floats in that color on the purl side, and a knit stitch in what was planned as an all-solid column on the knit. The results are seen at the top of the first sequence in the swatch. I chose to limit my number of floats to 4 to keep the process manageable, moved stitches on the left of the center needle to the front of the knit, and then followed with those to its right. One of the many things to explore in hand technique fabrics is finding a way to handle tools that may be more comfortable than others, practicing on single blocks of color first can help establish that. Below both yarns are equal in weight and thinner. The floats formed by the color in the B feeder are also hooked up on the center needle in each vertical group in that color, forming a pattern on the purl side as well.
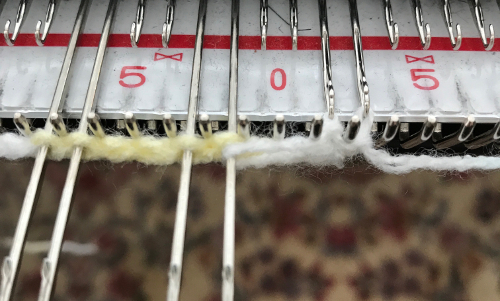
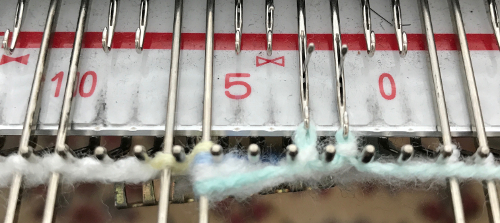
 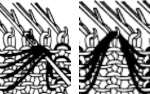 The needle position for selection for B feeder yarn also needs to be maintained. Bringing the needle out to E ensures it will knit on the next pass. In both of my tests, the slip stitch floats on the knit side lie more horizontally than the lifted-up floats on the purl.
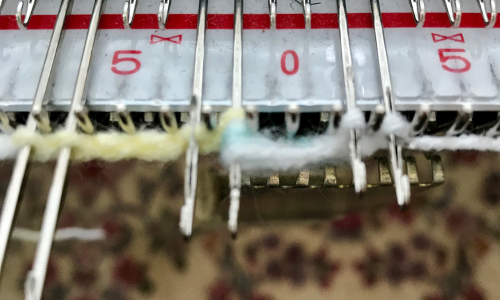
 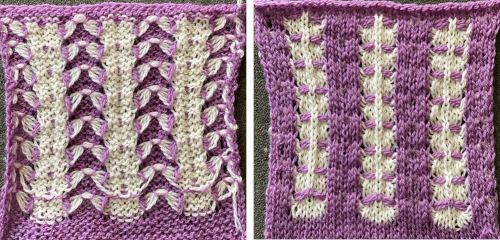 Other ways of working the fabric, along with a history of the FB thread offered by Claudia Scarpa including a single bed slip stitch version with an English downloadable PDF http://ratatatata.it/dragonfly/.
Her youtube video illustrates a different way of managing floats than mine.
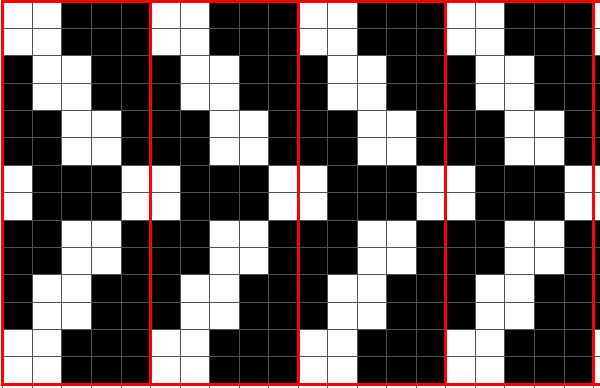
JuliKnit offers 2 videos knit on Silver Reed 1, and 2. Both are knit using the ribber, the first method uses holding to gather loops on each of the beds, and the second begins to address automation for needle selection on the top bed using DAK, with the selection on the ribber remaining manual. The stitch illustrations generated in DK offer knit stitch simulations such as these  Executing her versions on a Brother machine requires some interpretation. The fabric is constructed using the ribber in conjunction with the main bed. The vertical columns are 5 stitches wide.
Colors are worked one at a time. If a color changer is to be used, an even number of rows would be required for each pattern segment. For 4 floats followed by an all-knit row, the repeat would be 5 rows high, so one consideration would be operating with the second color from the right, requiring free passes. Studio machines release the top of the knit carriage at an angle from the bottom, so that explains the move seen in the video for the carriage to be moved to the right. Brother machines use the slip stitch setting in either or both directions, to achieve that. Using both buttons avoids any confusion. All needles in use must be in the B position for the “free pass” to avoid dropped stitches. The number of rows gets adjusted in the videos eventually to 6.
When working on the top bed, the ribber is set to slip both ways.
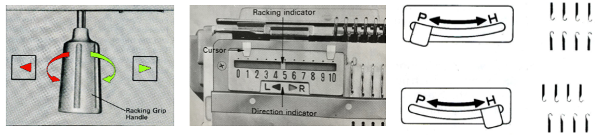
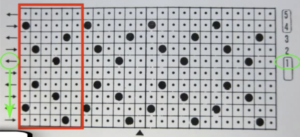
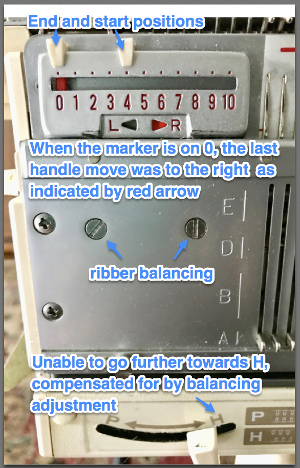
For those unfamiliar with Studio settings a brief review: the Studio SRP60N ribber introduced the option for knitting emulating the lili selection in Brother.  The grey plastic piece on the left of the studio ribber, the autoset lever, when cleared would essentially duplicate setting Brother levers to slip manually in both directions, clearing it again would return it to knit.
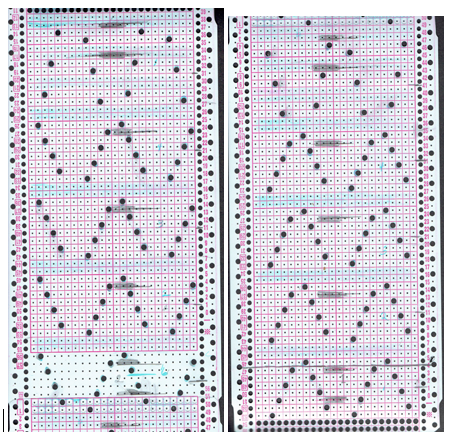
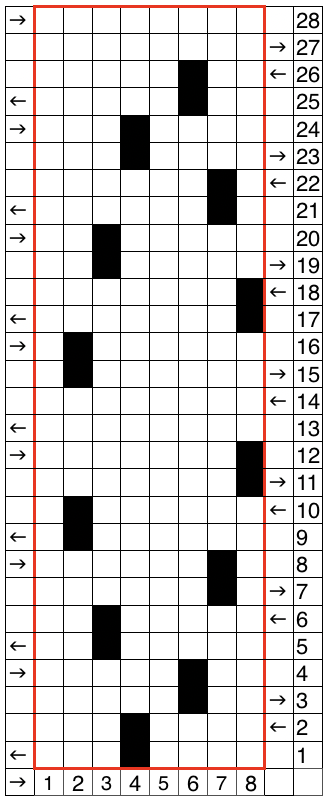
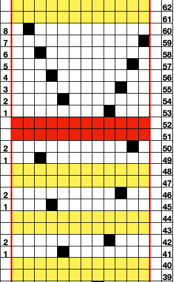
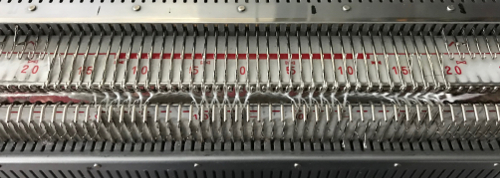
 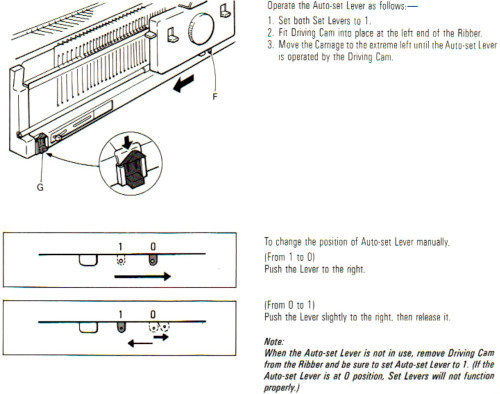 Cast on either EON or EN rib. Transfer needles in a 5X5 rib beginning and ending with a single needle in work on the ribber on the far left and right, setting up the initial needle arrangement for the fabric. Black dots represent needles in work on both beds, and the red ones the initial needles that will be worked in the holding position on the top bed.
 ![]() The video knits each color for an even number of rows. Bring the first and last needle into work on the ribber before knitting each row. The remaining stitches are knit only on the main bed. The knit carriage is set to knit, the ribber to slip in both directions. Pick up the chosen color on the left, and knit for an odd number of rows, when the carriages are on the right, push held needles back to work position so they will knit on the pass back to the color changer. The ribber knits the next color. A review of the Brother ribber carriage for those not familiar with it
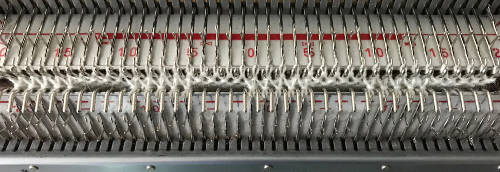
The video knits each color for an even number of rows. Bring the first and last needle into work on the ribber before knitting each row. The remaining stitches are knit only on the main bed. The knit carriage is set to knit, the ribber to slip in both directions. Pick up the chosen color on the left, and knit for an odd number of rows, when the carriages are on the right, push held needles back to work position so they will knit on the pass back to the color changer. The ribber knits the next color. A review of the Brother ribber carriage for those not familiar with it 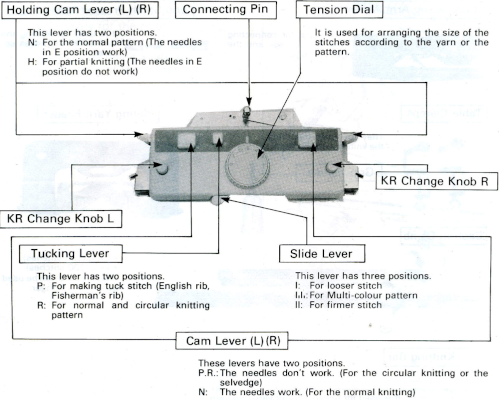 COL: the main bed will now slip in both directions, set it accordingly. The ribber only knits. The center needle on the top bed that held the butterflies is transferred down to the ribber, illustrated in the red dots over black ones. The center needles in the blank areas on the ribber, blue dots, are brought up to hold, the ribber levers are set to knit in both directions, holding levers are set to hold in both directions as well,
 ![]() knit for an odd number of rows, with carriages on the right, push held needles back to work position so they will knit on the pass back to the color changer. COL: the knit carriage changes back to knit settings, and the ribber slip setting in both directions is restored. The center stitches that formed ribber butterflies are transferred up to the top bed, and needles at the center of the blank areas on the top bed are brought out to hold. The color is changed, and the process begins again.
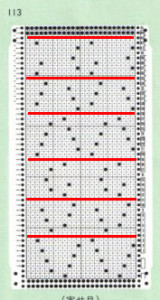
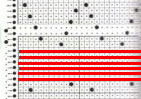
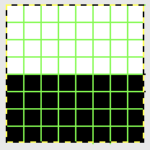
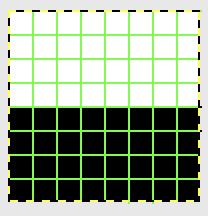
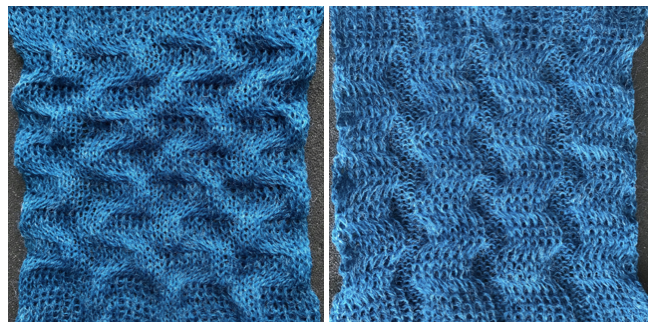
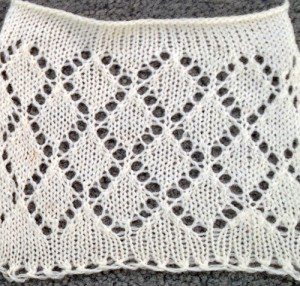
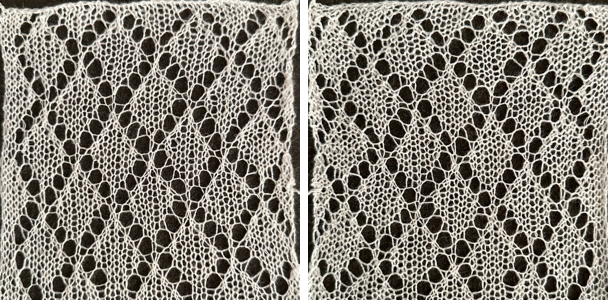
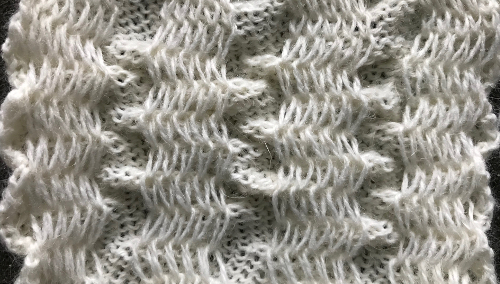
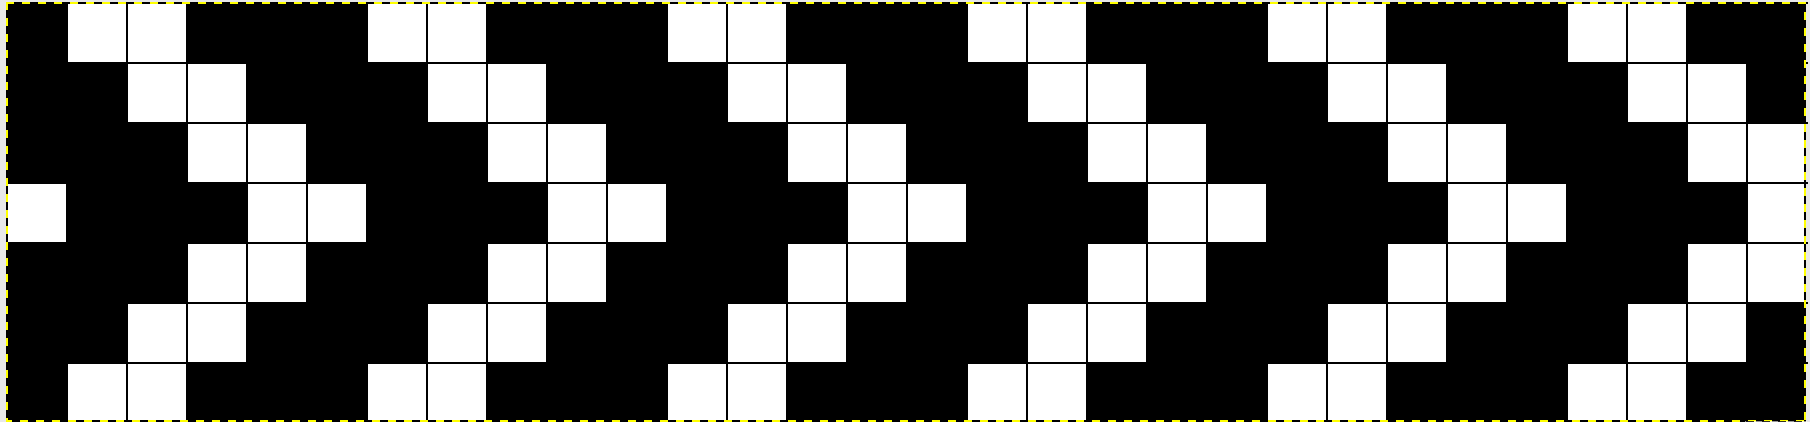
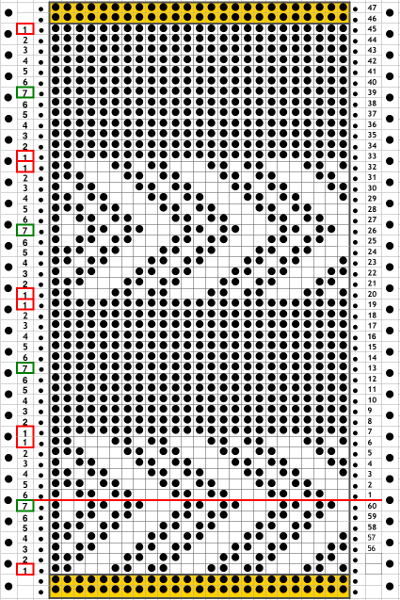
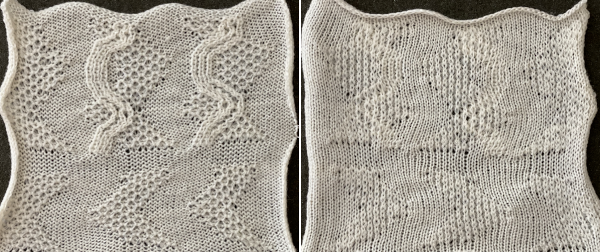
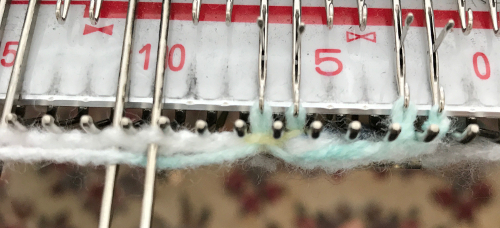
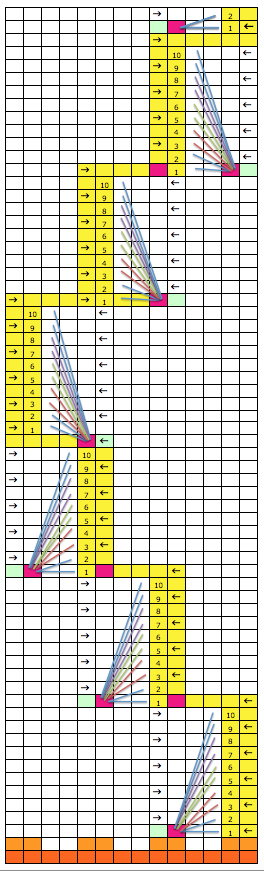
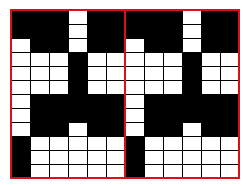
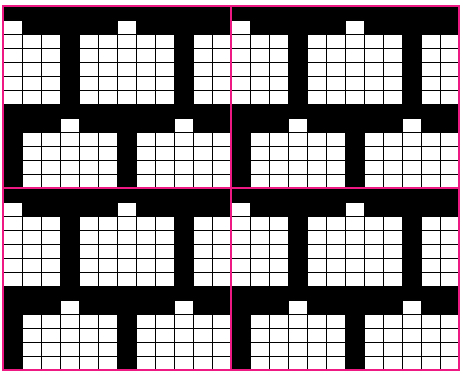
knit for an odd number of rows, with carriages on the right, push held needles back to work position so they will knit on the pass back to the color changer. COL: the knit carriage changes back to knit settings, and the ribber slip setting in both directions is restored. The center stitches that formed ribber butterflies are transferred up to the top bed, and needles at the center of the blank areas on the top bed are brought out to hold. The color is changed, and the process begins again. ![]() My first efforts were met with dropped stitches after a few rows and expletives. My second effort fared no better, I simply could not avoid dropped stitches on either bed, perhaps because of my yarn choice and the small tension it required. Working on the single bed once more, using the slip stitch setting and knitting one color at a time, I achieved a fabric more similar to the original photograph. The chart reflects the number of needles in my test swatch, with a 2 knit stitch border added on each side
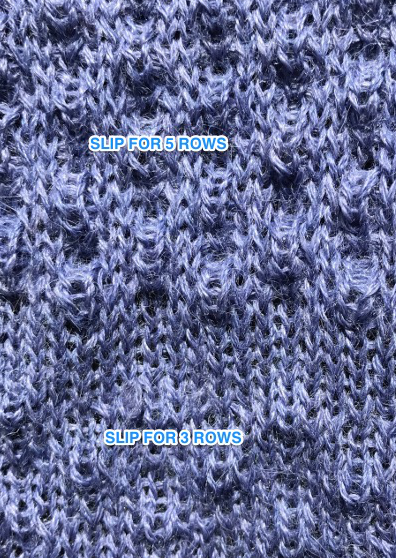
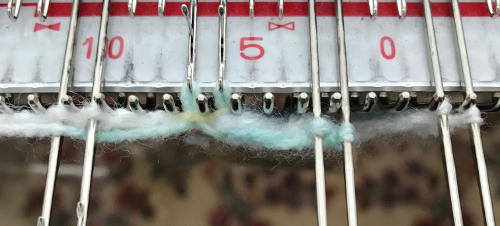
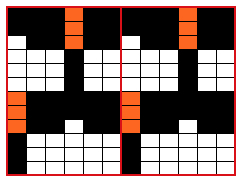
My first efforts were met with dropped stitches after a few rows and expletives. My second effort fared no better, I simply could not avoid dropped stitches on either bed, perhaps because of my yarn choice and the small tension it required. Working on the single bed once more, using the slip stitch setting and knitting one color at a time, I achieved a fabric more similar to the original photograph. The chart reflects the number of needles in my test swatch, with a 2 knit stitch border added on each side  Each color knits for 4 rows. At the end of each 4-row sequence, the non-selected needles allow for manipulation of the floats.
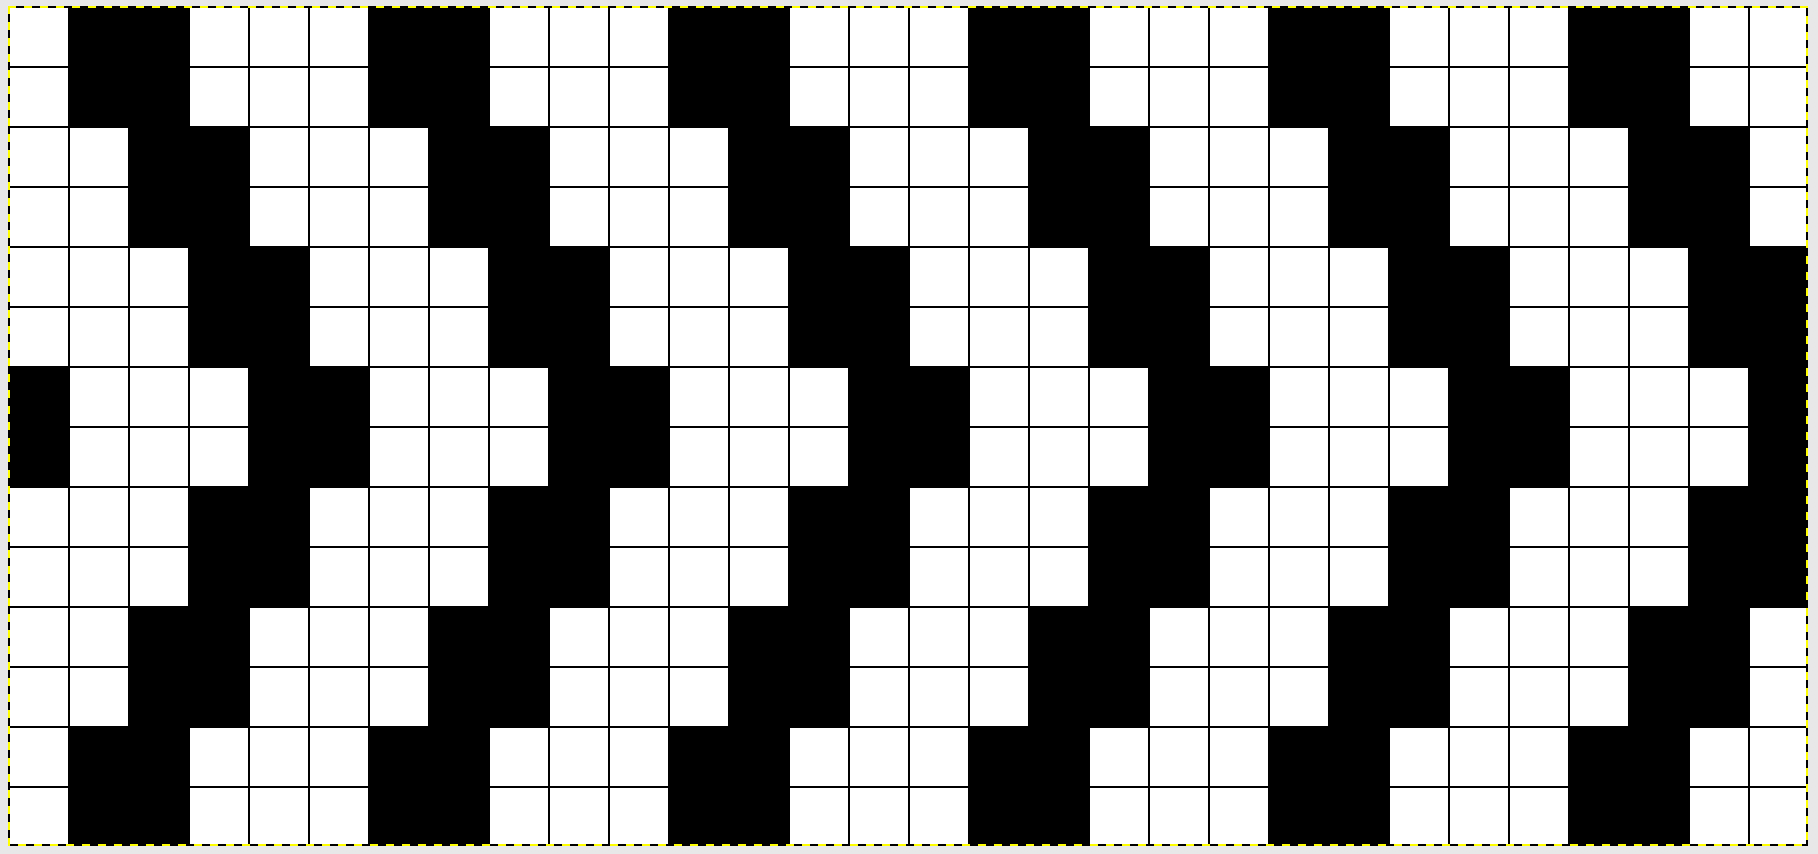
 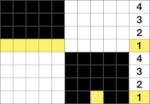 The transfers in the piece begin on row 5. Before the next row is knit in the alternate color, the slip stitch floats are reconfigured, bringing stitches 1 and 2, 4 and 5 in each group to the knit side of the fabric, leaving the center floats undisturbed.
 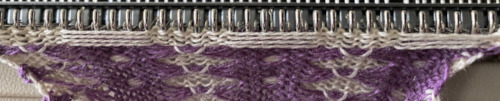 Bring the whole group out to the E position so they will form knit stitches with the first row of contrast as the carriage moves to the right.
  Knit 4 rows. The carriage will once again be on the left unless 2 carriages are in use from opposite sides. The center needle in each group of 5 will be left unselected.
  Lift floats up onto that center needle, and bring it out to E position so that it will form a knit stitch in the next color to be used.
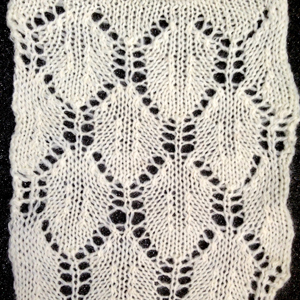
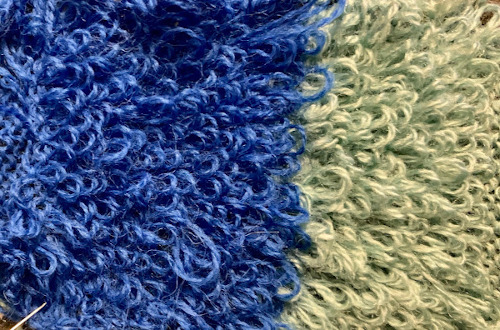
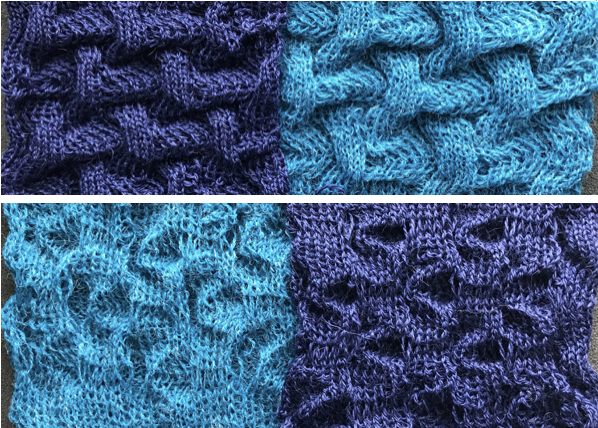
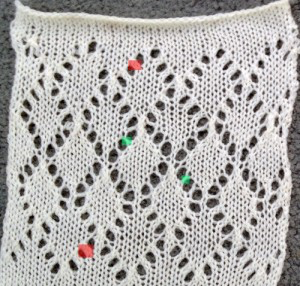
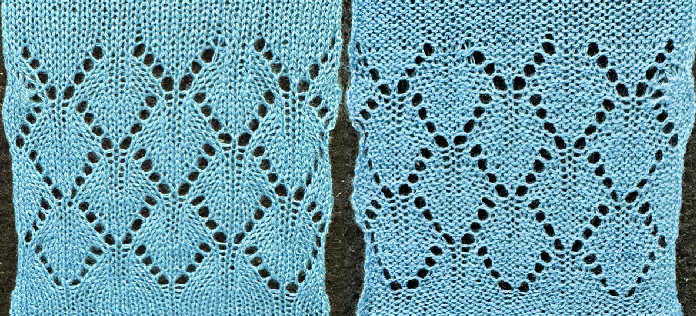
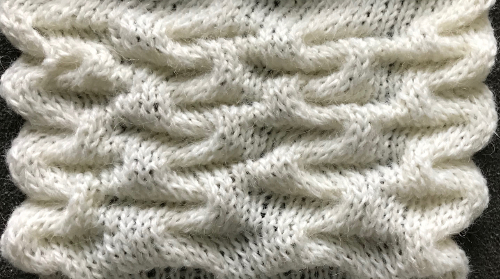
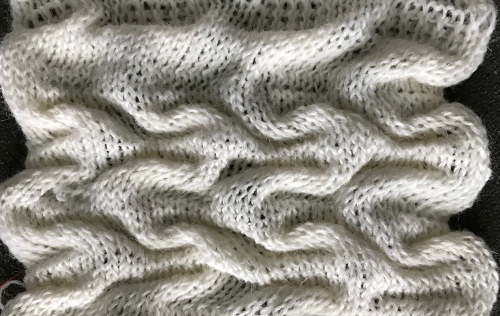
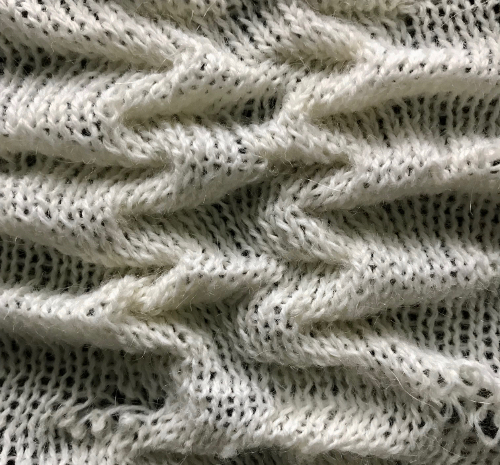
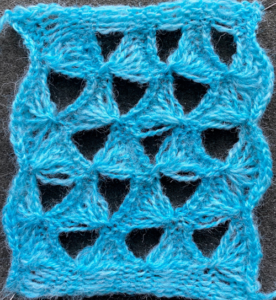
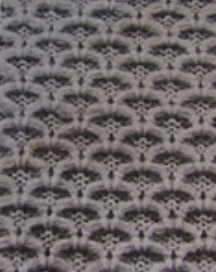
  The final result is closer to the original
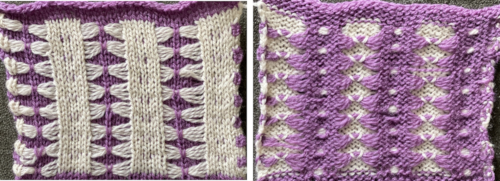
 Alternative settings for one color pile: Tech 256, back lock FX and both arrow keys, pushers one up, one down, front bed to LX, drop stitches every 2 rows.
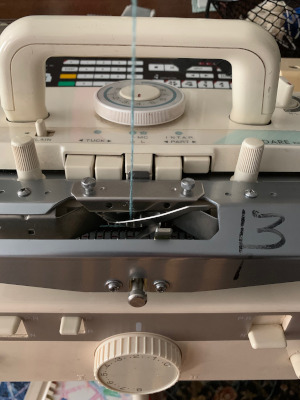 the loops, formed on every needle on both beds with the move to the left
 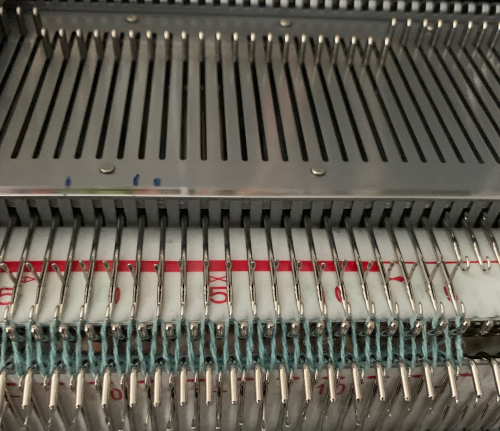 anchored in place on the ribber needles as the only the ribber knits as it returns to the right
 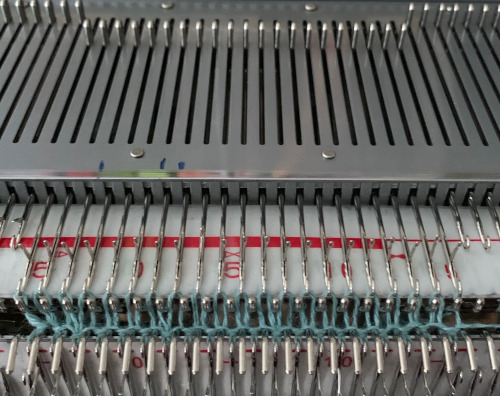 while the carriage is on the right, drop all stitches on the main bed,
 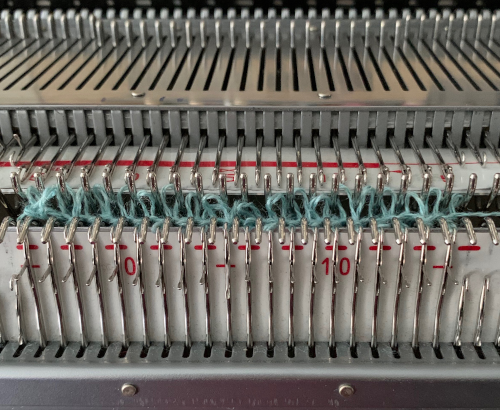 making certain no loops are stuck on gate pegs on the main bed,
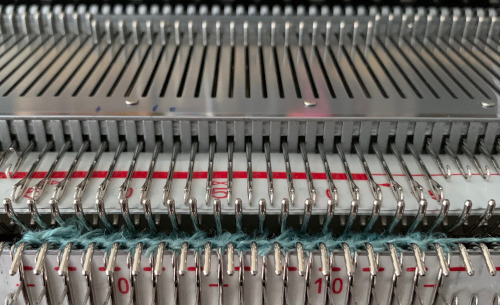
 Knitting was smoother with a change in yarn. An extra needle on each side of the knit on the ribber is brought out to hold manually to ensure their stitches knit with every pass of the ribber carriage. I prefer the all-over pile with its loops formed on the top bed. There were nearly no incidences of loops catching on gate pegs on the main bed. One of the drawbacks is that the main bed needles need to be dropped and brought back to the B position manually, bald spots will result where any needles are not returned to the proper work position, so they will not pick up loops.

 and this is likely my last try at the single pile in a pattern using every other needle tuck on the ribber with the release of stitches every 4 rows. I actually like the elongated stitches in the ground but found the stitches planned for loops simply did not release easily or at all,
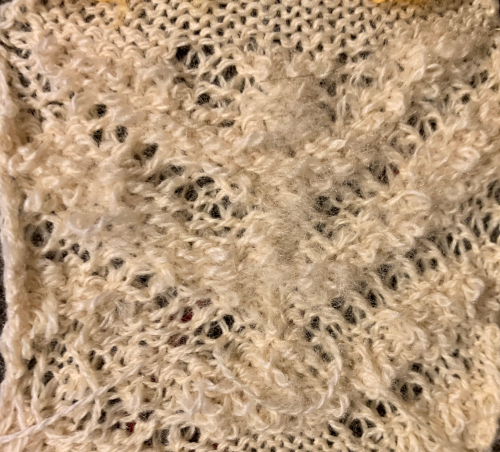
 shown below on the right
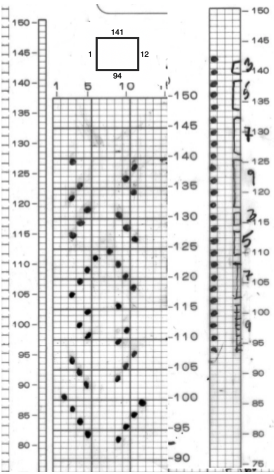
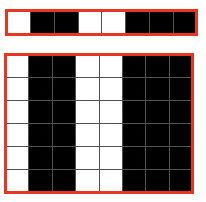
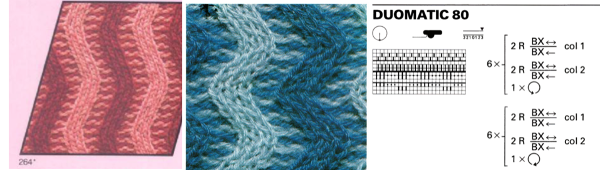
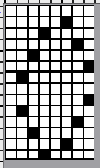
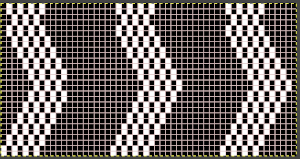
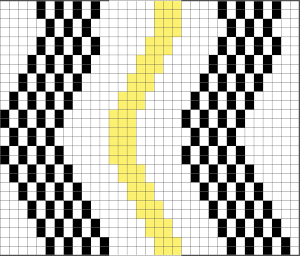
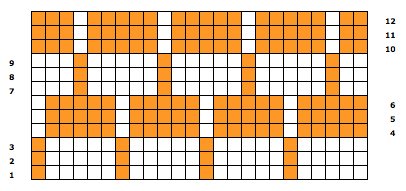
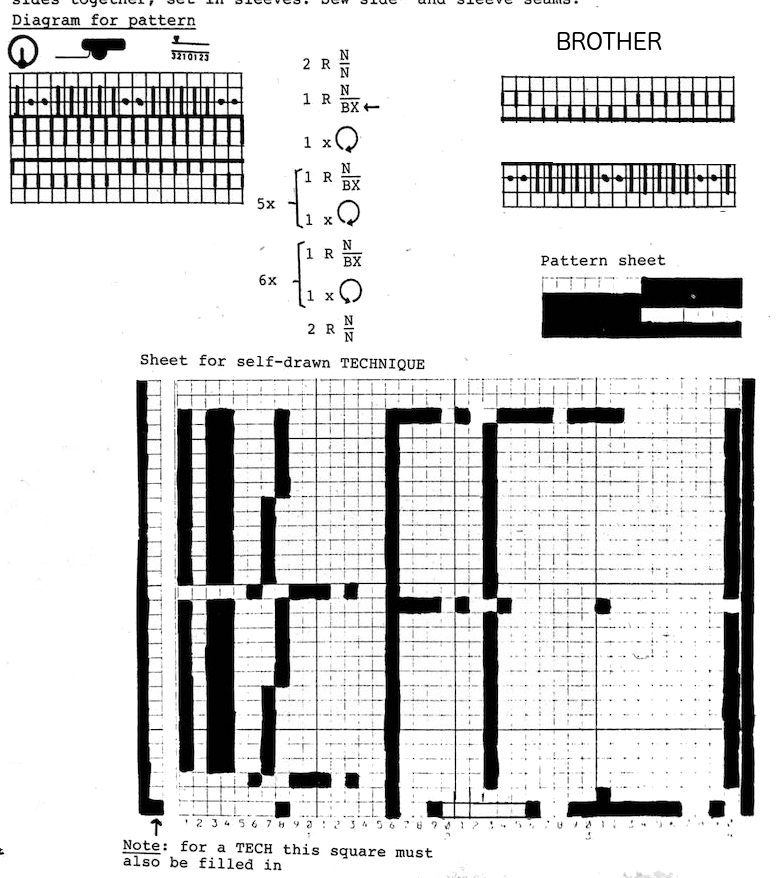 Translating Duo directions to black and white squares in order to develop a repeat for use on Brother: N/N is easy. The Duo is using buttons on the front bed and selection in response to their arrow setting to alter and progress through the pattern. The setup is with 7 needles up, 7 down, creating a 14 stitch repeat. BX on Duo (LX with patterning on front bed E6) is the equivalent of slip setting on Brother. No arrow keys, Passap on N, everything knits. Brother equivalent is a row of black squares (or punched holes if applicable) for each row on the N/N knit setting. BX <– will reverse the needle selection from whatever it was immediately before the previous rows of N/N, and remain there for the full racking sequence. After the first 32-row repeat is completed, at the end of the 12 racked rows, there will then be 4 all knit rows between racking sequences, two knit rows at the top would match 2 rows knit at the start. Once again, the BX<-for one row sets up the alternate blocks of racking. I chose to start my repeat with the 930 with a cast on in racking position 10. The chart shows racking positions on each row, reversing direction after having reached #4. E6 knitters may use the same repeat, matching the Duo racking starting on 3 left to 3 right and back
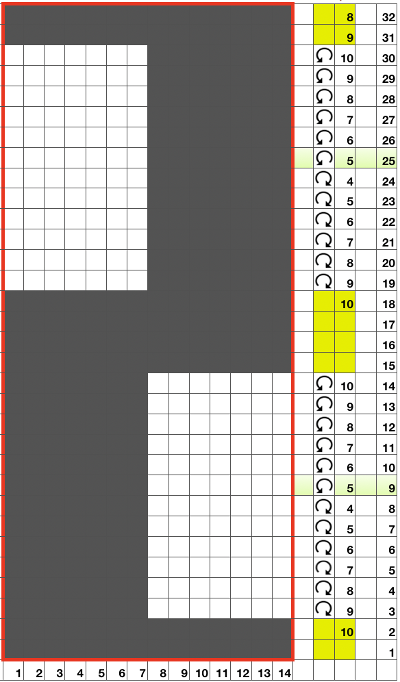 The repeat viewed tiled:
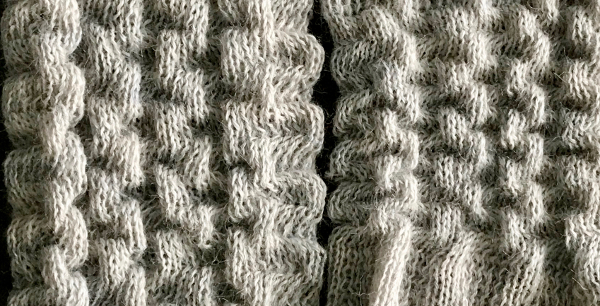
 After swapping out the needle retainer bar, knitting went smoothly. On the right in the photos below, the same racking sequences and needles out of work on the ribber are used, but the knit carriage was not set to slip, so essentially, every stitch on every row on the top bed was being knit. In addition to needle preselection, one should also check the type of stitches actually being formed. One of the disadvantages to knitting ribber fabrics is that several inches may be produced before one can actually evaluate the pattern being knit by peeking between the beds.
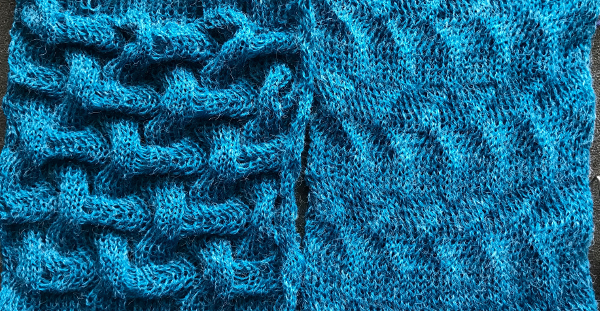
 I will have to revisit a


 All needles used in my swatch, I began the stitch transfers down onto the ribber needles on the far left, continuing across the knit bed.
 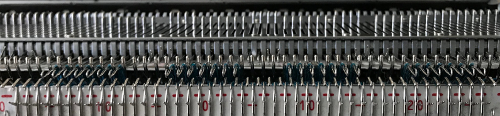 As end stitches knit on the ribber alone, a small edge weight may be required on that side. As stitches on the main bed are not worked in the slip stitch rows, they become elongated. Racking by 4 positions is not possible unless there is enough fabric so as not to pull so much that stitches will not knit off. If the yarn does not have some “give” that can make the changes in position harder, some yarns may break easily. The long stitches:
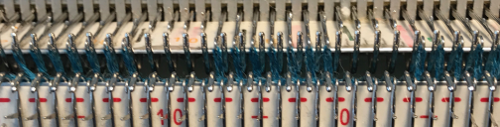

 This is the swatch knit changing ribber settings to and from slip <– –> to N/N on appropriate rows. I found the method above far simpler
  Coincidentally this morning a Duo pattern using a different setup was shown in Ravelry, and I was asked whether producing the same on Brother might have any advantages. The Duo results, shown on a
 Racking is from position 10 to 6 and back just as in the previous blue swatch, after the first preselection row at the start of the following repeat sequence. I began the stitch transfers down onto the ribber needles on the far left, continuing across the knit bed. The final look will vary with the choice of yarn and its color. Both swatch sides.
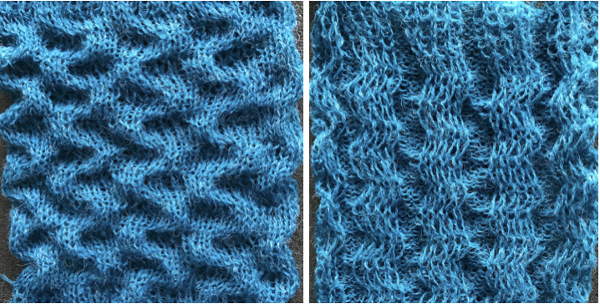 If for some reason horizontal direction matters simply cast on with racking position on 6, and continue to and from there to 10 and back. Below is a horizontal flip of the same swatch image, a way to quickly decide whether doing so might be preferred.
 The only way to find out is to try it. The lesson already learned: use a crisp yarn that can retain memory for maximum effect. Here, the swatch is knit in a 3/14 cotton. To start with, racking was from position 0 to 6 and back. Racking every 2 rows at the bottom of the sample, every row at its top
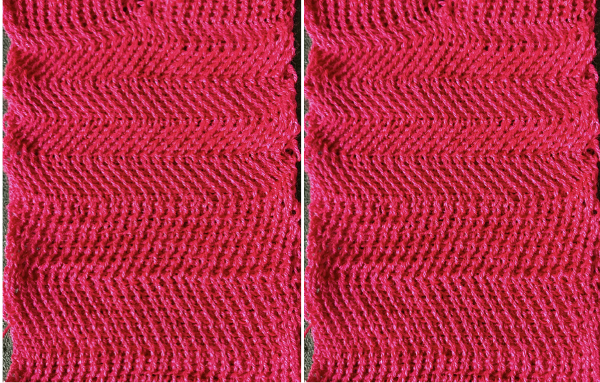 Now adding needles out of work with the expectation of folds at approximate center of each fold
 Racking started in center position 0, then swung to 3 left, to 3 right, ending on 0. I long ago got frustrated with the Passap numbering, marked the racking positions with a permanent marker from 0 on the right to 6 on the left. The knit result is a rolling fabric, though a bit less so than the Brother sample, which was able to move across more racking positions.
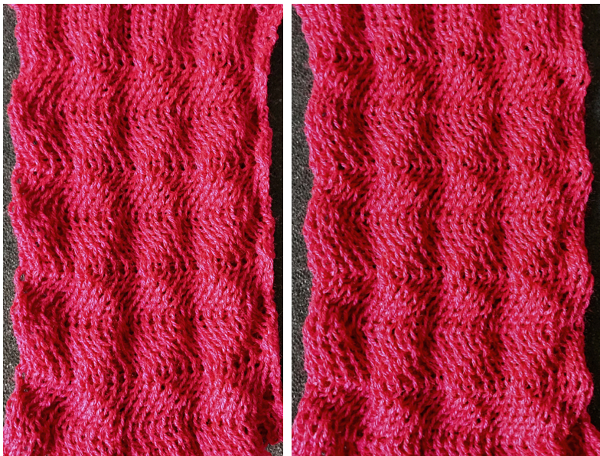
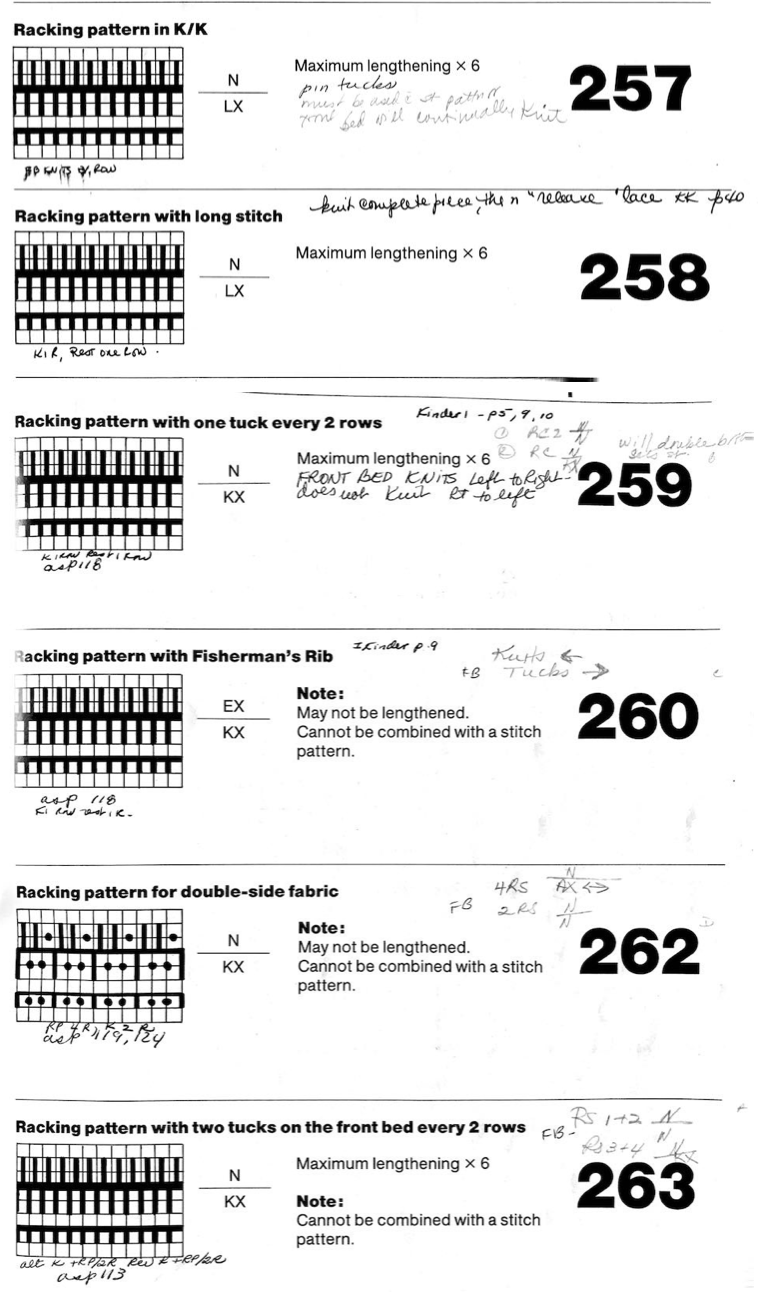
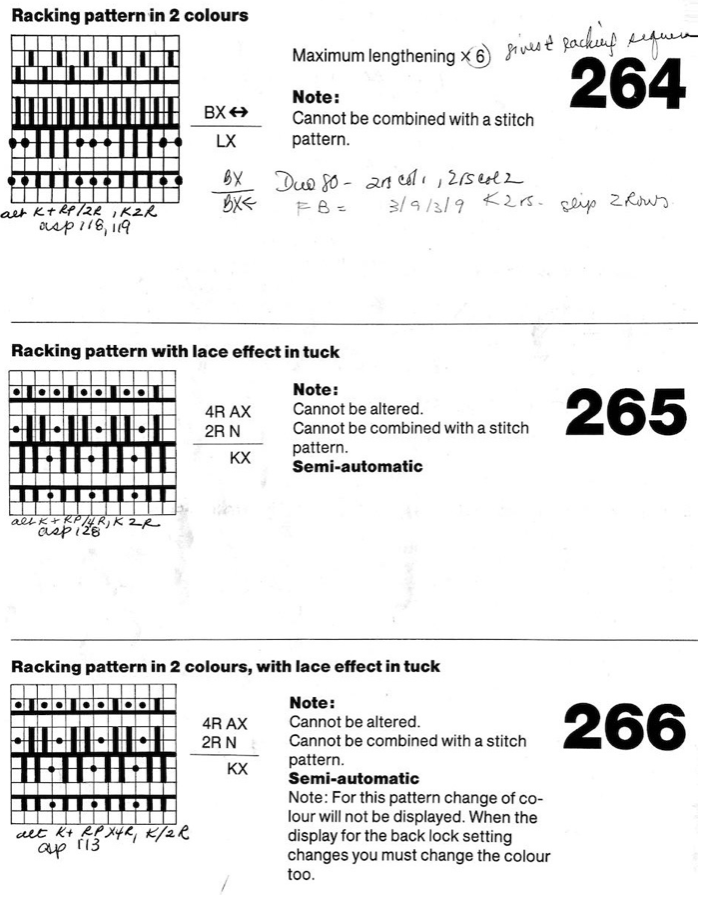
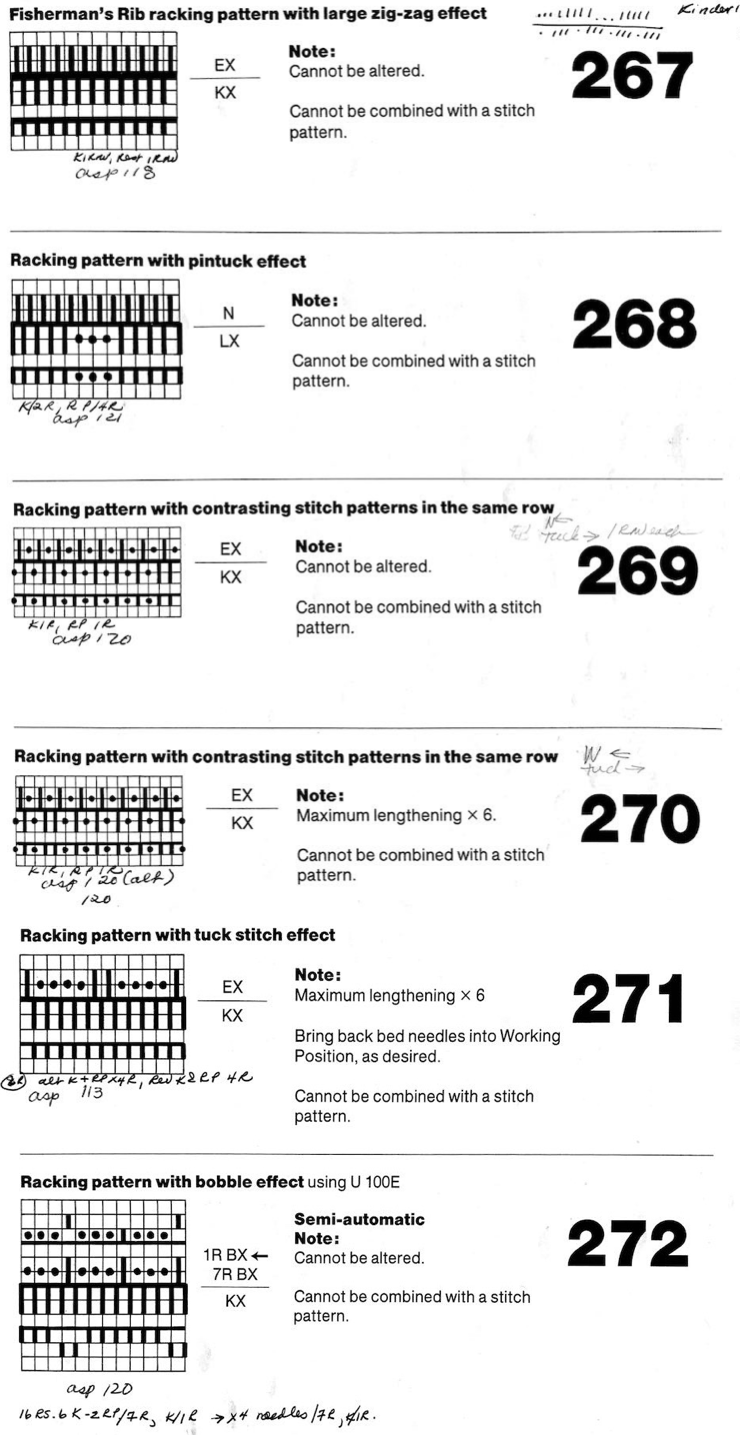
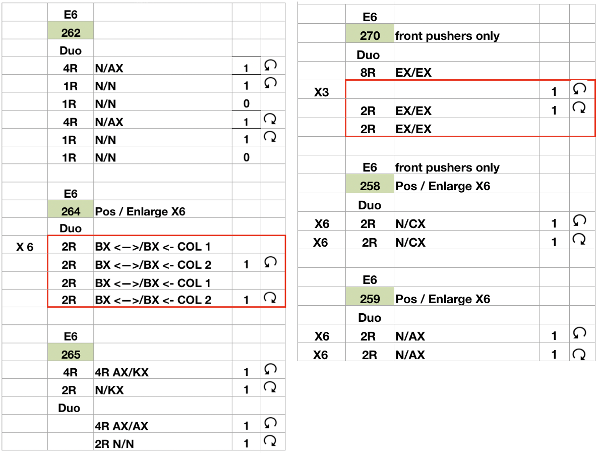
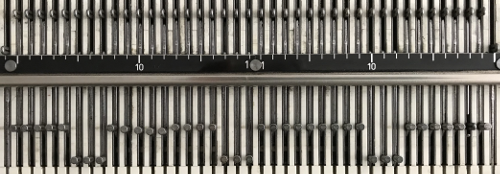
 The Passap E6 manual shows racking patterns possible with console built-in designs on pp. 118, 119, 120, 121, with techniques used in racking patterns number 257-272. The console gives prompts for the direction in racking sequences. Self-programmed designs would need a separate knitting technique entered into the console as an additional “design”. This can be done with a card reader combined with a pattern download from a computer. Programs that automate the function are no longer on the market. Typically, in published patterns for either brand, if the starting point for the racking sequence is important, it will be given along with the frequency of movements such as in this design from the Duo 80 book
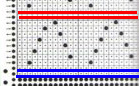
 Some Duo symbols and their meaning
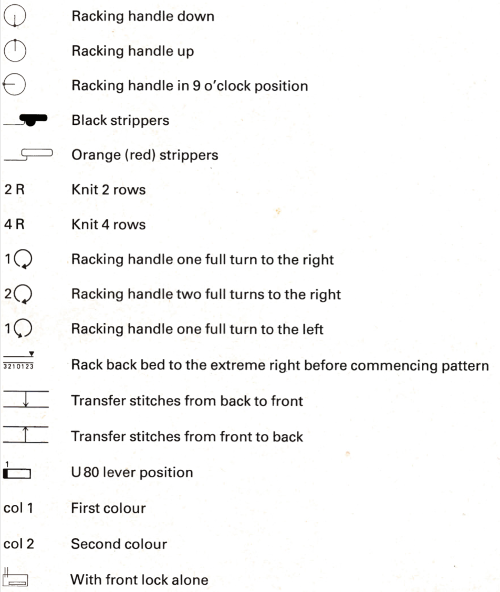

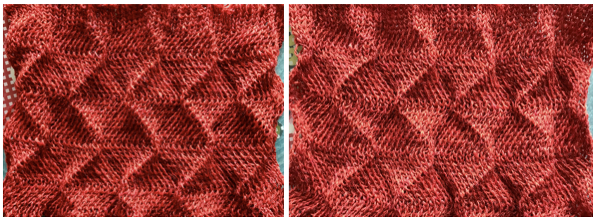
 My sample was knit in a tightly twisted cotton, and when off the machine had an interesting and unexpected fold 3Dquality
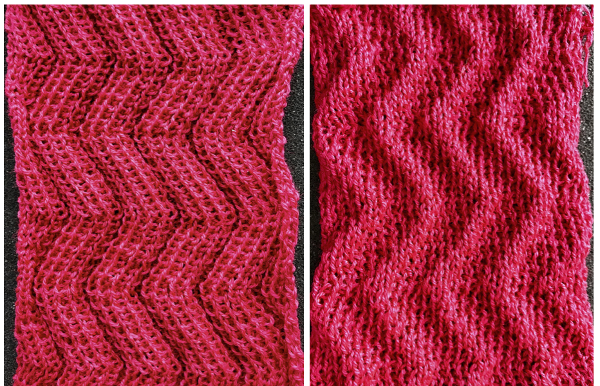

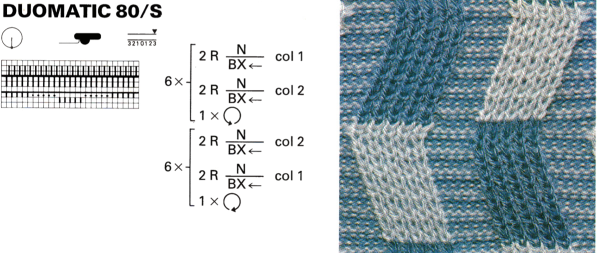
 The setup is essentially the same, with white squares representing needles and pushers that need to be out of work. Tech 258 uses LX (slip) on the front bed, back bed si set to N. The duomatic pattern has a different OOW needle arrangement, the front lock is also set to tuck = FX (E6=KX), adding another layer of texture and complexity. Needles are also out of work on the back bed.
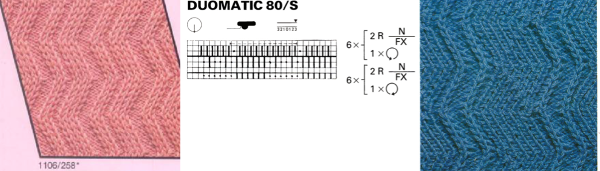
 What is knitting in terms of black and white squares if one continues:
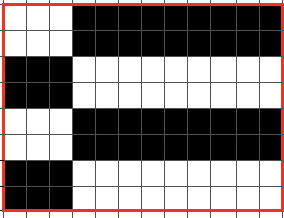
 this repeat is what is required to match the technique diagram

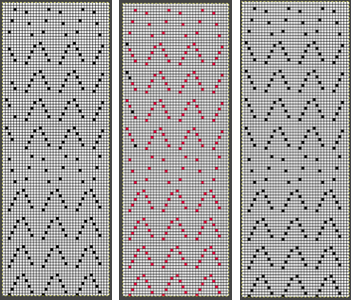
 Below the pattern alternates blocks of 5 black squares, 5 white, color changing every 2 rows and reversing racking direction after every 24 rows. The full repeat is 48 rows. If rows knit in the zig-zag are counted, they amount to 12 because each color slips it is not knitting for 2 rows. Note that to achieve the color reversal at the halfway point of the repeat the same color (2) knits for 4 rows, at the top of the repeat color 1 does the same.
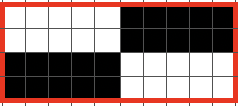

 Back to acrylic yarn, light color for more visibility, creative yarn snag on the left midway, full swing movement is shown, each is 48 rows in height. As always, it helps to check whether the stitches are obliging by staying on the needle bed. The top half of the swatch is pictured.
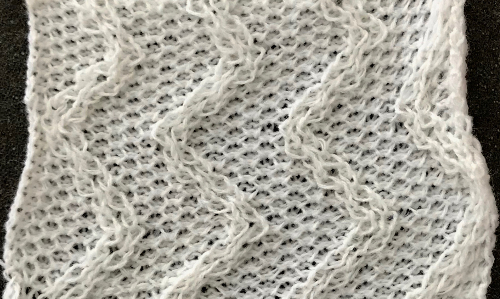 In turn, I programmed # 1000 X 6 in height, but the pusher selection was all up for one row, one down. I left it alone, and lastly, worked with pusher selection on the back bed, BX <–. Patterning advances a fixed repeat every row or every other, determined by original hand-selected up for selection and down above rail for out of selection. The front lock is left on N (disregard front for setting it to LX). There is a world of other possibilities, while the console racking sequences can be used from built-in techniques.
 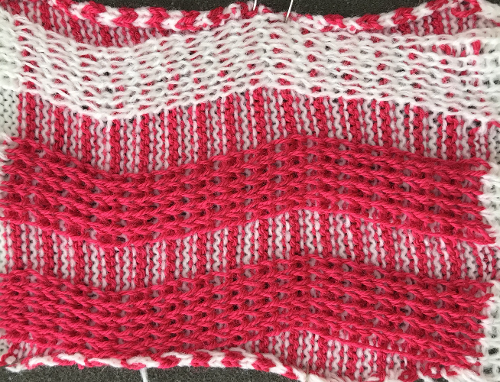 Any ribber needle selection on Brother other than with the use of lili buttons would have to be done manually.

 A comparison of my repeat using a single LC and the Knitlabo pattern expansion including memo options for use with 2 lace carriages
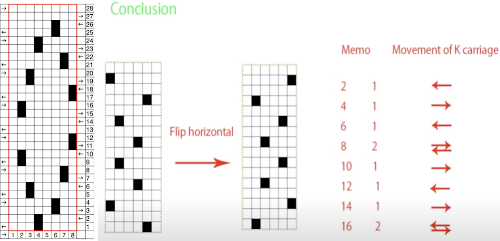


 The repeat required mirroring for use in my electronic 930. Experimenting with racking intersecting tuck stitch on multiple repeat png, stitches were picked up on the ribber aside from the first tuck stitch on the right, A, on the center, B, and on the left, C, of the knit stitch groups.
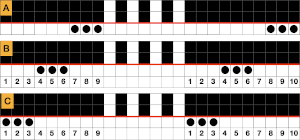
 changing ribber needle positions
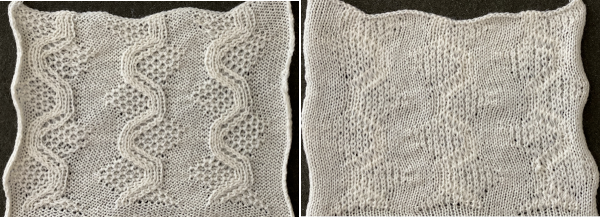 moving toward positioning the racked pattern further into the knit columns.
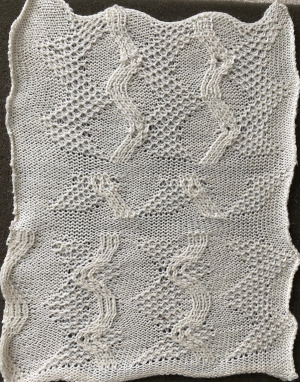
 Good notes and documentation of the final needle arrangement will make the technique easily reproducible. The needles involved on the top bed always need to be returned to the patterning position after any shares.
  At any point in the knitting, it is easy enough to transfer stitches on the ribber up to the main bed, drop the ribber down, and check on the placement of the racked pattern. If the place is satisfactory, the moved stitches can be returned to the ribber and the work is continued. If not, transferred stitches can be left on the main bed, other stitches can be shared with the ribber and patterning can continue with racking in the new location. One such adjustment is seen toward the bottom of this swatch.
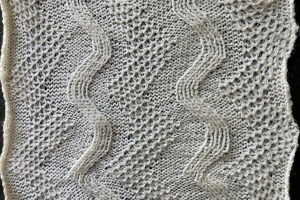
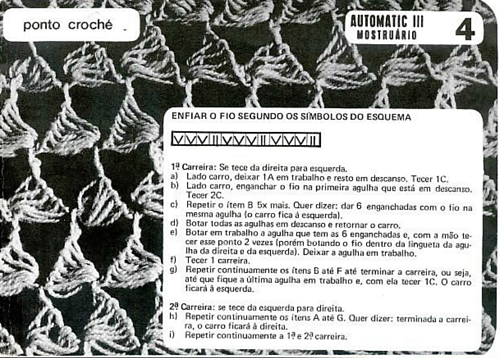
 Translation of symbols used in Knittax patterns
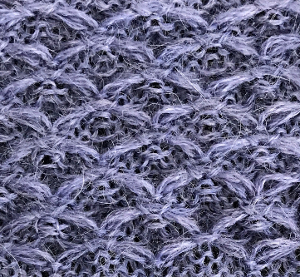
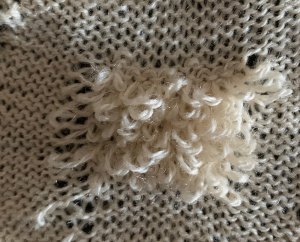
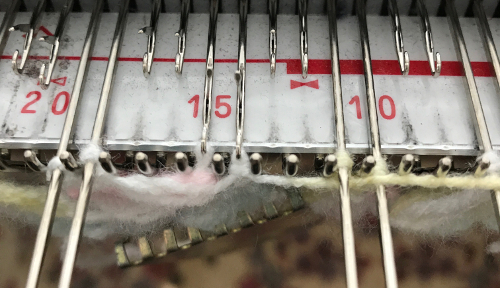
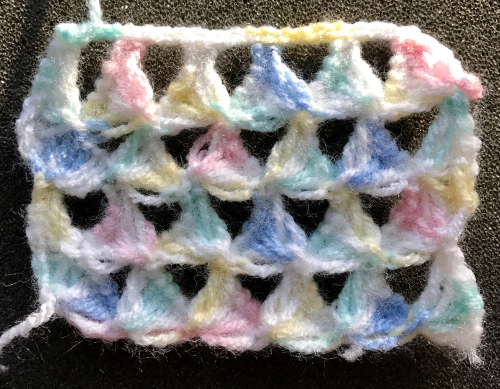
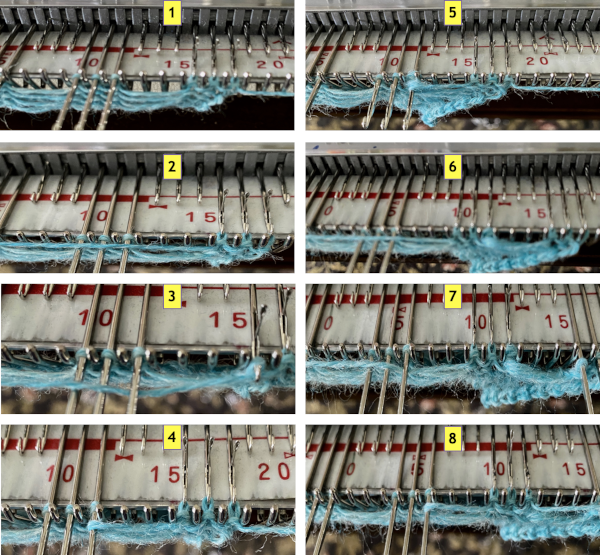
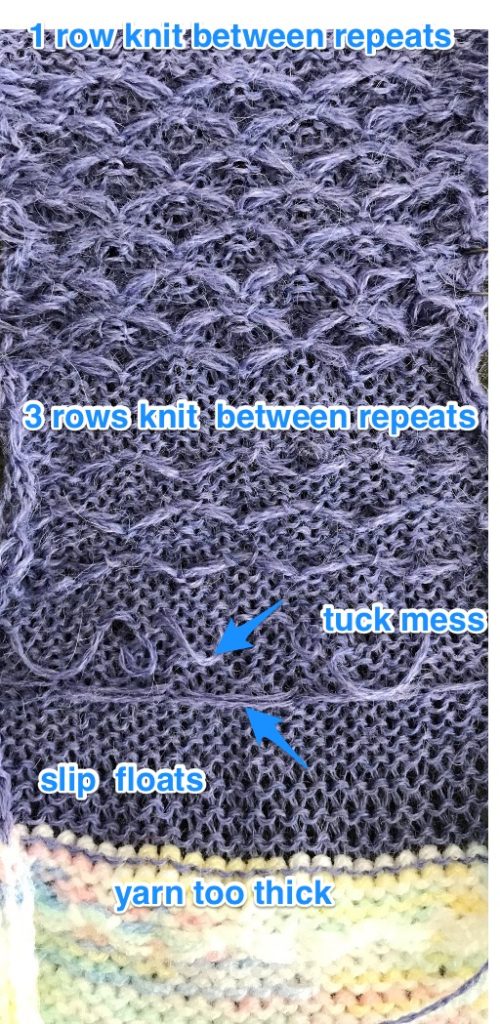
  On the purl side, this creates structures that emulate crocheted shells. My first attempts at trying to knit anything like this were in thin yarn, and I had enough issues to give up for the moment. Things worked out much better when I switched to a sport weight yarn that seemed to like knitting at T 10 for stocking stitch. With NOOW set up, my sample was knit at T 9. Waste yarn and ravel cord are often a good way to start, but not always necessary, the same is true of weight. I began with a crochet cast on, every needle, multiple of 4 st + 2, then dropped the alternate pairs of needles between the first and last 2 pairs of needles in work, pulling the needles back to A position, determining the width of my “shells”
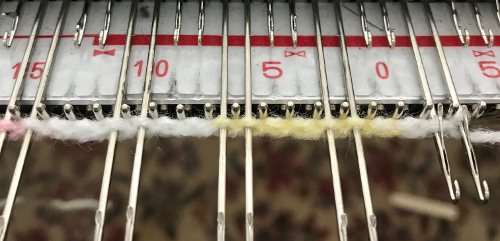
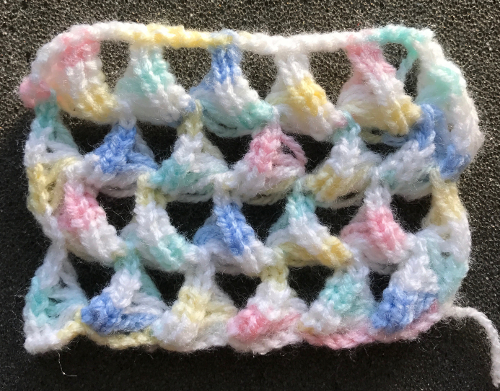 Variations can include the number of needles in and out of work, yarn choices, etc.
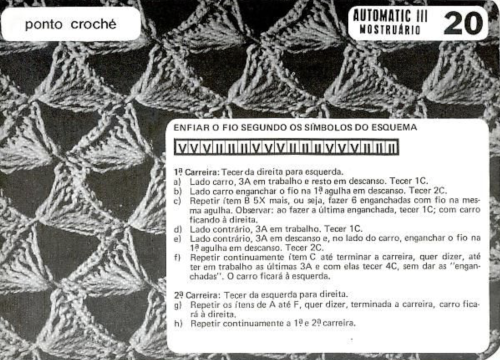
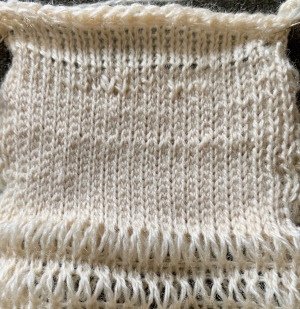
 The illustrated needle arrangement for #4
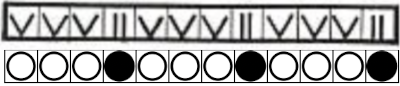 I like to begin using a chain cast on, and then dropping chains off needles out of work

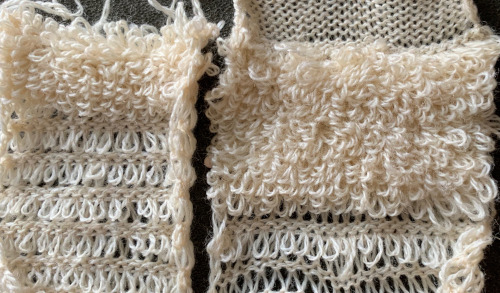
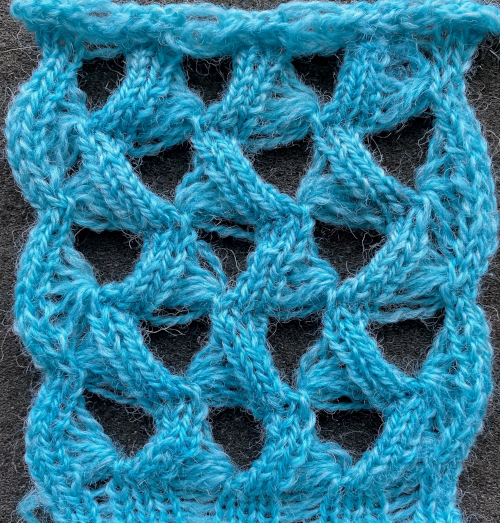
 The fabric shares knitting sequences with the first 2 samples
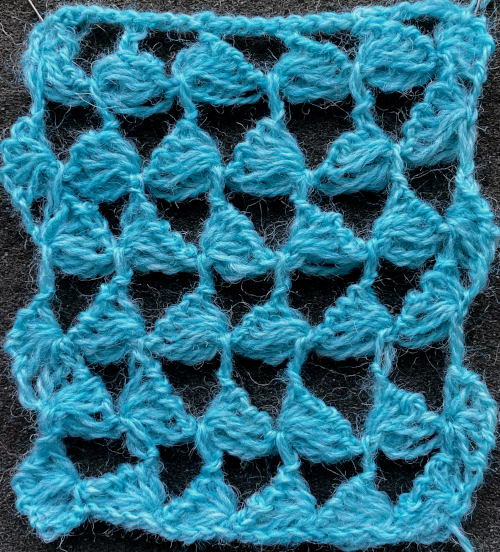
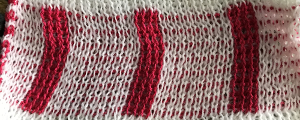
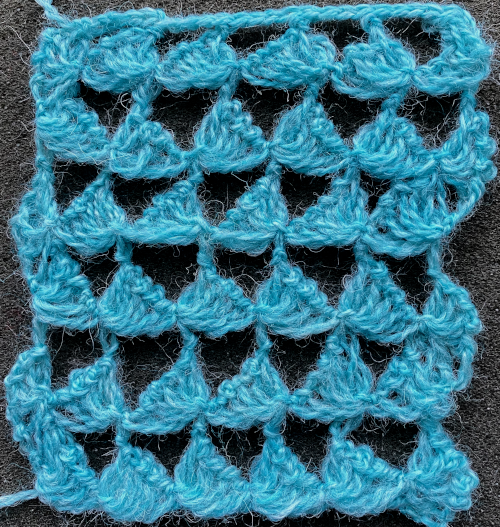 Here a similar technique is used for a trim, both sides are shown

 a bit closer,