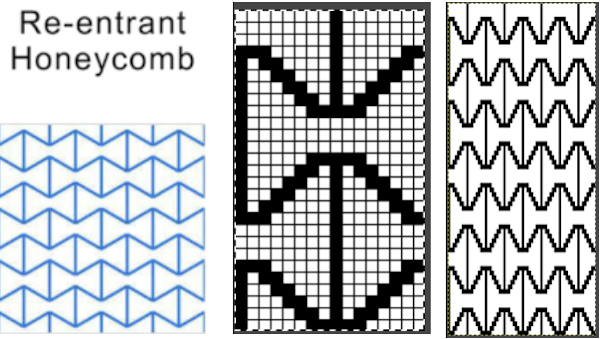
My original posts on exploring automating shell shapes were written in my 910 electronic days using mylar sheets in early 2013: Thinking of modules: a shell “diary”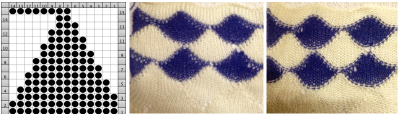 “Automated” shell shapes
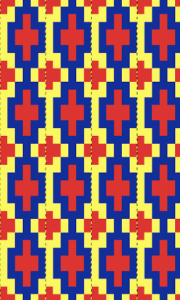
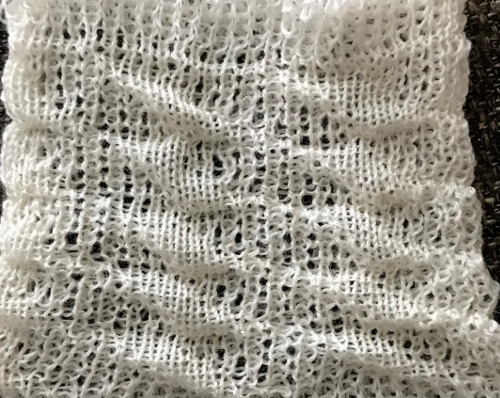
 The repeat produced a visually successful fabric. I received a question on FB about executing the shells on a punchcard machine, and another on how I “come up with these things”. The repeats are not quick inventions, they take working out, sometimes through several first failed attempts.
Since the early posts posts my approach to explanations has changed as I became increasingly familiar with newly available software and updates, and a 930 and img2track made downloading pngs possible in a new way.
iPhone cameras make it far easier to “shoot and share”.
My original mylar repeat entered as separate programs in days when each mylar sheet was precious. 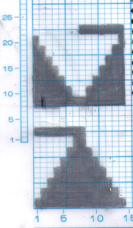 The 910 in my default setting produced the “image’ as drawn on the knit side of the resulting fabric. The post was written prior to my tiling the repeats as a matter of routine to check their alignments. Doing so would have shown a couple of missing pixels, and pointed to any other errors in filling in mylar squares.
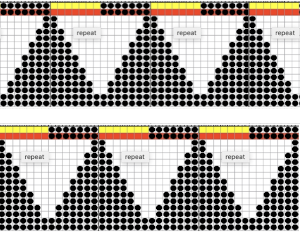
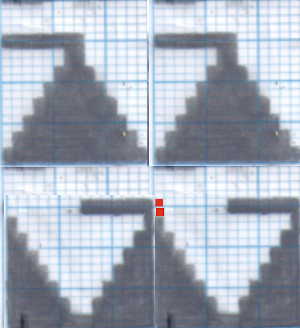 All transfers were made in the same direction.
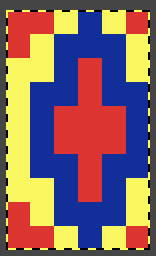
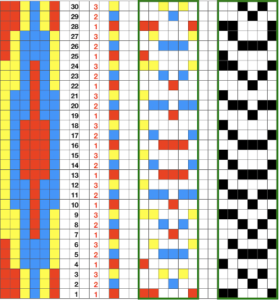
The start of the visualizing the shell shapes with errors later observed and resolved. 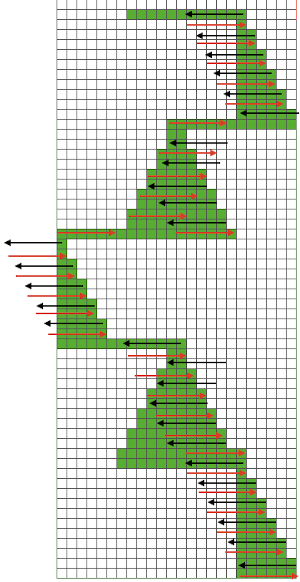 As always, ideas need error-proofing and refining, easier done in a chart if possible prior to any actual knitting.
This type of design begins to address an uninterrupted repeat on the electronic on a limited stitch count, whether all in a single direction or reversing every other full row of shapes. It is applicable to joining several punchcards, but only on single 24 stitch widths.
 There are a number of changes to make if it is necessary to get the pattern to reverse direction in alternate rows of completed shapes in a brick layout.
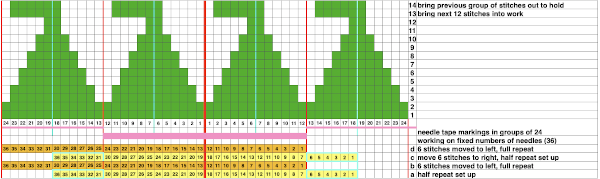
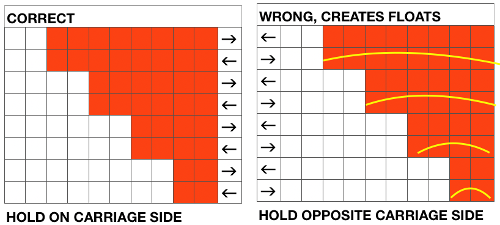
My first tests were planned with knitting moving only from left to right. To execute such a pattern on a punchcard KM, the repeat needs to be altered from 14X2 to 12X2 in width. This is the start of sorting that out: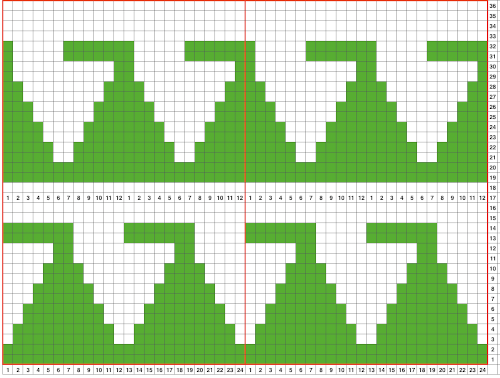 Attempts to visualize holding can happen in spreadsheets, documents, image processing canvases, or even simply on graph paper, moving/ “drawing” back and forth across the cells mimicking carriage movements and marking them accordingly.
Large staggered repeats can be programmed in electronic models
All shapes are limited in terms of the width of the repeat occurring across the number of available needles on any machine.
Some previous posts on electronic knitting such repeats:
Holding/short rows: hand tech to chart to automating with slip stitch 1
Ayab: short rows automated with slipstitch
A return to short row shapings: bumps and slits
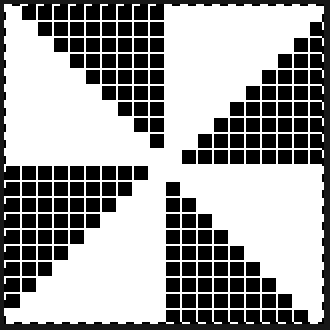
The 910 produced the design as programmed on the knit side. On the punchcard machines, the image-as-drawn is produce on the purl side.
Lettering is likely the most familiar instance where mirroring is required for punchcard machines to produce it correctly, a consideration here as well. 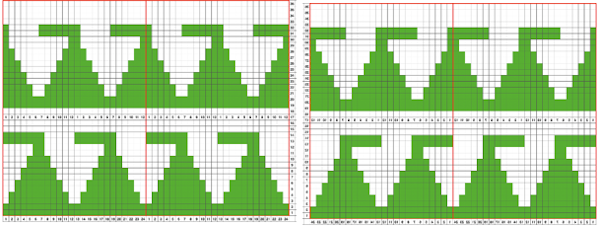 The 930 automatically mirrors downloaded motifs, if direction matters, as in these samples, either mirror the design horizontally prior to saving the png for download to the machine, or use the mirror button selection on the operation panel after the download.
I find it easier to fill in the shapes in the direction I wish to have them appear on the knit side.
An attempt at a continuous 24 stitch repeat, with the same technique applicable to electronic models while avoiding programming 2 different repeats and having shapes in different colors across full repeat segments.
This proved to be a fail.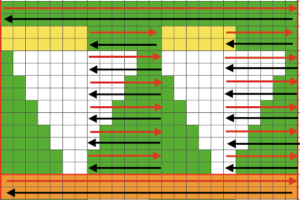
 With larger gaps between changes, the yarn may be changed every X rows manually, making an easy fix to breaking rules for when using the color changer.
The next step is working out 12 stitch repeats with patterning needles to be brought in and out of holding position as well. The options on a punchcard would include 8, 12, and 24 stitch motif widths.
The machines will be set to slip in both directions throughout, end needle selection must be canceled. This method is not executable easily on km models that do not offer that option, electronics use KC II.
Note that machines sold in Europe in comparable models may have different names for the same functions, ie. SM in some instances is the equivalent of KC II, whereas in US it signifies a Single Motif.
Punchcard settings for end needle selection:  I do not have any blank punchcards to test a repeat on at the moment.
The 930 essentially behaves the same way by producing the entered pattern on the purl side, making it possible to use the unaltered final designs.
The starting 24 stitch brick repeat  Other shapes have previously been explored using slip stitch, and later, slip stitch combined with holding. A brief return to previous turns at holding and slip stitch used to create alternating color shapes: in 2013/02/12/an-entrelac-pretender/, a continuous slip stitch only card was used. The result on the knit side,
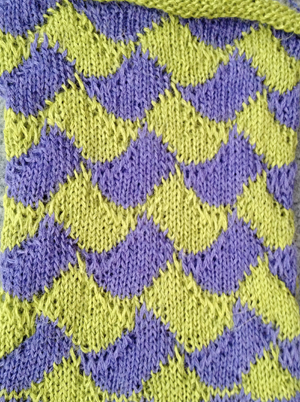 while on the reverse floats between alternating shapes are the norm
 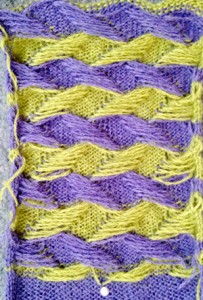 Results with no floats are found in the swatches in the posts, two designs are programmed alternately upon completion of each full row of shapes : 2013/02/21/entrelac-pretender-2/
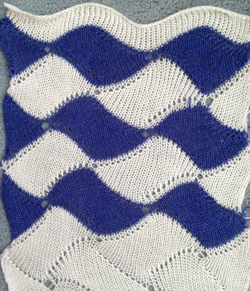 and a larger, 24 stitch motif used on a punchchard machine as a continuous repeat : 2013/04/11/entrelac-pretender-3/
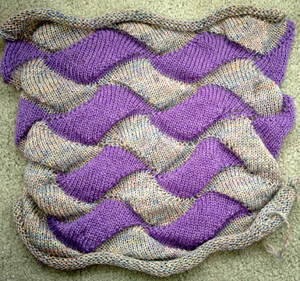
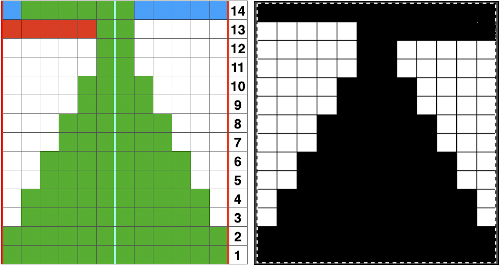
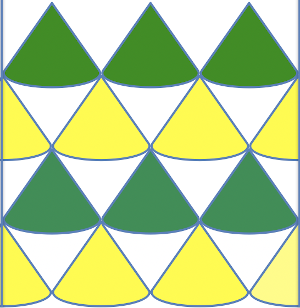
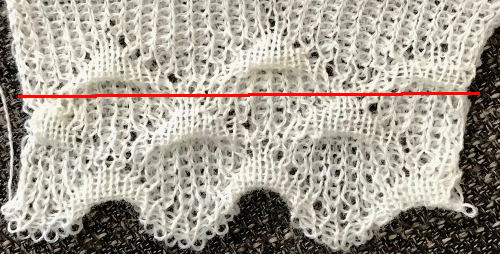
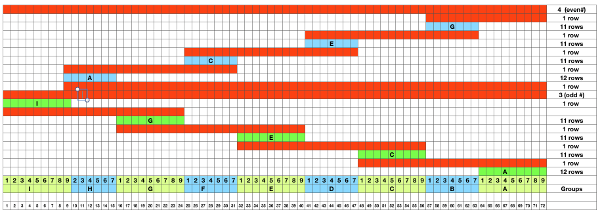
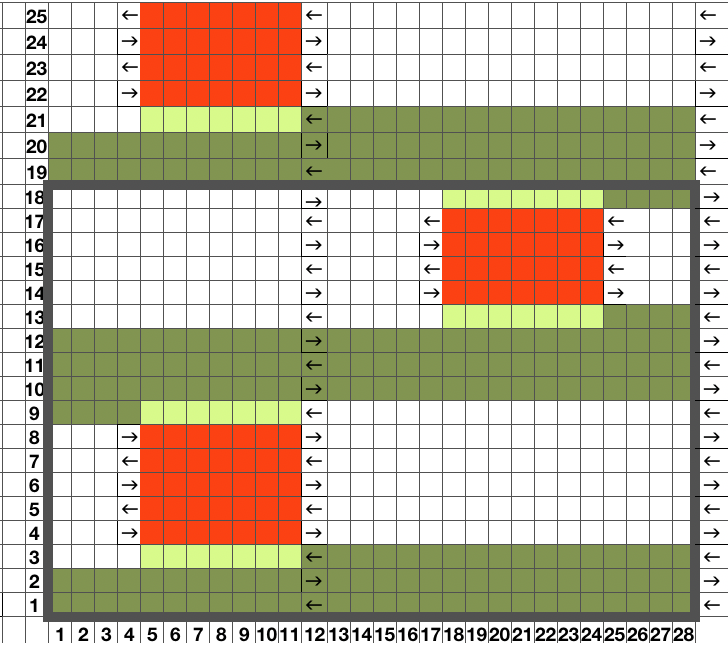
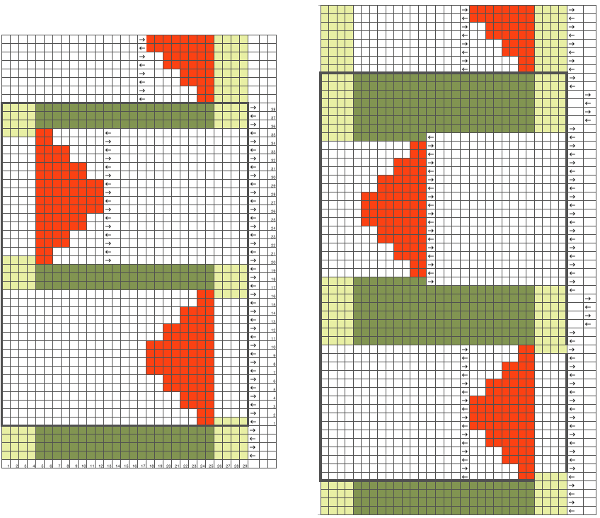
Returning to the goal of the moment: to knit the shells in a float-less way, using a technique executable on a punchcard machine as well. The repeat as initially drawn is 28 rows high.
If the punchcard or the electronic advance every row with each pass of the carriage, the alternating shifting blocks of the repeat will be selected in full with every 28 passes.
In this instance, one returns to the start of the design repeat every 28 rows. Identical shell full shapes are created across the knitting rather than the shifting shapes desired in alternating full row repeats.
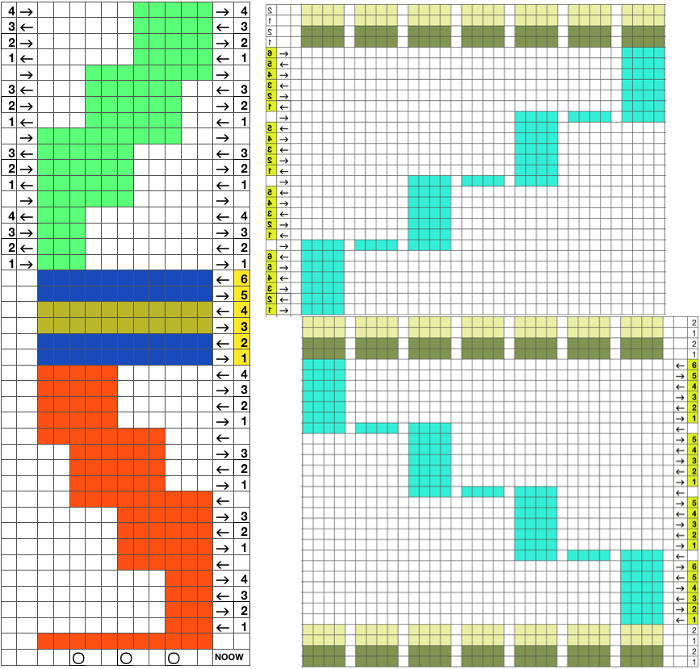
Separating the 28-row repeat into 2-14 row ones.
The 12 stitch repeat is tiled X2 horizontally, beginning with a half shape, 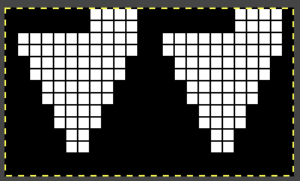 while here the repeat for all full-size shells is planned,
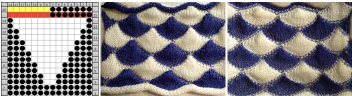
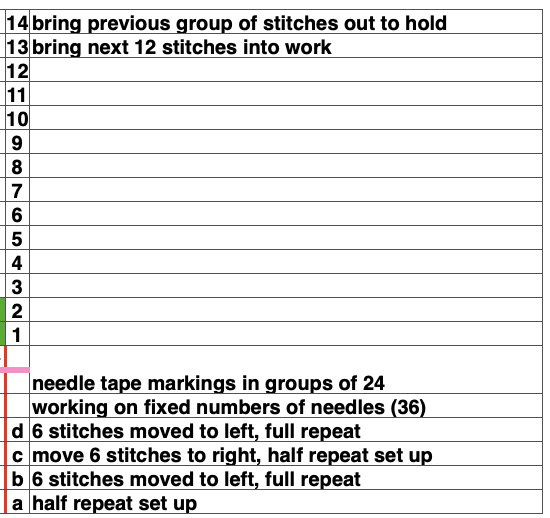
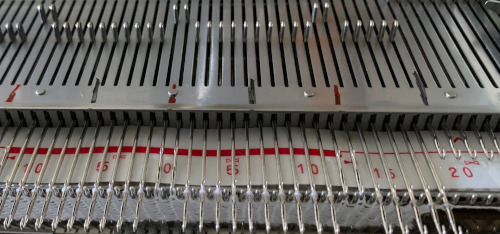
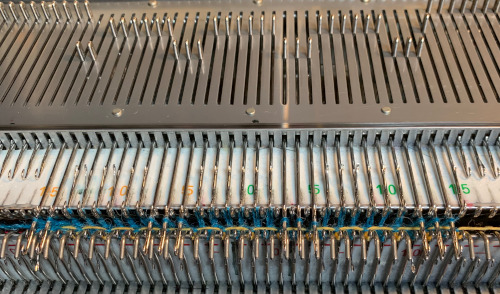
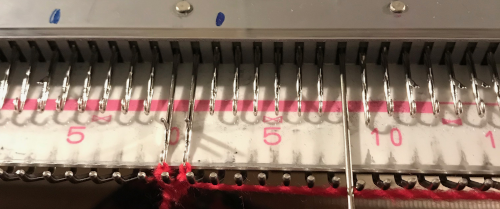
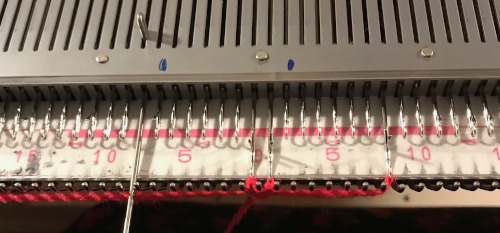
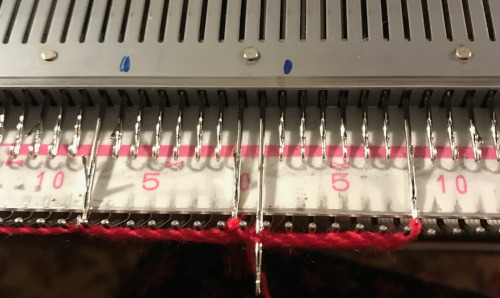
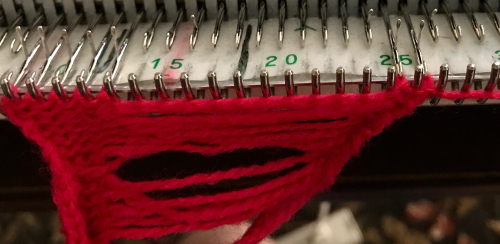
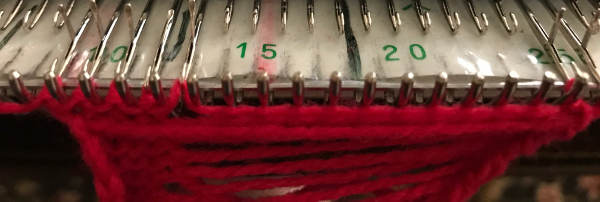
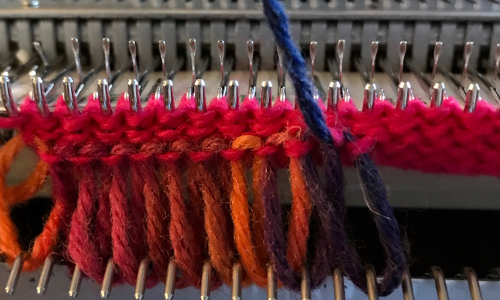
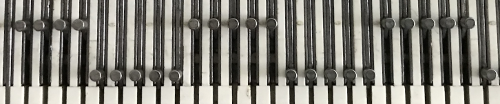
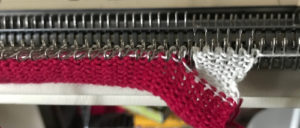
 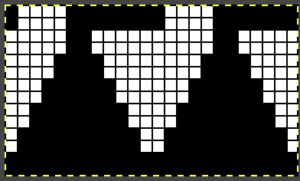 Marking up the needle bed with water-soluble markers or pencils helps track placements of repeats across the desired number of needles in work: dark lines indicate placement beginning with the mark for half a repeat to maintain straight side edges on the finished piece. Red lines mark the placement of the stitches when they are moved to the left in order to knit the full shells across the bed.
 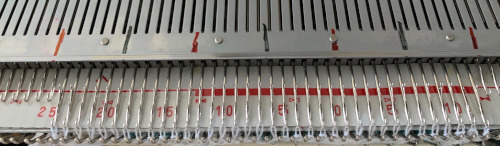 On a 930, the image will be knit in the direction of the pattern as drawn on the knit side, as it would be on a punchcard machine.
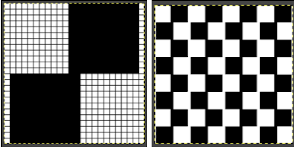
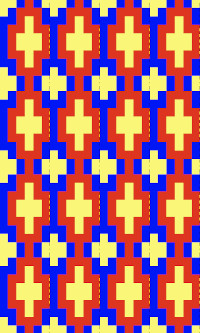
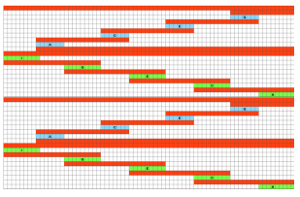
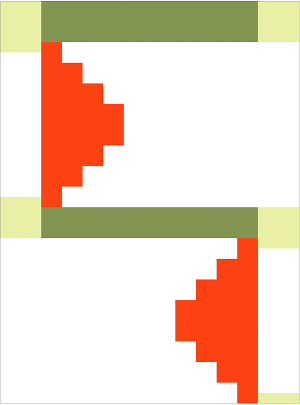
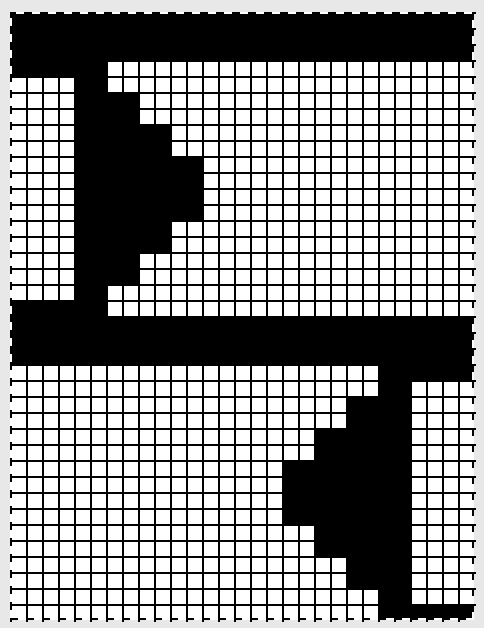
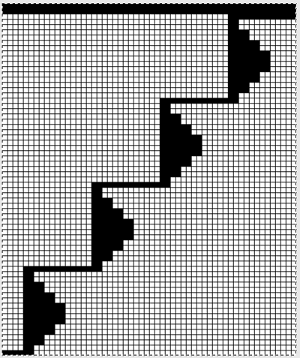
To begin knitting the shells with COR, since the pattern is fixed on the needle bed, one option is to move the work in one direction or the other on the needle bed using a garter bar, so that the knitting is in the proper place for the desired anticipated needle selection. This was easier in my own mind than reprogramming the pattern repeat for each full row of shells whether by entering a new download or altering placement using the position option at the start of each row. One of my first working repeats amended later in several steps is shown here mirrored in black and white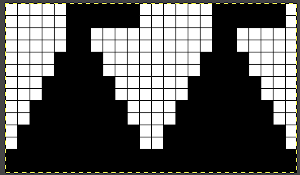 Visualizing the process on the needle bed
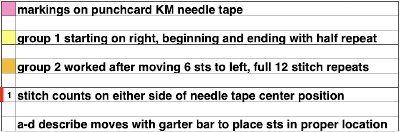
 Scaling the image to render it a bit more legible:
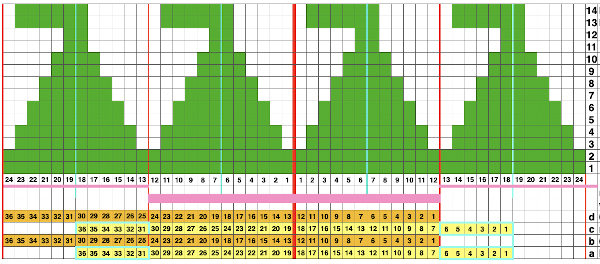
 The machine will be set for slip stitch in both directions and holding. End needle selection is canceled.
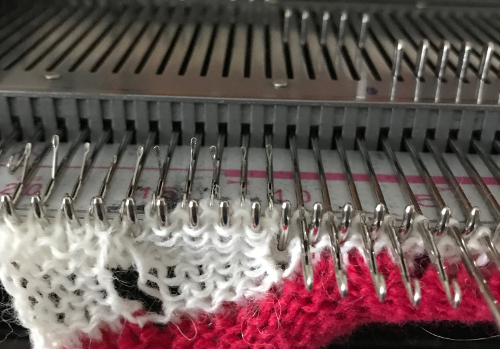
The first preselection row is from left to right. Every needle will be preselected and will knit every stitch for the first 2 rows in the desired shell color.
Color changes are made manually.
At the completion of a row of shells, its corresponding color ends on the left side, a free pass is made, returning to the right. Knitting with the new color for the alternate groups of shells begins again on the right side.
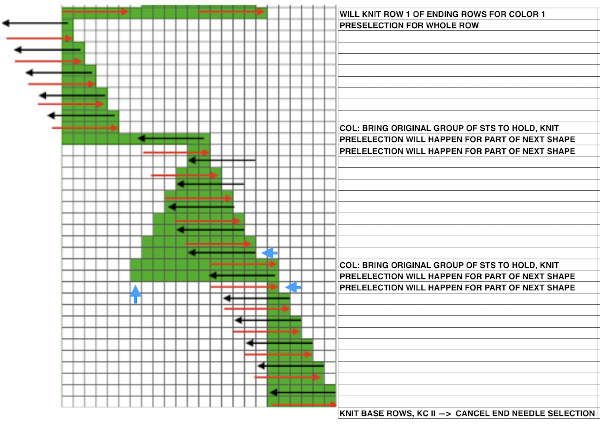
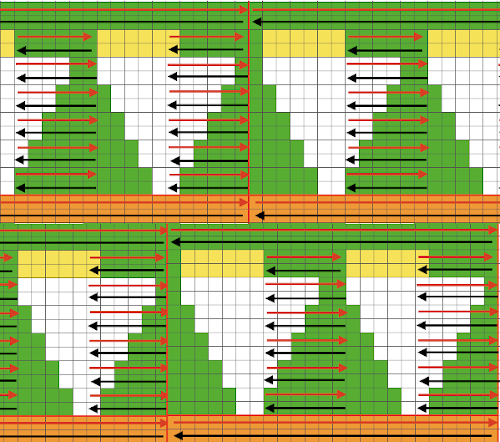
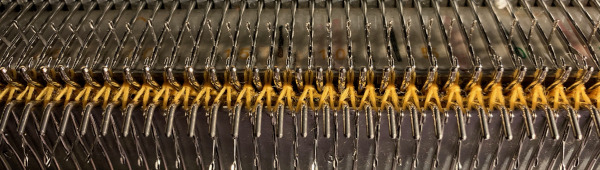
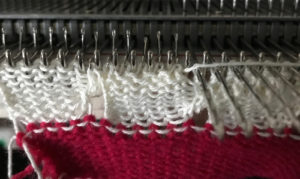
After the first 2 all knit rows, as the carriage works its way back to the right on the following pass, preselecting will occur for a decreasing number of stitches. This is the first-row holding selection when using the above repeat:

 Moving stitches on the needle bed avoids having to program separate repeats after each full stripe of shells.
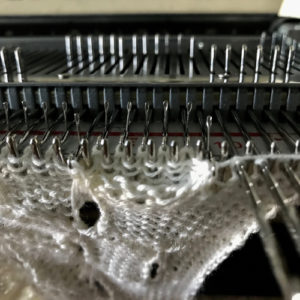
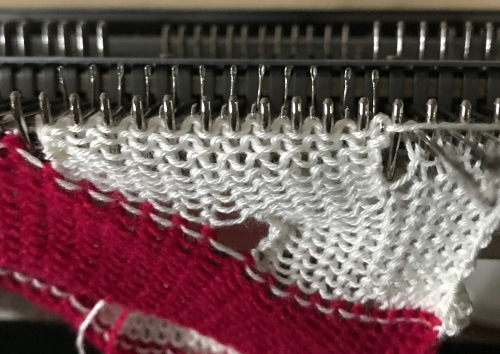
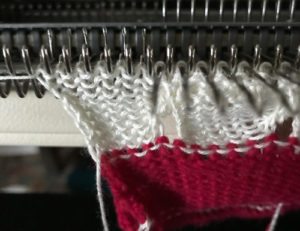
Beginning piece with half a shell on each side: all but the first 6 stitches are brought out to hold. When more than the single needle is selected at the top of the first half-shell (6 sts to start, 1 at the end), COR: bring the next group of 12 stitches to the left into work, knit to left.
COL: bring original 6 needles out to hold. Bring into work any needles not selected in the group of 12 into work as well.
Continue knitting, repeating the process across the bed.
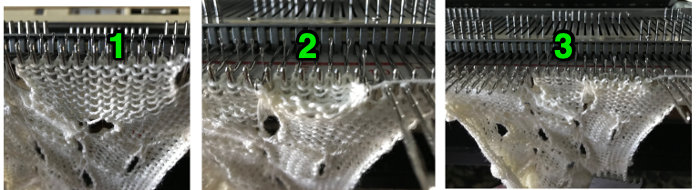
On design row 14 of the last half-shell remove work on a garter bar.
To execute full shells across the next row of shapes: using a garter bar move the work 6 stitches to the left.
Return emptied needles to A position (out of work, OOW).
With all remaining needles in B preselect the next row (1) from left to right. Cam settings need not be changed.
Change color if desired, knitting 2 rows across all the stitches.
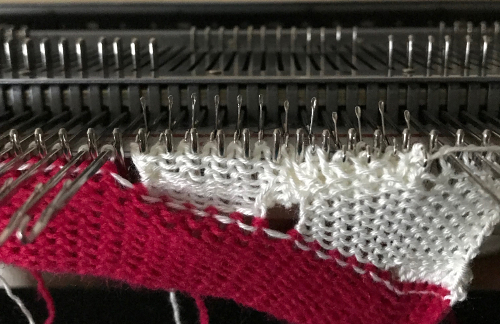
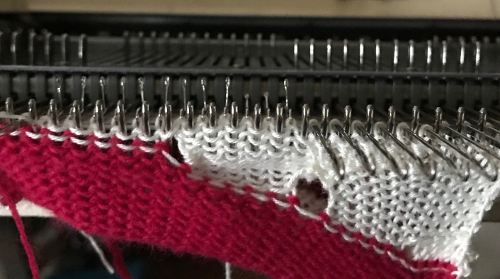
Bring all needles out to hold except for the first group of 12 sts between red marks, and repeat the process previously described across the bed.
When the last shell is completed, design row 14, remove the work on the garter bar again, shift it 6 stitches to the right.
Push back the now emptied needles back to A (OOW).
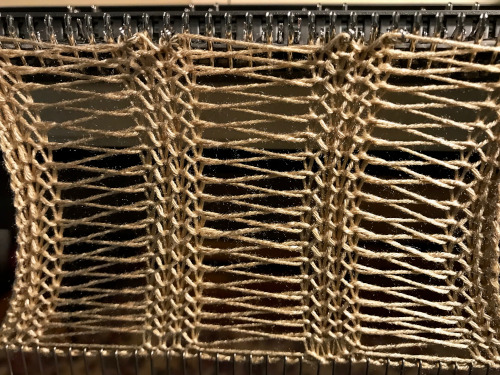
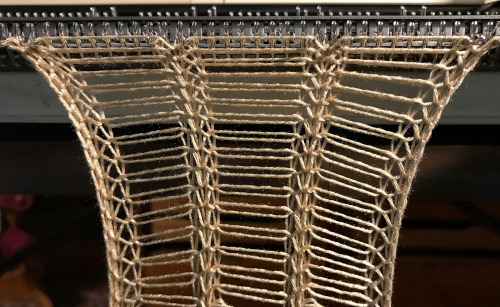
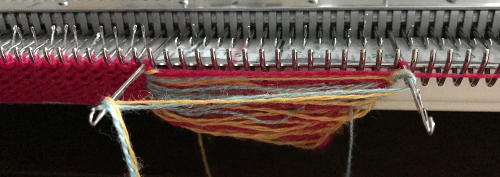
With all stitches in the B position, make a free pass to the right, row 1 of the half shell row will be preselected, change color, continue across the pattern row as described. This yarn is far too thin but makes stitch formation easy to identify.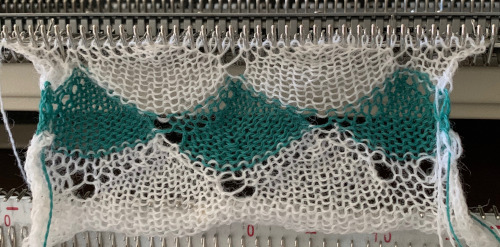 I used two repeats side by side to eliminate having to consider and choose the position option on the 930 needle bed, resulting in having the pattern centered in each 24 stitch fixed segment of needle selection.
Using a needle tape for punchcard machines electronic models make transitions when using published or DIY 24 stitch designs.
It is possible to add all knit rows or even patterned ones between shell rows. On an electronic KM with 2 carriages available, adding a FI band would be simpler than trying to manage to change cam buttons in addition to the other number of steps already involved with the slip stitch and holding combination along with moving the knit on the needle bed.
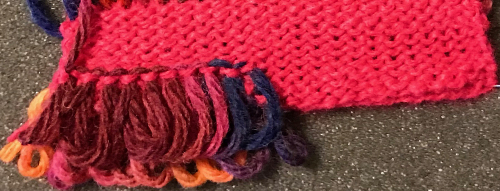
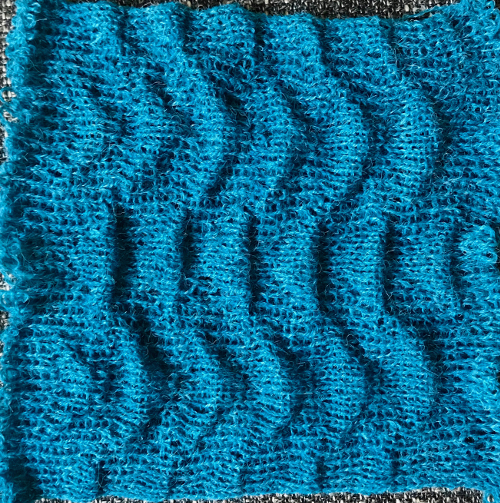
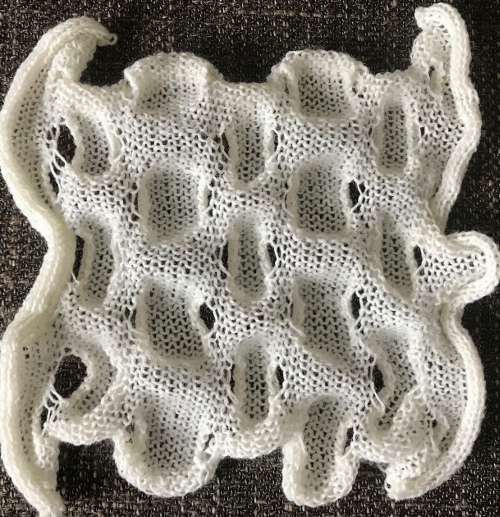
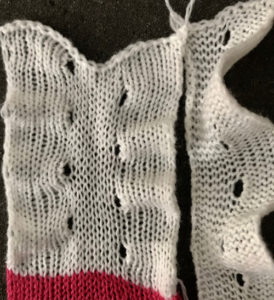
Contrasting color row stripes can be programmed by adding 2 or more/ even number rows of all black squares (or punched holes) at the top of each 14-row segment of the final repeat. Reverse shaping of shells appears to not be necessary to avoid biasing on my limited tests. The proof of concept swatch: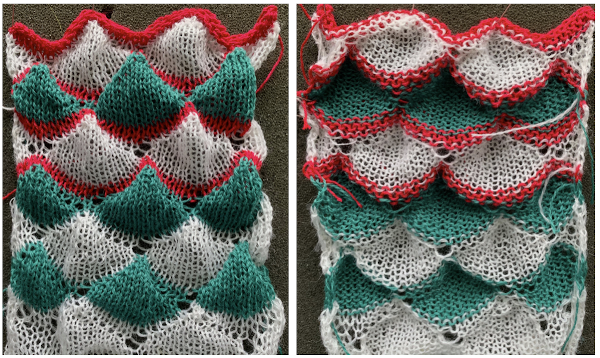 I was too aggressive with clipping yarn ends on the left side, especially while in the process of changing colors, not ever a good idea. Automating the pattern fully on electronic models using only slip stitch patterning is possible. The length of such patterns grows exponentially in proportion to the size of the repeats. Reviewing errors in the beginning concept
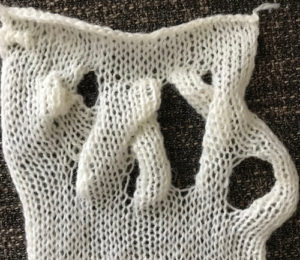
 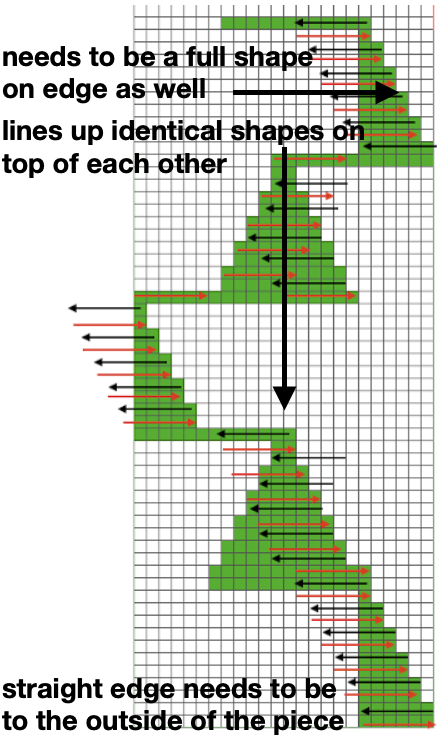 An attempt to visualize the placement of the shape variations in the finished piece using the shell motifs beginning with the shapes created in order to create a straight side edge
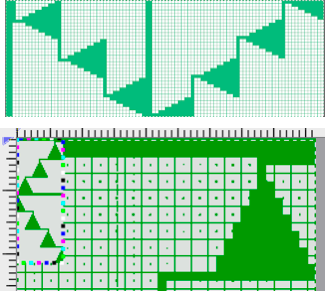
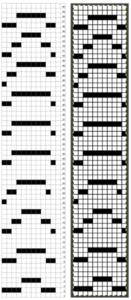
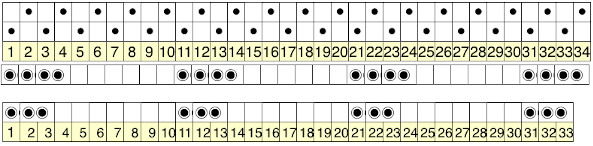
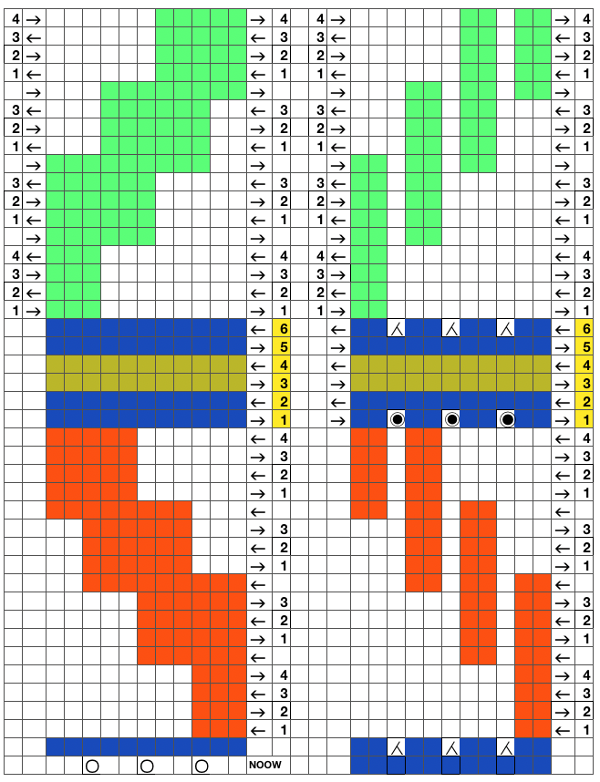
Redrawing the pattern for a 36 stitch test. On the left is the drawn image of the pattern, on the right the mirrored image for downloading to my machine to produce it in the desired direction. Much of the time is invested in developing and testing the final and correct image for download, the knitting that follows that is fairly quick. My repeat is 36 stitches wide, 98 rows high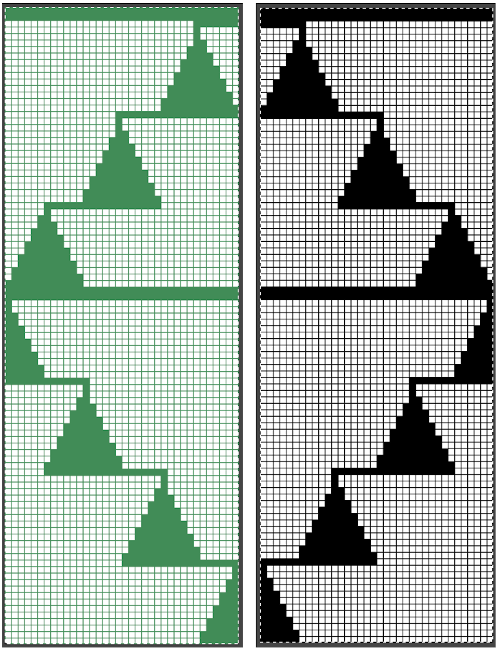 COR: knit a base row in color one from right to left
COL: KCII (no end needle selection) to right, the only needles preselected will be those corresponding to the programmed black squares, the remaining will be in B position. Knit to the right.
COR: set the machine to slip in both directions. Knit slowly and evenly. All needles in work on the bed must be cleared with each pass of the carriage.
Continue in pattern across the bed, checking that all stitches are knitting off properly.
When all needles are preselected, change colors for the next set of shells. These rows create the base for the next group of shapes. If a stripe or other pattern is wanted regularly, those rows are best added to the programmed pattern itself.
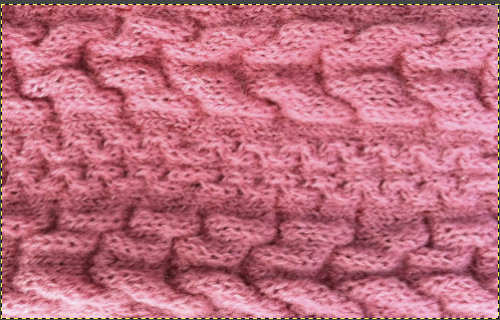
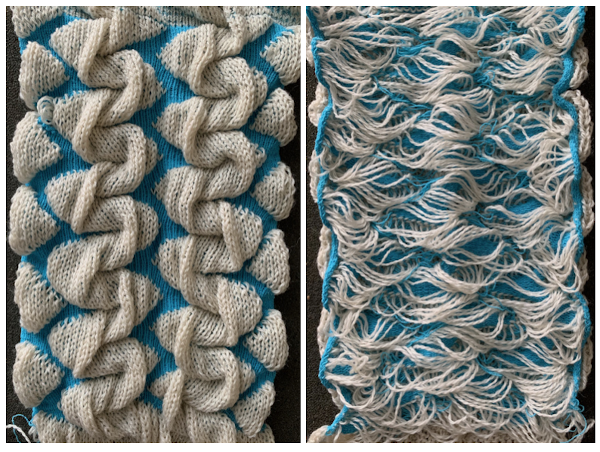
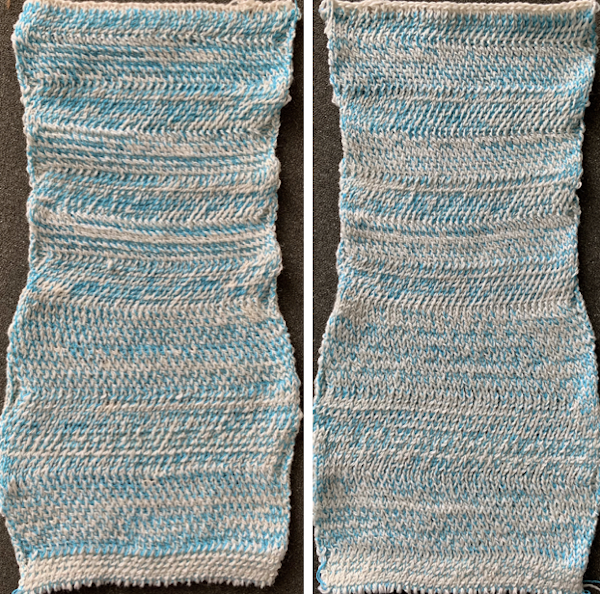
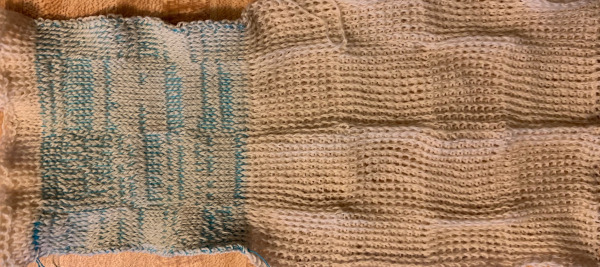
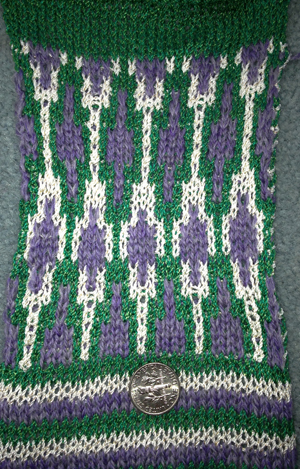
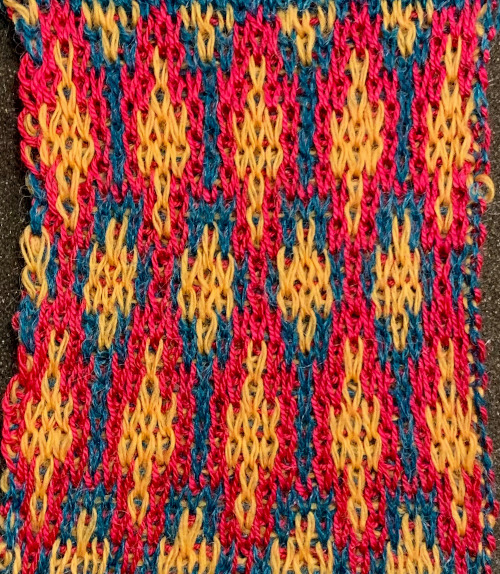
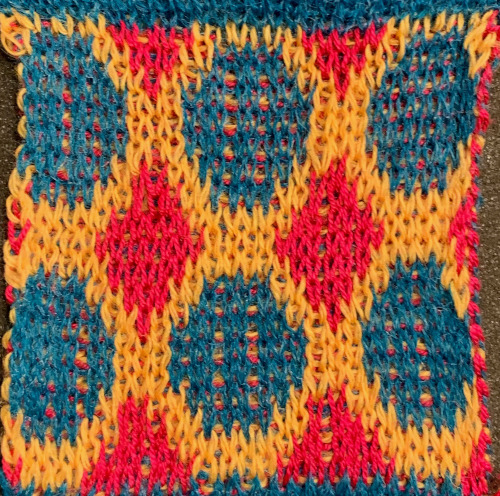
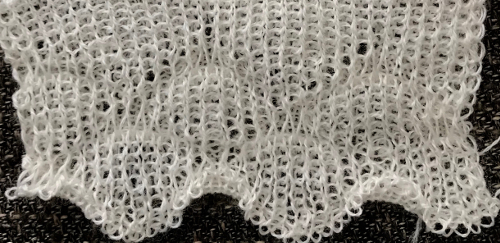
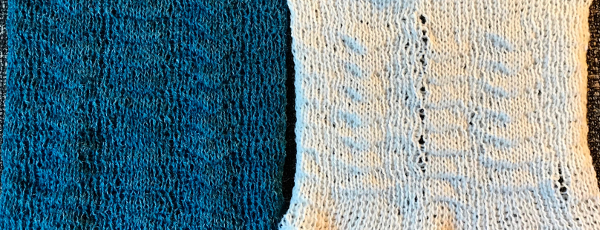
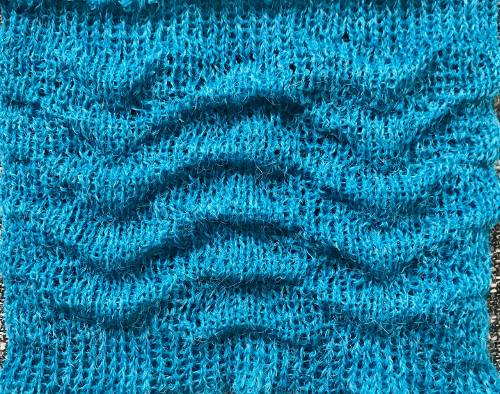
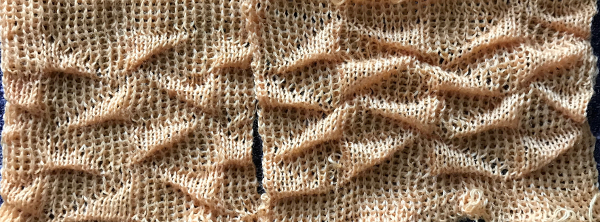
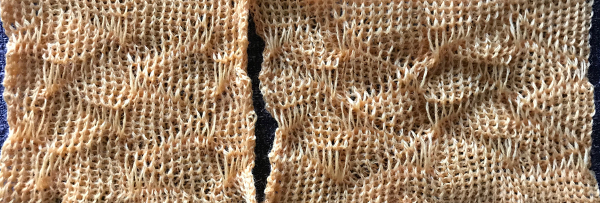
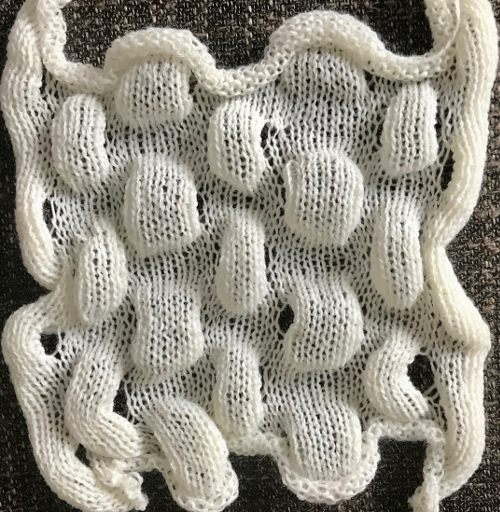
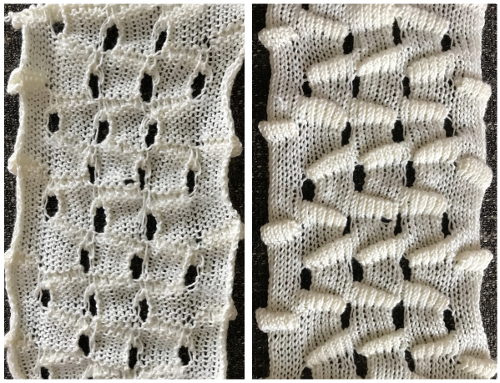
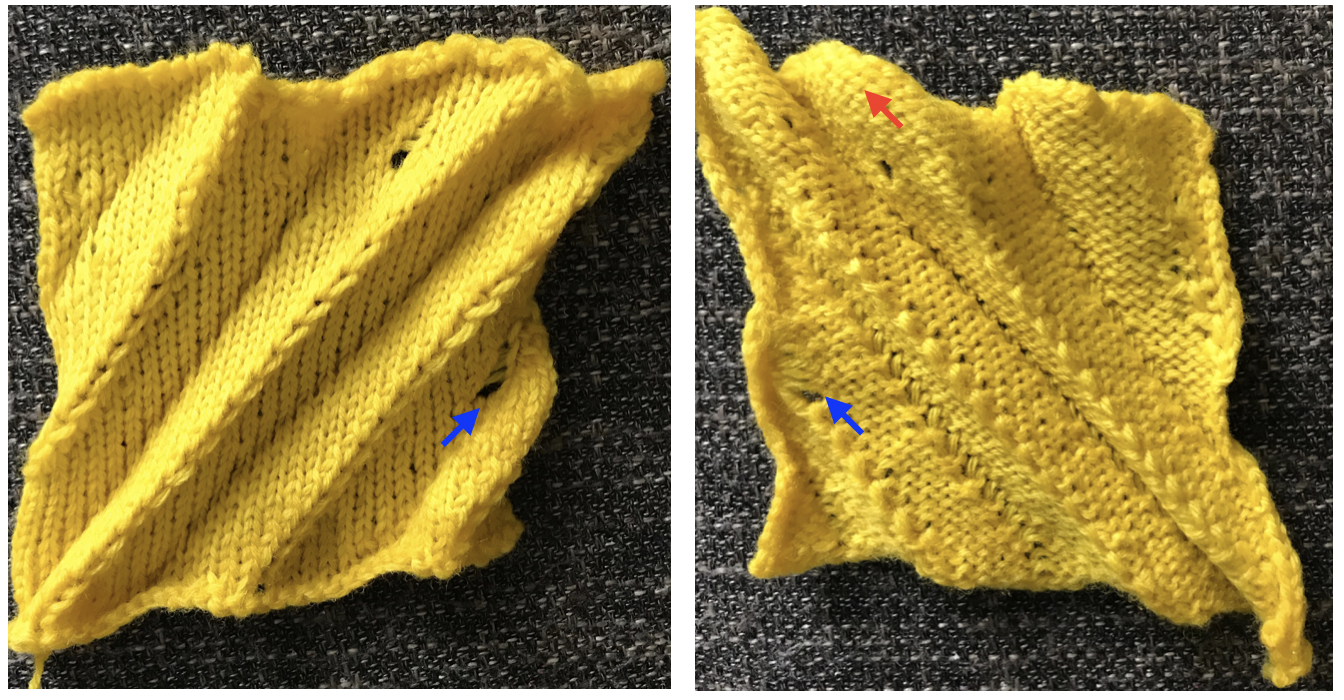
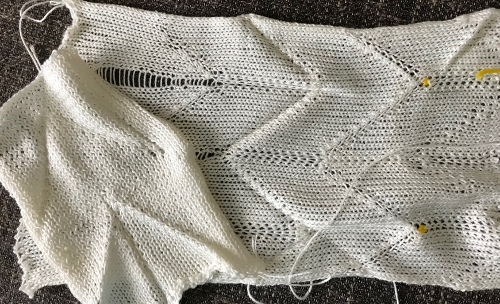
The automated test swatch: 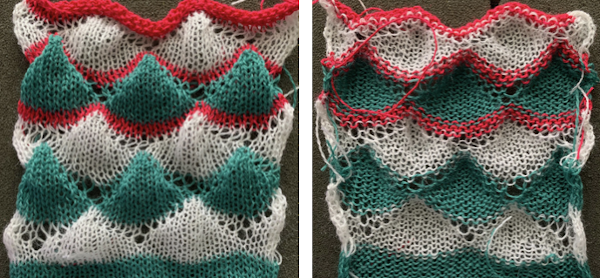 Preserving the 3D texture relies on using yarns with “memory”, ie wool and avoiding aggressive blocking. Using thinner yarns makes the stitch formation more evident. Hard pressing, in this case, knit using acrylic yarns, flattens the fabric considerably, and often, permanently. Both the hold/slip (top) and fully automated swatches (bottom) are shown.
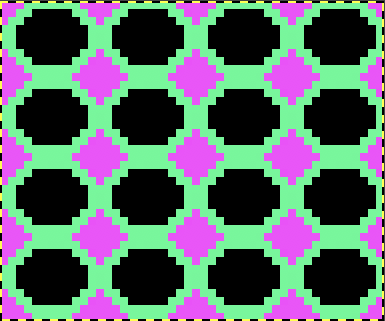
 2023: a screen grab from the shell charts was cropped to its outline, opened in ArahPaint, and using the program’s tool “guess weave from grid“, the 36X98 png was obtained with a few mouse clicks,
![]()
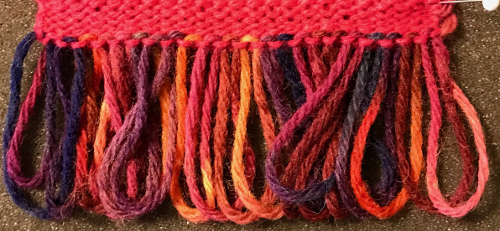
Isolating like modules and looking for any differences in each of them to prepare for a larger number of repeats across the needle bed in each half of the design  There are several methods for securing yarn ends both during and after knitting in the final pieces using these techniques. Testing such methods on swatches is the best way to determine what works for yarn and colors used as well as our own personal preference.
The pattern width may be adjusted to create considerably larger shells if desired. Punchcard knitters are limited to 8, 12, and 24 stitch repeats. For them, this would be the maximum size, including an added number of rows for contrasting color stripes, in this instance 4. 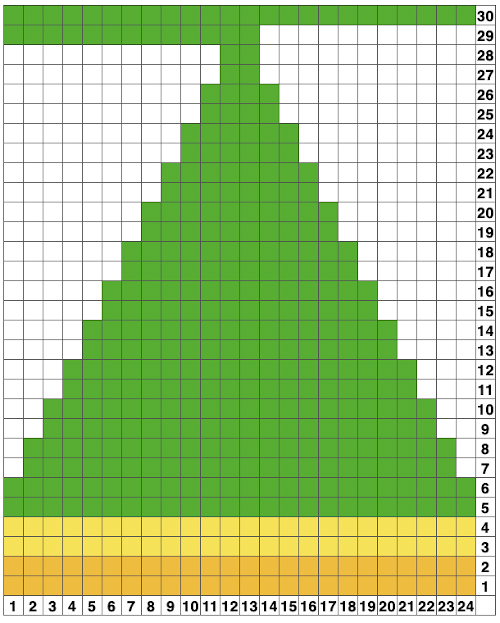 A return to the original 14 stitch repeat, illustrating a way to begin editing for an extra row in width at the bottom of the shape and ending on 2 stitches rather than a single stitch at the top
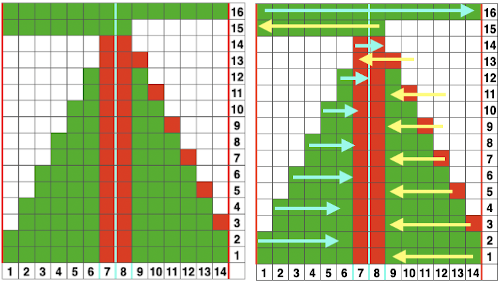 Imagining adding increases and or decreases for shaping at sides, which in turn could lead to an evaluation of switching to entrelac approaches when creating large shell shapes for similar effects. The 3D qualities and distortions are obviously missing from these illustrations.
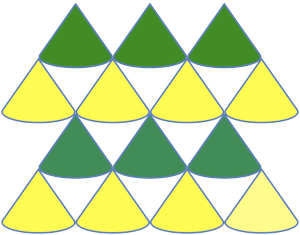
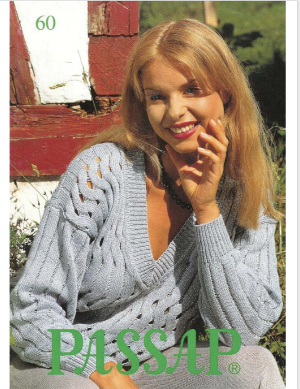
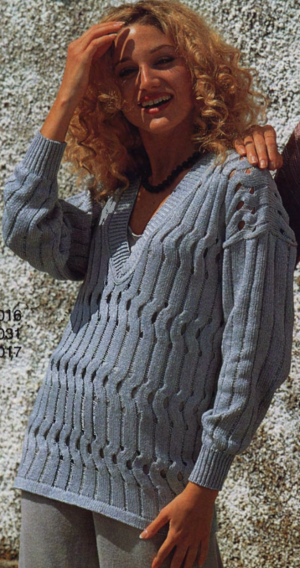
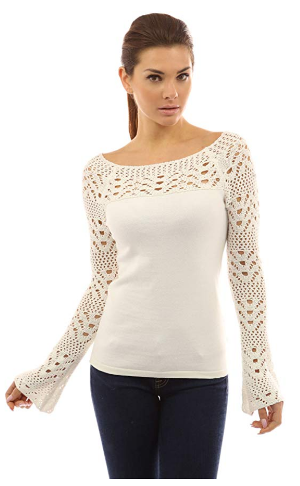
 A Prada sweater using similar shapes
 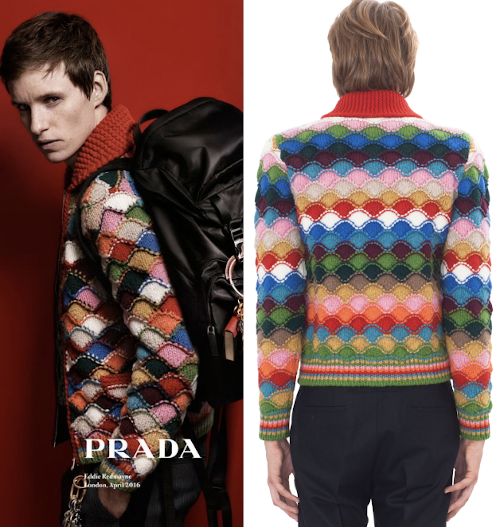 If you are interested in any large size clamshells, and intarsia appeals to you whether in hand or machine knitting, Cheryl Brunette has thorough directions for many such shapes, including 2 videos on shell shapes Part 1, and Part 2
More online inspiration using large shapes:
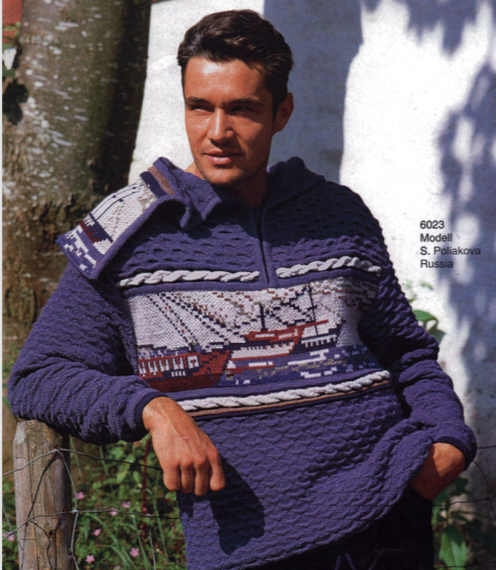
from a Russian blog
 a hand-knit blanket from Garnstudio
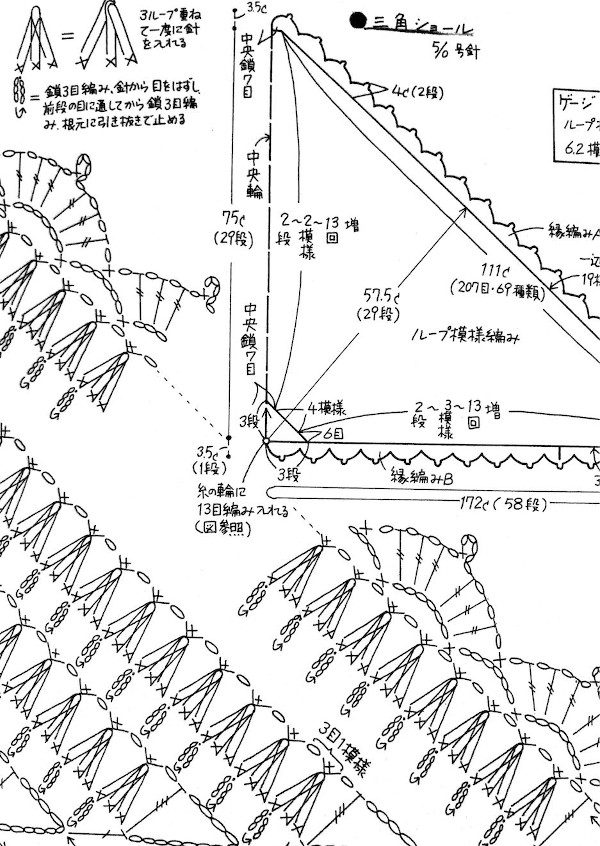
 ![]() the common illustration for shaping triangular shawls using such motifs
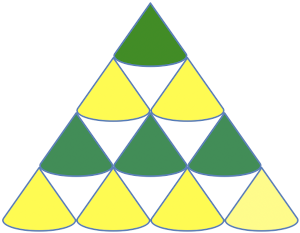
the common illustration for shaping triangular shawls using such motifs 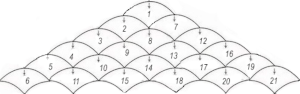 Similar pattern repeats are at times also referred to as scallops, fans, or scales. A “scallop” design
 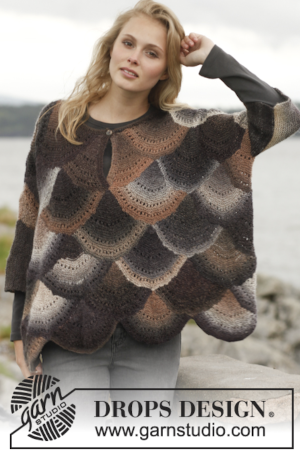 a “fan”
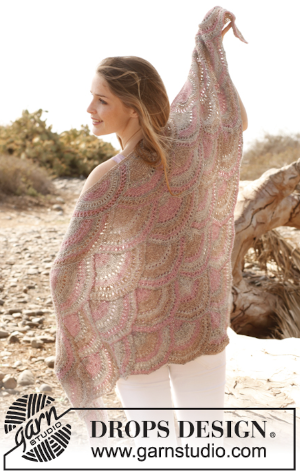

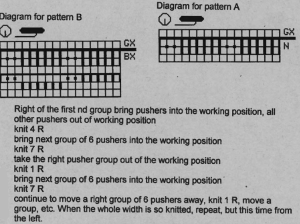
 and its accompanying punchcard repeat:
 UKI is no longer available. I recently acquired some
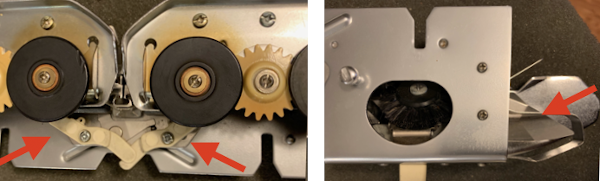
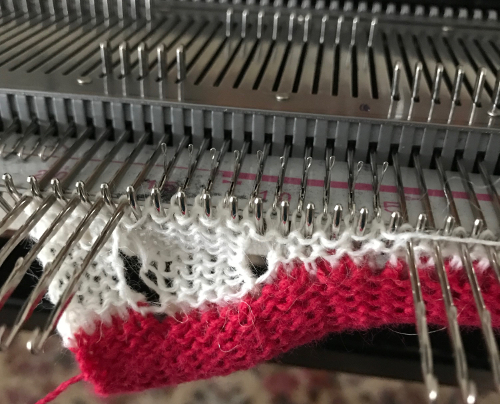
 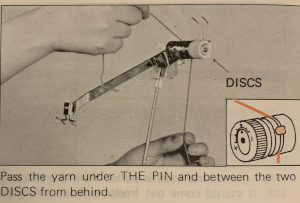 Here the white yarn shows position beneath the pin
 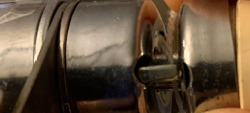 and scotch tape in place to adjust the amount of pressure exerted on the elastic.
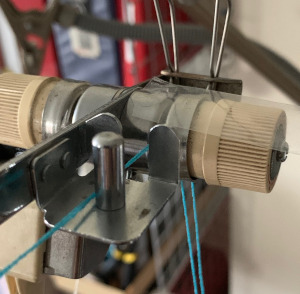
 Thread lace produces a single set of floats (in this case the elastic), the white border is not visible in the repeat below, it is the same as the above fabric, with colors reversed. I prefer the single float backing. In addition, for these fabrics the elastic is placed in the A feeder, the yarn in B
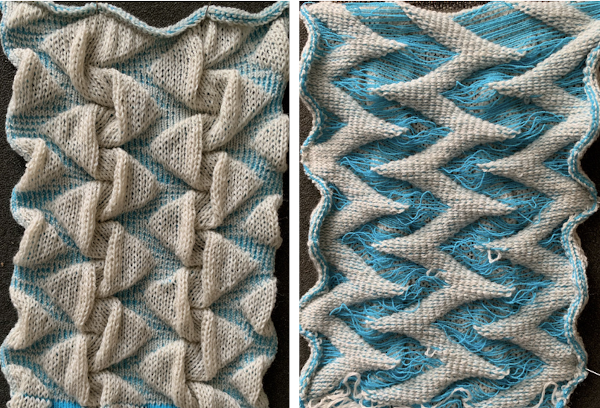
 A second thread lace variation:
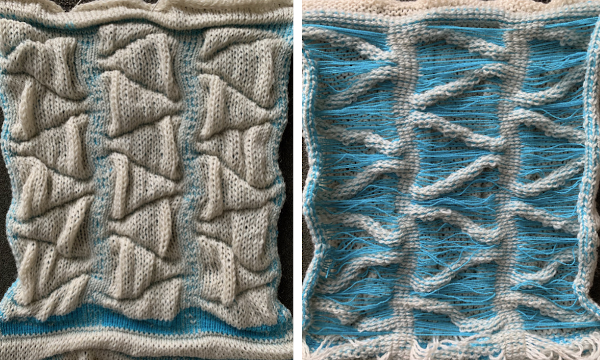 The multiple folds and creases, as opposed to smooth blister in all the above, are very interesting to me.
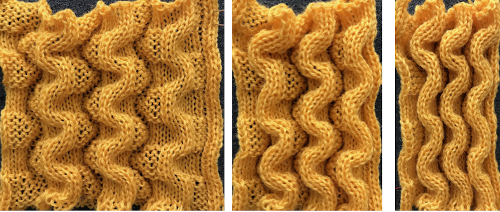
 The spots, where the elastic and yarn knit together, are compressed, so the results are quite different than what might be expected from studying the chart
 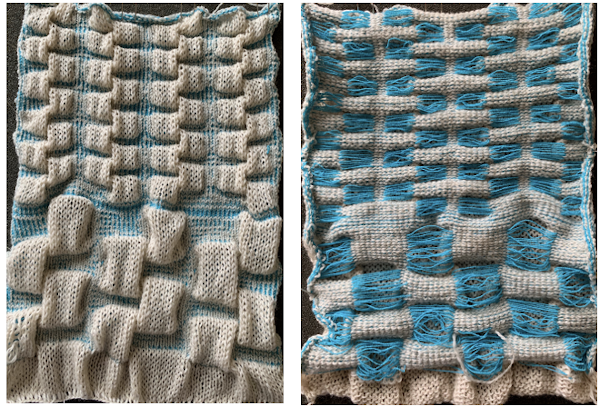 A quick, imperfect sample using a fine cotton and a single strand of the elastic, each with its own upper tension disk adjustments.
 Here the same pattern was executed on the same number of stitches with the white wool used above, but the elastic was plied with a 2/24 acrylic yarn and knit as DBJ with the blue, stretchy combination creating the
 I was curious to try a pattern previously tested in an all wool
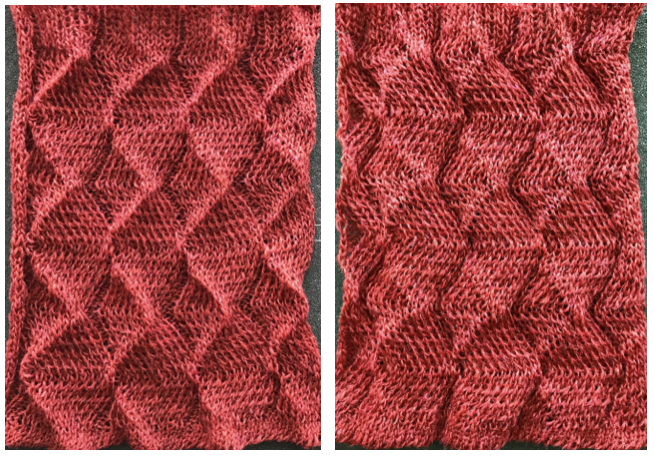


 Working with a similar arrangement I decided to try having patterning on the top bed, with the aim to tuck on the single needles in work in the repeat (bottom line of black squares). Not all ideas are an immediate success. Wanting to see the effect on the single-ply wool I began with that at the tension that appeared to be required for knitting it along with the elastic and stitches were far too loose.
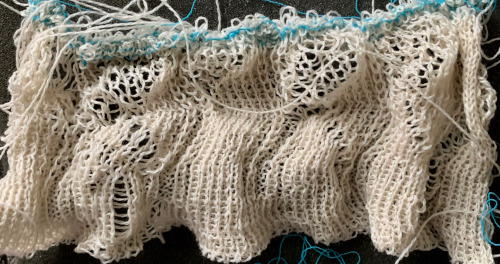 I had more success and a bit better definition of the fabric by knitting with both strands together from the bottom up. In an effort to attempt to have better color distribution I used the plating feeder and had some issues with stitches not knitting off properly. The result was not significantly different than that obtained by simply feeding both yarns together. When using plating feeders both on the single and the double beds one of the yarns may have a tendency to jump out, to prevent that from happening here is one “hack”.
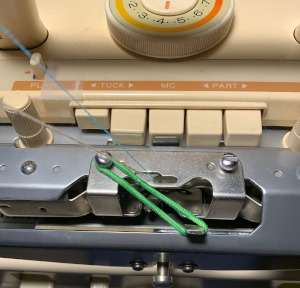

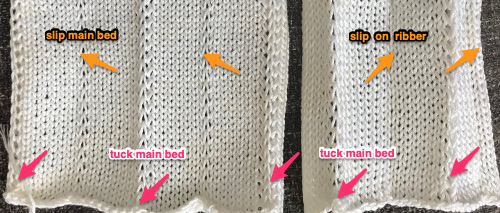
 The same yarn as above, also knit in tuck setting, showing the difference in size and dimension between slip setting on left, tuck on right
 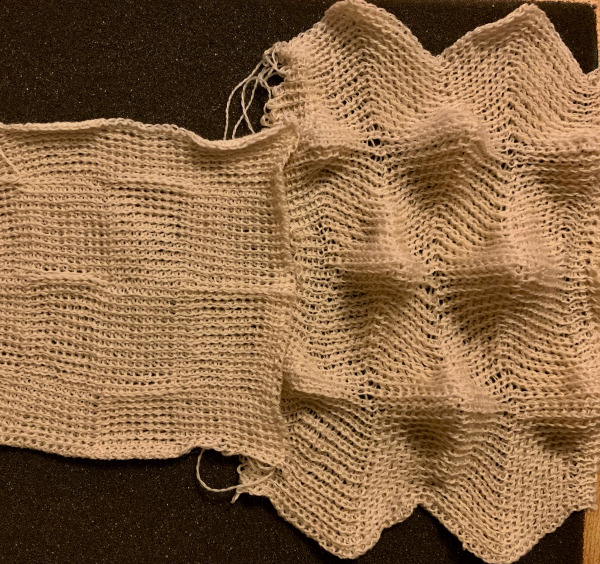 As with any knitting, keeping an eye on what your yarn is doing still matters. Such as this will lead to a series of circumstances that may bring your project to a far earlier end than planned ;-(
 A very last effort at attempting the scales with elastic and wool knit at a far looser tension that in previous tests, ended when elastic broke as a result of above, IMO an unremarkable fabric
 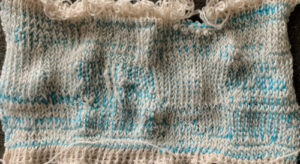 For more swatches and information see post on
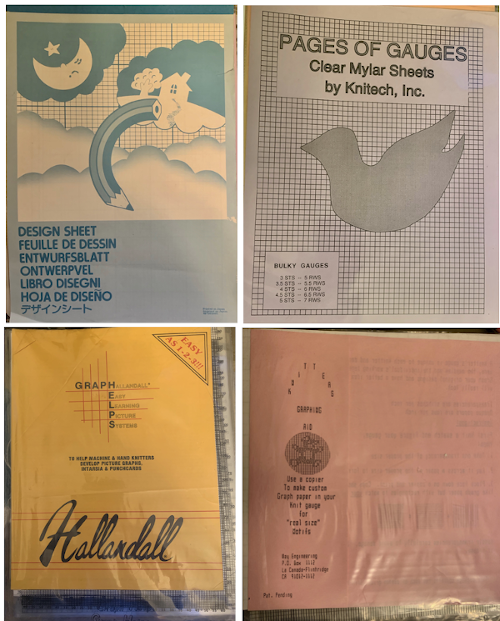
 the initial method:


 following that up, I planned for the 60 rows needed to complete the repeat, hid 30 rows, using this menu
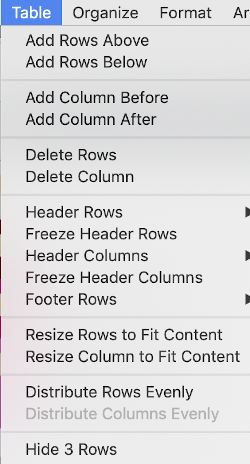 copied and pasted the black and white repeat on the above right, then unhid the 30 hidden rows (see previous posts using command key selections), having a new color separation repeat, created the final 2 color BMP in Gimp (whew!)
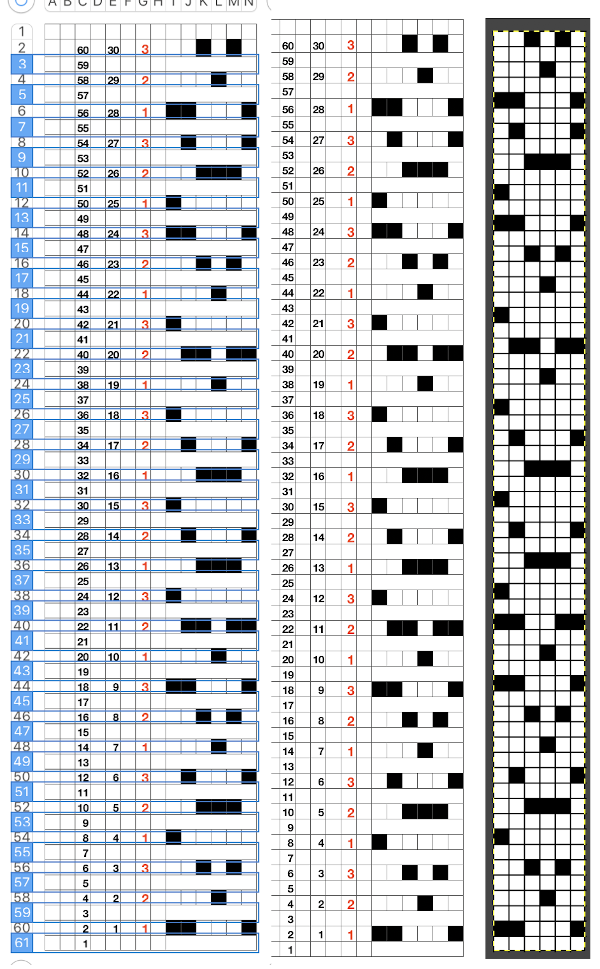 Since my separation is planned on 2-row sequences, I began with COR and my preselection row was from right to left.


 Again, there is some bleed-through, and even with this technique there is some elongation of each of the shapes, but less so than with other techniques. The backing of all these fabrics produces single lines in each color used
 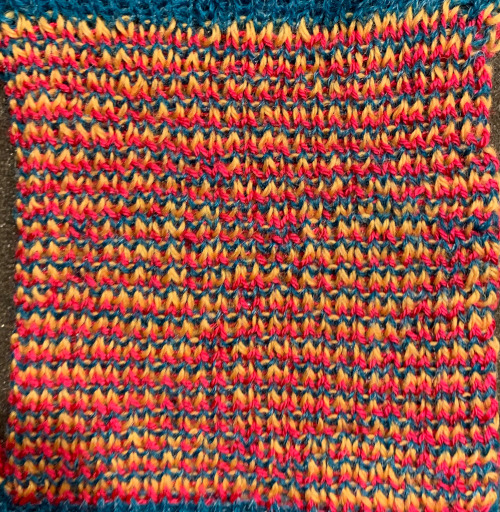 Even fairly small repeats can take time to color separate in this manner. The technique, however, is the only method available to punchcard knitters. Electronic machines with download cables and varying software open a very different world in terms of ease and range in repeat size possibilities.
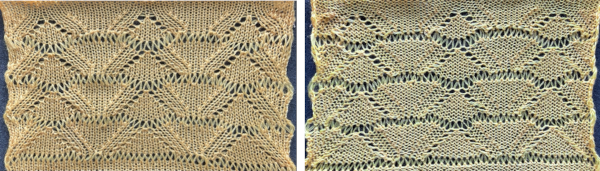
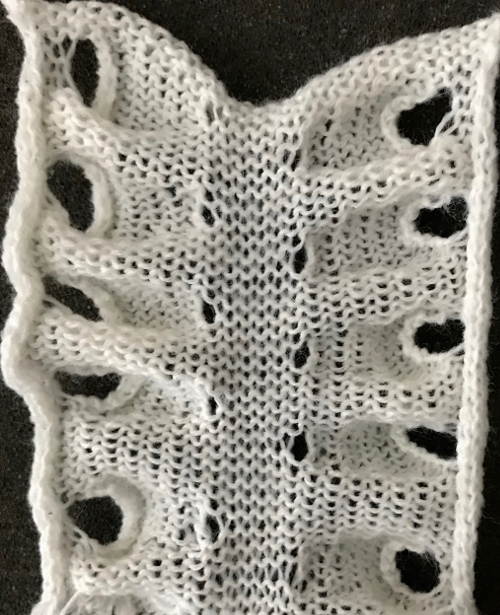
 At about that time I came across this image on Pinterest.
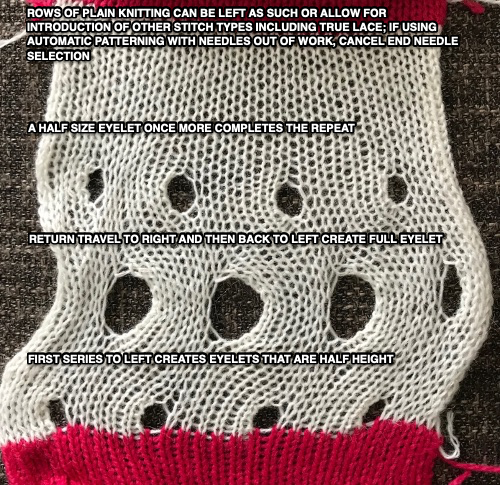
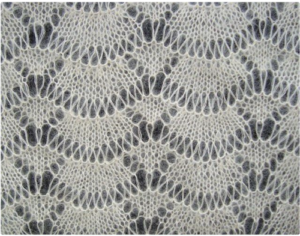 It combines transfer lace and long stitches, has characteristics that make some lace patterns unable to be reproduced on home knitting machines. Upon inspection, one will see that the number of stitches varies in different parts of the repeat. Aside from creating eyelets, the smaller triangular shapes increase in width, the fan shapes are decreased by half on their top row. Long stitches are created across all needles in work, then they are reconfigured so the center single stitch of the triangle and the center 2 stitches of the fan shape realign in the same position. The number of stitches at the start of the pattern and after the long stitches are created remains constant.
 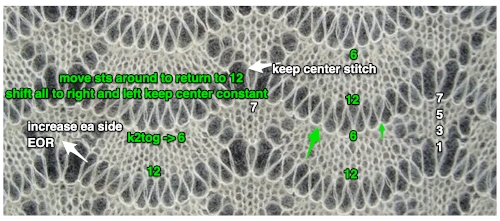 Trying variations on inspiration sources can lead to success, failure, somewhere in between, but also increase learning and skill that will carry over into other knitting techniques, even if the results are never used for a finished piece.
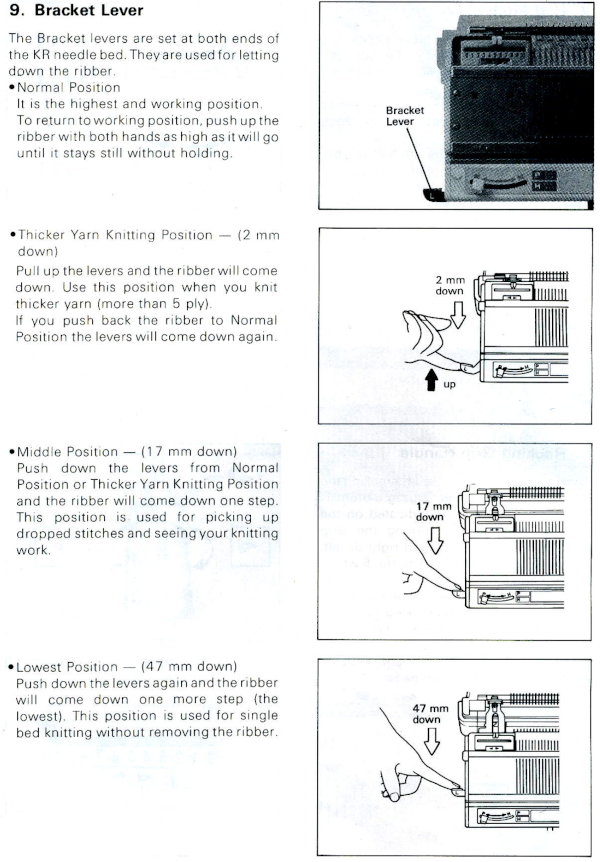
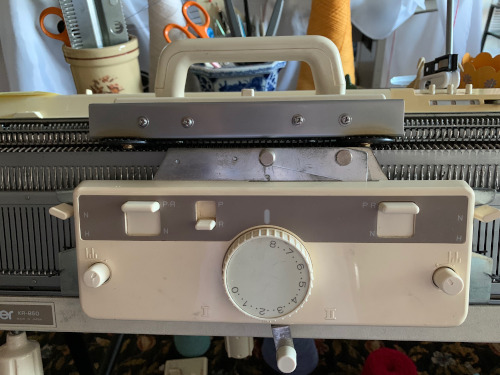

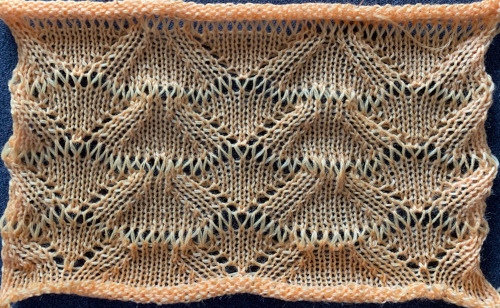
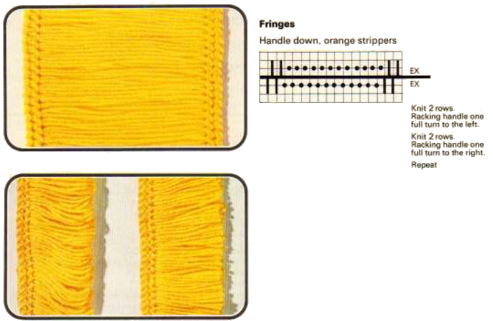
 I found making the transfers easier an the process more visible if I dropped one side of the ribber to the second, 17 mm. position
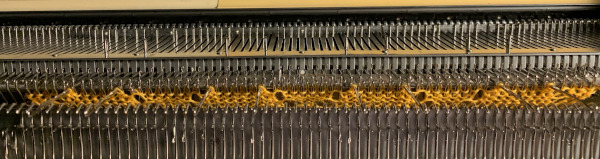
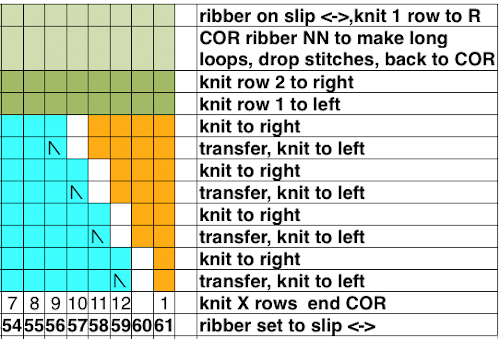
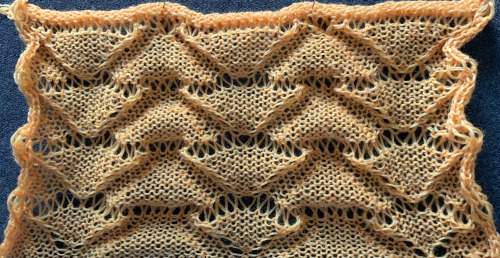
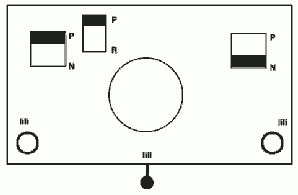
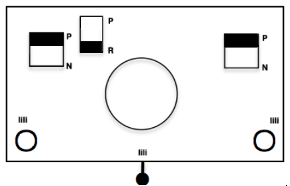 The ribber is set to N <– –> for three rows. On the first pass, all its needles will pick up the yarn, creating loops on every needle
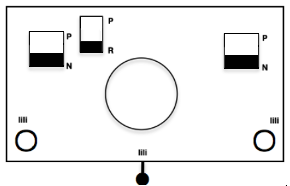
 With the ribber carriage alone, still set to N/N, free it, and make two passes to and from its starting side. The first pass releases the loops, the second returns it for coupling with the knit carriage. Below the long loops can be seen. My needle tape is “somewhere”, has not yet been returned to the ribber after my racking handle adventures were completed.
 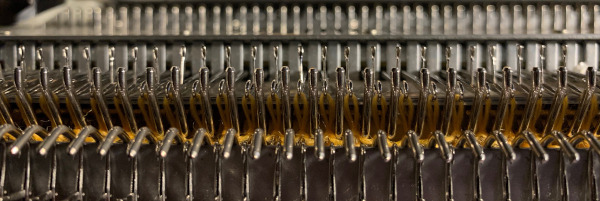 Return the ribber settings to slip in both directions, and repeat the process. Dropping the ribber to the lowest position at any point can verify goings-onHere one row has been knit on the main bed only, anchoring the loops, returning carriages to the opposite side prior to starting transfers once more
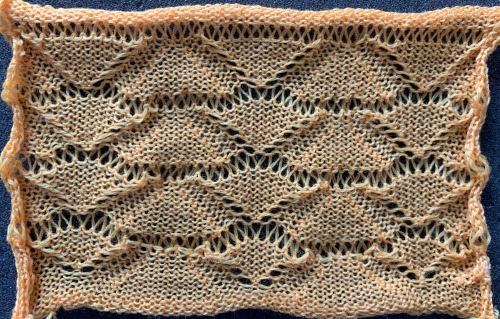
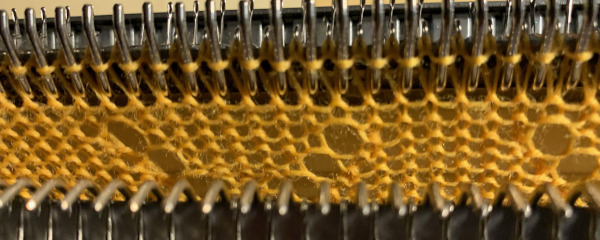 A word of caution: if loops are picked up on any single row that in theory was set to slip and was to be worked on only single bed, check to make certain the tuck lever has not been accidentally brought up to the tuck position. Although tuck <– –> can serve for a free pass on the main bed, having this setting on the ribber will create loops on all needles in work
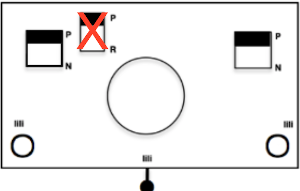
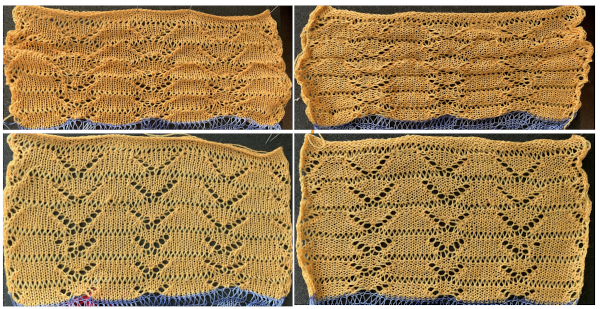
 I cast on 55 stitches 27 left, 28 right. A ribber comb and weights are required.
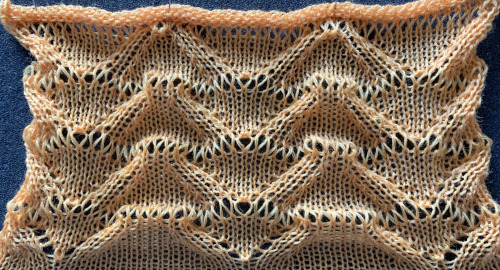
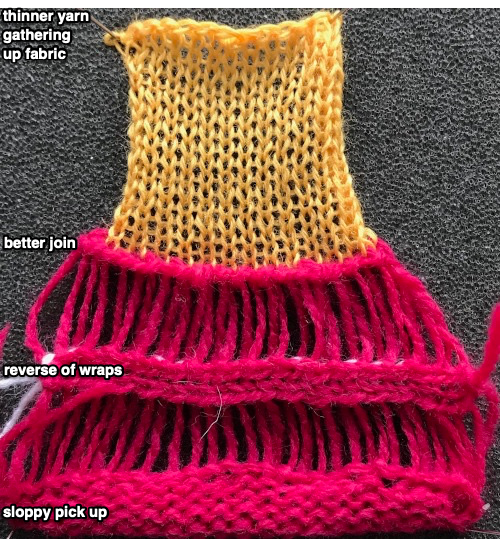
 e wrapping with second yarn before moving to left
 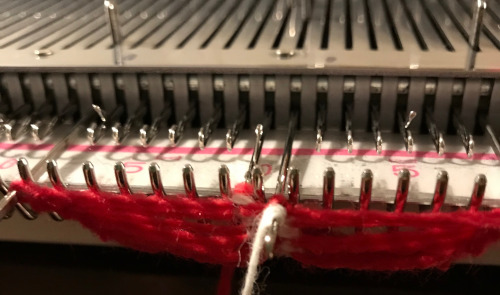 e wrapping with second yarn prior to returning to right, completing a sideways figure 8, end stitches out to E before prior to each carriage pass
 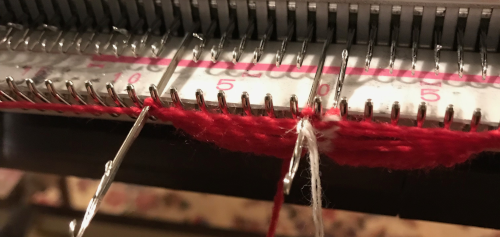 When the required number of rows has been knit, end COR. Unravel the first stitch on the right,
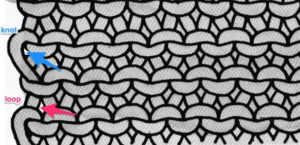
 Using thinner yarn for knitting after the join even if on the same number of stitches, will gather the fabric
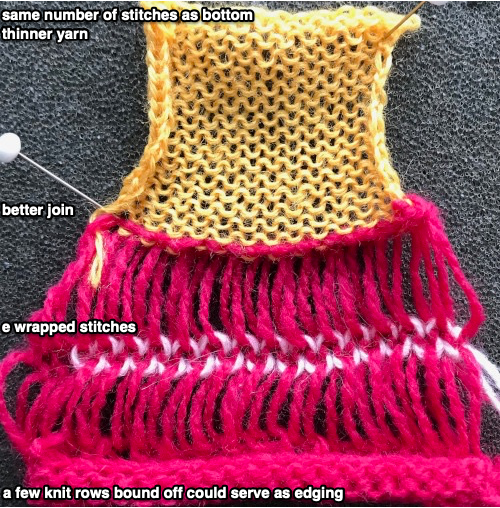
 More on seaming and joining knits
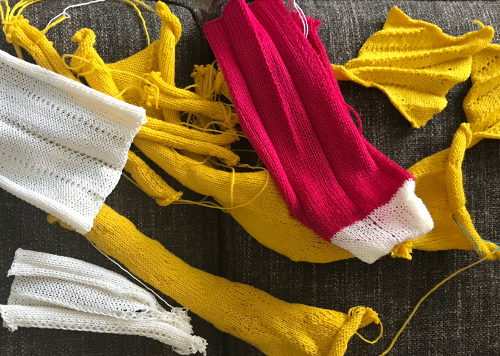
 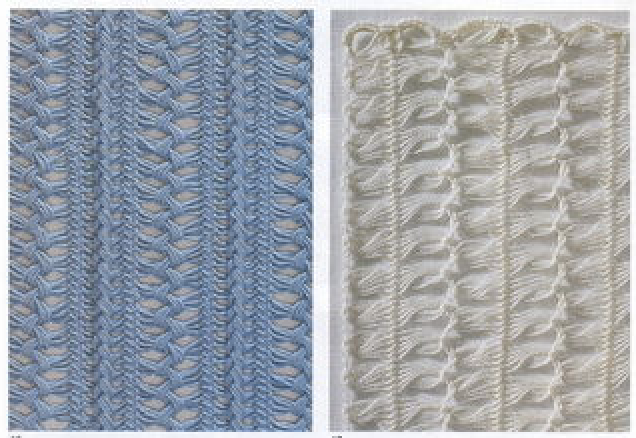 strips of different colors used
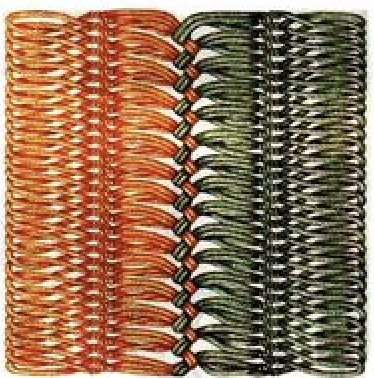
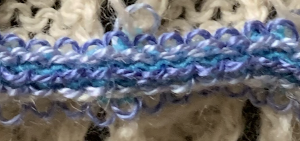
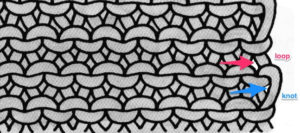
 The convention for joining strips of machine knitting by crocheting or latching side loops together suggest having a ladder space (white square, one or more may be used) and a side edge stitch on either side in segments of the final piece ie. afghan strips.
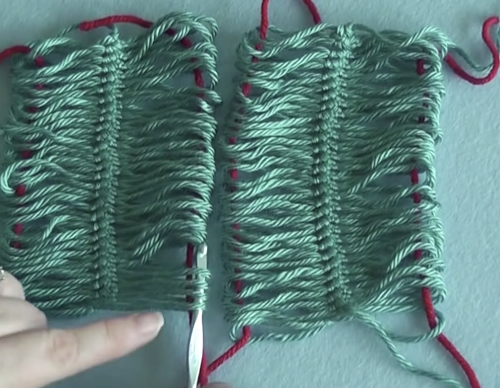
 A partial illustration from Pinterest from an unknown source showing how the loops coming together to make shapes might be charted out: the ovals represent chain stitches, the v slip stitches, the different colors the finish of a complete strip’s edge
  Tuck lace is a fabric produced with needles out of work in combination with tuck patterning on the main bed. Patterns for it can serve as the starting point for either the center strips in double-sided loop fabrics or they can be worked in repeats with wider ladder spaces between them for a far quicker “pretend” version. This is one of my ancient swatches for the technique from a classroom demo, using the 1X1 punchcard, shown sideways to save space.
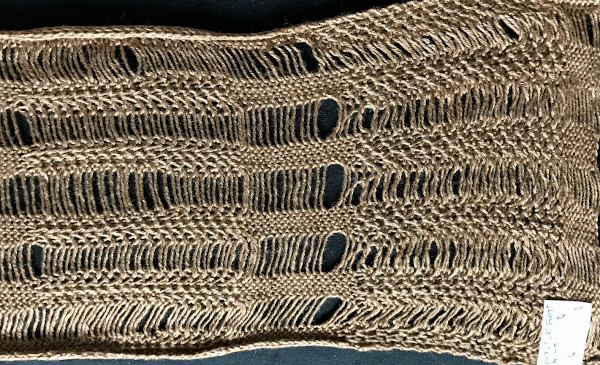 The card is used at normal rotation. Any time there are needles out of work, end needle selection is canceled to maintain patterning throughout including on end needles of each vertical strip. Tuck <– –> is used resulting in texture as opposed to simple stocking stitch and ladder fabric (center of the swatch). In the right segment, the ladder threads are twisted, in the one on the left they are not. This is what is happening: for twisted ladders on an even total number of needles have an even number in the selected pattern (4), and an even number out of work (6). This is one fabric that definitely benefits from the use of some evenly distributed weight and a good condition sponge bar. End needle selection must be canceled
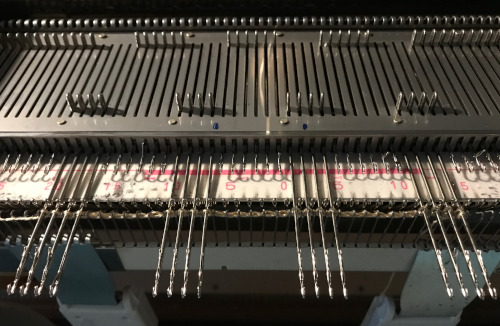
 Here the stitches are arranged with an odd number in work (3), an odd number out of work (7)
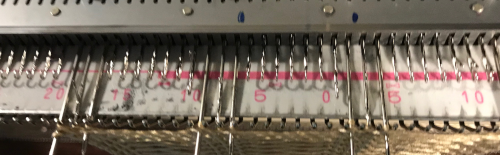
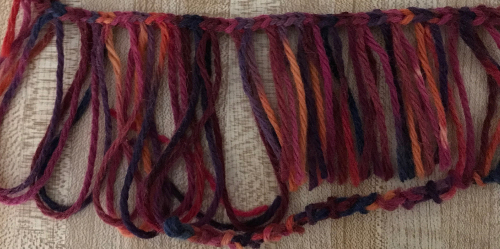
 I made a few items with twisted strands inspired by those seen in wovens produced by my weaving friends. I have no photos of those, failed to document my work for quite a few years. One excuse was the quality of any photos I attempted, and even back in the day, professional photographers charged $180 an hour plus model fees if used. It seemed that adding the cost of such photography to limited edition runs that were planned for sale would make the wholesale price higher than the market would bear. We all make choices based on information we have at that particular time, which was long before the recent easy-to-use photo technology.
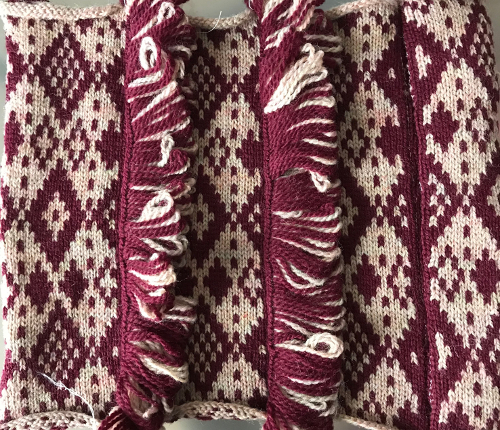
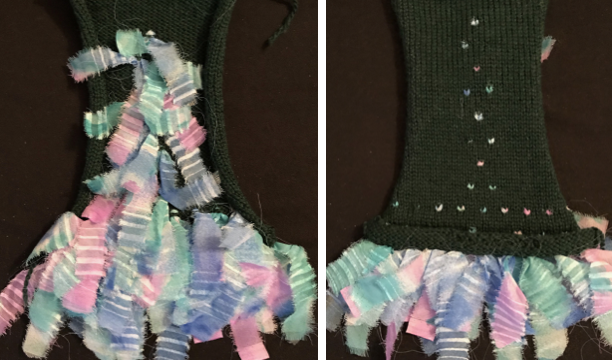
 Here a ladder space created by needles out of work is left between vertical fair isle repeats, producing a fringe in 2 colors. The design was not planned, a standard punchcard was used for the purpose of the demo. A planned repeat would have more impact. End needle selection is on, which is usual in FI, not for most patterns with either tuck or slip stitch settings combined with needles out of work, is also true here so that a vertical line on each side of the needles out of work between repeats aids in sewing the strips together. Width is limited since the fabric will be gathered by seaming and become significantly narrower and likely turned sideways. Both sides are shown. Joining could be planned to occur only at the bottom of a piece if desired, stitching lines will be less visible if thread color matches that of the yarn
 A needle in work away from the edge produces a side “fringe” followed here by felting partially, cutting the single edge stitch, and finishing the felting process
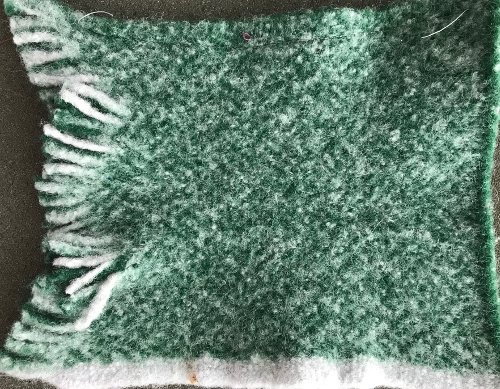 Adding thicker or multiple strands of yarns in
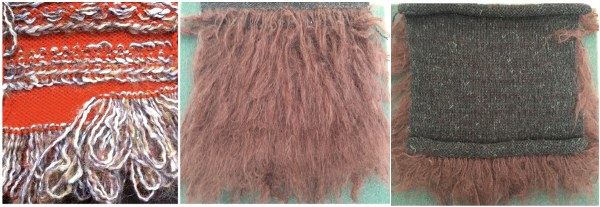
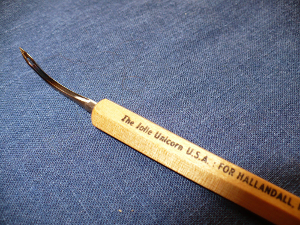 Most often every other needle use is best. Here lace and pom trims are used, purchased fringes of all sorts could be applied the same way anywhere in the piece, joins to knit can be seen.
 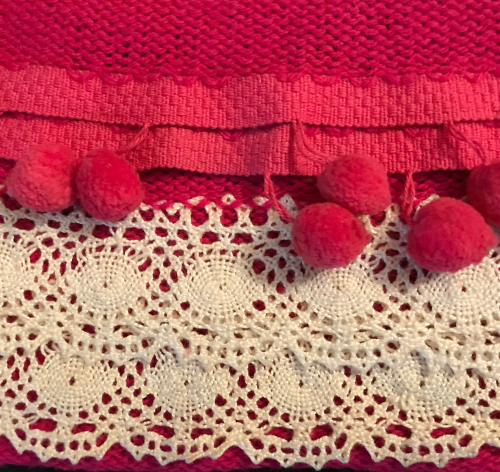 A length of roving may be twisted in its center and applied as you knit. For a while mittens using it as a lining for warmth were popular. A video by Carole Wurst shows a method used in socks
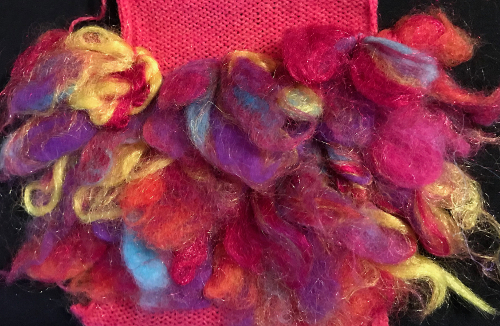
 The thickness of the yarn chosen is of critical importance. When I first attempted to knit a version of it on my 930 I encountered problems. To start with, I kept dropping off the stitches on one side or the other. I checked the ribber alignment, proper placement of the cast on comb, switched ribbers, and carriages, and continued to have problems. After all that, the solution turned out to be simply adding another 4 stitches (2 on each bed) toward the center of the piece (I did not count). Here I used a 2/24 which obviously does not have enough body to use as an edging. The Brother equivalent for the Duo setting is half fisherman rib, where one carriage knits in one direction, tucks in the other on every needle for every 2 rows knit, while the other bed’s carriage does the same, but in opposite directions. I used 3 needles on each side rather than 2 as in the Duo repeat, starting with the first needle in work on the left on the ribber, the last needle in work on the right on the top bed. One may begin to knit on either side, but when manually setting the cam buttons lead with settings so that first stitch knits as it moves to the opposite side. Using waste yarn at the start of the piece will produce a better cast on edge for the trim. Operating from the right:
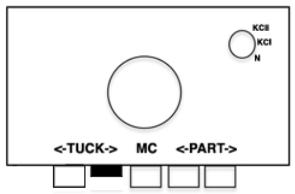
 A 2/11.5 acrylic provided more of a tension adjustment challenge but made for a better fringe.
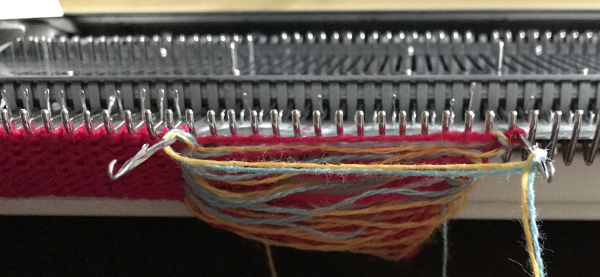
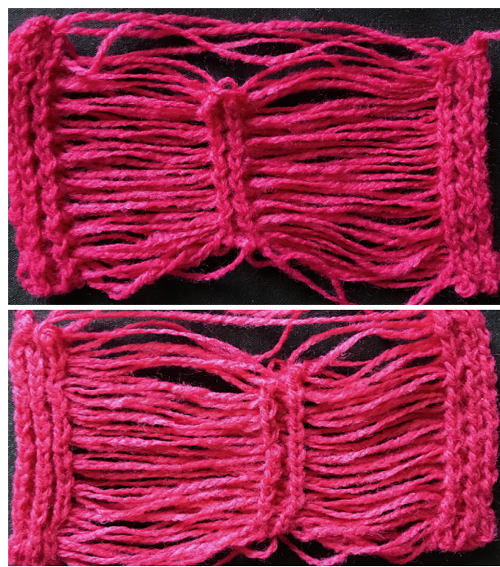 The first and last 3 stitches on either side were transferred to the top bed and bound off, the center stitches were not, allowing them to be unraveled if desired ie in case the fringe is to be folded in half. Those extra center stitches also provide a guide for cutting either down their center (bottom of photo) or on either side of them (toward the top). I found the latter method to produce a cleaner cut line
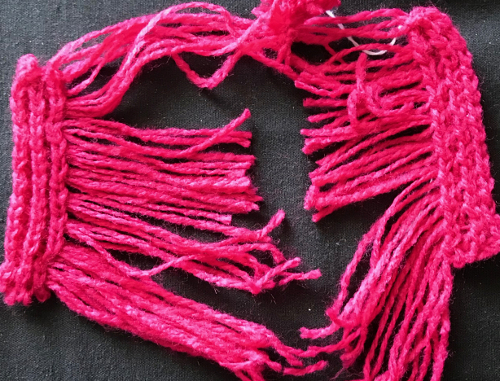 Suggestions for going wider with racked half fisherman rib on Japanese machines: begin with needle arrangement below, out of work needles can be as many as needed, set up and cast on with preferred racking position ie on 5, knit several rows in waste yarn making any adjustments needed so stitches knit are formed properly, weigh appropriately.
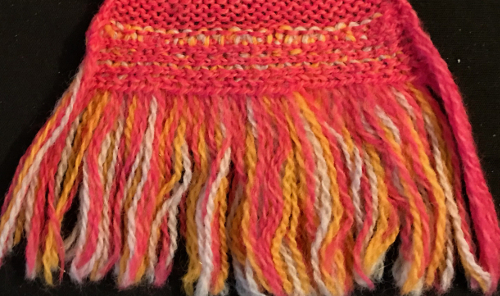
 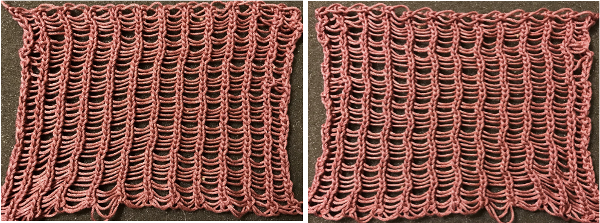 the edge that holds the fringe together is to be very narrow (or even added as one continues to knit) and one wishes to work on the single bed there are several options. With 4-ply and a “matching color” 2 ply I began with the top needle arrangement, and then switched to the one below it, knitting on a 4.5 mm machine.
  A permanent cast-on needs to take place in the preferred method over needles in work knit 2 rows. The stitch on the second needle from the left is going to want to stretch and tends not to be stable. To reduce that happening, there are 2 options involving the second strand of yarn. Here using a 2 ply helps serve that purpose and keeps the fringed strands closer together. The slower method is to remove the second stitch from the left on a tool after every 2 rows knit, then bring the separate yarn strand behind the now empty needle first from the right, then in turn from the left, returning the removed stitch to the machine, knitting 2 rows. I found that too slow for my patience, switched to just laying the second strand over needles before knitting each pair of rows, and decided to eliminate the out of work needle on the left side, moving the second stitch in work to its left.
 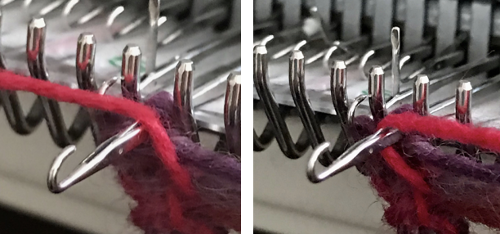 The single stitch on the far right of the chart need not be bound off. There will be 2 options after the work is off the machine. One is to unravel the single stitch column on the far right if loops are the goal, or cut it off, leaving a fairly good trimmed edge here, and what, in this yarn, appeared to me to be an acceptable edging. The 2 edge stitches on the left in my swatch did roll, making a very tight edge. Adjusting the tension used to change that effect would be another choice. Yarn use and personal taste contribute to a range of “successful” results when using any of these techniques.
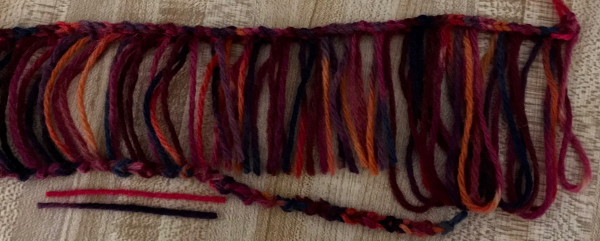
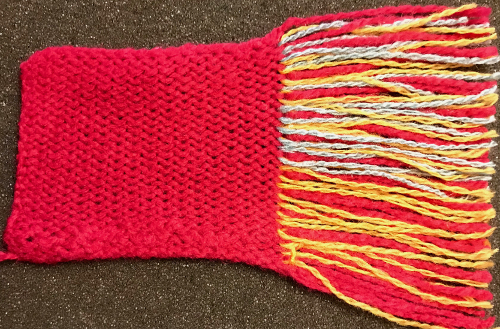
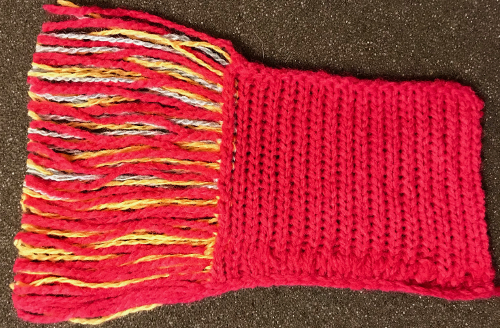
 At the top of the piece, I transferred and doubled up the stitches on left, bound them off, and the yarn end(s) can be woven back into the cord.
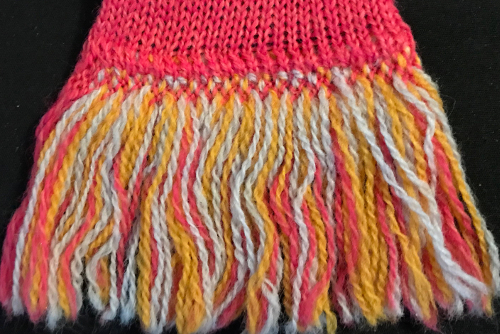
 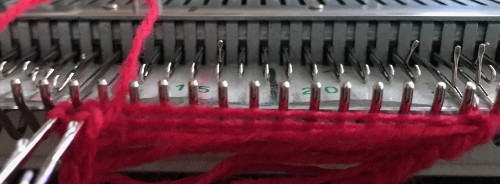 The side with the transfers is the “public” one, the finished fringe is usually hand sewn on, but it may also be used to cast on or be applied to several places in the knit both close together or at various intervals. Tension changes may be observed viewing from left to right, as well as the difference in length of loops as opposed to after the cutaway edge. The third stitch in work on the right may make for a more stable cutting line if looser tensions are preferred. Because the sinker plate used on the single bed has brushes and wheels in use, the width of the fringe can be considerable, without having to be concerned about stabilizing the center as it is when working on the double bed.
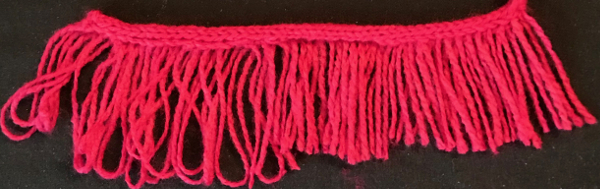
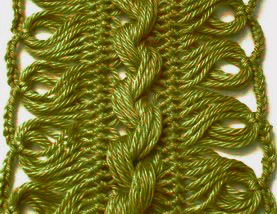
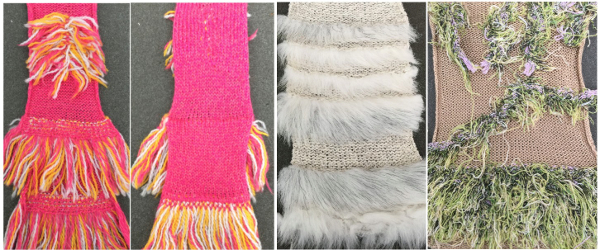
 Long loops are best in a thicker yarn, here they are shown in an every other needle arrangement using mohair on 2/8 wool ground
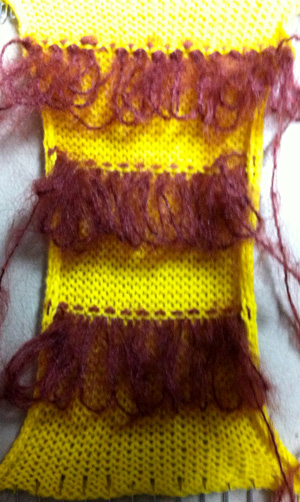

 With ribber in the down most position (4.5 cm loops)
 In this case, knitting ended opposite the fringe, only these stitches were bound off, not the single one on the far right
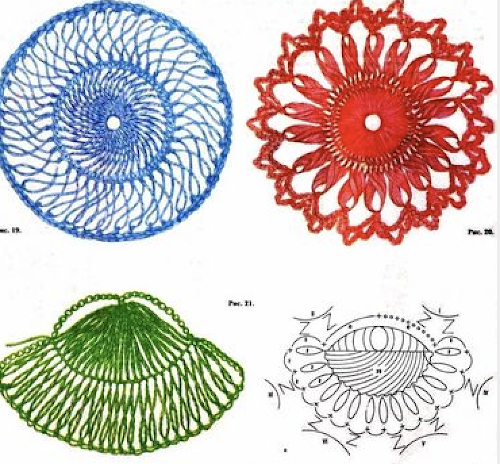
 Cut lengths of yarn may be added to edge or in the body of the knit, eyelets could be used as markers or for an all-over fabric, guiding placement. This illustration is from
 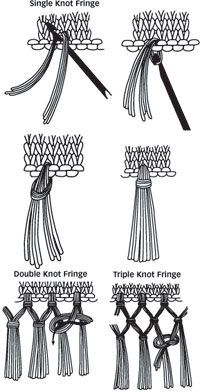 Fringes could also be crocheted or hand-knit, used to cast on the piece or be stitched in place upon its completion. I do not have the source for this, will credit it if I can find one
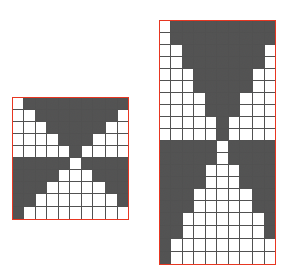

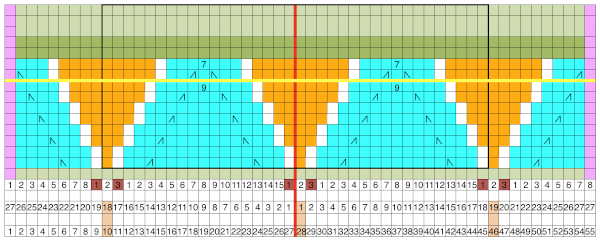
 tiled repeat to get a sense of the movement of the triangles:
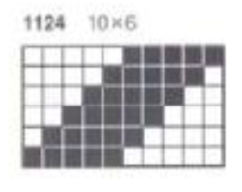
 note: the direction of the chart pattern repeat for 1124 is reversed in the blisters. It appears as drawn on the knit side of the fabric, where stitches are slipped and elongated to create the pintuck texture on the purl side
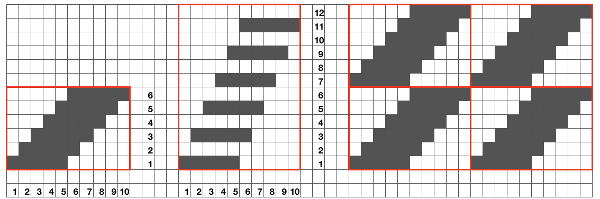

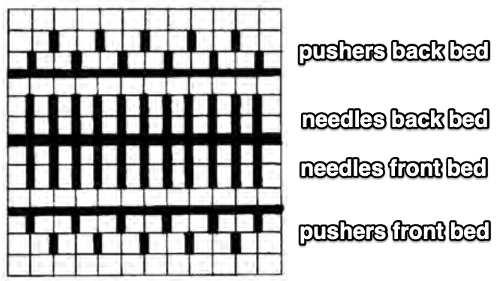
 In the Duo HX setting the front bed normally knits or slips according to the design for one row, and slips the next row. Again, the chart illustration is for the Duomatic and the lock there takes over the function performed automatically by the E6 technique. The back bed in this instance knits every row. In the E 6000 the front lock is set to LX (slip <– –>). The fabric created may be referred to as blister or pintuck (nothing to do with tuck stitch/brioche). The bubbly texture appears on the purl side. Stitches that slip on the bed with needle or pusher selection elongate, pulling extra rows together eventually, helping to form pockets that are sealed periodically by all knit rows. With pushers down, no needles selected the front (knit) bed skips/ slips associated needles. With the back bed (ribber) set to N, its stitches will knit every row.

 This shows the pattern as knit on the Passap, reduced to black and white squares
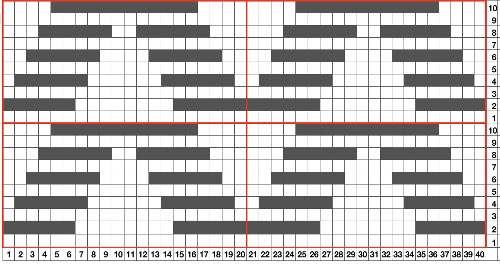
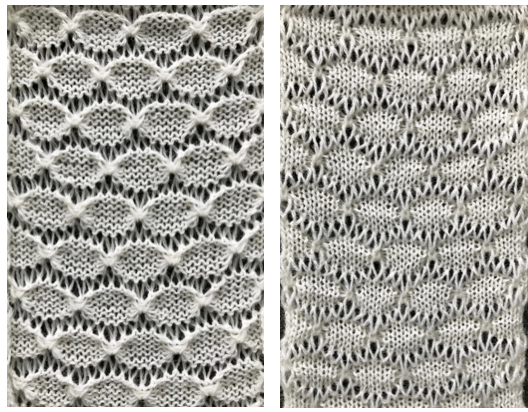
 Going for the safe repeat on Brother machine: color makes a significant difference in how visible the pattern will be. Both yarns are supposedly the same weight, the white was hard to knit, and there was a needle that dropped stitches regularly. The blue yarn knit with no problem
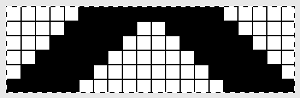

 The last swatch in the series: I am now able to use Ayab once more, img2track is having issues for me with its use on the 930. My repeat, therefore, is planned for the maximum width I may wish to test knit on the 910 machines, emulating tech 253. Every other row there is no needle selection on the main bed except for the first and last needle if KCI is used. On those rows the ribber only knits, there are more rows in the blister “pockets”. I knit the sample quickly, not checking every row, and in this instance had two dropped stitches on the main bed and no breaks. Yarns with memory ie wool are the best for texture retention, acrylics such as my blue yarn would flatten permanently if pressed, resulting in a very different fabric. It takes experimentation to sort out whether the extra step is worth the effort or is problematic during lengthier knitting
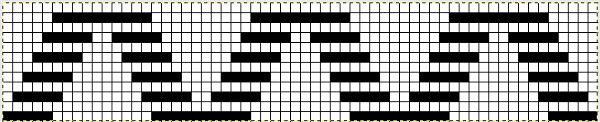
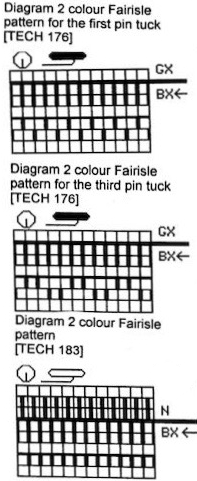 Tech 176: knits one color selection for 2 rows, then the alternate color selection for 2 rows; Pattern 1100,
  in the next sample the same repeat 1100 is programmed via the console and enlarged <–> X2, which means in the number of stitches only


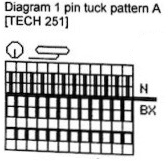
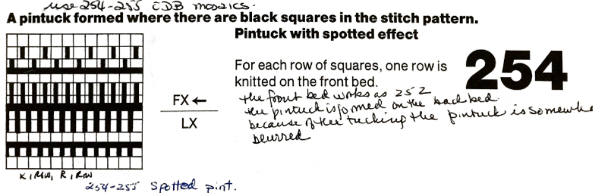
 the repeat is 20 by 20 stitches wide, E6 Tech 253 is suggested, white squares form the pintucks, the same technique used in my sample knit using console design 1124
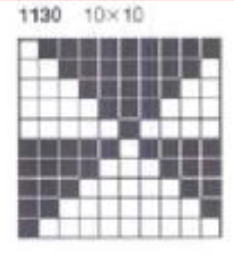
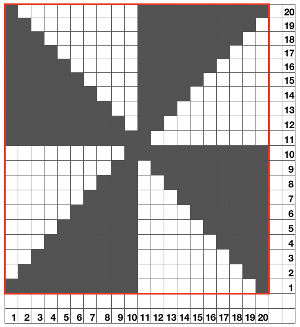 Working with simple shapes such as triangles can be an easy way to help one begin to understand how various techniques build up stitch or row counts, altering the original. Several of my DBJ posts are written using a cousin of pattern 1130 and include images of corresponding swatches executed on the Brother machine. In Brother, with rare exceptions (such as when needles are left out of work while in pattern) black squares (punched holes) knit, white squares (unpunched areas) slip. Slipped stitches are held until a black square or punched hole is reached, getting longer while the stitches on the opposite bed knit every stitch every row with that bed set to N/N. It is helpful to be using a yarn that does not break easily. Pockets are created of varying depths. As with any knitting, the color reverse option may produce an interesting variation or a “disaster” depending on the original motif. In the above chart, if knit as is, white squares would be slipped for 1-9 rows. Blisters of knit stitches will appear on the purl side. Tiling helps visualize the movement of the design in repeat.
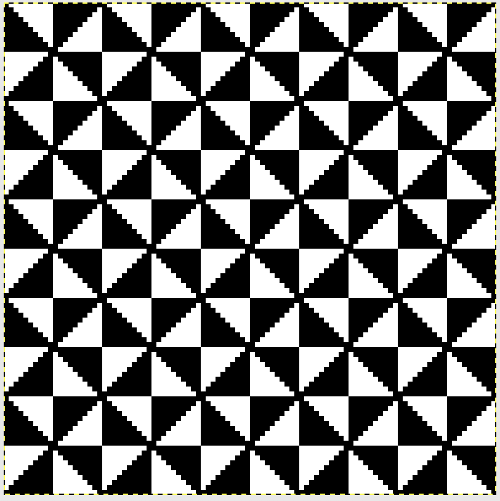
 its tiled view
 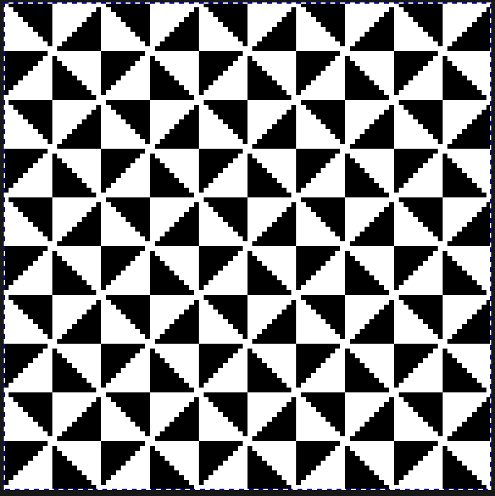 the expanded view of the original repeat emulating tech 253 now increases the height of the pattern to 40 rows from 20
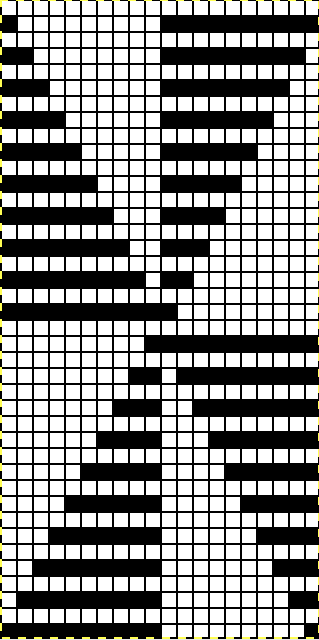

 Using the expanded 20X40 repat I did not have a slipped stitch issue such as yarn breaking, but because the pockets were so deep and so many stitches on the ribber were knitting for so many consecutive rows, the ribber stitches began to refuse to stay on their bed. I got this far: a large knit area can be seen, as well as slip stitch loops
 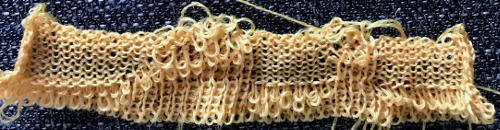 Can the same expanded repeat be used in another way? The color reversed version results in a subtle large scale pattern that might be quite interesting in a shiny rayon or other fiber
 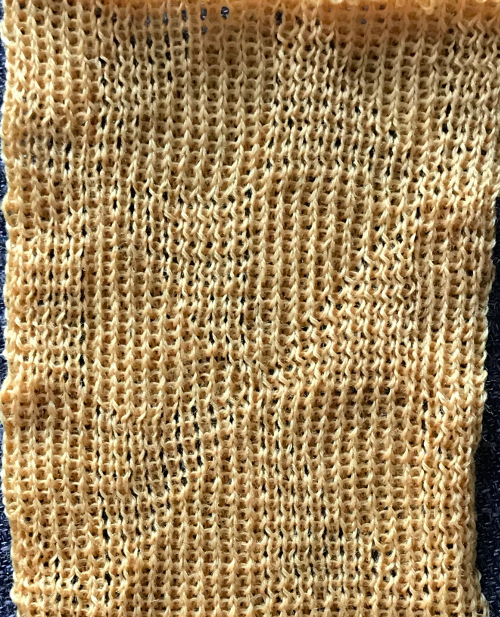 To review: Passap E6000 knitting techniques for pintucks are numbered 250-255. When using 250, 252, 254, the pint tucks are formed on the back bed on the needles that are opposite those with the pushers selected down in accordance with programmed black squares. The corresponding odd numbers 251, 253, 255, select pushers down according to programmed white squares (253 in the manual should say white, not black squares).
 with a touch of steam and light pressing
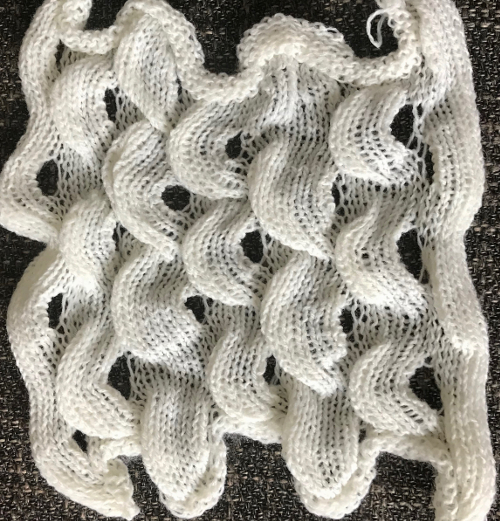
 This is the isolated repeat for converting the pattern to a file suitable for download
  and its mirrored version for knitting from the opposite side
 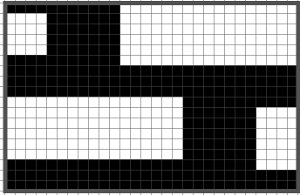 My test swatch was knit on the 930, using img2track. Because not every needle on the bed is in work throughout the knit, end needle selection must be canceled (KC II). The knit carriage after the preselection row is set to slip in both directions. Because only a few rows are knit on the red blocks in the chart, the result is subtle. The white yarn used in many of my tests happens to be a 2/24 acrylic, so on the too thin side, and likely to be well flattened if pressed.
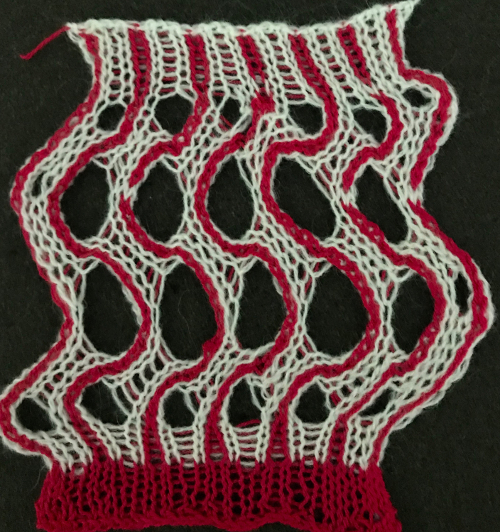
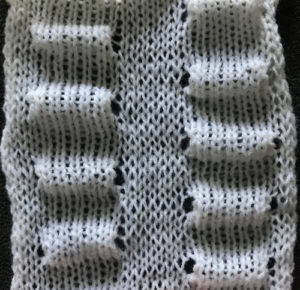 Often, the edge stitches on the carriage side will tend to be a bit tighter than those formed away from it. The same repeat may be used to create very different fabrics. Eliminating the all knit columns on either side of the center produces a piece with “ruffles” on either side of the center as the outer edge of each shape is no longer anchored down. The principle was used in knitting “potato chip” scarves popular in both hand and machine knitting for a while. Having a repeat on one side of an all knit vertical strip creates a ruffled edging.
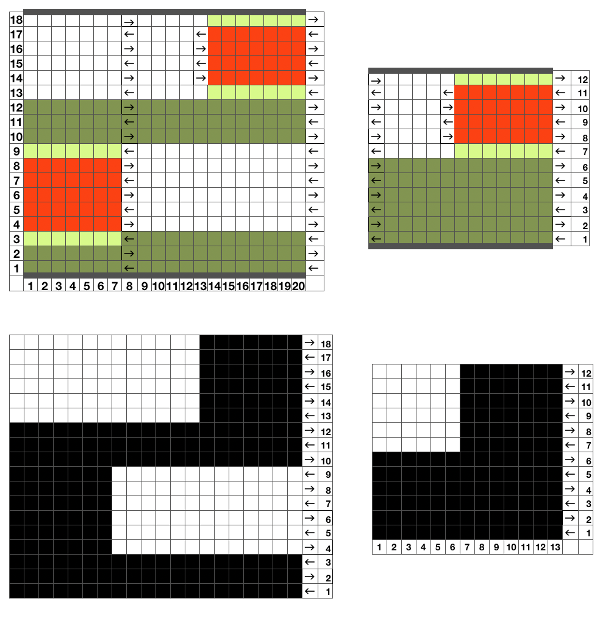
 Note the effect of the added all knit rows on the “wave” of the piece on the right.
 The shapes for the “bumps” may be changed, moving away from rectangular formats. Small repeats are used for the purposes of illustration here, but they, in turn, may be scaled up, rendered asymmetrical, vary in placement, and more. My design steps began with this idea
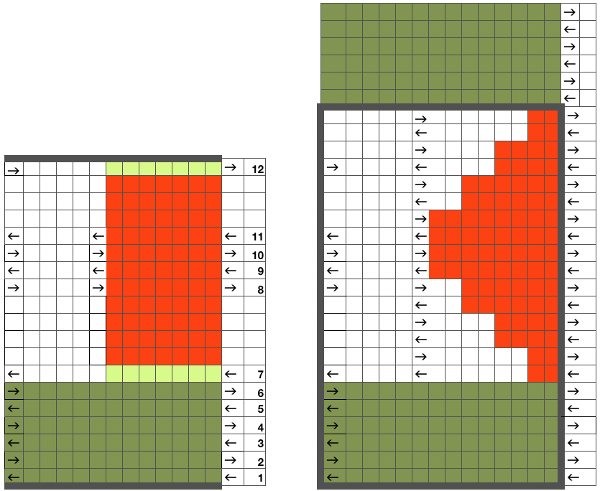 Following the goal to achieve bilateral placement along a central vertical knit strip, with vertical knit strip borders at either side, here shapes point in the same direction
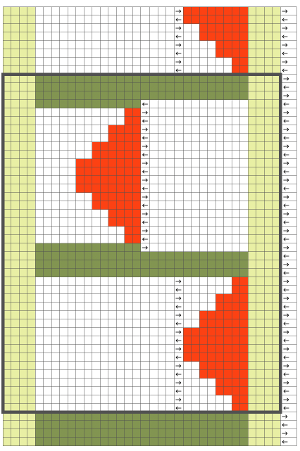
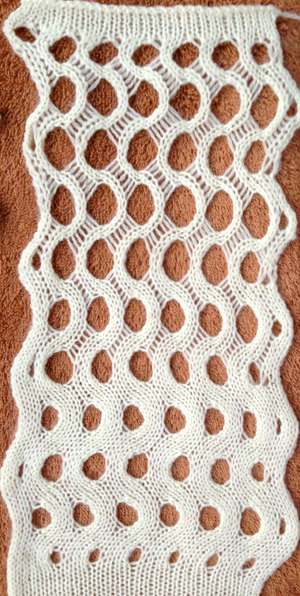
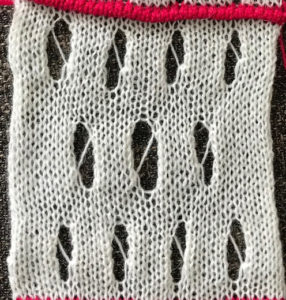
 I ran into an interesting problem for the first time. I had entered the row and stitch counts on my chart, used those counts to scale the image used for my repeat down to size for knitting, kept getting floats where there should not have been any, could not understand what the error in the repeat might be. What was happening is that because of the wrong row number used in scaling, there was an extra pixel row in the first test swatches resulting in knitting errors. The final repeat is 29 stitches wide, 38 rows high. This is the resulting swatch
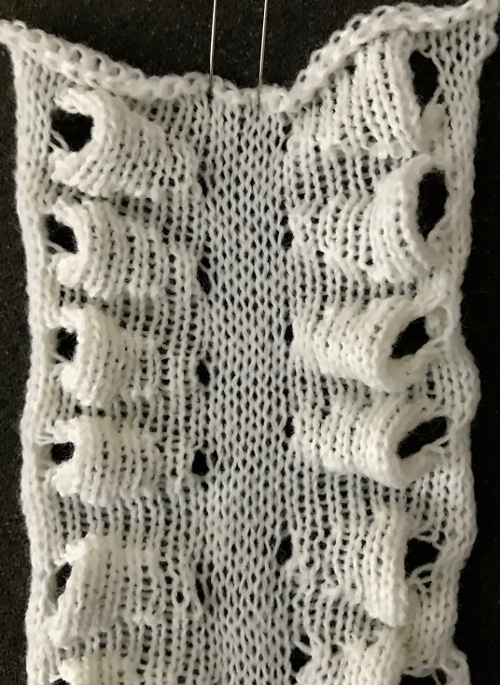
 Once more, the repeat could be reduced down to eliminate side knit strips, or limit shapes to one side only for a one-sided ruffle. What about repeating the same slit horizontally across a row? Repeats become very long, arrows are intended again as guides in the knitting direction.
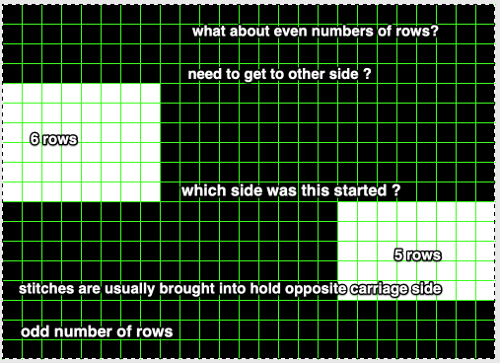
 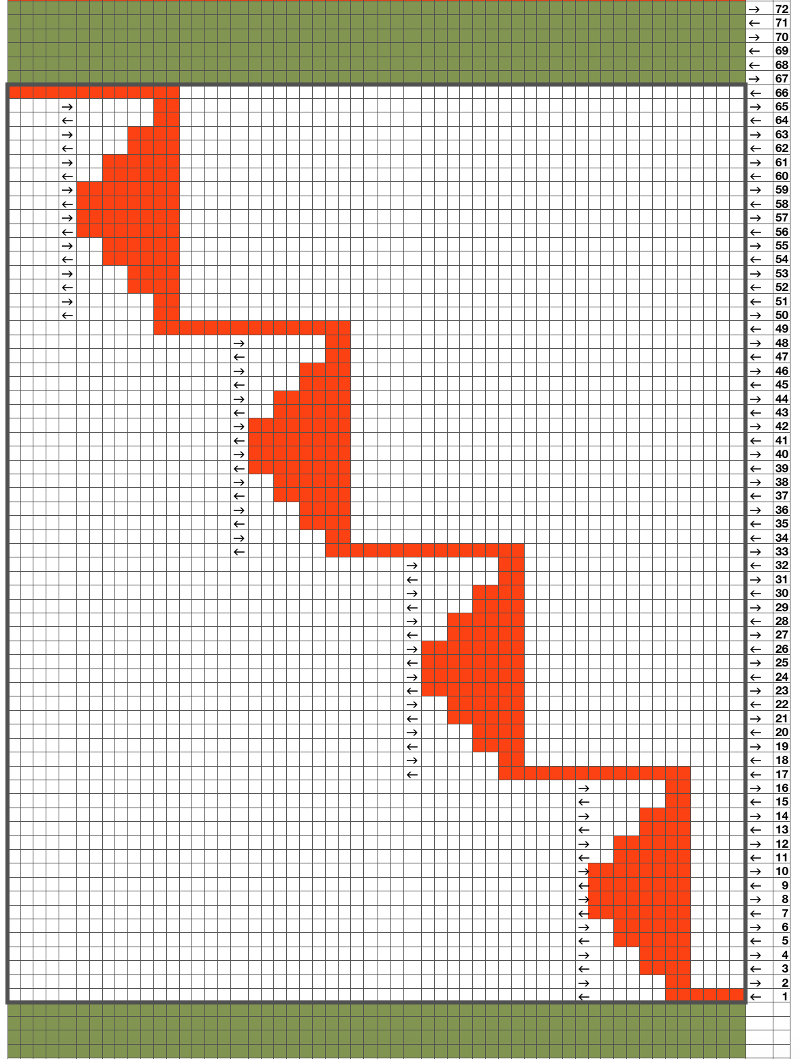 An even number of rows (green) at the end of the outlined repeat will return the carriage to begin knitting it from the right side once more. An odd number of rows added at its top will prepare for knitting the motifs beginning on the left.
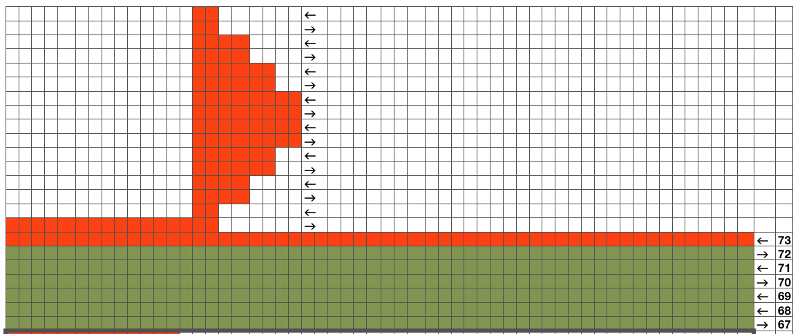
 Pushing unwanted needle groups back to the D position will make them knit rather than being held, which is another way to vary the texture distribution across any single row
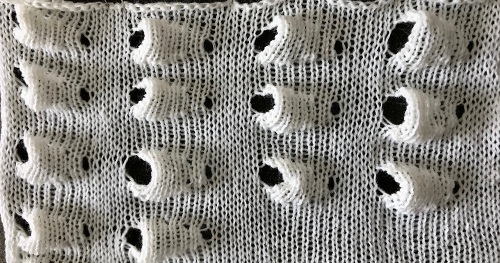
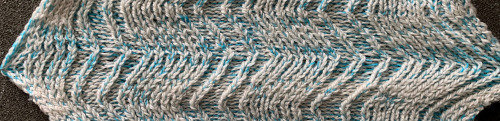
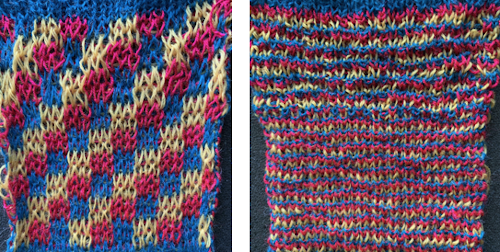
 The reverse side shows the same issue. Areas can be identified where the held stitches have been hung up to create hems. Note that as the knit grows in length, at the completion of each row of repeats there is one segment with no hem on alternating sides. A longer test swatch follows
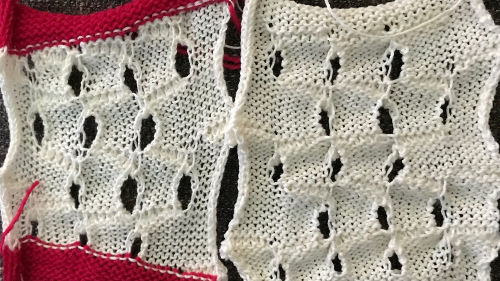
 I created my hems on the carriage side, immediately prior to bringing the following group of stitches into work opposite it, and knitting a single row across that new group of 3 segments. The highlighted area indicates the stitches to be hung to create the hem. The eyelet on the top, right, will be smaller than the one at the opposite side of the stitches to be hung up
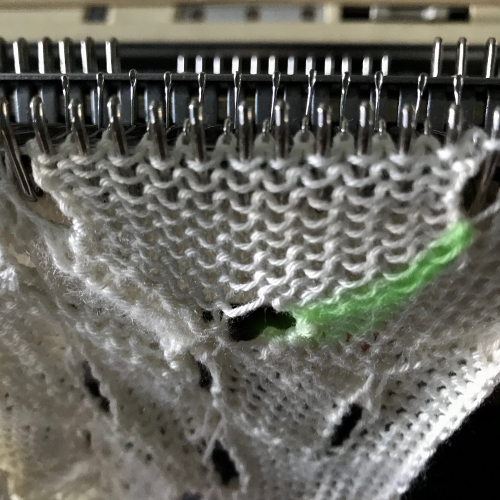

 Reversing the direction of segments
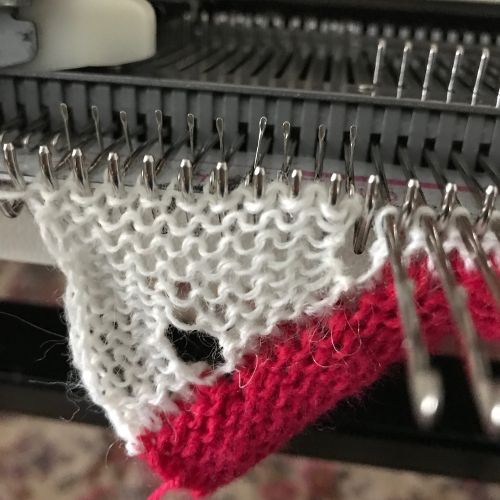


 This is one of my early graphics trying to imagine what is happening in chart form, which also references the repeat in the Passap garment, followed by plain knitting
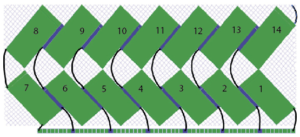
 This fabric is worked out differently, in groups of 2. After the first segment is completed, COR if the starting group 1 worked is on the right, bring group 2 into work, knit one row to left, immediately bring group one into hold, and continue across row. That “float” is created as the yarn traveling between the last stitch on the right now coming into hold and the first stitch to its left knits for many more rows gets pulled on as the piece grows.
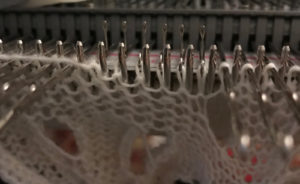


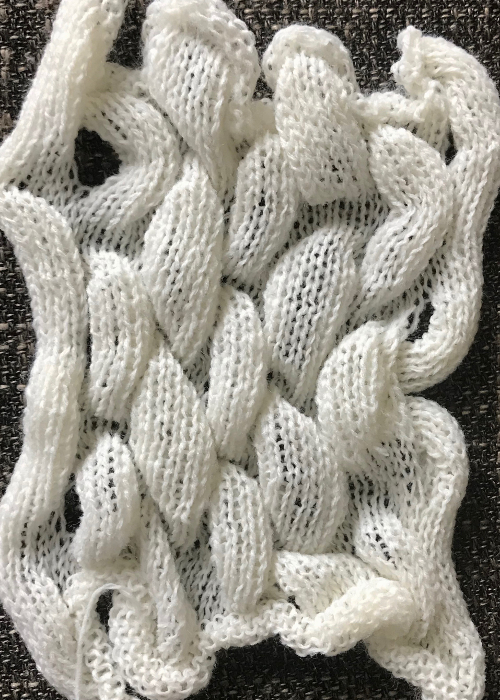
 Hems in knitting can be created on any number of stitches, anywhere on a garment, by definition join segments of the knit together permanently. Folds are freer. Here is an attempt at a different wisteria cousin with organized repeats. More on creating it will follow in a subsequent post now that holding techniques are back on my radar
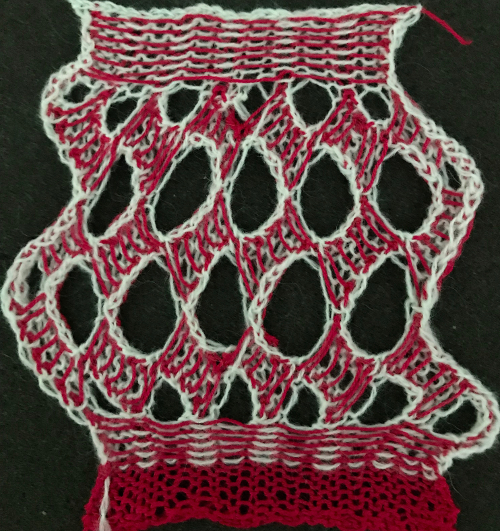

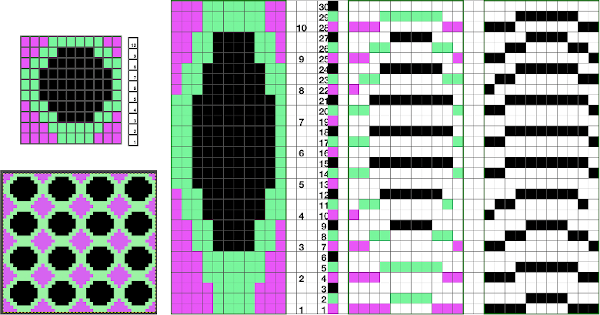
 The fabric had an interesting twist and roll if tugged in opposite diagonal directions when first off the machine.
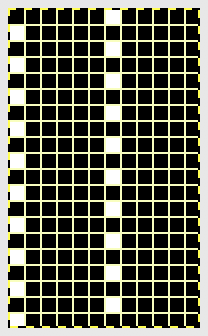
 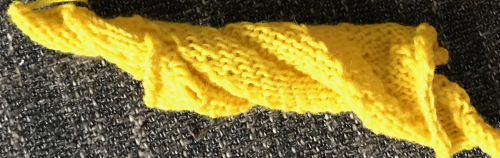 This is the working repeat, suitable for a punchcard machine. On the far left it is shown for use with electronics and color reverse, with the green grid highlighting black squares indicating holes that would need to be punched in a card, and lastly, as a tiled repeat looking for any errors in repeat sequences.
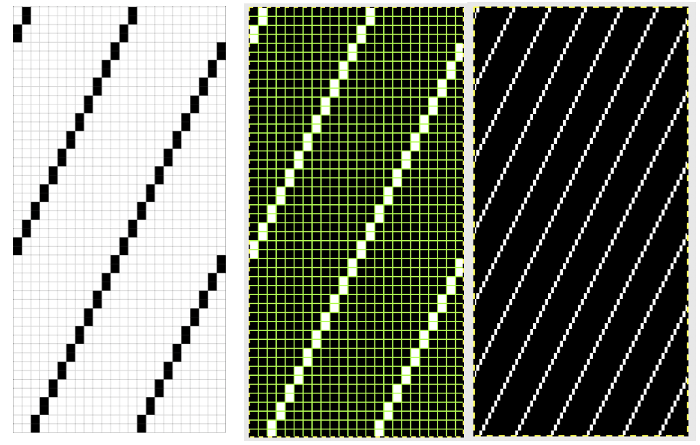
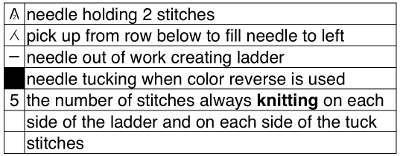
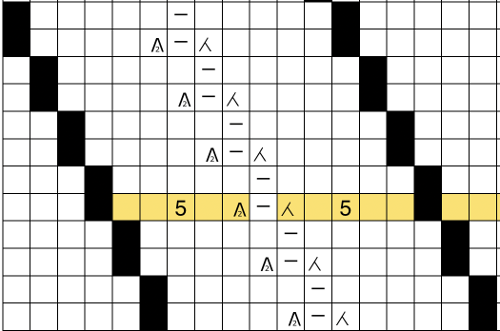
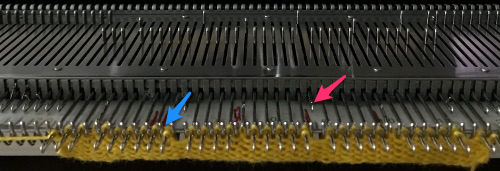
 This shows my swatch in progress. ? indicates operator error, in evidence if needle count on each side of the future tuck stitch or ladder space is checked
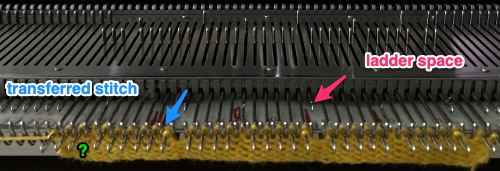 picking up loops from the row below to keep ladder width constant
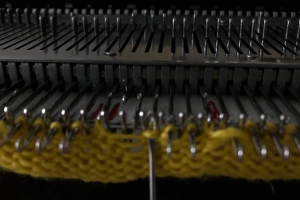
 Check that stitches have knit off properly
 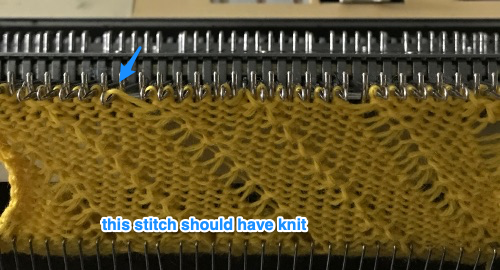 Needles with transfers or moved stitches may be brought out to hold position (E in Brother machines) for easier knitting. If this is done, be sure not to disturb needle selection or lack of it in location for next pair of tucked rows.
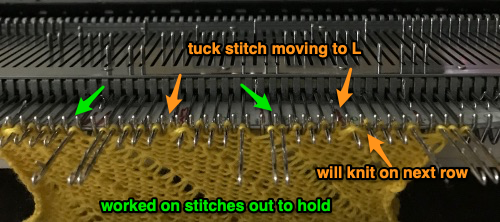
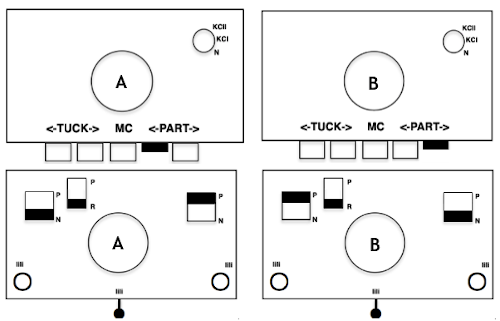
 Setting up a working repeat with blue representing tuck, purple slip (or vice versa). The distance between the vertical column, in this case, is fixed and seven stitches in width for a center folding repeat width of 16, color reverse is required
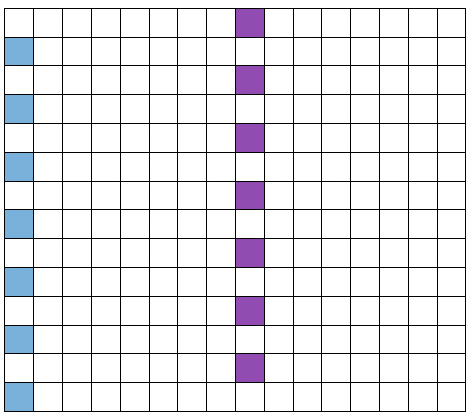

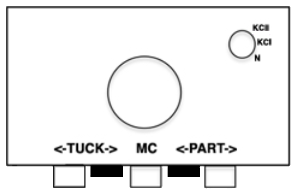
 Set up the cast-on as preferred. I used plain knitting, weighted it, and began my pattern work from the right-hand side of the machine. COL my preselection row was made from right to left. White squares in the chart with black ground and green grid become non selected needles on the main bed. Transfer nonselected stitches down to the ribber. Set the ribber to slip to the right, those stitches just transferred will slip moving to the right, knit on the return pass to the left. The knit carriage is set to knit until that first row is completed
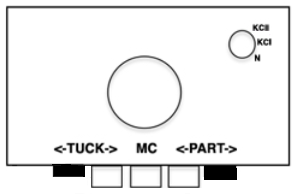
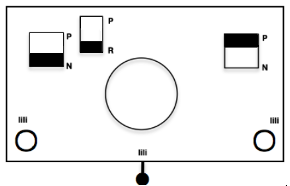 COR the ribber will knit on the next pass to the left. Set the knit carriage to tuck while the ribber is knitting
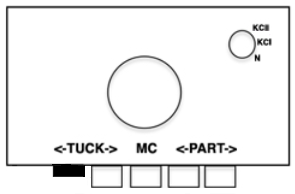 Continue in pattern to the desired length. Fabric narrows considerably, so several panels may be required for items ie. skirts. The repeat on the knitting bed should also be adjusted to allow for as close to invisible seaming as possible. The stitches on either side of the single needle in work on the ribber may be inclined to drop off. I was unable to use tuck on those same needles for any significant length for that reason. It pays to visually check for stitches knitting off properly to avoid this
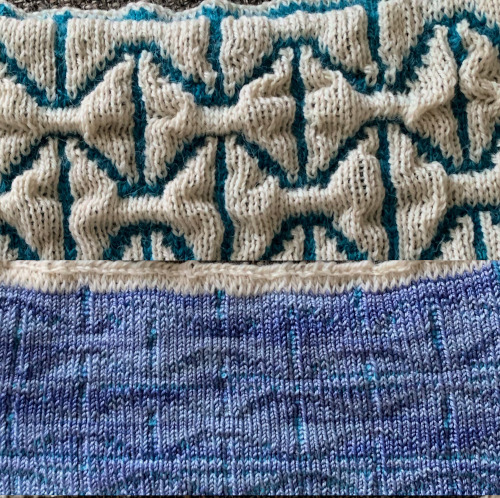
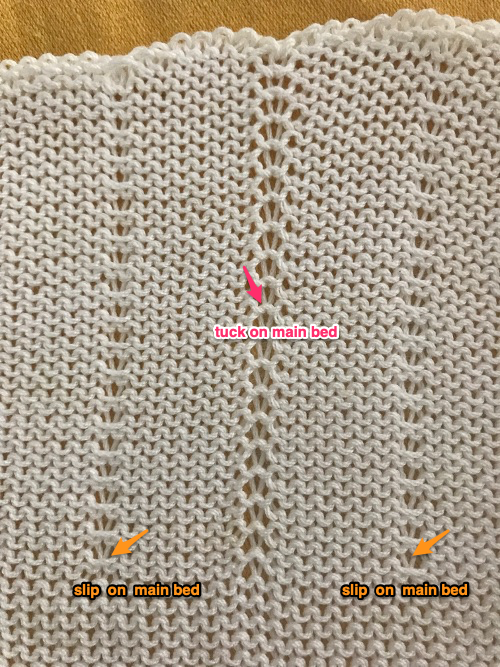
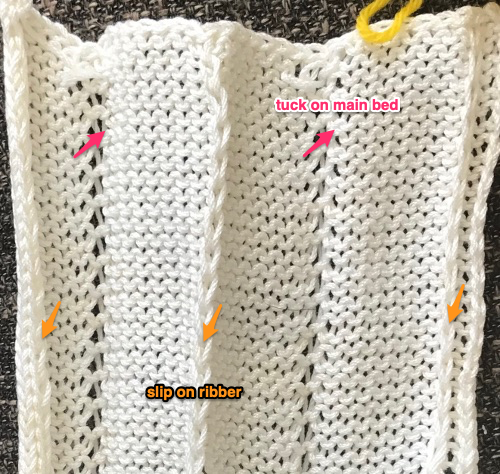
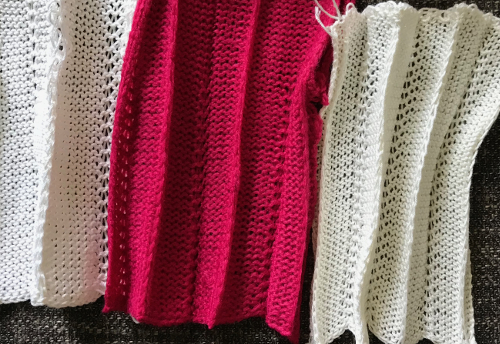
 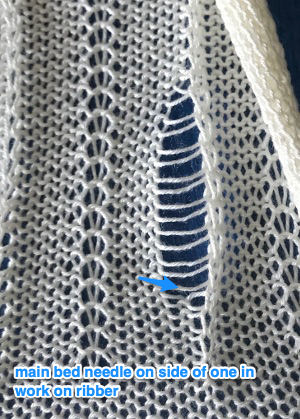 The start of vertical pleats, with the slip stitches folding to the purl side, the tucked stitches folding to the knit side on the machine, just after binding off.
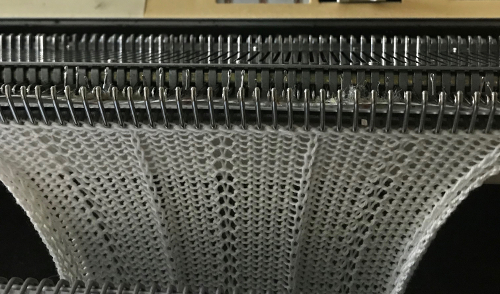

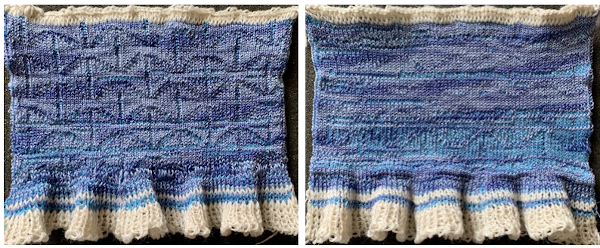
 Different fibers can produce varying results in fold and drape. Setting either bed function for the wrong direction will produce an all-knit fabric (top of the red swatch).
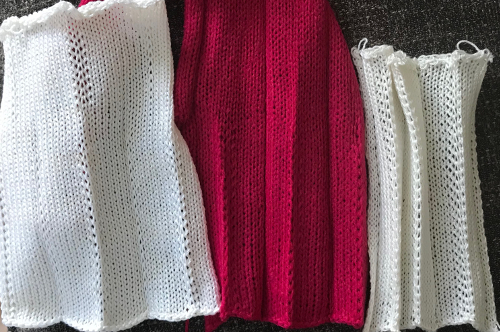
 This starts to address incorporating hand techniques and manual ones from the diagonal swatch and the one with vertical folds while also developing a design repeat to aid with planning or actions to be taken. It will be altered in future experiments
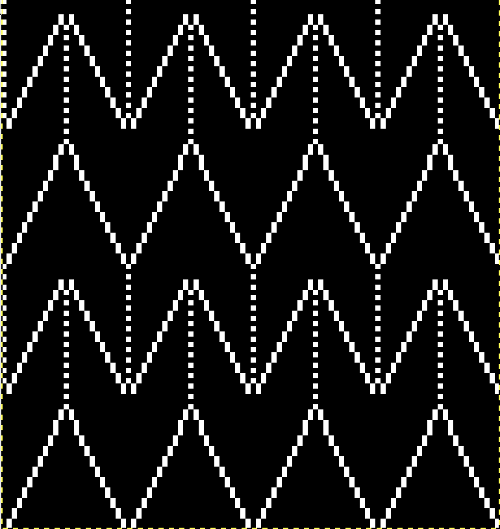
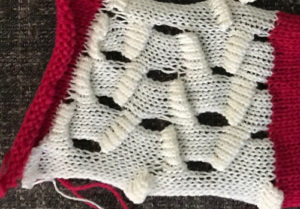
 This swatch is knit in wool, trying to sort out what does what and by how much. I am starting to get a bubble, but not a dramatic folding effect. The bottom folds more than the top. The filled eyelet technique has a hand-tooled tuck column on the reverse side. The top is automated using tuck stitch.
 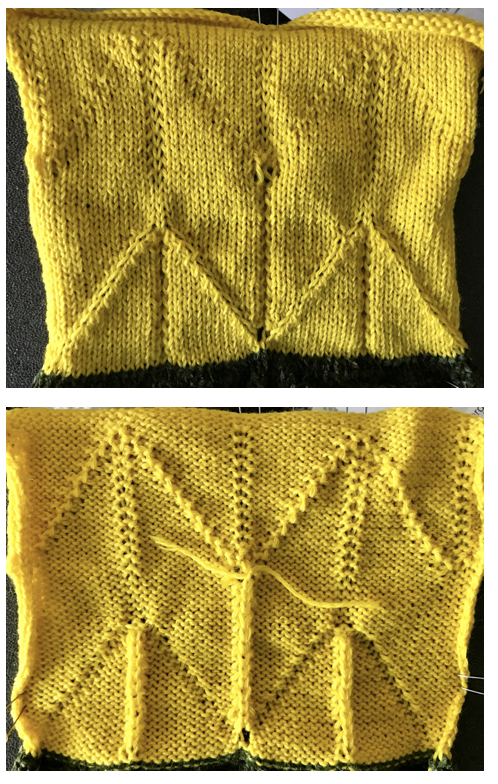 A different repeat: the bottom with carriage set to knit with needle selection as a cue to hand transfers, the top set to tuck automatically. Transition rows need to be considered further and altered where the twain meet.
 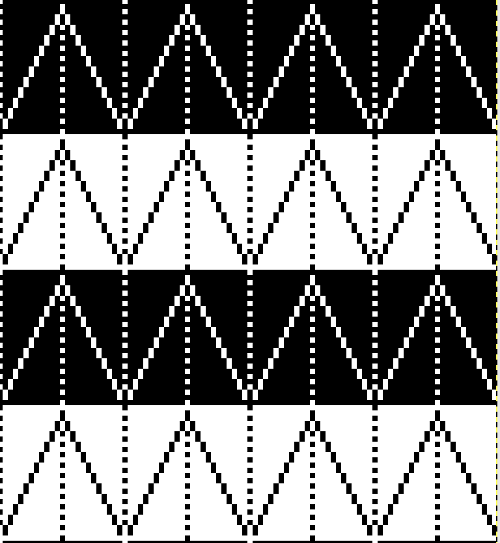 Returning to simpler creases and folds: a first experiment in racking double bed with NOOW. The setup and racking positions were not pre-planned. I knit 4 rows without racking at unplanned intervals as well; they produce a noticeable change in texture. The fabric is reversible, I actually rephotographed it adding a marker to make certain I had not shot the same side twice. The needle set up:
  the resulting swatch presented sideways for the sake of space:
 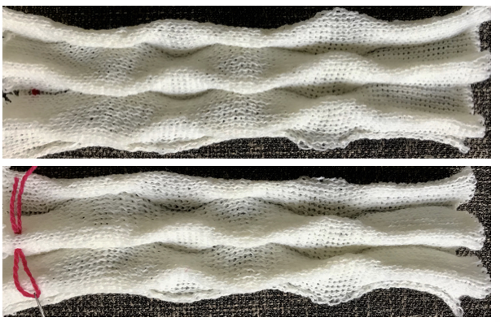 working with single needles out of work rather than two, with even spacing between them on each bed
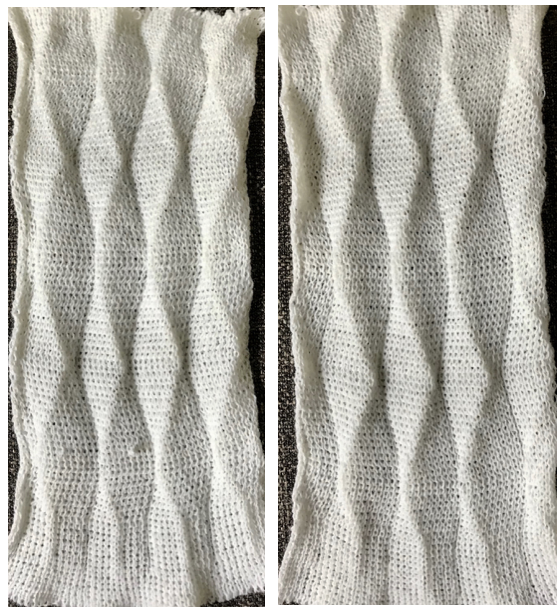 both swatches flattened to note differences between needle arrangement folds
 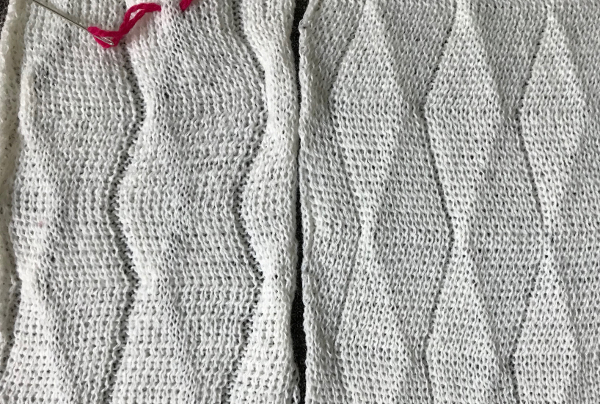 getting more organized, with a planned repeat: the needle set up
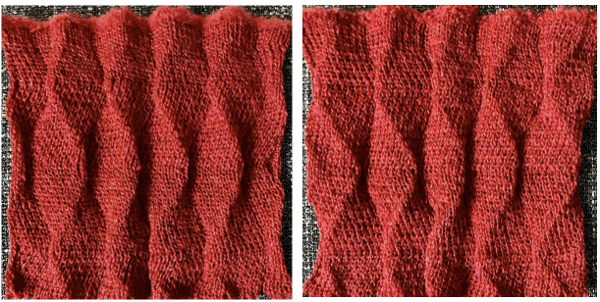 Here the arrangement here is with 2 needles out of work, racking every 2 rows in the same sequence. The resulting fabric has clear “spring” and foldsRR
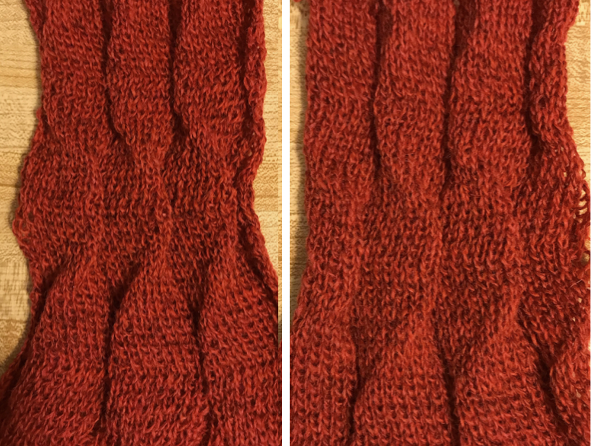 Returning to the previous needle set up, now racking every row from position 5 to 0, knit 1 more row with no racking; rack to position 10, knit one more row with no racking, reverse direction, end knitting on position # 5
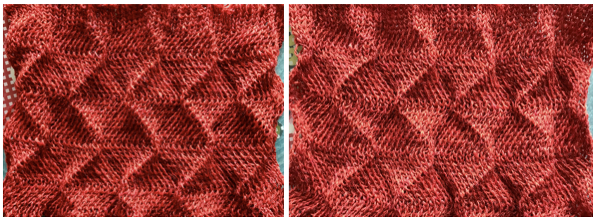
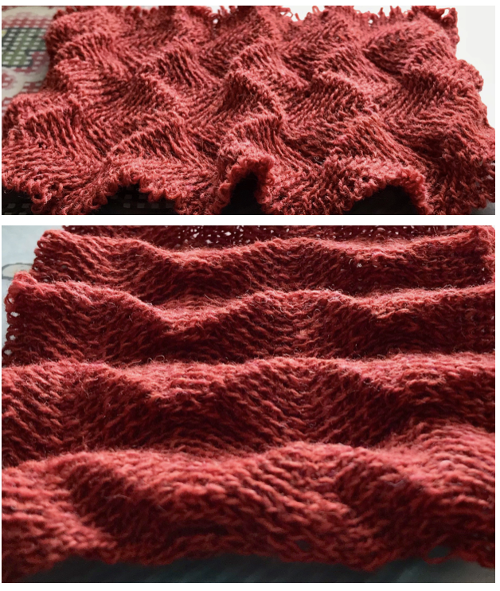 This last in the series is a personal favorite. I found racking from the center to 10, to 0, and back easy to track. One moves in the opposite direction when not allowed to go any further in the continuing direction by the machine. Single needles out of work appear to be enough to create the folds.
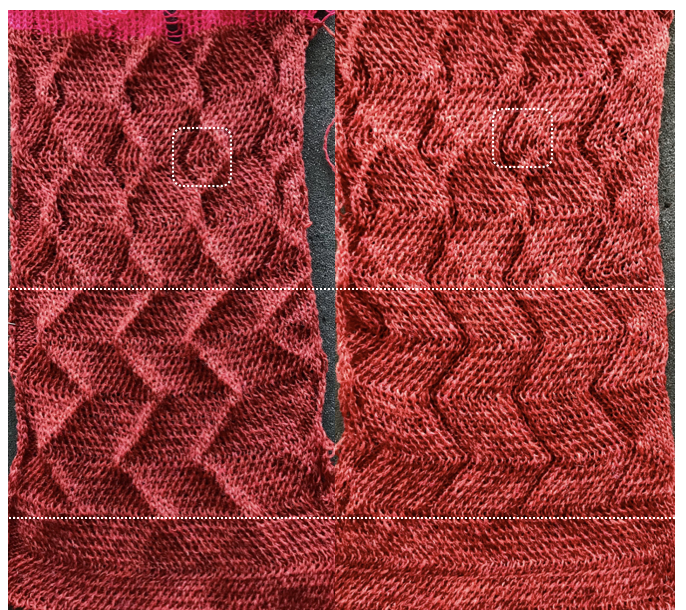 Racking starting position on 7: