This technique can be used in many ways including to attach a front band to a sweater, body pieces of a garment such as when knitting a raglan sleeve from the top-down, flat pieces of knitting to make a tube ie in some socks, and for decorative joins adding a strip of knitting between 2 (or more) previously completed pieces. Most often, one is joining the 2 (or 3) pieces with the purl side facing.
Looking at the purl side of any knitting you will see a knot and a loop along the side edges of the work. The loop is formed on the carriage side at the start of each pass, the “knot” opposite the starting carriage side as that side of that row is reached and the yarn twists. 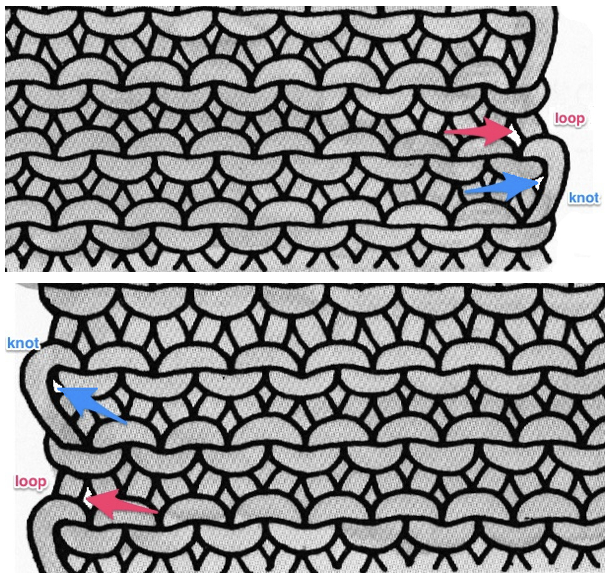 Work the first piece, A, and remove it from the machine. Generally, with a smaller row gauge it is best to join loops, with thicker yarns, and larger stitches, or if you plan to felt the finished piece, work with the knots. Any single or even double-eye tool, Jolie, or another favorite may be used to insert into the individual space at the edge for picking up.
If joining rows to rows: begin the second piece, B. Though the join can happen on either side, in this case, cast on, knit a row, and end with the carriage on the right side (COR). Pick up the first knot (or loop) on A, from its bottom-up, and hang it onto the left end needle (opposite the carriage) of the cast on row for B.
Knit two rows, returning to COR
Go to the next knot (loop) on A. Pick it up and place it on the outside left edge needle of B, opposite the carriage.
Knit 2 rows and continue on, repeating the last 2 steps to the desired length.
Remember to pick up knots (loop) opposite the carriage every other row.
If the pieces to be joined are long, place a yarn marker on the side(s) to be joined at regular intervals simply by adding a short piece of contrasting color yarn and laying it in the hook on the end needle(s). It will not become a permanent part of the stitch. The markers will serve as guides in seaming, and can be easily removed when they are reached by a quick tug.
 Open stitches may also be joined using this method, but they would have to be hooked onto the second piece every row rather than every other, and caution should be taken in terms of skipping any stitch, as any such stitch will unravel at the end of the process unless it has been secured.
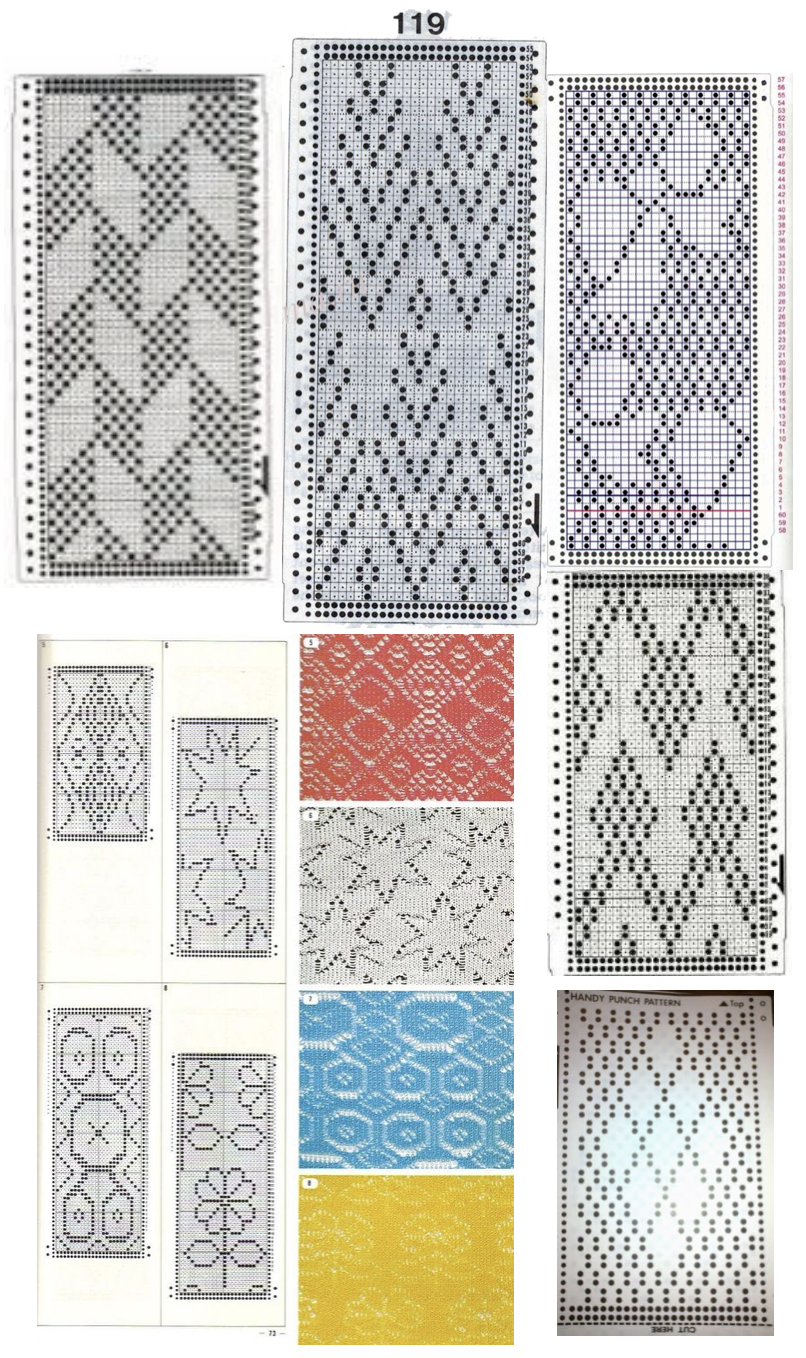
If a bound-off edge of a sideways knit is joined to a knit band, then some adjustment in gauge or row count needs to be made. Knit stitches generally around 4 in width to 3 in height so every 4th part of the bound-off chain may need to be skipped  Depending on the stitch type and yarn used a simple tension change and observing the loop (knot) rule every other row may work without any additional adjustments. The Brother Knitting Technique Book offers an interesting variation as a way of creating a double-wide repeat using a punchcard motif
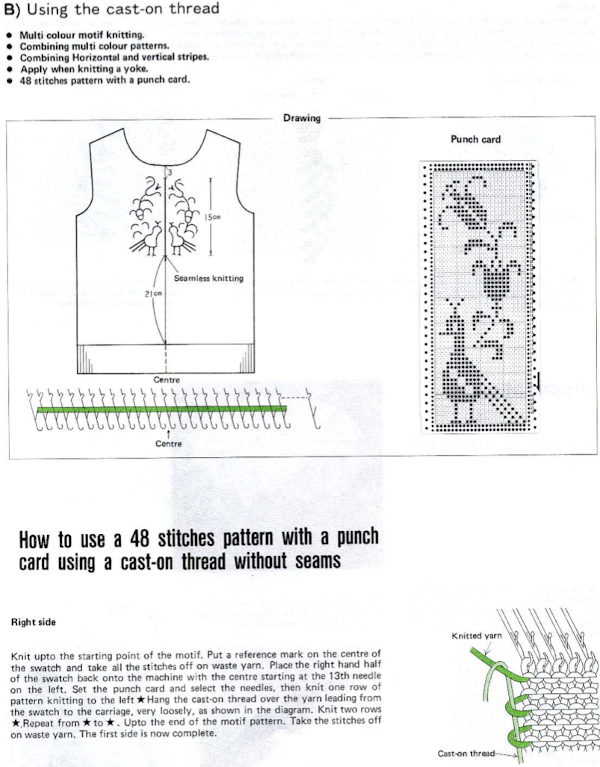
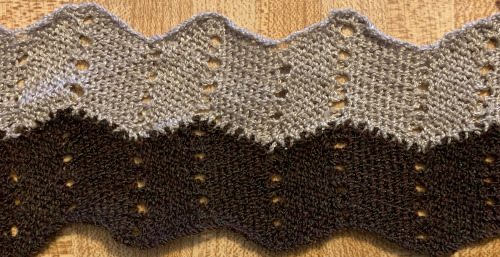
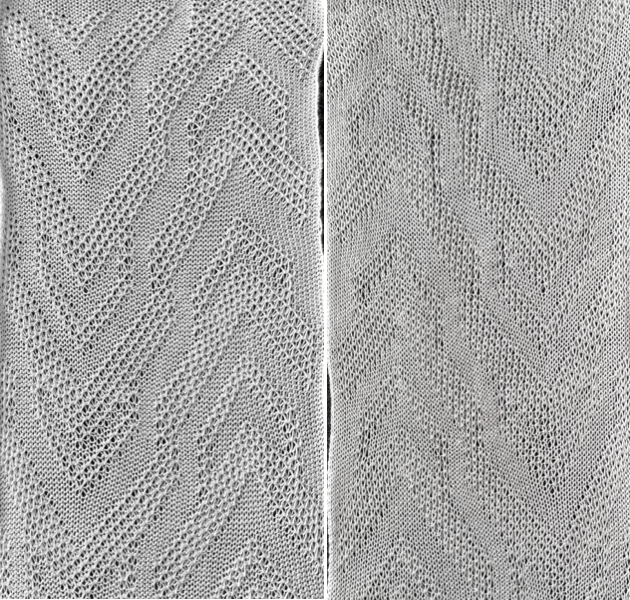
 This is a long-ago demo swatch. The chevrons are shaped by holding, could be knit on any machine in any width. After the first strip is knit to the desired length, the second is joined to it as it is being knit. I generally prefer the joins with the carriage on the right and the completed strip hooked onto its left side. If the color changer is to be used, then the strip being created to join to the finished piece should always be knit on the left side of the bed in order to allow for traveling to and from the color changer every 2 rows. The image here is turned sideways, the chevrons could be used either vertically or horizontally depending on the design plans.
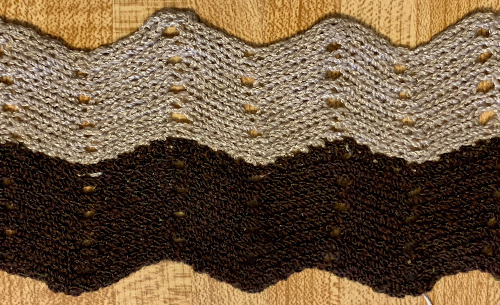
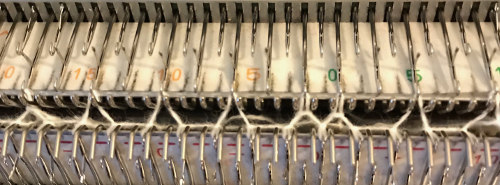
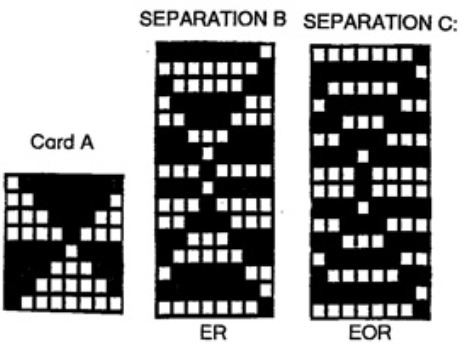
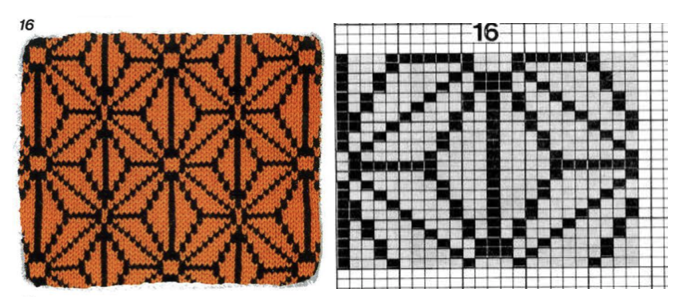
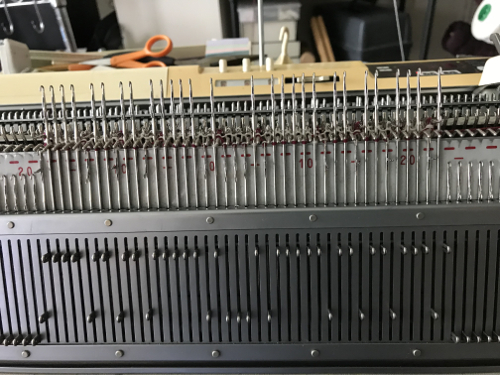
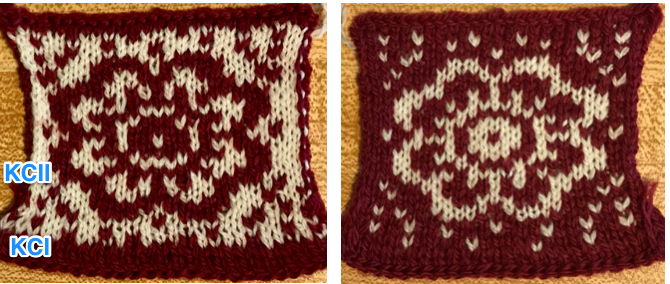
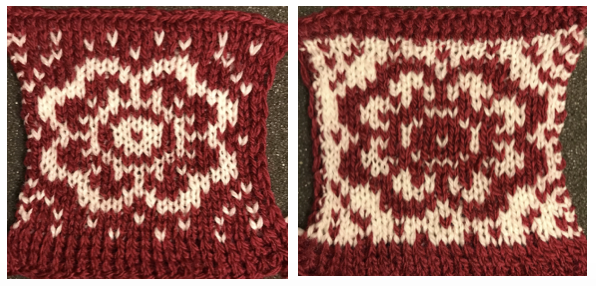
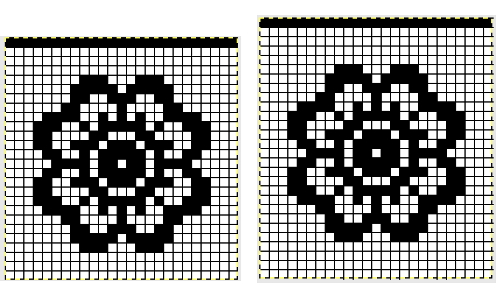
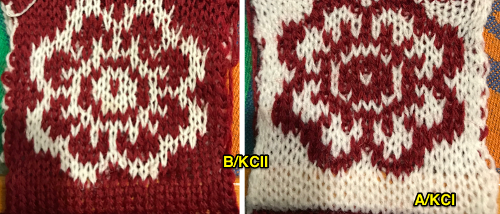
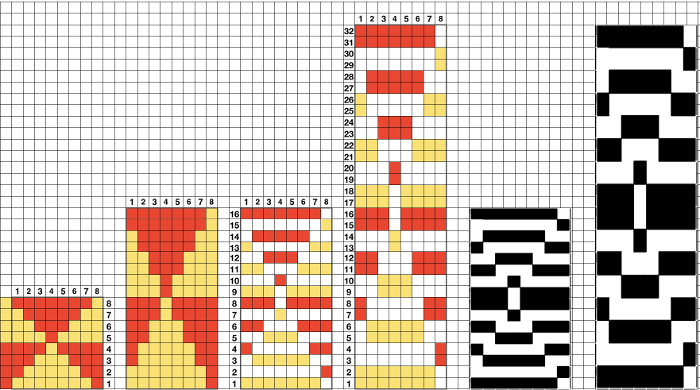
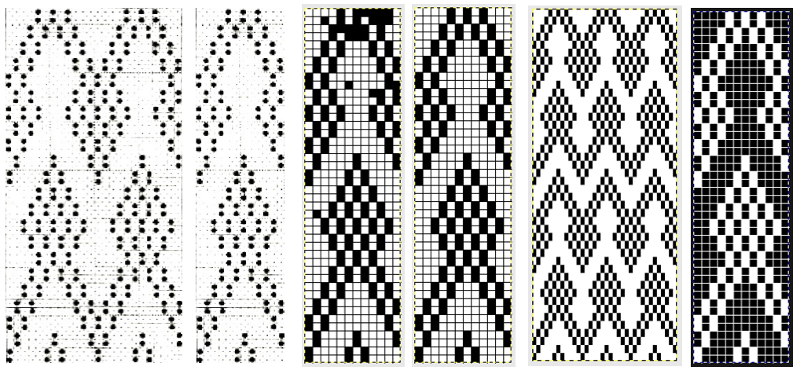
 The above method may be used to join fair isle patterns in order to achieve significantly wider final panels. Some artists, when no electronic models were available, would join cards in continued lengths and plan their repeats side by side to achieve large, non-repetitive images. The punchcard width markings on your Brother needle tape can serve as guides. I use punchcard repeats so often I replaced the needle tape in my 910 early on with one for punchcard models. Markings may also be seen on them for every 8 stitches
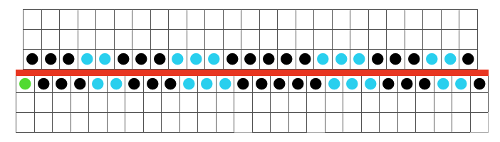
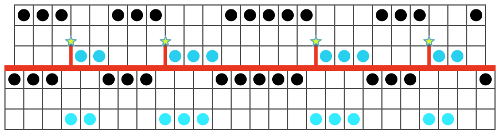
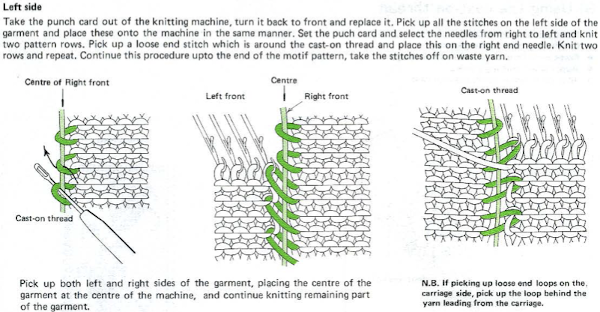
  If the second piece is to be joined with the new piece on its right, add a single stitch to the full punchcard repeat (solid line or thin line section on tape, anywhere on the bed) on the right side, hook up the edge loop (or knot) from the first piece onto the new one, which uses the same needle location as that extra needle in the previous piece for the first stitch in work on its left (full line or blank space on tape). The cast on thread as shown in the techniques publication is not necessary. If wishing to join on the opposite side, then add the extra needle to the first piece on the left edge of the full repeat. With care one can plan for smaller stitch repeats as well. The needle tape or even the knit bed may be marked with water-soluble markers to indicate the extra needle position when adding new vertical strips of knitting. In this former demo swatch, I used a space-dyed yarn for the ground accounting for the difference in color on each piece. Color pooling in such yarns is another consideration that may require specific planning in any technique.
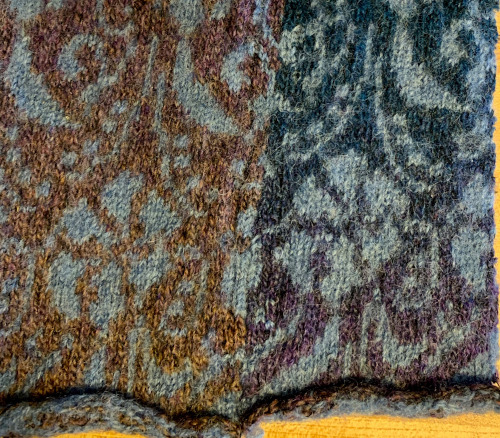
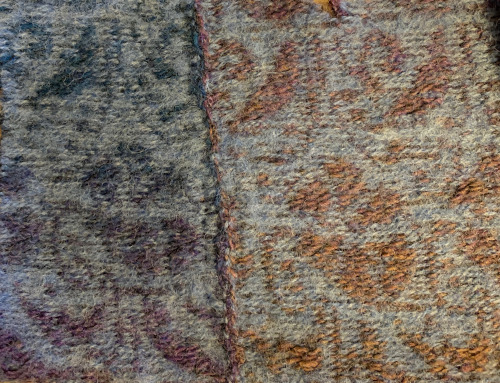 Here a slip-stitch ruffle was joined on the left to one of my completed shawl bodies.
  The above discussion is based on joins occurring on the same needle location on the needle bed. There is no reason why that should be a constant. A strip or shape can be created with two separate, completed knit pieces joined to it as it progresses in length. “Always” hook onto the new piece opposite the carriage, with usually a minimum of 3 stitches on the new center panel.
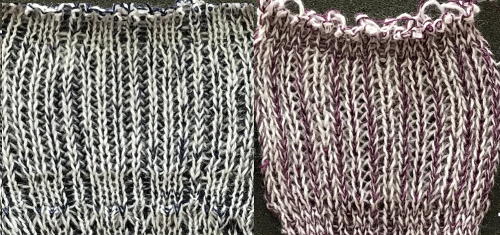
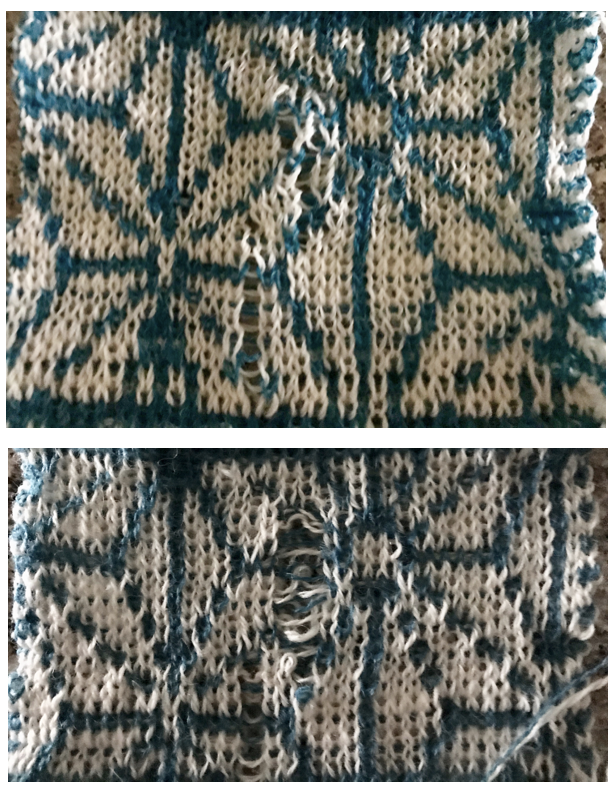
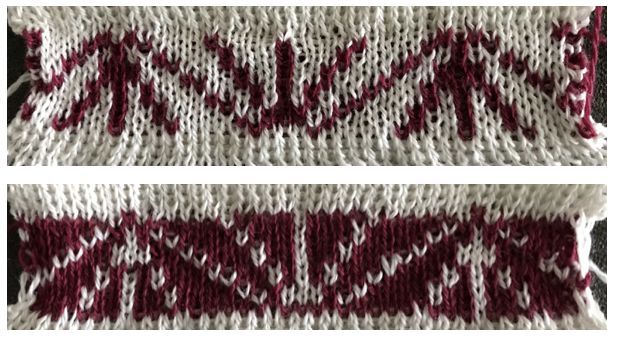
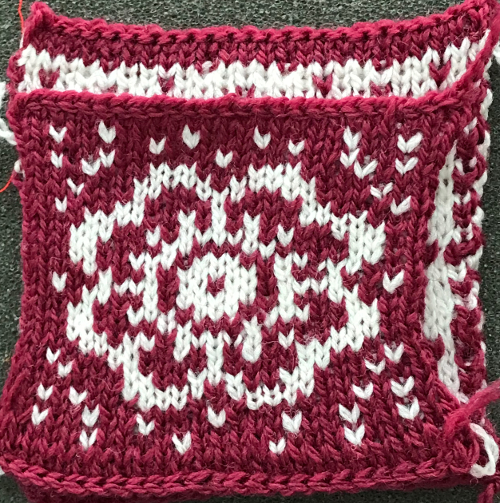
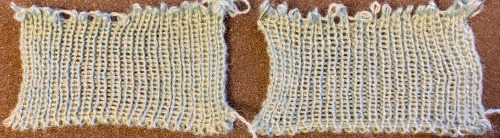
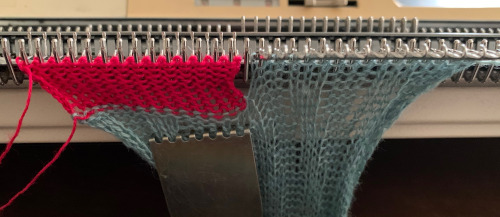
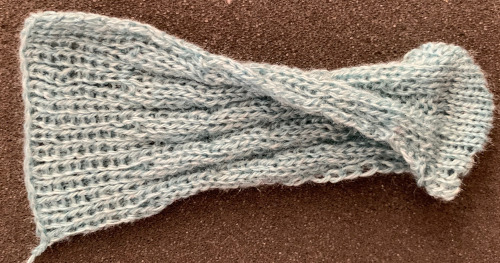
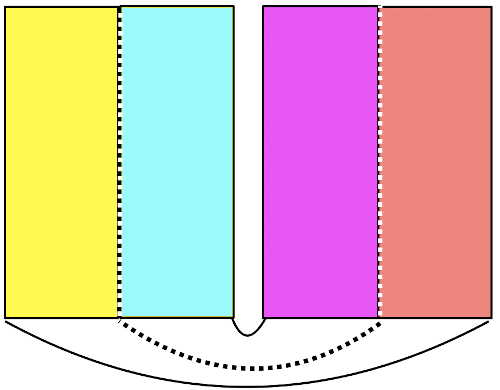
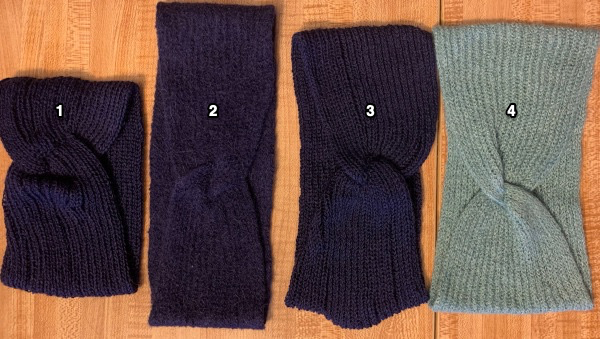
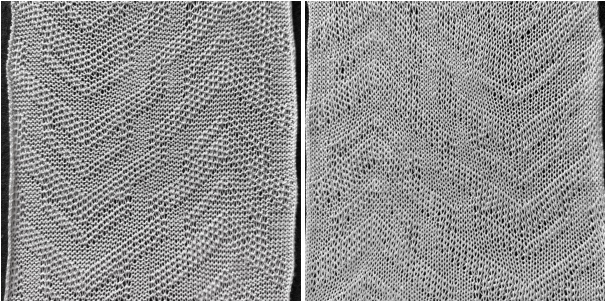
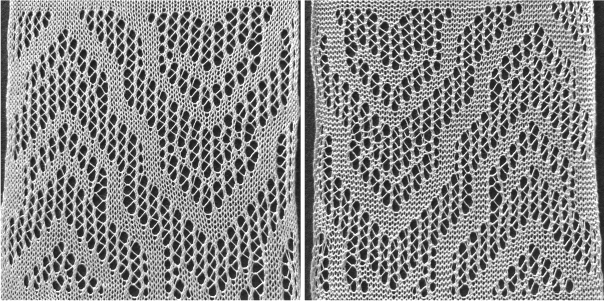
Here I grabbed 2 random swatches, one is knit side out, the other purl side out, and one is upside down. The magenta yarn is thinner than the wool, the tension initially used was a dot more than one, left that way by some other experiment or poltergeists. It pays to check all settings prior to beginning any project. To start with I cast on with the magenta and knit a row, hooked up the loop from piece one, starting from its planned bottom edge, COL knit one row to the other side, hooked up piece 2, COR
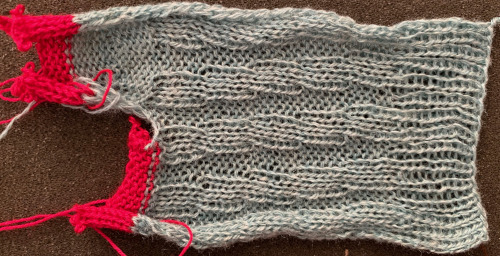
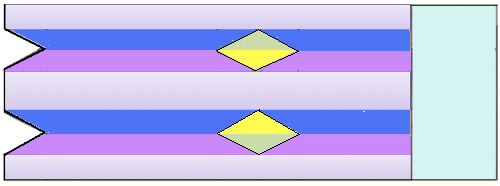
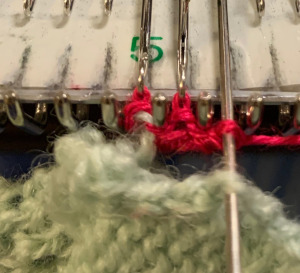 and continued until I reached the point where I wanted to experiment with increases, keeping the shape symmetrical. I picked up a loop from both added pieces and hooked them onto the first empty needle on each side of the strip, essentially casting on an added stitch on each side each time, following with 2 knit rows.
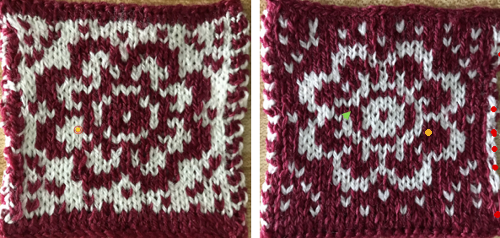
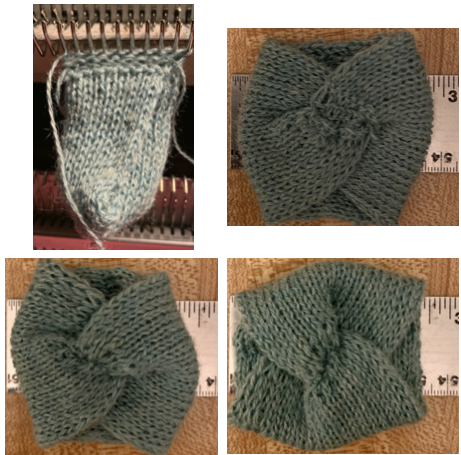
 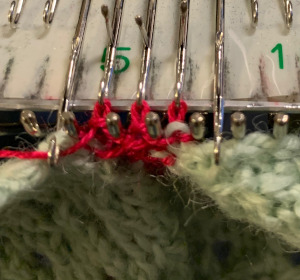 After working on my “desired shape” I tested decreases:
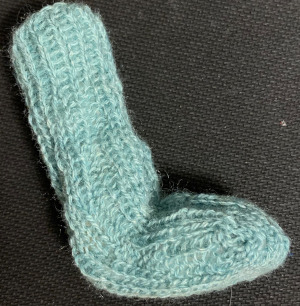
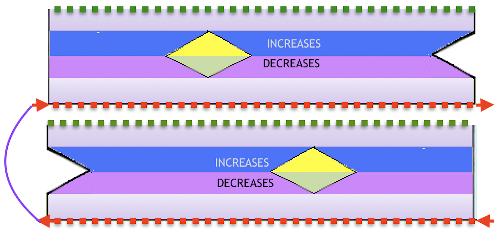
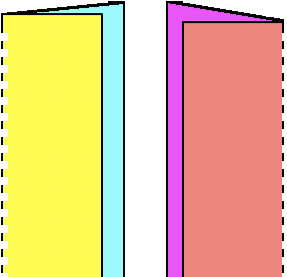
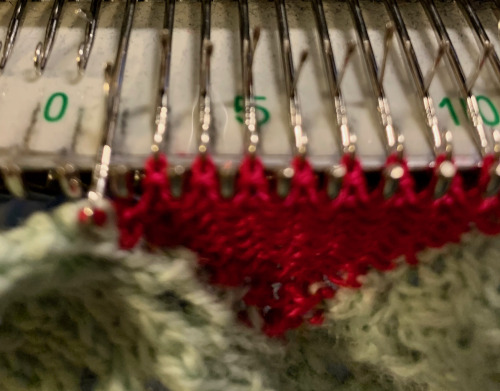 COR: after hooking up the next row, knit one row to the left
 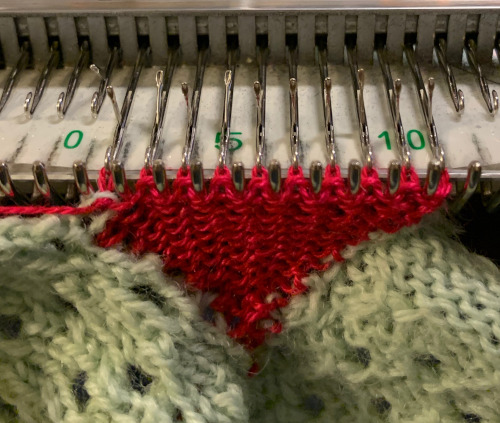 and transfer the stitch just created on the left onto the adjacent needle on its right, creating a simple decrease. Knit to the right and continue with a straight edge on the right side, repeating the decrease on the left every other row,
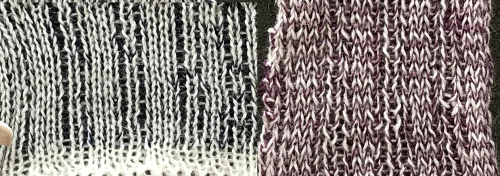
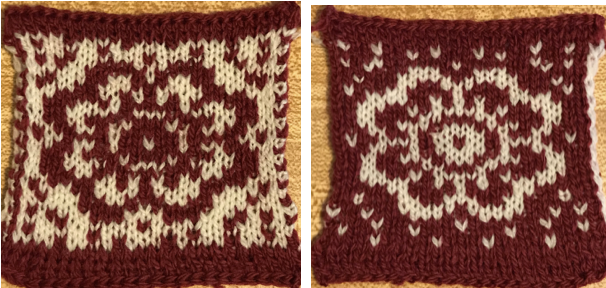
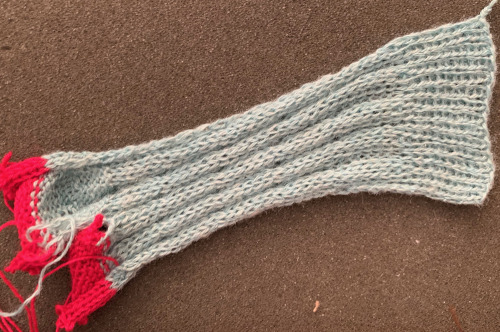
 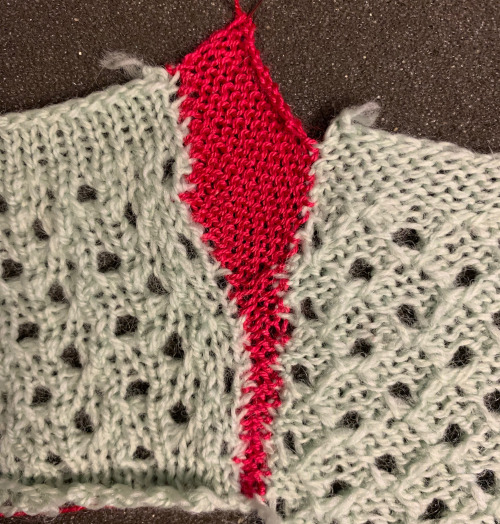 I kept a straight edge on the right after I reached the top of the piece there. Here is the reverse side of the piece.
 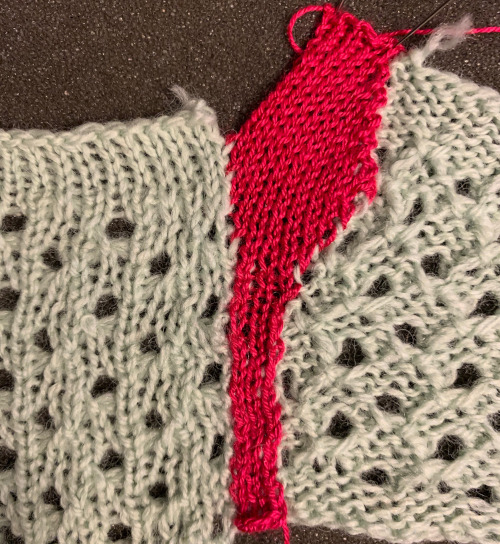 The cleanest joins happen when the edges are straight to start with, above there was a movement of the edges happening because of the distortion of the fabric created by the eyelets. A light pressing if possible may also set the edge stitches, help them lie flat, and make them more visible. When working with slanted edges on the first piece this is one way to join it, taking into consideration whether any adjustment in the frequency of hooking up needs to be made.
 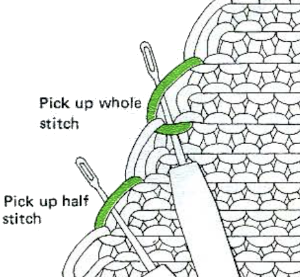 A better edge will be obtained if the decreases to that piece were made using the full-fashioned method, resulting in a neat “chain” for pick up along its finished edge.
Joining lace motifs  There are other options for decorative joins as one knits, one such is shown in a video by Roberta Rose Kelly.
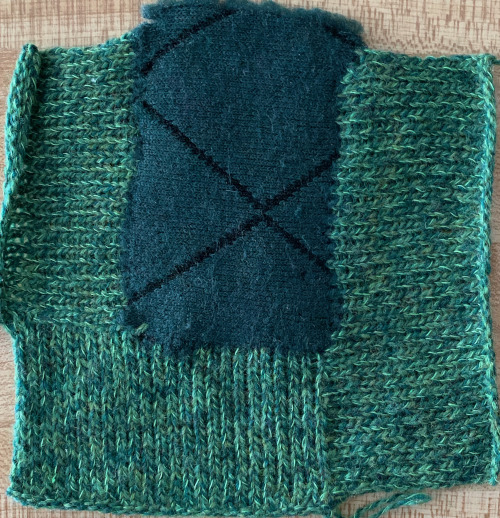
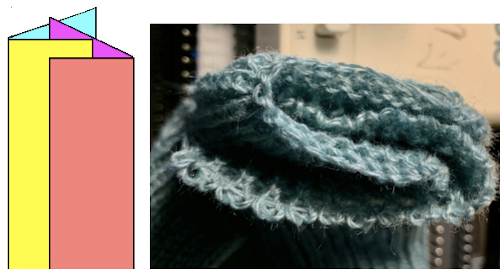
And not to be forgotten, playing with materials or anything else that allows for an edge to be hooked onto a latch holding a knit stitch ;-). Here the add-on is polar fleece, it could be crochet, lace, etc.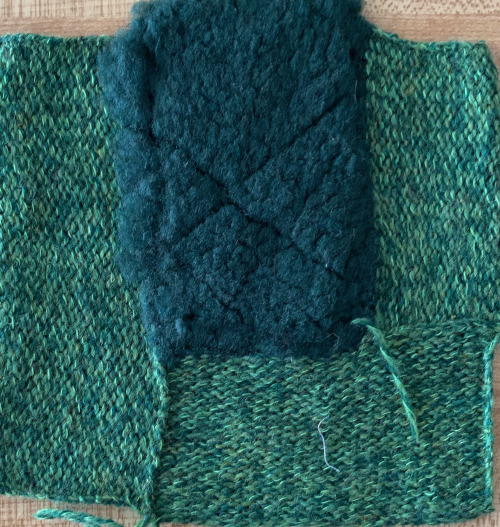
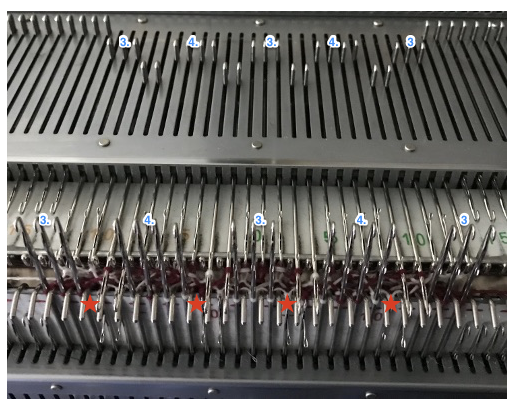
 the knit side, 2 circs on left, 3 on the right
 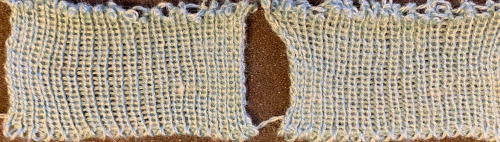 every other needle, purl side facing, 2 circs on left, 3 on the right, with markers indicating the “extra float”
 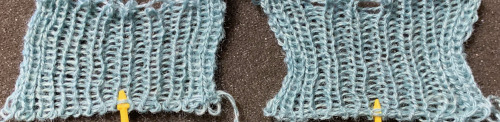 the knit side, 2 circs on left, 3 on the right
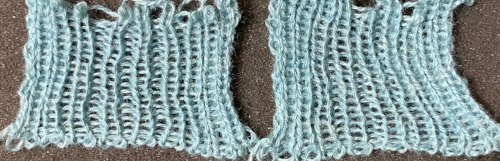
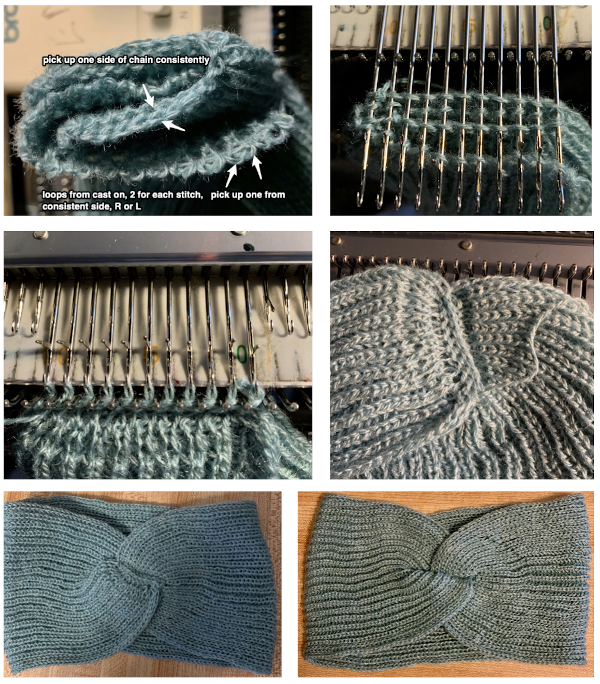
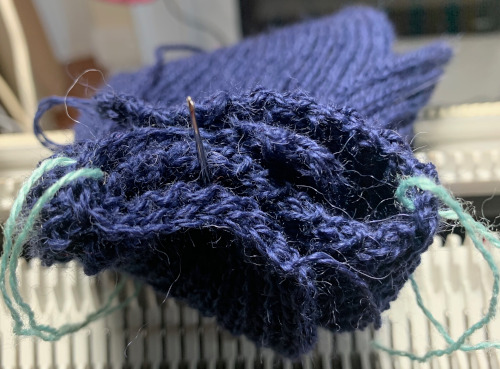
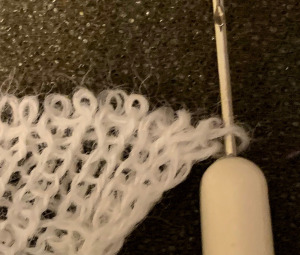 proceeding toward the yarn end, pick up one of the next 2 loops in the hook, here I consistently chose the one on the right
 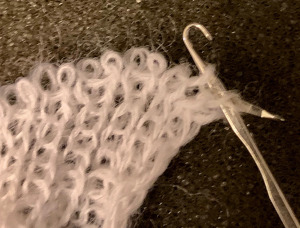 if the first loop slips in the hook again as well, get it behind the latch once more before proceeding
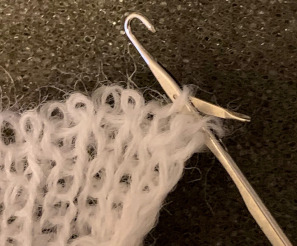 pull the second loop through the previous one
 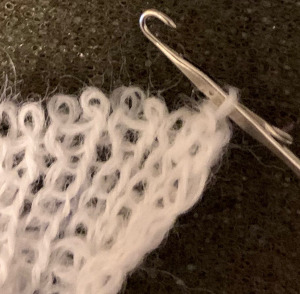 work across the row, secure the yarn end
 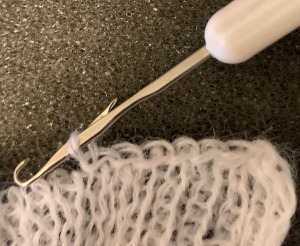 the appearance on the reverse side
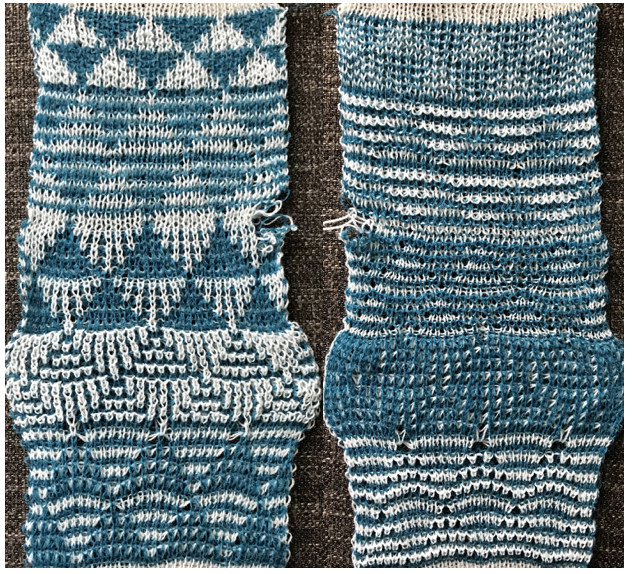
 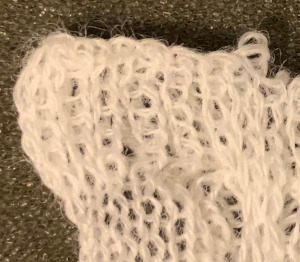 I can be a little bonkers with my finishing, have even been known when dealing with getting top and bottom edges to match in look and width to rehang every other loop, knit a row, and then perform the latch tool bind off. If tuck double bed fabrics are knit, they require planning for loose cast-ons and bind-offs. Slip stitch is short and thin, tuck stitch is short and fat, whether knit single or double bed and then is compared with fabrics where either bed predominantly knits plain.
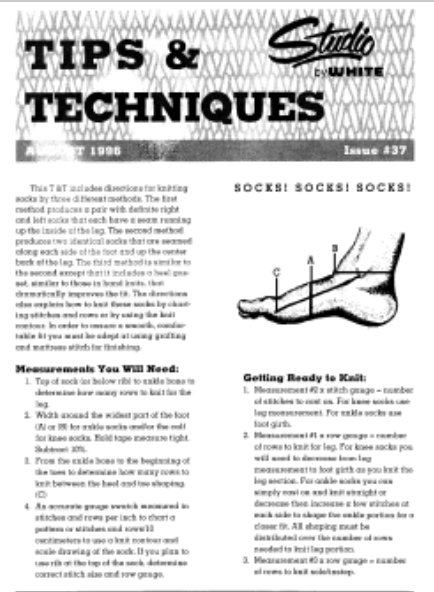


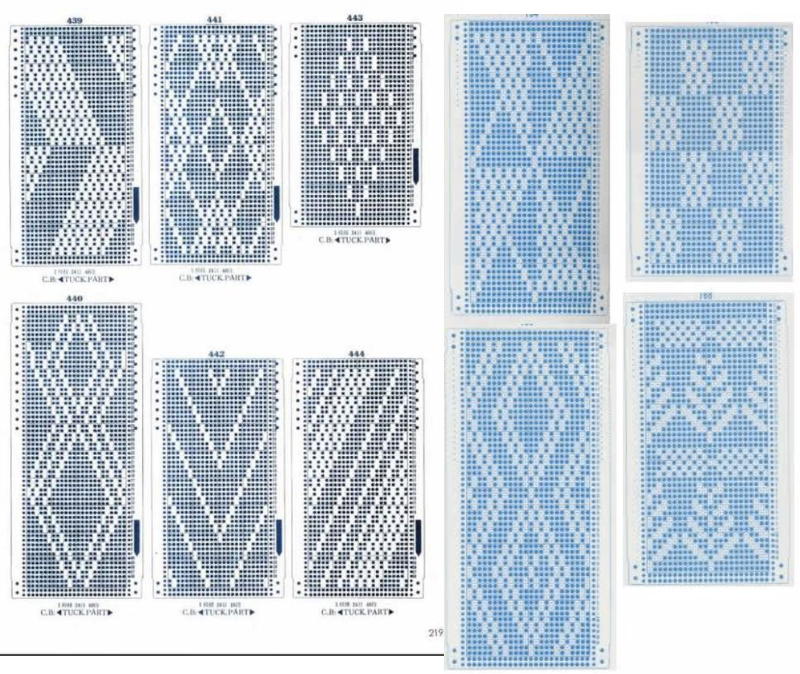
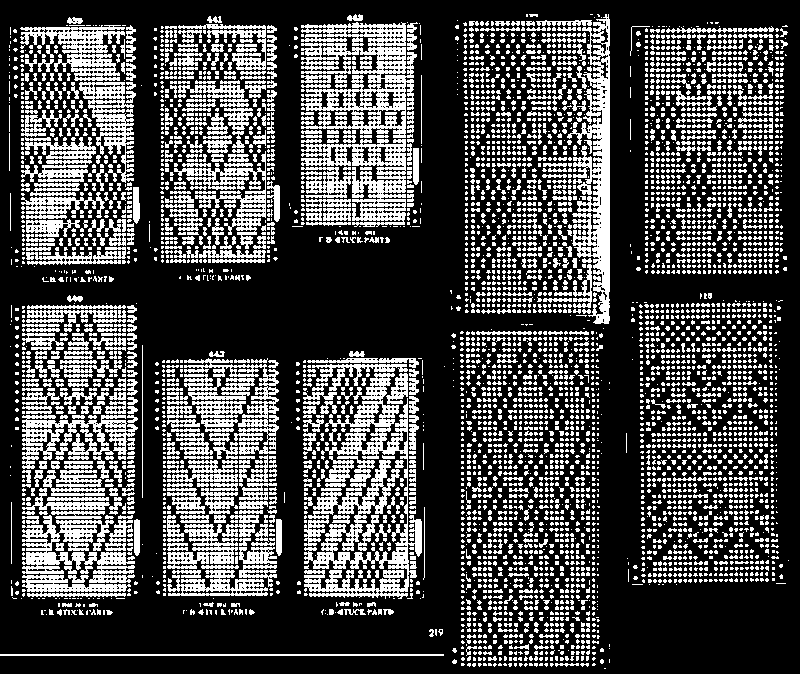
 Patterns from manufacturers: Superba manual


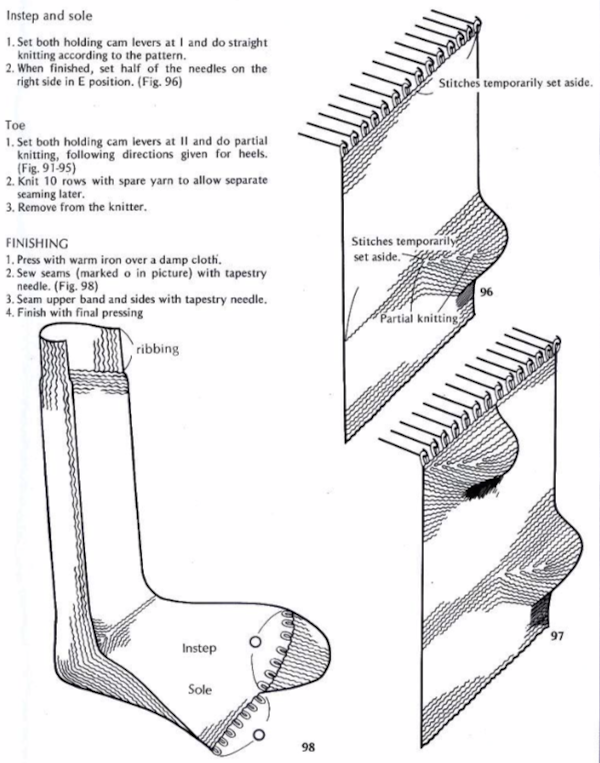
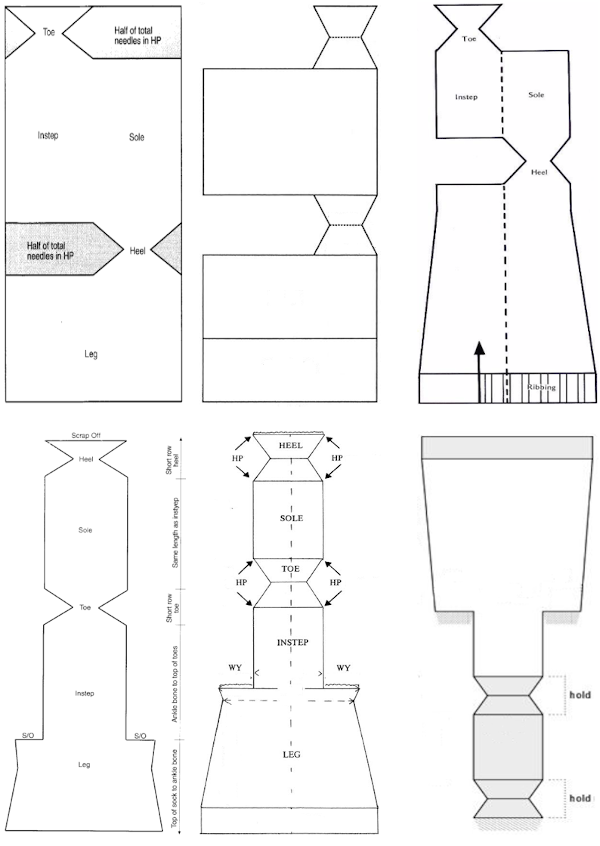
 on page 38 a repeat and instructions are offered for a spiral tube sock. The latter has no heel shaping, but traditional toe shaping can be added.


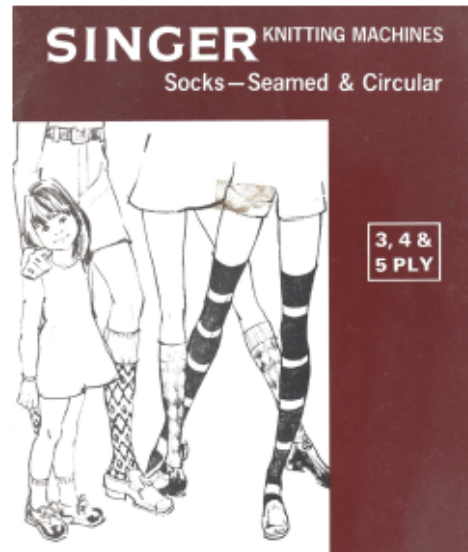
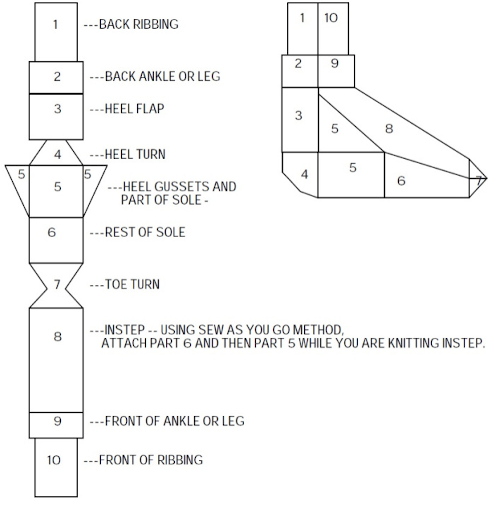
 Lastly, it is possible to knit socks sideways (as well as gloves), usually in garter stitch and in hand knitting. This is a crochet illustration that points to the general construction method.

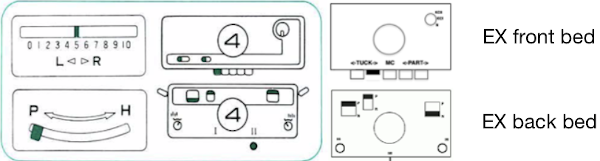
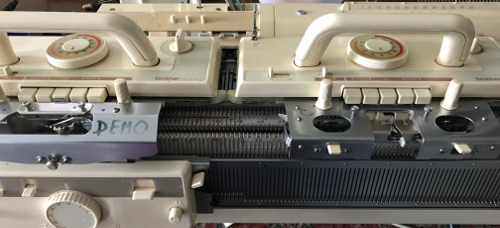
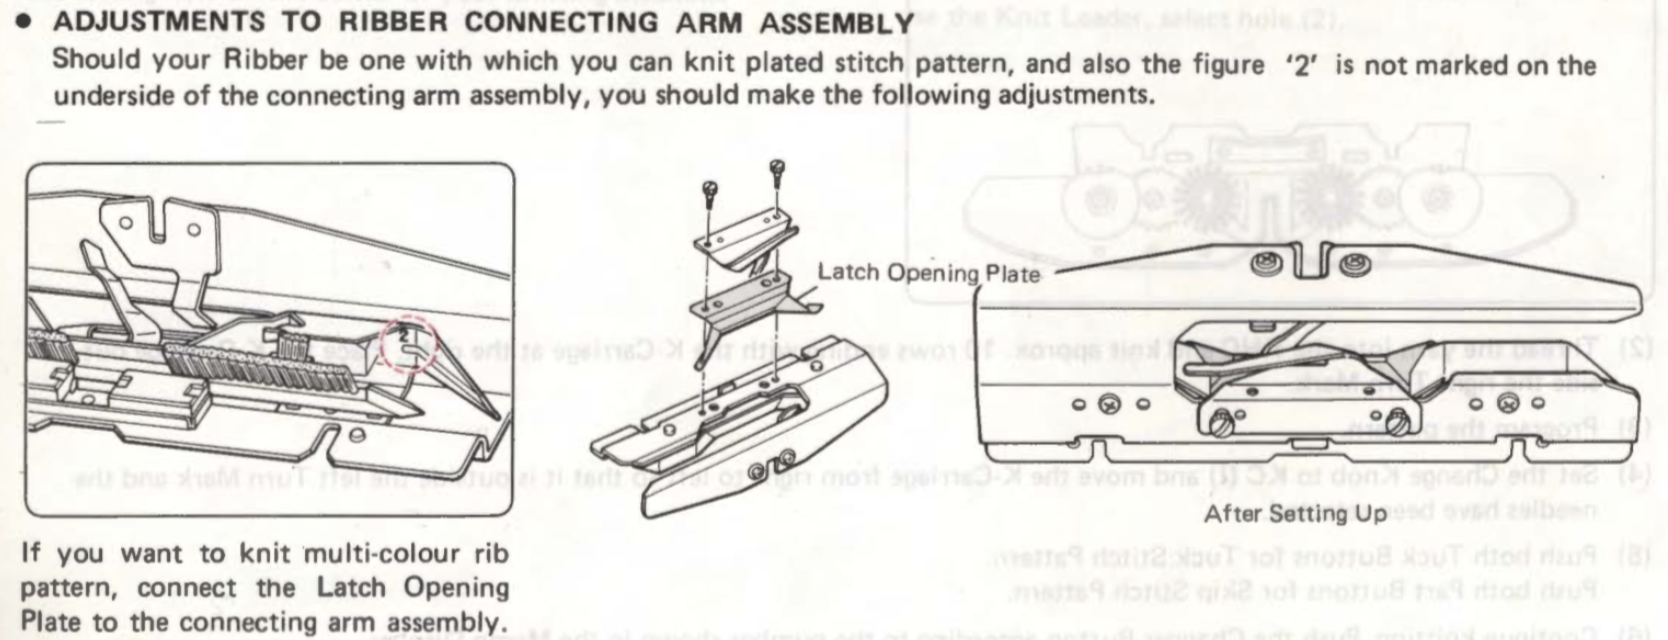
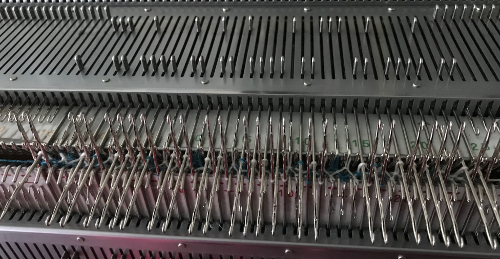
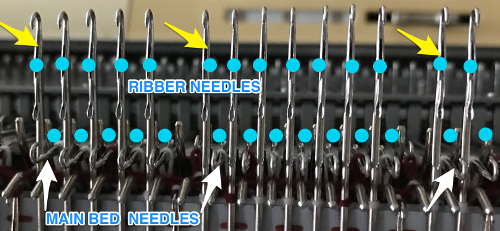
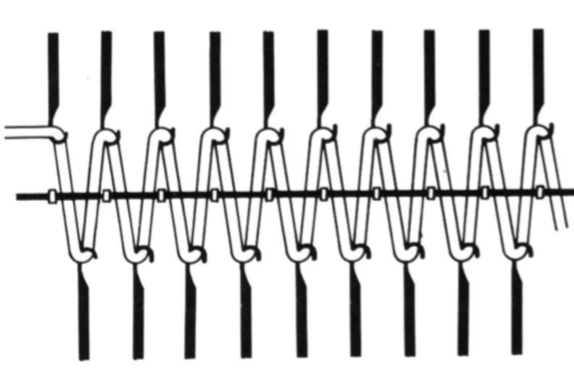
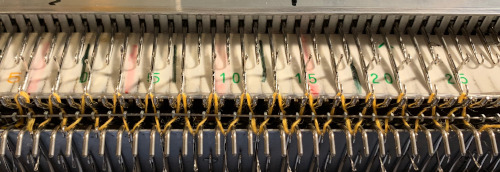
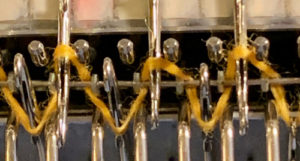
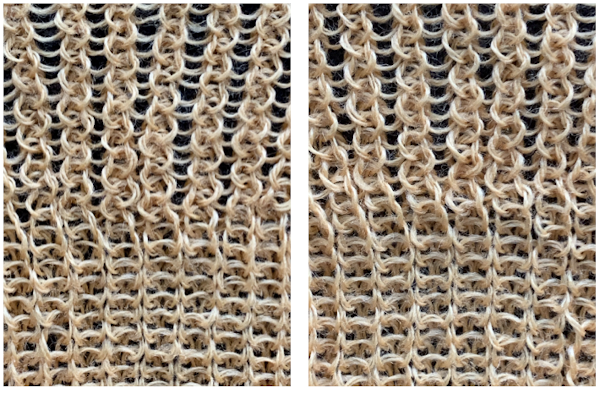
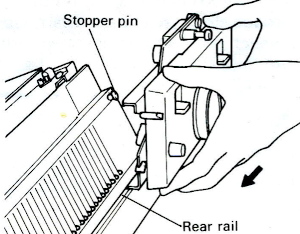
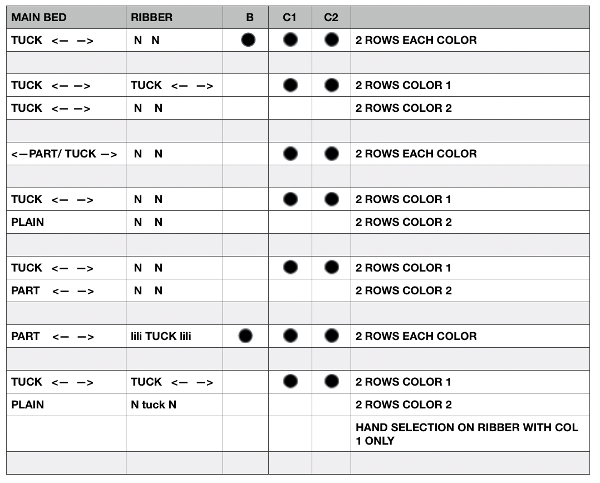
 The elongated stitches at the top of the “band” are due to an extra needle in use on the ribber. To review, the proper settings from the Ribber Techniques Book:
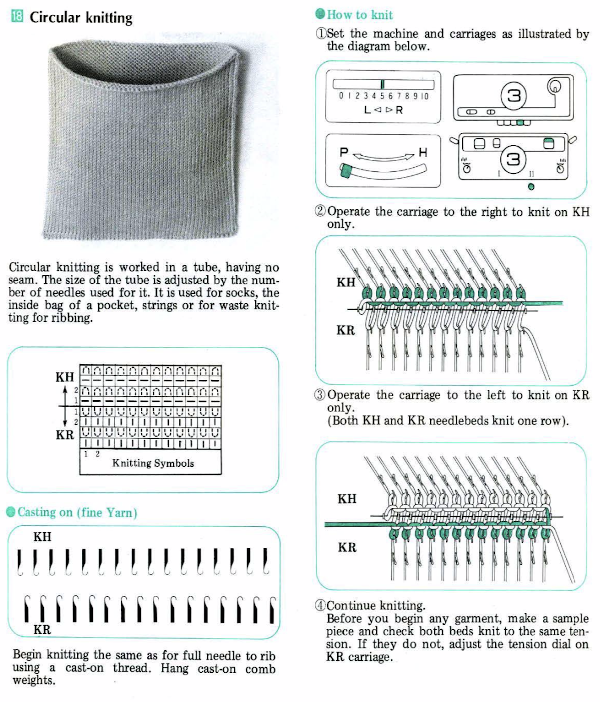

 The zig-zag will lean slightly to one side
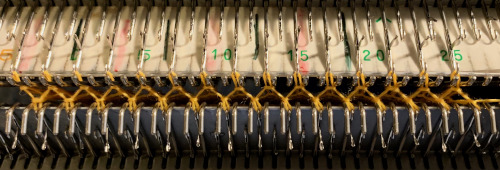
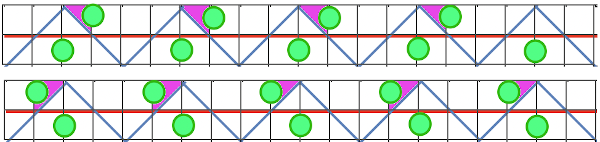
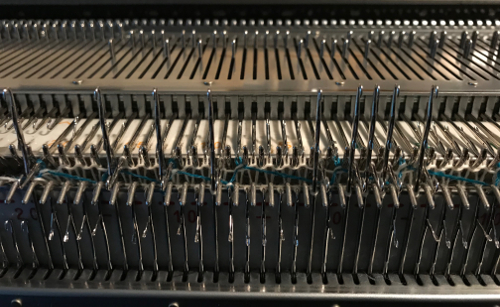
 If that is understood then one can make the choice of moving left or right and be off and running in the pattern, aside from the starting side or some of the other directions given in patterns or manuals. Cam buttons and patterning may be introduced as well. This is how a row of knitting might appear after racking.
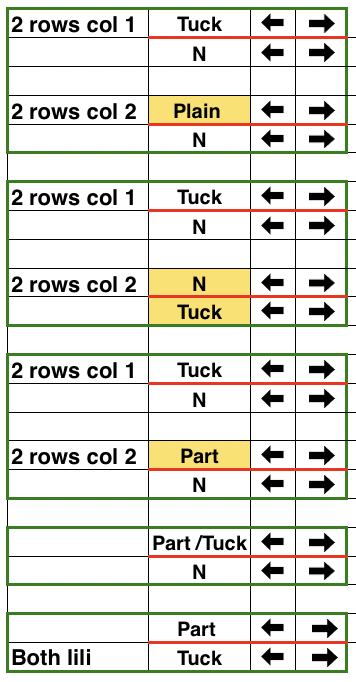
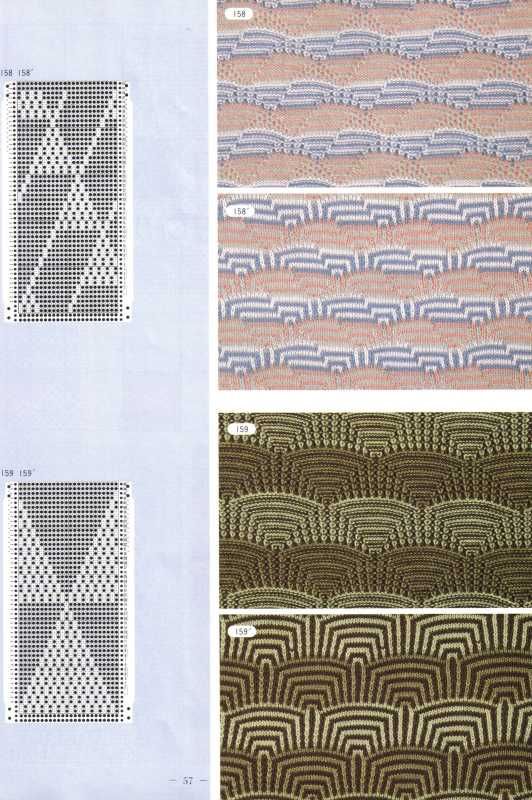
 This page from the Ribber Techniques book shows fabrics knit on EON, adding tuck cam buttons into the mix and slightly different needle arrangements, varying the look of the finished knitting.
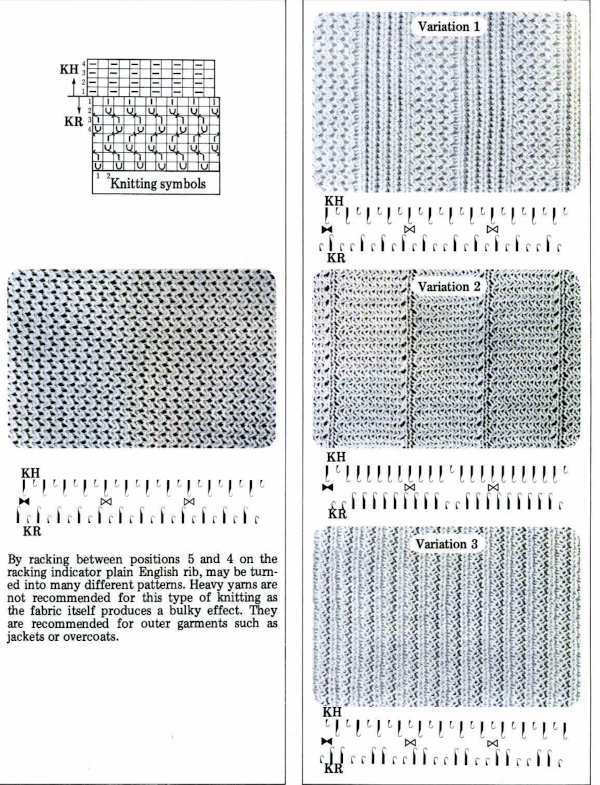
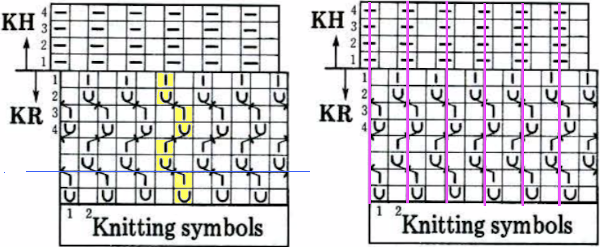 If multiple side-by-side stitches are in work on the ribber, the half-pitch setting applies as well. When tucking is added, for increased stretch, it may be necessary to compensate for the width of the resulting fabric by casting-on on every needle and then transferring in the desired configuration between the beds. Transferring is easier done in full pitch with a return to half-pitch prior to continuing to knit. The bind-off is likely to require considerations for an added stretch as well. Slip stitch narrows the fabric. Such adjustments are usually worked out in test swatches.
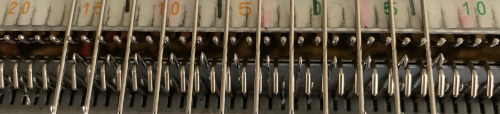
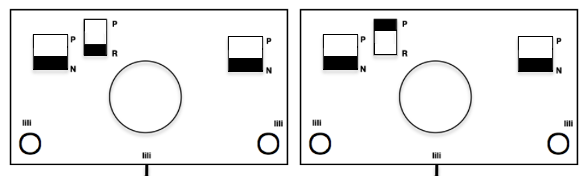
 By the way, the racking position indicators are slightly different in the Brother standard vs. the Brother bulky machines


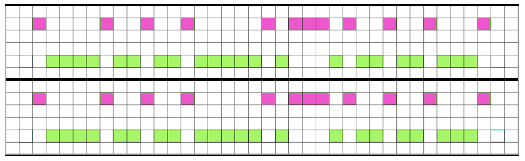
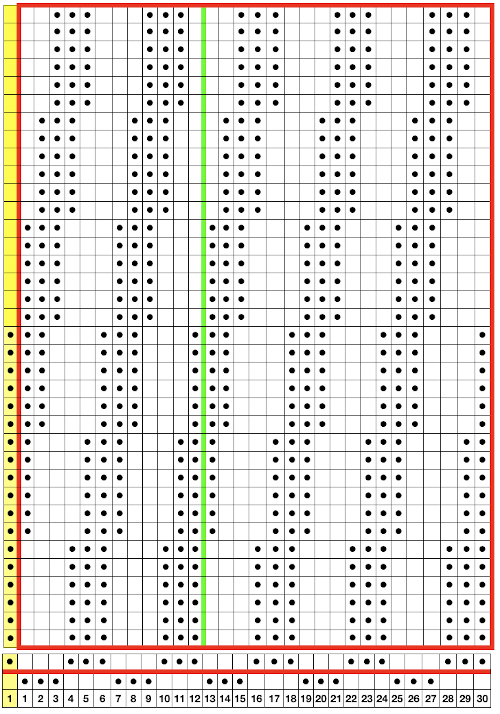
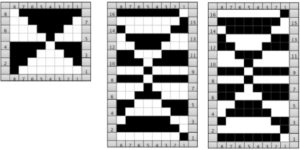 Susanna classifies the subsequent separations as C1 and C2. Because each color in each row knits twice, there may be an odd number of rows in the initial design repeat.
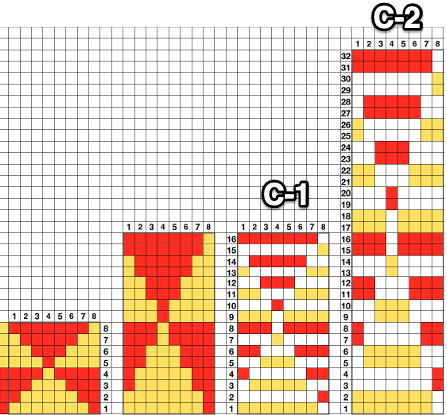

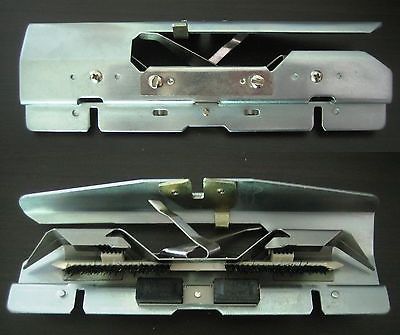
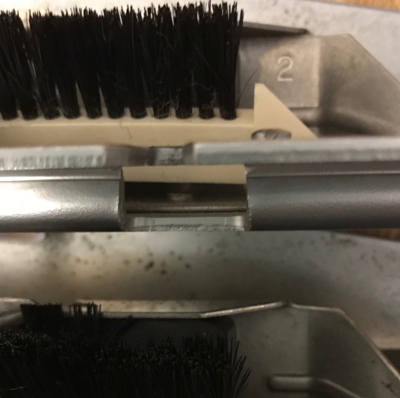
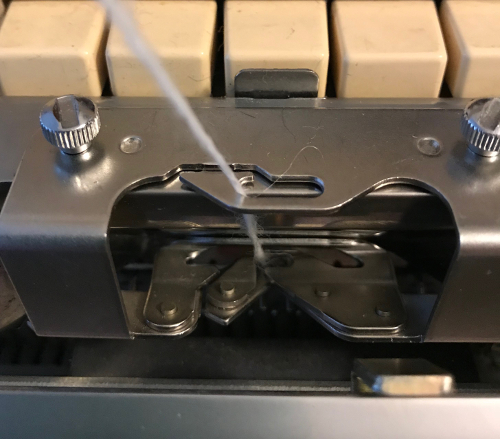
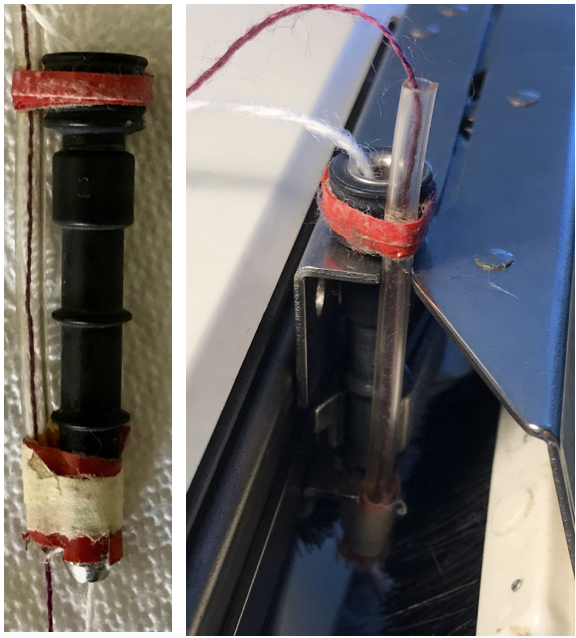
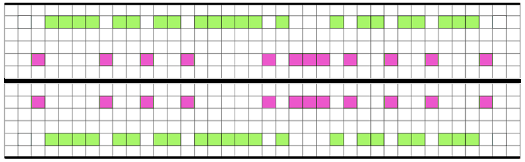
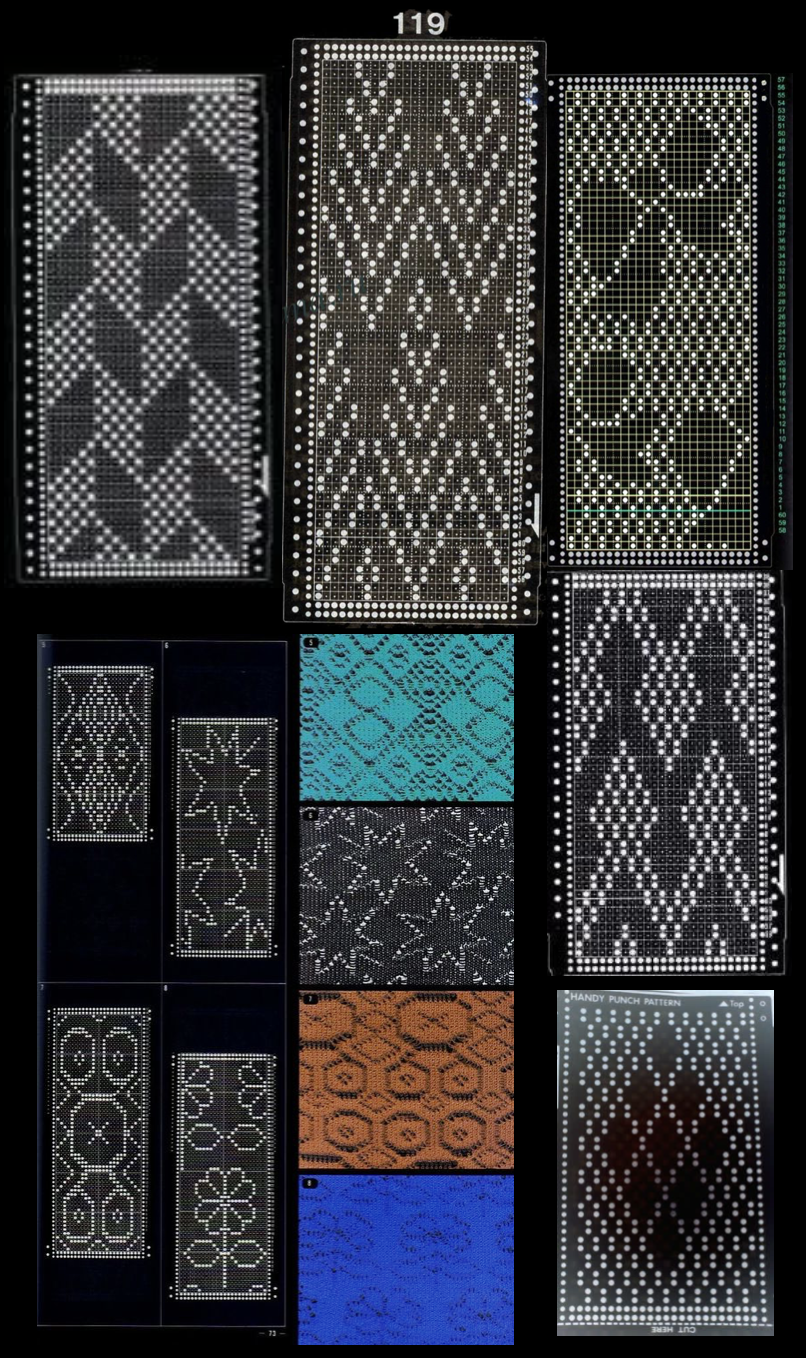
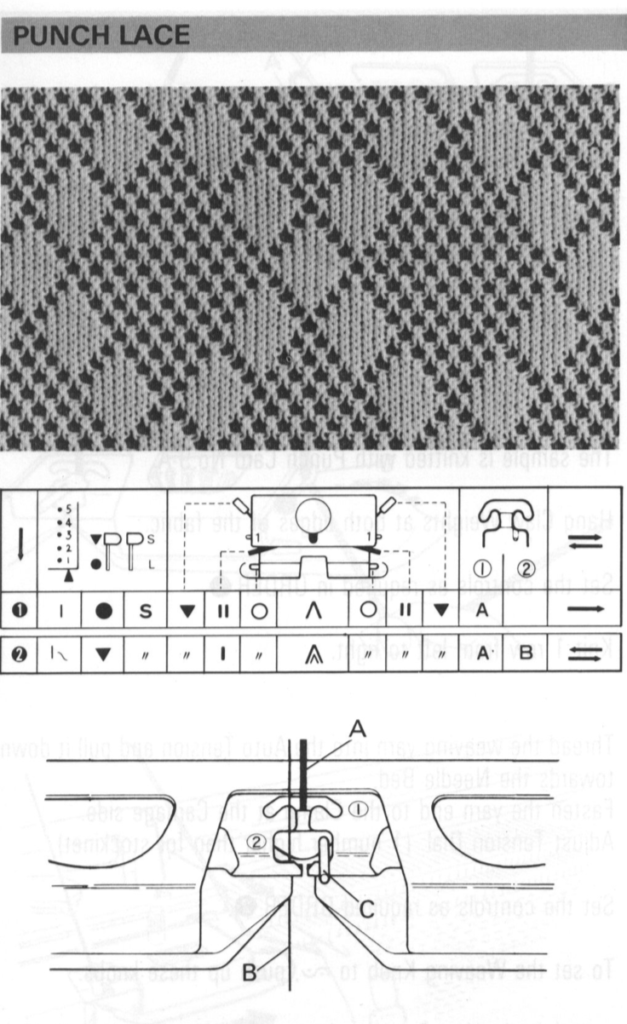 A quick “hack” to help keep the B position yarn from jumping out during knitting, taken during a different experiment
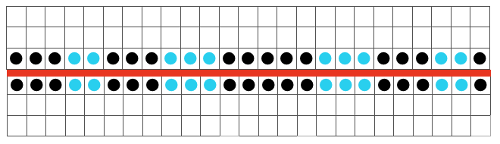
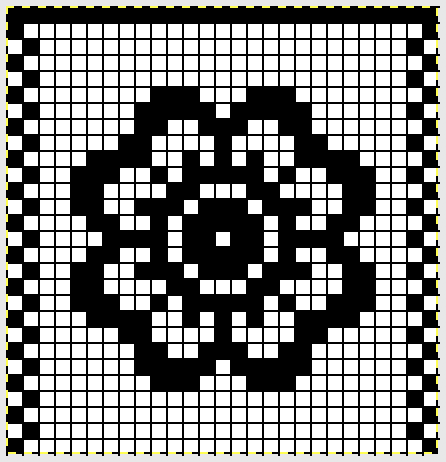
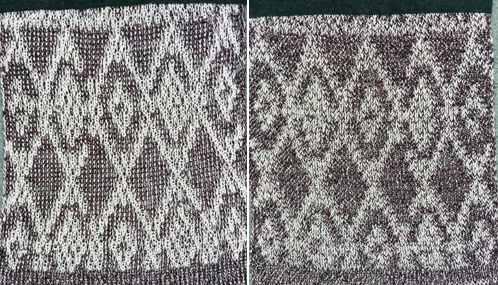
 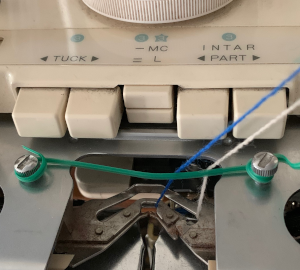 In tuck stitch, the unpunched areas, white squares, or pixels represent loops created on non-selected needles, punched holes / black squares, or pixels represent knit stitches. In punch/ thread lace those white areas knit both thick and thin yarns together, while in punched holes/black square or pixel areas the thin yarn knits on the stocking stitch side of the fabric, with the thicker yarn floating behind it. Depending on fiber content, gauge, etc. the illusion of eyelets can be created.
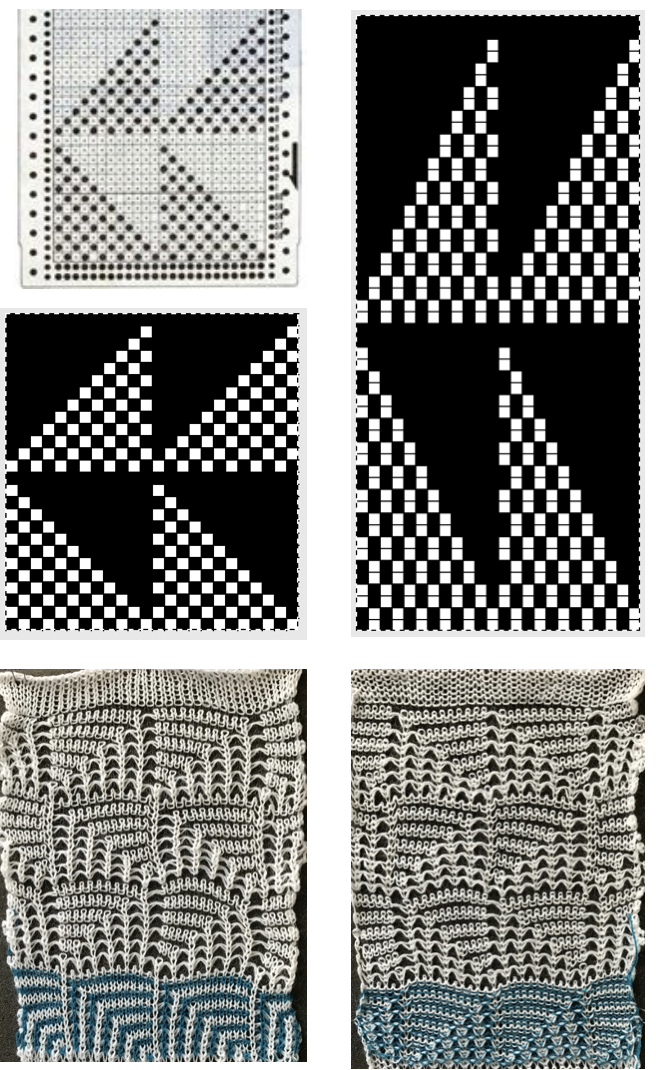

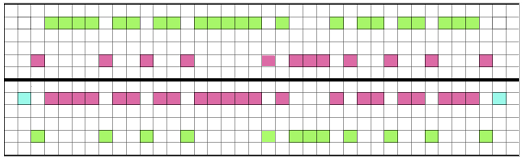
 2023: using StitchWorld # 545, 56X40 pixels
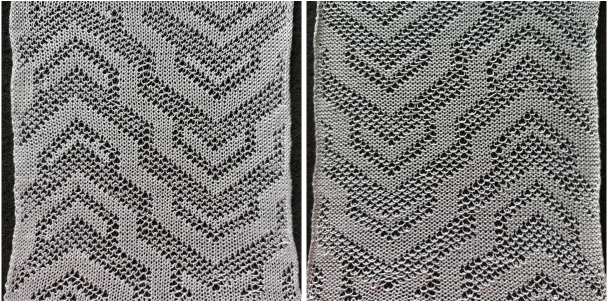


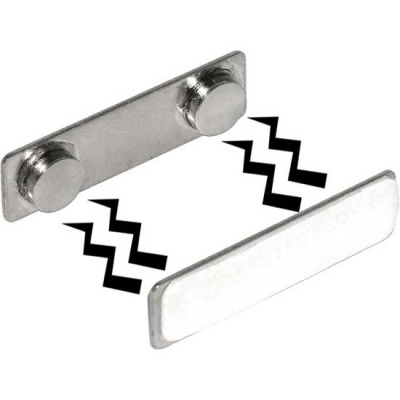

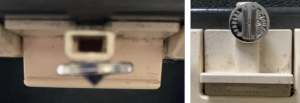
 Here the 910 LC is also missing its magnet (left), gluing on a magnet in the position shown below made it usable on the electronic again.