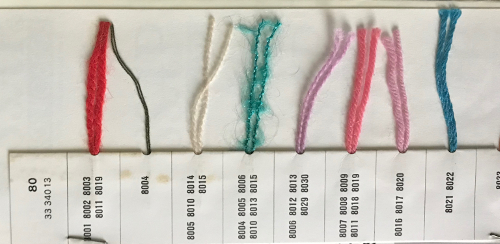
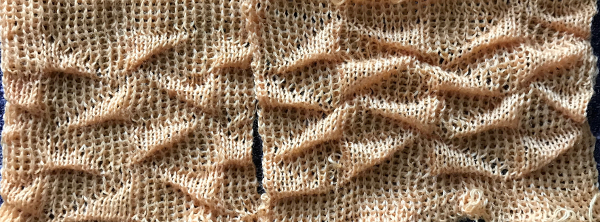
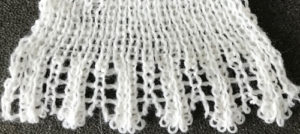
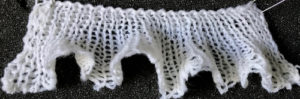
I have been asked whether this fabric discussed in the post could be produced on the Passap. 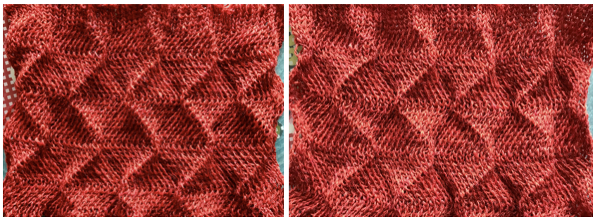 The only way to find out is to try it. The lesson already learned: use a crisp yarn that can retain memory for maximum effect. Here, the swatch is knit in a 3/14 cotton. To start with, racking was from position 0 to 6 and back. Racking every 2 rows at the bottom of the sample, every row at its top
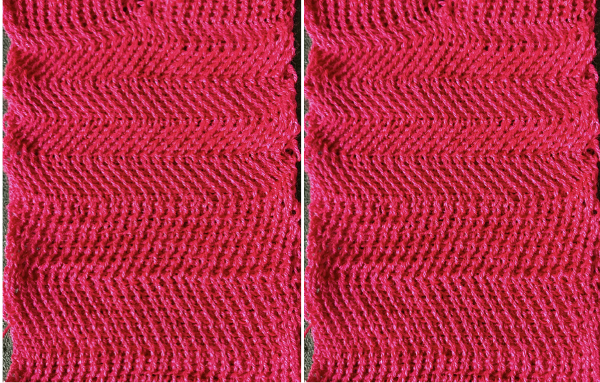 Now adding needles out of work with the expectation of folds at approximate center of each fold
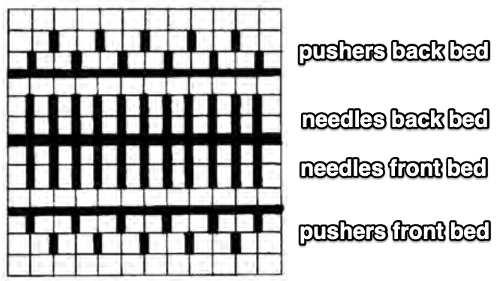
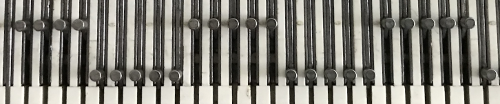
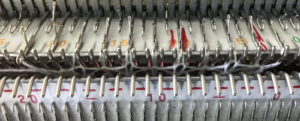
![]() This was my set up, after planning the repeat and transferring a couple of stitches on each end to the back bed for better side edges
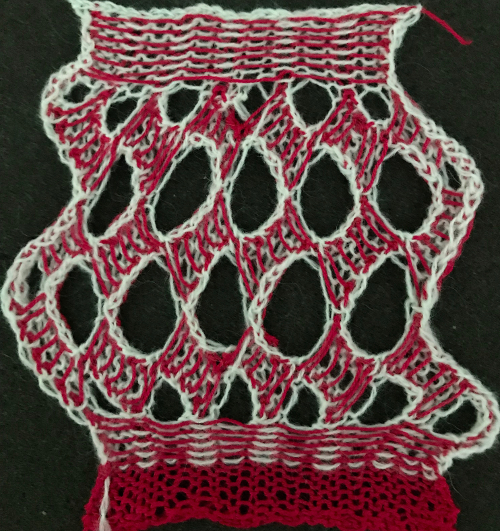
This was my set up, after planning the repeat and transferring a couple of stitches on each end to the back bed for better side edges  Racking started in center position 0, then swung to 3 left, to 3 right, ending on 0. I long ago got frustrated with the Passap numbering, marked the racking positions with a permanent marker from 0 on the right to 6 on the left. The knit result is a rolling fabric, though a bit less so than the Brother sample, which was able to move across more racking positions.
 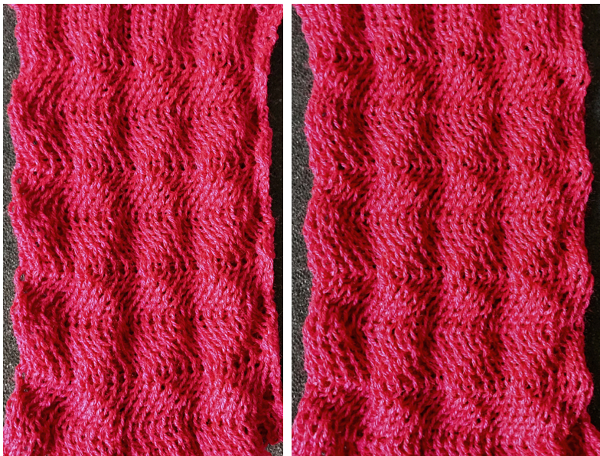 Reviewing some racking facts: several posts previously written that include information for racking designs on both brands
2018/07/19/more-scales-and-chevrons-in-ribbed-racked-4-fabrics/
2016/01/13/racking-2-vertical-chevrons-herringbone/
2016/02/02/vertical-racking-3-automating-half-fisherman-in-pattern-2/
2016/01/09/ribber-pitch-a-bit-on-racking-1-chevrons-horizontal-herringbone/
2018/10/14/fisherman-english-tuck-stitch-rib-1-checks-patterns-brother-passap/
2015/11/22/racked-ribber-cast-on-and-rib-configuration-tips/
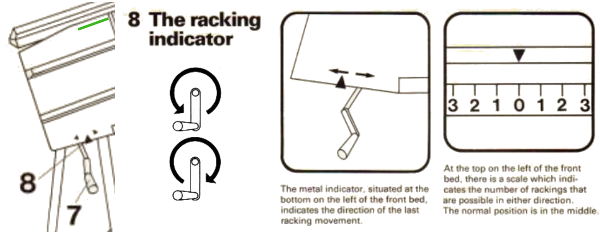
Brother racking controls: the handle, racking indicator, and pitch lever 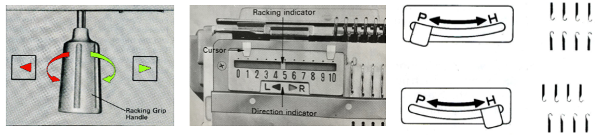 There are ample illustrations including from Brother Ribber Techniques Book in previous posts on procedural steps. Passap: racking handle is up for full pitch (point to point), down for half-pitch. It is turned one full rotation for each unit/ number change in ranking positions. Partial rotations may be suggested when some of its accessories ie their transfer carriage are used. As stated, Brother has 10 positions, Passap only 6.
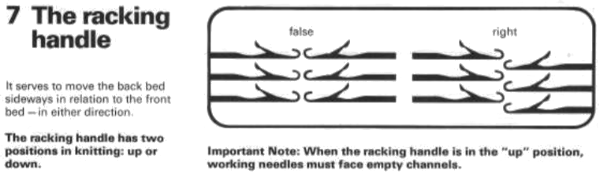
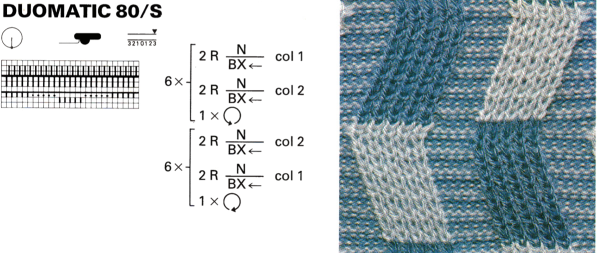
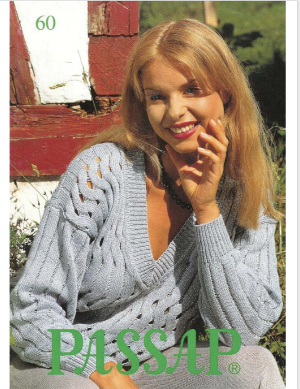
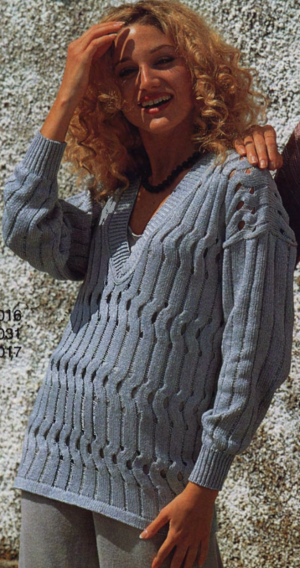
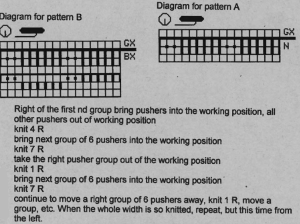
 The Passap E6 manual shows racking patterns possible with console built-in designs on pp. 118, 119, 120, 121, with techniques used in racking patterns number 257-272. The console gives prompts for the direction in racking sequences. Self-programmed designs would need a separate knitting technique entered into the console as an additional “design”. This can be done with a card reader combined with a pattern download from a computer. Programs that automate the function are no longer on the market. Typically, in published patterns for either brand, if the starting point for the racking sequence is important, it will be given along with the frequency of movements such as in this design from the Duo 80 book
 Programming the front bed on Passap or main bed on Brother with tuck or slip selections begins to enter far greater common ground. Decades ago, my advanced knitting curriculum included Passap weekend workshops in addition to Brother course classroom and studio hours. I spent a lot of time exploring techniques, often, my manual includes scribbled notes. Manual guidelines for E6 patterning, beginning with advice for knitting them
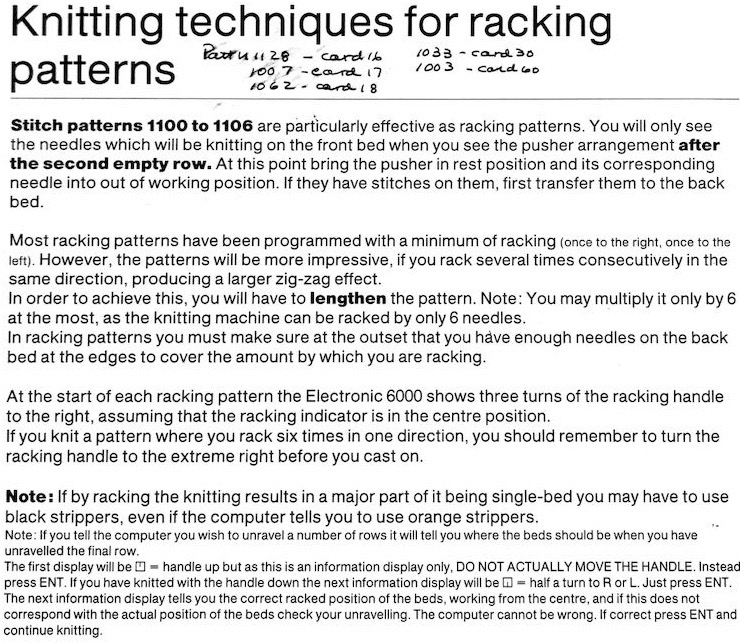
 I have to admit I cannot always decipher some of my note-taking or handwriting. The additional confusion that comes into work in cross-brand translations is the fact that some E6 techniques may only be used as programmed by the factory, others may be “combined with stitch patterns”. Getting it down to black and white squares when stitch patterns in E6 are to be translated for other KM brands is a bit more complex. It is easier done from the Duo 80 instructions when an E 6 is not available for test knitting. The Duo manual is low on swatches and pattern assortments, but a small book, available online,can inspire many textures, the Passap system’s particular strength.
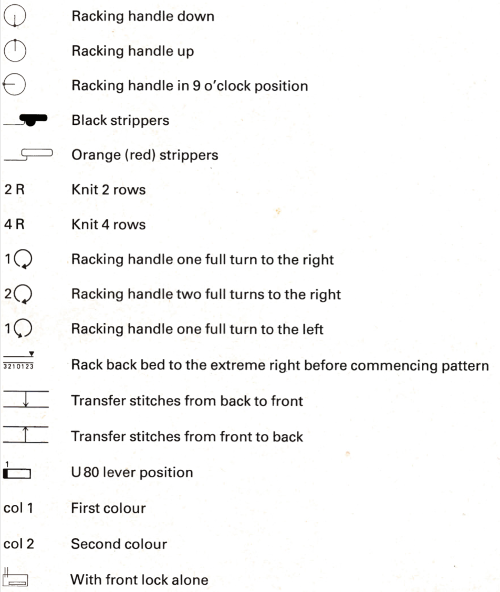
 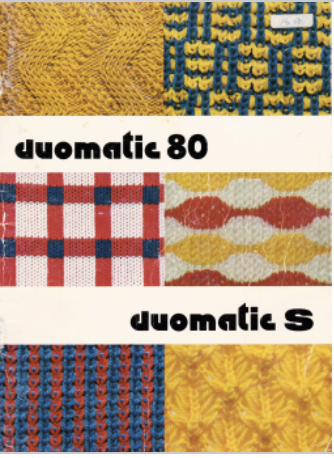 Some Duo symbols and their meaning
 Many designs are based on one or both beds having needles out of work. Transferring stitches from one bed to the other can be done based on needle diagrams on the Duo 80 and punchcard machines after the cast-on row is closed. If the specific technique in the E6 offers a pusher selection after the first SX/GX row (262,264, 265, 269, 270, 282) transfer stitches with locks on the left, otherwise, transfer after the second SX/GX pass to the right (257,258,259). After the pattern is set up in E6, place all the pushers in rest position, completely out of work.
Pushers corresponding to needles out of work on the back bed need to be in the back rail so as not to cause mispatterning if arrow keys are used. In Japanese electronics, transfers can be made after the first KC pass, making certain the emptied needles are placed completely out of work. Set up the knit bed first so that alignment relationships are correct for out-of-work selections on both beds.
As in any ribber pattern, if the major part of the piece is being knit single bed, the tension will need to be adjusted to closer to that used in stocking stitch for the same yarn. Passap knitters have the added option of changing the strippers in use to another color.
When designing your own patterns and starting the movements on either side of the machine, it will take some sorting out as to what arrangement of needles in work is best on the Passap back bed or Brother ribber is best for side edges as one bed moves beyond the last stitch in work on the knit bed. There should be no stitches on it without stitches behind them as the racked stitches travel from each side to the other if the goal is pieces that will be seamed ie. the front and back of a sweater.
The E6 console may not always give the proper selection for needle setup for the front bed as seen in one of my swatches. There are never instructions for the back bed needle or pusher positions. Those need to be hand-selected based on diagrams after the front bed is set up and following the diagrams provided with each technique to produce the specific fabric illustrated. That can be disregarded in one’s experiments with needle arrangement and lock settings and how they relate to the movement in the racked stitches.
If one needs to stop the process at any point, it is a good idea to devise a method of keeping track of where the stop occurred and whether a racking movement has taken place yet or not. Forming personal, consistent habits is also useful, ie. I find when racking with color changes, I rack before I change the color consistently. Racking when using multiple colors often happens at the end of the color change sequence, ie, 2 colors, rack after 4 rows. A bit more attention needs to be paid when racking is for only a few positions. I tend to start mine on the far right at 0, so I can move the one or 2 steps and am stopped by the machine on my return, giving me an error margin on only one side.
A few Duo/Passap comparisons 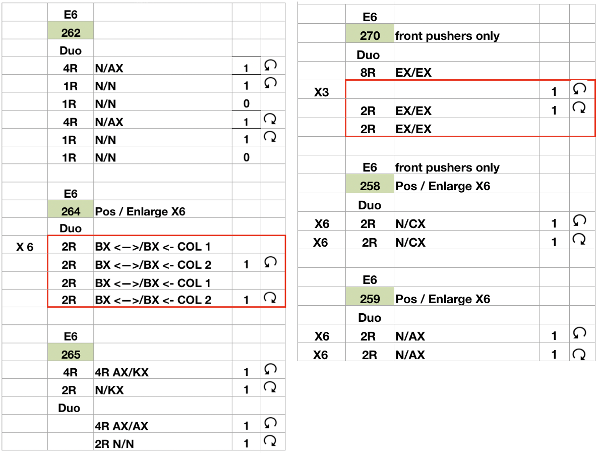
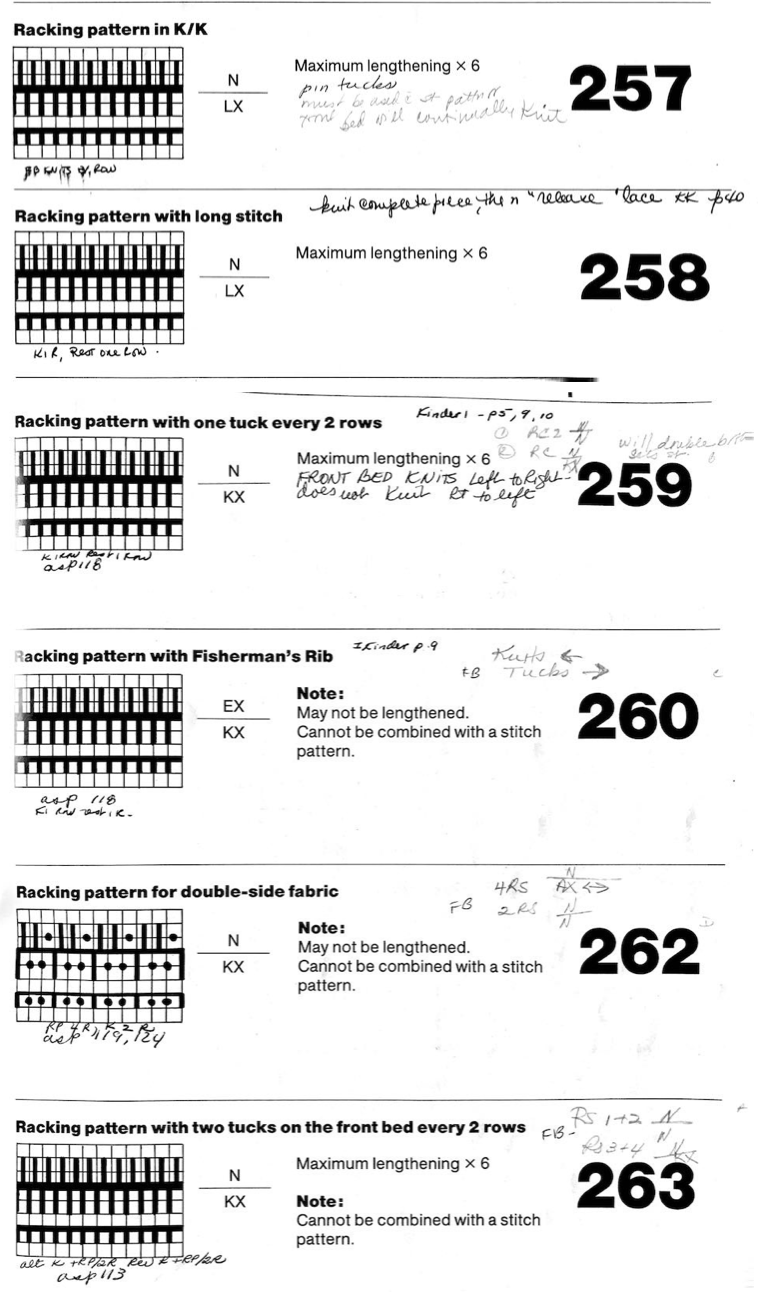
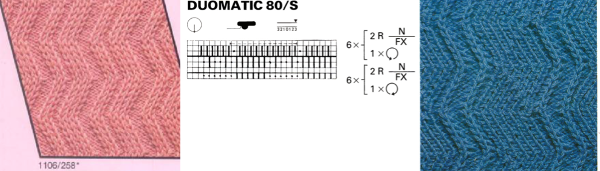
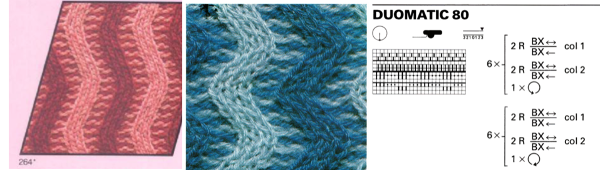
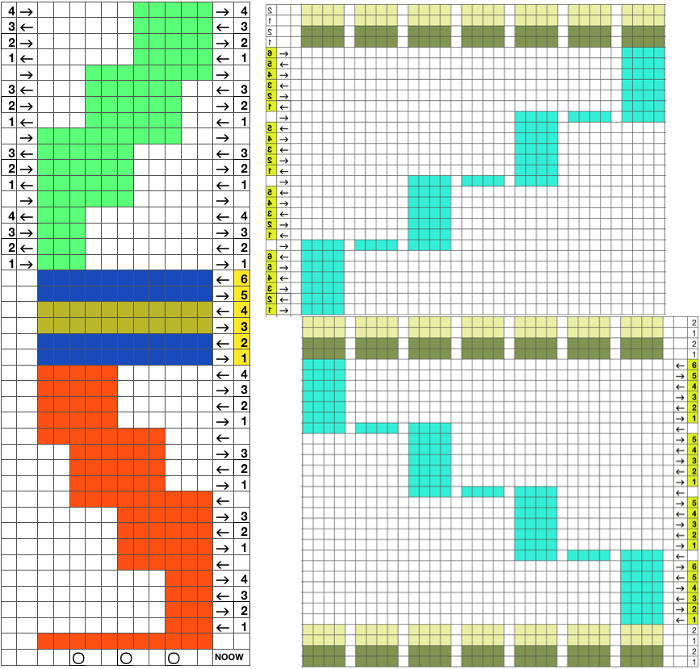
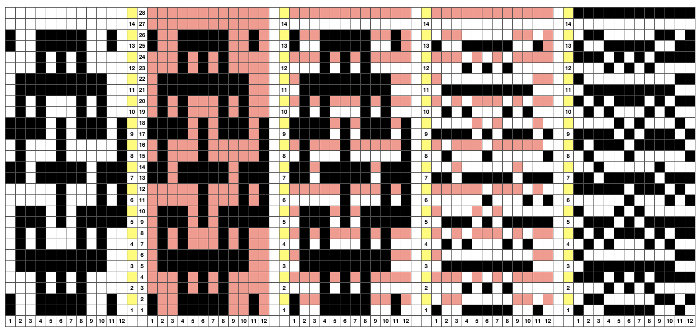
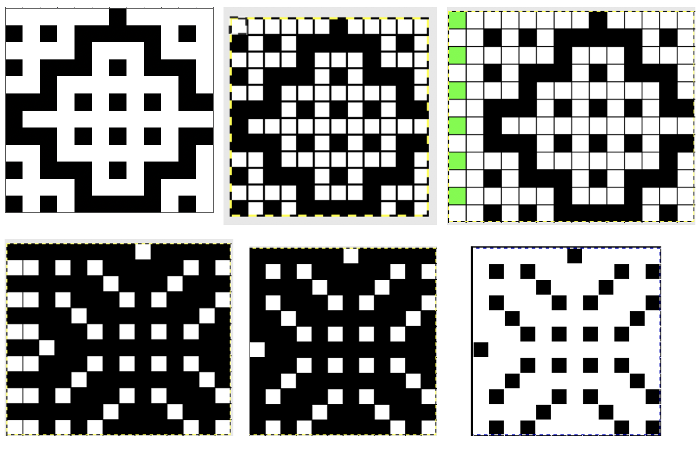
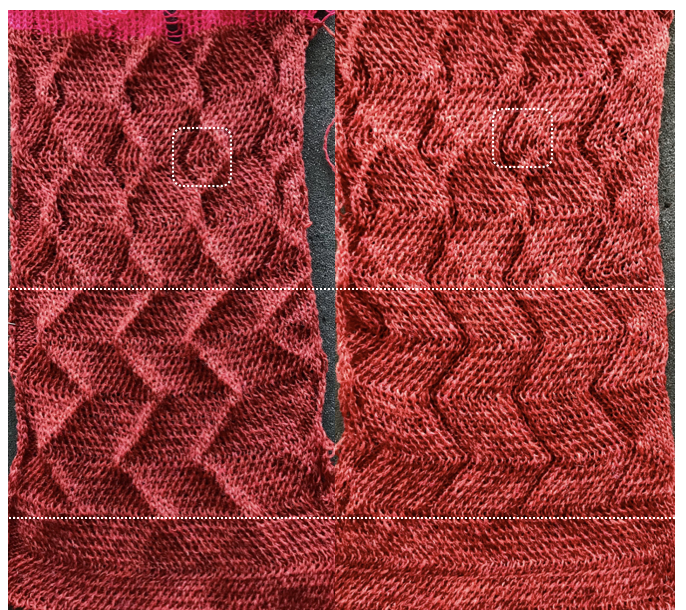
Swatches: this E6 design introduces needles out of work. The E6 swatch in color below on the far left has a slightly different needle arrangement than the DUO one to its right. Technique #257 has a * beside it, which indicates the repeat must be altered to produce the fabric. 120 is the page on which the swatch photo appears Altered designs are listed on pp. 129-131of the E6 pattern book for all stitch types. ![]()
![]() The original on the left is mirrored, the selection is fixed, the height is multiplied X 6. The lengthening does not influence the design, it tells the console how many swings in each direction are planned. The console, in turn, gives visual and sound prompts for each racking movement, in this instance, by one full turn clockwise. The prompts often start the pattern in the center 0, and begin and end with half a sequence.
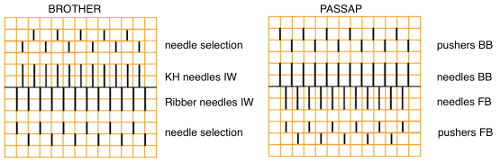
The original on the left is mirrored, the selection is fixed, the height is multiplied X 6. The lengthening does not influence the design, it tells the console how many swings in each direction are planned. The console, in turn, gives visual and sound prompts for each racking movement, in this instance, by one full turn clockwise. The prompts often start the pattern in the center 0, and begin and end with half a sequence. ![]() The front bed is set to slip stitch, so black squares knit. Both beds will knit every needle/pusher in work throughout. After the first preselection row on either brand, needles and pushers in non-selected areas need to be put out of work, accomplished by transferring them to the opposite bed. The design process is the same as having a fixed row on a punchcard machine, with a single selection repeated over and over. The racking position indicator on the duo shows the start of the pattern at 0 position, Brother equivalent = 10. In the Duomatic, the carriage is set for plain knitting, and no patterning is required. The needle out-of-work selection differs from the E6 sample, but the racking sequence is the same. Brother options: fixed needle selection if the fabric is created fully as a hand technique does not require any programming. Electronics could be used with the repeat drawn X6 in height so that the racking direction is reversed after the first sequence is completed and the return to row 1 of the repeat is preselected. Machines that allow for it can have info added to memo windows, or mylar sheets may be marked to help accuracy in long pieces. Punchcard machines could punch a single row on #1 for accurate needle selection if it falls within the 24-stitch limits or hand-select them, mark racking numbers in repeat, and go on from there.
The front bed is set to slip stitch, so black squares knit. Both beds will knit every needle/pusher in work throughout. After the first preselection row on either brand, needles and pushers in non-selected areas need to be put out of work, accomplished by transferring them to the opposite bed. The design process is the same as having a fixed row on a punchcard machine, with a single selection repeated over and over. The racking position indicator on the duo shows the start of the pattern at 0 position, Brother equivalent = 10. In the Duomatic, the carriage is set for plain knitting, and no patterning is required. The needle out-of-work selection differs from the E6 sample, but the racking sequence is the same. Brother options: fixed needle selection if the fabric is created fully as a hand technique does not require any programming. Electronics could be used with the repeat drawn X6 in height so that the racking direction is reversed after the first sequence is completed and the return to row 1 of the repeat is preselected. Machines that allow for it can have info added to memo windows, or mylar sheets may be marked to help accuracy in long pieces. Punchcard machines could punch a single row on #1 for accurate needle selection if it falls within the 24-stitch limits or hand-select them, mark racking numbers in repeat, and go on from there. 
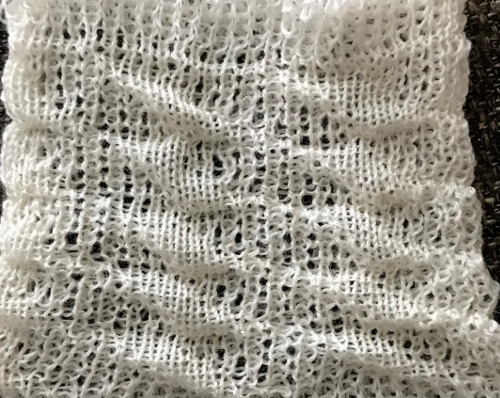
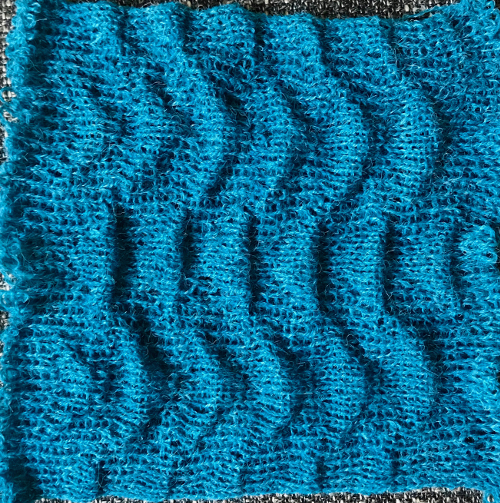
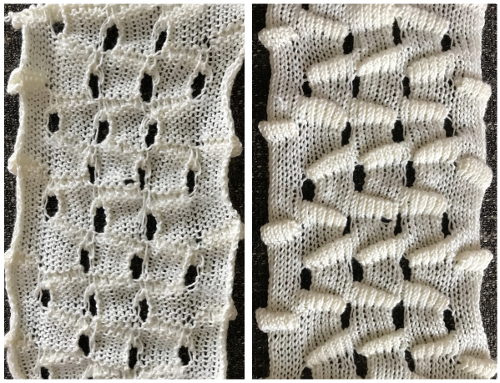
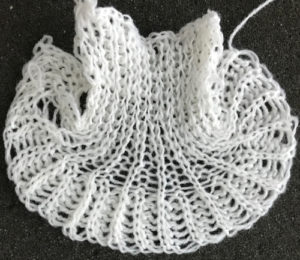
 My sample was knit in a tightly twisted cotton, and when off the machine had an interesting and unexpected fold 3Dquality
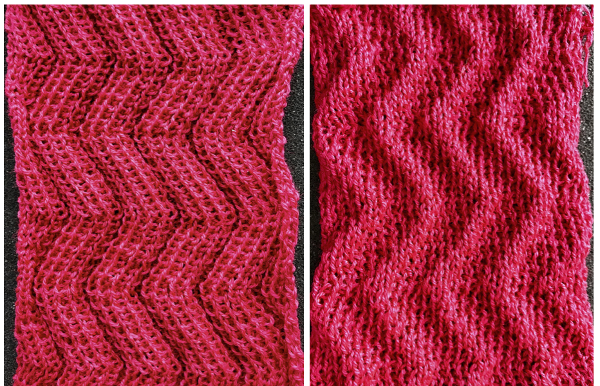

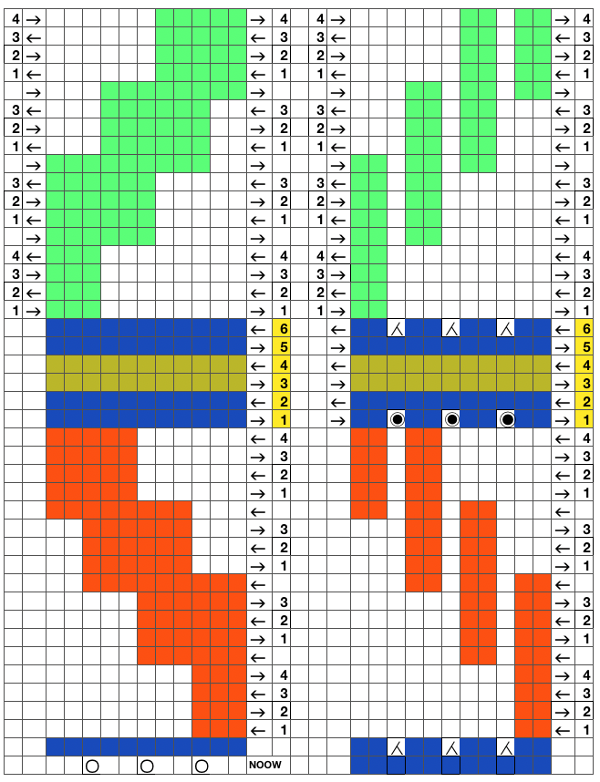
 The setup is essentially the same, with white squares representing needles and pushers that need to be out of work. Tech 258 uses LX (slip) on the front bed, back bed si set to N. The duomatic pattern has a different OOW needle arrangement, the front lock is also set to tuck = FX (E6=KX), adding another layer of texture and complexity. Needles are also out of work on the back bed.
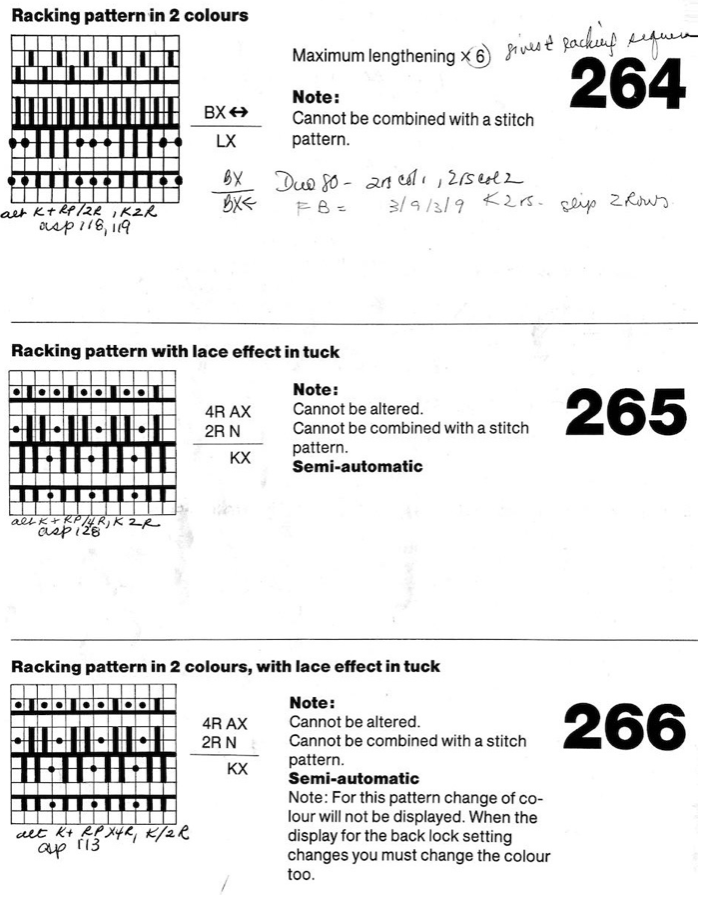
E6000 264* is used both as a pattern and a technique number uses the X6 as well for accompanying prompts. Needle/pusher selection is for 3 in work and 9 out of work for 2 rows, then reversing it for to 9 in work, 2 out of work for 2 rows, thus accommodating the alternating color change. The Duo on the front bed performs a similar selection with the BX <– arrow key, racking is every 4 rows in both. It takes 24 rows to reach the full racking position reversal. These were the pusher selections, each repeated X 2, creating the wrong fabric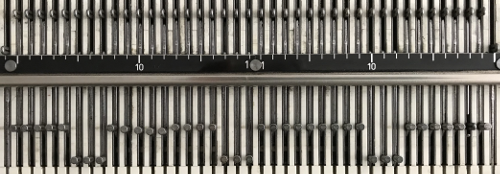 What is knitting in terms of black and white squares if one continues:
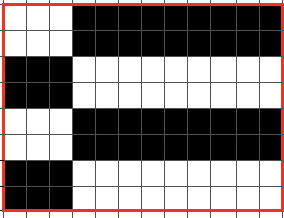
 this repeat is what is required to match the technique diagram
 After the first row of pusher selection transfer 3 stitches on either side of the center 3 in each group of 9 to the back bed. This shows the proper selection, each is repeated twice
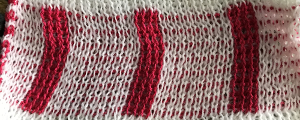
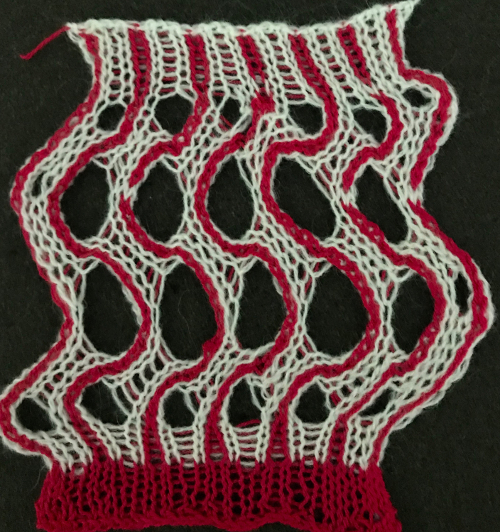
 I continued to knit with plain knitting on the back bed for proof of concept, every other needle selection, and slip (BX) stitch <– –> there would compress the “wave” since half as many rows would then be knit on that bed in each color. As always, forgetting to set the lock/carriage to slip will result in knit stripes as seen on the right of my sideways swatch
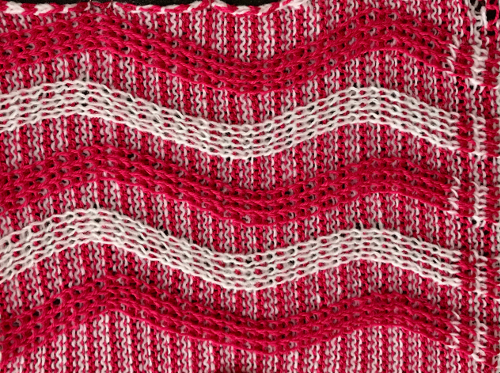
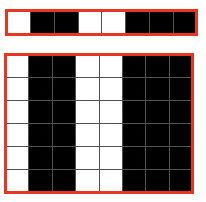
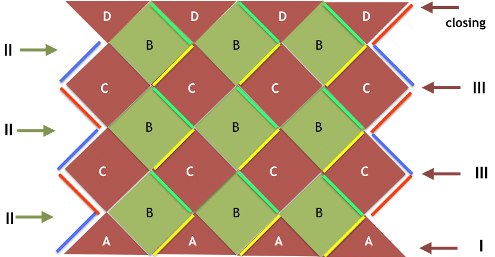
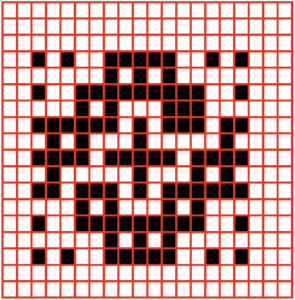
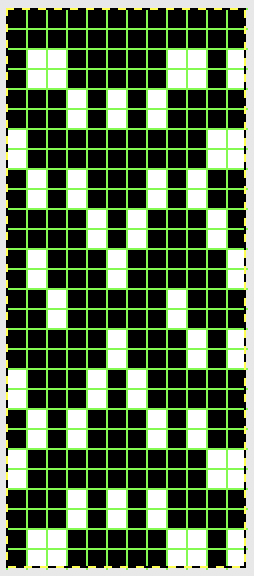
 Below the pattern alternates blocks of 5 black squares, 5 white, color changing every 2 rows and reversing racking direction after every 24 rows. The full repeat is 48 rows. If rows knit in the zig-zag are counted, they amount to 12 because each color slips it is not knitting for 2 rows. Note that to achieve the color reversal at the halfway point of the repeat the same color (2) knits for 4 rows, at the top of the repeat color 1 does the same.
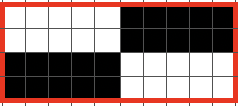
Below tuck patterning is introduced in both beds. The front bed is knitting tuck on every other needle for 2 rows each, easy to reproduce on Brother ![]() AX<– on the back bed will knit when pushers are up for 2 rows, tuck on the same needles when they are selected down, also for 2 rows. Brother knitters could try to set the ribber carriage to tuck in one direction only, or simply set it to knit every row
AX<– on the back bed will knit when pushers are up for 2 rows, tuck on the same needles when they are selected down, also for 2 rows. Brother knitters could try to set the ribber carriage to tuck in one direction only, or simply set it to knit every row
Though tech 264 states it may not be combined with a stitch pattern, I programmed built-in # 1002 X 6 in height, back bed set to slip (BX<–) every 2 rows. Racking occurs every 4. The full repeat is 48 rows. Back bed pushers should be in work so they stay inside the edge from knit stitches on the front bed. This was a quick test. The knit side is unremarkable. The mess on the left edge on the upper right of the top photo is because I began with 2 needles in work on the back bed like in the illustration above. As I racked counterclockwise, the stitches on them kept pulling away from the side edge (back bed, left). The technique continues to give racking prompts as written by the factory, none would exist for the rows with no racking in the pattern
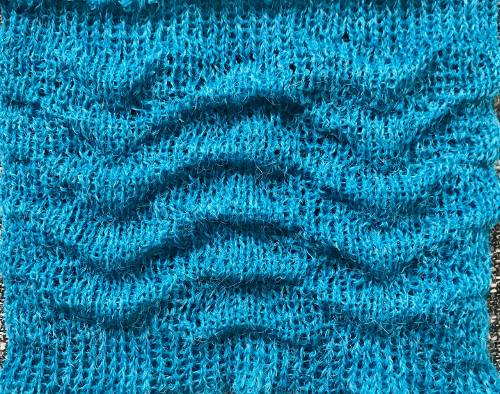
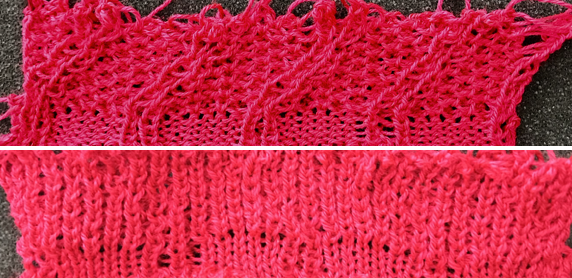 Back to acrylic yarn, light color for more visibility, creative yarn snag on the left midway, full swing movement is shown, each is 48 rows in height. As always, it helps to check whether the stitches are obliging by staying on the needle bed. The top half of the swatch is pictured.
 In turn, I programmed # 1000 X 6 in height, but the pusher selection was all up for one row, one down. I left it alone, and lastly, worked with pusher selection on the back bed, BX <–. Patterning advances a fixed repeat every row or every other, determined by original hand-selected up for selection and down above rail for out of selection. The front lock is left on N (disregard front for setting it to LX). There is a world of other possibilities, while the console racking sequences can be used from built-in techniques.
 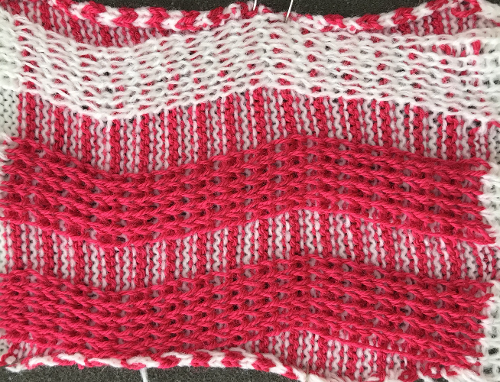 Any ribber needle selection on Brother other than with the use of lili buttons would have to be done manually.
The range of fabrics with programming additional patterns in tuck, slip, or combinations thereof, along with needles in and out of work on either or both beds, increases the possibilities for fabrics with texture and dimension exponentially.
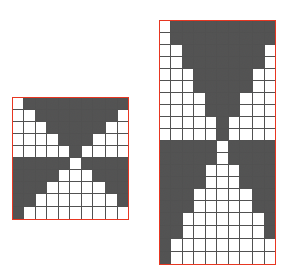

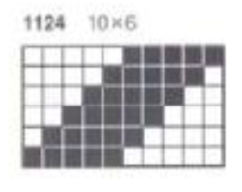
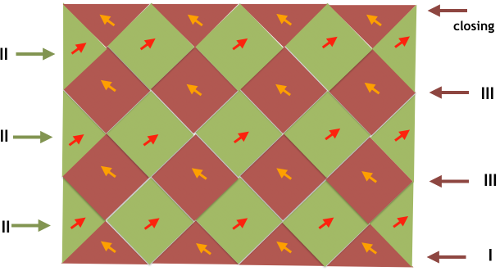
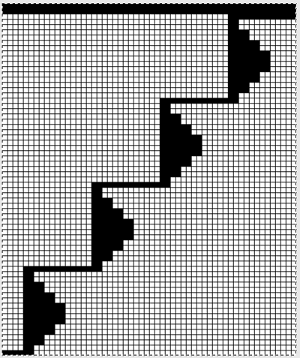
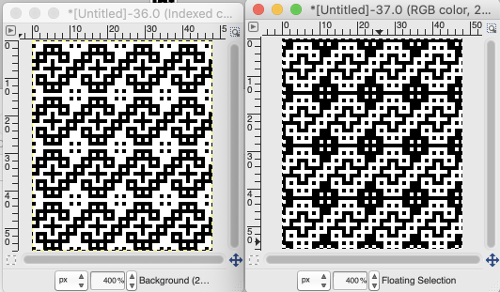
 tiled repeat to get a sense of the movement of the triangles:
 note: the direction of the chart pattern repeat for 1124 is reversed in the blisters. It appears as drawn on the knit side of the fabric, where stitches are slipped and elongated to create the pintuck texture on the purl side
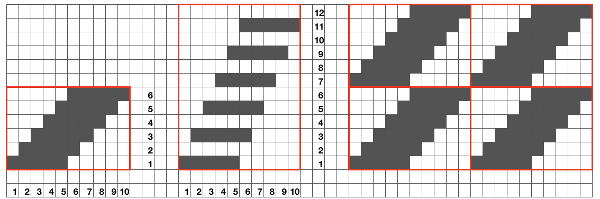

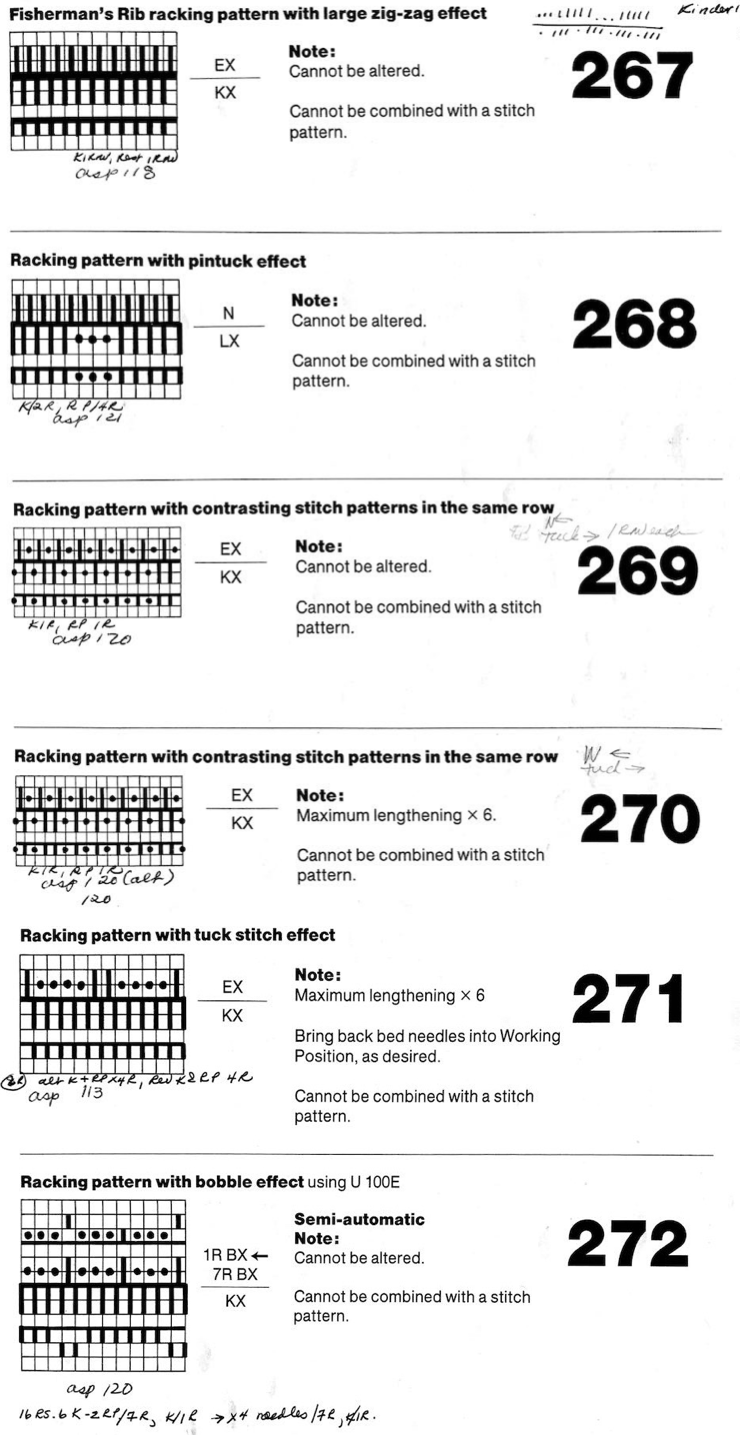
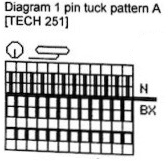
 In the Duo HX setting the front bed normally knits or slips according to the design for one row, and slips the next row. Again, the chart illustration is for the Duomatic and the lock there takes over the function performed automatically by the E6 technique. The back bed in this instance knits every row. In the E 6000 the front lock is set to LX (slip <– –>). The fabric created may be referred to as blister or pintuck (nothing to do with tuck stitch/brioche). The bubbly texture appears on the purl side. Stitches that slip on the bed with needle or pusher selection elongate, pulling extra rows together eventually, helping to form pockets that are sealed periodically by all knit rows. With pushers down, no needles selected the front (knit) bed skips/ slips associated needles. With the back bed (ribber) set to N, its stitches will knit every row.

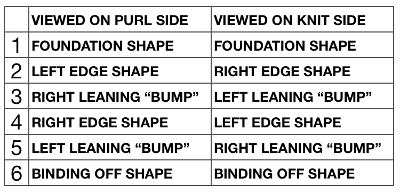
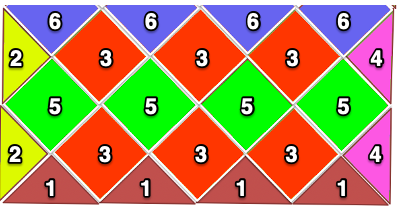
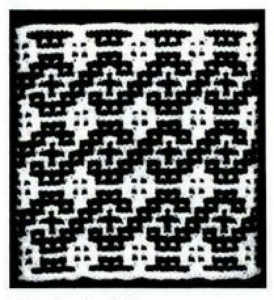
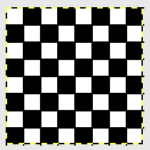
 This shows the pattern as knit on the Passap, reduced to black and white squares
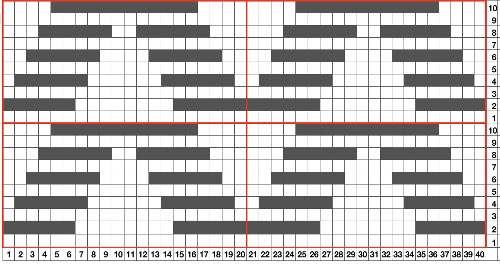
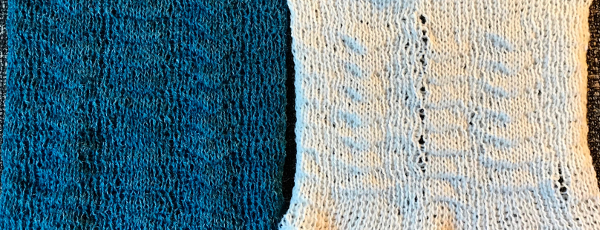
 Going for the safe repeat on Brother machine: color makes a significant difference in how visible the pattern will be. Both yarns are supposedly the same weight, the white was hard to knit, and there was a needle that dropped stitches regularly. The blue yarn knit with no problem
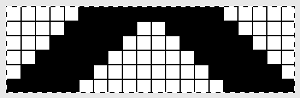

 The last swatch in the series: I am now able to use Ayab once more, img2track is having issues for me with its use on the 930. My repeat, therefore, is planned for the maximum width I may wish to test knit on the 910 machines, emulating tech 253. Every other row there is no needle selection on the main bed except for the first and last needle if KCI is used. On those rows the ribber only knits, there are more rows in the blister “pockets”. I knit the sample quickly, not checking every row, and in this instance had two dropped stitches on the main bed and no breaks. Yarns with memory ie wool are the best for texture retention, acrylics such as my blue yarn would flatten permanently if pressed, resulting in a very different fabric. It takes experimentation to sort out whether the extra step is worth the effort or is problematic during lengthier knitting
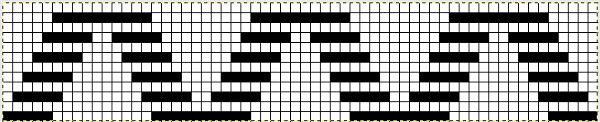
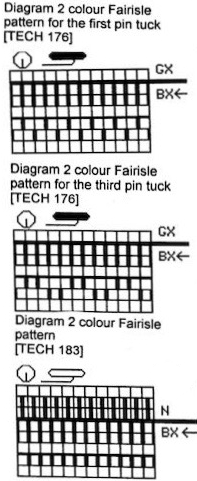 Tech 176: knits one color selection for 2 rows, then the alternate color selection for 2 rows; Pattern 1100,
  in the next sample the same repeat 1100 is programmed via the console and enlarged <–> X2, which means in the number of stitches only


 the repeat is 20 by 20 stitches wide, E6 Tech 253 is suggested, white squares form the pintucks, the same technique used in my sample knit using console design 1124
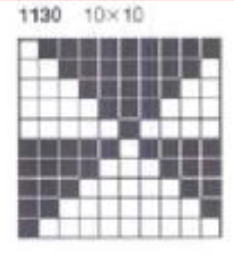
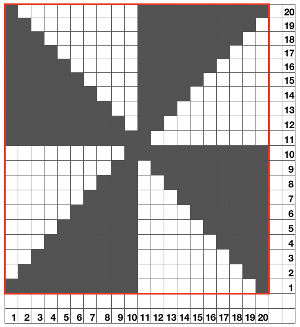 Working with simple shapes such as triangles can be an easy way to help one begin to understand how various techniques build up stitch or row counts, altering the original. Several of my DBJ posts are written using a cousin of pattern 1130 and include images of corresponding swatches executed on the Brother machine. In Brother, with rare exceptions (such as when needles are left out of work while in pattern) black squares (punched holes) knit, white squares (unpunched areas) slip. Slipped stitches are held until a black square or punched hole is reached, getting longer while the stitches on the opposite bed knit every stitch every row with that bed set to N/N. It is helpful to be using a yarn that does not break easily. Pockets are created of varying depths. As with any knitting, the color reverse option may produce an interesting variation or a “disaster” depending on the original motif. In the above chart, if knit as is, white squares would be slipped for 1-9 rows. Blisters of knit stitches will appear on the purl side. Tiling helps visualize the movement of the design in repeat.
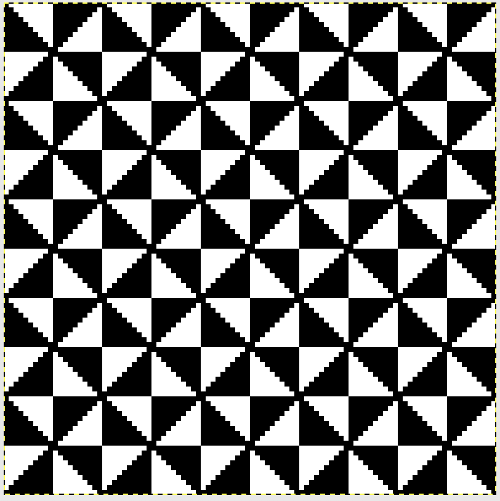
 its tiled view
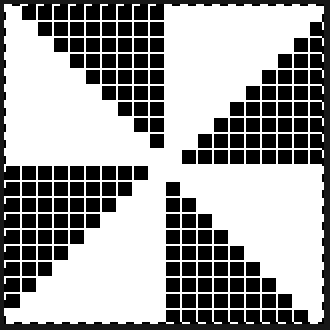
 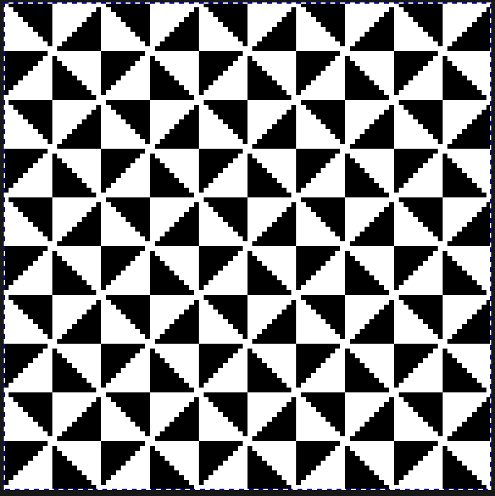 the expanded view of the original repeat emulating tech 253 now increases the height of the pattern to 40 rows from 20
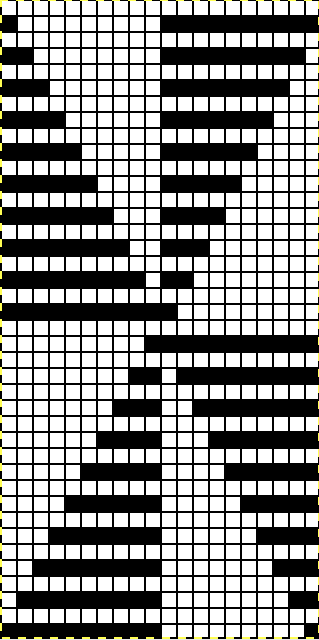

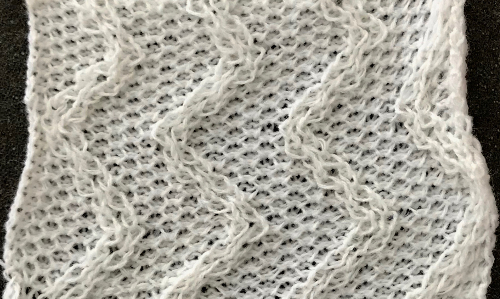
 Using the expanded 20X40 repat I did not have a slipped stitch issue such as yarn breaking, but because the pockets were so deep and so many stitches on the ribber were knitting for so many consecutive rows, the ribber stitches began to refuse to stay on their bed. I got this far: a large knit area can be seen, as well as slip stitch loops
 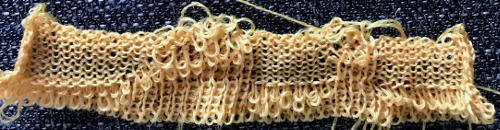 Can the same expanded repeat be used in another way? The color reversed version results in a subtle large scale pattern that might be quite interesting in a shiny rayon or other fiber
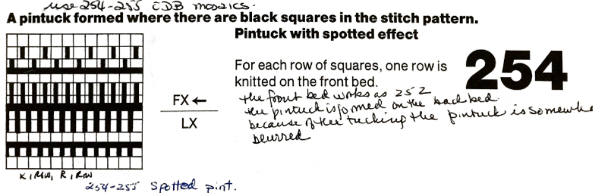
 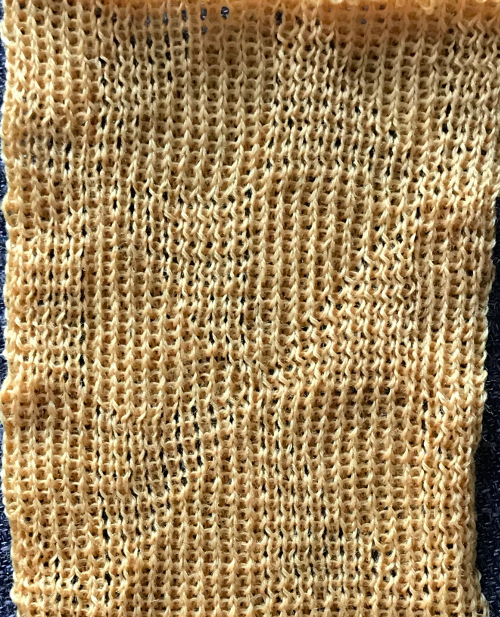 To review: Passap E6000 knitting techniques for pintucks are numbered 250-255. When using 250, 252, 254, the pint tucks are formed on the back bed on the needles that are opposite those with the pushers selected down in accordance with programmed black squares. The corresponding odd numbers 251, 253, 255, select pushers down according to programmed white squares (253 in the manual should say white, not black squares).
 a rearview with ends woven in
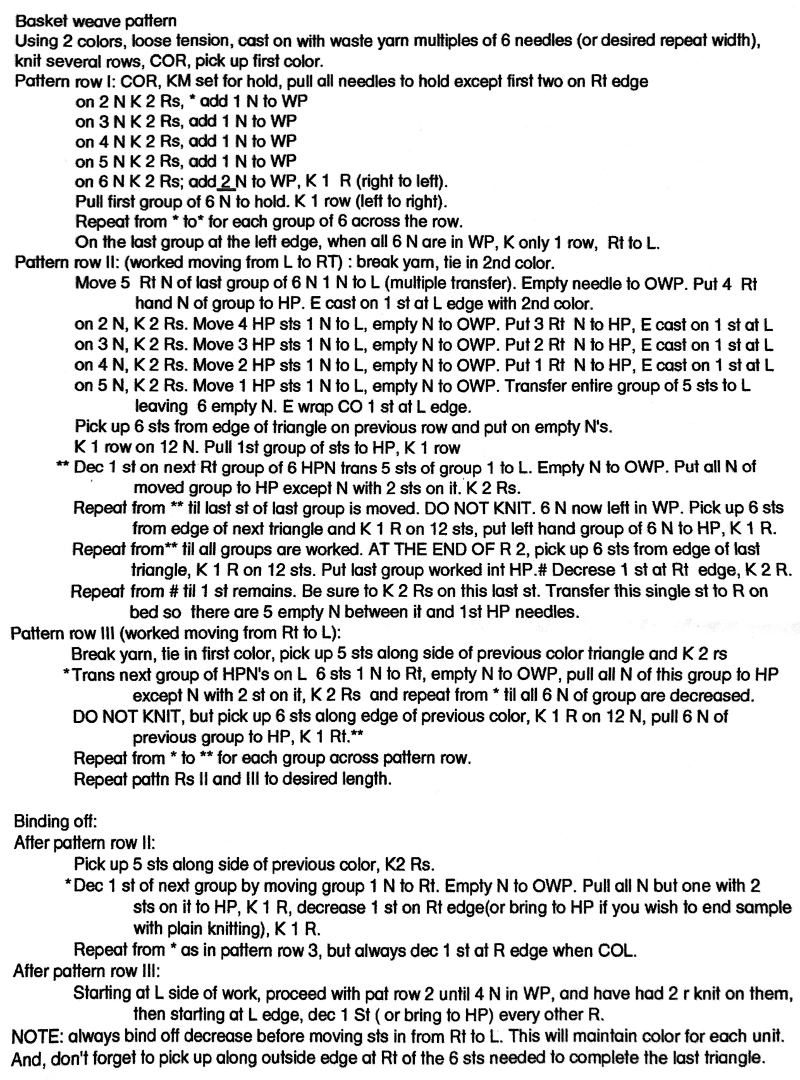
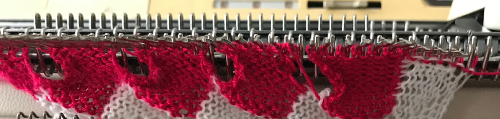
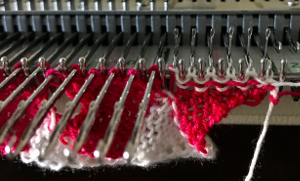
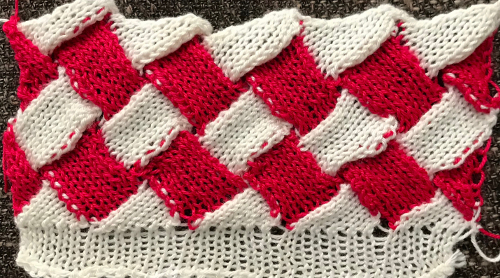
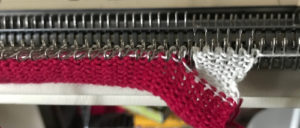
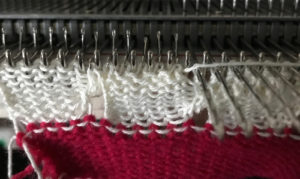
 When the end of the first row that row is reached, as contrast color is added, stitches need to be cast on on the far left in order to keep the work on the bed a constant number of stitches. The usual method suggested is e wrapping, this is picking up from the row below. I found either method produced looser, longer stitches on the far edge
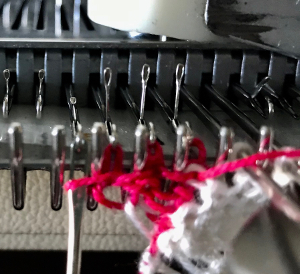
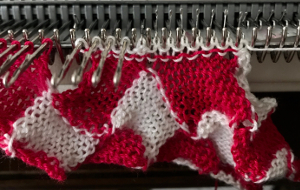
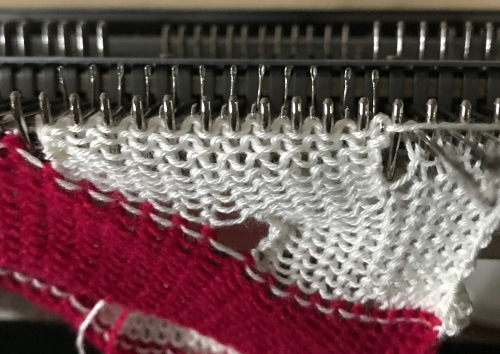
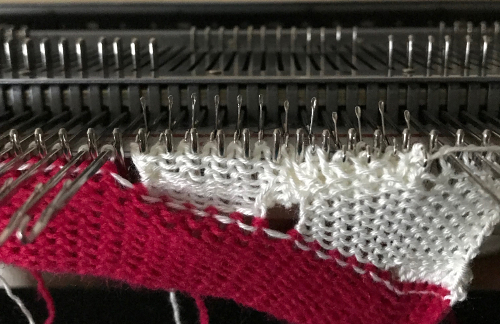
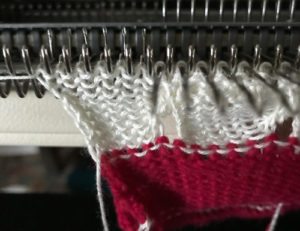
 reaching the far right:
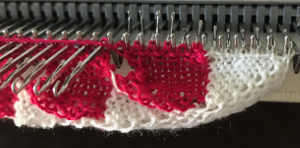
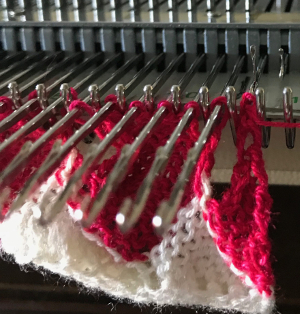
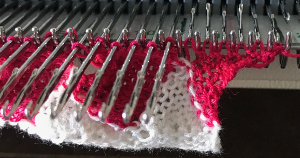
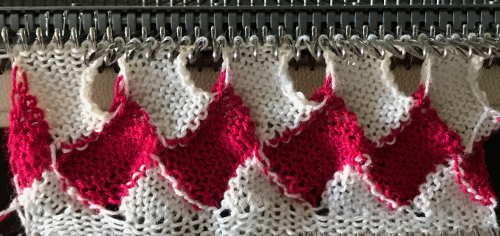
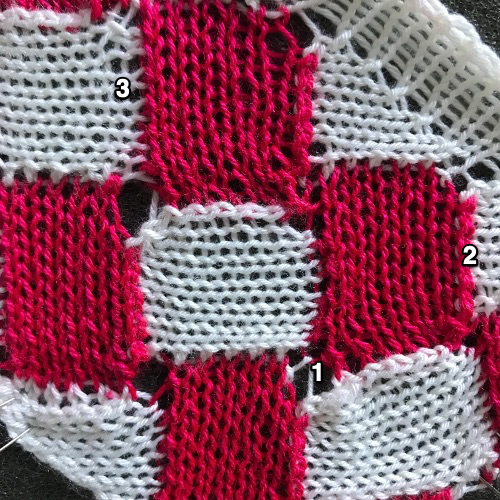

 It does a good job of weighing down those straight edges along the bumps, making the stitches easier to pick up. When rehanging those stitches, uniformly hanging the loops, not the knots along the edges involved will give a smoother join. Here a paper clip is used as the “hanger”
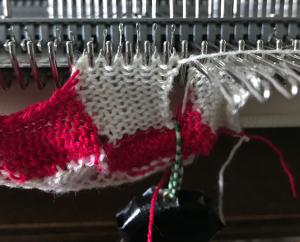
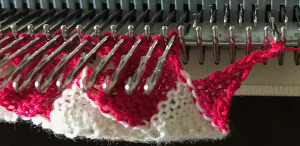
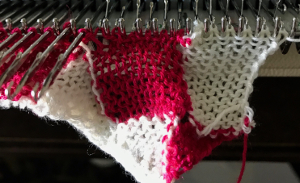
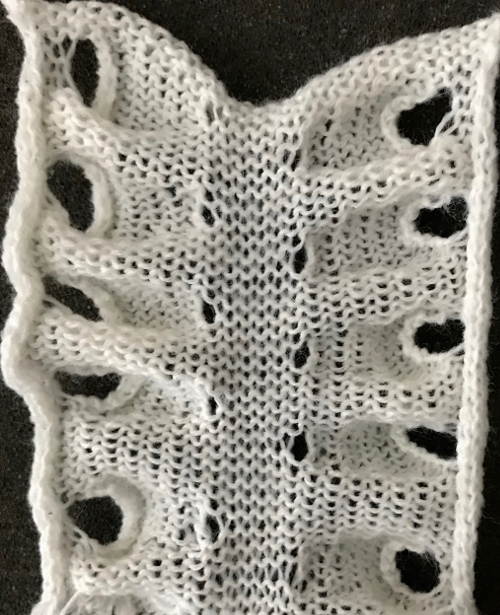
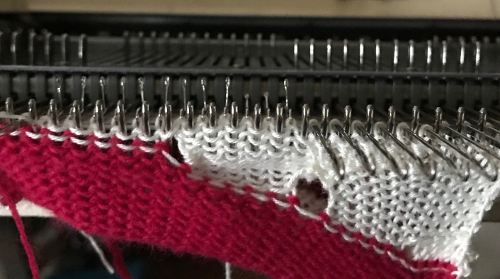
 Lastly, a swatch ending in all knit rows. The only remaining issue is the fact that those side triangles are formed by stitches that are looser than across the rest of the piece. This yarn is thin and a poor choice, but fine for getting the technique down and beginning to understand what happens to stitches, how one needs to move from one side to the other, and what happens along the edges of each individual shape
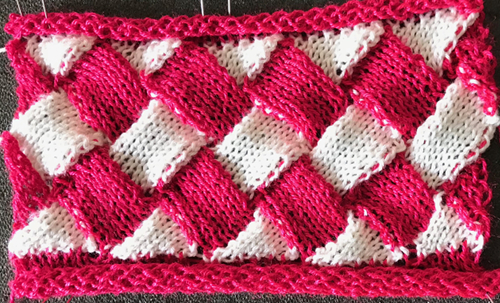
 to consider the number of stitches required and whether the fact that other than garter stitch knit stitches are not square,
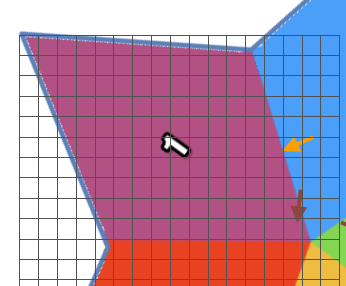
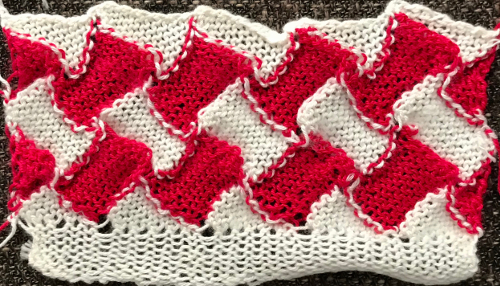
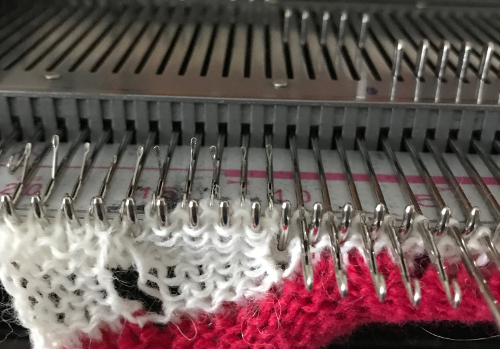
 with a touch of steam and light pressing
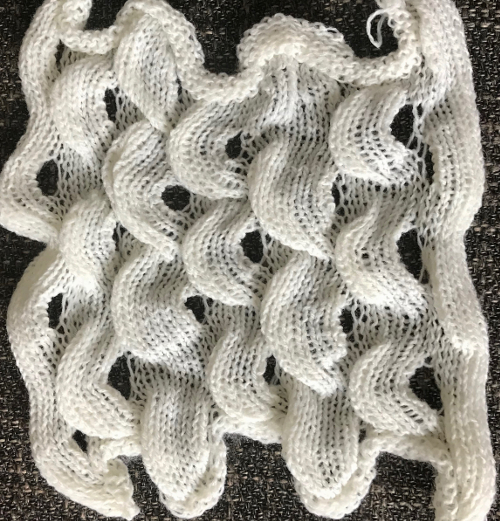
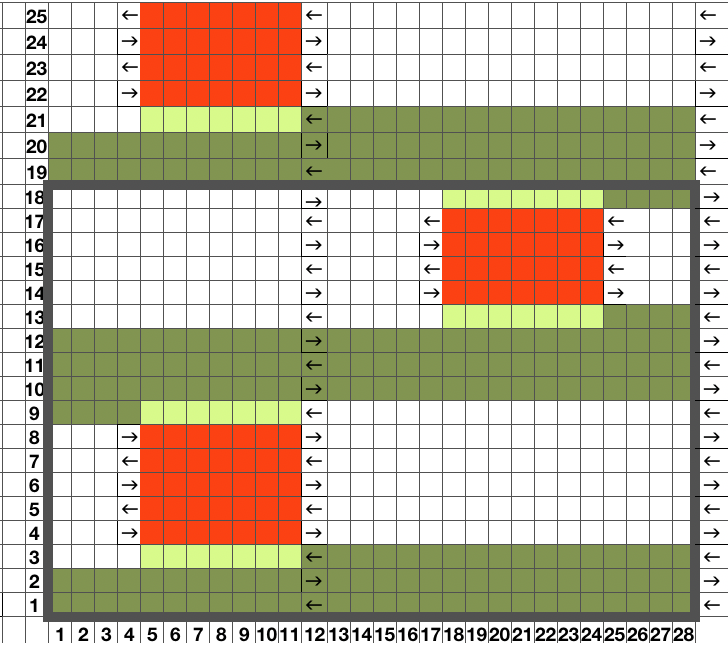 This is the isolated repeat for converting the pattern to a file suitable for download
  and its mirrored version for knitting from the opposite side
 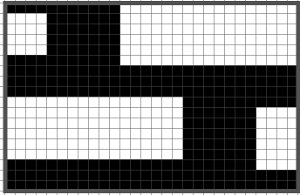 My test swatch was knit on the 930, using img2track. Because not every needle on the bed is in work throughout the knit, end needle selection must be canceled (KC II). The knit carriage after the preselection row is set to slip in both directions. Because only a few rows are knit on the red blocks in the chart, the result is subtle. The white yarn used in many of my tests happens to be a 2/24 acrylic, so on the too thin side, and likely to be well flattened if pressed.
 Often, the edge stitches on the carriage side will tend to be a bit tighter than those formed away from it. The same repeat may be used to create very different fabrics. Eliminating the all knit columns on either side of the center produces a piece with “ruffles” on either side of the center as the outer edge of each shape is no longer anchored down. The principle was used in knitting “potato chip” scarves popular in both hand and machine knitting for a while. Having a repeat on one side of an all knit vertical strip creates a ruffled edging.
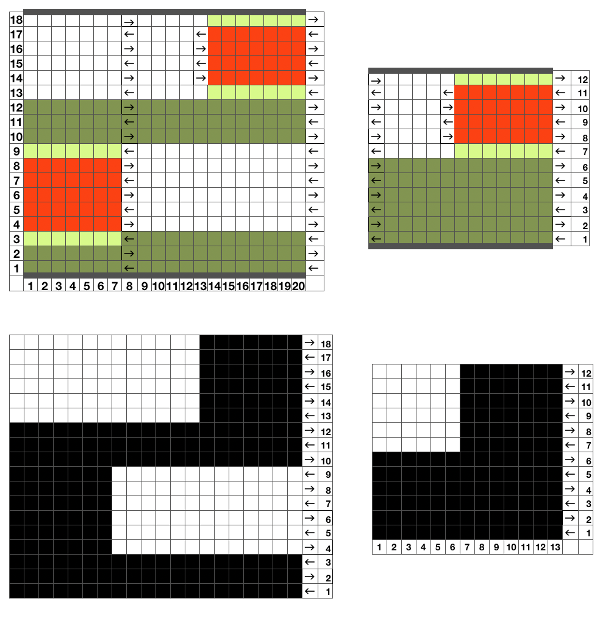
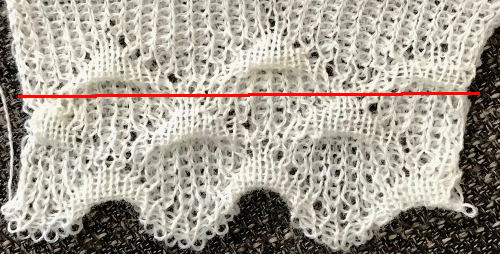
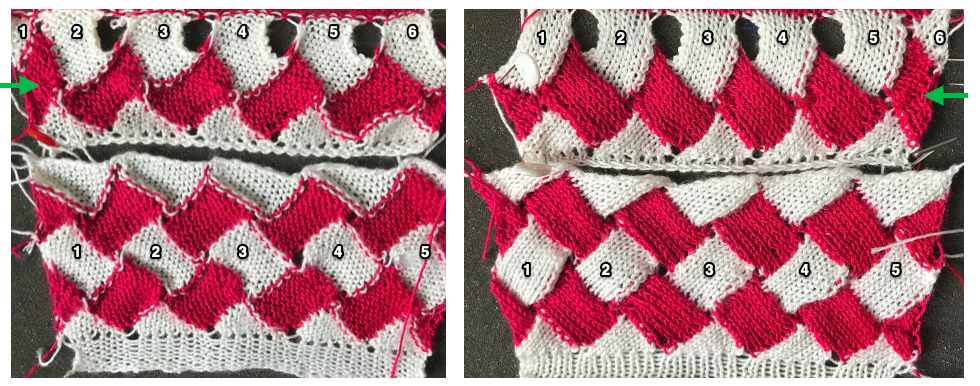
 Note the effect of the added all knit rows on the “wave” of the piece on the right.
 The shapes for the “bumps” may be changed, moving away from rectangular formats. Small repeats are used for the purposes of illustration here, but they, in turn, may be scaled up, rendered asymmetrical, vary in placement, and more. My design steps began with this idea
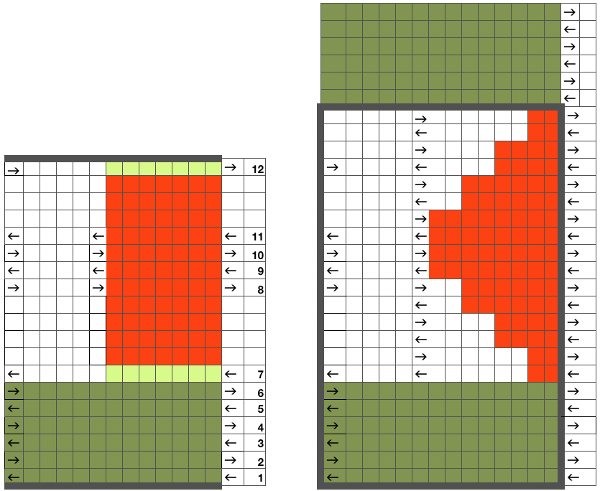 Following the goal to achieve bilateral placement along a central vertical knit strip, with vertical knit strip borders at either side, here shapes point in the same direction
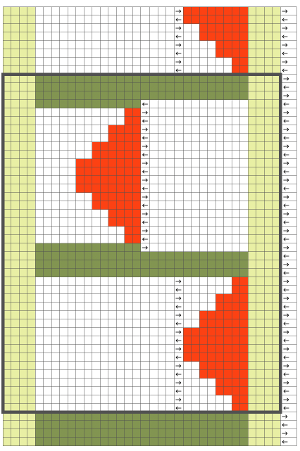
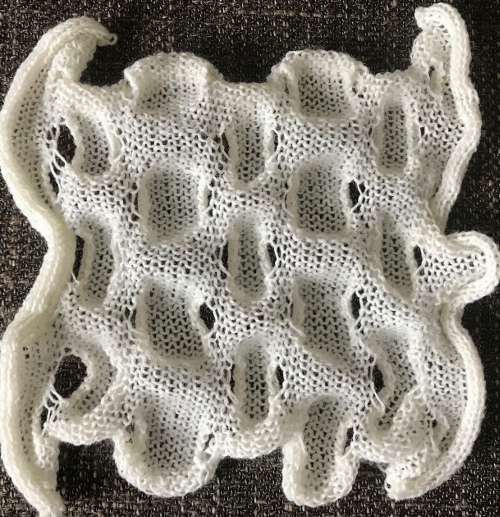
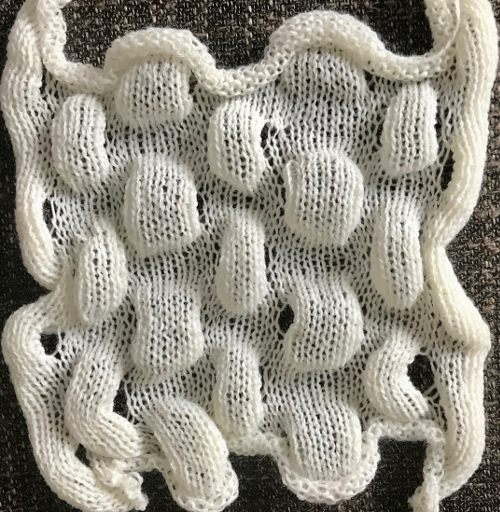
 I ran into an interesting problem for the first time. I had entered the row and stitch counts on my chart, used those counts to scale the image used for my repeat down to size for knitting, kept getting floats where there should not have been any, could not understand what the error in the repeat might be. What was happening is that because of the wrong row number used in scaling, there was an extra pixel row in the first test swatches resulting in knitting errors. The final repeat is 29 stitches wide, 38 rows high. This is the resulting swatch
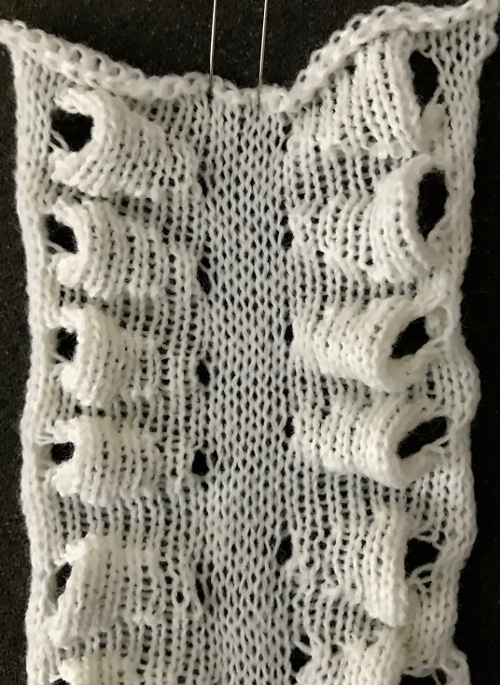
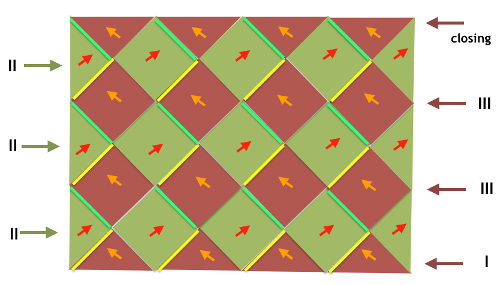
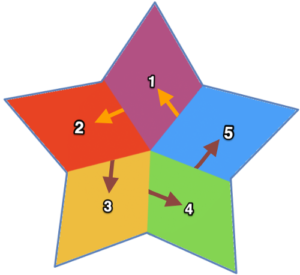
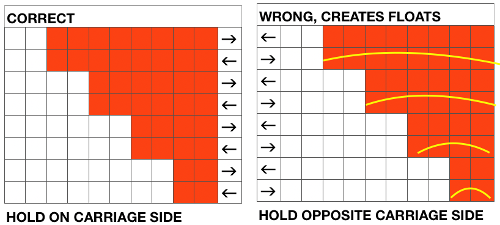
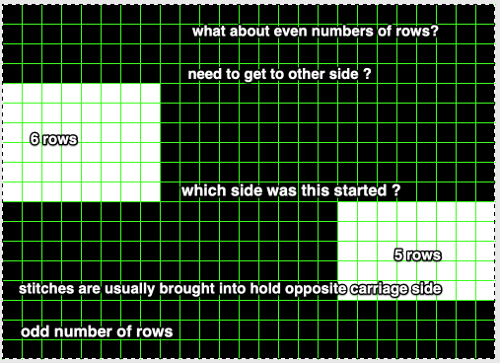
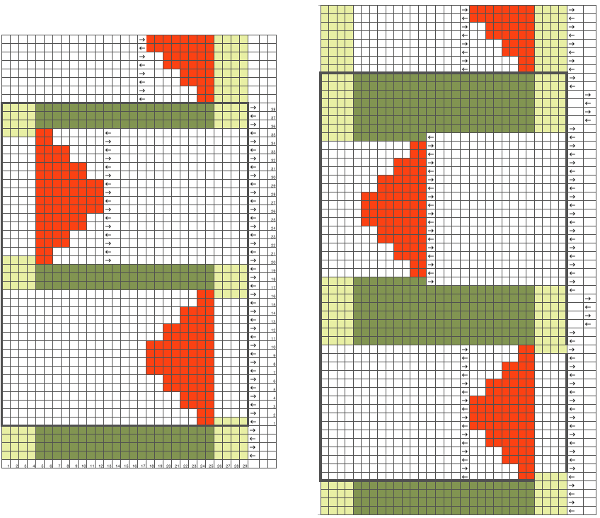
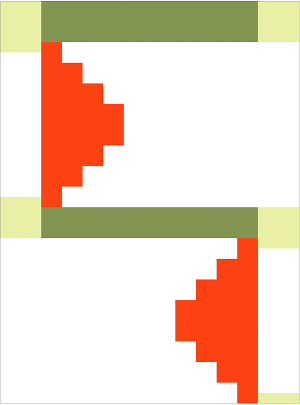
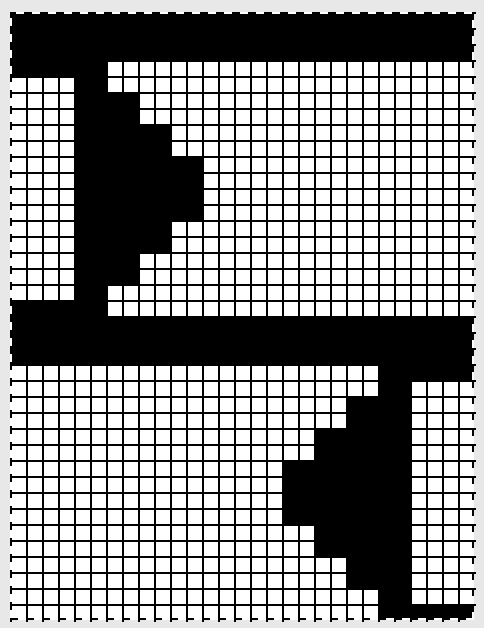
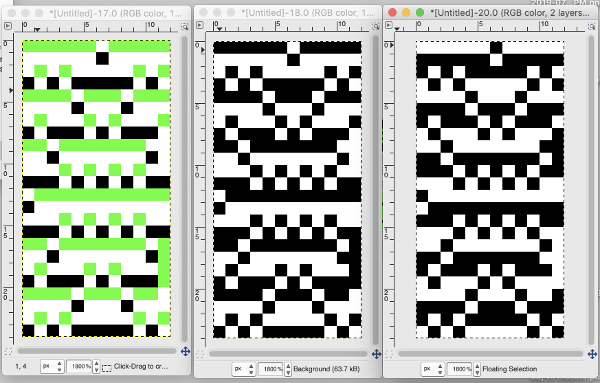
 Once more, the repeat could be reduced down to eliminate side knit strips, or limit shapes to one side only for a one-sided ruffle. What about repeating the same slit horizontally across a row? Repeats become very long, arrows are intended again as guides in the knitting direction.
 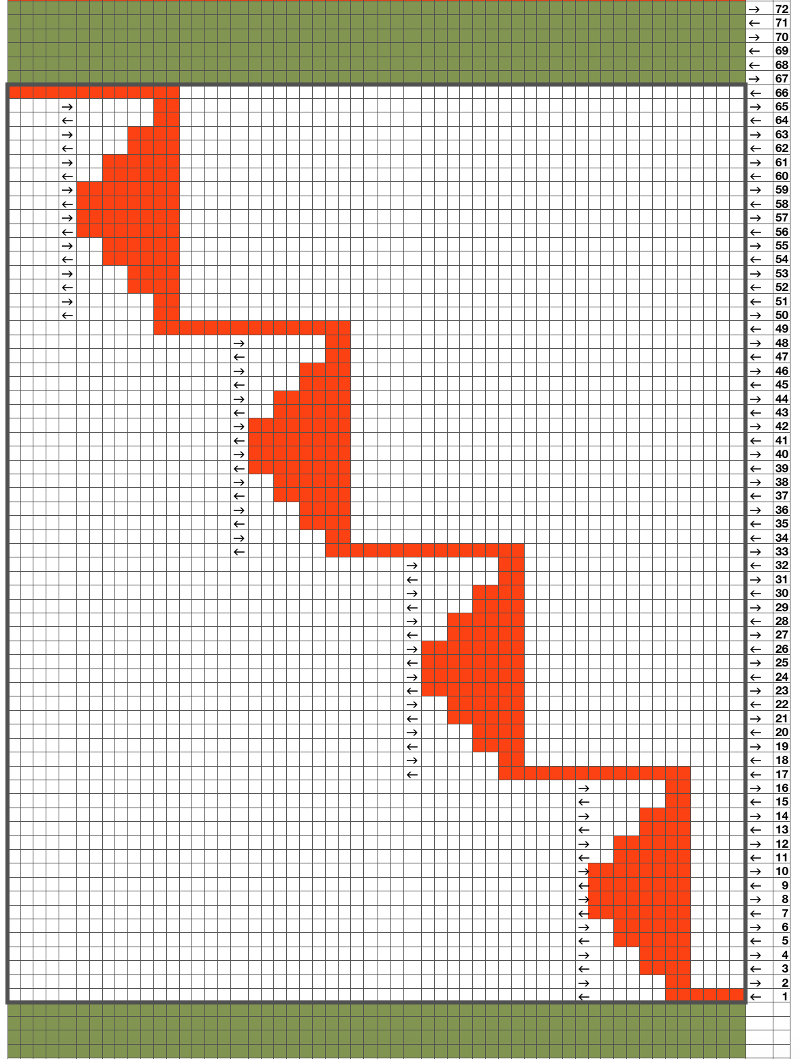 An even number of rows (green) at the end of the outlined repeat will return the carriage to begin knitting it from the right side once more. An odd number of rows added at its top will prepare for knitting the motifs beginning on the left.
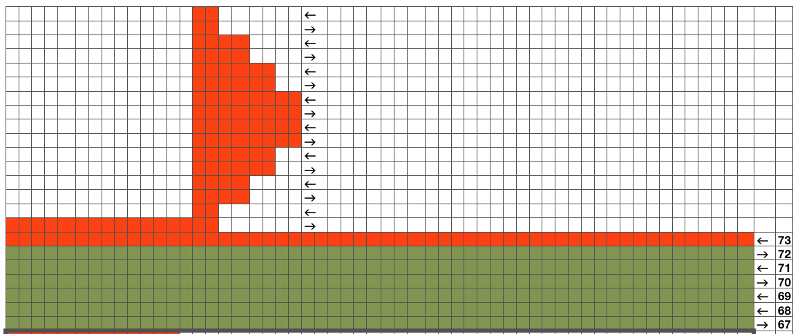
 Pushing unwanted needle groups back to the D position will make them knit rather than being held, which is another way to vary the texture distribution across any single row
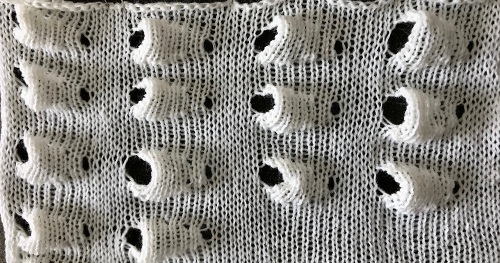
 The reverse side shows the same issue. Areas can be identified where the held stitches have been hung up to create hems. Note that as the knit grows in length, at the completion of each row of repeats there is one segment with no hem on alternating sides. A longer test swatch follows
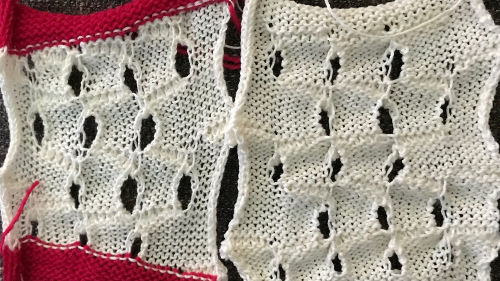
 I created my hems on the carriage side, immediately prior to bringing the following group of stitches into work opposite it, and knitting a single row across that new group of 3 segments. The highlighted area indicates the stitches to be hung to create the hem. The eyelet on the top, right, will be smaller than the one at the opposite side of the stitches to be hung up
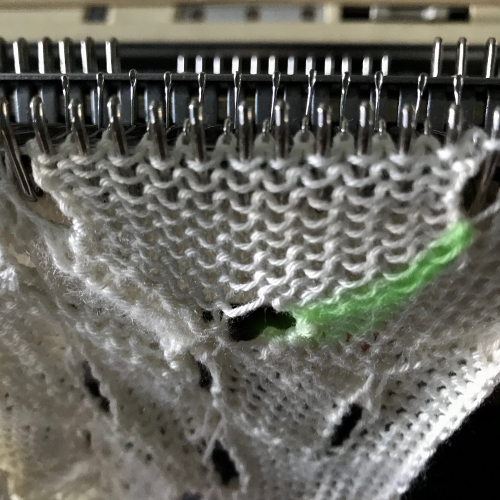

 Reversing the direction of segments
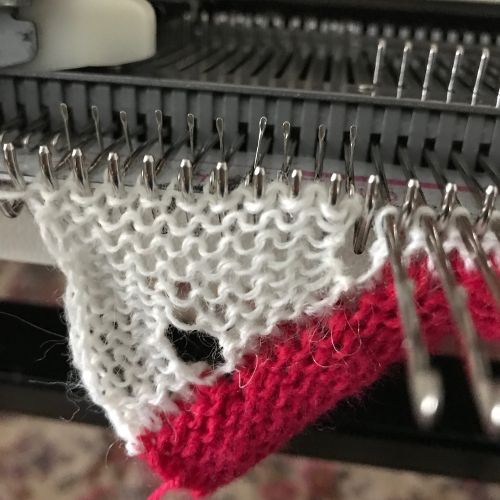


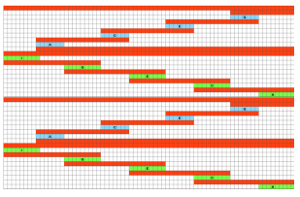
 This is one of my early graphics trying to imagine what is happening in chart form, which also references the repeat in the Passap garment, followed by plain knitting
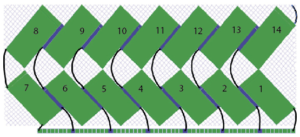
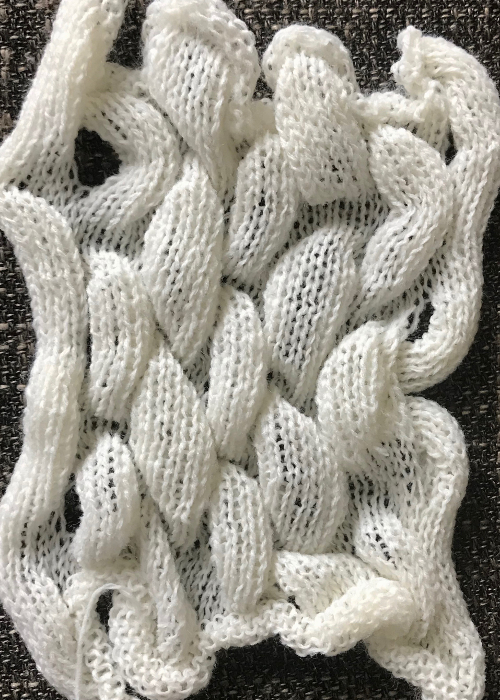
 This fabric is worked out differently, in groups of 2. After the first segment is completed, COR if the starting group 1 worked is on the right, bring group 2 into work, knit one row to left, immediately bring group one into hold, and continue across row. That “float” is created as the yarn traveling between the last stitch on the right now coming into hold and the first stitch to its left knits for many more rows gets pulled on as the piece grows.
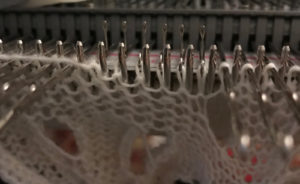


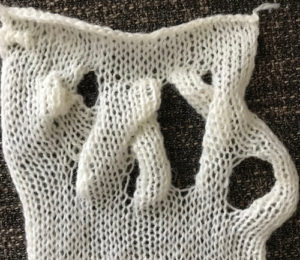 Hems in knitting can be created on any number of stitches, anywhere on a garment, by definition join segments of the knit together permanently. Folds are freer. Here is an attempt at a different wisteria cousin with organized repeats. More on creating it will follow in a subsequent post now that holding techniques are back on my radar
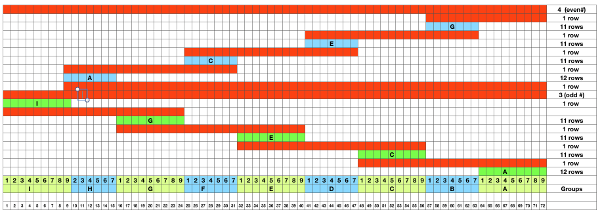
 the numbering system reflects every other row worked alternating sides of the work
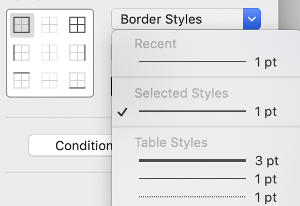
 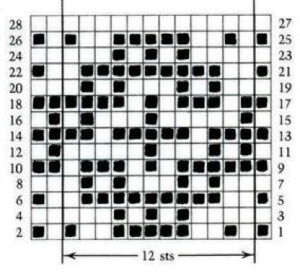 it is shown here with a superimposed table grid with its cells outlined in a thick border and positioned in front of a scaled screen grab of the original motif (arrange/ aspect ratio turned off)
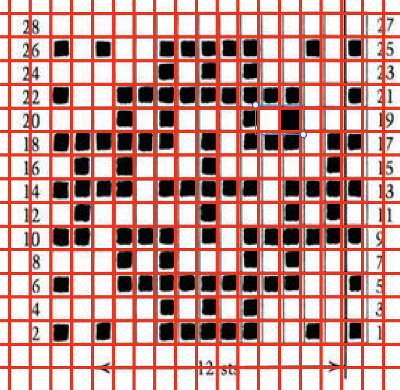
 the cell borders can be edited as wished. Here borders were removed by selecting none, then, in turn, the outer border was highlighted in an easy to identify a thicker red line
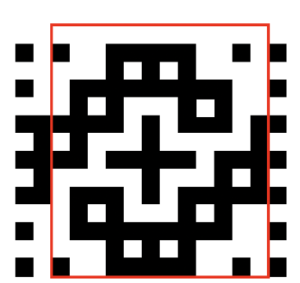


 the last image needs to be once again converted to BW mode. The 2 extra rows of pixels on left are cropped off, the image is scaled to twice as long for use with the color changer, and the original 12X14 repeat is now 12X56
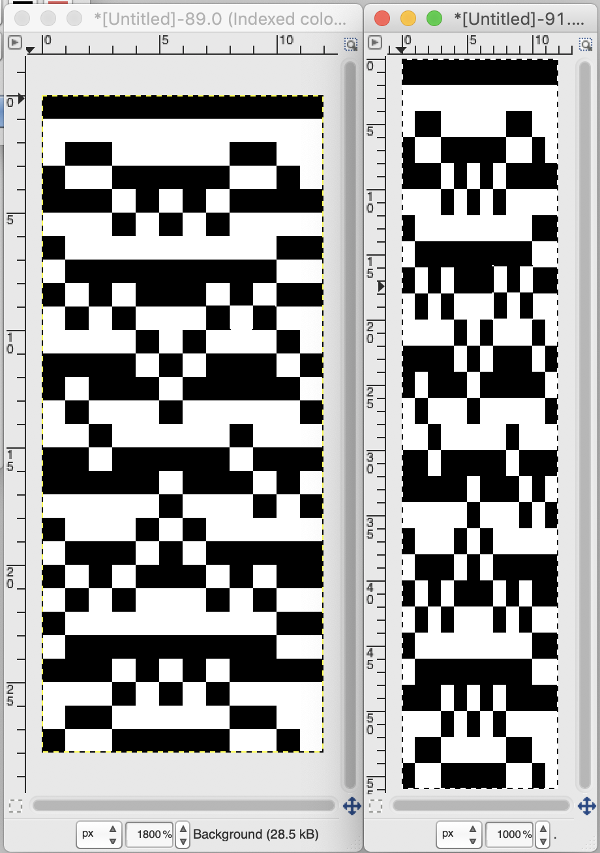 the actual BMP
 a “pretend” longer repeat
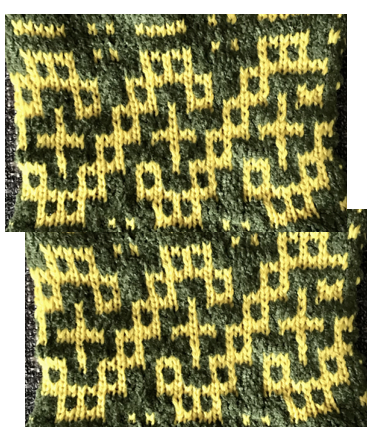

 is compared here with the earlier
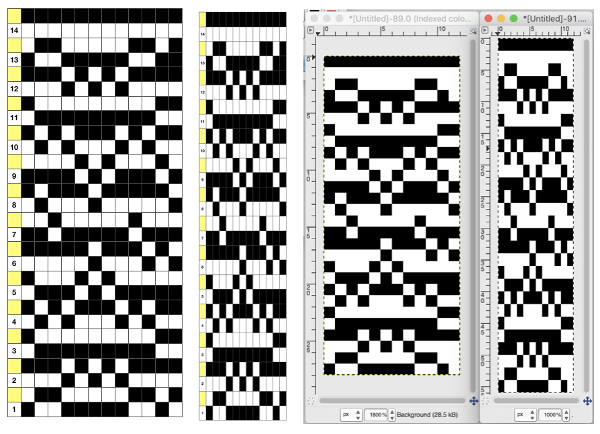
 Back to the drawing board: row height is as in the original repeat
 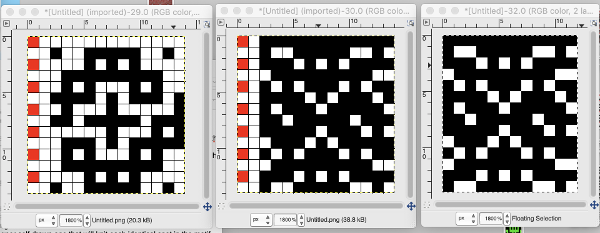 being extra careful, not necessary, the process can be inverted once more to check the repeat color separation
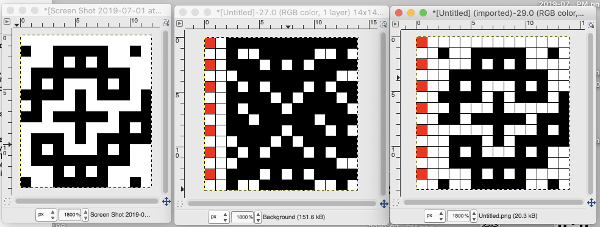
 the corresponding proof of concept swatch, with shorter floats than when the DBJ separation is used single bed
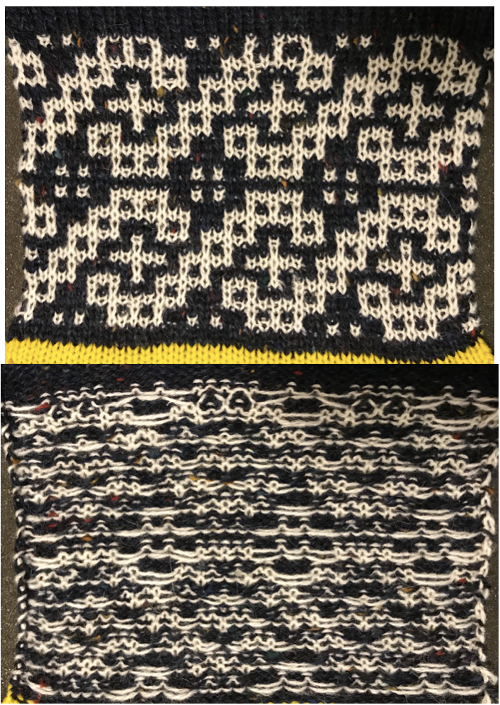
 the repeat of the design separation on the right is intended for use in electronics with color reverse and double length
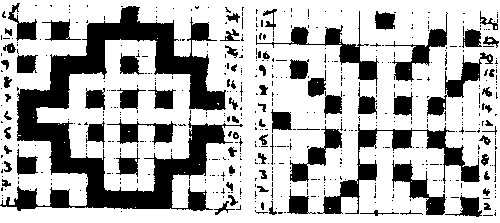
 for knitting purposes
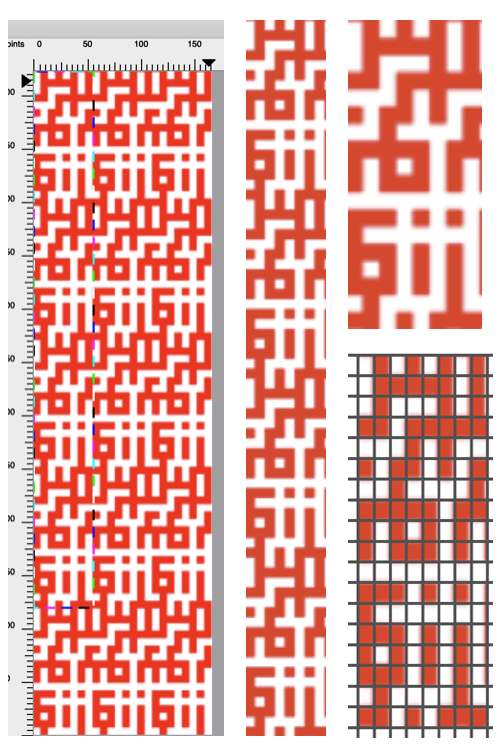
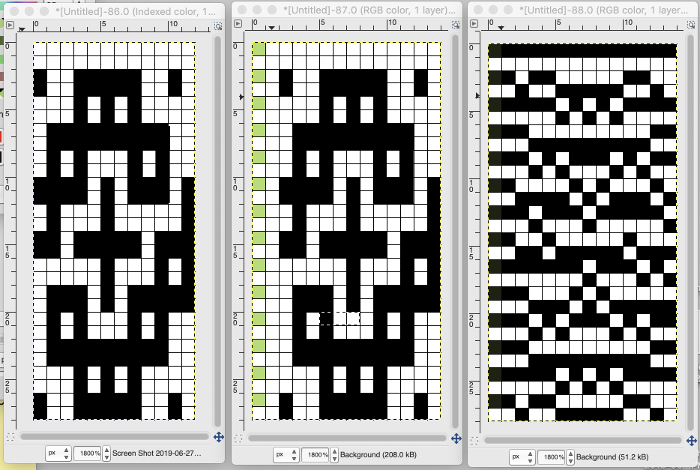
 The repeat (8X16) is then doubled in length for knitting after that single all-white row was edited out (middle images). The repeat is now 8 rows wide by 32 rows in height
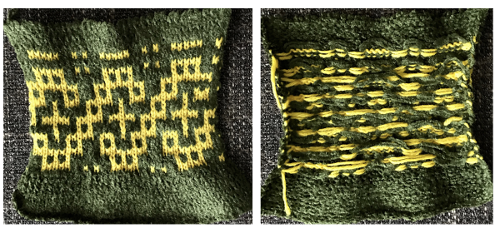
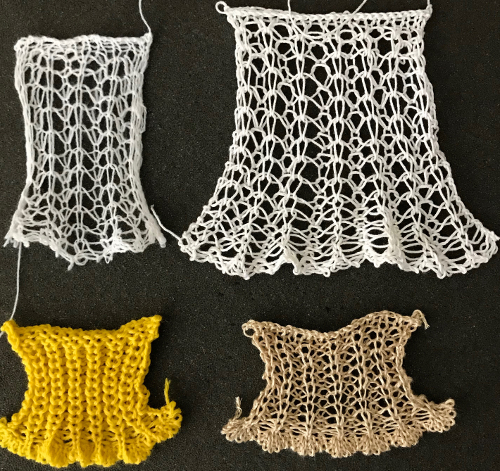
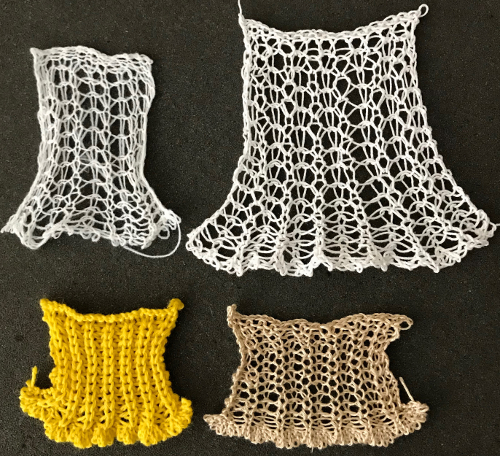
 One of the yarns is chenille, the other a wool. The chenille is slightly thicker and fuzzy, so some of the yellow rows are almost hidden but the pattern is definitely there. Here the design is knit using both slip (bottom) and tuck (top) settings. Again, there is a noticeable difference in width produced by each stitch type.
 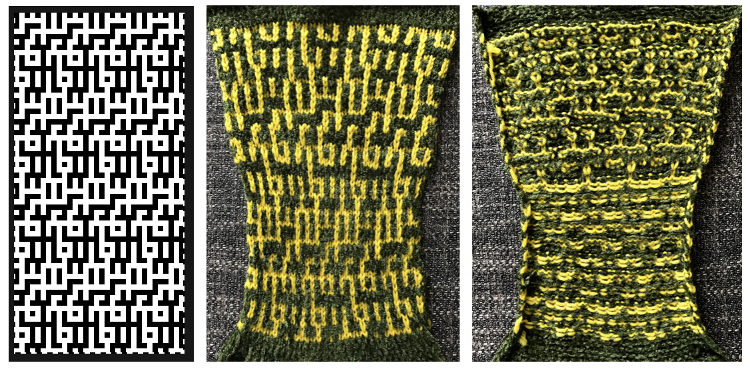 Observations: make certain that after the image is isolated in Numbers cell size is converted to square/ equal measurements in width and height before importing and scaling its screen grab in GIMP if not already so. It will likely load in RGB mode, convert to Indexed before scaling. Added colored squares are only possible if you return to RGB mode. After rows with colored squares are cut, return the image to indexed before saving as BMP for knitting. If any pairs of rows do not have 2 consecutive rows of cells in either color check your pattern. In DBJ the final repeat should be 4 times in numbers of rows in height to the original one, and thus divisible by four. The separation first doubles height for each row for 2 colors. Then height is doubled once more to allow for color changes every 2 rows. In Mosaics and Mazes, the color reversal happens on every other row in the original design. When that is completed, the height will be doubled for actual knitting to allow for color changes every 2 rows, with the final row count double that of the original motif. Rules for tuck knitting apply here as in any other technique. If white squares in the final chart have black ones on either side of them, the appearance is that tuck would be possible. Examining needle preselection is an easy way to assess that possibility.
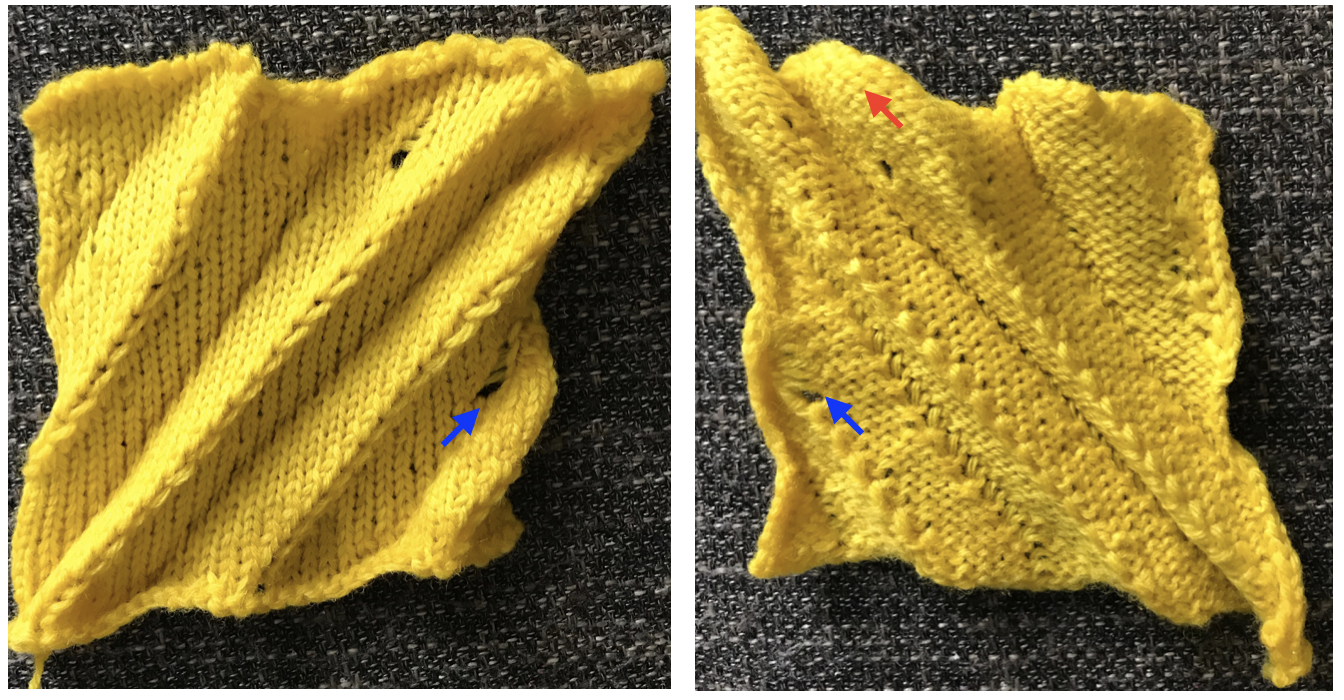 The fabric had an interesting twist and roll if tugged in opposite diagonal directions when first off the machine.
 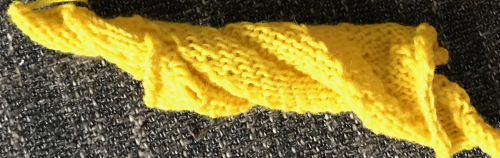 This is the working repeat, suitable for a punchcard machine. On the far left it is shown for use with electronics and color reverse, with the green grid highlighting black squares indicating holes that would need to be punched in a card, and lastly, as a tiled repeat looking for any errors in repeat sequences.
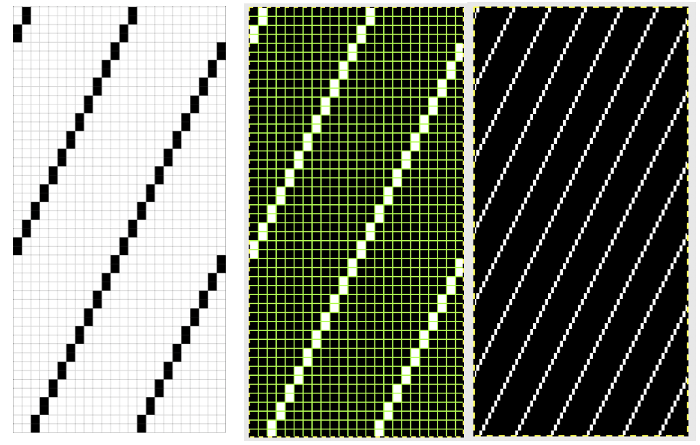
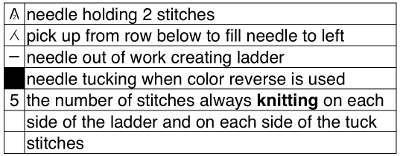
 This shows my swatch in progress. ? indicates operator error, in evidence if needle count on each side of the future tuck stitch or ladder space is checked
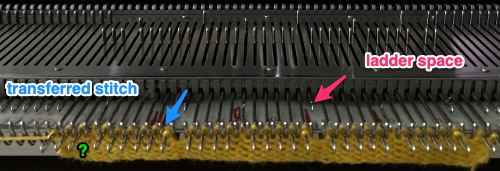 picking up loops from the row below to keep ladder width constant
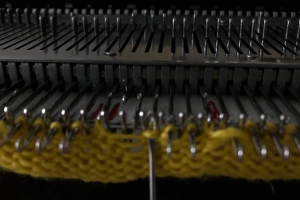
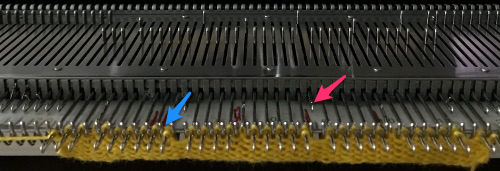 Check that stitches have knit off properly
 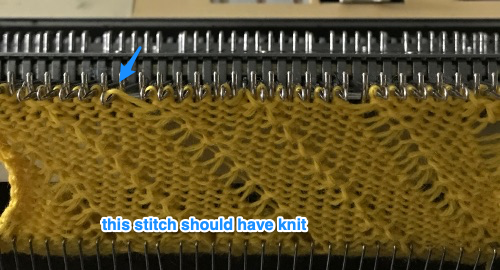 Needles with transfers or moved stitches may be brought out to hold position (E in Brother machines) for easier knitting. If this is done, be sure not to disturb needle selection or lack of it in location for next pair of tucked rows.
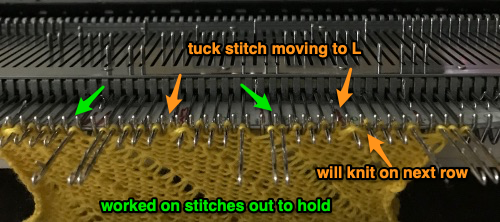
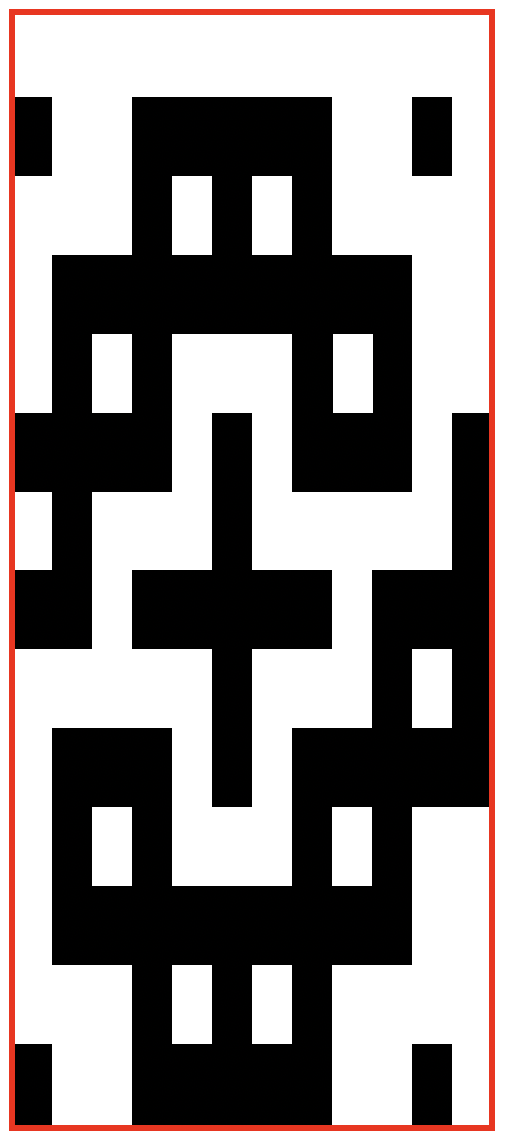
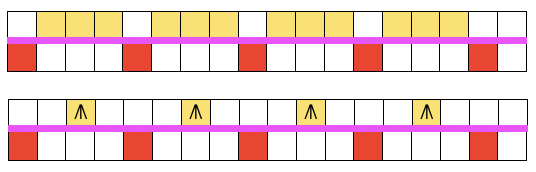
 Setting up a working repeat with blue representing tuck, purple slip (or vice versa). The distance between the vertical column, in this case, is fixed and seven stitches in width for a center folding repeat width of 16, color reverse is required
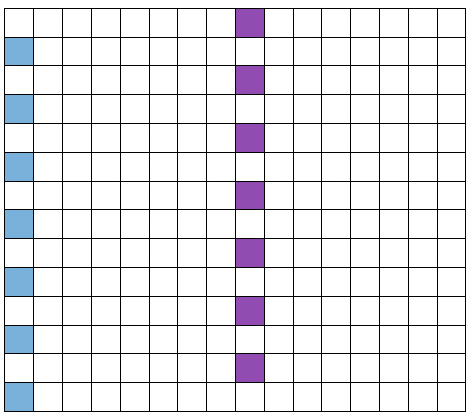
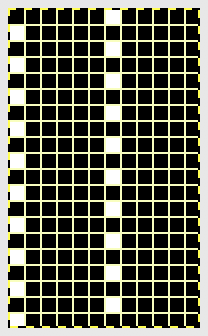

 Set up the cast-on as preferred. I used plain knitting, weighted it, and began my pattern work from the right-hand side of the machine. COL my preselection row was made from right to left. White squares in the chart with black ground and green grid become non selected needles on the main bed. Transfer nonselected stitches down to the ribber. Set the ribber to slip to the right, those stitches just transferred will slip moving to the right, knit on the return pass to the left. The knit carriage is set to knit until that first row is completed
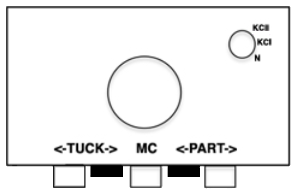
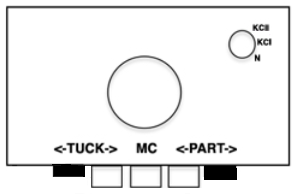
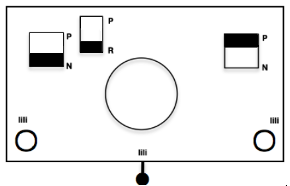 COR the ribber will knit on the next pass to the left. Set the knit carriage to tuck while the ribber is knitting
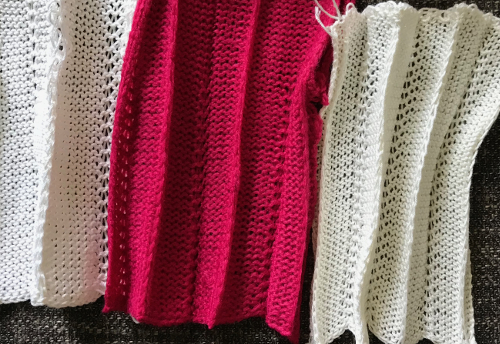
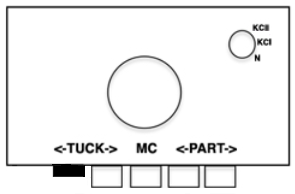 Continue in pattern to the desired length. Fabric narrows considerably, so several panels may be required for items ie. skirts. The repeat on the knitting bed should also be adjusted to allow for as close to invisible seaming as possible. The stitches on either side of the single needle in work on the ribber may be inclined to drop off. I was unable to use tuck on those same needles for any significant length for that reason. It pays to visually check for stitches knitting off properly to avoid this
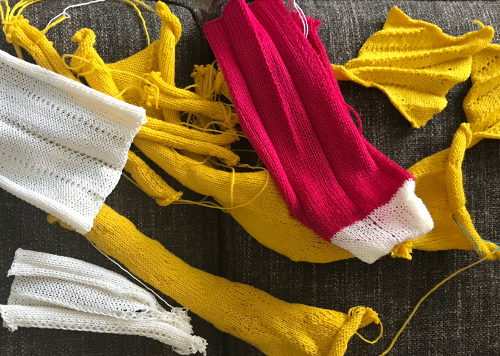
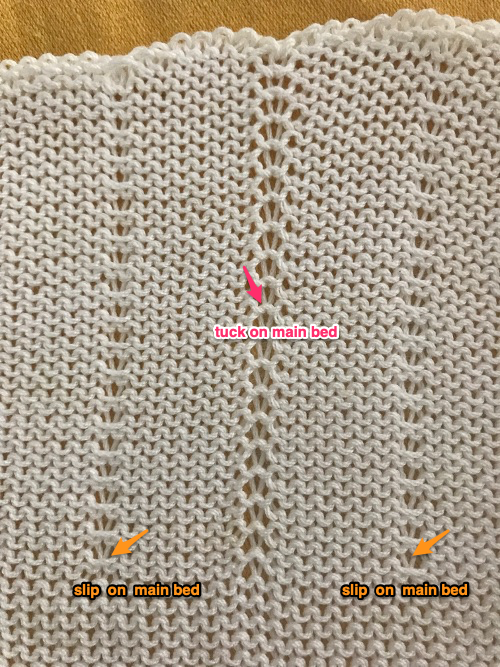
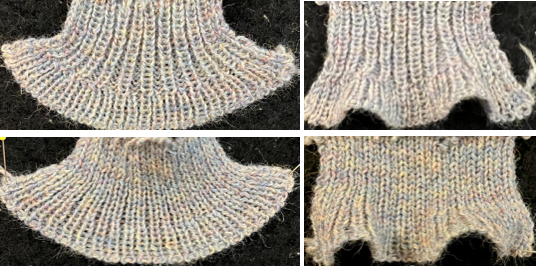
 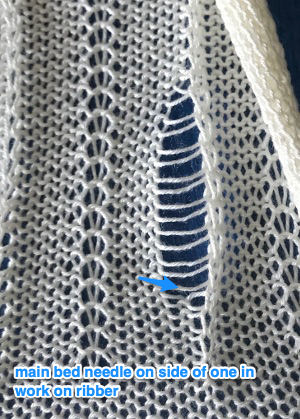 The start of vertical pleats, with the slip stitches folding to the purl side, the tucked stitches folding to the knit side on the machine, just after binding off.
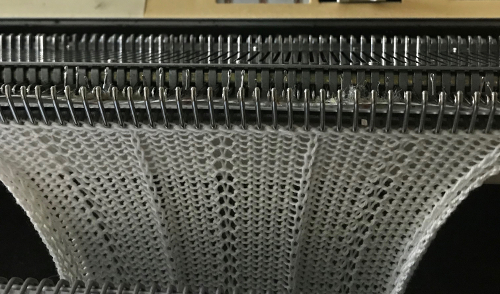

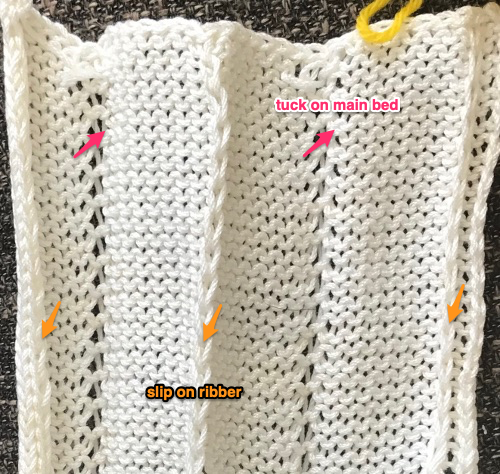
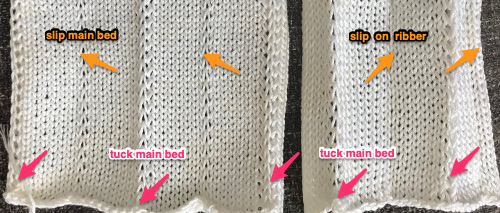 Different fibers can produce varying results in fold and drape. Setting either bed function for the wrong direction will produce an all-knit fabric (top of the red swatch).
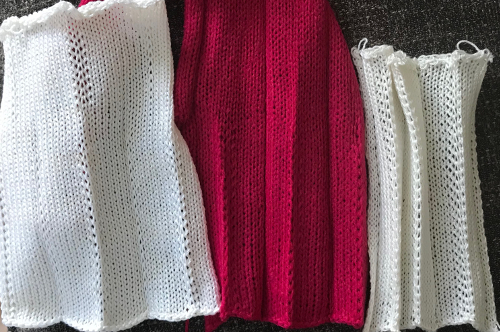
 This starts to address incorporating hand techniques and manual ones from the diagonal swatch and the one with vertical folds while also developing a design repeat to aid with planning or actions to be taken. It will be altered in future experiments
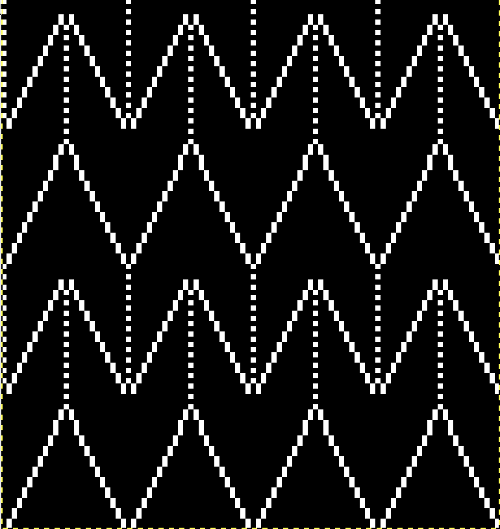
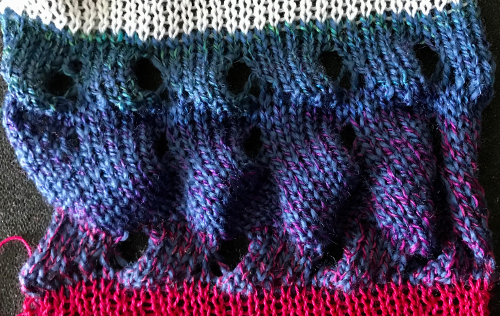
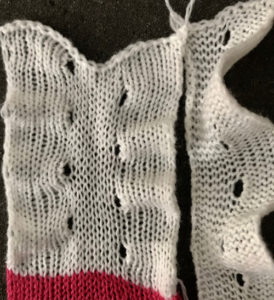
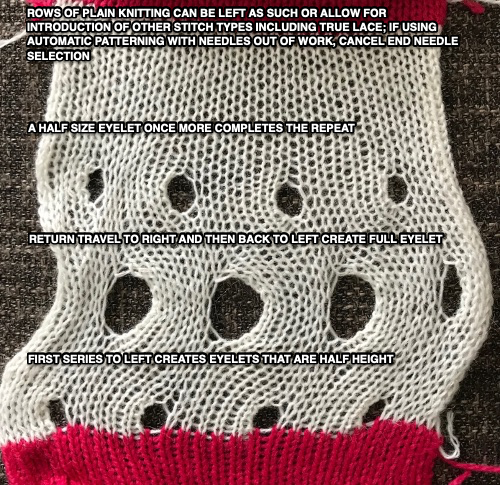
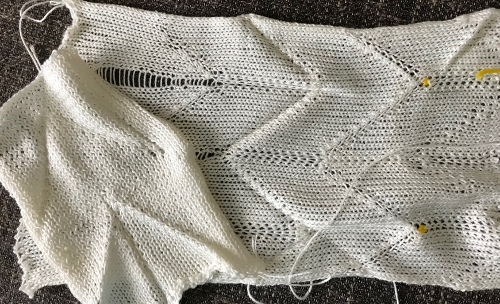 This swatch is knit in wool, trying to sort out what does what and by how much. I am starting to get a bubble, but not a dramatic folding effect. The bottom folds more than the top. The filled eyelet technique has a hand-tooled tuck column on the reverse side. The top is automated using tuck stitch.
 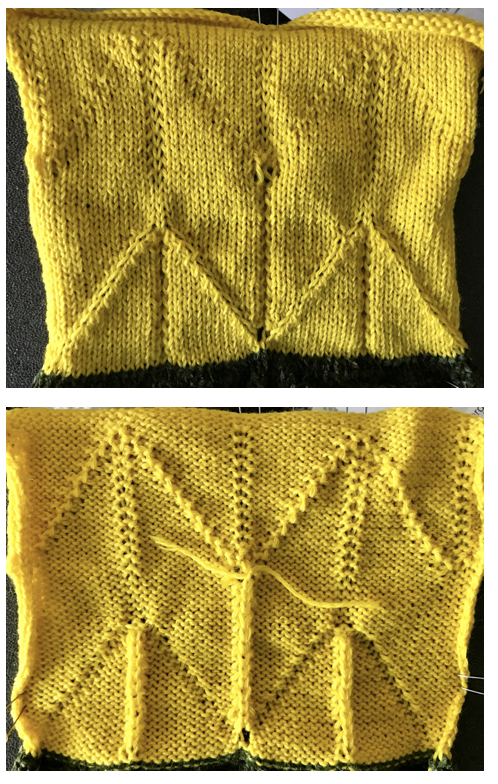 A different repeat: the bottom with carriage set to knit with needle selection as a cue to hand transfers, the top set to tuck automatically. Transition rows need to be considered further and altered where the twain meet.
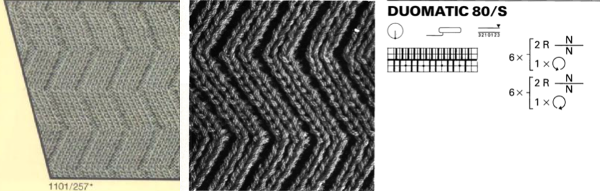
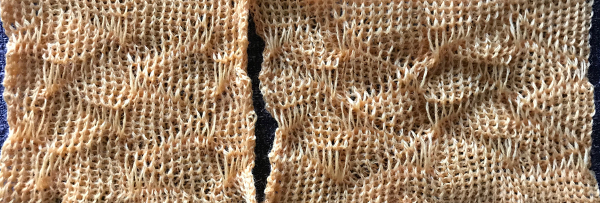
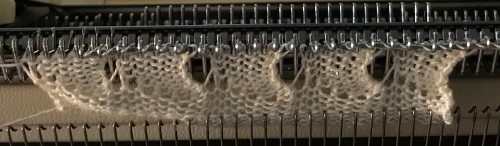
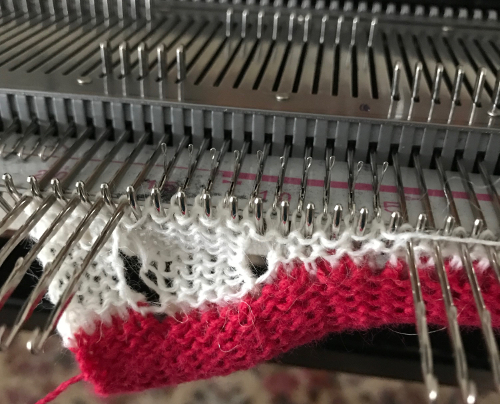
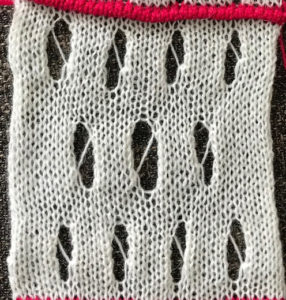
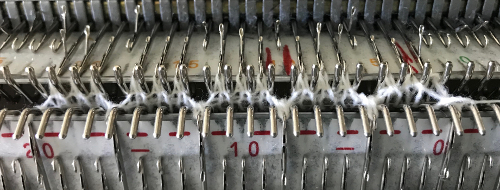
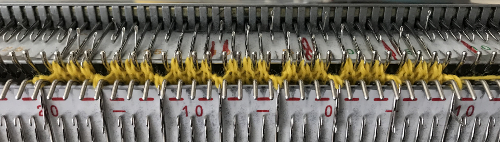
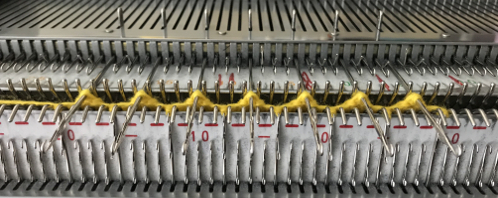
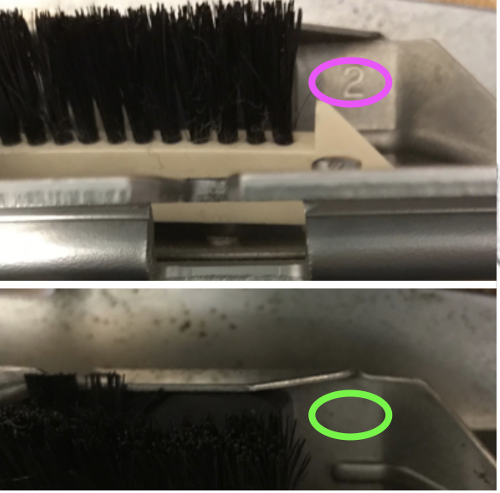
 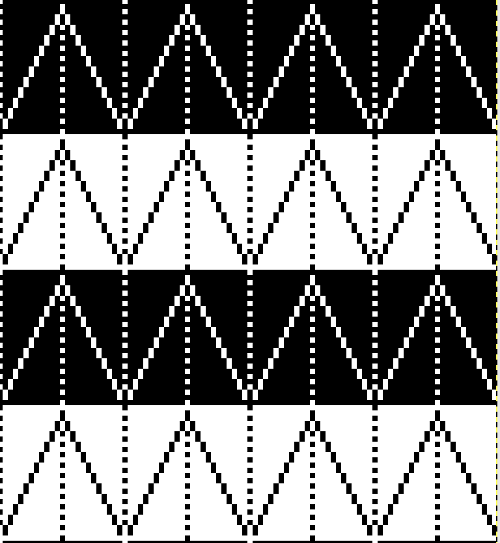 Returning to simpler creases and folds: a first experiment in racking double bed with NOOW. The setup and racking positions were not pre-planned. I knit 4 rows without racking at unplanned intervals as well; they produce a noticeable change in texture. The fabric is reversible, I actually rephotographed it adding a marker to make certain I had not shot the same side twice. The needle set up:
  the resulting swatch presented sideways for the sake of space:
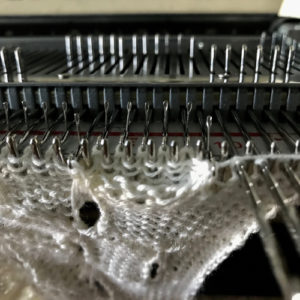
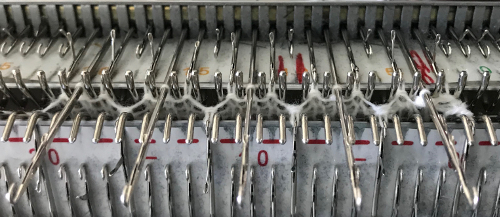
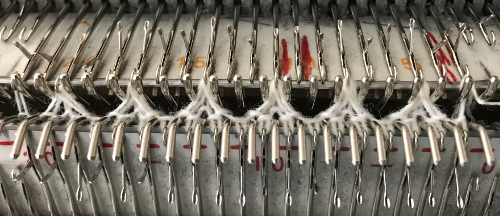
 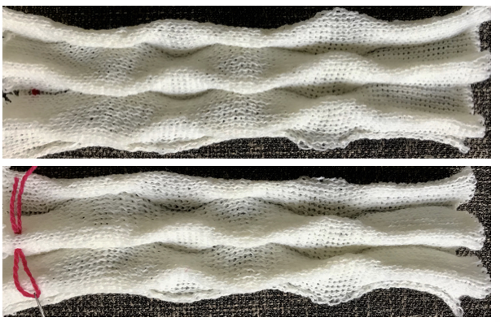 working with single needles out of work rather than two, with even spacing between them on each bed
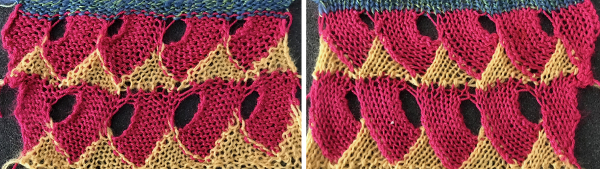
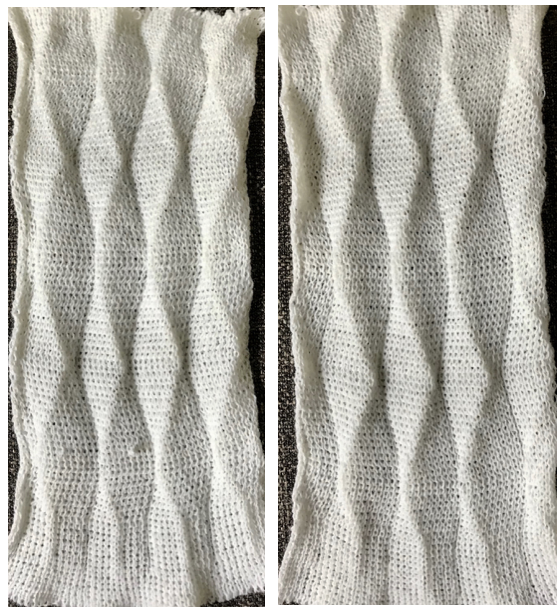 both swatches flattened to note differences between needle arrangement folds
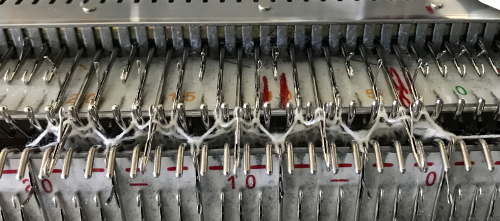
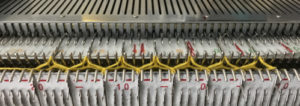
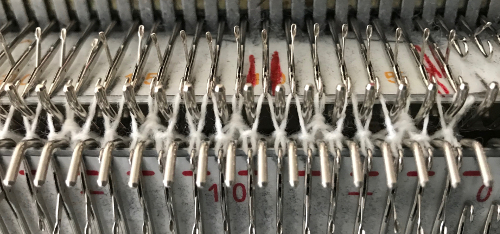
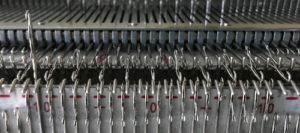
 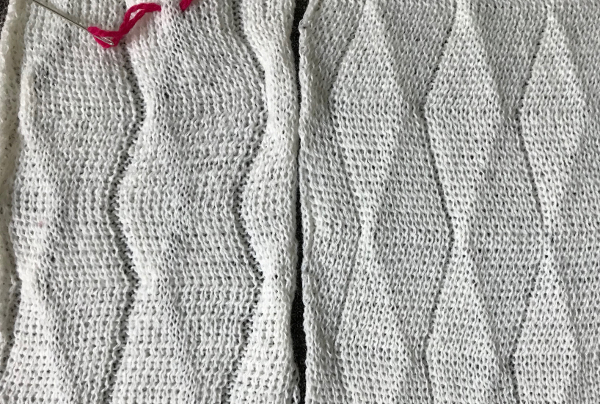 getting more organized, with a planned repeat: the needle set up
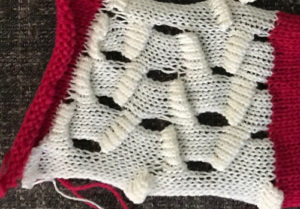
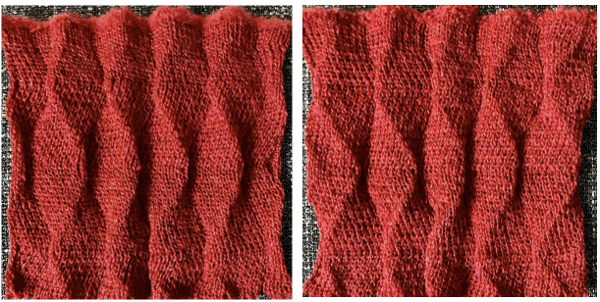 Here the arrangement here is with 2 needles out of work, racking every 2 rows in the same sequence. The resulting fabric has clear “spring” and foldsRR
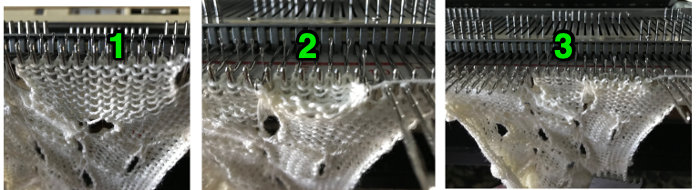
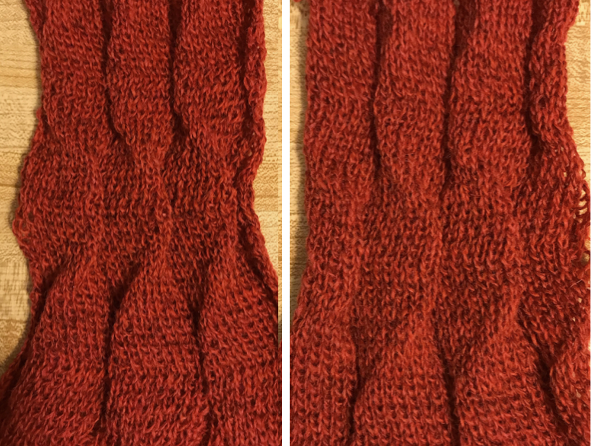 Returning to the previous needle set up, now racking every row from position 5 to 0, knit 1 more row with no racking; rack to position 10, knit one more row with no racking, reverse direction, end knitting on position # 5
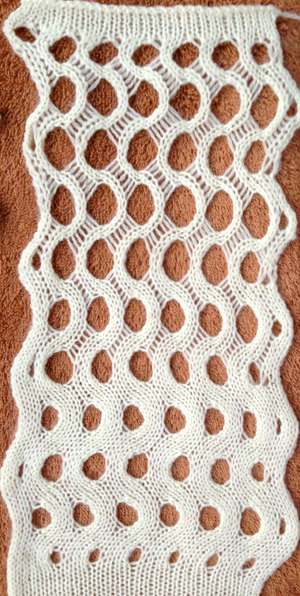
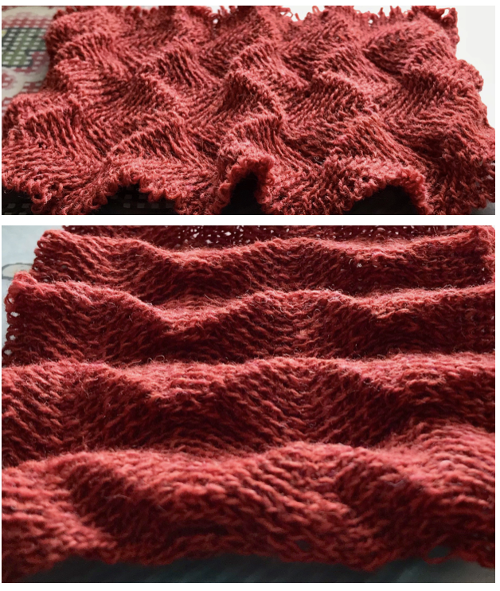 This last in the series is a personal favorite. I found racking from the center to 10, to 0, and back easy to track. One moves in the opposite direction when not allowed to go any further in the continuing direction by the machine. Single needles out of work appear to be enough to create the folds.
 Racking starting position on 7:
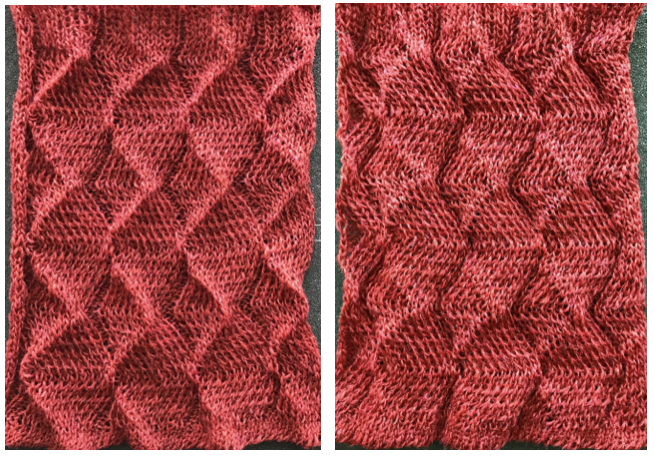 Consider playing with racking positions within the total number of needles in work on the main bed. For other possible needle arrangements and more on pleats created with needles in/out of work on both beds please see
 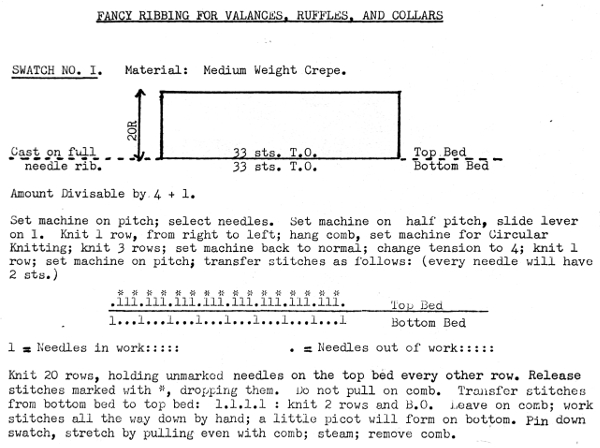 I like to chart out my repeats and plans for executing fabrics, along with ideas for possibly varying them in ways other than suggested, this was my beginning
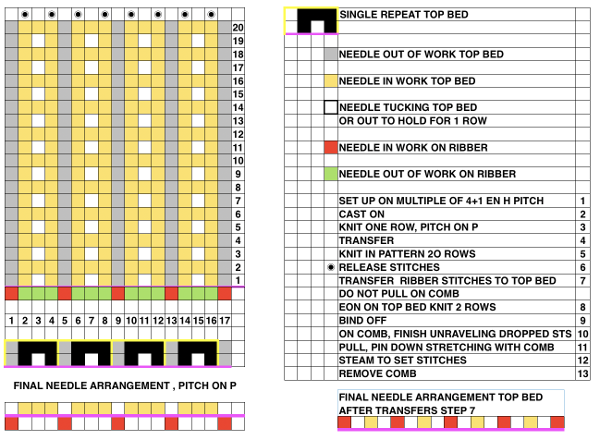
 knit one more row to return to the opposite side
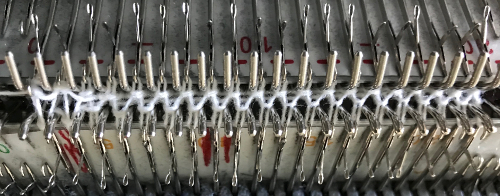

 I knit 3 rows rather than 2, to return to right side for bind off
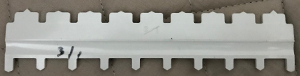
 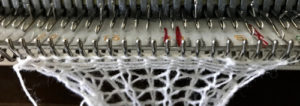 here is the swatch, still on comb for “setting stitches”
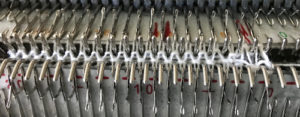
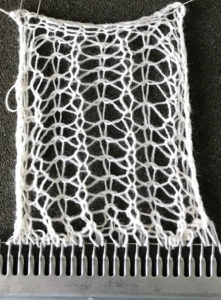
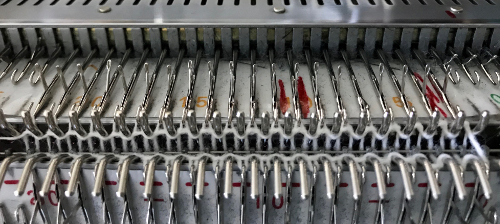
 when the 20 rows are completed the carriages will once again be on the right, all stitches will have been knit on the previous row
 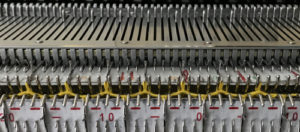 transfer all ribber stitches to top bed, knit 2 rows, bind off. None of my swatches were blocked other than by some tugging, particularly along the bottom edge. The spacing between stitches is narrower because ladders created by single needles left out of work are formed by yarn lengths that are shorter than those that happen when stitches are knit and then in turn dropped. The height of the swatch is also affected, and the half fisherman texture in the wool swatch, in particular, is more evident.
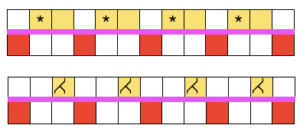 When the work is removed from the machine, stretch cast on outwards, then give each “scallop” a really good pull downwards. Steam lightly over the scallops to set them. Variations of the double bed trims may be worked on the single bed as well.
 2. knit second zigzag row to right
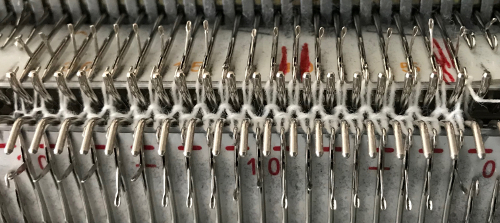


 In theory, it is possible to knit lace transfers in Brother by dropping the ribber bed enough for the lace carriage to move across the beds while clearing the gate pegs. This remains on my “try someday” list. To my mind, hand transferring remains the best way to deal with lace/ ribber stitches combined.
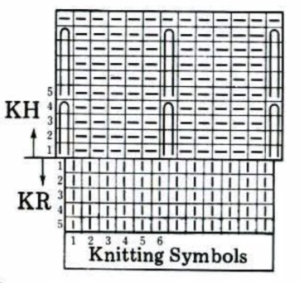 For a punchcard machine, the repeat must be a factor of 24 in width ie. 6 or 8, or 12 stitches wide. Electronic knitters can draw a single repeat, either the one on the left also using color reverse or the one on the right. Punchcard knitters need to punch the grey squares on the right across the card and repeat it in height. An extra all-knit row needs to be added at the top of each series of 4 rows tucked for the loops to be knit off automatically by the machine. Step 4 in the techniques book, resetting the main bed to N to knit a row after every 4 rows in a holding pattern is missing in their illustration above.
 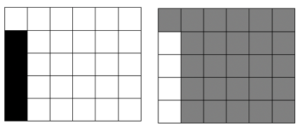 The punchcard repeat: punch each grey square to match the illustration
 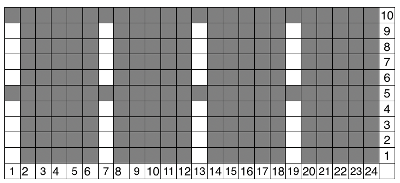 A few to try, shown in repeat X2, as BW gridded .bmps, and with the color reversed for knitting. All but one are 12 stitches in width, suitable for punchcard machines as well
 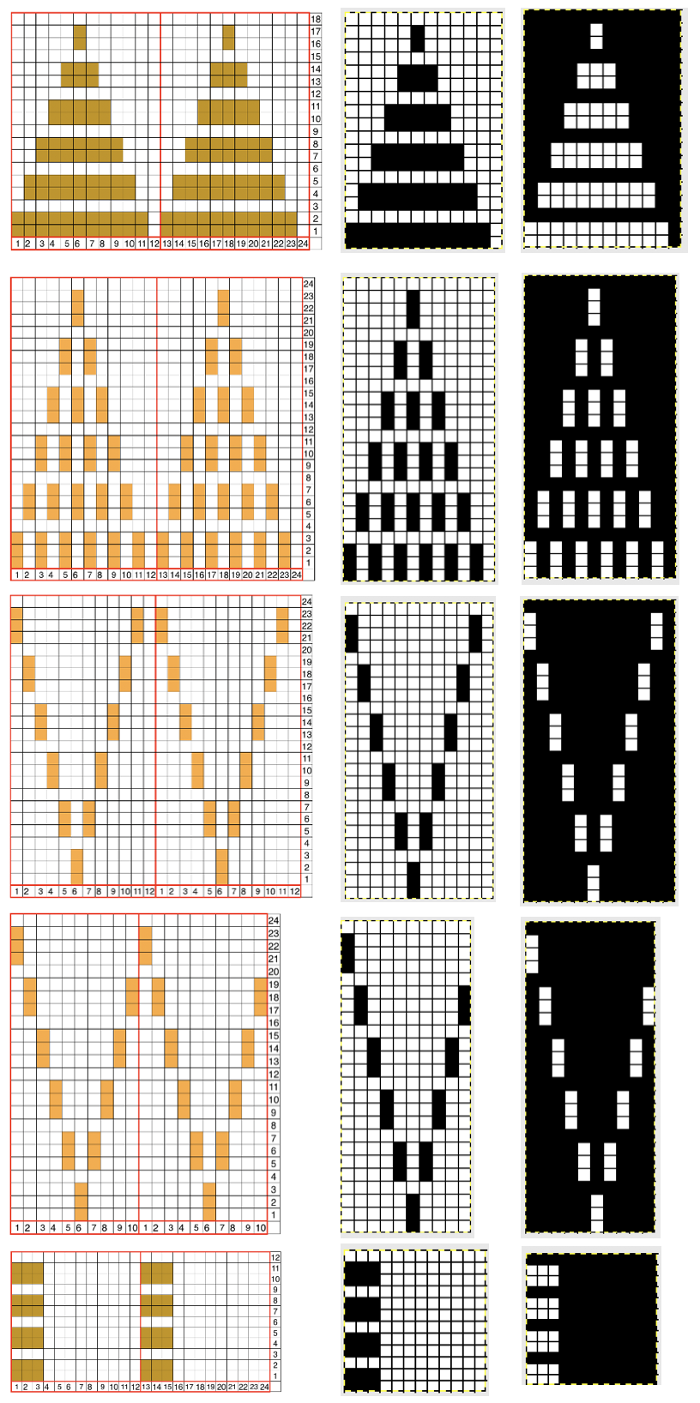 Too much black? want to count those black squares more easily? pick your preferred grid color, it will disappear when the image is saved
 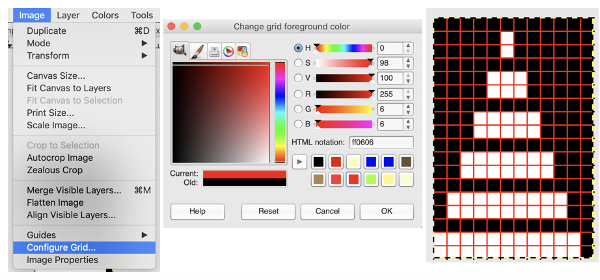 A screen grab from my iMac shows the original charts and the resulting single repeat .bmps after working in GIMP, ready for download with color reverse option and use on the electronic machines. Ayab knitters, in addition, would need to program the repeat in width to match the number of needles planned for use in the piece
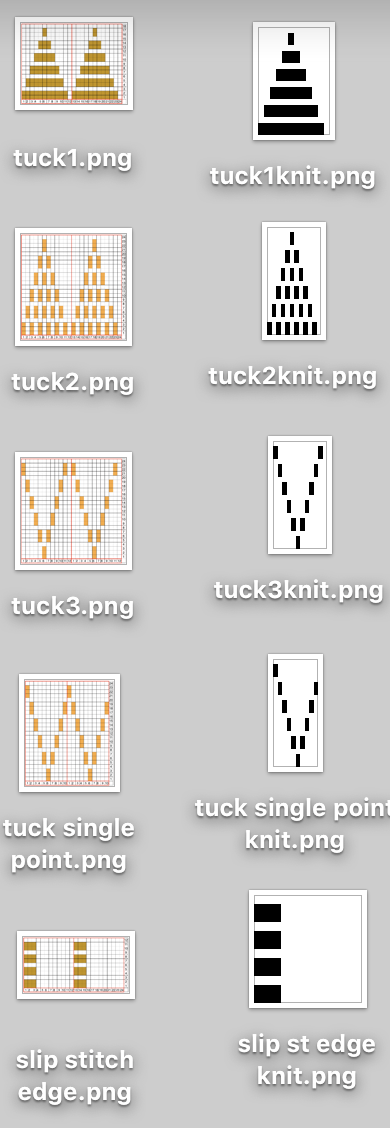

 Working it on Brother becomes a bit fiddly. Whether working on a punchcard or electronic KM, it is possible to introduce patterning on either or both beds as seen below. I preferred the look obtained with the racked cast on at the start. Setting up the Brother machine: program the repeat, half pitch for every needle rib, air knit to place the pattern on the bed so that the first needle on the left (or right if you prefer) is preselected forward and will produce a knit stitch on the first row knit. The yarn used is a 2/24 acrylic
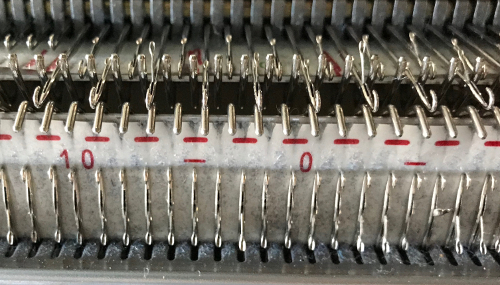
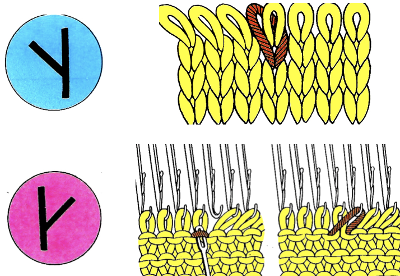
 now another needle on the ribber is brought in to work on the far left, it will tuck with lili selection when moving from left to right
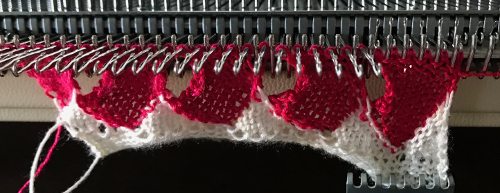
 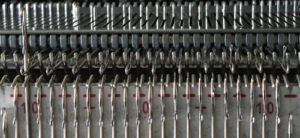 remember the ribber rule with lili buttons: an even number of needles must be in work, this shows the start and end of selection on the ribber on alternate needle tape markings, as required


 Both pieces compared for width and rippling
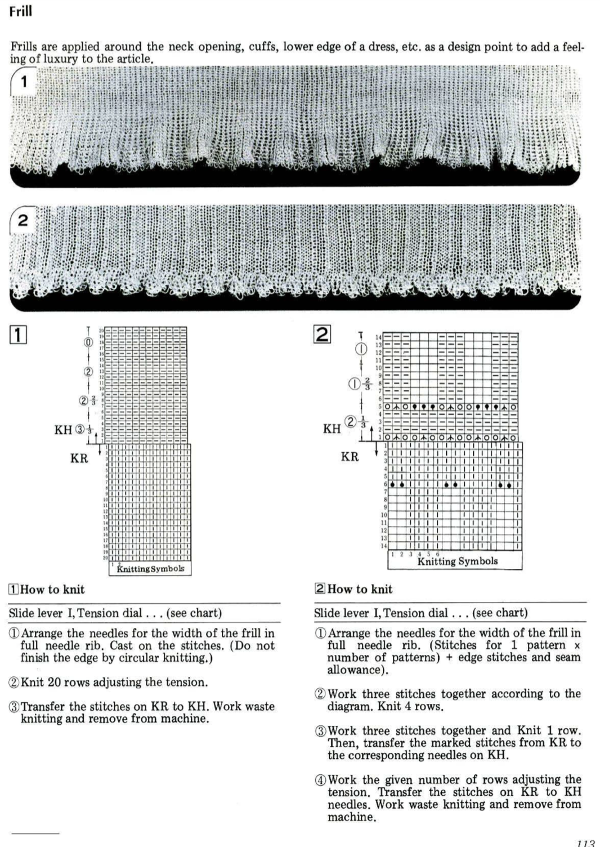
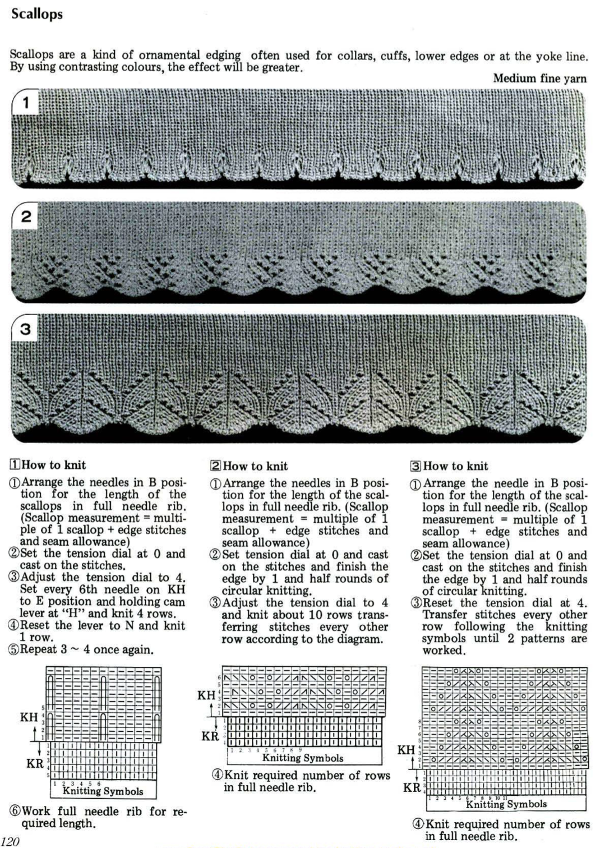
 An intro to scallops: p.120