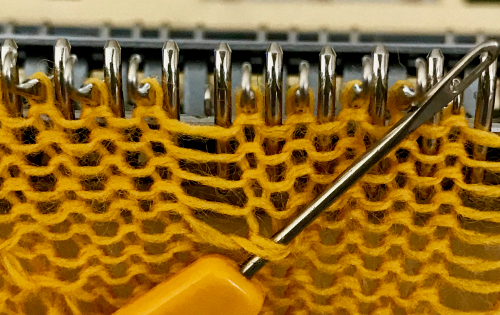
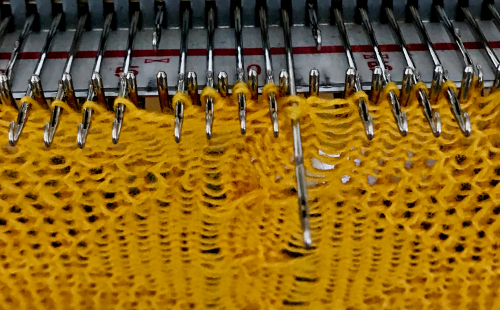
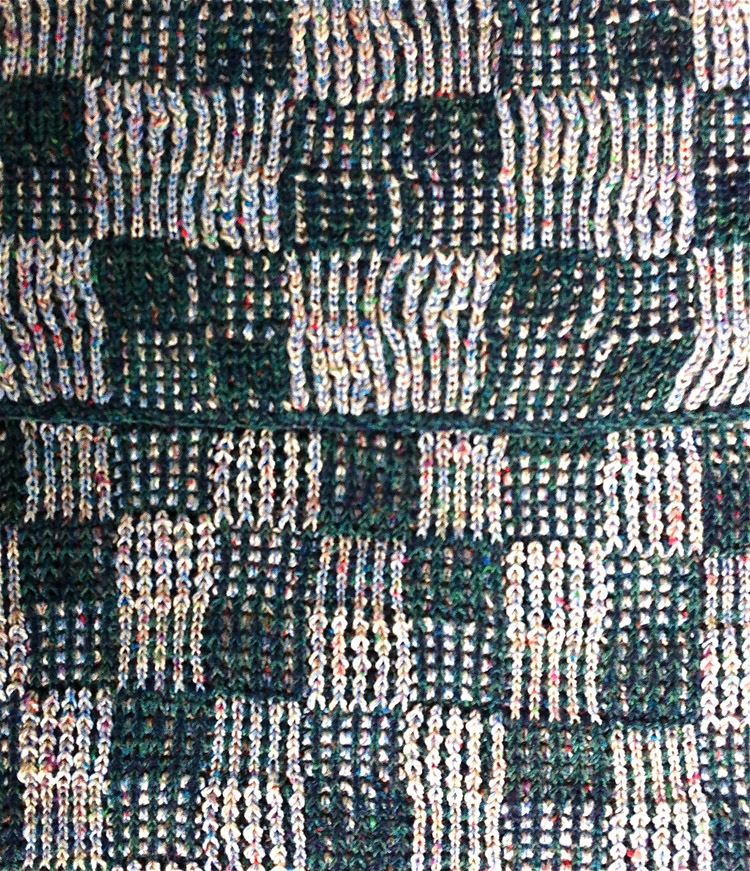
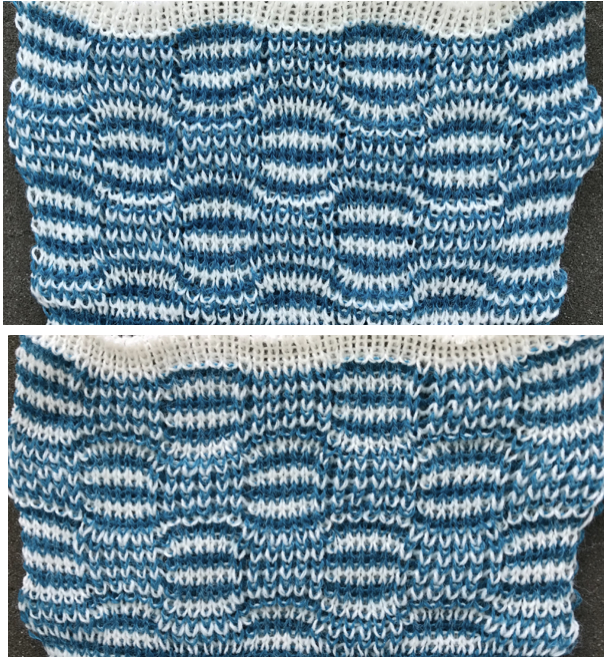
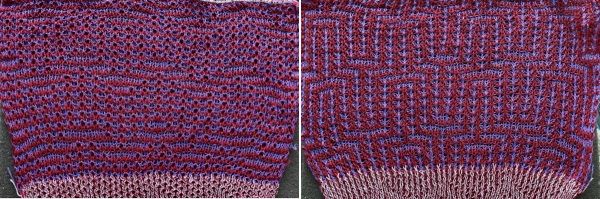
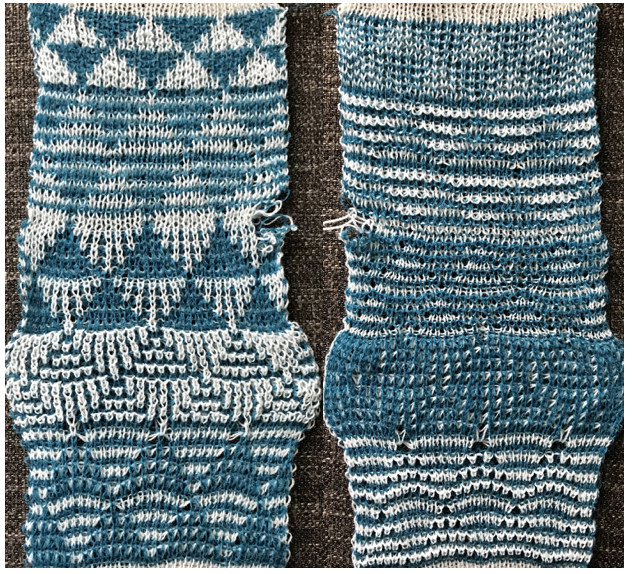
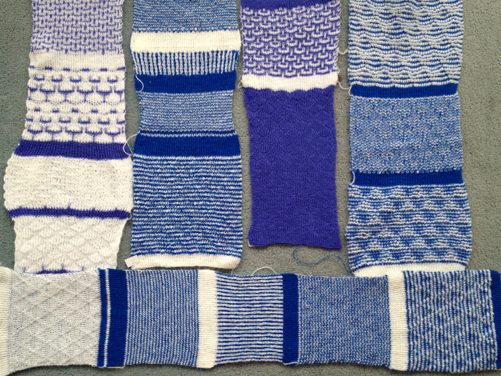
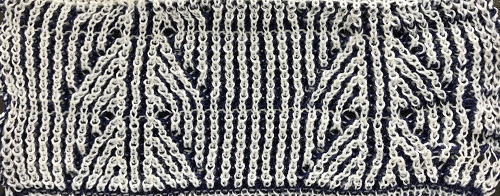
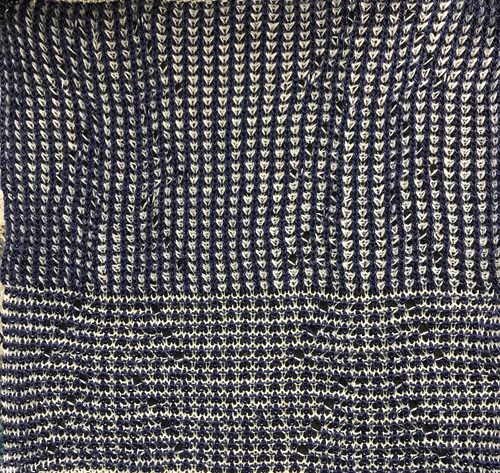
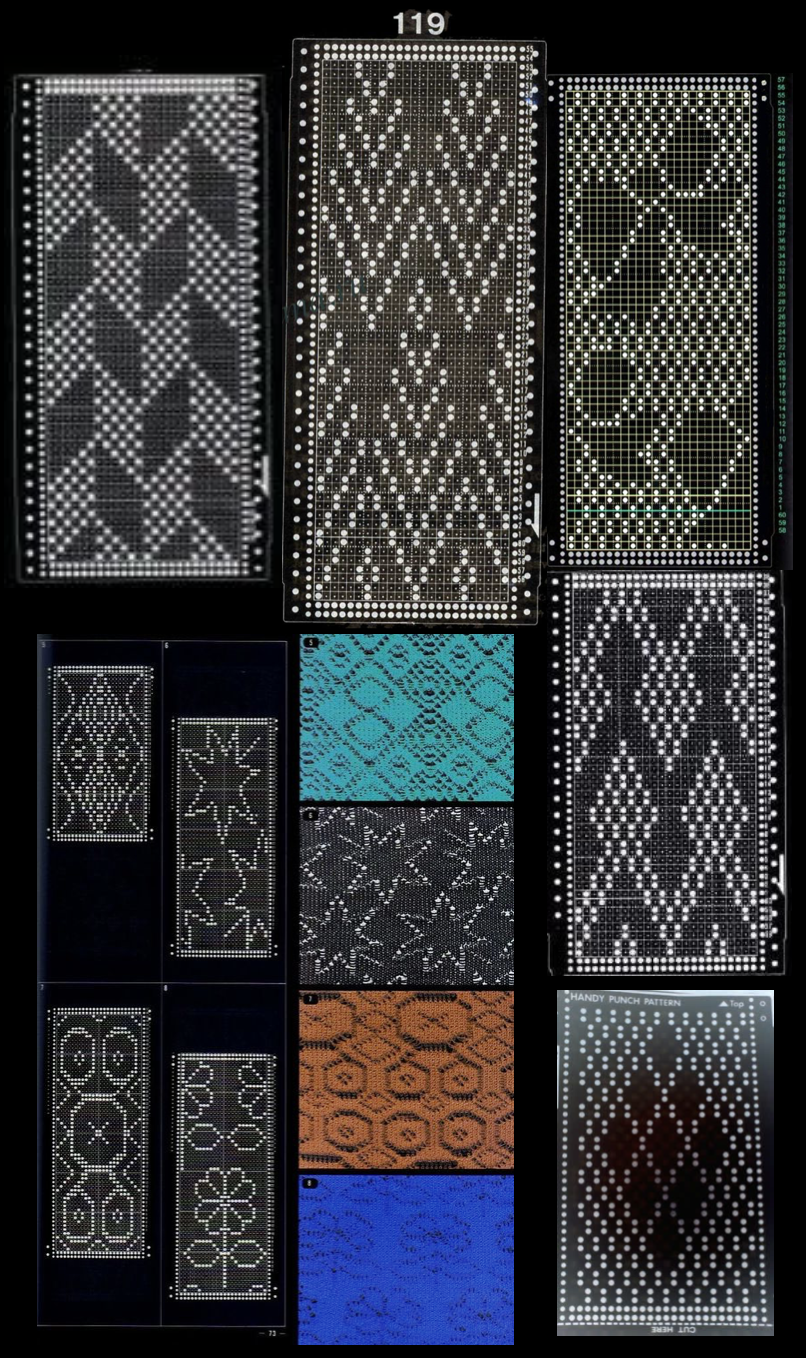
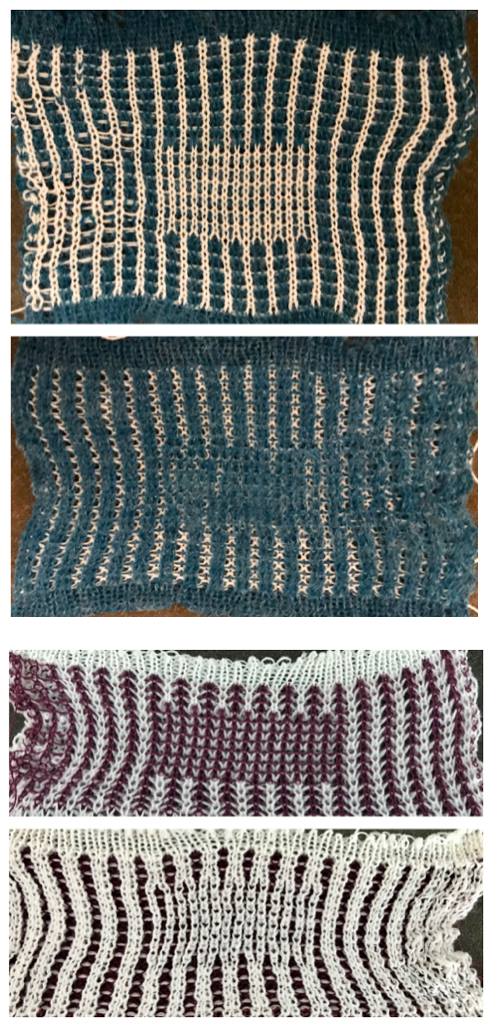
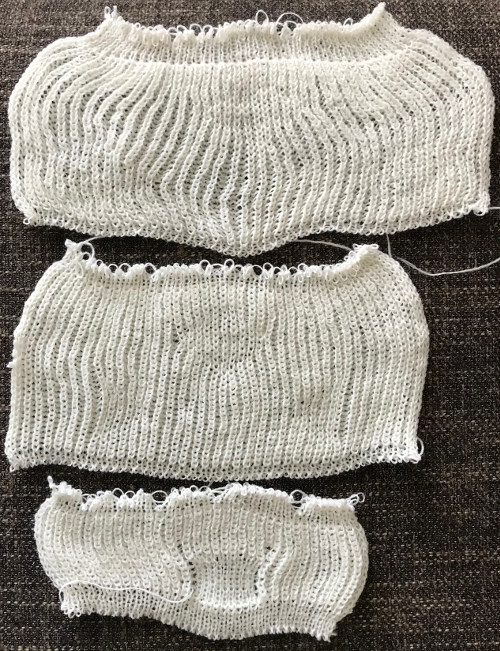
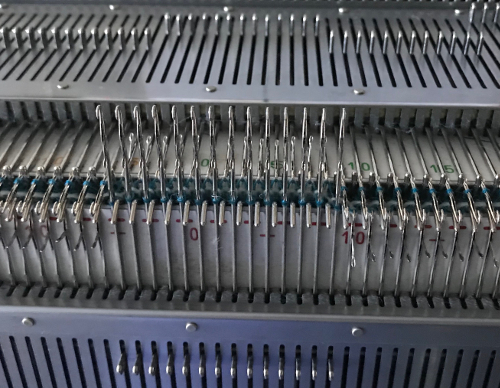
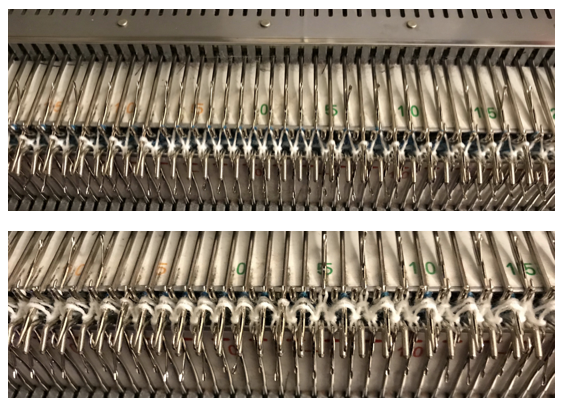
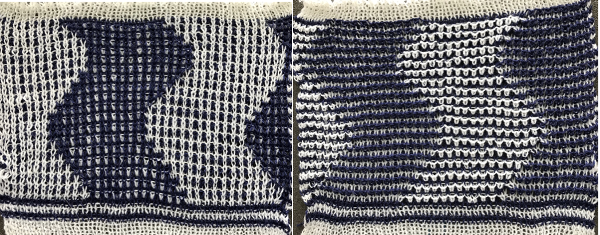
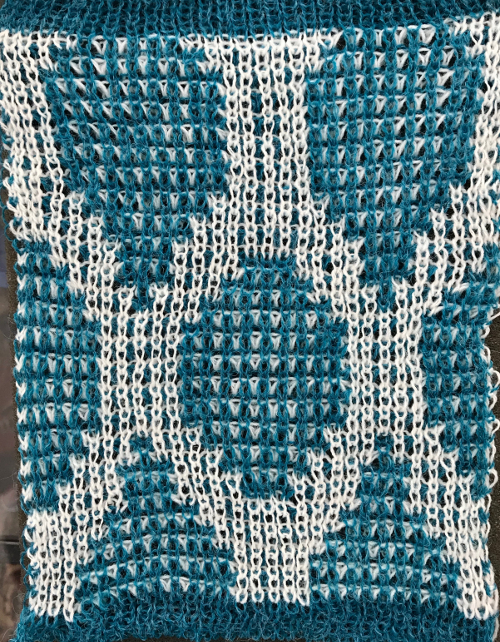
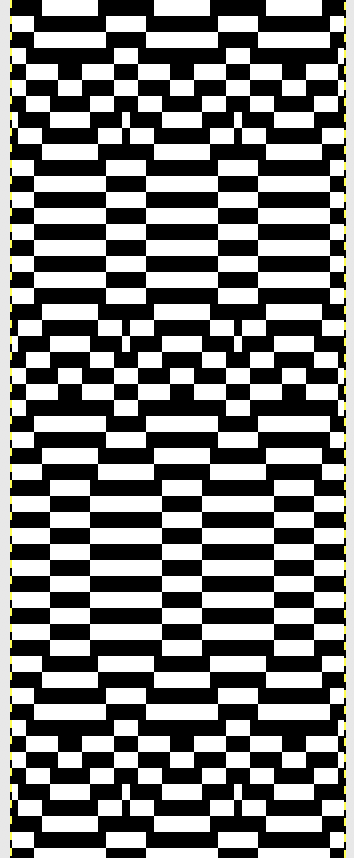
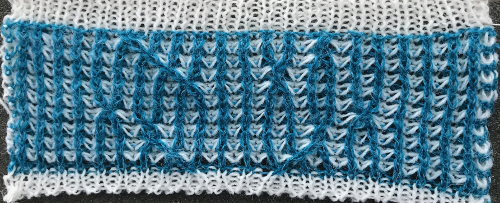
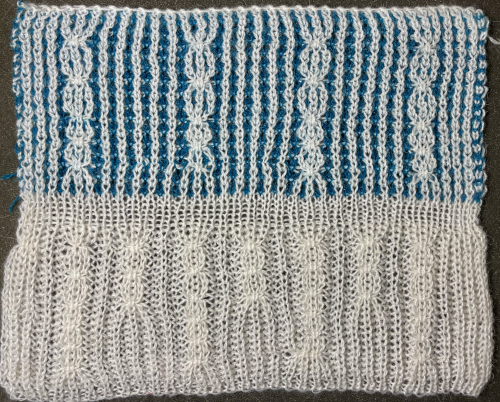
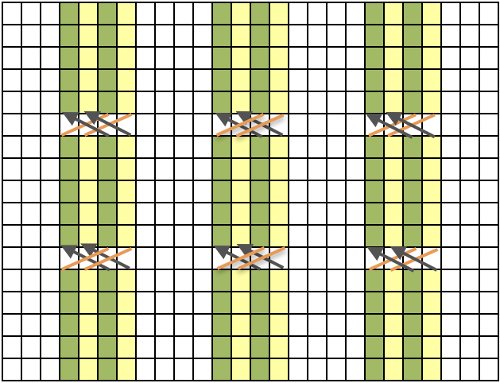
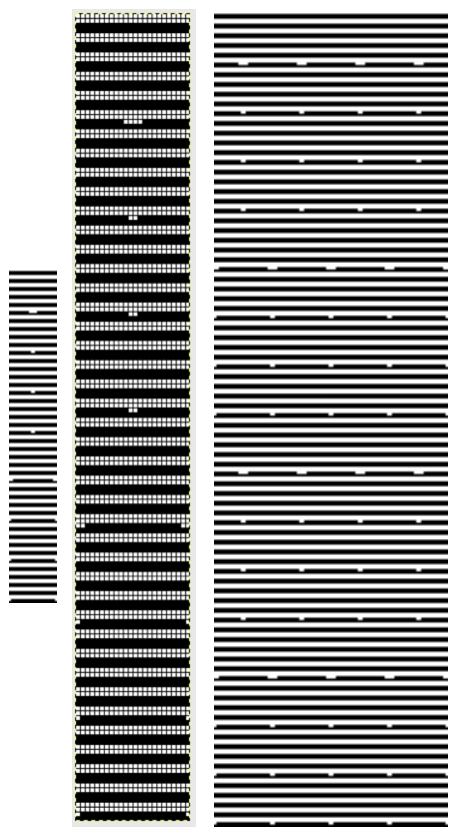
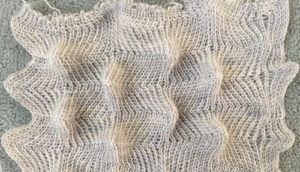
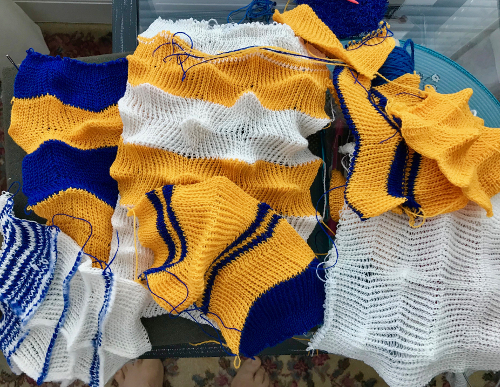
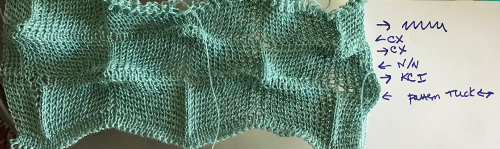
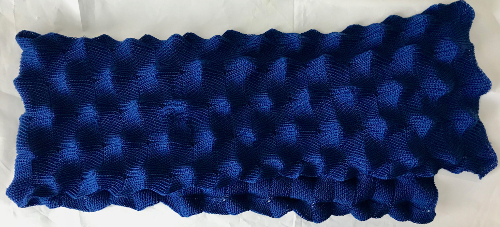
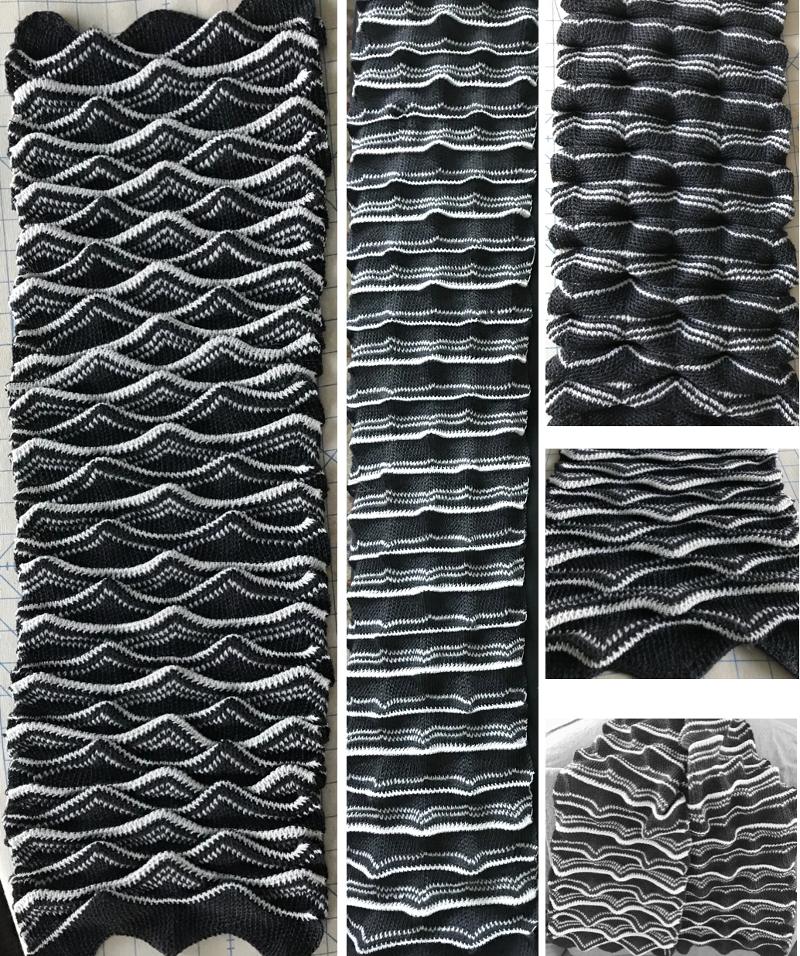
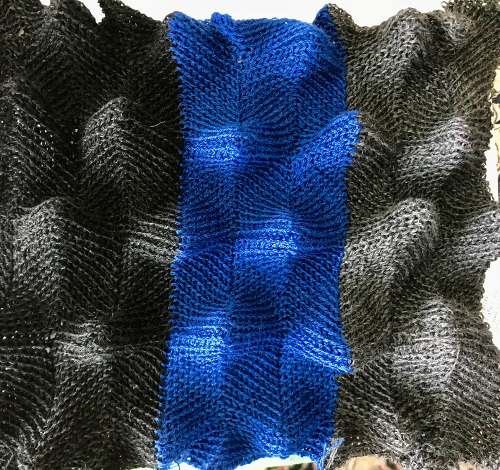
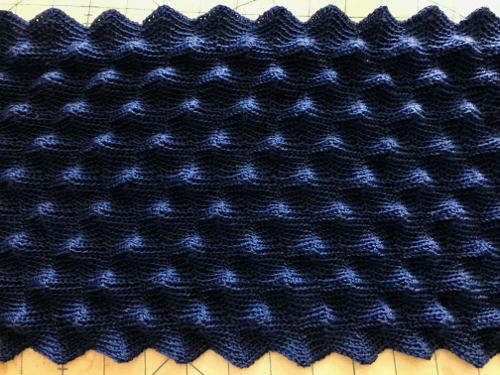
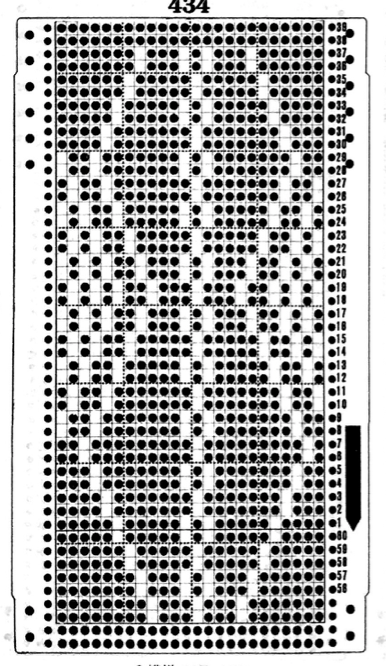
More than 6 years ago I produced a series of scarves that were double-sided, reversible, and were considered “manly” by some of the customers at my shows. Some were one color, some in 2. I found an early post with no clear instructions for them, but with this image and that of a punchcard marked for a racking pattern (given below). Coincidentally the question of checkerboard rib knit patterns came to light in a forum, and I found myself reviewing the technique, with part of the intent to reproduce this fabric. I have, over the years, been terrible at keeping good notes (if any). At times what I was working on was so “obvious” I had confidence I could rely on my memory. At others my attitude once the problems were worked out and a limited one of a kind series was produced, was that I was “done” with that particular fabric. Now here I am, years later, with a mystery pattern on my hands and a time-consuming quest, wishing I had documentation for how on earth I achieved it
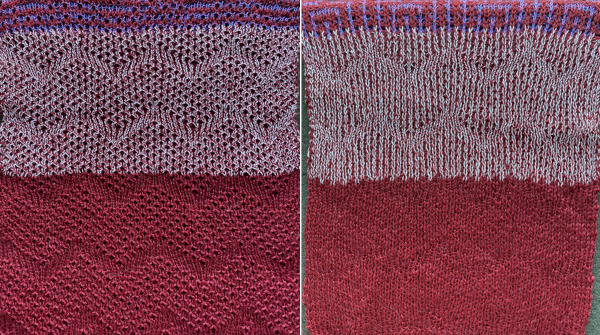
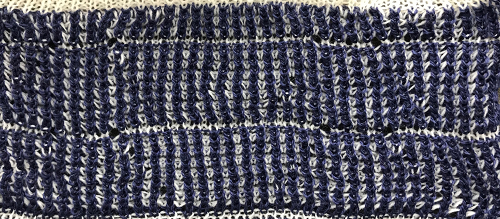
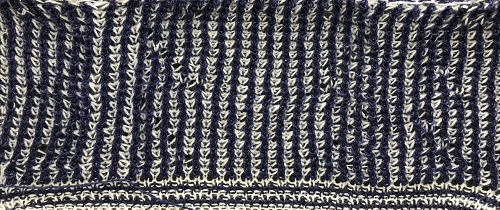
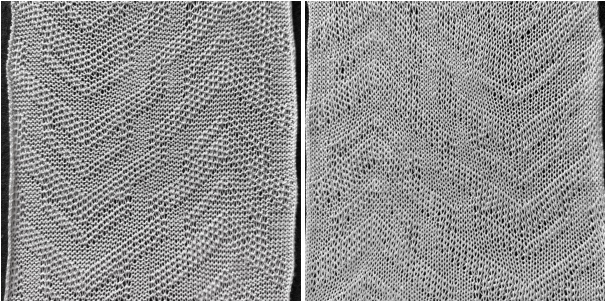
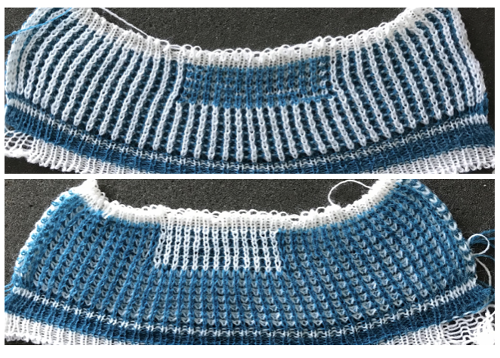
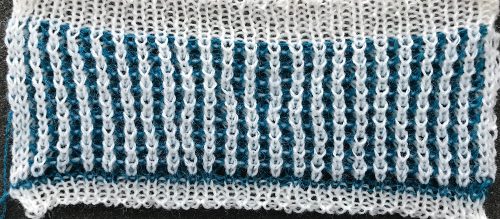
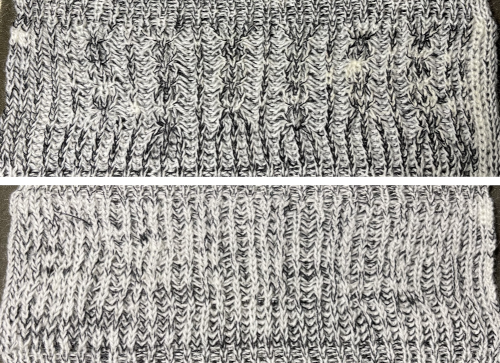
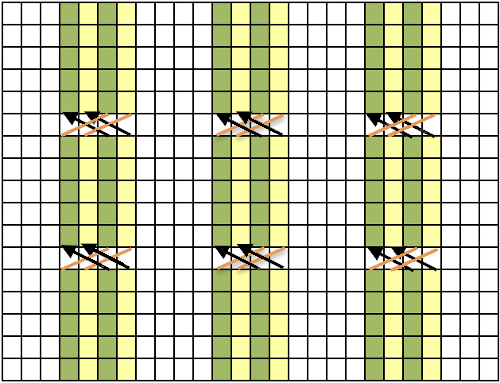
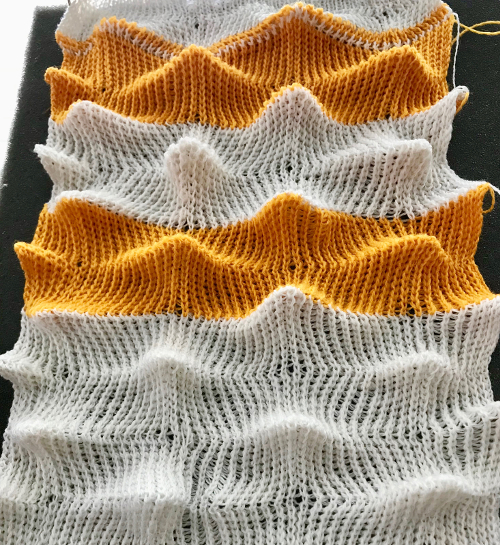
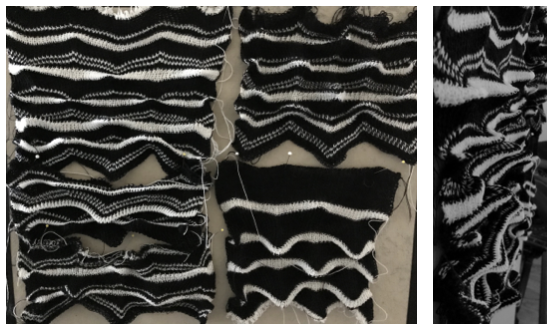
 Definitely not “there” yet:
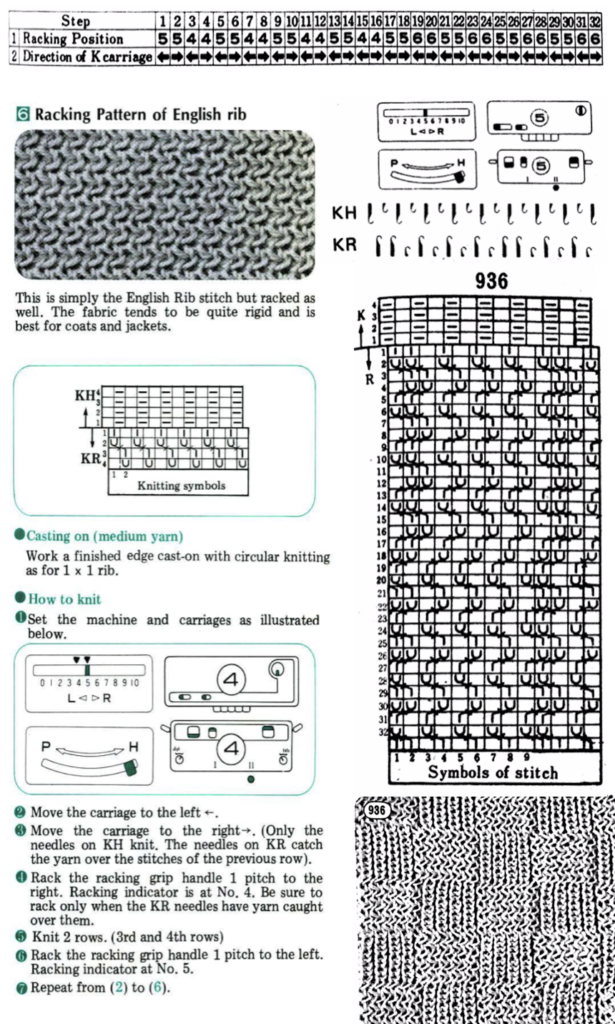
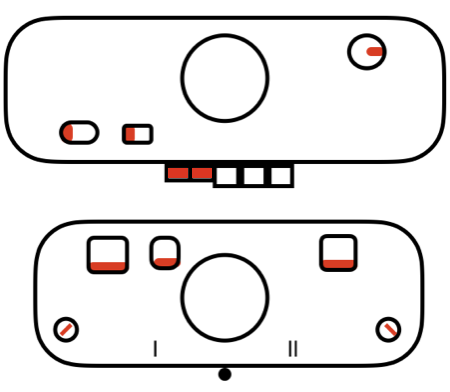
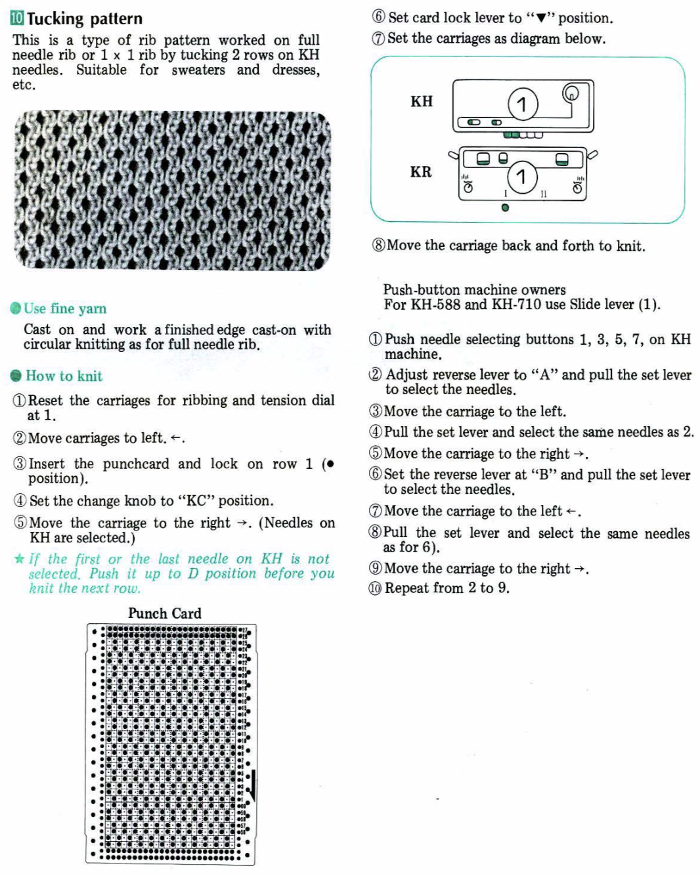
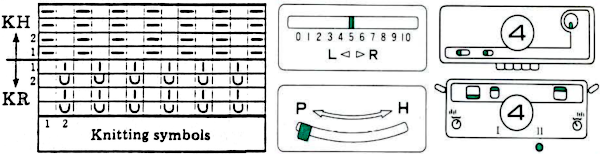
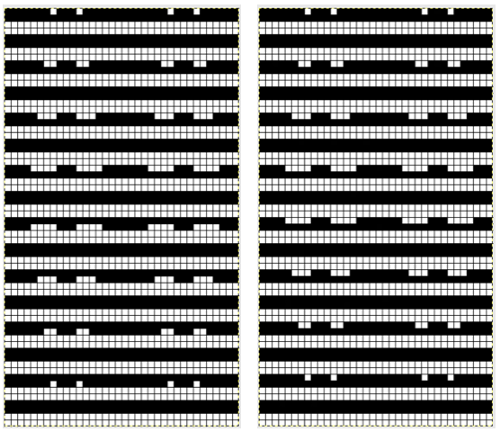
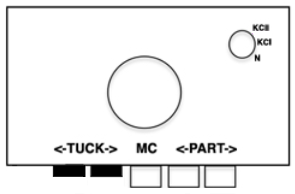
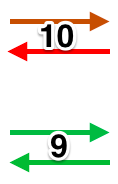
Early translations from the Japanese or German manuals did not always communicate clearly the meaning of symbols or actions required to be taken by the knitter. 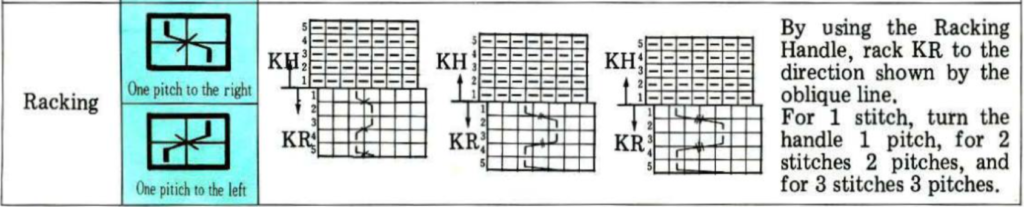 A bit clearer meaning may be gleaned from these instructions in Brother Punchcard Pattern Volume 5. The hatch marks on the racking symbol indicate the number of pitches the ribber is moved in either direction. The number of stitches moved corresponds to the number of needles in work on the ribber.
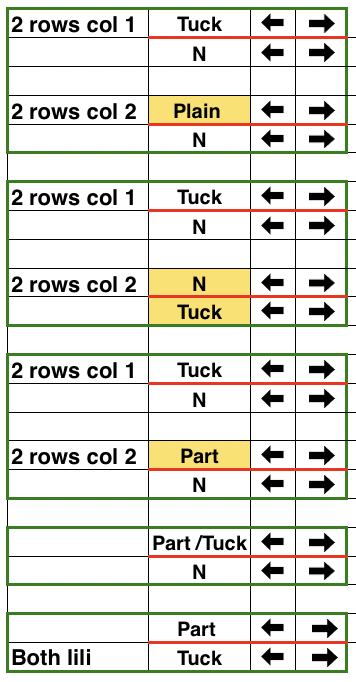
  Recommended settings for English rib also known as half-cardigan, royal rib, or pearl-stitch, with no patterning or racking, the beds may be reversed. It is a 2-row repeat. One row is tucking on the main bed on every needle in one direction, knitting on every needle in the same bed upon return to the starting side. The opposite bed knits every row. There is one textured round followed by one of 1X1 ribbing. It is not a balanced structure, looks different on each side.
 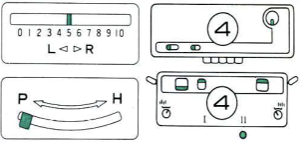 Variure denotes fabrics wherein the same bed is tucked for 2, 3, or even 4 rows followed by one or 2 rows of rib knitting every needle on both beds. The tucking bed may also be set up with needles out of work and with added racking as well.
In fisherman’s rib, the settings are for a tubular tuck, with opposite tuck buttons set in the carriages. While a bed tucks on every needle, the opposite bed knits every needle, reversing the process on the return row. It is also a two-row repeat and referred to as full-cardigan stitch or polka rib.
It has the same appearance on both sides and does not contain any rows in all rib. 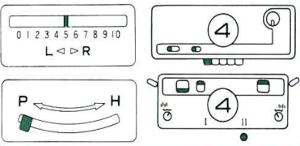 An additional illustration of both
 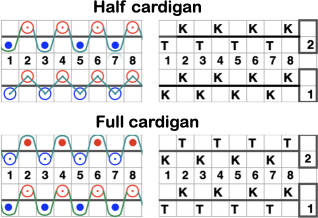 The recommended Brother ribber’s “needle rule”.
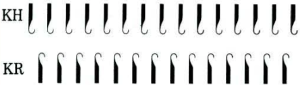 More tuck rib variations may be found in posts on interlock 1, and 2.
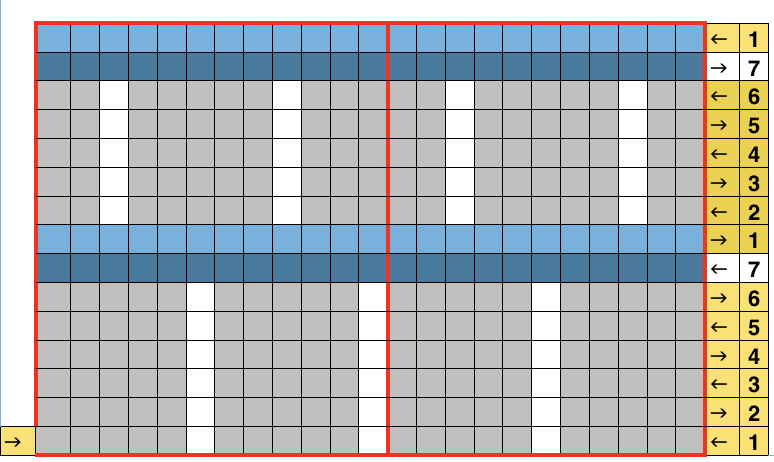
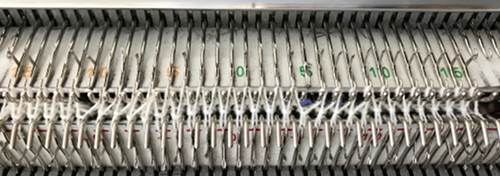
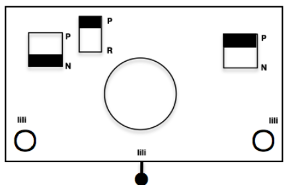
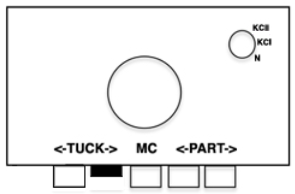
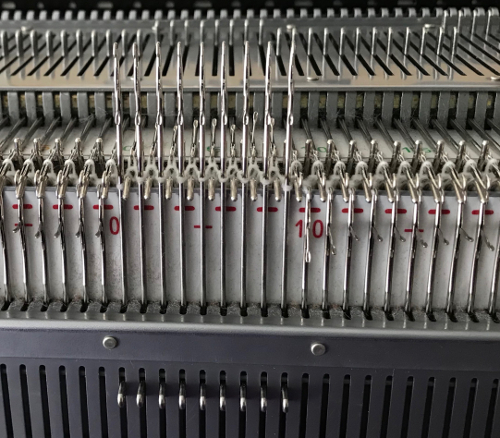
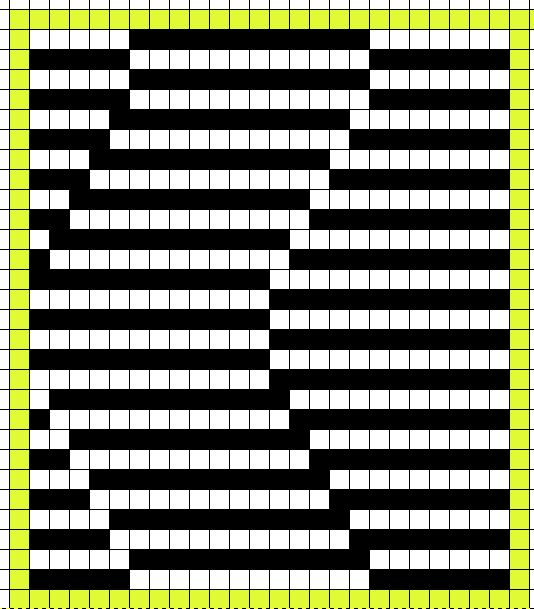
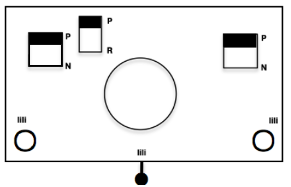
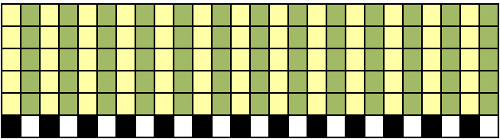
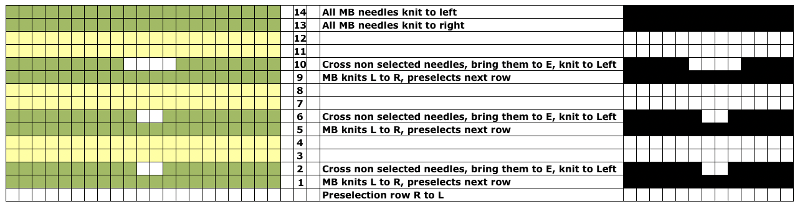
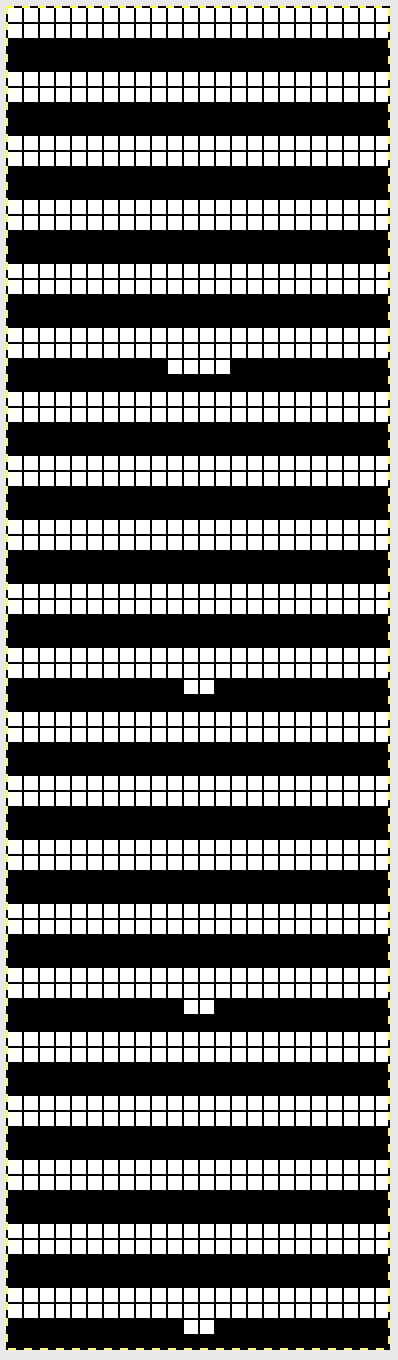
Adjustments to the needle rule may be needed depending on the fabric. If only one bed is knitting while the other is tucking, having the first and the last needle in work on the knitting bed. In English (aka half fisherman’s rib) only one (either) bed tucks. Directions marked with green #6 on left are from the Brother Ribber techniques. The remaining images are for the single-color racked checkerboard pattern from Brother Punchcard Pattern book #5. No pattern card is involved, every other needle arrangement suggested on the right accommodates slightly thicker yarns. A half-pitch setting is used.
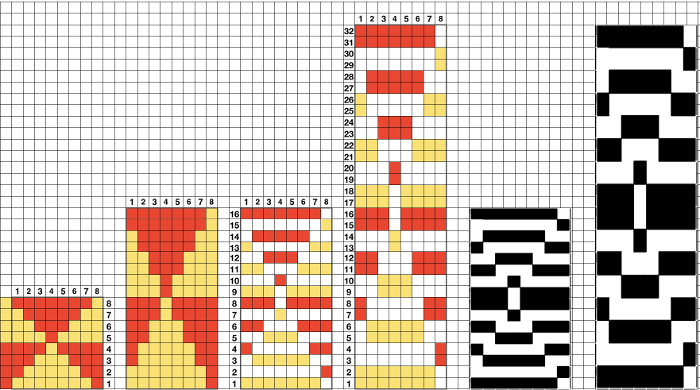
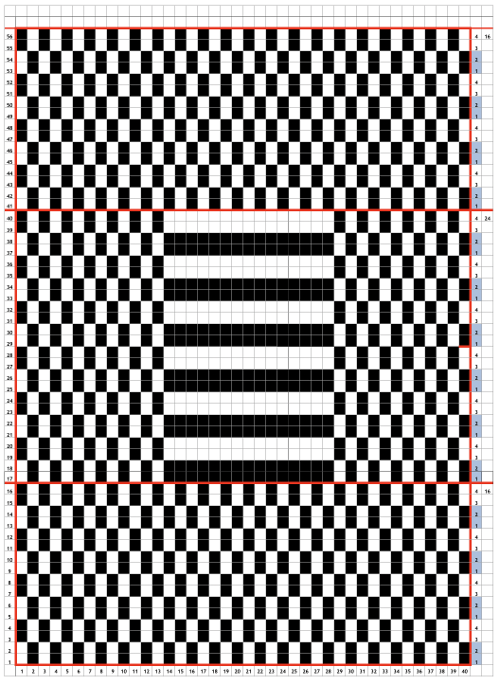
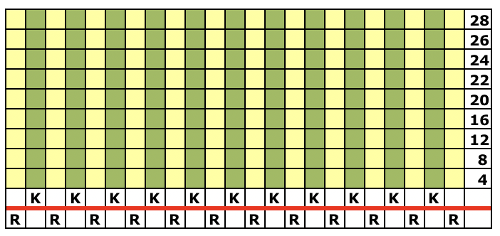
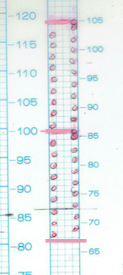
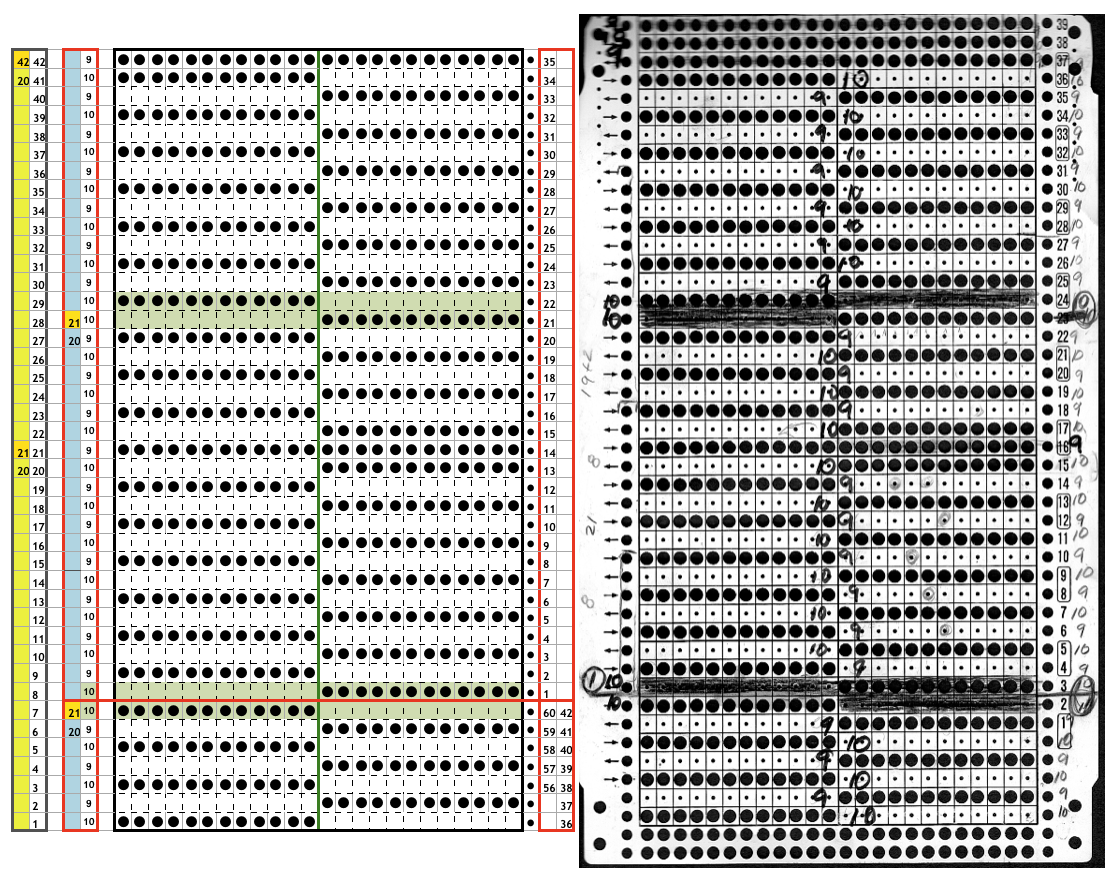
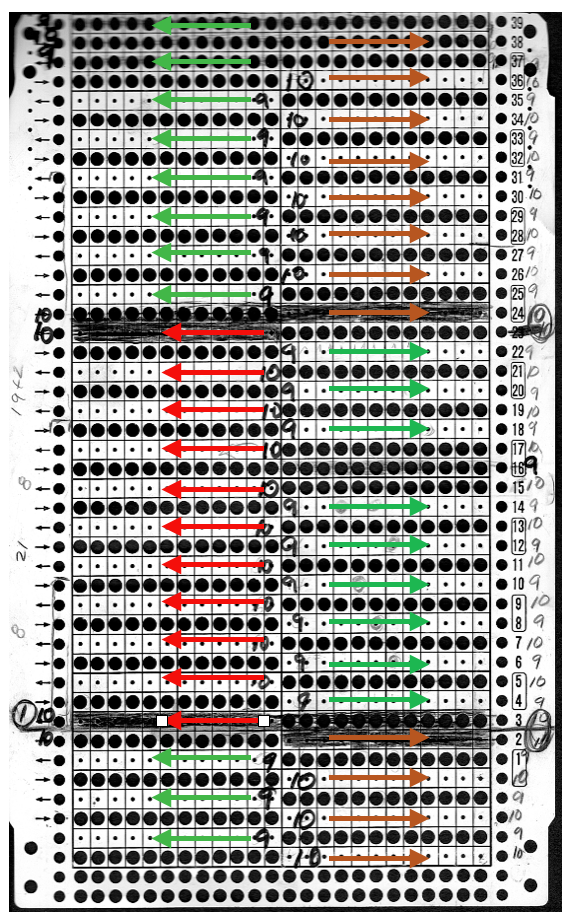
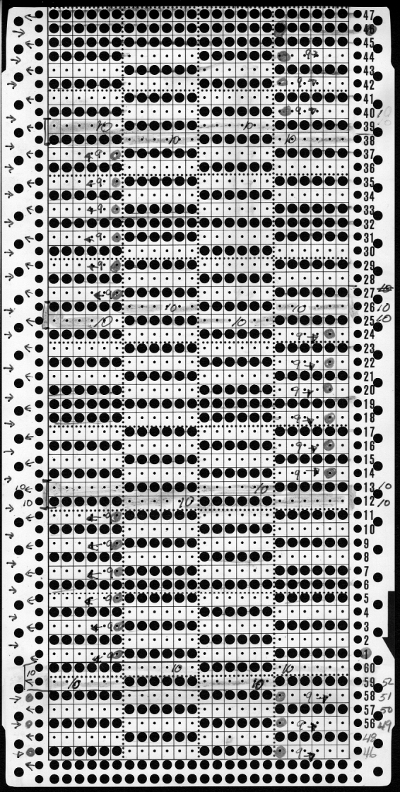
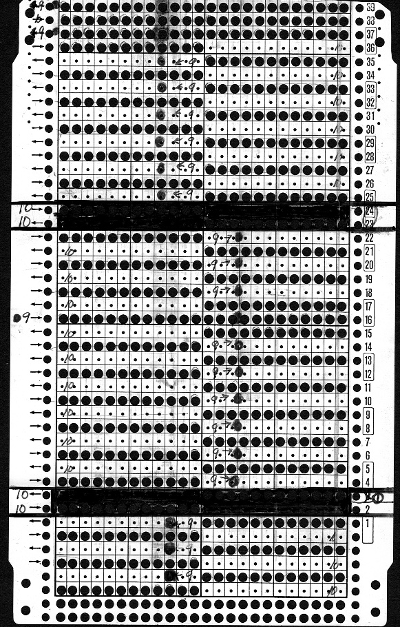
In the above instance, the main bed is not performing any patterning function, it is knitting on every needle in the work position. On a punch card machine, a card may be used to track racking positions. With the carriage set as usual for patterning and needle selection but with no cam buttons pushed in, the main bed will continue to knit stocking stitch. No rows are punched, and the numbers on the card in the colored columns indicate the racking position for corresponding rows. The “card” on the left is designed to match racking positions and carriage travel directions (colored arrows) to mirror those in the publications. Since a 36-row minimum is recommended for continuous punchcard use, the “card” on the right has added a 4-row segment for each segment of racking directions. The full repeat is now 40 rows rather than 32 in height. The numbered columns on the far right are as they would appear on standard blank Brother punchcards. The number one is at the level of the first visible row while the card reader drum is actually selecting the first design row. End needle selection is canceled (KCII on electronics). The first move as indicated by arrows is to the right, so the first row is preselected from right to left. The card is then set to advance normally and released. If any errors are made treat card adjustments as you would in any other fabric.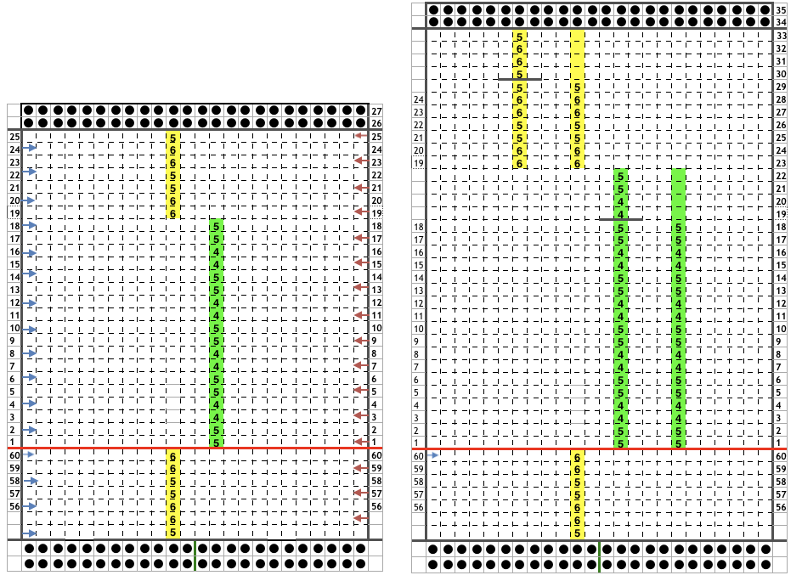
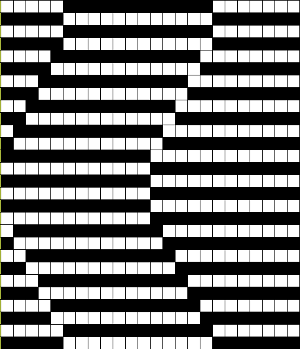
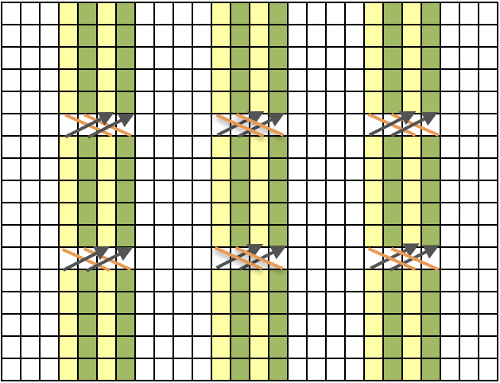
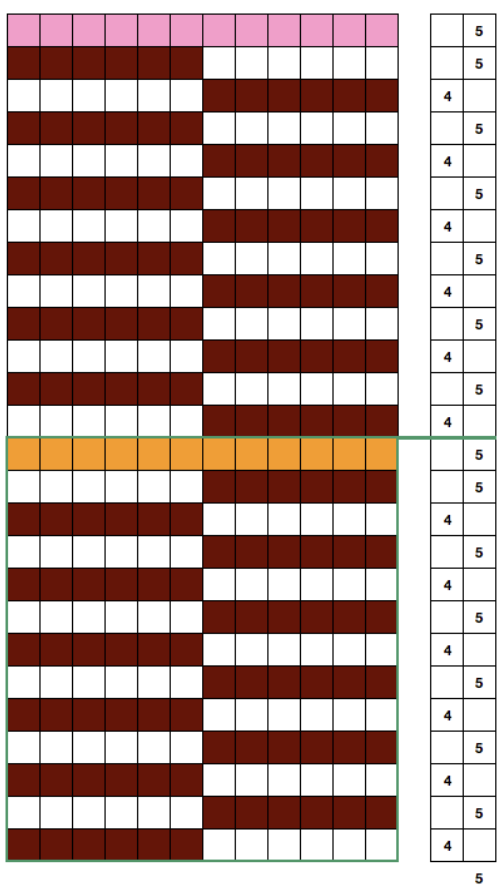
Adding main bed needle selection for selective patterning: the actual punchcard here includes annotated changes in racking sequences from 5/4 pitch positions at its start to 5/6 racking positions for the top half of the completed repeat on its left side. It may be used as-is or set to double length either for use with a single color or combined with color changes every 2 rows.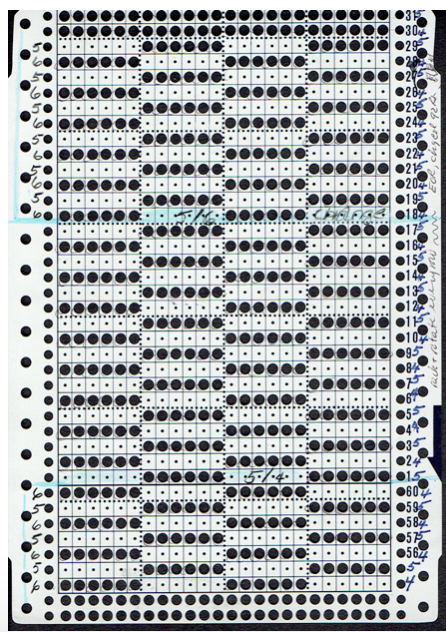
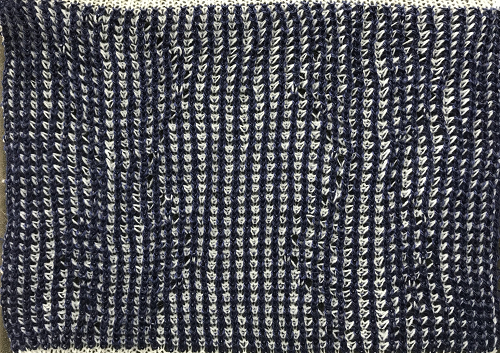
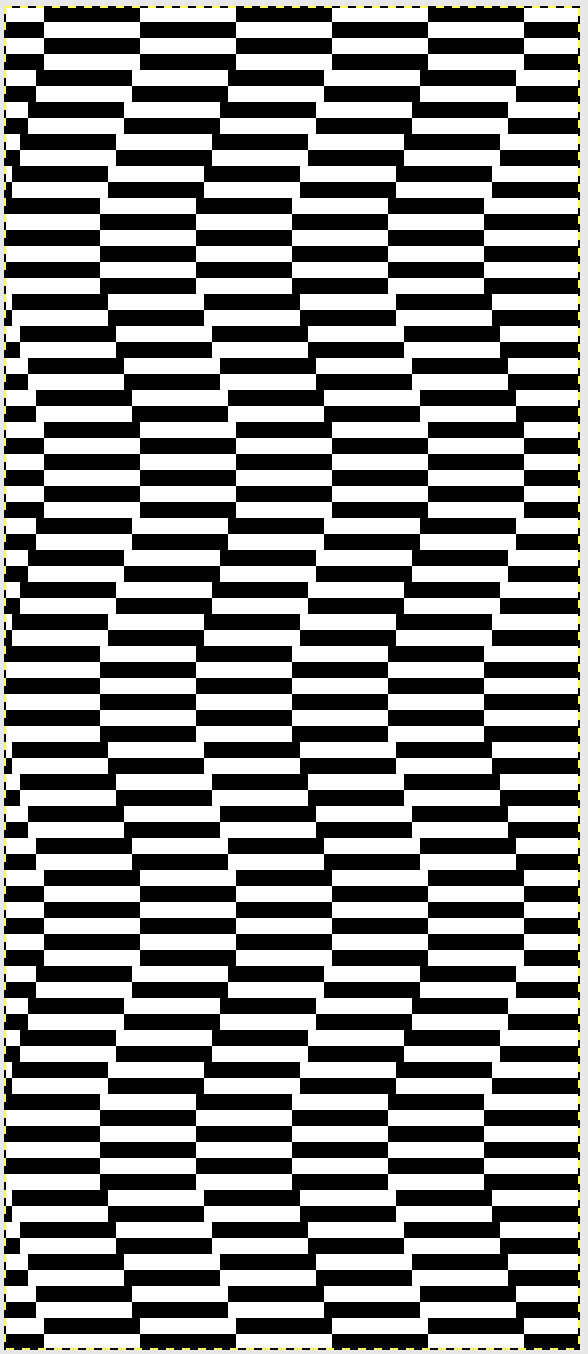
The card as punched may be used in many ways. In past experiments, I have shown that not changing the racking pitch for a single row while keeping the two alternating pitches constant created scale-like textures rather than checkerboard patterns
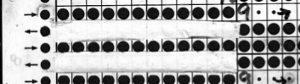
 here again for a 16-row sequence
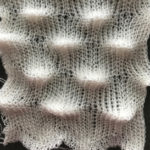
On fabrics with racking enlarge the stitch size by 1/2 to one full number to accommodate the stretch needed in racking the stitches.
Color changes: fabrics made in full fisherman rib are reversible, while those in half fisherman are not. In full fisherman rib in order to knit a specific color, that color must be knit for two rows and tucked for 2 rows alternately. In Passap AX with pushers and arrow keys must be used, in Brother, ribber needles would need to be hand-selected to the proper position on every row.
The yarns used should be soft and have some stretch. Every other needle patterning may be used with slightly thicker yarns.
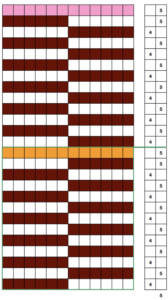
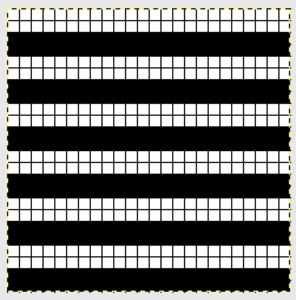
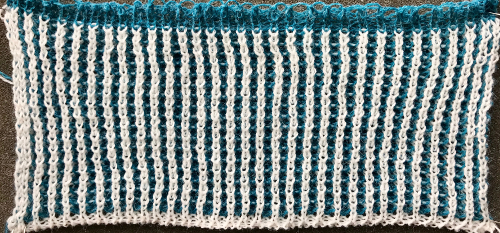
Racking in the same pairs of pitches ie. 4-5, 4-5 with no added actions taken, produces vertical columns, akin to results in any fabric that repeats the same functions in the same locations on the needle bed
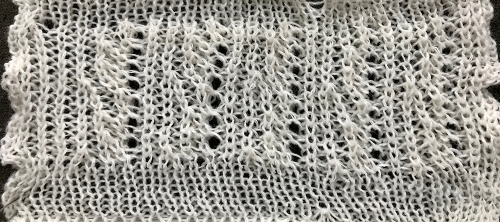
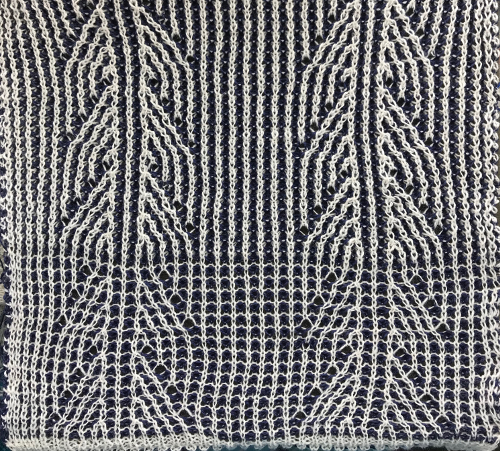
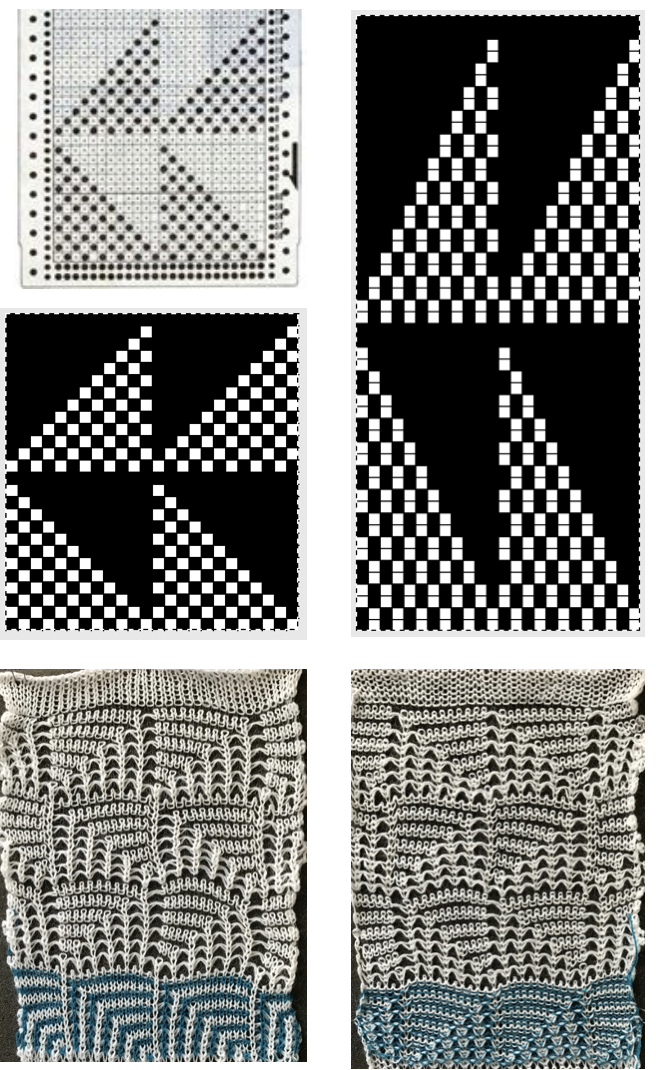
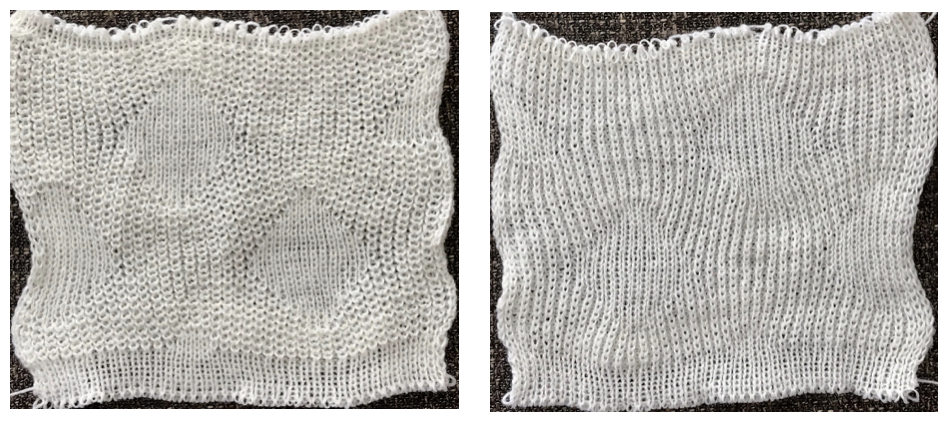
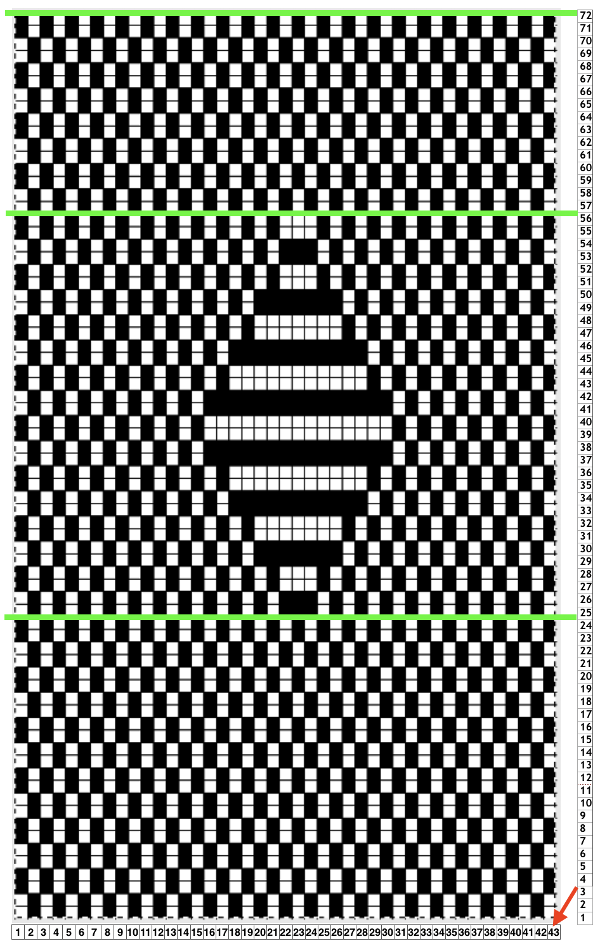
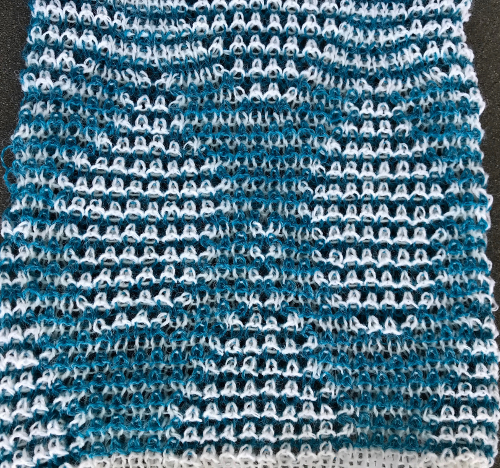
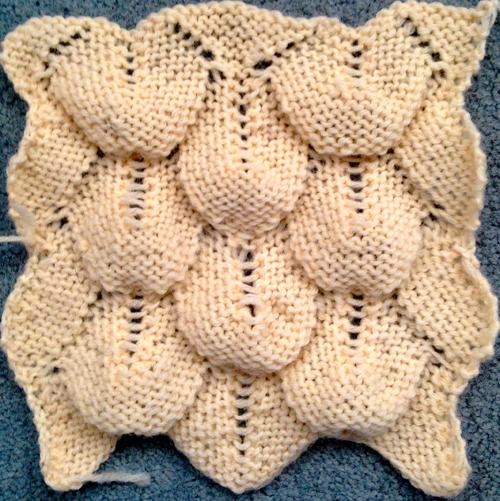
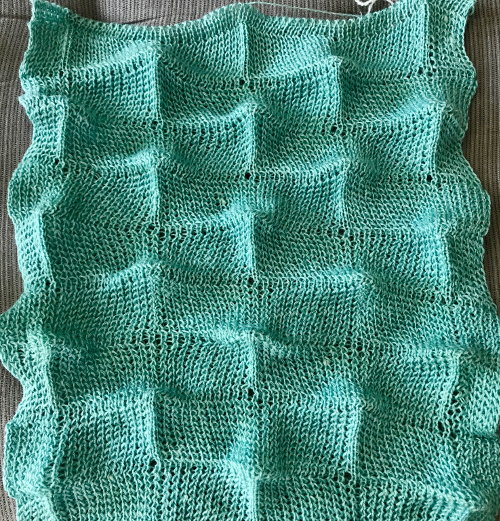
I knit my first “checks” sample on a 930 electronic programming a single repeat to match the card used double length. The goal: the check sample pictured in punchcard pattern book 5 
In programs or machines that allow for memos that correspond to design rows for each repeat, enter the racking pitch number beginning with design row number 1, and continue to 32 or more as needed. The racking sequence is changed at the halfway point of the full repeat.
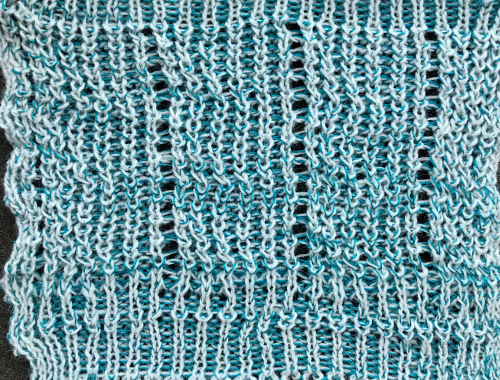
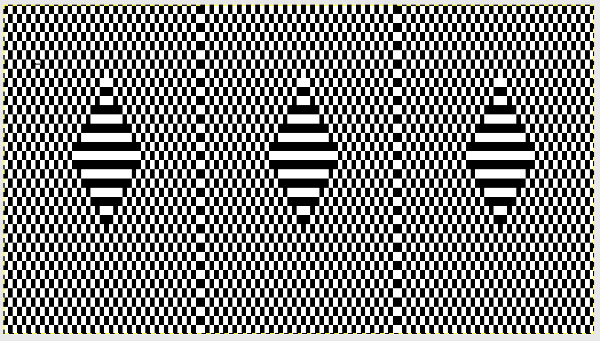
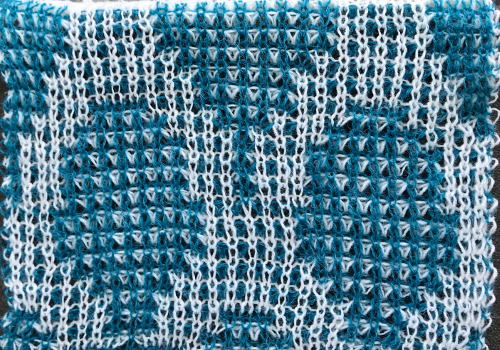
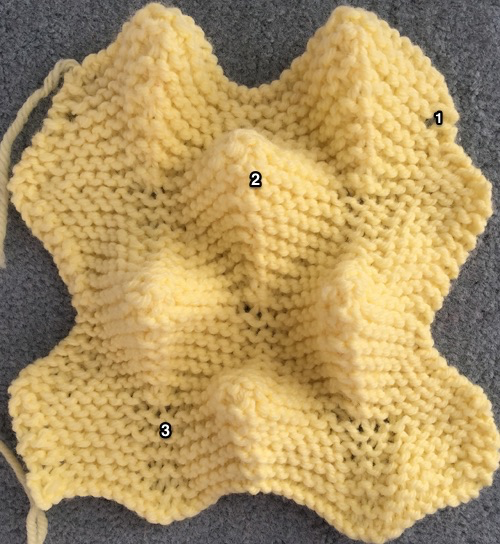
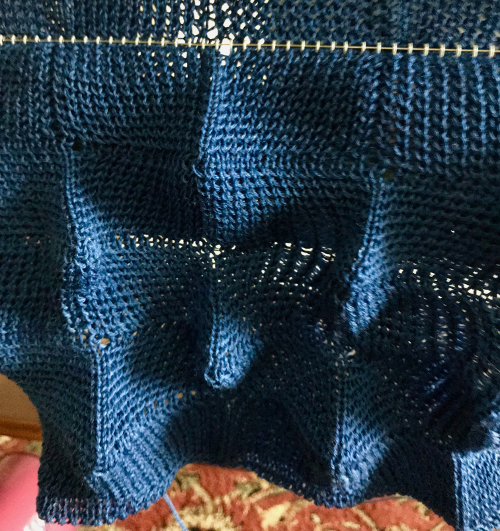
Added experiments: using the same electronic repeat above, here I worked *20 rows racking every row between positions 4 and 5. One row was then knit on all stitches on the top bed** (I pushed needles out manually rather than changing cam settings), repeated * to**. The fabric reminds me of racked herringbone, the “checkers” are distorted  Changing color every 2 rows shows the same lean in the fabric. I have had intermittent problems with my ribber, stitches begin to simply not be picked up by the main bed and are dropped for no apparent reason
 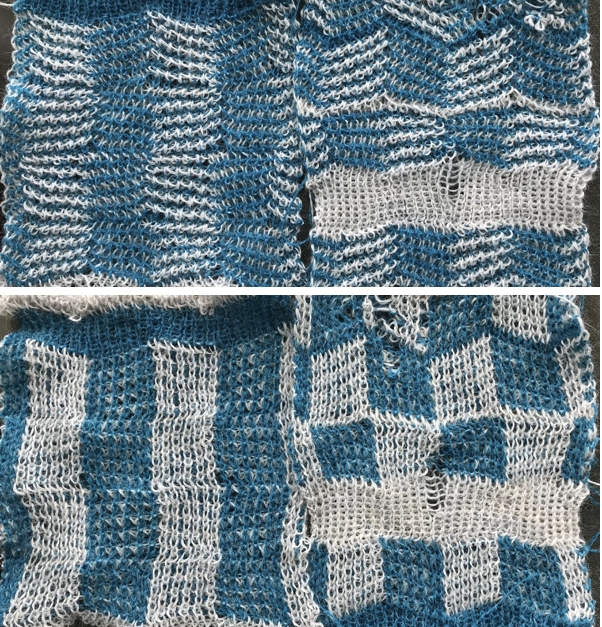 A very different fabric is created using the repeat and instructions below
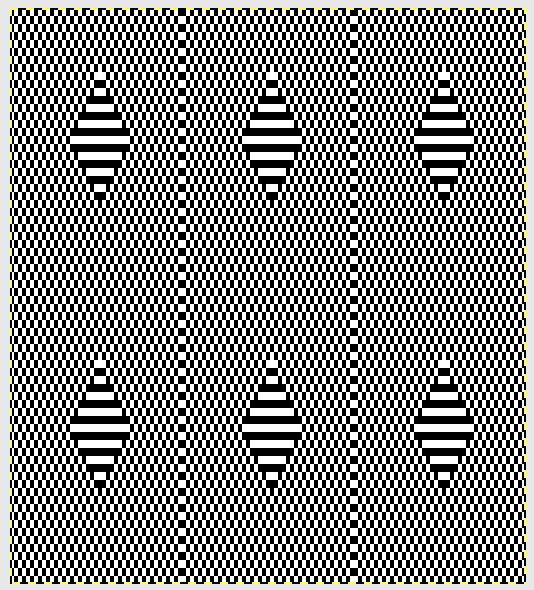
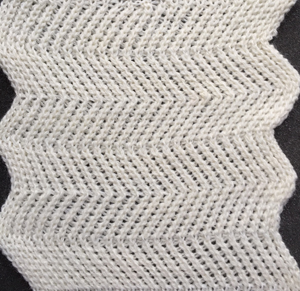
 *Knit 2 rows, rack 1 pitch to left; knit 2 rows, rack 1 pitch to right to RC 20 (or preferred row count); knit 1 row continuing in pattern to the opposite side without racking**. Repeat * to**. One repeat of the 2 sequences is 42 rows in height. At row 1 of each new (here 21 rows) sequence, the carriage starts on the opposite side
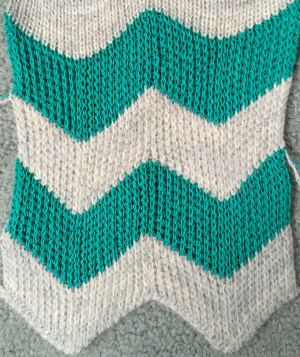
 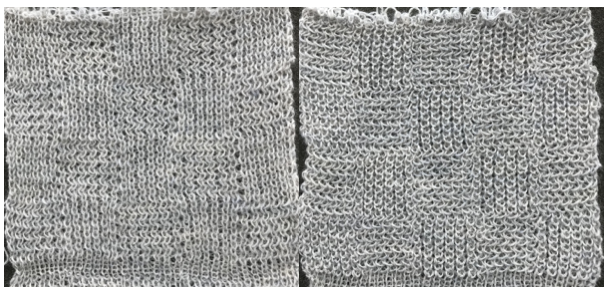 Changing colors every 2 rows is possible. The racking will begin with the carriages on alternate sides of the machine after the single-row knit without racking. In segment 1 racking occurs on the left, color changer side, and in segment 2 racking occurs on the right, opposite the color changer.
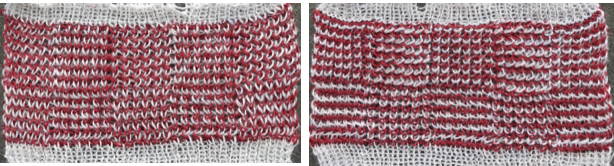
“Full” fisherman rib with patterning on both beds: on Passap the back bed is capable of many more patterning choices than in Japanese machines, and strippers help hold loops in place on the needle beds. The Passap “needle rule” places the first needle in work on the front bed, and the last on the back bed. This is also variable depending on the fabric being knitted. Using the repeat
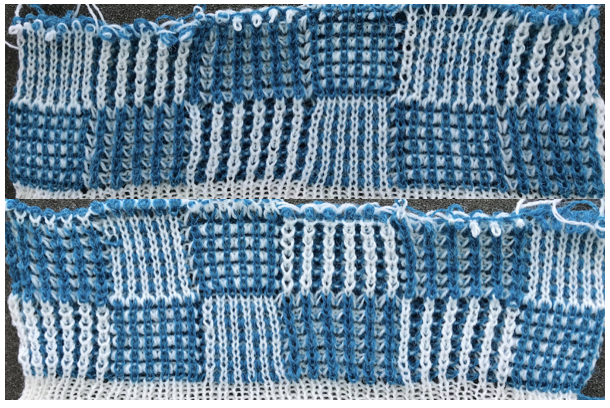
tech 129: (black square tuck for single row) on the front bed. Set up back bed after prep rows, making sure pushers are in the same work/rest position as on the front bed  *Knit 2 rows, rack to left, knit 2 rows, rack to right to preferred row count ie RC 20; knit 1 row still in the pattern, without racking**. Repeat * to**. One repeat of the 2 sequences is 42 rows in height. The resulting pattern is reversible.” This swatch was knit with the bottom 3 blocks using 6X6, both arrow keys on the back lock, and N in front. The back bed pusher setup is doing the patterning. The top 3 blocks are set to pattern selection on both beds, using AX, arrow keys, and KX on the front lock. Using technique 130 will double the height of the repeat, working each row twice.
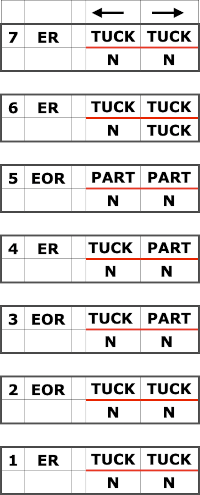
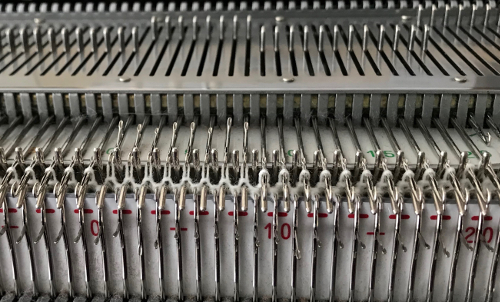
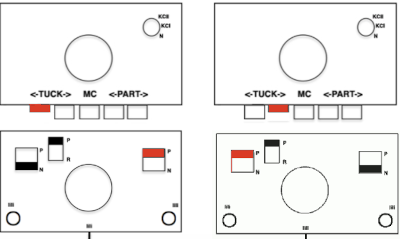
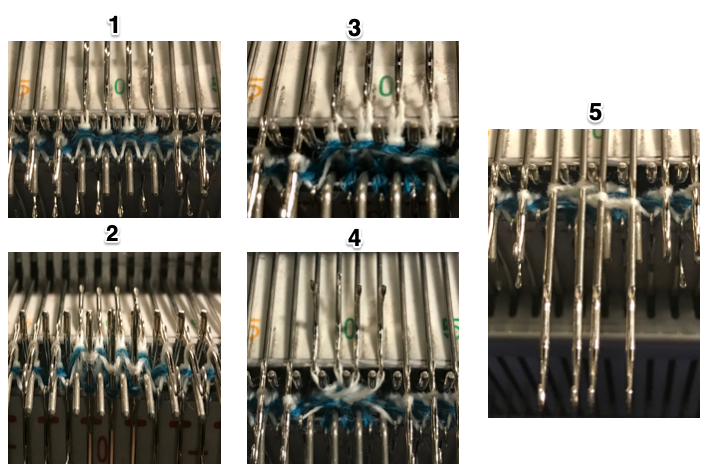
On Brother, the second bed selected needles will face tucking needles on the main bed. This creates a knit stitch on one bed, holding down the tuck loops on the other, allowing for side-by-side tuck loops on opposing beds. Such selections would need to be made on the ribber manually. Both beds are set to tuck, both arrow keys. The needles on the ribber immediately below the ones tucked on the main bed are brought to the E position and face the tuck needles on the main bed, while its non-selected needles will tuck. Rack before pushing those needles (black dots) that will be knit up to the E position. 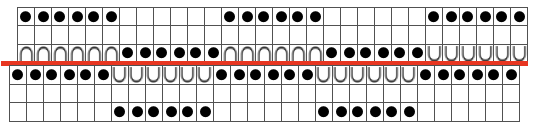 The Brother settings for full fisherman suggested in their Ribber Techniques Book and manuals produce a “circular” tuck stitch, with each bed tucking and alternately knitting on all stitches in opposite directions, so the cam button setup is different than when one is planning textures in varied patterns
 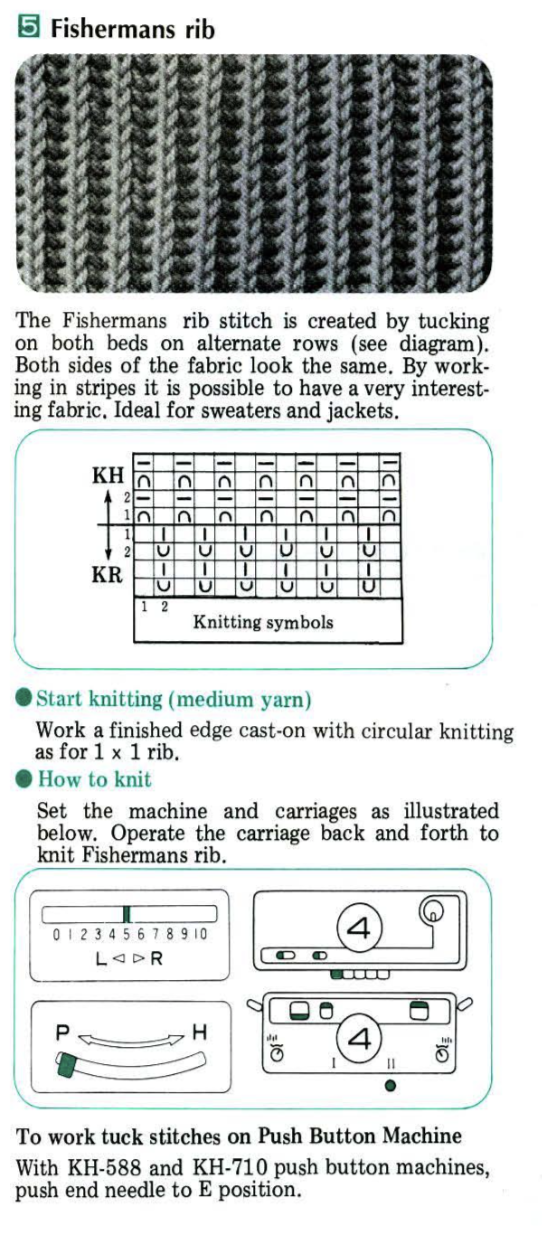 It is also possible to produce “checks” without any racking at all. On the Passap, this sample was produced eliminating racking completely. The front lock was set to knit throughout / N, the back lock alone did the work. Pushers were selected 6 up, 6 down, the back lock set to AX with left arrow key for even multiple rows divisible by 4. I used 24-32 to get a sense of scale. The arrow key was canceled for the next 2 rows AX 0 to switch the pushers. The working repeat became *32 rows 6X6, left arrow key, 2 rows AX 0*with the front bed programmed
Here the front bed is programmed for the repeat below, technique 130 (black squares tuck for 2 rows After the initial prep on the front of the bed, prior to knitting the first pattern row, pushers were manually selected on the back bed to match the pusher work/rest position selection on the front bed. Their position will change as the back lock moves to the left. After 12 rows, the arrow key was canceled for the next 2 rows to AX 0 to switch the pushers. The working repeat became *12 rows AX, left arrow key, 2 rows AX 0* with the front bed programmed, and its lock set to KX. The back bed produces a “checkerboard”, the front bed produces checks as well, but in a vertical alignment
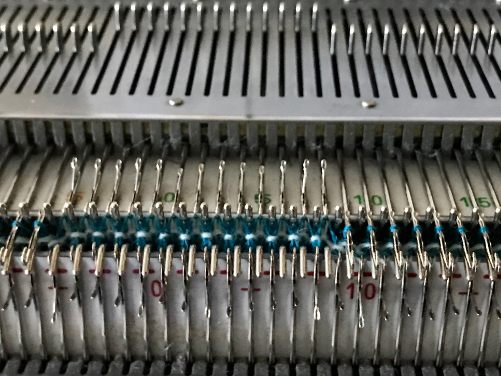
A similar half-fisherman (only one-bed tucking) fabric may be produced on Brother machines by automating patterning and switching “beds”. The main bed is set to tuck in both directions, the ribber is set to knit throughout. My sample was pretty much a disaster at the start. After trying different carriages, switching out needle retainer bars on the main bed, checking alignment, and every trick I could think of I was rewarded with stitches simply not being picked up at intervals by the main bed. Time for a break for both the operator and the machine. 
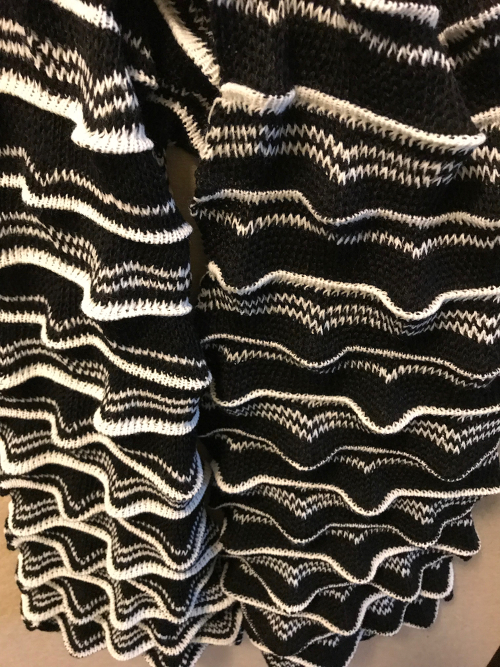
a bit more success:
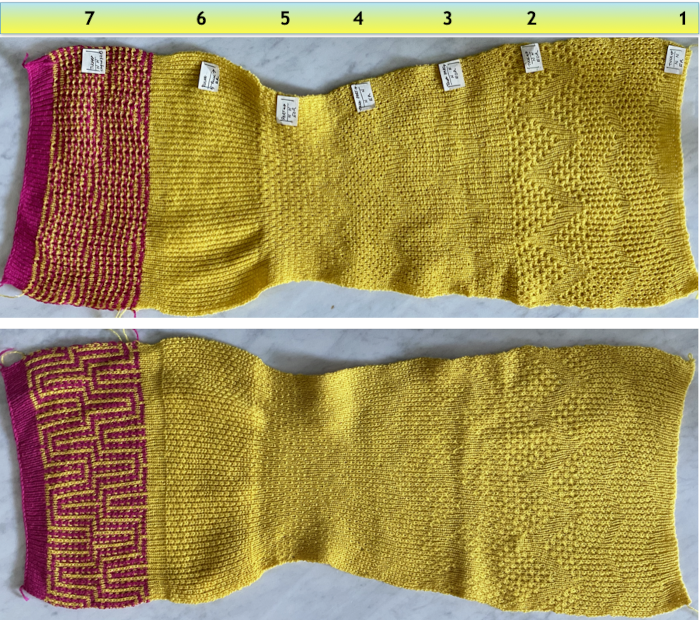
Below is my electronic repeat, 12 stitches by 56 rows in height. It is intended to mimic the work done by the pushers on the Passap. Alternate groups of 6 stitches will knit (black squares) or tuck (white squares) for 2 consecutive rows. At the center and the top of the full repeat, the two extra rows of squares result in alternate groups of stitches tucking or knitting for 4 rows, contributing to the shift in the color and texture of the checks.
Passap specials: the idea of hand-selecting needles every row while watching multiple loops tucking on both beds and even adding racking is far too daunting to my mind. Highly textured patterns are far more easily produced in machines that allow for a greater range of patterning on both beds. To review, E6000 tuck settings:
N, EX: same on both locks, may be used without pushers or console
KX and AX: tuck in both directions
OX and DX: tubular tuck. FB: tucks right to left, free pass left to right, BB is opposite
The FX setting is incorporated into several techniques used with KX, 104, 105, 112, 113, 167, 259, and 260. Some techniques for adding back lock settings are 106, 114,145, 158, 167, 168, and 190. Techniques 259, 260, 269, and 270 use racking; 200, and 212 require manual changing of arrow keys; 284 uses the U100 transfer carriage in combination with fisherman rib for an embossed effect.
Using FX settings with pushers full fisherman rib can be combined with full needle rib or half fisherman rib on the opposite bed.
Technique 167: use FX/KX
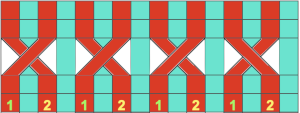
Front bed pushers are always selected up from right to left by the console independent of pattern, so they will knit. Set up pushers on the back bed in the pattern after the first row of the pattern, and make certain they are in the opposite arrangement of work/rest positions on the front bed. EX knits on all needles from left to right. Black squares represent knit stitches and white tuck ones. Making lock changes at the start of the repeat: knit 14 rows,* Knit 2 rows FX <–/KX, followed by 12 rows FX 0/KX** Repeat* to ** One full repeat of the 2 sequences is 28 rows. The original BW building block is 6 stitches wide, 7 rows high, pairs of each form the unit used to form the larger repeat blocks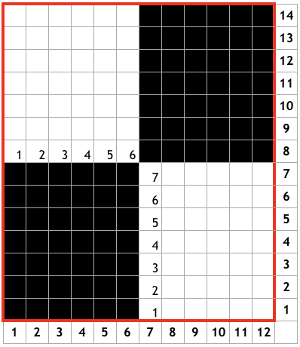
My chart for my full working repeat test sample: dots represent pushers, green highlights rows with lock changes for pusher reversal. The latter are made here on RC13 and 14 rather than RC 1 and 2
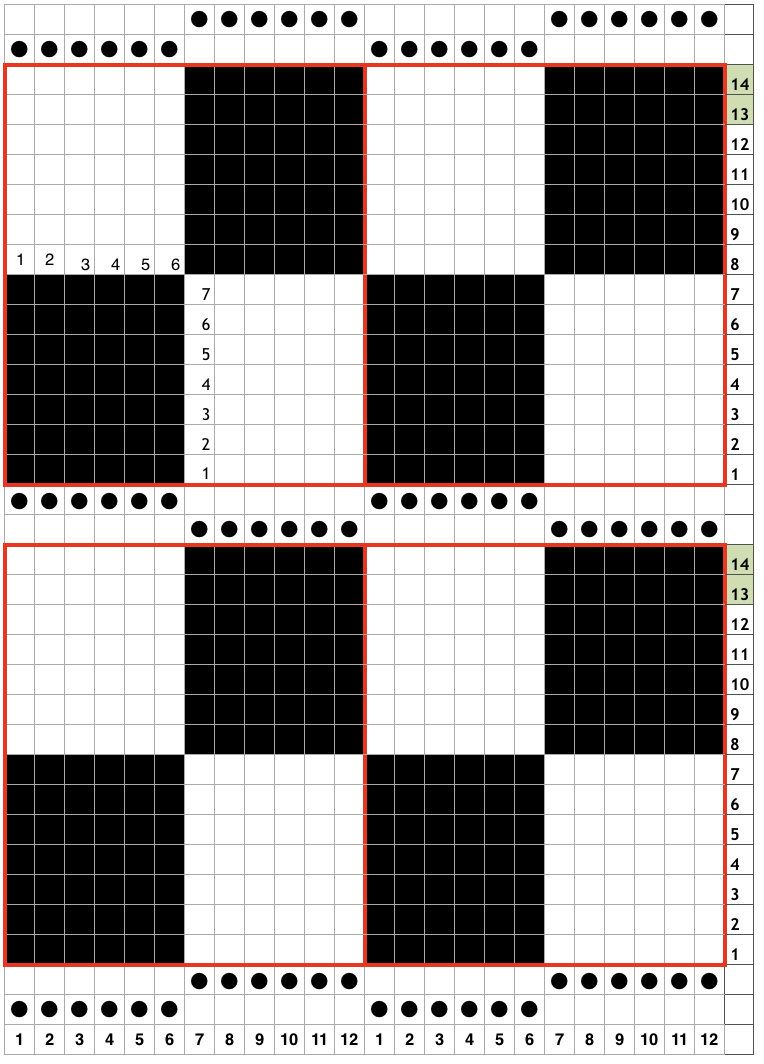
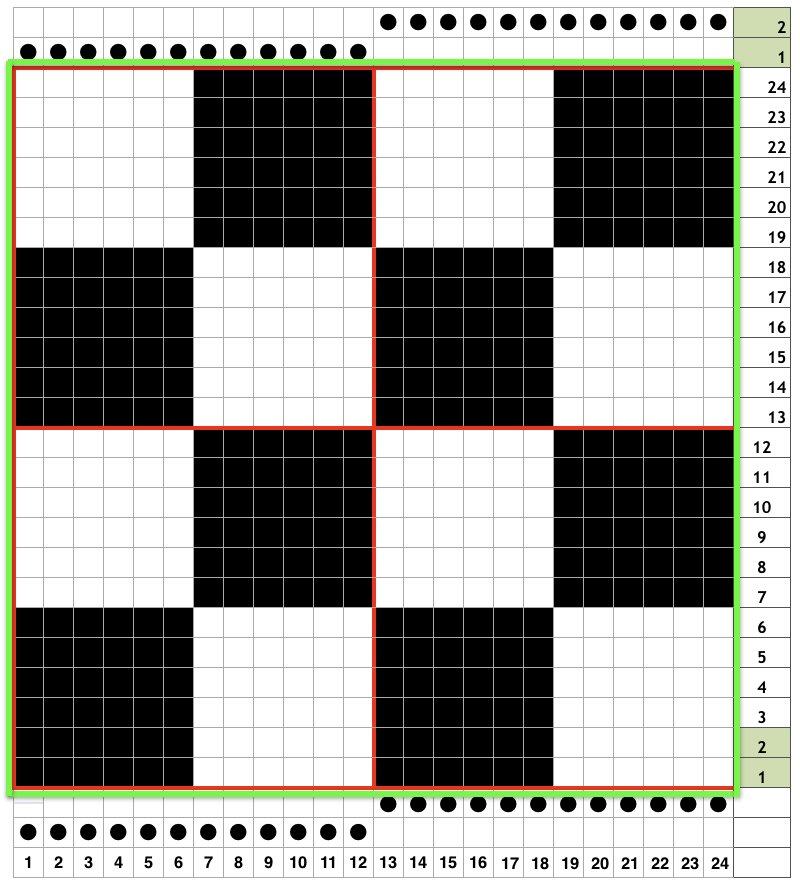
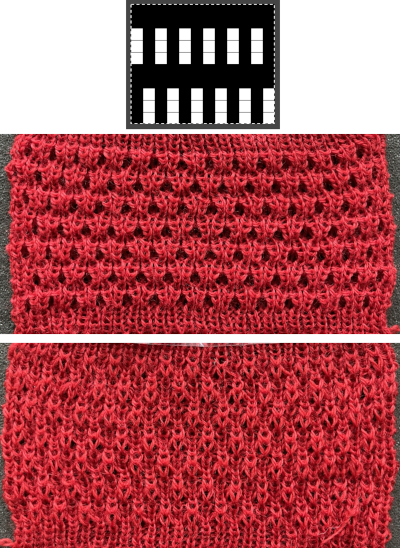
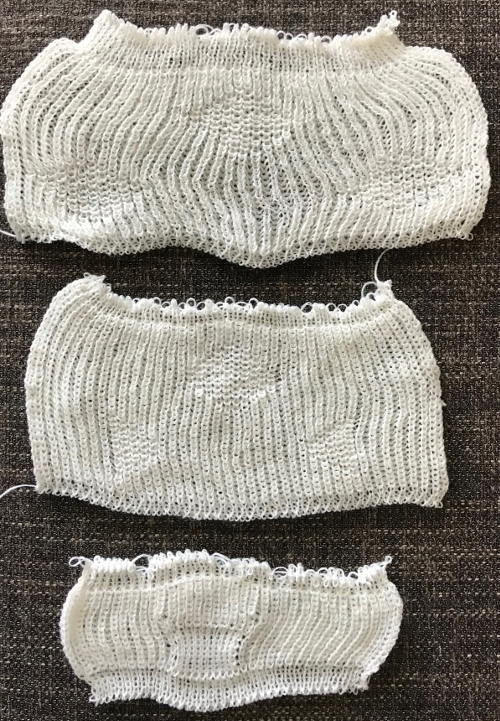
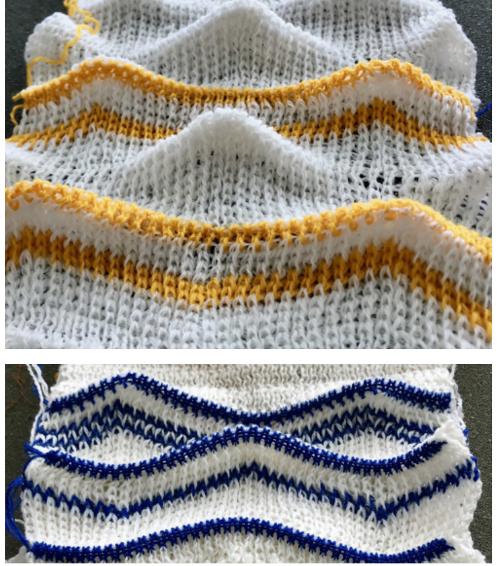
Getting back to that scarf and reversible checks, I finally sorted out the how-to and a repeat in a different number of stitches and rows. Technique 180: disregard console directions. Set up with 1 extra needle and pusher on the back bed at each side. Pusher selection on the back bed as described below matches half the number of stitches in the full repeat starting on the right side of the back bed. End with a single pusher on the far left in the opposite work/rest position of pushers in the group to its immediate right. Reset the front lock row counter manually at the end of each full repeat (24 for mine) back to 000. As an option one may choose to knit half a repeat at the top and bottom of the piece. My first swatch is testing one full repeat + a few rows. My full checkerboard repeat is 24 stitches wide by 24 rows high, composed in turn of a set of 4 blocks 12 stitches wide by 12 rows high. The AX setting changes pusher selection every 2 rows, and the AX 0 rows reverse pusher selection, resulting in the shift in the patterning on the back bed. Knit the first 24 rows (full repeat #) with no lock change, I found it easier to reset the arrow key at the start of the repeat on RC 1 and 2, rather than RC 23-24. The single BW building units are 6 stitches wide by 6 high with blocks 4 producing the 12W X12H repeat segments  A working chart for the full repeat: Black dots = pushers in their work/rest positions, numbers on right = full repeat in rows
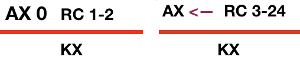
 ayab repeat for 30 stitch swatch, requires color invert
 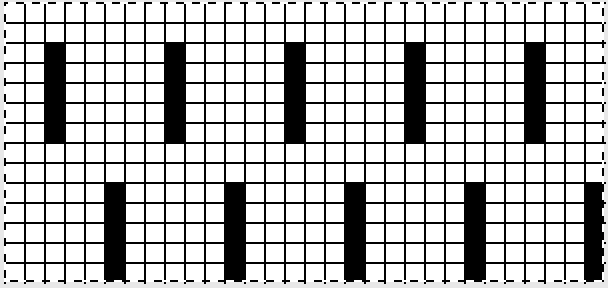 the same repeat, not requiring color invert after loading into software
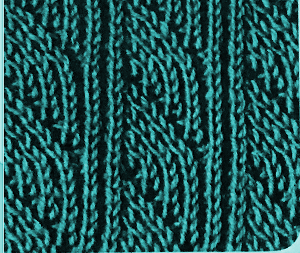
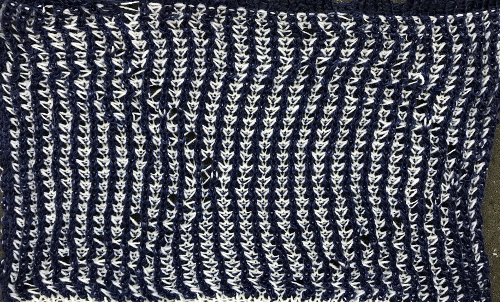
 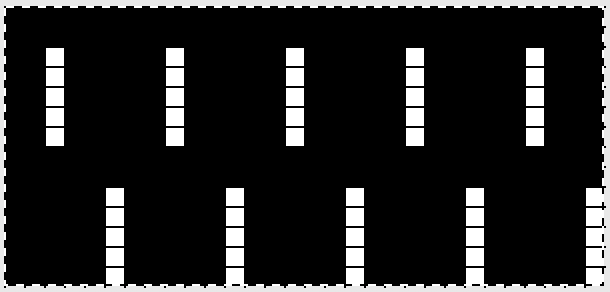 tuck fabrics are usually more interesting on their purl side
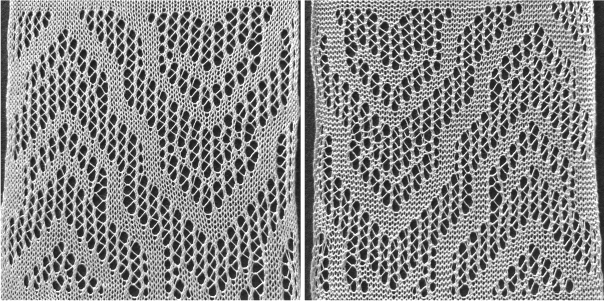
 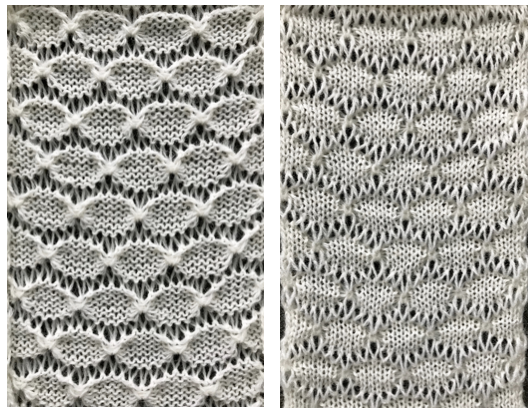 Tuck stitch combined with lace transfers
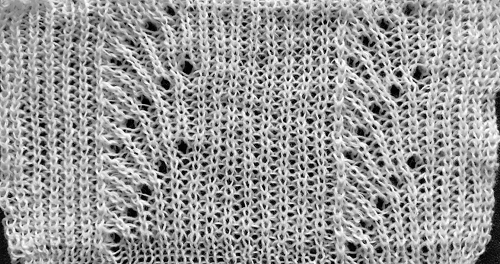
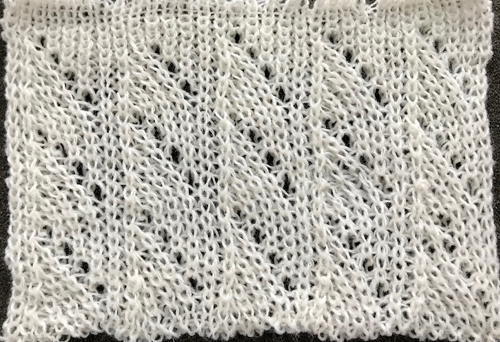
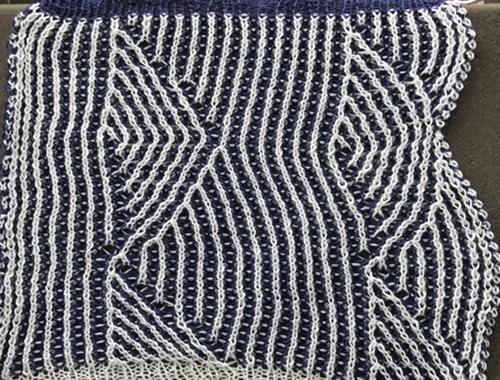
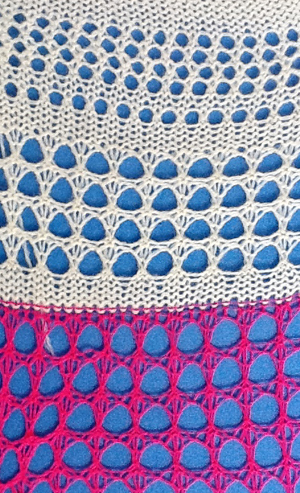 large-diagonal-eyelets
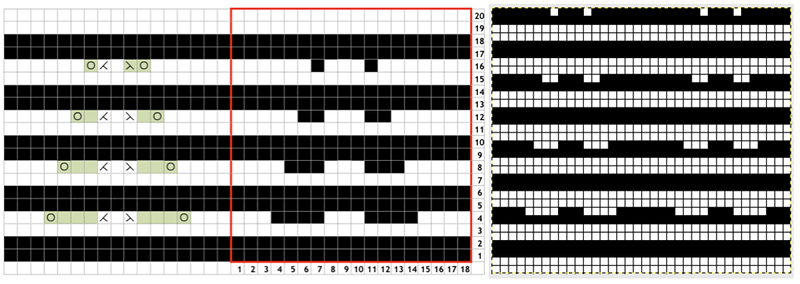
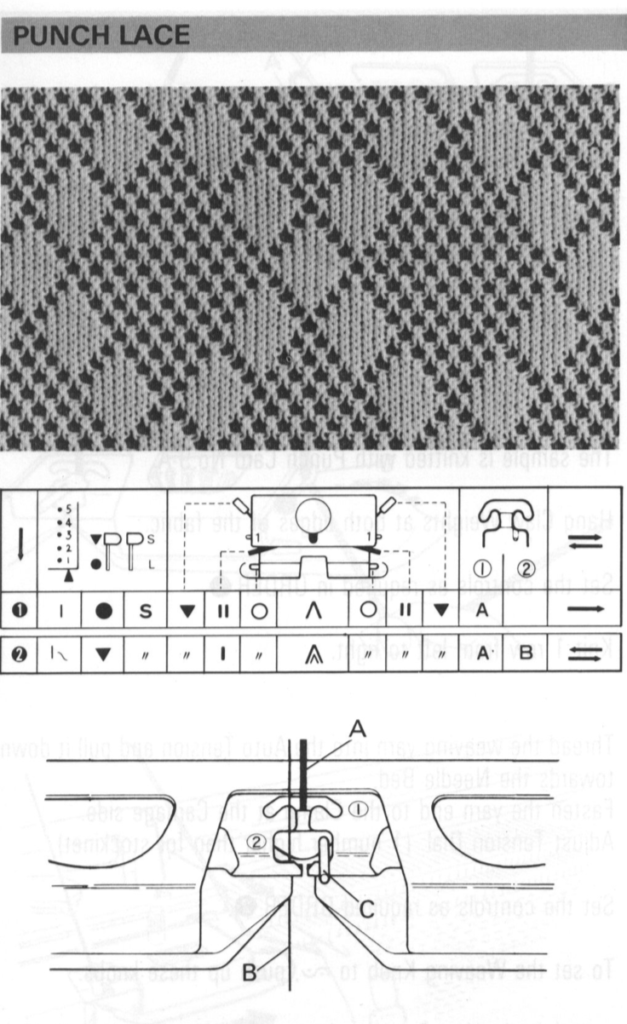
 The identical pattern in later model machines may be produced by using the tuck setting. The image below shows the punchcard partial repeat and the isolated electronic repeat for use with the tuck setting.
 The knit carriage appears to use “pick” as the name for what is now more commonly knows as the tuck setting.
 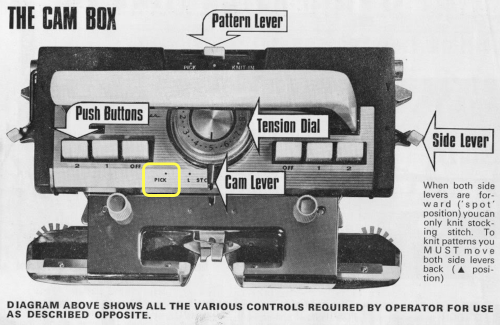 A downloadable


 Because, in most instances, the ribber is set to knit there are stitches on the ribber holding down tuck loops on the main bed, and typical tuck configuration rules may be broken. One such pattern to try: the punchcard repeat and the electronic one are identical
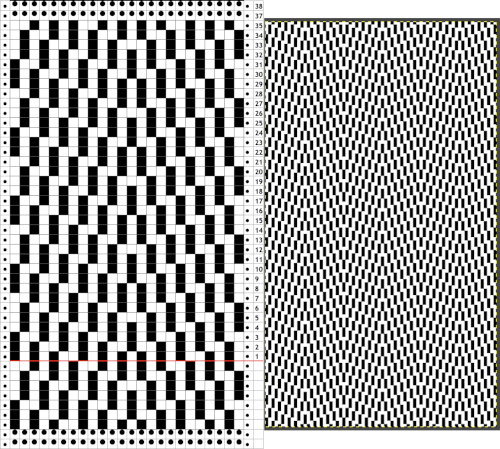
 Adding color striping
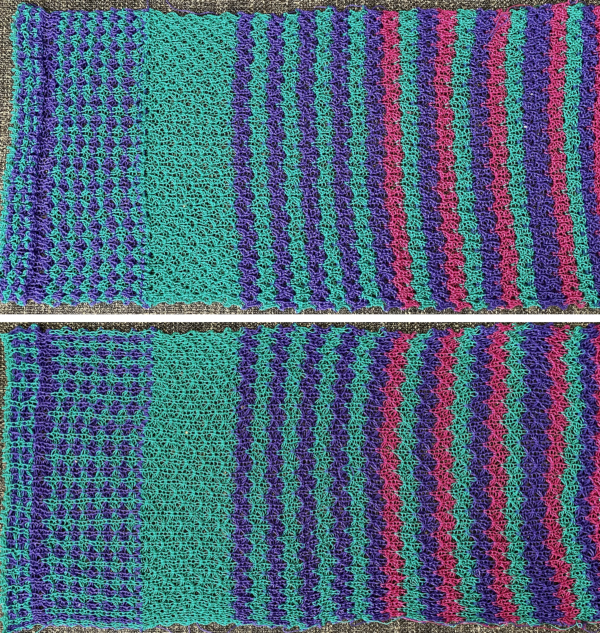
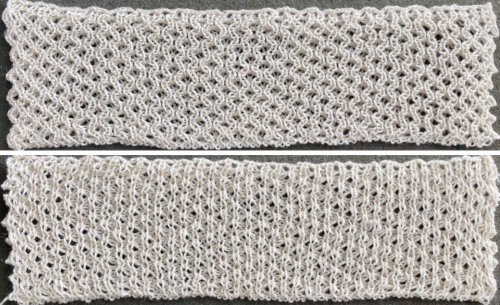
 Using the stitch type to create edgings or ruffles


 See “tuck lace” fabrics for some variations with top bed patterning also using sporadic needle transfers to ribber.
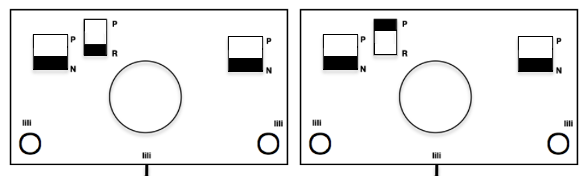


 Susanna classifies the subsequent separations as C1 and C2. Because each color in each row knits twice, there may be an odd number of rows in the initial design repeat.
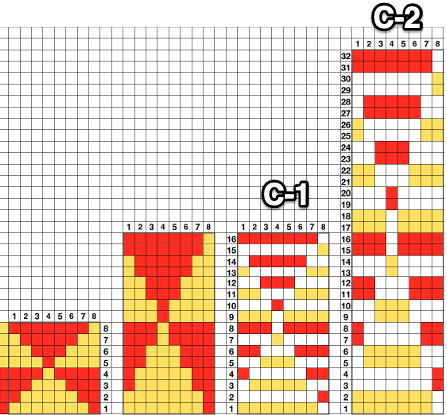
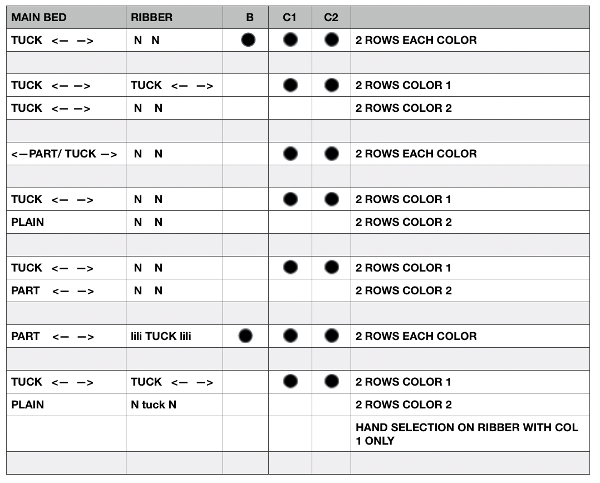
 Fisherman, aka full fisherman rib, is a tubular tuck with each bed tucking in one direction, knitting in the other

 Can plaiting give me 2 colors the “easy” way?


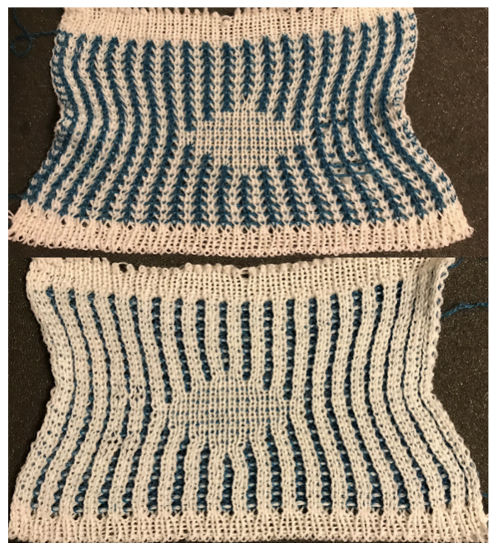
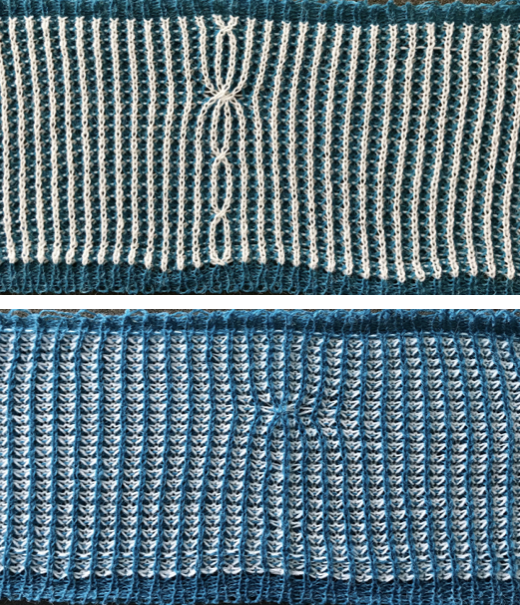
 its reverse side :
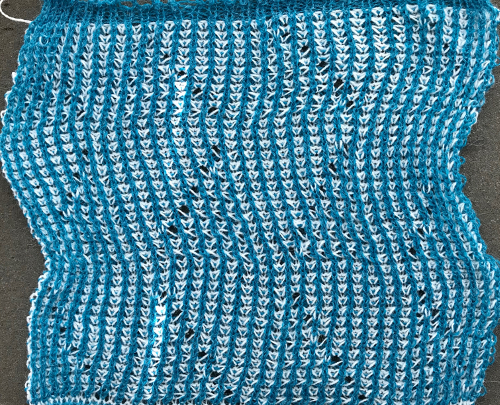

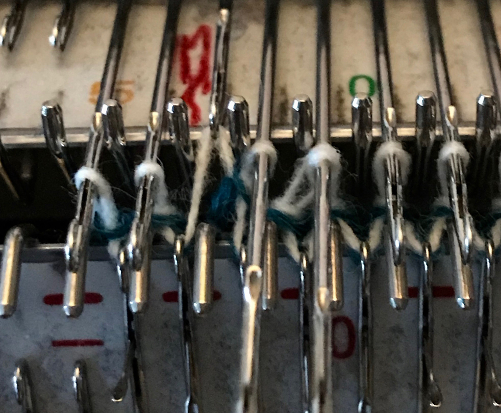

 This is what happens when a new design is being tested, and the lili buttons “accidentally” happen to be engaged on the ribber
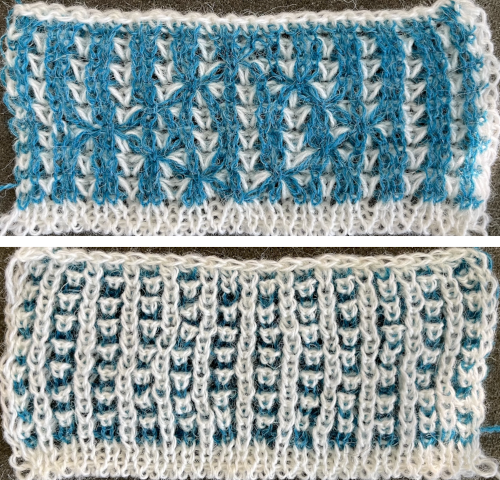

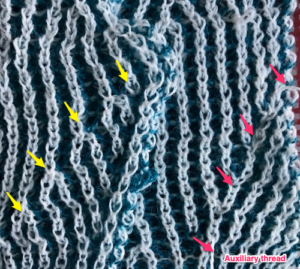
 A quick “hack” to help keep the B position yarn from jumping out during knitting, taken during a different experiment
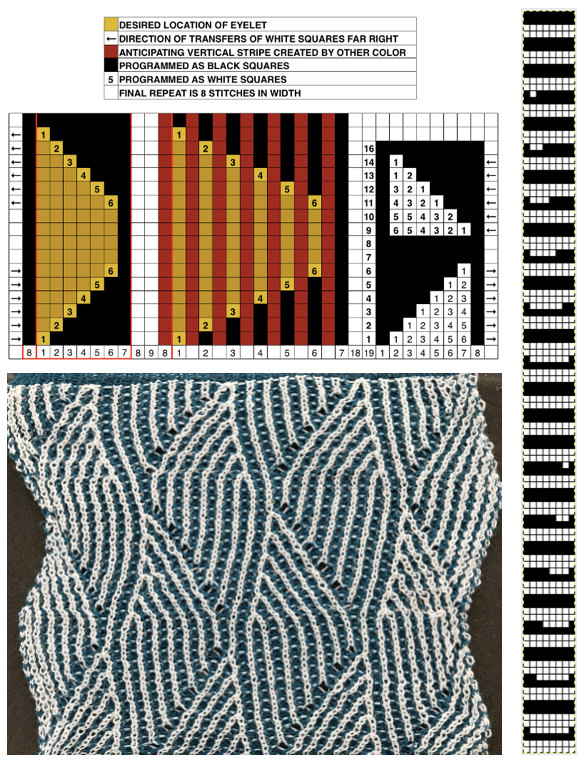
 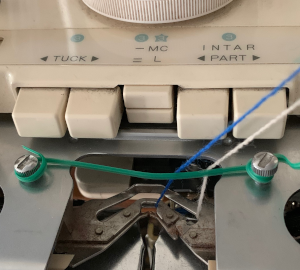 In tuck stitch, the unpunched areas, white squares, or pixels represent loops created on non-selected needles, punched holes / black squares, or pixels represent knit stitches. In punch/ thread lace those white areas knit both thick and thin yarns together, while in punched holes/black square or pixel areas the thin yarn knits on the stocking stitch side of the fabric, with the thicker yarn floating behind it. Depending on fiber content, gauge, etc. the illusion of eyelets can be created.

 2023: using StitchWorld # 545, 56X40 pixels
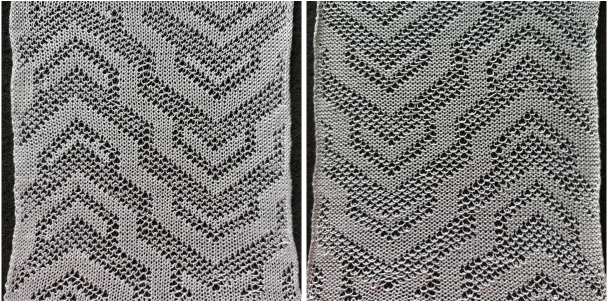


 Back to the original method used in the previous post where ribber settings are changed from knit to tuck <– –> every 2 rows along with color changes. I chose a design that would make it easy to identify the location of non-selected needles on the main bed in rows where the ribber will be set to tuck in both directions. The result is interesting, but the solid areas, narrower than the remaining knit, are in the opposite color to the dominant one on each side, the reverse of the inspiration fabric.
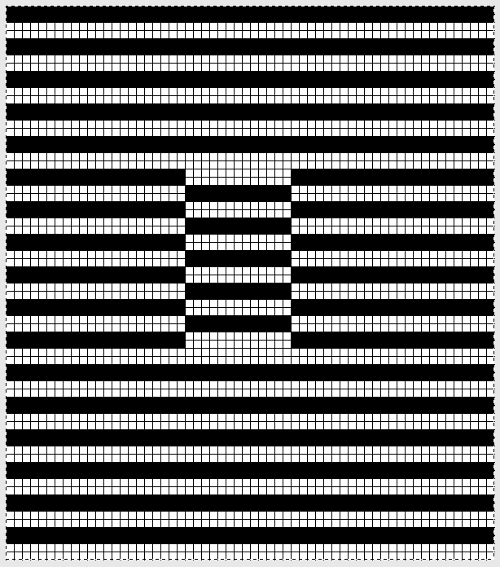


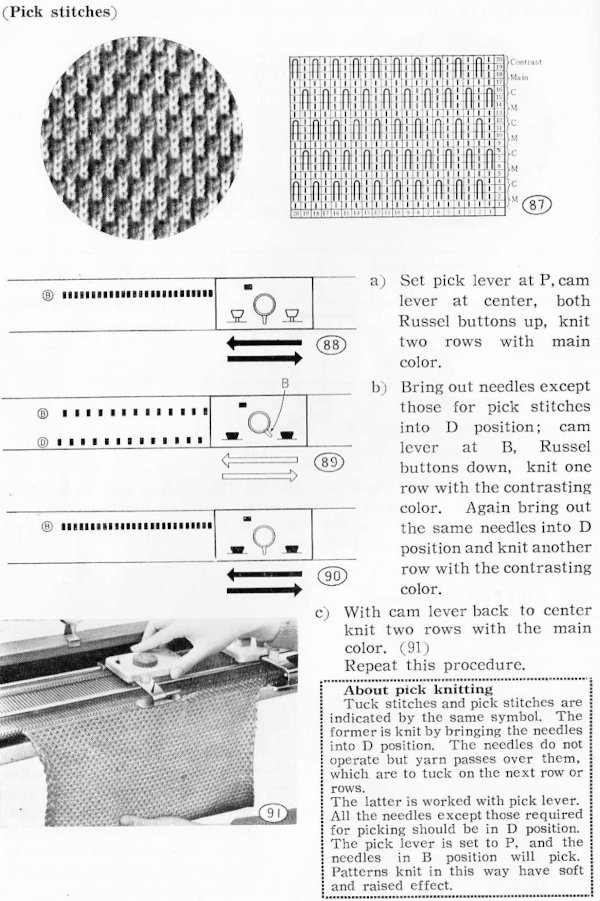
 The single 14X84 png
 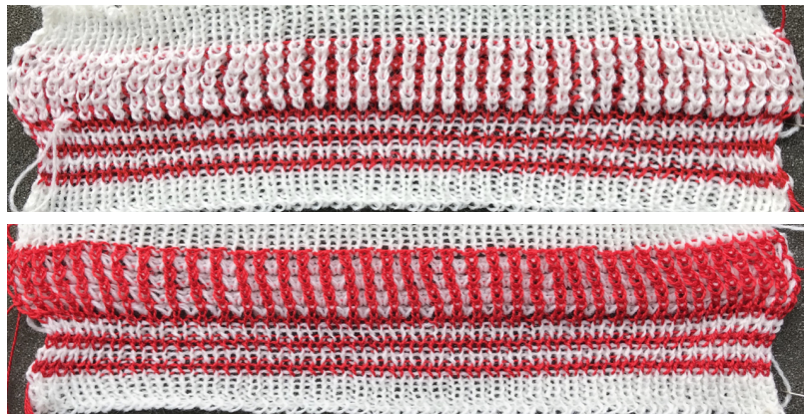 Each of the 2 colors tucks for 2 rows and in turn, knits for 2 rows alternately. Settings are changed manually as shown below after every 2 rows knit, following each color change on the left.
 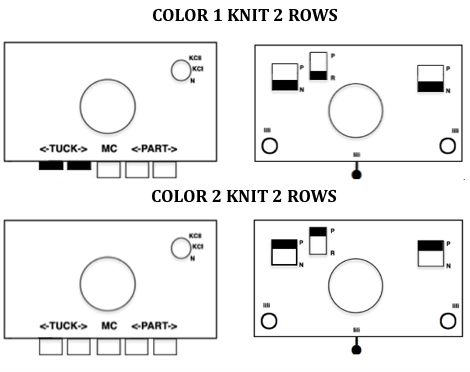 Making things a little easier: the top bed may be programmed on any machine, including punchcard models to avoid cam button changes in the knit carriage every 2 rows. With the main bed set to tuck <– —> throughout, black squares will knit for 2 rows, white squares will tuck, also for 2 rows. The first preselection row is toward the color changer. When no needles are selected on the top bed (white squares) the top bed will tuck every needle, the ribber is set to knit.
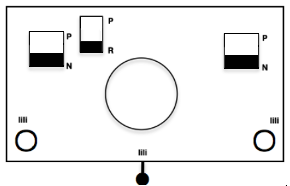

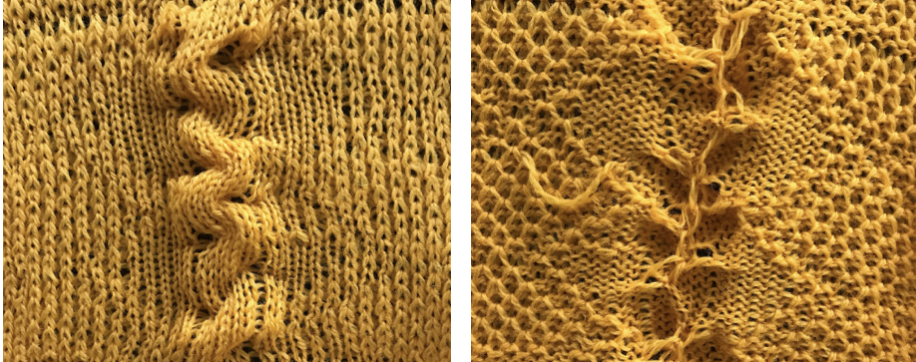
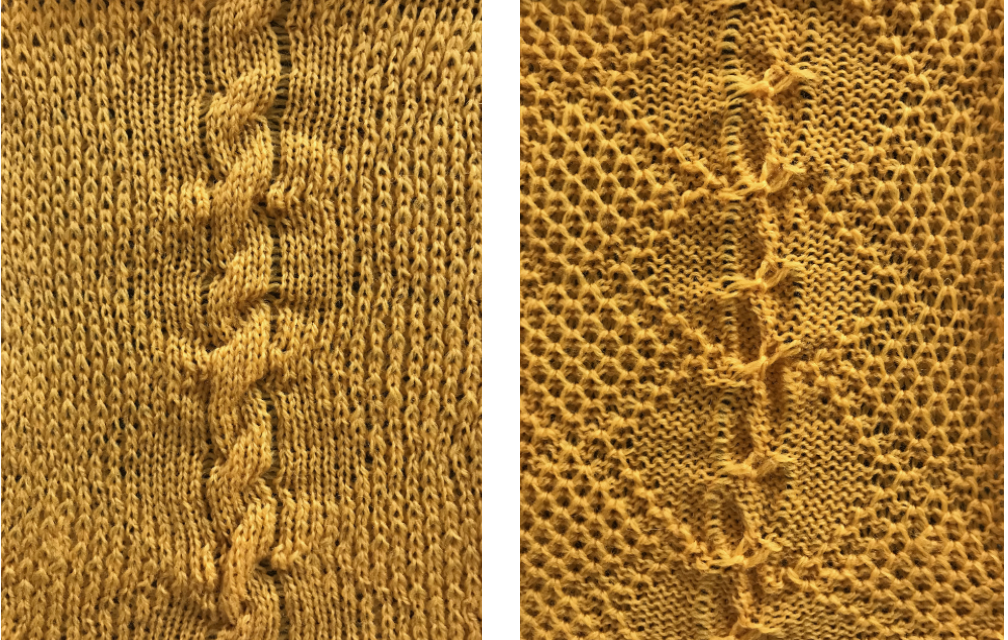
 Another attempt at cabling, 1X1 and 2X2. That white line in the bottom image on the right was caused by the color changer picking up and knitting both colors for part of the row before I noticed it. I got rid of the “wrong” color from the feeder and continued on. The wider 2X2 cables require “special handling” and eyelets are formed on columns aside from them after transfers are made.


 The situation is different when working on single bed vertically striped fair isle designs. One of my ancient machine-knit demo FI swatches:

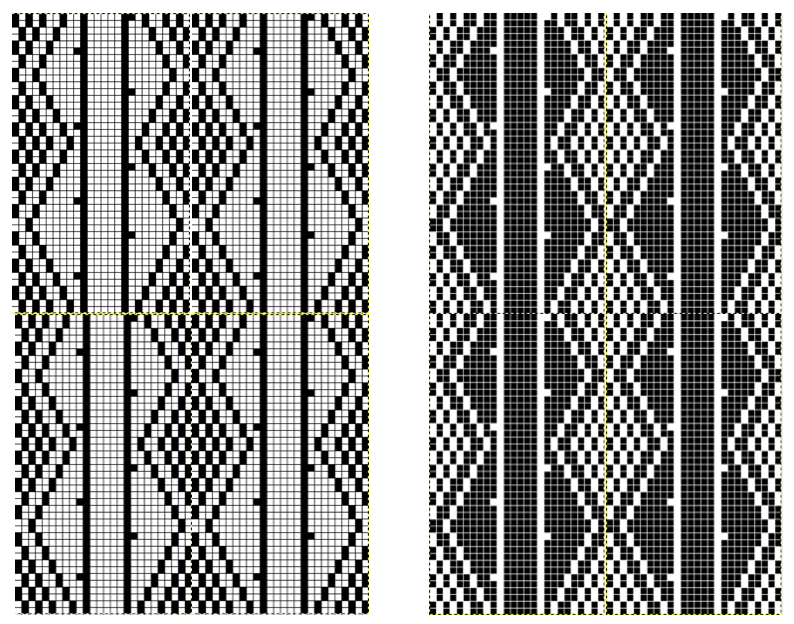
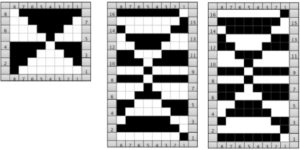
 The charted repeat on the left below when tiled shows the area of a patterning error, on the right with the missing blank rows added the problem is shown to be resolved, the repeat is now 24 X 84.
 Adding complexity, there is the possibility of


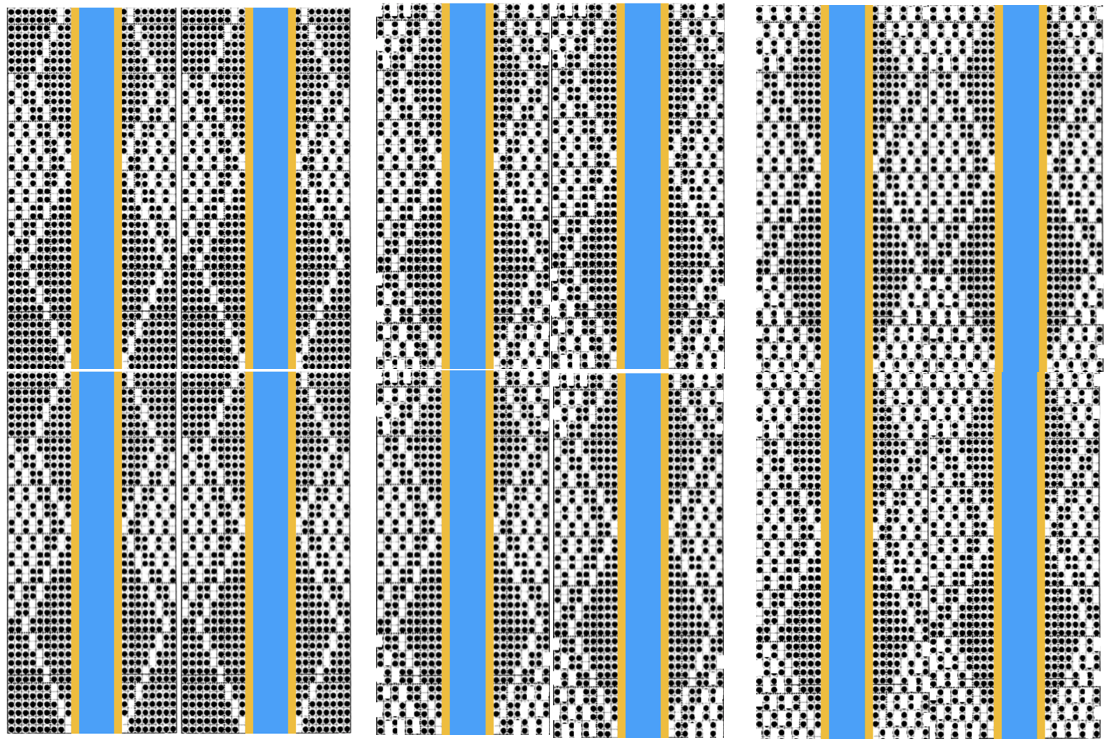
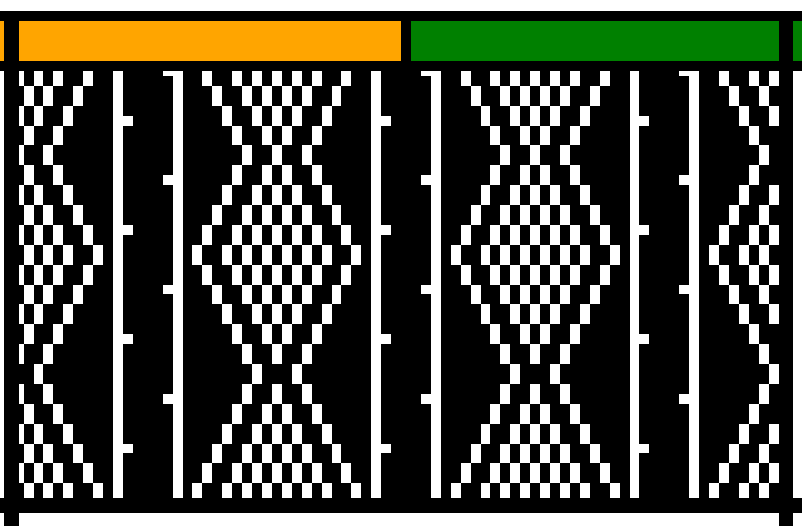
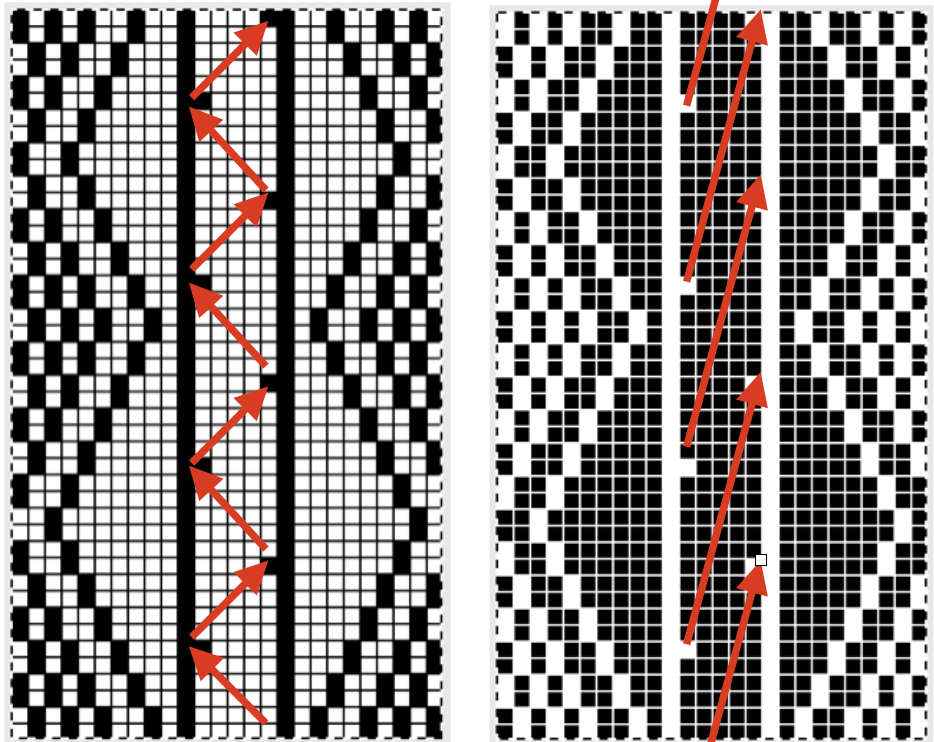
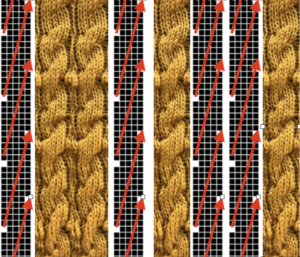
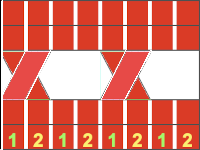
 The card is cropped to the 24 X 44 stitch in width and height for the repeat to be worked in electronics. The area colored blue on the far right indicates possible all knit rows for hooking up “cables” during knitting, mustard color indicates ladders created by an out of work needle on each side of the central, all knit column. The ladders make it easier to identify each all knit column. The tape over holes idea does not work for masking a punchcard since that blue area would need to be all punched holes. The tape over would result in “unpunched” ones.
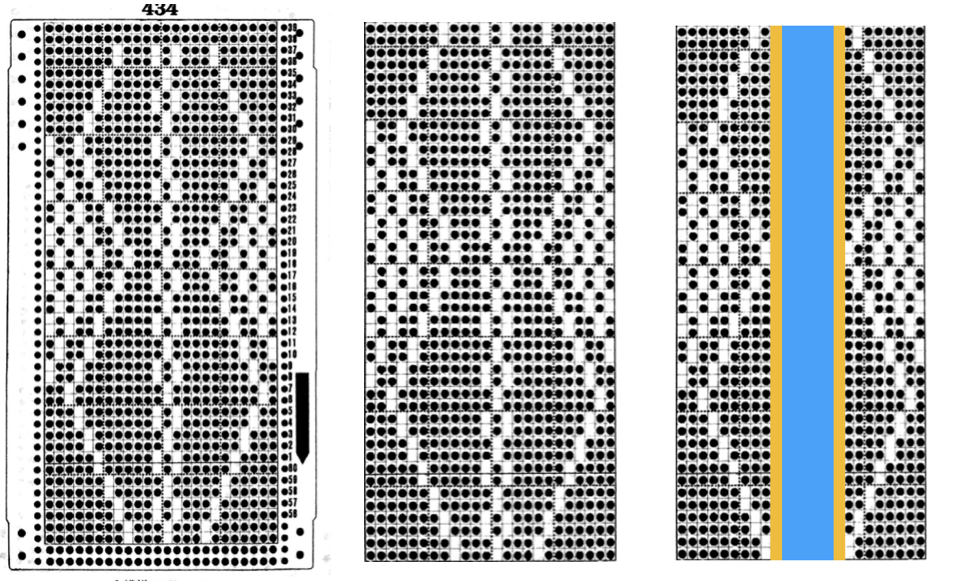 This takes the revised card single repeat and indicates some quick possibilities for altering it