After a slow down in my blog posts for a variety of reasons I find myself playing catch up with the eternal list of knit fabrics that I wish to explore out of my own curiosity and the attempt to answer questions from knitters who contacted me directly via the blog or have asked them in the online forums in which I am a member.
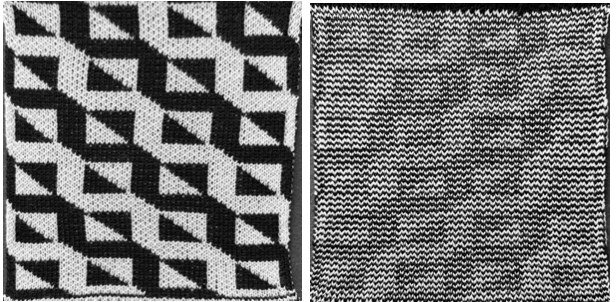
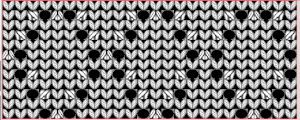
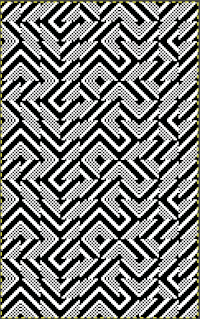
Stephen West is a prolific designer of colorful hand knits in a variety of techniques and complexity. This honey-striped scarf is an example.  Slip-stitch patterning is a likely way of knitting a similar effect combined with
the use of the concept familiar to many when making bias cast-on rags.
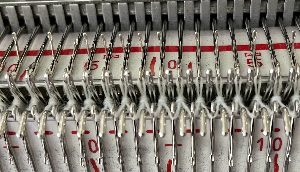
A fixed number of stitches is cast on and positioned as far to one side of the machine as possible. They are then decreased on a fixed side and increased on the opposite one.
The strip moves across the needle bed, when far enough on the side opposite to the starting one, it is returned to the original needle bed position and the process is repeated until the desired length is reached.
If the moves to and from are performed on solid color rows matching needle selections may not be an issue. If the repeats in other cam settings are to match, then proper needle placement can be assisted by marking the metal bed, the factory-supplied needle tape, or a custom-printed one, and hand-selection for the first design row may be required and planned.
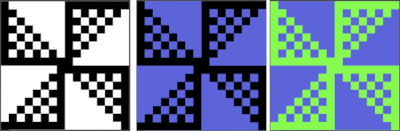
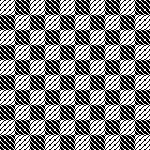
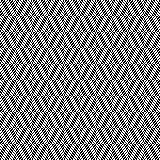
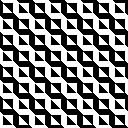
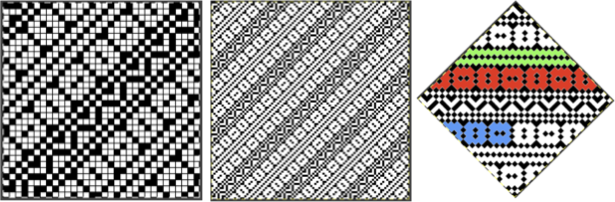
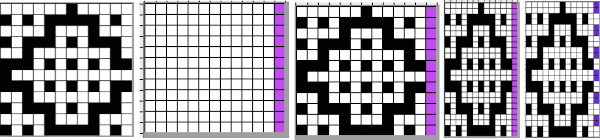
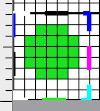
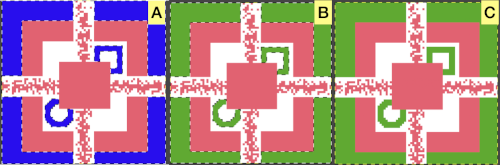
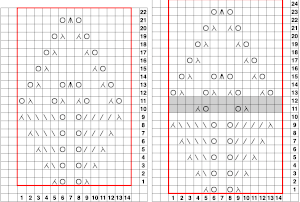
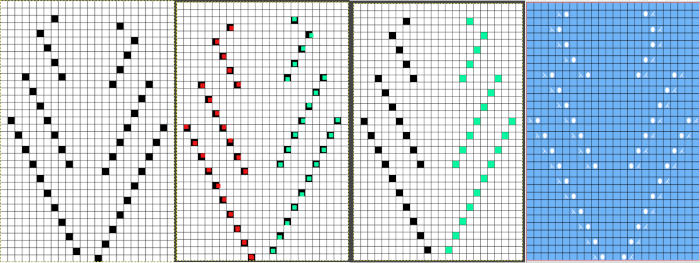
This chart attempts to visualize the proposed movement using colored stripes. Stitches are bound off on one side and cast-on on the other to maintain a fixed width with shaped edges. 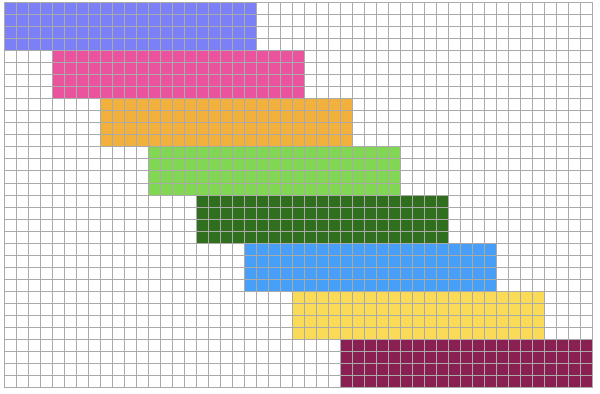 If the goal is to maintain straight bias edges, the design repeat would need to be rendered wider in order to compensate for the shifts on the needle bed in turn modifying increases and decreases at a different rate The black cells represent the adjusted stitch counts needed for each pattern band.
 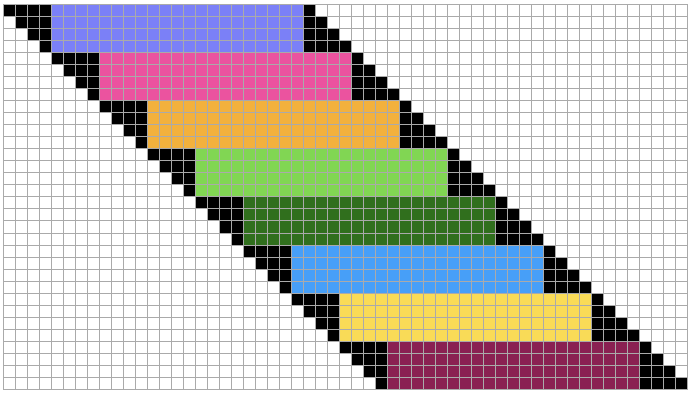 When an item such as a scarf is worn, both options will appear as diagonals.
 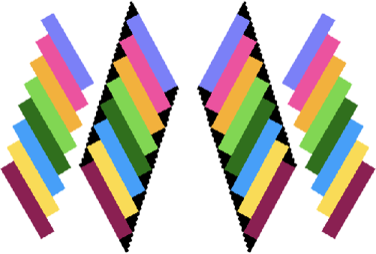 If any picture knitting is included and the direction of it matters when the piece is worn, appreciated particularly in representational fair isle, such accessories are best knit as 2 pieces knit from the bottom up, and grafted together at their center after the fact.
Increases and decreases are calculated carefully based on the knit gauge for garments. The approach to accessories may be more casual.
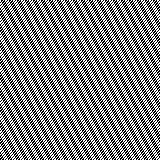
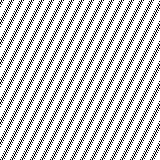
Stripe heights are varied to accommodate specific design motifs or cam settings, and they are, in turn, added to the base visualization charts.
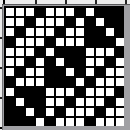
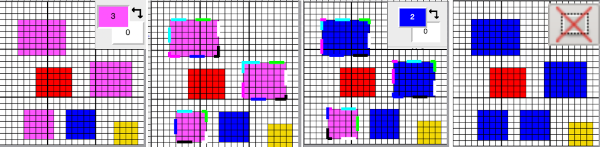
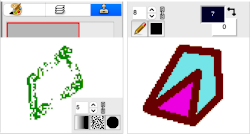
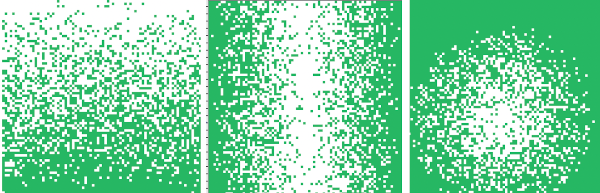
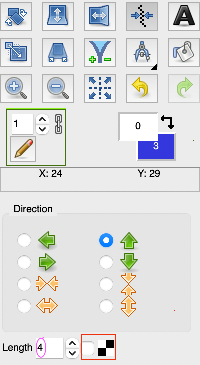
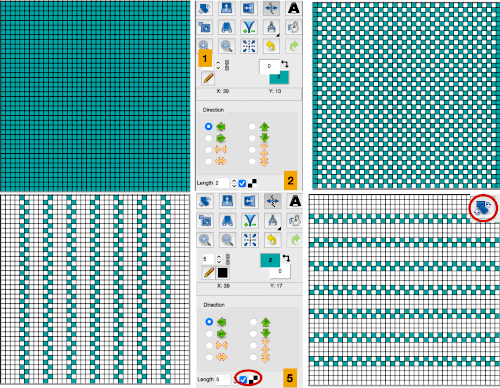
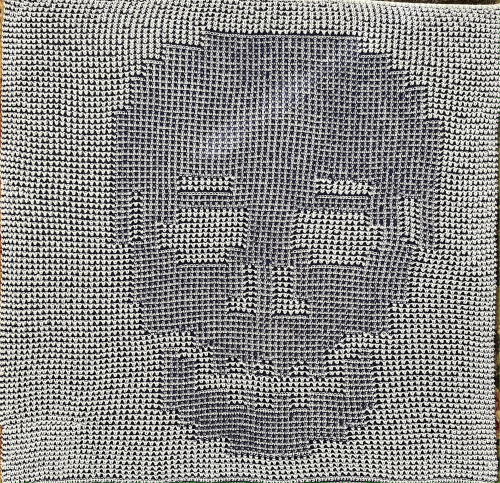
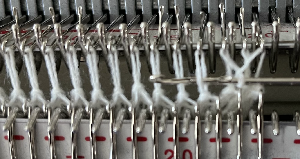
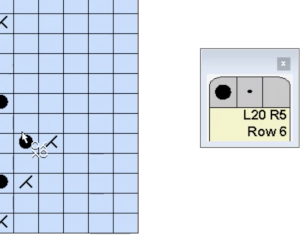
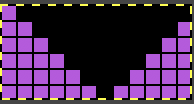
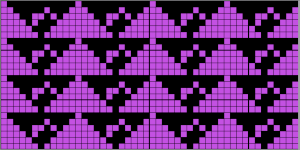
Here an attempt at 45-degree striping is made by beginning on a 3-stitch tab. Increasing on the carriage side creates loops, while those opposite the carriage form knots.
Increases and decreases are indicated by arrows.
Increases are made on alternating sides, opposite the carriage, to produce matching edges.
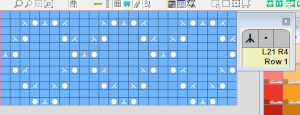
The red cells in the chart represent the carriage side before each pass.
Table cells have been rendered rectangular in a 4 to 3 ratio, estimating the difference in gauge between stitches and rows.
Striping for an even number of rows matters if color changes are made on a fixed side ie if a color changer is in use. 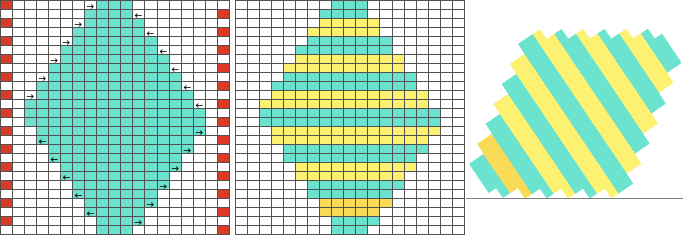 Yarn ends at color changes may be cut or the yarn can be carried up the side depending on preference and the number of rows involved. If carried up for long stretches, the alternate color yarn not in use may be secured by e wrapping it on the end needle periodically. Care needs to be taken that the float up the side is not so short as to have an effect on the swatch length and having an effort to remedy that will leave yarn ends too short to be secured.
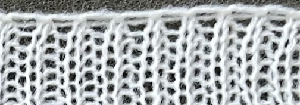
The result will not produce a proper square, garter stitch is the only knit stitch that results in approximately true square shapes.
If the center of the needle bed is used for swatches while keeping an eye on the stitch formation. If loops are formed repeatedly on specific needles akin to tuck stitches or problem areas such as those in the center of this swatch are encountered, they can be caused by damaged needles or sticky latches that may result from frequent use. 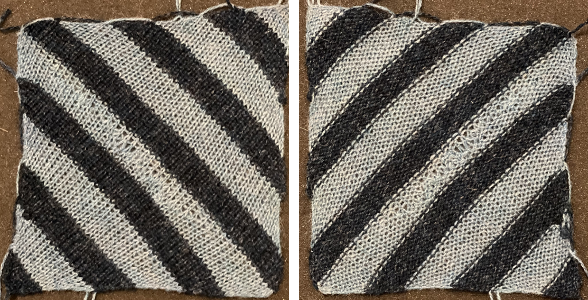 Diagonal lines in knits that maintain straight sides are also achieved using short row/holding intarsia techniques. Segments are planned in specific orders
 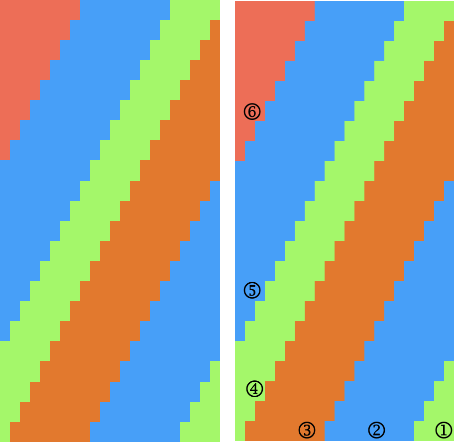 which can be varied to form added shapes.
 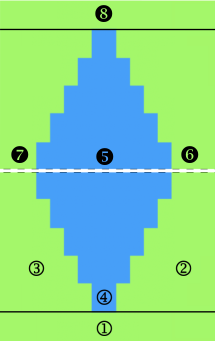 Chevrons would be more easily created by knitting separate strips and seaming as you knit or after the fact.
  The addition of small-repeat fair isle patterns is also possible. Keep in mind when bringing needles back into work to reverse shaping, needle preselection for accurate patterning in Brother machines needs to be maintained by hand selection.
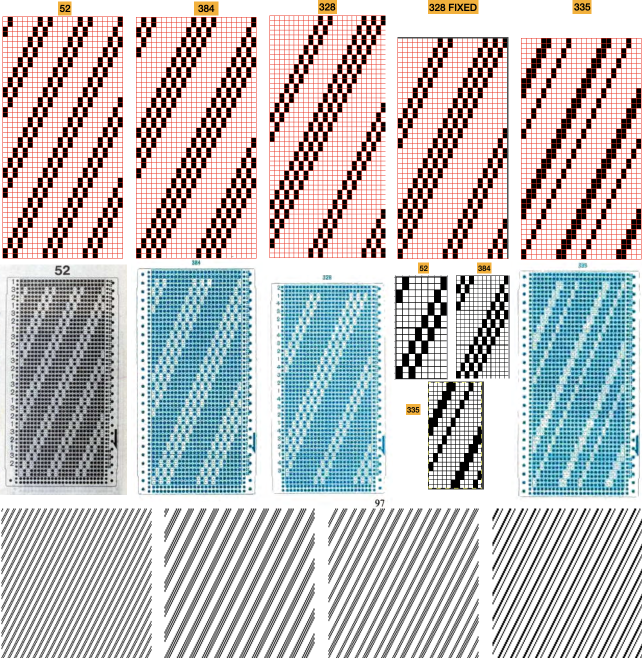
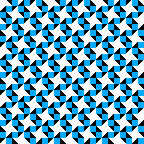
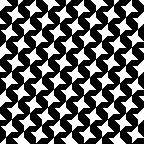
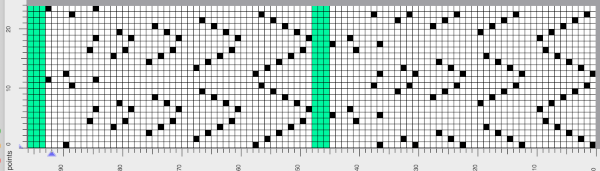
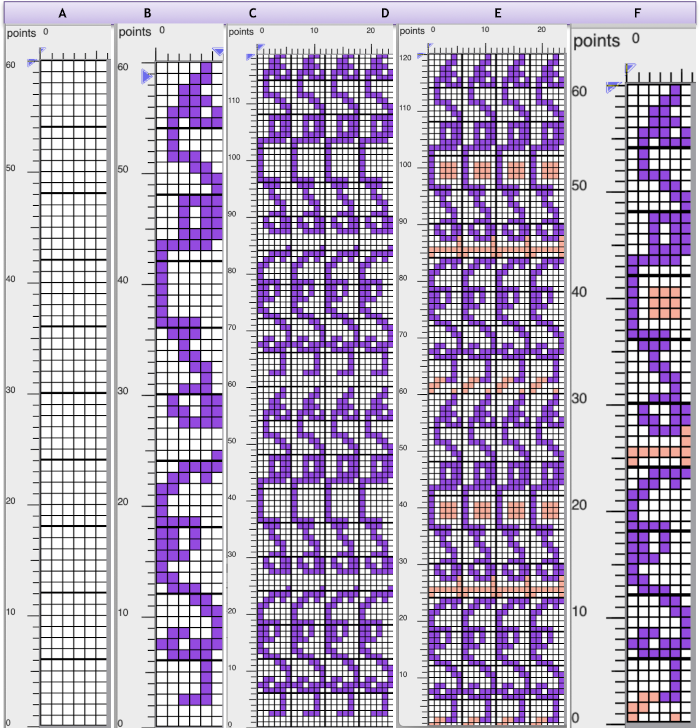
 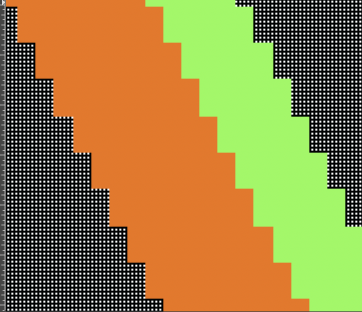 Some of the published punchcard patterns can serve as a source for diagonal lines that may be tiled and programmed for the full design in addition to being used for their original intent. Numbers 52, 384, and 328 (published with error), are suitable for tuck, slip, and FI with moderately wide floats, while 335 would fail as a tuck stitch.
For added ways to develop diagonal patterns using brush fill see post on developing designs using pattern fill for use on a range of machine models
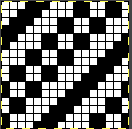
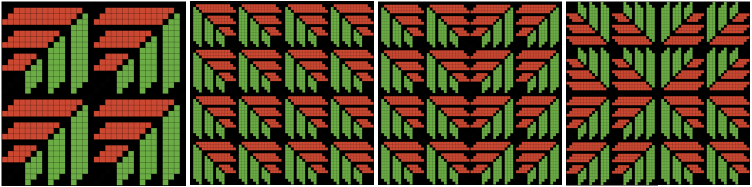
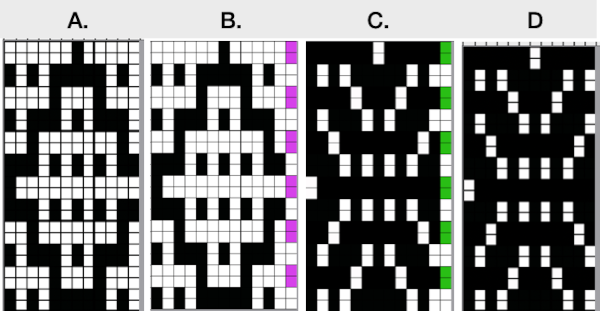
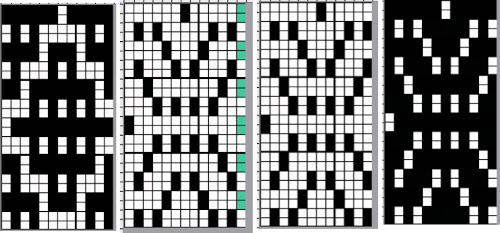
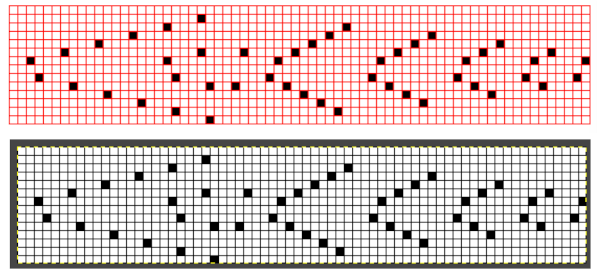
Tiling as in any patterning will reveal errors, such as here for 328. 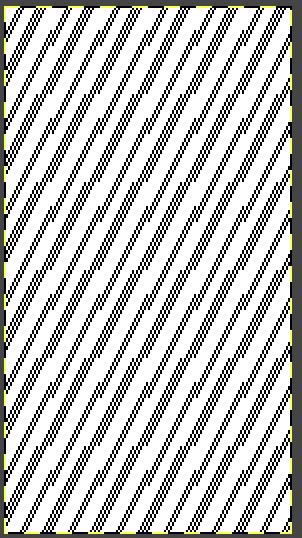 The latter was edited to a 22-stitch wide repeat, becoming suitable for only electronic machine models.
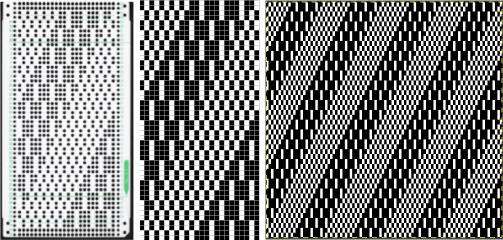
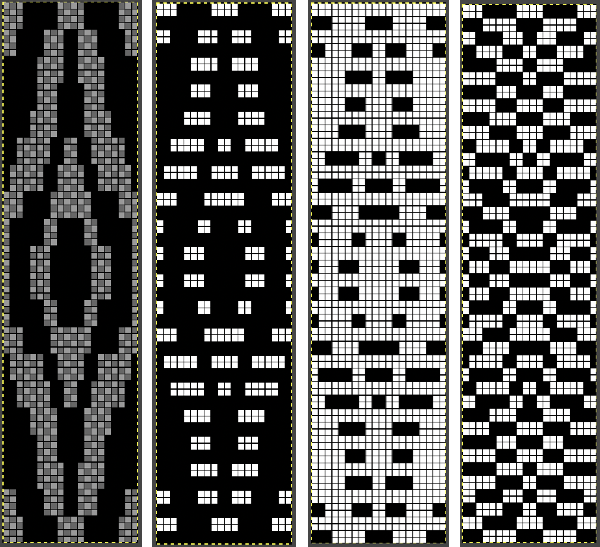
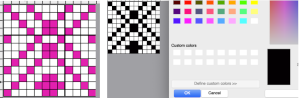
The charts with the red grid on the top row were rendered as tables in Numbers. Since their end use is different, they are the color-reversed version of the cards, whose screengrabs were in turn processed in Gimp to create knittable pngs.
The smallest repeats suitable for electronics are given in the center row of images, the amended 328 cannot be reduced in size. The last row illustrates tiling for all files as BW images that may be opened and amended to suit the size of the pieces planned.
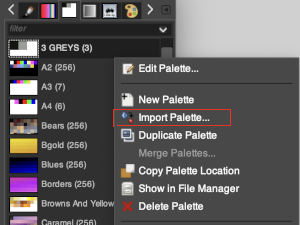
 Files in png formats for the group: if pngs generated by me in BW indexed mode are downloaded and opened in editors such as Gimp, they will open in RGB mode. To make them suitable for download programs, convert them to indexed BW mode again and save the result. There should be no loss of data.
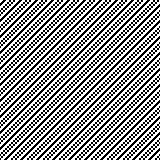
384, 12X24![]() 12X48
12X48 ![]() 144X144
144X144 328, 22X44
 ![]()
176X176
335, 12X24![]()
24X48 ![]() 144X144
144X144  52, 8X16
![]()
24X48 ![]() 192X192
192X192  The black lines formed by units 2 rows in height can be followed or erased to establish short rows shaping a stitch at a time every two rows, given at least 2X2 full repeats to check color placement.
 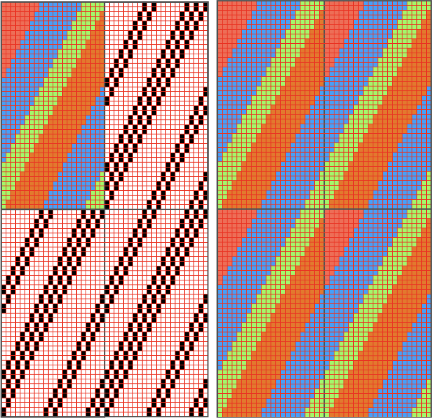 The method was used to isolate the previous ungridded color illustrations. Another instance of a published Toyota 901#11diagonal tuck card, in this case, incorporates a combination of 2 and 4-row tuck patterning. The repeat is 24X48
 ![]()
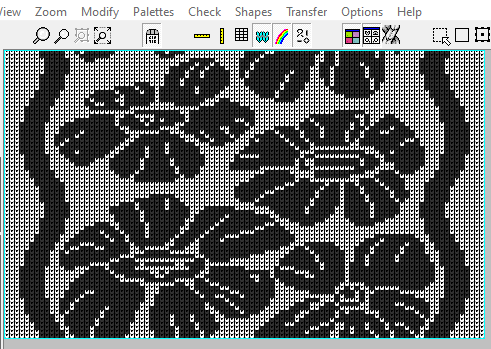
 The previews may be used to replace color selections with those matching yarn colors used in the project to develop some idea as to how color shifts might affect the final piece.
EON diagonal patterning surrounding blocks containing other shapes may be maintained with slight variations in the size of the shapes used to fill those blocks 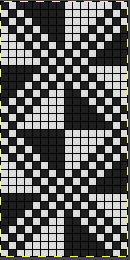
![]()
 References published for weaving can be a source of charts usable for this type of design.
The repeats are provided regarding width (shafts) and height (picks). For proper alignments, the provided charts must be reproduced in full, or in DIY adaptations careful editing with erasures or additions can still maintain the proper tiling.
A page from an 1898 pub 
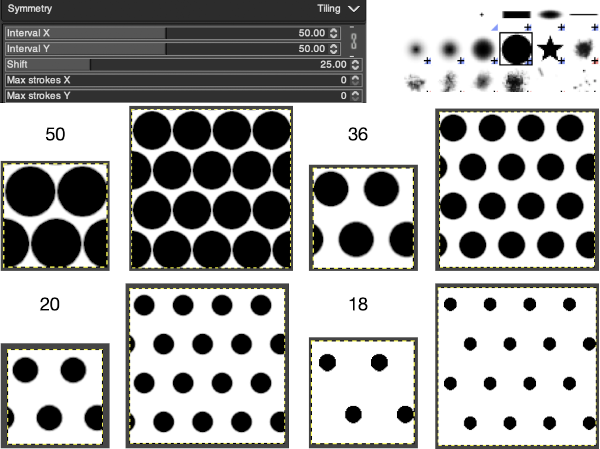
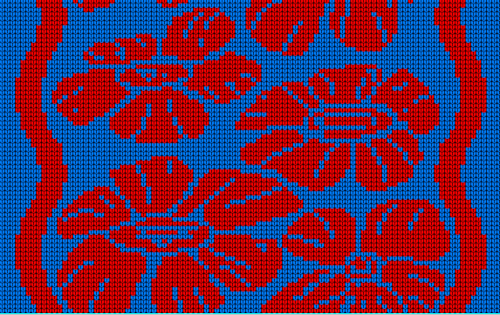
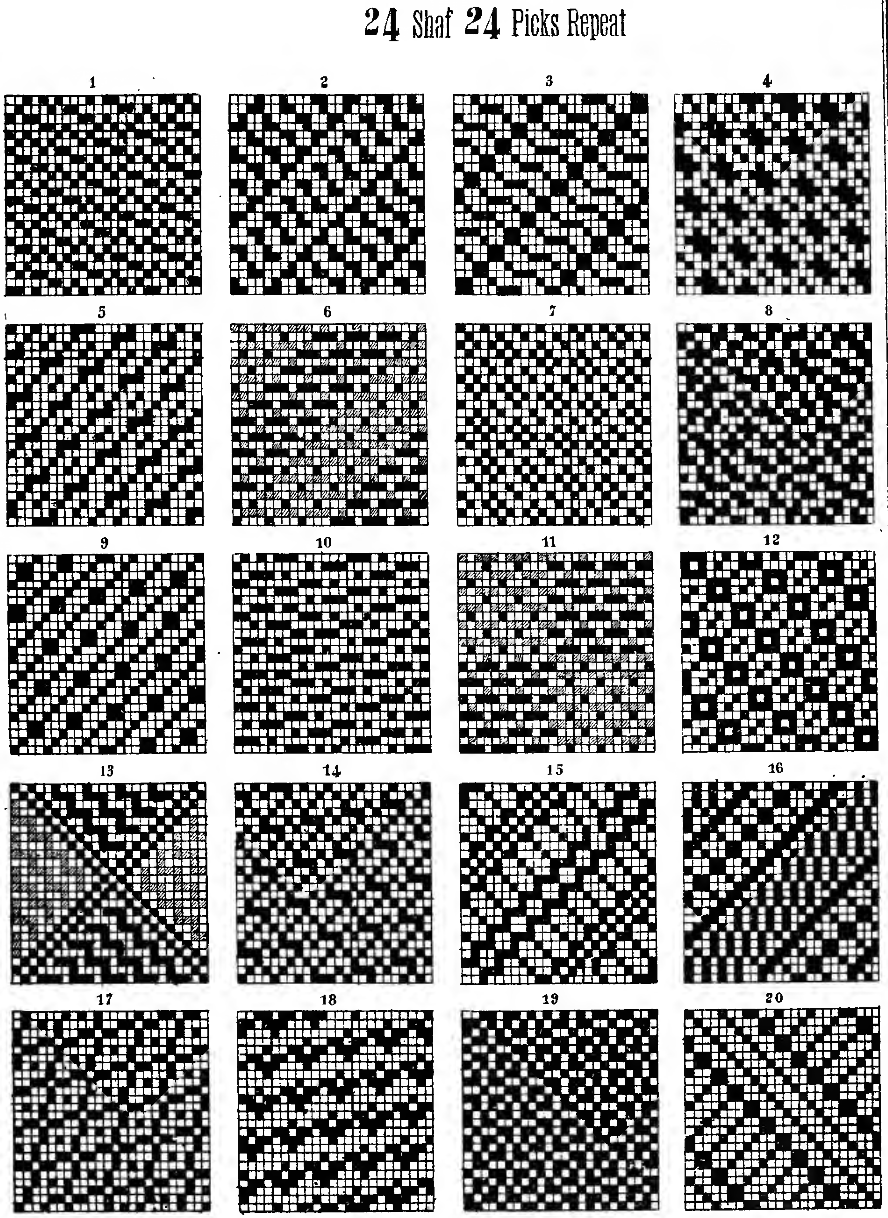 Playing with using #20 and #16 mirrored, isolating, erasing, or combining elements of each while keeping fixed some of the details that move diagonally to touch sides of the repeats, with the process illustrated in color.
Consider the width of the floats if planning for fair isle patterning.
Check the original for any errors, marked in the color chart in black. They are often not noticeable until the design is drawn in repeat. 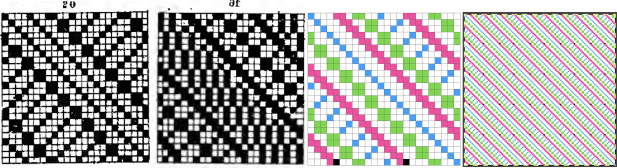
 The editable PNG for the center 24X24 design is tiled on the far right above. It is also suitable for punchcards
 ![]() A 16X16 electronic repeat
A 16X16 electronic repeat ![]() tiled to 128X128
tiled to 128X128
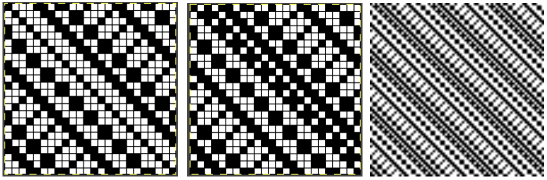
 Handweaving drafts such as those found at handweaving. net provides endless inspiration for designs, including diagonals.
8X8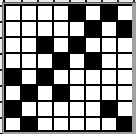
![]()
 12X12
12X12
![]() drawn in repeat X7
drawn in repeat X7 12X12
12X12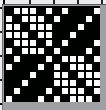
![]() drawn in repeat X7
drawn in repeat X7 15X15
15X15
![]()
 color reversed
  using color invert and quarter rotations to 30X30
 ![]()
 16X16
16X16
![]()
 16X16
16X16
![]()
 16X24
16X24
![]() drawn in repeat to 160X168
drawn in repeat to 160X168 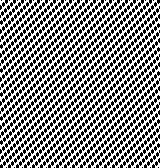 18X18
18X18 ![]() in repeat to 126X126
in repeat to 126X126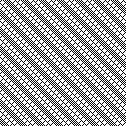 20X20
20X20
![]()
 32X32 with rotated segments
 ![]()
 playing with rectangles, squares, and fill-ins24X24
![]()
 30X30
30X30 ![]()
 A 32X32 diagonal DBJ design built with small color-reversed blocks
16X16 ![]() color-reversed
color-reversed ![]()
![]()
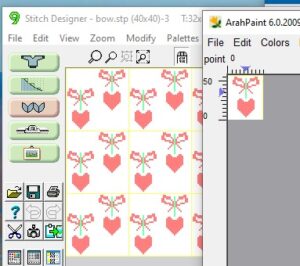
 A seasonal sample, 40X41
![]()
![]() 48X48
48X48 ![]()
![]()
 The movement is not as evident until the tiled repeat becomes quite large, the start, 168X150
 Chevrons can be developed from partial repeats. This is from Toyota 950#12, 24X20
 ![]()
![]() drawn in repeat to 144X140 Combined with added shapes 28X32
drawn in repeat to 144X140 Combined with added shapes 28X32 ![]() 56X32
56X32 ![]() rotated 180 degrees
rotated 180 degrees ![]() combined and trimmed to 56X62
combined and trimmed to 56X62  tiled and with an added frame, 124X134 for a blanket-sized project
  Cropping the frameless large design in different places vertically could provide a collection of accessories ie scarves, ie in this start, 86X132 png with 2 stitch vertical borders on both sides
  Whether in use for a punchcard model or an electronic one, the convention if the end goal is a tuck stitch fabric, is to color reverse the design
![]() It is possible to generate DIY designs easily using ArahPaint.
It is possible to generate DIY designs easily using ArahPaint.
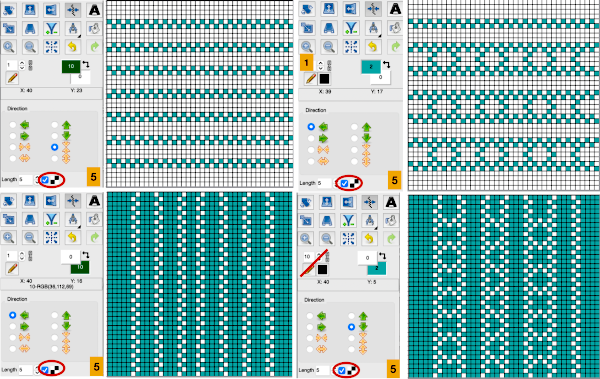
Taking diagonal patterning to the double bed for creating pintuck effects using the slip-stitch setting, this 24X48 repeat explores some of the potential spacings and the resulting ridges. ![]()
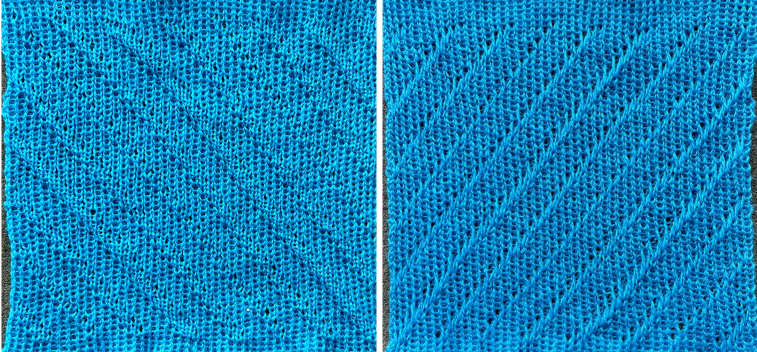 The next 2 repeats tested, both 24 stitches X 48 rows:
 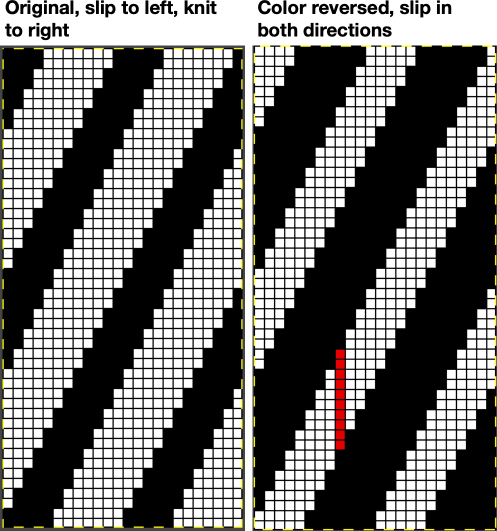 The red line is a reminder that the slipped stitches are being held for as many as 8 rows. It is best to use thin yarn that does not break easily and to watch for the knit stitches riding up.
Slipping in one direction produces a very subtle texture, ![]()
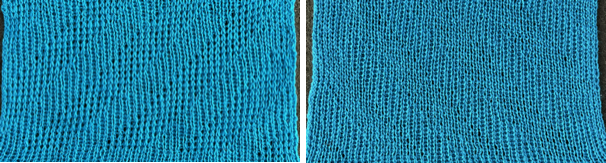 while the color-reversed design produces even-sized identifiable folds
 ![]()
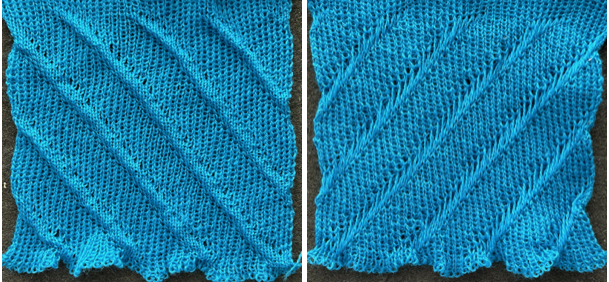 Adding lettering or small shapes and maintaining the diagonal can result in distortion of the motifs.
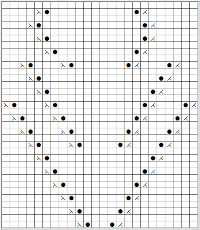
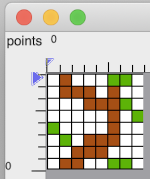
One option to add such motifs is to form the knit by beginning on 3 stitches as in this shared swatch and planning the stripes to heights and widths that accommodate adding designs or fonts. 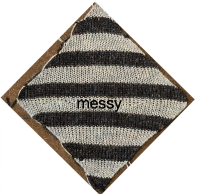 Short-row intarsia will also produce diagonal striping, from simple to complex as seen in this chart, with knitting sequence numbered for each segment.
 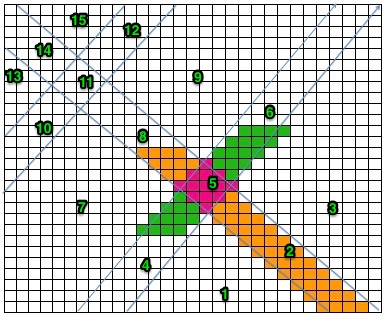 A limited number of rows may be knit in stocking stitch in areas following shapes not simply to travel to the opposite side and reverse shaping, but also to add small rolls or hems.
Another use might be to add small vertical motif details or patterning in their usual orientation.
The limit appears to be a maximum of 8 rows of alternative patterns, in order to keep the short-rowed areas from developing into distorted edges, which may be variable depending on the yarn and pattern used.
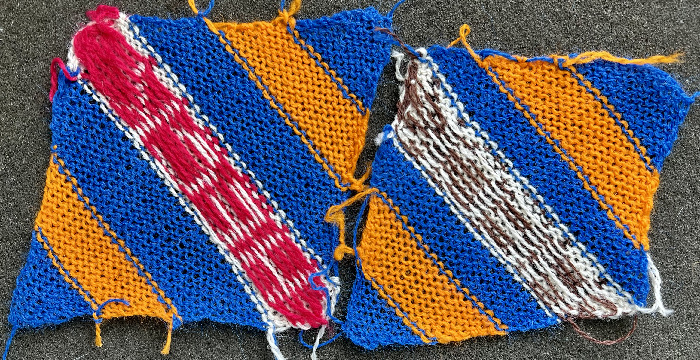
This first swatch was knit using progressively thinner yarns, wool, wool rayon, and a 2/24 acrylic in the FI segment. FI is a slip stitch that narrows the knit. The dark acrylic color stitch definition here gets lost. The band is seen pulling in the short-row segments on both sides. The shaping in both the top and bottom segments is by 2 stitches at a time. 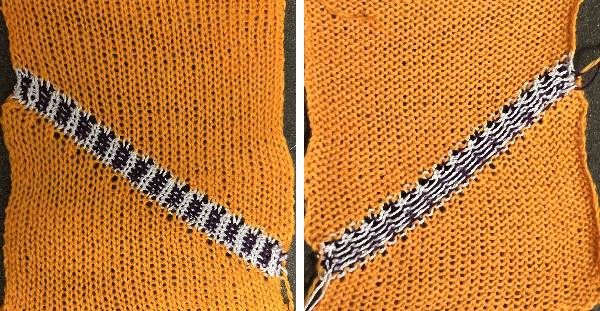 The result in different yarns of equal thickness, with the FI band knit at a tension one full number looser than the stocking stitch areas, with the top and bottom solid color segments now shaped 3 stitches at a time.
 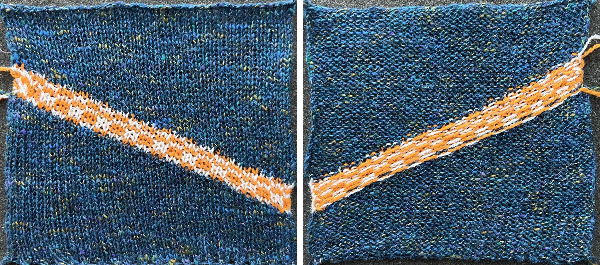 There is a trick when making A-line skirts to change the triangles that would poke out normally at the bottom if shaping were to begin immediately used as a design feature in many runway knits recently. If between an inch or 2 are actually knit up straight before shaping starts, the problem is eliminated. Depending on the design this may be a solution or it may read as a patterning error.
There are some conventions and “rules” for short-row techniques, but they do not always apply.
Keeping good notes helps to make successful experiments reproducible.
Two more tries began to experiment with working on the first and last groups in the holding techniques on a different number of stitches than the remaining shapes, noting differences. In the first an all-knit row is made across the short-row eyelets, reducing the planned FI band from 6 rows to 5. A rough spot in maintaining even stitches on one side is noticeable. 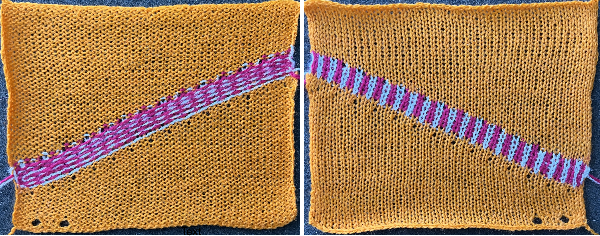 Progress: holding happened at the start of the bottom wedge, the FI was knit at 2 tension numbers looser than the stocking stitch, for 6 rows.
 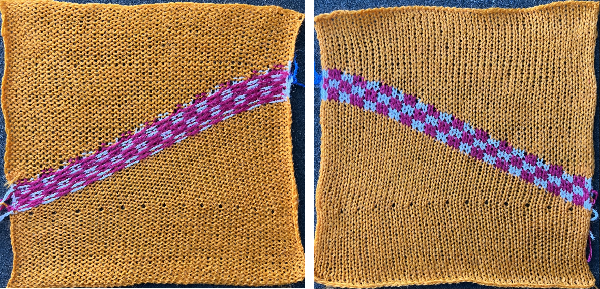 The goal in the short row shaping for the triangles is to maintain vertical edges that appear as straight as possible to the eye. One need not work on large swatches, small ones can provide clues as to differences resulting from variations in the starting side of the short-row shapings.
 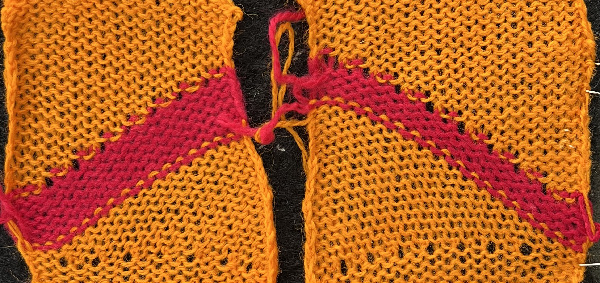 Studying the results can lead to many variations. There are student theses and careers based on exploring limited techniques to the max.
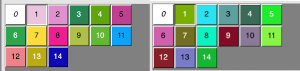
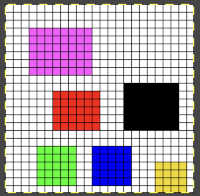
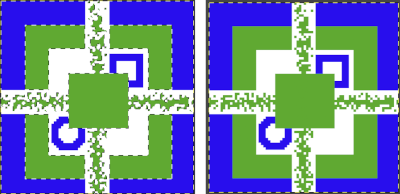
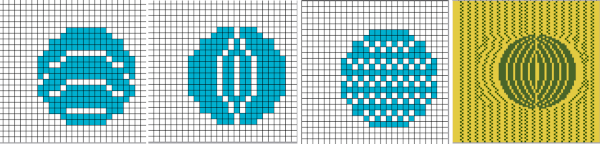
Building a theoretical true square or other predictable shapes is subject to the yarn and tension used. Beginning with a small sample, this shows the order of knitting 2 triangular shapes with the carriage beginning to knit each shape from alternate sides. In this case, 2 stitches are to be brought in and out of holding at a time. 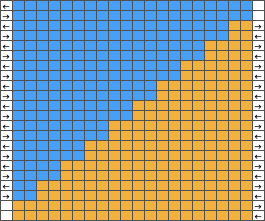 Because each color knits for 2 rows, small slits happen in the fabric resulting in eyelets. They may be used as design features, or attempts can be made to reduce their size. One way to do so is to have plain knit rows between holding selections to keep the small slits from intersecting and becoming double height. On the left swatch, one yellow row was knit to the left before reverse shaping in the same color. In the swatch on the right, in addition, 2 rows were knit in the blue prior to reverse shaping.
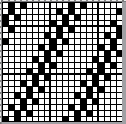
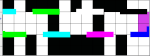
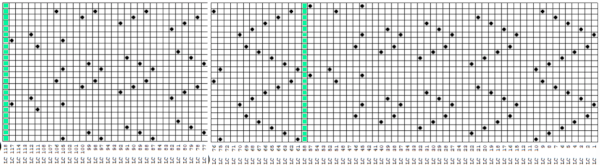
 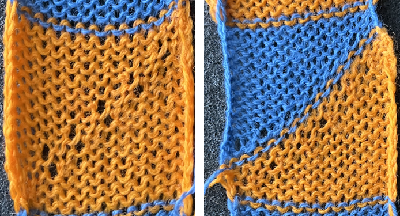 Reviewing the concept and developing a chart for larger swatches: the cyan color cells represent stitches in the hold position and the white cells stitches that will be knit.
At the top of the first wedge, most needles will be in the hold position, return them all to the B position manually before knitting the next row.
With the carriage on either side, set it for KCI with the cam buttons to slip for a free pass to the opposite side, the first FI pattern row will pre-select. Holding need not be canceled, since no needles are brought far enough out for the technique.
Cancel the slip setting, change the cam setting for FI knitting, place the pairs of colors in their corresponding feeders, and knit 6-8 rows of pattern.
Bring all needles out to hold except for the first desired group, if the holding lever has been canceled, reset it and commence reverse shaping. 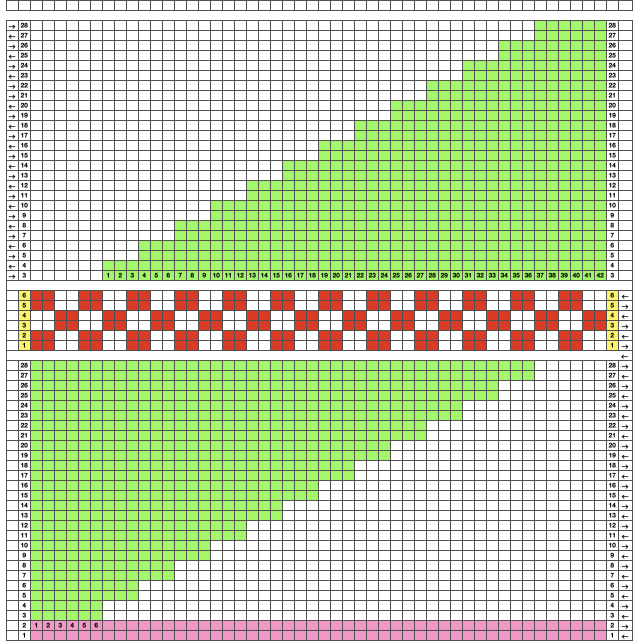 Merrily knitting along and you forget to loosen the tension for the fair isle stripe:
 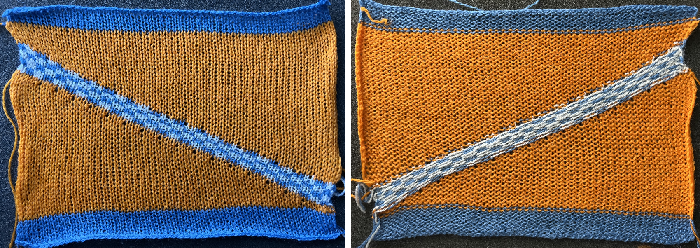 And what if the FI were to actually follow diagonal colored stripes? The approach is the same. I am right-handed, my default is often to begin on the right. Left-handed knitters can mirror charts as needed to make them easier to follow.
The first triangle is shaped from the right toward the left, subsequent ones begin on the left, then to wrap or not wrap becomes the question. 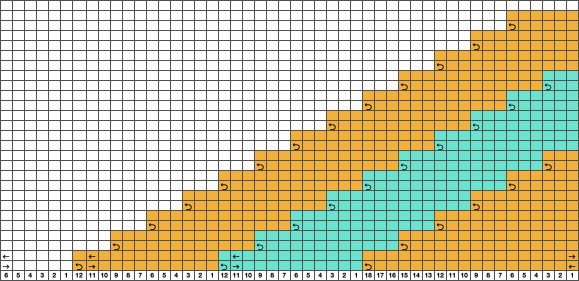 Review of wrapping, which does not disturb the stitch on or the position of the wrapped needle:
 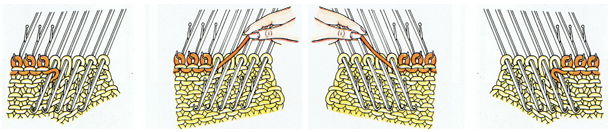 I obstinately use random yarns at hand, sometimes too thin for the task, true here. Any type of intarsia, of which holding is one, will be accompanied by lots of yarn ends that will require weaving in. Some of the stitches were wrapped here, some not, and maybe the eyelets could be considered a pleasing design feature. The 8 rows of FI, knit at 2 full tension numbers higher than that used for stocking stitch, minimizes the size of the eyelets all on their own on both sides of its stripe. Errors in bringing an added group or not into work may not always be immediately visible, frogging this type of knitting can be painful.
I would not use the last 6 stitch modification in any future swatches. 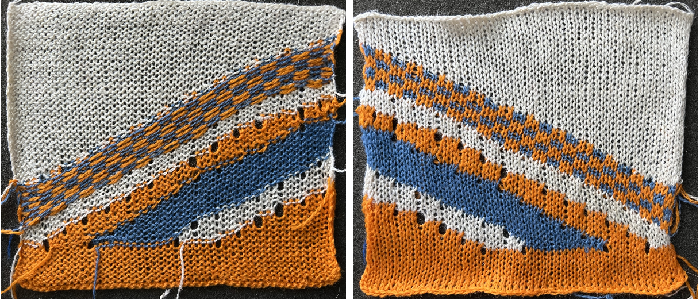 Elizabeth Zimmermann published many patterns for hand knitting utilizing garter stitch and striped diagonal wedges for garment shaping.
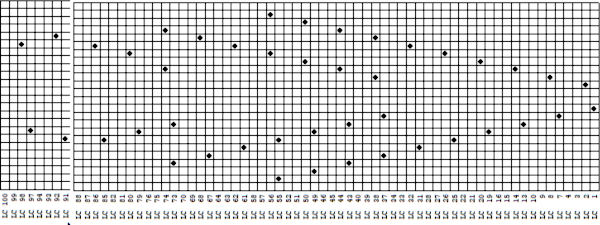
Multiple colors per row patterning may be maintained by beginning planning with diagonal straight lines, seen here in a 32X32 repeat. ![]() Opened in img2track
Opened in img2track  The design will be elongated, and 256 passes are required to finish a single repeat
  Each color may be edited to suit. Quick visualizations of a few of the possible repeat arrangements using the file as is
  Avoiding lots of extra knit rows by eliminating one of the colors.
 ![]()

 The larger designs may need to be knit in sections depending on the available memory in the knitting machine model being used.
Machine-knit stitches do not form as close to square ones found in garter stitches. Rendering the full-scale garment on a knit leader would make knitting to gauge while avoiding tons of math calculations possible.
DIY is a bit like assembling paper cut-outs that are required to fit together, first attempts at planning do not always succeed. One may begin at different parts of the piece and seam two halves together if necessary in order to keep matching stitch formations in both directions. Stripes may be added to form secondary intersecting shapes. 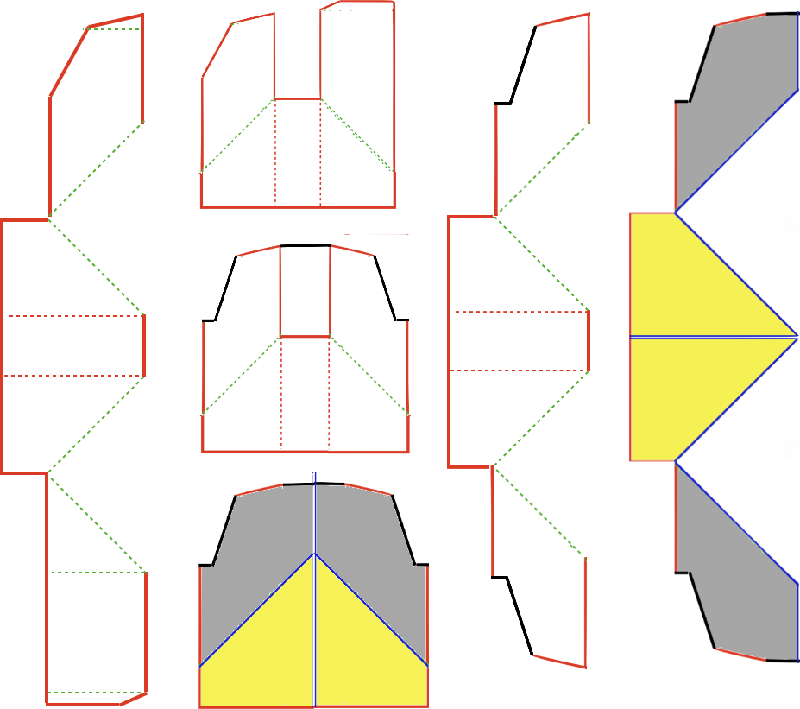 On the left is a simple one-piece vest concept with no miters in the back panel, which may be knit from the bottom up or as two pieces with a center seam.
The bolero style is repeated in 2 separate pieces with mirror shaping in the second and would be joined at the center back.
The knit gauge is easier to maintain in short or small wearables. 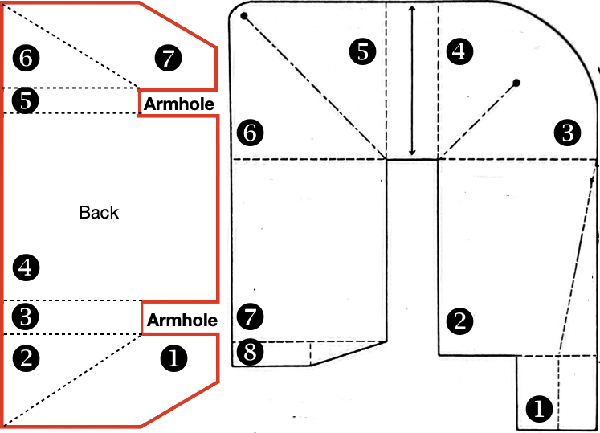 Many garments may be made following the concepts for creating “pies”.
Decades ago batwing sweaters based on a sideways circular knit concept were standard presentations at knit seminars. Short-row diagonal graduated wedges were followed by varying amounts of all knit rows.
This idea for a short sleeve garment is from a Japanese magazine. In creating such illustrations because of the scale of the publication, the aspect ratio is distorted. In the final garment, the bottom circumference can in fact be far narrower than it might appear to the eye in the sketch and may be gathered or left released depending on design goals. The neckline diameter at the end of the project, after joining one shoulder, is gathered with evenly distributed decreases to the desired measurement prior to knitting the collar. 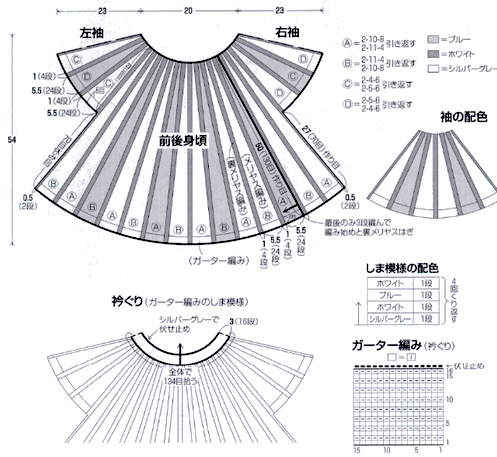 A way to form a long sleeve item, using binding off and casting on stitches in addition to shaped wedges followed by all knit rows.
  Knitting a garment on the bias at 45 degrees will produce a knit fabric that drapes differently.
Horizontal patterning can turn into diagonals and chevrons, and fancy decreases may be used in the center shaping of the garment.
Pre-computer programs and knitleaders, an easy way to sort out shaping for garments, was to begin by drawing on large sheets of graph paper. An all-square grid is fine.
Calculate a 10 cm/4 inch knitting gauge to the second decimal point before any rounding off. For example, if the gauge works out to be 5.728, and the measurement needed is 19.5 inches, the multiplied value result is 111.696, which can be rounded off to a 112-row line on the graph paper.
Working in cm can actually lead to easier calculations and is required when using a charting device.
Each cell in the graph paper grid equals one stitch and one row.
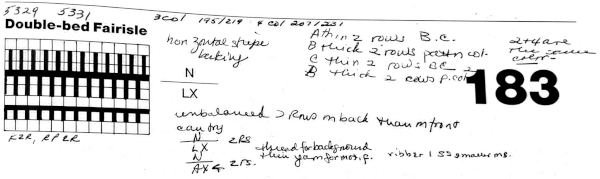
For knitting on the straight grain, based on gauge, draw series dots placing them on the beginning and the ending pots for each measurement, and connect them with straight lines.
Curves such as those necessary for necklines may be composed of short straight-line segments.
When knitting from the bottom up, continue with a colored pencil, filling in squares as they jog in or out, maintaining the new outline as close to the first as possible.
For the bias knit, whether on graph paper, the computer, or a charting device, begin by drawing a 45-degree line.
Rotate and trace the unmodified original straight-line image in place, follow the lines, and mark in and out jogs once more in color for contrast.
This is a very small chart so outline jogs in far larger pieces cannot be reflected. They would produce edges not as straight as in standard knitting, which will need to be considered when joining finished pieces.
As the piece is rotated, a wider grid base is required. Consider that the motif images as they are worked on the purl side will be mirrored horizontally on the knit side, a particular consideration if any text is introduced. 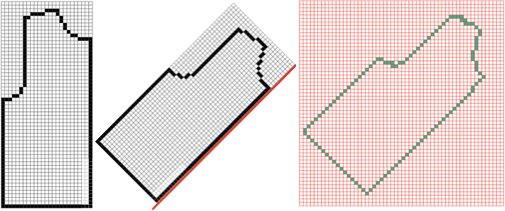
 Comparing theoretical purl as opposed to knit views on the left, two purl views on the right.
 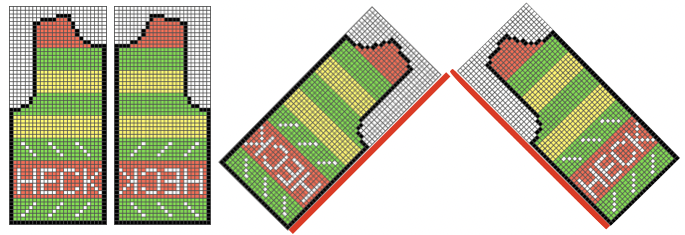 Fonts in various stitch and row counts are useful when planning knit text.
The point at which the text or pattern is introduced needs to have enough stitches in work on the machine to contain the intended words, ie for the above, a minimum ground, independent of shaping, would need to contain more than 9 rows if solid color stripes are to be added above and below it, and 26 stitches in width in this case.
A proof of concept swatch with arbitrary shaping on every other row illustrates the need for shaping based on a calculated gauge if a square is indeed the aim.
I knit on a 930 where mirroring is automated for programmed designs, so the text was programmed as drawn.
Sometimes less information is more. It became evident very soon that the placement of the text on the left was wrong if the aim was to have it centered in the final shape, and that more rows were needed at the top of the design.
On the right, the purl side as it faces the knitter is shown, with black pixels used to represent increases and decreases. The center red line separates the needle placements on either side of 0, and the text is shown in the default mirroring. 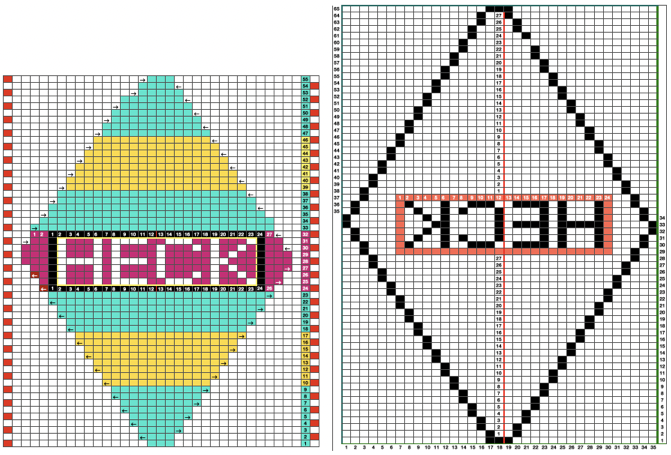 The respective swatches after their rotation preview one of the potential results
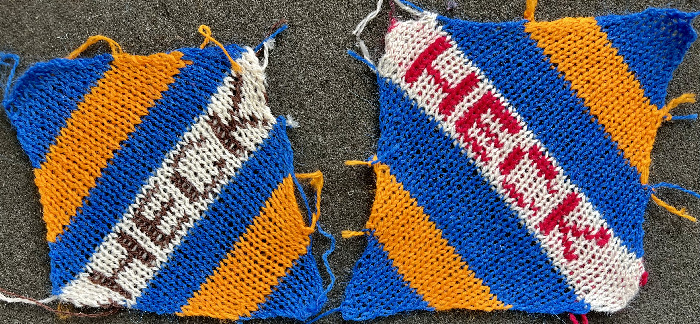
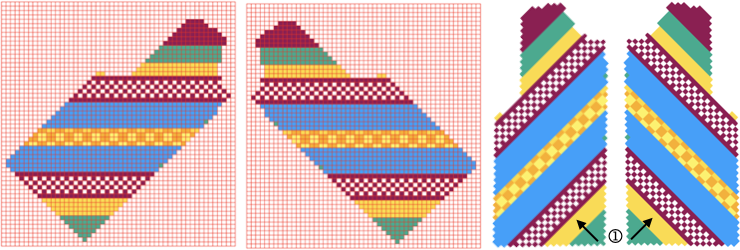
 A true diagonal repeat may be planned for motif patterning knit from the bottom up. The drawback is that for executing a fair isle using more than 2 colors or with multiple color changes, partially illustrated on the far right, the 32X32 repeat would need to be rotated and knit as above.
 ![]()
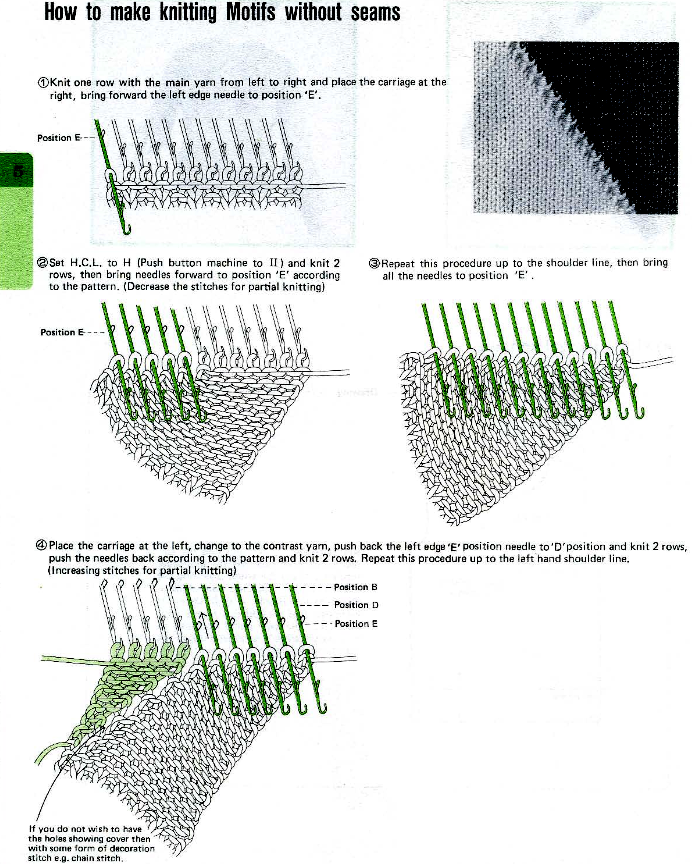
From the Brother machine knitting techniques book, a suggestion for dividing a sweater front into diagonal halves created by using the holding technique 
The idea of chaining the eyelet areas to reduce the size of the slits is an interesting one that up to now I have not tested.


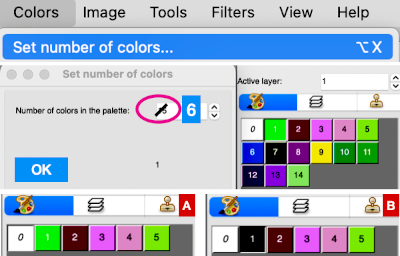
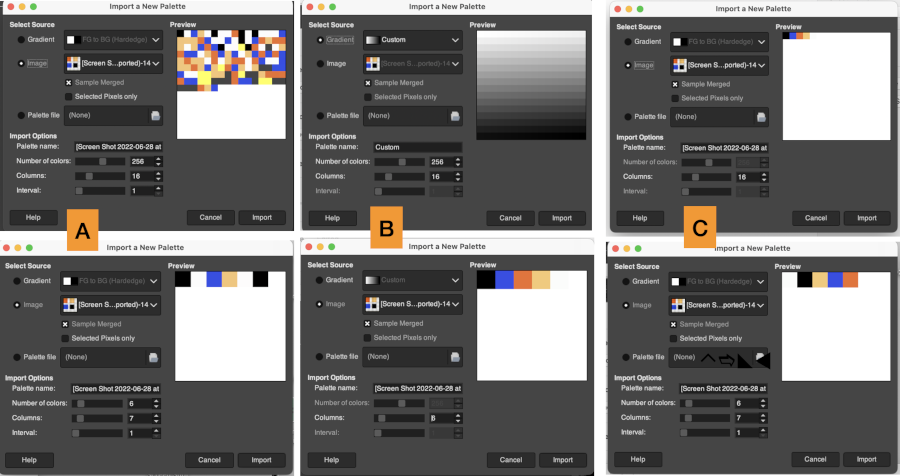
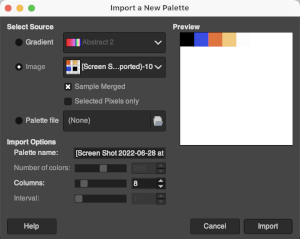


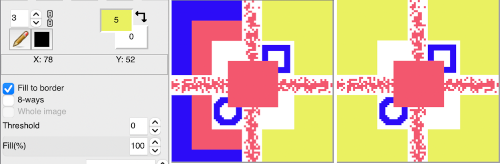
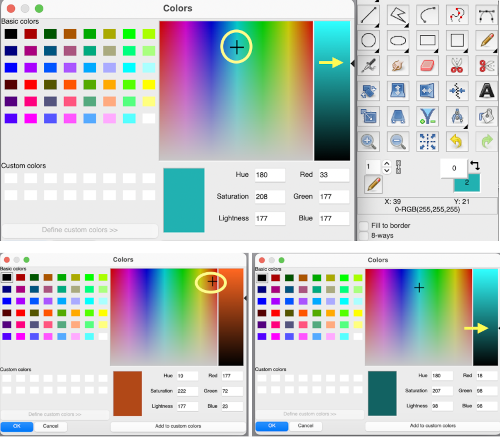
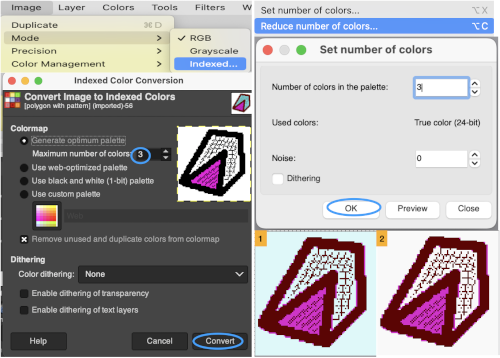
 Designing for fair isle, or when attempting to visualize and illustrate slip and tuck fabrics with frequent color changes, more colors may be required even though the final download will be in black and white. There is a quick way to add random colors assigned by the program and based on the initial palette:
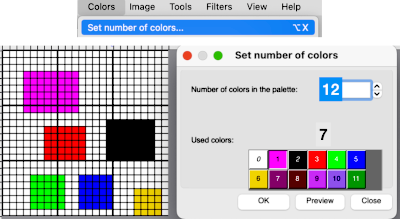


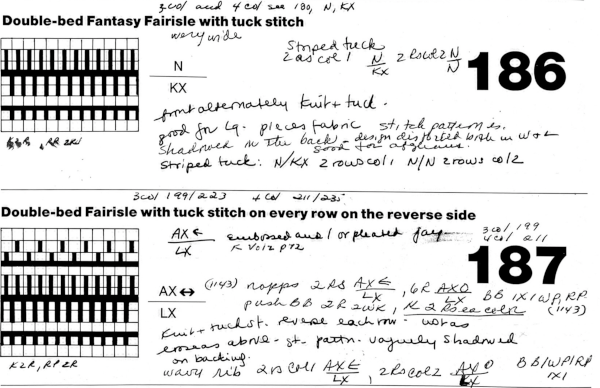 In Fantasy Fairisle knitting using 187 with alternating up and down pushers on the back bed and AX with 2 arrow keys would match Brother ribber knitting with lili buttons used on an even number of needles set to tuck.
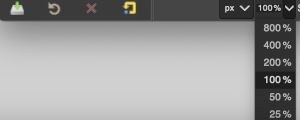
 For the 1-pixel grid in Gimp to be visible on an editable image, a magnification of at least 800 is required. The options offered by default
 can be changed to suit by simply typing in a new number.
 the processed image
  the trimmed 98X182 png
  doubled in length once more to 98X364
  Knitting process on a 930 using img2track:
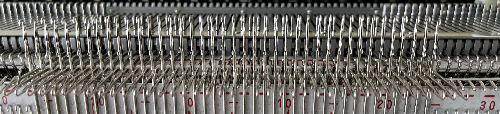
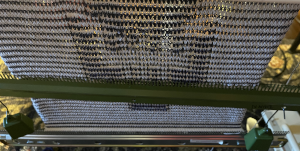 A reminder: in my experience, the Brother cast-on combs are usually chrome-colored, Studio grey, and Passap, and I believe Superba ones were traditionally green. The first 2 were designed for 4.5 mm machines, the latter for 5mm. The different mm spacing does not make the 5 mm combs suitable for casting on on Brother, but they can be poked through the knit in progress. I like to leave the first comb and weights on, insert the new comb closer to the beds, and then move the weight up, and then remove the lower position comb.
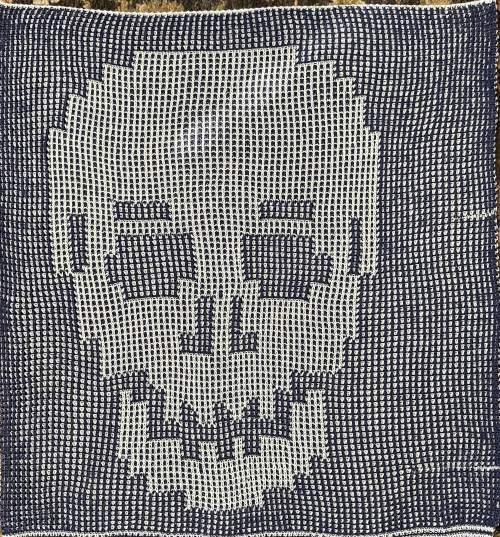
 In the Brother model, sometimes the yarn is left in the wrong place below eye level rather than its own individual one corresponding to its button, and both yarns are picked up with the next color change.
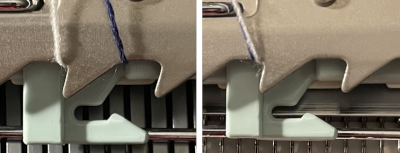
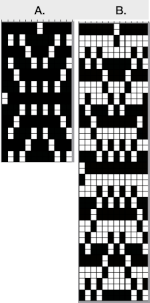
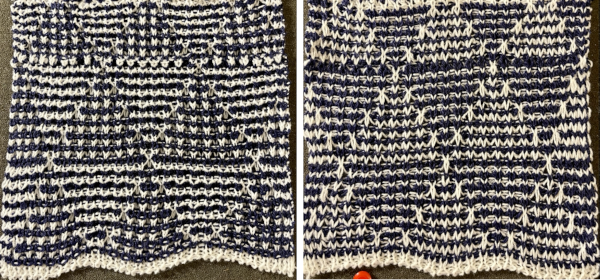
 a close-up of the texture at an angle
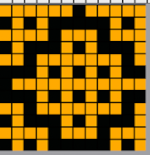
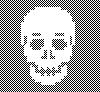
  Claudia Scarpa developed a skull variation using only layers in Gimp
 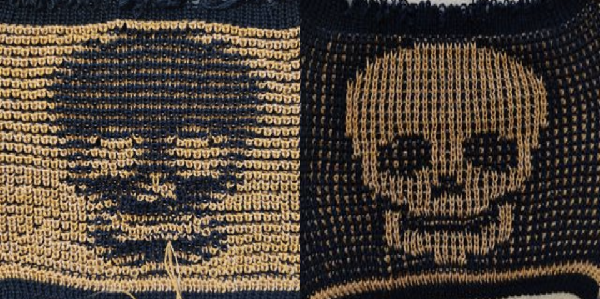 and has been kind enough to create a
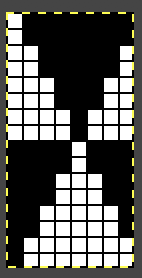
 It is possible to work some repeats on some machines with the ribber also set to tuck both ways with EON needle selection.
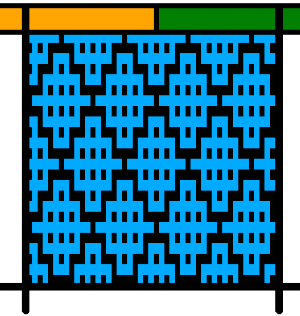
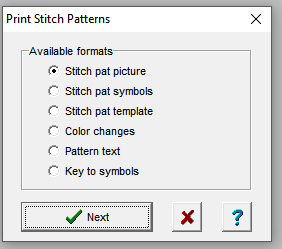
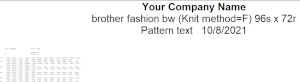
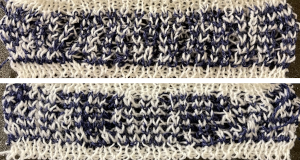 When using the Dak stitch design module, the color separation is automated. Choose any design repeat. This happens to be a 20X20 one, chosen from the thumbnail assortment, so not suitable for punchcard models. “Printing” the template using choosing the option of using dots rather than squares to represent knit stitches makes the resulting print screengrab easier to trace.
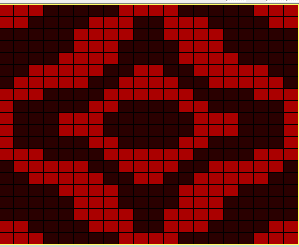 the 20X20 repeat as a BW png
 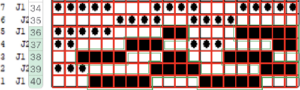 The result is screengrabbed, opened in Gimp, converted to BW mode, and scaled to the 20X40 expanded design size. Unless the double-length function in the machine is also used, it will need scaling again to double length prior to download.
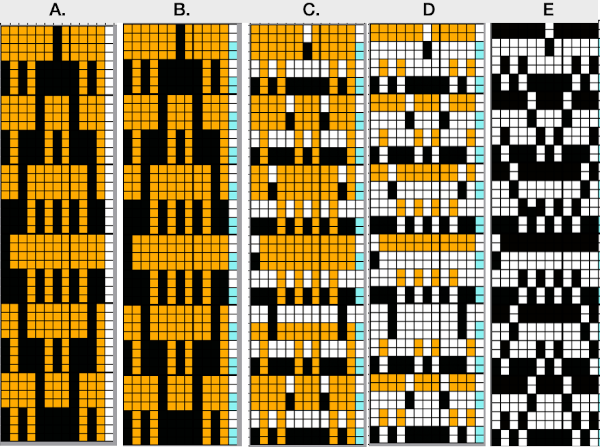
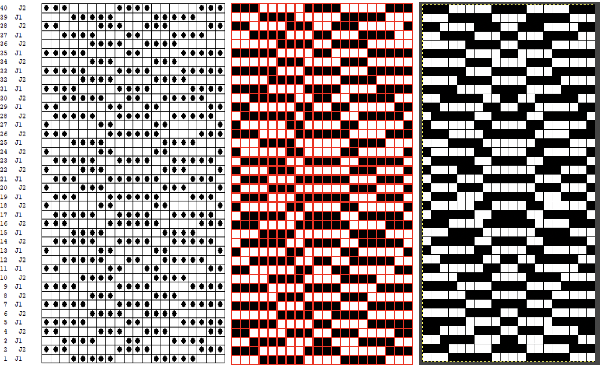 The final image double length, showing the difference between the separation using the template, and that using layers as in Claudia’s video, which appears different but is actually the same repeat, color reversed.
 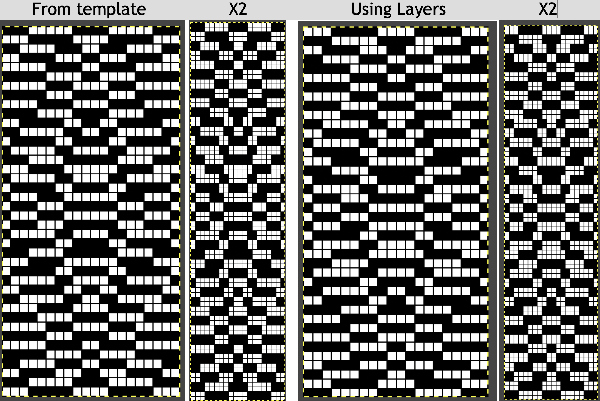 Using bucket fill for the ground in the second layer, as described in the video, the captured clipboard image can be very small
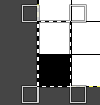
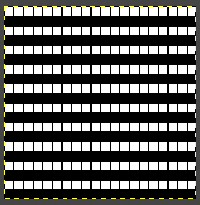 Alternately, the initial design may be scaled X4 to 20 X 80 pixels
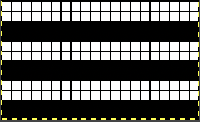
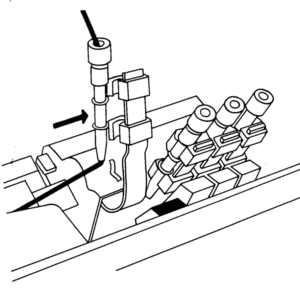
 drop the ribber

 I have to admit the first time I tried to knit both the associated png, mirrored and not, I experienced patterning errors. Whether due to operator fatigue, static, or any other possible cause, on a different day both designs knit successfully, and my appreciation of the module is growing steadily. The results for this, a complex shape, are quick and awesome when compared to the amount of time it would take to draft the pattern outside the program.
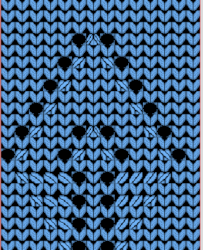
 An stp was created, the template is marked 74 rows in height, filled in as the stp was generated, right side facing
 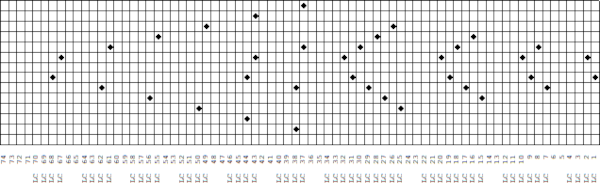 Numbers and Gimp reduced the template to a png 14 stitches wide by 52 rows long, needed to be mirrored using the number one button on the 930 for successful knitting,
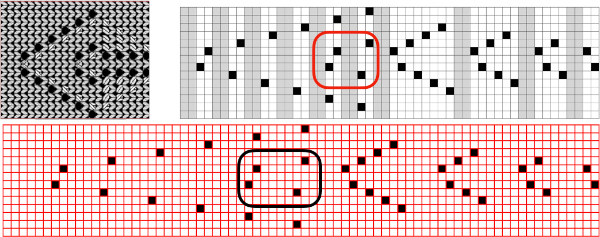
 matches the original illustration. Dak makes slight modifications very easy. The untested brick repeat, 28X104, developed using Arah followed by its png
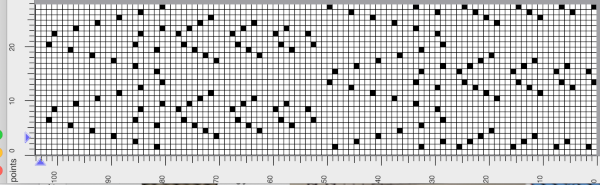
 The amended design drawn in repeat in dak visualizing the knit,
 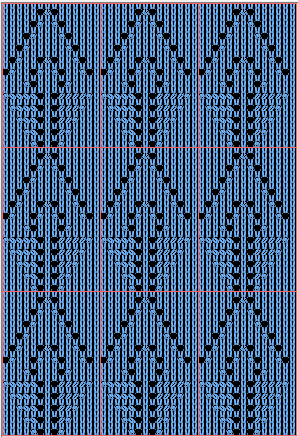 The print preview template:
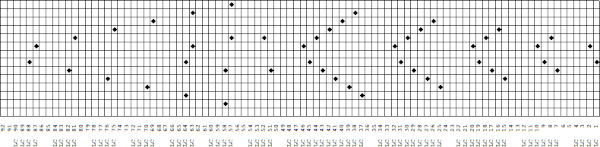
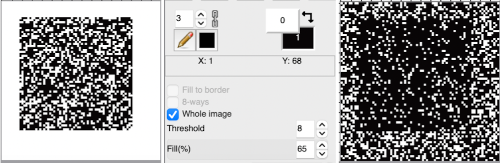
 the resulting png, 14 stitches by 68 rows, also knit using the number one button on the 930
 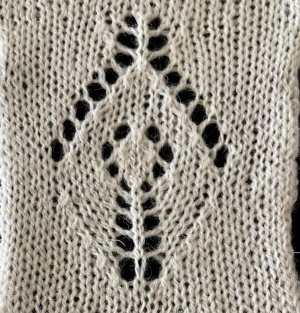 The brick repeat developed in Arah, now 28 stitches by 136 rows,
 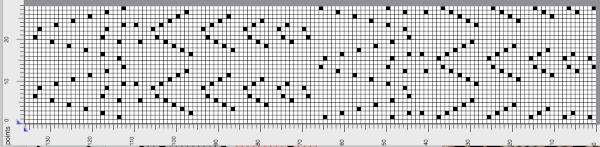 its png
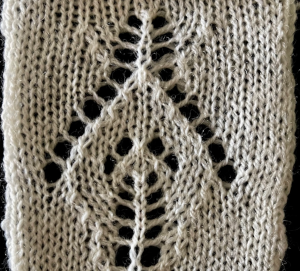
 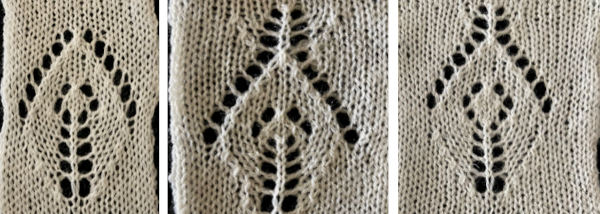 A test for the second brick repeat, here visualizing results with a screengrab of the stp.
 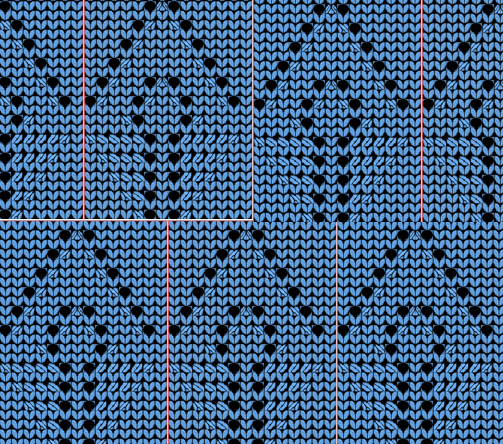 The test swatch is for a single repeat width, the initial yarn used ran out, hence the color change, the second yarn was thinner and broke, but there is enough to get a sense as to how the overall alignment of the knit shapes will appear, including that horizontal chevron between the shifting leaves. The png required mirroring when used on the 930.
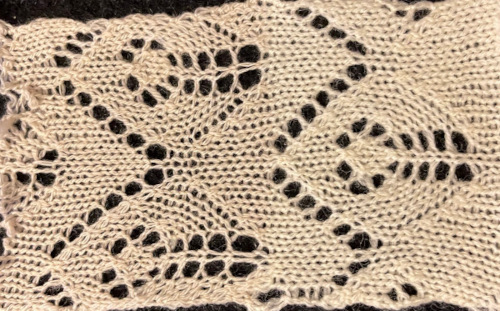
 it would need to be drawn eliminating the pairs of blank rows between transfers to match the original repeat because all those carriage passes are consecutive. Drafts with no blank rows between alternating transfers are not accepted by the program and ruled out in any template preview as well.
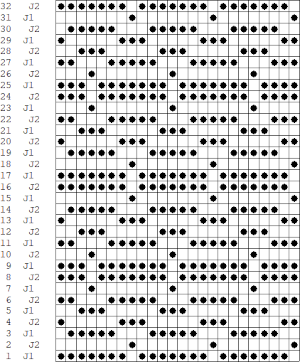
 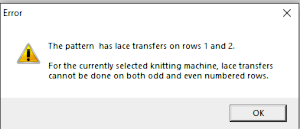 The complexity of working with a “simple” repeat: over the years I accumulated a notebook full of copies from Japanese magazine pages with what I believed to offer interesting potential, this repeat happened to be one. The markings for the knit rows on the right, and the two blank rows at the bottom identify it as suitable for Studio punchcard machines, and it would appear to be easy to translate for knitting on Brother thanks to those 2 blank rows between transfer cell markings.
 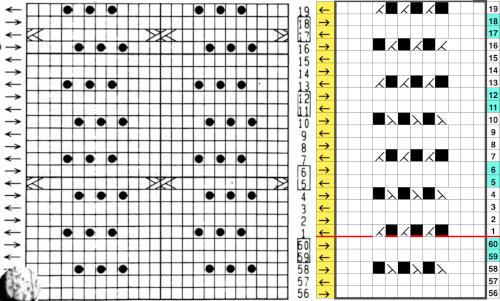 Developing the Brother repeat in Numbers for beginning with transfers to the left. The repeat is recognizable as a mesh variant, more information for mesh design repeats may be found in the
  the repeat on the right was created in Gimp.
 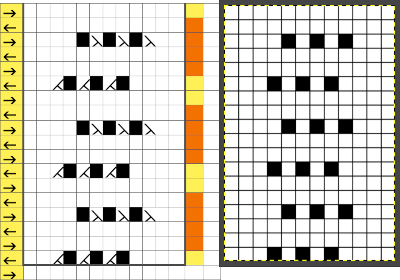 The 12X18 png
 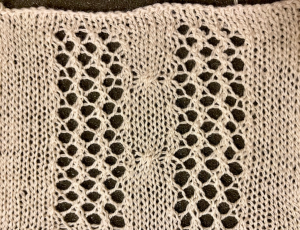 Creating the stp: the size of the png was used to create the image file, which required cropping, in Dak this would be the menu language after activating the proper tools. the stp size is 12X16,
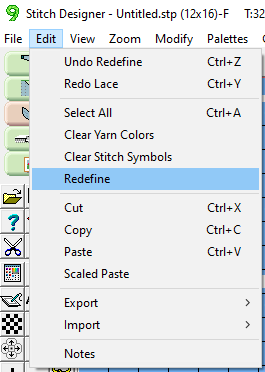
 The template generated for a Brother punchcard machine illustrates the problems and some of the confusion if the template repeat is used for actual knitting, especially on the punchcard machines. Drawing the eyelet and dragging the mouse one cell to the left is the intuitive way to draw for transfers to the left. The symbols appear to be right-side facing by default and if they are in turn mirrored by the program prior to saving, when the templates are generated, the intent for use of the design would match. The numbers on the left are in the punchcard template, adjusted by cropping the two extra rows in the Brother electronic template by the software, do not reflect the actual design row numbers. The starting row is wrong for the Brother lace carriage operation from the left to produce the first row transfers to the left in actual knitting. As far as determining sequences for knit row placement, that is left up to the punchcard knitter’s experimentation. The minimum repeat for a punchcard to roll continuously is 36 rows, that fact needs to be considered if punching cards. The repeat shift for the first transfers to happen toward the left is illustrated on the right.
 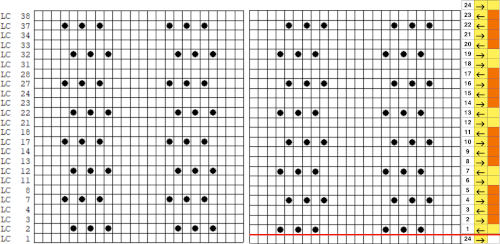 As initially given, with the lace carriage starting on the left, the first transfer row would be to the right. In many cases, this may not matter, but in this instance, where the knit rows happen after 2 or 4 LC passes respectively, the template offers another instance of the fact that the knitter using it needs to have previous understanding and experience in creating the particular stitch type. This version does not have an accompanying swatch.
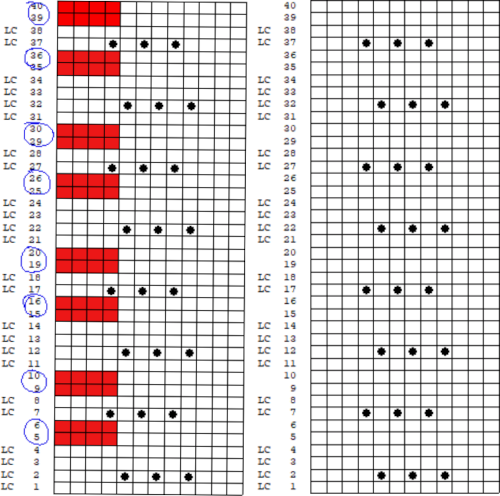
 For good measure, the repeat is also drawn as stitches and produced the punchcard template with a first blank row identical to that generated when using symbols
 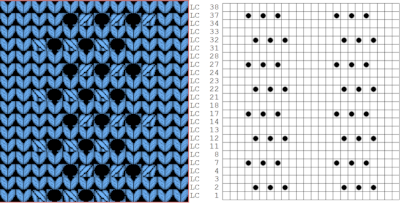 Using the pencil tool to draw the transfers differently resulted in a series of error alerts, so not an option.
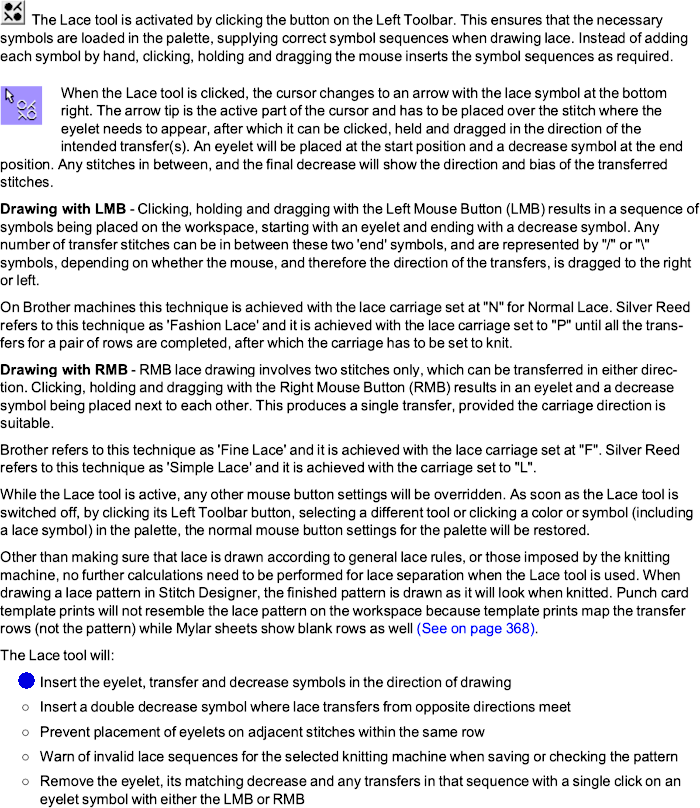


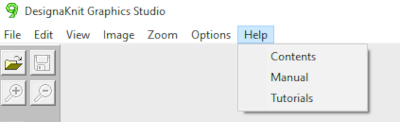
 When manuals are chosen in any module, there is an option offered to download the associated pdf
 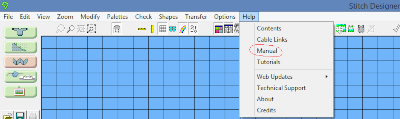 by clicking on the arrow key
  Update:
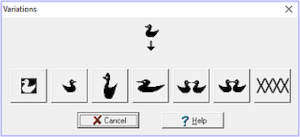
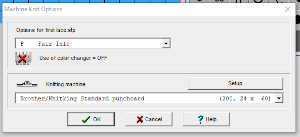
  The lace module is an extremely attractive solution for speeding up the lace design process whether from published charts or DIY. The left mouse button is used to draw as usual, but the right mouse button is used when drawing shared transfers in fine lace on Brother, or simple lace in Studio km.
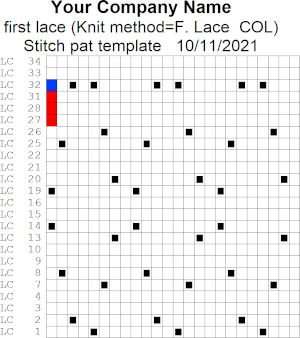
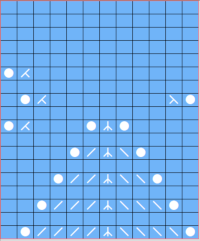
 The designer may enter patterns on this view as well, but I prefer to work with symbols
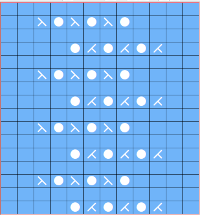
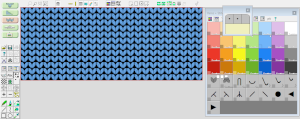 It is best to begin testing with a small repeat when exploring new techniques, find his format easier to use than drawing on “stitches”. There are several options for the canvas ground color, the default is in blue. As a first step, saved as an stp, Dak opened my saved file as pictured in this view.
 DAK row numbers do not refer to design rows, they reference row counts as would be seen in any row counter registering carriage passes
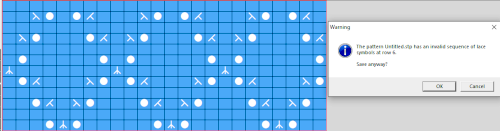
 If a symbol is missing from the drawing, the program alerts the knitter to the error. Here there are no eyelets represented.
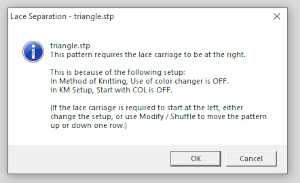
 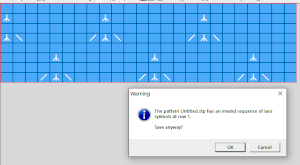 There was no warning for the error in the last row of the test stp, where in the last row two stitches were being moved in opposite directions on the same row. If the content is considered accurate, this window will appear, the safe button will be highlighted, click OK
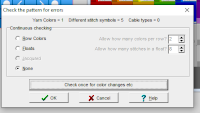

 wrong side facing is chosen for the purl side view.
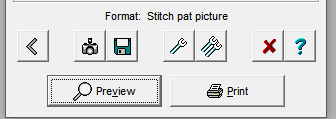
 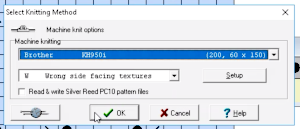 Stitch pattern print previews, using default settings for layout:
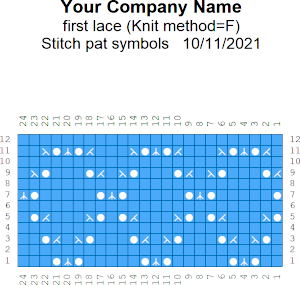
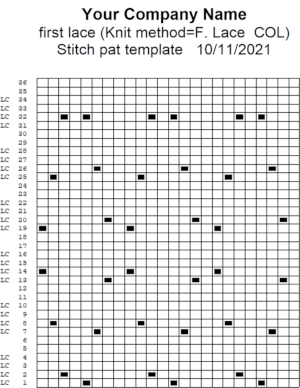
 This stp pattern was also created using the pencil tool in combination with symbols. In the print preview, there were 2 errors in the Dak printouts, the three blank rows rather than 2 in the outlined section between transfers, and transfers in 2 different directions occurring on the same row with the same carriage pass. I have no way to test whether the same issue would occur in interactive knitting using my own stp file. My repeat, drawn in Numbers on the right, is numbered in design rows.
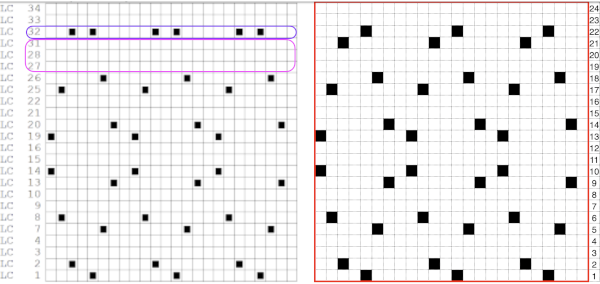
 choices can also be made on how to represent stitch units If the plan is to create a punchcard template and the repeat is too wide, an error message appears
 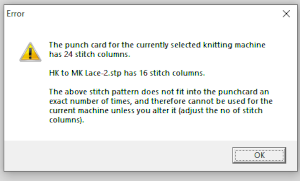 Paper size measurements in page set up other than US letter
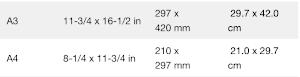 other associated menu choices
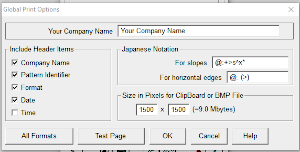
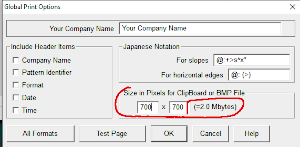
 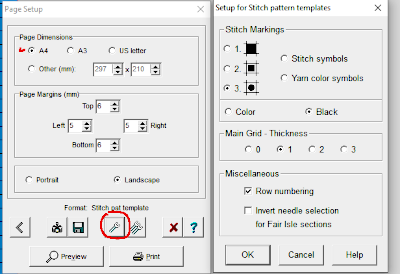 It is possible to save the template as a bmp of the full image. The size of the file is shown to the right of the pixel count number settings for the clipboard or bmp file, which will vary in proportion to the stitch and row count. Click on the floppy disk icon to save.
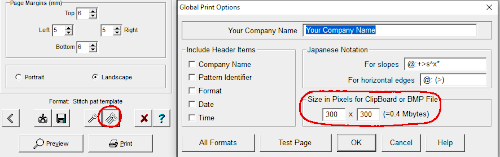

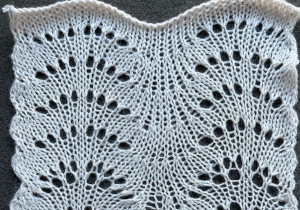
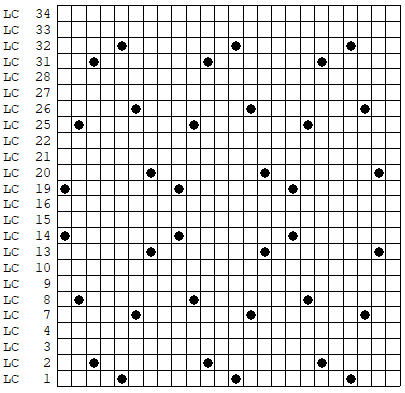 As an additional lace template test, I repeated the process on a portion of an stp file shared generously shared by a DAK FB group knitter along with photos of a completed, lovely lace sweater using it. The results are shown sideways because of the repeat length. The 950i template places four rows at the end of each lace sequence, while as seen in the published repeat of a different lace beside it, there should only be 2. The carriage passes made by the KC in traditional lace knitting though they advance the row counter, do not advance the pattern unless it is selecting needles as well, ie in trims that combine lace with the slip stitch setting. Exceptions to the 2 blank rows rule occur when the lace shape reverses direction such as in zig-zags, or when plain knit or pattern rows are planned deliberately to mix and interact with the lace design.
  Please see the previous
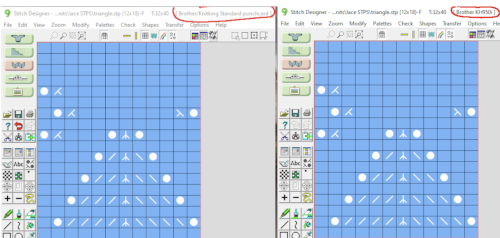
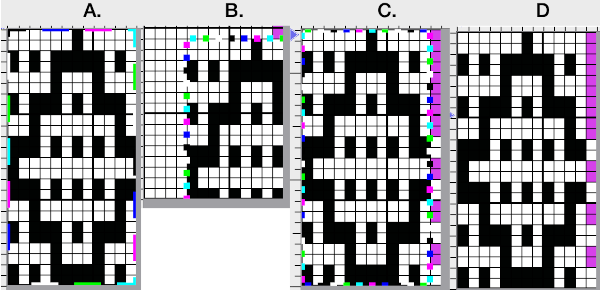
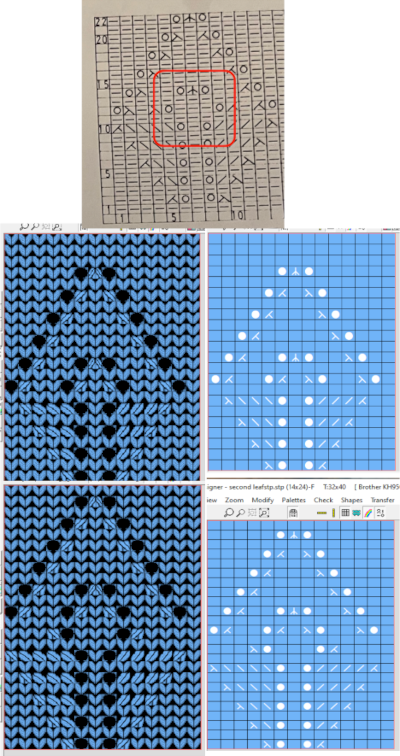
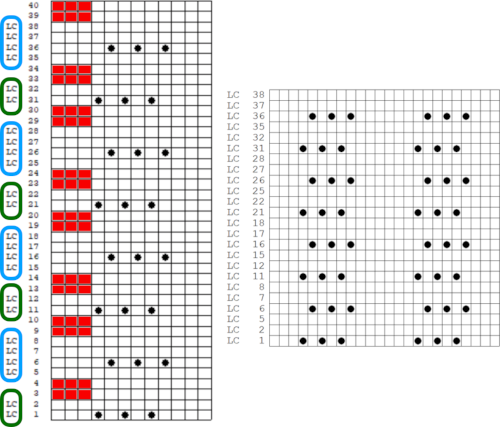
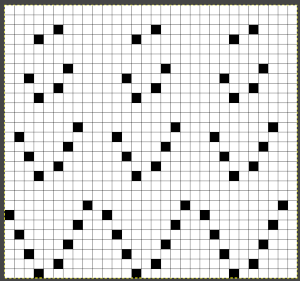
 The electronic preview continues to have a series of 4 blank rows between transfer segments. The punchcard template has 2 blank rows between each transfer segment and matches the published pattern with a 3-row exception toward the top of the card. The renderings below begin with the DAK punchcard template on the left with its confused numbering, the extra empty row at the bottom of the repeat was eliminated. The overall repeat is mirrored. It is followed by the published pattern associated with the chart, pixels are then marked for left and right transfers, followed by my amended final repeat, which when knit on the 930 required mirroring.
 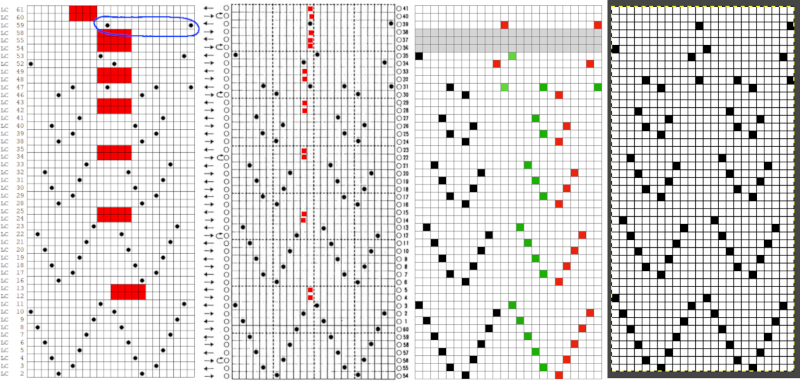 Lace tool use instructions begin on page 299 of the third module user manual, Stitch designer. From the manual: when the Lace tool is clicked, lace patterns can be created by using the LMB or RMB to click and hold on the stitch cell where the eyelet needs to be, after which the mouse can be dragged in the required transfer direction and let go on the stitch that needs the corresponding decrease. Intermediate transfer stitches will be added automatically where appropriate. If the button is clicked and the stitch pattern has a method that is incompatible with lace, the warning that is shown on the right will be displayed. The Wrong side facing texture is probably the most natural choice because this is generally considered the normal method of knitting on Japanese knitting machines. Sections of Lace and Fair Isle may be used in the same stitch pattern and either Fair Isle or Wrong side facing texture are good choices when working with lace patterns.
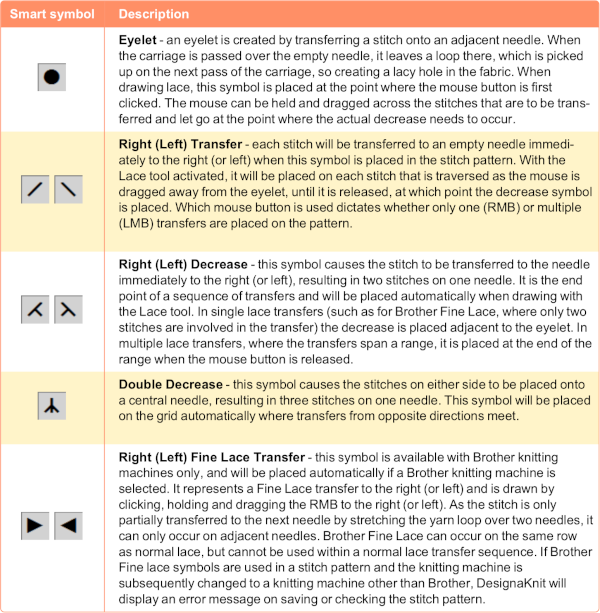
 The associated template preview for the punchcard nearly matched the one that was obtained with the pencil tool chart, but had some differences: the previous image was mirrored although no dak settings were changed. As in all punchcard template numbering, the knit row numbers are skipped in the sequence on the left, so they will not match design row numbers, and the small flower motif is placed differently
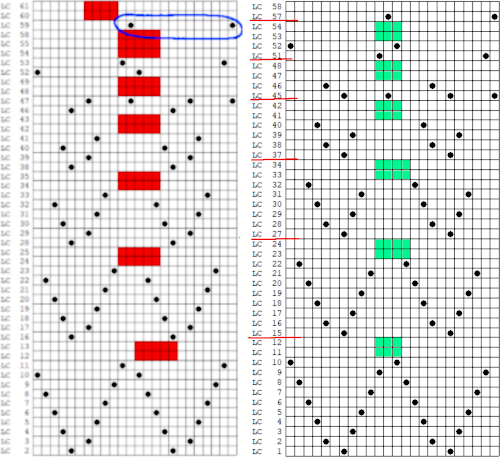
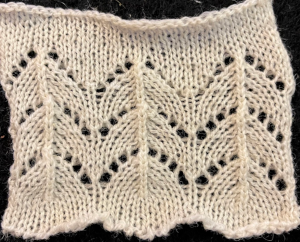
 A wider swatch
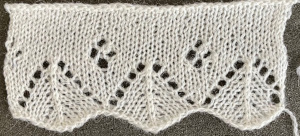 When attempting to use this repeat for a continuous one, unless the total number of rows is an even number, the second repeat will reverse the direction of the transfers, resulting in mispatterning and multiple side-by-side empty needles. Changing the total repeat to 48 rows by adding another blank row places all transfers properly. The 12X48 png
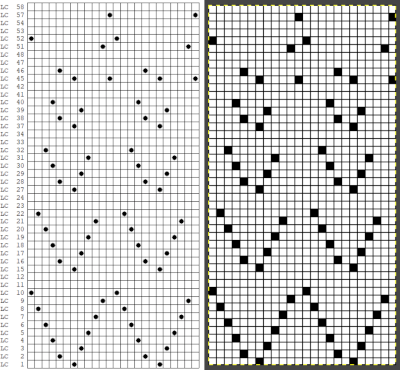
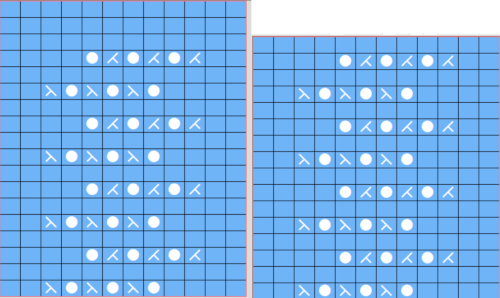
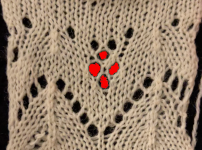
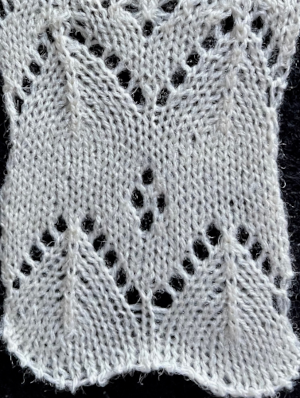 A half drop repeat is also possible. To achieve this test of a repeat drawn in a paint program, I knit 2 rows after the last “flower” eyelet and had to flip the repeat horizontally before continuing for the top half of the repeat, producing a very different look.
 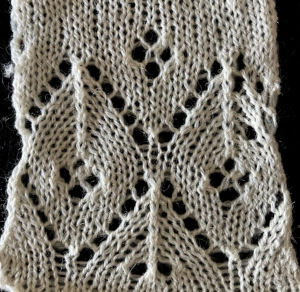 There is a transfer error in the knit swatch on the right where I “repaired” a dropped stitch. Edits would be needed if one is determined to make this pattern automated as a continuous design.
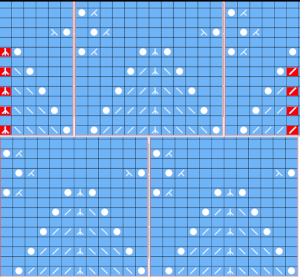


 my edit in a spreadsheet, the yellow cells mark rows missing in order to get the lace carriage back to the left side before the next pair of all knit rows.
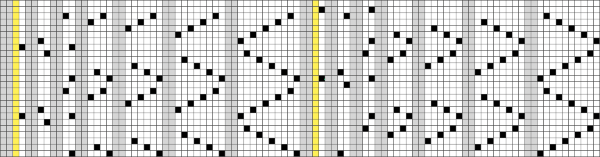
 the Arah image was saved as a png, knit on my 930 using img2 track, and mirroring
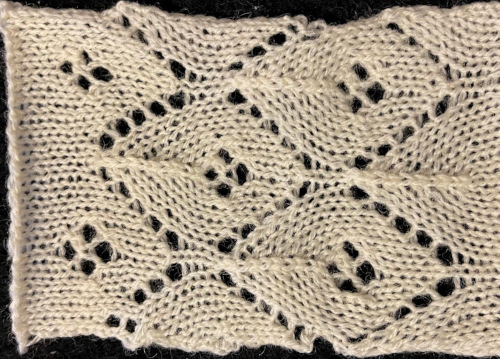

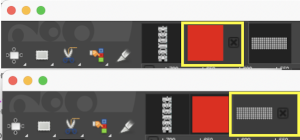
 There is a handy option in Dak when thumbnails are chosen from the image menu, one can browse through saved folders containing compatible file-formats including the images in those Brother magazine downloads. The small preview will identify the specific file size. When you left-click on your choice, it will appear enlarged at the bottom left of the view window, it has been moved from its corner in my screengrab,
 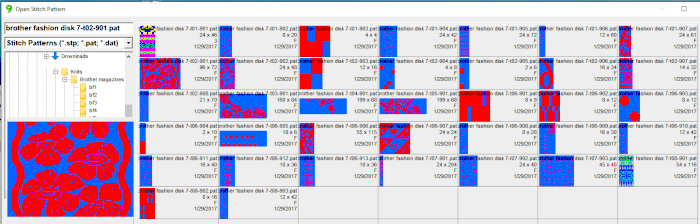 left-click OK on the enlarged image, and it will open in the program window. Minimize the size until no further reduction is allowed by using the magnifying glass or the scroll function in the mouse. This is a different operation from scaling the original to a different size. The save-as option for the image offered at that point is:
 For choices emulating export in other paint programs, right-click on the image, choose copy, open a paint program (Arahpaint is my favorite at this moment), and from its image menu choose paste.
 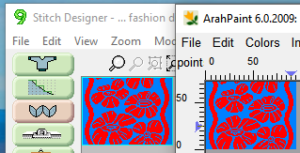 Using Arah’s color exchange, the image may then be converted to black and white for 2-color work and is saved in a format usable with other software and in other machines.
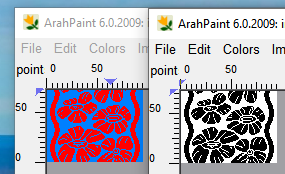

 but if the image needs to then be reduced to BW, Arah is the easier and predictable tool to use.
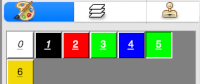
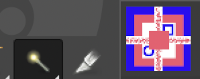
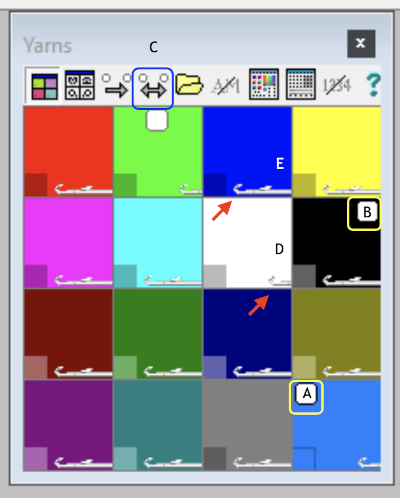 It is useful to establish working history using the same design motif. In the first image, left-click on red, the from color, right-click on white, the to color, click on the double arrow to make and apply the change
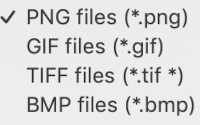
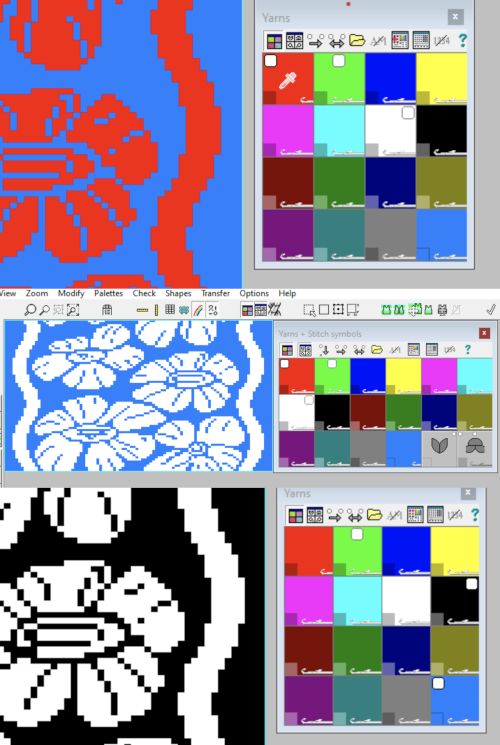 The print dialogue allows for saving patterns as bmps.
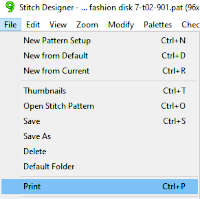
 choices may then be made about file name and the location for the save,
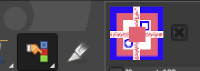
  If there are no “short” needles in the image being processed as in the last screengrab above, there will be an error message onscreen, pointing out problems in the numbers of colors present in rows ie more than 2 for FI. This is fixed by clicking on either the “needles” of one of the two active colors in the yarn palette to make one color the ground, and the other the contrast. The results from this process for printable bmp files are shown below, not for a bmp that may be used to knit the pattern on an electronic machine using a different download method. Here the resulting stitch pattern picture is shown in color reverse as well.
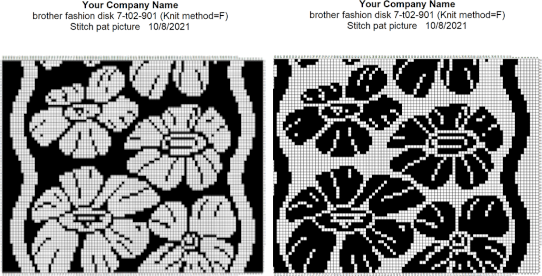

 At this time I am continuing to knit on my machines with punchcards and using Ayab, or img2track on my electronics, have no immediate plans to change that, hence my interest in using DAK software features while keeping in mind the possibility of using the final repeats on other machine models.
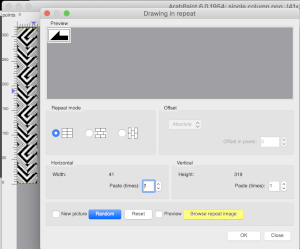 The information available to me as I began this post:
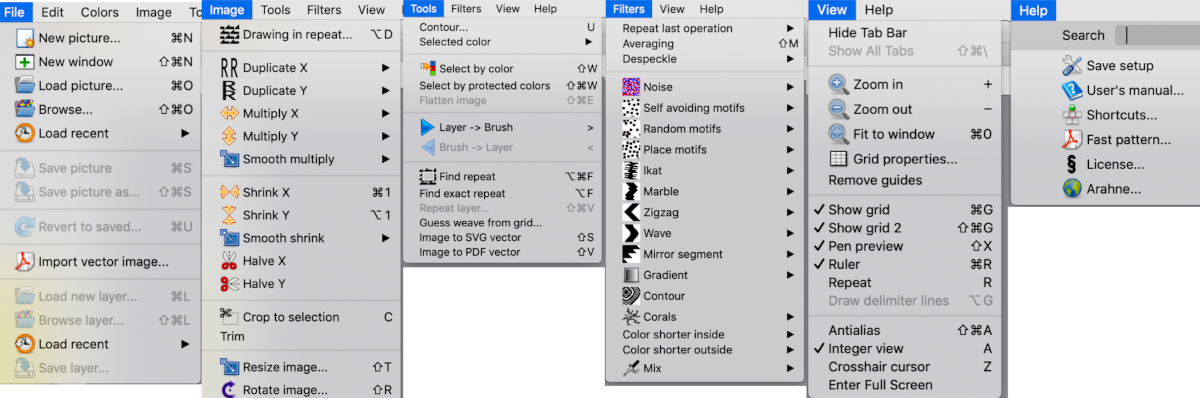
 When exploring design potential in any paint program, it is best, to begin with, to use a small repeat that can be clearly identified when tiled in various configurations, resized, and pixel edited. If drawing is with the goal to produce a BW bitmapped image for download of 2-color patterns, drawings can happen in those colors to start with. If color separations are planned in the development of the design, then 2 color images including black may be preferable.
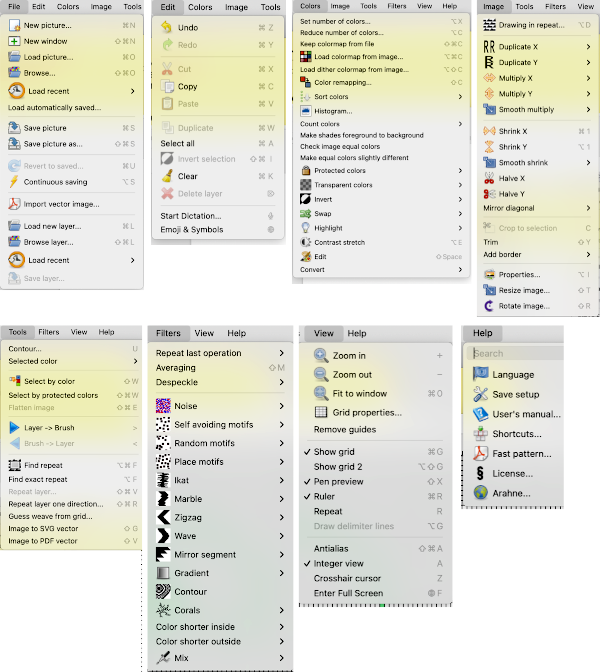
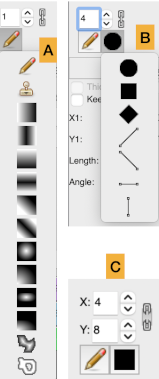
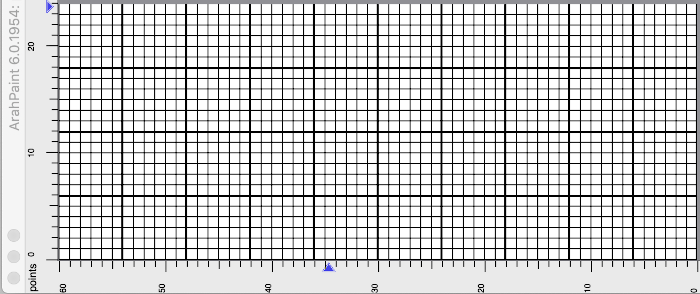
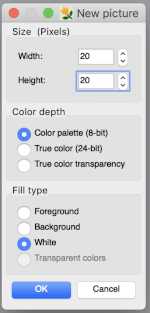 To work on the image, magnification will be required. This may be achieved several on the Mac, one is to click repeatedly on the magnifying lens icon in the toolbox, and the other is to press any number from 0 to 9 on the keyboard, and the zoom will instantly change for 1 at 100%, to 6 for 600%, to 0 for 1000. The latter is minimal for building repeats on a viewable grid, the magnifying lens may be used to reach a comfortable starting view. The zoom level for both increases and decreases may be changed during drawing operations as well.
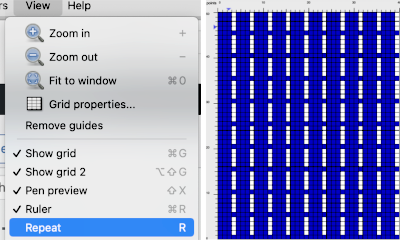
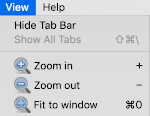 and the program may be used in full-screen mode on your device by making the very last selection in the View menu.
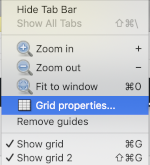
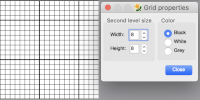
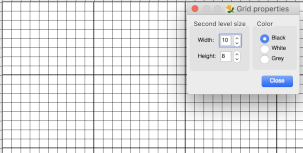

 In addition to the image grid, like Gimp, ArahPaint 6 also allows for positioning aids: guides. They are horizontal or vertical lines that are temporarily displayed on an image. To create a guide, double-click on the dark blue arrow displayed on one of the rulers in the main window. The guide is then displayed as a dashed line following the pointer. To move a guide after it has been created, hover a mouse pointer over the blue arrow and click and drag it to remove the guide to a new location. To delete a guide, double-click on the arrow. After a guide is created, another triangle in a different shade of blue appears below it. Use that to create the next guide, repeat as often as wanted both horizontally and vertically. To remove all guides choose View, Remove Guides.
 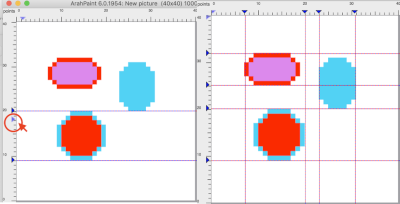 One use for the lines can be to mark plain knit rows between transfer markings in lace punchcards as illustrated in this Gimp image
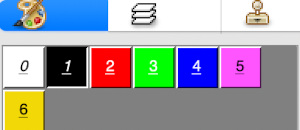
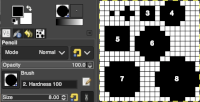
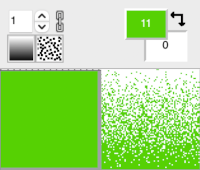
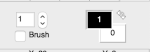
 The foreground (upper square) and background color (lower square) are used in drawing operations. They are numbered 1 and 0, not to be confused with the same numbers assigned to colors in the working palette. The starting palette may be altered to include black. Double-click on the foreground color at the top, the #1, not in the space below the palette icon. A color selection window will appear, choose, and click OK. This change is lost if one quits the program.
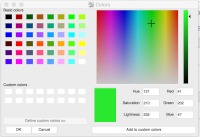
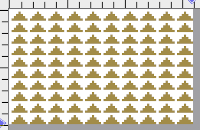
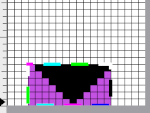
 If satisfied with the drawn repeat, use the selection tool to isolate the final motif.
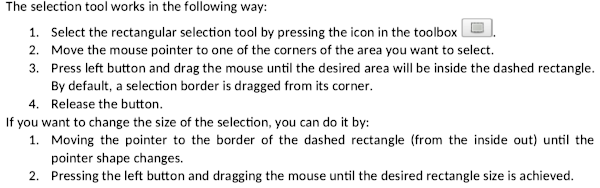

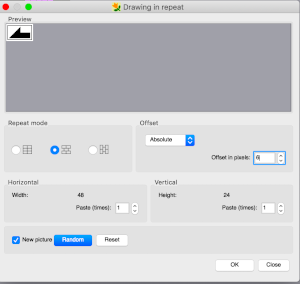
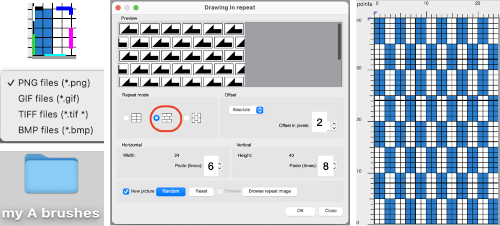
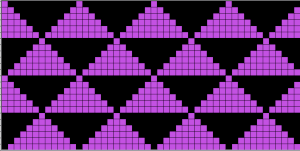 Pillar repeat also using offset in pixels
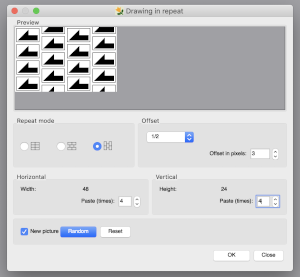
 Other offset options through the use of fractions
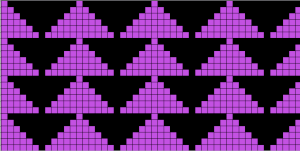
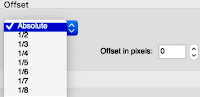 Playing with mirroring positions, producing a minimum 2 by 2 repeat,
 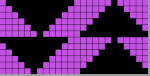 the result looks akin to the pillar repeat drawing above, but tiling again to check for alignment may yield surprises that can be viewed as design features or errors,
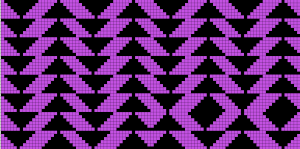


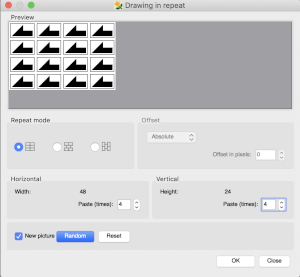
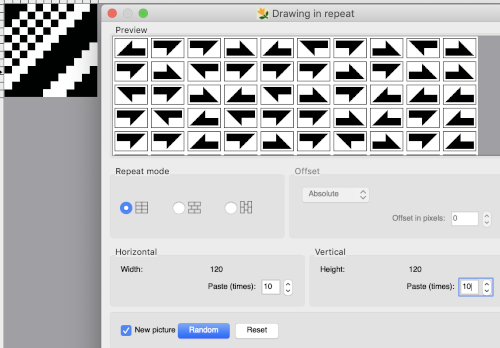
 Repeats may be built in a more controlled manner using the image/duplicate X menu,
 a half drop was added
 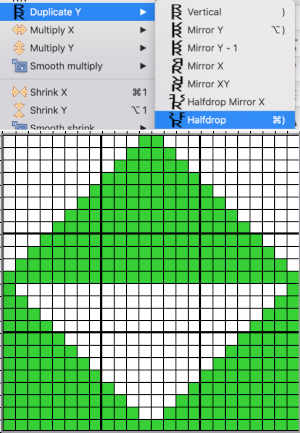 and the repeat was tiled to test alignment
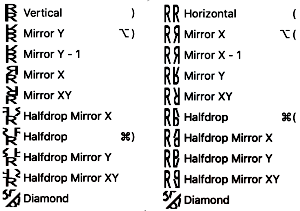
 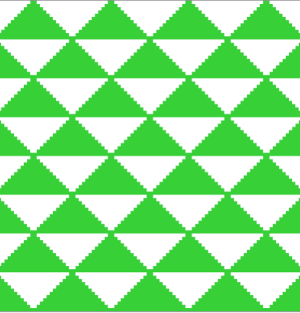 The duplicate tool enables the repeat of an image or part of an image in a fast way. All duplicate tools with the exception of Mirror X-1 and Diamond work similarly to the drawing in repeat tool if the new picture option is enabled. The mirror X-1 works the same as the normal mirror, except the last pixel of the image is omitted from the image
 Eliminating those double pixels can be achieved by cropping. The first mirror is for Y-1, the cropped image is tested for tiling by drawing in repeat
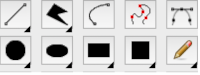
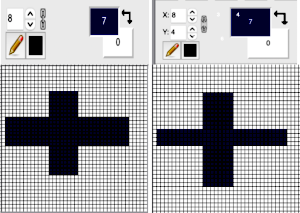
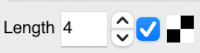
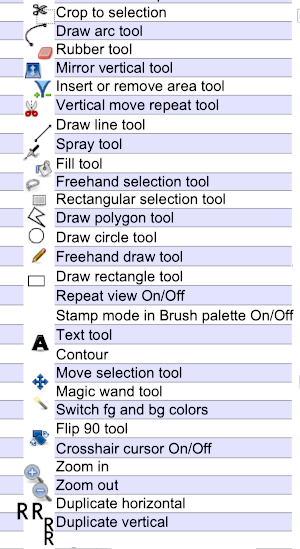
 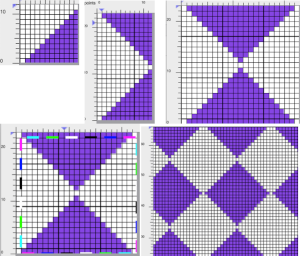 Drawing lines: use the straight-line icon button to activate the tool, select the line thickness by selecting a number of pixels to be used then move the mouse pointer to a line starting point on the canvas and press the left side of the mouse, dragging it until the line is of the desired length and angle. When the line is at that desired length release the mouse.
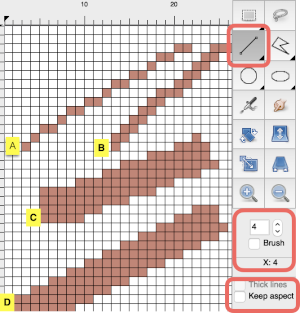 The thick lines option works only at line width 1, which will keep the single pixels connected
 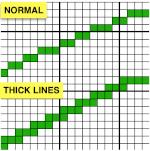 If you double-click on the line icon, the Straight-line icon is activated. Now you can draw horizontal, vertical, or diagonal lines. If you move a mouse horizontally—it doesn’t need to be perfectly straight, the drawn line is horizontal. If the angle between a line and the horizontal axis exceeds the angle of 23 degrees, the drawn line will be diagonal at 45 degrees. If you move the mouse toward the vertical axis, the line will be drawn as a vertical line.

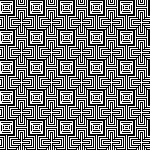
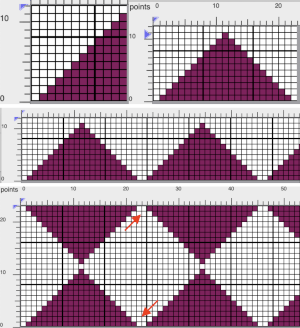
 The same process, using an 8X8 repeat drawn in repeat X3 in width to 24 stitches and X5 to 40 rows in height meeting the punchcard minimum height
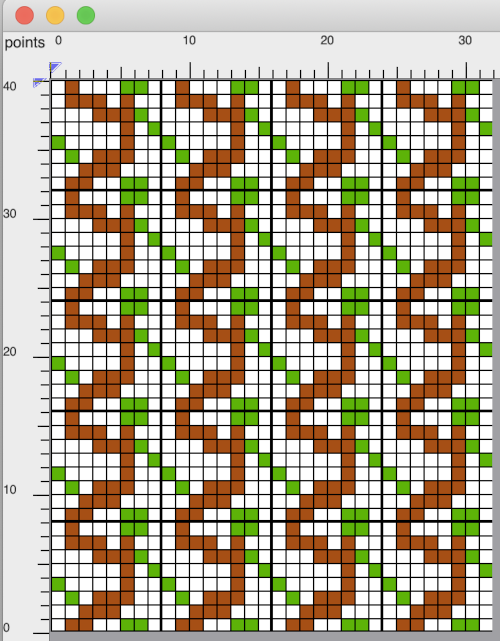
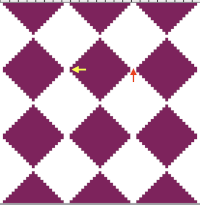
 Finding the repeat first on the complete resulting new image on left and testing its tiling, followed by finding the repeat again, cropping to the selection, and tiling that as well on the right
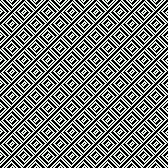
 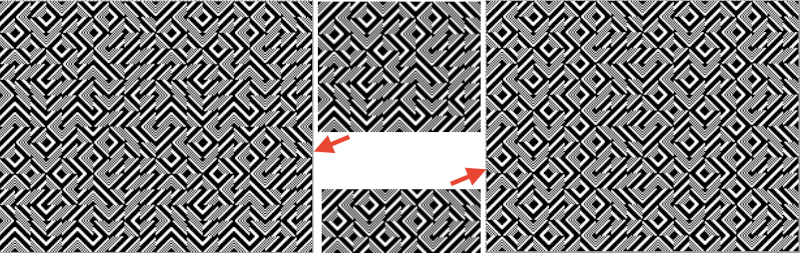 If the goal is to knit a scarf, 72 stitches wide, crop either repeat to a chosen 72 stitches in width, tile in length in either program to visually check alignment. If knitting in DBJ for approximately 1200 rows is the goal, one may obtain a visualization of the results ie for 1296 consecutive rows.
  A black pixel border could be added to the 72 stitches by copying and pasting the image on a larger canvas that will accommodate that border, or the border may be added by filling in pixels vertically to the edges of the original. Some repeats to play with: the 120 X 96 png
 I can see the process becoming addictive once a single personally pleasing starting repeat is developed, and its, in turn, becoming a possible source for collections of designs.
  October 2021: I have recently purchased both a PC and DAK software. At the moment I am not planning the purchase of any cables, the initial patterns
 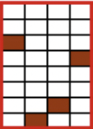 Create a new picture in the same dimensions, fill in the proper cells
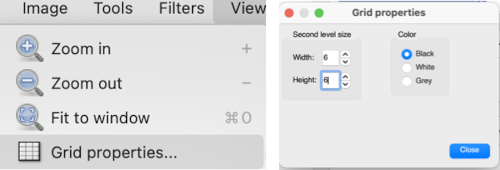 The resulting punchcard image
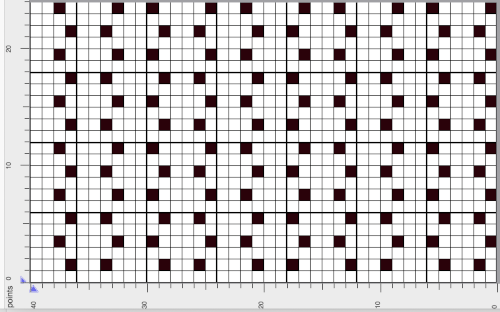
 The color exchange was easy and straightforward with self-drawn images in the opening palette when creating new documents in Gimp. It failed when working on a segment of published patterns. The Arah manual helped me find the solution. Converting the images from true color mode to color palette mode: the original image and its palette, this is not a “correct” working repeat,
 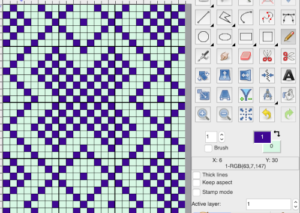 Converting for use with an expanded palette
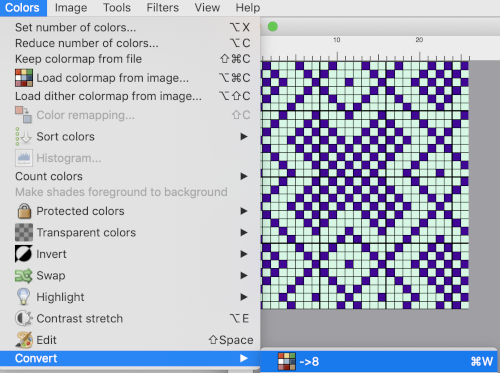 To change the color of the foreground, double click on it, choose black from the upper left corner of the colors window, the image and its foreground color will change accordingly.


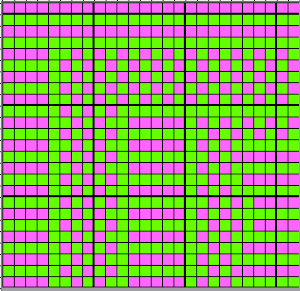
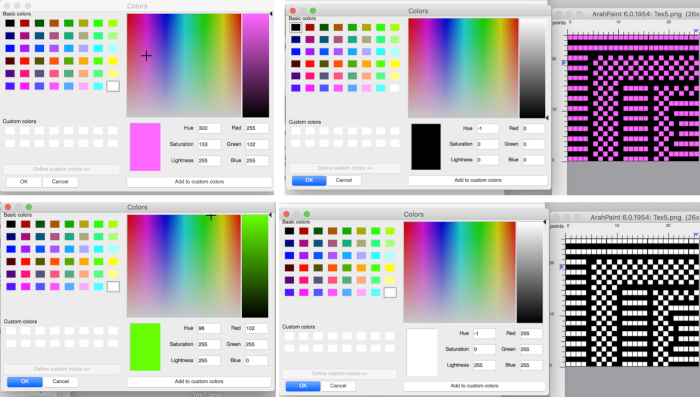

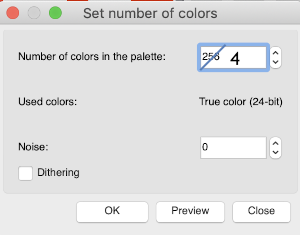 This repeat would work fine with a reduction to 3 colors, but the proof of concept uses a reduction to 4 colors for both repeats. The two shades of green will need to be exchanged separately, each shade is processed using the sliders on the far right, also note the crosshair.
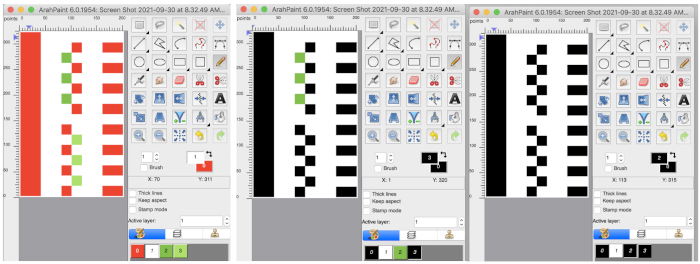
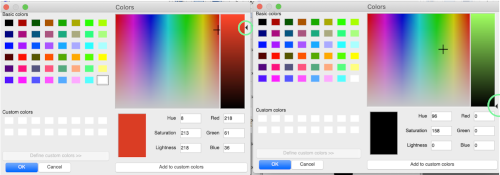
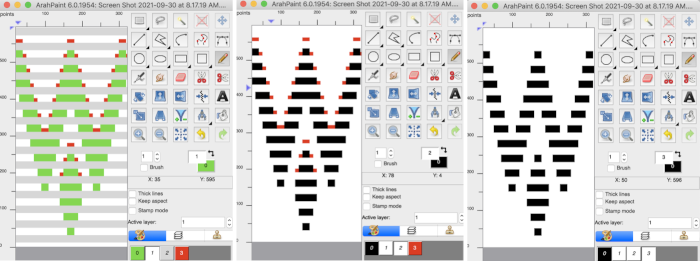
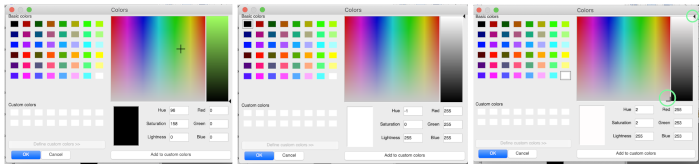
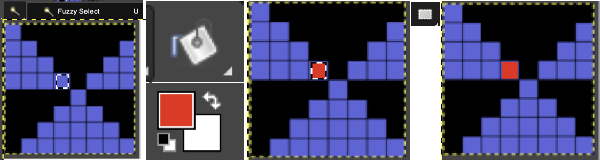

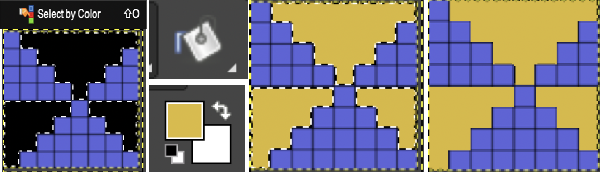
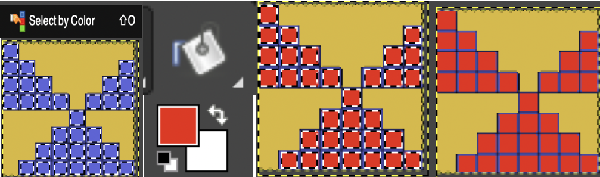
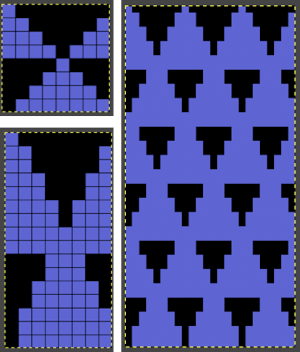 With added experience, I discovered part of the problem is that after restarts or working on multiple images, the interpolation setting changes randomly to cubic, and issue are resolved if the setting is changed to none again.
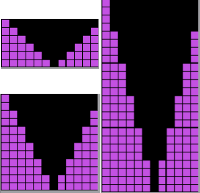 The Arah scaling appears to be quicker and far more accurate also when used on some published images that would require a lot of clean-up after resizing in Gimp. That said, when working with very large images Gimp offers the opportunity for controlled scaling to any size, keeping the image aspect ratio or not. This reference is described in translation as a pattern design course for Silver Reed knitting machines.
 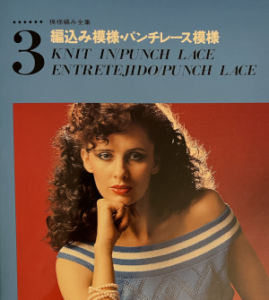 The publication offers many large-scale repeats that are suitable for punch lace, but also for what translates to “braided patterns” which when studied may be intended for fair-isle with enormous floats or for DBJ. No stitch and row counts are given, the goal is to match the manual 54X56 stitch and row count.
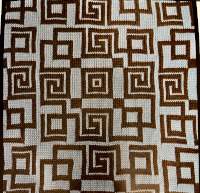
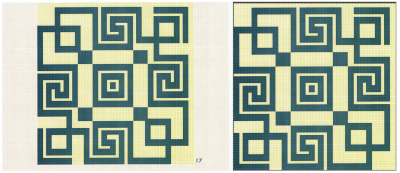 In Gimp, reducing colors: A
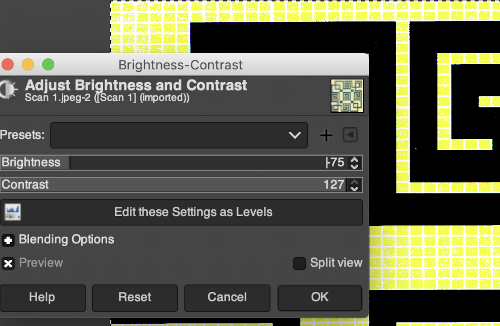
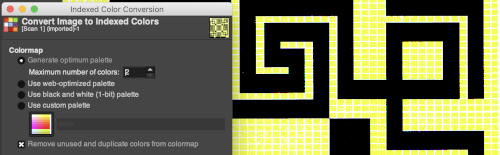 Use scale image to desired dimensions, checking first that values are a full multiple of the expected final repeat pixel count. If not, scale first to a full multiple of each value with aspect ratio off (broken chain link), then scale again with aspect ratio on (intact chain link), edit with a superimposed grid, cleaning up the repeat: C.
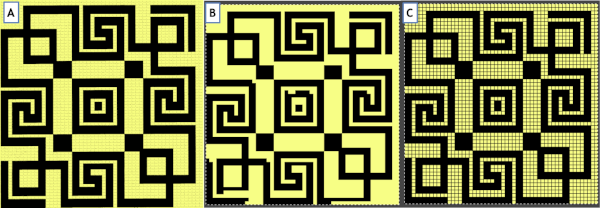
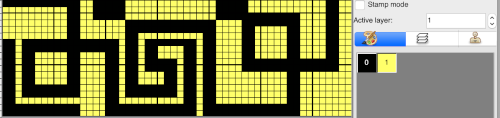
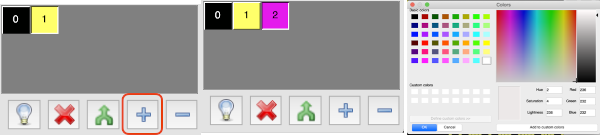
 single click on the yellow above to place it in this selection, double click on it
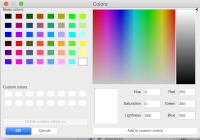
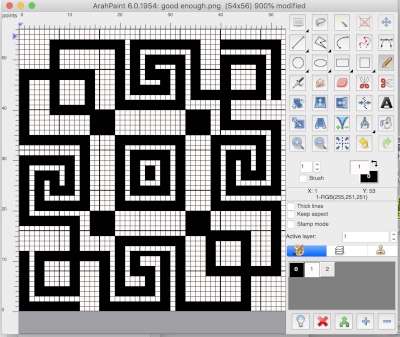 ArahPaint will also scale larger images in pixel units. Resizing may be achieved through the use of the image menu Resize option,
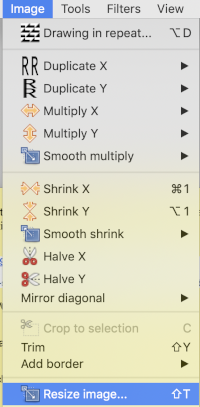
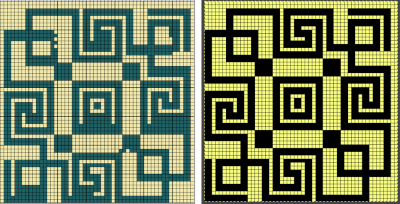
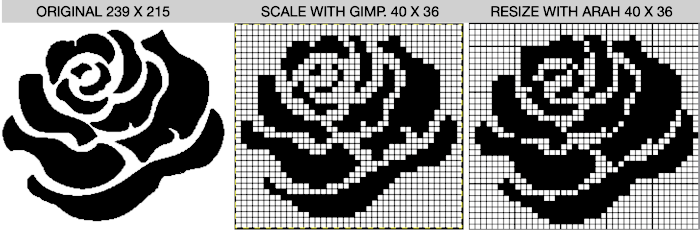

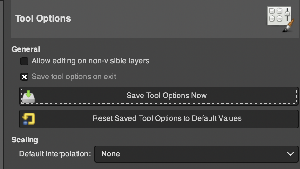
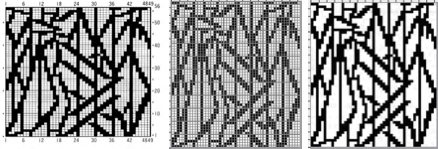
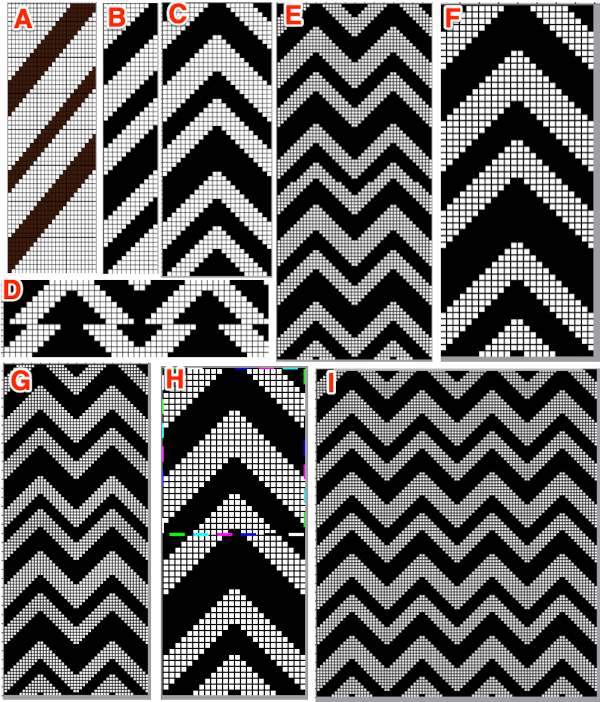 Planning a repeat suitable for a punchcard, the uncropped repeat F is opened in Gimp, and pattern fill is used in white areas to ready the file for tuck knitting. The image is then map tiled to check alignment once more, and if satisfactory, it can be saved, ready to be knit
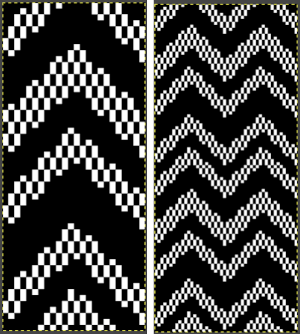
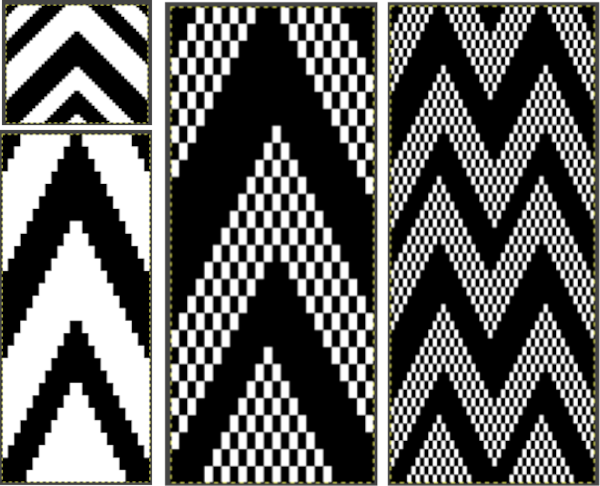 With experience, one can quickly imagine ways to clear errors and alter images. Electronic machines free us from repeat width constraints. Widening the zag repeat to 48 stitches, working in Arah, check vertical alignments first,
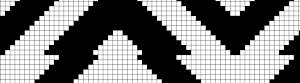
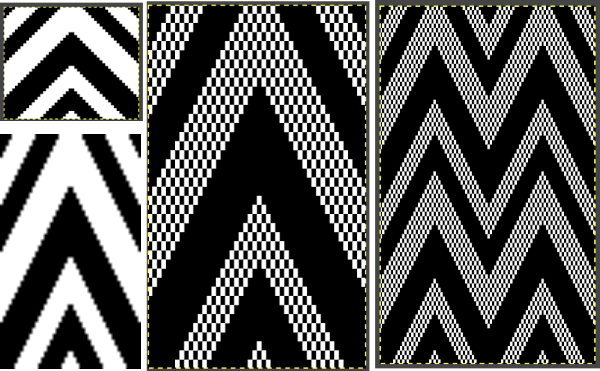
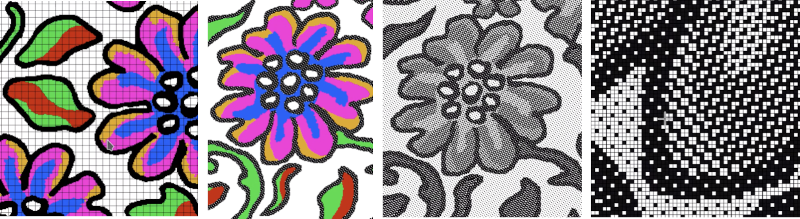 Working on a possible tuck repeat using only Arah Paint: draw and save the image you wish to superimpose on the ground. I chose to use the color red for visibility. Draw a new image, keeping magnification constant, ie using 0 for 1000 X. Draw a repeat unit for the brush you wish to use, choose repeat from the View menu, click on the stamp icon shown outlined in red, and the available brush will appear immediately below it.
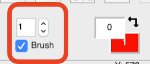

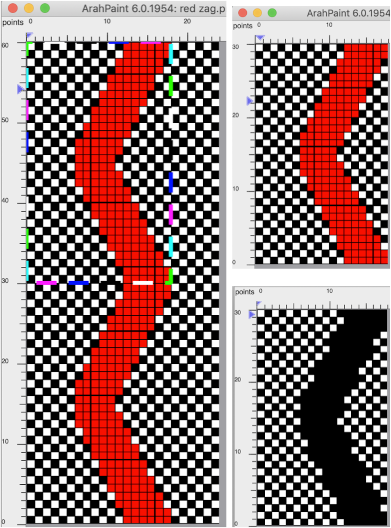
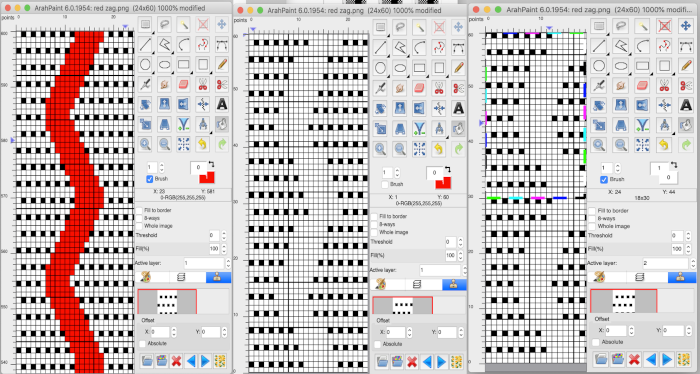
 Lots of knitters appear to be interested in large, nonrepetitive images. Depending on the machine used and its memory, the repeat may need to be split horizontally or vertically. Before electronic machines, many art-to-wear pieces were created by knitting repeats broken down horizontally into the punchcard widths, completing the height of each panel and then joining the strips together. Nowadays there are online tools for many tasks including dividing large images. For DIY, in the first instance, Arahpaint is used to split the “large” file in half horizontally, the resulting image saved. The action happens from left to right, so to achieve the split for the second half, the full-size original is flipped horizontally, split, and flipped again. Followers of my blog have seen the images of my friend Rocco recurring intermittently over the years. Dividing the image horizontally
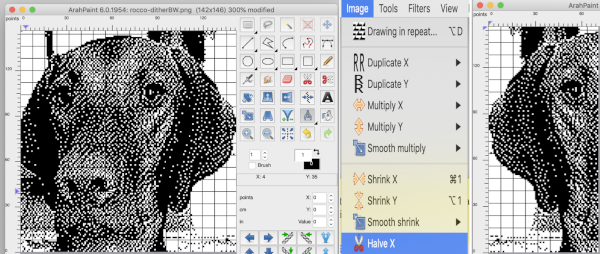
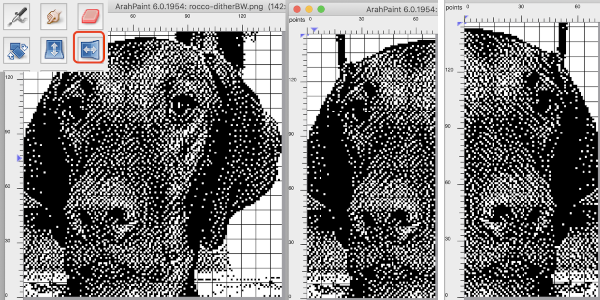 The same may be done vertically in a matter of seconds beginning with Image, Halve Y, and then using the mirroring tool
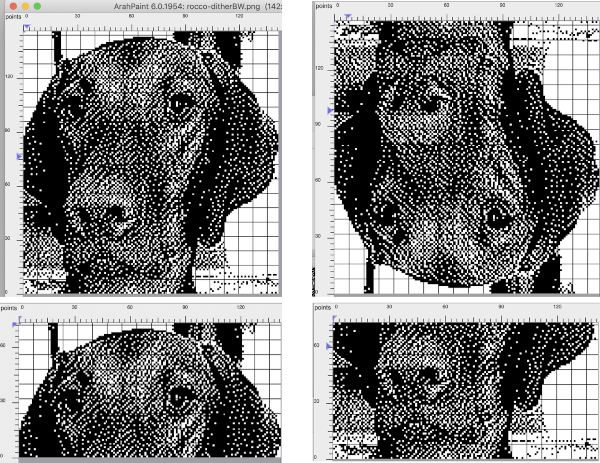 Color separations: the critical difference in the use of the Arah rectangle tool from that in Gimp is that it cannot be used for sequential selections of pairs of rows in color separations such as those for DBJ or mosaics. In those instances, the Arah image, scaled to the appropriate height may be saved, then opened, and processed in Gimp. For DBJ with each color in each design row knitting twice, design the shape and scale in length in Arah, save and open in Gimp for the separation, see post on working with
 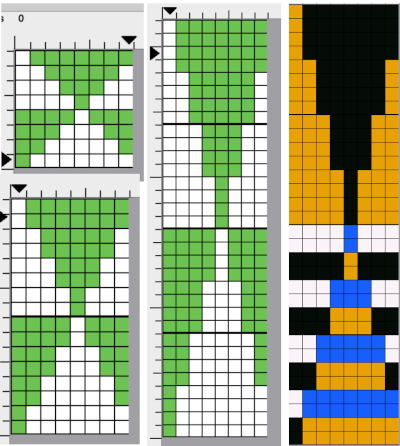 Mosaics: draw the desired repeat in Arah, double it in height, save the image, open in Gimp and proceed with mosaic color separation
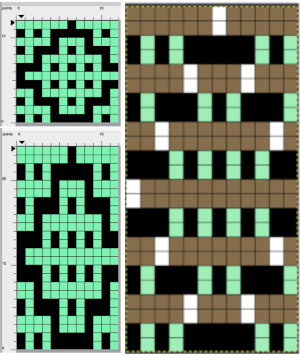
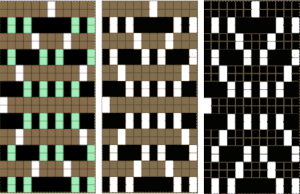
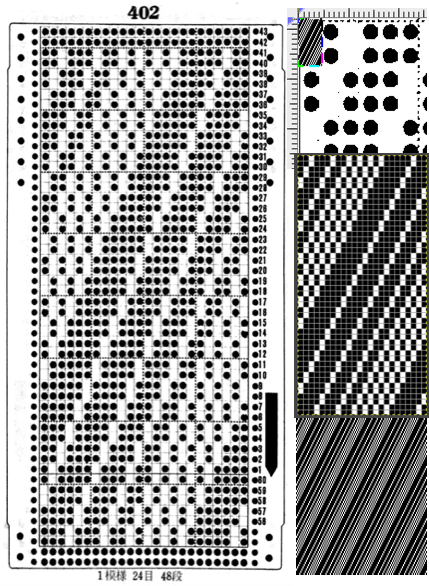
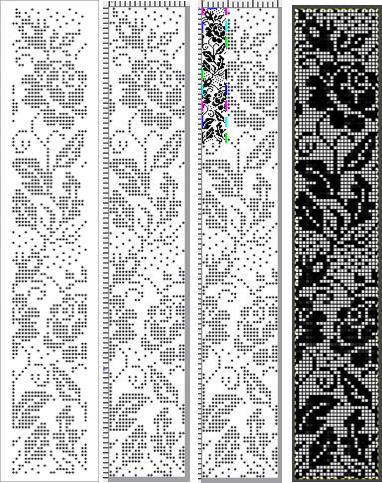
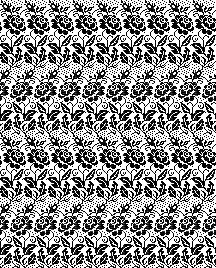
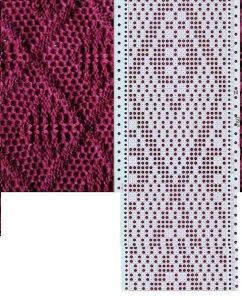
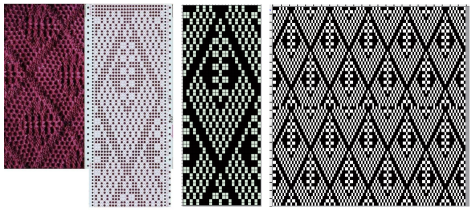


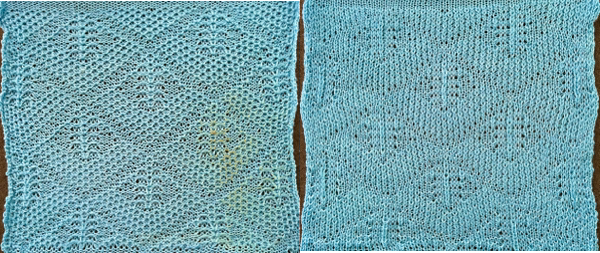
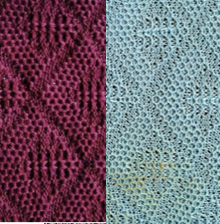
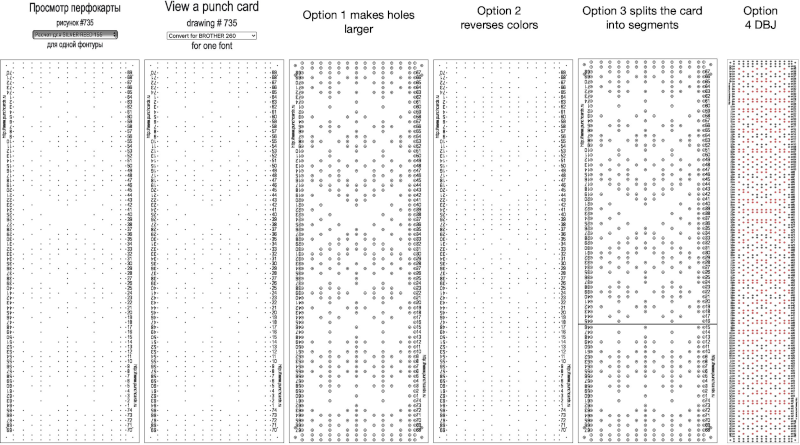 For some reason, I found the commands erratic when working on the translated version of the site, and fared much better in the original language publication.
 Screengrab the final image surrounded by extra white cells, and open it in GIMP.
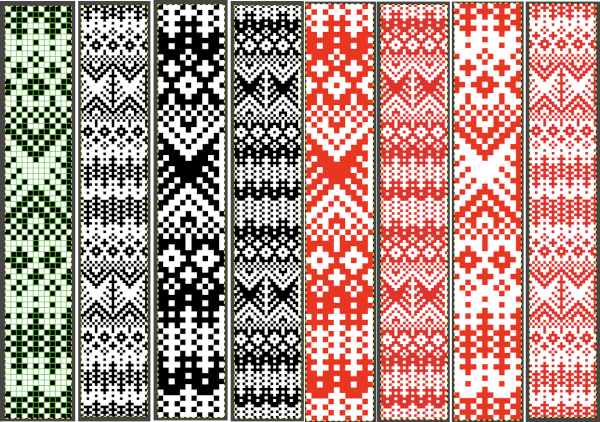 Getting a preview of how a finished garment might appear, here the tiled version is 192 pixels in width and one may glean some idea as to whether that repeat should ever really be used in a sweater or even a blanket. Further image scaling or cropping can happen based on the knit gauge.
 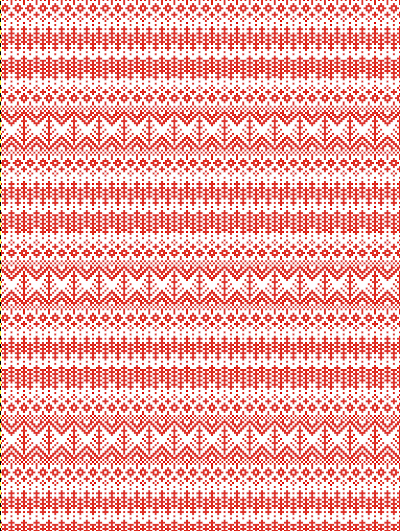 A very quick rendering imagining pattern and color placements using a simple sweater outline
 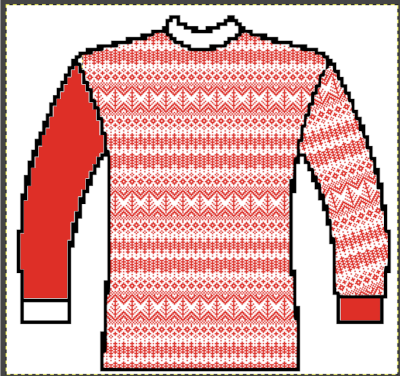 Collections of every other needle repeats for processing with a similar approach may be found in these volumes, available for free download
 Both volumes include accompanying swatch illustrations.
 For a better, printed match size, after capturing the image from the PDF for a single page outside image edges, opening it in Gimp, and cropping it to content, it is then possible to scale the results to measurements of a factory punchcard equal in width and adjusted for the number of rows in the image. My card required print measurements were 14.1cm by 26.1. Scaling executed with an aspect ratio that is too long.
 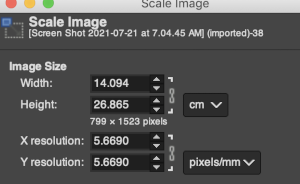 breaking the chain-link, removing size constraints
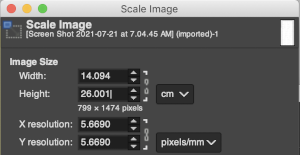
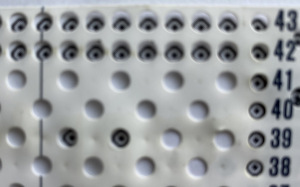
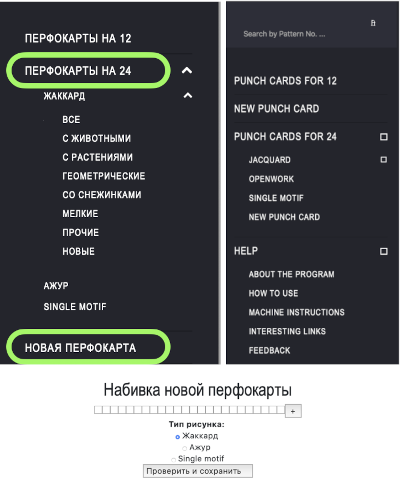
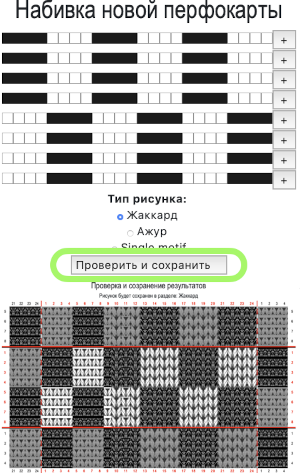
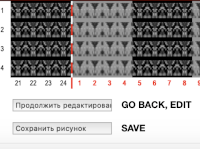

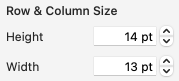
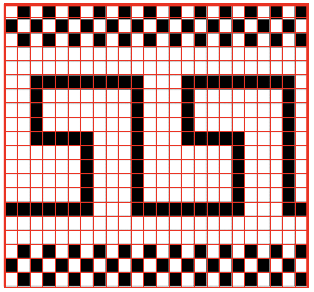
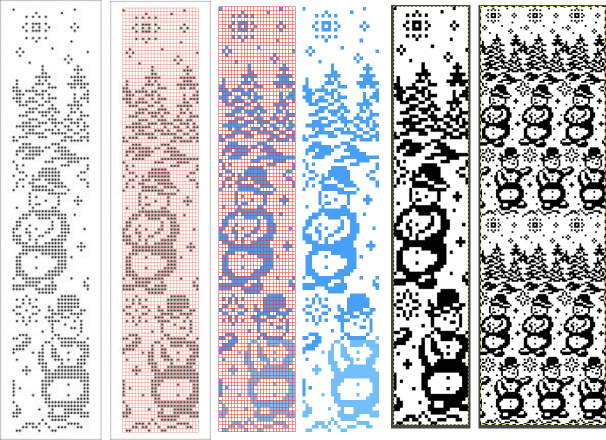
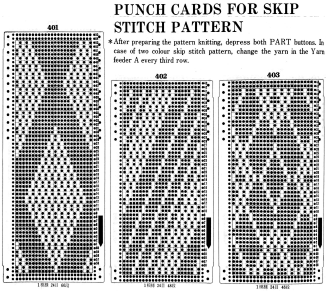
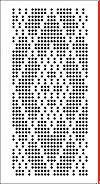


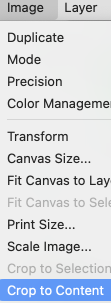


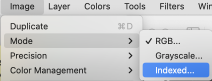
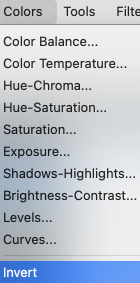
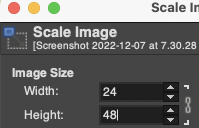
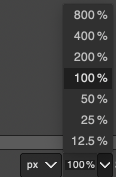
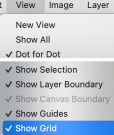
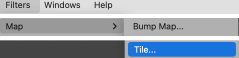
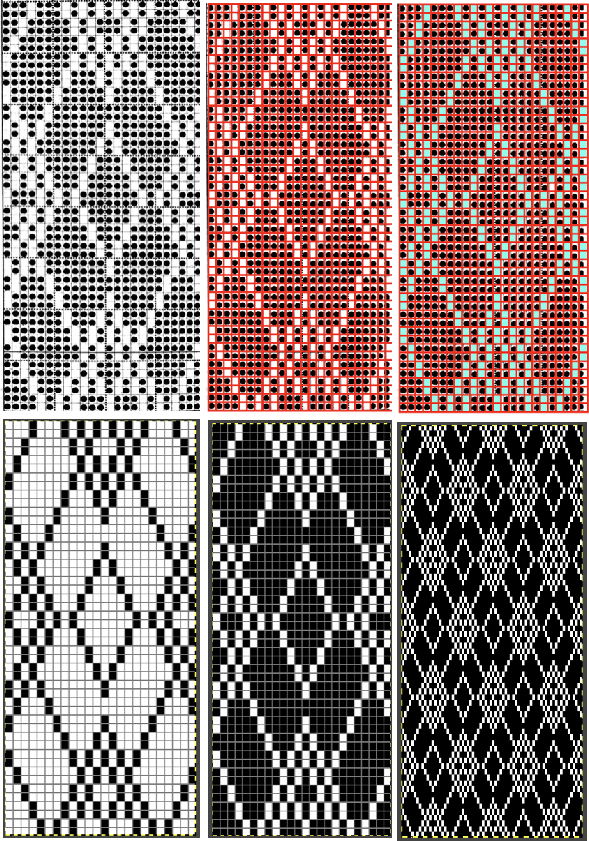
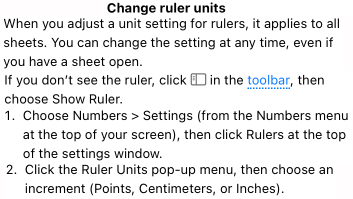

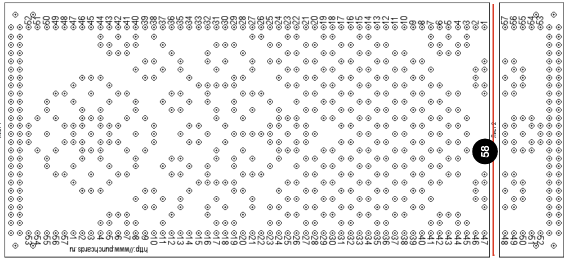
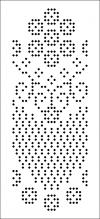
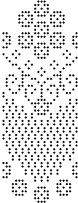
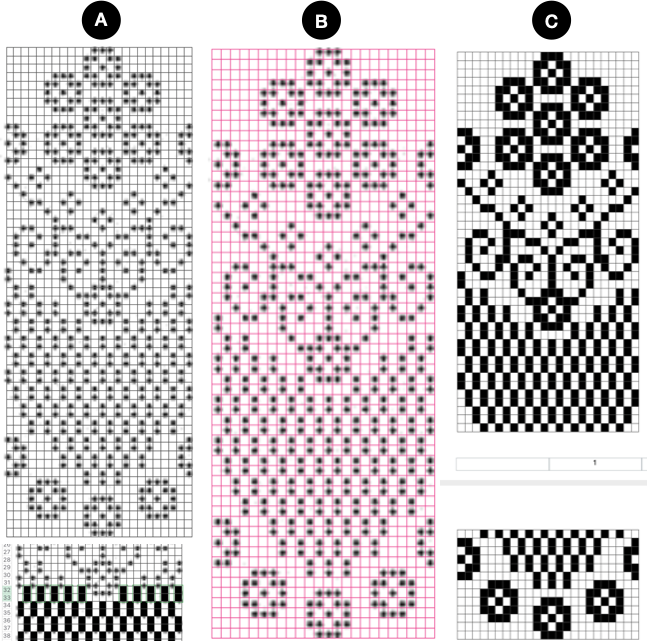
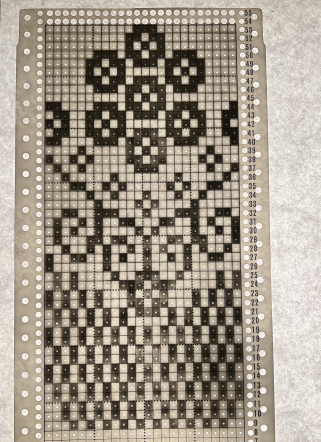
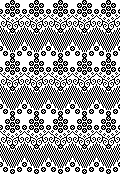
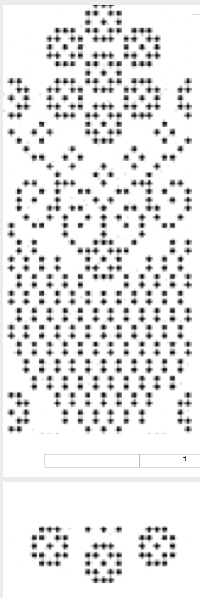
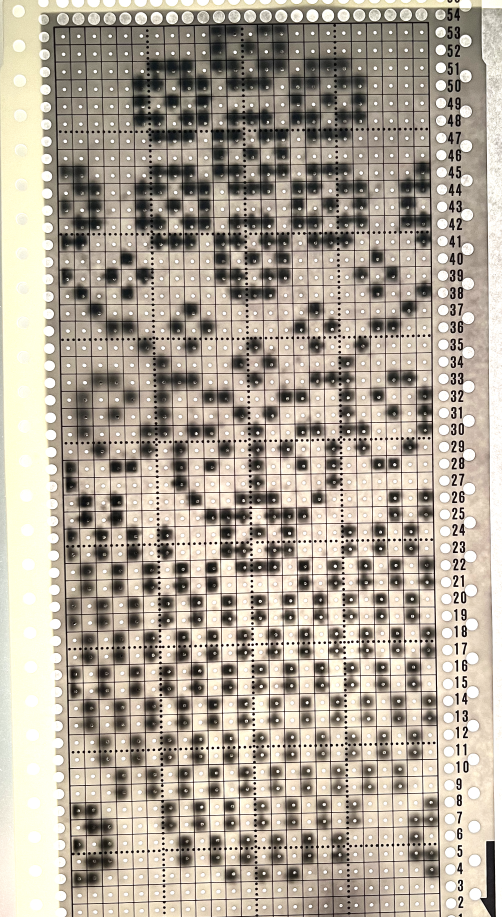
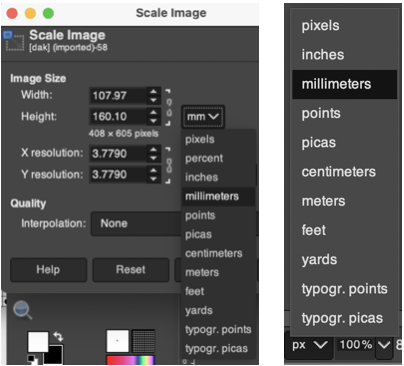
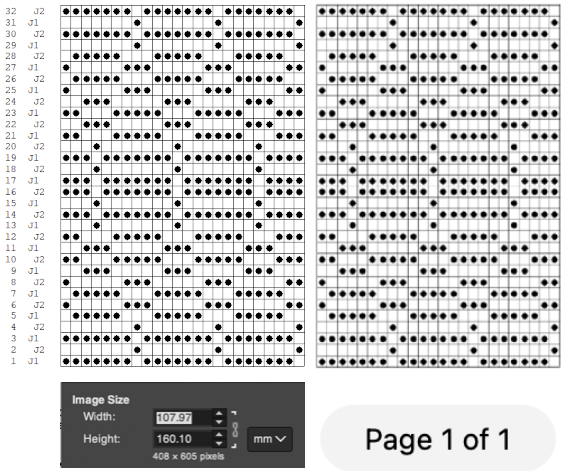
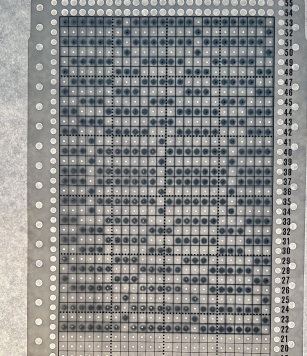
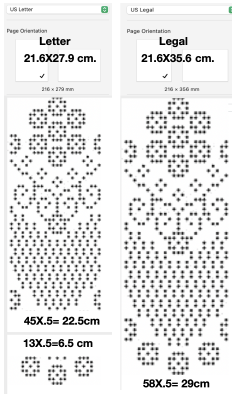

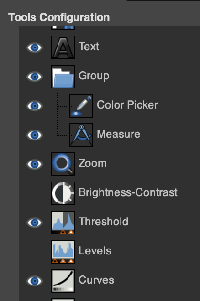
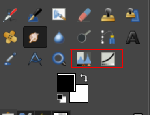

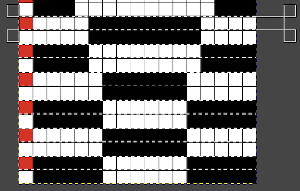
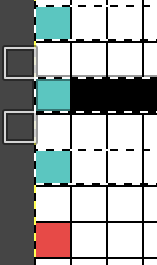
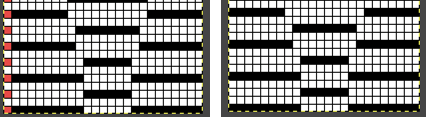
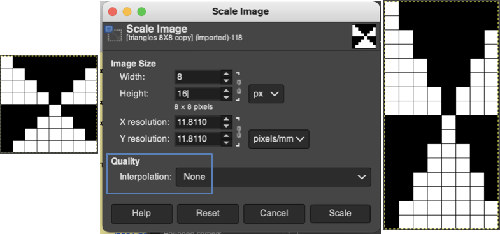
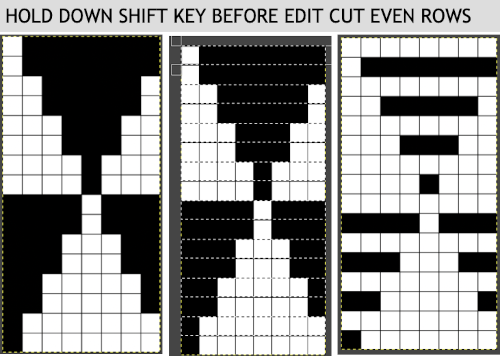 The results with the selection of even rows simply shift the result up a row
 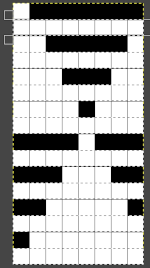 Test in your version of the program to see whether releasing the shift key prior to making edits changes them. Either way, being consistent in the choice makes for less confusing results. Experimentation takes a matter of seconds.
 using the rectangle tool, either odd or even rows may be chosen, remaining consistent for the height of the repeat in a scale to suit the end fabric goal. Here the original file is lengthened X2
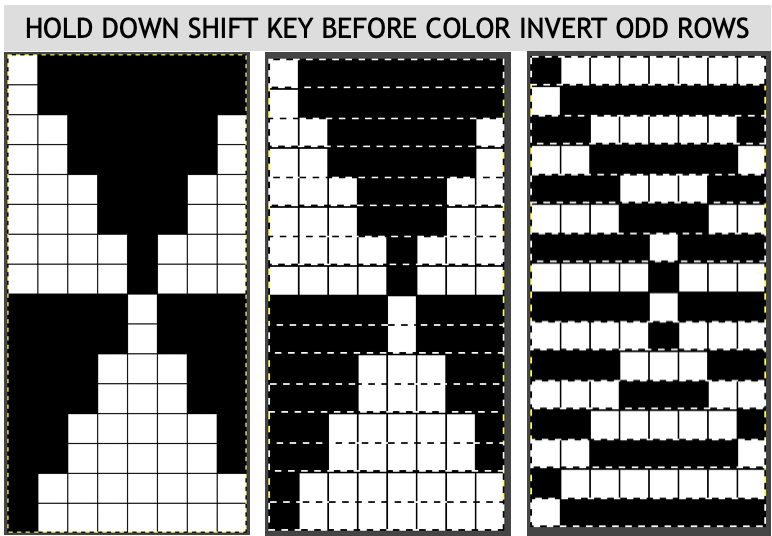 working with the original file lengthened x4. The selections can happen on every row or every other, whether singly or in pairs. Note the difference between making the first selection on the first pair of rows or the second.
 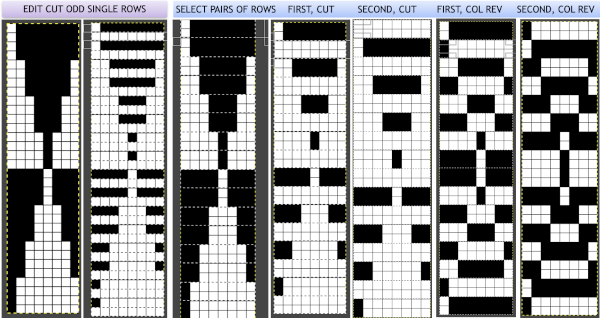 2021:
2021: 
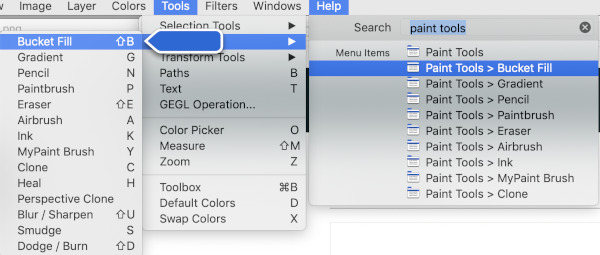
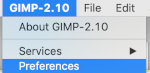

 single click on the filing cabinet icon on the right,
 double click on the patterns folder, and its own window will appear,
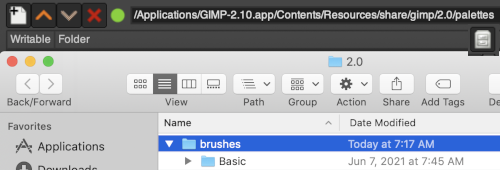

 For future use, any saved brush may be dragged and dropped into the named personal pattern folder icon, or into the folder after it has been expanded or opened in its own window. My opened brush folder
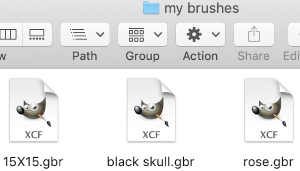
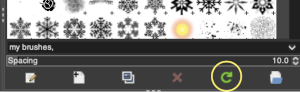

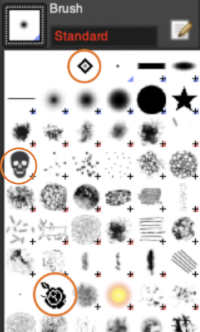
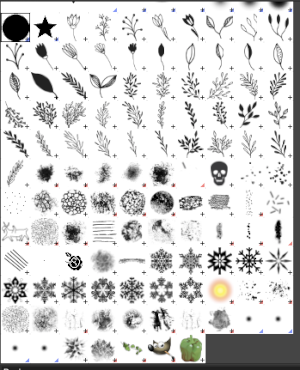 When exporting self-drawn brushes, the option is offered for adding spacing surrounding the shape, here a 10% addition was chosen
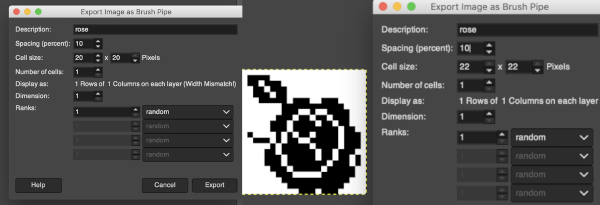
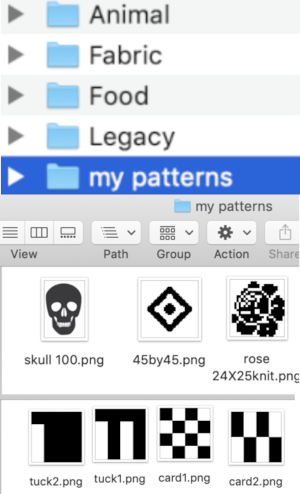 To save personal patterns, instead of choosing the file cabinet icon in preferences, one may choose the folder icon, following a similar series of steps to those above, including verifying the contents of the newly created folder
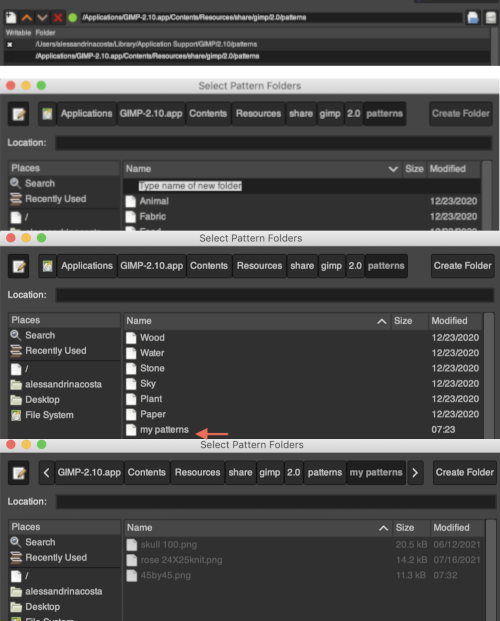 Use Windows, Dockable Dialogues, choose Pattern. The patterns will show on the right
 Click on the paint bucket, then on the pattern you wish to use on right, hover over the canvas with the paint tool, click on it and the image will fill in the chosen pattern.

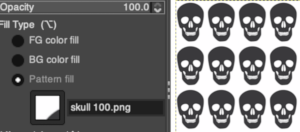


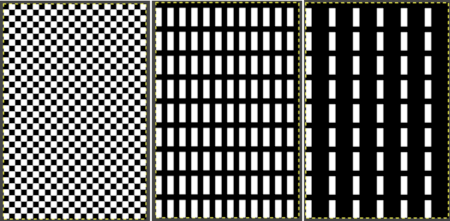
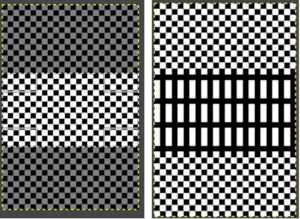

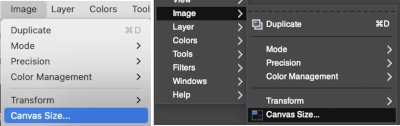
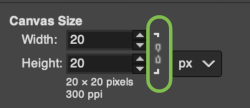
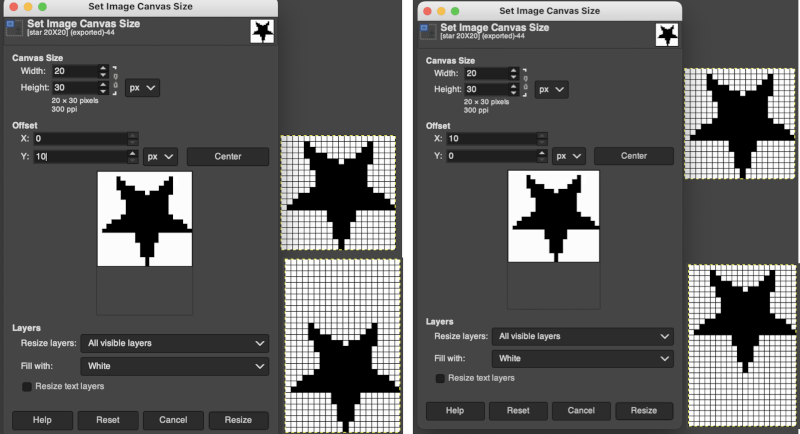
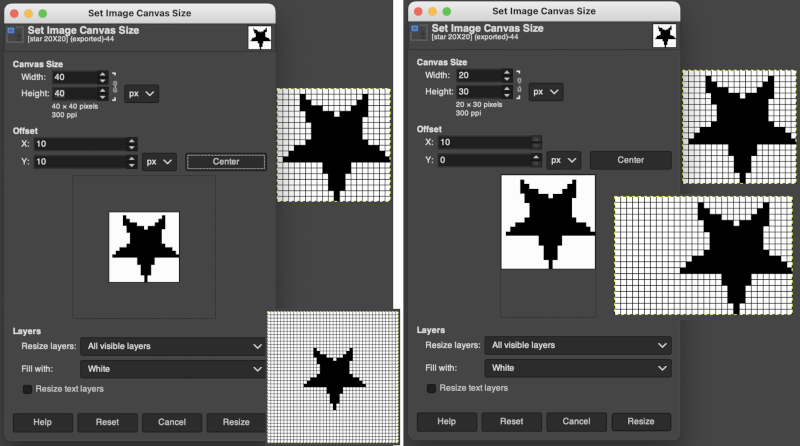
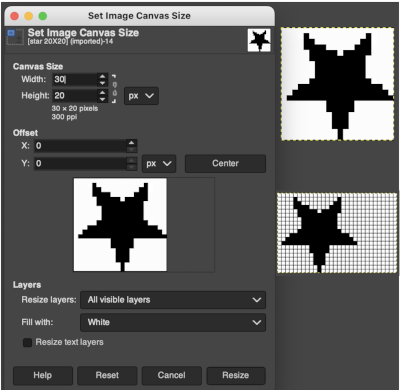
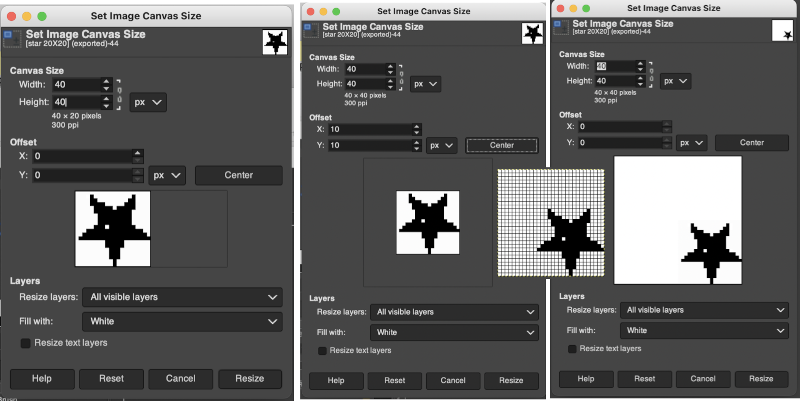

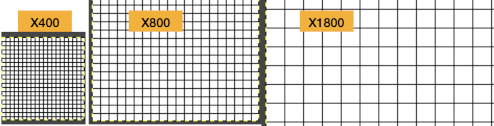
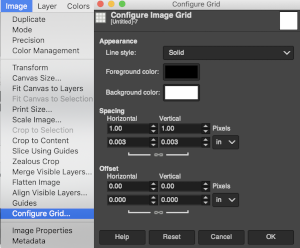
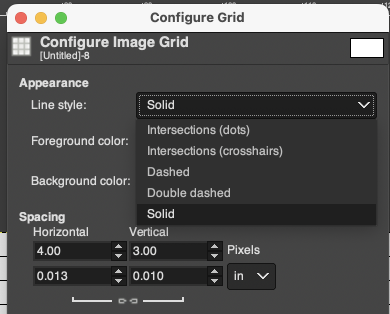

 Foreground and Background colors: in RGB Mode, click on the foreground color to select a new color for the grid, click OK
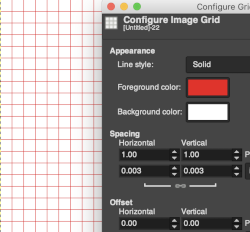
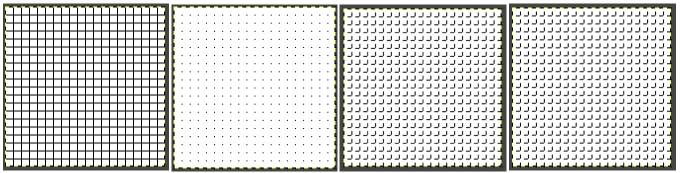
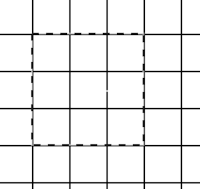 This command is found in the image menubar through
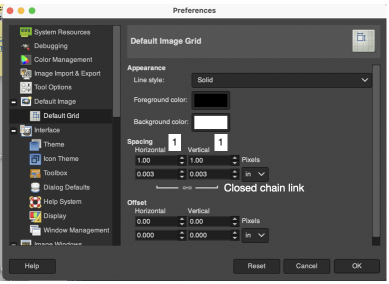
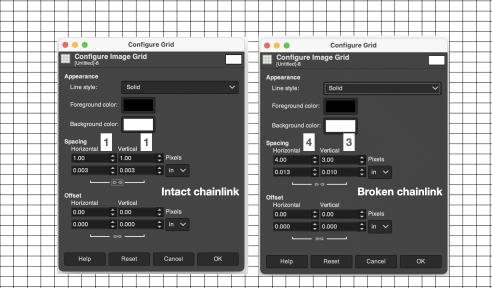
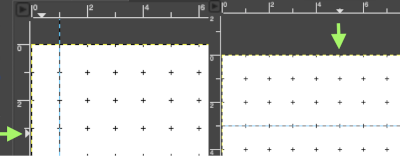
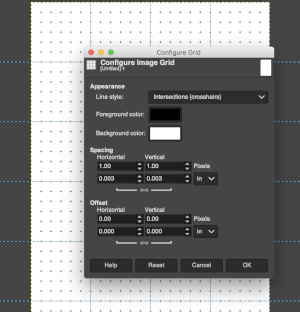
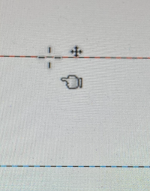
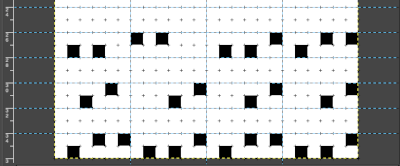
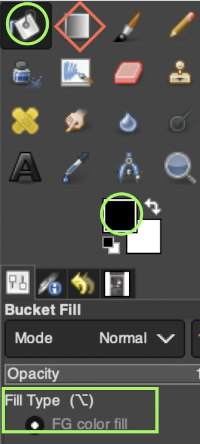
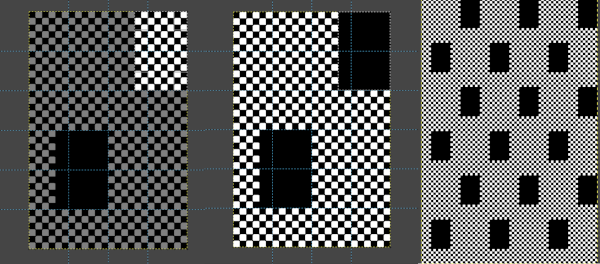 Built-in or custom brushes may be superimposed on a bucket-filled ground. Create an image in the desired width and height, here 24 X 24, and magnify at least X 800 for a grid view.
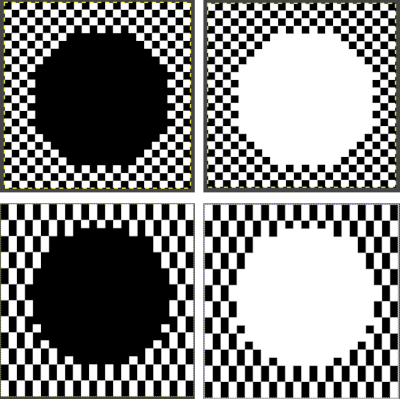

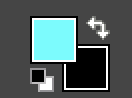
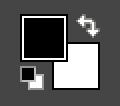
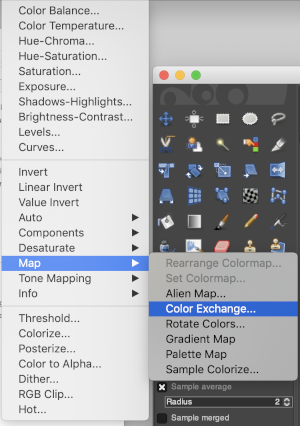 The color exchange window will appear. Here the white “from color” is left undisturbed. Select the dropper next to the “to color”, then click on the image on the color you wish to change, a palette window will appear. Make your choice, the color exchange window will now have substituted the chosen color for black, click OK, and white design areas are now changed to the chosen blue globally.
 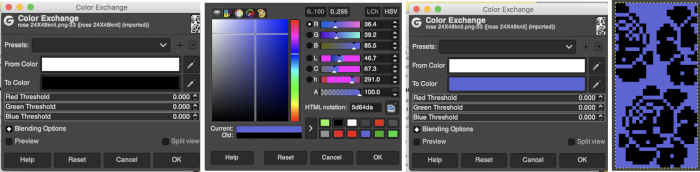 The process may then be repeated with the second color if desired. The color exchange window will show white as the default “from color”. Click on the white bar, choose black from the palette window or use the dropper to select black from the image. The from color will then appear as black. Repeat selection with the dropper from the right of the “to color” bar on any black pixels in the image, choose the color from the palette window to replace it, and the color exchange window will display the new “to color”. Click OK, and job done.
 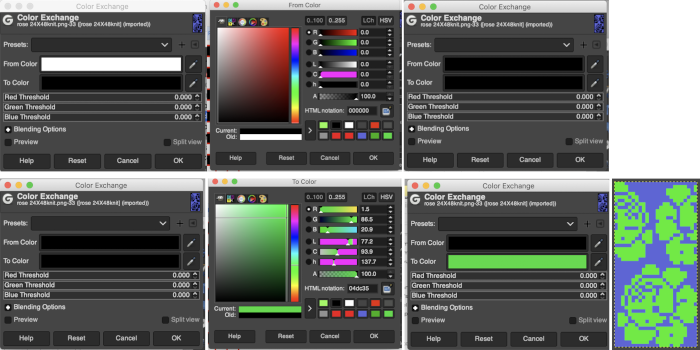 The process may be repeated multiple times on the same design or used on large-scale ones, giving one some idea as to whether or not to really commit to the estimated colors.
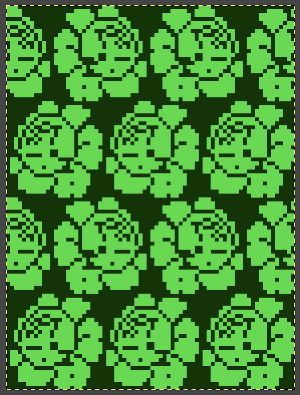
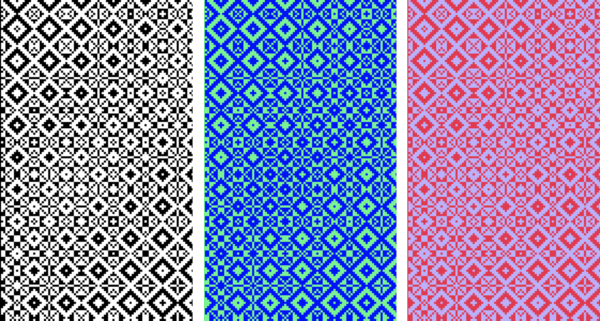 I recently had reason to review old PC files from my Passap knitting days and came across several cut files that when converted to png format appeared in colors rather than black and white, leading me to experiment with color exchange again. The image for the first experiment is part of a crib blanket by Cheryl Giles

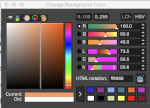

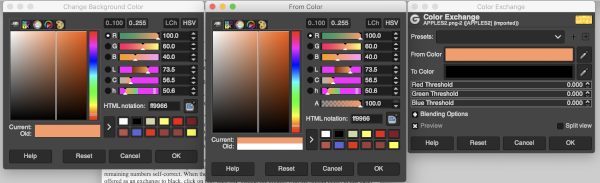

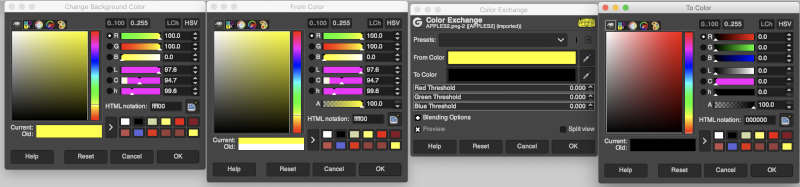
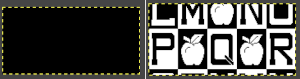 It is possible to colorize images originally drawn in black and white. The color exchange options will remain fixed throughout the process. The image may be worked on continuously and exported when color exchanges are completed, or saved and imported again after each step. The color exchange here happens consistently on the chosen background color, changing that quickly becomes familiar and easy. There are times that the repeat being processed will turn black onscreen, trust in the process and continue.
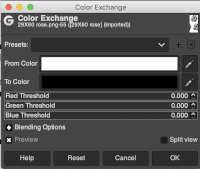
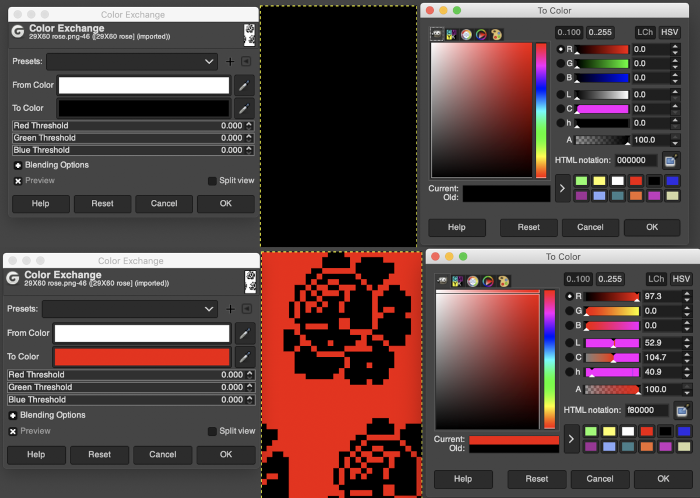
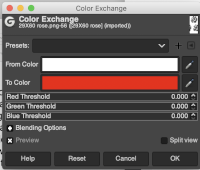
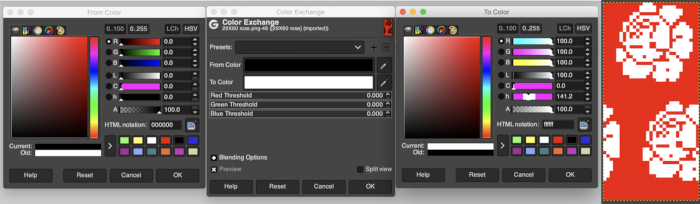
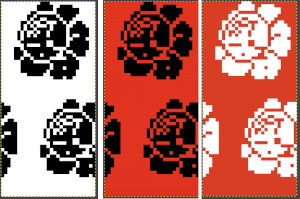 Developing custom palettes in order to visualize different colorways while using the same repeat:
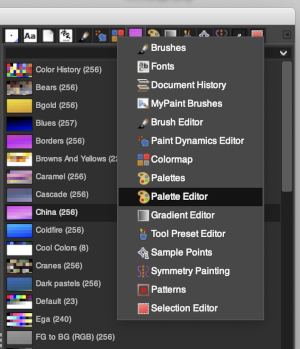 this window will open with selections for possible palette choices
 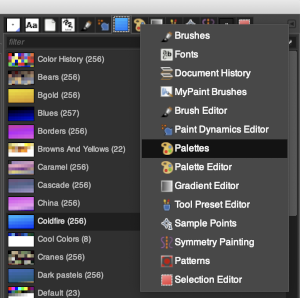 click on your choice, then click on the palette icon, and your color choices will appear, click on the white, to create a new background color.
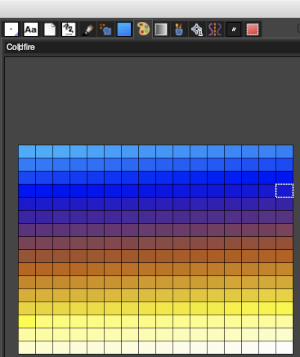
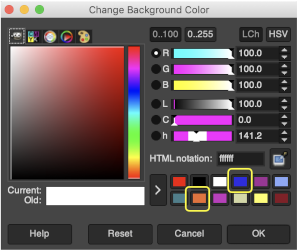

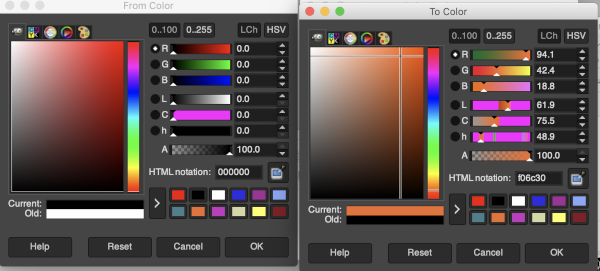
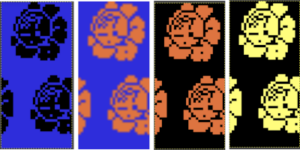 My success with series of other images in using color exchange has been spotty. Online forums reveal this is a recurrent issue with no clear solutions. Suggestions include stipulating that the cause may be the version of Mac OS in use. Color reductions using
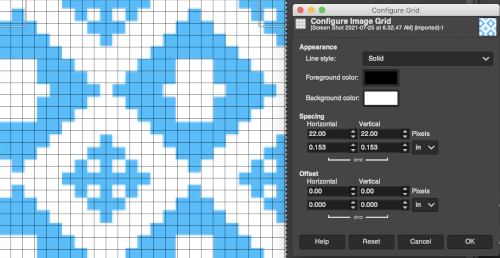
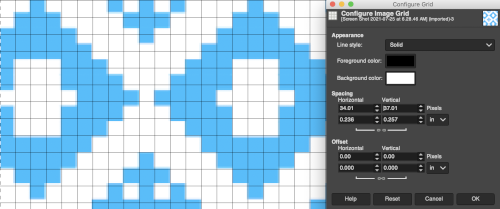 The image itself may be scaled concurrently to tweak grid border alignments. The final grid size below is 18X18, the image size is shown after scaling from a width of 277 pixels (with a broken link at that time) to a final 270 pixels in width
 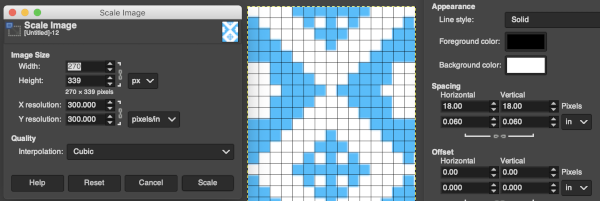 The screengrab of the above center, with a superimposed new grid; note the image, in this case, was also offset for better placement, a 3-pixel pencil was used to isolate the border of the possible smallest repeat
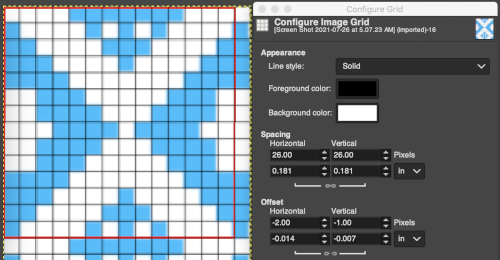
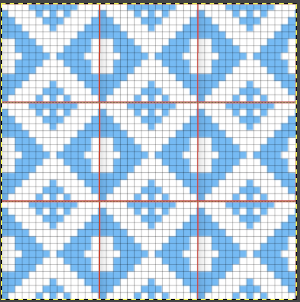
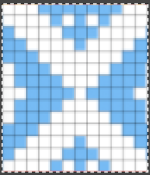
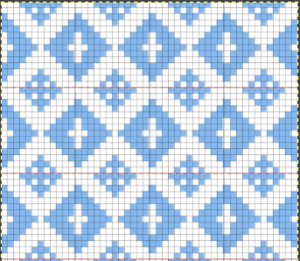 Translating the colored image to BW indexed may take several steps and some clean-up if only Gimp is used to process it. With the colored large-scale isolated repeat, the image is opened in Gimp. The Threshold tool transforms the current layer or the selection into a black-and-white image, where white pixels represent the pixels of the image whose Value is in the threshold range, and black pixels represent pixels with Value out of the threshold range. It may be activated from the pull-down colors menu or from the toolbox.
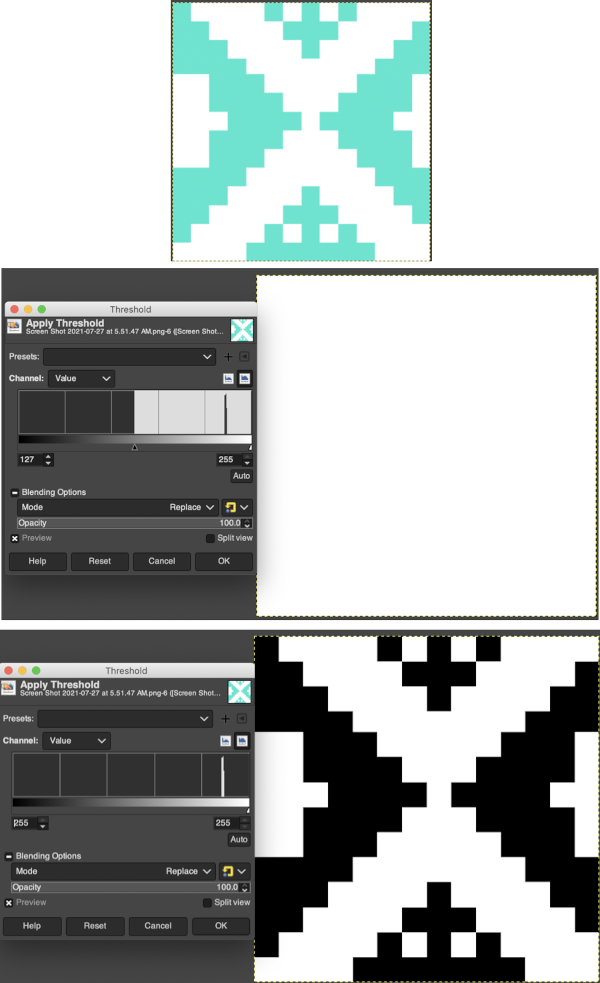
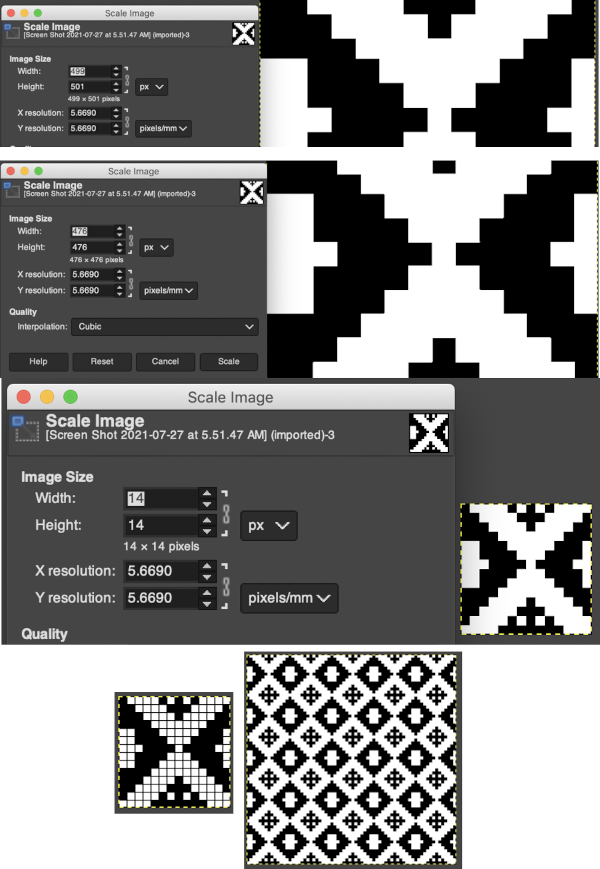
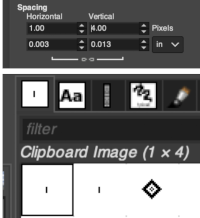
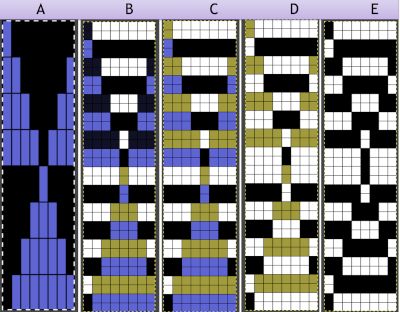 The appearance of the final repeat when color is reversed
 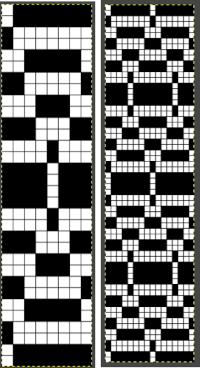 Another comparison of the 2 options for altering every other pair of rows in the specific color separation for a mosaic repeat. There is less filling in of cells with a different color, but in large files especially, I feel the result would become far more visually confusing to track.
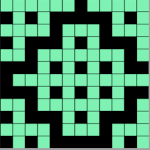
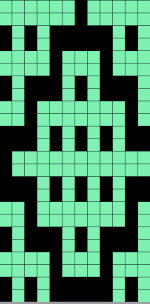
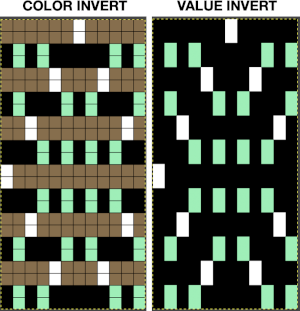
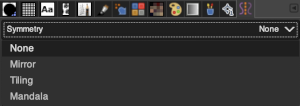
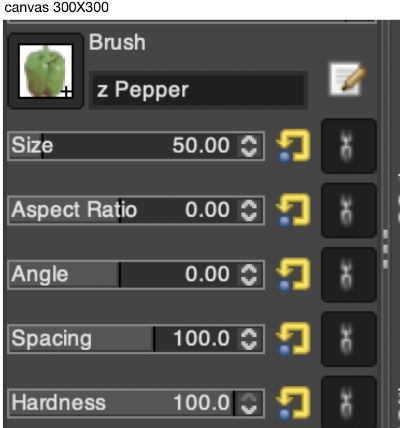
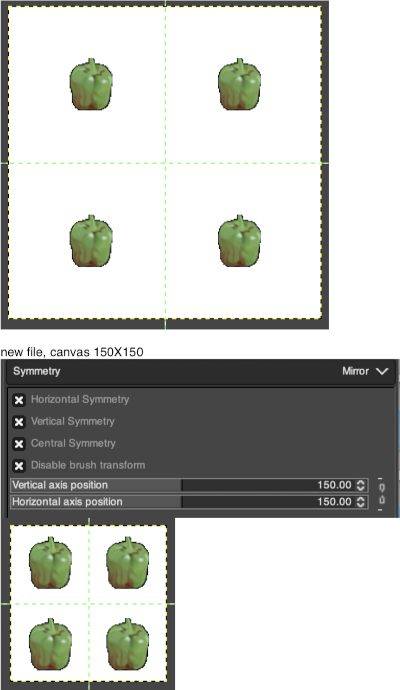
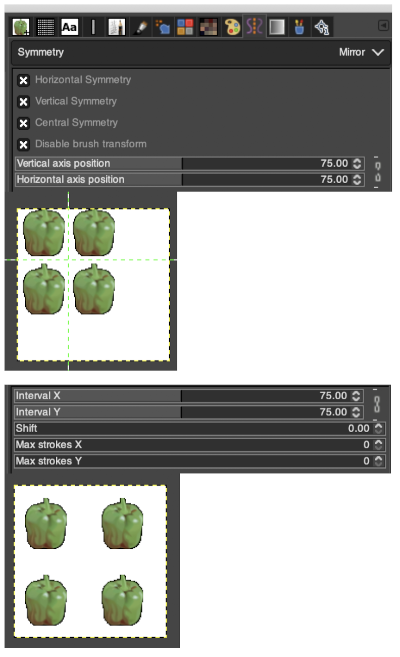
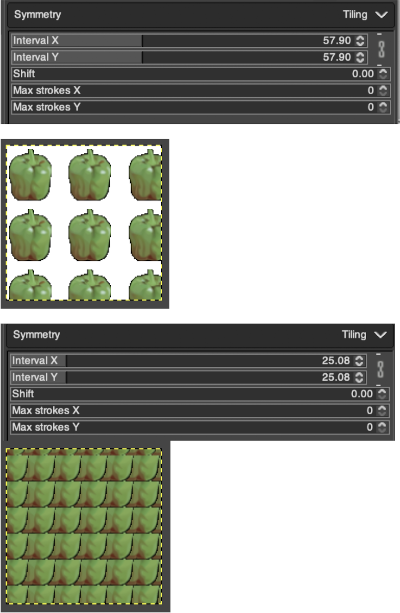
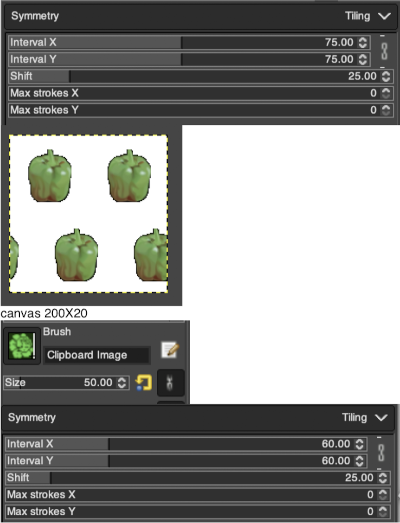
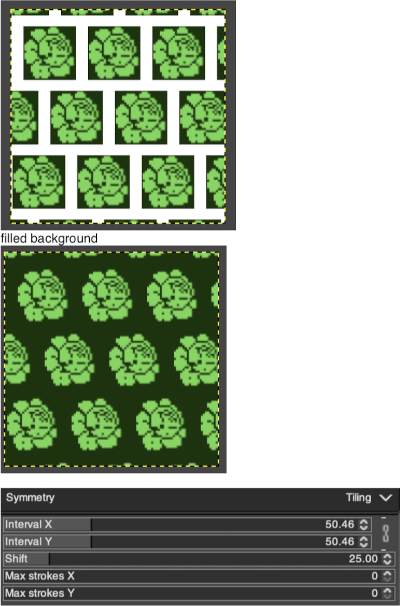
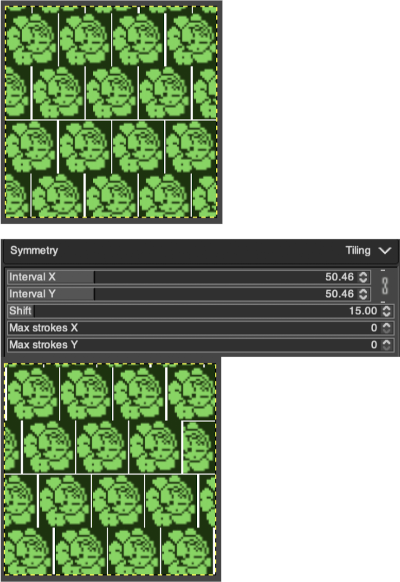
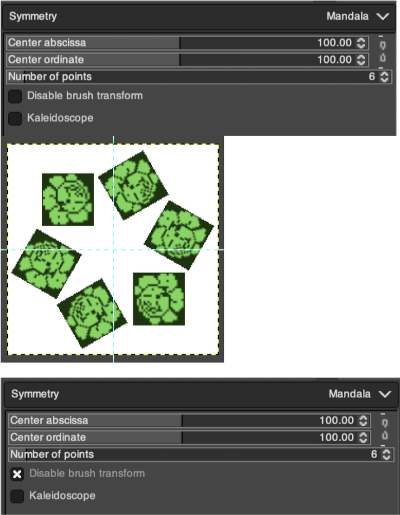
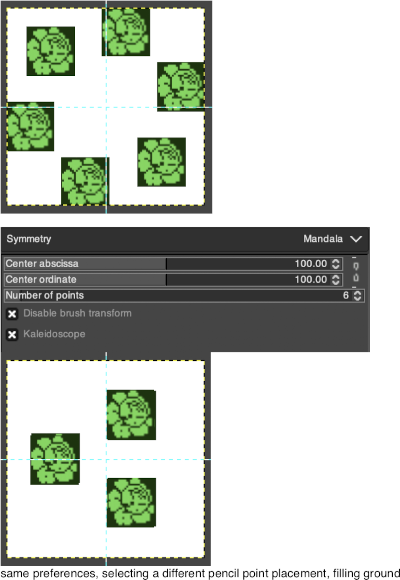
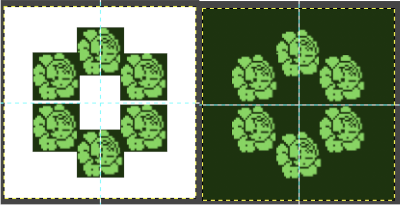 Working with potential knit repeats the scale is reduced further. Magnification is useful for the evaluation of repeats. The smallest repeat segments for use on electronic machines may be isolated. The filter, map, and tile option easily verify how the repeats line up overall. Cropping a 24-stitch width and tiling that also visualizes the suitability of the repeat for use on punchcards with the 24-stitch limitation. Grid view helps identify any need for “clean up”.
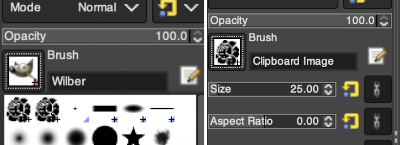 and a type of symmetry and accompanying settings, click on pencil tool, the motif will appear as on the above right, paste the image on the new canvas, undo and repeat setting adjustments until satisfied with the distribution of motifs.
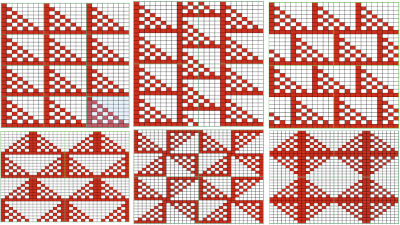
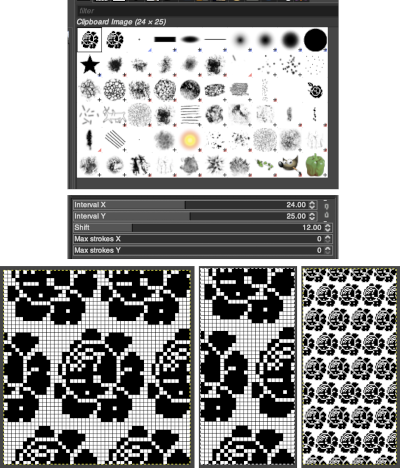 The 24X50 repeat:
 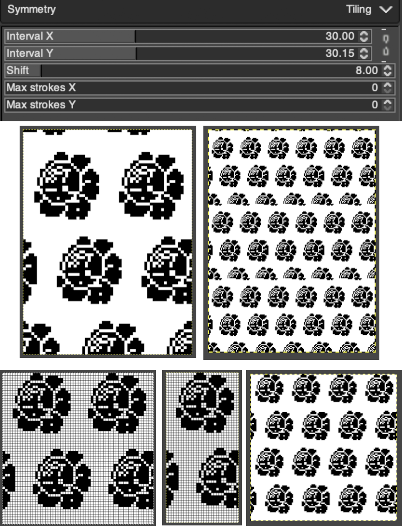 Being more deliberate with the math leads to a full, successful repeat
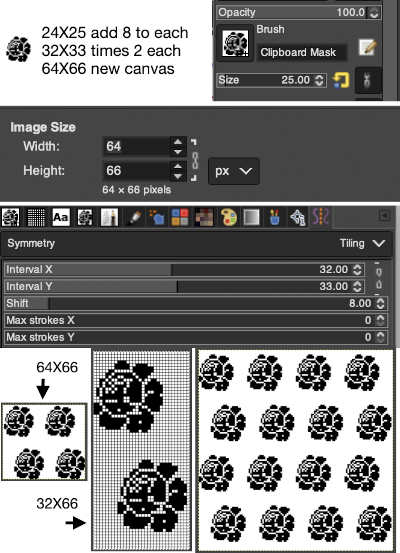
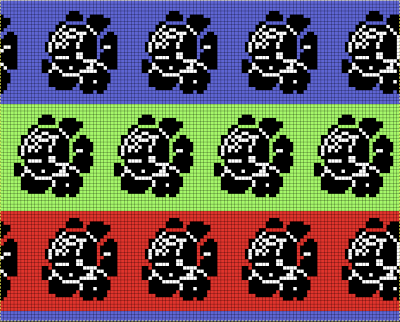 Using that small triangular 8X8 repeat
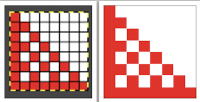
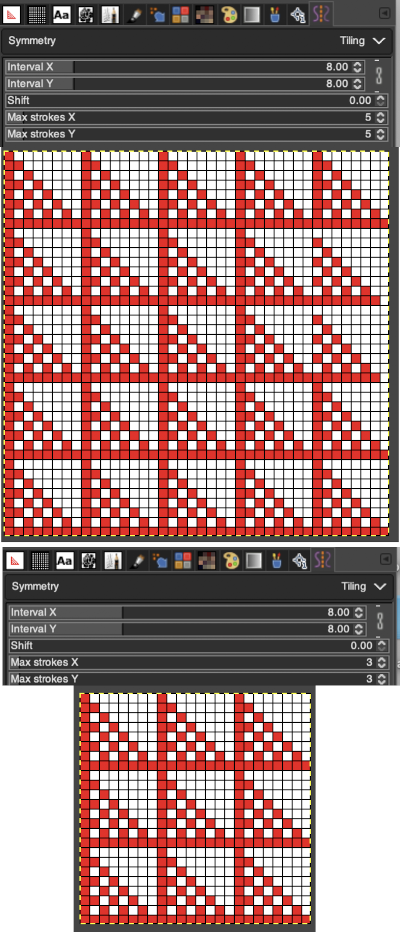
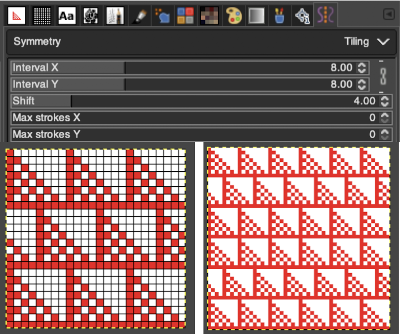 Again, preemptive math will yield images that avoid further processing. It is up to the user to recognize any problems, the repeat here needs to and can be isolated correctly from the file on the left, it is actually only 16 rows high. Here the adjusted repeat is created on a 24X16 canvas with the same symmetry settings, and filter/mapped/tiled
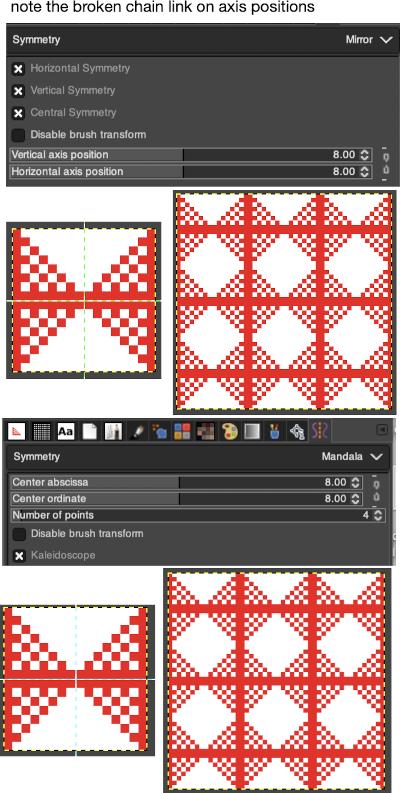 The above repeat was cropped and adjusted to 16 stitch width and 8 row height, the file saved, and the process repeated
  Using symmetry once more, remember to adjust the pencil size.
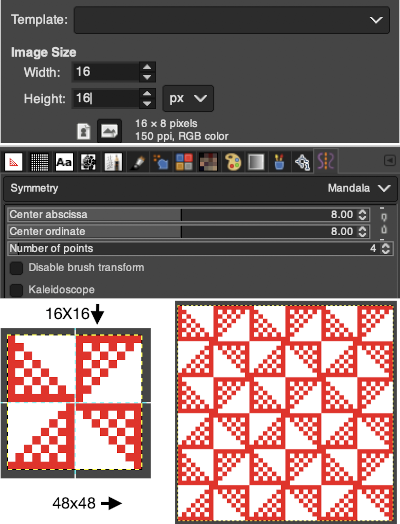 I was unable to use color exchange successfully on the above images, but with the saved 2 colors indexed red and white repeat both img2track and ayab appeared to load the repeat successfully.
 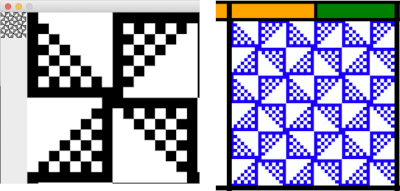 The map color exchange was successful using the steps described at the top of the post when beginning with the repeat drawn in a black and white version.