A return to short row shapings: bumps and slits meet entrelac

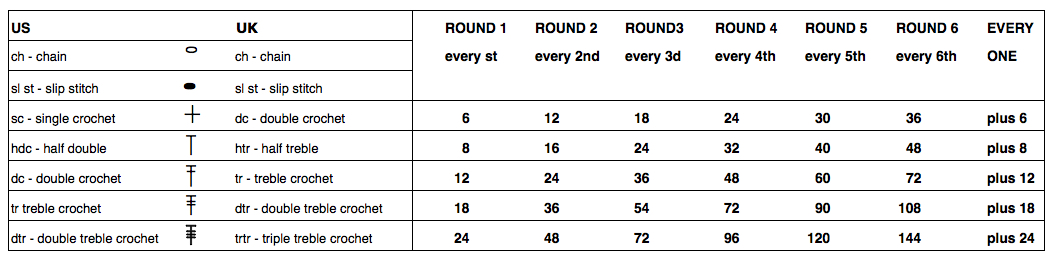
My recent revisiting of holding techniques led to my coming across handouts and notes from the late 1980s and early 90s, including the working notes below for an entrelac fabric. I sometimes read instructions I assembled long ago, and they seem to be in a foreign language at first. Entrelac was referred to as basketweave as well. On the knitting machine, it is usually executed removing part of shapes onto waste yarn. In these shared instructions it is knit completely on the machine. Blocks can be any size, knitting is started on a multiple of the stitches planned for each shape repeat. The number of colors used is limited by imagination and patience for weaving in yarn ends and dealing with issues at the start of each new shape, familiar to anyone who has tried intarsia. Weaving in those yarn ends may be performed during the knitting of larger “diamonds”.  It is helpful to understand the basics of short rowing prior to attempting this technique.

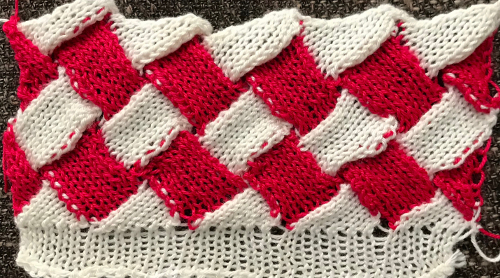
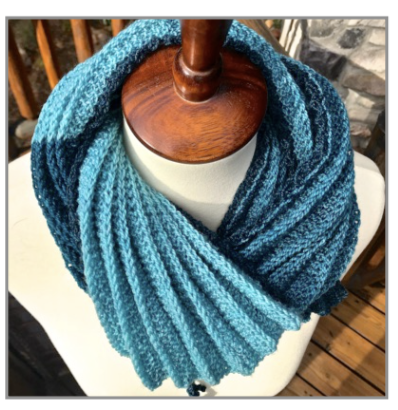
In a post in 2011, I shared a link to excellent directions found at howtoknitasweater.com , written by Cheryl Brunette. Here are 2 of my teaching samples, executed on 4.5 mm machine. In my teaching days, my demo yarns were in distinct colors, easily spotted, and not often preferred or even liked by students. They could be instantly recognized, so no one ever tried to use them in their class assignments, and colors were out of range for the comfort level of attendees at my workshops, so swatches tended to remain mine for the duration of those sessions and far beyond.

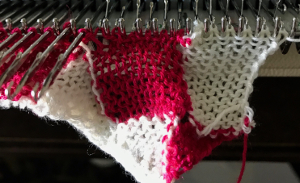
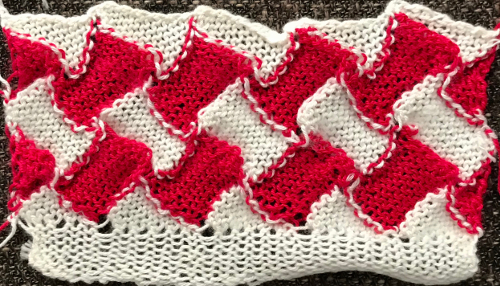
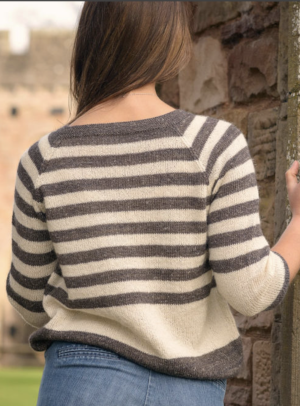
a rearview with ends woven in

It is best to start with a few rows of waste yarn, and the choice can then be made as to whether to cast on and go immediately into pattern, or ribs, stocking stitch, or other beginnings and endings may be chosen.
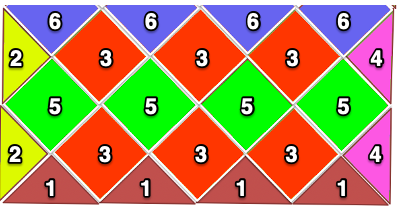
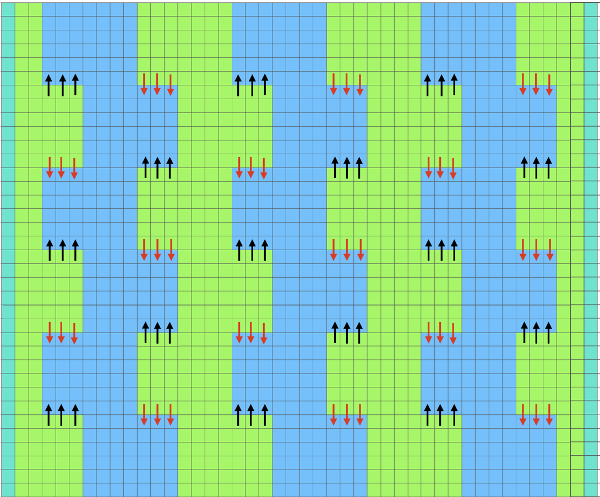
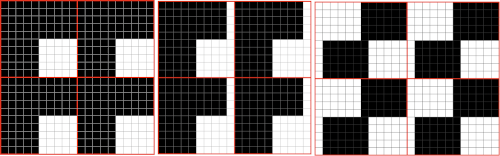
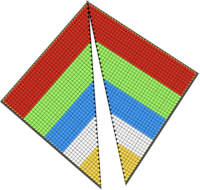
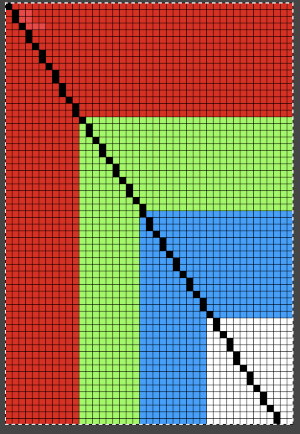
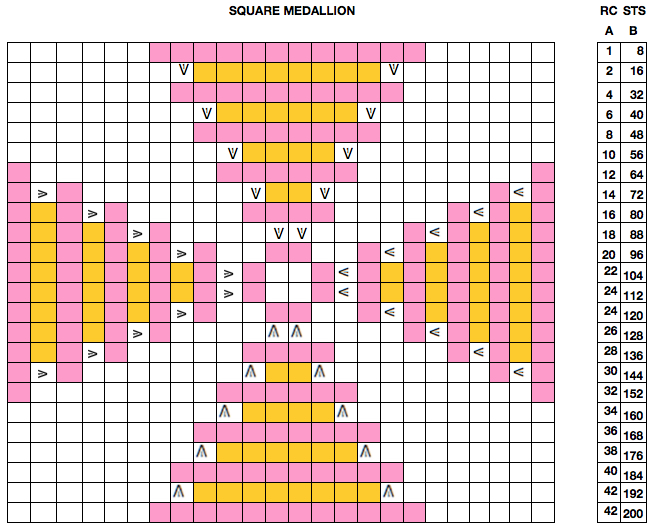
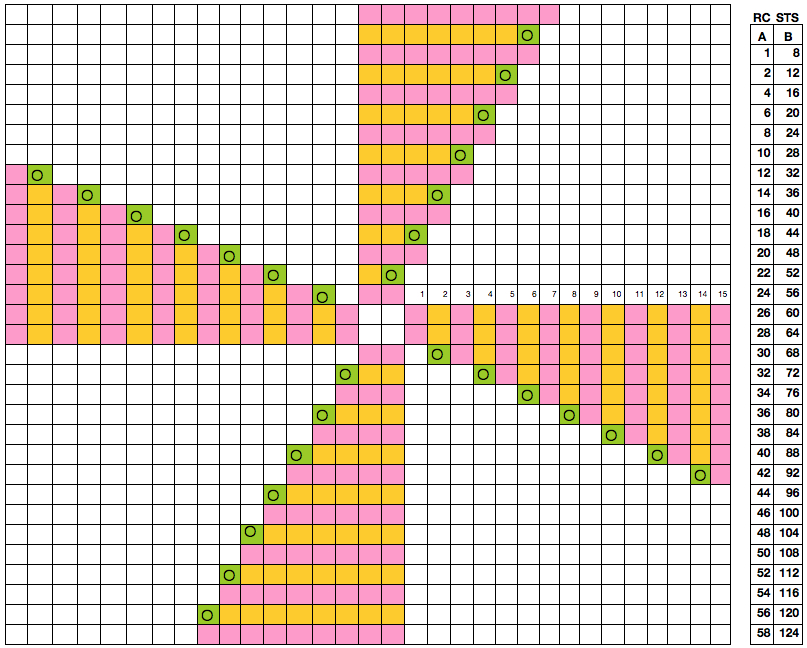
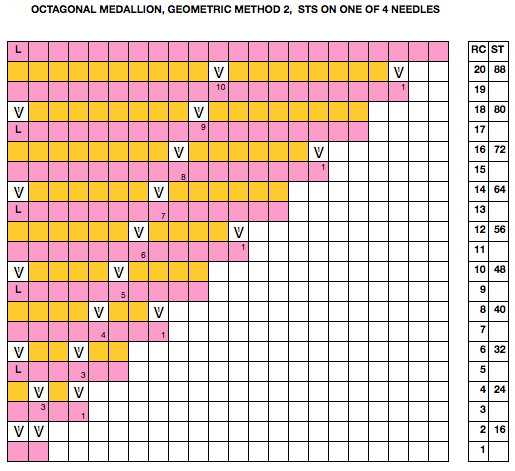
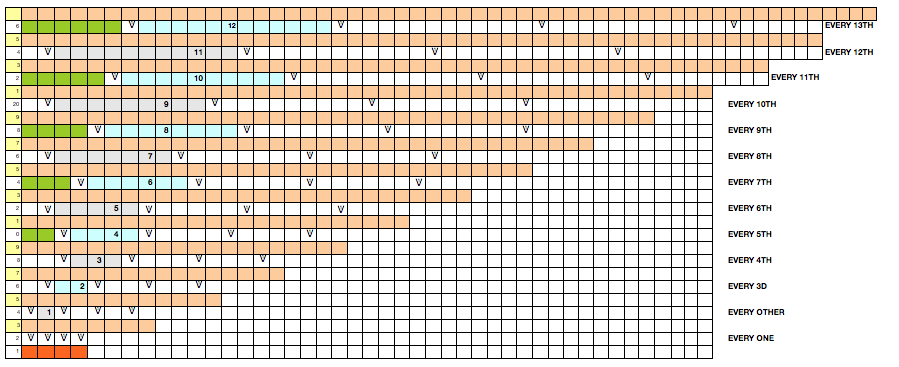
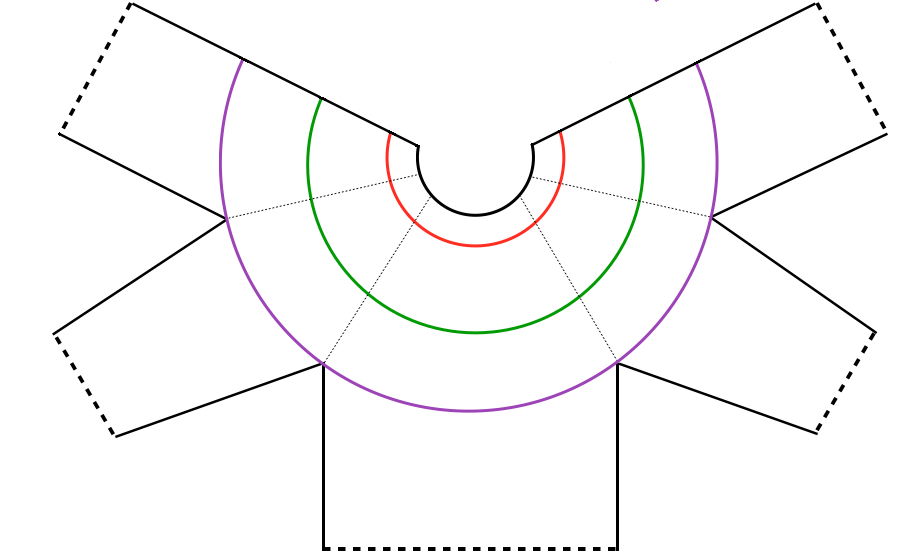
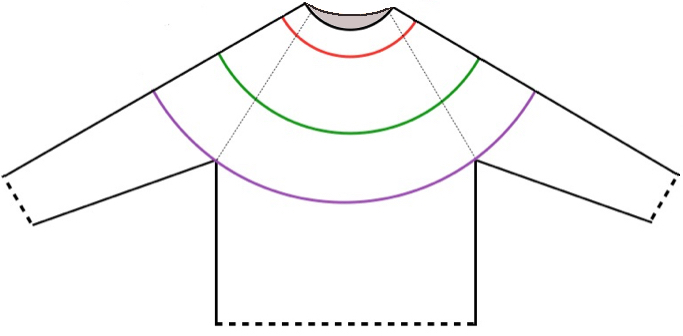
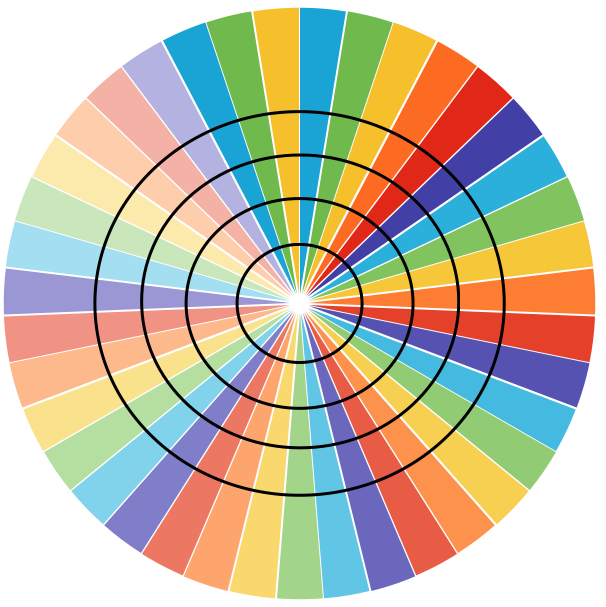
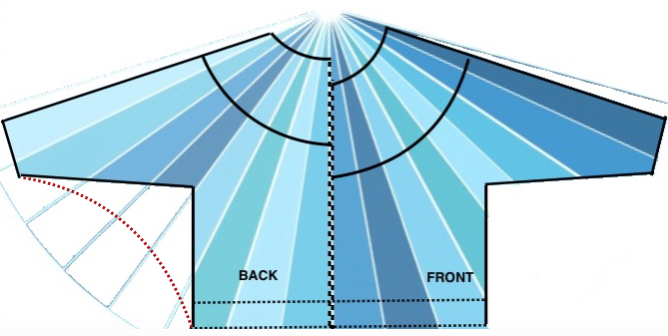
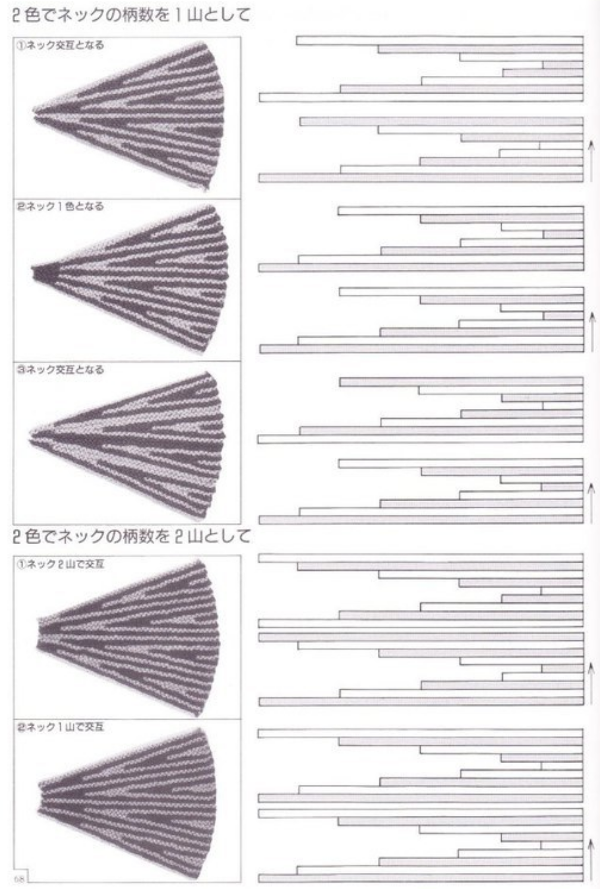
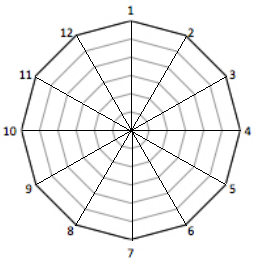
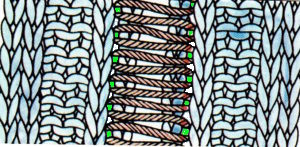
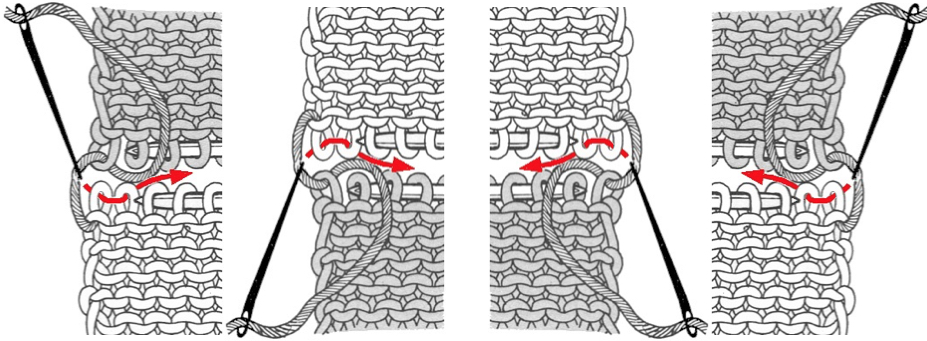
The blocks will appear square to rectangular depending on yarn choice and gauge, some writers refer to them as “diamonds”, they are joined together as you knit. My test swatches are all executed on Brother machines. My own working notes: 
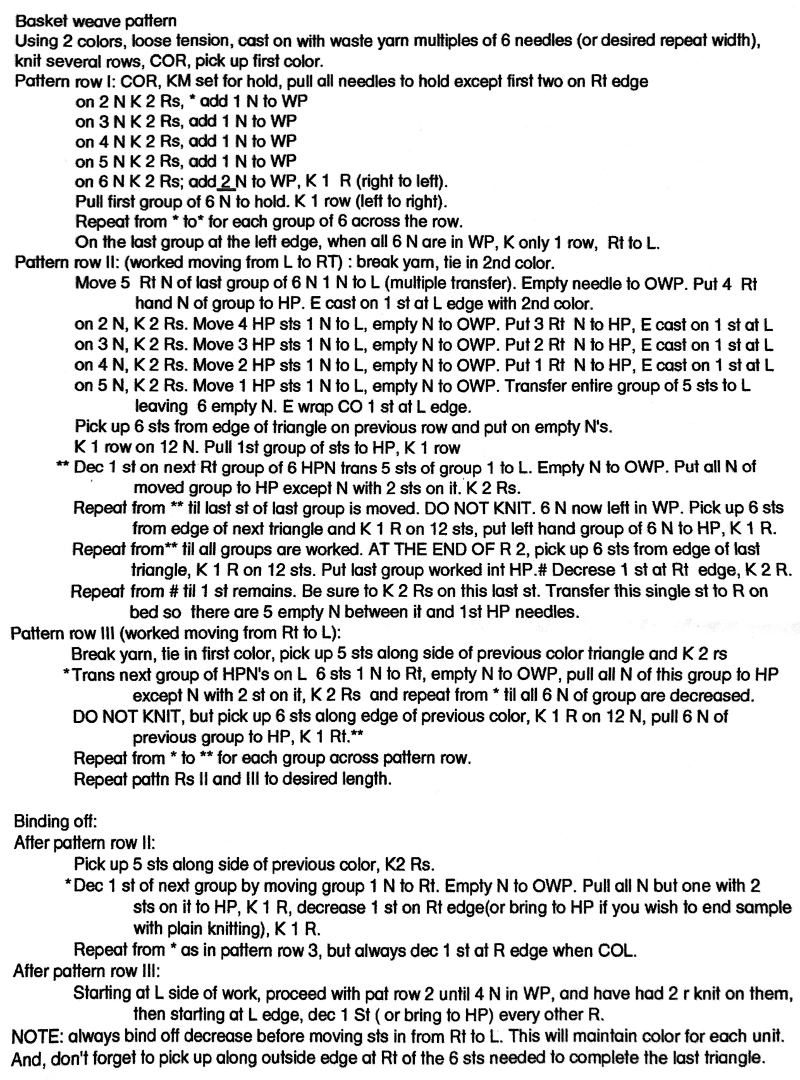
Visualization: here pattern rows II and III are shown in repeat, along with the direction of the carriage movement, and the lean in the shapes created with the purl side facing 
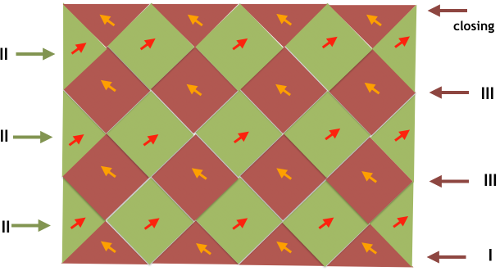
This attempts to identify the shapes by assigning numbers, in their order of knitting. As mentioned, the fabric may also end with added rows of knitting on top of the last row of shapes as they are formed

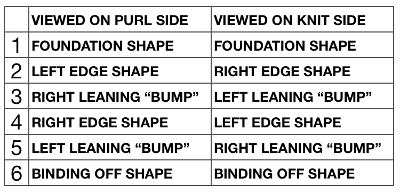
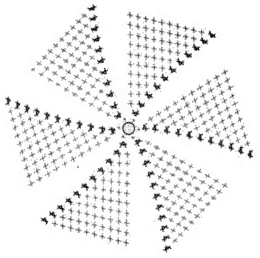
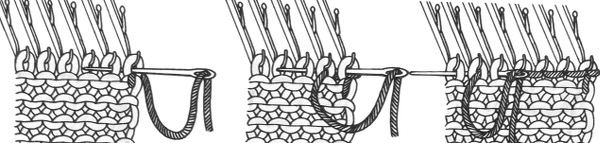
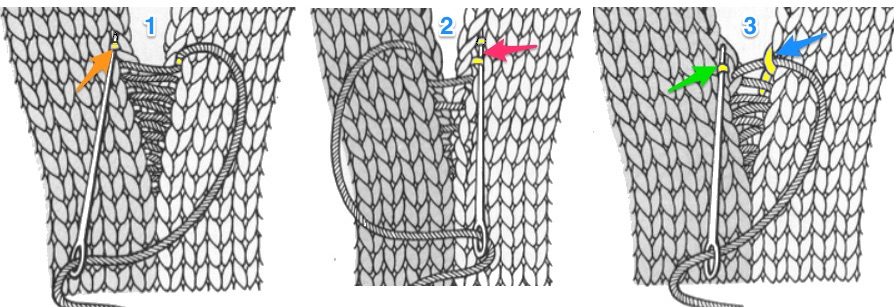
These photos do not document each step, are meant as an aid in parts that may be a bit tricky when starting to experiment with the technique

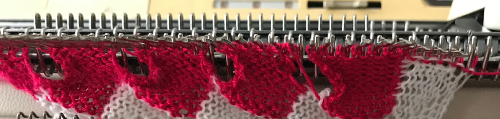
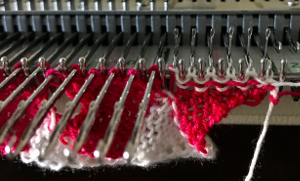
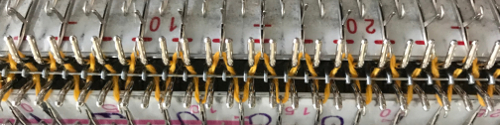
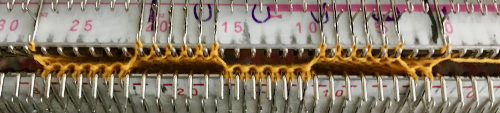
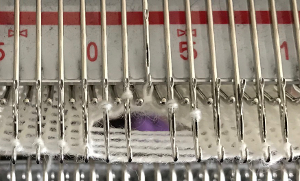
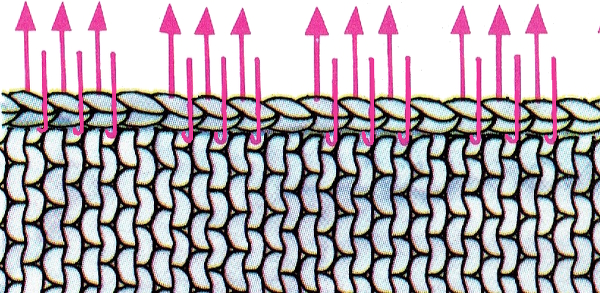
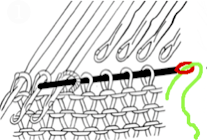
The set up for starting triangles:  note the similarity to some of the surfaces created in the last post. When using short rows, part of the stitches in work will knit many more rows than others on the machine. Accessories such as the cast on comb will tend to ride up on one side and drop off 
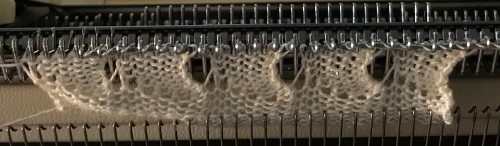
When the end of the first row that row is reached, as contrast color is added, stitches need to be cast on on the far left in order to keep the work on the bed a constant number of stitches. The usual method suggested is e wrapping, this is picking up from the row below. I found either method produced looser, longer stitches on the far edge 
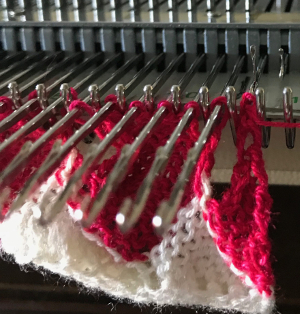
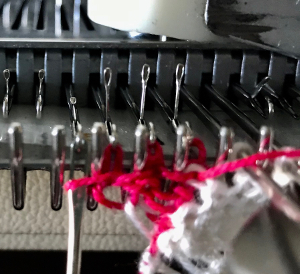
continuing across the row:
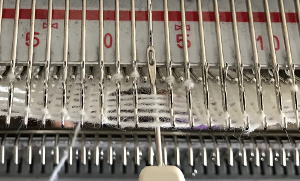
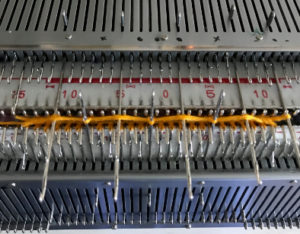
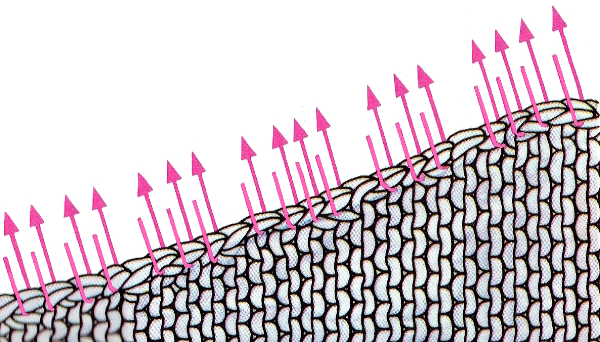
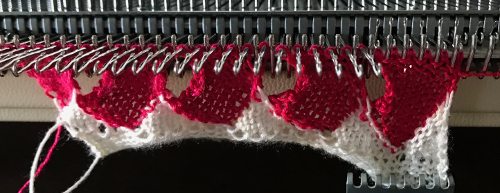
reaching the far right: 

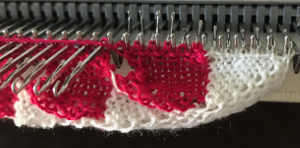
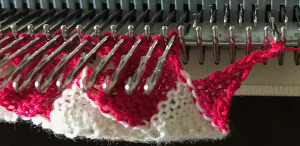
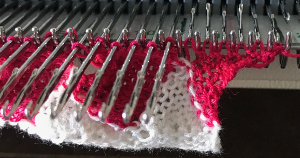
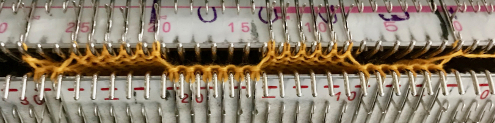
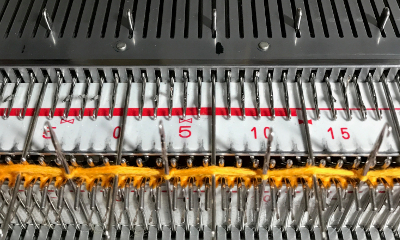
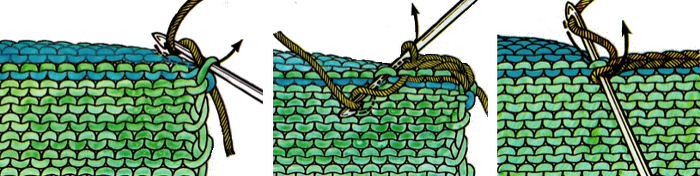
binding off across the row by transferring stitches when moving from right to left

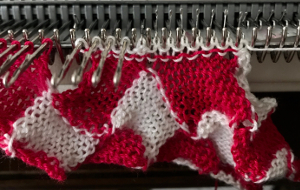
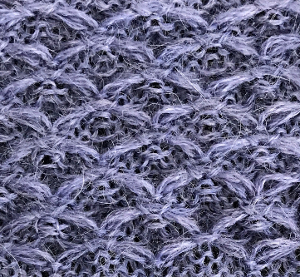
The colors were chosen for contrast, the yarns are slightly different thicknesses, the white is a 2/24. The latter is usually used double-stranded when knitting on the single bed unless intended as a “thin”. Bleedthrough at joins and some of the other features ie eyelets at corners might be reduced simply by making a better yarn choice. As for those “wisteria” eyelets, they could become part of an intentional pattern between bands of basket weave. Once the principle is understood many other variations become possible.

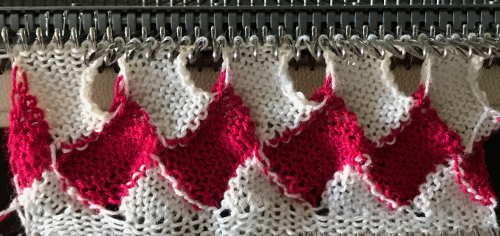
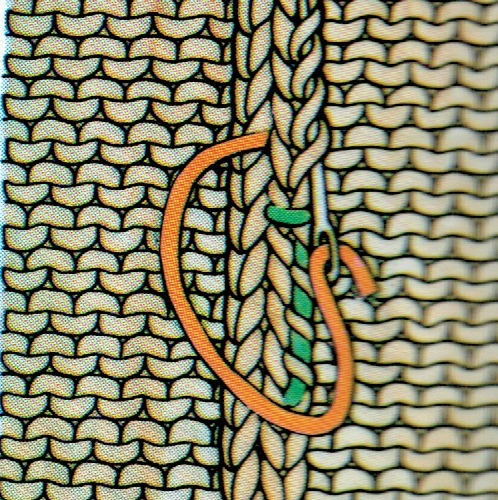
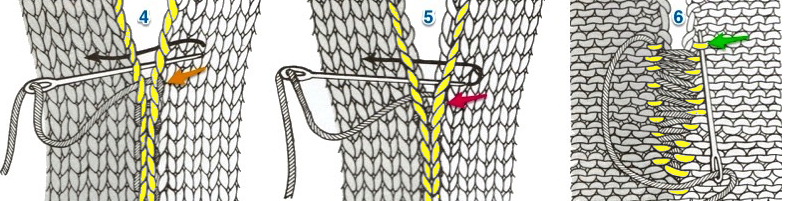
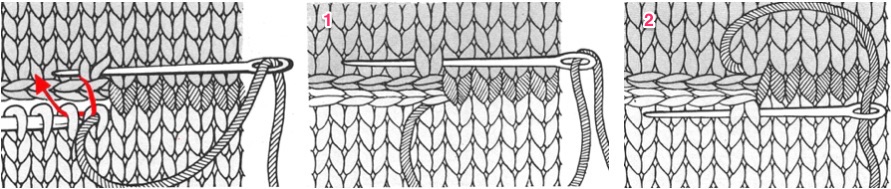
Many details in any technique wind up relying on personal preference for use of or added editing. Studying results on swatches can help one determine whether larger pieces are worth the effort, and what habits and their results may need to be changed. Contrasting colors help with evaluating edges in patterns such as these. This method relies on transferring groups of stitches by hand on the needle bed. The process could get far slower and impractical if the “diamonds” increase significantly in size. At the intersection of the shapes, there will appear an eyelet (1), also seen in hand knits, which disappears if the fabric is not stretched or pressed. How stitches are rehung in any part of the process can change the look of what is happening there as well. Picked up finished edges if tight will draw in the shape on that side (2), holding happens in 2-row sequences, and small eyelets happen there as well (3). Consistency matters. Though the shapes lean diagonally in the finished piece, they are picked up along straight edges, forming a square to a rectangular piece of knitting, with the usual grain, allowing for the addition of other techniques within the blocks

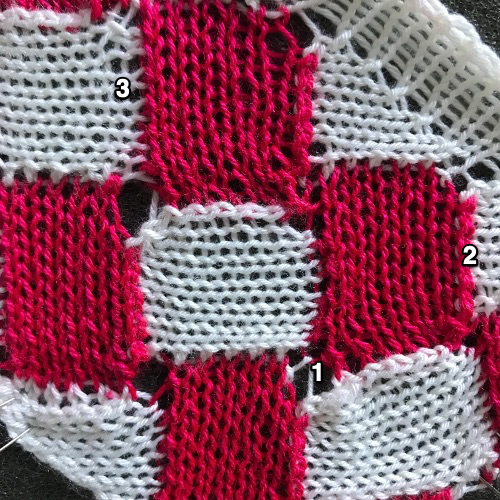
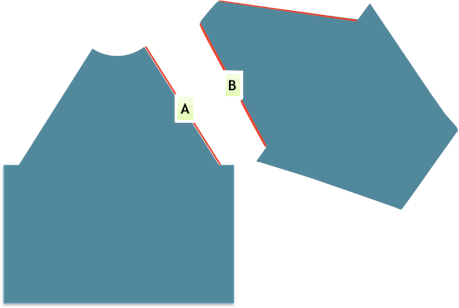
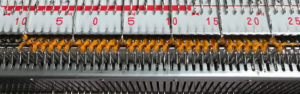
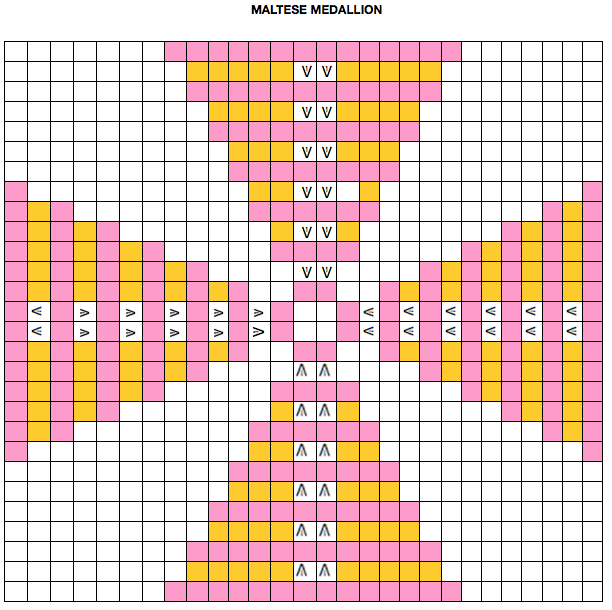
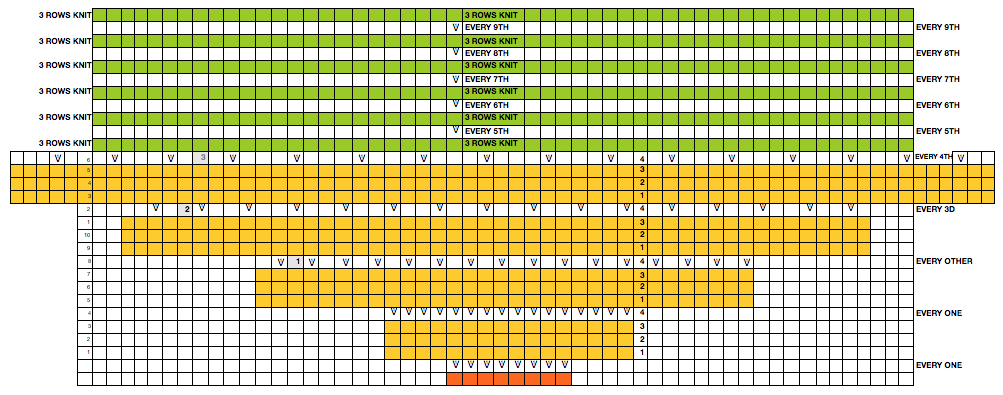
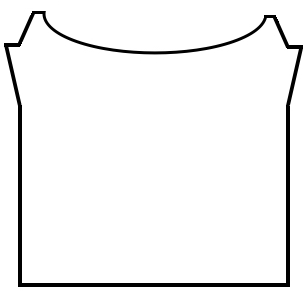
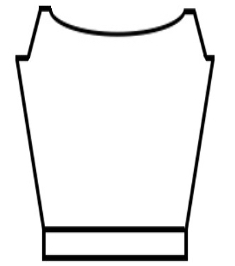
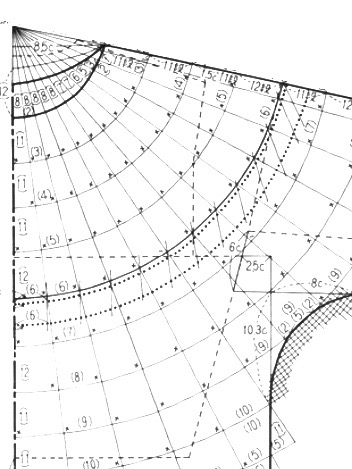
Trying to imagine where stitches may need transferring to waste yarn or “off label” tool? 
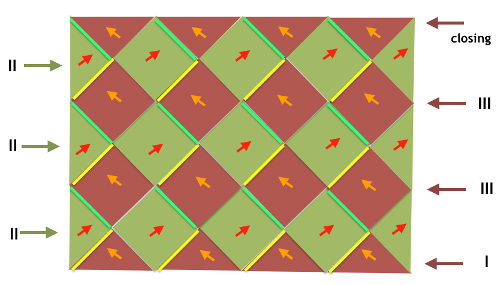
Alternative shapings at sides: what needs to be cast on or bound off?

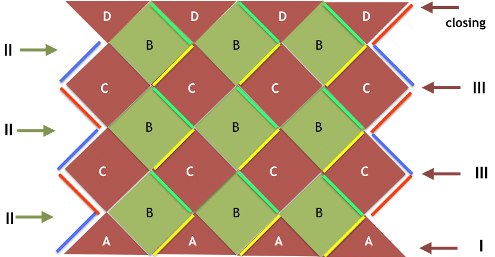
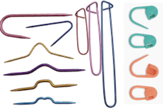
Troubleshooting ideas: a small weight might be enough to elongate those shorter closed edges to make them easier to rehang and to be a bit longer. Claw weights usually available with machines may be far too heavy, then DIY ones come into play. A common suggestion  at MK seminars used to be that of purchasing fishing weights, which commonly come in a variety of sizes often with openings or wire eyelets at their top, and using bent wire or even paper clips so one hooked end can be inserted into the hole on the weight, the other is used to hang it in turn onto the knitting. This is an exampleSuch weights are made of lead. That is a concern, there are products on the market that may be used to coat them. This one is easily found in home improvement stores and online

This round sample in the absence of the paint was covered in heavy-duty duct tape. It weighs 2 ounces, just half of one of my factory-supplied claw weights
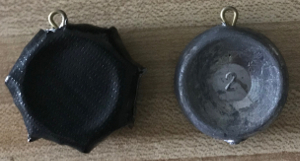
It does a good job of weighing down those straight edges along the bumps, making the stitches easier to pick up. When rehanging those stitches, uniformly hanging the loops, not the knots along the edges involved will give a smoother join.  Here a paper clip is used as the “hanger”
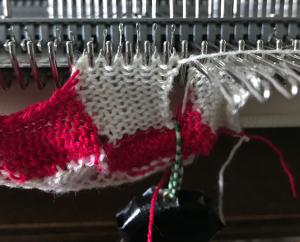
It is easy to get into a rhythm and think you “have it”. A reminder: the shapes at each side are triangles, not the full shape. Row II starts on the right, begins with decreases followed by rehanging, row III starts on the left, involves increases and working stitches in hold to its right.  Losing track will produce the start of an extra shape, which may perhaps be a “design feature”,  but not a good thing if the goal is a straight edge on both sides. Unraveling is easy if the problem is noticed soon, but is problematic if more rows of shapes have been completed. 
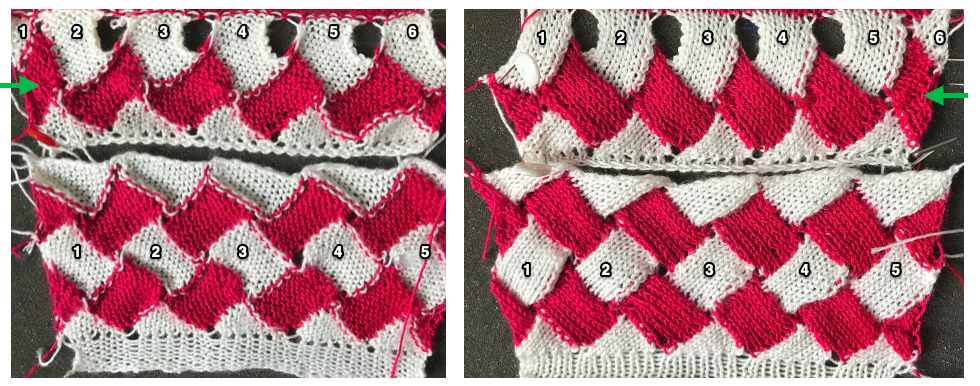
Lastly, a swatch ending in all knit rows. The only remaining issue is the fact that those side triangles are formed by stitches that are looser than across the rest of the piece. This yarn is thin and a poor choice, but fine for getting the technique down and beginning to understand what happens to stitches, how one needs to move from one side to the other, and what happens along the edges of each individual shape 
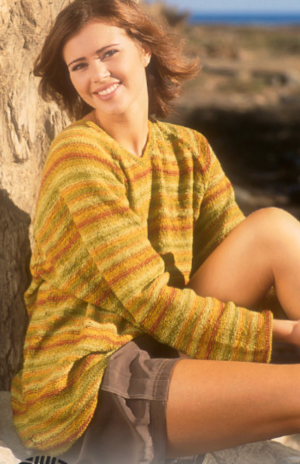
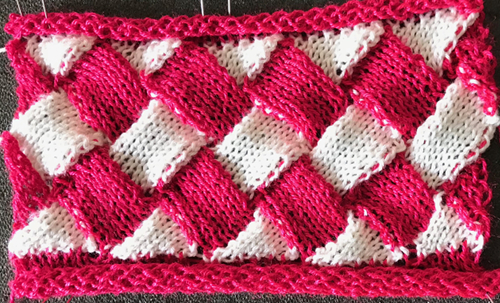
In switching to a thicker, space-dyed yarn, the effect is lost to a degree because of the length between color changes. This sample begins to address keeping some slits, but the repeat needs further sorting out 
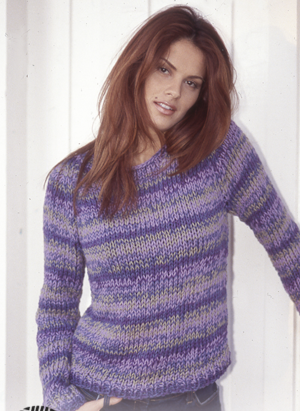
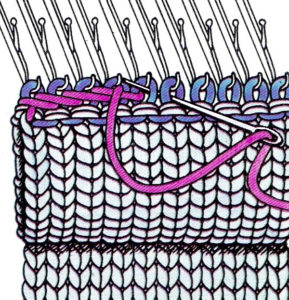
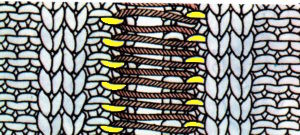
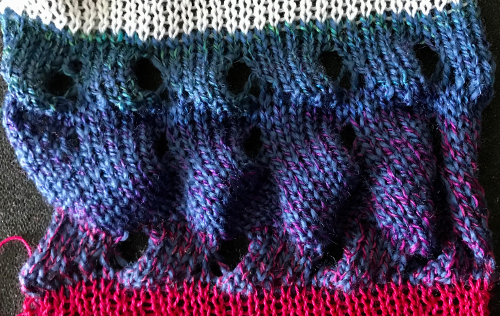
Following the same idea in visible colors: the yellow wool is another too thin wool (2/20), which makes the edge that will need picking up slow and tedious to deal with because of very small stitches. If I were to make a piece, I would work on the partial shapes in the magenta to make for a smoother color transition start. I used the foundation triangles and row II, with 2 rows of knitting when they were completed to help close the spaces at the top of the eyelets in the magenta. Some striping between repeats at the end of row II is worth considering in alternate colors, for more rows, or even in a thicker yarn. 

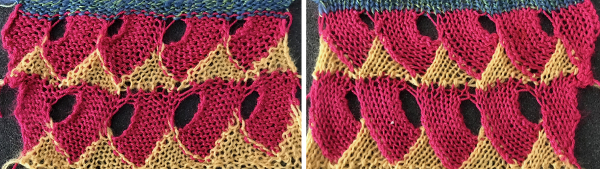
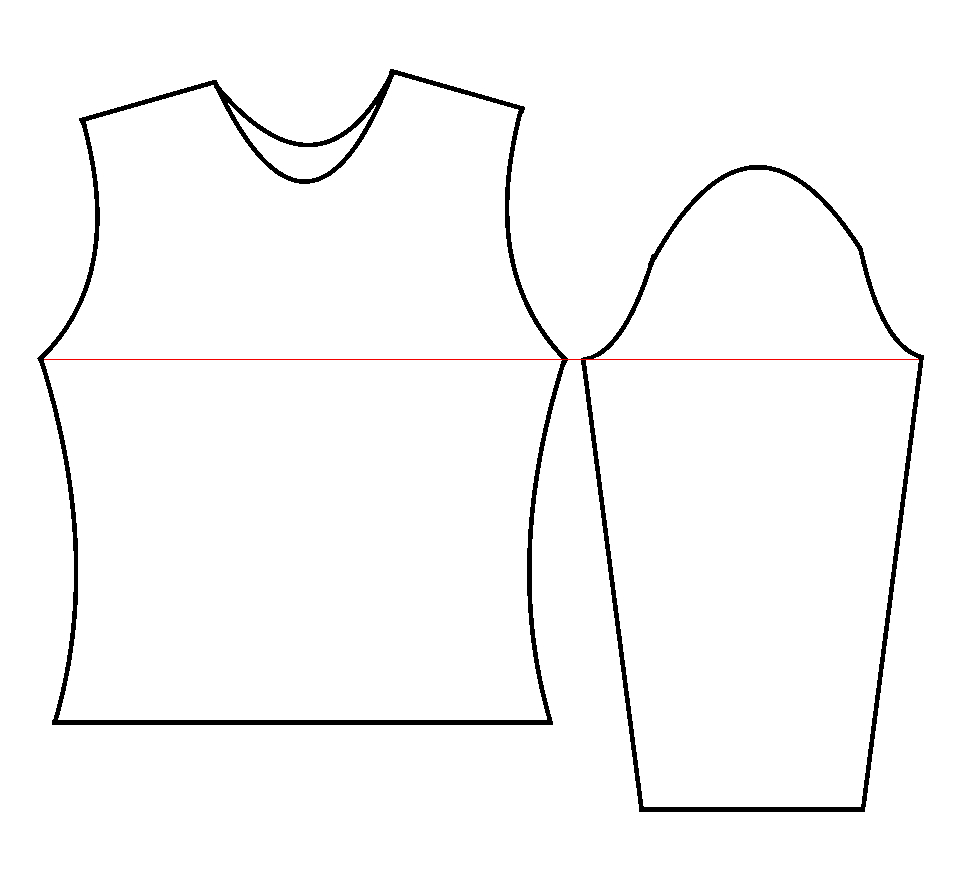
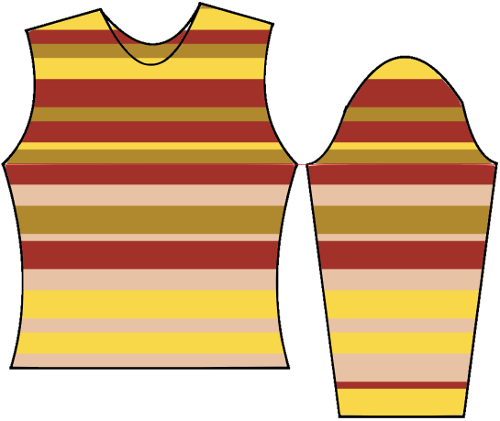
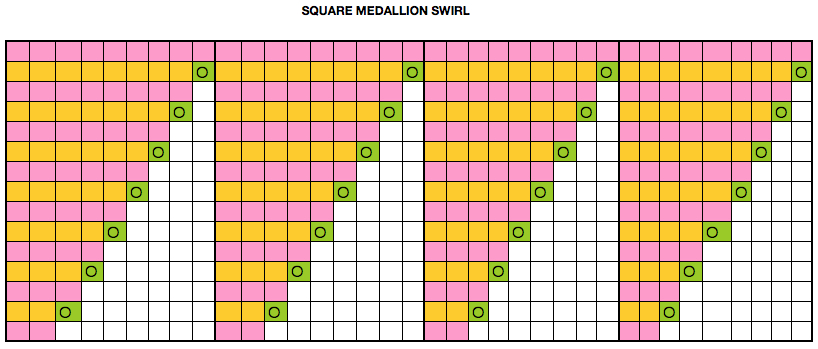
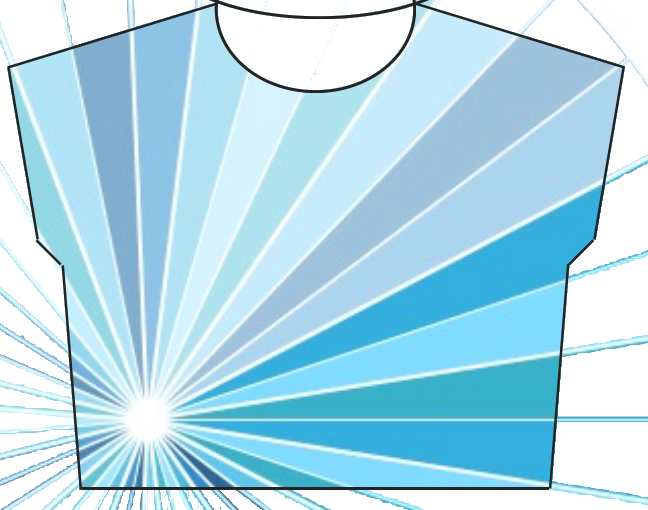
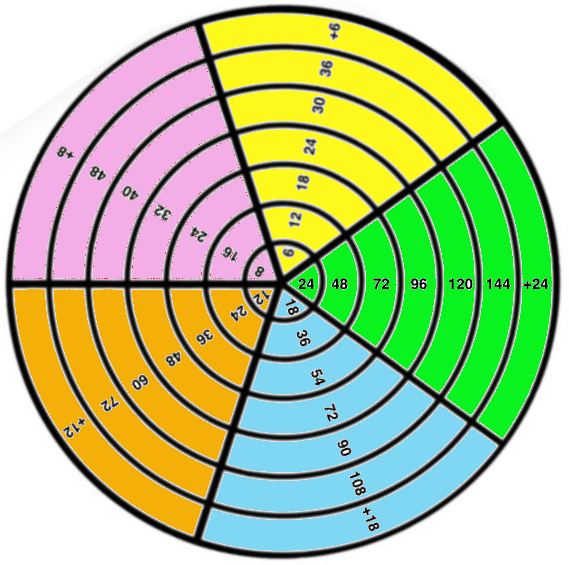
It is possible to develop shapes,
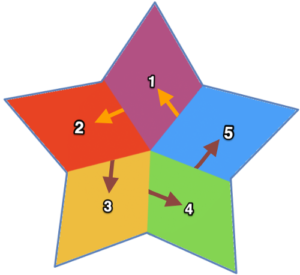
to consider the number of stitches required and whether the fact that other than garter stitch knit stitches are not square,
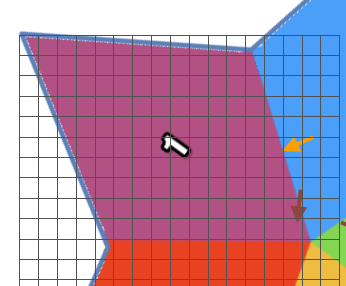
Then there is the world of making each section /shape as large or as small as desired, shaping them by increasing or decreasing stitches adding and subtracting them as needed by casting on and binding off, partially joining them, knitting and joining them when completed with seam as you knit techniques, changing color within each shape or at the end of every row/section of adjoining ones, working the piece in one color only or using a space dyed yarn for random color patterning. Quilting diagrams can be a boon for inspiration for seam as you knit.

I found this on Pinterest, it strikes me as masterful use of related techniques

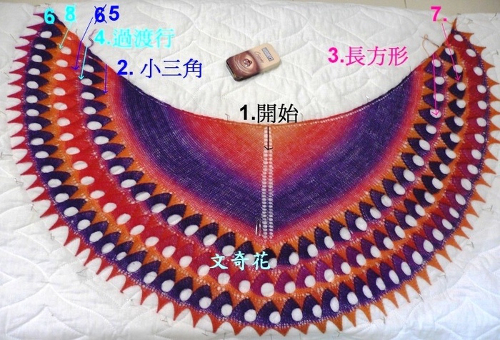
Lots of hand-knit inspiration and free patterns: https://intheloopknitting.com/entrelac-knitting-patterns/#freepatterns

This book explores the technique to the max
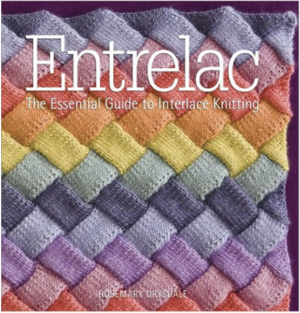
Some of its swatch images are shared in this review of it , there is also a sequel

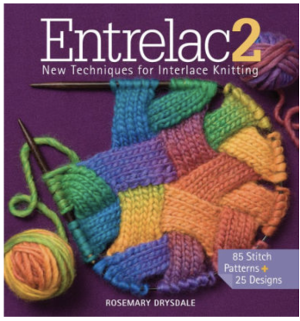
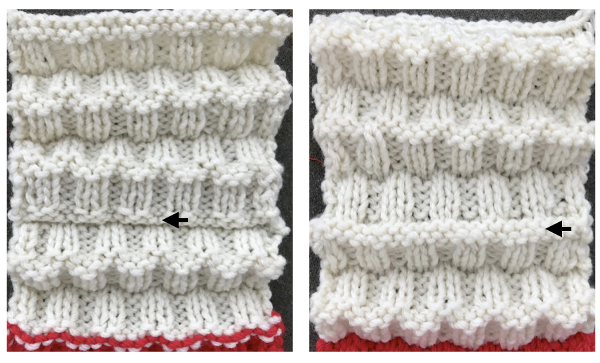
Three slip stitch entrelac pretenders using slip stitch patterning and holding

Knit and purl blocks to create folding fabric_ “pleats”

Knit and purl combinations may be executed in hand or machine knitting. Knit charts are generally planned and illustrated based on the fact that the same side of the fabric is always facing the knitter. Hand knitters have to accommodate for the fact that the work is turned over (unless knitting tubular) with every row worked, so plans would need to reverse knit for purl and vice versa if needed. For more ribbed, pleated/ folding fabrics please see Pleats: ribbed, folding fabrics , and Origami inspired 2: more pleats and fold using the ribber

The easiest way to produce this particular fabric on Brother machines would be to let your garter carriage do the walking and working. For those of us that do not have that option, there are transfer carriages, (I honestly have only used mine once, decades ago, will have to dig it out of mothballs) and transferring needles by hand. Pairs of identical stitch transfer tools may be used to move stitches from one bed to the other. If the goal is to produce a knit with tension as tight as possible, the latter can be problematic and result in dropped stitches, so testing the yarn and the mode of transfer should be part of swatch trials prior to committing to larger knit pieces.  I found moving stitches between beds one at a time for me was preferable and more reliable

The chart for the initial concept: The number of needles used for “pleats” is constant (7); 3 stitches move up (or down) in turn, indicated by arrows. After the first 3 are transferred, 3 more are now moved adjacent to the now remaining 4 stitches from the opposite bed in order to maintain a total of 7 on each bed, excluding any borders, in which stitch placement remains fixed.

cast on for every other needle rib after completing cast on rows, set up for pattern by transferring between beds*knit 6 rows, transfer between beds knit 6 rows, transfer again restoring original selections**repeat * to **; transfer to main bed, bind off. Swatch on KM prior to binding off If the goal is to retain the texture, it is best to knit using a yarn with “memory” such as wool, which may be steamed or blocked lightly while retaining the fabric’s quality. A rayon or cotton would flatten permanently if pressed. The photo shows both sides of my swatch, beginning on left with it slightly stretched with pins, relaxed in the center, and with a bit of vertical “tug” 
The fabric changes a bit when some stitches remain fixed on alternating beds, and the same sort of approach is used. My initial intent had been to transfer every 4 rows, but I actually did so after every 6 rows knit. Colors in the chart on right: Its numbers indicate the working needles on each of the 2 beds. The first 3 needles on either side are never transferred. Groups on either bed after transfers remain constant at 6 with the exception of the borders. The starting set up and the alternating one, repeated in turn throughout the knit. Note border stitch selection, constants in between still on the machine,  and my small test swatch. The fold on each side and the swing in the pattern appear crisper and better defined to me
What of horizontal folds? Transferring every stitch to and from the main bed manually is more than I am willing to deal with in addition to transfers for those blocks. I am also interested in the effect produced with the use of thicker yarn. This repeat is presently on my hand knitting needles, is suitable for electronics or punchcard machines. A single unit is 5 by 16 rows, the punchcard repeat is 24 X 16 X 3; 32 rows is a tad shy of enough rows for the punchcard to roll and advance properly, 36 rows in height is the recommended minimum. Knitting as tight as possible makes for a stiffer, crisper fabric. I decided there were things about this repeat I did not like, however, including the change in pattern at the folds 
The new repeat, with only 2 rows worked rather than 4 between block pattern reversal, the repeat is now 12 rows rather than 16 in height  The hand-knit swatch, using 4 ply yarn on #5 HK needles. The arrows mark the area where 4 rows were knit between knit and purl blocks rather than 2, creating an added ridge, and a straighter line than the row pairs 
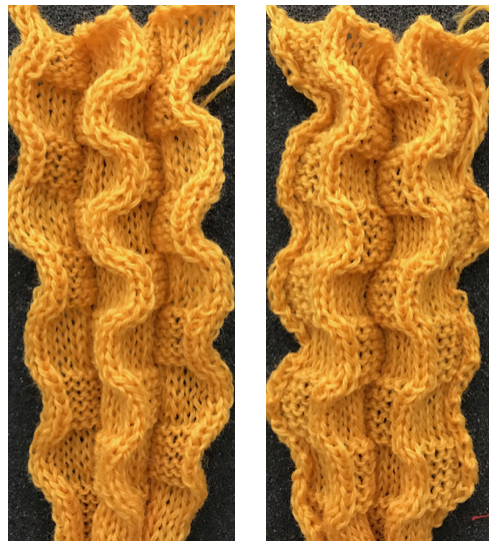
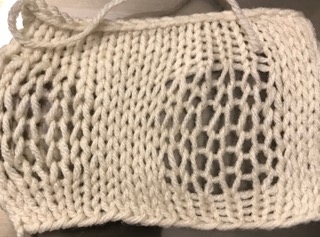
an attempt at a side view
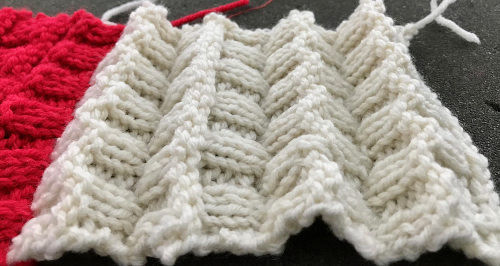
 an earlier hand knit project in the same stitch family 
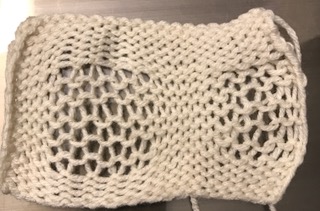
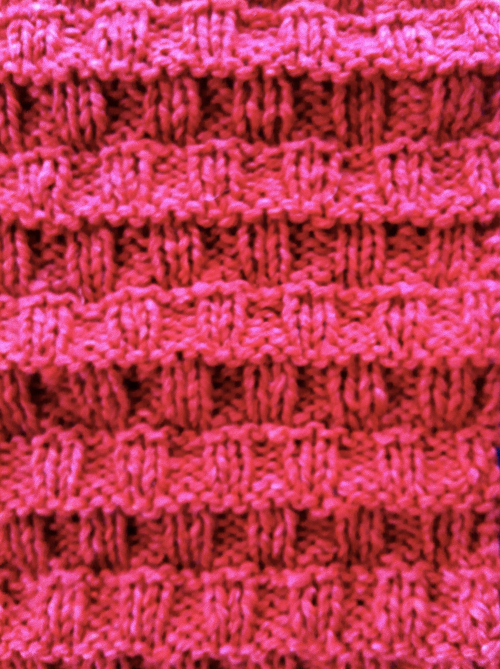
Another handknit swatch in worsted weight, perhaps suitable for G carriage Its repeat turned 90 degrees clockwise  Getting rid of those blocks altogether: a generously shared free pattern on Ravelry and a link to the author’s blog
More blocks to try
Zigzags in varied configurations

Matching patterns across sweater body and sleeves


There is a resurgence of circular yokes on the runways and market at the moment. My previous post discussed some of the considerations in knitting them. For those not up to working that particular way, there are variations in carrying the patterns around the body in continuous lines.

If raglan shaping is used, angular lines are created where patterns meet. All knit is essentially vertical striping. Raglan shaping should match both the front and back of the sleeve, the wider the raglan shape, the less sharp the stripe intersection. Striping in a traditional cap sleeve creates designs that move horizontally across the combined body and arm at rest.

In shaping raglans, however, the angle at which the stripes meet is also crucial in order to be able to use stripes matching in the number of rows. The stitch that is the closest to producing stitches in a square gauge is garter stitch. A charted sample of a mitered, even angled striped square: The start of imagining the graduated angles required in garter stitch for altering the shape, keeping in mind that the number of rows in each angle must match,  The assumption is that if knitting in garter since row gauge and stitch gauge presumably match, any striping on 2 edges at the same angle will also match. Hand knitting patterns can serve as a source of inspiration, garnstudio is a wonderful resource for such patterns, in multiple languages. These patterns are both knit in garter stitch: https://www.garnstudio.com/pattern.php?id=1078&cid=17https://www.garnstudio.com/pattern.php?id=1078&cid=17

In stocking stitch, gauge for stitch and row counts do not match, stripes meeting at different angles will be matching rows to stitches  Sometimes a stocking stitch band is placed between the 2 shapes facilitating matching rows to rows. Space-dyed yarns can create more forgiving intersections https://www.garnstudio.com/pattern.php?id=661&cid=17A stocking stitch sweater pattern for purchase on Ravelry: https://thefibreco.com/product/striped-sweaterMatching is possible with more planning than when using garter stitch, but compromises may need to be made in either or both the width of the body and the raglan sleeve cap, which may alter the amount of fabric pushed forward at the spot where the armhole and the body meet.
In a simple raglan sketch, both sides of each piece are symmetrical. The body’s back neck opening is knit straight across, the front is shaped. The front and back raglan armhole edges, A and B, measure the same, with an equal number of knit rows. The sleeve cap top is straight, helping to form the full-size neckline opening. The small bind-offs of at least one inch at the start of the armhole and raglan shaping help reduce the bulk of fabric in those areas as in when knitting dropped shoulder sweaters

When designing a sweater with a shaped sleeve cap, knit a sample of your stripe pattern. An online stripe generator can help visualize stripe formulas, colorways, etc. If knitting fair isle use row counts for FI pattern height for stripe placement. It is helpful to have a 1 row, 1 stitch graph to plot repeats out. It does not matter if the grid is square or rectangular, providing that vertical and horizontal numbers are based on your gauge. Draw a line from armhole point to armhole on both pattern and sleeve, and there is your match. Work stripe pattern up from armhole line for your cap,  down from line for sleeve repeats.

In my theoretical sweaters, the sleeve’s wrist edge is technically below the armhole to waistline length, so stripes need to be plotted accordingly, from the armhole down.  The same method is used if single motifs or other variations in striping are involved. For single motifs, if matching them in body and sleeve cap, begin by designing them so they fit in the cap’s crown. Place motif in body and sleeve on the same line, and plan the remainder of the sweater calculating from the armhole as for stripes, basing placement on numbers of rows in each design segment.

A collection of online references:
Ravellings on the knitted sleeve By Jenna Wilson
http://knitty.com/ISSUEfall04/FEATfall04TBP.html
http://knitty.com/ISSUEwinter04/FEATwin04TBP.html
http://knitty.com/ISSUEwinter05/FEATwin05TBP.html
math calculators for knitting
https://itunes.apple.com/us/app/knit-evenly-calculator/id370449748?mt=8
“magic formula http://www.getknitting.com/ak_0603triangle.aspx
http://www.getknitting.com/ak_0603mfcalc.aspx#
http://www.getknitting.com/mk_0603frilled.aspx# site is now closed, updated links to find it and other shaping information links may be found in the blog post: Online Pattern generators, hacks, free KM manuals, and more 


Bowknot/ Butterfly stitch on the machine

A recent Pinterest post got me searching out some of the fabrics in this group. In hand knitting, floats creating the butterflies/ bowknots are usually apparent on the knit side. For two such patterns please see http://www.knittingstitchpatterns.com/2014/11/butterfly-bowknots.html

http://www.knittingstitchpatterns.com/2015/04/butterfly.html

https://handlife.ru/vazanie/obemnyy-uzor.html caught my attention. Here we have a combination of knit and purl stitches, with floats formed on the purl side, making the fabric or a “cousin” of it possible on the machine 
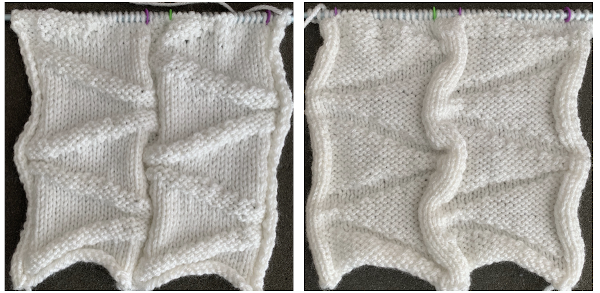
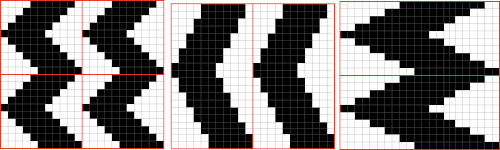
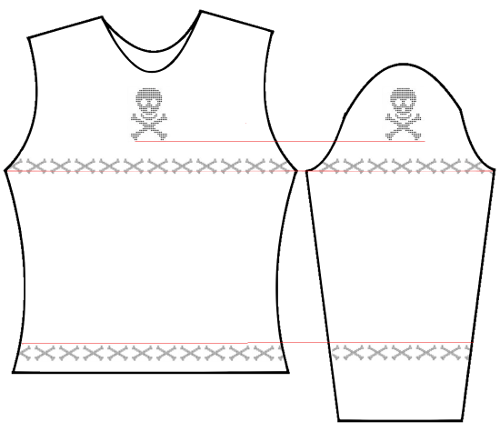
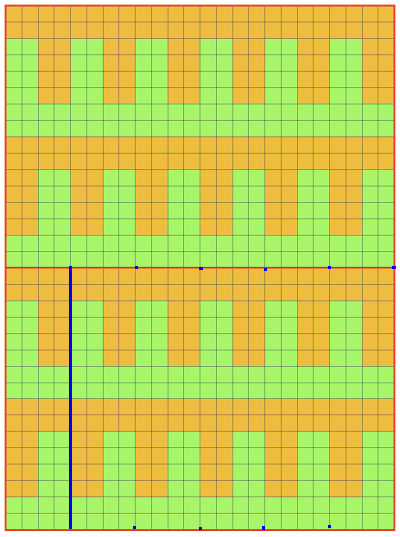
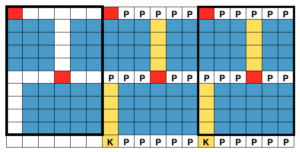
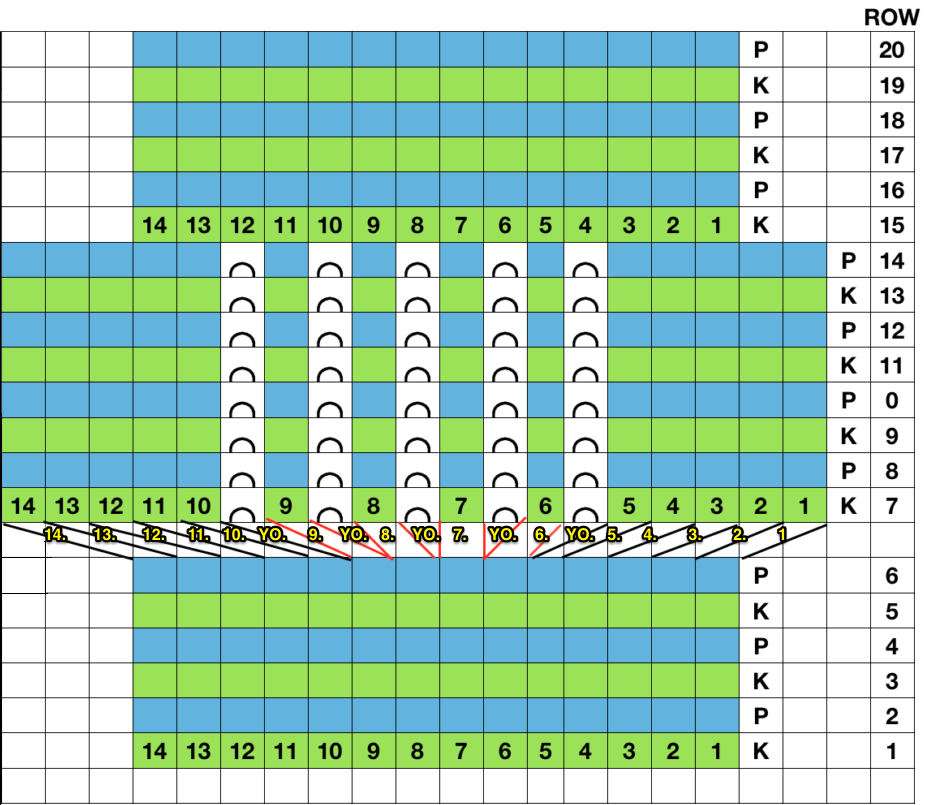
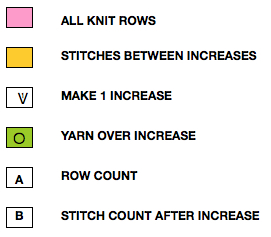
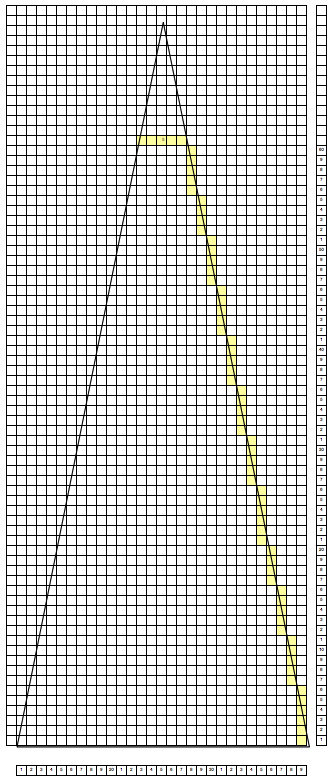
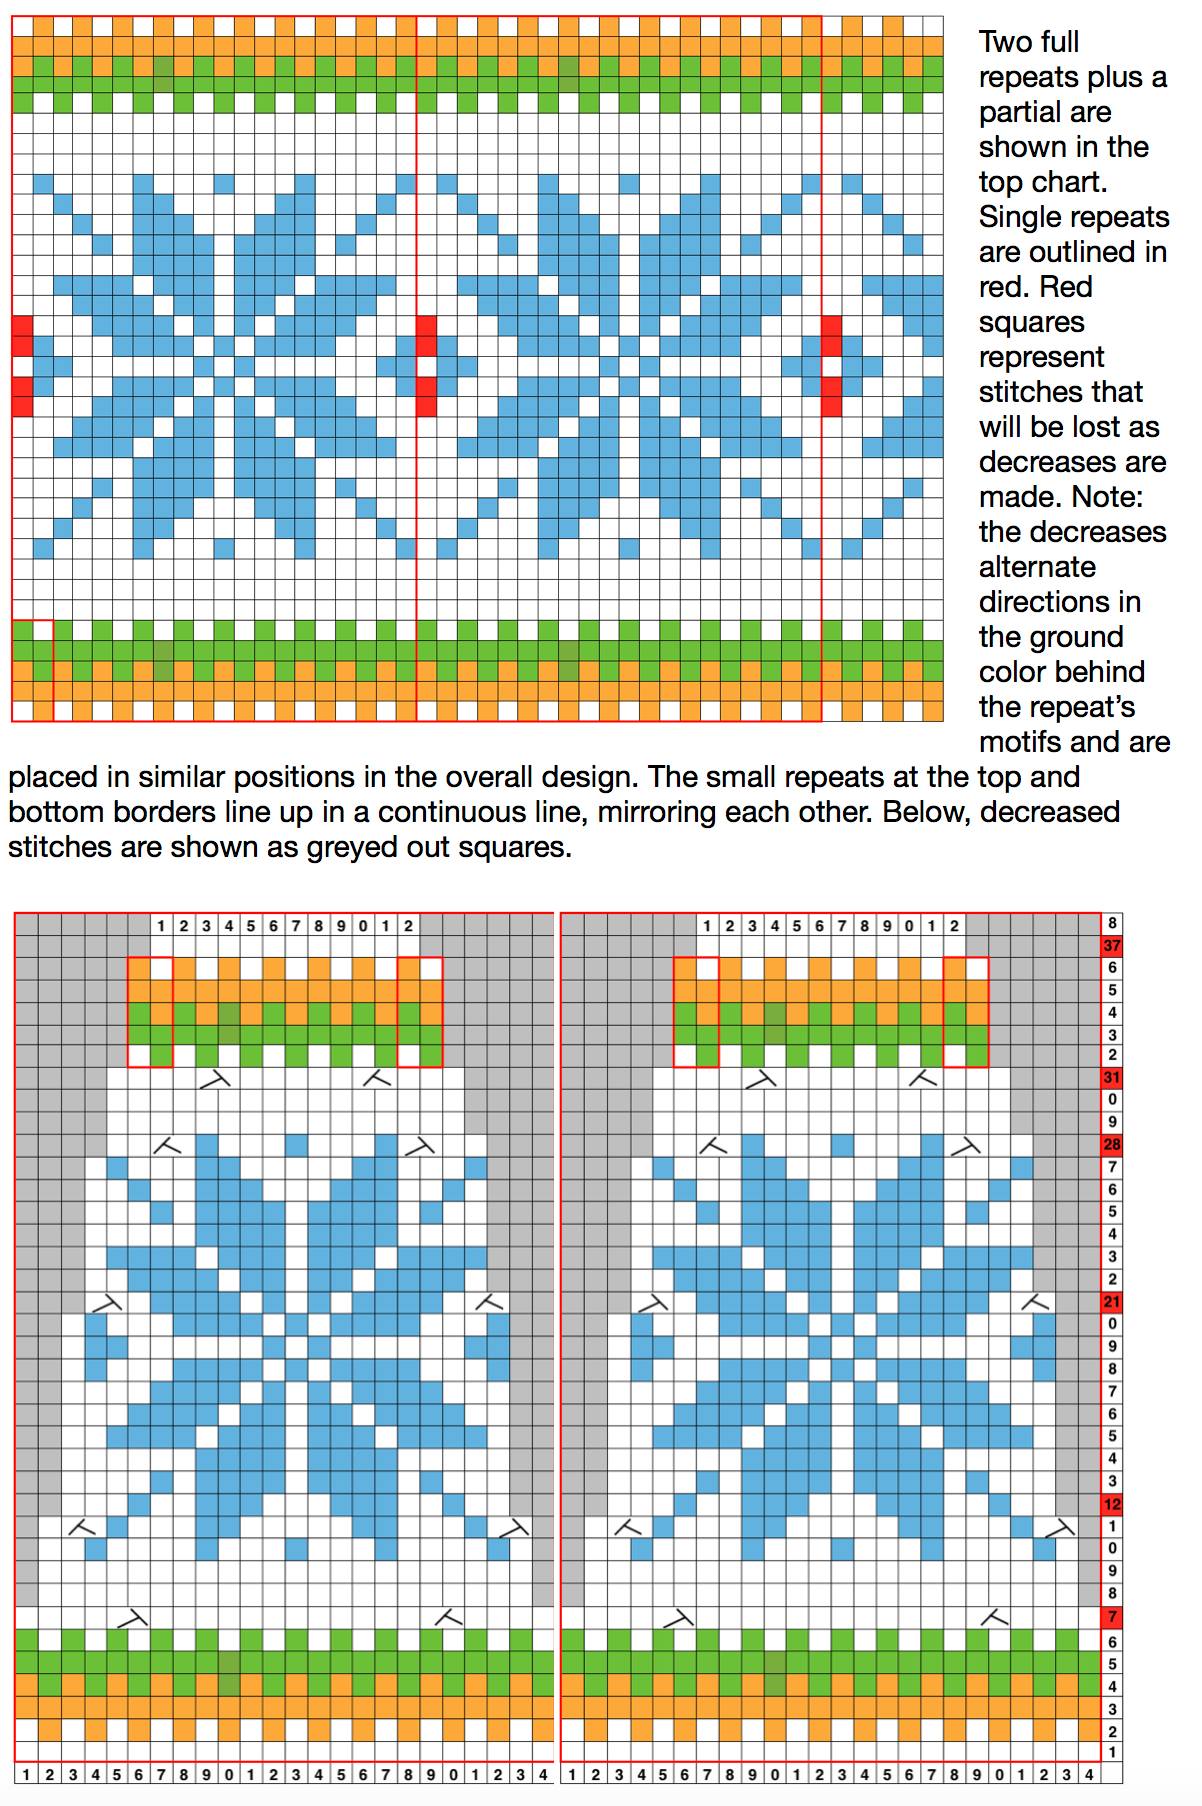
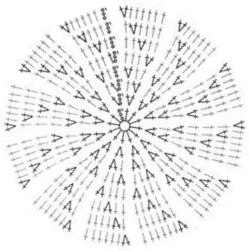
This is my first experiment with gathered slip stitch floats on the purl side of the knit. To begin, this chart indicates one punchcard pattern’s full repeat in width.  Four repeats in length would be required (the punchcard minimum repeat in length to achieve smooth continuous card feeding is 36 rows). Punch out blue squares, leaving white ones unpunched. A single repeat (outlined in black, 8 stitches by 12 rows) is for use in electronic patterning, where one may alternately draw or program white squares, then use color reverse.  The red line represents 0 needle position in Brother KM

Pitch on H5, ribber needles are centered between main bed ones, so the “knot” width, represented by white squares, can be even in number. Begin with the first needle left of 0 (red line) in the work position, continue across ribber bed with every 4th needle in work

The main bed knits in a slip stitch pattern for 4 rows, then knits 2 rows across all stitches. Floats are created every blank row throughout, composing the knots or butterflies. The ribber is set to knit (N,<–>N, will pick up stitches only on selected needles.
The fabric is a slip stitch one, so it will be short and narrow. That is something to be considered when planning cast on, bind off, and beginning and ending edges of the piece.
In Japanese machines, a ribber comb is recommended. If casting on the single bed, start with waste yarn, poke the comb through that, and proceed as you would for any other rib fabric.

My sample is knit on a 910, with white squares drawn. This is what happens when you forget to color reverse. The all-blue squares now became “white”, so those 2 rows were slipped, not knit, bringing float repeats closer together the 
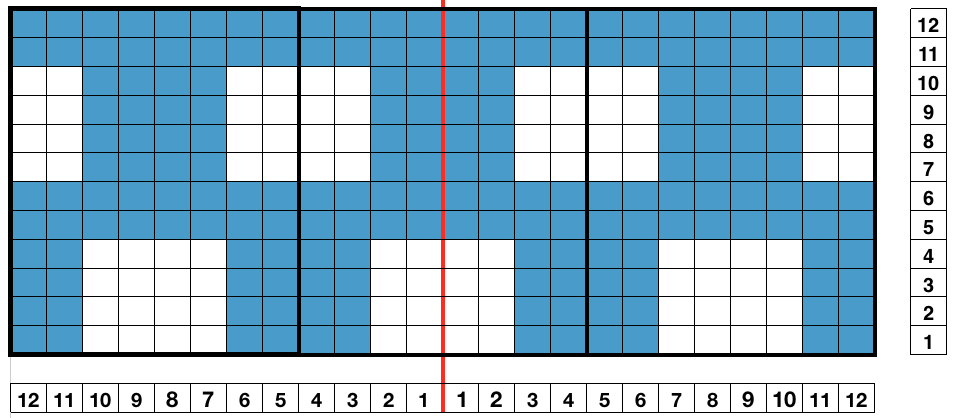
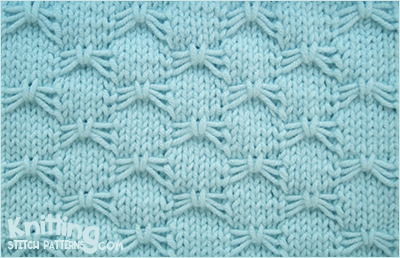
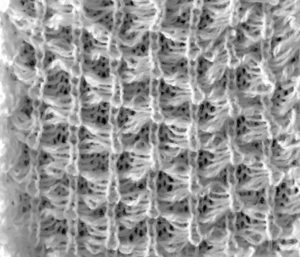
result with color reverse 
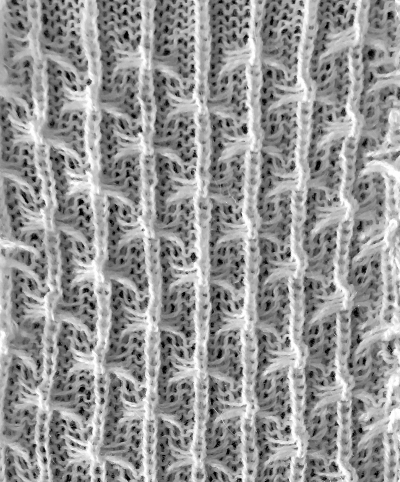
working out a mylar, electronic (unless DM 80 40 stitch width is in use) repeat for a variation of the fabric knit single bed. The stitch count is odd,  allowing for a center stitch manipulation. KCI is used to make certain the first and last needles knit on each side. Floats created close to edges may be left without hooking them up. The fabric separates slightly along the “bowknot”  edges because color-reverse is used, blue squares in chart slip, create floats when Rows 6 and 12 are reached respectively, that single square becomes a non- selected needle, and pick up those floats with any preferred tool 
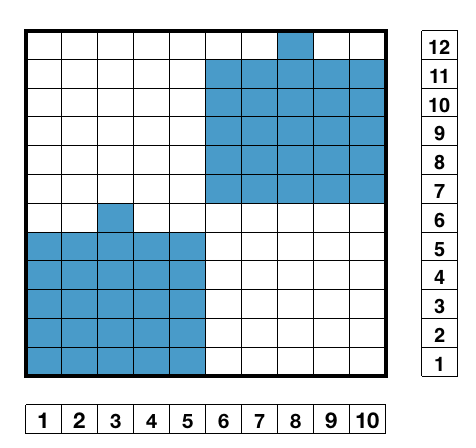
lift them up and onto that single non selected needle, push that needle out to hold
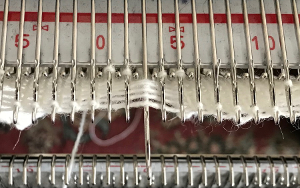
with the next pass the single needle and loops knit off together and become part of the alternating all knit block in the design
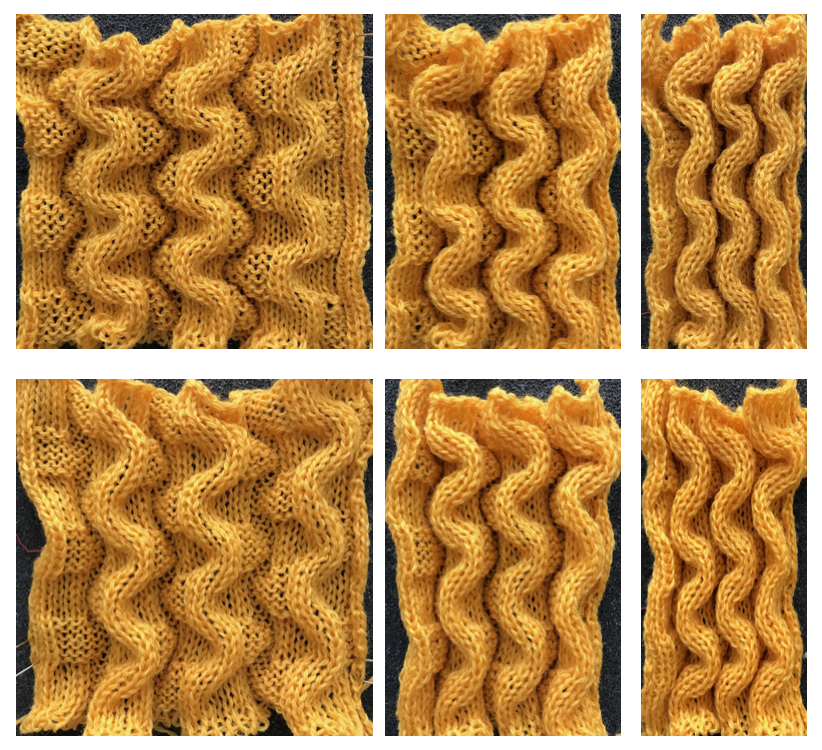
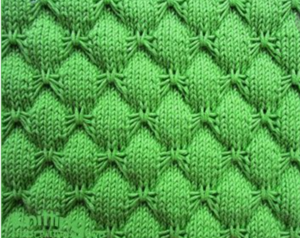
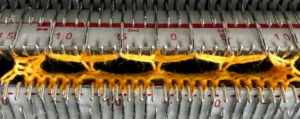
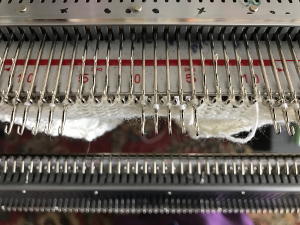
the swatches are knit in a 2/15 wool, the fabric might be better served using a thicker yarn. Here the “blocks” creating  “floats” are side by side

For another single bed cousin in different weight yarn, please see the previous post 

Fabrics worked on the single bed with groups of pulled-up stitches on the purl side will have some distortion of the stocking stitch side depending on the weight of yarn used, the number of rows hooked up, and stitch type. Working on the opposite bed to create the floats produces a more balanced fabric.

My charts often evolve. This may be done on graph paper if there is no access to the software. I began adding a space between each block, thinking about those knit stitches I wanted to create on the purl ground, hooking stitches up on red squares 
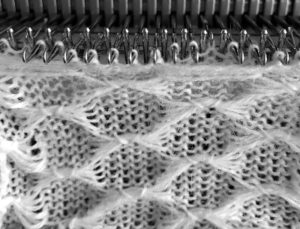
adding border stitches, and more theory on the placement of stitch type
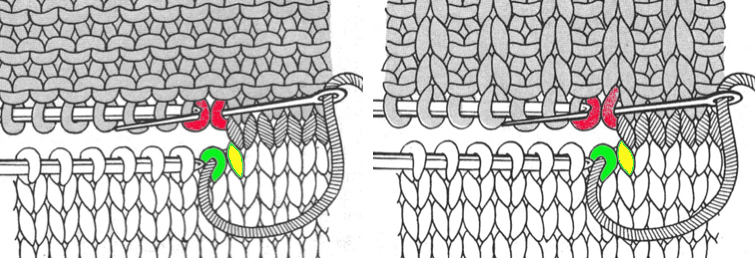
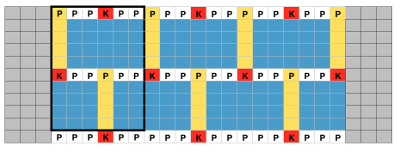
the result places “knit” stitches in the center of butterfly (magenta arrow), not at its sides, and I see and extra purl stitch (green arrow). Multiple stitch-wide borders create unwanted floats on one side
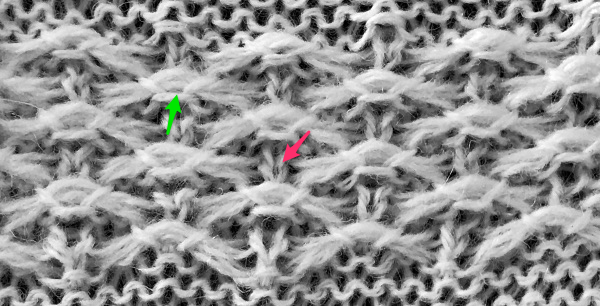
back to the drawing board and working things out first as a hand technique

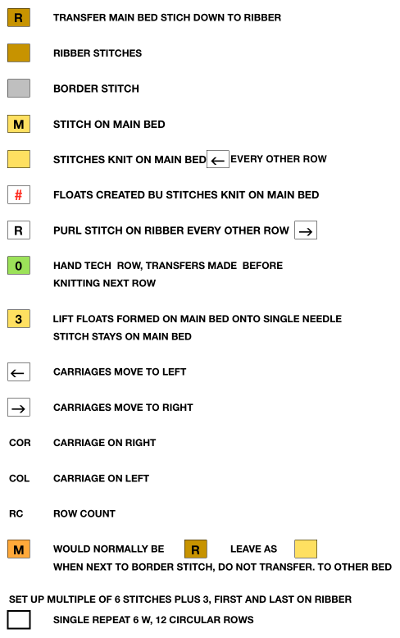
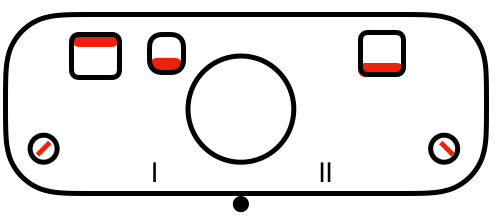
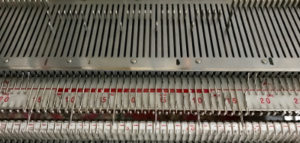
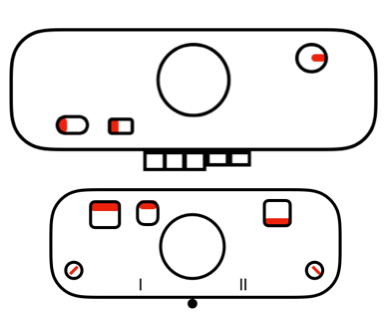
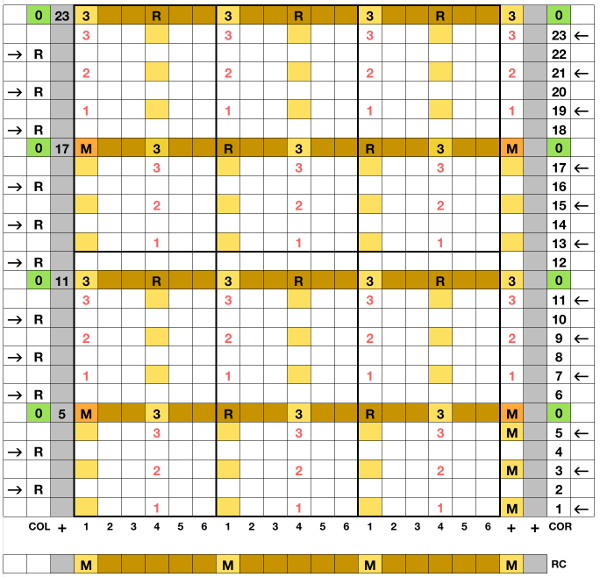
I began with my carriage on the right (COR), after setting up the repeat on a multiple of 6 stitches +3 as indicated above. The last stitch on either side on both beds is never transferred, and the short loops of every other set (rows 5 and 17 in the chart) are not hooked up. This will produce a slightly rolled edge on each side. The larger number of border stitches becomes problematic. The photos were taken while knitting 2 different swatches, so needle tape markings are not the same in all photos. To produce the circular knit, opposite part buttons are pushed in so with carriage on the right (COR), the settings would be

Cast on in any preferred method, ending with all stitches on the ribber Configure main bed needles as illustrated in a stand-alone setup row at the bottom of the chart With carriages traveling from right to left, the main bed knits on those single needles, creating floats between them and the ribber slips. When carriages travel from left to right, only the ribber knits, and the main bed slips. Here the carriages have traveled to the left, and back to the right 
With row counter (RC) set to 000 at the start of the knit, hand techniques occur on RC 5, 11, 17, 23, 29, and so on. Hooking up loops and transferring stitches between beds always occur with carriages on the left (COL). On those rows, the floats are hooked up on the center needle of the 5 empty groups. In this photo, the ribber is dropped to show what is happening on each bed. The last stitches on each bed are not moved, and those short floats, when created on completion of alternate repeat top halves, are not hooked up 
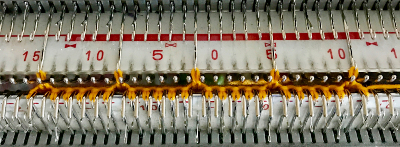
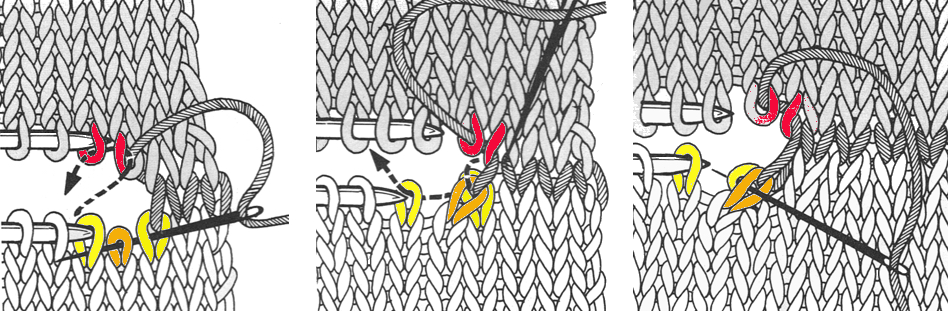
after the three floats have been hooked up, with COL each time, the in-between main bed stitches are transferred back down to ribberCOL: be sure when hooking up floats that all in the series are picked up. The space between the beds is fairly narrow, and the tool used is purely preference-based. Shifting the main bed needles forward will provide a visual check for loop count as you go. I bring needles with multiple loops out to hold before transferring to the ribber, and then also the transferred stitches on the ribber out to hold to ensure they will all knit on the next pass from left to right. Patterning occurs on every 6th needle on both beds, except border stitch groups

this is the needle arrangement/position in my final swatch, knit in 2/8 wool, COR

So what can be automated in the process? The knit bed needs to work the stitches that form floats every other row, while the card or mylar need to advance every row. Trying patterns out as an all-hand technique helps determine tolerance on the part of the machine and the degree of patience available. With thinner yarn, the fabric would be more compressed, and maneuvering stitches more frequently to achieve similar finished size knits, so I switched to a thicker yarn. I found more than 3 rows of floats were too hard for me to manage successfully.  “Air knitting” to determine the placement of knitting on any bed before patterning helps determine the number of needles in use, especially if edge needle placement or count matters: here is the first pass using my mylar  eliminating needles to any desired width, leaving only one needle in work on each side of selected needle each bed for this fabric 
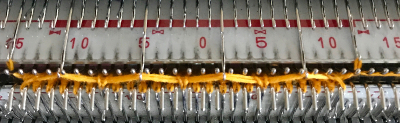
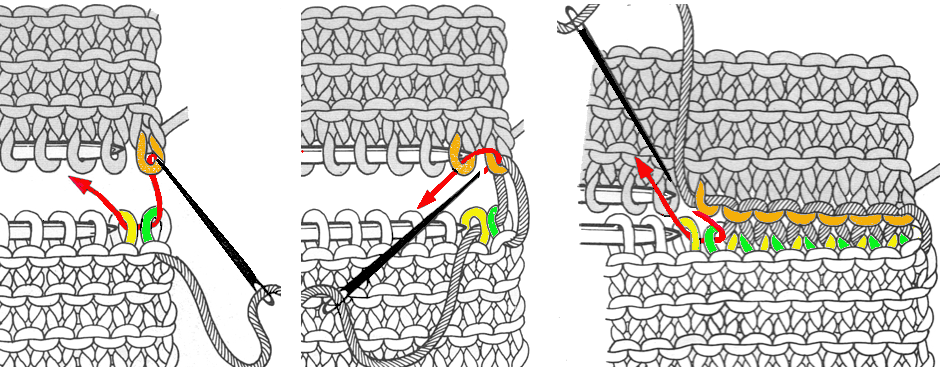
reducing main bed count so only one needle is left on either side of a selected one 
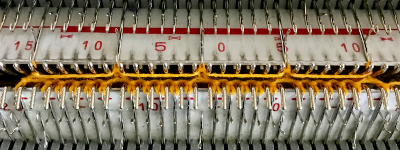
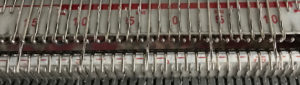
that needle (green arrow, gets transferred down to ribber now the number of needles involved on both beds is evident on both beds

While knitting in the pattern the ribber pitch is set on P (point to point) to keep stitches on opposing beds centered (P pitch also makes it easier to transfer directly from one bed to the other). If the cast-on is for every other needle rib with stitches then transferred between beds for pattern knitting set up, the cast-on and all rib rows need to be knit in H pitch, with a switch to P for transfers and knitting in pattern to be completed. With the first row set up on the selected segment of the needle bed, there are additional steps to take.

This is my working repeat. Since it is 6 stitches wide, it could be worked out on a punchcard, punching out all black squares. On my mylar, I marked yellow squares only, with no color reverse
To work consistently with the method described in the larger chart, the first row was manually set up on both beds preparing for the pattern with COL: change knob set to KCII (cancel end needle selection, not every needle in work on the main bed), KC set to slip <–>, so non selected needles slip with each pass of the carriages, advancing the mylar or card one row. The ribber set to N/N or as below will knit from left to right. Pre-selection row is made traveling to the right, ribber only knits

With COR: set RC (row counter) to 000. Make certain proper part (slip) buttons are engaged. MB knits in the pattern based on selected needles, ribber knits when moving from left to right. The fabric is tubular
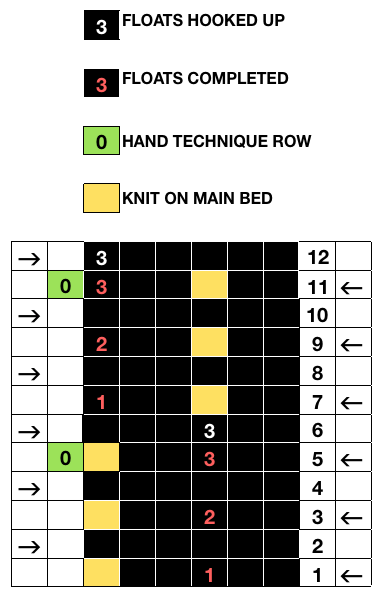
Hand techniques will now also occur when carriages are on the left, on RC 5, 11, etc as described in the hand technique chart, on rows with no needle selection. As in hand tech, transfers and multiple loops containing needles are brought out to hold before moving the carriages from left to right and selecting the needles for the next set of floats with that same pass.

This is my resulting fabric, hand tech shown, the short mylar test above was cropped

“Camino” bubbles, hand knit

I was written an email asking about the possibility of creating bubbles in hand knitting, this is my attempt, may serve as a starting point for DIY.

Below a small sample serves as an illustration of my first attempt. It was knit in acrylic,  steamed to the point of death, but shows the type of elongation of the “bubble” stitches using this technique. To keep things simple I stuck to a “square” shape. Stitch counts and placements of shapes may be adjusted to suit. It is possible to knit or purl the yarn overs, unraveling the extra stitches before knitting the original number of stitches when the top of the bubble is reached, but the resulting look is a bit different. It is worth trying, depending on preference for the type of result, or the way one is accustomed to dealing with elongated stitches and yarn overs in hand knitting.

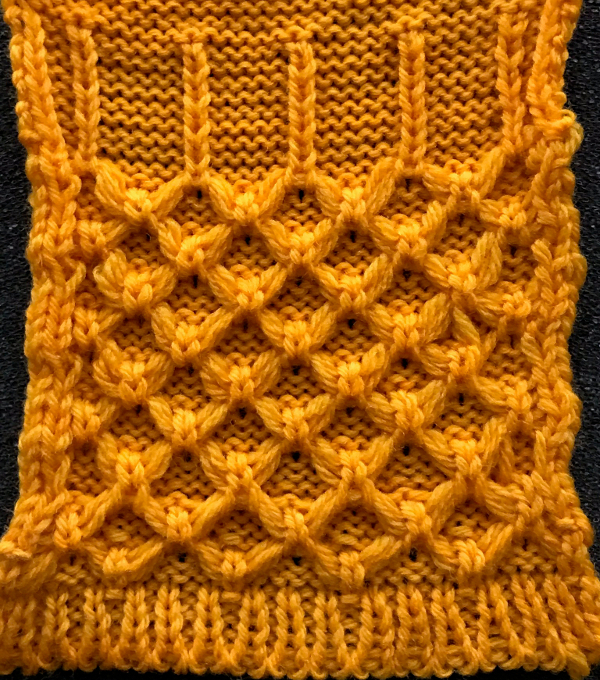
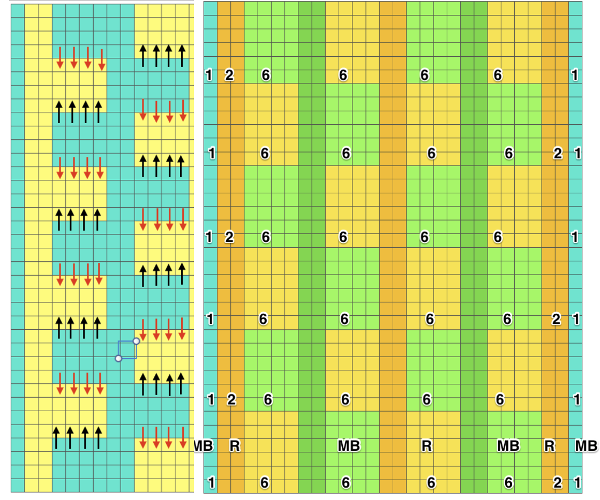
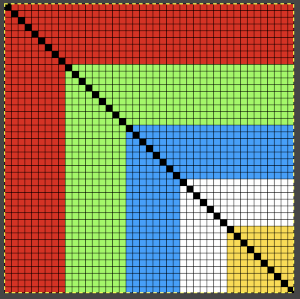
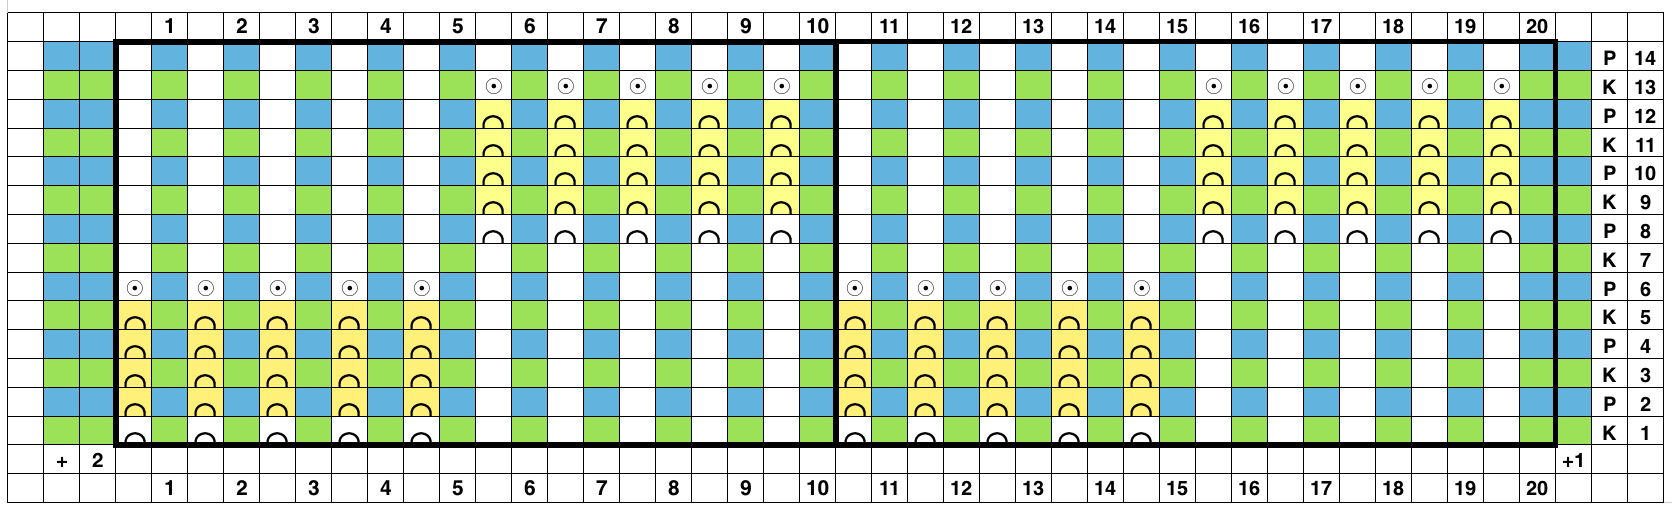
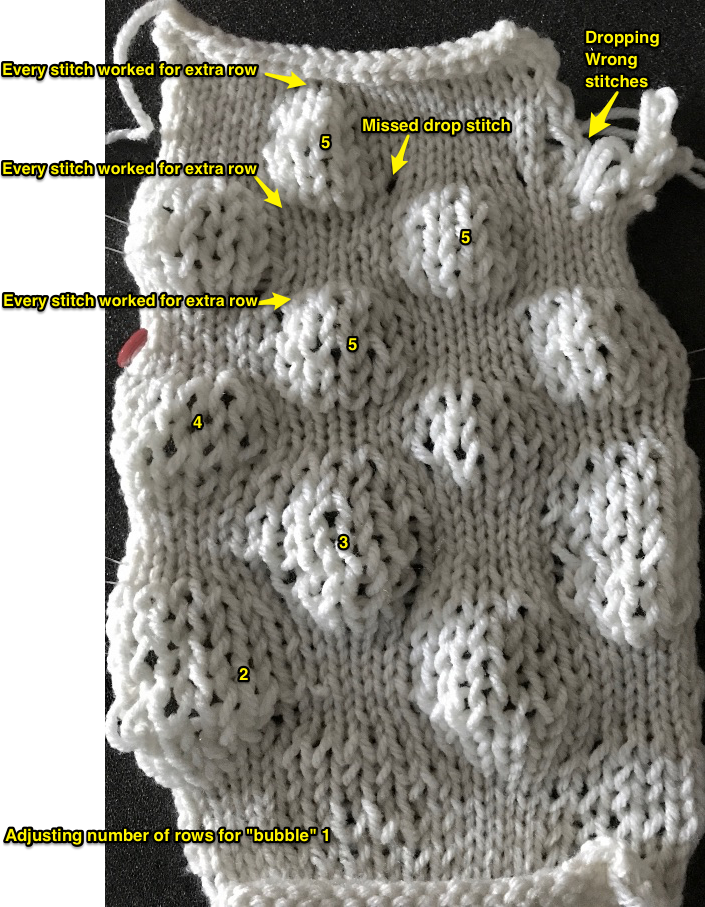
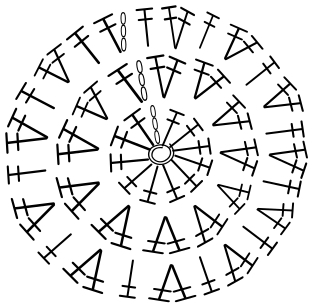
So I now own a new Mac, no longer have Microsoft Office available, and am now working my way through charting diagrams using Mac Numbers.  Below is a  possible working chart with a different stitch count than above. I would suggest larger blocks of all knit stitches and rows between “bubble” repeats

The further step of taking the technique to a brick repeat follows. I have been experimenting with a varied number of rows and stitches. Subsequently, I was happier with knitting or purling the yarn over as an extra stitch/ increase until I had worked the desired number of rows, then dropping those extra stitches, thus working once again on the original number cast on. The shape also seemed a little less square to me if a second row was worked before returning to making yarn overs. A border of more than one stitch on either side helps stabilize the shape edges.

This sample was worked in my “throw away” acrylic 4 ply. To my eye, the most pleasing and effective bubble happened on the least number of rows of dropped stitches (diagram provided above). The top and bottom edge of the “bubble” looked the best when stitches were taken off the needle on one row, and not allowed to “run” to the yarn over row until after the next row was knitted or purled all the way across. That may not be the best idea, especially when working much wider pieces of knitting. Dropping back to yarn over row as you work row 6, 13, etc. of chart provides a more controlled way of checking “runs” for individual stitches, making repairs for any errors easier. Dropping yarn overs with each pass seems to me to be the easiest way to track knitting as it progresses or gets wider, and counting bubble rows is far more easily tracked. Below, variation #5 matches the above chart.
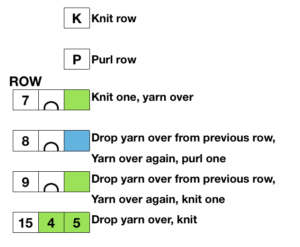
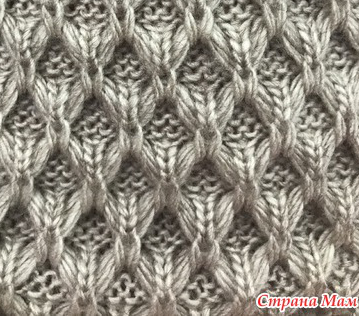
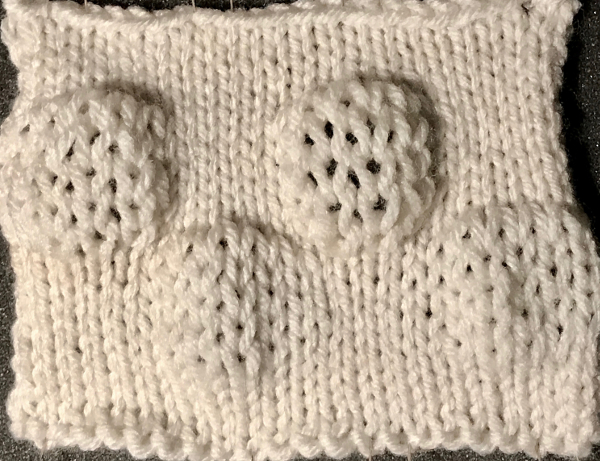
the reverse of the fabric, lightly killed with steaming and pressing 

A last swatch: here a row is knit or purled as seen in the chart above after yarn overs and their treatment is completed. If the aim is bubbles which will not be flattened out, dropping the yarn overs on each row worked gives a flatter (bottom of the swatch), less of a “bubble” effect than knitting or purling the yarn over before dropping it at the appropriate point (top of the swatch). If the fabric is to be “killed” as flat as possible, dropping the yarn overs each row may be good enough.


My machine knitting posts on this topic:  https://alessandrina.com/2012/09/21/knit-bubbles-and-stitch-ditchersdumpers/
https://alessandrina.com/2013/09/06/more-knit-bubbles/
https://alessandrina.com/2013/09/07/a-bubbles-cousin/
https://alessandrina.com/2017/10/18/revisiting-knit-bubbles-brother-km/


Return to circles, knit “pies”, miters and spirals 4

I  have gotten used to seeing charts for crochet in the round, and prefer charts to written instructions in knitting as well. My hand knitting has usually been project-oriented in terms of experimentation or exploration. Reviewing the information provided by both Zimmermann and Thomas in their early publications has led me to new appreciation and admiration for their efforts and for the knowledge made available to their readers, and not just in their time.

Looking at the additional medallions by Mary Thomas, I thought I would play with attempting to illustrate them, some in rounds rather than individual wedges lining up flat with blank or grayed out squares between them. The first example is my imagined square medallion (straight, geometric), p. 239 in my Dover edition 1972, and created in Excel. The work is begun on 8 stitches, divided evenly among 4 needles, knitting with a fifth. The cast-on is equal to double the number of sides of the square geometric shape, 4. A hexagon would begin with 12 (6X2), an octagon with 16 (8X2). In this instance, the increases are arranged at the beginning and end of stitches on every needle.  When compiling information on machine knitting, I generally swatch to proof ideas. I am not planning on making accompanying samples or swatches for these.

I knit primarily on the machine and prefer hand knitting on long straight needles as opposed to rounds, so I find myself often referring to counts as rows rather than rounds. For square medallions cast on 8 stitches, divided into 4 needles, knitting with a fifth. In all patterns after the cast-on row is divided, the first round is knit in the back of all stitches to flatten them. Stitch counts after increases sorted high to low is helpful when knitting from the outside edge in, and in that instance they become decreases. For the square medallions, they are shown in that order, with counts for many more rounds than those in the illustrations. Beginning with the pentagon, they reflect stitch counts from the start of each segment shown.
The windmill medallion (square, p. 240) instructions given: beginning on round 6 “M1 into the second stitch from the beginning and the third stitch from the end of each needle. Continue thus on all even rounds”

The maltese cross medallion (square, p. 240) lines up the side of the M1 increase, in the center of each wedge. Increases are grouped together at the center of each of 4 needles in use may also be grouped on either side of 2 center stitches they may also be grouped on either side of 2 center stitches In a square medallion (bias, swirl, pp. 241-242) increases are placed on only one side, at the beginning of each wedge. Yarn overs are used to create eyelets for more ease when attempting to keep the square flat, and the increase round is to be repeated: “as required”. If double yarn overs are used, drop the second yarn over on the next round. They are made before the stitch. Single increases are to be made each round. Here are the wedge shapes side by side around a center core For a pentagonal medallion (pp. 242-43) cast on 10 stitches divided evenly, or as the number of segments increase, work 2 sections or more on any one needle. For the swirl double yarn overs may be needed to keep the work flat. Thinner yarns may require additional knit rows between increases. Stitch counts For hexagonal medallions (p. 243) cast on 12  stitches, two sections are placed on each of three needles, knitting is done with a fourth. Each increase round will add 12 stitches; 2 or possibly even 3 rounds may be needed between each increase row to keep the shape flat. STS column reflects their number after increases have been made 
The hexagonal medallion swirl (p. 243) is shown using both M1 and YO increases. Here the rate of increase in rounds is slower than above (2 per needle as opposed to 4), so increase rounds are separated by only one row of  knit stitches The octagonal medallions (pp.244-245) are cast on 16 stitches, divided into 4 needles, and knit with a fifth. To make a smaller center hole, 8 stitches may be cast on, doubled on the next round, and then divided. The first geometric medallion shows increases (4 per segment, 16 per round) in single rounds, requiring several knitting rounds between the increases. The second medallion uses more frequently (2 per segment, 8 per round), so single all knit rows separate roundsFor the octagonal medallion swirl  (p.245) directions are the same as for the hexagonal one, with a 4th segment providing extra sides If the perimeter or circumference of the shape to be knit are known, the process may be reversed from the edge in, with decreases replacing increases. The advantage of working from the center out is that adjustments i.e. extra knit rows between increases, changing increases to yarn over(s) for added ease or decoration, etc. may be made far more easily as the work grows. Considerations should be given to leans of M1 stitches so they point in opposite directions on alternating sides. Motif and pattern placement can only be planned after these building units have been sorted out.


Return to circles, knit “pies” 3

Elizabeth Zimmermann provided guidelines for circular shawls in her books and publications, including “Knitting Workshop”. For a basic pi shawl (p. 112, Schoolhouse Press, 1984) the assumption is that each section is twice as deep as the previous section and has twice as many stitches. Below CO row represents cast on stitches if the work is to begin from the center out, Column A the row count on which the increases take place, column B the number of rows knit just prior to the increase row (A-1), and C the number of rows available for any planned repeat (A-2), these are constants. The columns directly below each cast on (CO) number (orange) counts represent the number of stitches when increases are complete. The stitch count doubles when the number of rounds has doubled. Mary Thomas’s Book of Knitting Patterns, Dover 1972, p.p. 245-247 provides guidelines for circular medallions. She calls her first a “disc” medallion. In executing it the aim is to scatter increases so they are less visible and do not form spokes. Four stitches are cast on, with 4 stitches increased in the total count every other row. The number of stitches between M1s increases by one on every other row. My chart happens to read from left to right. As with any knitting in the round, the process may be reversed, starting at the circumference and moving toward the center. I personally like charts to help visualize results, and have revised her counts in the illustration below so increases are at the same rate but placed a bit differently within the rows. On rows with even numbers between decreases, start row with half that number of knit stitches before the first increase. Because one is knitting in the round, with knit side facing, all rows are knit. If the work were knit on 2 needles, knitting every row would produce a garter stitch. what happens if increases “line up” For her circular “radiant” medallion after the first 2 rows increases are made every 4th round. My chart is renumbered excluding the first 2 rows, so the increase rounds would occur on numbers divisible by 4, making it easier for tracking them. Each “building” round increases the number of stitches by 16.

In her “target” circular medallion, the building increases are arranged in concentric circles. Each increase row begins with a M1. Once RC 20 is reached, a stitch is added between increases on each increase round. This chart reflects the knitting progress, but not the shape. STS column on right reflects the total number of stitches after increases have been made. Each building round after RC 6 increases the count by 32. Formulas for more, varied geometry-based medallions are also offered in the book.  I finally “discovered” actually using formulas in Excel! The video that clearly and quickly helped me learn how to: https://www.youtube.com/watch?v=QFVkSnGgZZclooking at the flow in table form for the first 2 medallions

These formulas do not take into account changes in gauge or stitch type within bands. For similar shapes to be achieved in machine knitting, the number of transfers would be prohibitive. In order to achieve similar shapes, one begins with the radius of the finished circle and the shapes in the family may be knit sideways, using holding.

Hand knitters can work with 4 double-pointed needles, one or 2 (or more) circular needles, and crocheters can follow similar shaping methods. The advantage to long circulars is less bunching up as the work grows, and if you like working flat or want to try the garment on while shaping it, you can use more than one long needle, making the piece or the try on manageable. Working from the top down when knitting such shapes may give one more control over the size of the finished piece i.e. on length of body and sleeves, height between bands, extending a yoke into a shoulderette or cape. Stitch pattern size and repeats add to the math calculations. Garter stitch is the only hand knit stitch that approaches a square gauge, could be used in combination with patterned bands.

The charted patterns above rely on M1 to increases. Yarn overs may be used for decorative holes at increase points. If preferred, the hole may be diminished by twisting the stitch when picking it up on the next round.

When knitting in stripes, the “jog” at the color change in knitting can be eliminated by slipping the old color purl-wise and starting to knit the second stitch. TECHknitting provides more alternatives in her posts: http://techknitting.blogspot.com/2007/01/jogless-stripes.html
http://techknitting.blogspot.com/2011/03/jogless-stripes-pretty-picture-version.html. For a method using yarn ends and a needle when the yarn is cut http://imgur.com/a/NREsH.

For shawl shapes and their geometry using YO increases, see the posts and publications by Holly Chayes.

To start it all from the center out: I am used to doing the magic loop cast on with a crochet hook, and then moving on from there, Kitty Falol shows it worked with DPNs.

Return to circles, knit “pies” 2, round yokes and more

Just as other knitwear styles have varied in style, ease, and fit over the years, round yoke sweaters have also done so. Yokes can be wide or narrow, in patterned or textured stitches, and in varied proximity to the neckline. This is not generally a tailored style. Ease in knits can be calculated on the basis of fashion or personal preference. With some familiarity with slopers, measurements may, however, be adjusted in this style as in any other sweater. Neckline measurements do not reflect the measurements achieved after adding finishes i.e. turtle or round. Depending on the size of the yoke, shaping can begin at the armhole level bind off (seen in the early hand knitting directions in the 70s), while smaller yoke shaping can begin at whatever point is desired, extending to the neckline, or simply to create a design band. The shaping is created by decreases if the garment is knit from the bottom up, and with increases, if worked from the top down. In most styles, the same number of rows are worked from the armhole bind off or held section to where yoke sections meet. At that point, if hand knitting on circulars the 4 sections: i.e. left sleeve, front yoke, right sleeve, and back yoke may be picked up and joined for completing the yoke. My illustrations have been created using Mac’s Pages lines and shapes.  They are not to scale.

Beginning to visualize the process: yokes are generally superimposed on raglan shaping

they form part of a flat circle; here is how they might appear in a partially seamed cardigan without front bands. They may be created in varying widths or patterns,

and in a pullover with shaping in the back that raises the rear neckline. Some of the early patterns were executed with front/ back and both sleeves sharing equal measurements and slopes

separate the elements: the yoke 

the front and back can begin to consider shaping at breasts, waist, and those wedges under where the yoke “circle” meets the sweater may be short rowed on each side with the intent of achieving a much better personal fit

sleeve 

Hand knitters are probably familiar with Elizabeth Zimmermann and her daughter, Meg Swansen. Handknitting with Meg Swansen 1995, and Elizabeth Zimmermann’s Knitting workshop 1981, Knitting around 1989, Knitting without tears 1971 are classical references that include information on yoke creation, including these guidelines

Other authors suggest 1/4 of total body and sleeve measurement in stitches (excluding armhole) for a tighter neckline (turtle neck), one third for a more open style (crewneck). Original circumference/ body measurement should include any ease. Though decreases for the yoke: first halfway up 25%(one out of every 4), second 3/4 of the way up 33% (one out of every 3), and last 1/2 inch before full depth is reached 40% (two out of every 5) are the most common, they can be placed and varied to suit your own design.

In drafting your own patterns and partnering with someone, a tape measure or string can be laid on the shoulder line, etc. for an idea as to preferred placement and measurement. Necklines finished by bound-off stitches whether machine or hand-knit, do not stretch, so measuring your head with something that does not as well gives you a guideline. Yokes end in open stitches, so the thing to consider there is what method is used to finish the neckline and its own stretch factor after bind off. Hand knitters have the added benefit of splitting the work onto 2 circulars and trying on the sweater or its pieces on while in progress to double check fit.

Japanese designers began to publish patterns that often included yokes that were constructed on the top of the drop shoulder line, with the back yoke placed higher than on the front. Such yokes also began to be represented in stepped figures showing decreases. In the round calculations are gauge based, not relying on the pi formula.

modified raglan for higher placement of yoke on the back of the body

full pattern with traditional full cap sleeve

pieces meeting at dropped shoulder line: dotted line represents back collar placement, note difference in height between the back panel on the lower back, and front panel on lower right

a sample diagram from a Japanese magazine 

Yoke shaping may be indicated in a stacked format. The final count and frequency of decreases are shown, publishers may vary in language. On the first row here 4 sts – 2X means there is a group of 4 stitches followed by a decrease 2 times, then 5 stitches followed by a decrease 23 times, etc.

Two online calculators are available to help with DIY:  1. the Yoke-U-Lator no longer live, and 2. for Lopi, Icelandic styles. The image below is a screenshot from the latter website, indicating a sample possible result. There had been issues with Silverlight not working in some late OS updates, making the site unusable for many. On 3/12/18 after installing the latest update for the plugin from Microsoft, I was able to run it using both Safari and Firefox respectively.

Jessica Tromp offers free circular knitting patterns with a round yoke, dimensions in inches and ounces.

There are endless possibilities for combining math formulas, gauge, and pi. There are many ways to do decreases. With planning so that much more frequent intervals happen between decrease rounds, the decreases themselves can be fabricated to line up in line, and the resulting texture creates the interest in the sweater as opposed to any color patterning (i.e. along white lines)

“pie wedges” may be placed on neckline, yokes, sweater parts, various silhouettes and garment pieces, or full shapes (red dots outline possible dolman sleeve)from a Japanese magazine a hint of detail that must be calculated and the pie may be oriented in different locations on any one piece 

from a Japanese knitting magazine, an idea for long sleeve and side details merging with and becoming part of a circular yoke For some of the math  calculations please see:  https://alessandrina.com/2011/06/18/oh-the-math

“Decreases” in rib sometimes can be achieved through changes in needle size if hand knitting or tension changes on the machine. The yoke in machine knitting would need to be split into 2 parts or knit sideways. Plain colored rows between bands of FI may appear noticeably lighter in weight, so using a 1X1 one color FI pattern or double strand of one of the pattern colors may improve the look.

Before transferring stitches on the machine in the single color rows, make your transfers. The lace carriage may be used after selecting appropriate needles and putting them in position. Knit the following row before removing knitting on from the waste yarn or garter bar. If stitches are tight for garter bar use sometimes the row after transfers may be knit at a looser tension to facilitate the process, and the difference may not be noticeable when knitting at “normal tension” is resumed. The carriage should be set to plain knit for row prior to and after transfers. It may be easier to work toward the center from each side when returning stitches to the needle bed. In order to match the pattern at the shoulder seams or when motifs need to stack in position on separate bands, the stitches need to be rehung at specific positions on the needle bed that take into consideration the size of the repeat and its location within the stitch count. Also, take into account the seam allowance. One stitch extra on each of the meeting seam sides will allow the end needle selection stitch or an extra patterning needle to be hidden within a full stitch join. Working on machines that preselect needles or pushers makes tracking a bit easier. It is possible to combine knitting pieces in both directions. For example, knit yoke up toward neck, join shoulders and then pick up appropriate stitches to knit body and sleeves from the top down. Top-down makes any adjustments in length easier prior to finishing the sweater. Short rowing in garment segments underneath the yokes makes for a better fit at the bust line and upper back.

Calculators to help with all that math: online
http://www.thedietdiary.com/knittingfiend/tools/MagicFormulaSleeveTopDown.html
http://www.thedietdiary.com/knittingfiend/tools/MagicFormulaSleeve.html
http://www.thedietdiary.com/knittingfiend/tools/EvenlySpace.html
http://www.thedietdiary.com/knittingfiend/tools/IncreaseEvenlySpace.html
http://www.thedietdiary.com/knittingfiend/EZsweater/catalogSizeChart.html
http://www.thedietdiary.com/knittingfiend/tools/PieWedgeShawls.html
http://www.eskimimimakes.com/knitulator-increase-decrease-knitting-calculator-eskimimi

for purchase:
https://itunes.apple.com/us/app/knitting-toolkit/id960312887?mt=8
https://itunes.apple.com/us/app/knit-evenly-calculator/id370449748?mt=8

Going low tech: if gauge works out to whole numbers, shapes can be plotted out on square grid graph paper (or grid created within the software to suit) where each square represents one stitch, one row. Draw connecting lines, follow the outline, filling in squares (or removing them) as the edge moves a whole unit (k2 tog). Here the goal is to go from 39 stitches to 5 over 60 rows. Color bands could be added and planned between decreases, which should occur on single color rows. Once a gauge is obtained, charting on graph paper or within programs can be boiled down to connecting dots and following outlines as above. Some simple breakdowns for outlines of garment pieces/ shapes 

more inspiration from an old Japanese magazine

visualizing a peplum 

This was a share of mine on FB last March attempting to illustrate shaping by decreases across rows while maintaining the FI design
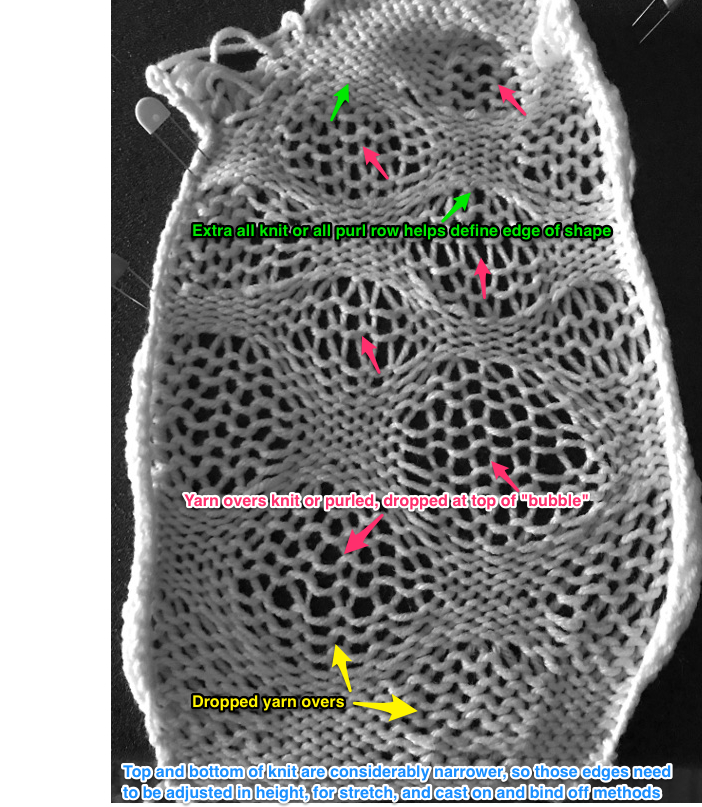
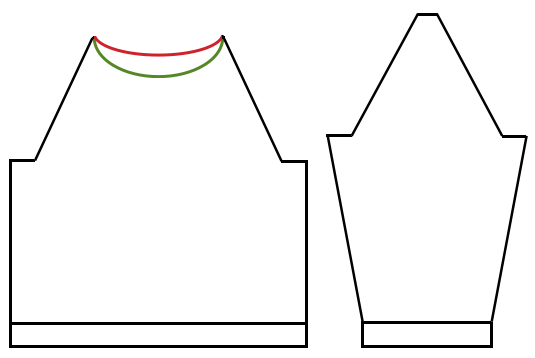
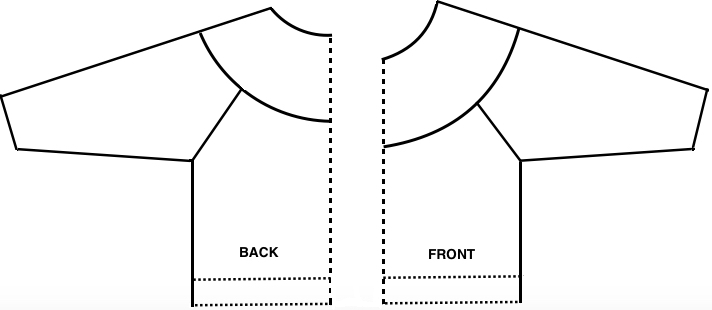
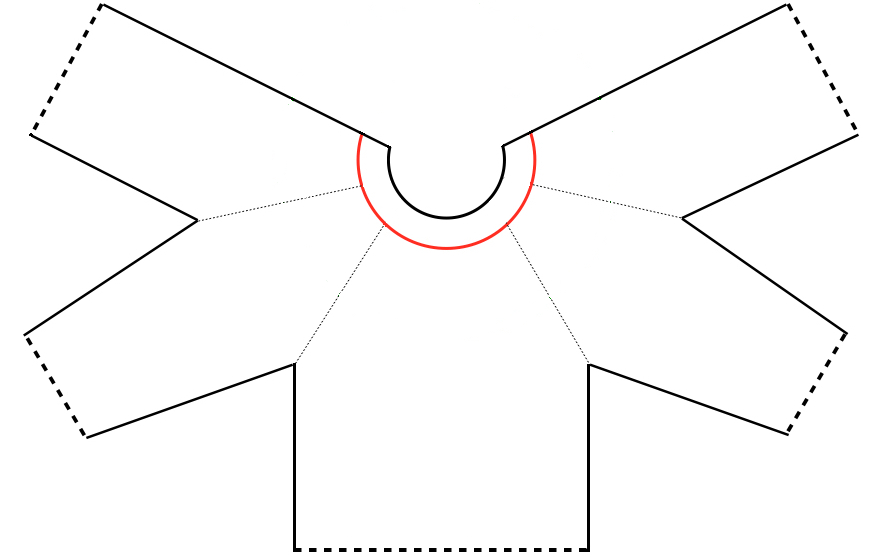
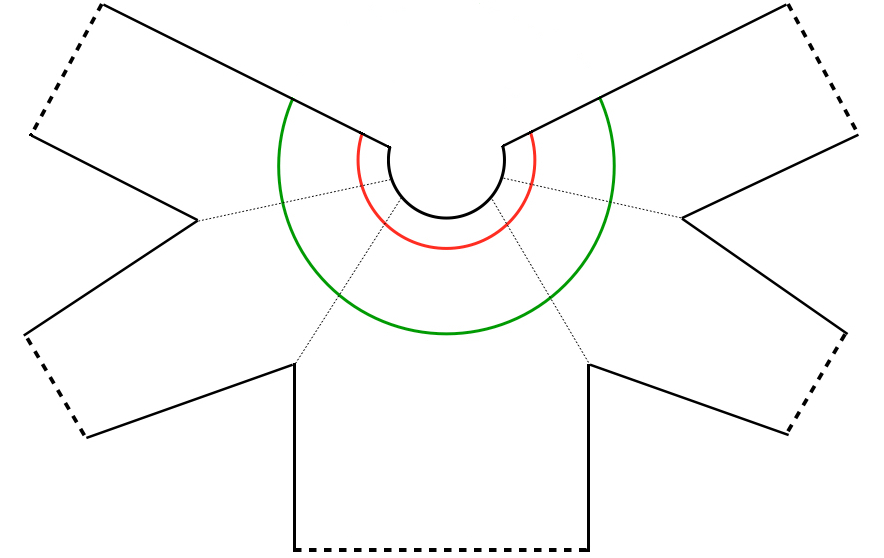
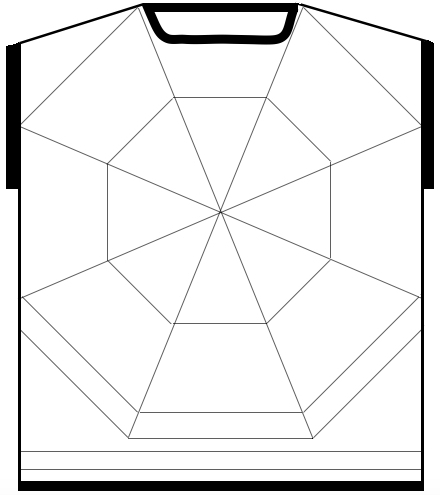
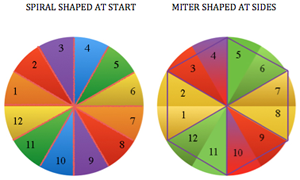
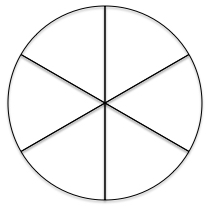
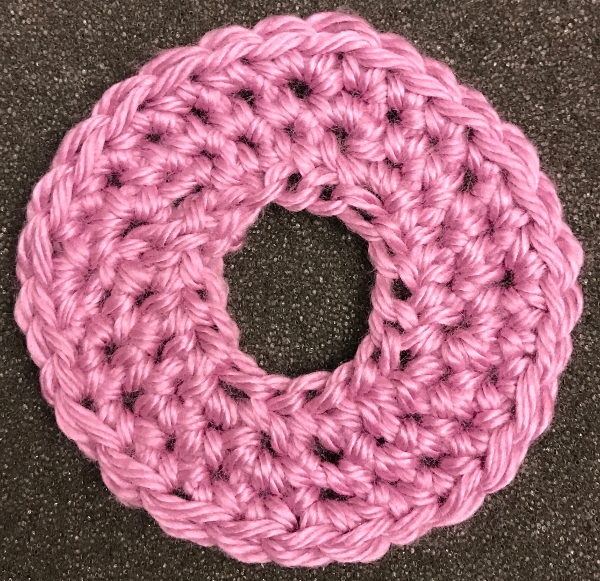
Starting with a square shape and going around.Garter stitch hand knit samples from a Japanese magazine, elongate X2 on the machine with selection toward the color changer for every 2 rows knit in each color to add striped patterning to modular wedges

Return to circles, knit and crochet “pies” 1

I began a series of posts on miters and spirals created on the knitting machine back in 2011. The oldest posts, knitting math and piesback to that pie, a bit of holding, and revisiting miters and spirals to form varied shapes begin to address creating flat circles in machine knitting using holding techniques.

Hand-knitting in circular format and crochet share some similarities. There are 2 methods of constructing circular work in crochet. 1: in rounds, (akin to knit miters in shape) where the end of each circular row is joined up to its own beginning to form a ring. A new starting chain (s) is formed to take the row to the proper height for the next row to remain constant. Depending on the pattern, one has the option of continuing by turning the work or not at the end of each row. Doing so allows the opportunity of altering textures and work on the fronts or backs of stitches. 2: in spirals. Rather than joining the ring, one continues on by going to the tops of the posts in the previous row.

With spirals, it is useful to mark the beginning of each round. Knitting markers shaped like safety pins are handy for that purpose. A line in a contrasting color can also be created using a separate strand of yarn and alternating carrying it back or to the front prior to forming the first stitch in the new row.

As with knitting, crocheted circles are not true circles, but rather, they are polygons. The way to make shapes more circular is to scramble the location of the increase points, putting them in different starting positions in each round (always spacing them equally and keeping the formula). Within limits, one may make the starting number of stitches in the first round a multiple of the number of segments in the finished shape.

With the creation of a flat circle in mind, the number of stitches needed depends on the height of the stitch. The taller the stitch, the greater the number of stitches required. If the stitch stays the same throughout, the number of stitches added on each round is constant. Test work regularly at intervals as the work grows by placing it on a firm, flat surface, to see if working only one stitch into each stitch is required / enough at that point to maintain the shape. The more segments, the smoother the circumference.

Unlike in hand-knitting, the first loop on the hook does not count as a stitch until you make it into something.

Spirals or miters knit on the machine begin with their radius; one possible construction method may be inferred from these images

Spreadsheet programs such as Excel and Numbers have pie charts and other tools that can help visualize or even plan the work with symbols. Unlike machine knitting, both crochet and hand knitting may begin and grow from the center out or from the outside in. Calculated shaping with increases or decreases along circumferences at different points on the pie creates the desired shape. For the purposes of this discussion, I will address stitches in US terms. There are various published guidelines with some variations. The fiber content and matching gauge (if required) may need editing of the numbers, but, as starting points:
Single Crochet [sc]: Start with 6 sc and increase 6 sc in each round so that the total stitch count in each round is a multiple of 6
Half Double Crochet [hdc]: multiple of 8
Double Crochet [dc]: Multiple of 12
Treble [tr]: multiple of 16

Some symbols and number of stitches required in base rows in table form, for working from the center out:
the more wedges in the pie, the smoother the circumference no matter what the method. Single crochet is worked in 6 wedges double crochet in 12 wedges,  wedges may be reduced to simple line segments rounds may also be created to log in and track more details adding wedge outlines before filling in symbols

single crochet worked with a slip stitch at the end of each row will produce  points similar to those seen in miters in machine knitting

spirals produce a rounder shape double crochet echoes the forms 

Building your own charts requires vector programs to allow for the rotation of symbols around an axis. My chart was quickly produced in Inkscape, which is free to download for both Mac and PC users. Mac users in addition will also need to download XQuartz to run the program. I created the chart with my own symbols and freeform and laid them down while viewing the grid. It turned out, however, that there are 2 published videos on how to use the program for charting crochet stitches, part 1 and part 2 by StitchesNScraps.com

Two YouTube videos on the topic:  using Illustrator CS 5.1, Marnie Mac Lean’s video, and using StitchWorksSoftware. An online generator by Stitch Fiddle, and its associated video.

if donuts are the goal: find your round 

An example: in single crochet, if round 3 had been completed, there would be 18 completed stitches. Chain 18, either slip stitch or continue in a spiral to match the count at that point. For round 4: increase every 4th, round 5: every fifth, round 6: every 6th, and round 7: every 7th stitch. Different stitch heights:

A few sites to see for crochet tutorials:
magic ring start: no chain stitches, no center hole
https://www.youtube.com/watch?v=sLUaywX0-WE
working in spirals
http://snovej.com/archives/freeform-crochet-spiral
a nice ending
https://www.youtube.com/watch?v=W_sW4xX_O70

https://www.youtube.com/watch?v=8L_rtWt78Jw&t=32s
crocheting a flat circle in single crochet: note the start “magic circle”
https://www.youtube.com/watch?v=8oDubbFVE3Y
https://www.youtube.com/watch?v=LZiCnCGP_NQ
changing colors https://www.youtube.com/watch?v=U8cLufFeenU

I tend to swatch in easy-to-see colors, and “friendly” yarn, and use tools that allow moving in and out of stitches easily until I have techniques sorted out. When knitting circles in the round, things get a bit more complex, particularly if one begins introducing items such as round yokes with patterns into garments where gauge matters significantly.

Some of the same principles may be used in hand knitting. For the magic loop start with circular needles: KnitFreedom and on DPs Webs yarn

Seaming, joining, picking up stitches on knits 2

I have an extensive library of both hand and machine knitting publications. I am not the originator of the base drawings for these illustrations. However, they have been accumulated from various decades-old sources, edited by me for content, color, size, etc. My editing program is Gimp. I will review, alter, or add to this library over time.
Sewn bind-offs on the machine 
knitting taken off on waste yarn joining a hem 
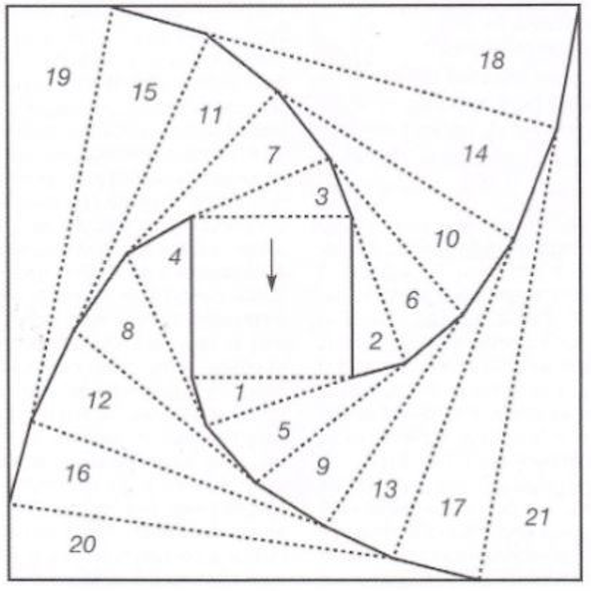
open stitches to finished hem crochet bind-off through the top or bottom of stitches in the last row respectively  weaving in yarn ends across a row on the purl side  Mattress stitch: work a few rows with loose stitches so entry and exit points are visible, then pull on yarn and tug on finished segments as you go to adjust stitch size
1. under the single bar between a full knit stitch on either edge of knitting, best for bulkier knits
2. under double bars between a full knit stitch on either edge of knitting, faster on smaller gauge knit
3. worked half a stitch away from the edge, every  row, under the bar on left, loop on the right

4. running stitch along and through the center of edge stitches, alternating sides every row
5. running stitch one full stitch away from the edge, alternating sides every row
6. joining purl stitches in every row

garter stitch 
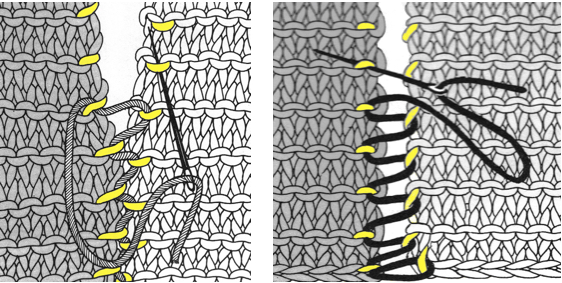
1. mattress stitch, knit side out, one full stitch away from the edge, adding a second strand of yarn to finish the join
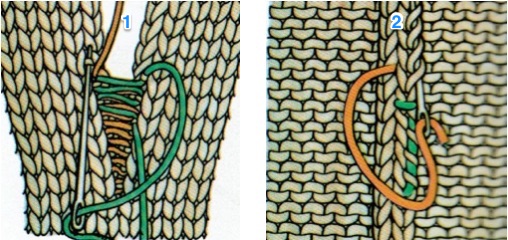
2. weaving in joined yarns along the inseam, traveling in opposite directions

2 X 2 rib ending with one knit stitch  2 X 2 rib ending with 2 knit stitchesrib join through “edge loops” of knit stitches  2 X 2 rib join ending with 2 knit stitches, 1 full stitch from edge 2 X 2 rib join ending with 2 purl stitches, 1 full stitch from edge For more illustrations in addition to the above for joining ribbed stitches see the later 2022 post
Picking up stitches to continue knitting or joining on the machine: straight edges,    curved edges open sts to bound off; bound off sts to bound off  (steps 1 and 2)knit to purl; knit to rib garter-stitch decreasing evenly at intervals across a row grafting with purl side facing if you are left-handed or the yarn end is on the alternate piece,  rotating the image or flipping it horizontally or vertically will provide guidelines.  There are many alternatives for increasing and decreasing stitches. These pages are from the KH 800, a Brother model made in 1970-71, and cover the basics and the often underused technique of using a knitting needle to remove stitches from the machine for any reason, here intended for decreasing evenly across a row as an alternative to scrapping off on waste yarn or using a garter bar.
Long and thin double-pointed needles are best on the standard, and sizing is more flexible when working on the bulky. If a double-pointed one is used, have a needle stopper on one end, and swap it out to the opposite side when shifting stitch positions. The work could be turned over with this technique as well. There are wide varieties of stitch holders that may be used to store or move stitches around when tools with enough prongs to serve the purpose are not available, as well as safety-pin-like plastic ones that can hold single open stitches or serve as markers at the edges of the knit. Sometimes appropriate lengths of ravel cord and a yarn needle can serve the purpose as well.

Seaming, joining, picking up stitches on knits 1