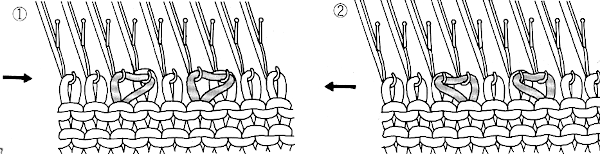
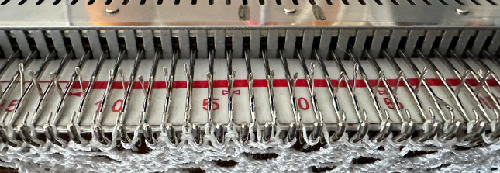
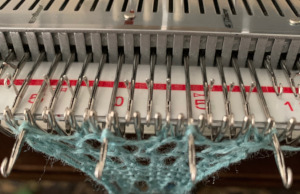
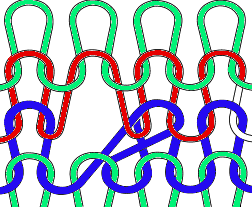
Early versions of the Brother Lace Carriage (LC) for machines such as the 830 and 860, even for the 890 did not offer options for choosing to using end needle selection, the default was none. From the 890 manual:  That said, they are present in the LC that accompanied my 892E punchcard model which match the 930 LC ones in appearance and operation and can override the selection made by the patterning device on the end needles. The two carriages, side by side, seen here with the slot in the horizontal position, indicating end needle selection is on.
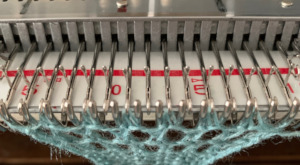
  The slot in the very center can be turned with a transfer tool, OW/out of work/ off, and W/work/on.
  In lace knitting, if any needles are selected for transfer to an end needle not in use in the piece, the LC still will attempt to transfer that stitch, and if no needle hook is there to accept it, the stitch will drop.
With all over patterning across the needle bed, when an end needle has been selected on either or both edges, those needles must be pushed back to B position manually.
Since such selection is not likely to happen on every row, it may be an easy thing to forget as the length of the piece grows.
There are also point cams, that help to change the spacing between vertical lengths of design repeats. For images of the Lace carriage and use of point cams please see posts 2017/10/05/lace-point-cams-…brother-machines ..
Electronic carriages are equipped with a magnet, and must always travel past the center needle 0 position center mark on the needle tape.
Markings on factory punchcards give clues as to which carriage to use and for how many passes.
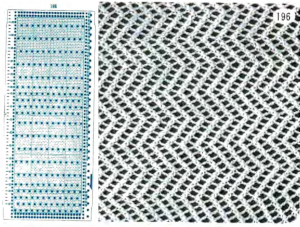
They also may vary depending on the year the punchcards or mylars were issued. To review, here are some of the markings commonly found The graphic from the KH 860 punchcard model manual
 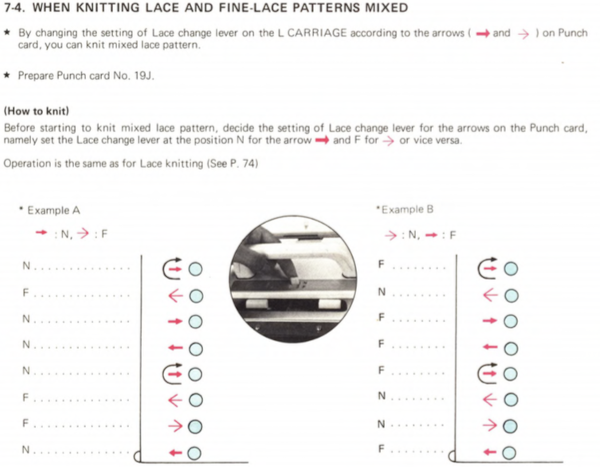 Illustration modified and adapted from multiple decades-old Japanese magazines of fine lace
 single complete transfers
  Multiple transfers may be made either as a hand technique or expanded for use in electronics. Because single stitches are moved with each carriage pass, pattern repeats can become quite long, with few punched holes or black pixels
  Use a smooth yarn that has some stretch and does not break easily. Because the yarn will be transferred to and from or in addition also being shared between needles in fine lace, some extra yarn may be needed for proper stitch formation. In overall meshes begin testing using a tension at least one whole number higher than when using the same yarn for stocking stitch. Too loose a tension can result in dropped stitches or loops getting hung up on gate pegs, too tight and the stitches will not knit off properly or drop, or the yarn may even break. When eyelets are few, tension adjustments may not be needed.
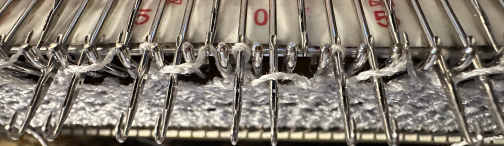
Begin with waste yarn and ravel cord, then followed by casting on and knitting at least 2 rows before beginning to use the LC.
The cast-on will need to stretch to accommodate the growth in width which increases with increasing numbers of eyelets. The same applies to the bind-off. One option for matching both is seen in this “Answer Lady” video.
It is only when the knit carriage is operated that actual knitting takes place.
The movements of the lace carriage serve only to move or transfer stitches across the surface of the fabric. The card does not advance when the KC knits a row, so the movement of the card does not reflect the progress of actual knitting.
In most punchcard repeats, if when the row of transfers is completed there are two or more empty needles side by side, troubleshooting is required to solve the problem unless they are intentionally planned in the design, with deliberate adjustments to components of the overall pattern repeat.
The needles need to be in good condition, with latches that open and close smoothly and easily. Also, check for any bent gate pegs, and use a tool to even out the spacing between them if needed.
Error corrections need to be made to match the proper stitch formation.
As in any other knit, if tuck stitches occur in the same location and are not part of the planned fabric, it is likely the needle is damaged and needs to be replaced.
If a loop is sitting on top of a needle with a closed latch before knitting the following row, that stitch will drop. If it is noticed before knitting the row, the loop can be knit through the stitch manually while being mindful of what action that same stitch should take in the progression of the pattern.
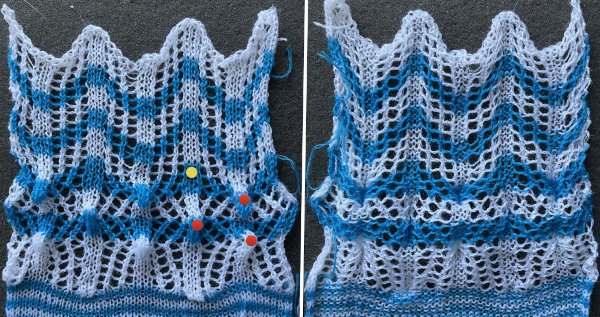
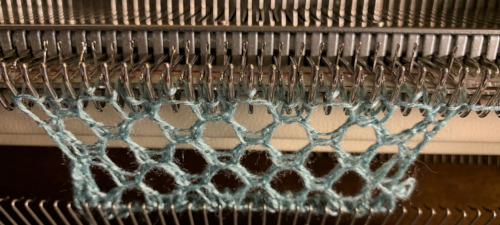
The appearance of tuck loops, red row To form eyelets a loop is created on the needles emptied by the transfers on the first pass with the knit carriage to the left (red), the stitch on that needle is completed as the knit carriage returns to the right (cyan)
 If when trying to correct the direction of a transfer or a dropped stitch the transfer is not formed properly and the stitch in that location is knit manually the eyelet will be absent
The traditional placement is for the LC (Lace Carriage) on the left, and the KC (knit carriage) on the right, but some patterns can work with their placement reversed or even swapped at regular intervals as knitting progresses.
Bringing needles out to E before the all-knit row may help avoid additional dropped stitches when there are multiple stitches on any needles.
Though knitting may proceed smoothly, checking the work frequently visually will make the rescue of problem areas possible as opposed to having to restart the project.
If test swatches are hard to knit, the problems will likely multiply when a larger group of needles is in use and the project should be put aside.
Because there are so few markings in lace, the lace card does not necessarily resemble the finished stitch appearance.
Needle pre-selection does not make as much sense as in other types of patterns. Where knit stitches occur in vertical stripes may also not be immediately evident. Needle selection on punchcard models is fixed, some shifting on the needle bed rather than centering may be required to have a specific repeat placement or a cleaner edge, which also matters in seaming.
There are definite top and bottom directions to lace, so in knitting scarves or sleeves that is a consideration. One solution is to knit 2 pieces in mirrored directions with many possibilities for methods to join them.
No top-down knitting on sleeves if you wish to match the body and it has been knit from the bottom up.
It is possible to use short rows combined with lace patterns, but any shapes created are likely to change visually, so planning is required unless those changes are deemed suitable.
Traditional holding by changing the knit carriage setting may not be used. Needles to be put on hold need to be knit back to A position and brought back into work as needed.
Ravel cord or any tightly twisted cotton may be used.
If needles have a tendency to slide forward when holding large sections or at the hold starting side as the piece progresses, some tape may need to be placed in front of the needle butts on the metal bed to hold those needles in place.
These illustrations of the process are from an early Brother machine manual  Lace and holding effects may be produced by combining LC use with the knit carriage set to slip stitch and also selecting needles in pieces such as automated edgings or doilies. The design repeats are not interchangeable between punchcard and electronic models.
When two carriages in Brother punchcard machines first move in the same direction selecting needles, ie. the knit carriage moves from left to right, the LC follows it also moving from left to right, the card does not advance. The same needles are re-selected on the next pass, repeating the design row.
On electronic machines, the mylar or memory/downloaded patterns are triggered by the magnet at the rear of the knit carriage to advance on every row.
The designs need to be planned or adapted based on the type of machine.
As with any knitting, there are times when nothing seems to work for no good reason after intervals of smooth knitting and no other changes, and a break is best for both the operator and the machine.
The greater the number of eyelets in the pattern, the wider the finished knitting. Blocking in some form will usually be required to set the stitches, and may be required if the piece grows in length and narrows as it is worn or hung when stored.
Out of habit I usually leave weaving and tuck brushes in use for all my knitting, but particularly when creating textured stitches and lace.
Gauge swatches should be larger than usual, all in the pattern, and treated as the final piece will be in terms of pressing, blocking, washing, and allowed to rest before obtaining measurements for garment calculations.
When stitch symbols first appeared in Japanese publications they were represented as the stitch formation occurring on the knit side of the fabric, which could be confusing since in machine knitting we are looking at the purl side. Eventually, Nihon publications made the transition and other pubs followed.  A comparison of hand-to-machine stitch symbols with illustrations and more information: hand-to-machine-symbols-5-lace/
For cross-brand use: 2019/02/23/revisiting-use-of-lace-patterns-studio-vs-brother-machines/
I have been blogging for years and sometimes return to topics after long absences. In terms of more information on lace design and some tips on translating hand-knitting instructions for machine knitting please see: 2013/07/23/from-hand-knit-lace-chart-to-punchcard-1/
2013/07/24/from-lace-chart-to-punchcard-2/
2013/07/26/from-lace-chart-…3-adding-stripes/
2013/07/27/from-lace-chart…-4-a-border-tale/
2013/07/29/from-lace-chart-to-punchcard-5-to-electronic/
2013/08/29/from-lace-chart-to-punchcard-6-to-electronic/
Transfer lace cards have very few black squares to avoid transcribing errors for punching holes or generating electronic repeats, work with a reproduction of the graph that makes it easy to view squares or pixel placements ie using Gimp, X800+.
Blank Brother cards are dotted in lines dividing the cards into 6X6 blocks.
Mark graph paper or software grids) if possible, in 6X6 blocks.
In ArahPaint the latter can be done by adjusting grid properties 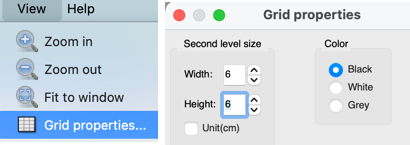
The Brother, Toyota, and Studio fashion lace punchcards may be used on all 3 brands as long as there are 2 blank rows after each transfer sequence.
The first row on Brother is preselected from left to right and transferred from right to left, while on Toyota it is transferred from left to right. Brother and Toyota cards are interchangeable provided the repeat is mirrored vertically or knitting starts with and operates with the carriages on the opposite sides recommended by the alternate brand.
Studio knitting begins with 2 blank rows, Brother starts with a punched row and ends with 2 blank rows, the first preselection row on the cards with locked selection needs to be adjusted accordingly.
The Brother LC does not advance the row counter, only the KC does.
Stitches are transferred in the direction that the lace carriage is moving. In most cases, the LC preselects toward the KC and transfers when moving away from it. Brother and Toyota cards are marked with U-shaped arrows to identify when to knit with the knit carriage.
Studio simple lace cards where stitch transfers and knitting occur in the same carriage pass may also be used on Brother machines, but require special handling discussed in other posts.
One of many methods to deal with dropped stitches: secure them by going through them using a needle threaded with a ravel cord.
Unravel back to an all-knit row undoing lace transfers carefully, to the point where stitches were dropped, rehang the dropped stitches, and remove the ravel cord.
Roll back the card, mylar, or electronic row count to match the number of rows unraveled.
Unless the knitting carriage is also set to select needles, only the LC advances the design rows. I prefer to roll back cards or electronic counts after each row is unraveled.
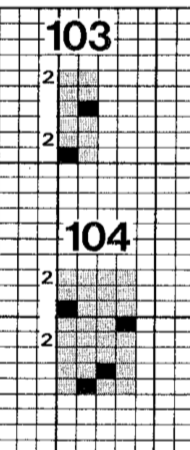
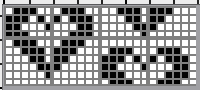
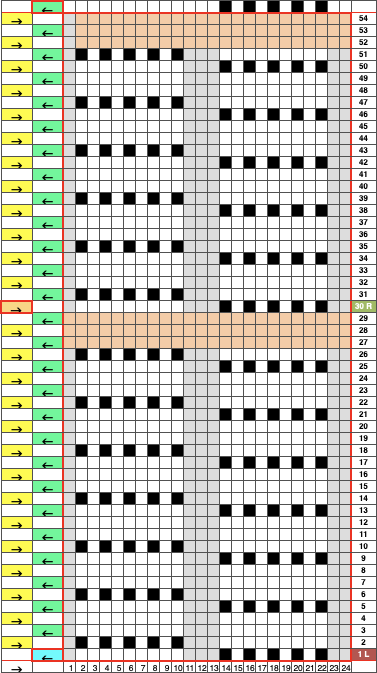
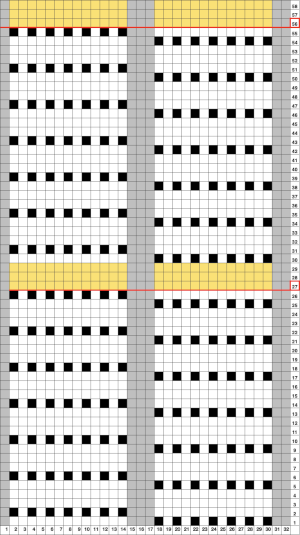
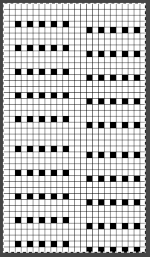
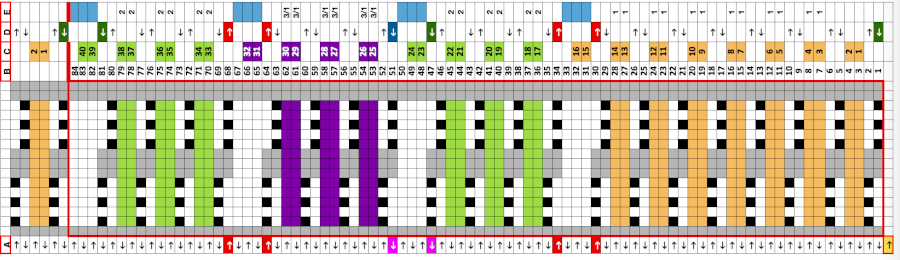
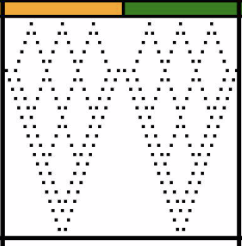
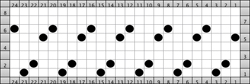
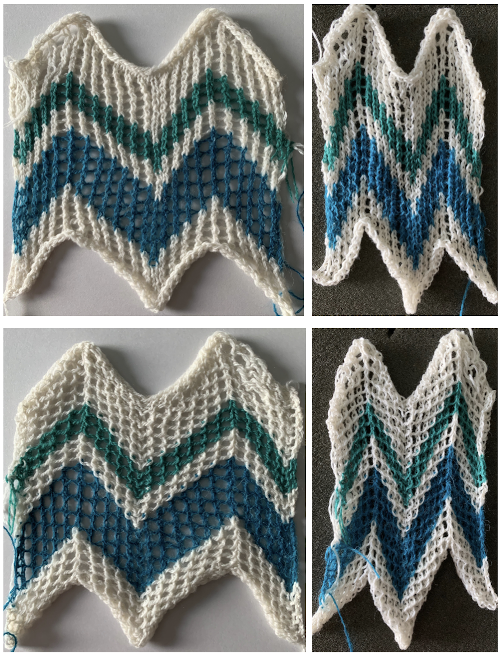
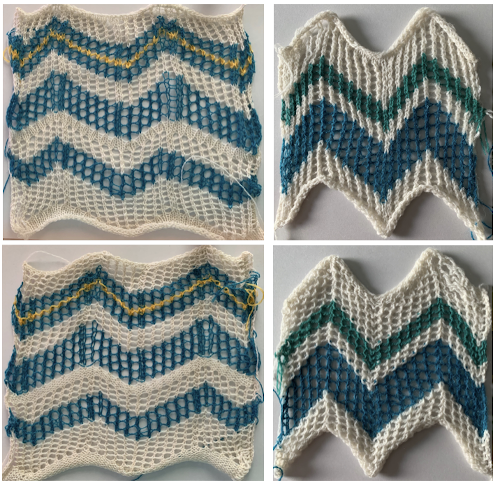
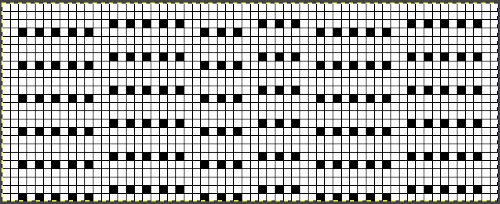
A punchcard tale: after the chevron post, single-color sideways chevrons appealed to me. Two variations from a Brother Punchcard Volume 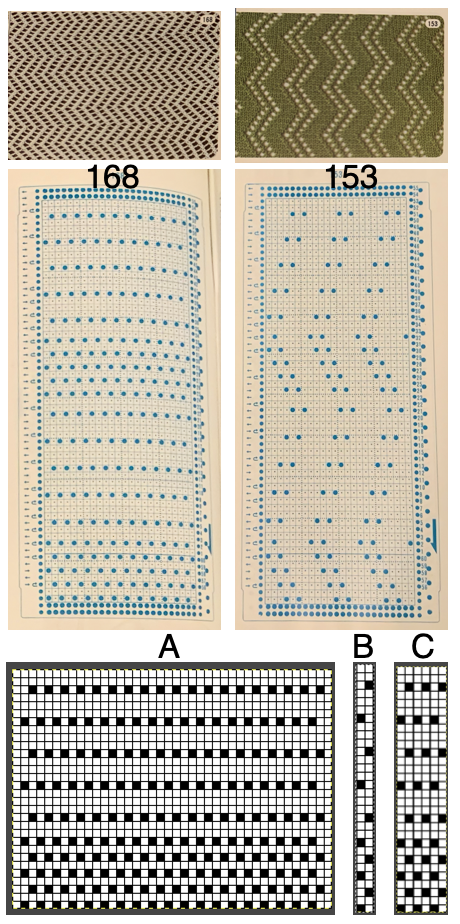 A the full 24 stitches wide repeat, half the required height for the punchcard user.
B the single electronic repeat.
C the single electronic repeat tiled X3, checking to see that pixel actually line up properly.
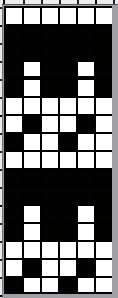
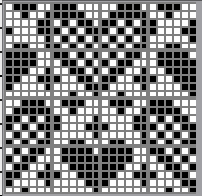
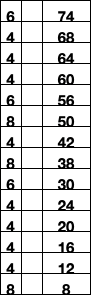
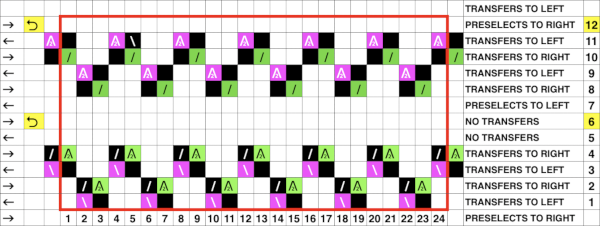
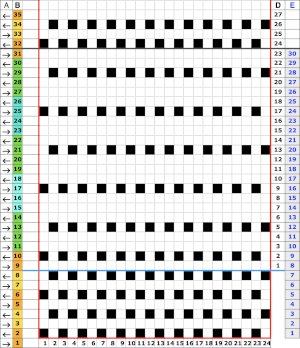
Punchcard markings of note:
A design row 1
B mark for the first row visible on the exterior of the machine, the card reader is reading 7 rows down
C typical markings for the direction of the LC movement on that row, and for knit rows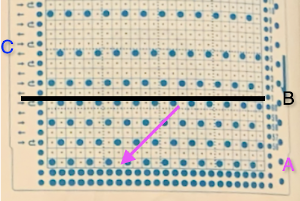 The two rows at the bottom of the card reflect the overlap when punchcard snaps are in use to keep the pattern continuous.
  Looking at it in more detail
  Column identification at the bottom of the chart:
A direction of the lace carriage, pixels, or punched holes preselected on that carriage pass
B direction of transfers; note there are extra blank rows where their direction is reversed indicated also by the change in the color of the arrows. Multiple rows in one direction only, happening here in a series of 5, will result in biased knitting. As bias is reversed, the zigzag shape begins to be created.
C markings for 2 rows worked with the knit carriage, the pattern does not advance on those rows on any machine
D markings on factory punchcard
E design rows
When working with electronics, the actions need to match those indicated on the factory design beginning with the row one punchcard marking on the right.
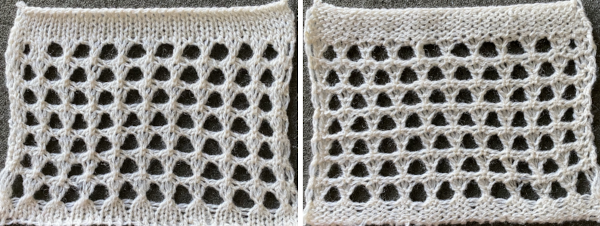
The width of the planned swatch or piece may be programmed for use with the single motif setting in img2track or the required default in Ayab. Adding a blank square at each end ensures the end needle will knit on every row, no pushing back needles by hand will be required.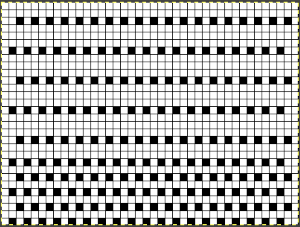 Changing fibers opens up a brand new world: this swatch (unblocked) is knit in a tightly twisted rayon, and edges also begin to create clearer shapes than that achieved by knitting the same design using wool.
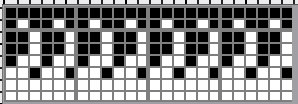
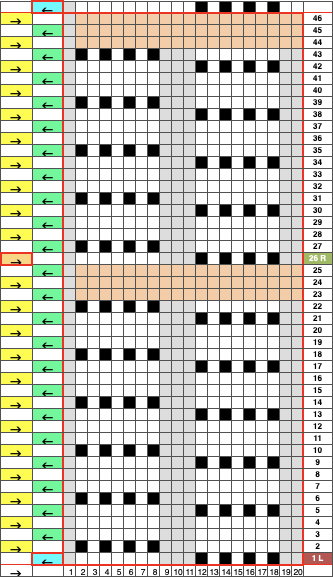
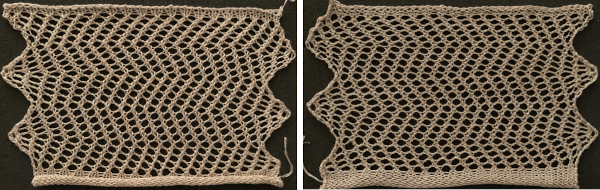 Spacing out the zigzags, another 24X30 repeat. This is the minimum repeat for electronic KMs as well, knit stitch spacing (white squares) can be planned to suit
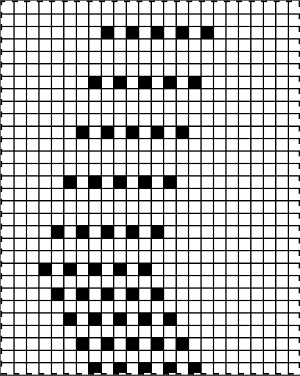
Once again, one must be aware of whether the lace repeat needs to be mirrored on the specific model machine. I initially forgot to do this on my 930, which results in error with the lace carriage operated from the left.
Planning the placement on the needle bed controls the number of knit stitches on either side of the resulting mesh shape. Today the rayon was having no part of knitting properly, this swatch is once again in wool. 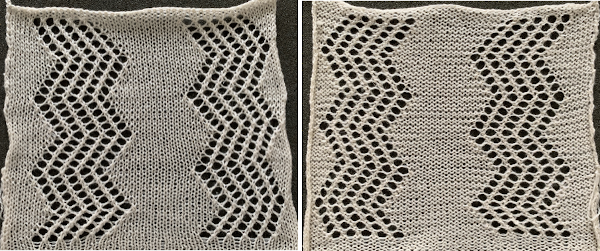
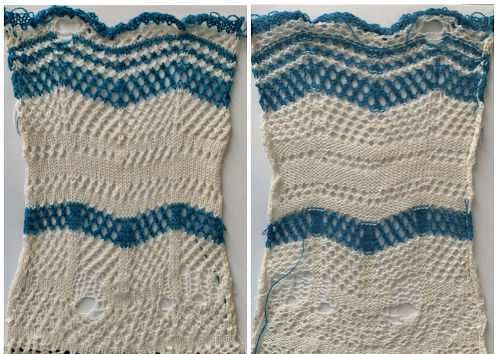
Ideas for automating mesh patterns in lace edgings using the LC and the KC (knit carriage) set for slip stitch
Changing the above repeat for a zigzag border: in my first experiment, I tried keeping the number of eyelets in the zigzags across rows constant, did not like the visual “extra” line away from the edge, and was happier with my second try. This fabric would do better with a yarn that can be blocked to shape, the wool used here is a tad too thin. There will be some tendency on the part of the eyelets on the very edge to appear smaller as the edge stitches are stretched into shape. It appears I also have a needle that needs to be changed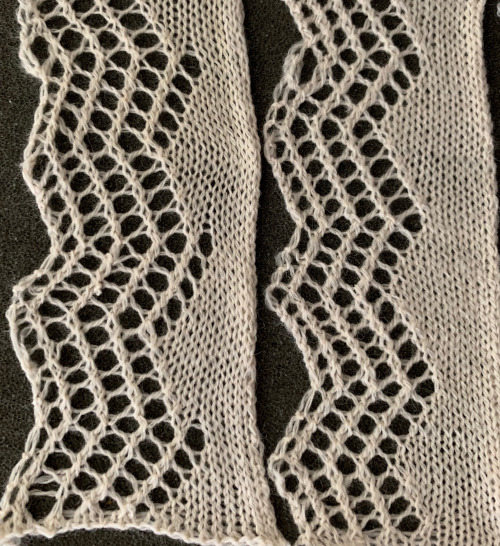 The transfers of the stitches by the LC while using the knit carriage set to slip in both directions to create the knit rows, and will automatically create increases and decreases along the left edge. Due to this fact, there will be one less eyelet in each transferred row than the number of pixels/punched holes in its corresponding pattern row.
The knit carriage in this instance preselects rows for the lace carriage, the lace carriage preselects all needles required on its way back to the left for the knit carriage to knit on its next pass.
This chart attempts to show the movements of the carriages and the location of stitches after they have been moved along with eyelet symbols in their locations after the transfers  The pattern repeat on the left below is as I drew it and intended it, on the right, it is mirrored for use to knit it on my 930
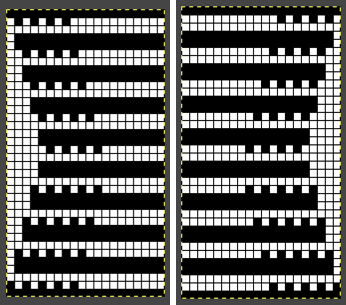 The first preselection row is from right to left, the knit is centered with 10 stitches on each side of 0.
In edgings beginning with a single all black pixels row, end needle selection is canceled on the knit carriage (KCII), turned on in the lace carriage (LC).
The first row is knit, when the KC reaches the left side, set it to slip in both directions. As it returns to the right it will form a second knit row on all needles in work, and preselect for the first LC pass.
Extension rails must be used as both carriages will lock onto the belt for pattern selection.
At the start of the piece, as the LC moves from left to right it will transfer preselected needles to the right. On its return to the left, it preselects needles that will knit as the KC returns to action from the right.
Each carriage in this design makes alternating pairs of passes.
When the top half of the pattern repeat is reached, the LC makes its pass to the right on a blank design row. As it does it preselects for the next row of transfers, which are made to the left as the LC returns to its home there (A). Though the Brother LC does not knit and transfer on the same row as the Studio one can, it can transfer and preselect for the next row of knitting (B). The above fact allows for planning transfers in both directions while still keeping the routine of 2 passes for each carriage to and from their original home.
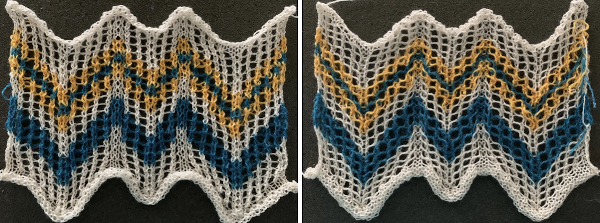
Based on that concept, here is another trim with eyelets in alternating directions along the side opposite the zigzag shape.
The repeat is now adjusted to 22 stitches X 48 rows to accommodate the reversing eyelets arrangement.
It is shown here mirrored for download to my 930.
There is a blank square at the top right corner, the corresponding stitch will be cast on by the knit carriage on its move to the left and transferred automatically when there is a return to transfers at the bottom of the design repeat. 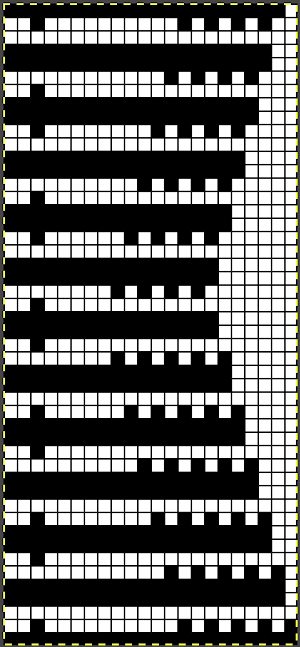 The yarn used or the swatch is a 2/18 wool silk. There will be 2 stitches on each needle (A) at the very edge where stitches are transferred for decreases and look different than where the edge stitch is simply moved one needle to its left (B), leaving behind an empty needle. A parallel, similar difference is also noted at the inner edge of the zigzag shape. The sample is pictured turned 90 degrees counter-clockwise, and its bottom edge appears on the right
 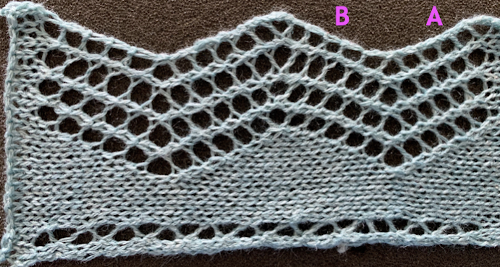 Transfer lace on the Passap: the console will be used to select needles for hand transferring stitches. The technique will determine the number of plain rows between transfers. Use tech 137 for two rows between transfers. The pushers will set the corresponding black cells for transfers, they will stay in that position until the next set of transfers. Many tuck patterns may be used to make the selections, they are not designed to knit on adjacent needles, choose ones that have white columns for nonselected pushers 2 rows in height. Stitches are worked on the front bed. The front lock is set to N and the back lock to GX. Move selected pushers up so that the corresponding needles are easily identified, and use a tool to move stitches right or left. Move all stitches in the same direction, first across a row to the right, then across a row to the left to avoid biasing if the pattern is an all-over one, for borders all transfers in the same direction may work as well. Leave the needles in the work position, return the pushers to rest, and continue in the pattern.
 Revisiting large eyelet lace, hand transferred (or not) 7/20
 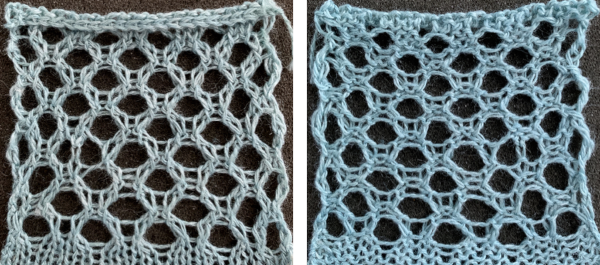 Large diagonal eyelet lace 6/12, electronic sample follows at the bottom of this post:
  Large eyelet lace, hand transferred (or not) 9/13
 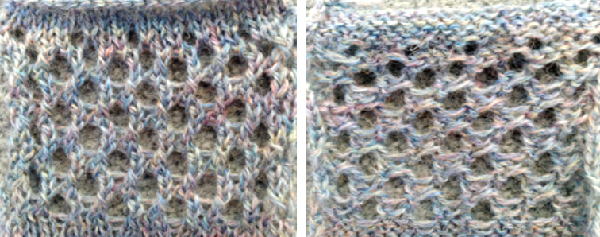 Large scale mesh, breaking the rules, the start of the explorations 4/11
 Single bed slits aka horizontal “button holes” 11/16
 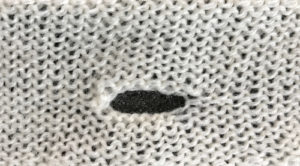 “Buttonholes” and “make many – increase” “lace” 5/15
 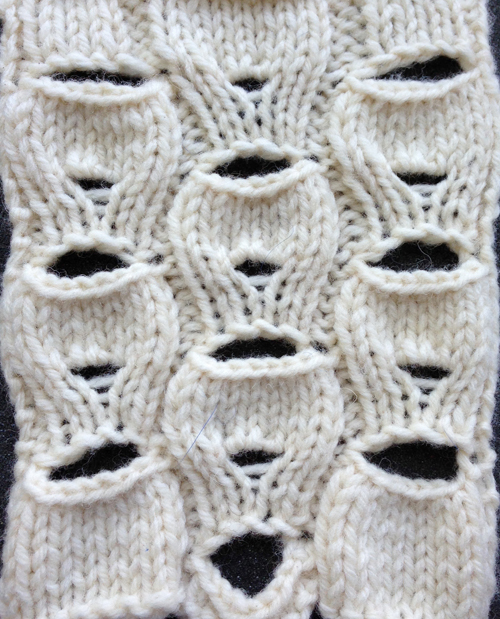 2024
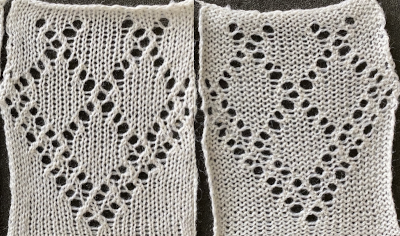
2024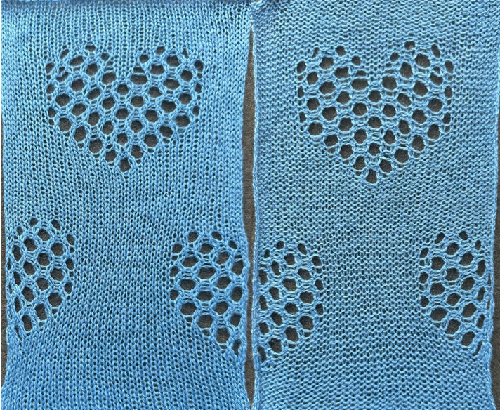 introduced a combination of standard and large eyelets along the edges of the shape for a better definition of the design.
 To knit: cancel end needle selection, KCII.
 The 6X24 png
 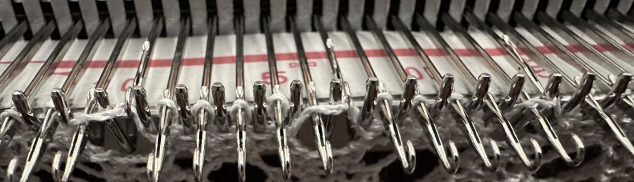 with slip-stitch floats holding down the first loop after the second KC pass as it returns to the right
  The proof of concept
  Pamela Cruse devised and shared another similarly mixed eyelet size knit. Her repeat is 6X16, with only the LC selecting needles, the KC remains set to knit, making it suitable for punchcard machines as well. The full card,
 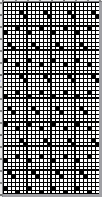 a single repeat,
 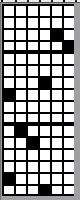 and the tiny PNG
 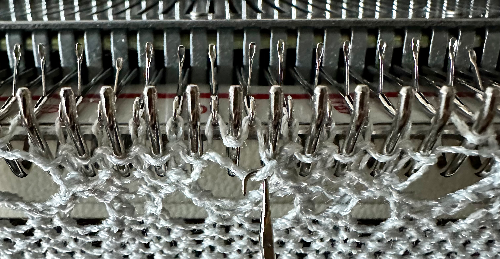 Needles will be preselected on each side of them, followed by transfers.
 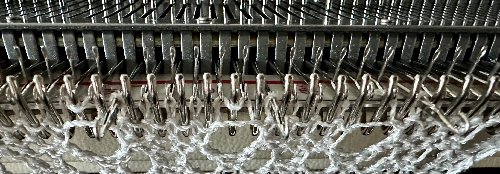 As those transfers are completed to the left and then to the right, it is those moved stitches that anchor down each loop.
  The first KC pass to the left forms single loops on the now empty needles,
 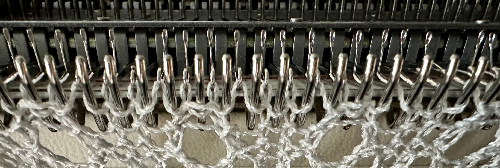 and the second KC pass to the right completes an all-knit row.
 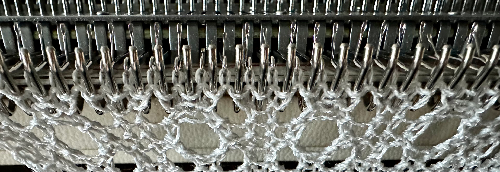 The process is repeated in brick configuration.
 This large eyelet variation was developed by Claudia Scarpa, who shared these repeats for Brother machines which use opposite tuck/part buttons
  to form stitches properly after the side-by-side empty needle transfers have been performed.
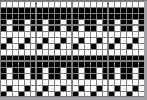
 the second slip pass to the right anchors the tuck loop as all needles are preselected for the pair of all knit rows that follow
 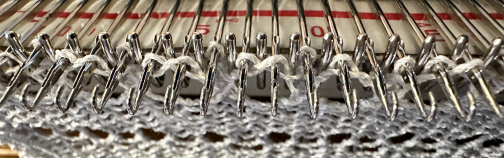 The process is repeated with the eyelets forming in either orientation
  As the KC makes its last pass to the right there is no needle preselection, a sign that it is time to return to the use of the LC operating from the left
 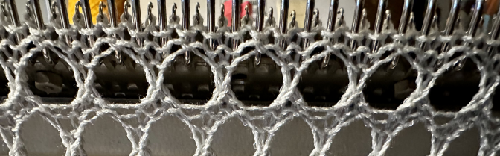 The vertically aligned repeat test swatch
 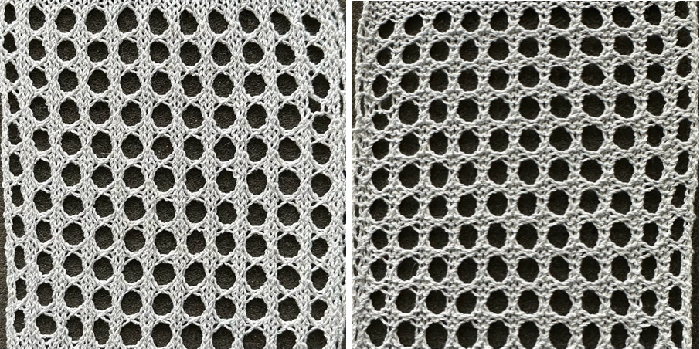 and the brick repeat test
 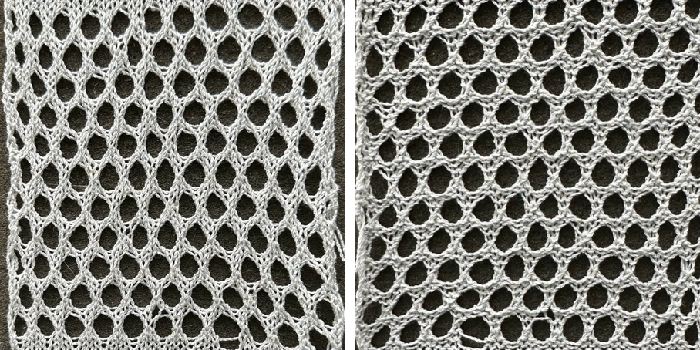 The 24X48 repeat for the diagonal mesh
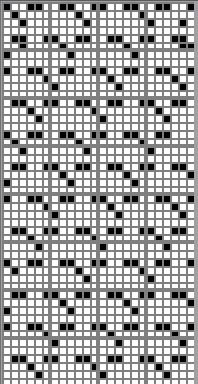
 as it returns to the right, the first double loop is dropped, and a second double loop is formed
 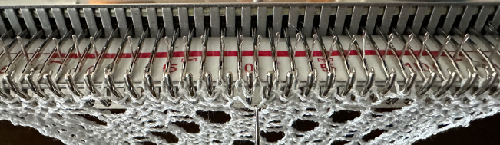 the next series of transfers will double up a single stitch on one of the two loops
 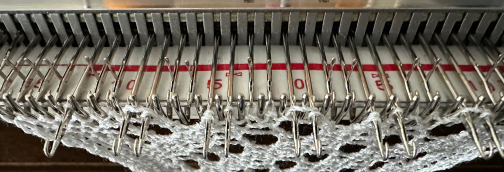 and the process is repeated as knitting progresses. The yarn used is knit wool rayon again, and the side edges were allowed to curl. There is one stitch that got away from me on the left.


 This placement is tested and kept in mind in other explorations.
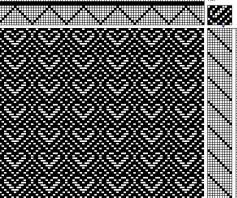
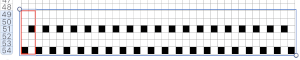
  Using a spreadsheet: the same sort of chart may easily be created quickly in Numbers. In this instance, my table is still planned for 24 stitches in width, but 54 rows in height. An extra column is added and used on the far left to mark rows to be hidden. Beginning at the bottom left two rows were filled in a different color, the third row is left blank, all 3 cells are selected. When multiple cells are selected, depending on which side of the selection box one hovers over with the mouse, a yellow dot/ handle will appear.
  The tool acts on the selection. Clicking on it and dragging it with the mouse will, in this instance, repeat the selection until the mouse is released. This may be done in any direction and quickly fills in whole tables. It is not necessary to perform this extra step before hiding rows, but I find having that extra color makes it easier visually, especially when working on long repeats. It also makes for easy return to selection if hiding rows is done in shifts.
 continue to the bottom of the chart, and under the Table menu, choose to hide 36 rows. With rows hidden the mesh repeat shrinks from 6 rows to 2.
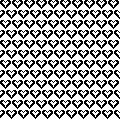
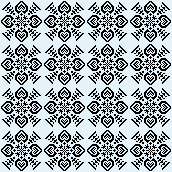
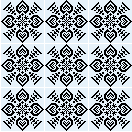
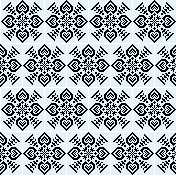
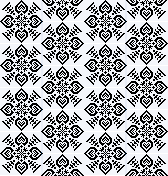
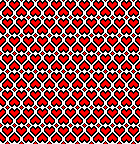
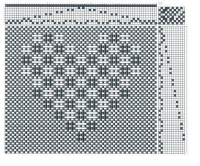
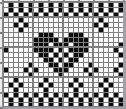
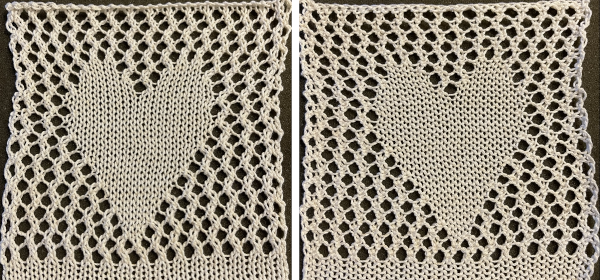
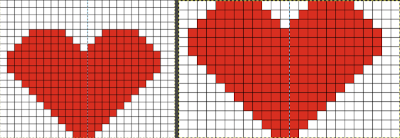
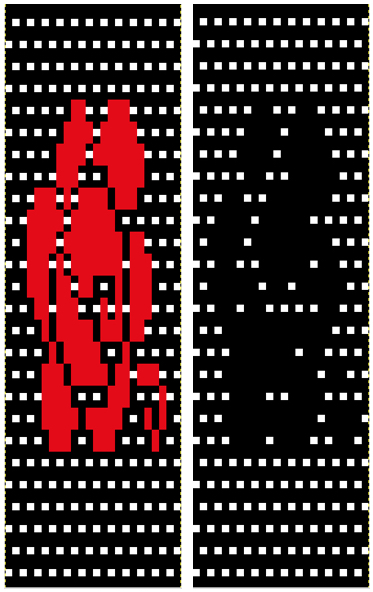
  A new 4 cell table is created. The 4 interior cells were chosen, copied, and pasted in the lower-left corner of the reduced height table. Once pasted, selecting the repeat again will allow one to use those yellow handles to fill the contents first toward the top, then to the right. The image on the left shows the results, with only the numbers for the unhidden rows shown on the left. In turn, the heart was the pencil tool to draw it using a third color in the chosen location.
 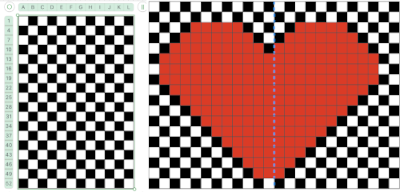 The unhiding rows function produces the expanded repeat with all knit stitches in red on the mesh grid ground. The column with the yellow cells is deleted before converting the Numbers repeat to an electronic or punchcard, the how-to discussed in other posts. Comparing the hand-drawn heart in Gimp alone on the left, to the spreadsheet results on the right, there appears to be a difference in the starting rows, and in only one other row, two black cells appear that can easily be altered in either repeat. Brother machine knitters would need to shift those 2 blank rows at the bottom of the repeat on the right to its top or to to start lace patterning on row 3.
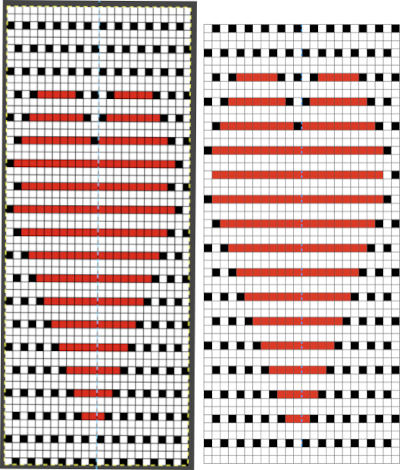
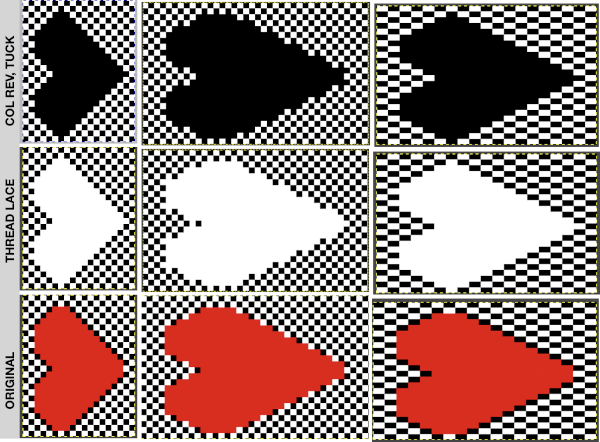
 More choices exist, continuing to place the heart 3 rows up from the bottom, and not using multiple layers.
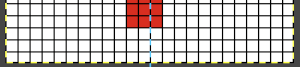
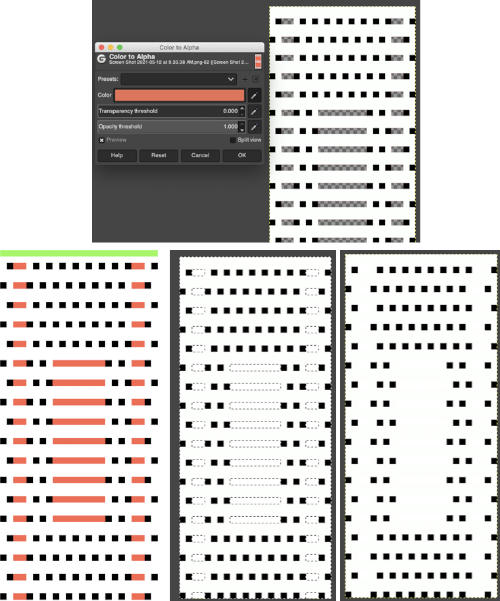
 The layer-to-alpha image may be saved as a png with transparent background for any future use.
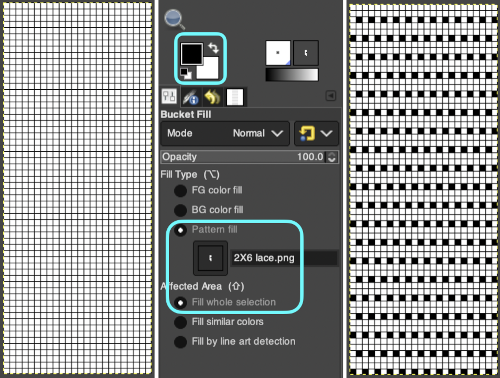
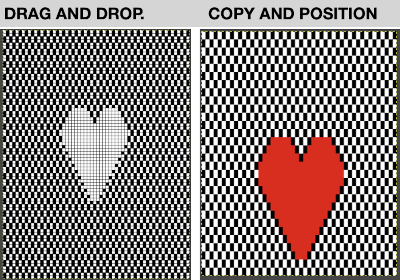
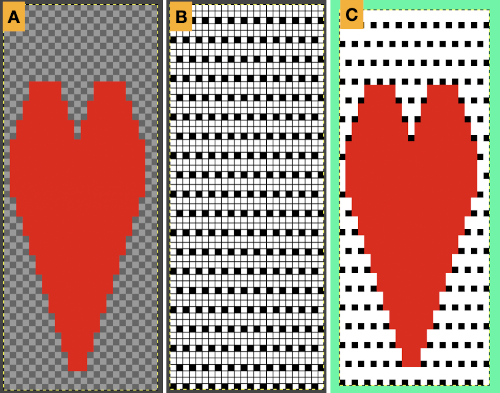 Even easier, working with the full-color, white ground heart repeat placed 3 rows up from the bottom, A, set red as the foreground color, and then use the bucket fill tool B to fill its ground with the mesh pattern, seen in C
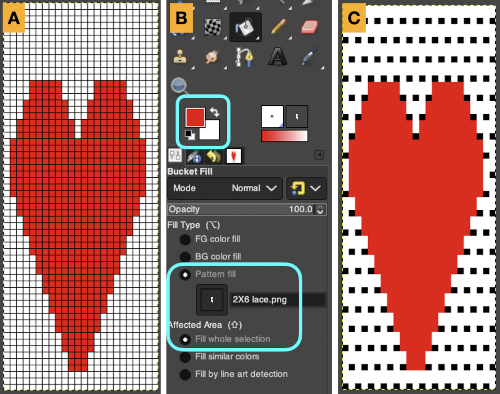 Comparing the all in Gimp Drawing to either of the last 2 patterns, two differences appear, an extra row of transfers before removing transfer stitches to start the heart shape, and those 2 extra black pixels/eyelets
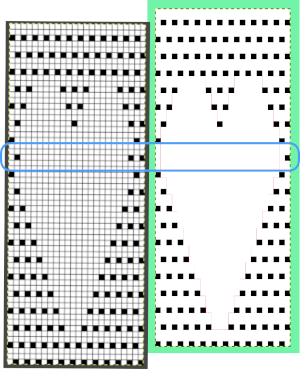
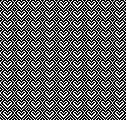
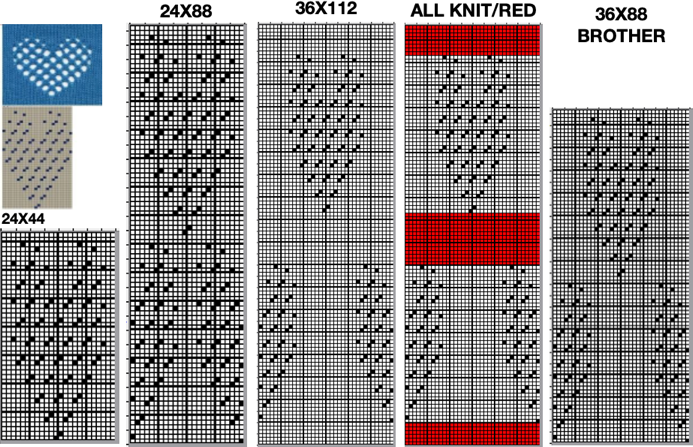
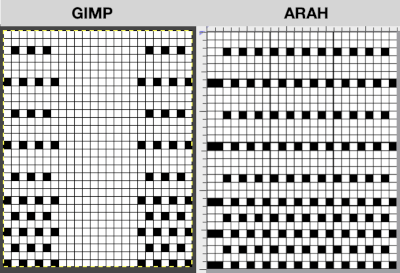
 Developing brick repeats or half drop is possible with offset and brushes in Gimp, but, to my mind, easier in Arah. Using the Arah drawing in repeat, the design is now 24 stitches wide by 120 rows high in a brick arrangement offset by 12 stitches.
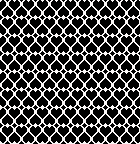
 The same heart, in half drop repeat, offset by 30 rows, now double wide, 48X60, suitable only for an electronic machine
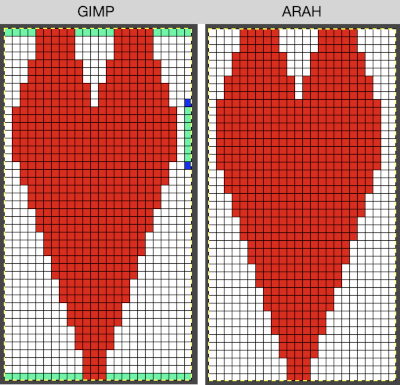
 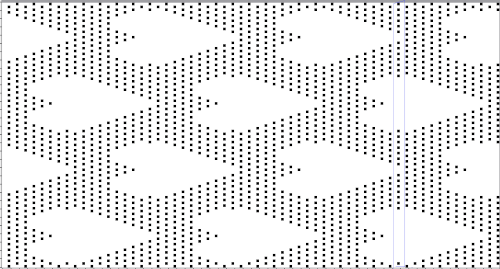 Changing the background grid for other stitch types: the heart is rescaled for use by 2 or 4 times in height. Again, the differences between Gimp’s incorrect scaling, A, and the Arah drawing in repeat, B
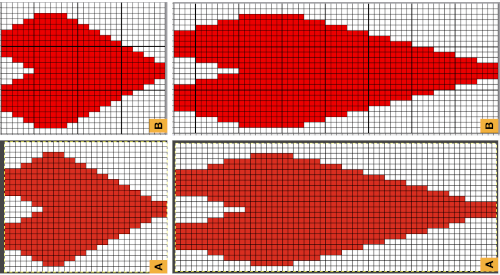
 Possible applications
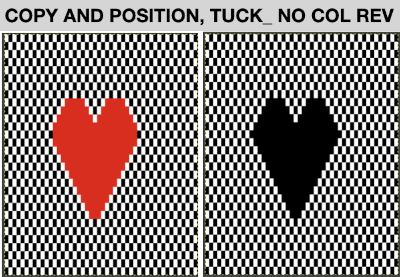
 This begs the question of working on larger images. For use on a lace mesh, simpler designs apart from overall size are best, but if a mesh base is not your favorite fabric or goal, tuck, slip stitch, thread lace or even fair isle patterns may be created with more overall flexibility, using the same principles on backgrounds.
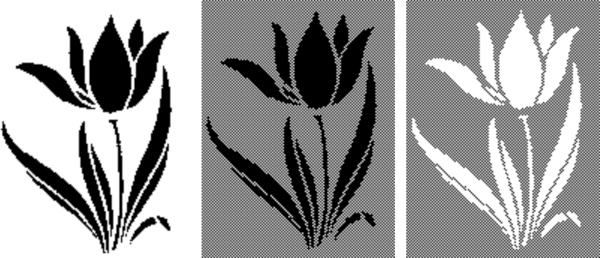
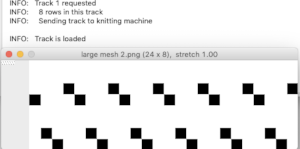
 This is the first attempt at a partial repeat test proof of concept. I have been telling people serger monofilament withstands ironing and light pressing, and periodically I test advice I have given formerly. To start with, the darn monofilament, which I even used in double bed garments, but nearly 2 decades ago, refused to feed properly or at all. Because it is nearly invisible, my knitting started with it pulling too tight, and I wiped out 12 needles out of 72 in different places on the needle bed in a single carriage pass. Determined, I sorted how to hand feed it, got the rhythm, complete a swatch. A marks an error I made in loading the second track in img2track, resulting in an added, wrong pattern row. The holes, B, C, and D were nonexistent until I tried flattening the fabric a bit with an iron, and the monofilament simply melted in various places.
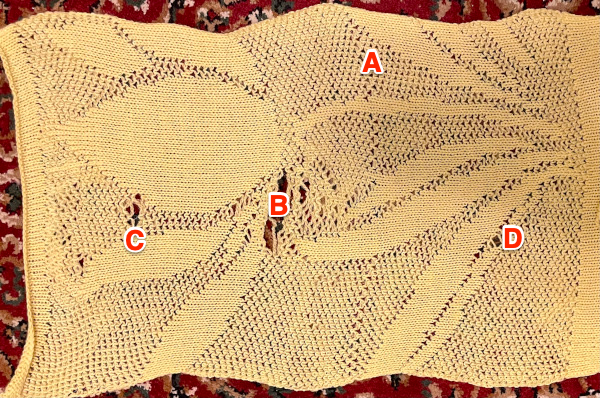
 I had interesting issues with having needle selection visually appear correct throughout, and the pattern itself appearing correct when checked at 1800 magnification. While the smaller sample was accurate until the filament began to melt, here I had 2 needles not knitting the yarns alternately but together, and an odd change in the center that looks as though yarn selection in those areas was reversed. The thicker yarn here is cotton, the thinner rayon. Troubleshooting is required. Unplanned tucking is a sign of damaged needles, but because the second yarn used herd is so thin, the effect was not obvious until the vertical pattern in the same area on the bed became apparent.
 The cam buttons and undercarriage were oiled. The first selection tests involved programming this
 The finished test swatch: because of the disparity between the number of all knit stitches vs patterned ones where one of the colors is slipped on every pattern row for every other stitch, the fabric shrinks dramatically when off the machine. The knit areas pop out a bit, and a lengthwise tug makes enhances the effect
 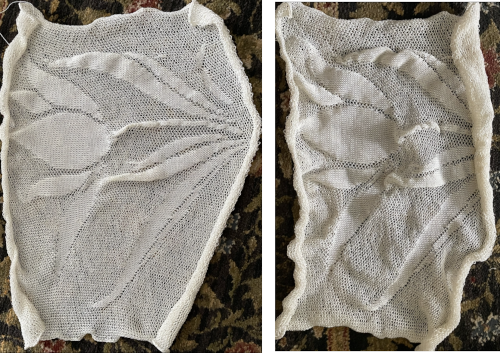 If the goal is a flat fabric panel, then blocking is a necessity. Here the piece is casually pressed, no pins, letters point out issues:
 The mesh effect was noticeable after resting, the piece measures 25 inches in width by 25 inches in height.
 a new file was opened, bucket-filled with the ground 2X2 pattern, the above was copied and pasted in the chosen position, resulting in this
 The 100X92 png
  which in turn needs to be color reversed for use as a thread lace pattern
 Depending on the electronic model or the software used to download patterns designed for lace, the final image may need to be flipped horizontally. This is true for use on my 930. Creating a template for mesh using numbers: begin with a table with square cells in numbers larger than you might need, ie 24 by 54. The method for doing so has been explained in previous posts. I happen to prefer cell units that measure 20 points by 20. The smallest repeat unit for use on any machine is isolated, shown bordered in red, is 4 stitches wide by 6 rows high, and drawn onto the template. The group of cells in the repeat are selected. If one hovers over any side or top and bottom borders of it, a yellow dot appears. Clicking and dragging on the yellow dot will repeat the full selection to the right, left, up, or down. Here the move is to the right
 The whole group is selected,
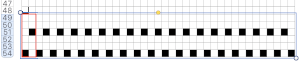
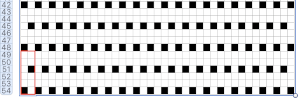 Beginning at the top or bottom of the table, hide all blank rows. Using the command key during the selection process will allow this to be done on the whole table at once or in groups of rows at one time; 36 of the 54 rows are hidden.
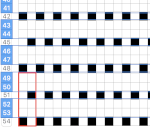
 the color may be replaced with white in the spreadsheet,
 The last image is in RGB mode once more, converted to BW indexed, scaled to 24 by 54, and exported as BMP or choose any other format ie png, etc. to suit your needs.
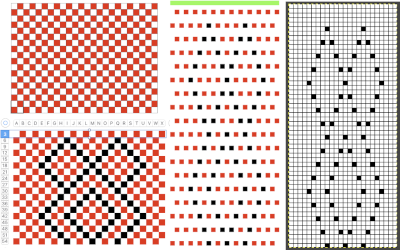
 The design was not planned as continuous, but is easily amended to be so. Here an alternate version is shown, with 2 linear repeats on the left, and a single expanded repeat to its right
 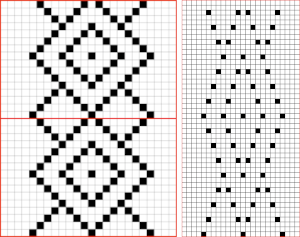 As for that mylar repeat, this is an image of the shapes with the chart collapsed, eliminating blank rows between black pixels.
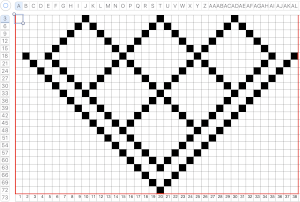
 In fabrics designed this way, using the image as drawn (left), or mirroring it horizontally, does not visually change the result. This does not hold true in more complex transfer lace.
 2024:
2024: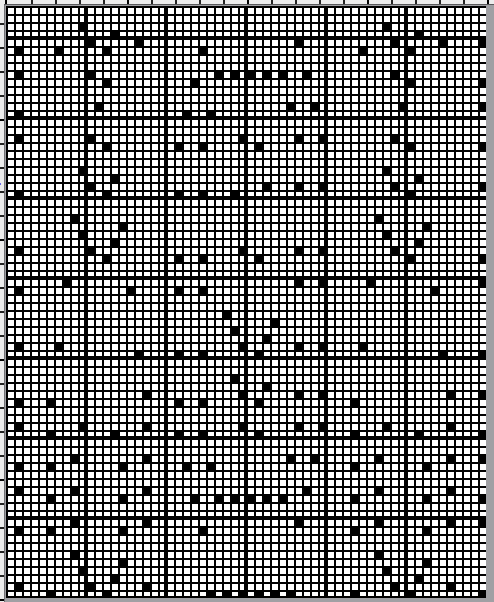


 The lace carriage makes 4 passes, followed by 2 rows knit. The arrangement at the end of each transfer sequence will have pairs of double stitches moved onto the adjacent needles, leaving 2 empty needles in between them. Placement on the needle bed should be planned, and added “border” stitches can be moved away and toward the starting number of stitches to keep eyelets forming at the side edges for all-over uniformity
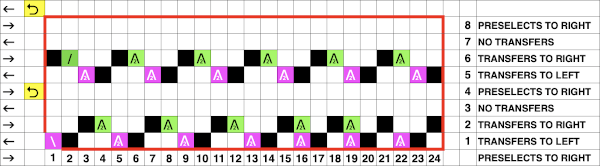

 after the transfers single needles are empty, with double stitches in adjacent ones, and transfers to the left are repeated once more, this is the result, with transfer needles pushed out to show doubled up stitches
  After all the sequence transfers are completed, there will be adjacent pairs of doubled up stitches with 2 empty needles between each pair. As the following 2 rows are knit, the first row creates loops in the empty needles, the second pass skips those needles, forming a “float”. Looking a bit closer after the knit rows
 as the process repeats, the first transfer
  and the second transfer
 The pairs of stitches that have been moved anchor the 2 side-by-side loops and result in the 3-strand stitch pairs, with every other remaining pair of needles empty between them. The LC returns to the left with no needle selection
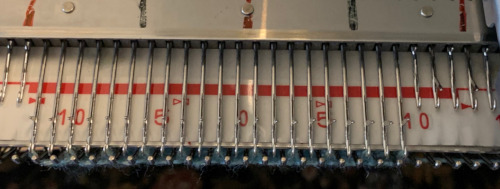
 Before the 2 knit rows, there will be the doubled-up loops in each of those needles, and the 2 doubled-up stitches made from the transfers are added to them as transfers continue. For all those strands to knit off properly, the whole row might best be brought out to the E position before using the knit carriage. The differences between the hooked-up float version of the pattern and the let it be one are shown in areas below the lines in the bottom corners and by arrows in the close-up
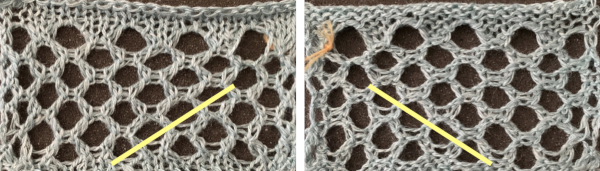
 Much easier and quicker to knit, though quite different, is
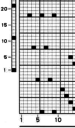
 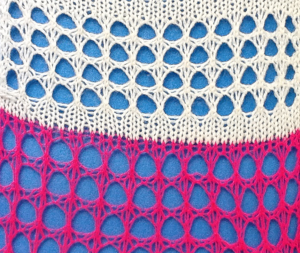 This chart was used in 2013 as a guide for hand technique using a 2/8 wool
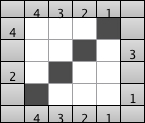
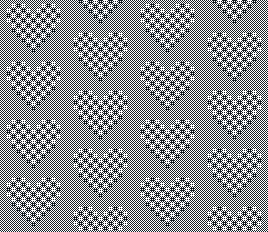
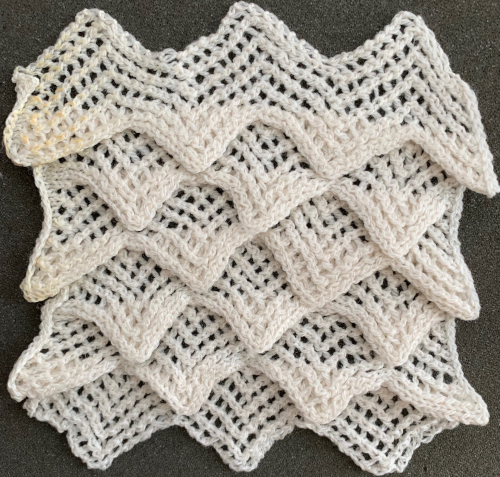
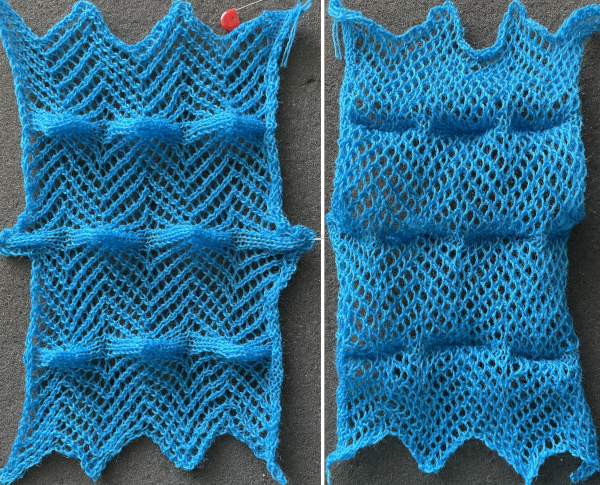
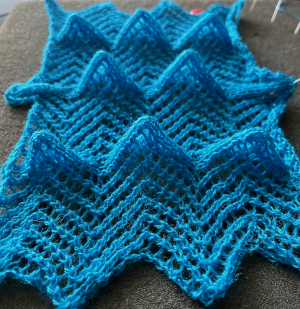
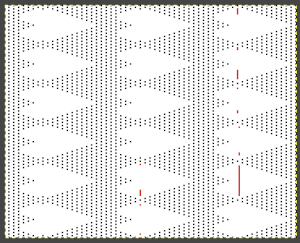
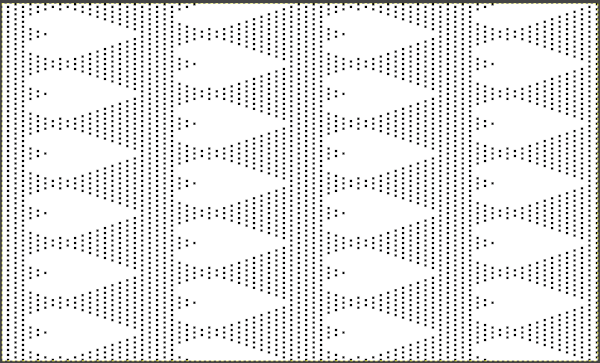
 Knitting lace sequences in a single orientation produces a mesh that is biased. It could be the start for one more chevron shape but was not the intended fabric.
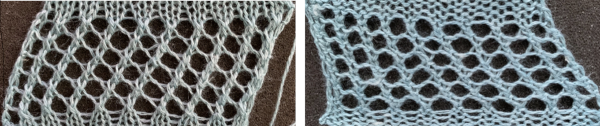 The adapted repeat: the odd number of passes between each repeating segment ensures that the following selections reverse the direction of the transfers
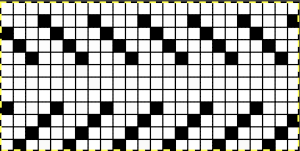 the proper orientation for use on the 930
 Needles preselected for transfer to the left
  during transfer, needles are preselected for transfer to the right. Doubled up stitches will now be moved

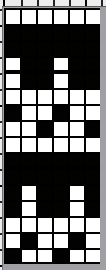
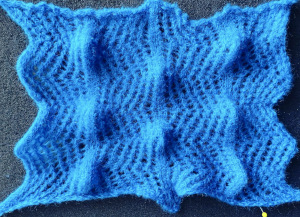
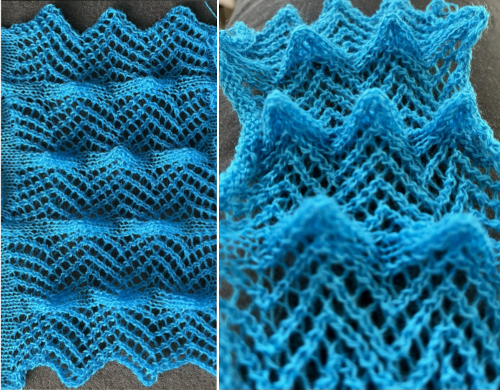
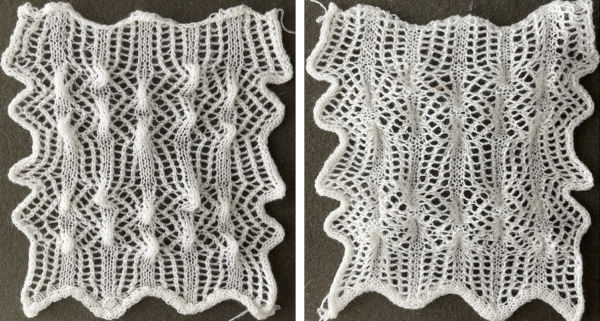
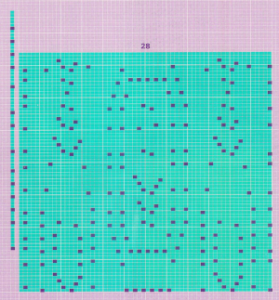
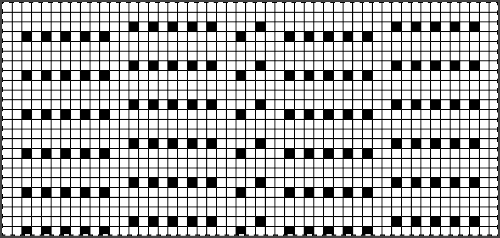
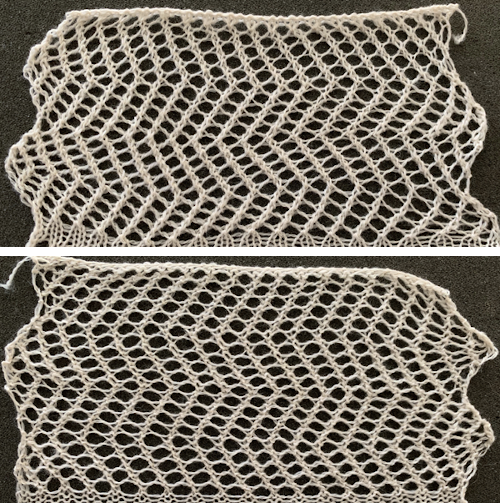
 A repeat that produces a smaller mesh with the swing right to left is found in other posts and references. Below part of a published punchcard is shown, with the resulting swatch, and in turn, compared with the large scale version of the same mesh structure knit on the same number of stitches.
 The fabric was capable of changing considerably in look and width that could be encouraged to remain more permanent with blocking. There is a visible asymmetry, with one side of the chevron actually containing an extra eyelet. Still trying to retain the 24 stitches in width design constraint, I began to work with simply counting eyelet transfers matching in number, guessing rather than planning. Tiling the repeats can help get a sense of how things line up horizontally and vertically. Electronic repeats can be minimal unless one is programming the pattern as a single motif that includes edge knit stitches etc when downloading via cable to an electronic or using the Ayab interface.
 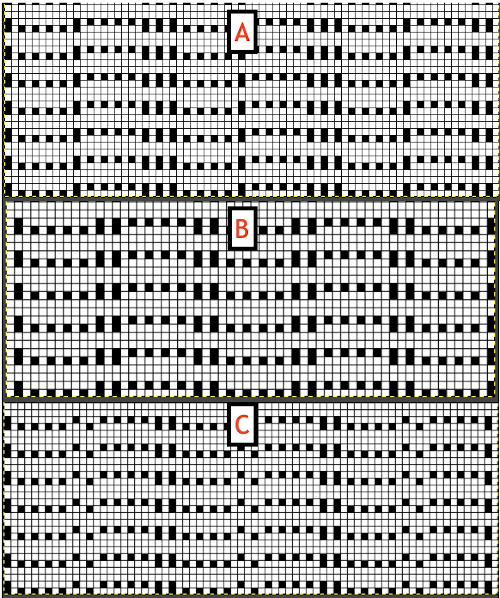 A and B continue to produce uneven numbers of eyelets on each half of the resulting “V” shapes. The greater the number of row repeats of eyelets in a single direction, the more the resulting bias. If asymmetry is the goal, then this may meet the need. I knit most of the swatches on 48 stitches, with more needles added on the right if needed to ensure the edge stitch will be a knit one. Larger shapes require wider tests. The photo is rotated to reduce its length on the page
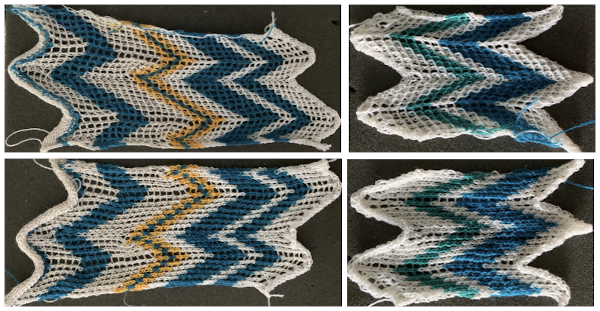
 The added eyelets in pattern C produce an interesting change from a sort of V shape to more of a W, but the fabric is still unbalanced
 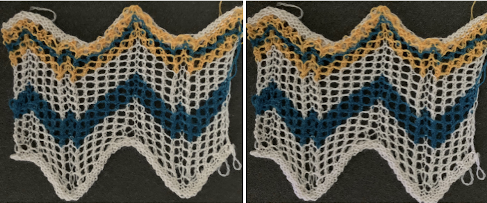 Back to the drawing board: a different mesh, with eyelets in alternating numbers, resulting in a more balanced fabric. Here the charted repeat is shown X2, side by side.
 Using electronics one may expand or reduce the number of stitches in the repeat to reach an estimated equal number of eyelets
 With any mesh, the number of knit rows may be varied between each pair of transfers. My swatch was knit using a 26 stitch repeat width
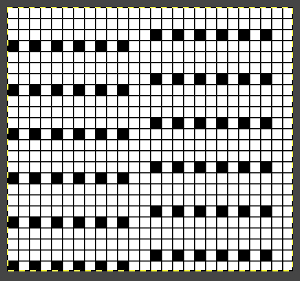

 Exploring a smaller repeat, also 24 stitches wide
 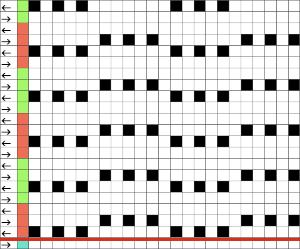 The white yarn used is the same cotton as in the previous sample, knit at tension 9, the chenille is rayon, 1450 yards per pound, the eyelet patterns are stable and distinct,
 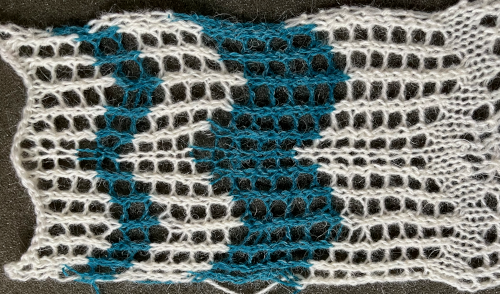 Another variation
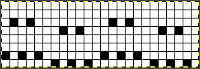
 The blue yarn refused to knit off properly, so the different added colors were tried to see if I fared any better using them.
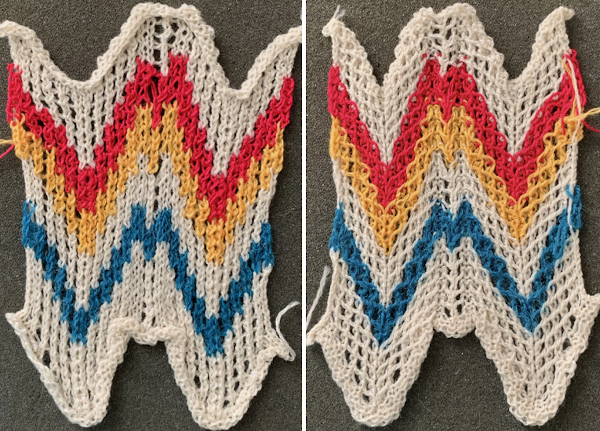 and has a very different appearance when lightly touched with my now fiber burning iron
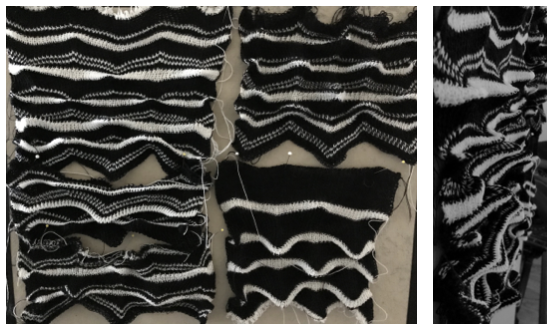
 During knitting, these fabrics will appear to be producing straight color stripes
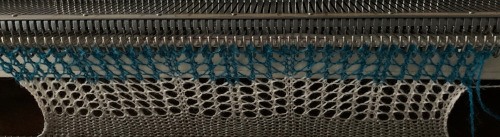
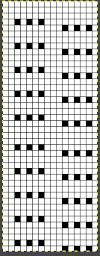
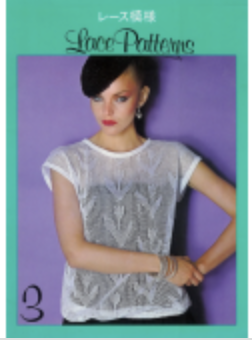
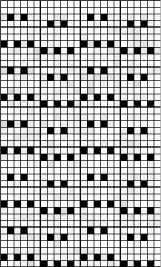
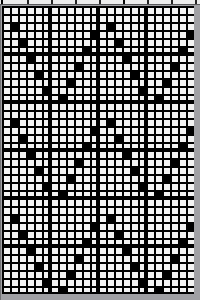
 Taking the guesswork out of repeats, one may begin with or use published cards as they are, this is from a Japanese magazine,
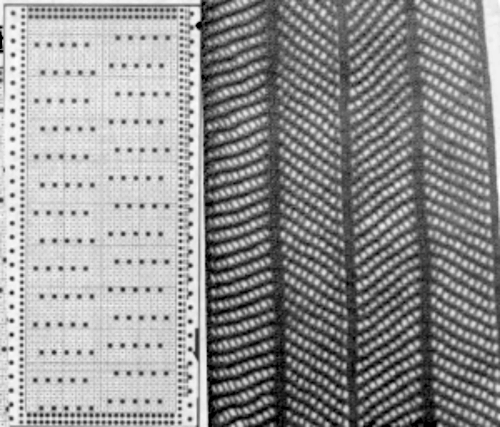


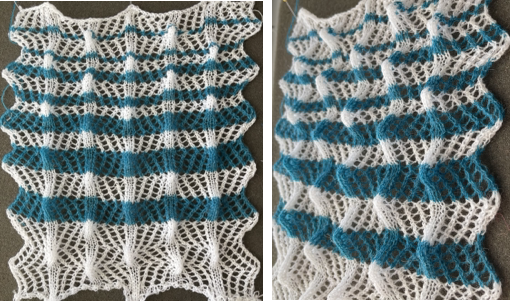
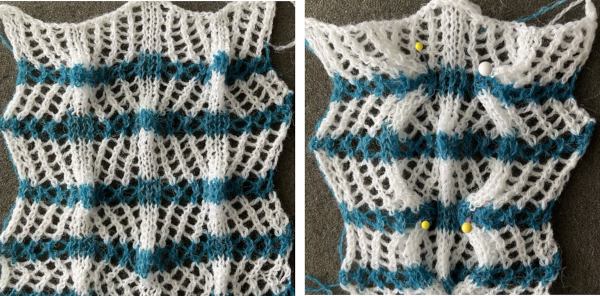
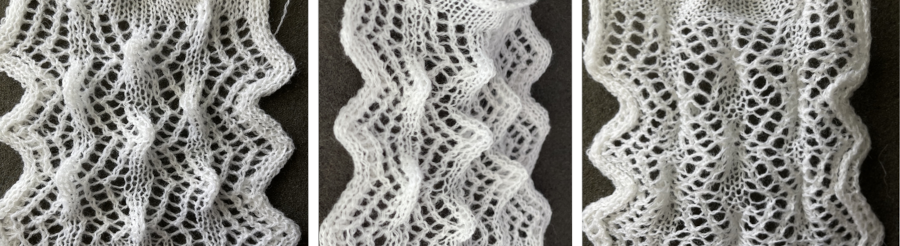
 Here the cast on and bind off match very closely. I used the looser cast-on method described by the “answer lady” in the
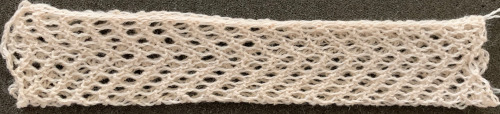


 A very different chevron in an advanced technique combining tuck stitches with lace and fine lace patterning
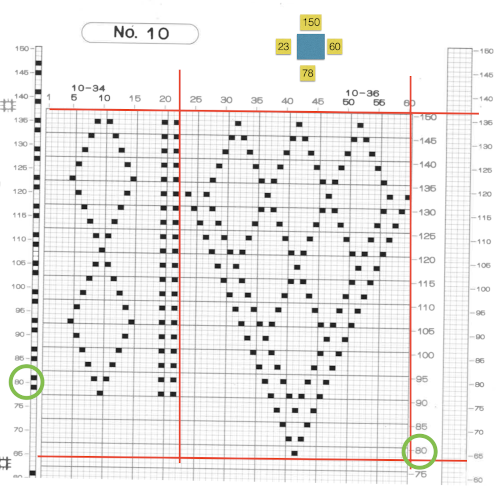
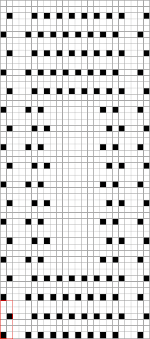
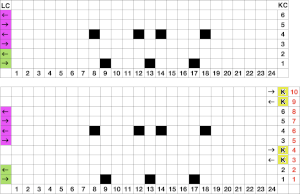
 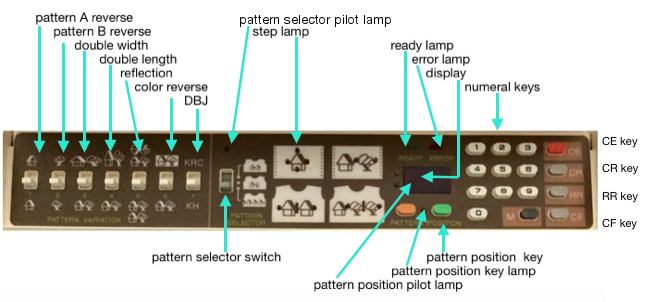 M= Memory: each of the tiny red spots on the garment representations lights up, as specs on motif are entered or reviewed. CE= cancel entry: corrects programmed numbers or cancels the red error light when it flashes. CR= cancel row: press in a number, say 2 on the panel, and the card moves back 2 rows. If you press the button and no number is entered, the error light flashes and the card stops advancing. This is the same as locking the punchcard to repeat a pattern row. RR= row return brings the card back to the set line. This is routinely done before shutting off the machine when knitting is complete or to remove the mylar for editing. CF= card forward. The mylar returns to programmed design row 1. Numbers pressed in using CR or CF do not change those programmed using the M button.
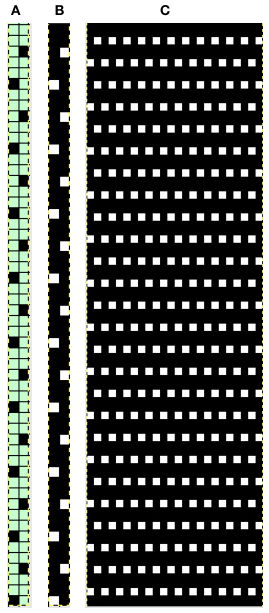
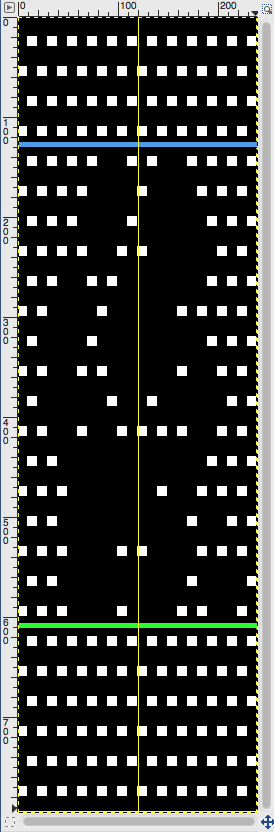
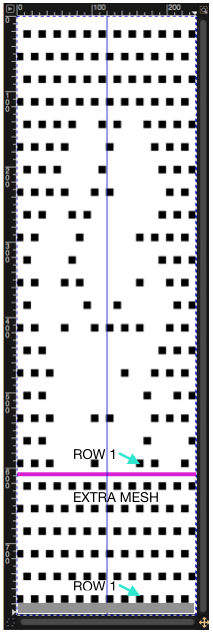
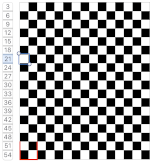
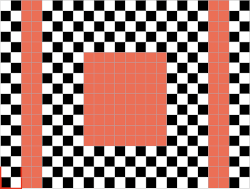
 In terms of placement: if the all-over mesh is programmed centered on G1, and the motif is positioned with FNP other than G1, any simple, extra rows of mesh prior to starting the all-over pattern (below green line), will need to be programmed separately with adjustments also in FNP to match the superimposed segment. The programmed repeat for the mesh “rose” below would begin immediately above the blue line, and the extra mesh rows at the top would provide the transition to the start of the rose once again. The height of the pattern seen in the B column in the first illustration may be adjusted accordingly.