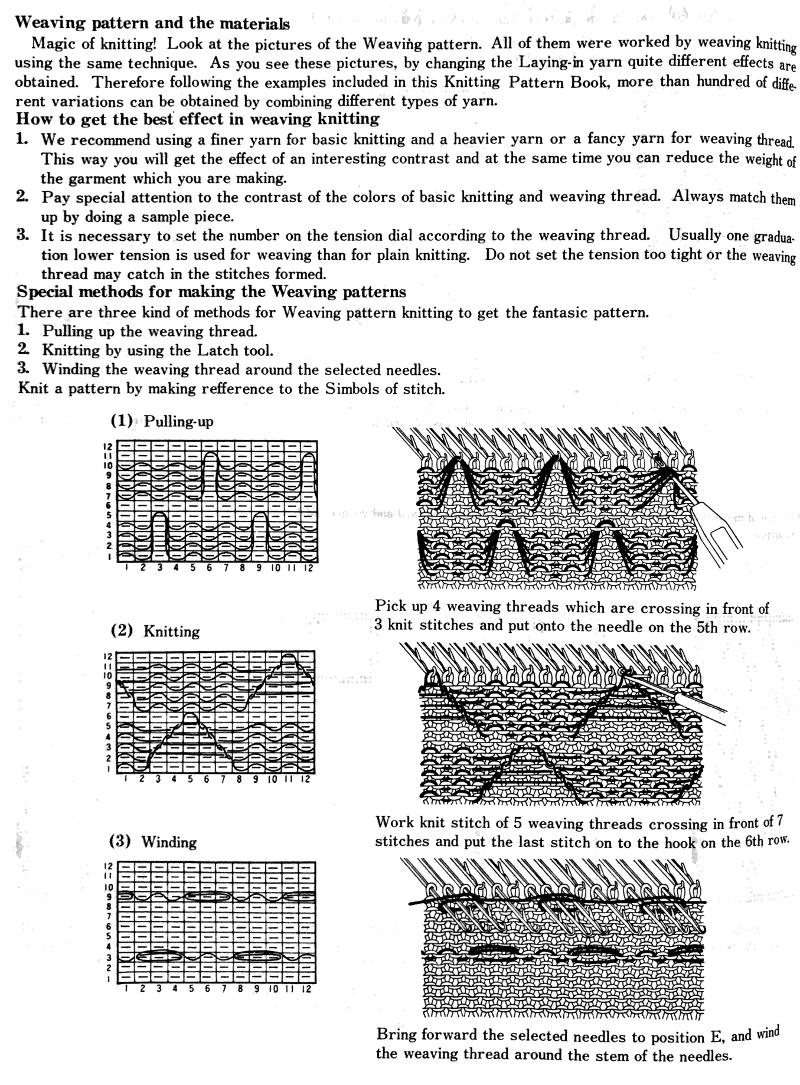
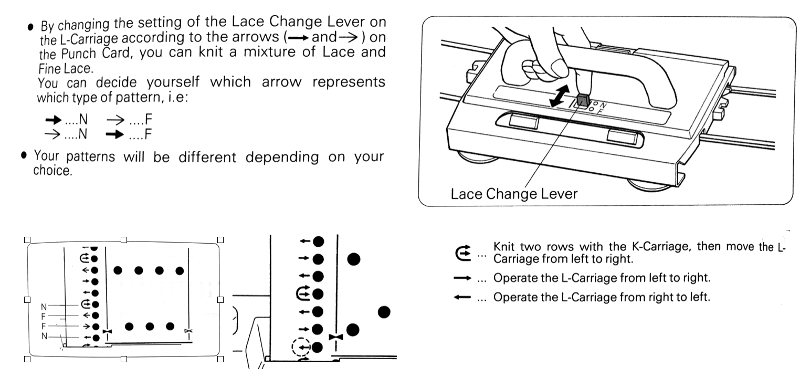
This is a copy of one of my former handouts, gathered from various sources  An online reference that includes hand knitting abbreviations as well: https://www.jessica-tromp.nl/brei_machine_knitting/knitting%20machine%20abbreviations.htm
Category: Machine knitting (MK)
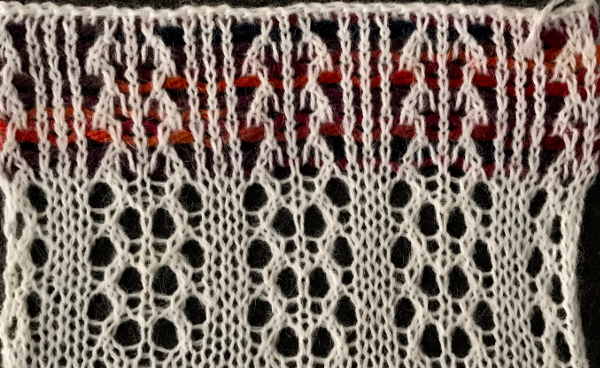
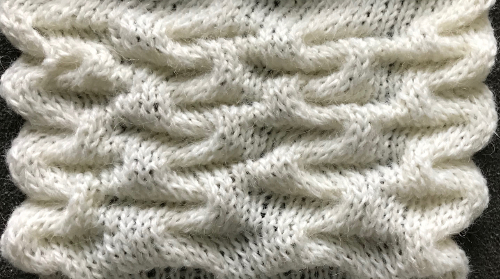
Ladder back double jacquard: backing variations
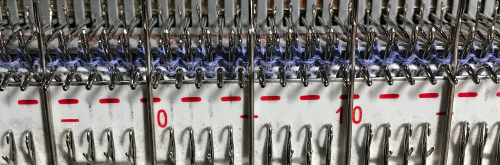
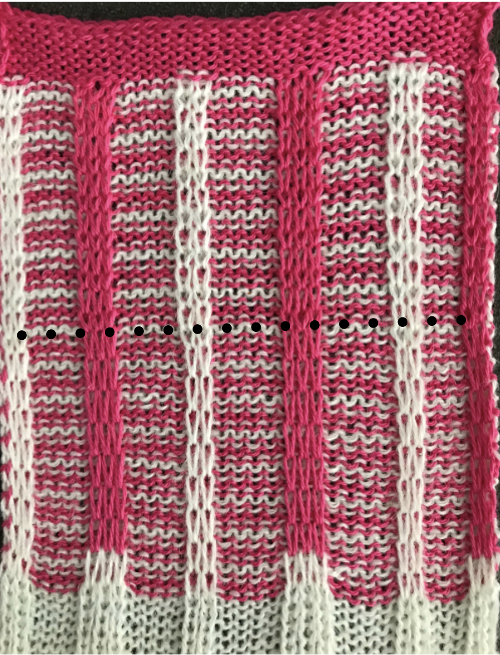
Periodically questions come up with regards to how to manage float control other than using familiar DBJ settings, or the best way to proceed to achieve it when one prefers to work in thicker yarns. In this technique, all main bed needles are in use for patterning and in working position, the ribber needles can be arranged in nearly any configuration in groups with 1 needle in work, and one or more needles out of work. The main bed tension is close to what would normally be used for a single bed fair isle, while the ribber is set at least one or two whole tension numbers tighter, thus reducing bleed through or vertical separation lines on the “outside” of the knit. The fabric uses less yarn than every needle rib DBJ, is lighter in weight, has more stretch, but will not lie as flat. In Brother, if needles are arranged in groups of 2 (pairs of lines and spaces on the needle tape with even spacing between them (i.e. 2 X2, 4X4, 2X4, etc) then lili buttons can be used. The latter method has less chance of the backing showing as a vertical line/ separation on the pattern surface. Sometimes the ribber needle arrangement may result in a secondary, interesting pattern on the purl side. It is still a good idea to have floats that are limited in width, generally less than 5 stitches. For the purposes of illustration, I knit 2-row stripes on the main bed, while altering settings on the ribber.
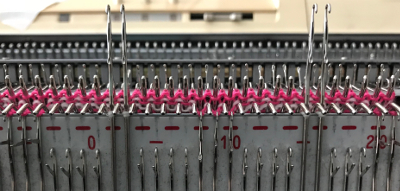
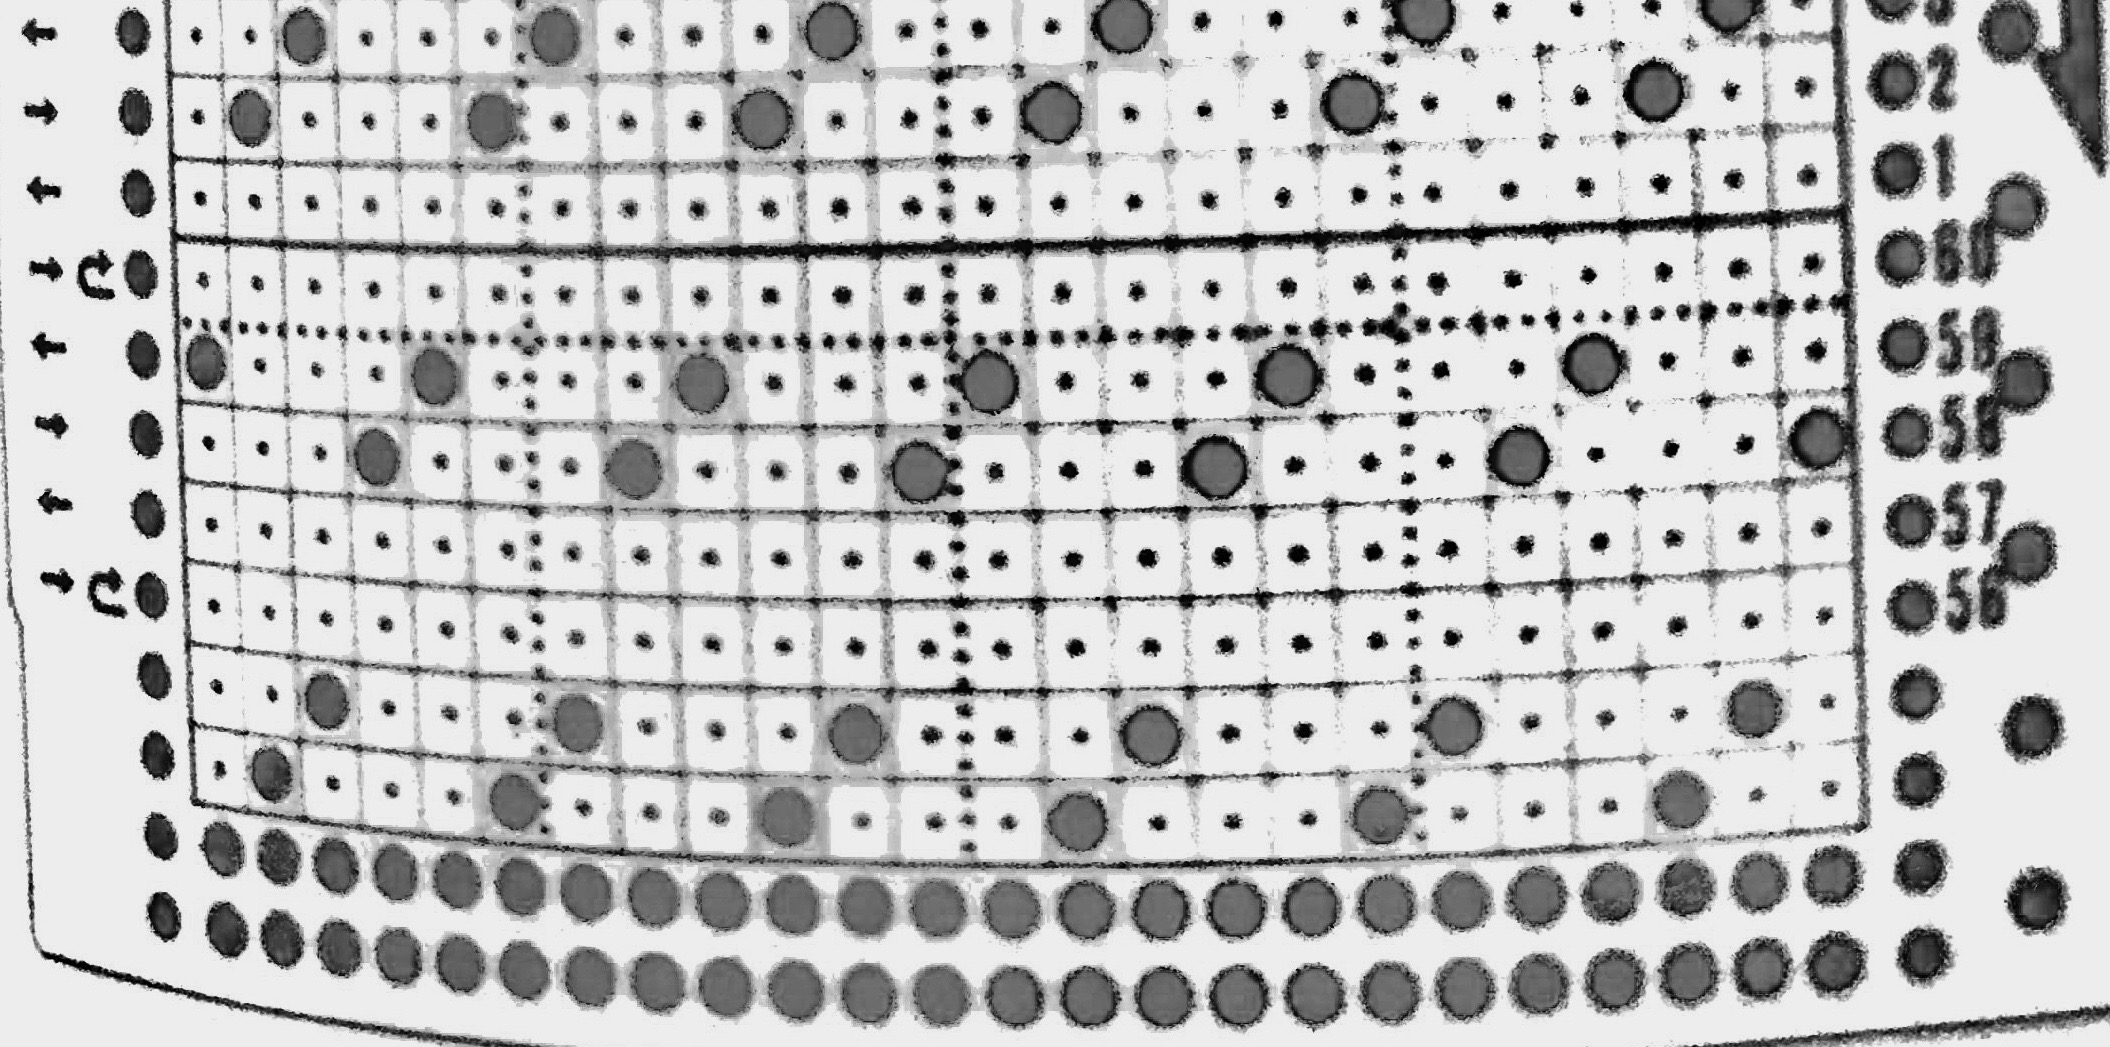
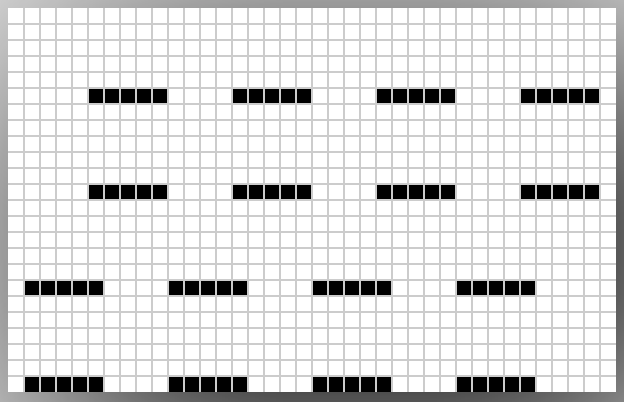
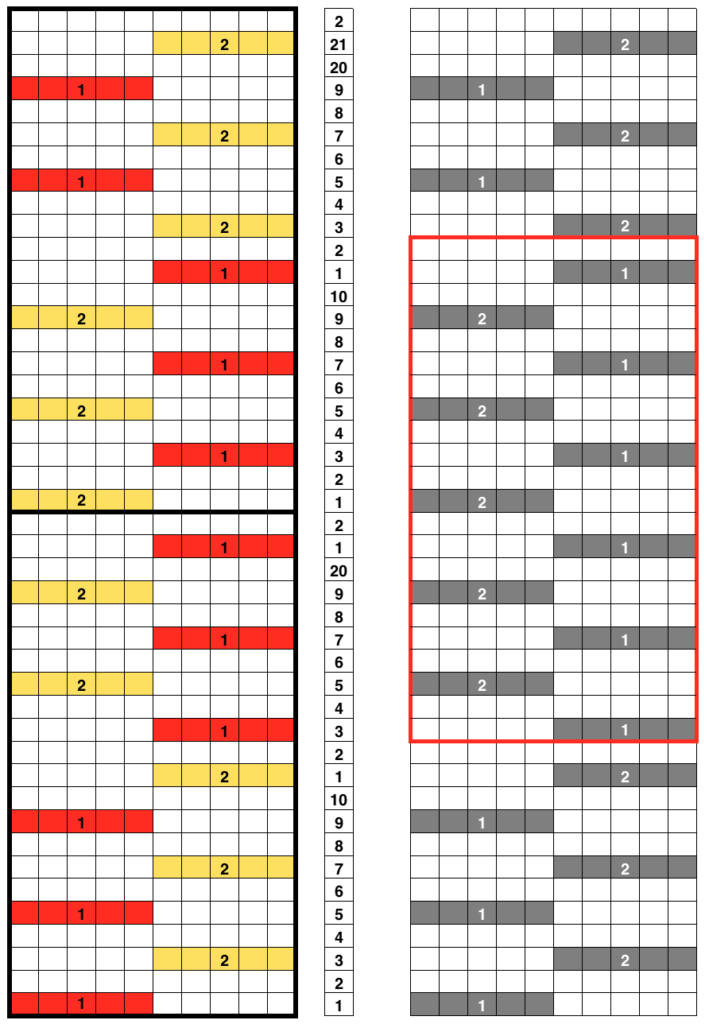
This was my initial setup. The ribber needle tape is marked in what I think of as dashes and blanks, in continuous pairs. When using single ribber needles for the ladderback, the number of out of work needles may be even or odd between the ones in work
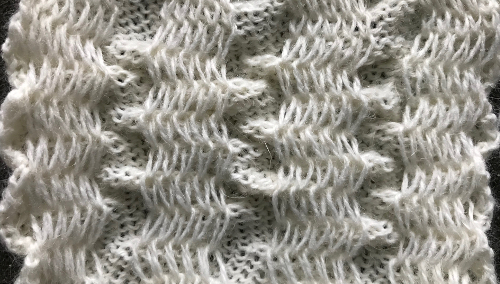
As each row is knit the ribber will pick up yarn, or not, depending on carriage settings, creating a knit stitch vertical chain on the purl side of the knit 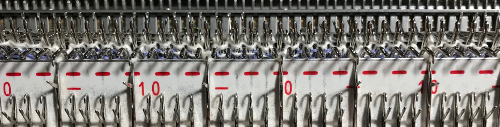
If empty needles are simply brought in to work above plain knit rows, eyelets will be created. One way to reduce their size would be to pick up loops between stitches on the main/ opposite bed and use them to œcast on your ribber needles. With ribber carriage set to knit in both directions, each color will knit with each pass of the carriages (2).
 With it set to knit in one direction, slip in the other, each color will knit on the ribber for a single pass, slipped in the opposite direction, and the slipped stitch becomes elongated (3).
  Having a needle in work on the ribber close to the edge of the knit may help reduce the roll along that edge (4).
 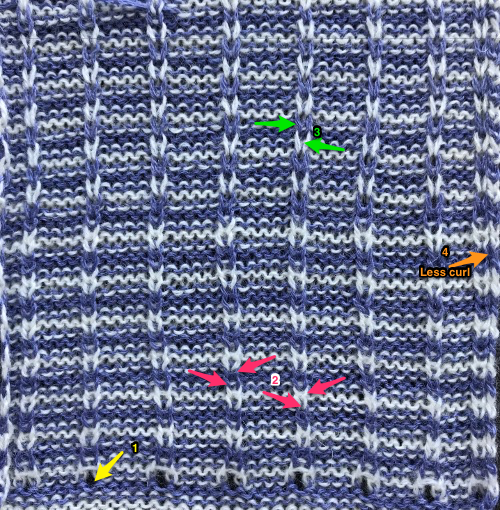 A slight separation may appear on the knit side in the location of the vertical columns created by the ribber stitches, it is less apparent when ribber knits on every other row
 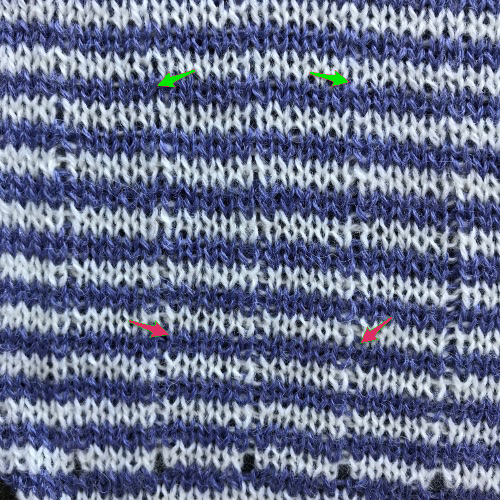 It is possible to only have one of the 2 colors knitting on the purl side. In my case, it was white knits, blue slips. Here the ribber carriage settings need to be changed with each color change, so for white I used
for the blue
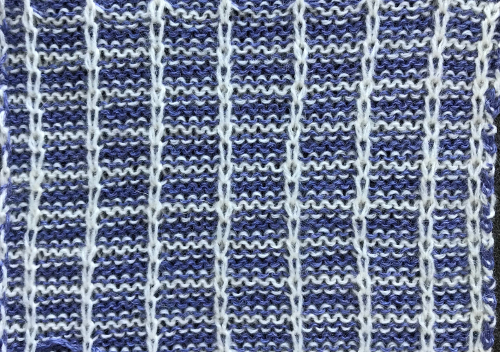
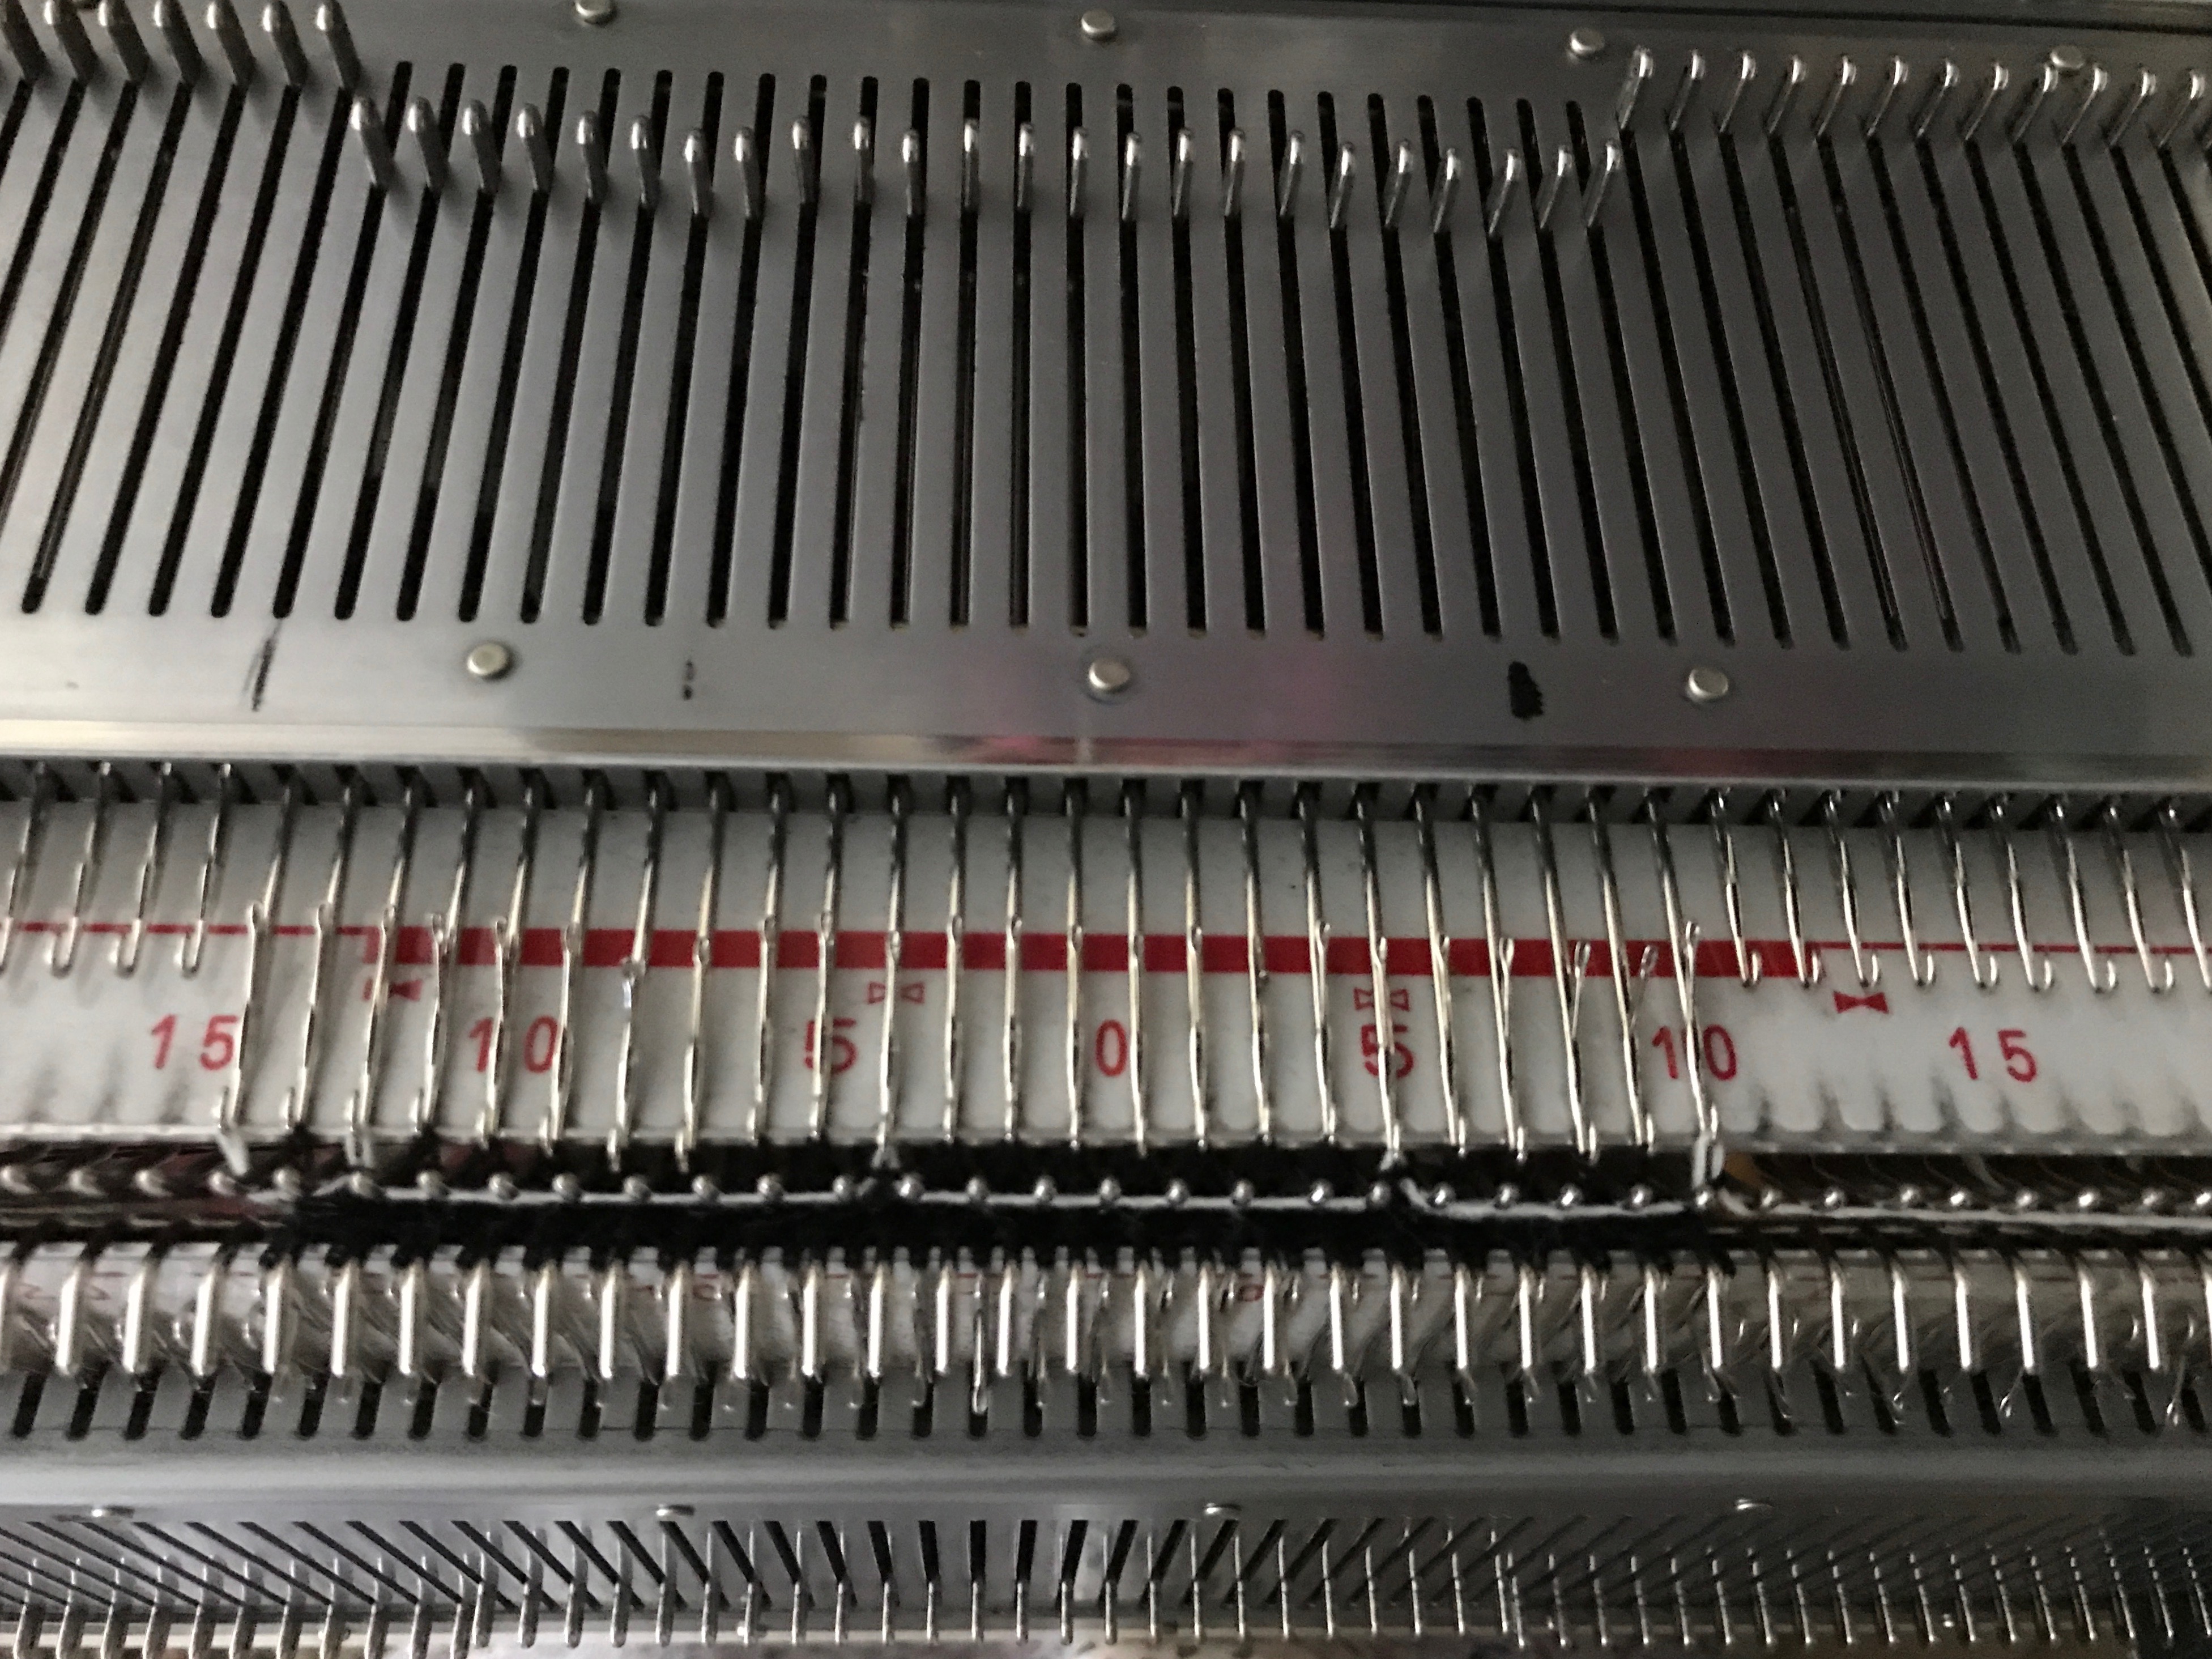
Setting up for using lili buttons: needles need to be in pairs, each with a matching “dash and a blank”, even number of out of work needles in between them. My previous set up required a bit of moving stitches around
 ribber is set to slip both ways, lili buttons engaged
  With the above settings, the needle on the right of each pair will catch the yarn on the pass to the right, the needle on the left of each pair will pick up the yarn on the way back to the color changer. Stitches are elongated because they are slipping alternately for one row, and are slightly offset from each other with a bit of a “jog” because they are not knitting on the same pass. This is noticeable in lili backed full DBJ as well. The color change from blue to pink is simply because I ran out of blue yarn.
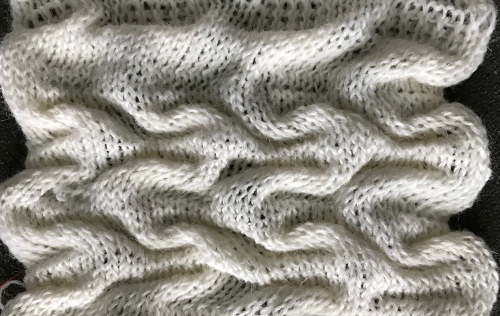
 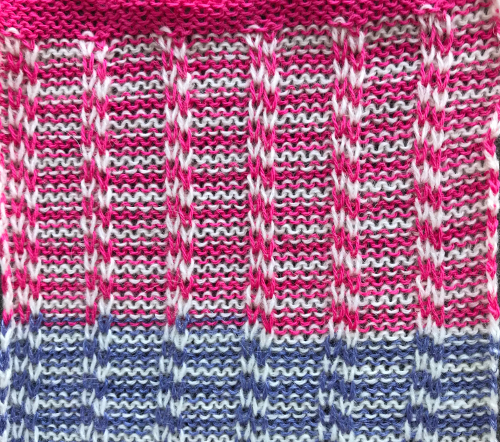 My ribber stitches should have been tighter throughout, but even in this tension situation, the knit side has the least noticeable vertical separation along vertical column edges in the series of tests
 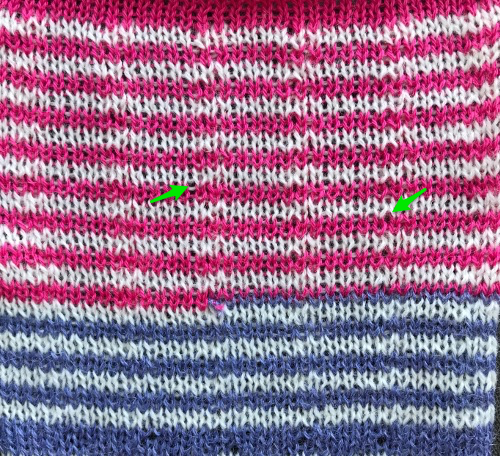 The technique may be used on any machine. This sample was knit on a Passap, using one of the patterns built into the console, pushers 2 up, 2 down for long stitch alternating color vertical lines, fixed distances between them, BX <–/LX, Tech 179.
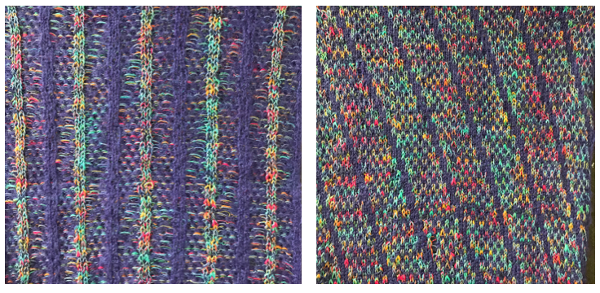 Similar backing may be produced on the Brother machine, but now a hand technique is involved. The ribber remains set to slip <– –> throughout, no lili buttons. The spacing may be chosen on the basis of the interaction with the main bed motif, or in a different configuration for each color, making the hand technique easier to track. Needles are brought to E position on the ribber for each row to be knit in that color. Here the different colors are easily identified
 the ribber settings
There are 2 options: one is for bringing appropriate needles to the E position for each color only once. I chose to do so immediately after each color change, with carriages on the left (below dots). The other is to bring them to E for the second pass of the carriages on their way back to the color changer as well (above dots). There is elongation in stitches in both options, less so when each color knits on the ribber for 2 consecutive rows, where one short and one longer stitch for each color may be observed. The first option also caused a bit of puckering on the knit side, which disappeared with pressing.
 the reverse side
Similar ideas, playing with the configuration of color blocks on either or both beds, can result in applique, embossed jacquard including pleats, and a whole range of other double bed knit fabric variations. A quick sample with transfers between beds
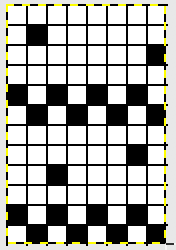
Lastly, here is a tiny swatch in an arrangement beginning to explore the odd number of needles in work on the ribber in conjunction with the use of lili buttons and adding needles to “fool the machine” as described in the post
Drop stitch lace using Ayab software
Some notes on how tubular software color separations such as the one automated in the ayab circular setting may be found in the previous post
In an effort to respond to a request I have had via my blog, I am sharing information on this topic as I have time to explore it. My first attempt when up and running with the Ayab software, was to reproduce an earlier sample I had created as a color separation originally intended for a hand-knit shadow knit experiment.
a chart from that blog post  the resulting hand knit, on the purl side
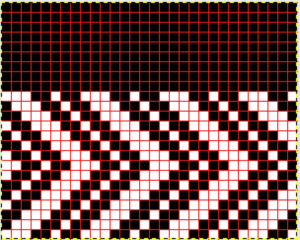
 the color-separated sample knit pre ayab
  the sample knit using the Ayab circular setting

Patterns predawn for shadow knitting, appear to be one published source for interesting 2 color drop stitch variations. What about geometric shapes or developing your own designs? Designs created using this technique lengthen considerably when off the machine. Both color sets of stitches become elongated as they are dropped, and that should be a consideration in planning your design. If your goal is a circle, the actual shape programmed may have to be closer to an egg laid horizontally rather than that of a “true” circle. The fabric also widens considerably when blocked and off the machine, making the cast on and bind off methods considerations another necessity. Design repeats may be drawn in Paintbrush or GIMP (both freeware), or Photoshop. I have been a long time GIMP user, and prefer to use it in tiling repeats as opposed to the copy and paste features in Paintbrush to accommodate the Ayab requirement of programming the repeats horizontally in the width of your piece.
In my previous, how-to posts on designing your own 2 color drop stitch lace, part of the color separation required elongating the design X 2. The starting side in Ayab for needle selection always needs to be from left to right, and elongation of the motif is not required when using the Ayab circular option.
This was my first working repeat, A = repeat charted out. B = the working bitmap or png, etc. (which would be the only requirement for the mylar). C = the image tiled for the chosen number of stitches (again, Ayab requires the repeat to be programmed for the width of your knit piece). D = the image elongated, not usable for this fabric, it results in too much elongation. If you would like a knit border on either side, that can be achieved by having extra stitch(es) in work on the ribber. 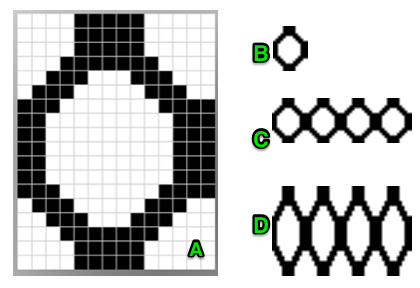 a possible ayab repeat, 56 stitches wide by 36 rows high
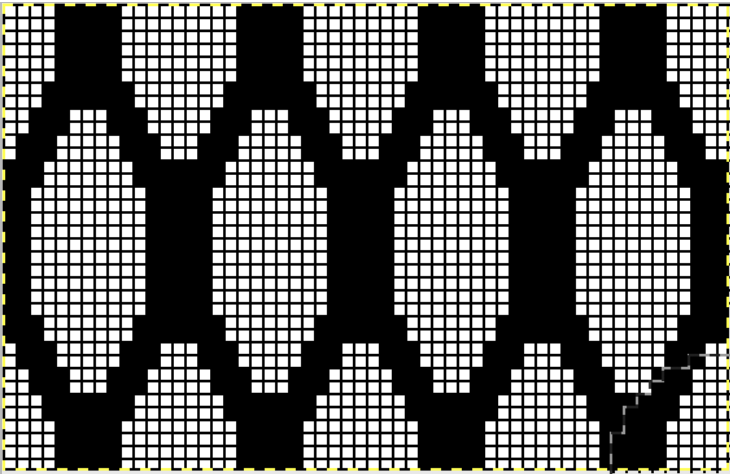
The results up to the point in which I had a yarn caught in brushes and stitches dropping on the left of the needle bed:


Drop stitch lace has been referred to over the years in other terms as well, such as release stitch, drive lace, and summer fair isle in Passapese. Passap knitters will recognize the results from this first method are akin to those produced using Technique 185.
Getting started: stitches intended to be dropped may be created on either bed. If the ribber is used to create loops, then the technique is a manual one. Using the main bed in Japanese machines to program dropped stitches increases accuracy and ease.
If you are swatching and testing, a permanent cast on is not necessary. The broken toe cast on is one of the two quickest on the Japanese machines, usable on either bed. It is fondly called that because if ribber cast on comb and weights are in the wrong place so that the wrong loops are dropped, everything falls to the floor, and likely on your toes. There is an online video by Diana Sullivan that shows its use for a tighter cast on row in 1X1 rib, but the use here is for a different purpose.
In producing this fabric you are technically knitting every needle rib. 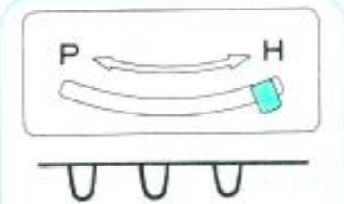 Cast on a fairly tight zig-zag row. The ribber comb wire needs to be placed so that it holds down the stitches on the bed on which you need to keep them. The principle and results are akin to the first row knit when you use a single bed cast on comb, and the second pass, with the first knit row anchors open loops before you continue to knit. Any loops not secured by the comb will result in dropped stitches. Any fabric, any time, when 2 stitches are empty side by side, stitches are not formed and the yarn is dropped off them creating a float or ladder. The red line indicates the ribber wire on top of the ribber loops in the zigzag row, placed so released knitting will be left on the ribber. Black lines your zig-zag yarn loops, blue dots the teeth of your ribber cast on comb. You can check placement by dropping just a few loops on the main bed before hanging your weights on the comb.
 ![]()
zigzag row showing the placement of cast on comb teeth, on each side of main bed needles
 with wire in place, anchoring ribber stitches
  testing out dropping a few stitches
  all stitches now on the ribber in preparation for dropping stitches created on main bed
It is possible to also use a wired cast-on comb for an open stitch cast on the top bed only. Remove the wire from the comb. Bring the comb up and between needles to be used, and re-insert wire. Needles and latches will need to travel easily under the wire when the first knit row takes place. 
The knit carriage will not clear the comb properly because of the location of its brushes, etc. For the “cast on” row, exchange the sinker plate on your knit carriage for the one normally used with the ribber. The first photo below shows the approximate location for the comb during the first row knit. Needles are centered between the teeth, the teeth themselves line up with gate pegs. The comb needs to be manually held in place since there is no opposing bed in use to help balance it. Working with the ribber up would ease the process in wider pieces of knitting. The ribber sinker plate has no brushes or wheels to anchor knitting on the knitting bed. Any rows knit single bed using it, will need to have needles brought out to hold position prior to knitting each row for all stitches to be formed properly
the comb in position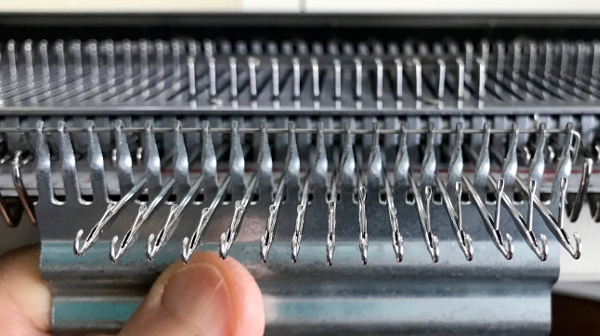 pass is made slowly with the ribber sinker plate in place
 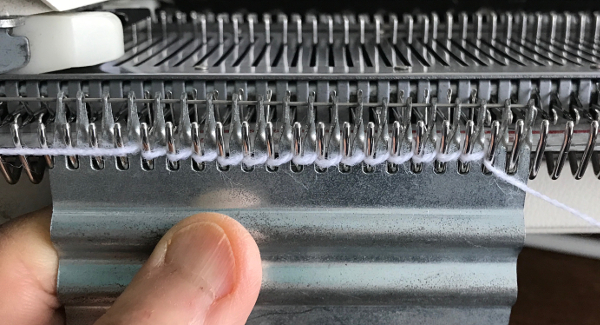 the comb is dropped
  bring all needles out to hold position
  knit one more row, returning to starting position
 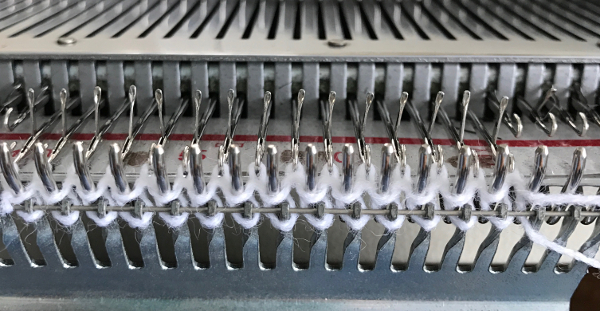 change sinker plate on knit carriage if needed, proceed with knitting
To use the same method with ribber in place: hold the appropriate ribber comb with the bump(s) up facing you, so that the teeth line up with gate pegs as shown above, and so the needles can come through the gaps. Leave the wire in, hold the bump(s) against the ribber, and tilt the comb against the knit bed. Hold the comb high enough to take the carriages across to the opposite side. Move carriages to the other side, drop the comb and weigh it. If continuing on the top bed only drop the ribber, switch sinker plates, and continue to knit.
“bumps”: Brother comb 
For other purposes and an edge similar to a weaving cast-on executed on Japanese machines use EON for the cast-on row, then bring into work and add the rest of the needles prior to knitting the second row.
Use a cast-on comb appropriate for your knitting machine’s gauge ie 4.5mm, 5mm, etc., the brand is not relevant, only tooth spacing is. It is possible to cut ribber cast on combs into different widths for use when knitting is planned on fewer stitches than those accommodated by their available commercial widths.
As for dropping those loops that will form the long stitches, one can do so manually with improvised tools. For more automatic dropping of stitches using knit carriage in Brother patterning, one may punch a card or draw a mylar with a method akin to color separation. A pass of the KH carriage across the knit is made with no yarn in the feeder, color 2 is actually no yarn/empty from left to right while establishing the proper needle selection on its return. The ribber would need to be reset to slip, or the ribber carriage separated from the knit one for the 2 passes to and from the color changer. This is the “scariest” option by far, more error-prone. It is not applicable when using the circular Ayab setting in creating the fabric. Without a specific tool, all stitches can be brought to E and back to B with a ruler, piece of garter bar, ribber cast on comb, or other handy ‘toy’. Dropping stitches is done while carriages are on the left, after the return to the color changer side. It is possible to modify the Studio accessory used to drop stitches
For 2 color drop stitch, the main bed is set to slip in both directions. Because not all needles on the main bed are used for patterning on every row, the KC II setting on the change knob is used, eliminating end needle selection on the 910. The ribber is set to knit every row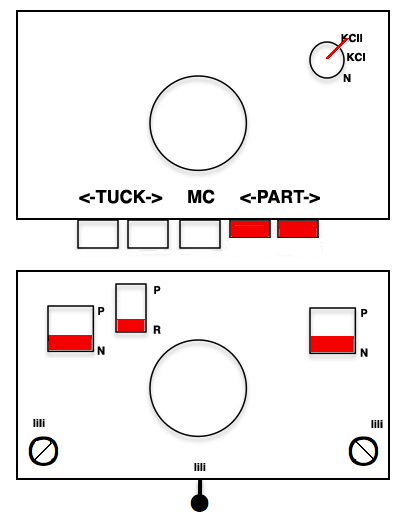
Ayab: begin your design repeat on your first row, choose its circular setting in machine type pull-down menu on the right
The first design row is preselected left to right
The main bed is set to slip <– –>, change knob on KC II (end needle selection is canceled)
Ribber is set to knit <– –> for the duration
COL: as you go from the left to right, needles are preselected on the top bed, they will knit, picking up loops that you will in turn drop on the subsequent passes of the knit carriage from right to left.
COR, the KC knits on preselected needles as it moves to the left.
Clear the color changer, set up your next color. Drop the stitches knit on that last pass
It may be necessary to push those loops down between the beds before you next pass, remember to pull down on your knitting periodically, visually check needle alignment on the main bed (all needles in B in the work area)
*With the new color move to the right, preselecting the next row of loops
Knit right to left, picking up loops on preselected needles, change colors, drop stitches,** and repeat * to ** steps in 2-row rotations
so I want circles, here is my test pattern 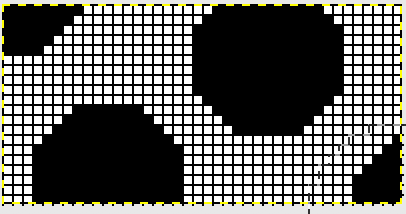 more like eggs, the black squares in shape appear as drawn on the purl side
  shapes are reversed as drawn on the knit side
It is possible using the circular setting to drop only one of the 2 colors, whether background or shape. I began by dropping the white ground. I used to encourage students to develop a tune/ repeat in their heads when regular actions needed to be taken. For me, in terms of yarn color, it was “white, knit, drop”, “brown = erase (push back to B), go back”. 1: white travels to the right, needles are pre-selected; 2: white travels to left, picking up loops 3: on left, change color, drop stitches. For brown: 1. travel to the right, needles are preselected 2: on the right, before traveling back to left push all selected needles back to B. Only the ribber knits on the way back to left, so brown will have knit 2 rows with no dropped stitches. I ran out of brown yarn, started over with the blue and white, planning on having the shape drop the stitches. There is a difference in the fabric width with the change in the distribution of stitches. I stopped knitting, not due to any mispatterning, but because I encountered another Ayab behavior that may be well known to punchcard knitters. Due to a yarn mast issue, I moved the knit carriage back to disentangle the yarn, and lo and behold the pattern advanced a row. Punchcard machines will advance a row with any movement of the carriage outside the edges of the knit. This was never an issue in the unaltered 910. At that point, I stopped knitting. 
Not fond of stripes? prefer one color? the sample below was worked on 40 stitches in width, using the repeat charted for 56 stitches. Here decisions are made at the design phase of your repeat. For single color, drop stitch use an image double length, and single setting in the Ayab software. The process is the same: *preselect stitches left to right, knit on selected needles right to left, drop loops just picked up traveling to left**, repeat from * to **. Settings are the same as for the 2 color drop stitch, but the elongation depending on the number of stitches dropped is not as noticeable. The texture in my swatch is diminished after a quick press, the yarn is an acrylic blend. The charted repeat illustrated is wider, but I worked it on only the center 40 stitches. As always in slip stitch, the black squares knit and they represent the stitches that are dropped. If you wish to create the long stitches on the ground (white squares), reverse use Ayab Action Invert prior to knitting
the chart as viewed and explained at the top of the post
Sources of inspiration from studio publications vary, patterns designed for pile knitting make for suitable one color drop stitch. A partial punchcard repeat
from an electronic collection
and a punchcard pattern book, where markings emulate eyelets, usable only for single color knitting
Note that in #2 card directly above, there is a solid row at the very start that is a design row (third all punched). In Ayab again, first-row preselection is left to right, you will be picking up loops on preselected needles going from right to left and then dropping them. That first design row needs to have punched holes or black squares/pixels in it. The color separation is essentially done for you in the source image. Do not use circular in Ayab, but rather, use “single” setting and follow instructions for creating the fabric as described above, with no color changes. The blank punchcard rows match the no selection rows in self-drawn color separations,
If double bed work is daunting, for a different stitch, worked single bed, that may cause interesting distortions in all knit, single bed fabrics see block stitch post.


The self-drawn design repeats for 2 color drop stitch may be offset as well, resulting in colors being dropped alternately. The design shape needs to be created in 4-row blocks in order for the yarn to make it back and forth to the color changer with both colors to complete one design row. The second pairs of rows in each 4-row block is erased. In this instance as well, rows marked with black squares will pick up loops on the main bed, which are in turn dropped to create the long stitches. The second design repeat is offset to try to get sections of it to create loops to be dropped as well. The final motif must be a multiple of 8 rows in height if it is to be used as Ayab’s infinite repeat in length.
Color changes are indicated in the vertical strip in the center of the design. This was my starting idea
Elongation to 4 rows per block, erasing the second pair of rows for each color on right. The repeat on the right may be used if only one color is to be dropped; the 2 blank rows in the design field represent stitches that will knit only on the ribber for 2 rows. No stitches are dropped in color(s) used in sequential rows of blank squares in all “white” areas of the chart, including multiple rows above and below the design shape. Color changes every 2 rows continue, creating continuous stripes.  shapes staggered, visually checking for placement of alternately dropped stitches
To accommodate the Ayab preselection for the first row to be knit from left to right, move the last blank row in the design to the first-row position. As the carriages travel from left to right and back to the color changer, the stitches will knit 2 rows only on the ribber. Continue knitting in steps as described earlier in the post, changing colors every 2 rows. On a larger knit ground such shapes may be arranged to suit. This was my working repeat, but I used a third fewer stitches in the swatch than in the chart.  Note that the images will be reversed on the knit side, so if preferred, use Action Mirror to flip the image horizontally prior to knitting it
The swatch has been quickly pressed, so the texture is flattened out, but I am reminded of a few shadow knits when viewing its purl side. 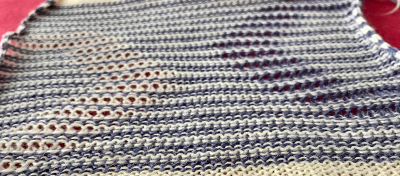
In an unaltered 910 with the ability to double the width of the programmed repeat, mylar users are not excluded from exploring a similar fabric. The repeat above may be rescaled to half the width, drawn that way, and then use the twice as wide built-in feature. Gimp does an “interesting” thing when scaling this design to half-width, note the right side of each repeat is an odd number of squares, the left side an even. The repeat may be used as-is or redrawn, adding or eliminating black squares if symmetry in each shape matters. Paintbrush produces the same image, mirrored.
The explanation: further analysis of the original design reveals the fact that some of the pixel numbers in the design black square blocks are uneven in width. In this instance, 3.5 is half of 7, and half pixels cannot be rendered, so the software assigns the split to 4 and 3. 
Lace punchcards meet Ayab
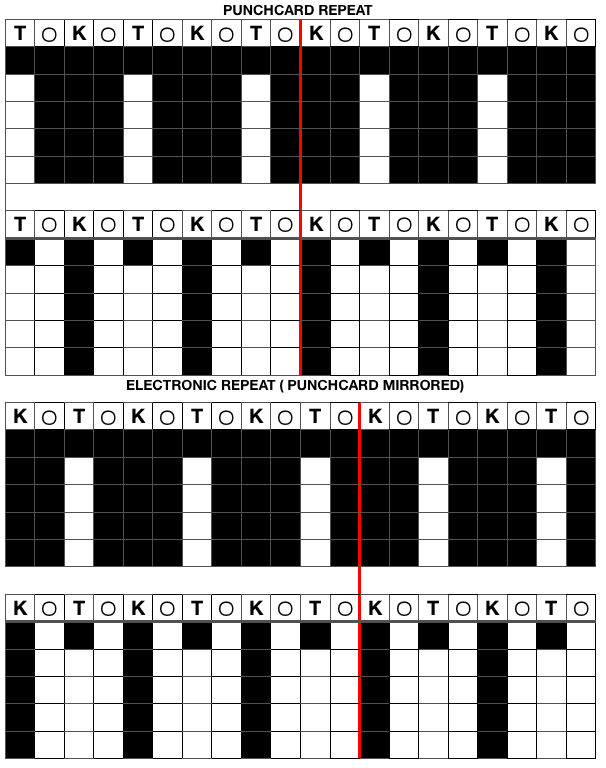
1/8/18 It appears I now have acquired preselection from left to right on the first pass with my Ayab software, which I have been told is its “normal”. I am revising the information I have offered since I began working with Ayab if needed because of this, beginning with lace. This punchcard design is worked with each carriage operating for 2 rows, and all transfers in the same direction. The LC (lace carriage) on left, the KC (knit carriage) on right. An added note: sometimes punchcard designs may be used as provided, not altering the repeat in any way. Accidentally marking squares or pixels in the wrong spot, or deliberately starting with the LC on the wrong side, may still produce interesting fabrics. As always keeping good notes is more than well worth it. 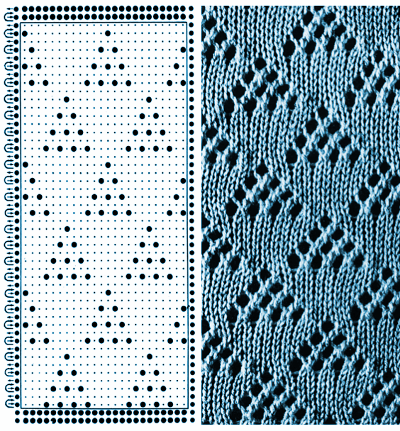 punchcard actions: transfers are all to the left (seen leaning to right on the knit side)
 With the first preselection row using Ayab beginning with the LC on the left, the same transfer sequences occur as in the punchcard machine or a single repeat on a mylar
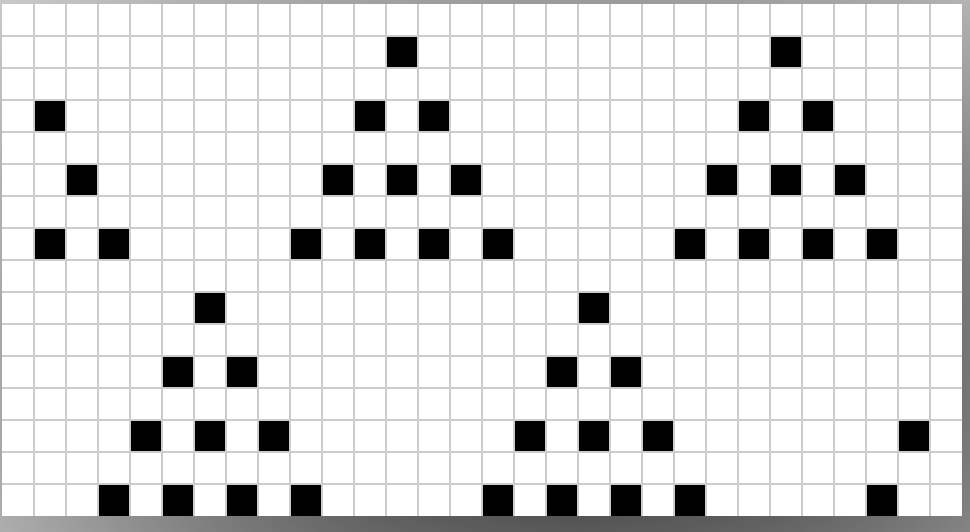
swatch knit with the LC operating on the left, the KC on right throughout
For use with the color changer, the same repeat may be used. Transfers, however, now need to occur with the LC operating on the right giving the knit carriage the opportunity to travel to and from the color changer in 2 (or more, even #) row sequences. Using a punchcard, one would turn a punchcard over before inserting it into the card reader to work with the LC beginning on and continuing from the right. To achieve the same fabric using Ayab, shift the top row to the bottom of the repeat, and either mirror your image prior to importing it into Ayab, or use its mirror action in the pull-down menu. The chart shows the repeat prior to mirroring, with desired actions described to its right. It is not possible to read the first row from beyond the right set line using Ayab, so the LC begins on the left, travels to the right on the first blank row, selects on the second pass to the left, transfers stitches as it travels to the right again and stays there, operating from that side for the remainder of the knit. All transfers are now reversed and made to the right, and seen leaning to left on the knit side of the fabric. After the first 3 LC passes, each carriage operates for 2 rows at a time, all transfers are to the right, lean to the left on the knit side of the fabric.
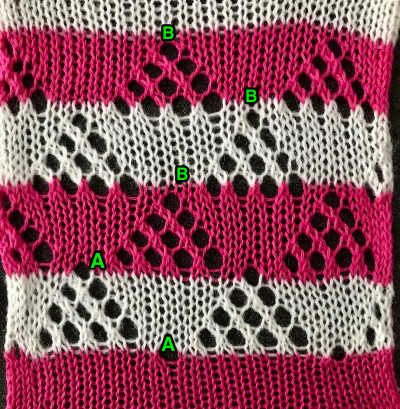
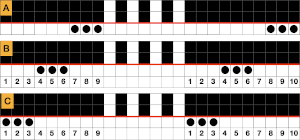
Possible striping choices: the differences between areas marked A or B is in the location of the color change. In A areas the color is changed immediately after the single transfer at the top of the “triangle”, in B areas the last eyelet is completed in the same color used up to that point, and the color change is made after the first row of 4 transfers at the base of the “triangle”. More complex lace repeats create much more interesting variations in the direction and movement of the stripes.
 verification on a different day, LC on Left, repeat not mirrored
 The punchcard for fabric from 1/25/18 post. This fabric creates large eyelets, there will be 2 empty needles side by side for the duration. Some of the old pattern books referred to it as one of the “mock crochet” ones.
operating with LC on the left  operating with the LC on the right: the repeat is mirrored
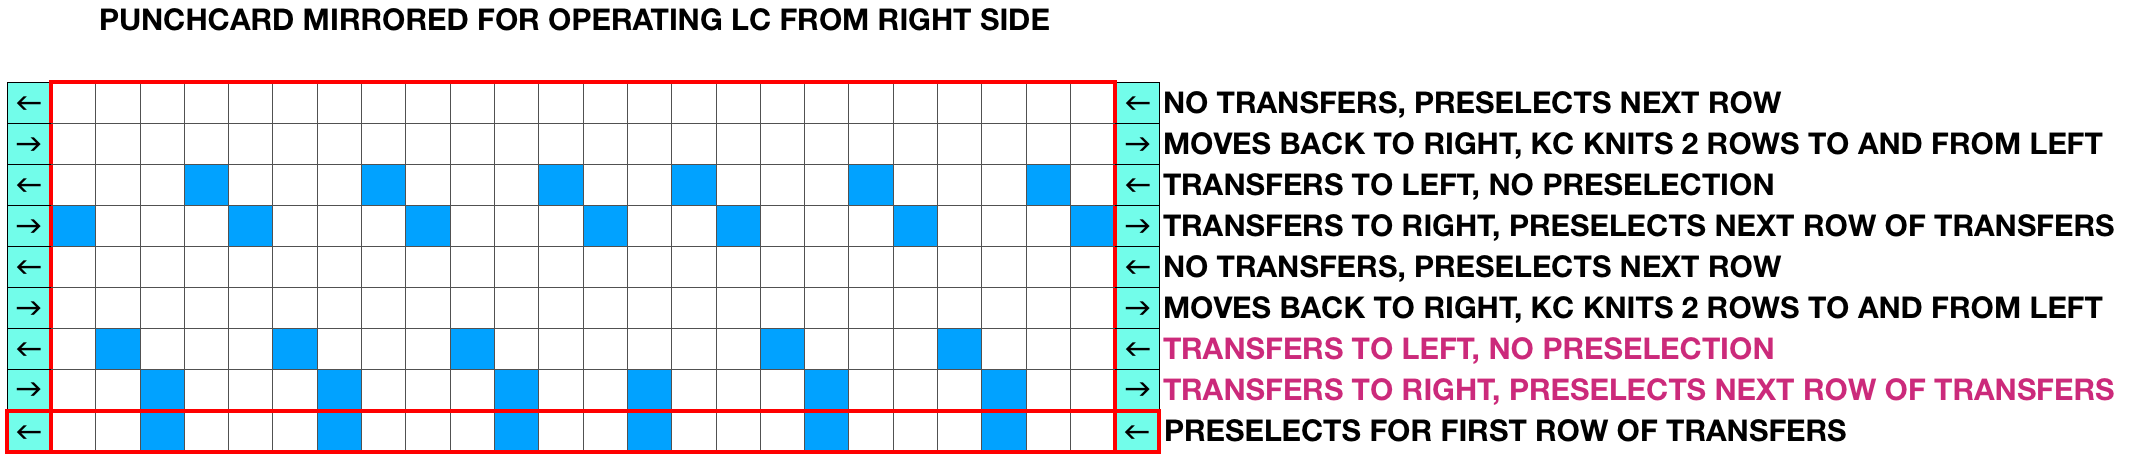
the original repeat (re-worked on 24 sts)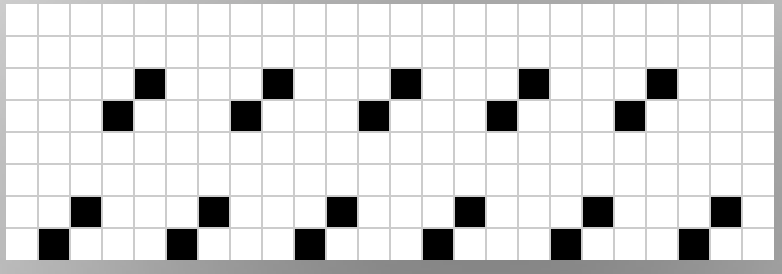 Ayab for operating with the LC on the left, repeat is mirrored
  Ayab for knitting with LC on the right, original repeat, rows split
The bottom of the swatch was knit with the LC operating from Left, the top with the LC operating from right after its third pass illustrated in the “triangle” lace description above  repeated testing, bottom LC operating from left, top LC operating from right
  For a discussion of the same punchcard worked in a variety of ways see Lace meets weaving on Brother machines.
for full details. The punchcard was originally designed for operating both the knit and the LC carriages from the right. If KC I is used resulting in end needle selection on only the first and last needles in use, prior to passes of the LC push those needles back to B. If there are 3 empty needles on the edge on either side on rows preselected for weaving, bring the outside needle to work/ E prior to laying in the weaving yarn. 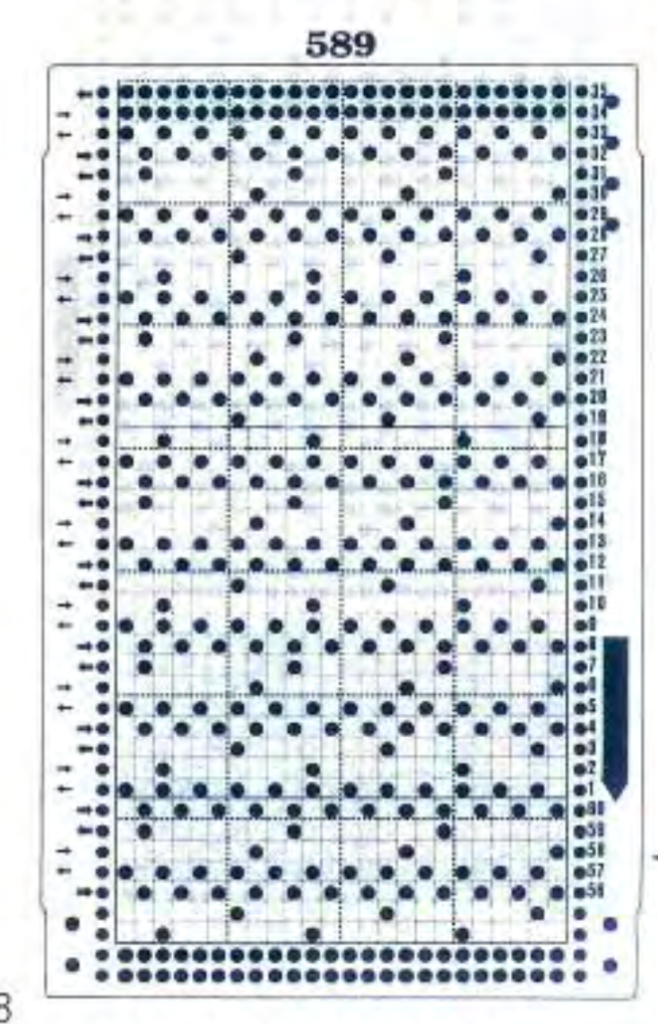 The image tiled for the width of my knit, in this case, 32 stitches, a multiple of 8
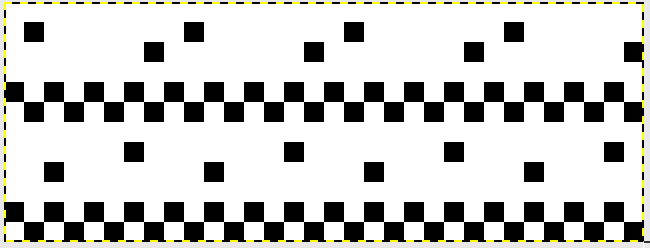 I actually cast on an extra stitch on each side at the beginning of the piece with the intent they not be in pattern and create a single knit stitch border in areas of transfers. Here are the results, barring a couple of spots the weaving yarn did not get caught properly. The pattern as drawn produces a fabric that is interesting, but different than the intended
 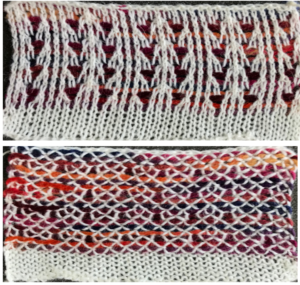 With the pattern flipped horizontally / mirrored, we now have the same results as in using the 589 punchcard
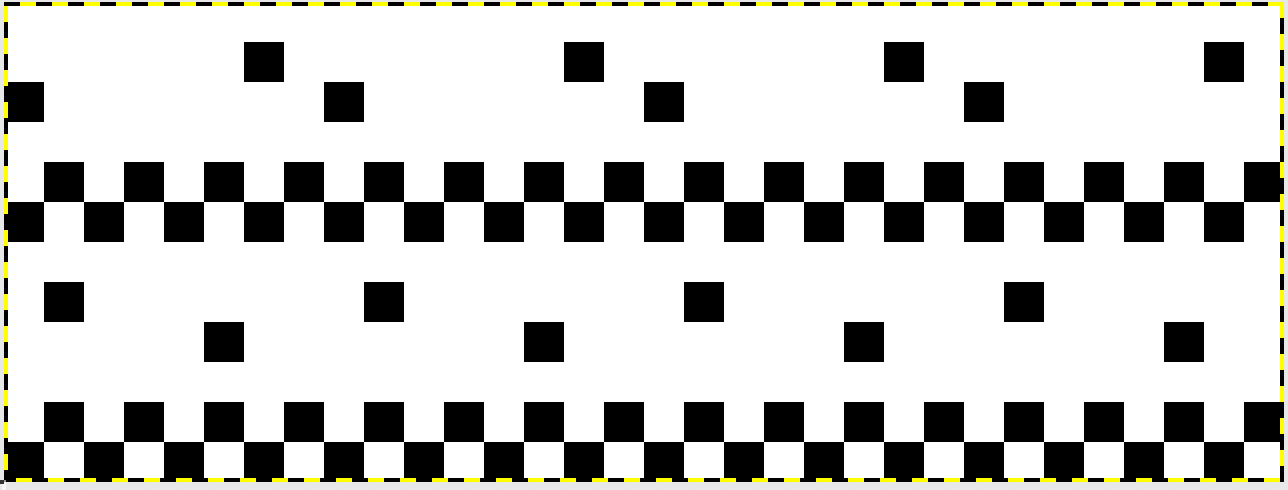
So to mirror or not to mirror? that is the question… I tested 643 and 650 from Pattern book #5, found mirroring was indeed required for transfer accuracy. I verified that the “triangles” do not need to be mirrored to match the punchcard swatch. The notable difference in the latter is that all transfers are in the same direction and that each carriage operates for only 2 rows.
Two more to try, directions are not ayab specific: a large diagonal eyelet lace combining lace and tuck
12/28/17: tuck lace meets hand technique 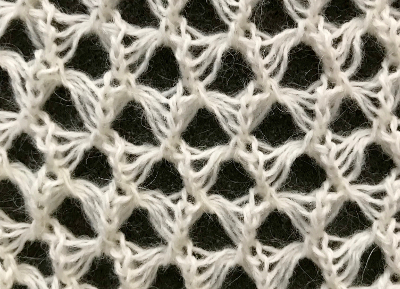
For more lace samples and symbols and suggestions from punchcard books on knitting the fabric, please see punch-card-book-symbols-and-samples
A Fair isle sample with deliberately mirrored lettering proved the program knits what it sees, so my letters were still reversed, as drawn.
On 12/25/17 I shared my first try at lace using Ayab and the workaround for the first pre-selection row occurring from left to right. The LC is the one to select for transfers, the KC knits to complete the formation of stitches. Brother punchcards for lace usually begin with selection rows, end with 2 blank rows at their top. Because Ayab requires a first pass from left to right for the next row to be selected, to get the pattern to work one needs to split the 2 rows at the top, bringing one of them down to the start of the repeat. If knitting continues with the LC pattern as originally drawn, the transfers will occur in the opposite direction of that intended. To work around that, the image may be mirrored in the paint program before download, or use action/mirror in the Ayab menu before knitting. One nice added feature is that blank rows may be left at both sides, creating a knit stitch border, and eliminating the problem of paying attention as to whether end needles are selected or not, and what measures to take. This fabric creates large eyelets, there will be 2 empty needles side by side for the duration. Some of the old pattern books referred to it as one of the “mock crochet” ones. These repeats do not hold with first-pass preselection from the left.
the original repeat  the repeat mirrored
 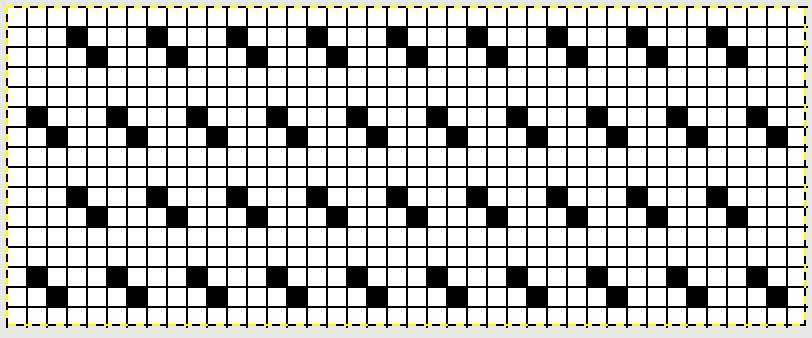 the resulting fabric, knit and purl sides
 no mirroring, software patterning errors in one of the test swatches
 operating from the right, using the color changer
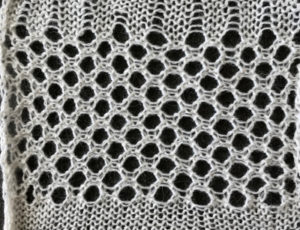
“Crochet” meets machine knitting techniques: tuck lace trims or fabrics 2
There have been several previous posts on “crochet” like stitches and “tuck lace”, this is another variant. The needles need to be arranged as in the diagrams below. After the first preselection row, the carriage is set to tuck
the full punchcard 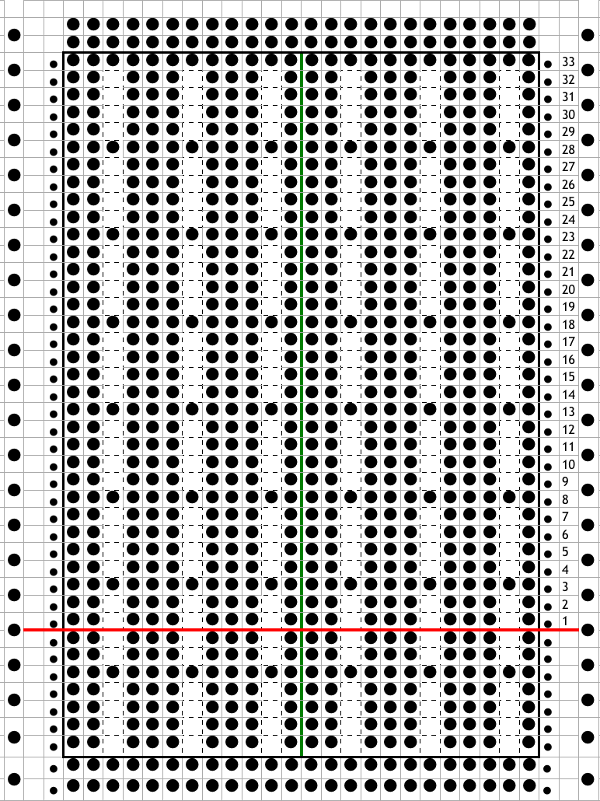 T= areas where tuck loops will occur, K = knit columns, o = NOOW, the red line the 0 mark on the needle tape
Every 5 rows, after the tuck loops are knit together (illustrated in repeats on far left), the formed stitch (single black square) is transferred in turn to the right and then to left; this works out happily so that transfers may always be made toward the knit carriage.
 The sole repeat (all that would be required on a mylar) is 4 stitches wide, 5 rows high. The number of needles used needs to be planned so that there is a knit stitch on either end of the piece. This is accomplished by using a repeated multiple of 4 + 1, so one side of the 0 mark has an even number of stitches, the other an odd (4+1=5). Ayab software requires that the repeat is programmed across the width of the fabric, so the final design would be a variant of this, my sample was worked on 20 left, 17 right. Non selected needles form tuck loops until they are knit together every 5th row
If you prefer to work with the top repeat programmed, then transfers will need to be made on each side of the non-selected needles to get the proper configuration. If programmed with the bottom repeat, then and every other needle cast on is fine. I generally stay away from combs and weights if I can, but this is a fabric that benefits by evenly distributed weight, a cast-on comb with weights added to it is a good idea. In the absence of any, start with waste yarn and ravel cord, thread a thin knitting needle or wire through the knit, and hang evenly spaced weights on that. Follow with your preferred cast on, and knitting in pattern. 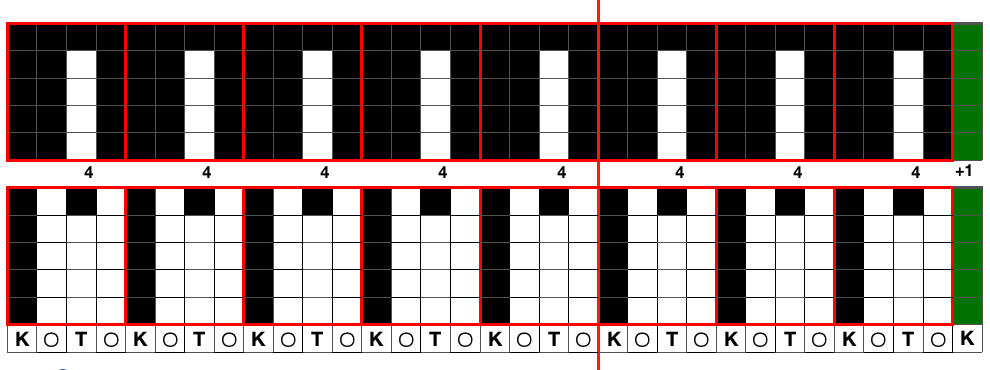
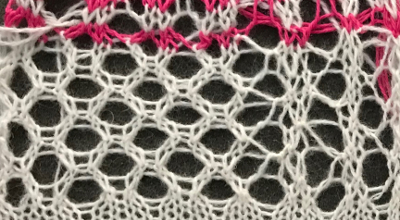
The swatch as it appears on the purl side (traditional “public side” for tuck stitch). The bottom 4 repeats show what the fabric looks like before one intervenes with the hand technique
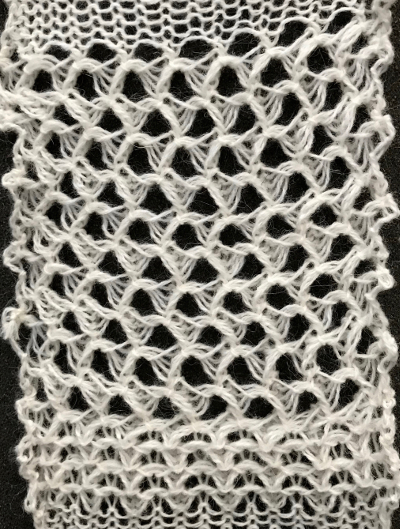 its knit side
  and a bit closer a few more
in early publications combinations of lace and tuck, creating a large scale mesh were also referred to as mock crochet

Combining knit carriage needle selection with racking
4/23/18: inspiration source is from a Russian pin, bottom left #198
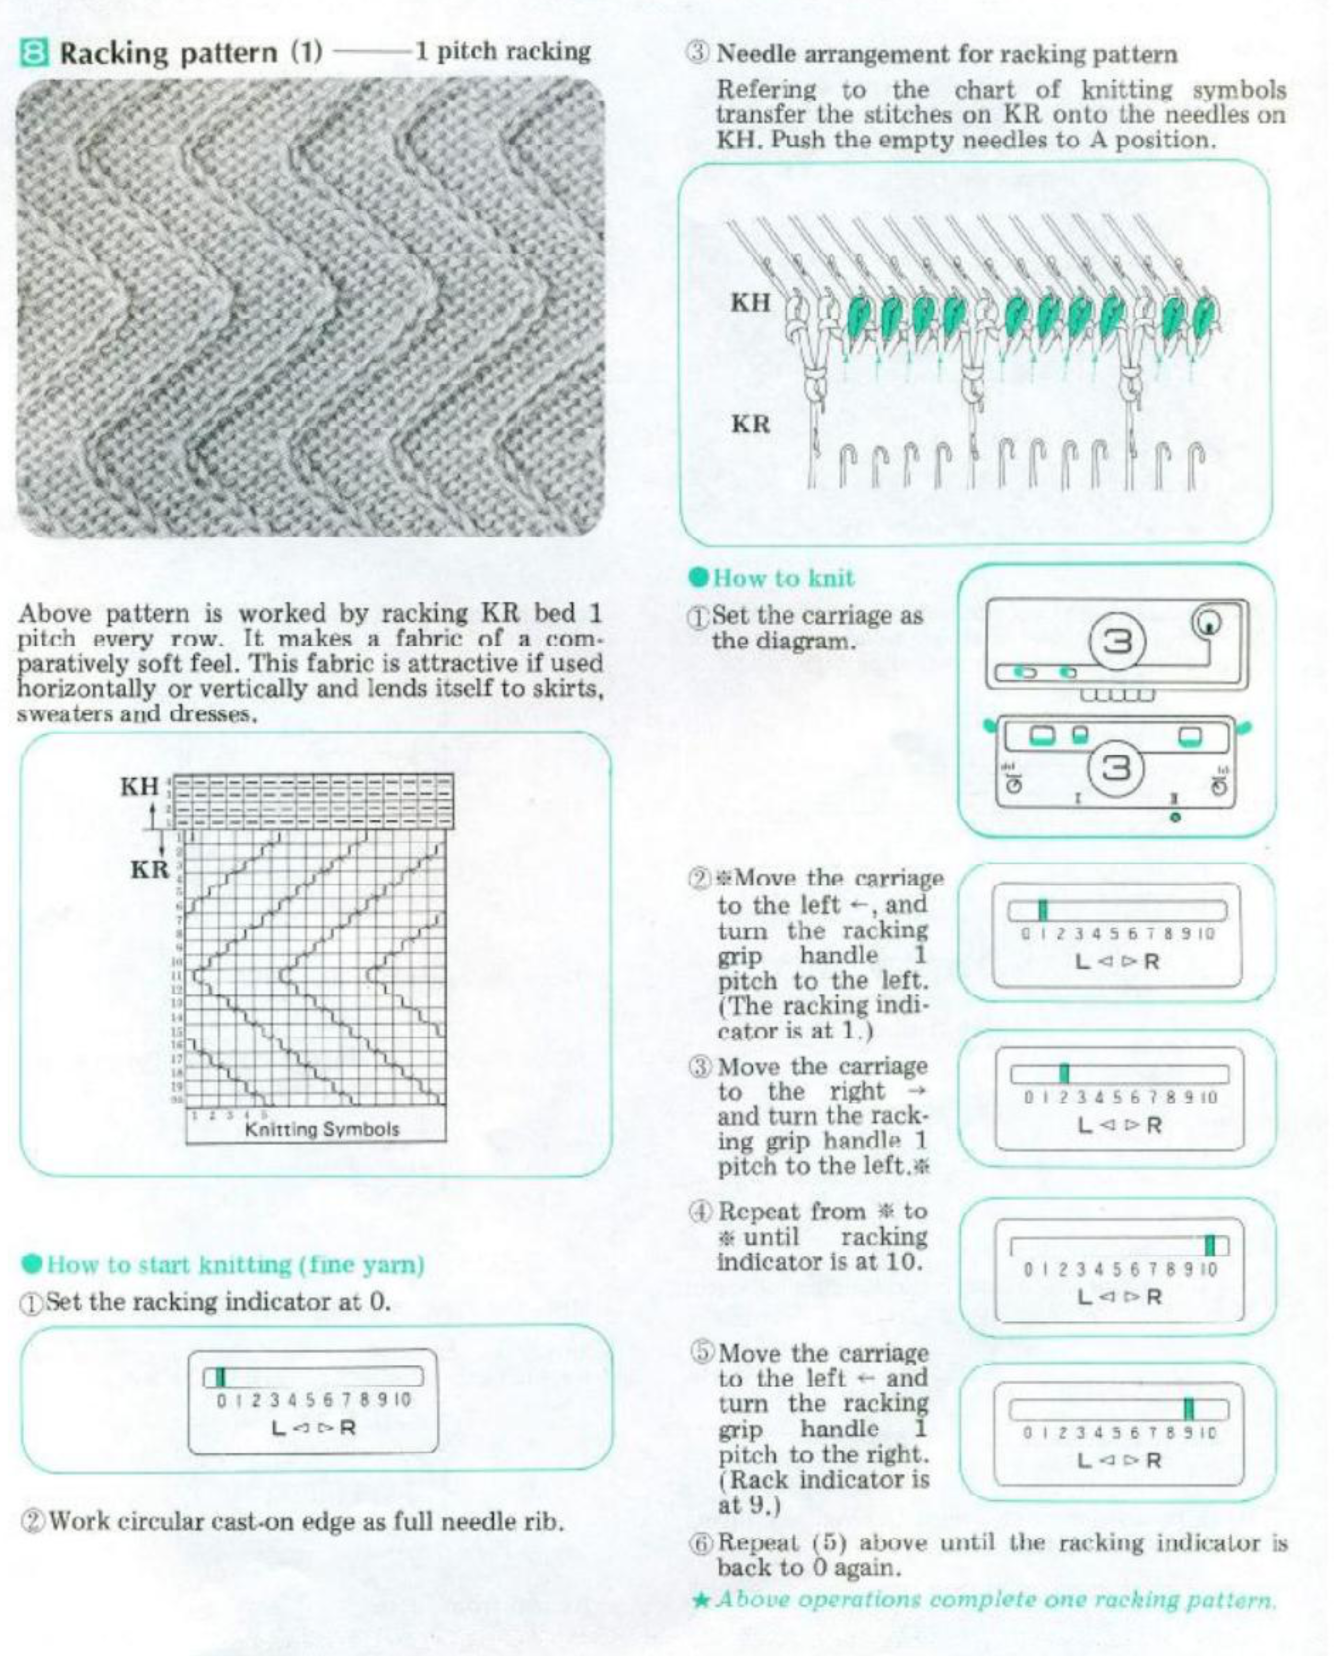
The first swatch, produced with manual selection, and varying the number of rows between racking to establish yarn tolerance
There are single rows of knitting on both beds, so the option of using 2 knit carriages is out of the running. My test swatch had the main bed doing all the knitting, the ribber knitting the joining segments with manual changes in its buttons from slip to knit and back when appropriate. The staring needle arrangement, on “graph paper”, and the subsequent racking positions: the top illustration is for racking position 4, the bottom for racking position 0.
 A tentative plan of attack: the combined knit and ribber carriages are to be used throughout. The main bed KC is set to knit, but the change knob is set to KCII. The blank squares will actually knit thanks to the setting, the selected needles will indicate the direction in which racking is due to take place prior to knitting the next row.
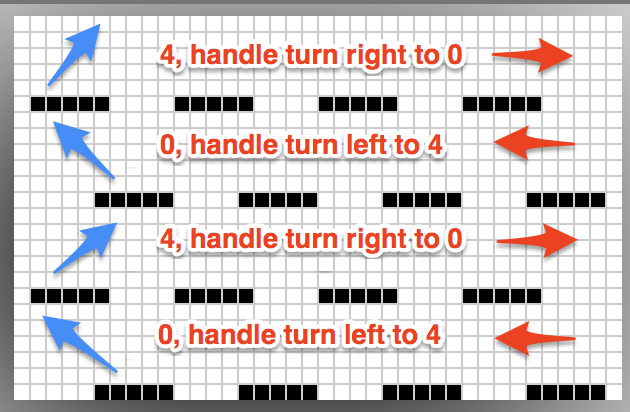
This is the starting ayab repeat, with single repeat segments highlighted (one alone would be adequate for most other electronics). 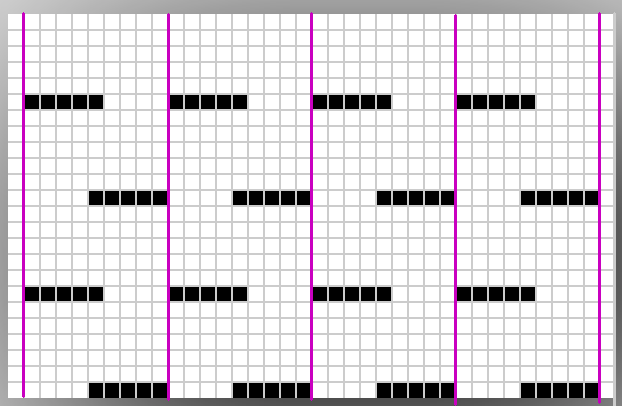
You will be working on the purl side of the knit. In what is an increasingly irksome feature to me, Ayab will automatically mirror horizontally any loaded image, so to get the above, you need to actually be either mirroring the image prior to loading it (my preference), or remember to do so through Ayab’s actions after. Enter this,  the ayab screen shows this
This is what appears on the left side of the Brother ribber. I prefer to rely on other methods to track directions and numbers of positions in racking, but the ribber itself provides some clues. My pitch lever will not move all the way to H, but that is made up for in the ribber adjustments, so it is not a problem. A reminder: turning the racking handle to the left is toward increasing numbers on the indicator, to the right is toward decreasing numbers 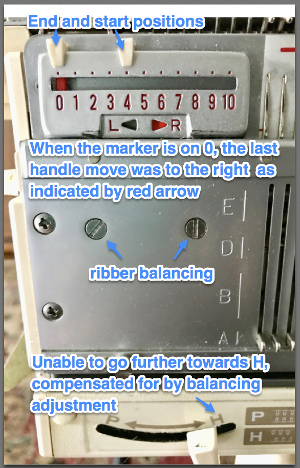 The set up for my swatches, and the first row knit on racking position 0.
The first preselection row in Ayab knits above needles on both beds. With carriage on the right, set the ribber to slip <– –>, and knit up to the next row where needle pre-selection appears. *Change the ribber button on the side to match the direction in which you will be moving the carriage (left if knitting to left, right if knitting to right) to knit from the slip setting, knit to the opposite side (no more needle selection), change ribber lever back to slip again prior to any more knitting.** Repeat * to **. Position 4:
 I began to run into issues with ribber stitches being too tight, this was knit with a tension adjustment, resulting in a less defined texture
Going a different route: another repeat, with each position, repeated once, repeat is pre mirrored
 a swatch with the racking happening only in the center of needles in work
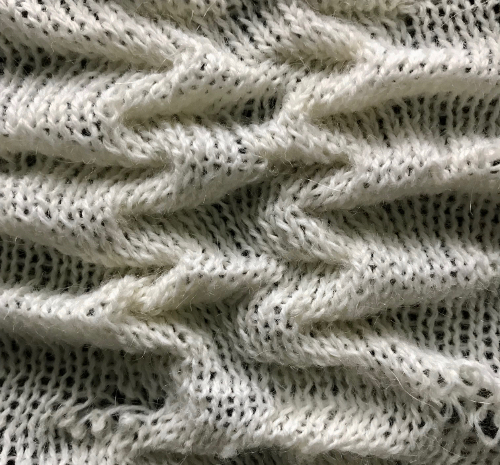
Starting position can be variable. With more stitches cast on, while keeping the same ribber configuration, racking can happen further to the right or to the left. There need to be enough stitches on the main bed so ribber needles do not travel beyond them when racked. The knit bed uses tension close to that used for stocking stitch. The ribber stitch size may need to be adjusted to allow for a wider move toward either side. A looser ribber tension results in a less sculptural surface on the knit side. I have seldom been able to knit more than 6 rows on the main bed with ribber combination stitches on Brother, often maxing out at 4 depending on the yarn. Consistent habits help develop one’s own most meaningful reminders for taking action.
5/12/18 2 more samples. This time racking is done by 3 positions, the ribber setup is with 3 needles out of work, and 5 in work. Set up is with the racking handle on 3, move to and from positions 0 to 3. Knit 4 rows single bed. Rack to the next position. Use ribber set to knit for 2 rows for the sample on left, for a single row for the sample on the right 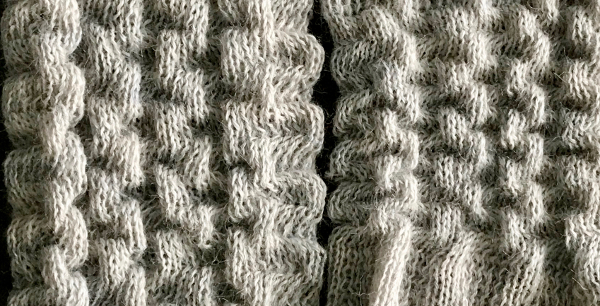
A printable “rib setup” to aid in charting P and H needle configurations, with some space for notes and carriage settings
5/8/18 This is from the dubied knitting machine pattern book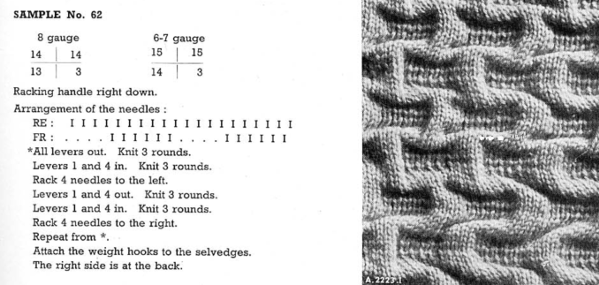
My step-by-step interpretation, which may be worked as a hand technique on any machine
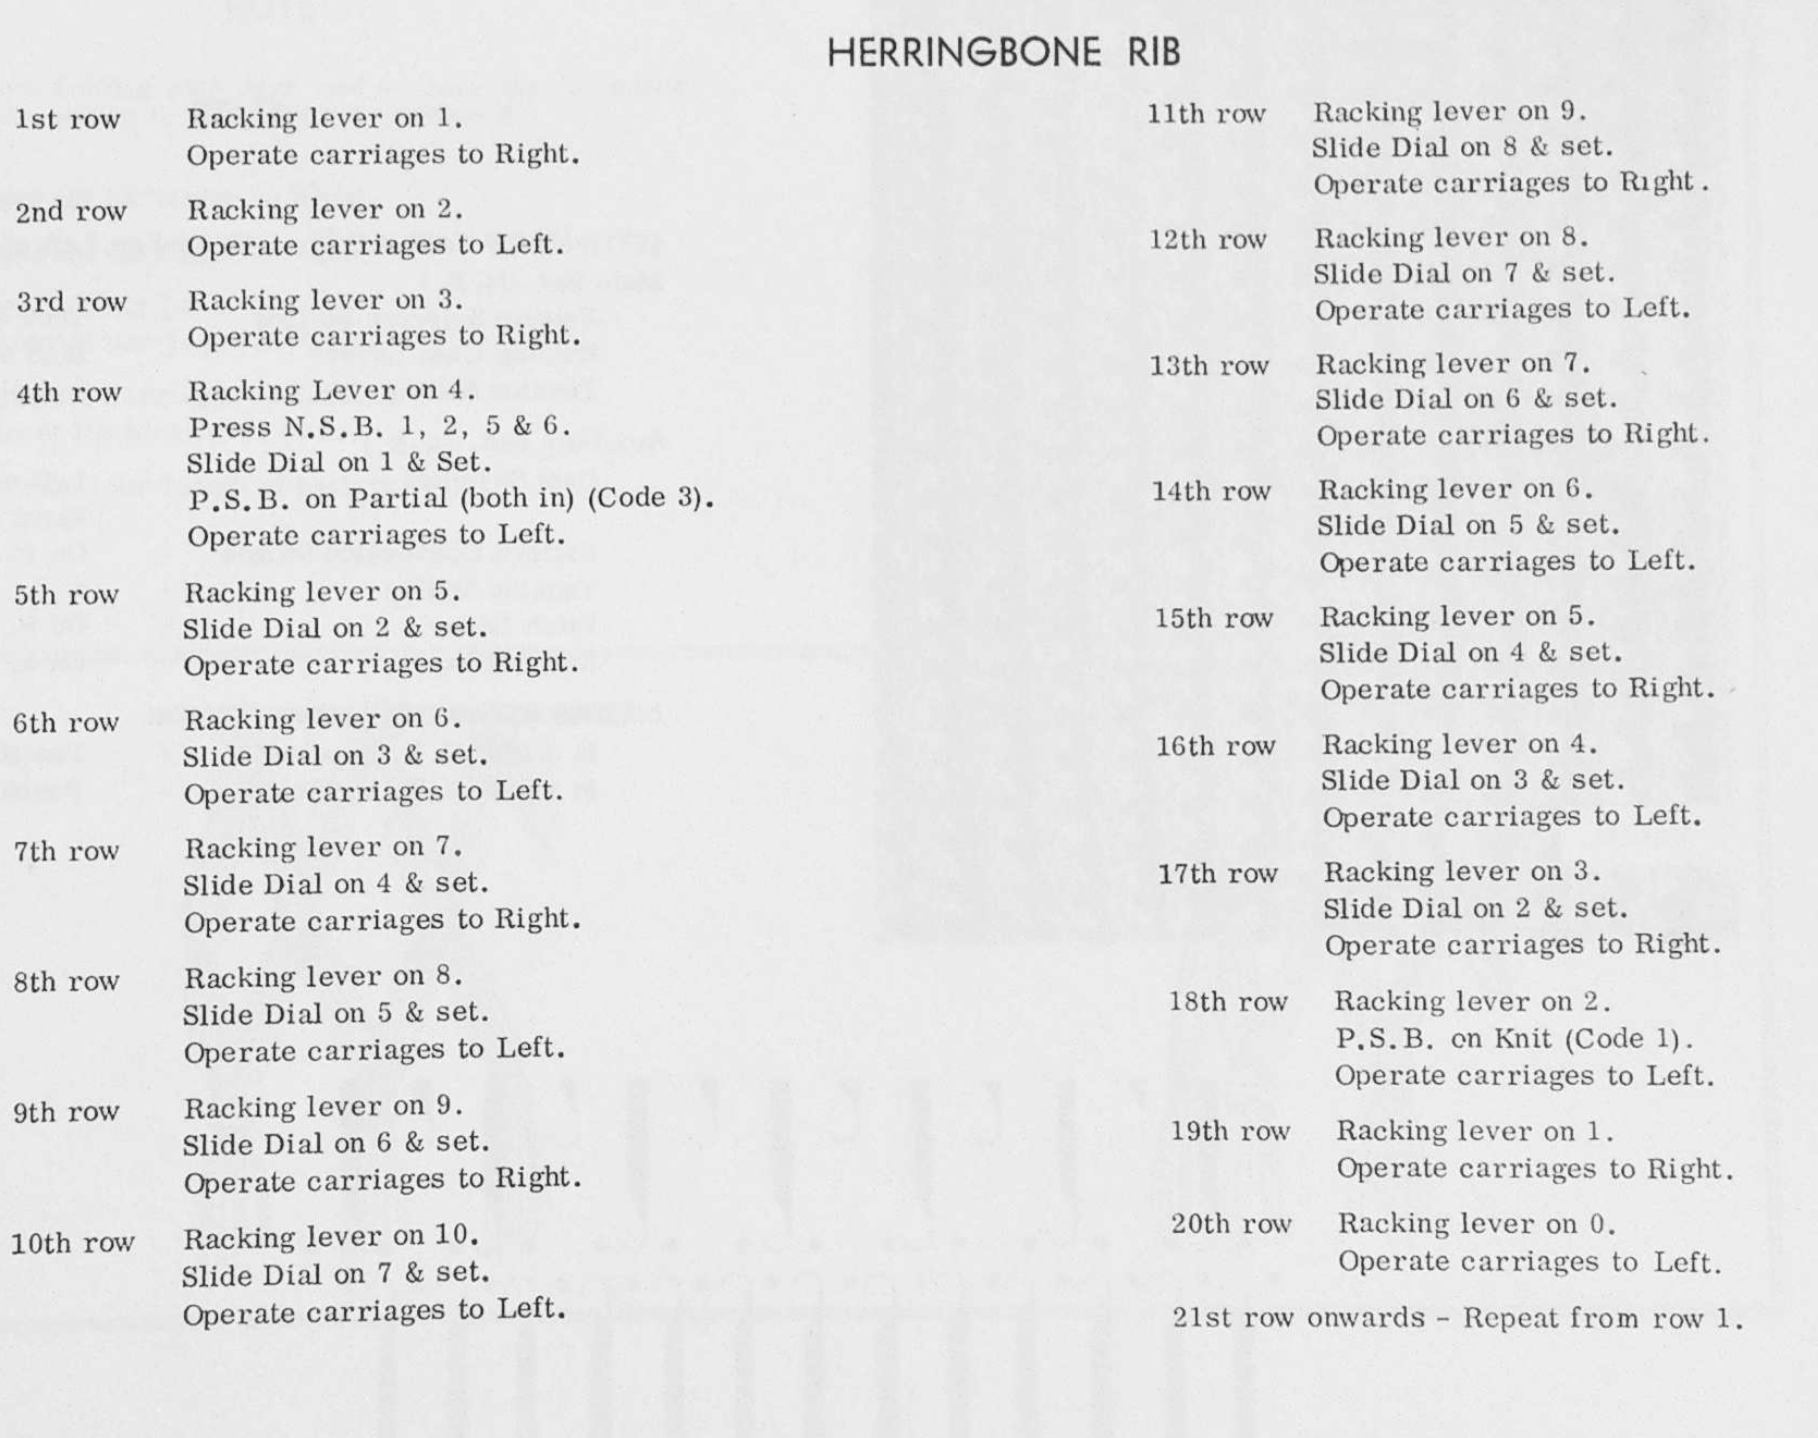
1. racking handle on 0, cast on for every needle rib
2. transfer stitches to the main bed to match the needle arrangement above, and knit 3 rounds
3. set the ribber to slip in both directions, knit 3 rounds
4. rack 4 to the left, set the ribber to knit, knit 3 rounds
5. set the ribber to slip in both directions, knit 3 rounds
6. rack 4 to the right, set the ribber to knit, knit 3 rounds*
repeat steps 3-6
The resulting swatch 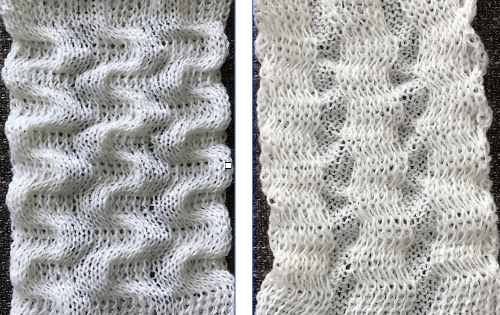 For a different method of knitting this same fabric, please see Combining knit carriage needle selection with racking 2017
The Brother Ribber Techniques book provides guidelines for variations on this stitch type, the following among them. It is available for free download online from various sites and is an excellent resource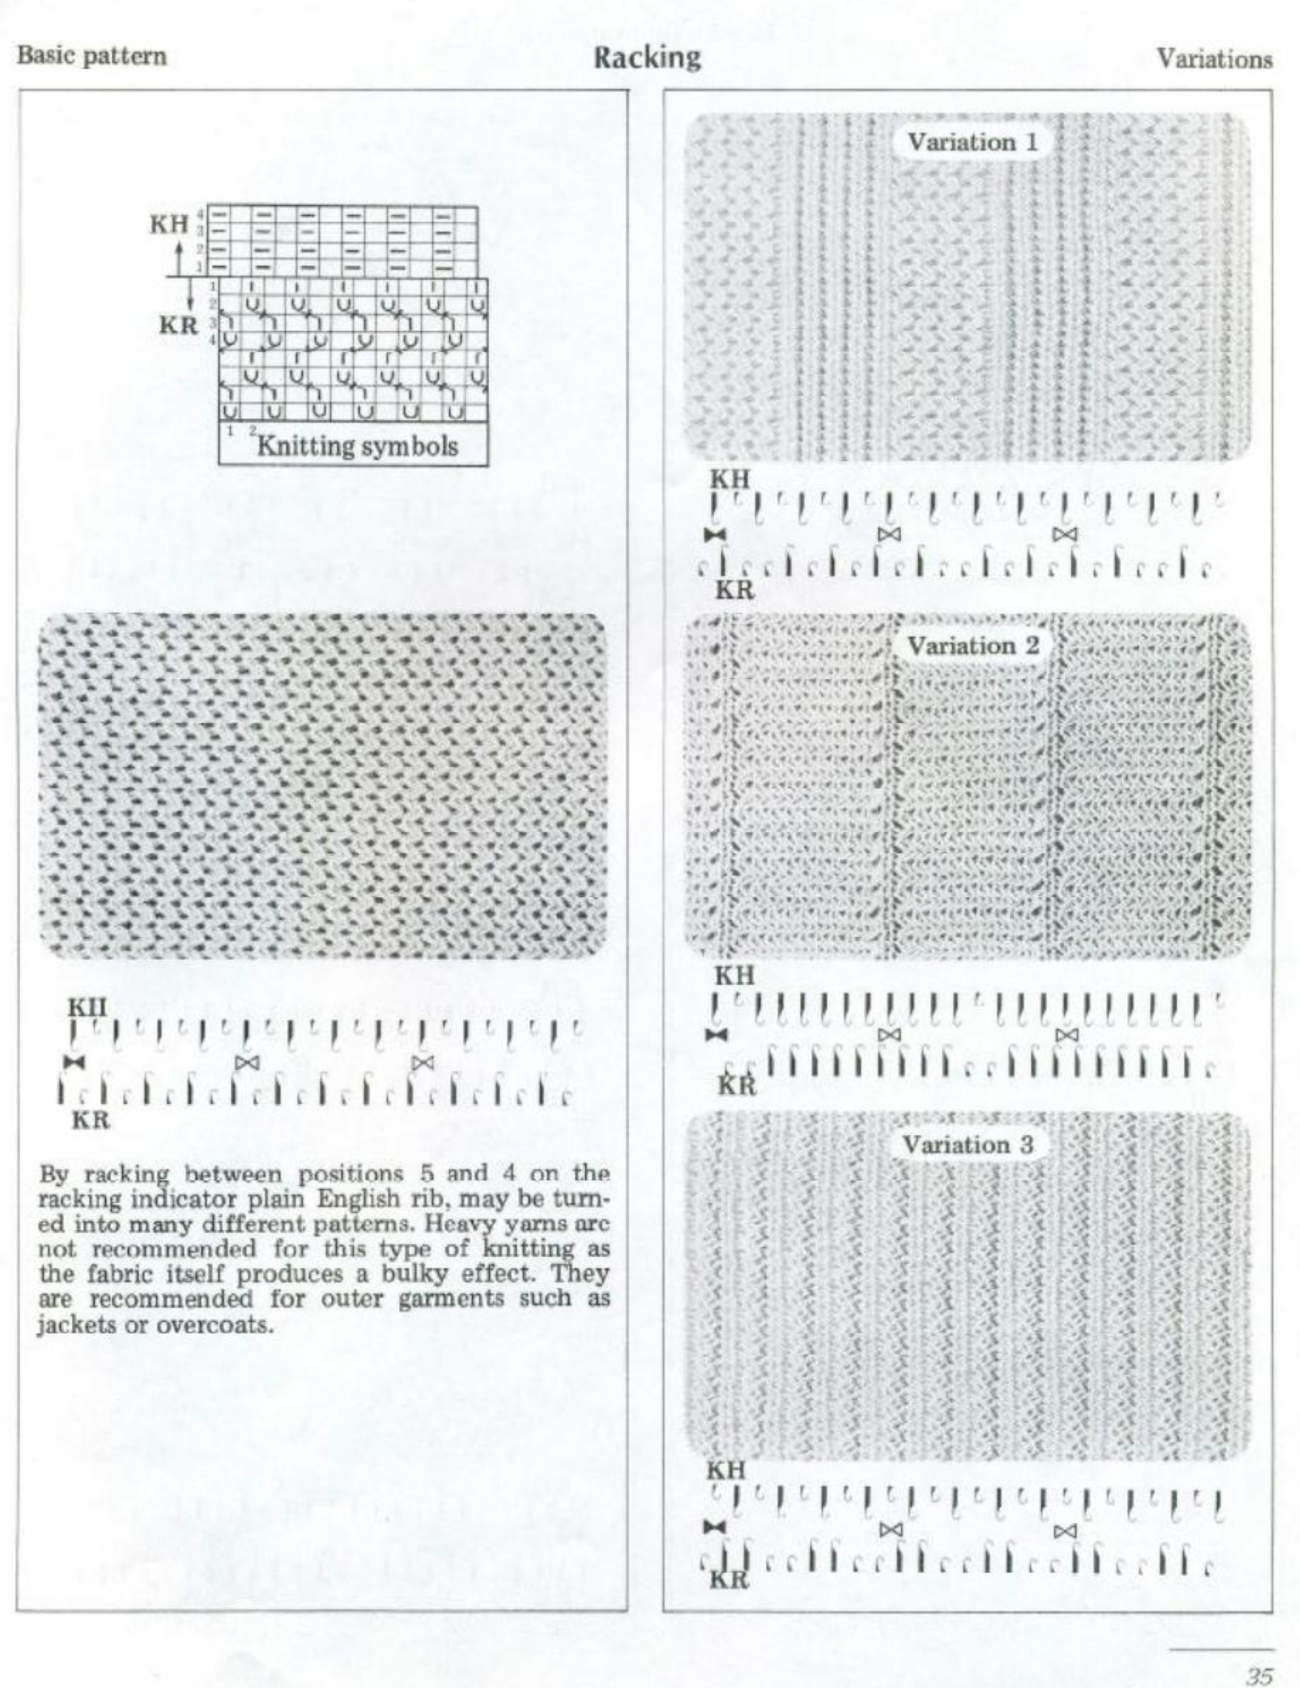
These images were shared on Facebook, they are from the Empisal ribber stitch book
 I have worked with racking in the past but never attempted to have racked shapes interacting with single bed patterning across the width of the piece on the KM. My 910 is presently connected to a Mac via the EMS Ayab kit. Sampling is quick and easy, replacing the mylar. One critical difference is that the repeat used must match the pattern in width numbering the same as the needles in use for the piece, so at least for testing my initial repeats were 30 stitches wide.
I find trying to chart things out before I actually knit helps me plan and understand what actions I need to take. Mac Numbers is my go-to for charts for the moment. Here a random slip stitch pattern is put on a knit ground that takes into consideration possible racking positions, with the ideal position for reversing the bend at the center of the chevron pattern. With a bit of planning, punchcard markings or even mylar ones may be used to help with tracking racking numbers for accuracy, but that appears lost using Ayab software
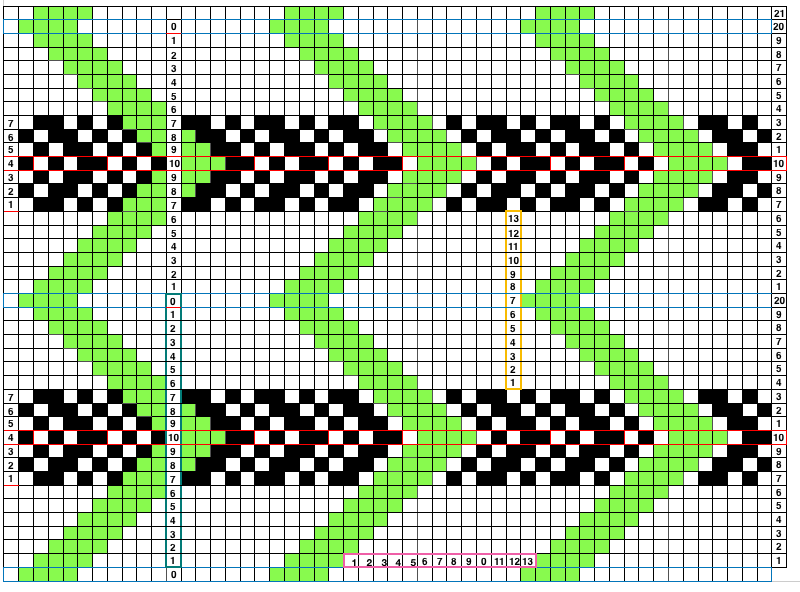 When planning for racking within the width of a piece, the racked columns will extend beyond the vertical edges of the knit. Since this is not about having zigzag edges but keeping the design within the body of the knit, the starting point and spacing for your ribbed stitches matter. Brother racking handle is numbered from 0 to 10. The numbering and direction of movement vary between KM brands. If you begin at 0, you are only allowed to move the ribber to the left, if at 10 the ribber only moves to the right. So that said, the racking sequence in the above illustration should be reversed, traveling from 10 to 0, and back. The green squares represent the direction in which the ribber stitches are moving, and the numbers in the column on the right represent racking handle positions.
I found this slip stitch repeat produced too little detail in my swatches, but were it reduced for mylar use, it would remain 7 stitches high. It was taken from a punchcard book, so black squares/punched holes represent knit stitches. To match the fabric, in mylar use, the color reverse would do the job. The Ayab kit bypasses both the mylar reader and the programming capacity of the buttons on the left, so double height, double width, color reverse, etc. including the DBJ setting are planned for in the file import into the software. In some instances, Ayab settings (ribber for DBJ, and “circular”) do the work for you. I am using GIMP to create my BMPs. Paintbrush is a free program, still available for Mac, and functional including in High Sierra. It is the program used by some forum members to create their repeats, providing an easy alternative for people who not be used to working with image editing programs.
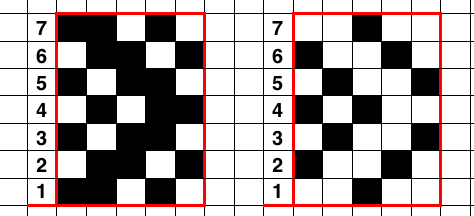
the slip stitch repeat in its original state: because slipped stitches create their texture on the purl side of the fabric, images do not need to be mirrored for the direction of the texture to be matched using electronic machines
 If the goal is to have the machine take care of keeping track of knit rows for you, without having to make changes in cam buttons, in the mylar a single repeat with blank squares programmed at the top and/or bottom of the repeat could then be knit using color reverse. Here the situation is similar to that of punchcard users who need to punch a hole for every knit stitch but considerably faster. If the original pattern is satisfactory, planning for all knit rows as automatic needle selection can be done by color reversing the pattern in the software and adding all black rows in the image for download.
 some other all-over variations to try, individually, or even sequentially for slip stitch all-over texture
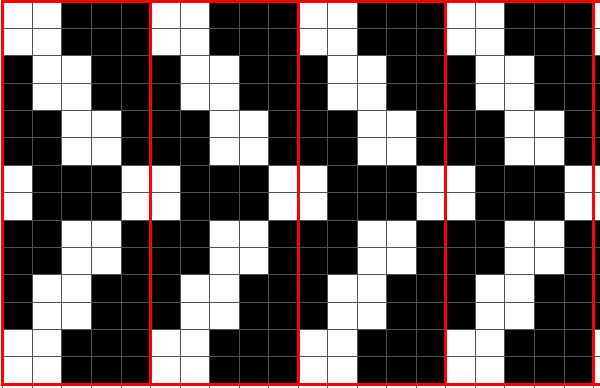
 the first tests, for the various slip stitches, nothing quite “there” yet
 this is getting closer to the goal
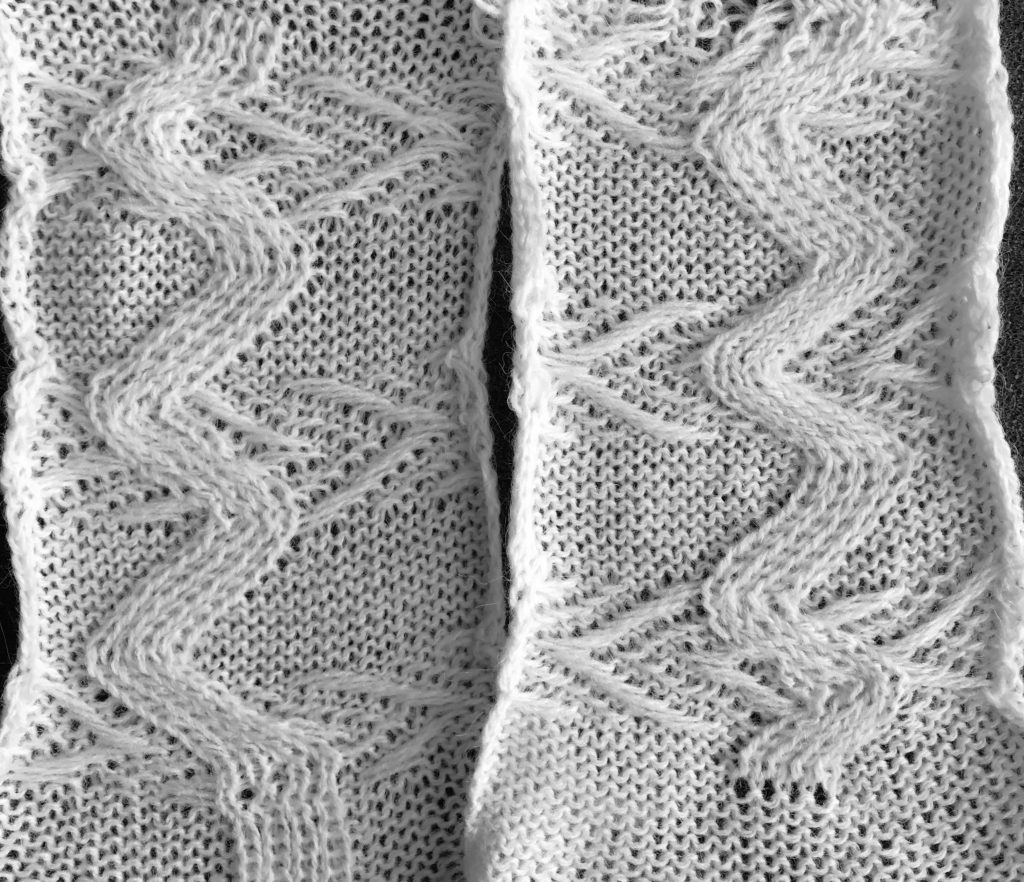
The above working repeat and all above swatches were knit with the first preselection row from right to left, not left to right. For these stitches, the starting side does not make a difference. If the pattern, however, was in blocks that were even-numbered in height (2, 4, 6, 8), and the color changer needs to come into play for striping using it, accommodations need to be made so that preselection for row 1 happens from the right side to the left, toward the changer. The programming needs to be set to begin on the very last row, so the repeat returns to row one for preselection from right to left, and knitting rows 1, 2, etc begin with the KC set to appropriate cam buttons, to and from the left side of the KM.
The racking sequence needs to be adjusted to have the points of the zigzag land in the center of both the slip stitch areas and those in plain knit if that is the goal. I am encountering needle selection issues with my hack, so this fabric is getting put to bed for the moment. In principle, the black squares in the illustration represent knit rows, and their number is easily enough adjusted in height. Punchcard users would need to punch holes for each black square, mylar users can fill in the white squares for a single repeat, add blank rows at the top or bottom, and color reverse when programming. In Ayab software, the repeat has to be drawn for the width of the piece but will repeat “infinitely” in length.
This is a possible punchcard template, with a shorter racking sequence. The Numbered column on left indicates the racking position. Pattern rows are preselected, so racking occurs prior to knitting across each row. I am also in need of purchasing more punchcards or another roll, so there is no test swatch at this moment. The top and bottom rows of punched holes on the colored ground are not part of the repeat, they overlap the first and last 2 rows of design in the punchcard, allowing the pattern to repeat in length. Ascending numbers swing to the left, descending to the right. Rows may be added at the level of #7 (7, 8, 9, 8, 7), so that the center of the swing may then occur on #9 positions in the racking handle, lengthen the card accordingly.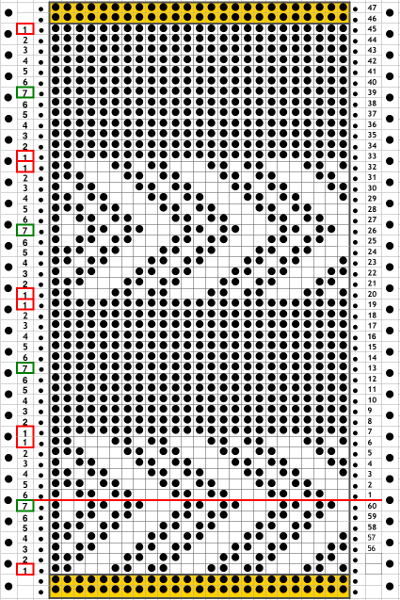 5/14/20
Electronic machine models make experimenting easy and quick. Here an all-over tuck stitch is programmed for the base fabric, and racking variations are considered with the goal to cross the base fabric at various points in the patterned areas, or within the knit space alone. With increasing racking indicator numbers the ribber moves to the right, the shape its stitches create on the main bed moves to the left. With decreased racking indicator numbers the ribber moves to the left, the shape its stitches create on the main bed moves to the right. 
 The repeat required mirroring for use in my electronic 930. Experimenting with racking intersecting tuck stitch on multiple repeat png, stitches were picked up on the ribber aside from the first tuck stitch on the right, A, on the center, B, and on the left, C, of the knit stitch groups.
![]() The tuck pattern tested, racking placed in the center position
The tuck pattern tested, racking placed in the center position  changing ribber needle positions
 moving toward positioning the racked pattern further into the knit columns.
  Making the knit columns wider, placing repeats differently.
![]() The intended placement of the racked pattern is shown in yellow.
The intended placement of the racked pattern is shown in yellow. 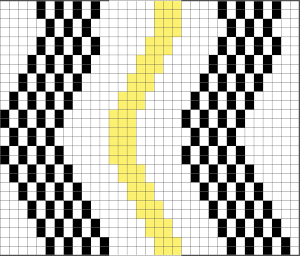 Good notes and documentation of the final needle arrangement will make the technique easily reproducible. The needles involved on the top bed always need to be returned to the patterning position after any shares.
  At any point in the knitting, it is easy enough to transfer stitches on the ribber up to the main bed, drop the ribber down, and check on the placement of the racked pattern. If the place is satisfactory, the moved stitches can be returned to the ribber and the work is continued. If not, transferred stitches can be left on the main bed, other stitches can be shared with the ribber and patterning can continue with racking in the new location. One such adjustment is seen toward the bottom of this swatch.
Punch cards to electronics: book symbols and samples
A number of variables need to be considered when adapting punchcard patterns for use on electronic knitting machines. These images pertain to Brother use, but the principles are shared between KM brands. I will add more information as time goes on. Online free downloads for magazines, manuals, etc. may be found at
http://knittsings.com/knitting-machine-manuals/
http://toyotaknitting.blogspot.com/
machineknittingetc.com
https://www.knititnow.com/ManualAndDocuments/
some additions of late include designs in 12, 18, and 30 stitch repeats in addition to the familiar 24 and 40 ones, and to help with interpretations of symbols: Japanese symbols for machine knitters
Punchcard collections for all brands @ needles of steel
For a later post including information on scanning and editing published designs electronically see https://alessandrina.com/2018/07/02/numbers-to-gimp-to-create-images-for-electronic-download/
As the transition was made from manual machines to push-button, and then to punchcard selection systems, the early collections included diagrams of symbols familiar to hand knitters, and interestingly worded text that disappeared or was reduced in later punchcard books. I am presenting information in the order in which it appeared in this particular collection’s paper version, I have not found this volume in the above-mentioned sources for free download. Images are gathered from more than one source, so there is some repetition of information

LACE KNITTING 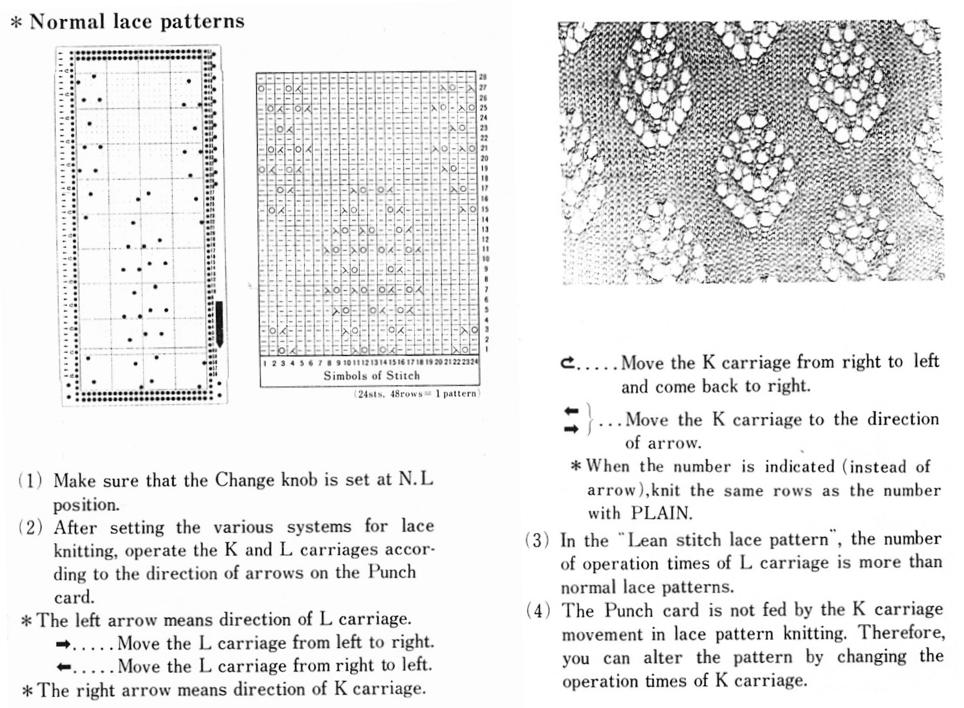
Punchcards may be used to guide one for hand techniques, here a version of e-wrap is used on selected needles for weaving effect, and the diagram on the upper left is for a different fabric. Punchcards may also be used to help track twisted stitches, cables, and racking 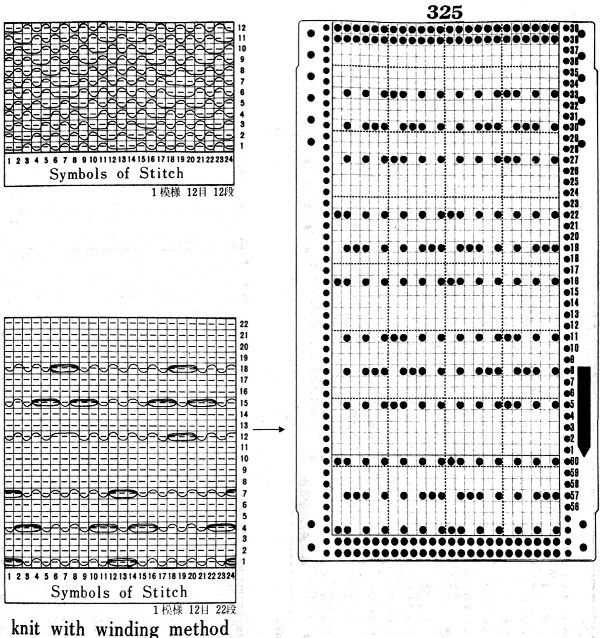 This is a 2 carriages patterning operation, lace extension rails must be used, with each carriage disengaged from the belt while the other is moving across the knitting and back to its resting place.
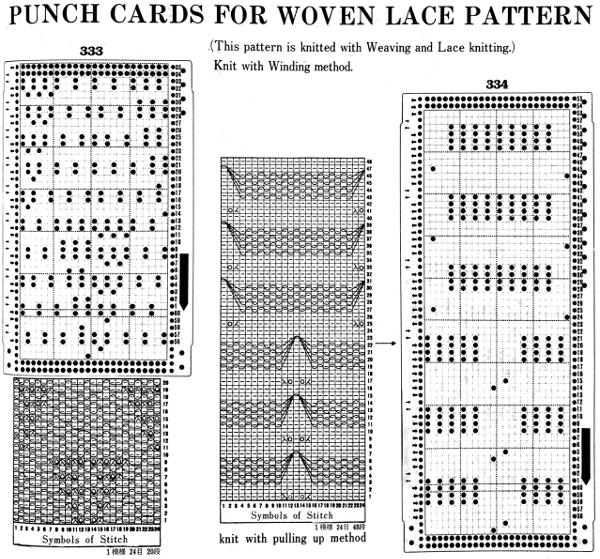

SYMBOLS IN PATTERN KNITTING
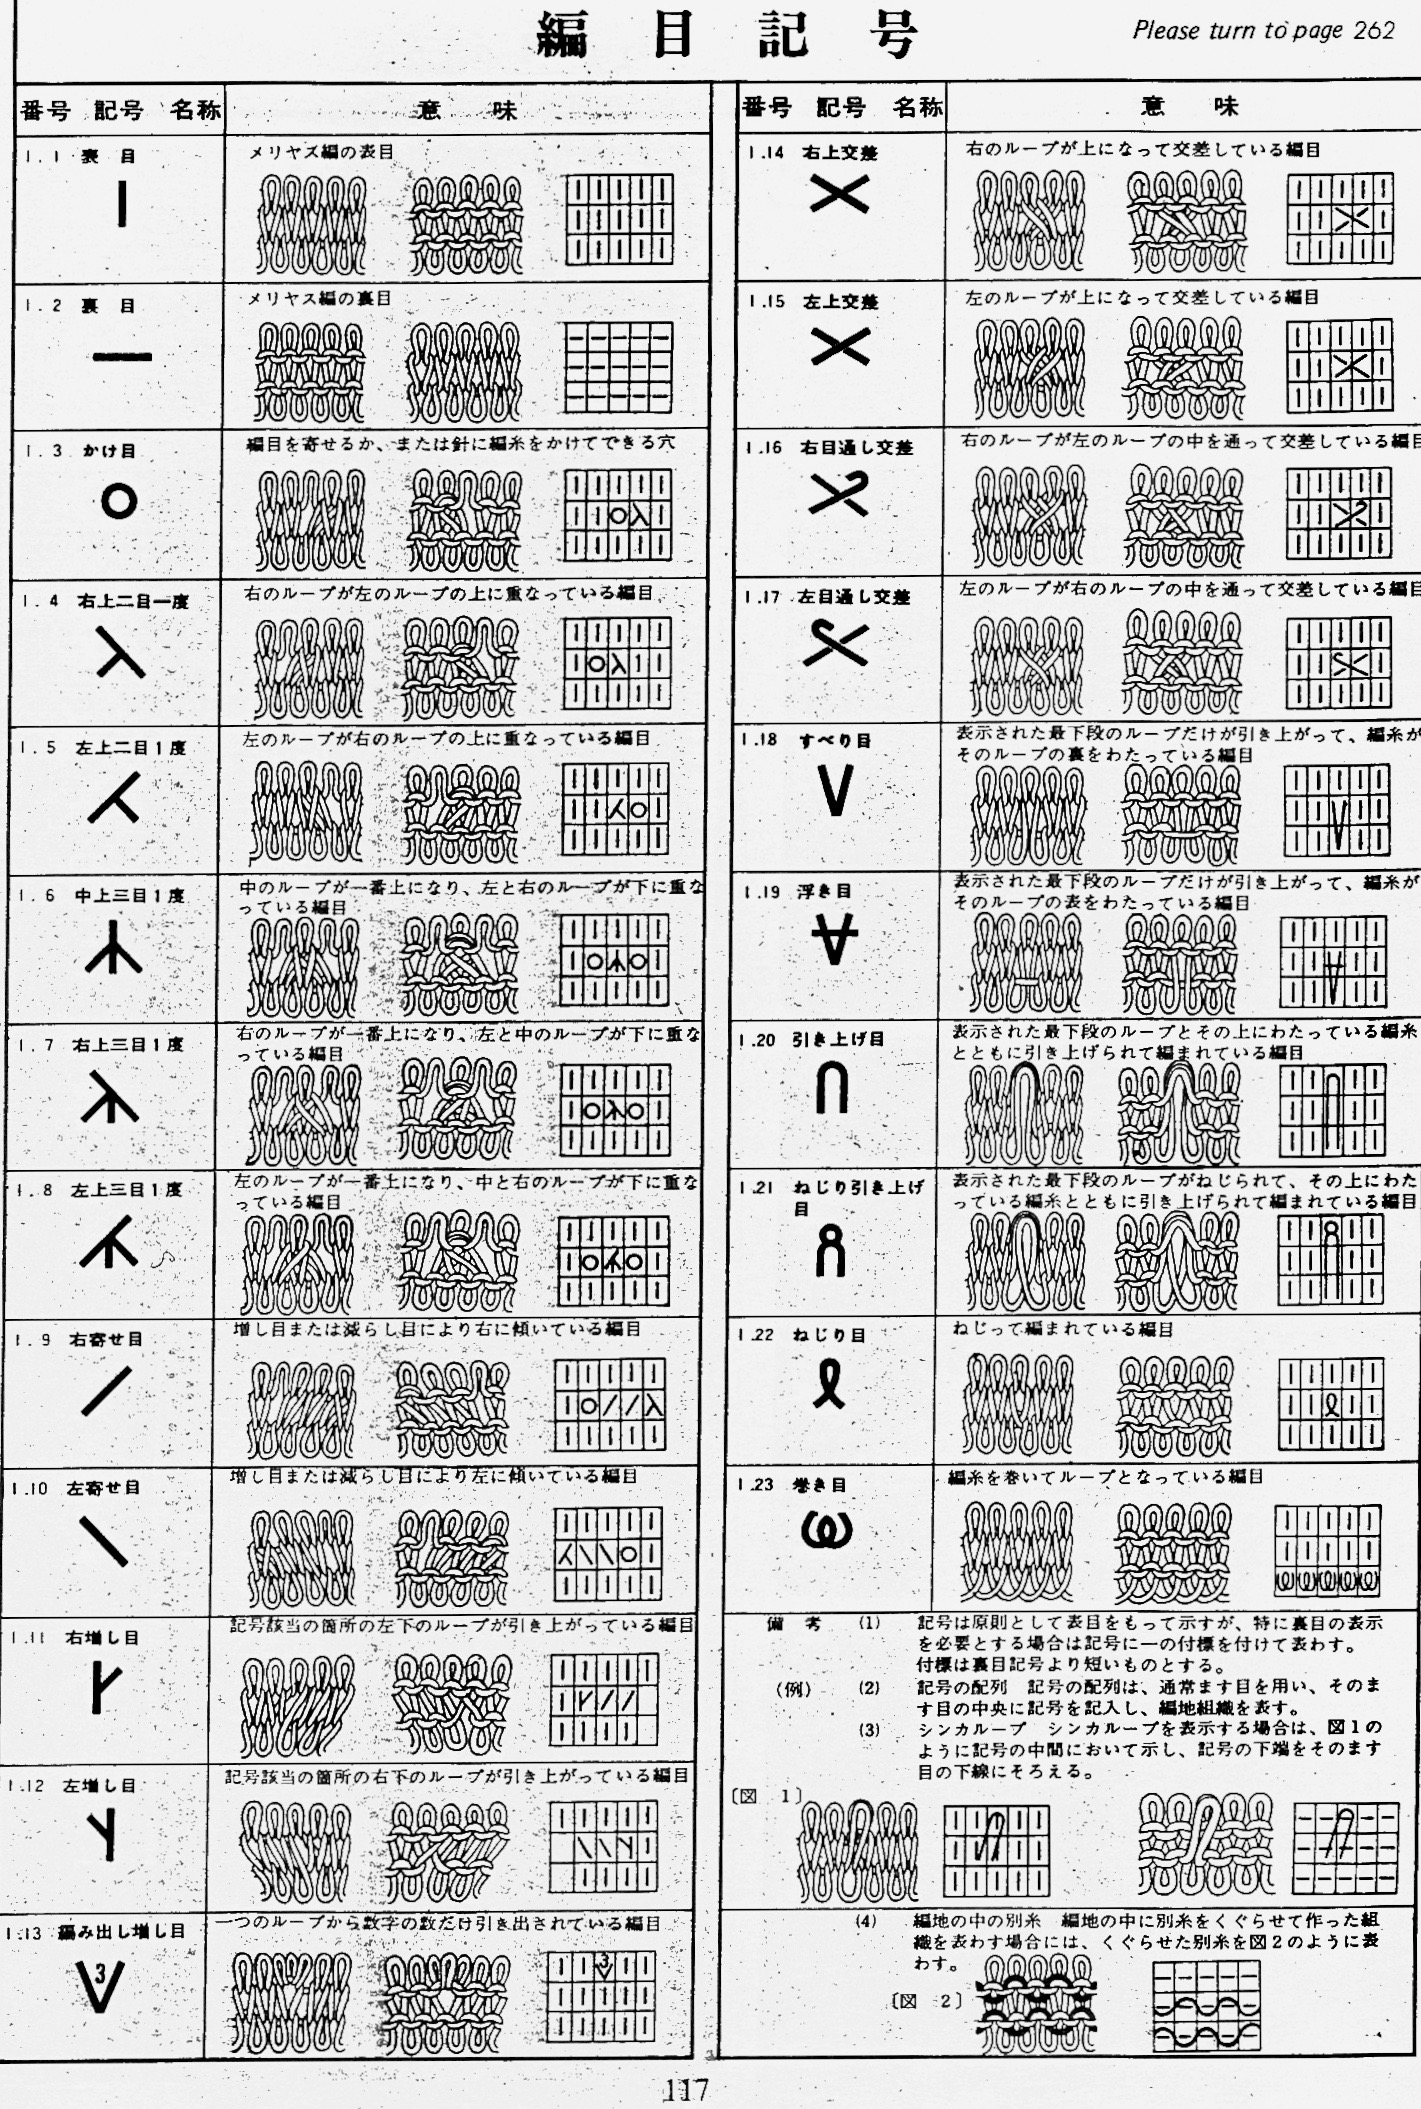 Below each punchcard, the repeat is identified in numbers for stitches and rows. The cards presented are the minimum length required for the card to roll smoothly within the reader when joined for continuous knitting (at least 36 rows). Electronic knitters may isolate the individual, smallest repeat, draw only the squares that appear as white in the cards, enter them via mylar or download, and use color reverse.
Skip is aka slip or part. These cards would work for tuck stitch as well, may even tolerate elongation, depending on yarn thickness.
Opposite cam buttons are in use, the fabric changes appearance depending on which of the 2 stitch types is forward, so if instructions with cards are to be followed, then the starting side for the attern in this instance should be COR. Both tuck buttons (or slip) may be used as well, for a different fabric. If the tuck or slip texture is created over an even number of rows (2, 4), changing colors for each paired row sequence can create some interesting color patterns with very short floats akin to planned mosaics and mazes. 
The fair isle patterns below are actually poor choices in terms of float control, pushing its limits. It is usually recommended that floats be no wider than 5 stitches, and even then, they may have to be controlled to make the finished garment easier to wear. 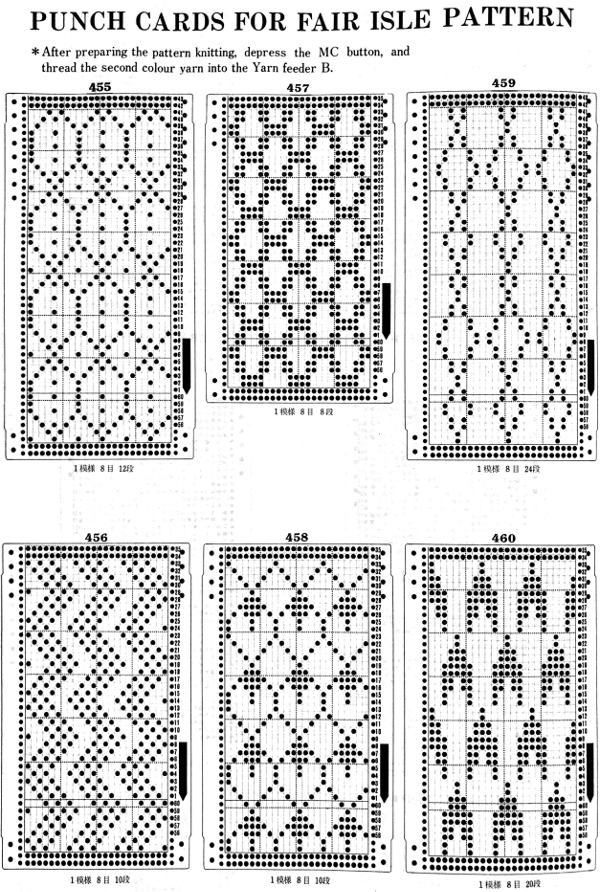
Brother only produces a transfer lace (as opposed to studio simple lace, where the carriage transfers and knits with each pass of the carriage). The lace carriage is the one advancing the punch card. The knit carriage does not select needles, but rather, knits 2 (or more) plain knit rows
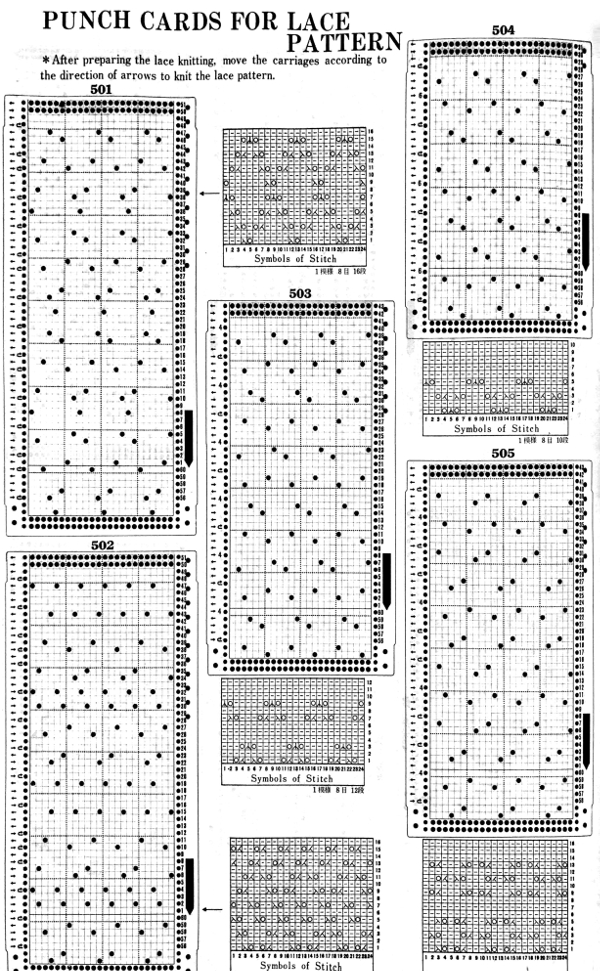
Lace card markings, including those for fine lace: in the latter, stitches are transferred and shared between pairs of needles, best knit in a light color, with smooth yarn so the surface texture becomes more noticeable.
Lace point cams may be used on the punchcard machine to create vertical bands of lace. This is also achievable on the electronic by programming for knit stitches between vertical (or horizontal bands).
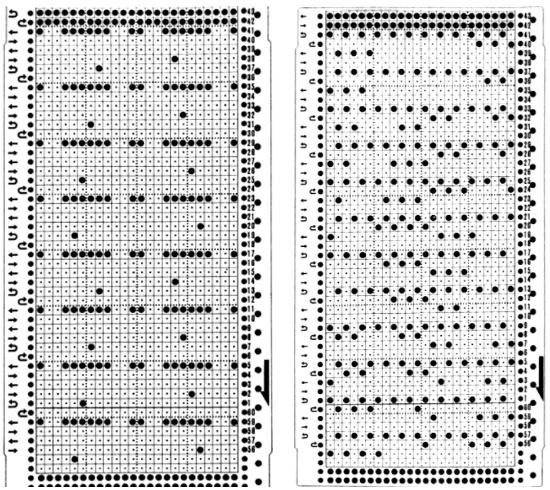
Tuck (left) and weaving (right) may be combined with lace. In these fabrics both carriages are selecting needles, so extension rails must be used. The two-column on the left of the cards indicate movements for the lace carriage on left and the knit carriage on right. Straight arrows indicate single carriage passes, curved ones 2.
Yet another fabric using 2 carriages selecting needles for patterning


Here the “openness” is created by having the appropriate needles out of work, creating ladders in those spaces. Some interesting results can be obtained by transferring the recommended out of work needles’ stitches to the ribber. “air knitting” can help with verifying proper needle placement is in use
to match the location of the out of work needles to markings for punchcards, which are often given with lines delineating 0 needle position, the image will need to be mirrored horizontally
THREAD OR PUNCH LACE is possible only on machine models that have 2 buttons in mc position  The thicker yarn knits along with the thinner one where there are unpunched areas or white squares, the thinner yarn knits alone where the punched holes or black squares occur, with the thicker yarn floating behind it
  more information on this fabric
Suitable for tuck and possibly tolerant of elongation as well:
Punchcard machines mirror motifs when knit. This may not be noticed when copying small repeats, but it becomes more evident in larger ones. For knitting on the 910, the supplied motif would need to be mirrored when programmed to retain the intended direction. With other machine models, one needs to know whether the “image” on the card will appear on the purl side, matching punchcard pattern and needle selection, or the knit side, thus reversing it.
Here are 2 FI samples: the one on the left is fairly evenly distributed, so little if any difference is noticed, the one on the right sends the biker to a different forest
 reversal of lettering
 When you think that that is all sorted out in your head, there are these in slip stitch, the direction of stitches matches, because the purl side is used, images are reversed on the knit side.
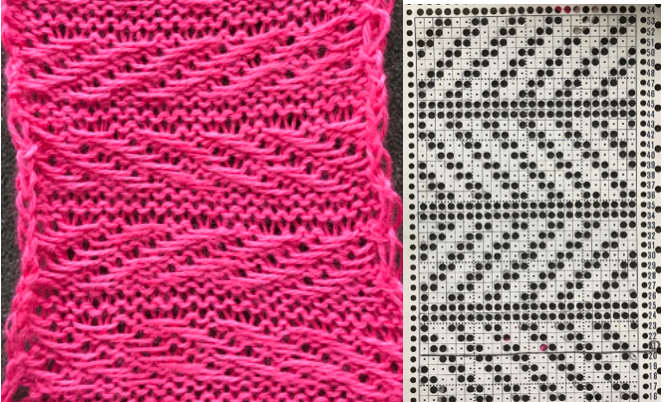
the mirrored punchcards  the punchcard change knob has selections for single motif and pattern knitting (KC)
the 910 has settings KC I and II, KC II cancels end needle selection, while in punchcard machines this has to be done manually if the pattern stitch requires it. One such example is when any patterns are made with needles out of work. End needle selection would make the needles on each side of the empty space select forward and create a knit stitch. In tuck or slip, that would be an out-of-pattern knit stitch, in FI, a vertical line of the color in the B feeder would appear along on each side of the OOW needles.
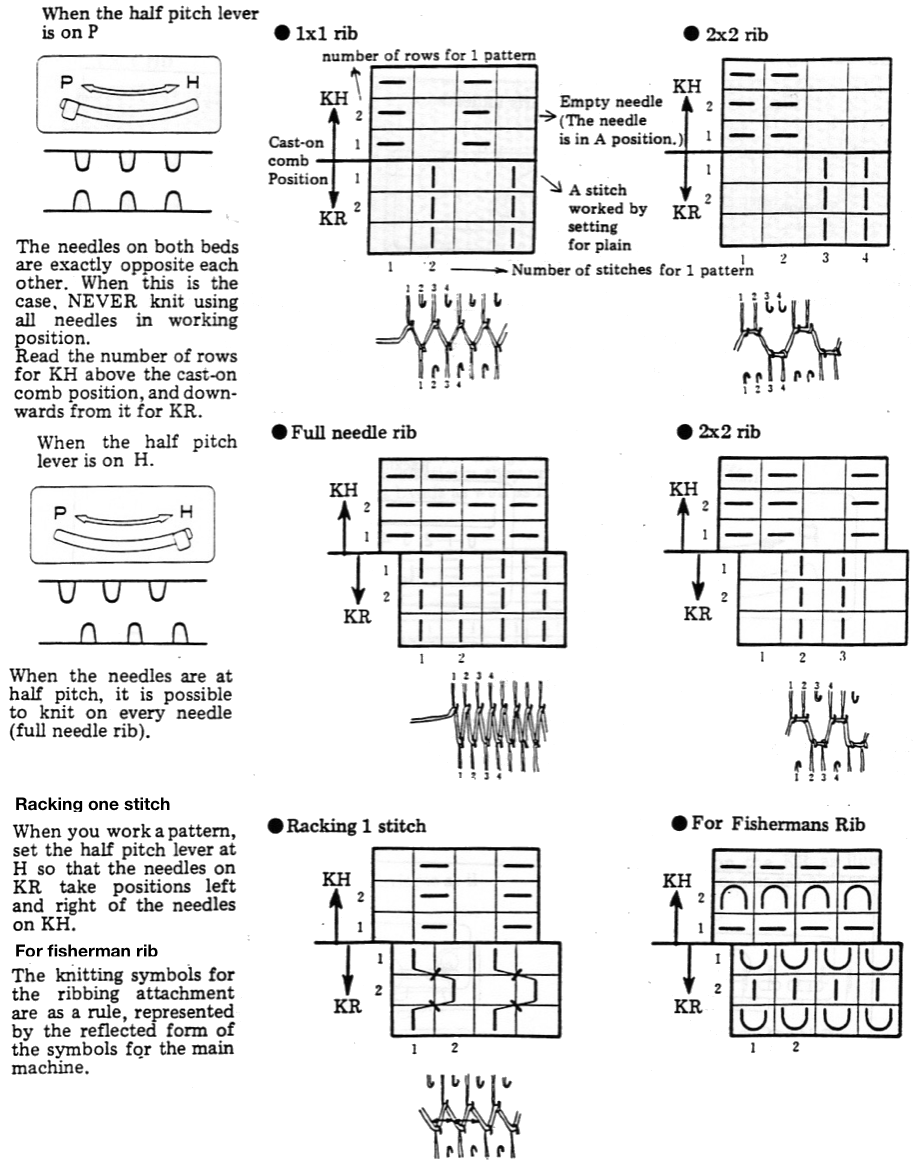
Ribber settings and symbols for Brother machines


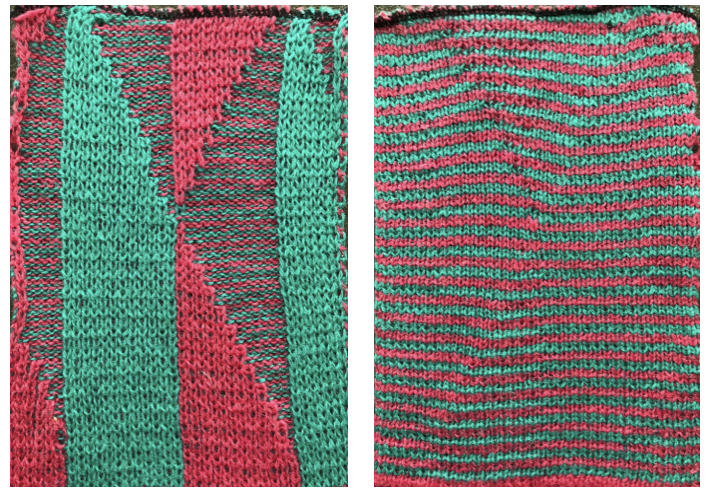
Tubular machine knit fabrics: fair isle, Brother/Passap
I recently came across this topic in yet another forum, so thought I would share some of my thoughts on it. The technique involves different patterns on 2 opposing beds. Table for 2 offered one option for programming 2 different knitting machine beds to achieve reversible DBJ or true tubular fair isle. I will be addressing Brother settings for the moment. Things to consider: the piece will be double thickness and 1.5 times the finished weight of one knit in single bed FI. FI technically knits 2 colors for each design row, the ribber at least one for the first piece here, so thinner yarn is probably best. If the main bed is creating a 2 color slip stitch, whether one color at a time (DBJ) or 2 colors together as in traditional FI, the fabric will be shorter and thinner because it gets pulled in by the shorter floats of yarn in areas that do not form knit stitches with that color. Generally, in FI it is good to have end needle selection on so that the second color gets caught at the edge, and the design does not separate from the rest of the knit at the sides. I knit my sample using KCI on the knit carriage. The ribber is going to knit one row for every 2 passes to complete each design row by knit carriage, so some adjustments in tension both beds need to be made for each side of the tube to be balanced. If the goal is to have the tube open at the bottom, I like to start in waste yarn and begin tubular while leaving a long end of the first color used so “bind off” can happen by sewing or crocheting the open stitches when the piece is done. The same can be done at the top of the piece, and both ends will match. Setting the needles point to point during tubular knitting will diminish any gap at the sides of the knit if the tube is made in the traditional setup. Since only one-bed knits at a time, needled will not come in contact even if directly opposite.
This fabric shares features with quilted fabrics, except there are no areas where the fabric gets joined to make pockets (needles on both beds knitting on any one pass of the carriages), the goal here is a continuously open tube. Minimal manipulation of carriage settings can be achieved in color separating for the specific fabric. My previous posts on quilting: 1 and 2, and on color separations for DBJ
It is always best to start with a simple design that allows one to recognize needle selection. Long verticals can separate at their edges if knit a single bed, but I went for a simple pattern of squares to test out my premise and winged it. Thinking color 1 knit left to right, slip right to left and ribber slips when main bed knits right to left, knits when main bed slips left to right. The all blank rows indicate the main bed slipping the width of the involved needle bed. The same applies after any other consecutive color change. My mylar repeat, free drawn  End the circular cast on/ waste knitting start and begin with opposite part buttons pushed in with COR; set change knob to select the pattern (KC I), to prepare for the move to left toward color changer. The main bed only will knit. With main bed set to knit <–, needles for the first row of the pattern are selected, but all stitches knit. The ribber needs to slip <– completing the circle. If in doubt, push up both part levers on the ribber.
 the start of the tube, needle selection for first pattern row
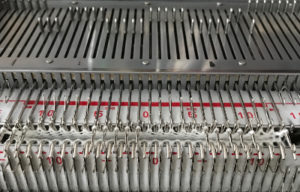
after the color change, with COL, change settings once more. The main bed will now knit to right and slips to left based on needle selection, while the ribber now slips to R, knits to L (the goal here is simple stripe)
 the start of a tube is evident if the ribber is dropped a bit
  the tube dropped off the machine
  the FI created on the main bed
 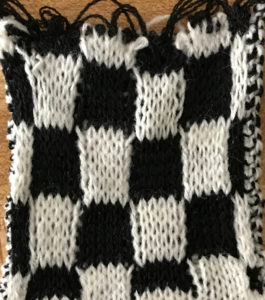 the pattern on the reverse, created by ribber
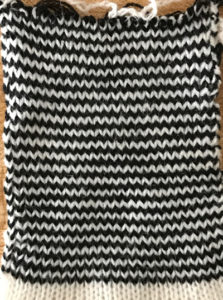
It helps to analyze the carriage actions on knitting the repeats. These charts illustrate the 2 colors knitting alternately with each pair of carriage passes. With any knitting motif, it is worth testing repeats consecutively in height and width to get a sense of what will take place using them on the finished knit. Here 2 lengthwise repeats are shown. The pattern could be planned to start the repeat with the area outlined in red on the right, and a full block would occur at the start of the tube. A bit of editing would make all rectangles equal in height.
So now that I have some blocks, what about other patterns and shapes? ……
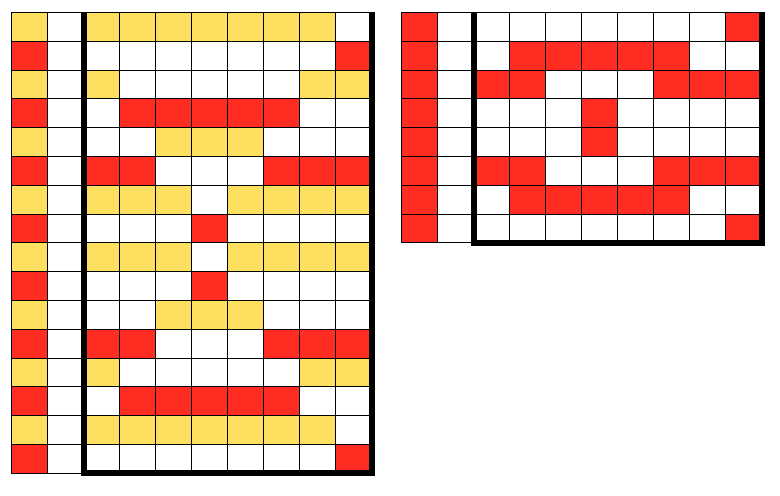
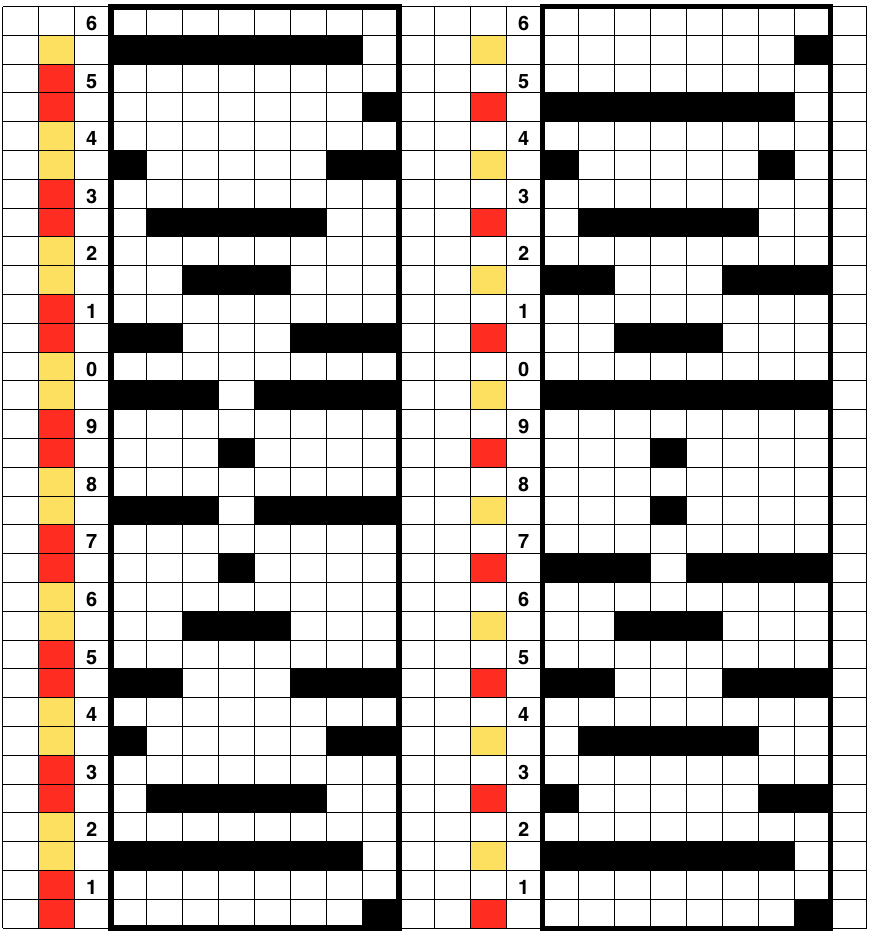
In a previous post with exercises on DBJ, 2 separations of the triangular shapes below were offered. Testing the idea of using pre designed jacquard separations for knitting tubular fair isle, I chose to use the 2 alternatives presented. The related information is available in PDF format for punchcard and electronic machines
Here we have the motifs, and 2 methods of color separation for DBJ, charted, drawing each color design row only once
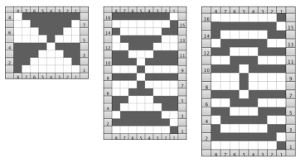
The middle image shows the method for separation achieved automatically in Brother by using the KRC button when using only 2 colors per row. It causes the least (if any) elongation of the motif. Each design row knits only once, programmed as is. If the KRC button is used, none of the other functions including double-length are allowed. The separation on the right is the most common color separation, actually knits each design row twice, which elongates the motif. As drawn, it would need to be programmed double length. If the knitting is representational, an adjustment may be needed in altering its height prior to downloading it for knitting. I used both separations above drawn on an old mylar for my second tubular FI attempt, sticking with my thin yarn, and working in small swatches while testing technique ideas. My initial premise was to knit each row twice using double length. The preparation was as already discussed. After the color change and resetting the carriages COL, the first row slips on the ribber, and the main bed knits the first design row in the alternate color, seen here in white. As in single bed FI, floats are created in that color between needles knitting it 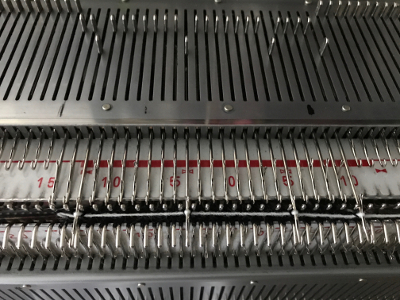 with COR, before traveling back to left for the color change, return all main bed needles back to B position with a ruler, ribber comb, or any preferred tool, so that only the ribber only will knit, keeping the knit tubular as you travel back to the color changer.
COL: change colors and repeat. Here are my trial tubes, again in too thin a yarn, but proofing the concept. My mylar was ancient, marked in #2 pencil on its reverse, and I can see a couple of spots that need darkening, but that is not a concern for this exercise

Adding color and expanding the charts to match the B/W versions  each row elongated X 2
 what knits when setting machine for tubular; in the swatches, the blank rows were achieved by manually pushing needles back to B as shown above
  this shows what happens when the first separation is collapsed into what actually gets knit by the carriages in this technique
 and the result in repeat in B/W like my swatch
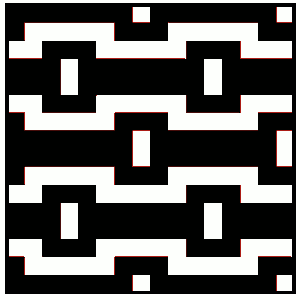
Both elongated repeats are reduced to black and white squares below, with blank rows, included to let the carriage do the work, without having to push any needles back to B position, KC set to slip <– –>. I often work out my separations in color, then fill the colors in with black and white. It is easier for me to draw the black only squares on the mylar or to enter them as pixels than trying to do that from a colored graph. I am now charting in Mac Numbers, no longer have access to Microsoft Office on my new Mac.
DBJ patterns predawn for punchcard machines or provided as charts for electronics may all be used for the FI pattern. The first separation method will yield a surprise. The second method if each row is illustrated only once needs elongation. In separations where the work is done for you, producing a result like the elongated swatch on the right, the pattern is ready to go.
Creating the separations by hand is time-consuming, having software separate the motif, eliminating that design time is quite helpful and more error-proof.
The ribber needle selection can be altered to produce patterning with hand needle selection, or by changing the slip lever positions as frequently as every row. That is a post for another day. That said, some things to consider: my own DBJ scarves often involve more than 1200 rows of knitting. The number of carriage or lock passes involved to achieve the same length is increased exponentially should I choose to knit the same designs tubular. If any needles on both brother beds wind up in work at the same time prior to the next row knit, the fabric will seal closed in those areas (another range of lovely fabrics, but not the plan here). For the ribber to knit in any other pattern than an easy stripe, one needs to either select needles by hand or add changes in levers possibly as often as every row. If multiple rows are knit on the ribber and then in turn on the main bed, one is actually creating a tapestry technique and there will be small slits at the sides of the knit, depending on the number of rows knit on either bed. It is truly helpful if the software in use or the machine’s console is able to recall the last row knit and to take you back to that spot if knitting is interrupted or put off for another day. That is one of the very convenient features of the Passap system providing the battery is still holding the charge. The latter also performs the same function and returns to the correct pattern row if one has to unravel rows and the number of unraveled rows is entered into the console. If long, nonrepetitive in length designs are in use and need to be downloaded in segments (wincrea has such limits), a warning noise when the end of the pattern repeat is reached would be nice to have. In my opinion, it’s fun to achieve things because we can, then it becomes a personal choice as to whether the process is worth it, and under what circumstances to use it. My own accuracy when a lot of hand manipulation or other details are in use has faded with my increasing age and decreasing attention span. Others can tackle the same with great success, such as seen in some of the wonderful all hand transferred complex machine knit laces found on Ravelry, and then there was the man who used to tour machine knitting seminars with a MK sweater he had made for himself in a fine yarn that incorporated over 3,800 (yes, thousands) cables, weaving in and out of each other and in turn in and out of crossing diamonds in a fine yarn (no, no one I know of actually counted them, the count was accepted on faith).
The Passap console has built-in color separations for tubular knitting. As with Brother, the simplest fabrics are in one color. For one-color fabrics, CX/CX (the equivalent result in Brother happens by using opposite part buttons on either bed) is used on both locks.
For 2 color fabric, the DM 80 front lock (carriage term equivalent) is set on HX <– while if using the E 6000 one may select KT (knitting technique) 243, with the front bed set to LX (slip). I have had very limited experience with the DM80 decades ago, can only speak for the E6000. The front bed is programmed as for any other pattern. With the back lock set to CX (no pattern) or HX (pusher selection for pattern), the function is fixed, the front bed knits to left and slips to right, the back bed slips to left and knits to right to create the tube
Horizontal stripe: is the simplest to execute: set the back bed on CX, or put all back bed pushers in work position and set back lock to HX, no arrow key. Pushers up knit, pushers down slip. (in Brother set the appropriate ribber lever to slip in one direction)
Vertical Stripe: “automatic”, bring pushers under every back needle into one up, one down, alternating in work and in rest. Set back lock to HX, left arrow key <–, changing color every 2 rows. The same needle selection is in the same location with each color change, creating the stripe
Birdseye backing, manual tech involved/ lock setting change involved: set back bed pushers alternating one up, one down, thus alternating in work, out of work. Knit 2 rows with the lock on HX, no arrow key, and 2 rows with the locks on HX <–.
Solid color backing is possible: set the front lock is set to LX <–” (slip <–”). When Tech 243 is in use, after the setup rows are completed, the console gives the prompt for setting up the pushers, all in work, and for HX <–”on the back bed. The result is that for 2 rows in the lining color, stitches knit alternately on each bed. The front bed then knits alone in turn for 2 passes; the color yarn in use creates a float the width of the knit as the locks return to the right, making it the least acceptable variation, and an unbalanced knit. The set up is different for both quilting (BX <–/LX) or solid color backed DBJ from tubular FI created in this manner.
My Passap manuals have been well used, often technique numbers are surrounded by notes in my scrawl. Techniques perform the color separations for the specific fabric, the accompanying diagrams and directions are suggestions for swatches provided as well in the alternate accompanying manual. Lock settings can be set to suit i.e. tuck substituted for slip, etc. The separation is fixed, but all lock settings are in the hands of the knitter.
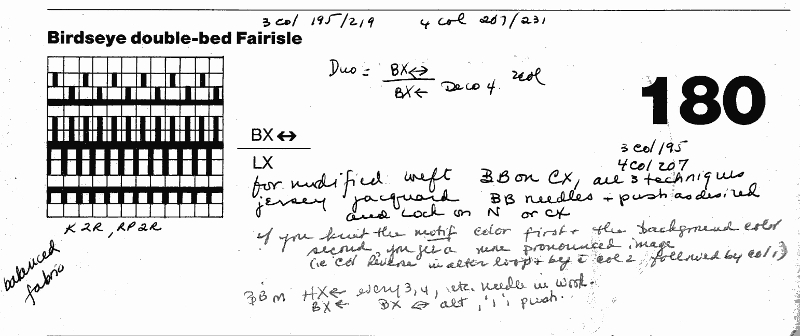
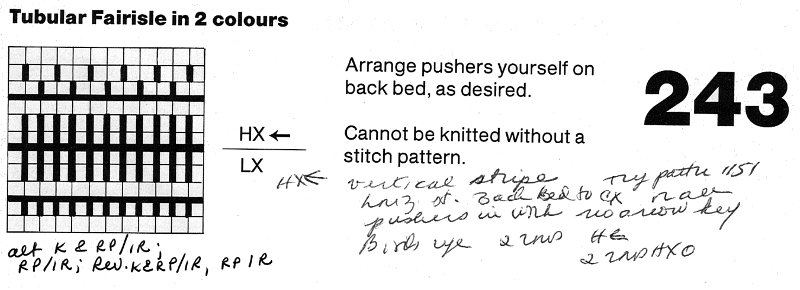
2 color circular tucked designs are produced using techniques 162-165, with the frequently unfamiliar settings using OX/DX. As with many other techniques, some may be used with stitch patterns, some not, but if you understand what is happening front bed patterning could be converted to the automated pusher or needle selection by entering a planned color separation as a pattern. OX is a combination, tubular tuck setting, paired with DX. OX is a combination of KX (tuck in the pattern) and CX (circular). DX is the tubular tuck setting for the back bed. OX and DX will knit needles with a pusher (needle selected on Brother) in work (selected needle), and tuck on needles with no pusher in work (non selected needle) moving from right to left. From left to right the front bed is not knit any stitches (contributing to making the fabric tubular). The back bed knits only from left to right, the second side of the tube. E6000 technique 185 with locks set to N/OX will produce tubular FI with long stitch. For three and four colors where the colors are separated at one row per color use technique 252, locks set to N/OX. Superimposing patterns for three and four color techniques require entering card reader techniques. With my cable set up, when I was experimenting with reader techniques eons ago, I believe I was successful downloading the pattern for the design from the PC, and entering the card reader technique as a second pattern, via the card reader. I have never tried doing so with additional software, and shy away from any situation where I have to enter commands to get the software to work. Out of the group, 162 is the only one that can be combined with a stitch pattern. The console gives cues as to when to change lock settings, with some thought similar fabrics could be knit on the Brother KM. The techniques, and my notes, which at this point would need some self-interpretation. The UX scribble is in reference to a fabric that slips over needles with pushers selected down from right to left, then tucks over needles with pushers selected down from left to right. Needles with pushers up will always knit. In Brotherese the pattern is knit with opposite function cam buttons in use slip <–, tuck –>. It will not produce a tubular knit. Worked out patterns for such fabrics were included in some of the Brother punchcard pattern books. 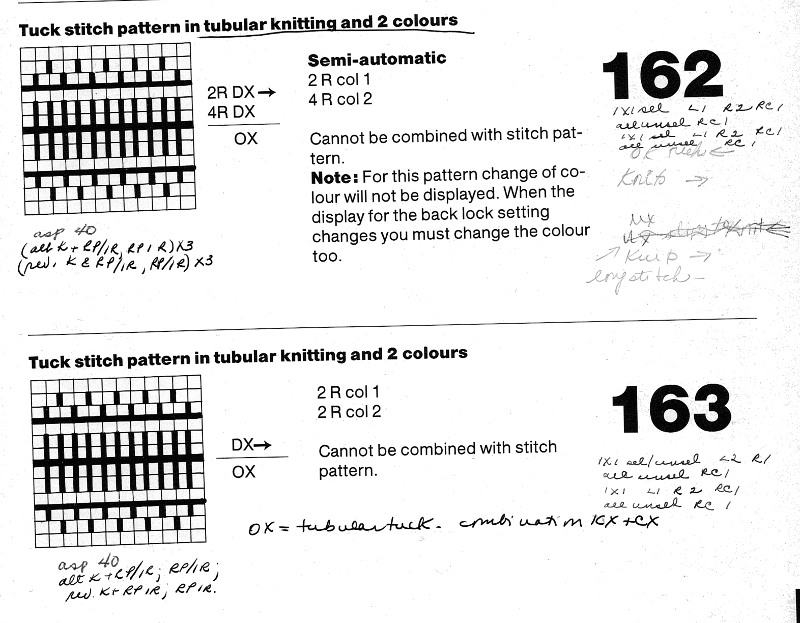
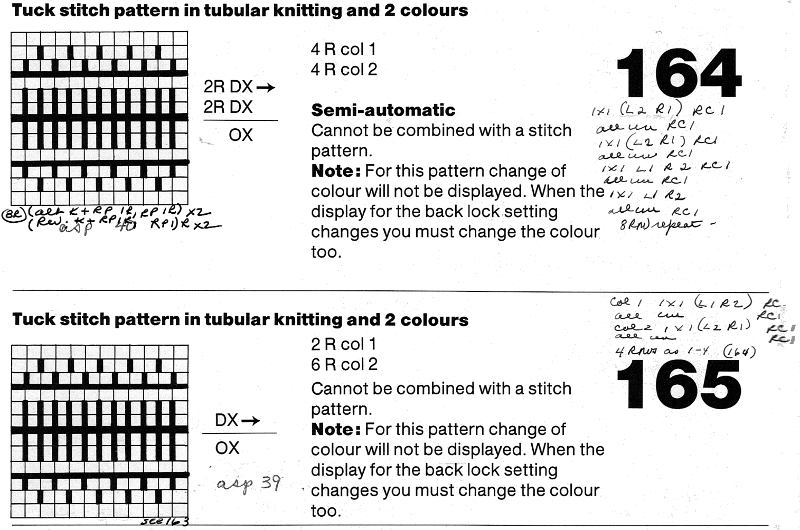 For tucked 2 colors fair isle use technique 185 with lock set on N/OX.
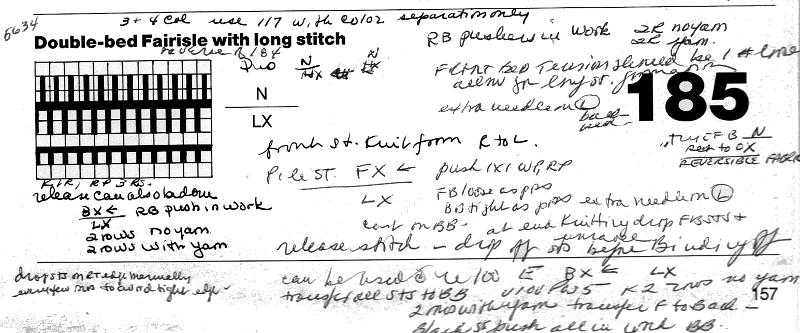
Bowknot/ Butterfly stitch on the machine
A recent Pinterest post got me searching out some of the fabrics in this group. In hand knitting, floats creating the butterflies/ bowknots are usually apparent on the knit side. For two such patterns please see http://www.knittingstitchpatterns.com/2014/11/butterfly-bowknots.html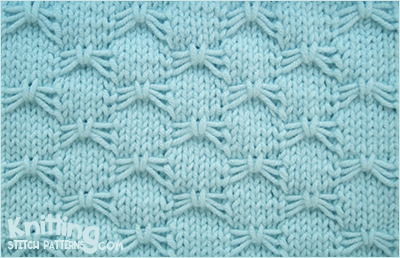
http://www.knittingstitchpatterns.com/2015/04/butterfly.html
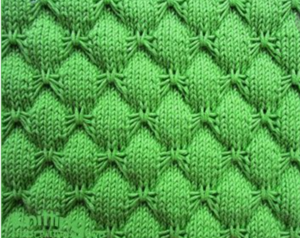
https://handlife.ru/vazanie/obemnyy-uzor.html caught my attention. Here we have a combination of knit and purl stitches, with floats formed on the purl side, making the fabric or a “cousin” of it possible on the machine 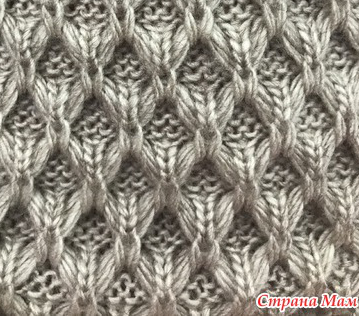 This is my first experiment with gathered slip stitch floats on the purl side of the knit. To begin, this chart indicates one punchcard pattern’s full repeat in width. Four repeats in length would be required (the punchcard minimum repeat in length to achieve smooth continuous card feeding is 36 rows). Punch out blue squares, leaving white ones unpunched. A single repeat (outlined in black, 8 stitches by 12 rows) is for use in electronic patterning, where one may alternately draw or program white squares, then use color reverse. The red line represents 0 needle position in Brother KM
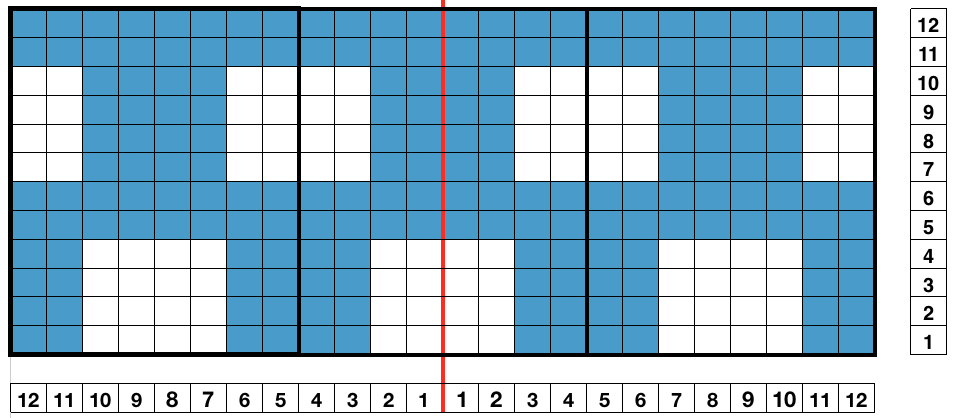
Pitch on H5, ribber needles are centered between main bed ones, so the “knot” width, represented by white squares, can be even in number. Begin with the first needle left of 0 (red line) in the work position, continue across ribber bed with every 4th needle in work
The main bed knits in a slip stitch pattern for 4 rows, then knits 2 rows across all stitches. Floats are created every blank row throughout, composing the knots or butterflies. The ribber is set to knit (N,<–>N, will pick up stitches only on selected needles.
The fabric is a slip stitch one, so it will be short and narrow. That is something to be considered when planning cast on, bind off, and beginning and ending edges of the piece.
In Japanese machines, a ribber comb is recommended. If casting on the single bed, start with waste yarn, poke the comb through that, and proceed as you would for any other rib fabric.
My sample is knit on a 910, with white squares drawn. This is what happens when you forget to color reverse. The all-blue squares now became “white”, so those 2 rows were slipped, not knit, bringing float repeats closer together the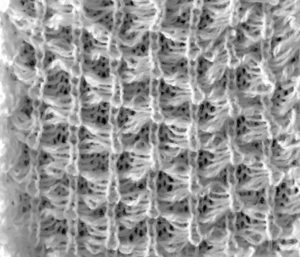 result with color reverse
 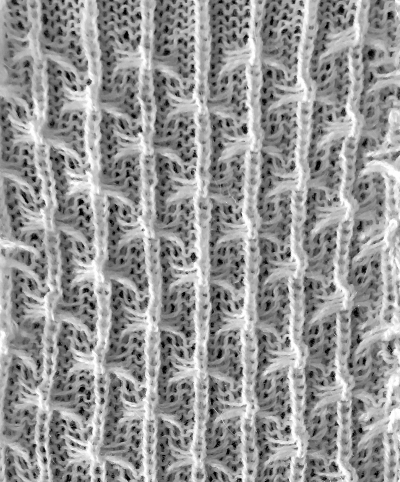 working out a mylar, electronic (unless DM 80 40 stitch width is in use) repeat for a variation of the fabric knit single bed. The stitch count is odd, allowing for a center stitch manipulation. KCI is used to make certain the first and last needles knit on each side. Floats created close to edges may be left without hooking them up. The fabric separates slightly along the “bowknot” edges
 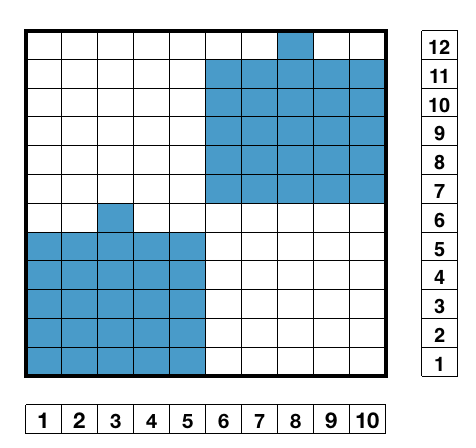 because color-reverse is used, blue squares in chart slip, create floats
 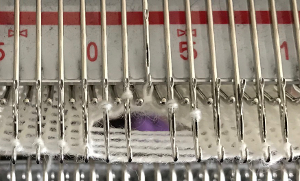 when Rows 6 and 12 are reached respectively, that single square becomes a non- selected needle, and pick up those floats with any preferred tool
 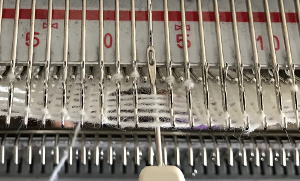 lift them up and onto that single non selected needle, push that needle out to hold
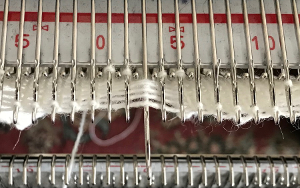 with the next pass the single needle and loops knit off together and become part of the alternating all knit block in the design
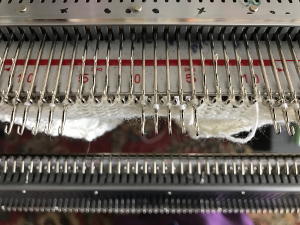 the swatches are knit in a 2/15 wool, the fabric might be better served using a thicker yarn. Here the “blocks” creating “floats” are side by side
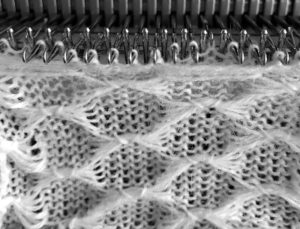
For another single bed cousin in different weight yarn, please see the previous post
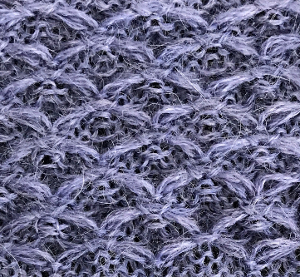
Fabrics worked on the single bed with groups of pulled-up stitches on the purl side will have some distortion of the stocking stitch side depending on the weight of yarn used, the number of rows hooked up, and stitch type. Working on the opposite bed to create the floats produces a more balanced fabric.
My charts often evolve. This may be done on graph paper if there is no access to the software. I began adding a space between each block, thinking about those knit stitches I wanted to create on the purl ground, hooking stitches up on red squares 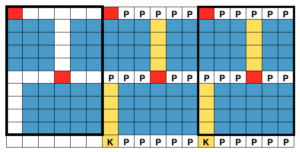 adding border stitches, and more theory on the placement of stitch type
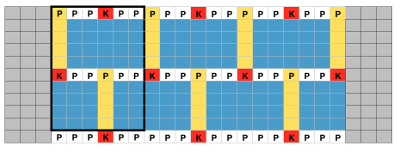 the result places “knit” stitches in the center of butterfly (magenta arrow), not at its sides, and I see and extra purl stitch (green arrow). Multiple stitch-wide borders create unwanted floats on one side
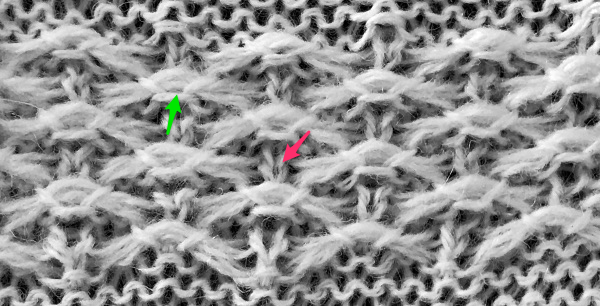 back to the drawing board and working things out first as a hand technique
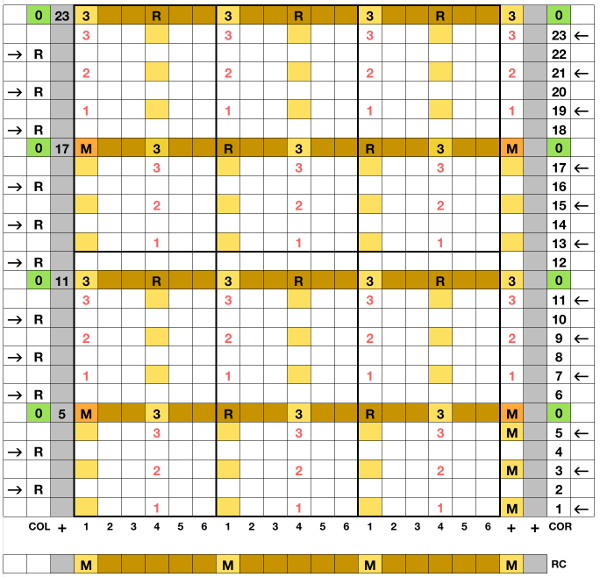 I began with my carriage on the right (COR), after setting up the repeat on a multiple of 6 stitches +3 as indicated above. The last stitch on either side on both beds is never transferred, and the short loops of every other set (rows 5 and 17 in the chart) are not hooked up. This will produce a slightly rolled edge on each side. The larger number of border stitches becomes problematic. The photos were taken while knitting 2 different swatches, so needle tape markings are not the same in all photos. To produce the circular knit, opposite part buttons are pushed in so with carriage on the right (COR), the settings would be
Cast on in any preferred method, ending with all stitches on the ribber  Configure main bed needles as illustrated in a stand-alone setup row at the bottom of the chart
 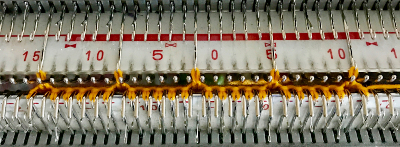 With carriages traveling from right to left, the main bed knits on those single needles, creating floats between them and the ribber slips. When carriages travel from left to right, only the ribber knits, and the main bed slips. Here the carriages have traveled to the left, and back to the right
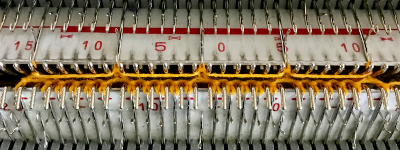 With row counter (RC) set to 000 at the start of the knit, hand techniques occur on RC 5, 11, 17, 23, 29, and so on. Hooking up loops and transferring stitches between beds always occur with carriages on the left (COL). On those rows, the floats are hooked up on the center needle of the 5 empty groups. In this photo, the ribber is dropped to show what is happening on each bed. The last stitches on each bed are not moved, and those short floats, when created on completion of alternate repeat top halves, are not hooked up
 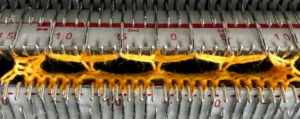 after the three floats have been hooked up, with COL each time, the in-between main bed stitches are transferred back down to ribber
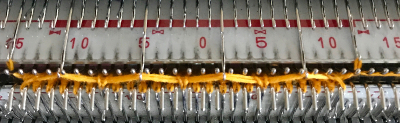 COL: be sure when hooking up floats that all in the series are picked up. The space between the beds is fairly narrow, and the tool used is purely preference-based. Shifting the main bed needles forward will provide a visual check for loop count as you go. I bring needles with multiple loops out to hold before transferring to the ribber, and then also the transferred stitches on the ribber out to hold to ensure they will all knit on the next pass from left to right. Patterning occurs on every 6th needle on both beds, except border stitch groups
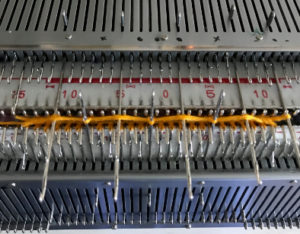
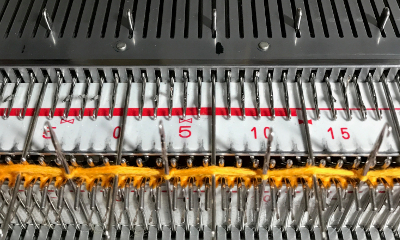 this is the needle arrangement/position in my final swatch, knit in 2/8 wool, COR
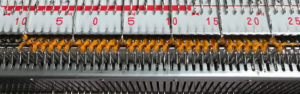
So what can be automated in the process? The knit bed needs to work the stitches that form floats every other row, while the card or mylar need to advance every row. Trying patterns out as an all-hand technique helps determine tolerance on the part of the machine and the degree of patience available. With thinner yarn, the fabric would be more compressed, and maneuvering stitches more frequently to achieve similar finished size knits, so I switched to a thicker yarn. I found more than 3 rows of floats were too hard for me to manage successfully. “Air knitting” to determine the placement of knitting on any bed before patterning helps determine the number of needles in use, especially if edge needle placement or count matters: here is the first pass using my mylar  eliminating needles to any desired width, leaving only one needle in work on each side of selected needle each bed for this fabric
 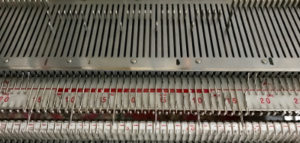 reducing main bed count so only one needle is left on either side of a selected one
 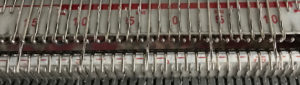 that needle (green arrow, gets transferred down to ribber
  now the number of needles involved on both beds is evident on both beds
 While knitting in the pattern the ribber pitch is set on P (point to point) to keep stitches on opposing beds centered (P pitch also makes it easier to transfer directly from one bed to the other). If the cast-on is for every other needle rib with stitches then transferred between beds for pattern knitting set up, the cast-on and all rib rows need to be knit in H pitch, with a switch to P for transfers and knitting in pattern to be completed. With the first row set up on the selected segment of the needle bed, there are additional steps to take.
This is my working repeat. Since it is 6 stitches wide, it could be worked out on a punchcard, punching out all black squares. On my mylar, I marked yellow squares only, with no color reverse
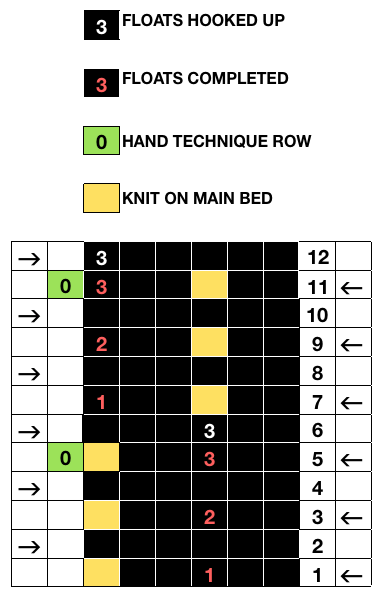 To work consistently with the method described in the larger chart, the first row was manually set up on both beds preparing for the pattern with COL: change knob set to KCII (cancel end needle selection, not every needle in work on the main bed), KC set to slip <–>, so non selected needles slip with each pass of the carriages, advancing the mylar or card one row. The ribber set to N/N or as below will knit from left to right. Pre-selection row is made traveling to the right, ribber only knits
With COR: set RC (row counter) to 000. Make certain proper part (slip) buttons are engaged. MB knits in the pattern based on selected needles, ribber knits when moving from left to right. The fabric is tubular Hand techniques will now also occur when carriages are on the left, on RC 5, 11, etc as described in the hand technique chart, on rows with no needle selection. As in hand tech, transfers and multiple loops containing needles are brought out to hold before moving the carriages from left to right and selecting the needles for the next set of floats with that same pass.
This is my resulting fabric, hand tech shown, the short mylar test above was cropped 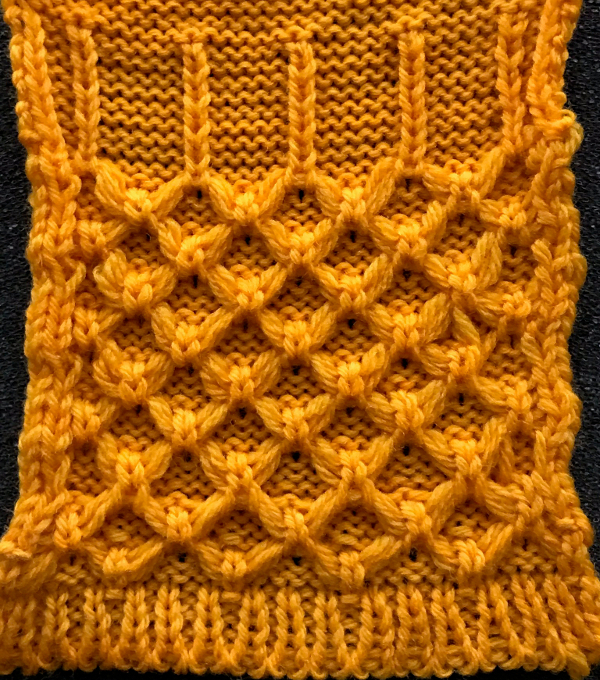
A return to Brother ribber and DBJ settings
I have recently been asked about DBJ on the bulky machine, ribber setting options are offered at the bottom of this post. More to follow.
Ribber settings vary from one brand of machine to another. Here is a review of the Brother carriage features
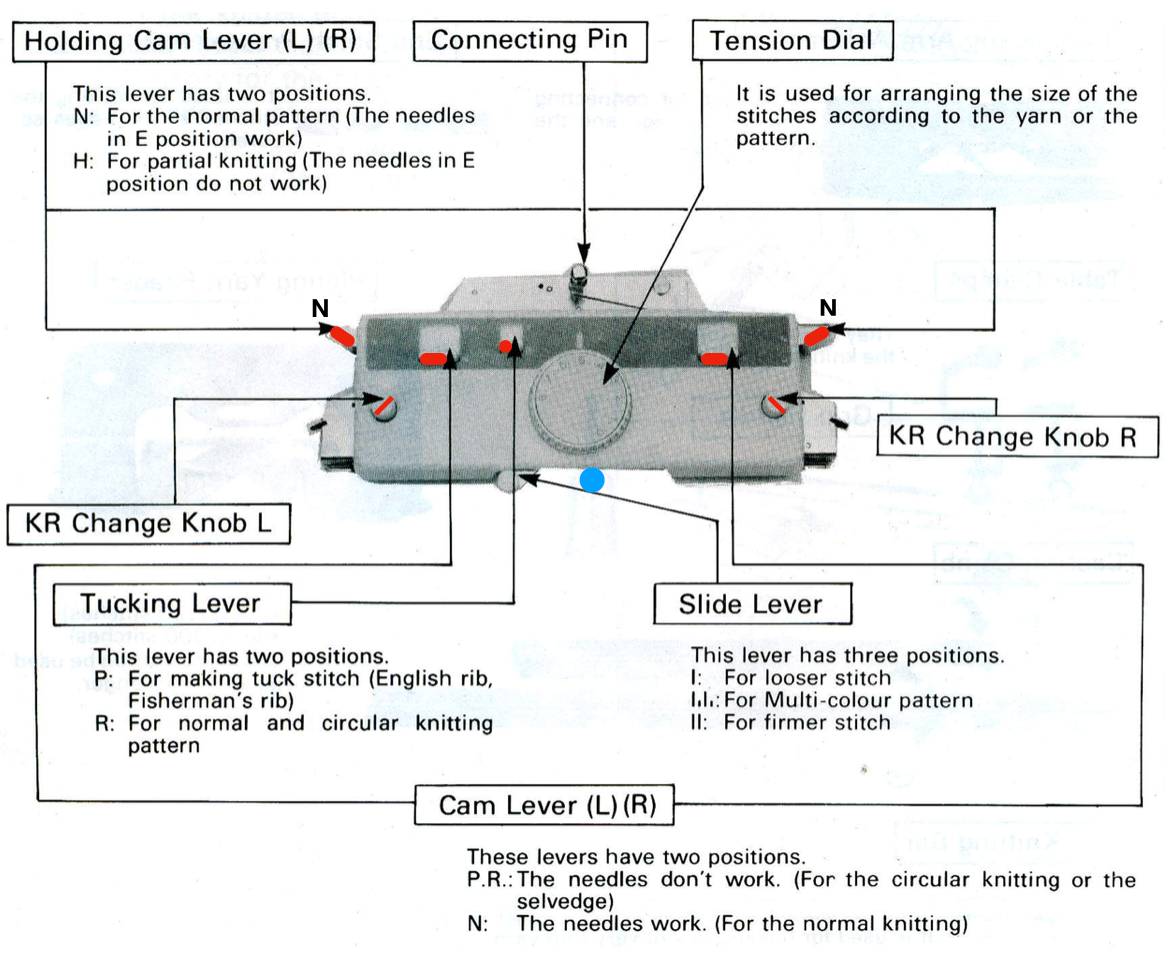 Back in 2015, I wrote on quilting on the machine, using the carriage representation below. Here lili buttons are positioned for use
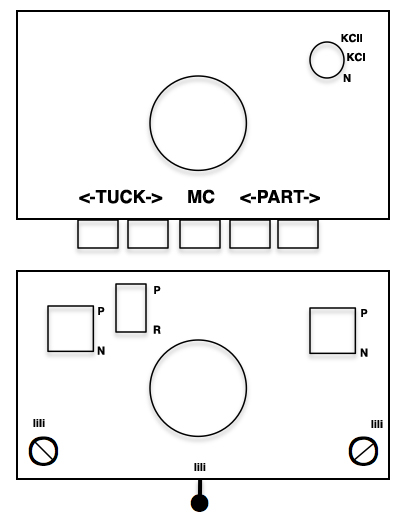
I no longer have Adobe programs available to me, for this post my images were created in Mac Pages. I have simplified the illustrated button and cam settings in red.
I tend to knit most if not all my rib fabrics with the slide lever in the center position (marked lili on the carriage, blue dot). This avoids accidental changes when altering the settings for sections of garments or forgetting to reset it ie. if one uses a ribbed band in a sweater front on one setting and accidentally uses a different one in the back, there will be a difference in width and height between the 2 bands that can be quite noticeable, and is not apparent until the garment pieces are completed and ready for seaming.
If you prefer to start with a 2 X 2 industrial rib, arrange needles to give a neat join at seams, plying yarns may again be required to give the rib more body. racking cast on may be used, avoiding transfers between beds after an every needle cast on Diana Sullivan shows one method of working and illustrates needle arrangement and transitions to main bed knitting well. Alternative needle setups:![]()
I personally never do 3 circular rows after the first cast-on row: it will produce floats on one side of the rib, which may be noticeable in your final fabric on one of the 2 garment sides.
To close holes when transitioning to garment pieces in other than every needle ribs, rack the beds one full turn, knit 2 rows, rack back again, and proceed as needed for the desired fabric
The lili buttons on the ribber are representations of every other needle set up, akin to the 1X1 card use on the main bed. It is essential for an even number of needles to be in use when the lili buttons are in use (pushed in, and turned toward the lili markings on each side of the ribber carriage, R to R, L to L). An easy way to ensure the even number is to look at the needle tape markings, which alternate between dashes and blank spaces between them. A line/ dash and space make a pair, so if you start with a needle on a line, the last needle on the opposing side needs to be on a blank space or vice versa. The holding cam lever remains in N position throughout these illustrations.
simple rib 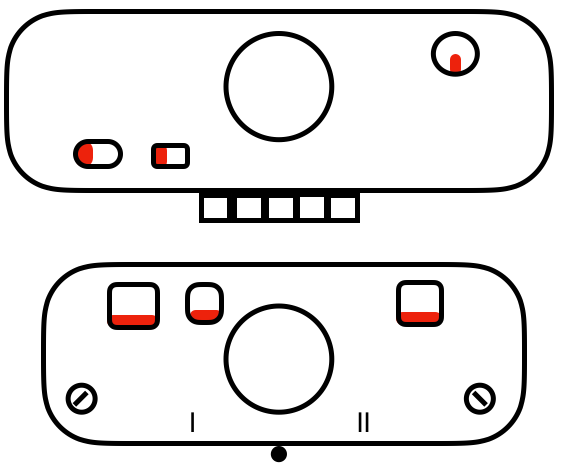
Setting for slip stitch: raising levers to P position will result in stitches slipping when the ribber carriage moves in that direction
slip to right  slip to left
  slip in both directions
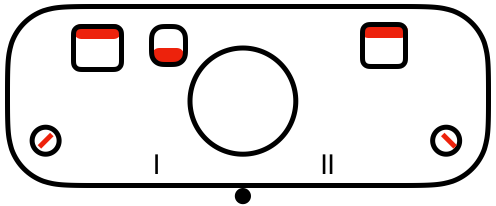
Setting for tucking on ribber: it is possible to tuck on every needle on either bed when knitting every needle rib, as long as the needle on each side of the stitch forming the tuck loop on the opposing bed is creating a knit stitch, anchoring down those tuck loops on each side.
tuck to left  tuck to right
 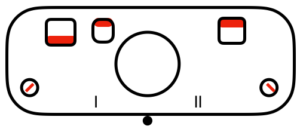 tuck in both directions
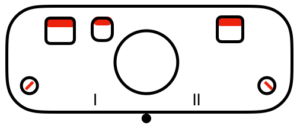
Double bed patterning DBJ
The most balanced fabrics are achieved when no more than 2 colors on any single design row are used, and the number of rows knit on the ribber total the same as the number of rows knit on the main bed. It is possible to knit designs with 3 or more colors per row. With Japanese standard machines, this would require a color separation, automatic ones are limited to 2 colors per row (Passap built-in techniques have a range of other options). The more strands of yarn, the thicker and heavier the fabric, with distortion in the aspect ratio of the design. As with single bed fabrics, double bed slip stitch creates knits that are short and skinny, tuck creates short and wide ones. As stitches slip, tuck, or get longer there will also be “bleed-through” of the alternate color on the front, “knit” face of the fabric. In small, balanced repeats this can create a color mix that may make the result either interesting or confusing. Garment swatches need to be larger than usual for when knitting single bed. I tend to use at least 80 or 100 stitches/rows on both beds to calculate garments.
When using no more than 2 colors per row, Japanese machines offer the option of a color separation that knits one design row per row, which is an added way to reduce motif elongations in the finished knit. Passap knitters may use tech 179 to achieve the same result. For different separation methods for double-bed fabrics, see color separation posts on them.
Brother lili buttons: illustrations found in brother manuals for their actions, an even number of needles in work on ribber is required
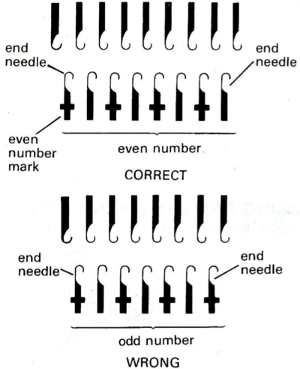
bird’s eye (lili <- ->): this is a common type of slip stitch. One pass of the carriage causes every other needle to knit. As the ribber carriage moves back to the starting side, the alternate needles knit, producing a single row of color. This helps double-check on the color used on the last row knit when knitting is interrupted on the color changer side. When knitting in 2 colors per row the fabric is fairly well balanced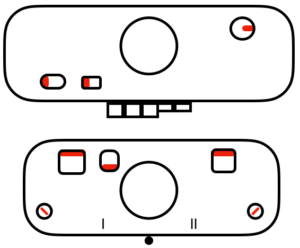
tucked bird’s eye backing (lili <- ->) with slip pattern on MB: if no cam buttons are pushed in on the Main bed, and the carriage is set to normal knit with no pattern selection, lili buttons on ribber will behave as though the 1X1 card is in use, no elongation or other changes are possible without changing levers manually as often as needed
tucked bird’s eye backing (lili <- ->) as above, with main bed set to tuck the main color and slip the contrast, requires manually resetting cam buttons with each color change, or alternately tucking the main color, knitting the contrast
color 1 color 2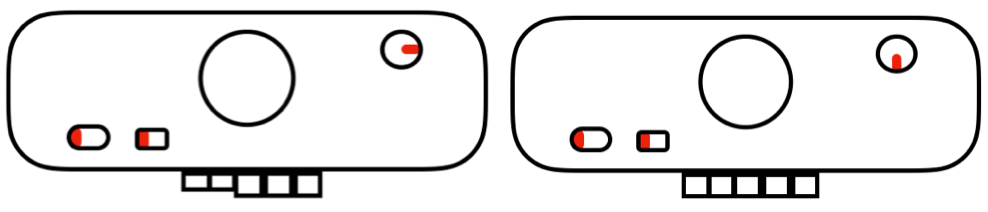
striper (double) backing: fabric is unbalanced, twice as many rows of ribber stitches as main bed ones, the design is elongated, but the fabric is softer and more flexible
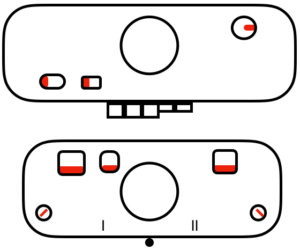
single (half) striper backing: fairly well balanced. The ribber knits only one row for each 2 passes of the carriages, so for 2 colors again, there are no extra rows knit. Part button on ribber may be engaged on either side  tubular: either pair of opposite part buttons used
  tucked half Milano: when using tuck/slip combinations opposite cam buttons are used i.e. if right tuck cam button is pushed in, then the left slip button is also
 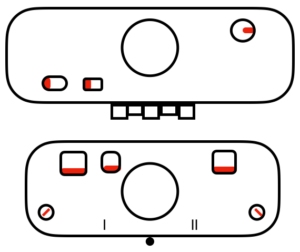 main bed <–> tucked jacquard: each needle on the ribber knits every row. Needles on the main bed knit in pattern according to punched holes, black squares on mylar, or programmed pixels. Non selected needles tuck. The patterns produced on the backside of the fabric are almost the reverse images of the front. Because so many tuck loops are formed the fabric is “short” and very wide, so cast ons and bind offs need to be planned accordingly
 variation: tucking the main color, knitting the contrast, manual cam button reset every 2 rows
solid backing: the part buttons on the ribber are reversed manually on the left side of the machine when the color changes are made. The solid backing color knits on the ribber when both part buttons are down (N<–>N), the second color will be slipped with both the part buttons in the up position. For an interesting effect use wool for solid back color 2, other fiber for color 1, and felt the result.
2 rows color 1 2 rows color 2 (solid back color)

See altering a sinker plate for producing this fabric using a second KC to knit rows only on the top bed, no ribber setting changes required.
tuck/plain combo: requires manually changing cam button settings on the main bed every 2 rows, change knob remains on pattern selection setting
2 rows color 1 2 rows color 2
no automatic patterning on the main bed, change knob on N for English or half fisherman rib: tuck every needle either direction on ribber only
 full fisherman rib: tuck every needle alternately on both beds, in opposite carriage directions (below = L/R, or use R/L)
Vertical striper backing and “ladder-back” variations involving some hand manipulation and selection of needles in work are also alternatives for DBJ backing.
I have for decades and in my posts referred to this part as the ribber sinker plate; technically it is called the connecting arm in the Brother literature. There were slight differences between model years for them as well. Later connecting arms were branded with the number 2, earlier ones were not.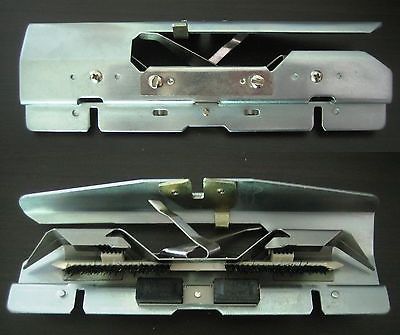
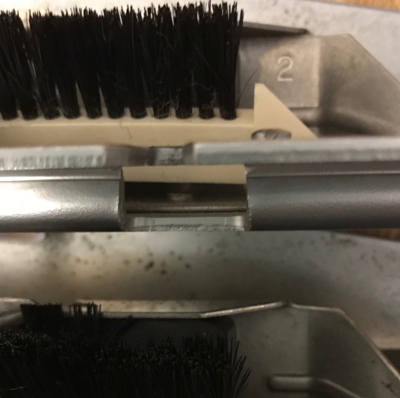
For knitting DBJ with the unmarked connecting arm, it was suggested in later manuals that an accessory be used: 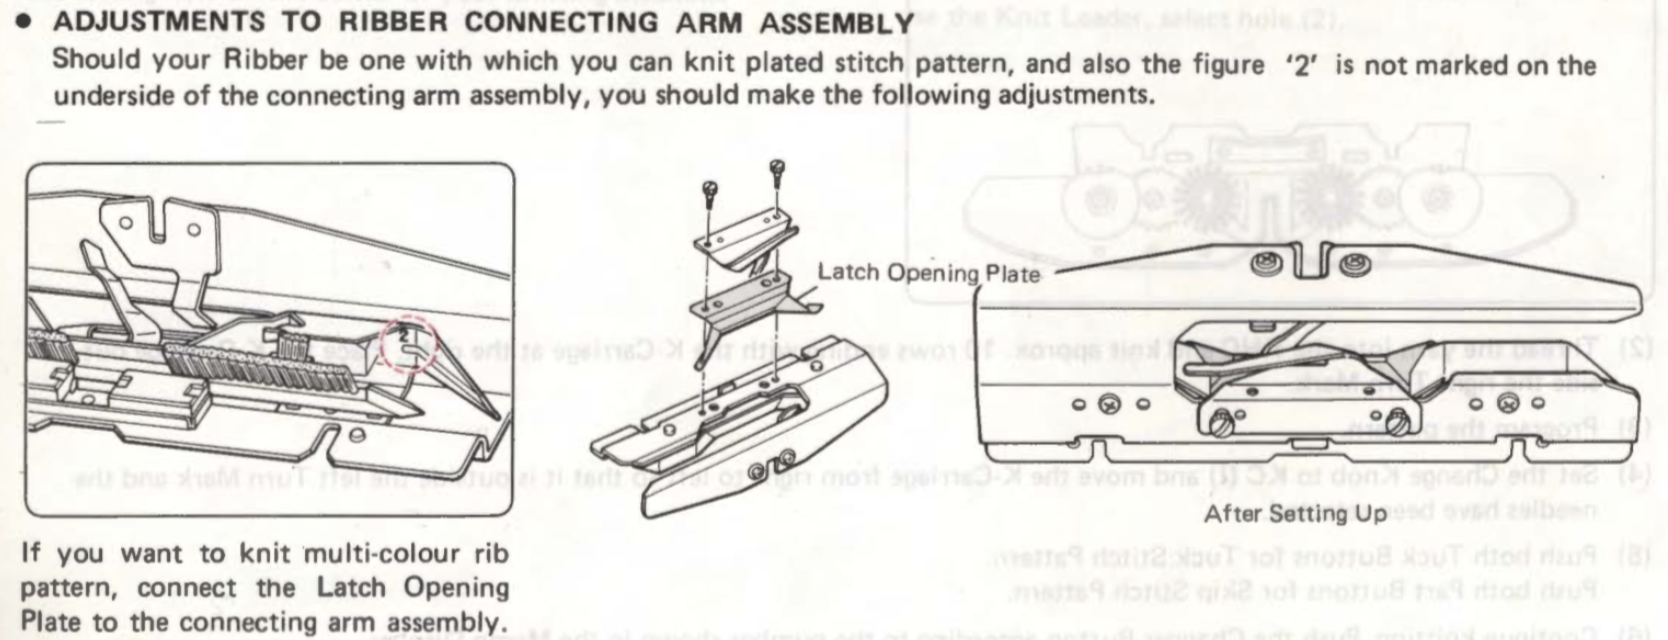 the result with the plate in place is a change in the height of the metal from the needles with stitches in work as seen below with the plate secured in place
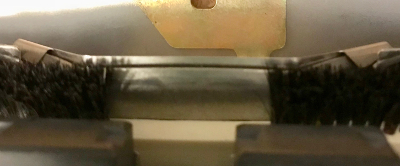
more on non-repetitive dbj images and ribber parts and settings:
two-color-dbj-non-repetitive-images/
ribber-fabrics-produced-with-2-knit-carriages-selecting-needles/
geometric-shapes-on-ribber-fabrics-with-tuck-stitches-2-knitting-with-4-carriages/
DBJ on bulky KR 260: parts as described in the ribber manual, followed by possible settings 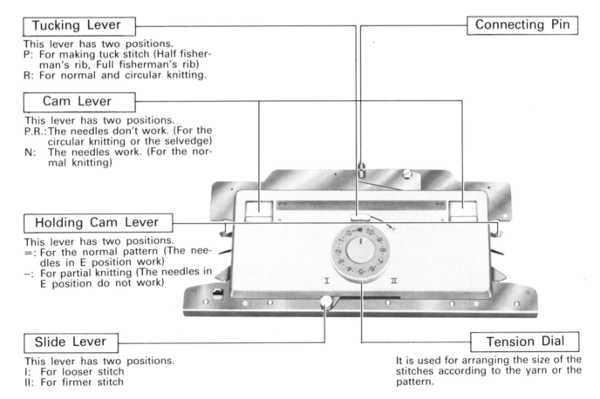
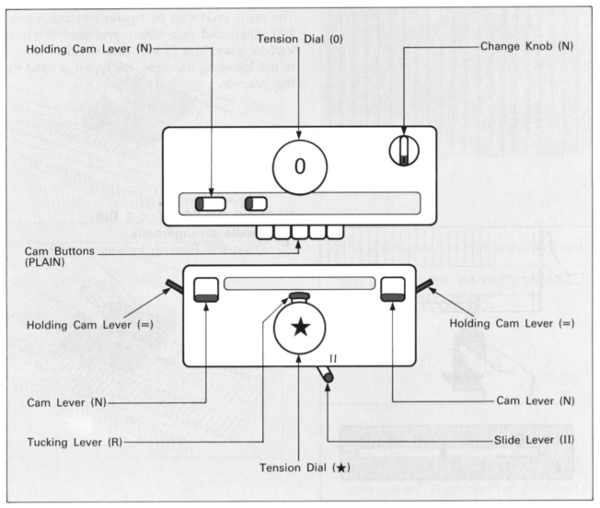 slip to right
 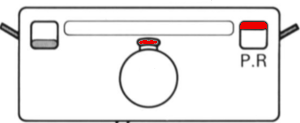 slip to left
 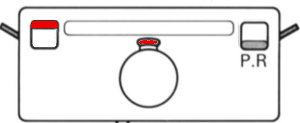 slip both directions
 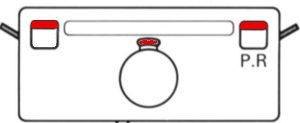 tuck to right
 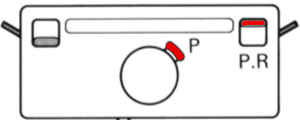 tuck to left
 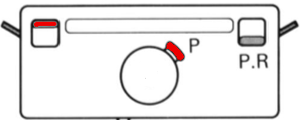 tuck both directions