Some DIY variations in combining both stitch types:
Combining tuck stitches with lace 2 (automating them) 3/15
Combining tuck stitches with lace 1 3/15
Large diagonal eyelet lace, (a similar card and fabric, not tuck setting) 6/12
Large scale mesh, breaking rules 4/11 explains the use of punch card below
Tuck stitch combination fabrics 5/19
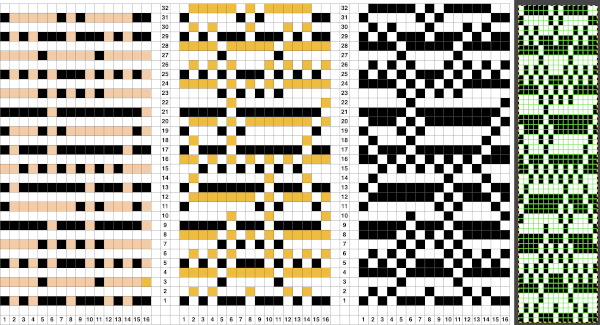
To execute this knit fabric, the lace carriage is set for normal lace, the knit carriage selects a pattern (KCI) and both tuck buttons are depressed. Each carriage works in sequences of 4 passes/rows throughout. The self-drawn card does not include familiar arrows on the left-hand side familiar to users of factory published lace cards  Working out an electronic repeat: the punchcard repeat is on the bottom, the expanded electronic one on top, yellow cells highlight rows with tuck stitches
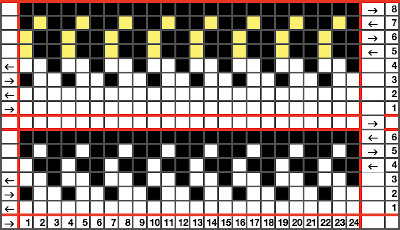
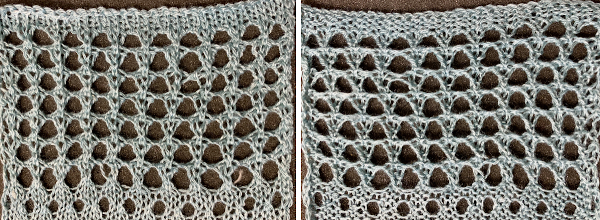
![]() In electronic machines, the first preselection row may be done with the knit carriage moving from left to right or the lace carriage moving from right to left, with either carriage moving toward its usual starting position. The knit carriage is set to KCI for end needle selection. Before the LC begins to move from the left the first and last needle will have been preselected, push them back to the B position. Continue to do the same if any end needles are selected just prior to a transfer row as you continue to knit. Each carriage makes 4 passes throughout the piece. The bottom row of eyelets shows the “standard” size eyelets that follow single transfers, illustrating the change in size with this technique. With the proper tension, transferring is not a problem. I sampled on a random number of stitches. For cleaner edges, a border where no transfers occur for 2-3 stitches can be planned in programming the final piece.
In electronic machines, the first preselection row may be done with the knit carriage moving from left to right or the lace carriage moving from right to left, with either carriage moving toward its usual starting position. The knit carriage is set to KCI for end needle selection. Before the LC begins to move from the left the first and last needle will have been preselected, push them back to the B position. Continue to do the same if any end needles are selected just prior to a transfer row as you continue to knit. Each carriage makes 4 passes throughout the piece. The bottom row of eyelets shows the “standard” size eyelets that follow single transfers, illustrating the change in size with this technique. With the proper tension, transferring is not a problem. I sampled on a random number of stitches. For cleaner edges, a border where no transfers occur for 2-3 stitches can be planned in programming the final piece.
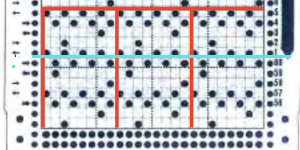
 Returning to Volume 4, here is a combination of lace and tuck repeat that appealed to me. I am repeating a process akin to that used in programming the woven lace samples. In this card, lace transfers are first to the left, then to the right, that sequence needs to be preserved. Colored pixels need to be used everywhere a punched hole is represented. The lace portion of the card will not tolerate color reversal. The published full repeat is for a brick configuration, I sampled the top half.
 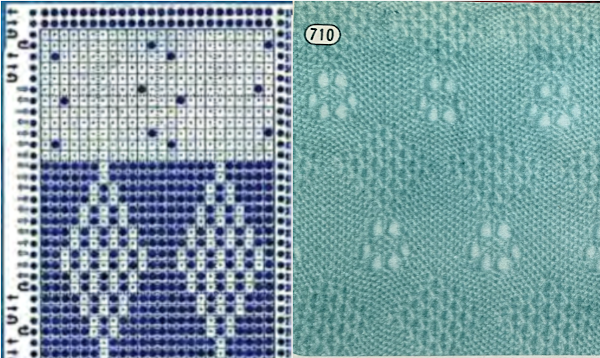 The actions of the 2 carriages on the electronic, the repeat prior to mirroring
 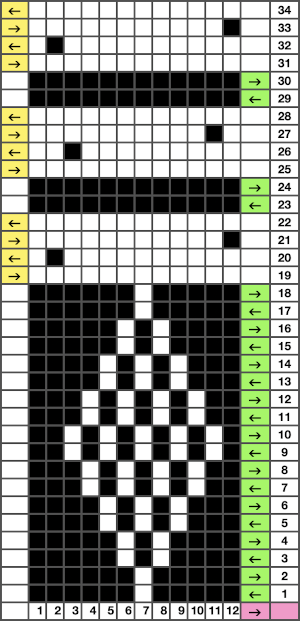 mirrored for use on the 930
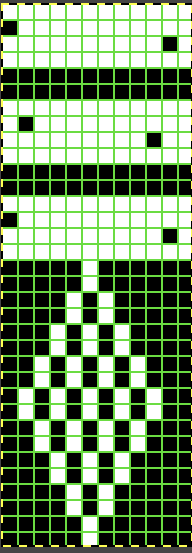
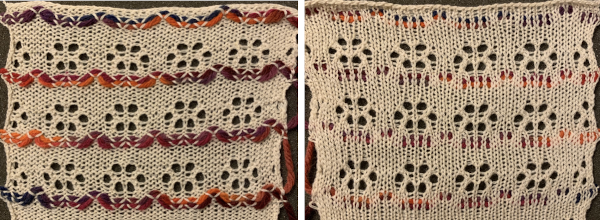
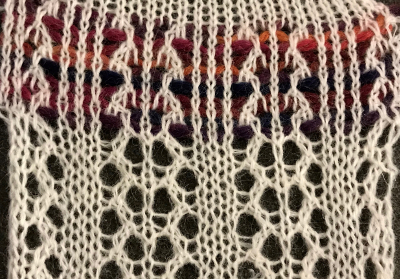
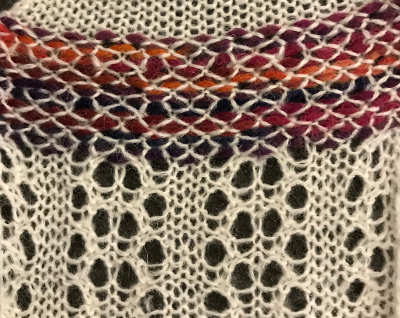
![]() The texture is more apparent on the purl side, the top and bottom edges could be coaxed into a wavy shape due to the gathering up of the knit by the tuck diamond shapes
The texture is more apparent on the purl side, the top and bottom edges could be coaxed into a wavy shape due to the gathering up of the knit by the tuck diamond shapes 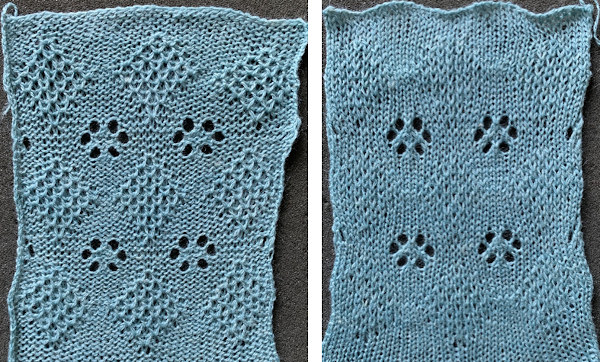 The chart for the brick configuration:
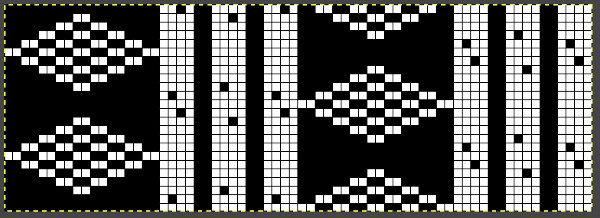
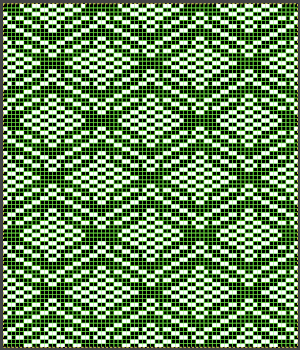
![]() An advanced technique fabric, combining lace, transfer lace, and tuck patterning
An advanced technique fabric, combining lace, transfer lace, and tuck patterning ![]()
Lace meets weaving on Brother Machines 2
Early Brother punchcard volumes showed symbol charts alongside punchcard repeats. The translations at times were not the best. Here is some of the advice offered for woven lace patterns: 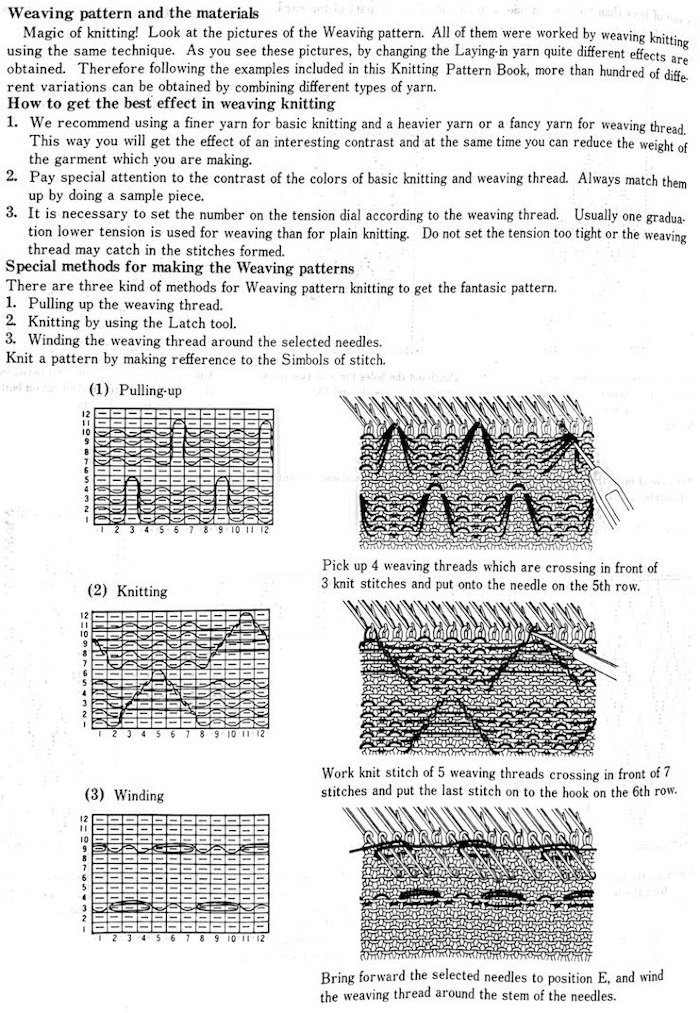
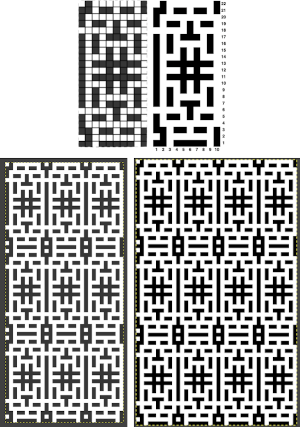
This was one of the first such punchcard volumes published by Brother after the pushbutton earlier models were replaced by ones with card readers  It has the added data on how each of the fabrics might look visualized in a chart prior to its expansion as a card in full repeat. This is the top half repeat of a card for pull up weaving combined with lace along with the directions for execiting the knit
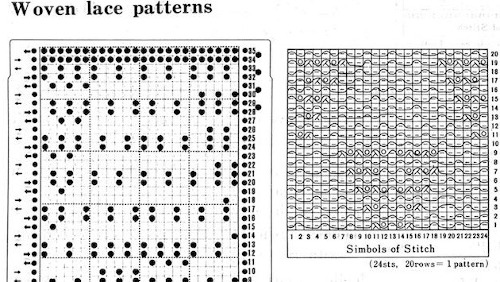
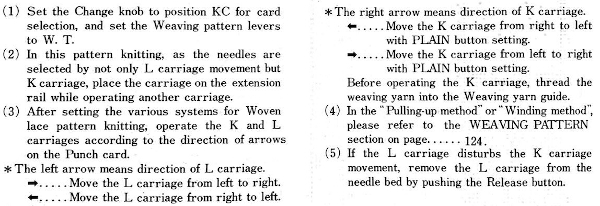

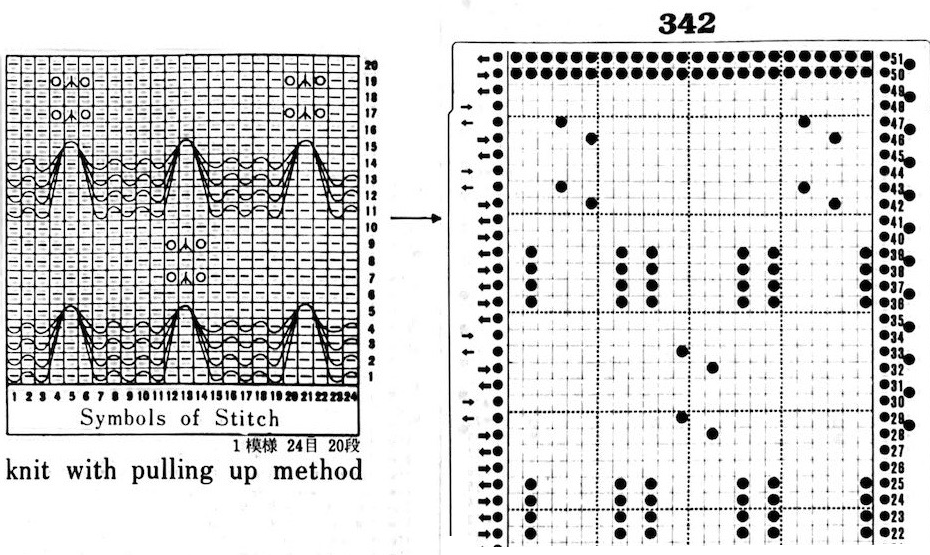 My experience with trying to knit CARD # 589, led me to notice immediately that all carriage passes, if the arrows are followed, are made from the same side. That avoids the repeated selections when carriages first start operating from the opposite sides. My interpretation of what the card is achieving:
 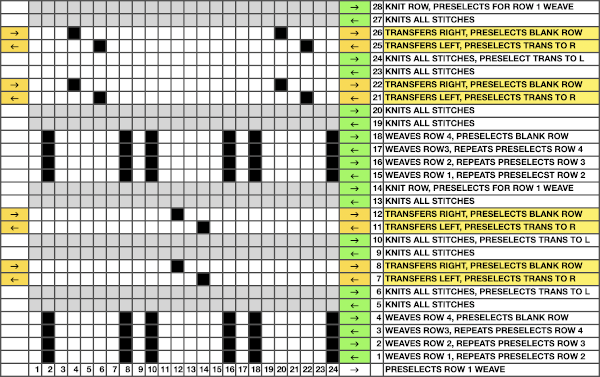 Taking carriages on and off the same side of the machine is nothing I would be inclined to do for any length on any machine. In theory, the identical repeat above could be used on an electronic KM in that way, but I did not get very far with that method before giving up.
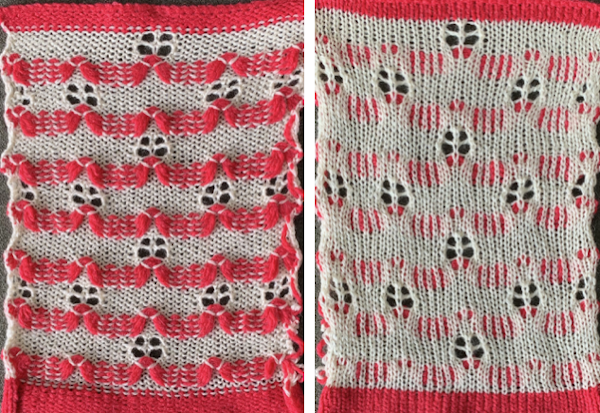
The expanded the repeat for use on my 930, with programmed all-black pixel rows for any pairs of all knit rows, made for smooth, easy knitting  The weaving yarn used in patterns such as these will be held in the hooks of the needles, combined with the knit stitch already there. In this instance that adds up to 5 loops that need to knit off smoothly on the next knit row, so yarn thickness choice meets with limitations.
The first preselection row is made from left to right with the knit carriage, it resumes patterning on the right, beginning the weaving pattern. End needle selection is on, KC I.
When the knit carriage is on the right and all but those single needles are selected on design rows 5 and 23, pick up the floats from the weaving yarn with a single eye tool and lift them onto the non selected needles, then bring the same needle out to E position before moving the carriage to the left to create the first all knit row.
Before transfer rows using the lace carriage, if any end needles have been selected in pattern push them back to B before traveling with it to the opposite side. The electronic repeat, followed by its .png 
![]()
Later punchcard volumes ie 4 and 5 took into account the repetition issues when carriages select needles for patterns from opposite sides, and that may be the best place for card designs that may be knit following arrows as shown, in the traditional manner. This design has fewer woven rows, a larger lace motif 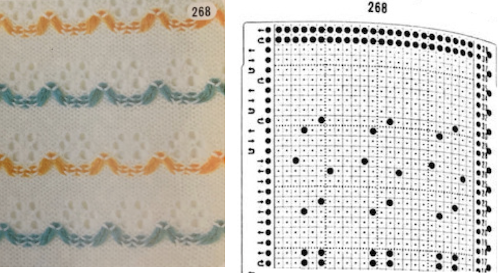 Volume 4 offers only this advice: “the empty needles are selected at the second lace pattern, but this is not a trouble, and you may pass the L carriage to the side which is indicated on the punchcard”. I take that to mean that after a transfer if the same needle is selected again, don’t be concerned, keep moving the carriage in the direction of the arrows.
 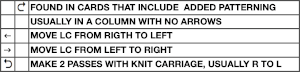 Because the weaving is for only 2 rows, the use of laid in, thicker yarn is well tolerated. The punchcard repeat amended for use on electronic, shown prior to mirroring
 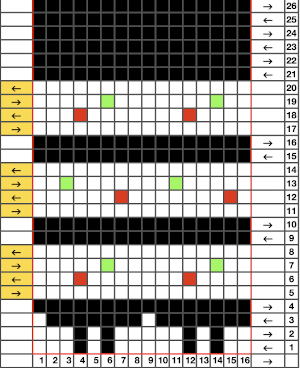 its .png
![]()
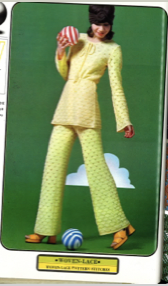
 A resource offering many more design patterns:
  for swatches in color see pattern # 321-360.
 There is often a discrepancy in previewing contents of downloads between thumbnail page markings and those on the document scan. In this case, diagrams begin on manual page 278-284, thumbnail # 284 – 290.
E-wrapping or other weaving techniques may be used on “weaving” row preselected needles, needles can also be hand-selected in knit areas in any other programmed lace repeat to add details on the chosen row(s) without engaging the card reader. Knit 2 plain rows, select weaving needles, wrap the yarn over or around them in the desired configuration, knit 2 plain rows again, and resume lace patterning. Varieties of wraps for use on every needle with yarn similar in weight to the ground, or every other needle with thicker yarn. 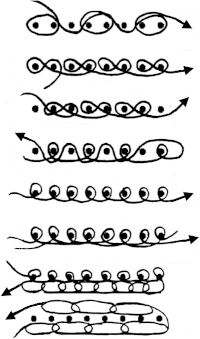 Once the desired effect is achieved, a repeat could in turn be configured and punched or programmed to make the process easier to track.
Pile_carpet stitch knitting on Passap and Brother KMs 3
Studio and Toyota machines could produce this type of stitch easily. Many efforts have been made over the years to produce the same fabric on Passap and Brother.
I was asked via a blog comment in my previous post #1 on this topic about creating a single color all-over pile on the Passap machine and have added these instructions
Executed with the lights off:
Cast on and begin with all stitches transferred to the back bed.
The back lock is set to EX, the front to CX, pushers are not needed
Knit two rows using those settings, and use a stitch ditcher to drop loops formed on the front bed.
One color carpet stitch, if programming technique #256, ignore console instructions
1. cast on so that all stitches are on the back bed
2. knit a few rows in stocking stitch testing for the tightest tension at which your yarn will knit, and experiment with the front lock tension to produce as large a loop as possible that will also drop off properly. Begin knitting your test with locks on the right side:
3. bring the back bed pushers to the in 1X1 arrangement, and set the back lock to FX with the left arrow key, not BX. Do not use the AX setting, it will tuck in both directions. All needles will tuck moving from right to left, and knit on their return to the right
3. with the front lock set to LX, it will knit on all needles when moving to the left creating loops on the front bed, while the back lock does the same, slips all needles moving on the front bed when moving back to the right.
When the locks reach the left side there will be loops on every needle on both beds. As they move from left to right, the needles on the back bed will knit, securing the loops there and anchoring the ones on the front bed while the front bed is slipped
4. with locks again on the right side, use stitch ditcher or another tool to drop off loops on the front bed, returning needles to proper work position, follow with a pass using a single eye tool to push loops between the beds, checking that none are left in the needle hooks
*make 2 more passes with locks from and returning to the right, drop off loops**, and continue from * to **
The difference in the size of the long stitches between loop rows in the photo was eliminated by tightening the tension on the back lock, it is evident that they are anchored more evenly in those segments as well. As with any fabric, the larger the intended piece, the more likely some further adjustments may have to be made. 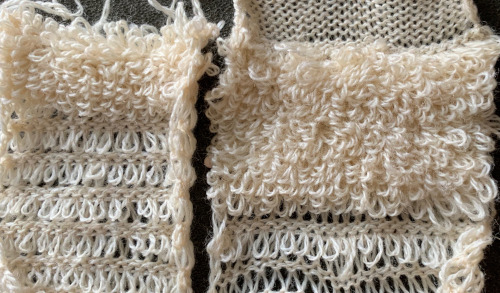
 Alternative settings for one color pile: Tech 256, back lock FX and both arrow keys, pushers one up, one down, front bed to LX, drop stitches every 2 rows.
For 2 color work, Tech 184, same settings.
For a similar effect on Brother machines, begin with all stitches in work on the ribber, with the settings: opposite tuck buttons, the main bed knits to left, ribber knits to right anchoring loops formed on the previous row  the loops, formed on every needle on both beds with the move to the left
 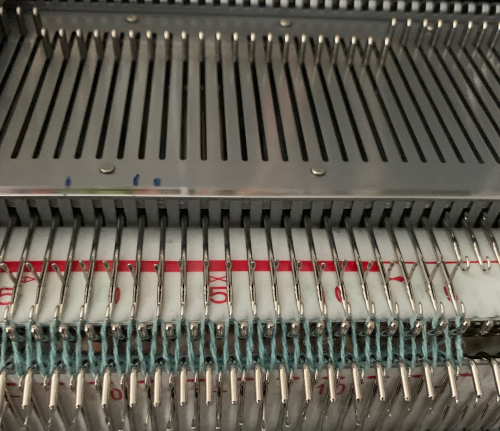 anchored in place on the ribber needles as the only the ribber knits as it returns to the right
 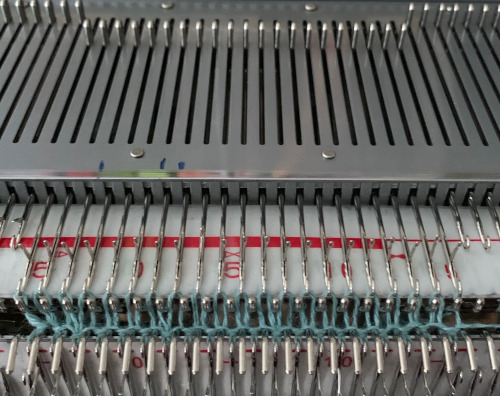 while the carriage is on the right, drop all stitches on the main bed,
 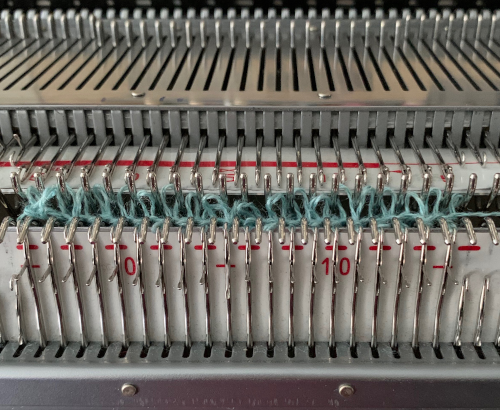 making certain no loops are stuck on gate pegs on the main bed,
 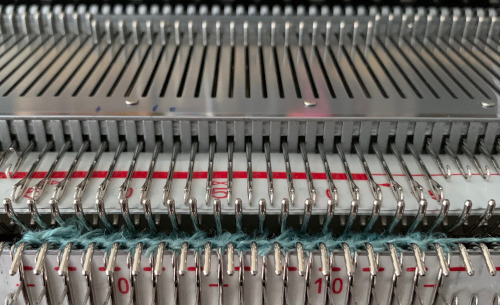 repeat the process throughout the piece. Occasionally skipped needles and their missing loops may not be noticeable, any loops hung up on gate pegs will be visibly longer. Tension needs to be “just right”. My first efforts, shown sideways
 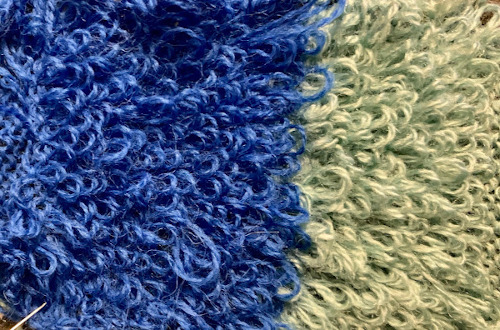 Knitting was smoother with a change in yarn. An extra needle on each side of the knit on the ribber is brought out to hold manually to ensure their stitches knit with every pass of the ribber carriage. I prefer the all-over pile with its loops formed on the top bed. There were nearly no incidences of loops catching on gate pegs on the main bed. One of the drawbacks is that the main bed needles need to be dropped and brought back to the B position manually, bald spots will result where any needles are not returned to the proper work position, so they will not pick up loops.

The traditional hack for other than Studio or Toyota kms involved this process:
to knit, bring up the first and last needle to the hold position on the ribber to ensure they knit when both carriages are on the right and the ribber will tuck on every needle as the carriages move to the left. The carriage settings: Loops are formed on the main bed as it knits from the right to the left, and slips on its return to the right. The ribber tucks on every needle moving to the left and knits on every needle returning to the right, anchoring the main bed loops. After the carriages reach the right side, loops on the main bed are dropped, and the process is repeated.
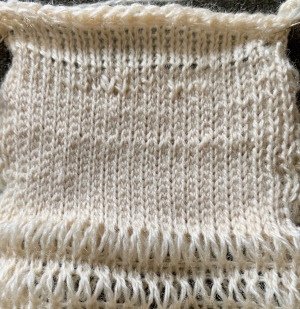
The results are dramatically different. If considering patterning on the main bed with the addition of a second color or creating isolated motifs whether on a single color or striped background, anchoring loops by tucking on every needle is no longer possible, making reverting to EON needle selection on ribber a necessity. Loops formed where no stitches are knit on the main bed would only sit in the hooks on the ribber and create a mess. Hence the “hack” where lili buttons and tuck stitch in both directions so that loops are knit off on the next pass, and with 4 rows knit before dropping stitches so that the maximum pressure is put on those loops to hold them in place. This requires the tightest possible tension on the ribber, and by default, the EON tuck will want to spread the fabric further apart. I have found this version a failure in producing a stable fabric with a satisfying pile formation. 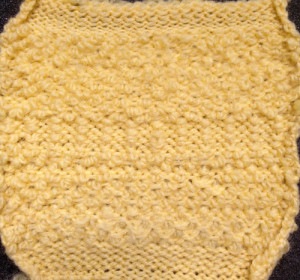 Returning to the pursuit of pile loops in pattern on Brother: my first effort with a simple, linear shape produced separation aside the loops akin to that seen in isolated FI motifs, both when using the ribber or the main bed to create the loops. Here a simple checkerboard was hand-selected, there was separation along the vertical edge like that seen in isolation motifs
 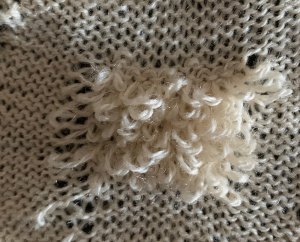 and this is likely my last try at the single pile in a pattern using every other needle tuck on the ribber with the release of stitches every 4 rows. I actually like the elongated stitches in the ground but found the stitches planned for loops simply did not release easily or at all,
 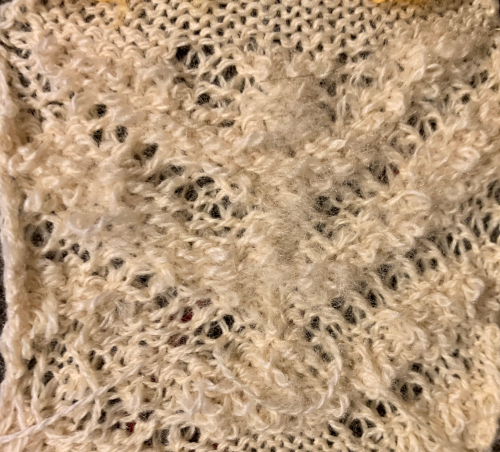 using thinner, smooth yarn resulted in breakage, while adding elastic obliterated loops, and wooly nylon simply broke regularly. It would appear if pile knitting on Japanese machines is the goal, by all means, add a studio KM to your stash ;-).
A lace quest
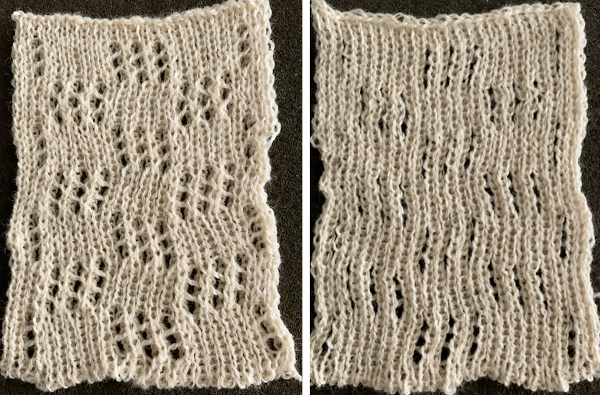
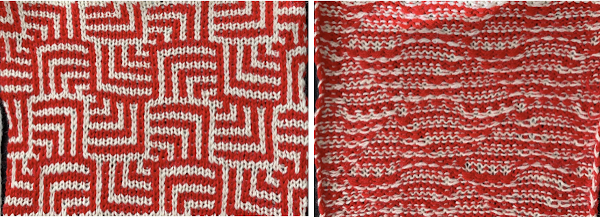
This image sparked my search for a method to develop a DIY pattern for a similar lace 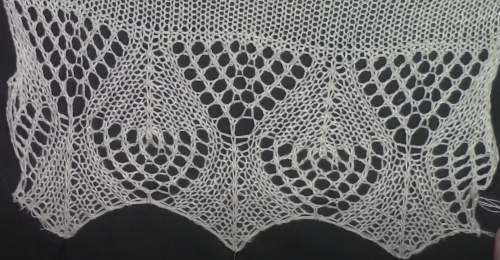 It is taken from a video by Knitlabo, a wonderful resource for both Brother and Studio machine knitting. My first goal was to work with a recurring triangular motif in a brick repeat. The same repeat was also used in my previous post on using lace motifs in ENR (every needle rib) fabric.
The extra rows of knitting and the added contrasting color stripe between lace segments helps to visually separate them 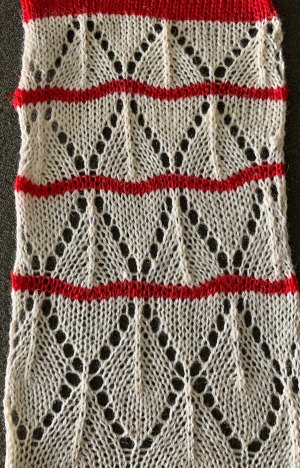 Before some light pressing, the lace had an interesting quality, harking back to my days seeking to form 3D scales
 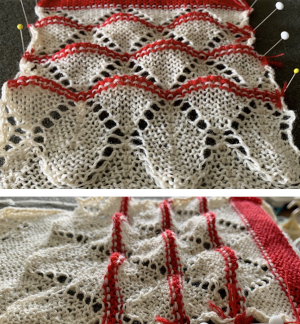 A start at a brick repeat adds spaces for mesh eyelets to be added between the punchcard repeats, the grey lines help align continuous vertical stitch placements
 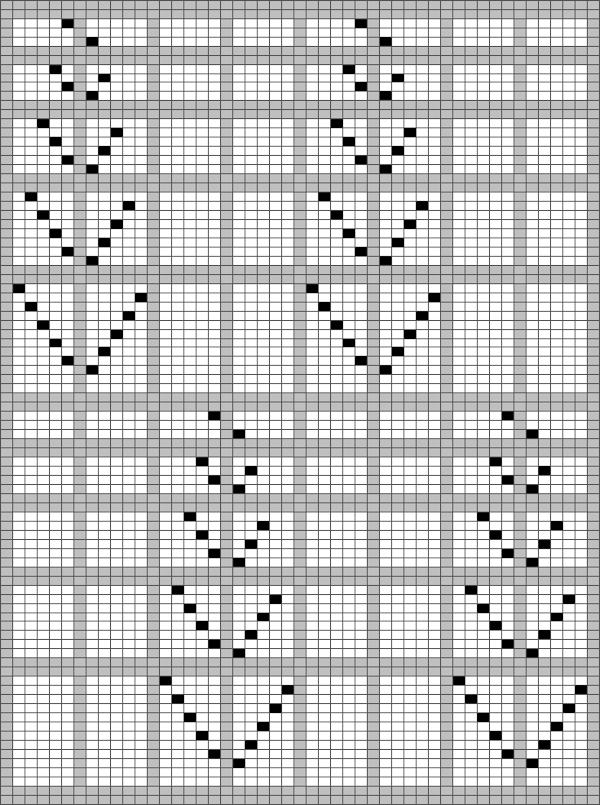 The first effort to add the in-between eyelets is made easier if different colors are assigned to the left and right transfers, in this case, red for left, green for right
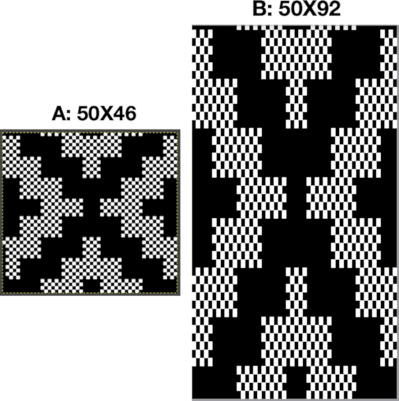
 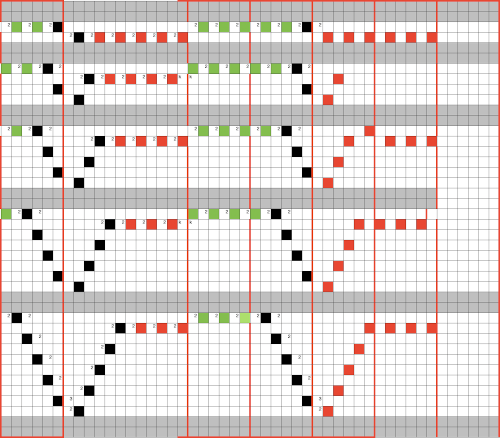 Planning for the electronic repeats in a brick layout, still eyeing center lines, now every 12 columns. In addition, the bottom half of the chart is marked with the location of stitches doubled up after transfers visualizing and thus avoiding side by side transfers and other issues “on paper”. A single, full repeat is bordered in black
 ![]()
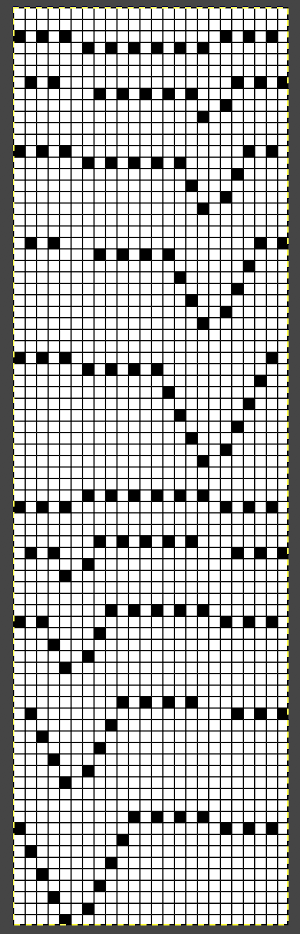
![]() A variation of the brick repeat, adding extra knit stitches aside previous mesh and knit shapes
A variation of the brick repeat, adding extra knit stitches aside previous mesh and knit shapes 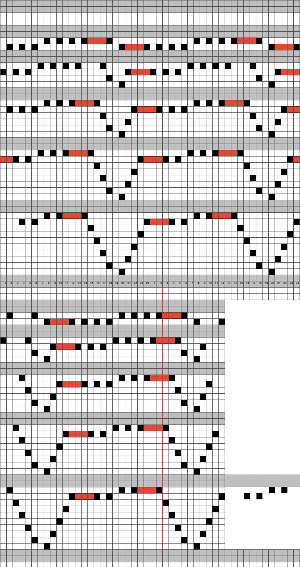
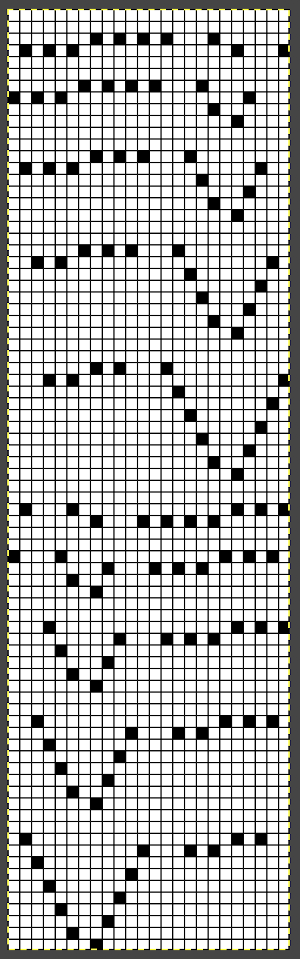
![]() The related swatch segments:
The related swatch segments:
A: the pattern with extra knit stitches, the error was an operator one, the result of mis-correcting a dropped stitch
B: the mesh without the extra knit spaces
C: B with extra knit rows. If adding a contrast color, knit 2 rows before changing color with the ground yarn, 2 rows or more with the second color, 2 rows of the ground once more prior to resuming transfers. The knit carriage in this fabric does not advance the pattern. The G carriage could be used to add purl rows between chosen repeat segments. 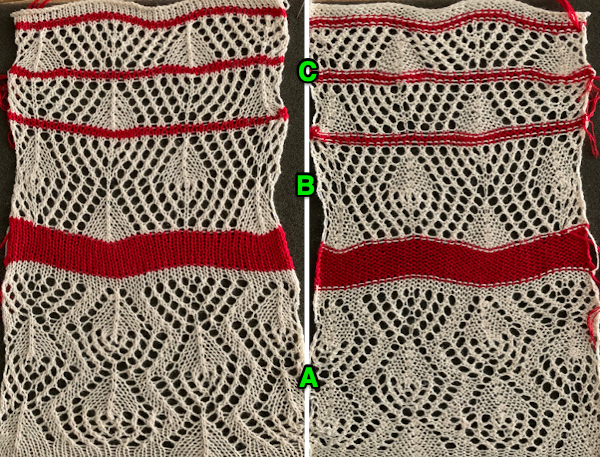 The repeat is 24 stitches wide and because only the lace carriage is selecting needles and operating from the same side, it could be used, mirrored, on a punchcard machine.
Lace meets weaving on Brother Machines 1
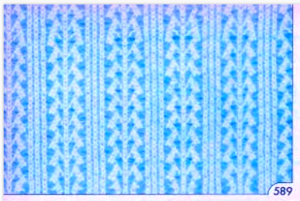
Several years ago, this punchcard was shared on Ravelry as one that was problematic in execution on an electronic model using Ayab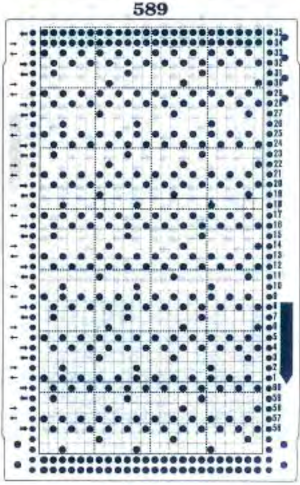 the supposed related swatch pictured in the publication
 At the time, I made a long, convoluted effort to produce the fabric. I am returning to the topic and comparing 2 cards in this post, the original 589, and a new-found cousin, 259. Looking to the published cards for clues, remember that markings for carriage movements related to the first design row at the bottom of the card begin on the left of the card, above the Brother line numbered 1 on the right. The start of both cards:
 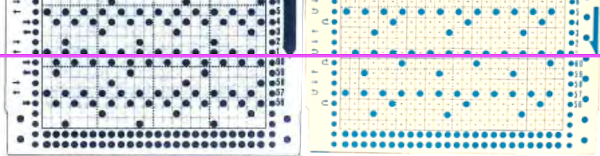 Lace patterning is unique in punchcard use. The card does not begin with the reader locked.
 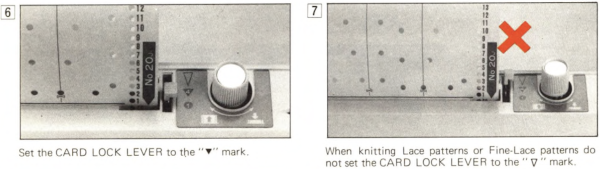 As the carriage moves to the right, the card will advance a row.
 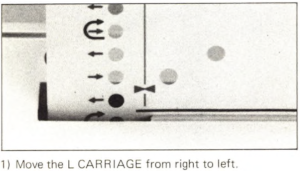 The lace carriage will begin to move in the direction of the arrows, making transfers on preselected needles in the direction of those same arrows as it moves away from and returns to the opposite side.
A typical pattern for mixing weaving and lace, seen in 259, usually starts with a blank row, followed by 2 rows with lace transfer markings, and a single every other needle arrangement row intended for the weaving pattern, repeating in varied sequences for the height of the card. The source for the repeat is Brother punchcard pattern book volume 5. Due to the added experience I have acquired in working with spreadsheets and converting lace punchcard repeats, it took literally minutes as opposed to hours to produce a working repeat for use on my now 930 and the desired proof of concept. It is interesting how our perspective and skill can evolve over time. This is the new, “quick” version, beginning with flipping the card segment over horizontally, a requirement with Ayab or img2track on my 930. 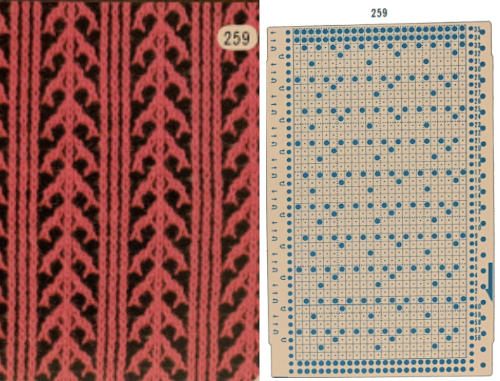 259 shows the traditional approach combining the two techniques that take into account the fact that when the second selecting carriage starts to move from the opposite side, the punchcard does not advance, repeating the same preselection. Added discussion of the differences in repeats for both machine types may be found in the post: Doilies: Lace meets hold and goes round In this instance expanding the punchcard repeat with extra blank rows to allow for extra LC passes to maintain proper transfer direction is not necessary, but the repeated punchcard selections need to be taken into account. There are 2 options for starts: if beginning with lace rows, the first preselection row is from right to left with the LC, if beginning with weaving, the first preselection pass from left to right. End needle selection is in the KC is canceled. As knitting progresses, if an end needle is selected in the pattern push it back to B prior to making transfers in that row. The movements when working with two selecting carriages on the electronic are standard, the repeat advances a row in the design with each pass of the carriage. Here each carriage operates for 2 passes, to and from its original side after the first preselection row. I began my proof of concept with woven rows. The punchcard repeat has been reversed
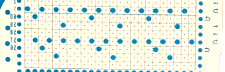
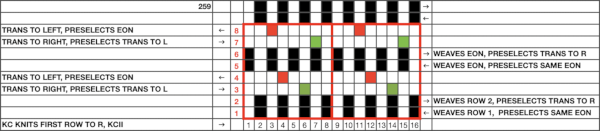 The top swatch tests the repeat as given above, beginning with the weaving pattern. Mirroring the repeat also produced an interesting variation, as seen in the bottom test
 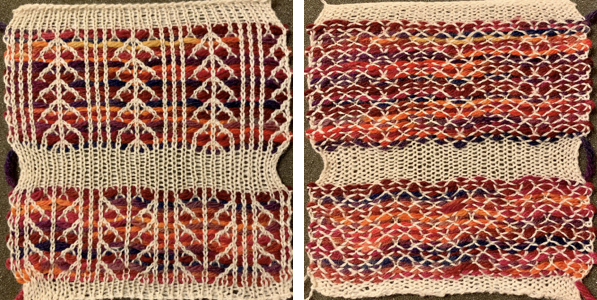 A review of 589, showed that it could be knit using each carriage for 2 passes as done above. The same repeat as the one in the original punchcard, mirrored,
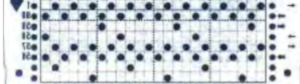 produces the same fabric on the 930 as with using the more complicated separation methods described further below. The chart depicts the desired actions. My first row was knit with the KC set on KCII, preselecting while knitting a plain knit row from left to right, followed with the first lace transfer pass also from left to right
 the electronic repeat and its .png
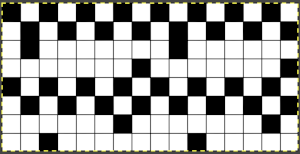
![]() Analyzing the card, sorting out possible repeats follows since mylars or bitmaps for download often only require a single repeat of the pattern. If you are not used to doing this, sometimes beginning with recognizable vertical ones first is a bit easier. The first problem: matching the arrow markings beginning just above row 1 mark on the right, it appears the first set of transfers should be to the left,
Analyzing the card, sorting out possible repeats follows since mylars or bitmaps for download often only require a single repeat of the pattern. If you are not used to doing this, sometimes beginning with recognizable vertical ones first is a bit easier. The first problem: matching the arrow markings beginning just above row 1 mark on the right, it appears the first set of transfers should be to the left,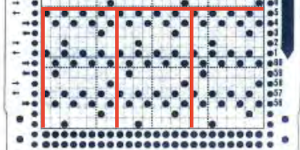
 The pattern is simply not workable as given using both carriages selecting needles from opposite sides of a punchcard machine, each moving for 2 rows.
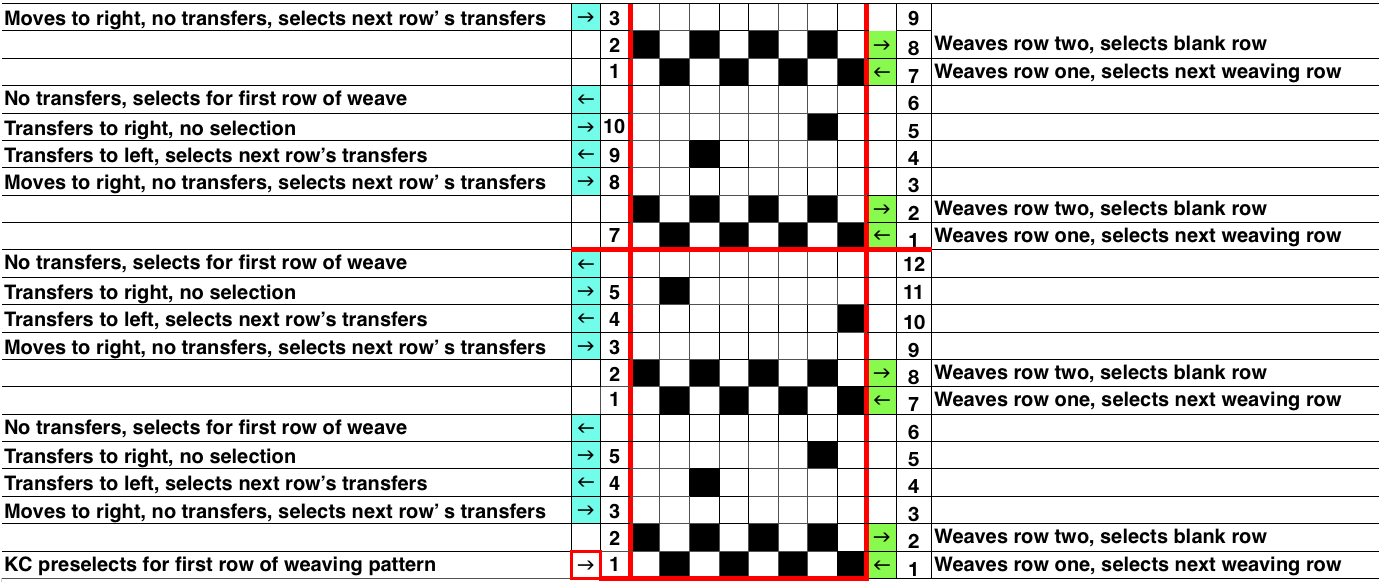
Reworking the repeat for use on the electronic in order to use the LC for four passes, beginning and returning to the left-hand side of the machine: the movements of the respective carriages on both models are plotted out, beginning with the theoretical punchcard one, mirrored horizontally, on the left, expanded in the center for the electronic, with the final repeat on the right. I now use different color cells to represent the direction of the transfers, here red for ones for those to the left, green for those to the right. The grey rows indicate blank ones that are required for the lace carriage to perform the necessary selections, transfers, and then to complete its return to the left side of the needle bed 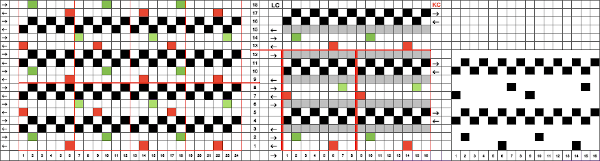 the smallest, single repeated in width X 2 for use on my 930
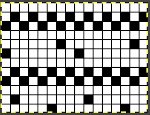 its .png
 ![]() Extension rails must be used as both carriages engage the belt. The LC operates from the left-hand side for four passes throughout. The KC from the right for 2 passes each time. It advances the design by one row for each pass, preselecting needles or blank rows depending on the presence or absence of pixels as it would in any other fabric type. End needle selection is canceled. The weaving yarn is laid over the groups of every other needle in D position. A quick proof of concept swatch, the ground yarn may need tension adjustments for the best result
Extension rails must be used as both carriages engage the belt. The LC operates from the left-hand side for four passes throughout. The KC from the right for 2 passes each time. It advances the design by one row for each pass, preselecting needles or blank rows depending on the presence or absence of pixels as it would in any other fabric type. End needle selection is canceled. The weaving yarn is laid over the groups of every other needle in D position. A quick proof of concept swatch, the ground yarn may need tension adjustments for the best result 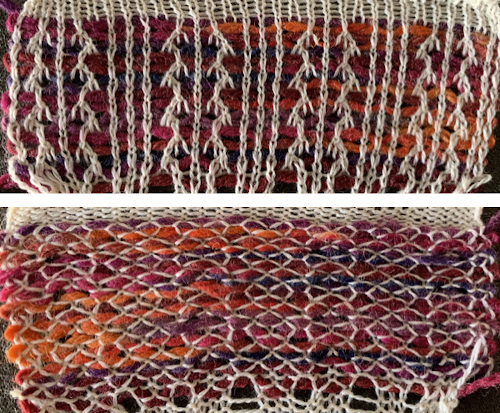 an interesting variation with the above repeat flipped horizontally
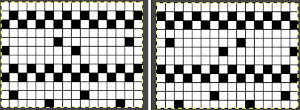
![]() the mirrored repeat is used in the top swatch, any dropped stitches will result in floats. The repeat prior to mirroring was used to knit the bottom swatch. Dropped lace transfers may be missed behind the laid in thicker yarn. Transfers may need to be made manually if they continue to be a problem, especially if the ground yarn tension needs tightening in order to achieve the desired effect.
the mirrored repeat is used in the top swatch, any dropped stitches will result in floats. The repeat prior to mirroring was used to knit the bottom swatch. Dropped lace transfers may be missed behind the laid in thicker yarn. Transfers may need to be made manually if they continue to be a problem, especially if the ground yarn tension needs tightening in order to achieve the desired effect. 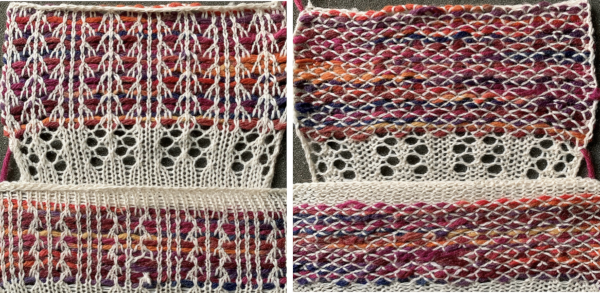 Starting the piece with 2 woven rows, rather than lace transfers: charting for working with the LC operating from the left for 4 passes, the KC from the right for 2 passes (worked on my 910, using mylar):
 comparing the sequences for both starts, weaving on left, lace on the right
 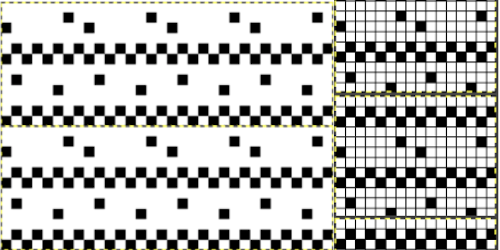 Patterning issues are not always due to needle selection problems. Weaving and lace pattern combinations may be tested in lace first to establish eyelet selection accuracy. Here the weaving test failures were due to a problem with the sinker plate. The weaving lever was working properly in one direction only. Check that both brushes are turning freely. If they are not, remove the screw and any fluff caught under them before replacing them and continuing to knit. Occasionally the lever that moves the brushes up and down fails and a new part is called for. Here, the hand technique success followed a change of the sinker plate
  a sample using 2 different weight yarns; irregular weaving may require changing the yarn, or adjusting the tension used for the background yarn
 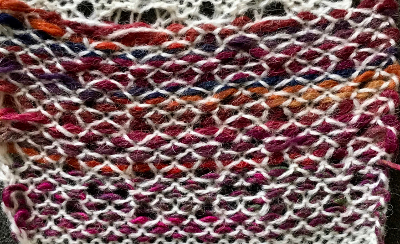 I like to test these repeats first in transfer lace, to sort out the best tension and yarn to use, errors in programming,
 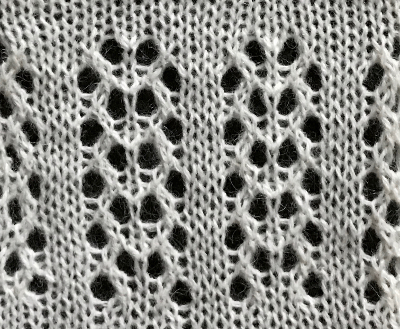 Taking another look at the original punchcard and those arrows on the left-hand side, a detail I had originally missed, they all start from and return to the right, the line thickness changing marking the alternate carriage
  Both carriages operate from the right side, for 2 rows each, switching their place on the machine bed. Arrows for design row 1 begin above the red line. Transfers are all first to the left, then to the right. The card advances a single row for each carriage pass. With carriages operating from the same side, the punchcard advances one row for each carriage pass
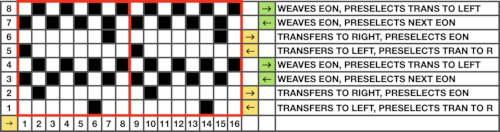
 As I was trying to understand what was happening, I was also able to produce a swatch using the original #589 card, using a method that, however, produced all lace transfers to the right, and differed from the desired effect:
KC passes are indicated with green text, LC passes in blue
Pass 1: COL, KCII, N for a knit row which preselects the first weaving pattern row, knit to the right
Pass 2: COR, KC, EON preselected, set the card to advance normally, lay in weaving yarn, KC moving to the left will weave the first row, preselect the second weaving row
Pass 3: COL, KC weaves second-row EON, preselects the first row of lace on its way to the right
Pass 4: COL, LC transfers to right, repeats previous row’s selection, as it moves to the right
Pass 5: COR, LC no transfer happens on empty needle selected for the second time by the previous row, selects for the next row of transfers, moves to the left
Pass 6: COL, LC transfers pre-selected row to right, preselects first EON row for weaving, moves to the right, release it, return it to left
Pass 7: COR, KC, EON, lay in weaving yarn, KC will move to the left and will weave the first row, preselect second weaving row
Pass 8: COL, KC weaves the second row EON, preselects the first row of lace on its way to the right
Pass 9: COL, LC transfers to right, repeats previous row’s selection as it moves to the right
Pass 10: COR, LC no transfer happens on empty needle selected for the second time by the previous row, selects for the next row of transfers, moves to the left
Pass 11: COL, LC transfers preselected row to right, preselects first EON row for weaving, moves to the right, release it, return it to left. This row matches design row 1 and is starting the repeat sequence again
Passes 2-11: each group complete 10 rows of knitting 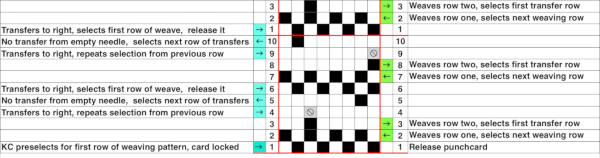 the knit, produced at the time on both my punchcard machine and with my 910 also requiring an LC release on its third pass,
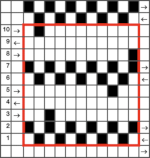 reflect all the transfers occurring in a single direction
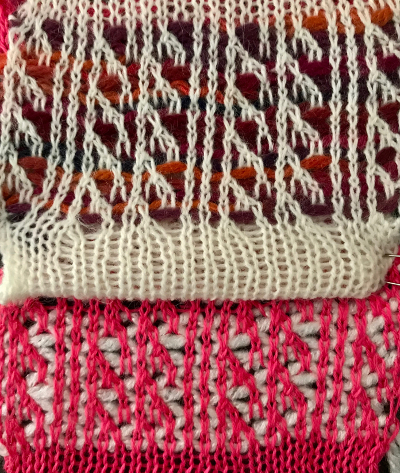
Unconventional uses for punchcards 3: lace in rib
Lace patterns for drop stitch: cast on as preferred, transfer MB stitches to ribber, where all stitches will be knit on every row. The main bed will be knitting the stitches that will be dropped (lace carriage will not be used), cancel end needle selection, program your repeat, push in both part buttons. As the carriage moves across the bed selected “lace” pattern needles will knit, the non-selected will be skipped.
Continue to knit until no needles are selected. At that point disconnect the main bed and ribber carriages, change the setting on the main bed to knit, remove the yarn from the feeder, bring the knit carriage alone across for 2 rows, and stitches will be dropped. After the disconnected carriage is returned to the opposite side, rethread, and connect again to the ribber carriages, set the knit carriage to slip and it once again will knit selected needles. Repeat the process for the length of the swatch. If on an electronic machine with 2 carriages: the number of rows is usually an even number, so an additional knit carriage with no yarn could be positioned on the opposite side to the one selecting pattern, set to do plain knitting, holding no yarn, and it will drop the stitches on “plain knit rows” on lace card without requiring the other additional steps and cam button changes.
Transfer lace on the top bed: the question periodically comes up with regards to the possibility of using the lace carriage when knitting every needle rib fabric. The lace carriage does not operate with the ribber bed in use in the standard up position, there is not enough clearance between the beds for it to travel from one side to the other across the needle bed. It is possible to drop the ribber down one click, opening up the space between the beds, supposedly to allow for the use of thicker yarns.
My machine is old enough for the ribber to be bowed in the center, increasing the space between the beds there. Trying to use that position for every needle rib in my desired yarn I got yarn breakage in the center of the bed, some skipped stitches, and the sides of the needle bed were still up too high for the LC to have a clear passage. The problem appeared to be due to its brushes hitting the gate pegs. With the brushes removed, but with some grinding against those same gate pegs the LC was able to move along the top bed. 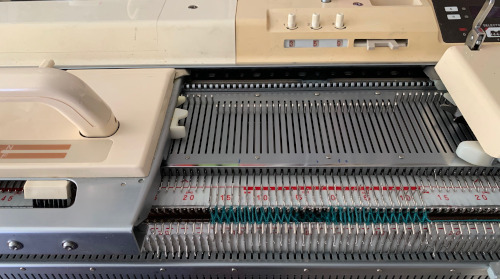 At least on my machine, I am giving up on the idea of using it, even if only to preselect needles, let alone make transfers.
This page is from the Ribber techniques book. The fact that transfers are broken up with blocks where there are no transfers, including some with stitches transferred to the opposite bed, makes it easier to track transfers than if using all over designs. Standard pronged tools are sufficient to move the single stitches or groups of three. 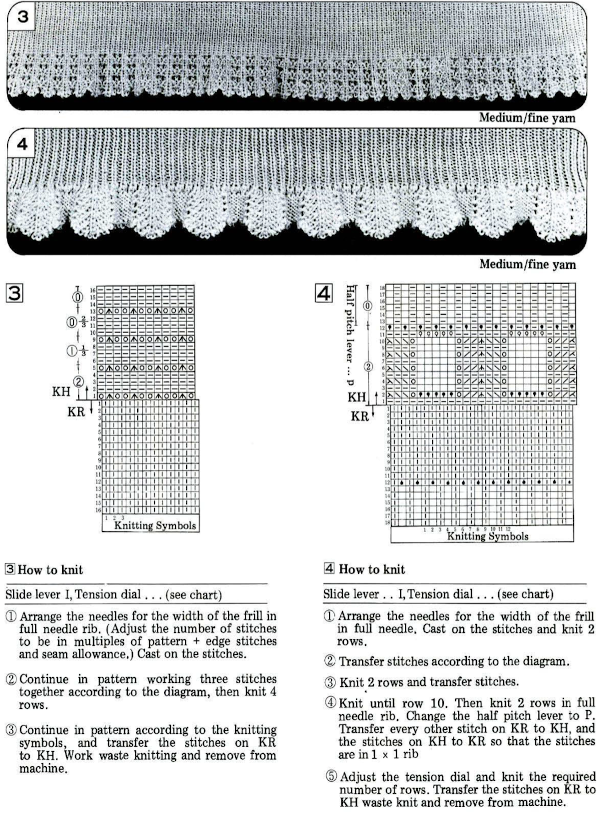
It is possible to transfer larger groups of needles on the main bed to create lace patterns, done of necessity in two-color brioche, but here I am seeking to modify lace punchcards so that the fabric based on them may be created successfully with as few errors and dropped stitches as possible.
My first attempt was made using a second knit carriage set to slip in both directions to preselect needles for transfers, using a small lace repeat to test the idea. The advantage of this method is that the original lace repeat does not need to be altered in any way. The disadvantage, aside from requiring a second carriage to use, is that the width of the piece on the machine is limited. The ribber carriage is in use and needs to remain at least in part on the machine bed on the far right, limiting the number of needles for possible use on the right side of 0 to about 20.  The same work could be done using only one knit carriage as well, but that would require changing the cam buttons from slip in both directions to knit and back to slip at the appropriate points, one of the methods that make it possible to knit lace on the 260 bulky machines
The repeat used is for this swatch is from StitchWorld, and is knit using the second knit carriage for needle preselection. Because each block contains lace transfers in only one direction, the fabric, even though it is a rib, reflects that in the biasing first in one direction, then in the opposite.
It helps to be clear as to whether one is producing lace repeat for use in a punchcard or an electronic model which in turn will require mirroring, such as when using Ayab or when using slip stitch selection with the knit carriage in combination with lace carriage selections to create shaped lace edgings. Testing on a small swatch will help determine whether mirroring is required for any specific design. Electronic machines usually produce the design as seen on the knit side, punchcard machines as they would be seen on the purl, thus making mirroring a requirement depending on the source for the design.
I usually begin by modifying my chosen repeat in a spreadsheet. On the left, the pairs of blank rows in the original repeat are temporarily colored in grey. It helps to be consistent. One repeat begins with a full motif, the other with half, which can be confusing when first starting out. The plan is to begin by producing a trim or edging, an all-over pattern for significant lengths appears daunting. Dropped stitches in single bed lace are no fun, in rib they may not even be noticed until the knitting is off the machine. The difference between the two repeats: the 2 grey rows on the left are replaced by black pixels or punched holes, with a blank row placed above and below each of the black row pairs. The design is now expanded from a 40-row height to a 50-row one suitable for use in a punchcard machine 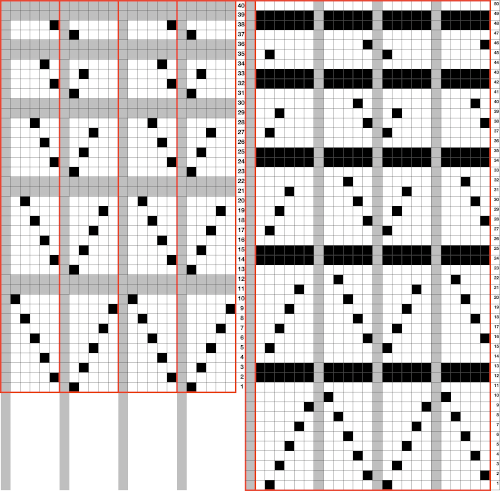 This explains some of the desired knitting actions
 ![]() Using the method described in other posts, this was the screengrab imported into Gimp. The grey line is a reference point. Cropping the image to content will allow the last blank row to be preserved by having the grey one there. After the crop, it can be bucket filled with white, or when the image is, in turn, bitmapped to B/W, you may find it disappears. Image scale is then used to reduce the repeat for knitting.
Using the method described in other posts, this was the screengrab imported into Gimp. The grey line is a reference point. Cropping the image to content will allow the last blank row to be preserved by having the grey one there. After the crop, it can be bucket filled with white, or when the image is, in turn, bitmapped to B/W, you may find it disappears. Image scale is then used to reduce the repeat for knitting. 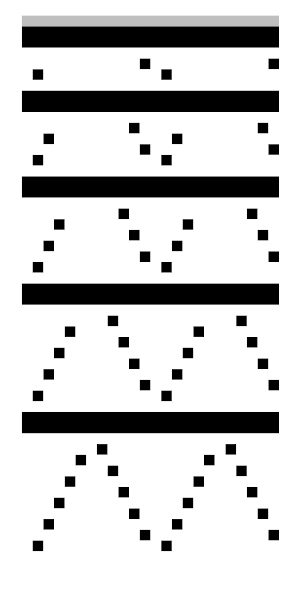 This is the repeat used to knit the swatch in my 930. If working from it, punchcard knitters need to mirror designs from an electronic source such as this and will find it easier to do so by turning the card over, marking the holes that require punching on that side, doing so, and then inserting the card in the reader in its usual orientation.
 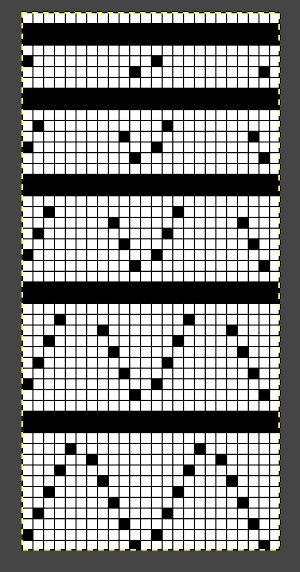 The 930 .png:
 ![]() Prior to knitting the pattern using the ribber, it pays to test the repeat single bed to get a sense of where the knit rows occur and to make certain the transfers are happening in the correct direction and in what place on the needle bed. There should be no side by side empty needles, and in this design, the first pairs of transfers result in 3 stitches on one needle in the center of each shape, not side by side holes as seen here in the false start prior to mirroring the image
Prior to knitting the pattern using the ribber, it pays to test the repeat single bed to get a sense of where the knit rows occur and to make certain the transfers are happening in the correct direction and in what place on the needle bed. There should be no side by side empty needles, and in this design, the first pairs of transfers result in 3 stitches on one needle in the center of each shape, not side by side holes as seen here in the false start prior to mirroring the image 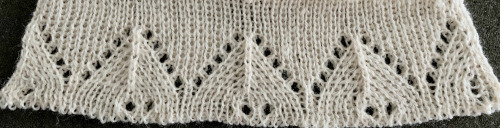 Making things work: both carriages will be operating to and from the left-hand side. The process is facilitated by the use of an extension rail and a color changer. The knit carriage alone will operate to preselect the needles that will need to be hand transferred to create the lace pattern. With the following modification of the repeat, all transfers are made moving away from the knit carriage. So if the KC is on the right, transfer to the left, if it is on the left, transfer to the right. The paired carriages will create the two all-knit rows between lace segments. The blank rows above and below the two all punched or black pixel rows are there to return the carriages to the proper, left side to begin preselection for the next row of transfers. If any end needles are preselected on the knit bed, push them back to B.
It is best to knit 2 rows of full needle rib before beginning transfer, that will ensure that stitches on both beds are formed properly. I did not, had a spot on the cast-on where the loops were not properly placed on the comb, and that is reflected in the area that looks like a stitch was dropped. 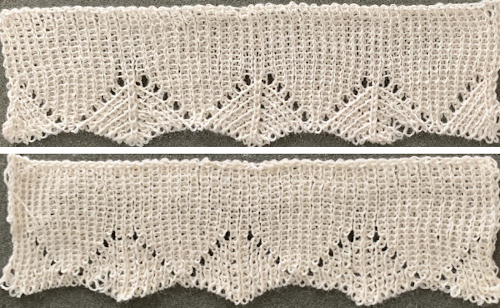 Begin with a zig-zag row from left to right, knit 2 circular rows, carriages will be on the right. Knit a sealing row to the left, followed by 2 all knit rows, ending with carriages once more on the left side.
COL: remove the yarn from the Knit carriage, hold it in color changer by pushing the adjacent feeder number
separate the 2 carriages
cancel end needle selection
KC is set to slip in both directions, it will remain there for the duration of knitting the pattern, make certain all main bed needles are in the B position
KC operates alone to the right and preselects the first row of transfers
COR transfer preselected needles to the left, away from the carriage. Make certain all needles are in the B position before the next carriage pass. KC will preselect for transfers to the right as it returns to the left side. Repeat the process until all needles are preselected for an all knit row as you knit back to the left
COL pick up the yarn, engage the ribber carriage knit 2 rows on all needles
Repeat: *COL: remove the yarn from the Knit carriage, separate the 2 carriages, operate KC alone making transfers away from the carriage until all needles are preselected as you knit to the left. COL pick up the yarn, engage the ribber carriage knit 2 rows on all needles** until ready to continue in every needle rib.
This method is slow, I found it oddly meditative. It offers an opportunity to review stitch formation, thus avoiding dropped stitches. Hand transferring lace preselection on the single bed as well can sometimes make a fabric achievable that is otherwise cursed by dropped stitches and fiber issues.
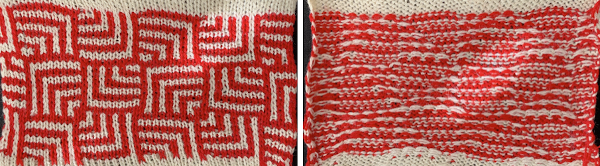
Mosaic and maze inspiration from additional sources
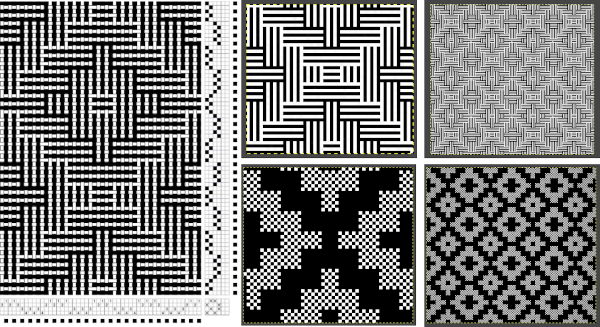
Reviewing properties of both: maze patterns have long vertical and horizontal lines broken by regular gaps and the pattern lines change course from the vertical to horizontal, and vice versa. Maze cards can be identified by completely punched row segments, some alternating with every other square marked for two rows, usually geometrically shaped. Areas of stocking stitch produce horizontal colored stripes, and alternating pattern stitches that slip or tuck cause the vertical stripes, which are sometimes pulled nearly diagonal by the influence of tuck or slip. The fabric will be unbalanced because the number of needles slipping or tucking will not be the same on every row. Odd rows usually form 2 color horizontal stripes, even rows vertical stripes, with color changes occurring every 2 rows.
Mosaics have a brick arrangement (tessellae), with clear perimeters and cores, and stepped diagonals (frets) that are partially formed bricks, their positive and negative spaces are created by the use of contrasting colors. The stripe sequence is not as obvious. The punchcard does not resemble the original design.
In single bed work, the reverse of the fabric will show the original design in the texture of its slip or tuck stitches. There usually will be no floats longer than one or two stitches.
The knit side may look like a fair isle but the back lacks any long floats, hence the name “float-less fair isle”
The row gauge is compressed. Tuck fabrics are short and wide, slip ones tend to be short and thin. Some patterns elongate in washing. The tension used is usually one number higher or more than that used for stocking stitch for slip patterns to reduce their narrowing. Tuck knitting may need adjustments to lower tensions. Smooth yarns in contrasting colors are the easiest to establish an easily recognized test pattern, the choices that follow may then be far more personal.
After a while repeat units begin to become familiar. Pondering possibilities: 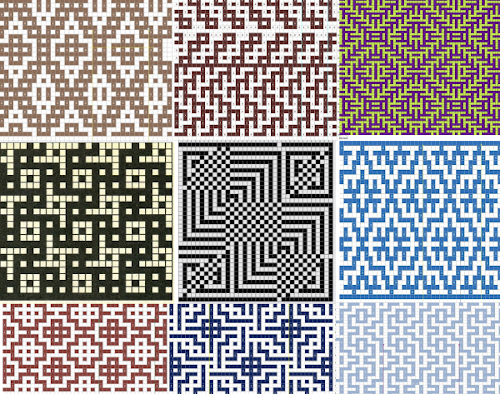 Here the design knit as a fair-isle pattern would produce long floats, going through the steps of converting it for “floatless fair isle” proves of no benefit.
I previously wrote about the use of weaving
drafts as inspiration for other textile techniques, ie. knitting.
Endless published drafts may be found online or in books that might be interpreted for use with mosaic/maze single bed knitting. Having electronic machines available lifts restrictions in pattern width, while repeats too large for narrow items such as scarves may become useful for shawls or blankets. One such repeat, with .pngs shown for both single and double-height:![]()

This repeat is 36X36 before being lenthened X2 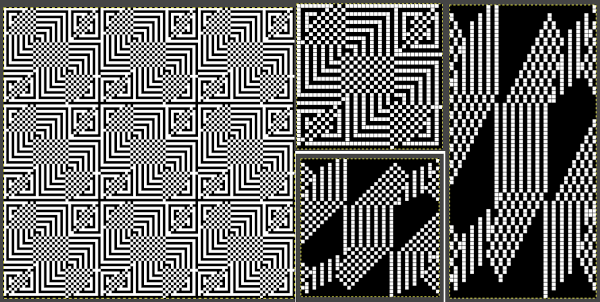
![]()
![]()
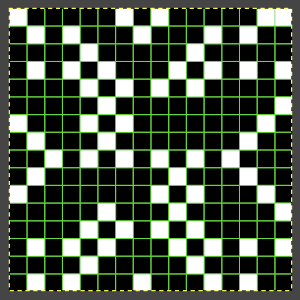
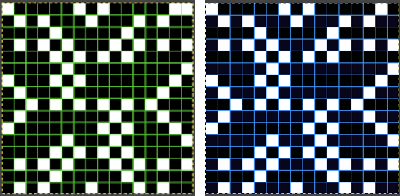
A different sort of challenge was posed by this 18X18 image with a row shift in areas with a large number of both filled-in or blank squares. As one moves up its magnified version in Gimp it becomes apparent that a row will have a very long float in one of the two colors. One option is to skip that row, resulting in the green gridded repeats for the converted motif both shown both for single and double length. The result in the knitting test swatch produces an unplanned color shift which could be declared to be a design feature, or one can continue with editing the inspiration source. 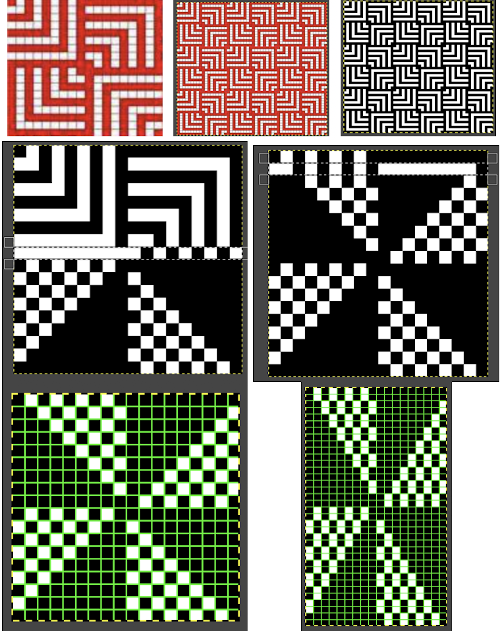
![]()
![]()
 Repeating the separation process with a new graph produces a workable cousin to the original
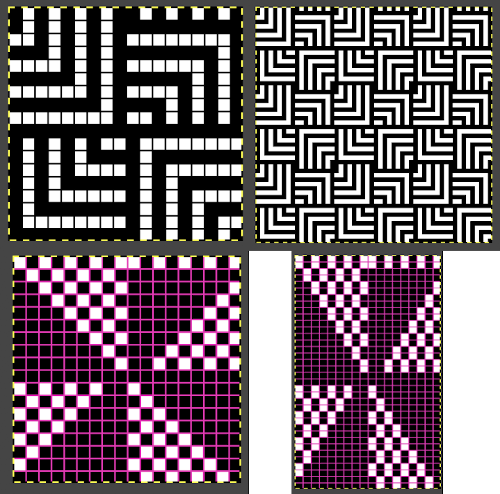
![]()
![]()
 Generally when creating these patterns on Brother machines, patterning selection varies for each pairs of rows. I got distracted while making the above swatch by a phone call, got to the point where there is a very obvious solid black all knit row in the repeat, but “forgot” its presence. I assumed I was having a selection or a carriage issue and scrapped the knitting off. Note to self: “remember to always check the programmed design before you do that again in the future”.
Knitting machine history and information, Silver Reed +
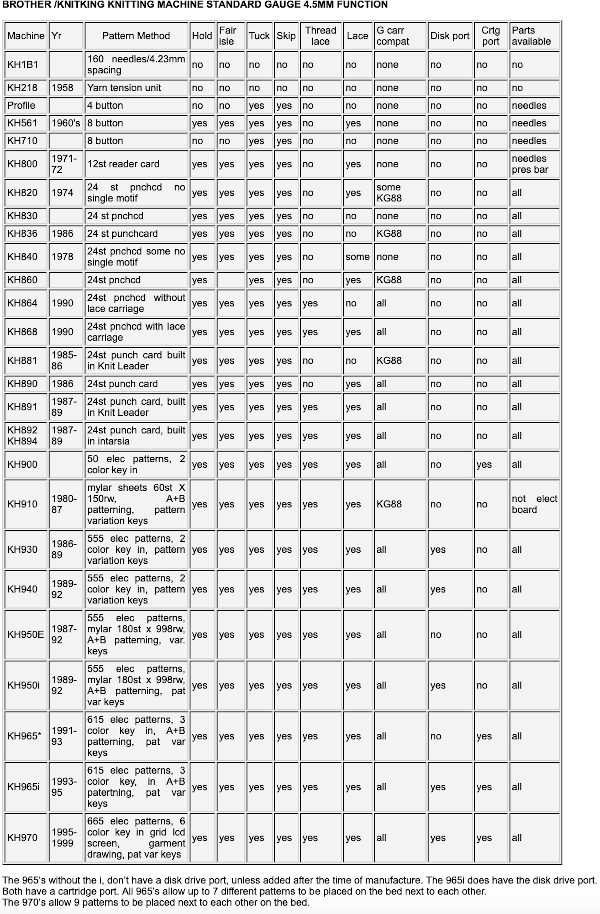
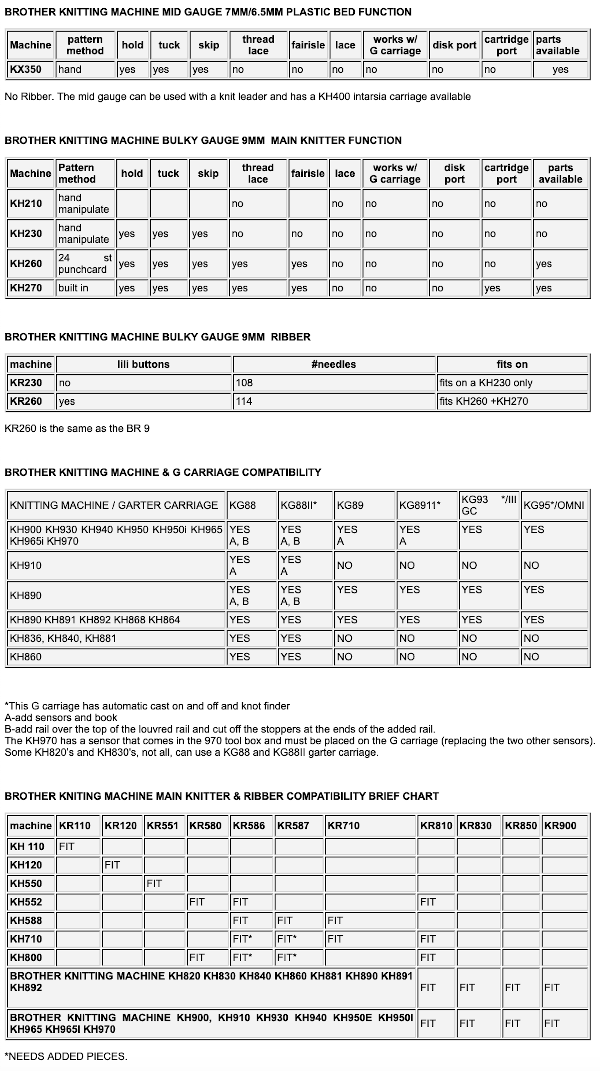
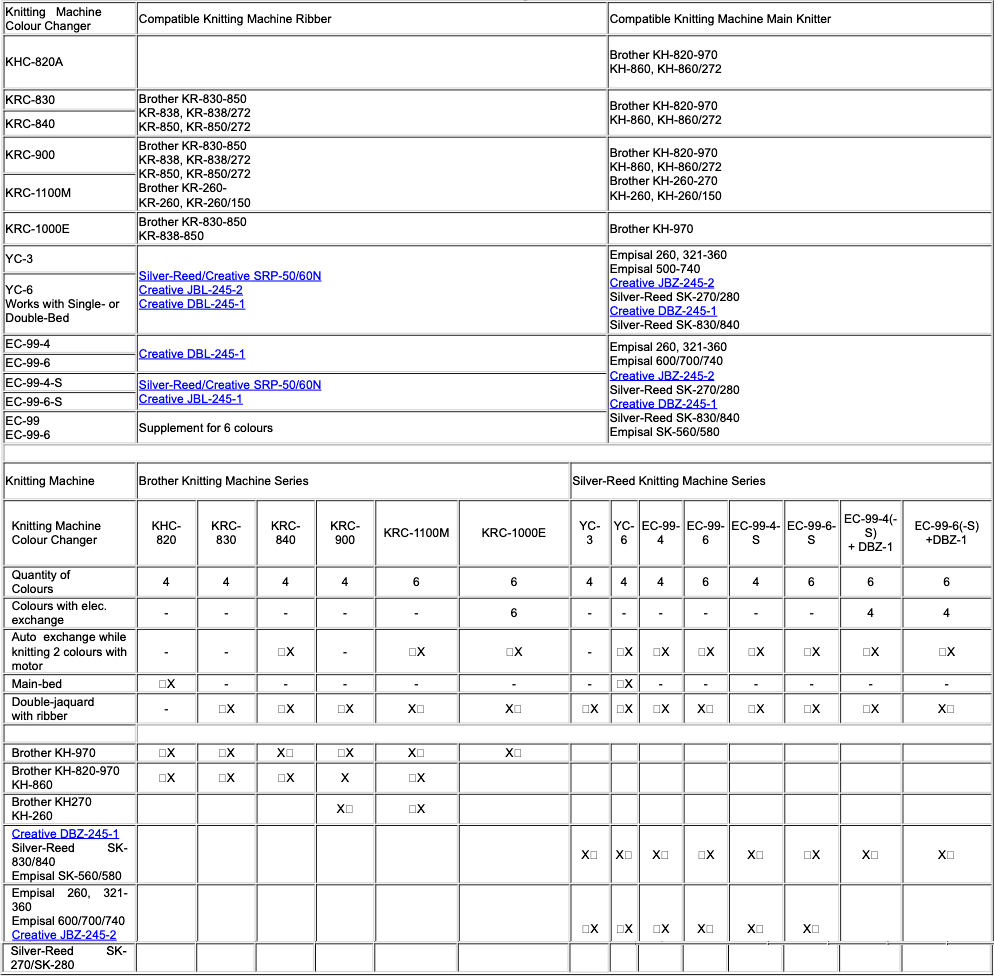
For Brother/ knitking please see Daisyknits brother compatibility charts/
The same model years may be sold with different names in other countries. This chart is reproduced with permission, and was developed by Claudia Scarpa 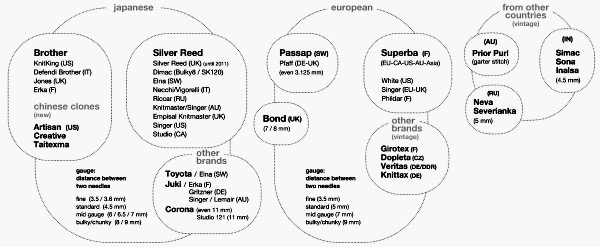 A 1993 Studio pub
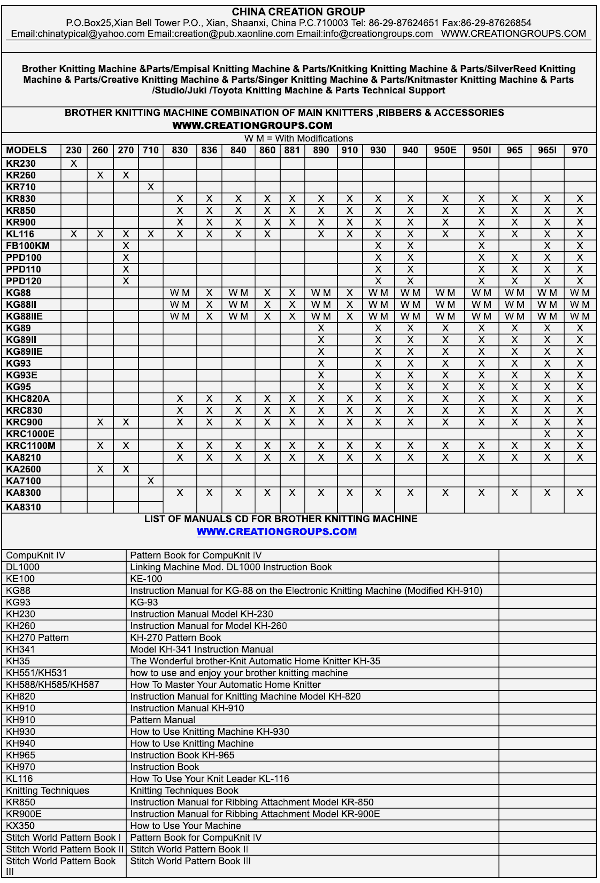
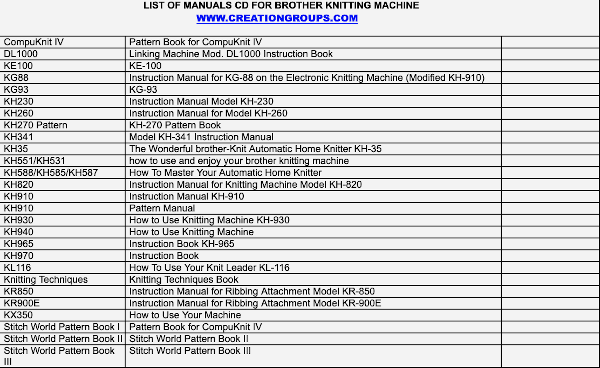
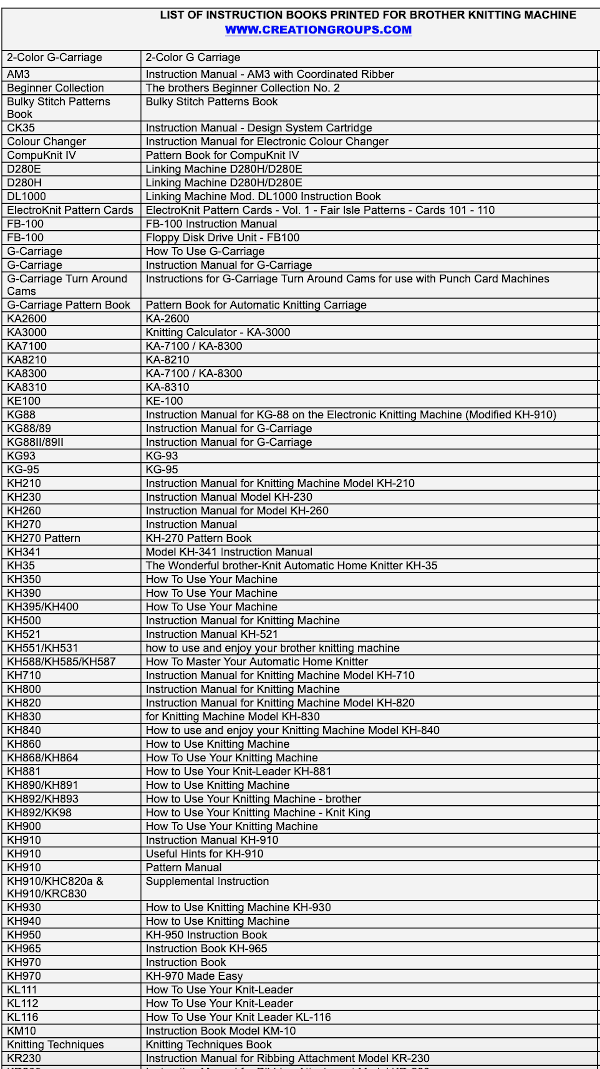
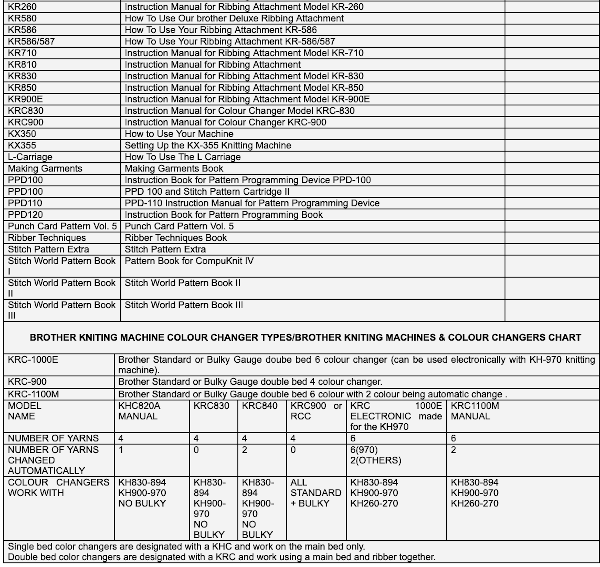
 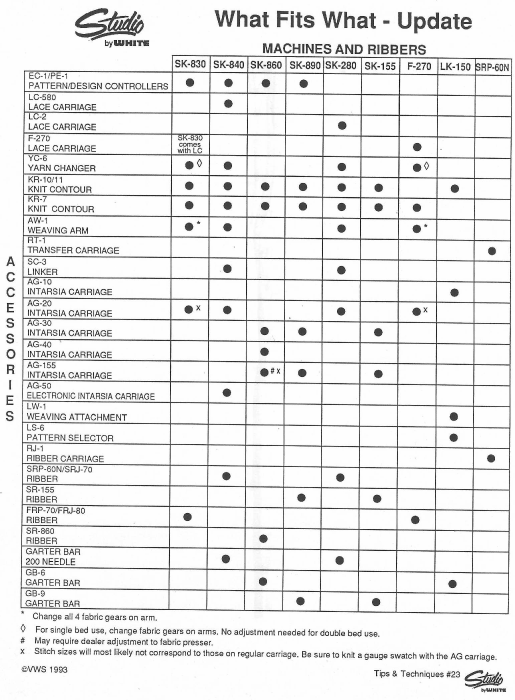 This information is from a Chinese commercial site, not fact-checked or edited in any way, models in blue lettering appear to be what is available for purchase through them
Mosaics, mazes, and DBJ charting meet Numbers, GIMP 2
 It is always a good idea after isolating the repeat to tile it in order to get a sense of how multiples line up
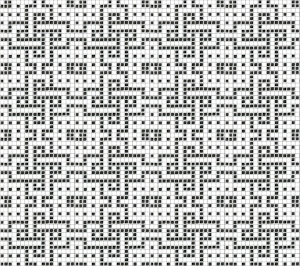 I was lazy about doing that with the first version of the colored repeat in Numbers and got the result in this swatch due to a missing black cell
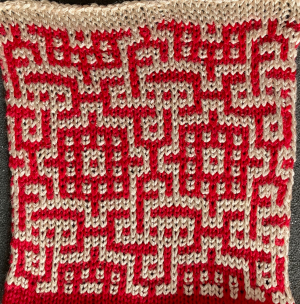
 The second try, see edit below to amend another missing cell
 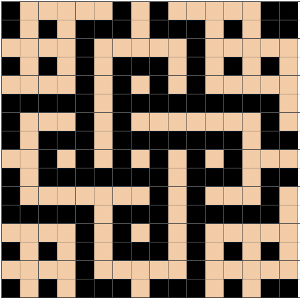 Beginning with the long method to create the design repeat in the color separation suitable for elongated dbj: the built-in color separation in most Japanese machines for DBJ (179 and color reverse in Passap) will knit each color in each design row only once, as happens on the single bed in knitting fair isle, which in turn is far quicker to knit in that setting than by using slip stitch with color changes every 2 rows. The first preselection row is from the left to the right, the first color knits once before colors are changed every 2 rows.
The dbj color separation that knits in each color for each design row twice begins with preselection from the right and continues with color-changing every 2 rows. The produced image will be twice as long as the original design, not desirable for keeping the aspect ratio as close to the original as possible, but a necessity in creating some alternative types of fabrics.
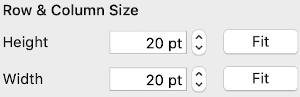
To start, create a table, making certain that cells are square and equal in size, height, and width. I prefer 20 X20 or more when working with small repeats.
 The zoom factor can be adjusted, increased for more visibility, and reduced prior to screen grabs that are planned to be further processed in Gimp. At less than 75% while creating charts, adding numbers or text, and sometimes changing the qualities of individual cells is harder to achieve. Large-size images may be scrolled through during the formatting process
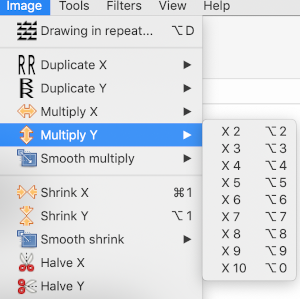
 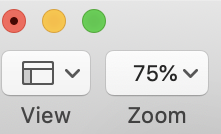 The working design repeat is 16X16. Create a new table that is 16 cells wide, twice its height, 32. While holding down the command key, select all the odd-numbered rows planned for the final chart repeat, any errors can be corrected by clicking again on the same spot, still holding the key down. The process may be done in steps, releasing the key in between selecting groups
 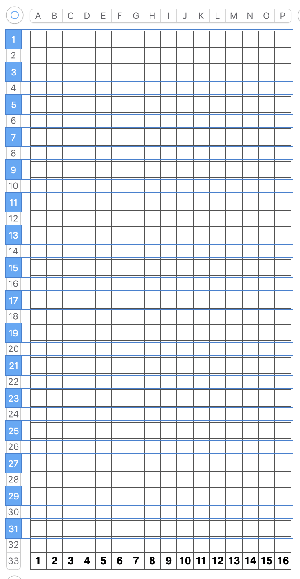 Choose the hide rows option, hiding 16 rows,
 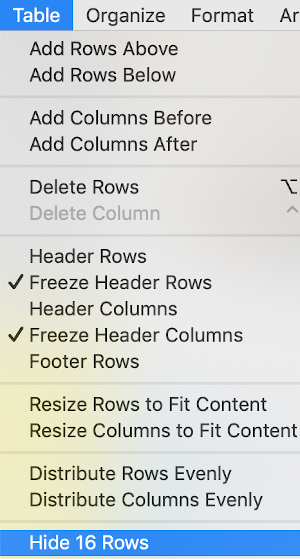 Add a column to the table. It will be colored, select the column and choose the no color fill option for it, then resize far wider by clicking and dragging the symbol
  at the upper table right to allow for copying and pasting the full repeat more than once.
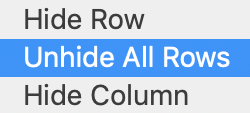
 To produce the .bmp file: copy and paste only the BW portion of the above table once more. Using the cell format option, remove all interior borders,
 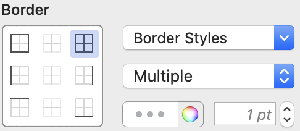 and if you prefer an outside guide, add an exterior border
 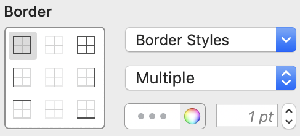 try zooming at 75% zoom, screengrab the table content, with an added blank border surrounding it, and import the result into Gimp. Choose crop to content, which will eliminate the extra white space around the image
 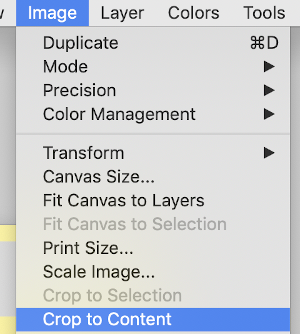 The final image needs to be double-height, so using the scale option choose image scale to 16 by 64 using the broken chain link prior to entering your numbers. These were my steps in scaling, I always check one more time for image size prior to saving. That is reflected in the last pair of numbers, with the now intact chain link symbol
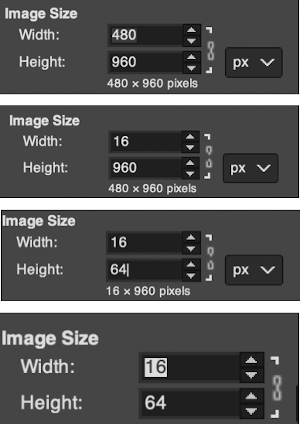
When I first used Gimp I devised and explained this method for mosaic color separations in prior posts. 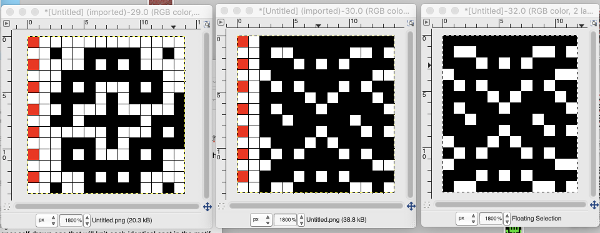 The expectation in working with such repeats is that on any rows there will be no more than 2 white squares marked side by side. On odd-numbered rows in the separation, the contrasting color squares slip, while on even-numbered rows the black squares slip. On odd-numbered rows, the main color (black squares) knits, on even-numbered rows the contrast color knits.
I think of row one/ odd rows as needing to knit black squares, row 2, and even rows having to knit white squares rather than marking in the traditional manner for slipped stitches on each row. I now have found a far quicker alternative to color separation for mosaic knitting using only Gimp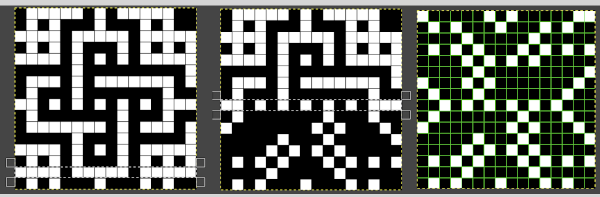 Working on the black and white indexed repeat, using a magnification of at least 1800X.
 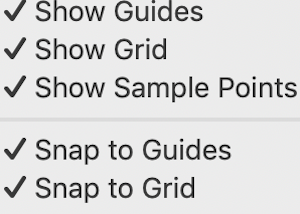 Using the rectangle select tool choose every other row beginning with the second one in the chart. That row will be highlighted by a white dotted line. Choosing
  will swap black and white cells in that row. Continue the process on every other row. It is not necessary to select the tool each time, as you advance and select the next row, the one just left remains briefly outlined in white dashes, making it easier to advance correctly in the design.
Import the black and white table, process as described, scaling for my final image to 16X32: 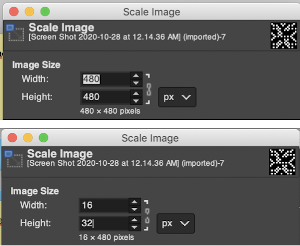
 This repeat posed by a quandary. The file may be used as-is and doubled in length after download. For doubling the height in Numbers, prior to importing the final screengrab into gimp, please see post: 2021/01/27/mosaics-and-mazes-charting-meet-numbers-gimp-3/
Because of my personal preference for not using elongation when knitting pieces in these techniques, I tested doubling height in Gimp with no success at all. However, I was successful in doing so using 2 paint programs, both available for free download for Mac. The first has an amazing range of features, including the illustrated resizing options https://www.arahne.si/products/arahpaint/
 and https://paintbrush.sourceforge.io/downloads/, which allows for scaling by percentages or pixels
  Comparing the results for the elongated repeat, errors in the first are obvious, there should be no white squares anywhere repeating for more than 2 rows
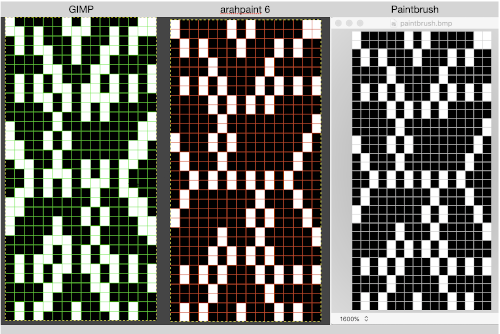
![]() Proof of concept
Proof of concept  December 2022: knitting the above again intending to share the result in Instagram, I noticed that 3 stitch/ row color block, which did not bother me at the time, but with the float showing behind the wire, I went about inserting that center cell. The red pixel in the image on the left marks the trouble spot. The remaining images illustrate using my latest Gimp separation method to rework the original png:
 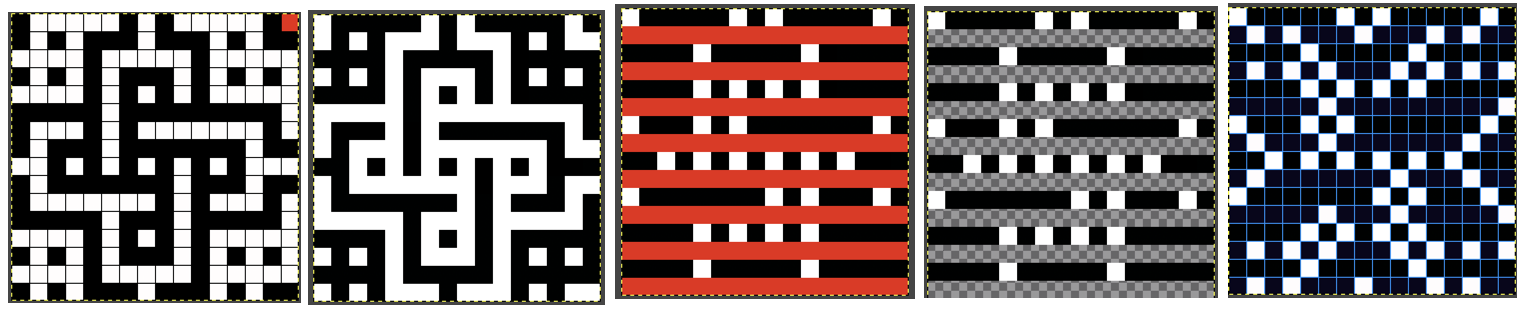 comparing the final result to the one in this post:
 The new file prior to lengthening X2,
 ![]() double length
double length![]() Returning to 2020:
Returning to 2020:
A review of a design from 2012/10/15/mosaics-and-mazes-from-design-to-pattern/, separated this new way 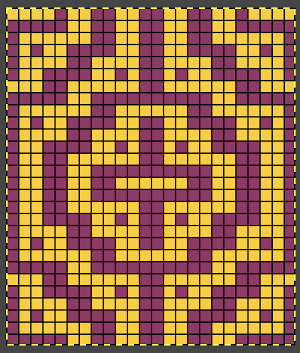 the repeat charted in Numbers
  tiling for viewing the repeat alignment revealed errors
 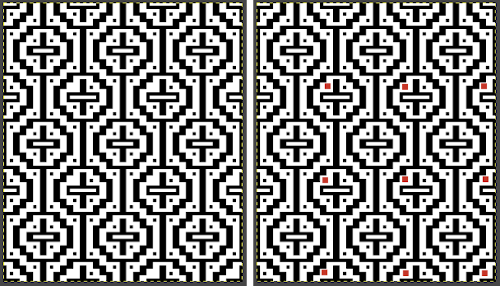 that will result in missing colored squares in the final fabric, which may not be noticed until after eyeballs have had a rest.
 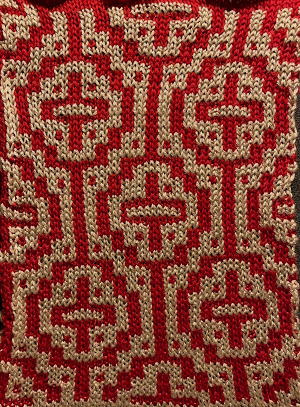 The amended repeat was color-separated working in indexed black and white and shown compared with the punchcard
 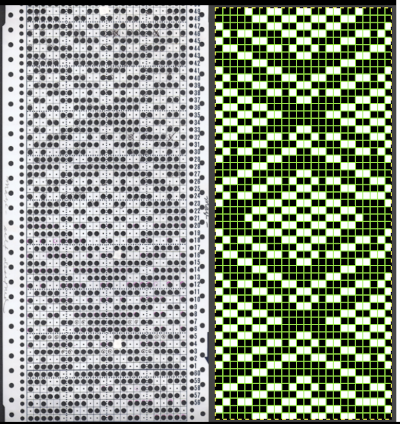 Here the final .bmp repeat is also compared with the color image in the previous post. It will need to be doubled in length for use with the color changer, the first preselection row is from right to left. End needle selection will ensure that each color knits the first and last needle on each side of the piece.
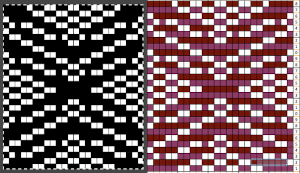
![]()
 The double-length repeat, 24X56
![]() Another very quickly separated repeat copied from 2015/10/03/working-with-generated-mazes-charting-1/
Another very quickly separated repeat copied from 2015/10/03/working-with-generated-mazes-charting-1/
 adapted for maze knitting, eliminating long floats, to be lengthened to double-height
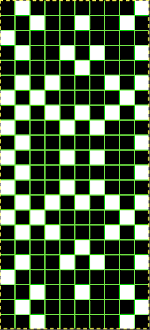
![]() drawn double-height via a paint program
drawn double-height via a paint program 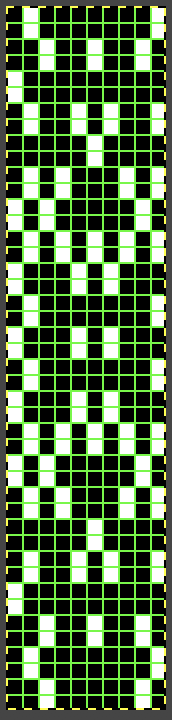
![]() Because there are no more than 2 white squares on top of each other, and no two side by side, I tested the pattern in tuck stitch, which produced some added texture. I had a major aargh moment with yarn where dropped stitches are seen at the top of the swatch
Because there are no more than 2 white squares on top of each other, and no two side by side, I tested the pattern in tuck stitch, which produced some added texture. I had a major aargh moment with yarn where dropped stitches are seen at the top of the swatch 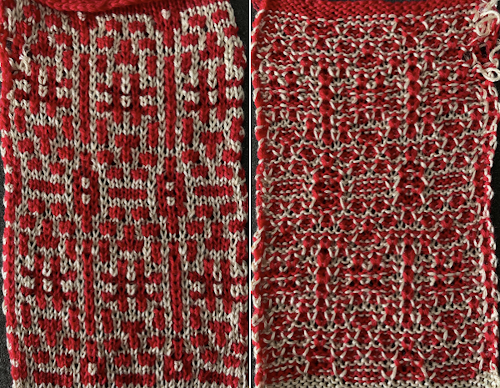 Using the maze generator by Laura Kogler, the larger BMP newly created with the program was imported into Gimp, explored in two renditions, eliminating double lines in the one on the right
 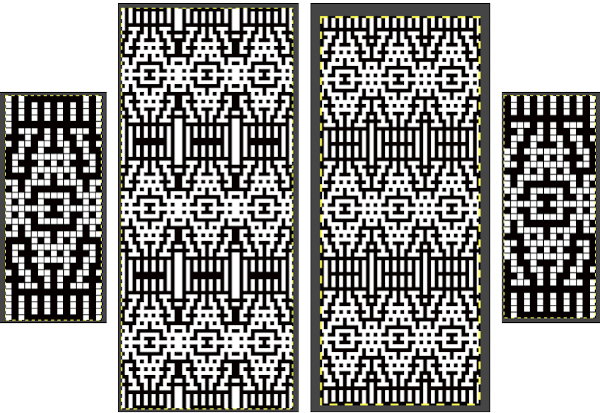 The proof of concept swatch for the version on the right, knit in tuck stitch
 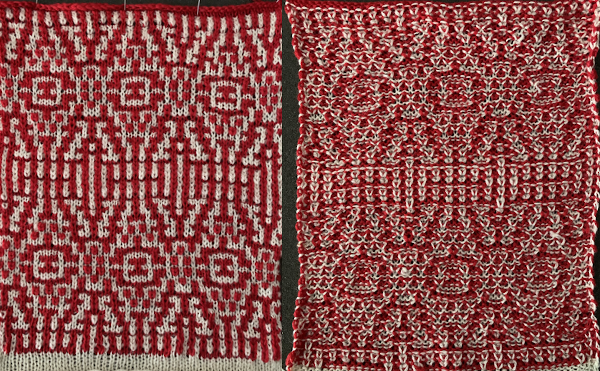 the double-length BMP ready for knitting, 14X68
![]()
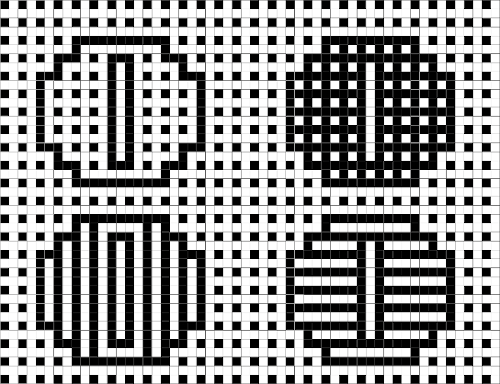
Designing your own motifs in expanded graphs: start with a template for either of the 2 grids shown below, and fill cells in or remove them. Remember these charts, unless knitted as a machine or software-separated dbj, will require a careful color separation. Beginning ideas for motifs, borders, and alphabets 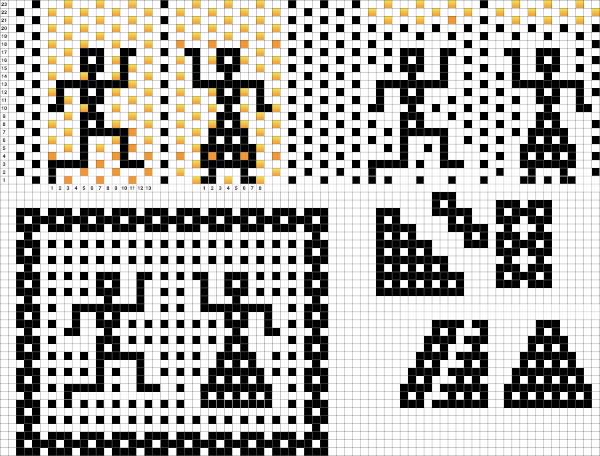
A collection of previous posts on this topic in reverse chronological order
2019/06/29/mosaics-and-maze…numbers-and-gimp/
2015/10/21/working-with-gen…-gimp-charting-2/
2015/10/03/working-with-gen…mazes-charting-1/
2012/10/15/mosaics-and-maze…design-to-pattern/
2013/05/06/mosaics-and-mazes-drawing-motifs/
2012/10/15/mosaics-and-maze…design-to-pattern/
2012/09/22/mosaic-and-maze-…-on-the-machines/
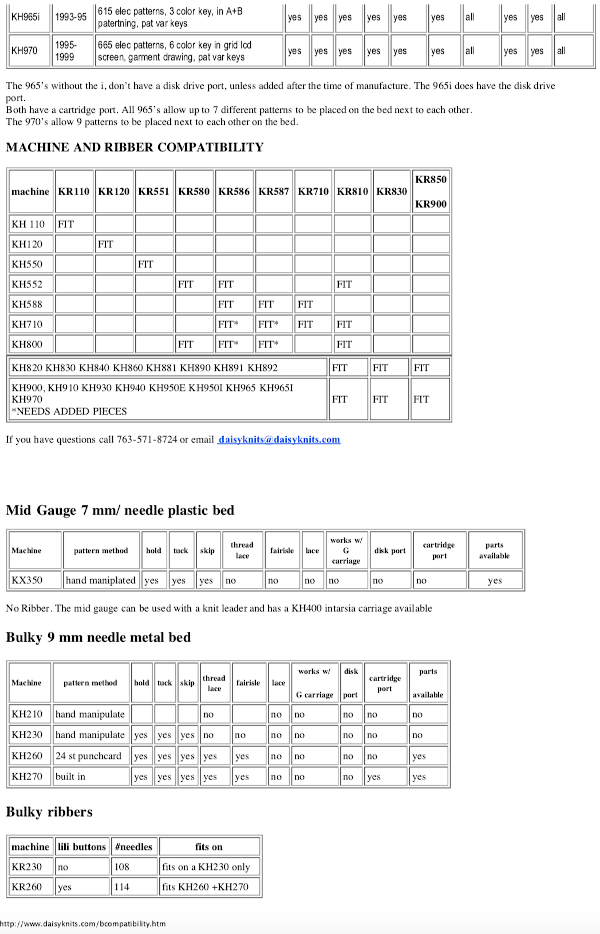
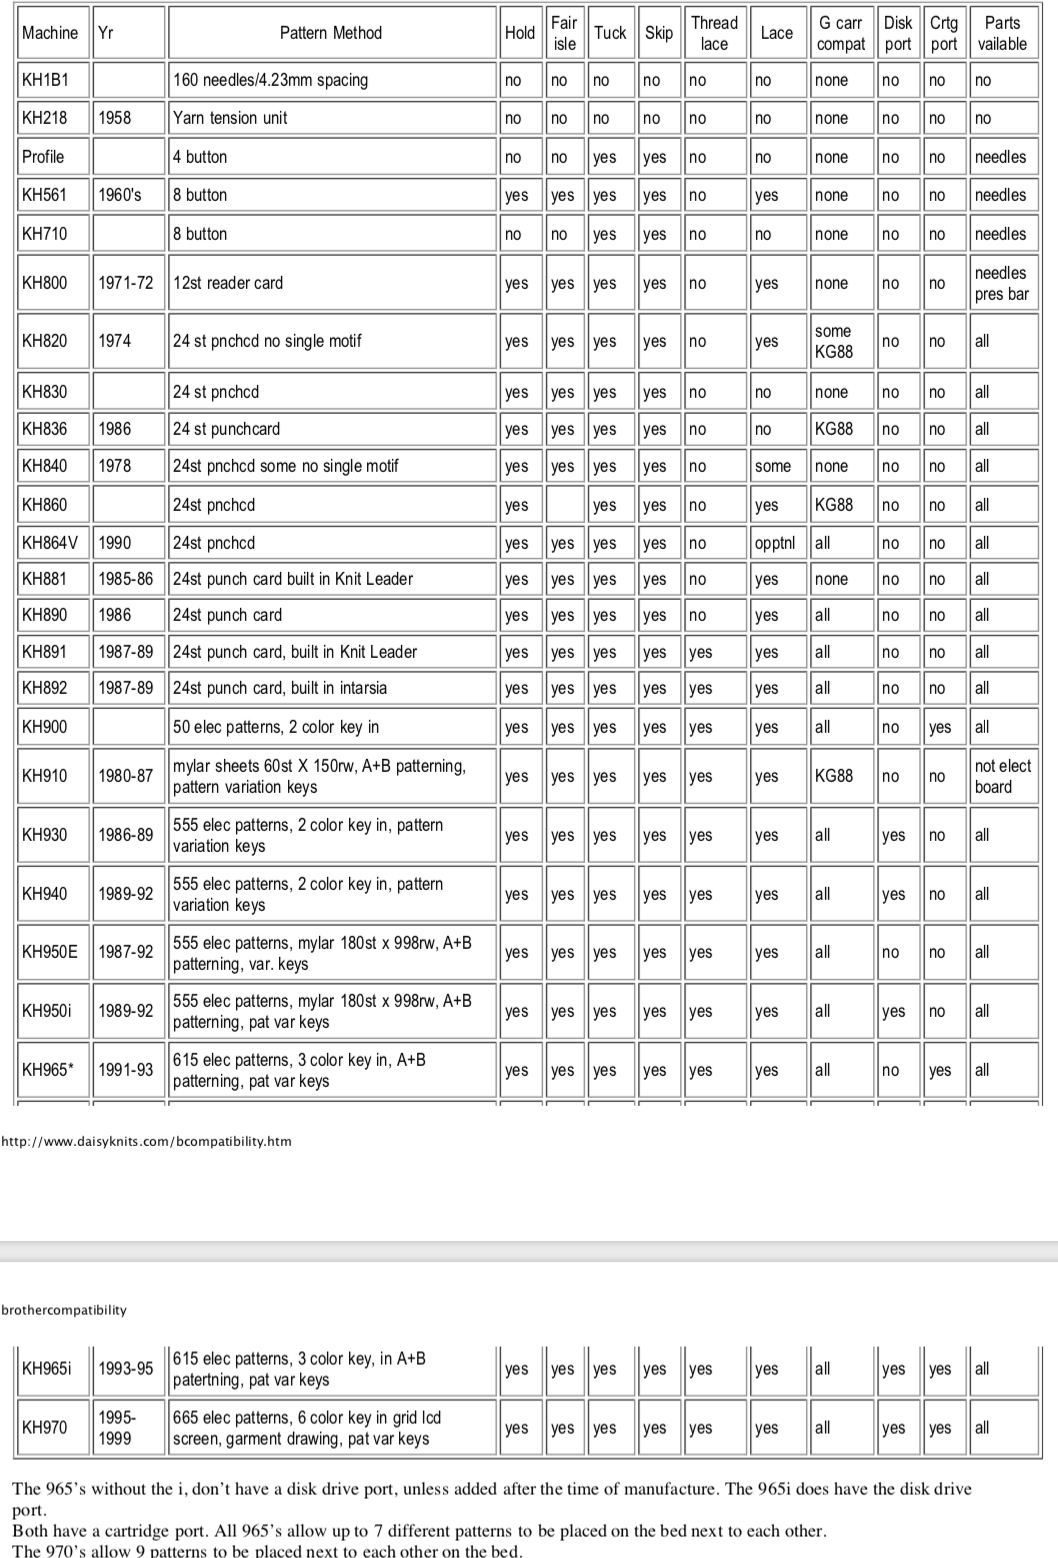
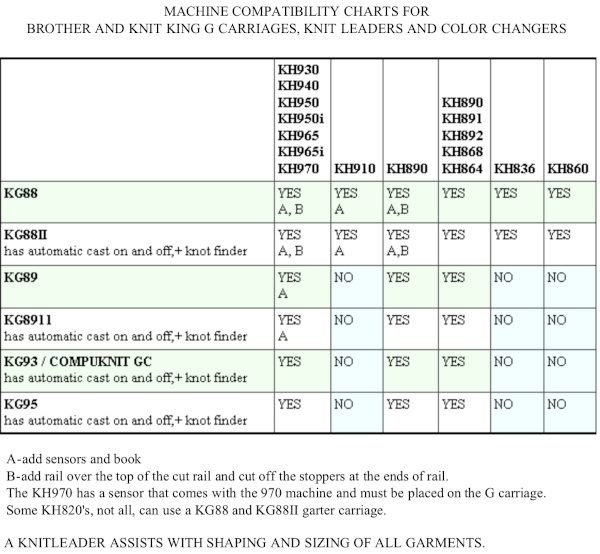
Daisyknits Brother compatibility charts and history
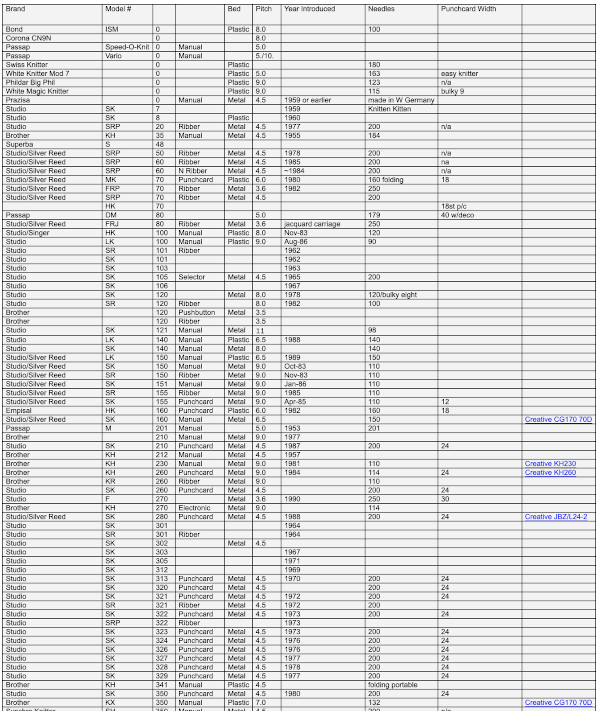
An excellent cumalative ongoing history of International brands by Claudia Scarpa and knitting-machine-history-and-information-silver-reed/
The website http://www.daisyknits.com/ is no longer available but can be found using https://web.archive.org/web/20160325002440/http://www.daisyknits.com/bcompatibility.htm. I have written an email asking for permission to share the information below several weeks ago, and have not received a response. The data gathered is highly valuable, I am sharing it here exactly as it was presented in 2008 and 2007 by its author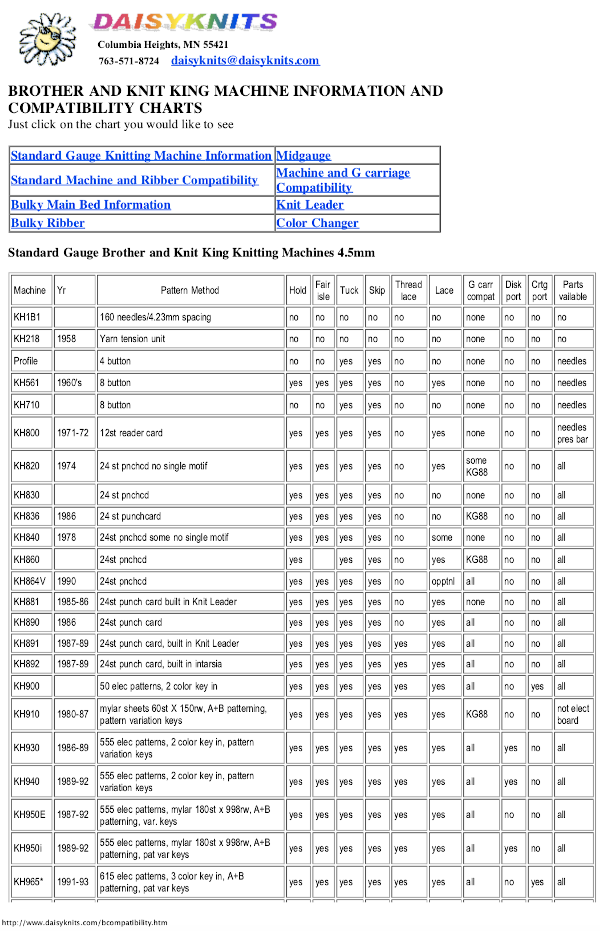

Addendum: this information is from a Chinese commercial site, not fact-checked or edited in any way