I have probably owned this accessory since the early 90s. After making a faint-hearted attempt at using it at the time and failing, it has been stored in the original box in the interim and just came out of retirement. The multiple languages operating manual for its use may be downloaded from http://machineknittingetc.com/brother-ka7100-ka8300-transfer-carriage-user-guide.html. There are several video tutorials available on Youtube. As a group, they generally illustrate simple transfers across an entire row in structures such as ribs used for bands and cuffs. This one is offered by Knitology 1×1, Elena Berenghean, a young knitter publishing very good machine knitting video instruction on a huge range of techniques.
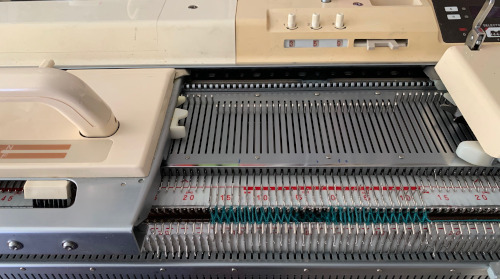
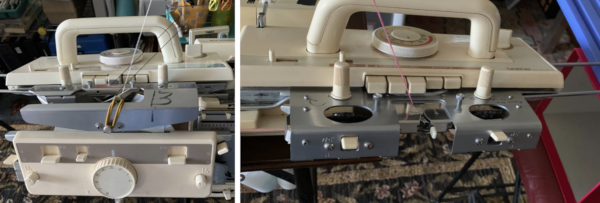
The tool is designed for the standard gauge and transfers only from the ribber up to the main bed. It is best to use yarn that has some stretch. The recommendation in the manual and in youtube videos is to perform the transfers with the pitch set to H. My own ribber is balanced, I found I had problems with transfers in that position, several carriage jams, and to get things to work properly in half-pitch I had to use the racking handle to move the ribber needles slightly more to the left for the transfers. The needles containing stitches to be moved, need to be slightly to the right of the needles with which they will share yarn, that spot may turn out to also be just wide enough to allow for the pattern to be worked without changing the ribber pitch. The yarn used is a 2/18 Merino, knit at tensions 3/5. 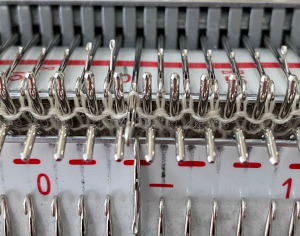 In terms of positioning the carriage, a wire that is akin to that found on Passap strippers is on its underneath. In positioning the carriage on the beds, check visually that it is indeed lying between the gate pegs of both beds prior to attempting to travel with it to the opposite side
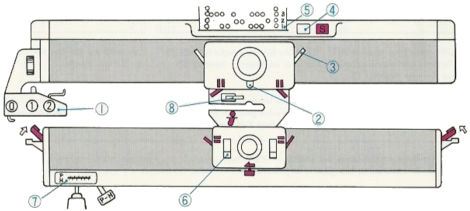
 ![]() If any carriage jam occurs, it takes cautious wriggling to release the wire and carriage. Upon completion of the transfers, simply lift up to remove it from the beds.
If any carriage jam occurs, it takes cautious wriggling to release the wire and carriage. Upon completion of the transfers, simply lift up to remove it from the beds.
Generally, the ribber tension used needs to be set on 4 at the minimum. The last row just prior to transfers will likely need to be knit at a looser tension than the remaining rib. If the stitches are too small they will not be picked up for the transfer. Folks familiar with lace knitting are aware that just the right amount of weight can make a difference in forming proper transfers. With these fabrics, too little weight may result in loops forming on gate pegs, too much weight, and stitches may remain over closed latches on the ribber needles and not share their yarn for transfers. Again, the transfer carriage operates only from right to left.
Studio instructions for their version of the accessory actually offer some different and more specific recommendations. When knitting full needle rib all the needles or pattern segments the machine generally will be in Half Pitch. Though there are needles in work on both beds, the ribber should be set to full pitch, aka P position, “point to point” prior to transfers, bringing them in close alignment in order to facilitate the process.  Passap machines accomplish the same by changing the angle of the racking handle to other than the full, up placement in order to achieve the necessary alignment.
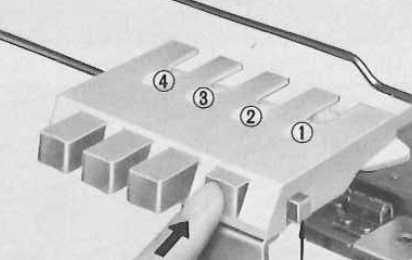
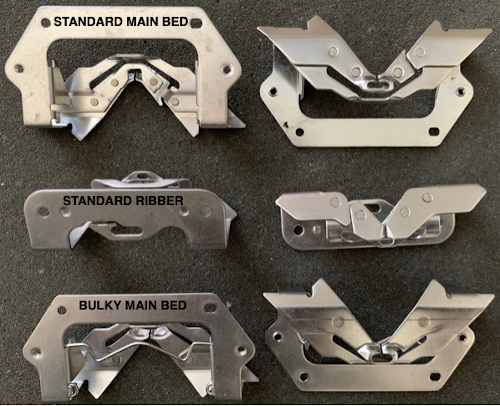
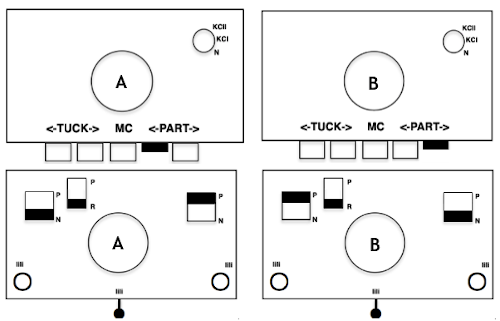
The Brother accessory and its parts, have clear imprinted illustrations for use
![]() The change lever has only 2 positions, up and down respectively
The change lever has only 2 positions, up and down respectively 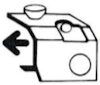
 Its position is determined by the number of needles on the ribber one wishes to transfer.
The carriage manual recommends its use after knitting a last ribbed row to the left, but it is possible to use it with both knitting carriages on either side, as long as there is generous space to clear all stitches when the accessory is placed on the bed, moved to the opposite side, and removed. An extension rail may be needed to achieve that amount of clearance.
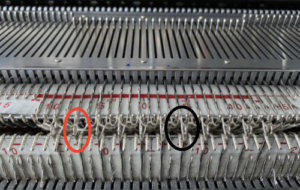
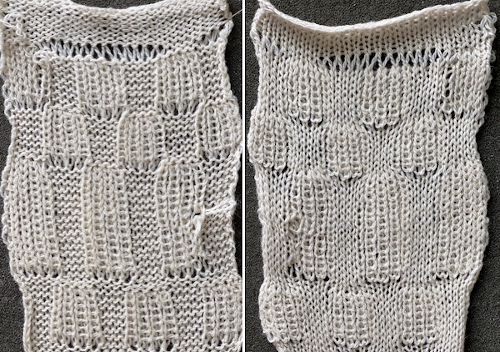
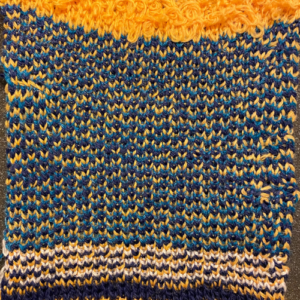
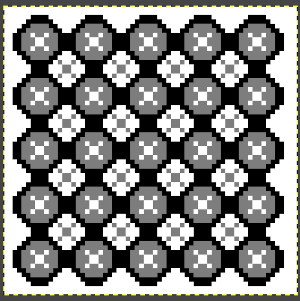
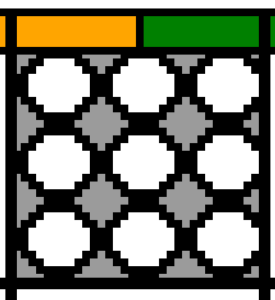
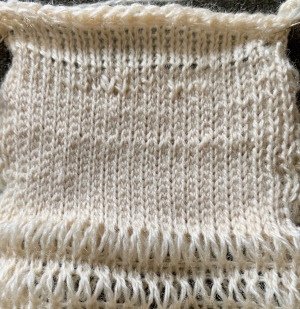
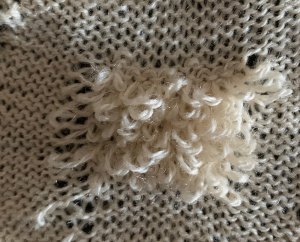
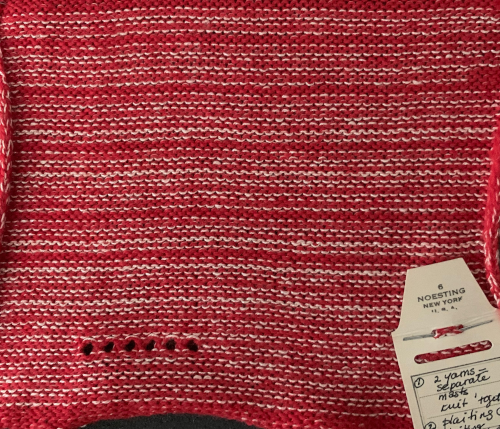
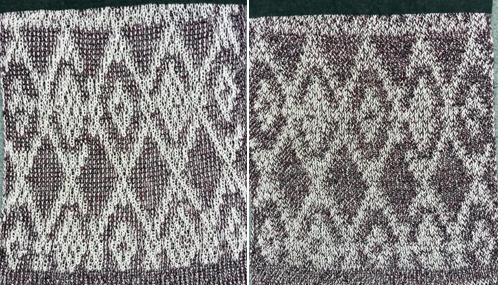
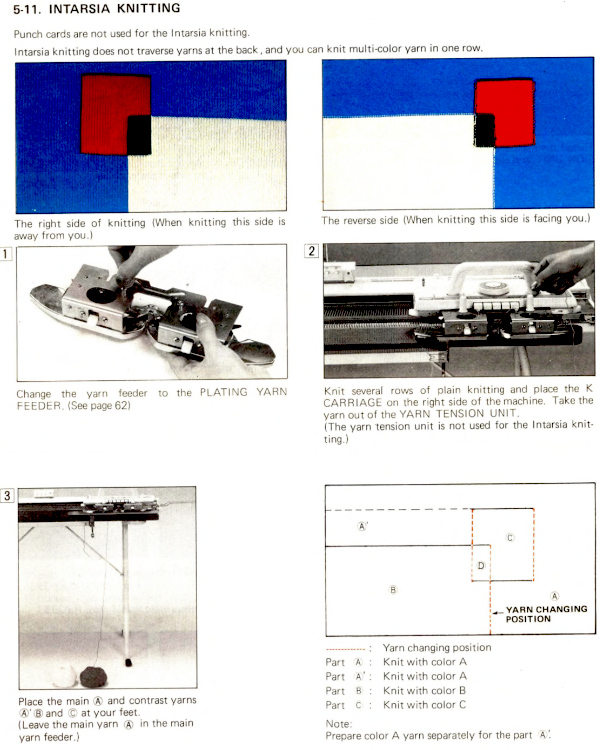
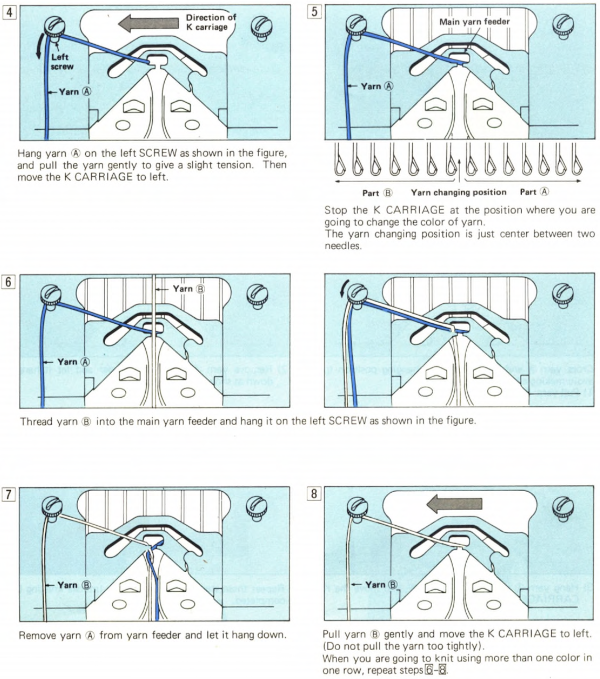
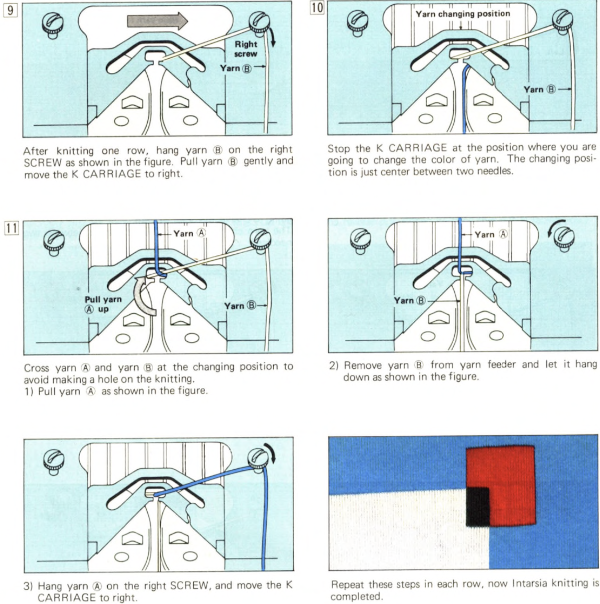
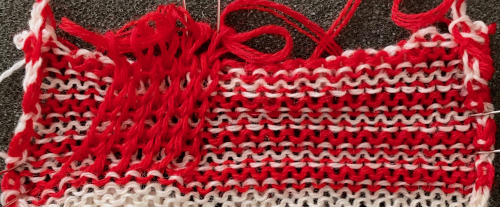
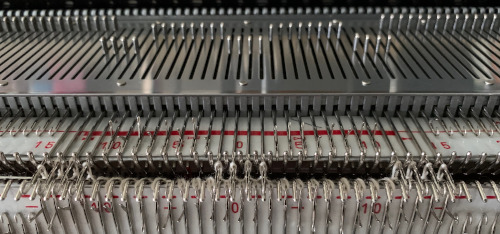
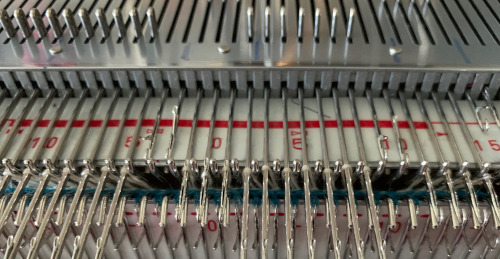
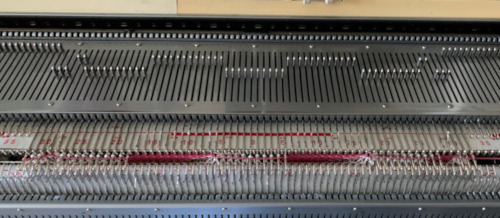
Operating slowly, one can watch the process of transfers while moving from right to left. Though skeptical, I found the transfers happened easily, with occasional skips. I worked with hand-selection of needles on the ribber to create a pattern, first with hand-selection, then with racking the ribber position to change the relationship of needles on one bed to the other, initially transferred after every 2 rows knit. The knit carriage was set to knit both ways, the ribber to knit in one direction, creating loops on the selected needles, and securing them in the other, allowing for the loops on the ribber needles to be transferred up to the main bed, before working 2 more rows. The “errors” in patterning were operator errors in needle selection as stitches were dropped, and not all the required needles were then returned to work position. Not a technique I would use for all-over fabric, but good practice.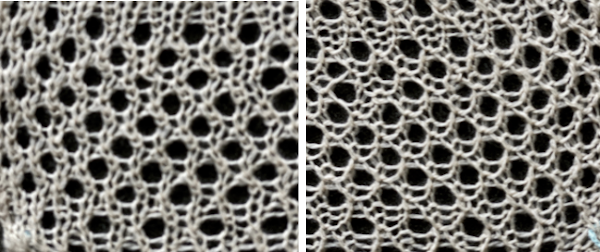 When the transfer occurs properly, the ribber needles will have yarn placed over closed latches, ready to be dropped, the yarn is shared and looped over stitches on the main bed, akin to tuck loops, outlined in the photo with the black oval. The first image is from the manual for the accessory, while in the photo, one improperly transferred stitch is outlined in red. To prevent dropped stitches from happening, any such locations will require a hand transfer to the opposite bed before dropping the remaining ribber bed shared stitches
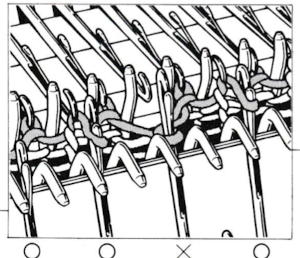
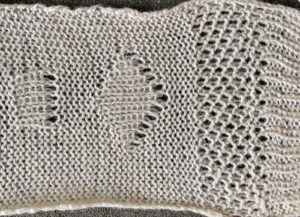
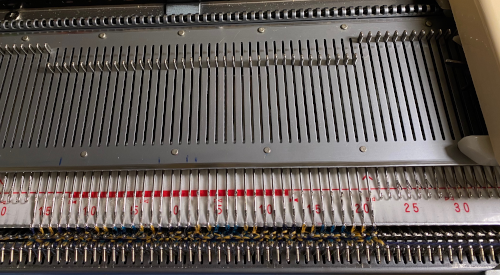
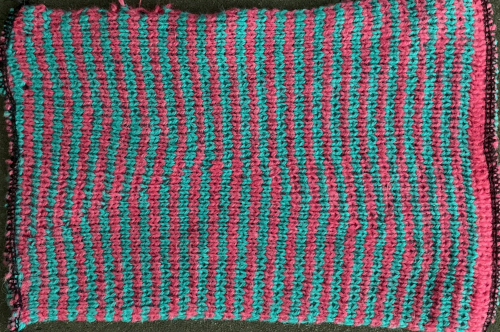
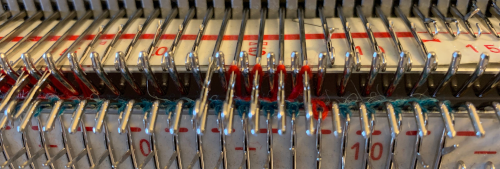
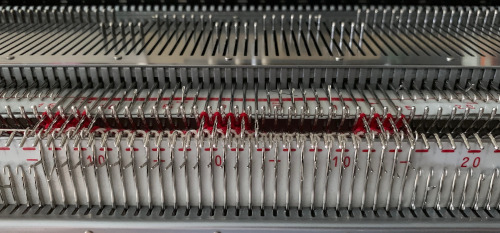
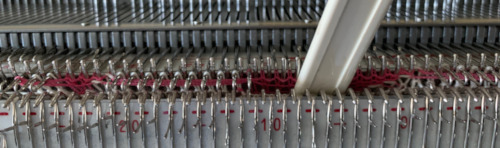
 For my test I used EON needles on the ribber, planned alternating selection for each new transfer. This could be done by selecting dashes and blank spots on needle tape ie. dash in the above photo, blank spaces below
 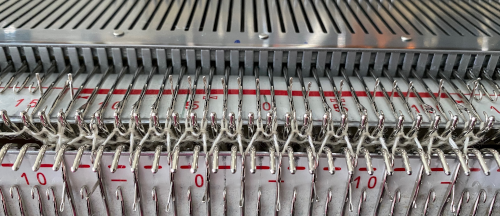 It was faster to achieve the effect by changing the ribber relationship to the main bed using racking by one position ie 10, 9, 10, 9, etc. prior to picking up the subsequent set of loops. The errors in the test swatch were from failing to bring all the needles back up to work after dropping their stitches. Using a tool ie. a ribber comb placed over the out-of-work needles prior to dropping stitches made the racking process far less error-prone, will keep the appropriate needles from being accidentally taken out of work.
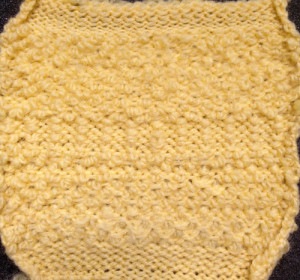
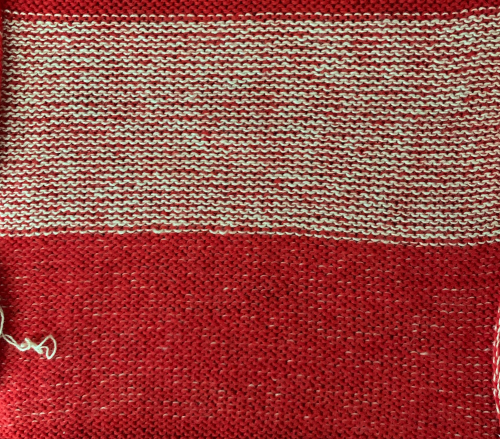
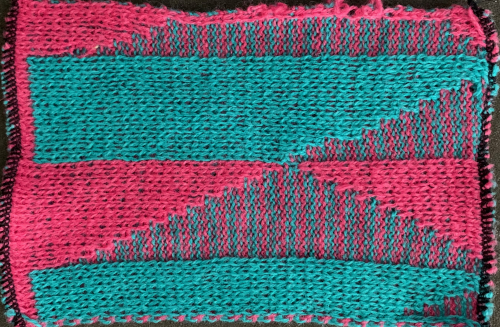
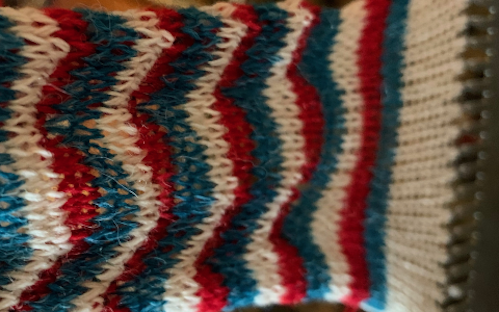
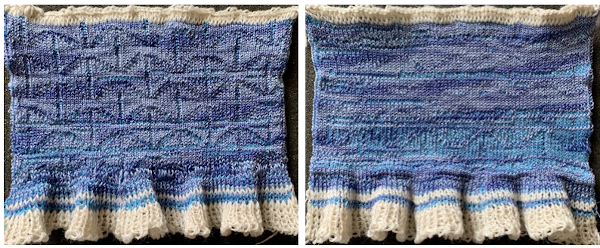
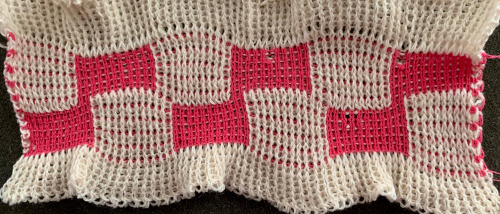
 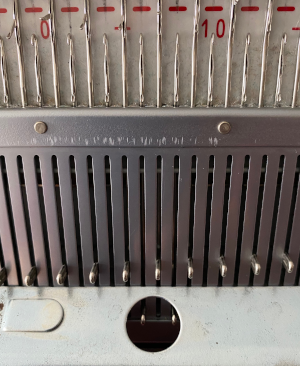 My first attempt at creating shapes includes a band at the bottom where the EON transfers as above were made, but every row. Simply bringing needles into work on the opposite bed creates an eyelet. They can be eliminated by sharing stitch “bumps” on the opposite bed, but for the moment they are a design feature. The texture created appears in the areas involved on both sides of the knit
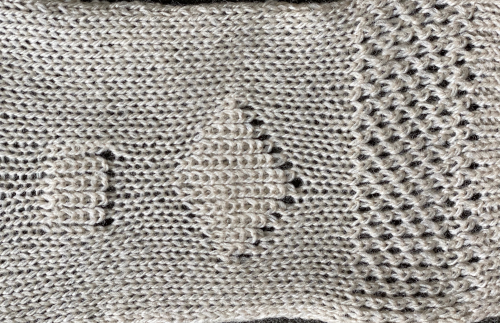
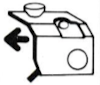
 It is possible to transfer single needles at sides of shapes ie
 ![]() or whole rows, but the change lever needs to be set to position accordingly.
or whole rows, but the change lever needs to be set to position accordingly.
Many knitters have one of these tools in their stash, they are sometimes referred to as “jaws”, intended to facilitate transferring between both beds, and patterning was intended for Studio punchcard machines. ![]()
 The enclosed punchcards:
  Shadow lace tools are marked side 1 and side 2. Some are blue on one side, cream or white on the other, the blue side is side 1. The process always begins with side 1, or blue. When the stitches have been removed, the jaws are closed, allowing the stitches to slide over to side 2. The jaws are once again opened, and the stitches are transferred to the opposite bed. Studio machines select and knit in single pass rows. Brother preselects for the next row of knitting while knitting any one row in pattern as well, so transferring in pattern from the top bed down with such a tool would be problematic to maintain proper pattern needle selection.
To transfer from the ribber up on any machine, place the teeth of the jaws on the needles on the ribber, holding it with both hands. Pull needles up until all stitches are behind the latches, then push down with another tool or one of your hands until all stitches are on the jaws.
Release the tool from the ribber needles, and rotate it away from you, toward the main bed. Close its teeth so the stitches are transferred onto side 2.
Open teeth, place eyelets over the main bed needles, and stitches are transferred onto the main bed by rotating the tool away from you just a little and tugging down a bit.
On Brother, the possibility of having patterning on the top bed to help track patterning on the ribber in some way comes to mind. This was my start, with the first draft of electronic repeats. 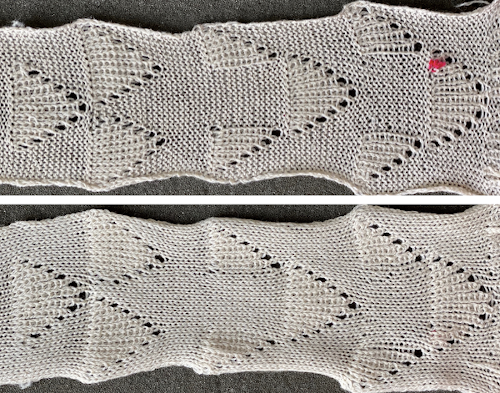 I stopped when I began to have some tension issues, loops on gate pegs, and a distracted brain.
 Transfers of stitch groups, whether by hand or using the accessories are made on rows where no needle preselection occurs on the main bed
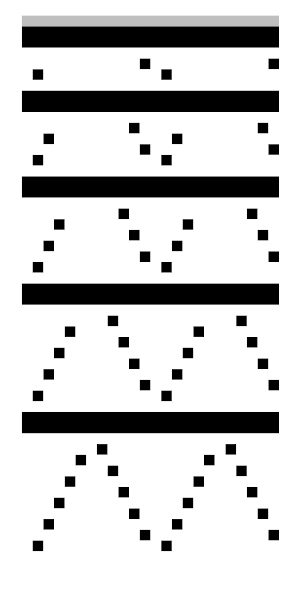
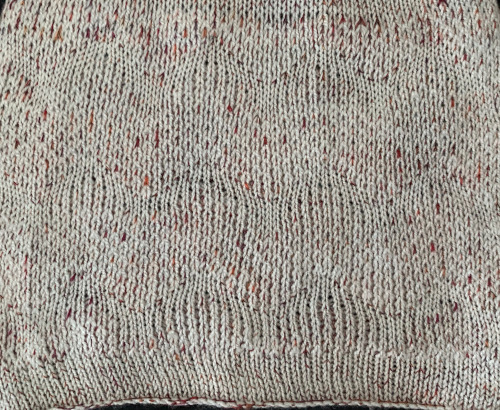
 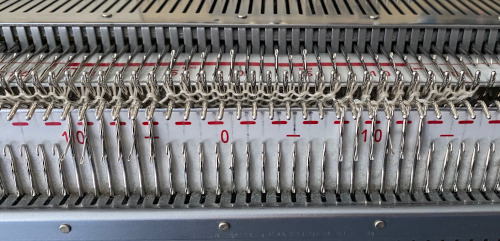 This series is a proof of concept for my approach to developing electronic cues
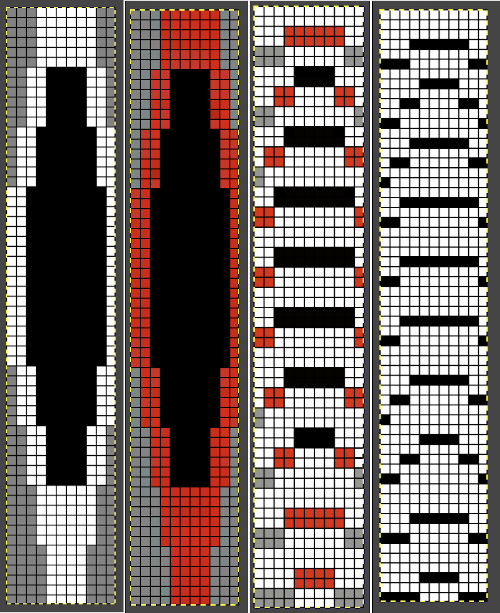
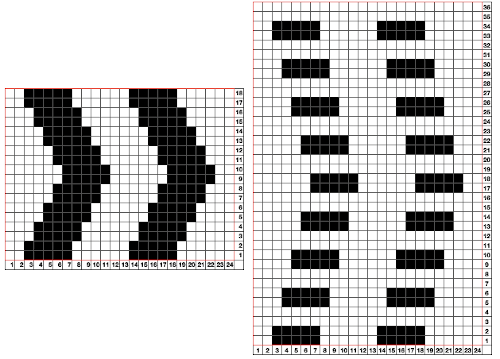
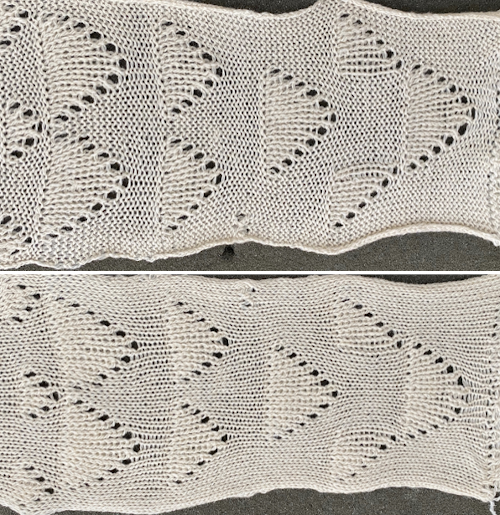 The original repeats were modified to include 2 blank rows between segments that allow for transfers between beds not hampered by needle preselection on the top bed. The motifs are color reversed, but not the blank rows between them.
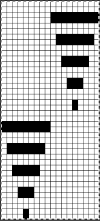
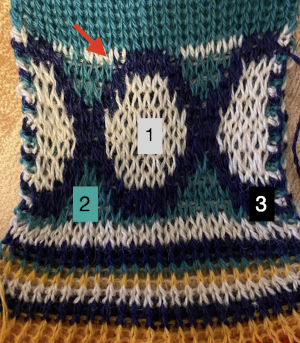
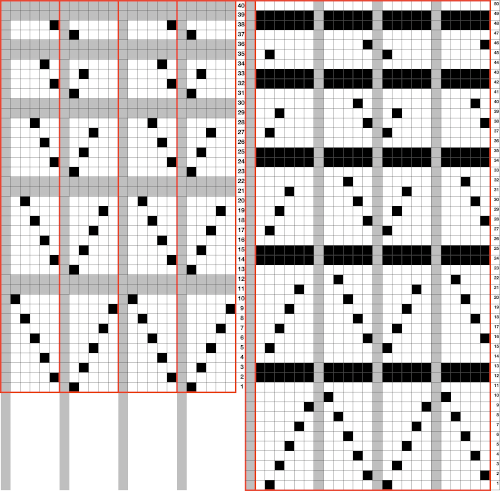
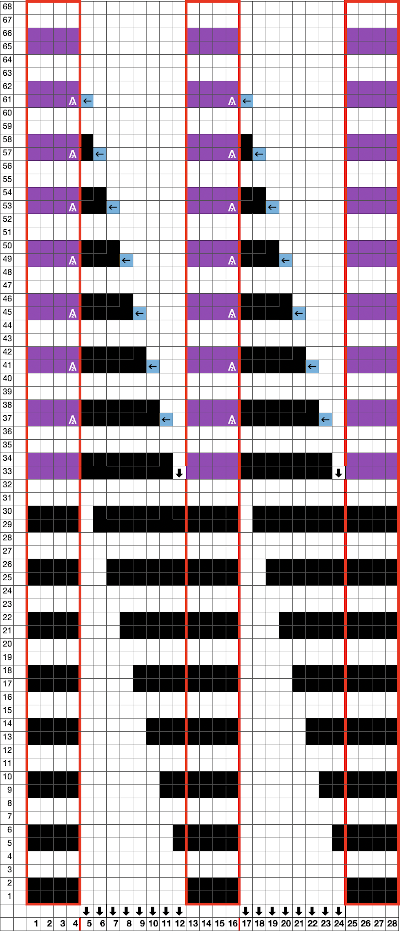
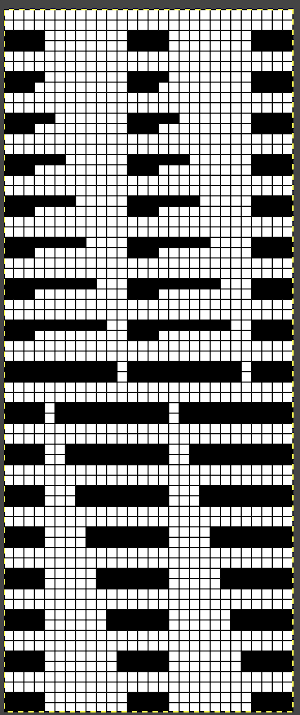
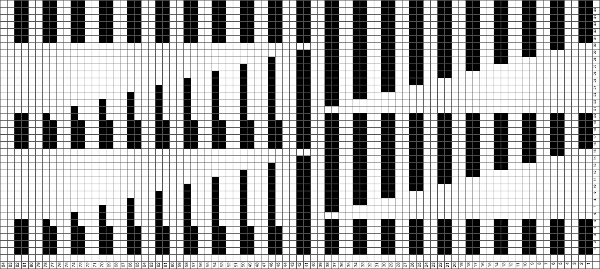
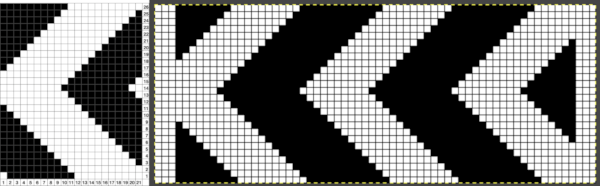
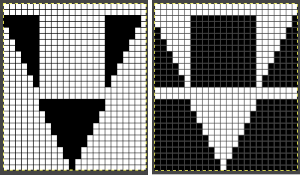 The knit carriage is set to select needles KC I or II, end needle selection does not matter. All needles on the top bed knit every stitch, every row, whether or not those design rows contain black pixels. No cam buttons are pushed in. Blank areas between black ones indicate the number of needles that actually need to pick up loops on the ribber to create shapes, filling in spaces between selected needles until an all-blank row is reached for making transfers. The chart on the far right illustrates a shape where the easiest method becomes one where stitches on the ribber are manually transferred to the top bed in order to reverse the shape and maintain every row preselection. The selected needle corresponding to the black square marked with the top of the red arrows is pushed back, the ribber stitch below is transferred onto it, the needle with the couples stitches is brought to E position, moving across the bed in proper locations prior to knitting the next row.
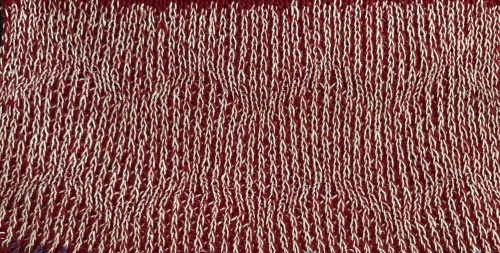
 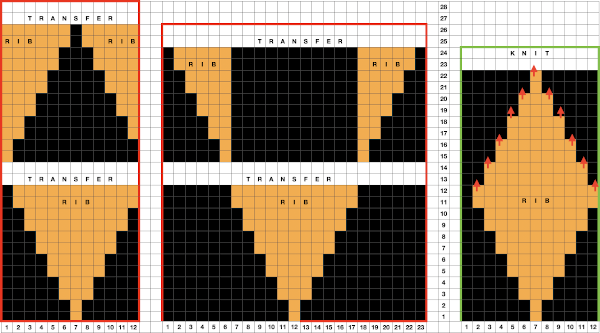 In this repeat, the side vertical panels of ribbed stitches are added. The knit stitches on each side of them roll nicely to the purl side, creating what in some fabrics can actually be planned as an edging.
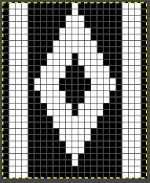
![]() My takeaway is to test the accessory with some patience, sort out the sweet spot for the ribber needles in relation to main bed ones in terms of handling transfers and yarn thickness, use colors that allow for easy recognition of proper stitch formation, keep good notes, and “go for it”.
My takeaway is to test the accessory with some patience, sort out the sweet spot for the ribber needles in relation to main bed ones in terms of handling transfers and yarn thickness, use colors that allow for easy recognition of proper stitch formation, keep good notes, and “go for it”.
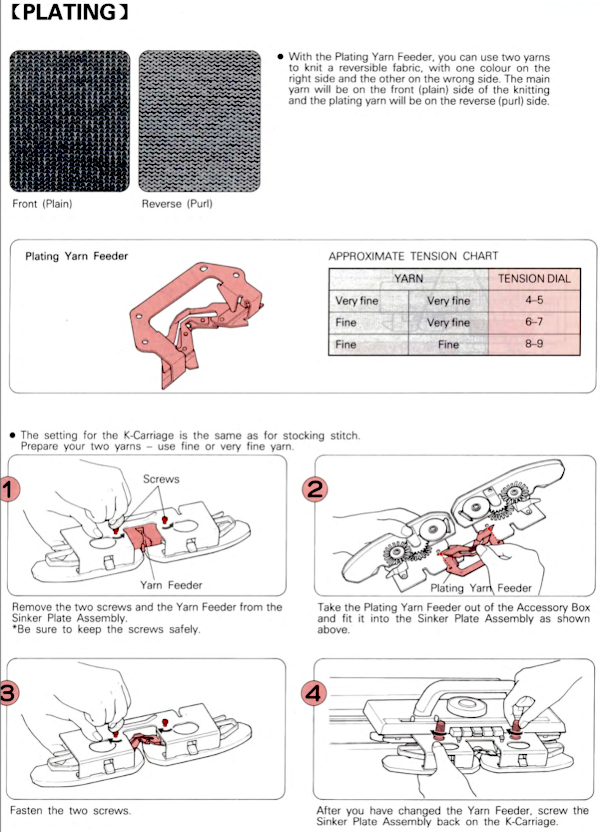
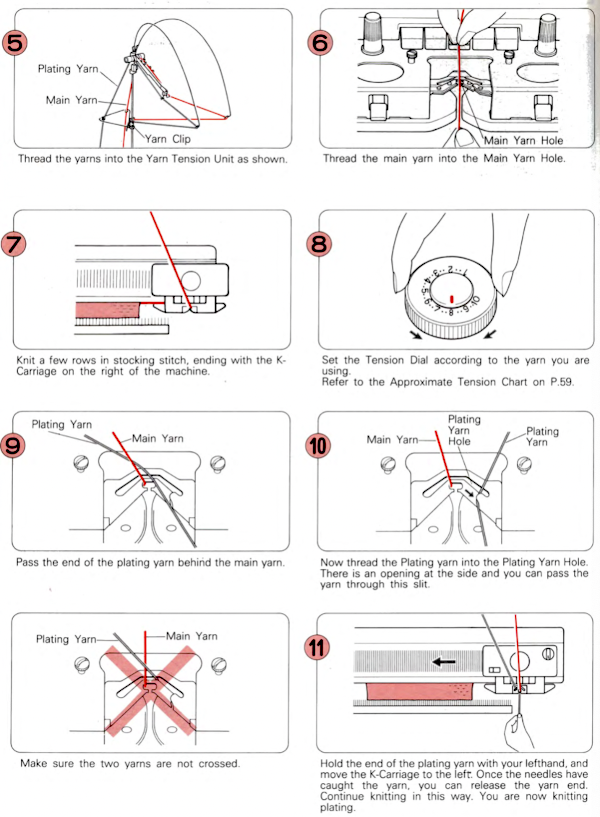
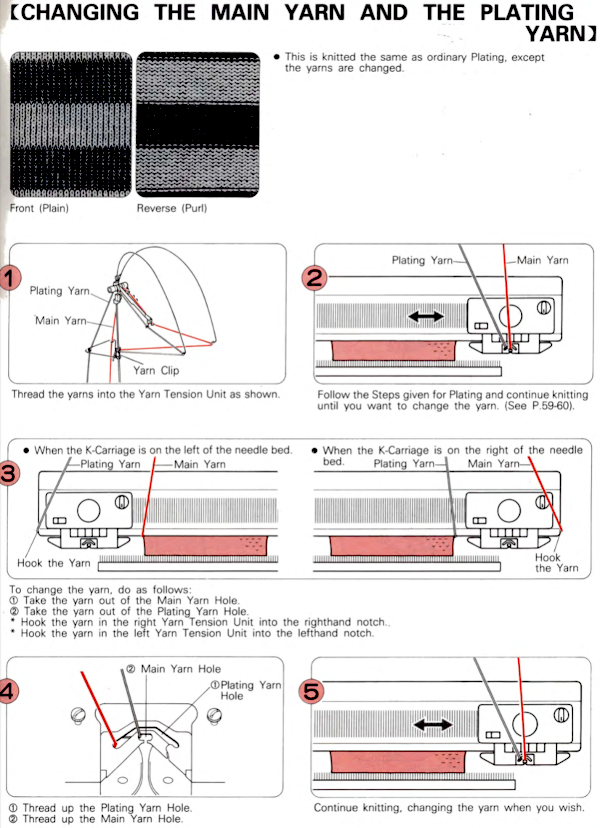
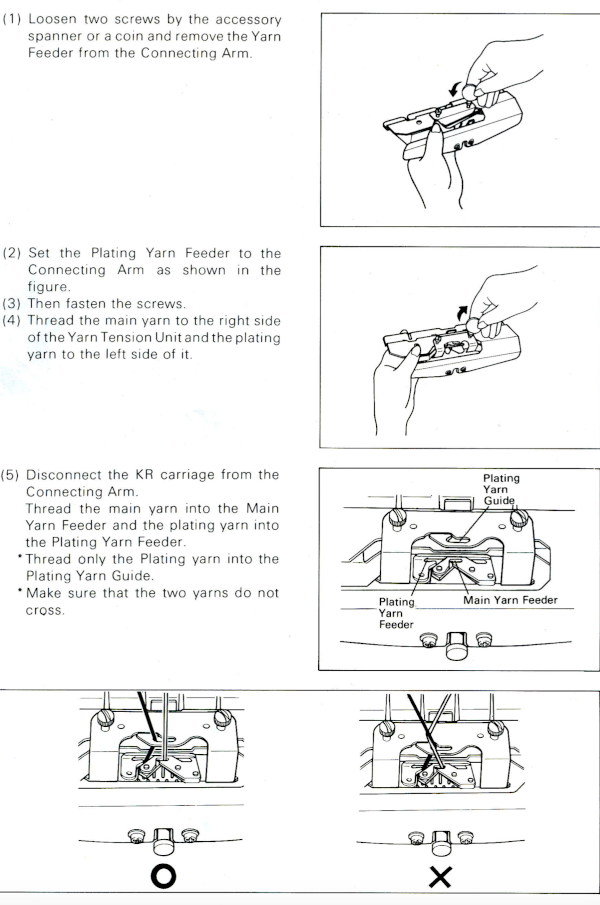
One way to add color to the mix is to use the plating feeder.
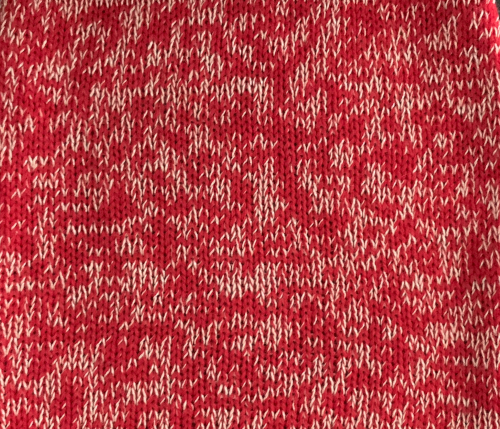
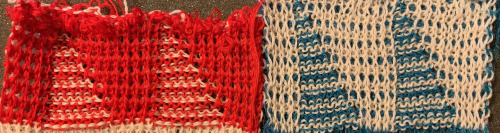
 In the first sample, equal thickness yarns were used, the colored yarn was a rayon slub with no stretch and slippery nature.
 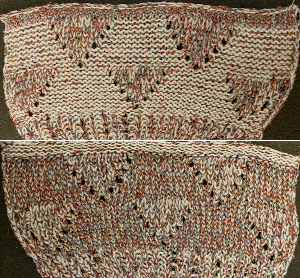 The bottom of this test used a wool yarn of equal weight to the light color, which proved hard to knit. The red is a 2/48 cash-wooll
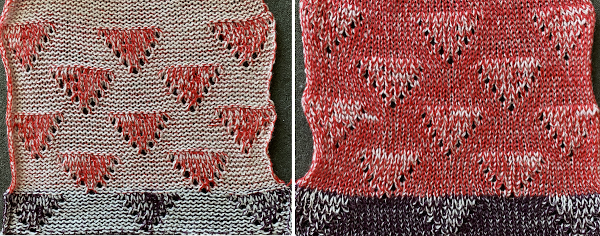
 A very narrow test for a possible pleated pattern
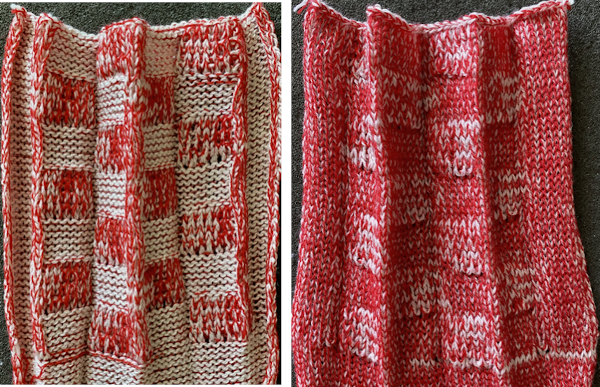
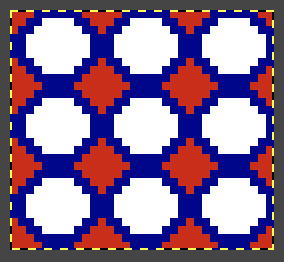
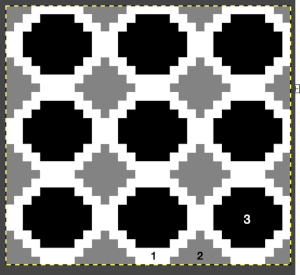
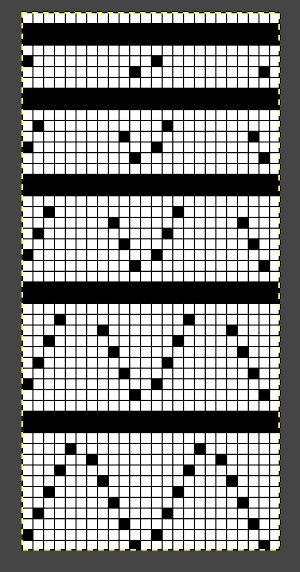
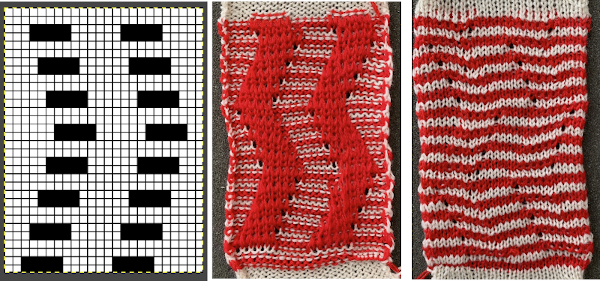
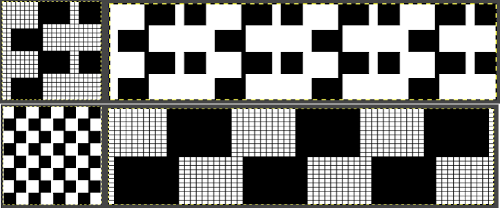
It is possible to construct the same type of fabric on a striped background. It can be achieved low tech with graph paper and pencils if needed, using a simple paint program, Gimp alone, this is my process using Numbers and Gimp:
1. determine the desired shape, width, and height, checking that it also tiles properly
2. create a table with square cells the same width as the number of stitches in your design, twice its height; use an even cell size ie 20X20 pt
3. hide all odd-numbered rows from the top of the table down, the table will shrink from 20 rows to 10
4. draw your repeat
5. unhide all rows
6. copy and paste the table; double the cell pt height only to 40, making the repeat twice as long
7. mark corners or part of the edges with another color to make it easier for Gimp to identify them, select all and remove borders, grab the image with an added surrounding colorless border
8. open the screengrab in Gimp, use crop to content, fill colored squares with white, change the mode to indexed BW, scale the result to the appropriate size, in this case, 18X40, export png 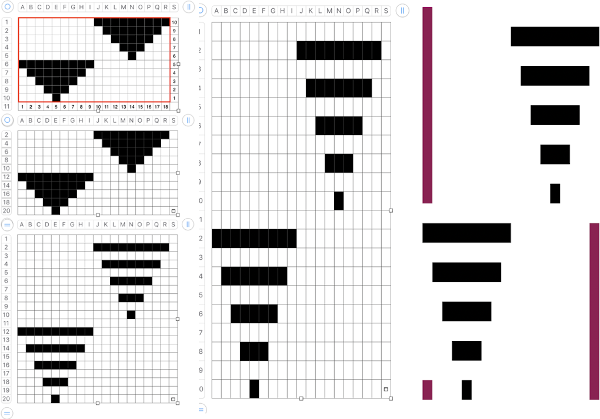
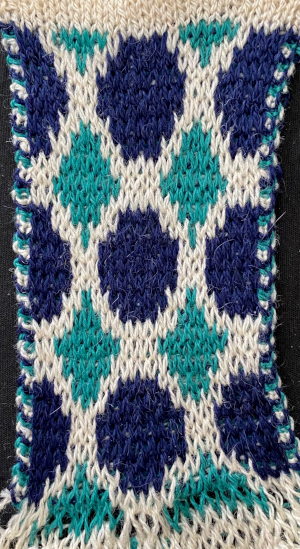
![]() Cast on for EN or EON rib. Transfer all the main bed stitches down to the ribber. Extra stitches can be cast on and transferred in addition to the planned width of the repeats to create a border on either side of the designs. During patterning there will be stitches in work on both beds at intervals, so the pitch needs to be set to H while knitting. When the top of the piece is reached, transfer all ribber stitches to the main bed and bind off.
Cast on for EN or EON rib. Transfer all the main bed stitches down to the ribber. Extra stitches can be cast on and transferred in addition to the planned width of the repeats to create a border on either side of the designs. During patterning there will be stitches in work on both beds at intervals, so the pitch needs to be set to H while knitting. When the top of the piece is reached, transfer all ribber stitches to the main bed and bind off.
The first preselection row is knit from right to left in the contrast ground color.
With COR bring all the needles to be worked in the pattern color to B position on the top bed.
The knit carriage is set to slip in both directions. End needle selection is canceled. The ribber remains set to N/N for the duration. Knit to the left and begin changing colors every 2 rows.
The shape increases are created automatically, with eyelets at the edges where each stitch is picked up for the first time on the top bed. COL when the first needle is preselected in this case for the start of the next shape, transfer all previously formed design stitches on the main bed down to the ribber, continue knitting 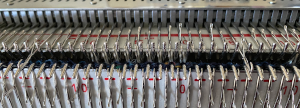 If any stitches are pushed all the way back or in mixed alignment during transfers,
 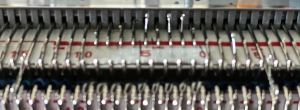 be sure to return them all to B position, not disturbing the needles already preselected for the next pattern row,
 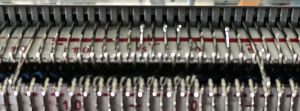 repeat as needed.
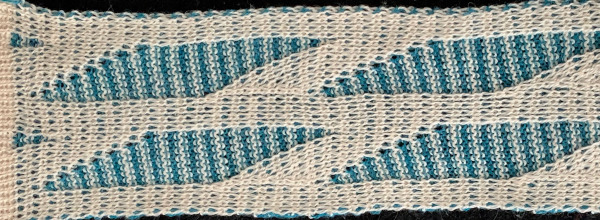
 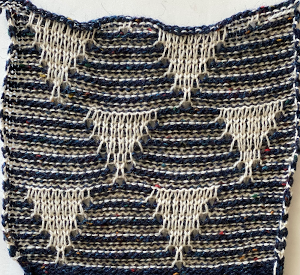 Because one color knits with every carriage pass while the other slips behind it not knitting for those 2 rows, the striped background fabric will become distorted depending on yarn and stitch size used, most likely particularly noticeable at the top and bottom edges of the piece.

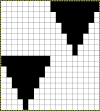
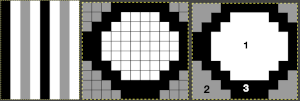
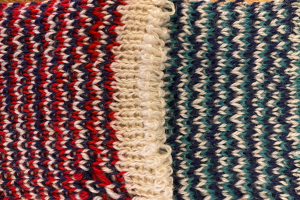
 A closer look
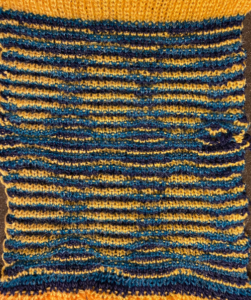
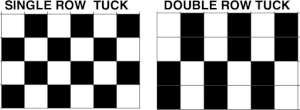
 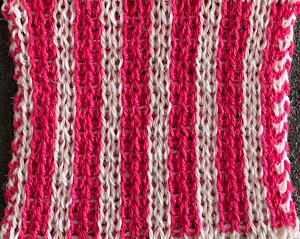 The same repeat may be used to produce a tucked version. In many punchcard machines, a card is supplied with a 2X2 check. With the main color, in a suitable yarn, cast on for 1X1 rib. Set the knit carriage to tuck and the ribber carriage toknit. Knit 2 rows with the contrast color, followed by 2 rows with the main color, repeating for the desired length of the rib. Knit the last row in the main color with both carriages set to knit. Transfer the ribber stitches to the main bed to continue knitting single bed.
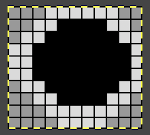 with my color changer in this threading sequence throughout
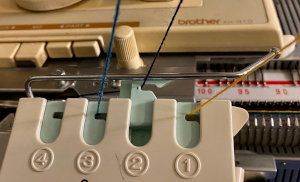
 where normally each color in each design row knits twice. Because selection occurs for pairs of rows, the first preselection row is from right to left. To decrease the backing rows, the ribber is set for birdseye. I prefer to have an end needle on each end on the ribber, keeping in mind that the total number of needles in use there needs to be even. The machine provides reminders as to which color should be knitting. My samples are knit using KCI on the top bed. Because the preselection happens twice, it is easy enough to knit in pattern from left to right,
 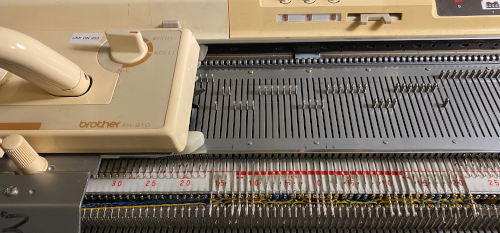 when the carriages have reached the right side, simply use a ribber comb to push all needles back to B.
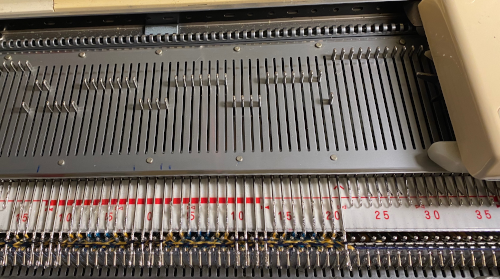

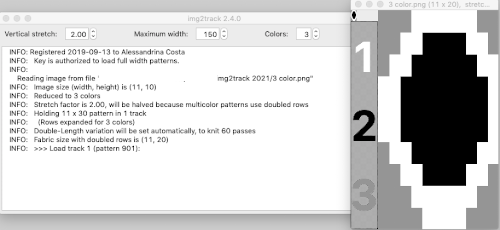
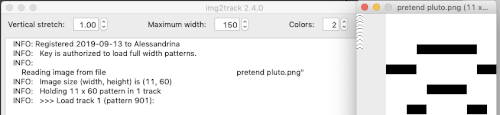
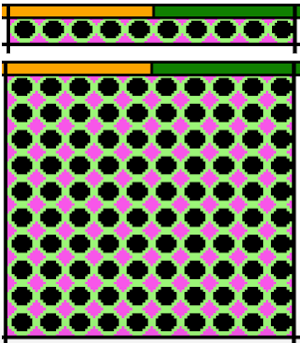
 Speeding things up with color separation, beginning with the method that will have each color, each design row knitting twice. The repeat is 10 rows high, so it is expanded X6 to 10 by 60 rows. In the final result, the second row for each color in the separation is in turn erased. The red was added to make all 3 colors visible while working the separation, avoiding confusion with the white ground. The knittable result as usual is in a black and white png
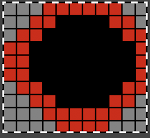
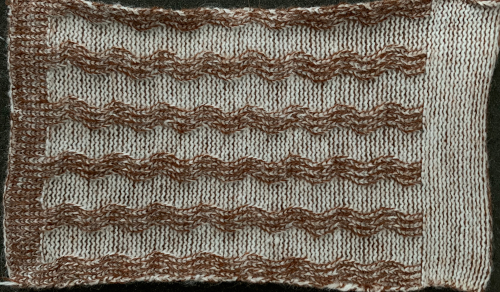
 The ribber can also be set to knit every row, resulting in elongation on the knit side, while creating an interesting striper backing
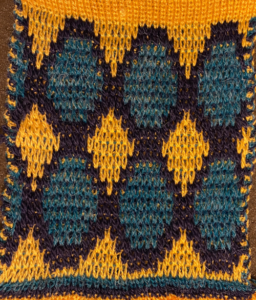
 Comparing this version to the birdseye backed one for repeat height
 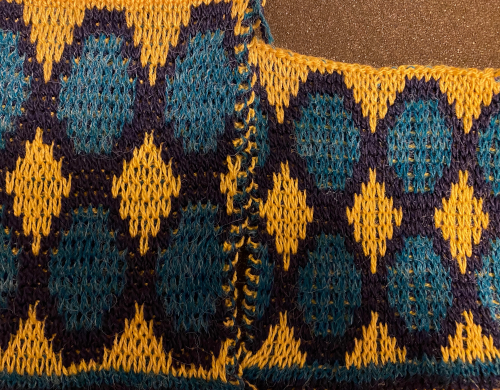 Comparisons: HoP, pushing back needles to B, and color separation results. In the latter, the design is likely elongated in part due to a change in the distribution of thinner yarns to larger design areas with no tension adjustments
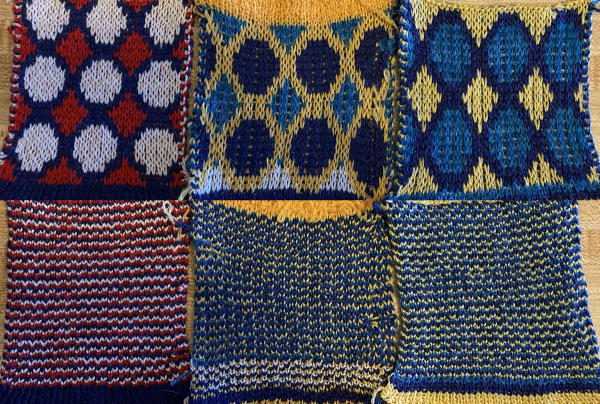

 The Ayab lettering as opposed to numbers move from right to left. The manual states that the color separation order is: white C, grey B, black A with their sequence = C (3), B (2), A(1). If the prompts for changing colors as given are followed it provides a very valuable in tracking them, but if out of habit one knits in the usual 1,2,3 sequence, the color placement occurs in an unexpected order and may result in errors. The on-screen letter prompt corresponding to the anticipated color change sometimes occurs with the knit carriage on the right, sometimes as it approaches the changer, and the size of the font was hard for me to see since the screen was not close enough for easy visibility.
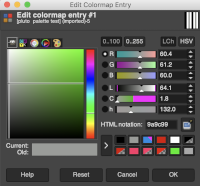 The small file makes for a quick test of proper color selection for each of the three colors used
 Having some idea of stitch counts for each color in the design in the first few rows can help identify proper, planned color placement errors
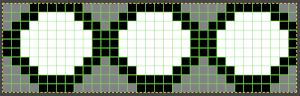
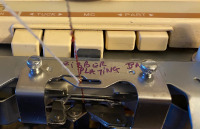
 My first swatch using the heart of Pluto separation and a greyscale motif
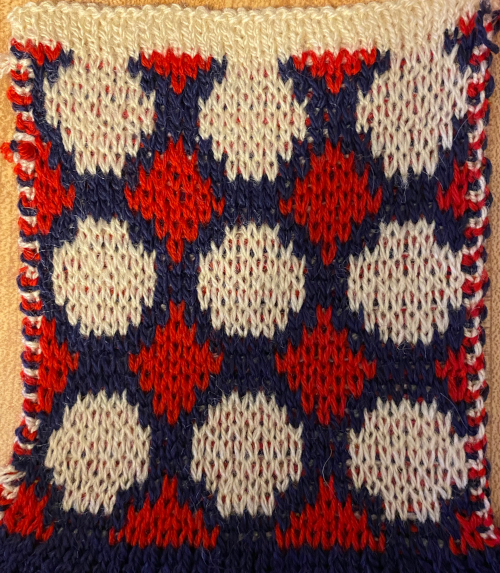
 My tested color change sequence is #1, #2, #3 colors throughout, I disregarded the prompts for color changes at the bottom of the Ayab screen. Some things to ponder: in pieces that require color changes, starting with waste knitting in the same colors can help assess the best tension, whether each color will be picked up properly, and if the colors work well together. Looking at these 3 small tests, it appears that a choice should be made when casting on about using color 1 or 2 for the preselection and cast on rows. If the setting to slip is forgotten for the first move to the left, the color in the feeder will knit every stitch rather than a pattern selection. Always check settings when on the right, making certain lili buttons are set as well. This pattern does not contain 3 colors on every row. In addition to that, when working DBJ with other color separations one is likely used to seeing knit bed needle selections on every row. That is not true here, is a function of the technique, not a patterning error. On rows that have colors missing, when that color is in use, the main bed slips, the ribber works every other needle, first in one direction, then the other, adding to the row count on the purl side of the knit.
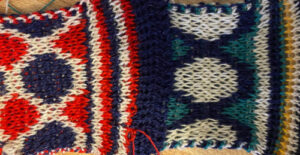
 The mess at the bottom was due to the green yarn getting caught on the needle bed and not knitting the necessary stitches on the ribber, so dropped stitches were formed
 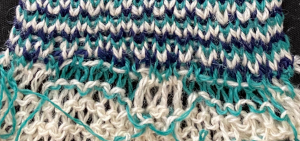 The assumption is that if the C, B, A rotation and prompts are to be followed, the middle color 2 can stay in place, and the placement of 1 and 3 can be exchanged.
 Alternative settings for one color pile: Tech 256, back lock FX and both arrow keys, pushers one up, one down, front bed to LX, drop stitches every 2 rows.
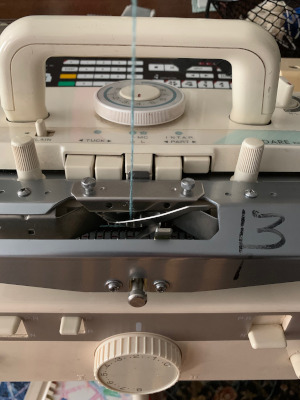 the loops, formed on every needle on both beds with the move to the left
 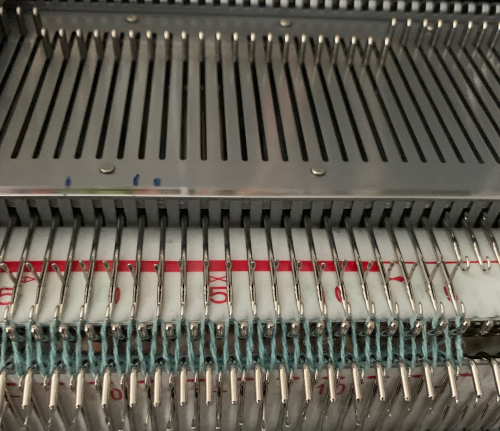 anchored in place on the ribber needles as the only the ribber knits as it returns to the right
 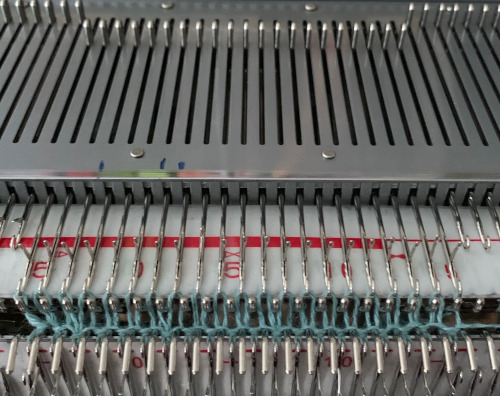 while the carriage is on the right, drop all stitches on the main bed,
 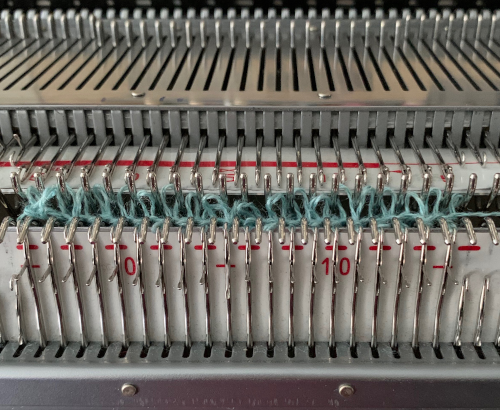 making certain no loops are stuck on gate pegs on the main bed,
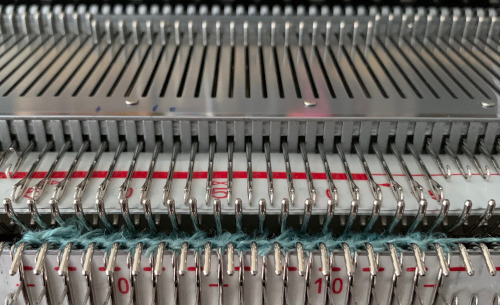
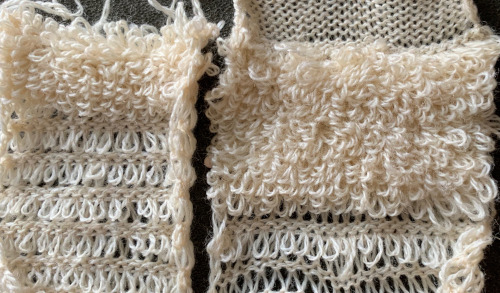
 Knitting was smoother with a change in yarn. An extra needle on each side of the knit on the ribber is brought out to hold manually to ensure their stitches knit with every pass of the ribber carriage. I prefer the all-over pile with its loops formed on the top bed. There were nearly no incidences of loops catching on gate pegs on the main bed. One of the drawbacks is that the main bed needles need to be dropped and brought back to the B position manually, bald spots will result where any needles are not returned to the proper work position, so they will not pick up loops.

 and this is likely my last try at the single pile in a pattern using every other needle tuck on the ribber with the release of stitches every 4 rows. I actually like the elongated stitches in the ground but found the stitches planned for loops simply did not release easily or at all,
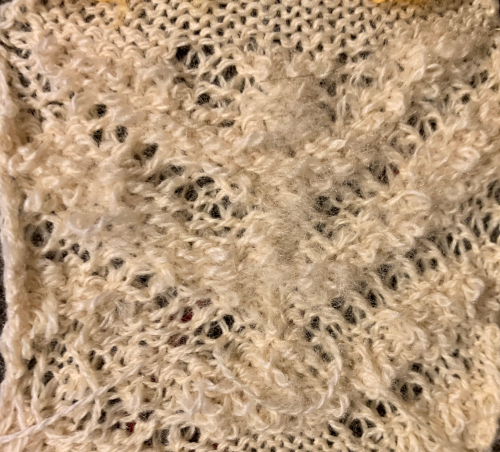


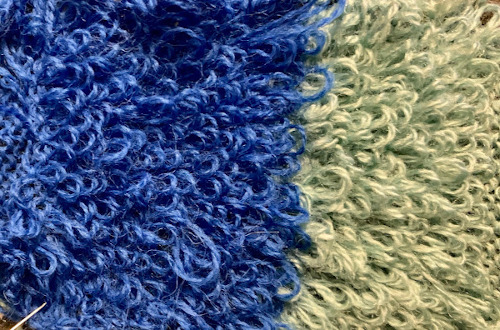
 plaiting with yarns swapped in feeders for reversible striped effect
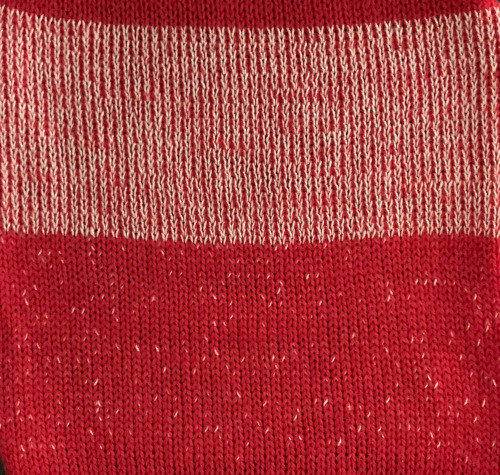
 Striping created by reversing yarn positions in plaiting feeder
 If your sinker plate has rubber wheels, check them and move them to the proper position if needed.
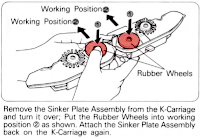
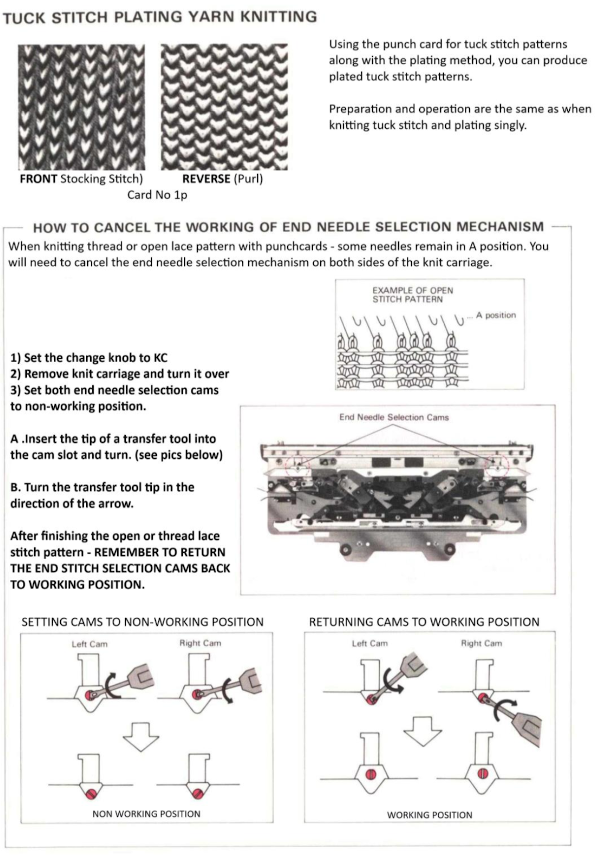
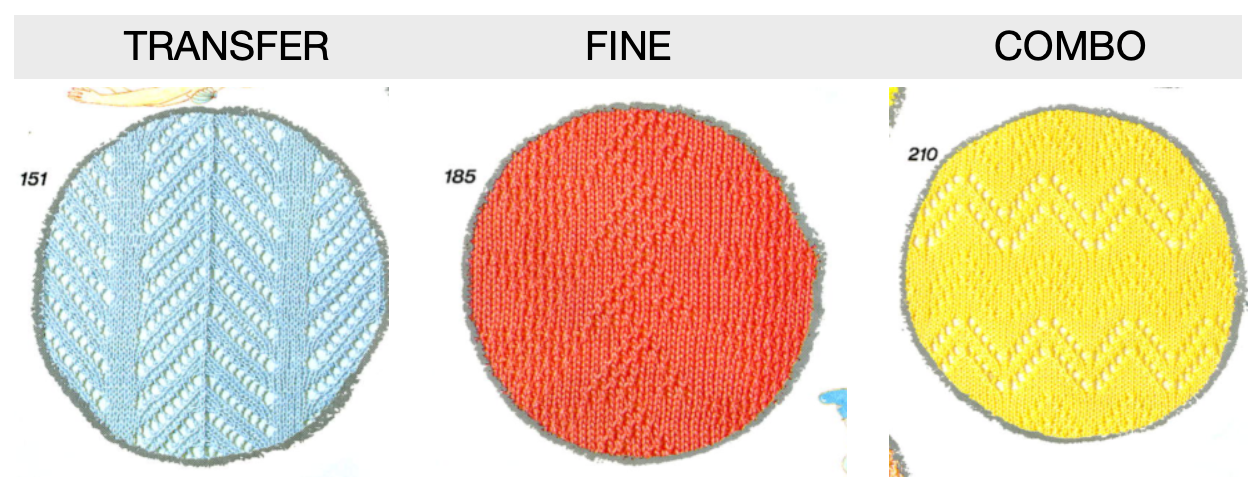
 More random, ancient swatches: stocking stitch using equal-weight yarns in a single bed tuck stitch
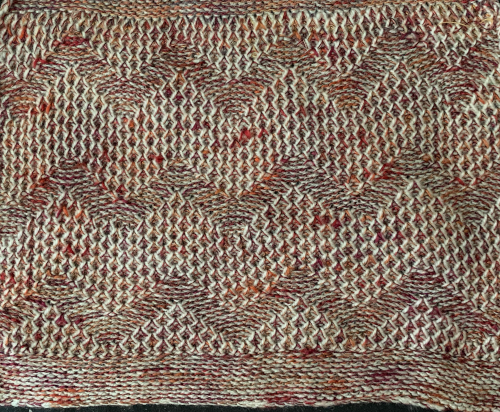
 double bed every needle rib tuck stitch using the same pattern repeat

 Shadow lace

 An experimental double bed fabric using the plaiting feeder and thread lace setting double bed
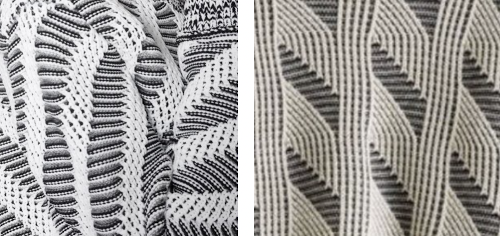
 The suitable dbj separation is the one where each color in each row knits for 2 rows, whether performed by hand, using the 3 colors per row separation in img2track or the default separation in Passap. The Ayab HOP separation is awesome, works for any 3 color design with as little elongation as possible, but is not suited for this purpose. How-tos for DIY separations and their automated versions by programs for knitting more than 2 colors per row have been discussed in other posts.
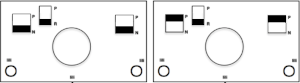
 A similar process on the Passap allows for playing easily with both racked colors because of the possible arrow and pusher settings on the back bed, but on Brother, this would require hand selection on the ribber on every row or a specific color separation for needle selection on the top bed
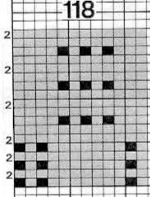
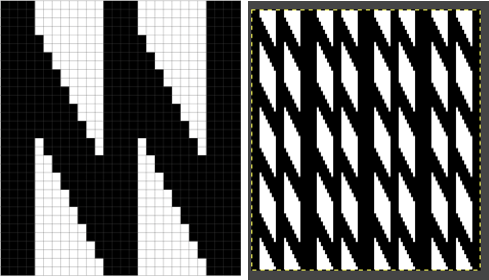
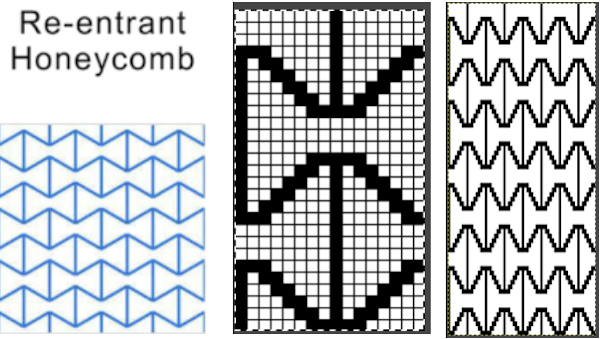
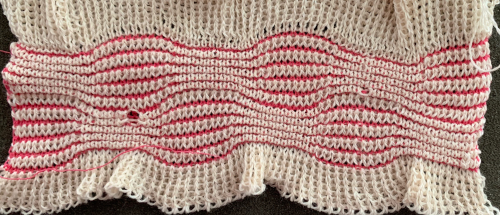
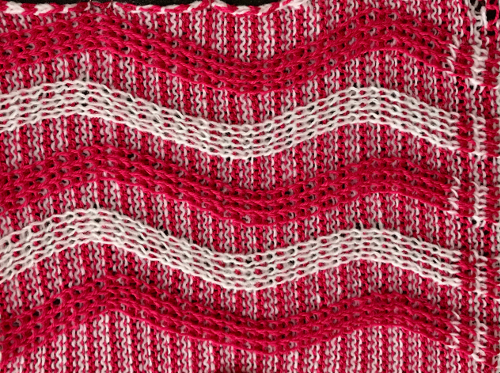 Seeking automation, keeping things simple, here is a basic zigzag pattern in a repeat also executable on punchcard machines. The ribber is now set to knit throughout (N/N), the main bed to slip in both directions. End needle selection must be canceled when using the slip setting selectively or when working patterning with needles completely out of work
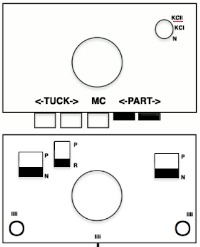
 The process using 3 colors: the patterning color will be knit on needles preselected on the top bed. As shaping is about to begin, in this pattern, one needle preselected out indicates the location for an “increase”, one preselected back to B position a decrease
 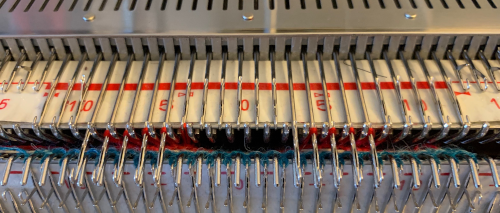 To perform the decrease, using a double eye tool to transfer the B position stitch down onto the ribber needle adjacent to the first needle in D position on the top bed
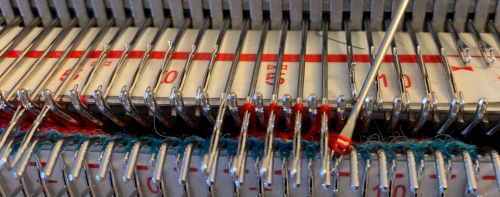


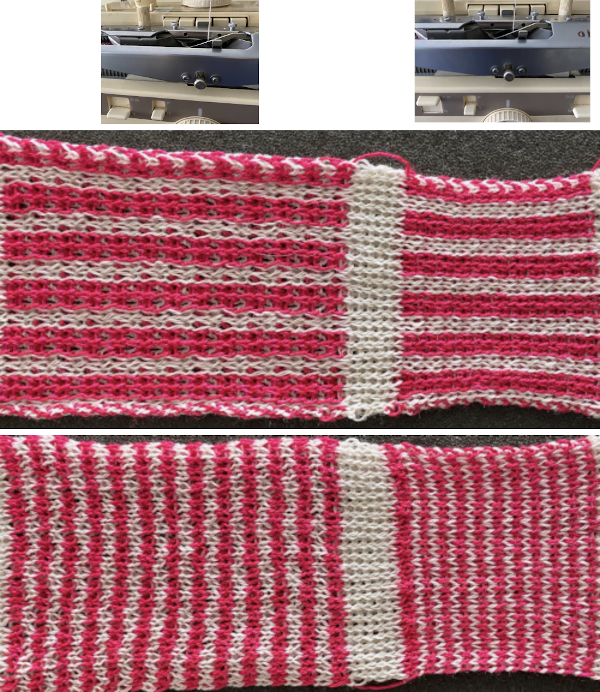
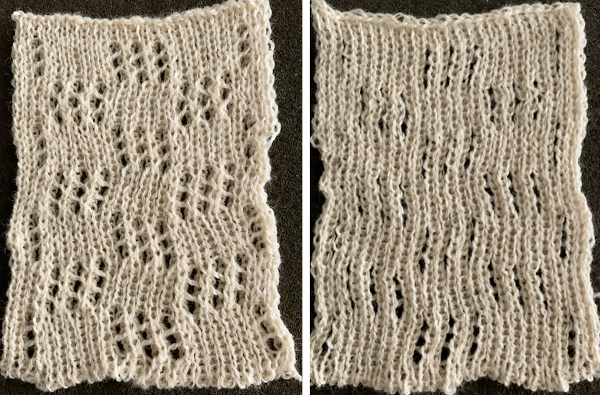
 The repeat and the knit shown on both sides:
 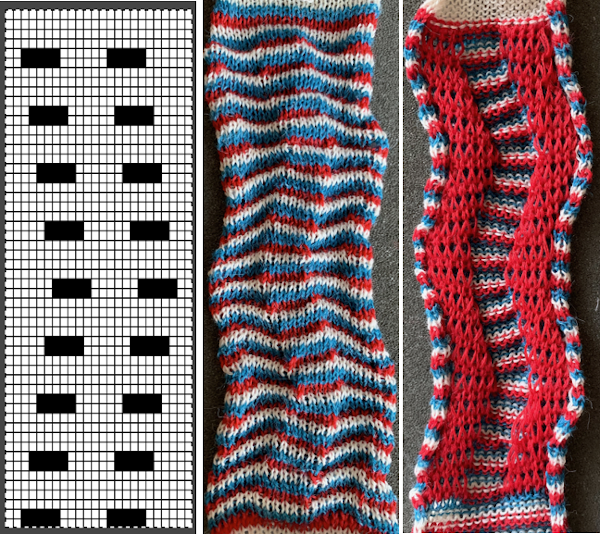 Comparing the 2 color and 3 color versions: aside from the obvious increase in length, note that the slipped segments in red on the 3 color swatch are now composed of longer stitches since they are held for 2 additional rows, and the overall fabric is more puckered than the 2 color version. The curling at the sides is the nature of edge stitches, especially if the yarn used is wool. At times that may be used intentionally, as a decorative edge.
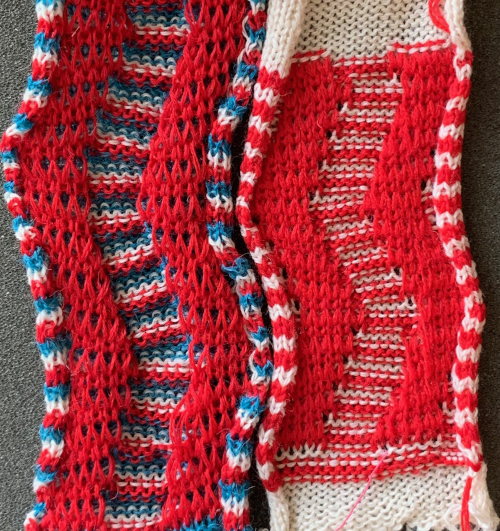
 Using the same color separation as for the simple zig-zag shape, the design is expanded to include knit bed rows that will be skipped completely, resulting in the ribber alone knitting in the second color for those rows. It is now twice as long as the original, 24X64
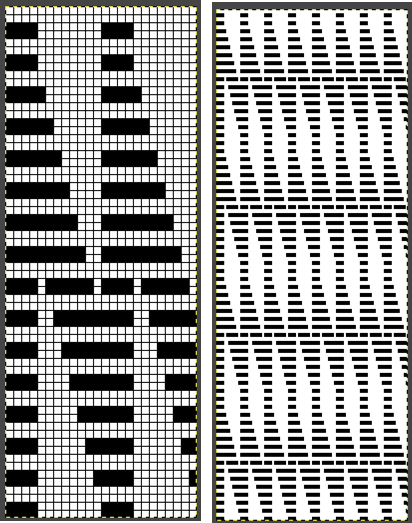 The planned proof of concept added a 4 stitch border on the right for a 28 stitch swatch centered with 14 stitches either side of 0. Tiling the repeat X2 again in height made it easier for me to plan how to manage transfers to expose the varying stripes in the ground. Visual comparison to the movement in the inspiration knit:
 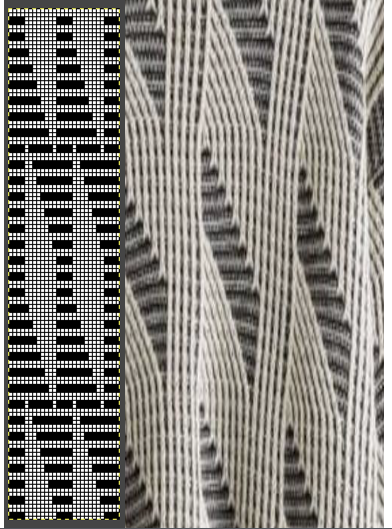 As the number of needles in work on either of the 2 beds is increased, it is likely tension or yarn changes may be required. The first preselection row is from the right, toward the color changer. The stitches on the non selected needles are transferred to the bottom bed
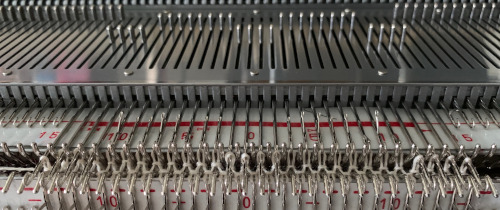
 with the color change, only preselected needles will knit on both the top and bottom beds moving to the right
 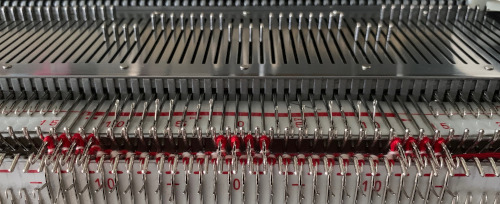 and will do so again on the return to the left while preselecting an all blank row
 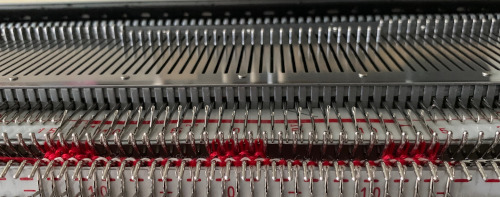 on the next pass to the right only the ribber knits in the ground color;
 Back to the drawing board in order to reduce the number of hand manipulations involved, with a shift in the center transition, the repeat in my spreadsheet is now 24 stitches wide, plus an additional 4 stitch border, and gets marked up with colors. I prefer to program the width of my knitting as opposed to a single repeat for all over patterning
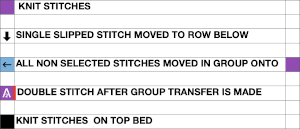
 The choice can be made based upon the preference of moving stitch groups to the right or to the left with the horizontal direction of the repeat adjusted for your KM model or software used.
 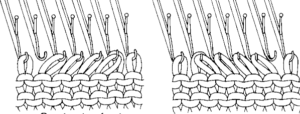 I planned the transfers in this swatch toward the color changer after picking up the proper color, white, and before knitting the next row using it. The 930 png:
 When the top of the repeat is reached, row 68, the only needles selected will be those of the 4 stitch vertical columns and the design repeat will return to its start
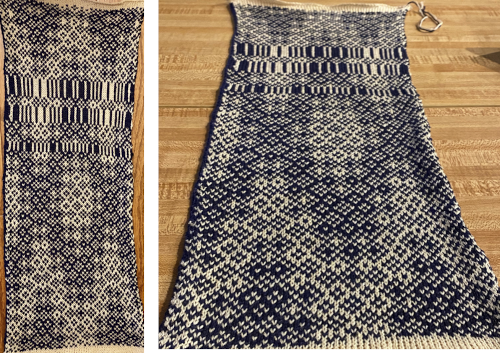
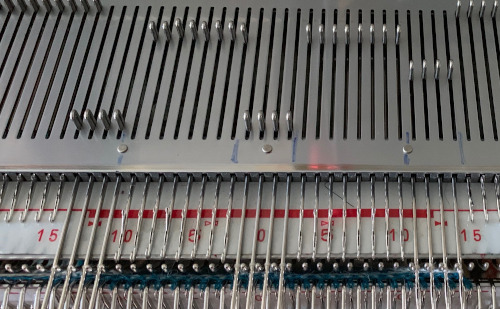 My proof of concept swatch is 3.75 inches wide
 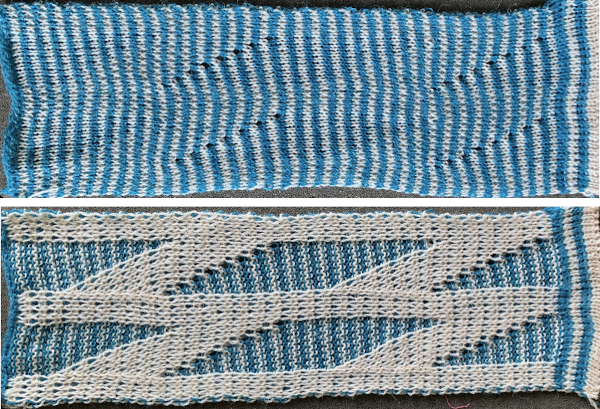 The inspiration sweater was knit using a wider repeat and significantly thicker yarn, reflected here in the small number of repeats composing the sweater body front
 The off white yarn used here was the same thickness but not fiber content as in the previous swatch, 2/18 wool-silk vs Australian wool in the former. It is not as smoothly spun. The result shows an interesting similarity in length, though there are 16 additional rows in the pattern repeat. This time I programmed my repeat for stitch transfers on the knit bed to move away from the color changer.
 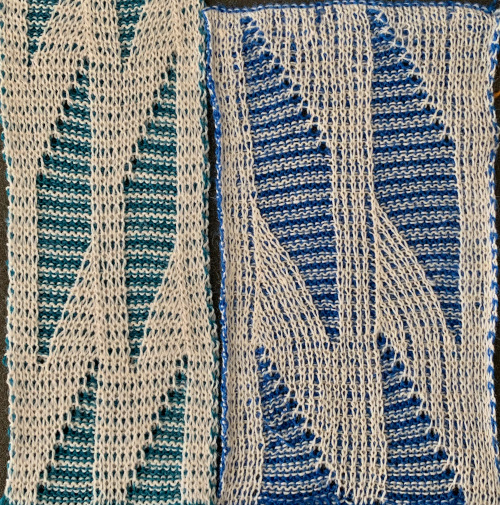 Eliminating the border on one side, a double repeat (30 stitches) measure 4 inches in width. To put the difference in scale to the sweater in perspective, an oversize garment with 40 inches in chest diameter would require 20 inches in width for the front piece. Ten single repeats, as opposed to the inspiration’s sweater 4, bring the total required the number of stitches to 150. With the added border of 5 stitches for matching side edges, the fabric is in the realm of possibility for producing a garment on the home knitting machine. My tension was set at 3/3 for all the swatches, with some teasing required on occasion to encourage stitches on the main bed to knit off properly. Ribber height adjustment can also have an effect on those numbers. I tend to do all my knitting with the slide lever in the center position. The double 30X84 repeat with no added border
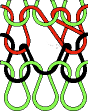
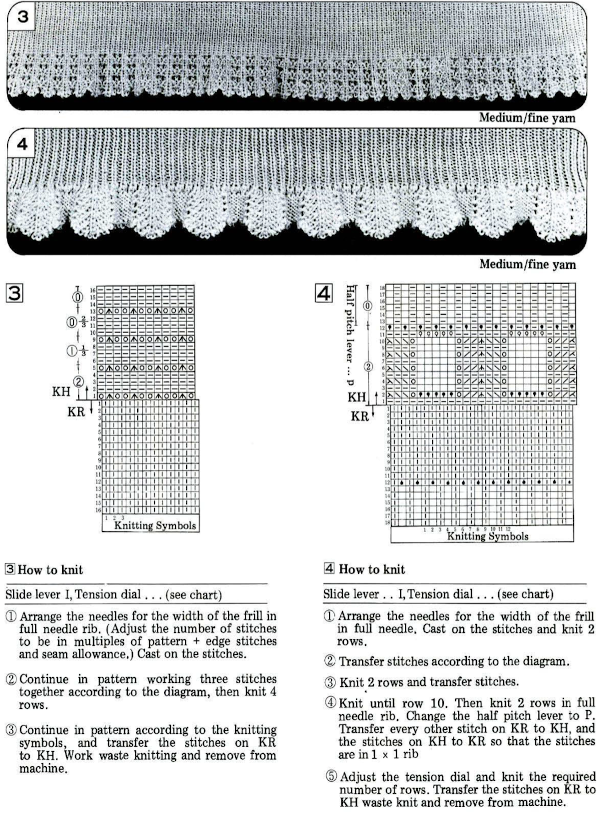
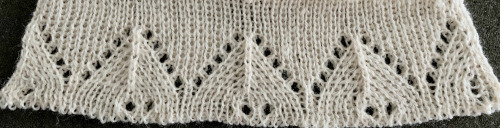
 There have previous posts on automated lace edging on Brother machines, ie
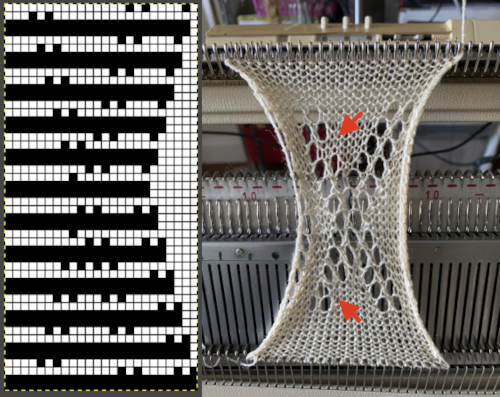
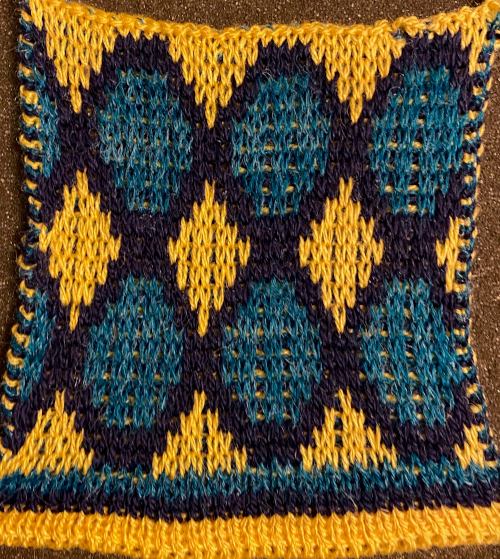
 Here the same pattern was executed on the same number of stitches with the white wool used above, but the elastic was plied with a 2/24 acrylic yarn and knit as DBJ with the blue, stretchy combination creating the solid color backing.
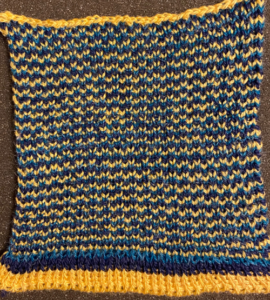
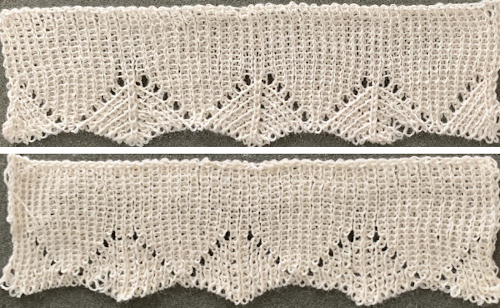
 The same pattern repeat knit with striper backing is far less interesting
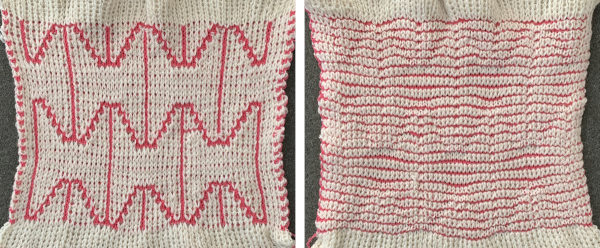
 The appearance of the fabric when stretched and weighted, still between the beds
 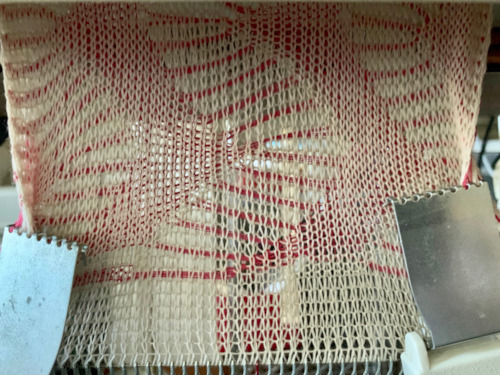 and off
 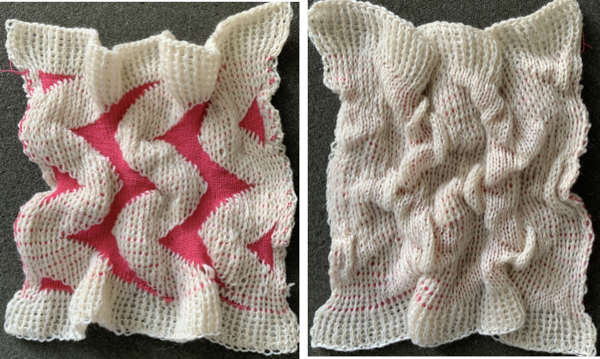 Going the far more traditional route of traditional dbj with the use of the color changer, striper backing with the ribber set to N/N yields a wider, flatter fabric with an interesting purl side
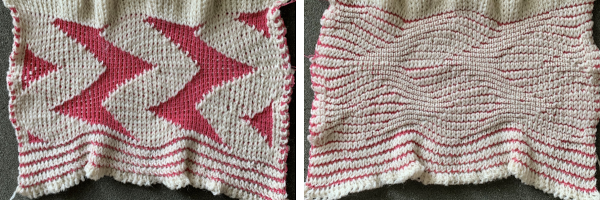
 The birdseye version had more of a bent on
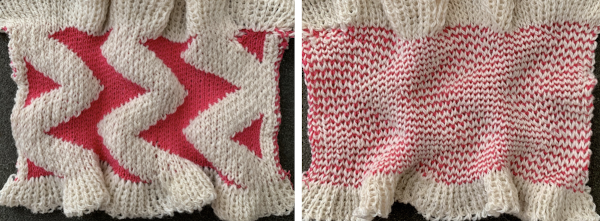
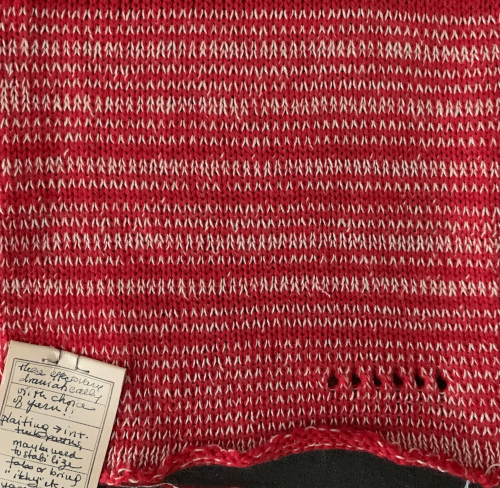
 Adding a third ply of elastic was disastrous at any tension. Better results occurred simply by increasing the ribber tension by 2 whole numbers, the knit tension by 1, and reverting to the previous yarn usage. There is a single dropped stitch in the elastic, and the result has much more of a 3D effect.
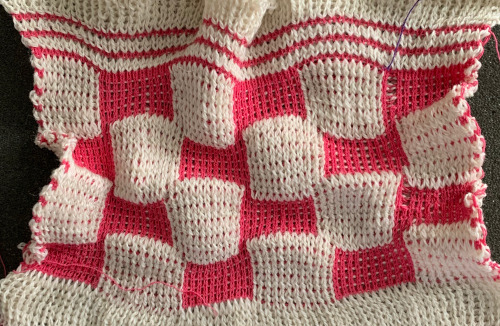
