Previous shares on aids to tracking cable transfers
Using punchcards to track small cables in pattern 1
Using punchcards to track cables and twists in pattern 2
Visualizing knit cables in color 2_ using Numbers and Gimp
Hand knitting patterns are usually depicted with the knit side facing.
If crossings are intended to match them exactly when working on knitting machines, they are made on the purl side, and their direction needs to be mirrored.
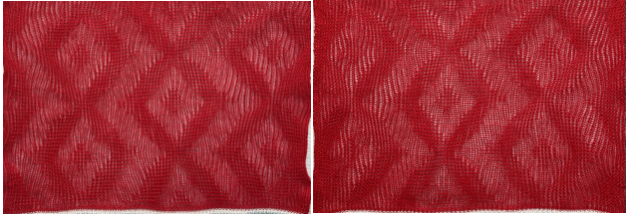
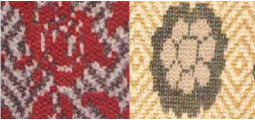
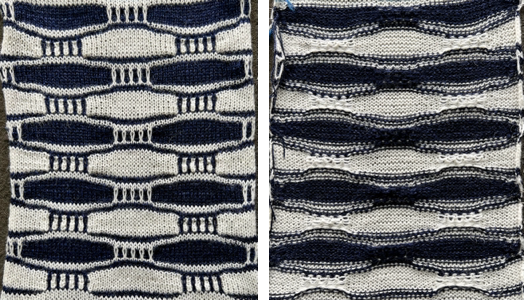
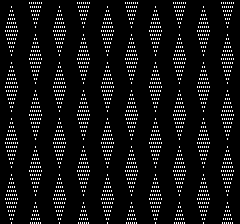
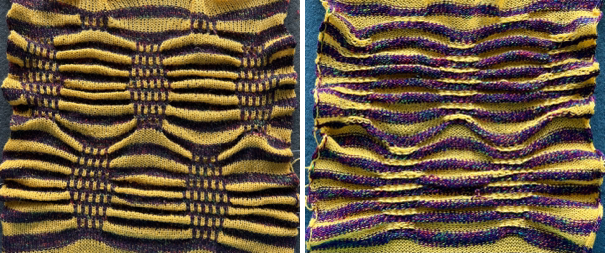
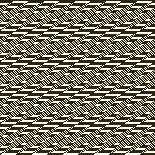
The blue dots illustrate hand-knit symbols, and the pink dots the machine-knit companions 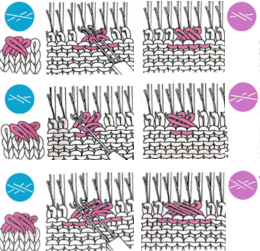 I was recently contacted about the possibility of reproducing the swatch on the far right. The image on the left is an actual knit, first tested with cable crossings mirroring each other along vertical columns.
The inspiration swatch was likely knit on the bulky, twisted every 4 rows, mine on a 4.5 mm machine, twisted every 5 rows.
It is possible to crop, copy, and paste initial photos, as in the center image, to visualize how the process may be altered prior to spending time creating new charts or any actual knitting. 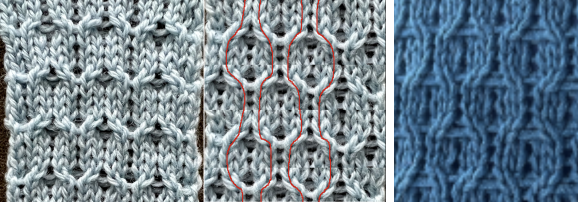 Building charts in a spreadsheet:
begin with creating and saving custom shapes, which can be made editable, and outlined if preferred (magenta) to further define the stitch brought forward, with the other moved behind it (blue).
Symbols used:
1. black cells/ knit stitches
2. white cells/ needles out of work, creating ladder spaces and non-selected needle areas where stitches are to be moved in the direction of superimposed arrows
3. red arrows/ stitches that are lifted off the needle bed, brought to the front on the purl side. The stitch on the adjacent black cell/selected needles is removed, travels behind it, and replaces it. The held stitch is then placed on the now-empty needle. Both stitches are brought out to hold/E position to knit properly on the next carriage pass.
The plan is to use the slip-stitch setting in both directions.
Since there are needles not in use, the end needle selection needs to be canceled.
Proper needle placement is required for patterning accuracy.
One option for achieving it is by air knitting the first row of the design, another is to program the width of the planned knit in electronic machines, establishing pairings, and using the single motif setting with no guesswork.
A chain cast-on can be performed, followed by dropping chains in ladder locations and taking those needles out of work to A position.
Even weight is useful if crossings are to begin after only 4 rows of knitting.
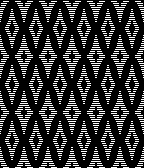
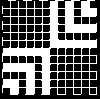
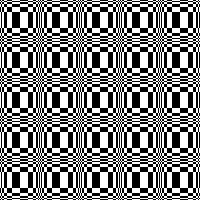
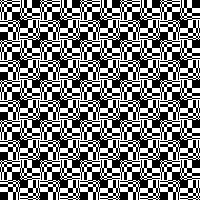
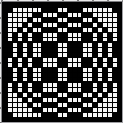
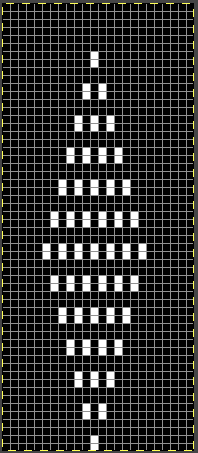
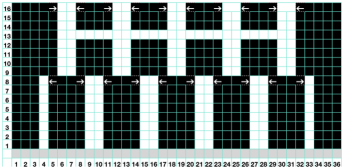
Each repeat is 8 stitches wide, punchcard users repeat it X3 in width, and in the charted height X3. 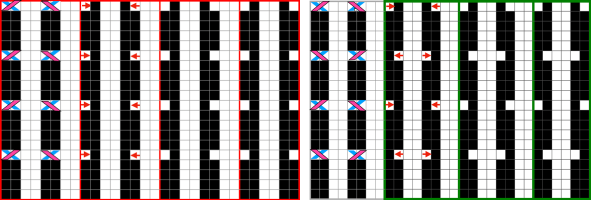 Proofs of concept: 30X20 electronic repeat for vertically mirrored transfers,
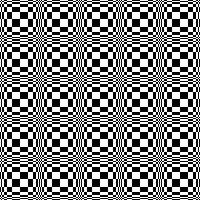
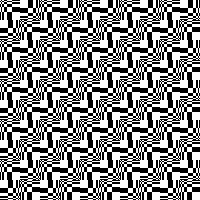
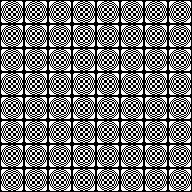
 ![]() and the alternating twisted arrangement
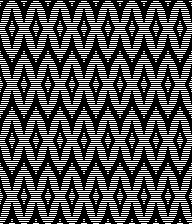
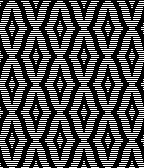
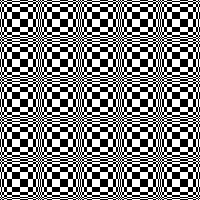
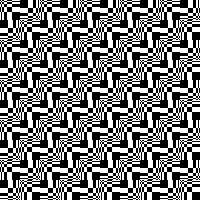
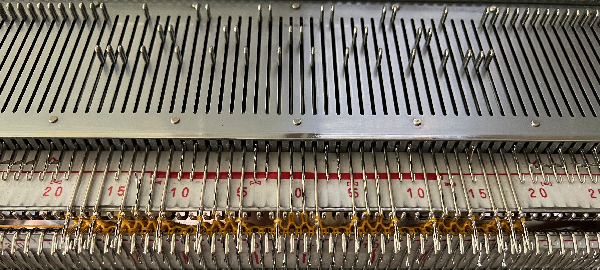
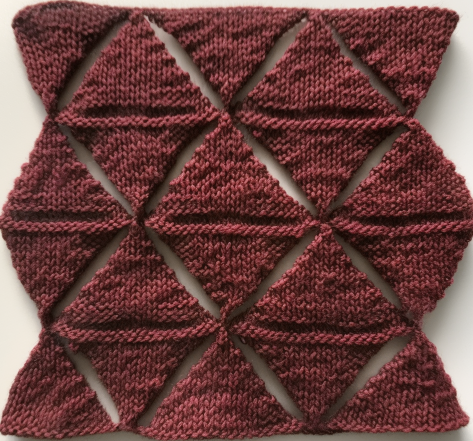
and the alternating twisted arrangement ![]() The work on the machine
The work on the machine 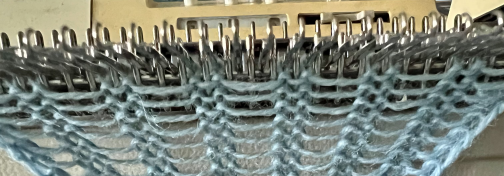 In the resulting swatches, patterning errors such as the marked one become difficult to repair after the fact as stitches grow in size and ladders nearly disappear
 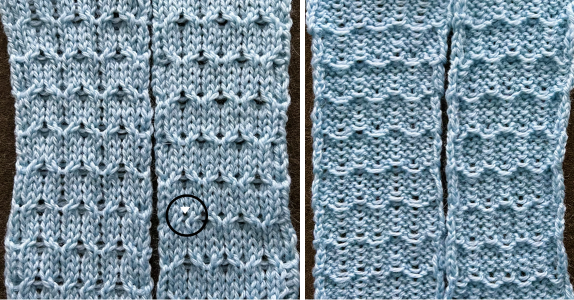 Both swatches measure less than 2.5 inches in width, another reason to explore the results on bulky models if they are to be used in garments.
If planned as panels combined with stocking stitch, careful planning is due to overall gauge differences and those in row counts when seaming and joining.
Category: Machine knitting (MK)
Blistered dbj 3
Names referring to the same knit fabric can vary between machine manuals for specific models and brands or references in books, magazines, and articles depending on the dates they were published.
My earlier share on the topic:
Blistered stitches dbj 1
Blistered DBJ 2 and technique variations on a single repeat, introduced some of the concepts involved.
Beginning with any random published repeat can offer the start of exploring a range of fabrics. This was a Pinterest punchcard share, markings indicate it was intended for Brother machines 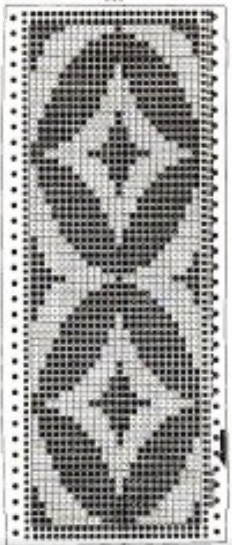 Methods for obtaining color separations for specific knits have been discussed in other posts.
Brother models can use the cam buttons to perform a function in one direction only, ie by using only one tuck or slip button, the machine will knit when the carriage reverses movement to the opposite side.
Developing specific color separations makes the files usable on other machine brands and models, makes it easier to return to specific rows in error corrections, and is my personal preference in test swatching and complete pieces.
Drawing the initial design in repeat provides a visualization of the resulting secondary shapes and the number of needles required for tiled variations in finished pieces based on gauge.
The first design is intended for use in every needle rib, with the knit carriage knitting in one direction, and using slip or even tuck in the opposite direction.
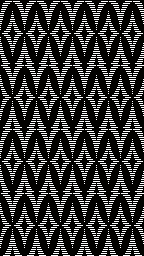
The 24X32 design extracted from the inspiration punchcard 
![]() A: the rendering scaling the design twice in length
A: the rendering scaling the design twice in length
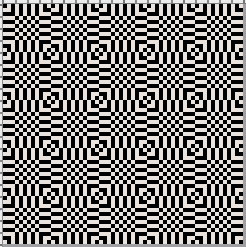
B: making the choice to color invert it in planning slipped stitches on the larger number of white pixels
C: superimposing black lines on every other row beginning with row 2 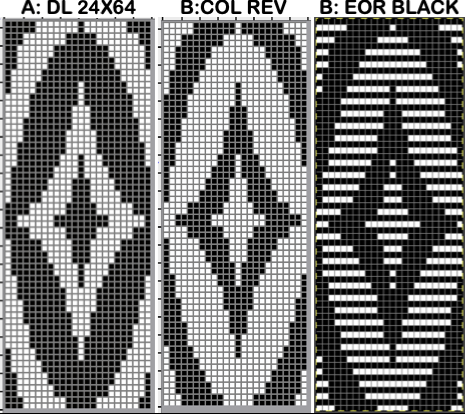 A quick review of the steps involved in working with Gimp:
begin with magnification for easy viewing, ie. 800X, view grid if preferred
the starting brush can be as small as this 2-pixel ![]() select it and save it to the clipboard by choosing copy visible, making it available to bucket fill images, or export the same design as a .pat file and save it in the appropriate settings folder for future use.
select it and save it to the clipboard by choosing copy visible, making it available to bucket fill images, or export the same design as a .pat file and save it in the appropriate settings folder for future use.  A: the original design repeat rendered in black and white
B: layer, transparency, color white to alpha
C: file, new, white ground, matching size, filled with a pattern of pairs of horizontal all-white pixel rows beginning with white on row one, followed by all-black pixel rows on row 2
D: copy B and paste it on C, and export the file as png 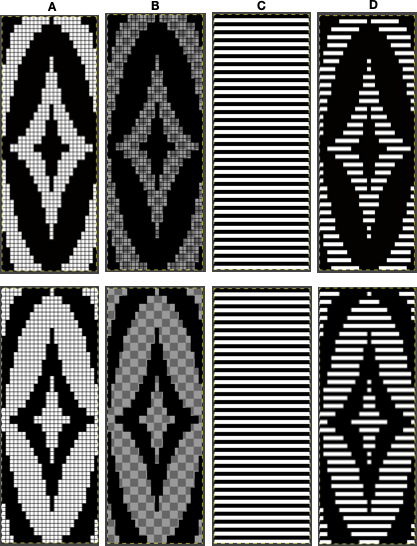 The chosen repeat may not be color reversed after programming it using the machine’s built-in electronic functions.
White pixels slip, stitches on the main bed in non-selected areas would not knit off for extended periods ie where red marks occur, and noticeable problems would develop quickly 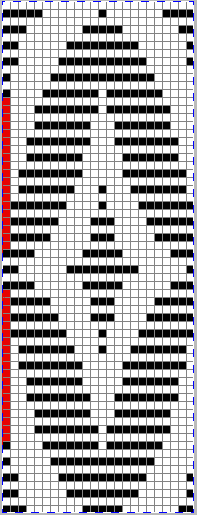 Beginning proofs of concept for this version, 24X64
 ![]() knit on 60 stitches using it drawn in repeat X3, 72X64, and programmed as a single motif
knit on 60 stitches using it drawn in repeat X3, 72X64, and programmed as a single motif  The result is a very subtle contrast lacey knit
 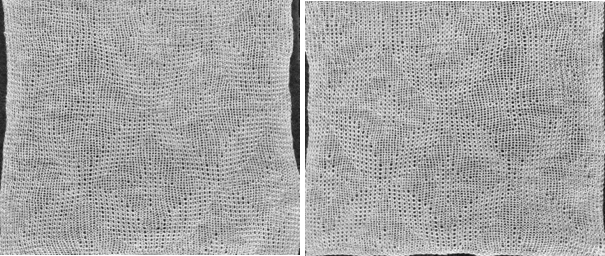 The yarn thickness and color were changed. The pattern begins using the slip setting and transitions to tuck, also in only one direction. Because the ribber is knitting every stitch between stitches on the top bed holding side-by-side loops down, tucking on multiple side-by-side needles can be performed, producing a wider, stretchy knit that also lies flat.
 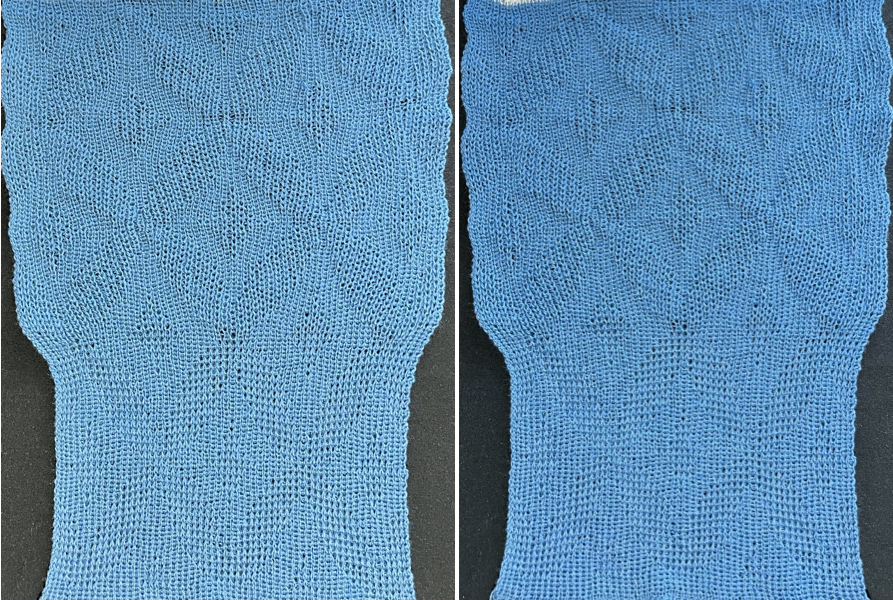 True blisters/pintucks generally knit rows on the top bed alone forming pockets that are eventually sealed by all knit rows.
Slip stitch settings are used.
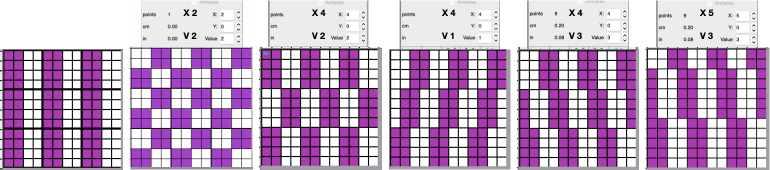
The design is at first lengthened X5, then every 5th row is filled with black pixels or punched holes.
A begins in smaller groups of gathers, testing for any errors or problems, while B allows for deeper folds. 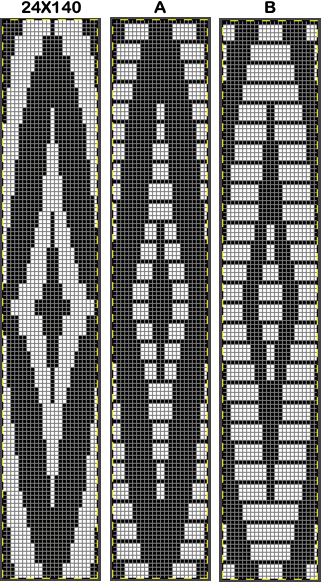 A:
A: ![]() the mark shows the stitches on the top bed begin to slip far too many rows
the mark shows the stitches on the top bed begin to slip far too many rows
due to using the color reverse option in the 930 before continuing to knit. 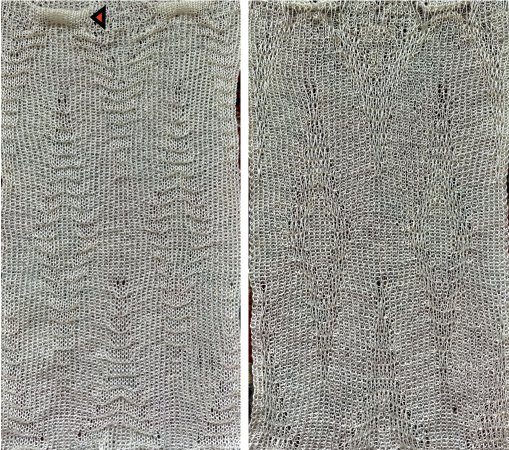 With a switch to the blue yarn, all-knit spaces between the pockets now begin to appear gathered. Slip stitch results in narrower knits, noticeable in the ruffled effects on every needle rib above the cast ons
 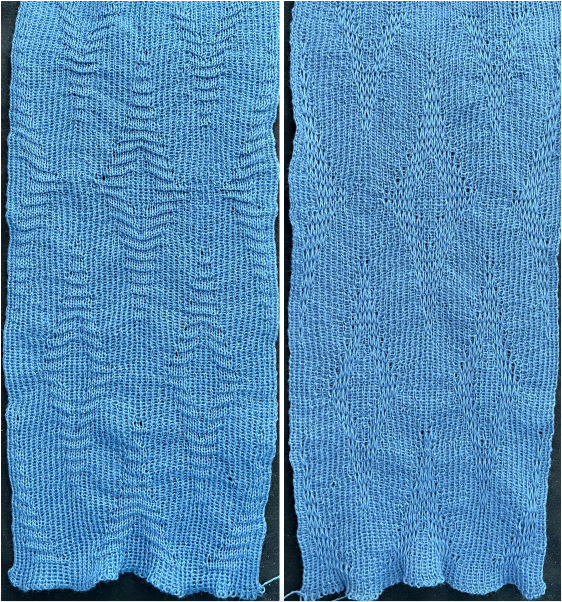 B:
B: ![]() the extra row of slipped stitches result in a far more textured knit
the extra row of slipped stitches result in a far more textured knit 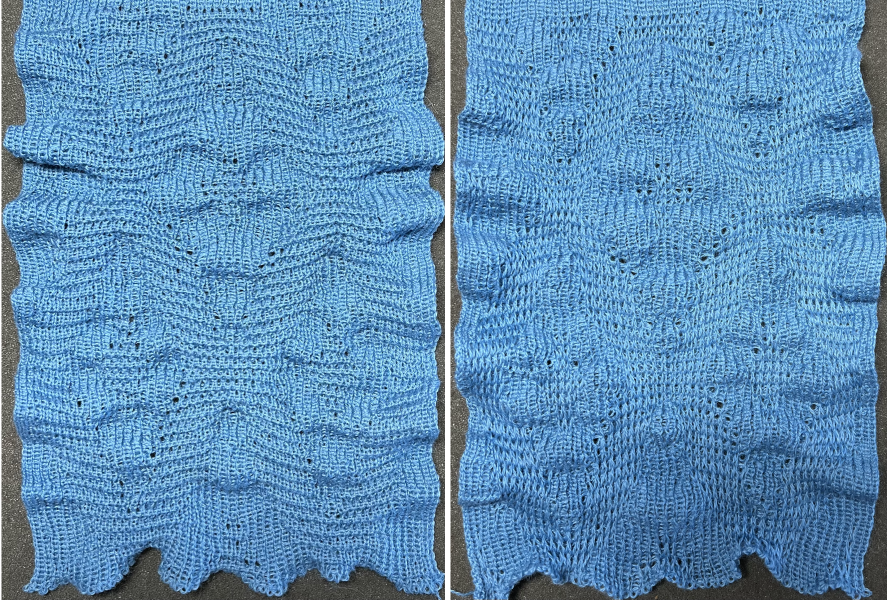 Developing other layouts for the same design, brick 24X128
 ![]()
 half drop 48X64
 ![]()
 Eliminating unwanted extra stitches from the original, modified to 24X28 pixels
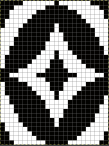
![]() drawn in repeat to 144X168
drawn in repeat to 144X168  brick version 24X56
 ![]()
 half drop 48X28
 ![]()
 adding those all knit rows
 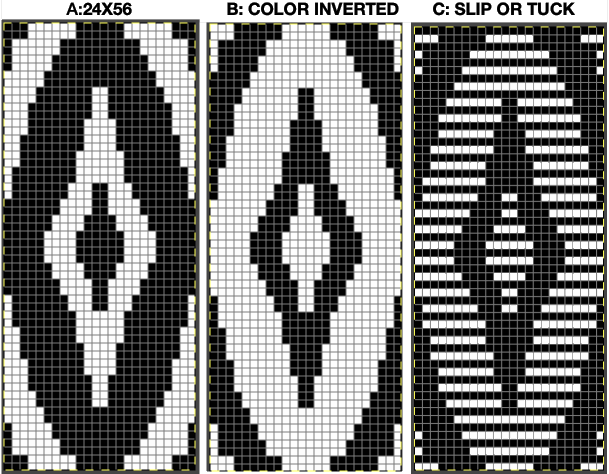 Viewing repeat alignments
 ![]()
 The 24X112 brick repeat suitable for punchcards, not tested,
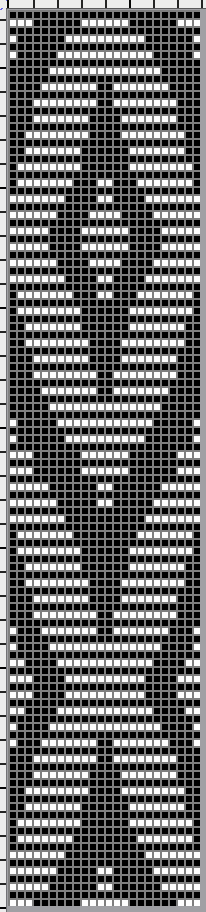
![]()
 and the half drop, 48X56
 ![]()
 tested using a 10/2 cotton and lightly steamed and pressed. Knit on 80 stitches, it measures 17 inches in width and 11 in height.
 an attempt at a more detailed look
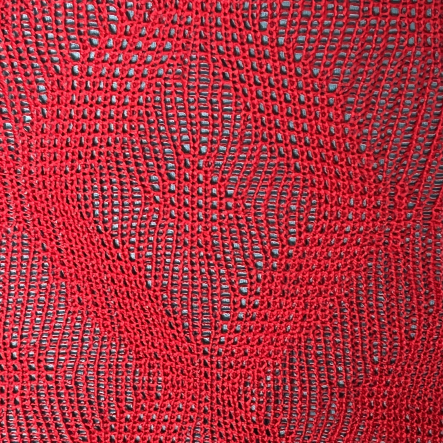
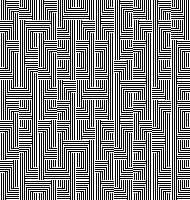
A collection of geometric design blocks built with squares, rectangles, and lines
I have grown fond of playing with ArahPaint’s functions: guess weave from grid, and drawing in repeat, and am constantly amused by the speed with which most design repeats and color separations can now be drafted when compared to the very first efforts in the days of anyone trying to use Excel spreadsheets to accomplish the same tasks.
Drafts designed for handweaving provide endless inspiration for knit design.
In conjunction with ArahPaint, Gimp remains a frequent go-to as well, along with Numbers for Mac for when spreadsheet tables meet charting or design needs.
The programs are free, there is no need to purchase expensive design programs in order to develop DIY motifs.
Developing tiled repeats suitable for multiple stitch types, including tuck , offered some repeats that began with geometric blocks built with squares, rectangles, and lines, some of which are suitable for punchcard knitting.
Many are included here again to serve as a cumulative collection of possible springboards for use as is or for developing more personal variations.
A reminder: the pngs below were saved as indexed, B/W files.
When downloaded, they may be converted automatically to RGB mode.
Prior to downloading any to machines, check their image mode, and if it is RGB, convert it back to B/W indexed. The pixel dimensions text for designs suitable for punchcard machines are highlighted in a different color.
More repeats are available in the post on Working with diagonal patterning in machine knitting
Larger pngs may be subdivided to change their appearance or alignment of specified numbers of cells.
To begin with, cells may be filled in any color, with mode and color changes to indexed BW if for electronic download
8X8 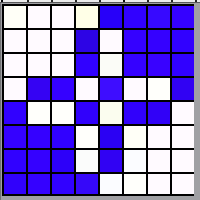 punchcard full repeat
 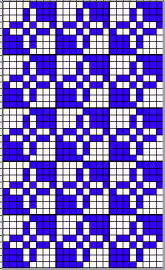 its png
![]() 12X12
12X12
![]()
 visualized drawn in repeat X12
  and modified using drawing X12 in random repeat for use in electronic machines
 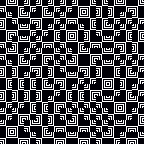 introducing dotted squares, another 12X12
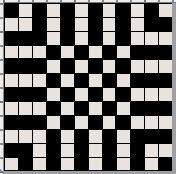
![]()
 19X19
19X19![]()
 18X18, shown tiled X 9 in both width and height
![]()
 and modified using random
  A Ravelry query prompted these designs
22×22
![]()
 22X30
22X30![]()
 32X32
32X32
![]()
 44X54
44X54 ![]()
 66X60
66X60

 The present series:
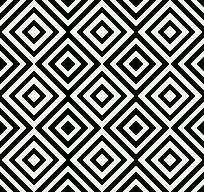
20X20![]()
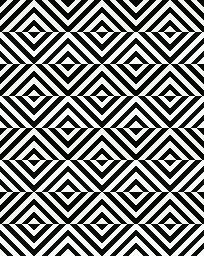
25X23![]()
26X23![]()
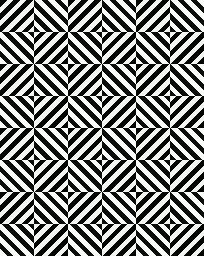
35X35 ![]()
 68X68
68X68 
 A visit to a quilting blog led to these explorations, beginning with a 20X20 repeat, rotated in 4 directions to be combined in new 40X40 repeats for different movements.
 ![]()
![]()
![]()
![]() A first simple 40X40 grouping
A first simple 40X40 grouping 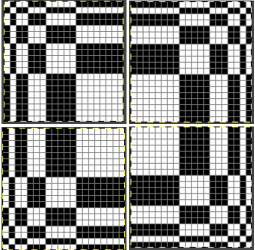
![]() tiled X5 in width and height, also color reversed to visualize the result with the potential exchange of the yarn positions in the color-changing sequences
tiled X5 in width and height, also color reversed to visualize the result with the potential exchange of the yarn positions in the color-changing sequences 
 Dividing the repeat in half, color inverting the 20X20 segment on the right,
 ![]() combining it with the left half
combining it with the left half ![]()
 And with color inverted quarter segments
 ![]()
 In the following designs, the meeting points are slightly offset.
 ![]()
 and lastly, aiming for more of a diagonal
 ![]()
 Varying shapes
12X12 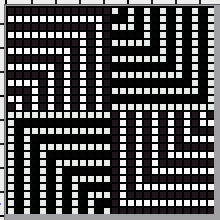
![]() drawn in repeat X13
drawn in repeat X13  26X26
26X26 ![]() drawn in repeat X6
drawn in repeat X6  with color inverted quarters
 ![]() drawn in repeat X6
drawn in repeat X6  16X16
16X16![]() drawn in repeat X10
drawn in repeat X10  drawn in repeat selecting random
  24X24
24X24
![]()
 24X20
24X20
![]()
 24X24
24X24

![]()
 Developing related series, stop or continue, choose a preferred design anywhere along the way
47X47 ![]() 94X94 with segment rotations
94X94 with segment rotations  drawn in repeat X2
 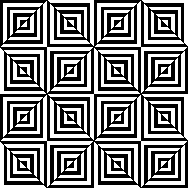 a few rows and columns removed, 43X43
 ![]() 86X86
86X86
 a series beginning with 68X64 pixels


 A purposeful effort to create outlines, 22X24
 ![]()
 55X59
55X59 
 Alternating outline colors, 50X72

 Using pixelated lines to break up blocks
8X28 ![]()
![]()
 16X16
16X16 ![]() drawn in repeat X10
drawn in repeat X10  14X14
14X14![]() drawn in repeat X11
drawn in repeat X11 24X24
24X24![]()
 24X24 with quarter-turned segments
![]() drawn in repeat X7
drawn in repeat X7
 24X47
24X47 ![]()
 cropped to 24X40, for different symmetry
 ![]()
 Developing repeats evocative of samplers
48X48 ![]()
 64X64
64X64 
 An electronic repeat with shifting angles, 32X32
 ![]()
 magnified 2X2 for a better view
  Color inverted quarter segments composing a slightly glitched pattern evocative of tartans, 128X128
 112X112
 Tiny details, large repeat, 48X98
 ![]()
 34X140
 74X74
74X74 
 The start of a different potential family, 93X32
 ![]()
 Introducing circles or parts of them to the library, 19X20
 ![]() tiledX10
tiledX10  random variations
 36X40
36X40
![]()
trimmed and redrawn to 36X79 ![]()
Passap to Brother 6, exploring a possible tuck stitch design
This post has been prompted by a recent Ravelry query with respect to having had disappointing results when attempting to knit # 1301 from the Passap Pattern Book as a double-bed fantasy fair isle using a Brother model machine. 
![]() Machine knitters using Japanese model machines are familiar with some tuck rules ie. white pixels/ unpunched squares that form tuck loops, should have a black pixel/ punched hole on each side of them and not occur vertically for more than 4 rows in order for stitches to knit off and form properly.
Machine knitters using Japanese model machines are familiar with some tuck rules ie. white pixels/ unpunched squares that form tuck loops, should have a black pixel/ punched hole on each side of them and not occur vertically for more than 4 rows in order for stitches to knit off and form properly.
Tuck punchcards illustrated in Brother Volume #5 on pp 218 and 219 include a few exceptions to those rules such as #786 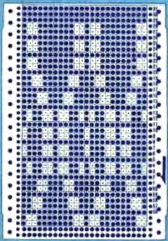 Looking at the reference design in the Passap Pattern book, it is used as a background motif only, not as a tuck one, and rotated using console commands.
 ![]()
 When uncertain as to whether a design repeat is appropriate for a specific stitch type, begin with a limited-size swatch, a thin and familiar yarn, knit slowly, and listen to the sounds the machine produces, which can be early warnings of potential problems.
The Passap motif issues in terms of tuck knitting analyzed on the first look: there are pairs of blank cells side by side, repeating vertically, and combined throughout 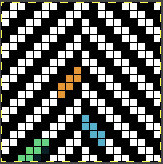 The first test is knit in acetate of unknown thickness, the guess is around 2/18. The 40-stitch swatch measures 6 inches in width, with transitions from and back to stocking stitch horizontal borders, and with the body knit on the single bed with the carriage cams set for tucking in both directions.
  The unaltered repeat may be used double bed, resulting in 8 inches in width, with lots of stretch, and the potential to increase the measurement even more with blocking.
A: transitioning from stocking stitch to every needle rib without added steps will form eyelets
the knit carriage is then set to tuck in both directions, and the ribber carriage is set to knit in both
B: a return to every needle rib before scrapping off 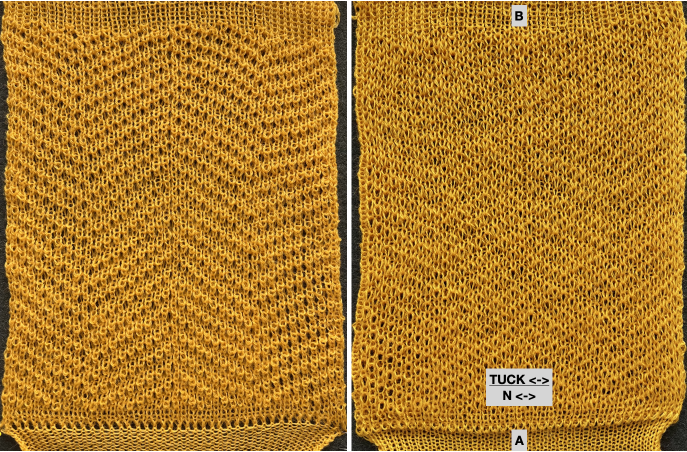 The chart on the left illustrates possible cam variations for knit and ribber beds using tuck settings in Brother machines.
Color separation is required to knit the design using two colors.
In the Passap electronic models, a technique number is entered and the appropriate color separation is performed by the console.
Many results as in this case, rely on each color in each design row being knit twice.
In Brother knitting, other methods need to be used in order to obtain the necessary separation.
The fabric though technically knit as dbj, will begin with the first preselection row from right to left toward the color changer as opposed to from left to right when the built-in electronic KRC separation is used.
Punchcard users can produce the same fabrics if 24 stitch width constraints are met.
The png for the repeat on the right is shared below, and tested using the cam settings 4: 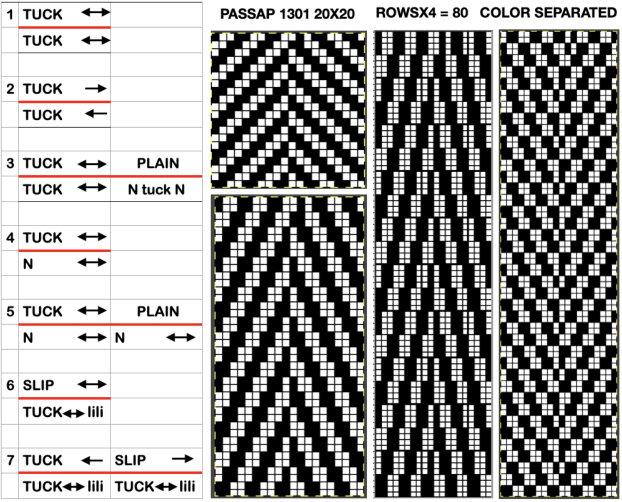

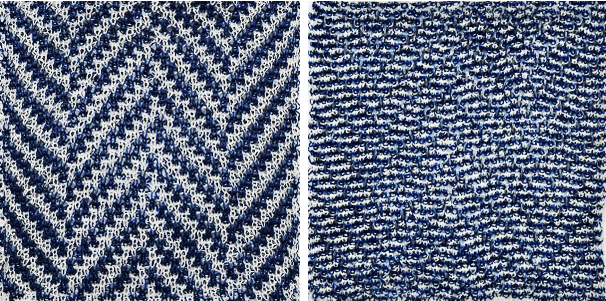 The results using other cam settings can be mixed, and generally far more successful using designs with larger shapes forming design and ground.
Using tubular tuck, 2 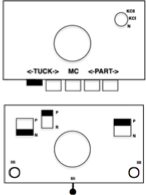 the knit results become muddied, as seen at the top of this test
Some previous blog posts exploring motifs worked on the double bed using tuck cam settings on either or both beds:
More shapes on ribber fabrics with tuck patterning, fantasy fair isle
Lace transfers meet fisherman rib, 2 colors, brioche on Brother KM
Lace transfers meet fisherman rib in 2 colors, brioche on Brother KM 1
Geometric shapes on ribber fabrics with tuck stitches 3
Geometric shapes on ribber fabrics with tuck stitches 2; knitting with 4 carriages
Geometric shapes on ribber fabrics with tuck stitches 1
Ribber fabrics with main bed tuck patterning 1/ pick rib
Fisherman and English tuck stitch rib 1_ checks patterns_ Brother, Passap
A different way to bend rules is to use multiple heights of row repeats within a single design, such as in this densely 24X20 tuck stitch design 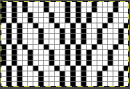
![]() Drawn-in-repeat to 120X120 pixels
Drawn-in-repeat to 120X120 pixels 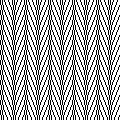 The design would need to be color reversed for use in electronic tuck knitting
![]() Punchcard users must punch all the black cells
Punchcard users must punch all the black cells 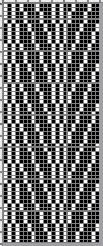 Using thin yarn is best with lots of evenly distributed weight, watch for loops getting hung up on gate pegs
 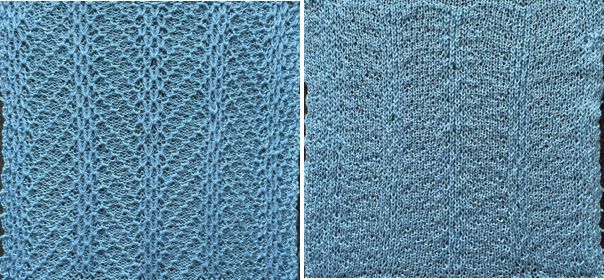 Eliminating one row of blank squares where there are 5 in a row, reduces the repeat to 24X16
![]() The result produces a similar texture. In this test swatch the number of stitches used was planned to attain similar side edges, and end needle selection was canceled
The result produces a similar texture. In this test swatch the number of stitches used was planned to attain similar side edges, and end needle selection was canceled 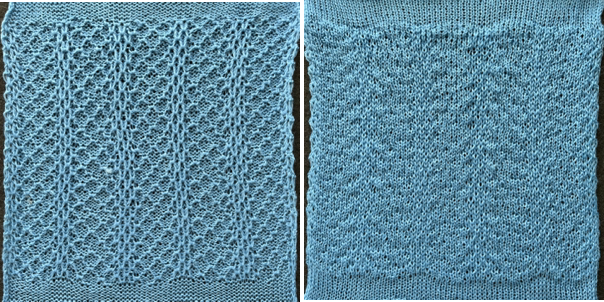
More slip stitch experiments inspired by commercial designs
PRADA knitwear often becomes a source for inspiration and discussion both in hand and machine-knitting forums. A recent sample:  Developing proofs of concept can begin to be achieved by reducing repeats in size, making sampling quicker to achieve and evaluate.
Larger automated repeats by default require electronic machine programming.
Spreadsheets offer an opportunity to plan color-changing sequences ahead of time and to check their horizontal and vertical alignments.
If a color changer is in use, in the Japanese machine models it sits on the left.
Color changes are made away from and back to the changer as frequently as every 2 rows, or as needed in the specific design.
Other brand machine models have color changers on each side, allowing for single rows knit in any one color and for dividing repeat segments differently.
The assumption here, to begin with, is that each color is carried for an even number of rows.
This chart was developed using Numbers for Mac. The repeat is 40 cells in width, and 52 cells in height, and is outlined with a red border. It is planned so as to return to the initial color selection when completed, maintaining a continuous design, 
![]() tested on 80 stitches.
tested on 80 stitches.  Its alignment is not on a true diagonal, and shapes are offset
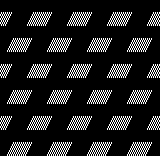 To duplicate the swatch, cast on and knit for a preplanned number of rows with the dark color.
Needle selection serves as a visual guide to the need for color changing in addition to or instead of row counts.
End needle selection is in use, there are no empty needles in this design.
COR: make the first preselection row from right to left, toward the color changer.
COL: remember to set the knit carriage to slip in both directions, pick up the light color
change color every 2 rows until every needle is preselected when moving from the right and back to the color changer (14 rows)
COL: every needle has been pre-selected. During every needle selection, only the dark color is used until preselection changes once more as the knit carriage returns to the left (12 rows)
COL: pick up the light color, resume with color changes every 2 rows (14 rows)
COL: a 12-row sequence with every needle preselection completes the 52-row design.
Repeat the process ending with a preplanned number of rows knit in the dark yarn, and bind off. 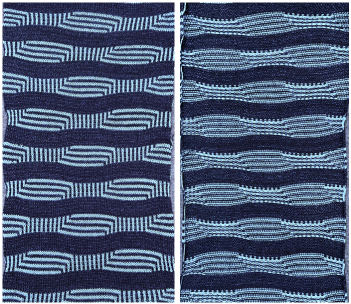 Expanding the design repeat would change the curvature in the solid color stripes.
This knit is by LAFAYETTE 148, NY.  It is offered with coordinated pieces, which appear to use both a knit and a purl version as the exterior of the knit.
 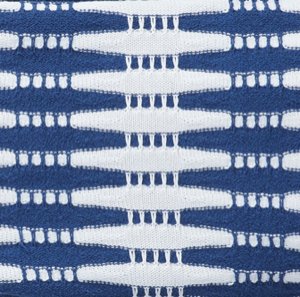 Beginning with an electronic slip stitch test emulating the larger shapes in alternating colors, adhering to the limitation of using an even number of rows in each color change, patterning shifts are explored in this 30X24 stitch repeat.
 ![]() A tiling test
A tiling test 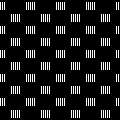 The extra horizontal lines formed in the swatch are because the goals are
1. to make larger shapes in alternating colors with long stitches in the contrasting color in front of them on the knit side,
2. automate the process,
3. and use the color changer.
In each case, the new color needs to be knit first to and from the color changer in order for its stitches to form those elongated stitches in it on the knit side, and knit again after the contrasting color rows to complete each segment of the full repeat.
The visualization chart for the first experiment:
A 30X24 repeat: black cells form knit stitches including below and above white cells. White cells slip until a black cell occurs directly above them.
B a knit side visualization of color changes: the elongated stitches, marked by conical lines, are drawn where they would appear, with floats formed behind them by skipped stitches. 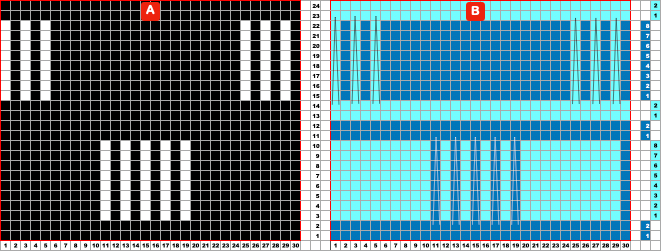
 Eliminating extra striping by bringing elongated stitches to the purl side may be achieved by transferring stitches between beds, and using programmed needle preselection to track when to do that.
Taking the same repeat into consideration, the orange cells serve as markers for stitch transfers 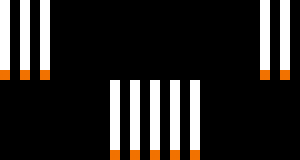 A programmable repeat:
 ![]()
![]() Cast on for every other needle rib, then transfer all stitches to the top bed. This allows for even weight distribution on all stitches.
Cast on for every other needle rib, then transfer all stitches to the top bed. This allows for even weight distribution on all stitches.
When a closed cast-on does not matter, the “broken toe” cast-on is an alternative to having all stitches on either bed  Using the ribber comb to cast on the single bed is documented in the post
 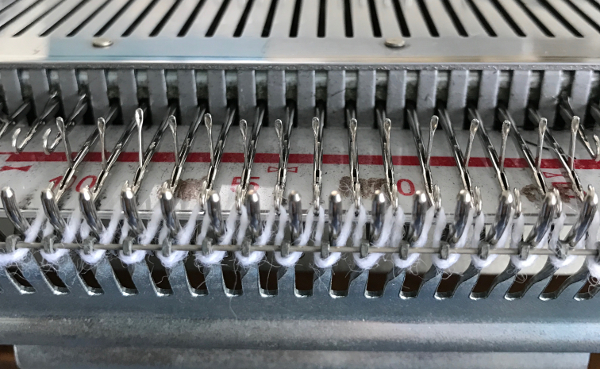 Both the knit and ribber carriages are in use.
 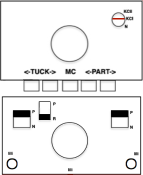 The knit carriage remains set to knit throughout, end needle selection is engaged.
The ribber carriage is set to slip throughout, with needles point to point, its stitches are never knit, they are held until a transfer is made once again.
They stay in the B position after transfers so as not to be knit, are held, and will form the elongated stitches on the purl side, knitting off when the same color is returned to the opposite bed every 8 rows.
After transfers, empty needles are taken completely out of work.
In this visualization, the conical shapes mark areas where the elongated stitches will form on the purl side, R marks stitches transferred down to the ribber, and M, the stitches transferred to the top bed: ![]() To duplicate my swatch, cast on and knit at least one base row with the dark color, ending COR
To duplicate my swatch, cast on and knit at least one base row with the dark color, ending COR
COR: program the first row, knit 1 row to the left
COL: transfer stitches on preselected needles down to the ribber, and push empty top bed needles out of work, OOW.
 Change to a light color. As the knit carriage moves to and from the color changer, floats will form in the location of the out-of-work needles on the top bed.
  COR: knit 8 rows, there will be a new preselection as the knit carriage moves to the left
  COL: transfer needles previously on the ribber onto the empty needles on the top bed, placing them in work position so they will knit on the next pass, and transfer new needle preselections down to the ribber.
  Knit 8 more rows, change to the dark color, repeat transfers of ribber stitches up, preselected stitches down, and continue knitting, following needle prompts.
 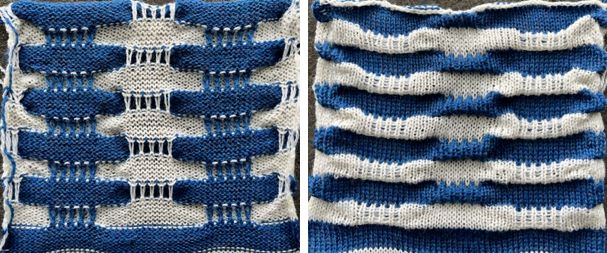 Printing custom needle tapes is an option that relies on printing the generated images to scale.
Marking the needle tape or metal bed with water-soluble pens or pencils is the old low-tech go-to.
However, custom markings can be made on strips of paper slipped under needles on either bed and marked for any chosen spacing as well as in multiple colors.
An illustration for a test on a repeat different from the programmed one began with marking a strip of paper on the top bed for alternating transfers to and from each bed using two colors:  The resulting tape may be used on either bed, seen here placed on the ribber. The markings on the metal bed are left over from a previous project.
  The reversed carriage settings
 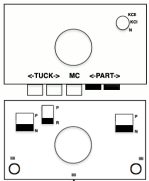 The repeat is not programmed, setting the knit bed to slip allows the knit carriage to make free passes from one side to the other, and the stitches moved to it never knit.
All knitting happens on the ribber.
In Japanese machines, the ribber often produces tighter stitches. Since most needles will be knitting, the tension normally used for the chosen yarn on the top bed for stocking stitch may have to be loosened by one or two numbers for smooth knitting. In Brother machines, the higher the number, the looser the stitch.
The ribber needle presser bar for Brother machines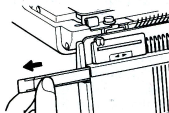 is made of plastic alone and does not exert as much pressure on the needles as the ones used on the single bed, requiring care in watching for needles that slide into other than the proper position during knitting.
Emptied needles need to be placed completely out of work.
Floats will form on the ribber as the carriages move across the beds in the location of the empty needles, and the skipped stitches on the opposite bed will grow in length.  Though the knit side of the fabric is facing the knitter, the long loops appear behind it on the purl side, with the results in the same family as the automated single bed result but with more fiddly execution.
  Seeking a closer match for the inspiration companion pieces:
in multicolor slip-stitch patterning, the initial preselection row is generally made toward the color changer, with changes happening from the left and spaced at predetermined even numbers of rows.
Shifting that convention allows for elongated stitches on alternating color shapes without extra horizontal stripes in each color.
The repeat was first visualized and planned in a spreadsheet, repeated twice the necessary width, and outlined with a red border.
A few rows were added at the top of the table, checking for proper alignment of both the design and the color changes. 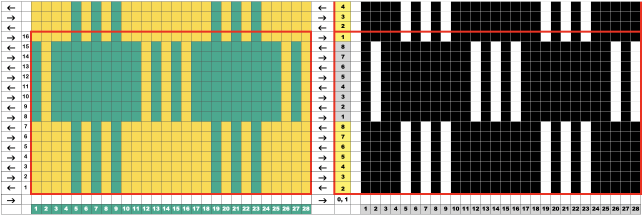 The single repeat measures 14 pixels in width by 16 in height
![]() and was tested on 44 stitches, with a planned knit stitch vertical border on each side.
and was tested on 44 stitches, with a planned knit stitch vertical border on each side. ![]() To duplicate the swatch, cast on using a dark color.
To duplicate the swatch, cast on using a dark color.
COL: the first design row in the adjusted repeat is programmed from left to right, away from the color changer with no yarn in the feeder. Setting the machine to slip in both directions allows the free pass when all needles are in the B position.
COR: thread the light color through the changer’s sinker plate, A position,  and knit to the left
COL: make certain the light color yarn is properly threaded in its place in the color changer.  Continue knitting until new needle preselections are made as the carriage returns to the left
COL: change to the dark color, subsequent color changes happen every 8 rows. 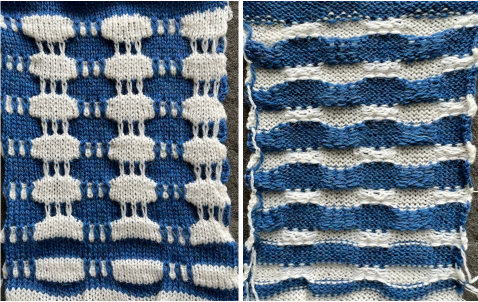
Reviewing a post from 2015 on a slip stitch experiment, the second source image now found attributed to Max Mara, inspired me to try a version using software presently available. 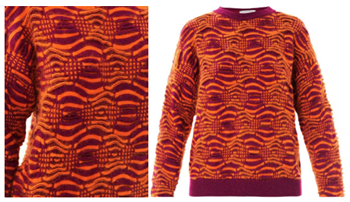 The speed in developing DIY designs and knitting them has grown exponentially with the use of new software and the capacity to move away from mylar sheets or punchcards.
The first 24X56 diamond shape
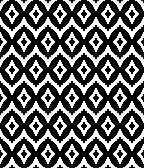
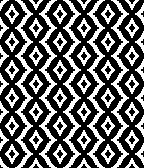
![]() rendered in half drop, to a 48X112 repeat, with a test in the alignment of multiples
rendered in half drop, to a 48X112 repeat, with a test in the alignment of multiples 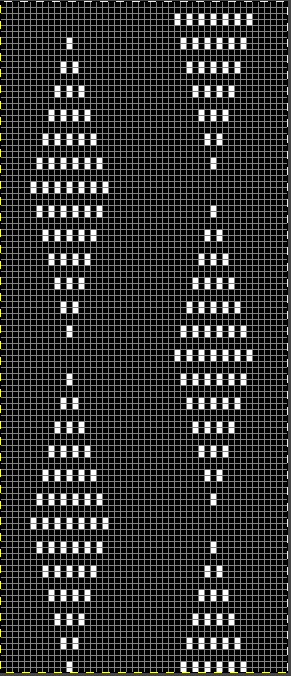
![]()
 The proof of concept was knit at first with color changes every 2 rows, then converted to double length using the machine built-in function, followed by color changes every 4 rows.
The light color yarn is a wool rayon, the dark is a shetland wool. 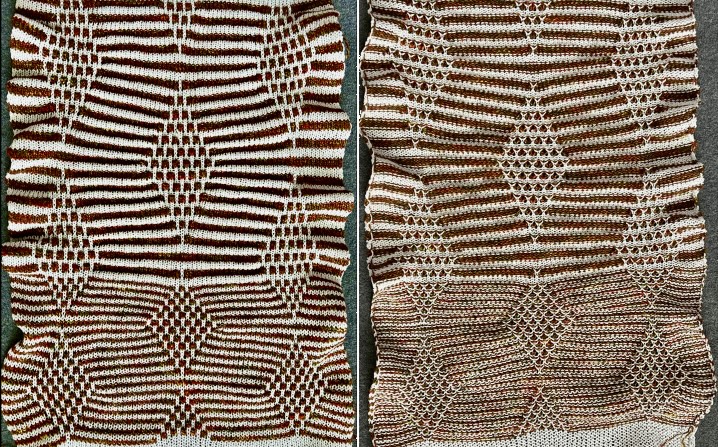 The all-knit rows on the side edges create ruffles.
An attempt to show the changes in texture on both surfaces: 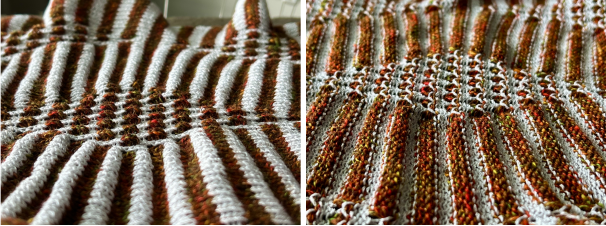 The limit on Japanese model machines for tuck stitch unless using very thin yarns is often 4 rows.
The inspiration image appears to have far taller color stripes, slip stitch is far more tolerant than tuck, what about trying color changes every 8 rows?
Keeping in mind that the light color consistently forms the elongated stitches on the purl side with no immediately visible long stitches on the dark color, the repeat first doubled to 48X224, if doubled in length again would require 448 rows of knitting! ![]() A quick partial test revealed the diamond shape is far too elongated and that dark stripe needs to be gathered as well,
A quick partial test revealed the diamond shape is far too elongated and that dark stripe needs to be gathered as well, 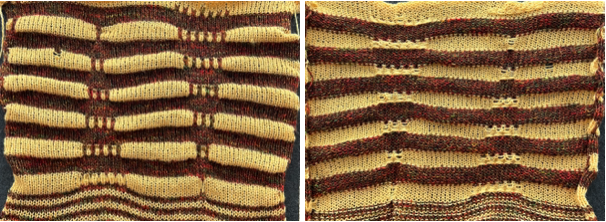 Back to the drawing board: after taking a break, the inspiration image is magnified and reexamined, revealing the fact that there are knit and purl stitch combinations across the same rows, not practical to execute on home knitting machines (excluding G carriages from the conversation).
  A compromise, still seeking to elongate only the stitches in the dark color on the knit side of a richly textured knit, planned for color changes every 6 rows,
 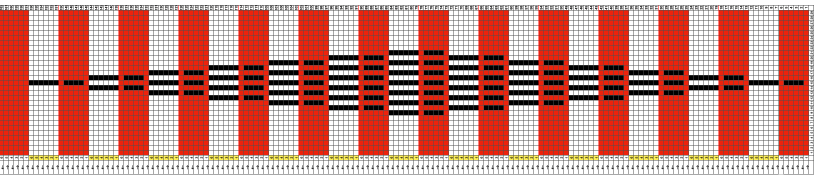 with color reversal necessary for slip stitch knitting, adjusted in width, the tested 40X162 repeat
 ![]() produces a gathered dark color as well. The knit stitches on either side of the shape form ruffles. There were tension adjustments at the bottom of the swatch, increasing the length of the held stitches, the shape is still too elongated for my eye
produces a gathered dark color as well. The knit stitches on either side of the shape form ruffles. There were tension adjustments at the bottom of the swatch, increasing the length of the held stitches, the shape is still too elongated for my eye 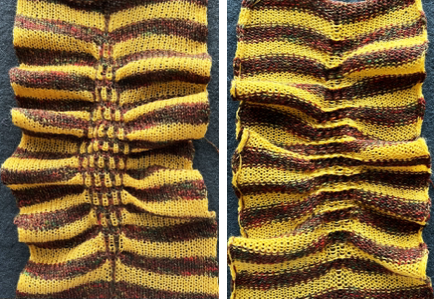 An adjusted repeat, the last in the series, 29X168
![]() tiled to check alignments
tiled to check alignments 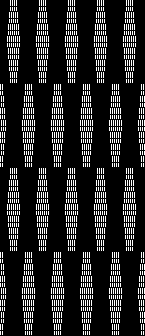 and knit on 80 sitch width using this 86 X168 programmed repeat
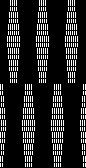
A return to plaiting and double bed hand transfers
These two sweaters, by Denimist on the left, and Chloé on the right, 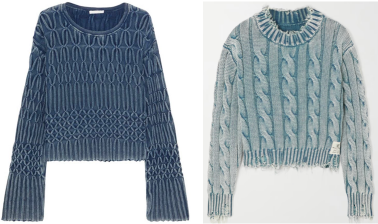 led me to reconsider plaiting, and as usual, whether any repeat may be programmed to make tracking of any hand techniques easier.
A review of plaiting on Brother machines.
The black cells represent needles in work and knitting on the top bed. Cast on for every needle rib, change the configuration so that stitches on needles represented by white cells are transferred down to the ribber.
Needles left empty after transfers are pushed back to position A, out of work/ OOW.
The first repeat was planned for 30 stitches, but some of my tests were knit on slightly different stitch counts. 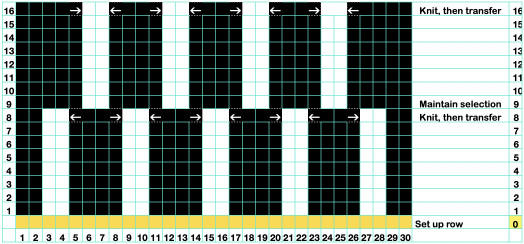
![]() The main bed is set to KCII. Any time empty needles are part of the design repeat, the end needle selection is canceled. The stitch count remains constant throughout.
The main bed is set to KCII. Any time empty needles are part of the design repeat, the end needle selection is canceled. The stitch count remains constant throughout.
The main bed does not need to be set to slip stitch, it can be left set for plain knitting.
The needle selection is used only as a guide to the transfers, which are made using a 2-prong tool in the direction of the arrows on the knit bed every 8 rows.
The swatch on the left was knit using 2/8 wool and no-stretch serger thread for the plaiting yarn, on the right the thicker yarn is 2/15, with fiber content for the thin yarn no longer readable. 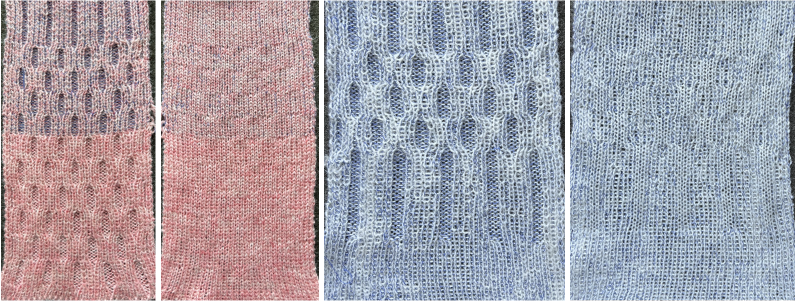 An equal-thickness dark is added on the left, with visible color distribution issues. On the right, the light is a 2/28 Italian import, the red a 20/2 rayon, and I began to test the introduction of possible cable crossings along with considering the width of all knit vertical side borders.
  Varying the overall spacing and the number of rows knit before cable crossings, 4 on the left, 6 on the right. The yarn in the latter swatch is a thin, coarse, inexpensive wool. The cabled stitches were hard to knit on the next pass, the low color contrast in the finished surface makes the texture effect subtle.
 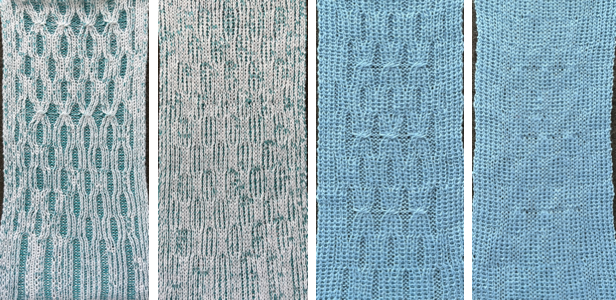 The instructions here in principle are as given above. The single stitch in the 1X2 cable crossings is always brought forward on the purl side prior to any transfers of the corresponding stitch pair.
A single repeat segment imagining actions to be taken, ![]() and a full chart for the proof of concept, 34 stitches in width
and a full chart for the proof of concept, 34 stitches in width 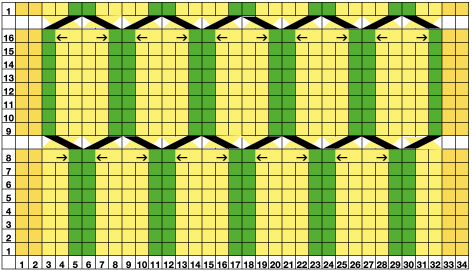 Stitches are moved after every 8 rows knit in the direction of the arrows using a 2-prong transfer tool, filling in a single empty needle to the right or left as indicated by arrows.
The empty needles are pushed back to the out-of-work position after the transfers.
The initial needle selection may be used for more than 8 rows at the bottom of the piece and the top if preferred.
A 36-stitch programmable repeat shifts the 8-row repeats shown in the colored chart ![]()
 The blank cells on row 13 will serve as the area on which the 2X2 cable crossings are made.
The initial setup
 after the first set of transfers
 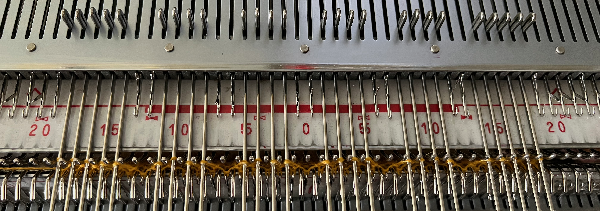 groups of needles with no needle preselection
 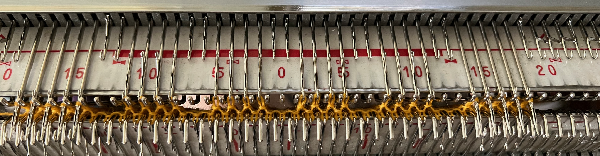 serve as markers for the 2X2 cable crossings
 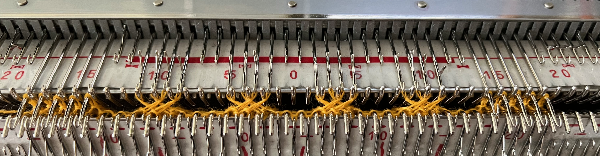 Bring needles with crossed stitches forward for easier knitting on the next carriage pass and continue knitting until needle preselection changes once more.
A: fixed needle selection
B: stitches moved with 2X2 cable crossings
C: fixed needle selection once more. Switch yarn feeder to plaiting accessory, add plaiting yarn, with 2 yarns of equal thickness in use tension is adjusted
D: stitches moved with 1X2 cable crossings
E: stitches moved with 2X2 cable crossings
Return to A selection. End the swatch matching the number of rows on the fixed needle selection at its start.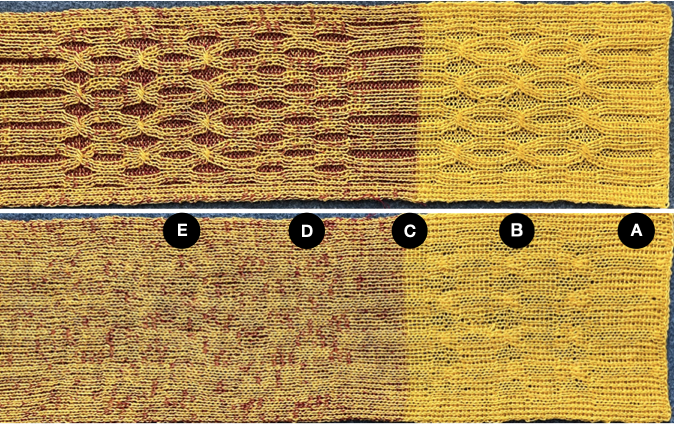
ArahPaint in knit design 4
Reviewing Tools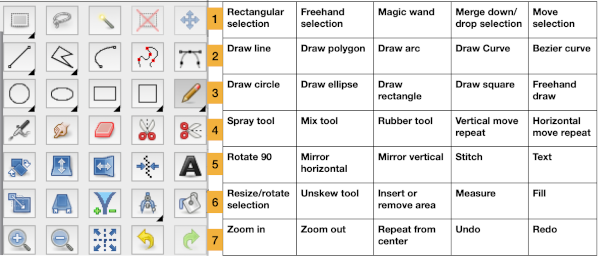 Guess weave from Grid
ArahPaint continues to be user-friendly for multiple applications including knit design.
The developer shares how-to videos that are frequently updated
https://www.arahne.si/public/news/
https://www.youtube.com/@arahpaint4/videos
The same holds for their downloadable manual, and any questions are answered in a timely and informative manner.
I am often driven by knit technique curiosity first, then find myself circling back periodically to program explorations to shorten the process for drafting blog charts and repeats, sharing new information as I notice it in manuals or online.
A recently reviewed https://www.arahne.si/tutorials/how-to-import-old-pattern-drafts/ led to my first experiment.
When using the weave guessing function, it is good to know that the program looks at the center of the grid, and tries to ignore the grid itself. If the center is not a single color and is homogeneous, use averaging to smooth it out before color reduction. If it is not filled properly, use contour operations (thickening) to make it stronger.
When guessing the grid, make sure you use the “preview” function, so you see what the program sees.
The steps, relatively “winging it”:
as in resizing/scaling any design, accurate cell/ anticipated stitch and row counts are needed. They may not be given in the source, where grid properties, cell shapes, and colors may all vary.
For example, the grid in the original may be 6X6 for punchcard designs, 10X10, or even 5X5 for electronic models. Recognizing the blocks used aids in examining and adding up counts when they are not provided.
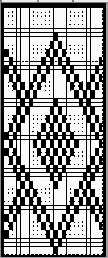
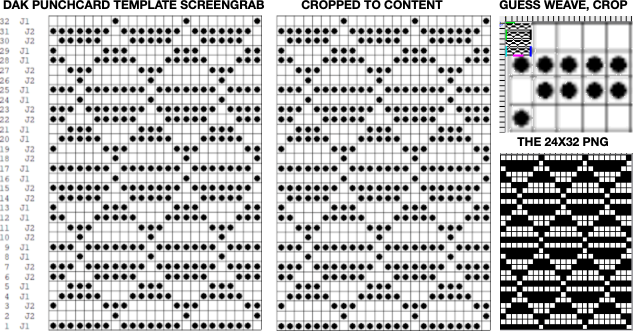
Load the selected picture, in this case, a random RGB one from a previous post, known to measure 24 stitches by 60 rows: 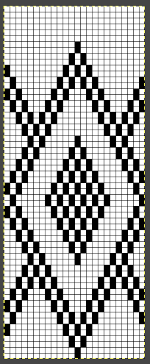 Go to colors, and select convert to 8-bit palette,
 ![]() resulting in these changes in the palette window on bottom right corner
resulting in these changes in the palette window on bottom right corner  Before reducing the number of colors to 2, adjust your background and foreground colors. Without disturbing the 0 value,
  use the shift key and with the mouse select a light color from the 8-bit values, it will replace the #1 value.
  Return to colors, set the number of colors to 2,
 Magnify the image as needed, and use the rectangle select tool to eliminate the dark frame. There will be a dotted color dashed outline that can be adjusted,
 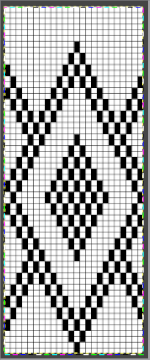 use Image/ Crop to the selection to eliminate the unwanted border.
Select Tools/Guess weave from grid, and a new window will open.
The program automatically defines the size of the original pattern. If the value is not the expected one, enter the desired pixel counts, and click OK. 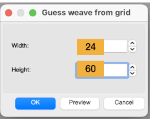 The “weave” will appear on top of the original pattern, surrounded by a bounding dashed line,
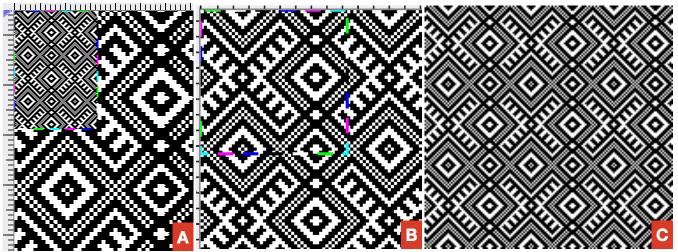
  choose Image, and Crop to the selection, and save the picture as PNG. The result matched that in the previous post, with the Gimp chart on the left, and the Arah on the right. Check that the final PNG is in indexed B/W before any electronic download. Select OK, Close, and save.
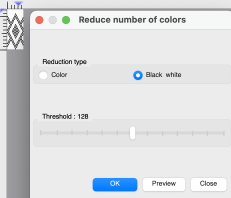
![]() The Threshold adjustment slider is found in the reduce the number of colors window and may be used to alter B/W images at any point in image processing.
The Threshold adjustment slider is found in the reduce the number of colors window and may be used to alter B/W images at any point in image processing.
In addition to using Image/draw in repeat to check alignments, the View Repeat option will tile the design an arbitrary number of times automatically, providing a large-scale view, illustrated only in part on the right in the image below. 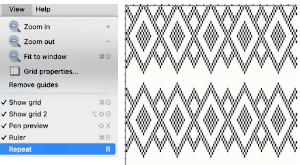 The process is repeated with pattern #42, 46X56, from a Brother electronic pattern book:
the original is on the left, the ArahPaint guess grid result is on the right, colored differently to make it easier to check for matches and any pixel placement differences, 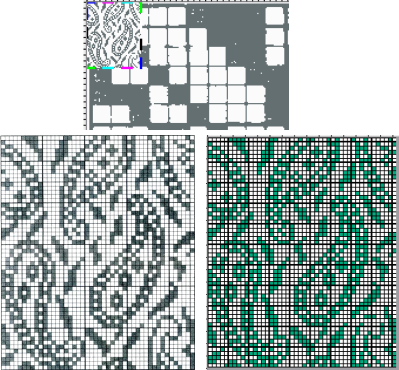 its B/W png.
 ![]() The steps again with #3604, 24X240, once again comparing Gimp results to those obtained with ArahPaint
The steps again with #3604, 24X240, once again comparing Gimp results to those obtained with ArahPaint 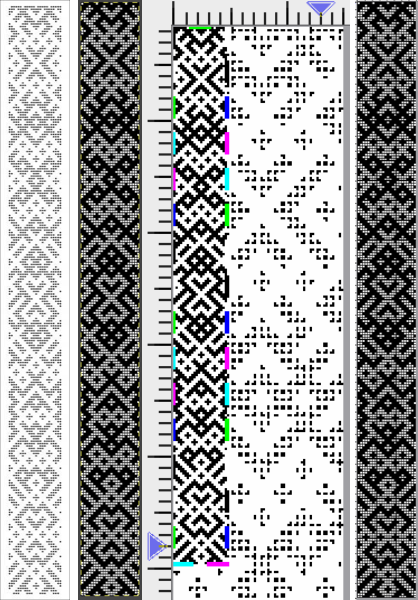
![]() One of the challenges which can appear to varied degrees when converting files is the amount of pixel cleanup required on the resulting images.
One of the challenges which can appear to varied degrees when converting files is the amount of pixel cleanup required on the resulting images.
One contributing factor that may be encountered is that the original to be processed may be askew, as only slightly in this image, #26 from the Brother 270 collection. 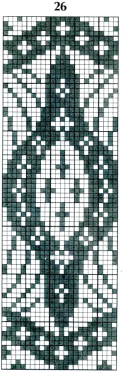 Using the unskew tool is one manner to fix the geometry of a layer distorted by perspective. Rotation may also be used.
Make a rectangular selection around the object which you wish to unskew.
Click on the Unskew tool ![]() Drag the corners of the selection to the distorted part of the image, they are marked by hollow squares at each corner
Drag the corners of the selection to the distorted part of the image, they are marked by hollow squares at each corner ![]() Click OK in the Unskew dialog box
Click OK in the Unskew dialog box  The selection becomes a normal rectangular layer. If uncomfortable working with layers, click on this tool to fix the image and remove the bounding box
 ![]() Repeat the process already described, reducing the number of colors to 2
Repeat the process already described, reducing the number of colors to 2  after cropping to the selection, the dark squares are not a true black. If the png is to be used for download to an electronic machine, change the grey to true black before saving.
The original, followed by the ArahPaint result and a tiled view of it 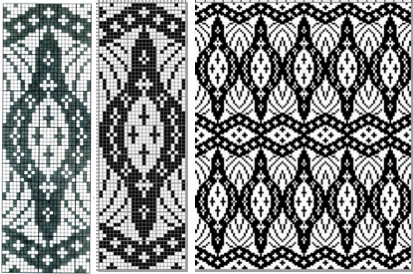
![]() The same approach may be used on large nonrepetitive images.
The same approach may be used on large nonrepetitive images.
Hand-count the number of cells in width and height if they are not provided.
A scan from the Dover publication on Celtic charted designs, converting this 73X54 image proved easy. 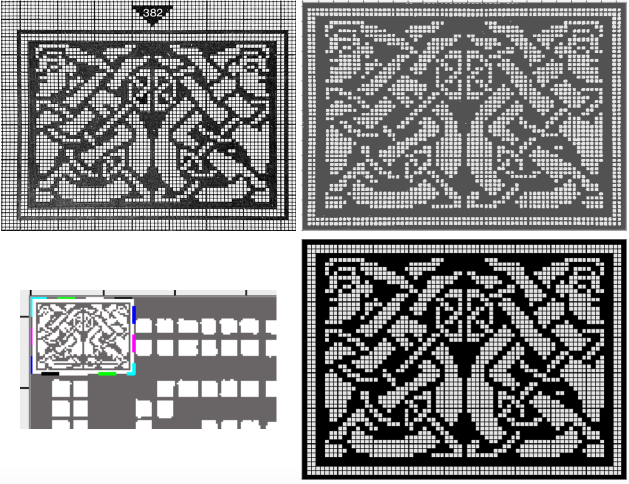
 The scan of a 130X95 stitch/row count chart from Charted Peasant Designs from Saxon Transylvania posed some issues.
The problem, in this case, was not the use of the basic technique, but that multiple areas of the chart were not marked with the black contained within grid cell borders.
Cropping problem areas, processing them separately, and pasting them in place on the previous result where needed appear to greatly reduce final pixel cleanup. 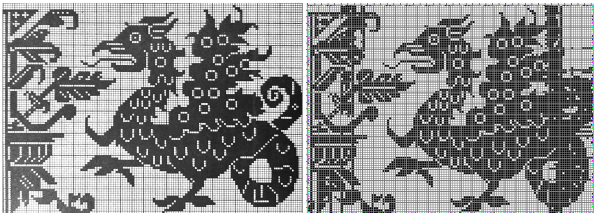
 While weaving and many needlework drafts are often represented on square grids, some knit designs are published to reflect the fact that actual knit stitches with the exception of garter stitch are typically rectangular.
In the early days of electronics, knitting machine models began to have libraries of stitch designs stored in memory, cassettes, or floppies. Often manuals or booklets were printed as companions, visual guides to stored contents. Colors and counts did not matter, since the intent was not to provide reproducible designs.
This chart is from Studio, published as a tuck pattern.
My best results were obtained after cropping the original to 74X60 unit counts and scaling the scan’s A: 1733X992 to B:1320X960, a multiple X16 of both values.
C: the result of reducing colors to 2, followed by guess weave-from-grid for a successful match to the original, a final 60X48. The png would need to be color inverted for use with the tuck stitch setting.  The png, after removal of a few wayward pixels, and color inverted for use with the tuck setting
 ![]()
![]()
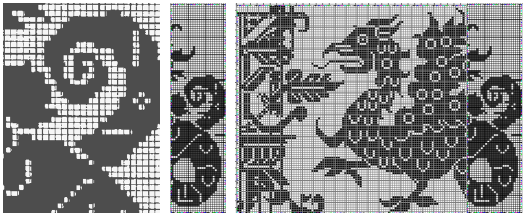
 Returning to that griffin, after resizing/scaling the original to multiples of 11, 1430X1045 pixels, the left portion of the design produced a clean match to the original, while the right segment with the off-grid dark cells still did not. The previously separately reduced segment was added on the far right yielding a far closer match.
  Weaving and cross-stitch libraries offer a huge range of potential design repeats.
This is from a 1912 cross stitch pub, measures 165X 230 pixels 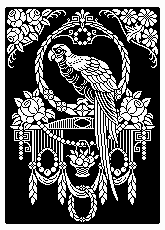 From a similar source: is that a kitty protecting his shawl, and what stitch is that?! 169X142 pixels
  Some resources:
Weaving library: fressinet offers images in black and white
Patternbase: from Dictionary of Weaves
Archive.org: filet crochet
Beginning with a design selected from p.83 in the Dictionary of Weaves 
 Color convert to 24 ->8, an expanded palette will appear. Press the Shift button and click inside the picture to manually select the colors, adding 63 in this case
Filters menu: choose Averaging, and follow with the second choice Repeat the last operation X10
Colors: set the number of colors directly to 2
Guess weave from grid to 18X18
Crop to selection, magnify and check results
Convert to black and white if needed
Check repeat alignment 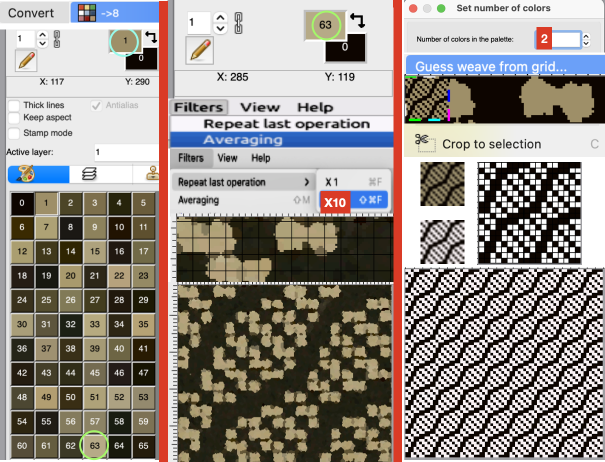 Other ways to handle the same task: another ArahPaint tutorial offers additional tips.
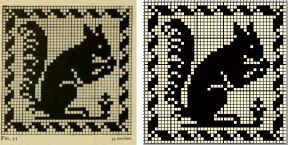
From the Cross stitch book, a 40X40 chart using a straightforward setting of the number of colors to 2. 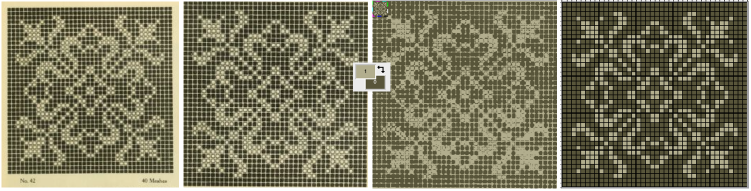 One way to convert the picture on the far right to black and white prior to saving it other than adjusting the palette colors is to use Threshold to reduce the number of colors.
1: select Black white, and Preview in the associated window
2: if an adjustment is required, the slider may be moved to the left or right, Undo if needed, and when satisfied stop
3: click OK and close the window, save the picture as bmp. 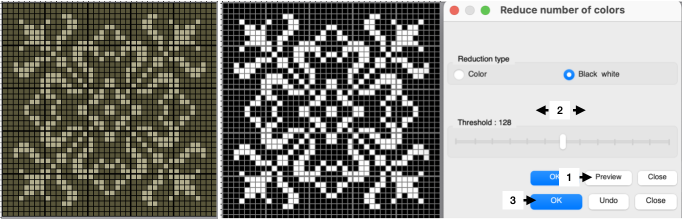 An earlier design intervention for the final B/W png: after setting the palette to 2 colors, reduce the number of colors with the same 3 steps using Threshold for another successful result.
 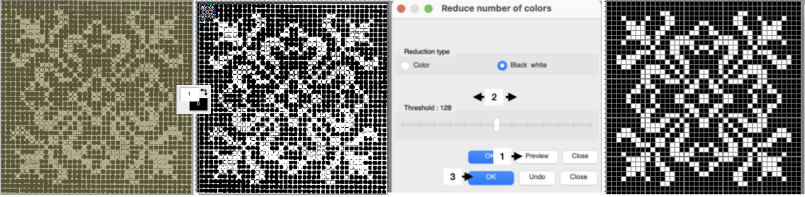 Reducing the number of colors window instead of setting the number of colors to 2:
Color convert to ->8, an expanded palette will appear
Choose Averaging, and follow with the second choice, Repeat the last operation X10
Open the Reduced number of colors window 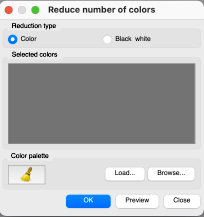 Press the Shift button and click inside the picture to manually select the colors for foreground and background, this did not work for me on my Mac with the latest OS. Selecting colors manually from the expanded palette by clicking on them is an alternative. The higher contrast between the two the cleaner the results.
Select Preview, if satisfied Click on OK, and Close
Select the whole picture
Guess weave from grid
Crop to content
Magnify, evaluate the results, adjust the palette to BW if needed, and save 
![]() Filet crochet pattern books also provide gridded sources that may be used in knit design. This 43X43 pixel file is adapted from Priscilla filet crochet book #1
Filet crochet pattern books also provide gridded sources that may be used in knit design. This 43X43 pixel file is adapted from Priscilla filet crochet book #1
![]() The same process may be used on color separation templates produced in DAK
The same process may be used on color separation templates produced in DAK
![]() From a random Pinterest find with an original 330X474 RGB chart:
From a random Pinterest find with an original 330X474 RGB chart:
A: guess weave from grid, crop to selection
B: tools, find repeat, crop to selection
C: the final 47X46 png drawn in repeat ![]()
 Adding colors to black and white pngs following the tip by the developer in the post comments:
Choose a black-and-white repeat, in this case, a 36X9 pixel repeat ![]() Double-click on one of the two colors to protect/lock it
Double-click on one of the two colors to protect/lock it  Double-click on it again, and the lock disappears, the color is no longer protected.
In the palette, use + to add a new color, this may be repeated more than once to add more colors or go to colors, set the number of colors to a number, ie. 6, for a random palette group that may, in turn, be edited to other values. 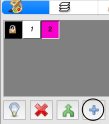 Double-click on the rectangle tool to draw filled rectangles
 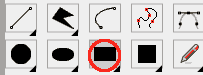 In rectangle options, above the palette icon, there are toggle buttons for Horizontal and Vertical, remember to protect a color
 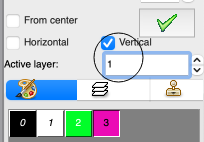 Once your selection is made, draw the filled rectangle across a selected width and height while keeping the protected color intact. Draw the result in repeat to check for alignment
  the protected color may be toggled to white
  If the designs are to be programmed for multiple color slip stitch or DBJ there are rules to be observed, and there may be restrictions on whether each palette color will be recognized as a third or fourth color by the download program ie. when using Ayab, where no two colors may occur in the same range of 8-bit values. For 4 colors, the ranges would be 0-63, 64-127, 128-195, and 196-255.
The img2track partial window with the associated color assignments for the first vertical variation. 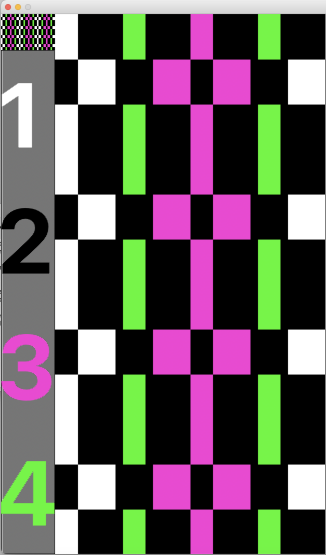 The horizontal choice allows one to play with selections possibly matching yarn colors in fair isle knitting,
 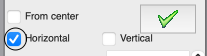 only 2 colors per row may be used, here the A feeder yarn remains fixed
 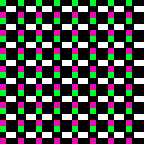 Remember to unlock the previous color choice if protecting new segment selections.
Visualizing possible FI striping results in progress 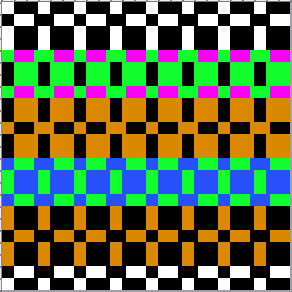 Working with diagonal patterning in machine knitting introduced some approaches.
Following guidelines in Easily generate random weaves it is possible to quickly generate DIY designs for use in multiple techniques.
To begin with, load a new picture 12 pixels wide and one pixel high
Set the number of colors to 2, black and white if the goal is downloadable pngs.
Fill in a repeat, and multiply it by Y multiple times to achieve the final number,  or fill in vertical bands using the pencil tool on the final planned starting canvas.
A single row repeat first multiplied Y X6, then X2  Select the measurement tool:
 ![]() The tilt tool shifts every next line of pixels, the width of the line in the X field for the horizontal tilt,
The tilt tool shifts every next line of pixels, the width of the line in the X field for the horizontal tilt, ![]() or in the Y field for the vertical tilt
or in the Y field for the vertical tilt  Default values are set to 0
  The selections for this design:
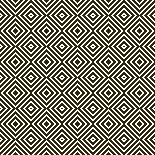
 ![]() The resulting file, also shown drawn in repeat:
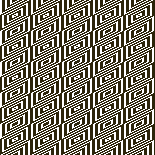
The resulting file, also shown drawn in repeat: 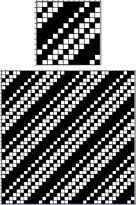 Two more, with a starting picture total height of 24 pixels
 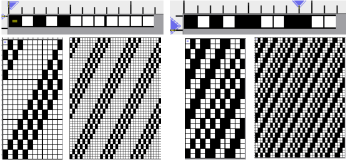 One repeat, multiple width selections
 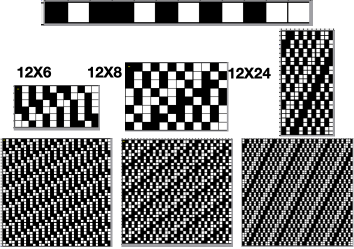 This repeat may be used for tuck or slip stitch, providing the final png is color reversed. The 12X24 initial result was multiplied X2 in height/Y to produce the 12X48 one. The image on the far right checks alignments
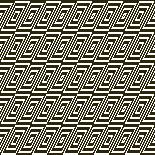
 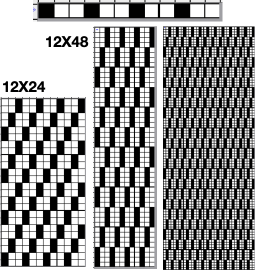 Working in multiple colors using the same approach:
 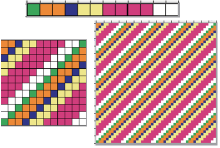 These charts continue to use the selections
 ![]() with reverting back to the original after each variation, though steps may be made sequentially and reversed in a matter of seconds
with reverting back to the original after each variation, though steps may be made sequentially and reversed in a matter of seconds 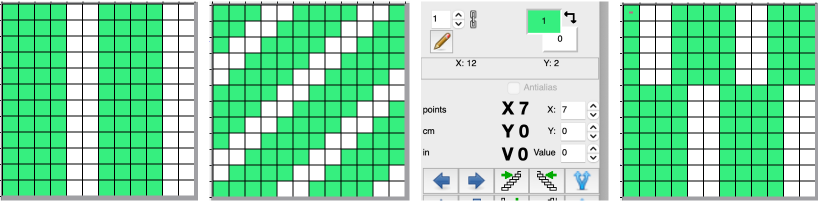
![]() Any results may be modified by adding other program functions to produce drafts of expanded repeats ie. through using drawing in repeat/ random. The results may be suitable for large pieces ie blankets and likely best knit as DBJ.
Any results may be modified by adding other program functions to produce drafts of expanded repeats ie. through using drawing in repeat/ random. The results may be suitable for large pieces ie blankets and likely best knit as DBJ. 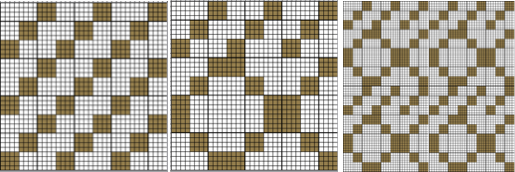 The ease of designing needs to be paired with good notes on charting cause and effect and an understanding of the relationship between pixels/ punched holes and stitch formation using varied cam button settings.
Using Filters is an additional way to develop images that play with the eyes, sometimes with only a few keystrokes.
A description of filters and their use may be found on pp 88-101 of the user manual (thumbnails # 96-108).
Filter options: 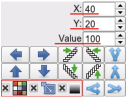 This first series uses only the contour filter
 ![]() and random selection of arrows from this tool
and random selection of arrows from this tool

 beginning with a 12X12 pixel design
 ![]() developing it into a 31X31 one, not all doubled pixels eliminated
developing it into a 31X31 one, not all doubled pixels eliminated ![]()
![]()
![]()
![]()
![]()
Midjourney inspired knits 1: single bed diamond shaped strips
My son recently introduced me to Midjourney and generated many images capable of inspiring a range of machine knits. The interpretation and execution may not be as simple as would initially appear, particularly to non-knitters.
Commercial knitting machines are left out of this conversation. The fact that they have multiple beds, ![]() and compound needles
and compound needles ![]() that facilitate whole garment shaping makes complex structures possible that may only be partially reproduced on home models.
that facilitate whole garment shaping makes complex structures possible that may only be partially reproduced on home models.
Japanese machines such as mine use two beds, with the ribber/ second bed added for knit and purl combinations, which may be lowered as seen below when not in use, or removed altogether. 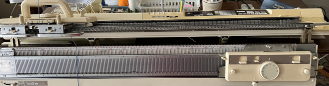 One accessory that would make things easier to reproduce more textured knit and purl variations would be a Brother G carriage,
  which operates on the top bed and slowly and loudly produces programmed patterns on both punchcard and electronic Brother models.
The initial Midjourney inspiration, 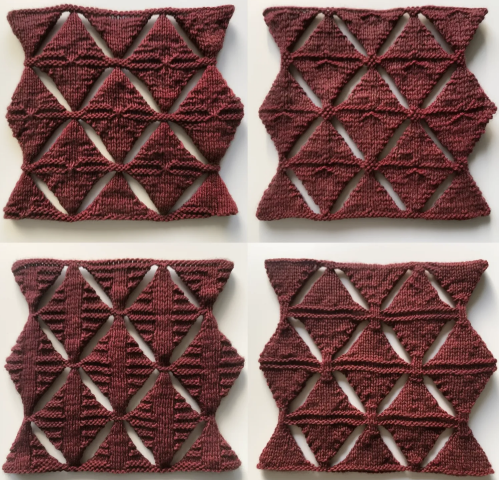 and a “simpler” variation.
 In hand-knitting concurrent shaping of both sides can be considered.
When working on 2 needles, because the work is turned over, knit and purl execution will change when ridges visible on both faces are planned.
Knit stitches are rectangular as opposed to square, often in a 4/3 ratio.
This chart begins to illustrate the actions involved. 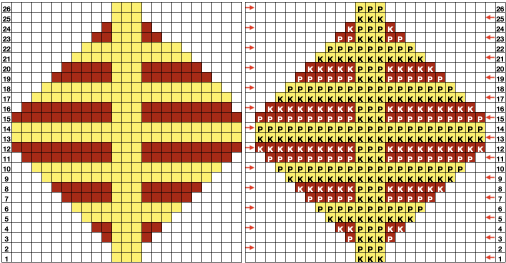 Machine knitters constantly look at the purl side when working on the top bed unless ladders are manually reworked into knit stitches or the work is turned over.
Turning the work over is executable using a garter bar accessory, available for use on multiple gauge machines.  The standard and bulky garter bars offer sections that may be joined together for use on the whole needle bed, while the tool for holding, transferring, or turning over small stitches offers only 30 eyelets, the red lines on it were made with red nail polish, a handy way to mark KM tools or even linkers at fixed intervals to save constant counting.
The work is pushed off onto the garter bar with the curved ridges up and returned to the machine to create the purl ridges after turning the bar over.
At that time, the needle hooks will grab the stitches from back to front and the bar can be removed.  If the yarn supply is to be kept continuous, the knit carriage and yarn need to be brought to the opposite side before resuming knitting.
Spreadsheets offer a way of visualizing steps ahead of any swatching. Not aiming for a direct copy of any of the Midjourney results, this is a start with 4-row sequences
 and an illustration of how strips might be joined to produce slightly different side edges.
  The diamonds are formed by increasing and decreasing on both side edges.
The sample is knit in a 2/8 wool, which even when knitting at tension 9 yielded stitches far too tight to remove onto the standard gauge garter bar, the 30 stitch tool was used.
Stocking stitch tends to roll to the purl side. For a cleaner edge, fully fashioned shaping is used.
From the Brother knitting techniques book, to decrease a stitch:  To increase one
 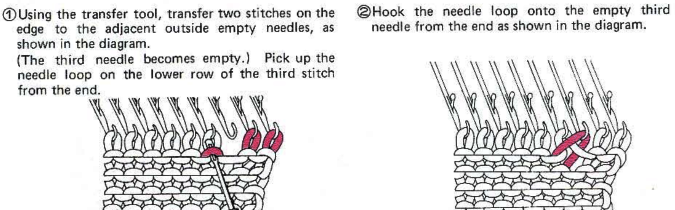 If both sides are shaped at the same time, the length may get affected by slight differences in stitch height formations on the carriage side as opposed to opposite the carriage.
In the test swatch increases and decreases were made consistently opposite the carriage, resulting in shaping on alternate sides every 2 rows.
Charting out the concept: the arrows represent the direction the carriage will be moving.
The blank row occurs where the knit is turned over.
A single row is knit across all stitches to the opposite side after the knit is turned before returning to shaping.
The last 2 rows in the chart would be the first 2 in the following shape.
The black cells represent what will become purl rows on the knit ground. 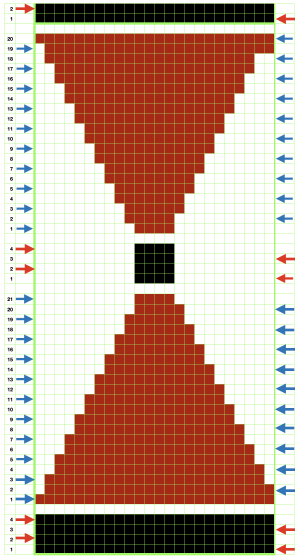 The proof of concept:
 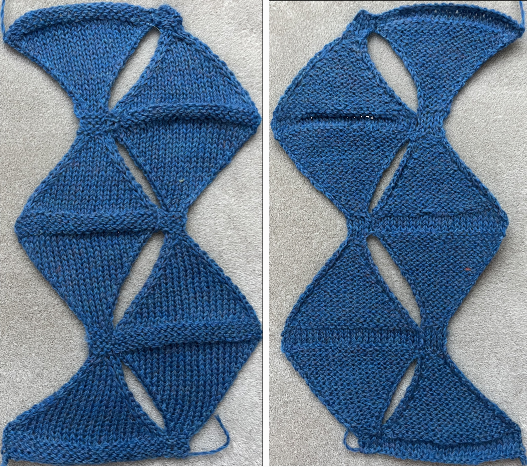 The machine-knit sample aside from a quick hand-knit on #8 needles, attempting garter ridges, offering a lesson in gauge and texture.
In a final piece, the shaping in the hand-knit would be carefully considered.  A first draft plotting out arrangements for alternating knit/ purl ridges: the center column can be adjusted to any width, and cables or other manipulations could occur at the narrow pivot points.
Seaming or joining would occur in areas where rows are outlined in blue. Those areas could be lengthened as well.
The chart can be further marked for beginning with either a half or a full diamond. For hand knitters, the yellow cells would be purled with knit side facing, and knit with purl side facing. 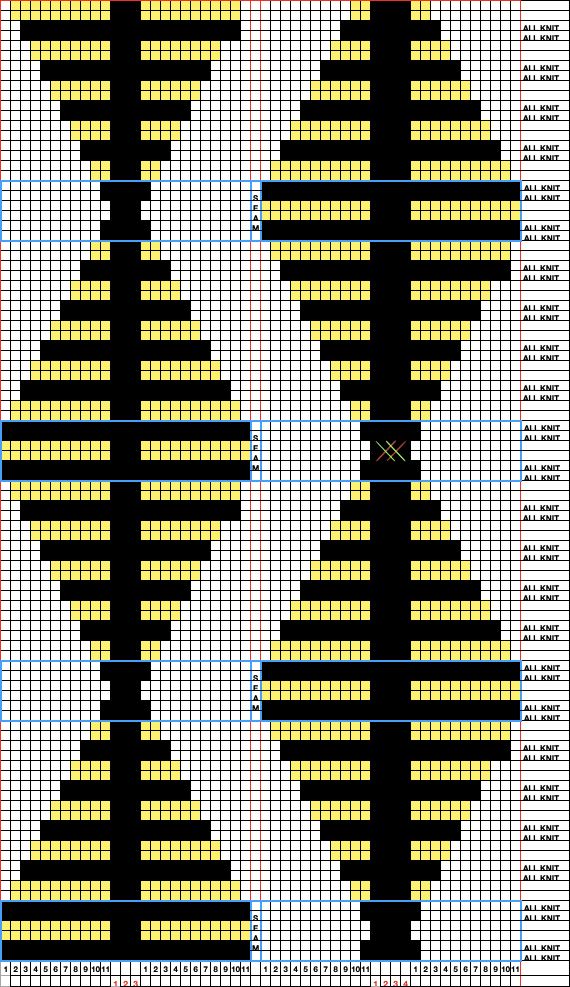 A Youtube video showing building the fabric using the short row technique: https://www.youtube.com/watch?v=H7WrYOV2A6w&t=1297s
For anyone with intarsia or multicolor fondness, some AI color renditions based on triangles as well 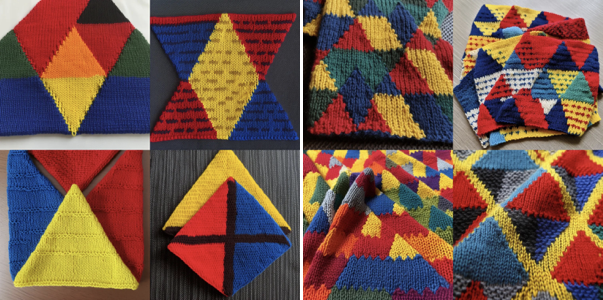
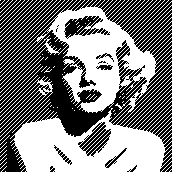
On a very different note, large, nonrepetitive AI-generated portrait images may be superimposed with brushes in any chosen design repeat to render designs such as these: 
Blistered DBJ 2 and technique variations on a single repeat
Blistered stitches DBJ began to explore some variations for the production of easy knits which resulted in pockets separated by areas of joined stitches, and depending on the design and whether one bed knits more stitches and rows than the other, can make the surface appear 3D to varying degrees.
There are several things to consider in DIY designs.
In my recent browsing and being inspired by “The curse of truchet tiles”, this png was one of the resulting repeats, developed using ArahPaint. It is larger than any previously tested with this technique.
Beginning with a 36X36 file ![]() drawn in test alignment to 108X108,
drawn in test alignment to 108X108,  expanding the design through a diagonal choice
![]() into a 72X36 repeat
into a 72X36 repeat ![]()
 Large repeats require large swatches if gauge matters, but smaller tests serve well to evaluate tension and cam settings. It is a good idea to be consistent in yarn choice.
Thinking things through:
the white pixel areas will produce the pockets, separating from the ground, and the black pixel areas will compose the joined portions of knit.
To increase the effect, the height of those black pixel areas is reduced by changing their configuration in order to use the slip stitch setting to shorten them.
The first pattern fill requires doubling the height of the whole repeat in order to use the file in a tubular setting. ![]()
 Rather than doubling the file in height, this brush is used to fill the same black pixel areas.
![]() After a few pixel cleanups, this is the final repeat,
After a few pixel cleanups, this is the final repeat, ![]()
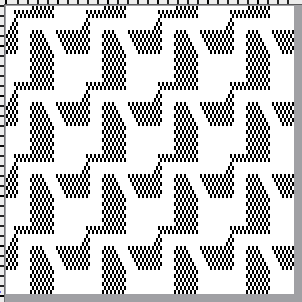 The png was tiled to the number of stitches planned, with the addition of a knit stitch border along each vertical side
 ![]() and knit on 88 stitches for proof of concept.
and knit on 88 stitches for proof of concept.
End needle selection is on.
The carriages are set to slip in opposite directions, in either arrangement A or B.  In one-color knitting starting preselection side does not matter.
The tension used, since so many stitches will be knitting on alternate beds, needs to approach that used for the same yarn when knitting stocking stitches.
The red yarn stitches mark the knit side of the fabric.
The cotton ball illustrates the formation of pockets.
The color change happened when the first cone of yarn ran out.
The yarns are 2/28 Italian imports of nonspecified fiber content.
The piece measures 10.5 inches in width.
When the settings are changed from tubular to every needle rib, the fabric is considerably wider and ruffles as seen at the top and bottom of the swatch, which could become a planned design feature. 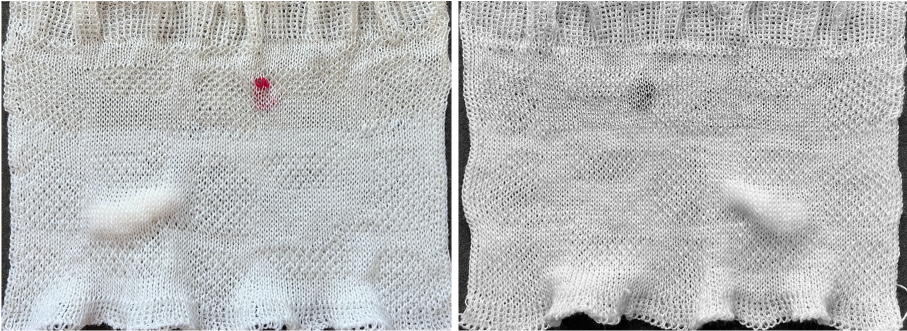 A segment was cropped from the 72X36 drawn once more in repeat to 84X72, repeating the same steps for processing the file

 alignment check
 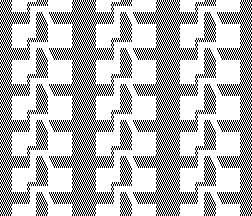 If the plan is to evaluate the effect of tuck stitch on the design, to begin with, the file needs to be color reversed, whether in the drawn png or using machine settings
  Exploring results with the ribber set to knit in on every row, the swatch below the red line was produced with the knit carriage set to knit in one direction, tuck in the other, while in the remainder the knit carriage set to tuck in both directions. The areas that in slip stitch would form pockets knit in every needle rib, while tuck stitch segments produce a lacy effect.
 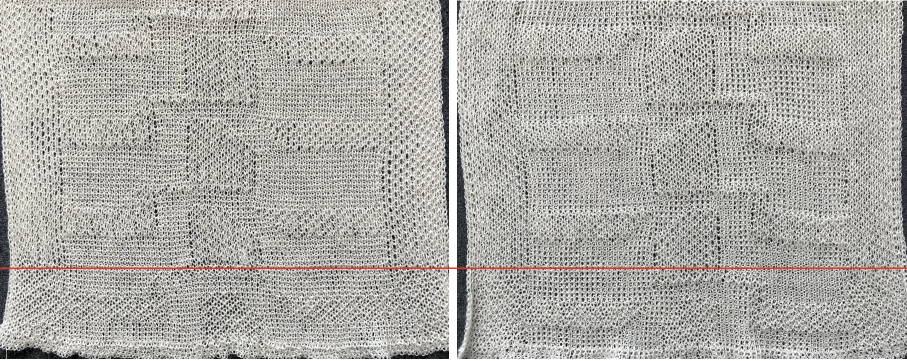 The same design, using the png created prior to color reverse, set for tubular slip stitch
 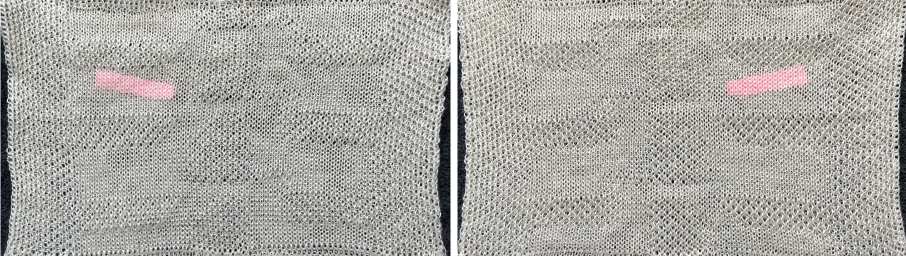 the transition between the changes in knit carriage cam settings results in changes in textures and added width
  The full tuck section (bottom) measures 16 inches in width, and the slip-stitch one (top) measures 11.5 inches.
Trying for a half-cardigan repeat with the same yarn produced an extremely wide knit with no discernible design.
Tired of double-bed knitting and swatches in a single color and large enough to cover pillows? the starting image reduced in size X4 to 21X18 pixels opens a new series of opportunities for knitting including on the single bed. 
![]() The design, knit here as DBJ, uses the built-in KRC color separation. At the bottom, the knit carriage is set to slip in both directions. The ribber uses the birdseye setting in both directions with the addition of lili buttons.
The design, knit here as DBJ, uses the built-in KRC color separation. At the bottom, the knit carriage is set to slip in both directions. The ribber uses the birdseye setting in both directions with the addition of lili buttons.
At the top, the knit carriage setting remains unchanged, and the ribber is set to knit in both directions, for a striper backing. The tension remained unchanged. The image illustrates the difference in the aspect ratio of the design and the height and width produced by the respective settings. 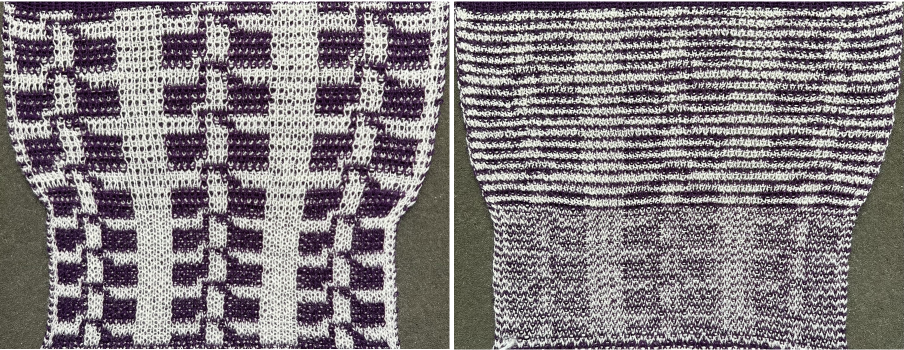 The same design knit as single bed fair isle produces problematic floats on the reverse which would need to be anchored down in a wearable.
 ![]() When knitting fair isle end needle selection is used to keep the yarn in the B feeder anchored so as to prevent any separations along the vertical edges of the design.
When knitting fair isle end needle selection is used to keep the yarn in the B feeder anchored so as to prevent any separations along the vertical edges of the design.
Here the light color is 2/8 wool. The yarn in the B feeder is switched to a 2/24 random contrasting color, and the knit carriage is set for thread lace. The white pixels knit both yarns together. Programming a blank row and knitting 2 yarns in this manner is considered by some an alternative to using the plaiting feeder.
End needle selection is canceled. If needles are brought forward, push at least one back to B so the combined yarns knit. In a long piece, a repeat in the width of the planned number of stitches could be planned with one or two blank pixel borders on vertical sides.
Due to the contrast in yarn thickness, the thin yarn creates large stitches that bulge in areas where it knits with the thicker yarn floating behind it, and the areas with combined yarns recede.
The areas in double thickness secure the yarn that produces floats, so that the latter may be trimmed on the purl side, leaving cut ends in any length. When cutting floats, consider sliding something under them and the thin knit so as to avoid cutting it as well, the fabric will release and flatten. 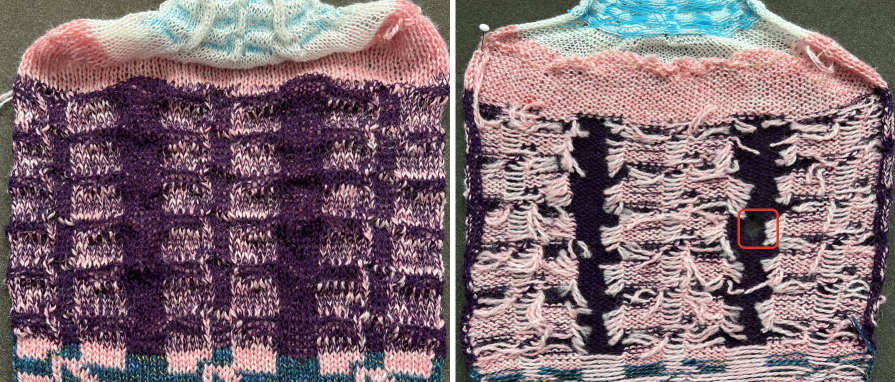 Using elastic, the background yarn used needs to be thinner, here a 2/20. The repeat program is left unchanged, but the position of the yarns is swapped so the elastic/ “thin” is placed in feeder A and the white/ “thick” in feeder B. There is a considerable change in size, observable at the top of the previous images.
 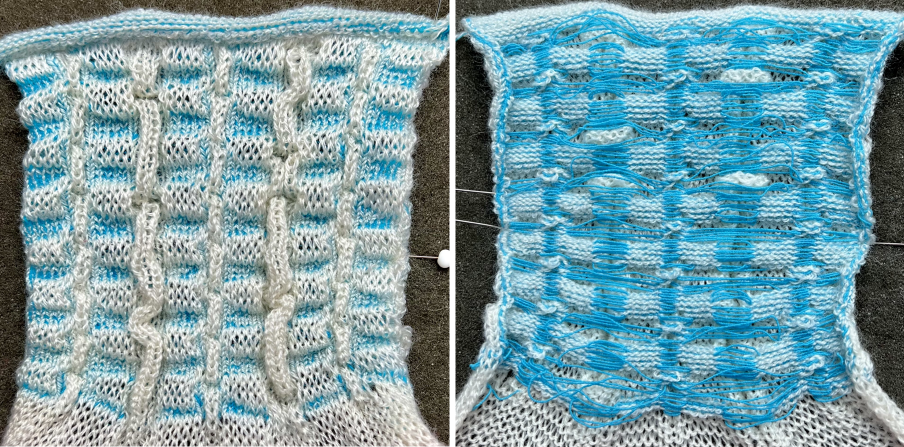 Aiming for float control, the repeat is edited.
 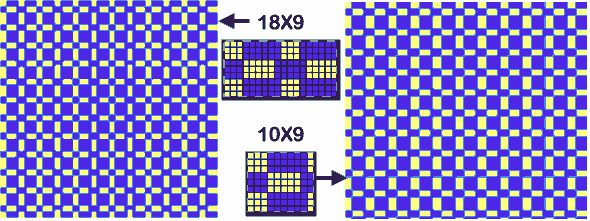 A test of the 18X9 repeat using the fair isle setting measures 6.5 inches in width,
 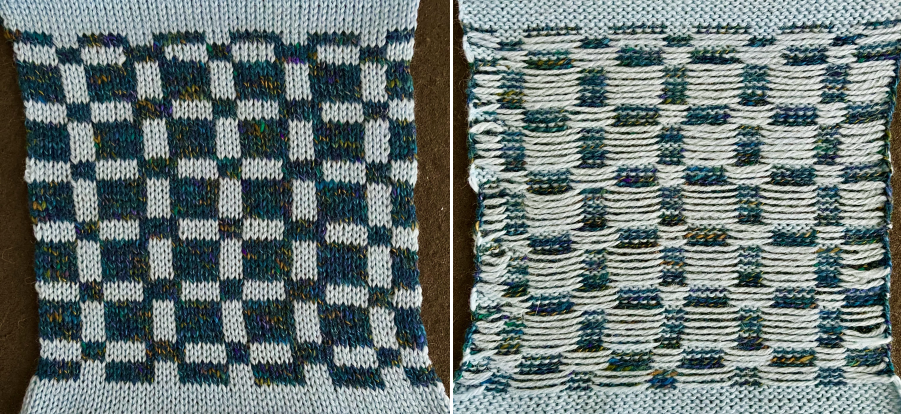 while the same stitch repeat knit using elastic and the thread lace setting adjustments once more, measures just under 2.5 inches in width
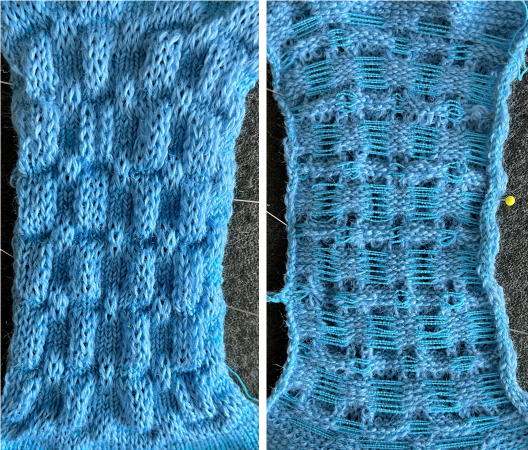
Developing tiled repeats suitable for multiple stitch types, including tuck
Punchcard machine users have limitations in terms of repeat width, depending on the brand and age of the machine. Those numbers might vary from 8 to 12, 18, 30, and 40, with a 24-stitch width eventually becoming the most frequent.
When electronic machines were first released decades ago, multiple built-in functions allowed one to manipulate programmed repeats. The latter were drawn with electronic pencils (Studio) or far more often with permanent jet-black ink on mylar sheets or “cards”. Passap at one point developed the initial Wincrea version with a very short dongle for downloading designs to the console away from the knitting bed.
Brother was the first manufacturer to allow programming multiple repeats on a single mylar sheet. It took Studio some time to play catch up to eliminate all the potentially wasted space on them.
Both brands used mylars with 60 rectangular cells in width by 150 in height.
Variation buttons for the Brother 910, for those not familiar with its options. 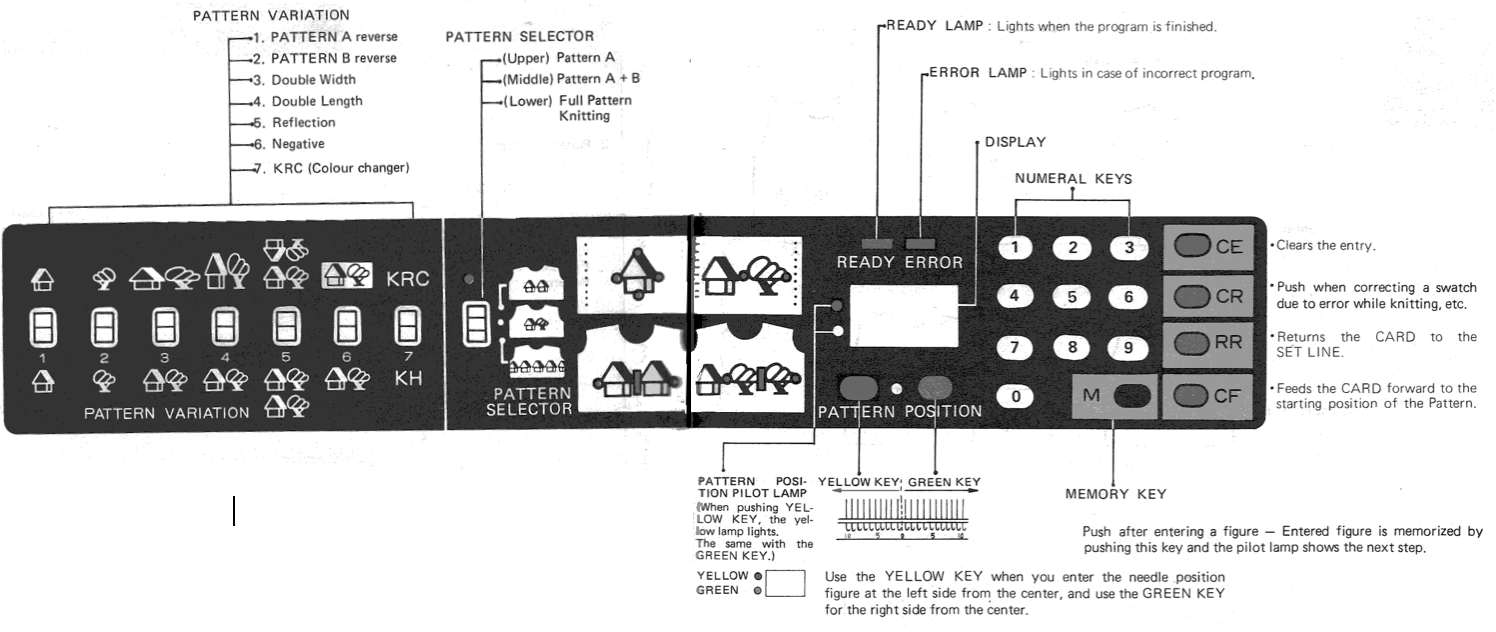 Building up a simple angular repeat can easily be done freehand filling in pixels, or with the use of the straight line tool in ArahPaint.
 ![]()
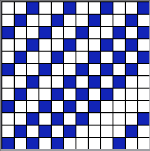 The 12-stitch design may be mirrored and rotated in a variety of directions. For use in a punchcard, this may be done once in width, and three times in height to meet the minimum length requirement.
It is not necessary when drawing to use only black and white to start with, though if the goal is ultimately to produce a programmable bmp or png, the final images need to be in those 2 colors.
It is easier to produce a design filling in fewer squares in lesser density and then to color reverse the results if that is required for the specific stitch type.
A: using horizontal and vertical mirroring yields the start of a diamond shape. Punchcard users may find it easier to mark the dark squares and punch everything else if the goal is to use the tuck stitch setting or to have a card “safe for everything”
B: checking alignment by tiling the file
C: if the intended goal is tuck stitch, and the minimum information is drawn in the design, then the repeat must be color reversed, whether in the program used to create the file or by selecting the built-in function in an electronic after download.
D: the color reverse image tiled, may be suitable for some interesting fair isle striping or exchanges of positive/negative spaces at the intersection of any of those rows where the double-height or double-width markings occur.
Red cells indicate two side-by-side unpunched holes or unmarked pixels. In theory, this breaks the tuck rule requiring a knit stitch/ unpunched hole or black pixel on either side of an unpunched area/white pixel, but it likely will be fine, producing something that looks more like a slipped stitch than a tuck.
The double-height areas marked in green would be a problem if one were to test the repeat by doubling its length, with a compounded issue in those areas where tuck stitches would then happen on side-by-side needles for 4 consecutive rows.
Usable with some care for knit weaving, slip stitch, and other stitch types. Results are not discovered unless actually tested.
Keep good notes.  Breaking the design into segments to knit as a striped fair isle ie in these 4 places
 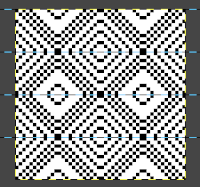 Variations are easier to imagine if one begins with colored repeat segments that can, in addition, be varied using color exchanges to resemble approximate yarn colors. Instructions on color banding using ArahPaint follow at post bottom.
 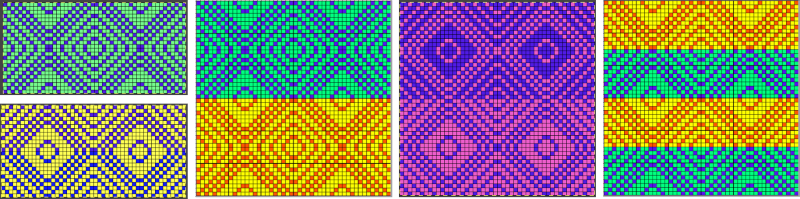 In the last post, the same image was mirrored using ArahPaint
 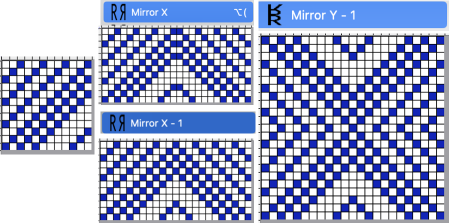 The result is a 23X23 pixel design.
Any incrementally larger repeats would require the same operations, using the mirror X-1 and Y-1 options to avoid any side-by-side equal cells, but the process is easier with some understanding of isolating repeats. When the 23-stitch file has been formed, manually trim one pixel along the bottom or top row, and one along either the left or right side, down to 22X22 pixels ![]() tested in B/W repeat
tested in B/W repeat 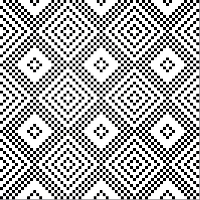 and here color inverted
 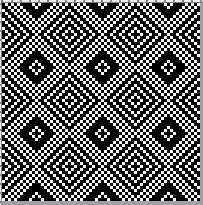 it is executable in double length
 ![]() thus offering the opportunity for color changing every 2 rows, testing the possibility of its morphing into a mosaic/maze design, remembering first to color reverse the repeat as given here,
thus offering the opportunity for color changing every 2 rows, testing the possibility of its morphing into a mosaic/maze design, remembering first to color reverse the repeat as given here, ![]() which in turn yields a file that may be knit with color changes every 2 rows, a technique that can produce maze/mosaic designs with an appearance very different from the same pattern knit as fair isle.
which in turn yields a file that may be knit with color changes every 2 rows, a technique that can produce maze/mosaic designs with an appearance very different from the same pattern knit as fair isle.
In this swatch, 2/20 wool yarns were used. This results in a knit that can be steamed to stay flat.
The variations in the amount of tucked stitches and their placement expand in some areas more than others yielding wavy vertical side edges.
The striping occurred to enhance the visibility of stitch formations on the machine, but can be a deliberate way to add even more colors to such pieces. 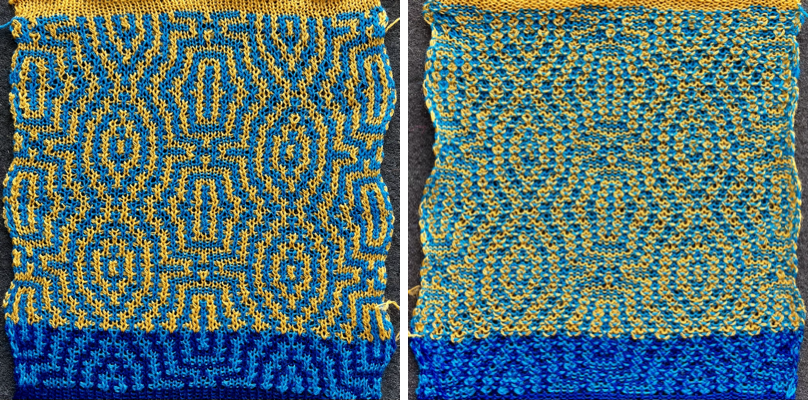 The same design, knit in 2/8 wool, begins to show that a pattern may produce very different effects with a simple change in materials or color choice
 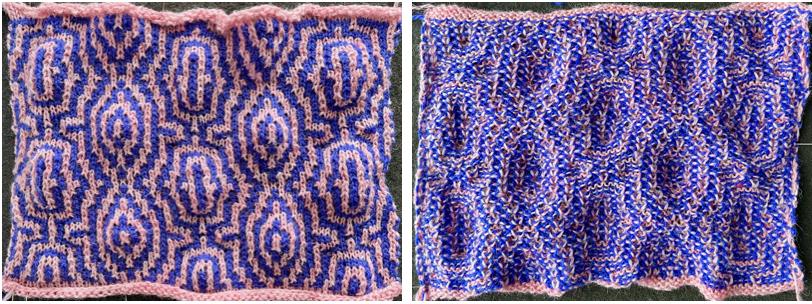 Working outside straight lines and exploring random starts: the post Working with diagonal patterning in machine knitting introduced several larger initial repeats also suitable for tuck patterning when reversed, including this 12X24 pixel design,
 ![]() and the companion larger file, 144X144 pixels
and the companion larger file, 144X144 pixels  The larger file can serve as the start for exploring knit pattern variations through the use of filters.
A description of filters and their use may be found on pp 88-101 of the user manual (thumbnails # 96-108).
A “fast pattern” user guide shared by the ArahPaint 6 developer October 2023 which demonstrates how to use filters with associated designs https://www.arahne.eu/pdf/fastpattern-EN.pdf
The associated tool options: This first series uses only the Contour filter ![]() and random selection of arrows from this tool
and random selection of arrows from this tool
beginning with a 12X12 pixel design ![]() developing it into a 31X31 one, not all doubled pixels eliminated doubled pixels eliminated
developing it into a 31X31 one, not all doubled pixels eliminated doubled pixels eliminated ![]()
![]()
![]()
![]()
![]()
 The Zigzag filter creates a zigzag from the image. The number of zigzags depends on the setting of the filter option (X, Y, and Value) and the direction (Horizontal, Vertical, or a combination of both).
X: determines the number of zigzags up and down, the number should be an even number ie. 144 divided by 12 would create 12 peaks
Y: creates the vertical direction of peaks
Value: set to 0 the whole image height is taken as amplitude
The variations can be endless, and exploring changes in settings will help develop a sense of what happens. The larger scale results may at times be reduced to a significantly smaller working repeat. Tools/Find Repeat often but not always will do that seamlessly.
The manual offers instructions for manipulating vertical bands of color. Such variants could be knit as intarsia or multiple colors per row, with limitations and considerations.
This 4X4, vertical repeat, tiled to 12X12 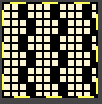 color reversed for tuck knitting
 ![]() drawn in repeat and filtered is knittable, but not interesting to me. The result, shown tiled for clarity
drawn in repeat and filtered is knittable, but not interesting to me. The result, shown tiled for clarity 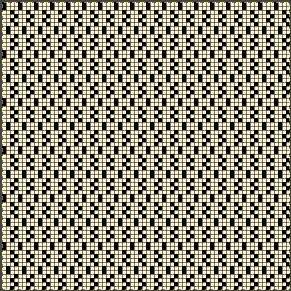 Moving away from straight lines, these initial experiments employed limited variations. The red X mark marks the repeat suitable only for fair isle knitting
 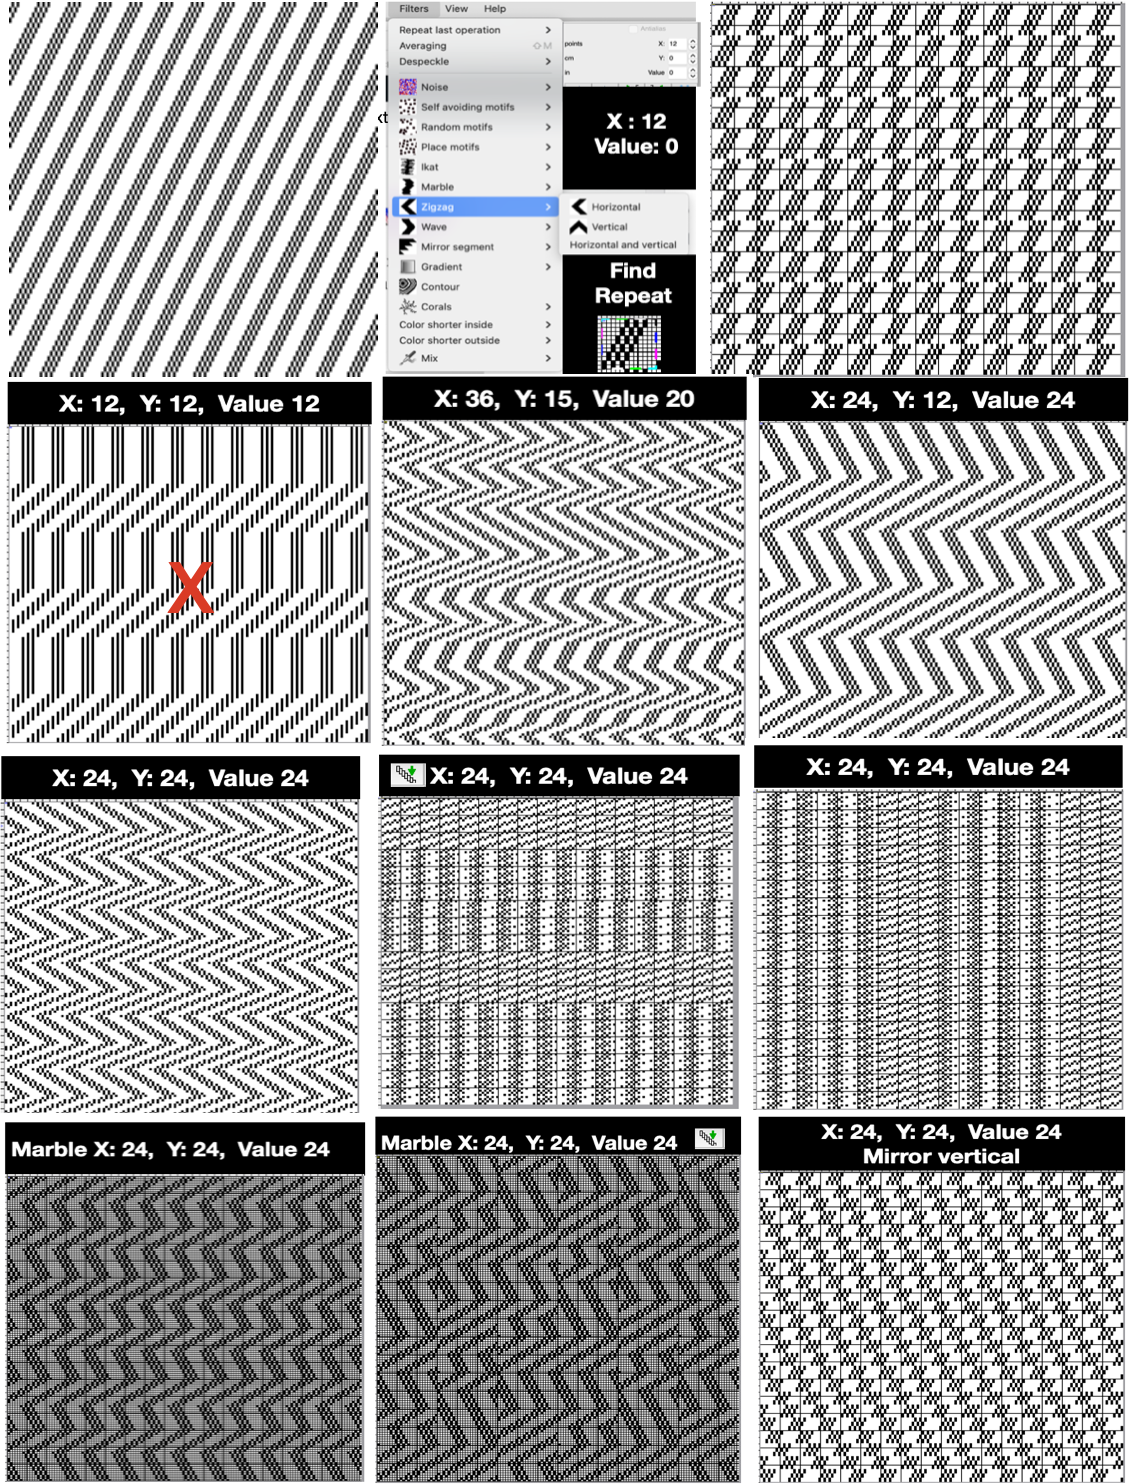 Choosing individual results to knit in tuck stitch, in review: the smallest repeats may be isolated and pixels cleaned up if preferred, remembering to color reverse when needed. This 24X24 repeat is suitable for punchcard models with the black pixels areas punched. Testing is far easier and quicker using electronic machines, do not use double length
 ![]()
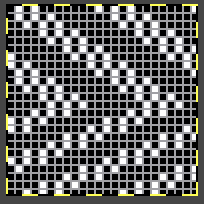 The design is asymmetric, subject to personal preference, and as usual, with results dependent on yarn and color choice.
The yarn used at the top of the photo is a wool-rayon, knit single bed. It was hard to identify stitch formations, hence the swatch was short in height for a visual texture check. Because of the rayon content, all edges steam and press fairly flat.
The other yarn is all wool, knit in every needle rib with the knit carriage set to tuck in both directions, and the ribber carriage set to knit in both.
This type of knit is often referred to as pick rib. Depending on the tuck stitch distribution, the stitches are forced apart vertically and can produce an eyelet effect in a fabric that lies quite flat. 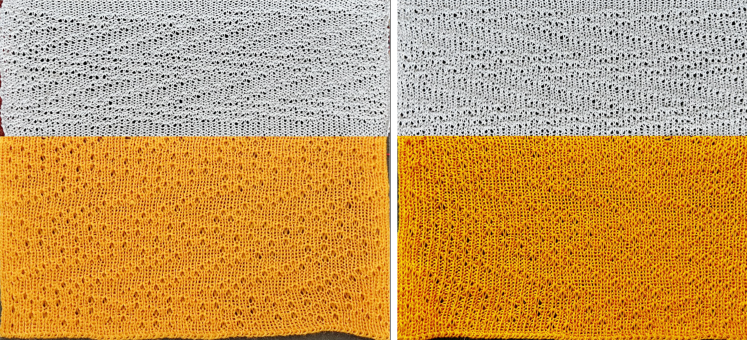 A closer look at approximately the same part of the ribbed fabric.
 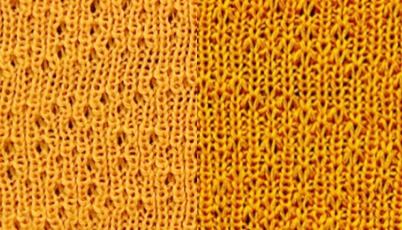 A 58X16 file after some cleanup and cropping of one of the other variations is to be color-reversed for use with the tuck setting. Depending on the thickness of the yarn, double length may be used safely for added texture.
 ![]()
![]() The swatch illustrates the difference between fair isle knitting and tuck stitch, even when the tension used in the knit carriage remains fixed. Fair isle is in the slip stitch family, so it is short and narrow, while tuck stitch tends to be short and wide. It is usually recommended that fair isle floats be no wider than 5 pixels. Many here break that rule and would need to be managed if the design were to be used in a finished garment.
The swatch illustrates the difference between fair isle knitting and tuck stitch, even when the tension used in the knit carriage remains fixed. Fair isle is in the slip stitch family, so it is short and narrow, while tuck stitch tends to be short and wide. It is usually recommended that fair isle floats be no wider than 5 pixels. Many here break that rule and would need to be managed if the design were to be used in a finished garment. 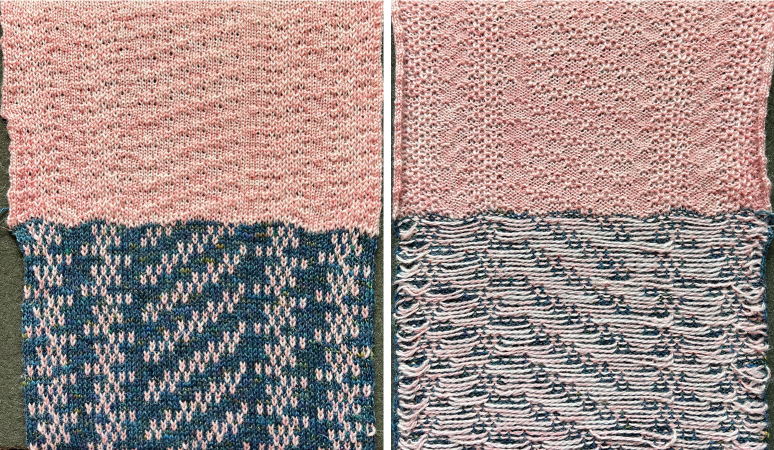 This
This ![]() segmented
segmented 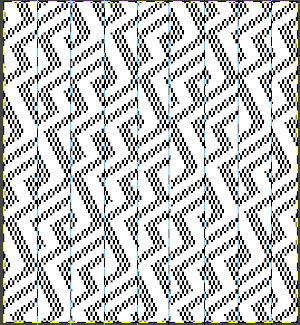 and cropped to 17X144 pixels
![]() Mirrored X-1, 33X144 pixels
Mirrored X-1, 33X144 pixels ![]() I like to plan repeats for any intended piece when possible in a width matching the number of needles in use, which allows programming as single-motif in the 930 with img2track and eliminates the need to turn on other built-in functions or assign needle positions. Doing so also offers the opportunity to add borders if desired.
I like to plan repeats for any intended piece when possible in a width matching the number of needles in use, which allows programming as single-motif in the 930 with img2track and eliminates the need to turn on other built-in functions or assign needle positions. Doing so also offers the opportunity to add borders if desired.
A 99X144 version 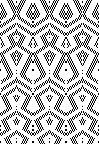 was programmed, and the central 71 stitch width was tested, likely suitable for an accessory ie a scarf
 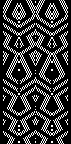 Those side-by-side white pixels are “OK” since they are in turn sided by black pixels and do not repeat for more than 2 rows.
At some point, one needs to commit to actual knitting. The first proof of concept swatch was knit in a softly spun, shiny rayon that had a slight tendency to split during knitting and steams and sets nearly completely flat. 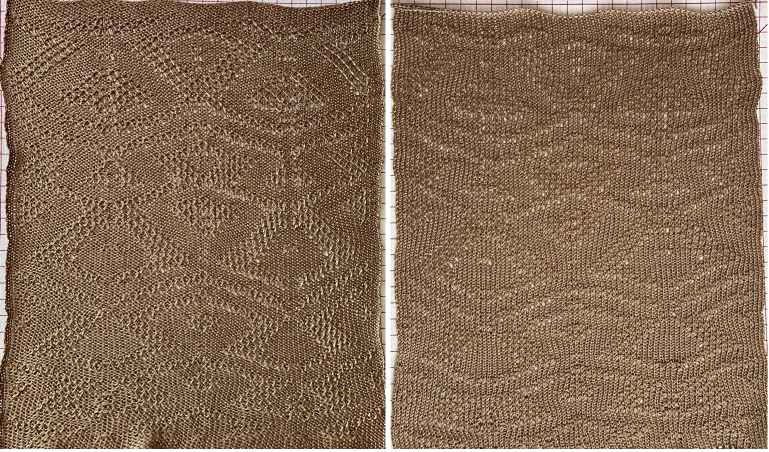 This swatch is knit using a 2/8 wool, retains its texture after steaming and pressing, and exhibits the usual roll to the knit side at the top and bottom of the piece, and to the purl side along the vertical side edges. The variations in the 3D surface that can happen with some tuck patterns appear here and are retained.
 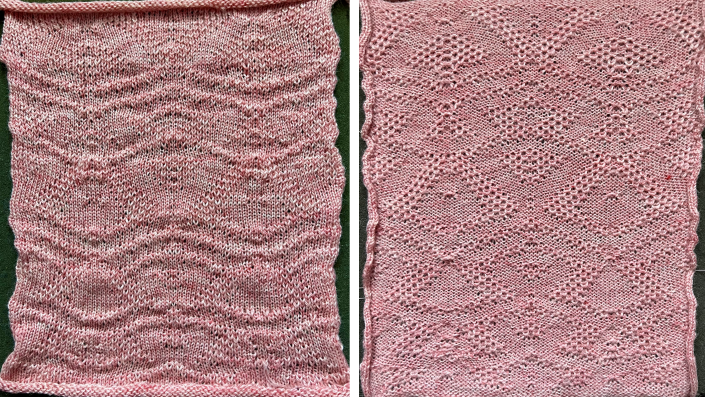 A brief look at Gradient filter included in post on Truchet inspired tiles.
Restricted use images may also be built from scratch.
Large published illusion-style designs even if beginning as black and white when scaled down in size can lose definition as a result rendering them speckled, needing a lot of pixel cleanup, or completely unusable.
This first attempted DIY version begins with a 31X31 repeat. The odd number allows for a corner-to-corner start. The lines are drawn using the straight line tool, with pencil size alternating between one and 2 pixels 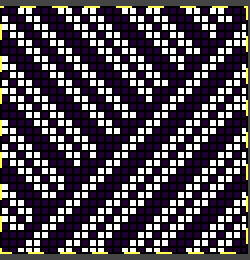
![]() Using mirror X-1, Y -1 to 61X61
Using mirror X-1, Y -1 to 61X61  trimming by a single pixel and width and height for routine tiling avoids lots of doubled pixels. The final repeat, with small single pixels placement edits, is now 60X60
  repeated in height only it could be used for perhaps a scarf, with or without solid borders at the bottom, top, and sides.
 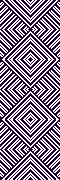 Drawn in repeat X3 in both X and Y directions it produces a 180X180 file large enough for a blanket, with a bit of wiggle room to add a narrow solid color frame if desired.
  The design may be knit as fair isle for a quick initial test or for a final piece since the floats are all very short or knit as DBJ to produce a no-roll final fabric without floats.
In this test, softly spun rayon and heathery wool were used, resulting in a surprising color mix when compared to their original colors. There were a few spots where the rayon fiber split and knit with the contrast. The end needle selection was off, so there are tiny eyelets in some places where the contrast was not knit on the side edge, and the fabric separates a bit. 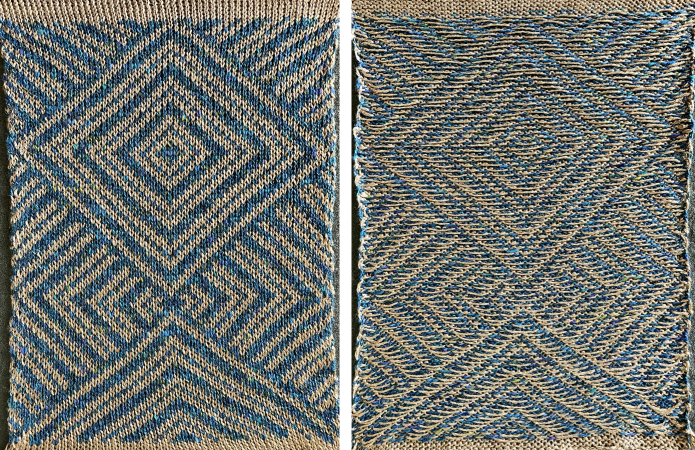 A variation for a different vertical repeat can easily be isolated from tiled drawings. This additional sample was also knit as a fair isle, with end needle selection on.
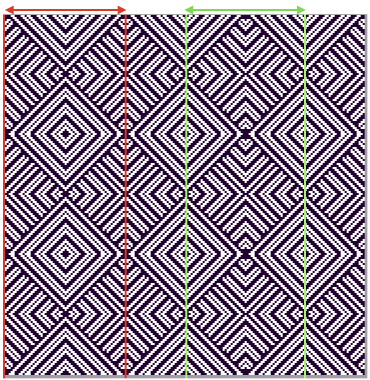

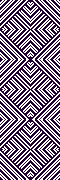
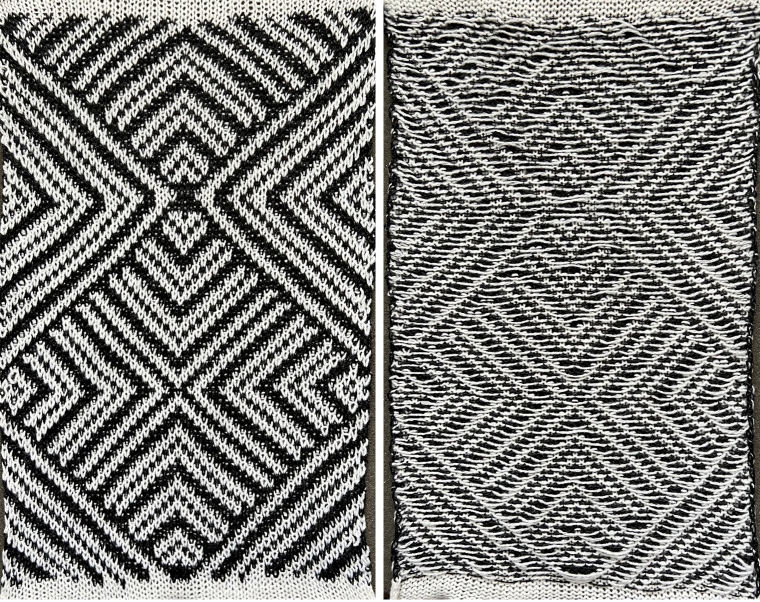 Suitable for punchcard knitting: a 12-stitch simple geometric repeat
![]() visualized X12 modified using drawing X12 in random repeat for electronic machines. 20X16
visualized X12 modified using drawing X12 in random repeat for electronic machines. 20X16 ![]()
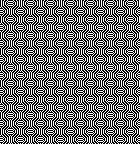 30X30
30X30 ![]()
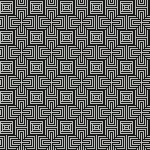 When the planned illusion is simple line distortion
18X18 “Café Wall” distortion ![]()
 tested on a 60 stitch width, the bottom is double stranded birdseye DBJ with a shift to single strands at the top. The single plies produce a wider, softer knit
 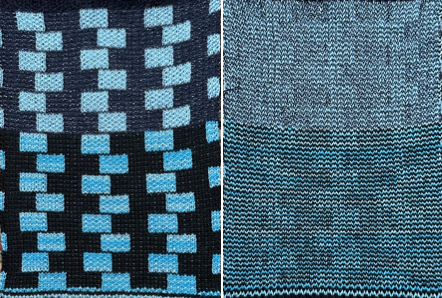 imagining a wider piece
 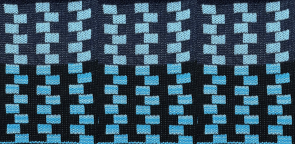 10X10 repeat
![]()
 Knit as DBJ, in 2/20 wool single strand, at as tight a tension as possible to allow for proper stitch formation, the bleed through is quite visible, the swatch is also 60 stitches wide
 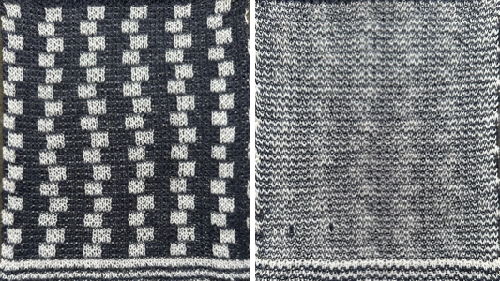 There is discussion online whether adding a single row of a contrasting color heightens the illusion, a 9X10 repeat adding a third color
 ![]()
Shifting gears, a different 18X18 ![]() visualized X 9 modified using random nearly the width of the full needle bed, 172X169
visualized X 9 modified using random nearly the width of the full needle bed, 172X169 ![]() A 24-stitch repeat
A 24-stitch repeat 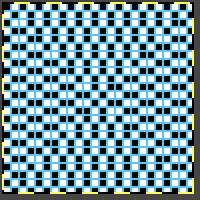
![]()
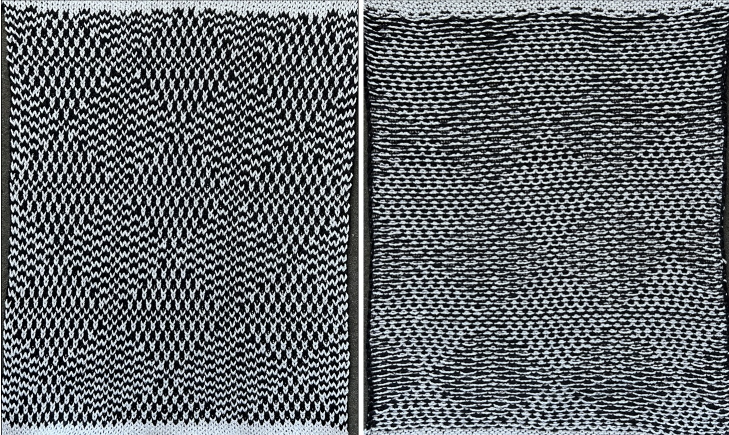 accomplishes an optical illusion of sorts. If only it would work for creating origami-style pleats!
A former Ravelry query prompted these designs,
22×22
![]() 22X30
22X30![]() 66X60
66X60
44X54![]() 42X46
42X46
![]()
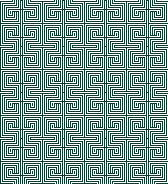 from a weaving draft, 46X46
 ![]()
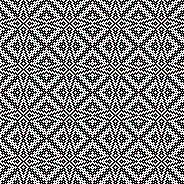 66X66
66X66 
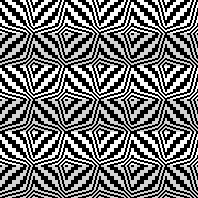 Johann Karl Friedrich Zöllner (1834 – 1882), a German astrophysicist with a keen interest in optical illusions was inspired by a cloth pattern that he observed in his father’s factory and first published the illusion that bears his name in the journal Annalen der Physik in 1860. The acute angles formed by the intersections of the short and long lines make the spaces between the diagonals appear to expand.
My knittable adaptation: the 84X84 repeat 
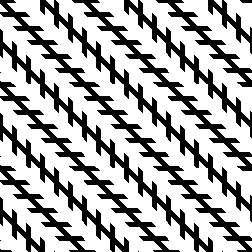 Building tiny shapes into secondary ones inspired by weaving drafts
56X148 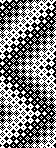
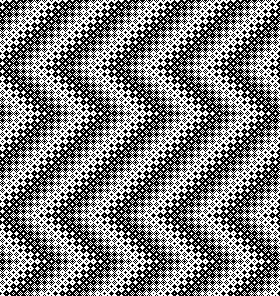 110X225
 Removing doubled vertical segments, 106X225
 Adding colors to black and white pngs following the tip by the developer in the post comments:
Choose a black-and-white repeat, in this case, a 36X9 pixel repeat ![]() Double-click on one of the two colors to protect/lock it Double-click on it again, and the lock disappears, the color is no longer protected.
Double-click on one of the two colors to protect/lock it Double-click on it again, and the lock disappears, the color is no longer protected.
In the palette, use + to add a new color, this may be repeated more than once to add more colors or go to colors, set the number of colors to a number, ie. 6, for a random palette group that may, in turn, be edited to other values. Double-click on the rectangle tool to draw filled rectangles In rectangle options, above the palette icon, there are toggle buttons for Horizontal and Vertical, remember to protect a color Once your selection is made, draw the filled rectangle across a selected width and height while keeping the protected color intact. Draw the result in repeat to check for alignment the protected color may be toggled to white If the designs are to be programmed for multiple color slip stitch or DBJ there are rules to be observed, and there may be restrictions on whether each palette color will be recognized as a third or fourth color by the download program ie. when using Ayab, where no two colors may occur in the same range of 8-bit values. For 4 colors, the ranges would be 0-63, 64-127, 128-195, and 196-255.
The img2track partial window with the associated color assignments for the first vertical variation. The horizontal choice allows one to play with selections possibly matching yarn colors in fair isle knitting, only 2 colors per row may be used, here the A feeder yarn remains fixed Remember to unlock the previous color choice if protecting new segment selections.
Visualizing possible FI striping results in progress