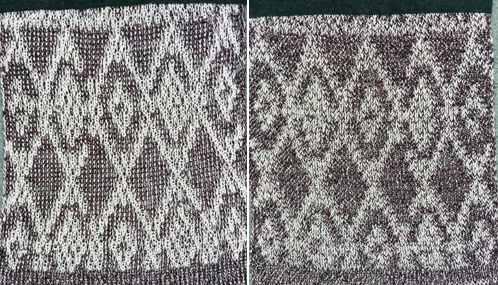
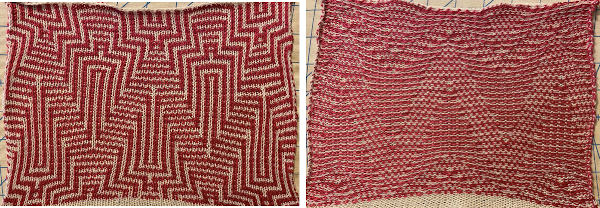
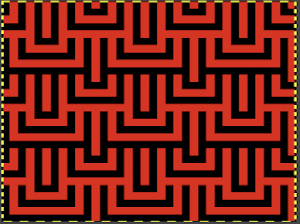
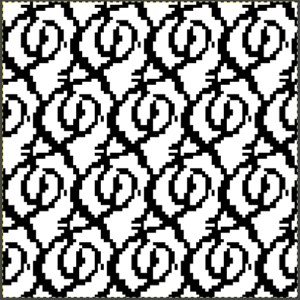
A recent FB post led the discussion to this repeat from a 910 mylar, which does not have the immediately recognizable format of the Brother lace patterns if viewed in a small screengrab such as this.  The repeat is included in Ayab test patterns. The full mylar collection and user manual may be found here http://machineknittingetc.com/brother-kh910-pattern-guide.html.
 The segment including the lace pattern
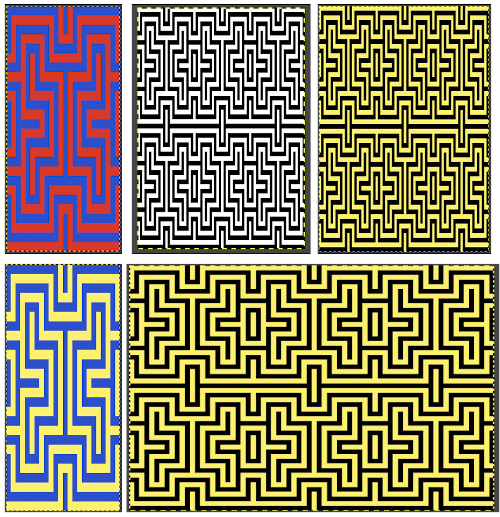
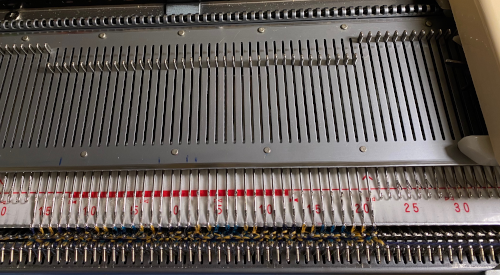
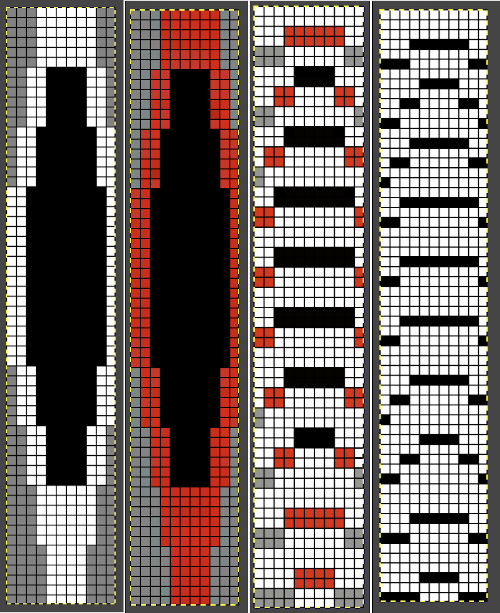
![]() Brother was the first to allow programming from multiple areas on a single mylar sheet. Starting and ending stitches and rows needed to be entered, I got used to drawing boxes for each pattern as seen on the upper right, reducing errors in future knitting. The red lines on the copy highlight the repeat’s border. Mylars were read 13 rows down, punchcard machines7. The equivalent of arrow markings on lace punchcards are provided in the column on the left, which extends over the top of the drawing space by the same number of rows, allowing it to remain visible above the card reader even as the top of the mylar patterning area is reached.
Brother was the first to allow programming from multiple areas on a single mylar sheet. Starting and ending stitches and rows needed to be entered, I got used to drawing boxes for each pattern as seen on the upper right, reducing errors in future knitting. The red lines on the copy highlight the repeat’s border. Mylars were read 13 rows down, punchcard machines7. The equivalent of arrow markings on lace punchcards are provided in the column on the left, which extends over the top of the drawing space by the same number of rows, allowing it to remain visible above the card reader even as the top of the mylar patterning area is reached.
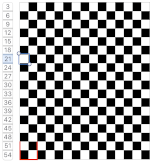
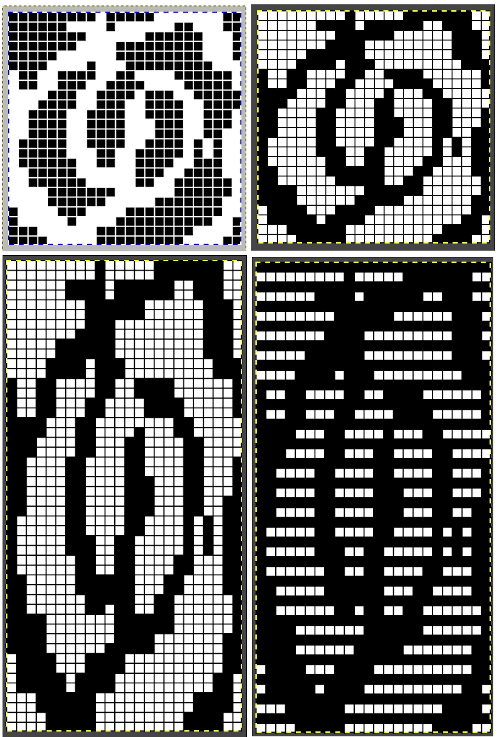
The design is actually created from isolated areas of a mesh repeat discussed in a previous post. The lace carriage is used for 2 passes and then for 4 alternately, as indicated on the left side of the punchcard. The 2 passes will result in transfers to the left, the 4 make in transfers to the right. This repeat, usable in nonelectronic models, appears in my pre-punched factory basic packs as both #17 and #20. 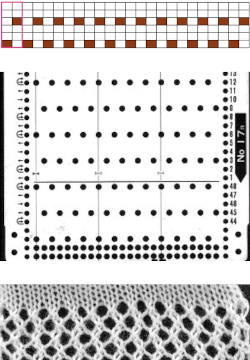 Depending on the electronic model or the software used to download patterns designed for lace, the final image may need to be flipped horizontally. This is true for use on my 930. Creating a template for mesh using numbers: begin with a table with square cells in numbers larger than you might need, ie 24 by 54. The method for doing so has been explained in previous posts. I happen to prefer cell units that measure 20 points by 20. The smallest repeat unit for use on any machine is isolated, shown bordered in red, is 4 stitches wide by 6 rows high, and drawn onto the template. The group of cells in the repeat are selected. If one hovers over any side or top and bottom borders of it, a yellow dot appears. Clicking and dragging on the yellow dot will repeat the full selection to the right, left, up, or down. Here the move is to the right
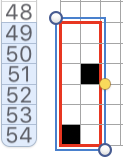
 The whole group is selected,
  and dragging on the yellow dot once more, the whole template can be filled
 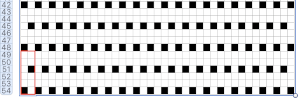 Beginning at the top or bottom of the table, hide all blank rows. Using the command key during the selection process will allow this to be done on the whole table at once or in groups of rows at one time; 36 of the 54 rows are hidden.
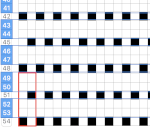
 At this point, there are a couple of choices. One is superimposing a solid shape. Using a contrasting color makes it easier to sort out its placement
 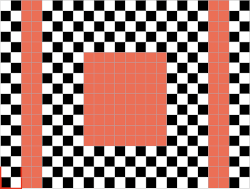 the color may be replaced with white in the spreadsheet,
 unhide all rows, and the lace pattern is ready for the final steps before using Gimp
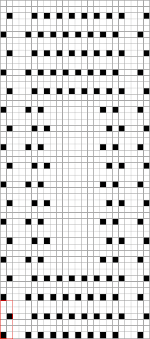
![]() The other option is to unhide rows on the colored table, screengrab as usual after removing cell borders. Open in Gimp, crop to content, eliminate the cyan row by filling it with white. It was intended as a placeholder for the last row in the pattern, is not part of the final repeat.
The other option is to unhide rows on the colored table, screengrab as usual after removing cell borders. Open in Gimp, crop to content, eliminate the cyan row by filling it with white. It was intended as a placeholder for the last row in the pattern, is not part of the final repeat.
In this instance, I used mode, indexed, to the maximum of 3 colors.
Choose the color to alpha option from the colors menu.
Using the dropper tool select the color you wish to be made clear, and click OK. Create a new image of the same size.
Copy and paste the color-reduced image onto the new one. Dotted lines will appear in areas that had the color removed previously. Clicking anywhere in the window outside the image anchors the paste and makes those dotted lines disappear. If that does not work, select the rectangle tool before doing so. The file is then ready for final scaling. 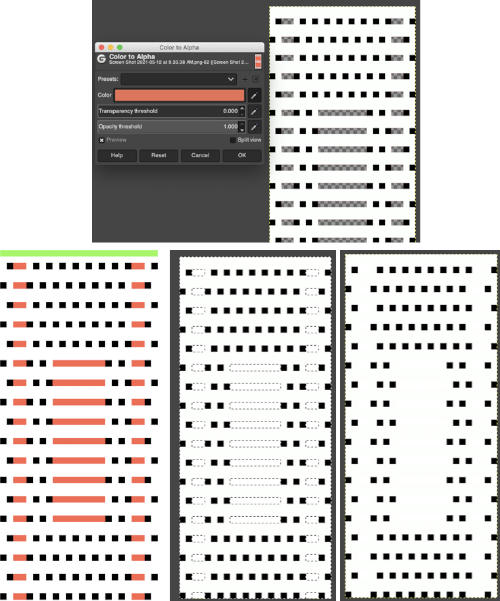 The last image is in RGB mode once more, converted to BW indexed, scaled to 24 by 54, and exported as BMP or choose any other format ie png, etc. to suit your needs.
Responses to alpha selection can vary depending on the original color palette used when filling cells.
Creating a template for drawing simple shapes using transfer lace, it is easier to start with the transfer grid in a color, rows are hidden as above, and eyelet shapes are drawn in black. The rows are unhidden. 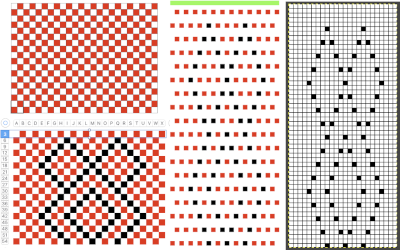 In this instance, the red was selected for converting to alpha with the image still in RGB mode, copied and pasted.
  The pasted image may be anchored in several ways. Using the image menu: select merge visible layers, or flatten image; layer menu: select anchor layer, or simply click on rectangle select tool and click again anywhere in the window. Changing the mode to black and white indexed will yield the repeat for final scaling.
 ![]() Each transfer design segment of the repeat is 6 rows in height and completed with 10 combined carriage passes. The lace carriage, LC, operates first, in a series of two passes at first, then followed by four, repeating the double sequence throughout. The mylar, card, or computer image, does not reflect the passes made by the knit carriage KC. The latter is set to knit, does not engage the belt, and does not advance the pattern. It helps to look at an expanded repeat to understand that indeed, transfers are made in 2 directions.
Each transfer design segment of the repeat is 6 rows in height and completed with 10 combined carriage passes. The lace carriage, LC, operates first, in a series of two passes at first, then followed by four, repeating the double sequence throughout. The mylar, card, or computer image, does not reflect the passes made by the knit carriage KC. The latter is set to knit, does not engage the belt, and does not advance the pattern. It helps to look at an expanded repeat to understand that indeed, transfers are made in 2 directions.
Referring to design row numbers, not necessarily those on a row counter:
1. LC preselects for transfers to the left as it travels to the right
2. LC makes transfers as it moves to the left, no preselection occurs, remains on the left side
3. KC, moves to the left, completing the first knit row, creating loops on needles emptied by transfers, the pattern does not advance and remains on the same row
4. KC, moves to the right, completing the eyelet stitches, the pattern remains on the same row, KC then stays on the right
5. LC moves to the right, no preselection
6. LC moves to the left and preselects for transfers to the right
7. LC moves to the right, transfers to the right, no preselection
8. LC returns to the left, no transfers or preselection, stays there
9. KC moves to the left, and the pattern remains on the same row
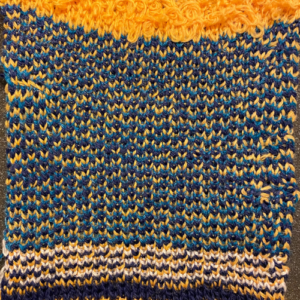
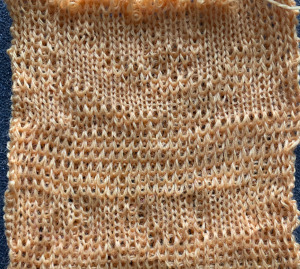
10. KC moves to the right, and the pattern remains on the same row, KC then stays on the right 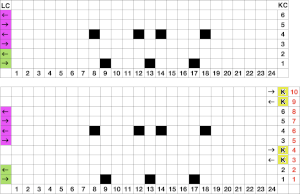 Those familiar with eyelet formation in the more traditional transfer lace will notice the differences here, where the geometric shapes are technically superimposed on a mesh whose structure is revealed depending on where the transfers creating them take place. The fabric is easy and very quick to execute since most of it is in stocking stitch. The proof of concept swatch:
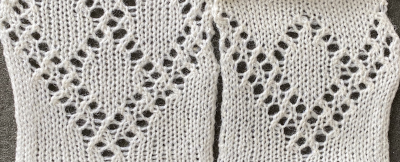
 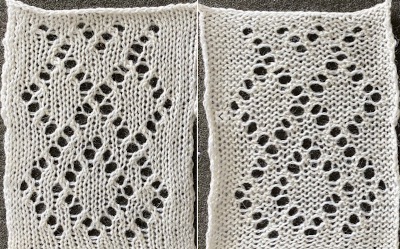 The design was not planned as continuous, but is easily amended to be so. Here an alternate version is shown, with 2 linear repeats on the left, and a single expanded repeat to its right
 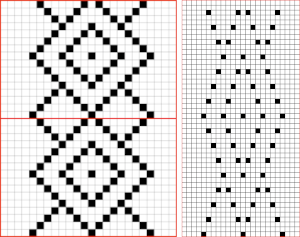 As for that mylar repeat, this is an image of the shapes with the chart collapsed, eliminating blank rows between black pixels.
 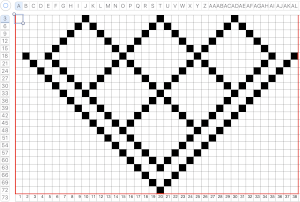 The resulting partial test used as drawn
 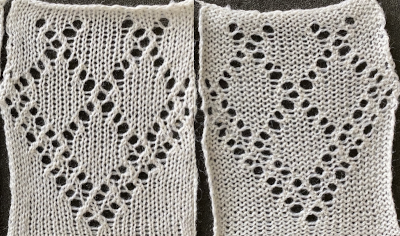 In fabrics designed this way, using the image as drawn (left), or mirroring it horizontally, does not visually change the result. This does not hold true in more complex transfer lace.
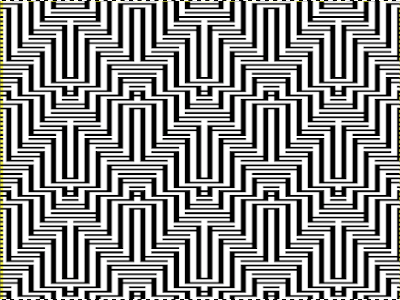
 Several large-scale designs based on this method are found in Brother-electro-knit-lace-patterns-3
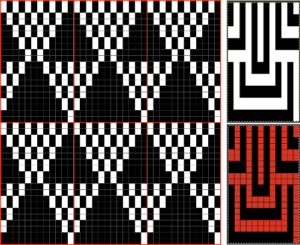
 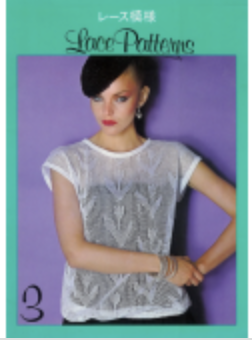 This random chart from the publication shows a pattern where the number of transfer rows between knit ones has more variation. Again, knit rows are marked in the column on the far left. Those marks on a mylar would remain visible on the outside of the machine, above the card reader as one progresses through knitting. Memo windows or handwritten charts may be the only option for accurate tracking, depending on the machine model and the row count variations. The repeat may also require it to be flipped horizontally. Simply reaching a row with no needle selection does not always mean the location for the 2 knit rows has also been reached.
 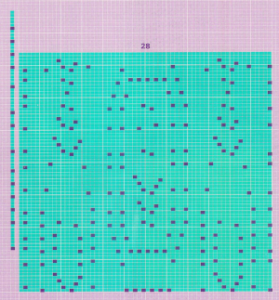 2024:
2024:
The above is listed as a fine lace pattern. Most such patterns can be executed as standard transfer lace as well.
The addition of the ArahPaint guess weave from grid tool makes the process of converting charts such as the above easier and quicker.
The final BW chart 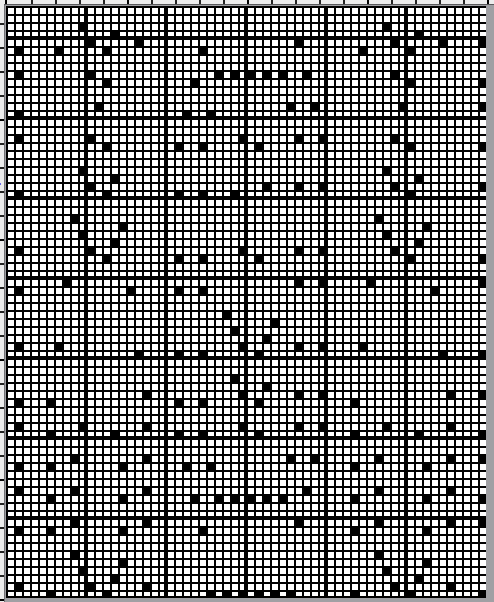 and the associated 60X74 png. Depending on the machine model, the file may need to be mirrored horizontally before any knitting.
  in repeat
  The original image had markings for mylar that inform the frequency of knit carriage passes, which extend above the start and end of mylar markings to allow for the fact that the first design row is scanned below the row visible to the knitter on the exterior of the machine.
 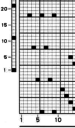 When the png repeat is loaded into machine memory, reading begins on row 1. The knit row single pixel markings on the original can still serve as guides as to how many passes of the LC are followed by 2 knit carriage passes
  The column on the left indicates the number of LC passes before two knit carriage ones, the column on the right reflects the corresponding design rows.
 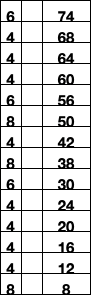 The image from the publication, with the color modified for clarity
  My sample was knit on a 930, hence mirrored horizontally, on 60 just stitches.
The yarn is a softly spun rayon with a tendency to split, and at the end of the second full repeat several stitches dropped, accounting for the length of the swatch;-) 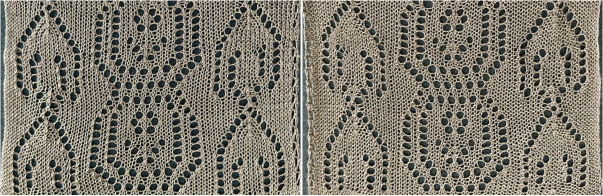 The second volume
  is also available as a free download, and in addition, mylars are as well.
The latter makes for clearer stitch and row counts and easier file conversions.
Category: Img2track
image editing and download software and cables
Visualizing maze or mosaic potential from tuck or slip stitch repeats
I have written extensively on mosaics and mazes, color separations required for drawing their motifs, and visualizing the resulting patterns while planning slip stitch or tuck repeats. A recent exchange with a knitting friend, Tanya Cunningham, brought up her idea of using Gimp to investigate the potential of self-drawn tuck patterns becoming pleasing mazes or mosaic designs in color. Tanya has worked extensively with img2track and can be found in the FB group and Ravelry. It had not occurred to me to reverse engineer designs for this purpose. Tanya uses Gimp in a different way than I do, I am hoping she will share her process for this purpose when documented.
I have grown comfortable and fast with the combined use of Numbers and Gimp to achieve what I desire in terms of color separations. At the moment, on the assumption that estimating the overall shape is the goal, a black-and-white processed rendering may be a sufficient representation of the result.
Punchcard books are a great source of “safe” tuck designs. The best are those that have columns one stitch wide by 2 rows high. They are also more interesting if there are areas of solid black. Patterns from publications intended for use on electronics are often color reversed to start with in order to minimize drawing pixels or to make the design easier to read and will have lots of blank areas. Punchcard users would need to punch the ground as opposed to the design, electronic users can achieve the goal by the flick of a switch or a quick software command. For my first series of steps and methods, I am using the repeat that appeared as a knit using different settings in the post on mazes and mosaics from universal patterns.
Presented on the left, the repeat would be suitable only for thread lace or FI with very long floats. Color reverse allows one to use it for tuck and slip stitch, whether in one color or with color changes every 2 rows. 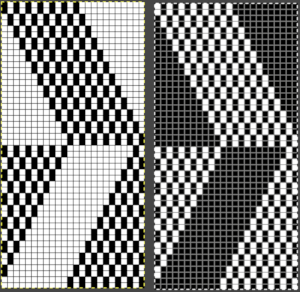 The color separation to approximate the result with color changes begins with the same process as that used for designing mosaics. Once the image is rendered as a correct B/W PNG with no apparent errors, it is copied and pasted on a larger canvas, and the mode is converted back to RGB. The red cells make it easier to keep track of rows that need to be color-inverted. Using the shift key and rectangle tool, multiple pairs of rows can be selected sequentially and color inverted. Beginning the selection with the very edge of the black squares on the left does not interfere with changing the color of the extra columns on the left side of the design. If pixels are added accidentally drawn in any of the 4 extra columns on the left, they can easily be removed when the completed conversion is cropped to selection for the final repeat.
 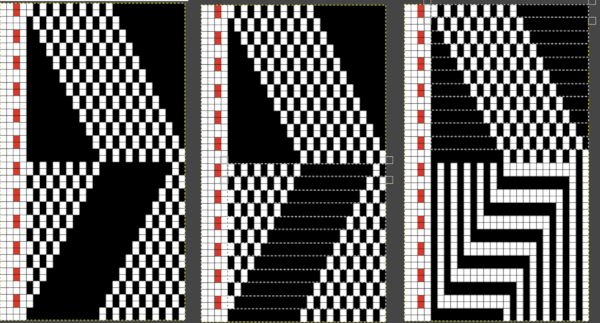 The completed color separation can then be filled to match imagined colors.
The repeats of the final knit pose the problem that results from working on a square grid and comparing the results, which usually form a rectangular one.
The representation of the linear patterns on the knit side of the piece cannot factor in some of the added distortions created by the stitch type used.
I process my images in Pages or Numbers, depending on which document contains my most recent work and happens to be open.
The final may be rescaled in Gimp.
Most knits approach a 4:3 ratio, with gauge variants in highly textured fabrics. To preserve a clean design, tile and save the original, screengrab the resulting image, load it in Gimp, and rescale to that ratio.
Repeat the motif for the same number in both height and width when tiling it. 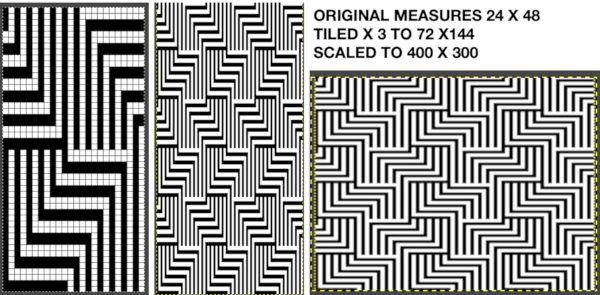 The colored versions before and after scaling, compared with the slip-stitch swatch.
  It is possible to produce a rectangular grid to start with on which to draw in Gimp, but the larger canvas size occupies a significantly larger space on the screen, complicating the process. For small designs, however, that may be an option to give one the sense of aspect ratio for the design in the final knit ie in representational FI. To resize the grid in uneven proportions, the chain-link below the spacing values needs to be broken
  This repeat is designed for an electronic, and requires color-reverse.
Since it is 24 stitches wide it may also be modified and used on a card.
In this instance, the original marks for rows and stitches are single height.
The image is processed, matching the original, rendered double-height, color reversed, and then alternate pairs of rows were color inverted to render the repeat used in the test swatch 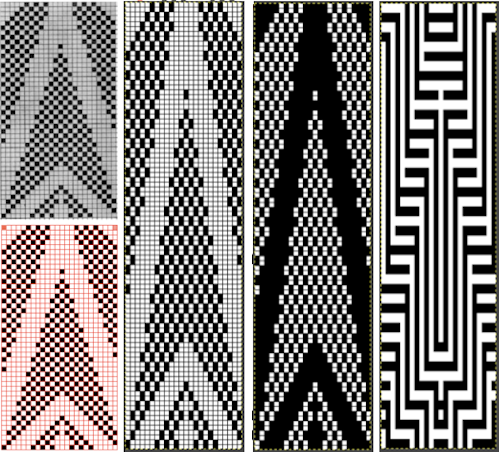 Once again, the possible change in scale is estimated. The repeat though only 24 stitches wide, is 92 rows high. On the left the repeat is shown as it appears on a square grid, to its right is the scaled 4:3 version, in a pixel count approximating the size of the swatch. It takes a bit of squinting to see the pattern more recognizable in the longer repeat in the larger tile
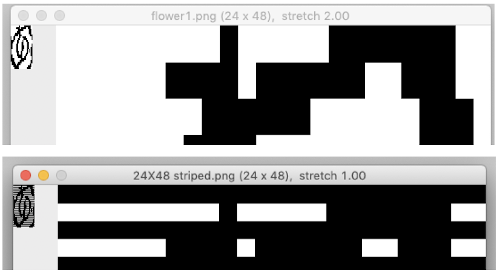
![]() The swatch was pressed, becoming wider than when first off the machine. It was knit using the slip stitch setting, which could also be executed in a tuck stitch, and would both widen and shorten the fabric and make the purl side more interesting.
The swatch was pressed, becoming wider than when first off the machine. It was knit using the slip stitch setting, which could also be executed in a tuck stitch, and would both widen and shorten the fabric and make the purl side more interesting.
The software can provide a preview of the result far more quickly than knitting samples, but again, the previews are only approximations of the scale, and cannot show distortions to lines as one adds more texture.
Repeating the process starting with a diamond shape that as given is only suitable for thread lace or FI with problematic floats, 
![]() and with a check tuck pattern that may change in aspect ratio considerably when knitted
and with a check tuck pattern that may change in aspect ratio considerably when knitted 
 The proof of concept swatch, knit in tuck stitch, begins to show the distortion by the stitch formations, textures vs plain knit, easily seen at the top edge. The bind-off is around 2 gate pegs in order to allow enough stretch.
 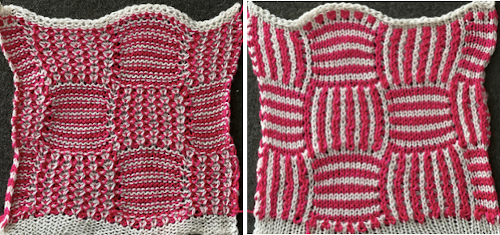 Anyone familiar with either or both programs may find this a very quick way to visualize the scaling and moving of motifs within DIY designs and their possible outcomes prior to test knitting
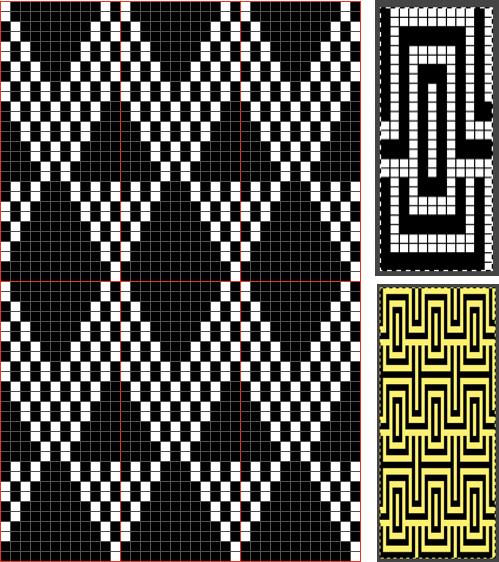
Img2track_multiple colors per row dbj, each color knitting only once
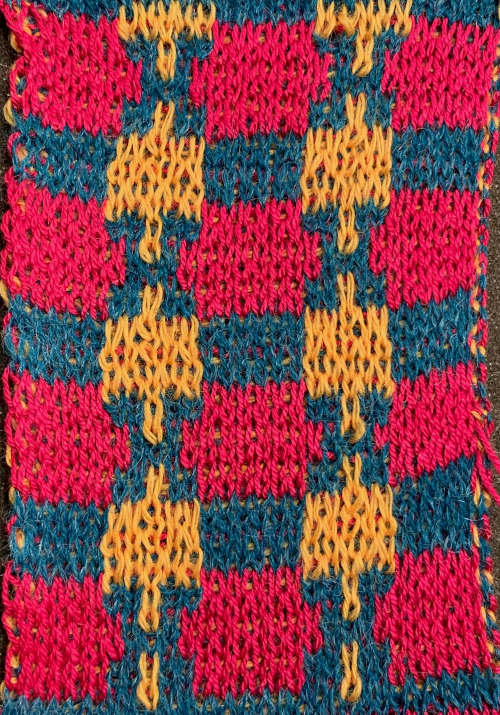
I have recently shared a post on using the heartofPluto separation in Ayab to knit a DBJ 3 color sample where each color was not represented in each row, with each color knitting a single height. Img2 track at this time does not offer a built-in similar option. There is a FB thread going on at the moment on this topic that can be followed there, Tanya Cunningham has shared a document on this topic. I am using the same repeat as in my Ayab tests, 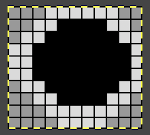 with my color changer in this threading sequence throughout
 The import into img2track shown here for the traditional 3 colors per row setup,
 where normally each color in each design row knits twice. Because selection occurs for pairs of rows, the first preselection row is from right to left. To decrease the backing rows, the ribber is set for birdseye. I prefer to have an end needle on each end on the ribber, keeping in mind that the total number of needles in use there needs to be even. The machine provides reminders as to which color should be knitting. My samples are knit using KCI on the top bed. Because the preselection happens twice, it is easy enough to knit in pattern from left to right,
 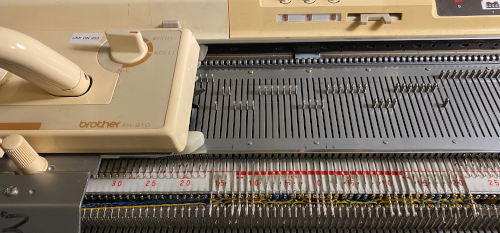 when the carriages have reached the right side, simply use a ribber comb to push all needles back to B.
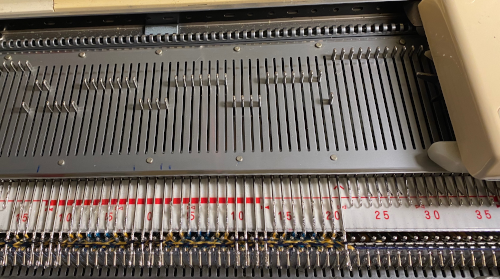
 The next color to be used is preselected as the carriages travel back to the left, change color when on left, and repeat.
It is easy enough to develop a rhythm. I used to tell students some things are made easier if one develops a tune to play in one’s head as a series of actions. Here I found myself thinking “knit to right, erase (selection), knit to left”. I had tension yarn issues on the right which explain some of the issues on the side edges and changed color 1 to blue for increased contrast. The proof of concept: 
 Speeding things up with color separation, beginning with the method that will have each color, each design row knitting twice. The repeat is 10 rows high, so it is expanded X6 to 10 by 60 rows. In the final result, the second row for each color in the separation is in turn erased. The red was added to make all 3 colors visible while working the separation, avoiding confusion with the white ground. The knittable result as usual is in a black and white png
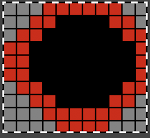
![]() The img2track settings are for now for 2 color knitting, the prompts for the color changes are lost.
The img2track settings are for now for 2 color knitting, the prompts for the color changes are lost.
The color-changing sequence used was still 1, 2, 3. The design with a birdseye backing 
 The ribber can also be set to knit every row, resulting in elongation on the knit side, while creating an interesting striper backing
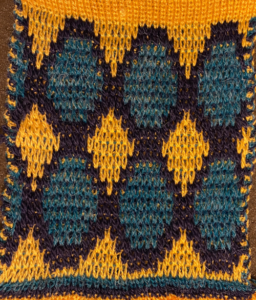
 Comparing this version to the birdseye backed one for repeat height
  Comparisons: HoP, pushing back needles to B, and color separation results. In the latter, the design is likely elongated in part due to a change in the distribution of thinner yarns to larger design areas with no tension adjustments
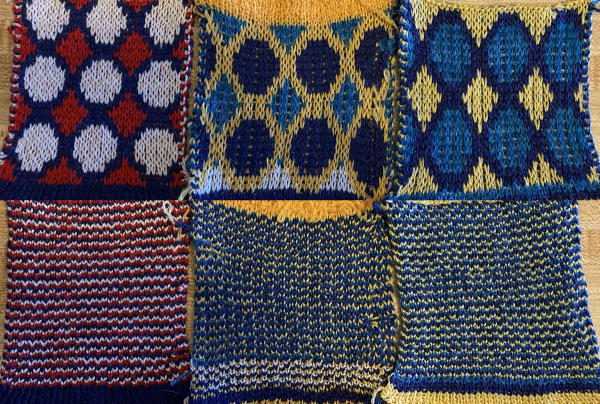
Gimp to create text for knitting
Recently there have been many questions in FB forums about incorporating text in knits. The techniques can vary depending on available tools. The most basic method is entering vowel and consonant shapes dot by dot in paint programs, with each dot becoming a pixel or punched hole in the final image. There are many free downloadable fonts for personal use that produce images that can fairly easily be translated this way, among them:
https://www.fontspace.com/munro-font-f14903
https://www.1001fonts.com/subway-ticker-font.html
https://www.1001fonts.com/01-digit-font.html
https://www.1001fonts.com/loud-noise-font.html
https://www.1001fonts.com/arcade-font.html
https://www.1001fonts.com/mobile-font-font.html
Knit stitch shaped units
https://www.fontspace.com/xmas-sweater-stitch-font-f28134https://www.fontspace.com/christmas-jumper-font-f21275
https://www.fontspace.com/knitfont-font-f6001
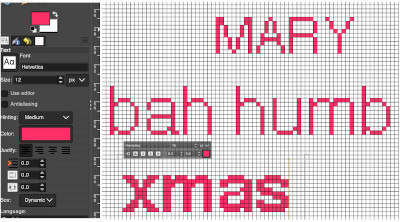
Notes on using GIMP update for Mac 2019, I had a quick FB share for a first exploration using Gimp:
“I have not previously put much effort into using text in gimp. A quick start: image 200X200,1800 magnification view grid, snap to grid, work in RGB mode, not indexed,
turn off anti-aliasing, it wants to smooth edges. Caution should be exercised when using antialiasing on images that are not in RGB color space. It is an effect used to smooth edges in bitmapped images and will blur the edge pixels to transparency.
In this instance, ultimately working in lo-res black and white for downloads, you want to keep the jaggies, not average them out.
I believe Passap actually has a built-in command to “smooth edges” in images downloaded into it. I have always preferred manipulating the images myself rather than relying on software to do it for me.
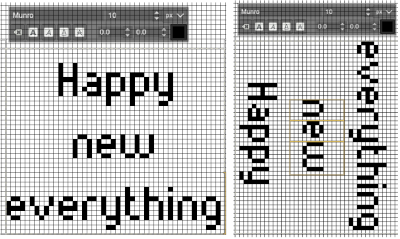
Start with a font size of 12 in the chosen font, and increase the font size if letters are too close together, the result is easily changed to black to make it ready for downloads, obviously not an answer for tiny letters. My capitals are font size 12, and the other 3 words size 16 to maintain spacing between the letters”
 Getting a bit more methodical,
info from the Gimp manual: Text management, Text tool
In addition, there are good online videos on this topic, but they are intended for use in much larger canvases, often using 150-200 as the font size, whereas in knitting that is likely the limit of our canvas size when planning for programming the full needle bed.
I am working on a Mac. From Windows tutorials found on Youtube, it appears there still are differences in some of the content and optics between the two platforms. A note: version 2.10.34, 2023 begins to incorporate some of the Windows commands in the Mac version.
Gimp is the only program that I personally prefer and use dark mode. To change the app’s appearance, the selections for dark, gray, or light themes may be made by choosing system preferences, then clicking on the theme, and selecting from options available on the right  a partial illustration of changes in the grey and light themes
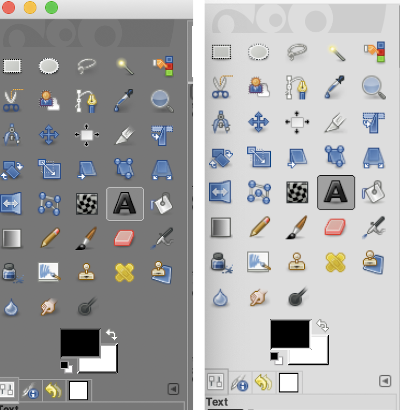 Text may be activated by choosing text in the image/ tools menu
 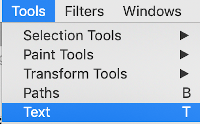 by clicking on the tool icon A in the toolbox
  or by using t as the keyboard shortcut, then clicking anywhere on the canvas.
Click on the fonts button Aa to open the font selector
 At the top of the Text tool dialog, the current Text Size, 11 in above, is shown in either pixels or points. A pixel is the smallest component in a bitmap image, and all measures in pixels depend on the screen resolution. A point is a fixed value, one inch is the same as 72 points. Standard screen resolution is often 72 pixels per inch, in which case text in pixels will be the same size as text measured in points.
You may also type in the name of the font you wish to use,  choosing from installed fonts. Text editing can happen by selecting buttons here or with direct on-canvas editing by making the changes within the semi-transparent floating toolbox on the canvas itself.
If you prefer to work with dockable dialogues go to and choose Windows, Dockable Dialogs, Fonts, and options will appear on the right  As long as a text box is active, making another selection from the fonts menu will instantly change the box content, creating a preview each time.
As mentioned, Antialiasing is best turned off when not in RGB color mode
Hinting “Uses the index of adjustment of the font to modify characters in order to produce clear letters in small font sizes” is helpful in lo-res text intended for knitting  Color default is black, click in the box beside Color selection and a dialogue selection box appears for changing it
  The choices listed at Gimp.org for text directions include the standard right to left, left to right as in most languages, and the following for vertical text
 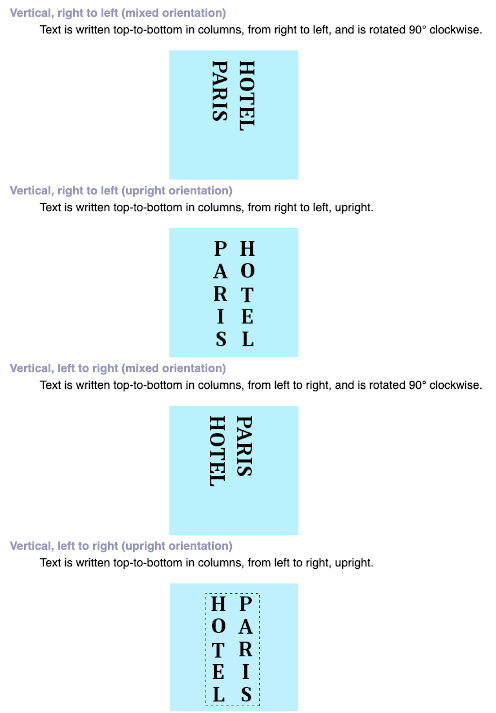 After the text is entered on the canvas, right-click on the inside of the text box to change text direction
  It is not necessary to work with the layers menu to start with. It is possible to “wing it” to get a starting sense of the process. Scaling and transformations are available, starting on a canvas size less than 200X200 based on needle counts on a standard km providing an ample field on which to play. If the intent is to change the direction of all the entered text, Image/transform may be used. Entering the same text in the same font size in an altered direction can change the overall pixel counts
 After the chosen text is placed change its mode from RGB to B/W indexed, then crop the image to your chosen size. Export.bmp, the result loaded into img2track and Ayab
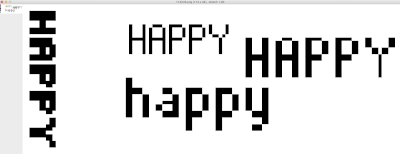
 For a different way to edit, choose Image/Flatten and individual components may be reconfigured on a new canvas to a very different size. This file is now 68 stitches wide, rather than 144
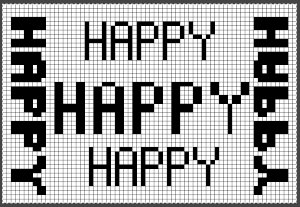
 The usual text alignment rules apply in text boxes as well, left to right
  using the return key, double-clicking in the box will highlight each letter and activate view grid should you wish to count pixels in each
 ![]() Text center-aligned
Text center-aligned
 Getting more control of the process: after the text tool is highlighted and clicking anywhere on your canvas two things appear automatically. The four little boxes represent the text box, which is dynamic by default and grows in size to accommodate typed text. Anytime you click on the canvas a new text box is created.
To change the size of the text box and you want the text to fit in a specific area, click and drag on one of the lower, small exterior boxes, and release. The box then becomes fixed, and the text will move automatically to the next line and is placed according to alignment settings. If the bottom of the text is cut off, click and drag on that small square on the bottom corner or the bottom line of the text box shape to expand its size to include it in full.
Double-click on a line of text to reveal those outlines around each letter or click and drag right or left on full words for editing. Click on a single letter space to delete it. Repeat if needed, type in the new letter(s) for a spelling correction or word change.
If following Windows instructions, it is helpful to know the comparable Mac commands ![]() pictured here on the bottom left of the Mac onscreen keyboard
pictured here on the bottom left of the Mac onscreen keyboard ![]() Use the option key and click on the canvas, and drag to place the text box on any specific area, or also to move all content in an existing text box, choose the move tool
Use the option key and click on the canvas, and drag to place the text box on any specific area, or also to move all content in an existing text box, choose the move tool  then click on any letter within the text box and drag and place. Random placement in the text box will move the whole layer
 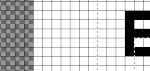 The spacing between the lines and between the letters may be adjusted as well. Clicking on the arrows to change the values here is one option, negative or positive numbers may be used
  or what appeared easier to me, the same may be done here
  A sample of adjustments in line spacing
 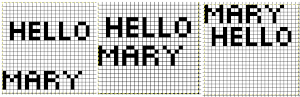 Very small fonts are likely not to have any room for decreased spacing in the between letters in strings of text.
A reminder before converting to .png for download
flatten image
convert mode to indexed B/W
crop content to the desired size
export as .png
Font: mazeletter
final image loaded into img2track and Ayab ![]()
Blistered stitches dbj
Some of my previous posts on double bed fabrics with designs creating pockets in both one and two colors:
quilting-on-the-knitting-machine-1/
quilting-on-the-brother-km-2-solid-color-back-dbj/
revisiting machine knit quilting
quilting using ayab software
references-for-double-bed-single-color-references-for-double-bed-single-color-fabrics-with-pockets/
A review of some of the terms used in describing fabrics with raised designs in various patterns:
blistered fabrics: two rows of the main color are knit the same as in standard dbj, but more rows are added and knit with the blister color on only one of the two beds used to create textured pockets. Technically they can be executed in a single color as well as in two colors per row. The extra rows result in the blisters being raised or lifted up from the fabric surface, they are often also referred to as pintucks. These fabrics do not have the width and stretch of many other 2 color dbj fabrics.
When exploring this family of knits, use plain, fairly smooth and thin yarns. This is a fabric where pressing should be avoided so the texture is not lost or altered. For setting the pockets created sometimes slipping a wire or tool through the bubbles will do the trick as for any hems. Simple, bold patterns work the best. Spreading the texture evenly throughout the design will decrease distortions in width. Leaving needles out of work combined with racking can alter the basic technique considerably.
In the two-color version, a double thickness fabric with a crumpled face side and a single color backing is created. The blistered areas are knit in one bed only, the rest is full needle rib with floats from each blister enclosed in the fabric.
Begin with a repeat that is elongated X2, the jacquard separated pattern needs to be double marked. Needles are arranged as for DBJ. For 2 colors the main bed is set to slip in both directions throughout, but the ribber settings need to be changed and set to knit and slip alternately for 2 rows to produce the single color backing. Good needle condition is a must if occasional stitches are dropped on the ribber they can be repaired when the work is off the machine.
Ripples are created by setting one bed to slip and the other to knit for several rows, then setting both beds to knit simultaneously to join the tucks in repeats. They are selective pintucks, on every needle rib. The main bed is set to slip on both directions throughout, the ribber carriage is set to slip for 4 or more even numbers of rows, and then to knit for 2 rows (this number may also be varied depending on the specific pattern). This is a fabric that likes to be weighted evenly. Tight ribber tension will help increase the definition of ripples. As in any multicolor fabric, each set of ripple stitches may be knit using a different color yarn. Some designs tolerate having the main bed set to tuck rather than knit.
Brother machines often are limited to 4 rows knitting on the bed creating the ripple before closing the rib.
Transferring blister stitches to the main bed, with a shadow lace tool or a transfer carriage is referred to as “shadow lace”. Adding blank rows in your design makes it easier to have a transfer point to the opposite bed. Using a plaiting feeder will add color contrast.
“Nopps” which are essentially small bumps on tightly textured tuck stitch grounds require careful tension adjustments.
An image was shared in a machine knitting group on Facebook. It cropped up in Pinterest, could be traced back to some Russian knitting forums and a how-to knit query was made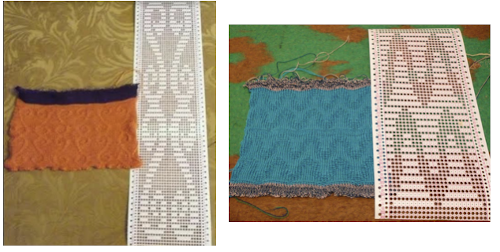
There is an Italian language youtube channel with a throve of machine knitting videos, one on jacquard groffato executed on punchcard machines, with a companion video on punching the card. Groffato means embossed.
Points to remember: the more needles on either bed knit alone to create the pockets, the more the tension used needs to approach the one for single bed knitting there with the same yarn. Large shapes are best used, represented by white squares /unpunched areas. Punchcards such as ones published with large unpunched areas for thread lace designs or tuck stitches with large punched areas color reversed can work once the principle is sorted out.
The setting used in the video is for tubular/ circular knitting.
The all punched rows in the video actually match rows that would be knit anyway because the main carriage is set to knit in one of the two directions, not slip. Two yarn ends are used, which could result in a fairly dense fabric with limited drape. Switching to a single yarn end can alter both considerably.
In designing your own patterns for testing it is best at the start to keep shapes simple and not worry about repeat variations. I am working on a 930 using img2track, but my repeat is 24 stitches wide and usable on a punchcard model, its source is another pin. To make the design twice as long, when planning an electronic download, the image can be stretched in the design software or by altering the stretch factor to 2 in img2track. Tiling the design prior to download can help one imagine the potential results in using it for an all-over pattern or what its appearance might be if the repeat is shifted into a brick configuration.
Use a familiar, smooth yarn in an easy-to-see color. Tension changes alone can change the dimension in the textured surface, so having a “normal” baseline for tensions and “feel” while knitting from previous uses of the yarn double bed gives one a good starting point.
The “flower” image used in my tests is shown here in the original, and then is color reversed so its shape will blister, not the ground. Below it, on the left, the image was stretched within img2track, on the right within my design program which happens to be Gimp. In both instances, the original 24X24 design becomes 24X48 in actual knitting
The tiled image for both a standard repeat and a brick configuration shifting by 12 stitches to the right are not thrilling me, but the goal is to explore the knit technique, modifications in the original or even abandoning it can happen later 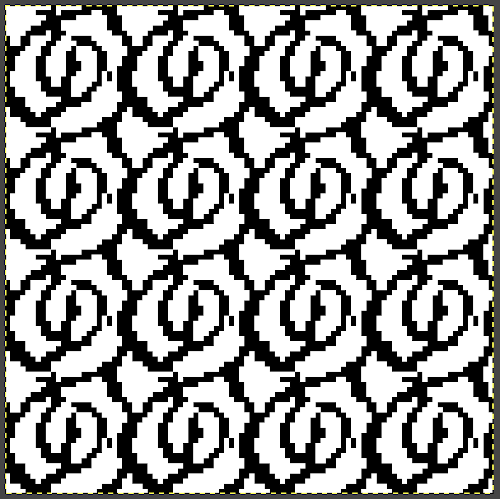
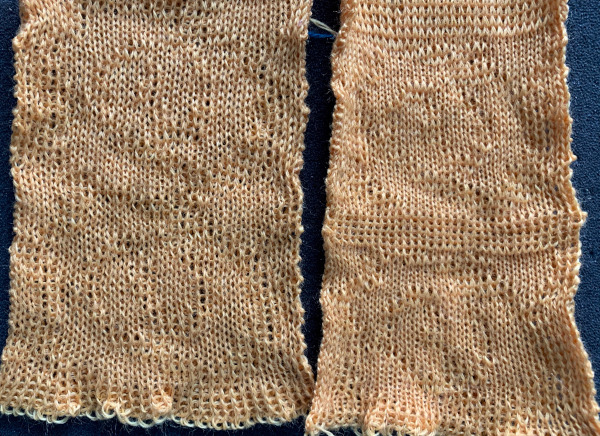
 My starting samples were knit on 32 stitches, not enough to get a sense of or a good view of the horizontal repeat of 24 stitches. At first, I used the design version with no horizontal black lines in the download. The difference between the every needle rib at the bottom of the pieces and the slip stitch blister fabric is easily seen. Slip stitches are short and thin whether single or double bed. On the left, I used the tensions of 4/4, as for the particular yarn in past experiments. On the right, the switch was made to 4/2. The tighter ribber tension made the blisters more pronounced. The non selected needles on the main bed create the pockets. Because functions repeat for pairs of rows in this design, the first preselection row can happen from either side and cam buttons may be reversed with similar results as seen in top vs bottom below. Opposite part buttons are used as in option A or B.
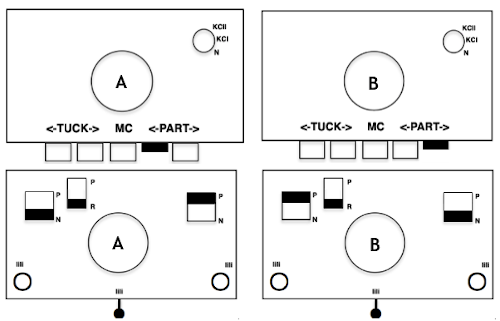 As I have explained in the past, I tend to leave the slide lever permanently in the center position. It becomes one less variable, forgetting to reset it can result in errors in gauge and more mishaps when knitting multiple pieces where gauge matters significantly or in reproducing previous work.


 The “striped” repeat produces essentially the same fabric. The knit carriage may be set to slip in both directions when using it since the row of all punched holes or black pixels will knit every stitch on every needle selected while in the previous samples the cam button set to knit in one direction performed that function regardless of any markings on the design repeat. The ribber is set to knit in one direction, slip in the other. Reversing sides for cam button settings produces the same fabric

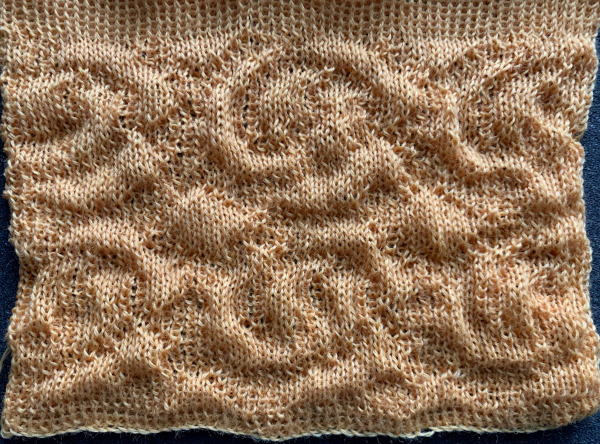
 To my mind, the best shapes for this sort of surface design are clearly geometric ones. My eye sees them as more easily identified on the surface of the resulting knit. Sticking with the original “flower” however, here it is after a bit of editing of just a few pixels followed by a larger swatch
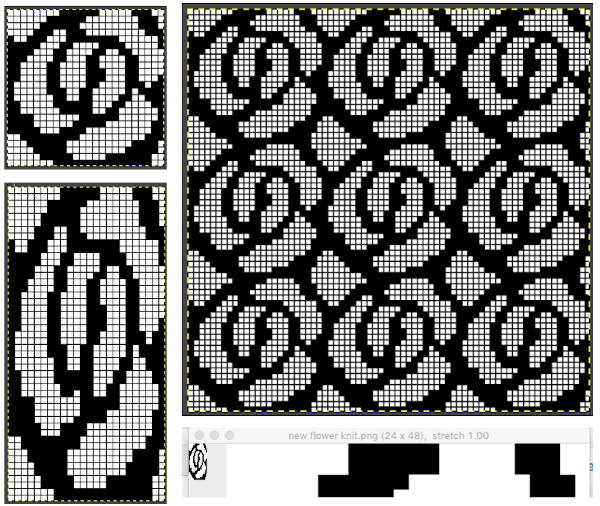
 The Stitchworld Pattern Book is another good source for predesigned repeats, many in units suitable for punchcards as well. I was attracted to the possible geometry in this particular pattern
 The repeat I chose is designated as suitable for the Garter Carriage. It is 24 stitches wide by 48 rows high, shown below as provided, charted in Gimp as .png for download, and tiled to help visualize how continuous repeats might line up. The image .png was downloaded with img2track to my 930, with a stretch factor of 1.0, retaining the original repeat size
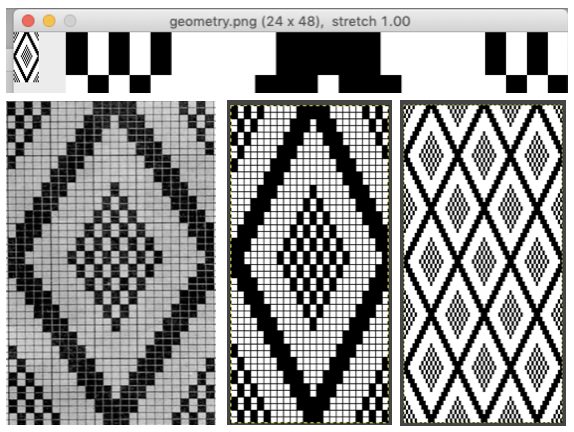 The resulting knit is interesting on both its knit and the purl sides, clearly shows how the “image” is shortened in slip stitch techniques, elongation would be required to create more of the diamond shape
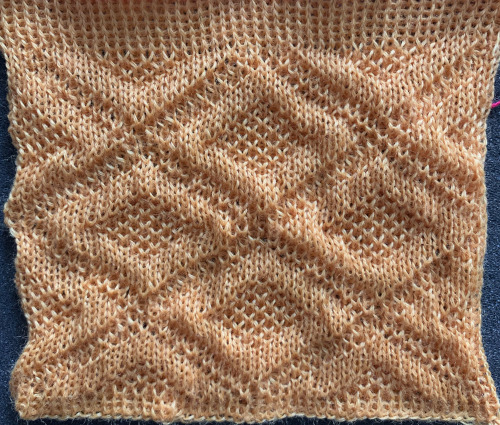
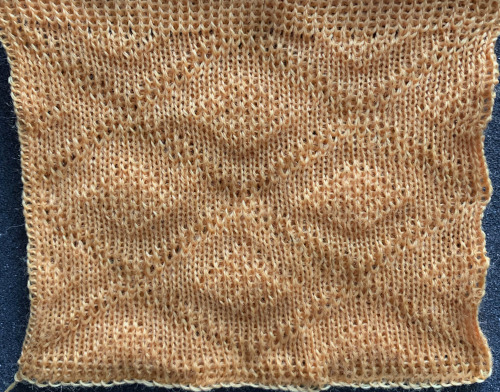 Final decisions are often best made after a period of rest for both the knit and for our eyes. It is only in the actual knitting that the shapes can be finally evaluated, worked on further, or abandoned. One of my own best selling felted items for more than a decade was born from an accidental effect on a large swatch that nearly landed in the trashcan after it became something different than what I had planned or expected.
DBJ: more than 2 colors per row 2
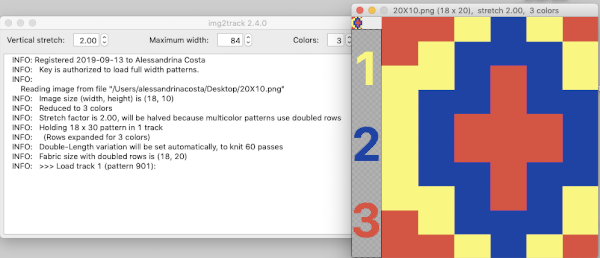
My first attempt to use a 3 color automatic separation was with img2track.
The default selector setting is for a single motif, perhaps on the assumption that the main use would primarily be for large-scale, nonrepetitive images.
In standard dbj the built-in separation, when KRC is activated, the first preselection row is made from left to right, and the first color knits for only one row on moving from the right side to the left, but if 2 colors with the same selection are required at the start, one row of the 2 rows is technically eliminated as a result, resulting in patterning errors.
The first preselection row in these knits is made from right to left, each color in each row will be knit twice.
As soon as a row begins to be knit, the numbers change in the memo window, indicating that the machine is using this pass to select the needles for the next row. As the carriage passes the midpoint of the bed, the row number will begin flashing indicating that this is the row you will be knitting next. The process is repeated as the carriage reverses direction.
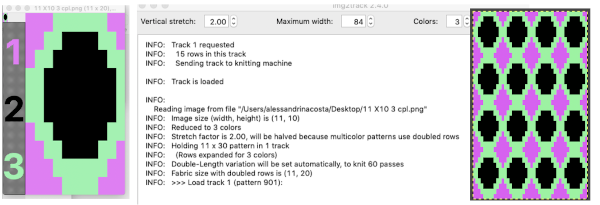
I had expected to use 3 shades of grey, a pleasant surprise: the program can import 3 colors other than grays. The test was using the 11-stitch repeat 
 Using Gimp, images worked in RGB can be reduced to indexed 3 colors for this purpose. If there are rows where no color is represented, then as explained later in the post, the indexing should be to 4 colors, not 3 for the planned import to work properly.
 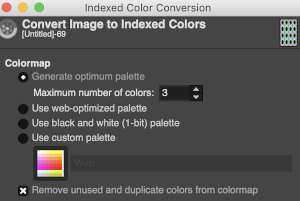 The design is automatically flipped vertically, so it will appear as intended on the knit side of the fabric.
Yarn colors may be placed in the color changer matching the order in the assigned color numbers to match the placements in the original image.
The program automatically adjusts for the vertical stretch, which changes the aspect ratio of the shapes.
The double height variation button is activated automatically.
On my 930 I received prompts on which color to change to before doing so, eliminating any confusion.
With no such prompts generally one can tell which color was knit last because it will appear on top of the previously used one on the left of the knit. With a stretch factor of 1 selected in img2track, the image height was reduced by half. 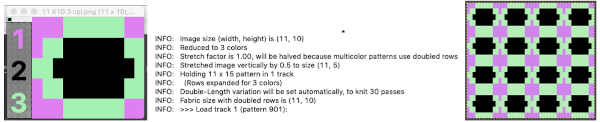
 To achieve a look closer to the intended shape, the repeat needs to be rendered twice as long, or the stretch factor can be adjusted in the program itself to 2.0
 In the past, I have preferred to elongate the design prior to importing with plans for download rather than to rely on memory for changing settings either in the download program or in the machine itself in future uses of the same design.
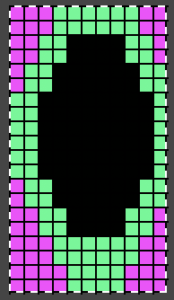
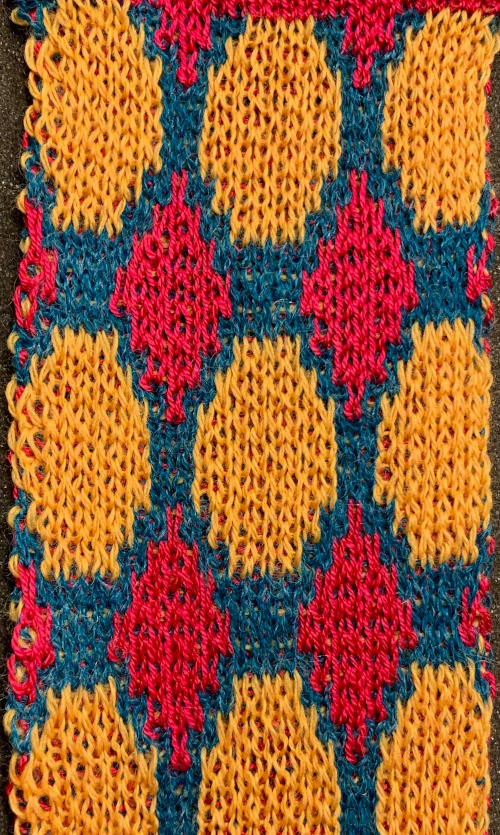
 The same yarns, tension, the total number of carriage passes, and settings were used showing the difference in aspect ratio between single color per row knitting and the img2track built-in color separation.
 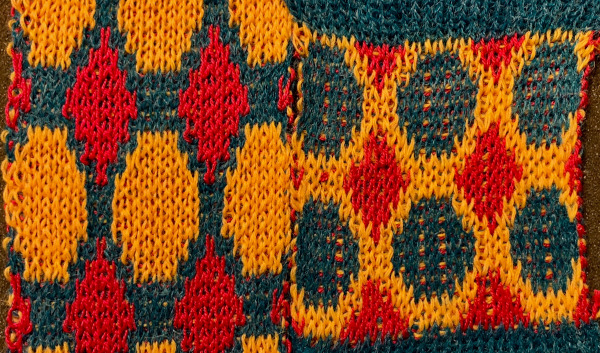 The width of both swatches is essentially identical.
Images may be loaded into the program without the cable being connected to the machine. Error messages do appear with download attempts if the cable is not properly in place. The machine also needs to be powered on before the program is launched if a download is planned. I am working in Mac OS Mojave 10.14.6, have no present desire to upgrade to Catalina.
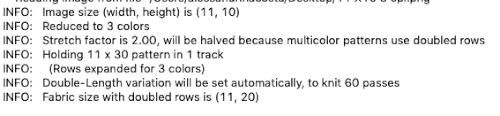
Executing fabrics that will knit each color in each row only once for every 2 passes on the main bed: back to that original repeat  Here it is used as drawn, note vertical stretch set at 2, will be cut in half by the software, getting the image back to the original height l0 X 3 = 30 rows required for all colors to knit in turn; there will be 60 carriage passes to complete one single repeat.
  The 930 will provide prompts for the next color to be selected by pushing the matching number button on the color changer, avoiding any confusion in terms of what should be picked up next. img2track will also flip the design horizontally automatically so the image will appear as originally drawn on the knit side. Images are loaded as single motifs, so the change in the selector needs to be made manually for an all-over pattern.
To have each color in each row knit only once: cast on with preferred method and color. Set up the machine so that the yarn colors are placed in the color shown in the image presented by the program to match your design. End with the machine on the left-hand side for the first preselection row.
COL: set both carriages to slip in both directions and all its needles in the B position, set lili buttons if not already in use, and pick up color 1
knit one row to the right
COR: knit to the left, color 1 will knit for a single row
**COL: change color, STOP! Push back any needles on the top bed back to B position, as you knit to the right the ribber only will be knitting, knit one row to the right
COR: preselected needles will be knit in the color last picked up on the way back to the color changer, knitting only one row in that color on the main bed as you return to the left**
repeat the last ** 2 steps throughout. One can get into a rhythm. A cast-on comb, part of a garter bar, or any tool of adequate width can make it a quick process of pushing needles back to B when needed to
trust the software, not the selection expected by your eyes.
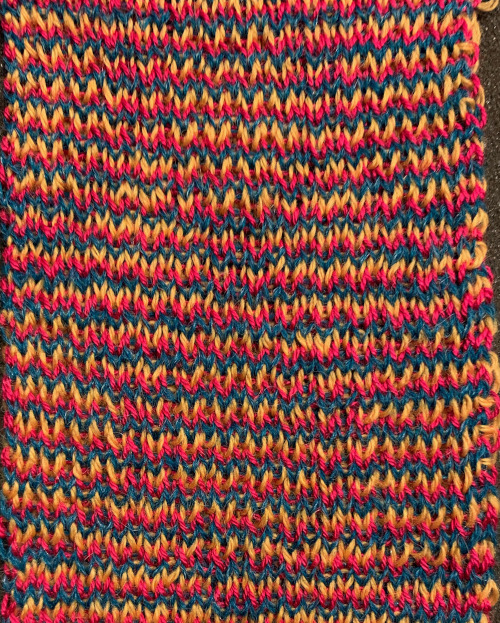
My swatch seemed to be growing in length at a faster rate than I remembered in the last exercise, here the results are shown side by side with the fabric executed previously 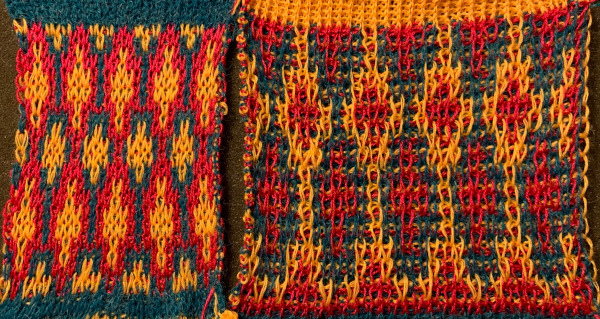
 Obviously a success in terms of the single row for each color reducing elongation of the design shape. While knitting occurs using the same yarns, at the same tensions, there is a clear difference in the length of each stitch on the main bed and their appearance. The reverse. Checking the ribber carriage I noticed on the left side it was set to knit only, not to slip: OOPS!
  N is king, so the ribber set as shown is knitting every other needle when moving to the right, but even with lili buttons in use, it knits on every needle when moving back to the left. Every other needle on the ribber will then be knitting for 2 rows as a result. The more knitting on the ribber for each pair of rows, the longer the stitches on the opposite bed. The backing is an interesting variation (half) birdseye. The elongated stitches on the main bed show more of the backing in between their shapes, it is referred to as bleedthrough. In some instances, the result can make the knit surface resemble weaving and its appearance far less familiar in a surprising, pleasant way. Beauty is in the eye of the beholder.
Remember always to double-check all settings at the start of any process in case something was missed or magically moved, and keep notes.
I was asked on Facebook whether the technique shown here is the same as the 3 color slip (skip) stitch patterns in the Stitchworld pattern book, my response: some of the StitchWorld patterns for 3 color slip are designed for or may be used on the double bed (often single bed as well). For instance, patterns 392 and 394. The original designs are rendered color-separated. The numbers on the left suggest the order for color changes to achieve a look similar to that in the swatch photos. Assuming the pattern is not easily accessible because of its being built-in your machine’s memory, it would have to be entered into a paint program manually to make it available for import and in turn for download. Note that the color-changing sequence may change throughout knitting the image, so prompts or notes of some sort would be needed to keep it correct. Each color in each row knits twice after each color change. My goals in my blog posts so far have been to keep a constant color-changing sequence with each color in each row of any personal design knitting only once. I did it first with my color separation, then, in turn, used the 3 color separation feature in img2track to achieve my desired result. Here are 2 images from the Stitchworld section in question 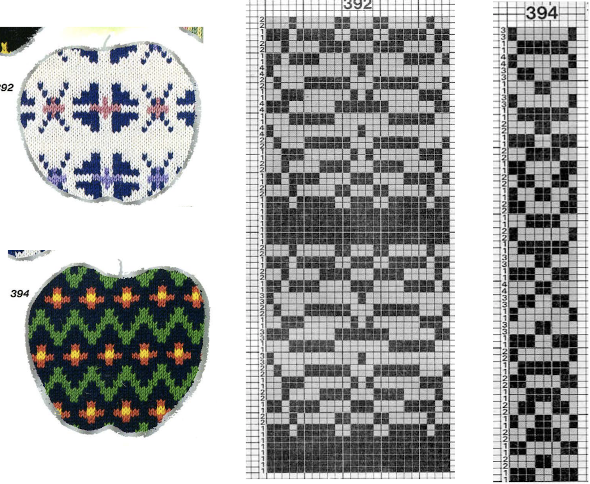 The images could be replicated as given in a paint program, using only one color for the squares, but “should be reduced to black and white”. Attempting to import an indexed 2-color image drawn in a color other than BW may result in strange results.
 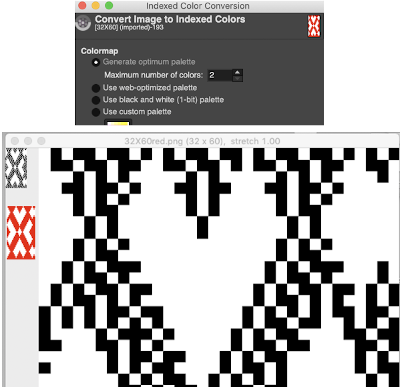 That said, if glitched knits are the goal, the above could work just fine. Curiously, here is the same process, using a different color, and a successful import. Checking again, I had forgotten to save the image after indexing it from RGB mode to 2 colors.
 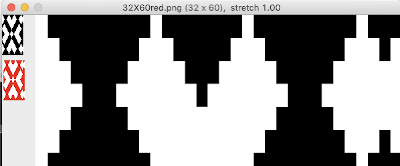 and a test with another color
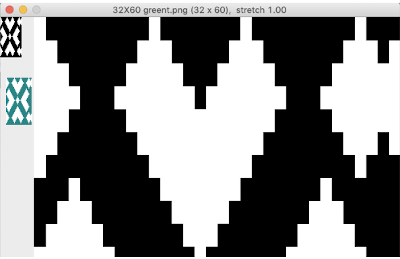
Drop stitch lace periodically comes up, I have written several posts on the technique, now considered the possibility of producing it in 3 colors. The resulting fabric tends to be long, thin, and in need of blocking. There is no way to avoid the striped ground. Passap knitters often refer to this type of knitting as “summer fair isle”. I adjusted the repeat width
 Note to self: if you are determined to use a punchcard carriage on your electronic machine remember there is no KCII to cancel end needle selection!
To knit this fabric, stitches must be cast on in whatever method you prefer, but before any patterning, all stitches must be transferred down to the ribber, and the main bed needles are placed in the work position but are empty. Because of the single-row knit for the first 2 design rows of color one, the start is a bit finicky. Alternative start follows lower in post
COL: KC II, main bed set to slip <– –>, ribber stays on N throughout, no lili buttons. Knit one row with color 1 (ribber only)
COR: as you knit to return to the left, the color 1 preselected needles will knit, while the ones corresponding to color 2 will preselect
COL: carefully drop any stitches on needles with color 1 on them without disturbing the new needle selection for color 2
**COL: change color, knit to right
COR: drop the stitches knit in the new color, make certain all needles are empty and in B position, knit back to left, and needles will be pre-selected for the next color**
Repeat the ** to**
Again, the resulting fabric is narrow and long, so it may take a bit of squinting to recognize the design.
If each color is not represented in each design row, the ribber only will knit with no selection on the top bed corresponding to those no-pixel rows.  A single repeat results in about 3.5 by 9 inches of knitting, a far cry from what might have resulted in a single row per color design row dbj virtually shown here in a tiled format
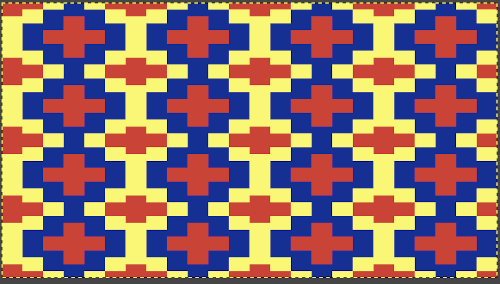
The question then comes up about dropping only one of the 3 colors. Using the manual selection described above, the knitting on the top bed would need to be canceled on every color, every row except for the single row in the chosen drop stitch color. To my mind, that is too much to keep track of for any length of time. It would be easier achieved with specific self-drawn color separations.
There is a lot of testing that can go into developing any fabric in unfamiliar techniques that may or may not meet our expectations or our “like”, it all contributes to learning regardless of whether the tests evolve into projects.
My last post on drop stitch lace from single color to two: revisiting the techniques on brother machines
2022: returning to the topic, exploring drop stitch lace in multiple colors
Reviewing what happens within the program one more time, highlighting significant items to verify before beginning to knit 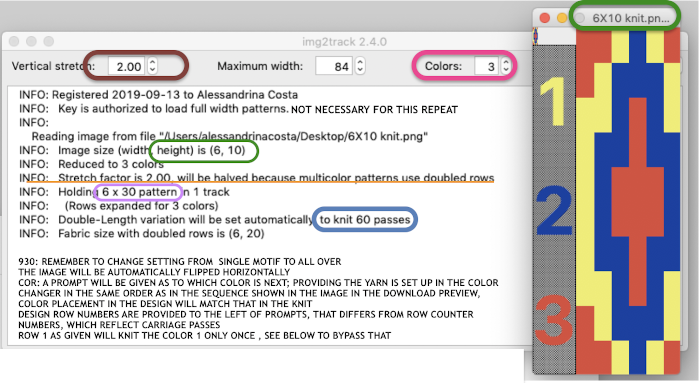 Getting that first row to knit twice instead of a single time if that matters in your technique or is your preference:
advance design row to last one in the sequence, in this case, 30
in the 930 when the pattern is loaded, using the down arrow key gets to the last row in the downloaded pattern more quickly
COL: set machine to preselect pattern, the next 2 passes would need to not knit, so both carriages are set to slip in both directions
knit one row to the right
COR: number 30 design row flashes
knit one more free pass to the left, row 1 of color 1 will preselect as you knit
COL: number 1 design row flashes
check all settings, main bed set to slip <– –>, ribber set to slip <– –> with lili buttons, and with an even number of needles in work for standard dbj 
 pick up color 1 in yarn changer
the resulting knit design will be elongated
COL: knit one row to the right.
As you knit the first row of color 1 design row 1 will knit, row 2 of color one design row 1 will preselect
COR: knit back to the left
as you knit back to left row 2 of color 1 design row 1 will knit, row 1 of color 2 design row 1 will preselect
COL: pick up color 2,
continue in pattern changing colors every 2 rows
In designing your own, small repeats can easily be rendered even in a simple paint program. Larger, more complex ones, may best be worked using layers and masking in a variety of programs ie. Photoshop or Gimp. It is possible to combine 2 color dbj and 3 color dbj in the same piece simply by using different color separations for each segment, but the look of the fabric in terms of the length of each stitch on the knit side may be quite different when moving from one segment to the next. Of course, the backing will change as well. Though the aspect ratio of the design changes in terms of height when one knits 2 rows for each color in each design row, it remains the easiest separation method. Adding the hand selection as described above so that the main bed knits in one direction only helps reduce some of the extra height, making the original image more recognizable. There is no option within img2track to perform the action automatically in terms of adding the necessary blank rows to replace some of the colored ones in the separation.
Passap knitters are not left out of this idea. Passap preselects pushers. On the E 6000 Tech 179 emulates the built-in KRC option in Japanese model machines. My guess was that technique 180 for 2 colors, perhaps 197 with both arrow keys on the back may work for 3 colors. TBD in my next spurt of knitting activity on it. That said, the console’s built-in designs may be used cross-brand. It is possible in Passap to layer repeats in order to add the third color to the mix. Here is one sample reworked for use on Brother and downloaded into img2track.  If black and white repeats are already in your library, one may easily recycle them adding a third color. Here I did so with a repeat intended for a very different topic in future posts. The image was altered and tiled in Gimp for a repeat alignment test and is also shown imported into img2track for possible knitting.
  What about using images published in punchcard machine references? It is probably best to start with smaller repeats. That said, this is from a Deco pattern book. Deco punchcards were 40 stitches wide, and could be joined together in length as can those for the Japanese models
 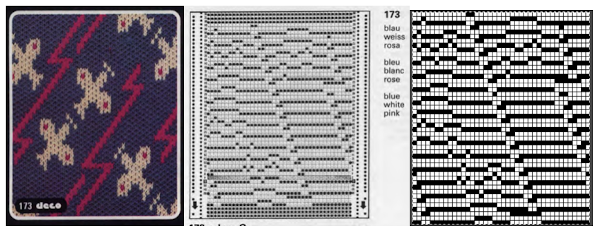 The image of the separation on the above right has not been proofed for accuracy. If it were, the next step would be to elongate it X 2 for color changes every 2 rows. One method is to elongate the original in a paint or photo processing program. The width is fixed (40), the height is scaled X 2. The resulting BW indexed image may be imported, using a 1.0 stretch factor, it remains unchanged. When I tried to elongate the unstretched image in img2track by 2.0 my first try failed. It turned out the reason was I had saved the import without first indexing it to 2 colors. With that corrected, the result matched the one from scaling X 2 in height in the paint program
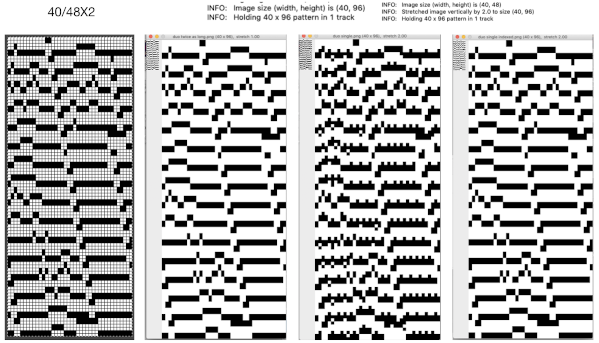 For years now I have been doing color separations which at first could be extremely slow, one pixel at a time. With increasing familiarity with Gimp and Mac Numbers over time, I have been able to decrease the speed to achieve them immensely. So here, with img2track I now have a program that can work with and separate multiple colors at a time (up to 6 in its pull-down menu option). Here I returned to my first separation in 3 colors for the now-familiar repeat A, elongated it in the paint program B and imported A into img2track choosing 2.0 stretch and 3 colors C. I can totally live with the fact the colors are not the same. The color changer can be set up with my chosen colors in any order I choose
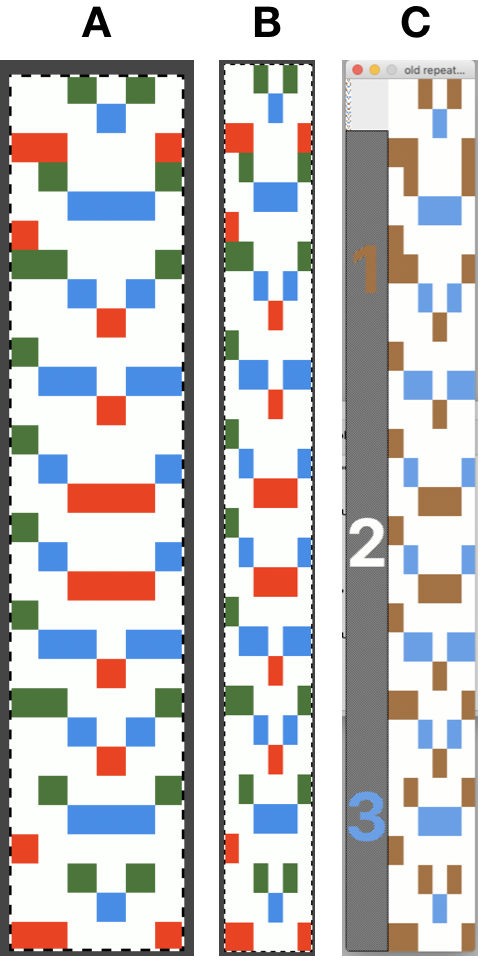
In my first tests with charting a repeat missing any color in some rows, I had scaled the original image taken from a spreadsheet to the wrong size in Gimp, so operator error resulted in crazy results in img2track. 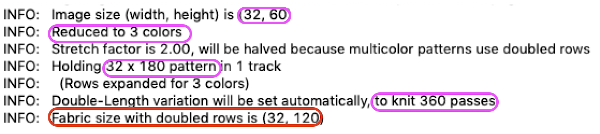 Here the image is scaled properly for each color represented for a single row in height and also scaled again for double height for possible knitting in Gimp. The Gimp scaling failed to be accurate for me (second image from left) until I indexed the original to 4 colors as well instead of 3. The no-color rows as we view them serve as a fourth color in the separations. Importing the proper size PNG into img2track for the separation of 4 colors per row now gives results that make sense: note the daunting estimate for the total number of carriage passes for a single repeat height
 If the ribber has knit on every needle by its return to the color changer and the machine is set to slip both ways with no needle selection on the main bed, the “no color” can be executed as an empty yarn holder in the color changer combined with no yarn in the feeder. The rows involved should simply not knit on the top bed, with no dropping of any of its stitches since no needles will have been selected thus coming forward with the yarn in the hooks and traveling behind the latches and in turn, slipping off the needles as a carriage with no yarn pushes the needles with now empty hooks back to B position.
In testing concepts, I prefer to work initially with small repeats. Punchcard books can be an excellent source, but the Stitchworld books have the advantage of actually showing a single repeat for each design, so an 8 stitch repeat, for example, would be shown as such and it would not be up to the person using it shown in a 24 stitch card one to isolate it. I randomly chose pattern 394. I realize that if used from a built-in library of patterns in any machine model the prompts may be provided by the machine, but here I am looking at simply duplicating the pattern for import into img2track.
 After duplicating the repeat and associated numbering using Numbers, these were some of my results. A pleasing surprise was that colors in the 2 color import need not be only black and white. That said, the pale green failed, the red did not, and the results from importing both the red/white and the black/white were identical. Another future time saver for me to keep in mind.
If colors were assigned to each pair rows representing each color used, the white squares were read as an added color on import, and the only way to have those few blocks for the 4th color to show up in the visual representation in an imported repeat was to assign a 5 color separation, resulting in a scrambled pattern. Removing the few squares in color 4 will produce inaccurate separations for actual knitting of the given pattern whether imported to be rendered for 3 colors or 4. The black and white on the right is the “correct” match, leaving any prompts for use of shifting color changers to be tracked somehow by the knitter. 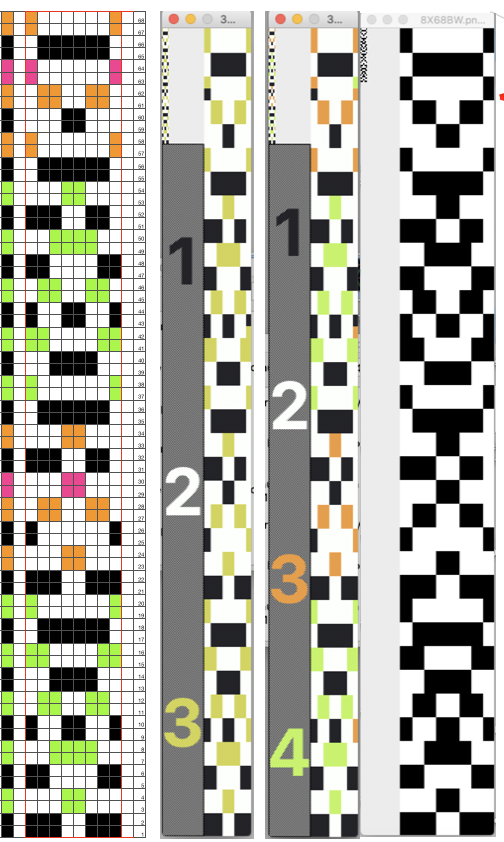 Punchcard knitters may have the easiest knitting variable color sequences since cards may be visually marked up with colored pencils matching needed change locations and taking into account your eyes are several rows above the row being read by the card reader. This number depends on the machine’s brand and model.
Some spreadsheets that may help with tracking row color changes or other regular actions on paper: 2018/04/tracking-rows-1.pdf
I have been asked about the position of the slide lever being fixed in my dbj illustrations. I have found the alternate positions can be wild cards, would rather make adjustments in carriage settings if needed rather than let the factory settings do some of the work for me. If the settings are accidentally in the wrong place as multiple pieces are knit, or in knitting ribber bands for garment pieces, the gauge is changed if the alternate setting is not adjusted and kept constant, and that may not be noticed until the piece of knitting in question is completed, needing a restart. With 15-20 machines active in each studio class and lab session, I tried to reduce as many variables as possible.
A video resource on using img2knit for 3 colors per row knitting with blank color rows in the design by Tanya Cunningham, and a Ravelry thread on the topic
Revisiting use of lace patterns Studio vs Brother machines
2011: There are several brand KMs still around and in use, most are no longer being manufactured. Questions often come up on how to use one KM brand pattern card on another. Card readers inside the machine are below eye level, so exterior number/other markings on cards or mylars reflect that, providing the knitter with a visual cue as to where they are in the repeat. If machines pre-select, the needle selection may not bear any relationship to the actual design row on the punched card or mylar as opposed to what one sees. In addition to this variable in lace one often has 2 carriages in use. It is possible to develop cards etc. from lace hand knitting graphs, but there is enough going on so a good place where to start experimenting is with pre-drawn ones. Lace preselection on any single row may have no obvious relationship to where the lace hole will ultimately end up.
Here are some random facts gathered from both sources and experience, they are applicable only if the knit carriage is set for plain knitting and no other function ie. slip or tuck is involved; plain knit rows do not advance the card reading mechanisms. In mixed structure fabrics, the rules change.
The Brother and Toyota lace cards can be used on studio punchcard machines as long as they are patterns which have 2 blank rows after each transfer sequence
Brother and Toyota have u shaped arrows to identify when to knit with the knit carriage, both brands read cards 7 rows down
The first row on Brother is transferred from right to left, while on Toyota it is transferred from left to right; Brother and Toyota cards are interchangeable provided the card is mirrored vertically (or a simple cheat: use carriages on opposite sides of usual)
For Studio knitting find the row number of the U shaped arrow and circle the 2nd and 3d row below that row that number to identify rows in which carriage is changed/set to knit
Brother knitting ends with 2 blank rows
Studio starts with 2 blank rows
on Studio begin brother card by locking card 4 rows before row 1, on row 3
Brother/Knitking lace carriage does not carry yarn, does not knit or trip the row counter; the stitches get transferred in the direction that the lace carriage is being pushed
Studio/Singer has a lace carriage available that transfers as it knits; on more complex laces one is sometimes instructed to set the carriage not to knit for a specified number of rows, the yarn may be removed, other adjustments are often required
though Studio and Brother lace cards are not directly interchangeable; aside from the numbering issue the transfer method is different, so a studio lace card working on a Brother or vice versa is a happy accident and likely to result in different fabric
Brother information is applicable to its new clone, Taitexma
A few references :
Machine Knitting: the Technique of Lace by Kathleen Kinder
Knitting Lace and A Machine Knitter’s guide to Creating Fabrics by Susanna Lewis
Machine Knitting: the Technique of Pattern Card Design by Denise Musk
John Allen’s Treasury of Machine Knitting Stitches
The Harmony Guide to Machine Knitting Stitches (their Colorful Guide to Machine Knitting Stitches does not include lace)
322 Machine Knitting Stitches (Sterling Publishing,1988)
2013 In this instance I am exploring the use of punchcards that are designed for transferring and knitting at the same time as seen in Studio simple lace in machines such as Brother, where the operation is the result of using 2 different carriages.
The studio card used  the resulting fabric
  The method: both carriages are used to select needles, use lace extension rails on both sides of the machine. Cancel end needle selection on knit carriage underside if possible, or push end needles back manually if needed to avoid their corresponding stitches being transferred throughout the piece. Set up for knitting the pattern as usual, punchcard row 3 (marked in pencil) becomes row 1 of the design when the above card is used in the Brother machine. The arrows always indicate the direction the lace carriage will move across the knit to make transfers in the direction of that same arrow.
- 1. begin pattern knitting with COR, card locked, change knob on KC, no cam buttons in use. This will result in needle selection, but the fabric produced is in stocking stitch. The lace carriage is engaged on the opposite side, and moves toward the knit carriage to make the transfers, as it travels across the bed the now empty needles will once again be in the B position.
2. (lace carriage) travels back to the right and is released off the machine (same needle selection appears, but those needles are now emptied of yarn)
3. COL: KC moves left to right, knitting the single row, all needle hooks are now full, and new needle selection occurs
4. LCOL: makes transfers toward the knit carriage, and then makes a second pass to return to the opposite side and is released.
These 4 steps are repeated throughout the knitting, with the knit carriage knitting and selecting, the lace carriage following its selection to make the required transfers. Not every transfer row will match the direction of the arrows as marked on the studio punchcard.
If there is no pattern needle selection with the KC pass on any row(s), continue to knit until there is needle selection, and begin the process using lace carriage to transfer toward the knit carriage from the opposite side and once again releasing it after its second pass.
A caution: hesitation and reversal in the movement of carriages in Brother machines advances the card in the reader, and results in mistakes in patterning; if errors are to be corrected or such movements need to be made for any reason, it is worth locking the card, checking row numbers, remembering to release the card before continuing, and visually checking pattern after the next knit row.
2013: While working out yet another HK to MK lace pattern, I sorted out the following method for using Studio simple lace on the electronic KM. It is a method that does not work on the Brother punchcard to produce the same fabric, however; on punchcard machines, as either carriage is moved to select from the opposite side of the bed, the card will not advance on the first pass, interrupting selection. I tried a swatch and got a very different lace design; depending on the starting pattern the results may be interesting (do not use elongation), but not the ones intended to match any original.
The knitting samples shown below were knit on a Brother 910. On electronic machines, as seen in previous posts on knitting with 2 carriages, the mylar (or otherwise programmed) repeat advances a row with each pass of the carriage, no matter on which side of the bed the pass originates. Dropped stitches are harder to repair in these fabrics than in patterns for multiple transfer lace (there knitting can be unraveled to the start of a sequence where 2 or more knit rows usually occur), so checking transfers, gate pegs, and adjusting stitch size and weights matter even more. There is no need to mirror the image horizontally if using a mylar; draw repeat as it is on punchcard, all variation buttons down
start knitting with KC (knit carriage) on left, Lace Carriage (LC) on Right program pattern 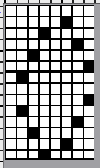 double length
 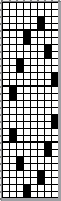 on the first row the LC selects, the next row it will transfer; LC always makes 2 passes first toward the KC, then away from it, even if those 2 rows in repeat have no needle selection. It is then removed from the bed to be returned to the bed on the opposite side after the knit row with KC that follows. In summary:
KC knits a single row to the opposite side
*LC is placed back onto machine opposite the KC to make 2 passes, is removed.
KC follows with a single knit row to the opposite side*. * to* steps are repeated
3 total carriage passes complete one row of knitting.
The preselection is repeated on the empty needles where stitches were just transferred.
The chart below shows actions and placement of carriages 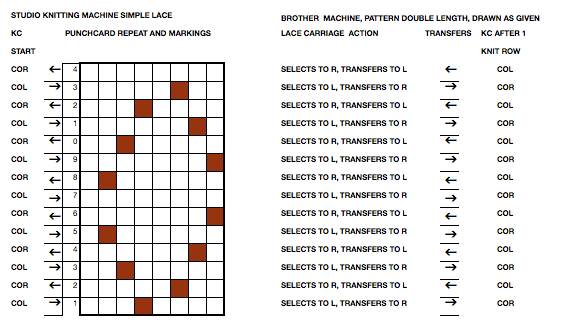 This sample was knit beginning with lace carriage on left, as can be seen in marked areas, the alternating repeats have a different quality in the sets of transfers marked red vs green
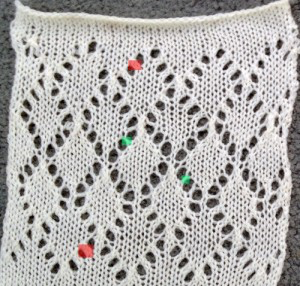 The successful swatch knit beginning with KC on the left, and LC on the right in the method described above
 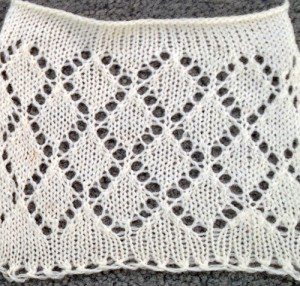 April 2019 I attempted the same repeat on the 930 with img2track. I mirrored the repeat horizontally and elongated it X 2 prior to knitting it. The arrows in the chart indicate the movement of the lace carriage, beginning with the first preselection row from the left
 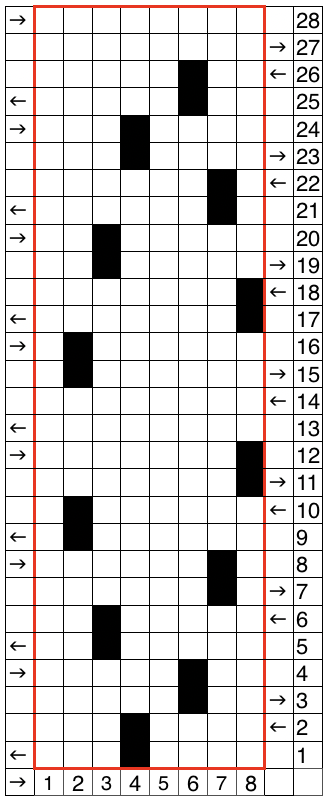 I had issues with the proper needles being selected (proofed also in fair isle), but with random stitches not being transferred. A switch in lace carriages, needle retainer bar, yarn, did not eliminate the problem. I finally had to perform some of the transfers by hand. This swatch also shows the joy of missed dropped stitches in lace knitting, the yarn used is a thin acrylic.
 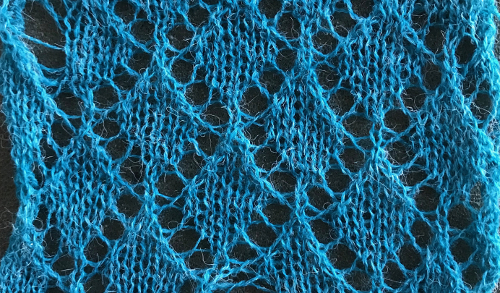 Different year (2023), even thinner yarn, with the image mirrored horizontally on the 930 using the method described above, the new knit proof of concept:
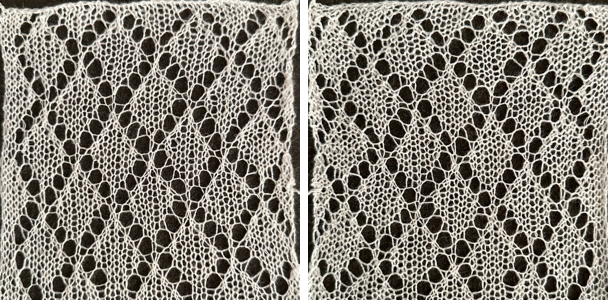
An interesting method using 2 electronic lace carriages found on youtube. The repeat used in the video is a variation of the one used in my sample above, programmed using img2track. The repeat is mirrored prior to knitting, there are extra knit rows to allow LCs to continue the pattern from alternate sides. The machine being used appears to be a 930. The requirement for mirroring of any pattern may depend on the model of electronic KM used to knit the lace and whether the download appears as drawn on the purl or the knit side of the piece 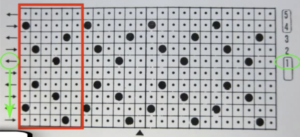 A comparison of my repeat using a single LC and the Knitlabo pattern expansion including memo options for use with 2 lace carriages
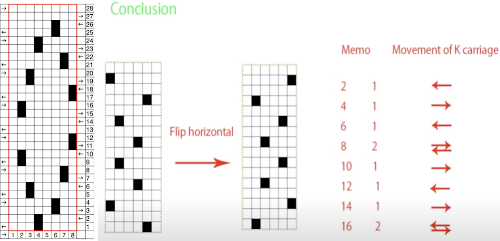
Studio transfer lace on Brother bulky and standard machines 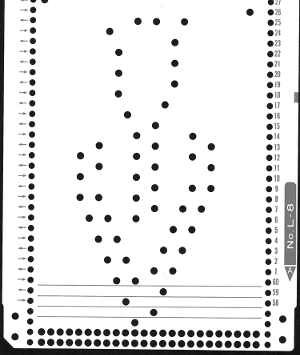
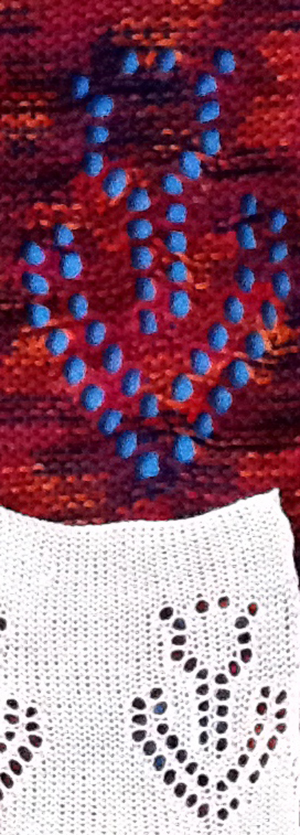
Studio multi transfer lace punchcard use on Brother punchcard machines
112, 113 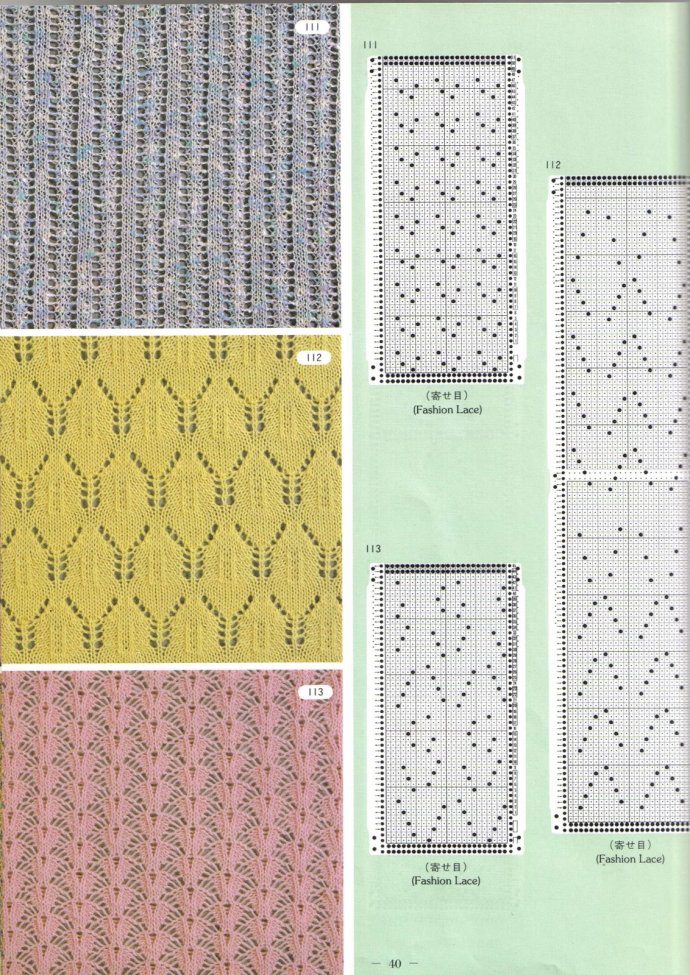 113 has single rows between repeat segments, requiring added manipulation of the knit carriage
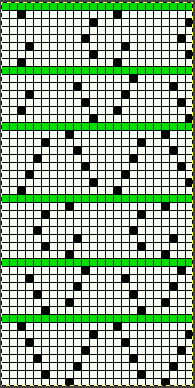 the 24X48 png
![]() On a 930 with img2track use the # 1 variation key with the pattern repeat as shown, or flip horizontally before downloading.
On a 930 with img2track use the # 1 variation key with the pattern repeat as shown, or flip horizontally before downloading.
Ayab knitters before the latest software release: mirror repeat, tile repeat width across the number of stitches to match the number of needles to be used in your final piece. There will be no needle selection at the end of each sequence, signaling the need to release the LC, knit one row, and continue with LC brought to the opposite side. This is a very fussy knit. At several points, it is loops formed on previously empty needles that get transferred rather than full stitches. They love to get hung up on gate pegs. It took a significant amount of time to produce a proof of concept swatch. It is a lovely lace. Knitting it on a punchcard would give one the luxury of frequent pauses and markings to make for additional clues
LCOL 9 passes, release
KCOR knit one row to the left
LCOR 7 passes, release
KCOL knit one row to the right
LCOL 5 passes, release
KCOR one row to left
LCOR 3 passes, release
KCOL knit one row to the right
In # 112 there are the standard pairs of rows between transfer segments. The punchcard pattern is composed of two 12-stitch matching vertical repeats, here 1 of the two halves is shown rotated counterclockwise. The additional extra knit rows in the Studio design have been eliminated. If knit as given this overall appearance will be different than that in the swatch pictured in the source. Brother machine knitters would need to track the midpoint location in the design, after the first 50 carriage passes, to place those extra knit rows, making six passes with the knit carriage rather than the standard 2. 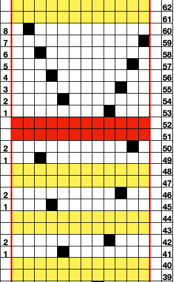
 The 12X104 png, on a 930 with img2track remember to use the # 1 variation key
 ![]() If one makes a choice or is required to repeat the width of the design to the number of needles used on the needle bed, it is easy to accidentally use the pencil in a paint program when working between windows. This test swatch clearly shows selection errors on a side edge only.
If one makes a choice or is required to repeat the width of the design to the number of needles used on the needle bed, it is easy to accidentally use the pencil in a paint program when working between windows. This test swatch clearly shows selection errors on a side edge only. 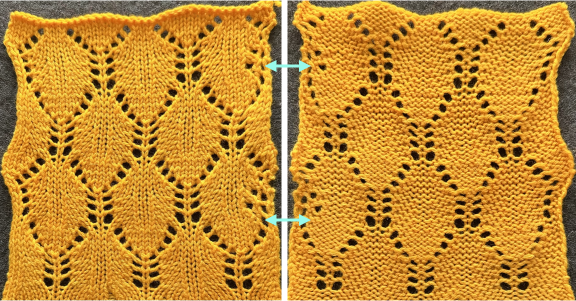 One way to check the repeat, handy when repeats are much larger or visually confusing: open the faulty one in Gimp, working in RGB mode, select by color and change black pixels to red, and make the white background color transparent by using Layer/Transparency/Color to Alpha. Open a new image, and carefully draw the design in repeat once more in the same location as in the first work window. Copy and paste the red pixels onto the black, revealing the missing pixels and the associated transfers on that edge. Fill red pixels with black, return the image to BW indexed mode, and save the new PNG to knit the piece.
 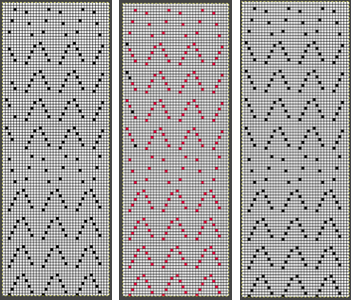 Redesigned for use on Brother machines with the LC operating from the left and the standard 2 knit rows between each design segment
 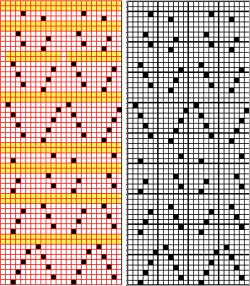 the 24X56 png
 ![]() knit mirrored horizontally on the 930, using a 2/18 wool
knit mirrored horizontally on the 930, using a 2/18 wool 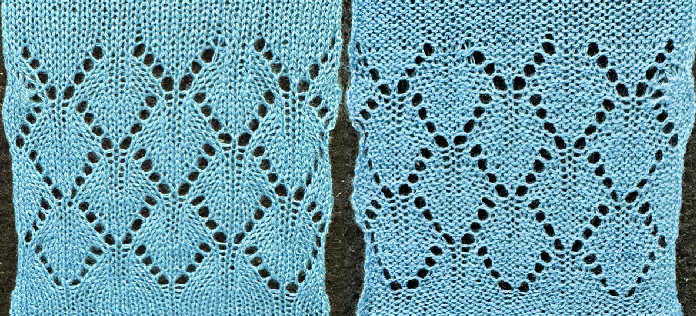 comparing both versions
 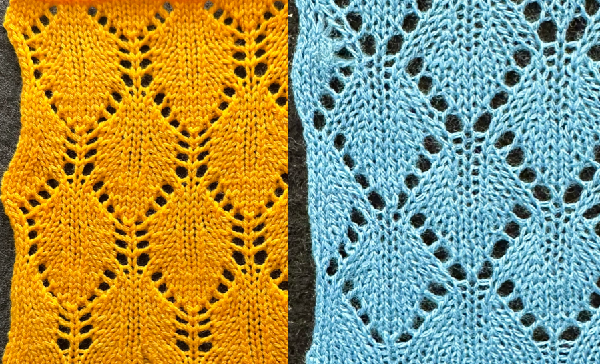 a cousin version executed as a bulky knit
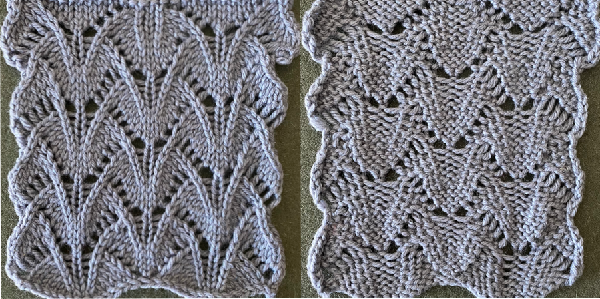 Yet another method, illustrated in Swatches based on adapting random online published repeats
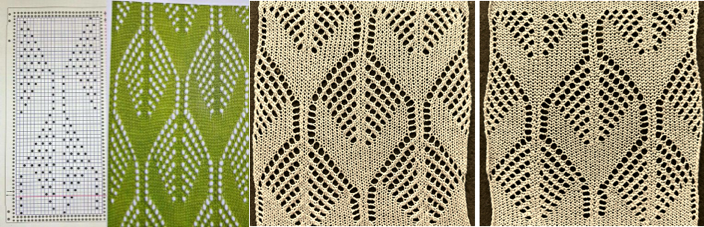 Mesh experiments using thread lace punchcards. This image also illustrates the yarn lines created in the eyelet spaces: a single thread when single rows are knit between repeats and twisted double threads when 2 rows are knit between transfers.
 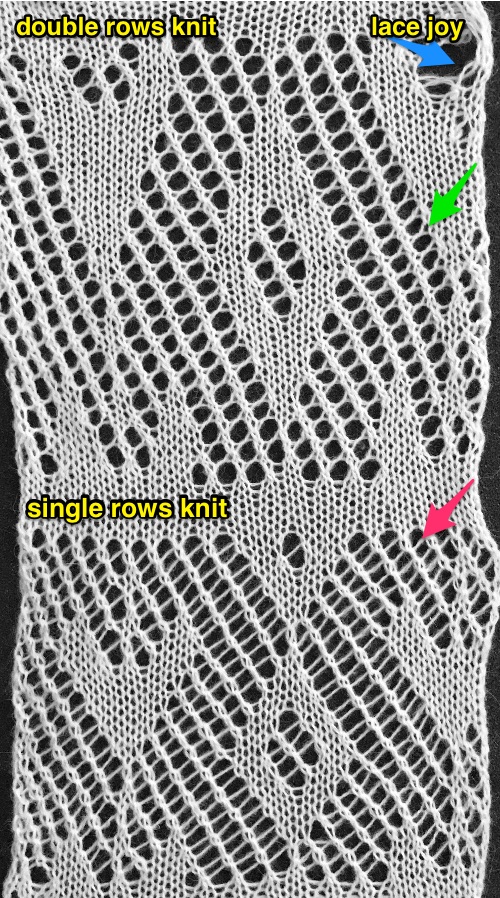 A later experiment Using StitchWorld #545
 ![]()
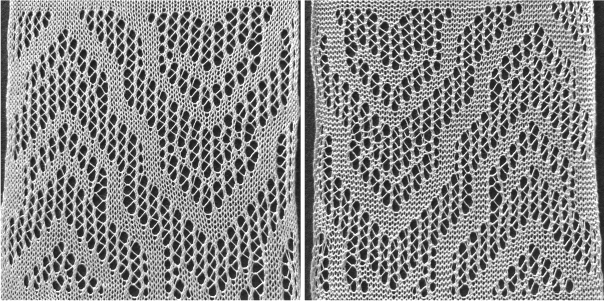
Geometric shapes on ribber fabrics with tuck stitches 1
The previous post elicited a Facebook query as to whether it might be possible to create solid shapes within the field of brioche vertical stripes. The inspiration for the query was a hand-knit pattern published in Ravelry 
https://www.ravelry.com/patterns/library/pariss-brioche-scarf
Many terms are used in instruction manuals and published directions. In my notes I will refer to fabric with tucking on both beds as full fisherman rib, tucking on one bed only as half fisherman. These were my first attempts at exploring the inspiration idea, the fabric has inherent differences as it requires both slip and tuck stitch settings, so technically it is neither fisherman. Knitting happened on a random drop stitch day, which explains the patterning interruption errors.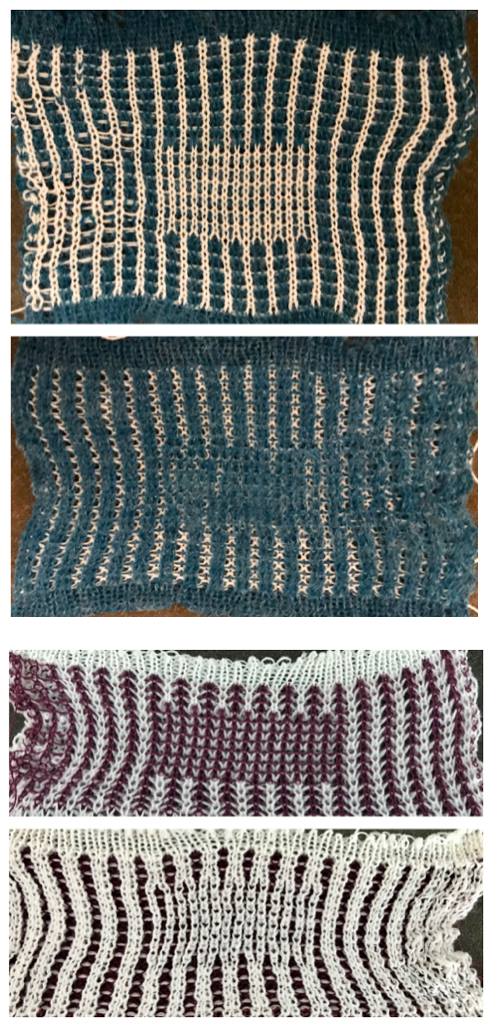 When attempting to knit isolated geometric areas on a field of frequently tucking stitches, automating the task when possible makes the process easier and faster. This was my first “diamond” pattern repeat, suitable for a punchcard machine as well. The design is illustrated on the left, converted to punched holes/black squares/pixels on the right
  The knit carriage is set to tuck throughout. The programmed repeat will alternate the knit/ tuck functions across the bed based on black squares, punched holes, or pixels.
 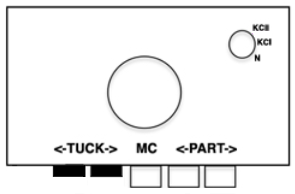 For full fisherman rib (top swatch) the ribber needs to tuck in one direction only, opposite to the action taking place on the main bed. A choice needs to be made on either of these 2 setting directions based on needle selection on the main bed and stays fixed throughout knitting. The ribber is set to knit on even-numbered design rows on the card, to tuck on odd. Row count numbers may be different than design row ones depending on row counter settings by the operator or built KM ones. Below are tuck settings for to the right on top, to the left on the bottom.
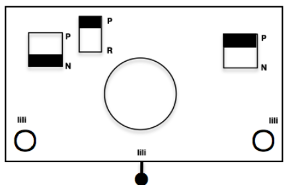
 For half fisherman rib (middle swatch), the ribber is set to knit with every pass.
 Note the half fisherman fabric is narrower than the full. Also, I am not used to my 930, overlooked that the machine was set for isolation, so its bottom diamond-shaped repeats are incomplete.
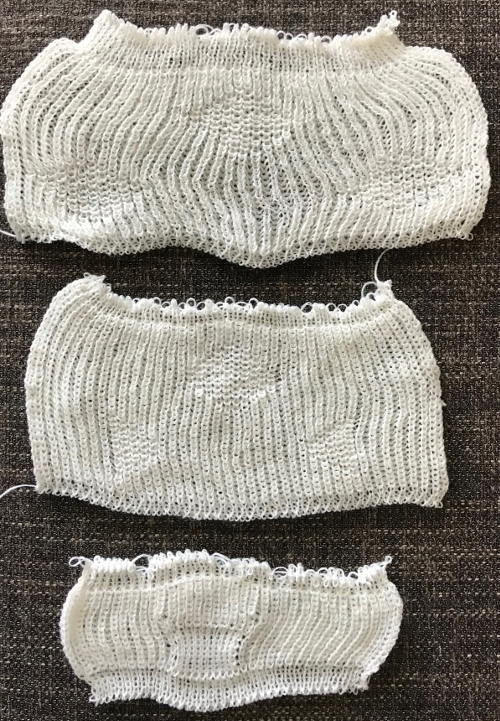
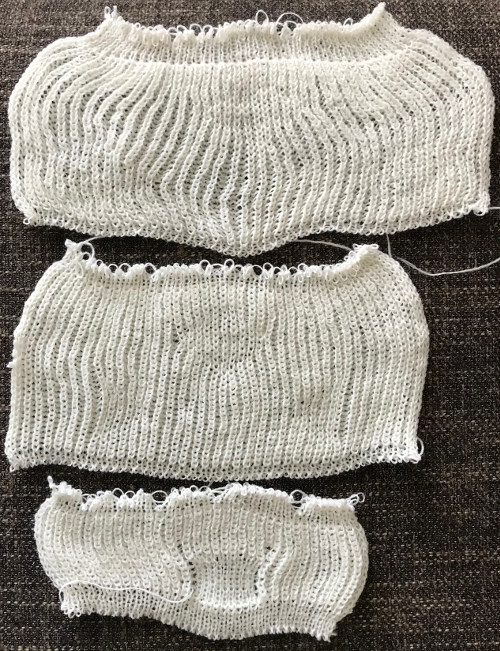
In the bottom swatch, I tried to produce a more distinct shape on tubular tuck created with only knit stitches on both sides of the fabric. Hand selection on the alternate beds on all tuck rows produced knit stitches in the desired area. A needle out of work made it easy for me to find a proper location on the needle bed.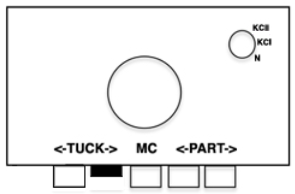
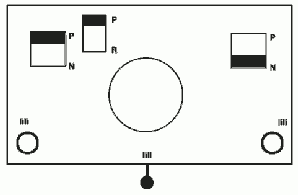 Getting back to automating at least part of the process for such shapes: the repeat needs to be altered
 main bed will be knitting the black squares in the chart on the right on every row, tucking the white ones. When the ribber carriage is on the side appropriate for it to tuck the following row and no needles are selected in design segments on the top bed (odd-numbered design rows, ones with the majority of black squares, tuck may not be used in those locations because then the resulting stitches would be tucking on both beds with nothing holding the tuck loops down.
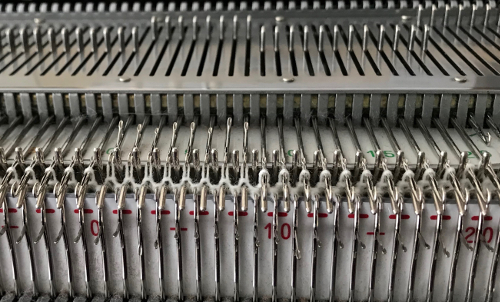 bring all needles between selected main bed needles up to hold on the ribber so that they will knit while the remaining needles tuck on the next pass of the carriages.
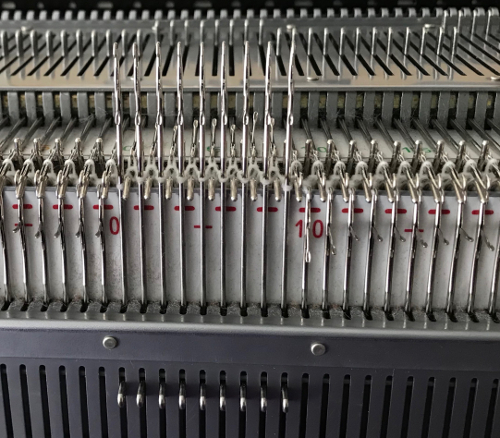
 In my sampling, the ribber was set to tuck when moving from right to left. Below is the resulting swatch, shown on both sides. Part of one diamond shape is missing due to the fact I was concentrating on moving needles around and missed the change in selection on one side of the machine.
 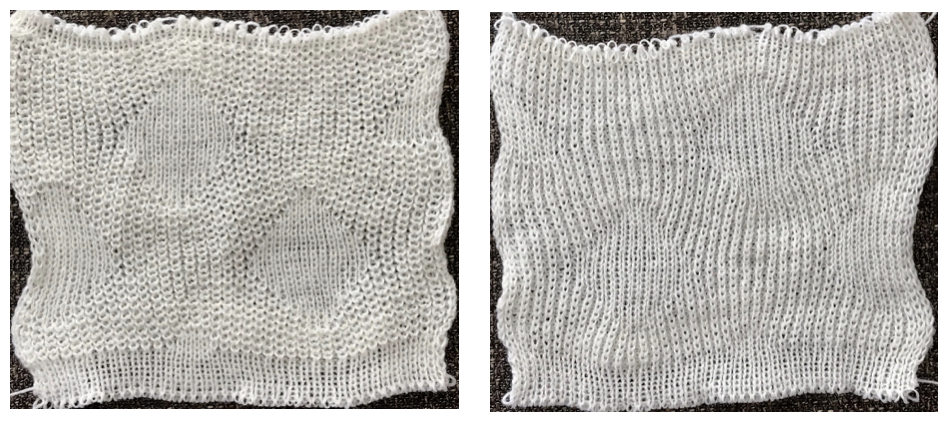 Back to the original method used in the previous post where ribber settings are changed from knit to tuck <– –> every 2 rows along with color changes. I chose a design that would make it easy to identify the location of non-selected needles on the main bed in rows where the ribber will be set to tuck in both directions. The result is interesting, but the solid areas, narrower than the remaining knit, are in the opposite color to the dominant one on each side, the reverse of the inspiration fabric.
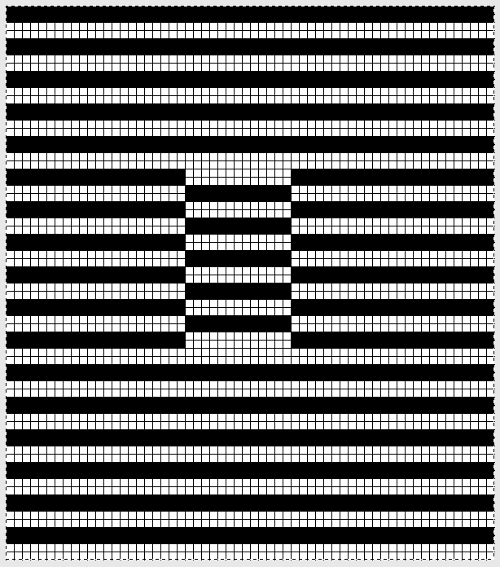 When needles are not selected on the main bed, interrupting the every needle selection.
 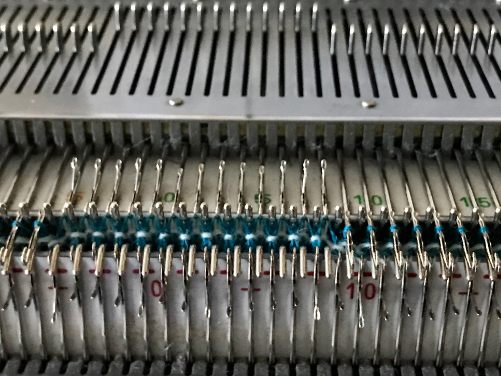 Bring all needles on the ribber between selected needles up to hold on each of the 2 passes from left to right, and right to left. Stitches on those needles will knit rather than tuck
 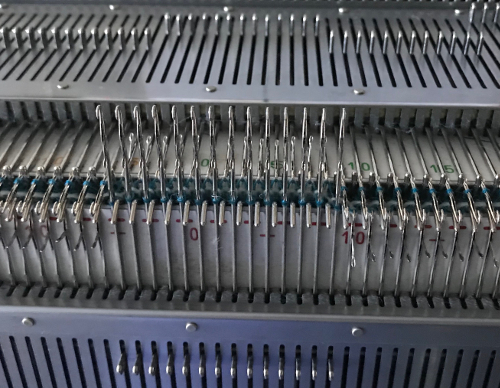 resulting in this fabric
 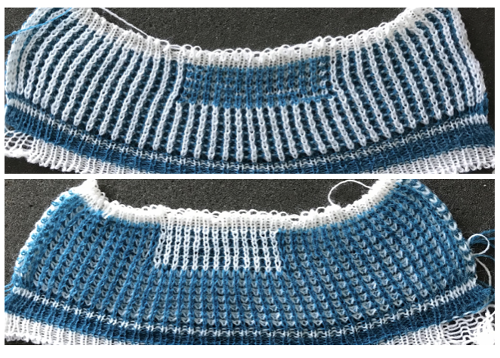 The first swatch at the top of this post was achieved going a very different route. Two knit carriages were used to select and knit from opposite sides of the machine. Each carried one of the two colors. When working with the first color and coupled carriages the main bed is set to tuck <– –>, the ribber to knit <– –>. The second color is knit using the main bed knit carriage only, set to slip <– –>. A knit sinker plate may be altered and used so as to knit on the main bed only rows, adjustments to it are shown in the post: 2018/04/15/ribber-fabrics-produced-with-2-knit-carriages-selecting-needles/. The chart for my working repeat with a multiple of 4 rows in each pattern segment, color changes every 2 rows indicated on right
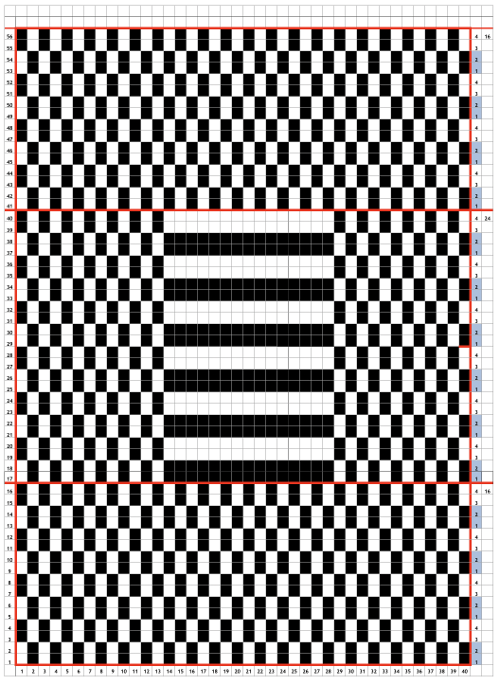 trying to produce a diamond shape using this technique, my first repeat had arbitrarily placed pixels:
  the cam settings on the right of the swatch images correspond to those used in each swatch segment. Colors were changed every 2 rows throughout. The first 2 rows in the pattern were knit in a tuck setting, followed by 2 rows knit in slip. In segment B when no needles were selected on the top bed, all those needles were brought out to hold before knitting to the opposite side. Because every row is now knitting in the corresponding color changes the result is a striped pattern. Segment C is knit with both carriages set for 2 rows as in C1 alternating with knit carriage only set as in C2. At that point the color being carried knits only on the ribber, skipping non selected needles on the top bed, avoiding the striped result. A float is created between the beds in areas where no needles are selected that will be “hidden” as one returns to knitting in rib with 2 carriages.
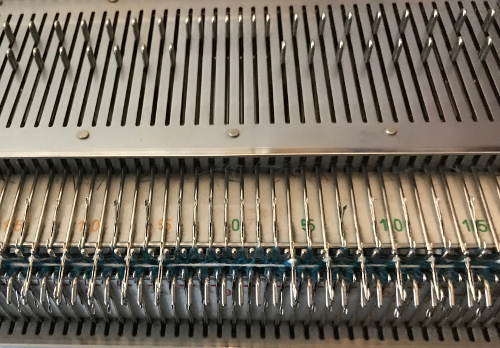 The arrow in the chart points to an area where two colors were picked up with the color swap rather than one. The resulting swatch samples
Analyzing the result in section C: the diamond is the same color on both sides, whereas the initial rectangular shape experiment reverses the colors. Reworking the diamond repeat in segments that are each a multiple of 4 rows: 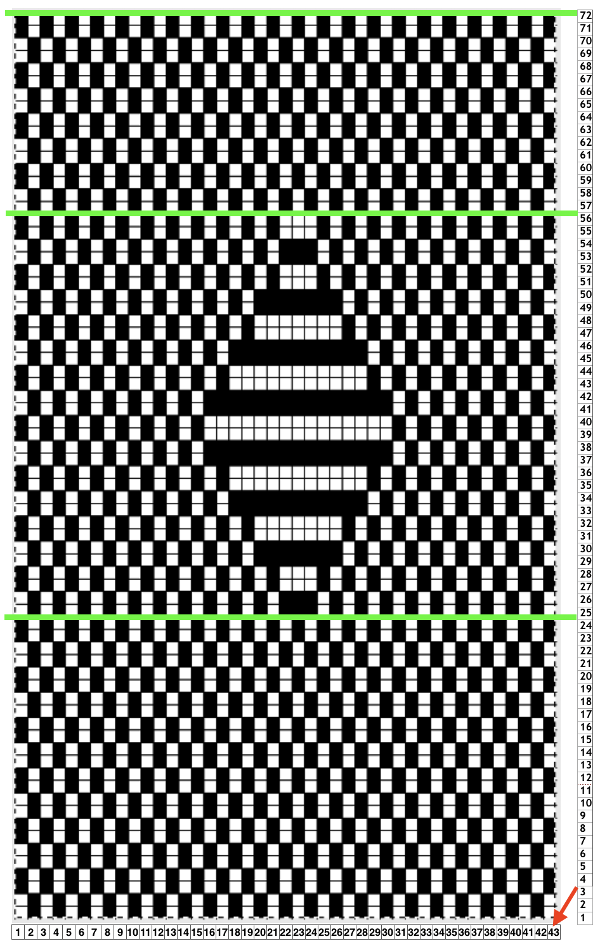 Other considerations in DIY designs. The background repeat for this pattern is actually composed of units 2 wide by 4 rows high. If the pattern is intended to be repeated across a larger number of stitches on the machine bed than that in the chart, it is always worth tiling the image to pick up any errors (sometimes happy design features). Tiling in width readily shows an error
 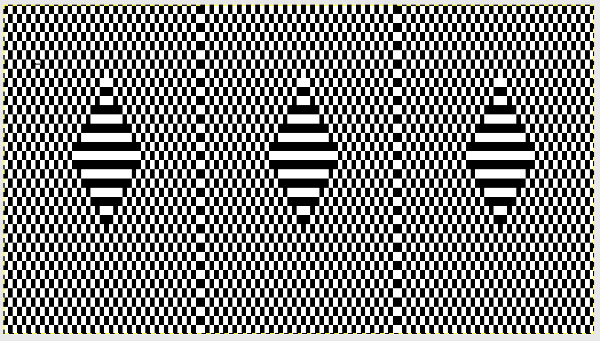 tiling in height as well proofs row intersections as well
 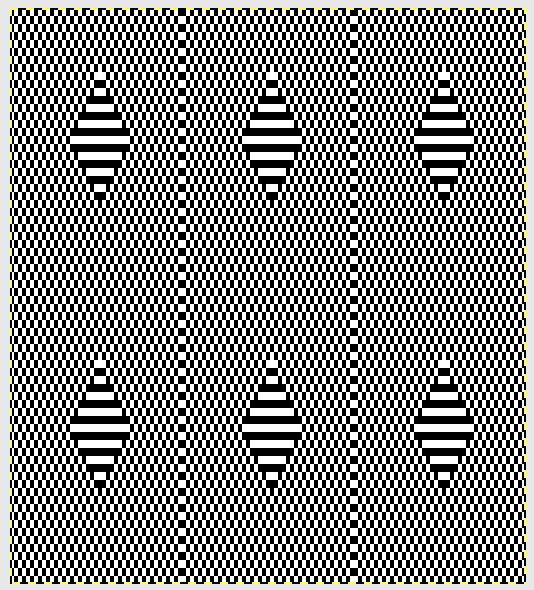 tiling the corrected width repeat, now 42 stitches wide by 72 rows high
 sometimes tend not to keep immediate notes when I test ideas, which often comes with a price. I knit my first swatch using this repeat beginning the pattern with 2 rows of tuck, resulting in this fabric (and some randomly dropped stitches once more) with the same color diamond on both sides:
 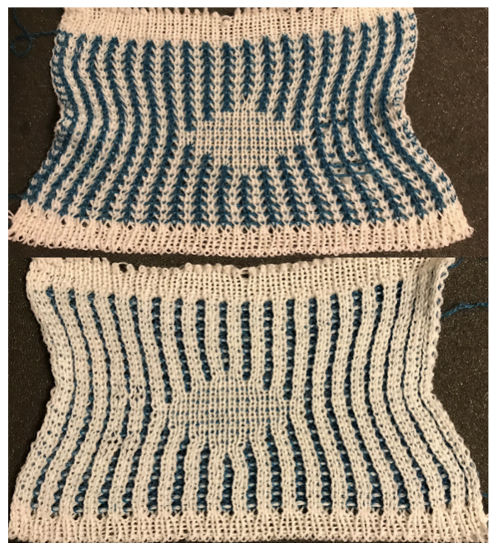 Beginning the pattern with 2 rows of slip stitch on the main bed only mirrors the swatch at the start of this post. Where no needles are selected on the main bed, with passes of the combined carriages, two rows of tuck will now be produced, resulting in the wider geometric shapes and the increased bleed through
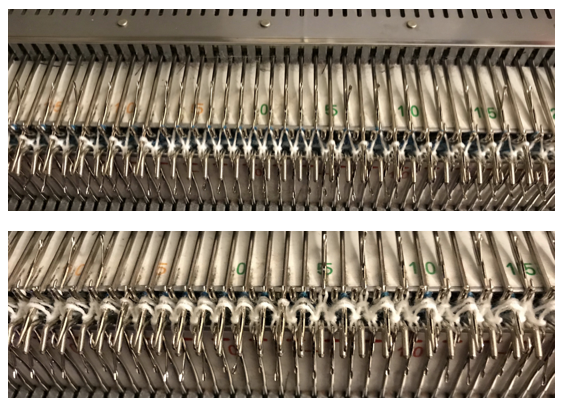
 The tuck loops created by the white in this instance have the elongated slip stitches in the alternate color (blue) partially covering them, creating the darker geometric shape in the top detail photo. The blue is thinner than the white, the effect will vary depending on yarn weight and tension used for the main bed yarn. One can begin to observe the change in width in areas with more stitches tucking.
If the aim is to have a tighter, more clearly defined diamond, after the swatches rested, the swatch that began in slip stitch setting appeared to “work” better to my eye, even with the single color geometric shape on both sides taken into account. Ultimately the choice is a personal one. The wider vertical stripes created in the white yarn in the slip combination fabric happen because of the 2- stitch wide repeat on the top bed as opposed to a single needle one in a true fisherman knit. Because of the slip setting the results will be narrower in width from it as well.
Ayab knitters will need to program any repeat across the width of the intended number of stitches, and use the single setting. Electronic knitters can enlarge the background pattern field easily, or create brickwork, extended repeats.
Arah-paint offers a free program that allows drawing repeats in different orientations with a few mouse clicks. Shifting this pattern must also be in pairs of pixels/black squares in this instance because of the 2X4 stitch background unit. The 21 (half) pixel shift shows an error in its continuity 22 stitch shift results in a “correct” all over repeat
Quite some time ago I experimented with shadow knits including in posts
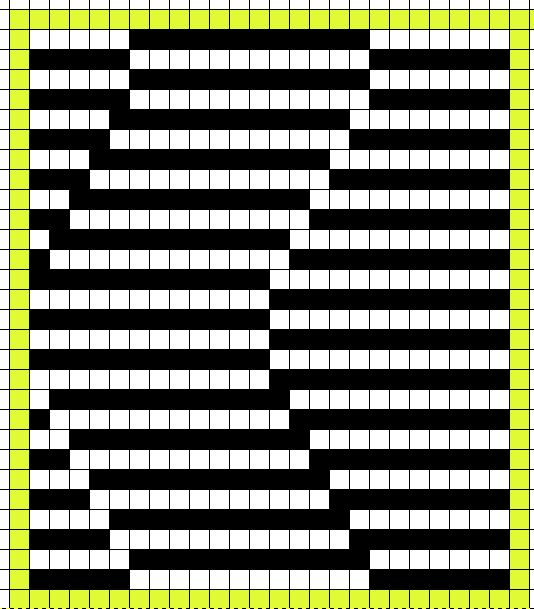

It occurred to me the same design might work in a tuck rib version. The original repeat was 24 stitches wide, 28 rows high ![]()
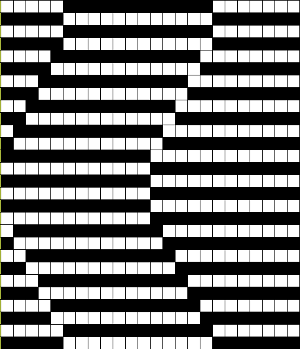 scaled to double length, 24 stitches wide by 56 rows high
 ![]()
 a tile test of the new pattern
  The ribber remains set for knitting in both directions throughout, with the main bed set to tuck in both directions.
Knit tests: the red yarn was very strong cotton, hard to knit smoothly, the blue encountered some stitches not being picked up on the main bed as well, but the concept may be worth exploring further. The main bed is set to tuck in both directions, the ribber to knit throughout. The red and white fabric is considerably wider because of the tension required to get the red cotton to knit.
 Better stitch formation results with the different yarn used for the second color
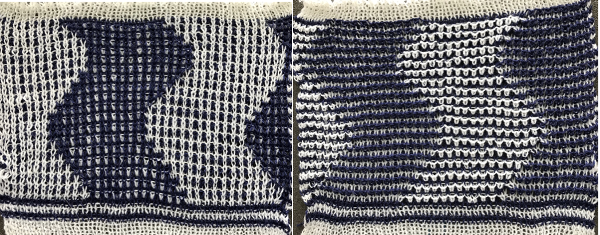
And lastly, a first quick adaptation of a design previously used for drop stitch lace, which requires some further clean up the yellow squares indicate loops tucking on both beds at the same time, the repeat on the far right is the one tested after eliminating those areas. It is 14 stitches wide by 80 rows high 
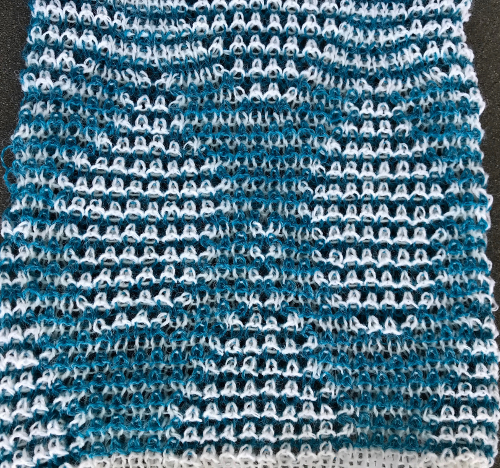
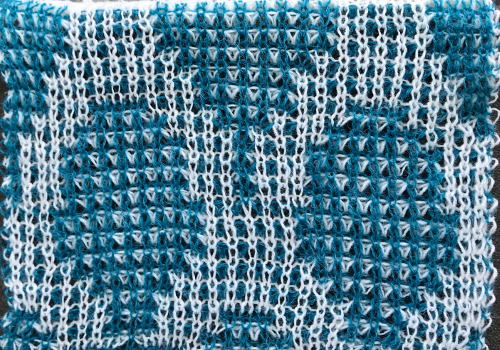 an “improved” version, the choice remaining as to whether to make all the blue shapes pointed at top and bottom or “flat”
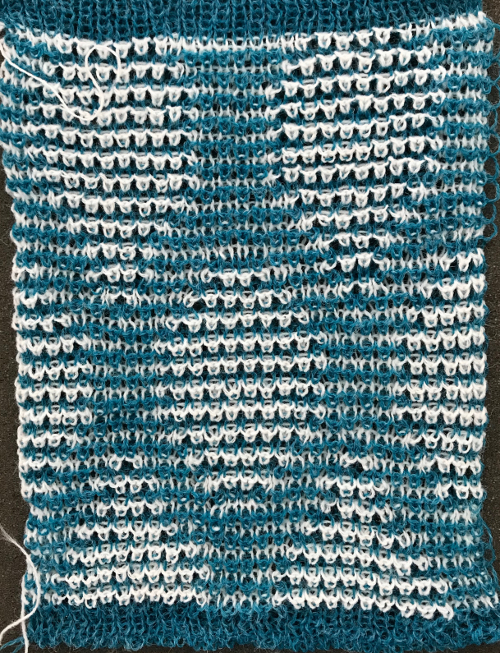
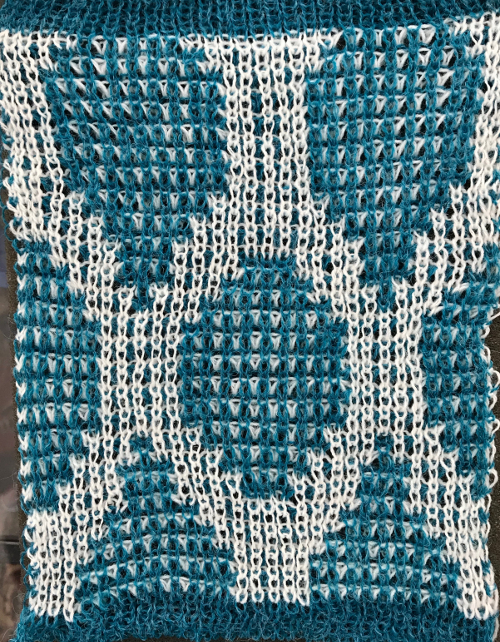 this is my repeat, tiled. It is 14 stitches by 84 rows
 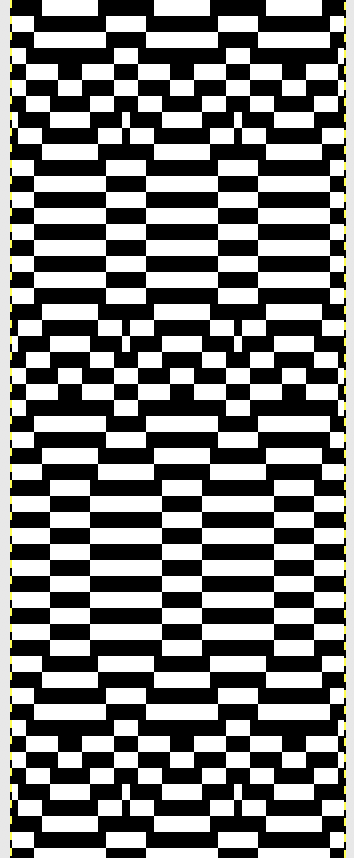 The single 14X84 png
 ![]()
2 color ribbed brioche stitch on Brother knitting machine 1
I have always found 2 or more color patterned brioche stitches executed in hand knitting as inspiring and complex challenges to admire, but have not been tempted to actually attempt to execute them in any way.
I have not knit on a Studio KM in more than a decade, have been asked whether this fabric is possible to produce on Studio/Knitmaster. The crucial difference between the 2 brands (Passap has its own universe) is the fact that Studio selects and knits with each pass. Needle pre-selection for clues as described here is not an option. Some Studio information from manuals on tuck knitting including settings for “English rib and Double English rib”: tuck on Studio km.
This was my first Brother machine knit swatch result: 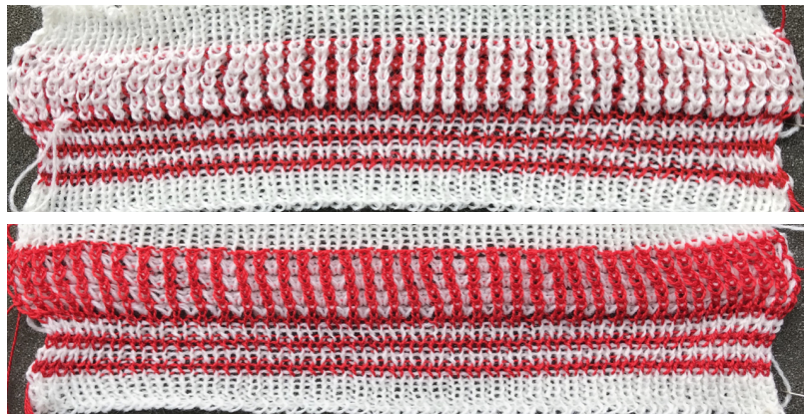 Each of the 2 colors tucks for 2 rows and in turn, knits for 2 rows alternately. Settings are changed manually as shown below after every 2 rows knit, following each color change on the left.
 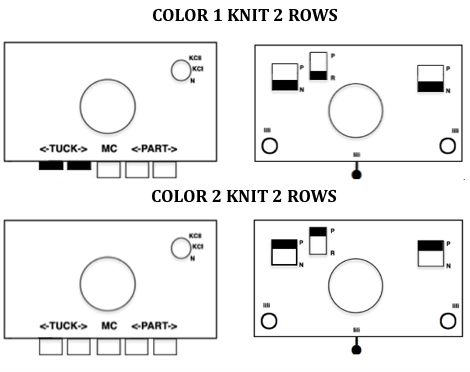 Making things a little easier: the top bed may be programmed on any machine, including punchcard models to avoid cam button changes in the knit carriage every 2 rows. With the main bed set to tuck <– —> throughout, black squares will knit for 2 rows, white squares will tuck, also for 2 rows. The first preselection row is toward the color changer. When no needles are selected on the top bed (white squares) the top bed will tuck every needle, the ribber is set to knit.
 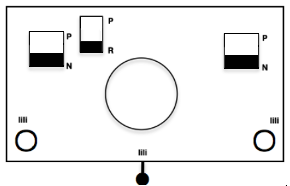 When needles are selected on the top bed (black squares), the ribber is set to tuck in both directions. The ribber will tuck on every needle.
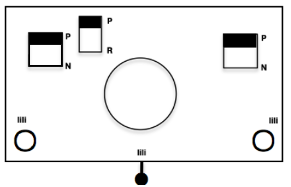
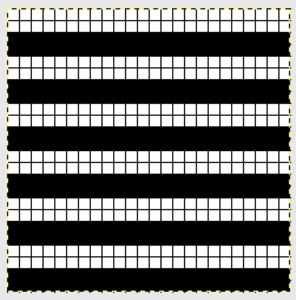
![]() Proof of concept: blue yarn is used on rows where main bed needles are selected (black squares). The crossed stitches at the top right begin to represent an effort to create surface shapes or designs on the fabric. They are created by crossing stitches 1X1, making certain the stitch creating the “shape” is carried to the front side of the fabric, the opposite stitch crossed so it is facing the knitter.
Proof of concept: blue yarn is used on rows where main bed needles are selected (black squares). The crossed stitches at the top right begin to represent an effort to create surface shapes or designs on the fabric. They are created by crossing stitches 1X1, making certain the stitch creating the “shape” is carried to the front side of the fabric, the opposite stitch crossed so it is facing the knitter.  I used KCI in this instance, the first needle on left in work on the ribber bed, last needle on right in work on the top bed. A border is created on the knit’s edges on the far right and left. The reverse side of the fabric:
 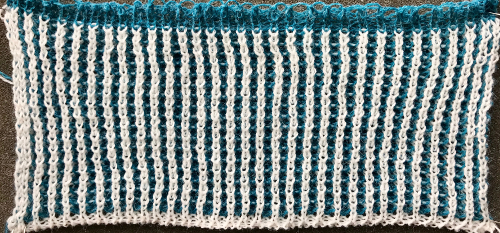 Using a blank square on a knit row to help track 1X1 crossing patterns
 ![]()
![]() Working the 24 stitch repeat using KCI; both first and last needles in work on the ribber bed. Due to operator error and forgetting to change ribber settings after a transfer row, I chose to stop knitting rather than attempt a pattern correction
Working the 24 stitch repeat using KCI; both first and last needles in work on the ribber bed. Due to operator error and forgetting to change ribber settings after a transfer row, I chose to stop knitting rather than attempt a pattern correction 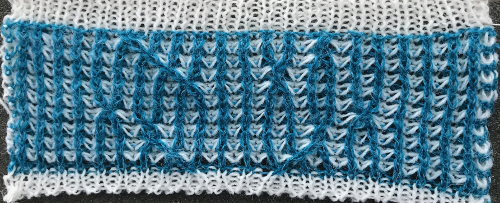
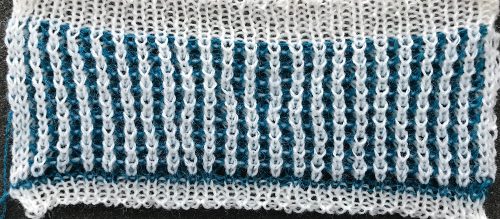 Another attempt at cabling, 1X1 and 2X2. That white line in the bottom image on the right was caused by the color changer picking up and knitting both colors for part of the row before I noticed it. I got rid of the “wrong” color from the feeder and continued on. The wider 2X2 cables require “special handling” and eyelets are formed on columns aside from them after transfers are made.
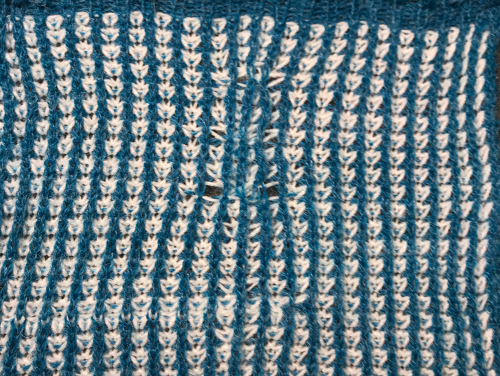
 In 2022 I wrote a series of posts on visualizing cables including using the charts to anticipate ribber work and using custom printed needle tapes to facilitate the process. This chart illustrates cable crossings, which can be made in either direction. My own cables were made with the #4 stitch moving in front and over the #2 stitch. Keep in mind when direction matters, crosses will be mirrored on the knit side.
This particular repeat when used in 2 color brioche will move the cable stitches across a center vertical line in the same color as the stitches being crossed
 For knitting using only one color, the machine is set with the main bed tucking on every needle in one direction, followed by knitting on every needle as it returns to the starting side, the ribber does the same but in the opposite direction. It is a circular tuck, also referred to as fisherman’s rib. The possible cam setting options:
 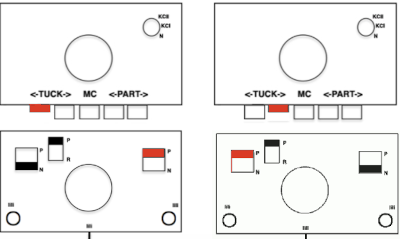 The cable crossings are made on an all knit row, following tape markings and always on needles marked in the chart.
Knitting the pattern in 2 colors requires ribber setting changes as described at the top of the post, and the first preselection row is made toward the color changer.
Knit rows are created after every needle is preselected, which happens for 2 consecutive rows. After the first row is knit, push back to B needles with stitches involved in the cable pattern,  cross the specific ones, push any/ all needles B position needles out to E, and the second all knit row will be completed with the return of the carriages to the left.
Tension adjustments will likely be needed with every needle tucking on each bed for 2 rows. I had a loop hung up on a gate peg that was not noticed, which can be seen as a snag toward the bottom of the colored swatch segment. After the fact repairs in these stitches can be hard if even possible.
The concept swatch has varied test spacing between crossings.
Again, note that with this method crossings occur over a center column in the same color, not the contrast as in previous swatches. 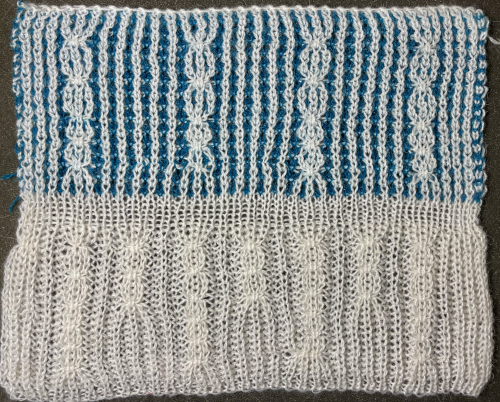 Plaiting is sometimes suggested as a way to imitate color changes in fisherman-rib. In this particular fabric, the result was quite muddy on both sides.
 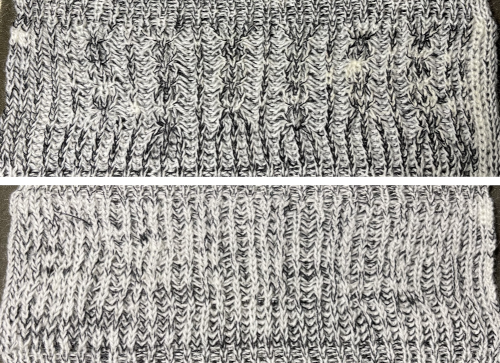 The situation is different when working on single bed vertically striped fair isle designs. One of my ancient machine-knit demo FI swatches:
  On any knitting machine with every other punched hole, or electronic with black squares, or pixels locked on a single row, if the pattern is knit in FI, continuous columns of vertical color are created.
 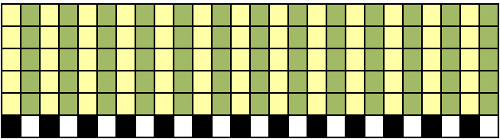 If the goal is creating the continuous and unbroken vertical stripe 2 color pattern single bed, one must place like color on like color.
Because FI is essentially a slip stitch the fabric, it will have less stretch and is narrower and shorter than when knitting either yarn in stocking stitch.
Cables on the machine need to be transferred across fixed widths between needles, so there are distinct limits as to how far stitches will allow their movement in groups in either direction. Loosening the tension can often help. Sometimes it is possible to create extra slack by a variety of means, making moving the stitches easier.
I have found my own limit for this fabric was working with a 2X2 cross (it is possible to work moving single needles as well).
Adding to the complexity of single bed: proper needle selection for the next row knit needs to be restored prior to knitting it when using the FI setting, movement of stitches is mirrored on the knit side in the opposite direction of that viewed on the purl. Visualizing some possibilities as worked on the purl side 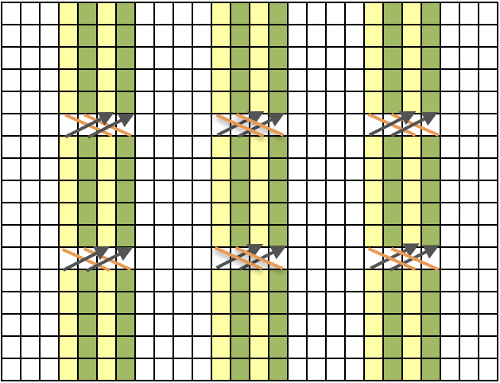 to consider the knit side appearance mirroring is not enough
 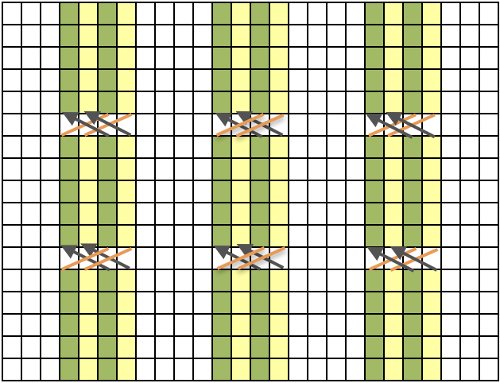 the direction and appearance of the crossed stitches on the knit surface are reversed from that on the purl as well
 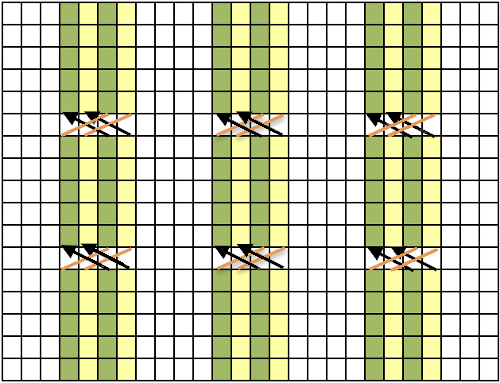 When working every needle rib it will take 4 rows of knitting with 2 color changes to produce the striping on a single row. R represents stitches on the ribber, K the stitches on the knit bed
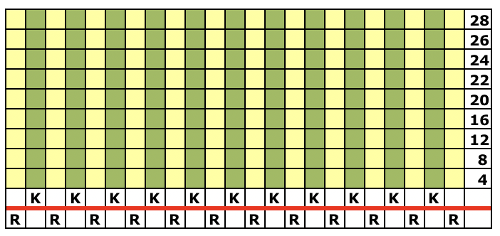 This shows an instance where crossing the numbered stitches on the main bed with color changes every 2 rows, by default, lines up the same color on the same color. Stitches in the same color are formed in the in-between needles on the opposite bed.
Another way of looking at the 1X1 crossings on the top bed behind a single central fixed stitch on the ribber. 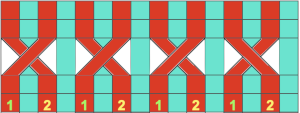 The fabrics may be tested and knit in single colors as well.
  When working on the 2 color brioche crossings are made on a row where all stitches are the same color; 1X1 cables when made in this case, are forced apart by the tucked stitches between them on the opposite bed, in the alternate color, implied here by the white line
 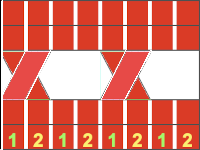 Tuck stitches widen the fabric. As a result, the tucked knitting in this chart on the ribber (represented by the color yellow), forces the space between the knit stitches produced on the main bed (represented by the color green) apart, while stitches tucked on the ribber will create the gap between the stitches knit on the ribber, appearing on the reverse side of the fabric. The combinations create the appearance of single stitch vertical stripes.
This is an illustration of one possibility for programming reminders for tracking the location of cable crossings 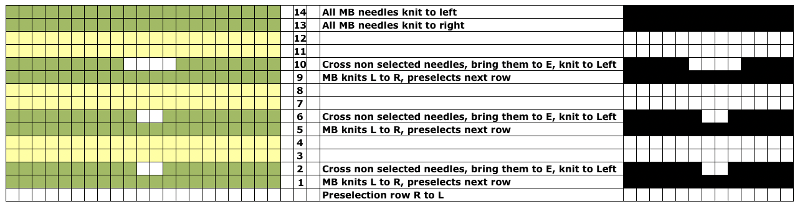 Every needle ribs are generally knit at tighter tensions than when the same yarn is knit single bed. Too loose a tension in any tuck fabric causes problems with loops forming or knitting off properly, too tight will produce stitches that do not knit off properly. One limitation of crossing stitches here is the actual stitch size, which needs to be constrained to produce the fabric. Tiny stitches need to travel across fixed space. One by one crossing is manageable, 2 by 2 requires extra slack to make the transfers possible.
Adding some “give” to crossed stitches
1: the carriage has moved from left to right after the color change. All needles except for the four white squares in my design were preselected prior to the next row of knitting. The carriage now stays on the right
2: take note of the white tuck loops formed on the ribber on the previous pass from left to right
3: white tuck loops ( I chose center 3) are lifted up and off their respective needles and allowed to drop between the beds. This will allow the 4 white cable crossing stitches to have more slack.
4: cross your cable in the intended direction
5: push cable stitch needles out to E
Knit from right to left, change color, continue in pattern
With some planning on longer pattern repeats it is possible to plan added clues to tracking rows on which the cables occur and their location on the needle bed. Repeats with very few marked areas merit testing in tile as any other repeat.
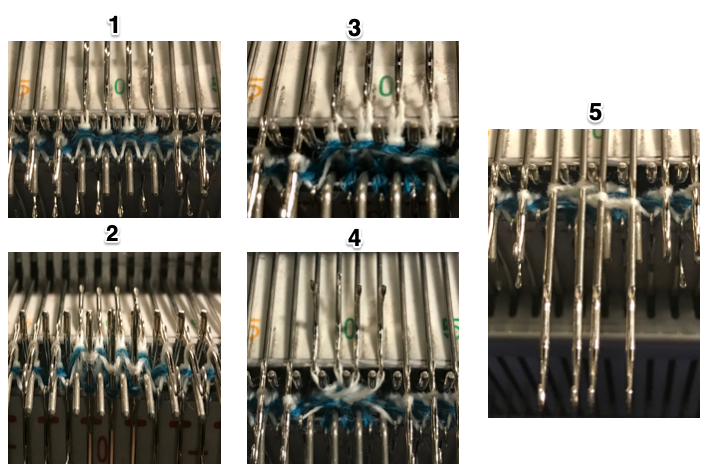 The charted repeat on the left below when tiled shows the area of a patterning error, on the right with the missing blank rows added the problem is shown to be resolved, the repeat is now 24 X 84.
![]() A proof of concept swatch:
A proof of concept swatch: 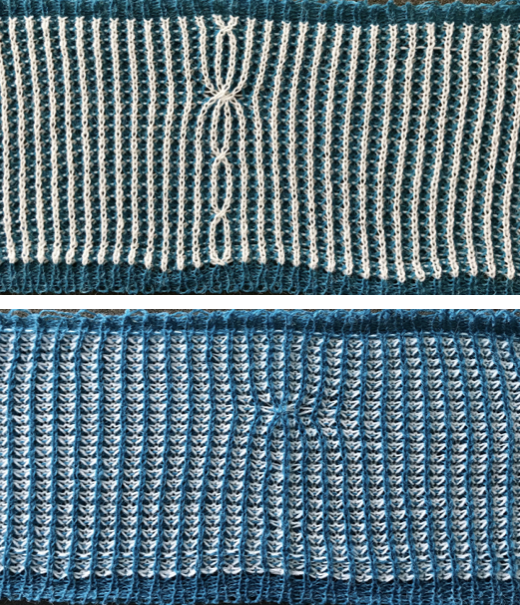 Planning for all over the brick layout of corrected repeat:
 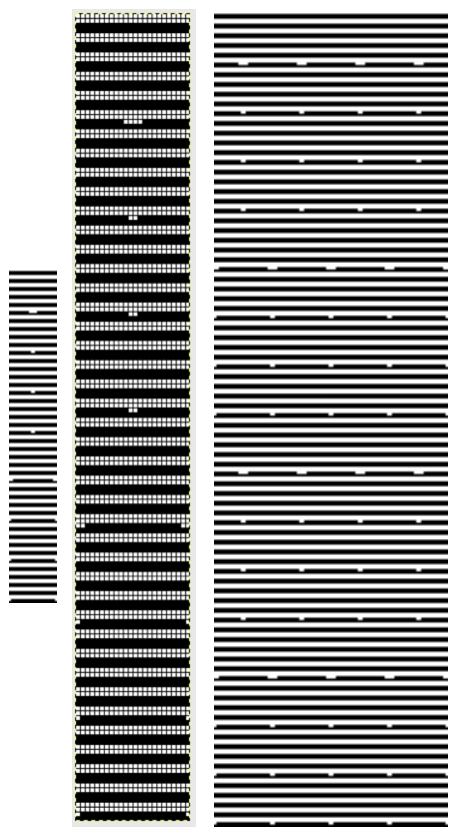 The tiled repeat .png, 96 X 336, the single 24 X 168.
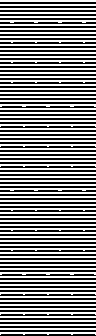
![]() More detailed charts of the 2 repeats, suitable for punchcard machines. Ayab knitters need to repeat the final motif across the width of the download in order to match the number of pixels to the number of stitches in use across the needle bed, using the single setting.
More detailed charts of the 2 repeats, suitable for punchcard machines. Ayab knitters need to repeat the final motif across the width of the download in order to match the number of pixels to the number of stitches in use across the needle bed, using the single setting.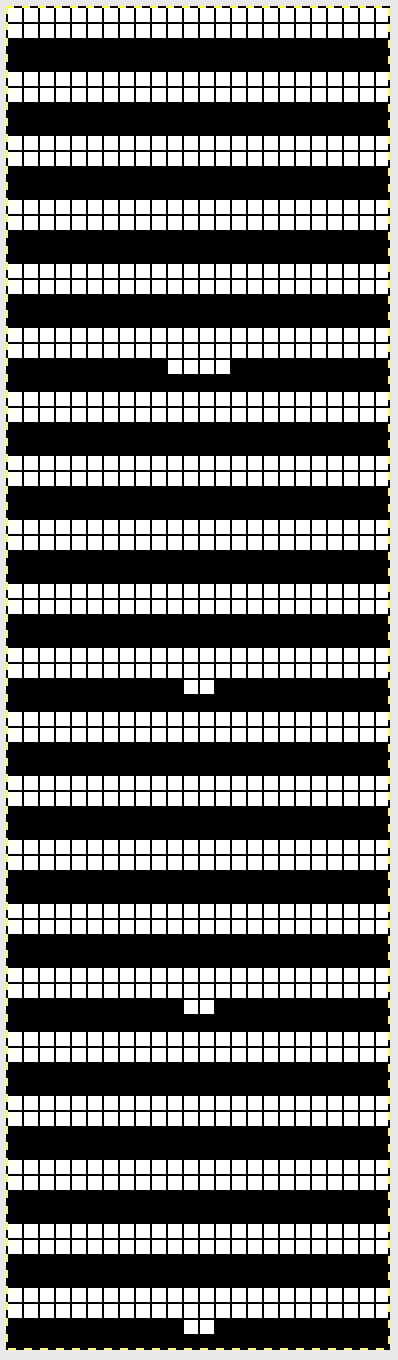
 Adding complexity, there is the possibility of lace transfers meeting fisherman rib
 and a plaited swatch attempting to avoid color changes every 2 rows, the technique is not a personal favorite
 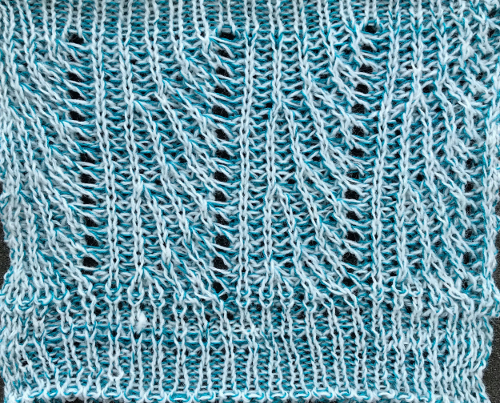 Other related fabrics may be found in posts:
Geometric shapes on ribber fabrics with tuck stitches 1
Geometric shapes on ribber fabrics with tuck stitches 2; knitting with 4 carriages
Geometric shapes on ribber fabrics with tuck stitches 3
Reversible DBJ, Brother knitting machines
I am including notes on my working through the process and some of my stumbles at the start of this post. More specific how-tos are found toward the bottom of it.
Such fabrics may be created with both the KRC built-in function or with the color separations that knit each color for each design row for 2 consecutive, identical rows. Punchcard knitters are not excluded. The starting side is on the left for the KRC setting (B in this illustration), on the right side for the alternate color separation (C, double length, or drawn with each row repeating X 2).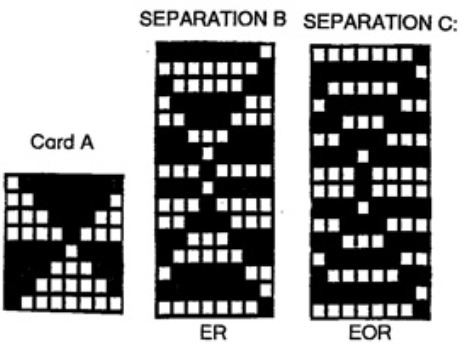 I am still testing my 930, for my samples I began by using the built-in pattern #16 in the Stitchworld Pattern Book I.
  In the absence of a jac40, the fabrics are knit by manually selecting stitches to the upper working position (E on Brother) on the ribber bed every row. Preselection for the next row to be knit on the main bed makes the process far easier.
In my first sample, the colors are the same on each face. Since the same number of needles are selected for both design and ground, both sides of the fabric will be exactly alike. There will be floats, enclosed by knit stitches of the opposite color. Beds are set at half-pitch. Consistency makes any process easier and more predictable. My ribber set up was also with an extra needle on the ribber at either end of those in work on the main bed. I found I had less issue with the long floats in my design when I made certain the needle selection began with needles to the left of those in work on the opposite bed rather than to the right, allowing for the color in use to knit first on the ribber, then in turn on the main bed. It may not matter with patterns with shorter spans worked between the 2 colors. The dropped stitch issues below were resolved by using different yarns, no other changes.
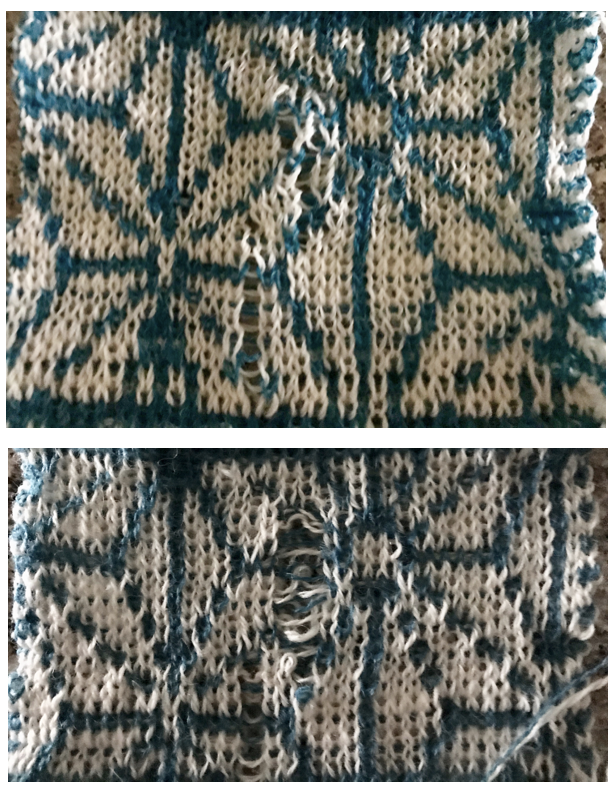 The needle set up in colored squares and on my needle beds showing matching selections on both beds (different design rows). Some of the floats may be seen created by the blue yarn in the bottom photo. If the first and last needle on each side were not selected on the main bed, the needles at each end on the ribber were added to hand selections for the next row (blue squares)

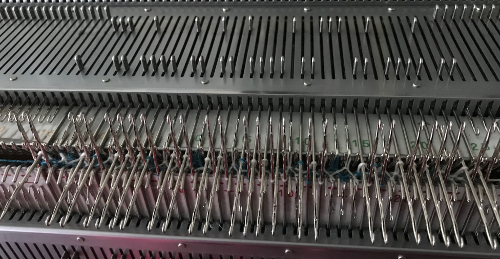
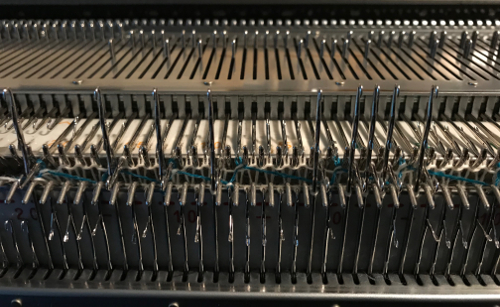 better results with the different yarn choice

For DBJ that reverses ground and pattern colors, opposite needles are selected on each bed. Color 1 knits the design on one bed and the background on the other at the same time, while color 2 knits the reverse. There are no floats. I knit this fabric as well at half-pitch. The ground color created pockets (white squares), with the pattern color (black squares) locking the layers of fabric together. Here again, first and last needles on the ribber were worked on each row. I began pushing needles up on the ribber beginning to the right of each needle in work on the main bed. Needle selection on ribber matches unselected needles on the main bed (pink). All needle positions in each bed are mirrored.
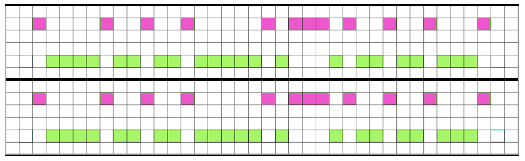 needles actually selected on both beds (pink), different design row
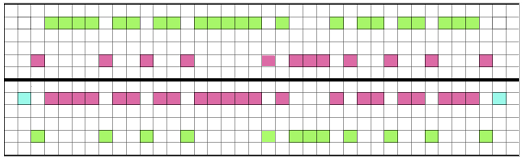 One design row, 2 different angles

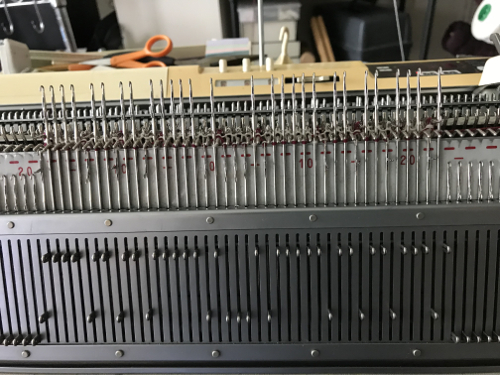
Since ribber fabrics are not visible for a large number of rows, I frequently scrap off after short distances to proof technique before committing to longer pieces as well as to assess whether the effort is worth it in order to produce the fabric in that particular technique or yarn.
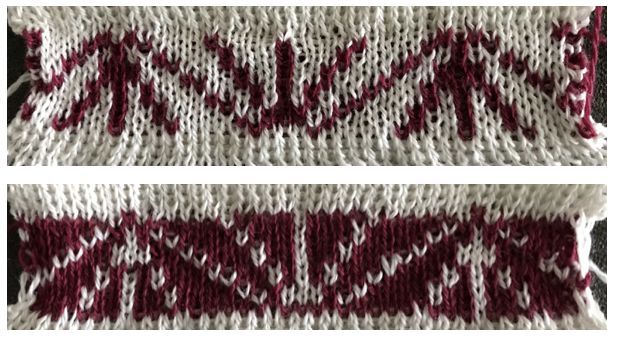 Moving on to a self-drawn pattern, the technique proved to be sound. On inspection, however, I saw I was actually missing a pixel in the .bmp I downloaded, and on the reverse, the green arrow is most likely operator error in needle selection. The orange dots highlight the missing pixel/contrast color stitch, and on the color changer side, I had a really sloppy edge that needs sorting out (red dots). A possible added factor: I knit the motif using KCI, and later recalled end needle selection does not always work with the carriage I am using.
 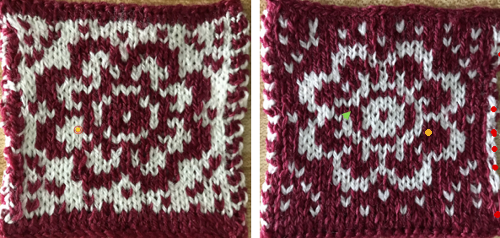 Here I filled in the missing pixel, and drew a single-pixel black line along each side, testing a “border”. The first and last needles on each side were now cast on and in work on the main bed.
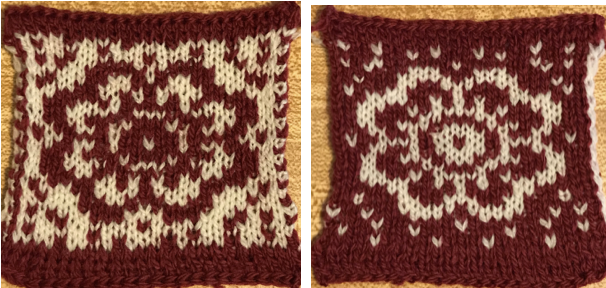
That single stitch solid color line does not add to the design in my opinion, so back to the drawing board: side “border” pixels are eliminated. The first and last stitch are now in work on the ribber. This fabric is the best by far, at the very start I forgot to cancel end needle selection (KCI), then switched to canceling it, KCII on electronic. 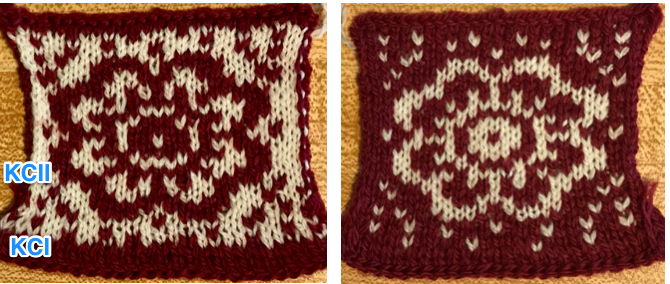 The how-to in summary: first and last needle are on the ribber.
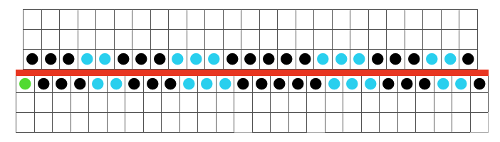 On the electronic choose KRC for the built-in color separation for the fabric to be worked in DBJ. KCII (no end needle selection). With a free pass to the right, both carriages set to slip <– –>, select for the first row of knitting to be worked in color represented by white squares in the design chart. Both carriages remain set to slip in both directions throughout. On the ribber bed, bring up to E/hold position first needle on the right of any needle selected on the top bed, then continue to push needles up into work to match the number of not selected needles on the knit bed. As needles are arranged, there will be a space between the last hand selected needle on the ribber, and the next needle in work on the main bed
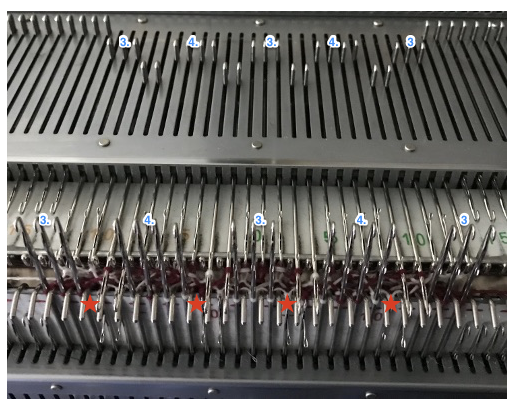 Now that there is that extra needle in work on the ribber on the color changer side, to match selection as seen above, needles are hand-selected to E beginning on the far left, still keeping that space just before the next needle selected by the pattern reader. Remaining selections began to right of needles on the main bed as described above.
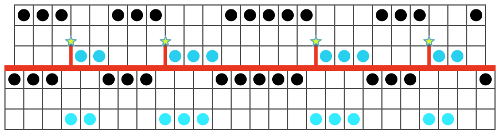 when selection begins on the main bed on the left
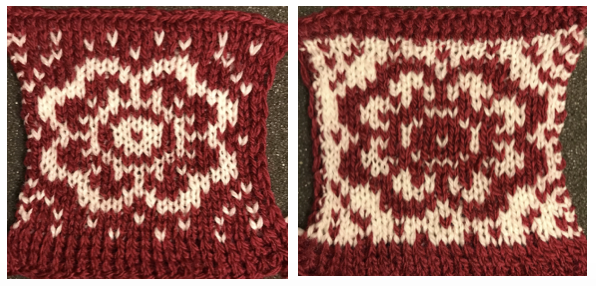 Getting back to working the same pattern on both sides of the knit: the first needle on the left is on the ribber, the one on the far right on the main bed. On the electronic select KRC for the fabric to be worked in DBJ. KCII. With a free pass to the right, both carriages set to slip <– –>, select for the first row of knitting to be worked in color represented by white squares in the design chart. Both carriages remain set to slip in both directions throughout. On the ribber bed, bring up to E/hold position first needle on the left of any needle selected on the top bed, then continue to push needles up into work to match the number of selected needles on the knit bed.
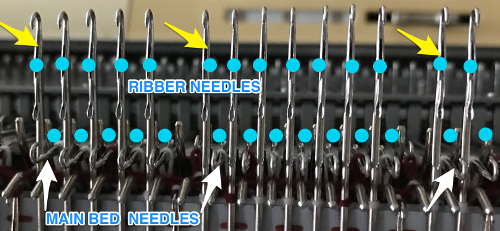
 Small selection errors are seen on the left image, ie on the second row on its right, may be easily repaired by duplicate stitching. The stitching yarn may be fed easily through layers of double knit for short distances before and after the “mistake”. With all settings and yarn being equal, there is a difference in size between this fabric (larger of the 2) and the one with color reverse on its other side
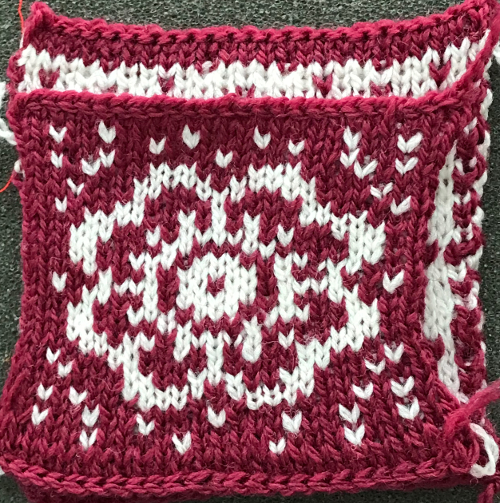
A similar setup, working in full pitch. Here needles line up directly below each other. If the wrong needle is selected it will be point to point with the needle immediately above it and is an added clue the wrong needle is being pushed up into hold/ E position. My first swatch had a distinctly different side / vertical edges. Cast on was for every needle, half-pitch (top image), the first needle on left on the main bed, last needle on right on the ribber. When completed, it was followed by a change to full-pitch prior to pattern knitting, lining up needles point to point, directly below each other (bottom image). 
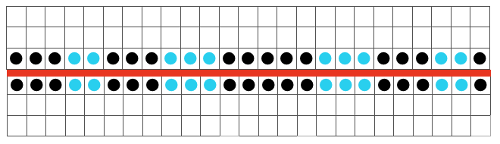 I prefer the edge obtained on the half-pitch throughout, seen in the previous sample
Still, pondering those edges, and what about repeats with large areas of a solid color? The image on the left is 25X26 rows in height, the one on the right adjusted for an even number of solid color rows, and a total row repeat divisible by 4, 25X28. The single black line at the top is a marker for returning the carriage to all knit when the top of the repeat is reached. When using full pitch, solid areas remained open at both edges with carriage set to KCII. A wooden tool handle is actually inserted through from one side to the other at the bottom of the swatch. Because the needles are point to point, no extra needles could be brought to work on both ends as a workaround. KCI will select end needles on the main bed. I tried that as the first workaround to seal the edges. I paid no attention to whether needles were selected at each end every row, and got another creative pair of edges.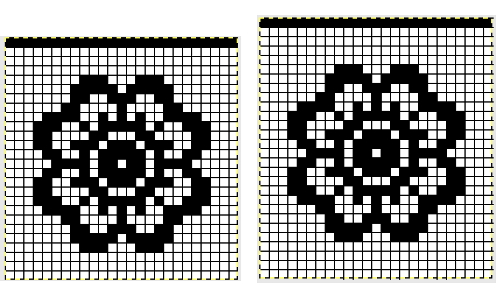
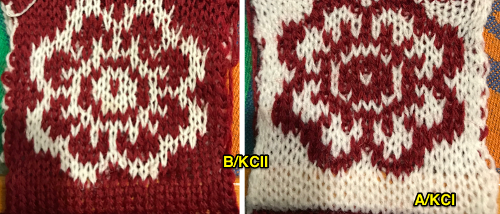
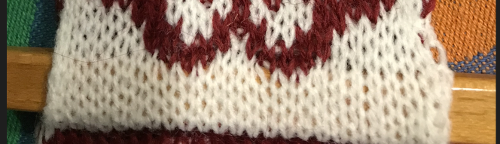 Returning to half-pitch I brought up to work the first needle on the left every row (too many rows at seen at R top edge compared to the other side) and pushed the last needle on right up to work if it was not part of the group to be brought up to E.
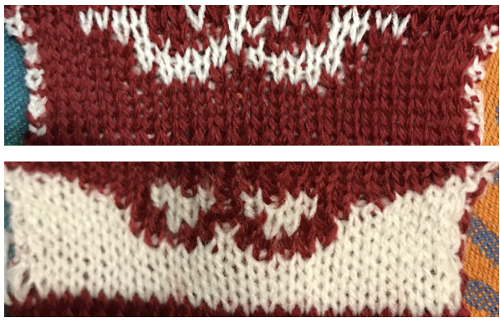 Analyzing the fabric structure in those areas of solid colors on alternating beds: at first full pitch makes sense if one has knit tubular stripes or solids which have closed edges, with the yarn making a single pass on each bed, traveling back to the color changer, with the option to stripe every X, even number of rows. Such stripes occur evenly spaced and identical on both fabric sides. Here the goal is to knit the fabric with large blocks of solid, alternate colors on each side. The main bed knits color 1 on selected needles on the top bed only, the alternate color is knit with the ribber needles being hand-selected up to E while the main bed is slipping, with none of its needles selected. Other than that first set up row with preselection from the left, 2 rows are knit in color A, followed by 2 rows in color B. There are no stitches traveling between the beds to seal the fabric together in those areas, creating open sides, so if the goal is to have the edges seal. other steps need to be taken. A single-pixel solid line along either edge of the repeat did not create a good edge. Full pitch is easier than half pitch to manage. One possible solution to both issues is to alter the side edges of the design repeat so there will be alternating needle selection along those side edges, thus sealing the fabric.
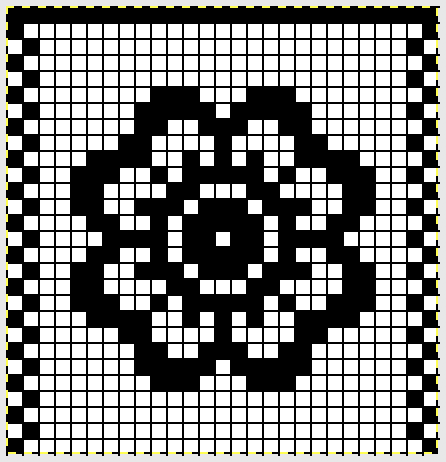
I decided to cast on with white and to continue with white as the first color used in the pattern (white squares in the chart). This swatch was knit in full pitch. Edges are sealed throughout. The only hitch was when the top was reached and that all black squares row was reached. I was on the right at that point, with my dark color in the feeder. The row toward the left would have knit in the dark color instead of the white on the top bed. I cut the dark yarn, made a free pass to the left, continued in plain knit in white to right, and then transferred stitches and bound off. Top and bottom edges /borders in terms of the number of rows, whether to add pattern there as well, are all subject to personal preferences and taste.
For an off-topic reversible double bed fabric using thread lace setting, see post