In 2012 I had a sort of leaf obsession, which led to my exploring a range of shapes created in both hand and machine knitting, including a series of shawls that were machine knit, using the lace carriage, intended for both gifts and sale.
Online resources were not as abundant back then, searches are more productive now via browser searches, pinboards, and Ravelry.
I have always been interested in holding techniques and automating them on both punchcard and electronic machines. In recently revisiting shell shapes I was reminded of leaves once more and thought I would return to working with them.
An early abandoned effort in trying to construct leaf shapes automating their shaping using holding in combination with slip stitch followed other earlier posts is shown below. In all honesty, I have been blogging long enough so I often do not recall previous writings on a recent spark of interest and execute a personal version of reinventing the wheel, starting from scratch, or executed poor note-keeping which in turn requires it.
A variety of lozenge and “leaf”-shaped forms may be found in previous posts on holding intarsia, some are strictly hand-selected, others are automated. There is a series of 5:
2016/06/21/a-bit-of-holding-1/
2016/06/29/a-bit-of-holding-2-moving-shapes-around/
2016/07/12/a-bit-of-holding-3-shape-variations-and-more/
2016/07/24/a-bit-of-holding-4-intarsia-and-more/
/2016/08/13/a-bit-of-holding-5-intarsia-and-more-2/
Checking the repeat for a single shape 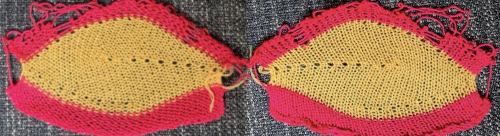 Adding a second color and reversing directions of shapes brings lots of yarn ends and its “price to pay”
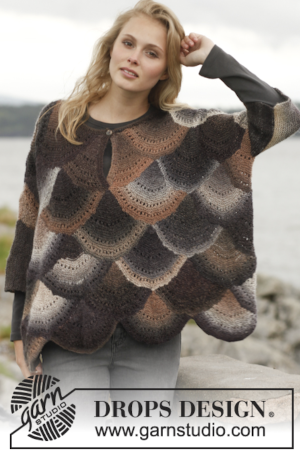
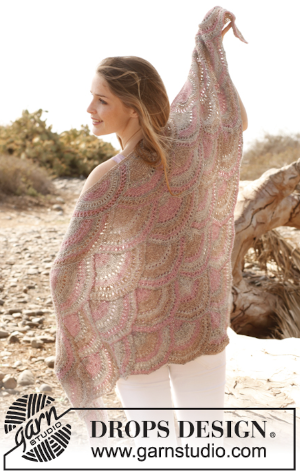
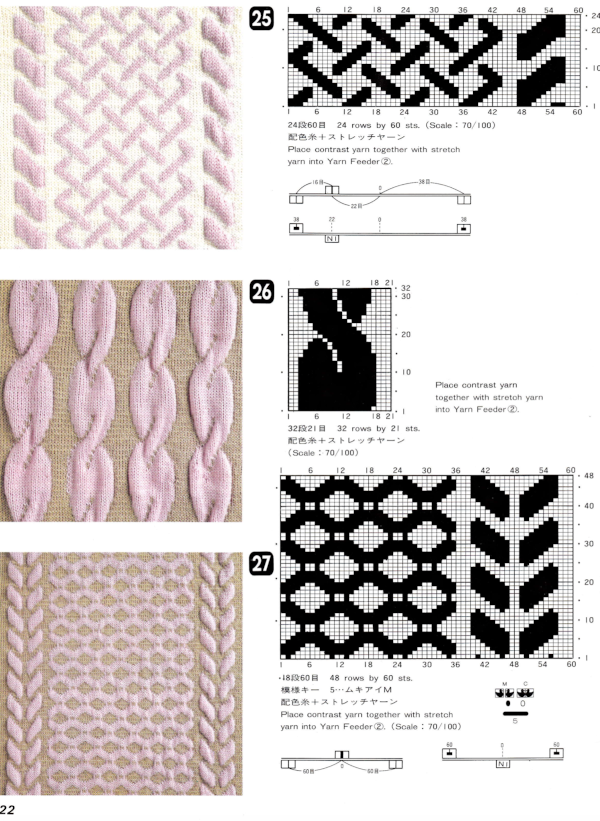
 Some handknit large scale inspiration to begin my revisit to MKing them: Garnstudio 1
 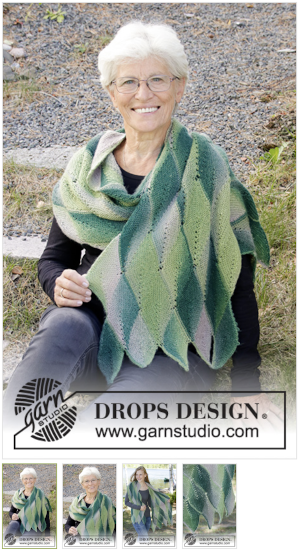 and Garnstudio 2, which introduces lace transfer stripes between leaf forms
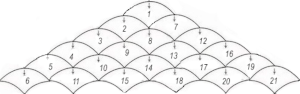
 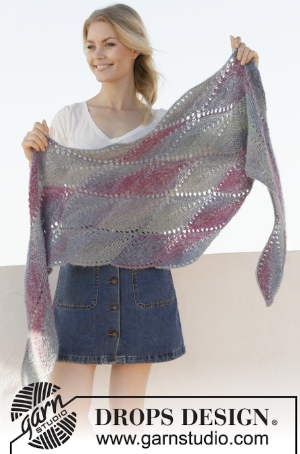 A free hand knitting pattern, “Papagena“, that takes similar shapes to a triangular layout for shawl shaping
 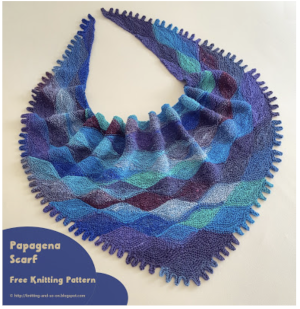 Stitch Maps is an online source for hand knitters with interesting graphics that include some for held shapes, such as this
 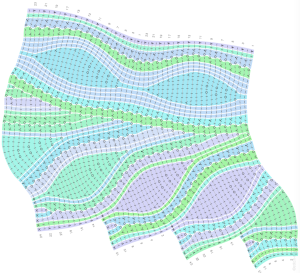 The chart is actually rotated 90 degrees counterclockwise, could serve as inspiration for an electronic pattern.
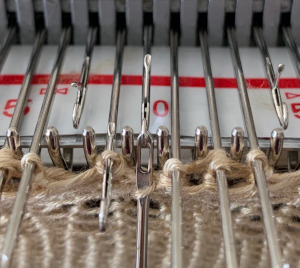
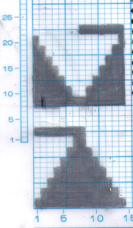
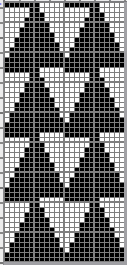
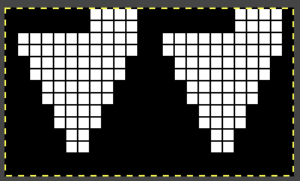
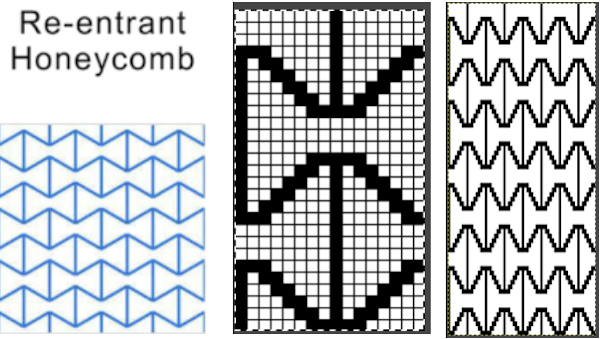
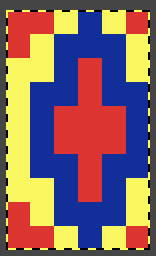
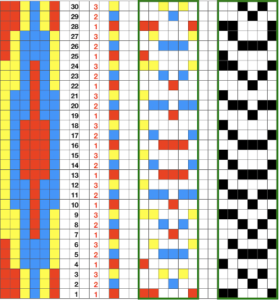
Returning to a possible far smaller repeat that may be executable on a punchcard machine as well. The central vein in the forms is created by having held stitches with no wraps along and up to its center in height, creating 2 continuous shapes that mirror horizontally and repeat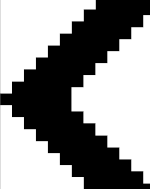 Automated holding sequences may be planned for single or multiple stitches in width, as well as for single and multiple rows in height. For the new initial test, which proved to need editing, this was my repeat
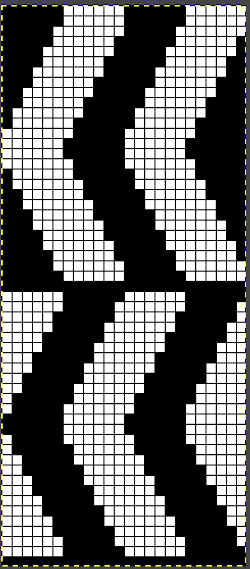 A tiny test in too thin a yarn
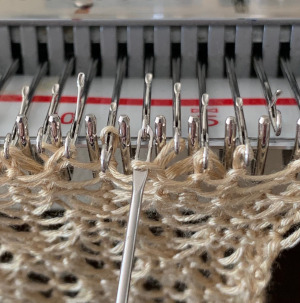
 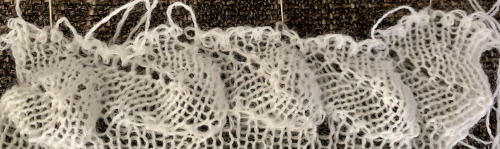 I am knitting on a 930, the image needs to be mirrored in order for it to appear in the direction I intend on the knit side. The above repeat did not work properly when knitting a whole row of shapes. With some patience, a final, edited, and mirrored repeat was developed that enabled a completed a full row of shapes using the slip setting and holding, and starting with working it from right to left. Sometimes differences are subtle, especially in designing using single-pixel units. The new repeat proved to also work for rows of shapes in the reverse direction after horizontal mirroring and restarting the pattern or design row 1. When working from right to left, the initial preselection row is from left to right, while when working from left to right, the first preselection row is from right to left. After a full row of repeats is completed, the pattern is rolled back to row 1 and mirrored. Punchcard knitters could turn the card over and start again on the proper row. I used contrast color knit rows initially in between rows of shapes to help me note transitions more clearly. The “leaf” is not pointy enough for me, but at times what was not planned may lead to a pleasing result of a different sort.
The amended, corrected repeat is shown on the right 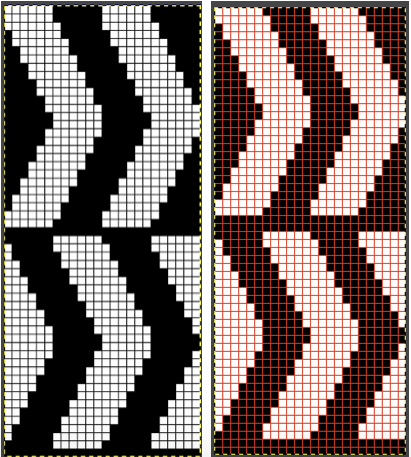
 To knit: cast on with a multiple of 12 stitches on each side of the center 24 on the needle bed
Cancel end needle selection
COL: first preselection row from left to right
COR: set machine for both slip <– –> and hold
all needles will have been preselected, knitting every stitch, knit 2 rows, return to the right, as the row is knit, patterned preselection occurs
COR: bring all needles to the left of the first 12 on the right into hold position, knit until all needles in the group of 12 are preselected again, the carriage will be on the right
*COR: bring a group of 6 needles to the left of the 12 stitch group just completed into work, knit one row to left
COL: bring 6 stitches from the completed shape on the right to hold, continue in the pattern on the new 12 stitch group until all 12 stitches are once again preselected, stopping with COR***
repeat * to *** end working the full last group of 12 stitches on the left, including the last 12 stitch preselection
At the completion of a row of shapes COL: make a decision about the transition, whether any extra rows knit are a problem or not, and whether added rows in contrasting colors are wanted. To proceed with no changes in cam settings and 4 rows of knitting between the rows of shapes remembering that the first preselection row needs to be made from right to left.
COL: manually return all needles to upper work position (D). They will knit row 1 of the stripe
COR: manually push all needles to D again, return program to design row one, check settings, as the first design row pattern is preselected an all knit row 2 will be added. As patterning resumes from the left another 2 all knit rows will be produced before selective patterning occurs.
If any extra all knit rows are wanted cancel patterning on the knit carriage, set it to N, knit the extra rows, remember to end on the proper side for the first preselection row, and what options may be necessary to complete that row correctly.
To reverse patterns without extra knit rows:
COL: store yarn. The carriage can be removed and brought to the opposite side, or stitches need to be manually be placed in the B position for a free pass to the right. This involves placing the cam selector button on N, returning the cams set to slip in both directions.
COR, all needles also need to be in work in B position, no yarn, in order to make a free pass to preselect from right to left, ending COL
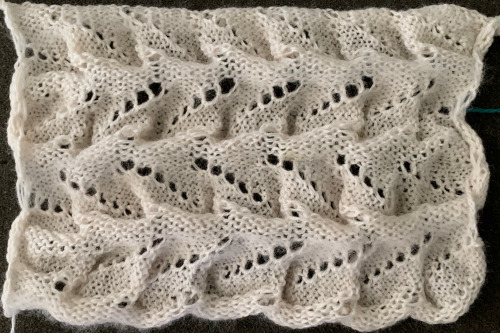
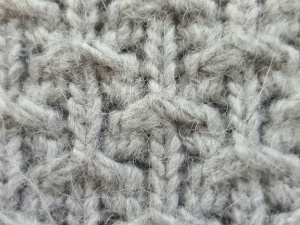
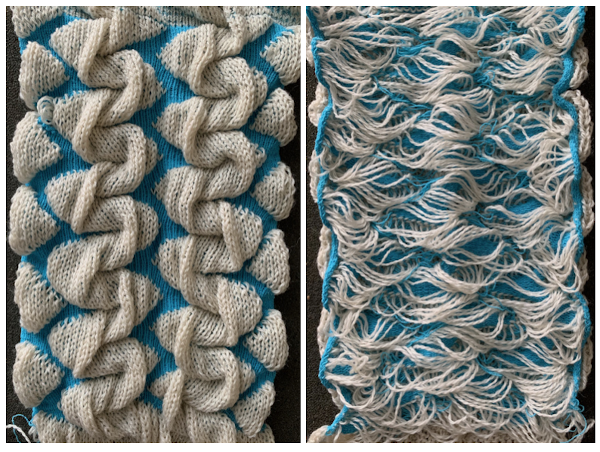
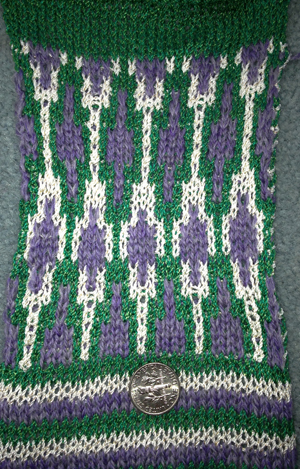
COL: pick up yarn and continue in pattern. These textures require a lot of carriage passes, which tend to fuzz up the yarn on the purl side of the knit a bit. The shape I created was not very leafy to my mind, but still interesting, especially on the purl side. The yarn used in a 2/15 wool, knit on Tension 5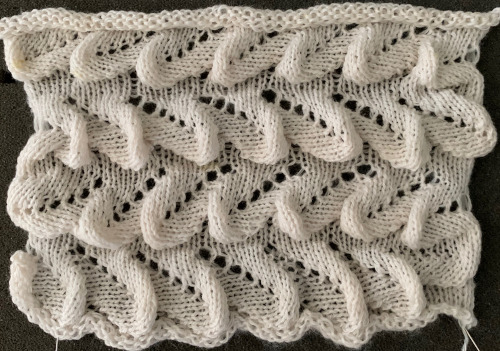
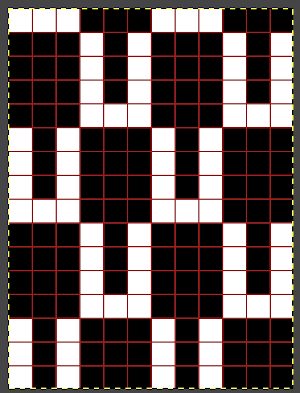
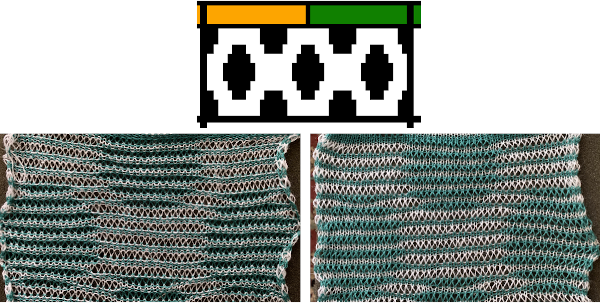
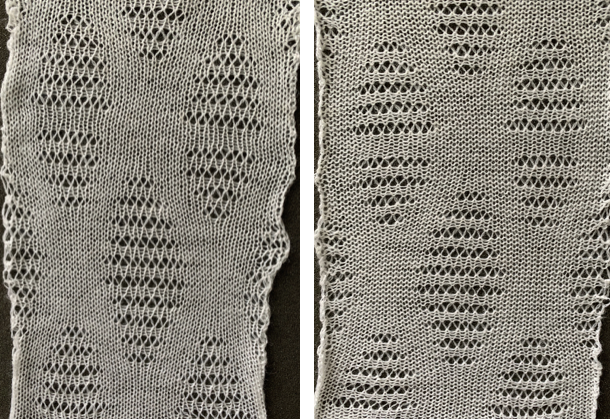
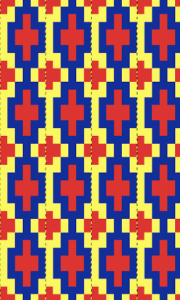
 Moving on to a wider version, using 24 stitches in width to allow for using the pattern on a punchcard: this repeats works both as-is and mirrored, the groups of stitches moved in and out of work is now half of the new design repeat = 12.
 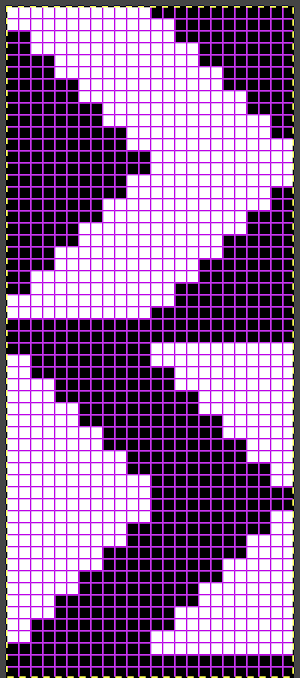 Making the repeat work in any number for this shape involves lining up the needle selection in each group of needles and constant counts for holding sequences. Punchard knitters would need 2 separate cards.
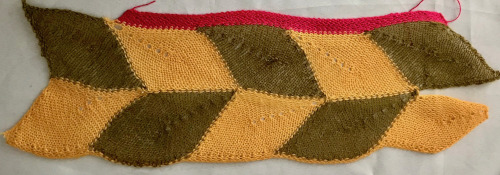
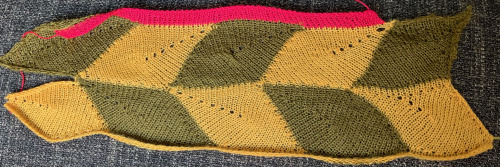
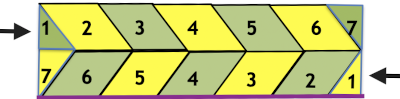
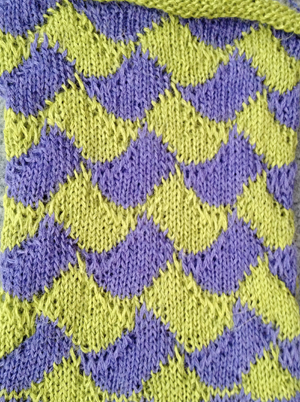
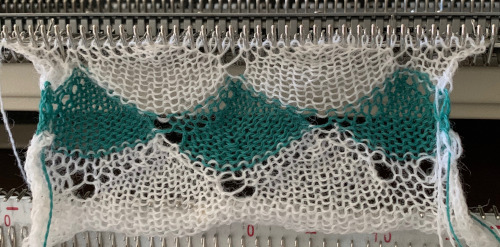
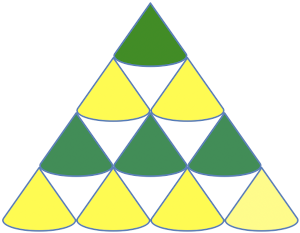
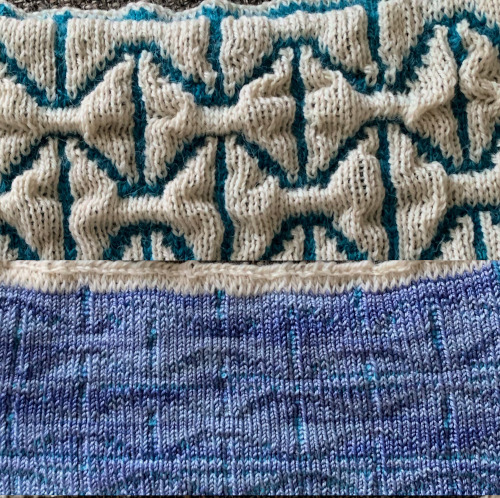
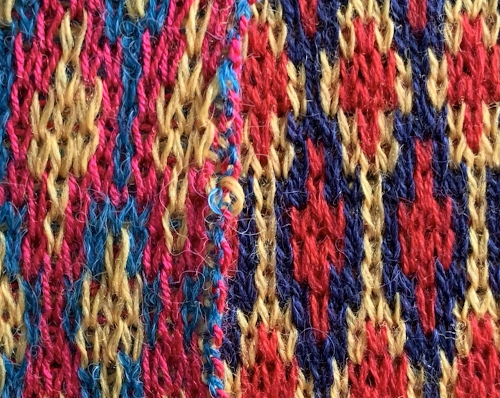
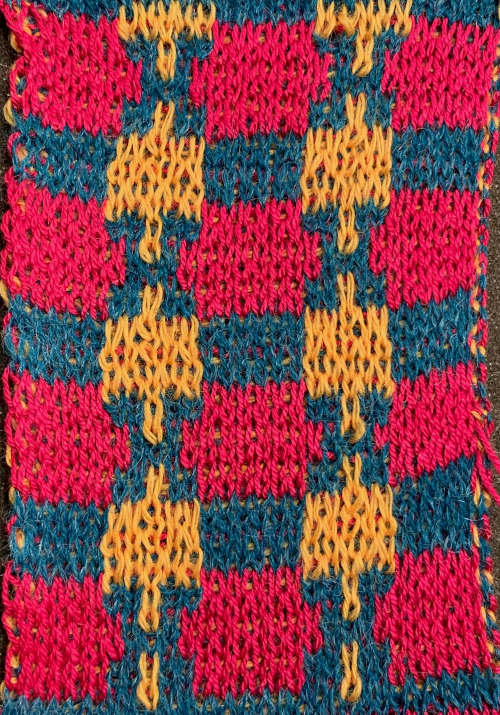
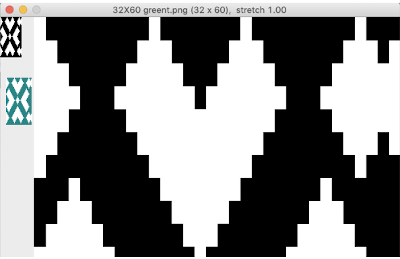
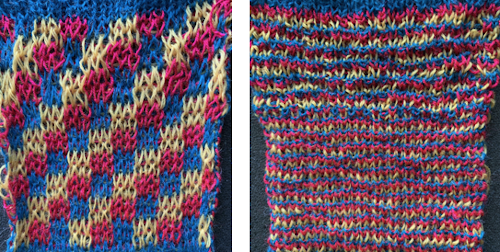
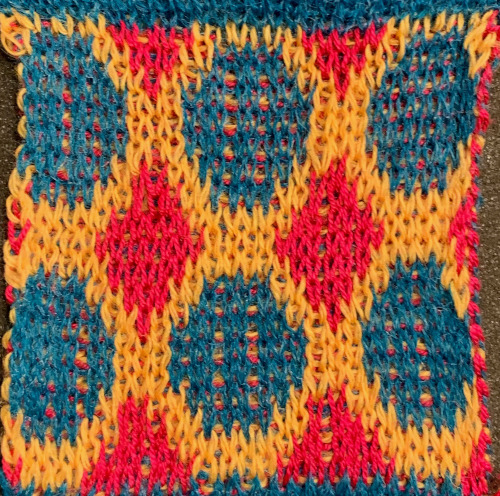
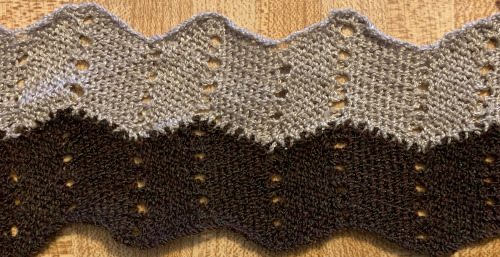
 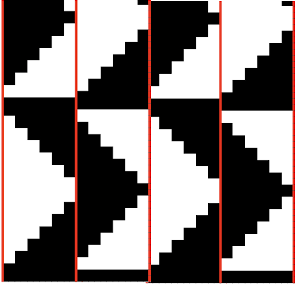 The lovely mess in the swatch happened when I stopped paying attention to everything but what was happening on the needle bed and missed the tangle of yarns in my yarn mast. There is enough knitting, however, to note that the repeat is sound and that the edges on both sides are formed by the narrowest part of the shapes in each direction. One way to solve that is by casting on and binding off along tops and bottoms of shapes as seen in the yellow and green swatch at the top of the post.
 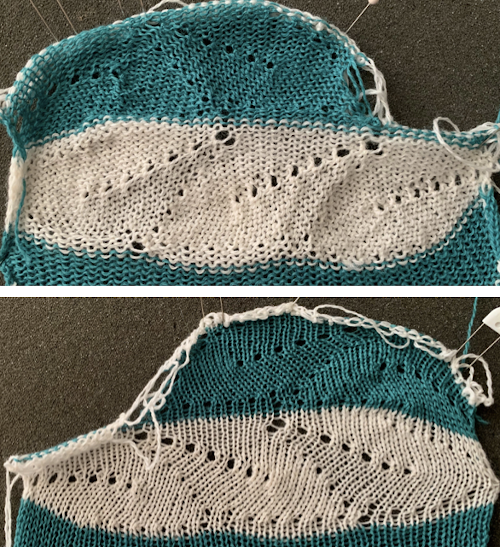 Planning things out to release those edges as seen at the top of the post
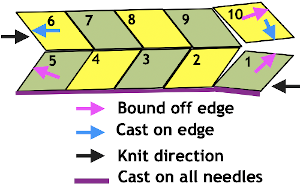
Working on outlining the shapes with contrast color: 
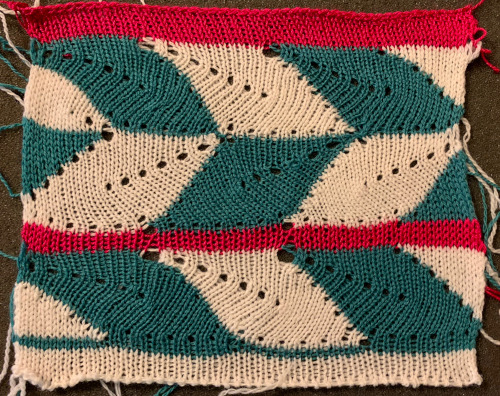
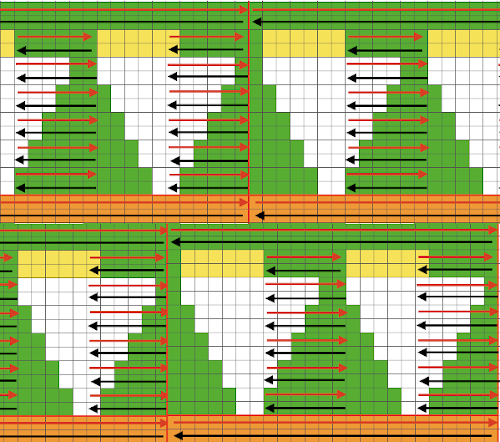
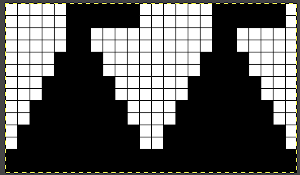
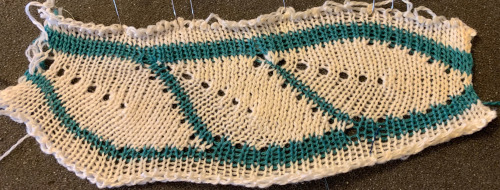 Problems to solve: maintaining an even number of rows in-between shapes and a straight edge along both sides. The latter could happen with triangles prior to knitting full shapes at either or both ends, the first sample failed on the left side due to both triangles being knit in the same sequence;
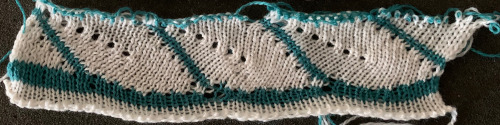 that may be solved by beginning shaping on 2 stitches on the left rather than the full 12, mirrored. The proper sequence for actual knit stitches for the first, bottom set, and mirrored for the second, top set
 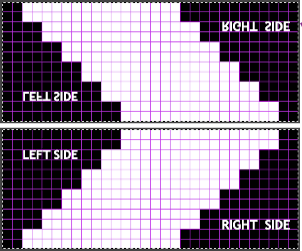 still only partway there
 I am presently knitting with my left hand in a splint that has exposed velcro teeth, which has caused some interesting issues with actual knitting and with yarn snags. To end this latest effort, in yet another knitting aaargh! moment, it appears my iron is now overheating and burned the wool! From observing the above swatch on the purl side it looks as though each row of shapes needs to have a triangular shape at each end. Also, the contrasting color line thickness is not constant. The purpose of automation should be to make things easier, not confounding. After yet another trial, I decided to give up on attempting to use the automated repeat to produce an effect that was consistent and made me happy.
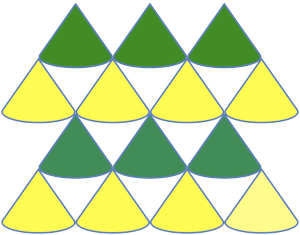
Setup for a leaf in each color is far less fiddly and simpler to execute. A tentative layout and knitting sequence:
 Begin on waste yarn, decide on the color of the cast on, and any additional knit rows prior to beginning in the pattern. Each of the side triangles is shaped using manual holding techniques over 12 stitches. If starting on the right, the first preselection row needs to be made moving from left to right as above on the first 24 stitches. With knit carriage set to both slip in both directions and holding with COL make certain the first 24 stitches on the right in B position make a free pass to the right.
COR: cut yarn, change color, knit the first shape repeat, end COR
COR: when all needles in the group are preselected, push the first 12 needles on the carriage side out to holding position, push 12 stitches on their left back into upper work position as you would in any holding pattern, they will knit in the slip setting as well. Cut the yarn, change color, repeat across the row of shapes
COR: when the last group of 12 needles on the left is preselected with all needles out to hold or removing the carriage and positioning it on the other side, begin knitting COL.
COL: manually knit triangle at top of the previous row of shapes
If a contrasting color stripe or any other pattern is intended between a full row of shapes, execute them and end COL
COL: shape the second triangle for the start of the reversed row of shapes, get the carriage to the right side by a pass over all needles in holding position or removing the carriage and bringing it to the opposite side
COR: the second pattern is programmed. Punchcard knitters use the second card, electronics mirror the shape. With the first 24 stitches on the left in B position and the knit carriage set for holding and to slip in both directions, make a preselection pass to left.
COL: change color, knit shape, and continue on as described above reversing shaping
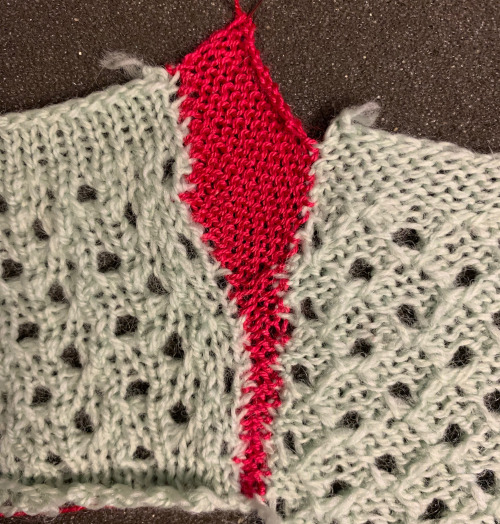
As with intarsia, there will be lots of yarn ends to weave in and clean up those eyelets at the start of each color change. The swatch after a quick pressing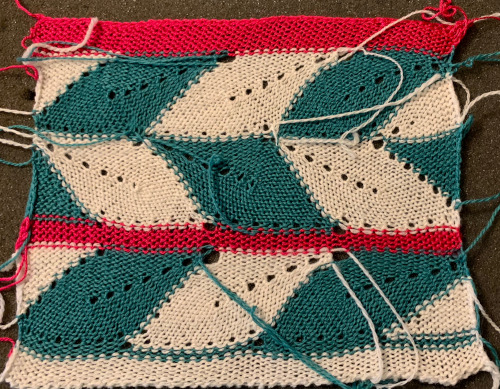
The possibilities could be endless. Electronic machines do not have the limitation of working within the 24 stitches maximum design width. Shapes can be fully automated using only slip stitch setting, no holding, but repeats become exponentially wide and long. The technique merits its own post.
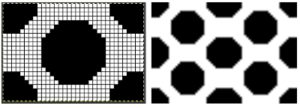
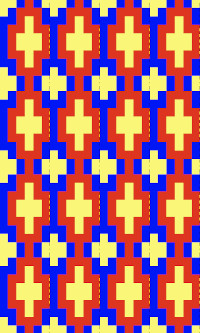
 Observations: there are elongated loops on the knit side of the fabric, likely created with slipped stitches. There appear to be eyelets on the purl side. The total number of stitches remains constant throughout the knit. The row repeat spacing is fairly close, so at least to start with I tried single repeats to achieve the look, was not pleased with any of the initial results. That led me to an online search for what would visually appear to have similar qualities in handknit samples. Knittingfool.com is an extensive resource and, to my eye, this slip stitch pattern,
 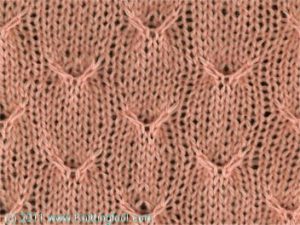 as do “oats” found in a 1984 handknitting publication
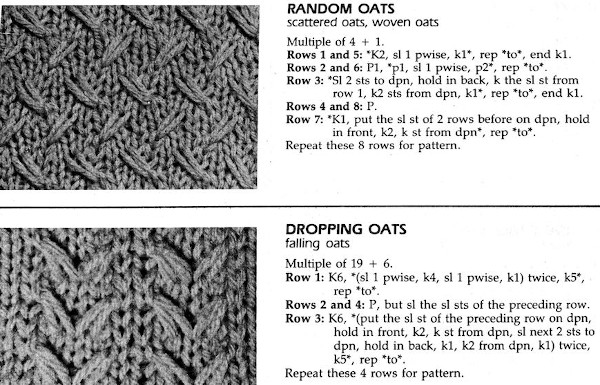
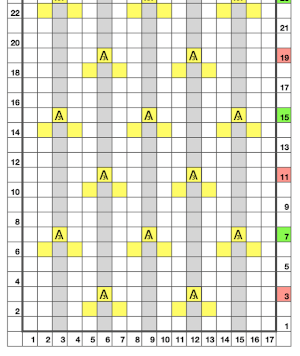 and then transitioned to translating any repeats for use in machine knitting, keeping in mind that in hand knitting actions are made as the row is being knit, while in machine knitting they take place prior to returning the carriage to the opposite side thus knitting that row. This was my first repeat after replacing cells with squares representing knit stitches with black and white planned pixels for electronic download.
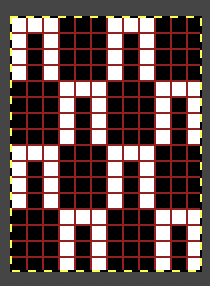 The slip stitch setting is used in both directions throughout. White squares represent areas where needles on the bed are skipped/slipped, not being selected forward and thus knit. This happens for 3 rows, resulting in the required elongated stitches. On the 4th pattern row, the group of 3 not selected needles is where the stitch transfers and crossings occur. Any cabling, eyelet fill-in, etc, needs to be performed prior to knitting that row and moving the carriage to the opposite side. The work is always done with purl side facing, so matching the direction of patterning to a hand-knit may also require mirroring of crossings, depending on your knitting machine model. The goal is to have the K3tog with the long loops in front of the single knit stitch in the center position.
 Move the stored original center stitch back onto that center position, there will now be 3 stitch loops held on the single needle
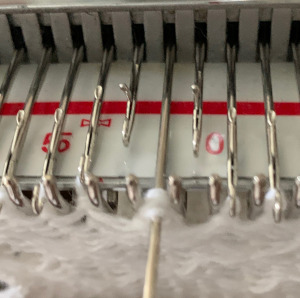

 repeat the process across the bed, bring all the needles used out to hold position prior to knitting the next row
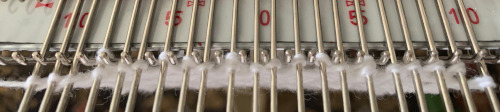
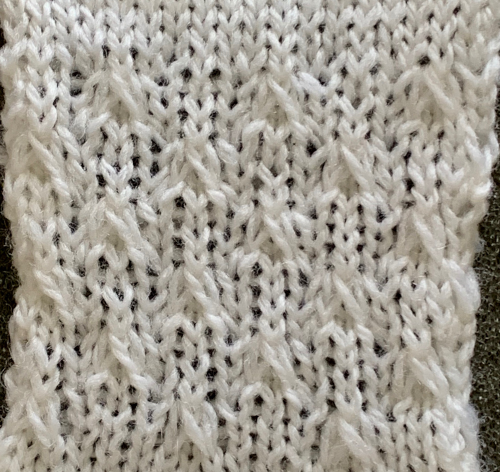
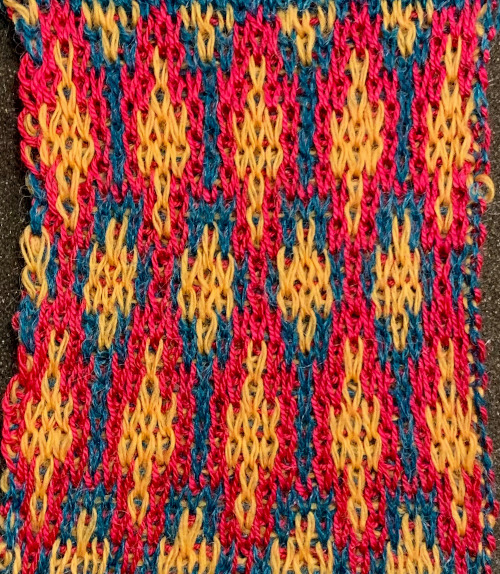
 The yarn used was 3/8 wool at loosest tension possible, the result is subtle as any spaces between stitches get pretty well filled in. Moving on to denser patterning
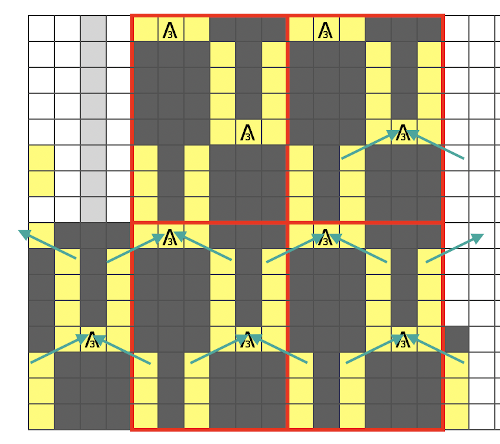
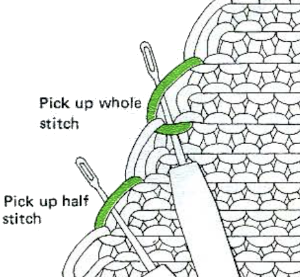
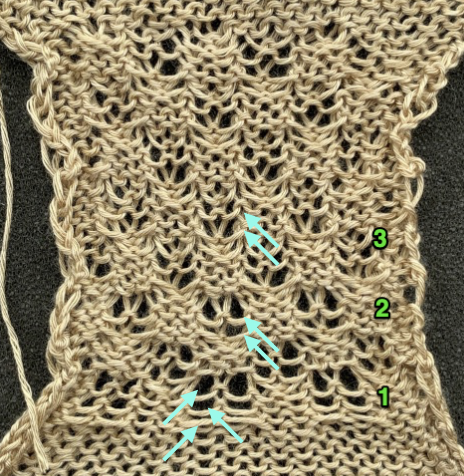
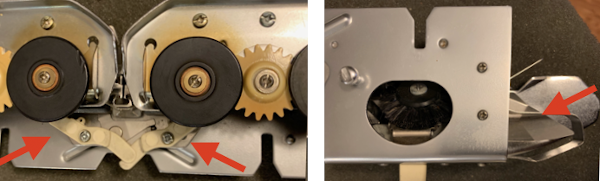
 The elongated stitch crossings now happen every 4 rows, but across two needles, not one. I used a tightly twisted rayon for the test swatch thinking they might be more visible, but the openness in the stitch formation because of the fixed spacing on the metal bed confuses the texture a bit. Simply leaving the empty needle out of work and continuing to knit (1) created too large an eyelet to my taste. Trying to pick up the third slipped loop (2) had the same effect. The best result was obtained by picking up from the row below on each side of the three stitches that are removed and then returned to the needle bed (3).
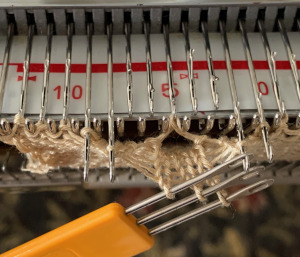 e wrapping the third row of floats can be tested by inserting a single eye tool front to back, twisting either counter or clockwise and rehanging on an empty needle, thus casting on an “extra” stitch
 the appearance on the knit side
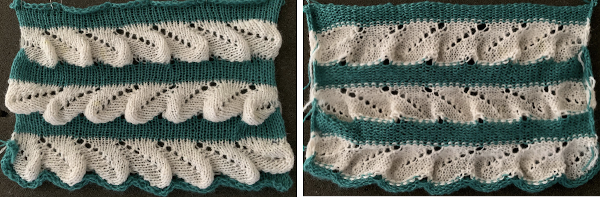
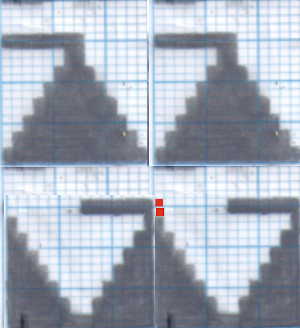
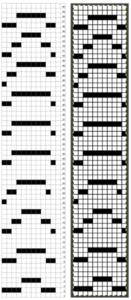
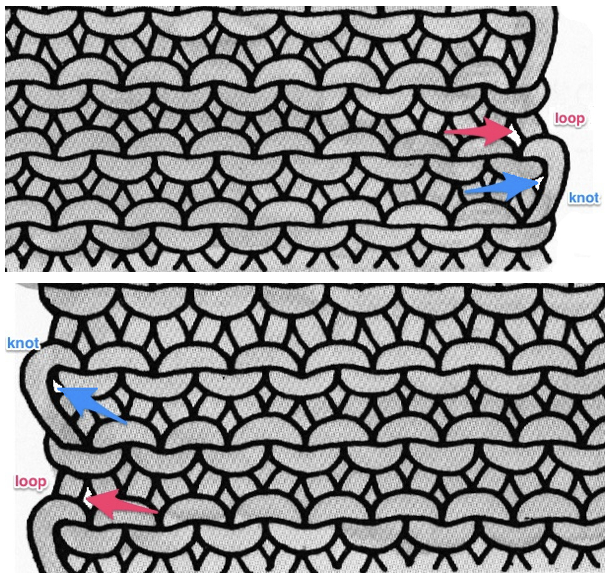
 Charting the actions for a hand-knit version: the top images illustrate the moves on the purl side while on the machine, below it those on the knit side when hand knitting the pattern
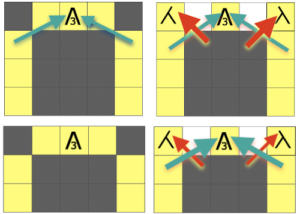 Plotting out borders and repeats for a small test including make-1 increases in order to keep the total stitch count constant. I do little hand knitting nowadays, so when doing so I add as much information as possible including some stitch counts until the pattern is established and I can visually follow it more easily.
 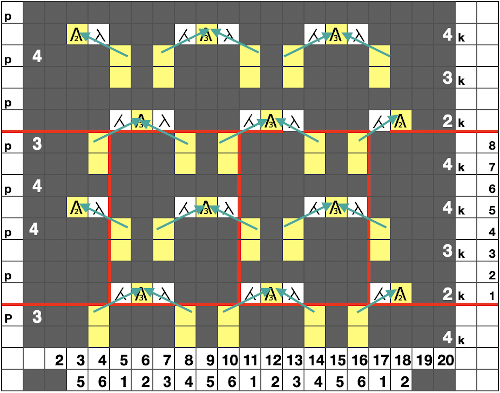 The resulting test swatch
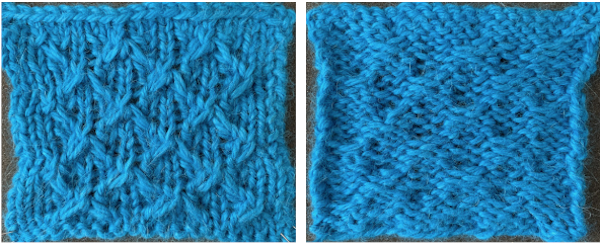
 This is an illustration of the method I used to “make one”, in my swatch I kept the direction constant
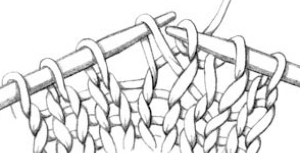
 The 910 in my default setting produced the “image’ as drawn on the knit side of the resulting fabric. The post was written prior to my tiling the repeats as a matter of routine to check their alignments. Doing so would have shown a couple of missing pixels, and pointed to any other errors in filling in mylar squares.
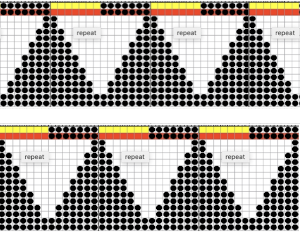
 All transfers were made in the same direction.
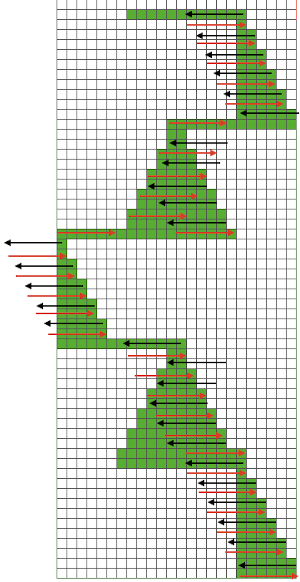 As always, ideas need error-proofing and refining, easier done in a chart if possible prior to any actual knitting.
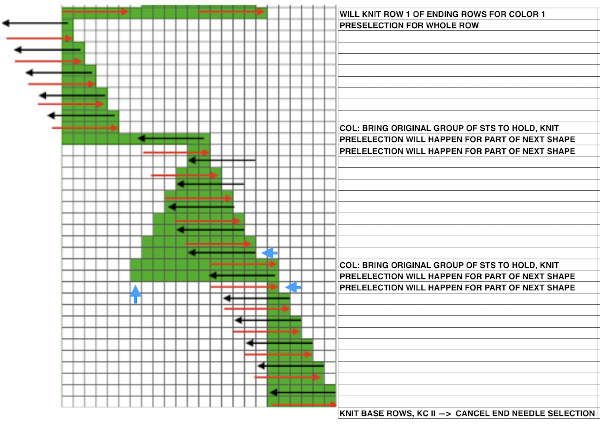 There are several changes to make if it is necessary to get the pattern to reverse direction in alternate rows of completed shapes in a brick layout.
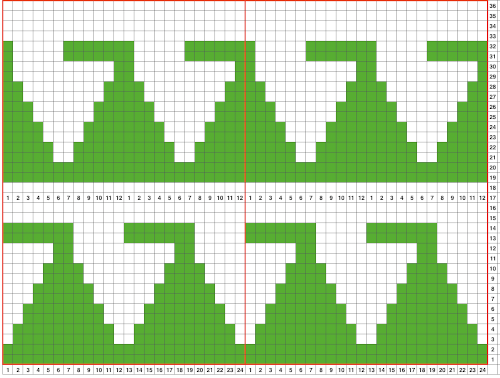 Attempts to visualize holding can happen in spreadsheets, documents, image processing canvases, or even simply on graph paper, moving/ “drawing” back and forth across the cells mimicking carriage movements and marking them accordingly.
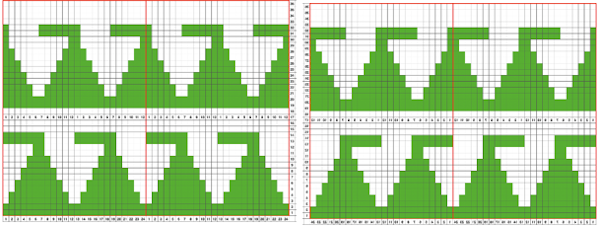 The 930 automatically mirrors downloaded motifs, if direction matters, as in these samples, either mirror the design horizontally prior to saving the PNG for download to the machine, or use the mirror button selection on the operation panel after the download.
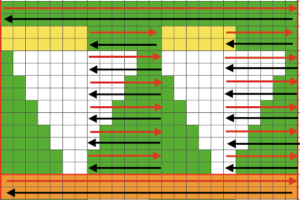
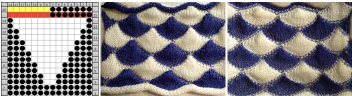
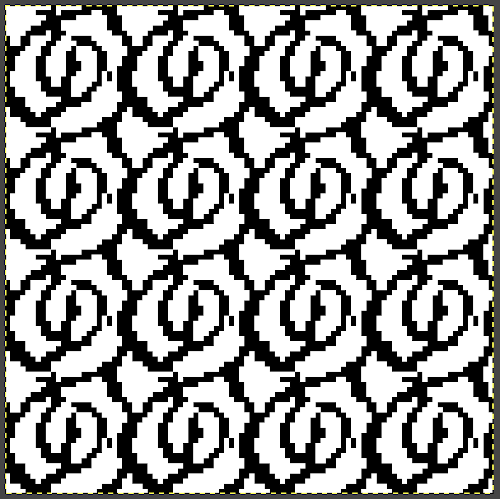
 while here the repeat for all full-size shells is planned,
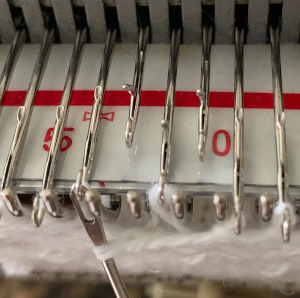
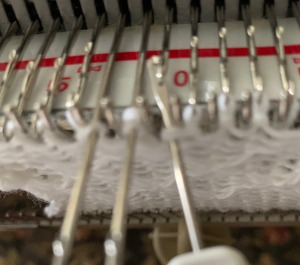
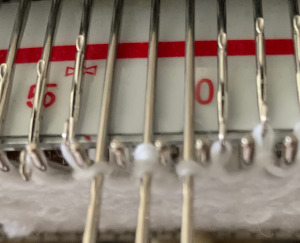
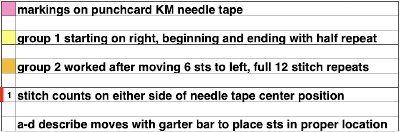
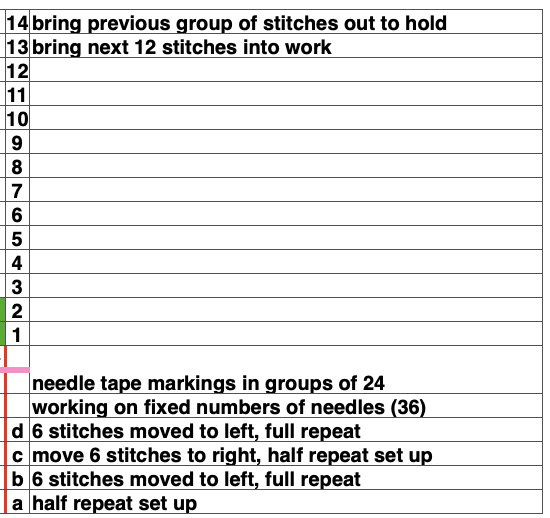
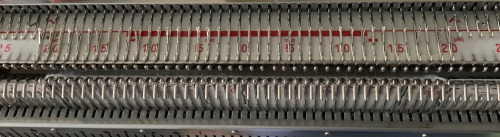
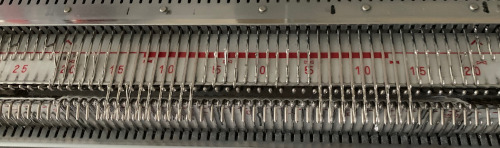
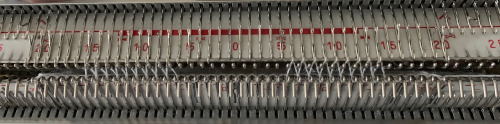
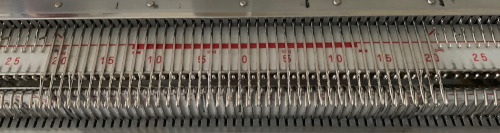
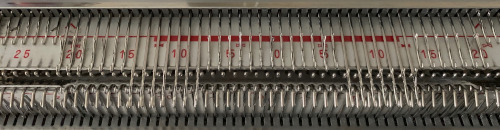
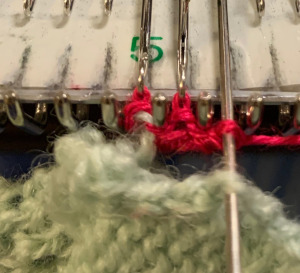
 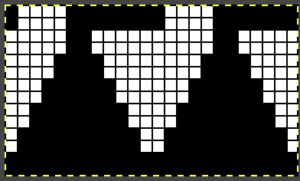 Marking up the needle bed with water-soluble markers or pencils helps track placements of repeats across the desired number of needles in work: dark lines indicate placement beginning with the mark for half a repeat to maintain straight side edges on the finished piece. Red lines mark the placement of the stitches when they are moved to the left to knit the full shells across the bed.
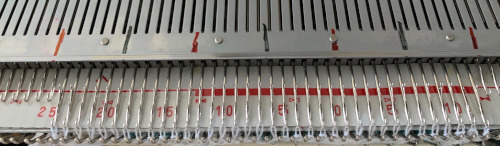
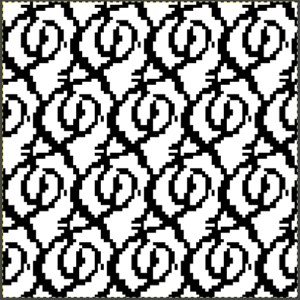
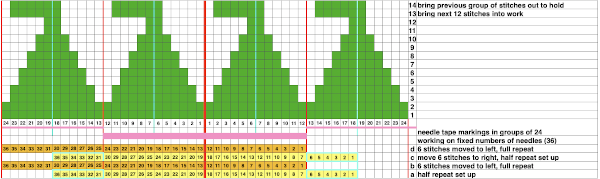 Scaling the image to render it a bit more legible:
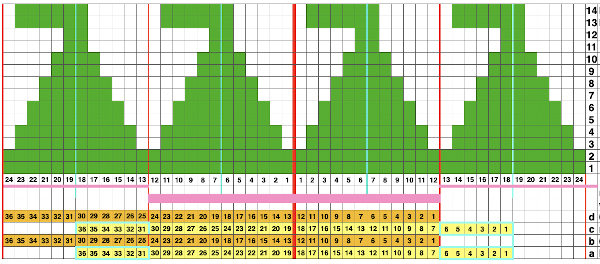
 The machine will be set for slip stitch in both directions and holding. End needle selection is canceled.
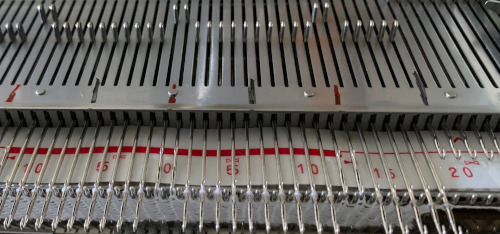

 I used two repeats side by side to eliminate having to consider and choose the position option on the 930 needle bed, resulting in having the pattern centered in each 24-stitch fixed segment of needle selection.
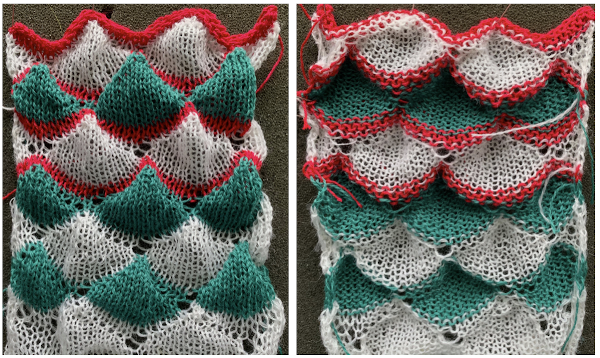 I was too aggressive with clipping yarn ends on the left side, especially while changing colors, not ever a good idea. Automating the pattern fully on electronic models using only slip-stitch patterning is possible. The length of such patterns grows exponentially in proportion to the size of the repeats. Reviewing errors in the beginning concept
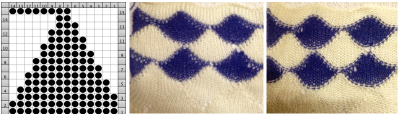
 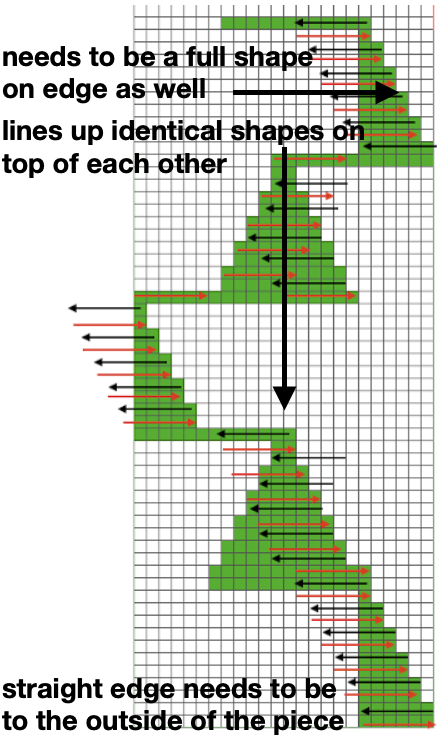 An attempt to visualize the placement of the shape variations in the finished piece using the shell motifs beginning with the shapes created in order to create a straight side edge
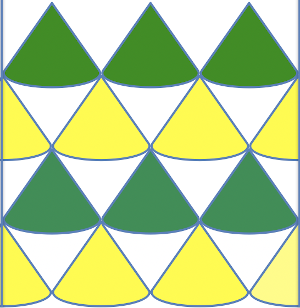
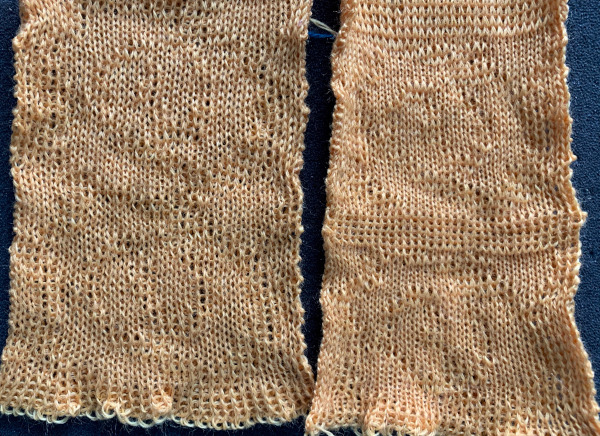
 COR: knit a base row in color one from right to left
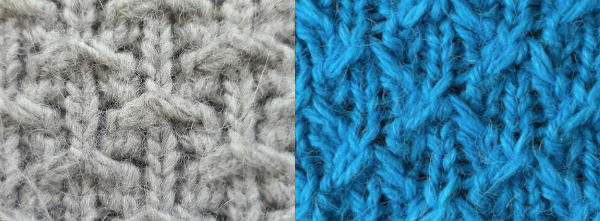
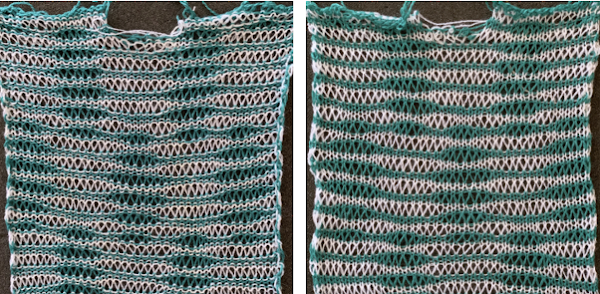
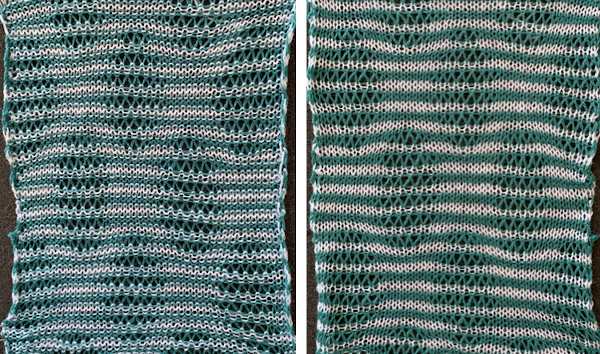
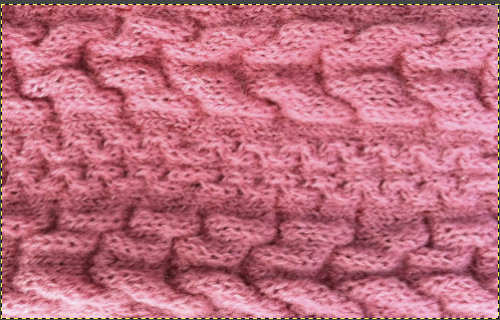
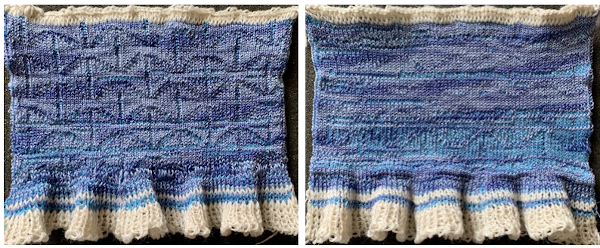
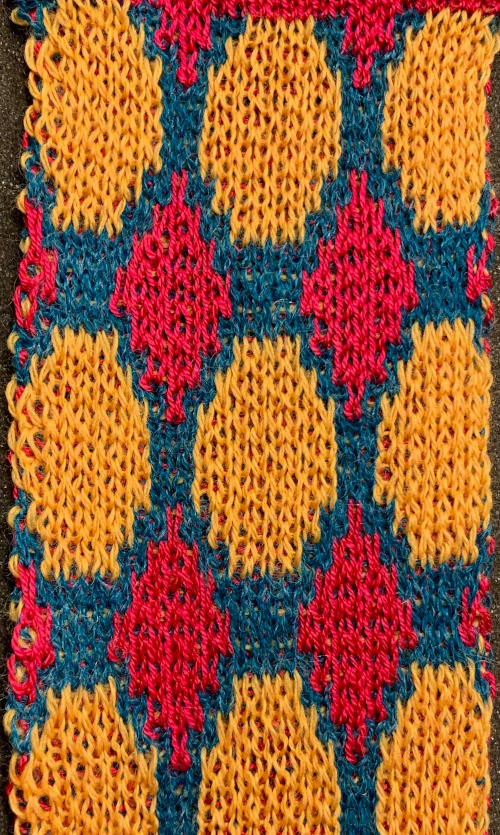
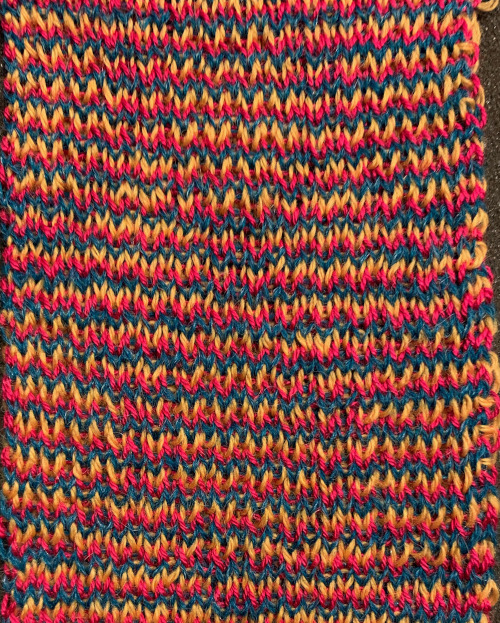
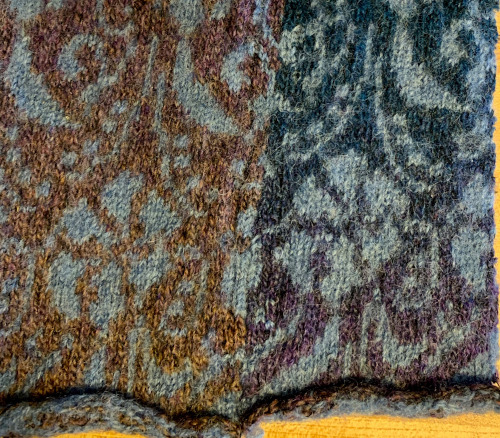
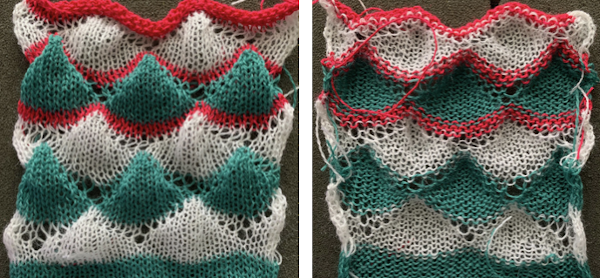 Preserving the 3D texture relies on using yarns with “memory”, ie wool and avoiding aggressive blocking. Using thinner yarns makes the stitch formation more evident. Hard pressing, in this case, knit using acrylic yarns, flattens the fabric considerably, and often, permanently. Both the hold/slip (top) and fully automated swatches (bottom) are shown.
 2023: a screen grab from the shell charts was cropped to its outline, opened in ArahPaint, and using the program’s tool “
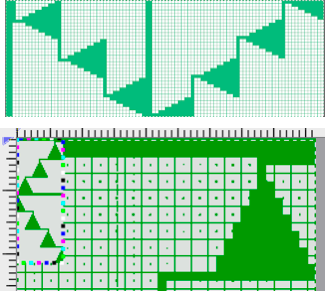

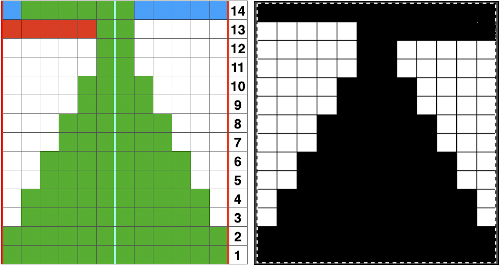
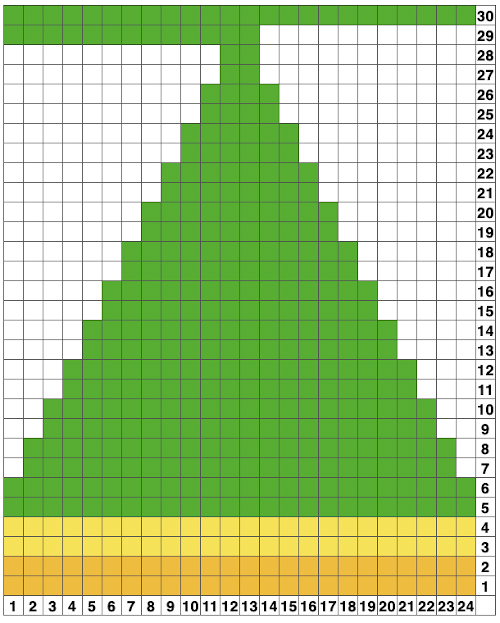 A return to the original 14 stitch repeat, illustrating a way to begin editing for an extra row in width at the bottom of the shape and ending on 2 stitches rather than a single stitch at the top
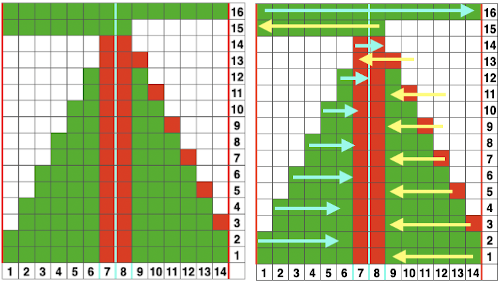
 A Prada sweater using similar shapes
 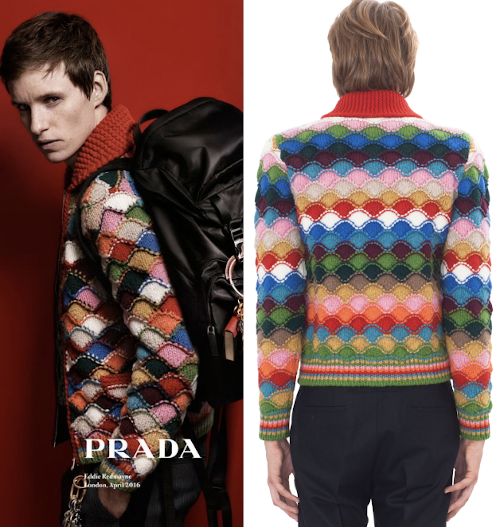 If you are interested in any large size clamshells, and intarsia appeals to you whether in hand or machine knitting,
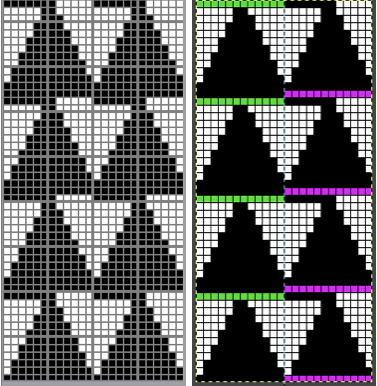
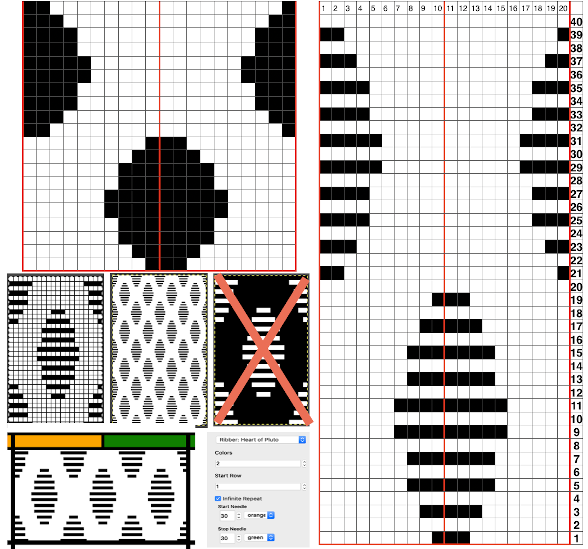
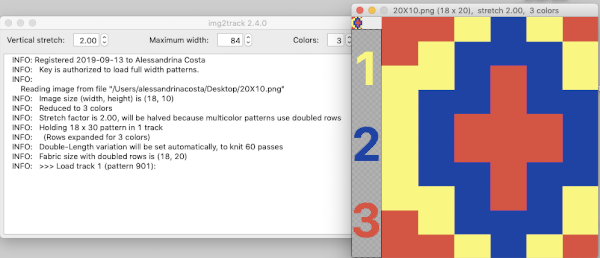
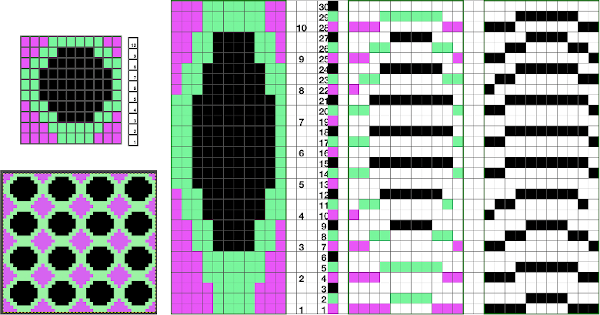
 Increments in height need to happen at sequences of 2 rows each, so the design was then doubled in height, resulting in a scaled image now 33 stitches by 46 rows in height, with a planned horizontal repeat X2 = 66. Note: the sidebar offers start and end needles are given for pattern placement on the needle bed. Sampling may occur on fewer stitches than that. Since the number of repeats programmed to add up to an even number and center alignment is chosen, the number of needles is even on each side of 0.
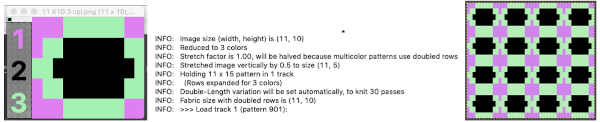
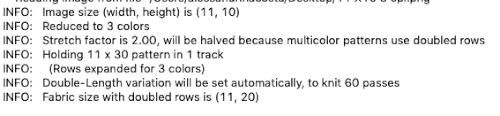
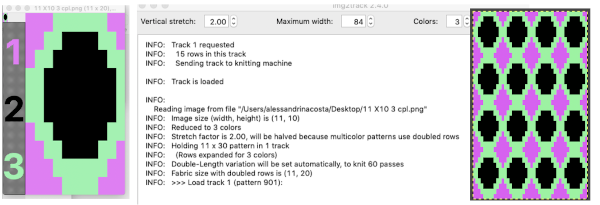
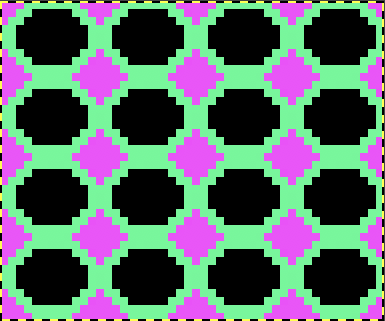
 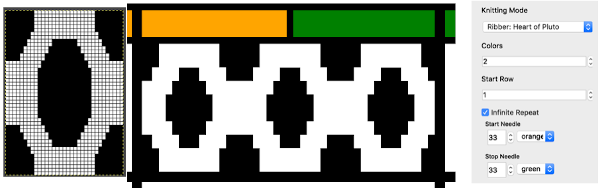 In my second series of swatches, I decided to try for a smaller “circular” shape, with the repeat now measuring 15 wide by 20 high, and a planned horizontal repeat X3 = 45. If centered, the software places the odd number of needles on the right-hand side of 0.
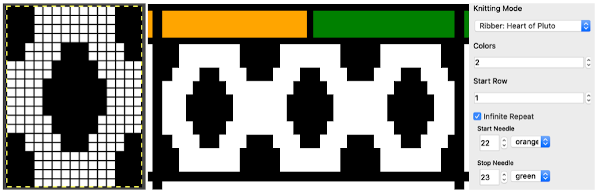
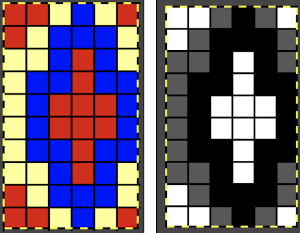
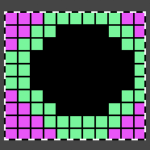
 The wider horizontal band of all knit stitches was due to operator error, happened when I pushed back preselection an extra time, resulting in the ribber only knitting extra rows. For the sake of added clarity, I have added color to the chart below, assigning yellow and grey to all-white design areas in the pattern. The black squares are what I choose to drop. For illustration purposes, this is only a segment of the repeat.
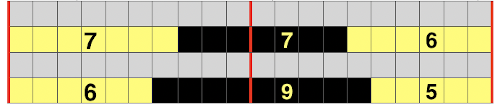

 drop the loops, return needles to B position. At this point, since all needles are in B a modified stitch ditcher may be used for 2 passes, dropping the loops on the first pass and returning the whole series back to B on the second.
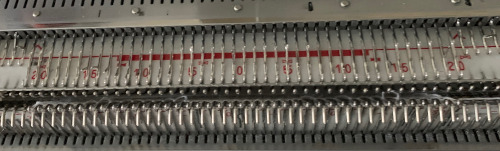
 COL: push all preselected needles back to B, as you knit back to the right the next group of white squares (yellow) in the next design row will be preselected
 COL: knit to the right in order to form loops on the main bed, continue for the desired number of repeats and end as suggested for the two-color version.
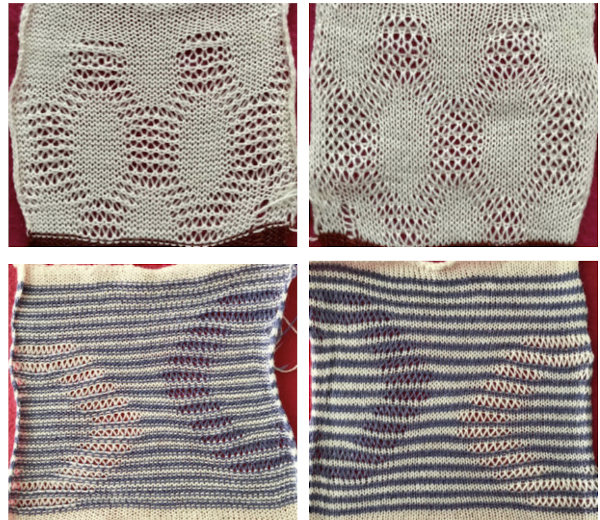

 and its accompanying punchcard repeat:
 UKI is no longer available. I recently acquired some
 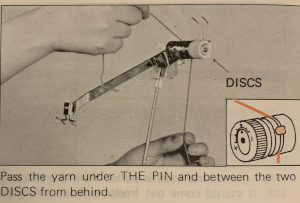 Here the white yarn shows position beneath the pin
 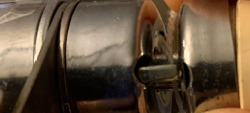 and scotch tape in place to adjust the amount of pressure exerted on the elastic.
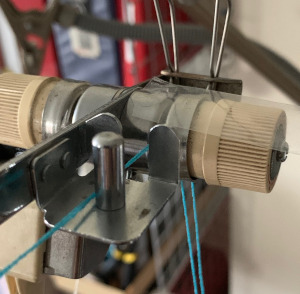
 Thread lace produces a single set of floats (in this case the elastic), the white border is not visible in the repeat below, it is the same as the above fabric, with colors reversed. I prefer the single float backing. In addition, for these fabrics the elastic is placed in the A feeder, the yarn in B
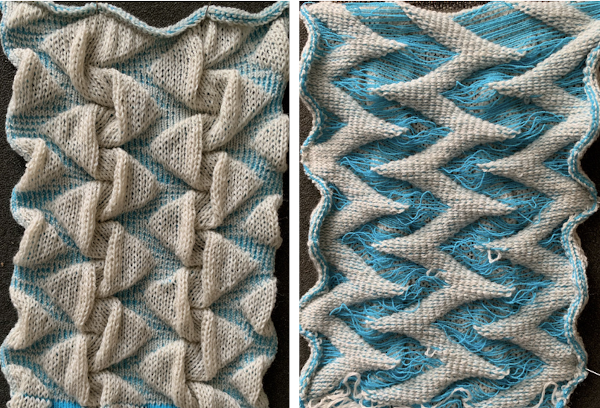
 A second thread lace variation:
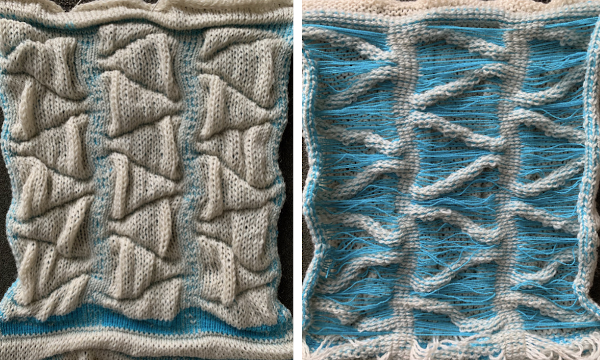 The multiple folds and creases, as opposed to smooth blister in all the above, are very interesting to me.
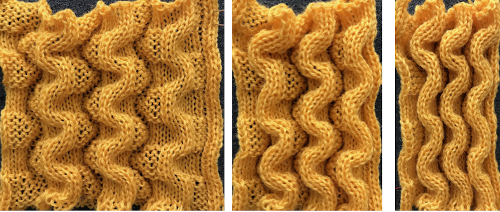
 The spots, where the elastic and yarn knit together, are compressed, so the results are quite different than what might be expected from studying the chart
 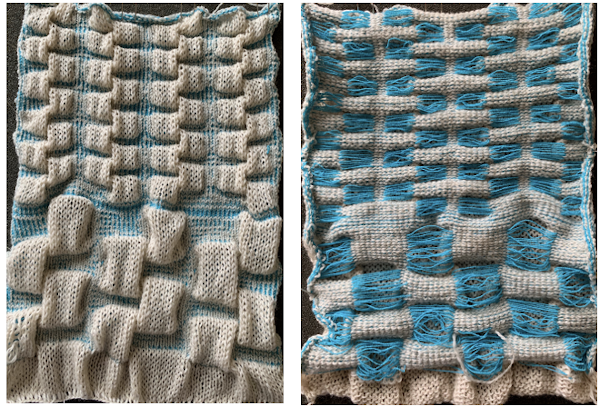 A quick, imperfect sample using a fine cotton and a single strand of the elastic, each with its own upper tension disk adjustments.
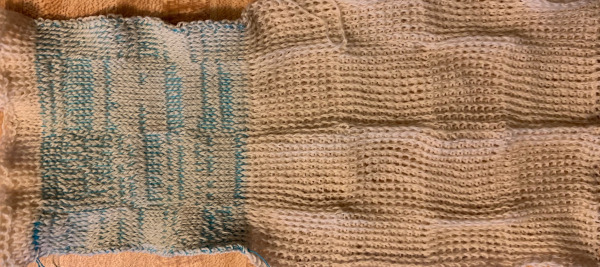
 Here the same pattern was executed on the same number of stitches with the white wool used above, but the elastic was plied with a 2/24 acrylic yarn and knit as DBJ with the blue, stretchy combination creating the
 I was curious to try a pattern previously tested in an all wool
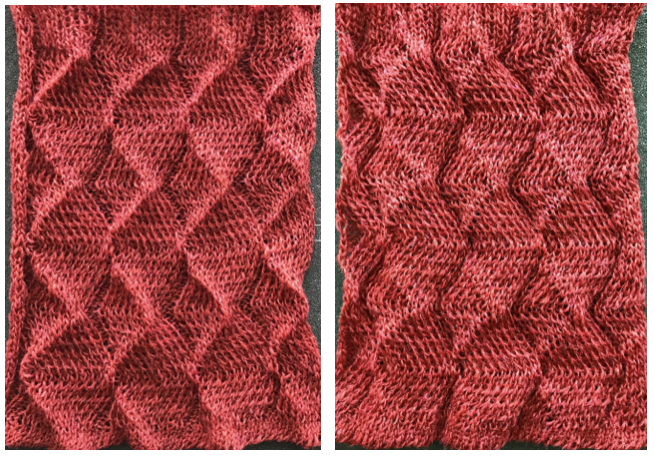


 Working with a similar arrangement I decided to try having patterning on the top bed, with the aim to tuck on the single needles in work in the repeat (bottom line of black squares). Not all ideas are an immediate success. Wanting to see the effect on the single-ply wool I began with that at the tension that appeared to be required for knitting it along with the elastic and stitches were far too loose.
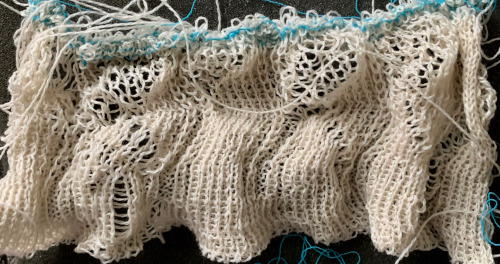 I had more success and a bit better definition of the fabric by knitting with both strands together from the bottom up. In an effort to attempt to have better color distribution I used the plating feeder and had some issues with stitches not knitting off properly. The result was not significantly different than that obtained by simply feeding both yarns together. When using plating feeders both on the single and the double beds one of the yarns may have a tendency to jump out, to prevent that from happening here is one “hack”.
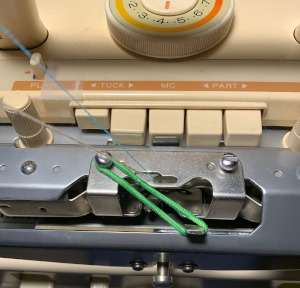

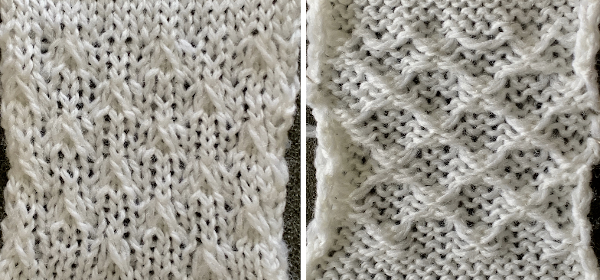
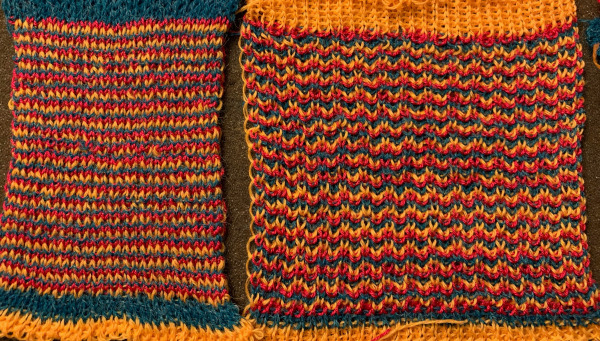
 The same yarn as above, also knit in tuck setting, showing the difference in size and dimension between slip setting on left, tuck on right
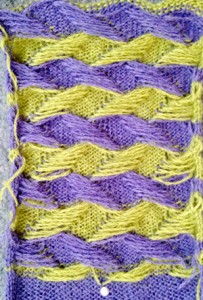
 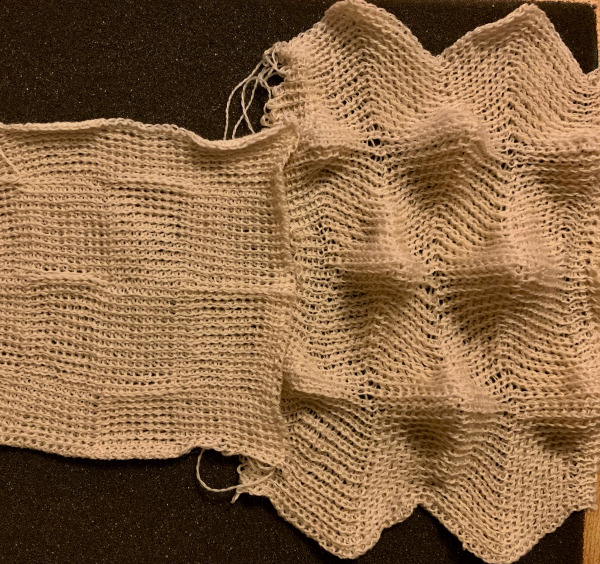 As with any knitting, keeping an eye on what your yarn is doing still matters. Such as this will lead to a series of circumstances that may bring your project to a far earlier end than planned ;-(
 A very last effort at attempting the scales with elastic and wool knit at a far looser tension that in previous tests, ended when elastic broke as a result of above, IMO an unremarkable fabric
 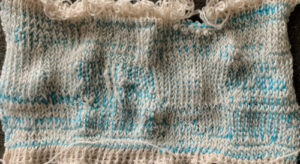 For more swatches and information see post on
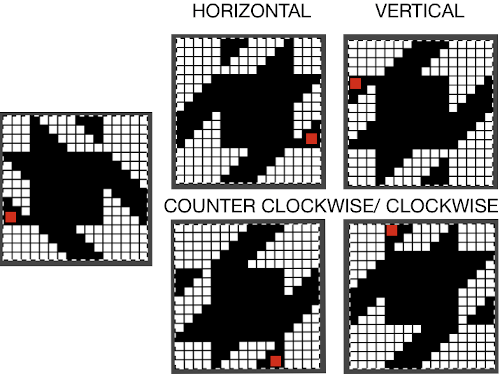

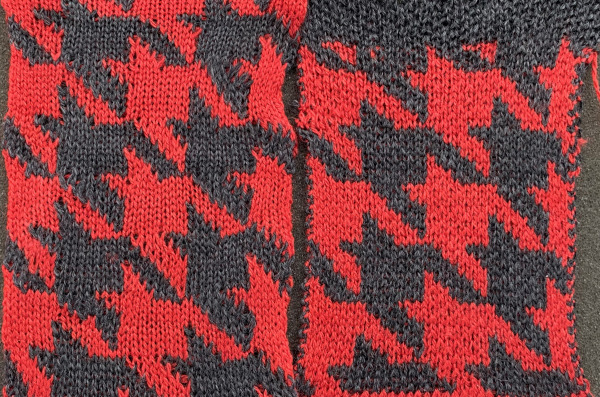
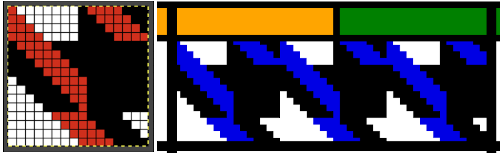
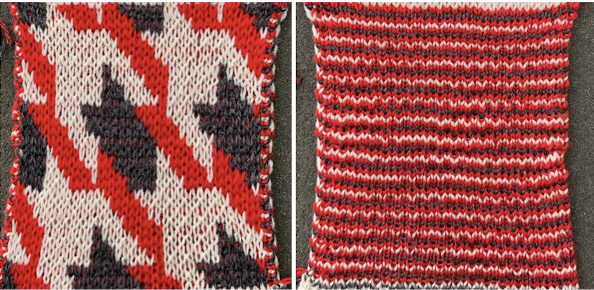
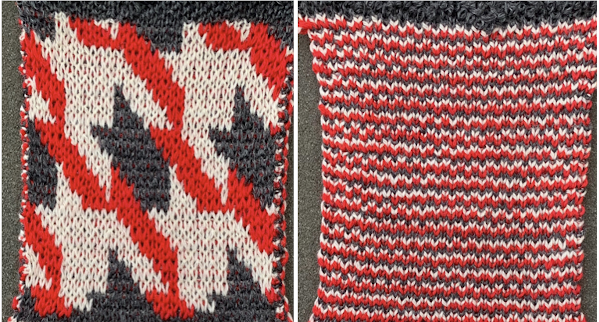
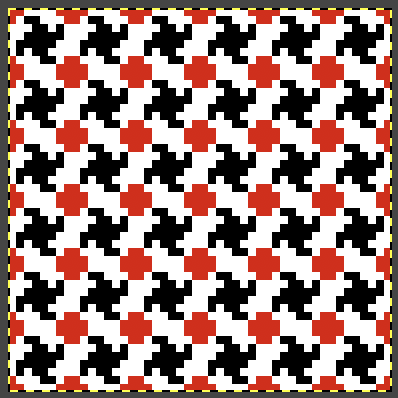
 The FI results are shown on the left, the first dbj test with lili buttons engaged and both carriages set to slip in both directions appear to the right. Note the difference in width and height of the resulting knit. The floats in FI are overlong, and there are some separation and lengthening of the stitches along the diagonal edges of the houndstooth shape
 The program does provide prompts as to which color should be picked up next, and clues as to where one is in the repeat, they are found at the bottom of the Ayab window. I happened to grab content with color B upcoming both times.
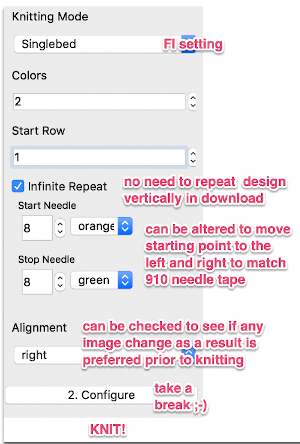
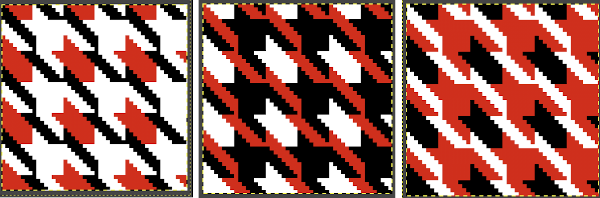
 When preparing images for download, they should be indexed to 3 colors
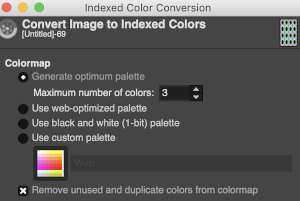
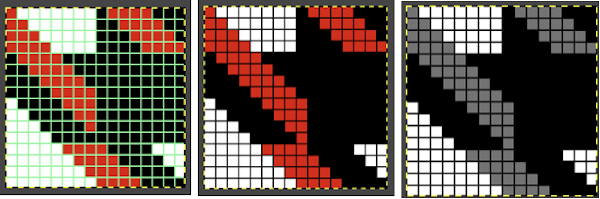
 It takes a while when knitting double bed knits before one can assess whether the results are correct in terms of patterning since the knit is hidden for some length as it drops between the beds. Because the Ayab prompts for color changes were altered sometimes when the carriage on the right, sometimes on the left, I dropped the first sample off after slightly more than one repeat, found its patterning to be correct, and that the prompts when on the color changer side for the following row to be knit from left to right were reliable, as shown in the knit swatches. In turn, I used an indexed greyscale image. The lettering on the right indicates where colors were placed following the give instructions, rather than where they were assigned in the original design. The manual states that the color sequence for the separation is: white, grey, black, gray, however, if the prompts for changing colors as given are followed, which is very valuable in tracking them, the knitting occurs in reverse order.
 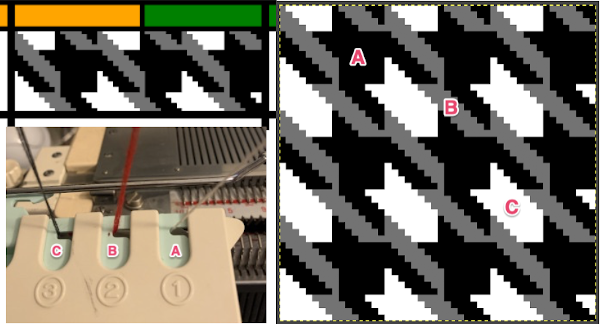 Knitting mode options for DBJ are listed below the single bed one,
 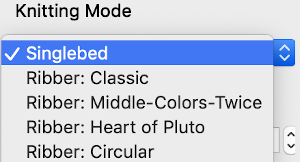 The main bed is set to slip in both directions, the ribber as well, with lili buttons engaged. The number of colors is not altered automatically by Ayab, the change needs to be made manually.
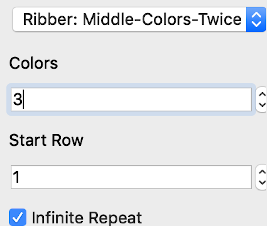
 This was the set up in the color changer
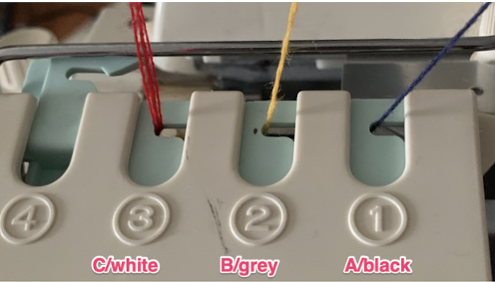


 Planned possible use of the middle color twice may be seen in this image


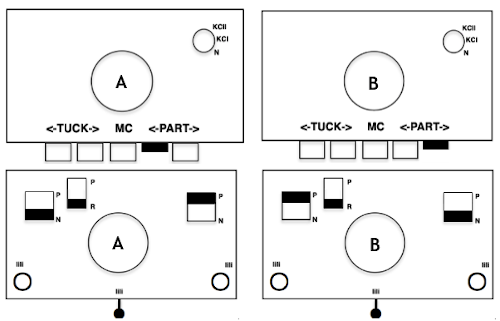
 The “striped” repeat produces essentially the same fabric. The knit carriage may be set to slip in both directions when using it since the row of all punched holes or black pixels will knit every stitch on every needle selected while in the previous samples the cam button set to knit in one direction performed that function regardless of any markings on the design repeat. The ribber is set to knit in one direction, slip in the other. Reversing sides for cam button settings produces the same fabric
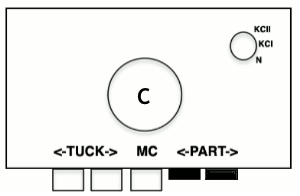

 The
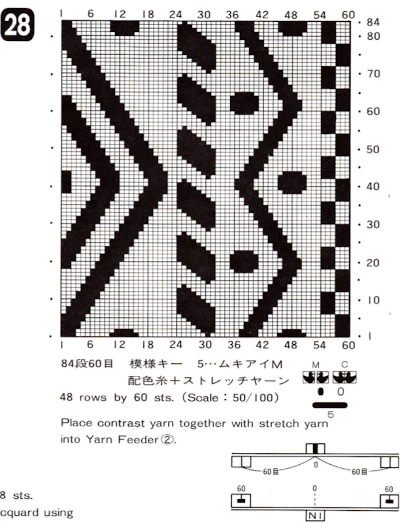
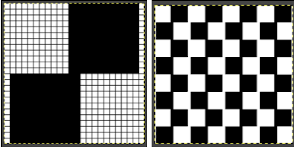
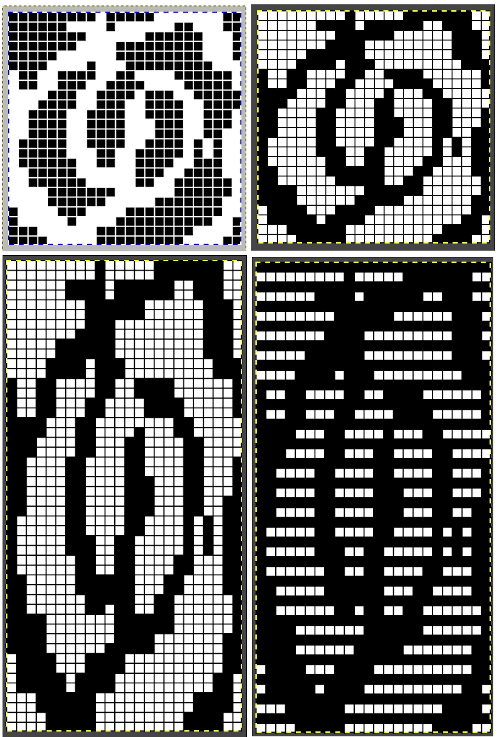
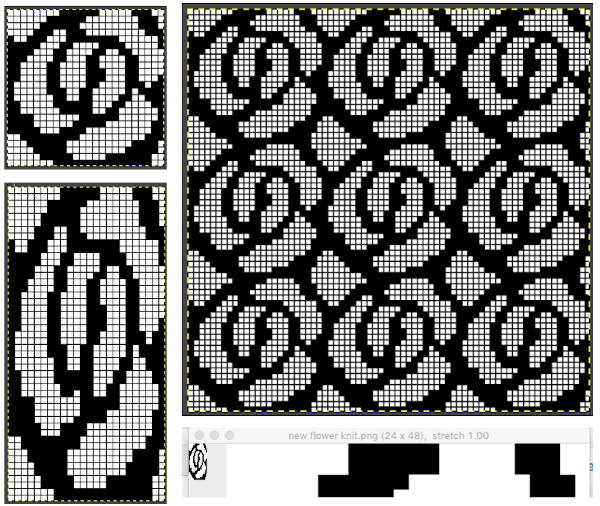
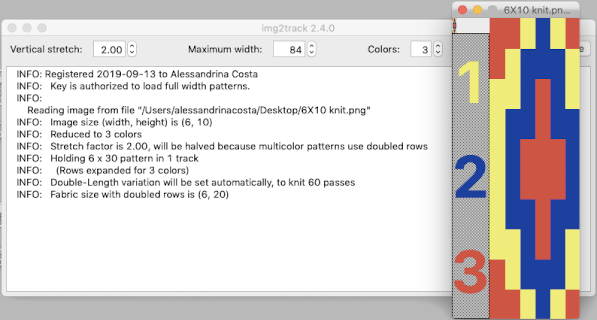
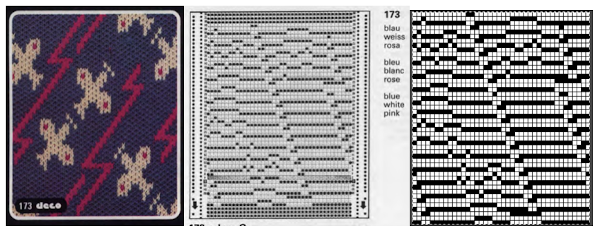
The  The repeat I chose is designated as suitable for the Garter Carriage. It is 24 stitches wide by 48 rows high, shown below as provided, charted in Gimp as .png for download, and tiled to help visualize how continuous repeats might line up. The image .png was downloaded with img2track to my 930, with a stretch factor of 1.0, retaining the original repeat size
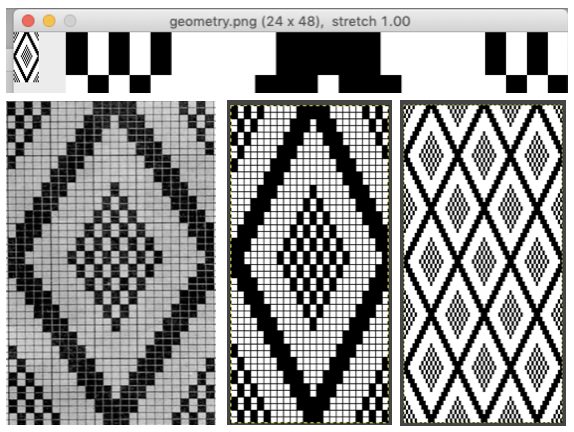

 In the past, I have preferred to elongate the design prior to importing with plans for download rather than to rely on memory for changing settings either in the download program or in the machine itself in future uses of the same design.
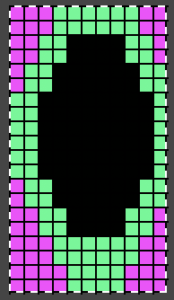
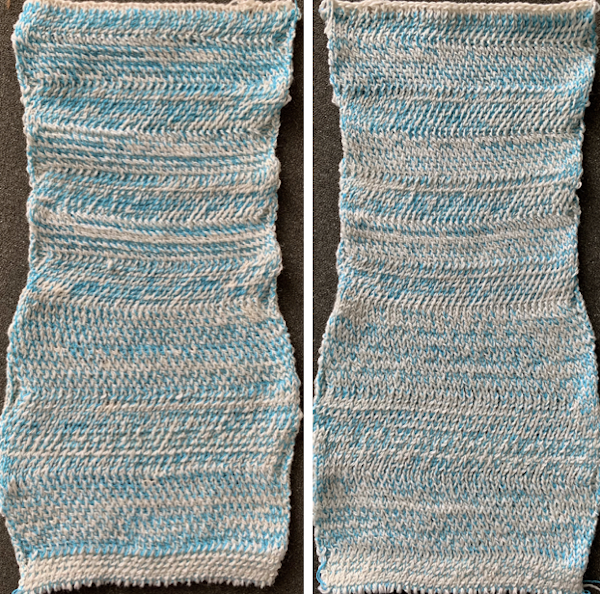
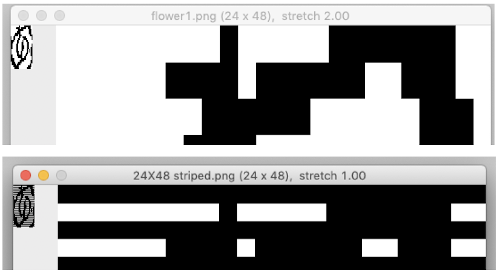
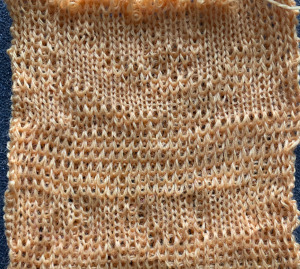
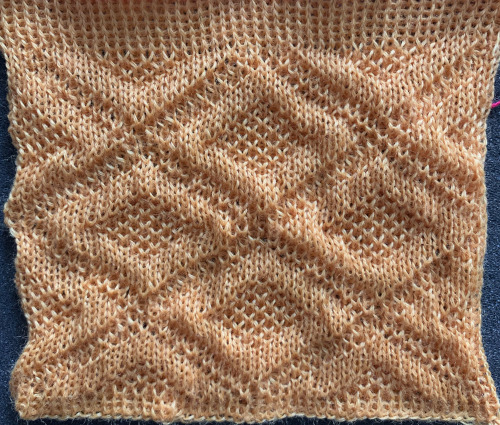
 The same yarns, tension, the total number of carriage passes, and settings were used showing the difference in aspect ratio between single color per row knitting and the img2track built-in color separation.
 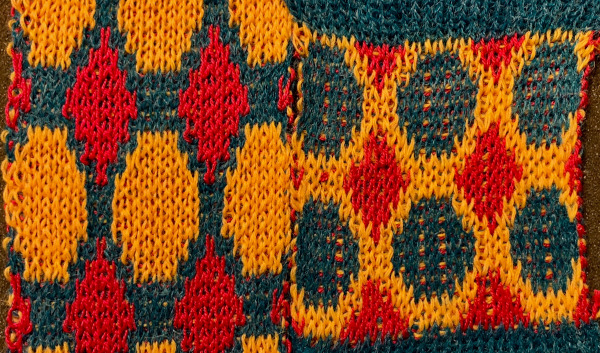 The width of both swatches is essentially identical.
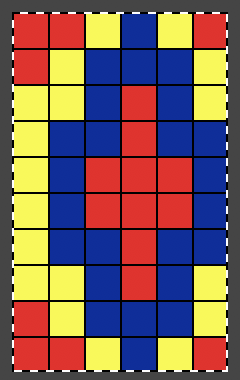
 The 930 will provide prompts for the next color to be selected by pushing the matching number button on the color changer, avoiding any confusion in terms of what should be picked up next. img2track will also flip the design horizontally automatically so the image will appear as originally drawn on the knit side. Images are loaded as single motifs, so the change in the selector needs to be made manually for an all-over pattern.
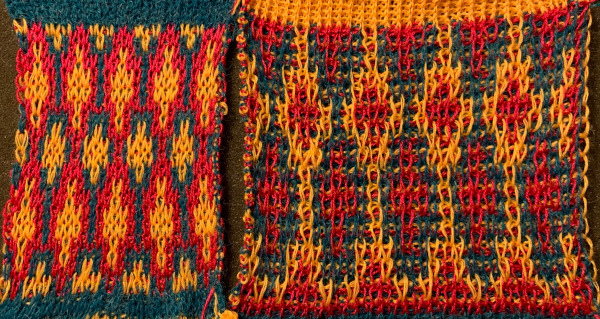
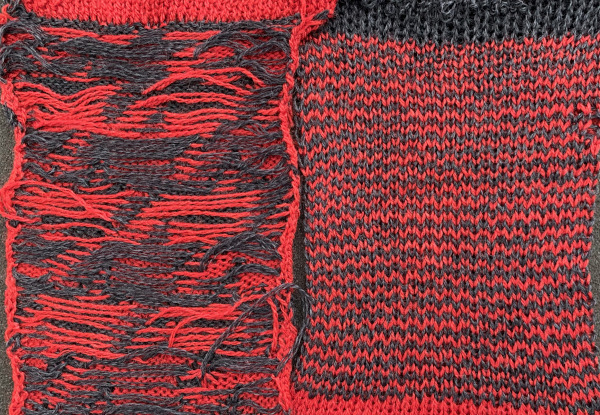
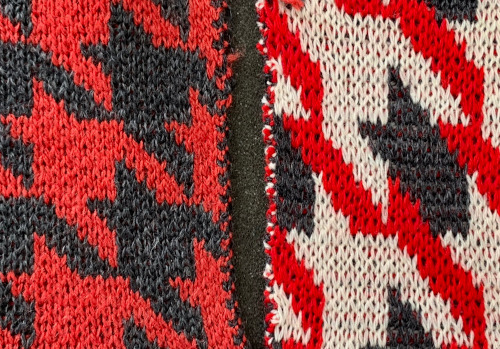
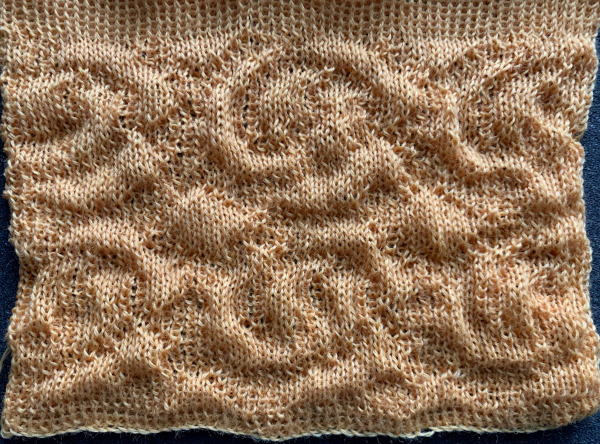
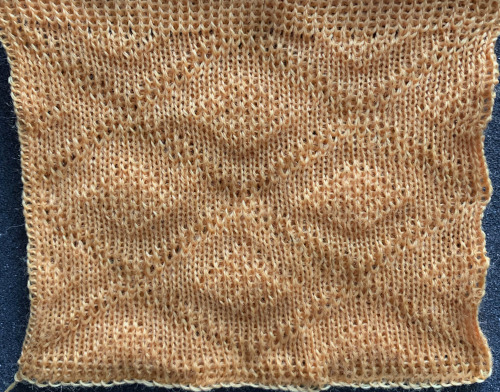
 Obviously a success in terms of the single row for each color reducing elongation of the design shape. While knitting occurs using the same yarns, at the same tensions, there is a clear difference in the length of each stitch on the main bed and their appearance. The reverse. Checking the ribber carriage I noticed on the left side it was set to knit only, not to slip: OOPS!
 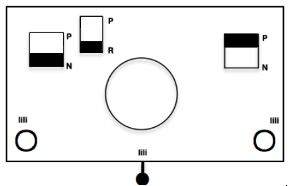 N is king, so the ribber set as shown is knitting every other needle when moving to the right, but even with lili buttons in use, it knits on every needle when moving back to the left. Every other needle on the ribber will then be knitting for 2 rows as a result. The more knitting on the ribber for each pair of rows, the longer the stitches on the opposite bed. The backing is an interesting variation (half) birdseye. The elongated stitches on the main bed show more of the backing in between their shapes, it is referred to as bleedthrough. In some instances, the result can make the knit surface resemble weaving and its appearance far less familiar in a surprising, pleasant way. Beauty is in the eye of the beholder.
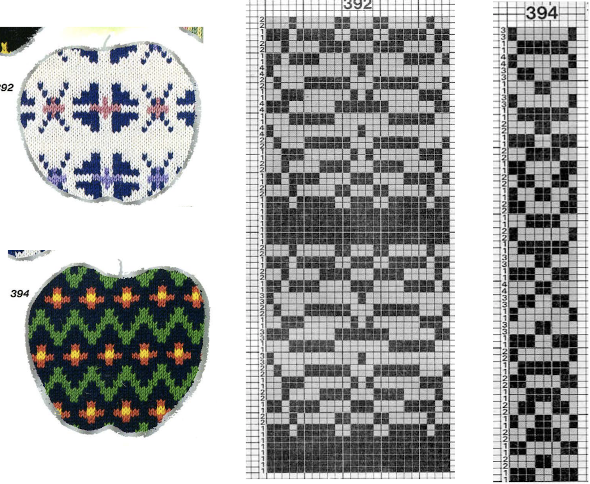 The images could be replicated as given in a paint program, using only one color for the squares, but “should be reduced to black and white”. Attempting to import an indexed 2-color image drawn in a color other than BW may result in strange results.
 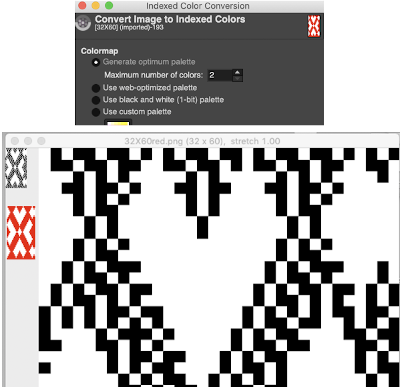 That said, if glitched knits are the goal, the above could work just fine. Curiously, here is the same process, using a different color, and a successful import. Checking again, I had forgotten to save the image after indexing it from RGB mode to 2 colors.
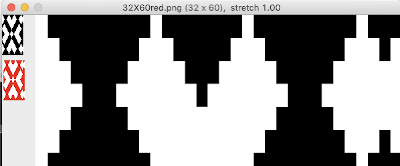

 Note to self: if you are determined to use a punchcard carriage on your electronic machine remember there is no KCII to cancel end needle selection!
 Getting that first row to knit twice instead of a single time if that matters in your technique or is your preference:
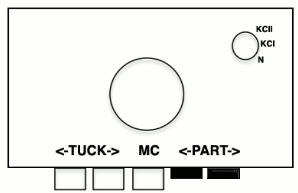
 pick up color 1 in yarn changer
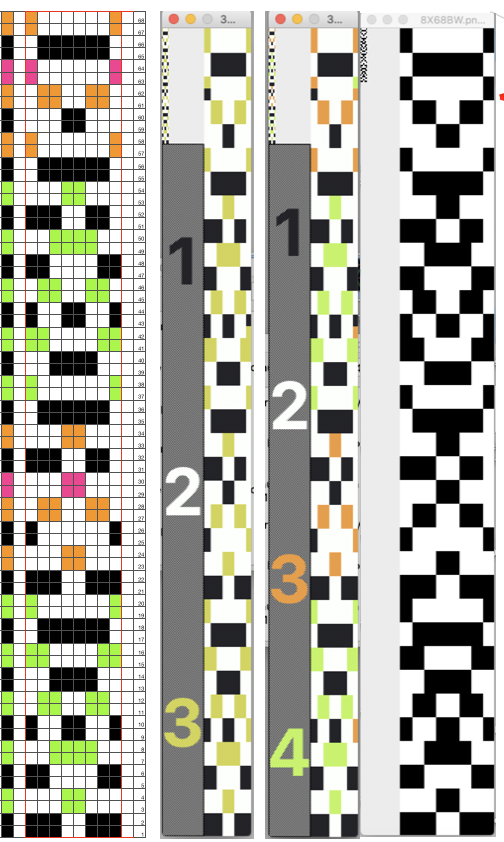
 If black and white repeats are already in your library, one may easily recycle them adding a third color. Here I did so with a repeat intended for a very different topic in future posts. The image was altered and tiled in Gimp for a repeat alignment test and is also shown imported into img2track for possible knitting.
 The image of the separation on the above right has not been proofed for accuracy. If it were, the next step would be to elongate it X 2 for color changes every 2 rows. One method is to elongate the original in a paint or photo processing program. The width is fixed (40), the height is scaled X 2. The resulting BW indexed image may be imported, using a 1.0 stretch factor, it remains unchanged. When I tried to elongate the unstretched image in img2track by 2.0 my first try failed. It turned out the reason was I had saved the import without first indexing it to 2 colors. With that corrected, the result matched the one from scaling X 2 in height in the paint program
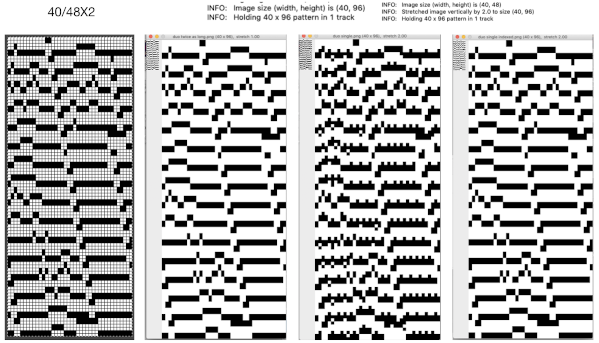
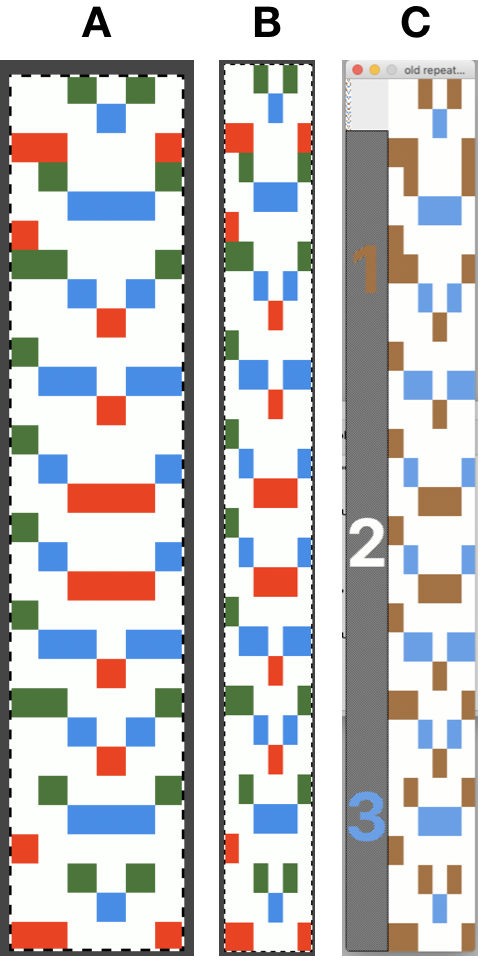
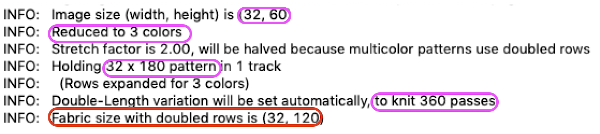 Here the image is scaled properly for each color represented for a single row in height and also scaled again for double height for possible knitting in Gimp. The Gimp scaling failed to be accurate for me (second image from left) until I indexed the original to 4 colors as well instead of 3. The no-color rows as we view them serve as a fourth color in the separations. Importing the proper size PNG into img2track for the separation of 4 colors per row now gives results that make sense: note the daunting estimate for the total number of carriage passes for a single repeat height
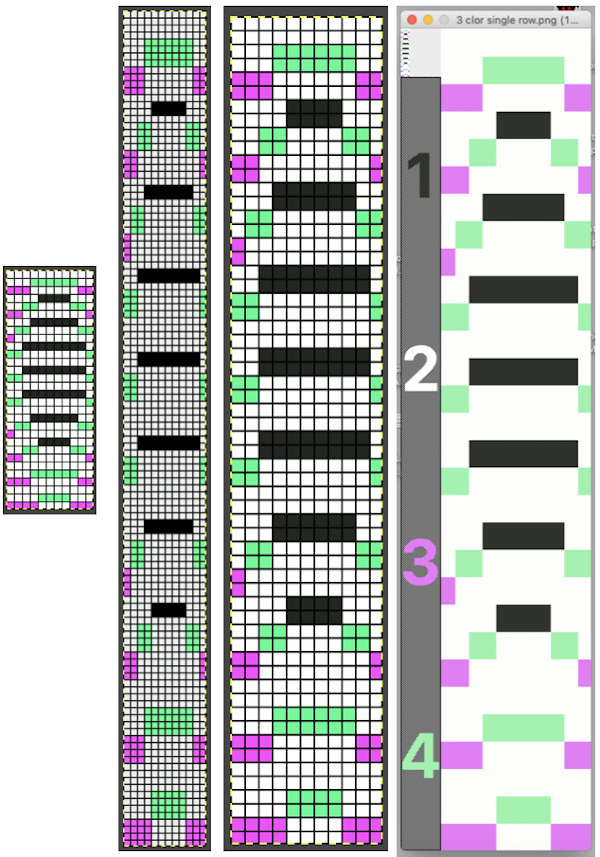 If the ribber has knit on every needle by its return to the color changer and the machine is set to slip both ways with no needle selection on the main bed, the “no color” can be executed as an empty yarn holder in the color changer combined with no yarn in the feeder. The rows involved should simply not knit on the top bed, with no dropping of any of its stitches since no needles will have been selected thus coming forward with the yarn in the hooks and traveling behind the latches and in turn, slipping off the needles as a carriage with no yarn pushes the needles with now empty hooks back to B position.

 Punchcard knitters may have the easiest knitting variable color sequences since cards may be visually marked up with colored pencils matching needed change locations and taking into account your eyes are several rows above the row being read by the card reader. This number depends on the machine’s brand and model.
 the initial method:


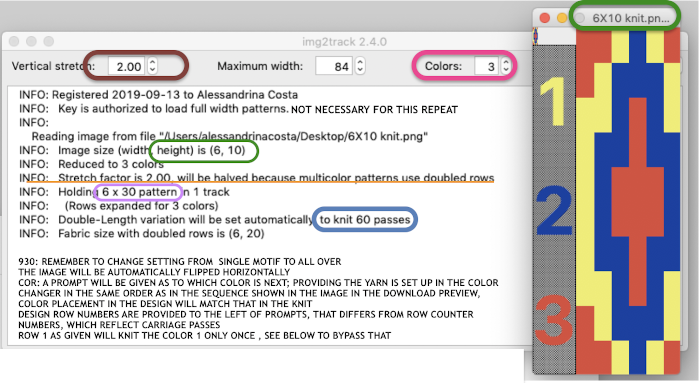
 following that up, I planned for the 60 rows needed to complete the repeat, hid 30 rows, using this menu
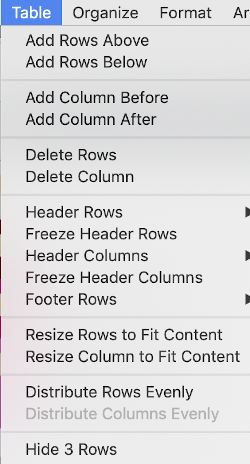 copied and pasted the black and white repeat on the above right, then unhid the 30 hidden rows (see previous posts using command key selections), having a new color separation repeat, created the final 2 color BMP in Gimp (whew!)
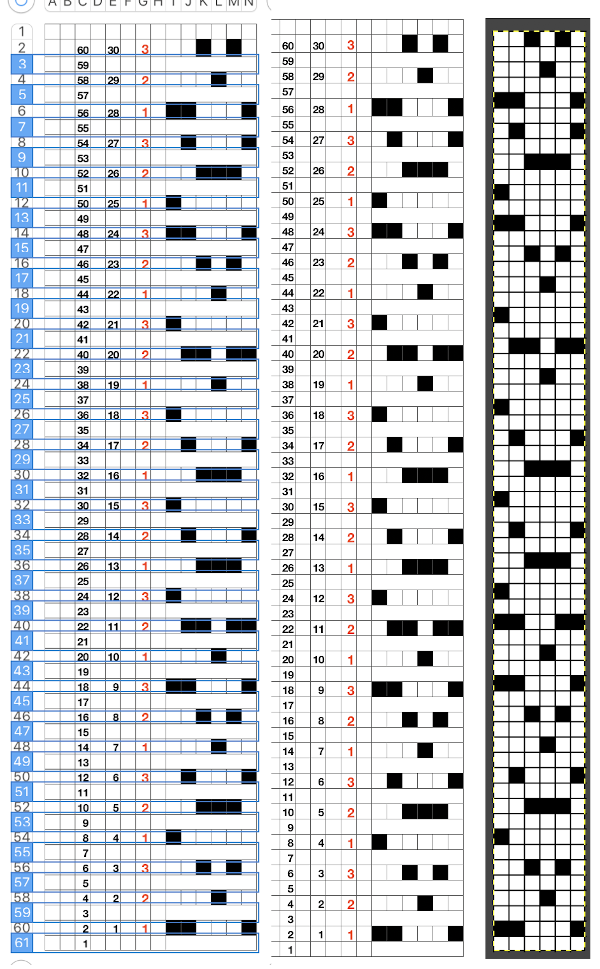 Since my separation is planned on 2-row sequences, I began with COR and my preselection row was from right to left.


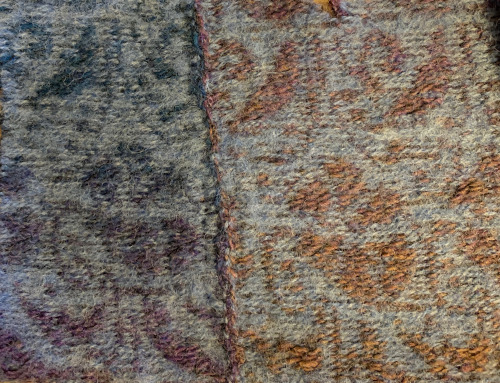
 Again, there is some bleed-through, and even with this technique there is some elongation of each of the shapes, but less so than with other techniques. The backing of all these fabrics produces single lines in each color used
 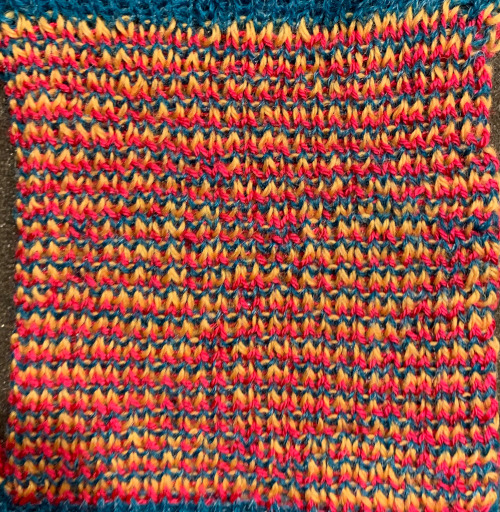 Even fairly small repeats can take time to color separate in this manner. The technique, however, is the only method available to punchcard knitters. Electronic machines with download cables and varying software open a very different world in terms of ease and range in repeat size possibilities.
 Open stitches may also be joined using this method, but they would have to be hooked onto the second piece every row rather than every other, and caution should be taken in terms of skipping any stitch, as any such stitch will unravel at the end of the process unless it has been secured.
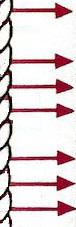
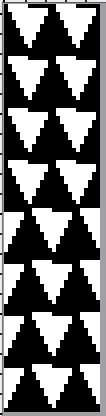
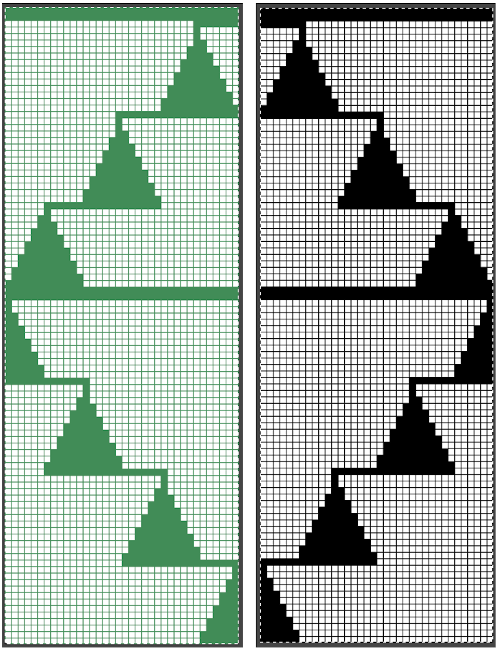
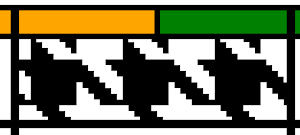
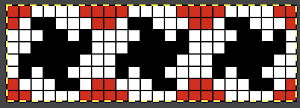
 This is a long-ago demo swatch. The chevrons are shaped by holding, could be knit on any machine in any width. After the first strip is knit to the desired length, the second is joined to it as it is being knit. I generally prefer the joins with the carriage on the right and the completed strip hooked onto its left side. If the color changer is to be used, then the strip being created to join to the finished piece should always be knit on the left side of the bed in order to allow for traveling to and from the color changer every 2 rows. The image here is turned sideways, the chevrons could be used either vertically or horizontally depending on the design plans.
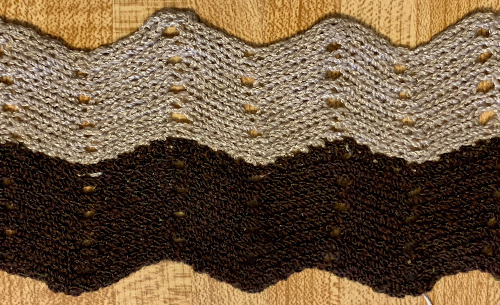
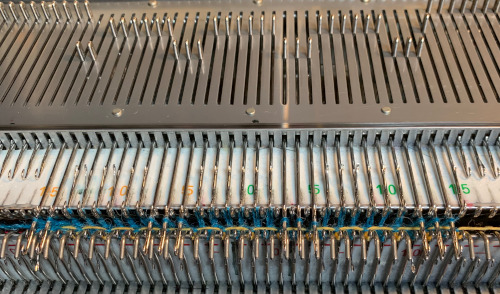
 The above method may be used to join fair isle patterns in order to achieve significantly wider final panels. Some artists, when no electronic models were available, would join cards in continued lengths and plan their repeats side by side to achieve large, non-repetitive images. The punchcard width markings on your Brother needle tape can serve as guides. I use punchcard repeats so often I replaced the needle tape in my 910 early on with one for punchcard models. Markings may also be seen on them for every 8 stitches
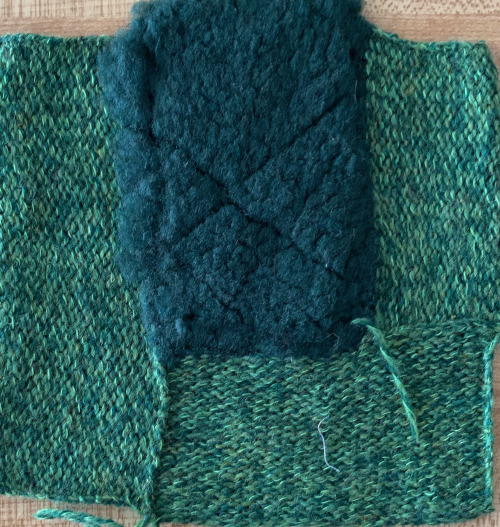
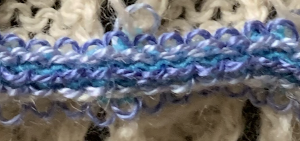
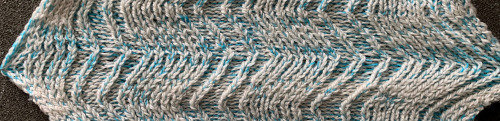
 Here a slip-stitch ruffle was joined on the left to one of my completed shawl bodies.

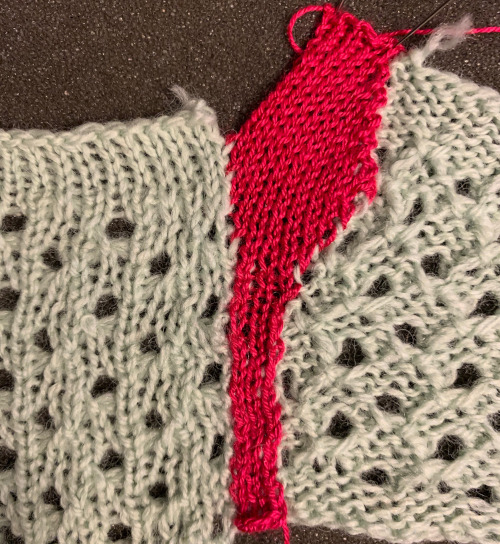
 and continued until I reached the point where I wanted to experiment with increases, keeping the shape symmetrical. I picked up a loop from both added pieces and hooked them onto the first empty needle on each side of the strip, essentially casting on an added stitch on each side each time, following with 2 knit rows.
 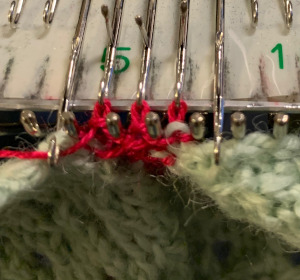 After working on my “desired shape” I tested decreases:
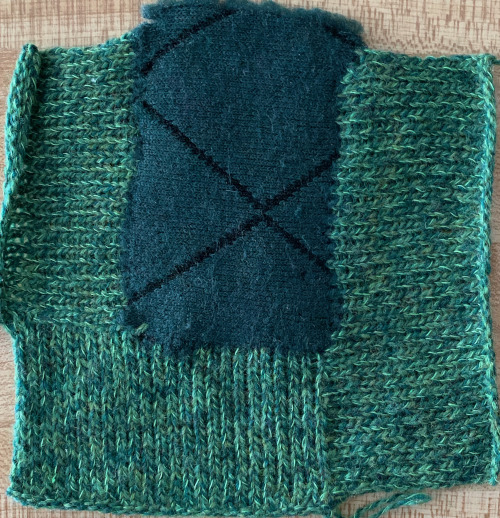
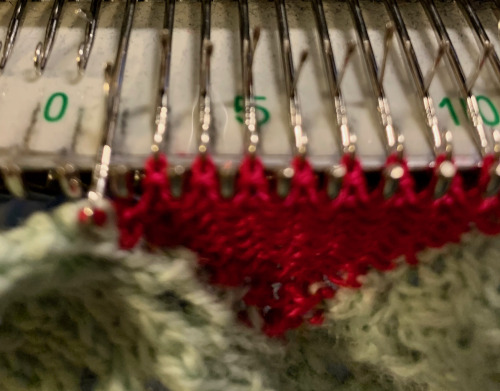 COR: after hooking up the next row, knit one row to the left
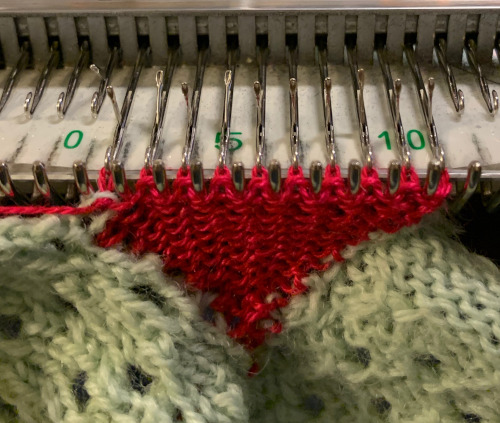
 The cleanest joins happen when the edges are straight to start with, above there was a movement of the edges happening because of the distortion of the fabric created by the eyelets. A light pressing if possible may also set the edge stitches, help them lie flat, and make them more visible. When working with slanted edges on the first piece this is one way to join it, taking into consideration whether any adjustment in the frequency of hooking up needs to be made.