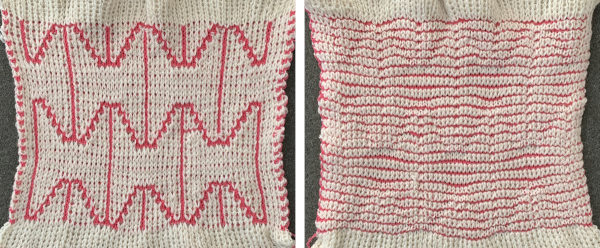
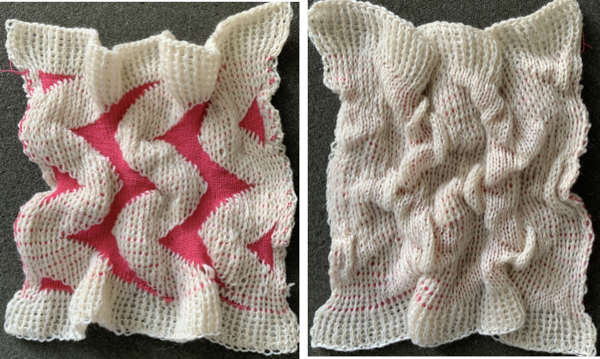
This video was recently shared on Facebook. The sample in the video was knit on a Studio/Silver Reed brand knitting machine and prompted the question about the possibility of knitting the same pattern on a Brother machine.
Some techniques require infinite patience.
A summary of observations made looking at the video:
1: the machine tucks for two rows
2: the card is set to elongation for weaving rows, where the pattern selection continues, but the carriage is set to knit the background for woven rows
3: the carriage is set to tuck once more to complete what are 8 or more rows of pattern
4: start the process again by knitting four rows of tuck followed by 2 rows of knit weaving until the top of the piece is reached, ending with two rows of tuck before binding off.
Studio machines select as they knit each row, while Brother machines preselect each row as knitting continues after the initial preselection row.
There cam buttons switch from tuck to knit, and the card rotation settings are changed frequently from single to double length on the repeat segment as given.
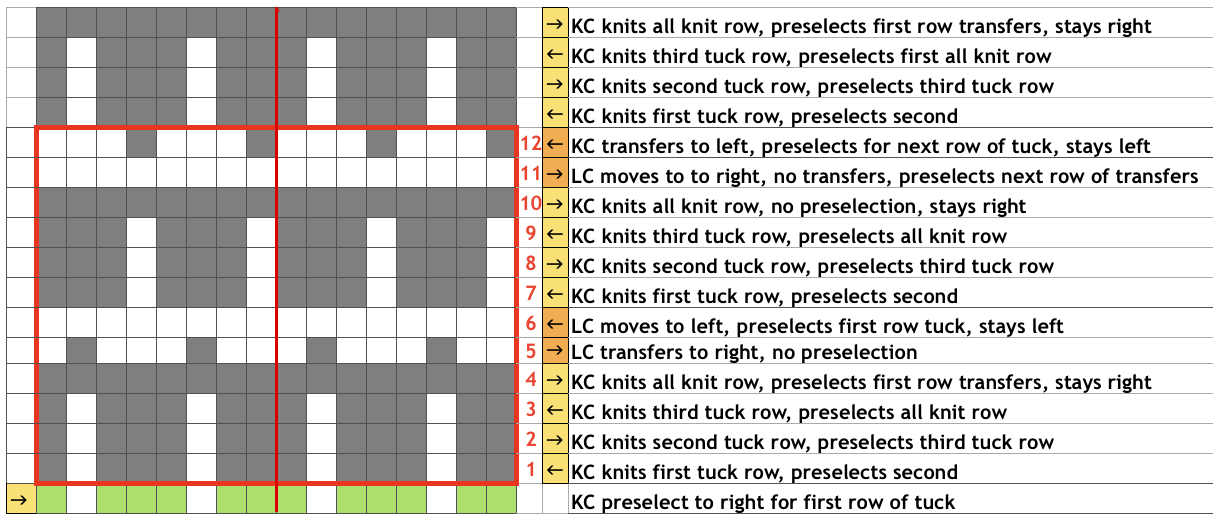
To mimic the video, this is a chart for the adjusted repeat planning to knit a swatch on an electronic model using 2 knit carriages selecting needles with the pattern advancing one design row for each pass of the carriage.
The cam button variations: the yellow cells mark tuck stitch rows. The red cells mark the knit-woven rows, where the carriage is set to knit with continued pattern selection, and a weaving yarn is brought into play for 2 rows.
The knit carriage is then set to tuck once more, and the process repeats. 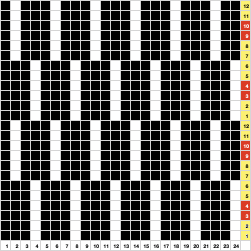 Punchcard users working with a single knit carriage can punch all black cells in the width given in the chart, and twice its height for 48 rows, eliminating the need for elongation shown in the video.
Using 2 knit carriages can eliminate cam button changes from tuck to knit and back.
When using any pair of carriages to select needles, each carriage must be disengaged from the belt while the other carriage is being used to avoid breaking it, so extension rails are required.
I began with the sample knit on 30 stitches on my 930.
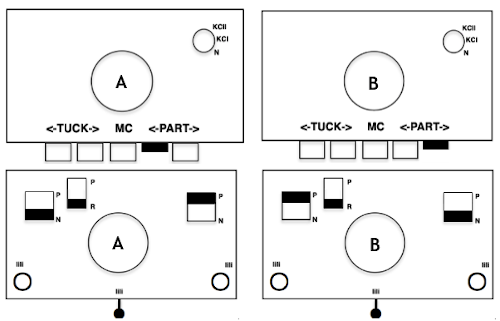
The carriage set to tuck operates from the left, the knit-weaving one from the right, with the first preselection row made from right to left.
The 30-stitch test includes a one-stitch knit border vertically on either side. ![]() The main background yarn used for tuck rows color is a 3/9 wool, and the knit weaving carriage is threaded with a slightly thinner, darker yarn of unknown thickness. The weaving yarn is a worsted-weight wool.
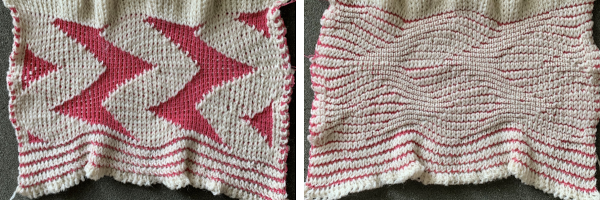
The main background yarn used for tuck rows color is a 3/9 wool, and the knit weaving carriage is threaded with a slightly thinner, darker yarn of unknown thickness. The weaving yarn is a worsted-weight wool. 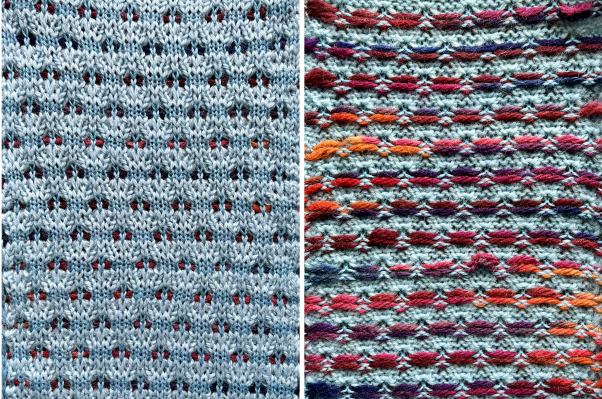 Changing the ground yarn to the same yellow 2/20 in both carriages, the pattern was first knit in tuck stitch alone, possible for 6 rows because of the yarn thickness,
 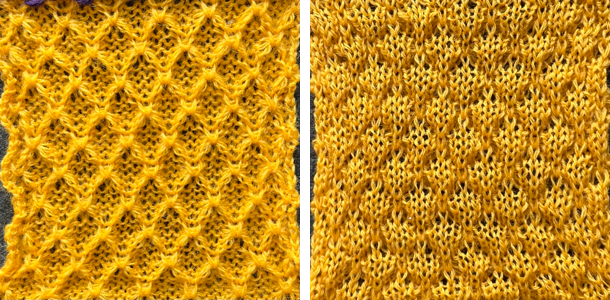 and then using the 2 carriages knit weaving at the same intervals resumed.
 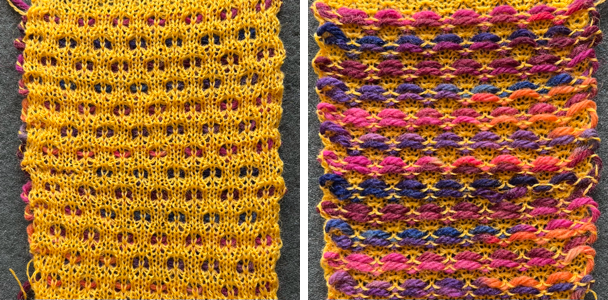 A pair of some of the previous posts on using 2 knit carriages to select needles on Brother machines
Knitting in pattern with 2 carriages vs color changer, Brother punchcard KMs 2
Knitting in pattern with 2 carriages, Brother punchcard KMs 1
The Punchcard used in the video 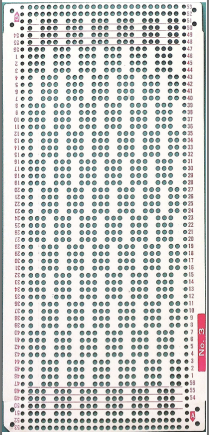 Brother punchcard machines repeat the preselection of needles on the first pass with the carriage from the opposite side to advantage in reproducing the swatch. The two 892E carriages
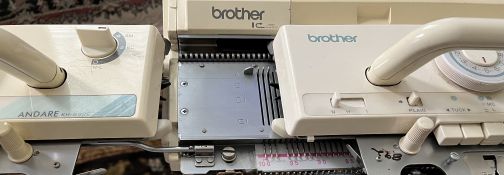
 If a second punchcard carriage is not available but an electronic one is, the model year may affect the fit, but an electronic carriage can be used on a punchcard machine to advance the card and select needles.
The first row on the Studio card is locked on row 3 to preselect the first tuck row on the Brother from right to left
Rows 1-2: COL, set the carriage to tuck in both directions, make 2 carriage passes, ending COL with the carriage positioned on the extension rail, clearing the belt
Rows 3-4: COR, begin with the second carriage set to KC and outside the set line, and do not push in any cam buttons. Prepare your weaving yarn. Knit to the left, the card does not advance.
COL: weave the second row, move the carriage back ending COR on the extension rail, clearing the belt
Rows 5-8: COL, the card does not advance on the first pass to the right, knit 4 rows of tuck stitches, ending COL on the extension rail, clearing the belt
Rows 9-10: COR, repeat 2 rows of knit weaving
reminder: any hesitation with movement back and forth of either carriage once it is on the knit bed and selecting, will advance the card one design row
Repeat Rows # 5-10 twice to complete each full repeat segment
Choose an ending pattern segment and bind-off.
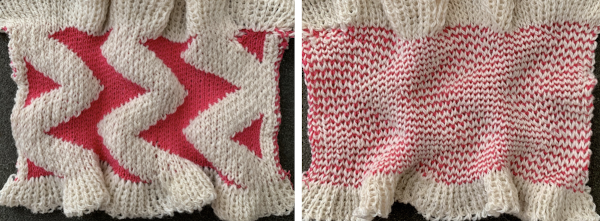
The proof of concept uses two slightly different yarn background shades again 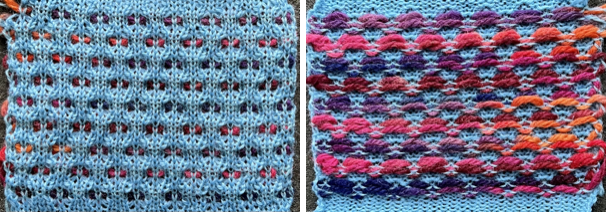 Other tuck-stitch combination fabrics
Tuck stitch combination fabrics
Combining tuck stitches with lace 2 (automating them)
Combining tuck stitches with lace 1
Tuck and garter stitch: from hand knit to machine knit
“Crochet” meets machine knitting techniques: working with short rows
More on using multiple carriages
Revisiting knitting with 2 carriages single bed, 910 vs Ayab so far
Geometric shapes on ribber fabrics with tuck stitches 2; knitting with 4 carriages
Ribber fabrics produced with 2 knit carriages selecting needles
Category: Patterning with 2 knit carriages
requires extension rails
Color separations for larger scale mosaics and mazes
There are generators online for many generators to aid with knitting design.
In 2015 I published a post on working with generated mazes: Gimp charting 1
The long lines of black or white cells make them unsuitable for traditional fair isle knitting.
There are many ways to achieve the same goals. One option for converting small-scale repeats is to begin with a file previously used and separated, magnified to 1800X.
1. using the rectangle select tool, begin on row 1, extending the handle outside the image, I work from left to right
2. hold down the shift key and continue selecting every other row. As each row is selected, it is outlined with dots. The handles to the right and left of that row serve as guides as to the last row worked, moving up as separation progresses. Clicking on the rectangle select tool at any point fixes the layer, and the dotted lines will disappear. 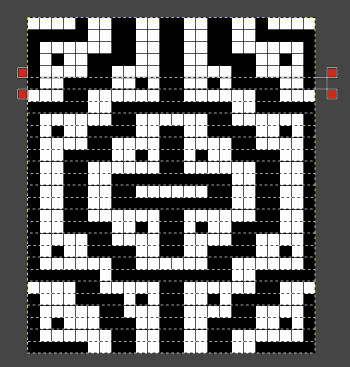 The process could be performed in steps, with guides placed before color inverting the previous steps in the sequence and moving on to the next.
 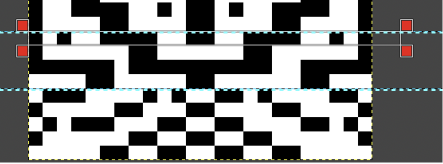 The guides remain until they are removed by clicking on the check mark beside show guides,
 ![]() or with the / / command.
or with the / / command.
This method may be more error-prone than using layers or colors to make rows transparent when developing large designs.
3. after each pertinent row has been selected, choose the color invert option and save the resulting file. The first steps in the separation are completed.
The final file must be color-inverted and lengthened X2 before knitting. The result matches the separation in the previous post.  Holding down the shift key when using the pencil tool on any image produces very different results.
 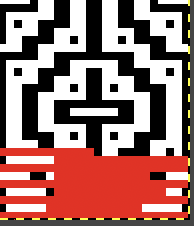 My samples continue to be knit on the 930 using img2track, a download program I find reliable and easy to use. The only errors in programming I have encountered were due to operator errors, not software ones.
Since 2015 working with larger images has become far less daunting as my methods for color separations of mazes and mosaics have evolved.
Laura Kroegler’s online Mosaic Pattern Generator is still available. Returning to it, and using these parameters  the pngs were downloaded both in red and then again in black and white.
 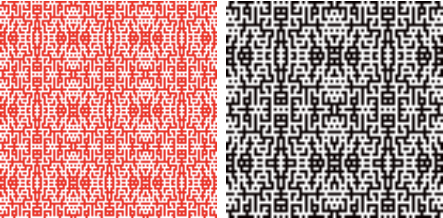 A 38X38 stitch repeat was isolated, and using Layer/Transparency/Color to Alpha a knittable mosaic design was obtained which, when knit, would require elongation X2 for color changing every 2 rows
 ![]()
 The last file, doubled in length to 76 rows in height, requires no further processing
 ![]() The separations are achieved now in just minutes.
The separations are achieved now in just minutes.
The proof of concept swatch: when using repeats that are so much wider, one must commit to far larger swatches to test them. In addition, the placement in the final piece may matter with shifting the pattern to highlight a preferred center, here the machine was allowed to place the design as a simple overall one on 78 stitches by 116 rows. 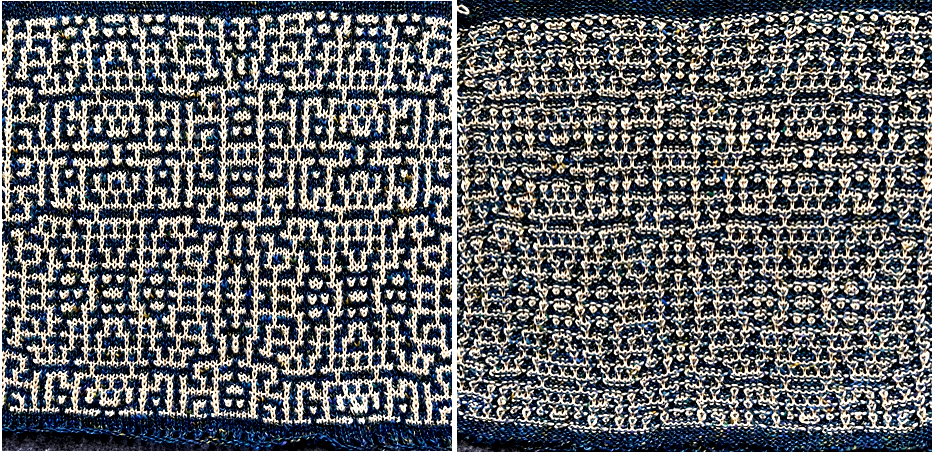 There are droves of inspiring large-scale mosaic crochet images published nowadays, which led me to wonder about DIY similar large graphic mosaics in machine knitting.
They can be built from scratch, or published designs may be used and converted for use in machine knitting.
A follow-up post on DIY Figurative designs in mosaic knitting
As a start, I performed the first color separation with shortcuts, mirroring the cleaned-up repeat, did not verify each step with tiling, and committed to knitting a test swatch.
A 68X136 repeat X2 in width and at least 40 more rows in height produced a 16X24-inch test swatch, on which a couple of missing pixels became noticeable.
The swatch was also knit using slip in both directions on the main bed, which produces a narrow, short fabric in contrast to wide and short when using the tuck setting,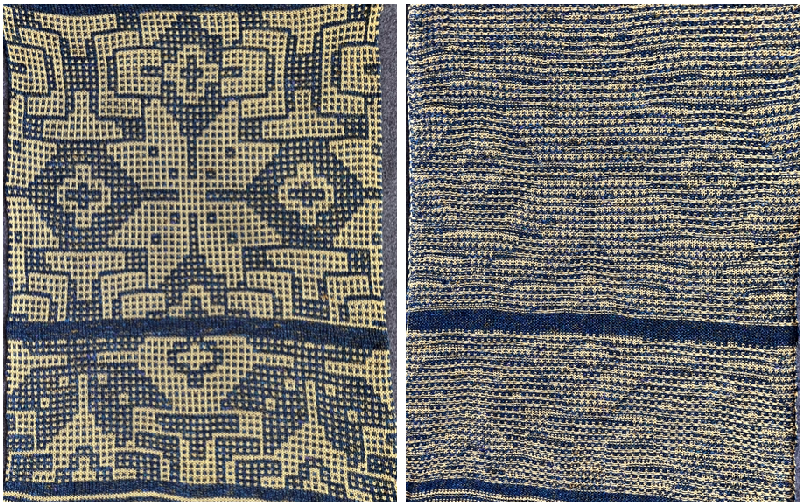 back to the drawing board.
DIY: The initial approach is similar to that used in creating mock filet crochet shapes on the machine.
With present tools ie Gimp begin with choosing any symmetrical design where the shaping of the motif occurs in single rows, this one measures 23X23 ![]()
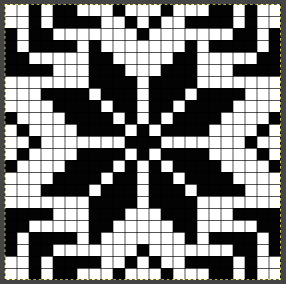 scale the file X3 in both directions to 69X69
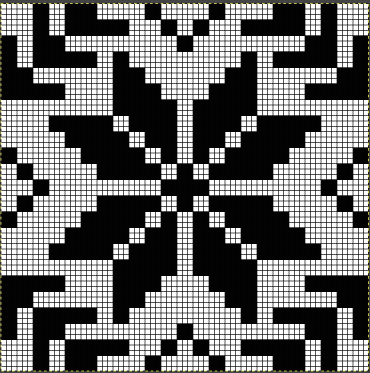 save this brush to use later for bucket-fill the design.
  Choose fuzzy select by color/black, each shape will be surrounded by a dotted line
 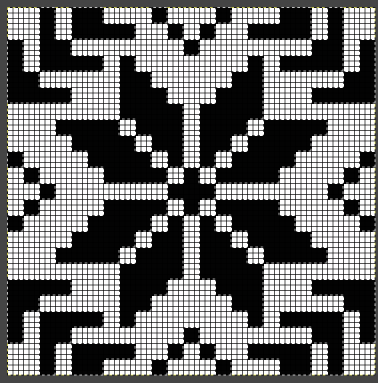 bucket fill the selections with the saved pattern
  click on rectangle select to fix the layer, work on and clean up the repeat, and check a magnified version for any missing or misplaced pixels.
  Save the png. for reference before continuing to work.
  Make one of 2 choices. If the goal is to place a motif and to add borders or horizontal additional design stripes, create a new canvas, larger than the above, fill it with the same pattern, and then Colors/Invert. Click on the rectangle tool to fix the layer.
 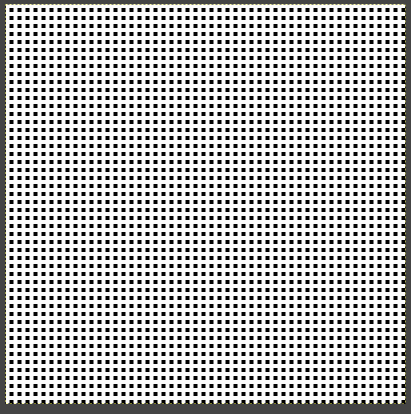 Change the white color to alpha in the previously processed snowflake, click on the rectangle tool again
 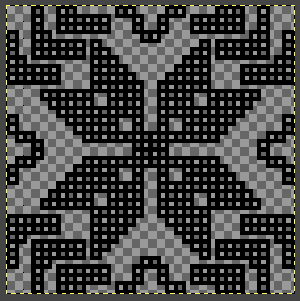 copy and paste the file onto the color-reversed grid, and click on the rectangle tool. Check the pasted image visually, and continue adding any other designs.
 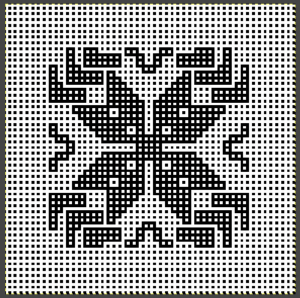 If the goal is to produce an all-over design, crop the shape on the dotted ground, and save it as a 69X69 repeat. Pasting the original on an equal-sized color reversed dotted ground does not work.
 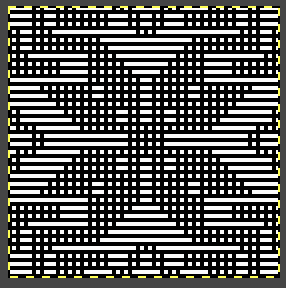 Tiling the result of the cropped repeat will show the need for cropping it by one row at the top and one column to the right.
 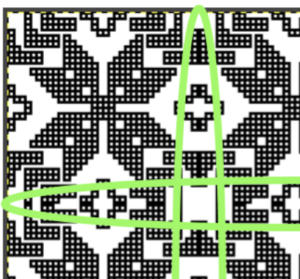 The resulting repeat, 68X68
  tiled X3 in each direction for a visual check.
 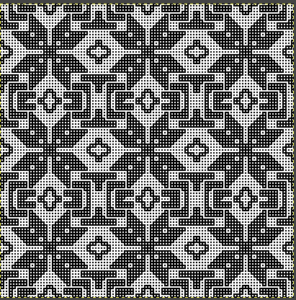 Using the process previously described
1. open the 68-stitch file in Gimp, and magnify it to at least 800X for a visible grid
2. open file/new, equal size and magnification
3. copy and paste 1 on 2, click on the rectangle select tool
Colors/invert, click again on the rectangle tool or anywhere in the work window 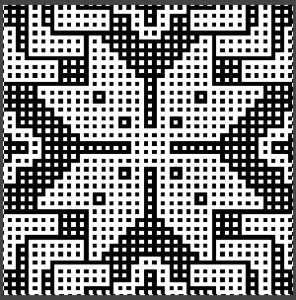 4: magnify further if needed. Using the pencil tool fill in every other row beginning with row 2 in a contrasting palette color, and click on the rectangle tool
  5. Layer, transparency, color to alpha, as described in the last post, click on rectangle tool
 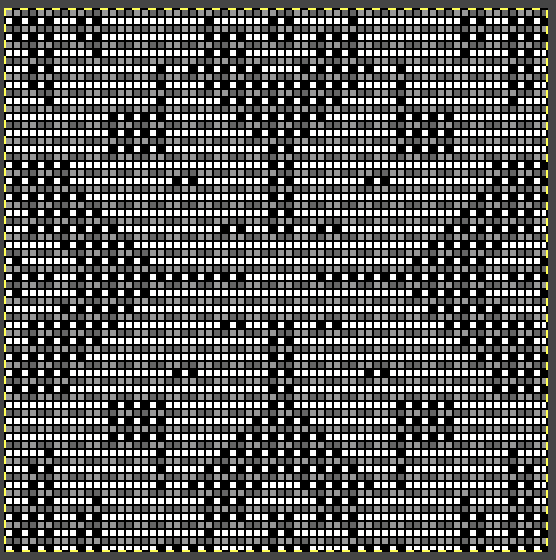 6. Copy and paste this result onto the 68-stitch file in the first window, there will be lots of dotted lines onscreen
 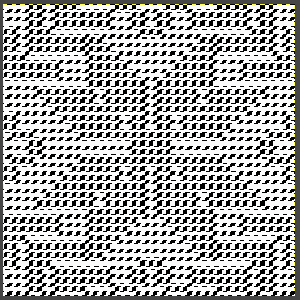 Click on the rectangle select tool to paste the image in place.
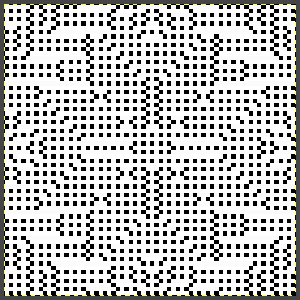 Since those large areas of white will be knitted in a tuck or slip fabric, the above result needs to be color inverted. If used as is, set the machine’s built-in double-length function.
 Doubling the length of the file before the download to km
  Added info on the technique may be found in the post on More separations for various knits using Gimp, color to alpha
Another approach with sequential files provided to test in DIY experiments  begin with the 68X68 image
  color invert it
  open a new file, 2 rows high with an added color, and save it to the clipboard, white color to alpha
 ![]() use the brush to fill the color inverted image,
use the brush to fill the color inverted image,  red color to alpha
  and paste the resulting image on the original
 double the file in length for knitting as mosaic, results matching the previous experiment
  Part of the view on the img2track screen for the 68X136 file is ready for download.
 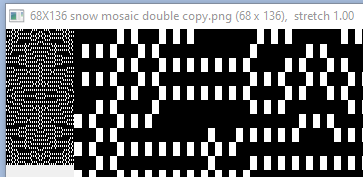 Committing to proving the concept:
  Inspiration drawn from a published design, color-separating the repeat as seen in ArahPaint in knit design 6: color separations
 The full repeat is 100 stitches X 200 rows. The yarns are 2/8 wools, the maximum thickness for tuck stitch on a 4.5mm machine.
The swatch, knit on 61 stitches and for 109 rows, measures 10.25X16.5 inches. The dark loops on the side were due to yarn being caught on gate pegs, the few spots on the knit side that may appear as errors are light color stitches that did not knit off properly due to that fact. 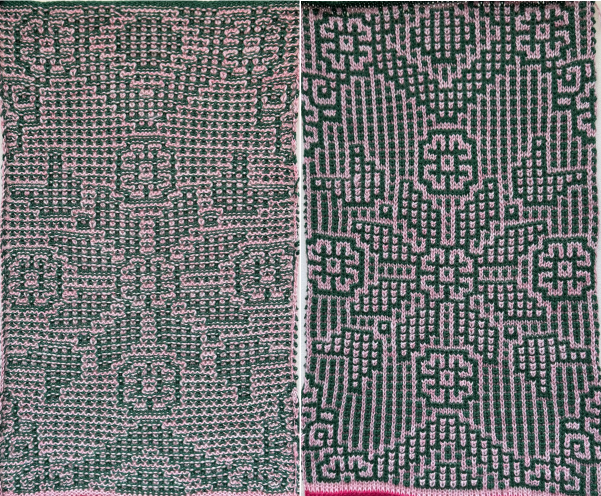 Knitting the original design as DBJ using the built-in KRC function and the birdseye setting to produce a flat knit with “no floats” is possible.
An even number of needles must be used on the ribber.
The first preselection row is made from left to right, the knit carriage is set to slip in both directions before continuing to knit from the right. The ribber is also set to slip in both directions, using lili buttons.
The patterning errors in the swatch result from needles with bent latches, posing a strong argument for always testing a design at least once at a minimum of the full width before committing to a final piece. 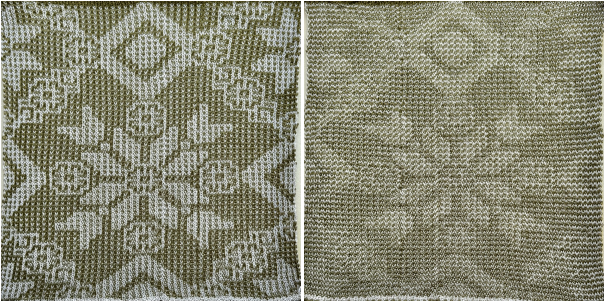
Large-scale mosaics can be planned by tripling the size of a previously tested pattern
1. the original 12X18 ![]() 2. is tripled in height and width X3 to 36X54.
2. is tripled in height and width X3 to 36X54.![]() To begin with, the process involves using multiple colors.
To begin with, the process involves using multiple colors.
Working in ArahPaint, save 2 brushes, each 2X2 pixels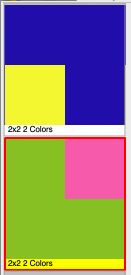 3. 36X54 new image in a new window is filled with the bottom brush
![]() 4. the black and white #2 is copied and pasted in place on #3 after rendering the black color transparent
4. the black and white #2 is copied and pasted in place on #3 after rendering the black color transparent ![]() 5. in a new window fill a new 36X54 image with the top bush
5. in a new window fill a new 36X54 image with the top bush ![]() 6. copy and paste #4 on #5 after rendering the white transparent
6. copy and paste #4 on #5 after rendering the white transparent ![]() check tiling
check tiling 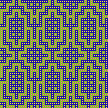 7. convert the color repeat to BW indexed
 ![]()
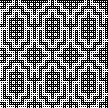 The patterns at this stage of the process may be knit double-bed as DBJ using the birdseye backing, as already shown, or as a “fantasy fair isle” with no further separation.
Download the repeat on an electronic machine, program it for the number of needles in use on the top bed, and select the KRC separation button.
The first preselection row is made from left to right.
After the carriages have reached the right, the main bed is set to tuck in both directions, the ribber to N in both directions.
Because the fabric is being knit using every needle on both beds, each main bed tuck loop will have a knit stitch on the opposite bed anchoring it down. Those rows will appear more compressed, producing narrower horizontal lines.
The knit is reversible, wide, and drapes well.
I recommend starting double bed fabrics with waste yarn and ravel cord, testing color changes, and checking that stitches are formed properly.
I missed several dropped stitches at the start of this piece, in areas marked with cyan arrows.
Because ribber fabrics sit hiding between the beds, dropped stitches or patterning errors may not be seen until several inches of fabric have been knit.
The test swatch, knit on 72 stitches, and testing partial repeat height, measures 17.5 inches in width. 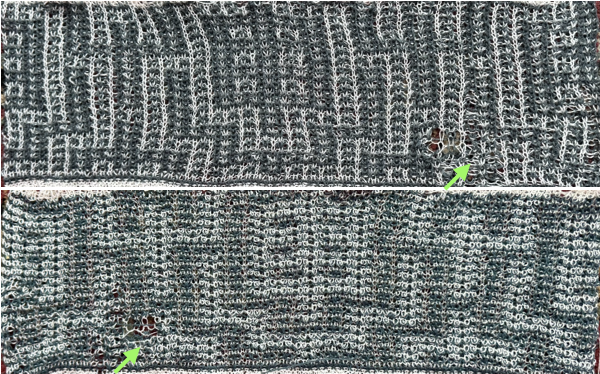 Performing the color separation for knitting the design in the traditional single-bed method
the starting file ![]() color-inverted
color-inverted ![]() new file, stripe brush-filled
new file, stripe brush-filled 
![]() copy and paste it on the color reversed image after rendering the purple transparent
copy and paste it on the color reversed image after rendering the purple transparent ![]() copy and paste the result on the original file after rendering cyan transparent,
copy and paste the result on the original file after rendering cyan transparent, ![]() double the result in length, 36X108
double the result in length, 36X108![]()
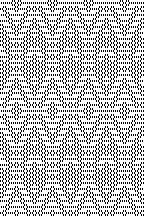 color invert, the 36X108 file, check that it is in indexed BW mode before saving.
![]() The proof-of-concept swatch uses the tuck setting. It was knit using 2/8 wool on 72 stitches X 120 rows and measures 10.5X11.75 inches.
The proof-of-concept swatch uses the tuck setting. It was knit using 2/8 wool on 72 stitches X 120 rows and measures 10.5X11.75 inches.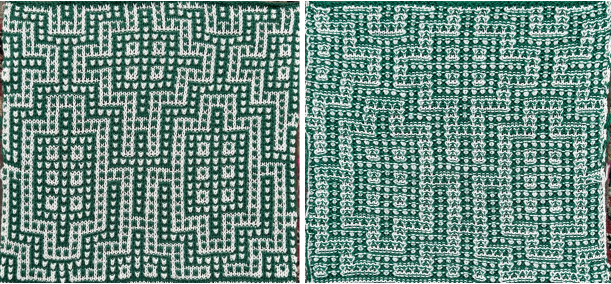
A file creating different shapes to play with, 32X86![]() tiled as is
tiled as is 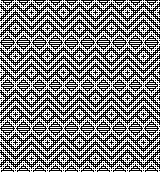 color reversed
 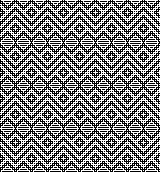 For color separation see ArahPaint in knit design 6
The final repeat, 32X172 rows ![]() The test swatch was knit on 60 stitches and for 182 rows, measured 9X11.25 inches
The test swatch was knit on 60 stitches and for 182 rows, measured 9X11.25 inches 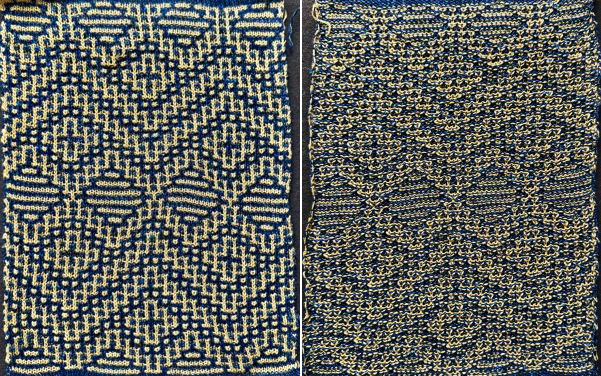 A larger BW design was processed using no modification of the original 75X71 motif. When using Gimp/File/Save, the result is a .xcf document similar to PSD files in Photoshop. It will store layers, transparency settings, and more information associated with and parts of the same project.
 Note to self: before deleting the .xcf, ensure the final PNG has been saved.
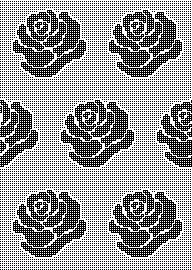
If determined to use the particular flower, the starting file 96X90 is copied and pasted on a new brush-filled ground with the black rendered transparent, adjusting placement, cleaning up edges
  a new color is used to outline the outer shape of the flower and the petals for better definition
  it is copied and pasted on a new brush-filled ground after the white is rendered transparent
  the colors converted to BW, playing with placement in any final piece
If one is familiar with image processing and fond of the maze appearance in designs, there is a font to try: Mazeletter
The downloadable associated documentation and source for inspiration: http://mazeletter.xyz/Mazeletter.pdf.
A sample text:  in a 129X32 BW version with no pixel clean-up
 ![]() Mosaic4way, is potentially usable for single bed fair isle or dbj.
Mosaic4way, is potentially usable for single bed fair isle or dbj.  The BW file, 199X32
![]() When scaling designs containing more than 2 colors, there is a variable loss of detail or added random pixels. ArahPaint’s guess weave from the grid tool is the best I have found for scaling such samples to knittable sizes.
When scaling designs containing more than 2 colors, there is a variable loss of detail or added random pixels. ArahPaint’s guess weave from the grid tool is the best I have found for scaling such samples to knittable sizes.
Pintucks 1 vs shadow pleats
Pintucks are in the family of ripple stitches. The size of both is limited by the number of rows that may be knitted before the stitches on the bed creating the ripples begin to ride up and off the needles. The number of rows possible for the rolls varies with the model knitting machine used and the type of yarn. The Passap strippers make their knitting easier. Generally, extra weight is required.
Basic pintucks are formed across the width of the fabric, no punchcard selection is required. For some basic instructions on forming them in a single color see the blog post on Shadow pleats knitting. Its follow-up, Shadow pleats with added patterning made me curious about the possibility of creating 2 colors, FI patterned pintucks.
For a very brief period of time, some designs were published creating similar effects by hooking up elongated fair isle patterns at regular intervals on the knitting bed. The preselection for the next row knit in Brother machines poses interesting issues in restoring and maintaining the proper pattern throughout the design.
A lot of changing cam button settings can make many fabrics almost possible but not practical on home knitting machines. Some of the constant switchings of functions may be achieved by knitting with separate pairs of carriages selecting the pattern, which in electronic models advances every row, making this an electronic “special”.
Ribber fabrics produced with 2 knit carriages selecting needles introduced the idea of using a KC with a modified sinker plate to make some fabrics easier and includes a knit sample of patterned ripple fabric.
The goal here is to try to create rolls evocative of the shadow pleated swatches in a double knit.
Because of the rolling on the knit surface, designs should be lengthed at least X2. The initial test used the same pattern as that in the shadow pleated samples with the number 4, double-length key selected on the 930. ![]() The carriage setups
The carriage setups  The width of the fabric is limited. Though the KC on the right may be moved off the machine if needed, the coupled carriages cannot be since the ribber and KC used on the left do not lock together in any way, and with the stops removed the ribber carriage could conceivably slip completely off its bed. The end of the belt still needs to be cleared, but this is about as far as one can safely move, with the KC just clear of the set mark on the left of the top bed.
 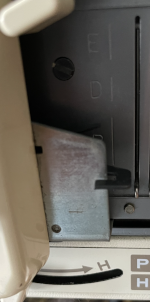 End needle selection is used in both knit carriages.
Extension rails are required.
The coupled carriages although selecting needles will be knitting on both beds to begin and end the fabric and to seal the folds setting the pleats.
To begin, test the tolerance for the number of rows knit on the top bed only. It is possible to coax extra rows by pushing fabric down between the beds by inserting a thin knitting needle between the beds at the start of the pintuck or halfway through and weighing each end. Longer rolls and hems tend to flatten.
The main bed will be knitting on every needle and FI is essentially a slip stitch, so the tension needs to be at least that for the yarns used in single bed knitting. More pronounced rolls may be produced if the tension and stitch size are adjusted accordingly.
Normally the sealing row would be knit in the light FI color. In these samples, the yellow yarn is used to help assess how those knit rows interact with the folds and to what degree they are visible.
The first try:
1. tested a solid color 8-row pintuck a single time, then switched to 6-row sequences and continued. Even though a contrasting color is used to seal the tucks, it is not immediately visible
2. the second carriage is set to FI and begins to operate from the right. Out of habit, I knit with weaving brushed down, a bad idea in this instance
3-4. this fair isle design is used double-length and forms some very long floats repeatedly, not the best choice even for single bed FI, definitely problematic here, time to regroup.
 Comparing the surface to the shadow pleat fabric
  For a different execution of the same design using a different main color on a different knitting day, see the bottom of the post.
Moving on to a simpler, random, smaller, 12X10 repeat ![]() planned for knitting on a 33 stitch swatch and rendered double-height planning six-row pintucks,
planned for knitting on a 33 stitch swatch and rendered double-height planning six-row pintucks, ![]() Visualizing the possible design along with placement of sealing rows represented by all-white pixel rows in the diagram. The single 8-row fold advances the remaining pattern by 2 rows, resulting in a subtle change in the design:
Visualizing the possible design along with placement of sealing rows represented by all-white pixel rows in the diagram. The single 8-row fold advances the remaining pattern by 2 rows, resulting in a subtle change in the design:  My swatch used white for the ground as in the above right, the 8-row transition is marked by the red arrow.
 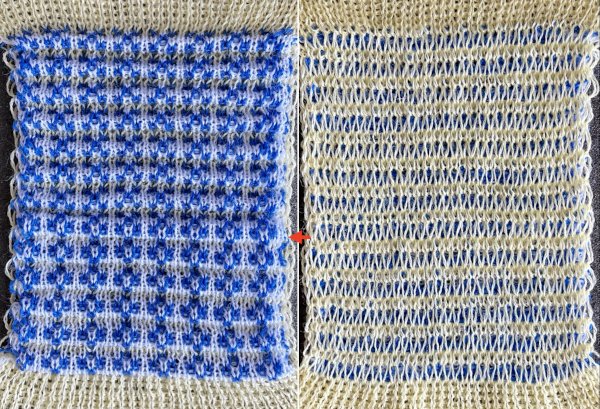 Knitting was easy and smooth, the 8-row tuck required a bit of coaxing. The fabric lies flat, does not have the drape of the single bed shadow pleats, it is not suitable for the same end-use.
Plain every needle rib knit is quite a bit wider, a consideration for casting on and binding off or transitioning to another fabric if this technique is used as part of a different fabric. This file was also downloaded and lengthened X2 ![]() The pattern is not very pronounced, but the short floats make for easy knitting.
The pattern is not very pronounced, but the short floats make for easy knitting.  Comparing the fabric to the single bed shadow pleat using the same design
 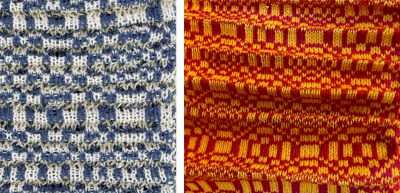 The pintuck main bed FI yarn could be slightly thicker. Since the 6-row sequence appears to work well, if the fabric is to be pursued, the design could be planned and adjusted accordingly.
Issues encountered in DIY deliberate design planning: beginning in Numbers, a table is set up with enough rows to accommodate more than the height of the planned design. Since the fabric planned would knit 6 rows on the top bed, then followed by 2 rows on both beds not affecting the design, starting at the bottom of the table, use the command key and work on hiding 2 rows following groups of 6 for the height of the table 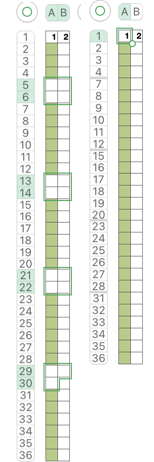 The theoretical design in beginning stages:
1: the rows marked in green are hidden
2. a design is drawn using 2-row blocks and shaping
3: it is tiled, appears worth pursuing.
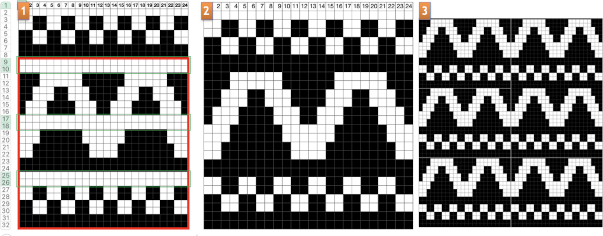 The expected carriage actions, color reversing the repeat so that the dark color will knit in feeder A of the FI single bed sinker plate
 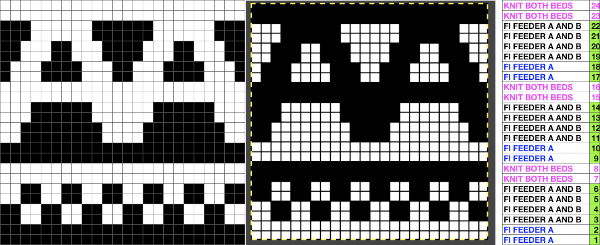 Points to consider while removing the use of the ribber from the equation:
both knit carriages are set for the end needles to select. When knitting fair isle this is necessary to keep the contrast color knitting from separating from the base color along the design edge. If at any point there are single-color stripes, the end needles if selected need to be pushed back to the B position, or the second color will catch the first and last needles in work, forming a float from side to side. If the yarn is removed from the B feeder and end needles are not pushed back to B, stitches on them will drop. My first try ![]() The transition to color reverse shown tiled
The transition to color reverse shown tiled 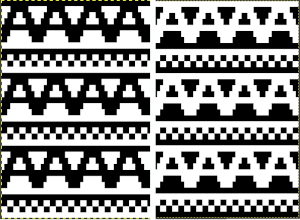 Leaving the contrast color in the B feeder on the all knit black pixel rows created the first mess. Because of preselection, the return to knit dark rows has every needle coming forward as the single bed KC is traveling back to the right, resulting in another mess.
Regrouping so the first pair of rows with no preselection will knit the dark color, the second pair of rows with no preselection will knit using the paired carriages, sealing the fabric, the larger geometric shape has 2 rows with no needle selection nearly at its halfway point. 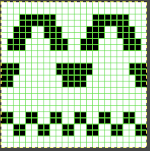
![]() The broken threads are due to stitches getting hung up on gate pegs, missed until more knitting had been completed. With more attention, knitting went more smoothly, and the planned design is identifiable.
The broken threads are due to stitches getting hung up on gate pegs, missed until more knitting had been completed. With more attention, knitting went more smoothly, and the planned design is identifiable. 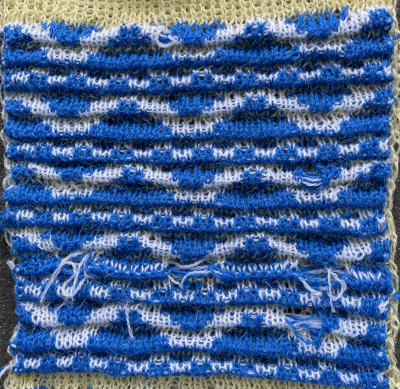 Perhaps as a farewell to the topic or out of sheer stubbornness now that the above had been knit and I have had some practice, I returned to the more straightforward knitting of that double-length flower pattern with far improved results. Some of the floats trapped behind the long stitches created on the ribber can be seen bleeding through on the right.
  Comparing the scale once again to the shadow pleats
  This fabric may fall in the category that need not be knit simply because one can. That said it may serve well in bands joined onto larger pieces, or any use for it may only be limited by patience and imagination.
Ribber fabrics with stitch transfers between beds 2
A collection of embossed patterns created by isolated groups of stitches being brought in and or out of work on the ribber
2021/05/09/double-bed-embossed-patterns/
2021/02/25/brother-shadow-lace-rib-transfer-carriage/
2021/03/11/slip-stitch-patterns-with-hand-transferred-stitches-double-bed/
2020/08/13/ribber-fabrics-with-stitch-transfers-between-beds-1
2017/12/20/combining-kc-patterning-with-racking/
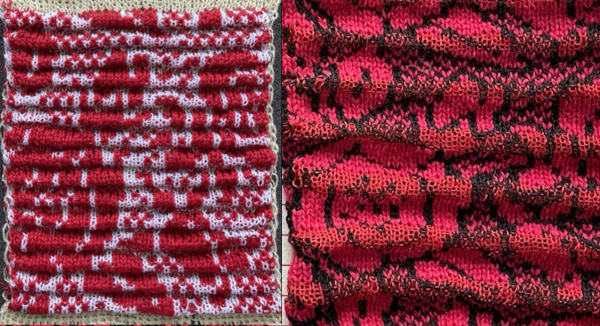
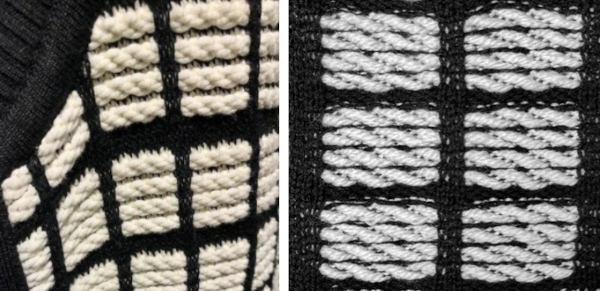
The inspiration fabric in the 2020 post and one of the resulting swatches 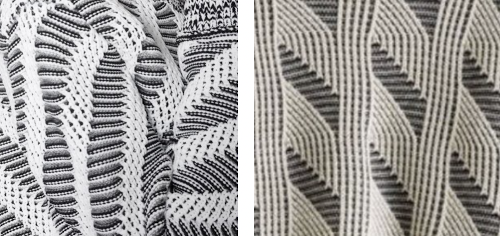 The inspiration fabric recently found online, source not known
 Analyzing the structure: it appears the fabric is knit with slip stitch textured patterning on the top bed, and occasional needles in work on the ribber creating elongated stitches that float on top of the light-colored rows.
Slip stitch textures narrow the fabric width considerably, so the single-color areas would need to be knit in slip stitch as well, here a 1X1 repeat is chosen.
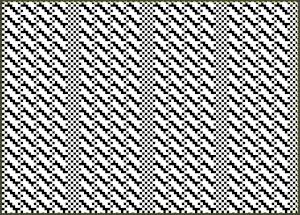
Needles brought up to work on the ribber are planned to interact at intervals with stitches on the top bed. The starting concept working in Numbers 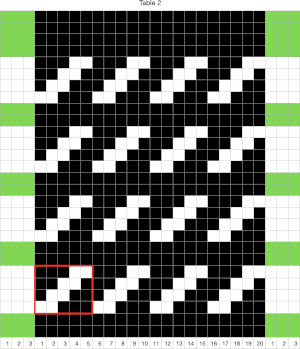 In slip stitch patterning the white pixels slip, the black pixels knit. This repeat is 20 stitches wide, so not usable for a punchcard machine. The first draft is 20 stitches wide by 32 rows high
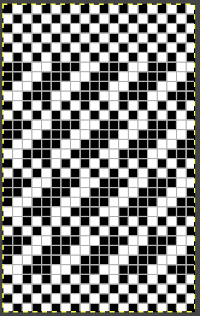
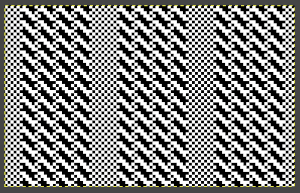
![]() The test swatch:
The test swatch: 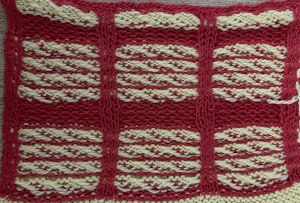 Any adjustments in the dark color stripe between will need to be made within the repeat itself, the floats in the light color will be wider by using a simple color reverse. The color reversed, modified repeat is now 20 stitches wide by 28 rows
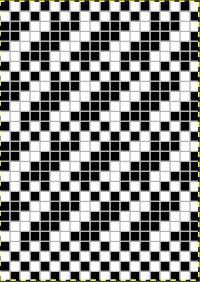
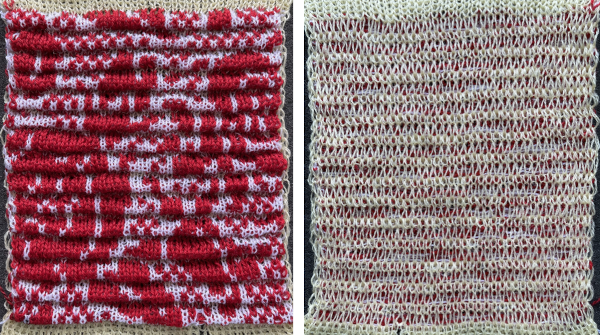
![]() The test swatch was executed using the same red/yellow yarn combination, then in black and white using different yarn thickness and tensions.
The test swatch was executed using the same red/yellow yarn combination, then in black and white using different yarn thickness and tensions.
The width of the spaces between stitches on ribber can be varied, creating shifting size “window panes” resulting in a knit fabric with a very different aesthetic.
The reverse surface is not particularly exciting. 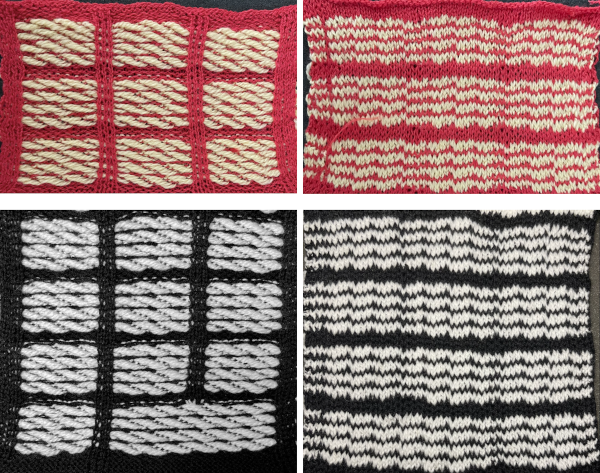 A comparison to the mirrored original inspiration, likely knit in thicker yarns
  The knitting process: with any textured or very lacy knits casting on and binding off require special consideration.
In test-swatching, knit the pattern single bed first to sort necessary tensions and visual appearance, follow with plain knit rows using the dark color,
use the ribber cast on comb to poke through the knit, hang ribber weights, bring needles into work on the ribber, stitches will be formed on it with the next pass. The ribber stitches need to be knit as loosely as possible, test the rib pattern and tensions.
If using only the coupled knit and ribber carriages, the first preselection row is made toward the color changer from right to left, the dark color knits first.
Needle pre-selection changes serve as guides to both color changes and to carriage setting changes on the ribber.
After every other needle preselection, the dark color knits with the ribber set to knit.
When the needle preselection changes to the alternate patterning, the color is changed, the ribber is set to slip in both directions. The main bed only will knit, in this instance, for 4 rows each time.
After every other needle has been preselected again, the color is changed to dark, the ribber carriage is set to knit in both directions, the process is repeated throughout.
I used a modified KC sinker plate and a second knit carriage selecting needles as shown in the 2018 post
A possible alternative for casting on a finished piece:
cast on every other needle rib from right to left
knit 2 circular rows, followed by an all knit row, the carriage will be on the left side once more
transfer all ribber stitches up to the main bed, bring up the desired needles on the ribber to pick up loops for new stitches before the next pass, with the first and last needles in work on the ribber.  Read the first row of the pattern, cam set to KC1 to ensure end stitches are knit when patterning occurs only on the top bed.
Knit to the left.
The first stitch on the left may need to be filled picking up a ridge from the stitch above it to form properly.
The knit carriage is now set to slip in both directions and knitting continues as described previously.
Once a pattern is set up, the same design can be explored in different ways.
Here the swatch was knit in a single color with the ribber set to knit in both directions on every row.
Because there are many more rows on the ribber knitting than on the main bed, the vertical line created by its stitches is not smooth and is forced up at the top of the piece, creating a wavy edge. 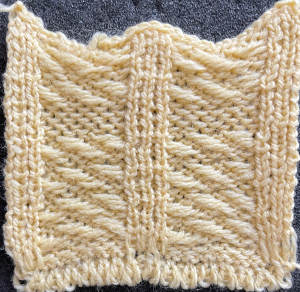 The cast on was deliberately loose. To tighten it up at the edge of the body of a narrower knit, every other loop can be picked up with a latch tool or crochet hook moving toward the yarn end at the cast on edge and is pulled through the previous one, producing a chain stitch. When the end of the row is reached, the yarn is pulled through the last chain and secured.
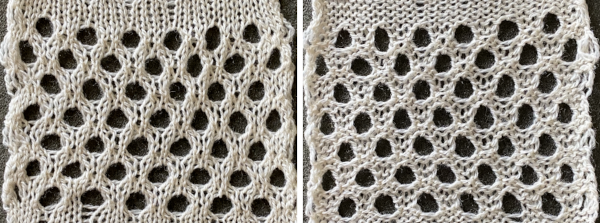
Large scale mesh, a punchcard repeat adapted for electronic
Previous posts including fabrics in this family:
2011: Large-scale mesh, breaking the rules
2013: Large eyelet lace, hand transferred (or not)
2020: Revisiting large eyelet lace, hand transferred (or not)
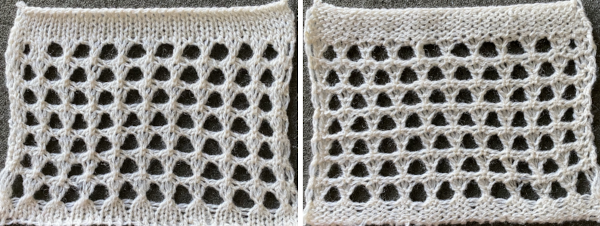
This was the punchcard provided in the first post, knit with 4 passes of each carriage, the knit carriage set to tuck in both directions  Brother punchcard machines do not advance pattern rows when two carriages are used for needle selection as each carriage begins to move from the opposite side, the same preselection is repeated. This means editing is required at times if the same designs are to be used on electronic machines, particularly true in lace combination fabrics. The process has been discussed in posts on automating lace edgings with slip stitch settings.
End needle selection is canceled in both carriages, if any end needles are selected prior to a lace carriage pass, they need to be pushed back to B position manually in order to avoid transfers resulting in decreasing stitch counts or dropped stitches.
All versions proposed below share transfers that result in 3 stitches on a single needle, with two empty needles on each side of them. Here the needles are preselected for the next pass which will begin to fill in the double space, the needle in D position will knit, the one in B position will tuck; 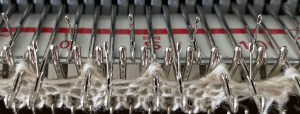 this is how the yarn is laid over those 2 needles after the first tuck row is completed,
 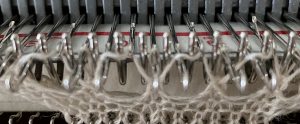 and both when using the card and in the first electronic repeat there will be a third tuck loop that is laid over the needle holding the 3 stitches. This is the appearance of the stitch formations just prior to an all-knit row
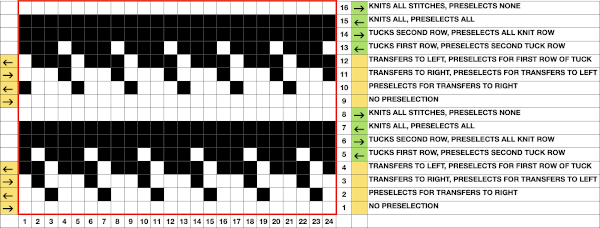
 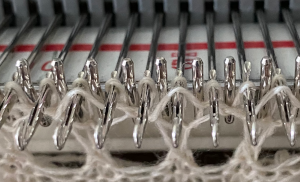 Here analyzing the actions of the punchcard, marking rows according to card actions, the repeat is expanded to include the extra duplicate rows. Though the repeat remains 24 stitches wide, it is no longer usable for use on a punchcard machine.
  For knitting on the 930, the design requires flipping horizontally in order to knit properly.
![]()
 The third tuck row may be eliminated to produce an extra all-knit row, resulting in a slight difference in the shape of the eyelets

![]()
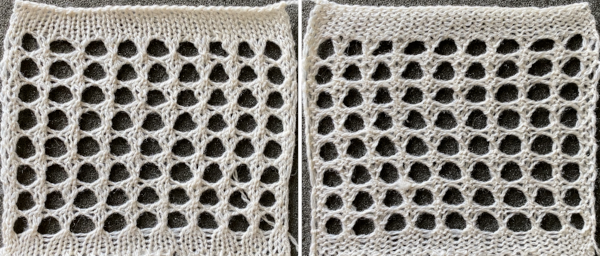 Lastly, the repeat may be amended with extra stitches and rows between each eyelet
![]()
Unconventional uses for punchcards 3: lace in rib
Lace patterns for drop stitch: cast on as preferred, transfer MB stitches to ribber, where all stitches will be knit on every row. The main bed will be knitting the stitches that will be dropped (lace carriage will not be used), cancel end needle selection, program your repeat, push in both part buttons. As the carriage moves across the bed selected “lace” pattern needles will knit, the non-selected will be skipped.
Continue to knit until no needles are selected. At that point disconnect the main bed and ribber carriages, change the setting on the main bed to knit, remove the yarn from the feeder, bring the knit carriage alone across for 2 rows, and stitches will be dropped. After the disconnected carriage is returned to the opposite side, rethread, and connect again to the ribber carriages, set the knit carriage to slip and it once again will knit selected needles. Repeat the process for the length of the swatch. If on an electronic machine with 2 carriages: the number of rows is usually an even number, so an additional knit carriage with no yarn could be positioned on the opposite side to the one selecting pattern, set to do plain knitting, holding no yarn, and it will drop the stitches on “plain knit rows” on lace card without requiring the other additional steps and cam button changes.
Transfer lace on the top bed: the question periodically comes up with regards to the possibility of using the lace carriage when knitting every needle rib fabric. The lace carriage does not operate with the ribber bed in use in the standard up position, there is not enough clearance between the beds for it to travel from one side to the other across the needle bed. It is possible to drop the ribber down one click, opening up the space between the beds, supposedly to allow for the use of thicker yarns.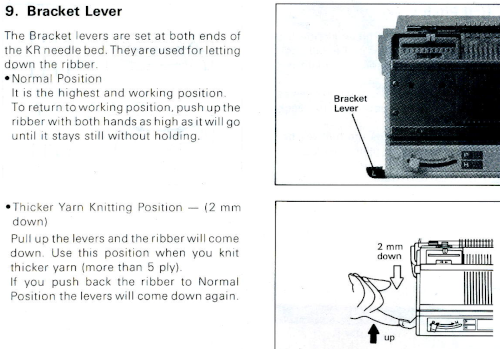
My machine is old enough for the ribber to be bowed in the center, increasing the space between the beds there. Trying to use that position for every needle rib in my desired yarn I got yarn breakage in the center of the bed, some skipped stitches, and the sides of the needle bed were still up too high for the LC to have a clear passage. The problem appeared to be due to its brushes hitting the gate pegs. With the brushes removed, but with some grinding against those same gate pegs the LC was able to move along the top bed. 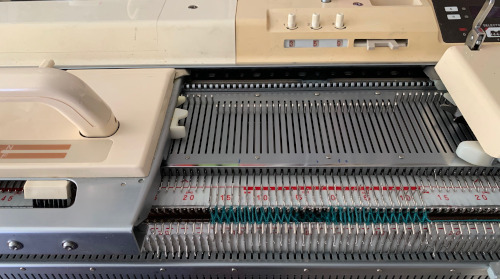 At least on my machine, I am giving up on the idea of using it, even if only to preselect needles, let alone make transfers.
This page is from the Ribber techniques book. The fact that transfers are broken up with blocks where there are no transfers, including some with stitches transferred to the opposite bed, makes it easier to track transfers than if using all over designs. Standard pronged tools are sufficient to move the single stitches or groups of three. 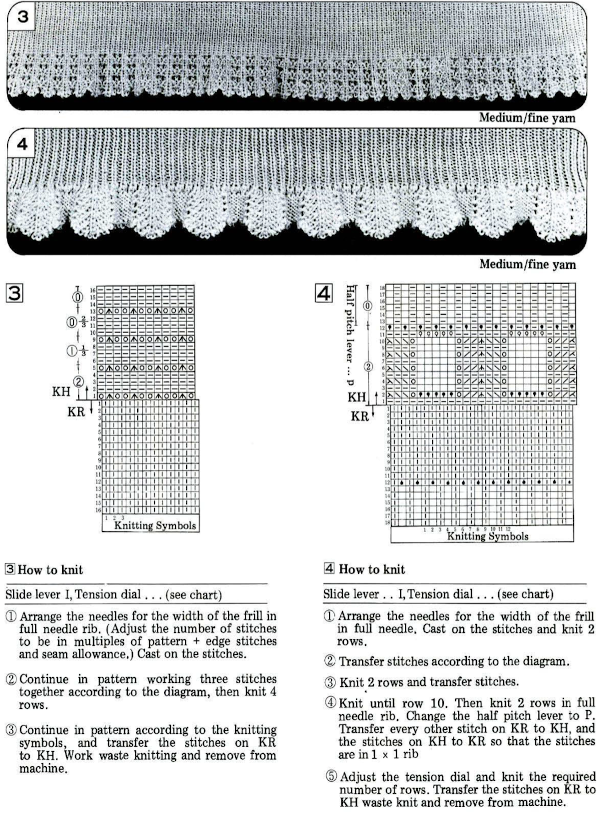
It is possible to transfer larger groups of needles on the main bed to create lace patterns, done of necessity in two-color brioche, but here I am seeking to modify lace punchcards so that the fabric based on them may be created successfully with as few errors and dropped stitches as possible.
My first attempt was made using a second knit carriage set to slip in both directions to preselect needles for transfers, using a small lace repeat to test the idea. The advantage of this method is that the original lace repeat does not need to be altered in any way. The disadvantage, aside from requiring a second carriage to use, is that the width of the piece on the machine is limited. The ribber carriage is in use and needs to remain at least in part on the machine bed on the far right, limiting the number of needles for possible use on the right side of 0 to about 20.  The same work could be done using only one knit carriage as well, but that would require changing the cam buttons from slip in both directions to knit and back to slip at the appropriate points, one of the methods that make it possible to knit lace on the 260 bulky machines
The repeat used is for this swatch is from StitchWorld, and is knit using the second knit carriage for needle preselection. Because each block contains lace transfers in only one direction, the fabric, even though it is a rib, reflects that in the biasing first in one direction, then in the opposite.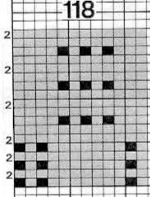
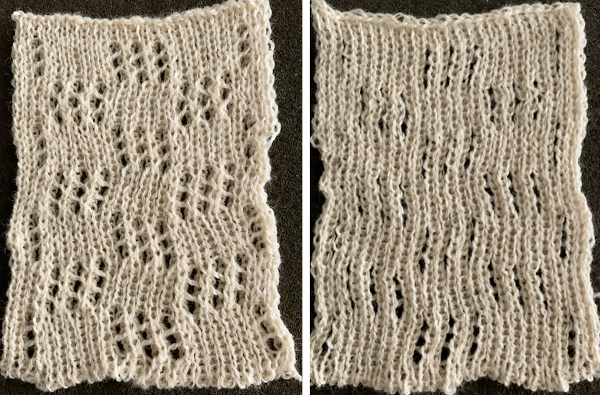
It helps to be clear as to whether one is producing lace repeat for use in a punchcard or an electronic model which in turn will require mirroring, such as when using Ayab or when using slip stitch selection with the knit carriage in combination with lace carriage selections to create shaped lace edgings. Testing on a small swatch will help determine whether mirroring is required for any specific design. Electronic machines usually produce the design as seen on the knit side, punchcard machines as they would be seen on the purl, thus making mirroring a requirement depending on the source for the design.
I usually begin by modifying my chosen repeat in a spreadsheet. On the left, the pairs of blank rows in the original repeat are temporarily colored in grey. It helps to be consistent. One repeat begins with a full motif, the other with half, which can be confusing when first starting out. The plan is to begin by producing a trim or edging, an all-over pattern for significant lengths appears daunting. Dropped stitches in single bed lace are no fun, in rib they may not even be noticed until the knitting is off the machine. The difference between the two repeats: the 2 grey rows on the left are replaced by black pixels or punched holes, with a blank row placed above and below each of the black row pairs. The design is now expanded from a 40-row height to a 50-row one suitable for use in a punchcard machine 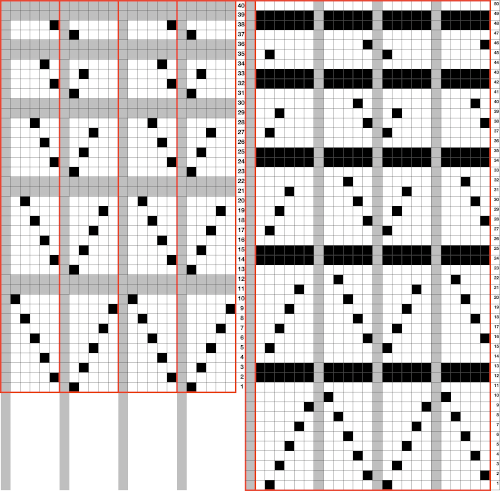 This explains some of the desired knitting actions
 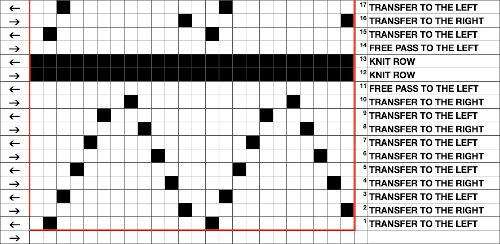 Using the method described in other posts, this was the screengrab imported into Gimp. The grey line is a reference point. Cropping the image to content will allow the last blank row to be preserved by having the grey one there. After the crop, it can be bucket filled with white, or when the image is, in turn, bitmapped to B/W, you may find it disappears. Image scale is then used to reduce the repeat for knitting.
  This is the repeat used to knit the swatch in my 930. If working from it, punchcard knitters need to mirror designs from an electronic source such as this and will find it easier to do so by turning the card over, marking the holes that require punching on that side, doing so, and then inserting the card in the reader in its usual orientation.
  The 930 .png:
 ![]() Prior to knitting the pattern using the ribber, it pays to test the repeat single bed to get a sense of where the knit rows occur and to make certain the transfers are happening in the correct direction and in what place on the needle bed. There should be no side by side empty needles, and in this design, the first pairs of transfers result in 3 stitches on one needle in the center of each shape, not side by side holes as seen here in the false start prior to mirroring the image
Prior to knitting the pattern using the ribber, it pays to test the repeat single bed to get a sense of where the knit rows occur and to make certain the transfers are happening in the correct direction and in what place on the needle bed. There should be no side by side empty needles, and in this design, the first pairs of transfers result in 3 stitches on one needle in the center of each shape, not side by side holes as seen here in the false start prior to mirroring the image  Making things work: both carriages will be operating to and from the left-hand side. The process is facilitated by the use of an extension rail and a color changer. The knit carriage alone will operate to preselect the needles that will need to be hand transferred to create the lace pattern. With the following modification of the repeat, all transfers are made moving away from the knit carriage. So if the KC is on the right, transfer to the left, if it is on the left, transfer to the right. The paired carriages will create the two all-knit rows between lace segments. The blank rows above and below the two all punched or black pixel rows are there to return the carriages to the proper, left side to begin preselection for the next row of transfers. If any end needles are preselected on the knit bed, push them back to B.
It is best to knit 2 rows of full needle rib before beginning transfer, that will ensure that stitches on both beds are formed properly. I did not, had a spot on the cast-on where the loops were not properly placed on the comb, and that is reflected in the area that looks like a stitch was dropped.  Begin with a zig-zag row from left to right, knit 2 circular rows, carriages will be on the right. Knit a sealing row to the left, followed by 2 all knit rows, ending with carriages once more on the left side.
COL: remove the yarn from the Knit carriage, hold it in color changer by pushing the adjacent feeder number
separate the 2 carriages
cancel end needle selection
KC is set to slip in both directions, it will remain there for the duration of knitting the pattern, make certain all main bed needles are in the B position
KC operates alone to the right and preselects the first row of transfers
COR transfer preselected needles to the left, away from the carriage. Make certain all needles are in the B position before the next carriage pass. KC will preselect for transfers to the right as it returns to the left side. Repeat the process until all needles are preselected for an all knit row as you knit back to the left
COL pick up the yarn, engage the ribber carriage knit 2 rows on all needles
Repeat: *COL: remove the yarn from the Knit carriage, separate the 2 carriages, operate KC alone making transfers away from the carriage until all needles are preselected as you knit to the left. COL pick up the yarn, engage the ribber carriage knit 2 rows on all needles** until ready to continue in every needle rib.
This method is slow, I found it oddly meditative. It offers an opportunity to review stitch formation, thus avoiding dropped stitches. Hand transferring lace preselection on the single bed as well can sometimes make a fabric achievable that is otherwise cursed by dropped stitches and fiber issues.
Knitting with “unusual” fibers/ elastic 2
My first DBJ tests from a previous post on knitting with elastic. used an axometric shape, with the tentative repeat worked out and in turn, elongated X2 and tiled to check alignment.![]()
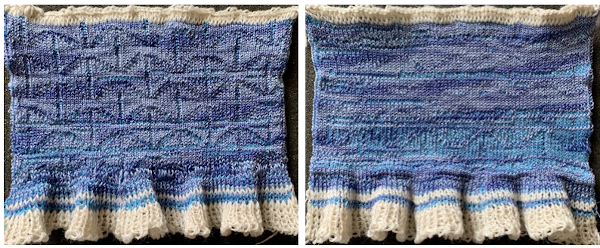
 Until doubled in height the original repeat is composed of an odd number of rows in height. Usually, double bed knitting relying on color changes or automatic DBJ KRC separations require an even number of rows in the motif. The first sample was knit using single-ply cotton and elastic yarns respectively, fed through separate upper tension disks but knit together as a single color. The swatch is 72 stitches in width but measures only 14.5 mm (5.7 inches) in width, producing a gauge of nearly 13 stitches for inch, not achievable when knitting with standard fibers on a standard 4.5 mm machine. The pattern is subtle, more visible on the knit side, hard to tell there are pockets in the knit. The cotton is space-dyed, and as true when using such yarns, that causes some confusion in immediately identifying a clear pattern. The ruffled effect is simply from a plain knit start and color-changing stripes to test tension and knittability on the planned needle width. Machine settings: opposite part buttons, no lili
 Here the same pattern was executed on the same number of stitches with the white wool used above, but the elastic was plied with a 2/24 acrylic yarn and knit as DBJ with the blue, stretchy combination creating the solid color backing.
 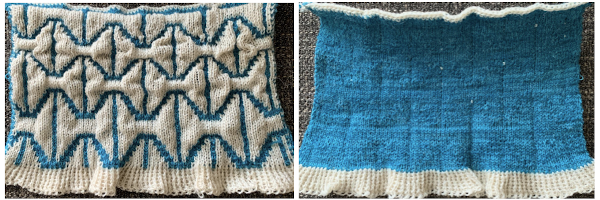 A comparison in scale
 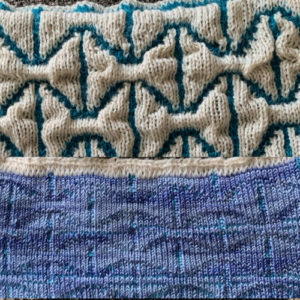 The same pattern repeat knit with striper backing is far less interesting
The solid color backing in DBJ can be produced by changing ribber settings with each color change from N/N to slip <– –> and back. I have sometimes knit DBJ with 4 carriages or with a third, knit-only carriage working the rows normally slipped by the ribber. The sinker plate for one knit carriage is altered as described in the post. The knitting requires that the ribber stops be removed, and that carriage(s) be off the bed on extension rails while the other(s) are in use so as not to damage the belt. The maximum width of the fabric is limited by the necessity of having the knit cleared on both sides with all carriage passes.
My mongrel setup includes a 930 bed, an 892 punchcard carriage with a magnet attached coupled with the 850 ribber carriage, and a 910 carriage with the modified sinker plate. As a bit of possible disaster prevention, the knit/ribber combo has an elastic to ensure the ribber stays on its own bed as well, while I grabbed extras to help support the rail on the other side just in case the 910 carriage went too far. 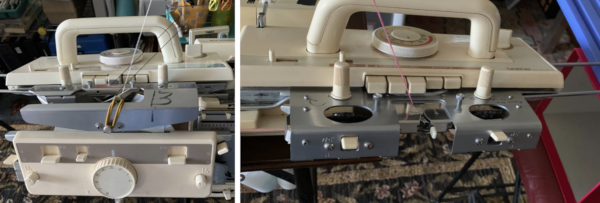 Because when using the KRC separation the white squares knit first, I planned the repeat for 64 stitches color reversing the repeat used the FI and thread lace samples in the previous post.
![]() to this,
to this,  I used a 2/18 wool at tensions 3/3 for the backing fabric and two strands of the elastic with no added changes to its yarn mast tension, at tension 7 in the single knit carriage.
Using this method of DBJ, which is the same as that used in 2 color quilting, when the ribber and knit carriage both knit, the fabric is sealed where there are needles selected on the main bed. When the ribber is set to slip in both directions, or the method here is used, the main bed only knits selected needles and skips the nonselected ones, creating floats and pockets in the fabric in those areas. 
 The appearance of the fabric when stretched and weighted, still between the beds
  and off
  Going the far more traditional route of traditional dbj with the use of the color changer, striper backing with the ribber set to N/N yields a wider, flatter fabric with an interesting purl side
  while my very brief effort at attempting to knit with one side of the ribber set to knit, the other to slip, met with immediate dropped stitches by the elastic.
  The birdseye version had more of a bent on
 the surfaces of both colors. I stopped knitting when a few of the elastic stitches on the left purl side dropped off. It would appear at this point that the most interesting effects in the simplest to execute DBJ setting are ones with balanced positive and negative spaces in the design.
Previously I used the repeat on the top left, also shown tiled. The subsequent swatch was knit using the bottom 66X22 tiled repeat, planning to start KRC preselection from the left on a white square, the ribber set to N/N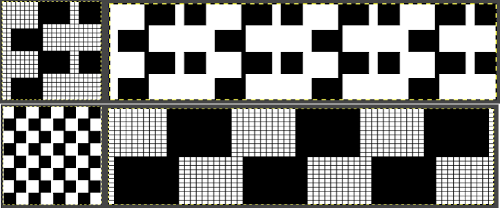
![]() I found the fabric attractive on the purl side, but I was having issues with dropped stitches I could not explain that would need sorting out if producing larger swatches.
I found the fabric attractive on the purl side, but I was having issues with dropped stitches I could not explain that would need sorting out if producing larger swatches. 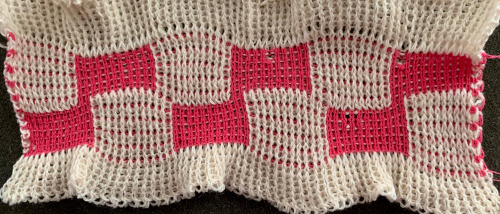
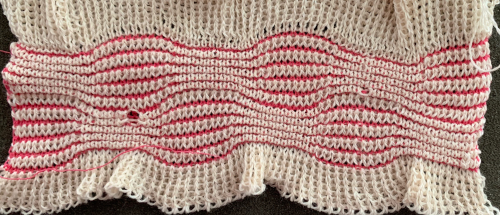 Adding a third ply of elastic was disastrous at any tension. Better results occurred simply by increasing the ribber tension by 2 whole numbers, the knit tension by 1, and reverting to the previous yarn usage. There is a single dropped stitch in the elastic, and the result has much more of a 3D effect.
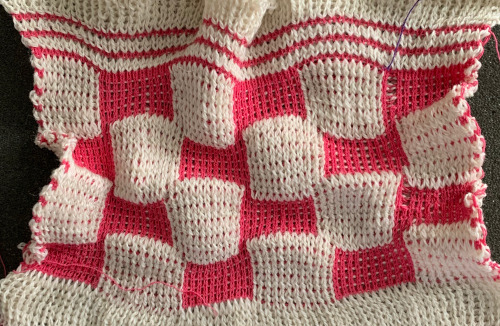

Geometric shapes on ribber fabrics with tuck stitches 2; knitting with 4 carriages
When switching between N/N and tuck/ tuck on the ribber it is not necessary to switch the tucking lever from its up position to the lower one. The ribber will knit every row when used in either of these settings  It is possible to knit this type of fabric using color separations such as those seen for one type of DBJ where color one for each design row knits 2 rows, followed by color 2 for corresponding design row also knitting for 2 rows. Each color may be drawn and programmed once, followed in turn with elongation X2 on both punchcard and electronic machines. I prefer to work with the elongated images, believing it makes it easier for me to correct errors or knitting problems, should they occur. This color separation is the default on Passap. In Brother electronics, it would need to be hand done and programmed. It is best to start with simple shapes. This triangle series has been used in several of my previous posts. The chart shows the transitions in the process
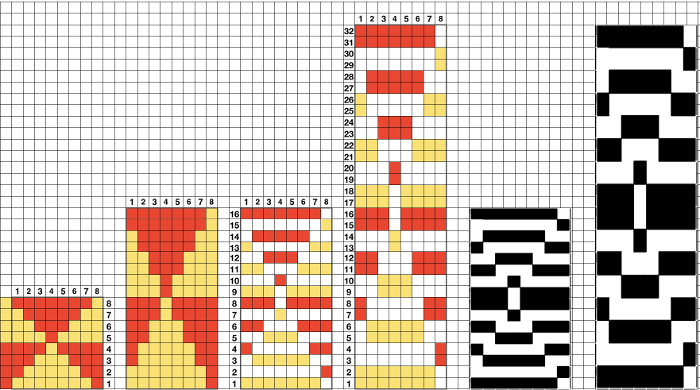
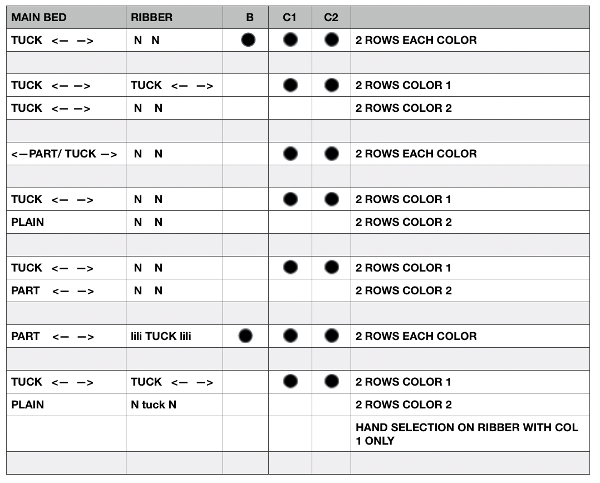
Brother DBJ settings using tuck on either bed, not addressing hand needle selection on the ribber for the production of reversible fabrics. The yellow color highlights cam settings that require changing by hand for every other pair of knit rows and making the changes with each color change. With the exception of the bottom 2, the same settings were used in some of my brioche variation experiments. 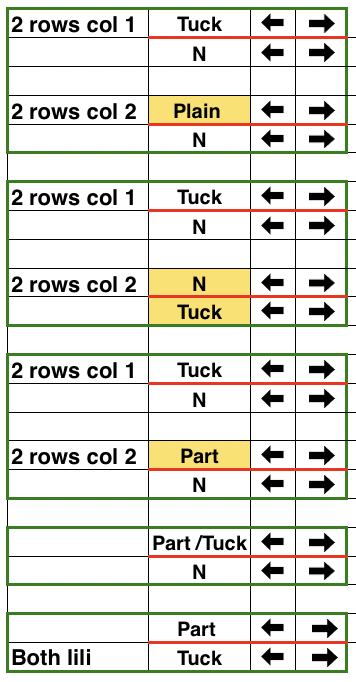 The resulting fabric, knit in reverse order from the chart (top setting down to first). The dropped stitches happened when I did not notice the ribber weight was resting on the floor, with no resulting weight on the fabric. There are single repeats of each motif.
 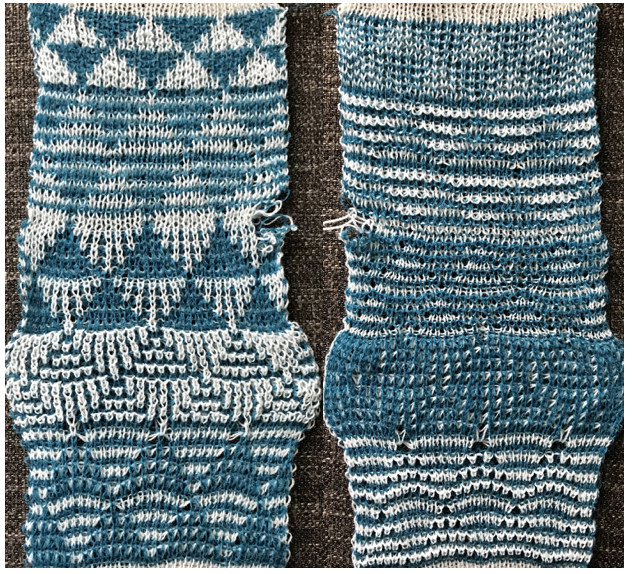 Two more possible DBJ variations
A full range of DBJ variations of the same repeat, including ones using slip stitch and shared in a previous post, executed in both one and 2 colors 
 Passap knitters have the option of arrow keys and stitch type on the back bed that makes fabrics possible with ease that is daunting to reproduce on Brother machines. There is a category search on my blog that will lead to a collection of posts on the topic of knitting with 2 carriages selecting patterns.
I have often considered the possibility of using 2 coupled knit and rib carriages for some of my patterns but found it limited knit width because of carriage stops on the ribber bed, the unwillingness to have my ribber carriages fly off the bed, and the added limitation imposed when both carriages are selecting needles. Now that setting changes were required every 2 rows on the ribber I found a solution of sorts. It is one of those try at your own risk tips, but for me, it made several of the last swatches in brioche achievable far more quickly and accurately.
Brother ribbers have a stopper pin on each end that will not allow for the ribber carriage to move beyond a fixed point or to be removed easily, requiring tilting the carriage forward to do so 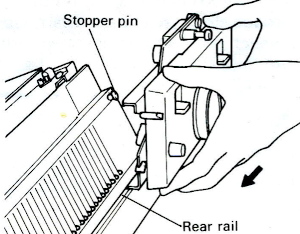 I have long ago removed both of mine. As in any knitting with pairs of carriages, when needle selection is happening from opposing sides, the turn marks need to be cleared on each side of the machine as the opposing carriage begins to move across the needle bed to avoid breaking the belt.
 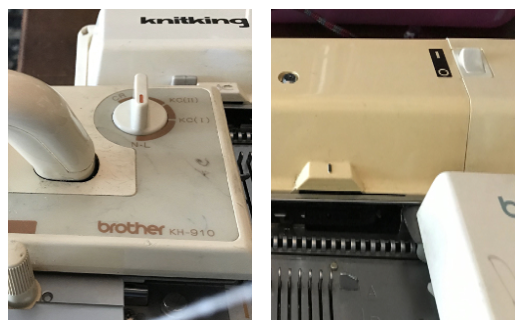 I happen to be knitting present swatches on my orphaned 930, which still knits producing interesting sounds. It came with no carriages. I am actually using a knit carriage from a 910 and one from my 892E punchcard machine, with a magnet glued to the proper location facing the rear rail. I removed the stopper pins from either side of the ribber bed, placed lace extension rails on both sides as well as the color changer with all change buttons released as seen in this illustration. On the left, as the carriages move beyond the end of the needle bed, the return signal lever is tripped, making a characteristic noise. At that point, the turn mark on the left has been cleared, and it is safe to operate the carriages from the right toward the left
The right side of the machine is more problematic. The extension rail will store the knit carriage safely, but the ribber carriage has to move out enough so without its stop it would fall to the floor. My solution was to jerry-rig an extension at the appropriate height so the ribber carriage could slide out as much as needed while being supported. I was able to knit the hundreds of rows required for many swatches with no problem other than operator errors. Here the pair of carriages on the right are seen resting far enough off the machine to clear the belt, at an adequate height for them to slide off and on easily. At first, I secured the connecting arm to the connecting pin with an elastic “just in case”, but that proved unnecessary. 
I have been asked lately about the lili setting used in all my ribber carriage illustrations (center position). I tend to use that as a default to prevent errors and for consistent quality in my ribbed fabrics, especially if matching gauge ie in garment pieces or bands are needed. That said, for the carriage to travel far enough on the right in this setup, the slide lever had to be used on I. The plastic tray helped reach the appropriate height and made for easy slide off and on. There are a few minutes of maneuvering when setting up the first selected row. As always it is good to begin with familiar yarn and previous experience with double bed fabrics.
Some of my own operator errors are due to the fact that I still am not used to the fact that the 930 appears to revert to factory defaults with each new design entered, that I have to remember to switch from isolation to all over, that the image is reversed on the knit side like on punchcard machines unless the reverse key is used. I spent decades using the 910, where once the selections were made and once the pattern variation buttons were set, that became the default until buttons were changed for specific applications.
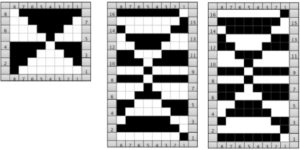
Double jacquard motifs in multiple styles, shapes, and sizes may be knit with variations in tuck settings. My post on a-return-to-brother-ribber-and-dbj-settings/ reviewed many of the possible cam configurations as well as working with multiple and even altered carriages. Passap machines have the added benefit of far more patterning than Brother on their back bed, the equivalent of the Japanese ribber. I am still obsessing over 3D folding effects, racked herringbone is back on my mind, as well as tuck ribber settings on Brother if one is willing to hand manipulate needle selection. I have been browsing through some of the directions in Susanna’s book again. For anyone unfamiliar with it, it was published first in 1986 and is the ultimate textbook on knitting fabrics on punchcard machines. It predated most electronics. Susanna continued to write for magazines and later addressed electronics in those articles and in her teaching lectures and workshops. This shows the cover of the paperback version. 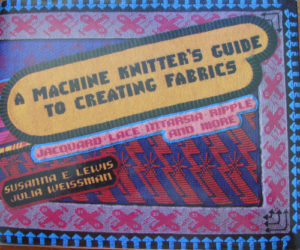 Over the years as many folks have written on DBJ, the separations have been named with some variations. In Susanna’s book, the original design is referred to as punchcard type A, the KRC separation built into Japanese machines is classified as Type B. This image shows the now-familiar series of triangles used in many of my blog posts on DBJ including at the start of this one. It is illustrated as the original repeat, then the separation is shown with either color represented by black squares. One of the peculiarities of this separation is the single-row color start. One may choose whether black squares or white squares knit first based on the pattern itself rather than simply on the convention in their specific machine brand. Color reverse in electronics is easy, but the function cannot be combined with KRC. It can easily happen if the separation is completed in software, prior to downloading the final repeat and knitting it. If a punchcard is used, simply exchange positions for each of the 2 colors in the color changer and follow the usual sequence. Designs must have an even number of rows.
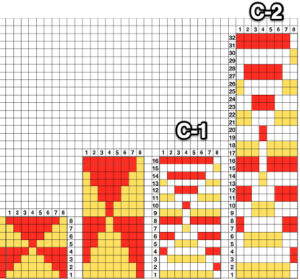
  Susanna classifies the subsequent separations as C1 and C2. Because each color in each row knits twice, there may be an odd number of rows in the initial design repeat.
  I am often asked as to why a type C1 or 2 separations would be a boon to fabrics made on Japanese machines. The options for new settings and resulting variations in the knit surfaces on both sides is increased many times over. These are some of Susanna’s suggestions for using the tuck setting in DBJ and begin to illustrate the point.
Revisiting knitting with 2 carriages single bed, 910 vs Ayab so far
The question has often been asked as to why knit with 2 carriages. For me, it became a personal favorite for knitting fabrics requiring color changes every even number of rows. I tend to push the limit with materials and found the Brother single bed color changer to be quirky. When using 2 KCs there is no pushing the wrong button for the proper color in the sequence, or accidental choosing of an empty slot and dropping the knitting. Some of the loops at the color changer side edge or yarn getting caught in wheels or hooks are also eliminated. Each carriage can be set for a completely different function from the other with no manual cam button changes ie single color knitting vs FI, its own tension depending on desired effect or fiber (ie striped shadow pleats), etc. Floats along the vertical edges of the knit as a result of the striping happen on both sides rather than all on the color changer side. The principles apply when using the lace carriage and combining it with tuck, slip, or FI settings in the KC. If one is following a published punchcard pattern for such fabrics, frequently there are guidelines as to when to change colors, but no explanation as to why the cards are punched the way they are, so understanding what happens enables one to interpret directions for electronics. When going from published 2 carriage punchcard machine repeats to electronic, the repeat needs to be adjusted to compensate for the change to row by row selection. In punchcard machines, the needle selection does not advance when you switch to operating the carriages from the opposite sides, so the pattern for those rows knits twice.
Many of the stitch world books seemed more concerned with larger repeats than with some of the more labor-intensive, specialty fabrics. The punchcard books, now downloadable for free are worth having and studying no matter what your machine. They do need to be brand specific. Studio and Toyota ones may be used, but adjustments may have to be made in terms of starting rows or even flipping the card over vertically. Download links for punchcard patterns, with symbols used and pattern samples, can be found in my previous post
I have added a new category to my sidebar to make this topic search easier: Patterning with 2 knit carriages. Included are color separations for some fabrics suitable for this method of knitting.
I am presently knitting my samples on an altered 910, using an EMS kit purchased last December. I have had selection problems related to my hardware, but some of the 2 carriage operation or lack thereof has been evaluated and duplicated by others. My successful experiments with 2 single bed carriages selecting so far:
Lace and slip stitch: both carriages selecting in their usual positions
2018/03/05/lace-edgings-on-brother-machines/
Start with 2 knit rows in a programmed pattern
with KC on left, preselect to right, set to slip <€” €”>, knit first 2 all knit rows, ending with KC on right, proceed with selection with LC on left
Will not work if the pattern is adjusted so KC knits the first 2 rows and parks on left, with attempted use of LC from the right. LC will not select.
Operating LC with KC plain knitting (no pattern selection) may be done with LC selecting from either side, with repeat adjustment 2018/03/05/lace-edgings-on-brother-machines/
Lace and weaving:
2018/01/02/lace-punchcards-meet-ayab/
both carriages selecting in their usual positions
Lace and tuck stitch: the fabric worked out for use with mylar sheet
Ayab actions for carriages, use LC on left, KC / tuck <– –> on right
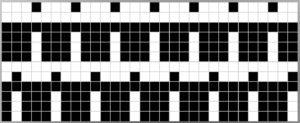
 a charted ayab repeat for my swatch
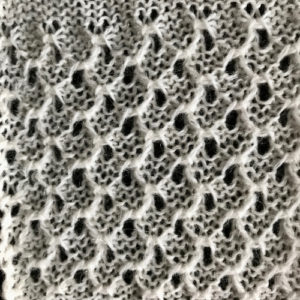
I came across this image on a pinboard, and imagining the possibility of knitting it led me back to a previous post illustrating a similar stitch structure, knit on an unaltered 910. The pin:
 working out the first repeat in the blog post
The swatch (sideways view) shows the repeat as illustrated in the upper segment of the above chart, and then lengthened X 2, with color changes every 4 rows (the length X2 is not presently an available action in Ayab)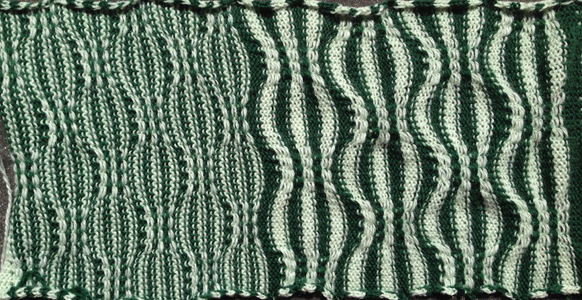

In the past, when I tried to knit with 2 KCs, one on the left and one on the right, both selecting needles, I was unsuccessful, but in light of the above experiments, I decided to test the idea with the RKC (the one that would operate from the right) selecting and then knitting the first 2 rows of color, in turn resting on the right side. I then operated the second KC from the left, alternating carriages every 2 rows. Knitting at a slower speed and moving each carriage perilously far out on the extension rails did the trick.
To use the repeat in Ayab, in order to keep the proper color sequence, the last design row is shifted down to row 1 position. There is an error in the repeat, marked by arrows I did not notice until I had completed the swatch. The repeat may be used as is, and color reversed via action inverse in Ayab, or color reversed prior to loading the image, which I chose to do personally. 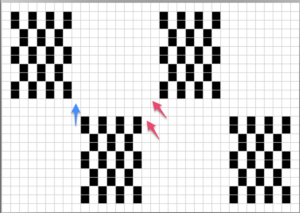
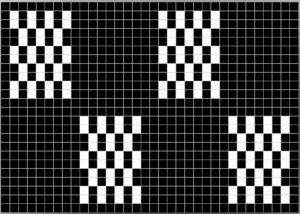
This is grabbed from the ayab screen: the knitting is actually mirrored automatically by the software, so what is shown onscreen is what appears on the knit side of the finished piece. Something to keep in mind in situations where placement and direction might have some importance. 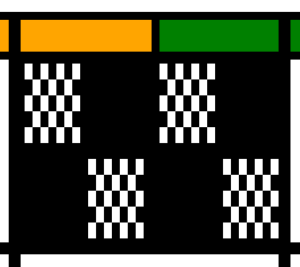
Things to notice in swatch: as already mentioned, there is an error in the repeat in terms of my intention. Placement for the slip stitch blocks could certainly be planned for an asymmetrical effect, varied in size, and more. Slip stitch produces a significantly narrower knit than the stocking stitch. That would need to be allowed for were the stitch to be used in a garment or gauge dependent knit.
Examining the purl side of the knit, which is facing as one machine knits: the intentionally dropped stitches at the start on both sides are there because I had cast on extra stitches that were outside the parameters of the programmed repeat width. The left side edge, next to LKC (left knit carriage) is visibly shorter than the right. The two yarns used were of different thicknesses but knit at the same tension. The LKC would have merited from a looser tension, and an edge weight on the very last stitch on that side would help with adjusting the length the white edge €œfloats€ from one color change to the other as stripes are created. The handling of side floats in striped knitting is dependent on the row height of such stripes. 
There are a great number of interesting ribber fabrics that can only be knit by manually changing the ribber settings to slip in both directions, so that the main bed only knits for X # of rows, with the ribber carriage periodically set to knit again. If the function happens for an even number of rows at a time and in both directions, the sinker plate for the KC may be altered for use with the ribber in the up position, to knit the main bed stitches only. Its change knob should be set to KC I to ensure that the first and last stitch is knit. I knit this sample using the altered KC selecting from the right, the KC engaged with the ribber sinker plate selecting from the left. I will address the altering process and steps involved in the knitting in a separate post. 
Lace edgings on Brother machines- automated with slip stitch
I wrote this post (unaltered) in March 2018, returned to the topic of automated lace edgings on Brother machines in July 2020. As often happens after some distance, details may be freshly observed or seen in a different light, and approaches then in turn vary or change.
Some of these edgings have been reworked, and new ones added in subsequent shares.
My blog posts include my notes as I work through concepts, not every chart represents a successful repeat.
As of this year (2020) I no longer own a 910 or an Ayab interface, so I am unable to provide further tested revisions or advice on their use.
The edgings outside this post were knit using img2track, but the same repeats should work in the 910 with Ayab with adjustments for starting row and mirroring.
At some point in time I began to include pngs as well as charts for my designs, they will be added for these trims as I review content.
A reminder: although I make an effort to include punchcard knitters in my writings, the 24 stitch repeats shared and used for my swatches testing this technique and knit on an electronic, are not suitable for use on punchcard machines. They would need to be adjusted along their full height.
When 2 carriages engage the belt selecting needles as the carriage from the opposite side first comes into use, the punchcard does not advance, selecting the same design row once more.
Many early published trim repeats were intended for use with hand transfers combined with plain knit rows. Such designs may be translated for use on electronic models using this technique.
The initial goal here is to produce a knit fabric using lace transfers in a familiar way, but the knit carriage will now be set to slip in both directions, also selecting needles with each pass.
In routine transfer lace knitting, the KC is set for plain knit, does not preselect needles, or advance the mylar, punchcard, or rows in electronic patterning.
This image, where all blue squares represent knit stitches and white squares unworked ones, is the start of planning it to produce a piece of knitting on the machine.
The initial hand technique approach might be to use a single prong tool to move the edge of the blue in one stitch to the right for a decrease and out one needle to the left for an increase.
When the decrease is made on the bottom curve, the needle from which the stitch was taken must be pushed back out of work.
When an increase is made, an empty needle is moved to work on left, and the last stitch on that side is transferred onto it. As knitting continues, that now empty needle location will create an eyelet.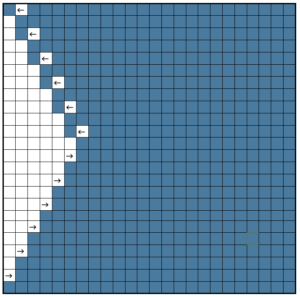 The stitches on the needles at the decreased edge will hold two stitches after the transfers, the ones at the increased edge will hold single stitches after the transfers, producing a different quality.
I decided to “wing it” for the first swatches. This illustrates the same knit shape. Blue rows represent all knit rows and stitches, the empty pairs of rows leave areas to insert lace eyelets in a pattern.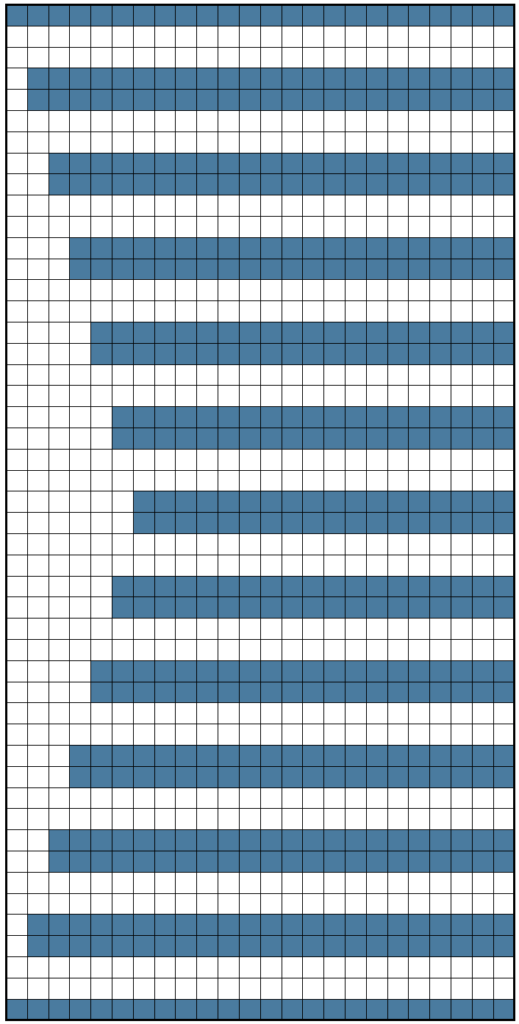 Arrows indicate the movement of the lace carriage on left, knit carriage on right. Red squares now represent transfers to right, green ones transfer to left
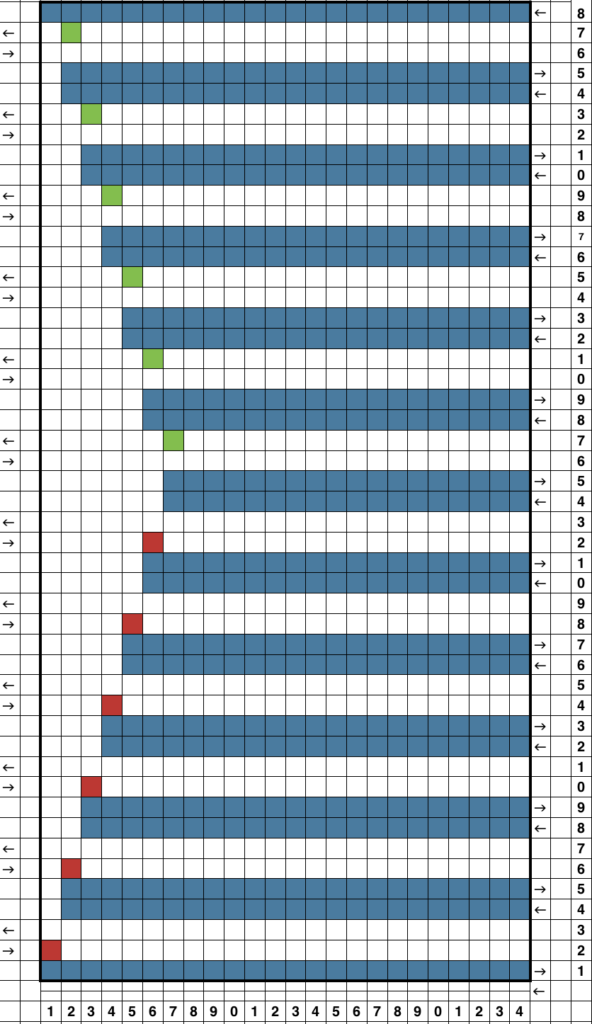 A second transfer to the right is included in the pattern close to the left edge of the trim to create eyelets next to the decreases, matching those eyelets created by stitches moving out in the increase segment of the chart
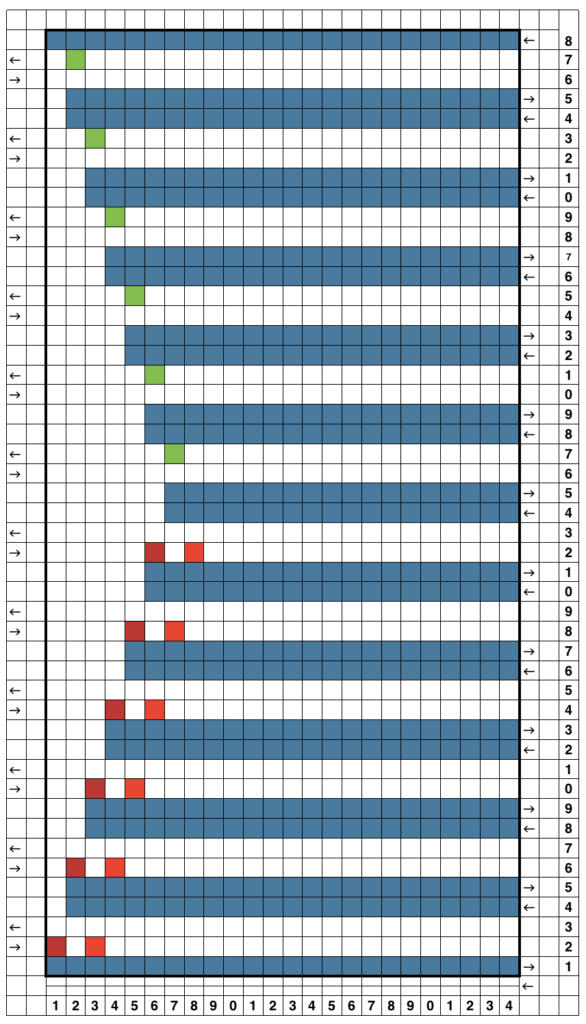 A theoretical series of right and left transfers is then inserted, creating a shape in the center of the trim’s width
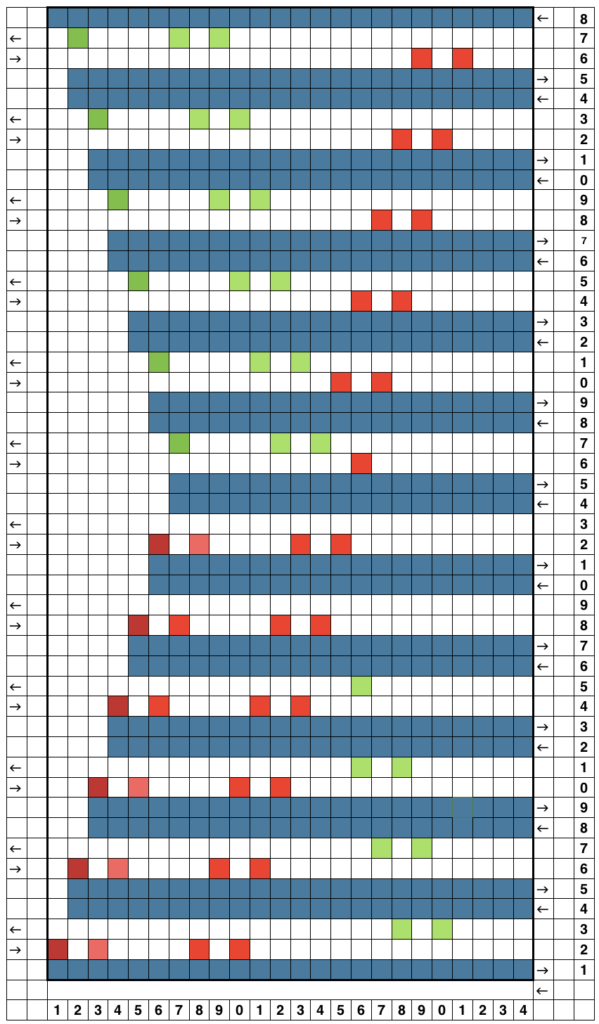 Now reducing it all to black and white squares or pixels for first preselection from right-hand side using an electronic. This repeat is not suitable for use in a punchcard machine even though it is 24 stitches wide. Electronics advance a design row with each pass of the carriage when cam buttons are pushed in and with both carriages set to needle select. Punchcard machines in those circumstances do not advance when the alternate carriage is brought into work from the opposite side.
This charted repeat and any designs beginning with a single row of black pixels are usable as shown on an unaltered910 using a mylar, or download programs that allow for the first preselection row from right to left.
The LC operates in the traditional manner from the left, KC from the right but in the decreasing shape, the transfers begin to the right instead of the traditional left. This requires a shifting of pixel placement since the traditional start in published Brother designs is usually with transfers to the left. Planning the repeat in that manner reduces the number of blank rows. 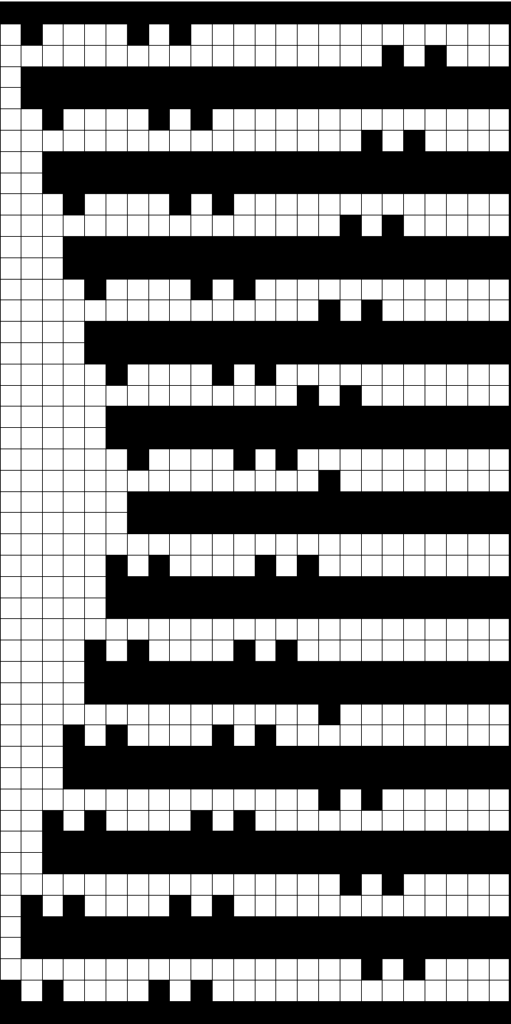 For use with Ayab software two other things need consideration.
Ayab mirrors lace repeats, so either mirror the repeat of the original design or choose action mirror in the software prior to knitting.
This is a screengrab of the repeat used for the initial test swatch.
The designs shared are not always resolved, problem areas are pointed out in proof of concept fails.
The section where the diamonds cross in at the center of the design was altered in the later repeat. 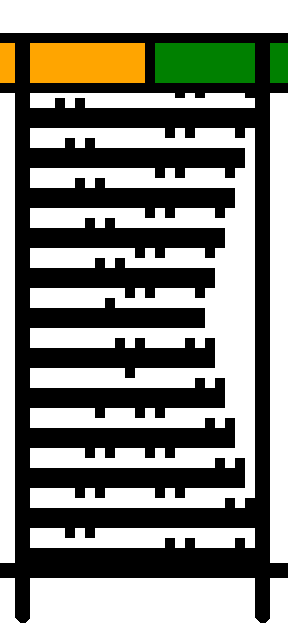 Since the knit carriage in the present Ayab version needs to preselect with the first pass from left to right, and to knit two rows with two more KC passes to return it in position on the right, the top row of the proposed design was moved down to row 1 position, resulting in two rows of all black pixels.
That can be achieved manipulating the starting row count or simply planning for mirroring and black pixel row starts in the DIY png.
Brother preselection can be confusing to new users. Carriages can knit one preselection while concurrently preselecting the next row.
Design rows as numbered in any chart may differ from those on a KM row counter or prompts from software.
To review: the KC here preselects left to right, knits black squares to left, preselects the same needle selection again to knit those same stitches traveling back to its home on the right, creating the two knit rows that in “normal lace” would be worked with the KC simply set to knit.
As the KC now knits the second row, it preselects needles for the first row of transfers, rests on the right
LC transfers to the right as it travels to the left preselects the next row of transfers. As it moves back to left it transfers to left, preselects for first of 2 all knit rows, rests on left
The sequence is repeated until the piece reaches the required length.
In these first repeats where the designs begin with two all knit rows, end needle selection is off on both carriages.
As LC travels to left, because of no end needle selection, the first needle on the right is not selected. An option is to manually pull that needle out to insure it knits. I preferred the chain created by those single stitches knitting only every other row, but was not happy with the elongated stitches on alternate rows edge stitches on the increase side. These would be the carriage actions 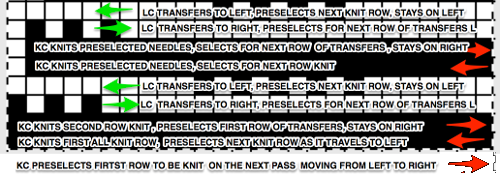 I had a serious yarn tangle on the right about halfway up the swatch, with some of the evidence visible near thecenter of the swatch photo
 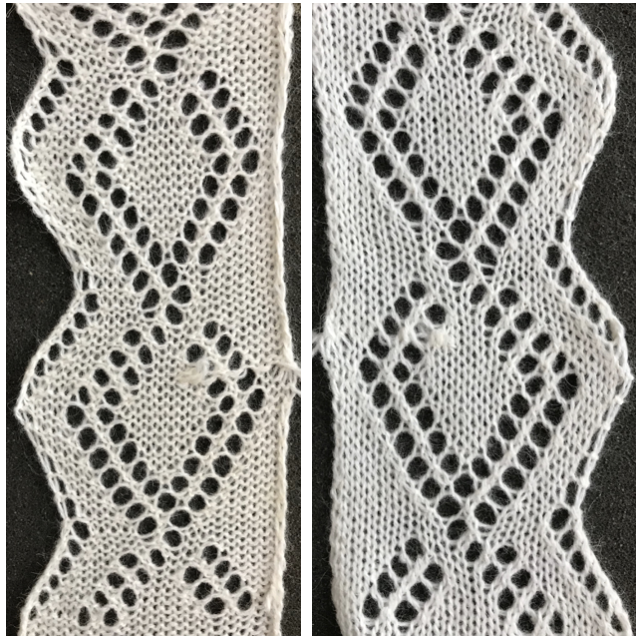 changing that crossing of the diamond outlines, still “winging it”
 My fiber is now crisp cotton, unmarked weight, tension 8, and it is much easier to observe areas that may still be a problem for me as the designer.
Ideally, I would prefer the lines created by the transfers marked in cyan to match the quality of those immediately below or to the ascending part of the diamond on their opposite side, which would require changes in the transfer sequences and space between knit rows.
The LC non-selected stitches on the straight creating every other row slipped stitch is still something I like.
The difference on the edge stitches in the ascending angle is happening because with each transfer out, there is a single thickness of yarn on the new edge stitch, and moving the stitch over a needles space elongates it.
Longer loops are also created when single increases are made by bringing needles into work on the carriage side prior to knitting a row across all needles. In the trim’s decrease edges, the transfers in each new edge stitch have double the yarn thickness contributing to a different appearance, highlighted with magenta arrows. There are 2 rows that have no edge transfers programmed intentionally in the center before reversing direction, so that area has no resulting edge eyelet. 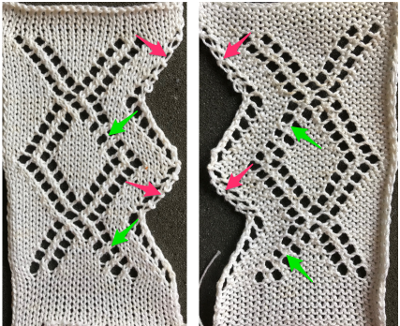 The last shot at adjusting the repeat, with improvement in those cyan, marked areas. Plain knit rows may be added between each repeat, the edge of the knit will be different than in the remaining trim on each side
 Going back to the wheel that has already been invented, how can pre-drawn published MK lace repeats be used instead of “winging it” endlessly or not having the confidence to perform the necessary assigning symbols and proceeding with the required separation? Still trying to work with a pattern that knits for 2 rows, transfers for 2, a chart from Stitch World:
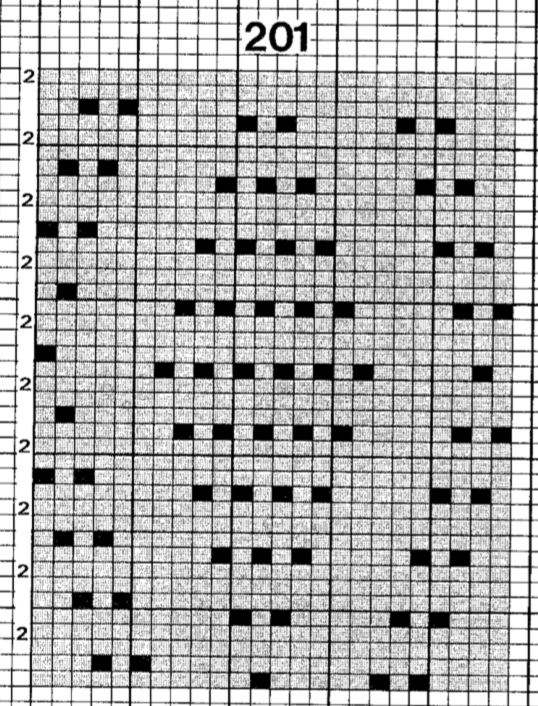 marking the 2 all knit rows that will be plain knit by programming black squares
  The pattern is actually for an all over lace. All the transfers in the central diamond actually are happening in the same direction. If the repeat was programmed in the usual manner, beginning with LC on the left, those transfers on the first design row and in the whole of the center diamond shape would all be to the left. I can live with them all being to the right, and would be interested in more eyelets at the edge of the trim. Here is a new repeat, with the increased eyelets at the curved edge
 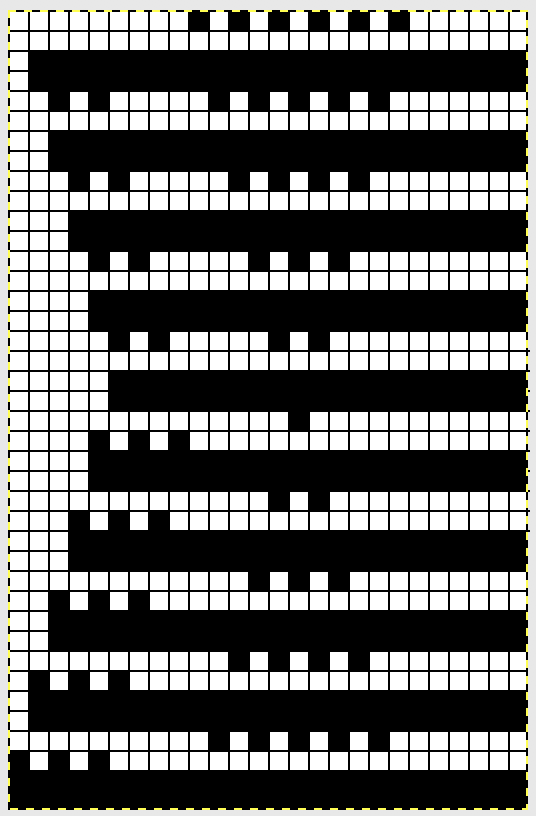 There is a disruption for 2 rows in the very center of the diamond, where no increases or decreases occur on the shaped edge prior to reversing the shaping. It was there in the earlier sample marked with arrows as well, but not as noticeable where the edge was created with the addition of single eyelets on increase and decrease rows.
 For pngs for this reworked, more resolved repeat see Lace edgings on Brother machines- automated with slip stitch 2.
  3/7/18: a lace punchcard repeat with transfers in opposite directions
 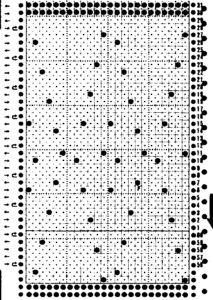 Assigning colors to transfers: red to left, blue to right. In theory the same repeat could be used flipped horizontally for operating the lace carriage from the right. Yellow lines highlight the 2 blank rows in card that will be replaced by black squares/ pixels (remember rules are different for slip and lace in punchcard knitting)
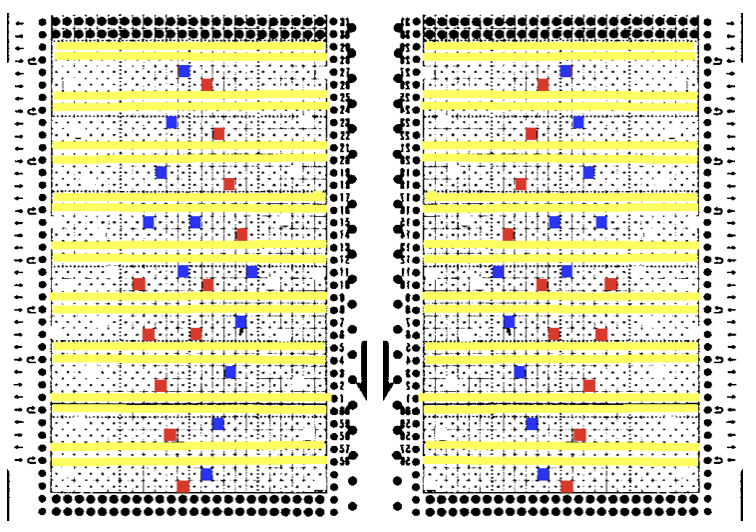 Since the goal is a trim, things are rearranged for knitting to begin on the full 24 stitches
 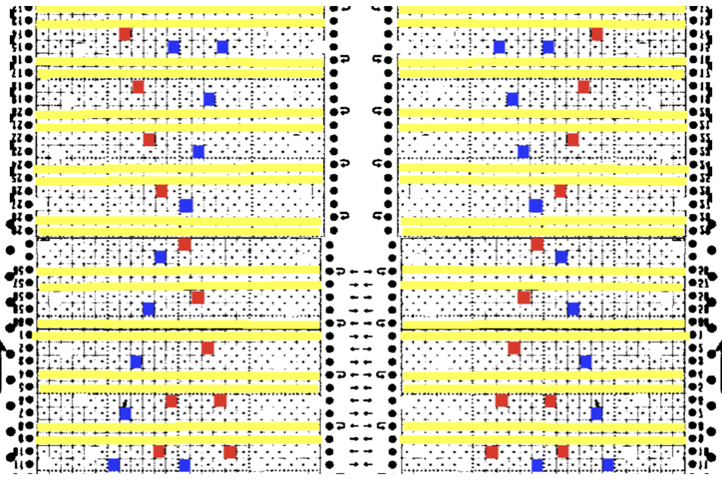 There are 2 ways to get the above repeat to work, one is by adding extra blank rows. I chose to reverse positions for transfers, moving left transfers up one row, and red down one row. With lace carriage operating from the left this is my new repeat, with edge shaping added for trim edge
 KC is set to slip after the first preselection row, first set of transfers is selected on its second pass to the right. The first transfers with the LC are made to the right, the second set to the left. If knitting the repeat using Ayab remember the above is mirrored by the software, so choose action mirror prior to configuring it.
I knit a swatch using the thinner yarn again. The difference in increasing angle can be seen here as well, the pattern is short, so the outer curve of the trim reflects that
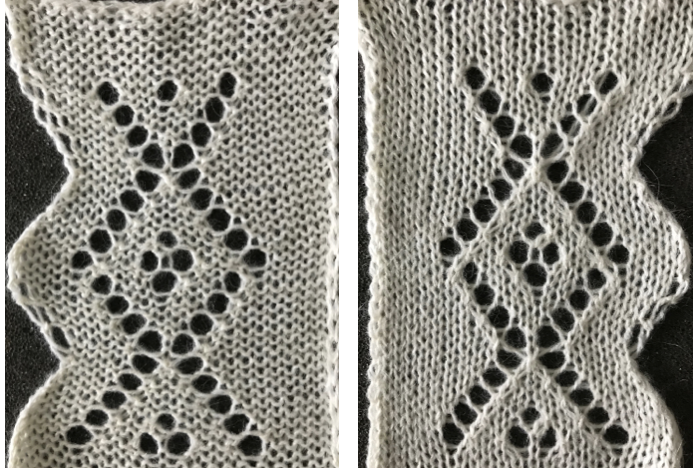 3/10/18: an adaptation of Susanna’s automatically shaped trim for Brother KM, p. 223 of “A Machine Knitter’s Guide to Creating Fabrics”.
This chart shows the first rows of the published punchcard. Please note: using my own lace carriage, when I tested canceling end needle selection, the problem was not solved. Brother setting recommendations made for a similar transfer pattern in an edging published by them, are given and repeat is pictured at the end of my post.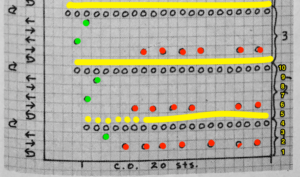 Row 1: LC moves to the right, no needles selected
Row 2: LC moves to left, preselects next row of transfers
Row 3: LC moves to the right, transfers preselected needles to right (red dots), selects needles (if any) for next pass to left
Row 4: LC travels to and transfers to left (green dots), preselects for the first row to be knit by KC In this particular pattern the direction of the arrows match the direction of the transfers with movements of LC operating from left
Row 5: KC from right, set to slip <– –> knits all needles in D position, repeats the same selection as it travels to left (yellow marks)
Row 6: KC travels back to right, in the second shaped knit row, preselects for the next transfers to be made by the LC
Row 7: LC travels to and transfers to right, preselects for next row of transfers
Row 8: LC travels to left, transferring to left if any needles have been preselected on the previous pass, and the process continues
The numbers on the punchcard chart do not reflect actual row numbers in knitting because when row 4, 10, etc is reached, on the next pass (a blank row in the card), the card does not advance and the previous selection is repeated. For each carriage to make an even number of passes to travel to and from its original position, the total length of the repeat must be an even number of rows.
Here is my series of steps in attempting to adjust the 24 stitch repeats for knitting on the electronic.
A for an unaltered 910
B indicating the direction of transfers (red to right, green to left). Arrows mark the problem row, and my solution to it
C on the far right, the repeat converted to black and white pixels, with a single all black pixel row
 Both KC and LC are set not to select first and last needles in the directions. When the decreases start to happen on the left of the chart because the end needle selection for transfer to the right again does not happen in areas marked with magenta arrows, there is an extra stitch that remains on the left that does not get transferred (orange dot) so it is not knit off and simply get held as subsequent rows of knitting take place.
Restoring needle selection in the LC is not a solution for the problem, so the final repeat has been amended by me to get that edge transfer.
The pattern starts on cast on 20, not the full 24 stitches. Ayab knitters: use the LC to begin selection from left.
The first pass will select for a knit row, push those needles back to B, and the LC will select for transfers to right on the next row as it moves to the left. When knitting is to take place there is a clear distinction in the number of selected needles (black squares).
The KC will be set to slip <– –>. Make certain to remember to return the remaining 4 of the 24 total stitches back to B so the full repeat is in work on the needle bed before continuing in the pattern, otherwise there will be needles there to accept stitches moved over for increases to left.
The two extra passes of the LC in this method result in a 2 stitch border on the increasing and decreasing angles of the piece, creating a much nicer edge than that in the samples at the top of the post. The eyelet so close to the right edge stitch which also winds up being slipped every other row made for very messy loose stitches in the thicker cotton that I could not control. The sample did better when I pulled the non selected needles on knit rows out to hold prior to moving across them with KC.
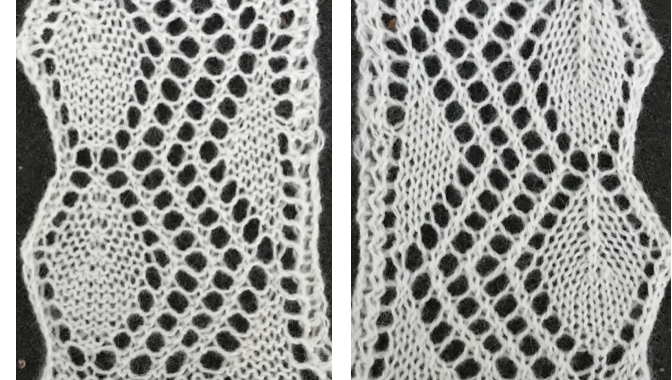 Adding extra stitches knit on the right side of the original repeat made it possible for me to use my cotton again, giving me a controllable edge on that side without having to pull stitches out to make them knit.
To my eye, I find the extra passes with the LC and extra knit stitches are well worth the effort along with planning extra knit vertical columns in the finished piece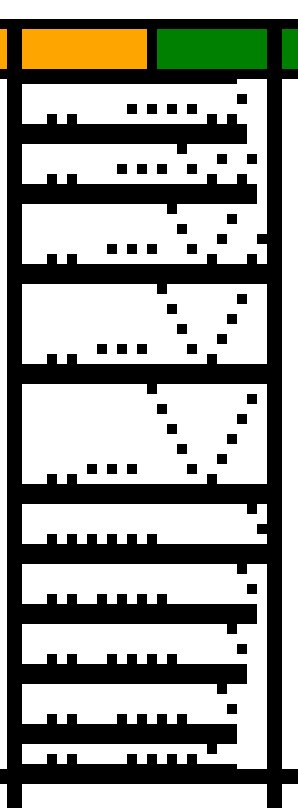
 I prefer to start my repeats on the full width of the repeat, this 24X70 png shifts the first segment to allow for that, still with a single all knit row start, making it suitable for non-Ayab knitting, its png is mirrored as it might be, depending on end use prior to download
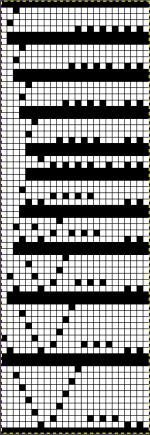
![]() The 26X70 repeat with start at the narrow end
The 26X70 repeat with start at the narrow end 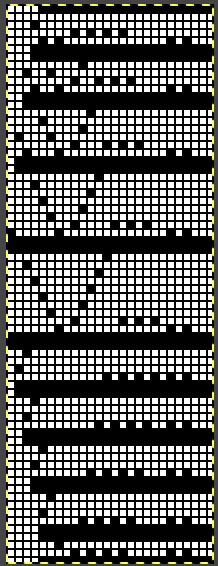 its matching png without mirroring, and beginning on the narrow end of the design.
 ![]() Something to try: I found instructions ascribed to Brother for another version of edging using a pattern that has the same eyelet sequences along the shaped edgings. Their recommendation for a 950i is to remove the non-selection mechanism on the lace carriage, and mention was made of the “rubber wheels on the carriage” being uppermost, allowing the end needles to be selected.
Something to try: I found instructions ascribed to Brother for another version of edging using a pattern that has the same eyelet sequences along the shaped edgings. Their recommendation for a 950i is to remove the non-selection mechanism on the lace carriage, and mention was made of the “rubber wheels on the carriage” being uppermost, allowing the end needles to be selected.
My lace carriage at this writing has fixed, old fashioned brushes, not rubber wheels, and my eliminating end needle selection did not solve the problem with that single stitch in the center of the repeat. And if there is not enough to keep track of, this also combines fine lace and traditional transfer lace, would work fine as just lace.
Many patterns recommending switching between fine fine transfer lace and traditional can be attempted without switching settings, as all transfer lace.
In fine lace, stitches are shared between two needles, the technique is sometimes referred to as half- lace stitch. Any resulting eyelets are significantly smaller, and the texture created by the partial transfers is subtle 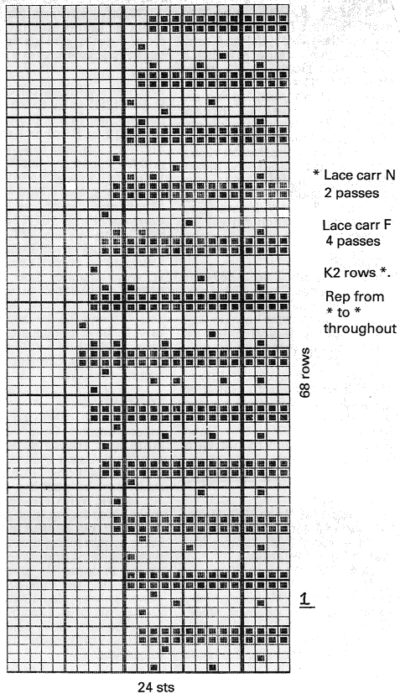 3/15/18 after more testing I have come to the conclusion that end needle selection cancellation on my 910 LC is working properly, but is not operative when I am working with my Ayab interface.
