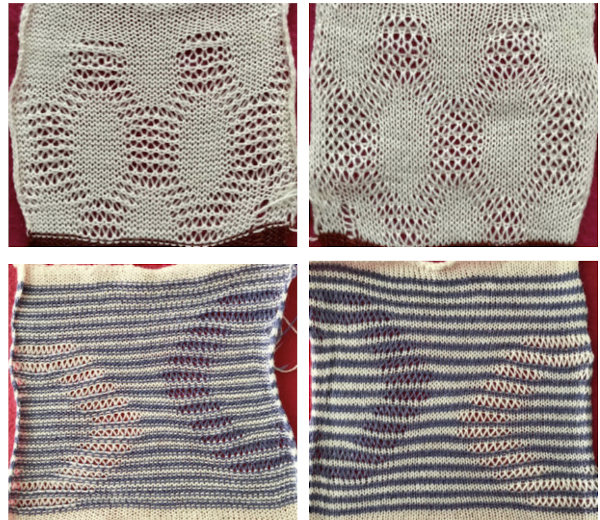
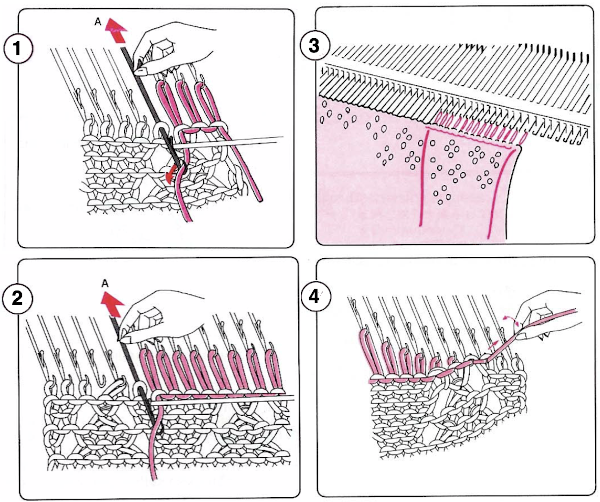
The main difference between the 2 stitch types is that in tuck stitch the strand of yarn on the non-selected needle is held in the hook of the needle forming a loop,  while in slip stitch the strand of yarn bypasses the non-selected needles as the row is knit, forming floats between stitches
  Symbols commonly used for both
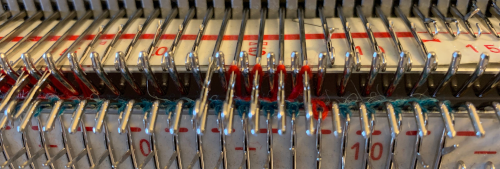
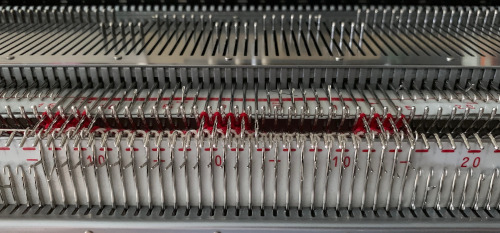
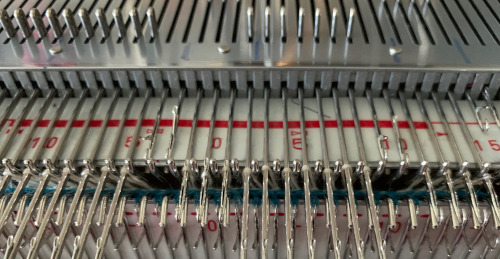
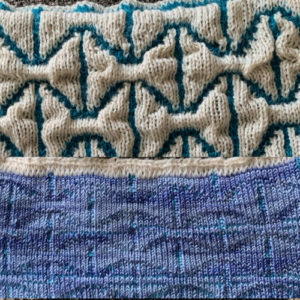
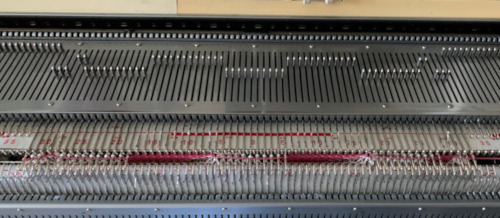
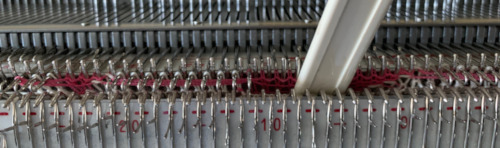
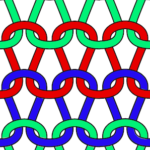
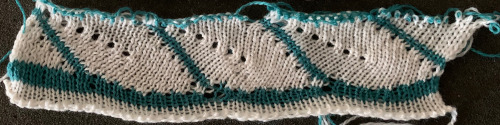
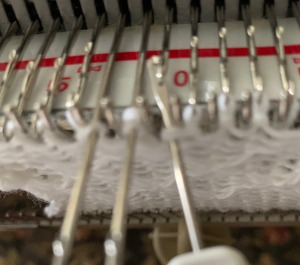
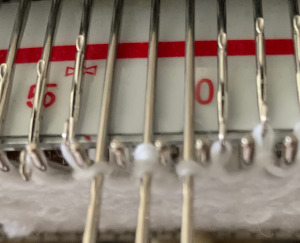
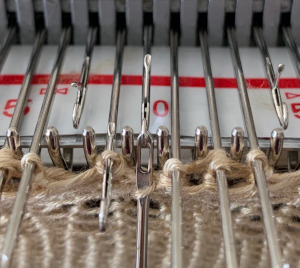
![]() In both instances the stitch on non-selected needles when the pattern begins (blue row in photo) is held in that needle hook, growing in length until that same needle is selected, and with the next row of knitting (red) one returns to the standard knit stitch formation.
In both instances the stitch on non-selected needles when the pattern begins (blue row in photo) is held in that needle hook, growing in length until that same needle is selected, and with the next row of knitting (red) one returns to the standard knit stitch formation.
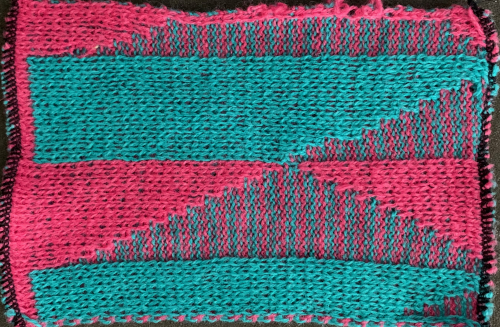
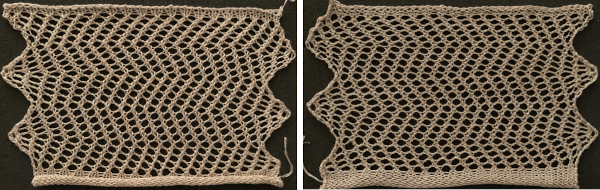
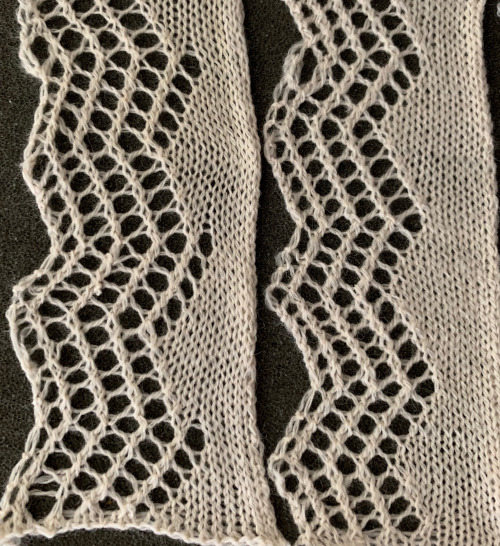
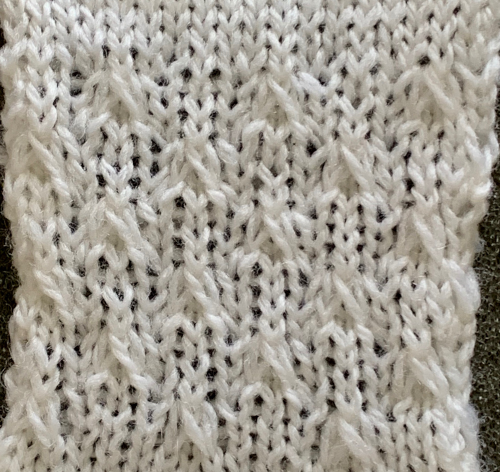
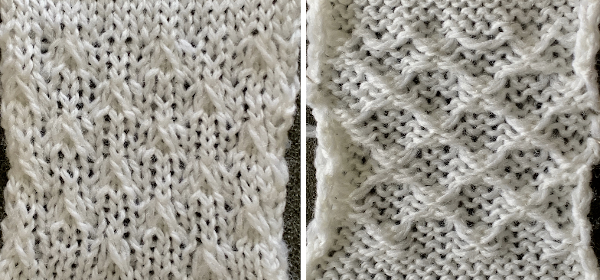
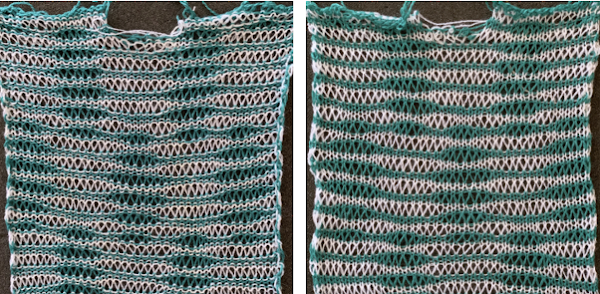
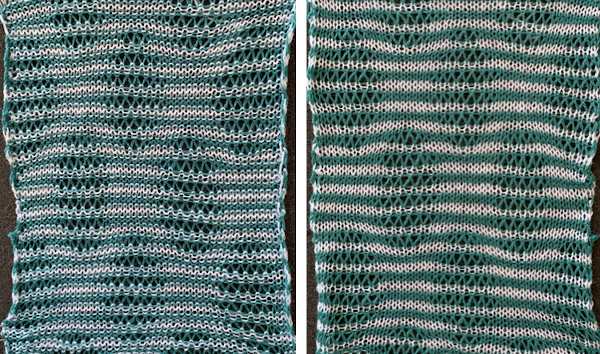
Both distort the fabric, the tuck stitch widens and shortens it, while the slip stitch narrows and also shortens it. Both are capable of producing textured, interesting fabrics on only one or on both sides of the knit depending on the pattern’s design repeats. Which side is chosen as the public side is simply a matter of preference. In accessories and clothing, the interplay and “reversible” effects can provide added interest.
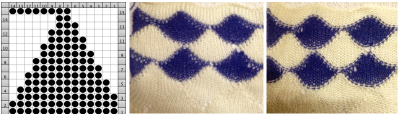
Because in tuck knitting the stitches are being held and gathered, more rows will be required to produce the desired length in pieces. Because the knit gets stretched sideways fewer stitches will be required to achieve the wanted width, making it suitable where larger garment pieces are planned. Looking at the stitch in a 2D diagram: A– loops are created for 2 rows, the original stitch is shown elongated. Each patterning needle hook now holds 3 yarn ends. B– the needle coming forward prior to the next pass whether by card reader selection or by hand, will knit on the next carriage pass to the opposite side. C– the originally held stitch as it might appear on the knit side
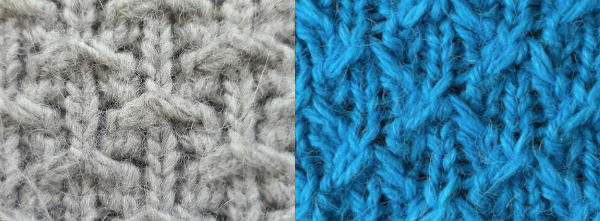
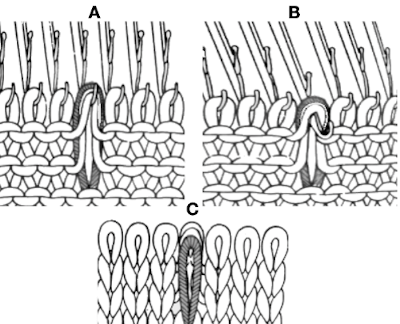 The group of loops as they knit together then forms small lumps/ bumps, or what I think of as “butterflies”.
The capacity of the needle hooks in terms of the number of loops they can hold and the quality and thickness of the yarn used place quick limitations of the number of rows one may use for tuck patterning. The Passap system tolerates many more such rows than the Japanese model machines, where the limit is often 4 rows. Slip-stitch is far more flexible in terms of applied “rules”.
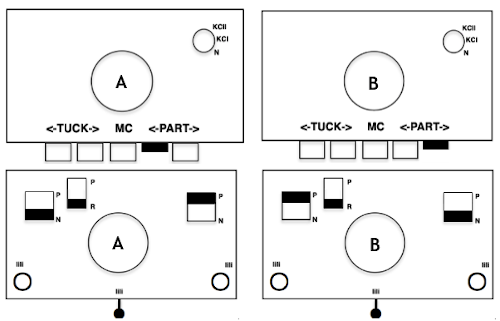
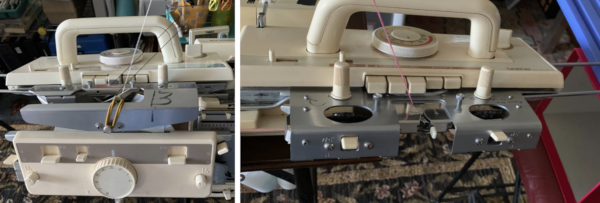
Brother controls for patterning in any model are by the selection of cam buttons that offer directional arrows on the carriage 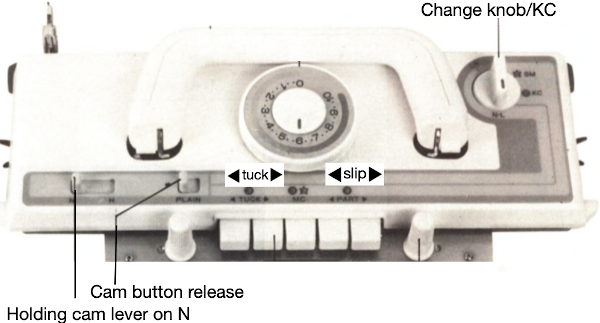 Some of the options:
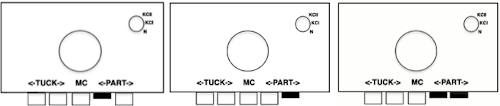
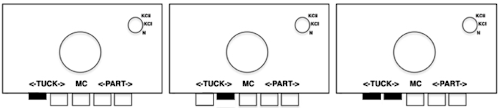 and not often used, but worth exploring, the use of opposing tuck and slip buttons at the same time.
  As with any knitting, for needle selection to occur the knit carriage (also known as KC) needs to engage the belt using the change knob set to KC. End needle selection or not depends on the goal fabric. If KC is in use but no cam buttons are pushed in, there will be needle selection, but the fabric produced will remain stocking stitch.
Any tuck cards may be used in the slip setting, but the reverse is not true.
Functions are in the directions of the arrows. For example, if a left button is pushed in, the next carriage pass will form loops or skipped stitches while traveling from right to left on the non preselected needles, and knit stitches on all needles on the return pass to the right, aside from any preselection being present. If both buttons are pushed in, the knit will form loops or skipped stitches with each carriage pass on non selected needles until those needle positions are pre-selected again, and then the stitches held in the hooks of the needles will knit with the next carriage pass.
It is possible to create the stitch structure on any machine, including manually by pulling selective needles out to hold for X number of rows. Motifs may be short or long, all over or isolated, can be arranged vertically, horizontally, diagonally, in diamond, basketweave, and plaid effects, may be combined with the use of stitches on the opposite bed, and with needles out of work (OOW) on either or both beds.
Punchcards are restricted to a maximum of 24 stitches or factors of 24 in the width of the repeats and require a minimum of 36 rows if they are to be used in continuous patterning. In electronics, the basic rules should be followed, but a single small repeat is enough to program, the size of large non-repetitive ones is limited only by machine memory and mode of download.
Both fabrics like to be weighted evenly, and several rows of waste yarn should be used at the start of the piece prior to testing patterns. Because it will be wide or narrow and short, that is a consideration if the plan is to combine several types of stitches in the same garment. Gauge swatches should be larger than usual.
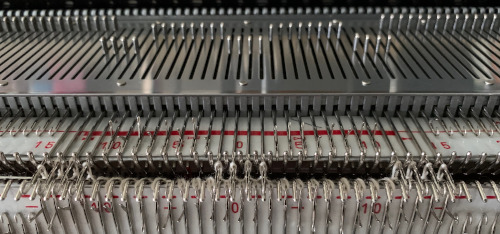
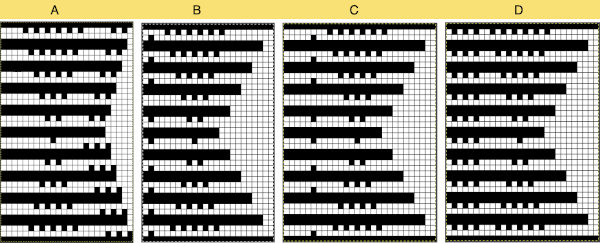
Boiling things down to black and white: in both tuck and slip automatic patterning, selected needles produce knit stitches. Punchcard knitters are required to punch a hole for every knit stitch, leaving only areas that will be forming the tuck loops or skip stitch floats blank on the card. In a published chart for the stitch is used, black squares may be used to represent knit stitches and rows, white ones the tuck or slip stitch locations. It is up to the user to determine whether if using a published source, color reversing the repeat in electronics, or punching out the all-white areas as opposed to black is required. In single bed stitch formation, if one knits with two or more empty needles in work side by side, it will quickly become evident stitches will not form properly on those needles without additional steps being taken. This remains true in tuck knitting, but not in slip stitches. Though there are some exceptions, the usual rule is to have no more than one unit in any row without a punched hole or black square/pixel on either side of it. Punchcard pattern books are a great source of “safe” repeats. Electronic users need to isolate and draw a minimum of one repeat, which may be quite small. If duplicating a whole card with fewer unpunched holes than punched ones, only the white squares need to be drawn as black, and later the repeat is color reversed. Punchcard patterns usually have two rows of all punched holes at the top and bottom of the card that will rest on the first and last 2 rows of the design repeat respectively, allowing for the card to roll continuously in its reader. Cards also need a recommended minimum of 36 rows. Brother #1 mark on the right is 7 rows up from the bottom, while the card reader is reading design row one inside the machine, out of view. Cards from other KM manufacturers may be used, but the starting row may differ, as was also true back in mylar days. Punchcard machines produce the pattern as drawn on the purl side. Some electronic models or download programs vary, and may require the pattern to be flipped horizontally.
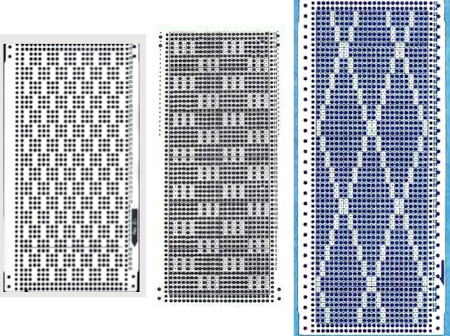
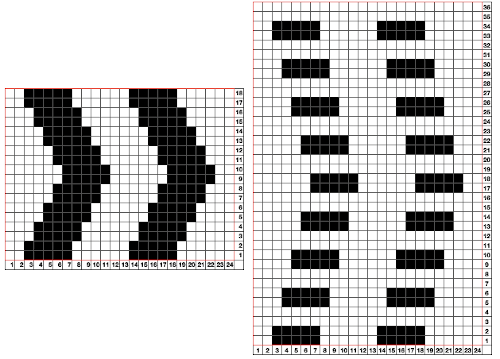
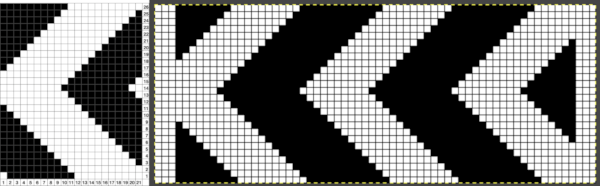
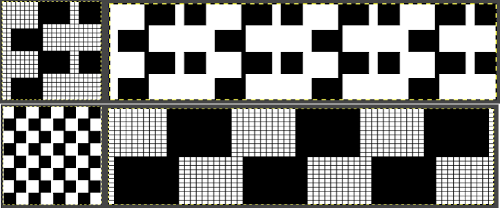
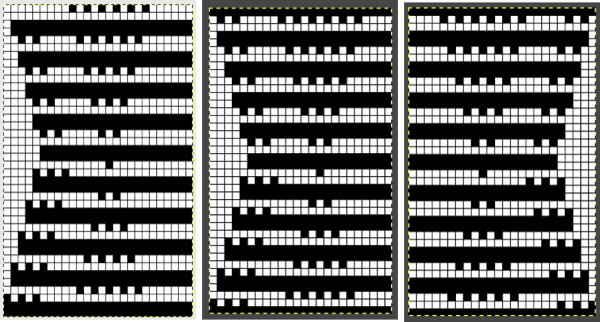
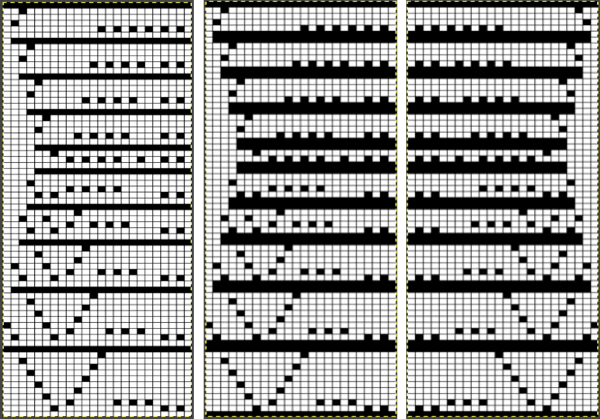
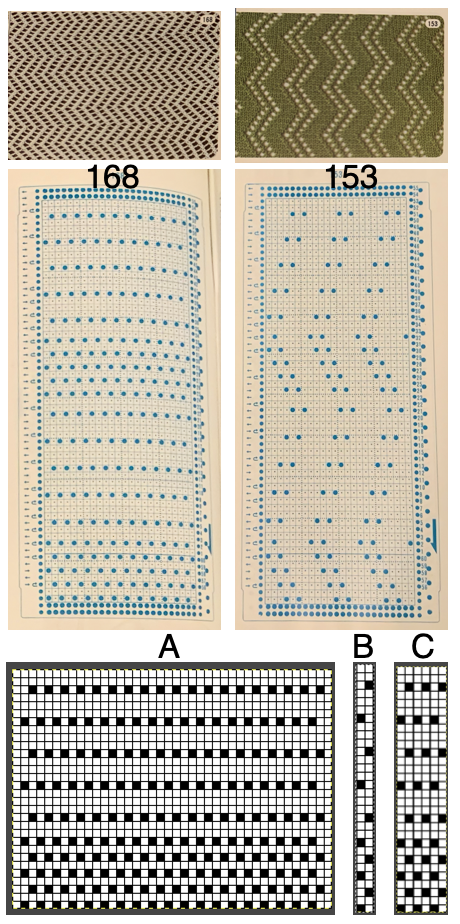
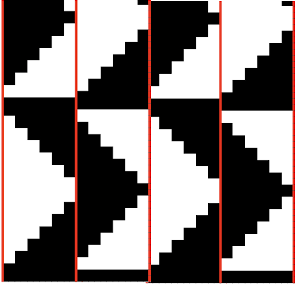
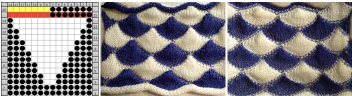
An easy way to start becoming familiar with the knit structure of stitches is to begin by working with “safe” design repeats, using a familiar yarn in a light color. Depending on the punchcard machine model year, the card on the left (1) was a standard Brother issue, the one on the right (2) not always. Both may be used to test all cam buttons and stitch types, card one tolerates elongation well, card 2 may meet some resistance with tuck stitch if the yarn is thicker than the needle hooks will contain easily. 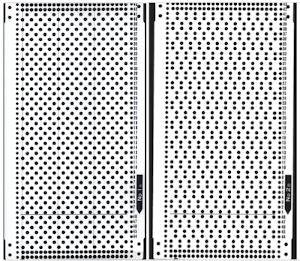 Converting the cards to black and white pixels: the small single repeats for each card are highlighted with a red border. Depending on the method for programming the electronic machine, however, the single repeat may have to be repeated horizontally to match the number of stitches to be used in the piece. The third repeat is a hybrid of the previous 2, the start of making what is published more personal
 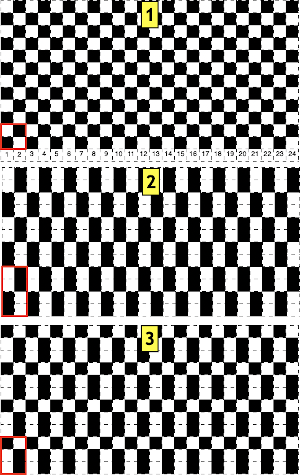 Studying published sources makes it easier to design more personal repeats. Cards that are “safe to use” can get one started in examining the texture and developing an understanding of how stitches are formed. They are often composed of variations of either card 1 or card 2 with added black areas. Using punchcards supplied in the packs with respective machine models appropriately can easily be done
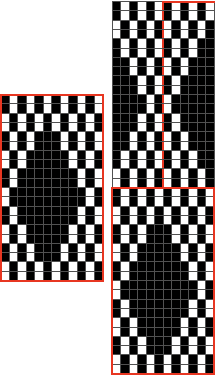
 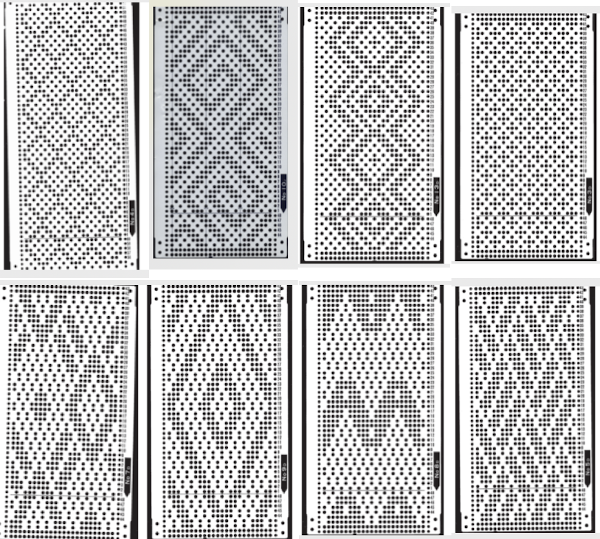 Additional published cards are also easily found increasing the number of tucked rows and observing the rule of knit stitches on both sides of the single unpunched squares resulting in no preselection. Below, some of the single repeats are outlined in red. With additional rows now tucking, the added insurance of having them knit off properly at regular intervals is achieved by all punched (or black squares) single rows, highlighted with orange squares on their left. The black border isolates the actual patterning rows in the designs. Again, the top and bottom pairs of all punched rows are not part of the overall design but are necessary for the punchcard machines to line up patterning for knitting a continuous design
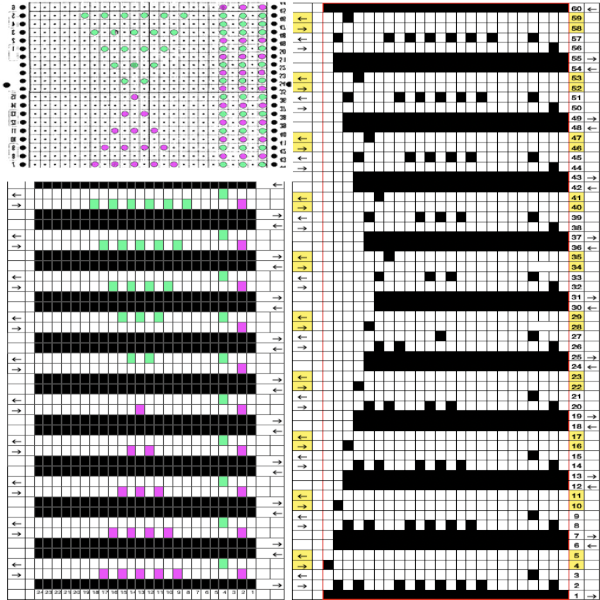
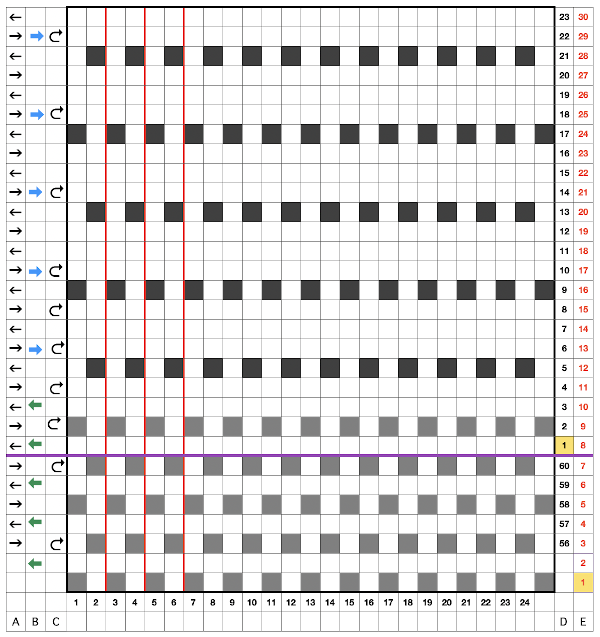
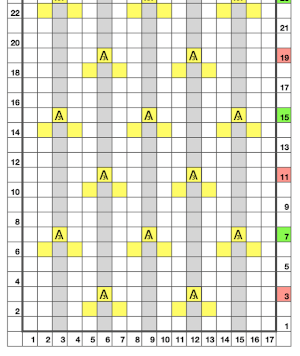
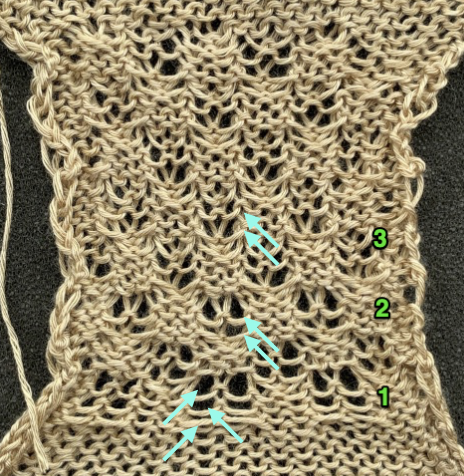
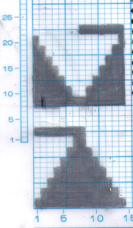
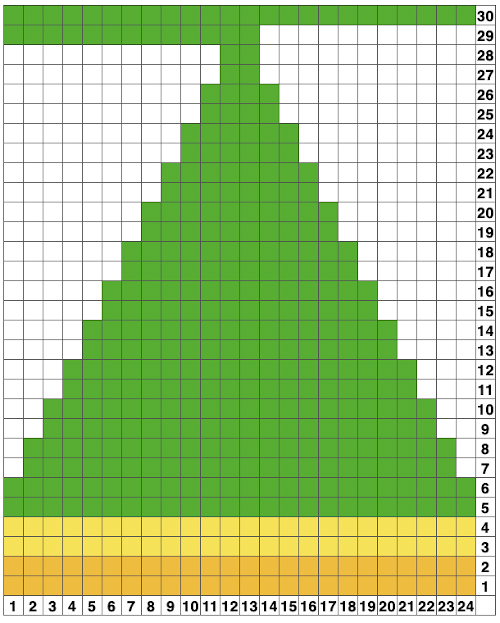
 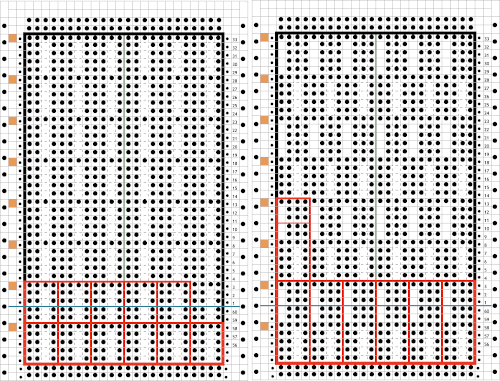 The blank vertical areas may be arranged moving across the repeat’s canvas in a variety of ways. In this chart the tuck symbol is evident, some of the knit stitches around each tuck series are highlighted at the bottom of the chart in green, the single electronic possible repeat is 4 sts by 12 rows
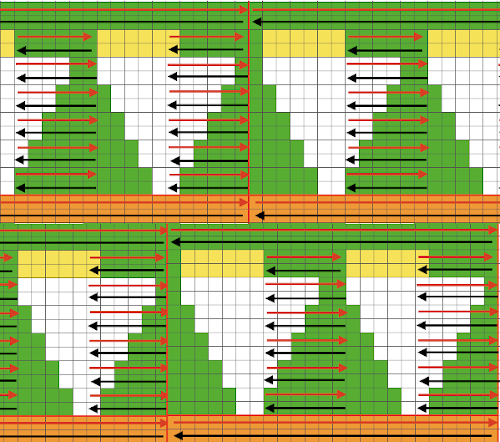
 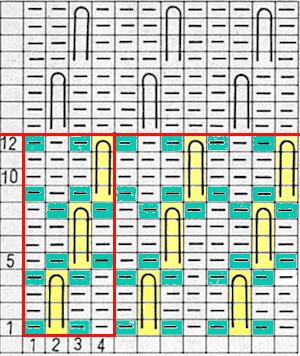 What may be confusing when symbols and charts such as the above are encountered is that the very first row of the symbol actually rests on the spot where the knit stitch that is being held for the next 3 rows rests, so design row 1, 5, 9, 13, etc are actually all knitted. The punchcard minus the all punched rows at its top and bottom:
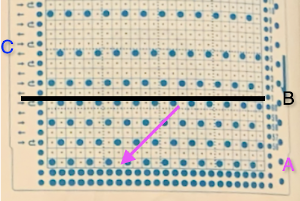
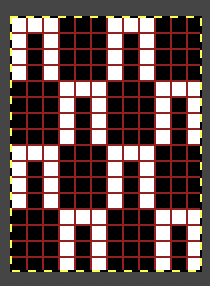
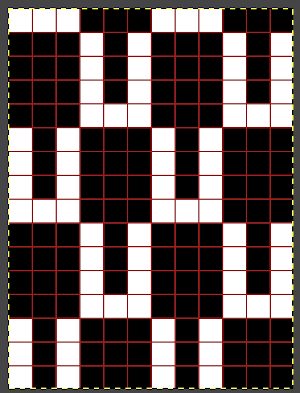
 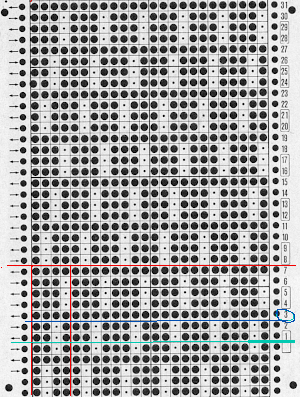 The factory-supplied blank cards may have arrows on the left, familiar in lace card designs. In the above case, the implied use is that the card start in the locked position on row 1 with the carriage on the right, preselecting to the left. If only a single color is to be used starting side does not matter. If regular color changes are recommended, more often than arrows dots, or color numbers are used in that column to indicate color change locations. In Brother machines, the first preselection row may be made from either left to right or right to left, depending on the fabric being created. With the exception of dbj using the KRC button or patterns that expressly specify the starting side, most patterns using the color changer will need a start from the right. Here if that is done, color changes could occur every 4, 8, or 12 rows using 2 or even 3 color sequences.
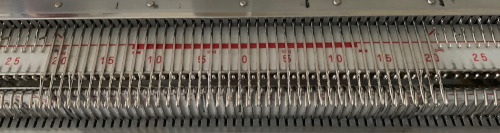
There is another issue to note. Counting up design rows from the bottom the card is marked row 1 five rows up. This is a Studio punchcard. If using it on a Brother machine, the starting row would actually occur with the card locked on row 3, color change row markings if given, would have to be altered accordingly.
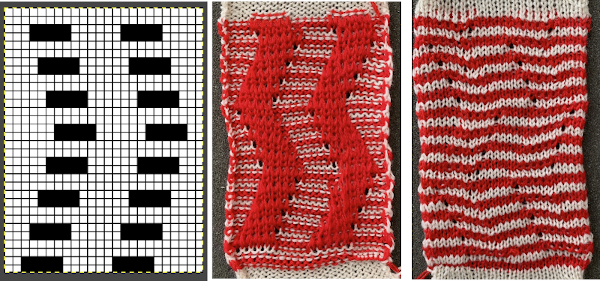
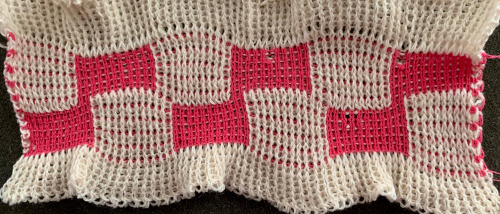
The distribution of tuck stitches can occur in groups, or more sparsely. The card on the right begins to break the rules with 2 needles tucking side by side for 3 rows. Those areas create floats akin to those created by slip stitches as the side-by-side loops drop off the needles in those areas rather than knitting off together. As areas of white become less balanced, punchcard knitters may find it easier to mark the tuck bars and punch all else, electronic knitters draw the white as black, and color reverse.
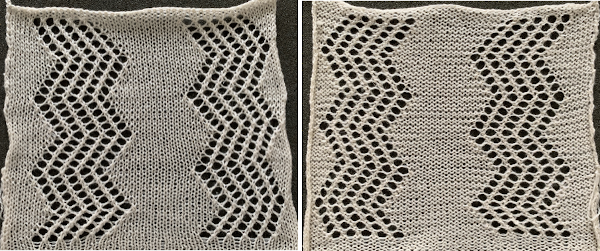
 Few tuck stitches amidst lots of plain knitting are likely to not distort the fabric very much or produce a noticeable texture. The fabric will lie fairly flat, and approach a width proportionately closer to that of stocking stitch using the same yarn. The outlines can serve as markers for the introduction of additional hand techniques ie tying objects or beads in the center of the shapes after knitting and prior to felting in order to obtain surface bubbles of non felted stitches, or marking areas for duplicate-stitch or other embellishments.
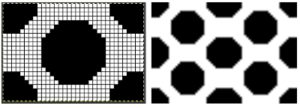
In some instances, thread lace repeats can provide DIY inspiration. With the color reversed, the structure for possible tuck can be observed and determined if suitable. In the bottom right image, those white solid lines are the easiest edit, shown in progress  With the basic structure recognized, weaving punchcards may be suitable, not all need be color reversed.
 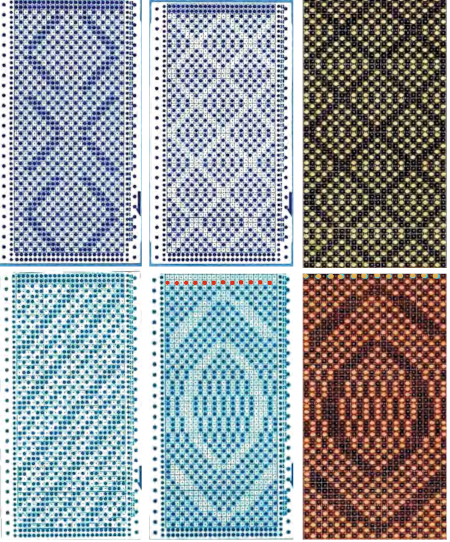 Electronic repeats may also be used directly or adapted for use on punchcard machines, providing the repeat unit is a factor of or up to a maximum of 24 stitches in width, which translates to 2,4,6,8,12, and 24, and repeated to the recommended minimum of 36 rows in height. For tuck stitch, those narrow vertical bars surrounded by black squares are the common factor. The StitchWorld pattern book charts require only matching a usable width for use in punchcard models since the knit stitches are shown as black squares. Here is a random selection
 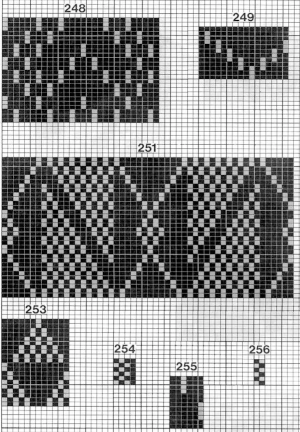 253 translates easily to this, it would need to be punched twice
 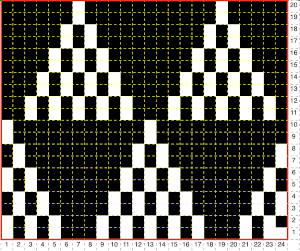 251 is a bit more problematic. Half the repeat is wider than 24 stitches. Here it is readjusted to 24 stitches, the height is 32 rows which may just barely squeak by punched only once
 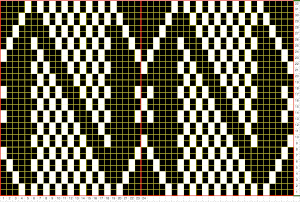 the repeat is tiled to check proper alignments
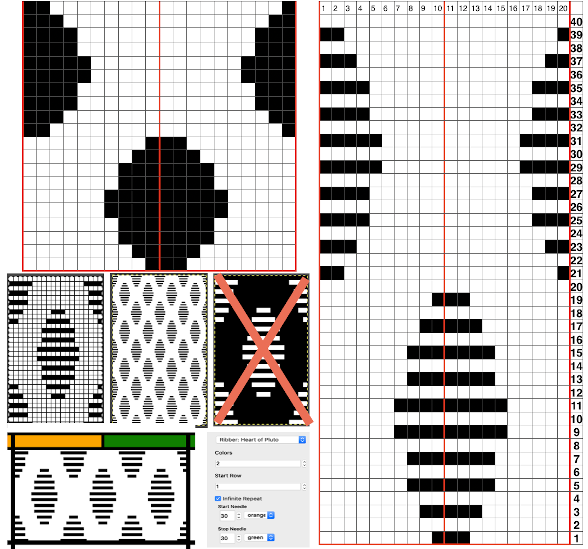
 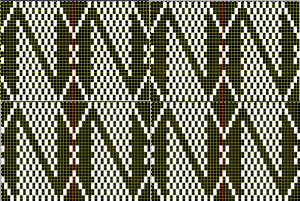 This repeat is from a Studio mylar sheet. It also may be used in punchcard machines after removing 2 columns, since only half the repeat is necessary, and it is 26 stitches in width. The color reverse option is necessary. In electronic machines, it is easily accomplished with a command or the flip of a switch/ push of a button. The white squares as given would produce loops on all the corresponding needles, with no stitch formation in those areas.
 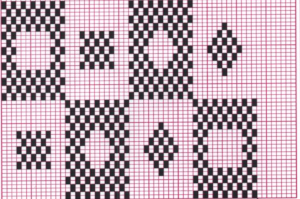 I chose to eliminate 2 columns from the blocks on the left. Tiling shows the amended repeat’s appearance, with the color reversed image for actual knitting to its the right.
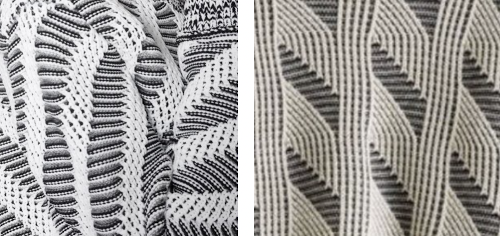
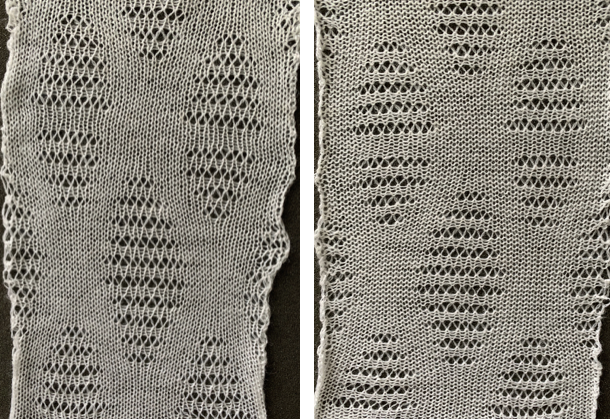
  Repeats with a balanced number of black and white squares provide all-over textures in fairly balanced fabrics. As the number of black squares on a field of speckled tuck stitches grows, the knit shapes may actually poke out from the surface of the knit, since those areas are not gathered in the same way as their surroundings. Yarn properties and tension also have an effect.
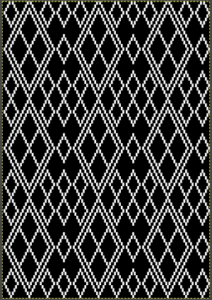
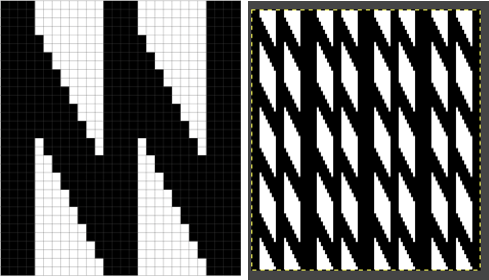
Design with very few black vertical single stitch “bars” are commonly found in patterns published for electronics, often also too large for use on punchcard models. As with lace, where there are few black pixels on large fields of white, caution in trimming the image is necessary. Tiling once again helps one locate possible errors. An example of such an image tagged as being 42X62: 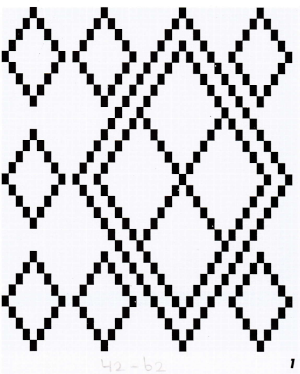
![]() tiled 42X62
tiled 42X62 adjusting to avoid those 4 rows tucking consecutively, now 42X60
![]()
 Designing your own can begin with the choice of a template, such as this one, 24 stitches by 36 rows.
 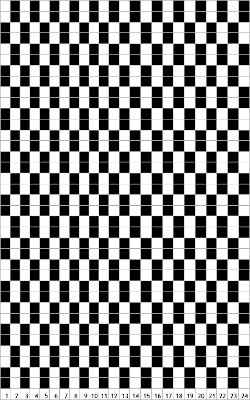 To begin with, I added a rectangle to the full template repeat on the left. To its right, the size of the rectangle then begins to be altered along with the addition of some all knit rows. The center illustrates making certain the 4 stitch repeat aligns properly at the top and bottom of the new repeat. The test final repeat image is on the right.
 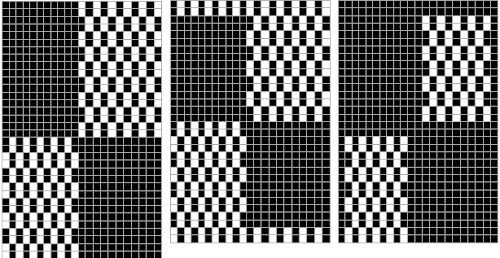 Working with a different shape, using copy and paste to place it, adding a brick variation on the right, for punchcard full repeats of 24X40
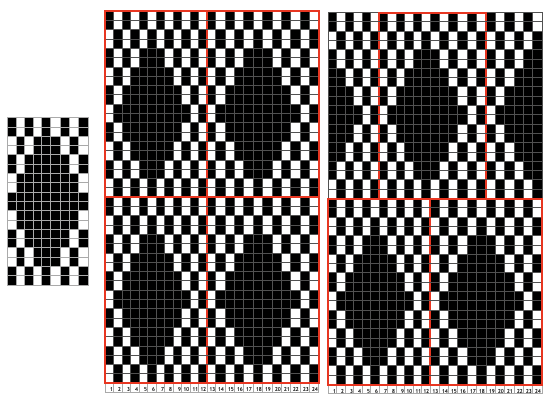
![]()
![]() The matching electronic repeats for both, unless your download requires programming for the total number of needles in use:
The matching electronic repeats for both, unless your download requires programming for the total number of needles in use:
 Testing tuck stitch limits, breaking the side by side white square rule in all over patterning with moving blocks of 2 by 2 blank squares
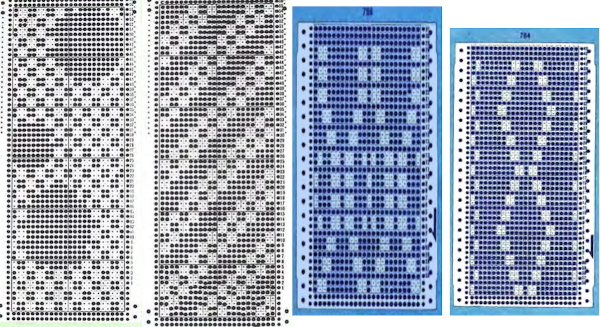
A collection of previous posts
When more than one stitch tucks
Tuck stitch meets thread lace repeats and vice versa
Tuck lace trims (and fabrics) 2
“Crochet” meets machine knitting techniques: tuck lace trims (and fabrics 1)
Tuck and slip color striping
For those who enjoy hand techniques/slip-stitch
A no longer “mystery pattern”
A hand-knit consult
 The suitable dbj separation is the one where each color in each row knits for 2 rows, whether performed by hand, using the 3 colors per row separation in img2track or the default separation in Passap. The Ayab HOP separation is awesome, works for any 3 color design with as little elongation as possible, but is not suited for this purpose. How-tos for DIY separations and their automated versions by programs for knitting more than 2 colors per row have been discussed in other posts.
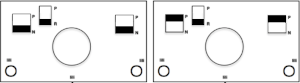
 A similar process on the Passap allows for playing easily with both racked colors because of the possible arrow and pusher settings on the back bed, but on Brother, this would require hand selection on the ribber on every row or a specific color separation for needle selection on the top bed
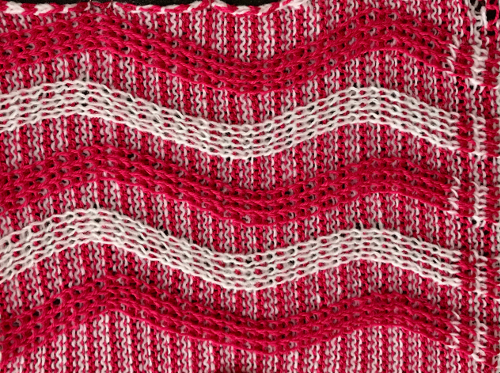 Seeking automation, keeping things simple, here is a basic zigzag pattern in a repeat also executable on punchcard machines. The ribber is now set to knit throughout (N/N), the main bed to slip in both directions. End needle selection must be canceled when using the slip setting selectively or when working patterning with needles completely out of work
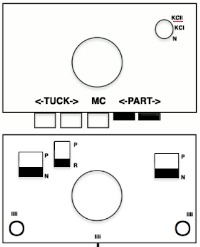
 The process using 3 colors: the patterning color will be knit on needles preselected on the top bed. As shaping is about to begin, in this pattern, one needle preselected out indicates the location for an “increase”, one preselected back to B position a decrease
 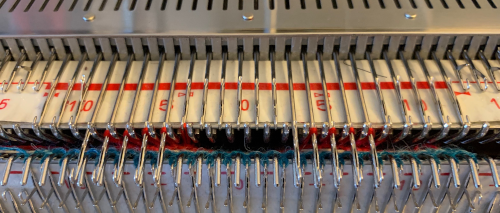 To perform the decrease, using a double eye tool to transfer the B position stitch down onto the ribber needle adjacent to the first needle in D position on the top bed
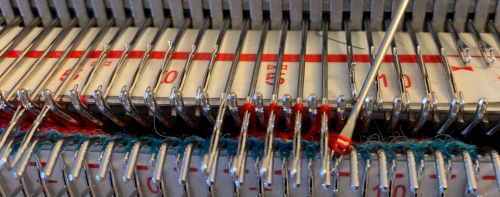


 The repeat and the knit shown on both sides:
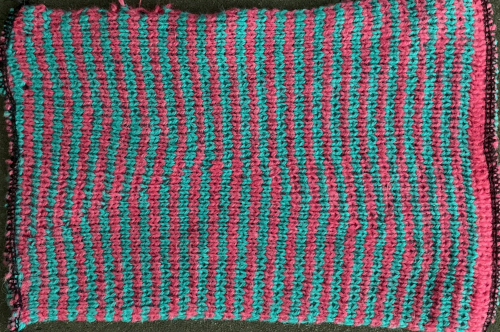
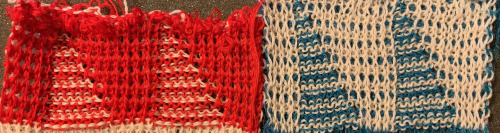
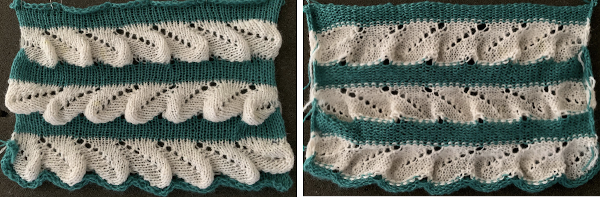
 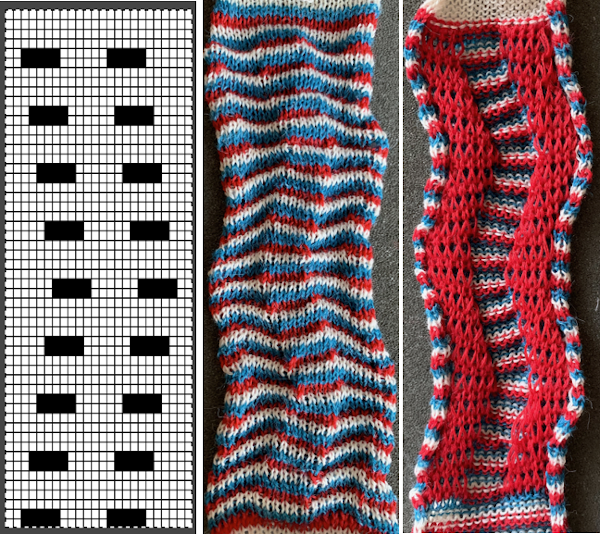 Comparing the 2 color and 3 color versions: aside from the obvious increase in length, note that the slipped segments in red on the 3 color swatch are now composed of longer stitches since they are held for 2 additional rows, and the overall fabric is more puckered than the 2 color version. The curling at the sides is the nature of edge stitches, especially if the yarn used is wool. At times that may be used intentionally, as a decorative edge.
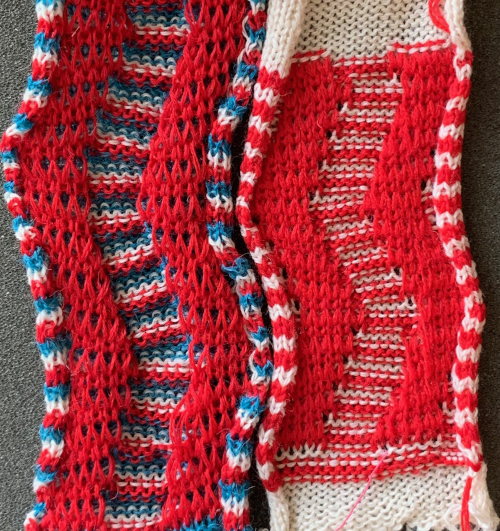
 Using the same color separation as for the simple zig-zag shape, the design is expanded to include knit bed rows that will be skipped completely, resulting in the ribber alone knitting in the second color for those rows. It is now twice as long as the original, 24X64
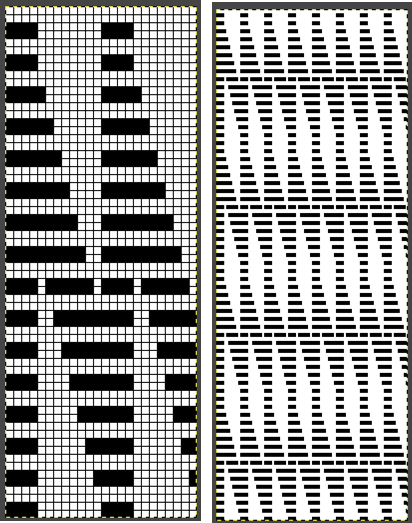 The planned proof of concept added a 4 stitch border on the right for a 28 stitch swatch centered with 14 stitches either side of 0. Tiling the repeat X2 again in height made it easier for me to plan how to manage transfers to expose the varying stripes in the ground. Visual comparison to the movement in the inspiration knit:
 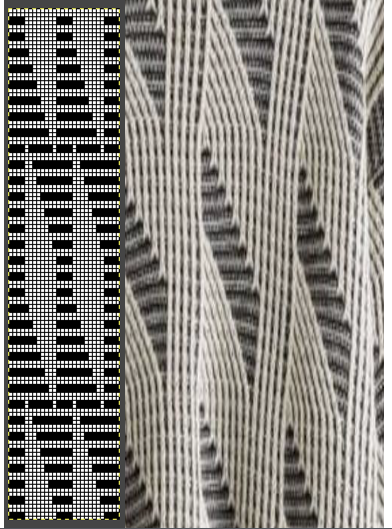 As the number of needles in work on either of the 2 beds is increased, it is likely tension or yarn changes may be required. The first preselection row is from the right, toward the color changer. The stitches on the non selected needles are transferred to the bottom bed
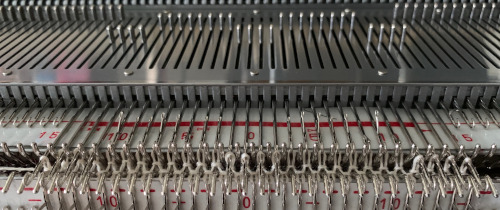
 with the color change, only preselected needles will knit on both the top and bottom beds moving to the right
 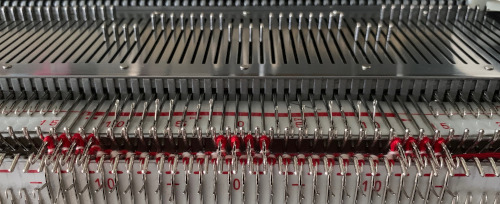 and will do so again on the return to the left while preselecting an all blank row
 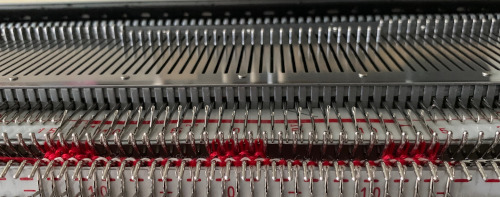 on the next pass to the right only the ribber knits in the ground color;
 Back to the drawing board in order to reduce the number of hand manipulations involved, with a shift in the center transition, the repeat in my spreadsheet is now 24 stitches wide, plus an additional 4 stitch border, and gets marked up with colors. I prefer to program the width of my knitting as opposed to a single repeat for all over patterning
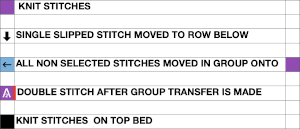
 The choice can be made based upon the preference of moving stitch groups to the right or to the left with the horizontal direction of the repeat adjusted for your KM model or software used.
 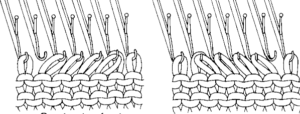 I planned the transfers in this swatch toward the color changer after picking up the proper color, white, and before knitting the next row using it. The 930 png:
 When the top of the repeat is reached, row 68, the only needles selected will be those of the 4 stitch vertical columns and the design repeat will return to its start
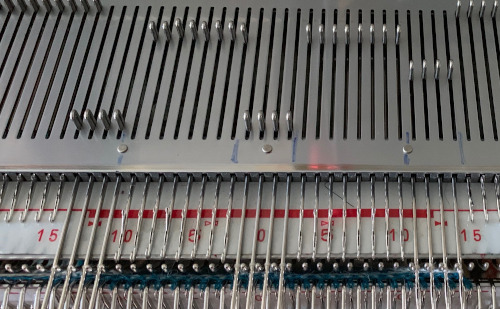 My proof of concept swatch is 3.75 inches wide
 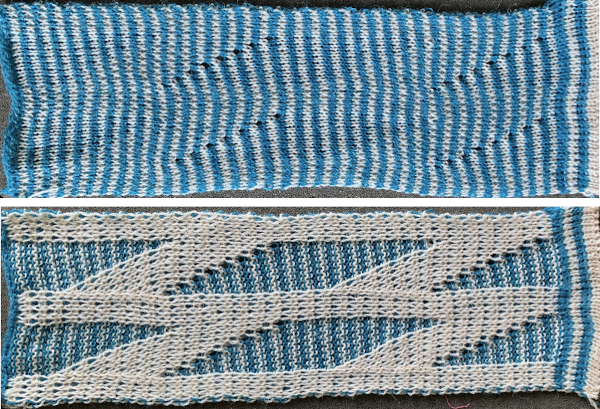 The inspiration sweater was knit using a wider repeat and significantly thicker yarn, reflected here in the small number of repeats composing the sweater body front
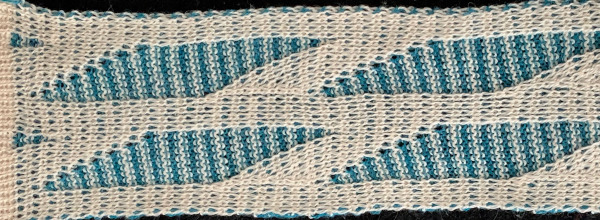
 The off white yarn used here was the same thickness but not fiber content as in the previous swatch, 2/18 wool-silk vs Australian wool in the former. It is not as smoothly spun. The result shows an interesting similarity in length, though there are 16 additional rows in the pattern repeat. This time I programmed my repeat for stitch transfers on the knit bed to move away from the color changer.
 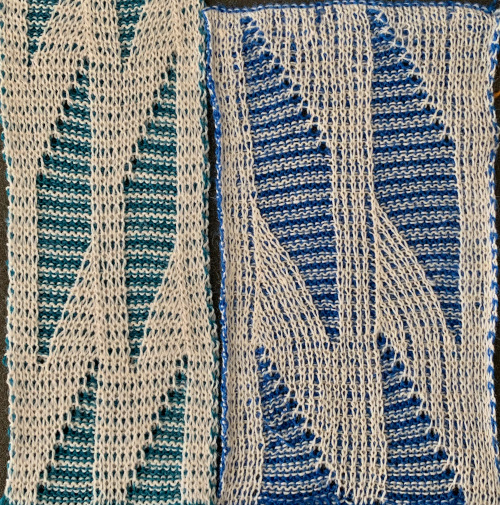 Eliminating the border on one side, a double repeat (30 stitches) measure 4 inches in width. To put the difference in scale to the sweater in perspective, an oversize garment with 40 inches in chest diameter would require 20 inches in width for the front piece. Ten single repeats, as opposed to the inspiration’s sweater 4, bring the total required the number of stitches to 150. With the added border of 5 stitches for matching side edges, the fabric is in the realm of possibility for producing a garment on the home knitting machine. My tension was set at 3/3 for all the swatches, with some teasing required on occasion to encourage stitches on the main bed to knit off properly. Ribber height adjustment can also have an effect on those numbers. I tend to do all my knitting with the slide lever in the center position. The double 30X84 repeat with no added border
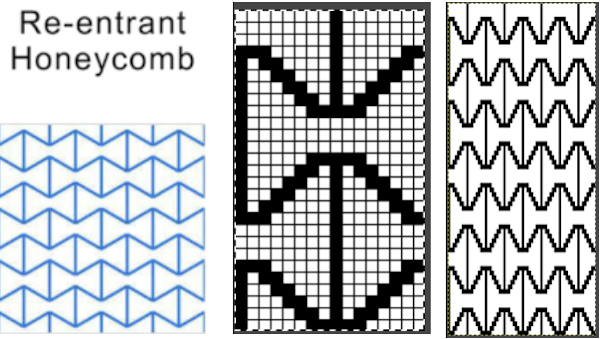
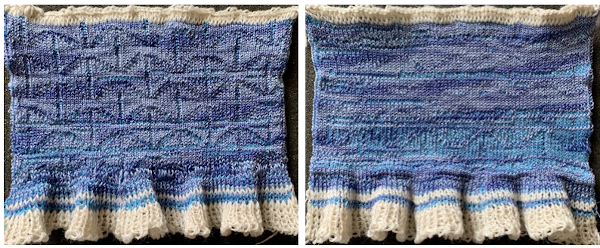 Here the same pattern was executed on the same number of stitches with the white wool used above, but the elastic was plied with a 2/24 acrylic yarn and knit as DBJ with the blue, stretchy combination creating the solid color backing.
 The same pattern repeat knit with striper backing is far less interesting
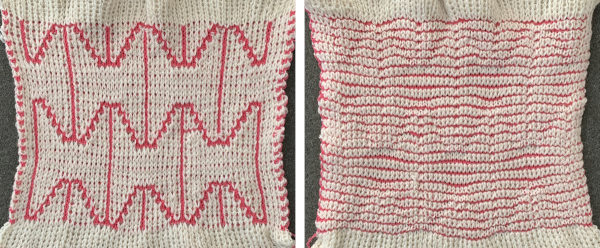
 The appearance of the fabric when stretched and weighted, still between the beds
 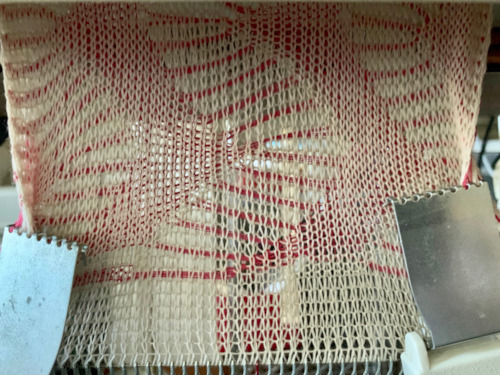 and off
 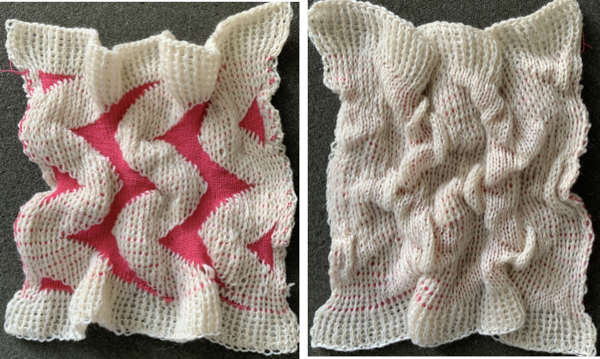 Going the far more traditional route of traditional dbj with the use of the color changer, striper backing with the ribber set to N/N yields a wider, flatter fabric with an interesting purl side
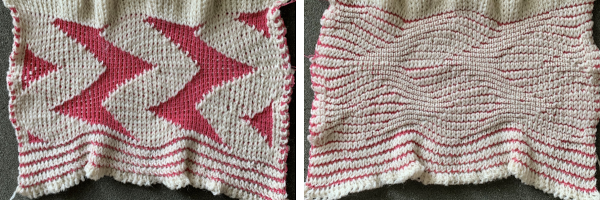
 The birdseye version had more of a bent on
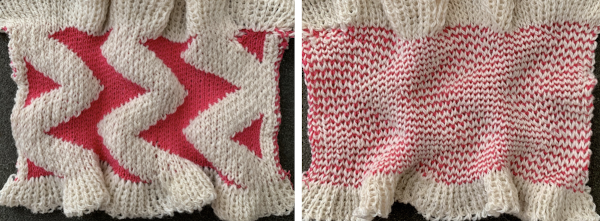
 Adding a third ply of elastic was disastrous at any tension. Better results occurred simply by increasing the ribber tension by 2 whole numbers, the knit tension by 1, and reverting to the previous yarn usage. There is a single dropped stitch in the elastic, and the result has much more of a 3D effect.
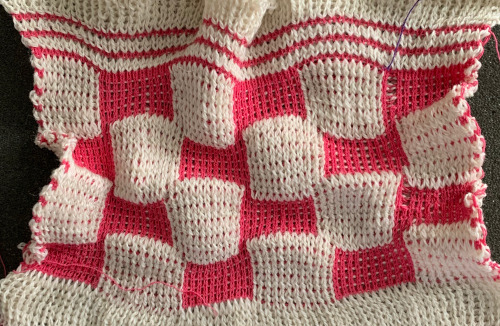

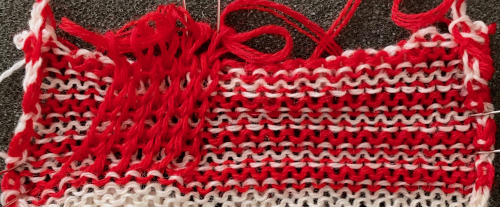
 The test swatch in progress
 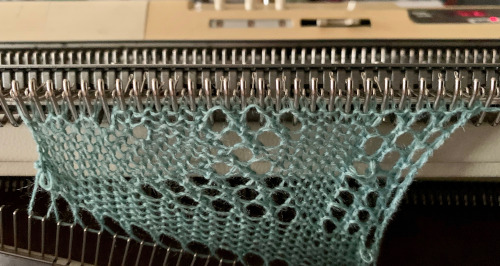 I used a short cast on comb for weight across the piece, moving it up cautiously on a regular basis
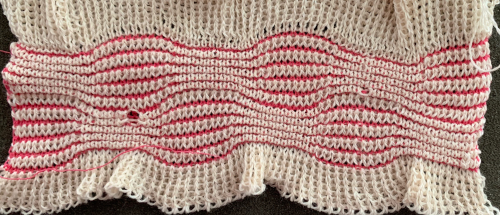
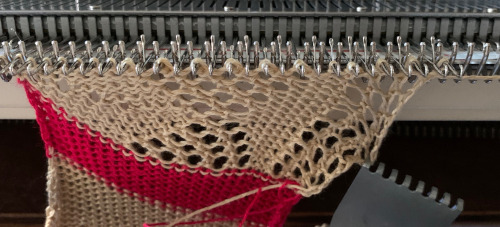
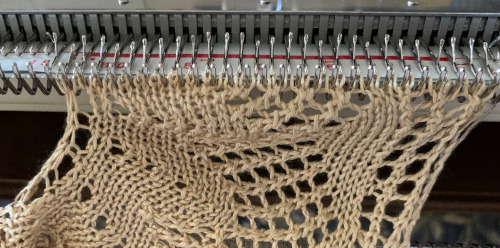
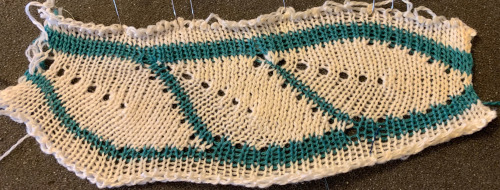
 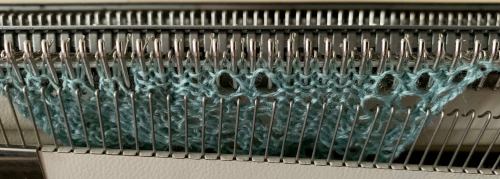 It is helpful when starting in waste yarn or simply using plain knit rows at the bottom of a test swatch to choose a clearly contrasting color. Here I did not do so, the drawn line is to help define the start of the shape formation created by the holding sequences and eyelets. The eyelet on the outermost edge of the circumference “disappears” as that edge gets stretched to the max. Two eyelets in the diamond shapes are not formed properly
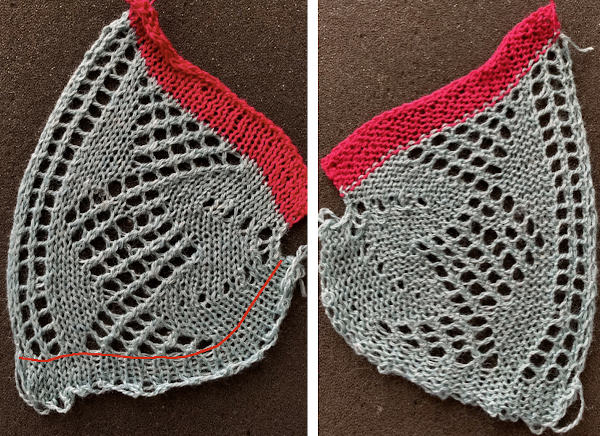
 knitting without a knit gauge can be dangerous, here a guess is made as to how many more units might be required to make the final shape go round
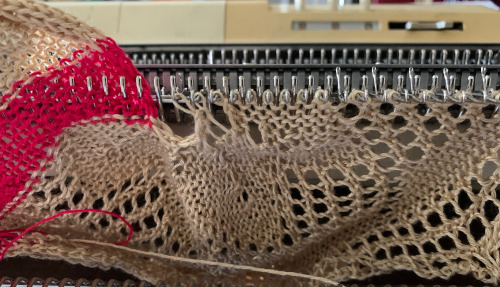 I committed to 8 wedges, another attempt at a check for size prior to seaming the shape.
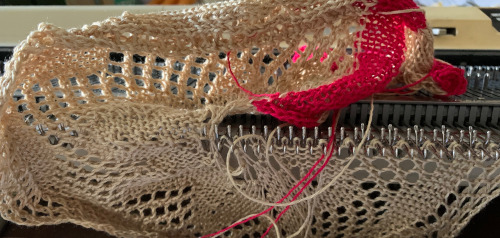 Before joining the stitches permanently, a quick look to see if there was enough knitting to form that pie
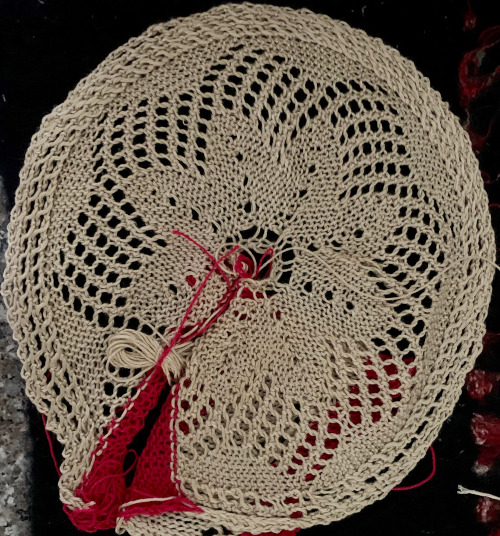
 The least satisfactory and most visible join is the latch tool bind off. Grafting by hand off the machine is the least so. For the sake of ease in identifying open stitches easily, both methods would benefit from a couple more all knit rows between each segment as seen in the repeat in the original doily post in spite of the fact that the shape around the very center opening will change.
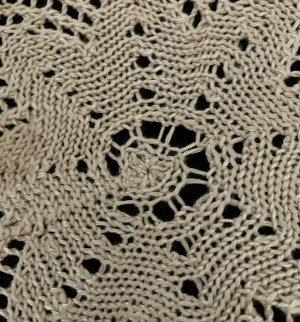
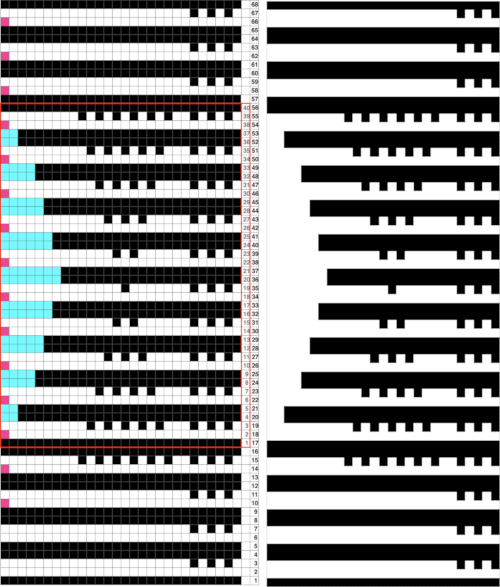
 Planning for diamond rather than bow shapes, the repeat was changed from a 28X68 one to a wider, 32 X 64
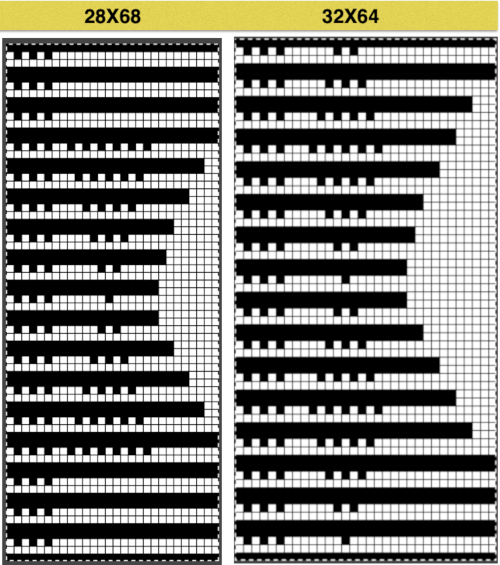
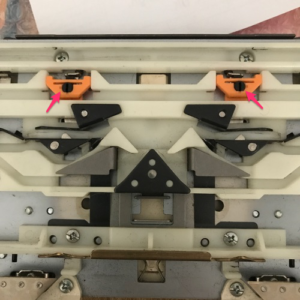
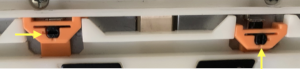 The 910 LC is also missing its magnet (left), gluing on a magnet in the position shown below made it usable again on the electronic
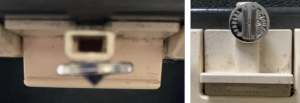
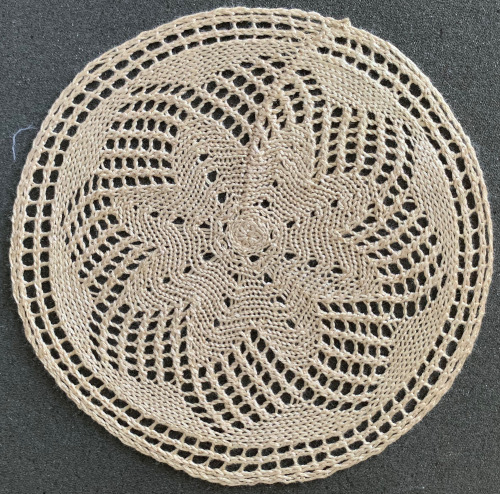
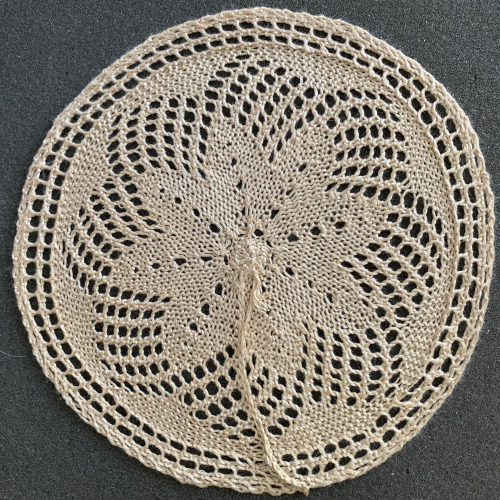
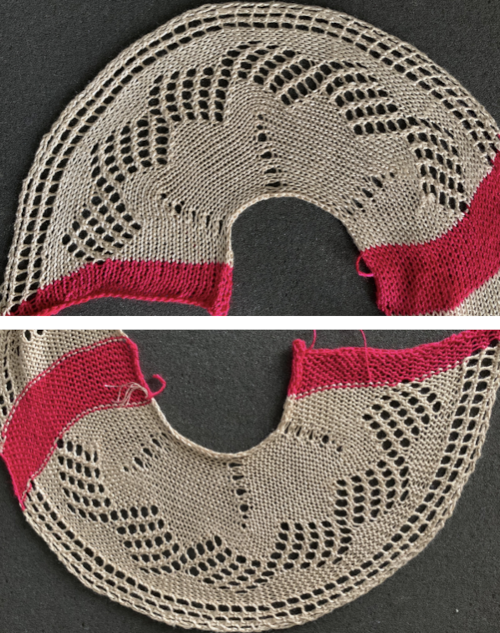
 The resulting, more successful swatch
 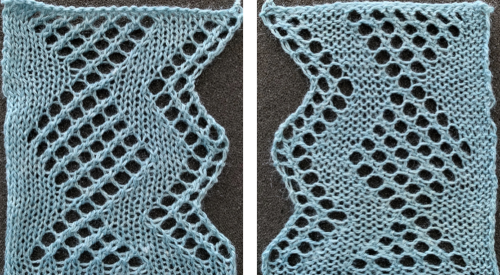 2018 failed attempt at a continuous pattern
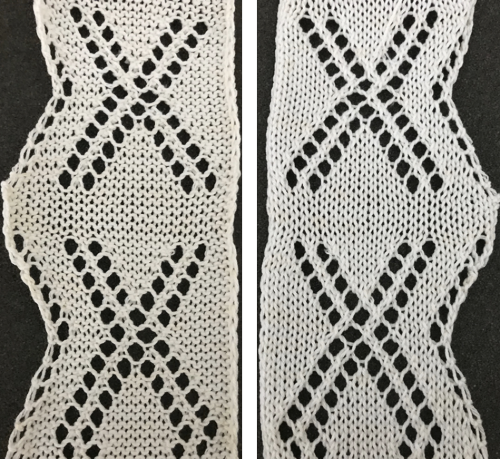 Charting it out anew: on the right is the amended repeat adding 4 more rows to the top of the original
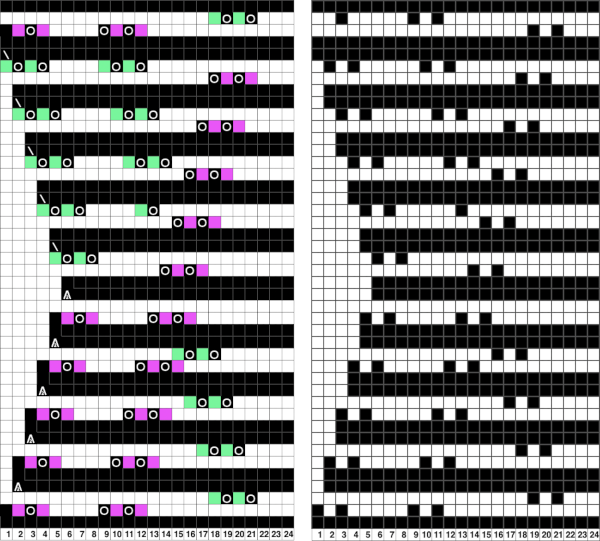 The resulting swatches:
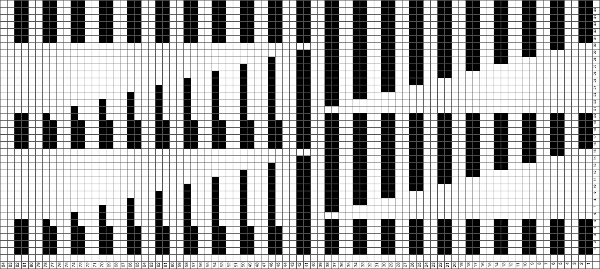
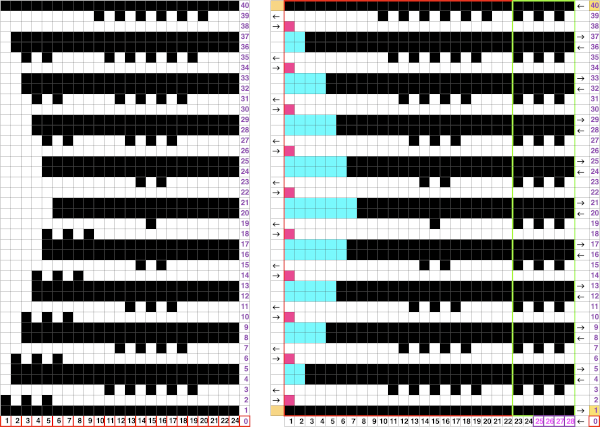
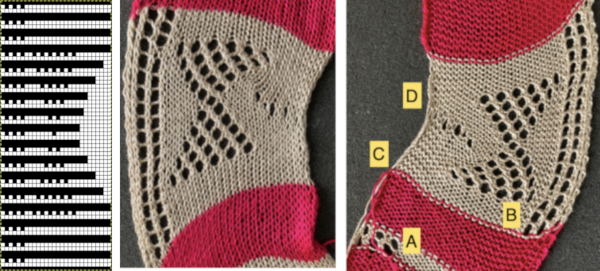
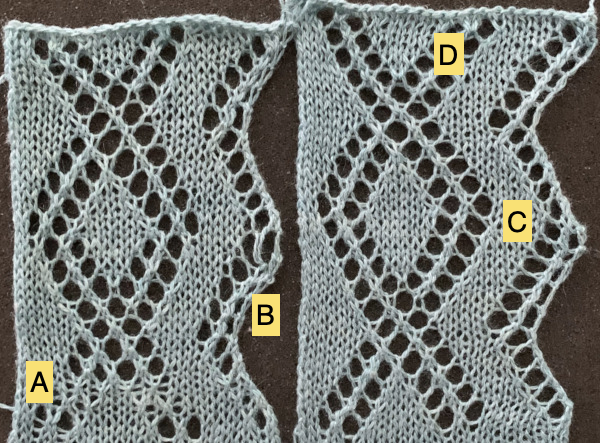 These charts illustrate the above repeat on the left. On the right, the edge transfers are imagined reduced to single eyelets on the increasing angle. In turn they would result in a wider area of knitting in the zigzag shape between the curved edge and the diamond shape. Another possible solution follows, using expanded graphs with extra LC passes
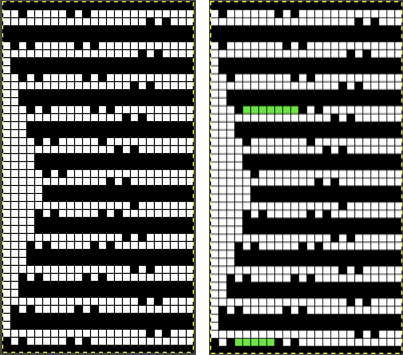
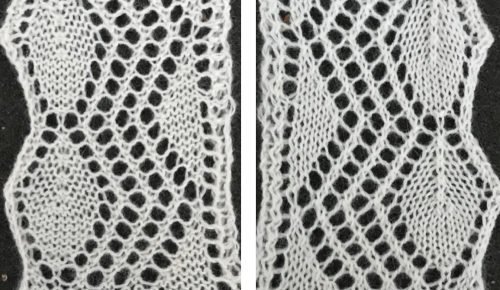
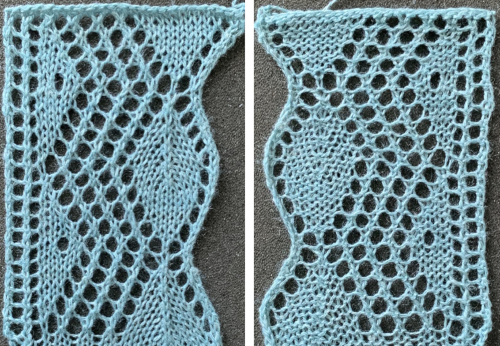 The curved edge is noticeably different and more uniform than in edgings where the increasing angle is formed only by a single stitch being transferred to the next needle on the left, creating an eyelet immediately to its right.
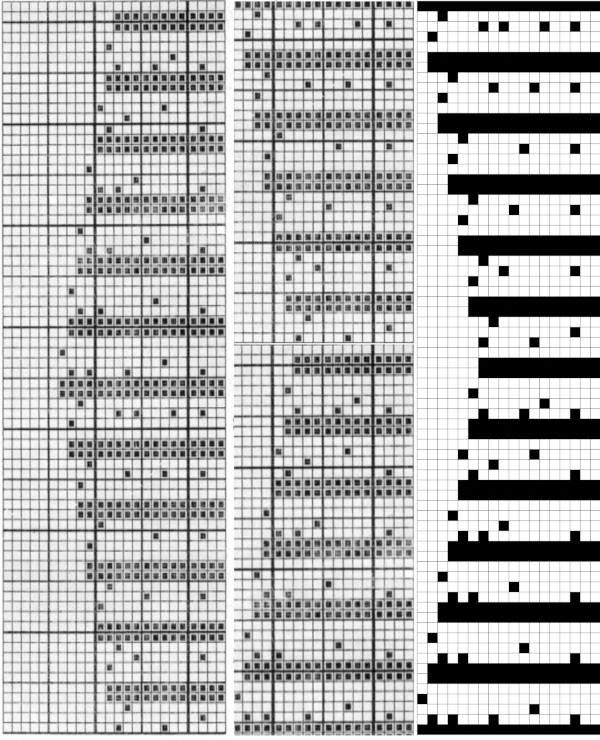 The test swatch
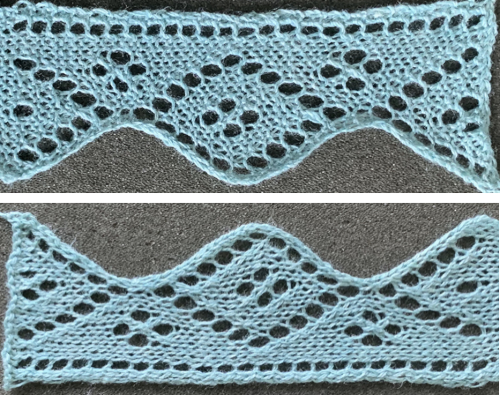 A fellow Ravelry member reminded me of Tessa Lorant’s lace publications. I had forgotten I actually owned this single one from 1981.
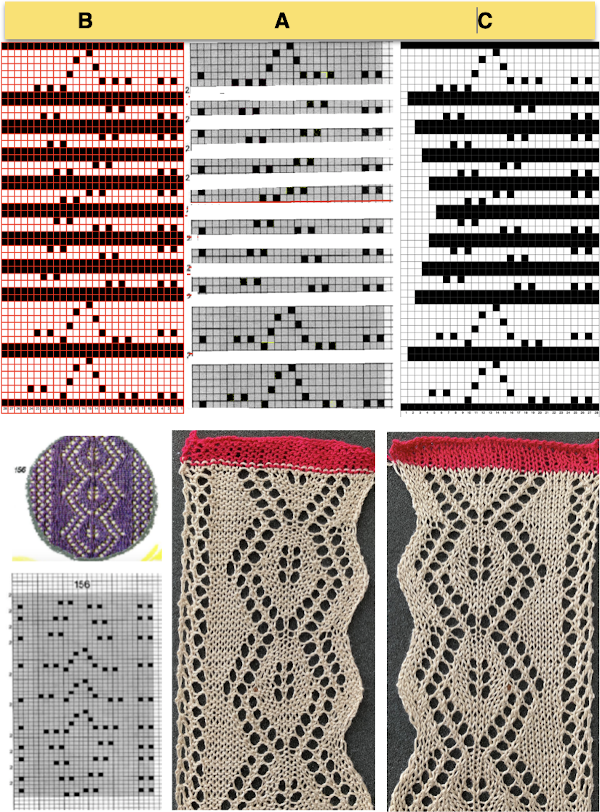
 Upon examining it, I rediscovered her patterns, many for hand knitting with accompanying written row by row instructions and charts, others at the back of the pub, with punchcard machine repeats.
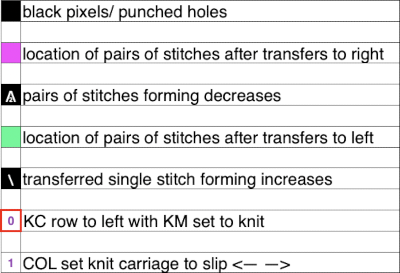
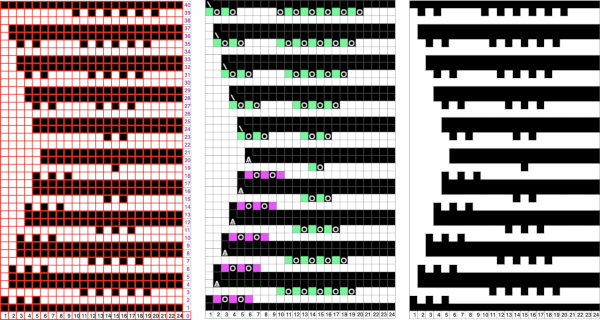
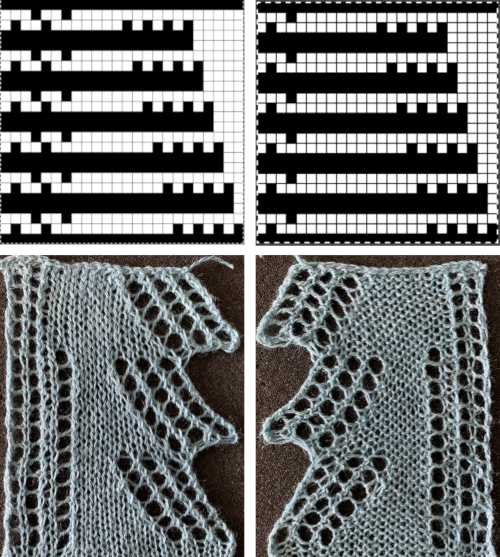
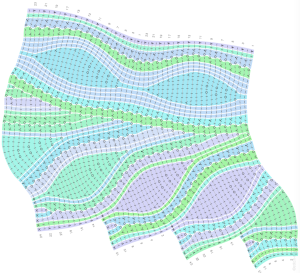
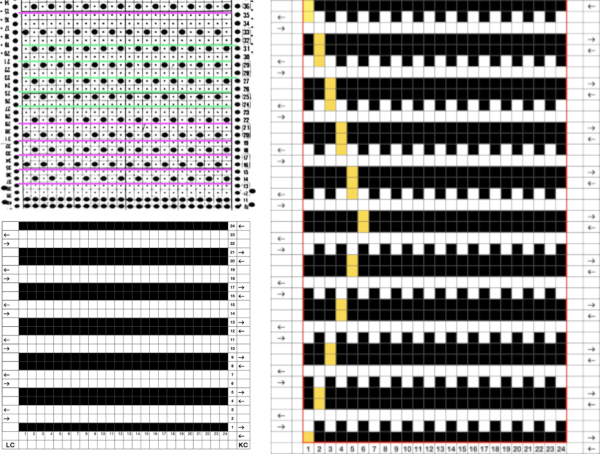 Working one chart through to knitting: the bottom left image shows part of the original card. Magenta squares indicate transfers to the right and cyan ones to the left. The straight edge border with the larger number of eyelets was a bit fiddly to knit, so the second option is also offered and tested.
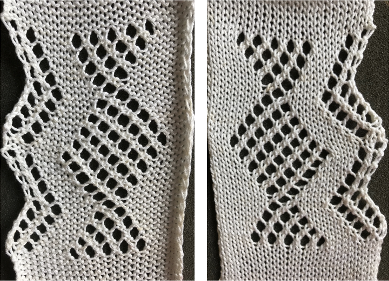
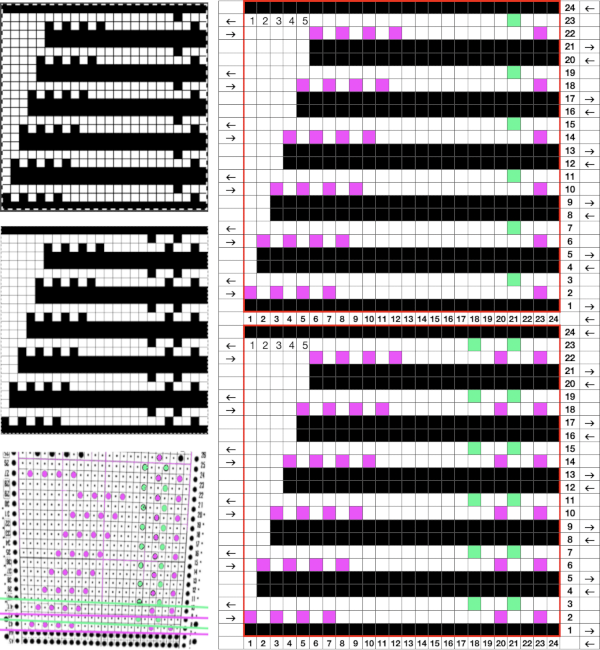
 I knit to the left after all the needles were preselected at the end of the decreases and then cast on over the empty needles on the left, bringing them out to hold so they would be knit for the second row as the knit carriage returned to the right side. A garter carriage weight seemed to be enough to help anchor down the newly formed stitches during subsequent transfers.
  Making a pattern design more one’s own: part of the original design from p. 52, split so the pattern may begin on the widest part of the repeat, punchcard “holes” marked for left and right transfers
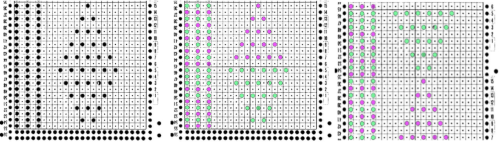
 This sort of knitting can be a bit fiddly. I believe if I were to produce any such trims in great lengths and had the option, I would choose to dedicate a punchcard KM to the project so it would be easier to step away from and return to it as the spirit moved me.
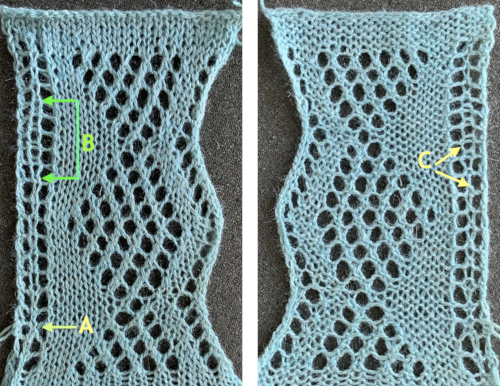 The last Tessa sample, from page 60, brings up the topic of large eyelet lace, also revisited in a recent
 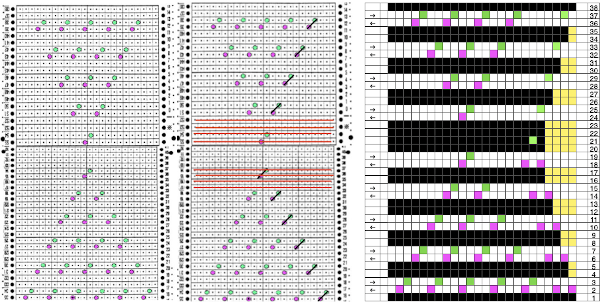 More transitions in planning:
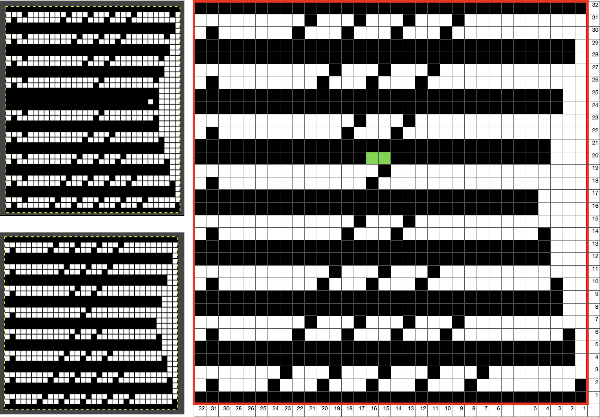 two of the rejected swatches
  Consideration needs to be made in terms of whether some small ladders are a design element or not, hooking up “floats” helps reduce or eliminate them on decreasing angles on both sides of the shape, but the resulting eyelets appear a bit larger and different than the rest.
 The Tessa trims are knit in fine yarns. This shows a portion the inspiration large eyelet trim, note the appearance of the space between the two center eyelets is different
 My version with the floats hooked up and onto the needles with no multiple stitches already on them at the center eyelet as the pattern shifts:
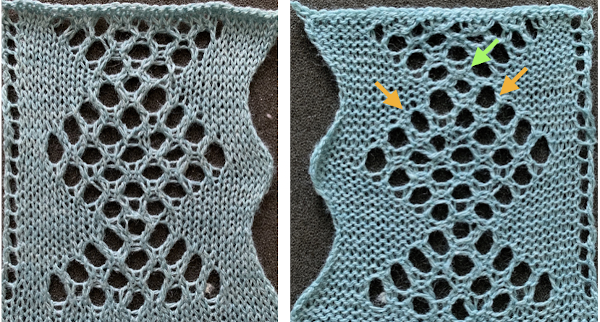

 At the top of the piece I did have to deal with closing the eyelets to facilitate 2 knit rows and binding off. I prefer to work from left to right, dealing with the right side of the loops first: drop loop on the right side, use a tool to enter the float created from its back
 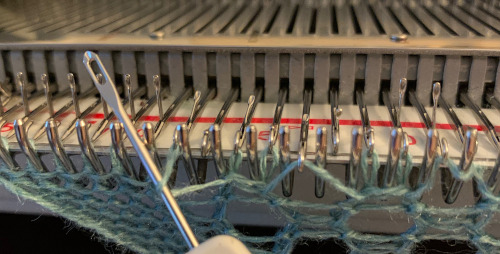 twist tool and yarn clockwise
 There were also point cams, that help to change the spacing between vertical lengths of design repeats. For images of the Lace carriage and use of point cams please see posts
 single complete transfers
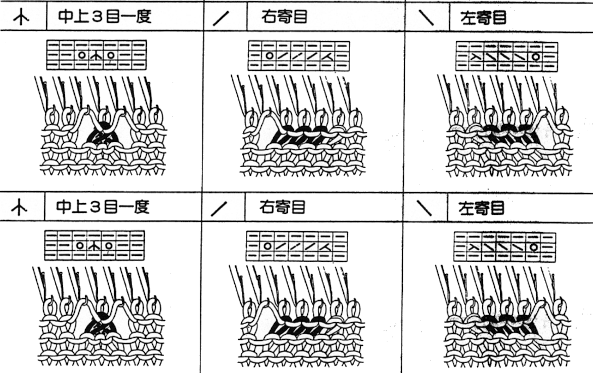 A comparison of hand-to-machine stitch symbols with illustrations and more information:
 The two rows at the bottom of the card reflect the overlap when punchcard snaps are in use to keep the pattern continuous.
 Column identification at the bottom of the chart:
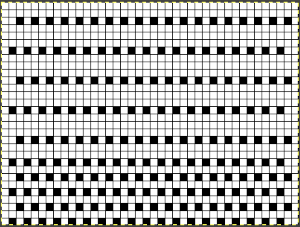
 Spacing out the zigzags, another 24X30 repeat. This is the minimum repeat for electronic KMs as well, knit stitch spacing (white squares) can be planned to suit
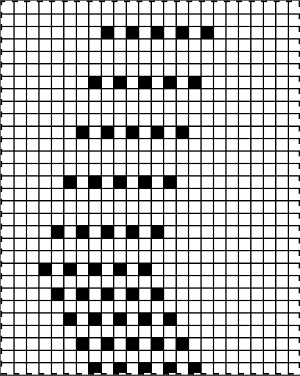
 The transfers of the stitches by the LC while using the knit carriage set to slip in both directions to create the knit rows, will automatically create increases and decreases along the left edge. Due to this fact, there will be one less eyelet in each transferred row than the number of pixels/punched holes in its corresponding pattern row. The knit carriage in this instance preselects rows for the lace carriage, the lace carriage preselects all needles required on its way back to the left for the knit carriage to knit on its next pass.
 The pattern repeat on the left below is as I drew it and intended it, on the right, it is mirrored for use to knit it on my 930
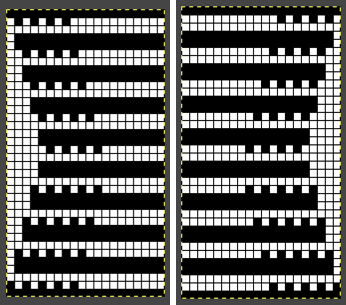 The first preselection row is from right to left, the knit is centered with 10 stitches on each side of 0. I canceled the end needle selection on both carriages. The first row is knit, when the KC reaches the left side, set it to slip in both directions. As it returns to the right it will knit a second row on all needles in work, and preselect for the first LC pass. Extension rails must be used as both carriages will lock onto the belt for pattern selection. At the start of the piece, as the LC moves from left to right it will transfer preselected needles to the right. On its return to the left, it preselects needles that will knit as the KC returns to action from the right. Each carriage in this design makes alternating pairs of passes.
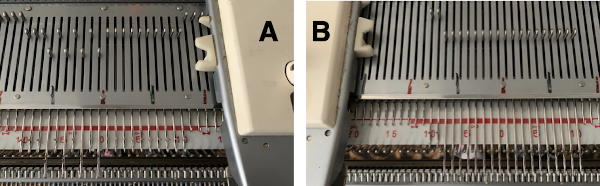 The above fact allows for planning transfers in both directions while still keeping the routine of 2 passes for each carriage to and from their original home. Based on that, here is another trim with eyelets in alternating directions along the side opposite the zigzag shape. The repeat is now adjusted to 22 stitches X 48 rows to accommodate the reversing eyelets arrangement. It is shown here mirrored for download to my 930. There is a blank square at the top right corner, the corresponding stitch will be cast on by the knit carriage on its move to the left and transferred automatically when there is a return to transfers at the bottom of the design repeat.
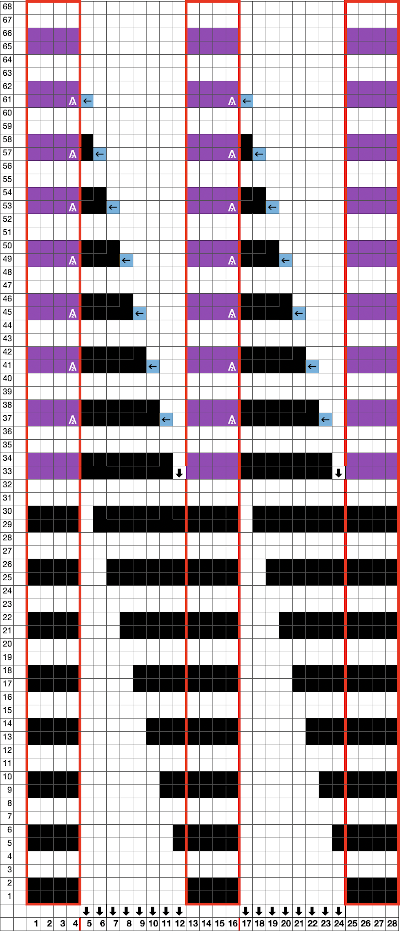
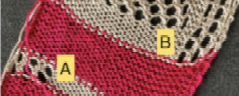
 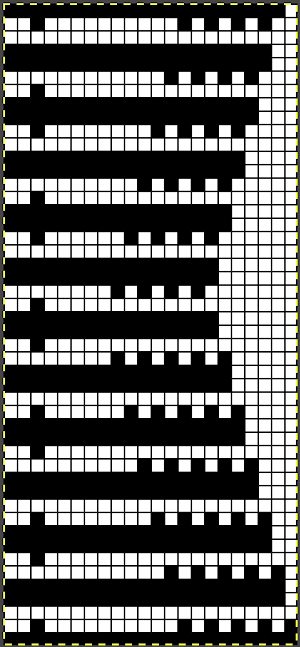 The yarn used or the swatch is a 2/18 wool silk. There will be 2 stitches on each needle (A) at the very edge where stitches are transferred for decreases and look different than where the edge stitch is simply moved one needle to its left (B), leaving behind an empty needle. A parallel, similar difference is also noted at the inner edge of the zigzag shape. The sample is pictured turned 90 degrees counter-clockwise, and its bottom edge appears on the right
 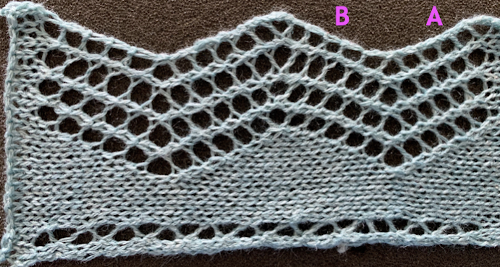 Transfer lace on the Passap: the console will be used to select needles for hand transferring stitches. The technique will determine the number of plain rows between transfers. Use tech 137 for two rows between transfers. The pushers will set the corresponding black cells for transfers, they will stay in that position until the next set of transfers. Many tuck patterns may be used to make the selections, they are not designed to knit on adjacent needles, choose ones that have white columns for nonselected pushers 2 rows in height. Stitches are worked on the front bed. The front lock is set to N and the back lock to GX. Move selected pushers up so that the corresponding needles are easily identified, and use a tool to move stitches right or left. Move all stitches in the same direction, first across a row to the right, then across a row to the left to avoid biasing if the pattern is an all-over one, for borders all transfers in the same direction may work as well. Leave the needles in the work position, return the pushers to rest, and continue in the pattern.
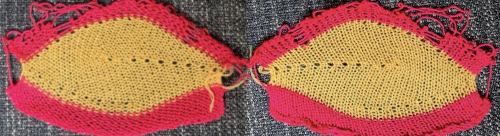 Adding a second color and reversing directions of shapes brings lots of yarn ends and its “price to pay”
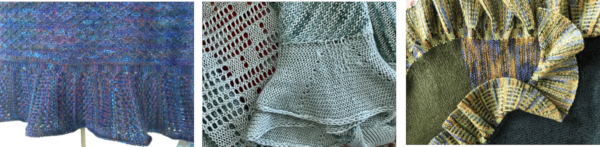
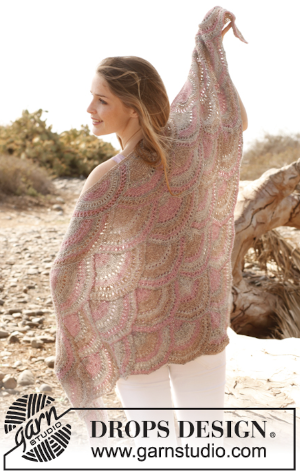
 Some handknit large scale inspiration to begin my revisit to MKing them:
 The chart is actually rotated 90 degrees counterclockwise, could serve as inspiration for an electronic pattern.
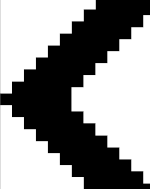 Automated holding sequences may be planned for single or multiple stitches in width, as well as for single and multiple rows in height. For the new initial test, which proved to need editing, this was my repeat
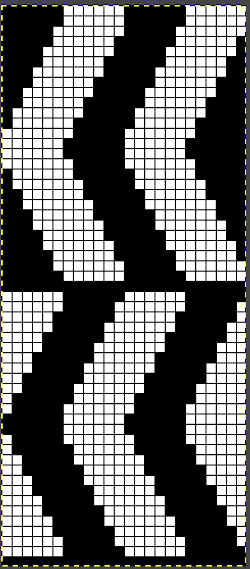 A tiny test in too thin a yarn
 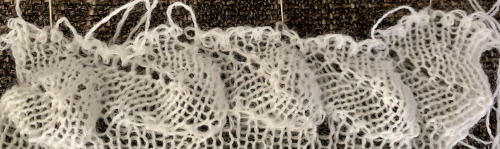 I am knitting on a 930, the image needs to be mirrored in order for it to appear in the direction I intend on the knit side. The above repeat did not work properly when knitting a whole row of shapes. With some patience, a final, edited, and mirrored repeat was developed that enabled a completed a full row of shapes using the slip setting and holding, and starting with working it from right to left. Sometimes differences are subtle, especially in designing using single-pixel units. The new repeat proved to also work for rows of shapes in the reverse direction after horizontal mirroring and restarting the pattern or design row 1. When working from right to left, the initial preselection row is from left to right, while when working from left to right, the first preselection row is from right to left. After a full row of repeats is completed, the pattern is rolled back to row 1 and mirrored. Punchcard knitters could turn the card over and start again on the proper row. I used contrast color knit rows initially in between rows of shapes to help me note transitions more clearly. The “leaf” is not pointy enough for me, but at times what was not planned may lead to a pleasing result of a different sort.
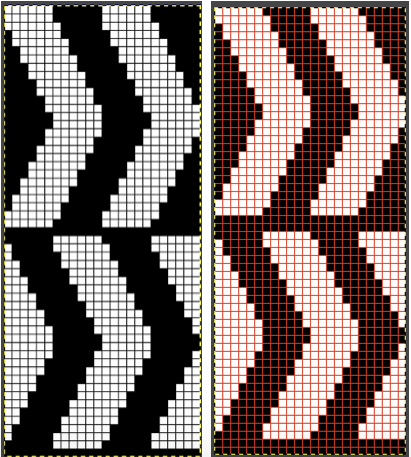
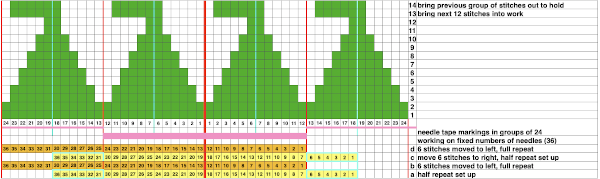
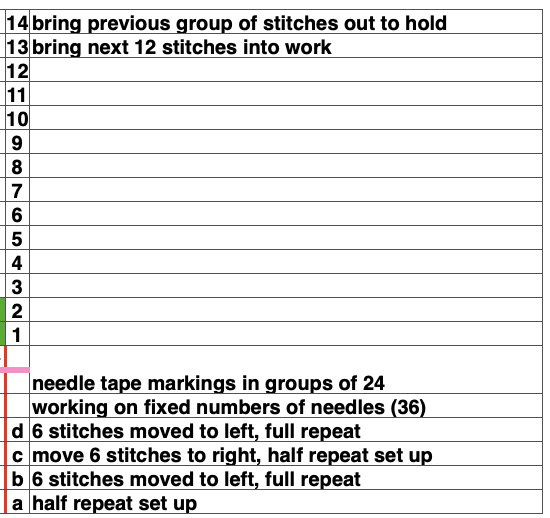
 To knit: cast on with a multiple of 12 stitches on each side of the center 24 on the needle bed
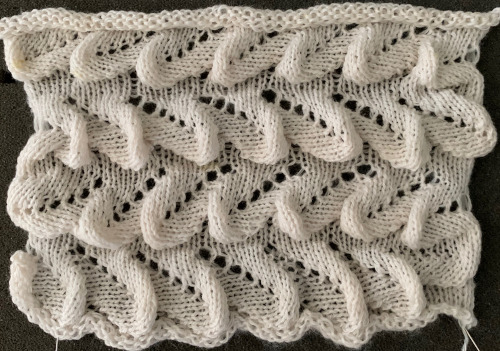
 Moving on to a wider version, using 24 stitches in width to allow for using the pattern on a punchcard: this repeats works both as-is and mirrored, the groups of stitches moved in and out of work is now half of the new design repeat = 12.
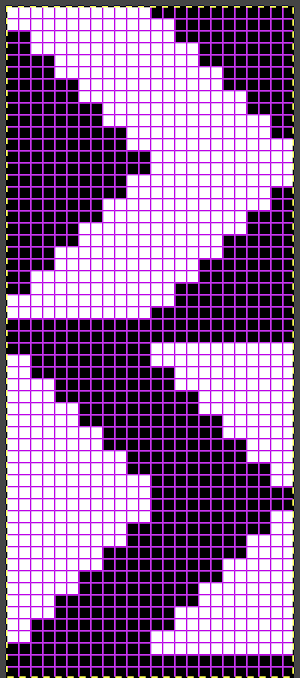
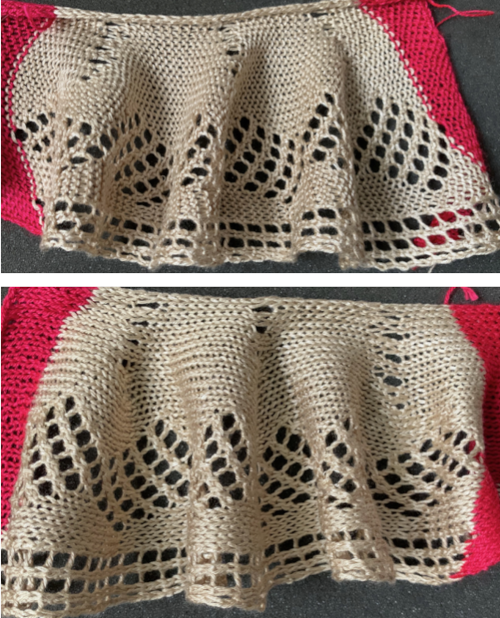
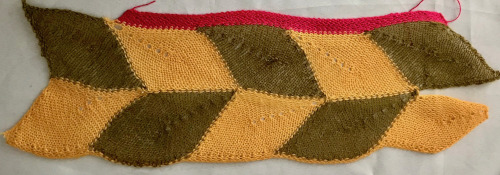
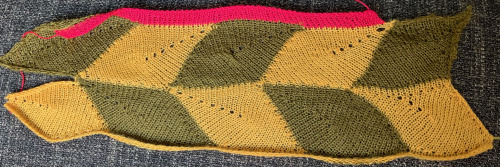
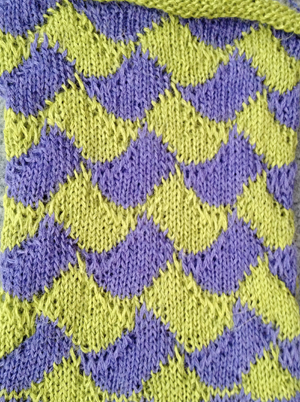
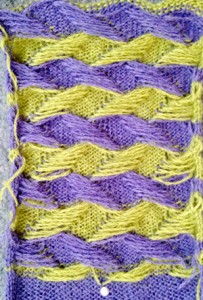
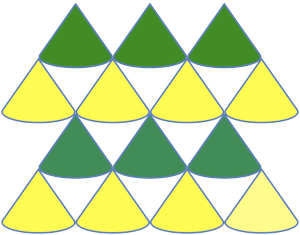
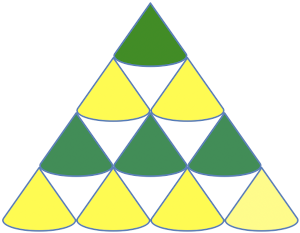
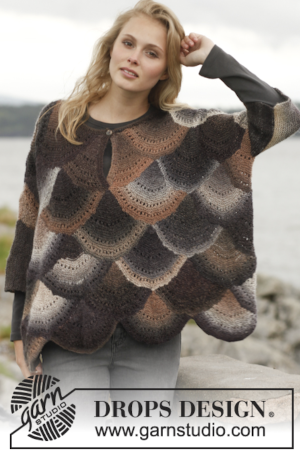
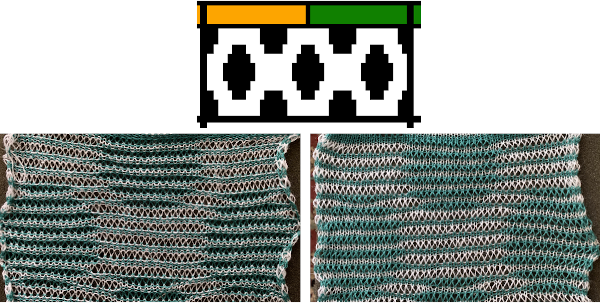
 The lovely mess in the swatch happened when I stopped paying attention to everything but what was happening on the needle bed and missed the tangle of yarns in my yarn mast. There is enough knitting, however, to note that the repeat is sound and that the edges on both sides are formed by the narrowest part of the shapes in each direction. One way to solve that is by casting on and binding off along tops and bottoms of shapes as seen in the yellow and green swatch at the top of the post.
 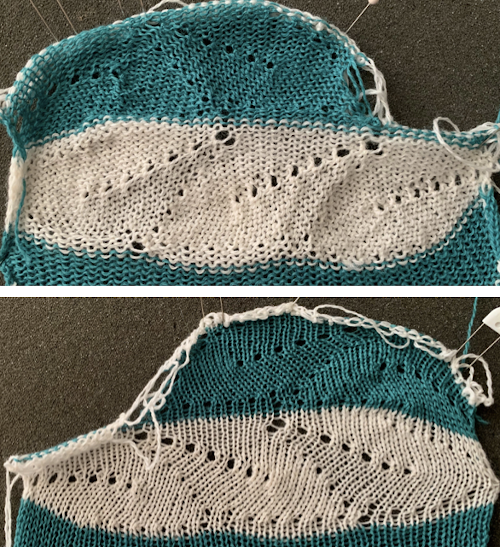 Planning things out to release those edges as seen at the top of the post
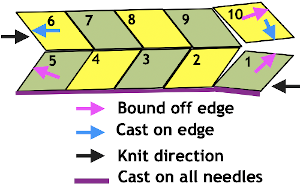

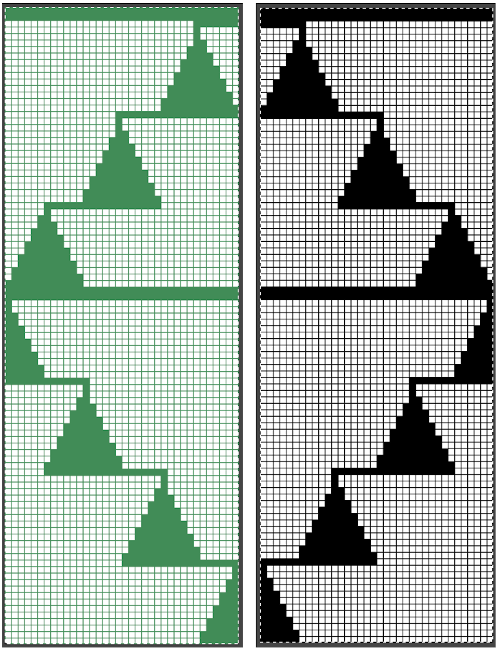
 Problems to solve: maintaining an even number of rows in-between shapes and a straight edge along both sides. The latter could happen with triangles prior to knitting full shapes at either or both ends, the first sample failed on the left side due to both triangles being knit in the same sequence;


 Begin on waste yarn, decide on the color of the cast on, and any additional knit rows prior to beginning in the pattern. Each of the side triangles is shaped using manual holding techniques over 12 stitches. If starting on the right, the first preselection row needs to be made moving from left to right as above on the first 24 stitches. With knit carriage set to both slip in both directions and holding with COL make certain the first 24 stitches on the right in B position make a free pass to the right.
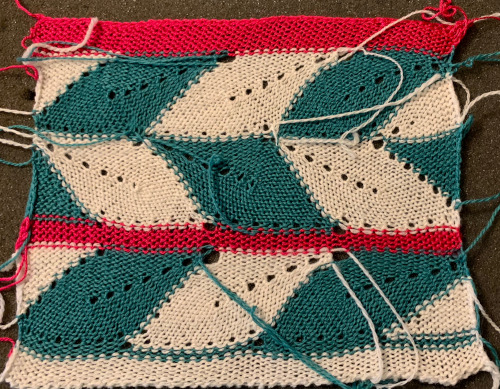
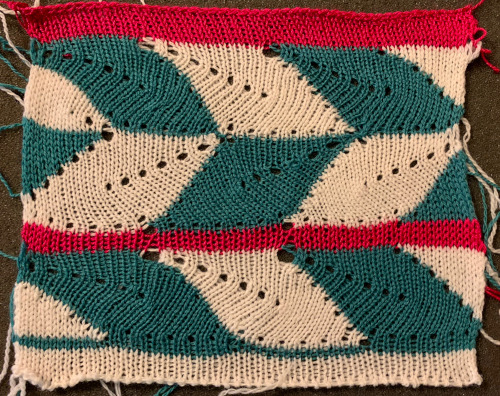
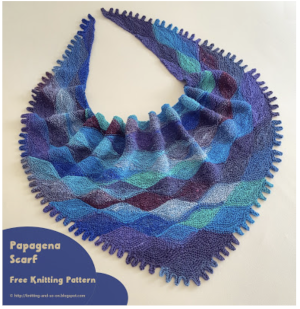
 Observations: there are elongated loops on the knit side of the fabric, likely created with slipped stitches. There appear to be eyelets on the purl side. The total number of stitches remains constant throughout the knit. The row repeat spacing is fairly close, so at least to start with I tried single repeats to achieve the look, was not pleased with any of the initial results. That led me to an online search for what would visually appear to have similar qualities in handknit samples. Knittingfool.com is an extensive resource and, to my eye, this slip stitch pattern,
 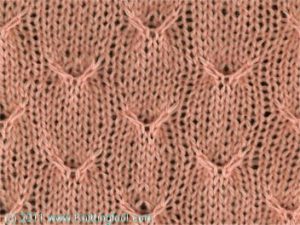 as do “oats” found in a 1984 handknitting publication
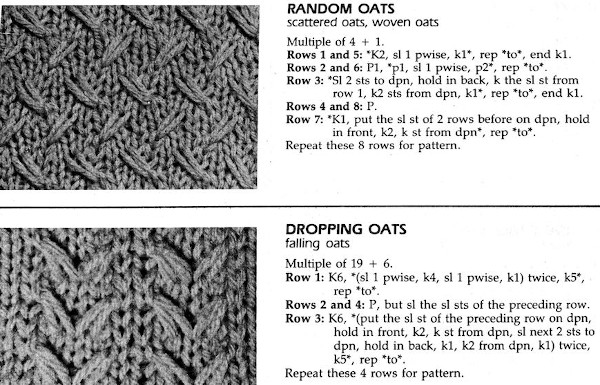
 and then transitioned to translating any repeats for use in machine knitting, keeping in mind that in hand knitting actions are made as the row is being knit, while in machine knitting they take place prior to returning the carriage to the opposite side thus knitting that row. This was my first repeat after replacing cells with squares representing knit stitches with black and white planned pixels for electronic download.
 The slip stitch setting is used in both directions throughout. White squares represent areas where needles on the bed are skipped/slipped, not being selected forward and thus knit. This happens for 3 rows, resulting in the required elongated stitches. On the 4th pattern row, the group of 3 not selected needles is where the stitch transfers and crossings occur. Any cabling, eyelet fill-in, etc, needs to be performed prior to knitting that row and moving the carriage to the opposite side. The work is always done with purl side facing, so matching the direction of patterning to a hand-knit may also require mirroring of crossings, depending on your knitting machine model. The goal is to have the K3tog with the long loops in front of the single knit stitch in the center position.
 Move the stored original center stitch back onto that center position, there will now be 3 stitch loops held on the single needle
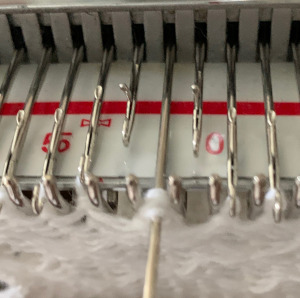

 repeat the process across the bed, bring all the needles used out to hold position prior to knitting the next row
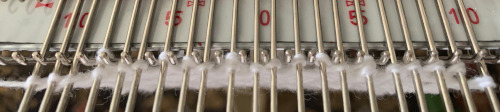
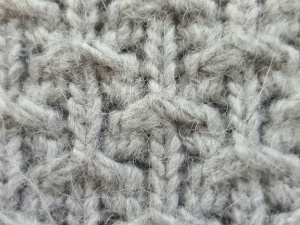
 The yarn used was 3/8 wool at loosest tension possible, the result is subtle as any spaces between stitches get pretty well filled in. Moving on to denser patterning
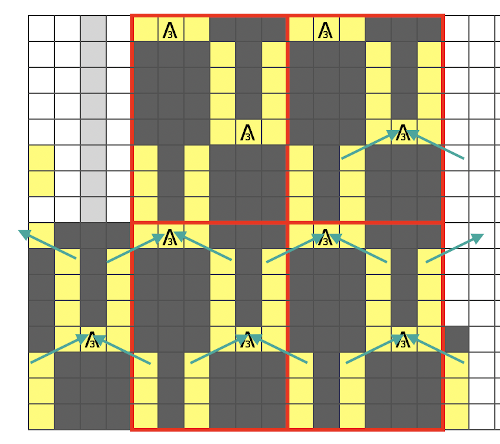
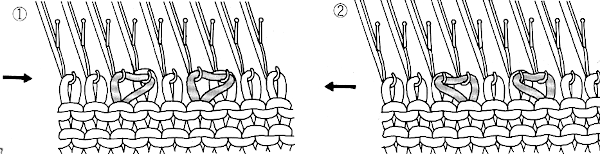
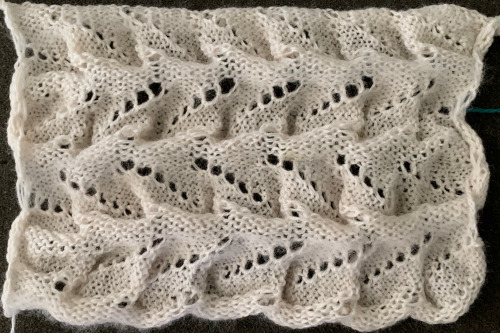
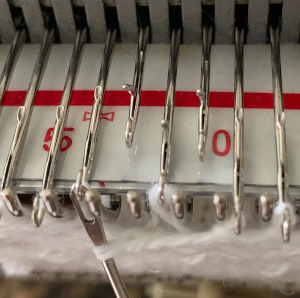
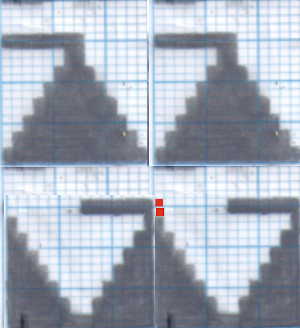
 The elongated stitch crossings now happen every 4 rows, but across two needles, not one. I used a tightly twisted rayon for the test swatch thinking they might be more visible, but the openness in the stitch formation because of the fixed spacing on the metal bed confuses the texture a bit. Simply leaving the empty needle out of work and continuing to knit (1) created too large an eyelet to my taste. Trying to pick up the third slipped loop (2) had the same effect. The best result was obtained by picking up from the row below on each side of the three stitches that are removed and then returned to the needle bed (3).
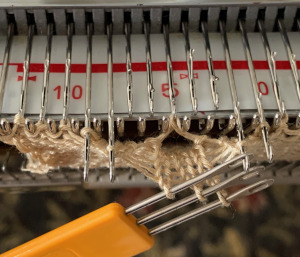 e wrapping the third row of floats can be tested by inserting a single eye tool front to back, twisting either counter or clockwise and rehanging on an empty needle, thus casting on an “extra” stitch
 the appearance on the knit side
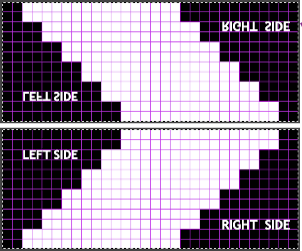
 Charting the actions for a hand-knit version: the top images illustrate the moves on the purl side while on the machine, below it those on the knit side when hand knitting the pattern
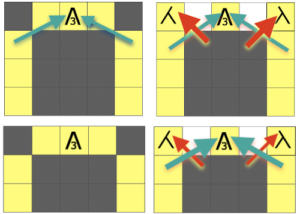 Plotting out borders and repeats for a small test including make-1 increases in order to keep the total stitch count constant. I do little hand knitting nowadays, so when doing so I add as much information as possible including some stitch counts until the pattern is established and I can visually follow it more easily.
 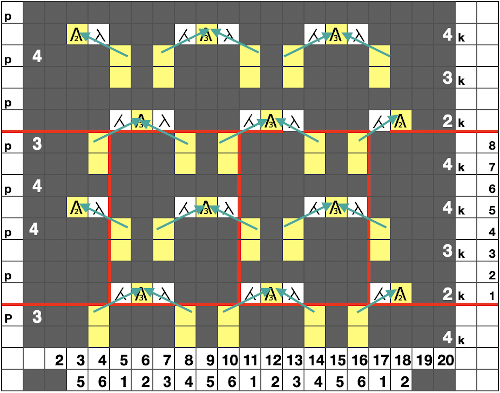 The resulting test swatch
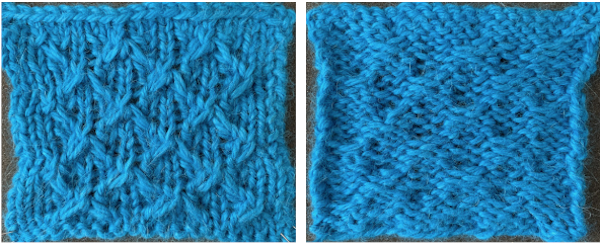
 This is an illustration of the method I used to “make one”, in my swatch I kept the direction constant
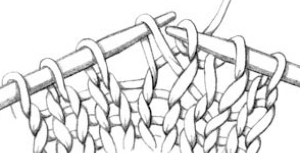
 The 910 in my default setting produced the “image’ as drawn on the knit side of the resulting fabric. The post was written prior to my tiling the repeats as a matter of routine to check their alignments. Doing so would have shown a couple of missing pixels, and pointed to any other errors in filling in mylar squares.
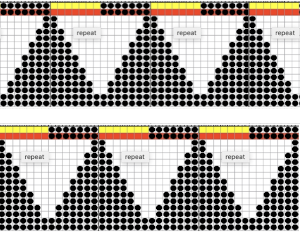
 All transfers were made in the same direction.
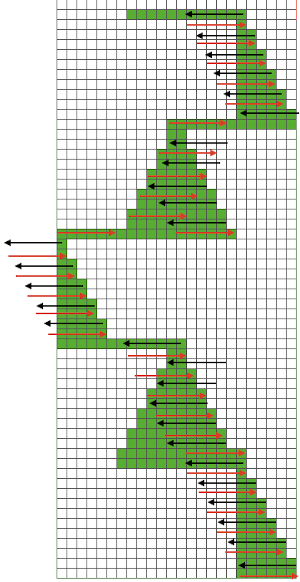 As always, ideas need error-proofing and refining, easier done in a chart if possible prior to any actual knitting.
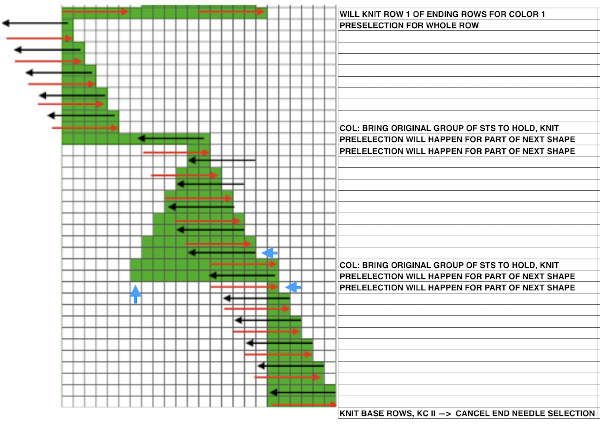 There are a number of changes to make if it is necessary to get the pattern to reverse direction in alternate rows of completed shapes in a brick layout.
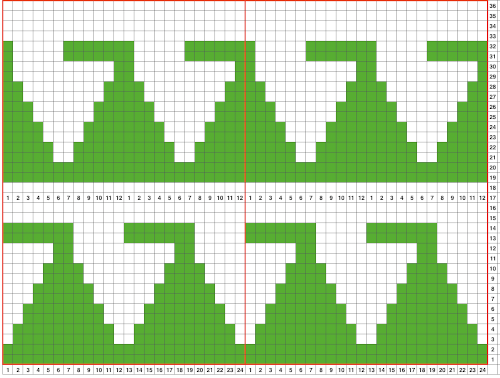 Attempts to visualize holding can happen in spreadsheets, documents, image processing canvases, or even simply on graph paper, moving/ “drawing” back and forth across the cells mimicking carriage movements and marking them accordingly.
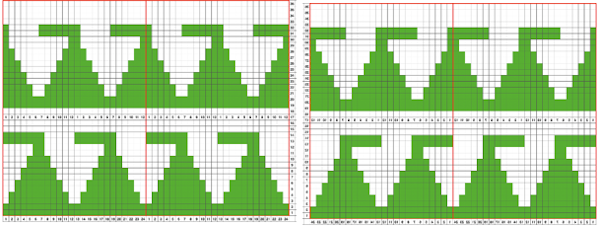 The 930 automatically mirrors downloaded motifs, if direction matters, as in these samples, either mirror the design horizontally prior to saving the png for download to the machine, or use the mirror button selection on the operation panel after the download.
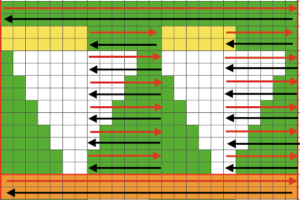


 while here the repeat for all full-size shells is planned,
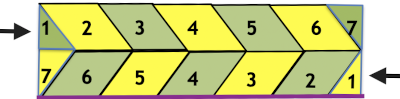
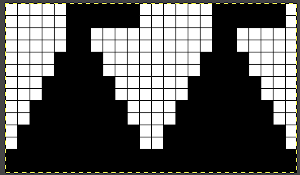
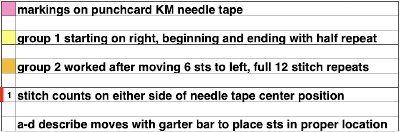
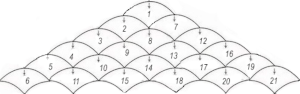
 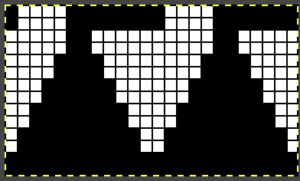 Marking up the needle bed with water-soluble markers or pencils helps track placements of repeats across the desired number of needles in work: dark lines indicate placement beginning with the mark for half a repeat to maintain straight side edges on the finished piece. Red lines mark the placement of the stitches when they are moved to the left in order to knit the full shells across the bed.
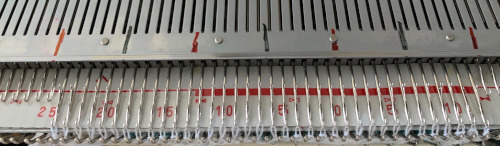
 Scaling the image to render it a bit more legible:
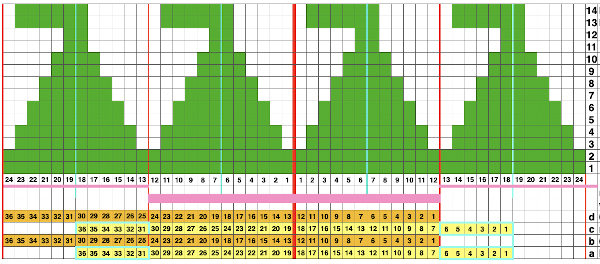
 The machine will be set for slip stitch in both directions and holding. End needle selection is canceled.
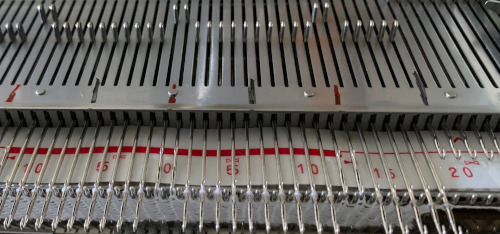

 I used two repeats side by side to eliminate having to consider and choose the position option on the 930 needle bed, resulting in having the pattern centered in each 24 stitch fixed segment of needle selection.
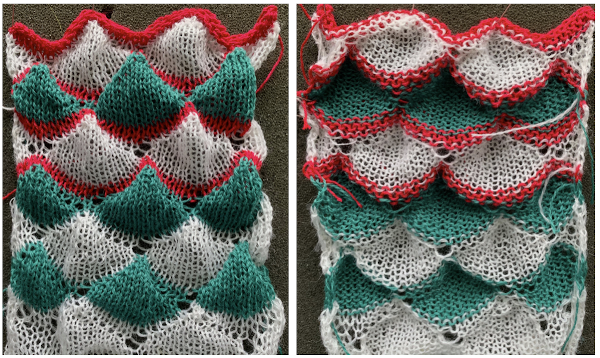 I was too aggressive with clipping yarn ends on the left side, especially while in the process of changing colors, not ever a good idea. Automating the pattern fully on electronic models using only slip stitch patterning is possible. The length of such patterns grows exponentially in proportion to the size of the repeats. Reviewing errors in the beginning concept
 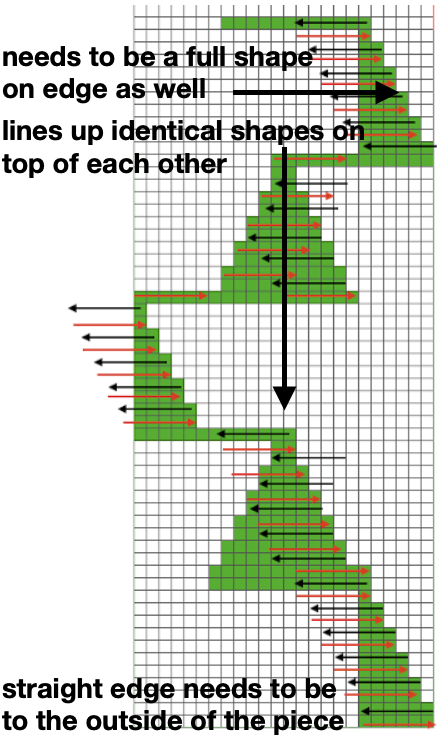 An attempt to visualize the placement of the shape variations in the finished piece using the shell motifs beginning with the shapes created in order to create a straight side edge
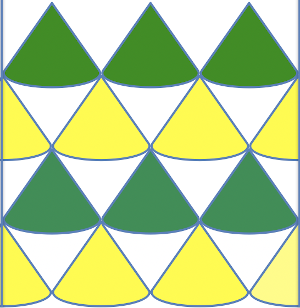
 COR: knit a base row in color one from right to left
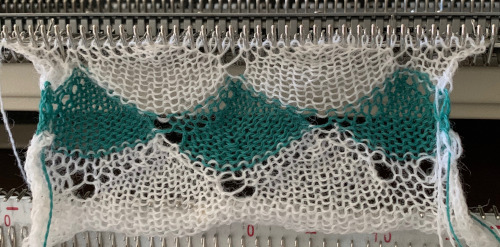
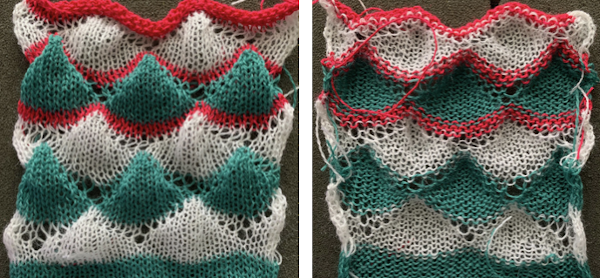 Preserving the 3D texture relies on using yarns with “memory”, ie wool and avoiding aggressive blocking. Using thinner yarns makes the stitch formation more evident. Hard pressing, in this case, knit using acrylic yarns, flattens the fabric considerably, and often, permanently. Both the hold/slip (top) and fully automated swatches (bottom) are shown.
 2023: a screen grab from the shell charts was cropped to its outline, opened in ArahPaint, and using the program’s tool “
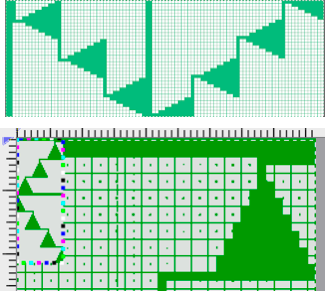

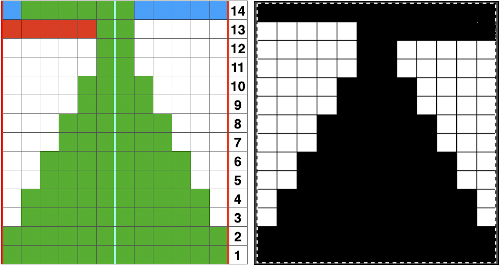
 A return to the original 14 stitch repeat, illustrating a way to begin editing for an extra row in width at the bottom of the shape and ending on 2 stitches rather than a single stitch at the top
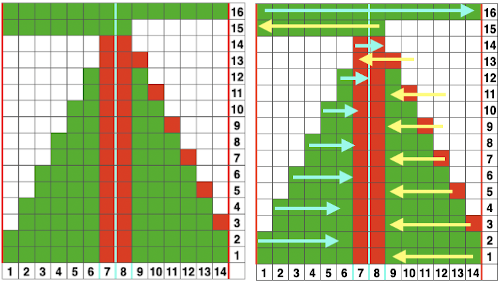
 A Prada sweater using similar shapes
 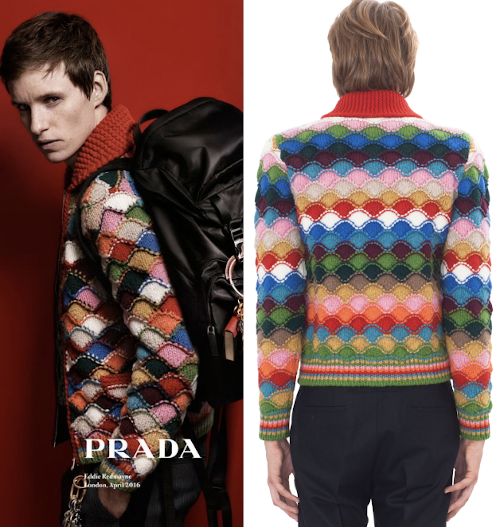 If you are interested in any large size clamshells, and intarsia appeals to you whether in hand or machine knitting,
 Increments in height need to happen at sequences of 2 rows each, so the design was then doubled in height, resulting in a scaled image now 33 stitches by 46 rows in height, with a planned horizontal repeat X2 = 66. Note: the sidebar offers start and end needles are given for pattern placement on the needle bed. Sampling may occur on fewer stitches than that. Since the number of repeats programmed to add up to an even number and center alignment is chosen, the number of needles is even on each side of 0.
 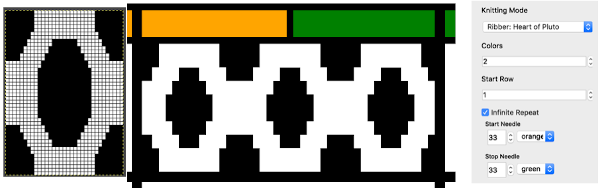 In my second series of swatches, I decided to try for a smaller “circular” shape, with the repeat now measuring 15 wide by 20 high, and a planned horizontal repeat X3 = 45. If centered, the software places the odd number of needles on the right-hand side of 0.
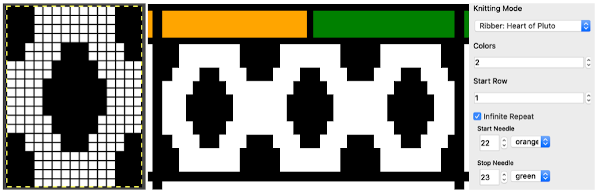
 The wider horizontal band of all knit stitches was due to operator error, happened when I pushed back preselection an extra time, resulting in the ribber only knitting extra rows. For the sake of added clarity, I have added color to the chart below, assigning yellow and grey to all-white design areas in the pattern. The black squares are what I choose to drop. For illustration purposes, this is only a segment of the repeat.
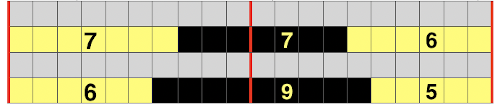

 drop the loops, return needles to B position. At this point, since all needles are in B a modified stitch ditcher may be used for 2 passes, dropping the loops on the first pass and returning the whole series back to B on the second.
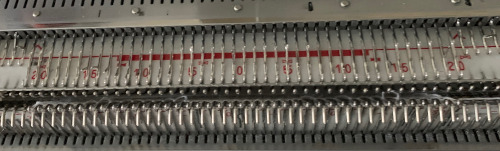
 COL: push all preselected needles back to B, as you knit back to the right the next group of white squares (yellow) in the next design row will be preselected
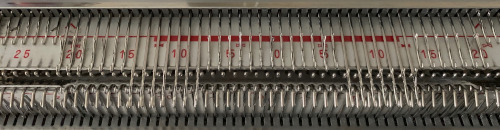 COL: knit to the right in order to form loops on the main bed, continue for the desired number of repeats and end as suggested for the two-color version.