Some DIY variations in combining both stitch types:
Combining tuck stitches with lace 2 (automating them) 3/15
Combining tuck stitches with lace 1 3/15
Large diagonal eyelet lace, (a similar card and fabric, not tuck setting) 6/12
Large scale mesh, breaking rules 4/11 explains the use of punch card below
Tuck stitch combination fabrics 5/19
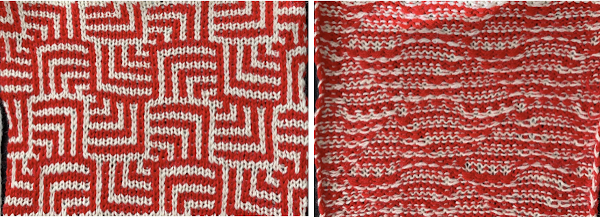
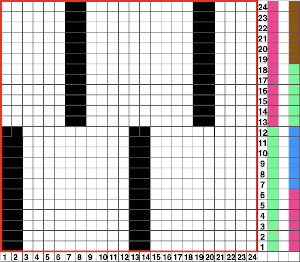
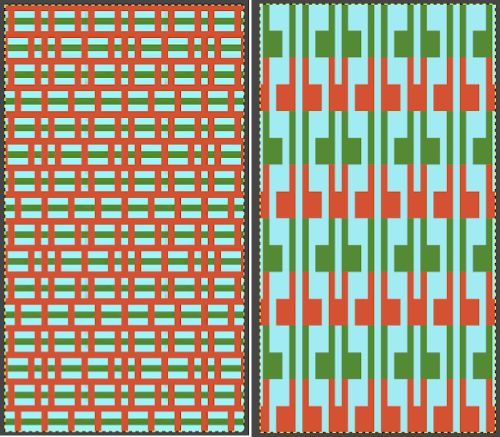
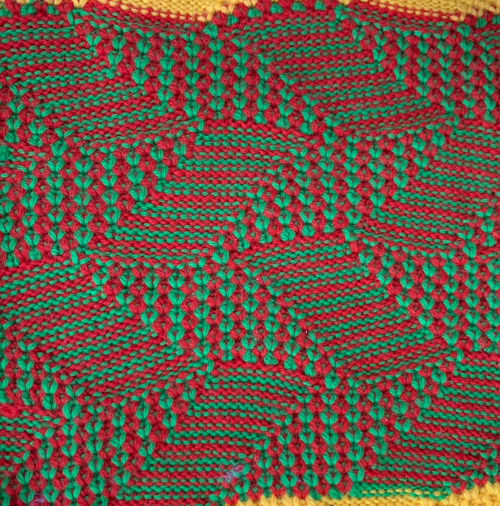
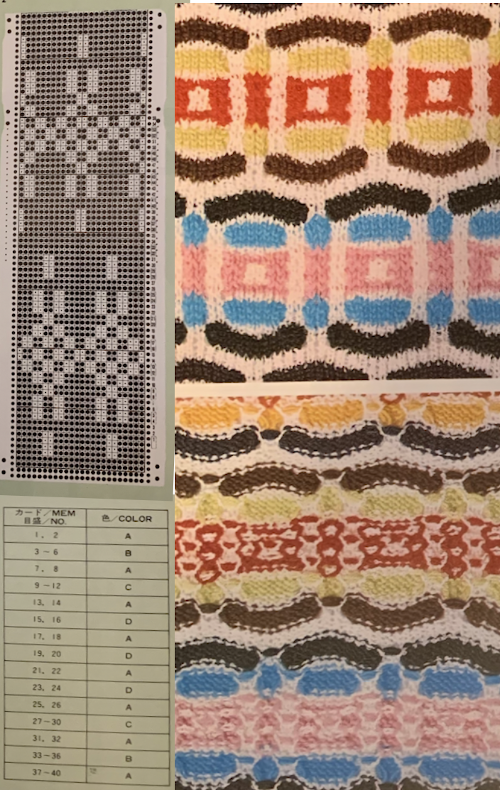
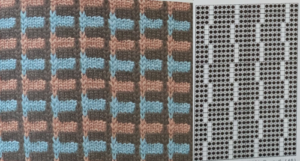
To execute this knit fabric, the lace carriage is set for normal lace, the knit carriage selects a pattern (KCI) and both tuck buttons are depressed. Each carriage works in sequences of 4 passes/rows throughout. The self-drawn card does not include familiar arrows on the left-hand side familiar to users of factory published lace cards  Working out an electronic repeat: the punchcard repeat is on the bottom, the expanded electronic one on top, yellow cells highlight rows with tuck stitches
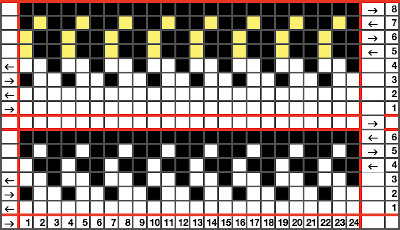
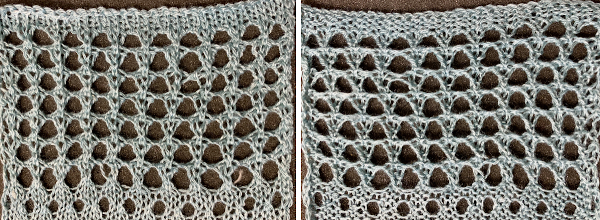
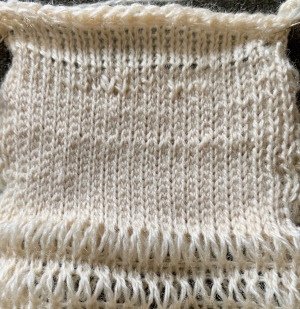
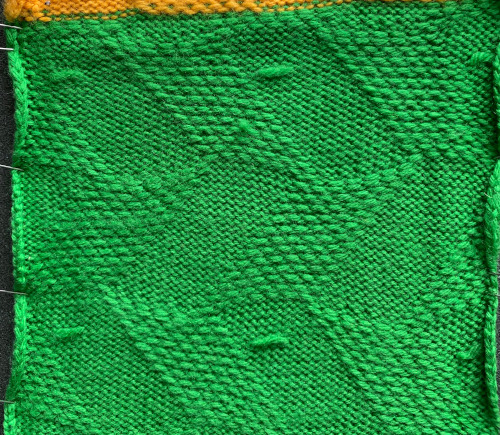
![]() In electronic machines, the first preselection row may be done with the knit carriage moving from left to right or the lace carriage moving from right to left, with either carriage moving toward its usual starting position. The knit carriage is set to KCI for end needle selection. Before the LC begins to move from the left the first and last needle will have been preselected, push them back to the B position. Continue to do the same if any end needles are selected just prior to a transfer row as you continue to knit. Each carriage makes 4 passes throughout the piece. The bottom row of eyelets shows the “standard” size eyelets that follow single transfers, illustrating the change in size with this technique. With the proper tension, transferring is not a problem. I sampled on a random number of stitches. For cleaner edges, a border where no transfers occur for 2-3 stitches can be planned in programming the final piece.
In electronic machines, the first preselection row may be done with the knit carriage moving from left to right or the lace carriage moving from right to left, with either carriage moving toward its usual starting position. The knit carriage is set to KCI for end needle selection. Before the LC begins to move from the left the first and last needle will have been preselected, push them back to the B position. Continue to do the same if any end needles are selected just prior to a transfer row as you continue to knit. Each carriage makes 4 passes throughout the piece. The bottom row of eyelets shows the “standard” size eyelets that follow single transfers, illustrating the change in size with this technique. With the proper tension, transferring is not a problem. I sampled on a random number of stitches. For cleaner edges, a border where no transfers occur for 2-3 stitches can be planned in programming the final piece.
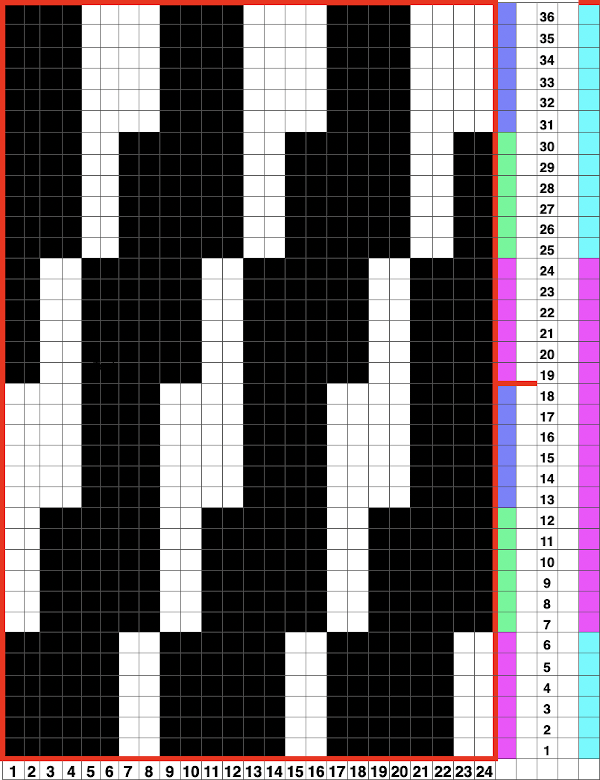
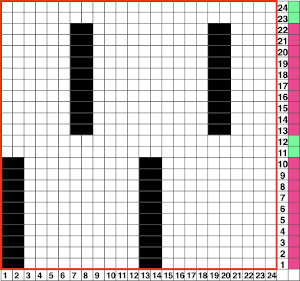
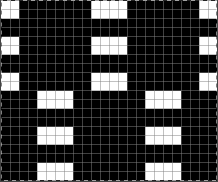
 Returning to Volume 4, here is a combination of lace and tuck repeat that appealed to me. I am repeating a process akin to that used in programming the woven lace samples. In this card, lace transfers are first to the left, then to the right, that sequence needs to be preserved. Colored pixels need to be used everywhere a punched hole is represented. The lace portion of the card will not tolerate color reversal. The published full repeat is for a brick configuration, I sampled the top half.
 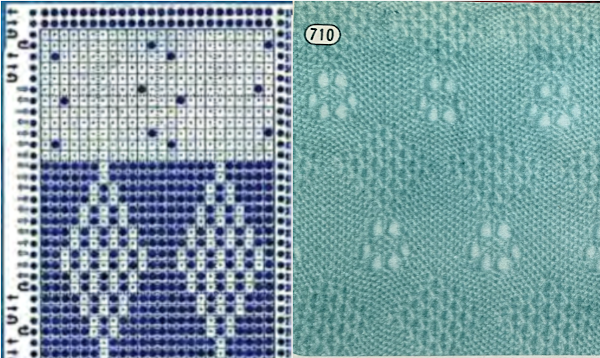 The actions of the 2 carriages on the electronic, the repeat prior to mirroring
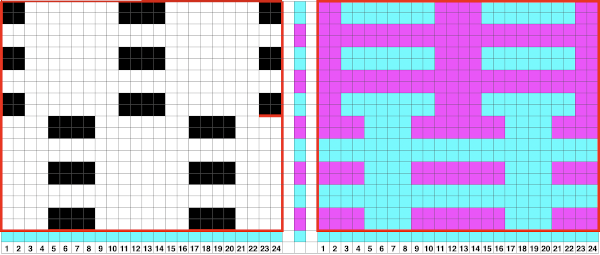
 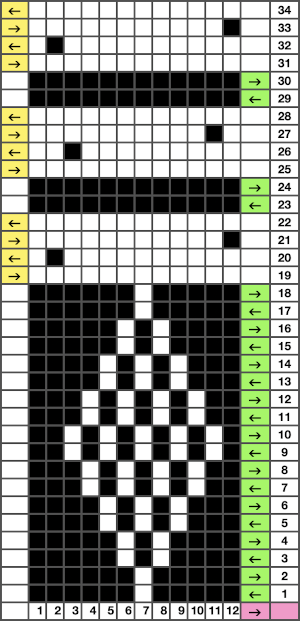 mirrored for use on the 930
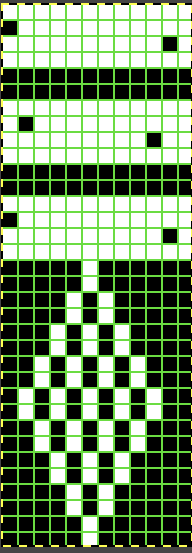
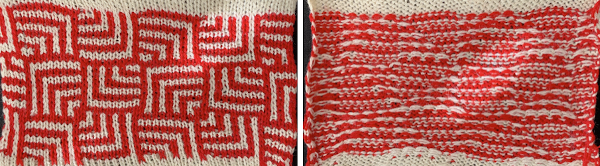
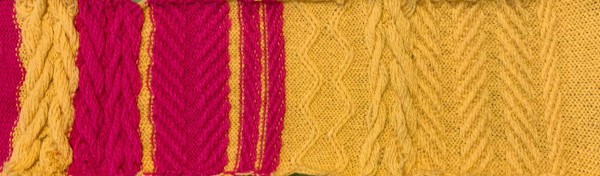
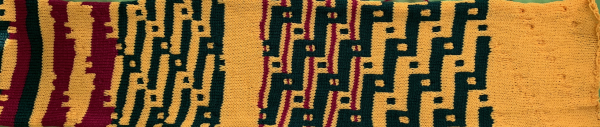
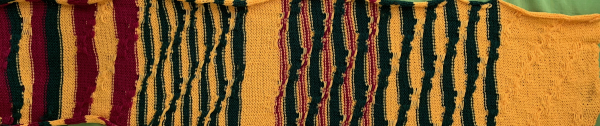
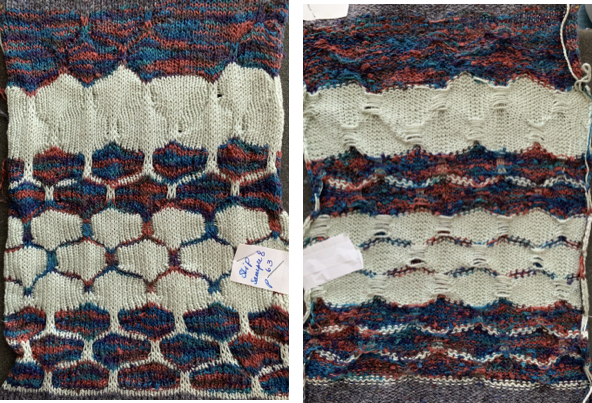
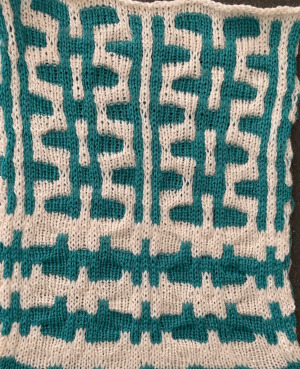
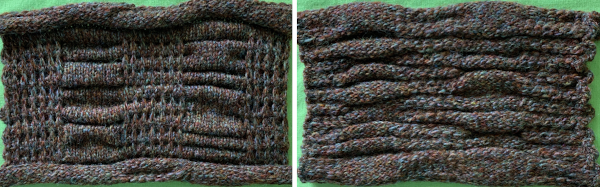
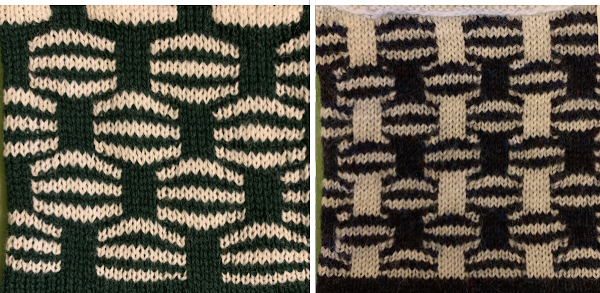
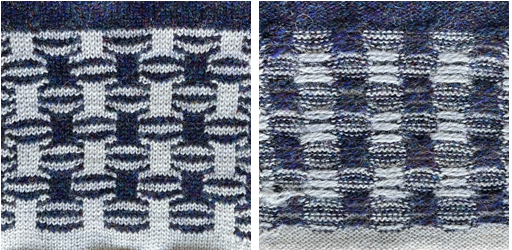
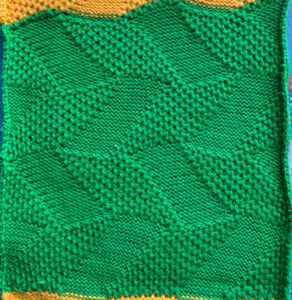
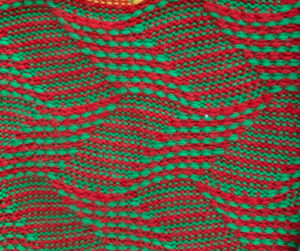
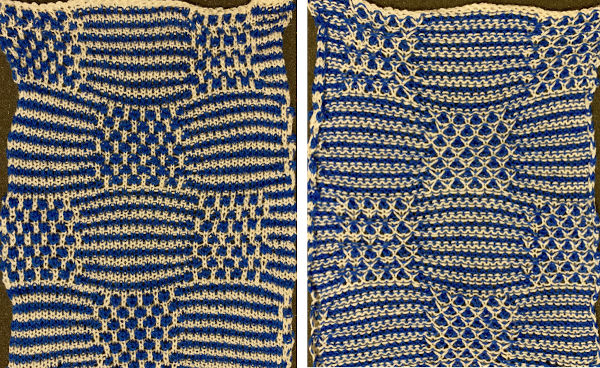
![]() The texture is more apparent on the purl side, the top and bottom edges could be coaxed into a wavy shape due to the gathering up of the knit by the tuck diamond shapes
The texture is more apparent on the purl side, the top and bottom edges could be coaxed into a wavy shape due to the gathering up of the knit by the tuck diamond shapes 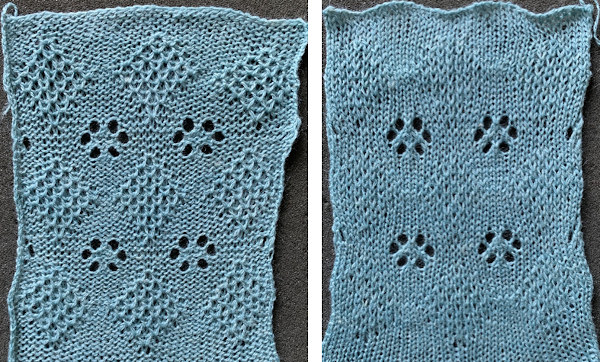 The chart for the brick configuration:
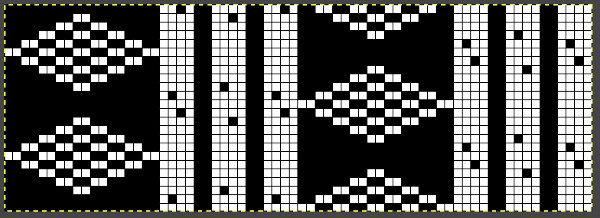
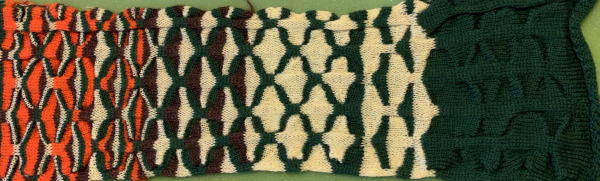
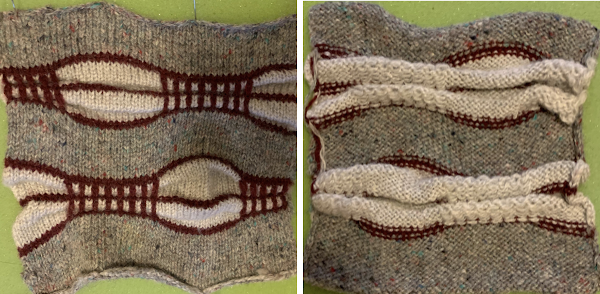
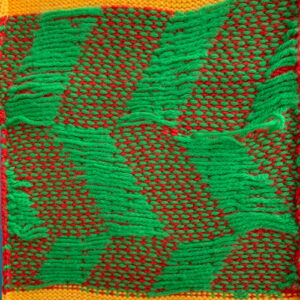
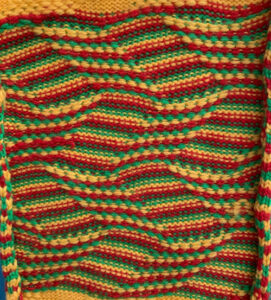
![]() An advanced technique fabric, combining lace, transfer lace, and tuck patterning
An advanced technique fabric, combining lace, transfer lace, and tuck patterning ![]()
Category: Tuck Stitches
Pile_carpet stitch knitting on Passap and Brother KMs 3
Studio and Toyota machines could produce this type of stitch easily. Many efforts have been made over the years to produce the same fabric on Passap and Brother.
I was asked via a blog comment in my previous post #1 on this topic about creating a single color all-over pile on the Passap machine and have added these instructions
Executed with the lights off:
Cast on and begin with all stitches transferred to the back bed.
The back lock is set to EX, the front to CX, pushers are not needed
Knit two rows using those settings, and use a stitch ditcher to drop loops formed on the front bed.
One color carpet stitch, if programming technique #256, ignore console instructions
1. cast on so that all stitches are on the back bed
2. knit a few rows in stocking stitch testing for the tightest tension at which your yarn will knit, and experiment with the front lock tension to produce as large a loop as possible that will also drop off properly. Begin knitting your test with locks on the right side:
3. bring the back bed pushers to the in 1X1 arrangement, and set the back lock to FX with the left arrow key, not BX. Do not use the AX setting, it will tuck in both directions. All needles will tuck moving from right to left, and knit on their return to the right
3. with the front lock set to LX, it will knit on all needles when moving to the left creating loops on the front bed, while the back lock does the same, slips all needles moving on the front bed when moving back to the right.
When the locks reach the left side there will be loops on every needle on both beds. As they move from left to right, the needles on the back bed will knit, securing the loops there and anchoring the ones on the front bed while the front bed is slipped
4. with locks again on the right side, use stitch ditcher or another tool to drop off loops on the front bed, returning needles to proper work position, follow with a pass using a single eye tool to push loops between the beds, checking that none are left in the needle hooks
*make 2 more passes with locks from and returning to the right, drop off loops**, and continue from * to **
The difference in the size of the long stitches between loop rows in the photo was eliminated by tightening the tension on the back lock, it is evident that they are anchored more evenly in those segments as well. As with any fabric, the larger the intended piece, the more likely some further adjustments may have to be made. 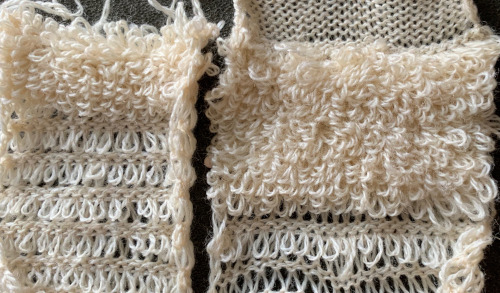
 Alternative settings for one color pile: Tech 256, back lock FX and both arrow keys, pushers one up, one down, front bed to LX, drop stitches every 2 rows.
For 2 color work, Tech 184, same settings.
For a similar effect on Brother machines, begin with all stitches in work on the ribber, with the settings: opposite tuck buttons, the main bed knits to left, ribber knits to right anchoring loops formed on the previous row  the loops, formed on every needle on both beds with the move to the left
 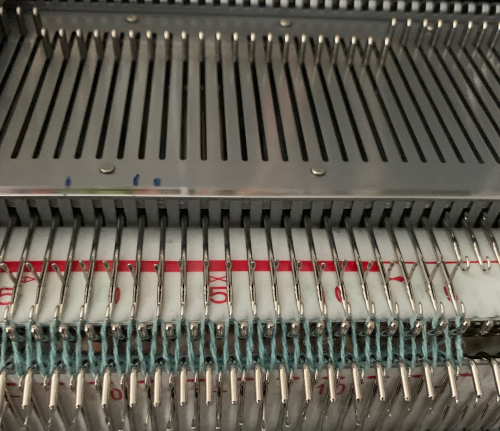 anchored in place on the ribber needles as the only the ribber knits as it returns to the right
 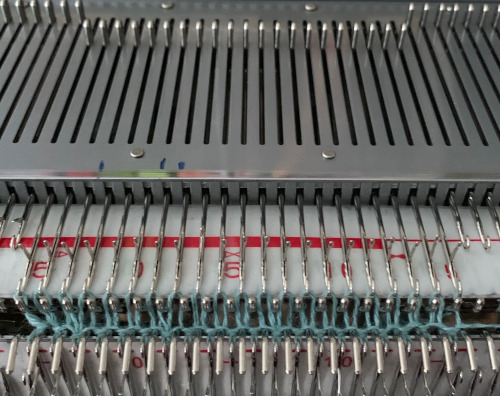 while the carriage is on the right, drop all stitches on the main bed,
 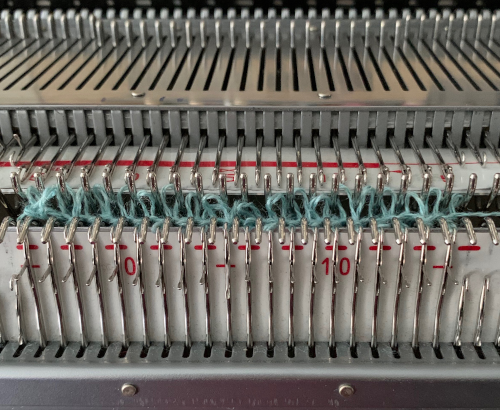 making certain no loops are stuck on gate pegs on the main bed,
 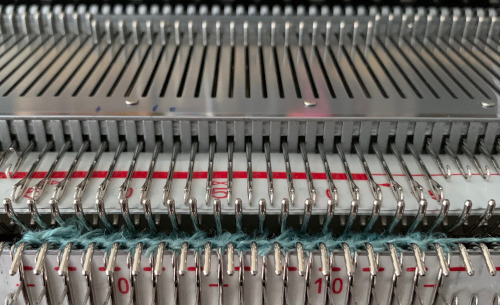 repeat the process throughout the piece. Occasionally skipped needles and their missing loops may not be noticeable, any loops hung up on gate pegs will be visibly longer. Tension needs to be “just right”. My first efforts, shown sideways
  Knitting was smoother with a change in yarn. An extra needle on each side of the knit on the ribber is brought out to hold manually to ensure their stitches knit with every pass of the ribber carriage. I prefer the all-over pile with its loops formed on the top bed. There were nearly no incidences of loops catching on gate pegs on the main bed. One of the drawbacks is that the main bed needles need to be dropped and brought back to the B position manually, bald spots will result where any needles are not returned to the proper work position, so they will not pick up loops.

The traditional hack for other than Studio or Toyota kms involved this process:
to knit, bring up the first and last needle to the hold position on the ribber to ensure they knit when both carriages are on the right and the ribber will tuck on every needle as the carriages move to the left. The carriage settings: Loops are formed on the main bed as it knits from the right to the left, and slips on its return to the right. The ribber tucks on every needle moving to the left and knits on every needle returning to the right, anchoring the main bed loops. After the carriages reach the right side, loops on the main bed are dropped, and the process is repeated.
The results are dramatically different. If considering patterning on the main bed with the addition of a second color or creating isolated motifs whether on a single color or striped background, anchoring loops by tucking on every needle is no longer possible, making reverting to EON needle selection on ribber a necessity. Loops formed where no stitches are knit on the main bed would only sit in the hooks on the ribber and create a mess. Hence the “hack” where lili buttons and tuck stitch in both directions so that loops are knit off on the next pass, and with 4 rows knit before dropping stitches so that the maximum pressure is put on those loops to hold them in place. This requires the tightest possible tension on the ribber, and by default, the EON tuck will want to spread the fabric further apart. I have found this version a failure in producing a stable fabric with a satisfying pile formation. 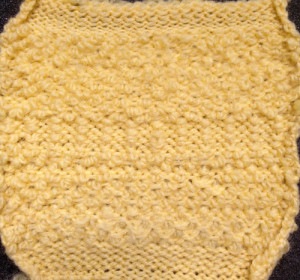 Returning to the pursuit of pile loops in pattern on Brother: my first effort with a simple, linear shape produced separation aside the loops akin to that seen in isolated FI motifs, both when using the ribber or the main bed to create the loops. Here a simple checkerboard was hand-selected, there was separation along the vertical edge like that seen in isolation motifs
 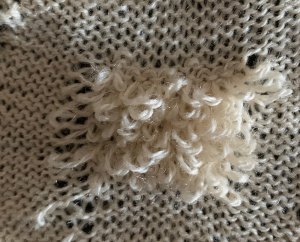 and this is likely my last try at the single pile in a pattern using every other needle tuck on the ribber with the release of stitches every 4 rows. I actually like the elongated stitches in the ground but found the stitches planned for loops simply did not release easily or at all,
 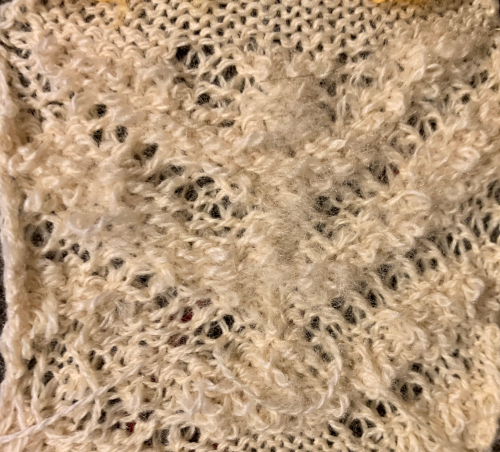 using thinner, smooth yarn resulted in breakage, while adding elastic obliterated loops, and wooly nylon simply broke regularly. It would appear if pile knitting on Japanese machines is the goal, by all means, add a studio KM to your stash ;-).
Mosaic and maze inspiration from additional sources
Reviewing properties of both: maze patterns have long vertical and horizontal lines broken by regular gaps and the pattern lines change course from the vertical to horizontal, and vice versa. Maze cards can be identified by completely punched row segments, some alternating with every other square marked for two rows, usually geometrically shaped. Areas of stocking stitch produce horizontal colored stripes, and alternating pattern stitches that slip or tuck cause the vertical stripes, which are sometimes pulled nearly diagonal by the influence of tuck or slip. The fabric will be unbalanced because the number of needles slipping or tucking will not be the same on every row. Odd rows usually form 2 color horizontal stripes, even rows vertical stripes, with color changes occurring every 2 rows.
Mosaics have a brick arrangement (tessellae), with clear perimeters and cores, and stepped diagonals (frets) that are partially formed bricks, their positive and negative spaces are created by the use of contrasting colors. The stripe sequence is not as obvious. The punchcard does not resemble the original design.
In single bed work, the reverse of the fabric will show the original design in the texture of its slip or tuck stitches. There usually will be no floats longer than one or two stitches.
The knit side may look like a fair isle but the back lacks any long floats, hence the name “float-less fair isle”
The row gauge is compressed. Tuck fabrics are short and wide, slip ones tend to be short and thin. Some patterns elongate in washing. The tension used is usually one number higher or more than that used for stocking stitch for slip patterns to reduce their narrowing. Tuck knitting may need adjustments to lower tensions. Smooth yarns in contrasting colors are the easiest to establish an easily recognized test pattern, the choices that follow may then be far more personal.
After a while repeat units begin to become familiar. Pondering possibilities: 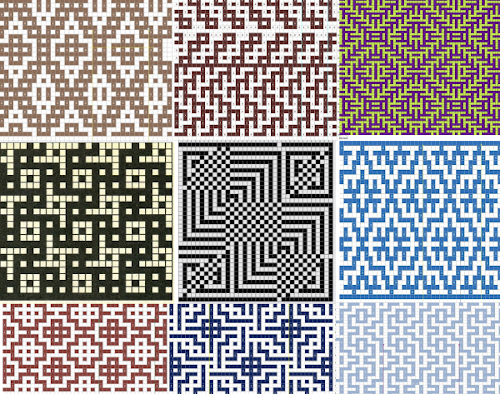 Here the design knit as a fair-isle pattern would produce long floats, going through the steps of converting it for “floatless fair isle” proves of no benefit.
I previously wrote about the use of weaving
drafts as inspiration for other textile techniques, ie. knitting.
Endless published drafts may be found online or in books that might be interpreted for use with mosaic/maze single bed knitting. Having electronic machines available lifts restrictions in pattern width, while repeats too large for narrow items such as scarves may become useful for shawls or blankets. One such repeat, with .pngs shown for both single and double-height:![]()

This repeat is 36X36 before being lenthened X2 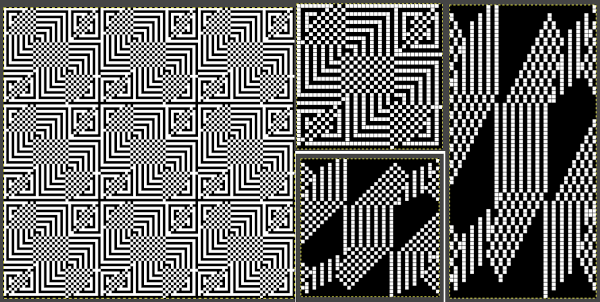
![]()
![]()
A different sort of challenge was posed by this 18X18 image with a row shift in areas with a large number of both filled-in or blank squares. As one moves up its magnified version in Gimp it becomes apparent that a row will have a very long float in one of the two colors. One option is to skip that row, resulting in the green gridded repeats for the converted motif both shown both for single and double length. The result in the knitting test swatch produces an unplanned color shift which could be declared to be a design feature, or one can continue with editing the inspiration source. 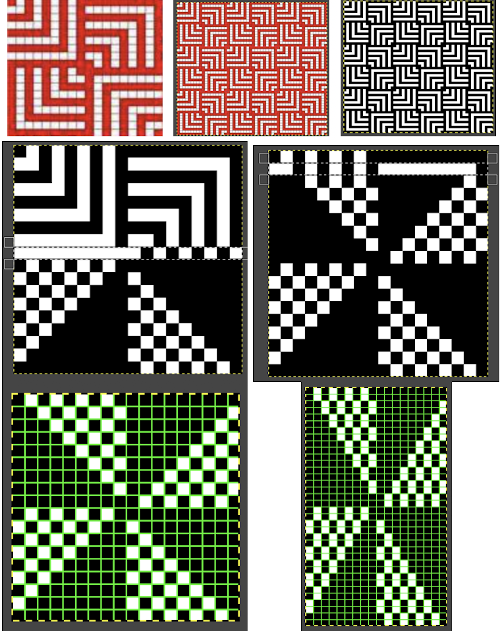
![]()
![]()
 Repeating the separation process with a new graph produces a workable cousin to the original
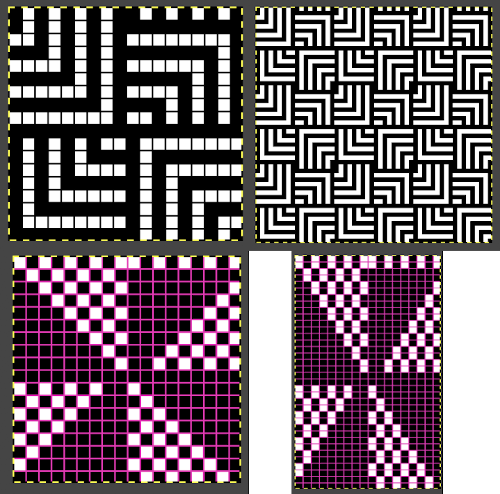
![]()
![]()
 Generally when creating these patterns on Brother machines, patterning selection varies for each pairs of rows. I got distracted while making the above swatch by a phone call, got to the point where there is a very obvious solid black all knit row in the repeat, but “forgot” its presence. I assumed I was having a selection or a carriage issue and scrapped the knitting off. Note to self: “remember to always check the programmed design before you do that again in the future”.
Single bed tuck/ mostly slip stitch fabrics 3
As with the tuck stitch, the knit carriage ignores the needles that are not selected in the pattern. All holes in a punchcard, black squares, or black pixels in electronic programming knit. A great deal of dimensionality may be achieved since the tuck restriction of the maximum amount of yarn being held in the hooks of the nonselected needles does not apply. The effects on the width and length of the fabric vary depending on the number of needles ignored in the pattern. If slipping in long vertical areas, the yarn that is held in the non-selected stitch(es) needs to be held for that long without breaking. Multiple colors per row patterns may in some cases require specific color separations, but as usual, a good place to start is with published patterns.
Stitch formation: the needle that is not worked holds a stitch that gets longer until that spot on the needle bed is selected again, resulting in a knit stitch being formed in that location with the next carriage pass. Floats are formed between knit stitches as the held stitches are skipped. The height and width of the bars created by unpunched squares or white squares or pixels need not be fixed and may be extended in both height and width, breaking tuck rules. Many patterns are impactful both with the use of single-color yarns or with color changes. With color changes, the elongated stitch carries its color up in that location on the knit side until it gets knit off (not always or necessarily in the same color).
Here stitches are held for 4 rows,  a planned color change on the next row would require needles that had been skipped, marked in red, being pre-selected forward for knitting back toward the color changer and returning to the previous or next planned color selection
 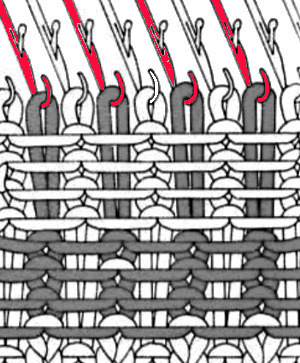 In textured knitting, fiber choice can be significant. It is best to use a yarn with some memory, such as wool. If yarns such as acrylics or rayons are used and in turn are pressed the fabric may become permanently flattened, which is not desirable unless it is a purposeful design choice.
Depending on the KM brand, the space between slipped repeats may be altered. In some cases, no matter what the programming method, and especially when using multiple colors, the length of the required repeats may grow exponentially no matter what machine is being used.
It is possible to use slip stitch in only one direction to create knitted cords, often referred to as i-cords. This technique is sometimes used as an introduction to the stitch type. Used for all-over patterning the possibilities for textures and 3D effects and shaping are endless.
Slip stitch patterns tighten the work widthwise, as well as shorten it in length. To achieve more drape in the resulting knit use a tension dial number 2 higher than that used in stocking stitch for the same yarn.
To retain a flatter fabric shape off the machine it may be best to slip no more than 2 side-by-side stitches. The number of rows for which stitches are slipped contributes to density. Some of the single bed patterns may be used double-bed as well, but the discussion here is for single bed patterning.
Here are some repeat ideas for working with diagonals from a punchcard reference, and one from the basic factory pack supplied with machines: 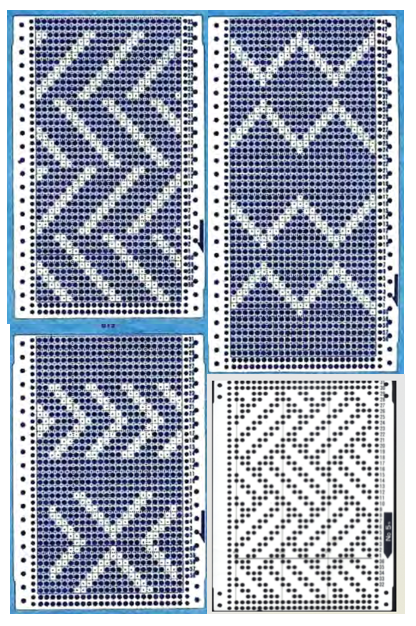 Remember that punchcards knit the image as viewed on the purl side of the fabric, so to match any swatch photos given in published pattern books, the exact repeat unless it is perfectly symmetrical, will usually need to be mirrored horizontally for use in electronic machines.
Similar shapes to the above, arranged differently: in A, arrows point to punched holes that create a vertical line containing 2 slipped rows followed by 2 knit ones, B is problematic because the long vertical white lines would mean the stitches corresponding to those locations on the needle bed would slip for the height of the punchcard, C is B color reversed to solve the problem, and suitable for slip-stitch knitting. An alternative for using B as is would be to have needles not selected in those all blank locations out of work on the main bed creating ladders (or transferred down to and in use on the ribber). As in any pattern knitting, if needles on the top bed are out of work, end needle selection must be canceled. If it is not, the needles adjacent to out-of-work needles will knit on every row, altering the planned pattern.
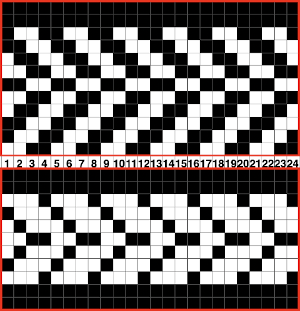
 The same shapes can be edited for use after rotating the original
 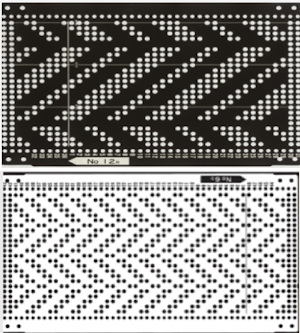 The 24-stitch repeat for the bottom option is shown, punchcard knitters would have to punch the height x4. The minimum electronic repeat is highlighted with a red border
 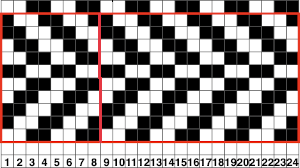 tiling to check the alignment of the 8X10 repeat.
 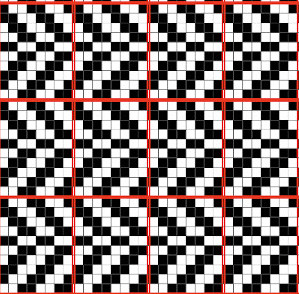 More repeats using similar lines, varying in density and consequently in their height: all knit rows (no white squares) make for easy to recognize color change possibilities and transitions
 ![]() other possibilities using checks rather than solid lines
other possibilities using checks rather than solid lines  When evaluating published repeats, keep in mind the basics; these are suitable for electronic KMs that will allow for color reverse
 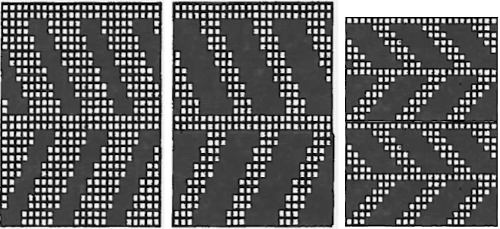 punchcard knitters would have to punch white squares, resulting in this arrangement
 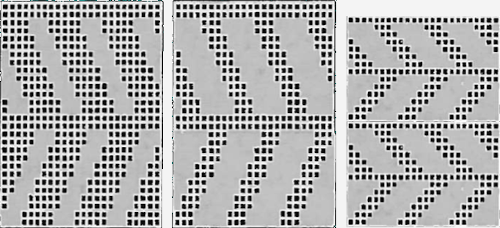 The knit side is not necessarily always interesting. With knit stripes in a different color breaking up the textured segments a secondary pattern will begin to emerge. A closer look at the samples below reveals one repeat is actually the other, drawn double length. This is an easy option, even in punch card machines. When knitting long pieces especially, however, I prefer not to use double-length built-in features, finding it easier to sort out where I am in terms of design rows if errors occur.
 ![]()
![]()

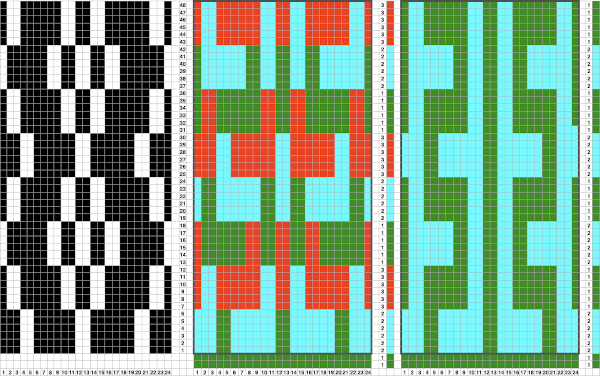
 Returning to a couple of the tuck stitch illustrations, adjusting the repeats for use with the slip stitch setting. Some of the color change sequences are suggested on the right side of the charts
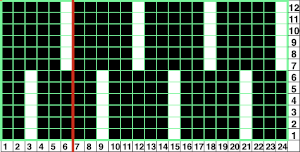
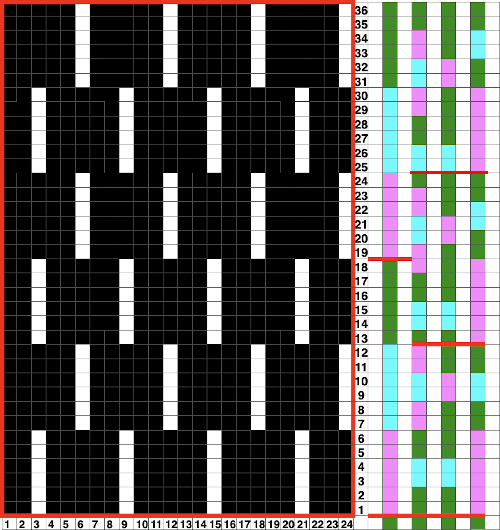
 The tuck stitch version,
 modifying it for use in slip stitch B, adding all knit rows between repeats A, and visualizing color placements on the knit side of the fabric.
 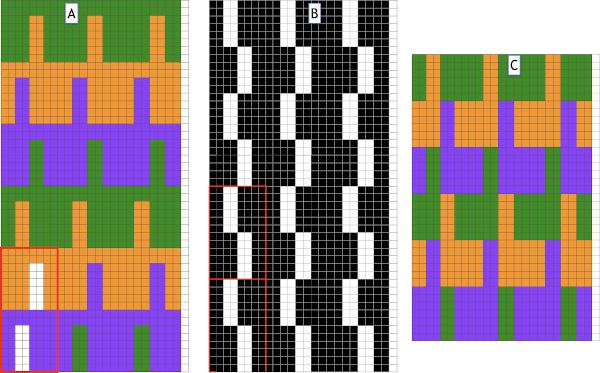 Depending on your machine ie Passap Duo requires 40 stitches punched repeats or modifying for electronics, vertical black columns or additional white squares may be added to the original design repeat units. The corresponding cells are filled with the color gray
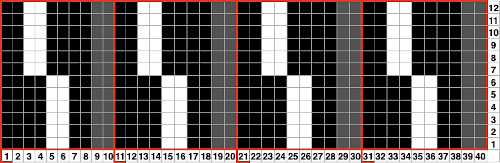
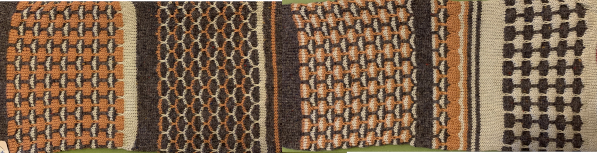
 Testing the waters: a swatch using 4 colors, beginning with color changes every 6 rows, ending at the top with every 2, more variations are possible.
 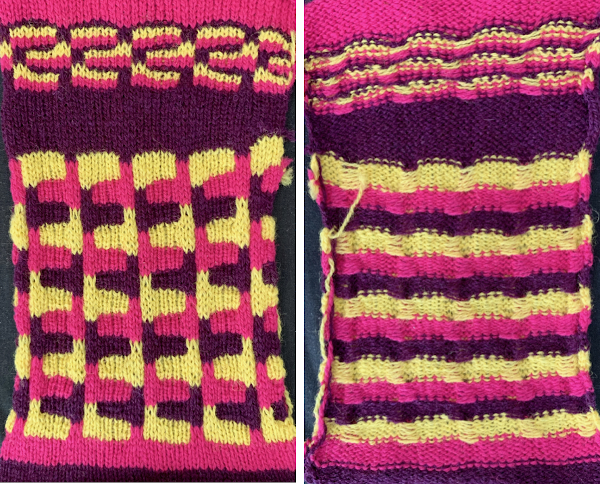 I have begun including .pngs with some of my posts. Check that your import method does not automatically change the mode to RGB. It is a common problem with such grabs from FB. If that happens, index the image to B/W and save it again before using it in download to KM software.
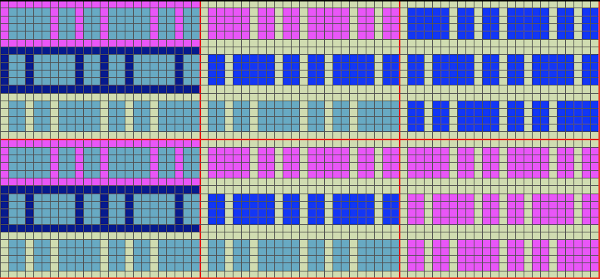
Making those shapes move: color striping variations for using 3 or 2 colors are seen on the right of the chart. The final surface may also work very well in a single color ![]()
 The resulting swatch is shown sideways for the sake of space. I usually begin tests with some striped knitting so I can be certain the color changer is threaded properly, that each color gets picked up without crossing or other issues, and that tension for any one color is not in conflict with that used with remaining colors. I am not a fan of the Brother single bed color changer, but it is a great convenience in fabrics such as these. A reminder when using it: add a lace extension rail on the left side. The carriage needs to clear the color changer far enough on its left for all colors to be picked up and changed properly
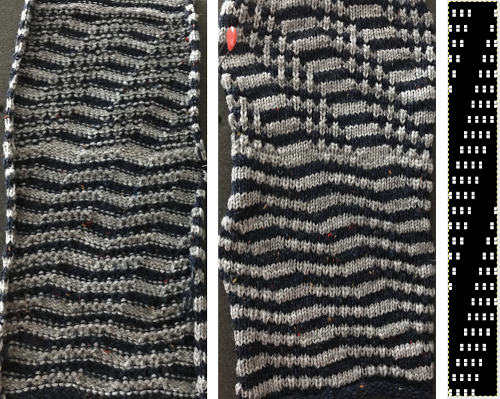
 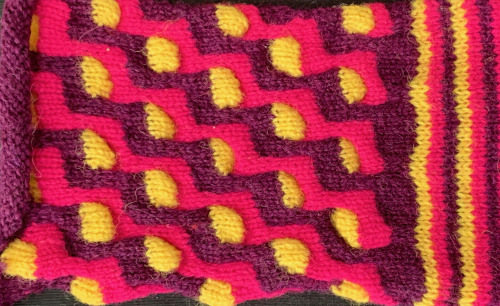 From long design studio inspiration swatches: the secondary shapes are created by varying the number of rows in the color change rotation and placement, the bottom swatch shows the purl side of part of the completed length. Float counts can help duplicate the repeat or color placements if notes are skipped during knitting.
 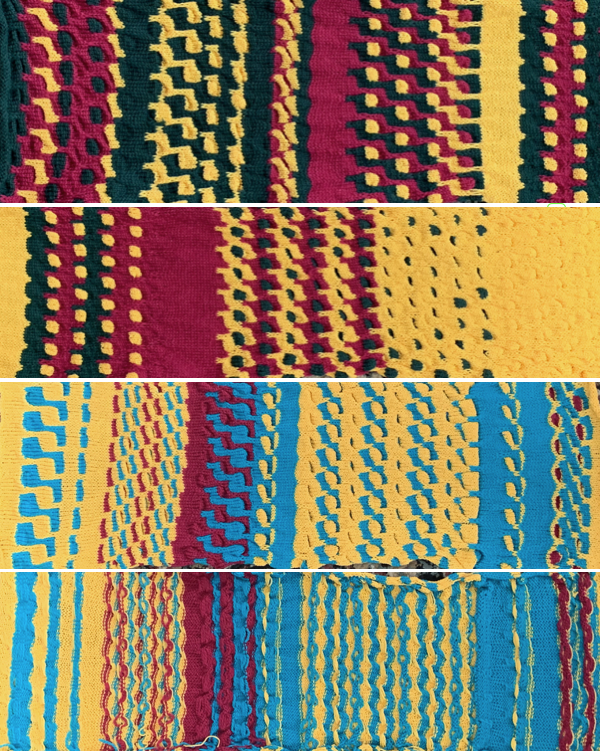 Working with multiple slip stitch “bars”: this shows my punchcard, marked with color changes once the final rotation was decided, remembering to begin markings 7 rows up from the bottom for Brother (5 for Studio).
 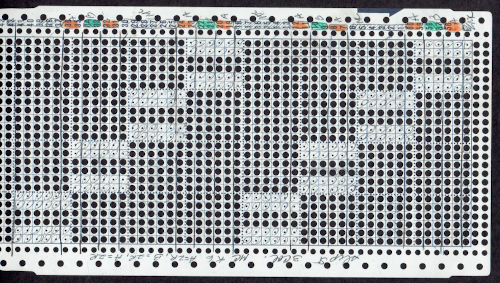 This design produces a fabric that is fairly flat on both sides: the .png is in the same orientation as the punchcard repeat, which you can see is produced with shapes reversed on the knit side in the swatches below it. Instructions on how the repeat was converted to .bmp for download using Gimp in post
 ![]() The working chart, along with an effort to visualize the location of possible color changes in order to create secondary patterns. Color changing on “wrong rows” or starting preselection from the left rather than the right will result in random, not necessarily successful designs
The working chart, along with an effort to visualize the location of possible color changes in order to create secondary patterns. Color changing on “wrong rows” or starting preselection from the left rather than the right will result in random, not necessarily successful designs 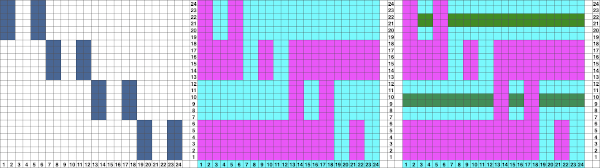
 This swatch segment illustrates the possibility of removing the slipped stitches from the needle bed and bringing them to the purl side, rehanging them on the same needles, bringing all needles out to hold before executing the next all knit row. The “floats” at the bottom of the swatch are from threads that were missed and not brought to the back of the slipped stitches
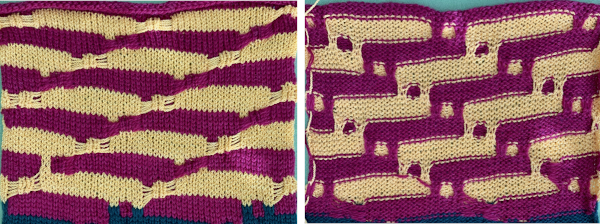
Attempting to visualize color changes using a larger, staggered repeat  which makes more sense when the image is tiled
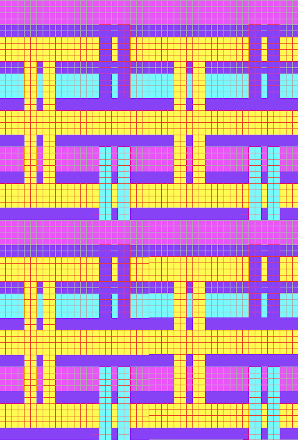
 Reducing the number of slipped rows
 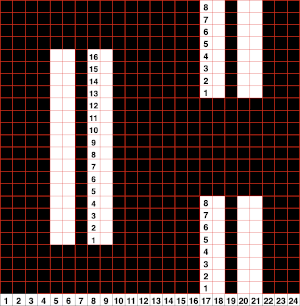 reducing columns to produce a trim, being certain as to placement on the needle bed
  This repeat produces a ruched fabric when no all knit rows are included, and a sort of “honeycomb” effect when additional color changes on all knit rows are added. The first long swatch
 ![]()

 The working repeat does not need to be symmetrical, using space-dyed yarn may result in a surface with an unrecognizable texture
 ![]()
 Shifting slip stitch units to form shapes
![]()

 If the slip stitch units begin and end with the same color knitting just before them and immediately after, the color carried on the knit side will be consistent throughout.
 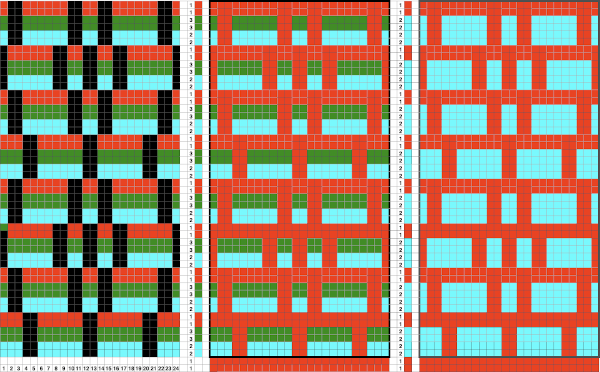 A sure way to get the shapes to match your design is to assign a number matching the number sequence in the color changer for your machine to each of the yarn colors. Imagining the results in a spreadsheet or even graph paper
 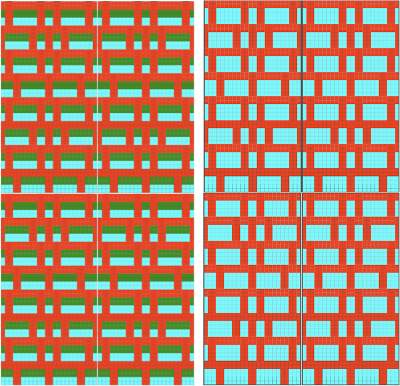 Expanding each section to 8 rows, the repeat now becomes 64 rows high and allows for 3 colors to show behind the slipped stitches in the chart on the left. On the right, the color-changing order shifts to 6 rows at a time in sequences 1,2,3,2,1,2,3. Design row 1 would begin the piece using the color red, the last row in the repeat is blue, shifting the color then carried up the front of the piece to blue.
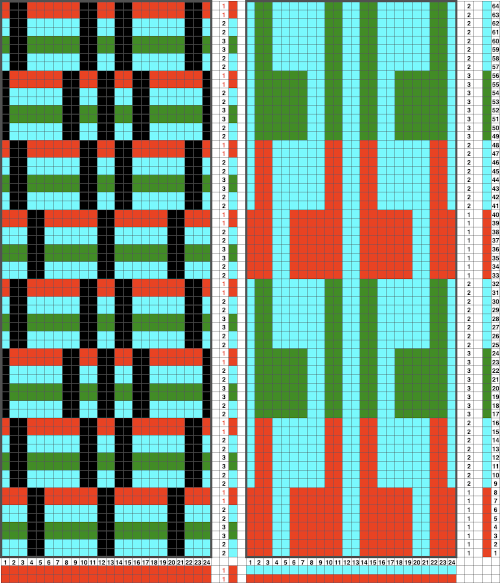
 Once the basics are understood, changes in scale and amount of ruched textures along with fiber content are easier to execute
 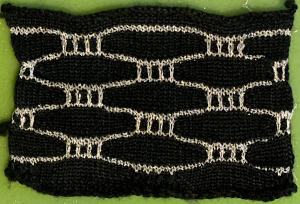 The chart for the sample below is 30 stitches wide by 84 rows high, and is shown turned counterclockwise
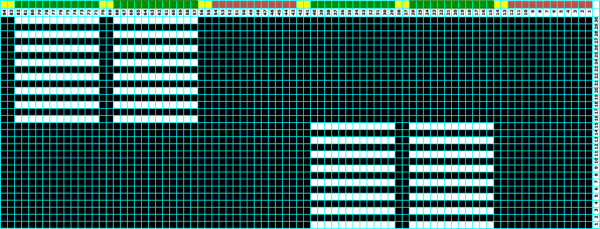
![]()
 This fabric has a more compressed shape, the blocks of slipped stitches are in a vertical arrangement directly above each other. A possible building unit for similar structures:
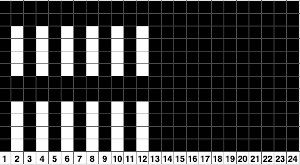
 An all-knit border on either edge automatically creates a ruffle on each side.
Here the repeats on the left need to be color reversed before knitting, punchcard users will need to punch all white squares, leave the black ones unpunched, and repeat all once more in height. Some rows are omitted on the right, reversing the color placement for the “solid” shapes with the next knit row. 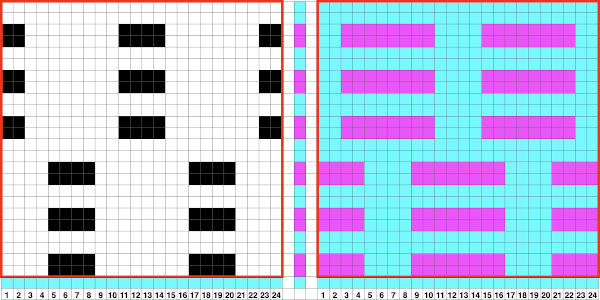

 The 24X20 repeat for the swatch on the above right, with the floats easily identified on the purl side of the swatch
 ![]()
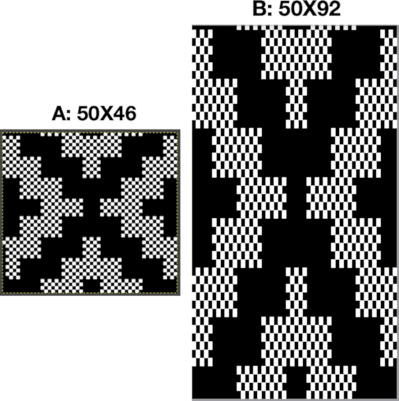
 Blocks of slipped stitches (black squares in the chart, before color reverse) may be used to create 2 color fabrics that have no long floats in the ground color, electronics allow for more complicated shapes
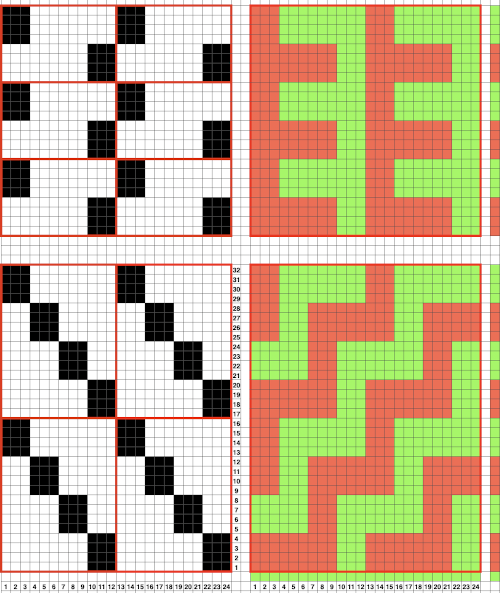 If the goal is to produce specific shapes, then the way to achieve them is to use a color separation suitable for multiple color DBJ, knitting the fabric either on the single bed. The machine does not know whether the ribber is in use. Using DBJ software’s built-in options or even the Ayab middle color one twice merit their own future post.
Previous slip-stitch-related posts
2015/04/07/more-slip-stitch-experiments/
2013/09/02/a-random-slip-stitch/
2013/05/09/block-slip-stitch-separations/
For mosaic and mazes, execution, and design links to historical posts, see 2020/09/21/single-bed-tuck-…s-2-adding-color/
The slip stitch setting may also be used to automate a variety of fabrics, some of which involve organized color striping as well; the topic is discussed in other blog posts
Single bed tuck and slip stitch fabrics 2: adding color
Any tuck repeat may be used in the slip stitch setting. The results for “safe” repeats executed in slip stitch may not be very textural or dramatic.
Though at times presented in color, the same patterns can be very effective in single colors as well.
Prior to testing multicolor patterns, I like to start the work with waste yarn, testing color changes there first, making certain colors are threaded properly, not crossed, and that the color changer is set up properly.
The Brother single bed color changer is unique, in that the yarn remains in the changer, not leaving it with each color change; its manual
In the absence of a single bed changer, some fabrics may be knit with the ribber up, using the double bed model. This is the only option available for the bulky machine. There is a limit as to the amount of tucking that can be achieved successfully since the ribber arm does not have the system of wheels and brushes that help keep loops and stitches in place single bed. Manuals
Instructions from the Brother single bed color changer manual 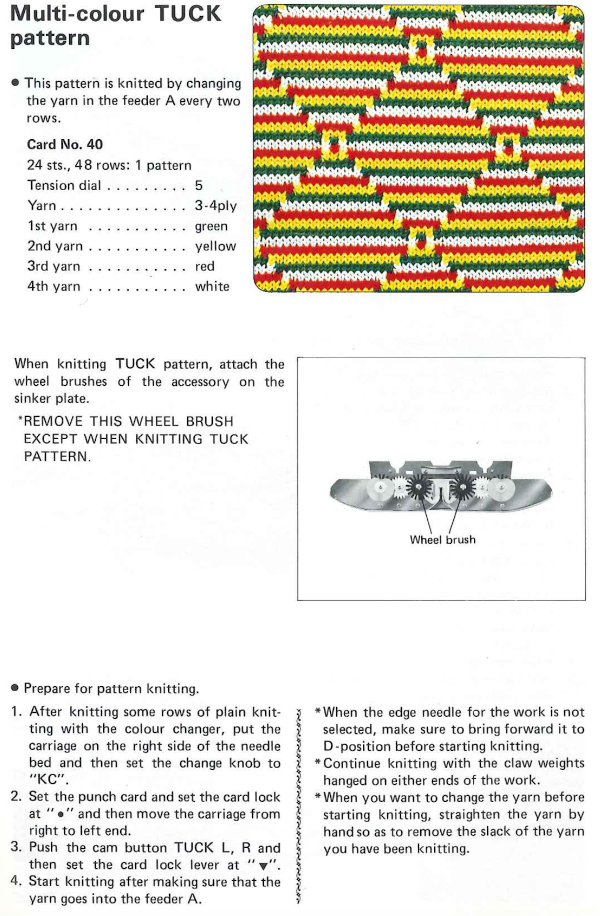
For Studio/ Silver Reed 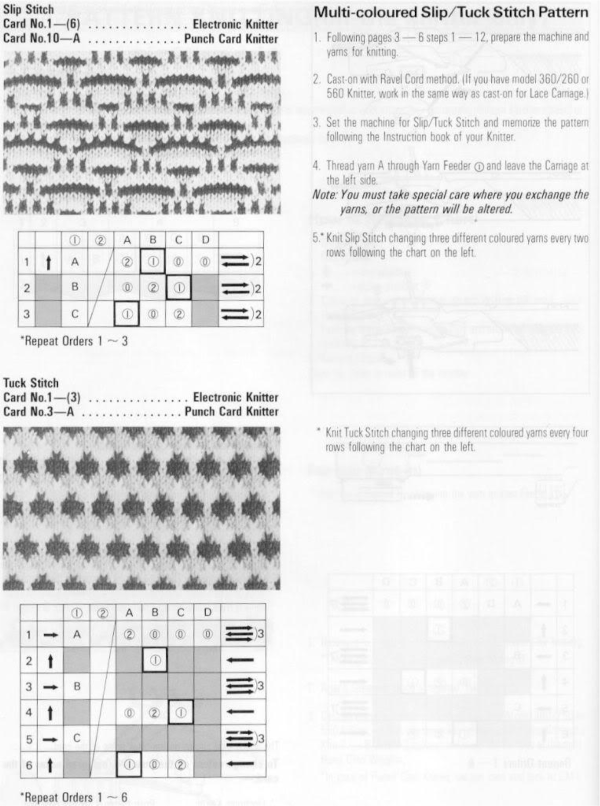
Punchcard volume collections are a great place to start to search for published repeats and subsequent DIY inspiration.
One such is Brother volume 5  Since the knit carriage needs to move to and from the left-hand side of the machine with each color change, an even number of rows in each repeating segment is recommended, but not necessarily required. The first preselection row is generally moving from right to left. End needle selection on helps the edge stitches knit. At times end needles will need to be pushed forward to knitting position by hand. Depending on how the repeat is placed on the needle bed, with some experience with a tuck or slip stitch, one can decide whether keeping the end stitches in the pattern creates a better effect at vertical edges. Analyzing 2 random repeats
 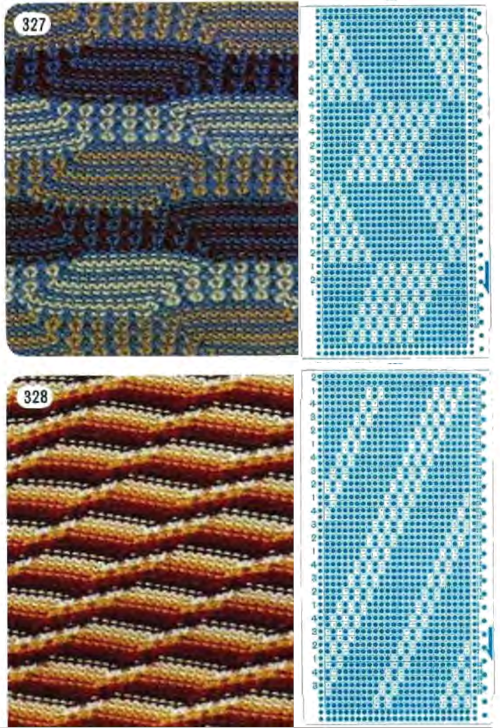 The respective .bmps
![]()
![]() As with all punchcards, the first and last 2 pairs or rows are not part of the design, they are necessary for the punchcard to roll continuously in the drum. Keep in mind that the card is reading design row one while your eye sees the row marked #1 by the factory on the card outside of the machine. Following the suggested color changes to match the specific swatch takes the guesswork out of the equation. In DIY or in trying a different color sequence, such guides may have to be shifted and marked accordingly. Specific color suggestions are given in the samples above in the left-hand columns. In #327 the order is in a variable sequence, which requires a bit more attention than #328. Follow the line below the #1 mark to the left, each card begins with color 1. Color notations in 328 are also next to those 2 all punched rows at the top. That is because those 2 rows overlap the first 2 design rows as the ends of the card are clipped together, front over back, for smooth, continuous, advancing movement. In 327 the sequence at the bottom would need to be hand-marked.
As with all punchcards, the first and last 2 pairs or rows are not part of the design, they are necessary for the punchcard to roll continuously in the drum. Keep in mind that the card is reading design row one while your eye sees the row marked #1 by the factory on the card outside of the machine. Following the suggested color changes to match the specific swatch takes the guesswork out of the equation. In DIY or in trying a different color sequence, such guides may have to be shifted and marked accordingly. Specific color suggestions are given in the samples above in the left-hand columns. In #327 the order is in a variable sequence, which requires a bit more attention than #328. Follow the line below the #1 mark to the left, each card begins with color 1. Color notations in 328 are also next to those 2 all punched rows at the top. That is because those 2 rows overlap the first 2 design rows as the ends of the card are clipped together, front over back, for smooth, continuous, advancing movement. In 327 the sequence at the bottom would need to be hand-marked.
Before tackling patterns with moving components, these charts begin to analyze color changes in a ready punched or self-designed card which produces a honeycomb-like effect. The chart colors used are random picks from the palette, for illustration purposes only, illustrating areas where color changes may occur. The tuck/slip stitch held in the hook of non selected needles gets elongated and comes forward on the knit side, creating vertical lines in the color that is not knitting. The blue highlights the row where a single stitch, single row tuck or slipped stitch is created and the corresponding positions of the yarn on the knit side of the fabric 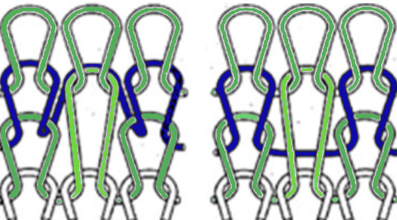 Four tucked rows is probably the limit on Brother machines unless one is working in fine yarns. In the first interpretation, the ground knits for 2 rows on all preselected needles. In the second, the surrounds of the interior striping knit for single rows only at the top and bottom of the repeat. Electronic repeats A and B on the right may be as small as a single 4X12 unit.
 The same card may be used, altering the color-changing sequence so the ground that will surround the tuck or slipped stitches changes as well. Using the same card would require a pattern start on card marking row 2, and an initial preselection row from the left to the right
 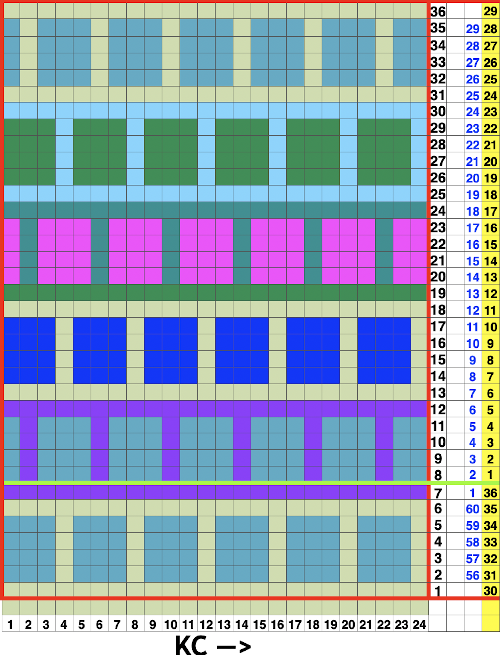 Keeping the 4 tuck row maximum the blocks of knit stitches between tucks can be varied, as can the movement of the vertical bars. The card repeat on the left would preselect from the right, while the repeat on the right would preselect from the left.
 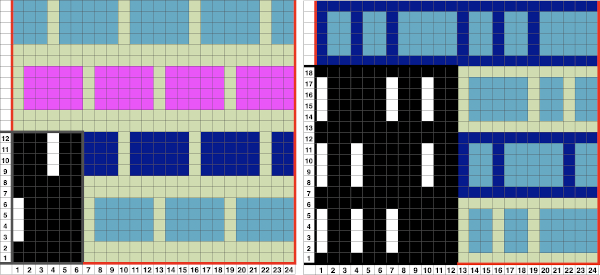 So the card on the right is already punched, and instead of changing the colors outlining the shapes, one wants them constant and with a start from the right? The workaround is to advance the card to the last row in the full repeat, #36, lock the card, and preselect toward the color changer continuing to change colors in 2 then 4-row rotations after releasing the card. Tiling the repeats multiple times as with any pattern helps isolate areas where color changes might work as well as give us a sense of pattern movement across the fabric. With so many tucked rows so close to each other, it is best to use thin yarn.
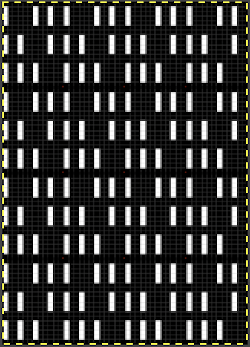
 For slightly thicker yarn, one possible “fix” might be to simply eliminate one of the 3 tuck bars across the repeat, again check tiling for any errors, or places for color changes. Here the shift is not completed, some tuck bars were not eliminated
 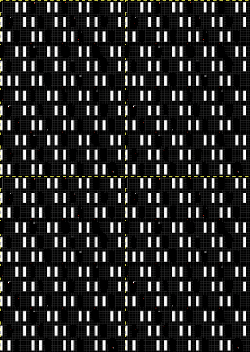 the “corrected” repeat without additional rows, some possible color changes can follow the colored chart suggestions
 ![]()
 Moving on to electronics, playing with symmetry the repeat now becomes 30 stitches wide, the tiled image check for the unaltered version on the left.
  The repeated adjusted two different ways in height to accommodate color changes in a few different spots
 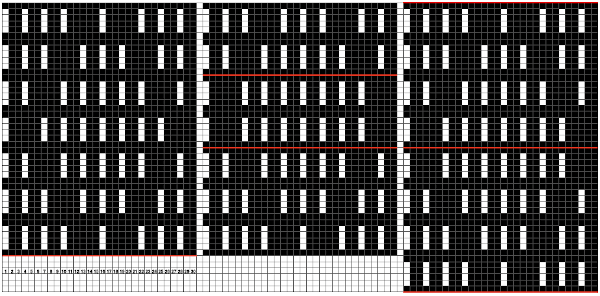 Working with repeats with tuck or slip bars that are only 2 rows high make for easier use of a range of yarn thicknesses. There are some surprises to be found when color changes are made as often as every 2 rows, sometimes using up to 4 colors. The extra all knit rows may be eliminated altogether.
Beginning with a pattern that has large areas of black squares can help one understand what happens to the design as that knit ground takes on color striping in the same frequency as the color changes. The yarn used here is a 3/8 wool, making the fabric a bit stiff. The repeat is a larger cousin of card #327. Before the days of software tiling methods, on way to check repeats was to knit them up as Fair Isle. The large floats in this made it not its best use, the floats were sometimes caught with the companion color or looped. Had the long floats been consistently free, they could have been cut for a fringed look on the purl side and would have held in place well. 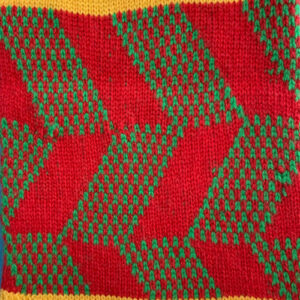
 Tuck knit in a solid color
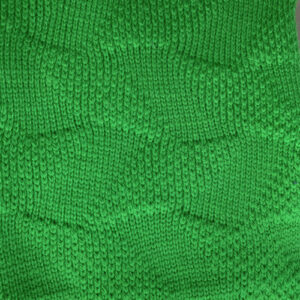
 Slip stitch in all variations has purl side edges which curl to a greater degree, the short skipped areas were probably due to too tight tension of too quick a carriage pass to the opposite side
 tuck alternating two colors every 2 rows
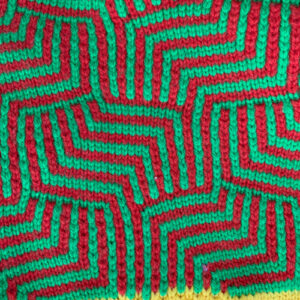
 slip stitch 2 color variation
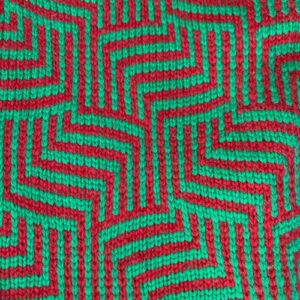
 slip stitch with the addition of a third color in the rotation
 The associated punchcard:
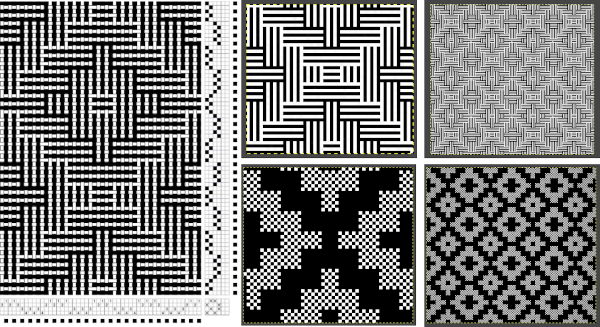
 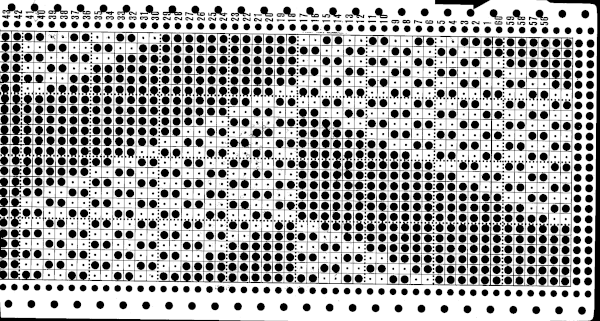 Some patterns using color rotations every two rows are referred to as mosaics, mazes, or floatless fair isle. They can be deliberately designed, but there are treasure troves of working repeats in punchcard pattern books that produce visual cousins and may also knit up as lovely fabric in single colors, and wonderful surprises at times when one designed for single color is striped. A few to try that are pictured with corresponding swatches shown on the knit side: from volume 5, the grey cells indicate the page numbers that correspond to the thumbnails in the downloadable version
 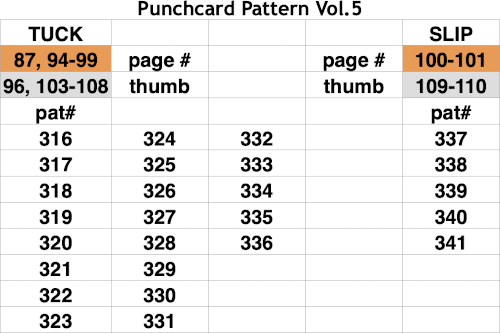 from Stitchworld, I have included repeat sizes, grey highlighted ones are suitable for use in punchcard as given
 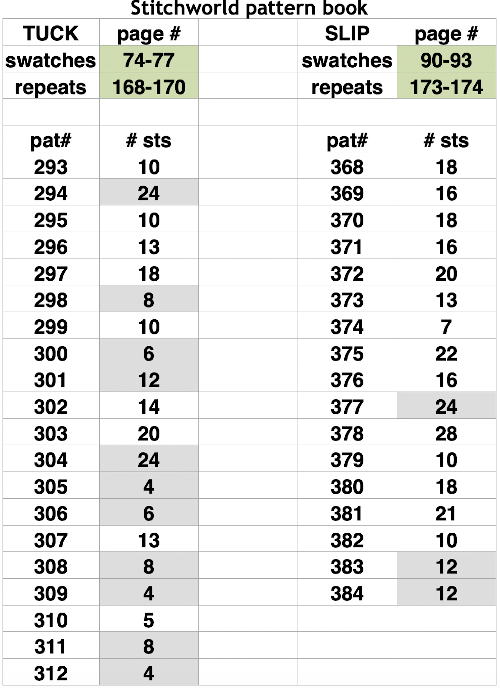 Brother yarn changers are numbered, from right to left, and their published card designs color suggestions reflect that. The lace extension rail must be used as the knit carriage needs to clear the color changer on that side in order for the colors to change properly.
 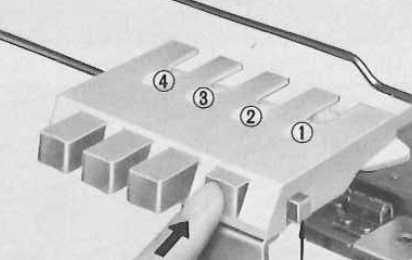 The Studio color changer color positions are marked with letters of the alphabet from left to right
  Some of the Studio punchcard pattern books showed both sides of the expected fabric assi\ociated with each card, here is a repeat that breaks the tuck rule of no more than one blank square side by side in any row.
 This swatch pattern from a Japanese magazine illustrates the difference in the formation of the tucked loops when two blank squares exist side by side. The repeat is 10X22, and the colors are assigned letters rather than numbers here as well.
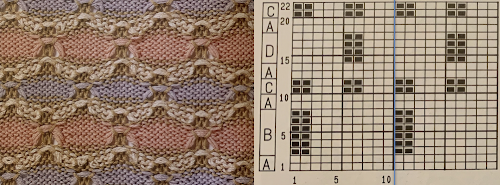 Another rule breaker: odd numbers of tucked rows with no added all-knit rows. Experimenting with such repeats results in less organized all-over patterns, here colors are changed every 2 rows,
  every 4 rows
 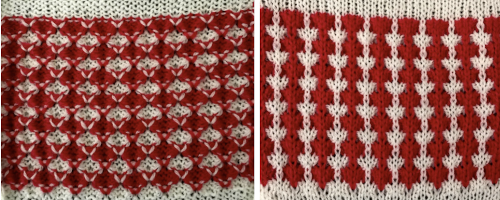 A single knit row may be added, for an added variation with color changes every 4 rows
 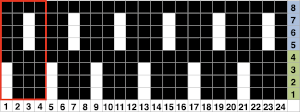 These repeats take shapes in another direction which becomes more textural and interesting when blank stitch areas are expanded for use in slip stitch setting
 This pattern, with color changes every 2 rows and two-row tuck sequences has an assumed interesting pattern shift.
 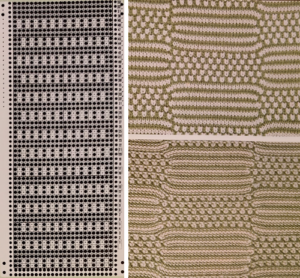 The tiled X2 horizontal repeats lined up side by side show that extra knit stitches have been added, shifting tuck stitch rows by one stitch in alternating directions, but just because it is published, it does not necessarily make the repeat correct. Those striped areas can only occur if there are solid all punched areas.
 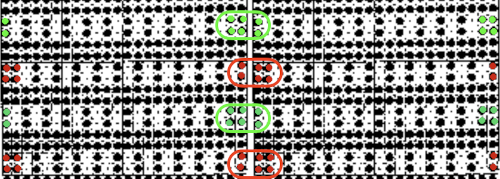 Keeping the constraints of a 24 stitch repeat, reducing the width of segments to 12 stitches rather than 24, the original repeat as amended
 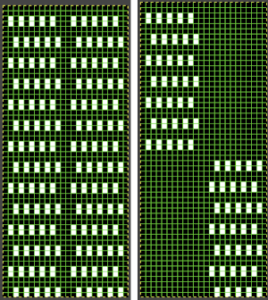 The tiled results for each
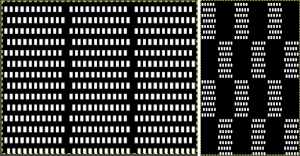 24X56 repeat proof of concept swatch in a far thinner yarn than the book photo
 ![]()
 An approach to designing such patterns can begin with a template for color changing every 2 rows and taking colored squares away to indicate stitches that will be slipped or tucked.
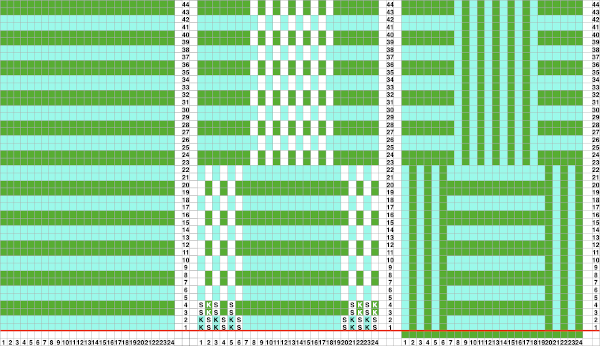 Repeats can be adjusted from wider electronic ones to the 24 stitch width constraint for punchcard machines, as well as shifted to change the resulting shapes and their colors on the knit side. The two-dimensional charts are not capable of reflecting the amount of gathering of the fabrics or distortions of the stripes on the completed knit
 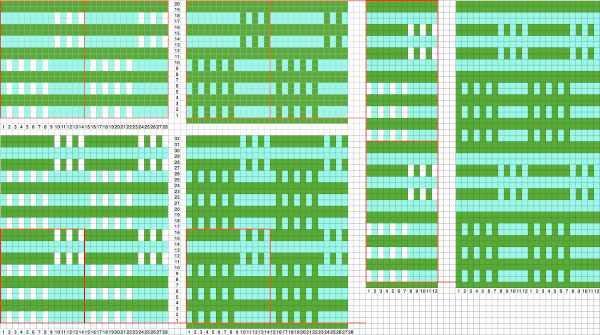 Japanese magazine publications often recommended many color changes, each for varied numbers of rows. Sometimes more is less. The number of colors may be reduced, and changing the numbers of rows used for each color as well can expand the number of fabrics produced from a single repeat. Good note keeping is a necessity if the intent is to easily reproduce the fabric at a later time.
Mixing things up for vertical designs: 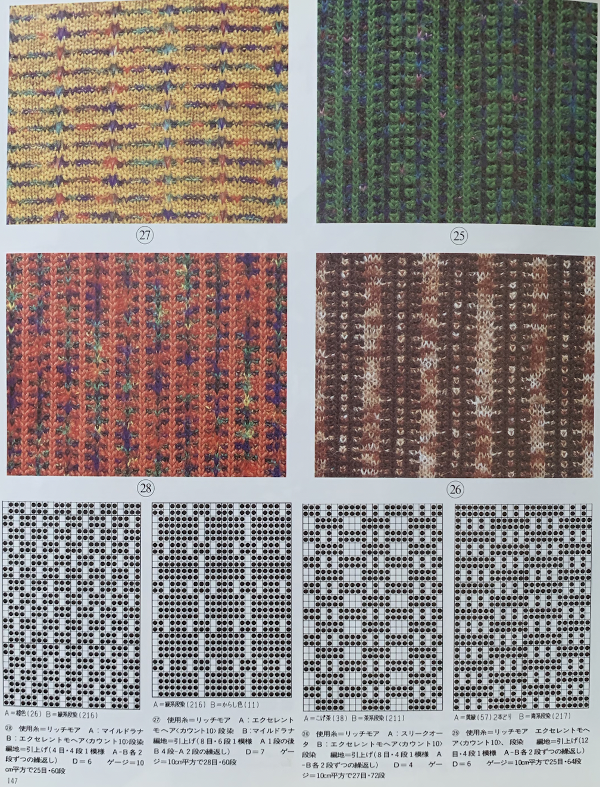 Adapting punchcard designs for use in electronics becomes easier once one is familiar with the stitch structure. This is a cousin of 328, 13 stitches X 52 rows. Tiling as in all designs helps sort out errors or missing pixels.
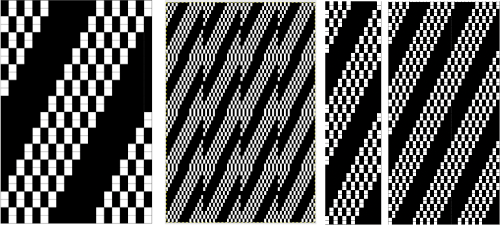 The “corrected” pattern, with the accompanying test swatches, the first knit in tuck stitch changing colors every 4 rows
 ![]()
 and slip stitch changing colors alternately every 2 rows, then every 4:
 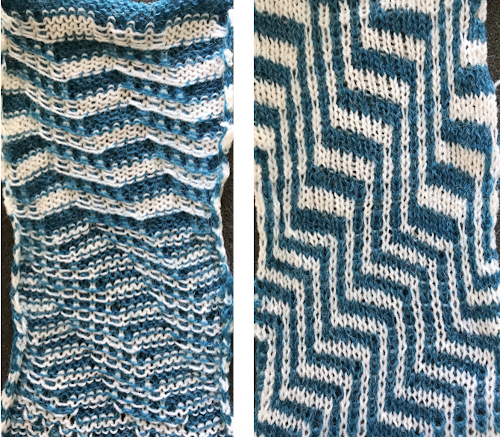 My blog posts on working with and designing mosaics (suitable for tuck and slip) and mazes (slip stitch only, multiple side by side unpunched holes or white squares in any row), in reverse historical order
2019/06/29/mosaics-and-maze…numbers-and-gimp/
2015/10/21/working-with-gen…-gimp-charting-2/
2015/10/03/working-with-gen…mazes-charting-1/
2012/10/15/mosaics-and-maze…design-to-pattern/
2013/05/06/mosaics-and-mazes-drawing-motifs/
2012/10/15/mosaics-and-maze…design-to-pattern/
2012/09/22/mosaic-and-maze-…-on-the-machines/
Single bed tuck and slip stitch fabrics 1
The main difference between the 2 stitch types is that in tuck stitch the strand of yarn on the non-selected needle is held in the hook of the needle forming a loop,  while in slip stitch the strand of yarn bypasses the non-selected needles as the row is knit, forming floats between stitches
  Symbols commonly used for both
![]() In both instances the stitch on non-selected needles when the pattern begins (blue row in photo) is held in that needle hook, growing in length until that same needle is selected, and with the next row of knitting (red) one returns to the standard knit stitch formation.
In both instances the stitch on non-selected needles when the pattern begins (blue row in photo) is held in that needle hook, growing in length until that same needle is selected, and with the next row of knitting (red) one returns to the standard knit stitch formation.
Both distort the fabric, the tuck stitch widens and shortens it, while the slip stitch narrows and also shortens it. Both are capable of producing textured, interesting fabrics on only one or on both sides of the knit depending on the pattern’s design repeats. Which side is chosen as the public side is simply a matter of preference. In accessories and clothing, the interplay and “reversible” effects can provide added interest.
Because in tuck knitting the stitches are being held and gathered, more rows will be required to produce the desired length in pieces. Because the knit gets stretched sideways fewer stitches will be required to achieve the wanted width, making it suitable where larger garment pieces are planned. Looking at the stitch in a 2D diagram: A– loops are created for 2 rows, the original stitch is shown elongated. Each patterning needle hook now holds 3 yarn ends. B– the needle coming forward prior to the next pass whether by card reader selection or by hand, will knit on the next carriage pass to the opposite side. C– the originally held stitch as it might appear on the knit side
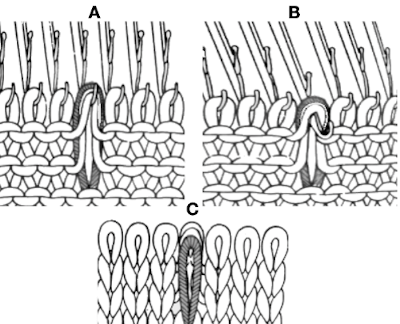 The group of loops as they knit together then forms small lumps/ bumps, or what I think of as “butterflies”.
The capacity of the needle hooks in terms of the number of loops they can hold and the quality and thickness of the yarn used place quick limitations of the number of rows one may use for tuck patterning. The Passap system tolerates many more such rows than the Japanese model machines, where the limit is often 4 rows. Slip-stitch is far more flexible in terms of applied “rules”.
Brother controls for patterning in any model are by the selection of cam buttons that offer directional arrows on the carriage 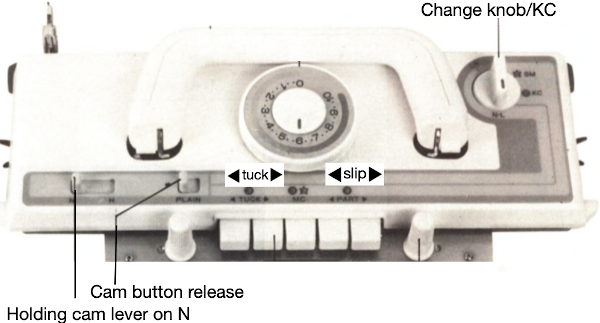 Some of the options:
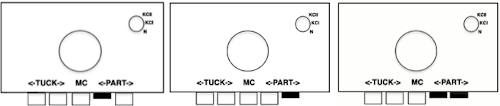
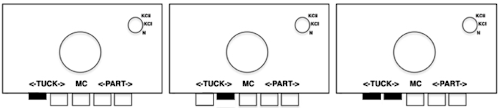 and not often used, but worth exploring, the use of opposing tuck and slip buttons at the same time.
  As with any knitting, for needle selection to occur the knit carriage (also known as KC) needs to engage the belt using the change knob set to KC. End needle selection or not depends on the goal fabric. If KC is in use but no cam buttons are pushed in, there will be needle selection, but the fabric produced will remain stocking stitch.
Any tuck cards may be used in the slip setting, but the reverse is not true.
Functions are in the directions of the arrows. For example, if a left button is pushed in, the next carriage pass will form loops or skipped stitches while traveling from right to left on the non preselected needles, and knit stitches on all needles on the return pass to the right, aside from any preselection being present. If both buttons are pushed in, the knit will form loops or skipped stitches with each carriage pass on non selected needles until those needle positions are pre-selected again, and then the stitches held in the hooks of the needles will knit with the next carriage pass.
It is possible to create the stitch structure on any machine, including manually by pulling selective needles out to hold for X number of rows. Motifs may be short or long, all over or isolated, can be arranged vertically, horizontally, diagonally, in diamond, basketweave, and plaid effects, may be combined with the use of stitches on the opposite bed, and with needles out of work (OOW) on either or both beds.
Punchcards are restricted to a maximum of 24 stitches or factors of 24 in the width of the repeats and require a minimum of 36 rows if they are to be used in continuous patterning. In electronics, the basic rules should be followed, but a single small repeat is enough to program, the size of large non-repetitive ones is limited only by machine memory and mode of download.
Both fabrics like to be weighted evenly, and several rows of waste yarn should be used at the start of the piece prior to testing patterns. Because it will be wide or narrow and short, that is a consideration if the plan is to combine several types of stitches in the same garment. Gauge swatches should be larger than usual.
Boiling things down to black and white: in both tuck and slip automatic patterning, selected needles produce knit stitches. Punchcard knitters are required to punch a hole for every knit stitch, leaving only areas that will be forming the tuck loops or skip stitch floats blank on the card. In a published chart for the stitch is used, black squares may be used to represent knit stitches and rows, white ones the tuck or slip stitch locations. It is up to the user to determine whether if using a published source, color reversing the repeat in electronics, or punching out the all-white areas as opposed to black is required. In single bed stitch formation, if one knits with two or more empty needles in work side by side, it will quickly become evident stitches will not form properly on those needles without additional steps being taken. This remains true in tuck knitting, but not in slip stitches. Though there are some exceptions, the usual rule is to have no more than one unit in any row without a punched hole or black square/pixel on either side of it. Punchcard pattern books are a great source of “safe” repeats. Electronic users need to isolate and draw a minimum of one repeat, which may be quite small. If duplicating a whole card with fewer unpunched holes than punched ones, only the white squares need to be drawn as black, and later the repeat is color reversed. Punchcard patterns usually have two rows of all punched holes at the top and bottom of the card that will rest on the first and last 2 rows of the design repeat respectively, allowing for the card to roll continuously in its reader. Cards also need a recommended minimum of 36 rows. Brother #1 mark on the right is 7 rows up from the bottom, while the card reader is reading design row one inside the machine, out of view. Cards from other KM manufacturers may be used, but the starting row may differ, as was also true back in mylar days. Punchcard machines produce the pattern as drawn on the purl side. Some electronic models or download programs vary, and may require the pattern to be flipped horizontally.
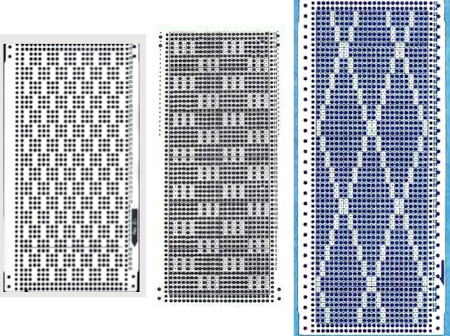
An easy way to start becoming familiar with the knit structure of stitches is to begin by working with “safe” design repeats, using a familiar yarn in a light color. Depending on the punchcard machine model year, the card on the left (1) was a standard Brother issue, the one on the right (2) not always. Both may be used to test all cam buttons and stitch types, card one tolerates elongation well, card 2 may meet some resistance with tuck stitch if the yarn is thicker than the needle hooks will contain easily. 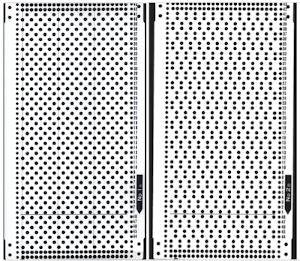 Converting the cards to black and white pixels: the small single repeats for each card are highlighted with a red border. Depending on the method for programming the electronic machine, however, the single repeat may have to be repeated horizontally to match the number of stitches to be used in the piece. The third repeat is a hybrid of the previous 2, the start of making what is published more personal
 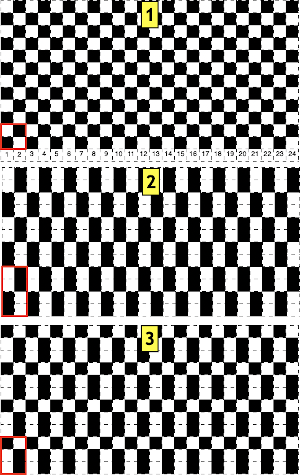 Studying published sources makes it easier to design more personal repeats. Cards that are “safe to use” can get one started in examining the texture and developing an understanding of how stitches are formed. They are often composed of variations of either card 1 or card 2 with added black areas. Using punchcards supplied in the packs with respective machine models appropriately can easily be done
 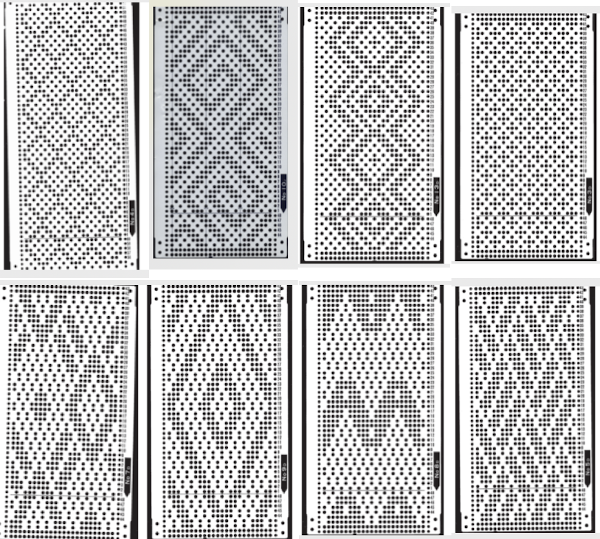 Additional published cards are also easily found increasing the number of tucked rows and observing the rule of knit stitches on both sides of the single unpunched squares resulting in no preselection. Below, some of the single repeats are outlined in red. With additional rows now tucking, the added insurance of having them knit off properly at regular intervals is achieved by all punched (or black squares) single rows, highlighted with orange squares on their left. The black border isolates the actual patterning rows in the designs. Again, the top and bottom pairs of all punched rows are not part of the overall design but are necessary for the punchcard machines to line up patterning for knitting a continuous design
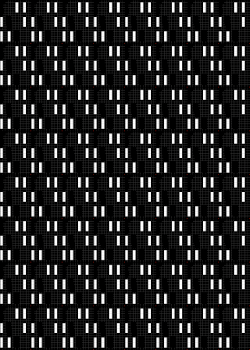
 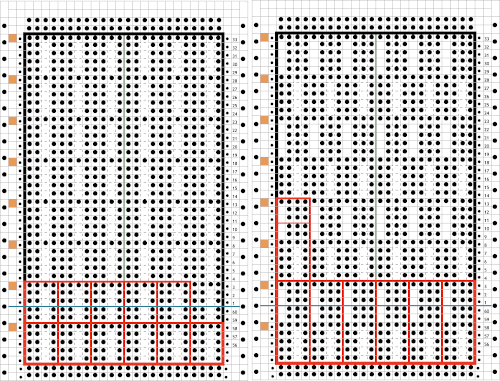 The blank vertical areas may be arranged moving across the repeat’s canvas in a variety of ways. In this chart the tuck symbol is evident, some of the knit stitches around each tuck series are highlighted at the bottom of the chart in green, the single electronic possible repeat is 4 sts by 12 rows
 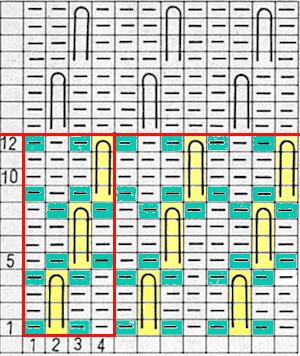 What may be confusing when symbols and charts such as the above are encountered is that the very first row of the symbol actually rests on the spot where the knit stitch that is being held for the next 3 rows rests, so design row 1, 5, 9, 13, etc are actually all knitted. The punchcard minus the all punched rows at its top and bottom:
 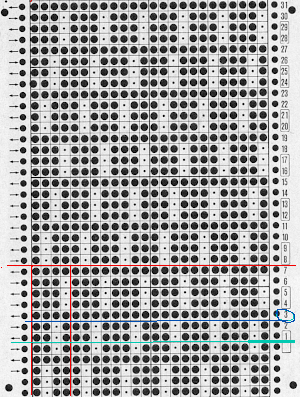 The factory-supplied blank cards may have arrows on the left, familiar in lace card designs. In the above case, the implied use is that the card start in the locked position on row 1 with the carriage on the right, preselecting to the left. If only a single color is to be used starting side does not matter. If regular color changes are recommended, more often than arrows dots, or color numbers are used in that column to indicate color change locations. In Brother machines, the first preselection row may be made from either left to right or right to left, depending on the fabric being created. With the exception of dbj using the KRC button or patterns that expressly specify the starting side, most patterns using the color changer will need a start from the right. Here if that is done, color changes could occur every 4, 8, or 12 rows using 2 or even 3 color sequences.
There is another issue to note. Counting up design rows from the bottom the card is marked row 1 five rows up. This is a Studio punchcard. If using it on a Brother machine, the starting row would actually occur with the card locked on row 3, color change row markings if given, would have to be altered accordingly.
The distribution of tuck stitches can occur in groups, or more sparsely. The card on the right begins to break the rules with 2 needles tucking side by side for 3 rows. Those areas create floats akin to those created by slip stitches as the side-by-side loops drop off the needles in those areas rather than knitting off together. As areas of white become less balanced, punchcard knitters may find it easier to mark the tuck bars and punch all else, electronic knitters draw the white as black, and color reverse.
 Few tuck stitches amidst lots of plain knitting are likely to not distort the fabric very much or produce a noticeable texture. The fabric will lie fairly flat, and approach a width proportionately closer to that of stocking stitch using the same yarn. The outlines can serve as markers for the introduction of additional hand techniques ie tying objects or beads in the center of the shapes after knitting and prior to felting in order to obtain surface bubbles of non felted stitches, or marking areas for duplicate-stitch or other embellishments.
In some instances, thread lace repeats can provide DIY inspiration. With the color reversed, the structure for possible tuck can be observed and determined if suitable. In the bottom right image, those white solid lines are the easiest edit, shown in progress  With the basic structure recognized, weaving punchcards may be suitable, not all need be color reversed.
 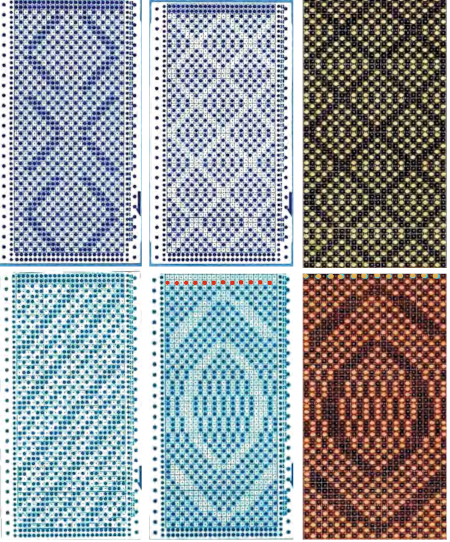 Electronic repeats may also be used directly or adapted for use on punchcard machines, providing the repeat unit is a factor of or up to a maximum of 24 stitches in width, which translates to 2,4,6,8,12, and 24, and repeated to the recommended minimum of 36 rows in height. For tuck stitch, those narrow vertical bars surrounded by black squares are the common factor. The StitchWorld pattern book charts require only matching a usable width for use in punchcard models since the knit stitches are shown as black squares. Here is a random selection
 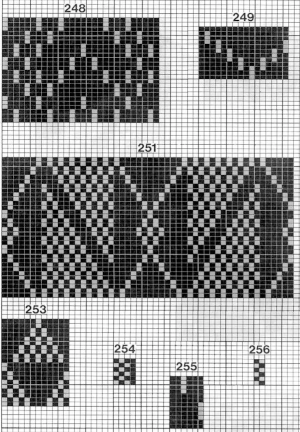 253 translates easily to this, it would need to be punched twice
 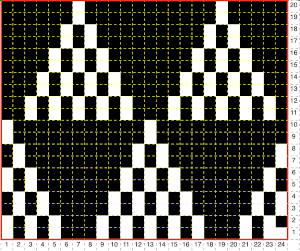 251 is a bit more problematic. Half the repeat is wider than 24 stitches. Here it is readjusted to 24 stitches, the height is 32 rows which may just barely squeak by punched only once
 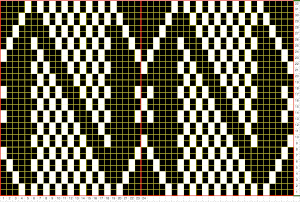 the repeat is tiled to check proper alignments
 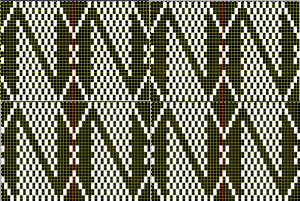 This repeat is from a Studio mylar sheet. It also may be used in punchcard machines after removing 2 columns, since only half the repeat is necessary, and it is 26 stitches in width. The color reverse option is necessary. In electronic machines, it is easily accomplished with a command or the flip of a switch/ push of a button. The white squares as given would produce loops on all the corresponding needles, with no stitch formation in those areas.
 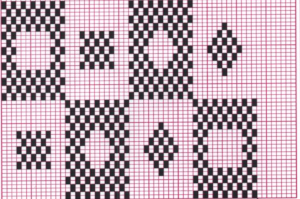 I chose to eliminate 2 columns from the blocks on the left. Tiling shows the amended repeat’s appearance, with the color reversed image for actual knitting to its the right.
  Repeats with a balanced number of black and white squares provide all-over textures in fairly balanced fabrics. As the number of black squares on a field of speckled tuck stitches grows, the knit shapes may actually poke out from the surface of the knit, since those areas are not gathered in the same way as their surroundings. Yarn properties and tension also have an effect.
Design with very few black vertical single stitch “bars” are commonly found in patterns published for electronics, often also too large for use on punchcard models. As with lace, where there are few black pixels on large fields of white, caution in trimming the image is necessary. Tiling once again helps one locate possible errors. An example of such an image tagged as being 42X62: 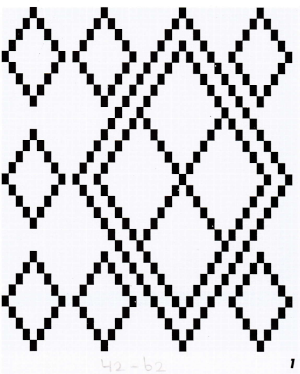
![]() tiled 42X62
tiled 42X62 adjusting to avoid those 4 rows tucking consecutively, now 42X60
![]()
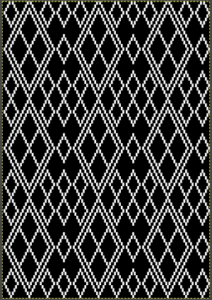 Designing your own can begin with the choice of a template, such as this one, 24 stitches by 36 rows.
 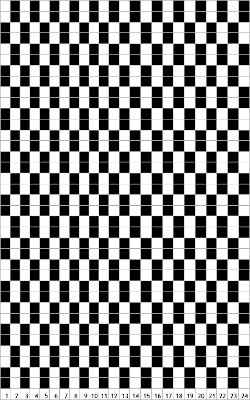 To begin with, I added a rectangle to the full template repeat on the left. To its right, the size of the rectangle then begins to be altered along with the addition of some all knit rows. The center illustrates making certain the 4 stitch repeat aligns properly at the top and bottom of the new repeat. The test final repeat image is on the right.
 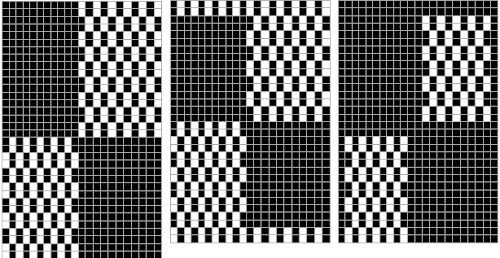 Working with a different shape, using copy and paste to place it, adding a brick variation on the right, for punchcard full repeats of 24X40
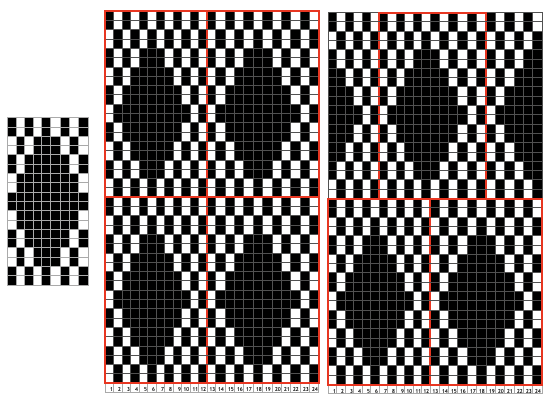
![]()
![]() The matching electronic repeats for both, unless your download requires programming for the total number of needles in use:
The matching electronic repeats for both, unless your download requires programming for the total number of needles in use:
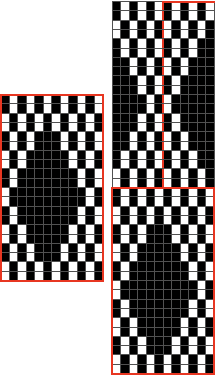 Testing tuck stitch limits, breaking the side by side white square rule in all over patterning with moving blocks of 2 by 2 blank squares
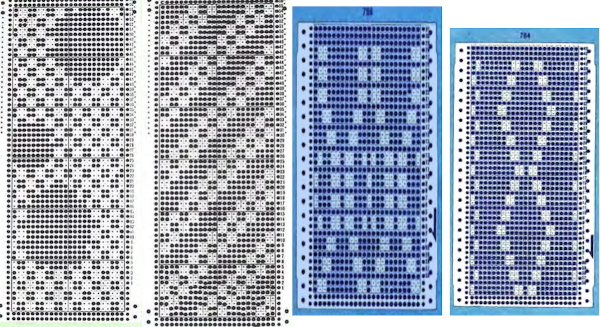
A collection of previous posts
When more than one stitch tucks
Tuck stitch meets thread lace repeats and vice versa
Tuck lace trims (and fabrics) 2
“Crochet” meets machine knitting techniques: tuck lace trims (and fabrics 1)
Tuck and slip color striping
For those who enjoy hand techniques/slip-stitch
A no longer “mystery pattern”
A hand-knit consult
A quick review of plaiting on Brother machines
Over time plying yarns and the resulting color distribution come into question, which often leads to discussions on plaiting.
The plaited knit can be reversible, traditionally the main color will dominate the knit side, the contrast the purl.
The two yarns are threaded in separate yarn masts, with the thicker yarn on the right.
Plaiting is sometimes used in bringing scratchy yarns such as lurex can be plaited with softer yarns so that the latter is worn closer to the body in the final garment.
One of my ancient swatches shows some variations in using 2 different colored fibers in three ways. It was tagged for display with myriad other assorted swatches on corkboards in my classroom, which were usually covered with a variety of illustrations of stitches and techniques covered in weekly classes and in response to recent trends. As always, effects vary dramatically depending on the choice of yarn color, fiber content, and thickness. Here the 2 yarns were fed through separate tension masts, and knit together 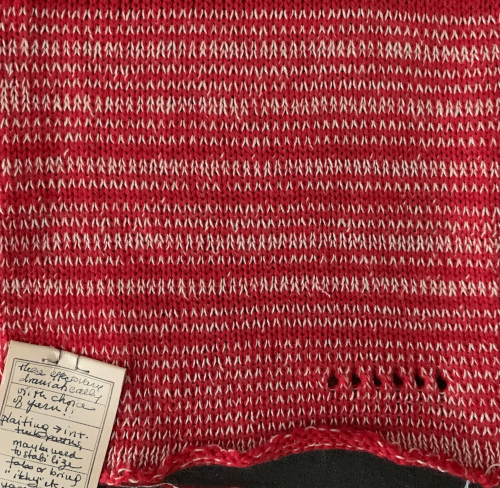
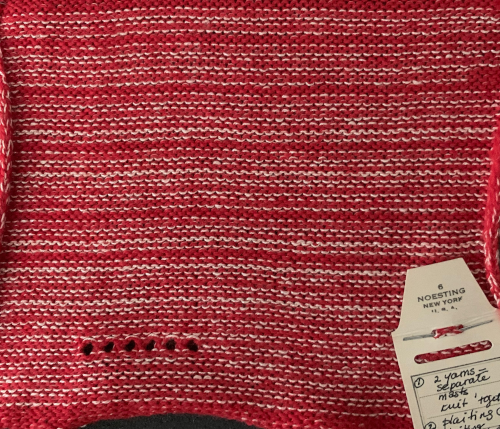 plaiting with yarns swapped in feeders for reversible striped effect
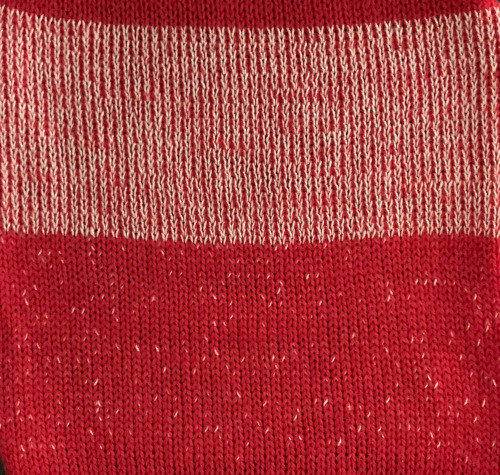
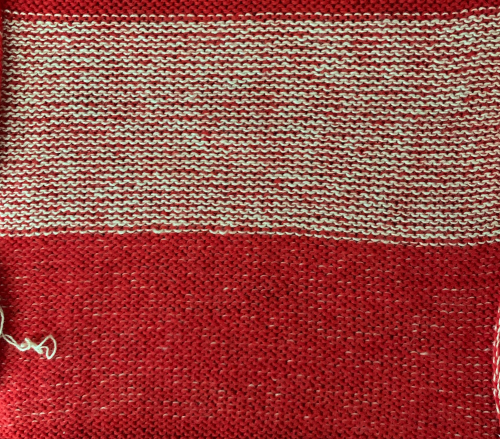 yarns wound together with yarn twister and used as a “single strand”
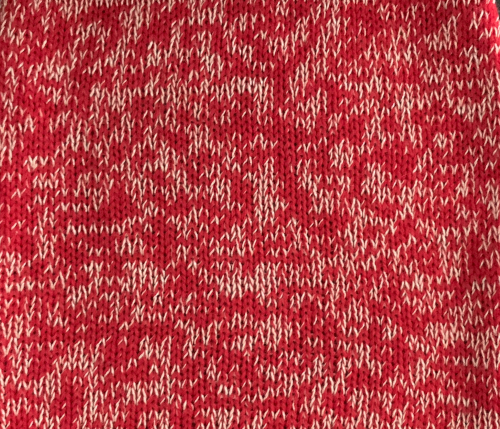
 Striping created by reversing yarn positions in plaiting feeder
  Using the thread lace setting and plaiting feeder working in every needle rib
 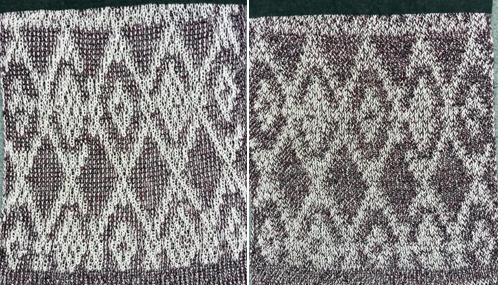 A mock plaiting effect may also be obtained without a special feeder by locking the pattern on any all blank row, the standard yarn feeder with A and B yarn placement, and the fair isle setting. Results are not as consistent in color distribution.
True plaiting usually requires a special feeder unless the specific model km has a built-in option. Two yarns are used in the plaiting feeder. They pass by the needles in sequence. One yarn always passes first, and the other follows. The standard feeder that normally carries the 2 colors when knitting fair isle is replaced, so this technique may be used in fabrics using cam button combinations other than fair isle and thread lace. Looking into the plaiting feeder from above you will see a central hole that traditionally carries the “main yarn”, and a crescent-shaped opening that carries the second yarn, which will trail behind as the carriage moves across the knitting bed. The second yarn appears on the purl side of the fabric.
On days when lurex combination scratchy yarns, and in any situation where the fiber used is unpleasant if touching the skin, a softer yarn may be used and brought to the interior side of the piece for comfort. I once made a chenille sweater with traditional cap sleeves that refused to knit to gauge. Adding matching wooly nylon and knitting it with the chenille solved the problem permanently and stabilized the knit.
The contrasting color can provide a pleasant effect when fold-over collars, cuffs, etc. are part of the garment, and so on.
Brother plaiting feeders: 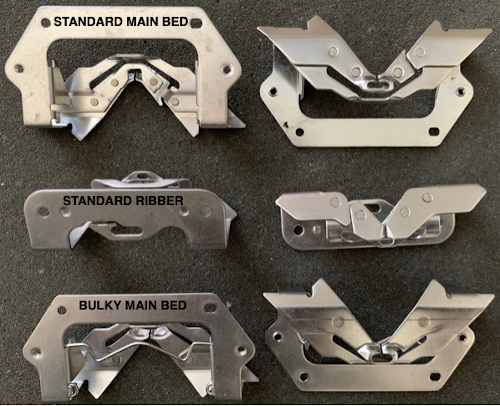 The central hole holds the main yarn and the crescent-shaped hole behind it holds the second yarn. As the carriage moves across the row, the yarn in the crescent-shaped hole trails behind the other yarn and is always the second yarn picked up by the needles, showing on the purl side of your knit.
Be aware if considering purchasing one that other parts appear on eBay and other sale sites under this name, but are not the specific accessory. The following illustrations and directions are from Brother pubs easily found for free download.
For use on the main bed, images from the KnitKing 893 manual: 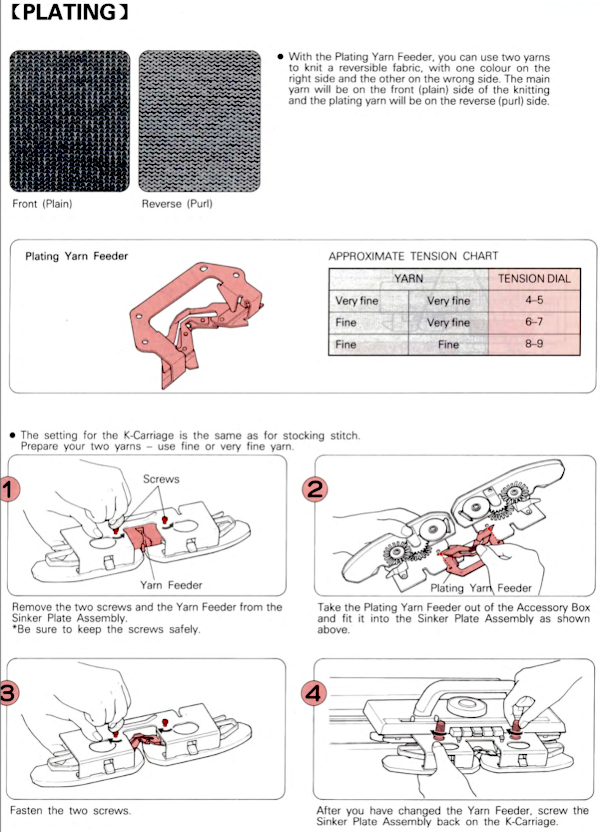
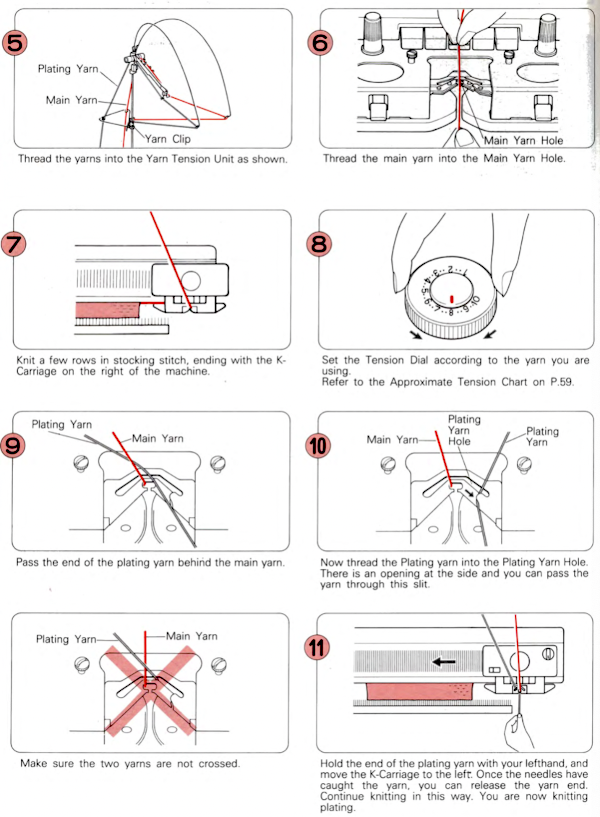
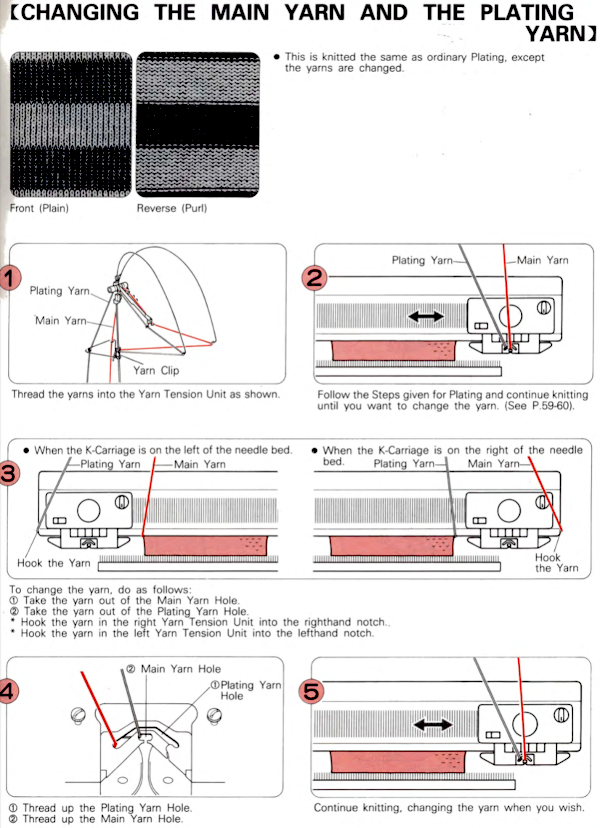
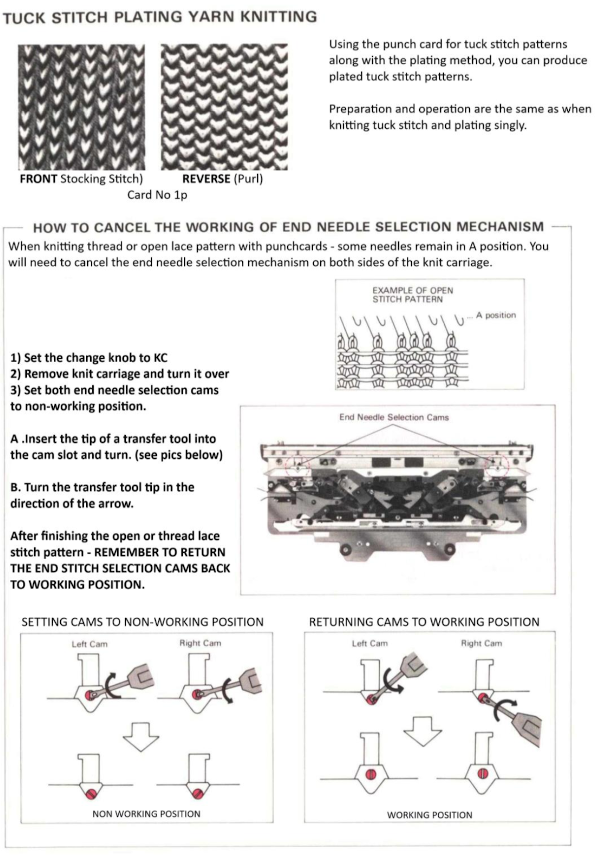 If your sinker plate has rubber wheels, check them and move them to the proper position if needed.
 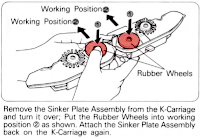 Canceling end needle selection applies in any situation and is used in tuck or slip stitch settings if there are needles out of work on the main bed for any reason to maintain proper patterning in needles in work. Electronic knitters have the KCII option in the change knob.
For use on the ribber:
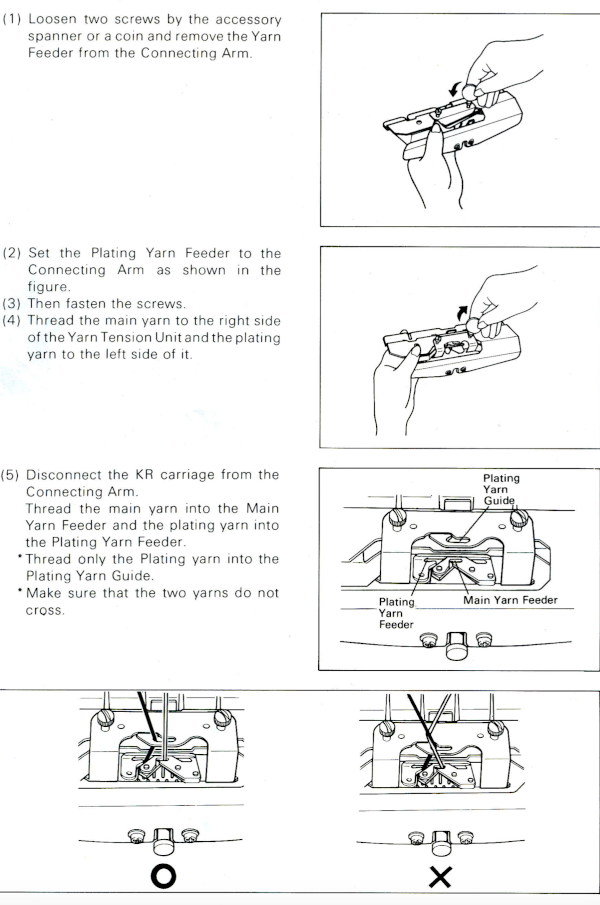
 More random, ancient swatches: stocking stitch using equal-weight yarns in a single bed tuck stitch
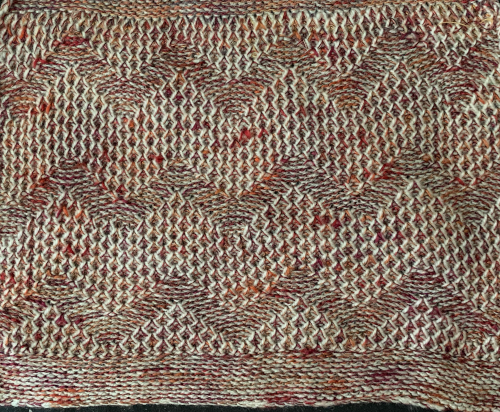
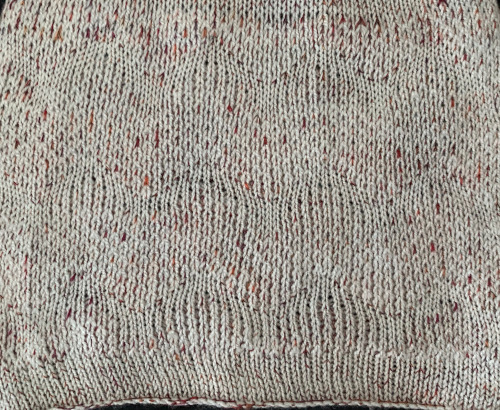 double bed every needle rib tuck stitch using the same pattern repeat
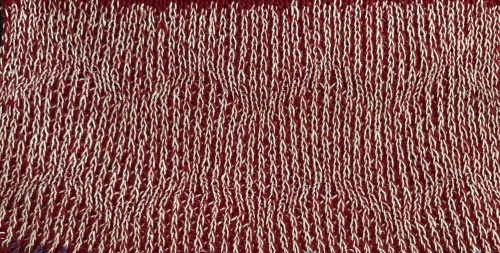 a racked sample
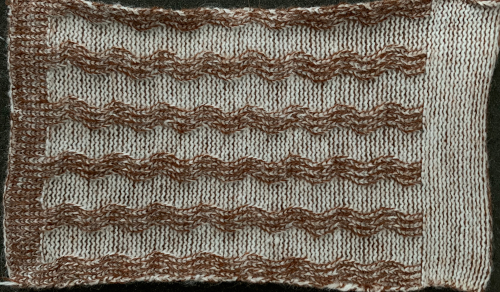 Shadow lace
 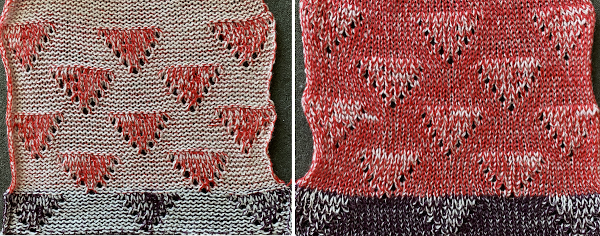 Pleated pattern
 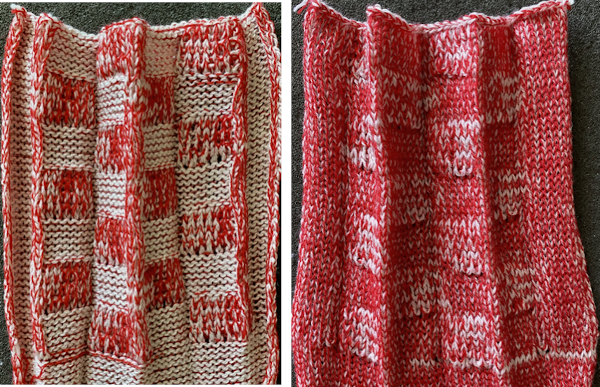 When working on large pieces, the yarn in the front feeder may slip out.
This is one option to prevent that when the ribber is in use  At one point, I produced several circular sweaters using equal-weight yarns to obtain the reversible 2-color look. I had more than one feeder, so I used a dab of glue in the slit below the yellow arrow
  The drawback to doing that is that the yarn cannot then be easily slid in and out of its position but rather has to be dropped through the remaining hole using a double eye needle.
These illustrations are from a Brother manual for the 860 punchcard machine, an idea for working intarsia. I have not tested the method myself, am sharing it as a possibility for working the fabric without an accessory carriage 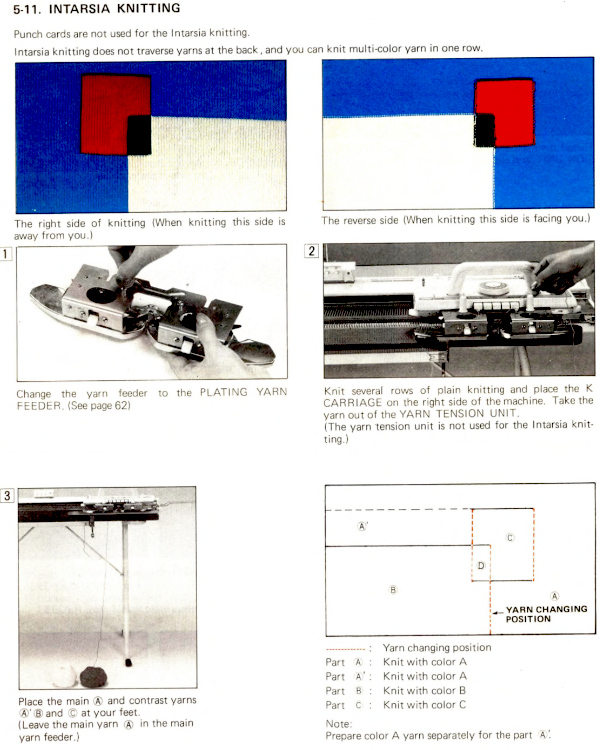
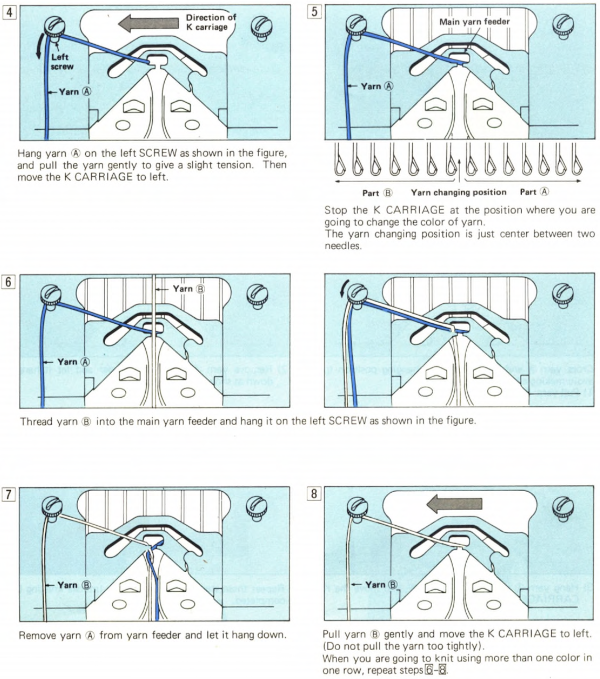
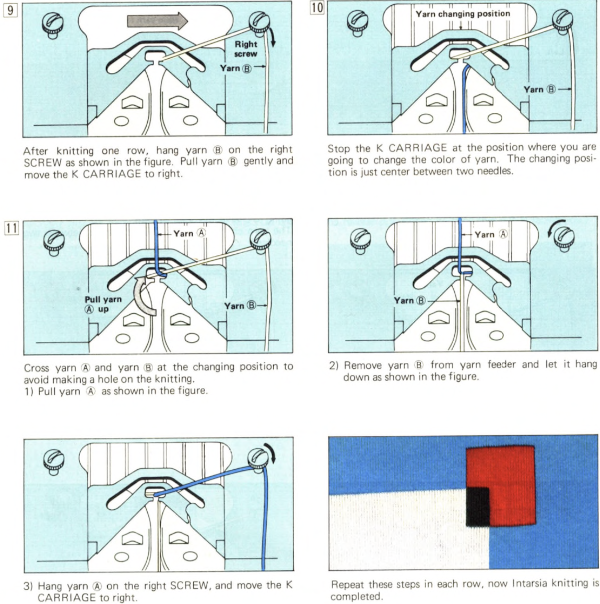 An experimental double bed fabric using the plaiting feeder and thread lace setting double bed 2015/12/05/thread-lace-and-punchcard-knit-carriage-use-on-brother-910_2/
Twisted headband meet fisherman rib, seaming, variation ideas
The machine knitting forums in both Ravelry and Facebook have recently been buzzing with versions of twisted headbands in varied techniques and yarn weights. Tanya Cunningham sparked the discussions by showing her bulky tubular knotted version. In her blog, one may find clear instructions on fold and assembly.
I chose to knit mine in full fisherman rib, making the fabric reversible, so that facing side at the start did not matter when seaming. I wanted a single thickness and a lightweight but warm fabric that would lie flat, perhaps being worn under jacket hoods on winter walks. My first band was knit with a punchcard carriage with a magnet placed for using it on my electronic. I forgot I had removed its row counter when it was last used for knitting with 2 paired main/ribber carriages in order to clear the end of the bed. As a result, I was unable to use the row counter, as that fact eliminated the tripper for it.
Part of my plan was also to avoid bulk at the twist as much as possible. Increasing the stitch count for such warmers can easily approach more of a hat shape, and a “top” could be added to complete the piece if it is intended to be worn as one.
In terms of inspiration, there are endless sources for twisted bands available, most for hand knitting, but sometimes they can be adapted to machine knitting easily enough, especially if one also owns a G carriage. One such source is Dropsdesign , simply enter headbands, knit, in the search field.
Head sizes and what each of us determines as comfort can vary tremendously. A table of head circumferences may be found at craft yarn council, and for much more detailed charts see
The twist will take up some of the finished lengths.
My first band sailed through on my Brother 930 standard:
Cast on 22 stitches in 2/18 silk wool, tension 5/4, at the same tension as the body of the band, intentionally loose.
Knit to head circumference, checking the length on the machine with weight off periodically after weight hits floor (scientific measurement), and periodically after the weight and comb are moved up.
Transfer stitches to main bed
Knit one row single bed at a looser tension (I used 8 in this version)
Bind off around gate pegs, OK if tighter than the bottom, it will be part of the seam
Twist and fold, rehang one side of the chain, alternate loops from the loose cast on
Knit a loose row across all layers and bind off,
Turn inside out.
Variations in color are due to the wonderful lighting in my apartment on another gloomy, rainy winter fall day.
Visualizing the necessary folds: make certain not to twist the fabric, fold it in half. Colors are used to represent portions of the finished, continuous rectangle, dotted lines the approximate center line when it is folded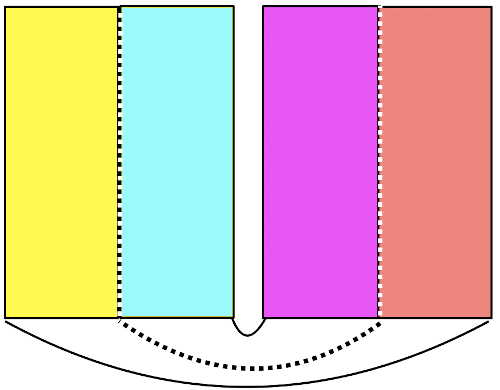
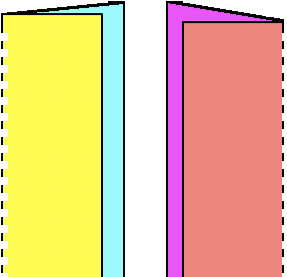
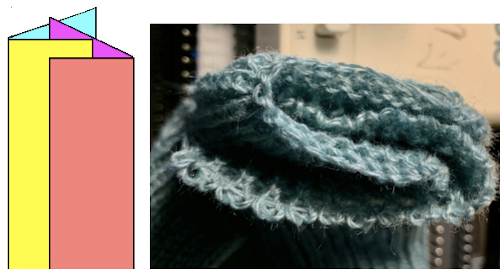
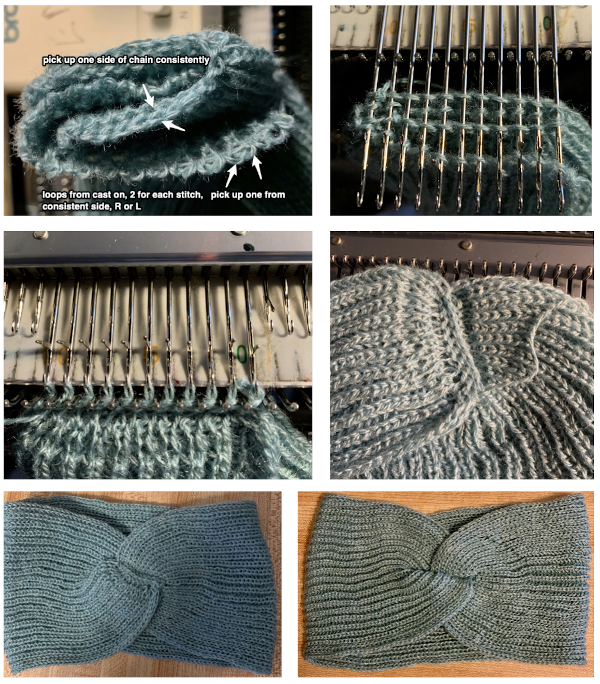
For my second effort, I switched the yarn to a yummy feeling 2/14 wool that was plagued with random dropped stitches on the Brother, no matter what I tried. That piece wound up lightly felted by hand after intentionally adding more knit length. I eventually gave up and moved over to my Passap, where things went smoothly knitting on 4/4. A reminder: in this fabric, one bed knits every needle while the opposite bed makes loops on every needle. It is helpful if the first stitch on each bed knits as carriages move to the opposite side.
Passap setting EX/ EX beginning on right and moving toward the left will tuck on the back bed (ribber setting), knit on the front (main bed setting) while tucking on front and knitting on the back when moving from left to right. Operating from the same side, the Brother settings to match would actually be the reverse of those illustrated in the ribber manual. Starting sides are in Brother instructions are often based on cast ons with 3 circular rows. I prefer 2 as I have explained in the past, it avoids a float forming between stitches on one side of the fabric. In this instance, it matters in set up only in terms of planning ahead as to which bed will form knit stitches first and having the first needle in work on that bed to ensure that the stitch will knit. In matching patterns between brands, cam settings could matter more. End needle selection brings stitches out to knit in patterning, but if KC is used here, all needles in work will be brought out to knitting position, so that is not a solution for having those stitches knit. Another thing to note in the instructions is one that might be missed upon a quick view. The Brother setting shown is for full pitch. That is because their instructions are for full fisherman knit for when every other needle is in use. If every needle were in use, the setting should be on H, not P 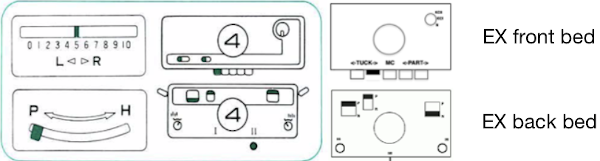 There is also the option when one wants to insure end stitches knit in patterns such as tuck to bring end stitches out to hold manually prior to knitting the next row.
A gauge swatch in double bed tuck should be at least 80-100 rows in length. One can sometimes “wing it”. It is important if you do that, that the length is measured between the beds as close to needles as possible, and down from there without weight and after the fabric has relaxed. Do not assume it will stretch to fit, the result may be several inches too small.
A comfortable length for me in the blue wool consisted of 310 rows, knit at T 4/4. Stitches were quite small, so after transfer to the back bed, I knit a row to the opposite side at tension 8 before binding off. I also placed contrasting color yarn markers at the center point of the cast on and bind off to make seaming up evenly easier, and held things together with a double eye tool so as not to accidentally twist the piece.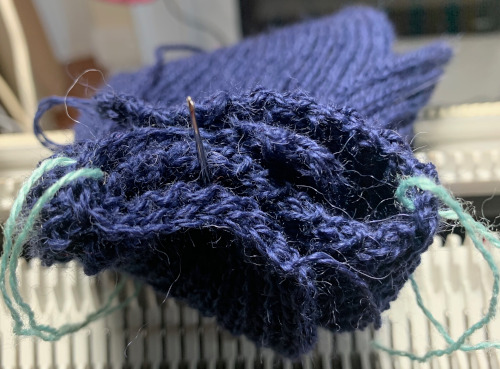
The number 4 band is my first sample, knit on Brother standard. Number one got pulled on to the planned length based on the “it will stretch” assumption. A metal ruler/yardstick was marked with tape at the desired height, while on the machine the marker was reached, but when off it, the final measurement was a whole 16 inches as the knit relaxed, far too small for most human adults! Number 2 is the brother version felted by hand to hide dropped stitch and edge stitch repairs, knit and shrunk to a measurement longer than head circumference for finished width, taking into consideration the fact that stretch is lost in felting. The fit was tested on my own head during shrinking and before drying. The number 3 band is the “comfy wool” one knit on my Passap. 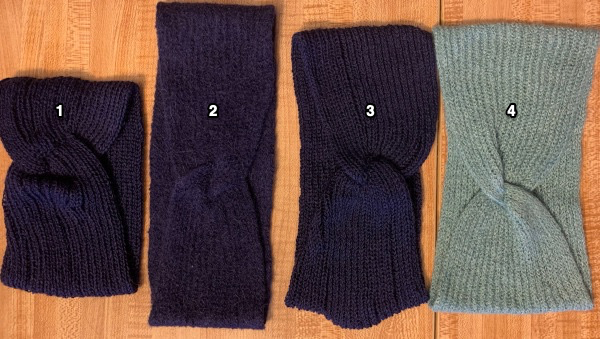 When I taught my course, after weeks of swatching the first “garment” involving a variety of automatic and hand techniques, students were required to knit a “baby hat with earflaps” exactly as given in printed instructions, using any stitch pattern and yarn of their choice. It provided an interesting exercise in gauge and proof of the need for swatching before beginning plans for actual garments. The results varied from so small the hats would only fit a small doll to ones too large for any human head.
Knitters are often resistant to swatching, but making assumptions about results can result in not the best use of both time and materials. If working in tubular stocking stitch the tension used should be the same as for knitting of that yarn in that stitch single bed. Tuck stitch is short and fat. In every needle rib there are stitches being worked on both beds, so double the number on the top bed would be actually worked than when using needles on only one bed. Loosening the tension by several numbers on both beds does not equate to matching width for similar numbers of stitches to the ribbed version. Here is a resulting mini-band, testing the same seaming technique used in the fisherman-rib samples. It was 20 stitches in width, 80 rows in length. I cast on at a loose tension, matching that used in the body of the stocking stitch tube and knit a row to seal before setting for circular knitting. When the top is reached, transfer stitches from the ribber to the top bed, knit at a looser tension tow to the opposite side prior to binding off and seaming (here I used 10). The technique should be usable on bulkier bands as well.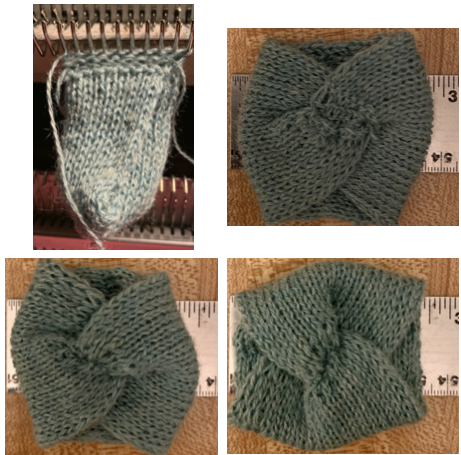 The elongated stitches at the top of the “band” are due to an extra needle in use on the ribber. To review, the proper settings from the Ribber Techniques Book:
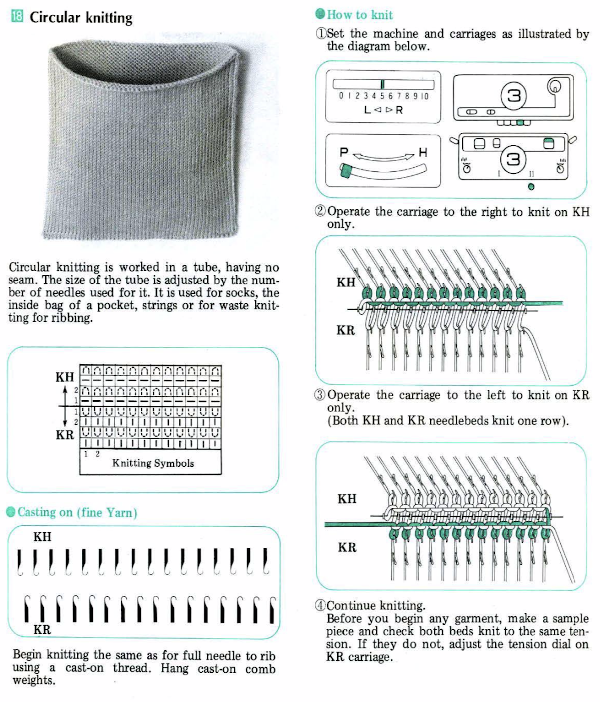
Machine knit fringes 2/ pretend hairpin lace
Several methods for creating fringes including some that may apply to this fabric as well were explored in the collection of fringes 1 post
Hairpin lace, familiar to many crocheters, is based on a central column with side loops that can be produced in strips, in turn, joined together in different configurations to compose open inserts, shawls, garments, serve as trims and joins.
A double-sided machine knit fringe can serve the same functions. My first swatch is knit using the #1 punchcard. Tension is totally dependent on the yarn used, the fabric may be executed on any machine, but as is often the case I am writing specifically for Brother.
The needle arrangement includes 2 center stitches, an even number of out of work needles to determine the width of the long loops, and one stitch at each end that is knit for the duration, then unraveled to loosen loops for various joining methods or uses as seen in hairpin lace references.
COR: to start with, 2 needles are cast on in the center of the piece, knit one row on them alone. This will produce a small tab that is woven in upon completion of the strip, as are yarn ends, and creates a base so whole loops may be added in equal numbers on each side.
Bring the side stitch on the carriage out to work skipping the chosen number of needles, knit one row to the opposite side, bring the outside needle on that side out to E, set machine for preselection row, knit back to the opposite side. Proceed to knit with both tuck buttons pushed in with end needle selection on.
A separate cone or ball of yarn will be needed in matching or contrasting colors to anchor stitches in the central vertical column. Bring the row counter to 000.
Multiply the number of loops required X2, since it will take 2 passes of the knit carriage to complete each pair, one on each side of the center.
I brought the side stitch on each side prior to knitting the next row out to E, rather than settling for using KCI alone, found that kept the side edges stable and I was not getting dropped loops.
If long strips are to be knitted, control over what is happening on each side matters in their assembly.
As you knit the two center needles will alternate coming forward, a separate strand of yarn is used to e wrap around the needle that comes forward with each pass of the carriage. Even though the illustrations for the technique show equal loop widths, they can actually be created asymmetrically as well, or the central column may be moved on the knitting machine as one advances through the piece for an asymmetrical version.
The dots on the metal bed are from another piece
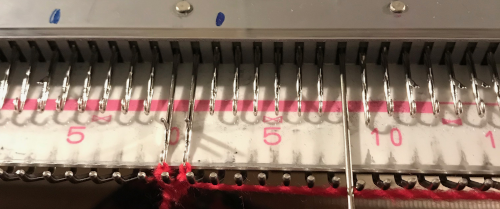
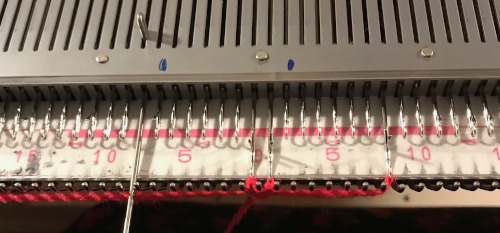 the first selection of a needle forward by punchcard
 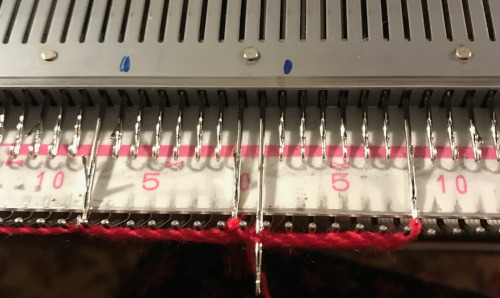 e wrapping with second yarn before moving to left
 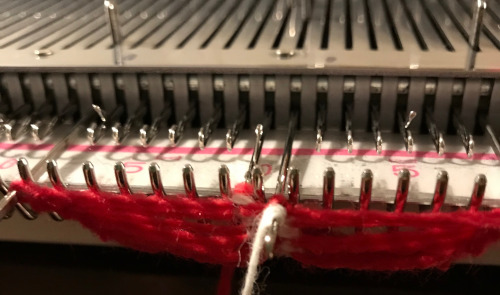 e wrapping with second yarn prior to returning to right, completing a sideways figure 8, end stitches out to E before prior to each carriage pass
 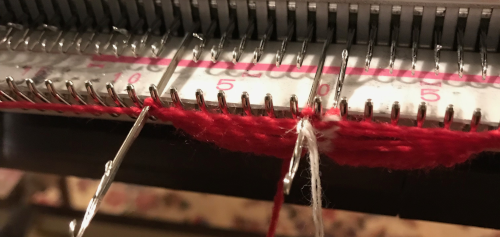 When the required number of rows has been knit, end COR. Unravel the first stitch on the right,
at the center transfer one of the two center stitches onto the other, and secure it with the center yarn.
Drop the strip off the machine, unraveling loops when you are ready to join the strips.
Using the finished sample as an insert brings up the topic of joining knits. Here there is a single stitch on each edge. The unbound off stitch at the top on each side can be hooked on and secured with the first pick-up.
Stitches in the sides of knits form “loops and bumps”. The loops are formed carriage side as the row knits, can be used as possibly the least satisfactory single stitch increase. Opposite the carriage, as that same pass is completed the yarn will twist and create the “knot”, an easy and often acceptable single stitch increase. Which of the two is used to pick up for joining depends on yarn thickness and desired effect. Swatching will serve as a guide. Being consistent gives the best seam/join, without bumps and lags. The single edge stitch side border needs to be stabilized if it is going to serve as the detail at the bottom of the piece.
E wrapping every other needle as shown above with separate strands of yarn for 2 stitches on each side may be used to produce a no-roll edge on the sides of any knit fabric.
Knot vs loop: 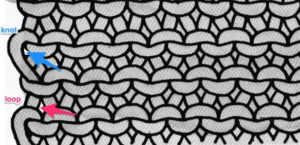
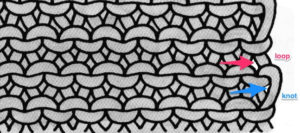 Using thinner yarn for knitting after the join even if on the same number of stitches, will gather the fabric
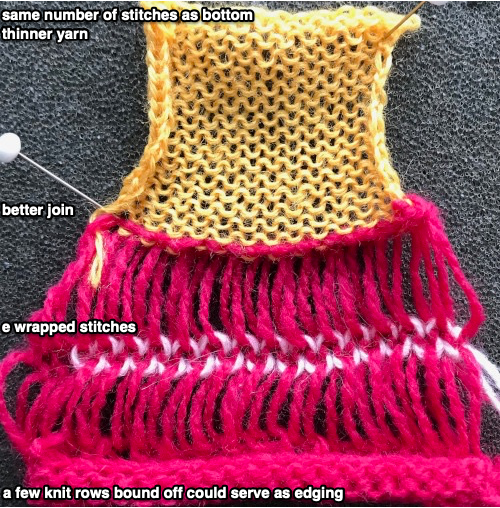
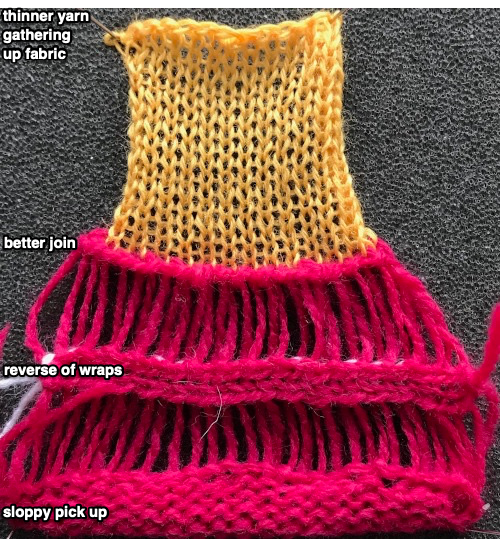 More on seaming and joining knits 1 and 2. Extensive accumulation of images (crochet) for inspiration and possible technique links may be found on Pinterest
On the left is a sample using an asymmetrical width, latched join method, while on the right loops are twisted broomstick lace fashion, and there is a crochet stitch join 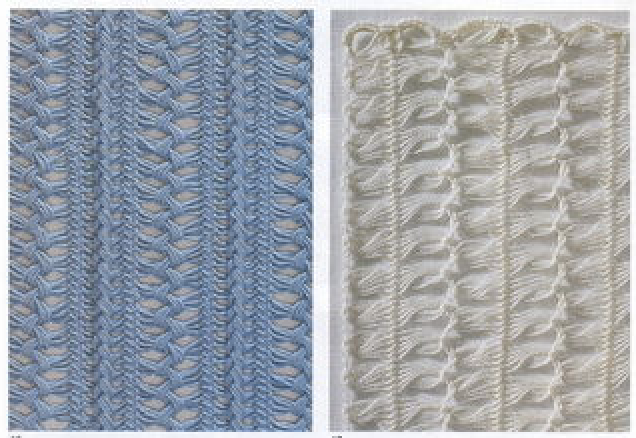 strips of different colors used
 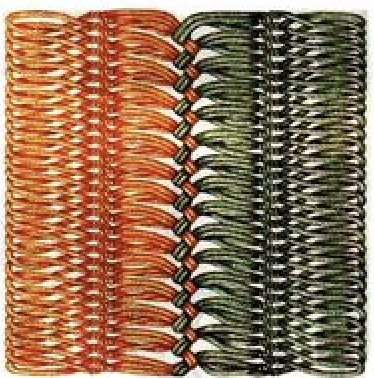 gathering tightly on one side can be the start of circles and shells
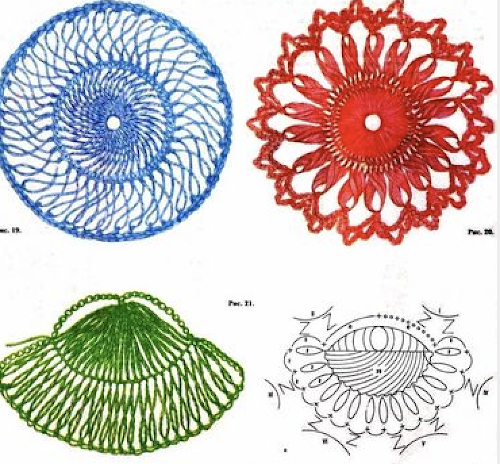
Japanese design books include their own symbols, here is part of a schematic for a shawl. It precludes an understanding of crochet symbols. The latter is simply illustrated and there is more convention as to their meaning than that for knit symbols, particularly as more and more designers are adding homegrown ones to self-published patterns 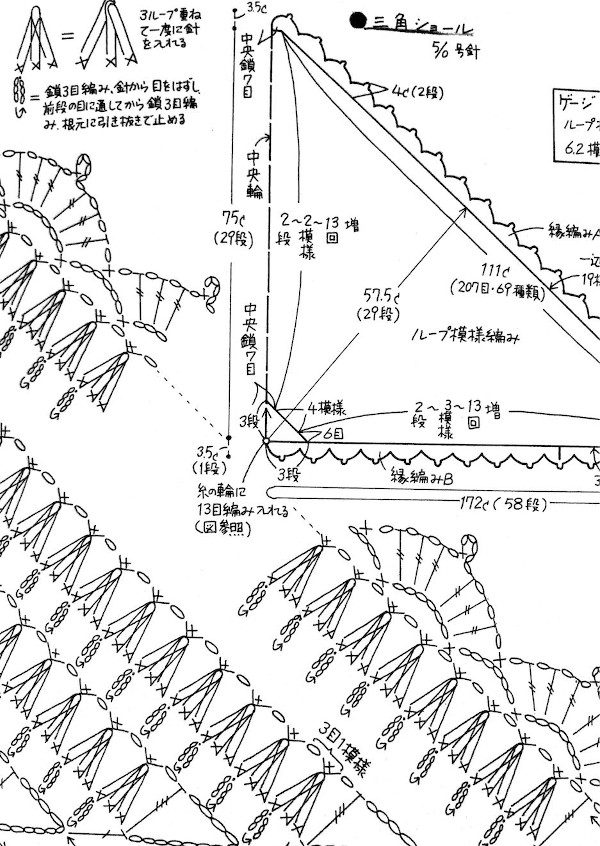 The convention for joining strips of machine knitting by crocheting or latching side loops together suggest having a ladder space (white square, one or more may be used) and a side edge stitch on either side in segments of the final piece ie. afghan strips.
 ![]() When binding off at the top of the piece, the first and last stitch on either side is skipped, leaving them open so that they may, in turn, be unraveled. The easiest method if the goal is to join pairs of strips is to line up two of them side by side, unravel side stitches from the top-down, only enough rows to match the number of loops that will be latched through each other, and proceed for the length of the piece.
When binding off at the top of the piece, the first and last stitch on either side is skipped, leaving them open so that they may, in turn, be unraveled. The easiest method if the goal is to join pairs of strips is to line up two of them side by side, unravel side stitches from the top-down, only enough rows to match the number of loops that will be latched through each other, and proceed for the length of the piece.
Depending on the yarn, work can be rehung on the machine, followed with a latch tool bind off, a segment at a time if needed, while maintaining a continuous piece of yarn.
Steps may be repeated for a crochet pretender edging at both ends if the number of needles on the machine will support that. Another alternative for the horizontal edges when no fringe is planned is to bind off with a crochet hook as follows: knitted edge: slip stitch in each knitted stitch, open section: chain 1, 1 single crochet stitch into first jumbo stitch, chain 1, 1 sc into second jumbo stitch, chain1 repeating across the row. If desired, sc again across all stitches. A row of single crochet may be needed to balance cast on edge as well.
Then there is the option of “winging it” and making a personal decision about other suitable alternatives.
When strips approach traditional hairpin, if you wish to work bottom-up or arrangements of loops are planned to be varied, whether, by crochet sequences or rehanging loops on the knitting machine, unraveling may be done while also threading a length of yarn through the loops akin to a lifeline in other types of knitting, making them more manageable. A hand knitting video by Bernat Yarns illustrates the principle on conventional hairpin lace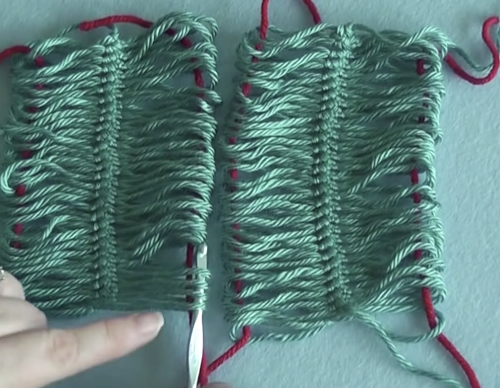 The technique is sometimes referred to as a cable join. The video also provides a reminder that if all the latching through is done in a single, same direction, the fabric will bias. To avoid that, start latching on right for one pair of strips, on left for the next pair. Finishing side edges by latching is shown in the Bernat #4 video along with adding a fringe to finish the top and bottom of the piece. If you enjoy crochet patterns longhand in the “old fashioned” way from out of print sources, here is a reference for inspiration, with hairpin illustrations # 448-456.
A join and side finishing, one side of each strip chaining strands of loops through each other, the outside edge twisting loops akin to broomstick lace: 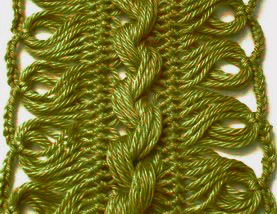 A partial illustration from Pinterest from an unknown source showing how the loops coming together to make shapes might be charted out: the ovals represent chain stitches, the v slip stitches, the different colors the finish of a complete strip’s edge
  Tuck lace is a fabric produced with needles out of work in combination with tuck patterning on the main bed. Patterns for it can serve as the starting point for either the center strips in double-sided loop fabrics or they can be worked in repeats with wider ladder spaces between them for a far quicker “pretend” version. This is one of my ancient swatches for the technique from a classroom demo, using the 1X1 punchcard, shown sideways to save space.
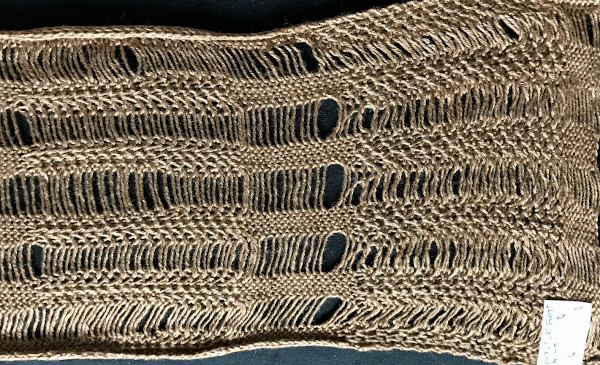 The card is used at normal rotation. Any time there are needles out of work, end needle selection is canceled to maintain patterning throughout including on end needles of each vertical strip. Tuck <– –> is used resulting in texture as opposed to simple stocking stitch and ladder fabric (center of the swatch). In the right segment, the ladder threads are twisted, in the one on the left they are not. This is what is happening: for twisted ladders on an even total number of needles have an even number in the selected pattern (4), and an even number out of work (6). This is one fabric that definitely benefits from the use of some evenly distributed weight and a good condition sponge bar. End needle selection must be canceled
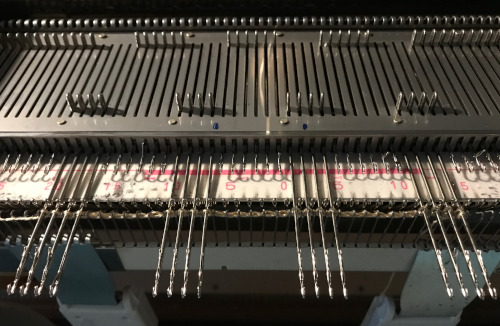
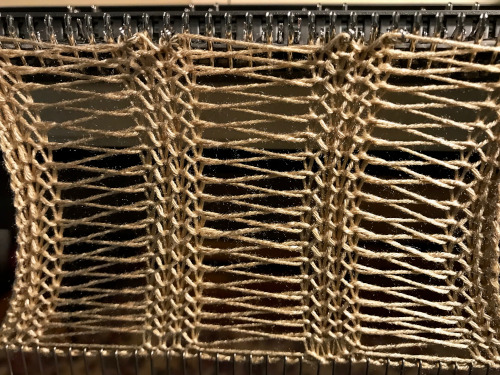 Here the stitches are arranged with an odd number in work (3), an odd number out of work (7)
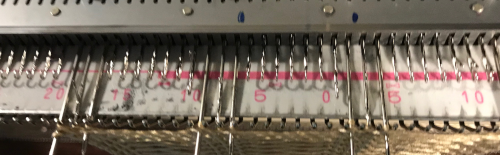
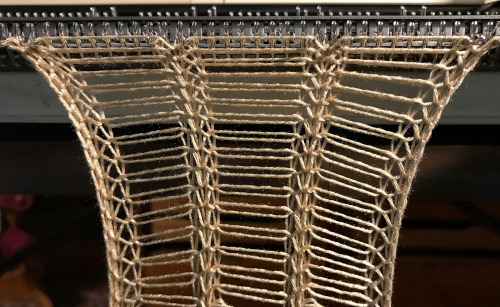
A way of determining needles out of work vs patterning/ in-work ones for both tests: the first is knit on a multiple of 10+4, the second on a multiple of 10+3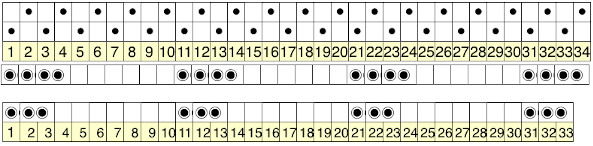
![]() These fabrics will narrow considerably when off the machine, here is an image of the above swatch after a period of “rest”.
These fabrics will narrow considerably when off the machine, here is an image of the above swatch after a period of “rest”.
A collection of fringes 1
Fringes are not a personal favorite of mine on machine-knit garments in their “simplest” forms. I can recall using them rarely. Here a cut Passap version was applied to a piece made in my student days, a ruana for which I no longer have the measurements. It was composed of wool DBJ, worked in 10 panels, using a mylar sheet on a 910 for patterning, hand pieced, and is still being worn by its owner. 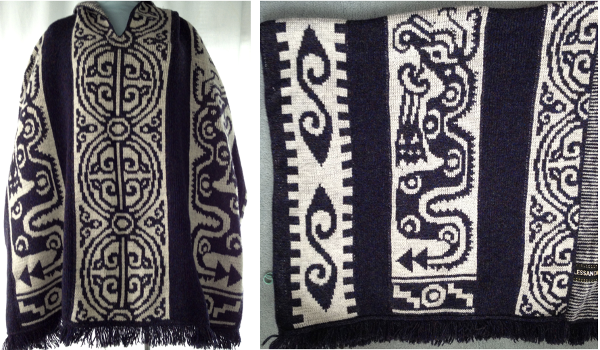
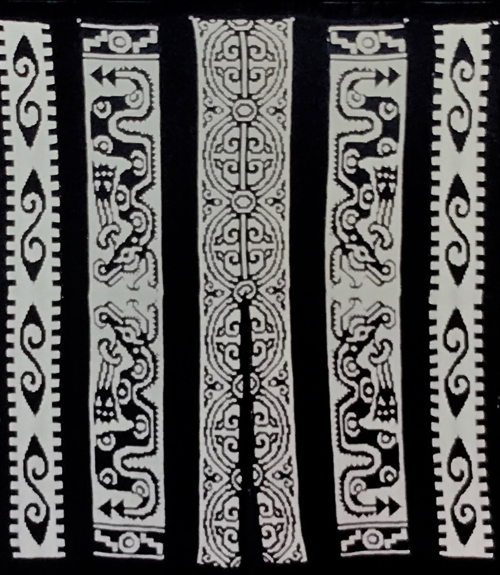 I made a few items with twisted strands inspired by those seen in wovens produced by my weaving friends. I have no photos of those, failed to document my work for quite a few years. One excuse was the quality of any photos I attempted, and even back in the day, professional photographers charged $180 an hour plus model fees if used. It seemed that adding the cost of such photography to limited edition runs that were planned for sale would make the wholesale price higher than the market would bear. We all make choices based on information we have at that particular time, which was long before the recent easy-to-use photo technology.
There now is a very good video by Diana Sullivan showing a machine knit version of twisted fringe produced on the machine.
For a while, I was on an i-cord kick. I liked the look, but they were very time-consuming on production items, with lots of ends to weave in, and there was a balance to be sought between far too many to be practical and too few and skimpy to be attractive.  Here a ladder space created by needles out of work is left between vertical fair isle repeats, producing a fringe in 2 colors. The design was not planned, a standard punchcard was used for the purpose of the demo. A planned repeat would have more impact. End needle selection is on, which is usual in FI, not for most patterns with either tuck or slip stitch settings combined with needles out of work, is also true here so that a vertical line on each side of the needles out of work between repeats aids in sewing the strips together. Width is limited since the fabric will be gathered by seaming and become significantly narrower and likely turned sideways. Both sides are shown. Joining could be planned to occur only at the bottom of a piece if desired, stitching lines will be less visible if thread color matches that of the yarn
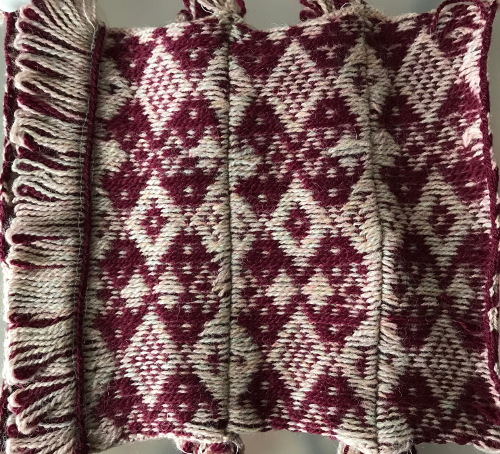
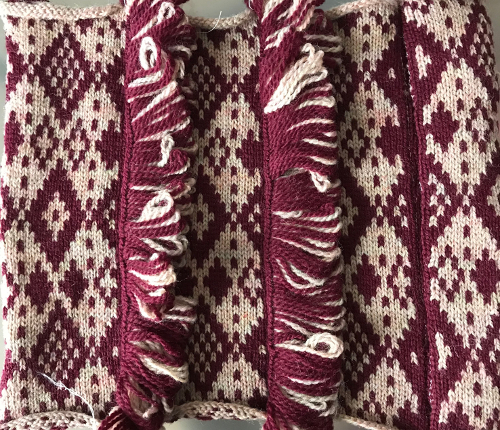 A needle in work away from the edge produces a side “fringe” followed here by felting partially, cutting the single edge stitch, and finishing the felting process
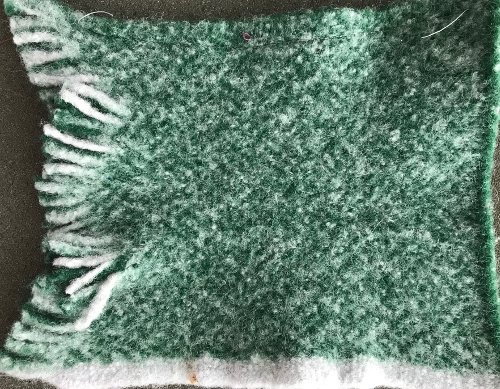 Adding thicker or multiple strands of yarns in long loops on edges, isolated areas, or all over
 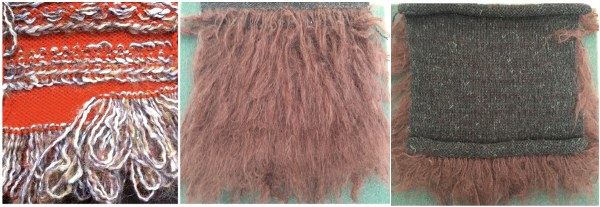 Let us not forget knit weaving with several strands of yarn, adding strips of the result as one knits, or simply hooking on strips of fake fur or thrums (the bits of yarn that litter the floor after you cut your weaving off the loom) at chosen intervals
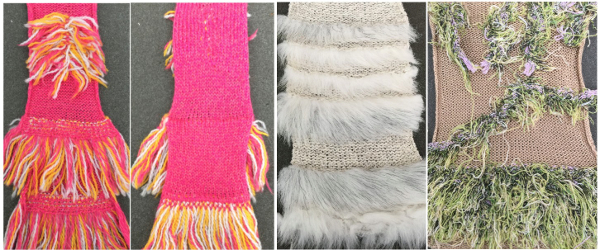
Finished edges on woven or lace trims, strips of fabric, and even roving along with self-made tassels may all be added at any point. Jolie tools, intended to aid in picking up dropped stitches can sometimes be helpful in picking up close to the woven edge (and pricking or piercing body parts on some days). The tool is available for both standard and bulky machines 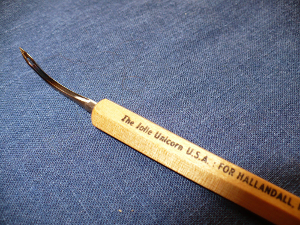 Most often every other needle use is best. Here lace and pom trims are used, purchased fringes of all sorts could be applied the same way anywhere in the piece, joins to knit can be seen.
 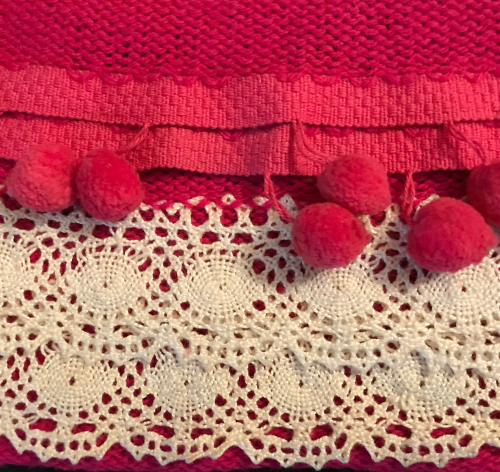 A length of roving may be twisted in its center and applied as you knit. For a while mittens using it as a lining for warmth were popular. A video by Carole Wurst shows a method used in socks https://www.youtube.com/watch?v=4FWmH6XW_FU. Roving will felt together to varying degrees over time, as seen here in another of my ancient swatches. The “sparkle” is there as a result of using an angelica/wool blend.
 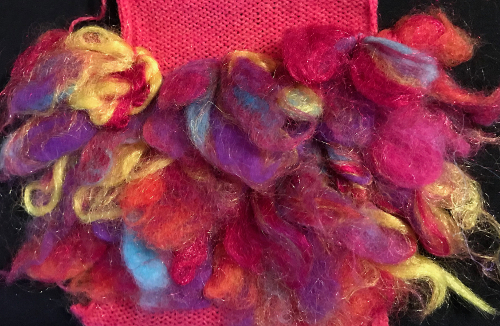 the same twist in the center/ knit through method may be used with torn strips of silk or other thin fabrics, mine here are 1.5 cm. wide. Background yarn may knit fine at standard tension commonly used for it, testing will determine it and the spacing required to meet your goal
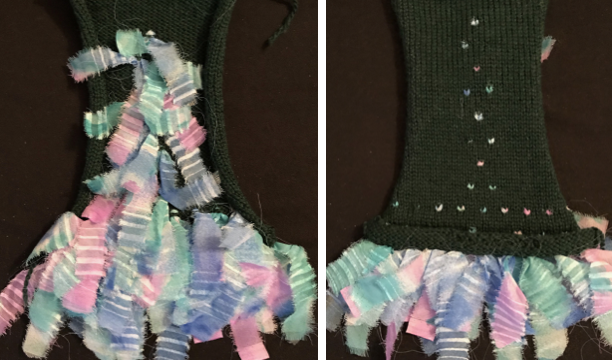
How-tos: to begin with, this is the “passap” version illustrated in the Duo Manual. One may choose wider knit bands between the floats that will be cut or folded over and doubled up
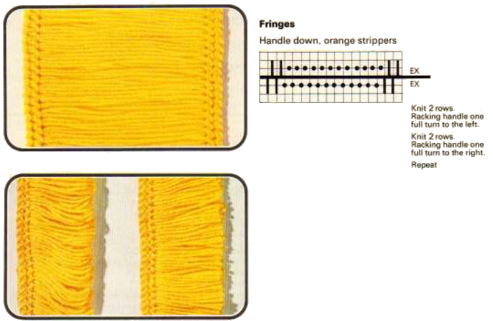 The thickness of the yarn chosen is of critical importance. When I first attempted to knit a version of it on my 930 I encountered problems. To start with, I kept dropping off the stitches on one side or the other. I checked the ribber alignment, proper placement of the cast on comb, switched ribbers, and carriages, and continued to have problems. After all that, the solution turned out to be simply adding another 4 stitches (2 on each bed) toward the center of the piece (I did not count). Here I used a 2/24 which obviously does not have enough body to use as an edging. The Brother equivalent for the Duo setting is half fisherman rib, where one carriage knits in one direction, tucks in the other on every needle for every 2 rows knit, while the other bed’s carriage does the same, but in opposite directions. I used 3 needles on each side rather than 2 as in the Duo repeat, starting with the first needle in work on the left on the ribber, the last needle in work on the right on the top bed. One may begin to knit on either side, but when manually setting the cam buttons lead with settings so that first stitch knits as it moves to the opposite side. Using waste yarn at the start of the piece will produce a better cast on edge for the trim. Operating from the right:
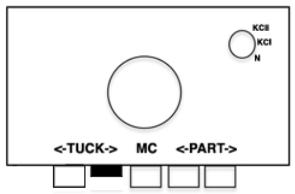
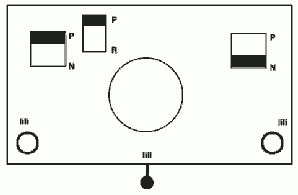
 A 2/11.5 acrylic provided more of a tension adjustment challenge but made for a better fringe.
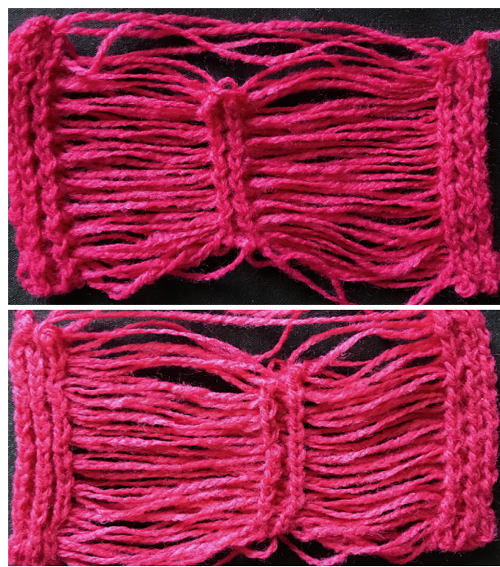 The first and last 3 stitches on either side were transferred to the top bed and bound off, the center stitches were not, allowing them to be unraveled if desired ie in case the fringe is to be folded in half. Those extra center stitches also provide a guide for cutting either down their center (bottom of photo) or on either side of them (toward the top). I found the latter method to produce a cleaner cut line
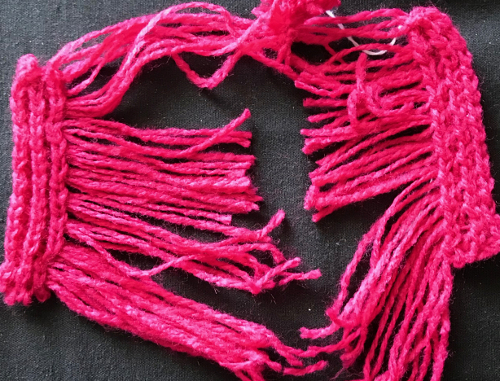 Suggestions for going wider with racked half fisherman rib on Japanese machines: begin with needle arrangement below, out of work needles can be as many as needed, set up and cast on with preferred racking position ie on 5, knit several rows in waste yarn making any adjustments needed so stitches knit are formed properly, weigh appropriately.
 ![]() Add needles on the main bed and remove one on the ribber
Add needles on the main bed and remove one on the ribber![]() Continue the test including in pattern, switch to a couple of rows of plain knitting and end with one knit row using ravel cord in a contrasting color. Cast on for fringe, knit 2 rows. Set for tuck rib, knit 2 rows, rack to position 4, knit 2 rows, rack to position 5, continue racking for the desired length, end with 2 knit rows and bind off or scrap off in case any additional length might be needed. When knitting lengths of trim, ending the piece on open stitches and waste knitting will give one the opportunity to either unravel or add more rows if needed.
Continue the test including in pattern, switch to a couple of rows of plain knitting and end with one knit row using ravel cord in a contrasting color. Cast on for fringe, knit 2 rows. Set for tuck rib, knit 2 rows, rack to position 4, knit 2 rows, rack to position 5, continue racking for the desired length, end with 2 knit rows and bind off or scrap off in case any additional length might be needed. When knitting lengths of trim, ending the piece on open stitches and waste knitting will give one the opportunity to either unravel or add more rows if needed.
Knitting fringes with a center band and cutting side edges will form variations on “feathers”. Pretend “hairpin lace ” produced on the knitting machine also uses related ideas.
An aside tip: if knitting pieces with strips of stocking stitch between ladder spaces often the side edges of the vertical knit columns will not hold and become wider and distorted. Using a single stitch in from each side of the columns on the ribber as well and racking one to left, one to the right from the original position every one or 2 rows will stabilize them. This swatch was knit in a very slippery rayon/cotton blend over 20 years ago using single neighboring stitches on both beds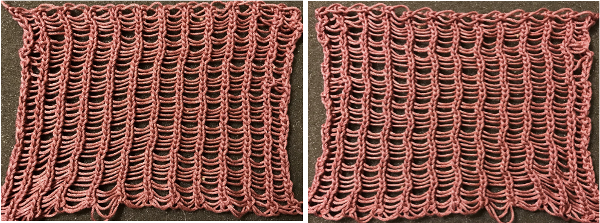 the edge that holds the fringe together is to be very narrow (or even added as one continues to knit) and one wishes to work on the single bed there are several options. With 4-ply and a “matching color” 2 ply I began with the top needle arrangement, and then switched to the one below it, knitting on a 4.5 mm machine.
  A permanent cast-on needs to take place in the preferred method over needles in work knit 2 rows. The stitch on the second needle from the left is going to want to stretch and tends not to be stable. To reduce that happening, there are 2 options involving the second strand of yarn. Here using a 2 ply helps serve that purpose and keeps the fringed strands closer together. The slower method is to remove the second stitch from the left on a tool after every 2 rows knit, then bring the separate yarn strand behind the now empty needle first from the right, then in turn from the left, returning the removed stitch to the machine, knitting 2 rows. I found that too slow for my patience, switched to just laying the second strand over needles before knitting each pair of rows, and decided to eliminate the out of work needle on the left side, moving the second stitch in work to its left.
 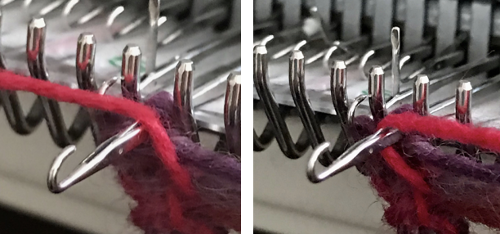 The single stitch on the far right of the chart need not be bound off. There will be 2 options after the work is off the machine. One is to unravel the single stitch column on the far right if loops are the goal, or cut it off, leaving a fairly good trimmed edge here, and what, in this yarn, appeared to me to be an acceptable edging. The 2 edge stitches on the left in my swatch did roll, making a very tight edge. Adjusting the tension used to change that effect would be another choice. Yarn use and personal taste contribute to a range of “successful” results when using any of these techniques.
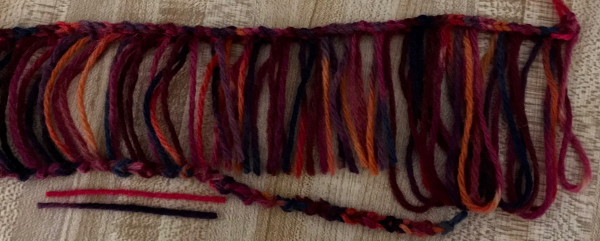
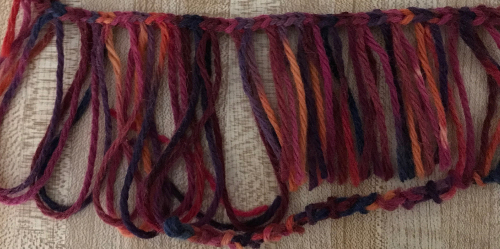 This version creates a true i-cord edging on one side, and produces a double fringe. Begin cast on with 5 stitches on one side, 1 on the opposite side to accommodate the desired width. As I knit my sample, I added a second stitch on that same side to make for an easier, more stable cutting line. Any changes in tension will affect the width and rigidity of the i-cord, and more markedly any stitches on the opposite side, and the length of the cut loops. As when knitting any slip stitch cords, the tension needs to be tightened by at least 2 numbers from that used in knitting the same yarn in stocking stitch. The carriage is set to slip in one direction, knit in the other, producing a float the width of the knit. Cast on. Beginning with COR knit one row to left, set the carriage to knit in one direction only (I happened to use the right part button, either can work). The process that draws the left side vertical column together into a cord : * transfer the fourth stitch from the left onto the fifth, move both stitches back onto the just emptied fourth needle, leave the fifth needle in work, “knit” 2 rows*. Technically, the 2 passes of the knit carriage to and from the left will produce only one knit row. I used the 2/11.5 acrylic, on the skimpy side. Thin yarns may be plied for the best effect. Here that second stitch has been added on the right, a few rows have been plain-knit.
 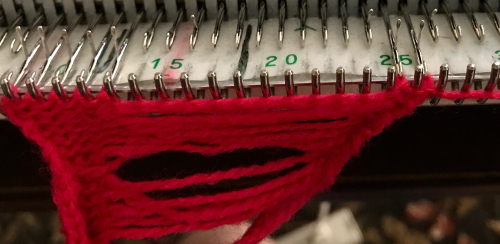 This shows the length of the slipped row, and that a loop is formed on the return to the other side on the empty but in work needle # 5.
 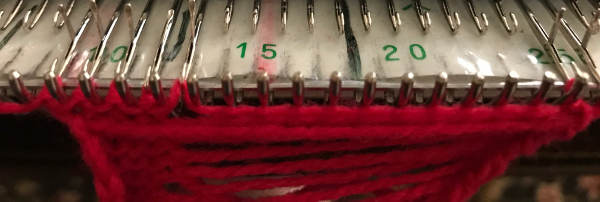 The transfers from needle 4 to 5 and back have been made, leaving the empty needle 5 in work.
  At the top of the piece, I transferred and doubled up the stitches on left, bound them off, and the yarn end(s) can be woven back into the cord.
 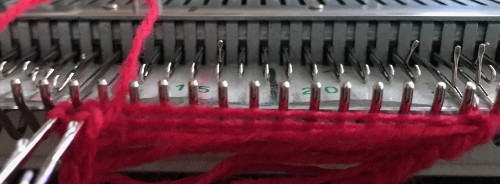 The side with the transfers is the “public” one, the finished fringe is usually hand sewn on, but it may also be used to cast on or be applied to several places in the knit both close together or at various intervals. Tension changes may be observed viewing from left to right, as well as the difference in length of loops as opposed to after the cutaway edge. The third stitch in work on the right may make for a more stable cutting line if looser tensions are preferred. Because the sinker plate used on the single bed has brushes and wheels in use, the width of the fringe can be considerable, without having to be concerned about stabilizing the center as it is when working on the double bed.
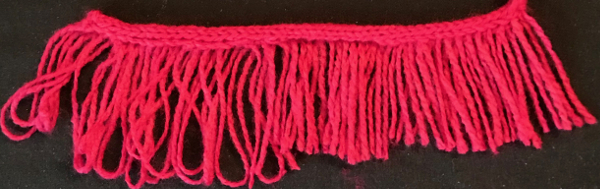
Introducing patterning single bed: knit weaving is perhaps the best way to control the number of plies, color mixing, designs in vertical bands, and knitting 2 fringe lengths at the same time. The 1/1 brother card is the most basic, but small repeats can be isolated for more interest or syncing with designs in garment pieces. To start: cast on and knit at least 2 rows on the chosen needle arrangement. Hang claw weights (or smaller) on each block of stitches. Combining strands for weaving adds fullness to the fringe. When any fringe is removed from the machine it should be stretched lengthwise and steamed to set the stitches (which I did not do in any of my swatches). As with other samples, the odd small number of stitches in the center or on the side are cut off to release the fringe. A sample arrangement: odd number of needles on either side and center, even number of needles out of work in-between. ![]() Visualizing the punchcard or electronic needle selection on the same number of needles in work as above helps. Here the first and last needle on each side knits at the start. End needle selection is off; if it is not the outside automatic needle selection will give that edge a different look. Using both settings will help determine if one is more preferred than the other.
Visualizing the punchcard or electronic needle selection on the same number of needles in work as above helps. Here the first and last needle on each side knits at the start. End needle selection is off; if it is not the outside automatic needle selection will give that edge a different look. Using both settings will help determine if one is more preferred than the other. ![]() A closer look at both sides of my ancient swatch knit in 2/8 wool
A closer look at both sides of my ancient swatch knit in 2/8 wool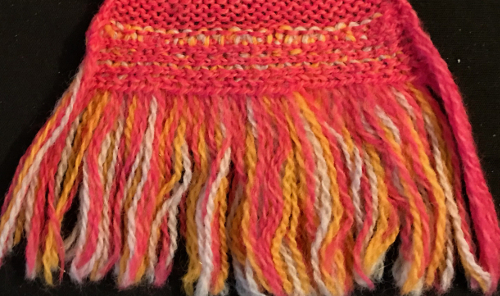
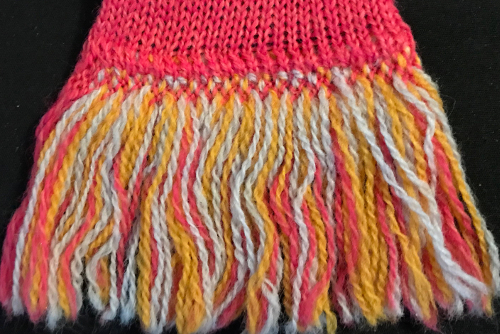 Long loops are best in a thicker yarn, here they are shown in an every other needle arrangement using mohair on 2/8 wool ground
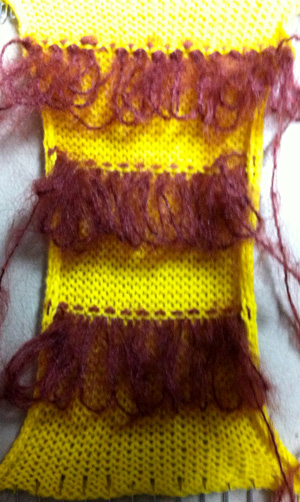 related post reviews some of the methods for creating the loops, there is at least one other. Published directions have taken it for granted that thinner yarn is in use: if working on a machine with a ribber use the gate pegs on the ribber as your gauge. Wind the yarn around the needle, then down to the sinker plate below it with ribber down one position, then around the same needle, down to the same gate peg, then up and around the next needle, continuing across. When the row of loops is completed, knit several rows, and lift the ribber up to release loops.
My test is with yarns of 2 thicknesses, one half the number of plies in the other. Cast on with background yarn, knit at least 2 rows. I wrapped the 4-ply on every needle on the main bed counterclockwise when moving from left to right (think e wrapping in either direction), clockwise when moving from right to left, bringing it down and around the corresponding gate peg. I found it easier to work with needles that were to be wrapped and moved forward from the B position.  The loops prior to being lifted off sinker plates
 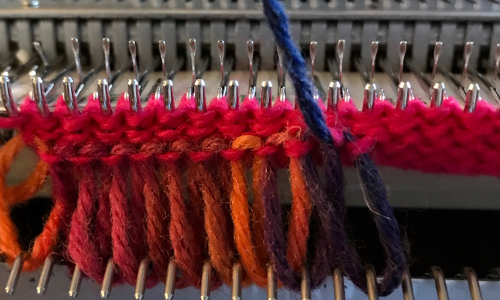 The first ribber height drop produced short loops (2.5 cm)
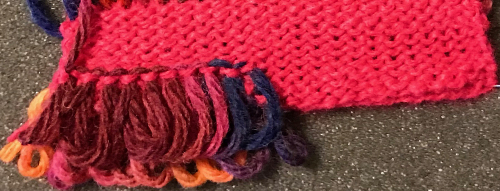 With ribber in the down most position (4.5 cm loops)
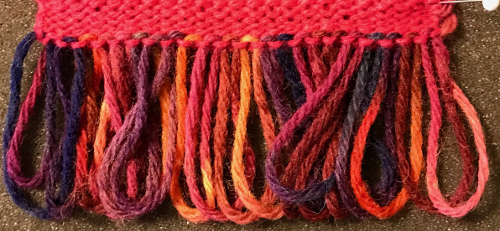 I found that just by knitting 3 more rows in this yarn I could lift the loops off the ribber gate pegs easily, dropping them between the beds and repeating the process. No need to raise the ribber back up. Whether these loops will bear being cut or be too slippery to stay in the ground will be determined by yarn choices.
There are times when a fringe is desired on one or both sides of the piece. Simply leaving needles out of work and an additional one in use to determine the width of the fringe can have skimpy results and an unstable edge stitch on the knit body. This is my solution for solving both: I began by knitting a couple of rows in the background yarn, then added a strand of yellow, and eventually the third strand in light blue, e wrapping the extra strand(s) in the direction away from the carriage. 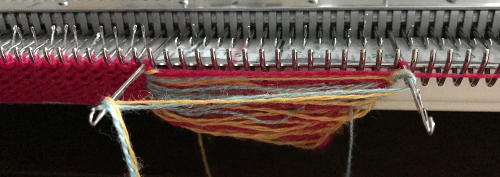
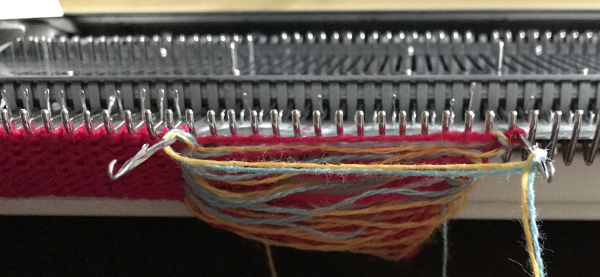 In this case, knitting ended opposite the fringe, only these stitches were bound off, not the single one on the far right
  The single stitch column was trimmed off, leaving a fairly full, stable fringe.
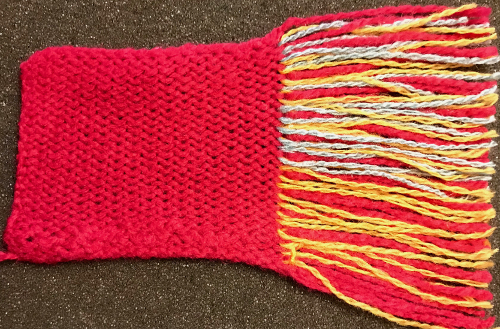
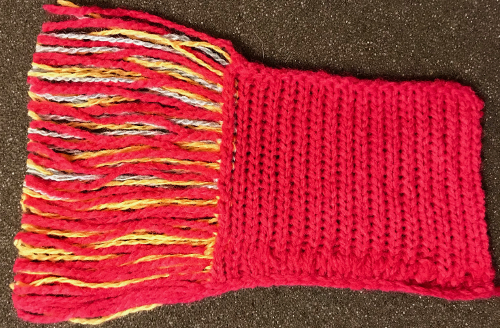 Cut lengths of yarn may be added to edge or in the body of the knit, eyelets could be used as markers or for an all-over fabric, guiding placement. This illustration is from Annie’s catalog
 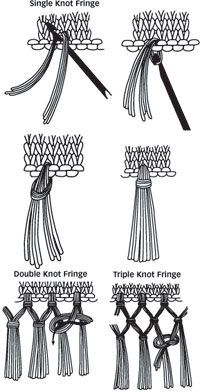 Fringes could also be crocheted or hand-knit, used to cast on the piece or be stitched in place upon its completion. I do not have the source for this, will credit it if I can find one