A Ravelry post discussing cable connections to knitting machines for downloading patterns and associated software has led to my accumulating the information below. I am primarily a Brother and a sometimes Passap knitter and can speak to only part of the content below from direct experience.
The information on electronic downloads cannot be separated from a history of hacking, which began with Brother machines when mylar sheets became less available and folks began to have an interest in bypassing them. A review of such efforts was also shared in a previous post:
a hacking history https://www.beautifulseams.com/2014/10/29/tricodeur-writeup/
only the intro is in German: a nearly hour-long presentation by Fabienne<https://www.youtube.com/watch?v=n1CRNjzOuto>
Brother 930: http://learn.adafruit.com/electroknit
Brother 970: http://glitchknit.tumblr.com
930 knitting: http://andrewsalomone.com
910: Claire Williams Wordpress site is no longer available
Fabienne http://fabienne.us/tag/knittingmachine/
keypad: http://travisgoodspeed.blogspot.com/2010/12/hacking-knitt…
FB100 Emulator software, disc utility program, cable
another approach for Brother models KH”‘930, 940, 950i, and 970: http://daviworks.com/knitting/ and the associated group on Ravelry
970 how to hack instructable
for additional cumulative information, software compatibility, and hardware specs see Claire Williams’ website
Superba hacking and open source software https://www.hackerspace-bamberg.de/Singer_Superba
E6000 https://www.hackerspace-bamberg.de/Passap_pfaff_e6000
hack and 3D printed accessories, Passap: Knitterstream
Present interfaces available for downloading patterns to Brother knitting machines: so far, both programs do not appear to run natively in the new iMac with M1 chip and Monterey OS.
That said, https://ayab-knitting.com , supported devices: https://ayab-knitting.com/supported-devices/. My experience using it has been with the 910. Pre-assembled kits used to be sold, over time they were offered by 2 different providers and were taken off the market by each of them. In many cases, there appear to be some issues with the program in DIY units as well resulting in mispatterning especially in long pieces of knitting.
Ayab operates as a true knit-from-screen, so the computer needs to be awake through the whole knitting process. In the case of the 910, the hack replaces the reader completely, the left side of the machine is left exposed, and the interface replaces the traditional patterning and power source, with its own cord connecting it to the power supply.
The last update to the program was in 2019. It performs color separations for dbj in multiple colors per row, including the only one of its kind, the Heart of Pluto one that eliminates jacquard color separation patterning errors and knits single passes for each color in each design row on the main bed.
Since the built-in patterning control buttons are rendered inoperable, Actions such as color invert, setting the number of repeats, vertical flip, mirror, rotate left, and rotate right are available within the program. Patterns may load both in color and shades of gray, palette color choices make a difference in achieving successful color separations.
Ribber settings include classic, middle color twice, HOP, and circular for tubular fair isle or other fabrics.
https://xxxclairewilliamsxxx.wordpress.com/hack-ta-machin… is an early post on the hack, showing steps involved. Kits with parts for DIY may be found online including at https://ko-fi.com/redpinkgreen/shop.
The program is free, any incurred expenses depend on how and from where the interface components are purchased.
The related Ravelry group has been quiet for a very long time, for more information on what is being developed and what users are knitting, the FB group has frequent shares. I would urge anyone interested in the program to join the group before making final decisions, to observe issues reported, and the finished projects if any using it https://www.facebook.com/groups/1384431355220966.
A recently added video KH 900+ KH 965 Brother knitting machine – How to install the AYAB Shield/alternative pattern control|
On my blog when I actively used the program, I shared my experiences using it and explored a variety of fabrics using its settings.
img2 track: works with Brother models KH 930, 940, 950i, 965i, and 970. https://daviworks.com/knitting/index.html. The program is also free to use on swatches limited to 60 stitches in width, to use the full width of the needle bed a the purchase of a registration key is required, the cost is around $100. The download cable can be ordered directly from Davi and directions are available for those with the ability to build their own. The program downloads the pattern into machine memory, so the computer does not need to be awake other than during download. The size of the download is limited by the machine model brain, with the 930 being the smallest.
When large files are planned, the program will reduce the pattern into tracks, and each has to be entered as a new program after the previous track is completed. The KH-930 takes just a few seconds to load the track because the memory holds only 2 KB of data (about 13000 stitches). Later models have a much larger memory (32 KB). The KH-940 and KH-950i require 42 seconds to load a track. The KH-965i and KH-970 load only the requested pattern, so the loading time depends on the size of the pattern. With Brother models KH-965i and 970, you can load a pattern from img2track without erasing the previous ones in the KM, as long as they fit in the memory. So you can have 901, 902, etc. loaded and choose between them.
Color separations are available for multiple color dbj, but not as a single pass for each color in each row as in Ayab Heart of Pluto. Images open in shades of grey. Each color in each design row is knit twice. It is possible to knit each design row color only once by adding a hand technique.
Adjustments may be made for vertical stretch, maximum width, and the number of colors used. Any remaining changes can be made by using knitting machine button selections.
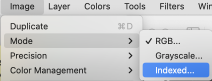
Out of habit, I have used both programs to open bmps and pngs saved in indexed mode though both are said to open common file formats ie. jpg, gif, png, bmp, tiff, …Neither program exports files in other formats or allows for editing specific pixels in the designs in any way after they have been opened.
I have found img2track to be completely reliable, errors encountered during knitting or programming have usually been operator ones. I develop my patterns outside either program in paint programs, I prefer to use Gimp or ArahPaint6.
The AYAB GitHub offers a huge library of ready for download images from various sources, most in png format.
I do not have any direct experience with Studio Electronic machines post-EC1 Studio’s approach to machine brains was to develop an exterior box that could be purchased separately from the knitting beds, EC1 on the left, their PC1 on the right 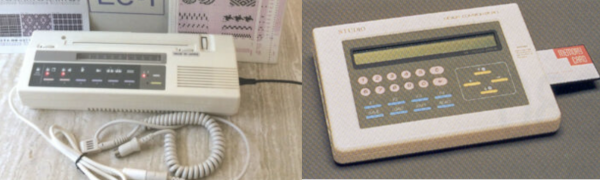 From the manual on its use
  The following information is gleaned from online searches: Studio or Silver Reed’s efforts to move away from mylar sheets as seen in the EC1, headed in a different direction than seen in Brother knitting. There are two options still available are the SilverKnit and SilverLink systems:
SilverKnit, with more info at https://silverknit.nl/dk/silverknit-en.htm “provides the knitting functionality of the EC1/PE1 for electronic Silver Reed machines. The site lists all pertinent information on system requirements and compatible models. One can knit patterns without the need for additional software, which may be created with a graphics package of your choice.” The pieces involved include a controller unit, a coil cable connector curly cord, and the box, which may be secured on its side to the knitting machine case using velcro strips, usually true for other switch boxes and control units as well. There is a SilverKnit software user interface. 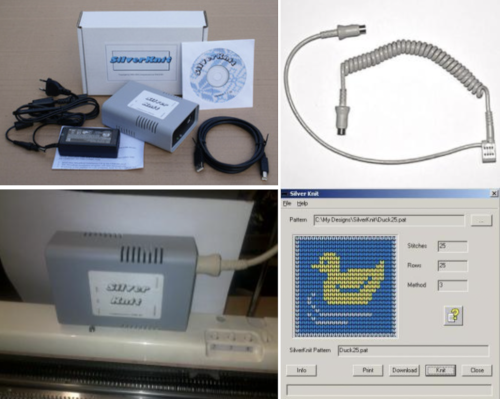 For Superba machines, there are the Superbaknit packages available: type A for pressure pad, 624, 9000 models, and type B for light scanner/pegboard models. They allow patterning across the entire bed, accept multiple file formats, and seem to use the same platform as the Silverlink program.
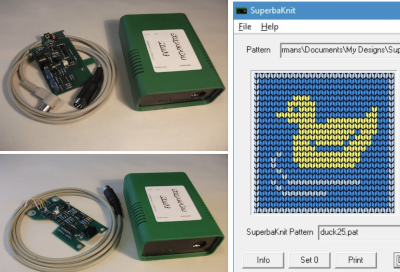
The Silverlink, now in Series 5 is for use with DAK. Manuals for softbyte cables include information on series 3, 4, and 5. 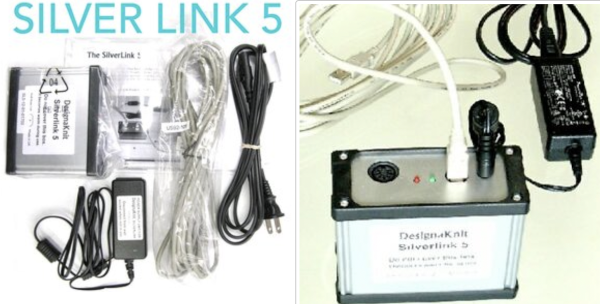 There are distributors in each country listed on the Softbyte site. There are also individual dealers selling related DAK products in other states and locations. Prices are not necessarily fixed, and relationships with local dealers may foster easier-to-reach individual support.
A 2020 review of the Five Pattern Control Methods for a Silver Reed Knitting Machine.
Passap knitters were first introduced to Creation 6 as the proprietary Madag E6000 software, usable with a short dongle on computers available at the time, making it necessary to remove the card reader from the machine in order to get it close enough to the computer for download. The dongle was plugged into where the curly cord connects on top of the console. Cochenille developed a download, knit from screen cable, and my early Passap pieces were made using Suzan Lazear’s BitKnitter on a reader with 8K memory. With true knit-from-screen, console memory is bypassed. The system was also available for Studio machines, both became abandoned.
As is true for the present DAK system, there was also a proprietary Passap file format used, CUT, aka Dr. Halo. Eventually, I purchased a switch box and download cable from Richard Croucher in England, and up to the present-day that has been my go-to for downloading patterns using and an ancient laptop. Personally, where I go now that I have a new PC available, is TBD. I failed to get the system to work using VMware on my old iMac.
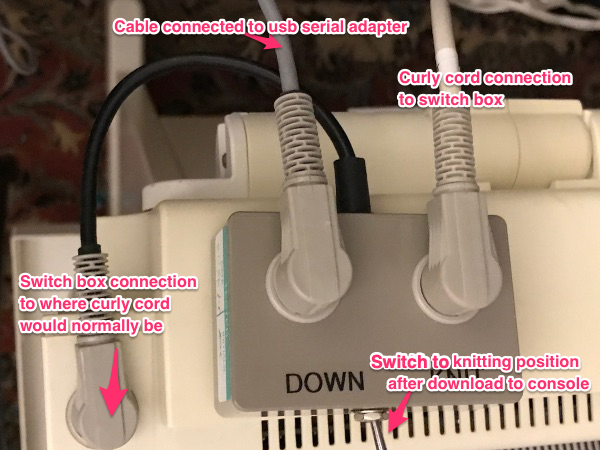
One of the caveats with downloading to the Passap is that the cable connection for both the curly cord and the download cable share a single entry point to the console. This connector was temporarily available and spared some of the wear and tear on the console  The addition of a switch box, secured with velcro on the console, allows for the possibility of downloading and knitting patterns without having to make any multiple other connections.
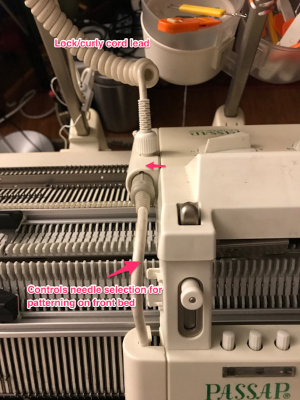
 Aside from connections to the machine, there was the issue of available software for drawing repeats and downloading in the proper format.
In the heyday of machine knitting aside from textbooks and articles beginning to appear from authors such as Lewis in the US, Kinder in the UK, and Carmen Router in Australia, lots of practical accessories and other info grew out of a very active knitting community in Australia as well. Accessories included a plaiting feeder and a stitch ditcher, and homegrown freeware was shared for printing reader cards. To this day Wincrea is still available for downloading to the E6000 machines. Others have followed ie Journal 6, which is now available as freeware, the repository may be found here. Wincrea remains the easiest to use. Supported formats are CUT/ Dr. Halo, BMP, and WMF (Windows metafile). At the present time, downloads of patterns are only possible in machines that allow PC downloads with later manufacturer chips and larger, 32K memory.
CUT files have a separate palette, the program reads the palette if it is found in the same folder as the CUT file. If the program palette is not the same as when the pattern was saved previously, the colors may not be as expected.
Some scaling may be done within the program. Files may be saved in both CUT and BMP formats.
If one chooses to, saving palettes is done by using specified names in the 256 color PAL (Dr. Halo) format.
When a design is uploaded to Wincrea step one is to have it read the correct number of needles and the number of colors used. If it does not recognize a com port, it will give an error message, and com-ports can be reassigned using the E6000 settings option menu. Once it recognizes the port, then it will come up with the download to E6000 option, and will also give an estimated time for the download to take place. It walks the user through how to prepare the machine for download. Two things are required: the console’s correct buttons need to be pushed to get to a “PC start” programming position, which verifies the machine itself is capable of accepting the download, and the switch must be in the download position. If things work, a beep follows once the download option is selected and the LED screen on the passap actually shows a progress bar for downloads that take longer than a few seconds. If the pattern has indeed downloaded successfully, the console beeps again and then follows up with questions on whether you want to alter the design in any way from its built-in additional options, what knitting “technique” you want to use, how many needles you want in work on either side of 0, and if you want to place the design in any particular place on the bed. It is possible to continue programming, either segments or different patterns altogether. At that point, cables are swapped out or if using a switch box, providing the operator remember to flip the switch to the knitting position, things should go smoothly. If one has forgotten to change to the knit position, the machine will beep and give you a totally different error message and beep. The Passap console has a whole series of lovely beeps, for all sorts of prompts and reasons that may be at times downright infuriating to people using the machine.
Passap color changers were available as add ons for automatic sequential color changing for up to 4 colors, are placed on the right rather than on the left as in Japanese machines, so programming downloads and first preselection rows must take that into consideration.
As CUT files proliferated, shared by Madag and individual designers, or as knitters wished to create their own, interest grew in creating, reading, and converting formats. Programs like Dr. Cutter for doing have long since become unavailable. Stitchpainter’s early versions were able to save CUT files, I have not been able to verify online whether the present version still does.
Present-day options for opening and converting CUT files include for purchase Graphic converter. On my new M1 iMac, I had issues with CUT files not opening. The software developer was responsive to questions and troubleshooting, a nod of thanks to Thorsten Lemke. The advice: please download the latest version http://www.lemkesoft.org/beta.html, and make certain that in preferences, the box aside Detect Only clear formats is unchecked. 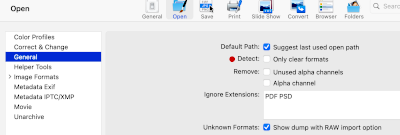 and for solving the same issue in XnviewMP, a nod of thanks to Pierre-e Goulet for the solution: in Settings, General, make certain that Show all graphic formats is checked.
 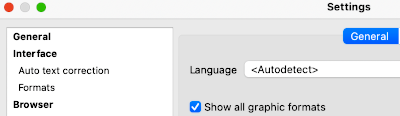 Xn Convert allows for easy batch conversions. I did not encounter any issues on Mac.
As these programs have grown in complexity, some of the CUT files open in strange colorways, need adjustments and editing, possible within the above programs, for increased or any visibility while some are viewed clearly. Batch conversions to other formats are possible, performed easily and quickly. A Windows-only image conversion program for exploration: Konvertor
DAK proprietary formats ie STP and PAT to my knowledge are not readable by any program outside the DAK universe.
Softbyte now offers a similar setup with a switch box allowing for download to a console capable of accepting PC downloads, the E6000 Link 2. “This link has a switch that enables the selection of either downloading or Interactive Knitting. It means that the cable can be kept permanently attached to both the E6000 console and bed. This avoids the need for repeated connection and disconnection of the link, and therefore also avoids wear and tear on the E6000’s sockets. The other links do not have the switch and need to be disconnected after downloading, so even if Interactive Knitting is not required, we recommend using the Serial E6000Link 2.”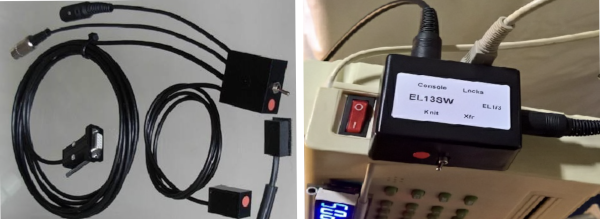 The Softbyte links for Brother machines include versions for downloading and uploading with a Brother PPD or to machines that take a pattern cartridge. The magnet arm for interactive knitting is not included with all, may be purchased separately. “The USB Brother Link 5 enables patterns to be downloaded from DesignaKnit, and any 900 series patterns to be uploaded to DesignaKnit. The 900 series pattern numbers are those loaded from another source into your knitting machine or PPD (e.g. from the PPD, Brother FB100 Disk Drive, or DesignaKnit). This link supports downloading and uploading with the KH930, KH940, KH950i, KH965i, KH970, and with the PPD using Cartridge III in KH900 mode, or with the PPD using the CK35 cartridge. This link is identical to the USB BrotherLink 1 except that it includes a magnet arm that attaches to the carriage and thereby enables Interactive Knitting with any knitting machine, including non-electronic ones.”
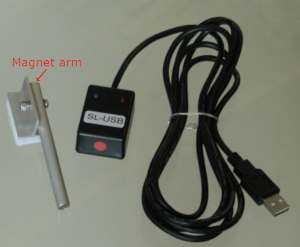
The ScreenLinks provide row by row instructions and audible memo alerts for non-electronic machines or anyone using mylars, built-in patterns, or other software for the pattern downloads. They are not able to download patterns. The Universal Link for DesignaKnit allows one to connect any knitting machine, including plastic beds, to the DesignaKnit interactive knitting as opposed to knit from screen function. The USB cable is attached to your personal computer. The other end of the cable is attached to the mainframe of your knitting machine, the magnet to the carriage or lock of your knitting machine. The cable senses the magnet as it moves past it, and as it does DesignaKnit will advance the pattern one row. From the manual: 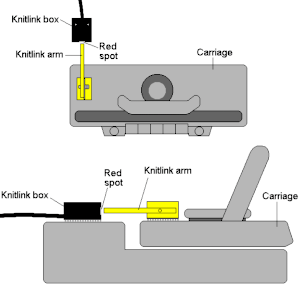 And shown applied to a plastic bed machine @ https://www.allbrands.com/
 Garment shapes filled with patterns may be developed in DAK, the cable allows one to use DesignaKnit as a knitleader or knit radar device increasing the capabilities of the knitting machine when shapes are created illustrating pixel-based increases and decreases, akin to what could be drawn on graph paper with each cell representing both a single row and a single stitch, and connecting dots placed on the basis of gauge calculations.
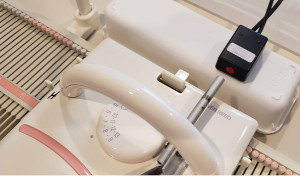
Having a small supply of self-stick velcro tape to put on each of your machines, allows for the cable and magnet to be moved as required.
A second knitlink arm appears to be required for the use of the lace carriage. I would guess it might be attached to a second knit carriage as well if one is choosing to knit with 2 knit carriages selecting needles.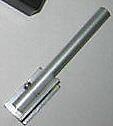 DAK cable manuals published by Softbyte. Full Dak software manuals are not available until the program is purchased. There are 5 program modules. Some of the user experiences, answers to questions, and related knits may be found in the FB associated group.
 There are three hand-manipulated methods available on most machines. True intarsia knits all parts of a design simultaneously and is best suited for complicated designs. Short-rowing is best suited to diagonal shapes, while the slip method is to vertical shapes. Both knit designs one section at a time and have no floats between shapes on the purl side.
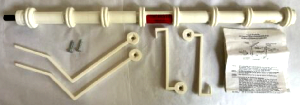 and very recently shipped my Brother 260 bulky intarsia carriage to a Parsons student, so by default any of my experiments at present will be knit on a standard km.
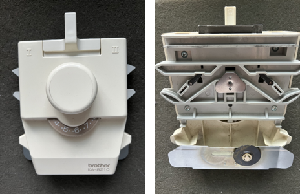 It was intended for use on early Brother punchcard models listed in the manual. Trippers were required to advance the row counter in later models.
 The B tripper doesn’t engage in my carriage, the A tripper does, and triggers the row counter in my 930.
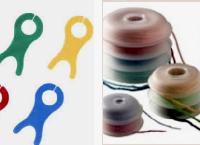 When knitting more than a swatch it is likely far easier to work without a ribber in place. I like to do all my knitting with the main bed anchored and angled with ribber clamps rather than flat.
 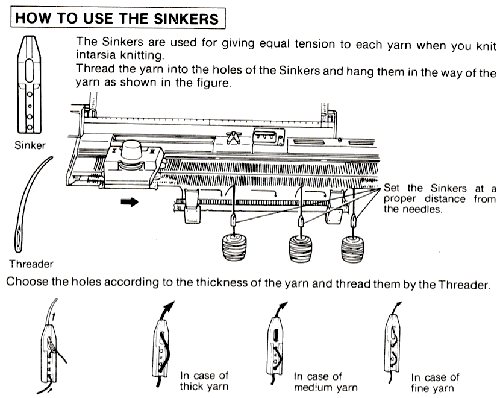 If the threader is missing from the supply of sinkers, floss threaders can help, and are also handy when beading on the machine. The used yarn here is 2/18
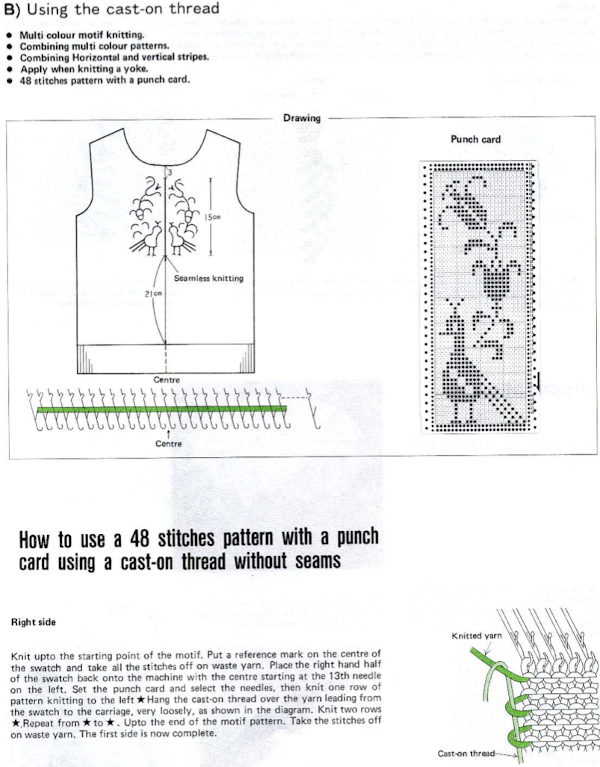
 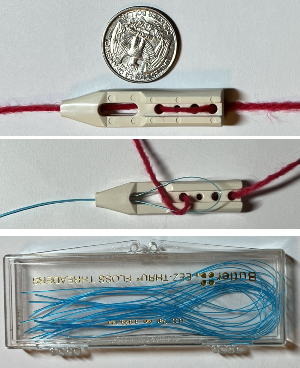 To knit: begin with a familiar yarn. This carriage may actually produce a different stitch size and resulting gauge than the result when using the same tension number on the knit carriage, a factor if the plan is to combine intarsia segments with the main carriage for any stocking stitch across all needles in use.
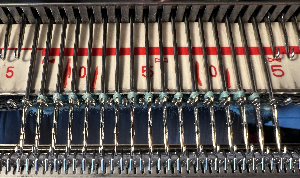 If any latches are closed, the stitches will drop on the next intarsia carriage pass. They will drop as well if the yarn skips being laid over any of the needles in the D position. There will be an eyelet at the very start of the process which is eliminated when the yarn ends are woven in. A reminder for Studio knitters: Brother needle positions are A, B, D, and E, C was present in very early models but was then eliminated permanently, while Studio kept the alphabet in proper order.
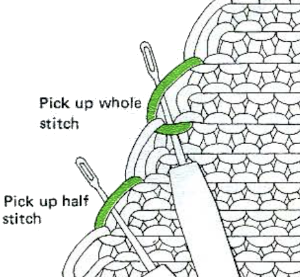
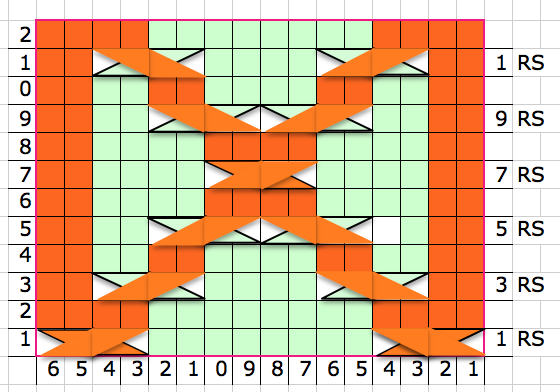
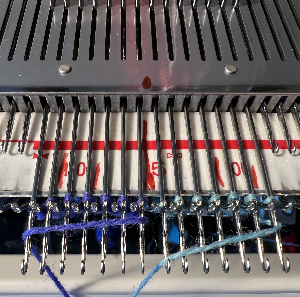 An illustration of the crossings to eliminate holes.
 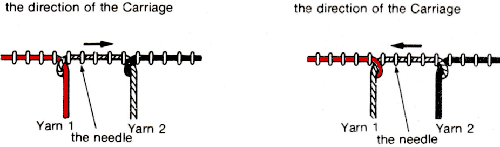 I had initially begun on an uneven number of stitches, then decided it was more practical to be able to use 7 prong tools for my planned cable crossing, so I decreased on each side accordingly.
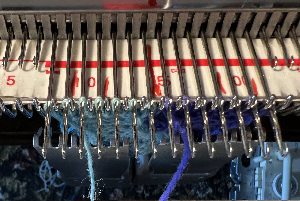
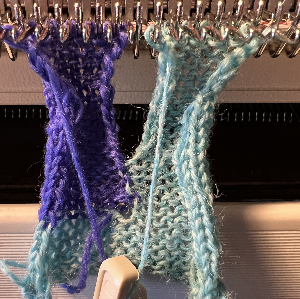 Using the appropriate tools remove the stitches onto them.
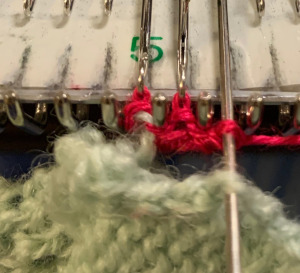
 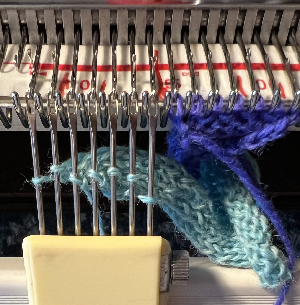 The yarn ends need to be kept free for the next intarsia carriage pass, the needles are aligned in the B position after the cable crossing is created.
 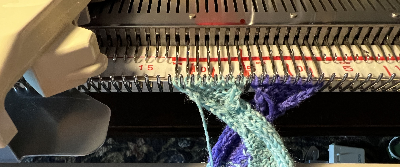 Remove the carriage by sliding it off the bed or using the release knob
 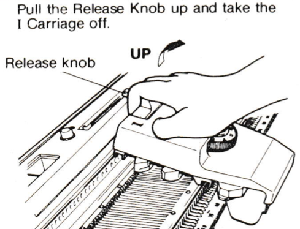 Return it to the opposite side to make a free pass and return to the side of the needle bed where the necessary yarn ends will be available to proceed.
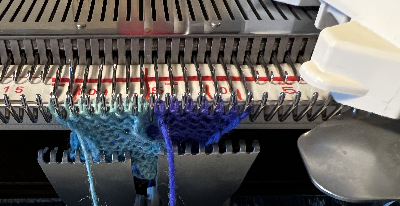
 Resume wrapping to join the strips once more
 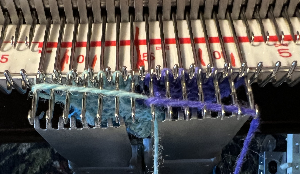 Knit to the desired length, and bind off in one or more colors.
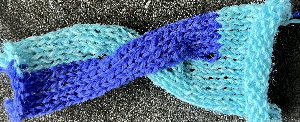
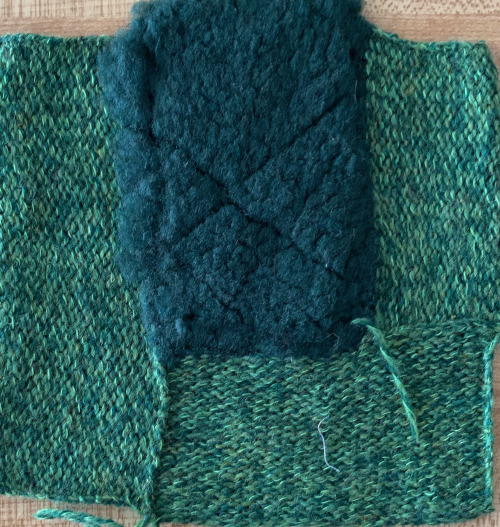
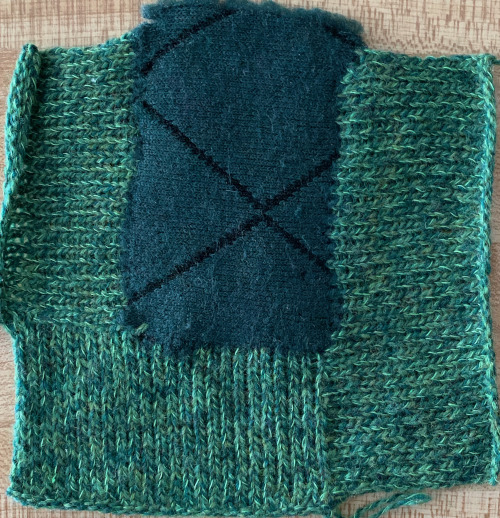
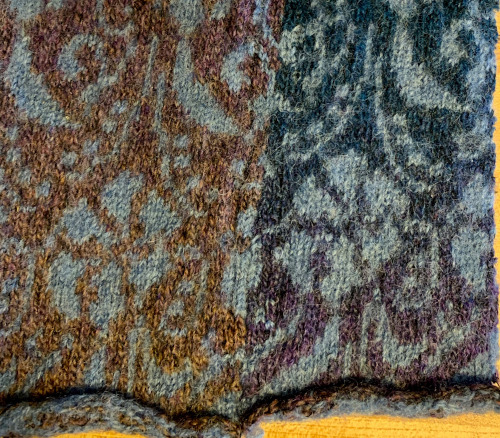
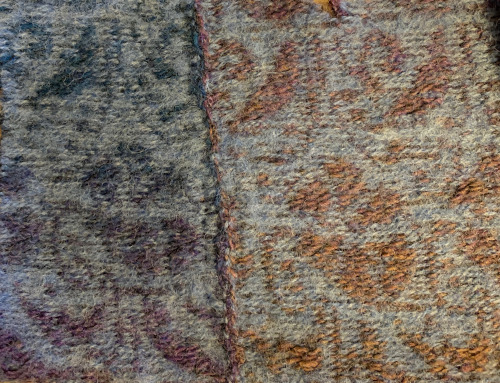
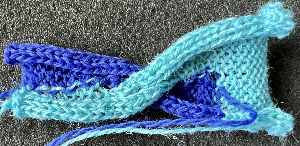 Here the knit is exposed to steam and some light pressing
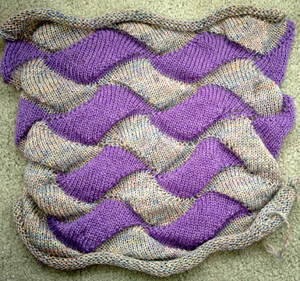
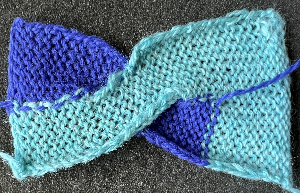 This gigantic swatch, for me, is the end of my intarsia knitting, though it is best to never say never.
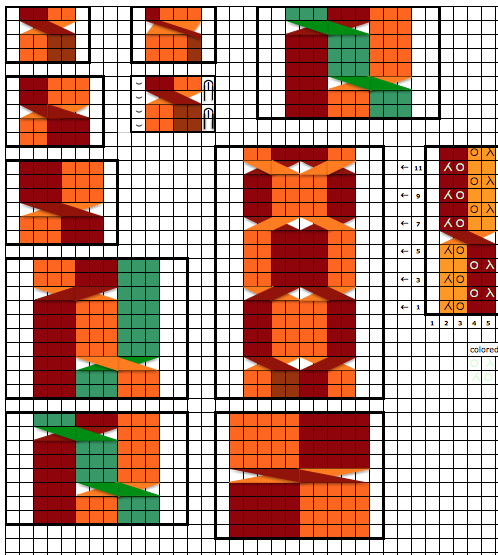
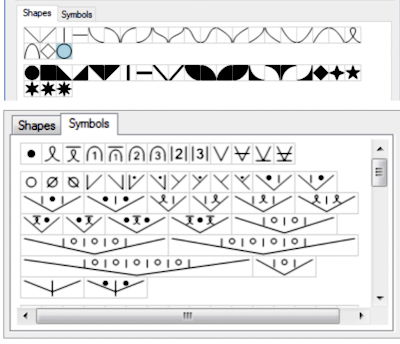
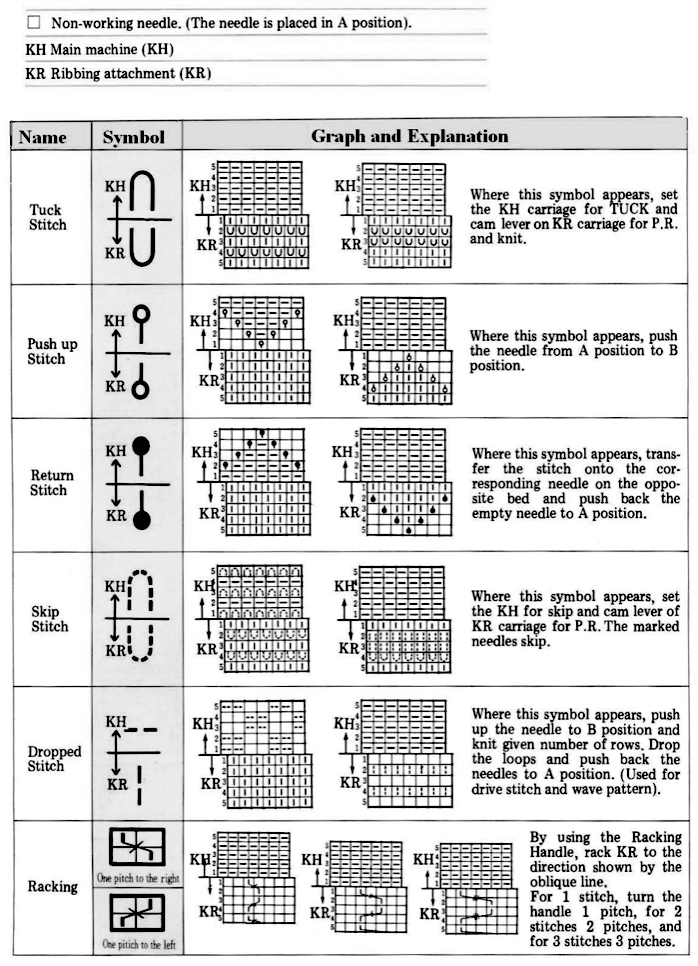
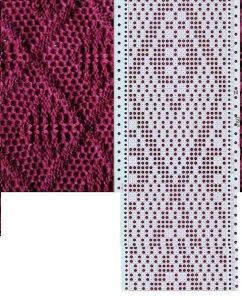
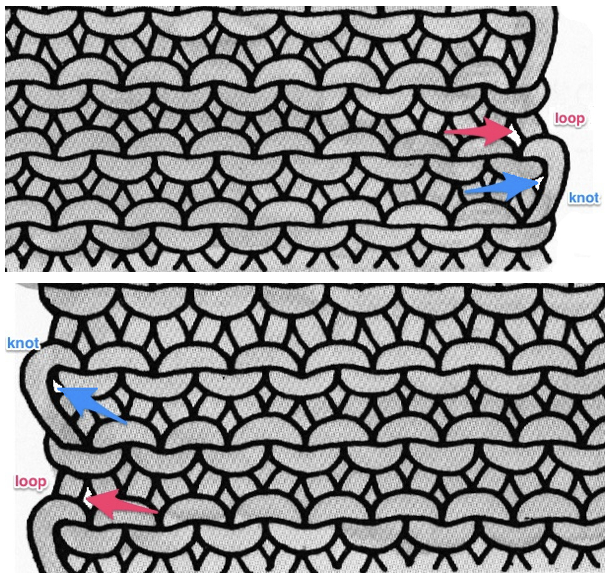
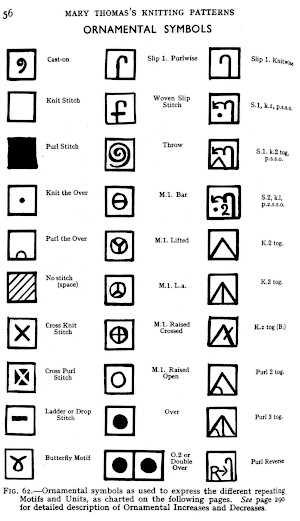 Japan’s contributions to lace patterning
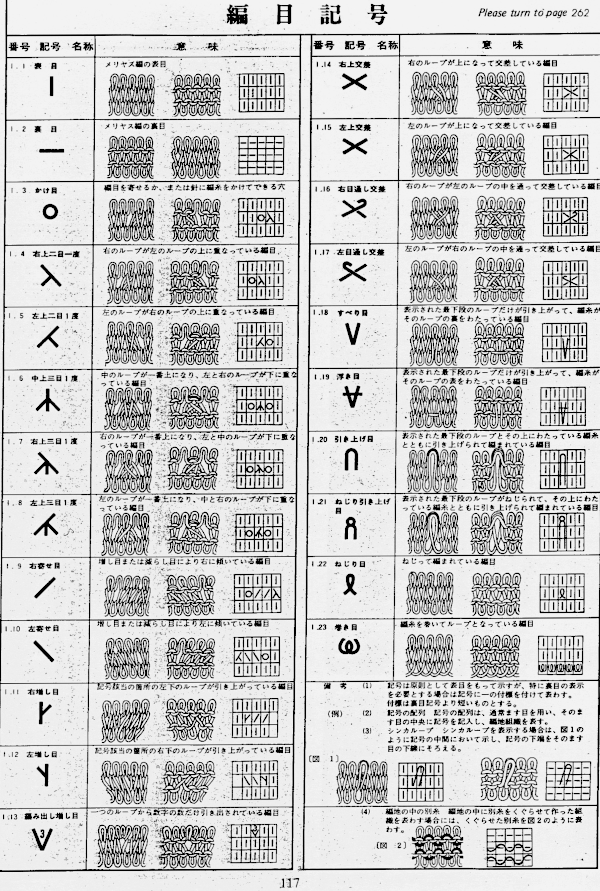 A clue as to surface being represented is that it is a convention that vertical straight lines | represent knit stitches, horizontal ones — knit.
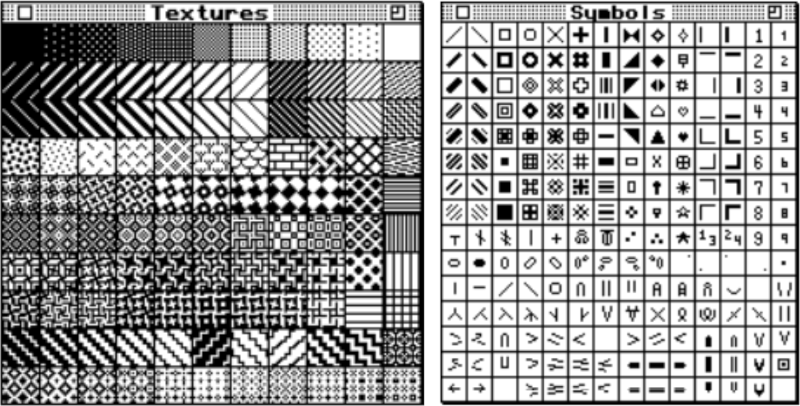
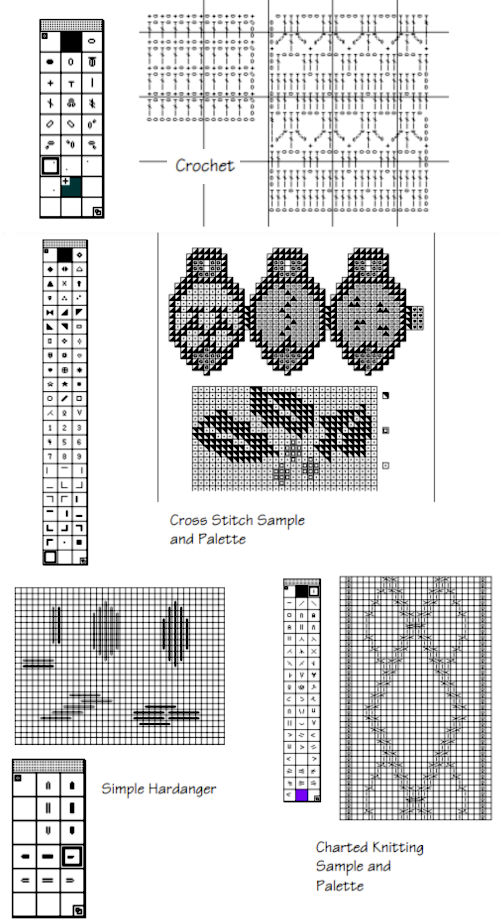
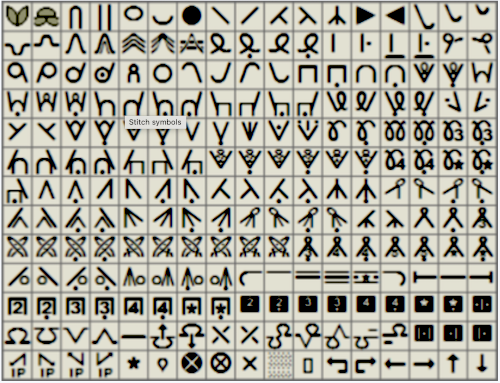
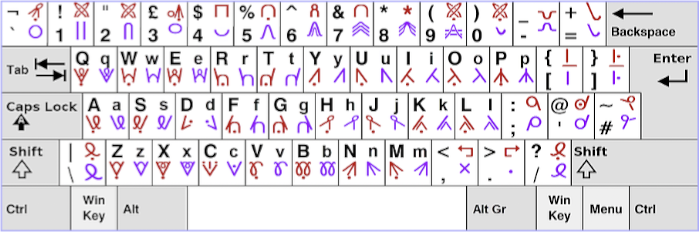
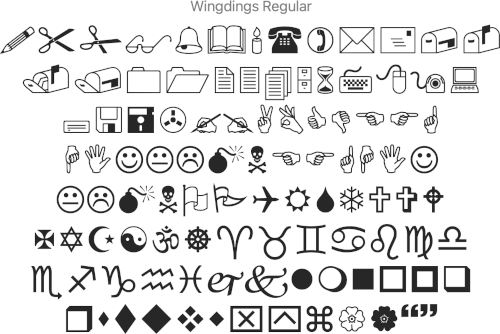
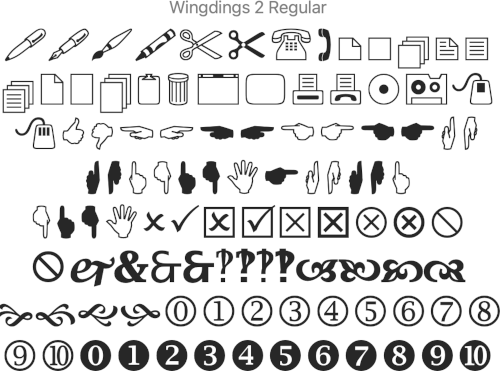
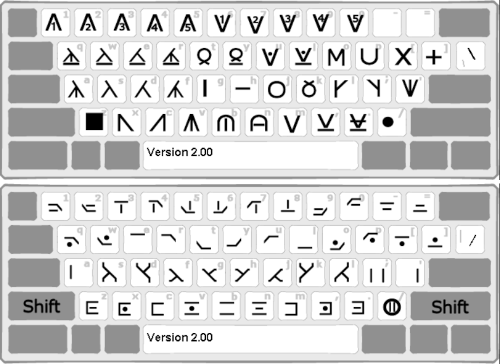 Knitter’s symbol fonts by David Xenakis, were enclosed in frames, though extensive, I did not find them helpful, a sample:
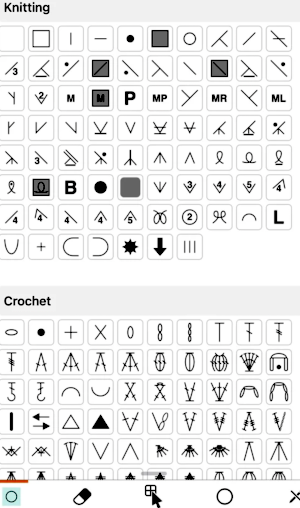
 but other attractive features include illustrating crochet patterns in the round (done here using
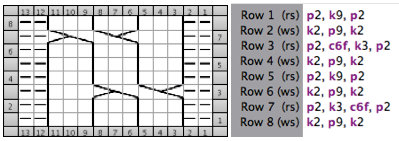
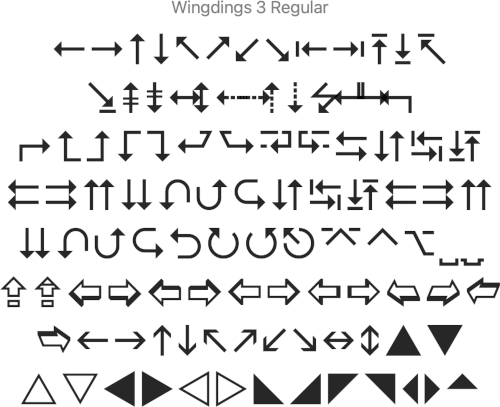
 Limitations are encountered when using symbols in any self-drawn chart if there are no bridging units between cell units both horizontally for cables, and vertically for stitches and textures worked between both beds.
 Long since then, I have no longer had access to Excel, the topic may merit a revisit using Numbers.
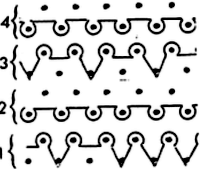
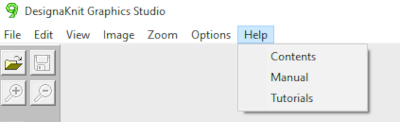
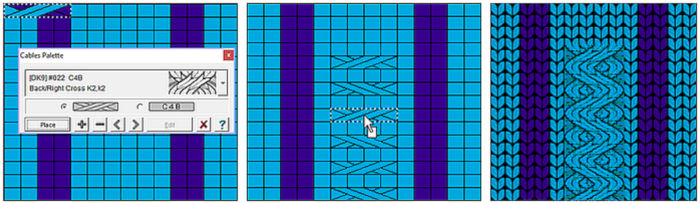
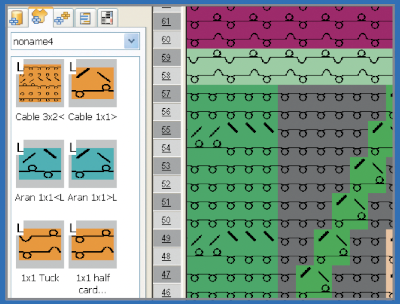
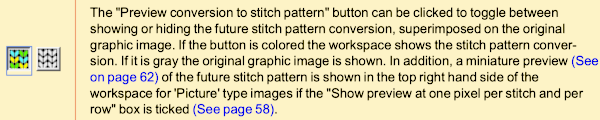
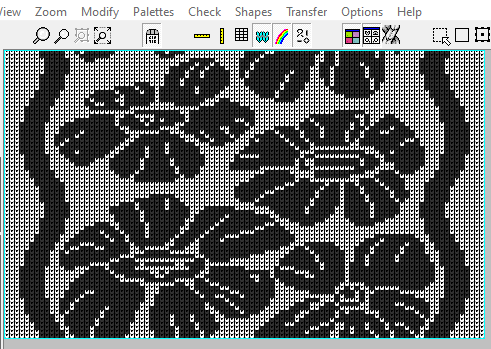
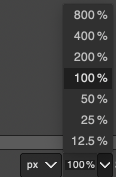
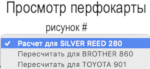
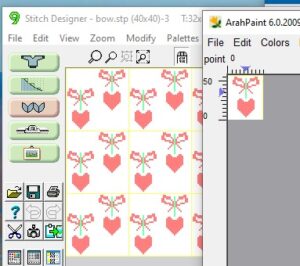 There is a handy option in Dak when thumbnails is chosen from the image menu, one can browse through saved folders containing compatible file-formats including the images in those Brother magazine downloads. The small preview will identify the specific file size. When you left-click on your choice, it will appear enlarged at the bottom left of the view window, it has been moved from its corner in my screengrab,
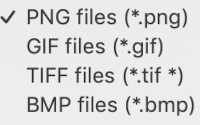
 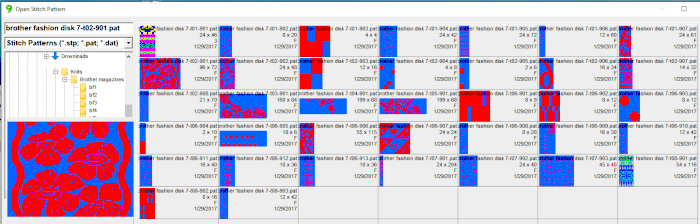 left-click OK on the enlarged image, it will open in the program window. Minimize the size until no further reduction is allowed by using the magnifying glass or the scroll function in the mouse. This is a different operation from scaling the original to a different size. The save-as option for the image offered at that point are:
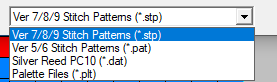 For choices emulating export in other paint programs, right-click on the image, choose copy, open a paint program (Arahpaint is my favorite at this moment), and from its image it menu choose paste.
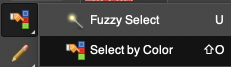
 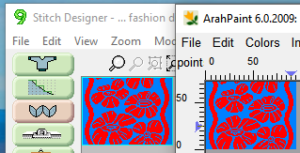 Using Arah’s color exchange, the image may then be converted to black and white for 2-color work and is saved in a format usable with other software and in other machines.
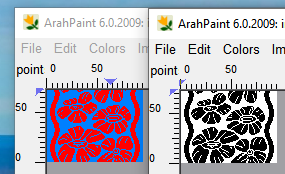

 but if the image needs to then be reduced to BW, Arah is the easier and predictable tool to use.
 It is useful to establish working history using the same design motif. In the first image, left-click on red, the from color, right-click on white, the to color, click on the double arrow to make and apply the change
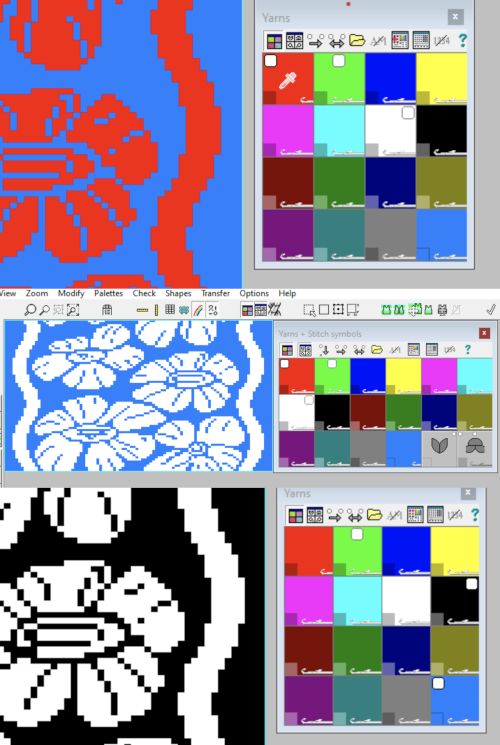 The print dialogue allows for saving patterns as bmps.
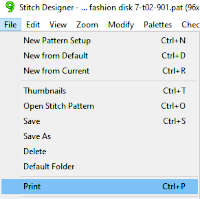
 choices may then be made about file name and the location for the save,
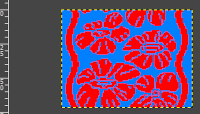
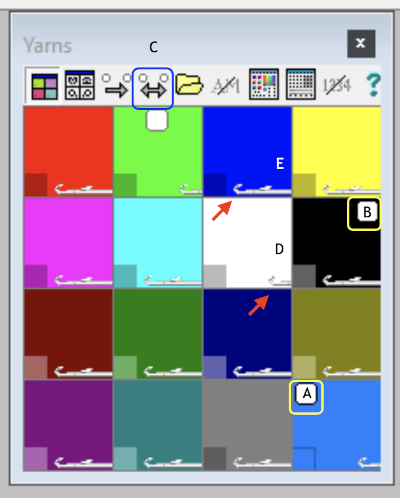
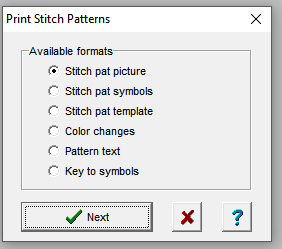
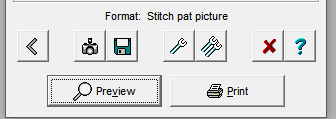
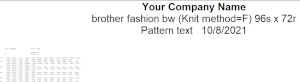
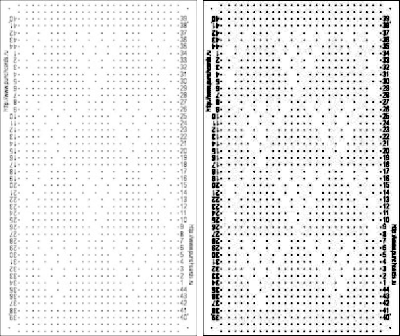
  If there are no “short” needles in the image being processed as in the last screengrab above, there will be an error message onscreen, pointing out problems in the numbers of colors present in rows ie more than 2 for FI. This is fixed by clicking on either the “needles” of one of the two active colors in the yarn palette to make one color the ground, the other the contrast. The results from this process for printable bmp files are shown below, not for a bmp that may be used to knit the pattern on an electronic machine using a different download method. Here the resulting stitch pattern picture is shown in color reverse as well.
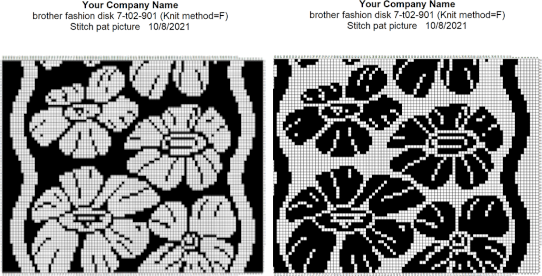

 At this time I am continuing to knit on my machines with punchcards and using Ayab, or img2track on my electronics, have no immediate plans to change that, hence my interest in using DAK software features while keeping in mind the possibility of using the final repeats on other machine models.
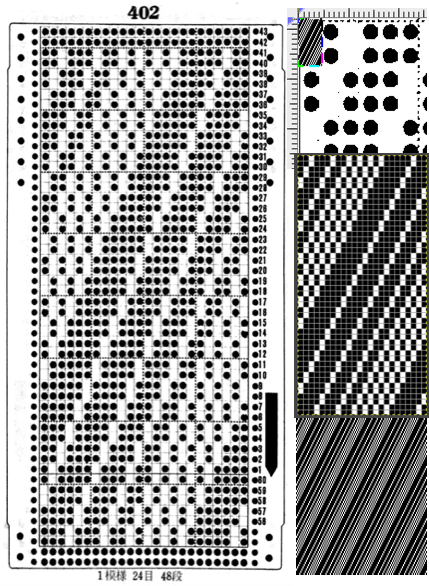


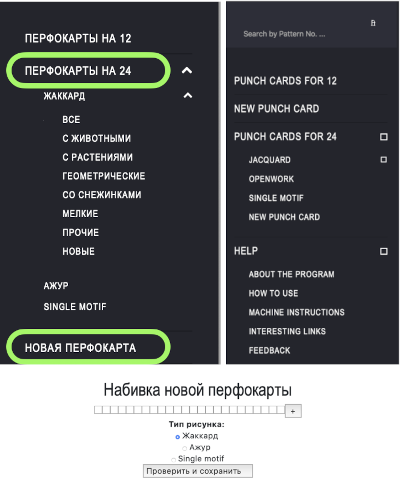
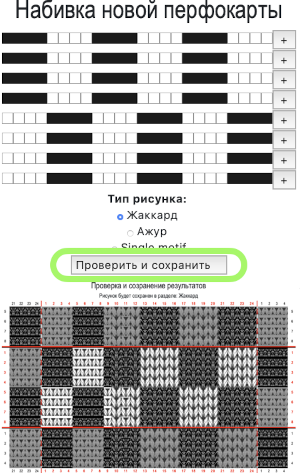
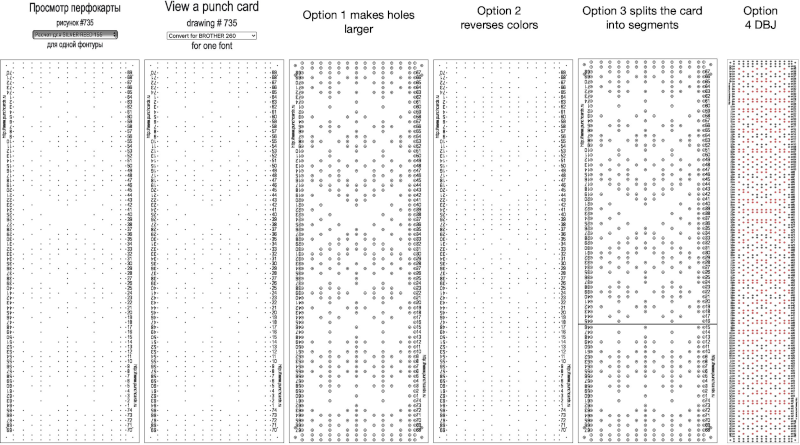 For some reason, I found the commands erratic when working on the translated version of the site, and fared much better in the original language publication.
 Screengrab the final image surrounded by extra white cells, and open it in GIMP.
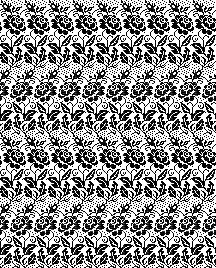
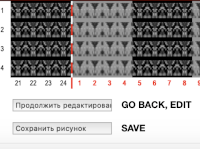
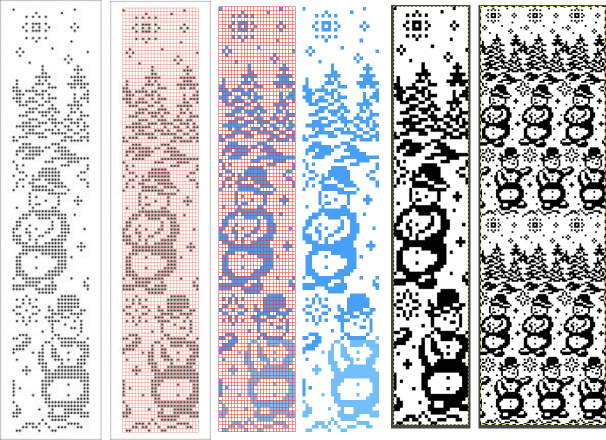
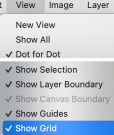
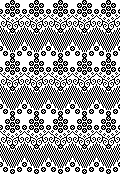
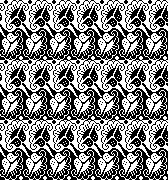
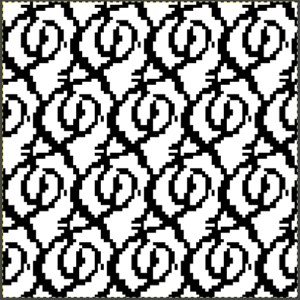
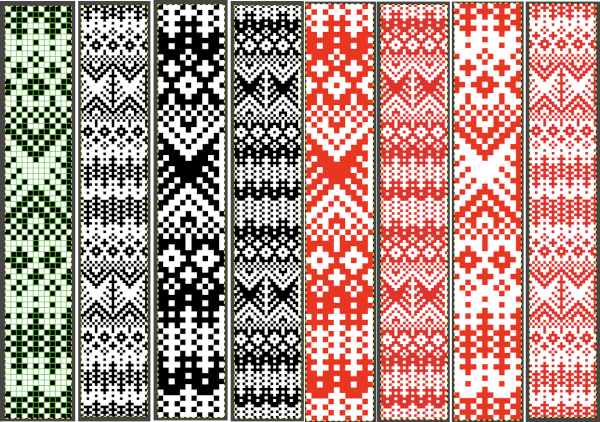 Getting a preview of how a finished garment might appear, here the tiled version is 192 pixels in width and one may glean some idea as to whether that repeat should ever really be used in a sweater or even a blanket. Further image scaling or cropping can happen based on the knit gauge.
 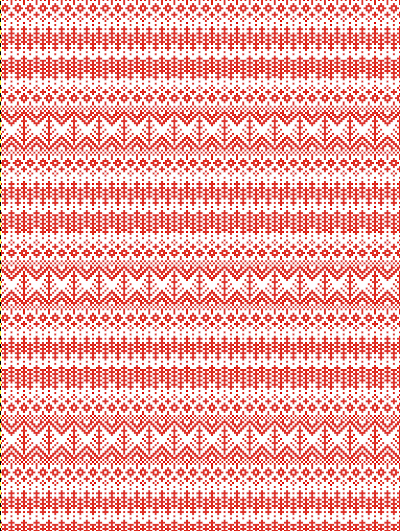 A very quick rendering imagining pattern and color placements using a simple sweater outline
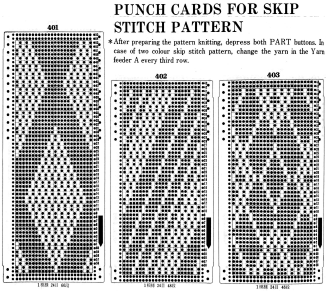
 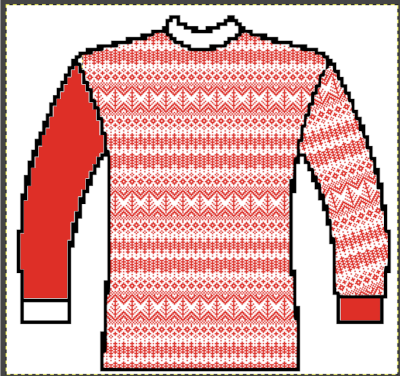 Collections of every other needle repeats for processing with a similar approach may be found in these volumes, available for free download
 Both volumes include accompanying swatch illustrations.
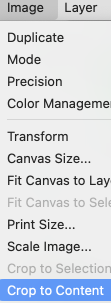
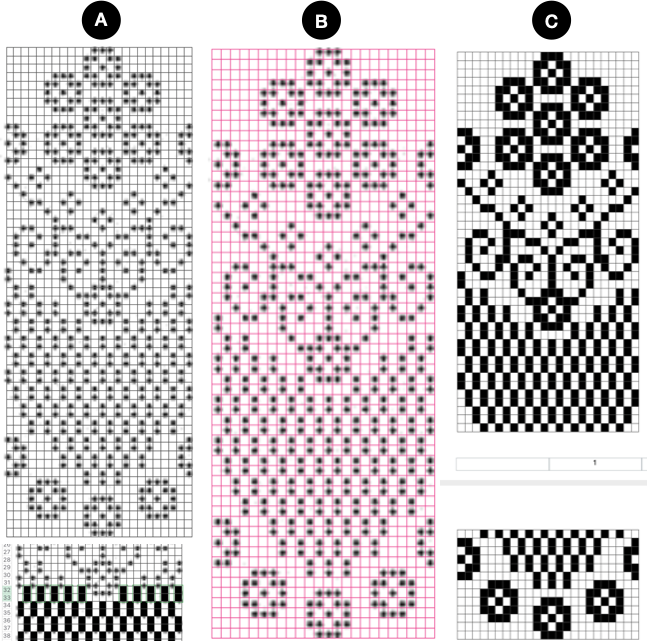
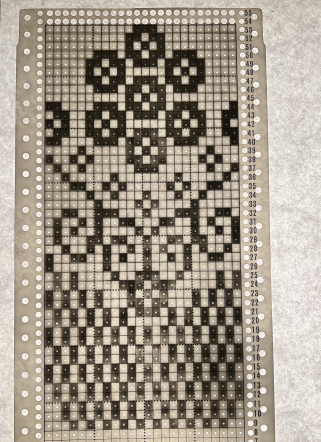
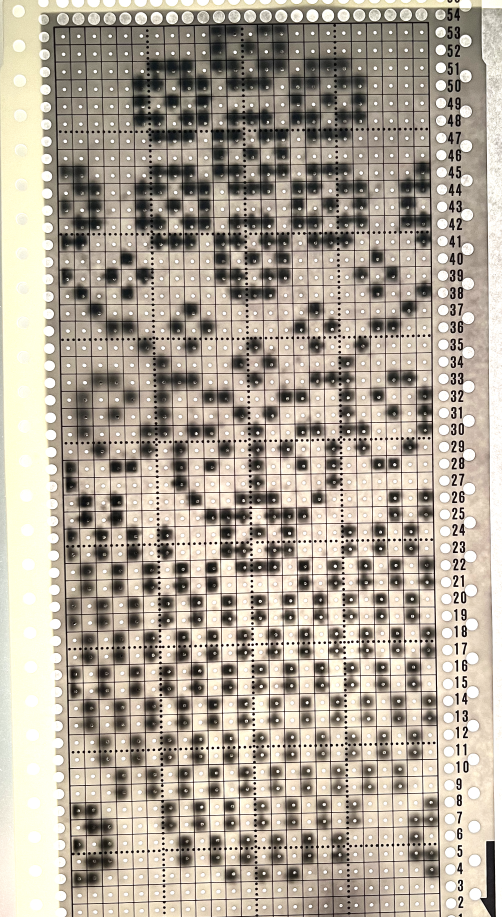
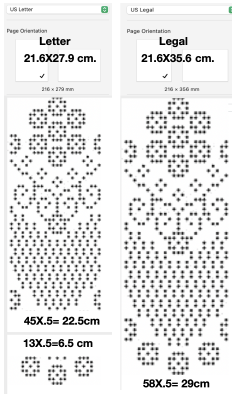
 For a better, printed match size, after capturing the image from the PDF for a single page outside image edges, opening it in Gimp, and cropping it to content, it is then possible to scale the results to measurements of a factory punchcard equal in width and adjusted for the number of rows in the image. My card required print measurements were 14.1cm by 26.1. Scaling executed with an aspect ratio that is too long.
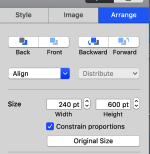
 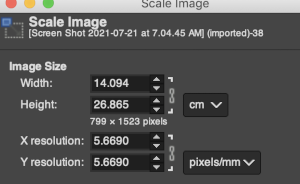 breaking the chain-link, removing size constraints
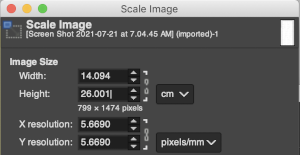

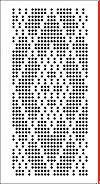


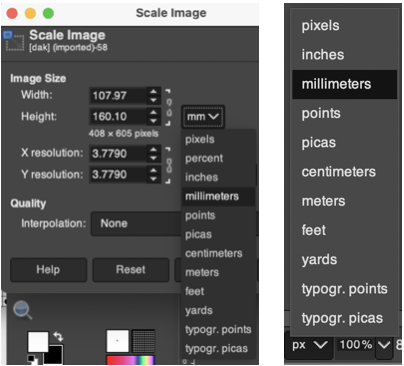


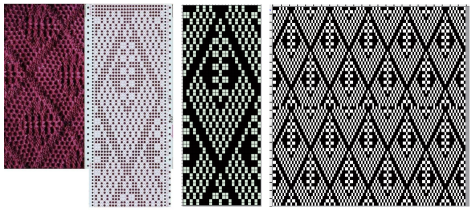
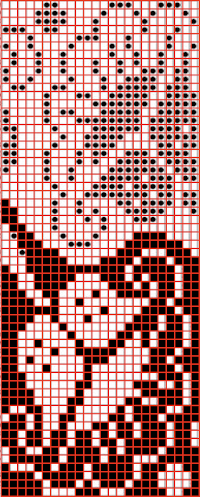
 The units in many such illustrations are not square, and the goal is to end up with a PNG where each square unit represents one stitch, one row.
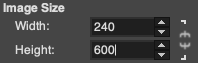
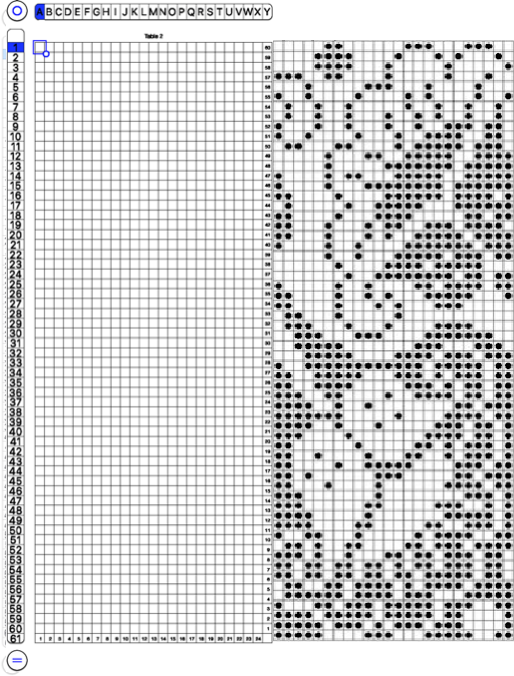
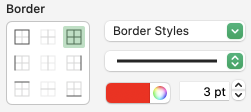
 and alter the cell borders to a bright, contrasting color. I chose red, 3-point thickness.
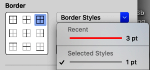
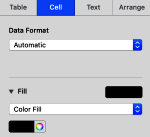
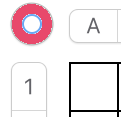
 Copy and paste the completed table. Make certain there is a different color cell in any white squares at the far corners of the image, in this case, upper right and upper left (yellow), remove cell borders
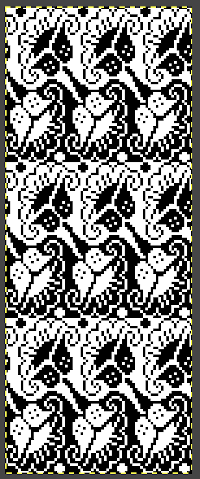
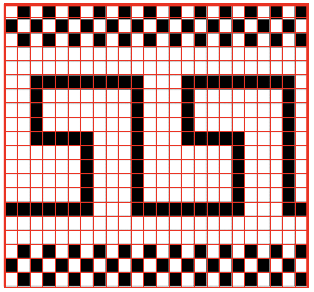
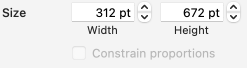
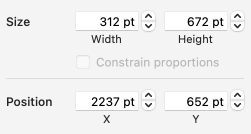
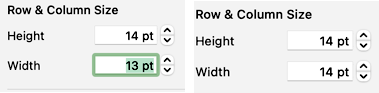
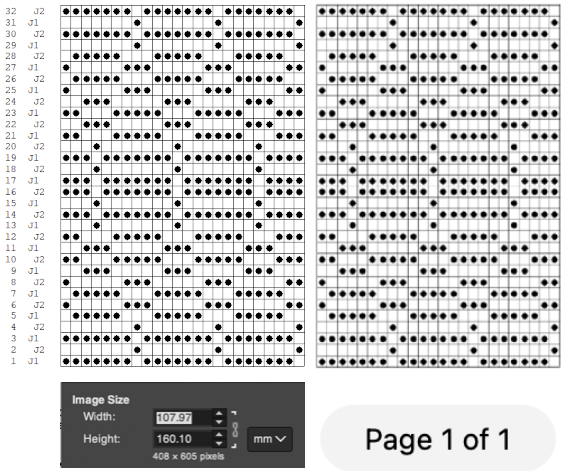
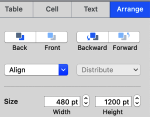
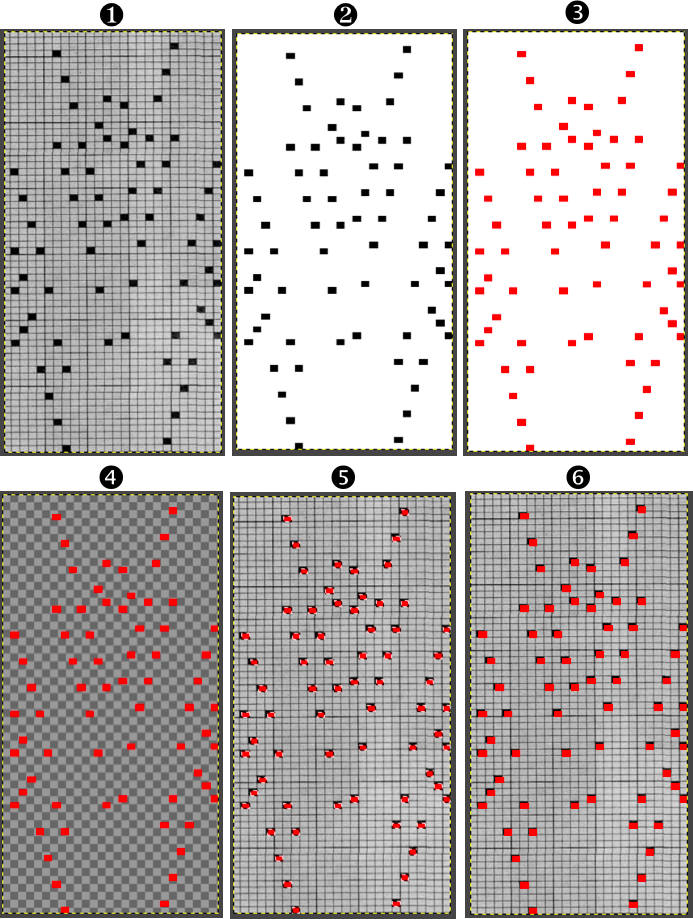
 Proceed as for the first image, being mindful of an unnecessary row at the bottom. The saved image can be tweaked in size by turning off Constrain Proportions and adjusting values for width and height for proper placement under the table grid. It soon becomes evident that the card is composed of smaller repeat segments, which in turn can be copied and pasted making for quicker work in filling in the whole punchcard row requirement.
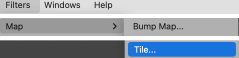
 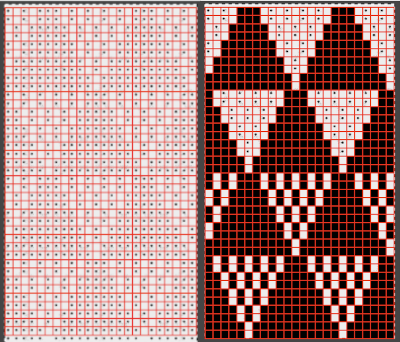 Check the repeat alignment by tiling it.
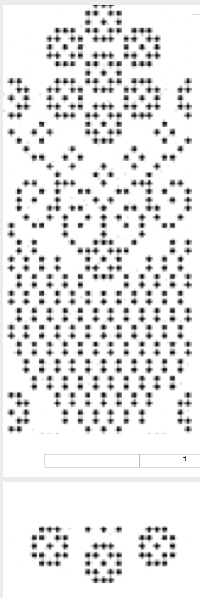
 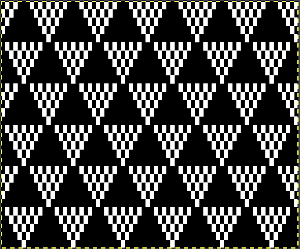 The smallest adjusted electronic repeat, 12X20 pixels.
  The converted, partial punchcard repeat
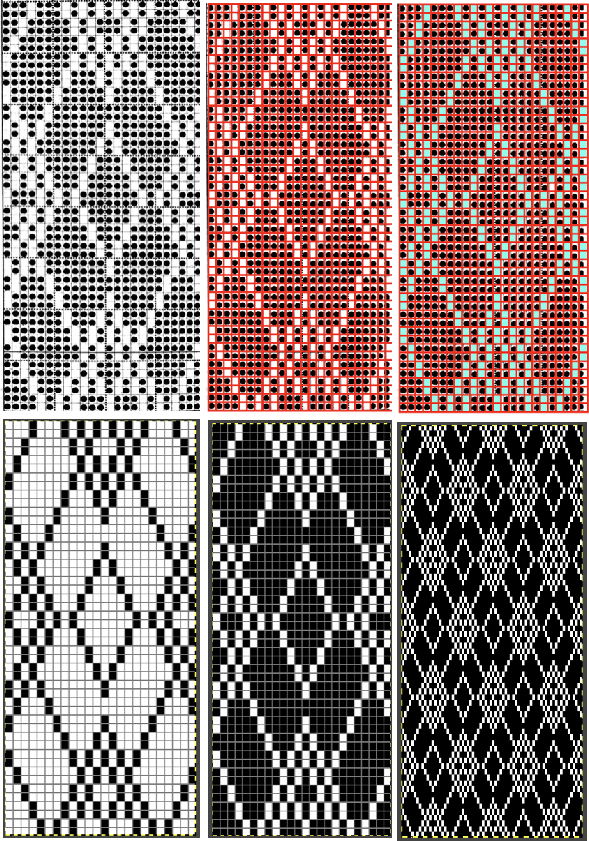
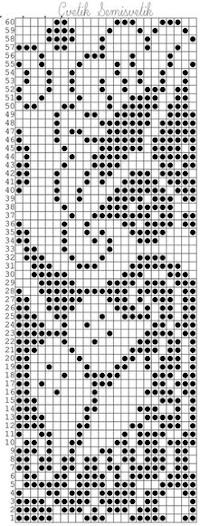
 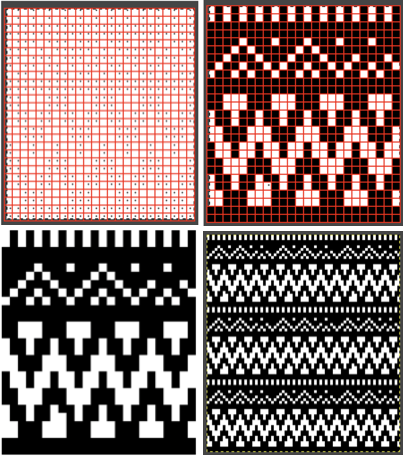 2023: ArahPaint‘s weave from grid tool makes working with the full repeat possible. The final repeat was cropped by 2 rows at the top to 24X206 to avoid a 4-row solid color line produced when the original was tiled vertically.
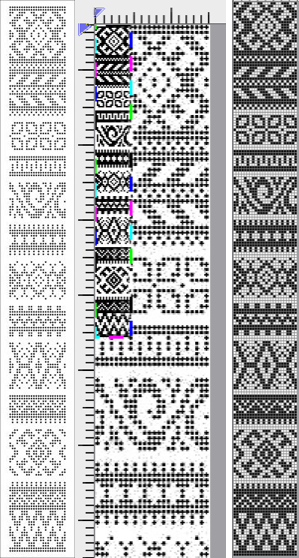
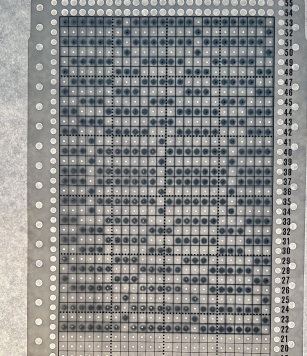
 if used, will change the numbering on the side of the card, but not the design content
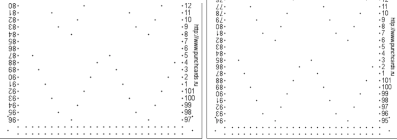
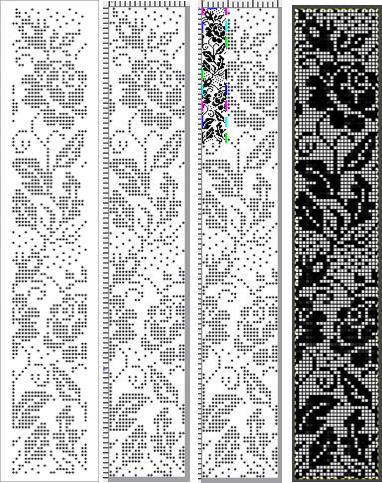
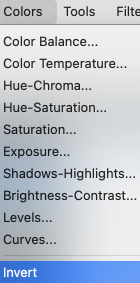
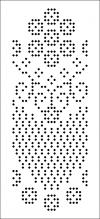
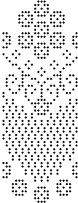
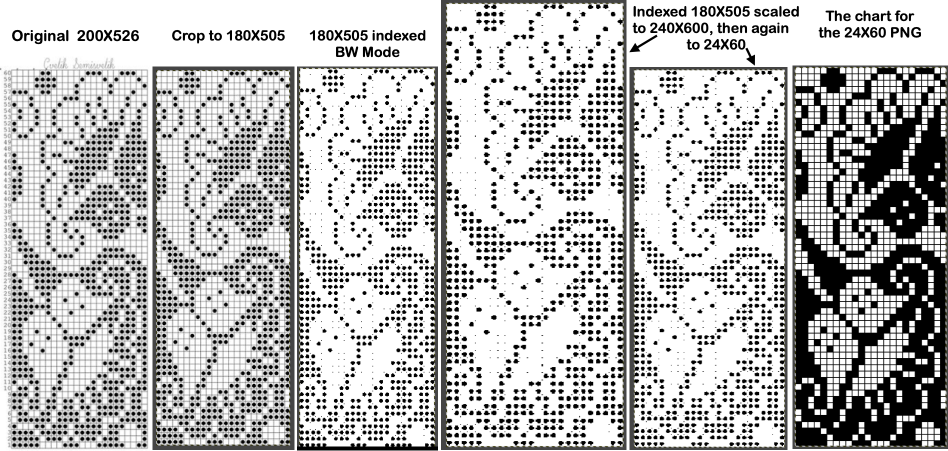
 In the past I have found lace repeats, in particular, to be particularly cranky when scaled down in Gimp due to the paucity of black cells. After the above steps, I decided to try color invert, resize, and color invert again, which in this instance, produced what appears to be an accurate repeat. Of course, the final png is likely to need mirroring for use in some electronic models
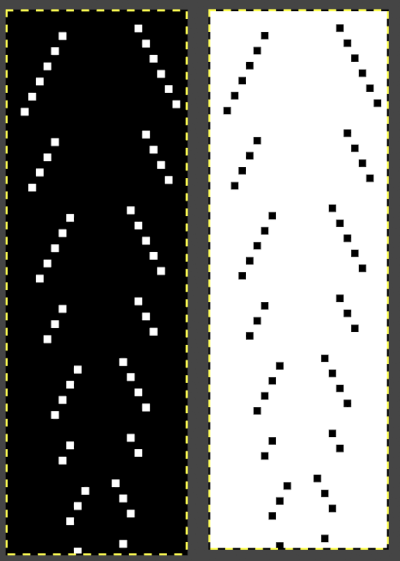
 2023: a different approach:
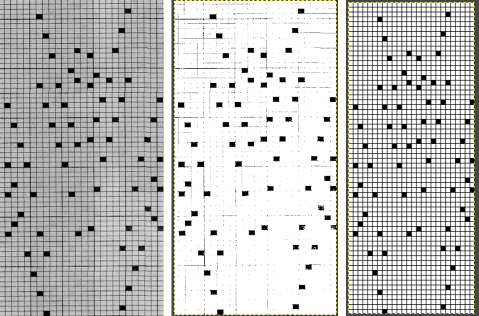
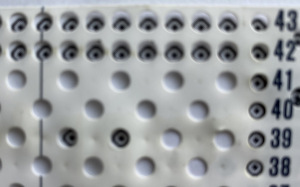
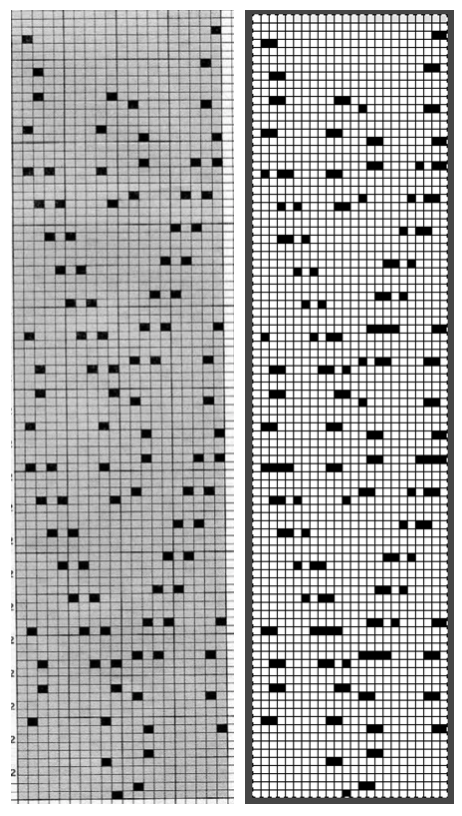
 The 910 in my default setting produced the “image’ as drawn on the knit side of the resulting fabric. The post was written prior to my tiling the repeats as a matter of routine to check their alignments. Doing so would have shown a couple of missing pixels, and pointed to any other errors in filling in mylar squares.
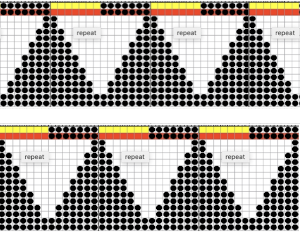
 All transfers were made in the same direction.
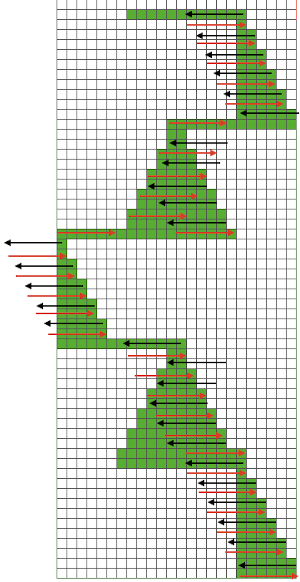 As always, ideas need error-proofing and refining, easier done in a chart if possible prior to any actual knitting.
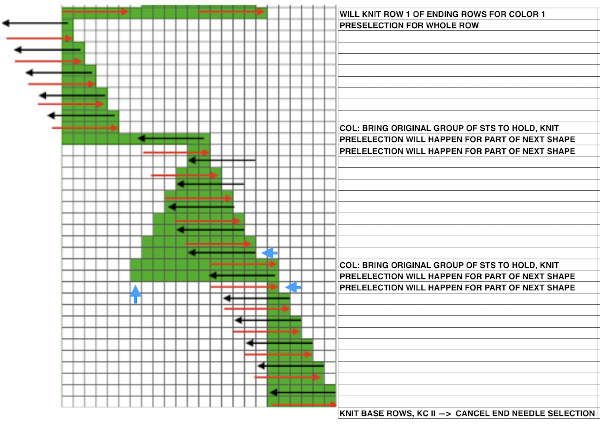 There are a number of changes to make if it is necessary to get the pattern to reverse direction in alternate rows of completed shapes in a brick layout.
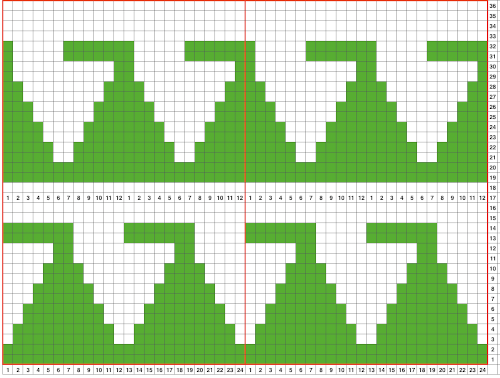 Attempts to visualize holding can happen in spreadsheets, documents, image processing canvases, or even simply on graph paper, moving/ “drawing” back and forth across the cells mimicking carriage movements and marking them accordingly.
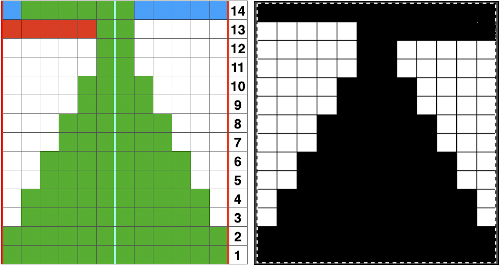
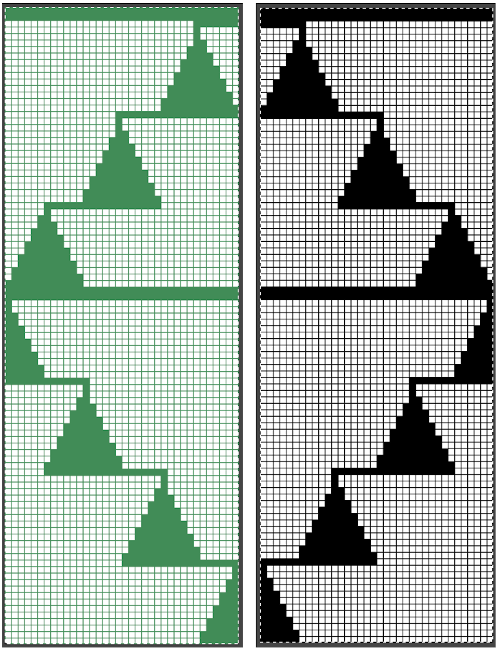
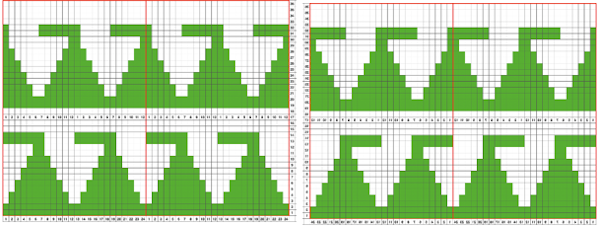 The 930 automatically mirrors downloaded motifs, if direction matters, as in these samples, either mirror the design horizontally prior to saving the png for download to the machine, or use the mirror button selection on the operation panel after the download.
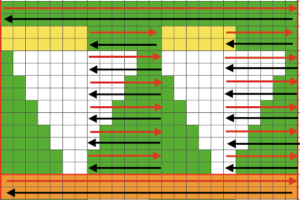
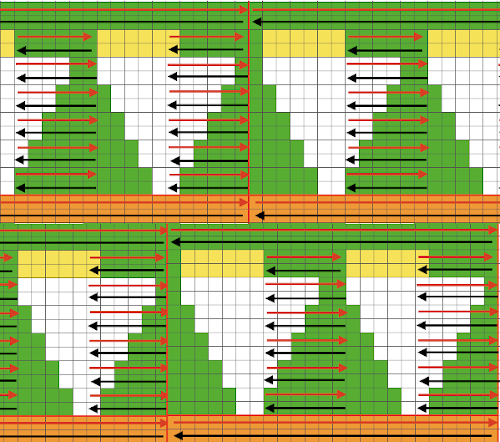


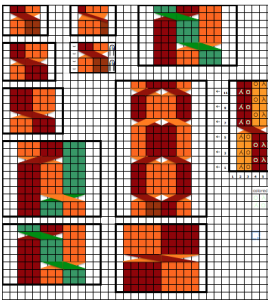
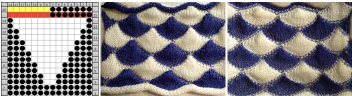
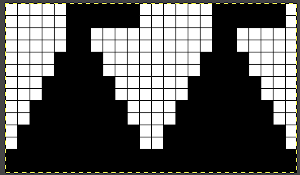
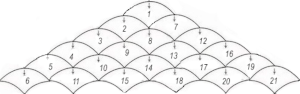
 while here the repeat for all full-size shells is planned,
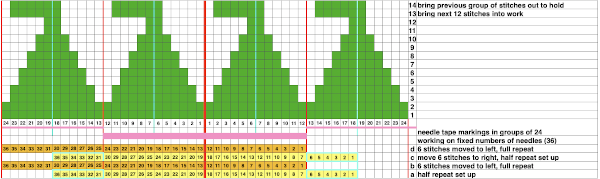
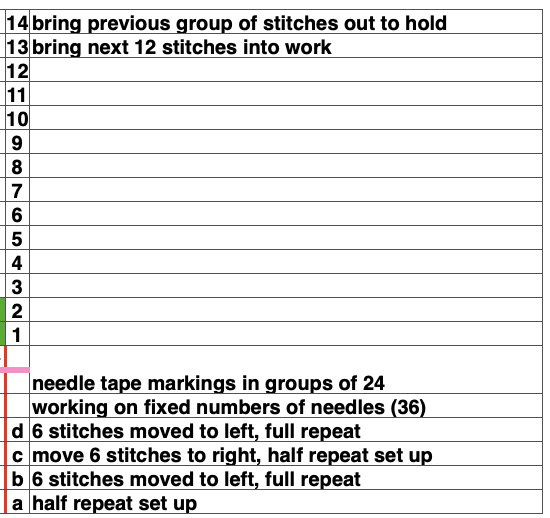
 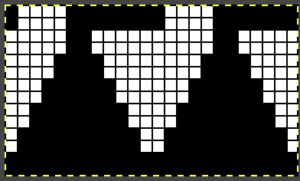 Marking up the needle bed with water-soluble markers or pencils helps track placements of repeats across the desired number of needles in work: dark lines indicate placement beginning with the mark for half a repeat to maintain straight side edges on the finished piece. Red lines mark the placement of the stitches when they are moved to the left in order to knit the full shells across the bed.
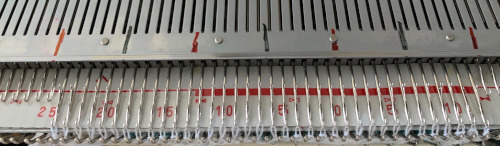
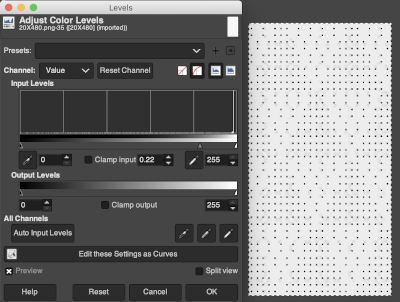
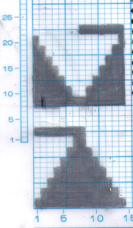
 Scaling the image to render it a bit more legible:
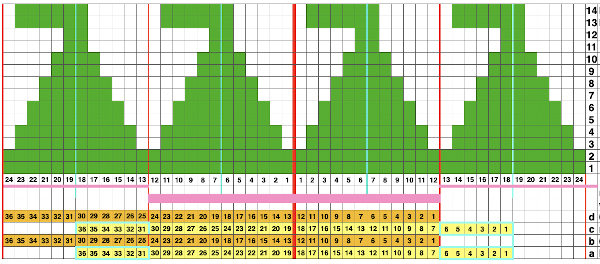
 The machine will be set for slip stitch in both directions and holding. End needle selection is canceled.
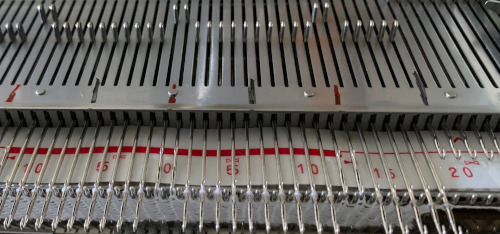

 I used two repeats side by side to eliminate having to consider and choose the position option on the 930 needle bed, resulting in having the pattern centered in each 24 stitch fixed segment of needle selection.
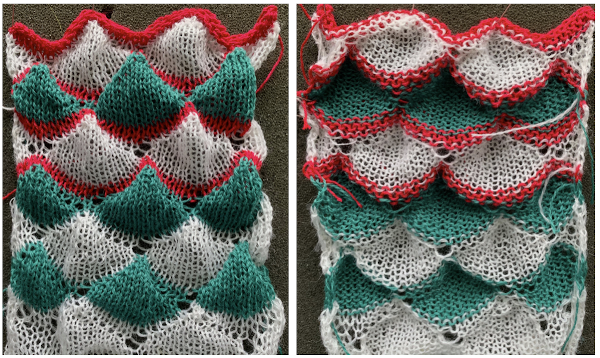 I was too aggressive with clipping yarn ends on the left side, especially while in the process of changing colors, not ever a good idea. Automating the pattern fully on electronic models using only slip stitch patterning is possible. The length of such patterns grows exponentially in proportion to the size of the repeats. Reviewing errors in the beginning concept
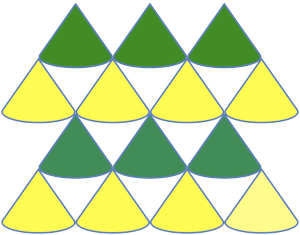
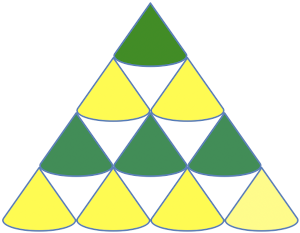
 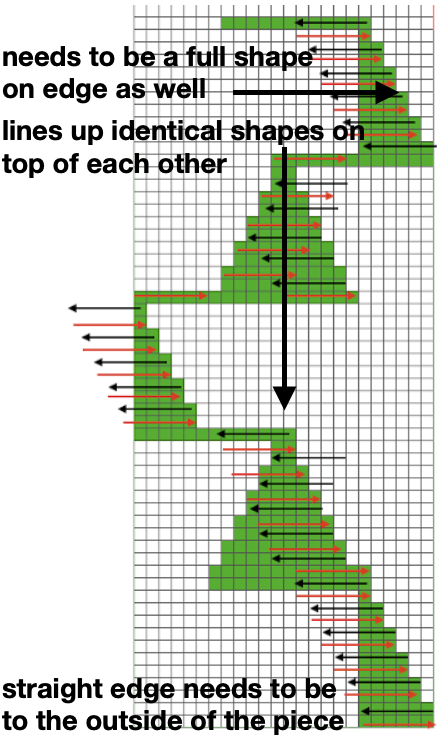 An attempt to visualize the placement of the shape variations in the finished piece using the shell motifs beginning with the shapes created in order to create a straight side edge
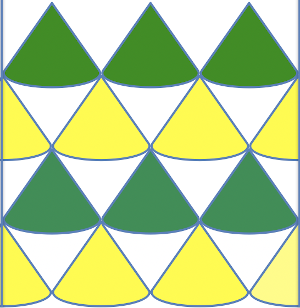
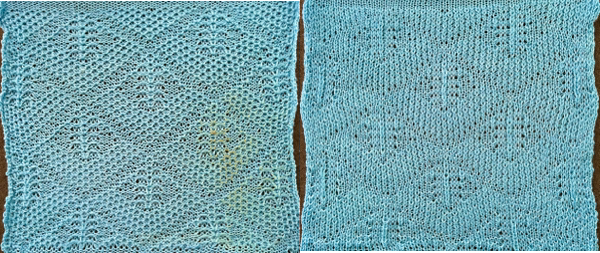
 COR: knit a base row in color one from right to left
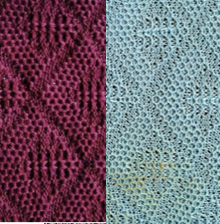
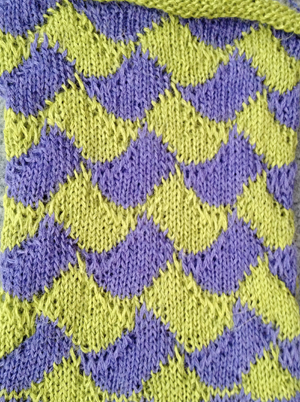
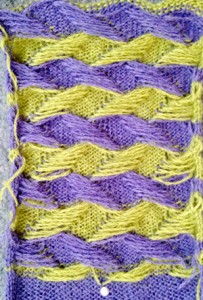
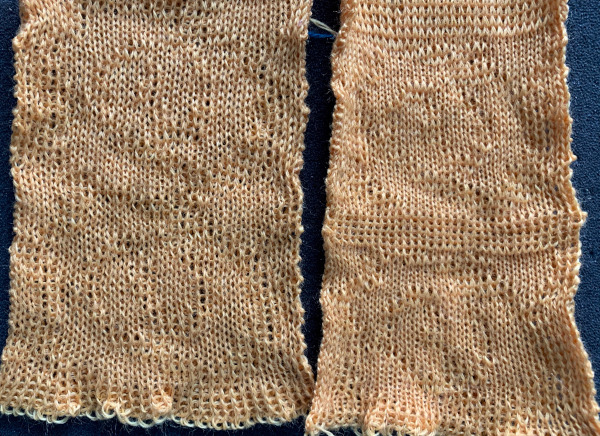
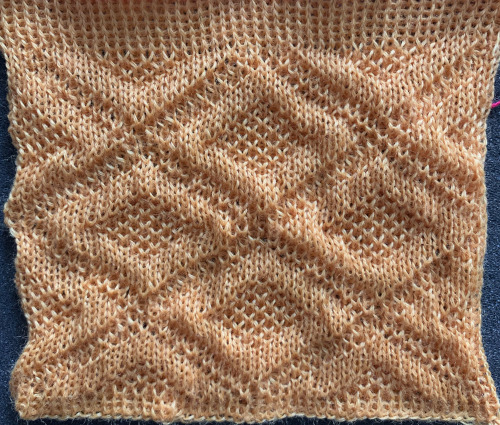
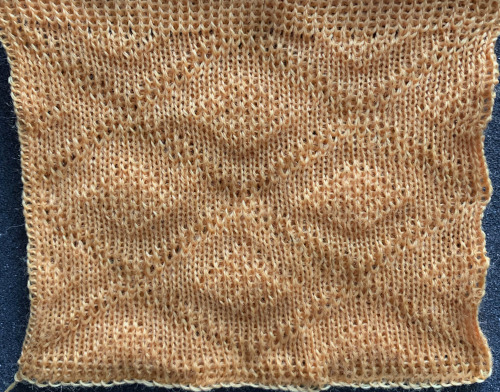
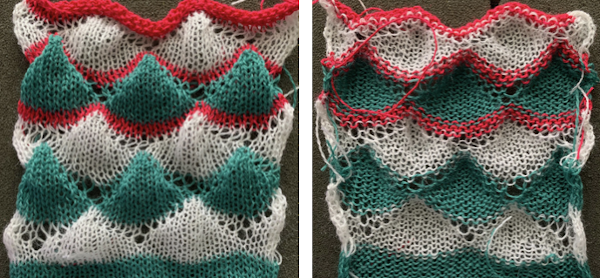 Preserving the 3D texture relies on using yarns with “memory”, ie wool and avoiding aggressive blocking. Using thinner yarns makes the stitch formation more evident. Hard pressing, in this case, knit using acrylic yarns, flattens the fabric considerably, and often, permanently. Both the hold/slip (top) and fully automated swatches (bottom) are shown.
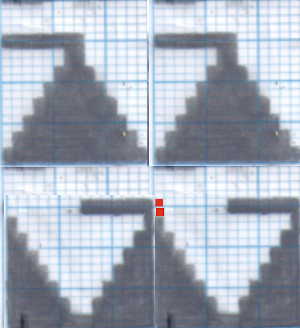
 2023: a screen grab from the shell charts was cropped to its outline, opened in ArahPaint, and using the program’s tool “
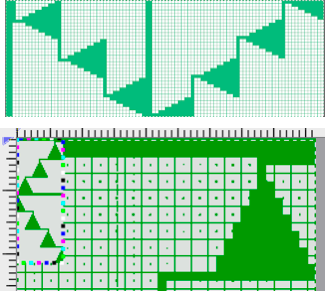

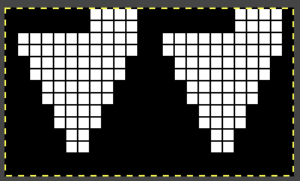
 A return to the original 14 stitch repeat, illustrating a way to begin editing for an extra row in width at the bottom of the shape and ending on 2 stitches rather than a single stitch at the top
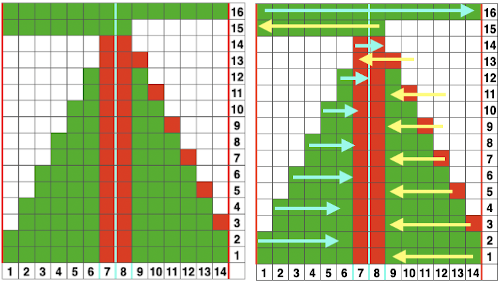
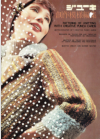
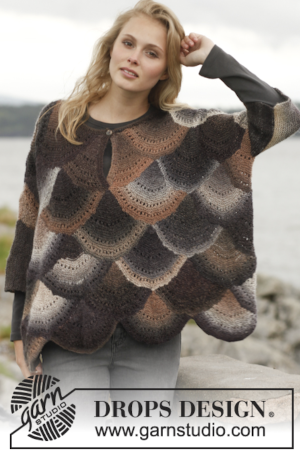
 A Prada sweater using similar shapes
 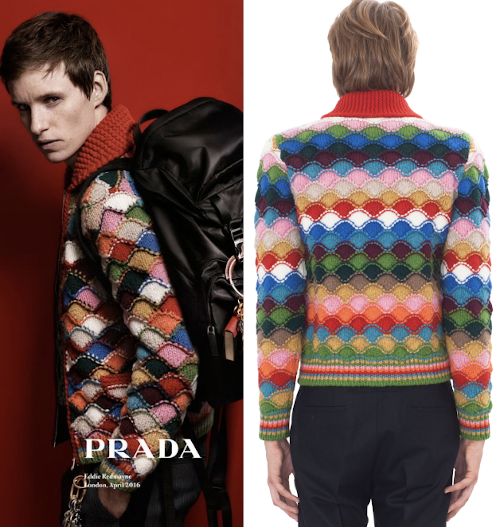 If you are interested in any large size clamshells, and intarsia appeals to you whether in hand or machine knitting,
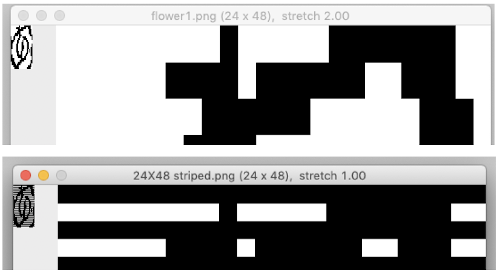
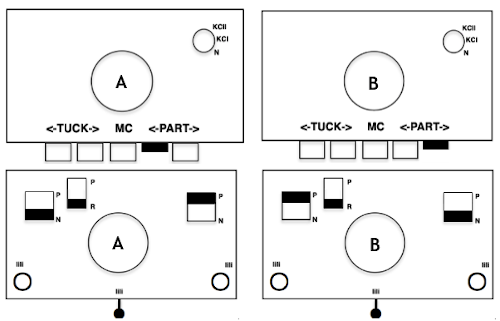


 The “striped” repeat produces essentially the same fabric. The knit carriage may be set to slip in both directions when using it since the row of all punched holes or black pixels will knit every stitch on every needle selected while in the previous samples the cam button set to knit in one direction performed that function regardless of any markings on the design repeat. The ribber is set to knit in one direction, slip in the other. Reversing sides for cam button settings produces the same fabric
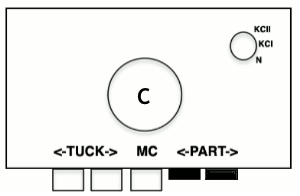

 The
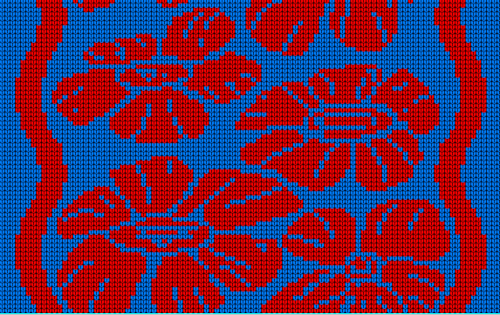
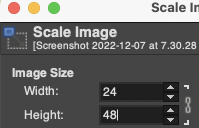
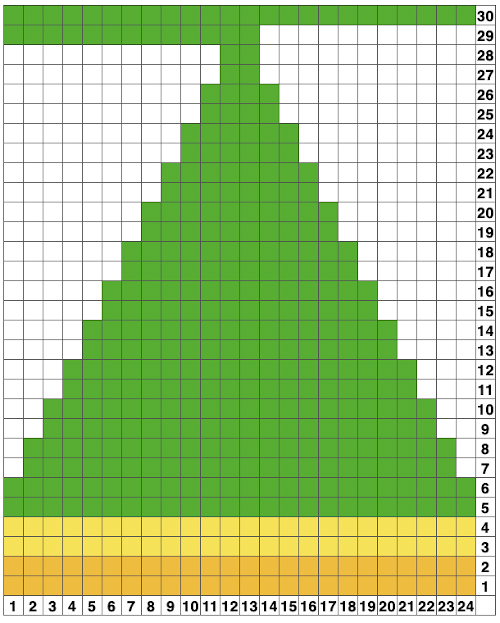
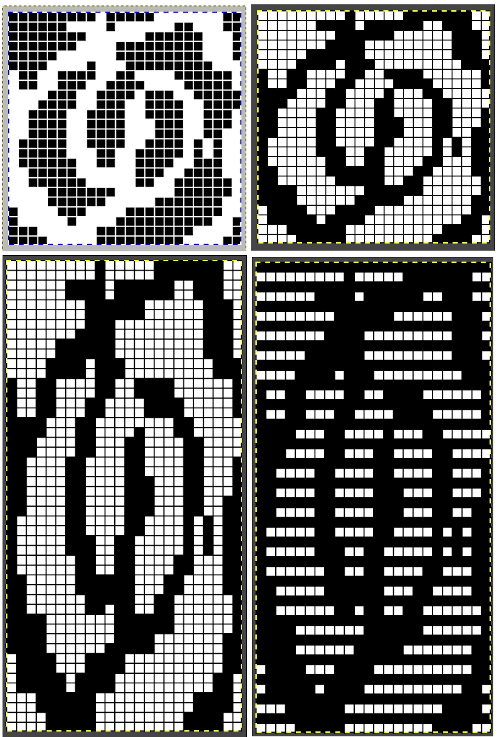
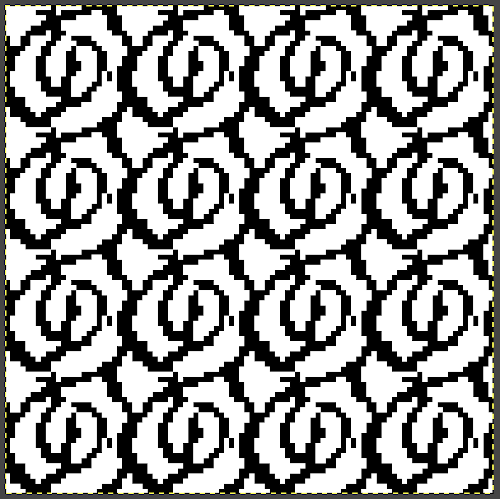
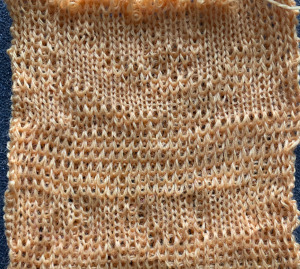
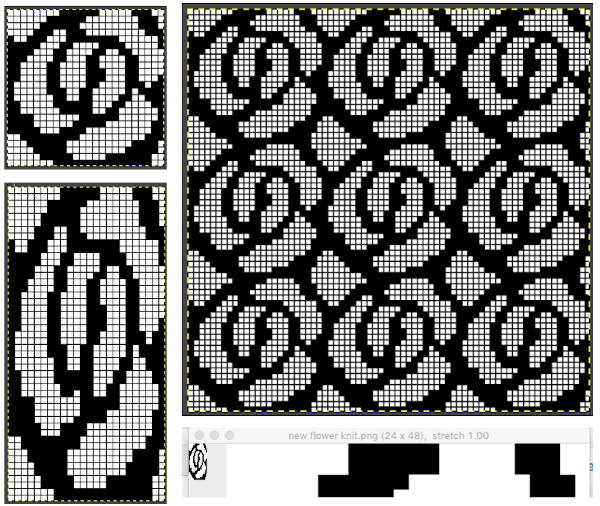
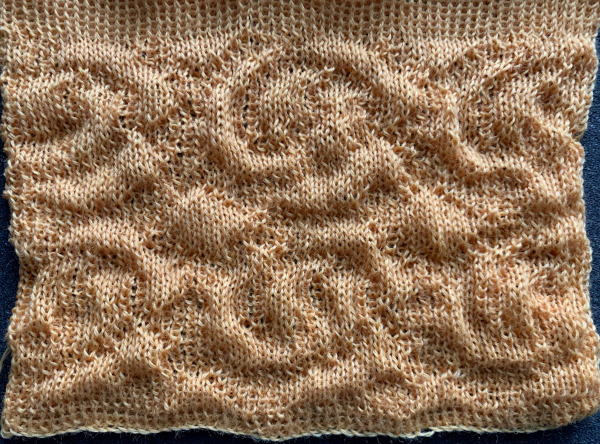
The  The repeat I chose is designated as suitable for the Garter Carriage. It is 24 stitches wide by 48 rows high, shown below as provided, charted in Gimp as .png for download, and tiled to help visualize how continuous repeats might line up. The image .png was downloaded with img2track to my 930, with a stretch factor of 1.0, retaining the original repeat size
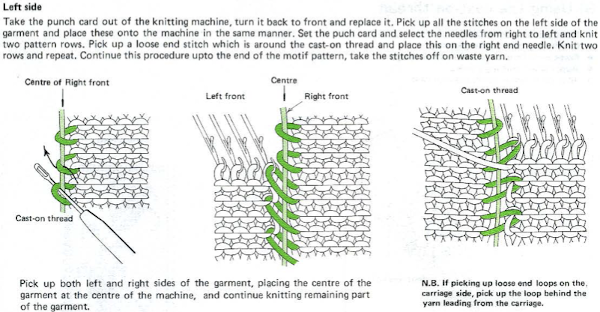
 Open stitches may also be joined using this method, but they would have to be hooked onto the second piece every row rather than every other, and caution should be taken in terms of skipping any stitch, as any such stitch will unravel at the end of the process unless it has been secured.
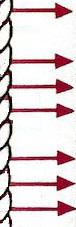
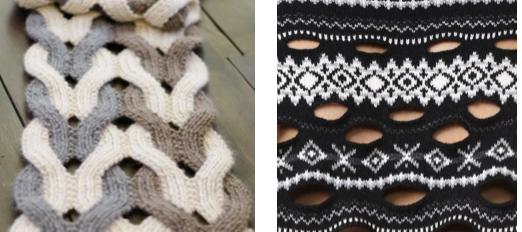
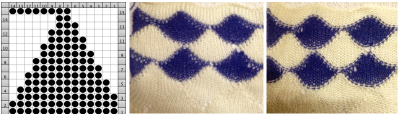
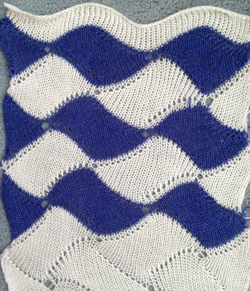
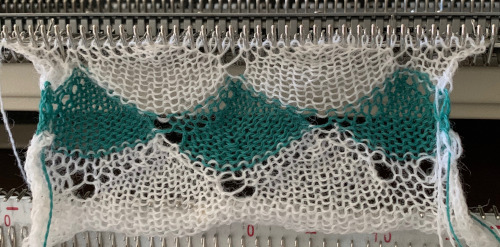
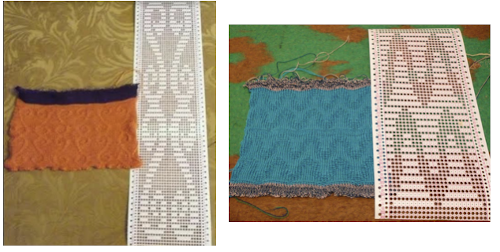
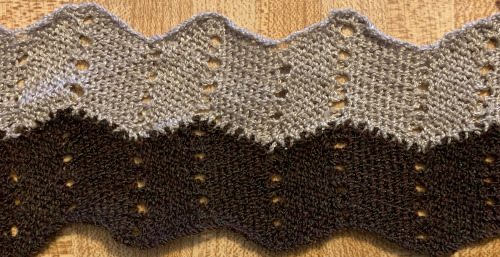
 This is a long-ago demo swatch. The chevrons are shaped by holding, could be knit on any machine in any width. After the first strip is knit to the desired length, the second is joined to it as it is being knit. I generally prefer the joins with the carriage on the right and the completed strip hooked onto its left side. If the color changer is to be used, then the strip being created to join to the finished piece should always be knit on the left side of the bed in order to allow for traveling to and from the color changer every 2 rows. The image here is turned sideways, the chevrons could be used either vertically or horizontally depending on the design plans.
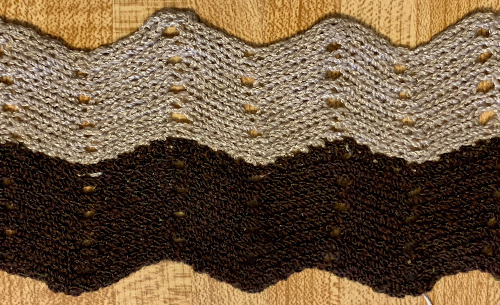
 The above method may be used to join fair isle patterns in order to achieve significantly wider final panels. Some artists, when no electronic models were available, would join cards in continued lengths and plan their repeats side by side to achieve large, non-repetitive images. The punchcard width markings on your Brother needle tape can serve as guides. I use punchcard repeats so often I replaced the needle tape in my 910 early on with one for punchcard models. Markings may also be seen on them for every 8 stitches
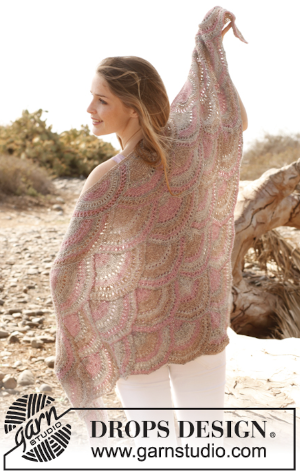
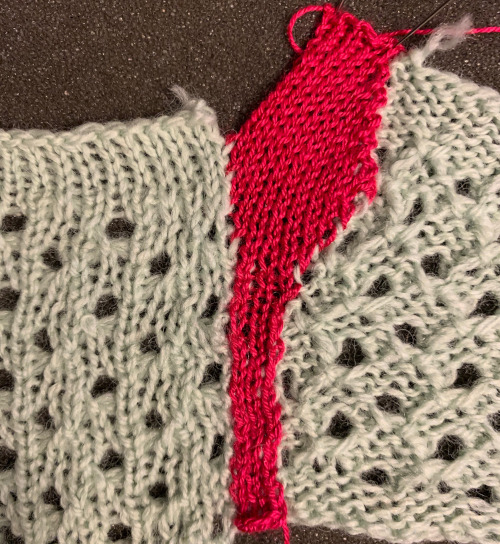
 Here a slip-stitch ruffle was joined on the left to one of my completed shawl bodies.

 and continued until I reached the point where I wanted to experiment with increases, keeping the shape symmetrical. I picked up a loop from both added pieces and hooked them onto the first empty needle on each side of the strip, essentially casting on an added stitch on each side each time, following with 2 knit rows.
 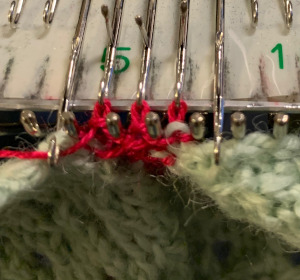 After working on my “desired shape” I tested decreases:
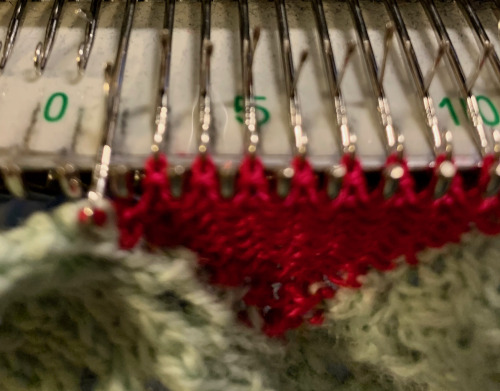 COR: after hooking up the next row, knit one row to the left
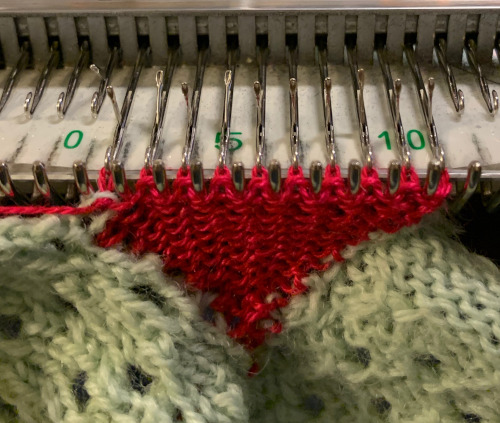
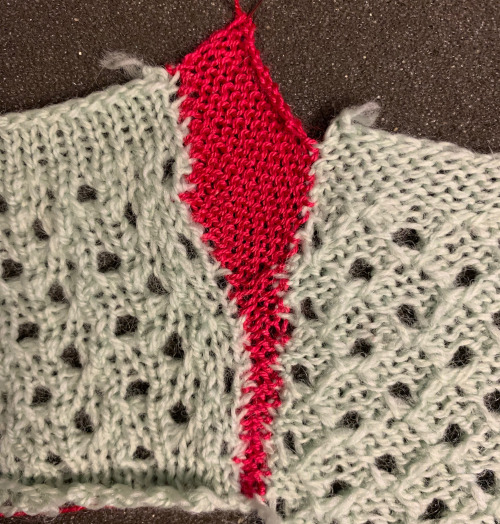
 The cleanest joins happen when the edges are straight to start with, above there was a movement of the edges happening because of the distortion of the fabric created by the eyelets. A light pressing if possible may also set the edge stitches, help them lie flat, and make them more visible. When working with slanted edges on the first piece this is one way to join it, taking into consideration whether any adjustment in the frequency of hooking up needs to be made.