I recently came across this topic in yet another forum, so thought I would share some of my thoughts on it. The technique involves different patterns on 2 opposing beds. Table for 2 offered one option for programming 2 different knitting machine beds to achieve reversible DBJ or true tubular fair isle. I will be addressing Brother settings for the moment. Things to consider: the piece will be double thickness and 1.5 times the finished weight of one knit in single bed FI. FI technically knits 2 colors for each design row, the ribber at least one for the first piece here, so thinner yarn is probably best. If the main bed is creating a 2 color slip stitch, whether one color at a time (DBJ) or 2 colors together as in traditional FI, the fabric will be shorter and thinner because it gets pulled in by the shorter floats of yarn in areas that do not form knit stitches with that color. Generally, in FI it is good to have end needle selection on so that the second color gets caught at the edge, and the design does not separate from the rest of the knit at the sides. I knit my sample using KCI on the knit carriage. The ribber is going to knit one row for every 2 passes to complete each design row by knit carriage, so some adjustments in tension both beds need to be made for each side of the tube to be balanced. If the goal is to have the tube open at the bottom, I like to start in waste yarn and begin tubular while leaving a long end of the first color used so “bind off” can happen by sewing or crocheting the open stitches when the piece is done. The same can be done at the top of the piece, and both ends will match. Setting the needles point to point during tubular knitting will diminish any gap at the sides of the knit if the tube is made in the traditional setup. Since only one-bed knits at a time, needled will not come in contact even if directly opposite.
This fabric shares features with quilted fabrics, except there are no areas where the fabric gets joined to make pockets (needles on both beds knitting on any one pass of the carriages), the goal here is a continuously open tube. Minimal manipulation of carriage settings can be achieved in color separating for the specific fabric. My previous posts on quilting: 1 and 2, and on color separations for DBJ
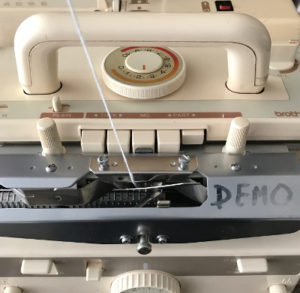
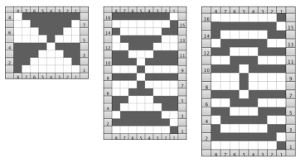
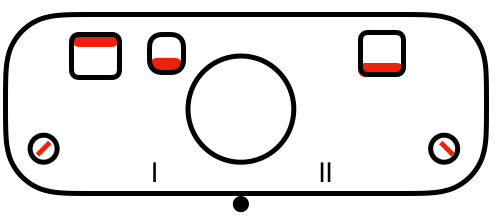
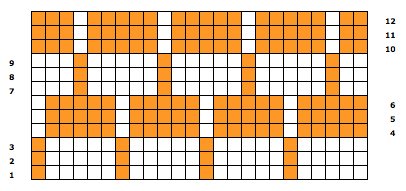
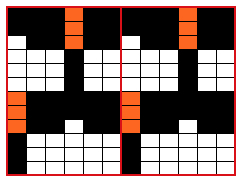
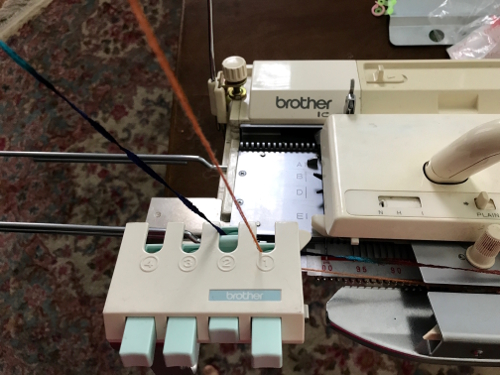
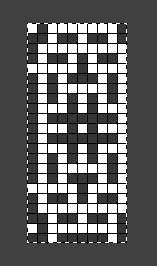
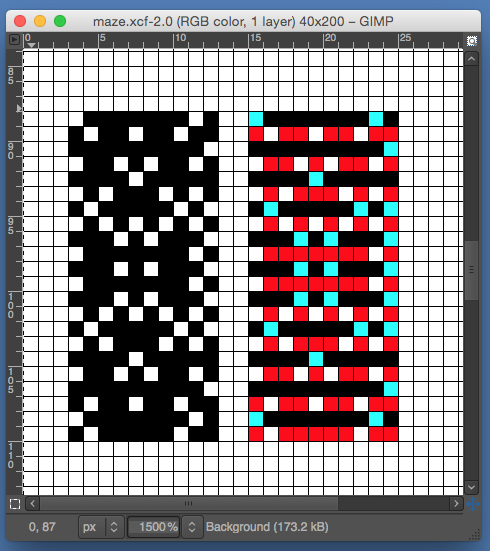
It is always best to start with a simple design that allows one to recognize needle selection. Long verticals can separate at their edges if knit a single bed, but I went for a simple pattern of squares to test out my premise and winged it. Thinking color 1 knit left to right, slip right to left and ribber slips when main bed knits right to left, knits when main bed slips left to right. The all blank rows indicate the main bed slipping the width of the involved needle bed. The same applies after any other consecutive color change. My mylar repeat, free drawn  End the circular cast on/ waste knitting start and begin with opposite part buttons pushed in with COR; set change knob to select the pattern (KC I), to prepare for the move to left toward color changer. The main bed only will knit. With main bed set to knit <–, needles for the first row of the pattern are selected, but all stitches knit. The ribber needs to slip <– completing the circle. If in doubt, push up both part levers on the ribber.
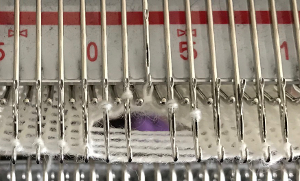
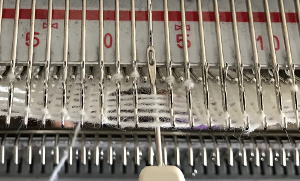
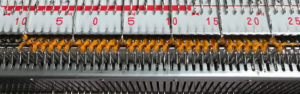
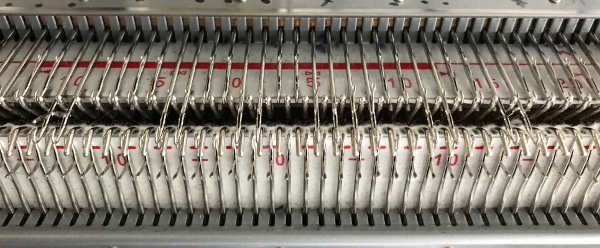
 the start of the tube, needle selection for first pattern row
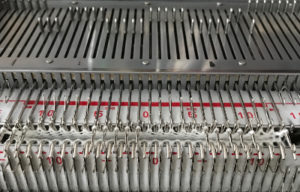
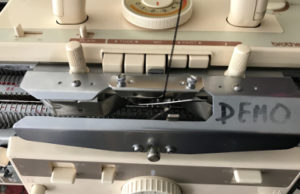
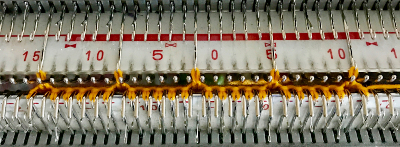
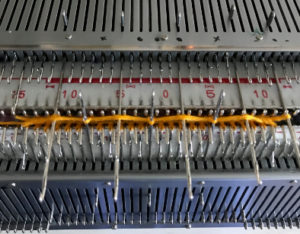
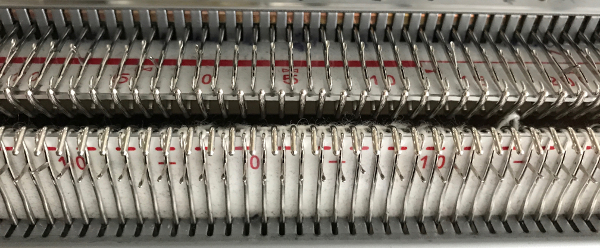
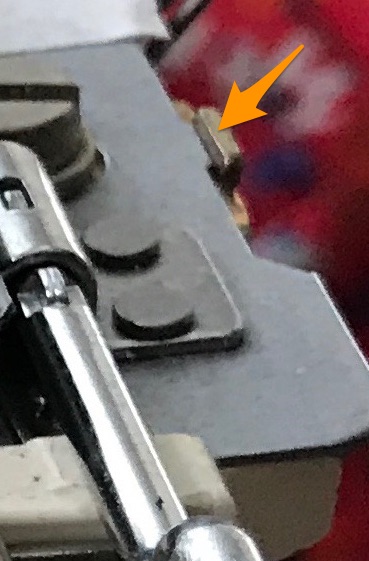
after the color change, with COL, change settings once more. The main bed will now knit to right and slips to left based on needle selection, while the ribber now slips to R, knits to L (the goal here is simple stripe)
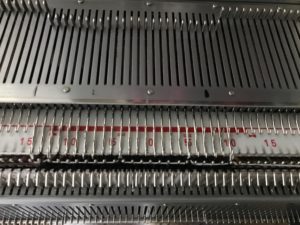
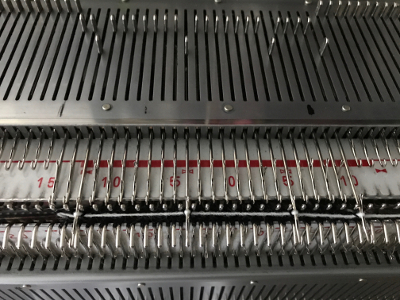
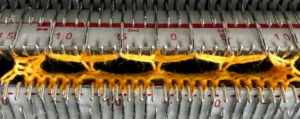
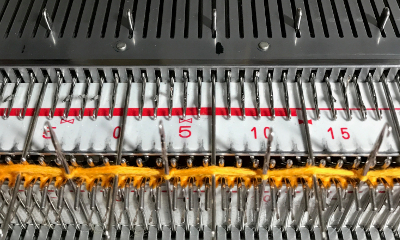
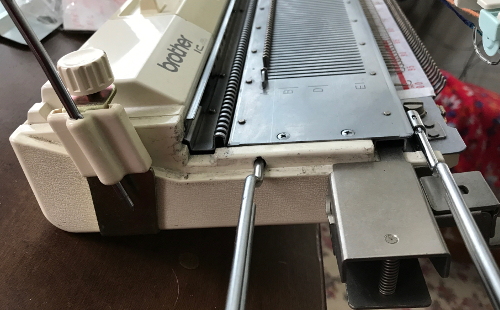
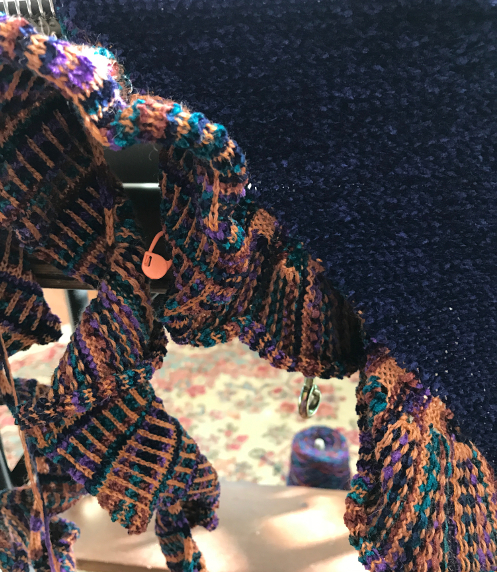
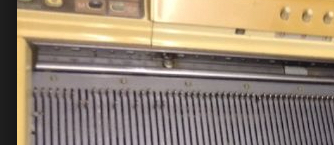
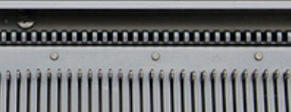
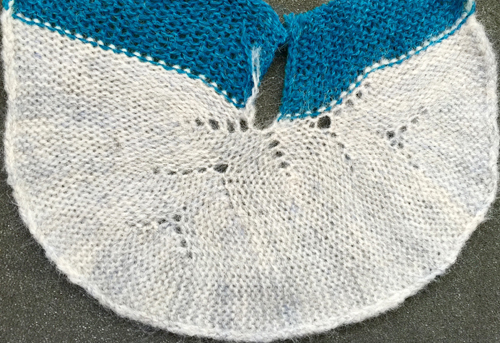
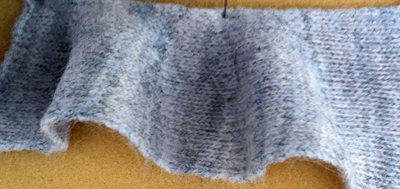
 the start of a tube is evident if the ribber is dropped a bit
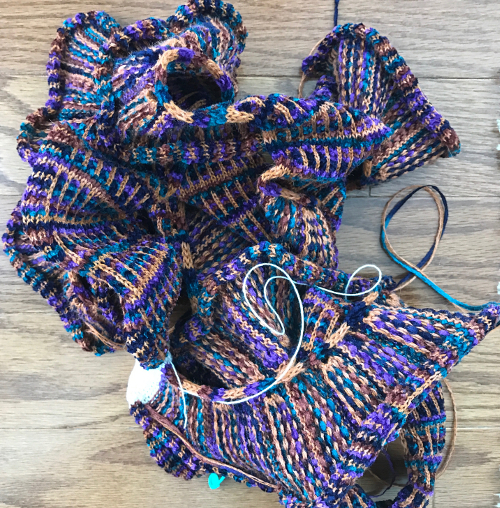
 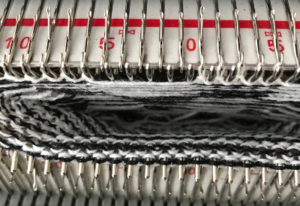 the tube dropped off the machine
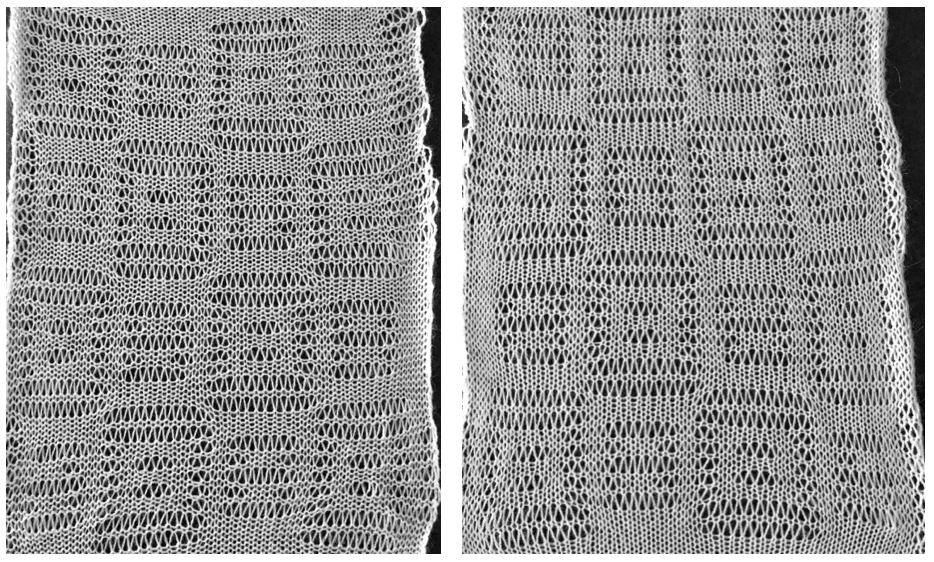
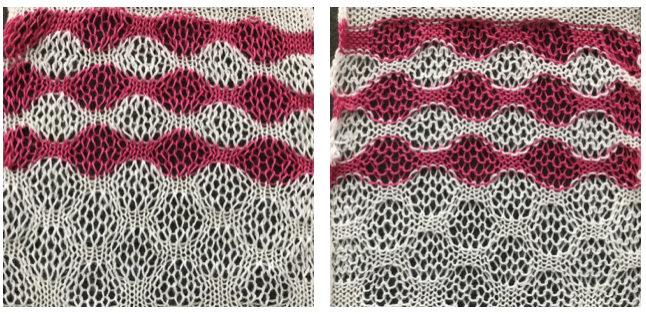
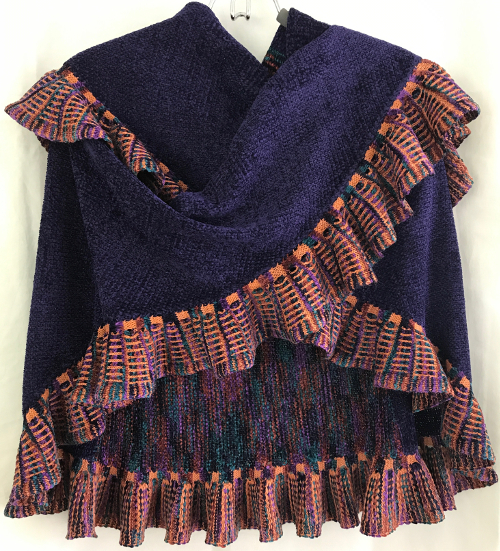
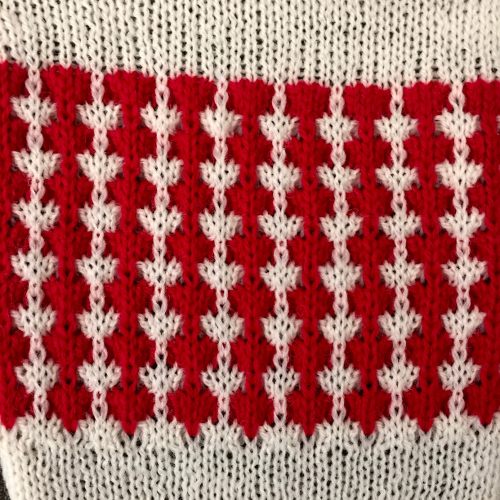
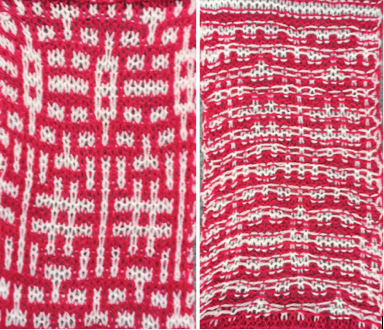
 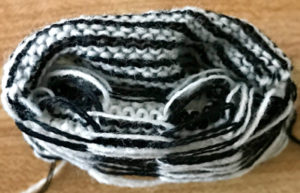 the FI created on the main bed
 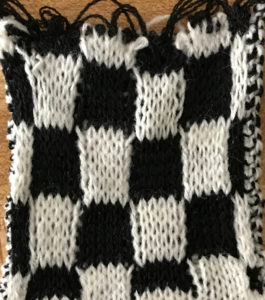 the pattern on the reverse, created by ribber
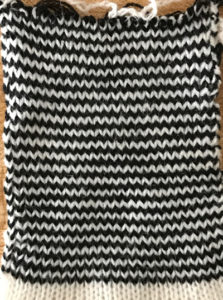
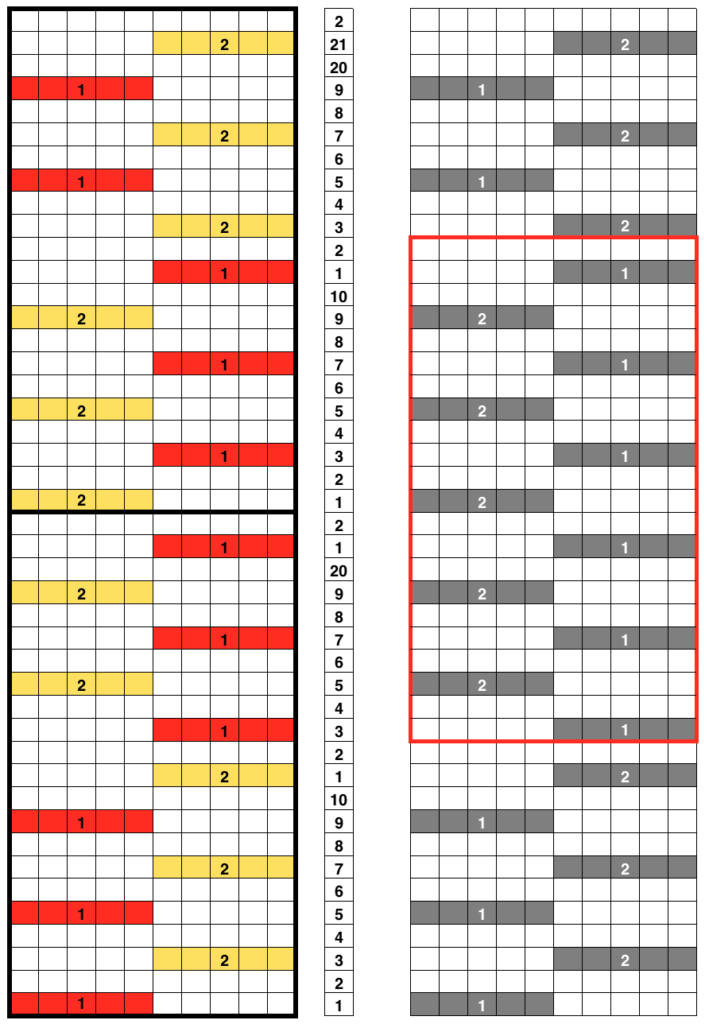
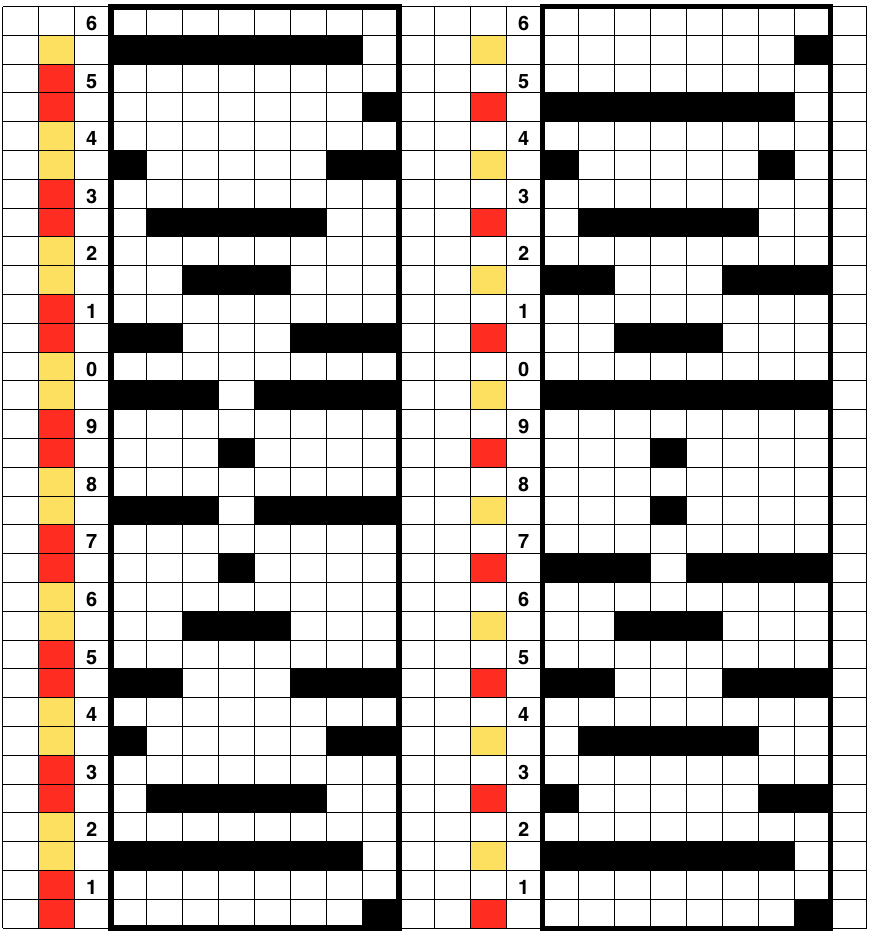
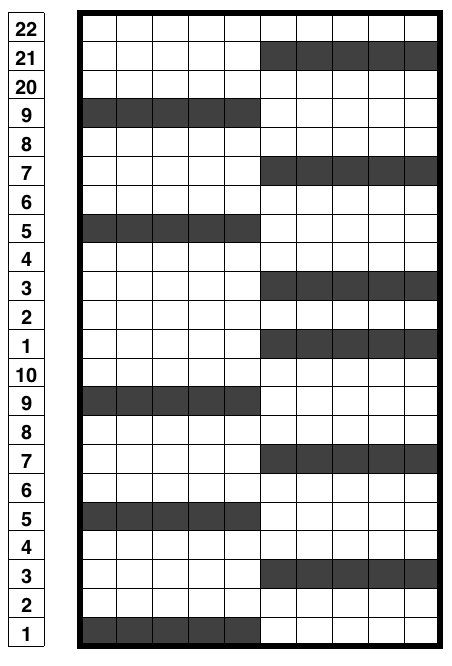
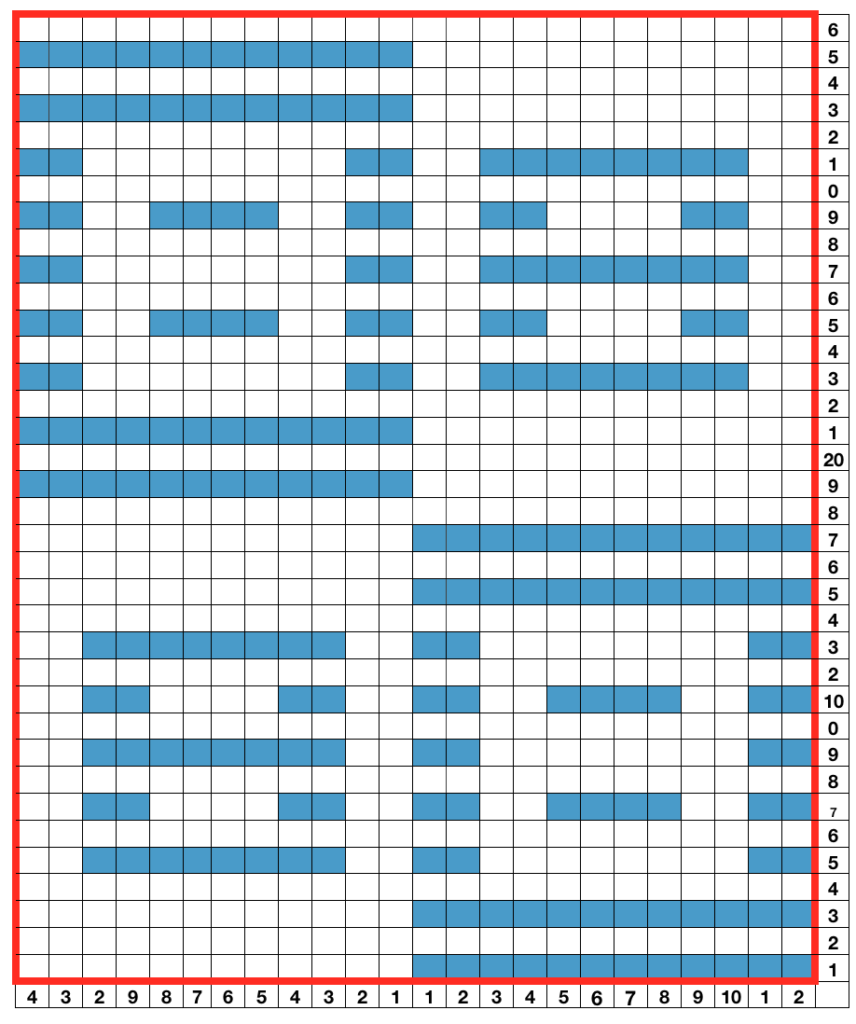
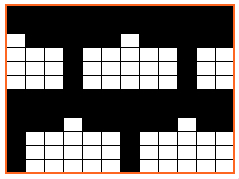
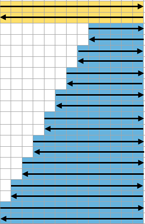
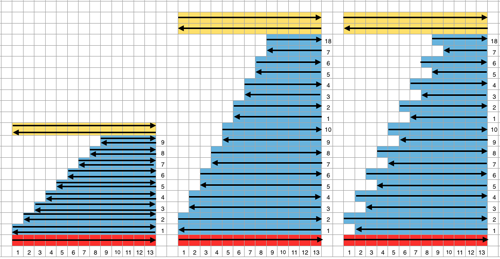
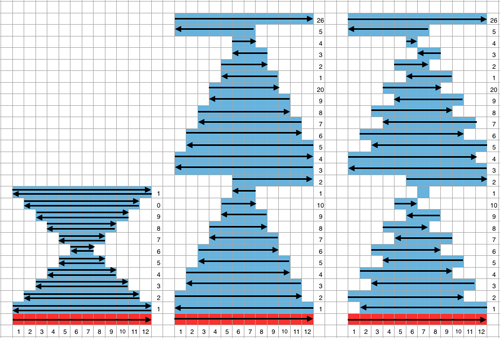
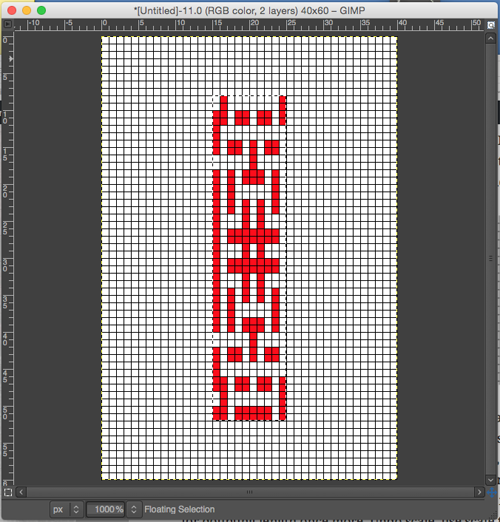
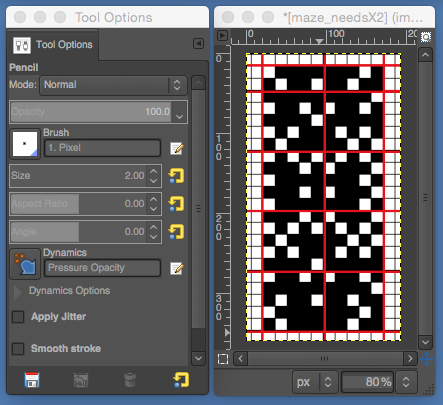
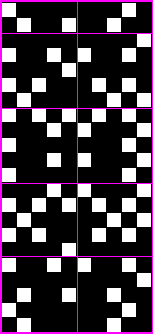
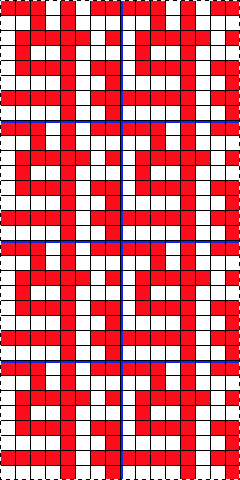
It helps to analyze the carriage actions on knitting the repeats. These charts illustrate the 2 colors knitting alternately with each pair of carriage passes. With any knitting motif, it is worth testing repeats consecutively in height and width to get a sense of what will take place using them on the finished knit. Here 2 lengthwise repeats are shown. The pattern could be planned to start the repeat with the area outlined in red on the right, and a full block would occur at the start of the tube. A bit of editing would make all rectangles equal in height.
So now that I have some blocks, what about other patterns and shapes? ……
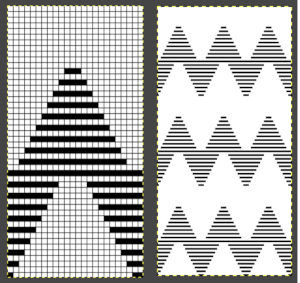
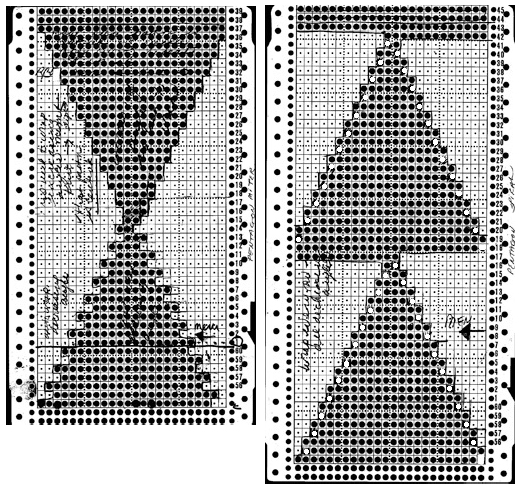
In a previous post with exercises on DBJ, 2 separations of the triangular shapes below were offered. Testing the idea of using pre designed jacquard separations for knitting tubular fair isle, I chose to use the 2 alternatives presented. The related information is available in PDF format for punchcard and electronic machines
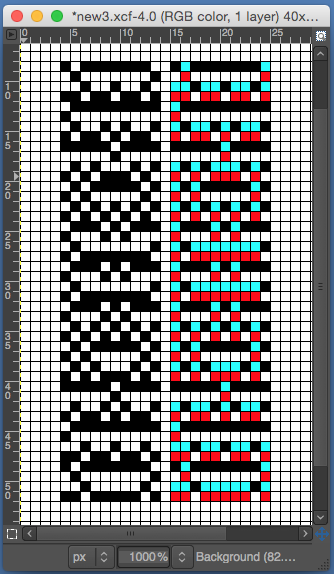
Here we have the motifs, and 2 methods of color separation for DBJ, charted, drawing each color design row only once
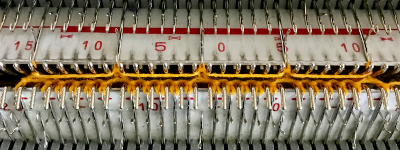
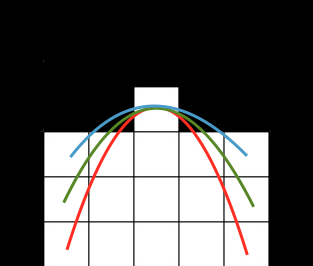
The middle image shows the method for separation achieved automatically in Brother by using the KRC button when using only 2 colors per row. It causes the least (if any) elongation of the motif. Each design row knits only once, programmed as is. If the KRC button is used, none of the other functions including double-length are allowed. The separation on the right is the most common color separation, actually knits each design row twice, which elongates the motif. As drawn, it would need to be programmed double length. If the knitting is representational, an adjustment may be needed in altering its height prior to downloading it for knitting. I used both separations above drawn on an old mylar for my second tubular FI attempt, sticking with my thin yarn, and working in small swatches while testing technique ideas. My initial premise was to knit each row twice using double length. The preparation was as already discussed. After the color change and resetting the carriages COL, the first row slips on the ribber, and the main bed knits the first design row in the alternate color, seen here in white. As in single bed FI, floats are created in that color between needles knitting it 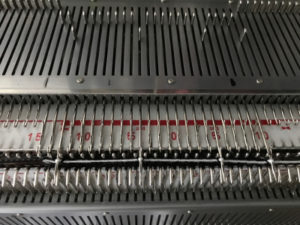 with COR, before traveling back to left for the color change, return all main bed needles back to B position with a ruler, ribber comb, or any preferred tool, so that only the ribber only will knit, keeping the knit tubular as you travel back to the color changer.
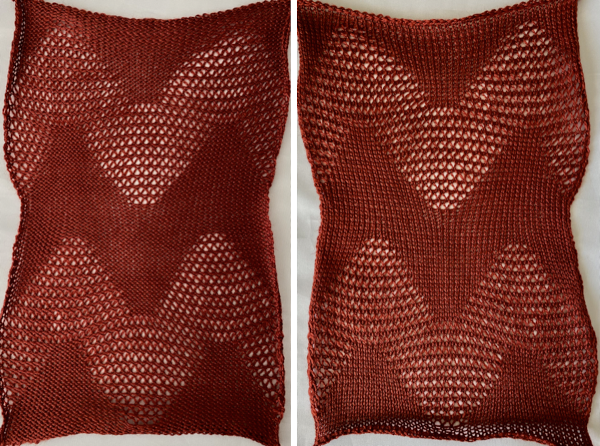
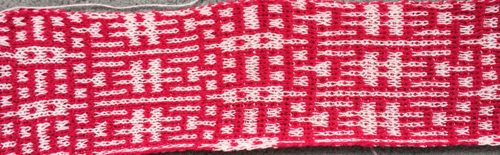
COL: change colors and repeat. Here are my trial tubes, again in too thin a yarn, but proofing the concept. My mylar was ancient, marked in #2 pencil on its reverse, and I can see a couple of spots that need darkening, but that is not a concern for this exercise

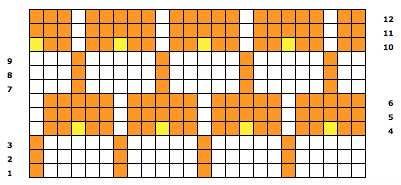
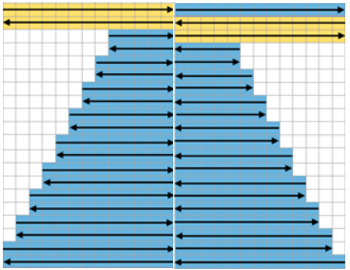
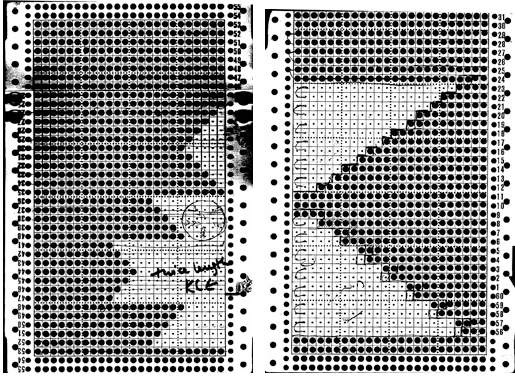
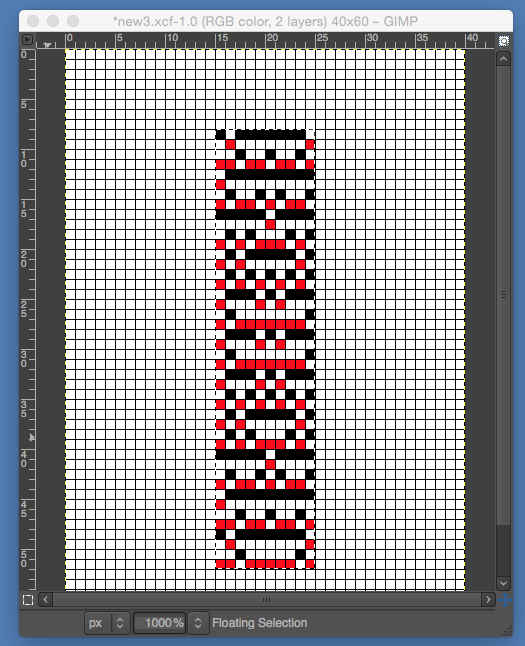
Adding color and expanding the charts to match the B/W versions 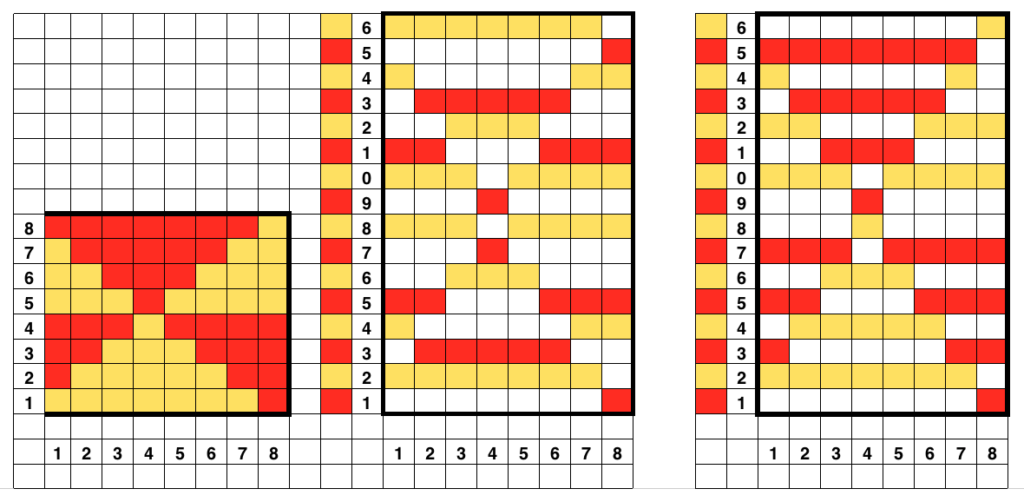 each row elongated X 2
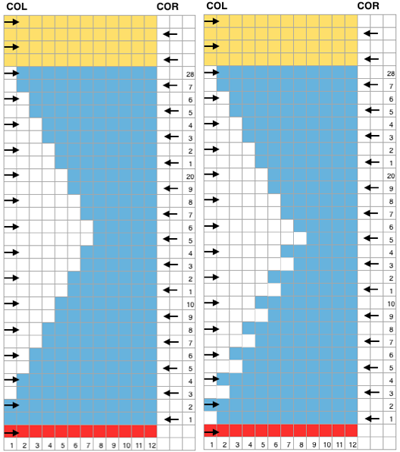
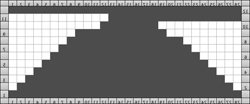
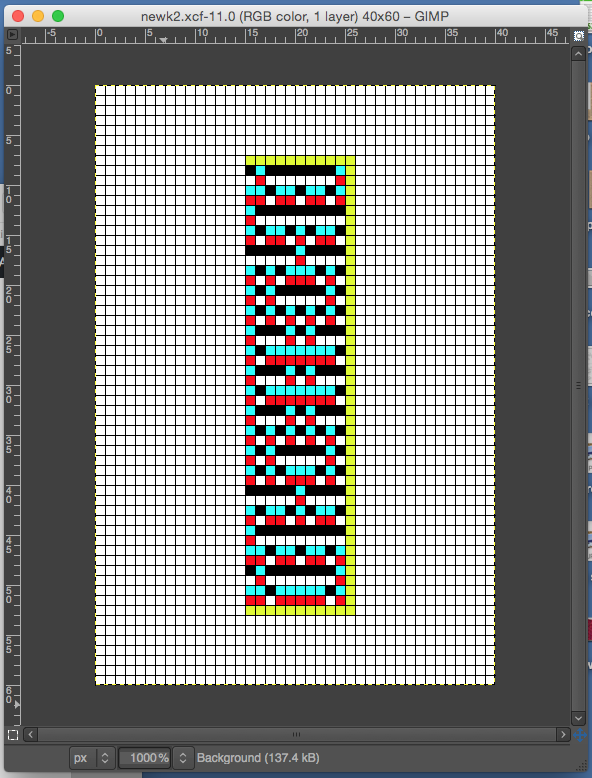
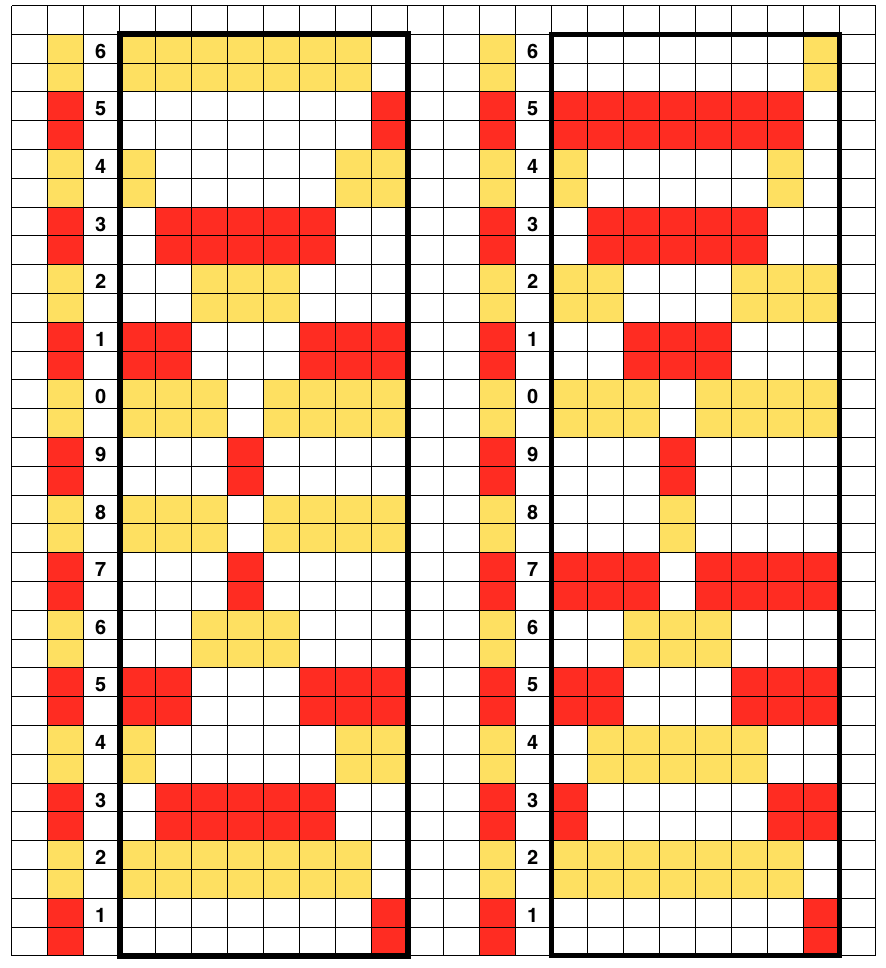 what knits when setting machine for tubular; in the swatches, the blank rows were achieved by manually pushing needles back to B as shown above
 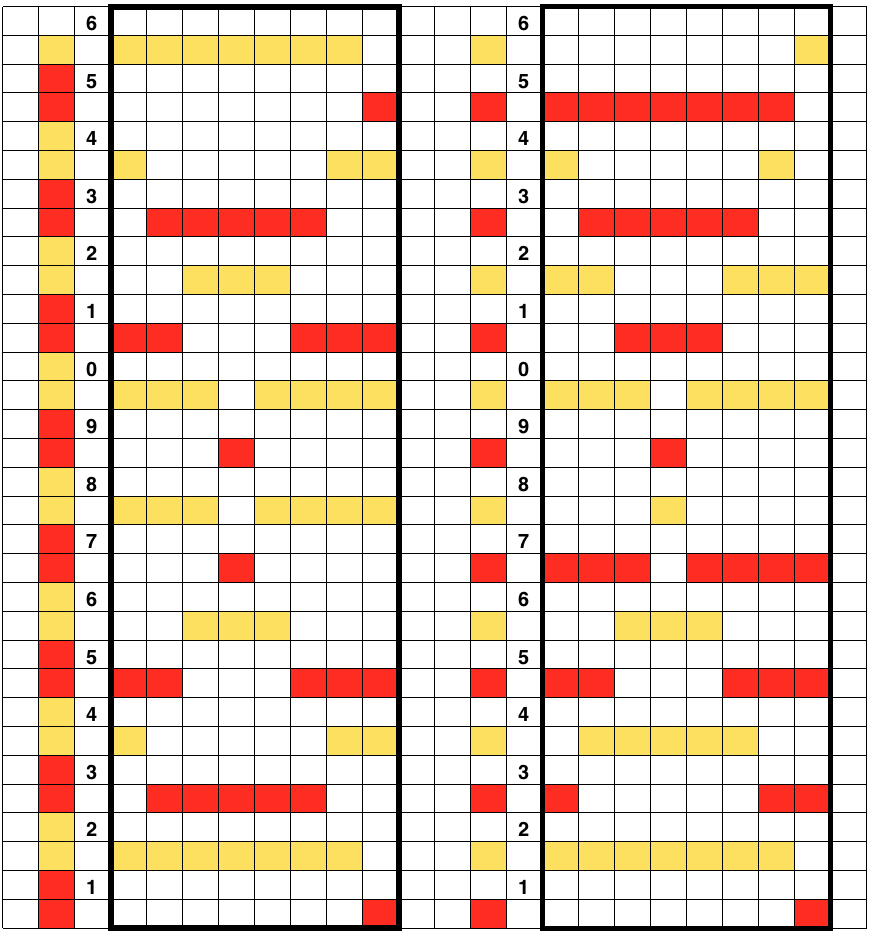 this shows what happens when the first separation is collapsed into what actually gets knit by the carriages in this technique
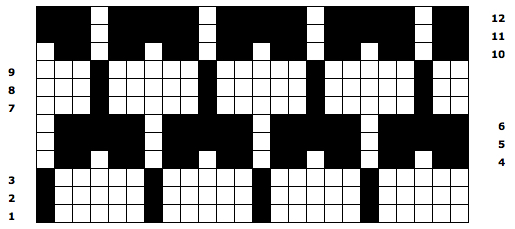
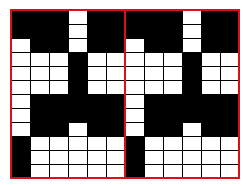
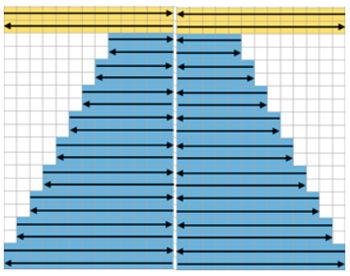
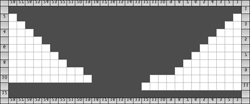
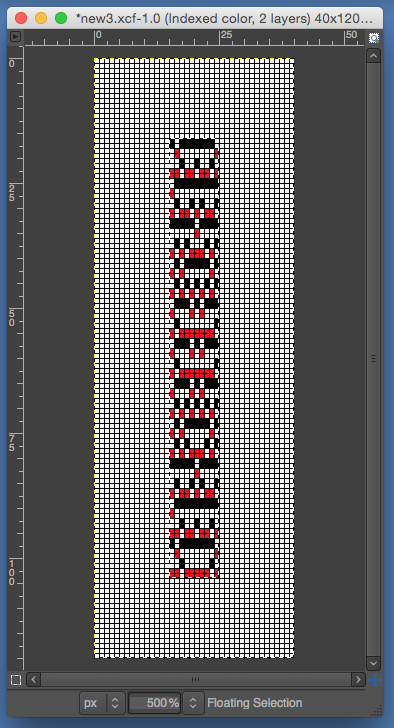
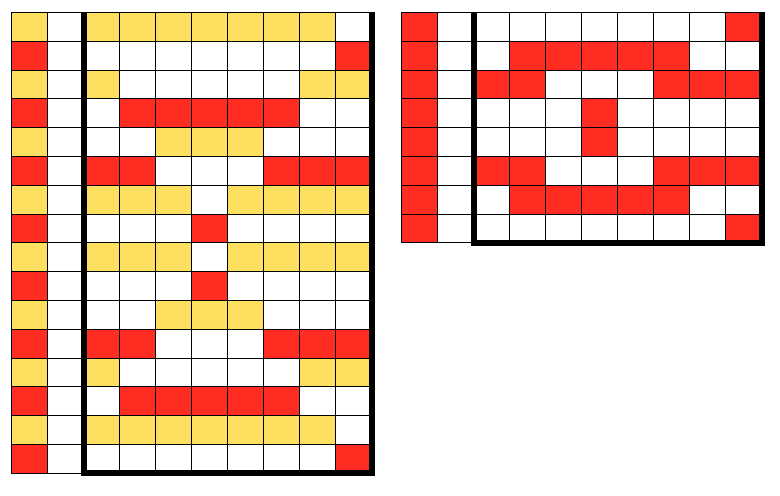 and the result in repeat in B/W like my swatch
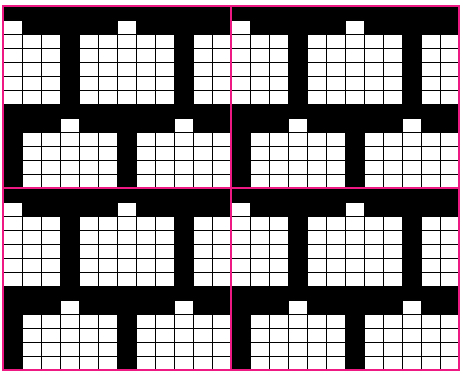
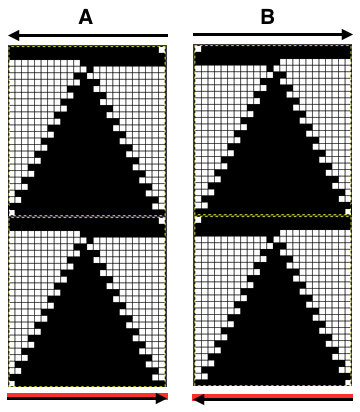
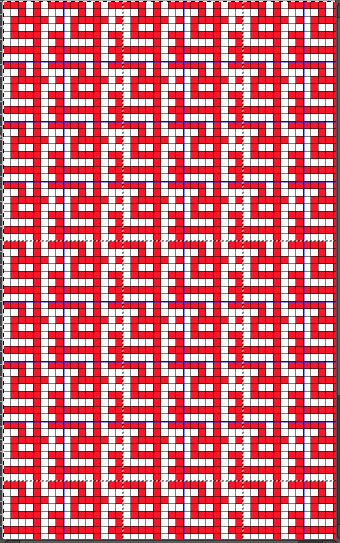
Both elongated repeats are reduced to black and white squares below, with blank rows, included to let the carriage do the work, without having to push any needles back to B position, KC set to slip <– –>. I often work out my separations in color, then fill the colors in with black and white. It is easier for me to draw the black only squares on the mylar or to enter them as pixels than trying to do that from a colored graph. I am now charting in Mac Numbers, no longer have access to Microsoft Office on my new Mac.
DBJ patterns predawn for punchcard machines or provided as charts for electronics may all be used for the FI pattern. The first separation method will yield a surprise. The second method if each row is illustrated only once needs elongation. In separations where the work is done for you, producing a result like the elongated swatch on the right, the pattern is ready to go.
Creating the separations by hand is time-consuming, having software separate the motif, eliminating that design time is quite helpful and more error-proof.
The ribber needle selection can be altered to produce patterning with hand needle selection, or by changing the slip lever positions as frequently as every row. That is a post for another day. That said, some things to consider: my own DBJ scarves often involve more than 1200 rows of knitting. The number of carriage or lock passes involved to achieve the same length is increased exponentially should I choose to knit the same designs tubular. If any needles on both brother beds wind up in work at the same time prior to the next row knit, the fabric will seal closed in those areas (another range of lovely fabrics, but not the plan here). For the ribber to knit in any other pattern than an easy stripe, one needs to either select needles by hand or add changes in levers possibly as often as every row. If multiple rows are knit on the ribber and then in turn on the main bed, one is actually creating a tapestry technique and there will be small slits at the sides of the knit, depending on the number of rows knit on either bed. It is truly helpful if the software in use or the machine’s console is able to recall the last row knit and to take you back to that spot if knitting is interrupted or put off for another day. That is one of the very convenient features of the Passap system providing the battery is still holding the charge. The latter also performs the same function and returns to the correct pattern row if one has to unravel rows and the number of unraveled rows is entered into the console. If long, nonrepetitive in length designs are in use and need to be downloaded in segments (wincrea has such limits), a warning noise when the end of the pattern repeat is reached would be nice to have. In my opinion, it’s fun to achieve things because we can, then it becomes a personal choice as to whether the process is worth it, and under what circumstances to use it. My own accuracy when a lot of hand manipulation or other details are in use has faded with my increasing age and decreasing attention span. Others can tackle the same with great success, such as seen in some of the wonderful all hand transferred complex machine knit laces found on Ravelry, and then there was the man who used to tour machine knitting seminars with a MK sweater he had made for himself in a fine yarn that incorporated over 3,800 (yes, thousands) cables, weaving in and out of each other and in turn in and out of crossing diamonds in a fine yarn (no, no one I know of actually counted them, the count was accepted on faith).
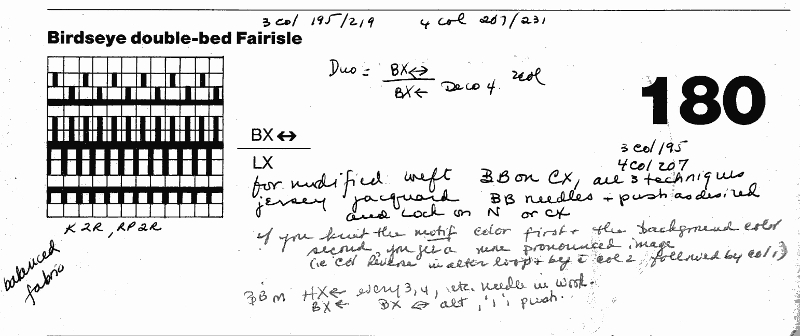
The Passap console has built-in color separations for tubular knitting. As with Brother, the simplest fabrics are in one color. For one-color fabrics, CX/CX (the equivalent result in Brother happens by using opposite part buttons on either bed) is used on both locks.
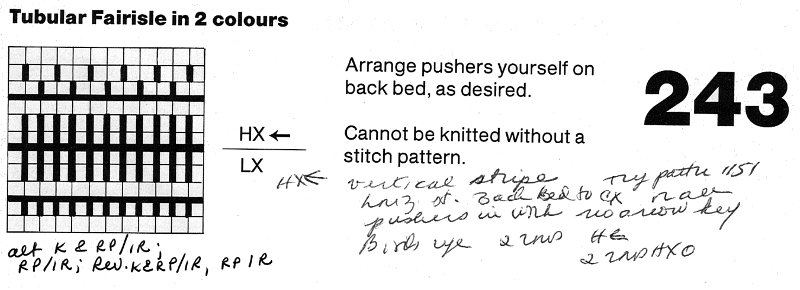
For 2 color fabric, the DM 80 front lock (carriage term equivalent) is set on HX <– while if using the E 6000 one may select KT (knitting technique) 243, with the front bed set to LX (slip). I have had very limited experience with the DM80 decades ago, can only speak for the E6000. The front bed is programmed as for any other pattern. With the back lock set to CX (no pattern) or HX (pusher selection for pattern), the function is fixed, the front bed knits to left and slips to right, the back bed slips to left and knits to right to create the tube
Horizontal stripe: is the simplest to execute: set the back bed on CX, or put all back bed pushers in work position and set back lock to HX, no arrow key. Pushers up knit, pushers down slip. (in Brother set the appropriate ribber lever to slip in one direction)
Vertical Stripe: “automatic”, bring pushers under every back needle into one up, one down, alternating in work and in rest. Set back lock to HX, left arrow key <–, changing color every 2 rows. The same needle selection is in the same location with each color change, creating the stripe
Birdseye backing, manual tech involved/ lock setting change involved: set back bed pushers alternating one up, one down, thus alternating in work, out of work. Knit 2 rows with the lock on HX, no arrow key, and 2 rows with the locks on HX <–.
Solid color backing is possible: set the front lock is set to LX <–” (slip <–”). When Tech 243 is in use, after the setup rows are completed, the console gives the prompt for setting up the pushers, all in work, and for HX <–”on the back bed. The result is that for 2 rows in the lining color, stitches knit alternately on each bed. The front bed then knits alone in turn for 2 passes; the color yarn in use creates a float the width of the knit as the locks return to the right, making it the least acceptable variation, and an unbalanced knit. The set up is different for both quilting (BX <–/LX) or solid color backed DBJ from tubular FI created in this manner.
My Passap manuals have been well used, often technique numbers are surrounded by notes in my scrawl. Techniques perform the color separations for the specific fabric, the accompanying diagrams and directions are suggestions for swatches provided as well in the alternate accompanying manual. Lock settings can be set to suit i.e. tuck substituted for slip, etc. The separation is fixed, but all lock settings are in the hands of the knitter.
2 color circular tucked designs are produced using techniques 162-165, with the frequently unfamiliar settings using OX/DX. As with many other techniques, some may be used with stitch patterns, some not, but if you understand what is happening front bed patterning could be converted to the automated pusher or needle selection by entering a planned color separation as a pattern. OX is a combination, tubular tuck setting, paired with DX. OX is a combination of KX (tuck in the pattern) and CX (circular). DX is the tubular tuck setting for the back bed. OX and DX will knit needles with a pusher (needle selected on Brother) in work (selected needle), and tuck on needles with no pusher in work (non selected needle) moving from right to left. From left to right the front bed is not knit any stitches (contributing to making the fabric tubular). The back bed knits only from left to right, the second side of the tube. E6000 technique 185 with locks set to N/OX will produce tubular FI with long stitch. For three and four colors where the colors are separated at one row per color use technique 252, locks set to N/OX. Superimposing patterns for three and four color techniques require entering card reader techniques. With my cable set up, when I was experimenting with reader techniques eons ago, I believe I was successful downloading the pattern for the design from the PC, and entering the card reader technique as a second pattern, via the card reader. I have never tried doing so with additional software, and shy away from any situation where I have to enter commands to get the software to work. Out of the group, 162 is the only one that can be combined with a stitch pattern. The console gives cues as to when to change lock settings, with some thought similar fabrics could be knit on the Brother KM. The techniques, and my notes, which at this point would need some self-interpretation. The UX scribble is in reference to a fabric that slips over needles with pushers selected down from right to left, then tucks over needles with pushers selected down from left to right. Needles with pushers up will always knit. In Brotherese the pattern is knit with opposite function cam buttons in use slip <–, tuck –>. It will not produce a tubular knit. Worked out patterns for such fabrics were included in some of the Brother punchcard pattern books. 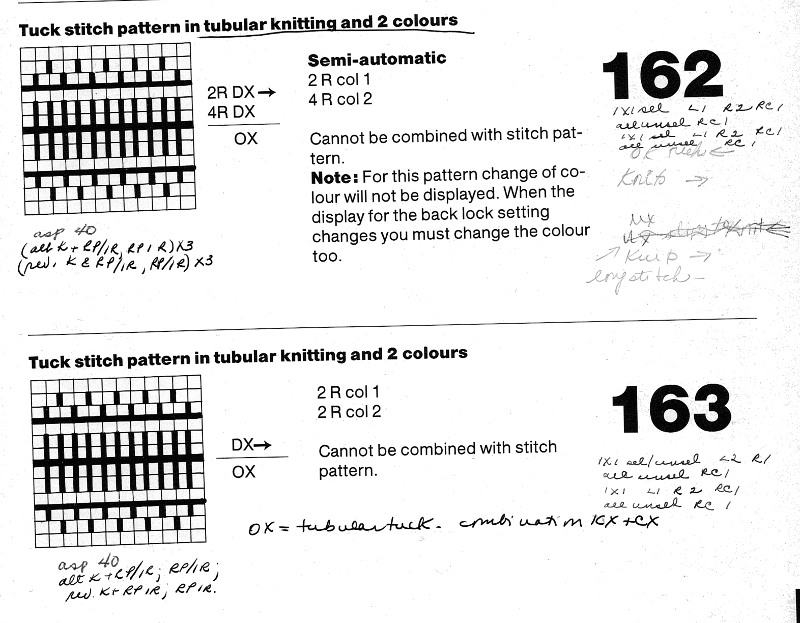
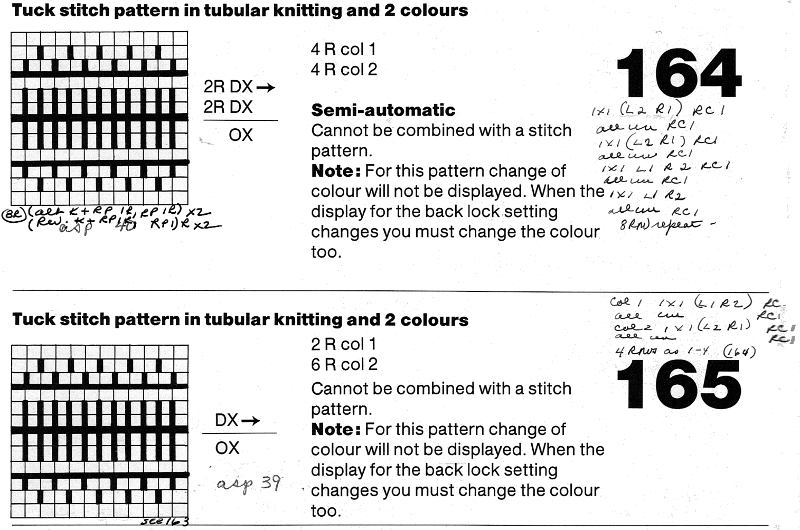 For tucked 2 colors fair isle use technique 185 with lock set on N/OX.
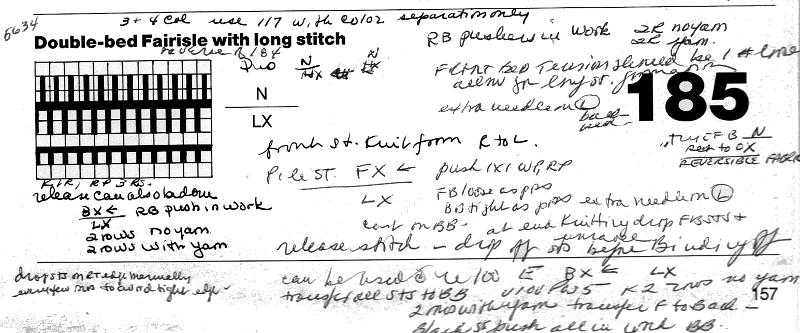
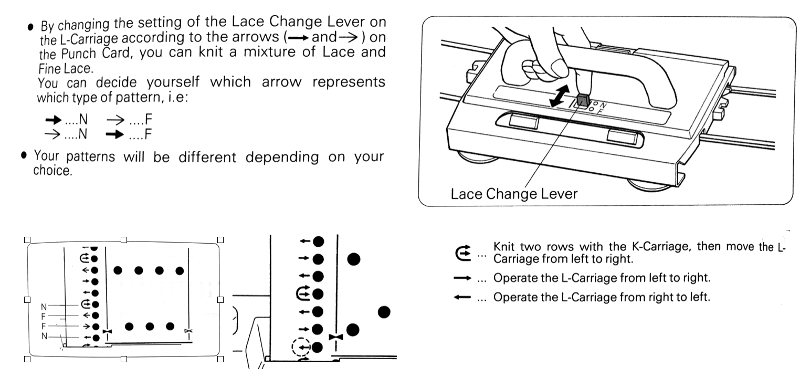
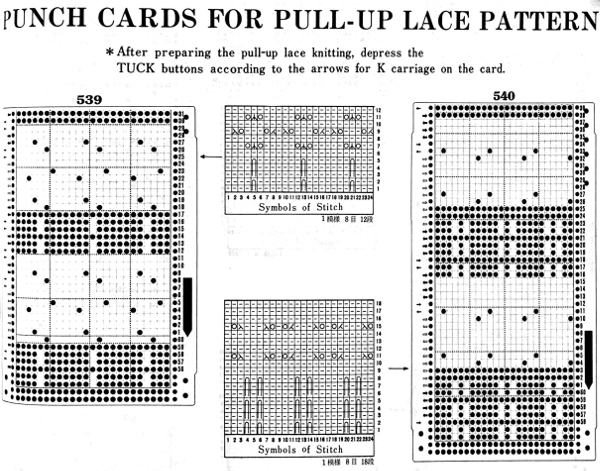
 This is a 2 carriages patterning operation, lace extension rails must be used, with each carriage disengaged from the belt while the other is moving across the knitting and back to its resting place.
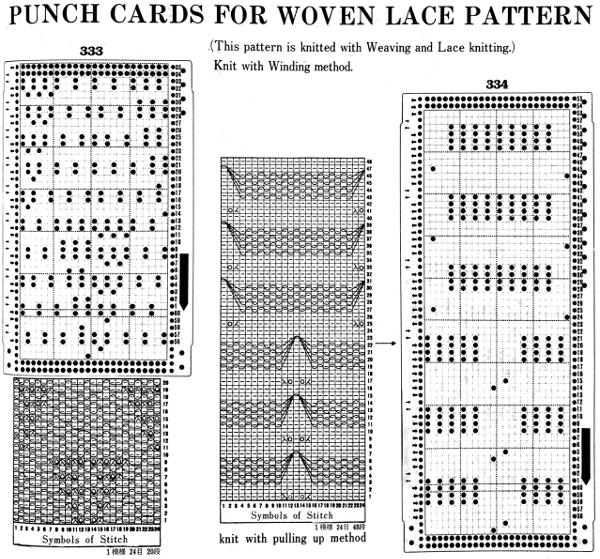

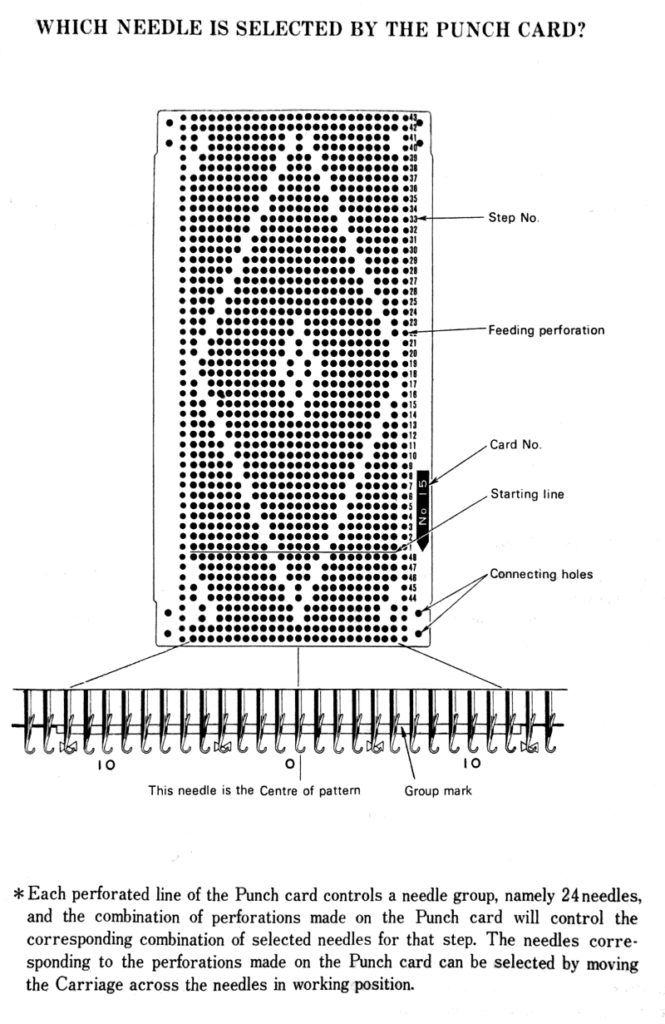
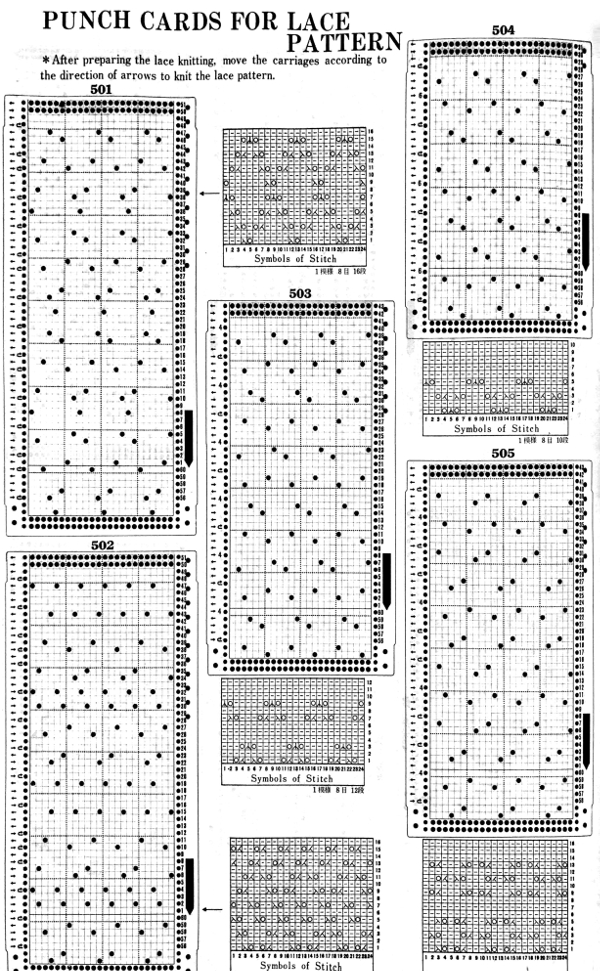
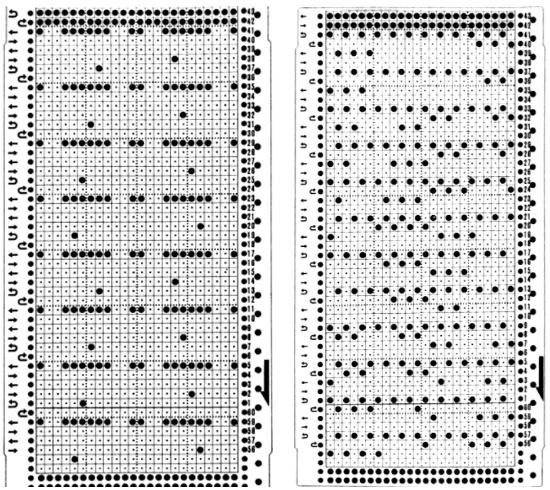
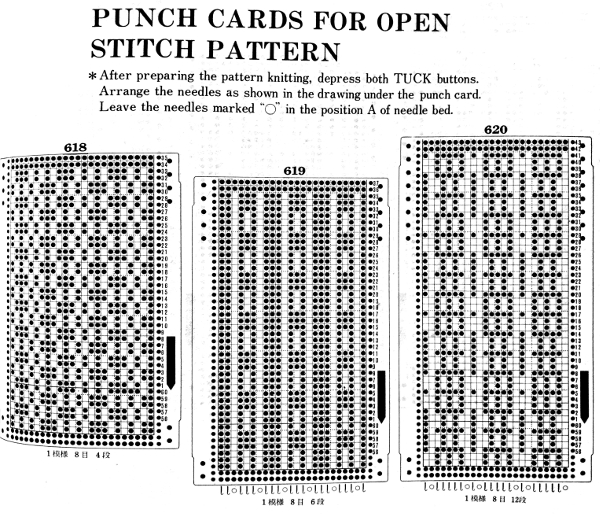
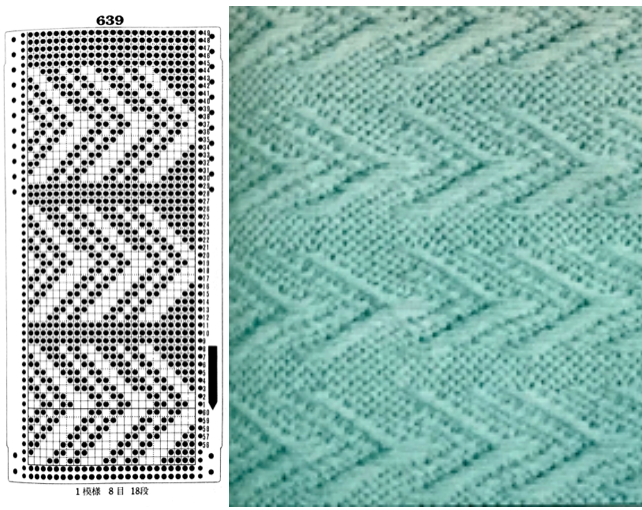
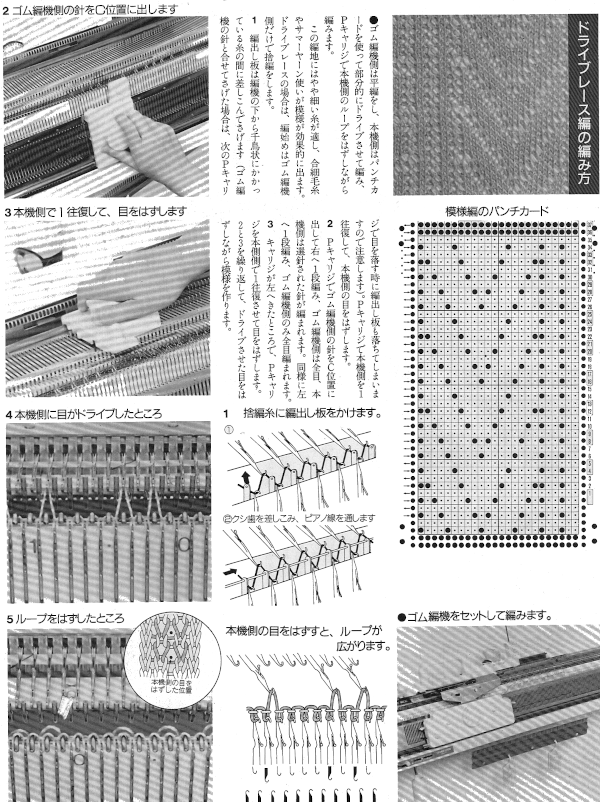
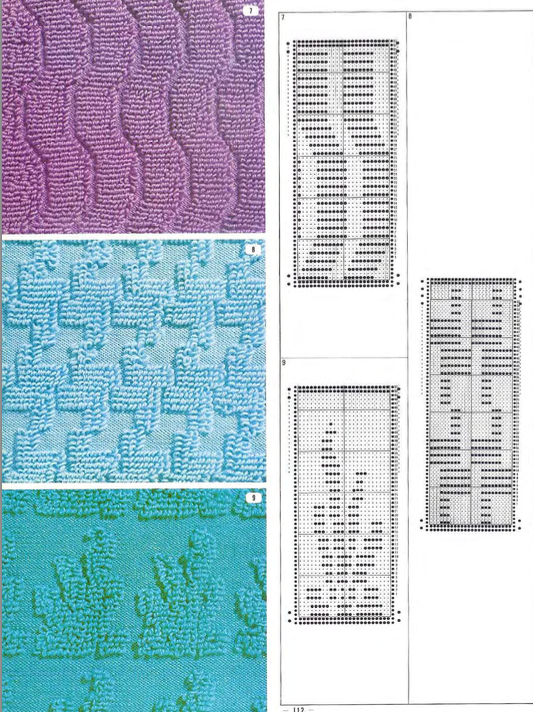
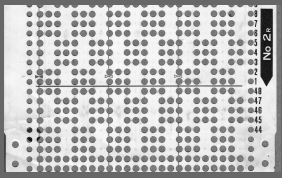
 Below each punchcard, the repeat is identified in numbers for stitches and rows. The cards presented are the minimum length required for the card to roll smoothly within the reader when joined for continuous knitting (at least 36 rows). Electronic knitters may isolate the individual, smallest repeat, draw only the squares that appear as white in the cards, enter them via mylar or download, and use color reverse.
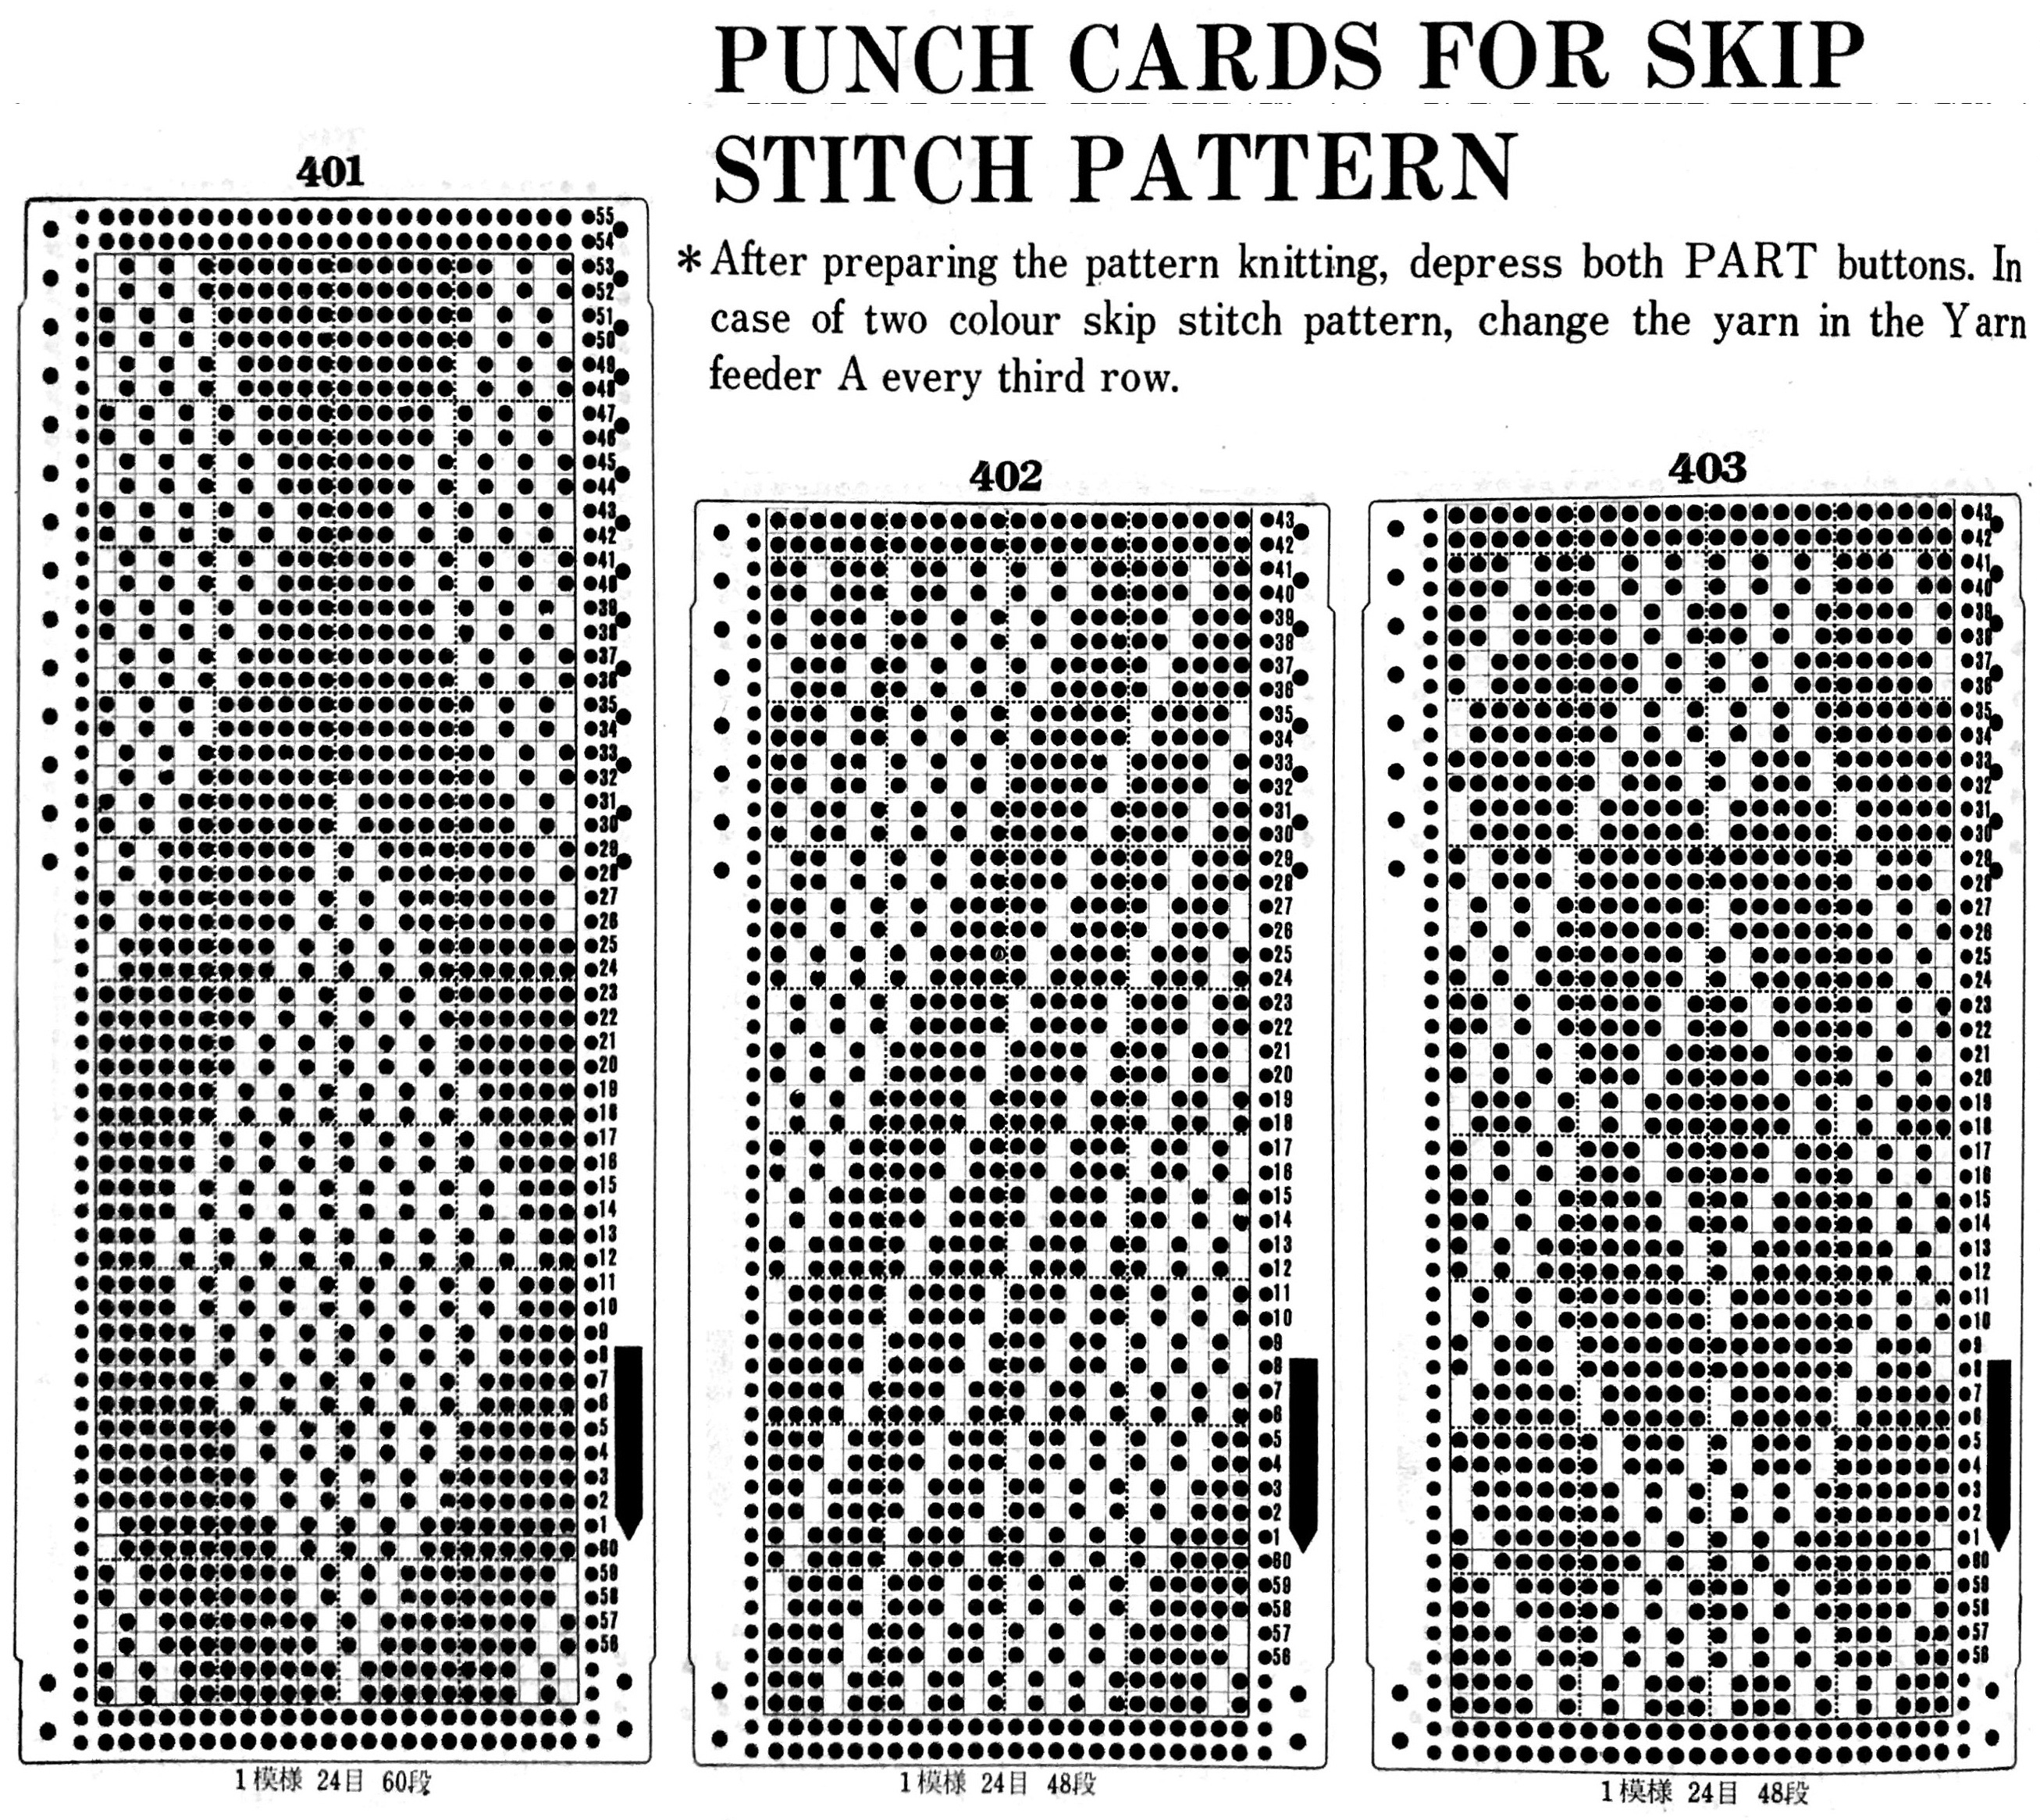
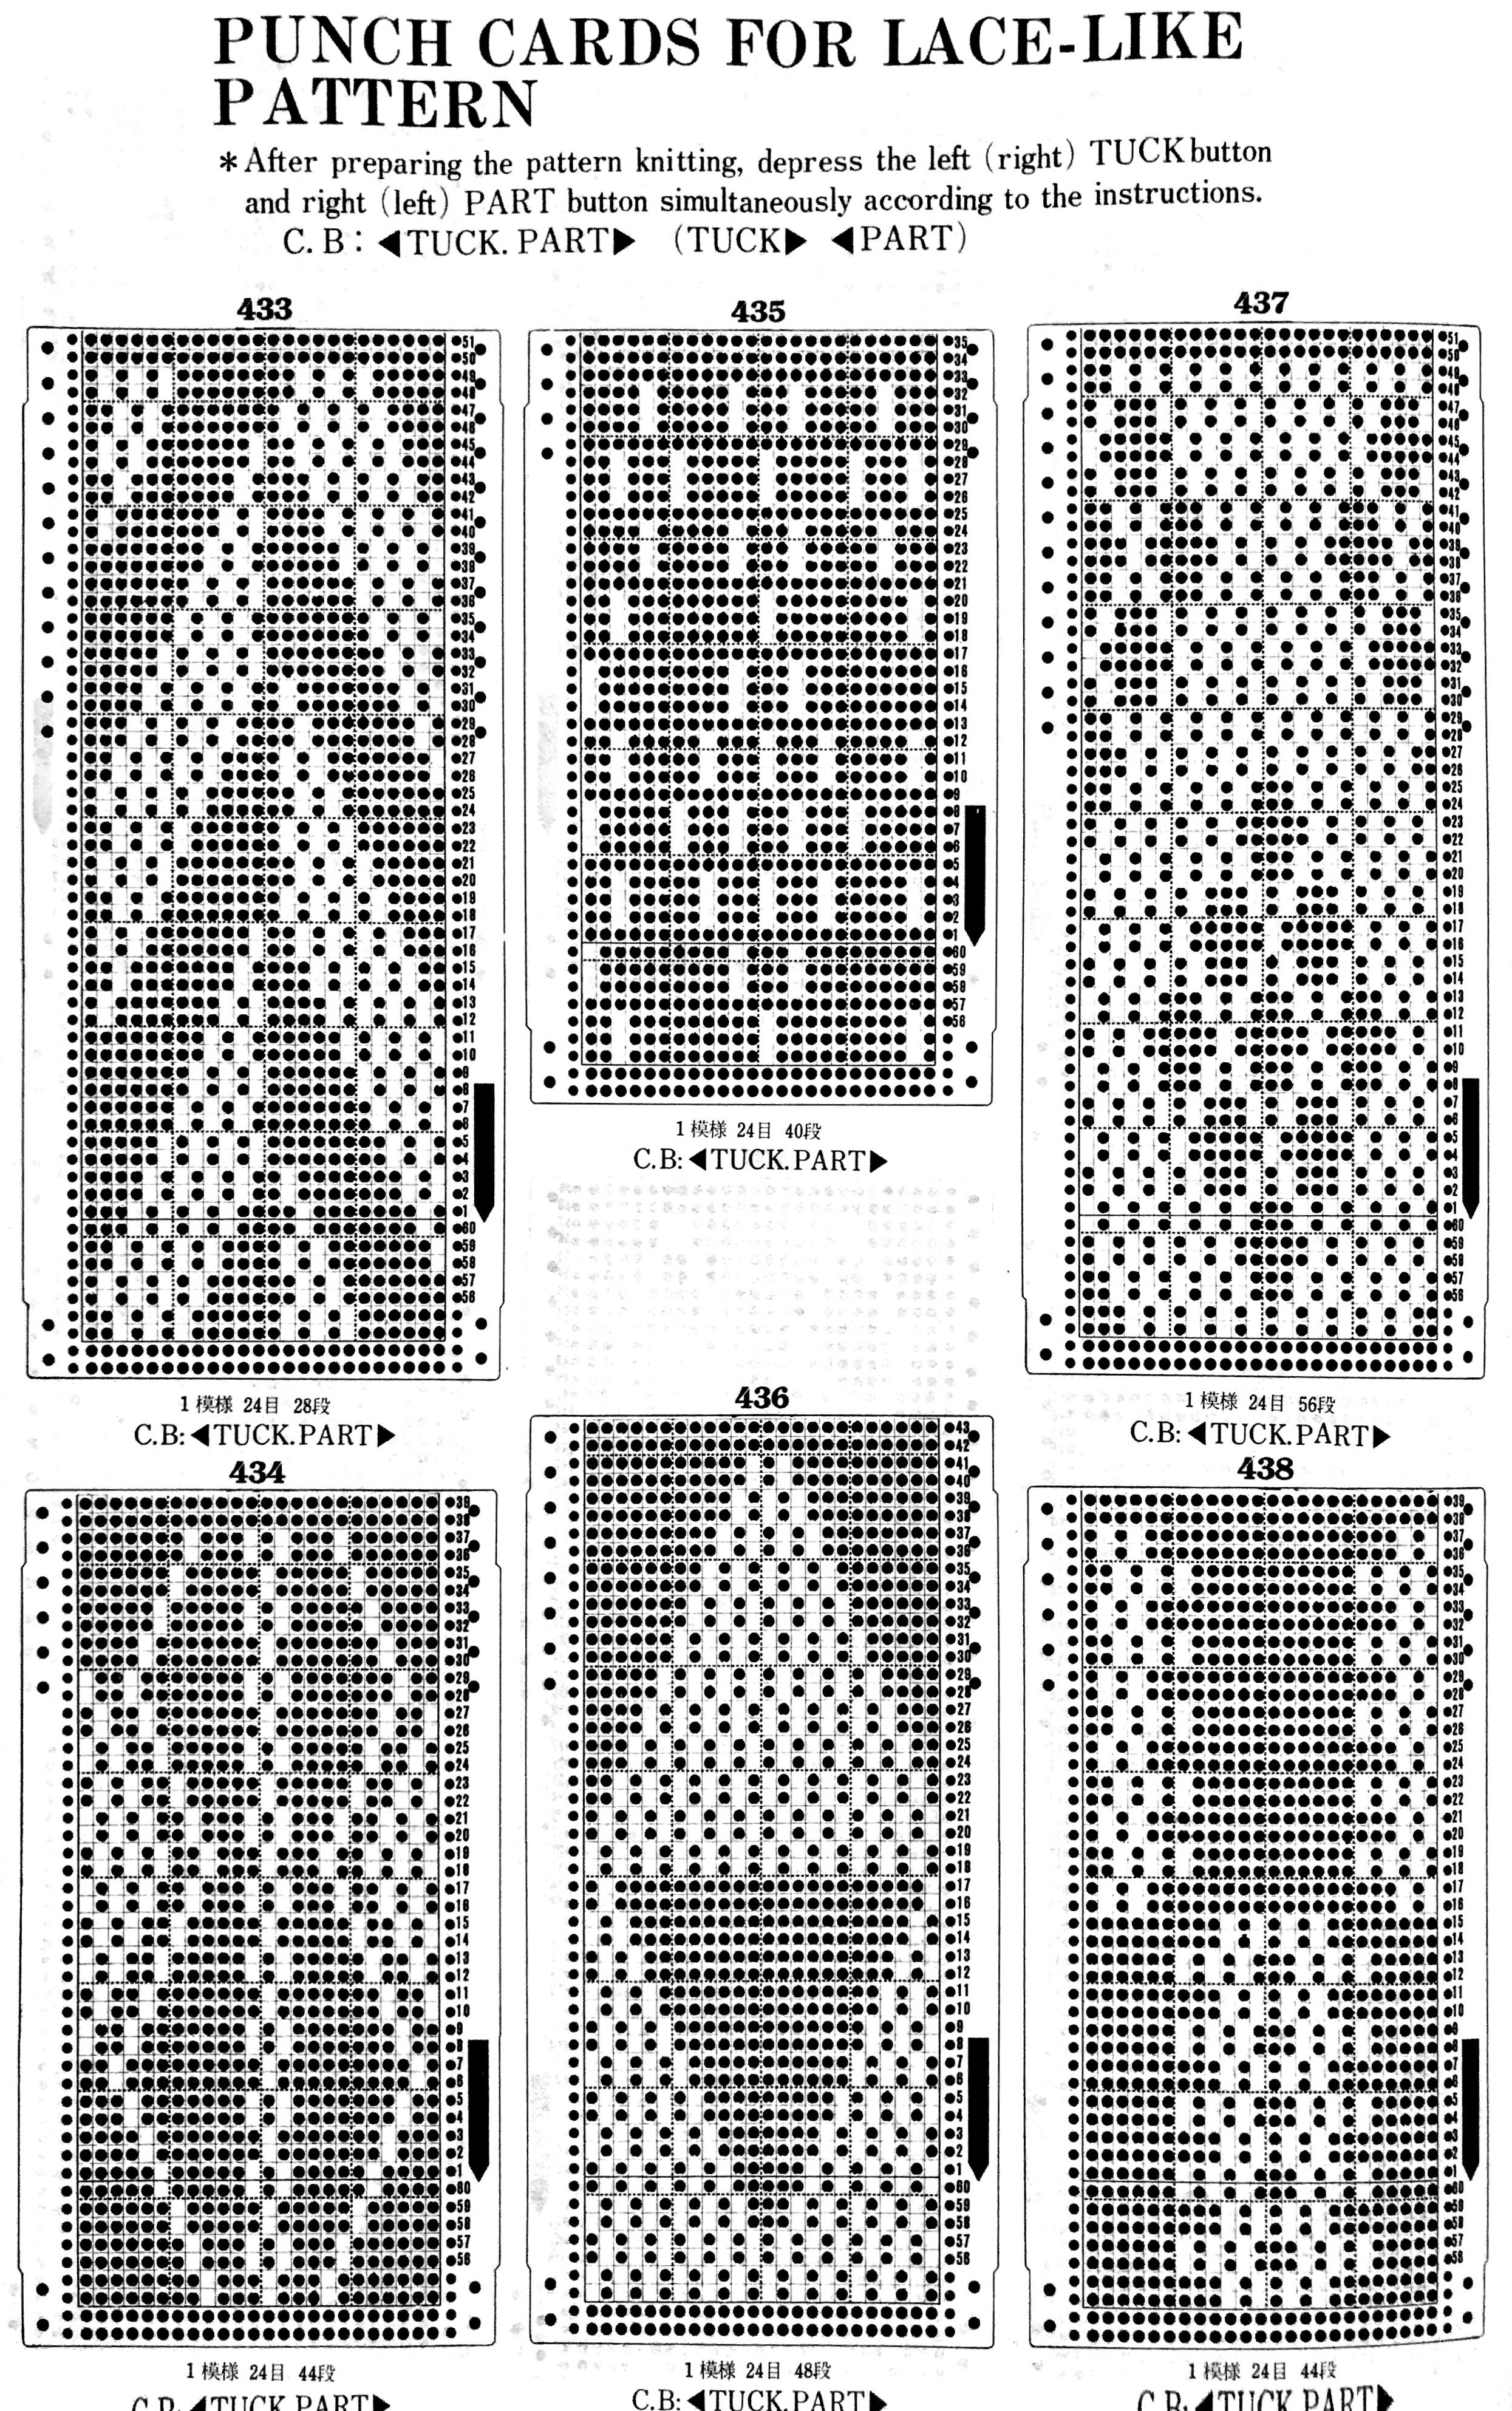
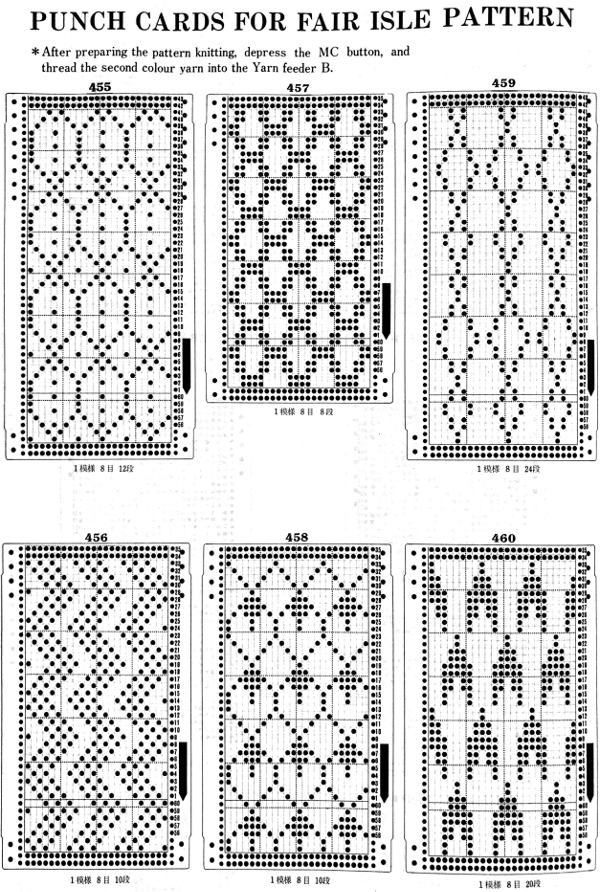

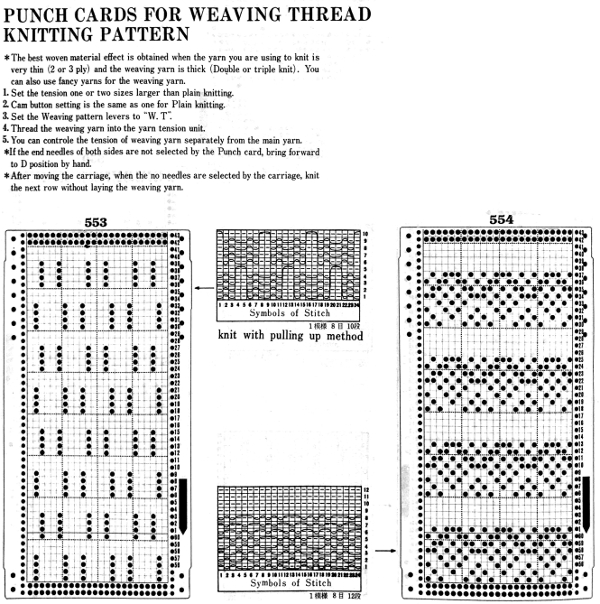


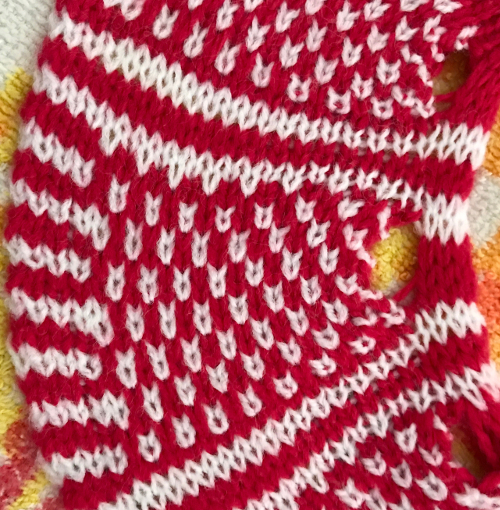
 The thicker yarn knits along with the thinner one where there are unpunched areas or white squares, the thinner yarn knits alone where the punched holes or black squares occur, with the thicker yarn floating behind it
  more information on this fabric
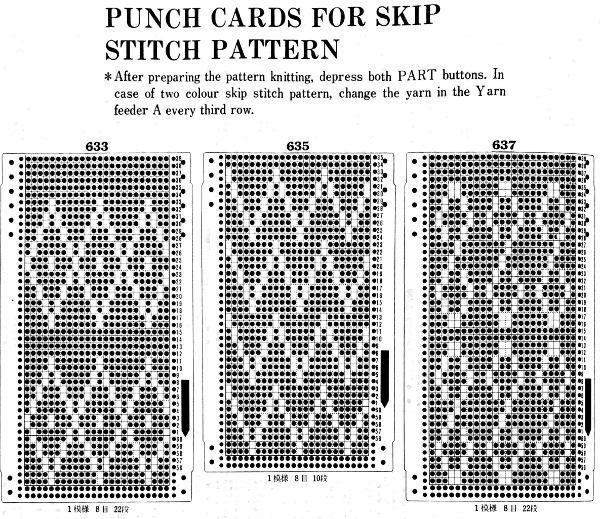
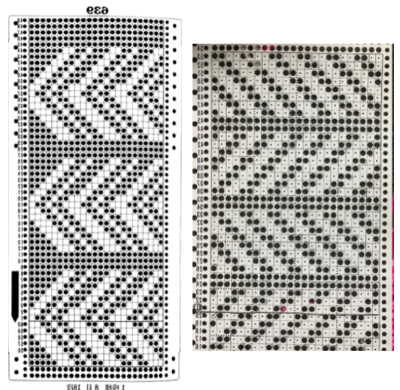
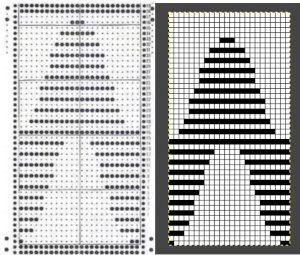
 reversal of lettering
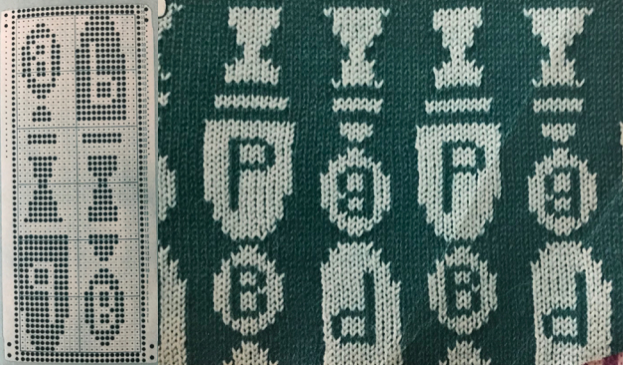
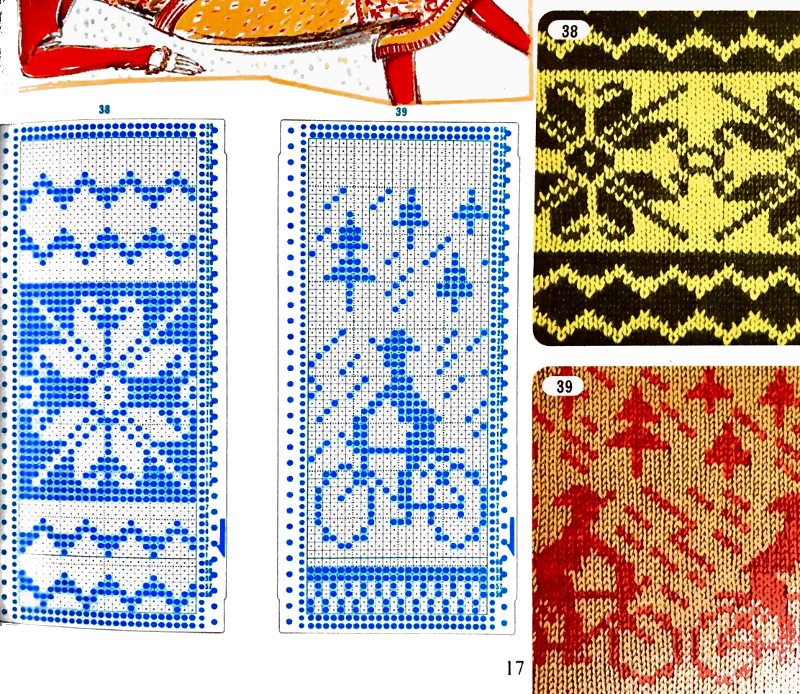
 When you think that that is all sorted out in your head, there are these in slip stitch, the direction of stitches matches, because the purl side is used, images are reversed on the knit side.
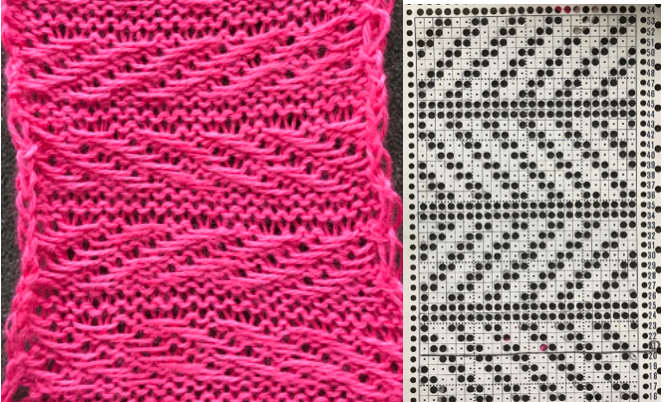
 the punchcard change knob has selections for single motif and pattern knitting (KC)
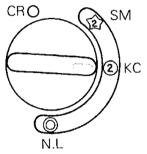


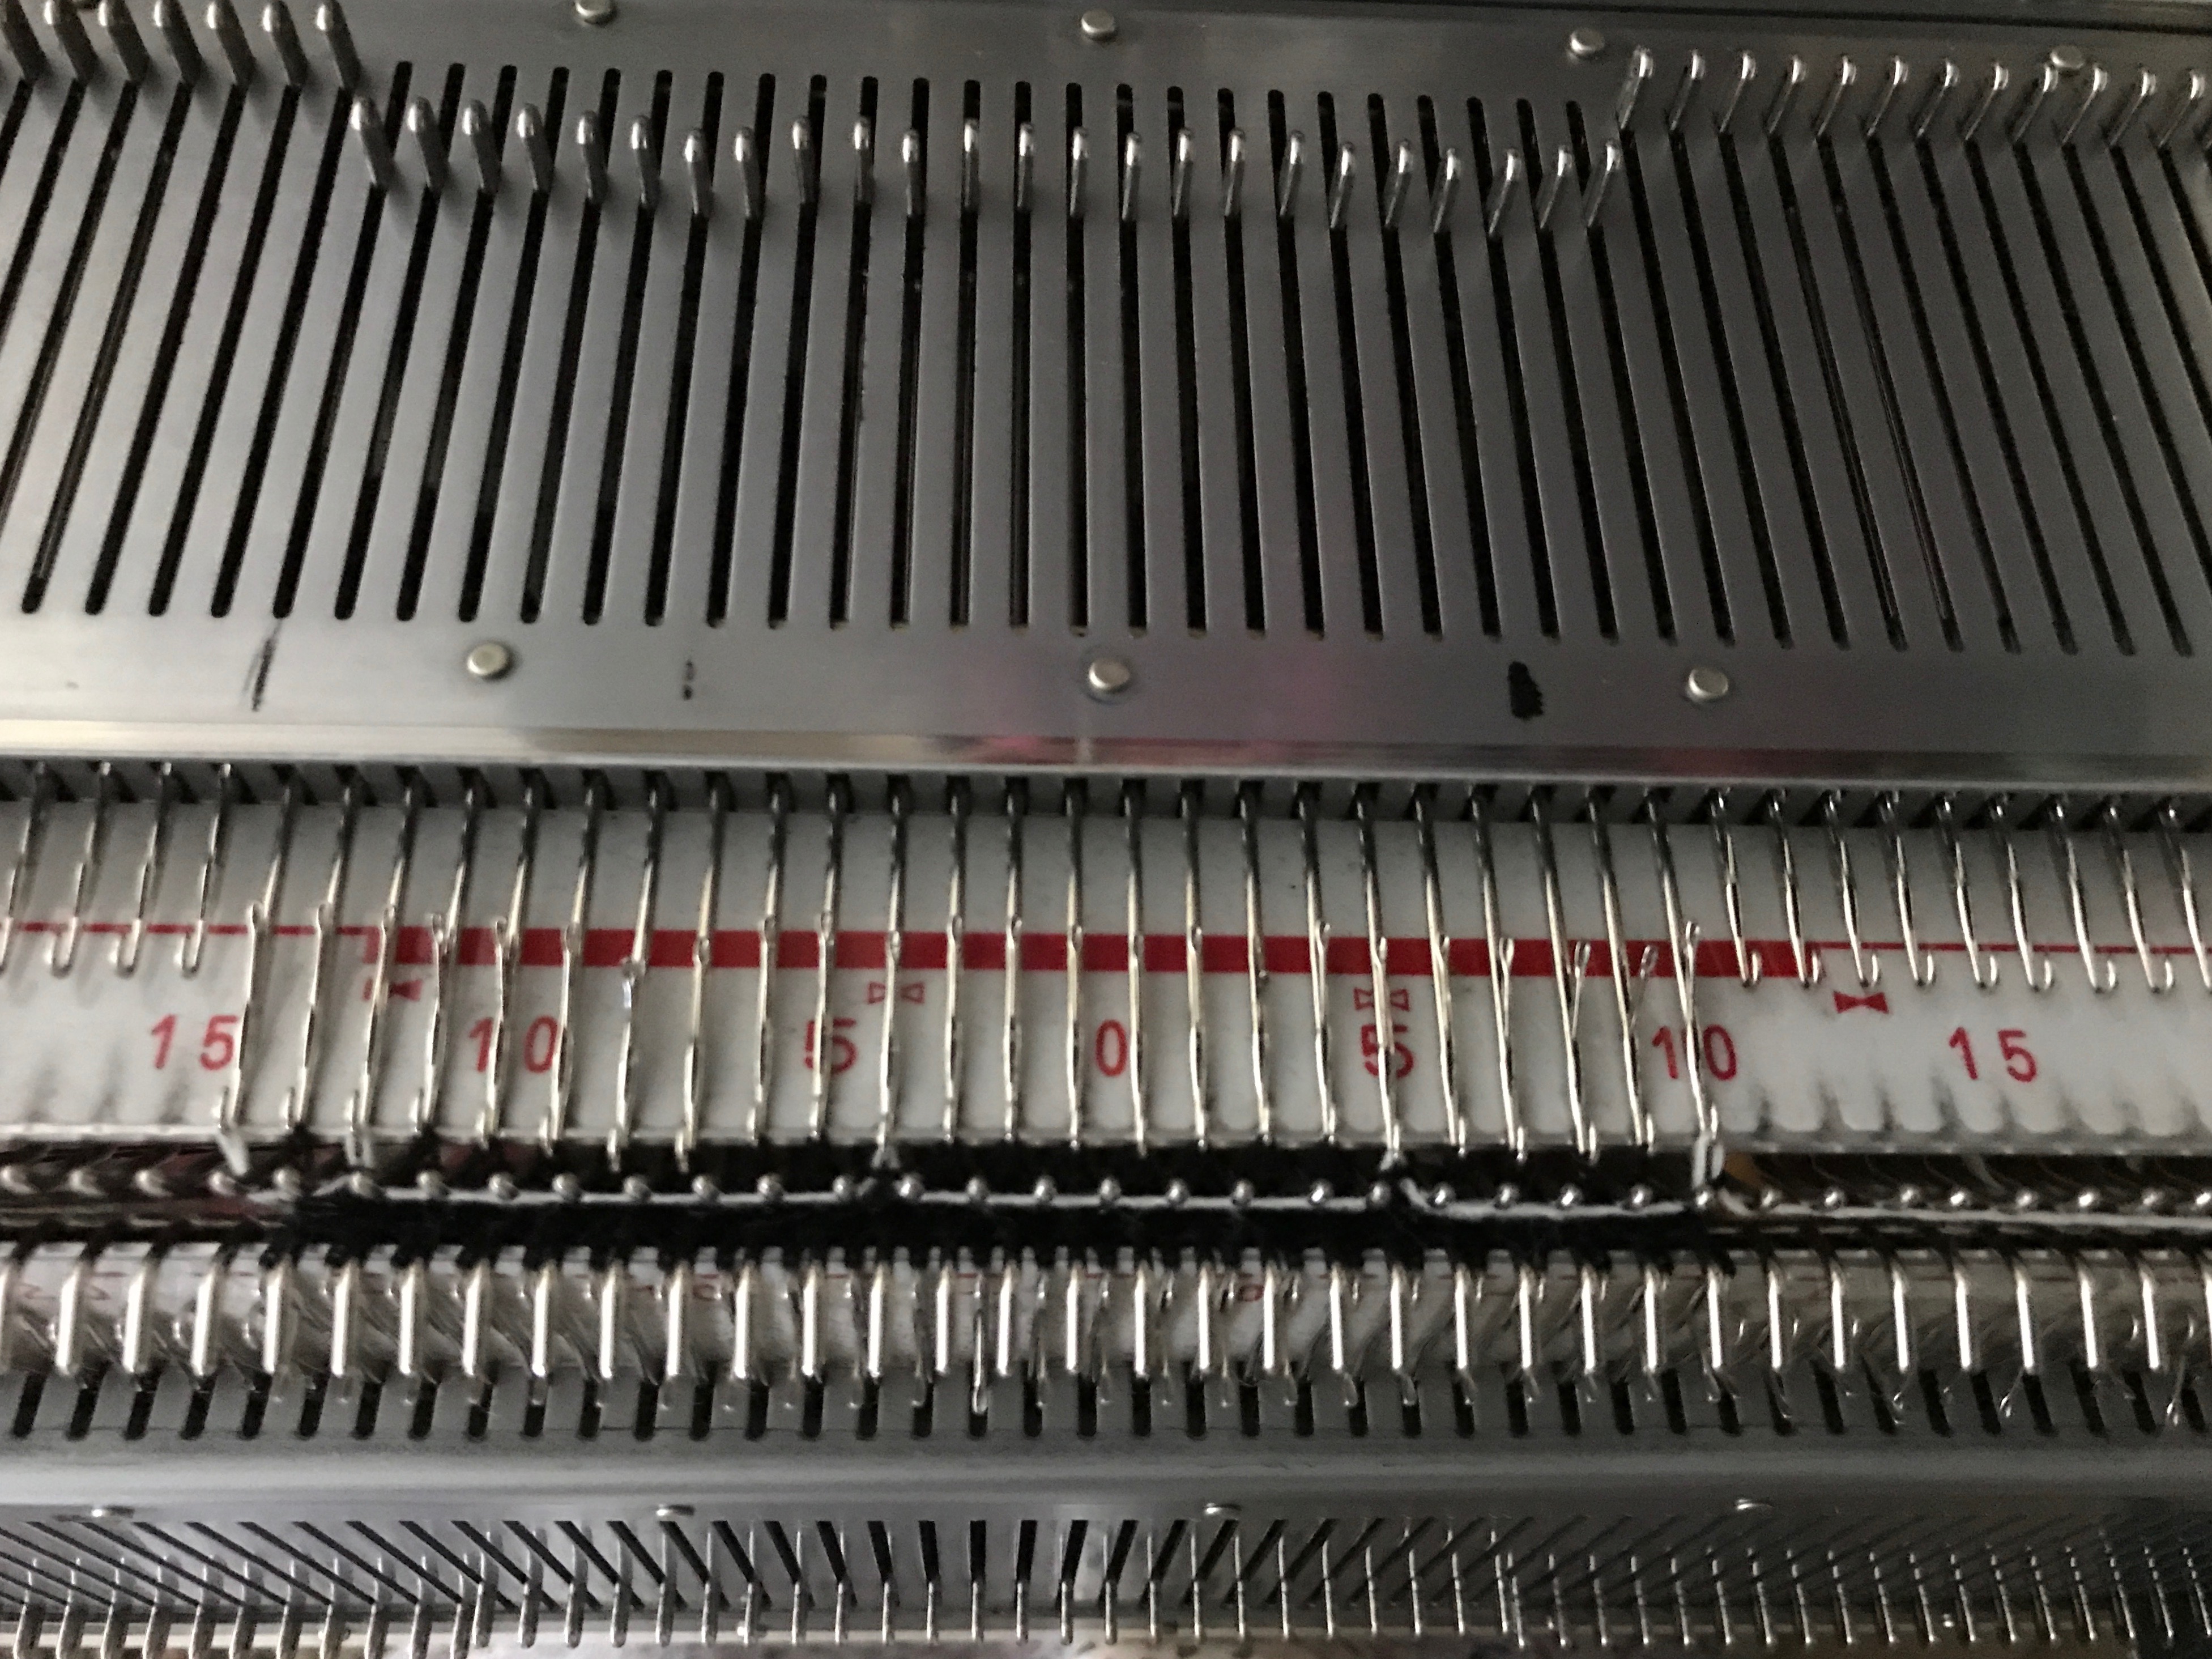


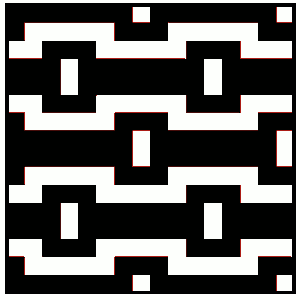
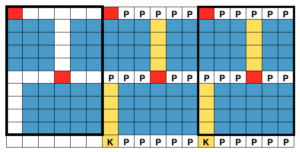
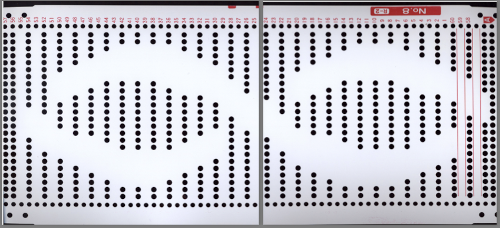
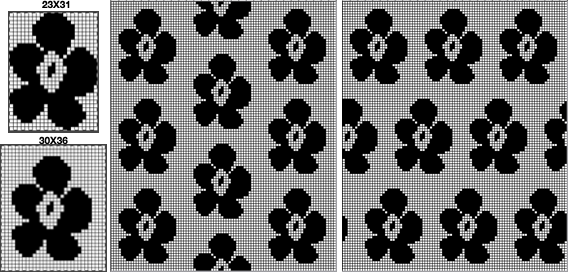
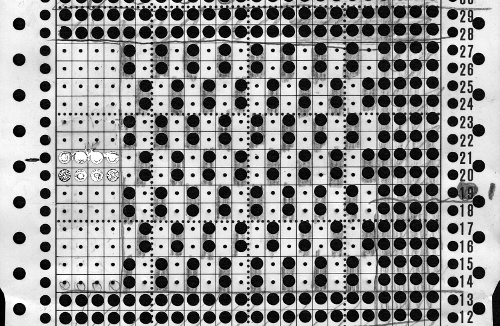
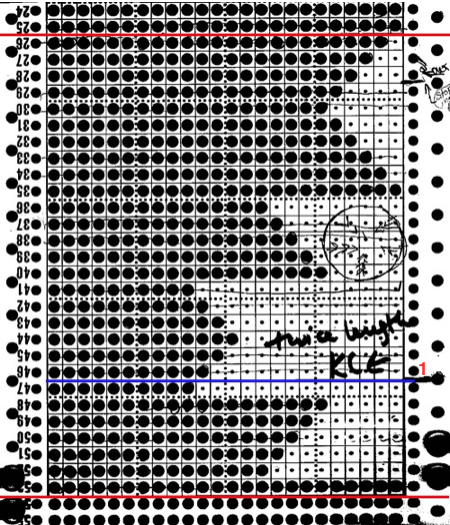
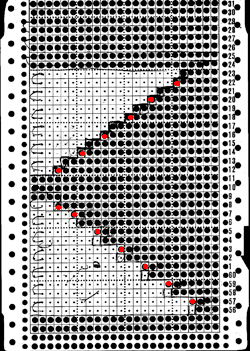
 This is my first experiment with gathered slip stitch floats on the purl side of the knit. To begin, this chart indicates one punchcard pattern’s full repeat in width. Four repeats in length would be required (the punchcard minimum repeat in length to achieve smooth continuous card feeding is 36 rows). Punch out blue squares, leaving white ones unpunched. A single repeat (outlined in black, 8 stitches by 12 rows) is for use in electronic patterning, where one may alternately draw or program white squares, then use color reverse. The red line represents 0 needle position in Brother KM
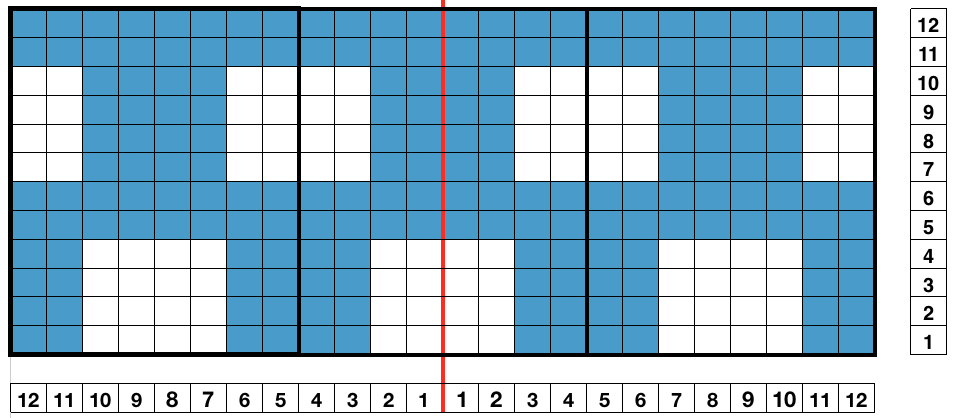

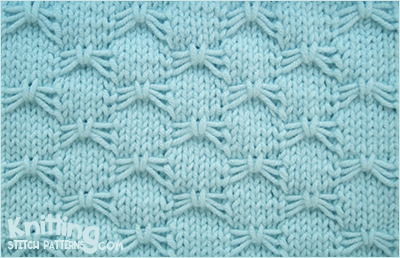
 result with color reverse
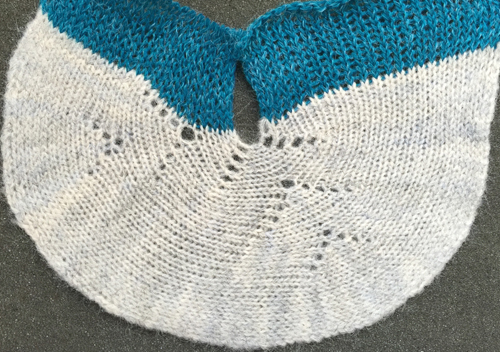
  working out a mylar, electronic (unless DM 80 40 stitch width is in use) repeat for a variation of the fabric knit single bed. The stitch count is odd, allowing for a center stitch manipulation. KCI is used to make certain the first and last needles knit on each side. Floats created close to edges may be left without hooking them up. The fabric separates slightly along the “bowknot” edges
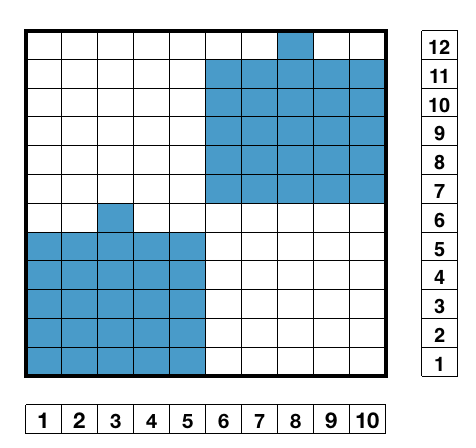
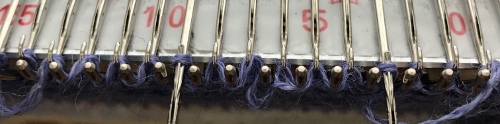
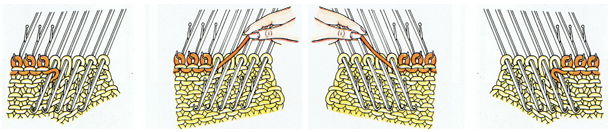
 lift them up and onto that single non selected needle, push that needle out to hold
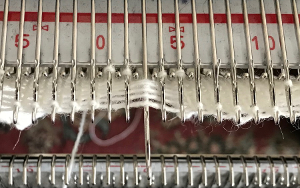 with the next pass the single needle and loops knit off together and become part of the alternating all knit block in the design
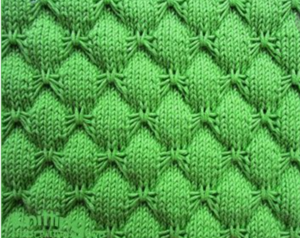
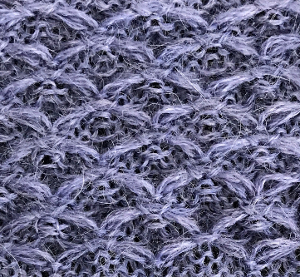
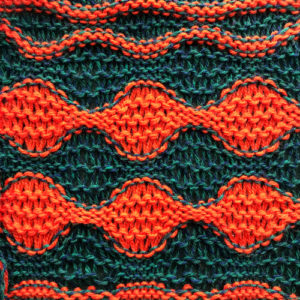
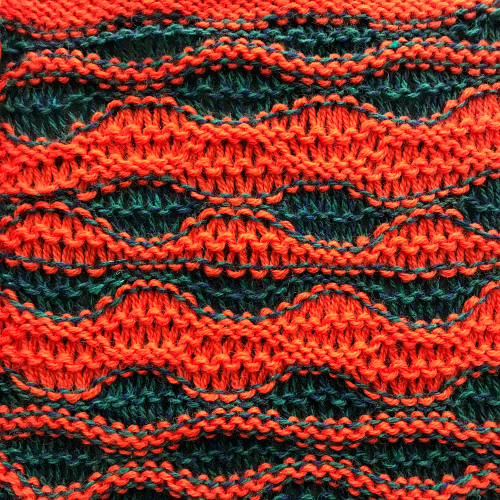
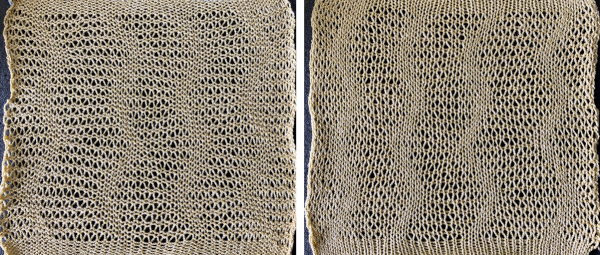
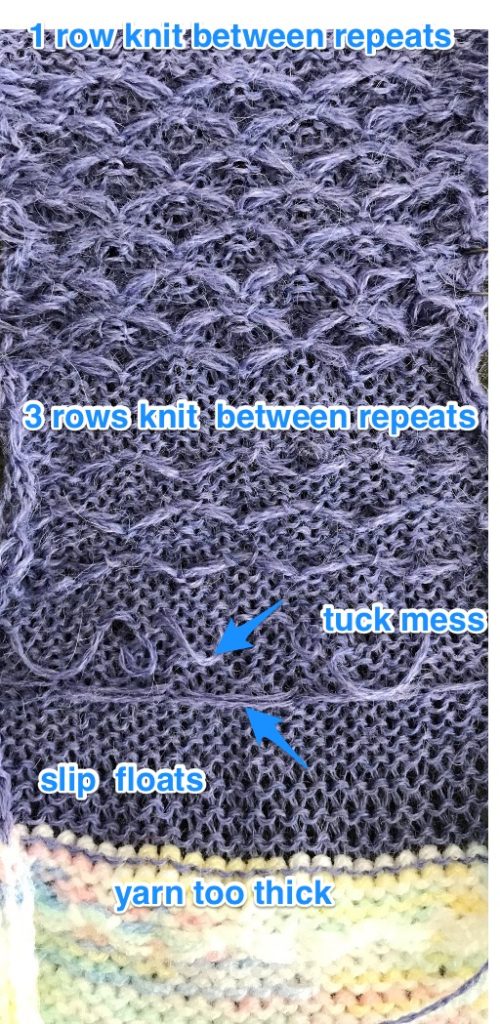
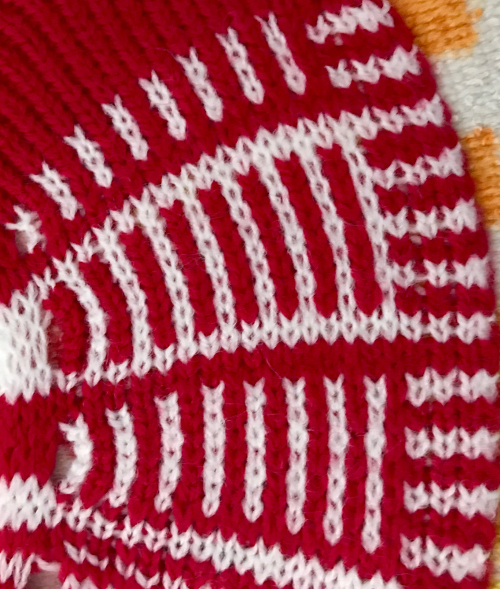
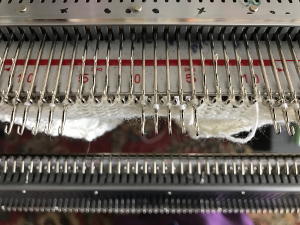 the swatches are knit in a 2/15 wool, the fabric might be better served using a thicker yarn. Here the “blocks” creating “floats” are side by side
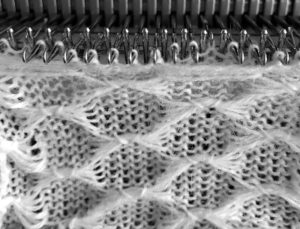
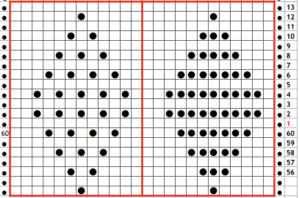
 adding border stitches, and more theory on the placement of stitch type
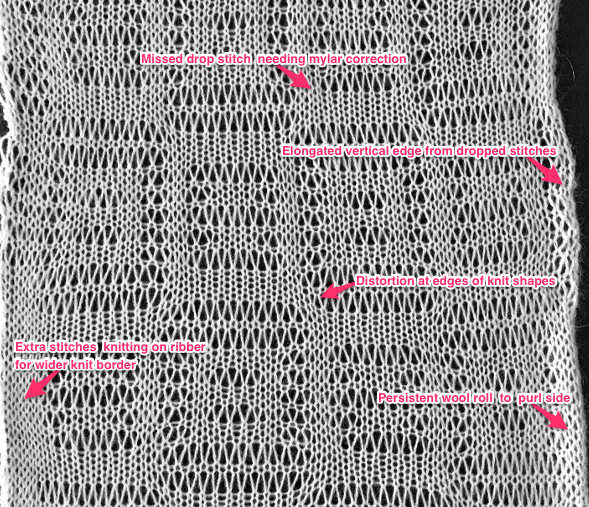
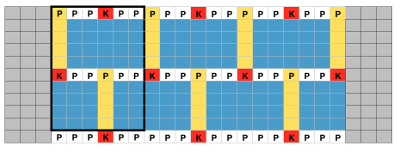 the result places “knit” stitches in the center of butterfly (magenta arrow), not at its sides, and I see and extra purl stitch (green arrow). Multiple stitch-wide borders create unwanted floats on one side
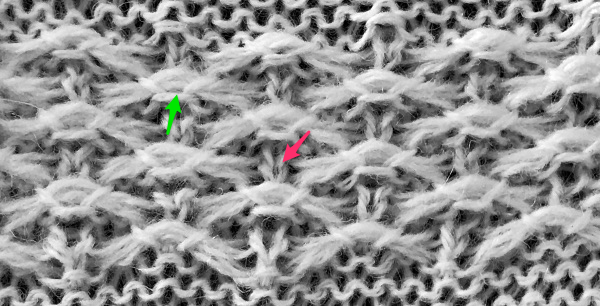 back to the drawing board and working things out first as a hand technique
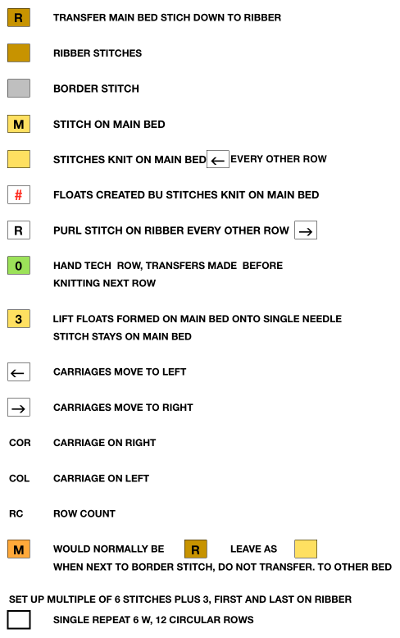
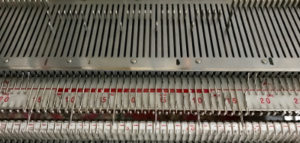
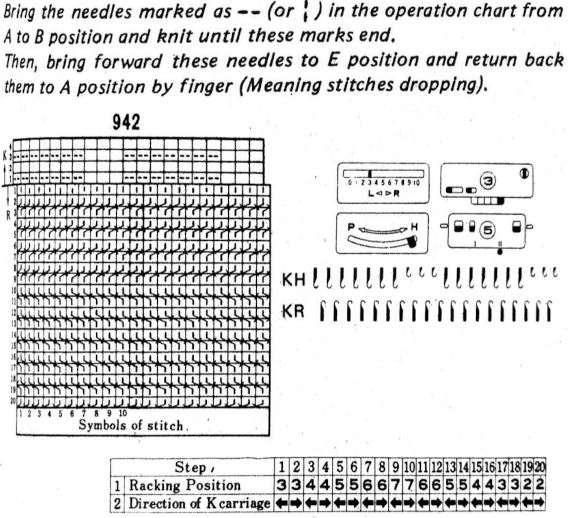
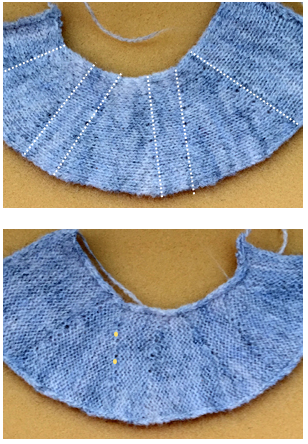
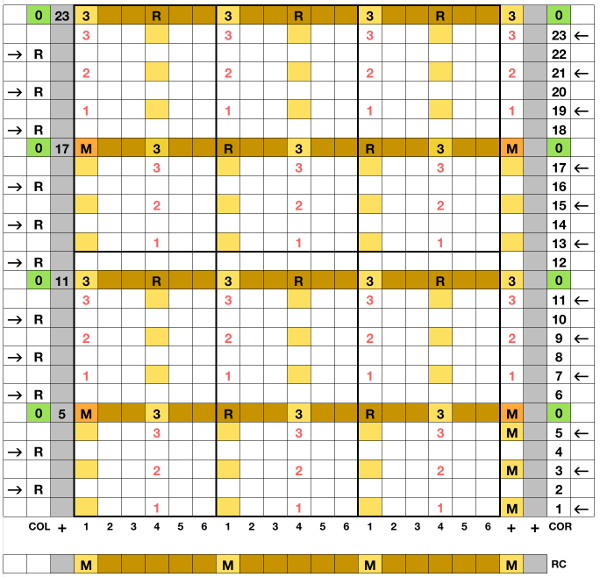 I began with my carriage on the right (COR), after setting up the repeat on a multiple of 6 stitches +3 as indicated above. The last stitch on either side on both beds is never transferred, and the short loops of every other set (rows 5 and 17 in the chart) are not hooked up. This will produce a slightly rolled edge on each side. The larger number of border stitches becomes problematic. The photos were taken while knitting 2 different swatches, so needle tape markings are not the same in all photos. To produce the circular knit, opposite part buttons are pushed in so with carriage on the right (COR), the settings would be
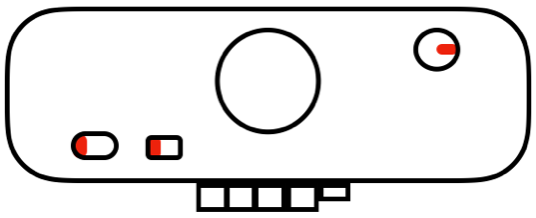

 after the three floats have been hooked up, with COL each time, the in-between main bed stitches are transferred back down to ribber
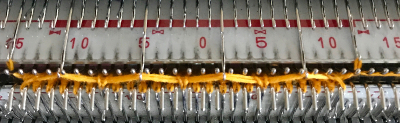

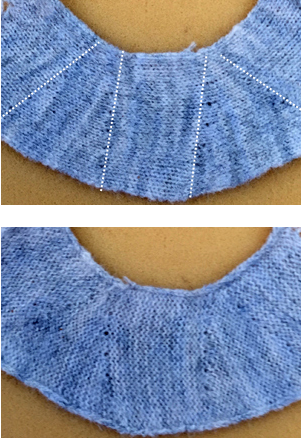
 reducing main bed count so only one needle is left on either side of a selected one
 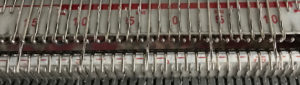 that needle (green arrow, gets transferred down to ribber
  now the number of needles involved on both beds is evident on both beds
 While knitting in the pattern the ribber pitch is set on P (point to point) to keep stitches on opposing beds centered (P pitch also makes it easier to transfer directly from one bed to the other). If the cast-on is for every other needle rib with stitches then transferred between beds for pattern knitting set up, the cast-on and all rib rows need to be knit in H pitch, with a switch to P for transfers and knitting in pattern to be completed. With the first row set up on the selected segment of the needle bed, there are additional steps to take.
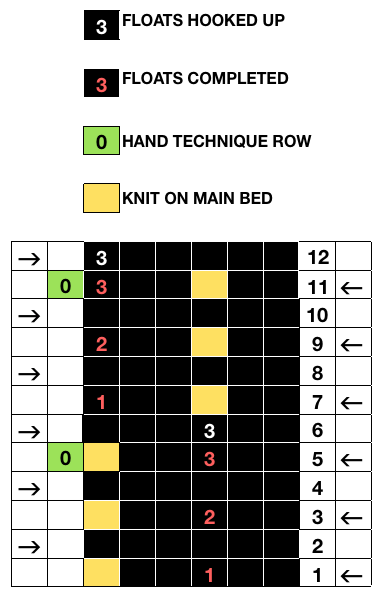
 Hand techniques will now also occur when carriages are on the left, on RC 5, 11, etc as described in the hand technique chart, on rows with no needle selection. As in hand tech, transfers and multiple loops containing needles are brought out to hold before moving the carriages from left to right and selecting the needles for the next set of floats with that same pass.
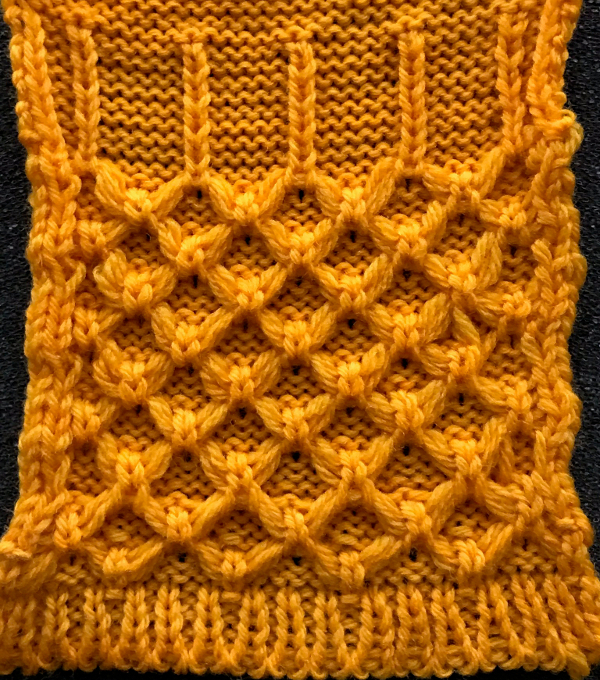
 revised with fewer single dots, and solid lines in the ground
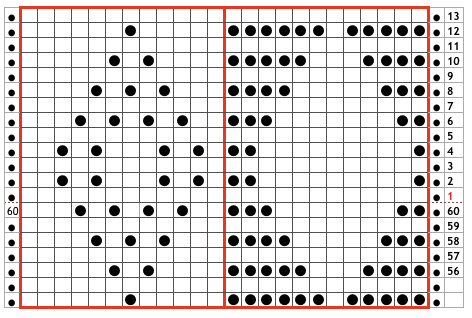
 using any method you prefer, set up knitting so all stitches are on the ribber. If you prefer to set up complete repeats prior to watching, “air knitting” prior to ribber set up or using the position option on the main bed if that is available, will help achieve that
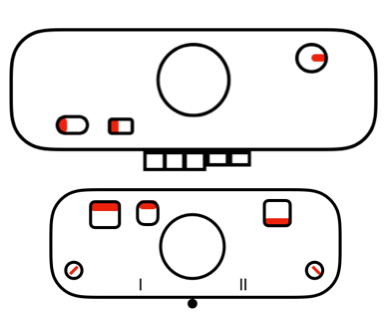
 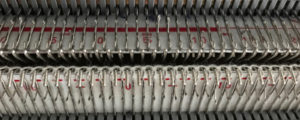 set knit carriage to KC II (used when patterning does not occur on every needle across the needle bed), both part buttons pushed in for free pass to the opposite side of km, no knitting occurs but the first row of pattern knitting is selected. Ribber is set to N<–> throughout
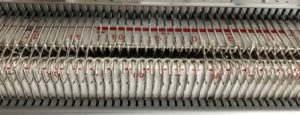 the carriages now move to the opposite side, selected needles on the main bed pick up loops, and nonselected needles stay empty. Ribber knits every stitch
 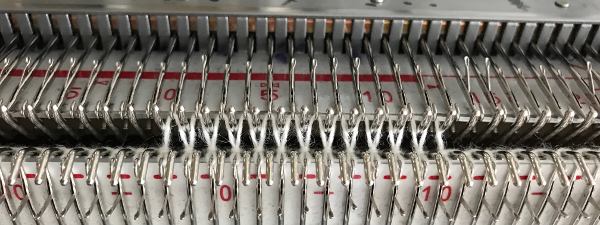 using a ribber cast on comb, stitch “dumper”, or another tool, move needles holding stitches forward to drop loops, and return empty needles to work position (B)
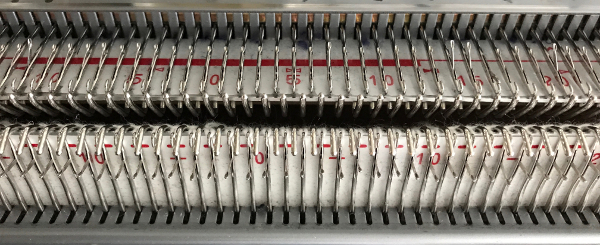 as carriages move to the opposite side, needles are selected for next row of knit stitches to be knit on main bed
 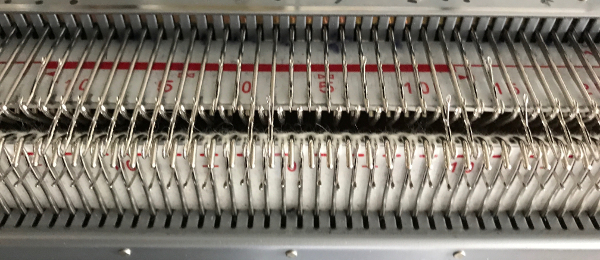 carriages now move to the opposite side, loops are picked up on selected needles
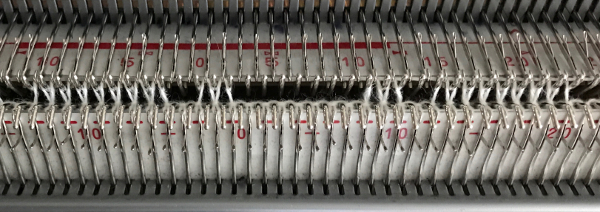
 carriages move to the opposite side, picking up loops
 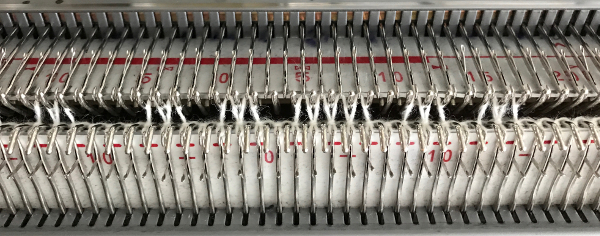 before carriages move again, drop stitches formed. Watch loops after they are dropped, if tugging knitting it is not enough to pull them out of the way of needles returning to patterning, take a tool, or something like a credit card. Slide it from one side to the other between the beds, thus keeping loops clear away from the main bed
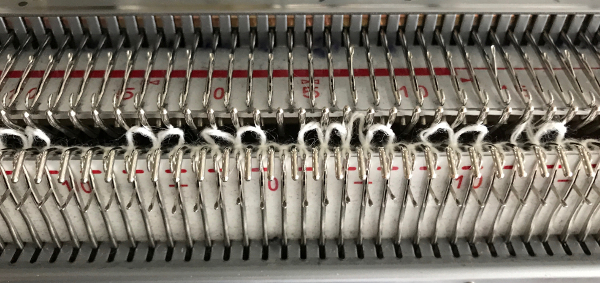
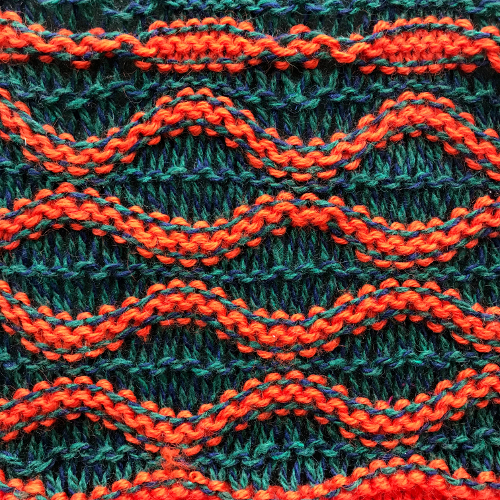
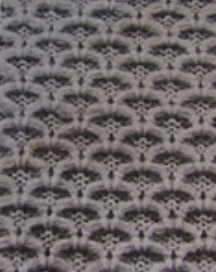
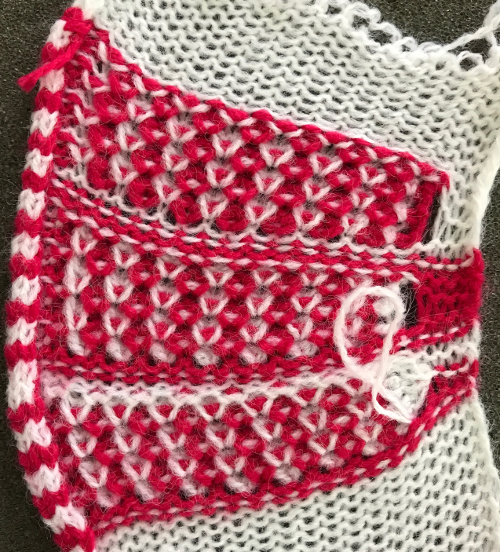
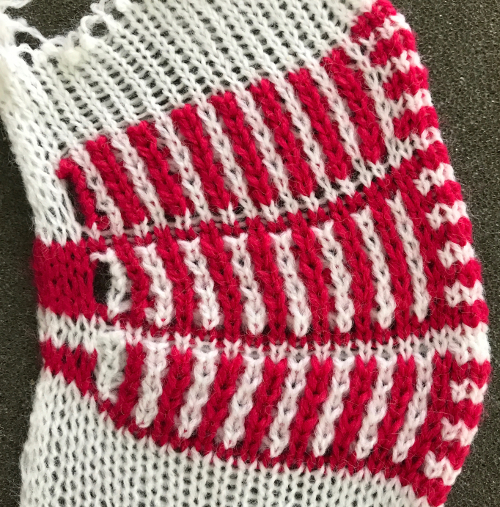
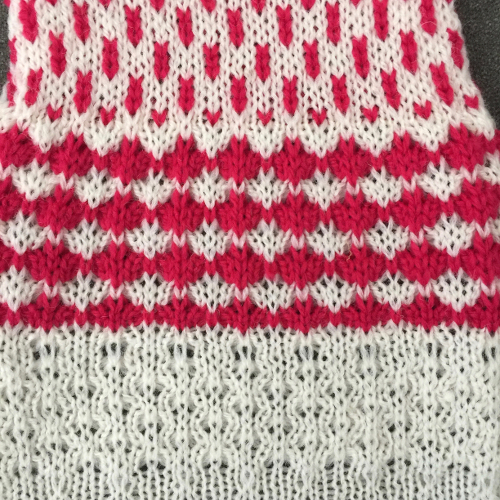
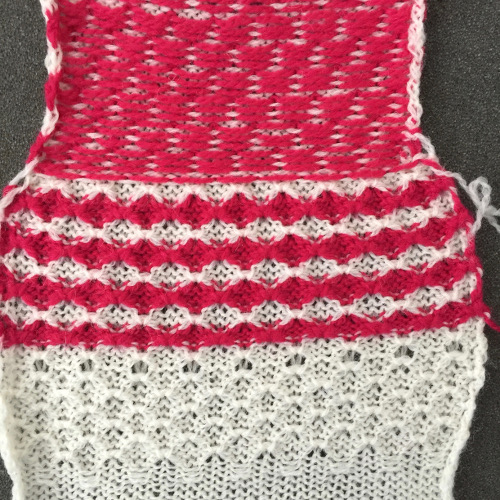
 purl side is shown first for each segment, followed by its knit
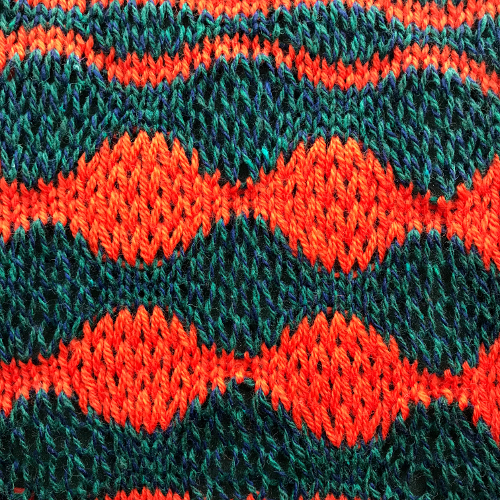

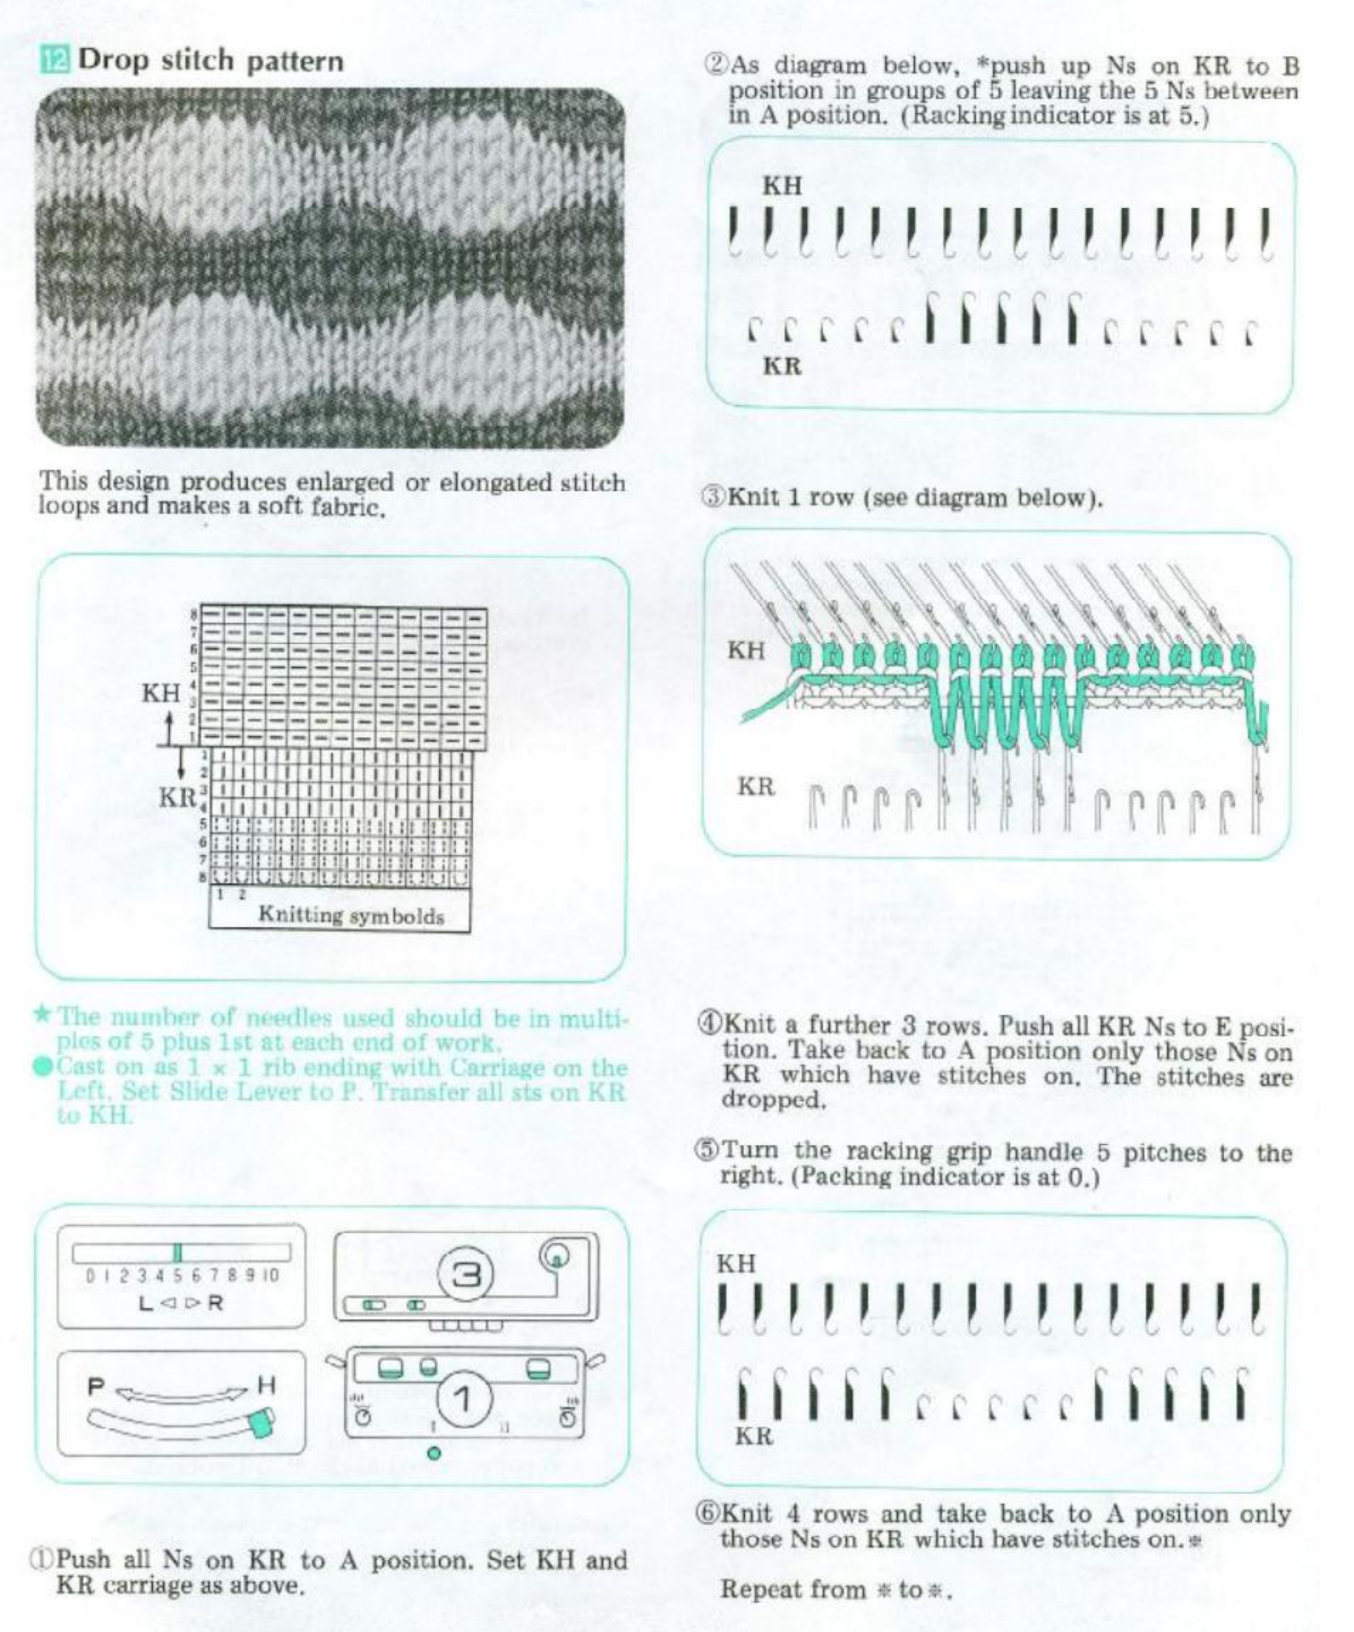
 If using punchcard machines, factory issue punch cards provided with the KM may be used
 A slip stitch edge may be planned to keep edges of items such as scarves from rolling
  consider top and bottom edgings that include the technique (illustrated in the
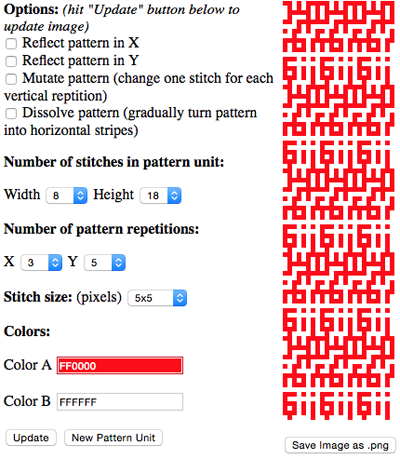
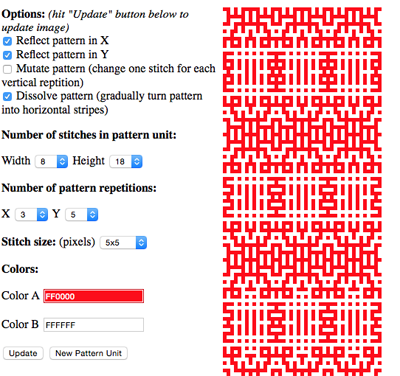
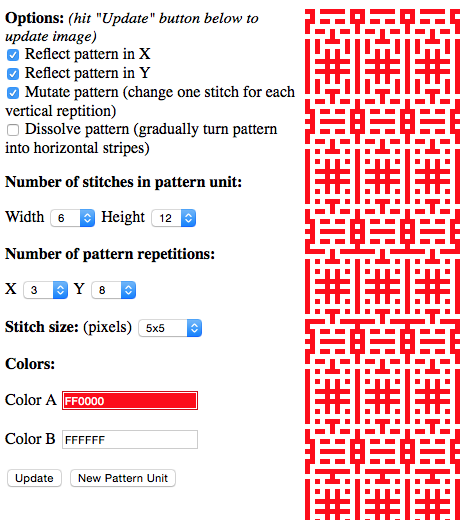
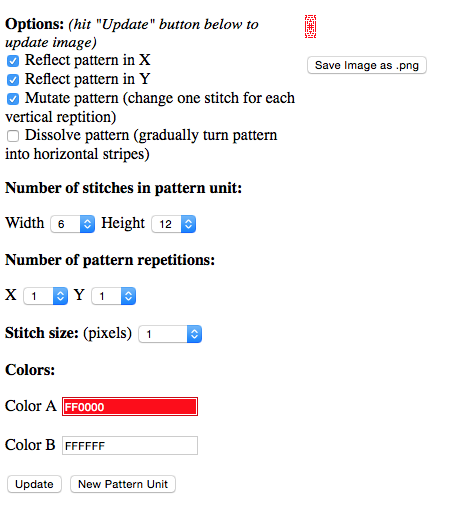
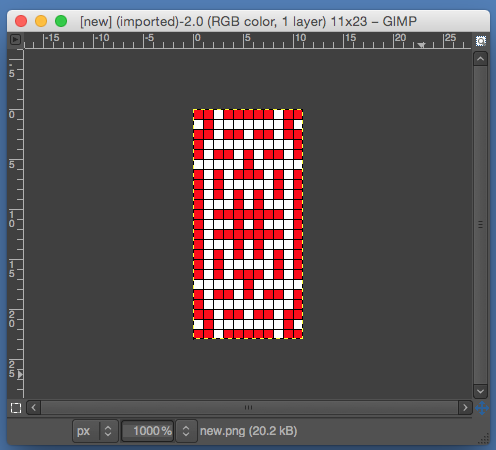
 An alternative way to produce this fabric on Brother is to use the knit carriage with no yarn to do the “stitch ditching”. The basic design programmed into any brother machine, electronic or punchcard will need to be altered. The intended design in my sample is a 4 X 4 square, colors represent what would be punched holes, black squares, or pixels. Simple block patterns such as these may be released upon completion of each “square” series, in this case, after 4-row segments.
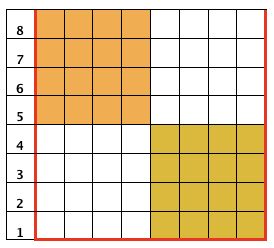
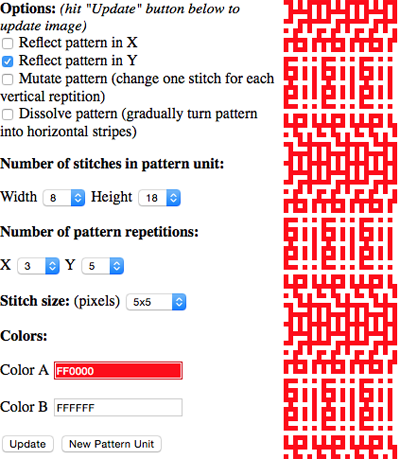
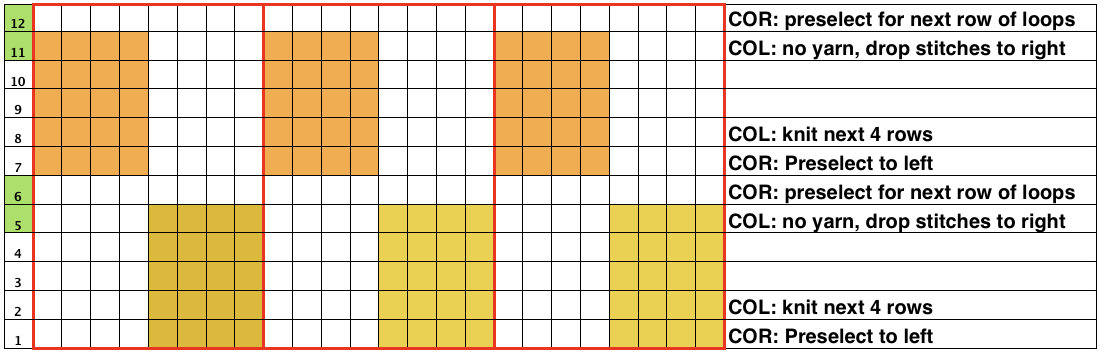 Rows 5 and 6, 11, and 12 are not part of the original repeat. The 5th design row provides needle selection, traveling from right to left. When the carriage passes in turn from left to right with no yarn, those preselected needles will drop while preselecting a blank design row (6) that allows the carriage to return to the left-hand side. As it moves back to the left, the carriage will preselect the first row of the design. With COL yarn is picked up in order to knit the next set of dropped stitches. A color change may be made while the carriage is on the left.
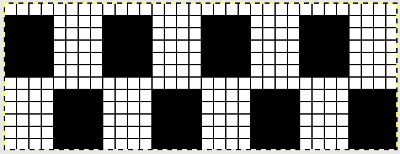
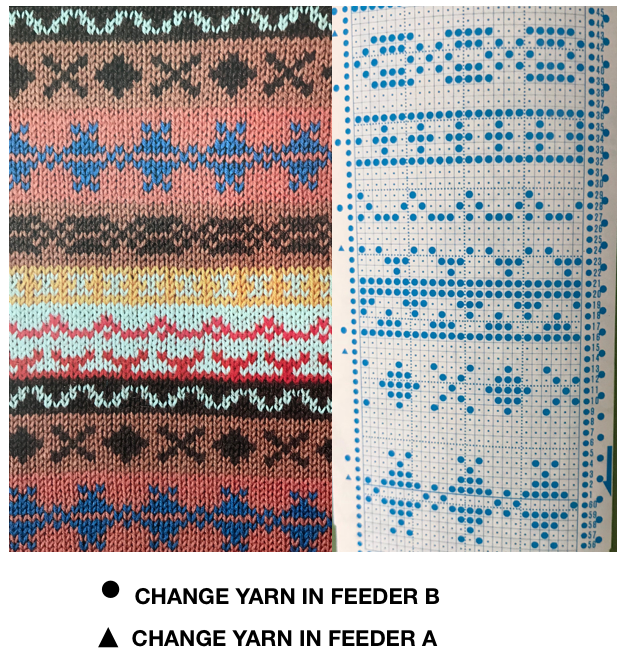
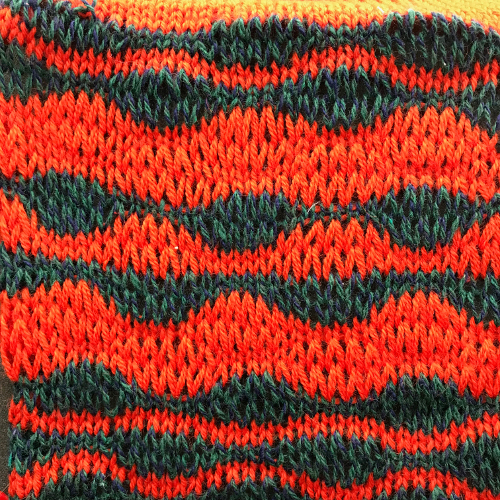
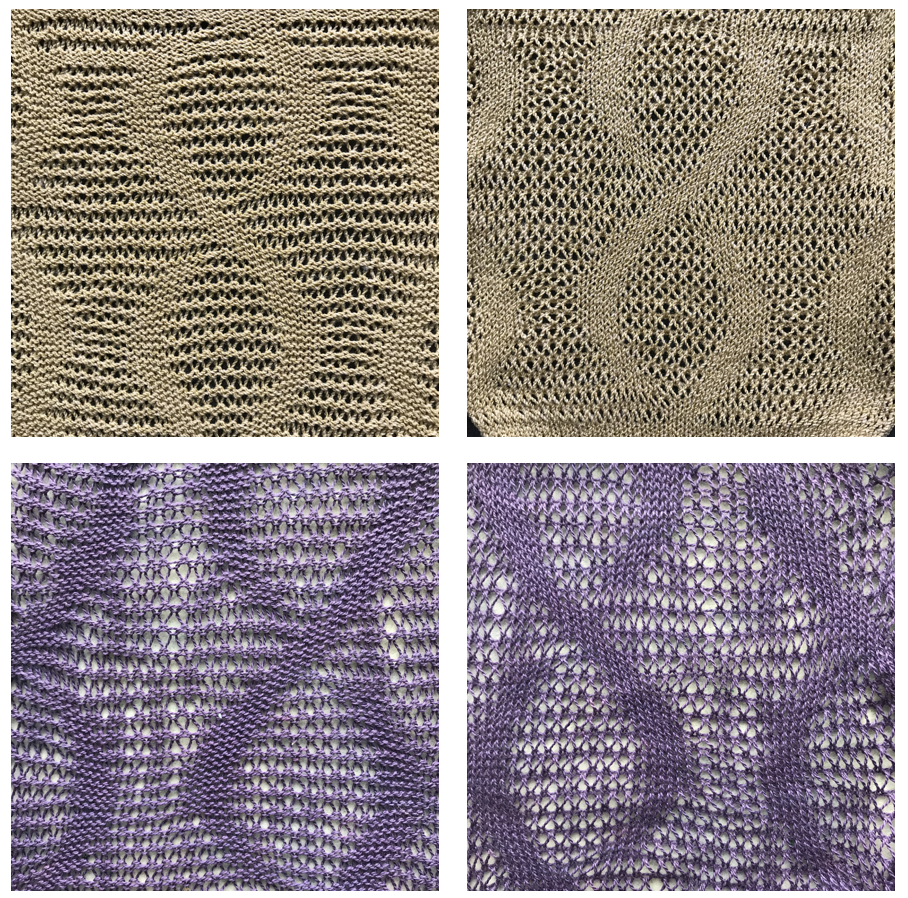
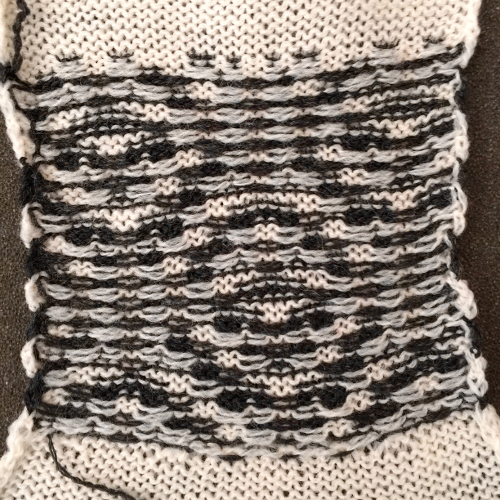
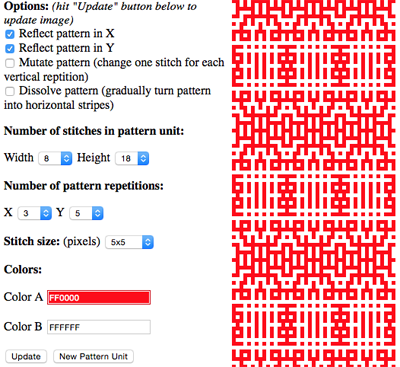
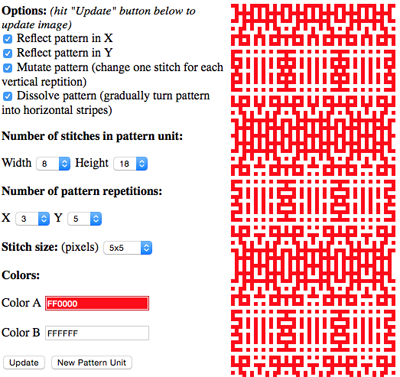
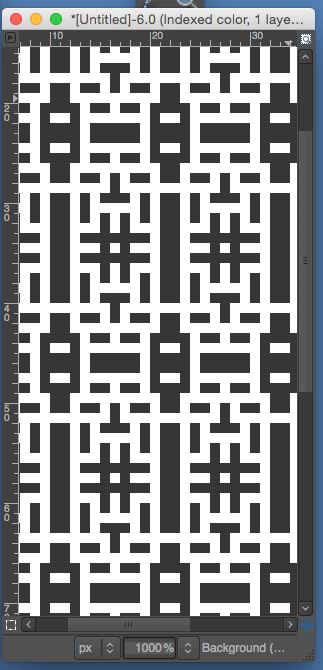
 More to try: the typical appearance to look for in the source inspiration is that of single-row horizontal geometric designs with all blank rows separating them from each other.
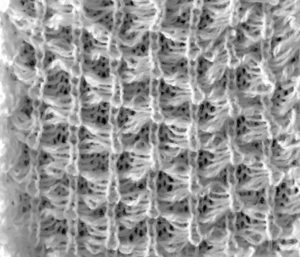
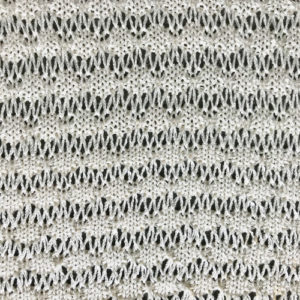
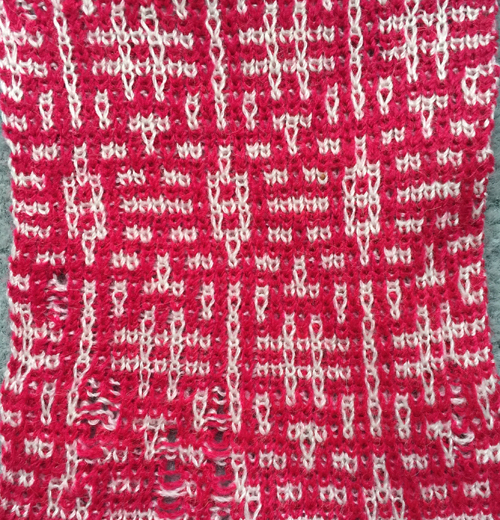
 The yarn used here was a softly spun rayon that began eventually to split, and get partially caught up on gate pegs, leading to the ending of the swatch
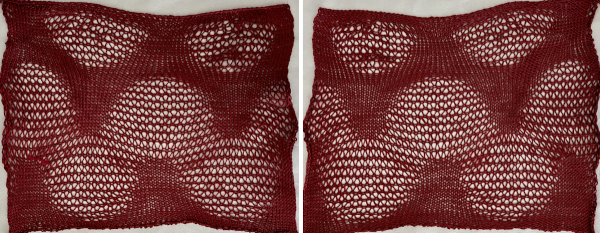
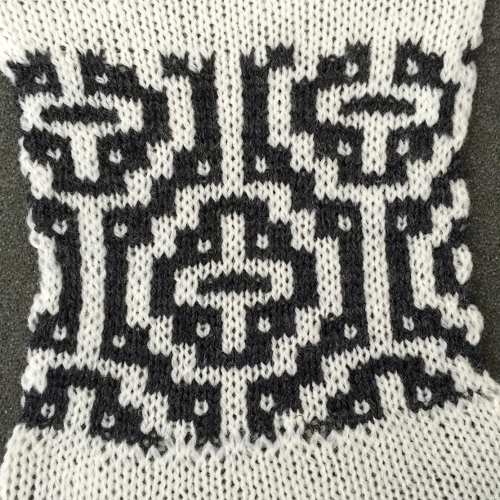
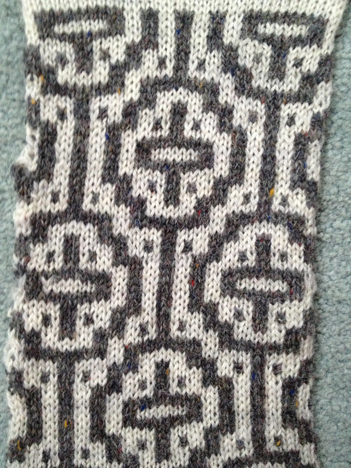
 Fair Isle
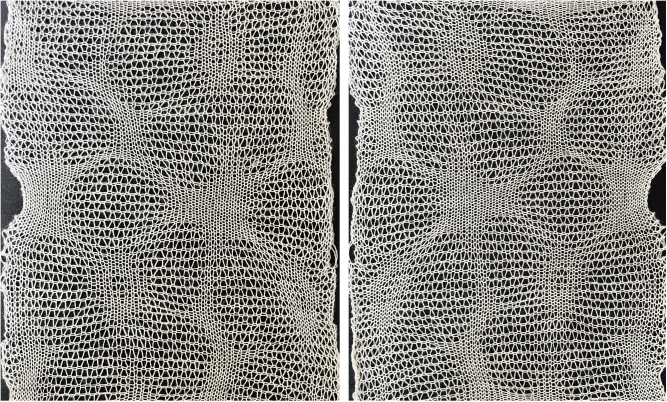
 a bit closer,
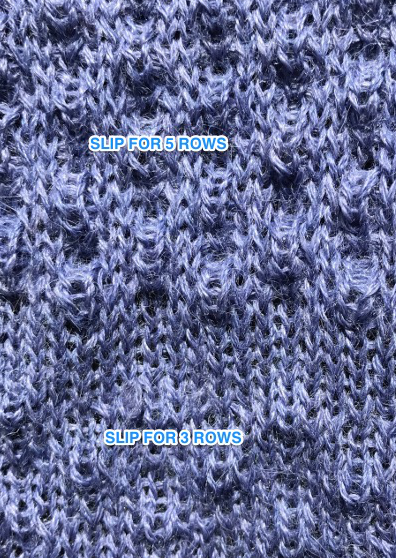


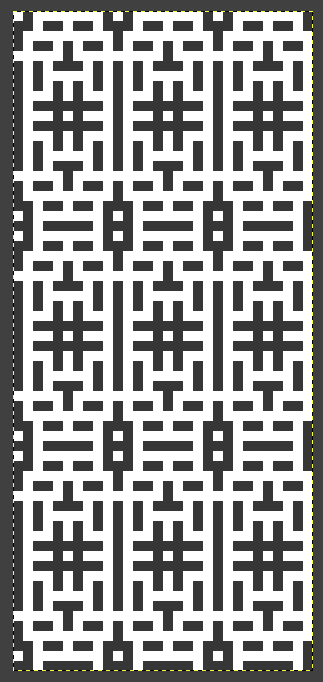
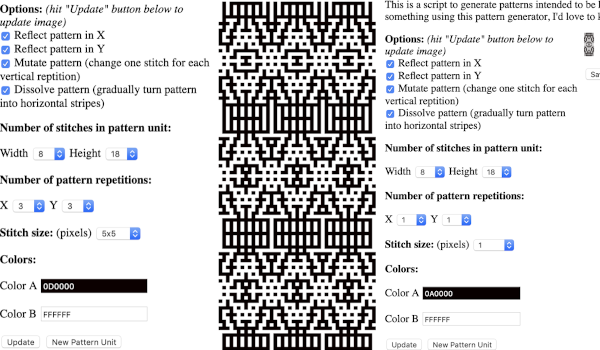 the BMP in Gimp, explored in two renditions, eliminating double lines
 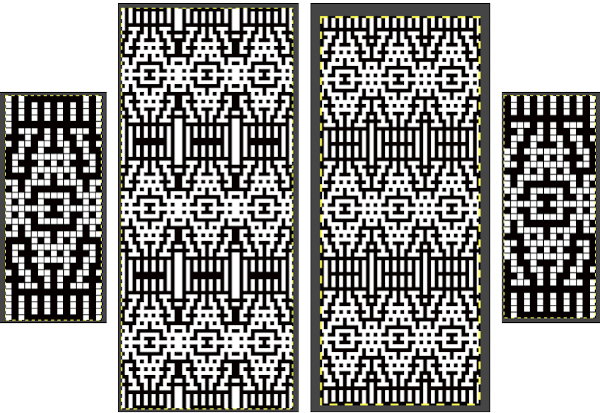 The proof of concept swatch for the version on the right and knit in tuck stitch
 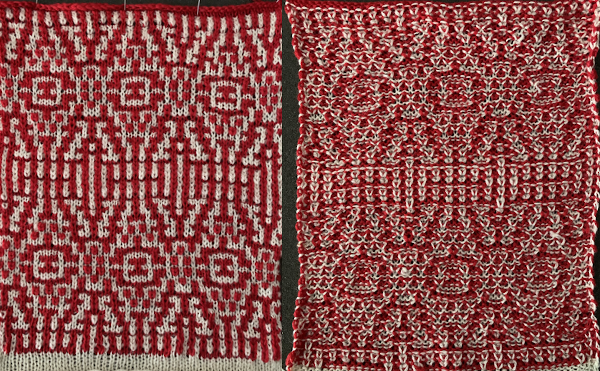 the double-length BMP ready for knitting, 14X68