One is limited to imagination, skill, and patience when working short-rowed fabrics. The techniques may be used in borders, on isolated areas, symmetrically or not, and the yarn, in turn, may be able to be pressed, stiffened, felted (which minimizes any slits), or otherwise processed to achieve desired effects. The scale of the shapes affects both the final look and purpose. Development for large sculptural pieces is very different from that used if one is aiming toward a comfortable, perhaps even flattering variable in a garment, but both can blend for interesting one-offs or even collections.
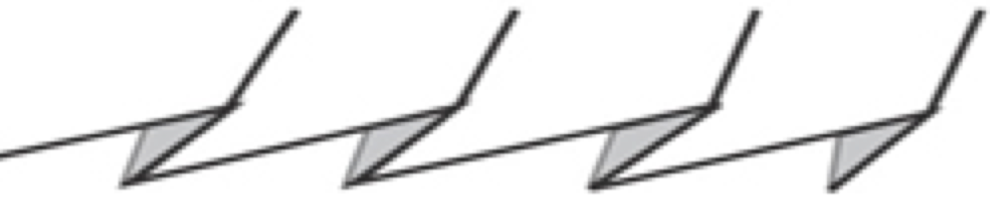
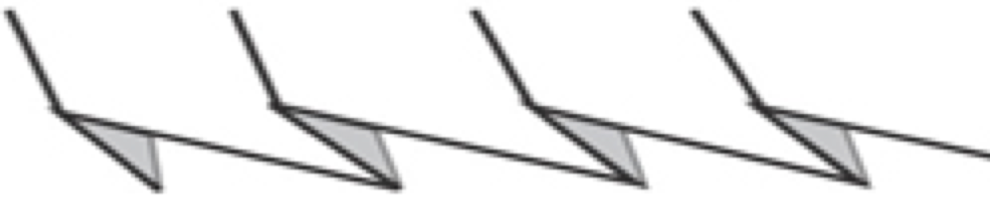
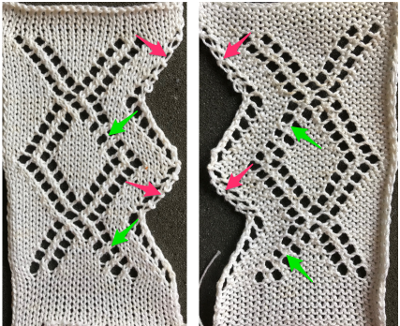
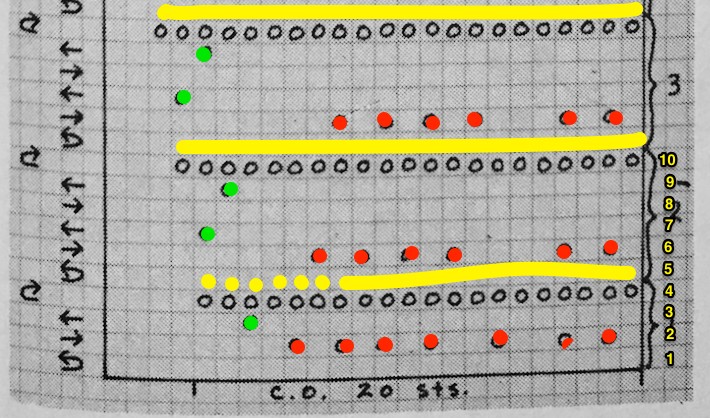
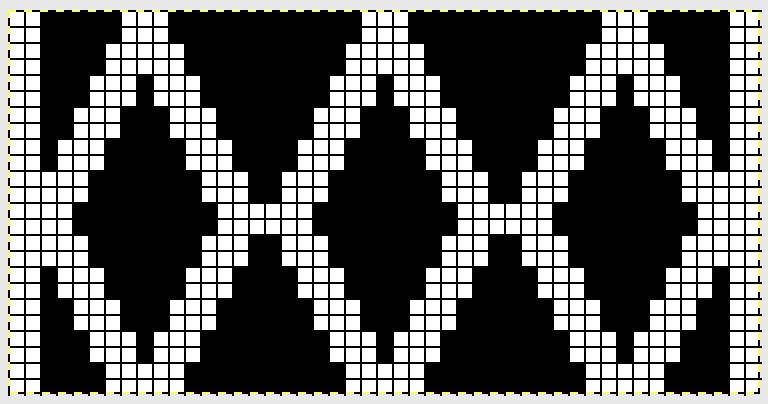
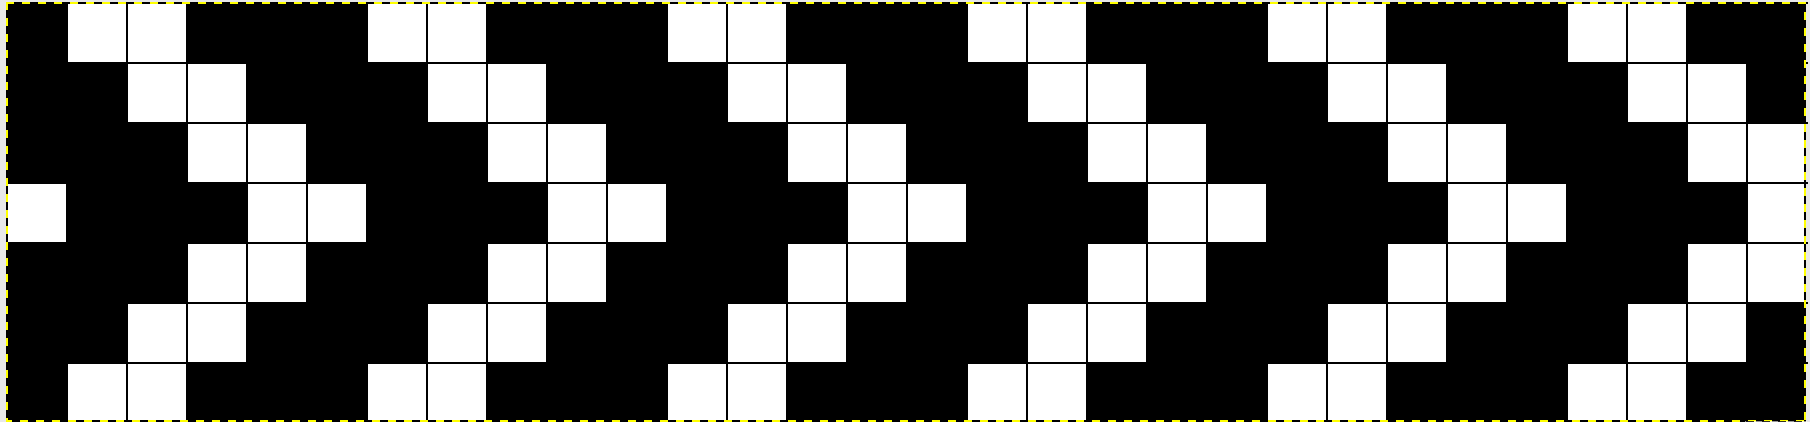
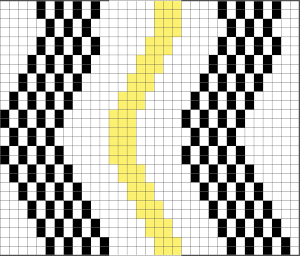
The usual conventions apply: stitches are brought to hold opposite the carriage side, or floats will be created, indicated by yellow curved lines 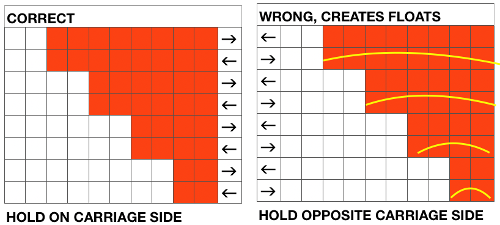 That is a rule that may be broken when planned angles require decreases every row, and a decision is made that such floats and their respective width are acceptable.
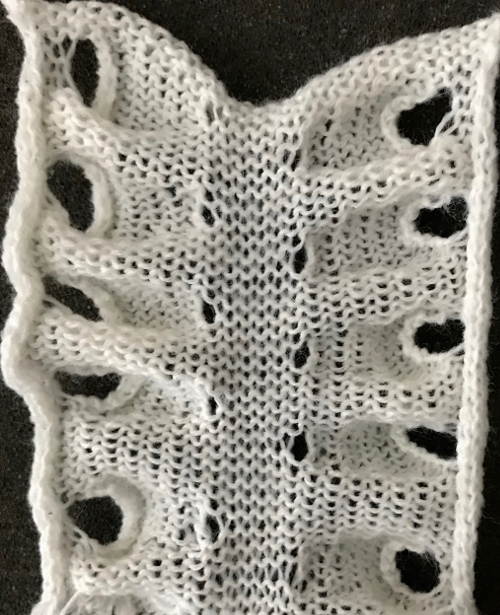
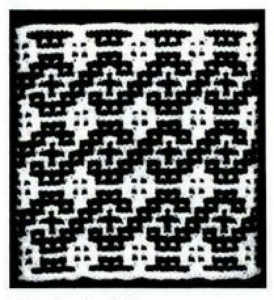
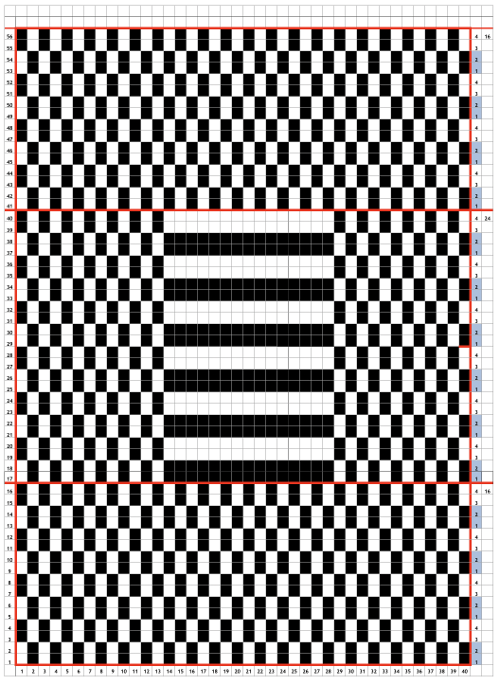
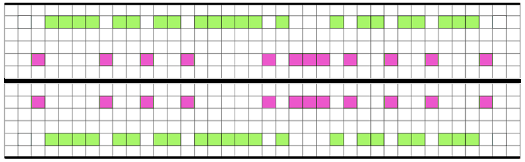
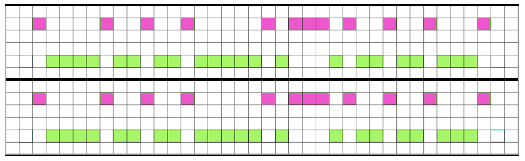
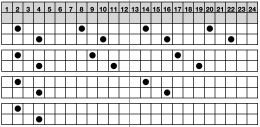
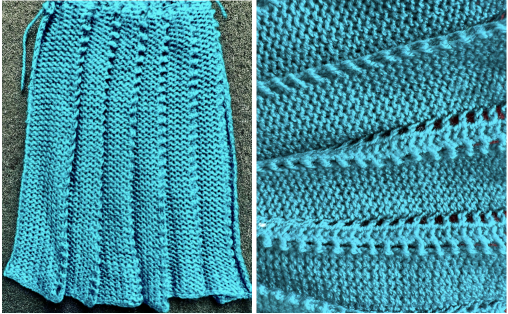
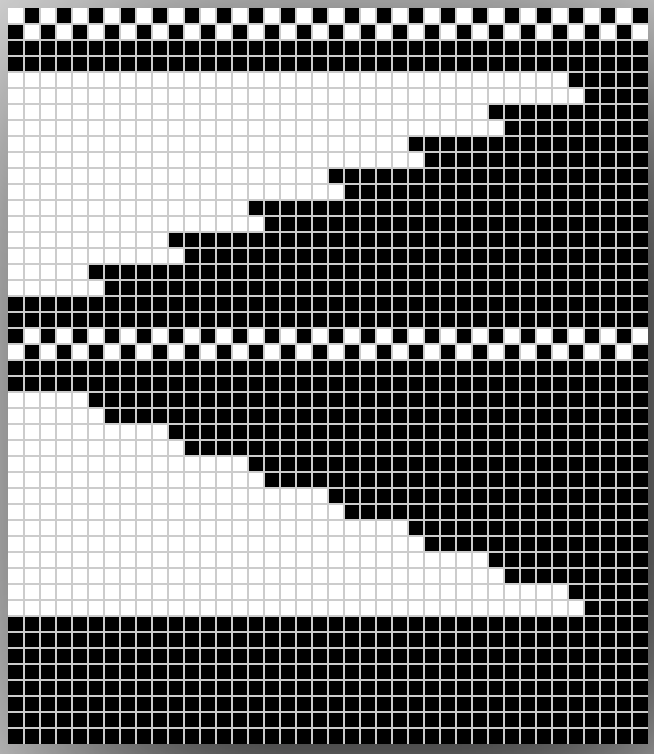
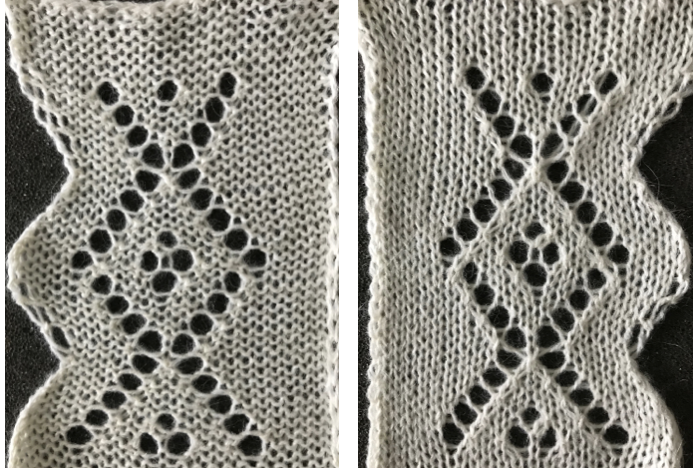
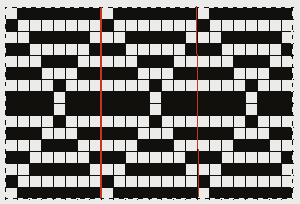
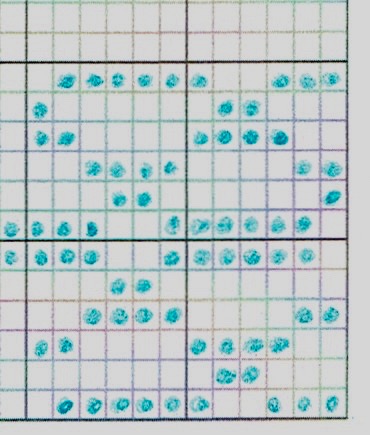
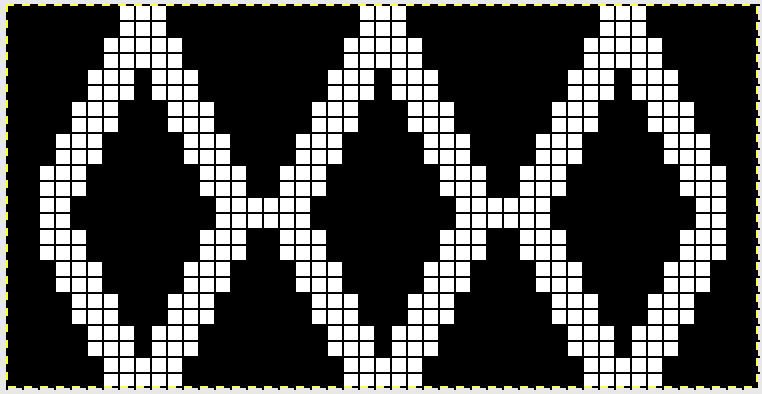
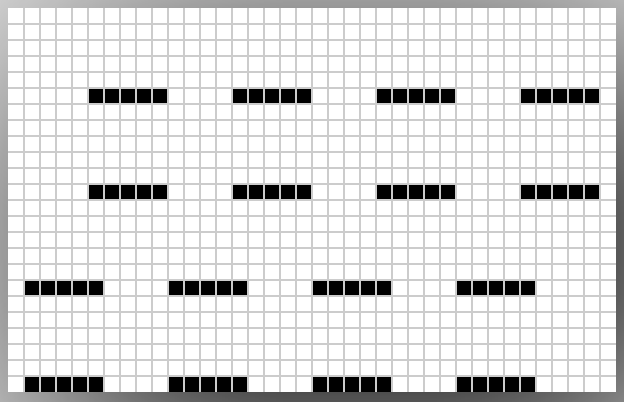
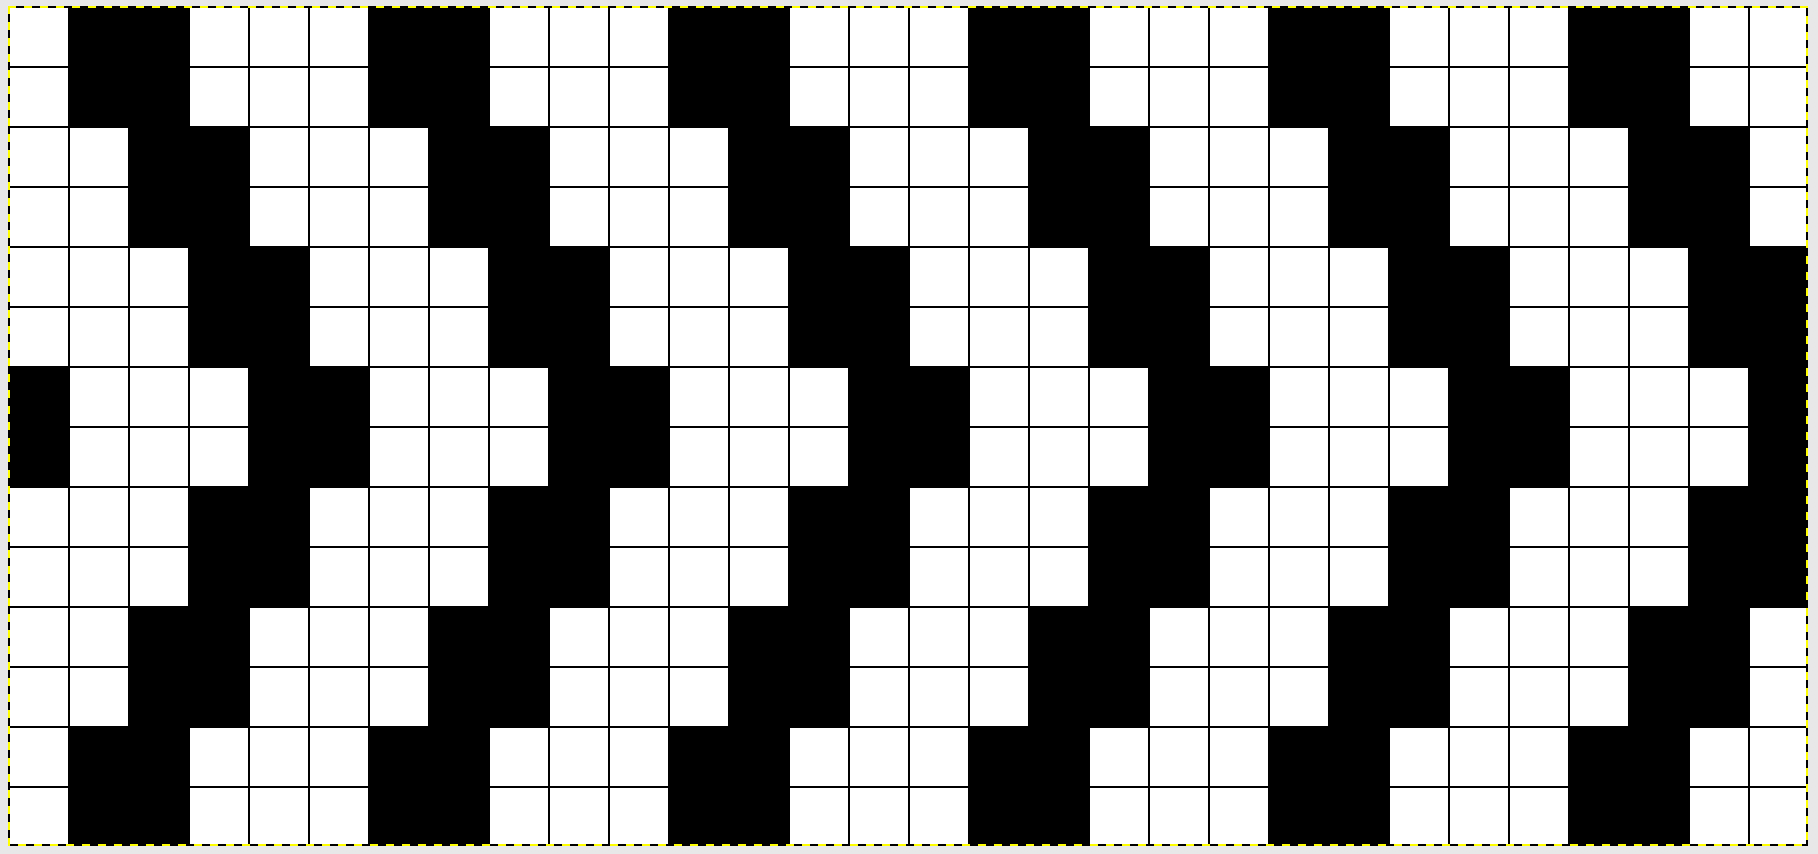
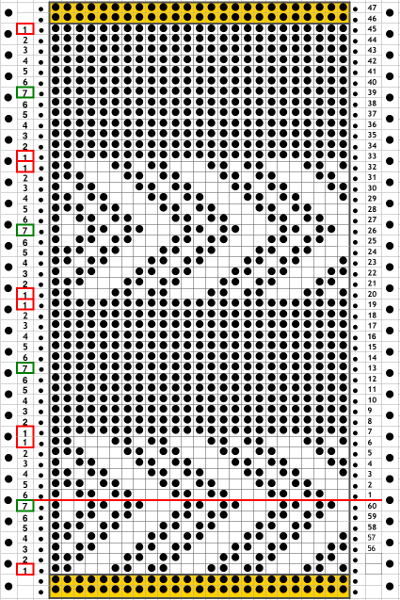
There are many more variations of the patterns I have previously referred to as “wisteria”. This is one, using different (2) width repeats in a systemic manner across a piece. I find myself going to a spreadsheet prior to any actual knitting nowadays. Low tech can achieve the same, and be as basic as colored pencils on graph paper. Representing actual rows knit would make for a very long chart. This is a compressed version with red representing rows knit on that portion of the needles in work, the other colors for each of the 7 and 9 stitch repeats respectively 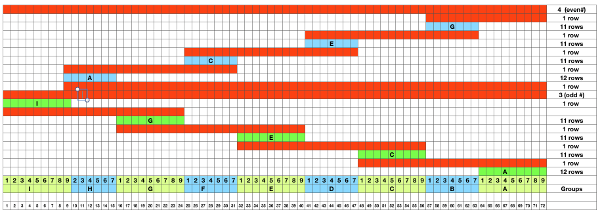 some sense of how repeats would line up, again not to proper scale
 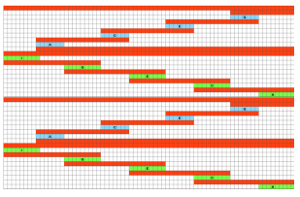 To knit: cast on and knit at least 4 rows on the desired width for the planned piece. I prefer to end COR, but directions could easily be reversed for a start from the opposite side.
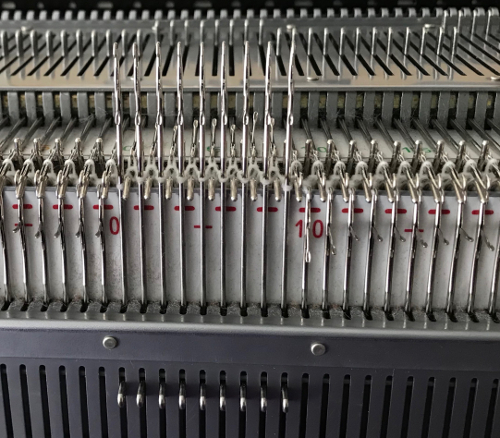
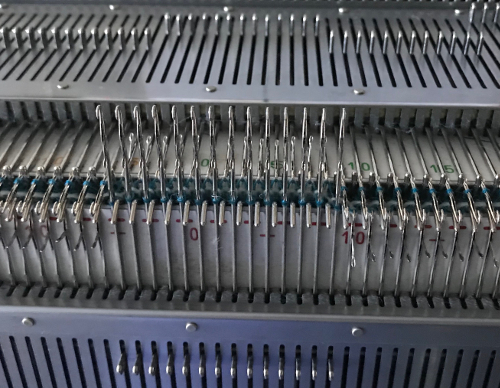
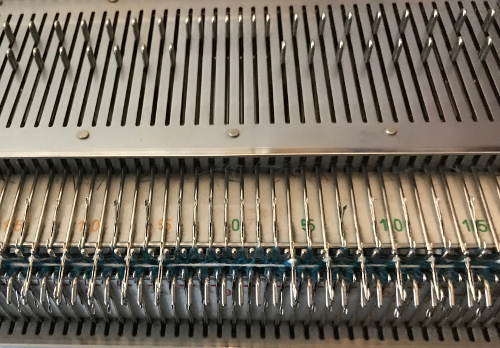
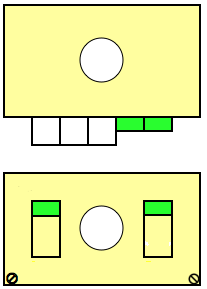
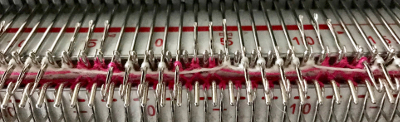
The row counter may be set to 0 and used for each segment, or the tripper for it can be turned off as preferred. With labor-intensive fabrics, I sometimes calculate based on a minimum number of repeats rather than row counts. The gauge can be even more difficult to calculate even if rows are tracked somehow. In addition, the choice of yarn, its weight, whether each segment is weighted down or not, and the tension in masts and carriages all can make the result uneven or harder to predict. The use of claw weights is a personal preference. I prefer to avoid them whenever possible. They can help control the length of the slits at their side(s), but sometimes distort the length of the knit stitch on either side of them. COR: set the carriage to hold, bring all the needles to the left of the first group of 9 needles to hold, knit 12 rows (even number), returning to the right.
COR: push back to knit groups B (7stitches ) and C (9 stitches) to the left of A into work
Knit one row to left
COL: bring A (9 stitches) and B (7 stitches) to the right of C out to hold, knit 11 (odd #) of rows on C, ending with COR once more (one row had already been knit on those stitches, so the total remains constant).
Repeat in groups of 3 as described in the last 2 steps across the row ending COL
Knit a few rows, ending COR
Bring the first group of 9 stitches on left out to hold, knit one row to left
Bring all stitches to the right of the first group of 7 stitches out to hold, knit 12 rows, ending COL
Bring the next two groups of 9 and 7 needles out to work, knit one row to the right
Bring the remaining stitches to the left of the new group of 7 out to hold, knit 11 rows (odd #), ending COL. Continue across row. At the end knit a few rows, ending once more on the right.
I found at least 3-4 rows were needed between sections of segments to achieve shapes that did not meet to create extended slits with threads across them and to achieve a look I preferred. In the interim, all knit rows could serve as the opportunity to add other stitch types or techniques including purl ridges on the knit side, which could be achieved easily enough with a G carriage, but may prove perilous with a garter bar.
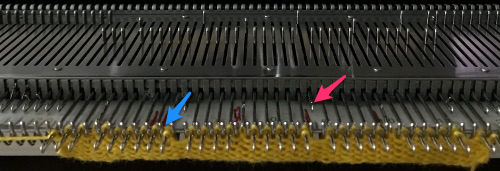
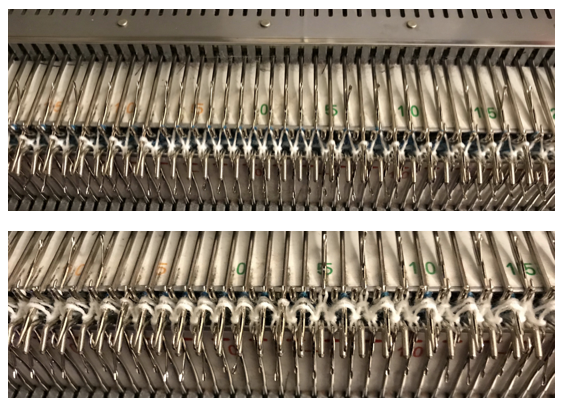
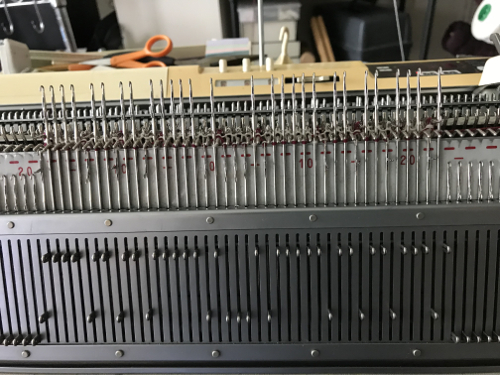
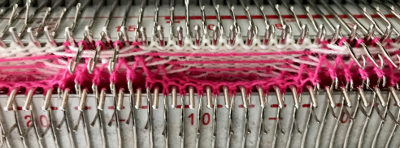
The needle bed or the needle tape may be marked with a water-soluble pen between needle groups to help make tracking easier.
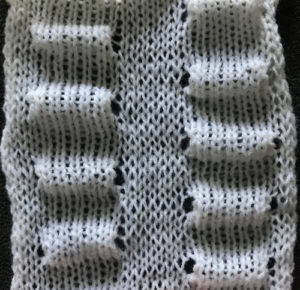
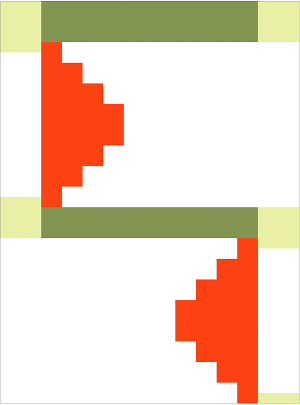
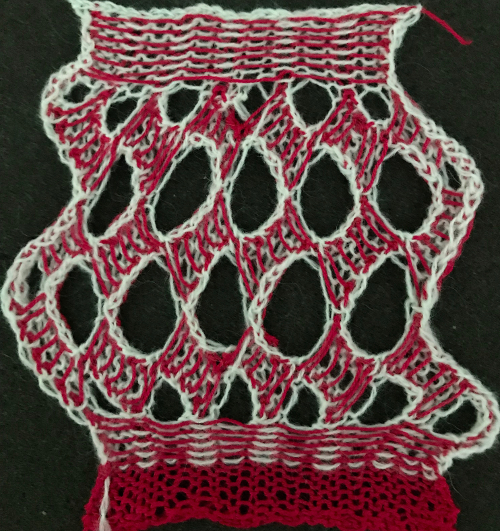
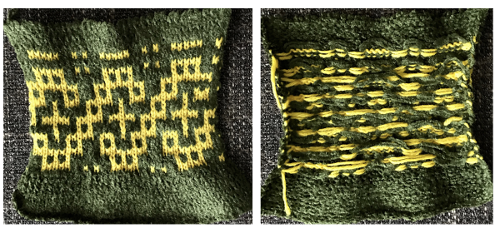
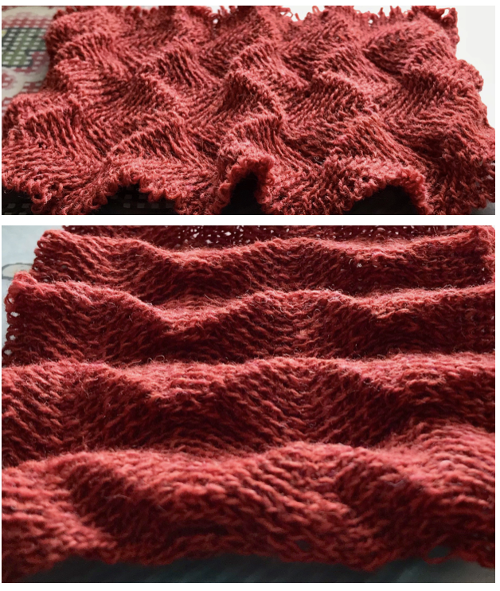
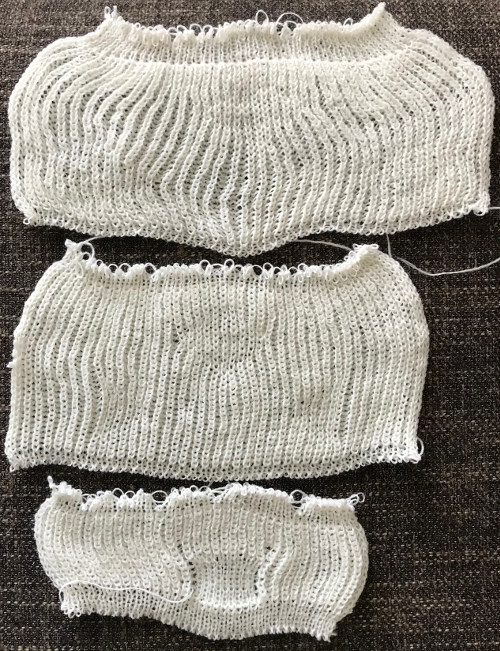
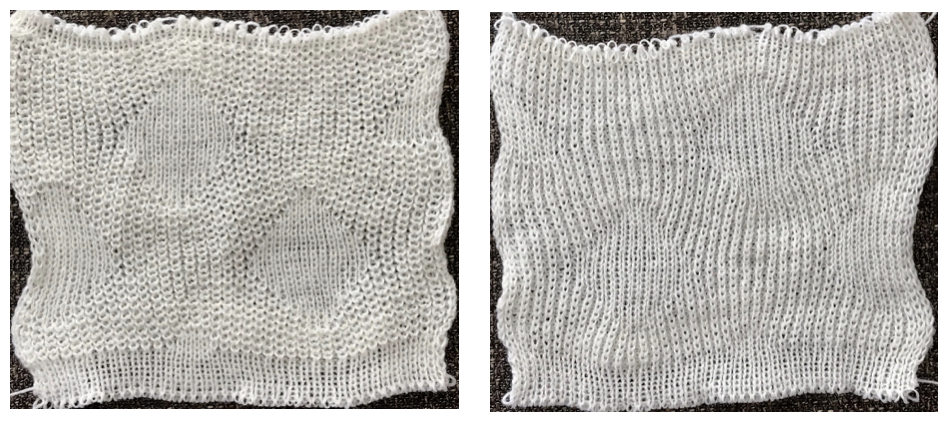
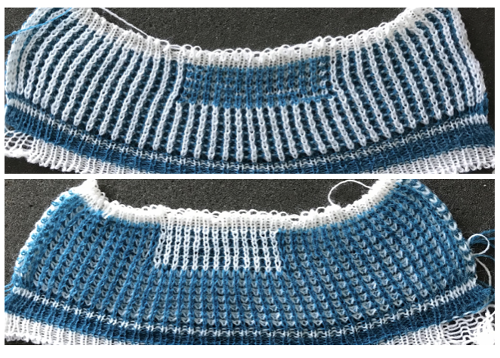
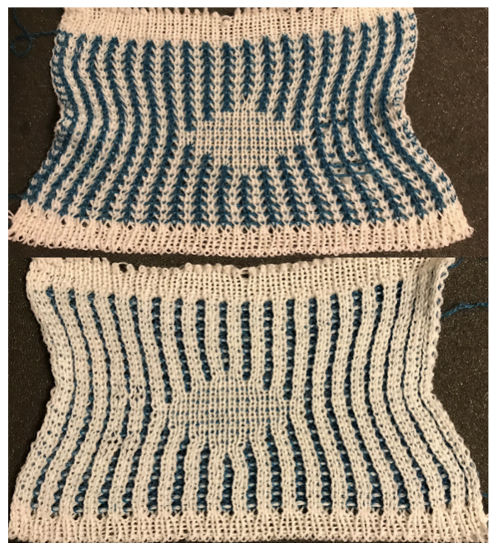
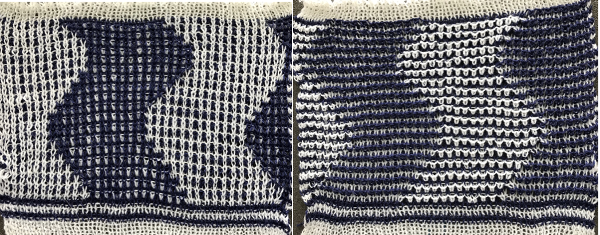
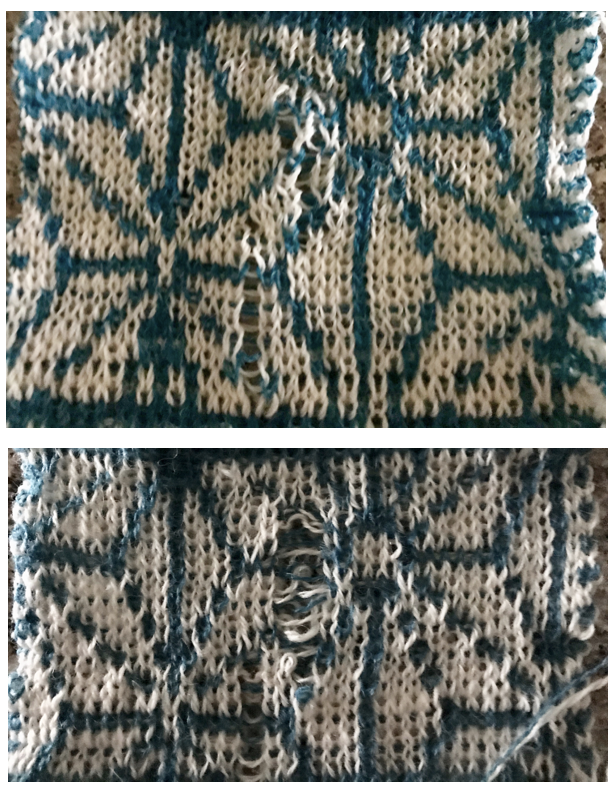
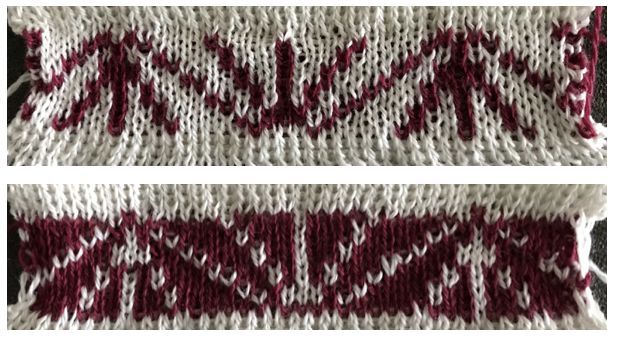
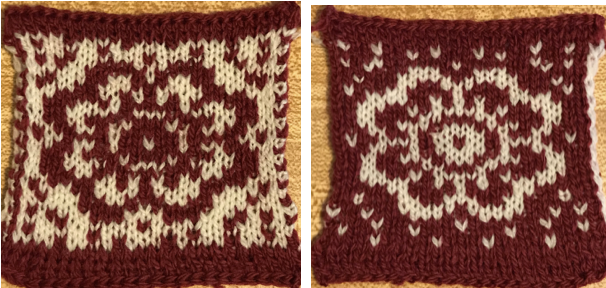
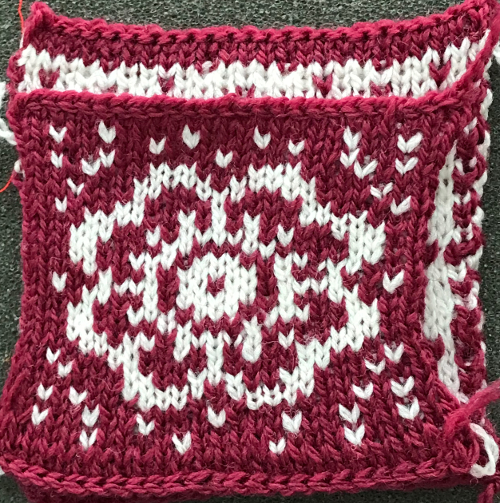
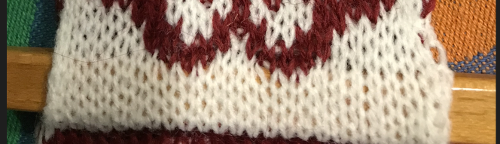
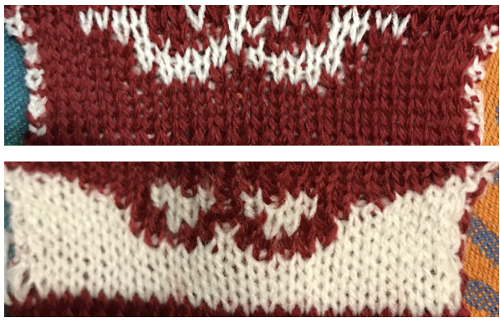
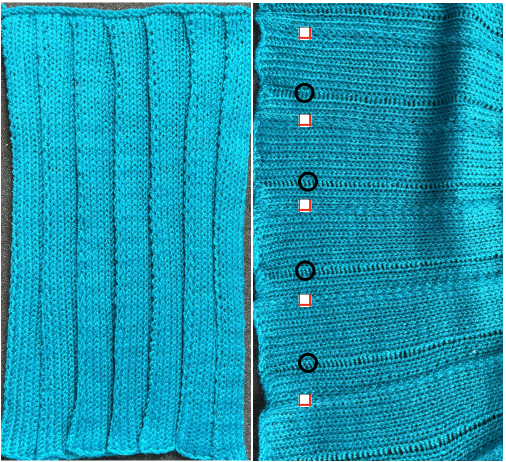
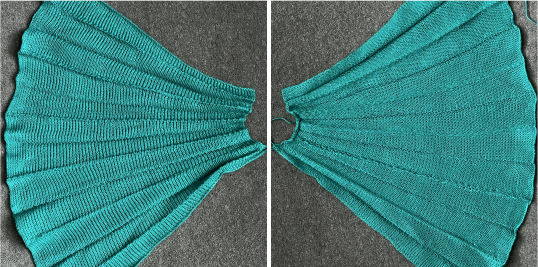
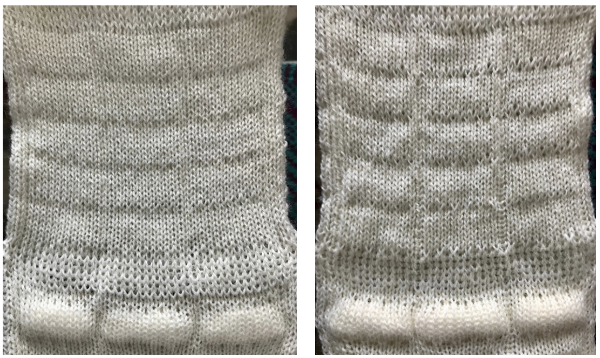
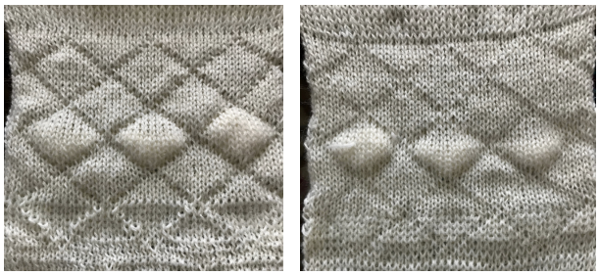
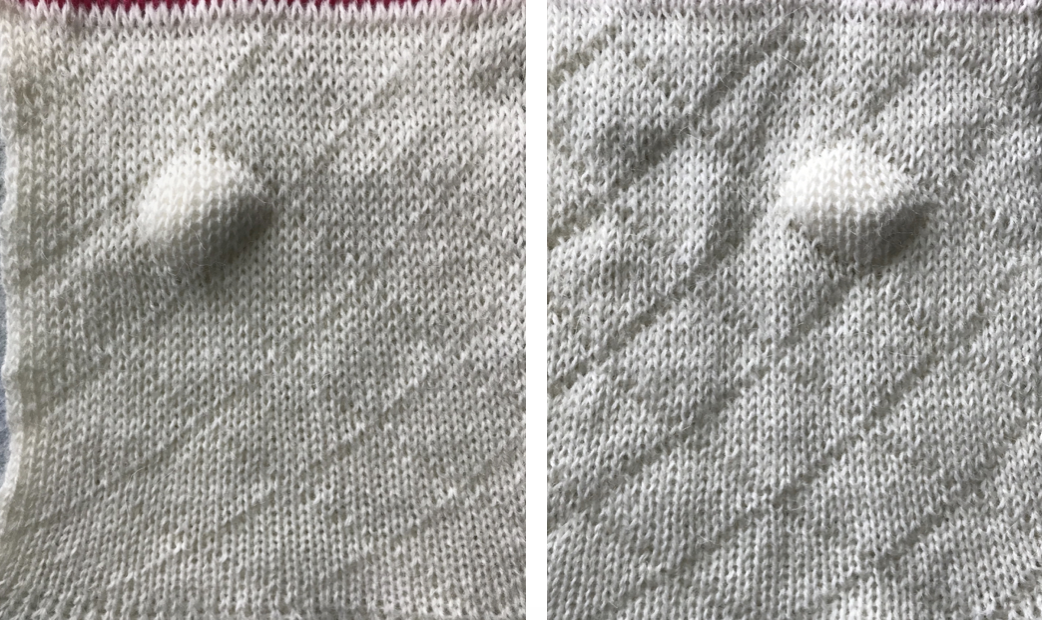
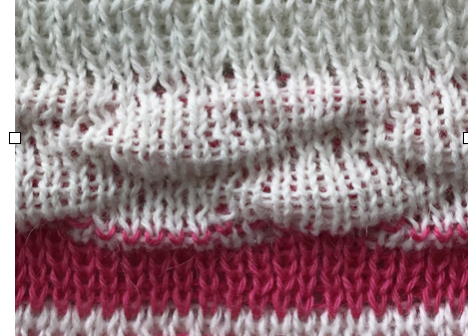
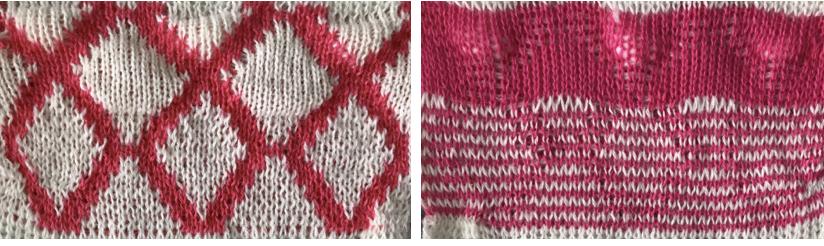
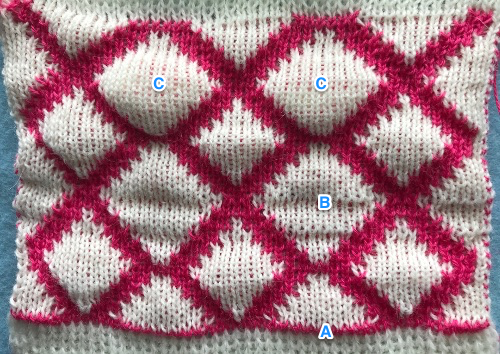
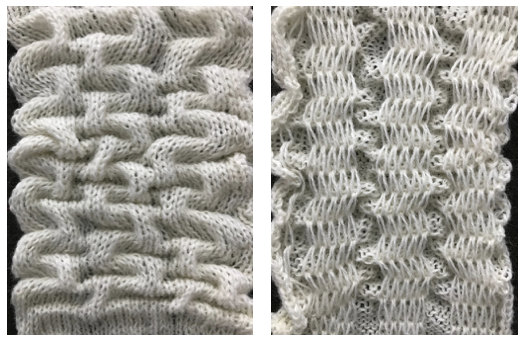
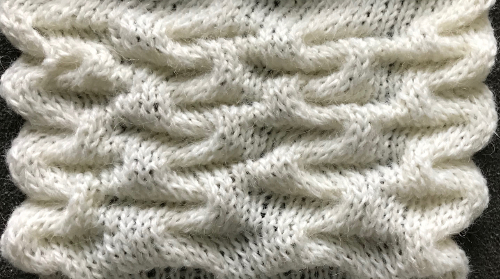
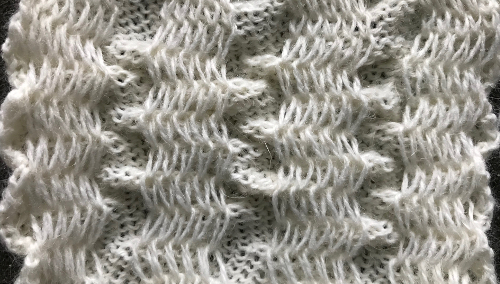
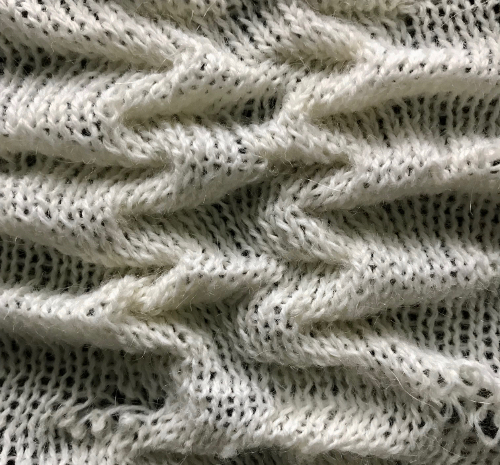
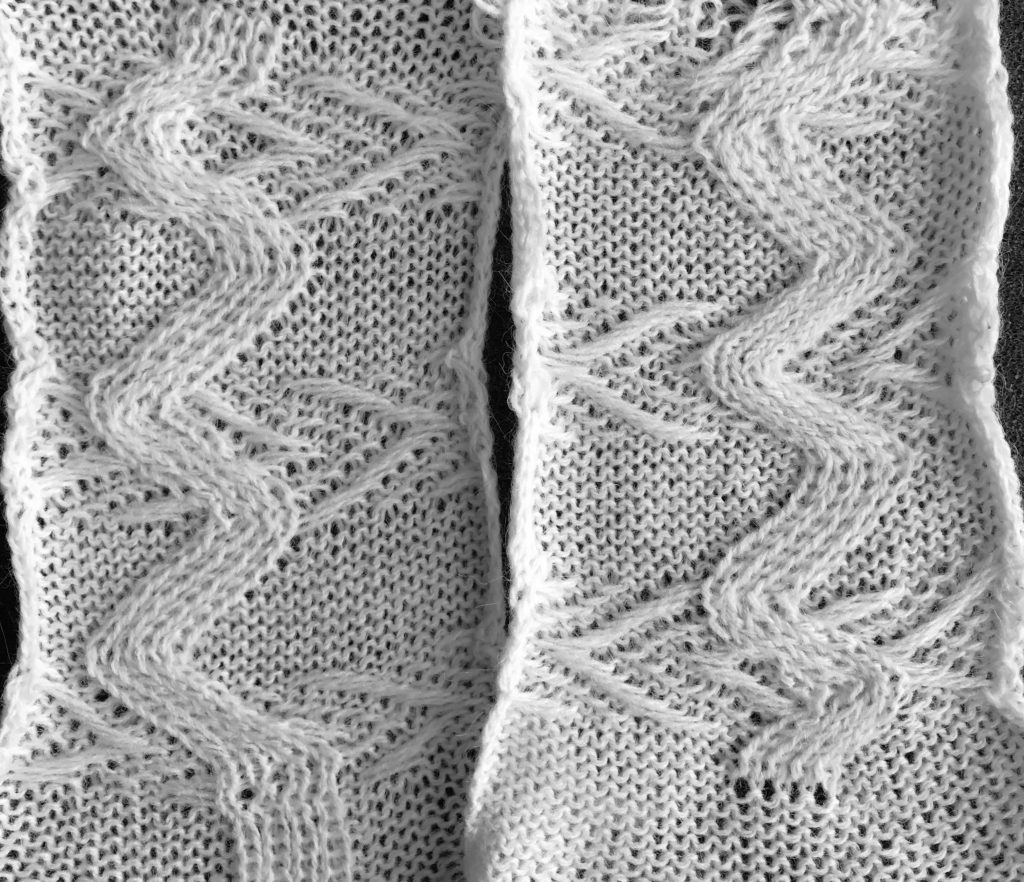
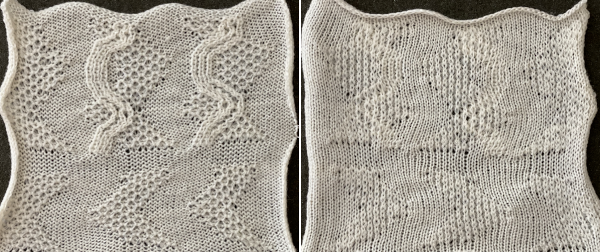
Proof of concept purl side 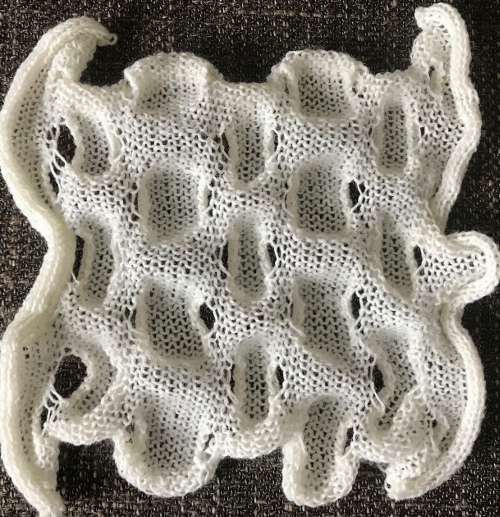 knit side
 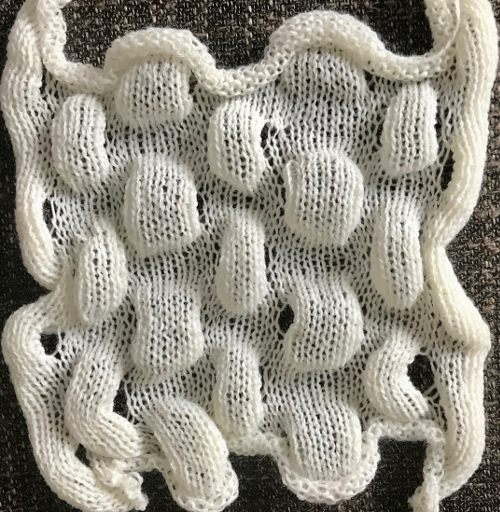 slightly scrunched up
 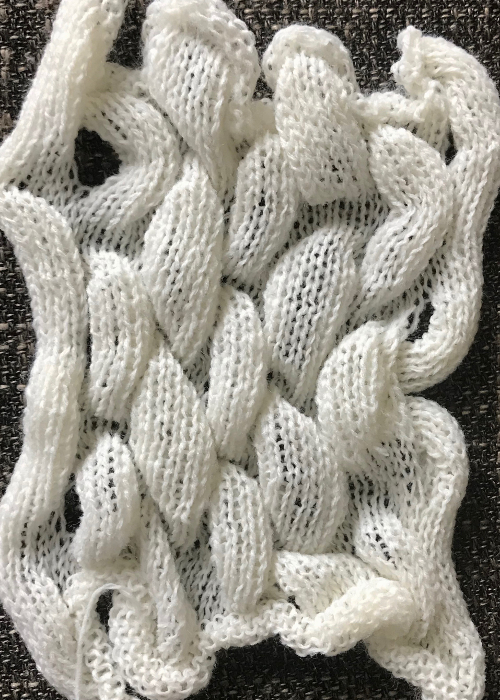 with a touch of steam and light pressing
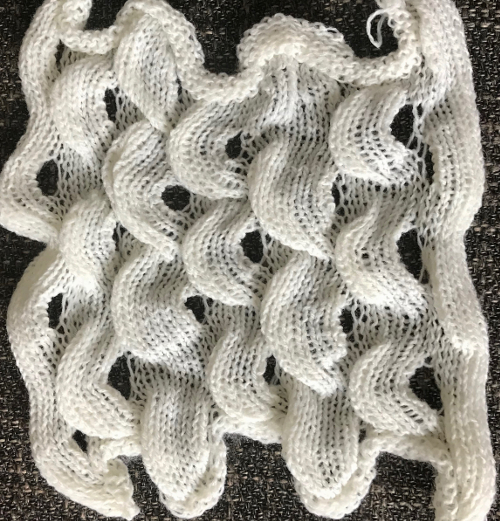
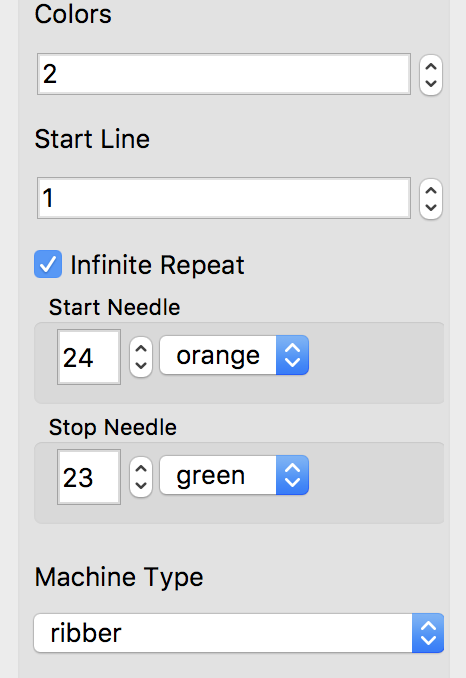
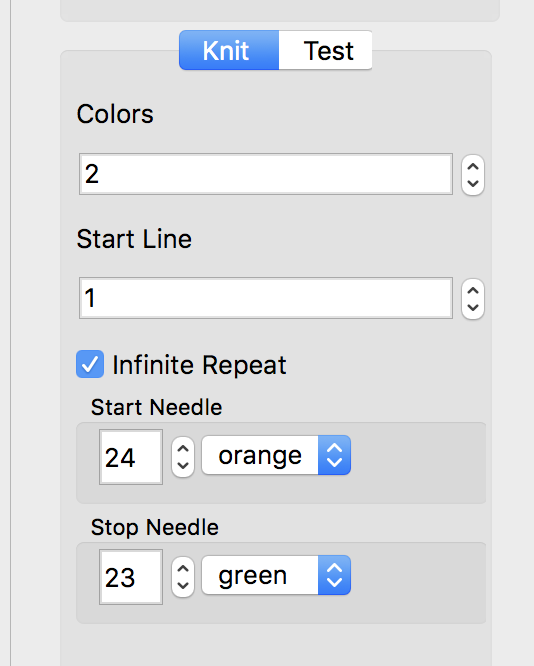
Planning your own pattern in scaled-down numbers of stitches and rows is good practice, and may also lead to pleasant surprises. As with any test, keeping notes while in progress is well worth it. What may be obvious while knitting may escape recall after the fact. Then there are “little things” that factor in as well. For decades I knit on a 910 or a punchcard machine. On the 910 settings stay as preferred unless changed manually. In my electronic default, the repeat direction was set to be as seen on the knit side, on the punchcard, it is fixed as seen on the purl. At one point I received an orphaned, frozen 930 that I was able to get moving following online video advice. I have often forgotten to set the number one variation button or to change the default isolation to an all-over-one in knits where that mattered critically. If programming a repeat, the starting side for a preselection row matters, and it will change based on which side of the finished fabric reflects your planned motif.
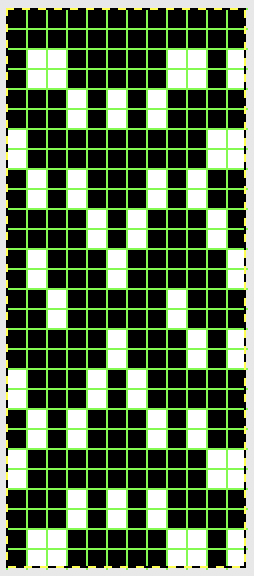
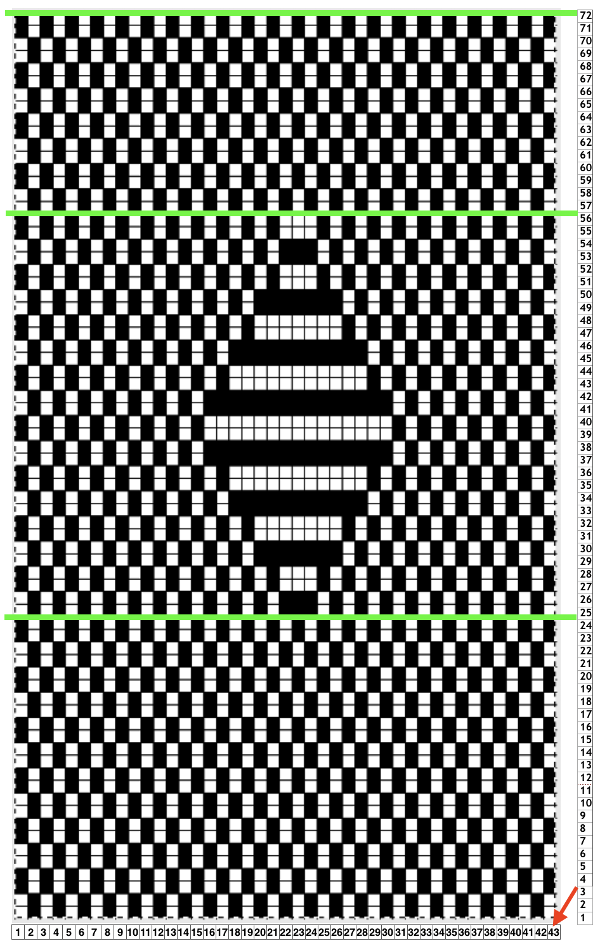
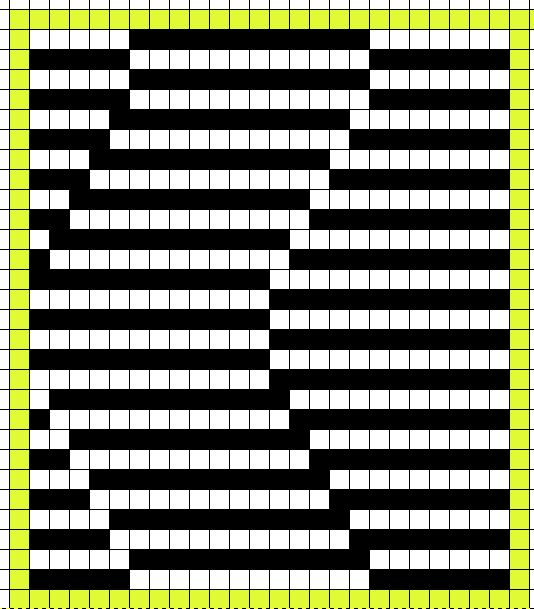
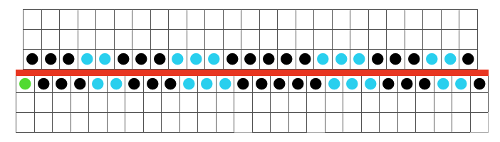
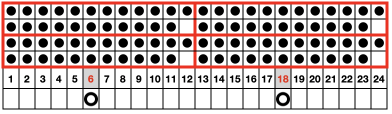
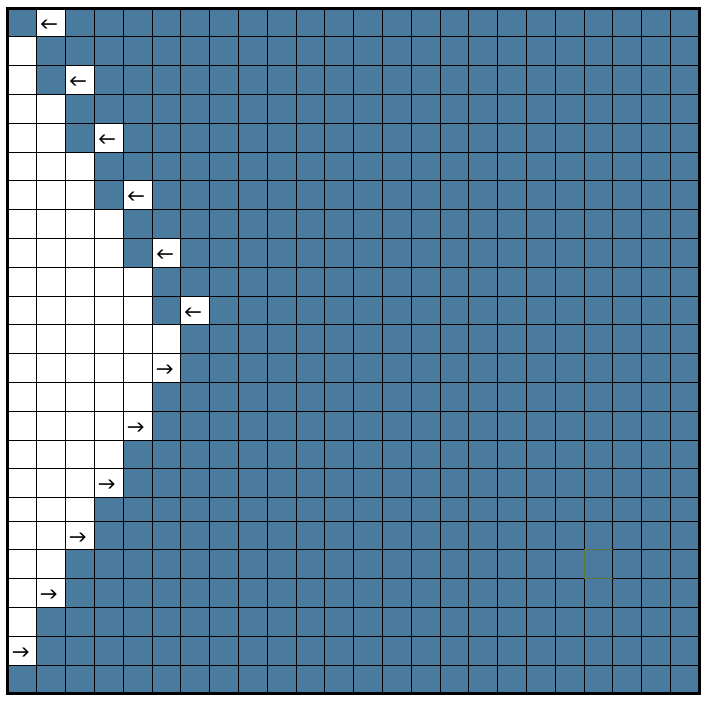
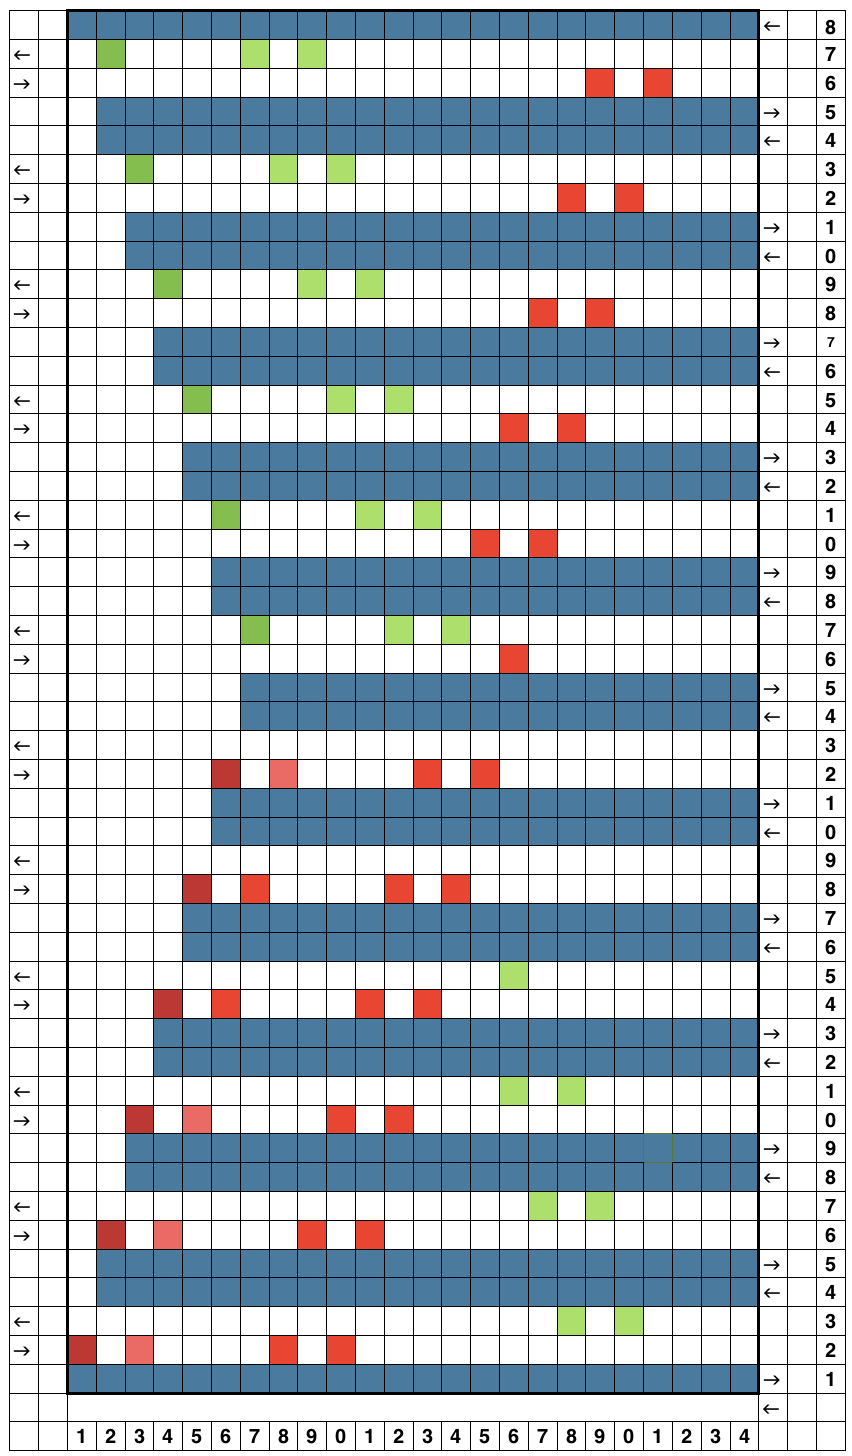
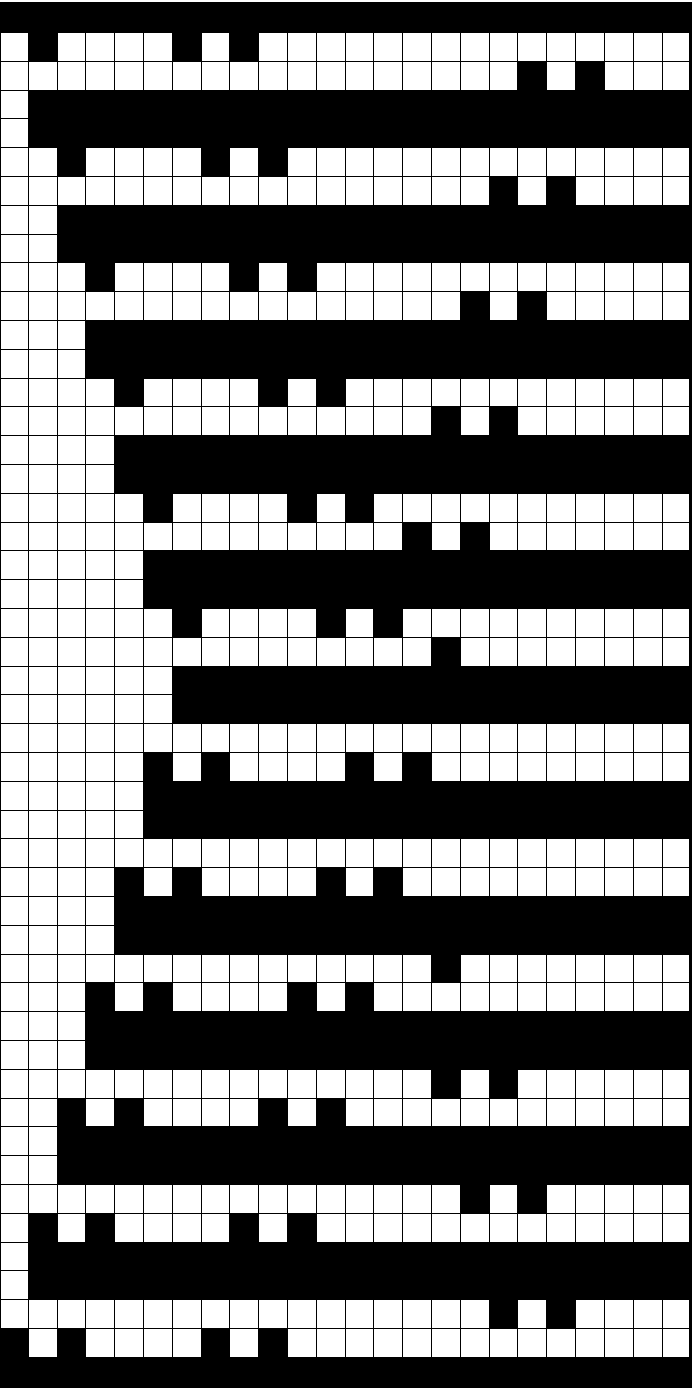
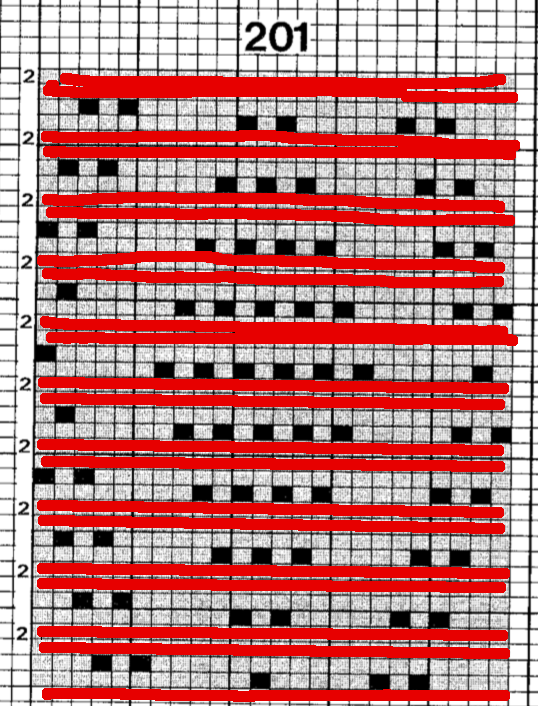
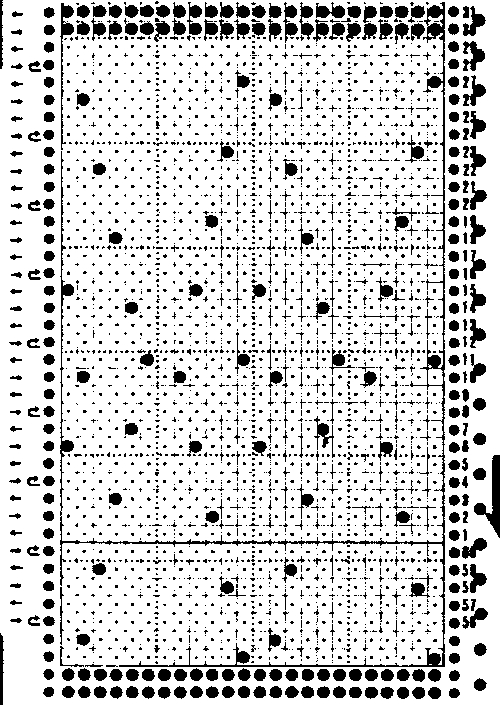
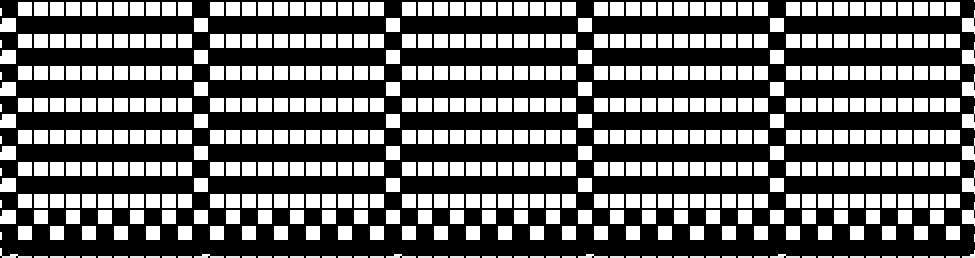
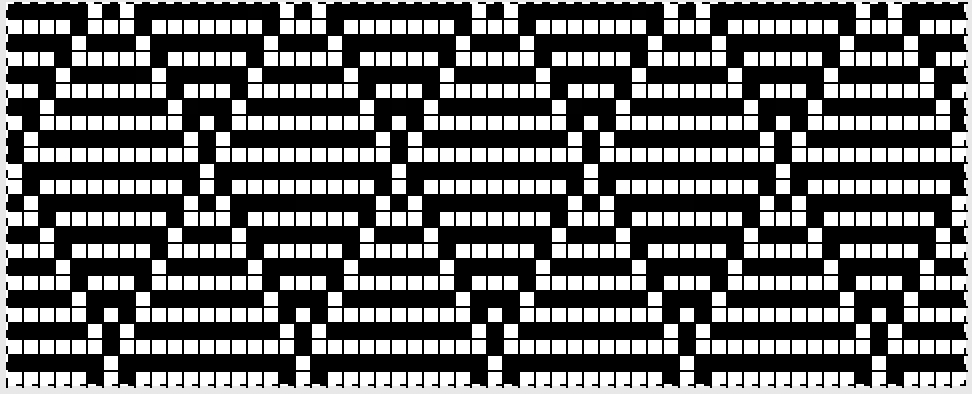
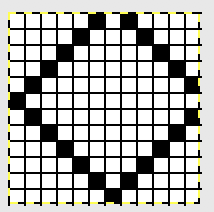
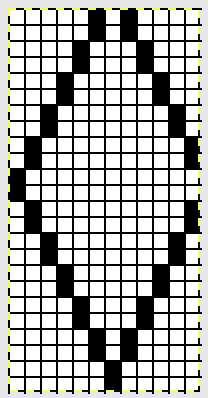
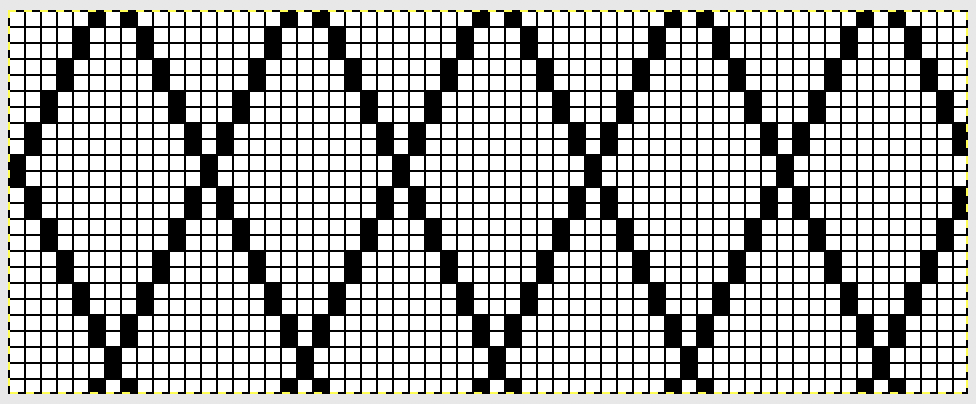
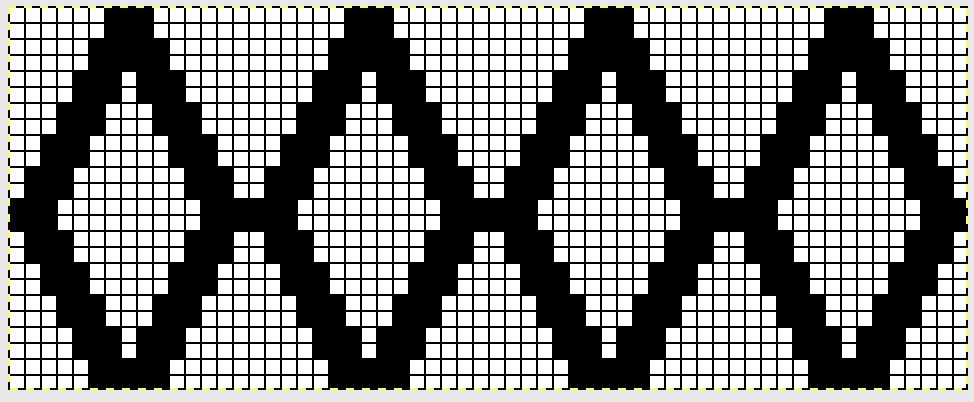
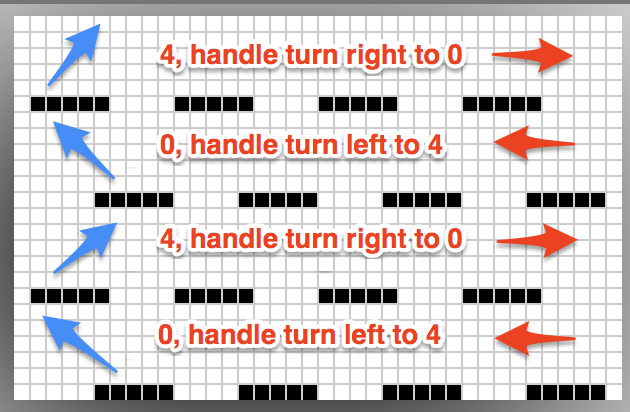
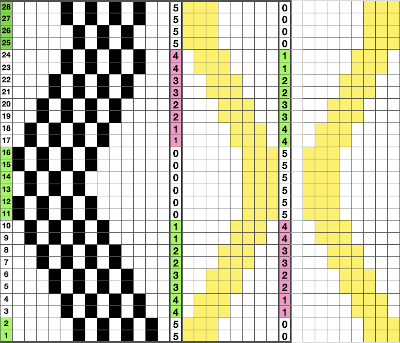
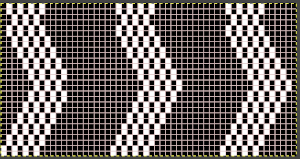
The start of an idea with points to be considered, some observations, and questions 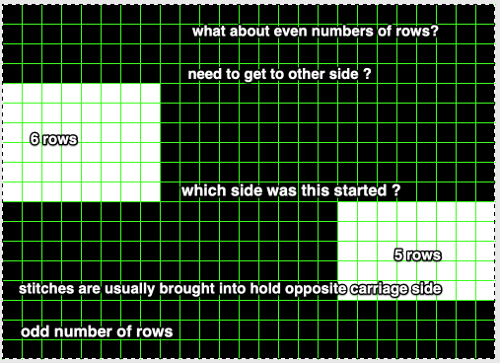 Working it out on a spreadsheet: arrows indicate the direction in which the carriage needs to be moving, I prefer to start COR, the image can be flipped horizontally for starting with COL. The repeat is outlined with a thick border, is too wide for automating for punchcard, but as hand technique variations can be endless. To produce longer slits and raised shapes, add an even number of rows to the red colored blocks, for more distance between raised motifs, add an even number of rows to the side to side all green areas, maintaining the directional arrows.
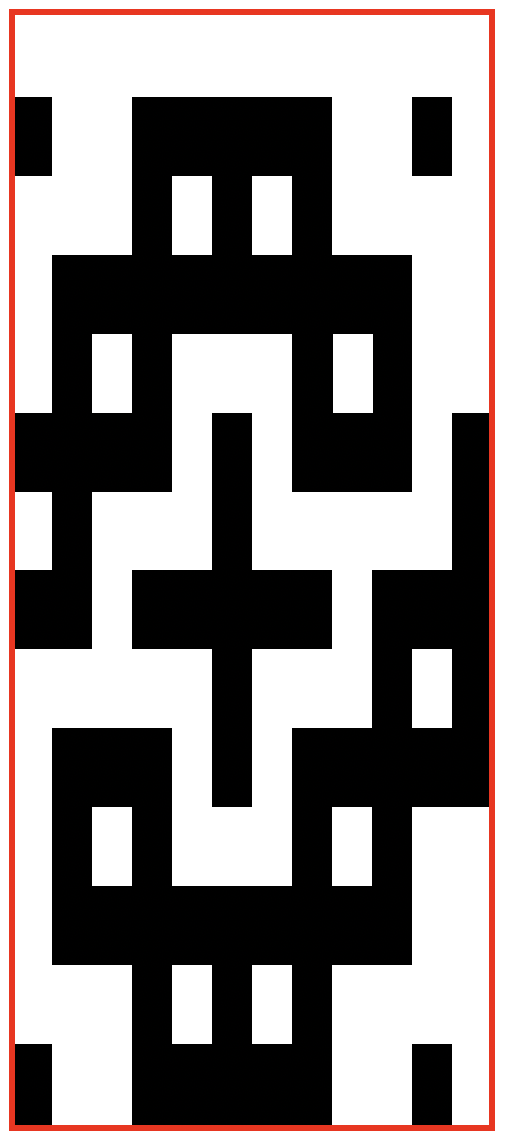
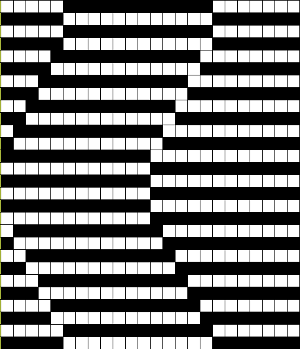
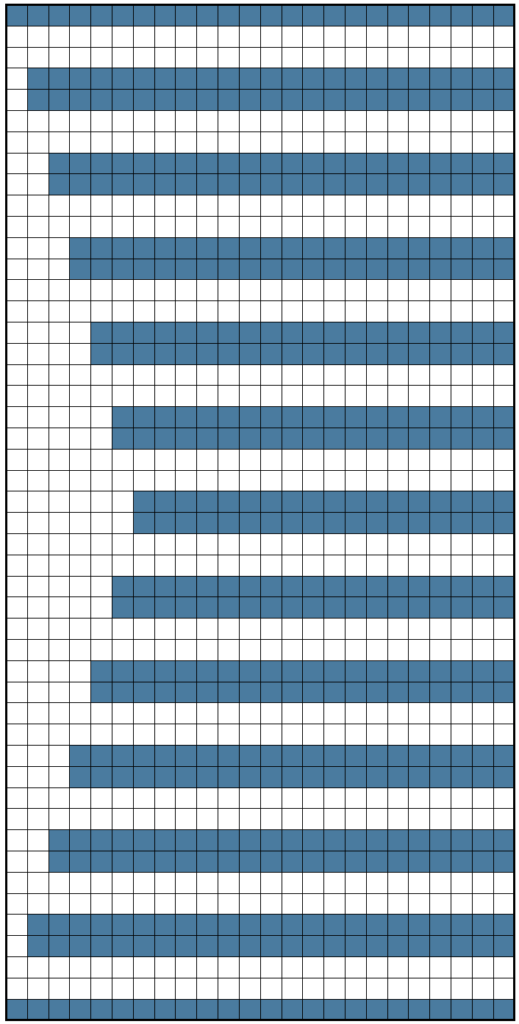
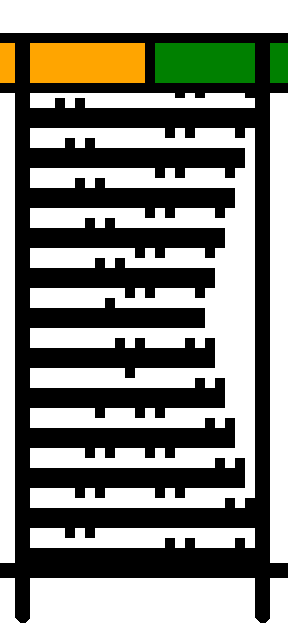
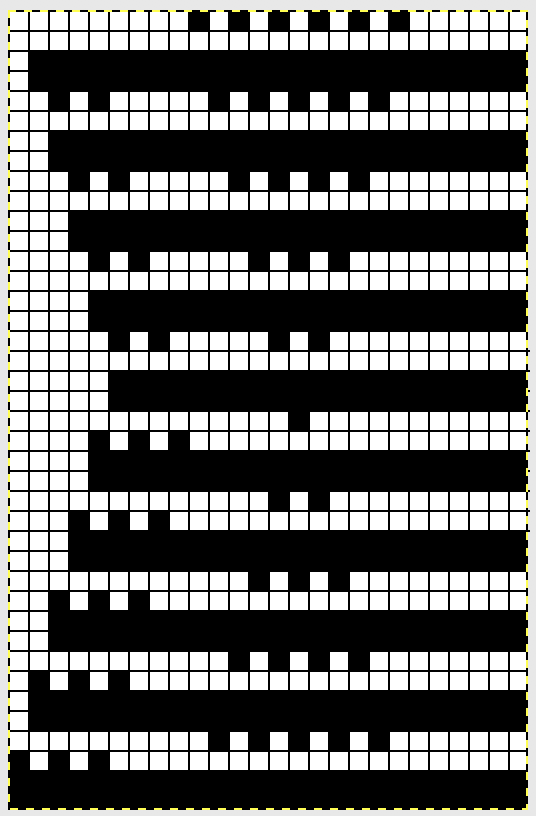
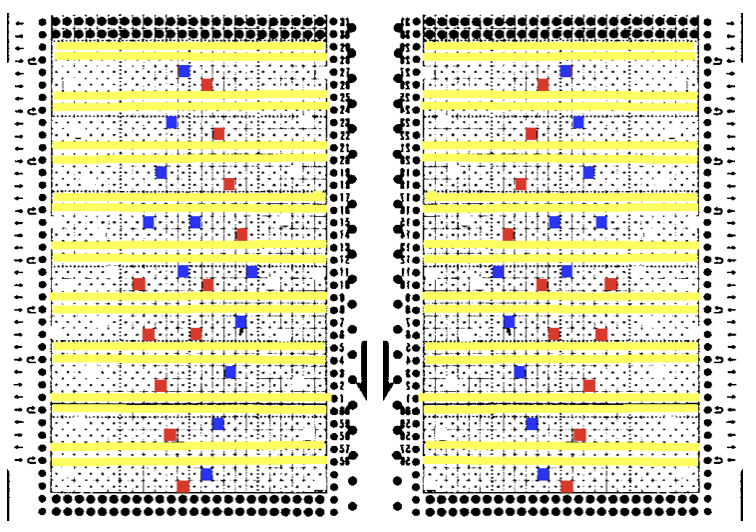
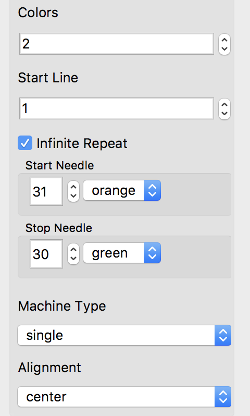
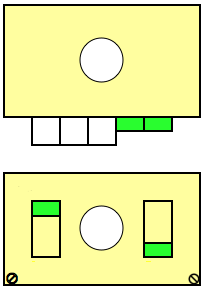
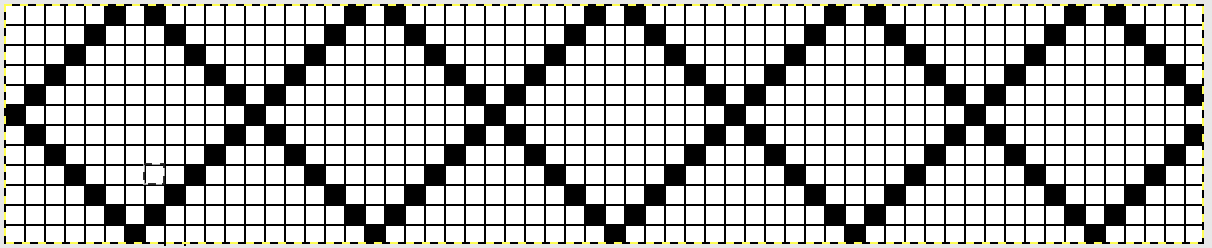
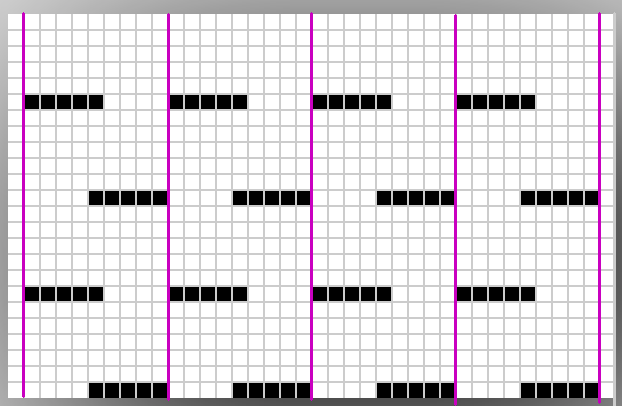
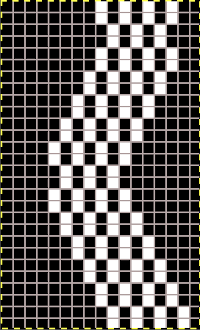
 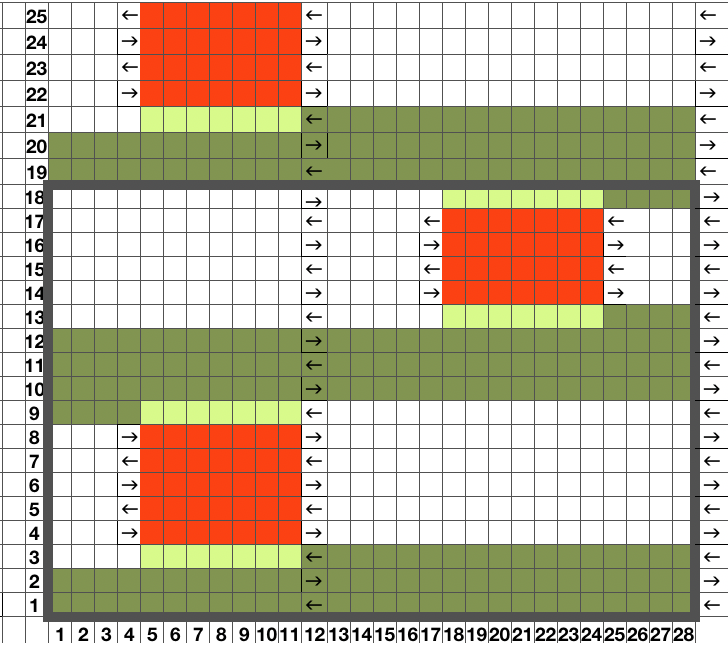 This is the isolated repeat for converting the pattern to a file suitable for download
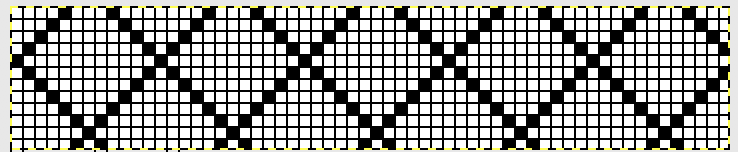
  and its mirrored version for knitting from the opposite side
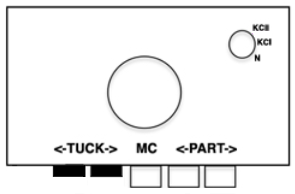
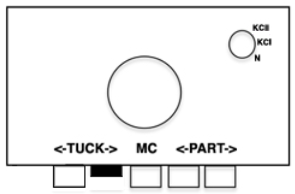
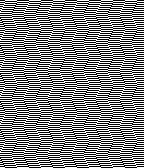
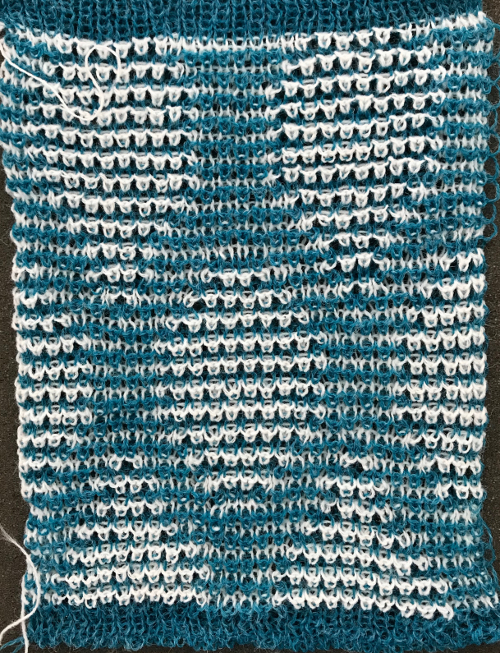
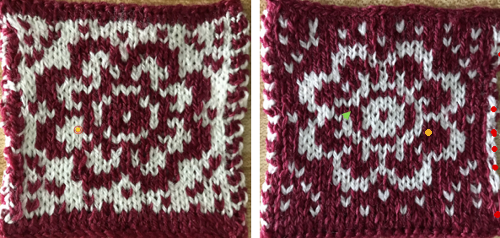
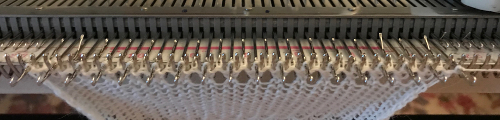
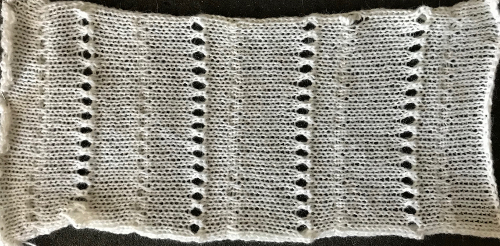
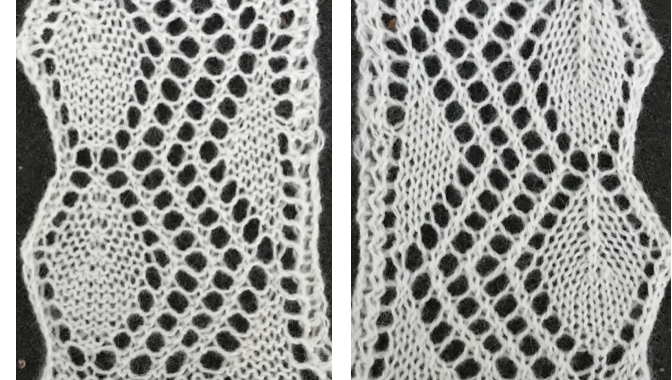
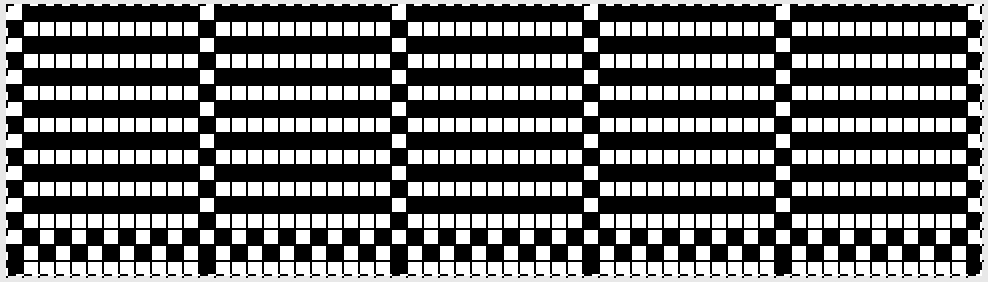
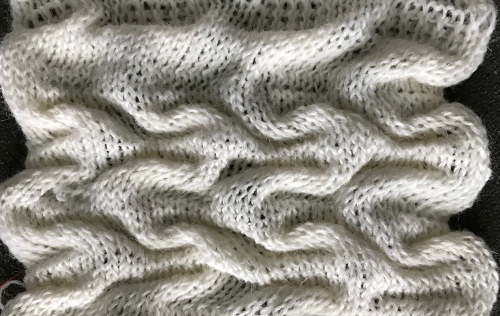
  My test swatch was knit on the 930, using img2track. Because not every needle on the bed is in work throughout the knit, end needle selection must be canceled (KC II). The knit carriage after the preselection row is set to slip in both directions. Because only a few rows are knit on the red blocks in the chart, the result is subtle. The white yarn used in many of my tests happens to be a 2/24 acrylic, so on the too thin side, and likely to be well flattened if pressed.
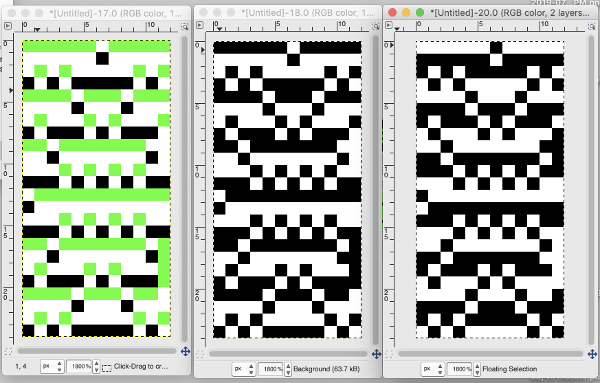
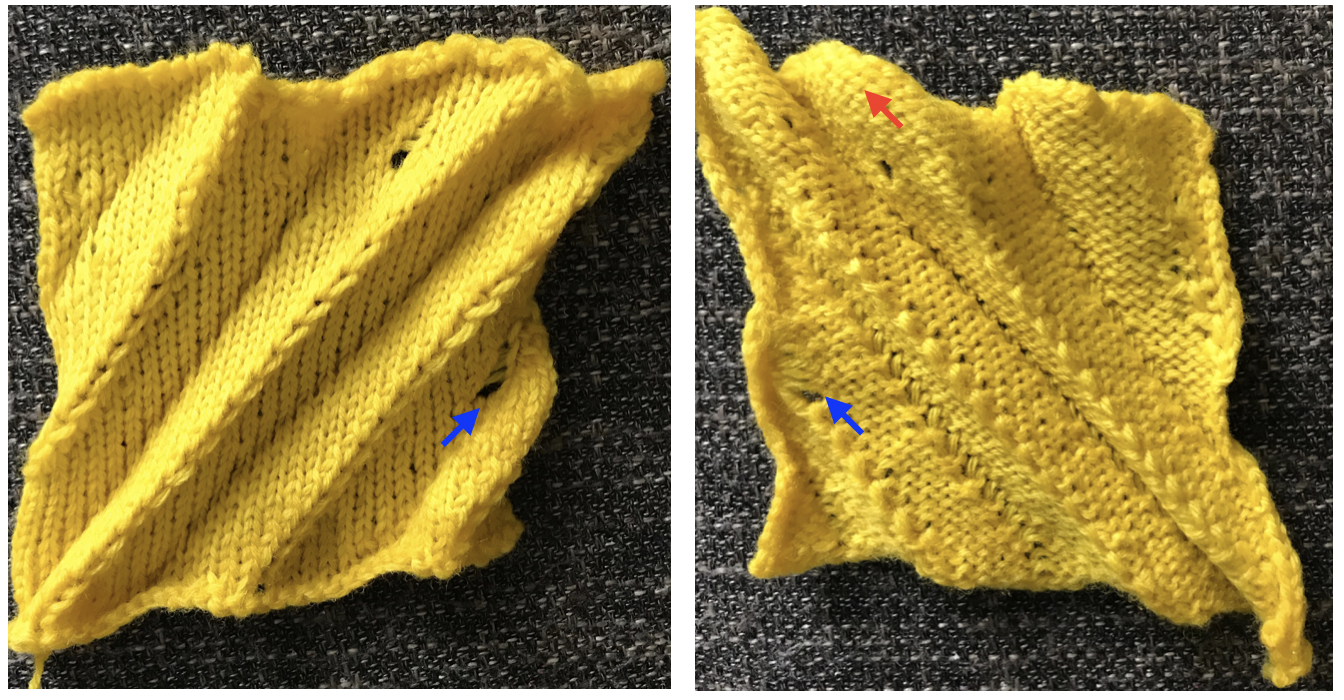
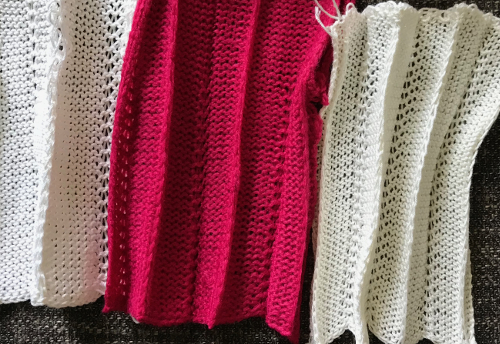
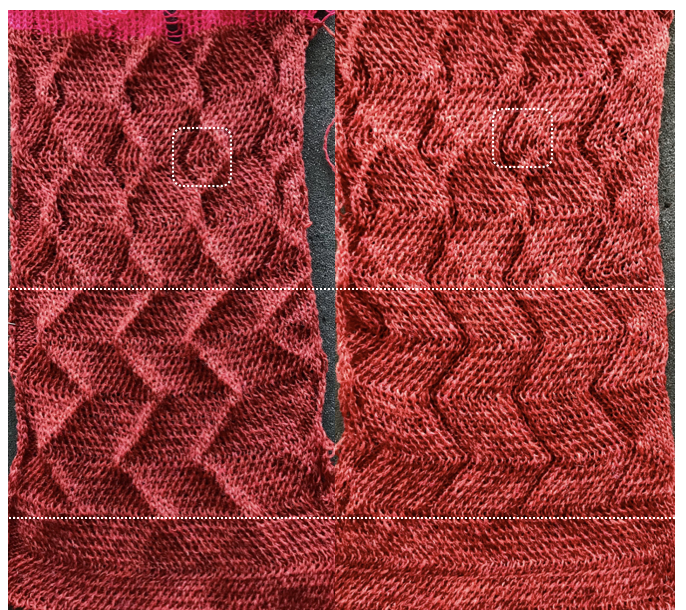
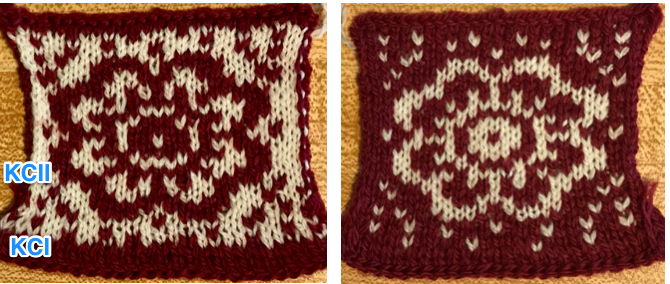
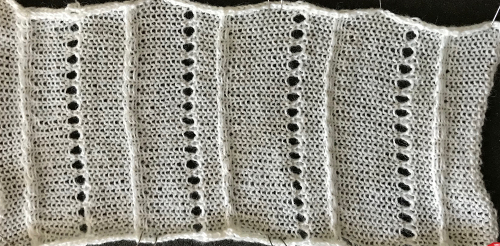
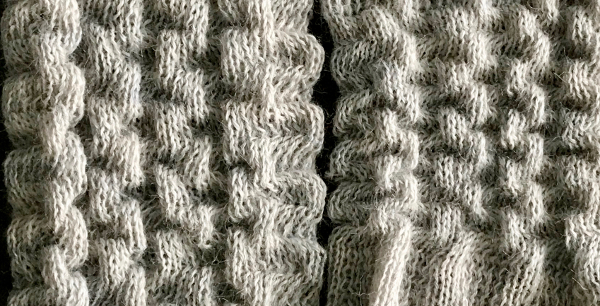
 Often, the edge stitches on the carriage side will tend to be a bit tighter than those formed away from it. The same repeat may be used to create very different fabrics. Eliminating the all knit columns on either side of the center produces a piece with “ruffles” on either side of the center as the outer edge of each shape is no longer anchored down. The principle was used in knitting “potato chip” scarves popular in both hand and machine knitting for a while. Having a repeat on one side of an all knit vertical strip creates a ruffled edging.
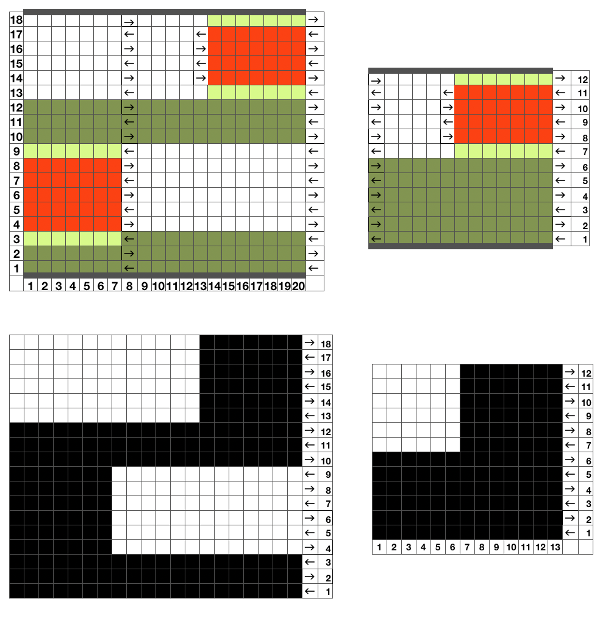
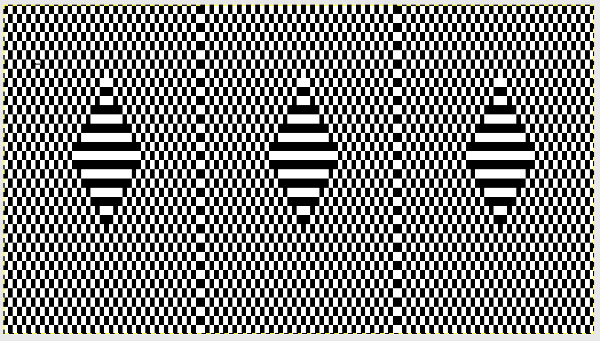
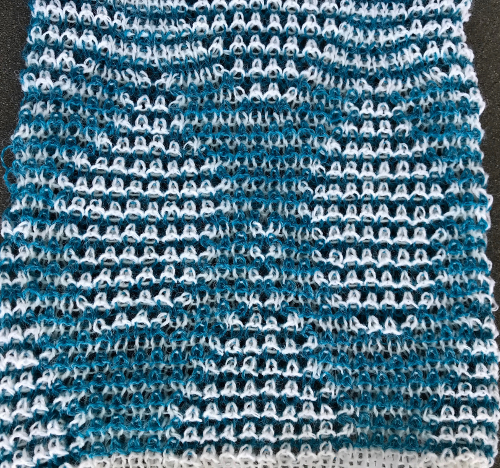
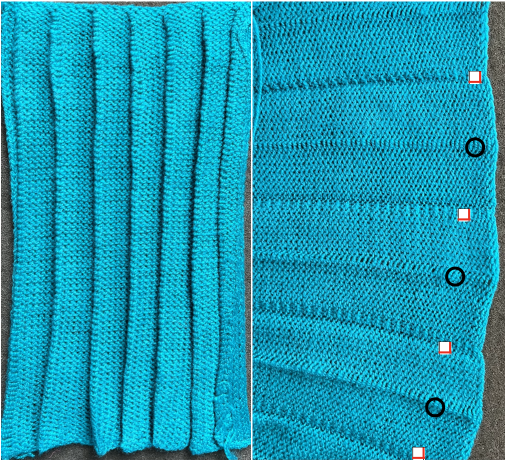
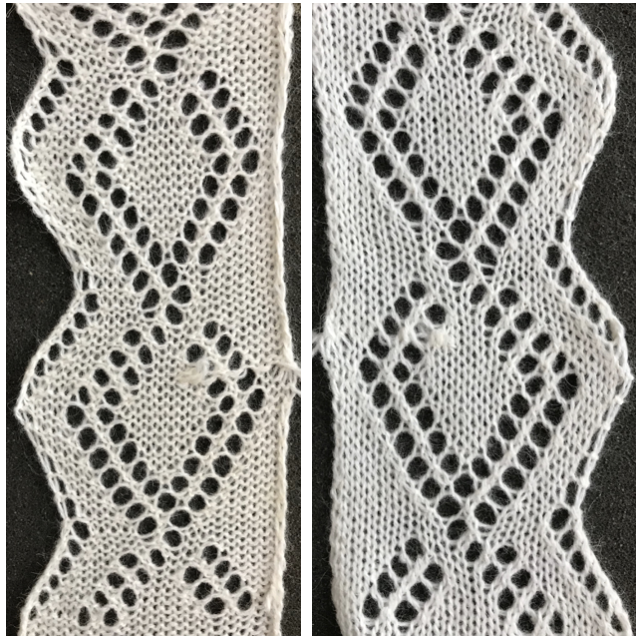
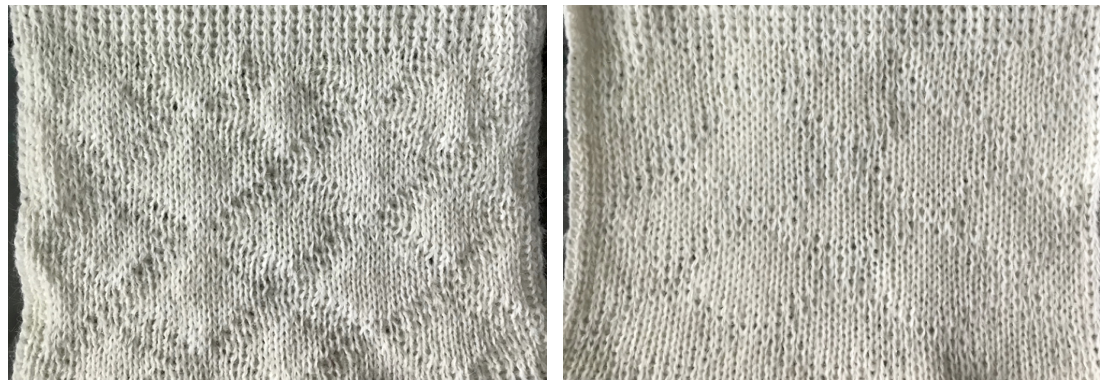
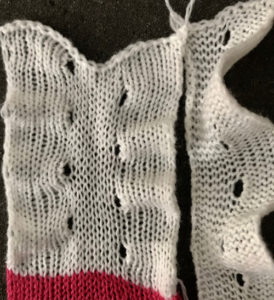 Note the effect of the added all knit rows on the “wave” of the piece on the right.
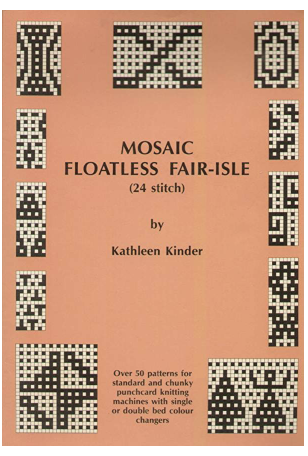
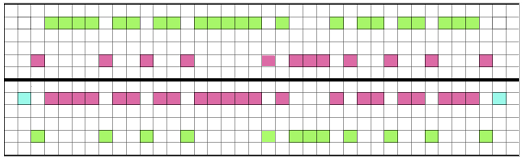
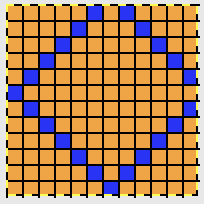
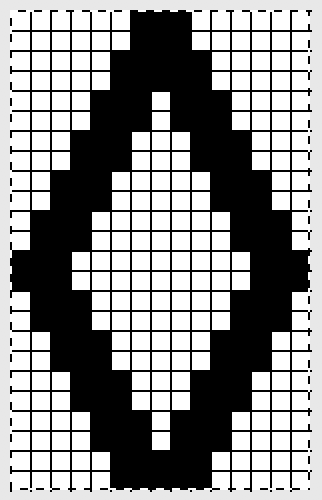
Many patterns are published for hand knit variants as well, Lion Brand Yarns offers the opportunity for learning both knit and crochet stitches. Some patterns are free with login (website info access is also free). Here are 2 such designs with slits and bumps to the max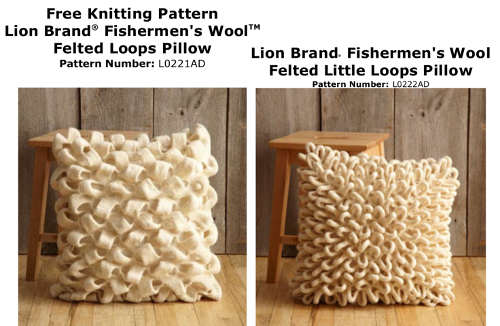 The shapes for the “bumps” may be changed, moving away from rectangular formats. Small repeats are used for the purposes of illustration here, but they, in turn, may be scaled up, rendered asymmetrical, vary in placement, and more. My design steps began with this idea
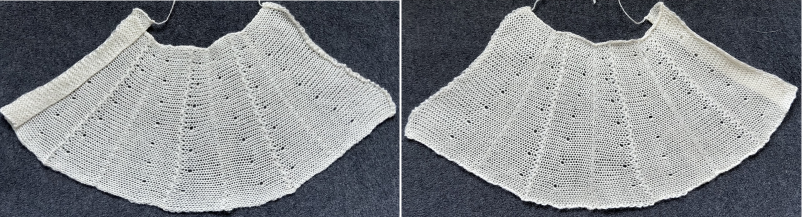
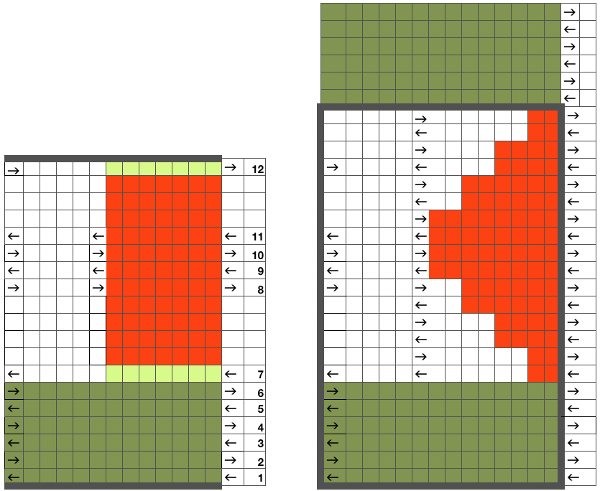 Following the goal to achieve bilateral placement along a central vertical knit strip, with vertical knit strip borders at either side, here shapes point in the same direction
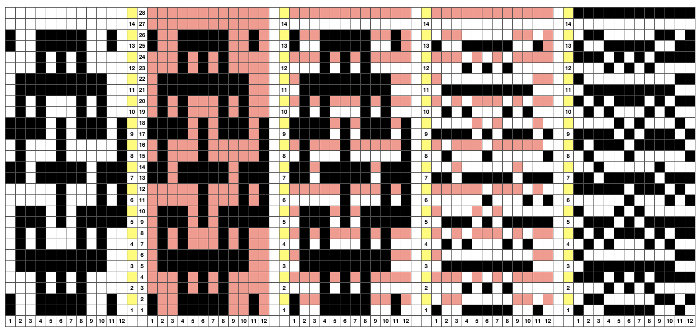
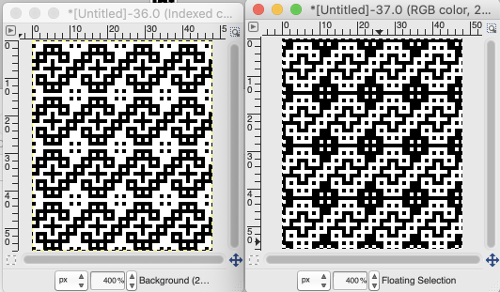
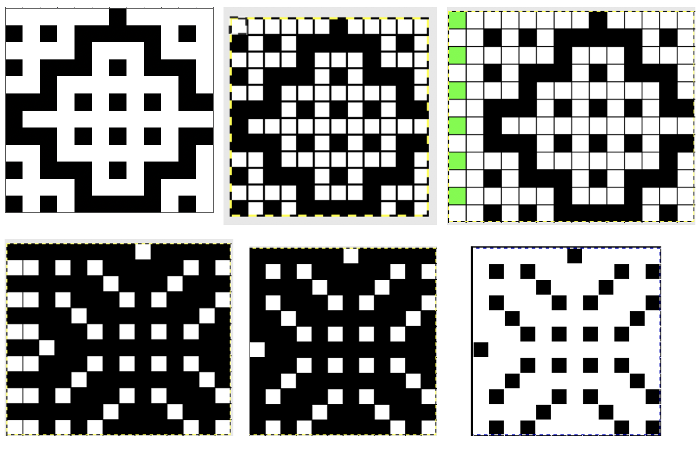
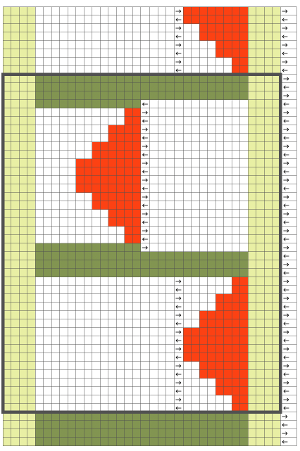 Aiming for shapes pointing in opposite directions, following those arrows for “pretend knitting”, a repeat is highlighted with a dark border on the left, while to its right placement for extra rows of knitting is suggested (must be even numbers). The repeat is then isolated and “grabbed” for use in GIMP
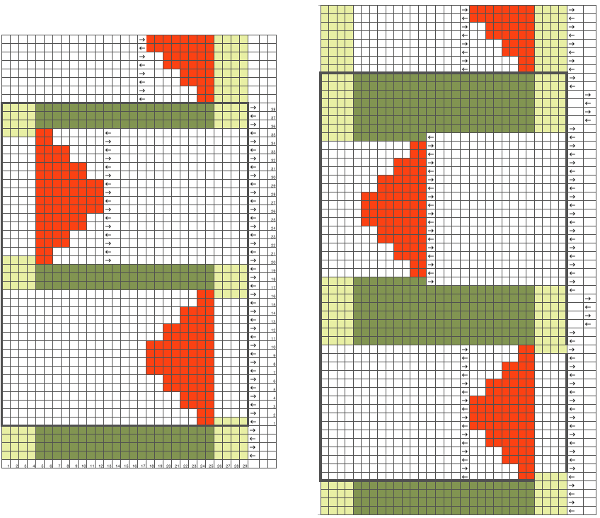
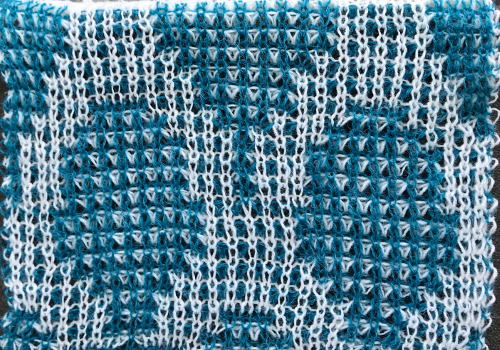
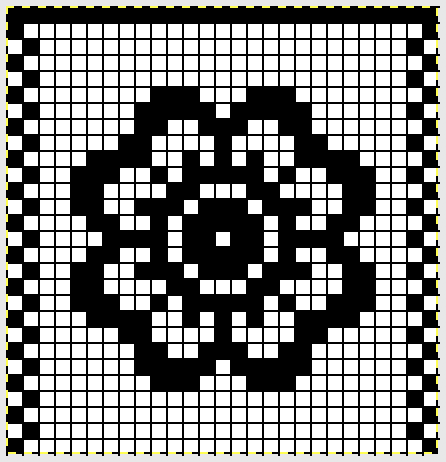
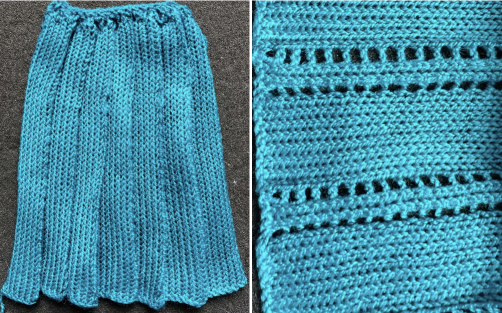
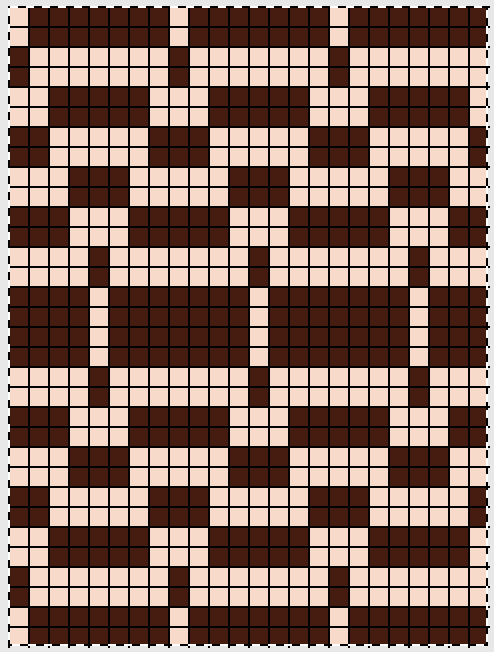
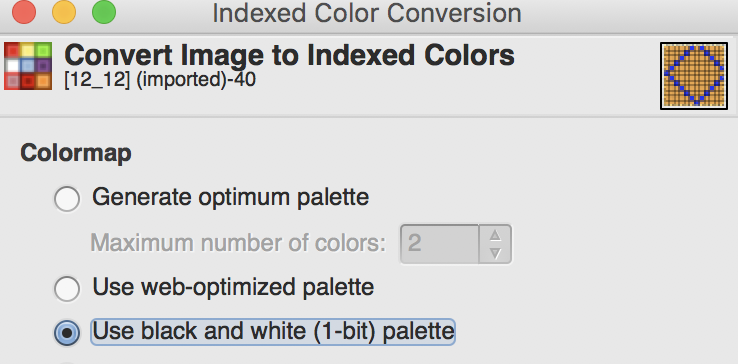
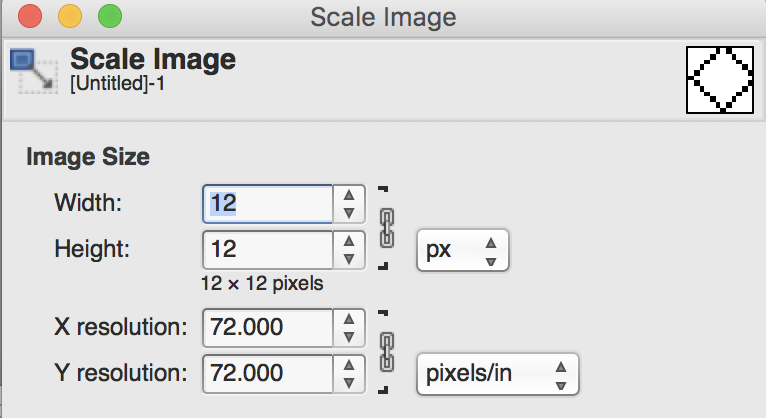
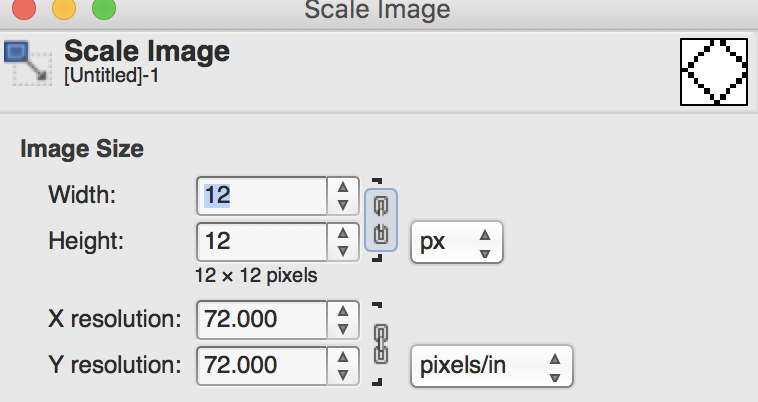
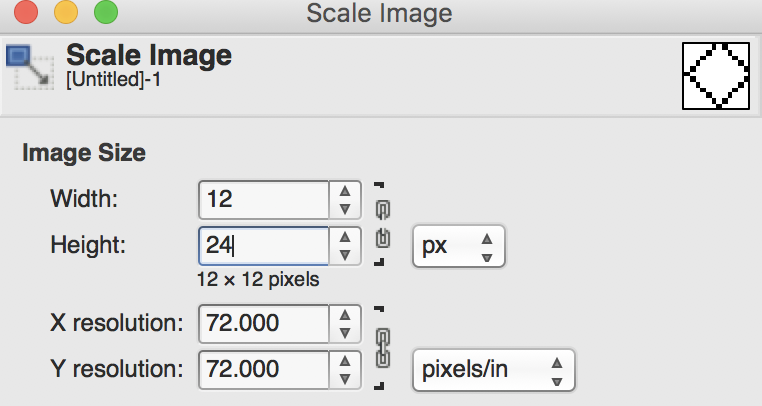
In Gimp the bucket fill was used to fill all colors to black, the image was converted to bitmap BW, scaled, and then knit. This feature changed in Gimp 2.10, requiring the use of the fuzzy select tool to achieve that goal. This is the final repeat used 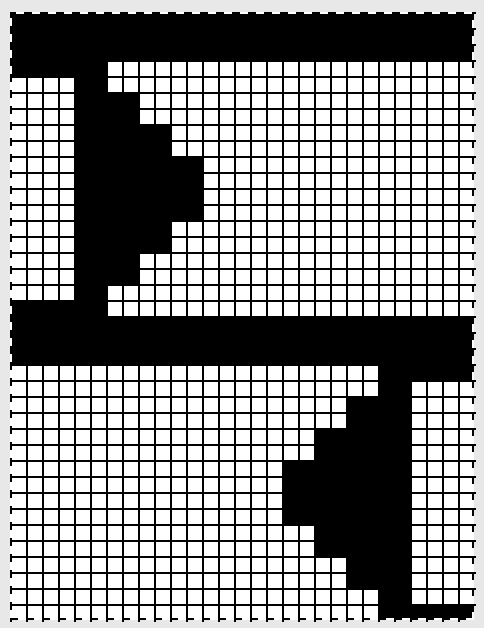 I ran into an interesting problem for the first time. I had entered the row and stitch counts on my chart, used those counts to scale the image used for my repeat down to size for knitting, kept getting floats where there should not have been any, could not understand what the error in the repeat might be. What was happening is that because of the wrong row number used in scaling, there was an extra pixel row in the first test swatches resulting in knitting errors. The final repeat is 29 stitches wide, 38 rows high. This is the resulting swatch
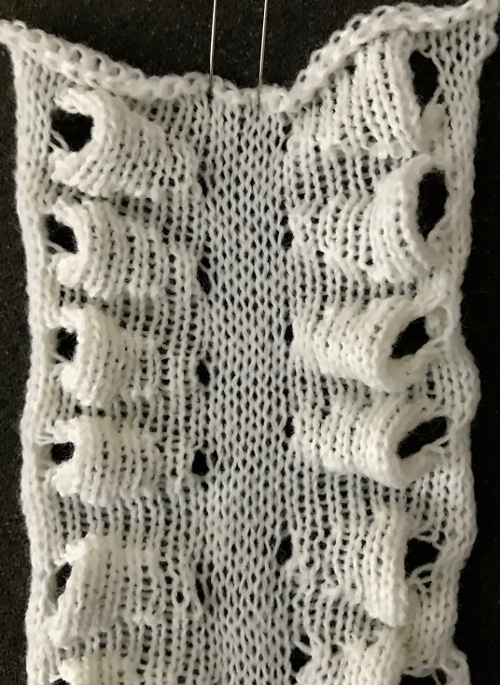
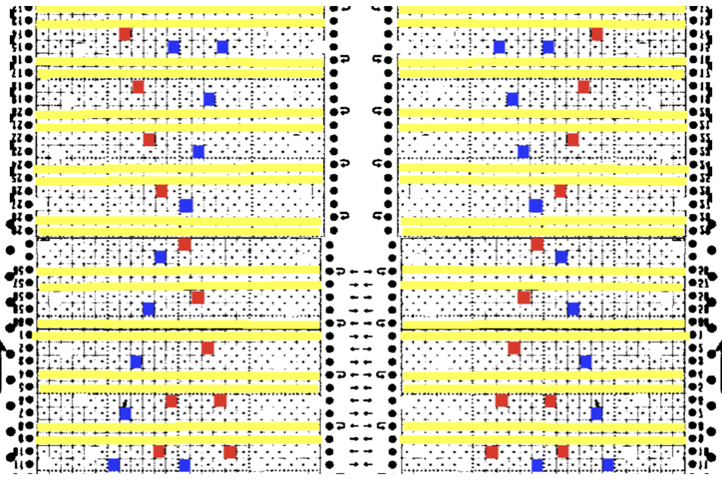
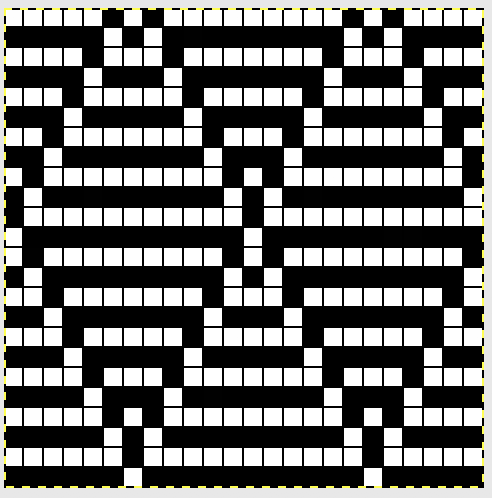
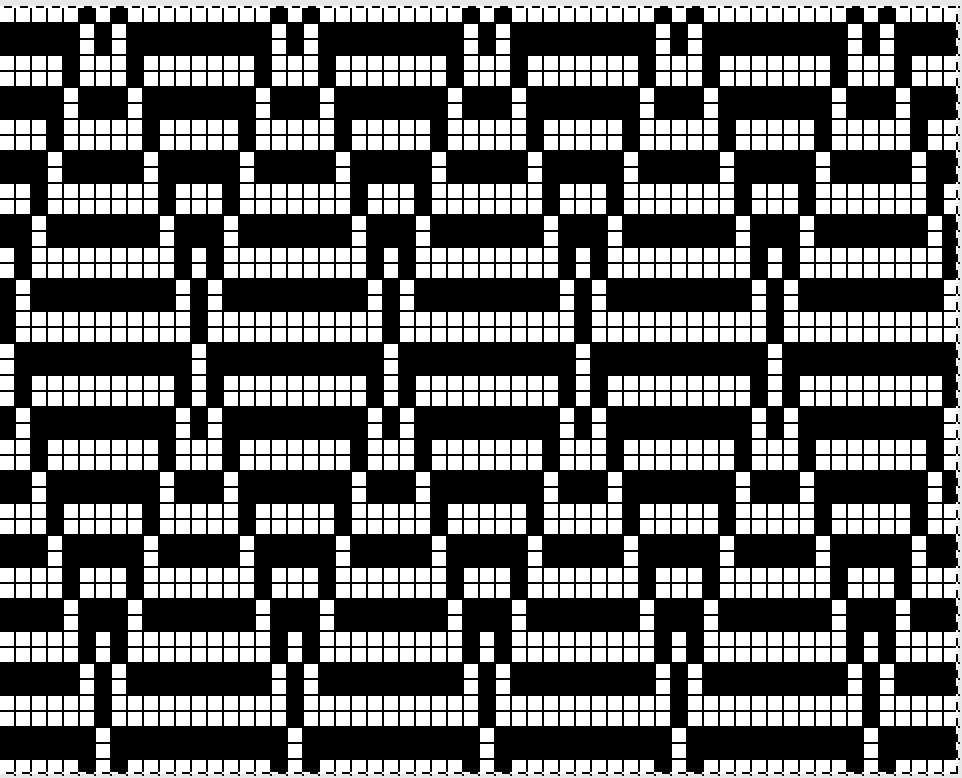
 Once more, the repeat could be reduced down to eliminate side knit strips, or limit shapes to one side only for a one-sided ruffle. What about repeating the same slit horizontally across a row? Repeats become very long, arrows are intended again as guides in the knitting direction.
 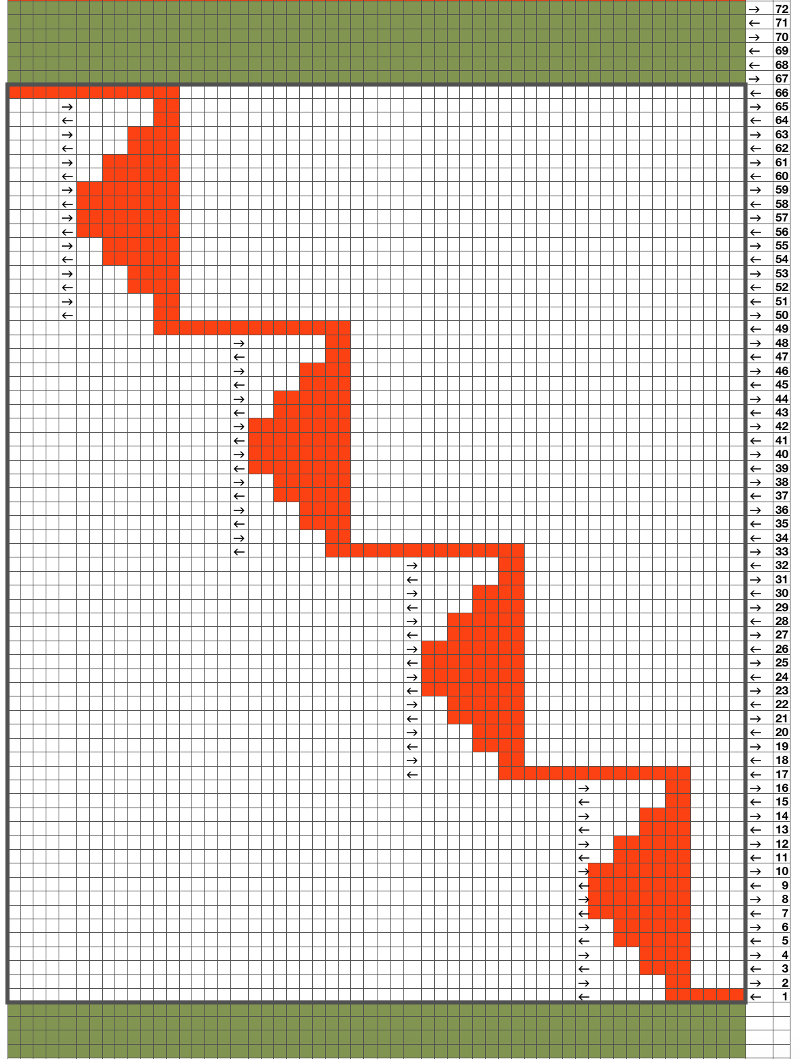 An even number of rows (green) at the end of the outlined repeat will return the carriage to begin knitting it from the right side once more. An odd number of rows added at its top will prepare for knitting the motifs beginning on the left.
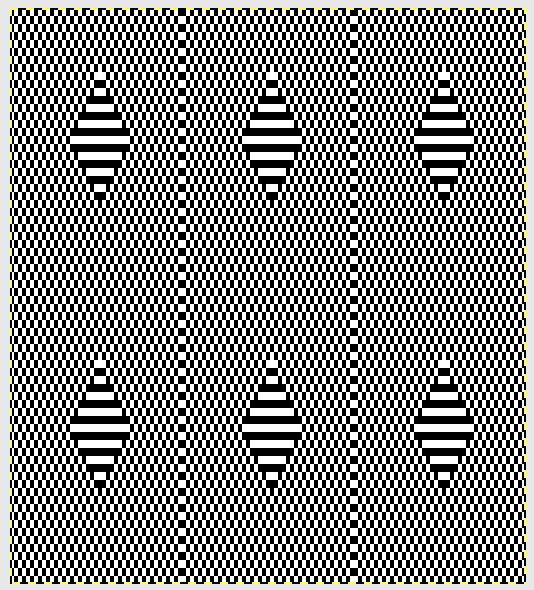
 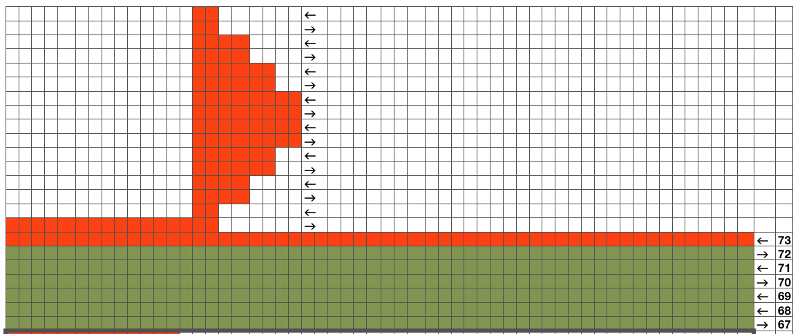 Again, motifs may be brought closer together, laid out directly above each other, in brick fashion, mirrored, or as otherwise desired. Adding rows at the center of the shape will make the “smaller” eyelets at the corner larger as well as the ones created by its outer edge. The possibilities are endless. If an automated slip stitch is used, it is the selected needles that knit. This is my final test repeat, flipped because I insist on forgetting to turn on the #1 variation button on my 930, and I like to begin sequences from the right.BringingB
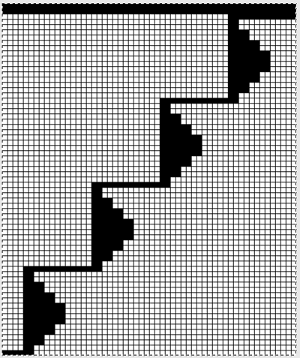 Pushing unwanted needle groups back to the D position will make them knit rather than being held, which is another way to vary the texture distribution across any single row
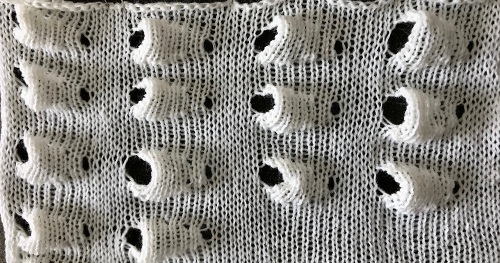 It is possible to add color changes between or within pattern repeats as well as needles out of work.
A free pass may be made to the opposite side by bringing all needles out to hold, and once there, returning the next group of stitches to be knit into work. If electronics are in use for automated patterning, the carriage may be removed from the needle bed and brought to the other side before continuing. If a punchcard is in use, an odd number of rows will need to be programmed for one of the colors in order to maintain proper needle selection.
Repeats in the charts below are for illustration purposes, not fully worked out Adding color stripes, with or without ladders 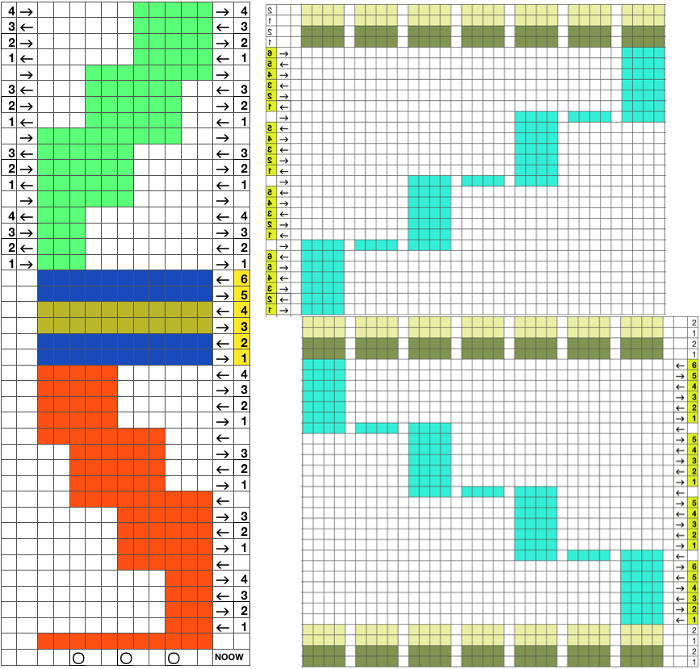 Needles out of work with lateral transfers alternated with needles returned to work will add eyelets to the piece and allow for every needle stripes of colors (or plain knit). If a lot of eyelets created from needle transfers are in play, it may be necessary to change the direction of those transfers.
 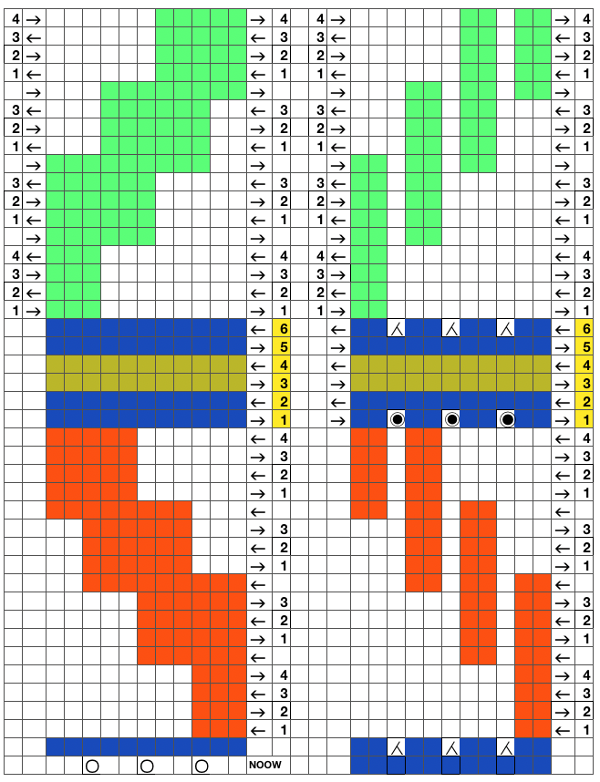 It is also possible to combine patterning and holding.
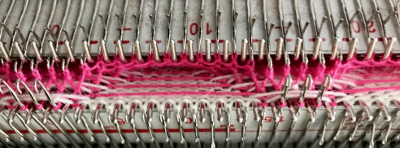
As needle groups are brought in to and out of the hold position, the needle selection must be maintained in order to keep correct patterning. There also seems to be a sweet spot in most machines for how far back a needle needs to be pushed for it not to “bounce” to an undesired position, thus picking up and knitting in the wrong color or dropping stitches off. Some variations are also found in how far the active knitting needs to be cleared with each carriage pass on each side. One row in my test swatch has obvious extra stitches in white, my feeder B color. I am not certain as to the cause.
The introduction of patterning adds yet another layer of complexity to track. Once again I am using 2/24 yarns.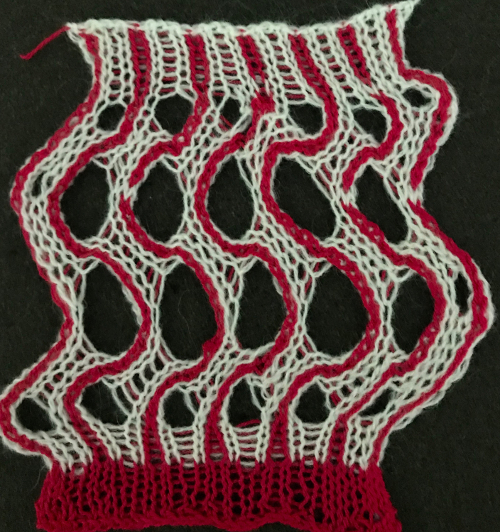
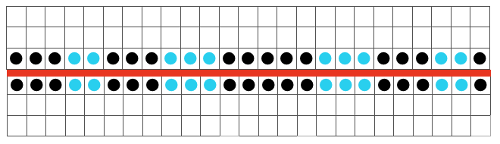
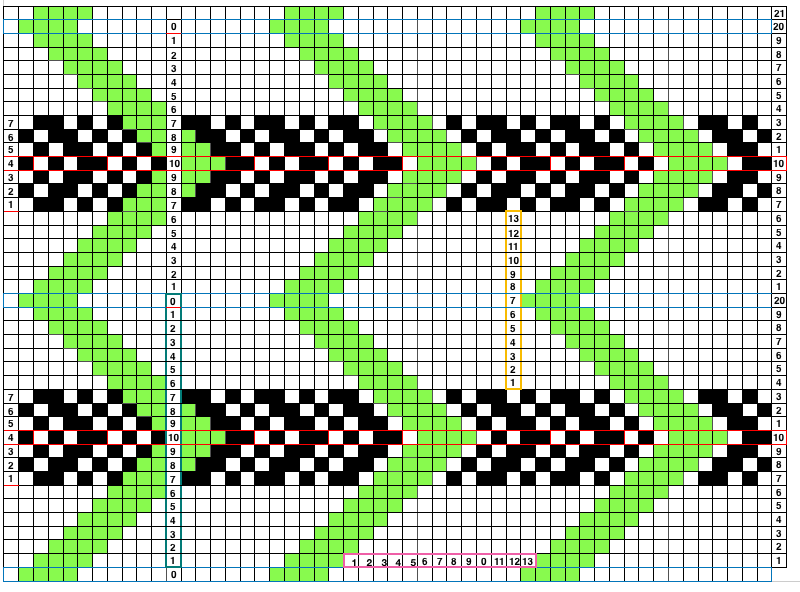
 the numbering system reflects every other row worked alternating sides of the work
 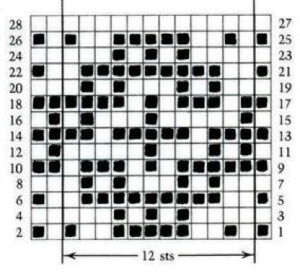 it is shown here with a superimposed table grid with its cells outlined in a thick border and positioned in front of a scaled screen grab of the original motif (arrange/ aspect ratio turned off)
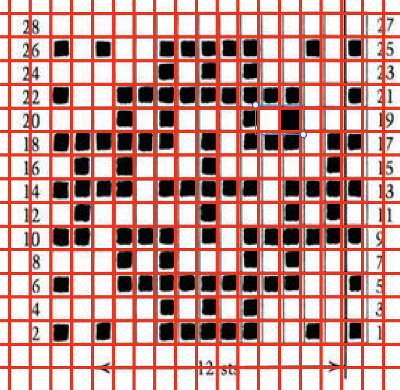
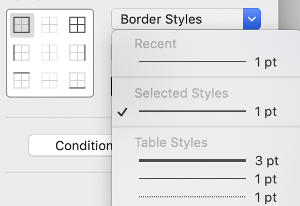
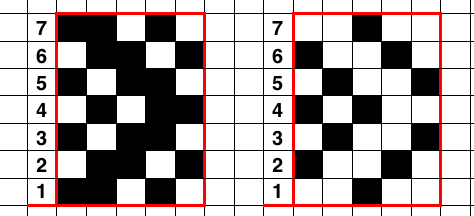
 the cell borders can be edited as wished. Here borders were removed by selecting none, then, in turn, the outer border was highlighted in an easy to identify a thicker red line
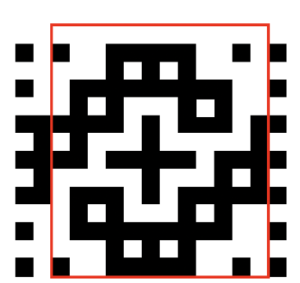


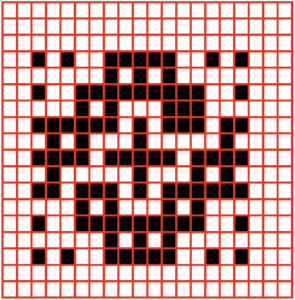
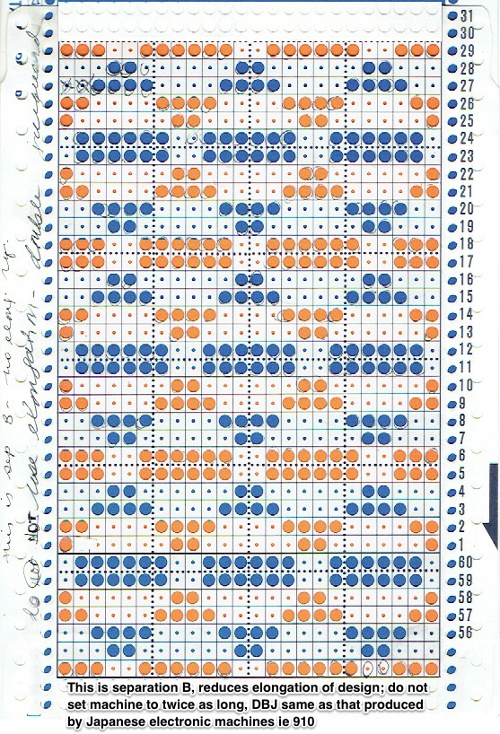
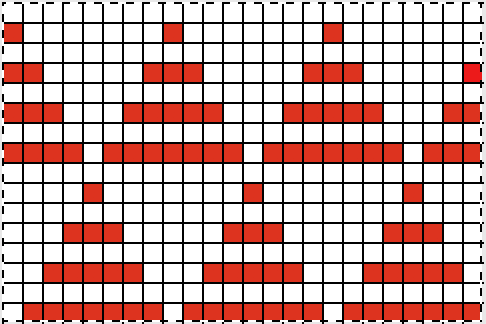
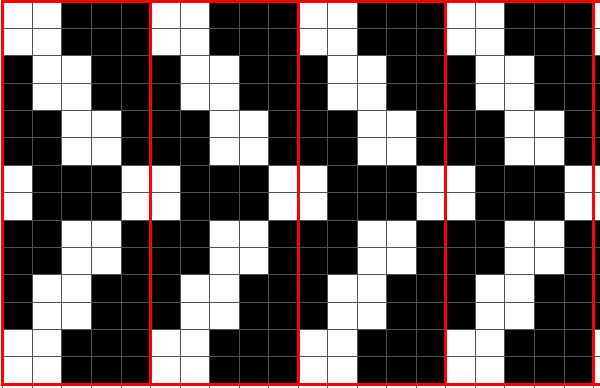
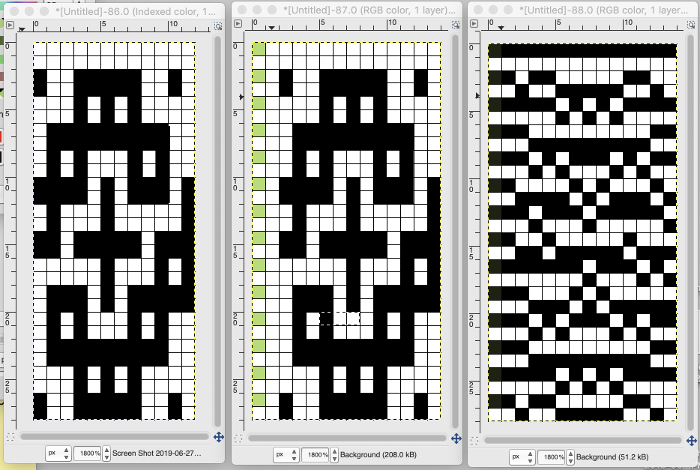 the last image needs to be once again converted to BW mode. The 2 extra rows of pixels on left are cropped off, the image is scaled to twice as long for use with the color changer, and the original 12X14 repeat is now 12X56
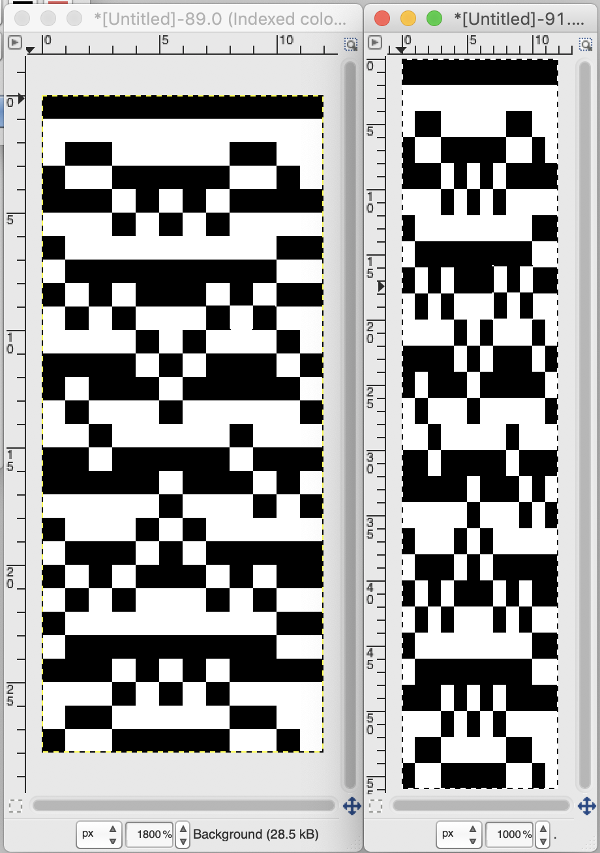 the actual BMP
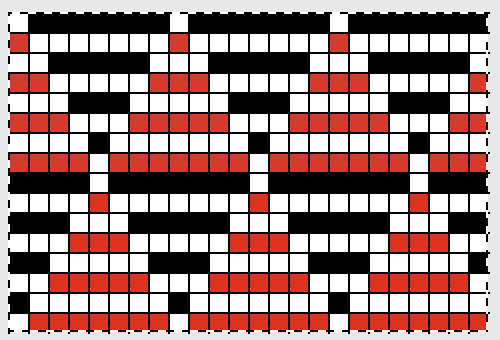
 a “pretend” longer repeat
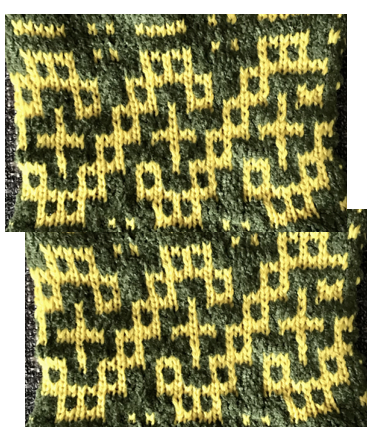

 is compared here with the earlier
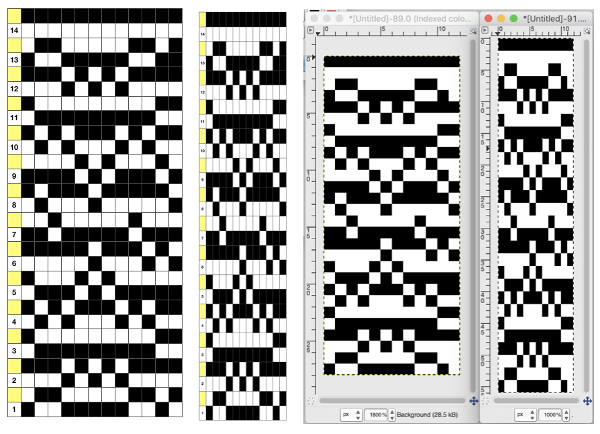
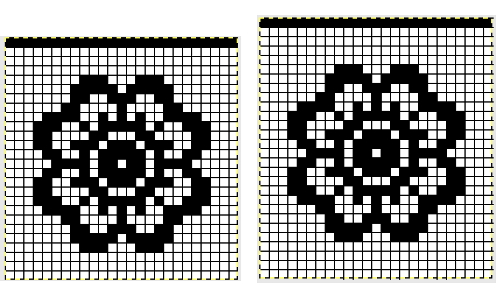
 Back to the drawing board: row height is as in the original repeat
 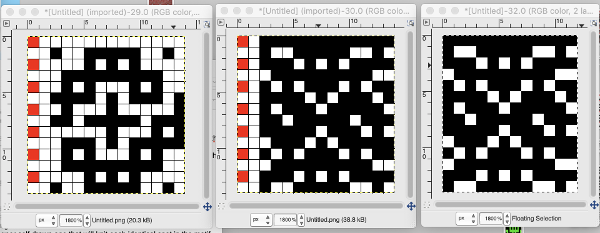 being extra careful, not necessary, the process can be inverted once more to check the repeat color separation
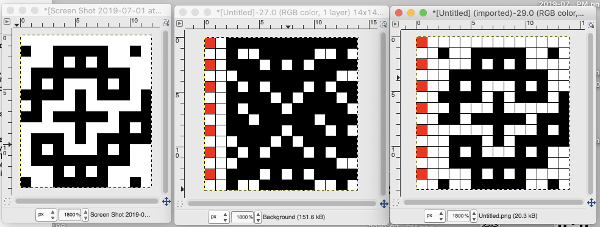
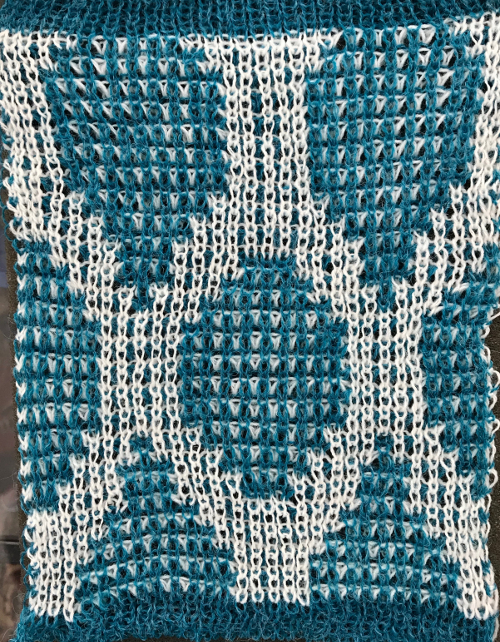
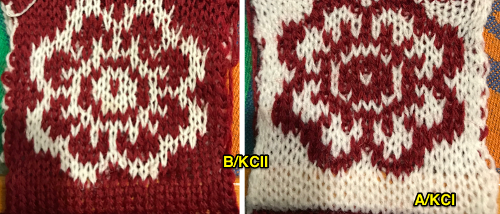
 the corresponding proof of concept swatch, with shorter floats than when the DBJ separation is used single bed
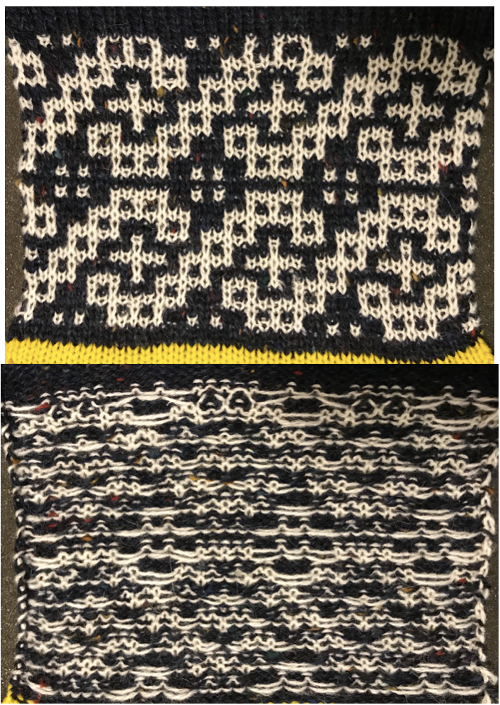
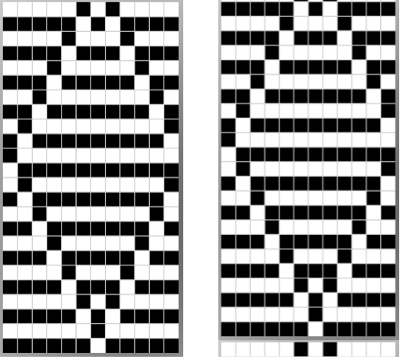
 the repeat of the design separation on the right is intended for use in electronics with color reverse and double length
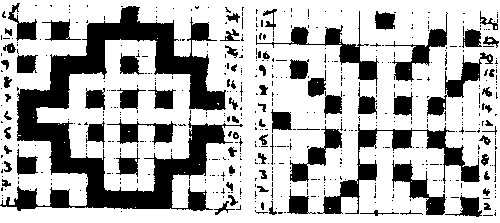
 for knitting purposes
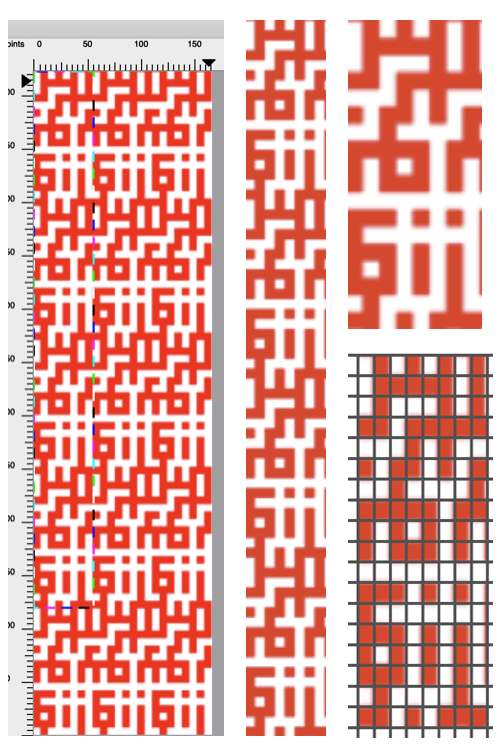
 The repeat (8X16) is then doubled in length for knitting after that single all-white row was edited out (middle images). The repeat is now 8 rows wide by 32 rows in height
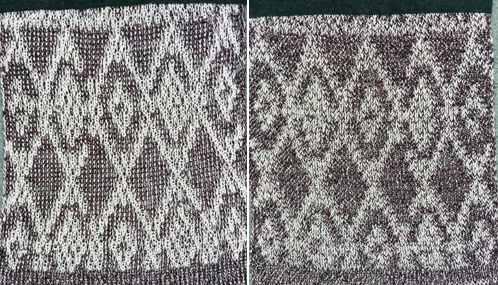
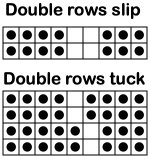
 One of the yarns is chenille, the other a wool. The chenille is slightly thicker and fuzzy, so some of the yellow rows are almost hidden but the pattern is definitely there. Here the design is knit using both slip (bottom) and tuck (top) settings. Again, there is a noticeable difference in width produced by each stitch type.
 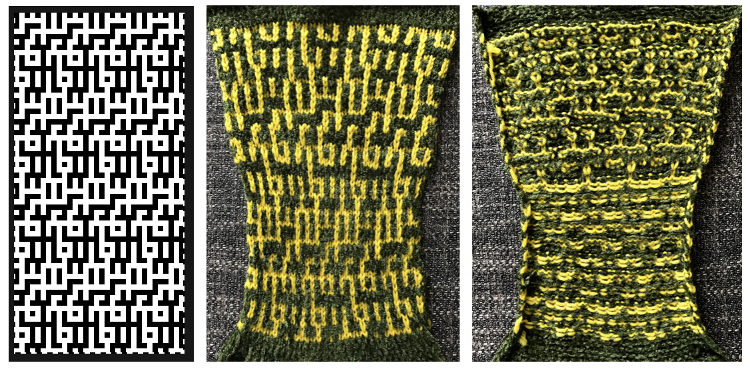 Observations: make certain that after the image is isolated in Numbers cell size is converted to square/ equal measurements in width and height before importing and scaling its screen grab in GIMP if not already so. It will likely load in RGB mode, convert to Indexed before scaling. Added colored squares are only possible if you return to RGB mode. After rows with colored squares are cut, return the image to indexed before saving as BMP for knitting. If any pairs of rows do not have 2 consecutive rows of cells in either color check your pattern. In DBJ the final repeat should be 4 times in numbers of rows in height to the original one, and thus divisible by four. The separation first doubles height for each row for 2 colors. Then height is doubled once more to allow for color changes every 2 rows. In Mosaics and Mazes, the color reversal happens on every other row in the original design. When that is completed, the height will be doubled for actual knitting to allow for color changes every 2 rows, with the final row count double that of the original motif. Rules for tuck knitting apply here as in any other technique. If white squares in the final chart have black ones on either side of them, the appearance is that tuck would be possible. Examining needle preselection is an easy way to assess that possibility.
 The fabric had an interesting twist and roll if tugged in opposite diagonal directions when first off the machine.
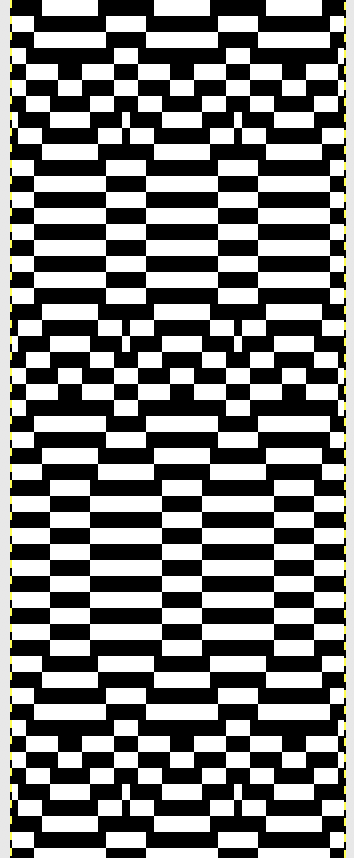
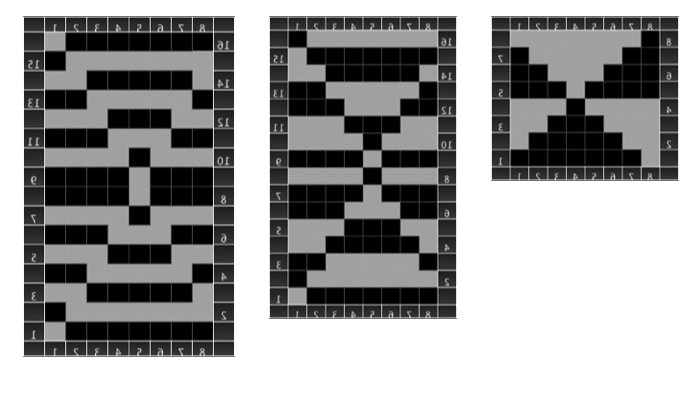
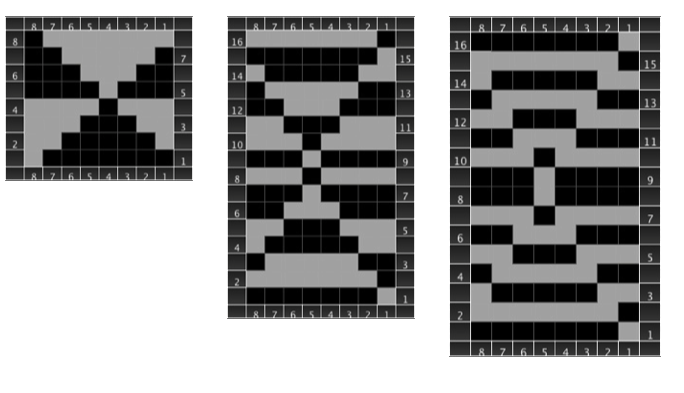
 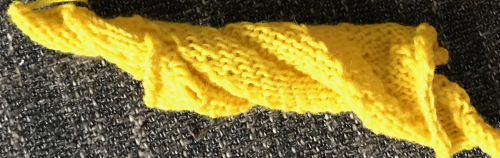 This is the working repeat, suitable for a punchcard machine. On the far left it is shown for use with electronics and color reverse, with the green grid highlighting black squares indicating holes that would need to be punched in a card, and lastly, as a tiled repeat looking for any errors in repeat sequences.
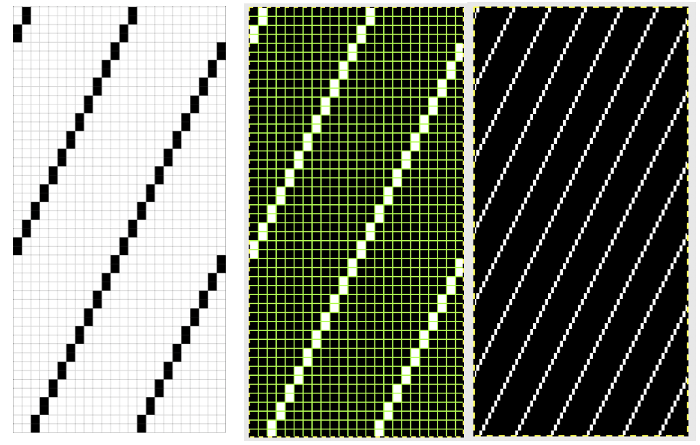
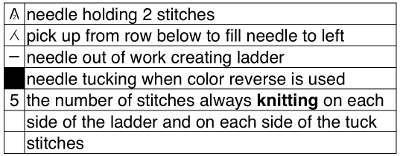
 This shows my swatch in progress. ? indicates operator error, in evidence if needle count on each side of the future tuck stitch or ladder space is checked
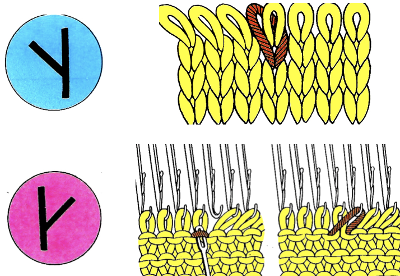
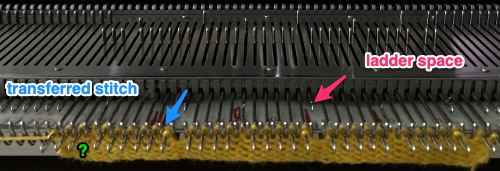 picking up loops from the row below to keep ladder width constant
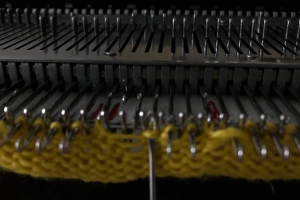
 Check that stitches have knit off properly
 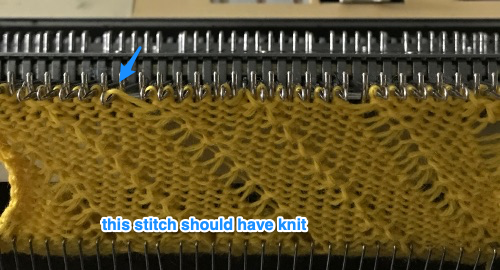 Needles with transfers or moved stitches may be brought out to hold position (E in Brother machines) for easier knitting. If this is done, be sure not to disturb needle selection or lack of it in location for next pair of tucked rows.
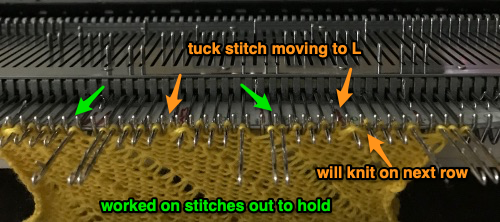
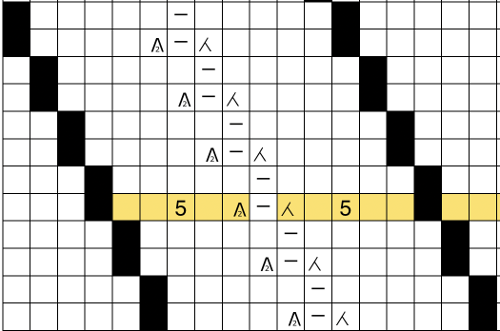
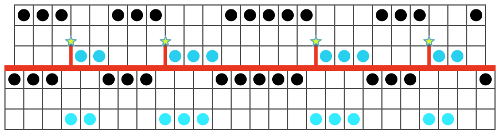
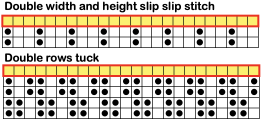
 Setting up a working repeat with blue representing tuck, purple slip (or vice versa). The distance between the vertical column, in this case, is fixed and seven stitches in width for a center folding repeat width of 16, color reverse is required
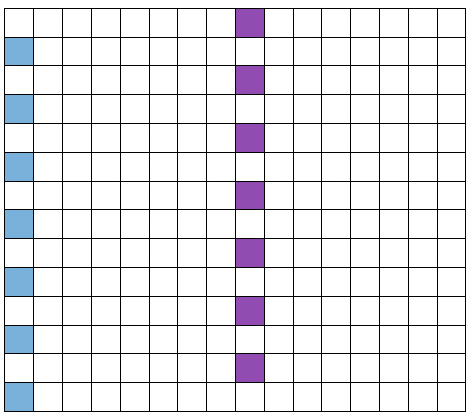
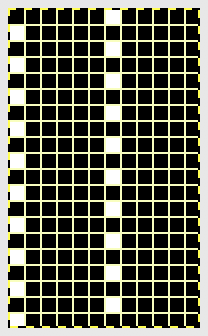

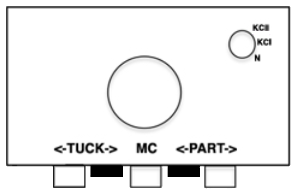
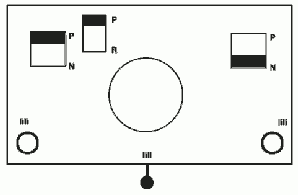
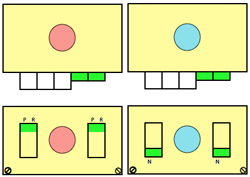
 Set up the cast-on as preferred. I used plain knitting, weighted it, and began my pattern work from the right-hand side of the machine. COL my preselection row was made from right to left. White squares in the chart with black ground and green grid become non selected needles on the main bed. Transfer nonselected stitches down to the ribber. Set the ribber to slip to the right, those stitches just transferred will slip moving to the right, knit on the return pass to the left. The knit carriage is set to knit until that first row is completed
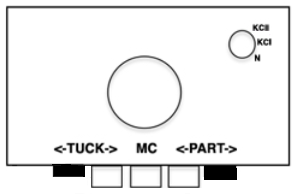
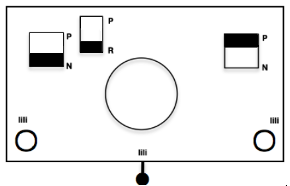 COR the ribber will knit on the next pass to the left. Set the knit carriage to tuck while the ribber is knitting
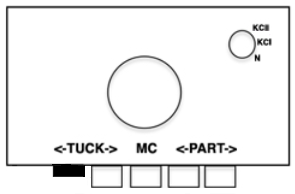 Continue in pattern to the desired length. Fabric narrows considerably, so several panels may be required for items ie. skirts. The repeat on the knitting bed should also be adjusted to allow for as close to invisible seaming as possible. The stitches on either side of the single needle in work on the ribber may be inclined to drop off. I was unable to use tuck on those same needles for any significant length for that reason. It pays to visually check for stitches knitting off properly to avoid this
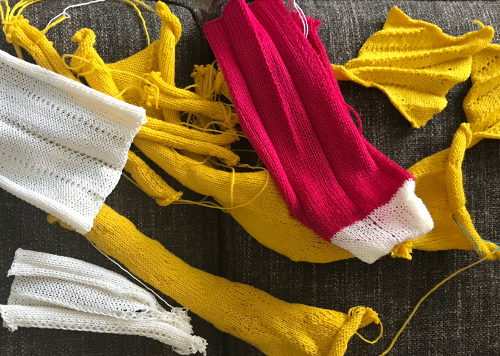
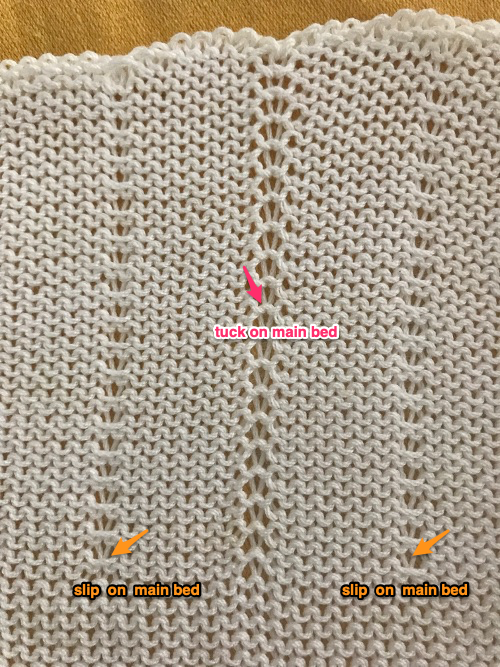
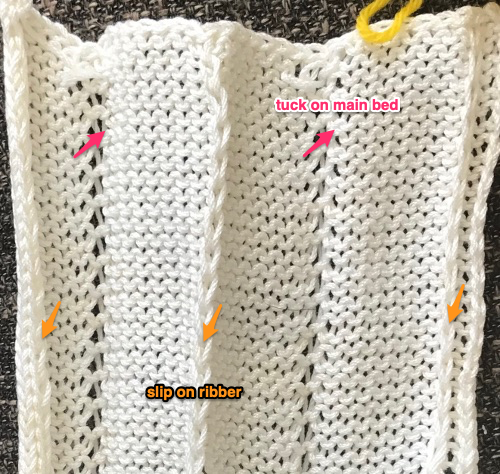
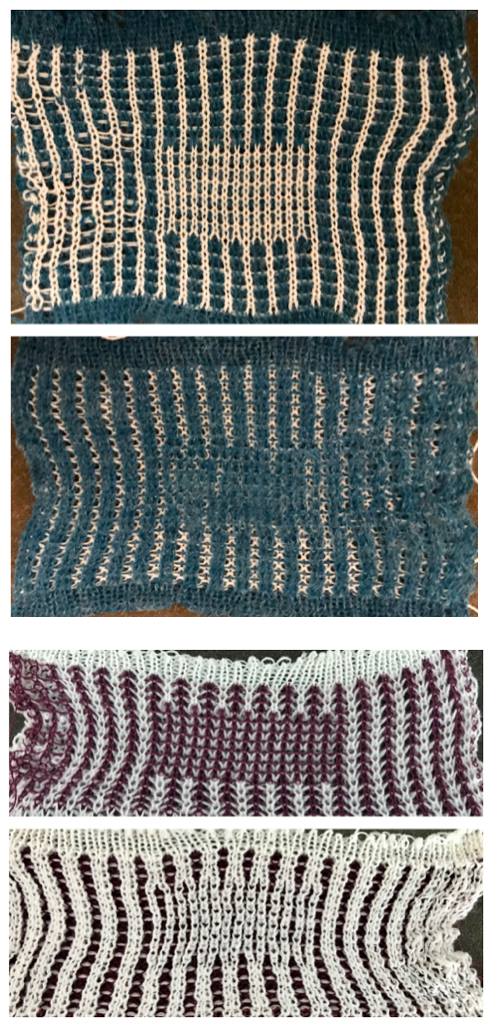
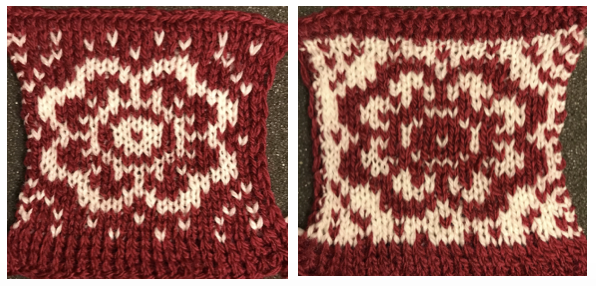
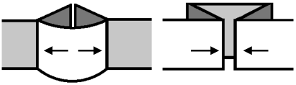
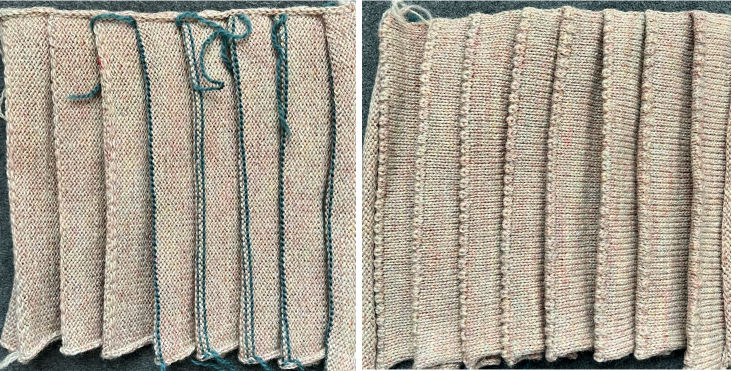
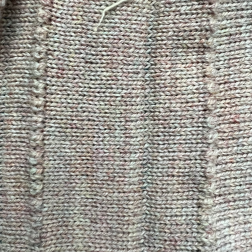
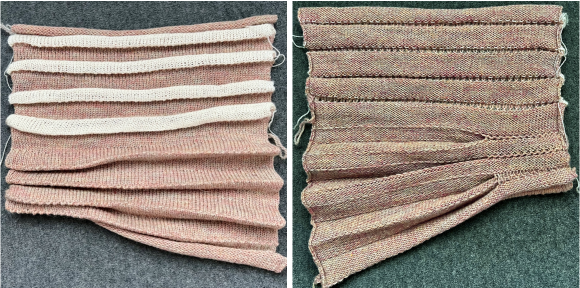
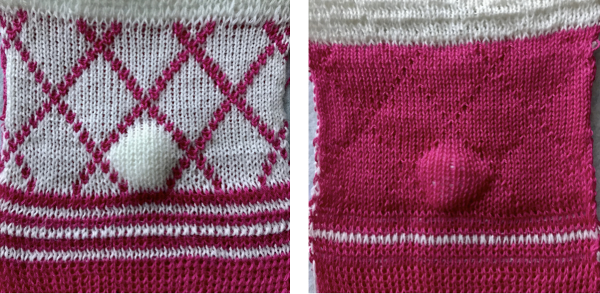
 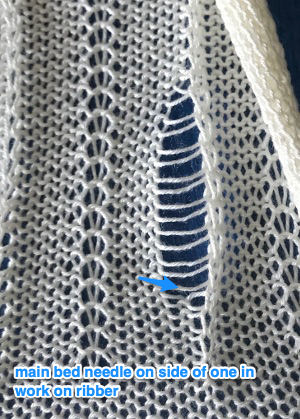 The start of vertical pleats, with the slip stitches folding to the purl side, the tucked stitches folding to the knit side on the machine, just after binding off.
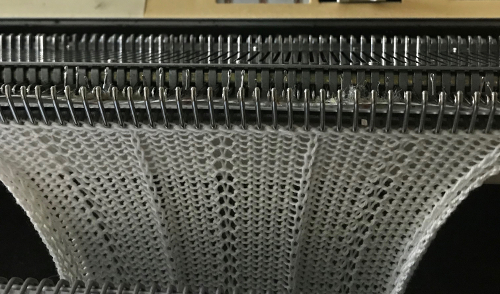

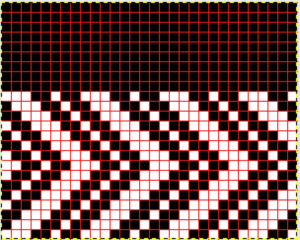
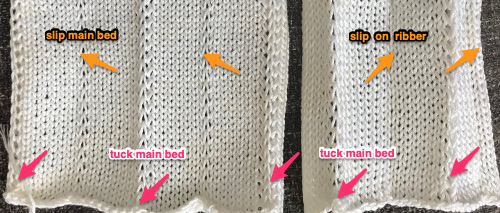 Different fibers can produce varying results in fold and drape. Setting either bed function for the wrong direction will produce an all-knit fabric (top of the red swatch).
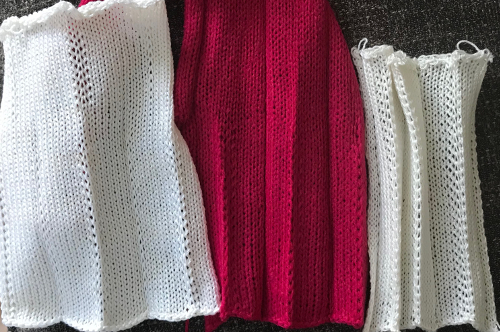
 This starts to address incorporating hand techniques and manual ones from the diagonal swatch and the one with vertical folds while also developing a design repeat to aid with planning or actions to be taken. It will be altered in future experiments
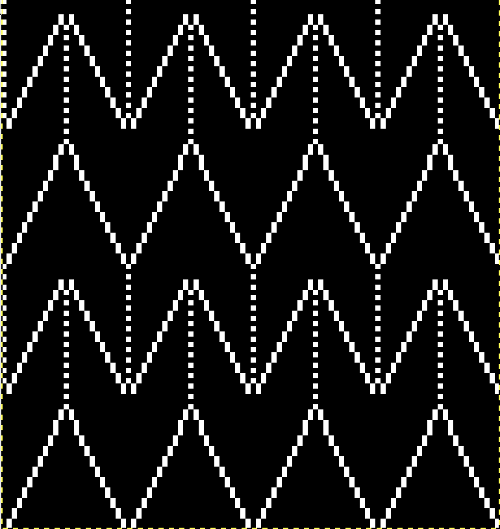
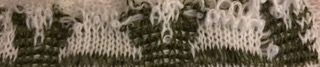
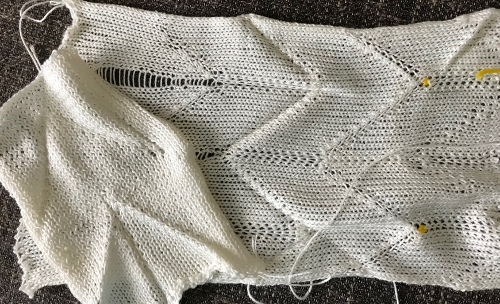 This swatch is knit in wool, trying to sort out what does what and by how much. I am starting to get a bubble, but not a dramatic folding effect. The bottom folds more than the top. The filled eyelet technique has a hand-tooled tuck column on the reverse side. The top is automated using tuck stitch.
 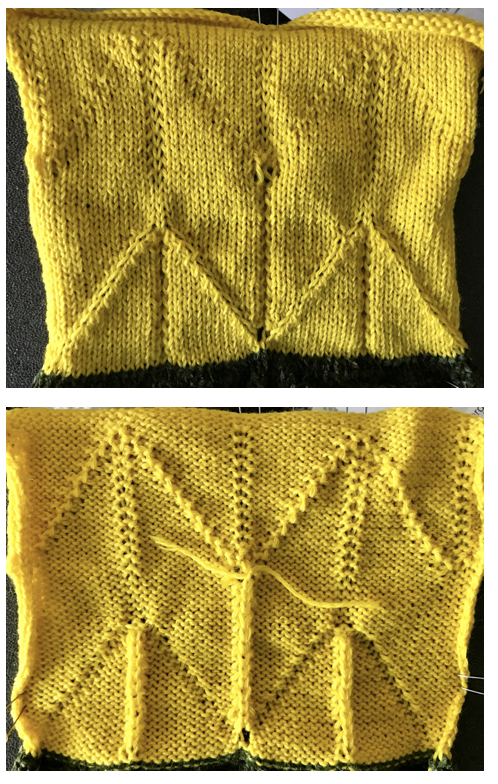 A different repeat: the bottom with carriage set to knit with needle selection as a cue to hand transfers, the top set to tuck automatically. Transition rows need to be considered further and altered where the twain meet.
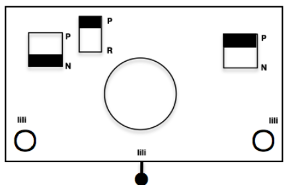
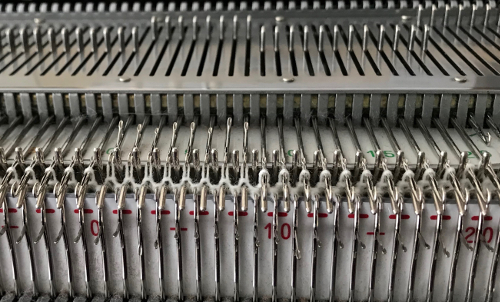
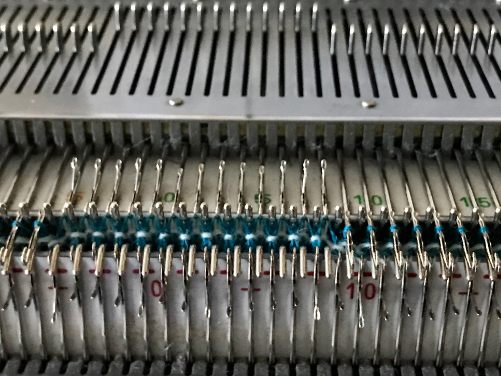
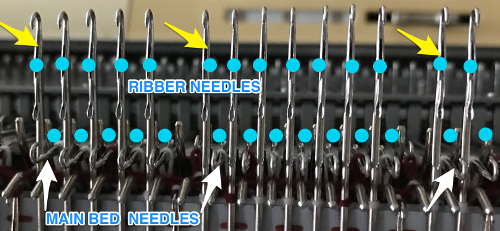
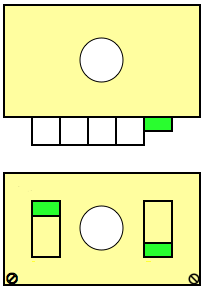
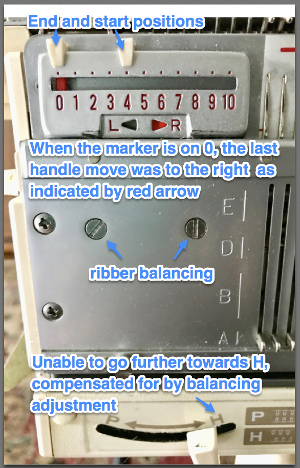
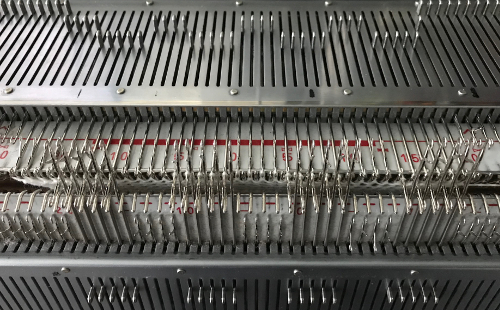
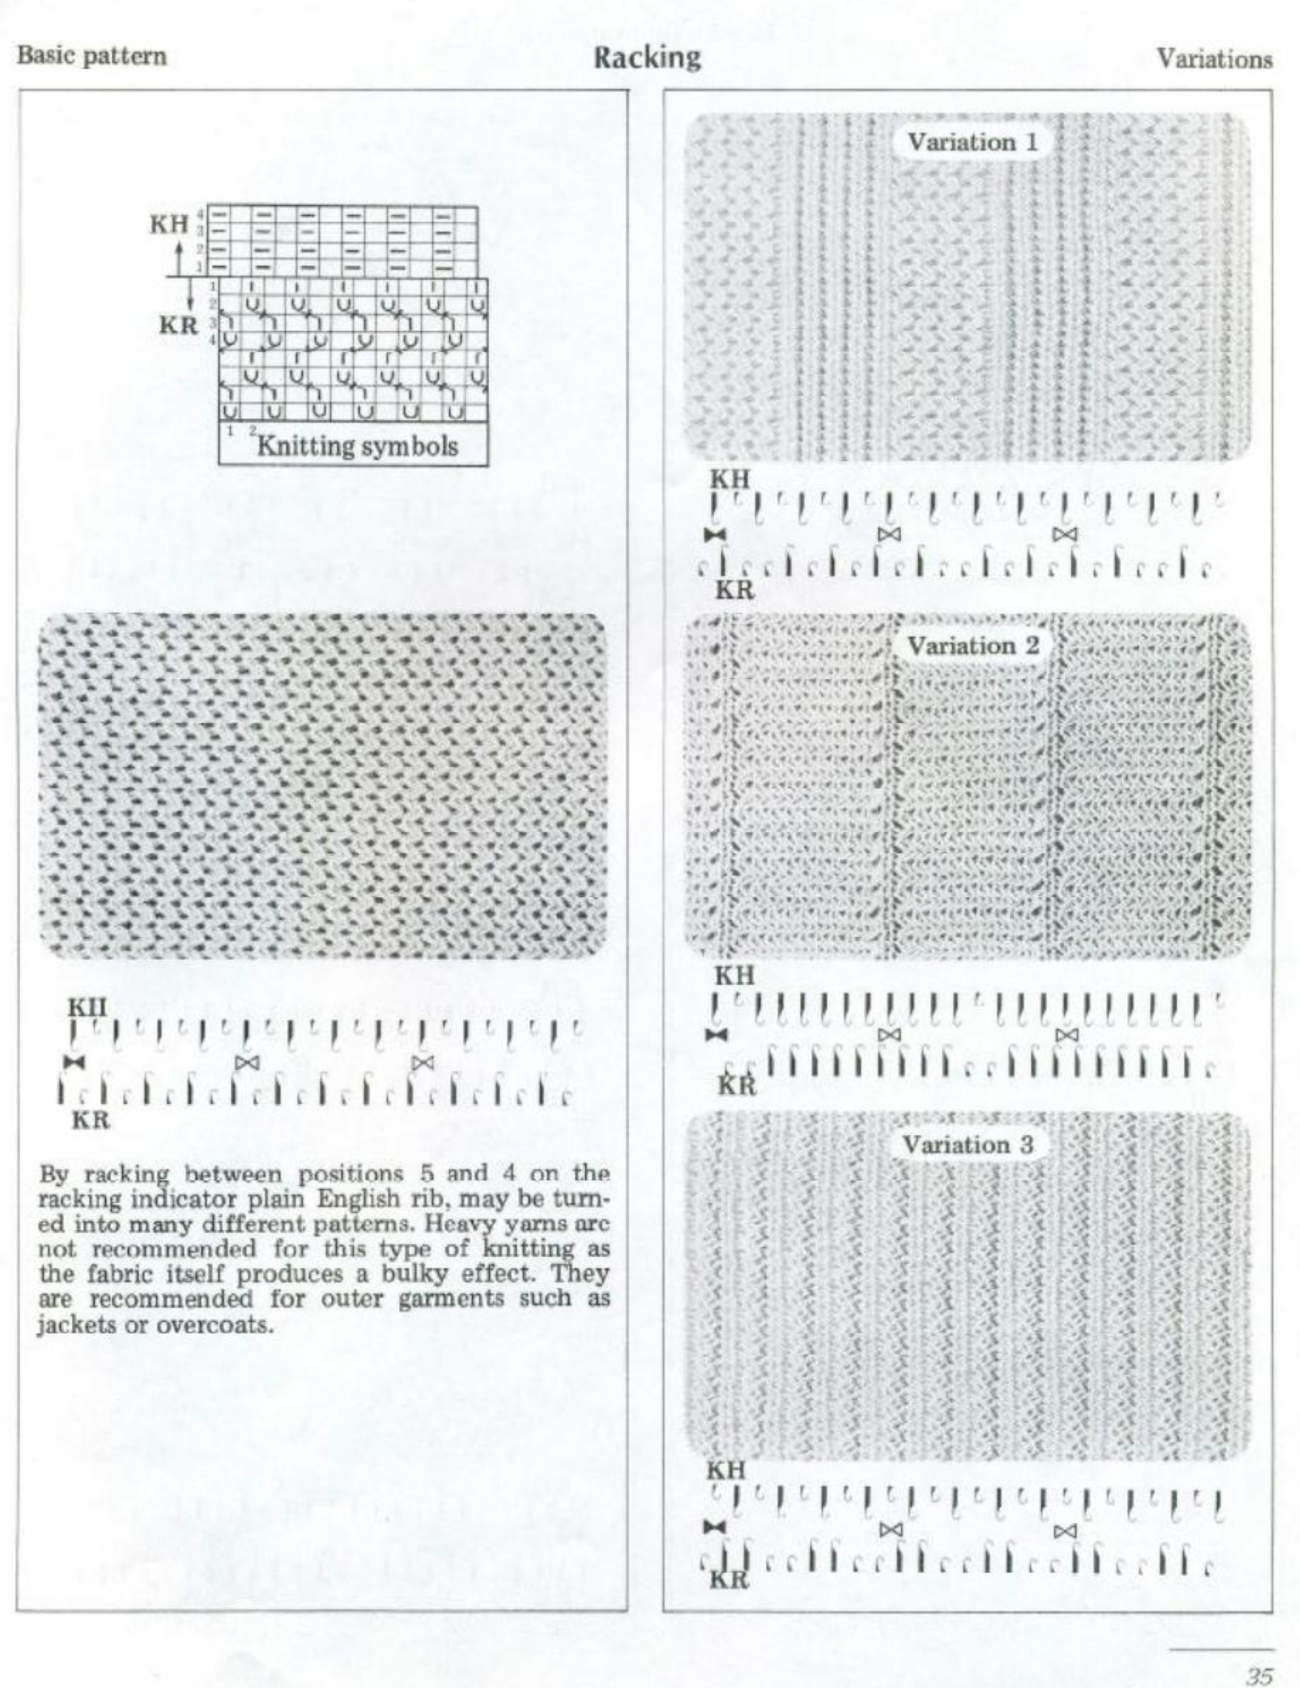
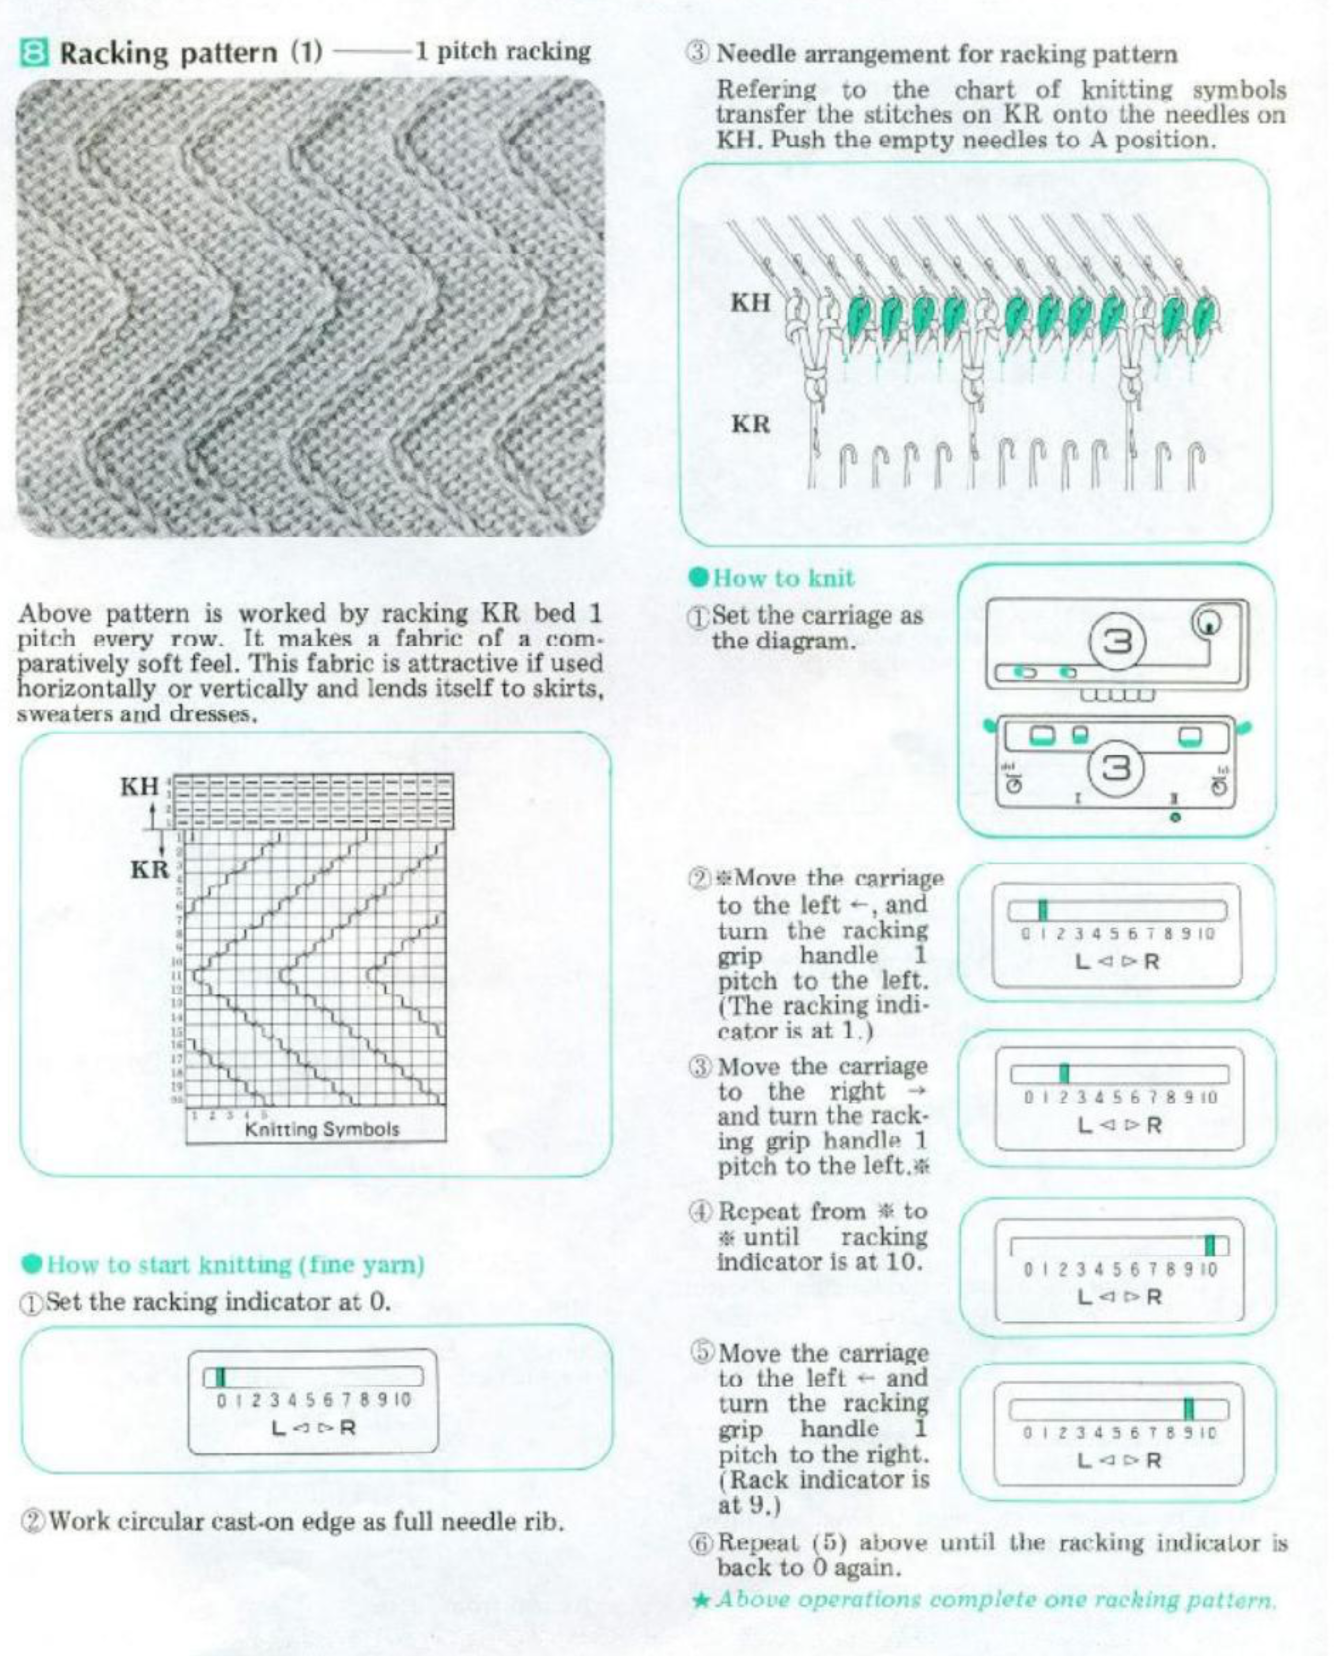
 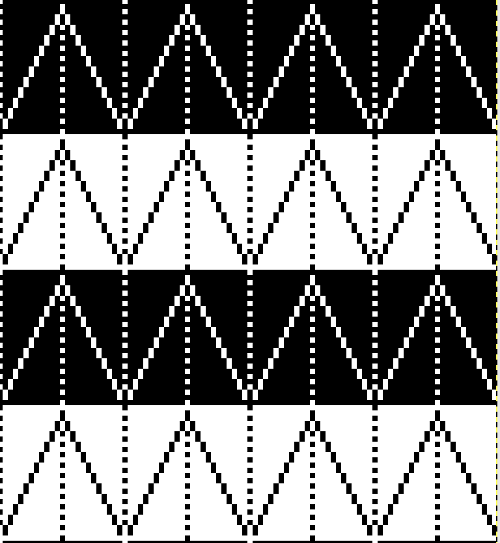 Returning to simpler creases and folds: a first experiment in racking double bed with NOOW. The setup and racking positions were not pre-planned. I knit 4 rows without racking at unplanned intervals as well; they produce a noticeable change in texture. The fabric is reversible, I actually rephotographed it adding a marker to make certain I had not shot the same side twice. The needle set up:
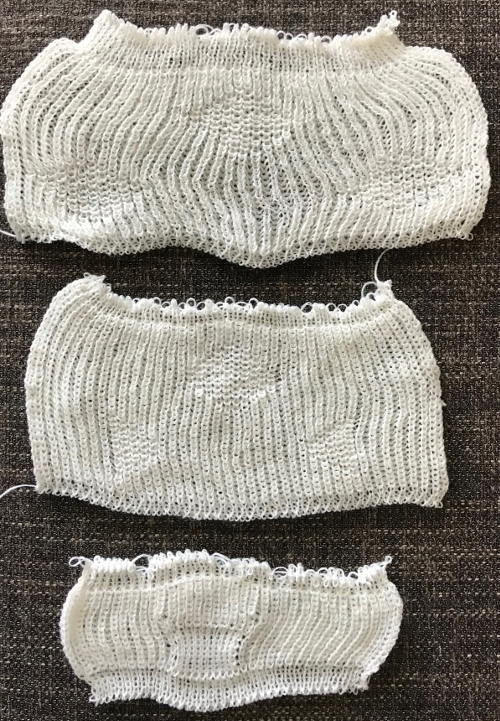
  the resulting swatch presented sideways for the sake of space:
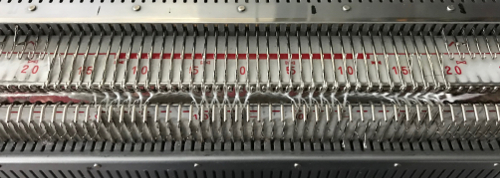
 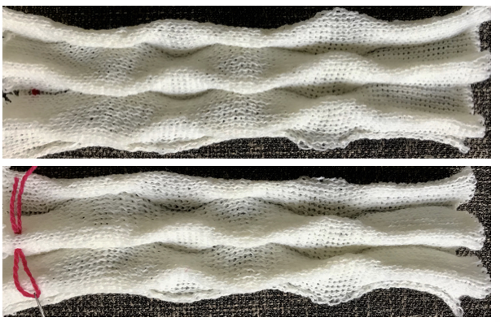 working with single needles out of work rather than two, with even spacing between them on each bed
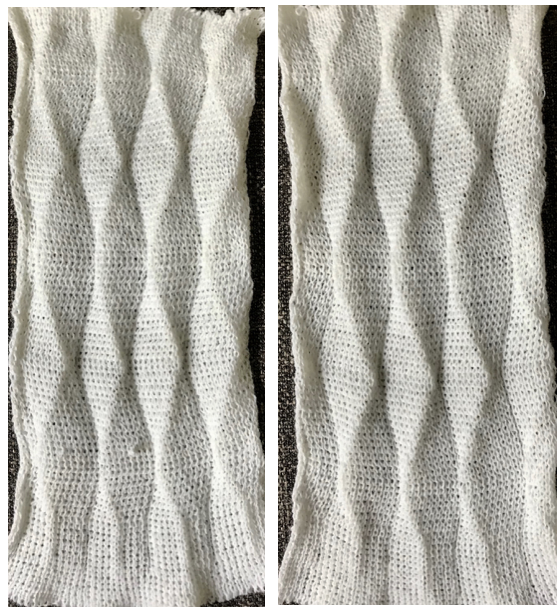 both swatches flattened to note differences between needle arrangement folds
 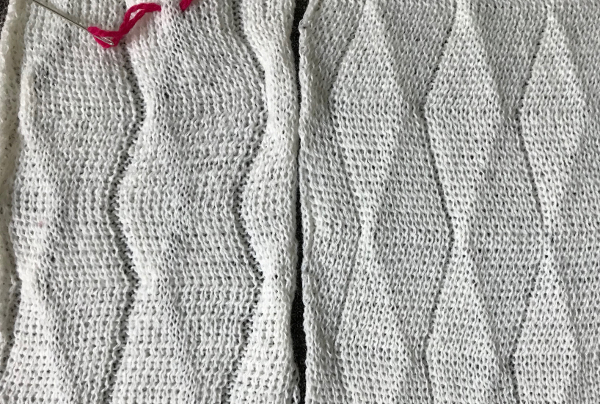 getting more organized, with a planned repeat: the needle set up
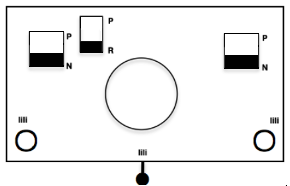
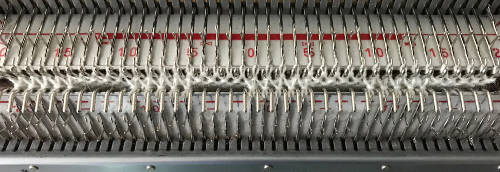
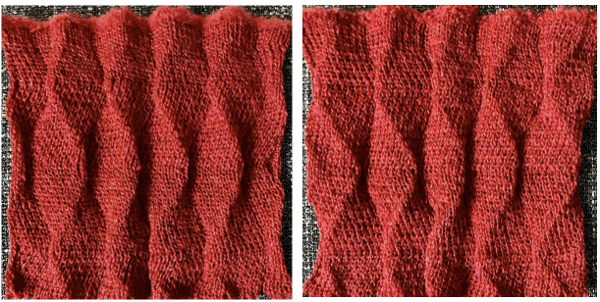 Here the arrangement here is with 2 needles out of work, racking every 2 rows in the same sequence. The resulting fabric has clear “spring” and foldsRR
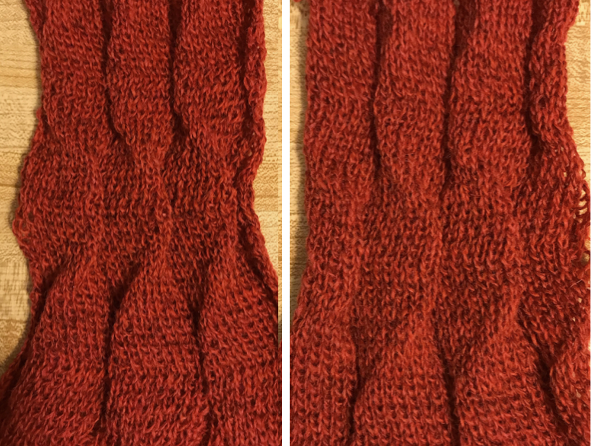 Returning to the previous needle set up, now racking every row from position 5 to 0, knit 1 more row with no racking; rack to position 10, knit one more row with no racking, reverse direction, end knitting on position # 5
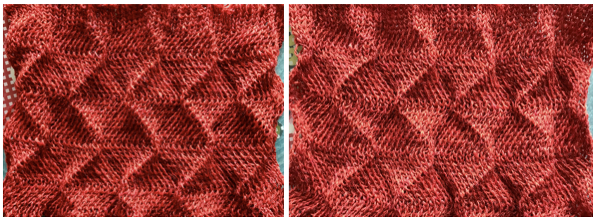
 This last in the series is a personal favorite. I found racking from the center to 10, to 0, and back easy to track. One moves in the opposite direction when not allowed to go any further in the continuing direction by the machine. Single needles out of work appear to be enough to create the folds.
 Racking starting position on 7:
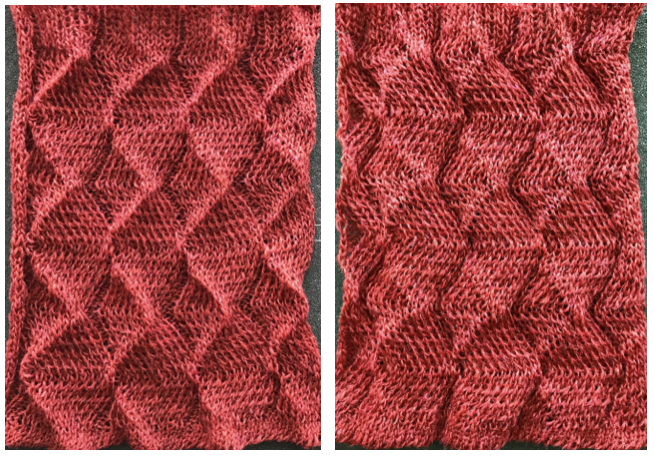 Consider playing with racking positions within the total number of needles in work on the main bed. For other possible needle arrangements and more on pleats created with needles in/out of work on both beds please see


 Back to the original method used in the previous post where ribber settings are changed from knit to tuck <– –> every 2 rows along with color changes. I chose a design that would make it easy to identify the location of non-selected needles on the main bed in rows where the ribber will be set to tuck in both directions. The result is interesting, but the solid areas, narrower than the remaining knit, are in the opposite color to the dominant one on each side, the reverse of the inspiration fabric.
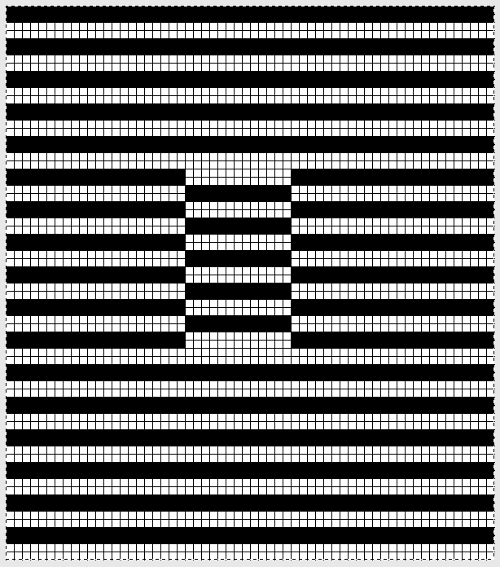


 The ribber remains set for knitting in both directions throughout, with the main bed set to tuck in both directions.

 The single 14X84 png
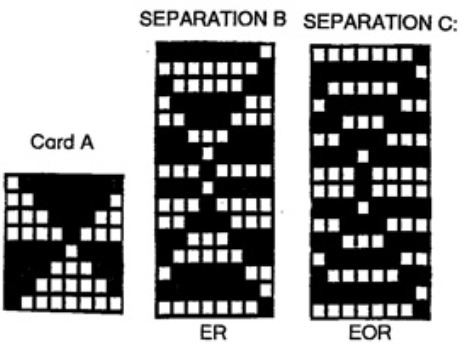


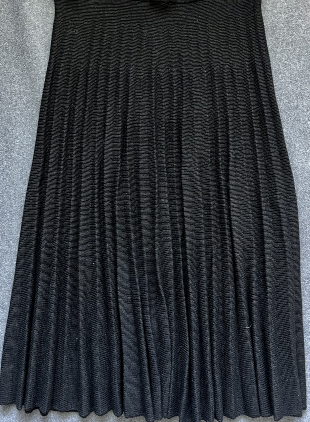
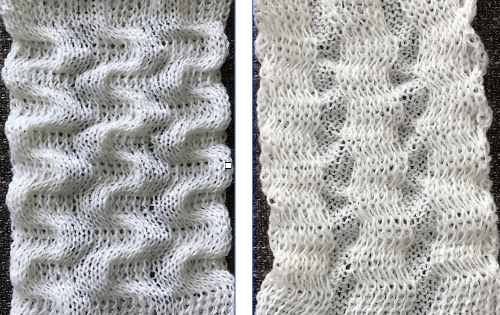
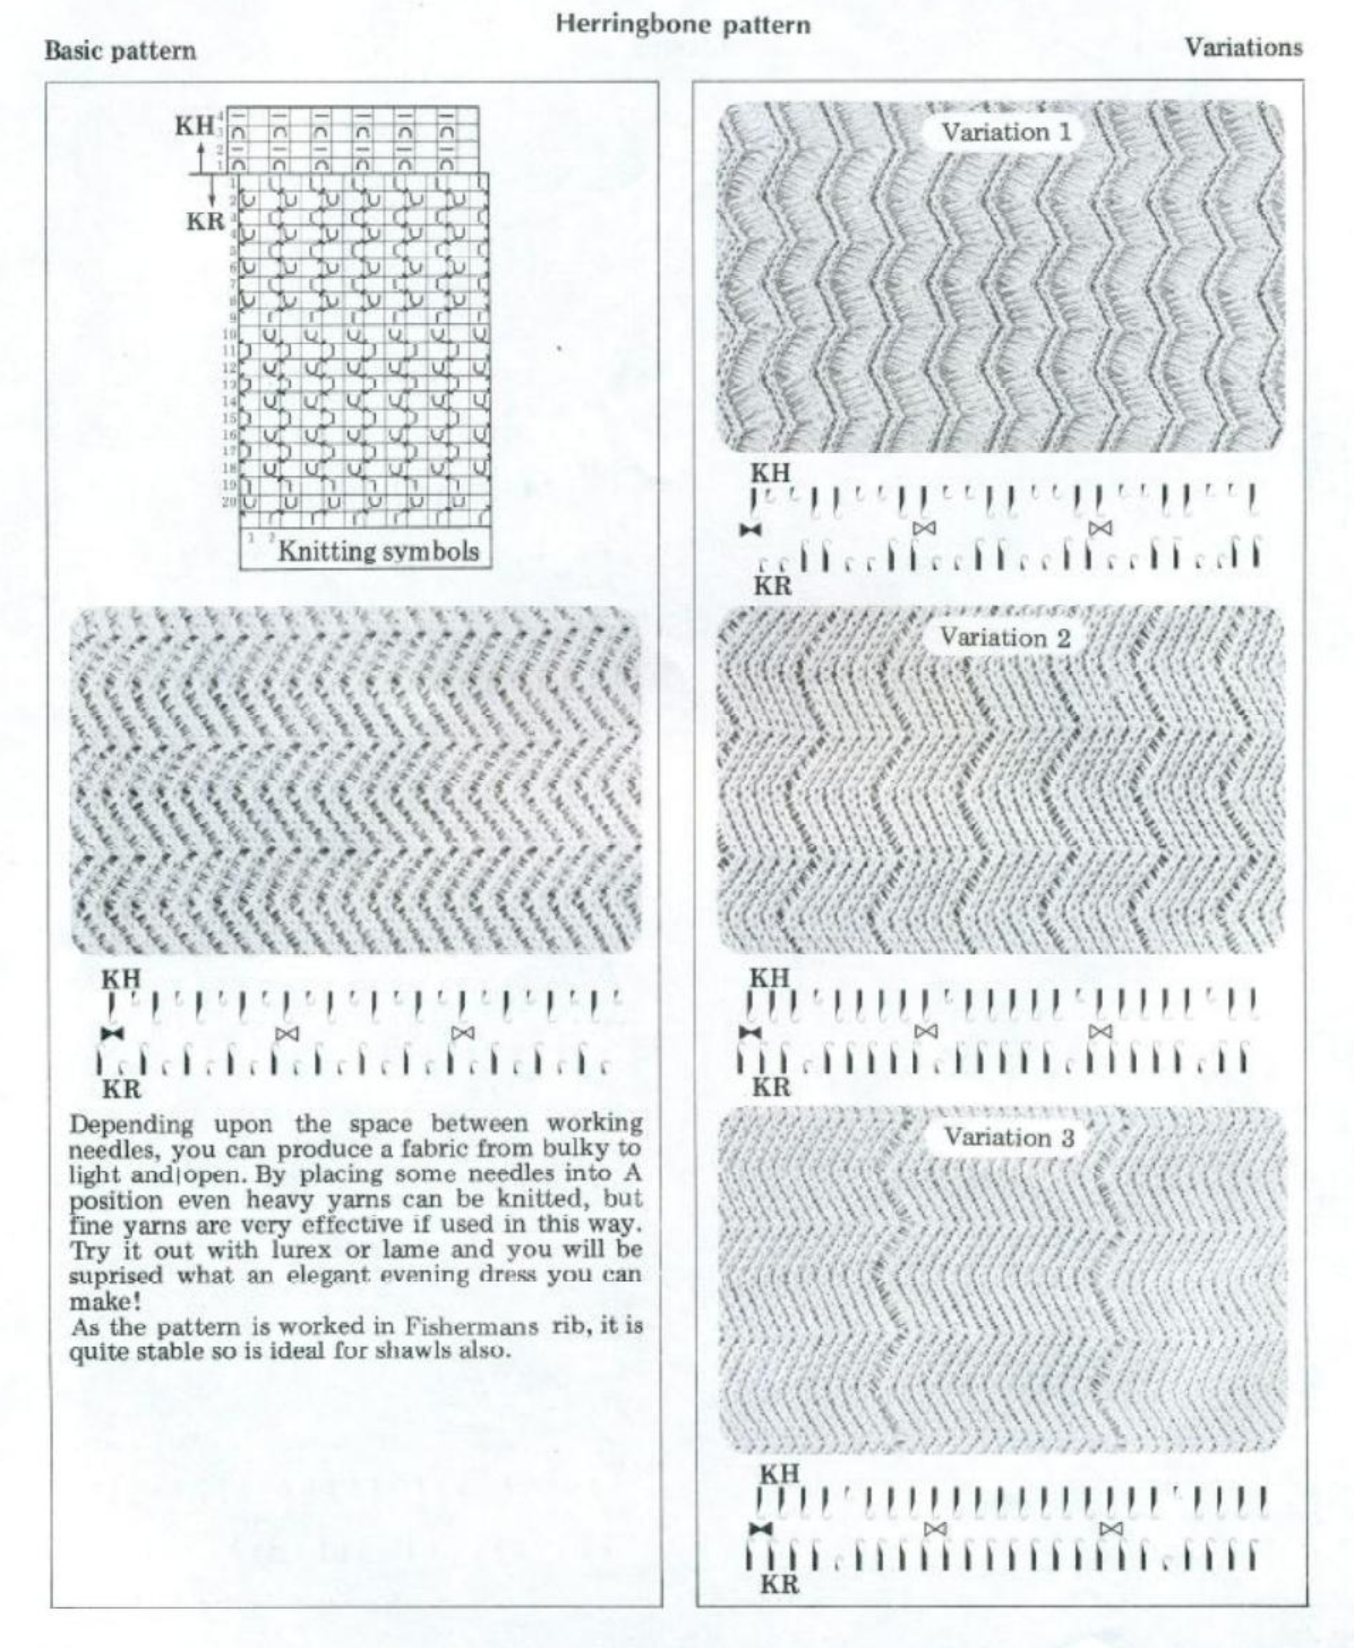
 The fabric narrows considerably as it is stretched lengthwise to set the stitches. Several panels would be required for a garment such as a skirt. Such an item would need to be pulled into shape, pinned, and hot pressed. Fiber content will determine the crispness of the pleats after blocking, and their retention after cleaning. The swatch below is turned sideways for the sake of space.
 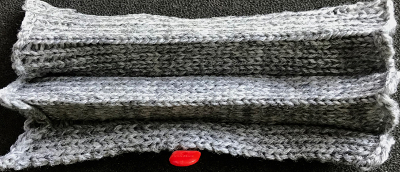 More variations with folds can be made by varying the “rules” commonly recognized for creases. Working sideways once more: on a punchcard machine, using card # 1 locked, cast on making certain every other needle as well as the first and last are selected.
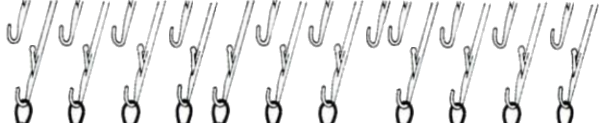
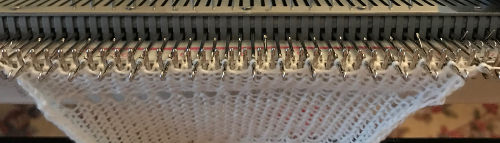 Cancel the slip setting, complete the next knit section, and transfer every other needle to the adjacent one on either the right or left.
 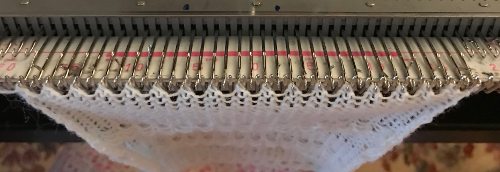 The needles holding 2 stitches may be brought out to the hold position as each transfer is made, or pushed out to hold after the fact to insure the stitches have been transferred and will knit off properly. The number of needles in work remains constant.
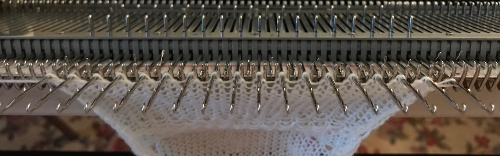
 The slipped stitches form the inside folds in the pressed swatch, while eyelets and tuck stitches fold a picot edge to the outside.
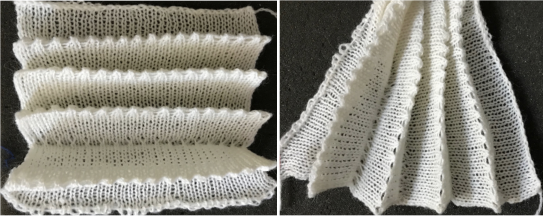
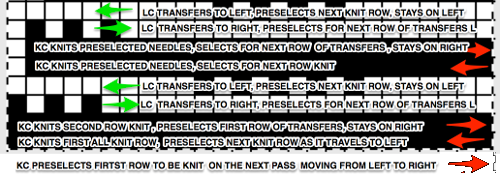
 Arrows indicate the movement of the lace carriage on left, knit carriage on right. Red squares now represent transfers to right, green ones transfer to left
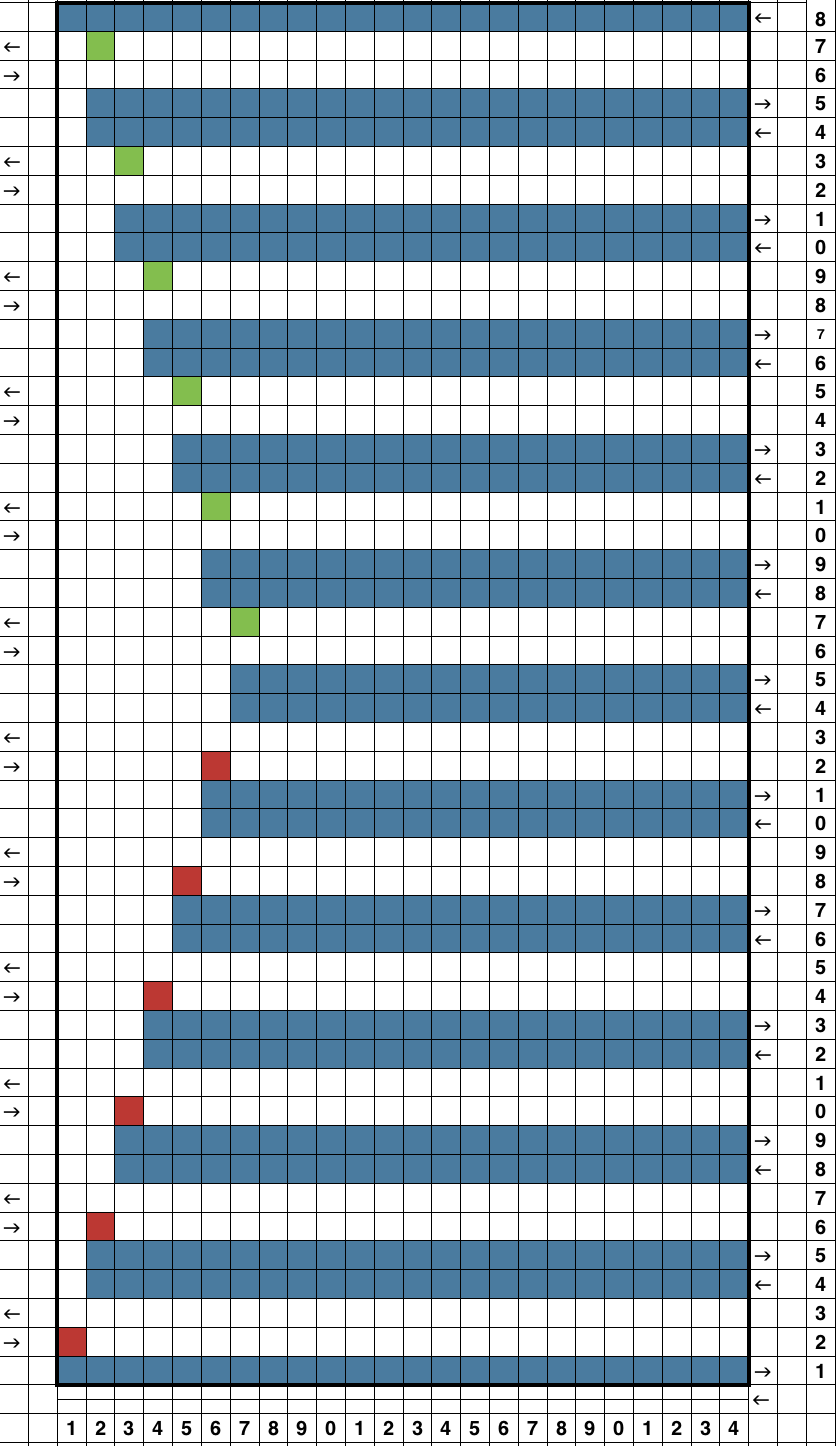

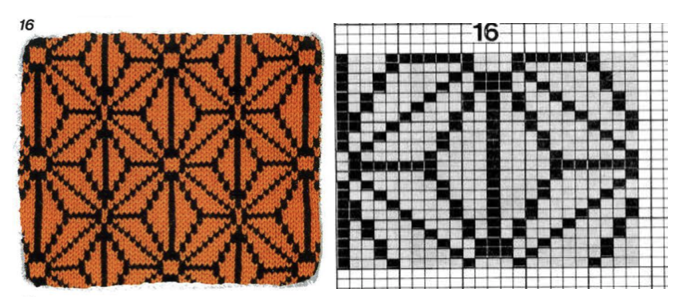
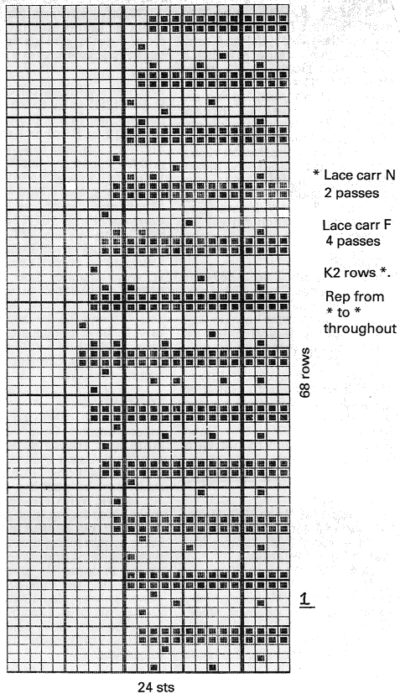
 Going back to the wheel that has already been invented, how can pre-drawn published MK lace repeats be used instead of “winging it” endlessly or not having the confidence to perform the necessary assigning symbols and proceeding with the required separation? Still trying to work with a pattern that knits for 2 rows, transfers for 2, a chart from Stitch World:
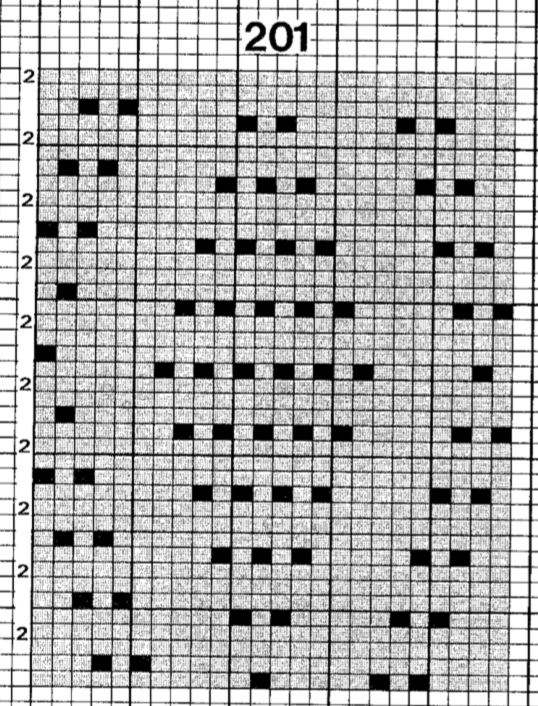
 For pngs for this reworked, more resolved repeat see
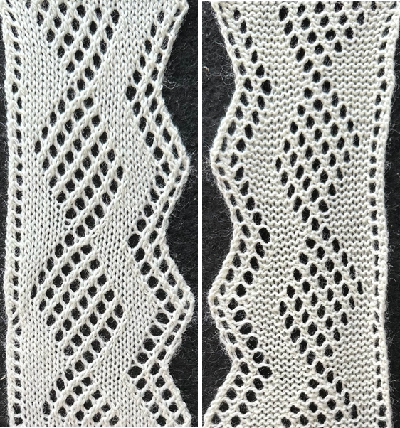


 Adding extra stitches knit on the right side of the original repeat made it possible for me to use my cotton again, giving me a controllable edge on that side without having to pull stitches out to make them knit.
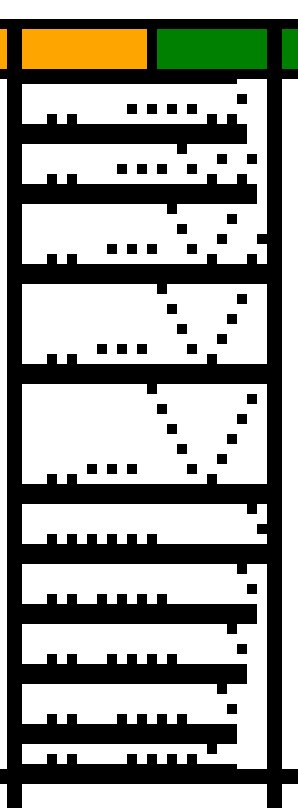
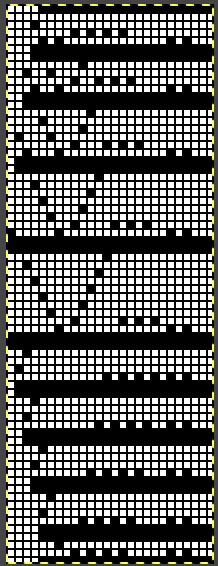
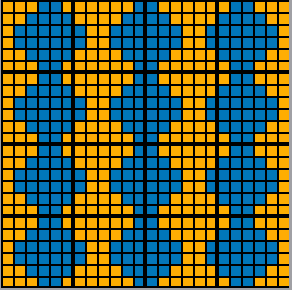
 I prefer to start my repeats on the full width of the repeat, this 24X70 png shifts the first segment to allow for that, still with a single all knit row start, making it suitable for non-Ayab knitting, its png is mirrored as it might be, depending on end use prior to download
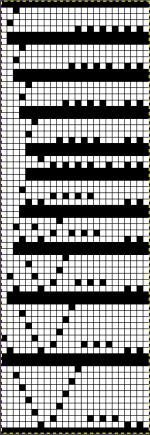
 Helpful tools: on one blank card color each section of the card, representing color change sequences. This may be used later to check color separation.
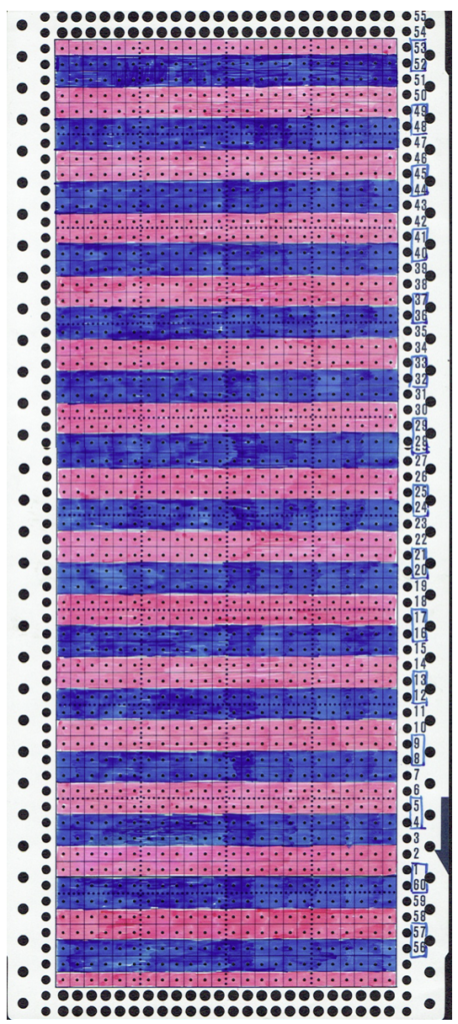 On a second blank card, prepare a master. The first row is left blank, then 2 rows are punched out, followed by 2 rows left blank, repeat, ending with a blank row. Again working upward, number each row you have punched out on the left-hand side starting with number 54, then 55-56, 57-58, etc, ending with a single row, 23. This will result in number markings matching both sides at the bottom of the card, below the #1 factory mark. My own master began on the left with the # 53. I also added corresponding design row numbers for each row on the far left. (1 and 2, 3 and 4, and so on). Written notes on right: an even number of rows need to be knit in each color, so in this method, the pattern must be an even number of rows in height, boxed numbers represent rows knit in ground color.
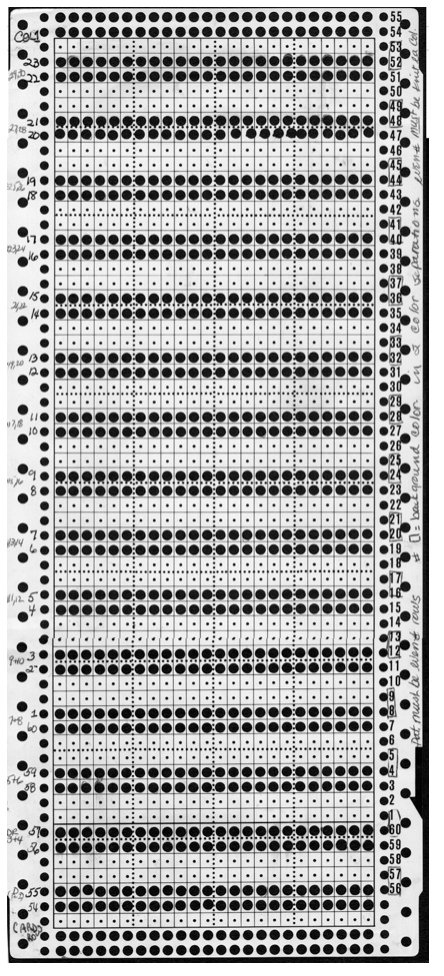 1: In this method, each color in each design row knits only once, reducing the elongation of the height to width aspect ratio in the knit.
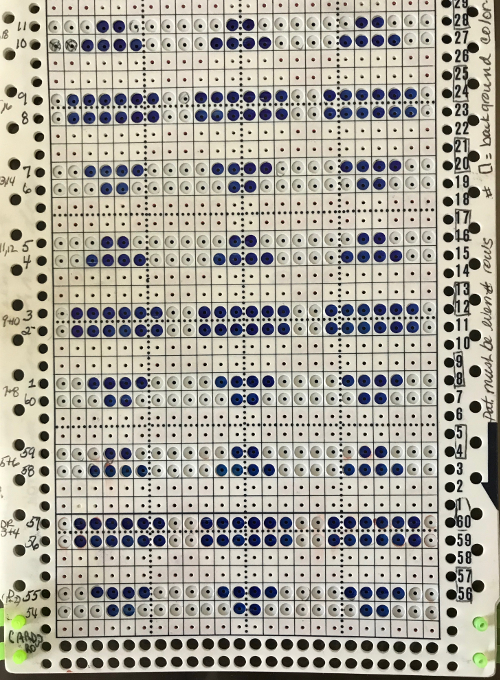 When the completed repeat is marked, unfasten the snaps and move the card down by one row. You will now see the marks you have made through the top row of each set on the master card. Mark through each lower row any blank squares in the row above.
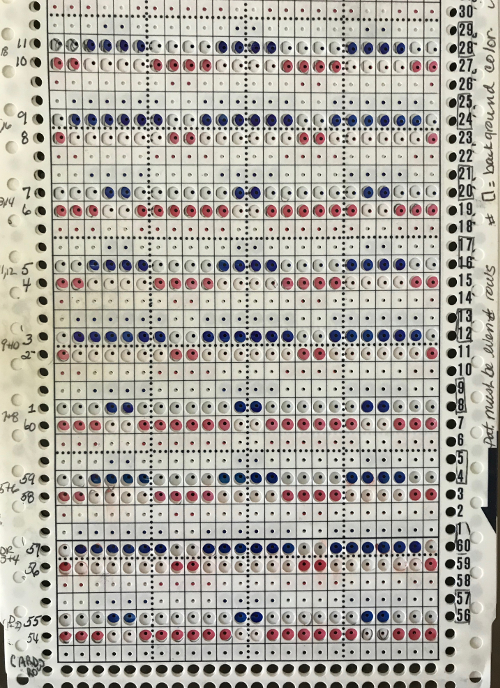 Again, after completing the repeat unfasten the snaps and slide the master up by 2 rows. The card will now be back to its original position, and up by one row. Now you will see the marks you have made on the blank card showing through the bottom of each row of the master card. Mark through each upper row on any square opposite the ones marked in the row below.
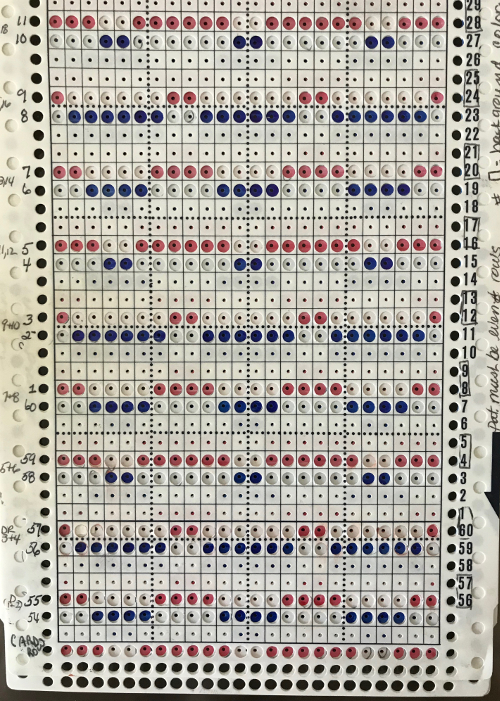


 I chose to continue to test on a narrower repeat. An added consideration: in knitting fair isle, the first and last needle on each side is normally selected whether by using change knob on KC I in 910, or adjusting knit under carriage in punchcard machines. One can program black squares on either side of the full pattern repeat for the width of the fabric to insure that any number of edge stitches knit every row on each side. Working on a smaller repeat, now 47 X 24
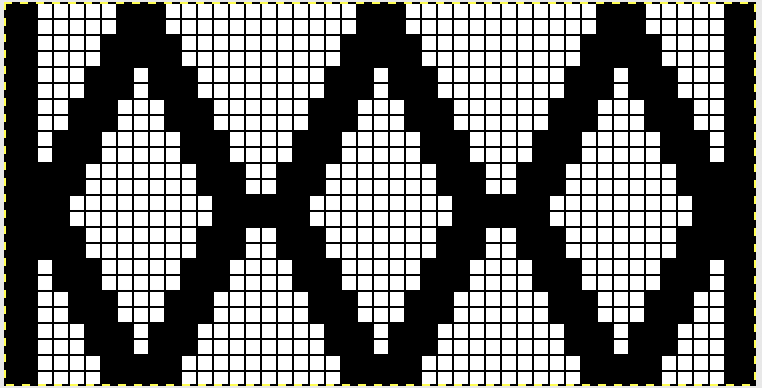


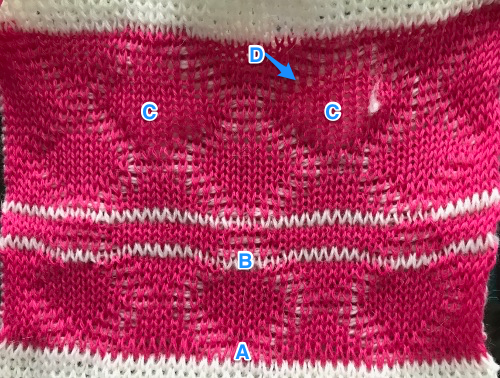


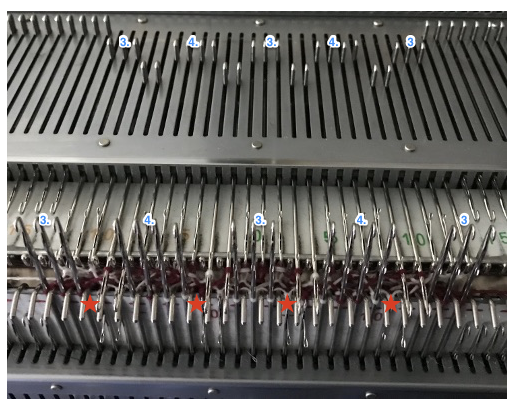
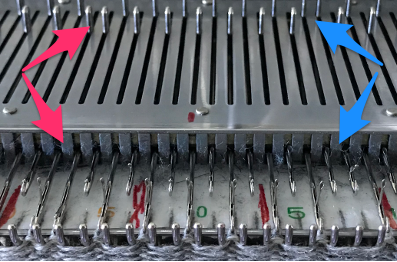
 The repeat required mirroring for use in my electronic 930. Experimenting with racking intersecting tuck stitch on multiple repeat png, stitches were picked up on the ribber aside from the first tuck stitch on the right, A, on the center, B, and on the left, C, of the knit stitch groups.
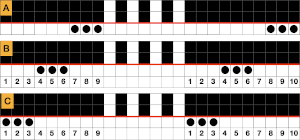
 changing ribber needle positions
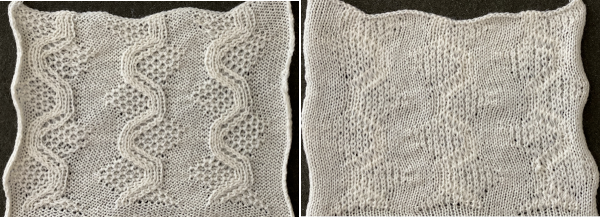 moving toward positioning the racked pattern further into the knit columns.
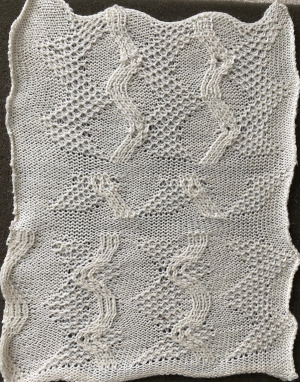
 Good notes and documentation of the final needle arrangement will make the technique easily reproducible. The needles involved on the top bed always need to be returned to the patterning position after any shares.
 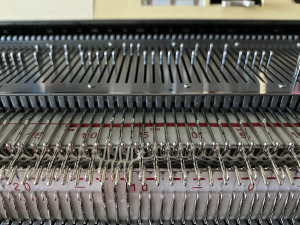 At any point in the knitting, it is easy enough to transfer stitches on the ribber up to the main bed, drop the ribber down, and check on the placement of the racked pattern. If the place is satisfactory, the moved stitches can be returned to the ribber and the work is continued. If not, transferred stitches can be left on the main bed, other stitches can be shared with the ribber and patterning can continue with racking in the new location. One such adjustment is seen toward the bottom of this swatch.
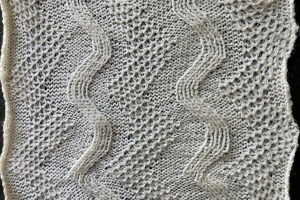