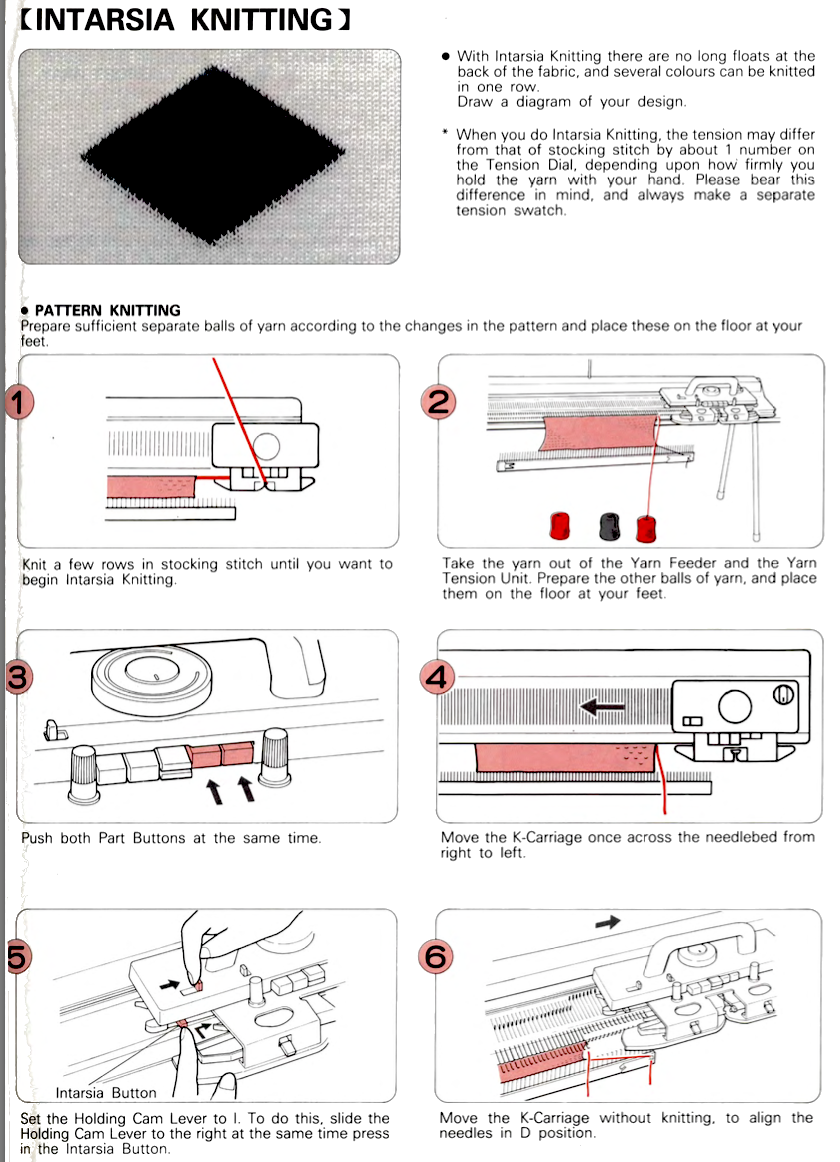
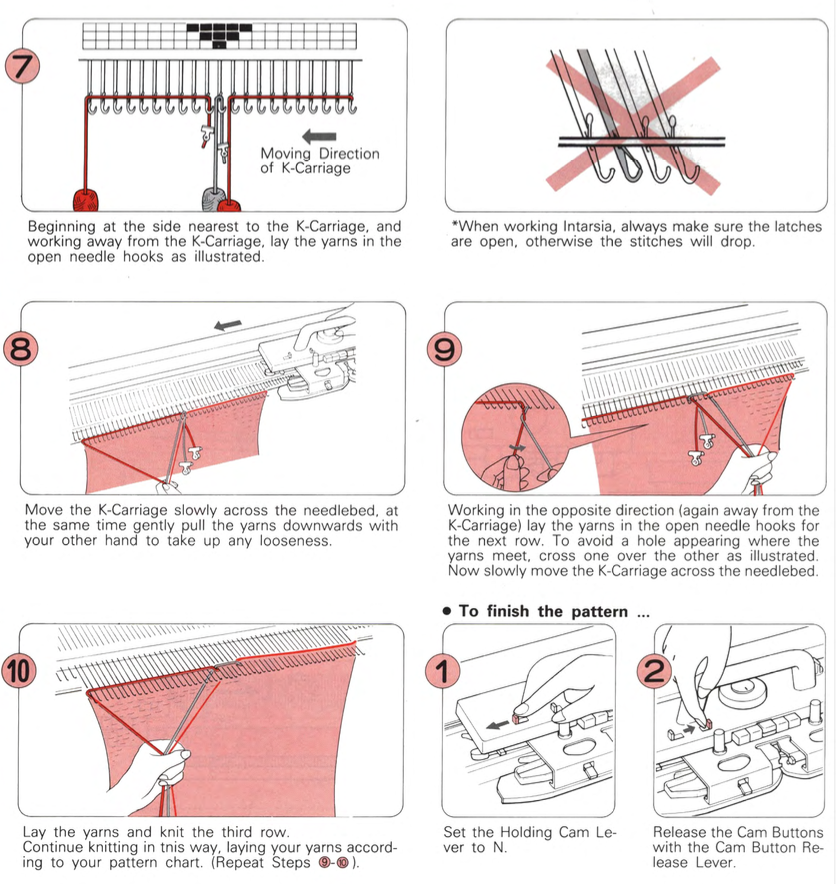
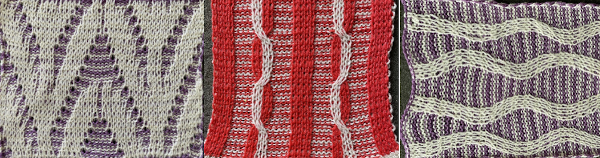
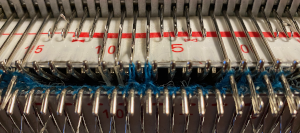
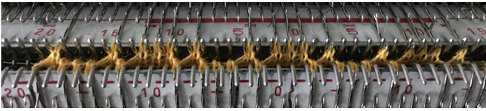
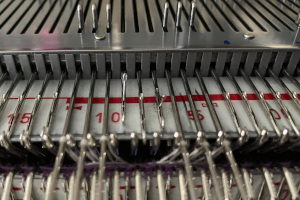
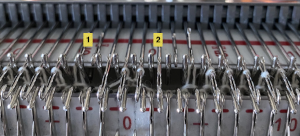
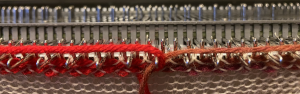
In Brother knitting one of the issues encountered when combining fair isle patterning with short rows is that if the fair isle pattern is to be maintained, one must hand-select needles to the proper position prior to knitting across needles newly returned to work.
The short row method here is a modified version of that used in the “wisteria” post, with the addition of needles regularly left out of work.
Analyzing what is happening in fabrics in this group: the working repeats need not be symmetrical, but for the purposes of beginning to understand the moves required and developing an awareness of how the stitches on the needle bed behave, it is easier to begin by using hand selection that is rhythmic and consistent.
Avoiding dark colors is helpful in recognizing dropped stitches in time to pick them up.
With some exceptions, most machine-knitting short-row patterns are worked in two-row sequences with stitches brought out to hold opposite the carriage and into work on the carriage side.
Typically the first row of eyelets will be approximately half size, and the knitting may be stopped at the top of the piece to match that.
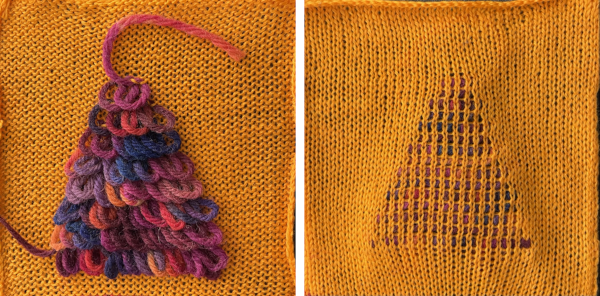
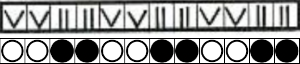
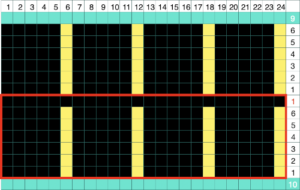
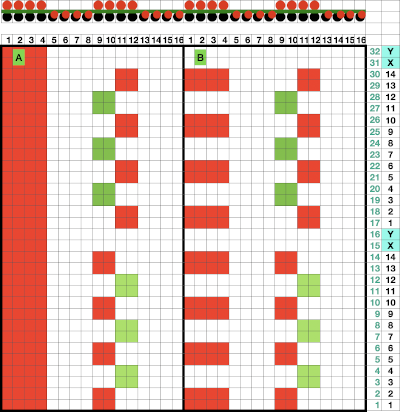
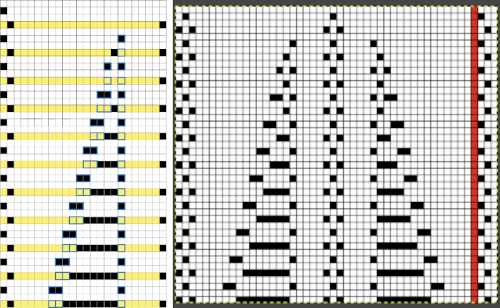
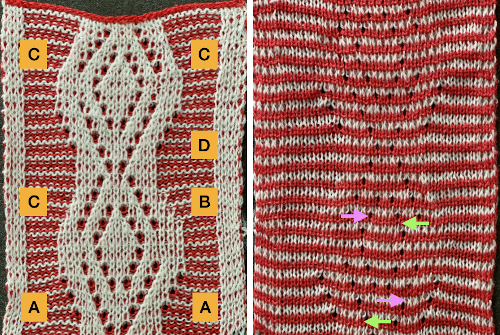
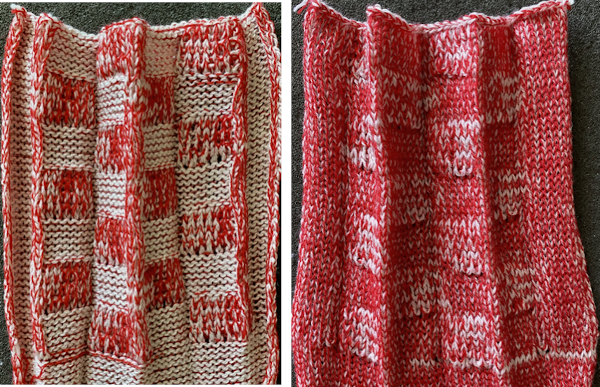
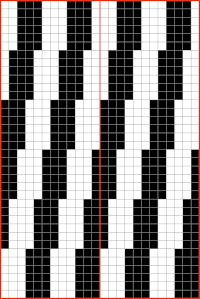
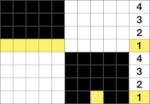
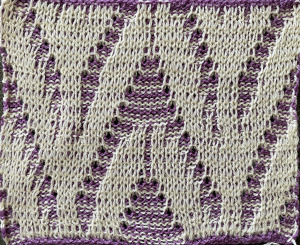
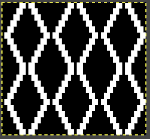
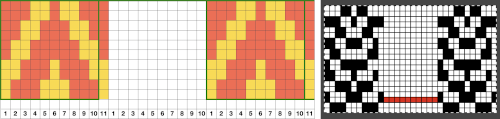
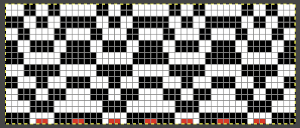
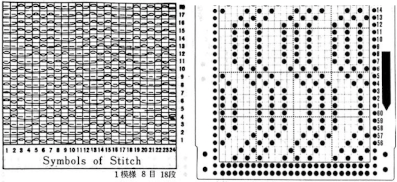
This chart begins to visualize a pattern composed of vertical columns with colors knit on every other needle, produced using the repeat.  The arrows indicate carriage movements.
The grey cells represent needles out of work.
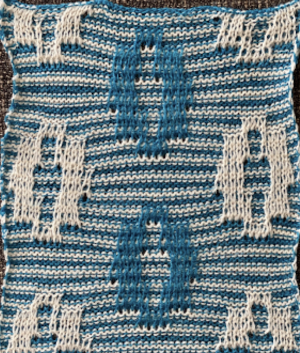
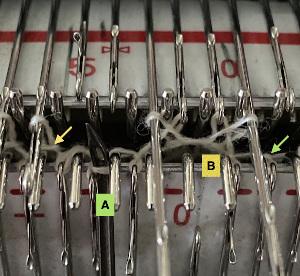
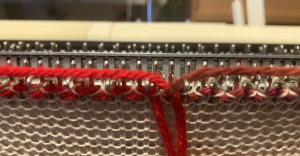
The blocks of black and white columns represent the colors in the FI pattern selected and relate to the A and B yarn feeders. In this exercise, preselection is kept constant to facilitate maintaining proper patterning as needles are pushed back into work. Often, after an initial number of rows, all but the first group of stitches in the pattern are brought out to hold. In my swatch, the fair isle pattern had already been established across the needle bed for several rows.
Here one would begin with the knit carriage on the right, COR.
COR: the first group is knit for an even number of rows, ending COR.
COR: a number of needles are pushed back into work on the left, FI needle position is restored with needles placed in proper positions, knit on one row on the combined groups to the left
COL: bring the first group’s needles out to hold, knit an odd number of rows, ending COR.
Repeat moves and selections until the last group of stitches is reached, knit an even number of rows, and end COL.
COL: reverse the process, moving from left to right.
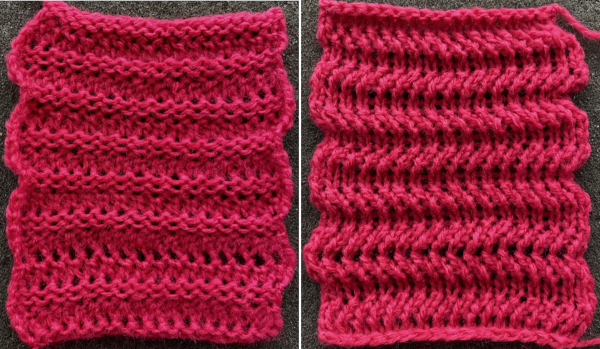
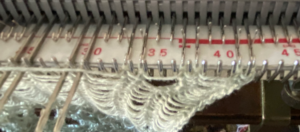
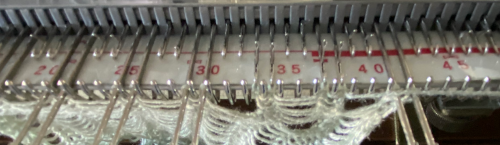
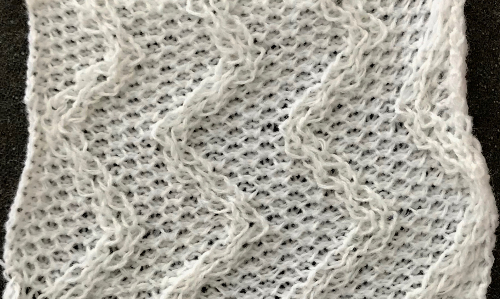
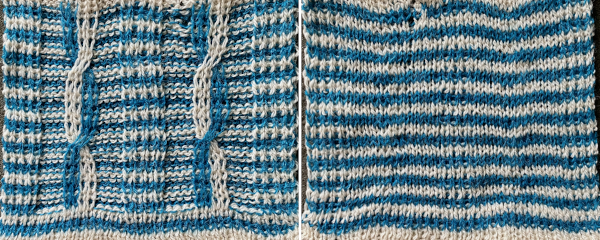
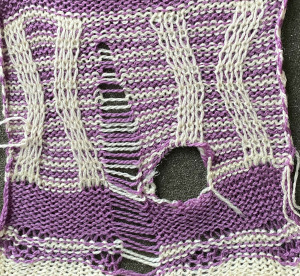
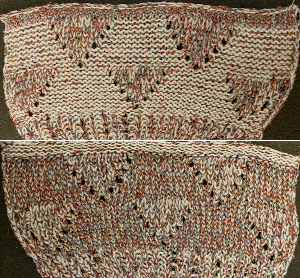
This method results in threads appearing between the short rowed shapes. 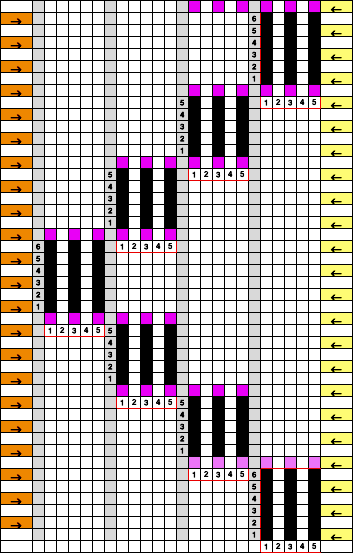 The first preselection row is made from left to right. End needle selection is canceled. Cast on is over a multiple of 6 stitches ie 36, with every 6th needle out of work. I began the sequence COR with 10 rows knit, returning COR, followed by 9 as the odd number of rows once the next group of needles is brought into work, and the last group worked is pushed out to hold, then reduced the even number to 8, the odd to 7 in the top half of the swatch.
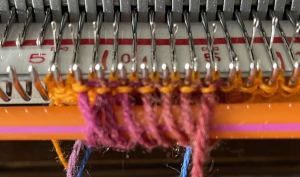
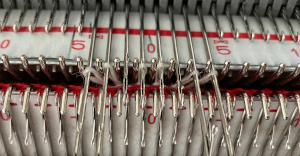
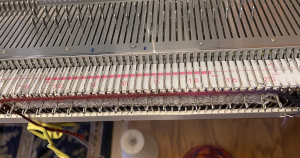
Here the work is seen on the machine, on the left, COR, and the needle selection for the pattern in the next group to its left is restored. On the right: after knitting to the left, the initial group of needles worked is brought out to hold before continuing to knit.
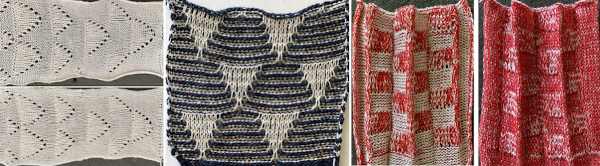
 A mini version in a single color
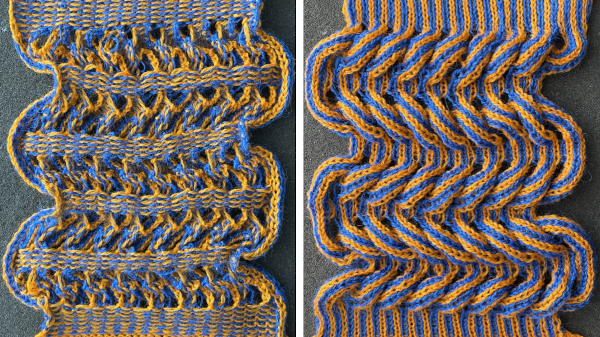
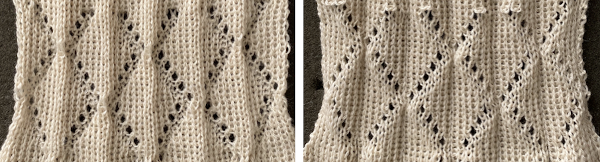
 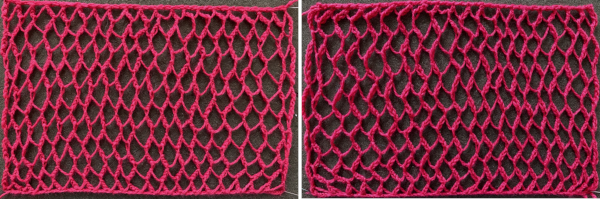 Changing the holding sequence to eliminate the long threads between held shapes, beginning once more to sort out the how-to before adding fair isle patterning: cast on 36 stitches, with every sixth out of work moving from left to right, knit several rows.
  To knit: each group of 5 stitches in work has a reference number, 1-6
first pattern row:
COR: Set the machine for hold, leaving only group 1 in work
COR: knit 8 rows on the first group of stitches on the right (1)
push second group (2) into work and knit 8 rows, returning to COR
COR: push the third group (3) into work and knit one row to the left
COL: push group (1) on its right out to hold, knit 7 rows across the remaining 10 stitches, returning to COR
COR: bring a new group on the left into work, knit one row to the left
COL: bring the group to its far right out of work, repeat the process across the row
when the second to last 2 groups on the left (6 and 7) are reached, knit 8 rows on both, returning to COL
COL: push the second to the last group out to hold (6)
COL knit 8 rows on the last group on the left (7)
COL, reverse the process repeating all selections moving from left to right for the second pattern row. Begin the process by knitting 8 rows first on the first group of five stitches on the left, which will now have been knit for 16 rows in order for the stitches to create the large eyelets that will now form.
In my swatch, I occasionally varied the odd number of rows knit between seven and 9. Even a couple of rows can make a noticeable difference depending on the color of the yarn, the tension used, and other usual suspects. Test out the idea in the swatch to help make the decision as to whether unraveling is required to keep a constant quality to the holes as the project grows, and to practice unraveling rows back to the proper location. If fair isle patterning is added, corrections become a bit more complicated.
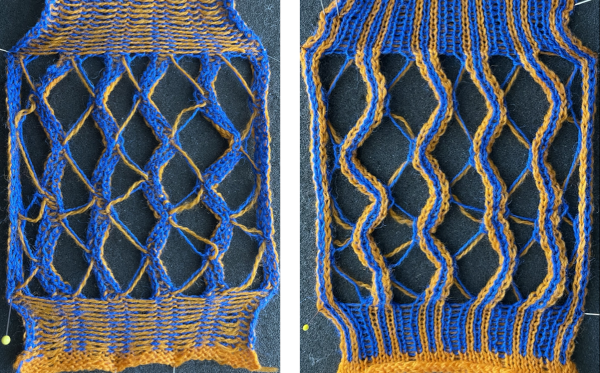
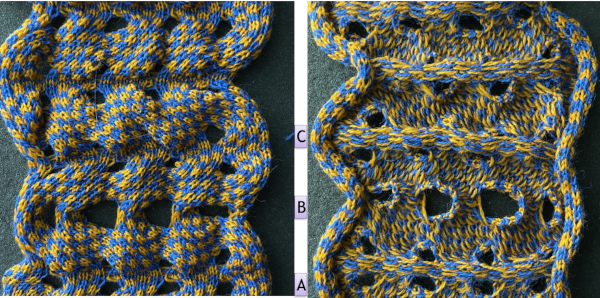
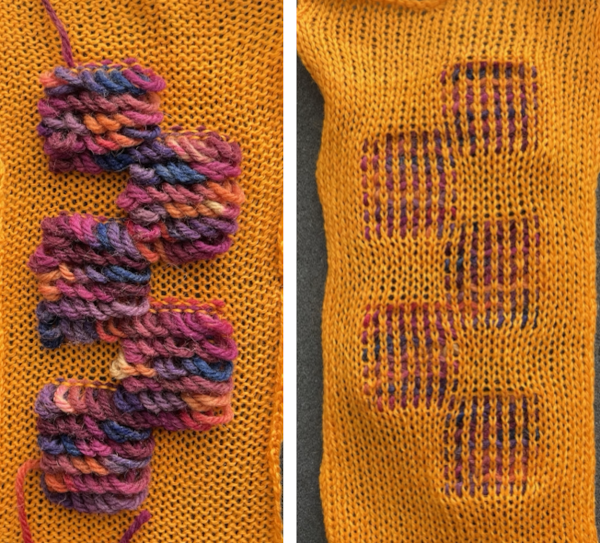
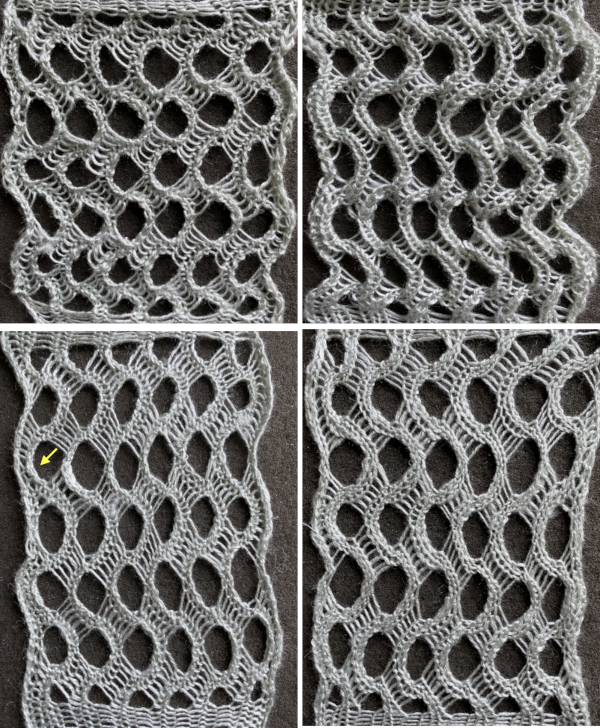
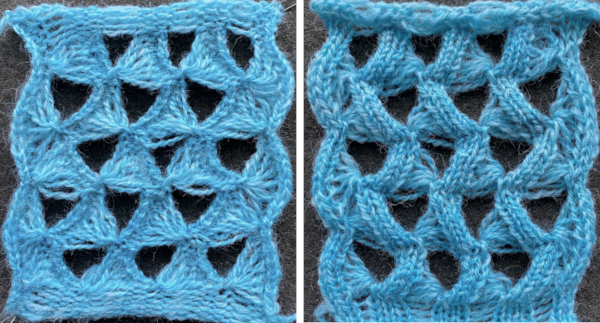
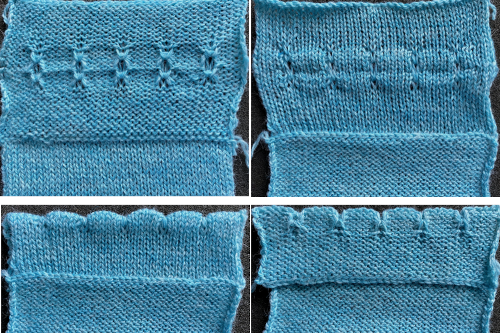
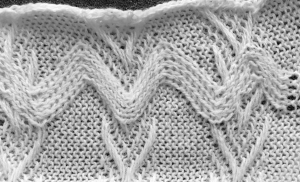
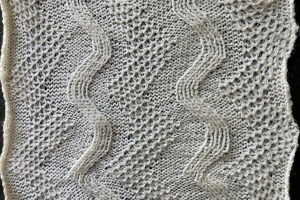
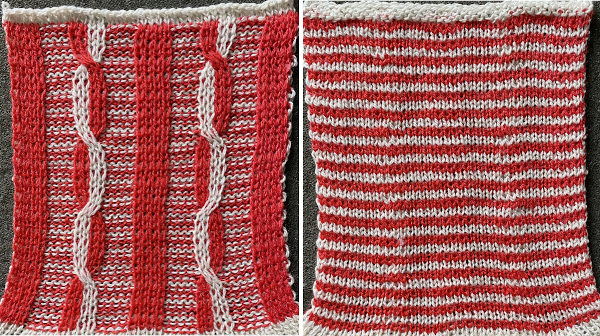
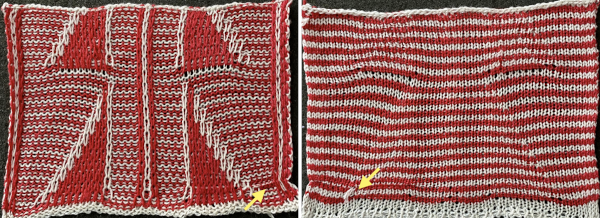
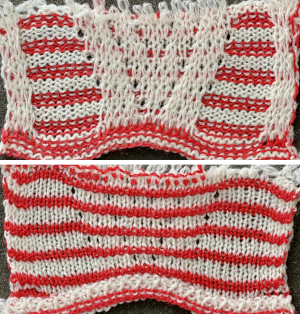
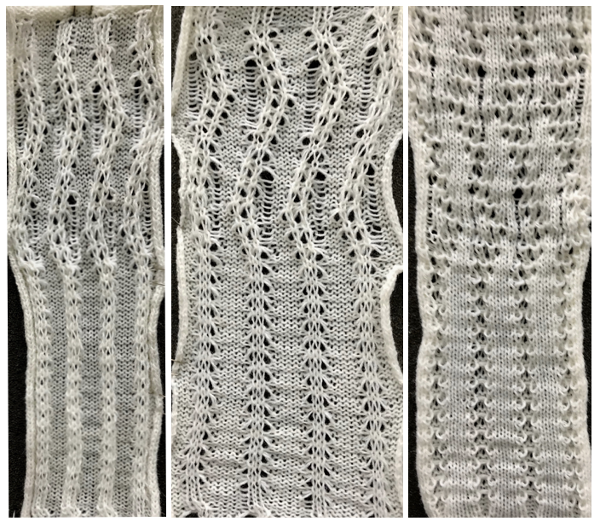
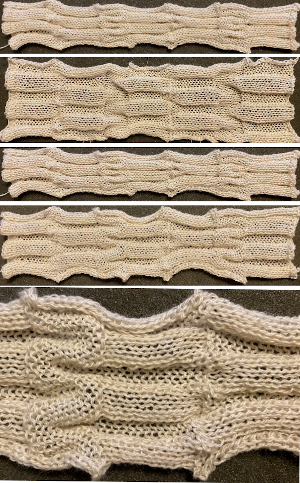
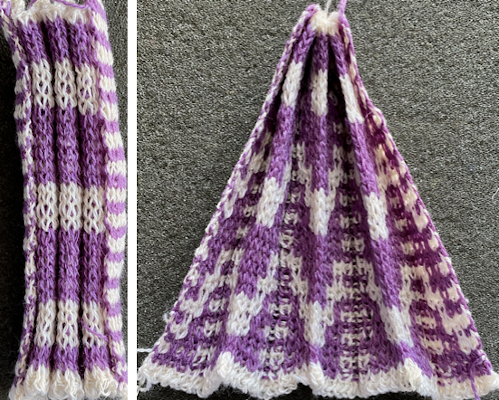
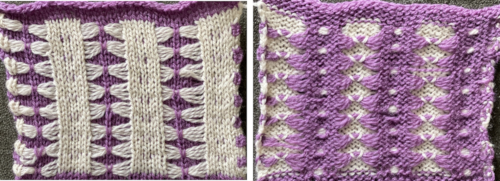
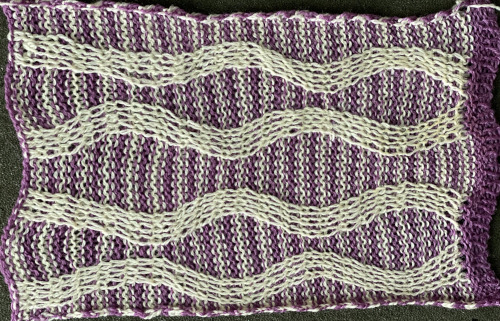
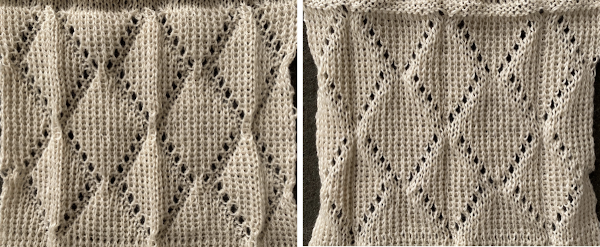
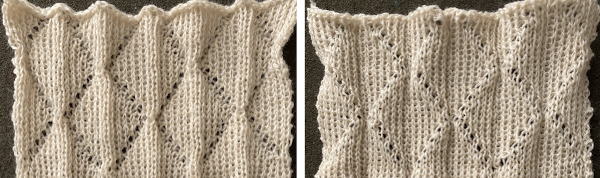
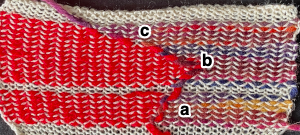
The resulting proof of concept swatch: 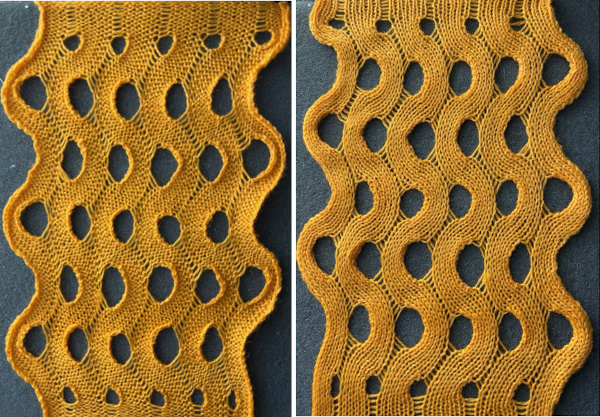 With the addition of the fair isle patterning: note that here, when the last set of needles was reached, they were not worked twice before reversing direction, so the edge eyelets are of a different size than those in the remainder of the row, forming smaller waves on each side.
 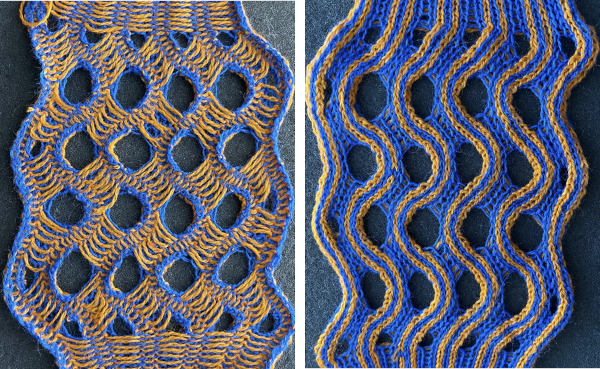 Any openwork fabric will likely be wider than that knit in stocking stitch or fair isle on the same number of needles, making it necessary to consider providing stretch in any rows knit at the bottom or the top of the planned project or using the contrast as part of the final design.
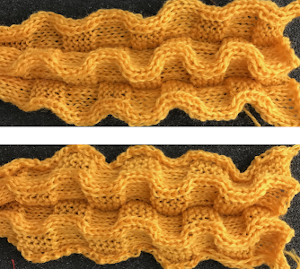
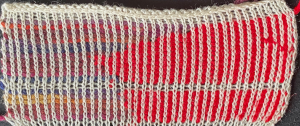
Adding hems to the above technique is also possible 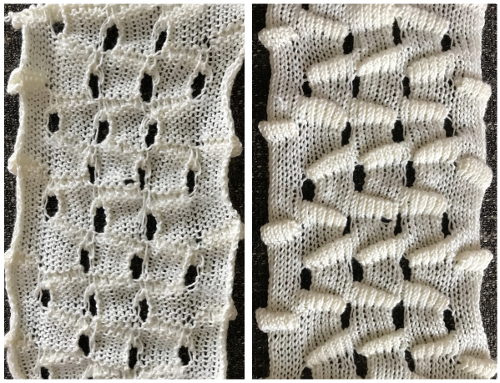
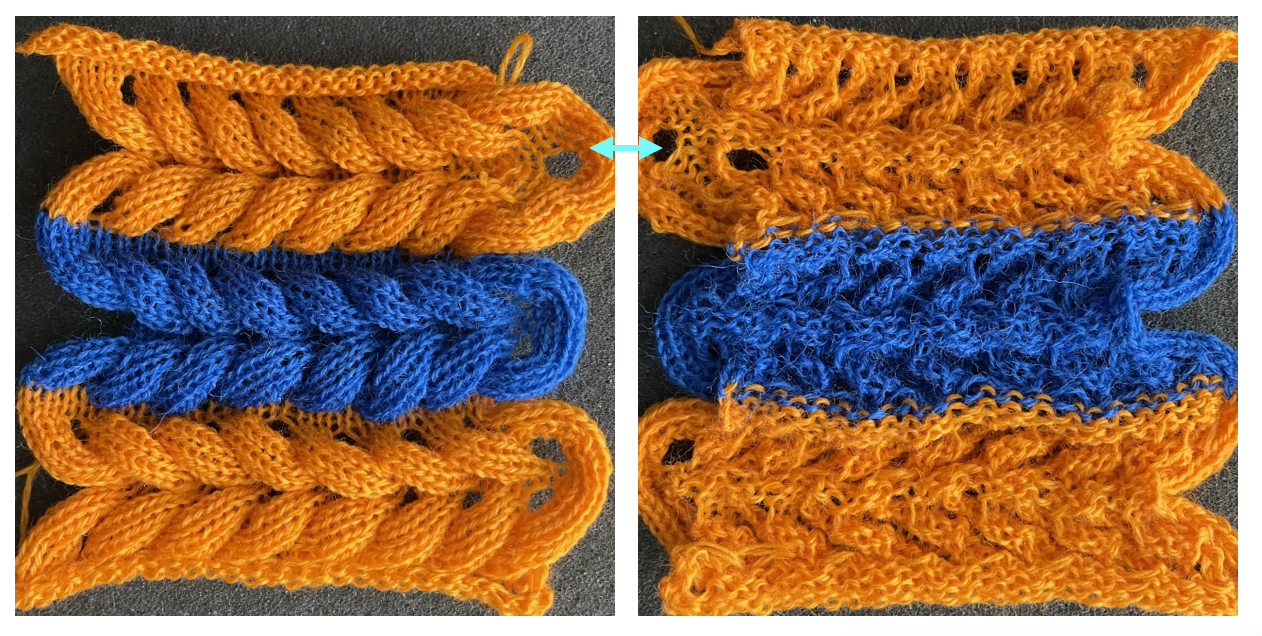
The short row repeat used here is a modified version of the “fern leaf” one in the post. The sequences are different, every needle is in work.
I began by casting on 36 stitches, knitting 12 rows for the even number, and 11 for the odd, with random variations.
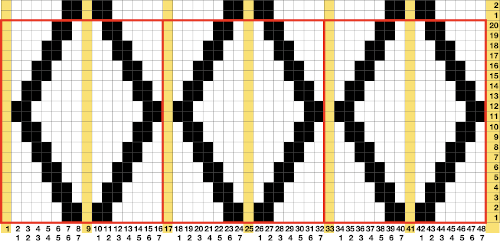
Results need not be symmetrical either in the length of the shapes or in the direction of the knit, but rhythmic repetition can help one understand stitch formation, other changes that follow can then be deliberately planned rather than accidents or errors, keeping notes while the work is in progress, will help reproduce effects.  The knitting method, and tips: the fair isle repeat is 2 stitches wide by one row high, and the respective cells are bordered in red, it may be programmed to suit. When using a punchcard model, the card could simply be locked on any row with every other cell punched. The result will be vertical lines on every other needle, slanting in the direction in which short-rowed shapes are knit.
I chose to begin my design with the first needle on the right selected to pick up the color in the B feeder and used that as the basis for adjusting selections in subsequent groups of stitches.
Electronic machines have the option of mirroring the pattern to change that, punchcard knitters can move the knitting one needle to the right or to the left to get the selection they prefer.
As additional needles are brought into work, the A and B yarn feeders selections need to be restored so as to maintain proper FI patterning.
If you have not worked with this type of technique before, it is good to start using a light color and to work in small stitch groups, not adding added patterning until later.
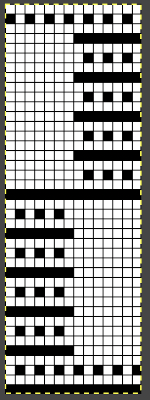
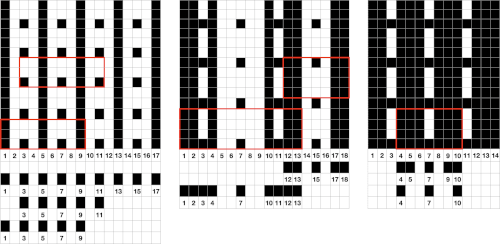
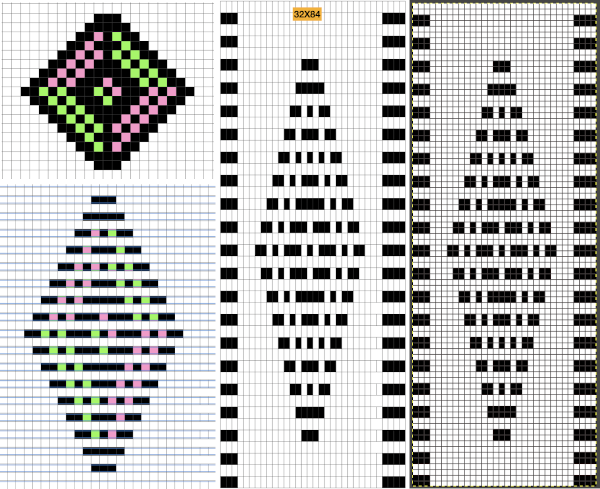
Attempting to visualize the movement of the stitches across the needles in work: the colored cells illustrate the movement of stitches across the needle bed as they are brought in and out of work, and the number of held rows is altered to reduce the chart’s height, does not match the directions for the test swatch that follow it exactly. The black cells represent all knit rows. 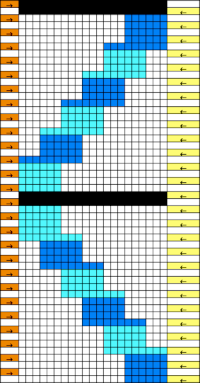 1. Cast on the desired number of stitches, in this case, 27, a multiple of 3, and knit several rows at tension appropriate for stocking stitch when using the same yarn
2. COR. Set the machine to not knit stitches brought out to the hold position.
3. Leave 6 needles (3X2, double the number in each working group) on the right in the work position, and push all the remaining stitches out to hold.
4. Knit 10 rows (an even number), ending COR.
5. Push back the first 3 needles on the left back into the work position
6. Knit one row from right to left (9 needles), end COL, and push the 3 needles on the right out to the holding position (6 needles will now be in work again).
7. Knit 9 rows (odd number) ending COR
8. Repeat steps 5-7 until you reach the last 6 stitches, knit 10 rows (even number) over these last 6 (3X2, double the number in each working group) needles, ending COL.
9. Set the machine to knit all needles out in the hold by pushing needles back or releasing the hold lever, and knit 4 rows over all the needles. It is possible to vary the number depending on one’s preference, but for me, only two rows simply were not aesthetically enough.
10. Holding lever on H, reverse shaping from left to right, beginning again on 3X2=6 needles, (double the number in each working group).
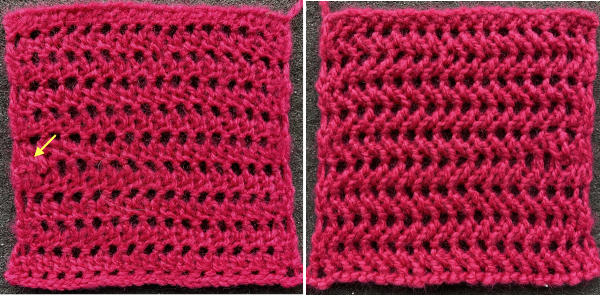
Reverse the process, moving in the opposite direction, beginning with knitting an even number of rows on the first chosen group of stitches on the left.
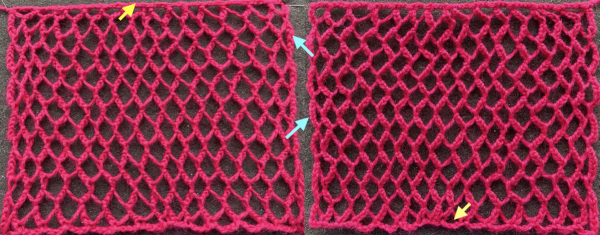
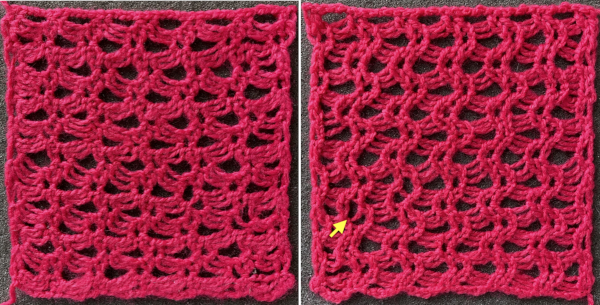
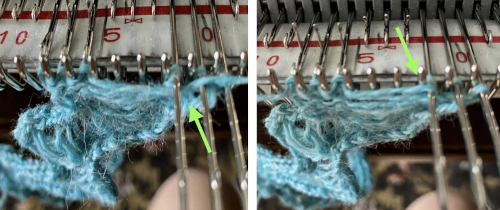
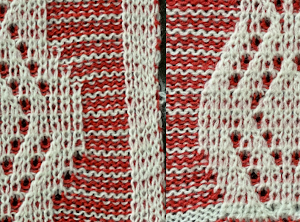
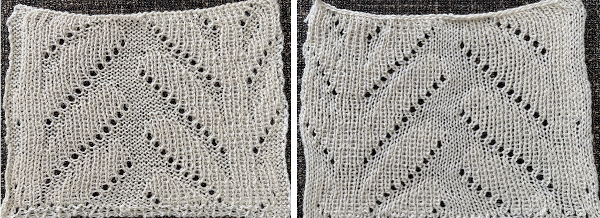
The difference in the edging of the swatch, marked by arrows, is due to a variation in the sequence for working on the specific group of stitches. If performed as an error, it will appear as an obvious deviation if not corrected while the work is in progress. The same action may also be performed deliberately as part of the overall design.
Color changes may be made easily where the 4 rows are knit in between segments on every needle used. End with 2 rows in the first color, knit with two rows with the second color before returning to the holding sequences.
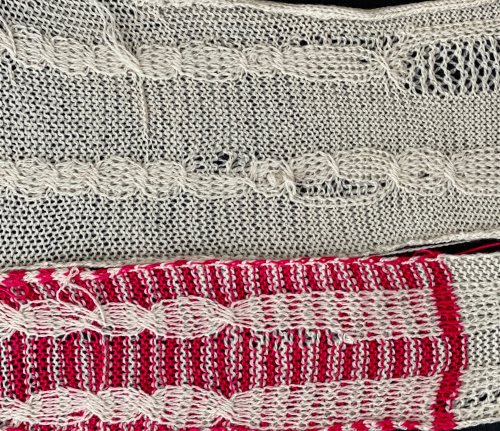
 Worked on a significantly smaller scale in one color.
 This far more symmetrical result than the first effort worked in the vertical stripe fair isle pattern on 40 stitches: begin with some FI patterning, end COR
COR: bring all but the first 8 needles closest to the carriage out to hold,
Proceed as described for the single color design, but this time 4 stitches are pushed into work and returned out of work rather than 3. Knit 12 rows when even numbers are required, 11 for the odd number.
Four rows of fair isle patterning are knit at the end of each repeating segment.
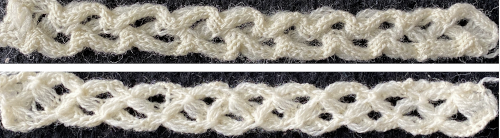
 It is possible to work with far larger groups as well,
  thus providing an opportunity for adding larger fair isle patterns into the mix.
  Cast on 48 stitches.
In this sample various size eyelets were produced, using 12 rows, A, which did not seem to yield the degree of 3D texture I wanted. More rows were tried where larger holes appeared, B. Four rows of fair isle patterning separated each row of the held shapes.
 To produce a more symmetrical knit, begin working short rows COR with a group of 16 (8X2) stitches on the right, knit for 20 rows as the even number (in the range of 8X2X1.5), 19 for the odd, returning groups of 8 stitches into work knitting moves across the needle bed, ending the pattern with working 20 rows on the last 16 stitches in work on the left. Knit 4 rows restoring fair isle needle selection across the needle bed, returning COL. COL reverse shaping.
 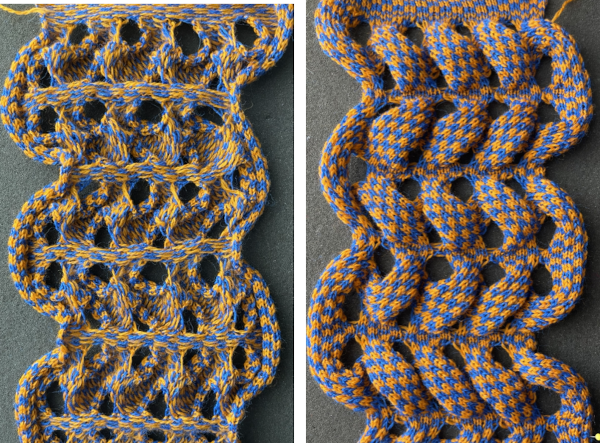 Knitting all the holding sequences in the same direction for multiple rows as in any eyelet fabric will result in a knit that biases to a degree proportionate to the number of stitches and rows in each unit. The start of yet another idea:


 Chain cast on 2 in work, 2 out of work, end with 2 needles in work
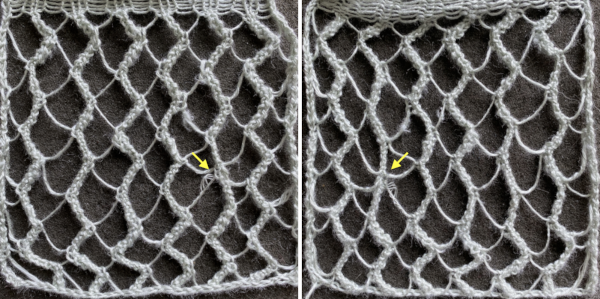 Number 11 is a close relative but worked on every other needle
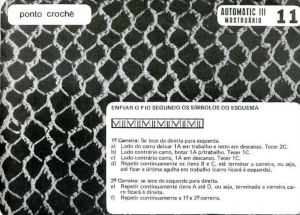
 The rayon used in the previous sample, and a 2/8 wool, were less successful than a 2/11 acrylic in knitting the swatch. The stitches need to be as tight as possible while also needing to be able to knit off properly

 This knit begins on every needle
 Eliminating those ladders or floats, here eyelets are created where stitches are held for two rows.
 push first 2 of needles out to hold

 COL knit 10 rows, bring the third pair of needles into work, knit one row
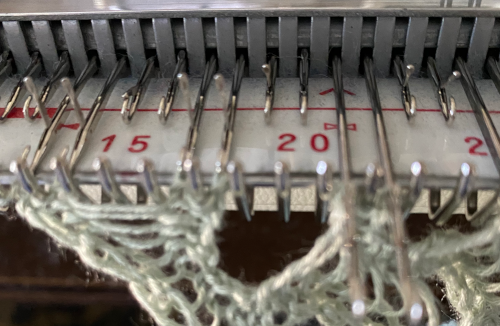
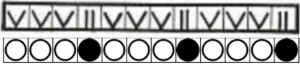
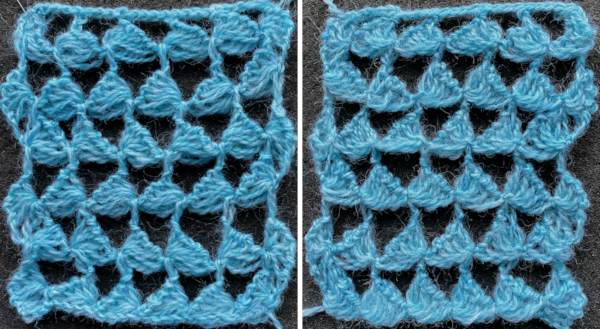
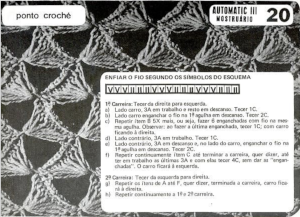
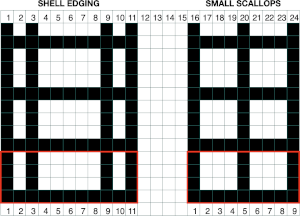
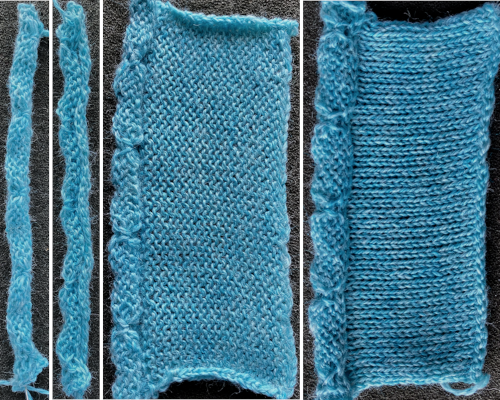
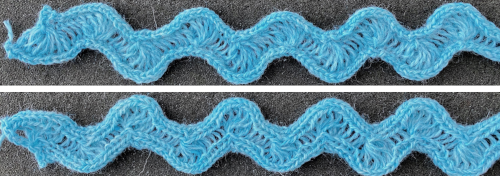
 Shell shapes: #4 and # 20 directions are given in the 2017 blog post
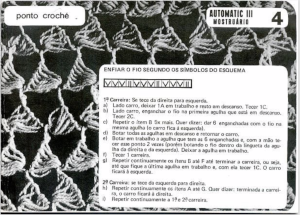
 Some of the trims in this pub may be far more easily and quickly executed using tuck stitches.
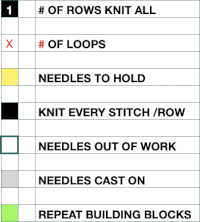
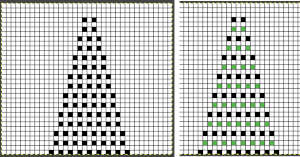
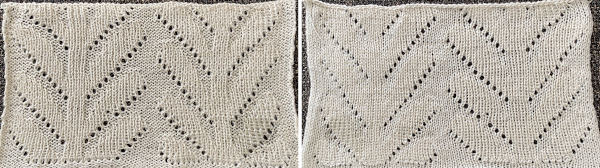
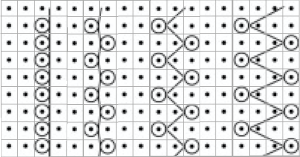
 Segments marked with green cells may be grouped in a variety of ways to create repeats in different widths, asymmetrical ones are also a possible consideration

 The usual single bed tension for this yarn might be 7 or 8, depending on stitch type. The greater the number of knit stitches on either bed, the closer the tension will have to be adjusted to that used in stocking stitch for the same yarn. Wool also has memory, will want to roll to knit side at the top and bottom, to the purl side along vertical edges, steps often need to be taken to reduce the rolls. Using this repeat

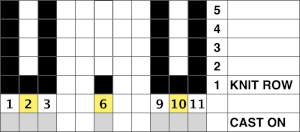
 A variety of edgings may be produced by simply hooking up ladder floats created by leaving needles out of work after X number of rows. In this instance chain cast on over 11 needles, dropping the center 5 chains and taking the corresponding needles out of work.
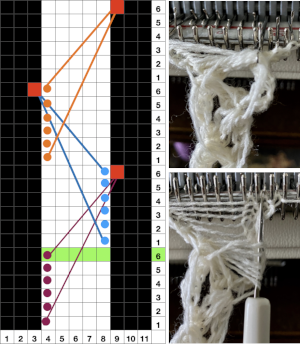
 This variation uses the thicker blue yarn, knit at tension 4; 12 rows are knit before hooking up the lower groups of six ladders, which makes the floats easier to pick up or count using a single eye tool. Repeating selection on the same side allows the trim to be easily bent around corners
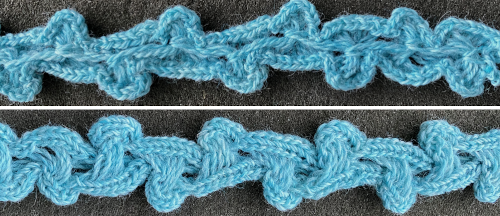
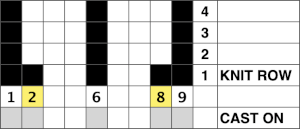
 Trims using holding alone border on the possibility of automation using slip stitch programming. A simple one to start: cast on 7 stitches, with the center needle out of work. Knit a few rows, set knit carriage to hold.
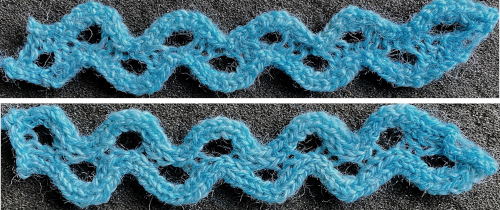


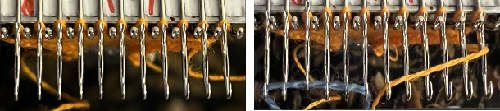
 This is from a Japanese language manual for the 891(1987-89) punchcard machine, which appears to introduce the idea of replacing the use of the knit carriage and plaiting feeder with one specifically designed for intarsia
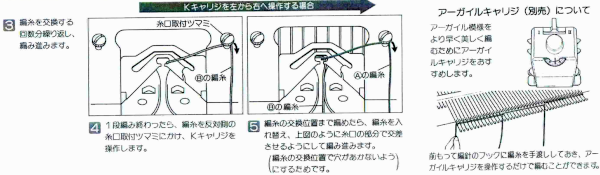
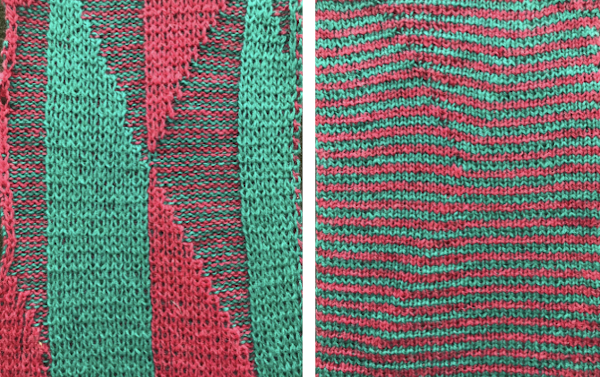
 If the intent is to have solid vertical columns of color, those areas as in column marked A, need to be adjusted for using alternating colors as well. Using the repeat on the left of the chart
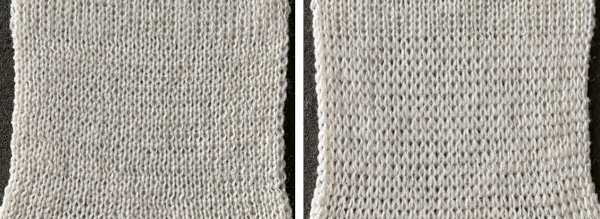

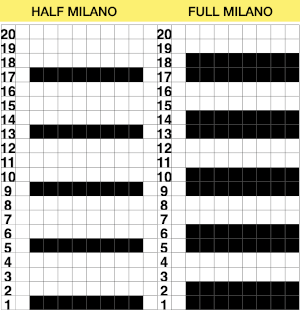

 Half Milano stitch formation on the left, full on the right
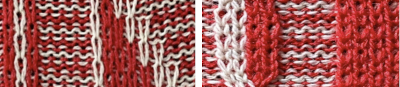
 In executing the fabric as a hand technique, the main bed is still set to slip in both directions, the ribber to knit every row
 Begin with simple shapes, examining the quality of increases and decreases, whether single or multiple, eyelet formation. Picking up from the row below before the next pass with the contrast color eliminates eyelets
 picking up from row below at any point during knitting
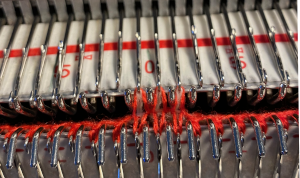
 Simple increases or decreases are made by moving stitches laterally in either or both directions. Increases may be made by moving contrast color stitches laterally, followed by the choice as to whether to fill in the empty needle or allow it to create an eyelet.
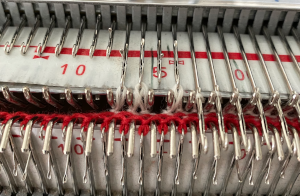

 Fully fashioned increases or decreases are made by moving a stitch or a group of them to the adjacent needle/s to the left or the right and then taking the double stitches back to the original position, leaving a single empty needle for the planned eyelet formation. There should not be multiple needles with no stitches on them unless the goal is to expose a stripe of ground
 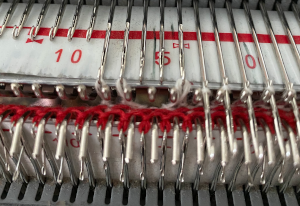 typically, in these exercises, there should be single empty needles after transfers, making certain proper needle selection for the pattern group is maintained
 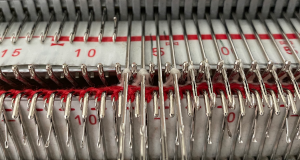 Combining eyelets with lateral increases
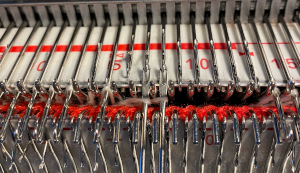

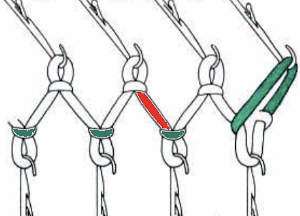
 When transferring stitches, watch for any loops getting caught on gate pegs, as seen on the left below, increases and decreases may be pre-formed on more than single stitches
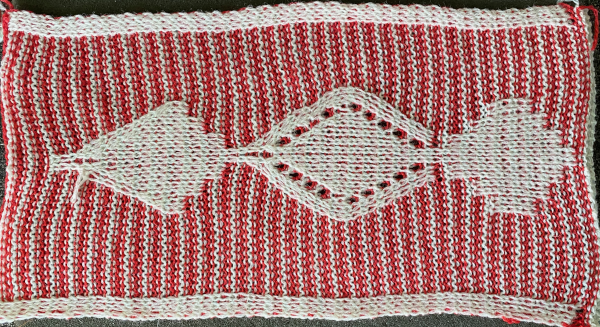
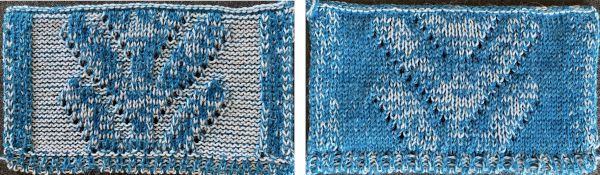
 At the top of the single medallion, the stitches were transferred to the ribber prior to knitting with the same color once there was no needle preselection for it on the top bed.
 The first preselection row after the chosen cast on is from right to left with end needle selection canceled and the knit carriage already set to slip in both directions, with all required needles on the top bed in the B position.
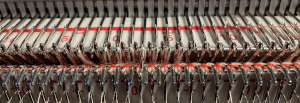
 To eliminate the extra white rows, the main bed stays set to slip every row, the ribber settings alternate. It is set to slip for two rows immediately after knitting with the red yarn, then will be reset and knits for 4 consecutive rows. Transfers to create eyelets are made on selected needles on each of those two rows, always toward the carriage, even as the transfers themselves change directions as the angles of the shape decrease toward its center on the top half of the design. After the first transfer and the carriages travel to the right, a long float will be evident, will “disappear” on the return to the left.
  Patterning selection will reappear as the carriages return to the left.
 As with single bed lace, the first pass after transfers creates loops on empty needles, which here need to be kept in upper work, D position after transfers. For non Brother knitters, Brother positions are A, B, D, E, skipping C.
 Knitting over the loops on the next pass on that bed completes the stitch. This design is knit as continuous, the striping at the bottom is wrong because the red was not picked up after the first 2 rows knit in pattern with white, most sequences for the remaining fabric are 4 passes with white in the feeder, followed by 2 in the red. All eyelets here are reduced in size by picking up from the row below, all transfers for decreases are made laterally, the border is set to a width of 4 stitches, the pivot point for the repeat has been narrowed
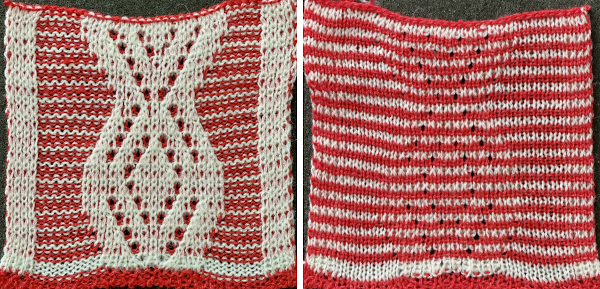
 Many of the same principles may be applied to designs using tuck stitch settings, where the striping will appear vertically rather than horizontally
 Here the fold is created by 2 stitches tucking for 2 consecutive, then knitting on the same needles for 2 rows on regularly spaced pairs of needles on either bed. Most knitting is on a single bed. A lacey series of eyelets begin to appear, and in some random racking at the top of the swatch, the possibility of developing a secondary pattern due to the combination of racking and tucking begins to show. The middle image is of the fabric slightly stretched. Passap
 Brother: the ribber can do the stocking stitch background, every needle in work, carriage set to knit. The setup is the same as the Passap diagram. A repeat with 2 black rows of squares followed by 2 white can be programmed on the top bed. On every needle selected rows, pairs of needles will knit, on the white, no selection rows the same pairs of needles will tuck for 2 rows.
 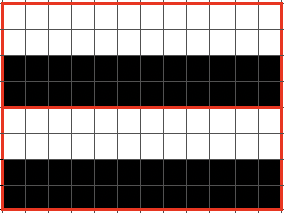 Moving away from vertical ribs becomes significantly easier if one has a G carriage. The alternative option is to create geometric folds that require transferring between beds. Any of these fabrics are best knit in a yarn that has memory and can spring back. Yarns such as acrylic can be permanently flattened by pressing, resulting in loss of texture. A quick experiment: black cells represent knit stitches, blue purl ones
 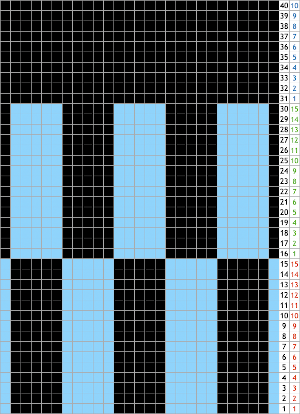 The needle setups: after casting on, transfer for a stitch configuration based in this case, of blocks that are 5 stitches wide. A single needle on the opposite bed is used on each outside edge of all needles in work.
 The repeat, 10 stitches by 40 rows.
 Pleated one color “shadow lace” in
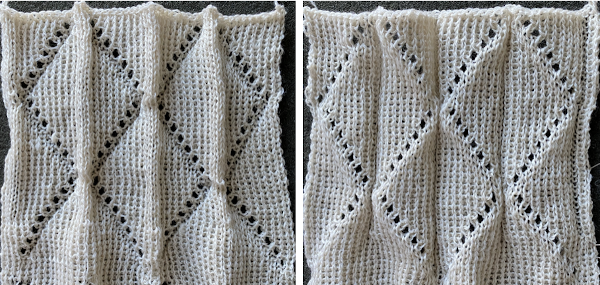
 As stated, the process is easier and quicker working on non-selected groups. Above, the yellow yarn was thicker than the blue. To maintain proper color selection in the non-selected column, the center needle needs to remain in the B position, with the slipped stitch forming floats below it before the next row knits. If the needle is brought out to E, it will knit in the contrast color, forming floats in that color on the purl side, and a knit stitch in what was planned as an all-solid column on the knit. The results are seen at the top of the first sequence in the swatch. I chose to limit my number of floats to 4 to keep the process manageable, moved stitches on the left of the center needle to the front of the knit, and then followed with those to its right. One of the many things to explore in hand technique fabrics is finding a way to handle tools that may be more comfortable than others, practicing on single blocks of color first can help establish that. Below both yarns are equal in weight and thinner. The floats formed by the color in the B feeder are also hooked up on the center needle in each vertical group in that color, forming a pattern on the purl side as well.
  The needle position for selection for B feeder yarn also needs to be maintained. Bringing the needle out to E ensures it will knit on the next pass. In both of my tests, the slip stitch floats on the knit side lie more horizontally than the lifted-up floats on the purl.


 The transfers in the piece begin on row 5. Before the next row is knit in the alternate color, the slip stitch floats are reconfigured, bringing stitches 1 and 2, 4 and 5 in each group to the knit side of the fabric, leaving the center floats undisturbed.
  Bring the whole group out to the E position so they will form knit stitches with the first row of contrast as the carriage moves to the right.


 The extra needle selection prior to the next all knit row helps track the direction of the moves, stitches are moved three at a time, there are no cable crossings
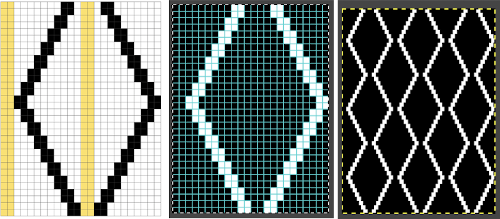
 The next step for me was to explore cable crossings on elongated stitches working double-bed. A basic pattern on any programmable machine for playing with elongated stitches on one bed while knitting every stitch on the other is to program pairs of blank rows followed by solid punched or black pixel rows. The yellow line in this chart illustrates the row on which cabling might occur.
 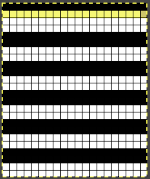 Programming the width of the needle bed allows for only the stitches forming vertical columns in chosen locations to be put into work, allowing one to place groups that will involve crossings anywhere on the chosen pattern width. A base is knit in the ground color, which slips for 2 rows on the main bed, creating the elongated stitches that will be cabled. I had no problem with 2X2 cables,
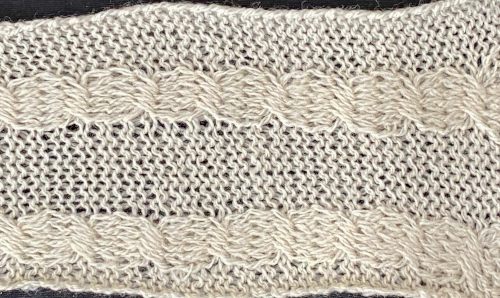
 Cabling, returned to in a later post, with adjustments, making things work.
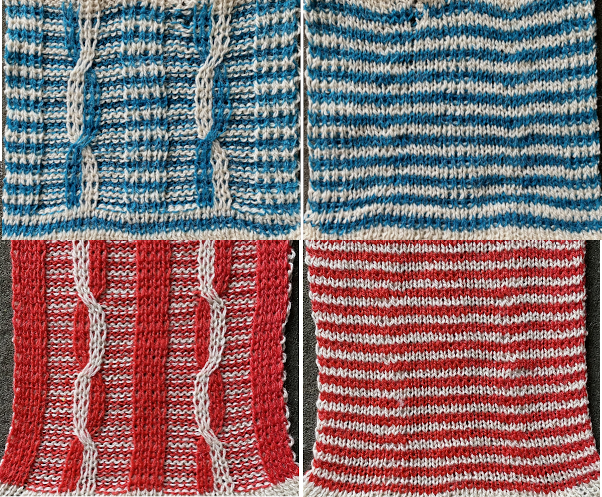 Continuing with shapes on striped grounds, this is the result of a self-drawn pattern
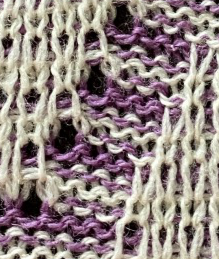
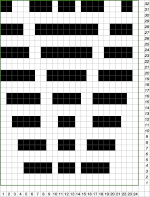
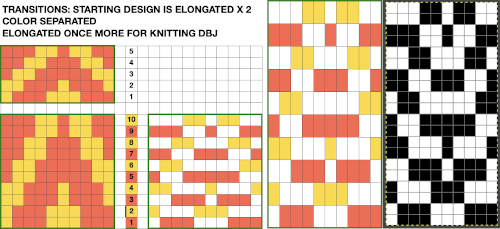
 Punchcards, in theory, may be used as given and set to double length, while for use in electronics drawing the pattern single height and using the double-length setting is also an option. Starting sides and fixing errors have always been more confusing for me when using the double-length feature, I prefer to punch holes or program pixels as I intend to knit them. The isolated reduced repeat for use in the electronic is charted, with an initial one-pixel error in 2 consecutive rows, marked with red cells. In transcribing any design, it is worth checking repeats multiple times after eyeballs and brains have had a rest. This was my start:
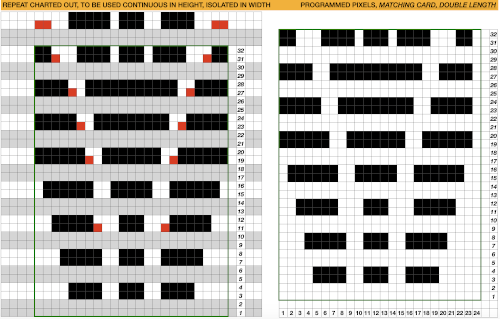 The first test is of an isolated motif. The yellow arrow points to the pixel error, the cyan to the positions where some needles in the full repeat were “accidentally” placed in A position, not B, resulting in pattern stitches not being formed.
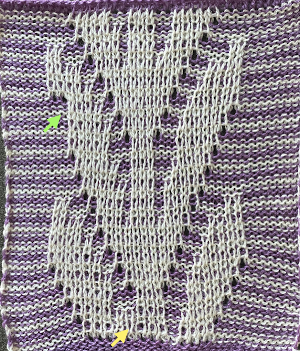

 Two other options for charting the fabric in numbers: A. draw the repeat as given
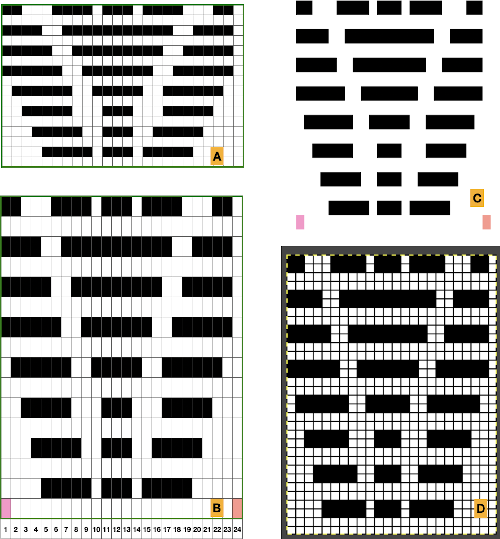 Any simple Fair Isle repeat may also be used. The numbering in the charts matches what is normally seen on the left edge of the tables

 The world of possibilities grows even further for single color shadow lace, when, examining the same design, one recognizes that the pile knit card, with the blank rows filled in in pattern, is the same as the fair isle version of the repeat, rendered double long
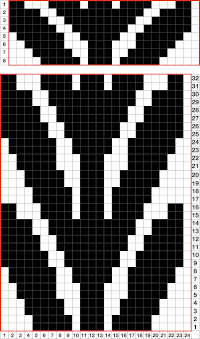
 the file for multiple repeats after color reverse
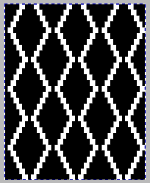

 Take care if copying and pasting single columns to alter a repeat width that the whole column is indeed copied and that if using the pencil tool flood fill is not used unintentionally. The original intent was also to correct the elongated slip stitch segments on the edge of the programmed vertical designs marked in blue, but the paste with errors in red accomplished creating the same issue
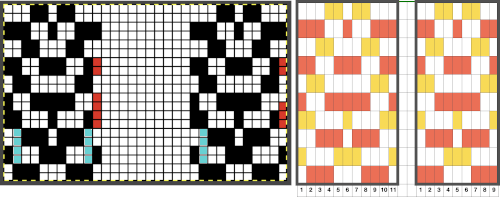
 The first segments were knit using striper backing, with the ribber knitting every stitch, every row, in both colors. When a slip stitch is used with needles out of work on the main bed, end needle selection should be canceled. In A it was not. The result is that end needles alongside the out-of-work column knit with each color in each row. In B, end needle selection was canceled, and one can now see the elongated slipped stitches that result from areas that should have been marked with the contrasting color
 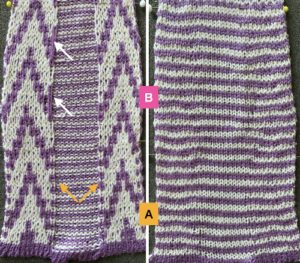 As long as the number of stitches on the ribber is even, lili buttons may be used, affecting the scale of the pattern in both height and width. In A, they were used with the ribber set to slip in both directions, in B, set to tuck in both directions. C marks the return to the N/N setting, with needle transfers to mark a possible pleat.
 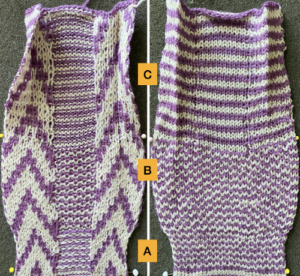 The initial pleat idea charted out for single stitch folds, stitches transferred to ribber in the R columns, to the top bed in the T columns
 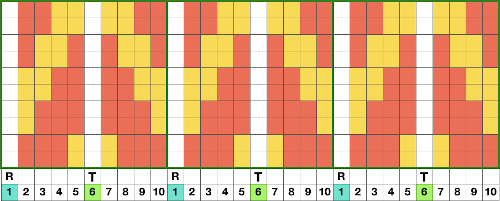 The result is a fairly soft pleat, the choice below was to retain end needle selection.
 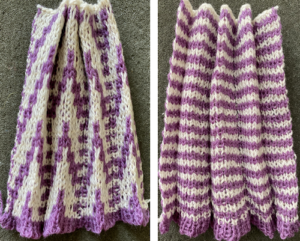 Various ribbed pleat configurations are explored in
  Paired transfers in the planning stages: because the repeat is small and has a single center pivot point, it is rendered once more, adding columns
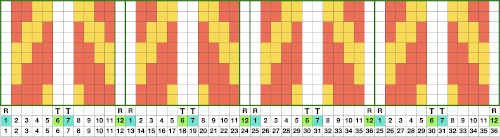
 The resulting fabric relaxed on the left, lightly steamed on the right
 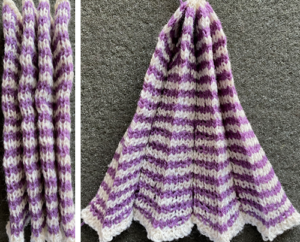 Note: the color positions in the design have been reversed from those in the first swatch. If “floats” are noted at any time in the spaces where needles are out of work on the ribber, look for dropped stitches.
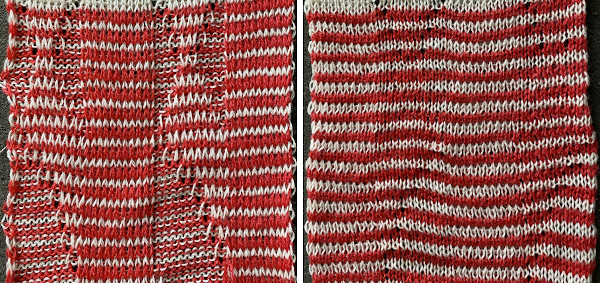 Needles in locations where only the backing is to be shown are transferred down to the ribber. Leaving the eyelets, they were transferred back up to the main bed when brought into work to reverse or change the shape. Addition and subtraction of stitches take place before the next pass with the alternate color. Here movement is random, to get some sense of the effect, it could be made deliberate by following a chart or color separating and automating the pattern, with its starting side on the right.
 What of having shapes appearing in each of the 2 colors on a striped ground? Eliminating some of the guesswork I used the repeat from a previous single-bed blog post on
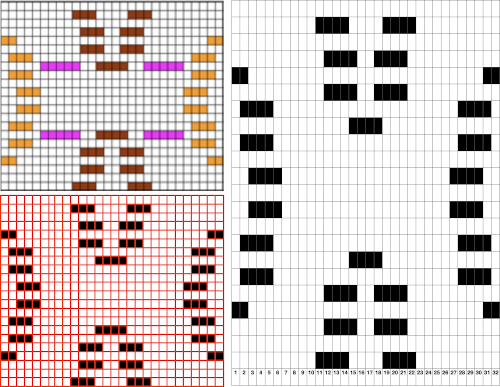
 The resulting sample, the yarn is thin, might have benefited from tighter tension and more contrast.
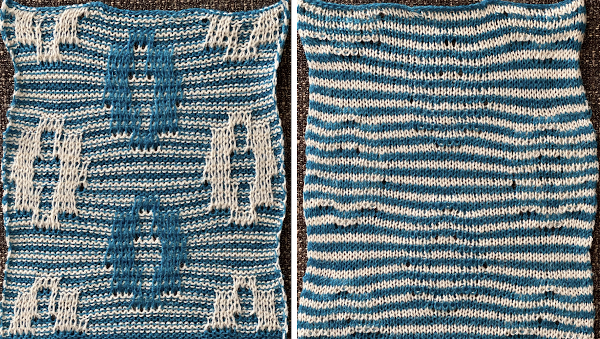
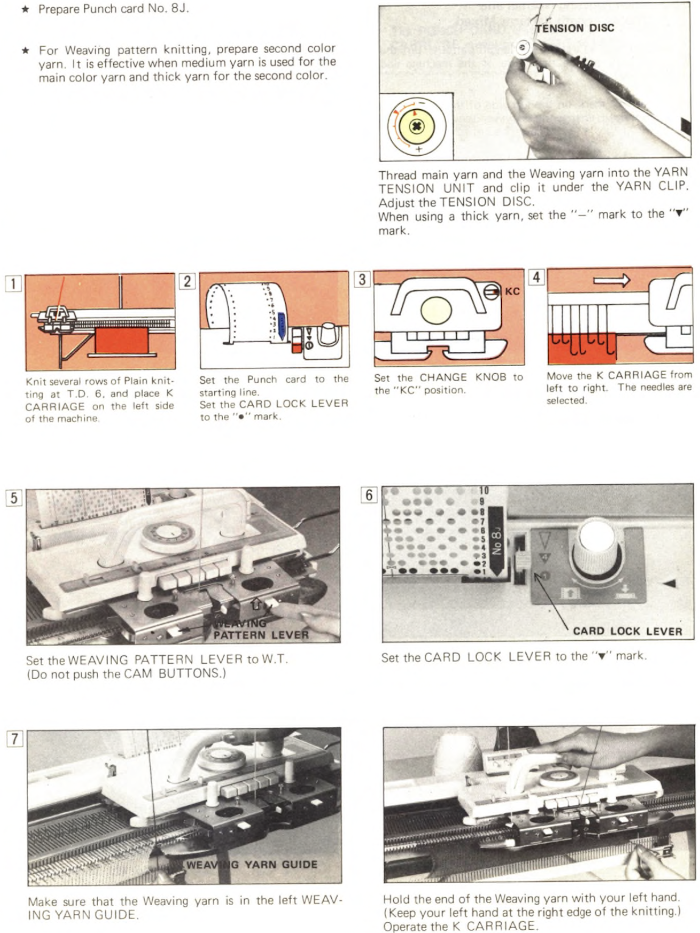
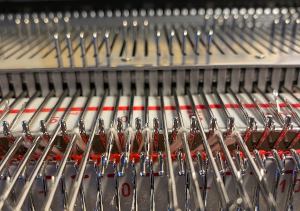
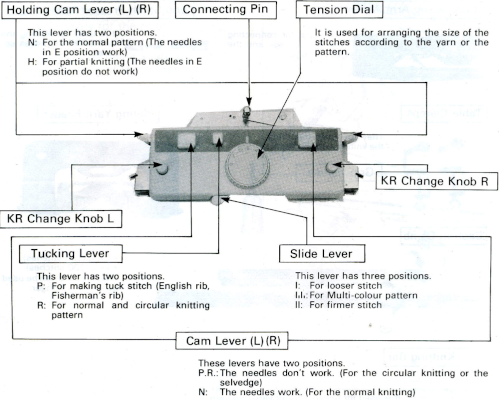
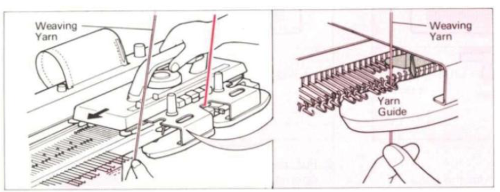 The “yarn guide” is that mysterious notch in each arm of the sinker plate. In the Studio accessory, the
 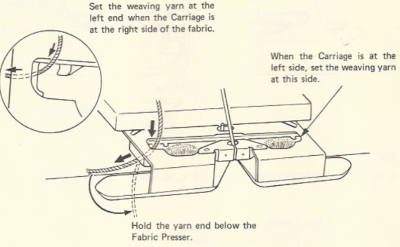 Start the piece with waste yarn and some evenly distributed weight based on fabric width. Make sure the weaving brushes are activated. In Brother standard, their position is changed using the corresponding lever, in the bulky 260 the L and R wheel brushes need to be placed in their corresponding slots.
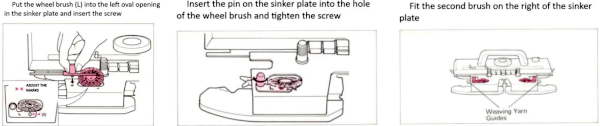
 In general, the knitting yarn is thinner than the weaving one. The tension needs to be adjusted to accommodate the surface yarn, not the background one. The tighter the tension the firmer and narrower the weave.
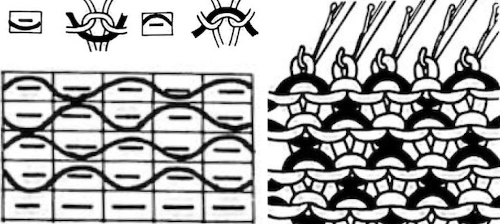
 Locking the card, as with any other pattern, will repeat the same needle selection, creating vertical repeats that resemble twill weaving on a loom.
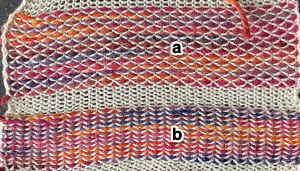 a: because stitches are actually knitting every other row, slipping while the needles on each side of them knit, they will alternately be a bit elongated; b: same needles knit every row, so their appearance is consistent.
 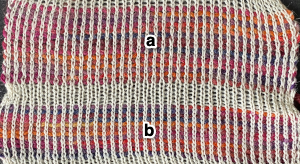 Depending on the difference in yarn thickness, the knit stitches in the ground become forced apart with what can be significant “bleed-through” on the reverse of the weaving to make that a really interesting fabric feature as well.
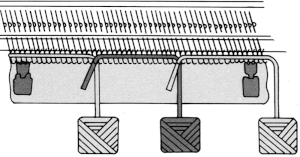 the “wraps” needed in each direction
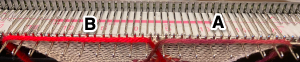
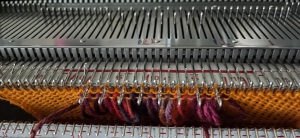
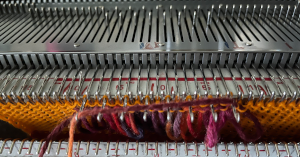
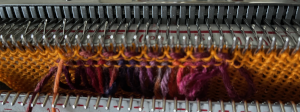
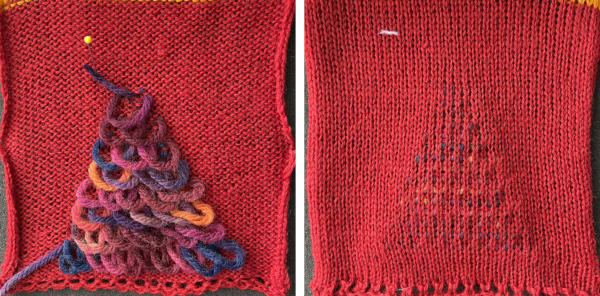
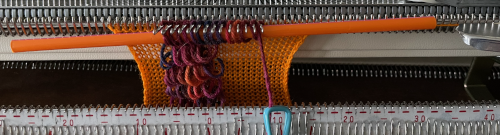
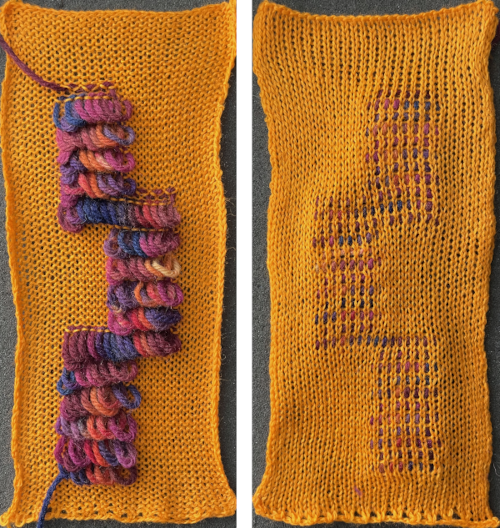
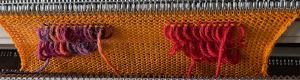
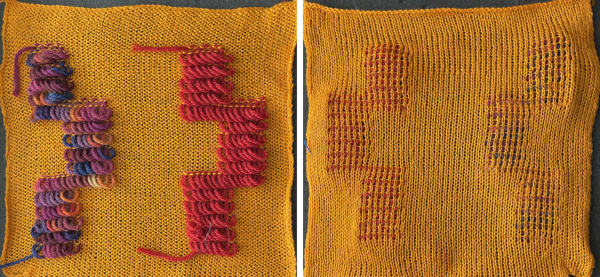
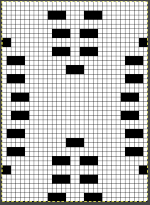
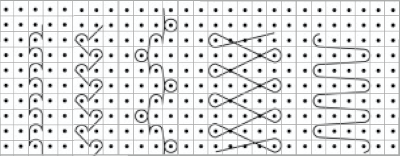
 To create isolated shapes: lay the yarn in any chosen area
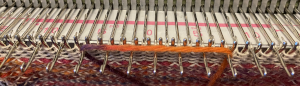
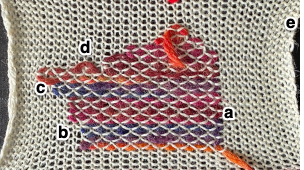
 The ground yarn and color may be changed for added striping and color interest. Sharp angles are created by crossing over two weaving needles, and more gradual ones by crossing over more needles. Blank areas of ground may be left as well.
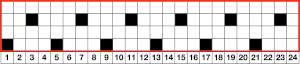
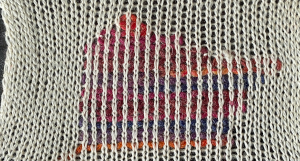
 A later experiment combining
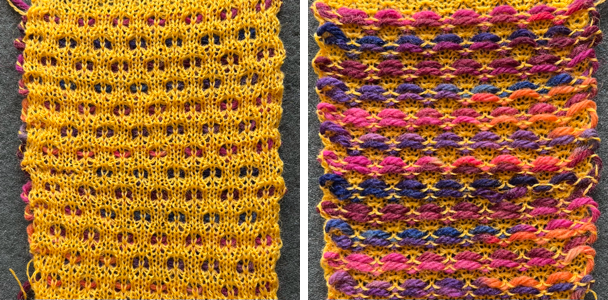

 This is the wrong way to feed the yarn, as the row gets knit woven in, the yarn will be locked in place and cannot be advanced to proceed up the knit
 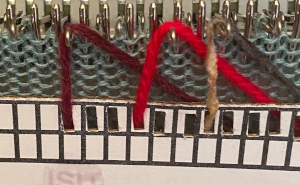 The way to have continuously available yarn
 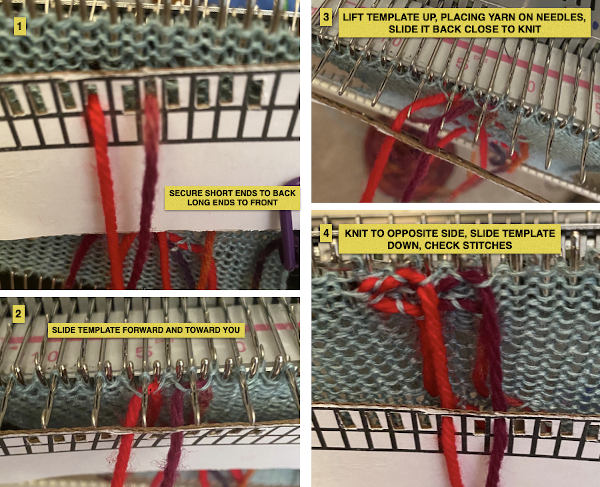 Adding a second set of holes for the yarn stabilize the short yarn ends and maintain even spacing throughout, some tape could be used in addition to secure the ends on wider widths of vertical weave
 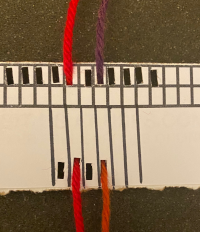 A spreadsheet or graph paper may be used to plan the configuration of the weaves including double wraps, this was executed using Numbers, individual bobbins might be a practical consideration
 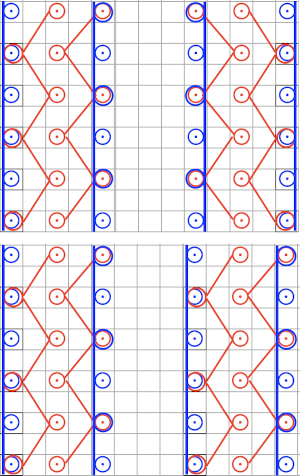 In my own experience most hand techniques and single bed textures are far easier to execute with the ribber removed. It is easier to view progress, move up weights, and correct mistakes. That said, my machines are all set up with the ribber brackets, not flat, I feel it helps slide the knit down toward the gate pegs, and in my opinion that makes textures and even lace easier to produce. I have ribber covers, they can be improvised if needed with paper or cloth, never use them since I see no reason for moving the knit on the top bed in front of the ribber. If the ribber is removed, it is worth checking its balance once more prior to returning to any rib knit. Ultimately this sort of thing is about personal preference, no steps are ever universally applicable and correct.