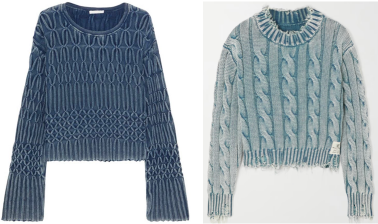
Reviewing Brother carriages: 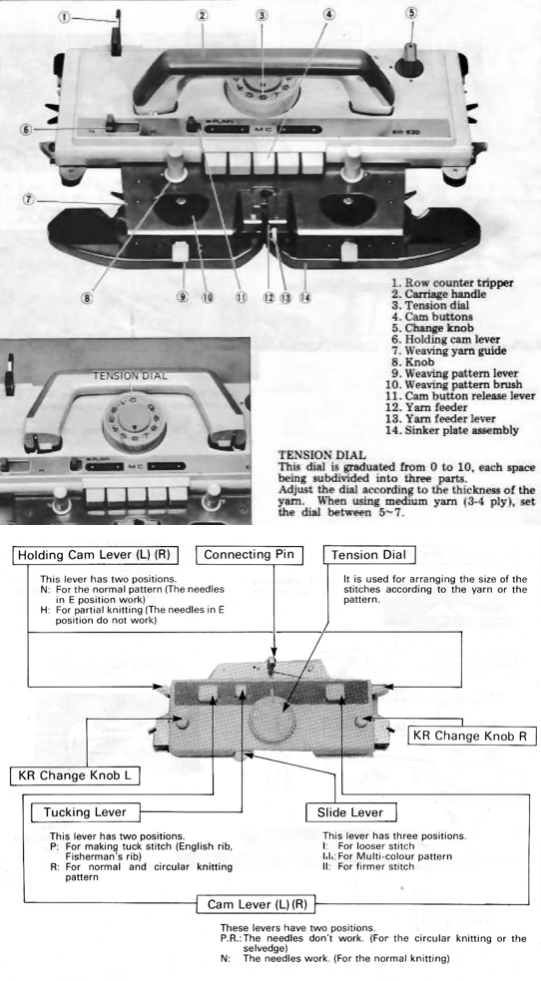 I am drawn to published pattern books for different brand machines at different periods of time and enjoy the puzzle of converting their designs to machines I have ready access to.
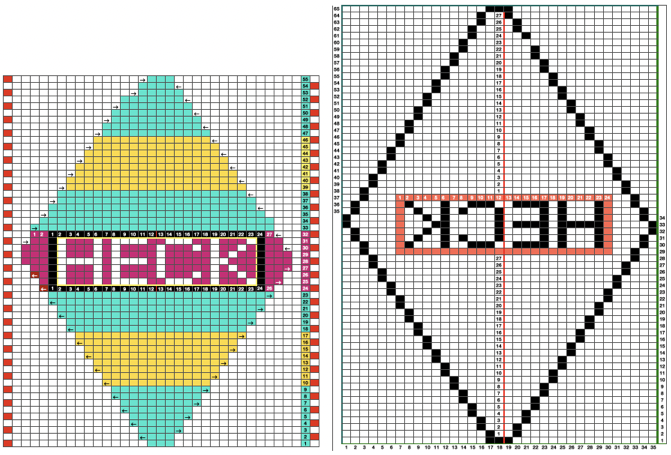
At this point in time most of my swatches are produced on a 930 using img2track to download files when needed while still making an attempt to share repeats usable on punchcard knitting machines when possible.
I have never been in the same space as a Dubied, but have been researching online trying to gather any information that might help me translate more of the patterns presented in the manual “for developing your hand and machine sampling”. These are my personal notes, not meant as accurate teaching tools, but shared to perhaps serve some use to others when decoding cross-brand pattern instructions.
Close to the completion of this post, I acquired the manual for the Dubied N4 model from a friend, with these images and some variations of the text.  The associated tools from an online sale site:
 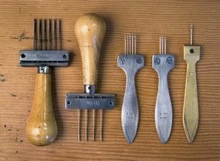 Manuals available online for free download
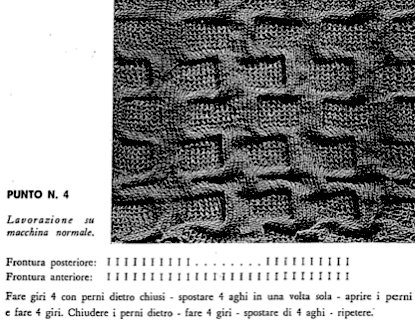
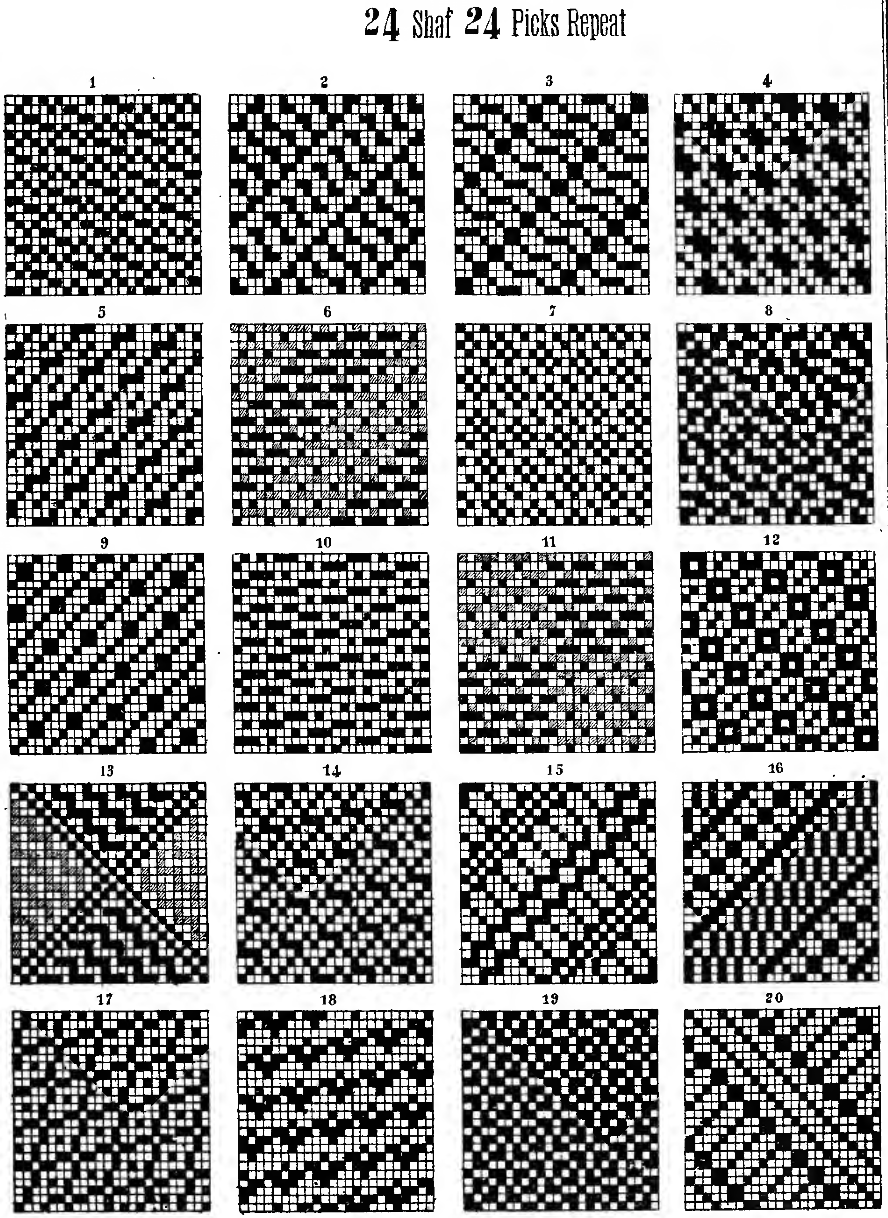
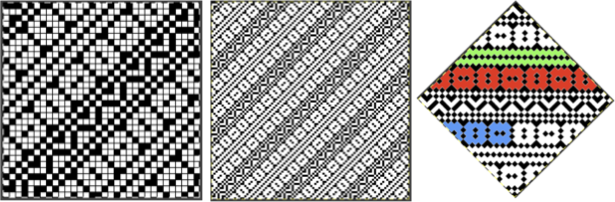
 Another source of inspiration for a different machine, Italian text only available, with many similar stitch structures:
 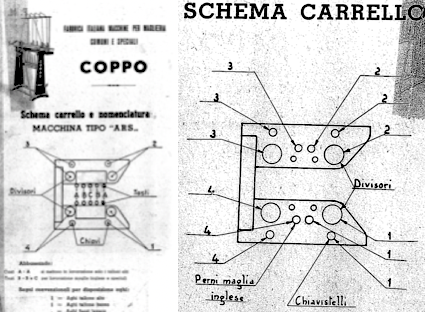 The Coppo numbering for settings in a box format
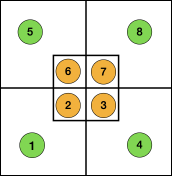
 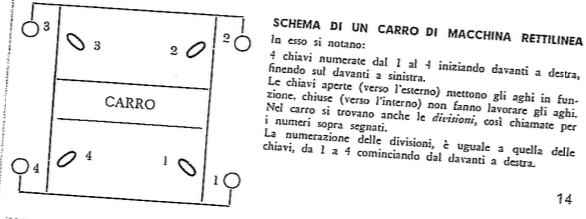 My initial attempts to develop an understanding of functions began with an illustration from the Dubied N4 parts manual
 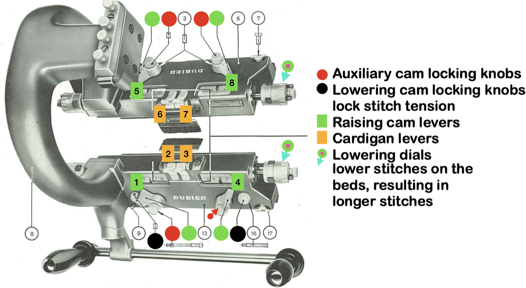 Some related functions, the term cardigan is used to refer to what many of us know as tuck stitch.
 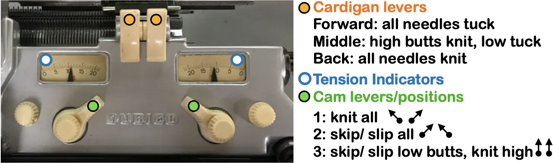 Visualizations of mirrored matching cam lever positions on opposite beds.

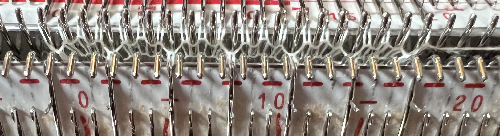
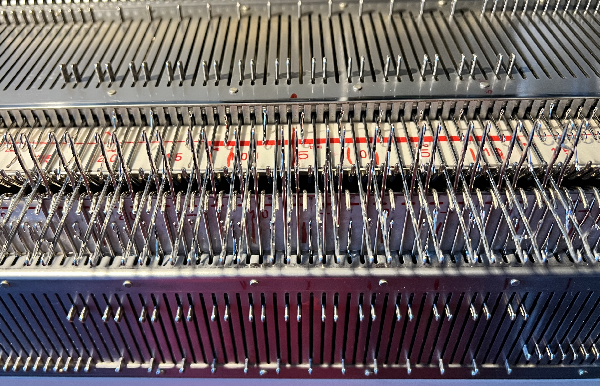
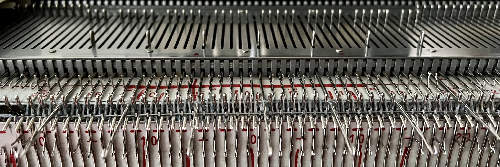
 These machines do not create patterns via punchcards, instead, cams inside the carriages are controlled by switches that alter stitch formations. They are classified by the inclusion of the following symbols
N: equipped with rib and tube cams
F: equipped with cardigan cams for the execution of all tuck stitch fabrics
H: fitted with high and low butt needles. The raising cams operate either all the needles or high butt needles only. All machines with these needles are equipped with cam-plates allowing all the knit-and-tuck or all-tuck combination fabrics to be formed
4: 4 yarn carriers, which can be placed on either side and allow the manufacture of different pieces at once.
Basic rib structures are modified further by positioning needles in specific needle arrangements.
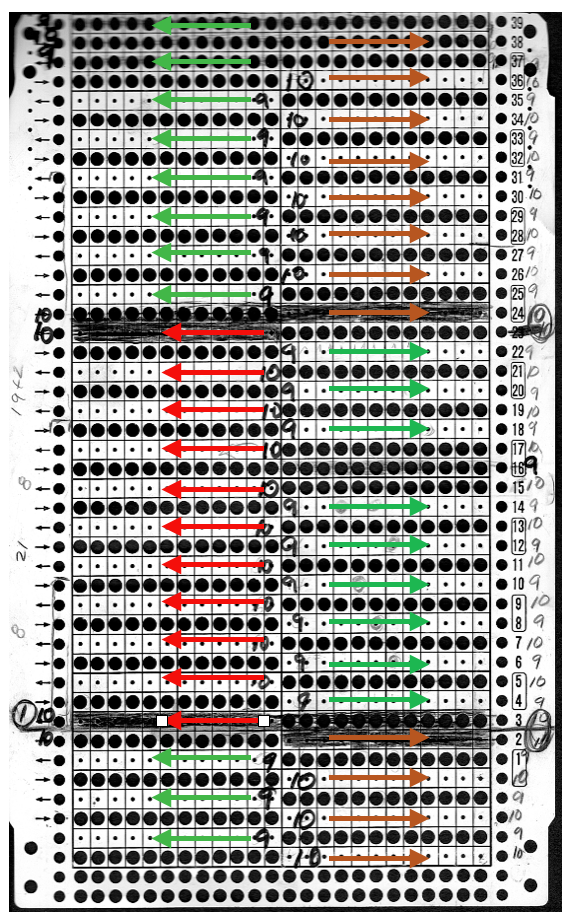
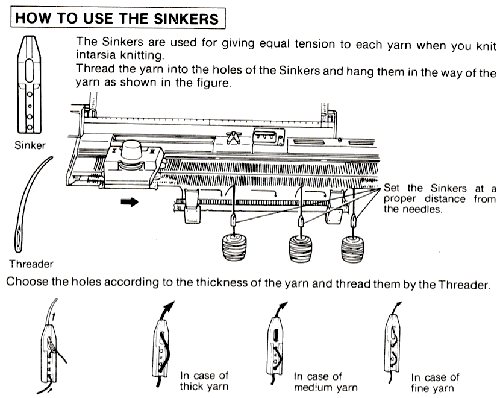
Functions and settings are often represented in manuals and publications in varied ways. The N4 manual supplement shows an undercarriage numbering system that uses a different sequence than my illustrations. The particular model introduced the addition of auto cams, allowing for alternate function patterning on needles in different positions. 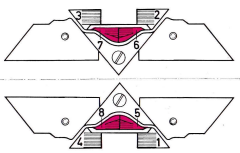
 I find it easier to think of settings on each bed separately, especially in cases where bed instructions also need to be reversed.
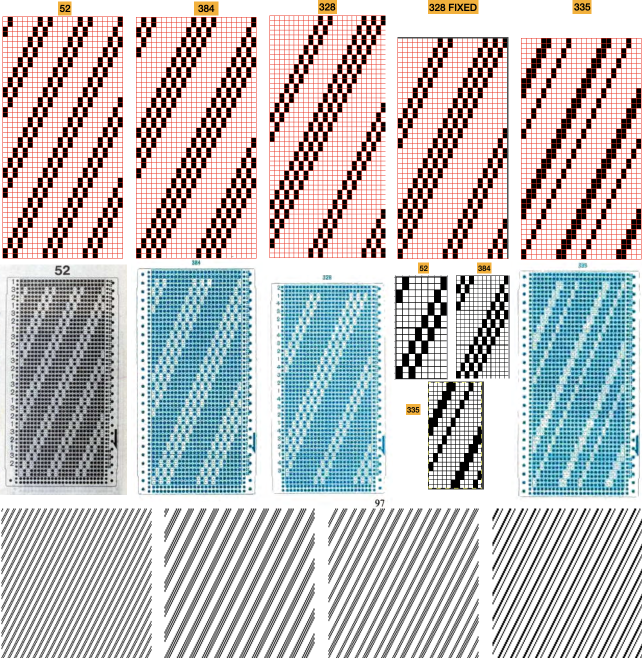
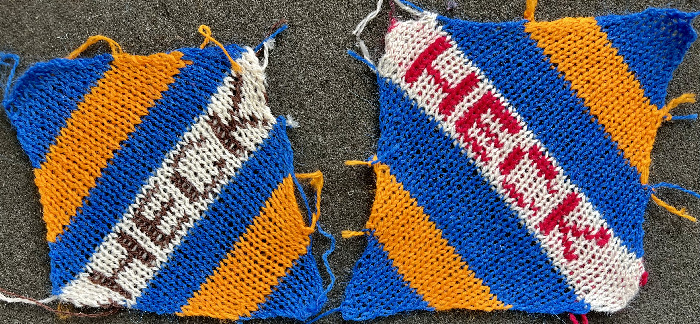
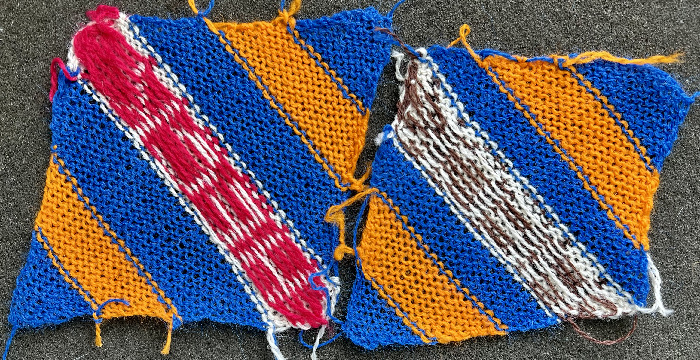
This is my initial effort at illustrating comparisons between the Dubied and Brother settings for knitting specific swatches.
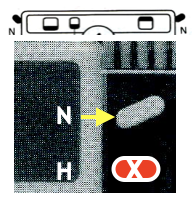
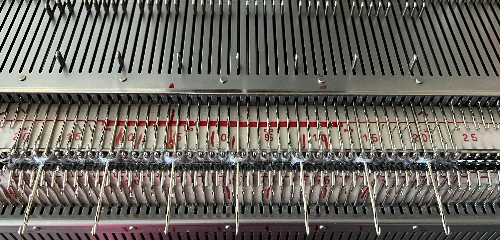
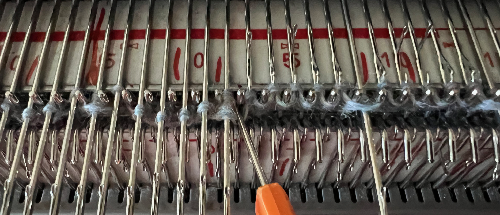
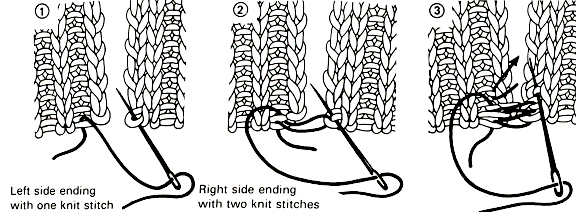
Any fabrics acting on stitches occurring on selective tuck or slip stitches on one or both beds would need to be programmed in Brother machines for patterning on the top bed. On the ribber, the use of lili buttons will automate card 1 needle selection in the pattern on an even number of needles, but in many instances, in executing the Dubied patterns, hand selection in specific needle arrangements may be required as often as every row.  Information from N4 pub after I had created the above, with additions and some paraphrasing: the numbering system for “keys and levers”
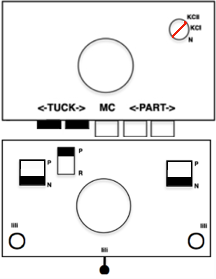
 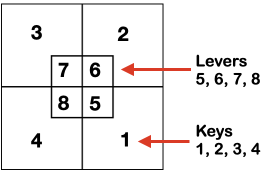 Key positions:
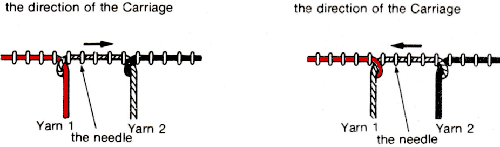
1. closed if turned toward the inside of the carriage, no rows will be knitted ie slip stitch in both directions for a free pass, no knitting, with no yarn using Brother
2. opened if turned toward the outside/ away from the carriage, rows will knit
3. central position for floating threads on the low-heel needles, knit/slip, programming for needle selection in upper work, Brother D, and lower, Brother B, or limited Brother ribber selections using lili buttons
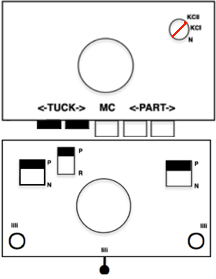
Stitch size dials:
Numbering from 1-20, two on the front carriage, two on the rear carriage, three lengths can be set using the stitch size dial, indicated by three colors red, black, and green  (Cardigan) Levers: each lever can be positioned separately: pointing toward the outside of the carriages/ back: the space between them
 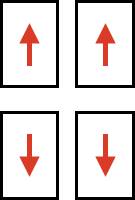 neutral/middle: if activated will hold the thread on all needles (tuck loops across all needles in work)
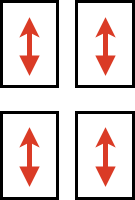 pointing toward the inside of the carriage/ forward: if activated will hold the thread (form tuck loops) on the low heel (non-selected needles in Brother)
 Sliding unladen (no yarn) carriage/ free pass: made with keys 1, 2, 3, 4 closed/ Brother carriages set to slip in the direction of knitting
Plain knit or any rib setting: Keys 1, 2, 3, and 4 open the carriages work on selected needles, levers facing outward/ Brother with both beds set for plain knitting
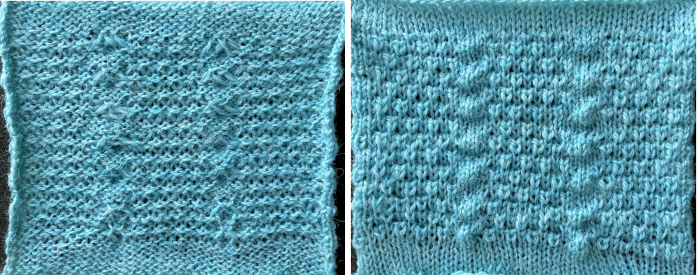
Combining knit carriage needle selection with racking 2017 and
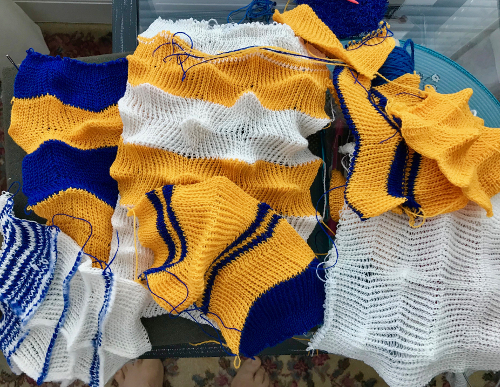
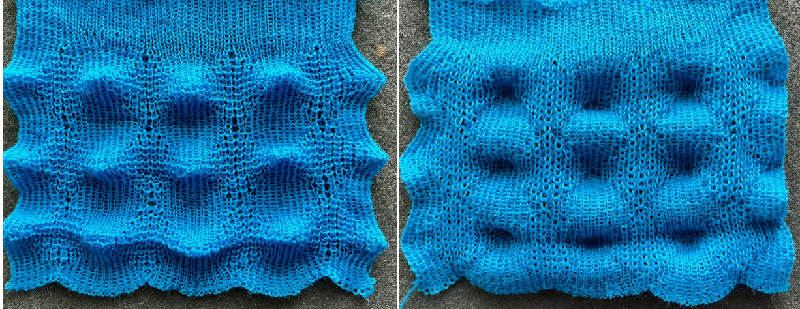
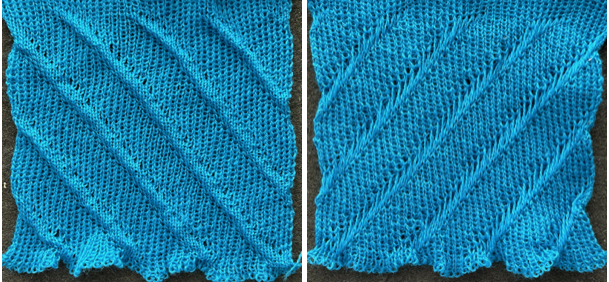
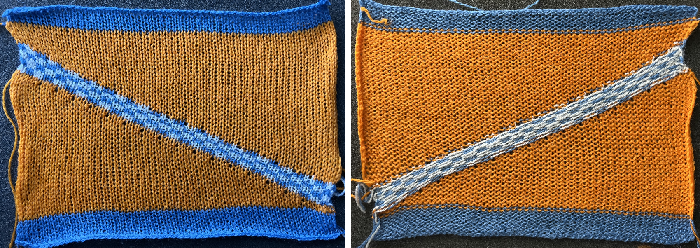
A racking tale: Passap/Brother 3 in 2019 used this repeat as the springboard for textures that did not match the original in stitch and row counts or racking sequences. The racking handle position is referred to as up or down, similar to the Passap system. 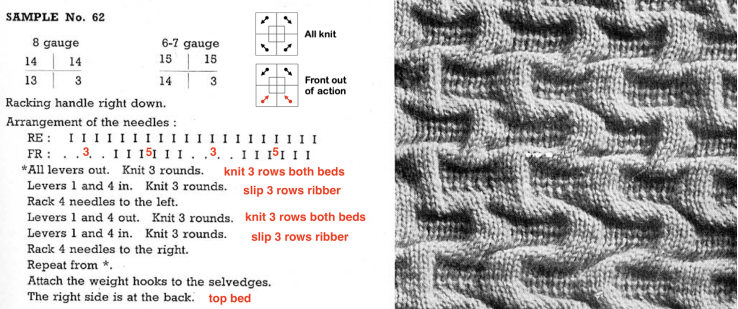 The ribber is used as the front bed.
I initially interpreted a round as a single row of knitting and held onto that for a while, and my arrangement for needles in and out of work on either bed was reduced.
Sometimes there are good reasons why our swatches do not match the inspiration one, a bit like changing ingredients in a recipe and wondering why the result is different.
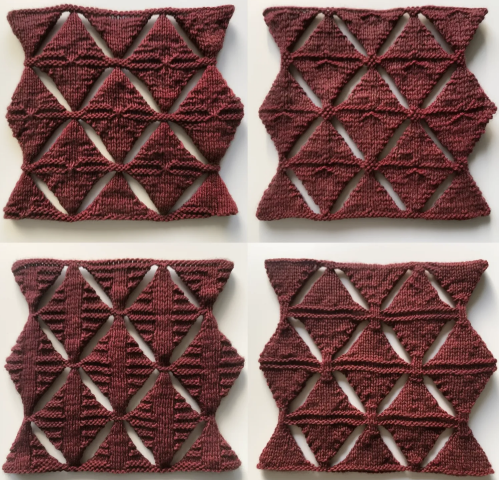
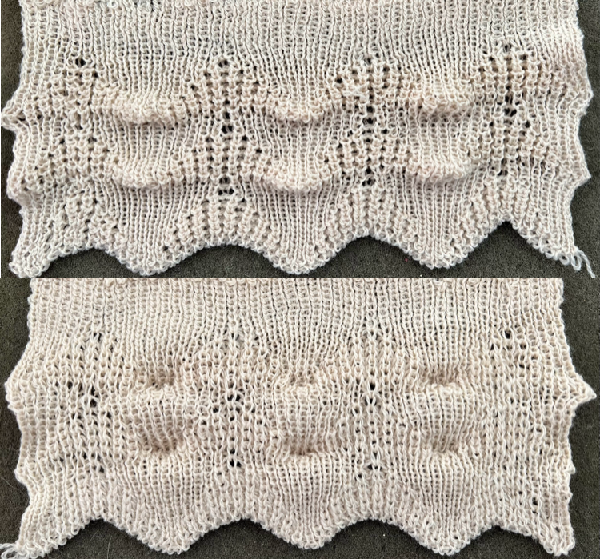
The first test: in practice, I was simply unable to get the ribber to rack by 4 positions after only 3 knit rows, the problem was solved by a change in the needle arrangement and racking by only 3 positions in either direction. Another option would have been to add more all-knit rows between racking sequences as seen in the subsequent Coppo machine pattern adaptation, creating deeper folds.
The tension was adjusted to the tightest possible and remained fixed with no variations on either bed.
The gauge is likely looser than that in the Dubied manual, forming larger stitches and resulting in a softer shape definition.
Brother tension adjustments can only be made on one dial on either carriage, while the Dubied offers multiple settings on both beds.
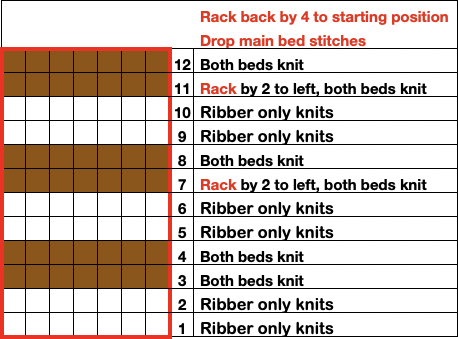
To knit manually changing ribber settings, cast on with racking position on 7.
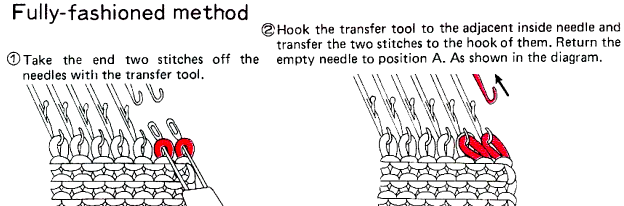
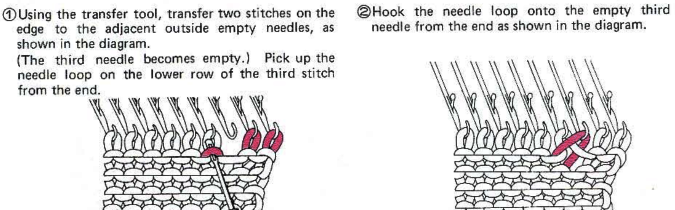
After casting on and transferring stitches up to the top bed the needles are arranged as follows, blank cells represent needles placed out of work back to A position:  1. Knit 3 rows on both beds
2. Set the ribber to slip in both directions, knit 3 rows on top bed only, and rack to position 10
3. Set the ribber to knit, knit 3 rows on both beds
4. Set the ribber to slip in both directions, knit 3 rows on top bed only, and rack back to position 7.
Repeat the 4 steps, ending with 3 knit rows before binding off.
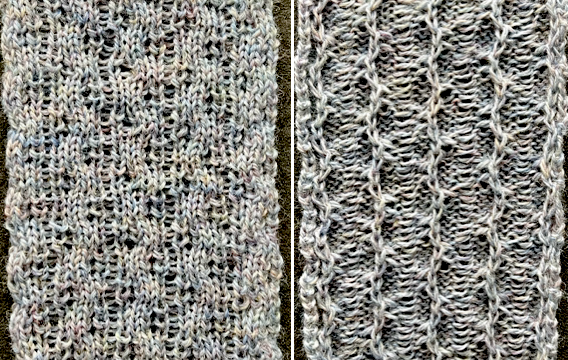
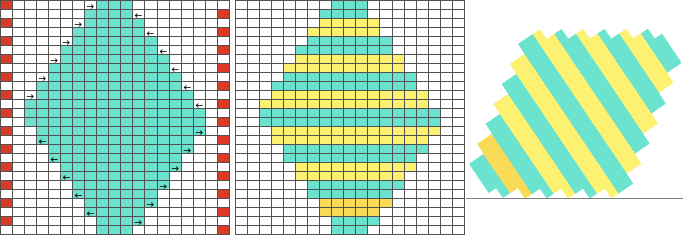
Elongated stitches happen on the bed with needles out of work, in this case, the ribber, and the texture will appear on the knit side.
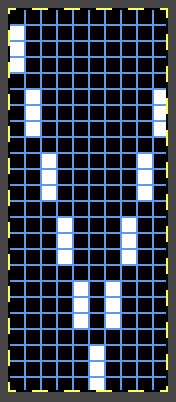
The needed racking positions become easy to identify as the knitting begins to grow. If one wishes to track hand techniques along with their respective row numbers and racking positions a spreadsheet can quickly be created including specifics ie in this case row counts, ribber settings changes, and racking positions: 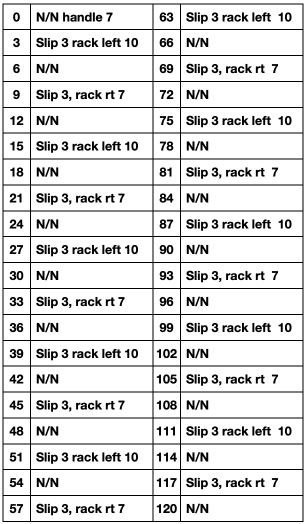 Automating the selection, and swapping beds make the process easier to track: begin on racking position 7, inverting the needle arrangement in order to keep the same racking sequence. Cancel end needle selection whenever any needles are out of work on the main bed and the knit carriage is set to slip in both directions. It is not always necessary, but a good habit to develop.
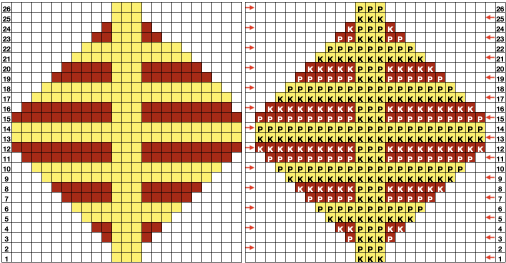
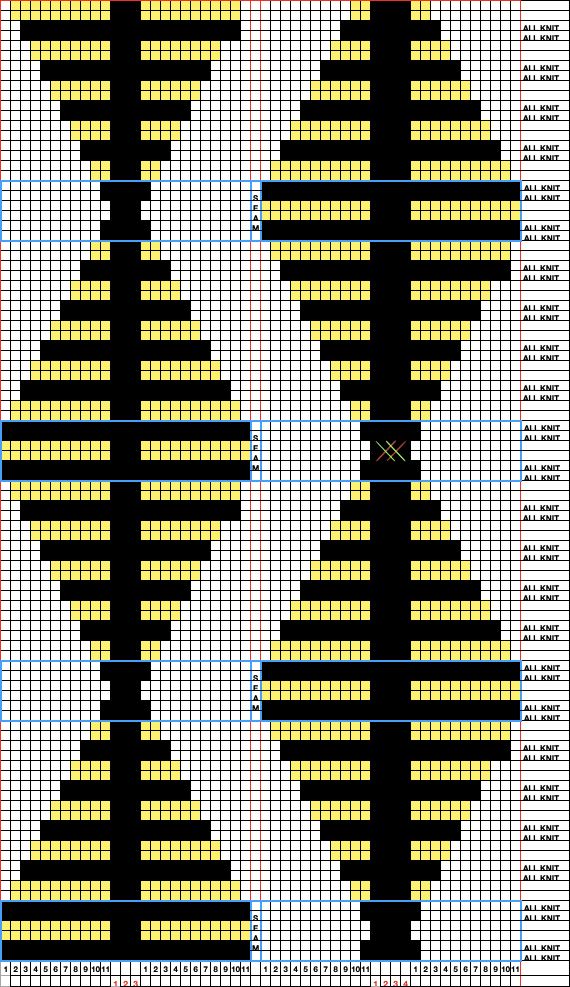
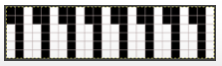
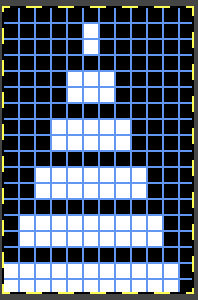
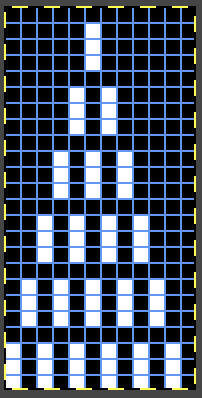
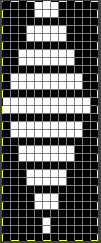
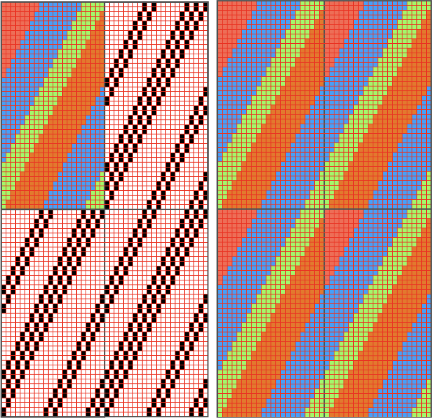
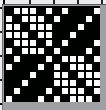
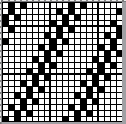
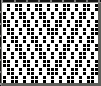
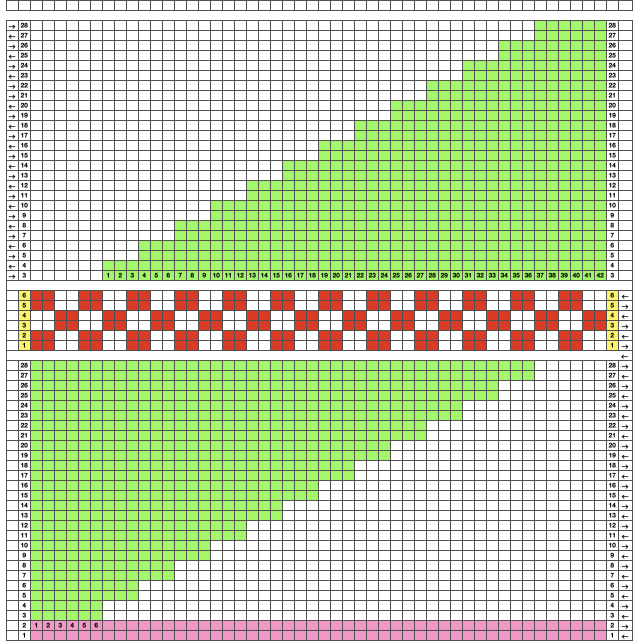
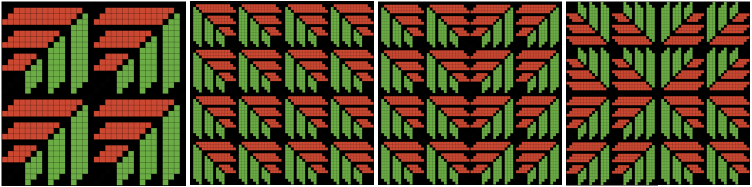
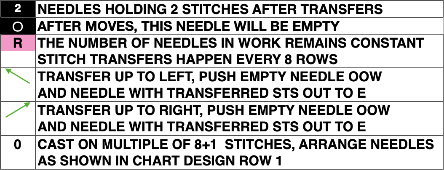
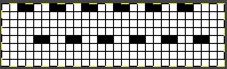
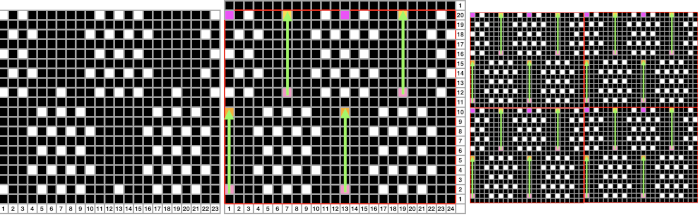
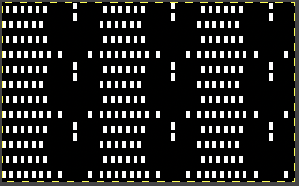
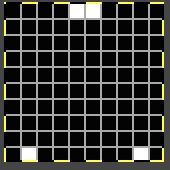
  The width of the main bed is programmed using a repeat that has 3 rows of punched holes/black pixels, followed by 3 unpunched rows/white pixels repeated X2, for a total of 12 rows.
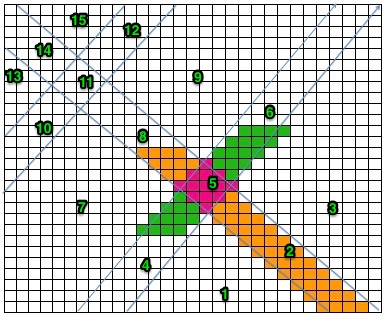
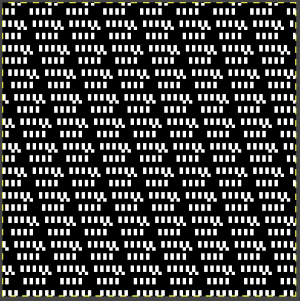
 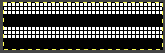 Emptied needles on the knit bed are pushed back out of work to the A position. All ribber needles are in the work position.
Needle preselection in Brother on the knit bed will not interfere with racking since ribber needles are continuously in the B position.
Cancel end needle selection, KCII, as in any fabric with slip stitch selection on the top bed combined with needles out of work.
After the repeat is programmed and the first preselection row has been made, racking will happen every 6 rows, first to position 10, and then back to 7.
Starting side does not matter unless color changes are intended on every even number of rows.
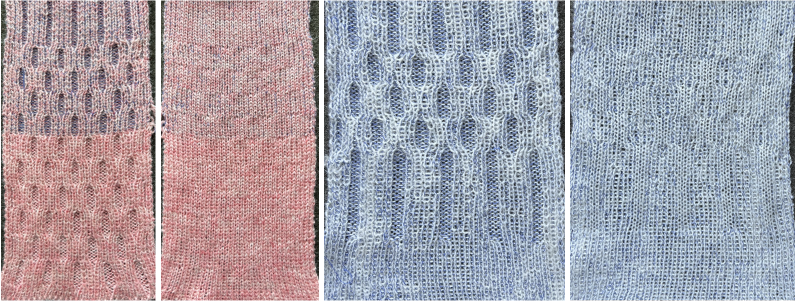
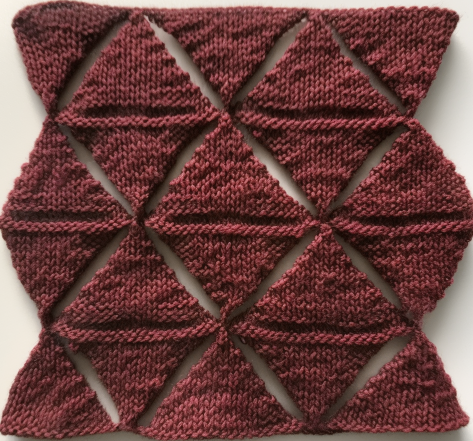
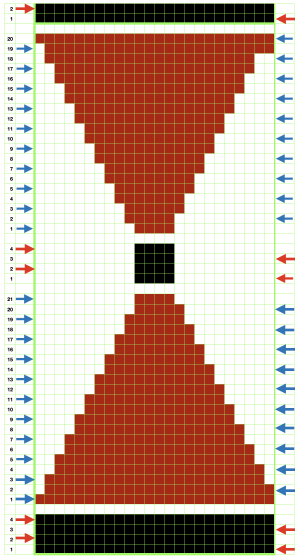
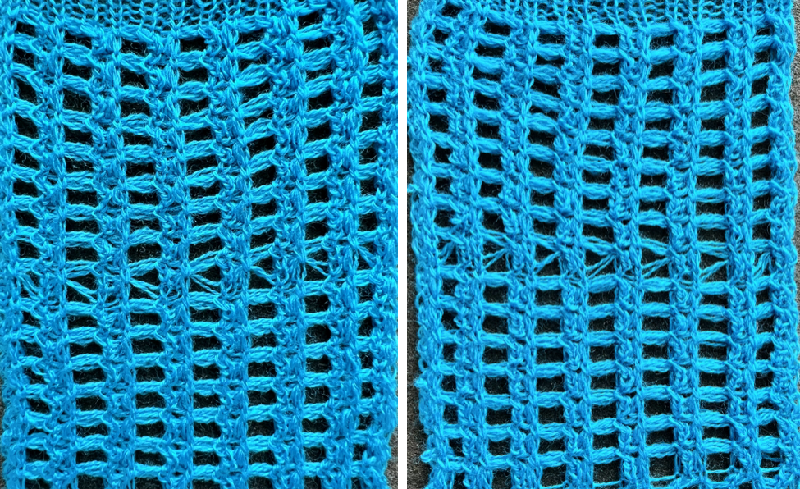
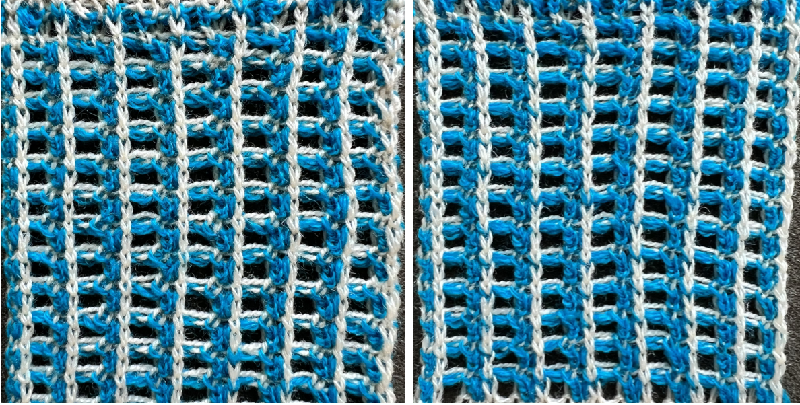
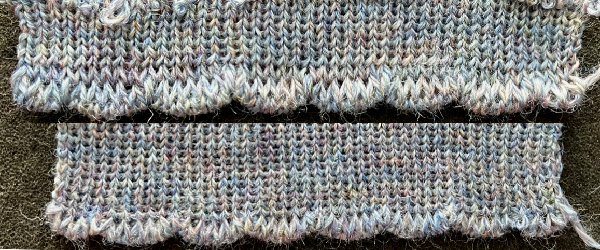
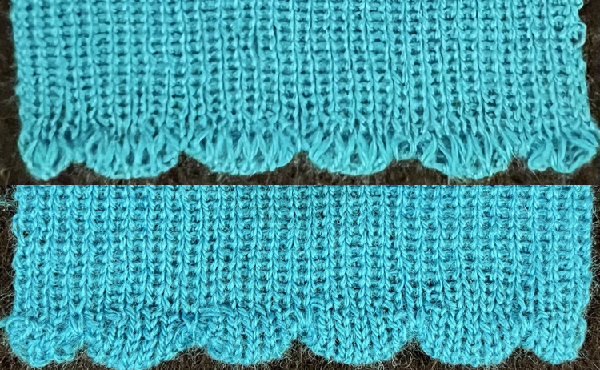
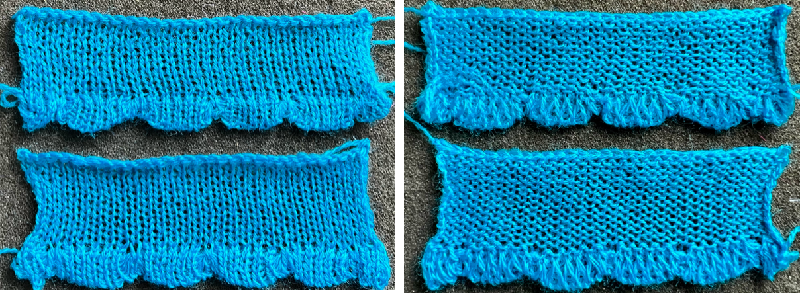
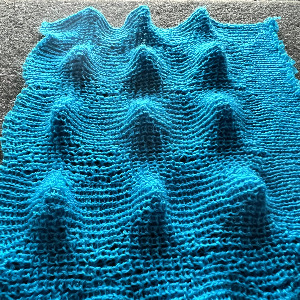
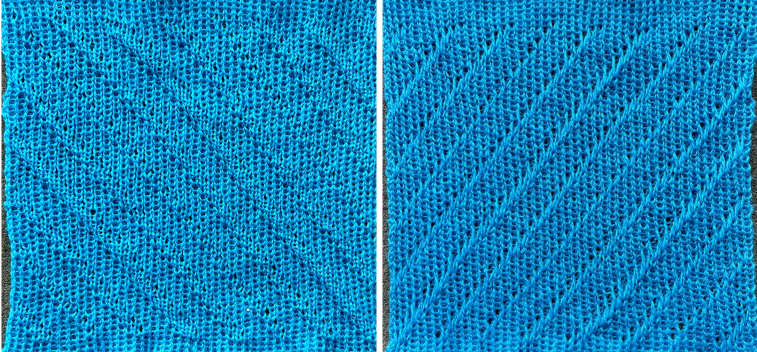
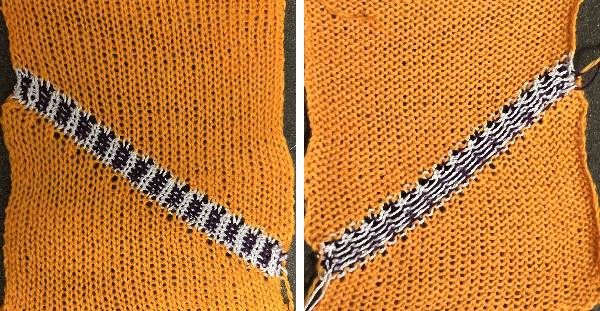
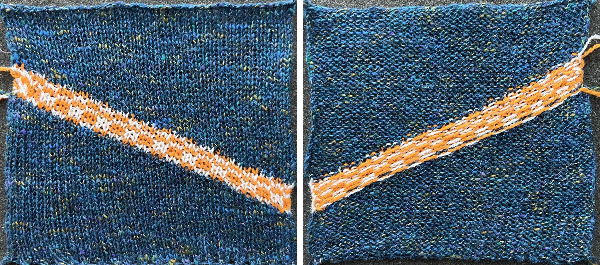
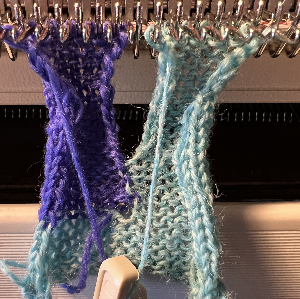
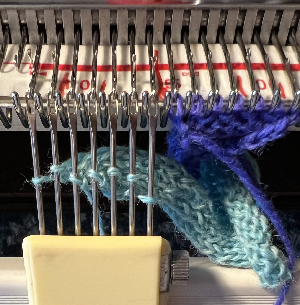
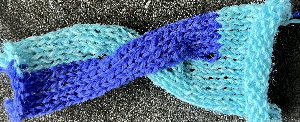
Elongated stitches happen on the bed with needles out of work, the texture will appear on the reverse side, where all needles are in work (NOOW). The blue is knit with NOOW and with setting changes on the ribber every 3 rows, while the yellow swatch is knit with the main bed programmed with NOOW and a 12-row repeat using the slip stitch setting in both directions.  When a round is interpreted as 2 rows of knitting, the carriages leave and return to the same side, color changes can be considered. The out-of-work/in-work needle arrangements now match the published counts, along with the repeat for knitting with the top bed set to slip and knit rather than the ribber. The method is the same as previously described.
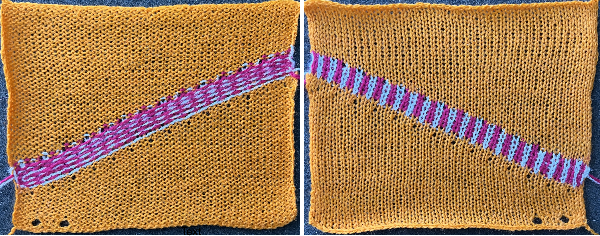
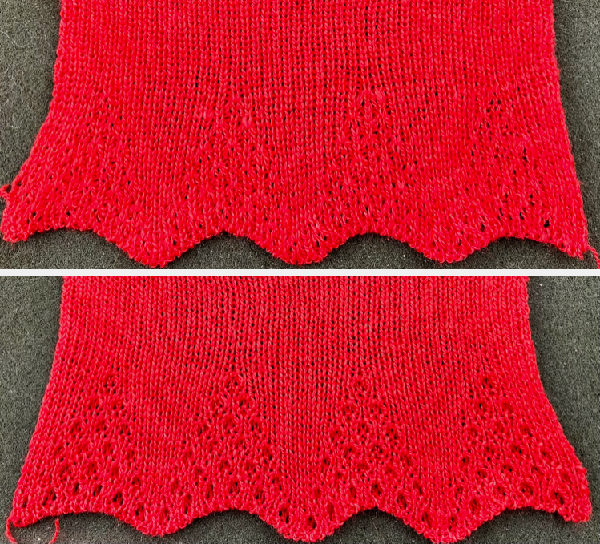
Racking is now planned by four positions, and occurs every 12 rows once the needles are all preselected on the top bed, starting at racking position 6, to 10, and back to 6,  producing a swatch matching the original.
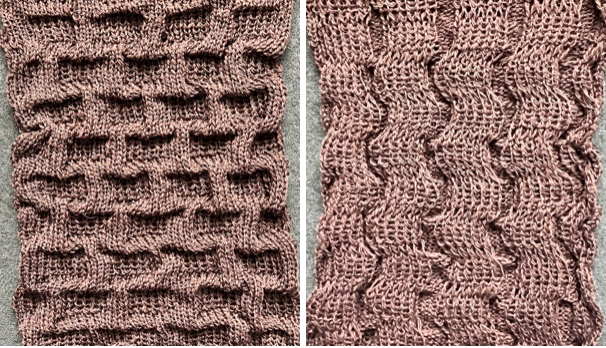
 What about adding color changes? An easy place to change color is when the needle selection changes from slip to knit, with each color knitting for 6 rows, remembering to also rack after every 12 rows.
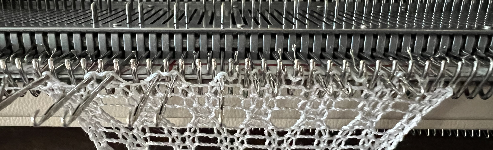
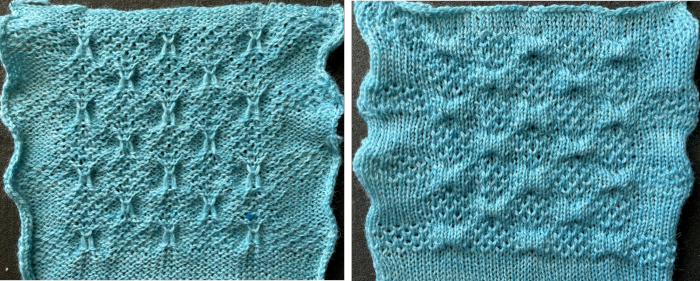
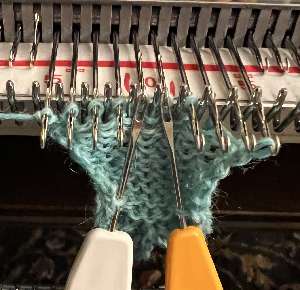
The brown yarn was hard to see clearly on the needle bed. When off the machine there were interesting unplanned areas of dropped stitch lace where dropped stitches on the top bed had been missed.
Tabling the idea of adding other colors to this particular pattern, at least for now, but never say never in knitting (and baking).  And then there is this related pattern in the manual that involves racking by 4 positions and deliberately dropping stitches
  With some experience needle setups can be varied to suit, while achieving the same results as published illustrations.
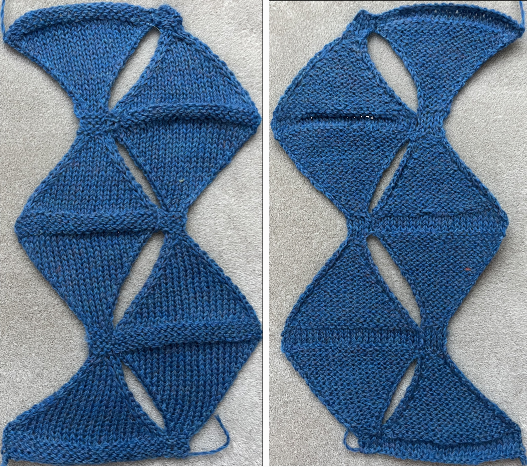
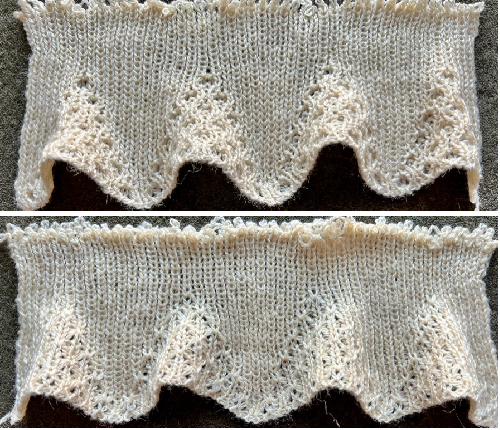
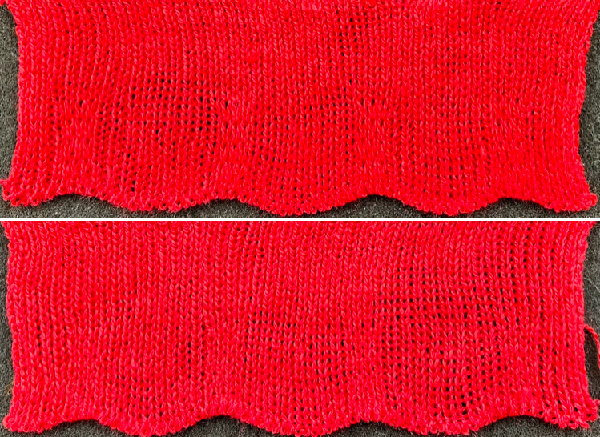
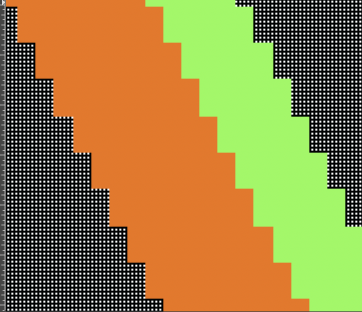
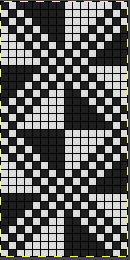
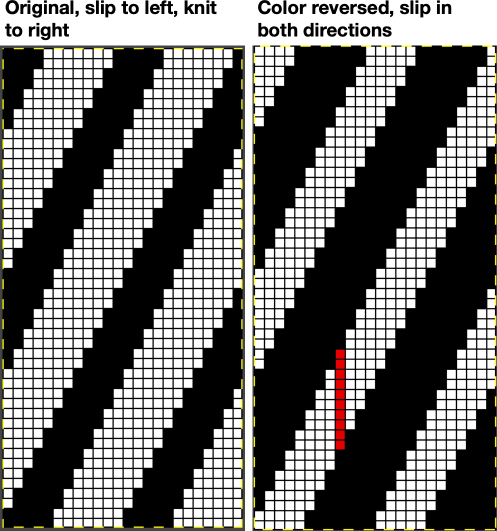
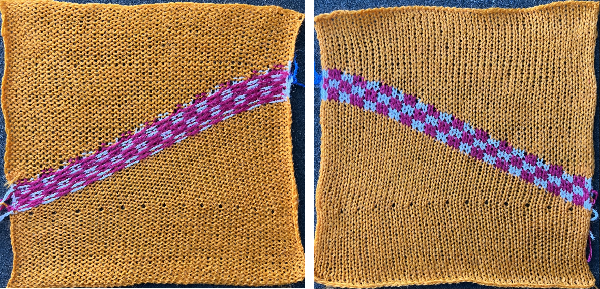
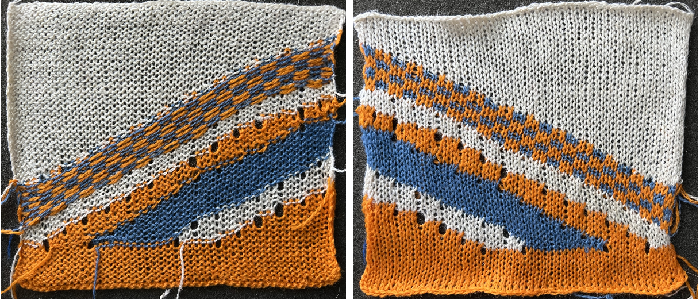
I prefer to start with racking to left, as a result, the shapes in my swatches are mirrored horizontally when compared to those in the manual’s photo.
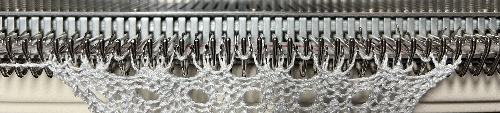
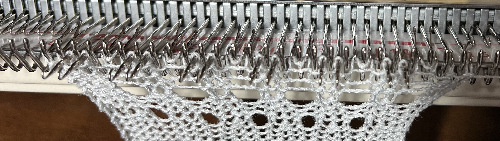
There are ways to make casting-on quick for testing small swatches when permanent edging starts do not matter.
One method to do so was described in the post: Ribber cast on comb/ open stitch single bed cast-on and was used here.
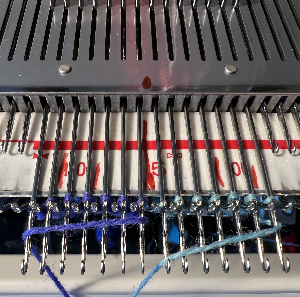
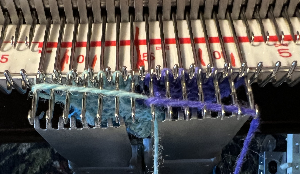
Ribber cast on combs traditionally came in different colors. I happened to try to use one of my grey ones presumably a Studio 4.5 mm one and found the spaces between its teeth not matching that between my Brother machine needles evenly. There were no issues when using the “silver” Brother comb. Here it is shown in position, with stitches cast only on the top bed,  and picking up loops for stitches on the ribber as the carriages travel to the opposite side.
  The plan is to move ribber stitches to the left by two positions three times before returning them to their original position.
The ribber carriage is set manually to knit on dark yarn rows and to slip on light yarn rows.
The ribber setting “song”: light/ slip levers up, dark / slip levers down.
The dark forms the dropped stitch lace pattern, it is thinner than the light yarn and the knit steams fairly flat.
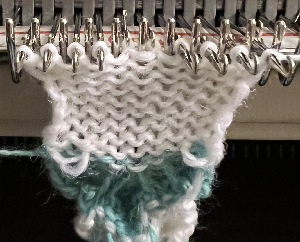
Stitches are dropped by disconnecting the ribber carriage and making passes with no yarn, first to drop the stitches, and then to couple it once more with the knit carriage to continue knitting. 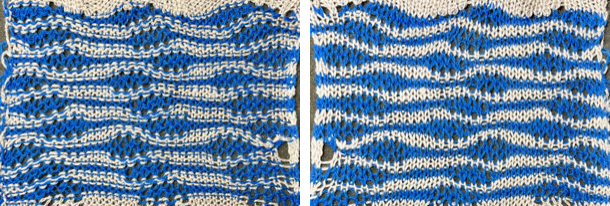 Automating the pattern, switching beds: program a 12-row repeat for 2 rows slipped, 2 knitted across all needles in work.
Note to self, when you swap beds and the ribber is forming all the knit stitches, do not use the ribber carriage to drop all the stitches on it!
Both yarns here are thin, and steam/press fairly flat.
If a ribber cast on for every other needle is used, remember to change the pitch from P to H after the transfers between the beds have taken place. A check to confirm that indeed needles will not smash into each other is quick to perform and well worth doing before continuing.
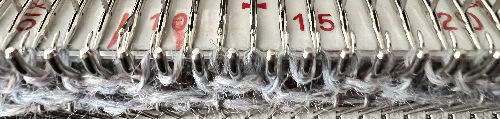
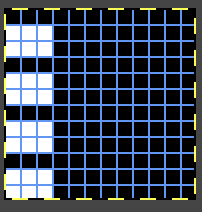
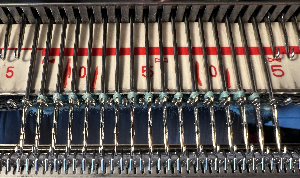
My needle arrangement: 

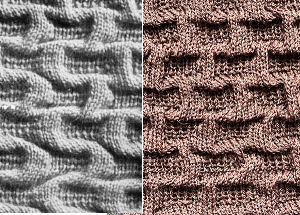
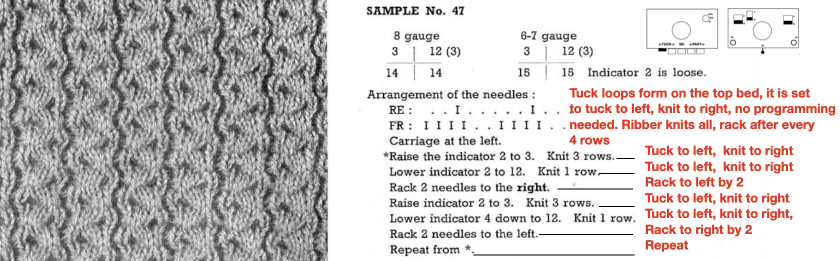
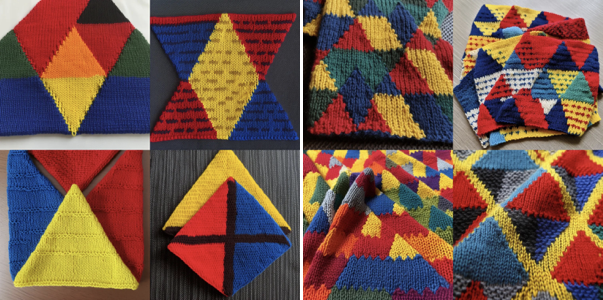
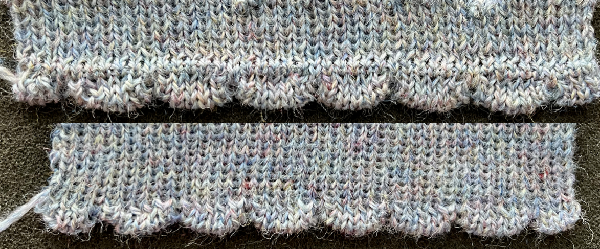
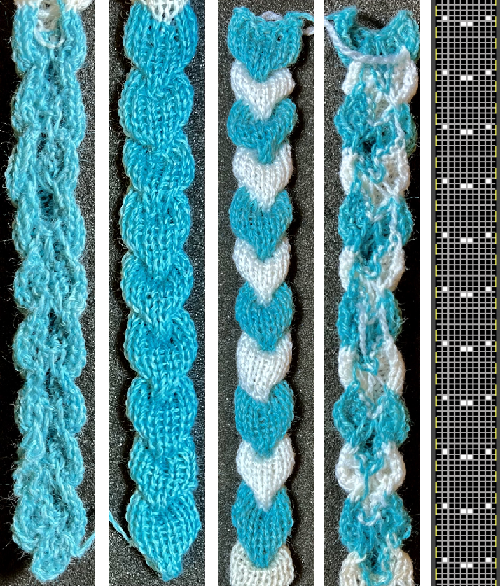
It is interesting that the swatch photographs accompanying directions in the Coppo manual are not “perfect”, some showing pattern adjustments or even sporting holes not part of the design. This texture is very similar to the above
 I initially interpreted 4 rounds as meaning 4 rows of knitting.
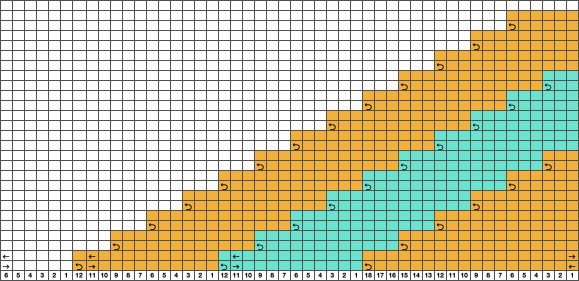
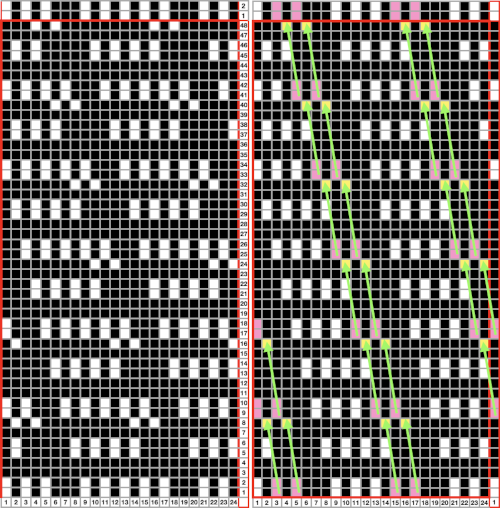
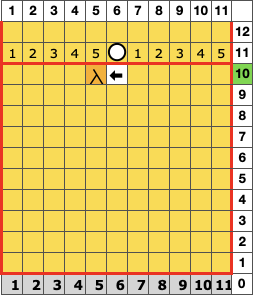
The resulting adaptation: cast on with the racking indicator on 6. The red numbers illustrate the guide provided in the publication and the bold black count adjustments in the actual knitting of the pattern. if attempting to match the original the 6 rows knit on the top bed should actually be 8 prior to racking.
The racking handle is set to 6
1. Knit 4 rows on both beds
2. Knit 4 6 rows on the top bed only
Rack by 4 positions, no direction given, I chose left to 10
3. Knit 4 rows on both beds
4. Knit 4 6 rows on the top bed only
Rack by 4 positions, I chose right to 6
Repeat steps 1-4
The elongated, slipped stitches are formed on the ribber, the bed with needles out of work, and the texture will appear on the knit side.
In any racking, the ribber bed may move beyond the stitches on the knit bed as the carriages move past the needles originally cast on and past the end stitch on one side or the other. This can help create some interesting side edgings.
That said, the first test swatch is knit changing ribber settings from knit to slip. If all needles are in work and the slip stitch setting is used, a float will be formed on the ribber if it has moved beyond the last needles in work on the opposite bed until the yarn reaches the stitches on the main bed as well.
It will not be an issue if stitches on that side are transferred up to the main bed. 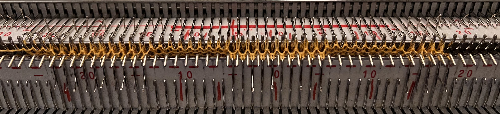
 Automating the process, the beds are reversed, the repeat is now 20 rows high, and the knit carriage will be set to slip in both directions.
  The needle setup matches that given by the manufacturer.
  Empty needles are pushed back to the A position after transfers.
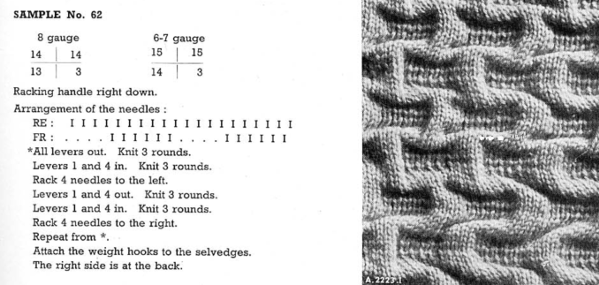
Racking happens every 10 rows, just after every needle in work preselection on the main bed.  This pattern utilizes the cardigan/tuck function and requires thicker yarn. The wool used here is a 2/8 weight, knit at as tight tension on the ribber as possible, in this case, 6. Here the instructions for knitting include references to specific numbers of rows rather than rounds.
 I was unable to reproduce anything like this sample in the manual with the illustrated needle arrangement, revised it.
 The revised needle arrangement allowed for forming a vertical single-stitch column as in the swatch, and the racked patterns occurred at the center of a purl ground.
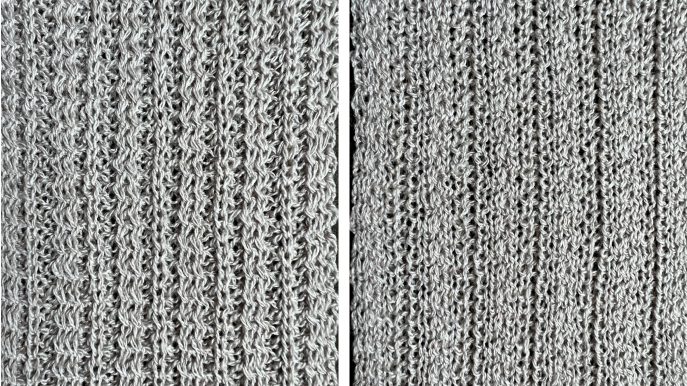
The swatches are knit in different wool weights. Racking happened by 2 positions after each round/ pair of knit rows, starting side did not matter. 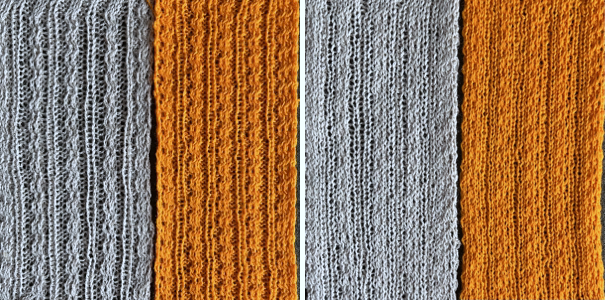 The above were knit using the slip stitch setting.
Reviewing the manual once more, it was noted that the sample was in the center of a page with the heading: racked fabrics in the cardigan/ tuck stitch. The stitch formations using tuck stitch on alternating Brother and Passap beds are reviewed in the post on Fisherman and English rib.
No specific lever or key instructions were provided. The general advice given to knit the cardigan aka fisherman’s rib is to start with the Dubied carriage on the right, all keys open, and push lever 8 (front left) and lever 6 (rear right) to a neutral position (9). In the outward direction, the carriage knits along the rear needle bed and holds the thread on all the needles of the front needle bed; on the return, it alternates the processes, a tubular tuck.
On Brother, it would be done by selecting opposite tuck buttons, making either the selections on the left or on the right  That is simply not happening with the pattern needle arrangement on a Brother machine, there are not enough stitches on opposing beds to anchor down tuck loops.
Half fisherman, aka English rib, tucks on every needle in work on one pass and knits every needle on the same bed on the return pass.
The new swatch is knitted using the same modified needle arrangement as added to the photo from the manual, starting from the right, with the ribber carriage set to tuck to left, knit to right, and the main bed set to knit every needle. 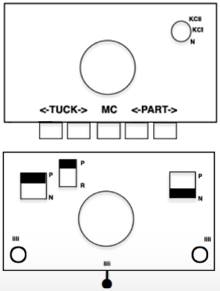 The swatch is shown in progress on the machine with needle placement as it would appear in the starting setup prior to knitting 2 rows.
The first row tucks on ribber needles when traveling to the left, the second knits on them when returning to the right, followed by racking 2 positions to the left.
Two more tuck/knit rows are followed by racking by two positions back to the right, in the starting needle arrangement.


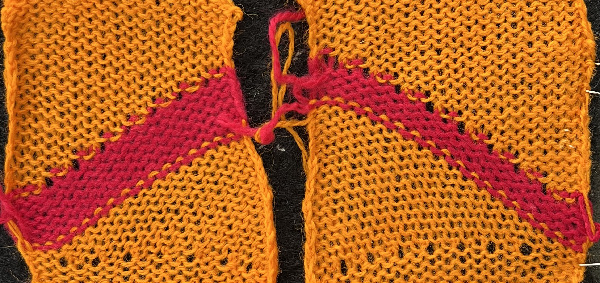
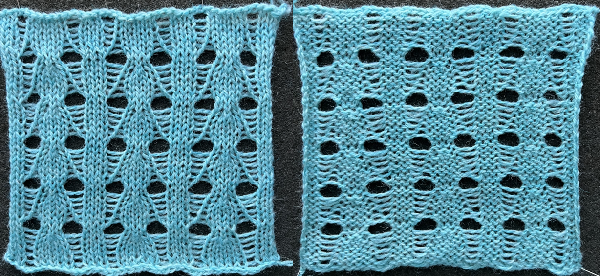
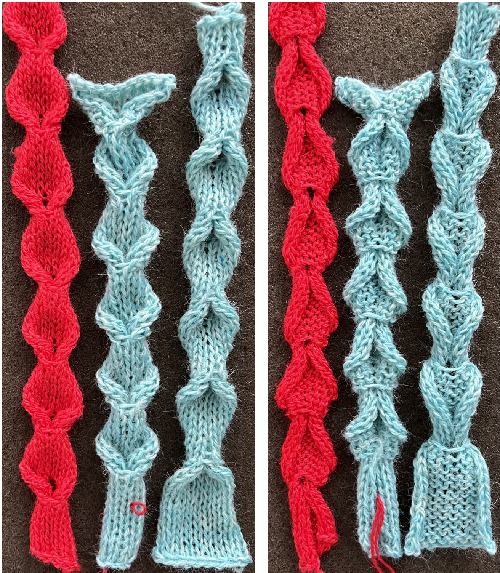
 The manual image is shown on the left, and the Brother swatch, mirrored horizontally, is shown on the right.
 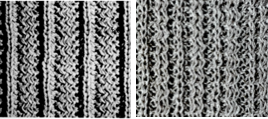 The following Dubied knit was particularly interesting to me and reminded me of this sample knit single bed in a previous post.
 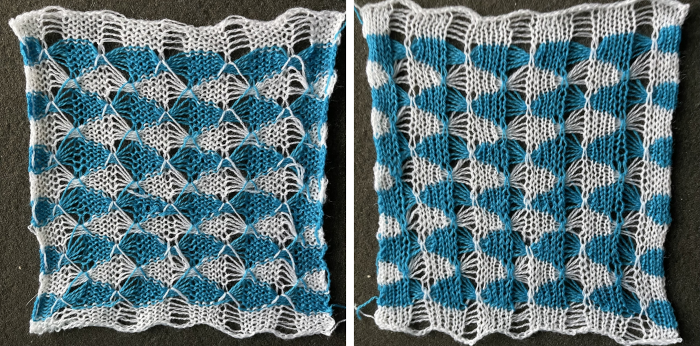 Autocams are drum pattern devices that attach in pairs to the Dubied carriage that modify the stitches much like a punchcard would. It is a drum with pegs of different sizes and positions which rotates with a pass to the opposite side. The cams are selected by fingers. The description is evocative of the Passap needle pattern selection in response to its pusher placements.
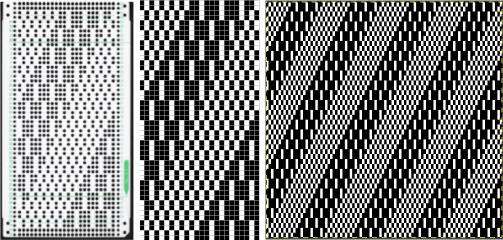
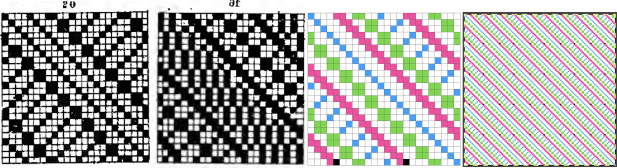
To execute this swatch, the top bed was programmed with a repeat suitable for punch card machines.
Guilloche fabrics are made with rows of stitches where tuck and knit stitches are combined and alternated for multiple fixed needle selection rows.
The working theory on converting the published instructions:  While the program eliminates having to change cam buttons manually on the top bed, the ribber settings need to be changed with each color change.
The tucks happen on both beds for 6 rows, so it is a necessity that any Brother sampling is knit using thin yarns. Here the dark is a 2/20 wool, and the light is a 2/28 unknown fiber, possibly acrylic, knit at tension 4 on both beds.
End needle selection is on, KCI.
The repeat is 12 rows in height.
Color changes and carriage settings happen every 6 rows.
The first preselection row is toward the color changer, the design will begin with a tuck pattern on the top bed and the ribber set to knit. 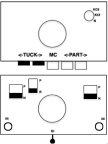 On completion of the first 6 rows, COL, every needle on the top bed will have been preselected to the D position, the warning that a color carriage setting changes are due before continuing to knit. The top bed remains set to tuck but will subsequently knit every needle. The ribber needs to be manually set to tuck in both directions.
 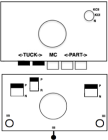 Upon completion of the 12-row repeat, with COL once more, the top bed will have been preselected in the tuck pattern, the warning that color and carriage setting changes are due before continuing to knit.
The ribber is set to knit once more, and the process is repeated.
Two views of the needle setup: 
 A small proof of concept
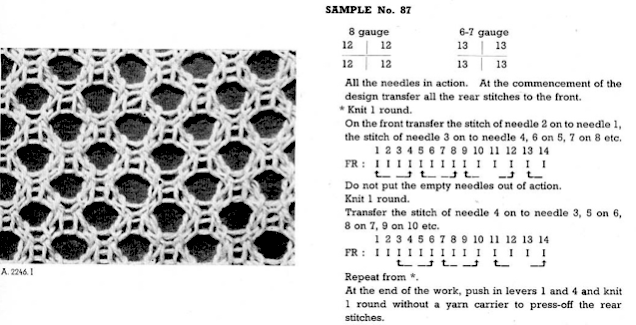
 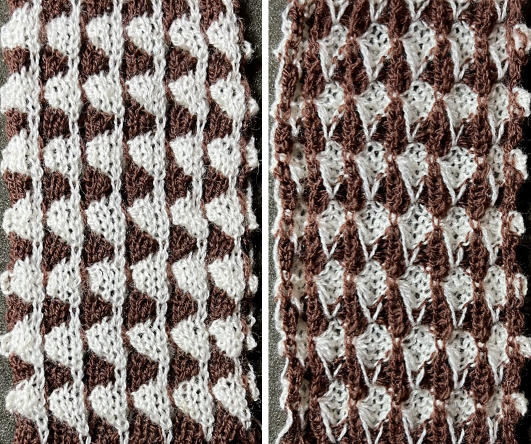 One from the Italian language supplement:
  For this fabric, the ribber needles need to be manually selected for every other pair of rows. Needle selections on the top bed provide clues as to what the settings should be on the ribber as in the previous swatch.
The top bed is programmed with a repeat suitable for punchcard machines  The needle arrangement was set up as given. The end needle selection is on, set to KCI.
The main bed remains set to tuck in both directions.
The colors and settings on the ribber are both changed after each 2-row sequence.
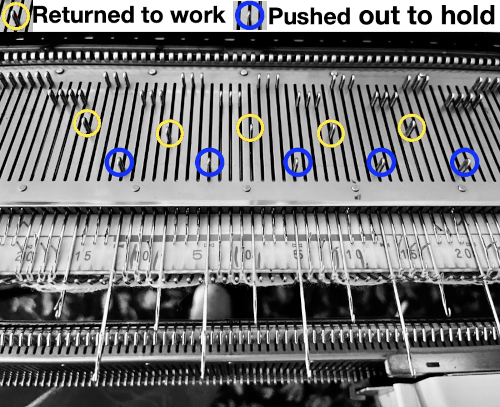
The ribber needles need to be manually selected with 1 needle up to the E position for knit stitches followed by 2 needles in the B position for tuck stitches repeating across the knitting width.
The ribber settings also need to be changed and set to tuck in both directions so that the needle selection will knit on the “high”, and tuck on the “low” needles as in the Dubied.
When the two ribber tuck rows have been completed, with the next color change, COL, the ribber carriage is set to knit in both directions once more and patterning reverses beds. 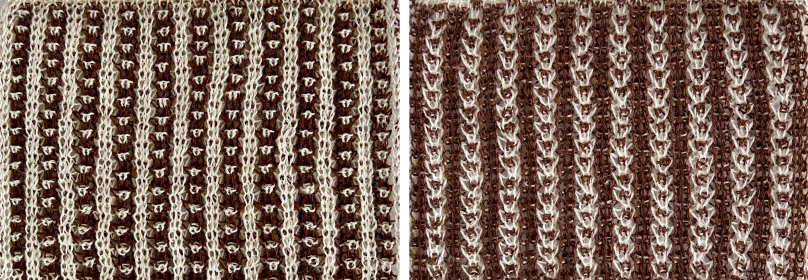
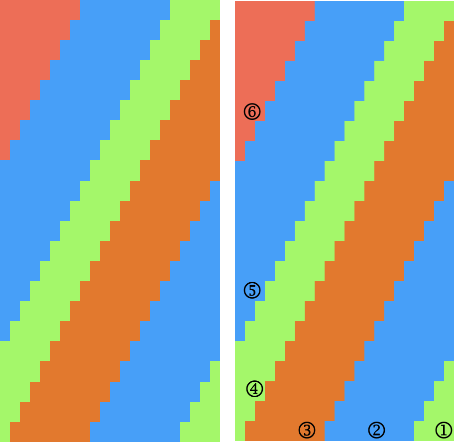
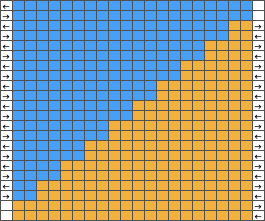
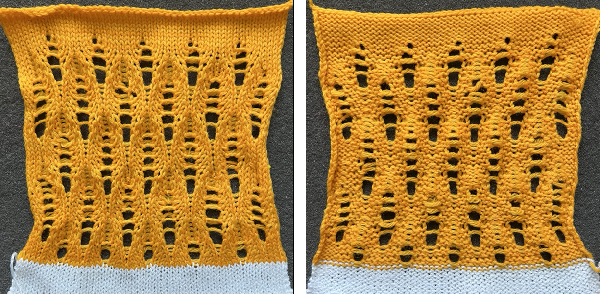
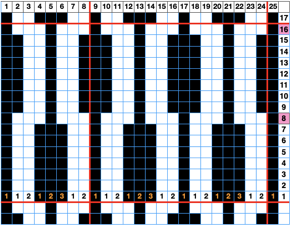
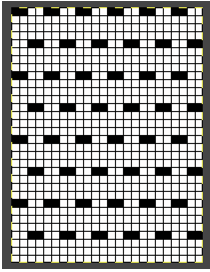
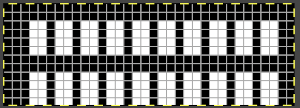
A simple plaid idea using the slip setting: the 32-row repeat shown on the far right was programmed, and color changes happen after altered preselection on the top bed.
The dominant color (white cells) knits on all needles, while the contrast (dark cells) knits on the ribber only while stitches skipped on the top bed become elongated as they are skipped. 
 Things to consider:
A. when first changing colors, the yarn may drop the first few stitches or for other reasons even drop a whole row. If the knitting is started on waste yarn prior to any permanent cast-on for the piece, one can insure that color changes happen properly and asses the proper tensions for the yarn used on the specific needle arrangements.
B. the ground color in this instance is changed after 16 rows, the contrast at far shorter intervals. Lengths will form on the color changer side of each contrasting color. They can be intentionally lengthened further so that at the completion of the piece they may in turn be cut, resulting in yarn ends long enough to be woven into the rib. If doing so, make certain those first few stitches after the color change form properly. There are other ways to handle yarn loops and ends like these, test any favorite on long enough swatches first.
C: all rib areas will be slightly wider than those where only a single bed knits
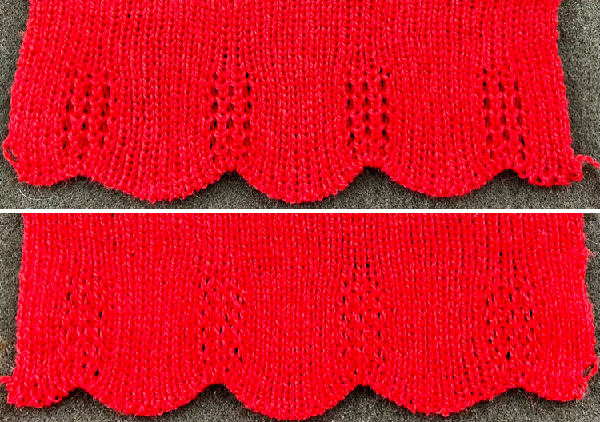
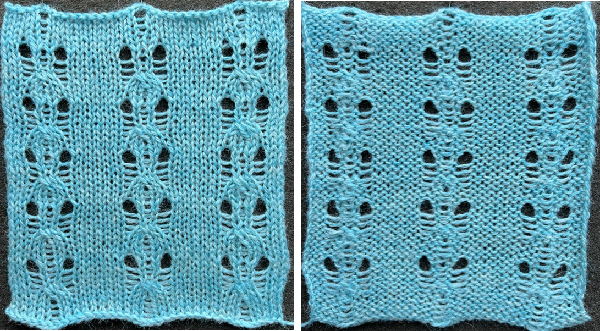
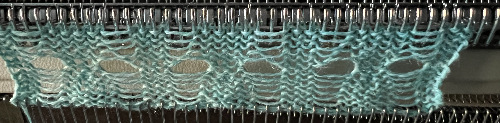
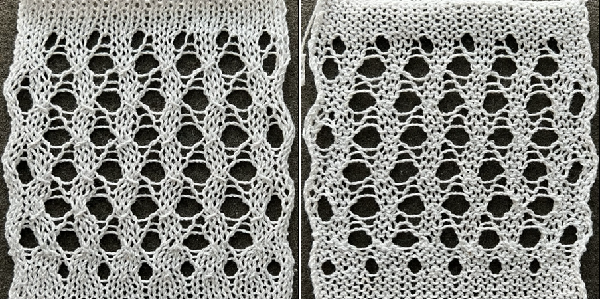
D: in the areas where only a single bed knits there will be some narrowing. 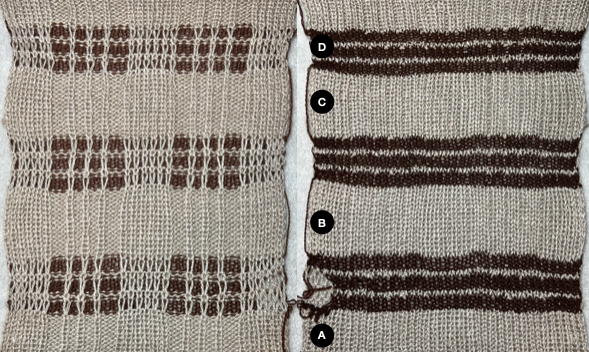 Revisiting Large eyelet lace, hand transferred (or not) 2013
 It would appear the original cast-on for this is performed on the double bed with transfer to the front of all rear stitches.
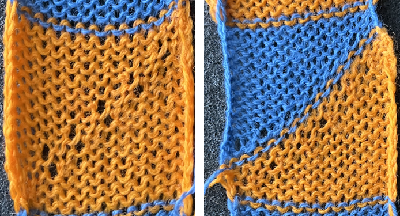
To duplicate in Brother, cast on every other needle, and transfer all stitches to the knit, top bed, or cast on the top bed. The fabric benefits from the use of even weight.
This sample uses 2/8 wool, tension 8. The setup was changed slightly, resulting in empty needles at alternating side edges.
Planning out the repeats on a multiple of 4+2
 The edge stitch is moved as well. As recommended in the instructions, all empty needles are left in work position B or pushed to E prior to knitting the next row. Knit one round translates to knit 2 rows, which happens after each row of transfers, the carriage will move from and return to the same side.
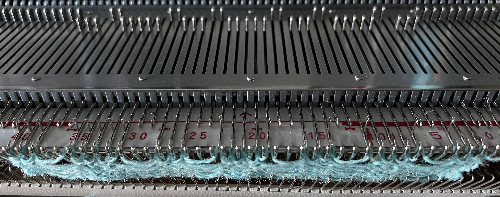
The swatch in progress, watch for any loop formation on either side:  As with any time in knitting when there are 2 side-by-side empty needles, the loops on those needles will not form stitches, but rather, ladders with each carriage pass.
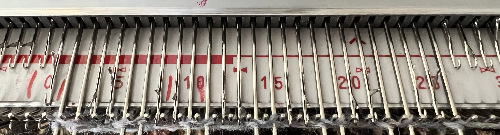
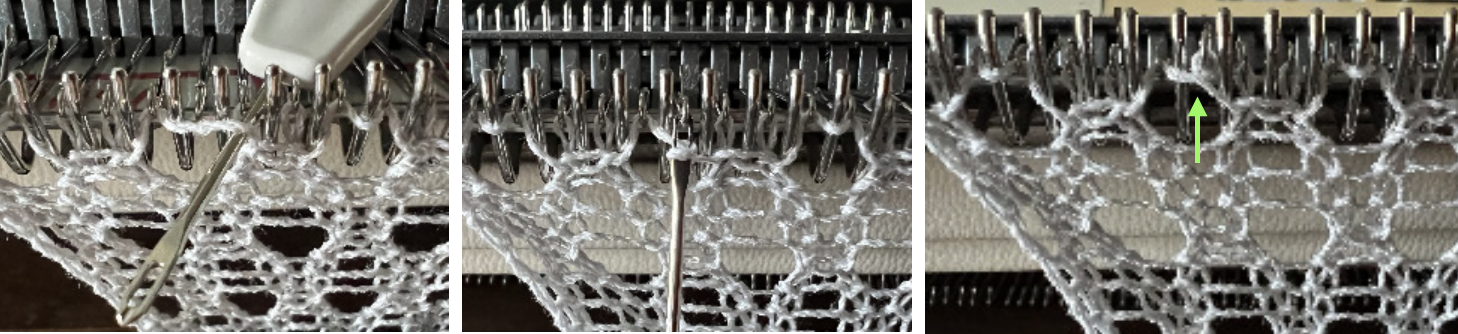
 The transferred stitches have been knit for 2 rows, so the transfers are made again of single stitches onto the loops on either side of them, securing the loops before knitting continues. Here there is an empty needle on the far left,
 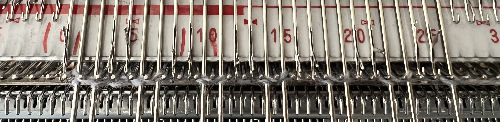 and here on the far right
 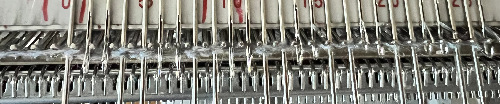 The resulting swatch, with a dropped stitch I missed on a row shortly after casting on
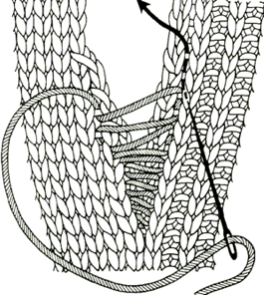
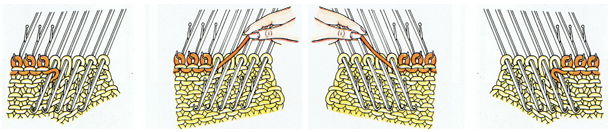
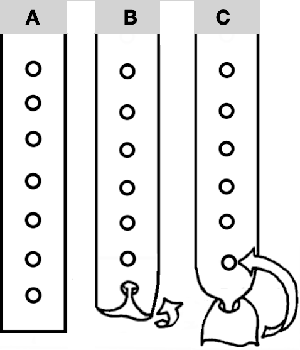
  Before binding off, after a single row is knit, drop one of the double loops, insert a single eye tool back to front, turn it clockwise, and lift the result onto the now empty needle, essentially creating an e-wrap. Work across the row, knit at least 2 rows, and bind off loosely.
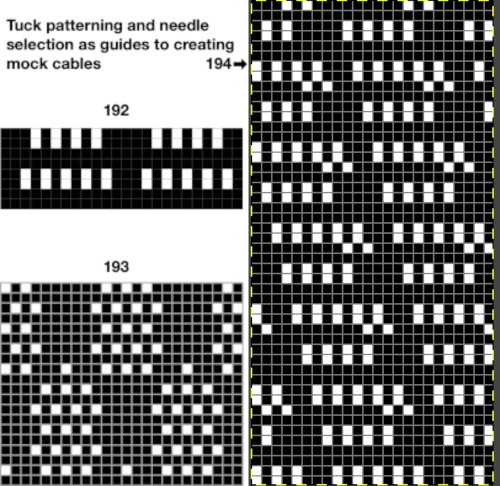
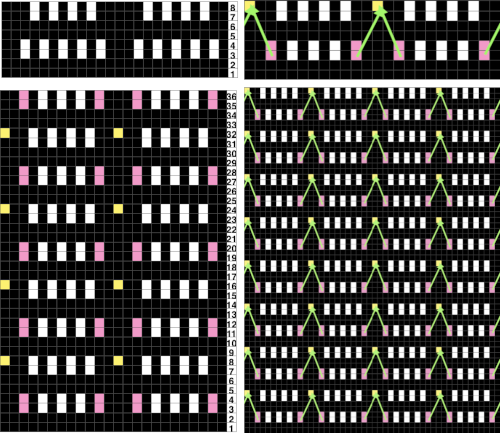
 led me to reconsider plaiting, and as usual, whether any repeat may be programmed to make tracking of any hand techniques easier.
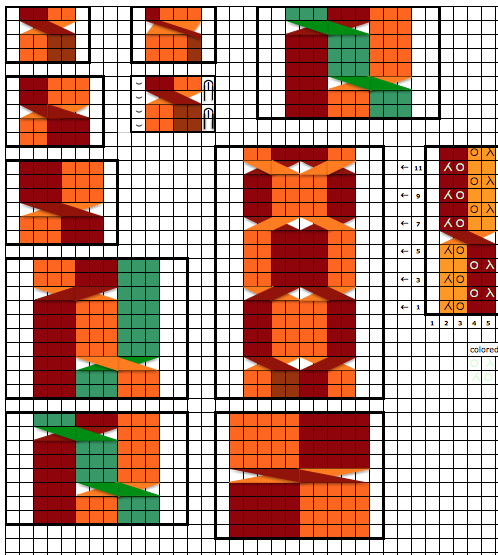
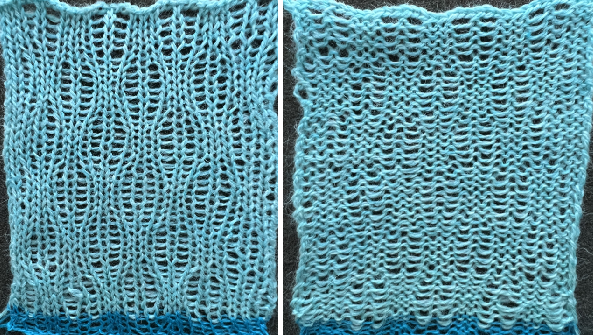
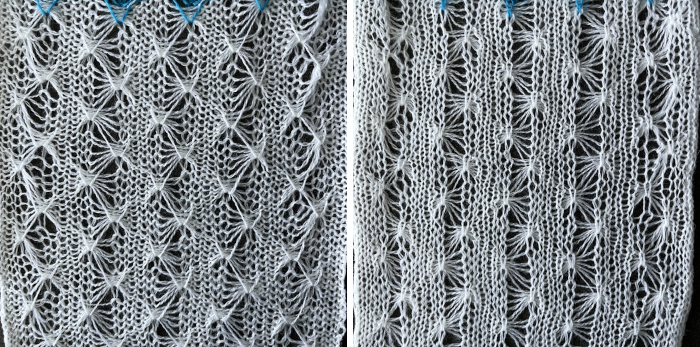
 An equal-thickness dark is added on the left, with visible color distribution issues. On the right, the light is a 2/28 Italian import, the red a 20/2 rayon, and I began to test the introduction of possible cable crossings along with considering the width of all knit vertical side borders.
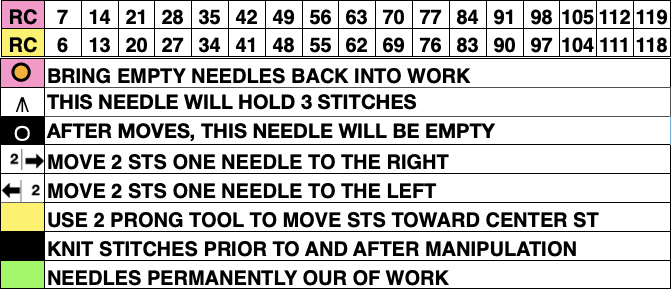
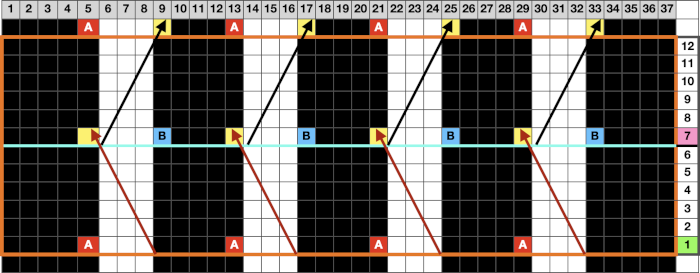
  Varying the overall spacing and the number of rows knit before cable crossings, 4 on the left, 6 on the right. The yarn in the latter swatch is a thin, coarse, inexpensive wool. The cabled stitches were hard to knit on the next pass, the low color contrast in the finished surface makes the texture effect subtle.
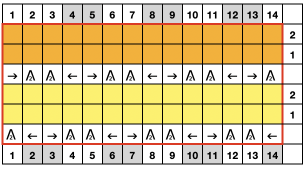
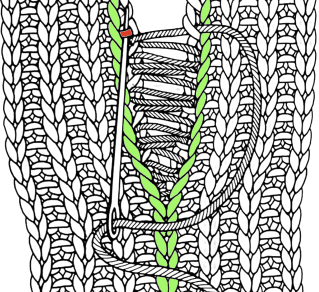
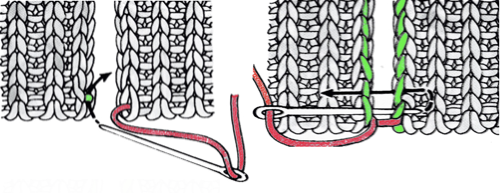
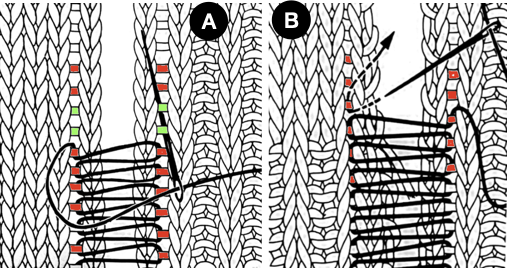
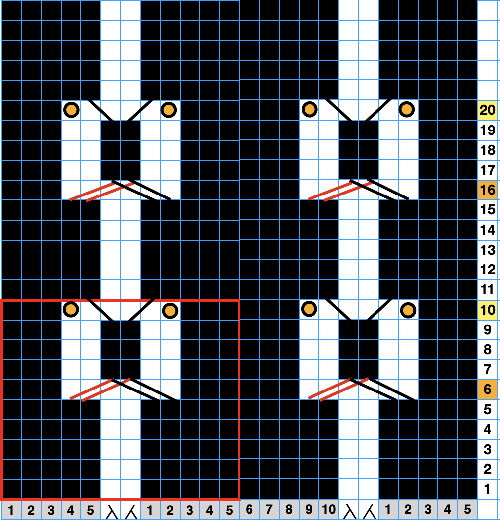
 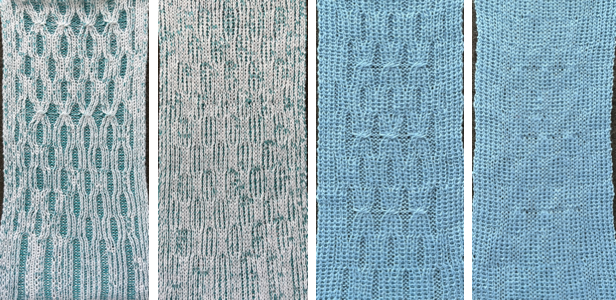 The instructions here in principle are as given above. The single stitch in the 1X2 cable crossings is always brought forward on the purl side prior to any transfers of the corresponding stitch pair.
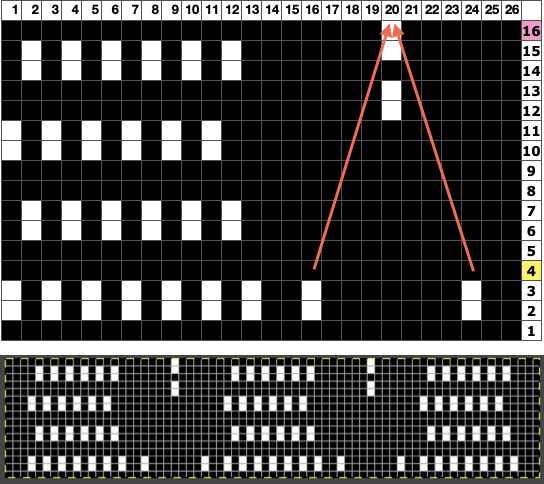
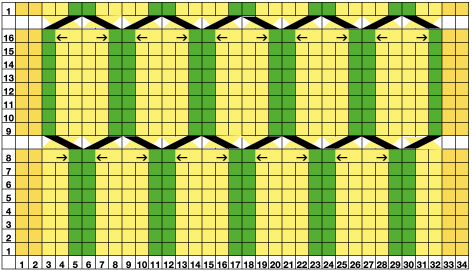 Stitches are moved after every 8 rows knit in the direction of the arrows using a 2-prong transfer tool, filling in a single empty needle to the right or left as indicated by arrows.
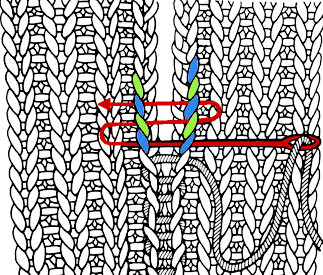
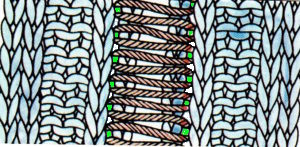
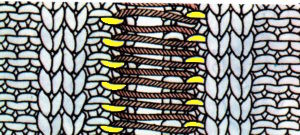
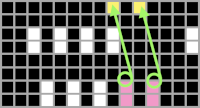
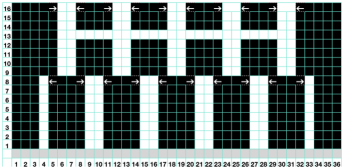 The blank cells on row 13 will serve as the area on which the 2X2 cable crossings are made.
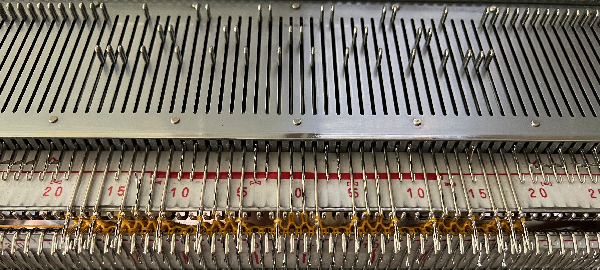 after the first set of transfers
 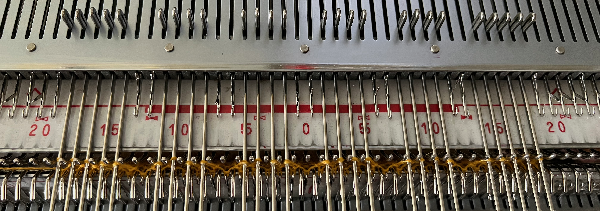 groups of needles with no needle preselection
 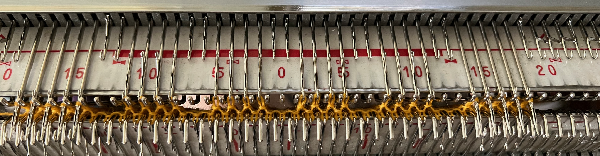 serve as markers for the 2X2 cable crossings
 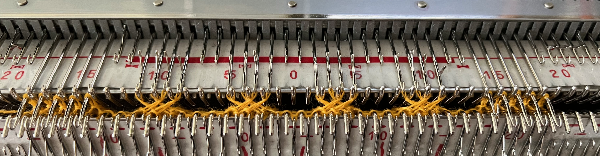 Bring needles with crossed stitches forward for easier knitting on the next carriage pass and continue knitting until needle preselection changes once more.
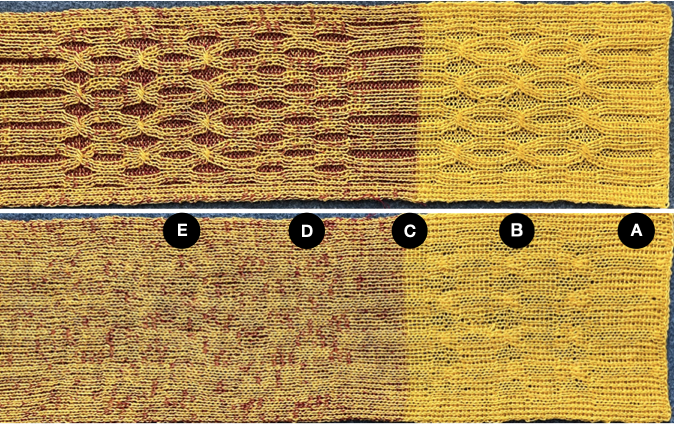


