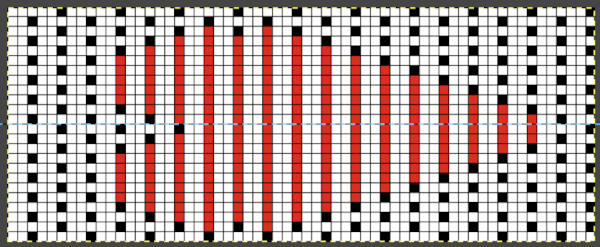
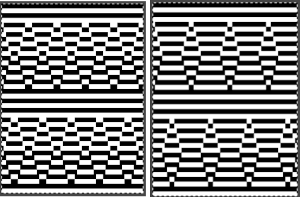
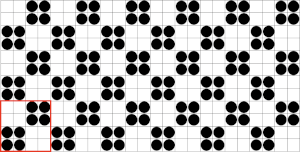
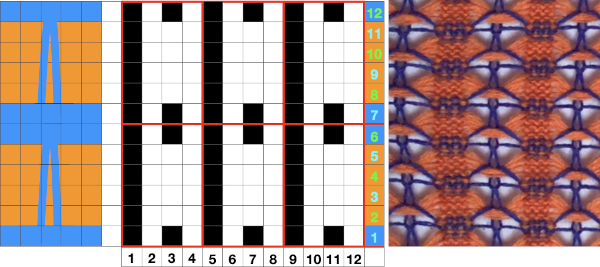
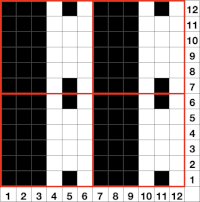
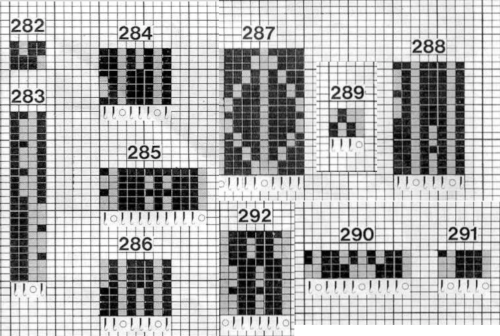
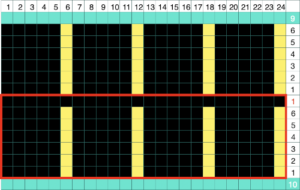
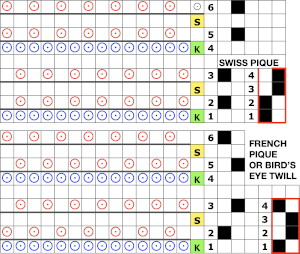
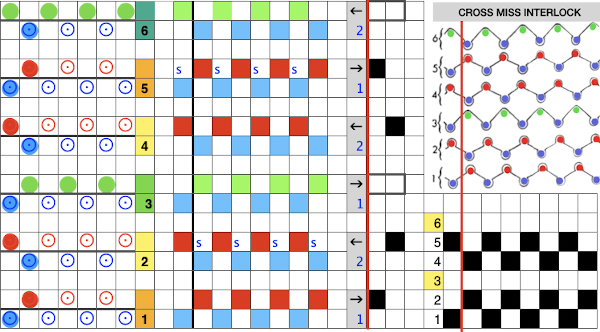
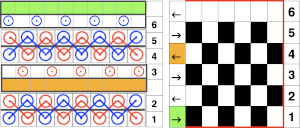
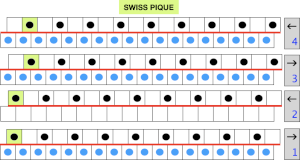
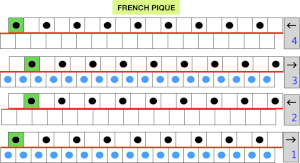
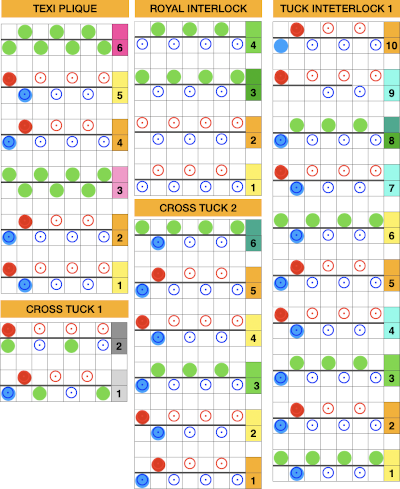
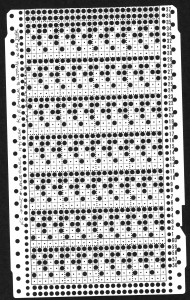
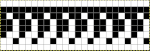
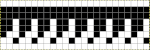
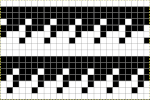
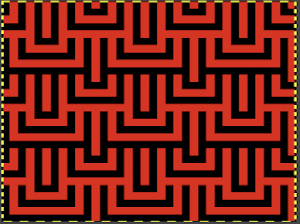
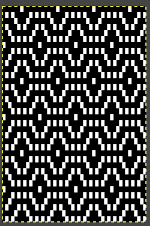
Fantasy fair isle is the term often used to refer to dbj fabrics created using tuck settings on either or both beds. Typically in the required color separation used each design row in the repeat is expanded into 4 rows, with the same selection occurring for each color pair of consecutive rows. A tuck/plain combination is used here, with the backing essentially being a striper one, where each color knits every stitch on the ribber on every row.
In this illustration, the blue symbols represent knit stitches on either bed, the red, the tucked stitches on the top bed. The chart represents a single design row expanded into 4, the results would, in turn, be rendered double length in knitting the final fabric.  The last post related to this topic: 2021/09/07/geometric-shapes-on-ribber-fabrics-with-tuck-stitches-3/
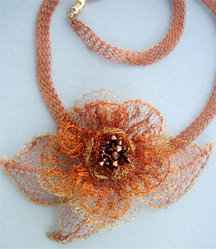
Recently a friend shared images of a punchcard skull pattern she was using in a hat and followed with a query as to the possibility of using the pattern on a mesh grid. The inspiration for the conversation began with this image, the work of Claudia Scarpa.  The possibility of adding images on a true mesh transfer lace or mesh-like thread lace images may be found in 2021/12/14/to-mesh-or-not-to-mesh-9-more-on-mock-filet-design/
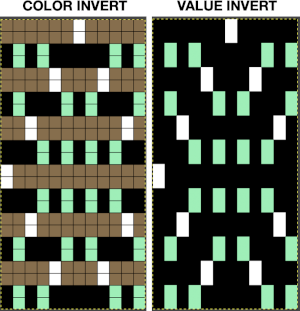
My DIY skull image in a potential thread lace pattern, in a 100X92 pixel png. 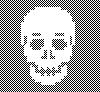 Concurrently the topic of illusion knits on the machine has also resurfaced in FB with some spectacular panels executed using the Garter carriage and changing colors every 2 rows. Some small geometric shapes begin to have a somewhat “similar” appearance using this technique, but as with beauty, the success in the imitation is in the eye of the beholder.
The techniques involved: my proof of concept was knit using img2track on a 930. Traditionally two-color designs may be opened and then downloaded, using the standard dbj built-in KRC function for the color separation, not suitable for this dbj version, while for designs in 3 or more colors the program will separate the repeat in a way that each color for each design row is knit twice, the separation required here.
At this point, the color separation is executed by filling in pixels and observing a variety of rules. DAK produces templates of jacquard separations of varied types that may be printed for use outside its universe. The same file may be screengrabbed, traced, and redrawn pixel by pixel for use in a Brother download using other download software.
Passap by default separates knits for 2 color DBJ with each color for each design row knitting twice mode. Tucking on either or both beds is made easier because of the way stitches are formed on the Passap beds, along with the use of strippers which push down on tuck loops with each pass, ensuring that they will knit off properly. The fabric widens considerably when off the machine, requiring loose cast-ons and bind-offs. The dbj variant, dubbed fantasy fair isle, is often used to create lap or quilt blankets.
The Passap built-in reader techniques that are often recommended for large knit pieces ie blankets using the same design are 186 for throw size, 187 for lap blankets, and 183 for crib quilts. All three share the fact that the front bed pushers are selected in pattern in the up/knitting position alternating with the down/slip/tuck position alternating every 2 rows, producing the jacquard discussed here.
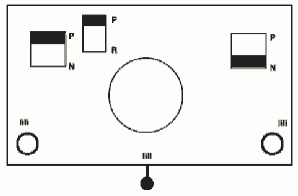
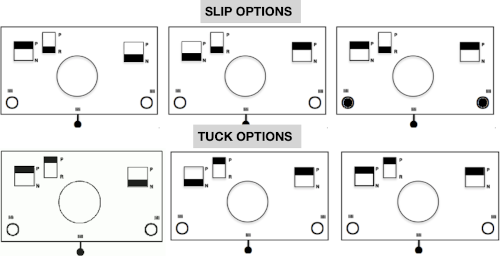
Slip settings produce narrow, short results, tuck short and wide ones. For non-Passap knitters, N is Passapese for plain knit, KX is tuck with patterning on the front/ knit bed, and AX for tuck patterning on the back/ribber bed.
Back in 2018, I began another post I meant to return to on traveling between the two brands.
My Passap E6000 manual is filled with scribbled notes from decades ago, expanding on how each technique may be used for a variety of fabrics. 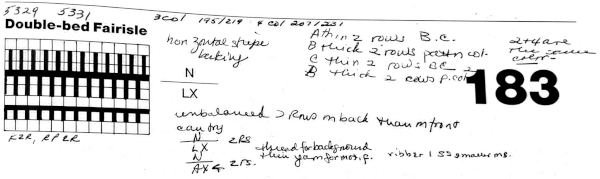
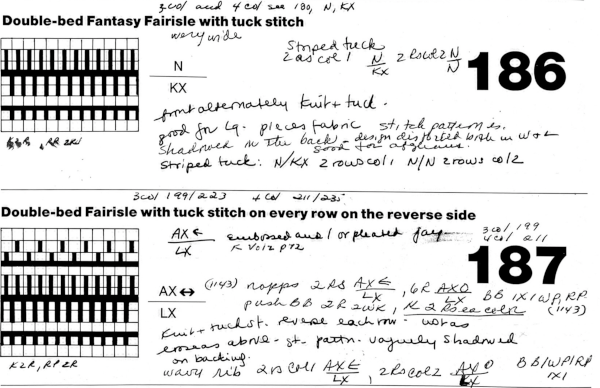 In Fantasy Fairisle knitting using 187 with alternating up and down pushers on the back bed and AX with 2 arrow keys would match Brother ribber knitting with lili buttons used on an even number of needles set to tuck.
Working with the large skull image the setting of knit every row on the ribber and tuck in both directions on the knit bed is used as in technique 186, with a critical difference. Passap knitters may download the original black and white image while for Brother knitting a color separation is required.
The original skull image is 100 pixels wide by 92 high.
Converting the white ground layer behind the skull to alpha produces an image on a clear ground that can be placed exactly where desired on a new file with a white ground using the grid and guides
The alpha double long skull, now 100 by 184 pixels  For the 1-pixel grid in Gimp to be visible on an editable image, a magnification of at least 800 is required. The options offered by default
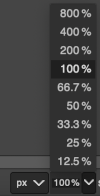 can be changed to suit by simply typing in a new number.
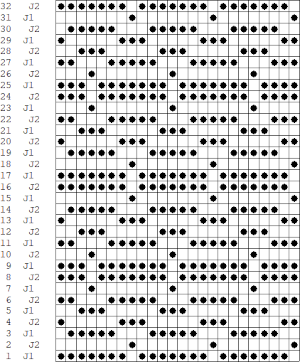
As described in other posts including in Gimp update for Mac2, I chose to mark every other row with a red pixel, making it easier to track color-inverting every other row. This is achieved by selecting the rows with red dots using the rectangle tool one row at a time and choosing Invert from the colors menu. The red dot will also change color, making it easy to locate converted rows in more complex patterns. The dotted blue line is a guide for placement.  in progress
  the processed image
  the trimmed 98X182 png
  doubled in length once more to 98X364
  Knitting process on a 930 using img2track:
the 930 has a tiny brain, so the image is broken down by the software into multiple tracks of 96, 134, and 134 respectively. One of the critical differences when using this type of DBJ color separation is that the first preselection row is made from right to left toward the color changer rather than from left to right as in KRC separated 2 colors DBJ.
The first and last needles are in work on the ribber to ensure the edge stitch on that bed will knit every row.
The knit carriage is set to KCII, canceling the end needle selection.
Once the first row has been preselected and the planned color is chosen, with COL, set the main bed to tuck in both directions, leave the ribber set to knit, and continue knitting changing color every 2 rows.
In my swatch, the dark contrast color was used for the initial black pixel all-knit rows.
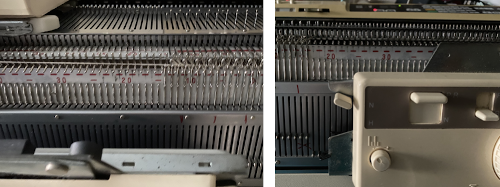
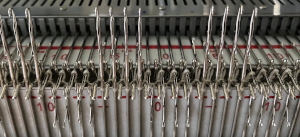
The work on the machine: 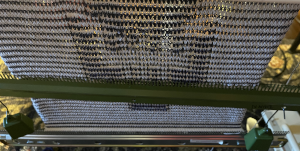 A reminder: in my experience, the Brother cast-on combs are usually chrome-colored, Studio grey, and Passap, and I believe Superba ones were traditionally green. The first 2 were designed for 4.5 mm machines, the latter for 5mm. The different mm spacing does not make the 5 mm combs suitable for casting on on Brother, but they can be poked through the knit in progress. I like to leave the first comb and weights on, insert the new comb closer to the beds, and then move the weight up, and then remove the lower position comb.
There are lots of side-by-side stitches tucking on the main bed, made possible by the fact that each is anchored in place by a knit stitch on the opposite bed.
The tension needs to be set so that the stitches will knit off properly while having tuck loops not so loose as to get hung up on gate pegs. It can take a bit of trial and error to find proper settings and they, in turn, may need to be adjusted again when moving from small swatches to knitting on a far larger number of needles.
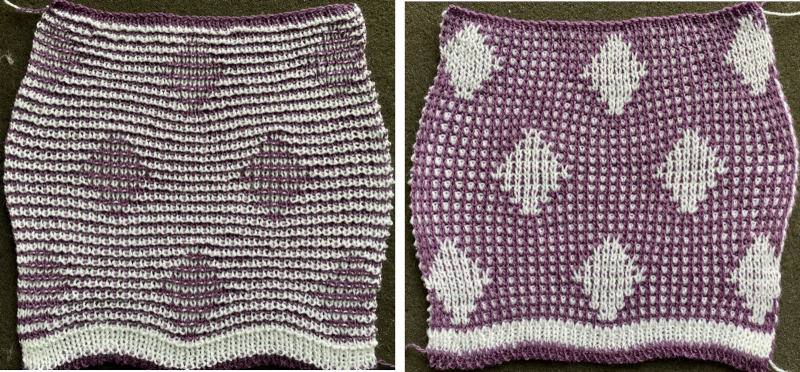
The finished piece measures 25 inches in width by 24 in height.
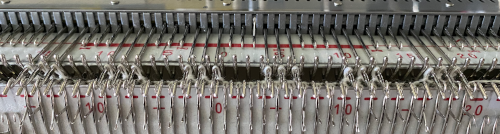
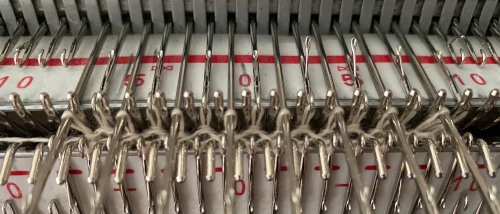
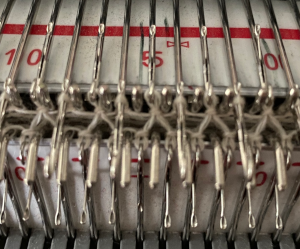
The appearance on the bed set to N, in this case, the ribber: 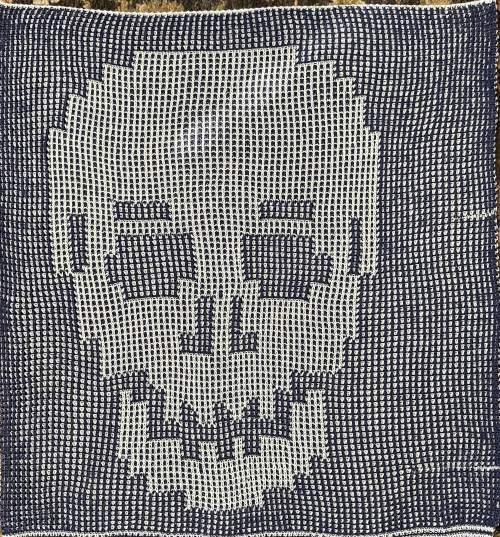 Those white lines on the right are spots where the color changer picked up both color threads, a problem that does not occur in Passap knitting, where each color is picked up in its own yarn holder.
 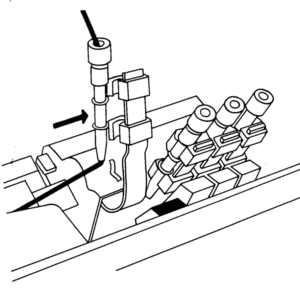 In the Brother model, sometimes the yarn is left in the wrong place below eye level rather than its own individual one corresponding to its button, and both yarns are picked up with the next color change.
 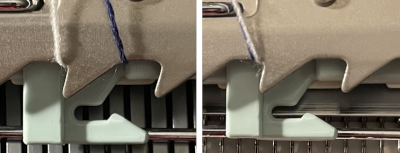 The more textured knit side of the piece,
 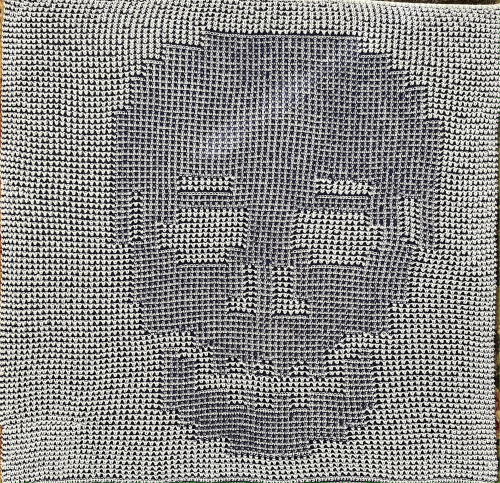 a close-up of the texture at an angle
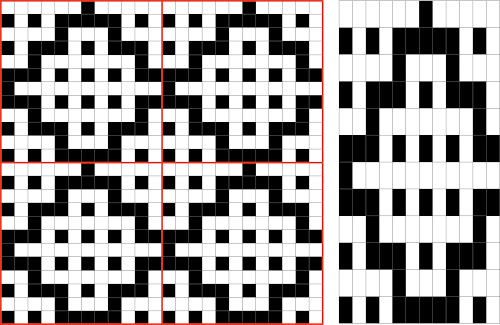
  Claudia Scarpa developed a skull variation using only layers in Gimp
 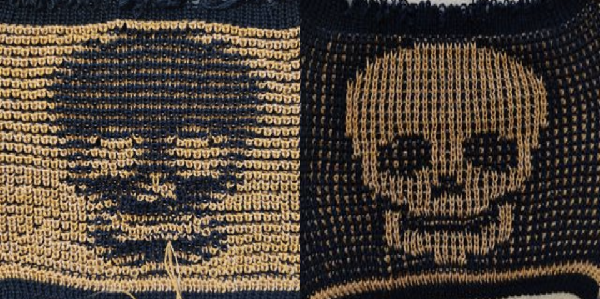 and has been kind enough to create a Youtube video illustrating the process. The separation is easy and quick as opposed to my more prolonged hack, and I will return to attempt to use it for various fabrics in a follow-up post.
This skull is more compact and better defined than mine. With the double-long original image superimposed on alternating pairs of black and white rows, the resulting png can not be lengthened again as tucking would then occur for 4 rows, not likely possible in a Brother machine. The variant is a very interesting cousin to mine.
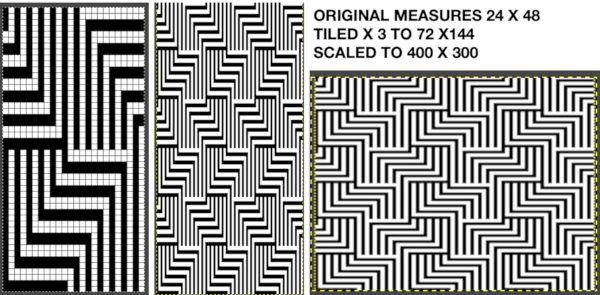
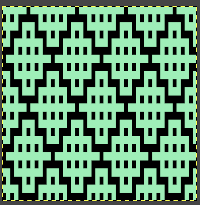
In DAK using Method C color separation each color row separates into 2 rows of knitting and when using the result rows do not have to be repeated in pairs but the double-length switch will need to be used in Japanese knitting machines if working within the program. For those intending to use the separation outside the DAK universe, the color separation may be printed, traced/redrawn to create a png or bmp, scaled double length, and used as in the skull swatch. The template for the double long triangle in the post and the associated 24 stitches by 32 rows png, followed by the associated drawn png 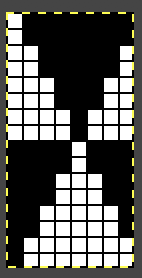
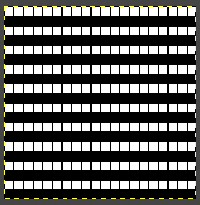
![]() The png doubled in length, 24 stitches by 64 rows.
The png doubled in length, 24 stitches by 64 rows. ![]() This is a small repeat, suitable for punch card machines. The test swatch is knit with the main bed tucking both ways and the ribber knitting every row.
This is a small repeat, suitable for punch card machines. The test swatch is knit with the main bed tucking both ways and the ribber knitting every row. 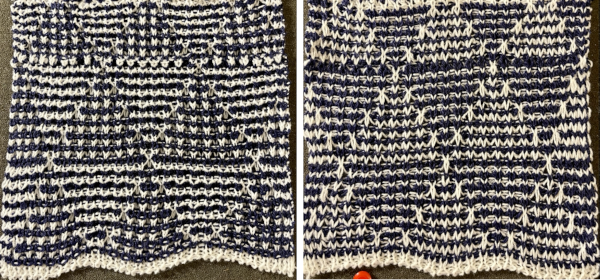 It is possible to work some repeats on some machines with the ribber also set to tuck both ways with EON needle selection.
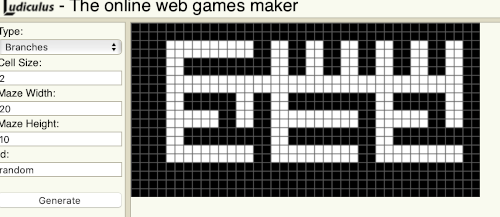
In Brother that is achieved by using lili buttons with an even number of needles in work on the ribber. The first and the last needle would be in work on the top bed, the KCI setting is used for end needle selection to ensure that the first and last needles on each side of the piece will knit. I did not find this method workable and soon had to stop because of a loopy mess. 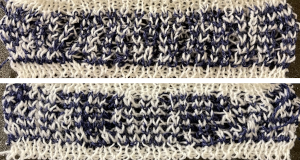 When using the Dak stitch design module, the color separation is automated. Choose any design repeat. This happens to be a 20X20 one, chosen from the thumbnail assortment, so not suitable for punchcard models. “Printing” the template using choosing the option of using dots rather than squares to represent knit stitches makes the resulting print screengrab easier to trace.
 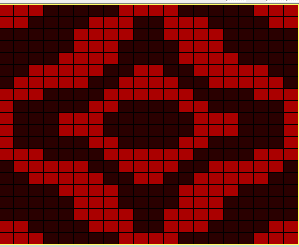 the 20X20 repeat as a BW png
 ![]() The template was overlayed with a grid in numbers, filling in cells over the dotted areas.
The template was overlayed with a grid in numbers, filling in cells over the dotted areas.
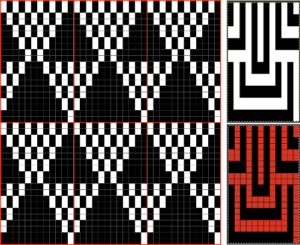
A portion of the work in progress using the generated dbj option C template and tracing it transitioning from template to Numbers, to Gimp: 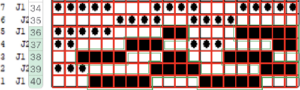 The result is screengrabbed, opened in Gimp, converted to BW mode, and scaled to the 20X40 expanded design size. Unless the double-length function in the machine is also used, it will need scaling again to double length prior to download.
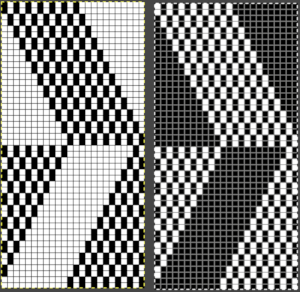
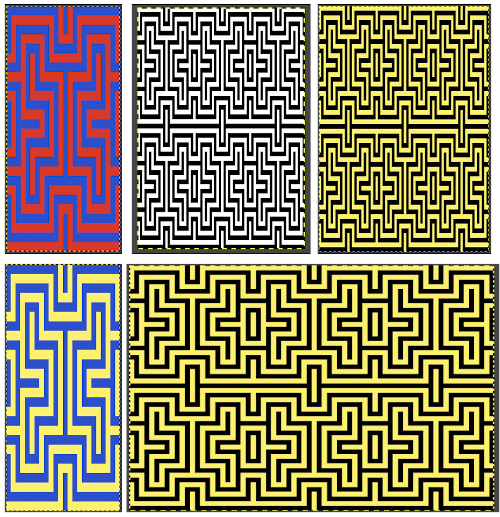
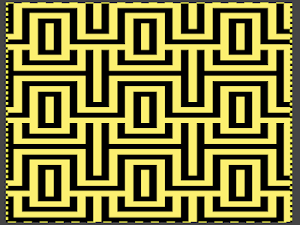
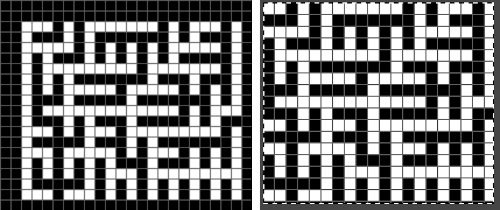
Illustrations for the generated dbj option C template, tracing it in Numbers, processed in Gimp, 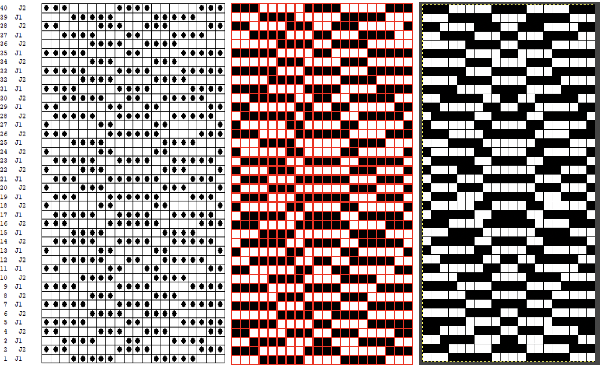 The final image double length, showing the difference between the separation using the template, and that using layers as in Claudia’s video, which appears different but is actually the same repeat, color reversed.
 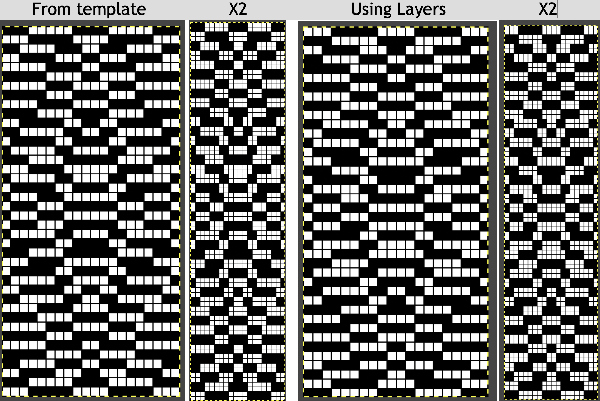 Using bucket fill for the ground in the second layer, as described in the video, the captured clipboard image can be very small
 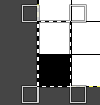 or stripes any width may be captured, even up to that of the full repeat width
![]() Remember to click on the screen outside the area chosen with the rectangle tool before using the bucket fill in pattern tool.
Remember to click on the screen outside the area chosen with the rectangle tool before using the bucket fill in pattern tool.
The result is the same using either brush.
 Alternately, the initial design may be scaled X4 to 20 X 80 pixels
 ![]() and it is superimposed on a ground flood-filled with 2 black rows alternating with 2 white rows
and it is superimposed on a ground flood-filled with 2 black rows alternating with 2 white rows 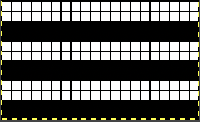 the steps resulting in a match to the previous elongated version
 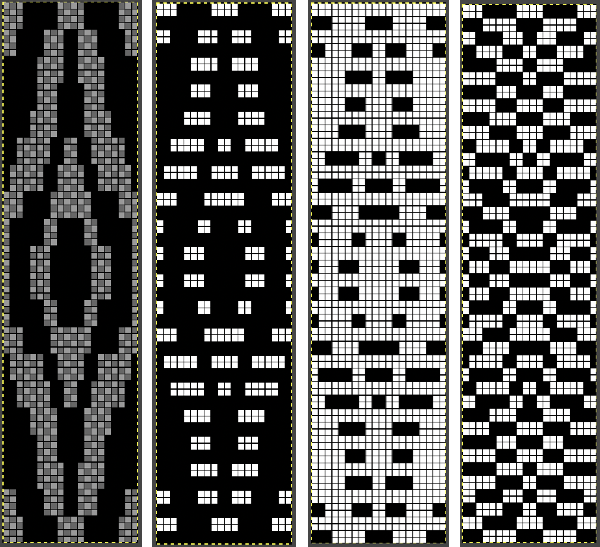 the 20X80 png
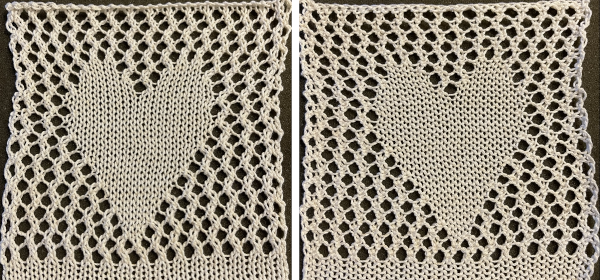
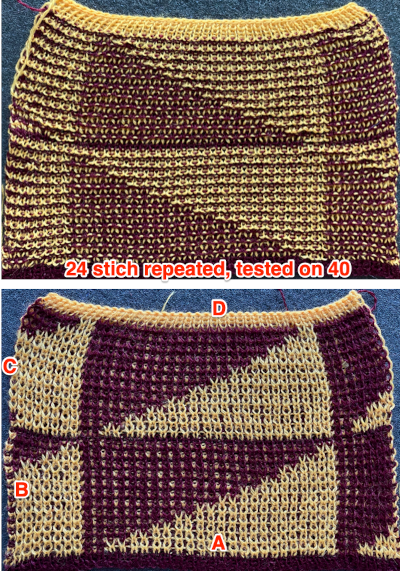
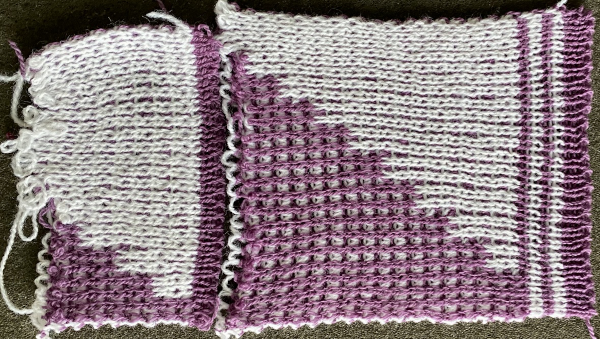
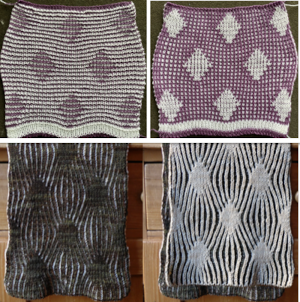
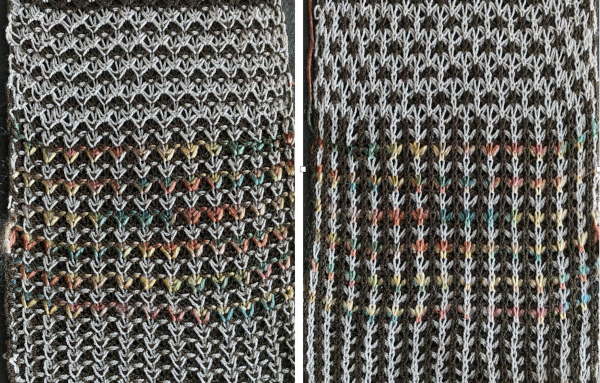
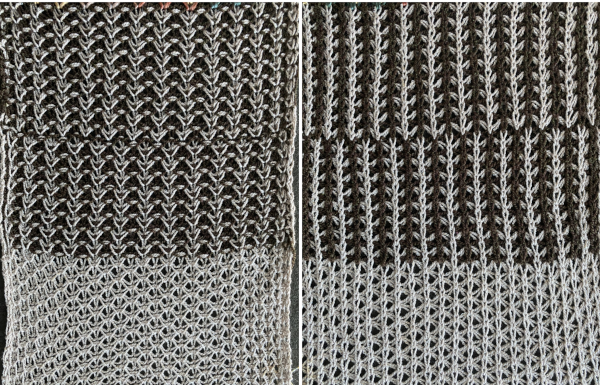
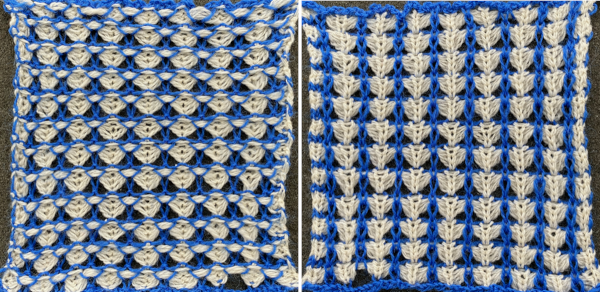
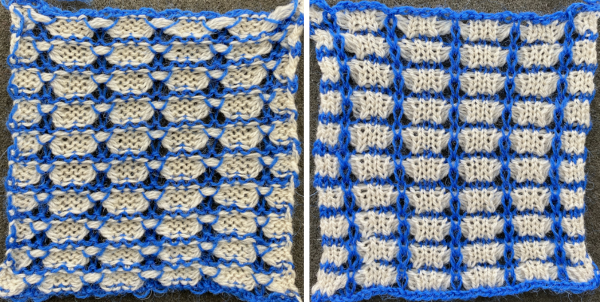
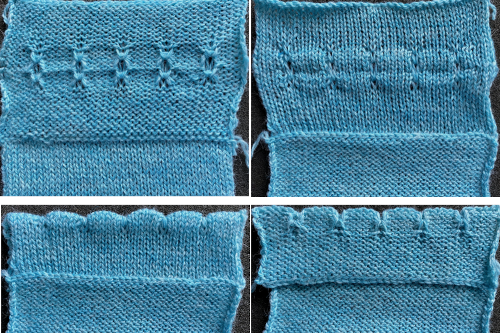
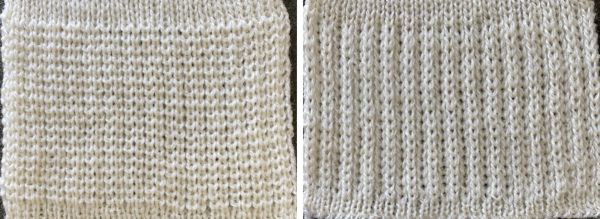
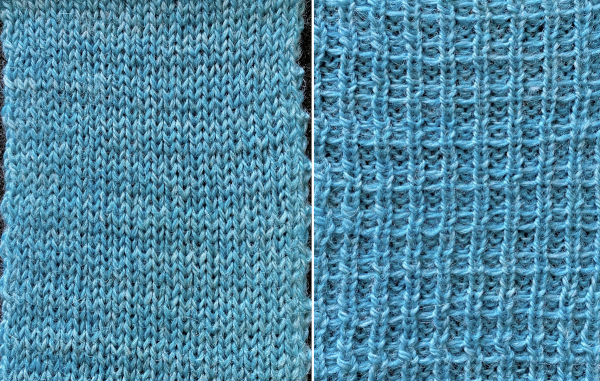
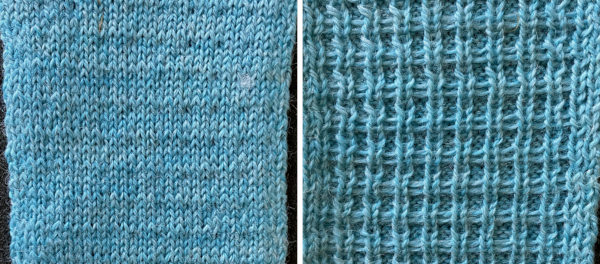
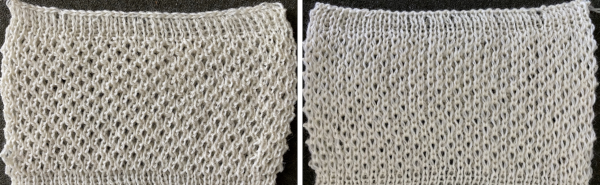
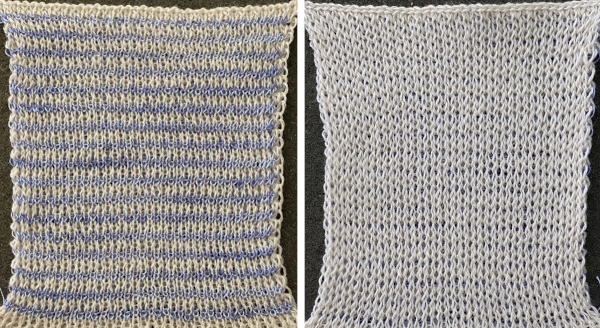
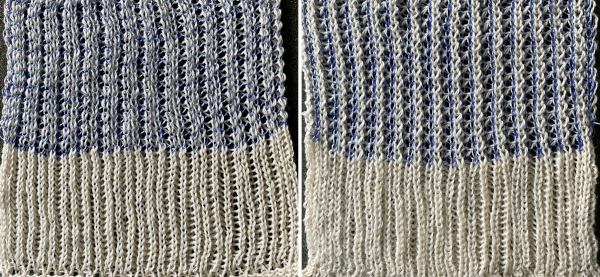
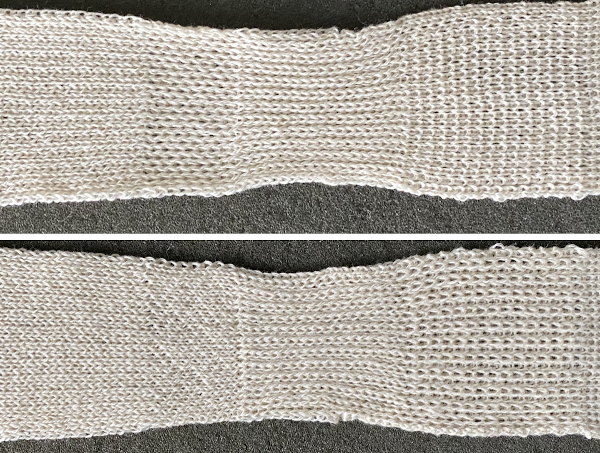
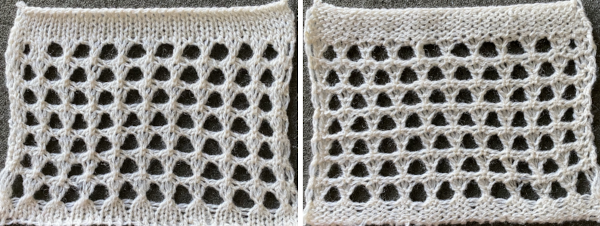
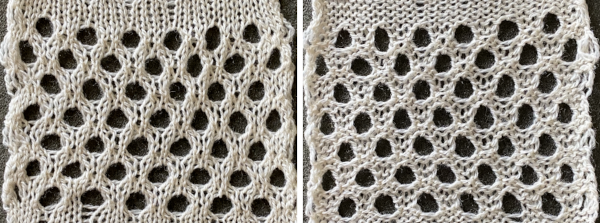
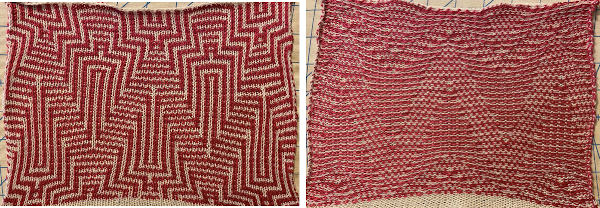
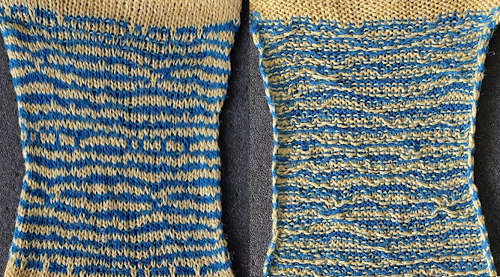
 ![]() In the related swatch patterning is used on 40 stitches by 100 rows. The relaxed fabric when off the machine measures 7 inches by 7 inches and the knit side view reflects the elongation of the design one might observe when using the same color separation in standard striper-backed DBJ. On the bottom, the swatch is stretched and the stitches are set with some casual steaming and pressing to 10.5 to 6.75 inches, gaining the familiar texture appearance seen in so many Passap blankets.
In the related swatch patterning is used on 40 stitches by 100 rows. The relaxed fabric when off the machine measures 7 inches by 7 inches and the knit side view reflects the elongation of the design one might observe when using the same color separation in standard striper-backed DBJ. On the bottom, the swatch is stretched and the stitches are set with some casual steaming and pressing to 10.5 to 6.75 inches, gaining the familiar texture appearance seen in so many Passap blankets.
The color differences are due to lighting, with the photos being taken at different times of day. 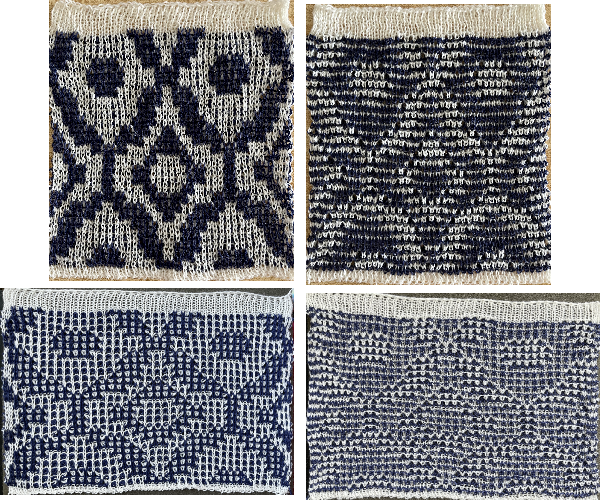 For a loose cast-on row, I used a racked version at the same tension as the body of the knit.
For a loose bind-off to accommodate the stretch, I used this method, one of many taught in Passap seminars.
To perform the same on Brother machines: knit the piece, ending with the carriages on the right.
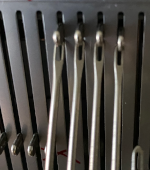
Transfer all the stitches up to the top bed, ![]() bring the ribber needles up into work between them
bring the ribber needles up into work between them 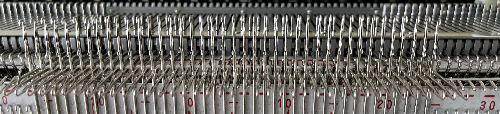 set the ribber to a looser tension number, here it was increased from 4 to 7. Knit one row from right to left, picking up loops on the empty ribber needles
 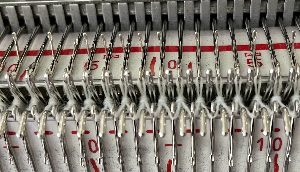 drop the ribber slightly by using this bracket lever position to elongate the main bed stitches.
  Using a latch tool, beginning with the first stitch on the right, insert the open latch tool into the first stitch on the right, then insert it into the second stitch moving down until the first stitch is behind the hook. Do not allow the second stitch to go behind the latch, keep it in the hook. Pull the latch hook up moving the second stitch through the one behind it, forming the first chain. Repeat across the row, going through the center of each stitch, continuing the chained bind-off.
 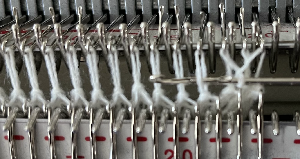 A yarn end is pulled through the last stitch and the now completed chained row is secured
  The beds are returned to the up position, and loops and stitches are dropped off all the needles.
An attempt at a more detailed look at the bound-off edge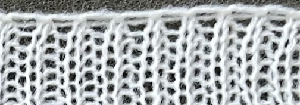
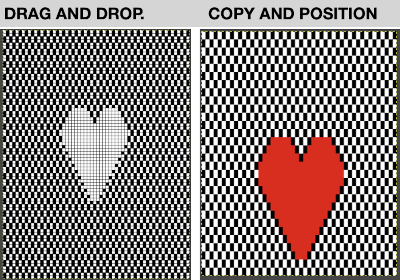
 This placement is tested and kept in mind in other explorations.
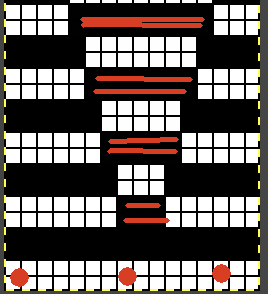
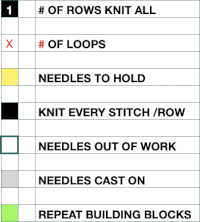
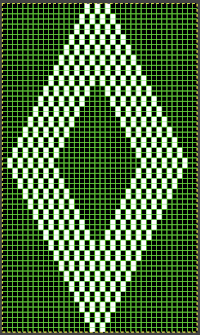
 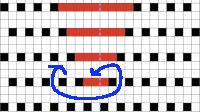 Using a spreadsheet: the same sort of chart may easily be created quickly in Numbers. In this instance, my table is still planned for 24 stitches in width, but 54 rows in height. An extra column is added and used on the far left to mark rows to be hidden. Beginning at the bottom left two rows were filled in a different color, the third row is left blank, all 3 cells are selected. When multiple cells are selected, depending on which side of the selection box one hovers over with the mouse, a yellow dot/ handle will appear.
 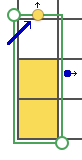 The tool acts on the selection. Clicking on it and dragging it with the mouse will, in this instance, repeat the selection until the mouse is released. This may be done in any direction and quickly fills in whole tables. It is not necessary to perform this extra step before hiding rows, but I find having that extra color makes it easier visually, especially when working on long repeats. It also makes for easy return to selection if hiding rows is done in shifts.
 continue to the bottom of the chart, and under the Table menu, choose to hide 36 rows. With rows hidden the mesh repeat shrinks from 6 rows to 2.
 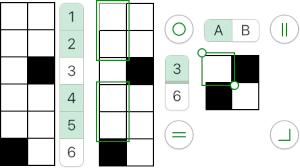 A new 4 cell table is created. The 4 interior cells were chosen, copied, and pasted in the lower-left corner of the reduced height table. Once pasted, selecting the repeat again will allow one to use those yellow handles to fill the contents first toward the top, then to the right. The image on the left shows the results, with only the numbers for the unhidden rows shown on the left. In turn, the heart was the pencil tool to draw it using a third color in the chosen location.
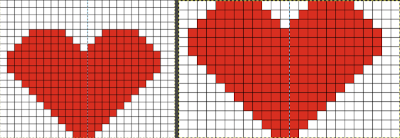
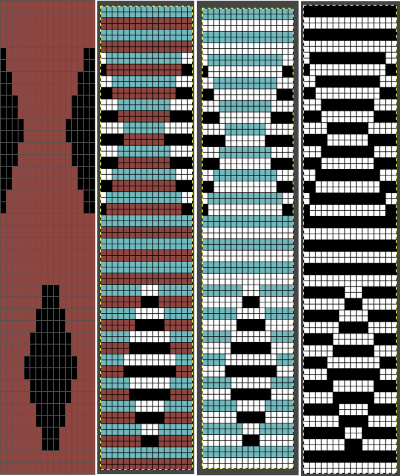
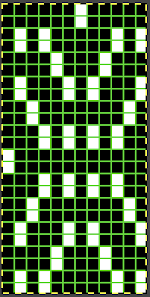
 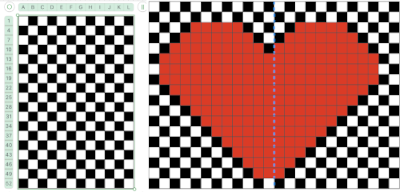 The unhiding rows function produces the expanded repeat with all knit stitches in red on the mesh grid ground. The column with the yellow cells is deleted before converting the Numbers repeat to an electronic or punchcard, the how-to discussed in other posts. Comparing the hand-drawn heart in Gimp alone on the left, to the spreadsheet results on the right, there appears to be a difference in the starting rows, and in only one other row, two black cells appear that can easily be altered in either repeat. Brother machine knitters would need to shift those 2 blank rows at the bottom of the repeat on the right to its top or to to start lace patterning on row 3.
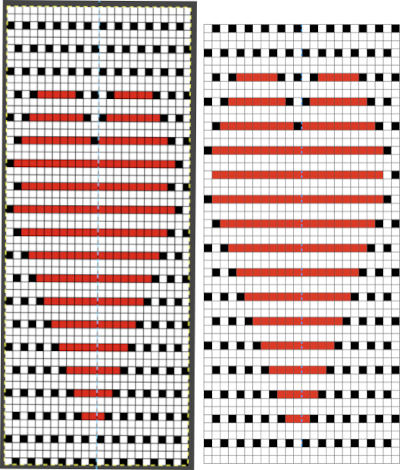
 More choices exist, continuing to place the heart 3 rows up from the bottom, and not using multiple layers.
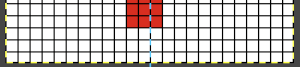
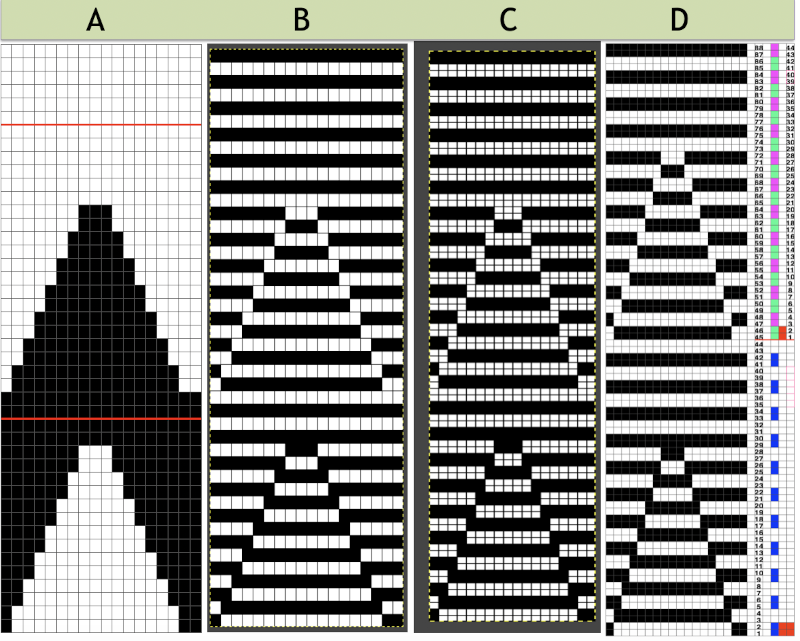
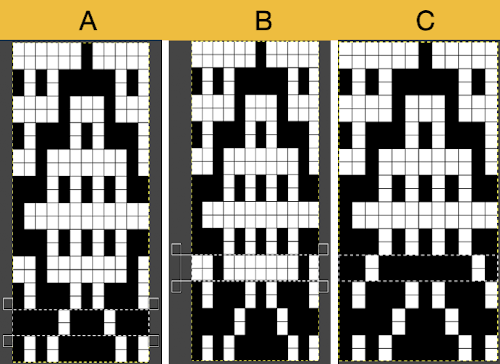
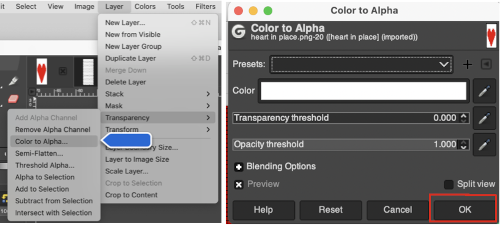 The layer-to-alpha image may be saved as a png with transparent background for any future use.
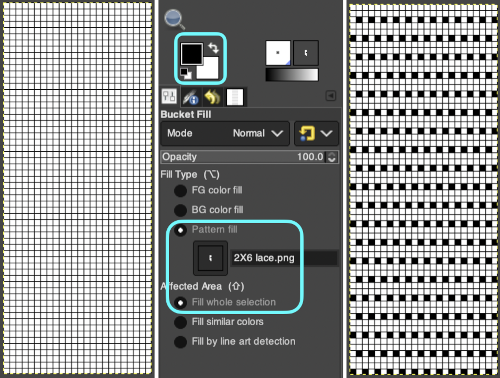
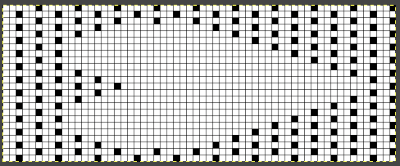
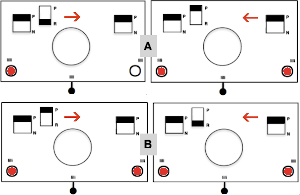
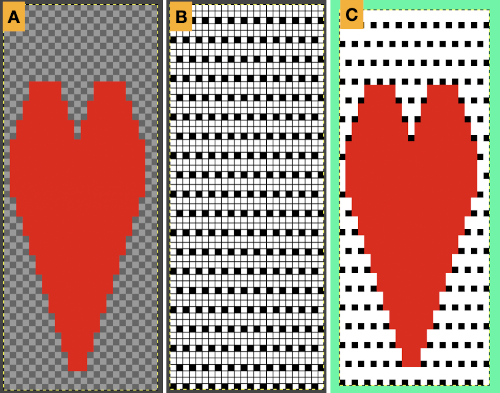 Even easier, working with the full-color, white ground heart repeat placed 3 rows up from the bottom, A, set red as the foreground color, and then use the bucket fill tool B to fill its ground with the mesh pattern, seen in C
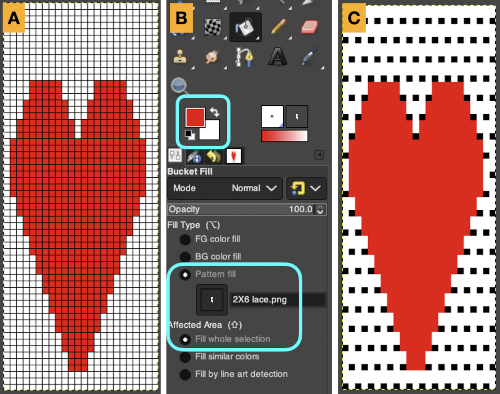 Comparing the all in Gimp Drawing to either of the last 2 patterns, two differences appear, an extra row of transfers before removing transfer stitches to start the heart shape, and those 2 extra black pixels/eyelets
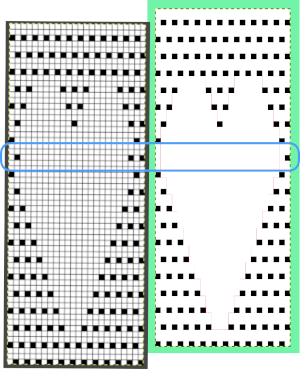
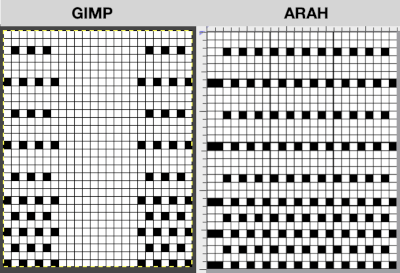
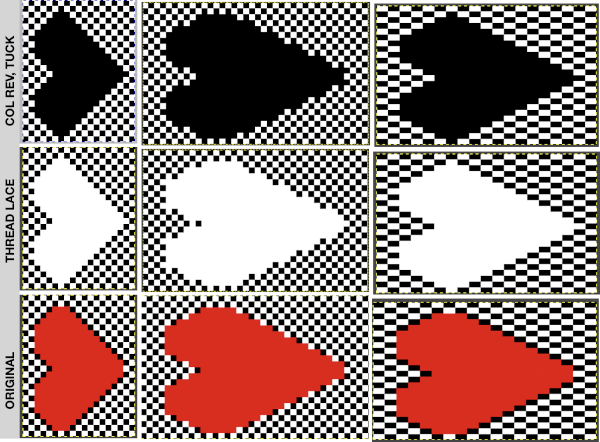
 Developing brick repeats or half drop is possible with offset and brushes in Gimp, but, to my mind, easier in Arah. Using the Arah drawing in repeat, the design is now 24 stitches wide by 120 rows high in a brick arrangement offset by 12 stitches.
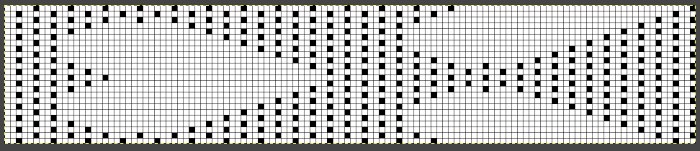
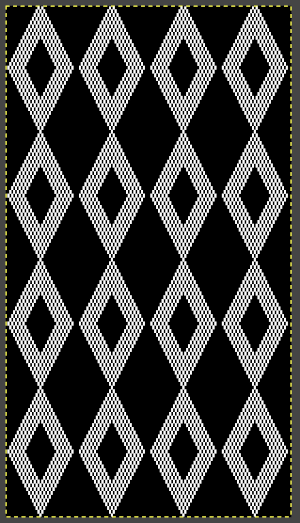
 The same heart, in half drop repeat, offset by 30 rows, now double wide, 48X60, suitable only for an electronic machine
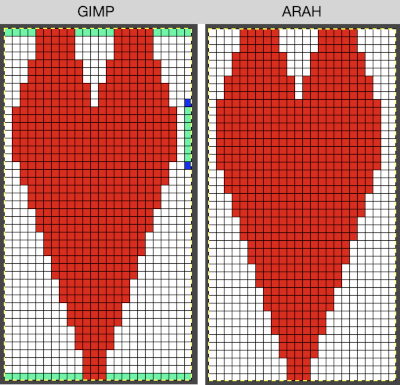
 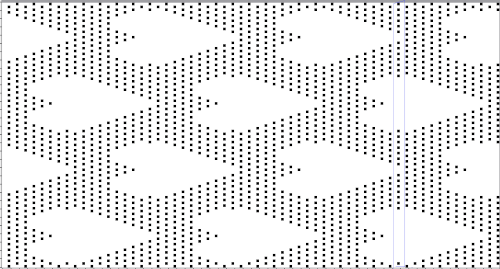 Changing the background grid for other stitch types: the heart is rescaled for use by 2 or 4 times in height. Again, the differences between Gimp’s incorrect scaling, A, and the Arah drawing in repeat, B
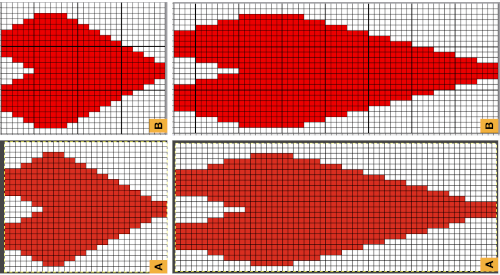
 Possible applications
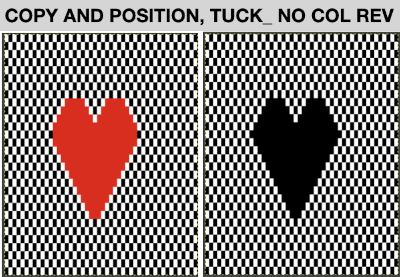
 This begs the question of working on larger images. For use on a lace mesh, simpler designs apart from overall size are best, but if a mesh base is not your favorite fabric or goal, tuck, slip stitch, thread lace or even fair isle patterns may be created with more overall flexibility, using the same principles on backgrounds.
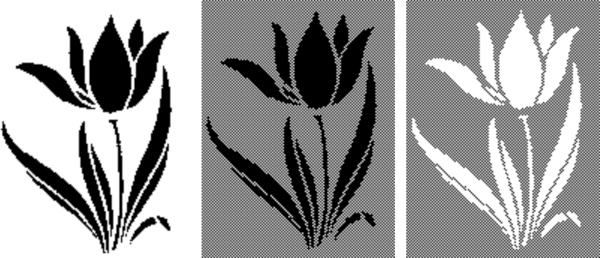
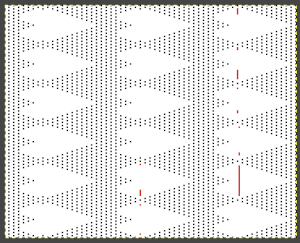
 This is the first attempt at a partial repeat test proof of concept. I have been telling people serger monofilament withstands ironing and light pressing, and periodically I test advice I have given formerly. To start with, the darn monofilament, which I even used in double bed garments, but nearly 2 decades ago, refused to feed properly or at all. Because it is nearly invisible, my knitting started with it pulling too tight, and I wiped out 12 needles out of 72 in different places on the needle bed in a single carriage pass. Determined, I sorted how to hand feed it, got the rhythm, complete a swatch. A marks an error I made in loading the second track in img2track, resulting in an added, wrong pattern row. The holes, B, C, and D were nonexistent until I tried flattening the fabric a bit with an iron, and the monofilament simply melted in various places.
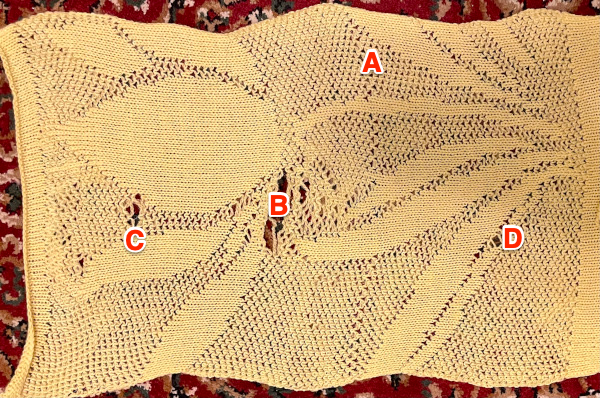
 I had interesting issues with having needle selection visually appear correct throughout, and the pattern itself appearing correct when checked at 1800 magnification. While the smaller sample was accurate until the filament began to melt, here I had 2 needles not knitting the yarns alternately but together, and an odd change in the center that looks as though yarn selection in those areas was reversed. The thicker yarn here is cotton, the thinner rayon. Troubleshooting is required. Unplanned tucking is a sign of damaged needles, but because the second yarn used herd is so thin, the effect was not obvious until the vertical pattern in the same area on the bed became apparent.
 The cam buttons and undercarriage were oiled. The first selection tests involved programming this
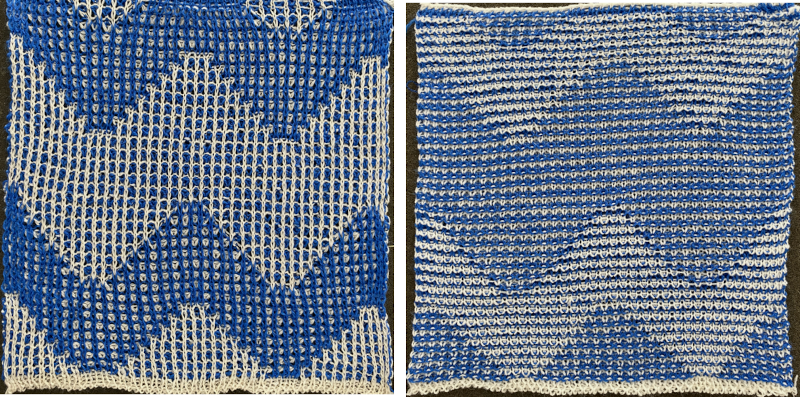
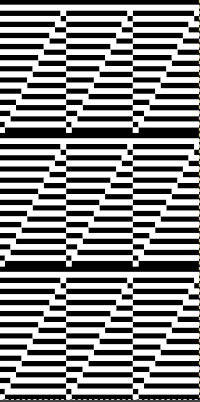
 The finished test swatch: because of the disparity between the number of all knit stitches vs patterned ones where one of the colors is slipped on every pattern row for every other stitch, the fabric shrinks dramatically when off the machine. The knit areas pop out a bit, and a lengthwise tug makes enhances the effect
 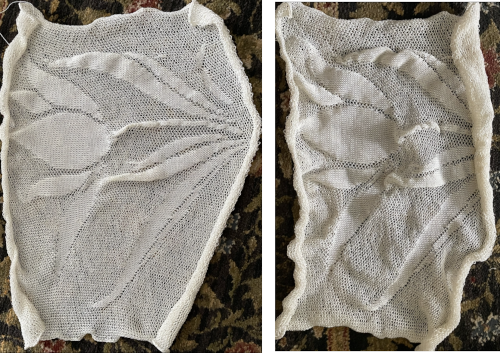 If the goal is a flat fabric panel, then blocking is a necessity. Here the piece is casually pressed, no pins, letters point out issues:
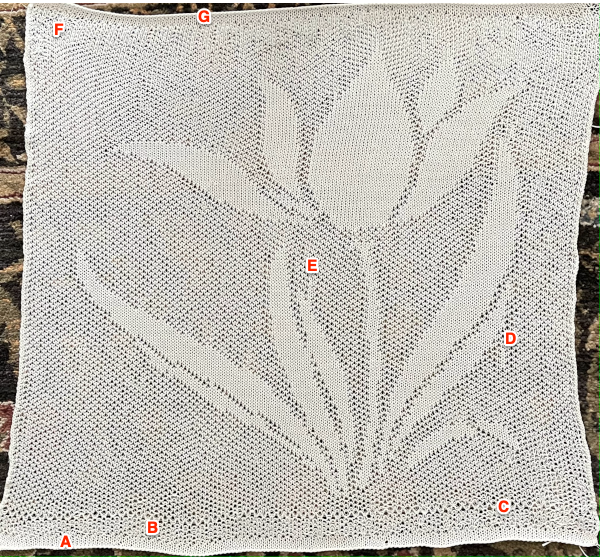 The mesh effect was noticeable after resting, the piece measures 25 inches in width by 25 inches in height.
 a new file was opened, bucket-filled with the ground 2X2 pattern, the above was copied and pasted in the chosen position, resulting in this
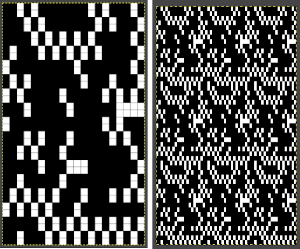
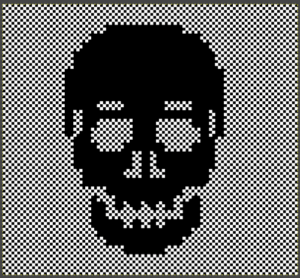 The 100X92 png
 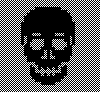 which in turn needs to be color reversed for use as a thread lace pattern
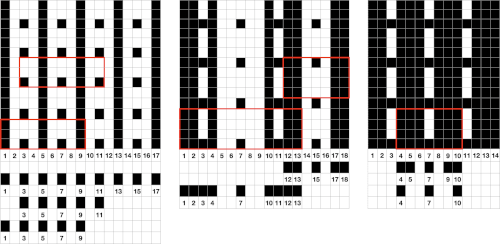
 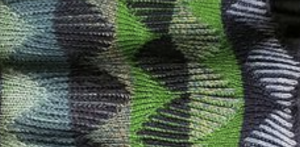 The plan is to create a repeat which may be knit using color changes every 2 rows. Each design row knits each color twice, so the standard built-in KRC separation is not a consideration, though the same cam settings may be used in those fabrics as well.
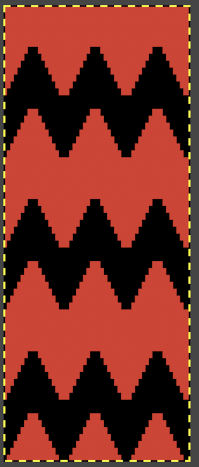
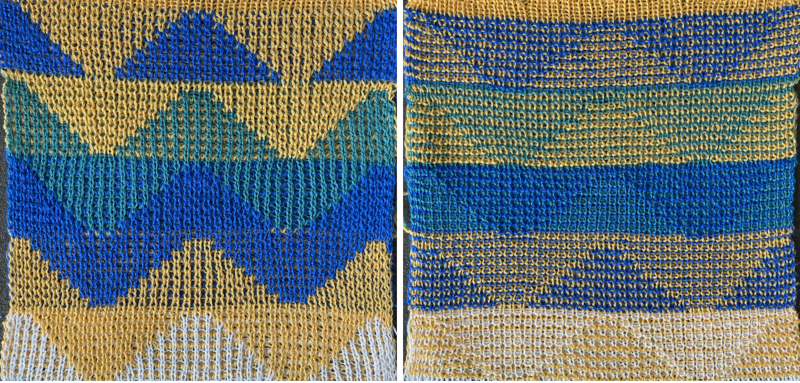
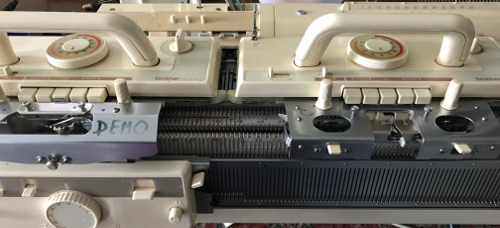
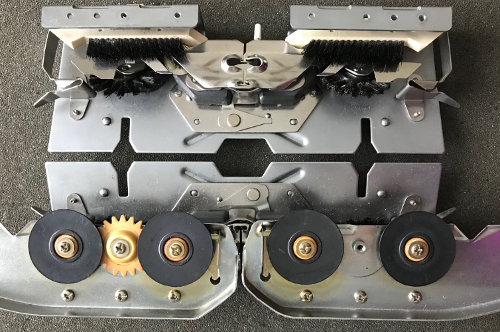
 Lock settings are easier to achieve on the Passap than switching out cam buttons in Brother machines. This was knit using 4 carriages. Color one knits with the main bed set to tuck both ways, color two knits with the main bed set to slip both ways. The slip stitch reduces the width of the fabric considerably
 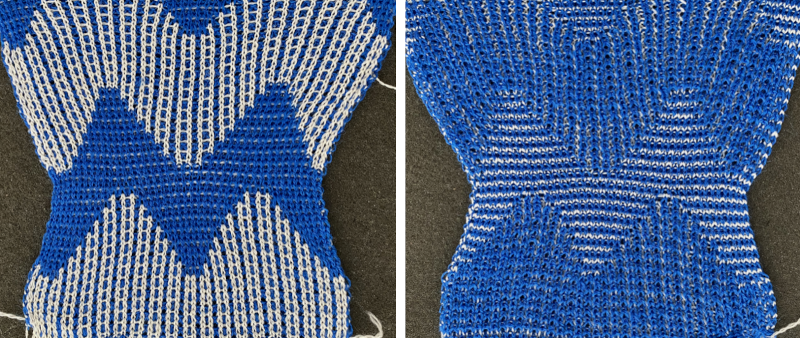 Here each color alternately tucks and slips. The choice of cam buttons matters, tucking first from left to right, slipping from right to left, with cam buttons set COL after the first preselection row
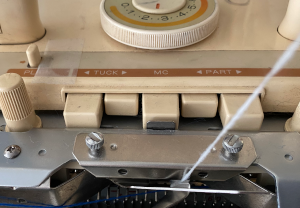
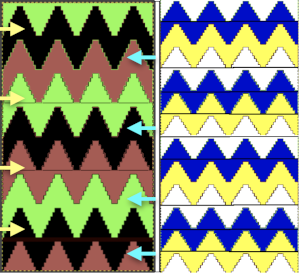
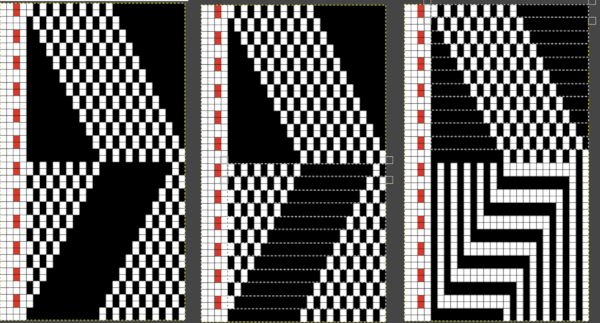
 This last cam setting appears to my eye to produce a texture “close enough” to the inspiration fabric. Attempting to add more colors: the repeat, D, is still 18 X 88 but is now shifted slightly.
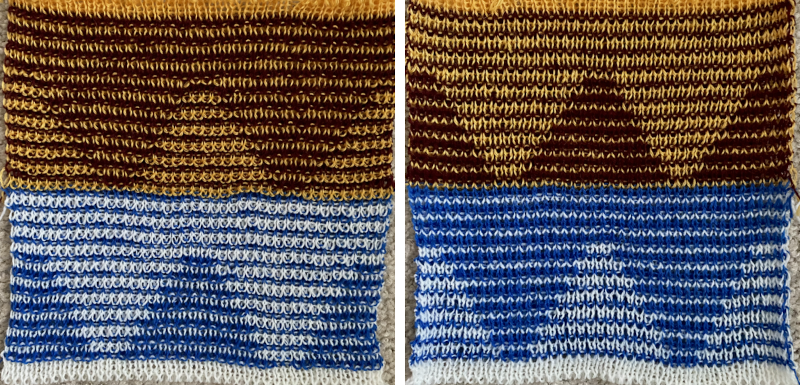
 The existing repeat may be reduced further to 18 X 64, eliminating some of those extra rows in the center of the chevron shape
 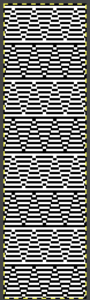 Whether or not the design is intended to retain chevron shapes in alternating textures, actions may be plotted pre knitting in any way that visually makes sense to the person designing the pattern and tools available to them.
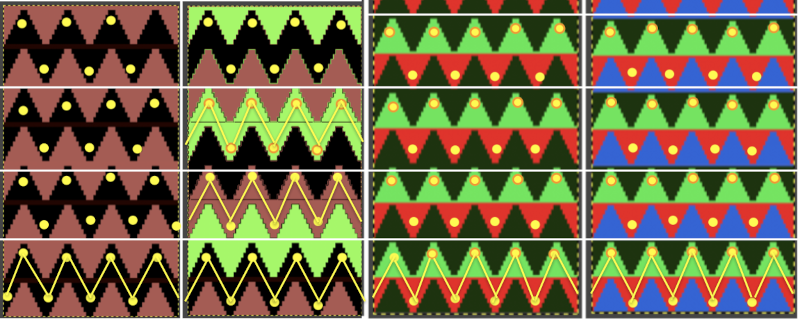
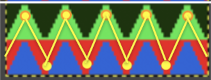
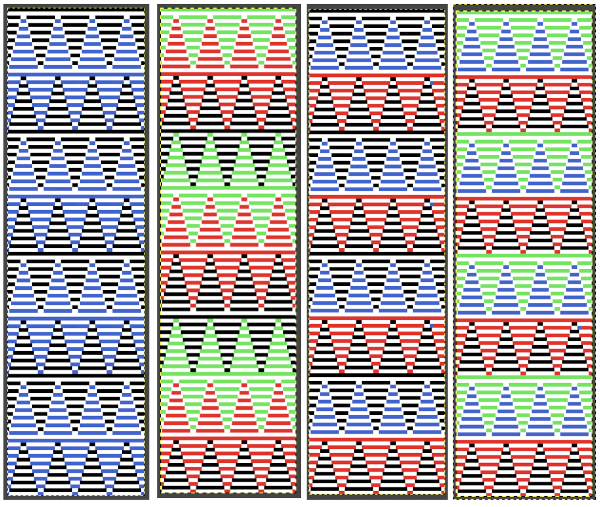 Reversing the png so that the more textured stitches will begin with the color in yarn position 1
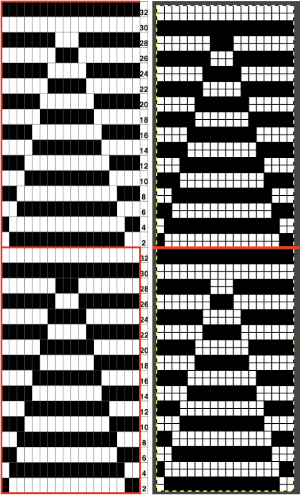 Adding colors can be planned cautiously or allowed to happen randomly depending on the preferences of the designer and end-use. Ribber fabric designs are not visible until several inches have been knit, too late to catch color sequence errors. Some machines allow for memo placements or sounds to help track color changes, but only within the initially programmed repeats. A quick spreadsheet can provide customizable checkboxes or added information. For an attempt to retain chevron shapes in different textures:
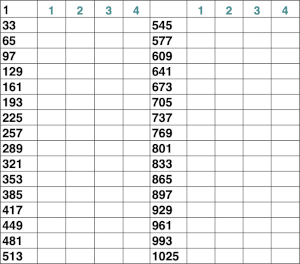

 A PDF including row numbers and space for notations
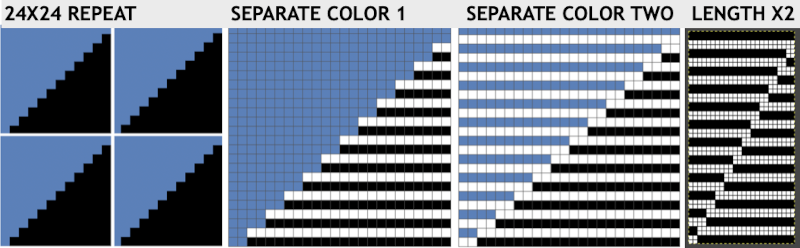
 Continuing on a 24 stitch repeat, the original design may be rendered at double height and separated once more, doubling the separation height to 96 rows
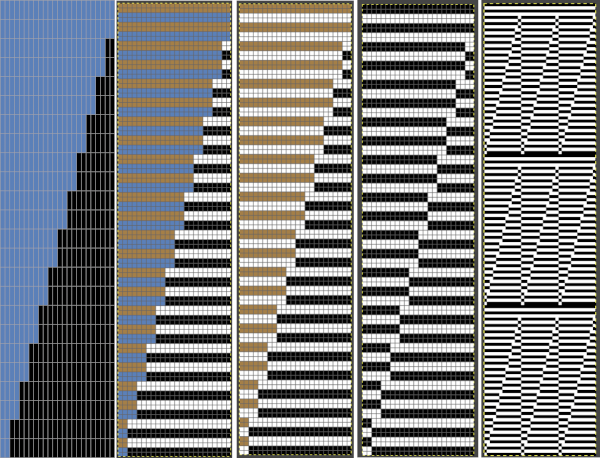
 Another even more complex inspiration from a sweater attributed to Falke, Spring 20 collection, using similar stitch structures, but in addition, also transferring stitches between beds exposing a purl striped ground.

 Adding needles out of work by simply choosing to cast on and working on every other needle it does not matter whether even or odd needles are in use, the pattern will be identical but simply shifted over by one needle. For frequent color changes, make the first preselection row toward the color changer to start with, keep notes as to where the repeat color selections happen as experiments are expanded, evaluate color choice as a third or even fourth color are introduced
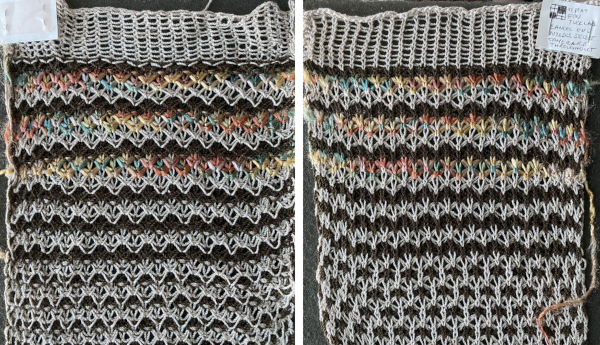
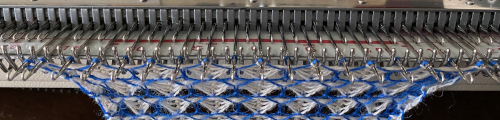
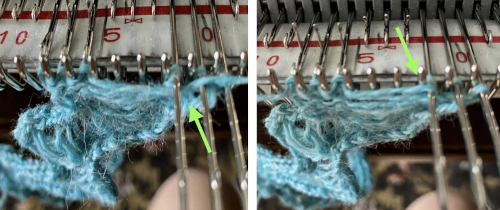
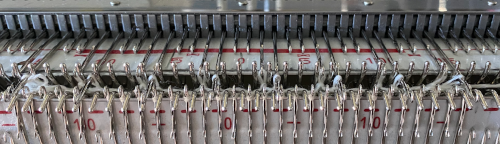
 the third tuck row on the machine
 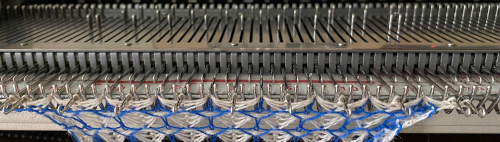 the fourth tuck row with needle preselection for the first all knit blue row
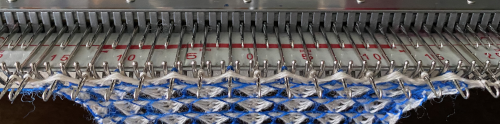
 Two from one: the same tuck repeat was altered by changing the needle out of work arrangements. Slub yarn may be used but changes the value of the lines formed by the floats created in the needles out of work gaps.
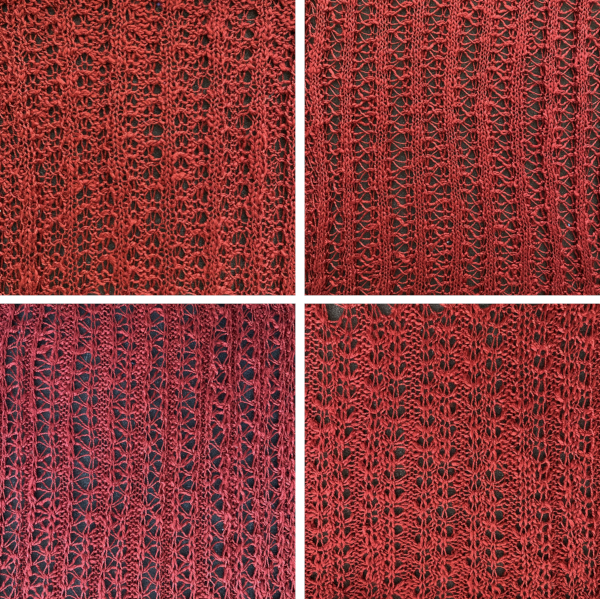

 Segments marked with green cells may be grouped in a variety of ways to create repeats in different widths, asymmetrical ones are also a possible consideration
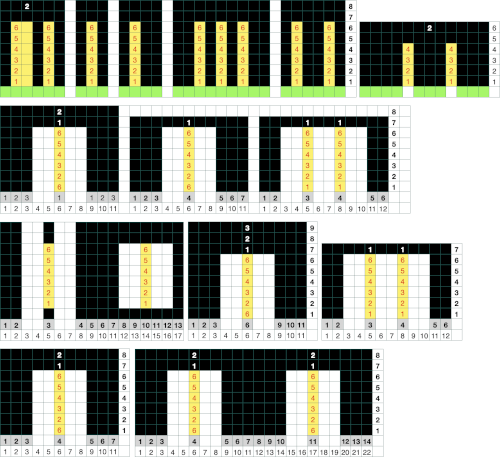

 The usual single bed tension for this yarn might be 7 or 8, depending on stitch type. The greater the number of knit stitches on either bed, the closer the tension will have to be adjusted to that used in stocking stitch for the same yarn. Wool also has memory, will want to roll to knit side at the top and bottom, to the purl side along vertical edges, steps often need to be taken to reduce the rolls. Using this repeat

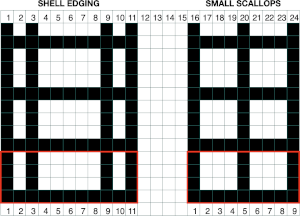
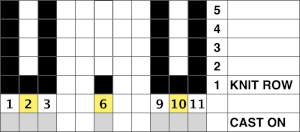
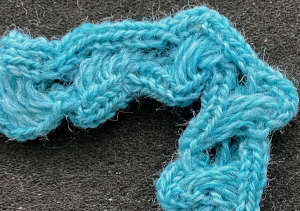
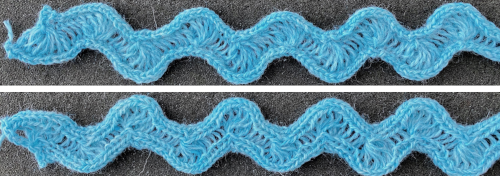
 A variety of edgings may be produced by simply hooking up ladder floats created by leaving needles out of work after X number of rows. In this instance chain cast on over 11 needles, dropping the center 5 chains and taking the corresponding needles out of work.
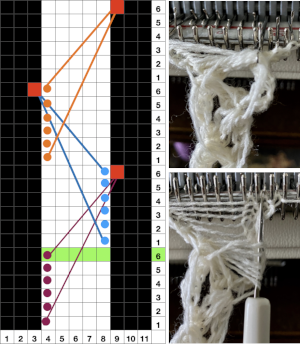
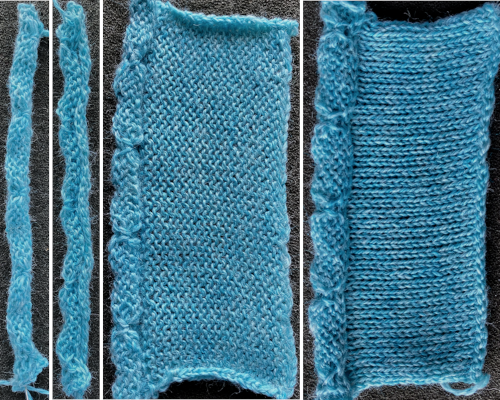
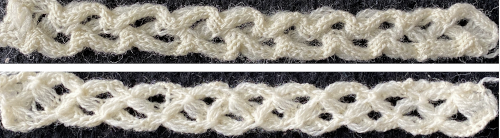 This variation uses the thicker blue yarn, knit at tension 4; 12 rows are knit before hooking up the lower groups of six ladders, which makes the floats easier to pick up or count using a single eye tool. Repeating selection on the same side allows the trim to be easily bent around corners
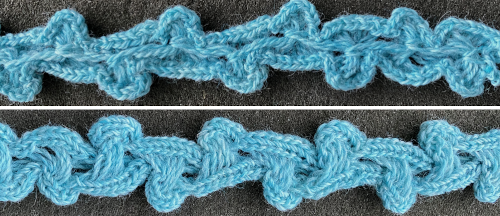
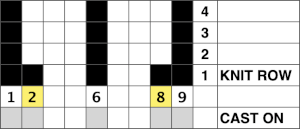
 Trims using holding alone border on the possibility of automation using slip stitch programming. A simple one to start: cast on 7 stitches, with the center needle out of work. Knit a few rows, set knit carriage to hold.
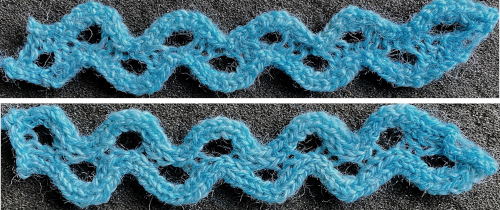
 translated for knitting, patterning may be used on either bed, with the opposite bed set to knit every stitch. If patterning is on the ribber, have the first and last needles in work on the main bed.
  The top bed is set to tuck in both directions, the fabric is shown lightly stretched
 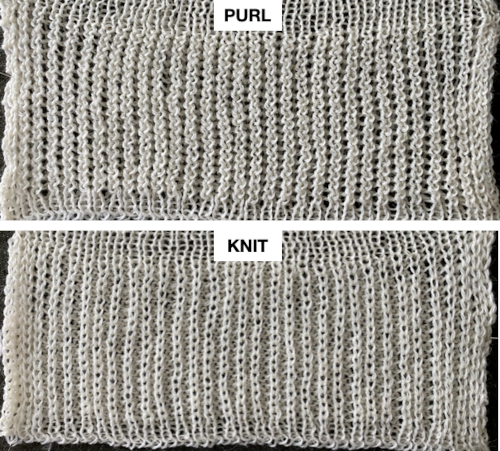 and could conceivably be used to create a ruffled edge when followed by narrower stitch types ie. every needle rib or Milano variants
 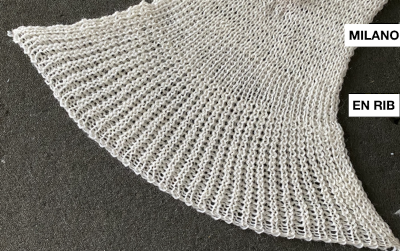 Changing settings: with the knit carriage set to slip in one direction, knit in the other, the ribber knitting every row
 Needles may be taken out of work to create pleats in every needle ribs, alternating their placement between the 2 beds. Knit stitches stabilize tuck ones. Here every other needle is taken out of work on only one bed. The tuck loops are more visible in any open spaces between the vertical rows of ribbed stitches. The ribber will knit every row on the same needles aligning directly above each other, thus ruling out full pitch.
 The needles are set up so that the first and last are in use on the ribber, ensuring that a knit stitch will be on the side of any tuck stitch selected on the top bed,
 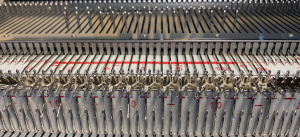 on the top bed the every other needle tuck selection reverses as the direction of the knit carriage does, needles brought forward knit, the ones skipped hold tuck loops in their needle hooks,
 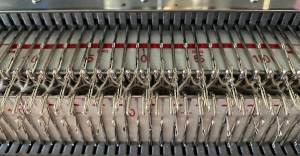 the resulting fabric
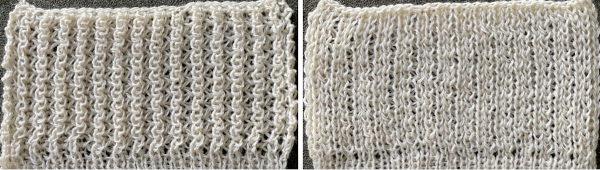
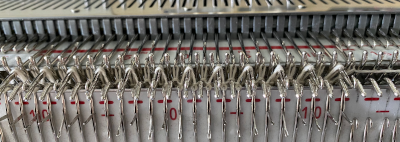
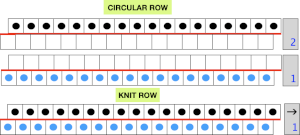 Choosing spacing between needles in work on the main bed
  A working repeat with 4 circular rows, 6 full rows knit
 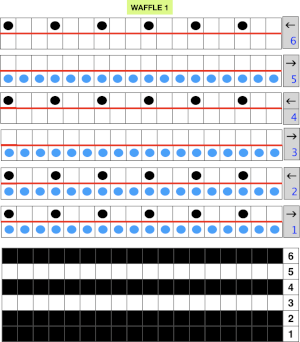 My first swatch in the technique was in response to a Ravelry member share describing the stitch pattern used in a finished garment
 followed by float formation when only the top bed knits
 The resulting grid may be used as a guide for hand techniques off the machine in isolated areas or all over
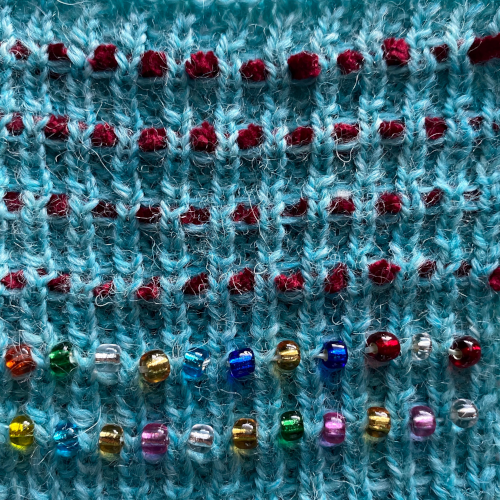
 Needle arrangements may be varied to accommodate thicker yarns, or alter the texture by varying both the number of knit rows and circular ones
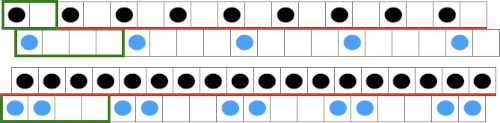
 Because the top bed needles are in pairs, the EON selection remains evident, each of the first 2 passes completes one row of knitting.
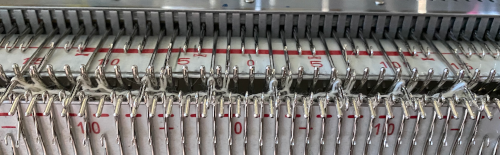
 When only the top bed knits, floats are formed between the needles in work
 Half Milano with tucked long stitch: the main bed needles will tuck one row, then slip one row. The ribber needles will first knit a row, then slip a row while the second bed knits both rows. Then the ribber needles knit one row then slip a row while the second bed knits two rows.
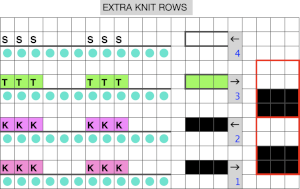


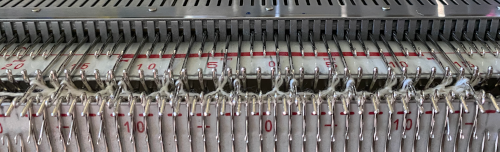
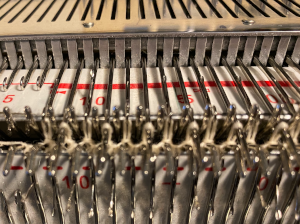
 the tuck row is formed with the knit pass to the right, no preselection
 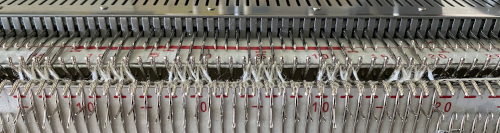 the row of stitches is skipped on the way to the left, preselecting for the next first knit row, tuck loops visible on top of the hooks of the selected needles
 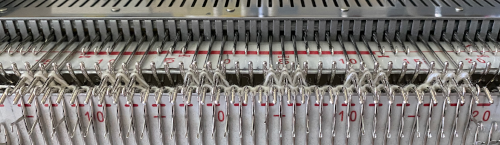 the process is repeated. The resulting fabric:
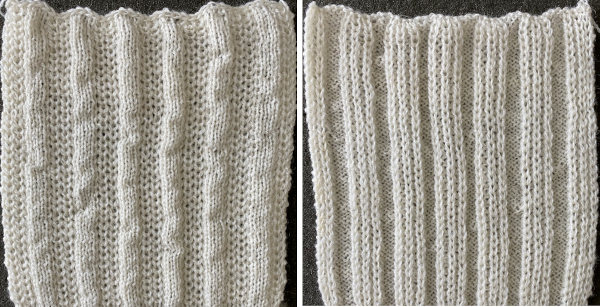
 In DIY the potential for exploration is endless. As always, if needles are out of work on the main bed, end needle selection is canceled. Here slip setting in both directions is used, along with needles out of work on both beds, the 1X1 needle repeat is programmed.
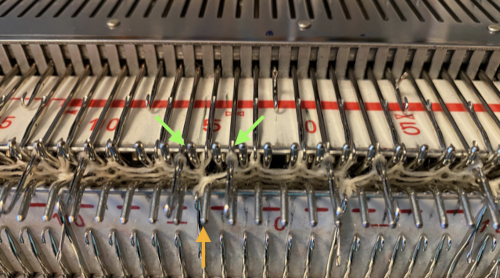
 the result has floats on the purl side, a slightly pleated look on the knit side.
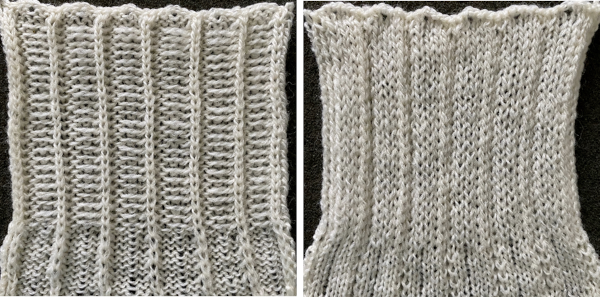
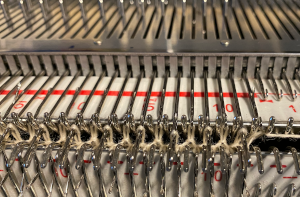
 After both no preselection row bring alternate needles out to hold using any EON needle tool. In my case, COL, I began with needle 1 on the left on row 3, alternating beginning with needle 2 on the left on row 6. The number of rows in between hand techs is an odd one, so sides for the hand tech will alter as well. This shows the tuck loops formed EON as the carriages travel to the right.
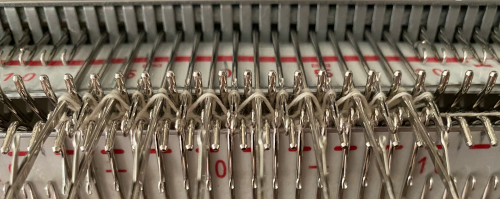 Prior to resuming pattern knitting, needles with loops on them need to be returned to the B position, maintaining the EON needle preselection for the next pass
 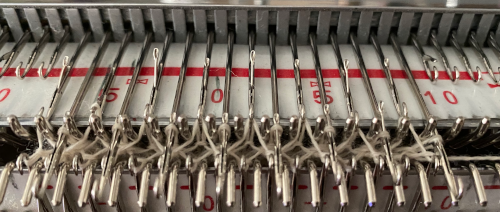 Repeat the process when design row 6 is reached, beginning with needle 2 on the left. The texture appears on the purl side of the piece, shown on the left
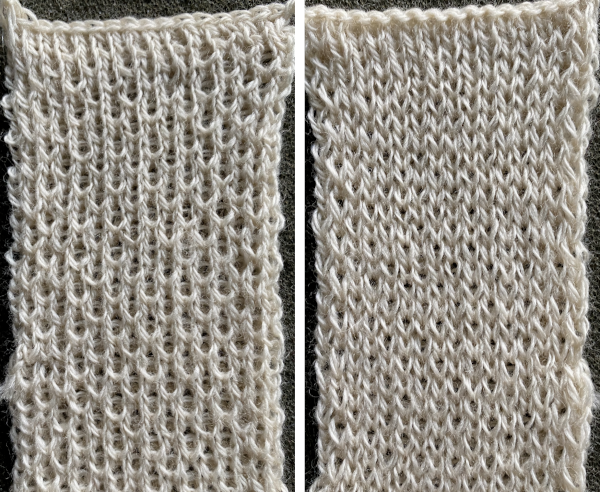 This repeat uses 6 passes as well. The tuck loops on the top bed occur above slipped stitches in the previous pass, which may be replicated, but the real problem is that every third row on the ribber is also having to tuck on specific needles with no knit stitches between them. The tuck loops happen directly above knit stitches formed in the previous row if the tucking lever is changed manually from R to P on those rows. That is a lot to juggle, a no.
 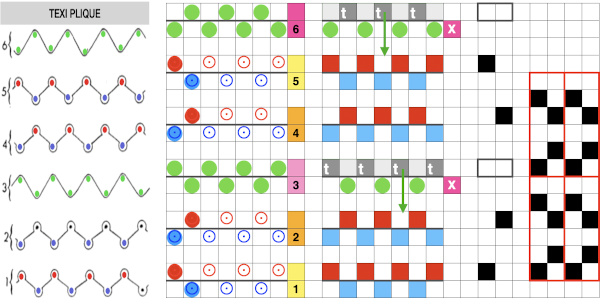 Here the eon tuck would fall on slipped stitches in the previous pass, so that is doable. It is possible to fool the lili selection into believing there are extra needles in work on each side of the ribber, which can “make” the first stitch on either side knit rather than slip or tuck. The method is used in creating a
 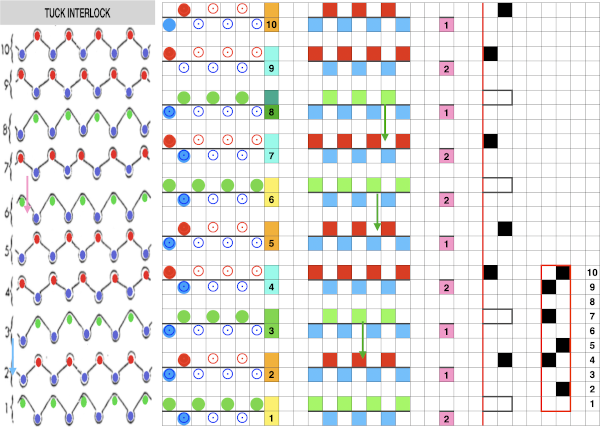 This pattern repeat is a short one, the changes are more regular on the ribber. The hand tech tuck stitches could be formed for 2 rows with all stitches getting worked back to B position in between those preselected for the next pattern row. The lili buttons need to get fooled after alternating pairs of rows, the start of several nos for me.
 Planning for interlock:

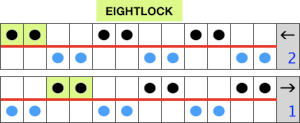
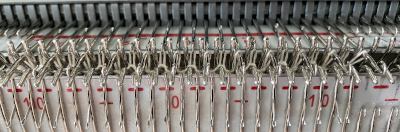
 when the lili buttons are used with the machine set to slip in both directions. Studio or Knitmaster knitters would require an RJ1 ribber carriage. I refer to the marks on the Brother ribber needle tape as blanks and dashes. When lili buttons are in use, one must work on an even number of needles. Pairs of both are required. The starting placement on either of the 2 marks does not matter, the first needle on the carriage side on the left will always slip, with the last stitch away from the carriage always being knit. This observable if one “air knits”, slowly moving the ribber carriage from side to side. As in any pattern knitting, needles selected to D or E will knit, the ones lined up in B position will slip or tuck.
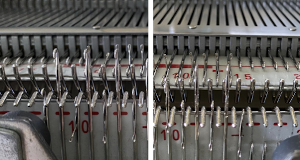
 Imagining the sequences required to complete a single row of knitting. I prefer to start with a knit stitch on the left, top bed, end needle selection is canceled
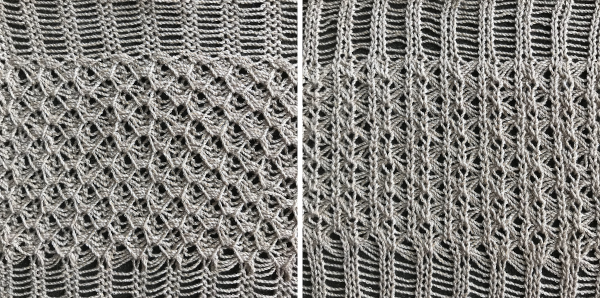
  When testing new ideas, particularly in rib setups, I often begin on a small number of needles and in a way that feels “safe”. This was my first test, with the ribber set at half-pitch. There is an obvious difference in rib before the slip stitch segment and the every-needle, EN, segment.
 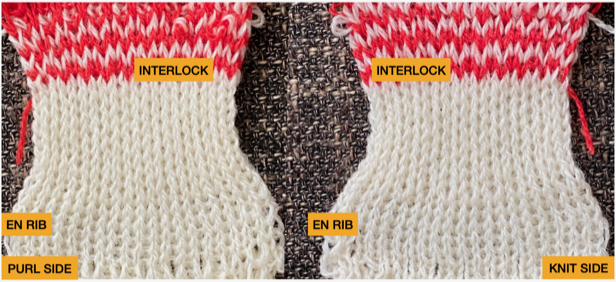 Using a very thin space-dyed cotton, tension 4 on both beds, produced a soft, drapey, squishy fabric. Because once the cast on and needle set up are complete, the knitting occurs on every other needle in alternate directions, full-pitch is used without any problem even though every needle is in use on both beds.
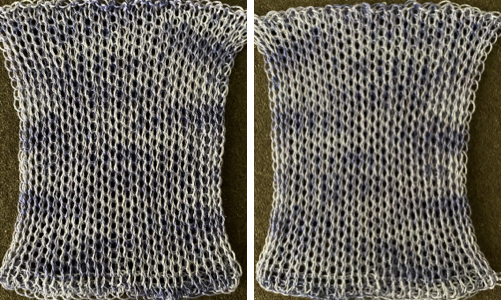
 after only the top bed knits with slip stitch floats behind every skipped stitch, which, in turn, will appear longer on the knit face
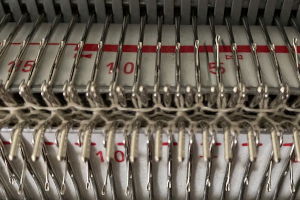
 Ponte di Roma
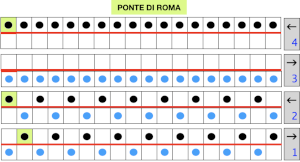
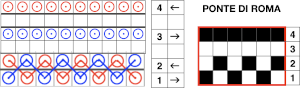 the modified version of the repeat used in my test swatch
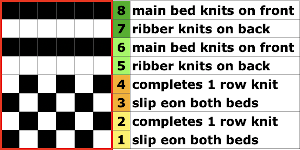 Pairs of rows of interlock are followed by pairs of circular rows. The repeat was changed and the second color was used to define the difference in stitch formation between the two groups, color changes were made every four rows.
 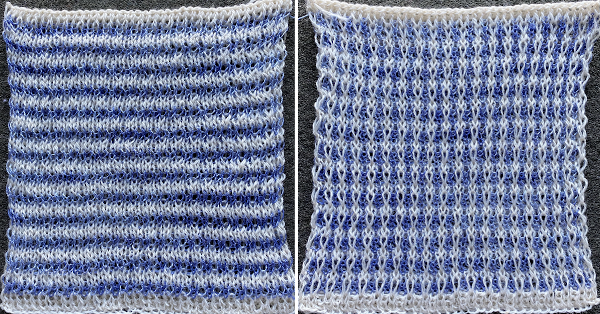 Using a single pair of carriages and having to constantly change cam settings appears far too complicated to manage for producing any length of fabric. My hack for making things easier and faster was to resort to knitting with 4 carriages. One pair was set for interlock operating from the left, the other set so as to achieve tubular knit. The ribber carriage is set to knit from right to left and to slip from left to right when the main bed knits. The knit carriage is set to slip in both directions so that the pattern selection remains continuous. It will slip all stitches while moving to the left on rows with no needle preselection, knit on all preselected needles on its return to the right.
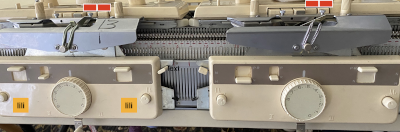


 My initial test was to knit twice as wide a repeat, thinking it might be easier to identify stitch formation, working on 4 X an odd number of stitches, in this case, 36, beginning and ending with knitting on the top bed,
 single row pockets are formed.
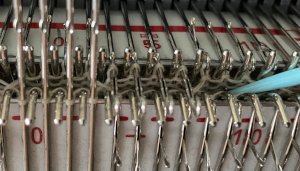


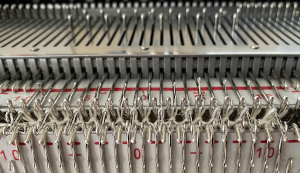
 With both part buttons pushed in, in every needle rib, the needles in D will knit, the ones in B get skipped completely. As the carriage passes to the right, the needles for the next row are preselected, come forward holding only the skipped stitches in the row just knit, while the alternate needles are set up to be skipped on the next pass to the left
 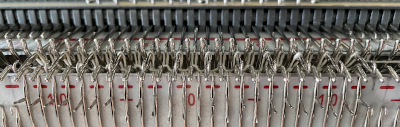 After the two passes one full row of knitting is completed on the patterning bed. The needle preselection is now on the next row of the repeat, in this case, row 1.
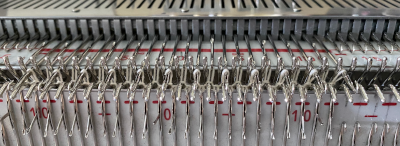
 The process repeats throughout. Two passes complete a single row of knitting. The carriage actions for completed passes 1 and 2
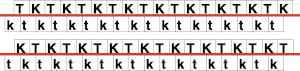
 The close-up begins to make the tuck loops a bit more visible. The swatch was knit at half-pitch. Using full pitch in patterns that allow for it, diminishes the appearance of “ladders” between rows of stitches, indicated by cyan arrows.
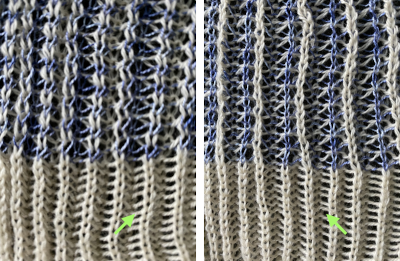
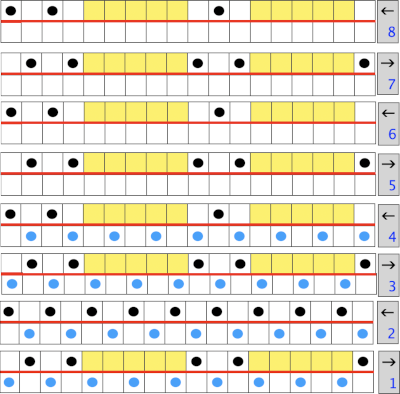
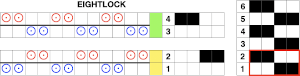
 Manually the tucking lever position can be changed from R to P for a single row or more of tucks and then returned to the R placement. Switching between the 2 stitch types on the ribber is far easier and less complicated than changing cam buttons on the main bed, however, there are no rows where only tucked loops are created without knit stitches beside each of them if the lili buttons are in use. Using the slip-tuck Brother selection on the main bed allows for slip and tuck settings to be used at the same time in the same row as long as opposite cam buttons are in use. Some of the old punchcard books include patterns referred to as “lace-like” using the setting. The starting side makes a difference in results as to whether one leads with a slip stitch float or a tuck loop in the actual knitting. Swatches in this post have begun with the first needle in work on the ribber and a forward, to be knit, stitch selection on the first needle on the top bed, with an even number in work on both beds. The end needle selection is canceled unless stated otherwise. The cam setting used for these tests
 After the return pass to the left, the tuck loops are evident on top of the needles preselected forward to knitting position on the next pass to the right. Two carriage passes fill one row of knitting, here ending COL.
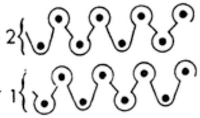
 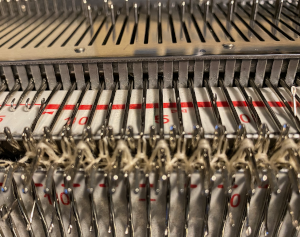 On the ribber, as seen in the thumbnails, one may choose slip or tuck in one direction alternating with an all knit row in the other, or tuck or slip in both directions in an alternating pattern EON_EOR, on an even number of needles with the addition of lili buttons. The appearance on the ribber of the formation of the loops echoes that seen on the main bed changing needle placement unless the carriage is set to tuck in only one direction.
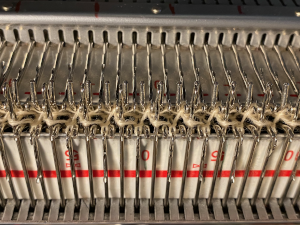
 A test can quickly be made to observe the stitch formation with the main bed set to knit every row. I chose the left tucking lever down to R when the carriages were on the left, up to P when the carriages reached the right. The tuck stitches with no further action line up over the knit stitches in the previous row
 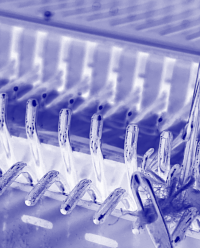 Experiments outside the interlock family: the two-by-two repeat is supplied in most packets of cards that come with the purchase of a punchcard machine. At one point in time, Kate Armitage published a book containing 104 variations of knitting using the card, both single bed and combined with ribber use. There was also the equivalent for card #3, the point being variations are limited only by time and imagination.
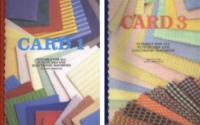

 Brother punchcard machines do not advance pattern rows when two carriages are used for needle selection as each carriage begins to move from the opposite side, the same preselection is repeated. This means editing is required at times if the same designs are to be used on electronic machines, particularly true in lace combination fabrics. The process has been discussed in posts on automating lace edgings with slip stitch settings.
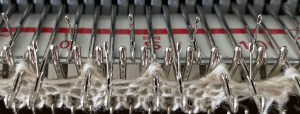 this is how the yarn is laid over those 2 needles after the first tuck row is completed,
 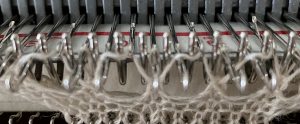 and both when using the card and in the first electronic repeat there will be a third tuck loop that is laid over the needle holding the 3 stitches. This is the appearance of the stitch formations just prior to an all-knit row
 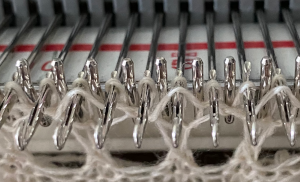 Here analyzing the actions of the punchcard, marking rows according to card actions, the repeat is expanded to include the extra duplicate rows. Though the repeat remains 24 stitches wide, it is no longer usable for use on a punchcard machine.
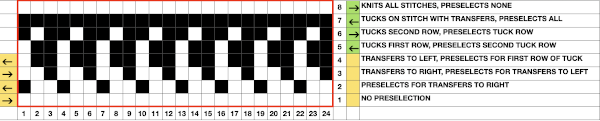


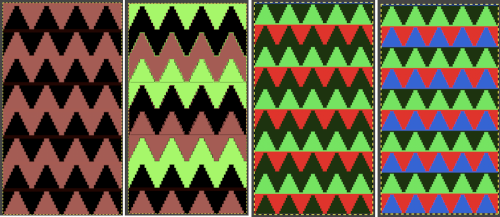
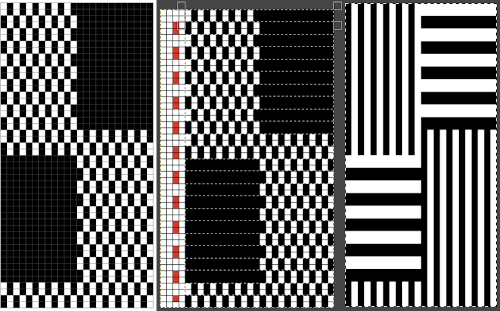
 The colored versions before and after scaling, compared with the slip-stitch swatch.
  It is possible to produce a rectangular grid to start with on which to draw in Gimp, but the larger canvas size occupies a significantly larger space on the screen, complicating the process. For small designs, however, that may be an option to give one the sense of aspect ratio for the design in the final knit ie in representational FI. To resize the grid in uneven proportions, the chain-link below the spacing values needs to be broken
 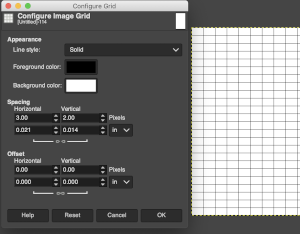 This repeat is designed for an electronic, and requires color-reverse.
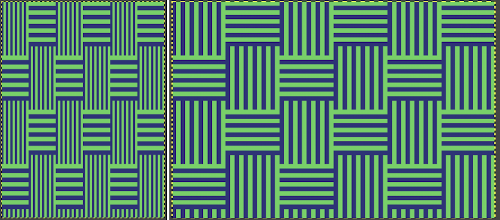
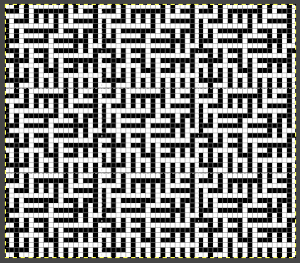
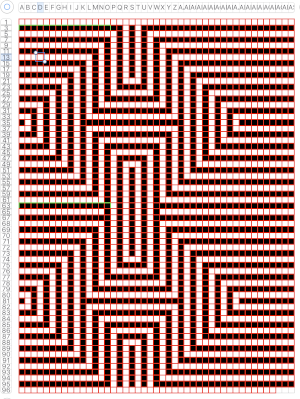
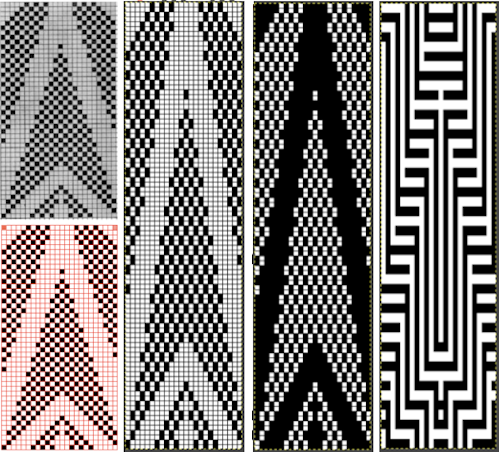 Once again, the possible change in scale is estimated. The repeat though only 24 stitches wide, is 92 rows high. On the left the repeat is shown as it appears on a square grid, to its right is the scaled 4:3 version, in a pixel count approximating the size of the swatch. It takes a bit of squinting to see the pattern more recognizable in the longer repeat in the larger tile
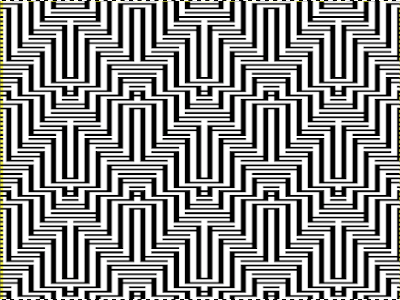

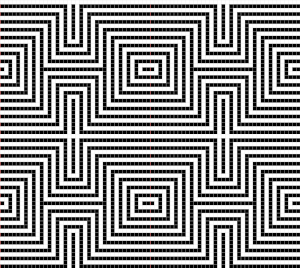
 The proof of concept swatch, knit in tuck stitch, begins to show the distortion by the stitch formations, textures vs plain knit, easily seen at the top edge. The bind-off is around 2 gate pegs in order to allow enough stretch.
 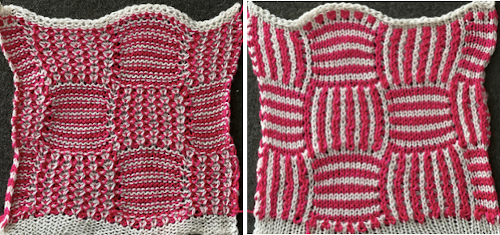 Anyone familiar with either or both programs may find this a very quick way to visualize the scaling and moving of motifs within DIY designs and their possible outcomes prior to test knitting
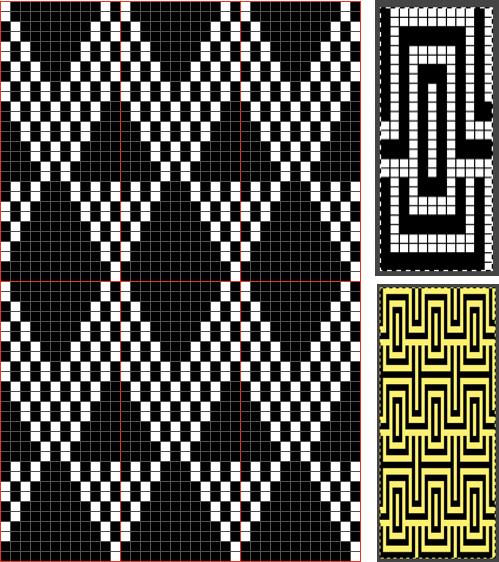
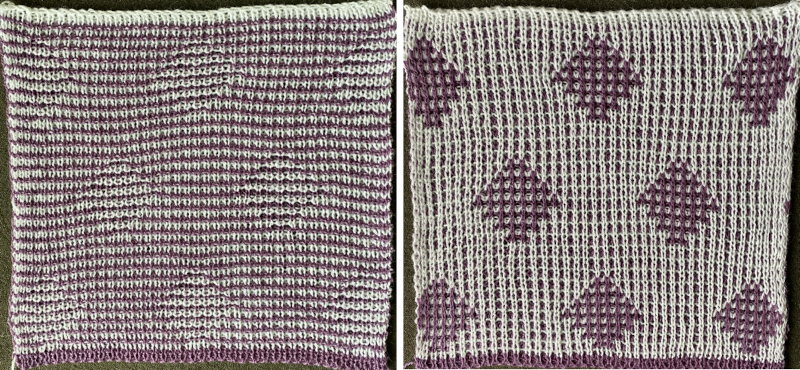
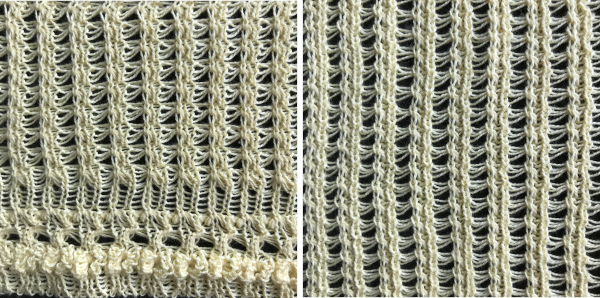
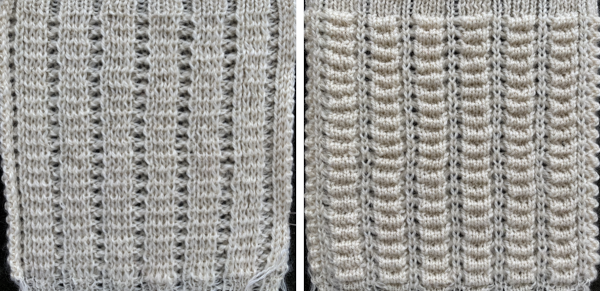
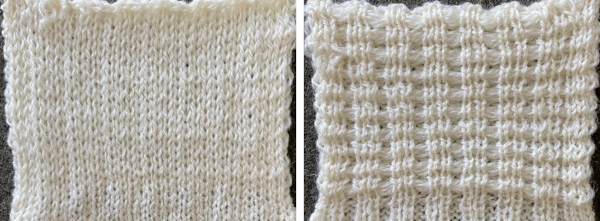
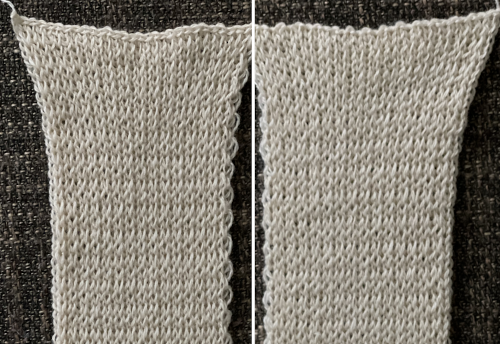
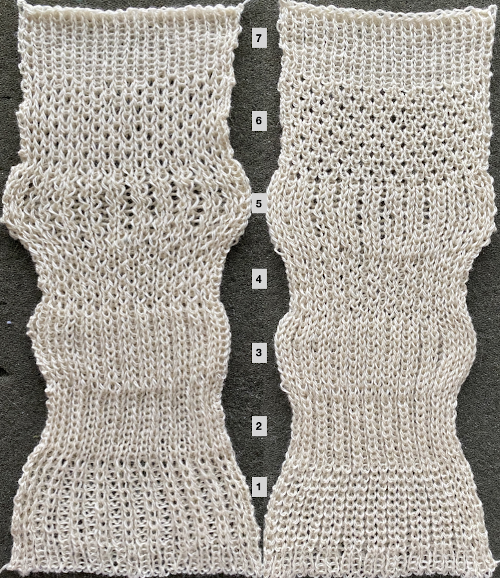
 Proof of concept: the bottom half is knit using the slip stitch setting, the top half in the tuck setting. The added texture on the tuck stitch purl side makes the fabric a more interesting, reversible one, and wider than its companion.
 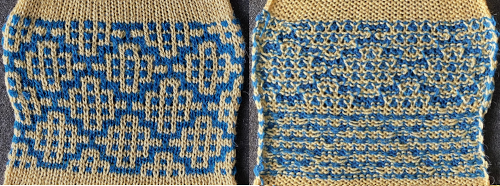 For a different way of working with two-color initial images using only Gimp, see tips in
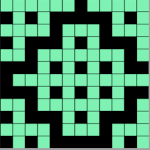

 Numbers processing to ready the repeat for final gimp editing:
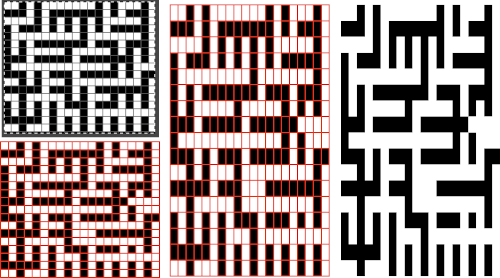
 Getting back to clearer pattern results: when using electronics, it is possible to create far wider and taller repeats for download. The technique to achieve them uses the same process. That said, there are quicker ways to attain the final repeat illustrated in the 2024 posts on using Gimp color to alpha through the Layer> Transparency option or Colors> Color to Alpha.
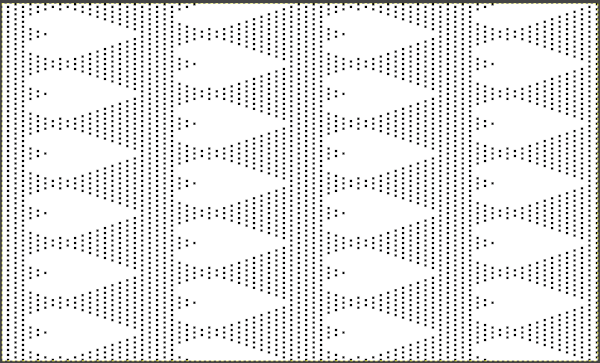
 the isolated repeat, double-length
 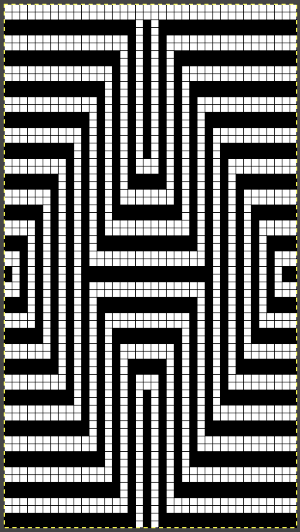 the color separation in progress
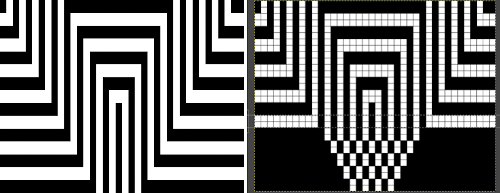 When knit, that white cell pair of rows break up the overall shapes and shifts the pattern in the top and bottom half
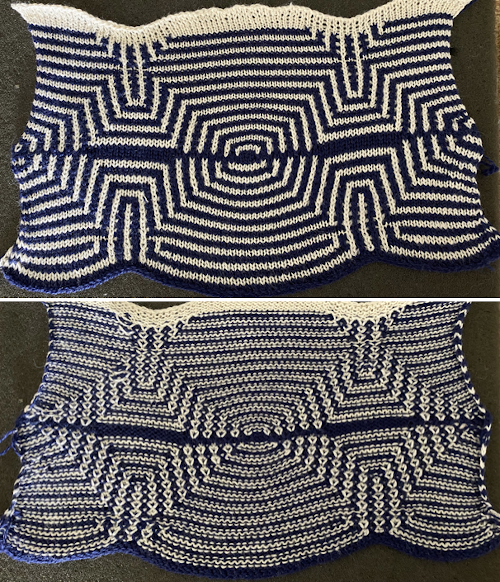
 The final adjusted repeat
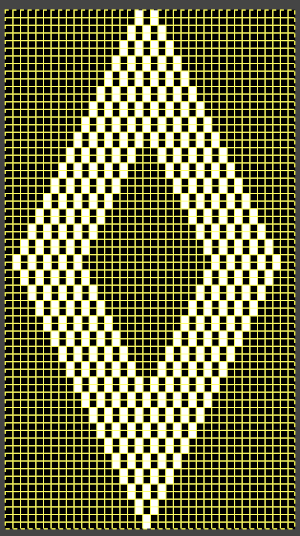
 knit using the tuck stitch setting in both directions, KCI, first row left to right, leading with the dark color
 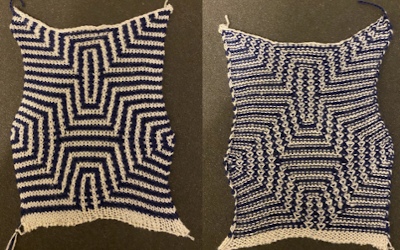 and here with the lighter color
 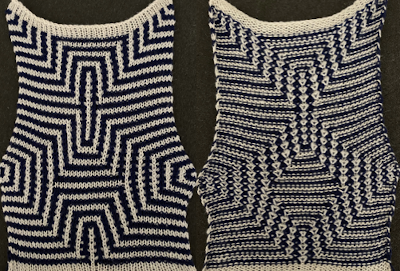 In progress, on the km
 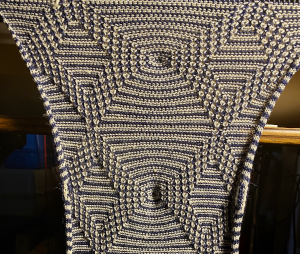 the relaxed, 3D-ish view on the reverse
 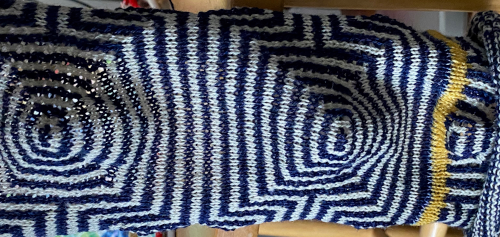 why projects can take longer than planned
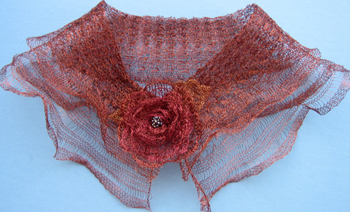
 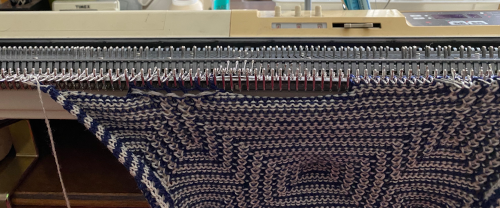 The finished, relaxed scarf with pressed edges only, retaining the conical striped forms
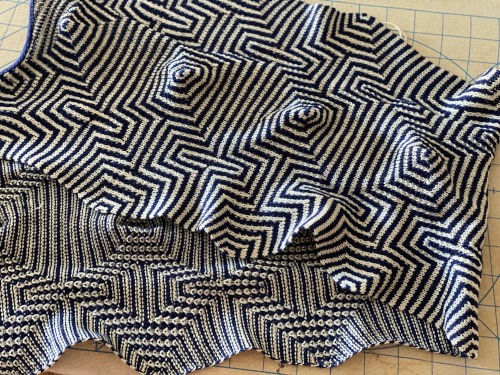 The repeat knit double length, changing colors every 2 rows, becomes something quite different, with a sharp curl to the purl side
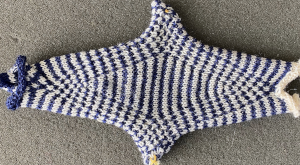