Nearly 9 years ago, I began exploring scale designs. At the time, my charts were generated using Excel 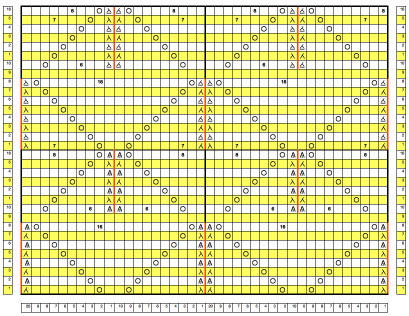 and a program called Intwined Pattern Studio, which soon became inoperative
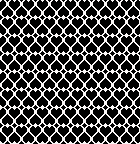
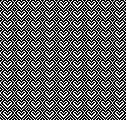
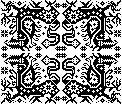
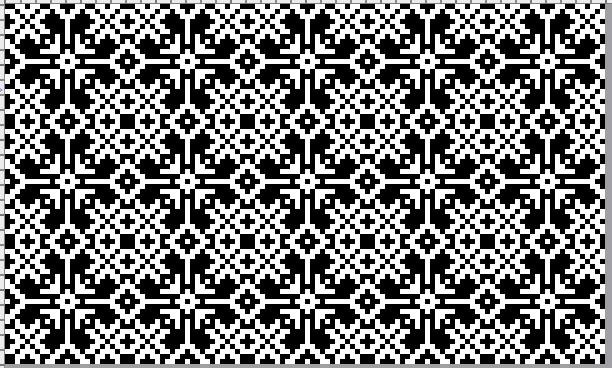
  The above repeat, visualized tiled.
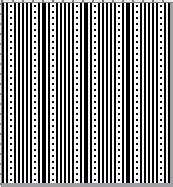
 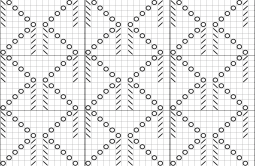 At present, using custom-printed needle tapes has proven useful in tracking actions required in hand-manipulated stitches.
The attached PDFs have been printed in the proper aspect ratio with the following changes from default settings using Mac Preview,  and Acrobat Reader
 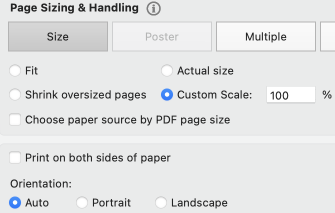 7 needles
single 4.5
Whether the knit tests are worth pursuing in large pieces with or without modifications is subject to end-use and personal preferences.
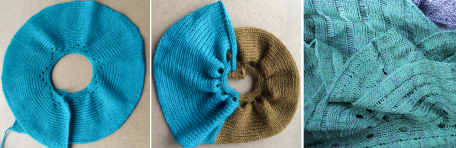
To begin with, stitches were transferred, the empty needles were pushed back to the A position, Out Of Work, and returned to the work, B position, for reversing or shifting the shapes.
Forming ladders: the chevron shapes are created by single stitch transfers, and bringing needles in and out of work.
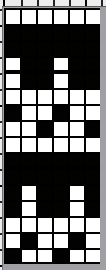
A starting chart:  Keeping the same palette as in previous charts, yellow cells represent needle positions where stitches are not disturbed, and the white cells where needles are taken OOW. The up-arrow needles mobed to A/OOW, and the down-arrow needles returned to B.
The work in progress:
1: to reduce the line length formed by the single stitches, the point at which needles are returned to work can be varied
2: in this instance, as 5 empty needles side by side are reached, bring needles into work for the next shape on each side of the single stitch decreasing the number of empty needles to four. As the knit carriage returns to the opposite side, loops are formed on each of the needles returned to work
3: continue to bring an empty needle into work aside each pre-existing loop
4: after the last 2 empty needles are returned to work and are followed by a knit row the last two loops are formed
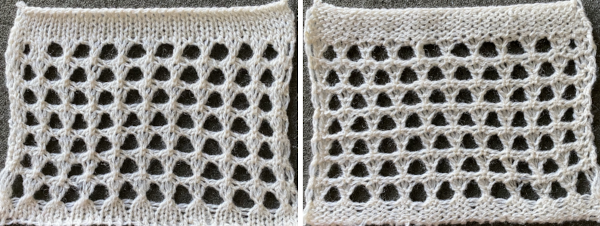
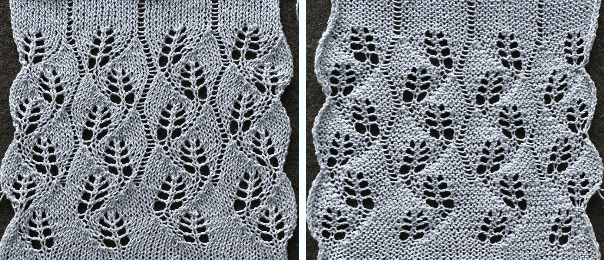
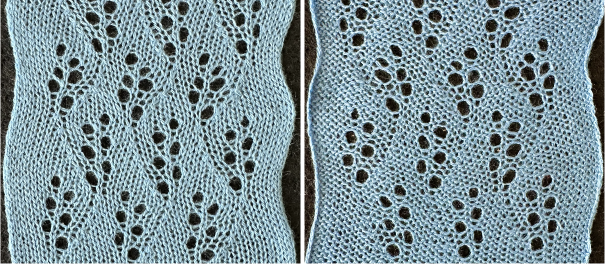
5: knit one last row across all the needles, and begin transfers for the alternate shape. 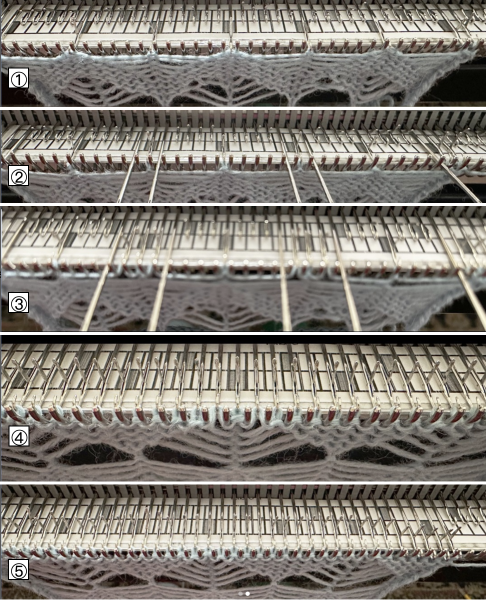 This yarn is a 2/8 wool, which worked nicely for holding ladder edge stitches in the leaf swatches but yielded a stiff knit in this case, and the elongated single stitches fold over at the top, creating extra nubs on the surface of the knit.
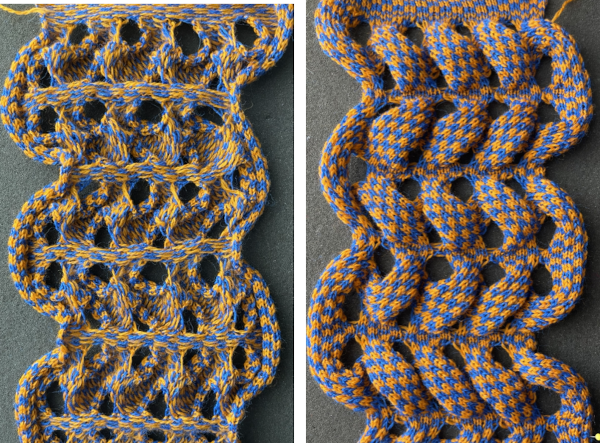
  Continuing designs with similarly shaped outlines but leaving the emptied needles in work, B position, produces different shapes. All needles remain in B throughout.
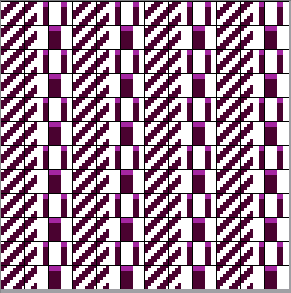
The yellow columns in the chart indicate the locations on the needle bed where stitches are never moved.
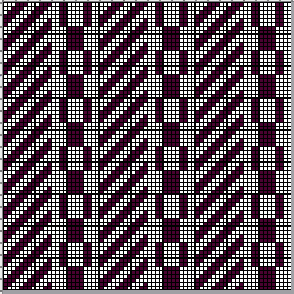
Visualizing the tiled repeat and the direction of the transfers: the initial experiment is also a 12-row repeat. The magenta cells indicate spots where extra all-knit rows may be added in DIY.
The work in progress:
A 7-prong tool is handy in making the 5 and 4-stitch transfers.
After each transfer, loops will form on the empty needles with the next carriage pass
3: the loop becomes part of the subsequent transfer, and the newly emptied needle remains in work
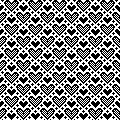
The first swatch began with a 12-row repeat and an all-knit row before transfers began for the alternate shape. 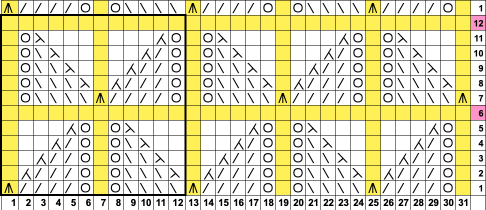 Visualized in larger BW tiling
 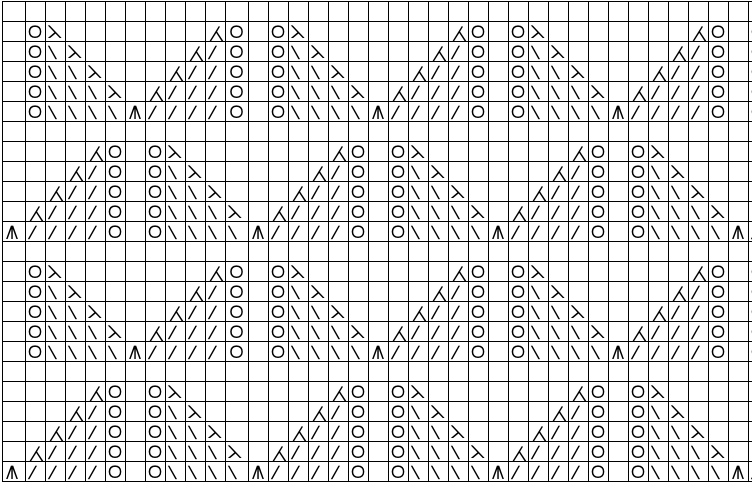 The transfers are made away from the circles in the chart using multiple transfer tools.
After each transfer, the empty needles are left in B or pushed out to E.
As the knit carriage moves to the opposite side, loops are formed on the empty needles.
Each loop becomes part of the next transfer.
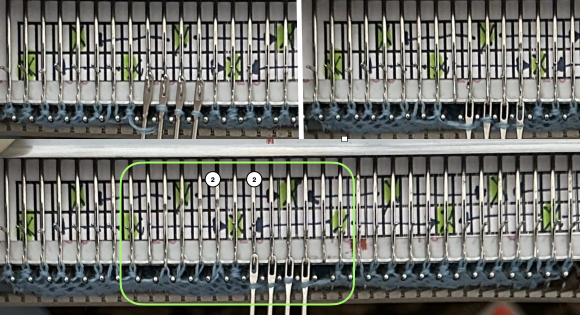
Setting up the first design row using a 7-prong tool with 5 prongs selected: the numbers in the lower image indicate the number of stitches on each of those needles as the setup row is completed. 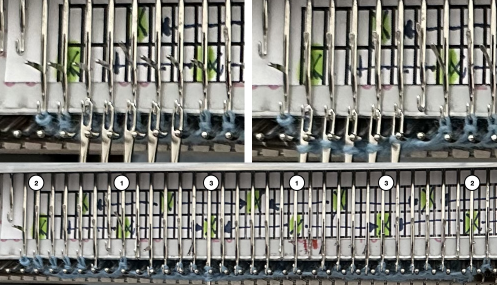 The second group moves 4 stitches at a time. Loops are treated as stitches.
After the transfers, there will be groups of 2 stitches adjacent to those holding 3 in the previous row.
The outline in the lower image points to one pair of transfers in the process of being completed.
 1: When this configuration is reached, knit one more row to the opposite side,
2: begin transfers away from the midpoint between the shapes to form the brick repeat. 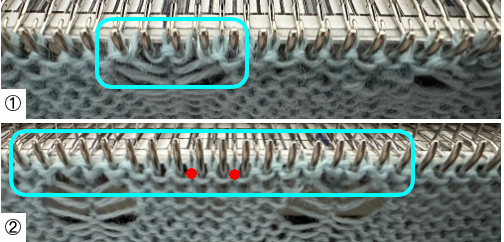 The result forms a bump once more due to the length of the single knit stitch columns.
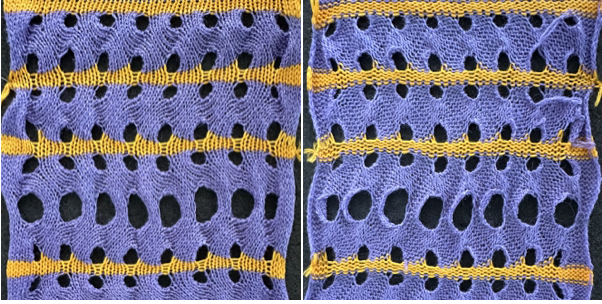
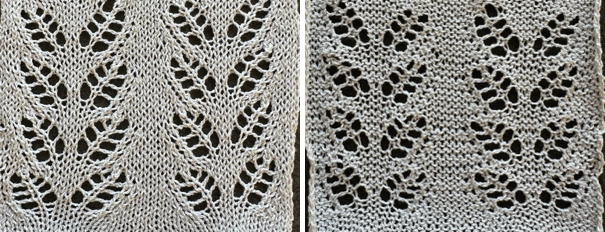
 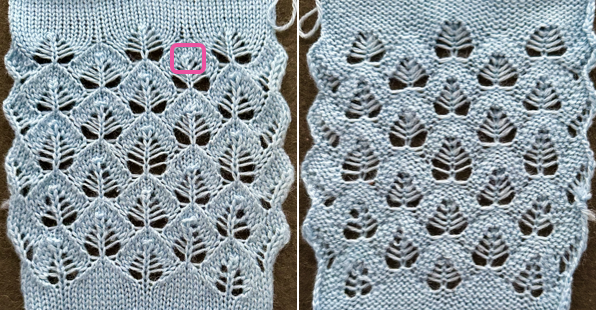 The above yarn is a 2/8 wool, the swatch was quite stiff. A second swatch was knit using a softer, thinner, alpaca-silk blend.
The relaxed knit after removal from the machine was very textured and narrow, 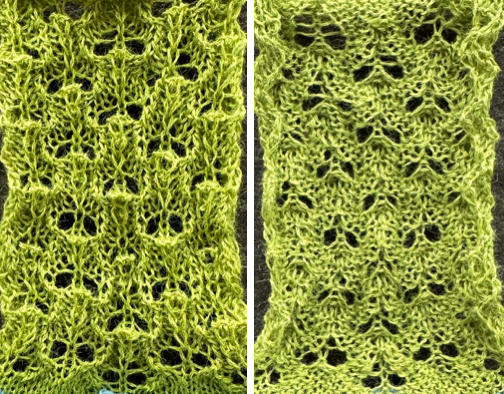 this result followed some light pressing and steaming.
Traditional wet blocking would be required to maintain the shapes in a final piece. 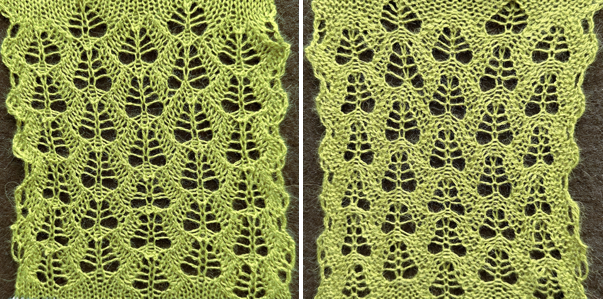 Eliminating the all-knit row to reduce the extra lengths of those single-stitch columns did not produce what to my eye was an improved knit.
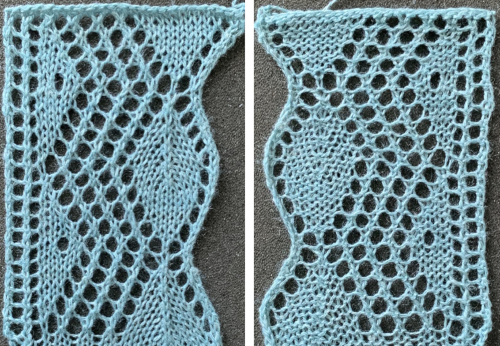
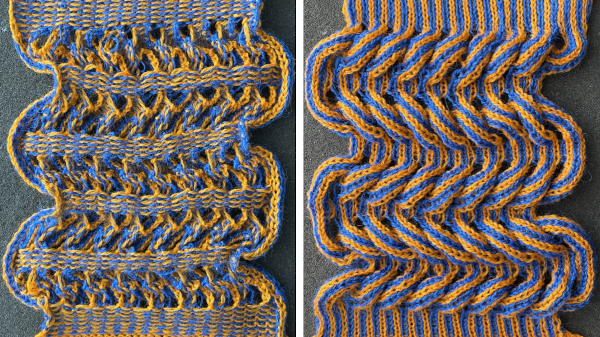
In a last what-if test, the chart was turned 180 degrees, with transfers beginning with a single stitch, and ending with moving five. 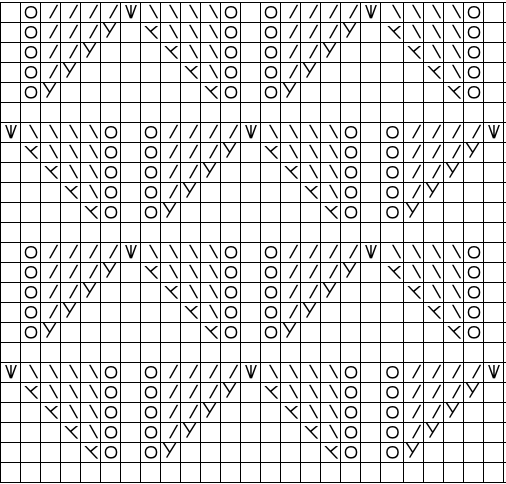 The results, knit in 2/15 wool and lightly steamed and pressed, appeared more successful to my eye.
  relaxed overnight, the surface is a bit more 3D
 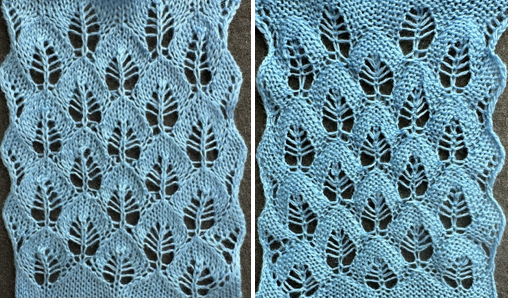 Using a similar technique for multiple transfer lace designs: a 14-row repeat, magenta cells mark all knit rows, and all transfers are made toward stitches aside every 7 stitches except for on rows 6 and 13,
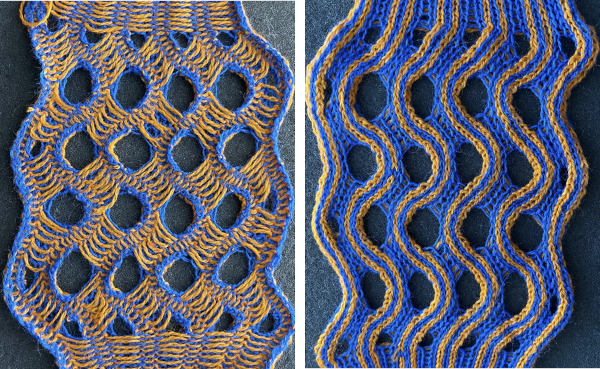
 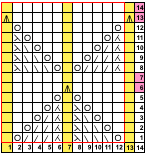 circles in the chart now indicate eyelets, transfers are made every row.
 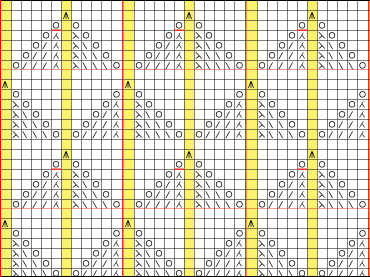 1: the setup row.
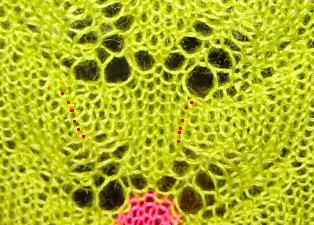
Empty needles are left in work, B. Cyan dots mark needles holding 2 stitches after the beginning transfers
2: the next knit carriage pass forms loops on the empty needles
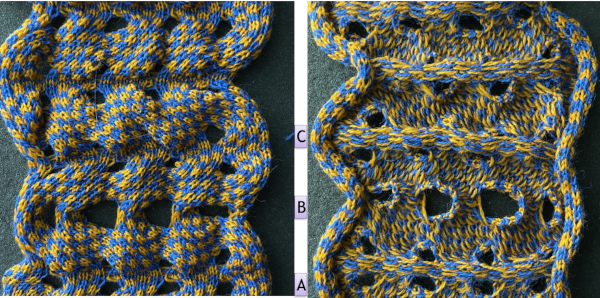
3: with the next transfer, an empty needle results adjacent to each loop, the start of the next eyelet 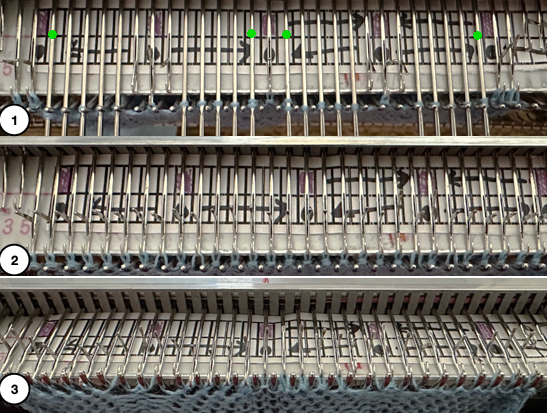 On Row 6 the last transfer results in 3 stitches on the normally undisturbed vertical stitch columns, 6A as the next carriage pass is made, 6B, loops are formed on the empty needles. A second row is knit on every needle, 7, and transfers begin to be reversed for the top half of the shape, 8.
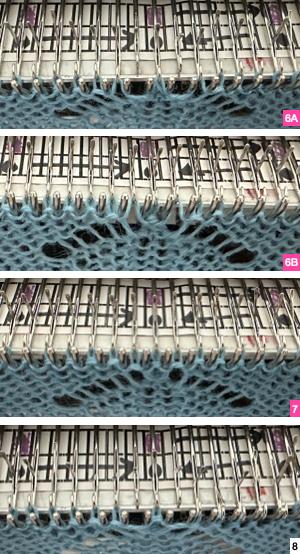
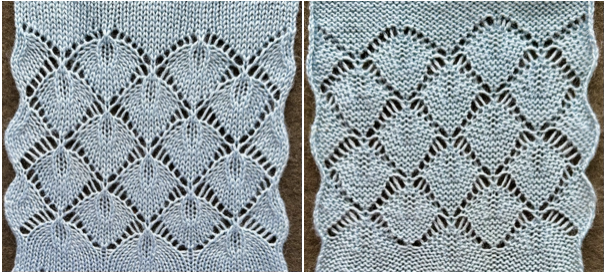 The result shares some similarities with another hand technique .
![]()
Author: Alessandrina
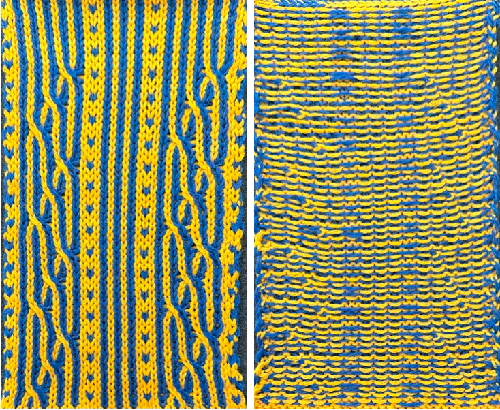
Cables meet fair isle
This sweater by Namesake, in the Fall 2024 collection, led to a FB query as to how to produce a cable version inspired by its color movement on home knitting machines. 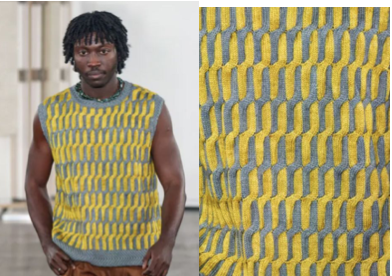 The discussion leads back to how to produce cables in 2 colors on home knitting machines best and accurately.
One way to achieve color movement is to begin with using and modifying vertical lines.
Due to the fixed width between machine needles, it is best to use a fiber with a bit of stretch such as wool, and often 2X2 crossings appear to be the limit for designs containing them in frequent, all-over patterns.
When working in single colors there are ways to obtain extra slack to make the crossings easier, but using the FI settings makes the knit tighter as in any slip stitch, limiting the use of such measures. In addition, returning the needles to the proper preselection position in pattern after the transfers needs to be performed manually.
A starting best-guess rule is to knit a minimum number of rows between crossings matching the number of stitches moved ie. for a 3X5 cable, knit at least 8 rows before repeating.
Tracking transfers can be achieved in several ways. The needle bed or tape can be marked with water-soluble ink, custom paper needle tapes may be printed to size, or paper strips simply marked and slid under needles in work.
In machines such as Brother, where needles are preselected, that fact can be used to advantage in establishing guides for the cable locations within the programmed design.
This swatch can be knit using a 1X1 locked needle selection.
While hand knitters have the advantage of seeing the color movement clearly on the knit side, machine knitters can find it harder to follow their locations with only the purl side facing them. 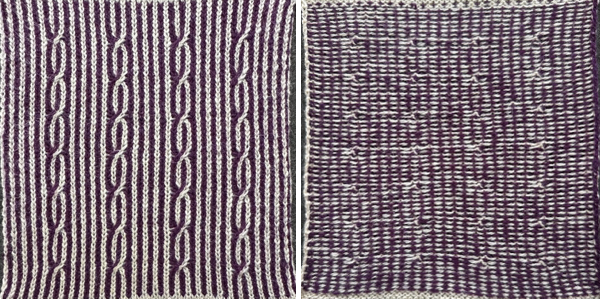 The vertical stripes can be interrupted at intervals by additional patterns or shifting cable locations.
My charts begin in a spreadsheet, Mac Numbers. The first trial effort: 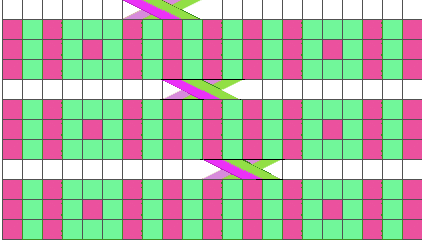 To begin with, the goal was to avoid the 2 by 3-pixel blocks that occur with tiling, which upon later consideration, might aid in avoiding placing cables in the wrong columns,
 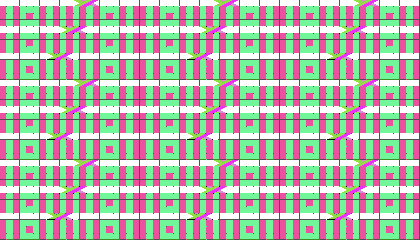 resulting in a 20X18 design. Black pixels represent the dark color, or simply the color in the B feeder.
![]()
 The alternate repeat to yield those double-width blocks, 21X18
 ![]()
 When matching hand-knit designs such as in complex arans, the direction of the crossings matters and may need to be reversed throughout.
 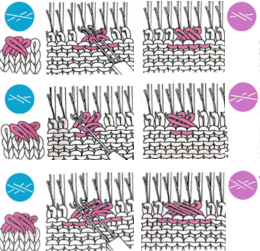 In these instances, it is enough to be consistent, and their direction can be a personal choice. I prefer cabling right over left.
 ![]()
![]() In the first test, using the 20-stitch repeat, I marked up a paper strip placed under needles in work and followed markings for Row Counts and needle GrouP shared in the table on the right.
In the first test, using the 20-stitch repeat, I marked up a paper strip placed under needles in work and followed markings for Row Counts and needle GrouP shared in the table on the right. 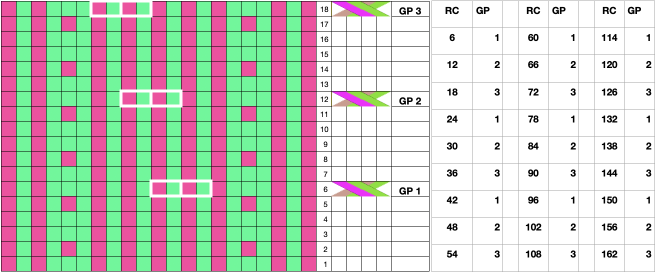 The result begs the question of how to avoid cables in the wrong columns and the possibility of repeating them more frequently than every six rows. Occasional stitches in the wrong color may be duplicate-stitched to mask them, but small cables in the wrong place or the wrong direction are problematic.
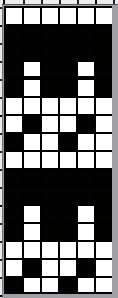
 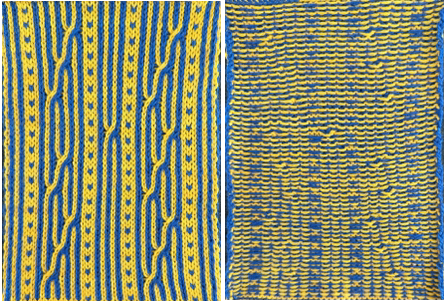 This repeat is 20X12 pixels, and it includes areas missing needle selection that will serve as visual cues on the needle bed for where stitches need to be crossed, now every 4 rows. Using the repeat on the 930 required mirroring horizontally to achieve the desired direction
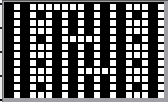
![]()
 Returning to the inspiration sweater, imagining a possible repeat keeping in mind cable crossings no wider than 2X2,
 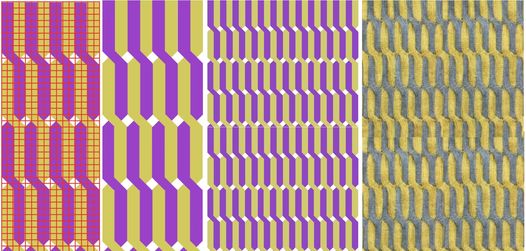 The knit tests were knit using 2/13 wools at T10+.
It proved impossible to use a tighter tension or to across more than 24 stitches along any single row without stitches dropping from becoming too small or the yarn breaking. The solution was to place the cabled details in a center panel. Using similar panels between undisturbed plain or patterned columns could become planned design features.
The full swatch repeat, 40X20 pixels, reversed on the 930. 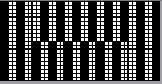
![]() The end needle selection is canceled, and cable crossings are all made in the same direction. The left pair moves under the right pair to the right, and the right pair moves to the front and behind them onto the two empty needles every 10 rows, immediately after the change in needle preselection and before the following knit carriage passes.
The end needle selection is canceled, and cable crossings are all made in the same direction. The left pair moves under the right pair to the right, and the right pair moves to the front and behind them onto the two empty needles every 10 rows, immediately after the change in needle preselection and before the following knit carriage passes.
A printed needle tape can help track their locations. 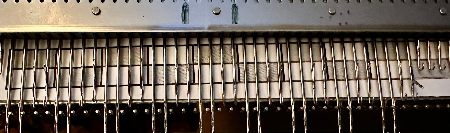 It is placed on the proper preselected needles, bring those needles out to the E position, check that transfers have been made properly, and knit the next 10 rows, repeating the process.
 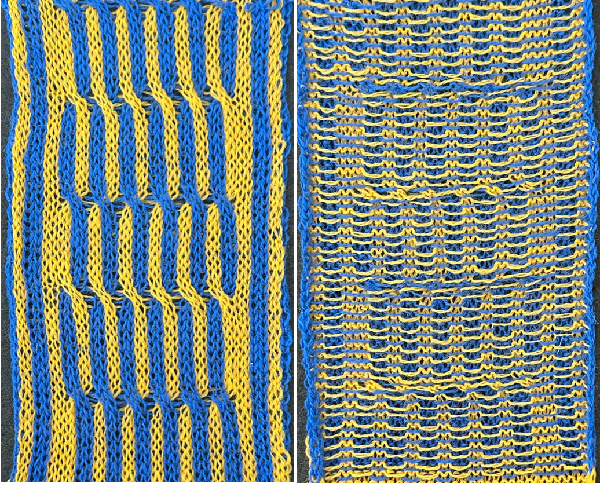 Maintaining diagonal details requires planning a repeat that works as an all over design, then choosing a panel to add to cable details. One such repeat, 12X12
 ![]() the smallest repeat, 6X6,
the smallest repeat, 6X6,  could be used for bucket filling parts of designs with pattern in Gimp
tiled alignment test: maintaining diagonals with cable crossing blocks,
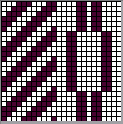


 The proof of concept after testing yarn tolerance for crossings, using the 24 stitch repeat suitable for punchcard model machines as well:
 ![]()
 Fails are easily predicted in a paint or image processing program when rows are added keeping the repeat at 24 wide, the diagonal is not changed, but the spacing between cables is increased ie by 2 more rows:
 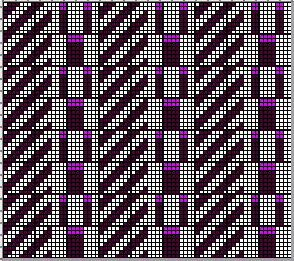 Making it work: 24X48 rows
 ![]()
More on developing DIY cable charts:
Visualizing knit cables 3_ using Numbers and Gimp
Visualizing knit cables in color 2_ using Numbers and Gimp , includes cumulative links
ArahPaint is often a part of the process now as well
Revisiting lace leaf design repeats 2
I am constantly drawn into multiple knitting rabbit holes. Along with my revisiting 3D surfaces, more leaves are still in my line of sight for further exploration.
Here they are surrounded by a traveling mesh ground: a 12X52 repeat, marked for punchcard use:
 the associated PNG
 ![]() The test swatch knit on 38 stitches:
The test swatch knit on 38 stitches: 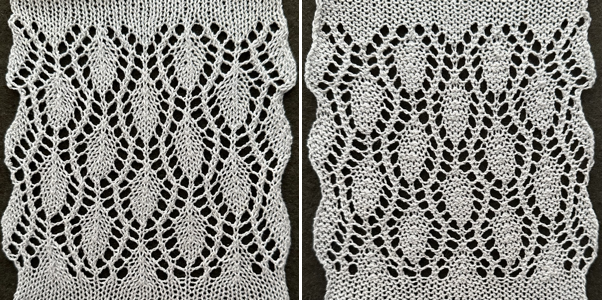 This design was shared as an stp file for use with DAK by Claudia Scarpa.
Her blog post includes downloadable files with clear markings for knit row locations, a punchcard version, a schematic for working it as a possible hand technique, and more.
DAK does not allow for exports in other file formats ie PNG.
Charts for the designs can be screengrabbed and processed with other programs ie Gimp and ArahPaint to make them usable in other ways including download options.
This electronic repeat is 20X136 pixels.
Horizontal mirroring was not required when using it in my 930. 
![]() Knit on 40 stitches, using the same wool-rayon yarn as in the first sample, there is a considerable change in the size of the resulting leaf shapes
Knit on 40 stitches, using the same wool-rayon yarn as in the first sample, there is a considerable change in the size of the resulting leaf shapes 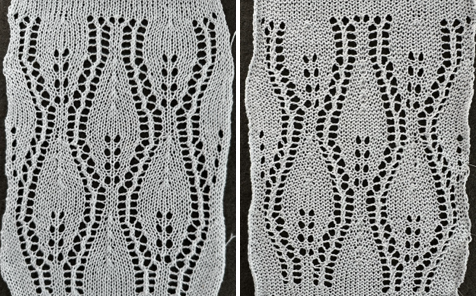 This is my chart for Claudia’s punchcard version, marked in 6X6 squares blocks as found in Brother factory punchcards,
  the result is a longer repeat resulting in larger leaf shapes, 24X228 pixels
 ![]() And then there is the world of leaves formed with hand techniques and surrounded by ladder spaces.
And then there is the world of leaves formed with hand techniques and surrounded by ladder spaces.
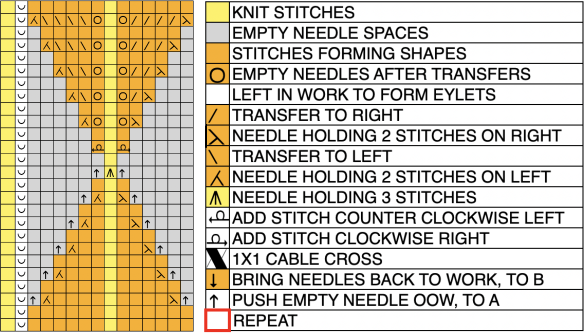
This was published in an early Silver Reed/ Studio pub eons ago and got filed in my “someday” image folder. 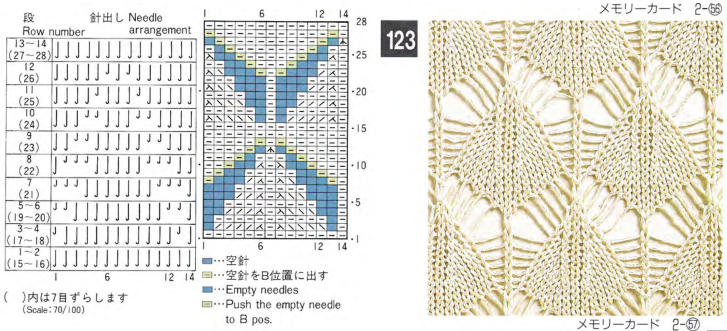 Visualizing repeats and necessary actions in spreadsheets before any actual knitting is useful.
With practice, we develop a personal library of choices regarding symbols and any additional information.
This was my initial draft taking into consideration:
the direction of the transfers
the location of single-stitch columns that are left undisturbed throughout
the needles on which stitches are doubled after transfers
where stitches are decreased, every 2 rows, marked with orange cells in the second column from the left
where stitches are brought back into work on every row, marked with green cells and arrows that point up in the first column on the left
 Printing custom needle tapes is an alternative to marking the needle beds or needle tapes to offer guides that help avoid errors or lots of needle counting in many hand techniques.
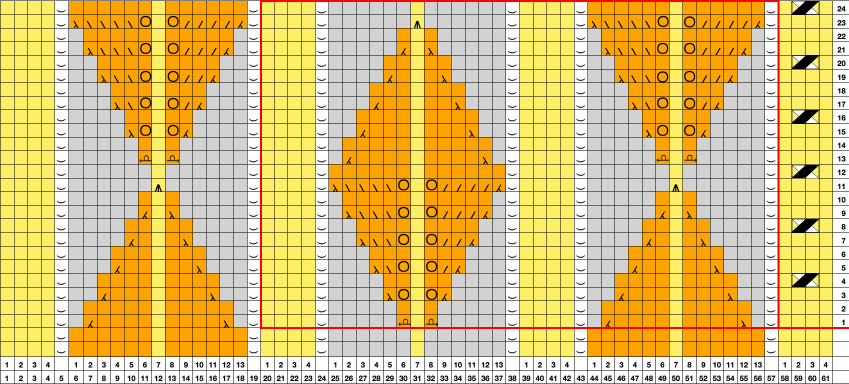
Mac Numbers version at present: 13.2. Its rulers can be set to centimeters for easy calculation of needle space cells with Japanese machine needles set 4.5 mm apart.
This PDF printed to the correct size for me when set to 100% landscape: 7 needles
4.5X7=31.5 mm: to convert the mm to cm in DIY move the decimal point one number to the left. Row height can vary with the limit being about 2 cm. The specs from the shared file: 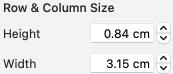 The work in progress on the machine as transfers are being made and the empty needles are taken out of work back to the A position.
 ![]() The end of transfers approach and needles are returned to work before each carriage pass, forming loops on them.
The end of transfers approach and needles are returned to work before each carriage pass, forming loops on them. 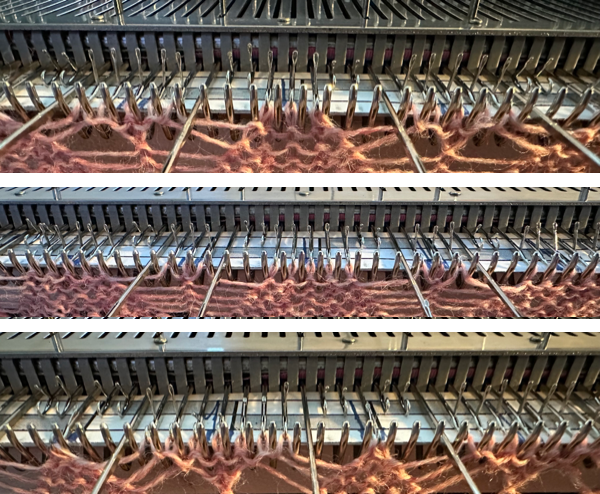 The test swatch, knit in 2/8 wool at tension 9, the color chosen randomly for weight and easy visibility
 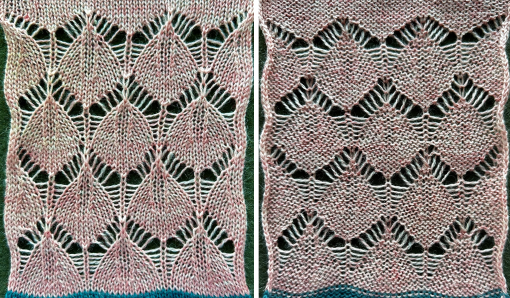 The pattern is evocative of another Studio transfer lace #112, 12X104
 ![]() a smaller design without the missing stitches and empty spaces.
a smaller design without the missing stitches and empty spaces. 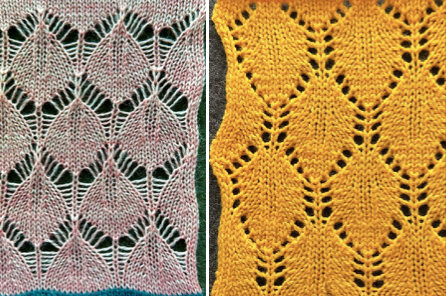 Following some research, the chart for Studio punch card 123:
 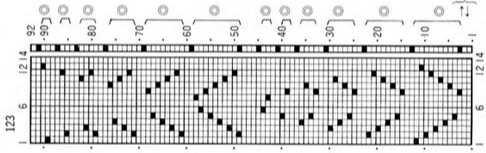 The electronic equivalent, 14X92 cells
 ![]() The file adjusted for knitting on Brother is now reduced to 14X88 cells, and the cyan is marking areas where the knit carriage makes 4 passes rather than the usual 2
The file adjusted for knitting on Brother is now reduced to 14X88 cells, and the cyan is marking areas where the knit carriage makes 4 passes rather than the usual 2 
![]() The result is a 14-stitch leaf in traditional transfer lace.
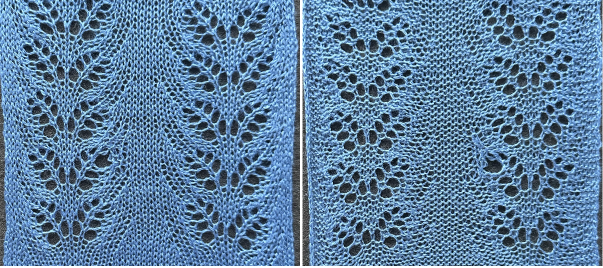
The result is a 14-stitch leaf in traditional transfer lace. 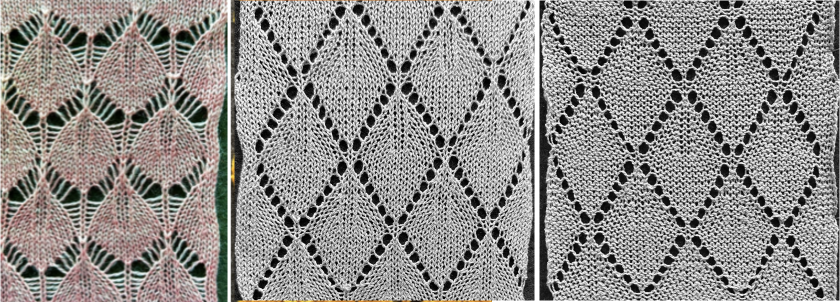 And then, the general shape begins to “appear” in other, older post swatches such as in this, part of the development of very different 12-24 stitch designs.
 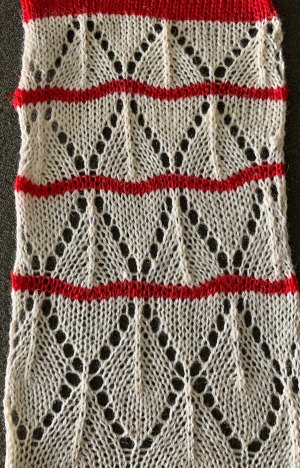 More leaves combined with open spaces, returning to hand techniques:
in DIY charts symbols can be developed to suit and included or eliminated in final directions. Convention matters if directions are to be published with patterns for general use, and matters less when for personal use.
Examples:
 the starting diagram:
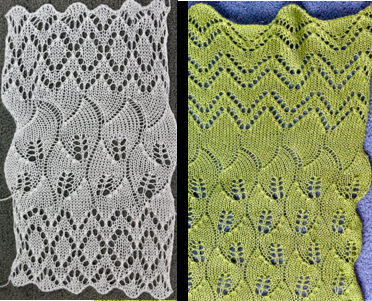
 The test swatch was begun on 2/8 wool, then switched to a 4/10 alpaca and silk because it was green, and the guess that the resulting looser stitches using it might make cable crossings and transfers easier, As can be seen in the work that follows, the size and definition of knit stitches at the edge of the vertical columns and the leaves are sharper and better retained in the thicker yarn.
 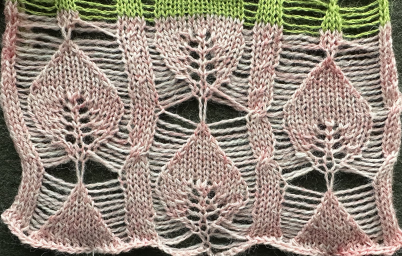 A chain cast-on was performed on the number of needles as shown above, and chains were dropped to achieve the proper setup
 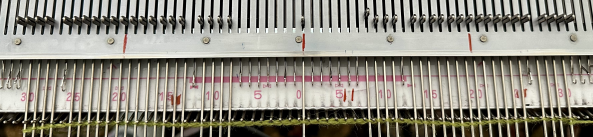 To make a visually balanced increase from one to three stitches, the tool is inserted from back to front of the ladder on each side of the stitch, twisted clockwise on the right, counter-clockwise on the left, with the twisted loops lifted and placed on the empty needles each side of that center stitch.
  An illustration from one of my earlier posts on leaf shapes surrounded by ladders
 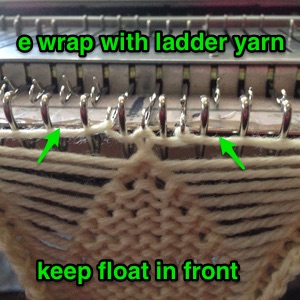 It is helpful to have a couple of 7-prong transfer tools to speed transfers along, with one set to move 4 stitches, the other 5, or simply use a combination of the standard ones.
  Another variation:
 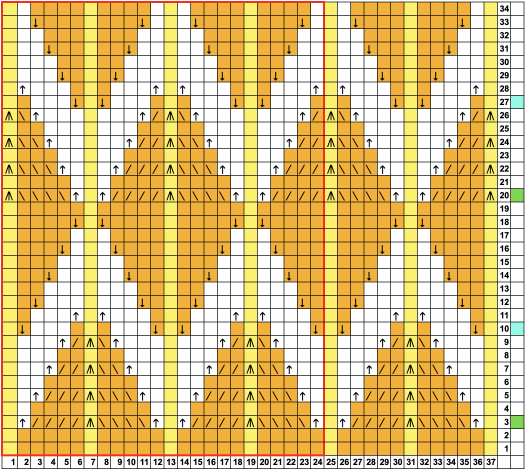 The slightly revised repeat
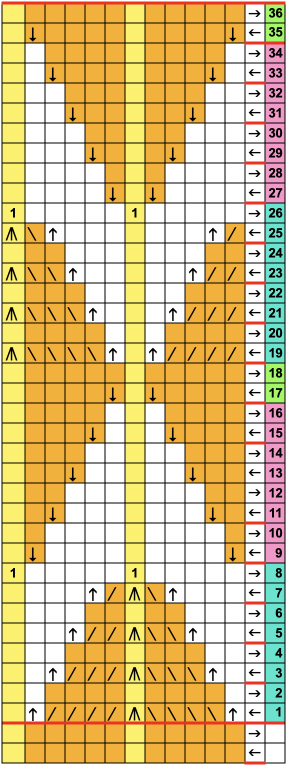
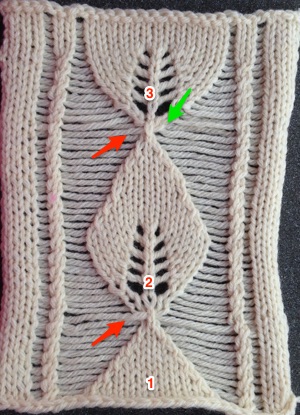
 A few images of the work in progress: in this design, actions take place every 2 rows.
The dark segments on the custom-printed needle tape mark the needle positions for stitches that are never transferred, ie rows # 1, 7, 13, 19, etc. in the chart.
At this point in the work, there are 3 stitches on the needles holding the last transfers, marked with circles, and single stitches on the alternate needle locations, marked with squares. 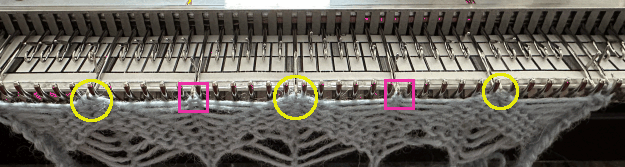 After a row is knit to the opposite side, the groups of 3 stitches are reduced to a single stitch.
 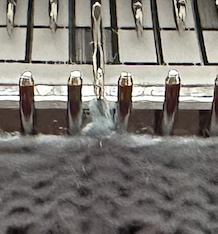 and it is time to begin to reduce the width of the floats.
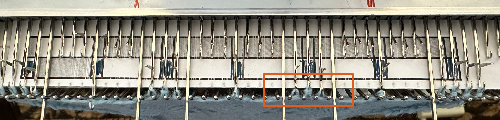
Empty needles are brought to B position/work on each side of the single stitches.  Loops will form on each of those needles as the knit carriage moves to the opposite side.
 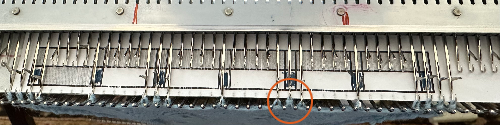 Moving forward, empty needles are brought into work adjacent to each loop every 2 rows.
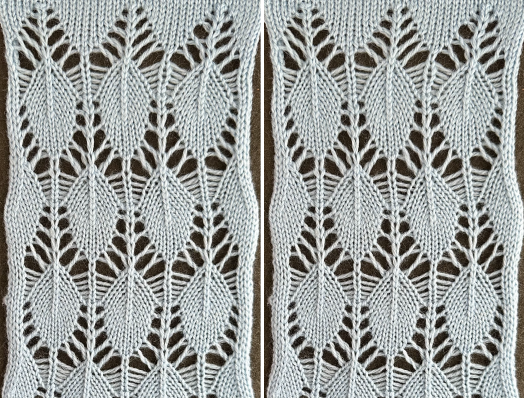
 A closer look at the twist in the floats as the action continues and the number of needles out of work is reduced:
 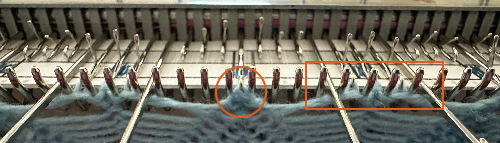 The locations in which stitches are taken out of work form straight floats, where needles are returned to work, the floats form the familiar twists seen in transfer lace patterns.
Not to be forgotten, fully automated lace edgings such as here
 and this, with both patterns shared in the same blog post
Revisiting “wisteria” 3D shapes and their possible automation
Present software makes automating textured designs in these families easier to plan and execute.
This method is limited to single colors being used at any one time and does not allow for additional patterning through fair isle or end needle selection.
Slip stitch in both directions results in black cells being knit sequentially, and the limit in width for the total design is limited to the width of the knitting machine and how the program is read and implemented.
End needle selection is canceled.
All needles in work need to be cleared with each carriage pass.
My electronic km samples are now knit on a 930, which automatically mirrors any downloaded repeats, an advantage for lettering, but not for many other situations. These designs require mirroring when using any machine or software that does so if the holding is to begin with the knit carriage on the right. 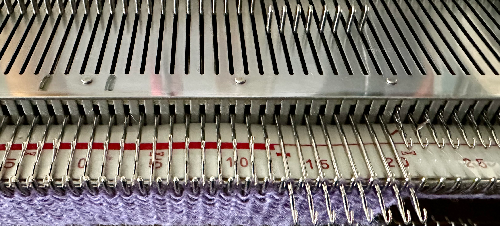 The direction of movement for the knit carriage is illustrated by arrows in the charts, which serve as guides in planning sequences.
The original charts were executed using Mac Numbers, the table was converted and scaled to size using Gimp as described in other posts, downloaded using img2track, and mirrored horizontally before test knitting on the 930.
Both swatches are 40 stitches wide, planned in blocks 8 stitches in width and height, the first repeat 40X178 pixels 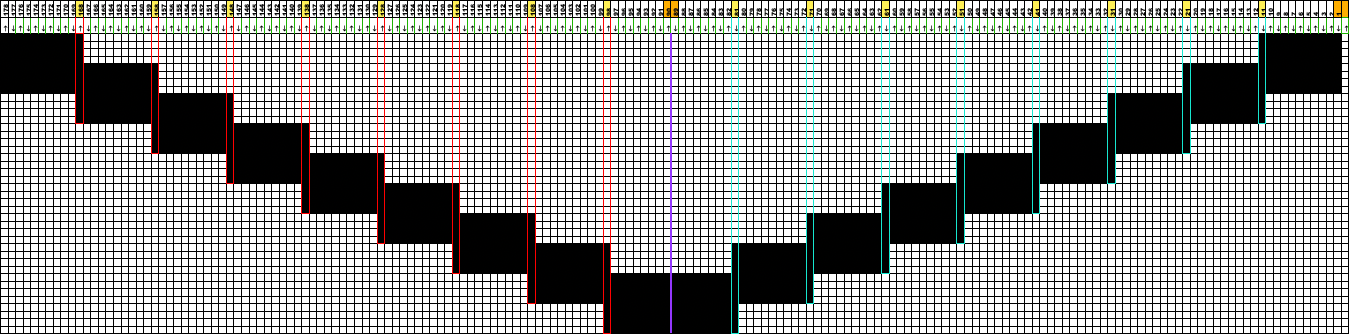
![]()
The first test: the knit carriage is set to slip in both directions. A wool yarn was used, retaining spring-back for more of a 3D texture. The design can be interrupted with all knit rows breaking up the shapes at varied intervals, with added colors if preferred. 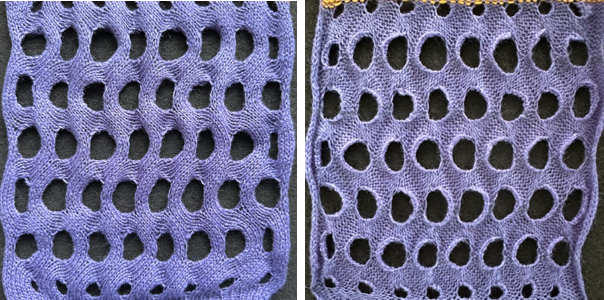
 The second repeat, 40X 226 pixels.
 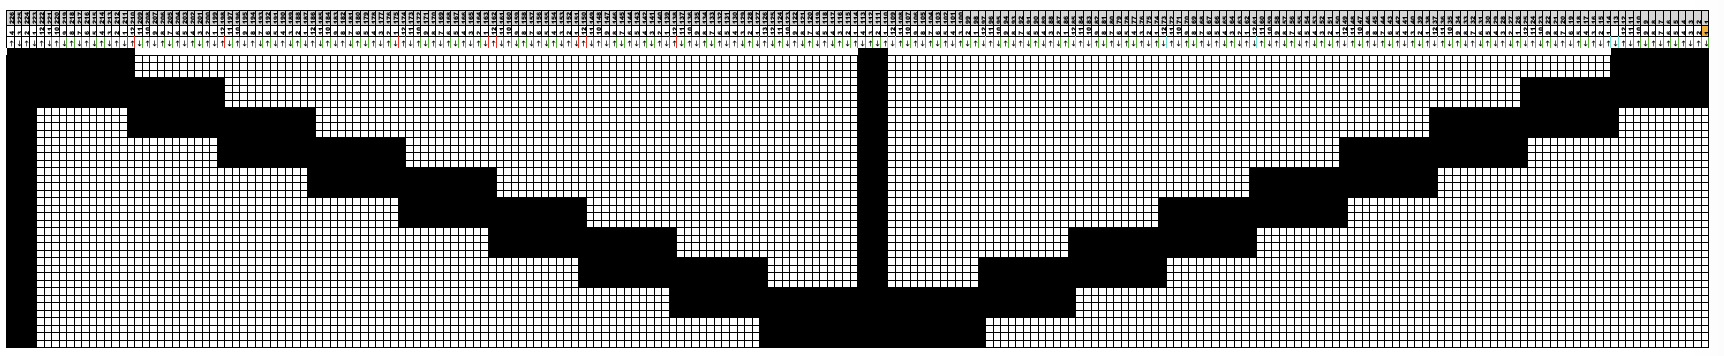 A PDF for larger views of both files pdf
A quick test in a 2/18 wool produced a soft, loose, drapey knit. 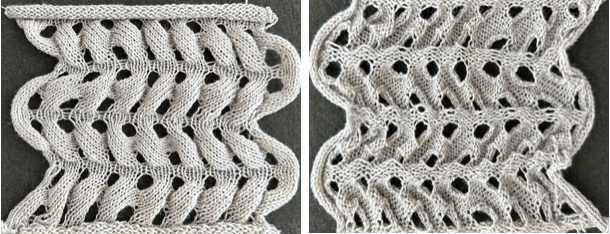 The same swatch was photographed 48 hours later, in a relaxed state.
 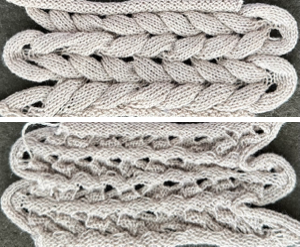 A 2/10 wool knit on the same number of stitches produced a firmer and more clearly 3D effect which remains unaltered with time.
Hems and a knit stripe were tested as a way of breaking up the shapes 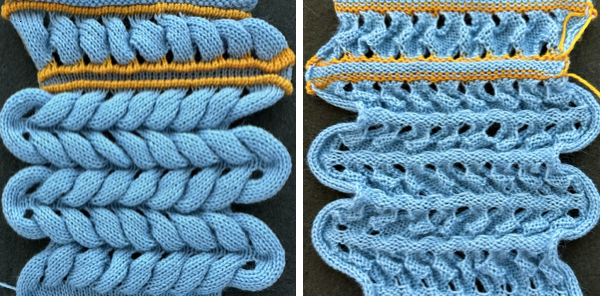 Possibilities with hand selection of needles: some samples from Adding fair isle patterning to short row patterns creating eyelets.
 “Wisteria” meets hems
 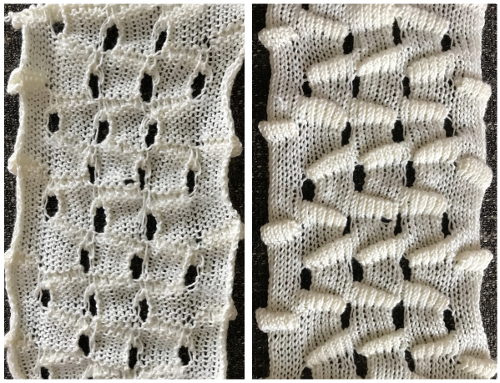 “Wisteria” cousin 2, also called fern leaf, hand technique
  “Wisteria” cousin revisited (“holding” using slip stitch), the first programmed repeat, drawn on mylar. The 910 knit the image as drawn on the purl side, with no mirroring necessary

“Wisteria” 2  Horizontal “cable”
To mesh or not to mesh 10: more large eyelet variations
Some of the relevant previous posts and a few of the associated test swatches for quick comparisons:
Large scale mesh, a punchcard repeat adapted for electronic 4/21 Tuck setting used in both directions, one of 3 variations 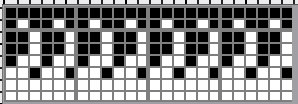
 Revisiting large eyelet lace, hand transferred (or not) 7/20
 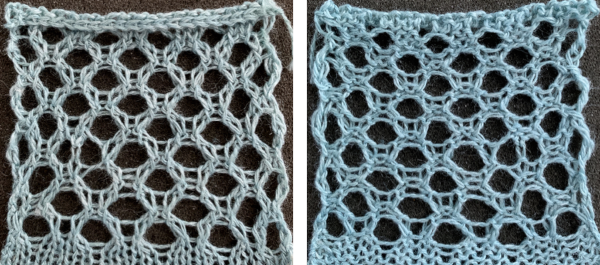 Large diagonal eyelet lace 6/12, electronic sample follows at the bottom of this post:
  Large eyelet lace, hand transferred (or not) 9/13
 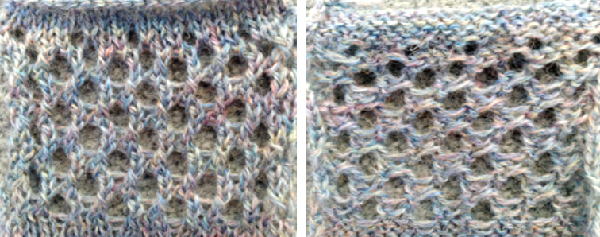 Large scale mesh, breaking the rules, the start of the explorations 4/11
 Single bed slits aka horizontal “button holes” 11/16
 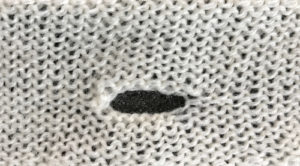 “Buttonholes” and “make many – increase” “lace” 5/15
 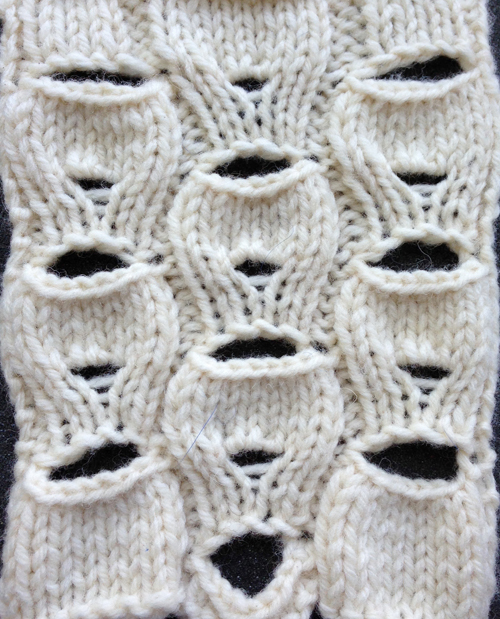 2024
2024
Seasonal knits inspired by published repeats 2_hearts
36X88 ![]()
 introduced a combination of standard and large eyelets along the edges of the shape for a better definition of the design.
A recent FB share prompted a discussion of a different fabric combining selections by both the LC operating from the left, and the KC operating from the right, using the slip setting to secure the extra loops that result after a knit pass when side-by-side transfers are made in opposing directions.
When two carriages are selecting needles from opposite sides, each needs to clear past the respective set lines on the needle bed so as not to engage the belt while the other carriage is selecting and transferring or knitting, extension rails are a must.
Although this design repeat is 6 stitches in width, and in theory, it could be reproduced on a punchcard, it is not suitable for doing so.
On electronic machine models, each carriage pass advances the design by a single row.
When the alternate carriage is brought into action from the opposite side, punchcard models do not advance the card, repeating the last preselection, so the same stitch type is repeated for a second time. Some illustrations of the differences and contrasts can be found in the posts on doilies and edgings.
Planning the repeat in a spreadsheet helps to ensure that the direction of the lace carriage passes is kept accurate when the LC returns to selecting and transferring, as marked with the arrows on the left of the chart. The yellow cells and the arrows on the right reflect KC passes.  To knit: cancel end needle selection, KCII.
If any end needle is selected before a LC pass, manually push it back to the B position. If any end needle is not selected before a KC pass, push it out to D or E
position.
The LC, set to N, consistently makes 4 passes starting from and returning to the left, followed by 2 passes of the KC set to slip in both directions starting from and returning to the right.
On the 4th LC pass, as it moves from right to left all needles will be preselected forward, a clear marker that the next pass will be with the KC.
The repeat is 6 stitches in width by 24 rows in height. The empty cells on rows 12 and 22 will produce slip-stitch floats below skipped needles that secure the second loop formed by the side-to-side transfers.
This is the pixel or punched-hole configuration that produces the side-by-side transfers.
 The 6X24 png
 ![]()
The side-by-side empty needles ![]() after the first pass with the KC to the left, with needles not selected, in B position, matching white cell placements in otherwise all black cell rows
after the first pass with the KC to the left, with needles not selected, in B position, matching white cell placements in otherwise all black cell rows 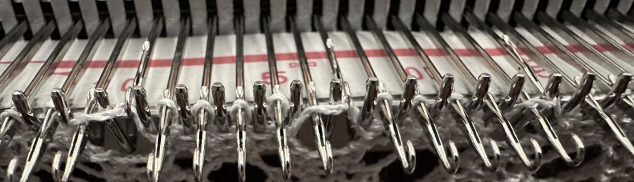 with slip-stitch floats holding down the first loop after the second KC pass as it returns to the right
 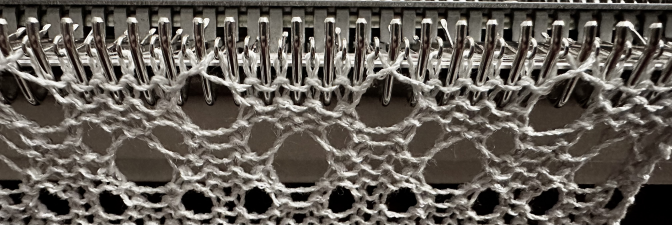 The proof of concept
 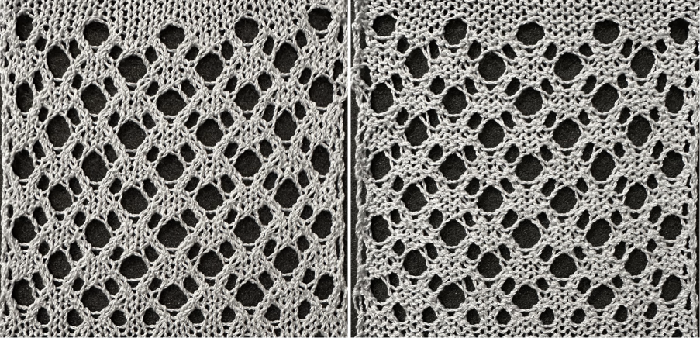 Pamela Cruse devised and shared another similarly mixed eyelet size knit. Her repeat is 6X16, with only the LC selecting needles, the KC remains set to knit, making it suitable for punchcard machines as well. The full card,
 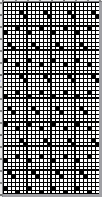 a single repeat,
 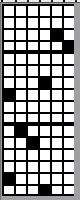 and the tiny PNG
 ![]() The knit in progress: after the two side-by-side needles are emptied, the next KC passes produce two consecutive loops, the first does not stay on the needles, but rather, gets dropped, forming a float
The knit in progress: after the two side-by-side needles are emptied, the next KC passes produce two consecutive loops, the first does not stay on the needles, but rather, gets dropped, forming a float 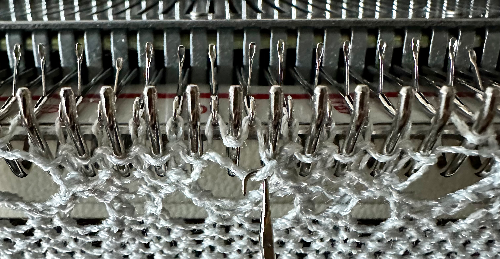 Needles will be preselected on each side of them, followed by transfers.
 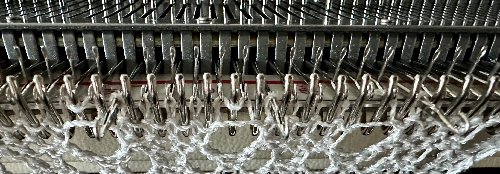 As those transfers are completed to the left and then to the right, it is those moved stitches that anchor down each loop.
 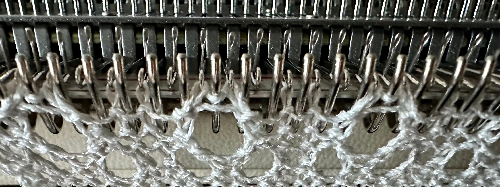 The first KC pass to the left forms single loops on the now empty needles,
 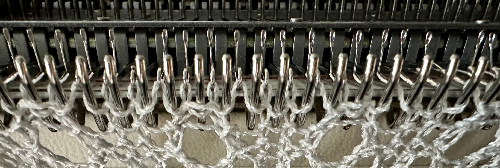 and the second KC pass to the right completes an all-knit row.
 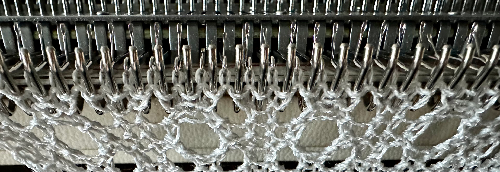 The process is repeated in brick configuration.
Mirroring horizontally was not required on the 930. When it was tested, an all-over single eyelet was produced, seen a the bottom of the swatch. 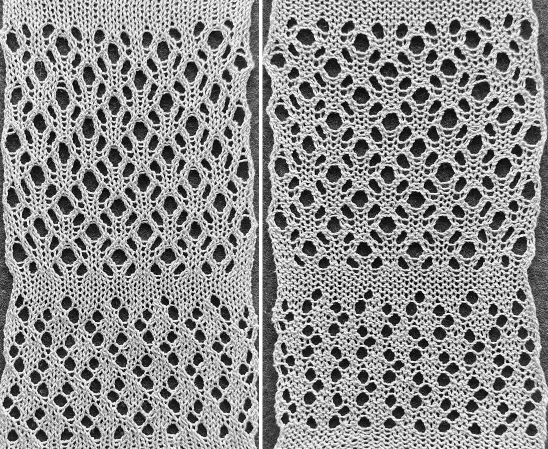 This large eyelet variation was developed by Claudia Scarpa, who shared these repeats for Brother machines which use opposite tuck/part buttons
 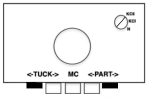 to form stitches properly after the side-by-side empty needle transfers have been performed.
There are 2 versions, each beginning with 6 stitches X 16 rows design.
Aligning eyelets vertically 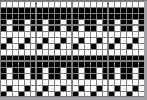
![]() and in a brick arrangement
and in a brick arrangement 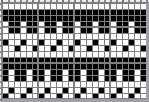
![]() To knit: cancel end needle selection, KCII.
To knit: cancel end needle selection, KCII.
If any end needle is selected before an LC pass, manually push it back to the B position. If any end needle is not selected before a KC pass, push it out to the D or E position. The LC, set to N, consistently makes 4 passes starting from and returning to the left, followed by 4 passes of the KC set to tuck to the left, slip to the right, starting from and returning to the right of the needle bed.
After the LC transfers have formed the double eyelets, when rows for the formation of tuck loops followed by slip stitch floats have been preselected, there will be pairs of needles brought forward to the D position.
The first KC tuck pass to the left forms tuck loops on the non-selected needles 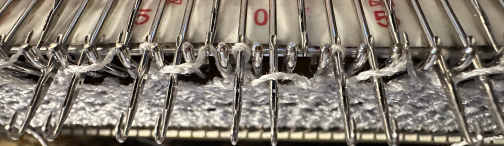 the second slip pass to the right anchors the tuck loop as all needles are preselected for the pair of all knit rows that follow
 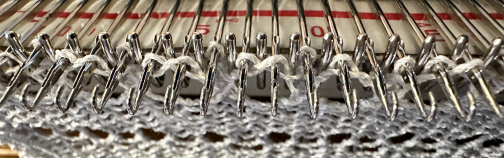 The process is repeated with the eyelets forming in either orientation
  As the KC makes its last pass to the right there is no needle preselection, a sign that it is time to return to the use of the LC operating from the left
 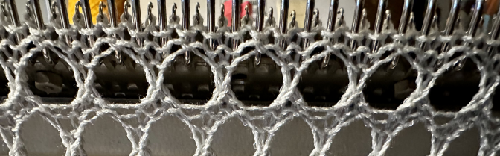 The vertically aligned repeat test swatch
 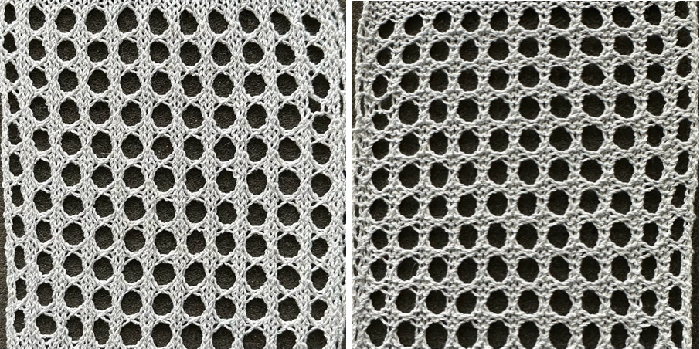 and the brick repeat test
 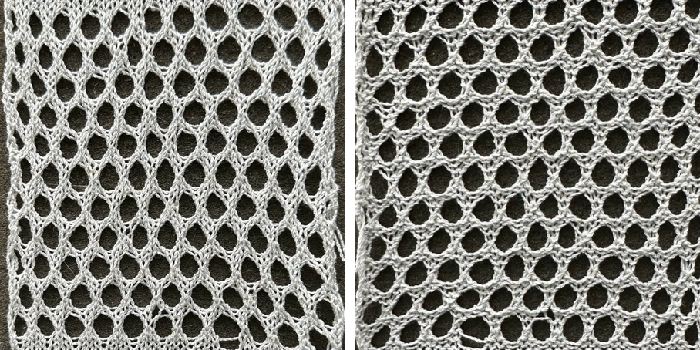 The 24X48 repeat for the diagonal mesh
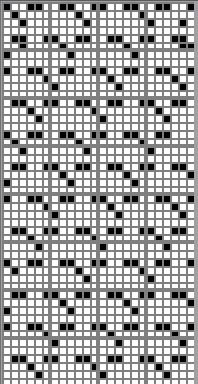
![]() The lace carriage makes 4 passes left to right followed by 2 passes of the knit carriage from right to left for the full repeat.
The lace carriage makes 4 passes left to right followed by 2 passes of the knit carriage from right to left for the full repeat.
The first KC pass creates double loops on the side-by-side empty needles 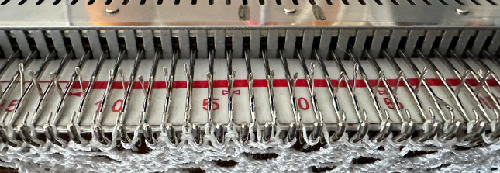 as it returns to the right, the first double loop is dropped, and a second double loop is formed
 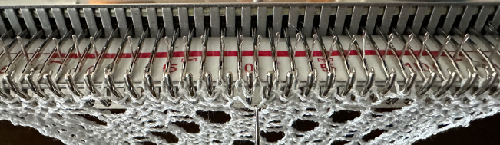 the next series of transfers will double up a single stitch on one of the two loops
 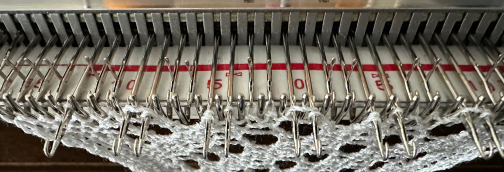 and the process is repeated as knitting progresses. The yarn used is knit wool rayon again, and the side edges were allowed to curl. There is one stitch that got away from me on the left.
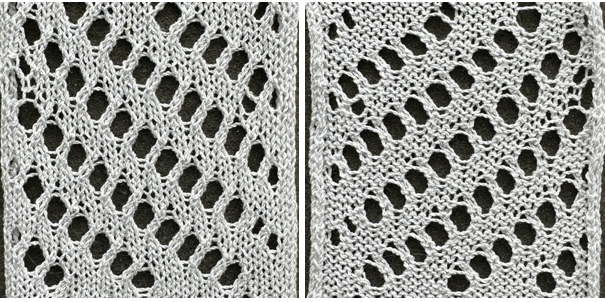
Revisiting lace leaf design repeats 1
Just about a decade ago, I began one of my many temporary technique obsessions by finally attempting transfer lace knitting, and it continued for a few years during which I produced scarves and shawls for gifts and sale in galleries and craft shows.
Leaf shapes held a particular attraction for me.
That long ago I was not sharing the pattern repeats used in my production items, and my note-keeping was not what could be defined as consistent or compulsive, so in looking at yet another pin sharing a lace leaf pattern in the present time, I went looking for some of my early repeats and let us say I did not immediately locate them.
My lace production pieces were worked on a 910 with mylar or a Brother 892 punchcard model, long before I entered the world of spreadsheet tables, downloads from Mac with Ayab to the 910, and later owning and favoring to a 930 with img2track.
A review of previous shares:
Beginnings, 2/11, adapted from a design published by Susanna Lewis
 In progress, 2/11
  On the blocking board 2/11
 Back to lace/ 2/12, hand knit
  More on those slanting lace leaves 2/12 hand knit, pattern graph available for download
  Back to leaf lace, add rib, and take it to the Passap, hand transfer, E6000 with console assist 3/12, added punchcard unrelated design
 The post punchcard, reconstructed in 2024 using Mac Numbers, Gimp, and ArahPaint, with similarities to the design that evolved in later explorations producing the more successful 24X64 repeat reproduced on the right.
 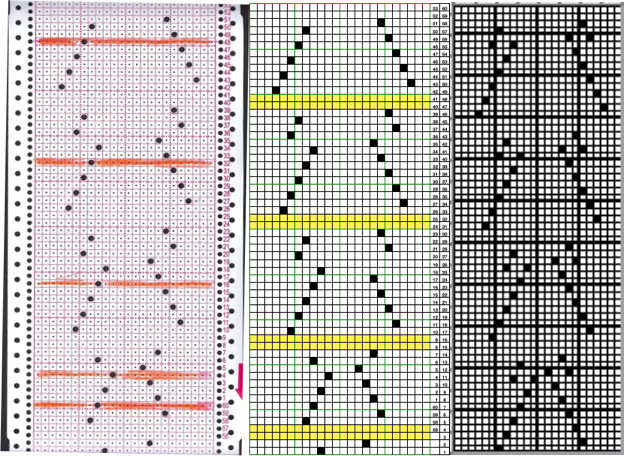 Comparing the knitted results:
 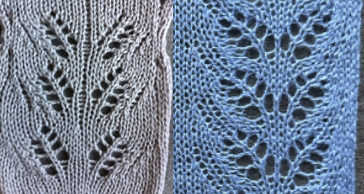 Getting there hand transfer tech with card assist 3/12
  The joys of lace on the KM 3/12, dropped knitting, or too many dropped stitches can happen.
 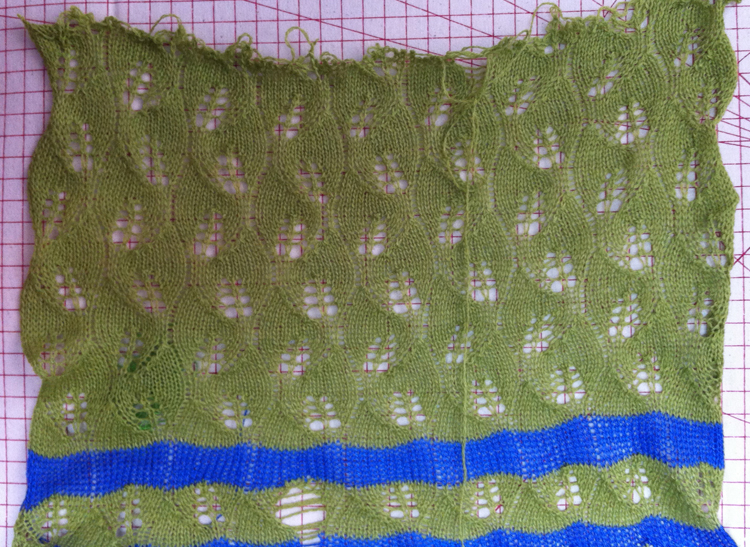 Getting there leaf motifs, adding borders 3/12, goal: find the related punchcard
 2024 the punchcard was located.
A punch card roll was used. When purchased, it was advertised for Brother but factory number markings on the right are for Studio machines, with row 1 on row 5 from the bottom all punched rows as opposed to row 7 for Brother. Keeping the use of the roll continuous, the factory markings become irrelevant in such DIY long repeats.
In this instance, the card is 104 rows in length. 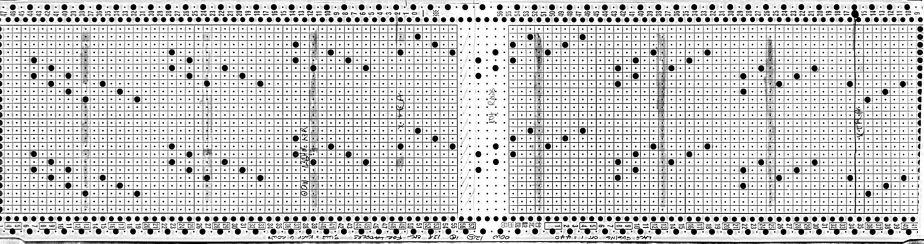 Using Mac Numbers, Gimp, and ArahPaint, for easier reproduction, here it is shown with 6X6 grid block markings typical of Brother factory cards
 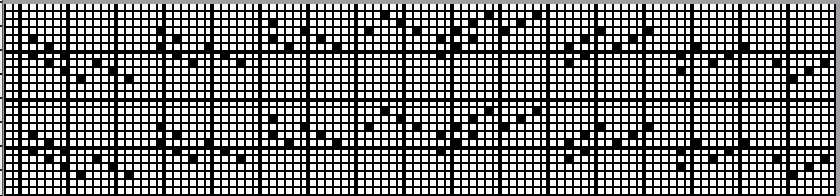 The card begins with a blank row, and the first transfers will be made to the right rather than to the typical left
In the swatch, only two knit rows were knit after each series of transfers occurring after 19, 22, 36, 52, 62,74, 88, 104.
Needles were taken out of work beginning with needle 1 on the right of 0, and 13 on the left, continuing every 12 stitches on wider knits.
 The earlier swatch has extra rows knit between shapes
 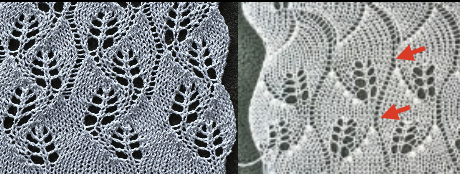 A quick test on 24 stitches with 4 rows knit after 52 and 104 passes of the LC respectively
 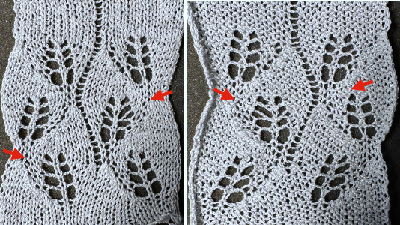 Yes, a punchcard is possible leaf motifs 3/12, card, find repeat
  the card, also finally found
 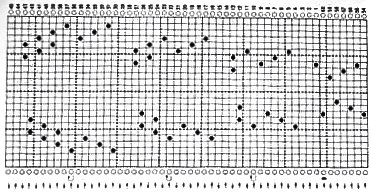 exploring detail options ie adding knit rows, where to place the repeat for side edge variations, using ladders between motifs, latching the ladder to reproduce single row tuck stitches, applying the choices to a long-ago final shawl.
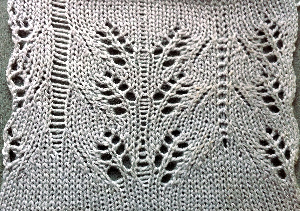
 The repeat shortened for swatching 2024: 24X52
 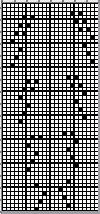 needles out of work help define the leaf shapes
 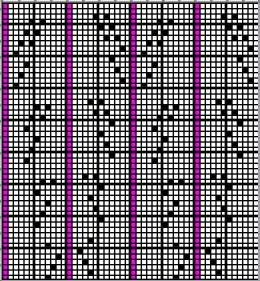 the png
 ![]() proof of concept with 4 rows knit after the 52 LC passes that complete one pair of leaves.
proof of concept with 4 rows knit after the 52 LC passes that complete one pair of leaves. 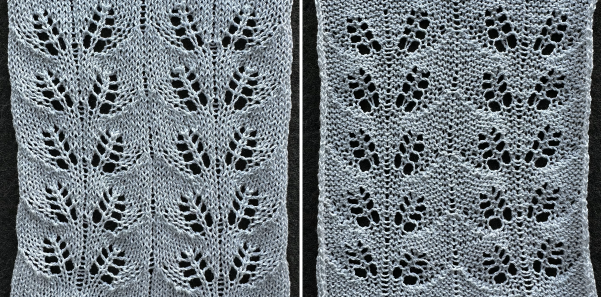 With so many transfers between knit rows on a long piece like a shawl or scarf, knitting 4, 6, or more rows upon completion of each full repeat is an option. Six appears to have been my choice in that work on the machine
 This repeat is composed of 24X64 cells, there are 16 rows of LC transfers followed by 2 rows of knit stitches throughout, after 64 LC passes only 8 rows of actual knitting have taken place.
Remember to oil the LC as well as the KC, and look out for dropped stitches, like the one in the swatch followed by a lazy “repair” that is particularly noticeable on the purl side. 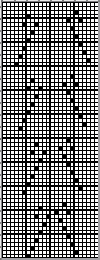
![]()
 The evolution of a simpler and easier-to-execute pattern with similar movement can be found at the bottom of this post.
Ladders with lace, (leaf) “making things work” 1 3/15
Ladders with lace, (leaf) “making things work” 2 3/15
 A new “leaf” lace 4/17, chart provided
 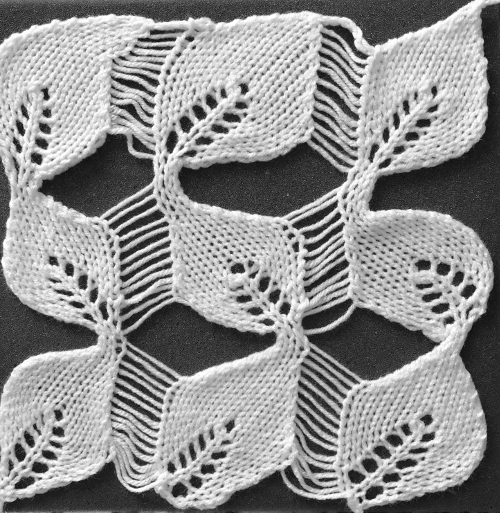 The start of a new series aiming for DIY: this repeat is 24 stitches wide, suitable for punchcard models, but tested on a 930 where it was necessary to mirror it horizontally, and is knit using 2/18 wool.
Plotted on a spreadsheet with LC passes and direction of movement marked on the left side, knit rows after LC passes 2, 8, 12, 20, 26, 36, 40, 48, 54, 64, 72, 84 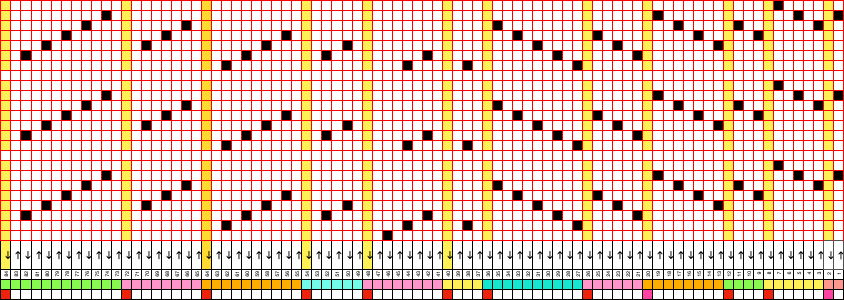
 the 24X84 png
 ![]()
 Playing with more variations does not always lead to results worth pursuing, but they provide learning experiences that inform future choices. Anyone familiar with lace knitting, particularly where so many transfer rows occur between knit rows, has experienced a lot of this from time to time.
 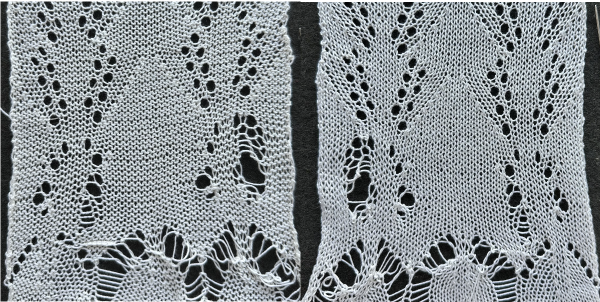 Lace can only be described as temperamental.
I am perennially in awe of videos where some knitters appear able to knit lace yardage with a motor with no dropped stitches to be seen anywhere. That has not been my experience, though for a while I did manage to produce a line of one-off scarves and shawls knit in a variety of lace patterns. I got good at unraveling down to knit rows and rehanging.
Avoiding dropped stitches, and managing dropped ones have avid advocates for different methods, a topic for a different discussion.
It helps to have a needle retainer bar that is in really good condition, needles with latches that operate properly, tension and suitable weight of yarn based on the number of needles used, and begin testing with yarn colors that make it easy to identify transfer issues as they are happening as opposed to after the fact when large holes seem to magically appear.
Unless the goal is to create a large mesh, if side-by-side needles are preselected in most designs including these, the causes may be punching or drawing errors, or simply that in the specific machine model, or software used, the pattern needs to be mirrored horizontally, as in my 930.
New to me now: the assumption is made that the LC will be slipped off the belt when the other carriage is in use. That is not necessary if the knit carriage does not also select needles, locking onto the belt.
Generally, the patterns are advanced by any carriage set to select needles as it moves past the center of the needle bed.
If the lace carriage does not clear the set mark on the left side of the machine, the pattern may not advance sporadically, which is evocative of needle selection fails, but it will resume doing so when the LC is moved far enough to the left before making its next pass to the right.
In this repeat, the knit rows are easy to track. They happen after there is no needle preselection as the LC moves from right to left, ie. after 4, 8, 6, 10 carriage passes, etc.
The blank number of rows between black pixels is not always even and can be odd when a reversal of the direction of transfers is required with a Lace Carriage that operates only from the left.
If needles out of work are used, care should be taken not to accidentally bring them back into work during knitting. If several rows have been knit, the stitch is dropped, and the needle is brought out of work again, the resulting ladder will be wider than the one in the space below it.
Maintaining the goal of producing a design suitable for punchcard models as well, this new repeat is composed of 24X72 cells 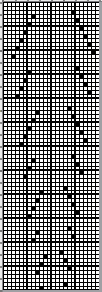 the png.
 ![]() adding needles out of work helps define the shapes which can also change appearance depending on yarn and color choices.
adding needles out of work helps define the shapes which can also change appearance depending on yarn and color choices. ![]() A more successful swatch, knit in wool rayon:
A more successful swatch, knit in wool rayon: 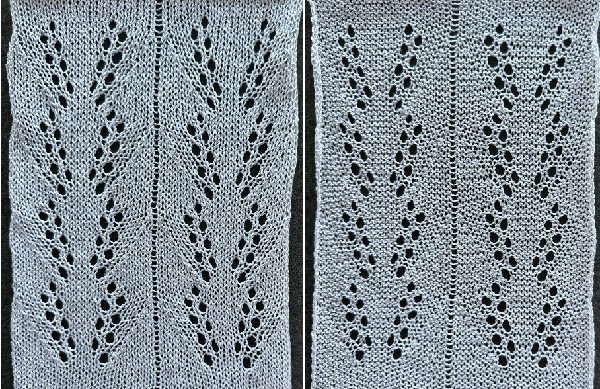 Modifying the design for use on electronic models only, an 18X48 repeat, knit in a 2/8 wool that really wanted to split upon being transferred, adding a ladder between repeats as above, and 4 knit rows rather than 2 upon the completion of each design segment
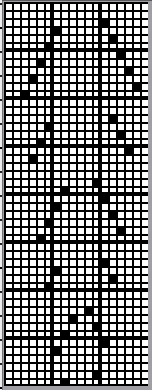
![]() Three would-be runaway stitch spots are visible.
Three would-be runaway stitch spots are visible. 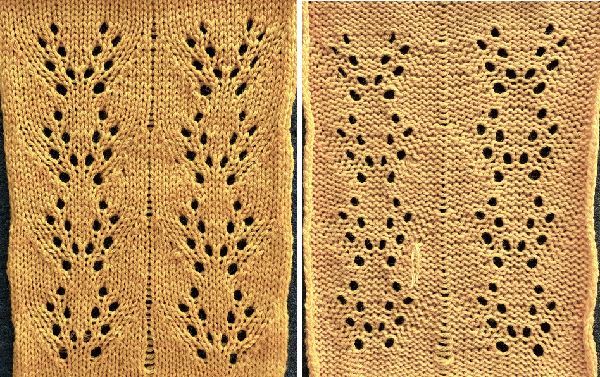 Wanting to shift eyelets, changing the repeat:
 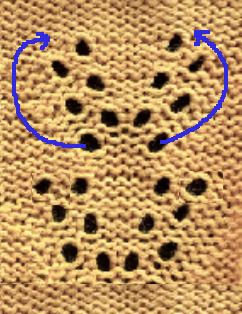 The first try, 20X48 pixels repeat proved to be quicker and easier to knit, with only single transfers at any one time, two rows were knit after every 12 LC passes.
 ![]()
 A shift to a 19X48 row repeat, planning to add ladders between each of the repeats
![]() I like to program repeats taking into consideration the number of stitches required for the project, which offers the opportunity of adding extra blank columns for knit borders on either side and avoids any confusion with positioning when returning to the design at some future time.
I like to program repeats taking into consideration the number of stitches required for the project, which offers the opportunity of adding extra blank columns for knit borders on either side and avoids any confusion with positioning when returning to the design at some future time.
The swatch on the machine, beginning with needle one on the right side of 0 taken out of work, followed by every 19th in either direction, 4 rows were knit after every 12 LC passes.
![]()
 Widening the repeat to 24 cells wide makes it suitable for use on punchcard models
 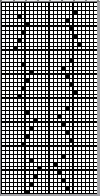 The extra columns of knit stitches allow for placements of twisted stitches upon completion of each row of shapes:
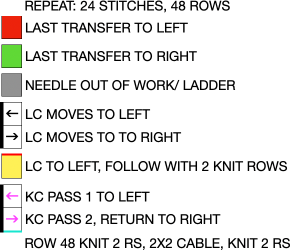
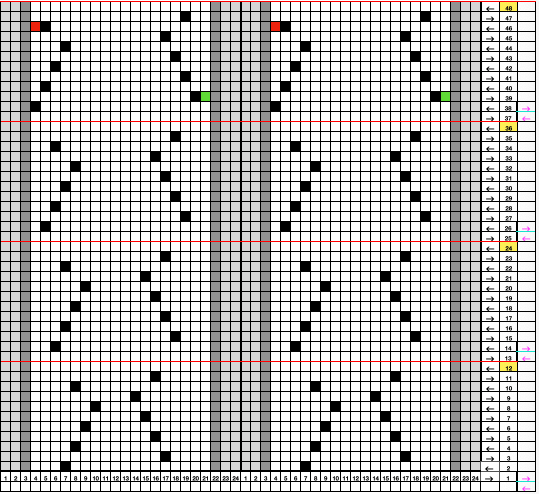 In the final swatch 2 rows were knit after every 12 LC passes. Upon completion of a full row of shapes, 48 LC passes, 2 rows were knit again, the 2X2 cable crossings were made, followed by 2 more knit rows before returning to the use of the LC.
Having a ladder on each side and vertical columns of 3 stitches aside them will form a roll to the purl side that may in many instances be a satisfactory side edge. 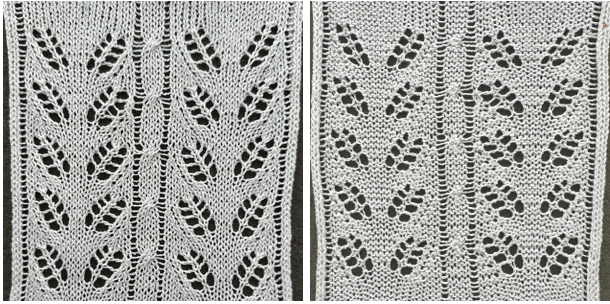
An untested converted design from  pattern 201
 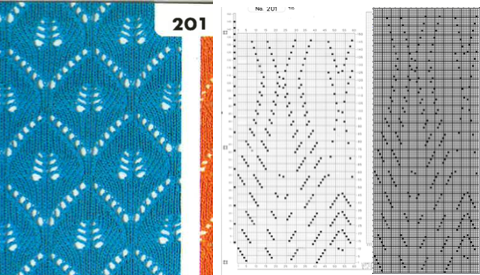 the locations of knit rows marked with black cells on the far left of the mylar
  the 60X150 png
Some to try: from Stitchworld 
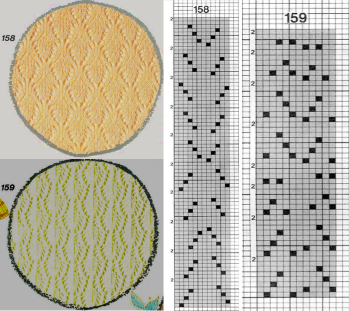
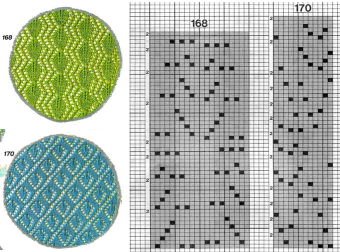 12 stitch repeats are also suitable for punchcard models
144, 12X36![]() 159, 12X52
159, 12X52 ![]() 170, 12X60
170, 12X60 ![]() 158, 12X80
158, 12X80 ![]() 145, 10X56
145, 10X56 ![]() 168, 20X56
168, 20X56![]()
Seasonal knits inspired by published repeats 2_hearts
Charts are included for repeats suitable for punchcards, where the designs must repeat in height to a minimum of 36 rows.
Some reminders: the BW pngs here are intended for import into a paint program or image processor where they can be magnified to suit, with a grid view for counting cells to consider the width of floats if used in single bed fair isle, adjust the design in DIY variations, or import into download programs as provided.
The tiled repeats help to visualize how the final appearance on the knit side.
While the pngs are shared in BW indexed mode, when dragged to desktops or otherwise copied and are opened in image processors, they may change to RGB mode by default and will need to be converted back to BW indexed mode prior to use for import and download to knitting machines.
Some machine models will automatically mirror the image horizontally, depending on brand and model year as does Ayab software.
When direction matters, ie in representational designs or transfer lace, the mirroring may be performed on the image provided before using it, or by using the appropriate button or command after downloading to electronic machines.
Punchcard users can mirror after the fact by simply turning the card over before inserting it, after marking and numbering at least the starting row on its reverse.
To retain symmetry in developing half-drop or brick repeats, it is useful to have an even number of stitches and rows in the original design. Some designs are broken up in ways that are subject to use based on personal visual preferences.
If used for blankets, the repeats can be tiled to dimensions leaving room for coordinated borders.
12X10 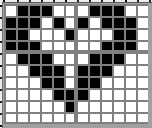
![]()
 12X10 to 12X20 brick
![]()
 12X10 to 24X10 half drop
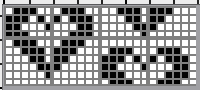
![]()
 24X24
24X24 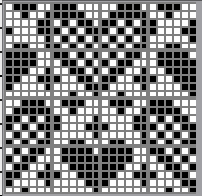
![]()
 24X28
24X28 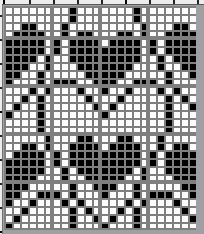
![]()
 32X32
32X32 ![]()
 34X34
34X34 ![]()
 43X43
43X43 ![]()
 adjusted to 44X44, an all symmetrical suitable as a single motif or in larger formats
 ![]()
 brick 44X88
 ![]() brick tile
brick tile  half drop tile 84X44
 ![]()
3 color 14X3, requires a different color separation than KRC, each color in each row needs to be knit twice ![]()
 the 2-color version
 ![]()
 From weaving drafts: a mosaic-like design
 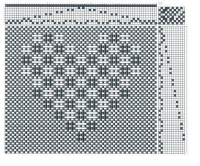 the 68X58 png
  cropped to 67X58 to avoid double stitches
its half drop repeat 134X68 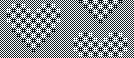
 the source for a much smaller repeat
 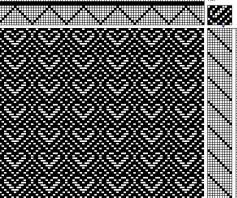 the 14X20 png
 ![]()
 When all you need is a border, repeats that may be used vertically or horizontally, presented in punchcard configuration, 24X21:
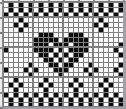
![]()
![]() 24X20, rotated for horizontal use would become usable on electronic models only
24X20, rotated for horizontal use would become usable on electronic models only 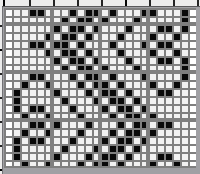
![]()
![]()
From To mesh or not to mesh 9: more on mock filet design ![]()
 See the post for additional repeats and my method of developing the design.
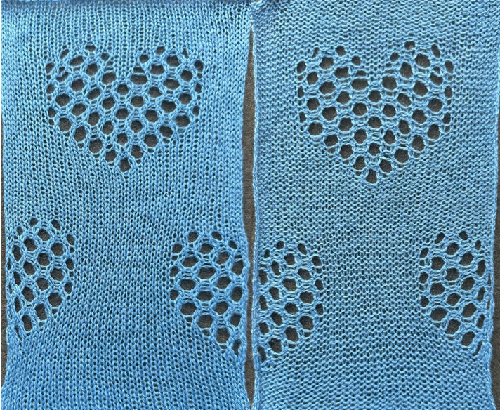
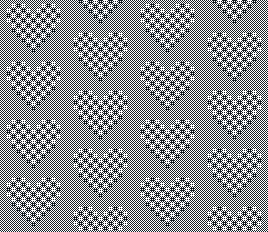
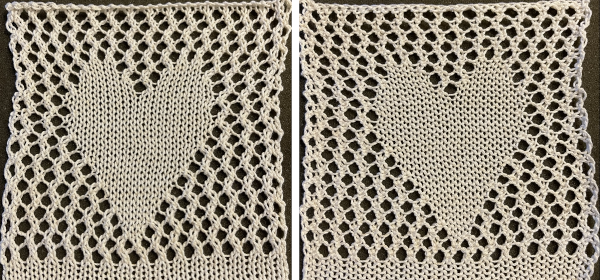
I could not find the source for this Pinterest find on the upper left, which results in a combination of large mesh and single transfers to create the heart shape.
The initial 24X44 png ![]() brick repeat, 24X88
brick repeat, 24X88
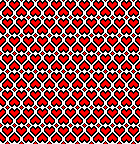
![]() with more knit stitches between shapes, 36X88
with more knit stitches between shapes, 36X88 ![]() the knit rows separating the stripes of heart motifs are highlighted in red.
the knit rows separating the stripes of heart motifs are highlighted in red.
On Brother machines the KC does advance the repeat in standard lace, so each of those red stripes is reduced to two rows of blank cells, resulting in the 36X88 repeat charted on the far right 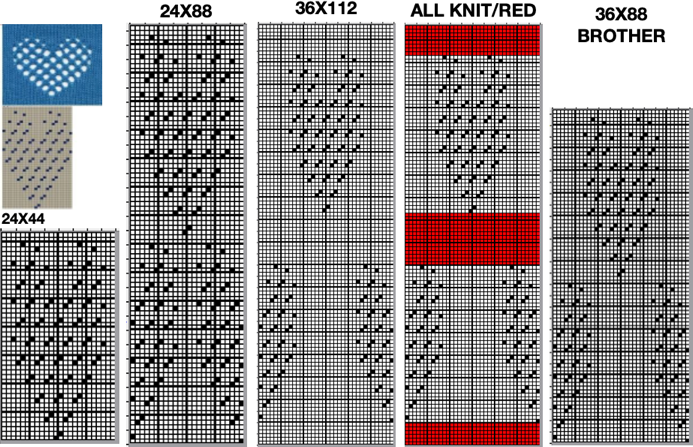 A small proof of concept knit in 2/18 wool A Studio 560 was my first electronic model machine, owned decades ago. Among the mylars saved even though the machine was sold many years ago, I found this repeat, 24X47 cells, the last offered in this series. Studio mylar sheets were marked in 6X5 blocks as opposed to Brother’s 5X5. The punchcard repeat chart here is outlined in 6X6 blocks of cells, the convention in Brother punchcards.
  the png
 ![]()
![]()
A series also shared in the post Seasonal knits inspired by published repeats 1
two from the various groupings
24X39![]() 24X78
24X78 ![]()
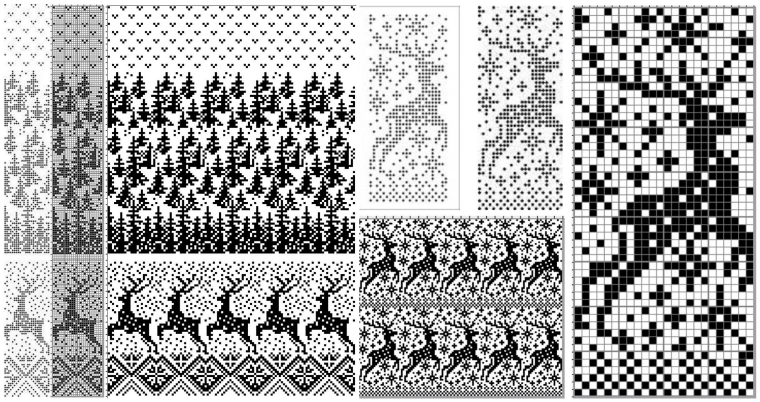
Small to large repeat figurative designs inspired by filet crochet charts
Reducing figurative designs to repeats for knitting on a low needle counts results in loss of definition.
Filet crochet charts can serve as a starting point for repeats, but usually are planned on more than equivalent 24 stitch counts, so results of adapting them are often usable on electronic machine models only.
The knitting technique used to execute the design determines whether the lengthwise aspect ratio is affected or not.
1: the source image
2: processed using Mac Numbers
3: opened in Gimp
4: the grid color can be altered to view and match stitch counts
5: the color reversed image to visualize the possible appearance of doing so in the knit
6: a small border frame is added, bringing the figure color to the edges of the knit piece, and the figure is mirrored, helping to make a choice about its orientation on the the knit side 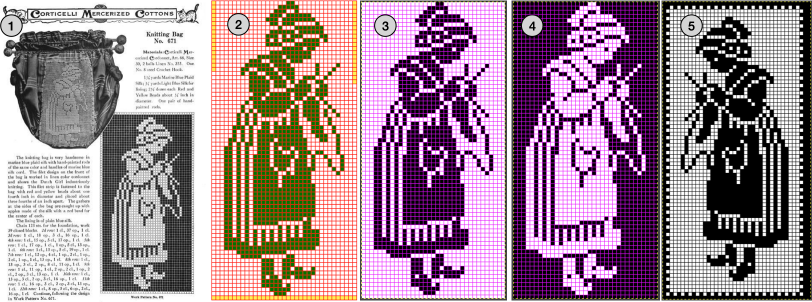 Depending on the model machine used, the motif may appear as drawn on the purl or on the knit side, mirroring it when direction matters may be done using machine settings or mirroring before download.
On my 930 mirroring was not necessary, the swatch was knit on 40 stitches, with the added frame.
The figure alone, 35X72 pixels ![]() shown on 6X6 grid blocks
shown on 6X6 grid blocks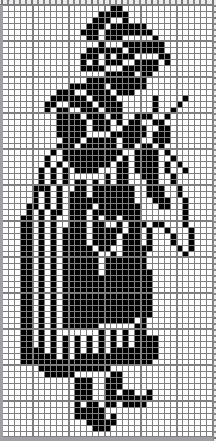 A DBJ swatch with birdseye backing
 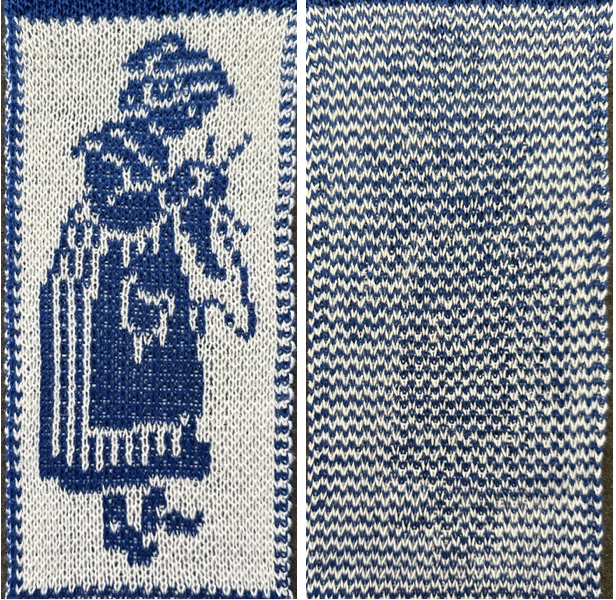 A sitting companion, inspired by random Pinterest find, processed using ArahPaint, not knit tested, 49X65 pixels
 ![]() shown on a 5X5 pixel grid
shown on a 5X5 pixel grid 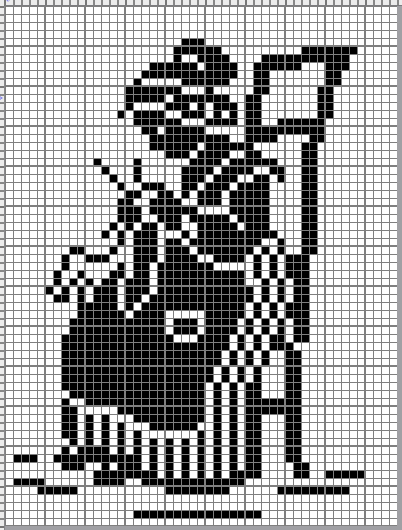 Graduating to pillow or blanket size, a bit of romance in advance of February, from a Priscilla Filet Crochet book, the original was in a nearly oval format.
A border was added to complete the original to full oval shape,
black pixels were added to complete the inner shape, and the BW image was extracted and saved.
Working in RGB mode, the border needs to be adjusted for symmetry, not fully complete here, and bucket pattern fill may be used to customize it or any frame 
 the 117X154 modified oval chart and png
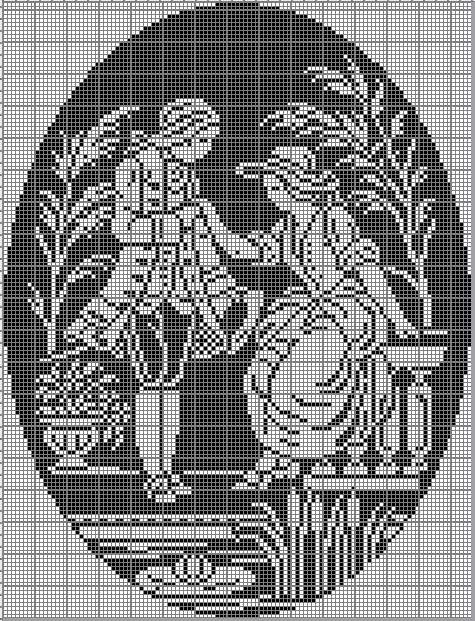
 color inverted 107X154 for DIY modifications to other shapes
  A 137X184 RGB version with editable border
  Mythological inspiration from a Priscilla source
A: the original
B: processed with GIMP
C: processed with Arah 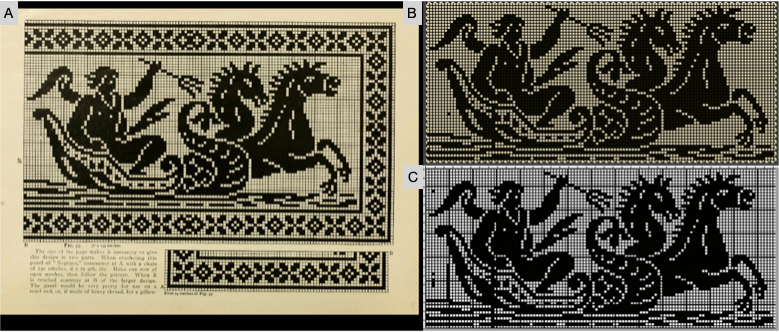 the final png chart, with some pixels removed
 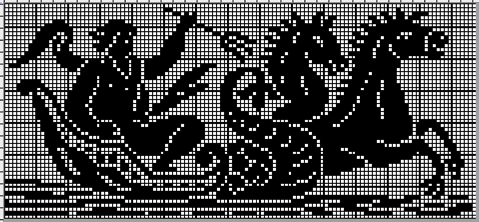 and the 118X54 png
  A 142X81 pixel version that includes a border
 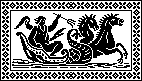 From previous posts:
74X54 Celtic design 
43X53 squirrel ![]() This image is not from a filet crochet chart but from one of my Studio 560 mylar sheets dating back decades. It is used to illustrate the possibility of mirroring in different directions to produce far larger designs ie wall hanging or blankets.
This image is not from a filet crochet chart but from one of my Studio 560 mylar sheets dating back decades. It is used to illustrate the possibility of mirroring in different directions to produce far larger designs ie wall hanging or blankets.
Alone it could serve as a scarf, with the image rotated and perhaps even mirrored at the opposite end of the scarf to match directions when draped around the neck 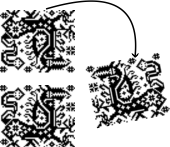 The 60X50 cell repeat
  It takes a few clicks of a mouse and a couple of program windows nowadays to make the addition of single cells at the top, bottom, or sides of such large designs that avoid tiling intersections with double cells if that is the goal.
It is also easy to manipulate the chosen designs to visualize the appearance of a final piece. Printing the pixelated results in a larger format can aid informed choices before any actual knitting.
Adding a single cell blank column on the right, and one with a few pixels on the bottom a blank row on the top, 61X52  in a 122X104 repeat that with coordinated borders could approach the use of most of the needle bed
 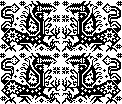 with the initial shape mirrored horizontally and then drawn in repeat a column with double pixels appears again at the center of the design
 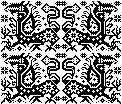 staying with that, but making shapes go around
Seasonal knits inspired by published repeats 1
In previous posts, ie Numbers and GIMP: online punchcard patterns to electronics 2, I shared some ways of converting online images from varied published sources.
This series was edited using primarily ArahPaint and some Gimp, both are available for free.
DAK users have the ability to achieve similar results in that universe, producing stp proprietary files. There is no export (or import) available to other formats ie png or bmp possible.
Fair isle is not in my preferred wheelhouse, especially in season specific designs, but that said, I have been sharing these repeats in the FB machine knitting forum and thought I might make them available to others here as well.
The pngs are editable for further DIY modifications.
 24X189
![]() 24X94
24X94 ![]() 24X85
24X85 ![]() cropping given repeats for desired tiling, # 1068
cropping given repeats for desired tiling, # 1068 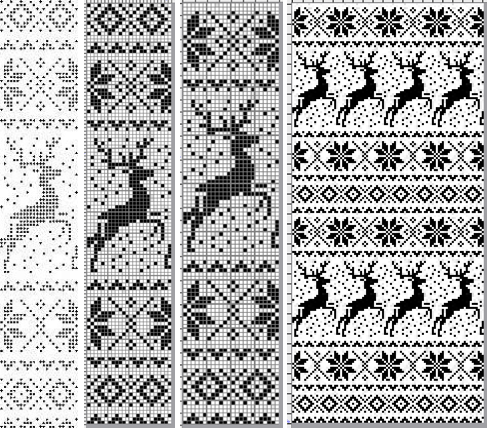 the original 24X119 png
 ![]() cropped to 24X105
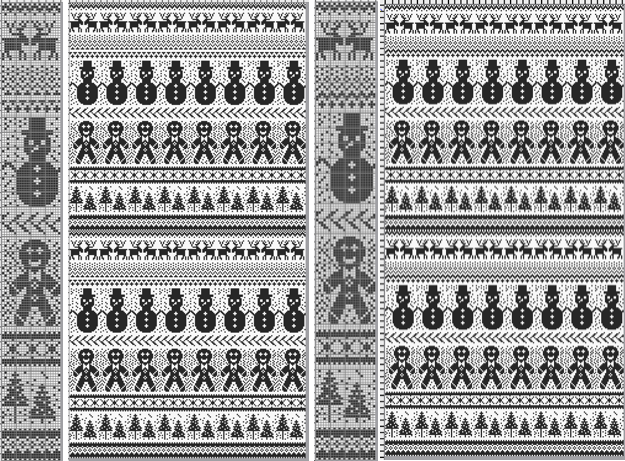
cropped to 24X105 ![]() My first encounter with “naughty reindeer” was during a Brother dealer-sponsored small machine knitting club meeting. A present update, using a Pinterest find as the source
My first encounter with “naughty reindeer” was during a Brother dealer-sponsored small machine knitting club meeting. A present update, using a Pinterest find as the source  the original 24X60
 ![]() with 2 rows added to 24X62
with 2 rows added to 24X62![]() in brick repeat, 24X124
in brick repeat, 24X124 ![]()
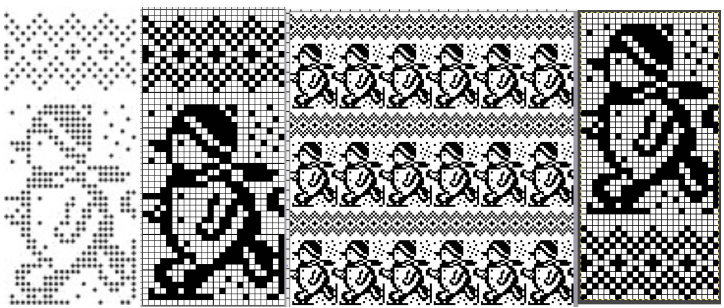
A 40 stitch Madag design 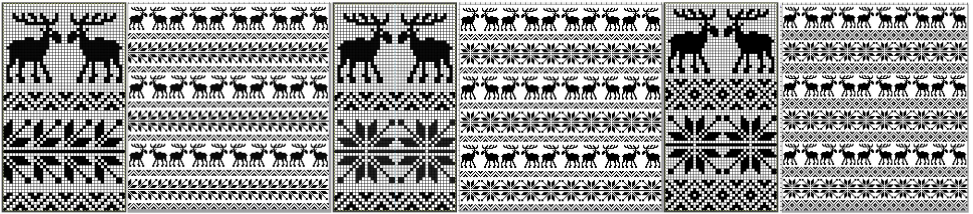 40X68_1
 ![]() 40X68_2
40X68_2 ![]() A 24 stitch version, with the moose, and without
A 24 stitch version, with the moose, and without 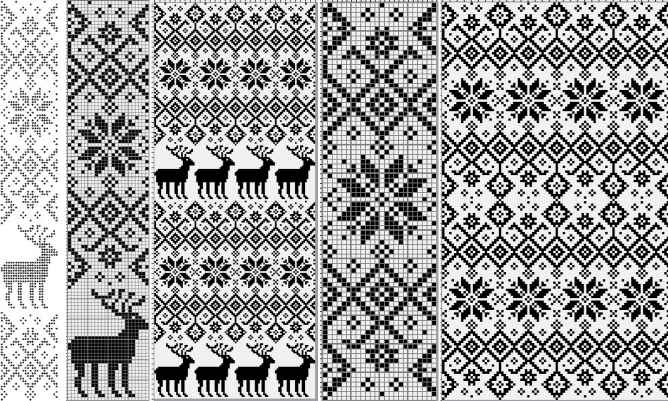 the original, 24X152
 ![]() cropped to 24X118
cropped to 24X118 ![]() with the moose edited out, 24X84
with the moose edited out, 24X84 ![]() Snowmen and trees
Snowmen and trees
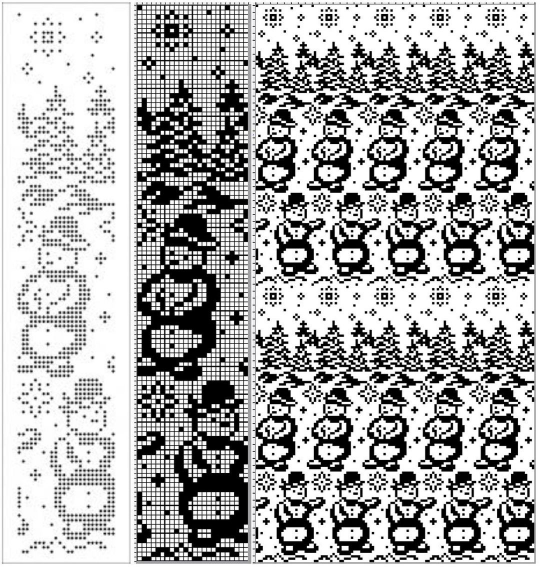 24X120
![]()
 24X50_1
 ![]() 24X50_2
24X50_2 ![]() testing tiling prior to knitting, editing out unwanted symbols
testing tiling prior to knitting, editing out unwanted symbols 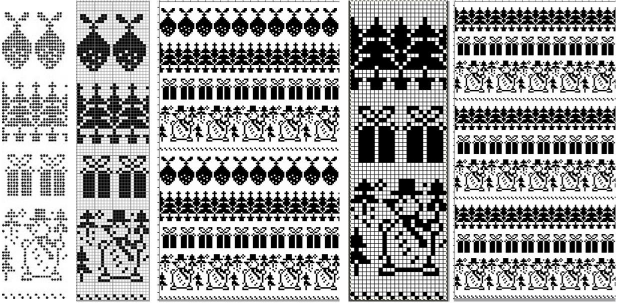 the original 24X99
 ![]() the edited 24X74
the edited 24X74 ![]()
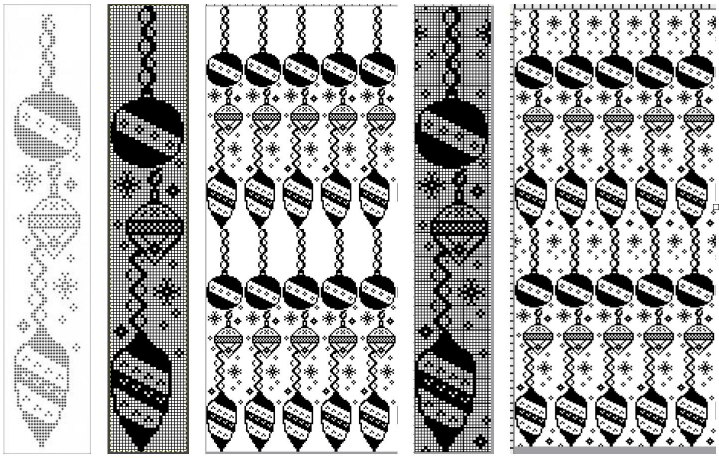 As a 24 stitch repeat, this is suitable only for single motifs, since repeating them horizontally would join the darker ball shapes. Adding a blank pixel column on the far right changes the horizontal alignment. A few pixels added at the top of the motif form an unbroken join vertically, the final 25X146 shown on the right
 ![]() This Santa was identified as being attributable to Knittery, a company long defunct that offered pre-punched cards for purchase. Images where the background is punched out make it possible to introduce striping it with the color changer or using the chart for duplicate stitch embroidery on a knit ground.
This Santa was identified as being attributable to Knittery, a company long defunct that offered pre-punched cards for purchase. Images where the background is punched out make it possible to introduce striping it with the color changer or using the chart for duplicate stitch embroidery on a knit ground. 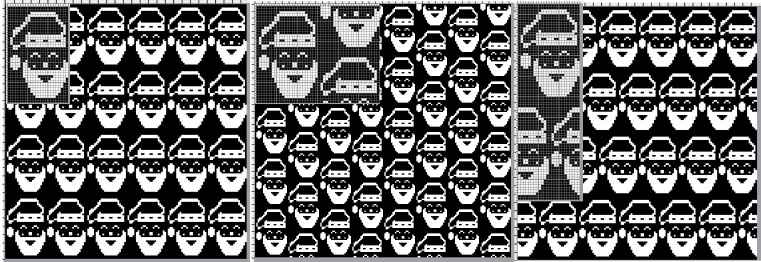 the original, 24X38
 ![]() in half drop, 48X38
in half drop, 48X38 ![]() and in brick repeat, 24X76
and in brick repeat, 24X76![]()
the original, 24X185 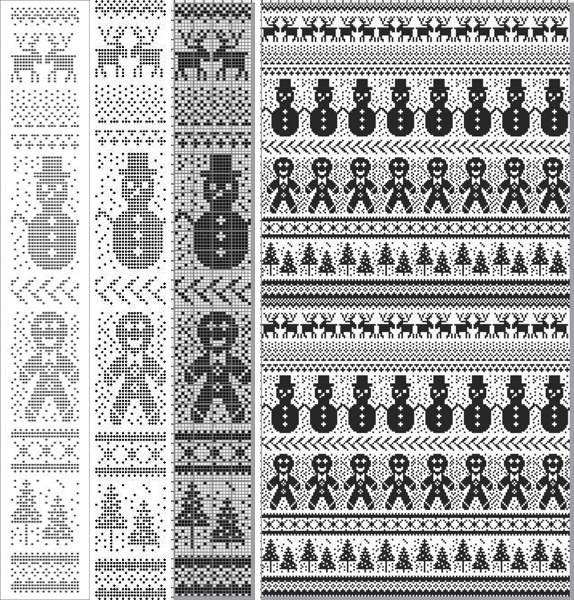
![]() with the elimination of some rows, first at the very top
with the elimination of some rows, first at the very top 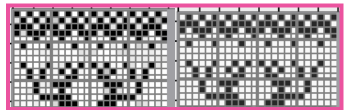 and then just above the snowman’s hat
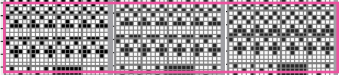
 the final 24X182 png
 ![]() The question as to how to adjust repeats for use on 12 stitch knitting machines often comes up in forums.
The question as to how to adjust repeats for use on 12 stitch knitting machines often comes up in forums.
Continuing in the seasonal vein, the easiest method is to begin with a 12-stitch repeat that occupies only half of the card vertically and twice in width. Here the original “half” is 12 stitches wide, 46 rows tall.
One method for the conversion is to work on a spreadsheet:
Begin with a table 24 cells wide, adding enough rows to the expected planned height to repeat the snowflake border, 46 cells in total
configure the cell borders for easy viewing, ie with a 3 pt red lines
hide 12 columns beginning with the second from the left
fill in black cells matching the original design or the DIY version
unhide all 12 columns for the final repeat 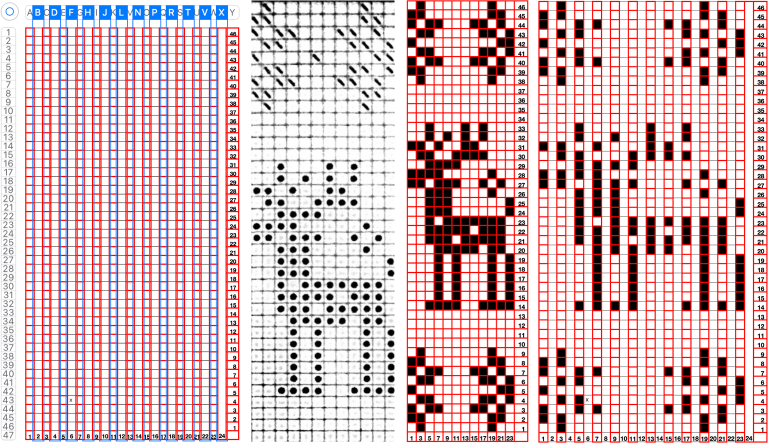 When converting the screen grab from a spreadsheet to png in Gimp, before scaling to final size, a first scaling may be required to make certain the result is divisible by the expected number of stitches and rows using the broken chain link, and then scaled again with closed chain link, the first png
 ![]() Working in Gimp or any paint program
Working in Gimp or any paint program
draw the “original” and save it, mine now has 2 added rows, one above and one below the deer, making it 12X48 pixels ![]() scale it to twice the original width
scale it to twice the original width ![]() configure the grid properties for contrast/easy viewing
configure the grid properties for contrast/easy viewing
fill in every other column with white using a straight line white pencil. To do so, select a pixel with the mouse, hold the shift and command keys down to draw the lines, and release the mouse to stop. The first white pixel may be placed within an easy-to-follow section of black ones and then the mouse may be held and moved up and down to complete each column. Save the result.
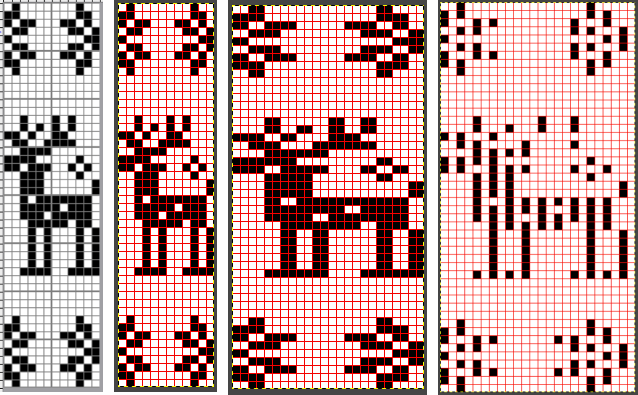 Proof that it is always a good idea to draw the initial image in repeat before committing to color separations or any downloads and actual knitting:
 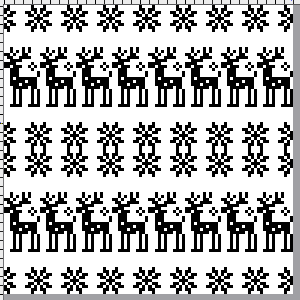 Two possible alternatives in adjusting the design to one’s preference are marked in 6X6 grids in ArahPaint to match markings on blank Brother factory blank cards:
the first removes a snowflake border and is reduced to 12X39 pixels, ![]() the second adds 4 rows at the top of the second snowflake border, 12X52
the second adds 4 rows at the top of the second snowflake border, 12X52 ![]() the number of rows between motif segments can be varied for planning the introduction of stripes in added colors
the number of rows between motif segments can be varied for planning the introduction of stripes in added colors 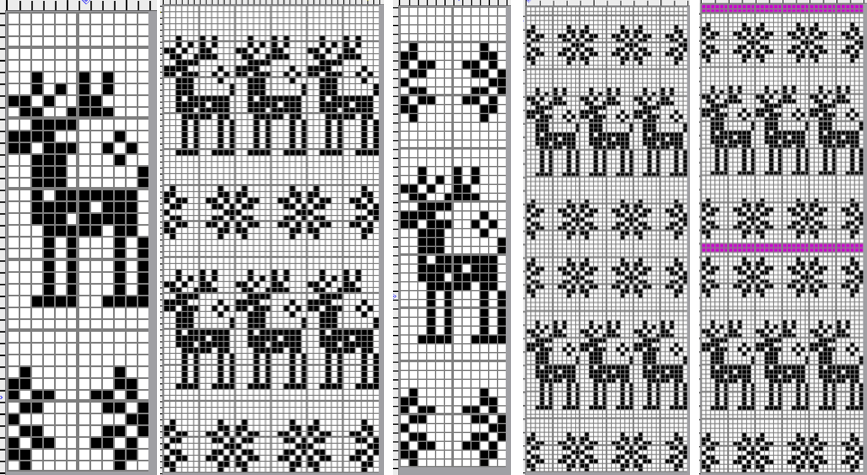 If only Gimp is available, I have not found a way to vary colors in grid borders in blocks other than to use guides, appearing as dotted blue lines.
  A break from reindeer, teddy bears, and hearts follows, perhaps for a baby gift or to save for Valentine’s Day. When there are clear horizontal borders added to motifs the half-drop repeats will produce mixed results.
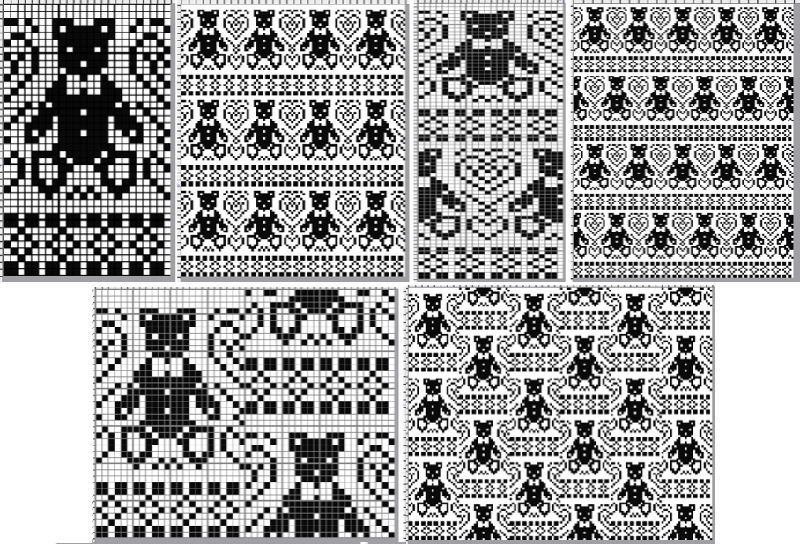
 the pngs:
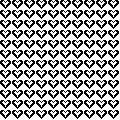
24X39![]() 24X78
24X78 ![]() 48X40
48X40 ![]() 24X60
24X60![]() 24X30
24X30![]()
48X30 ![]()
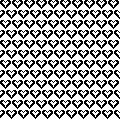
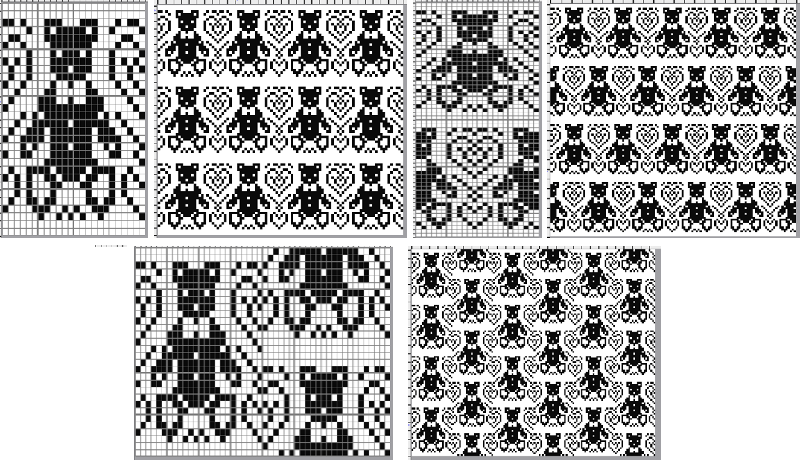
24X26
![]() 24X52
24X52 ![]()
48X26 ![]() Bell motif variations
Bell motif variations 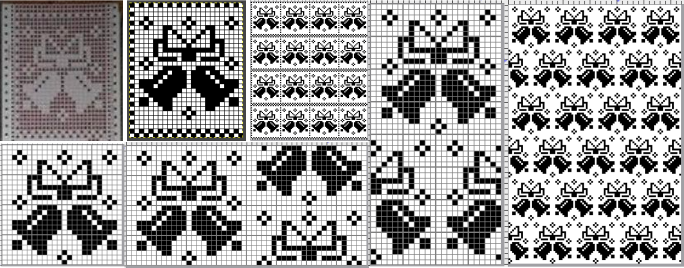
24X30![]() 24X48
24X48 ![]() 48X24
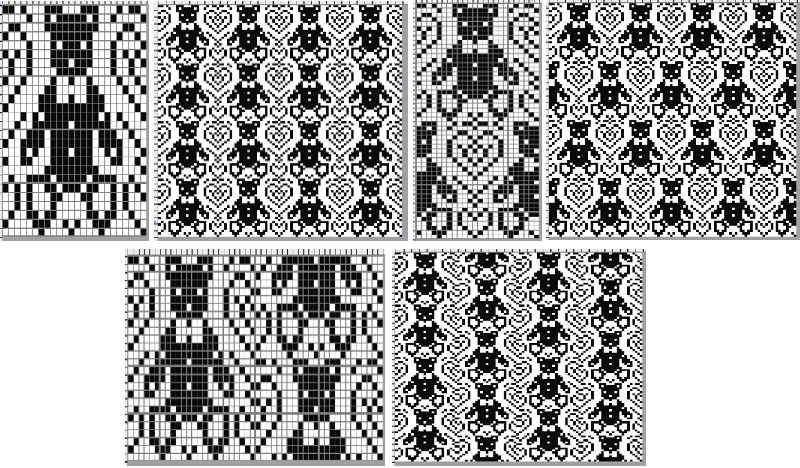
48X24 ![]() The last in this series, a nutcracker motif inspired by a larger scale cross stitch design, reduced by me to a workable 24 stitch MK design with varied borders and collaged small motifs in the background
The last in this series, a nutcracker motif inspired by a larger scale cross stitch design, reduced by me to a workable 24 stitch MK design with varied borders and collaged small motifs in the background 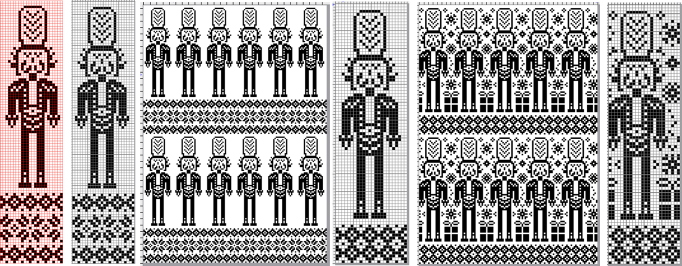 24X101
 ![]() 24X87
24X87 ![]() 24X87 with added background designs
24X87 with added background designs ![]() Considerations in choosing a design are guided by its end use, tiling the repeats leaves fewer surprises in any actual knitting.
Considerations in choosing a design are guided by its end use, tiling the repeats leaves fewer surprises in any actual knitting.
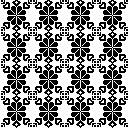
This might appear in casual observation to be a “snowflake”.
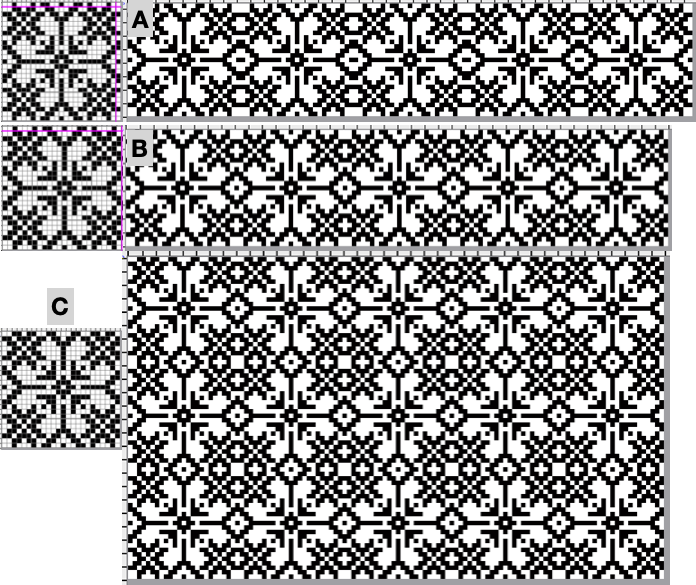
The full 25X25 pixel version can be isolated, with matching fragments around the whole. Magenta lines indicate cropping points depending on end use if double stitches not immediately obvious or planned are to be eliminated. 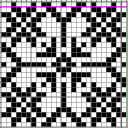
![]() A: the full design as a potential knit border
A: the full design as a potential knit border
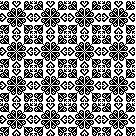
B: trimmed a one-pixel width column on the right to 24X25 while retaining matching top and bottom rows ![]() C: trimmed the single top row as well to 24X24 for an all-over execution, drawn in repeat for an opportunity to evaluate whether the design as it now appears produces the initial imagined shapes and effect
C: trimmed the single top row as well to 24X24 for an all-over execution, drawn in repeat for an opportunity to evaluate whether the design as it now appears produces the initial imagined shapes and effect ![]()
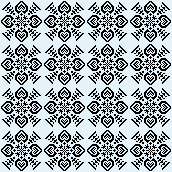
 Then there is the optical effect change that happens with color invert, for which an easy test may be made during knitting by simply switching yarn color positions in the knit carriage sinker plate
 ![]()
A slip stitch patterned ruffle and more
A recent Instagram share led to my being asked how the ruffle attached to the piece as partially shown on the left was created. The images on the right illustrate 2 of the color-way explorations prior to committing to a final one, all knit in rayon chenille yarns. 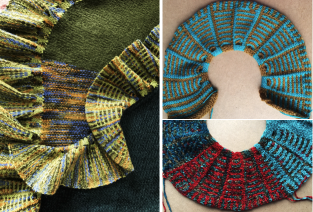 At that time a punchcard was used. The repeat technically is 24 stitches wide and 18 in height, repeated twice to meet minimum punchcard height requirements, while for electronic patterning the 18 row segment is used.
 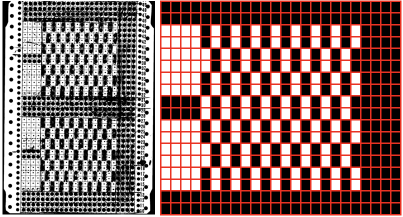 That said, repeating and shifting the minimum pattern repeat in a paint program or spreadsheet allows for visualization of possible color change sequences,
 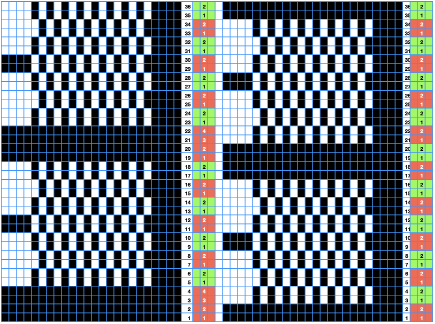 A 24X36 electronic repeat beginning with 4 all knit rows:
 ![]() Knitting does not always need to be programmed to start on the first design row.
Knitting does not always need to be programmed to start on the first design row.
When miles of trim ie when it is planned as an edging for items such as shawls are planned, there are other considerations.
I prefer to use the seam as you knit method. Since rows will be joined to rows, use a 1 to 1 ratio. Doubling up on stitches happens every 2 rows along the knit border’s vertical edges.
After estimating the number of rows in the final piece, any trims can be knit separately, taken off the machine on waste yarn, and joined as the piece progresses. If needed, after removing the waste yarn, more rows can be added to the trim or unraveled to shorten it before binding it off.
The other option is to finish the body of the knit item, and then join the trim as it is being knit.
The process is rendered easier if the ribber is off the machine.
Switching between punchcard and electronic models, it can get confusing as to whether the design needs to be mirrored horizontally or knot.
In this case, the png was used on my 930 in the same orientation as the punchcard design.
To reduce the roll to the purl side, it may be best to use yarns that will block flat ie rayon, or acrylic.
The knit is centered on the needle bed. My 930 has a punchcard needle tape in place, I prefer programming based on 24-stitch needle selections to avail myself of the position option available on the electronic.
The first preselection row is made toward the color changer.
End needle selection is canceled, or unwanted floats will be formed, pulling in the edge of the knit.
When the color changer is reached and the proper color is in the yarn feeder, set the machine to slip in both directions.
Continue color changes in the preplanned sequences.
In proper pattern selection, the slip stitch column/non-selected needles occur on the right (1).
The all-knit stitch column/ selected needles occur on the left (2). 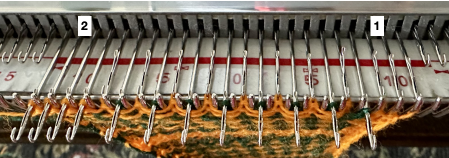 Rows, where every needle is preselected, will knit a solid color with the next carriage pass.
 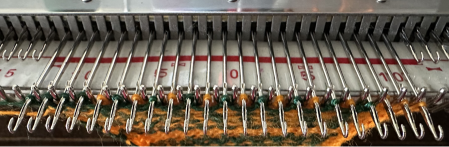 As colors are changed small floats will be created between the stripes, a light edge weight may be needed, depending on the yarn used and its fiber content, to keep the edge stitches from being reduced in size or even gathered.
1. the same color is used for 4 consecutive rows when all needles are selected and are followed by color changes every 2 rows until all needles are preselected once more
2. color changes are made every 2 rows
The cyan arrows illustrate the floats on the purl side the differences in the stitch shapes on the knit when the end needle selection is on, and the lack of proper formation of color blocks, especially if the goal is a reversible knit. 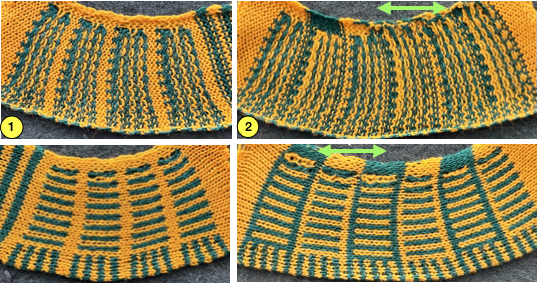 Added knit rows will result in less of a flounce, offer the opportunity to play with striping, and more colors may be added, accompanied inevitably by cut yarn ends
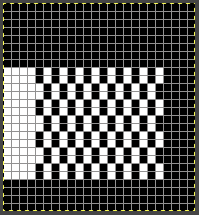
![]() For a reduced roll on narrow edgings, add a 2-3 stitch every other row border,
For a reduced roll on narrow edgings, add a 2-3 stitch every other row border, 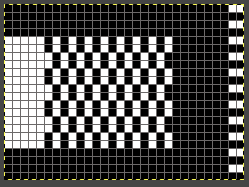 the result illustrated in this close up of a different slip stitch ruffle, also joined to the shawl using the seam as you knit technique.
  Ruffles may be created with other stitch types ie tuck, which shortens and gathers the knit stitches aside them in areas where they are used.
 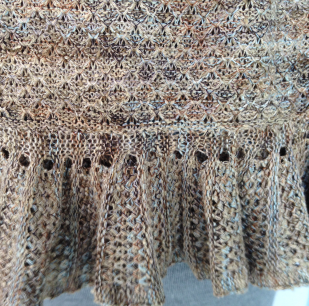 For those not familiar with slip and tuck stitch formation, it is reviewed in the post: Single bed tuck and slip stitch fabrics 1. Here hand-selected short-row techniques form the wedges, with ladders added for more surface interest on the far right.