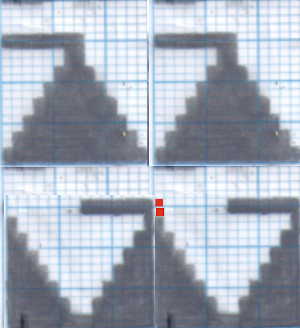
Early versions of the Brother Lace Carriage (LC) for machines such as the 830 and 860, even for the 890 did not offer options for choosing to using end needle selection, the default was none. From the 890 manual:  That said, they are present in the LC that accompanied my 892E punchcard model which match the 930 LC ones in appearance and operation and can override the selection made by the patterning device on the end needles. The two carriages, side by side, seen here with the slot in the horizontal position, indicating end needle selection is on.
  The slot in the very center can be turned with a transfer tool, OW/out of work/ off, and W/work/on.
  In lace knitting, if any needles are selected for transfer to an end needle not in use in the piece, the LC still will attempt to transfer that stitch, and if no needle hook is there to accept it, the stitch will drop.
With all over patterning across the needle bed, when an end needle has been selected on either or both edges, those needles must be pushed back to B position manually.
Since such selection is not likely to happen on every row, it may be an easy thing to forget as the length of the piece grows.
There are also point cams, that help to change the spacing between vertical lengths of design repeats. For images of the Lace carriage and use of point cams please see posts 2017/10/05/lace-point-cams-…brother-machines ..
Electronic carriages are equipped with a magnet, and must always travel past the center needle 0 position center mark on the needle tape.
Markings on factory punchcards give clues as to which carriage to use and for how many passes.
They also may vary depending on the year the punchcards or mylars were issued. To review, here are some of the markings commonly found The graphic from the KH 860 punchcard model manual
 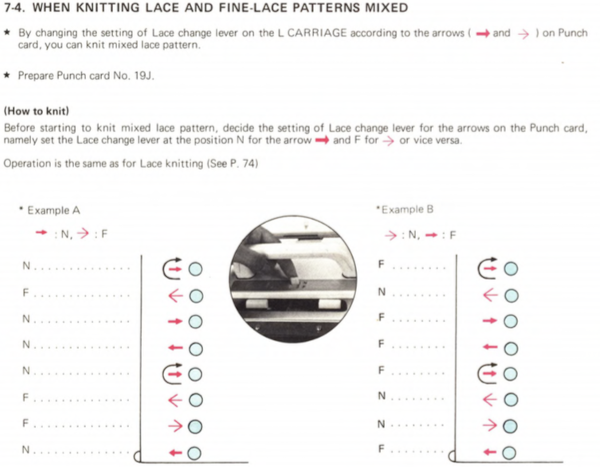 Illustration modified and adapted from multiple decades-old Japanese magazines of fine lace
 single complete transfers
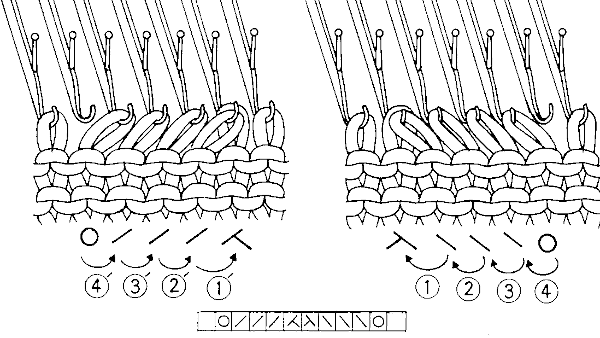
 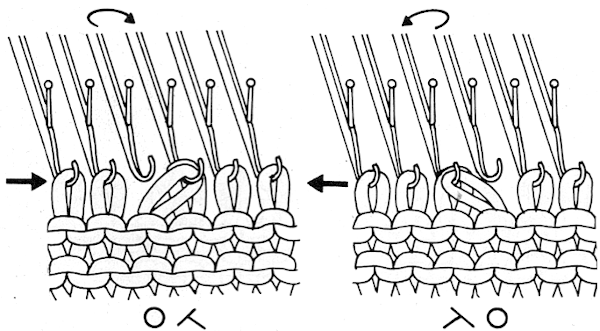 Multiple transfers may be made either as a hand technique or expanded for use in electronics. Because single stitches are moved with each carriage pass, pattern repeats can become quite long, with few punched holes or black pixels
  Use a smooth yarn that has some stretch and does not break easily. Because the yarn will be transferred to and from or in addition also being shared between needles in fine lace, some extra yarn may be needed for proper stitch formation. In overall meshes begin testing using a tension at least one whole number higher than when using the same yarn for stocking stitch. Too loose a tension can result in dropped stitches or loops getting hung up on gate pegs, too tight and the stitches will not knit off properly or drop, or the yarn may even break. When eyelets are few, tension adjustments may not be needed.
Begin with waste yarn and ravel cord, then followed by casting on and knitting at least 2 rows before beginning to use the LC.
The cast-on will need to stretch to accommodate the growth in width which increases with increasing numbers of eyelets. The same applies to the bind-off. One option for matching both is seen in this “Answer Lady” video.
It is only when the knit carriage is operated that actual knitting takes place.
The movements of the lace carriage serve only to move or transfer stitches across the surface of the fabric. The card does not advance when the KC knits a row, so the movement of the card does not reflect the progress of actual knitting.
In most punchcard repeats, if when the row of transfers is completed there are two or more empty needles side by side, troubleshooting is required to solve the problem unless they are intentionally planned in the design, with deliberate adjustments to components of the overall pattern repeat.
The needles need to be in good condition, with latches that open and close smoothly and easily. Also, check for any bent gate pegs, and use a tool to even out the spacing between them if needed.
Error corrections need to be made to match the proper stitch formation.
As in any other knit, if tuck stitches occur in the same location and are not part of the planned fabric, it is likely the needle is damaged and needs to be replaced.
If a loop is sitting on top of a needle with a closed latch before knitting the following row, that stitch will drop. If it is noticed before knitting the row, the loop can be knit through the stitch manually while being mindful of what action that same stitch should take in the progression of the pattern.
The appearance of tuck loops, red row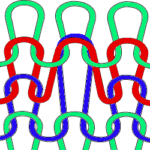 To form eyelets a loop is created on the needles emptied by the transfers on the first pass with the knit carriage to the left (red), the stitch on that needle is completed as the knit carriage returns to the right (cyan)
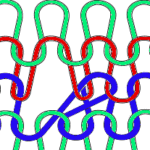 If when trying to correct the direction of a transfer or a dropped stitch the transfer is not formed properly and the stitch in that location is knit manually the eyelet will be absent
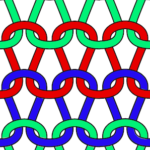
The traditional placement is for the LC (Lace Carriage) on the left, and the KC (knit carriage) on the right, but some patterns can work with their placement reversed or even swapped at regular intervals as knitting progresses.
Bringing needles out to E before the all-knit row may help avoid additional dropped stitches when there are multiple stitches on any needles.
Though knitting may proceed smoothly, checking the work frequently visually will make the rescue of problem areas possible as opposed to having to restart the project.
If test swatches are hard to knit, the problems will likely multiply when a larger group of needles is in use and the project should be put aside.
Because there are so few markings in lace, the lace card does not necessarily resemble the finished stitch appearance.
Needle pre-selection does not make as much sense as in other types of patterns. Where knit stitches occur in vertical stripes may also not be immediately evident. Needle selection on punchcard models is fixed, some shifting on the needle bed rather than centering may be required to have a specific repeat placement or a cleaner edge, which also matters in seaming.
There are definite top and bottom directions to lace, so in knitting scarves or sleeves that is a consideration. One solution is to knit 2 pieces in mirrored directions with many possibilities for methods to join them.
No top-down knitting on sleeves if you wish to match the body and it has been knit from the bottom up.
It is possible to use short rows combined with lace patterns, but any shapes created are likely to change visually, so planning is required unless those changes are deemed suitable.
Traditional holding by changing the knit carriage setting may not be used. Needles to be put on hold need to be knit back to A position and brought back into work as needed.
Ravel cord or any tightly twisted cotton may be used.
If needles have a tendency to slide forward when holding large sections or at the hold starting side as the piece progresses, some tape may need to be placed in front of the needle butts on the metal bed to hold those needles in place.
These illustrations of the process are from an early Brother machine manual 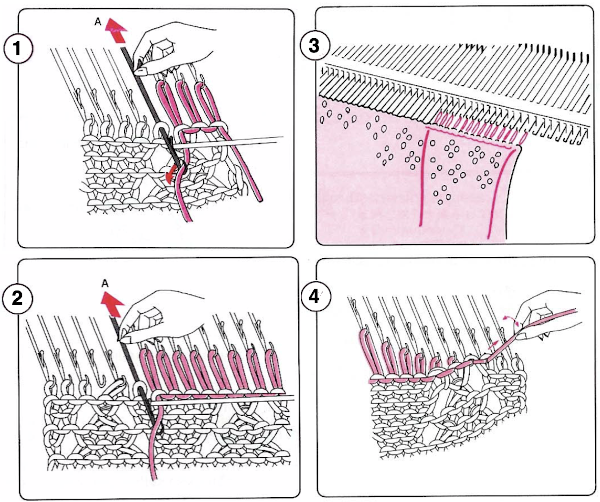 Lace and holding effects may be produced by combining LC use with the knit carriage set to slip stitch and also selecting needles in pieces such as automated edgings or doilies. The design repeats are not interchangeable between punchcard and electronic models.
When two carriages in Brother punchcard machines first move in the same direction selecting needles, ie. the knit carriage moves from left to right, the LC follows it also moving from left to right, the card does not advance. The same needles are re-selected on the next pass, repeating the design row.
On electronic machines, the mylar or memory/downloaded patterns are triggered by the magnet at the rear of the knit carriage to advance on every row.
The designs need to be planned or adapted based on the type of machine.
As with any knitting, there are times when nothing seems to work for no good reason after intervals of smooth knitting and no other changes, and a break is best for both the operator and the machine.
The greater the number of eyelets in the pattern, the wider the finished knitting. Blocking in some form will usually be required to set the stitches, and may be required if the piece grows in length and narrows as it is worn or hung when stored.
Out of habit I usually leave weaving and tuck brushes in use for all my knitting, but particularly when creating textured stitches and lace.
Gauge swatches should be larger than usual, all in the pattern, and treated as the final piece will be in terms of pressing, blocking, washing, and allowed to rest before obtaining measurements for garment calculations.
When stitch symbols first appeared in Japanese publications they were represented as the stitch formation occurring on the knit side of the fabric, which could be confusing since in machine knitting we are looking at the purl side. Eventually, Nihon publications made the transition and other pubs followed. 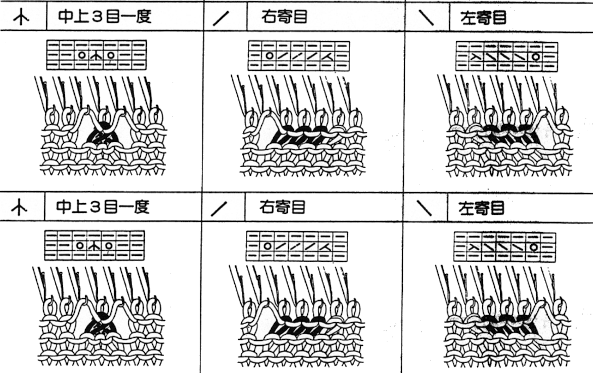 A comparison of hand-to-machine stitch symbols with illustrations and more information: hand-to-machine-symbols-5-lace/
For cross-brand use: 2019/02/23/revisiting-use-of-lace-patterns-studio-vs-brother-machines/
I have been blogging for years and sometimes return to topics after long absences. In terms of more information on lace design and some tips on translating hand-knitting instructions for machine knitting please see: 2013/07/23/from-hand-knit-lace-chart-to-punchcard-1/
2013/07/24/from-lace-chart-to-punchcard-2/
2013/07/26/from-lace-chart-…3-adding-stripes/
2013/07/27/from-lace-chart…-4-a-border-tale/
2013/07/29/from-lace-chart-to-punchcard-5-to-electronic/
2013/08/29/from-lace-chart-to-punchcard-6-to-electronic/
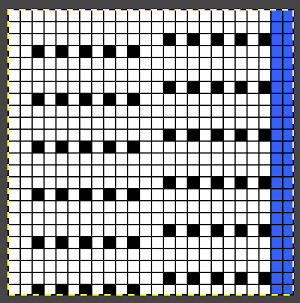
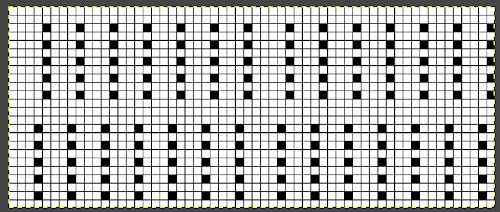
Transfer lace cards have very few black squares to avoid transcribing errors for punching holes or generating electronic repeats, work with a reproduction of the graph that makes it easy to view squares or pixel placements ie using Gimp, X800+.
Blank Brother cards are dotted in lines dividing the cards into 6X6 blocks.
Mark graph paper or software grids) if possible, in 6X6 blocks.
In ArahPaint the latter can be done by adjusting grid properties 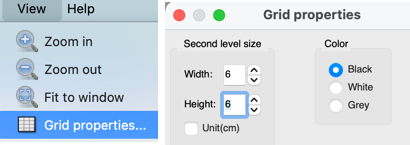
The Brother, Toyota, and Studio fashion lace punchcards may be used on all 3 brands as long as there are 2 blank rows after each transfer sequence.
The first row on Brother is preselected from left to right and transferred from right to left, while on Toyota it is transferred from left to right. Brother and Toyota cards are interchangeable provided the repeat is mirrored vertically or knitting starts with and operates with the carriages on the opposite sides recommended by the alternate brand.
Studio knitting begins with 2 blank rows, Brother starts with a punched row and ends with 2 blank rows, the first preselection row on the cards with locked selection needs to be adjusted accordingly.
The Brother LC does not advance the row counter, only the KC does.
Stitches are transferred in the direction that the lace carriage is moving. In most cases, the LC preselects toward the KC and transfers when moving away from it. Brother and Toyota cards are marked with U-shaped arrows to identify when to knit with the knit carriage.
Studio simple lace cards where stitch transfers and knitting occur in the same carriage pass may also be used on Brother machines, but require special handling discussed in other posts.
One of many methods to deal with dropped stitches: secure them by going through them using a needle threaded with a ravel cord.
Unravel back to an all-knit row undoing lace transfers carefully, to the point where stitches were dropped, rehang the dropped stitches, and remove the ravel cord.
Roll back the card, mylar, or electronic row count to match the number of rows unraveled.
Unless the knitting carriage is also set to select needles, only the LC advances the design rows. I prefer to roll back cards or electronic counts after each row is unraveled.
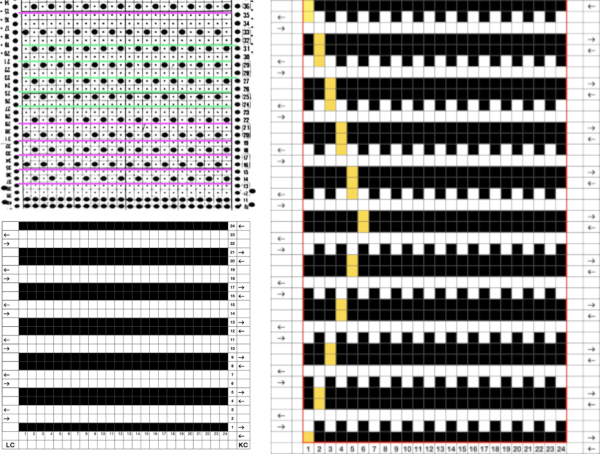
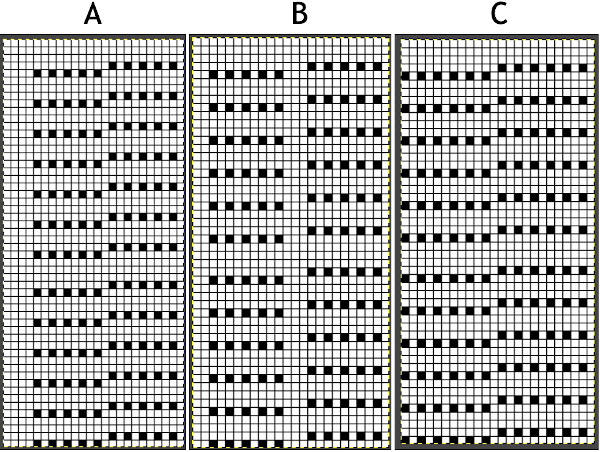
A punchcard tale: after the chevron post, single-color sideways chevrons appealed to me. Two variations from a Brother Punchcard Volume 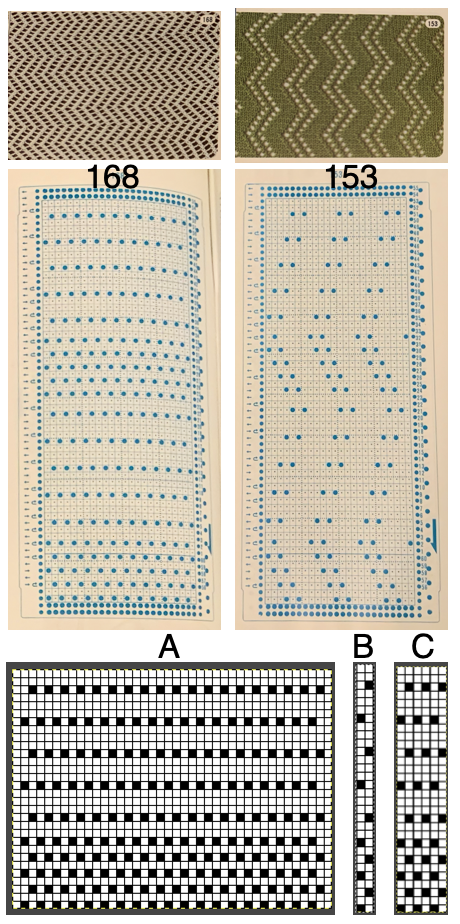 A the full 24 stitches wide repeat, half the required height for the punchcard user.
B the single electronic repeat.
C the single electronic repeat tiled X3, checking to see that pixel actually line up properly.
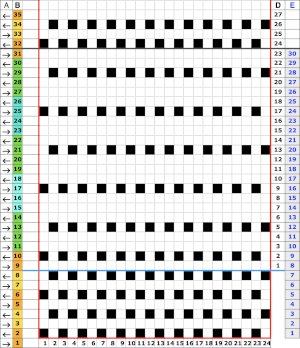
Punchcard markings of note:
A design row 1
B mark for the first row visible on the exterior of the machine, the card reader is reading 7 rows down
C typical markings for the direction of the LC movement on that row, and for knit rows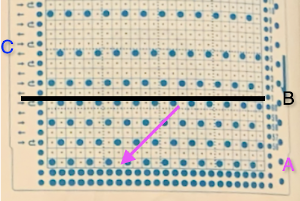 The two rows at the bottom of the card reflect the overlap when punchcard snaps are in use to keep the pattern continuous.
  Looking at it in more detail
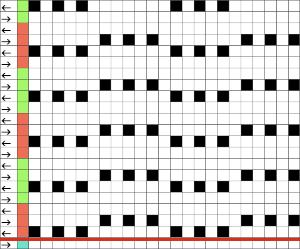
 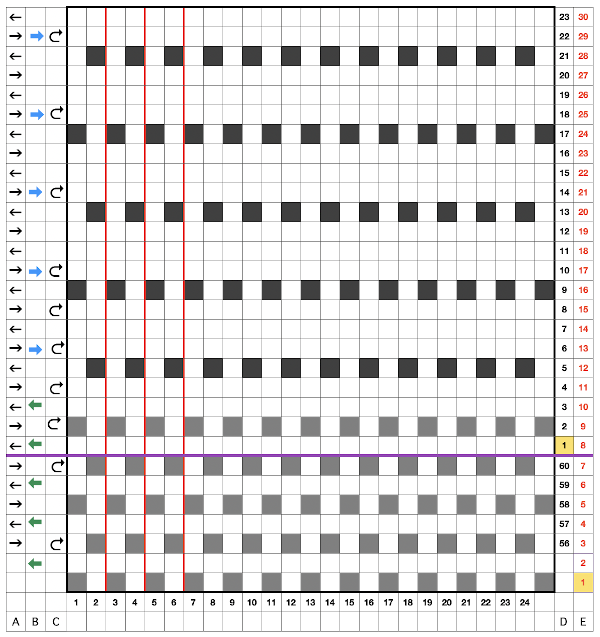 Column identification at the bottom of the chart:
A direction of the lace carriage, pixels, or punched holes preselected on that carriage pass
B direction of transfers; note there are extra blank rows where their direction is reversed indicated also by the change in the color of the arrows. Multiple rows in one direction only, happening here in a series of 5, will result in biased knitting. As bias is reversed, the zigzag shape begins to be created.
C markings for 2 rows worked with the knit carriage, the pattern does not advance on those rows on any machine
D markings on factory punchcard
E design rows
When working with electronics, the actions need to match those indicated on the factory design beginning with the row one punchcard marking on the right.
The width of the planned swatch or piece may be programmed for use with the single motif setting in img2track or the required default in Ayab. Adding a blank square at each end ensures the end needle will knit on every row, no pushing back needles by hand will be required.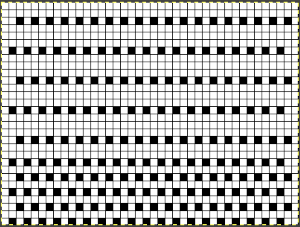 Changing fibers opens up a brand new world: this swatch (unblocked) is knit in a tightly twisted rayon, and edges also begin to create clearer shapes than that achieved by knitting the same design using wool.
 Spacing out the zigzags, another 24X30 repeat. This is the minimum repeat for electronic KMs as well, knit stitch spacing (white squares) can be planned to suit
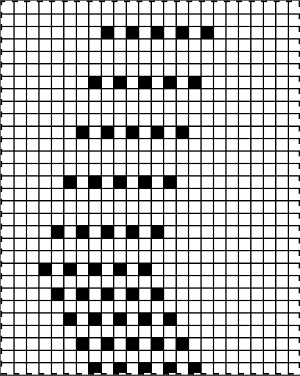
Once again, one must be aware of whether the lace repeat needs to be mirrored on the specific model machine. I initially forgot to do this on my 930, which results in error with the lace carriage operated from the left.
Planning the placement on the needle bed controls the number of knit stitches on either side of the resulting mesh shape. Today the rayon was having no part of knitting properly, this swatch is once again in wool. 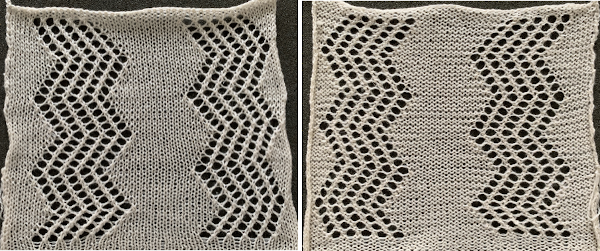
Ideas for automating mesh patterns in lace edgings using the LC and the KC (knit carriage) set for slip stitch
Changing the above repeat for a zigzag border: in my first experiment, I tried keeping the number of eyelets in the zigzags across rows constant, did not like the visual “extra” line away from the edge, and was happier with my second try. This fabric would do better with a yarn that can be blocked to shape, the wool used here is a tad too thin. There will be some tendency on the part of the eyelets on the very edge to appear smaller as the edge stitches are stretched into shape. It appears I also have a needle that needs to be changed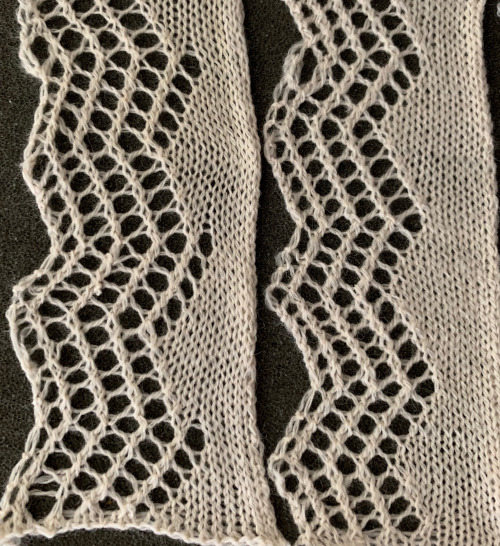 The transfers of the stitches by the LC while using the knit carriage set to slip in both directions to create the knit rows, and will automatically create increases and decreases along the left edge. Due to this fact, there will be one less eyelet in each transferred row than the number of pixels/punched holes in its corresponding pattern row.
The knit carriage in this instance preselects rows for the lace carriage, the lace carriage preselects all needles required on its way back to the left for the knit carriage to knit on its next pass.
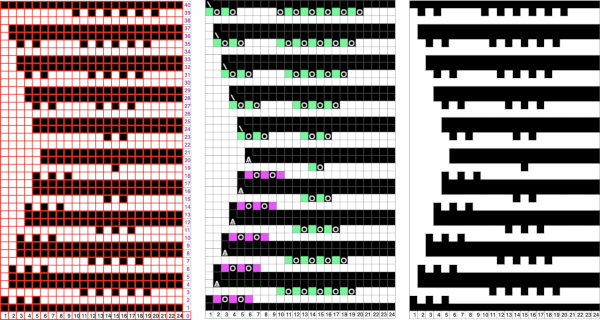
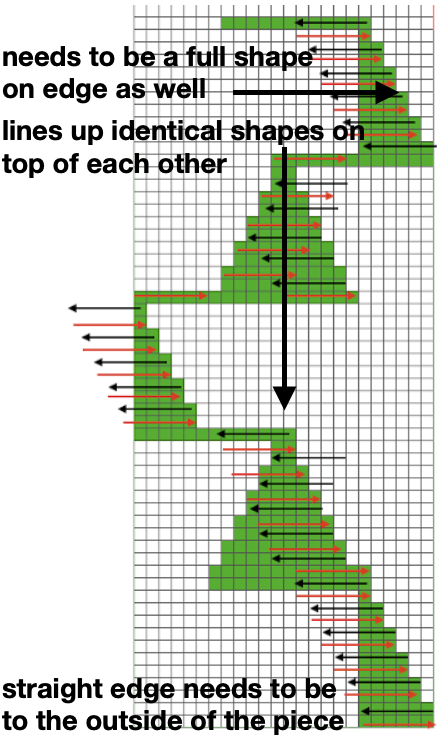
This chart attempts to show the movements of the carriages and the location of stitches after they have been moved along with eyelet symbols in their locations after the transfers 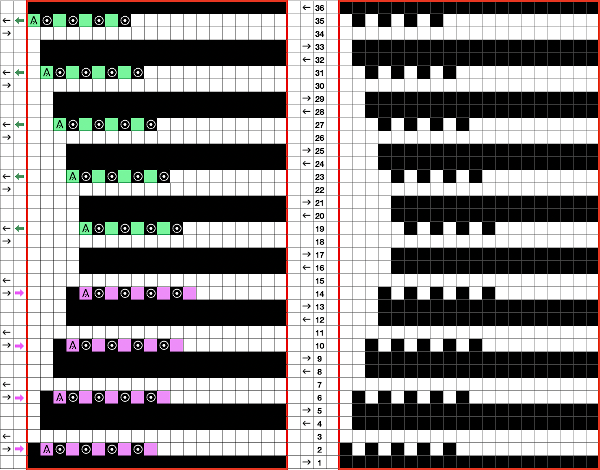 The pattern repeat on the left below is as I drew it and intended it, on the right, it is mirrored for use to knit it on my 930
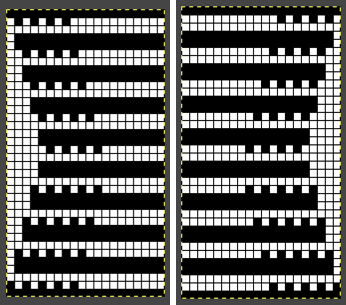 The first preselection row is from right to left, the knit is centered with 10 stitches on each side of 0.
In edgings beginning with a single all black pixels row, end needle selection is canceled on the knit carriage (KCII), turned on in the lace carriage (LC).
The first row is knit, when the KC reaches the left side, set it to slip in both directions. As it returns to the right it will form a second knit row on all needles in work, and preselect for the first LC pass.
Extension rails must be used as both carriages will lock onto the belt for pattern selection.
At the start of the piece, as the LC moves from left to right it will transfer preselected needles to the right. On its return to the left, it preselects needles that will knit as the KC returns to action from the right.
Each carriage in this design makes alternating pairs of passes.
When the top half of the pattern repeat is reached, the LC makes its pass to the right on a blank design row. As it does it preselects for the next row of transfers, which are made to the left as the LC returns to its home there (A). Though the Brother LC does not knit and transfer on the same row as the Studio one can, it can transfer and preselect for the next row of knitting (B). The above fact allows for planning transfers in both directions while still keeping the routine of 2 passes for each carriage to and from their original home.
Based on that concept, here is another trim with eyelets in alternating directions along the side opposite the zigzag shape.
The repeat is now adjusted to 22 stitches X 48 rows to accommodate the reversing eyelets arrangement.
It is shown here mirrored for download to my 930.
There is a blank square at the top right corner, the corresponding stitch will be cast on by the knit carriage on its move to the left and transferred automatically when there is a return to transfers at the bottom of the design repeat. 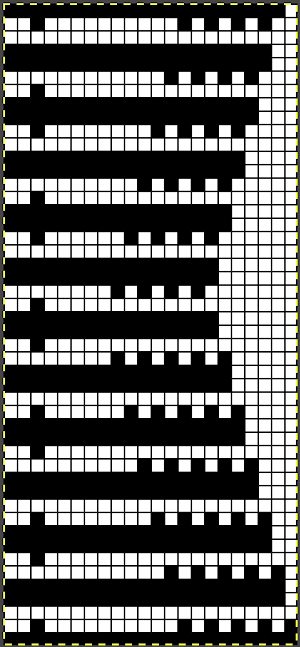 The yarn used or the swatch is a 2/18 wool silk. There will be 2 stitches on each needle (A) at the very edge where stitches are transferred for decreases and look different than where the edge stitch is simply moved one needle to its left (B), leaving behind an empty needle. A parallel, similar difference is also noted at the inner edge of the zigzag shape. The sample is pictured turned 90 degrees counter-clockwise, and its bottom edge appears on the right
  Transfer lace on the Passap: the console will be used to select needles for hand transferring stitches. The technique will determine the number of plain rows between transfers. Use tech 137 for two rows between transfers. The pushers will set the corresponding black cells for transfers, they will stay in that position until the next set of transfers. Many tuck patterns may be used to make the selections, they are not designed to knit on adjacent needles, choose ones that have white columns for nonselected pushers 2 rows in height. Stitches are worked on the front bed. The front lock is set to N and the back lock to GX. Move selected pushers up so that the corresponding needles are easily identified, and use a tool to move stitches right or left. Move all stitches in the same direction, first across a row to the right, then across a row to the left to avoid biasing if the pattern is an all-over one, for borders all transfers in the same direction may work as well. Leave the needles in the work position, return the pushers to rest, and continue in the pattern.
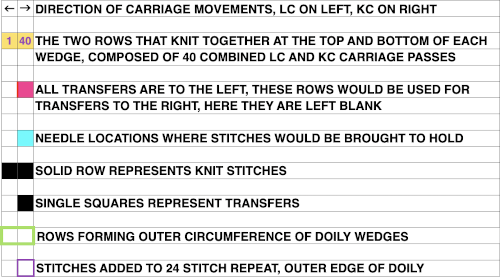
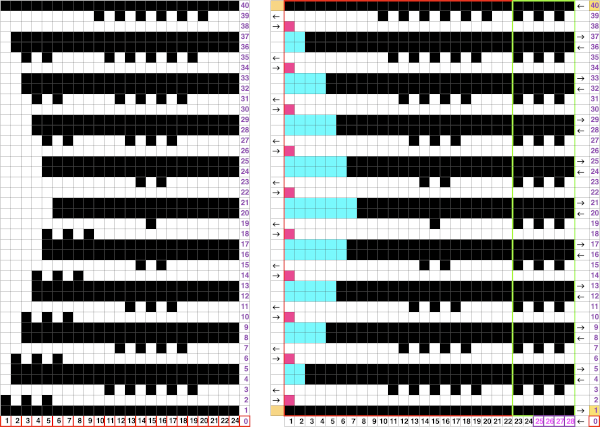
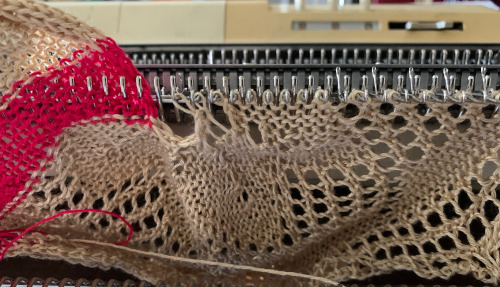
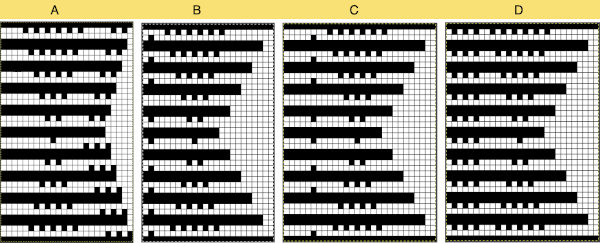 The test swatch in progress
 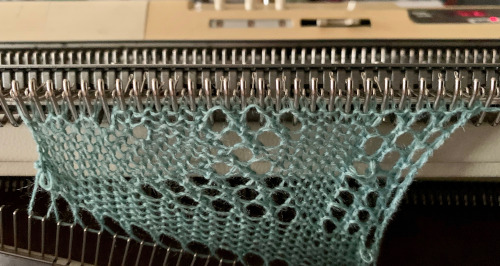 I used a short cast on comb for weight across the piece, moving it up cautiously on a regular basis
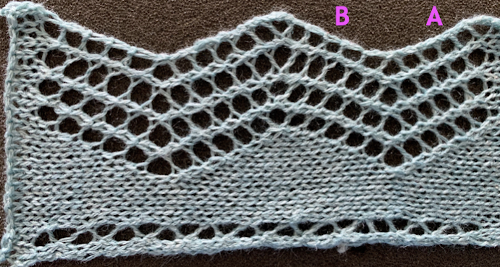
 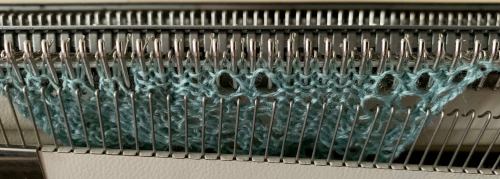 It is helpful when starting in waste yarn or simply using plain knit rows at the bottom of a test swatch to choose a clearly contrasting color. Here I did not do so, the drawn line is to help define the start of the shape formation created by the holding sequences and eyelets. The eyelet on the outermost edge of the circumference “disappears” as that edge gets stretched to the max. Two eyelets in the diamond shapes are not formed properly
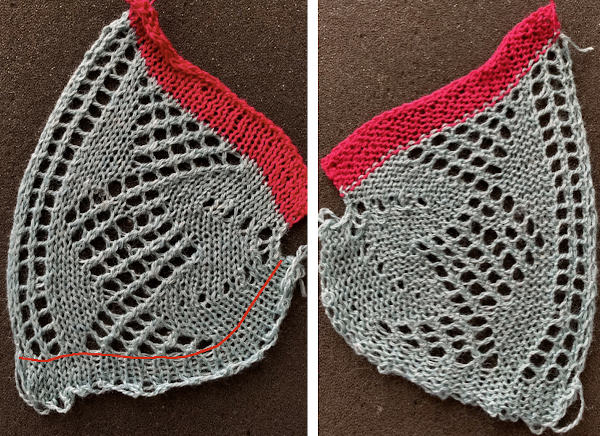
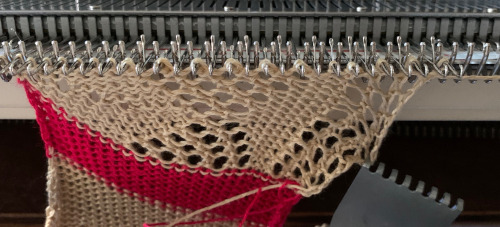 knitting without a knit gauge can be dangerous, here a guess is made as to how many more units might be required to make the final shape go round
 I committed to 8 wedges, another attempt at a check for size prior to seaming the shape.
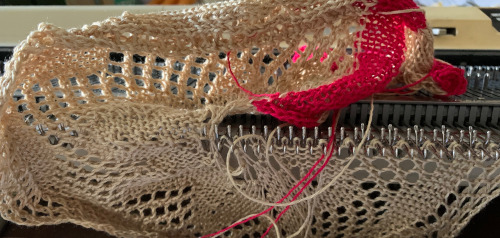 Before joining the stitches permanently, a quick look to see if there was enough knitting to form that pie
 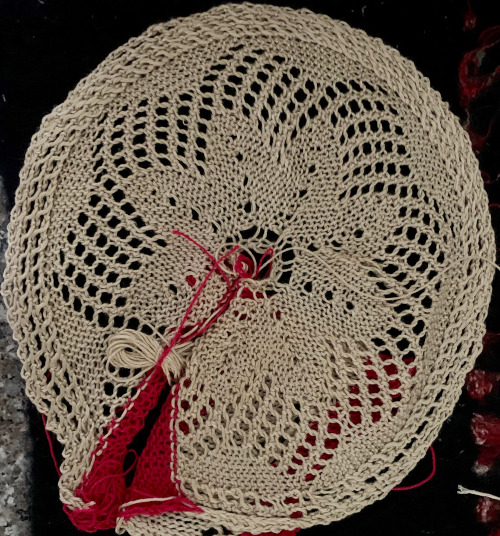 With the knit side as the expected public side of the piece, the work was scrapped off the machine after some wast knitting, one end was rehung with knit side facing and the waste yarn was removed
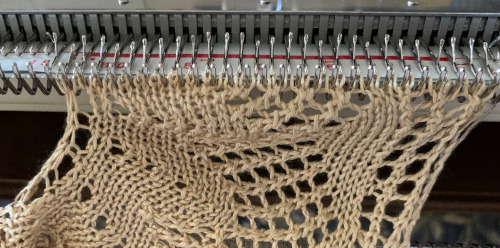 and the process was repeated with the open stitches at the other end of the piece
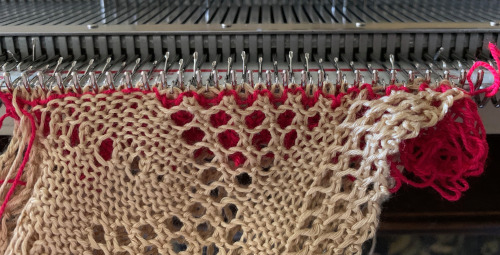 The least satisfactory and most visible join is the latch tool bind off. Grafting by hand off the machine is the least so. For the sake of ease in identifying open stitches easily, both methods would benefit from a couple more all knit rows between each segment as seen in the repeat in the original doily post in spite of the fact that the shape around the very center opening will change.
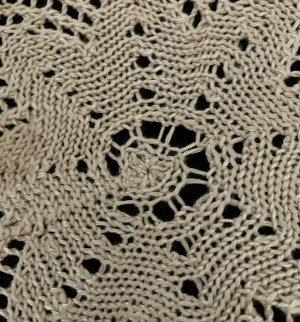 The ladders in those spaces were latched up to get rid of those holes. The doily after a very quick and casual press:
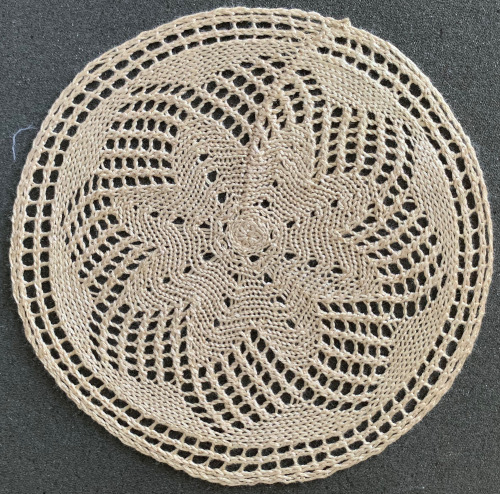
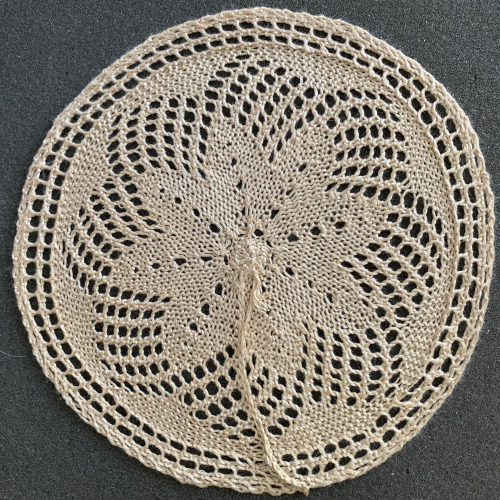
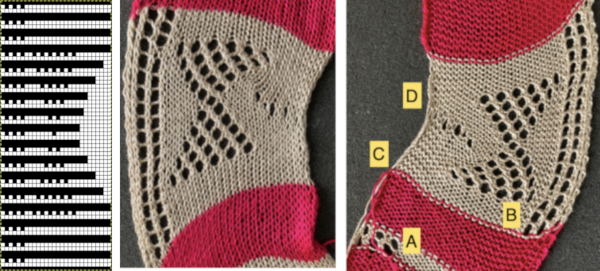
 The resulting pattern and reject:
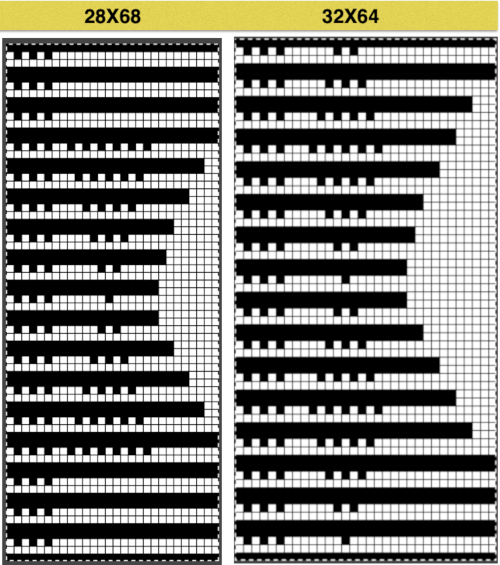
 Planning for diamond rather than bow shapes, the repeat was changed from a 28X68 one to a wider, 32 X 64
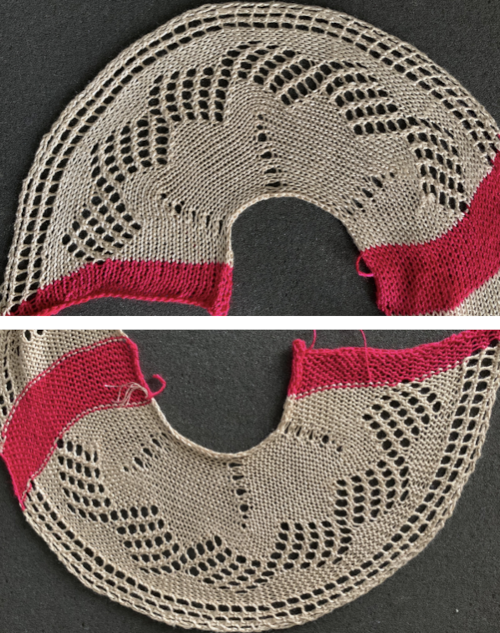
  The extra knit stitches on the “held” side make for easier joining of the ruffle to the body of the piece. The “diamond shape” is restored. Its shape has some distortion as the spiral is created. The test swatch was lightly pressed after its removal from the machine, just enough to help it stay flat. In yarns with “no memory” (possibilities other than wool) stitches will be set permanently with pressing and steaming.
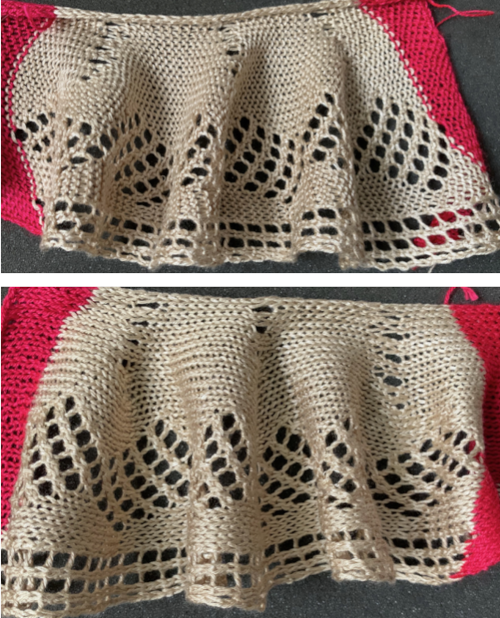 If the basic principle is understood, other stitch types may be combined with slip stitch rows including tuck stitch, slip stitch, and 2 color patterning, seen here in some seam as you knit ruffles I added to some of my shawls and garments

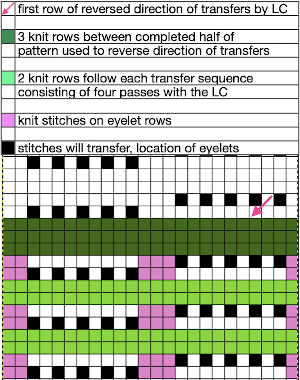
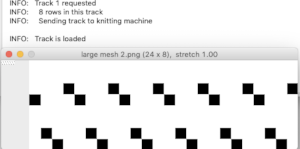 The lace carriage makes 4 passes, followed by 2 rows knit. The arrangement at the end of each transfer sequence will have pairs of double stitches moved onto the adjacent needles, leaving 2 empty needles in between them. Placement on the needle bed should be planned, and added “border” stitches can be moved away and toward the starting number of stitches to keep eyelets forming at the side edges for all-over uniformity

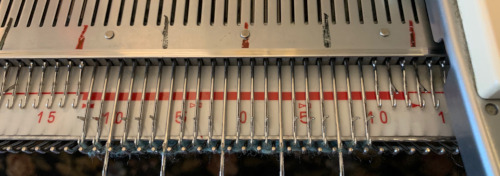
 after the transfers single needles are empty, with double stitches in adjacent ones, and transfers to the left are repeated once more, this is the result, with transfer needles pushed out to show doubled up stitches
 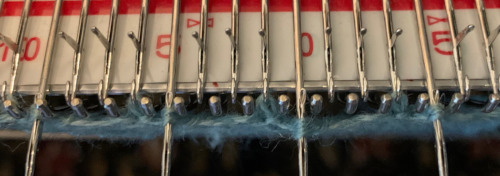 After all the sequence transfers are completed, there will be adjacent pairs of doubled up stitches with 2 empty needles between each pair. As the following 2 rows are knit, the first row creates loops in the empty needles, the second pass skips those needles, forming a “float”. Looking a bit closer after the knit rows
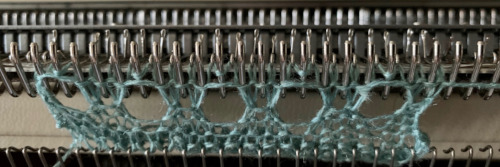 as the process repeats, the first transfer
 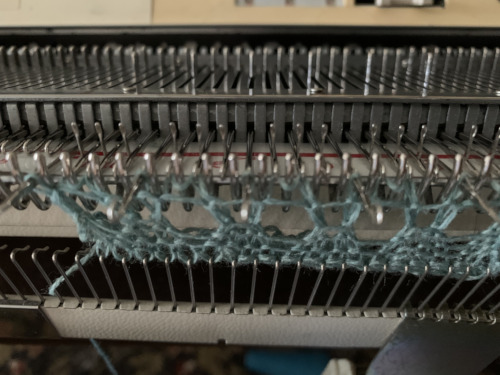 and the second transfer
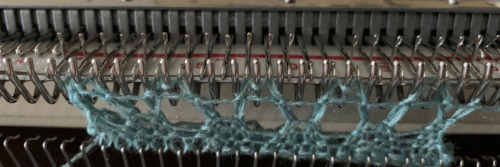 The pairs of stitches that have been moved anchor the 2 side-by-side loops and result in the 3-strand stitch pairs, with every other remaining pair of needles empty between them. The LC returns to the left with no needle selection
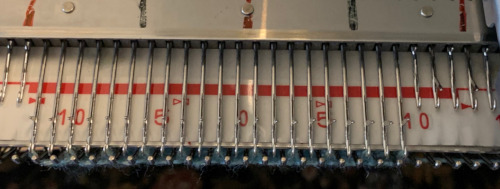
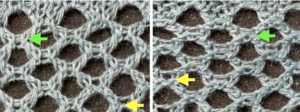
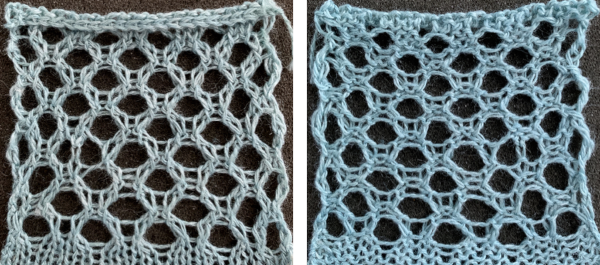 Those short “floats” at the top and bottom of the eyelets can be reduced. This adds a hand technique to every opening, whether results are worth it becomes a personal decision.
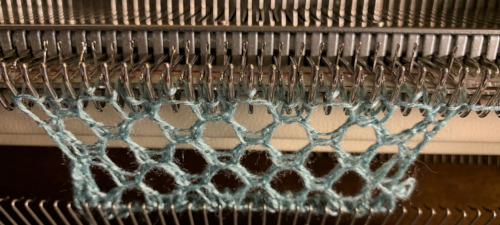
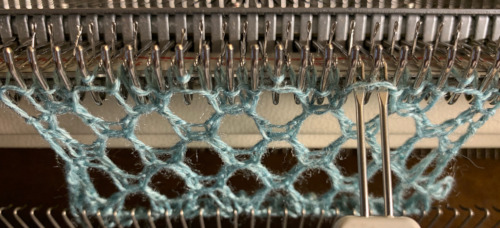
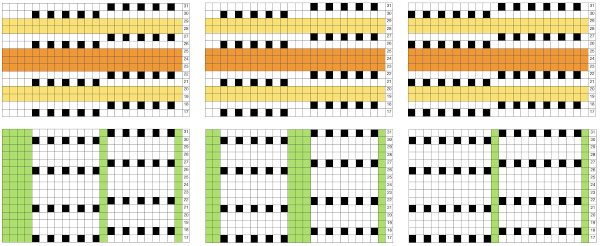
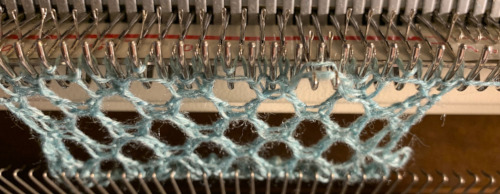 Before the 2 knit rows, there will be the doubled-up loops in each of those needles, and the 2 doubled-up stitches made from the transfers are added to them as transfers continue. For all those strands to knit off properly, the whole row might best be brought out to the E position before using the knit carriage. The differences between the hooked-up float version of the pattern and the let it be one are shown in areas below the lines in the bottom corners and by arrows in the close-up
 Much easier and quicker to knit, though quite different, is
 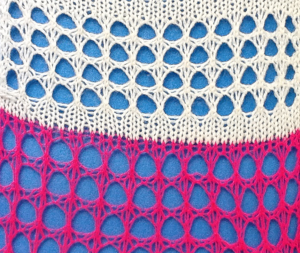 This chart was used in 2013 as a guide for hand technique using a 2/8 wool
 Knitting lace sequences in a single orientation produces a mesh that is biased. It could be the start for one more chevron shape but was not the intended fabric.
 The adapted repeat: the odd number of passes between each repeating segment ensures that the following selections reverse the direction of the transfers
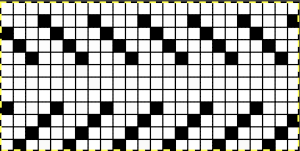 the proper orientation for use on the 930
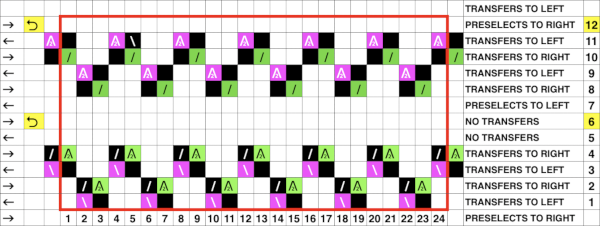 Needles preselected for transfer to the left
 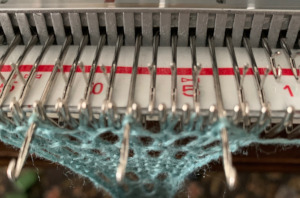 during transfer, needles are preselected for transfer to the right. Doubled up stitches will now be moved
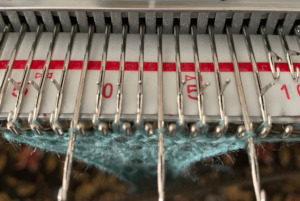

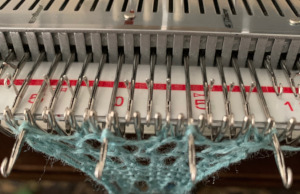
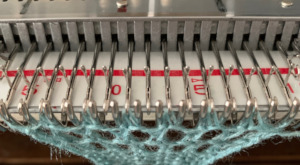
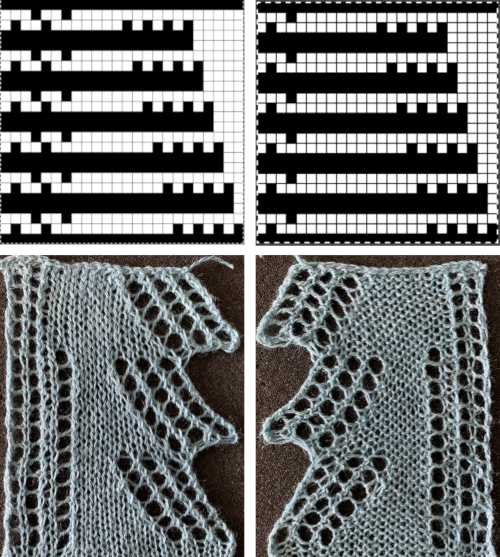
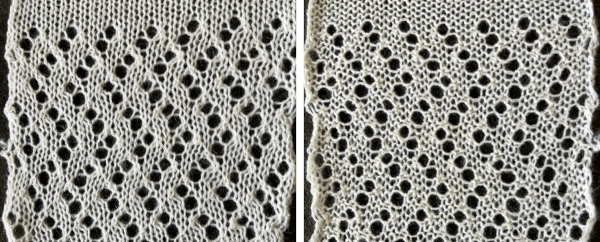
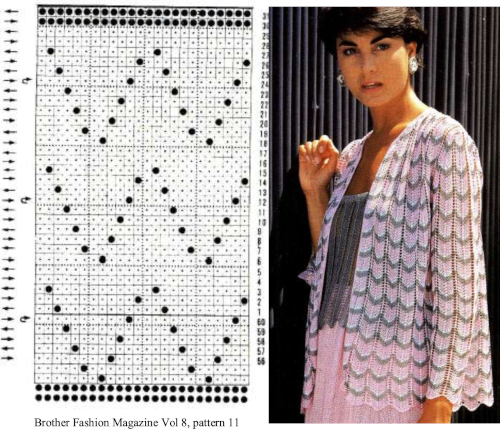
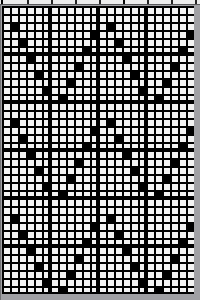
 A repeat that produces a smaller mesh with the swing right to left is found in other posts and references. Below part of a published punchcard is shown, with the resulting swatch, and in turn, compared with the large scale version of the same mesh structure knit on the same number of stitches.
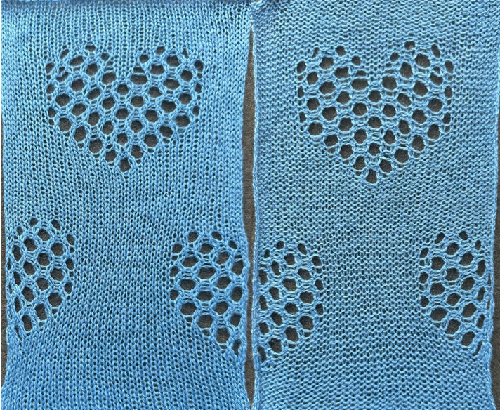
 its 22X48 png
  Most of the more recent proof of concept swatches have been knit on a 930 using img2track for downloads.
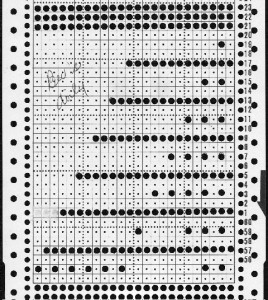 When using the slip stitch setting and changing the number of needles in work, or having ladders created by having needles out of work in the A position, the knit carriage end needle selection needs to be canceled (KCII).
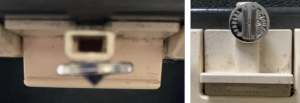
 In a working later model LC, end needle selection is in work (W) with the slots in the horizontal position, out of work (OW) in the vertical position.
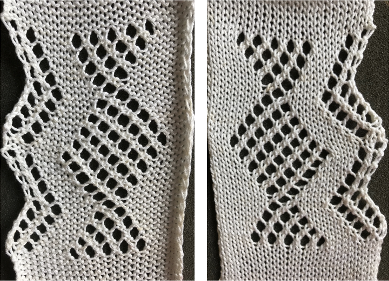
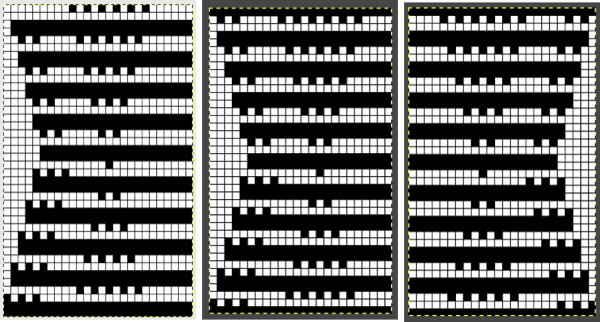
 The resulting, more successful swatch
 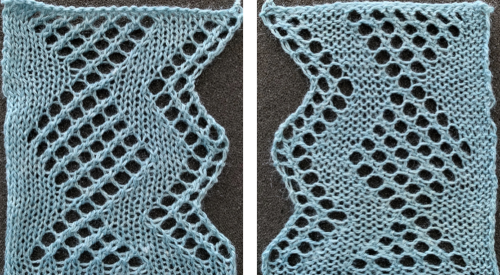 revisited 2024, the repeat PNG
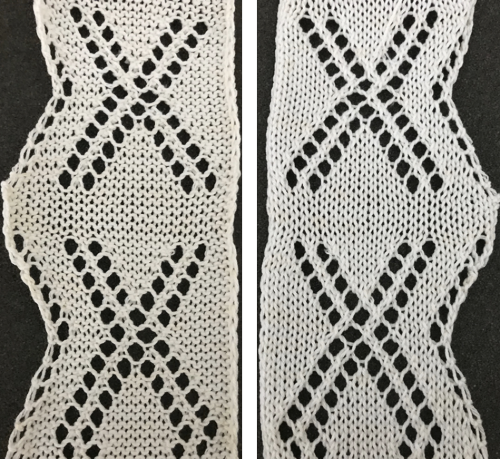 Charting it out anew: on the right is the amended repeat adding 4 more rows to the top of the original
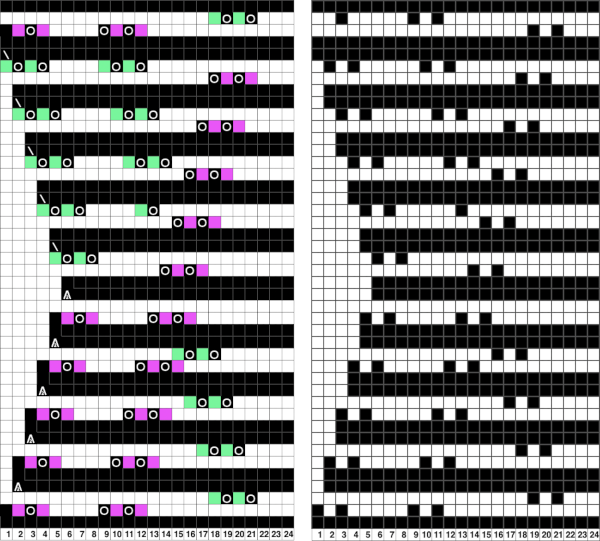 The resulting swatches:
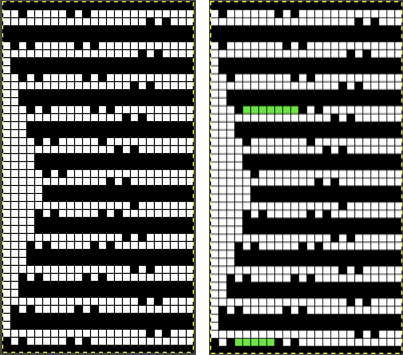
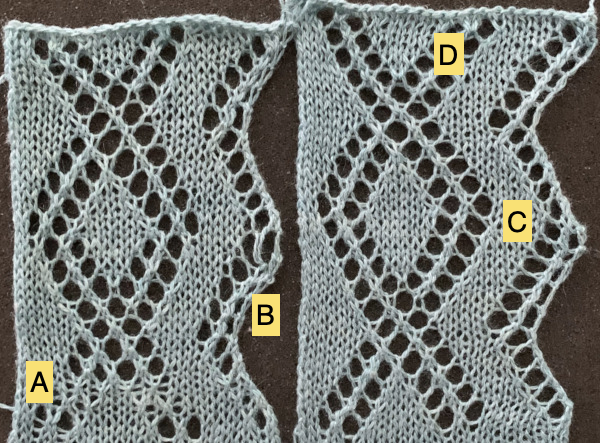 These charts illustrate the above repeat on the left. On the right, the edge transfers are imagined reduced to single eyelets on the increasing angle. In turn they would result in a wider area of knitting in the zigzag shape between the curved edge and the diamond shape. Another possible solution follows, using expanded graphs with extra LC passes
  Returning to the above repeats after a break in 2024, a new design, 24X48 is more resolved, columns of knit may be added along the straight edge, with or without planned eyelets, and the shape at the center of the XX also offers enough room for forming a DIY smaller shape.
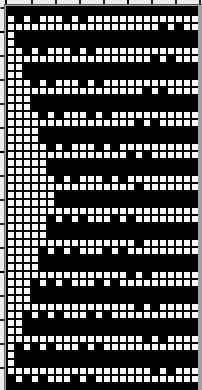
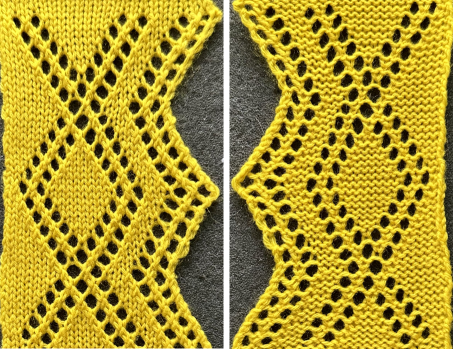
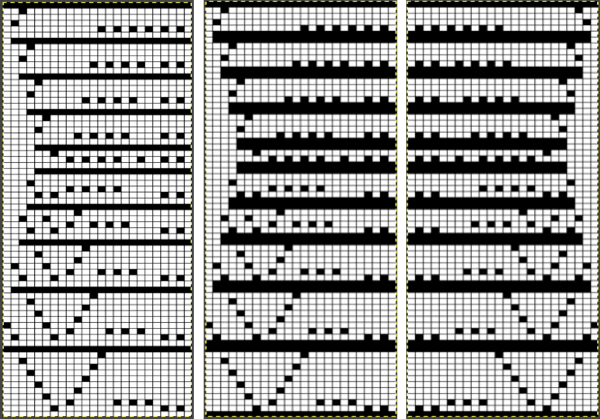
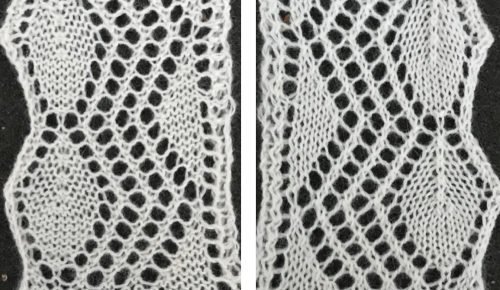 2020, a 24 X70 stitch version beginning at the widest part
 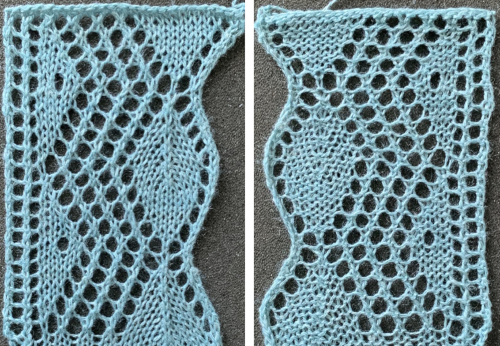 The curved edge is noticeably different and more uniform than in edgings where the increasing angle is formed only by a single stitch being transferred to the next needle on the left, creating an eyelet immediately to its right.
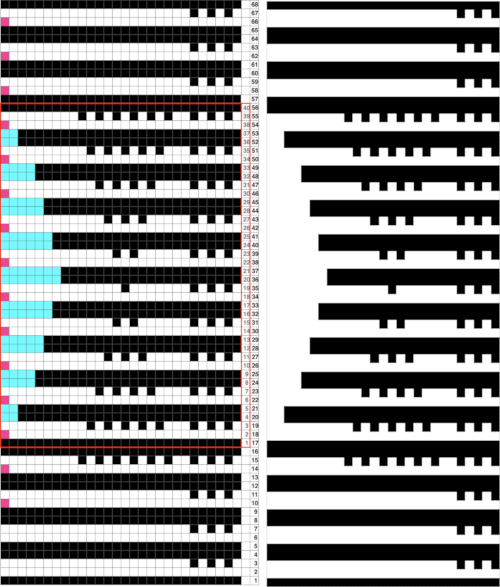
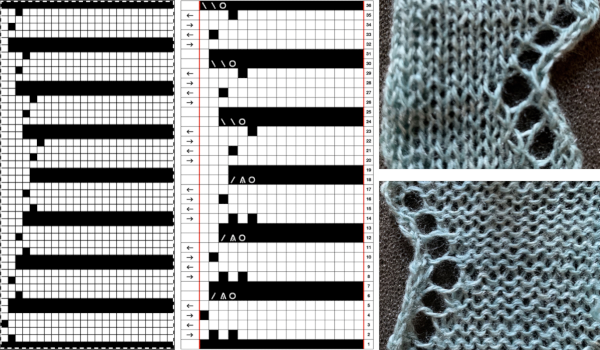 Moving on to the Brother published chart at the bottom of the 2018 post: the original is on the left, readjusted for planning to begin with the decreasing curve in the center, and charted for download on the right (mirrored in turn for use on the 930). The original was said to be 68 rows high but proved to be 72. It is also 18 stitches at the widest point, not 24. I did not follow the publication’s directions for alternating between fine and normal lace either, simply left the LC set to N.
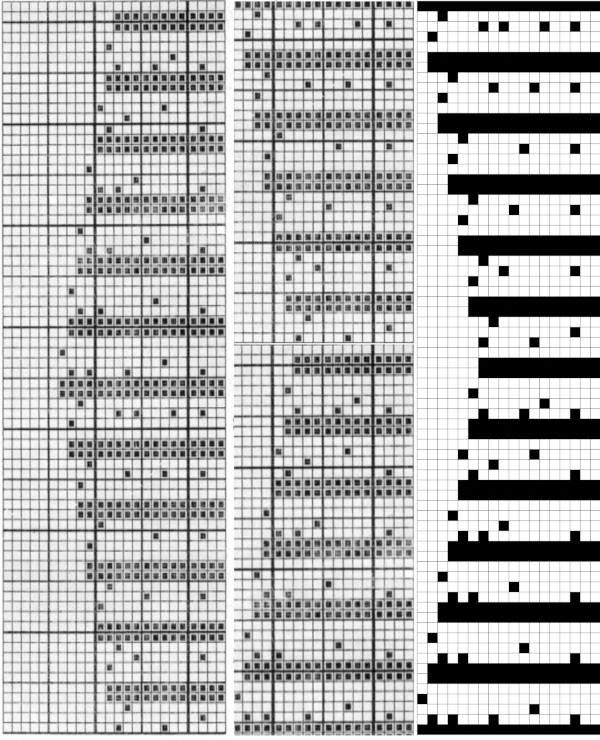 the png for the repeat as drawn, 18X72 pixels
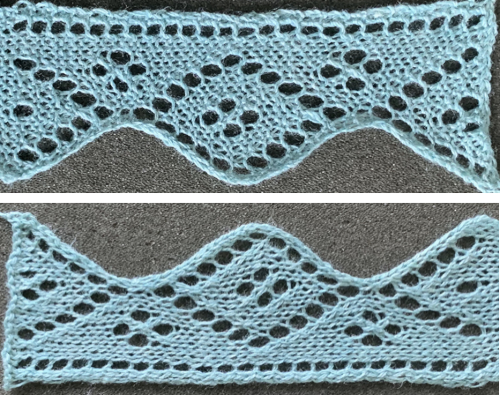 A fellow Ravelry member reminded me of Tessa Lorant’s lace publications. I had forgotten I actually owned this single one from 1981.
 Upon examining it, I rediscovered her patterns, many for hand knitting with accompanying written row by row instructions and charts, others at the back of the pub, with punchcard machine repeats.
 Working one chart through to knitting: the bottom left image shows part of the original card. Magenta squares indicate transfers to the right and cyan ones to the left. The straight edge border with the larger number of eyelets was a bit fiddly to knit, so the second option is also offered and tested.
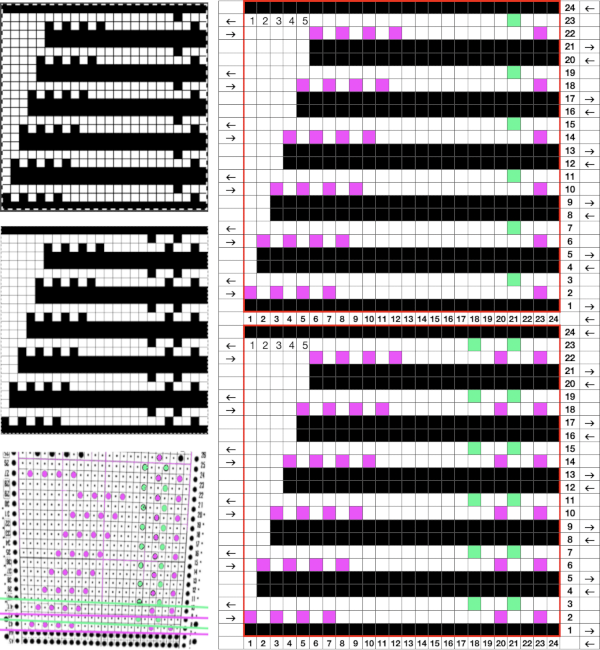
 I knit to the left after all the needles were preselected at the end of the decreases and then cast on over the empty needles on the left, bringing them out to hold so they would be knit for the second row as the knit carriage returned to the right side. A garter carriage weight seemed to be enough to help anchor down the newly formed stitches during subsequent transfers.
  Making a pattern design more one’s own: part of the original design from p. 52, split so the pattern may begin on the widest part of the repeat, punchcard “holes” marked for left and right transfers
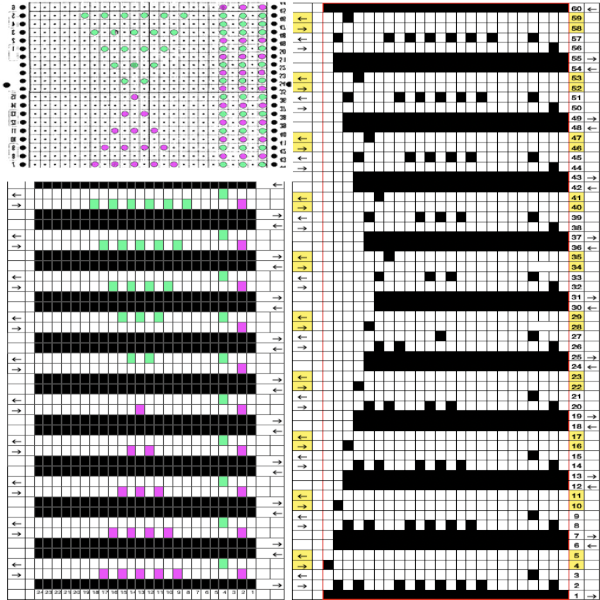
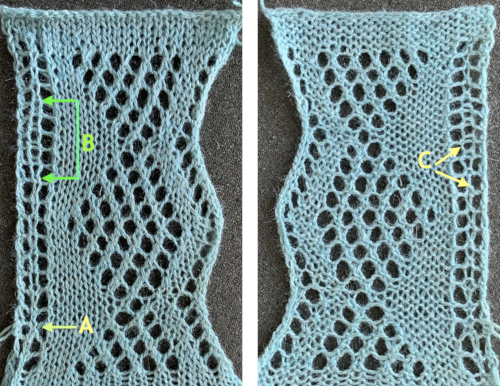 The last Tessa sample, from page 60, brings up the topic of large eyelet lace, also revisited in a recent
 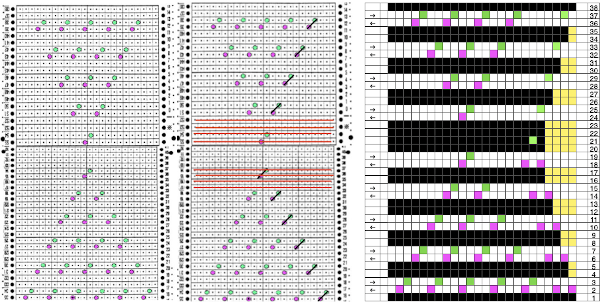 More transitions in planning, a 32X32 repeat:
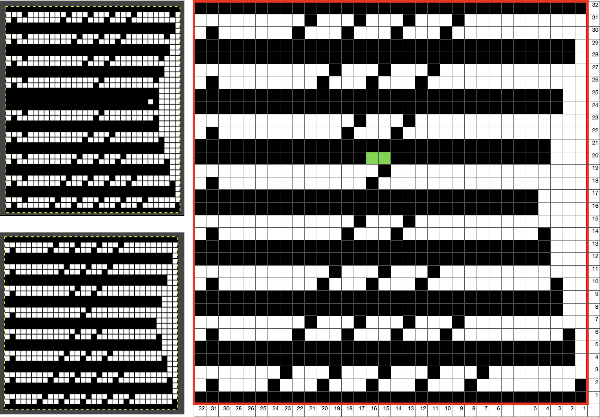
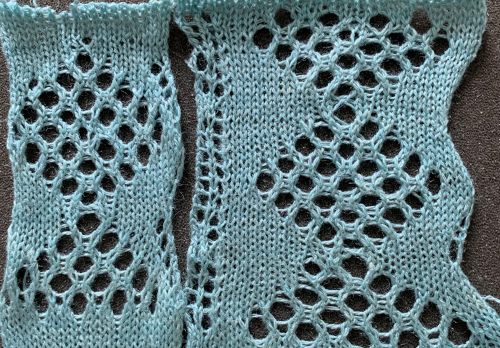 Consideration needs to be made in terms of whether some small ladders are a design element or not, hooking up “floats” helps reduce or eliminate them on decreasing angles on both sides of the shape, but the resulting eyelets appear a bit larger and different than the rest.
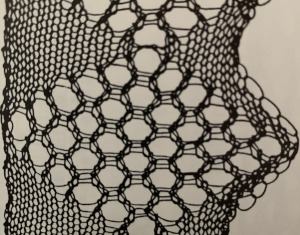
 The Tessa trims are knit in fine yarns. This shows a portion the inspiration large eyelet trim, note the appearance of the space between the two center eyelets is different
 My version with the floats hooked up and onto the needles with no multiple stitches already on them at the center eyelet as the pattern shifts:
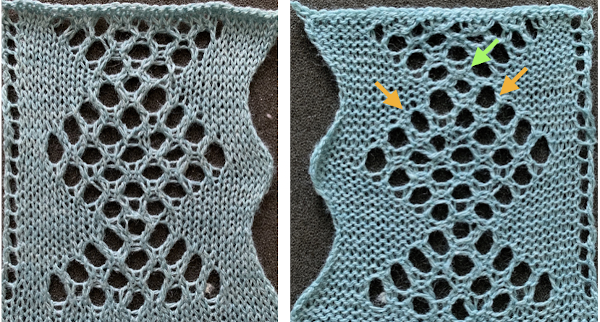
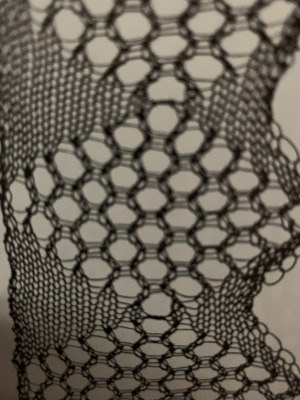
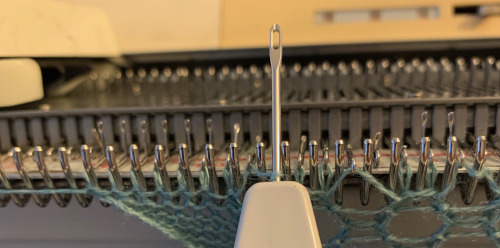
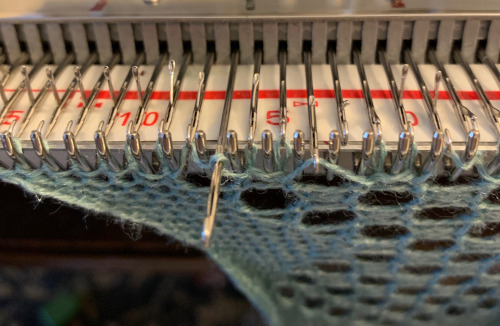
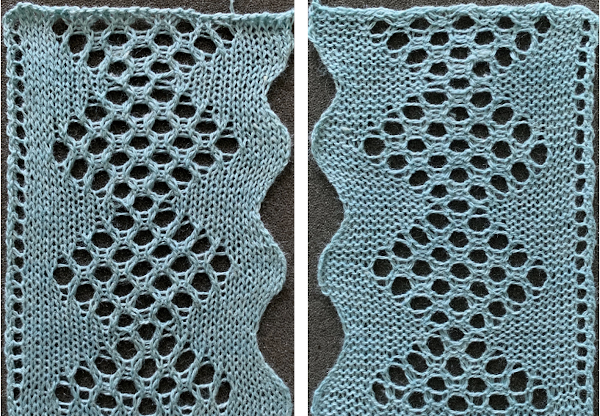 At the top of the piece I did have to deal with closing the eyelets to facilitate 2 knit rows and binding off. I prefer to work from left to right, dealing with the right side of the loops first: drop loop on the right side, use a tool to enter the float created from its back
 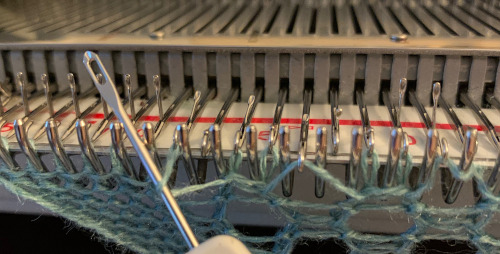 twist tool and yarn clockwise


 single complete transfers
  Multiple transfers may be made either as a hand technique or expanded for use in electronics. Because single stitches are moved with each carriage pass, pattern repeats can become quite long, with few punched holes or black pixels
  Use a smooth yarn that has some stretch and does not break easily. Because the yarn will be transferred to and from or in addition also being shared between needles in fine lace, some extra yarn may be needed for proper stitch formation. In overall meshes begin testing using a tension at least one whole number higher than when using the same yarn for stocking stitch. Too loose a tension can result in dropped stitches or loops getting hung up on gate pegs, too tight and the stitches will not knit off properly or drop, or the yarn may even break. When eyelets are few, tension adjustments may not be needed.


 A comparison of hand-to-machine stitch symbols with illustrations and more information:

 The two rows at the bottom of the card reflect the overlap when punchcard snaps are in use to keep the pattern continuous.
 Column identification at the bottom of the chart:
 Spacing out the zigzags, another 24X30 repeat. This is the minimum repeat for electronic KMs as well, knit stitch spacing (white squares) can be planned to suit

 The transfers of the stitches by the LC while using the knit carriage set to slip in both directions to create the knit rows, and will automatically create increases and decreases along the left edge. Due to this fact, there will be one less eyelet in each transferred row than the number of pixels/punched holes in its corresponding pattern row.
 The pattern repeat on the left below is as I drew it and intended it, on the right, it is mirrored for use to knit it on my 930
 The first preselection row is from right to left, the knit is centered with 10 stitches on each side of 0.
 The above fact allows for planning transfers in both directions while still keeping the routine of 2 passes for each carriage to and from their original home.
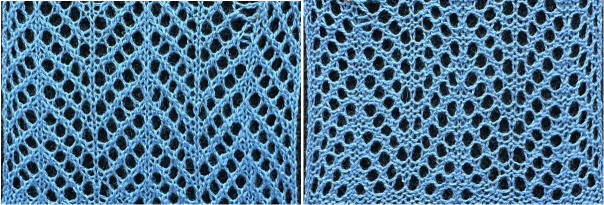
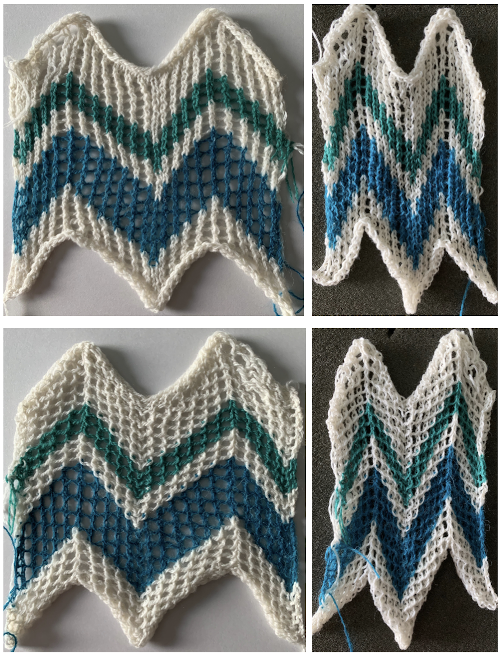 The fabric was capable of changing considerably in look and width that could be encouraged to remain more permanent with blocking. There is a visible asymmetry, with one side of the chevron actually containing an extra eyelet. Still trying to retain the 24 stitches in width design constraint, I began to work with simply counting eyelet transfers matching in number, guessing rather than planning. Tiling the repeats can help get a sense of how things line up horizontally and vertically. Electronic repeats can be minimal unless one is programming the pattern as a single motif that includes edge knit stitches etc when downloading via cable to an electronic or using the Ayab interface.
 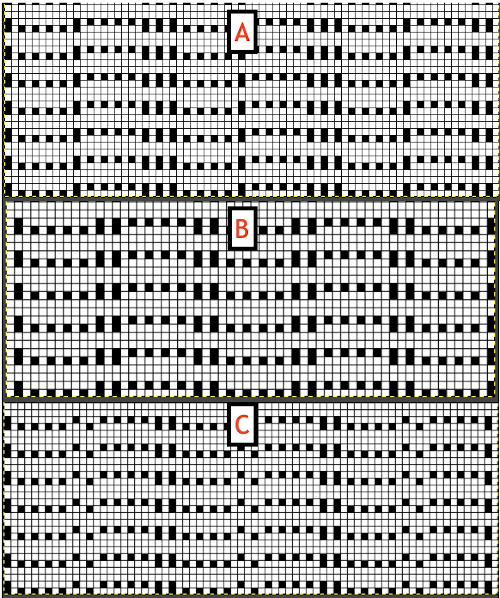 A and B continue to produce uneven numbers of eyelets on each half of the resulting “V” shapes. The greater the number of row repeats of eyelets in a single direction, the more the resulting bias. If asymmetry is the goal, then this may meet the need. I knit most of the swatches on 48 stitches, with more needles added on the right if needed to ensure the edge stitch will be a knit one. Larger shapes require wider tests. The photo is rotated to reduce its length on the page
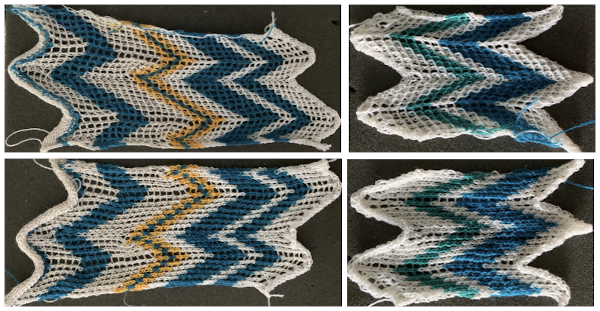
 The added eyelets in pattern C produce an interesting change from a sort of V shape to more of a W, but the fabric is still unbalanced
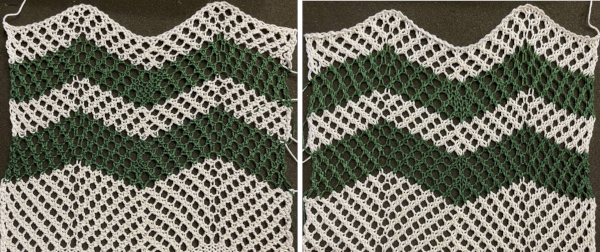
  Back to the drawing board: a different mesh, with eyelets in alternating numbers, resulting in a more balanced fabric. Here the charted repeat is shown X2, side by side.
 Using electronics one may expand or reduce the number of stitches in the repeat to reach an estimated equal number of eyelets
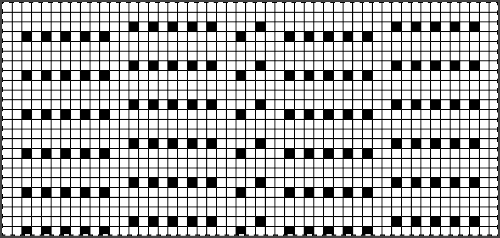
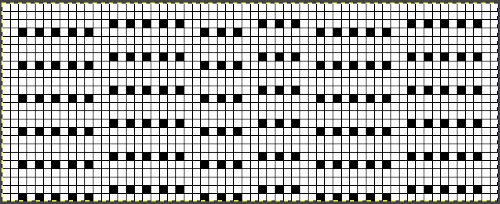
 With any mesh, the number of knit rows may be varied between each pair of transfers. My swatch was knit using a 26 stitch repeat width



 Exploring a smaller repeat, also 24 stitches wide
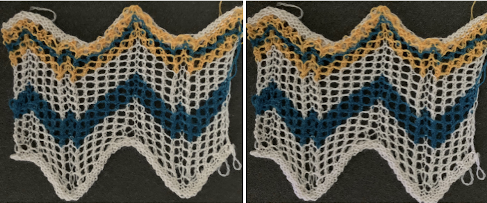
 The white yarn used is the same cotton as in the previous sample, knit at tension 9, the chenille is rayon, 1450 yards per pound, the eyelet patterns are stable and distinct,
 Another variation
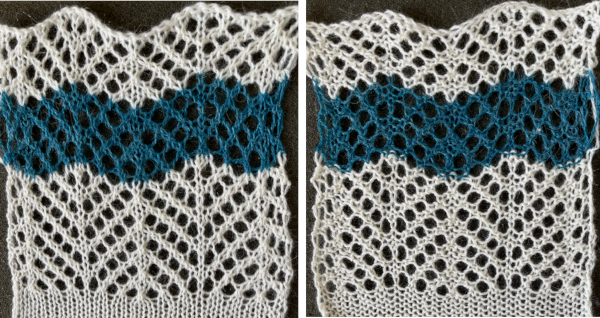
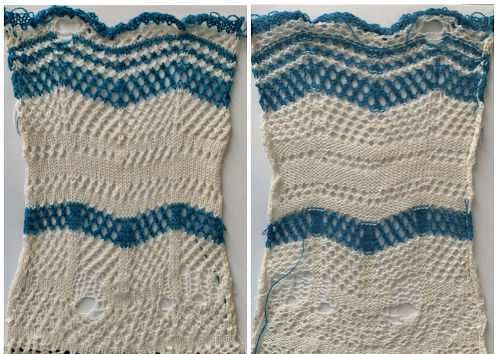
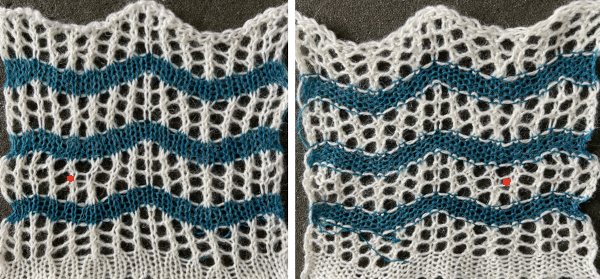 As often can happen in machine knitting, on a different day, the same yarns, same tension, same operator, and stitches drop, get hung up on gatepegs, and perform other unwanted actions.
 The blue yarn refused to knit off properly, so the different added colors were tried to see if I fared any better using them.
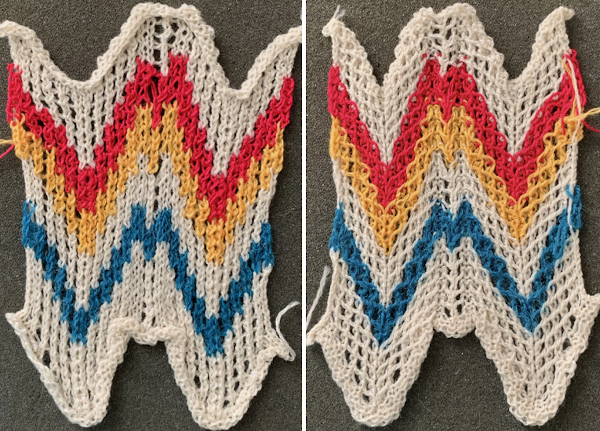 and has a very different appearance when lightly touched with my now fiber burning iron
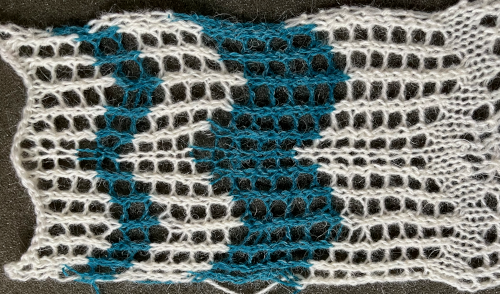
 During knitting, these fabrics will appear to be producing straight color stripes

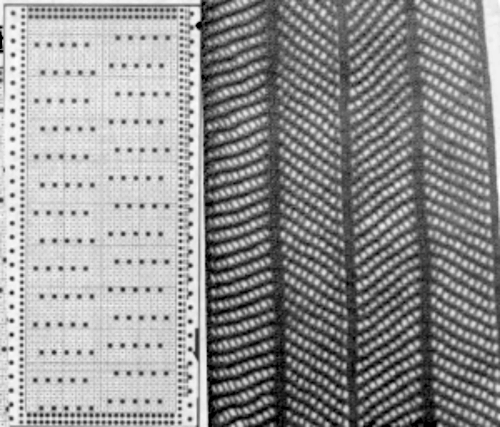
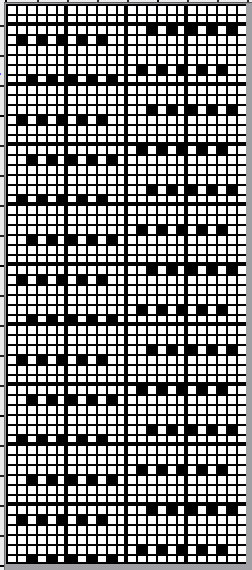
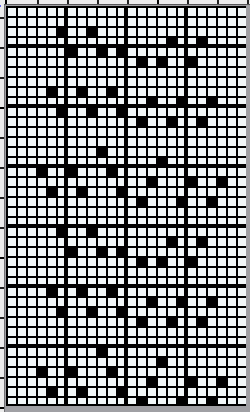
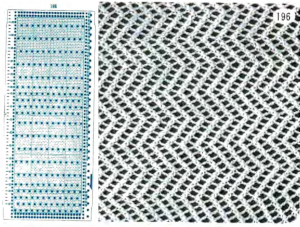
 Taking the guesswork out of repeats, one may begin with or use published cards as they are, this is from a Japanese magazine,

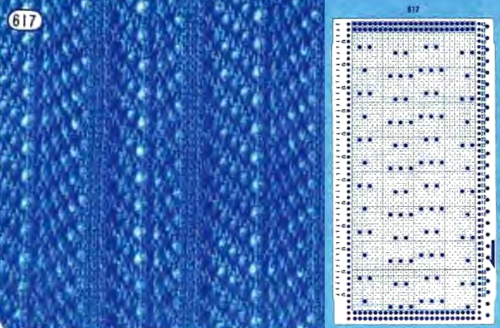
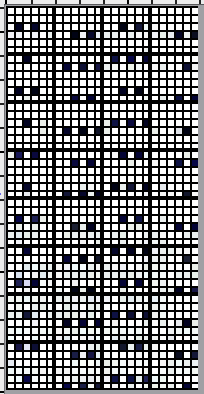
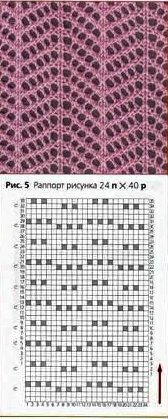
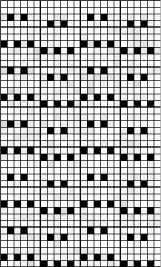
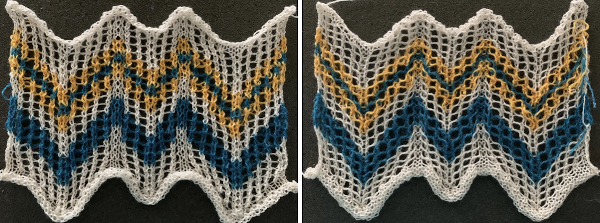
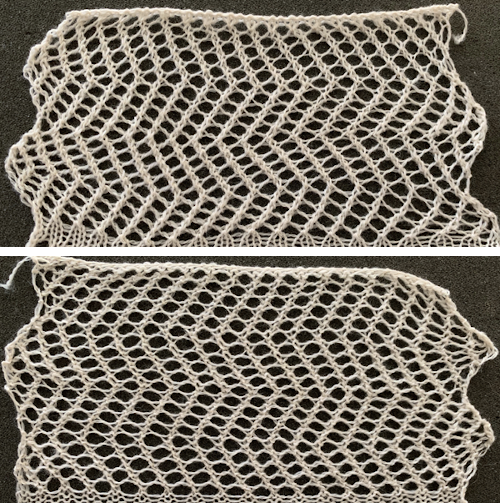 Here the cast on and bind off match very closely. I used the looser cast-on method described by the “answer lady” in the
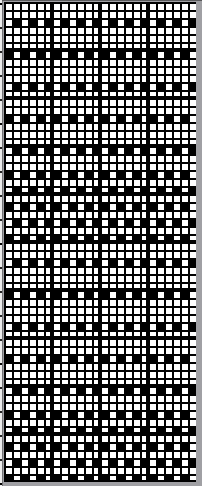

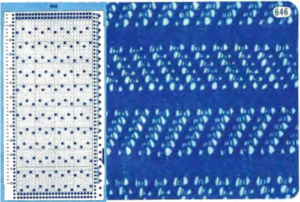
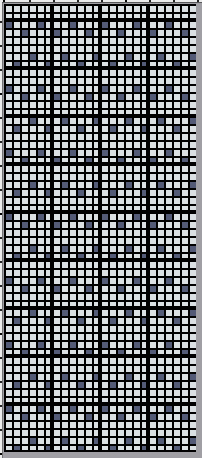
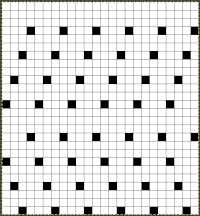


 A very different chevron in an advanced technique combining tuck stitches with lace and fine lace patterning
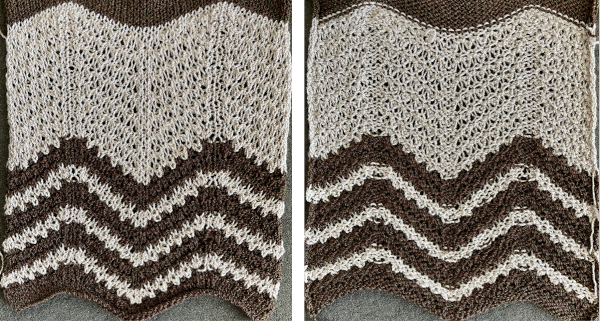
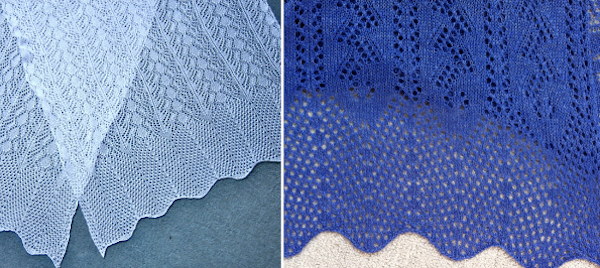
 A variation of Card C, with 2 rows blank after each pair of transfers throughout was used in borders in some of my lace shawls including these, made in 2011.
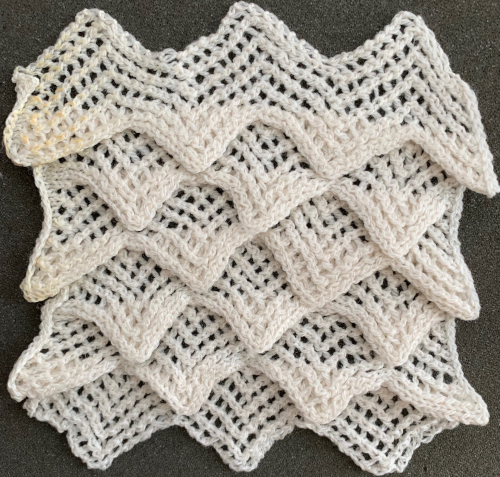
  The knit side of the fabric is the most interesting. The swatches were first photographed as they were immediately after their removal from the knitting machine. I also tried to photograph them at an angle to show the protrusions from the surface. Pattern A:
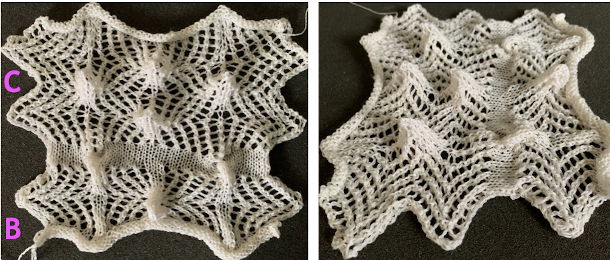 When using card A, the shapes alternate vertically between all mesh ones with all knit rows at the outer edge of the folds. Using Card B, all protrusions have a fixed number of knit stitch rows at the outer fold. Card C produces an all-mesh fabric that made me think of ocean waves somehow. Turned sideways, and pressed to set the folds, the resulting fabric could provide a springboard for a host of other, different ideas:
 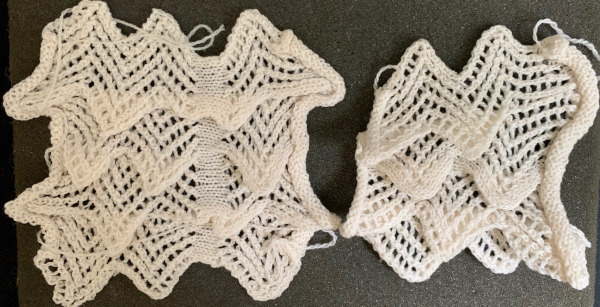 A larger swatch started on waste yarn, with 2 rows of knitting at the bottom and at the top before binding off. The design is card B, with 4 rows added to each half of the design. I am still working with the constraints of a punchcard machine, and for the moment, of retaining symmetry in the width of the “scales”. The working chart, turned counterclockwise to save space
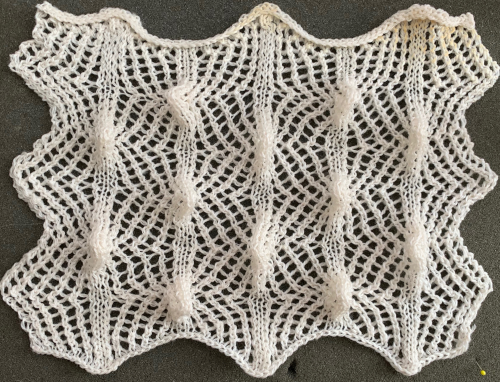
 the above arrangement will, in turn, need to be mirrored for the lace pattern. My sample was knit using 2/15 wool at tension 7, using needles 36 left to 35 right
 The knitting in progress

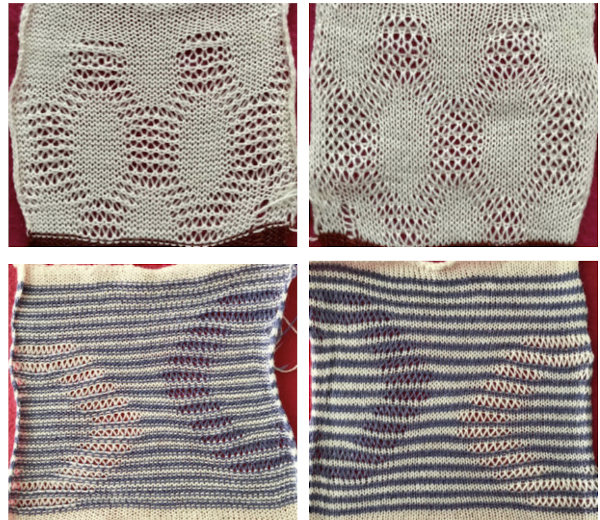
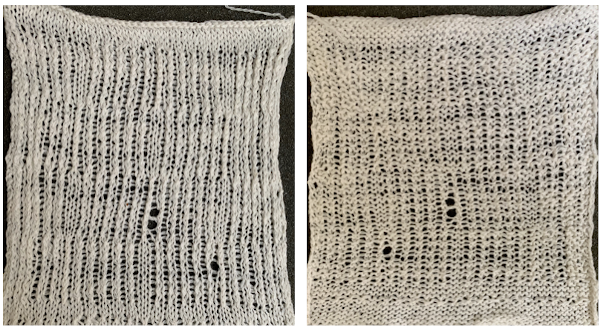
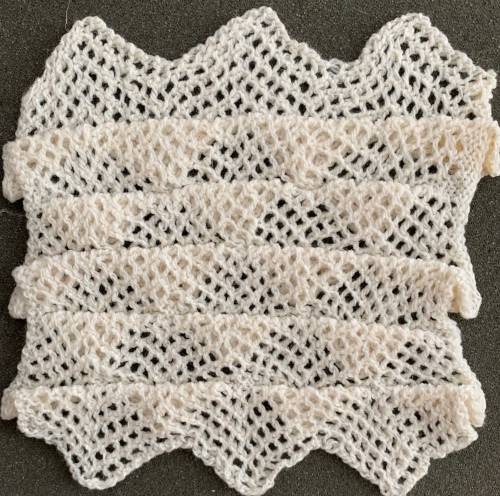 Often the question of what fine lace is and how it is made comes up. Fine lace is a fabric against which I have a personal bias. It seems to involve a lot of work for the result unless one is using a light-colored yarn with a smooth surface to show the subtle and at times hard to observe surface changes. It fares better visually when mixed with eyelets. The yarn is shared between the needle that would normally be left empty and the one with the formed stitch already on it to its right or left depending on the direction of the transfer. If the shared yarn is dropped instead of staying in the hook of the transfer needle, as the next 2 rows are knit there will be eyelets on the ground lacking them anywhere else. Card C, knit using only the fine lace setting on the LC, looks very different from the previous fabrics, both knit and purl sides are shown, with a couple of spots where the yarn was not shared by 2 adjacent needles, forming eyelets
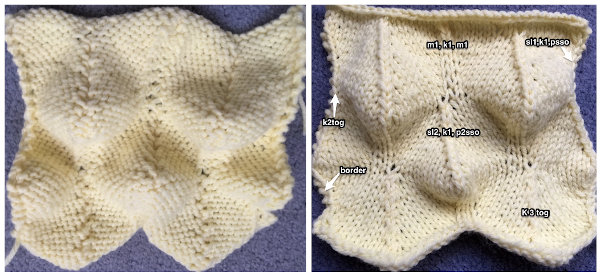
 Now evaluating the possibility of mimicking my
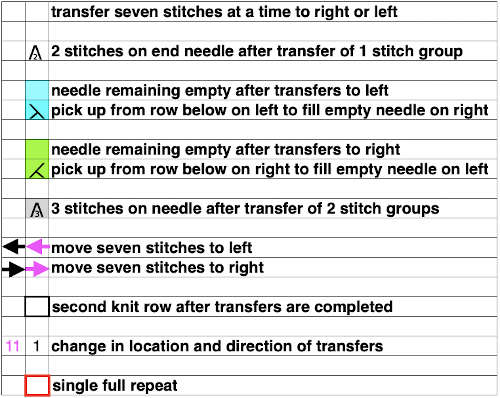
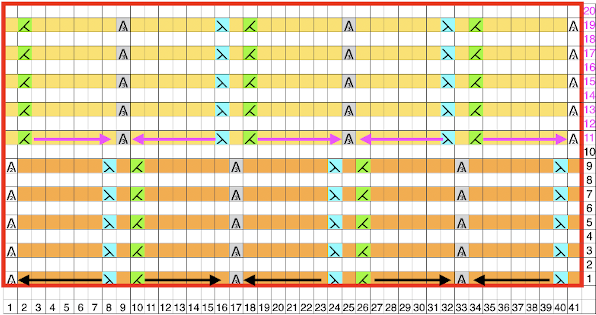
  Planning out a repeat in chart form:
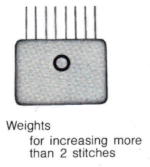
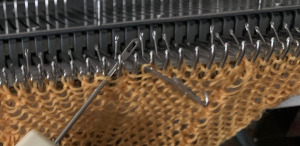
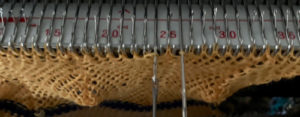
 Knitting began with working in a 2/15 wool, tension 6, using a 7 prong tool with all prongs engaged to transfer groups of stitches onto their new positions on the needle bed. The first two images review picking up from the row below to fill in needles emptied by transfers. It is one of the machine-knit equivalents for the M1 direction in hand-knitting patterns. As a result, the number of stitches being knit remains constant throughout the piece.
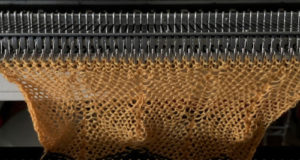 The stitch structure so far appeared too loose to me, so I then switched to a 2/8 wool, at tension 7 with the intent to test knitting as tightly as possible while still facilitating the multiple moves of stitch groups on each row. The resulting fabric was stiff and wanted to curl strongly to the purl side, needed pins to help it lie flatter. The shapes refused to stay poked out to the knit side.
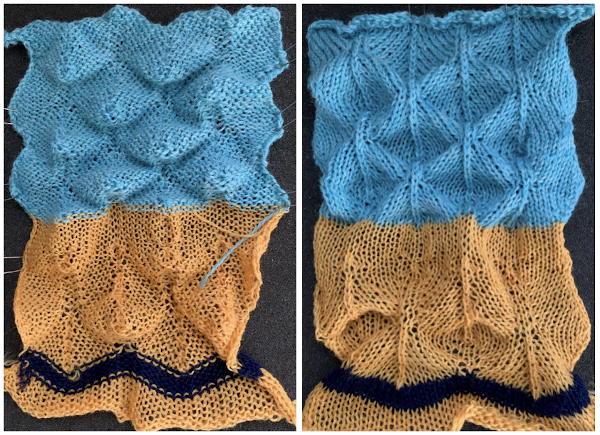
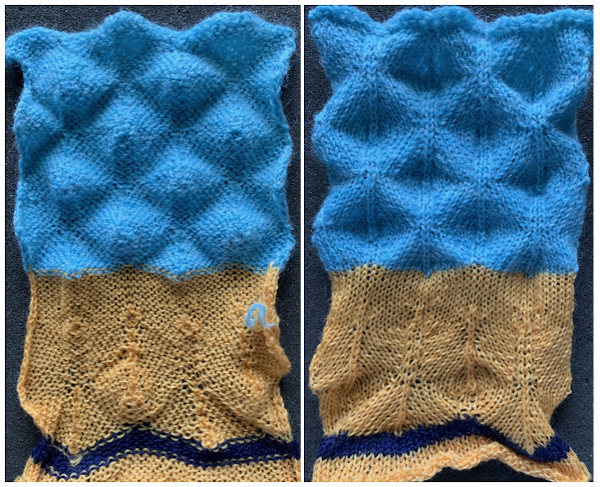 On electronic machines, one does not have the same limitations in terms of the width of the repeat maxing out at 24. For example, the number of eyelets on either side of the block components of the repeats may differ, the greater the number of eyelets, the wider the spacing between the 3D shapes. Graduations may be planned in height and width of repeat blocks across the full needle bed, limited only by patience in designing, the capacity to download, and the tolerance for both the yarn and the operator to complete wide, long pieces using the technique.
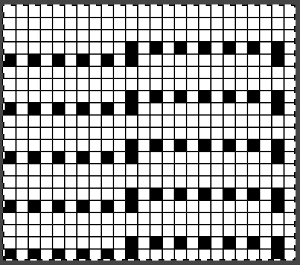 and in a staggered one, tested at the top of the swatch
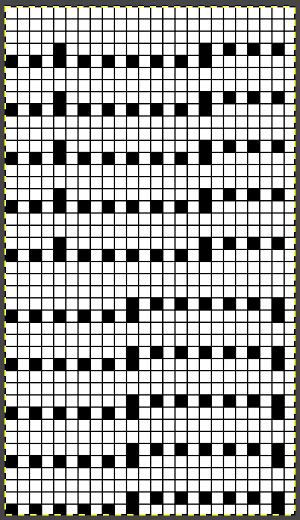
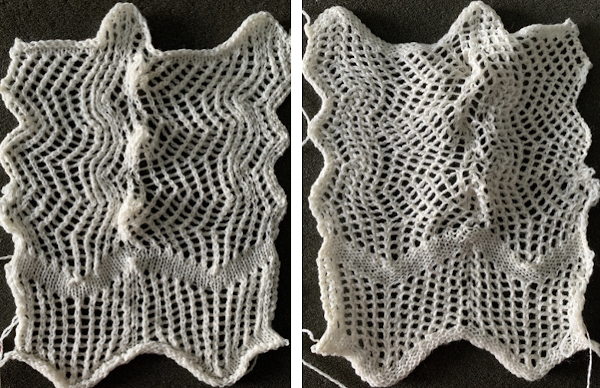 The “scales” were more like twisty bumps, with subtle variations vertically in some of the stitch groups. That said the results were dramatically different when color changes were added to the pattern knitting in the shorter repeat. Blocking may make an even more marked difference depending on whether the mesh (lightly steamed) or the tighter knit (vertically pulled, should be washed) produces the preferred effect. The looser stitches at the top outside edge ie at the top left corner are the result of a stitch that got away from me. The cast on was a bit too loose, I knit 4 rows at the bottom after the cast on and 4 rows at the top of the repeat before binding off.
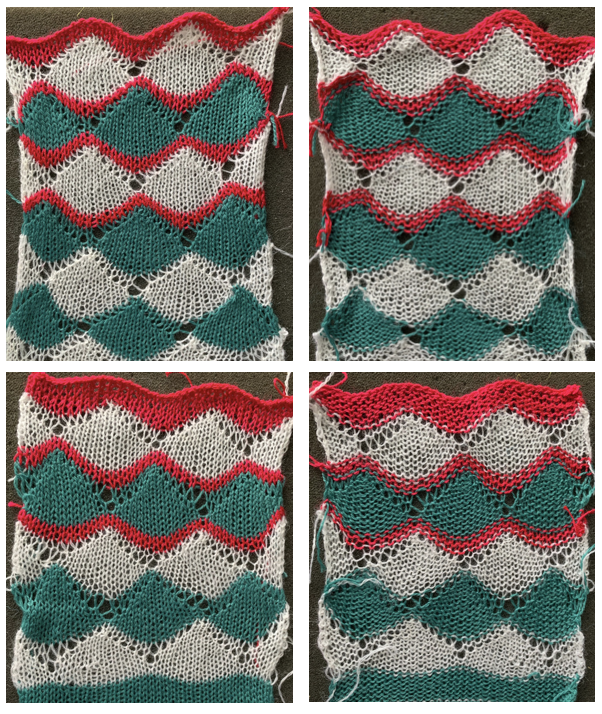
  Adding a second color and reversing directions of shapes brings lots of yarn ends and its “price to pay”
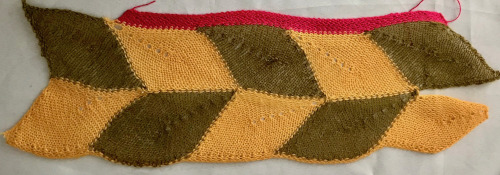
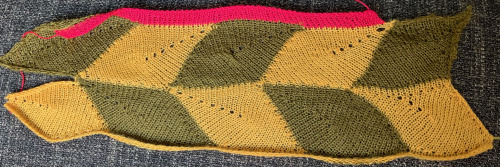 Some handknit large scale inspiration to begin my revisit to MKing them:
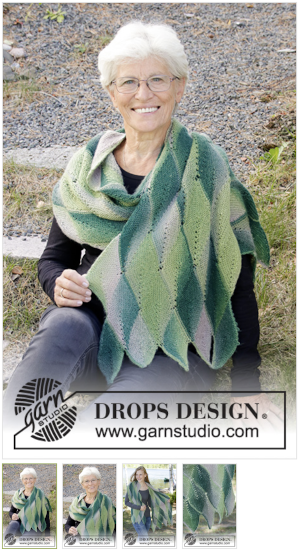
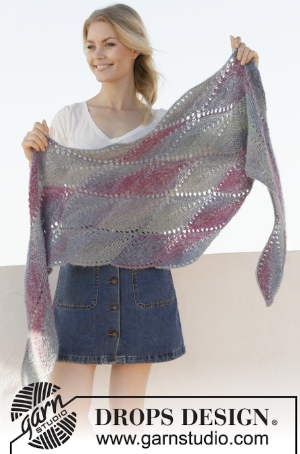
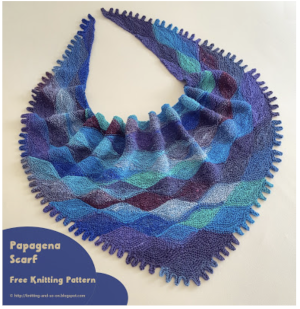
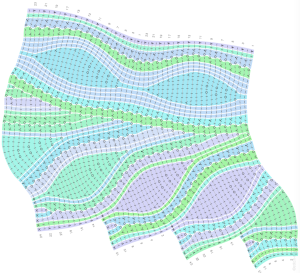 The chart is actually rotated 90 degrees counterclockwise, could serve as inspiration for an electronic pattern.
 Automated holding sequences may be planned for single or multiple stitches in width, as well as for single and multiple rows in height. For the new initial test, which proved to need editing, this was my repeat
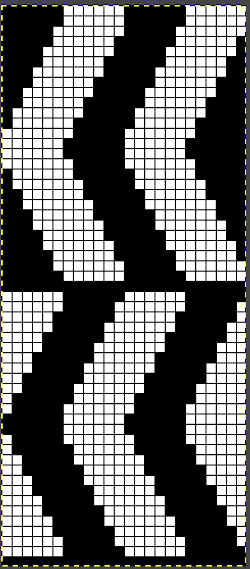 A tiny test in too thin a yarn
  I am knitting on a 930, the image needs to be mirrored in order for it to appear in the direction I intend on the knit side. The above repeat did not work properly when knitting a whole row of shapes. With some patience, a final, edited, and mirrored repeat was developed that enabled a completed a full row of shapes using the slip setting and holding, and starting with working it from right to left. Sometimes differences are subtle, especially in designing using single-pixel units. The new repeat proved to also work for rows of shapes in the reverse direction after horizontal mirroring and restarting the pattern or design row 1. When working from right to left, the initial preselection row is from left to right, while when working from left to right, the first preselection row is from right to left. After a full row of repeats is completed, the pattern is rolled back to row 1 and mirrored. Punchcard knitters could turn the card over and start again on the proper row. I used contrast color knit rows initially in between rows of shapes to help me note transitions more clearly. The “leaf” is not pointy enough for me, but at times what was not planned may lead to a pleasing result of a different sort.
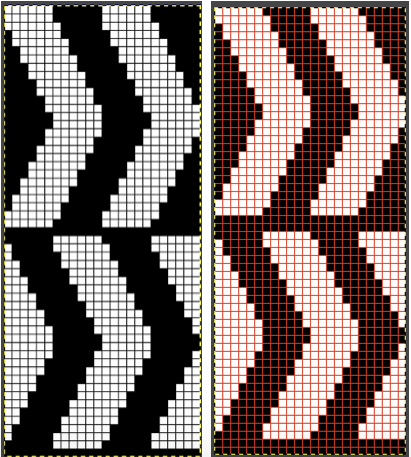
 To knit: cast on with a multiple of 12 stitches on each side of the center 24 on the needle bed
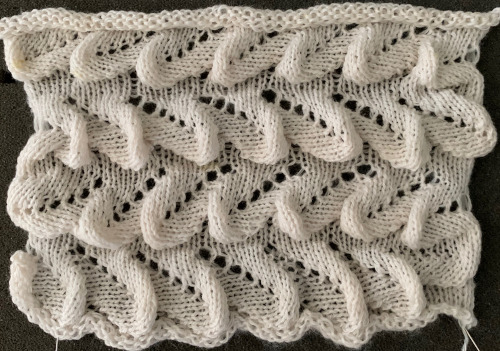
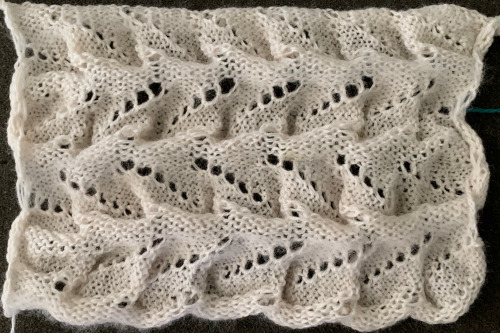 Moving on to a wider version, using 24 stitches in width to allow for using the pattern on a punchcard: this repeats works both as-is and mirrored, the groups of stitches moved in and out of work is now half of the new design repeat = 12.
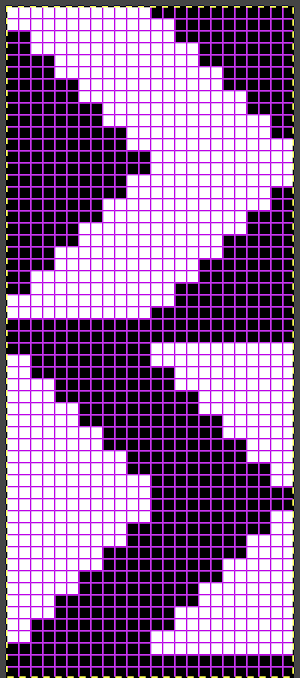
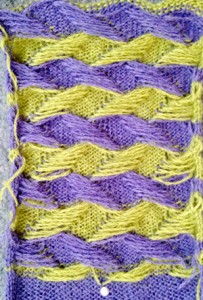
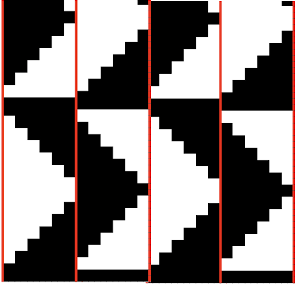 The lovely mess in the swatch happened when I stopped paying attention to everything but what was happening on the needle bed and missed the tangle of yarns in my yarn mast. There is enough knitting, however, to note that the repeat is sound and that the edges on both sides are formed by the narrowest part of the shapes in each direction. One way to solve that is by casting on and binding off along tops and bottoms of shapes as seen in the yellow and green swatch at the top of the post.
 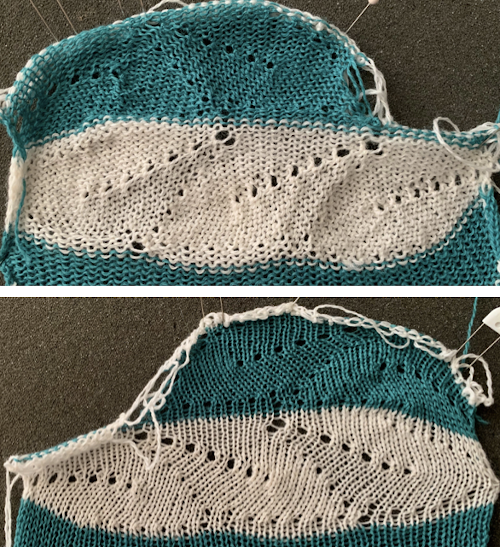 Planning things out to release those edges as seen at the top of the post
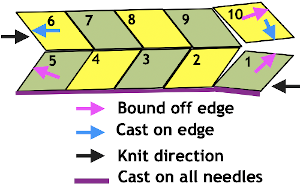

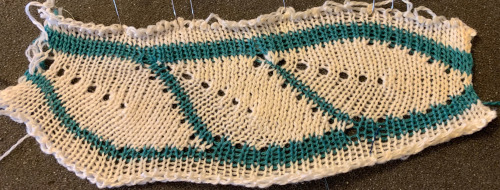 Problems to solve: maintaining an even number of rows in-between shapes and a straight edge along both sides. The latter could happen with triangles prior to knitting full shapes at either or both ends, the first sample failed on the left side due to both triangles being knit in the same sequence;

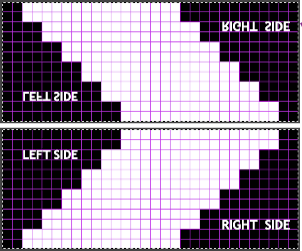

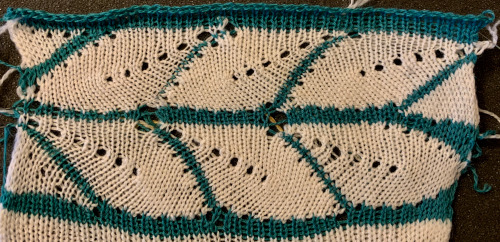
 Begin on waste yarn, decide on the color of the cast on, and any additional knit rows prior to beginning in the pattern. Each of the side triangles is shaped using manual holding techniques over 12 stitches. If starting on the right, the first preselection row needs to be made moving from left to right as above on the first 24 stitches. With knit carriage set to both slip in both directions and holding with COL make certain the first 24 stitches on the right in B position make a free pass to the right.
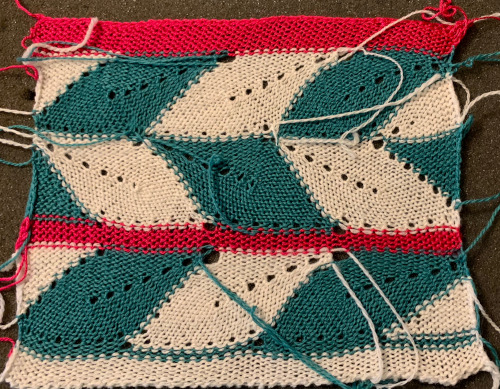
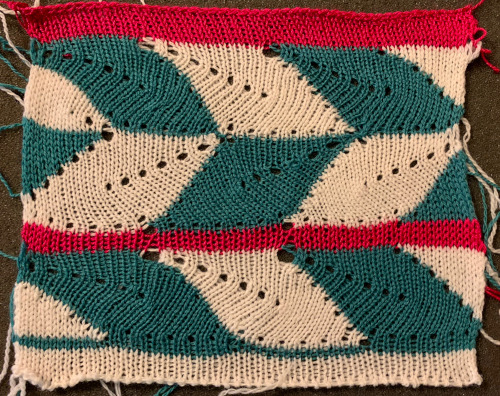
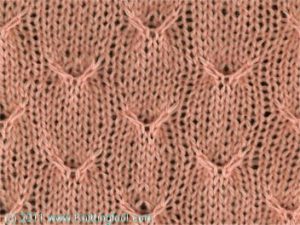
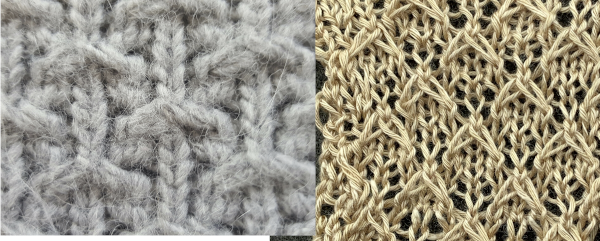
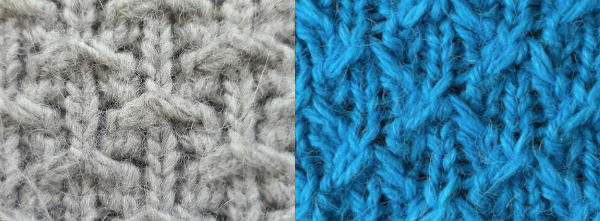
 Observations: there are elongated loops on the knit side of the fabric, likely created with slipped stitches. There appear to be eyelets on the purl side. The total number of stitches remains constant throughout the knit. The row repeat spacing is fairly close, so at least to start with I tried single repeats to achieve the look, was not pleased with any of the initial results. That led me to an online search for what would visually appear to have similar qualities in handknit samples. Knittingfool.com is an extensive resource and, to my eye, this slip stitch pattern,
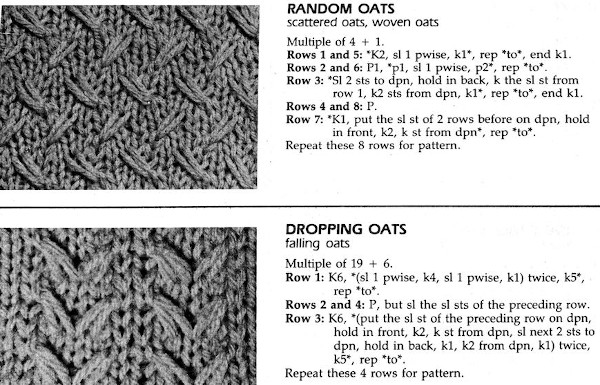
  as do “oats” found in a 1984 handknitting publication
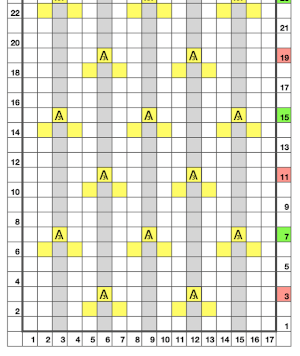 and then transitioned to translating any repeats for use in machine knitting, keeping in mind that in hand knitting actions are made as the row is being knit, while in machine knitting they take place prior to returning the carriage to the opposite side thus knitting that row. This was my first repeat after replacing cells with squares representing knit stitches with black and white planned pixels for electronic download.
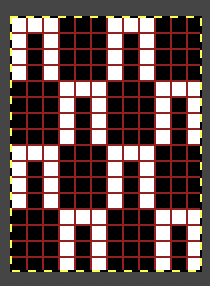 The slip stitch setting is used in both directions throughout. White squares represent areas where needles on the bed are skipped/slipped, not being selected forward and thus knit. This happens for 3 rows, resulting in the required elongated stitches. On the 4th pattern row, the group of 3 not selected needles is where the stitch transfers and crossings occur. Any cabling, eyelet fill-in, etc, needs to be performed prior to knitting that row and moving the carriage to the opposite side. The work is always done with purl side facing, so matching the direction of patterning to a hand-knit may also require mirroring of crossings, depending on your knitting machine model. The goal is to have the K3tog with the long loops in front of the single knit stitch in the center position.
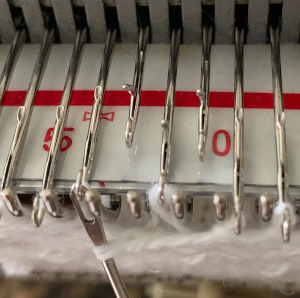 Move the stored original center stitch back onto that center position, there will now be 3 stitch loops held on the single needle
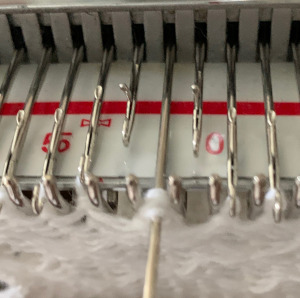

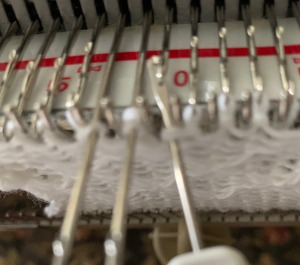
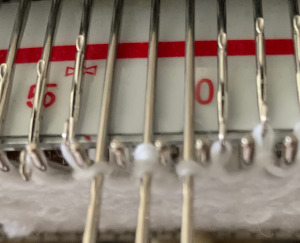 repeat the process across the bed, bring all the needles used out to hold position prior to knitting the next row
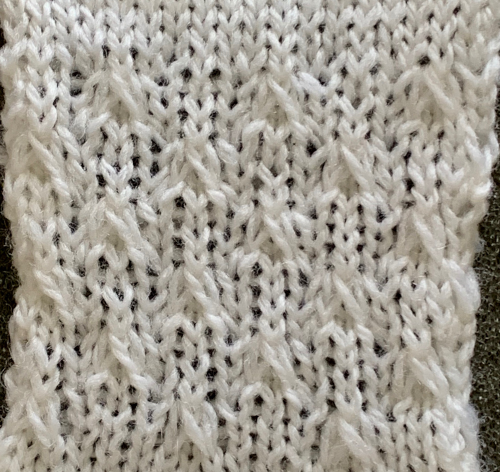
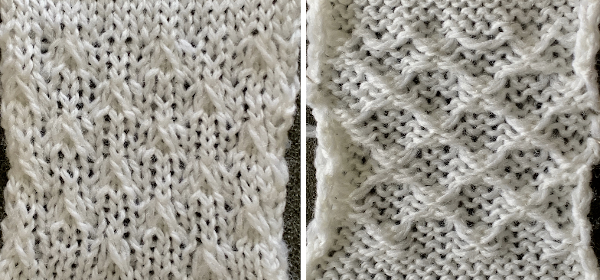 The yarn used was 3/8 wool at loosest tension possible, the result is subtle as any spaces between stitches get pretty well filled in. Moving on to denser patterning
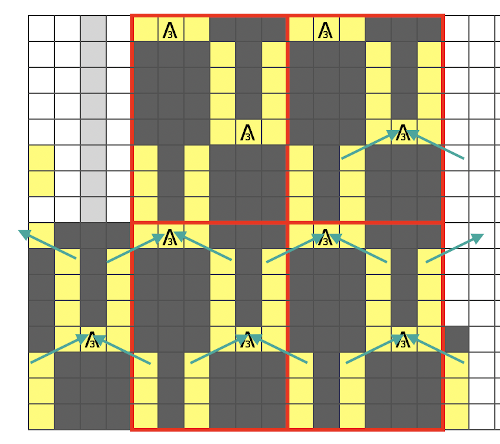
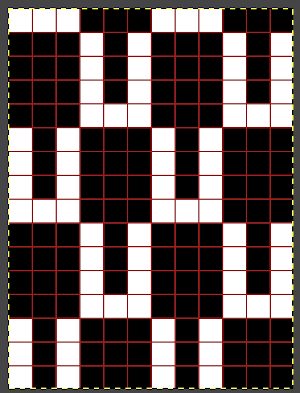 The elongated stitch crossings now happen every 4 rows, but across two needles, not one. I used a tightly twisted rayon for the test swatch thinking they might be more visible, but the openness in the stitch formation because of the fixed spacing on the metal bed confuses the texture a bit. Simply leaving the empty needle out of work and continuing to knit (1) created too large an eyelet to my taste. Trying to pick up the third slipped loop (2) had the same effect. The best result was obtained by picking up from the row below on each side of the three stitches that are removed and then returned to the needle bed (3).
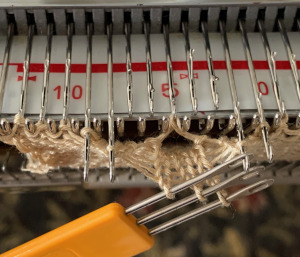 e wrapping the third row of floats can be tested by inserting a single eye tool front to back, twisting either counter or clockwise and rehanging on an empty needle, thus casting on an “extra” stitch
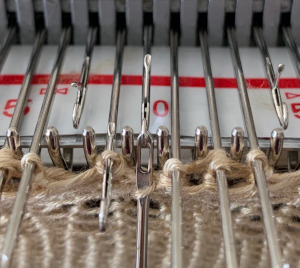
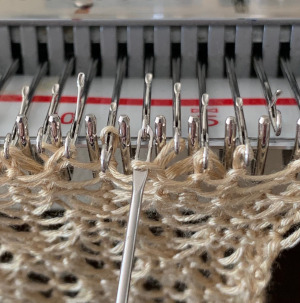
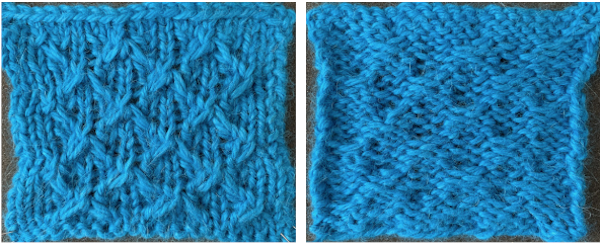
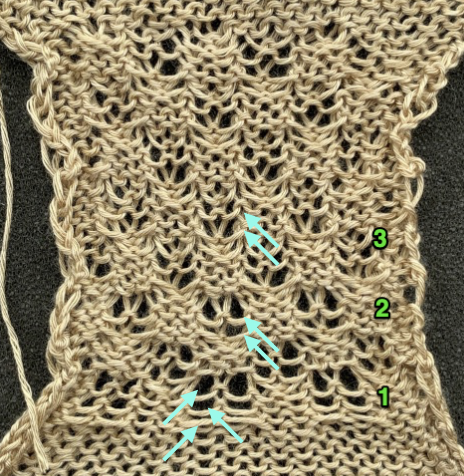 the appearance on the knit side
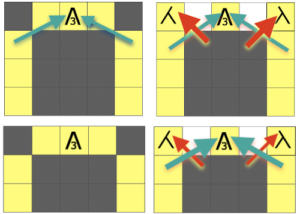
 Charting the actions for a hand-knit version: the top images illustrate the moves on the purl side while on the machine, below it those on the knit side when hand knitting the pattern
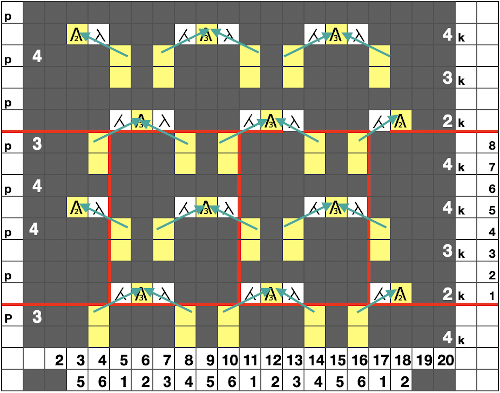
 Plotting out borders and repeats for a small test including make-1 increases in order to keep the total stitch count constant. I do little hand knitting nowadays, so when doing so I add as much information as possible including some stitch counts until the pattern is established and I can visually follow it more easily.
  The resulting test swatch
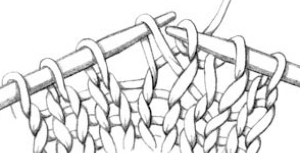
 This is an illustration of the method I used to “make one”, in my swatch I kept the direction constant


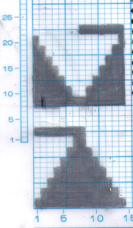 The 910 in my default setting produced the “image’ as drawn on the knit side of the resulting fabric. The post was written prior to my tiling the repeats as a matter of routine to check their alignments. Doing so would have shown a couple of missing pixels, and pointed to any other errors in filling in mylar squares.
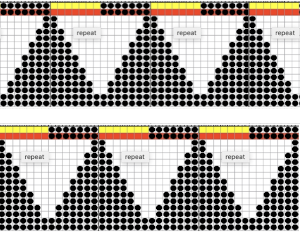
 All transfers were made in the same direction.
 As always, ideas need error-proofing and refining, easier done in a chart if possible prior to any actual knitting.
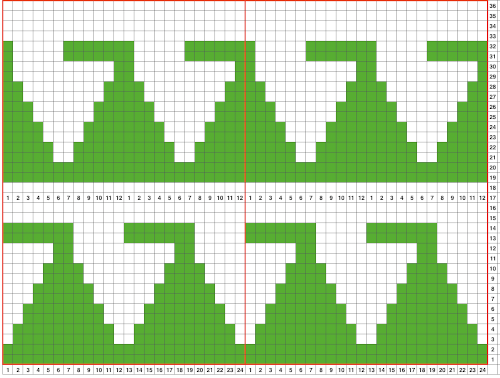
 There are several changes to make if it is necessary to get the pattern to reverse direction in alternate rows of completed shapes in a brick layout.
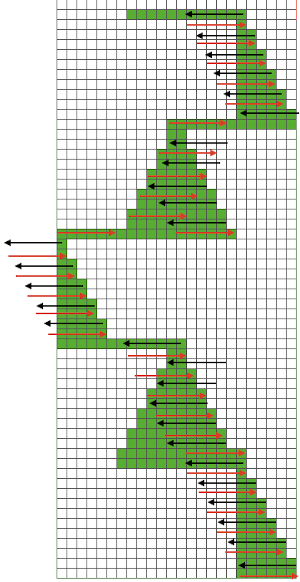
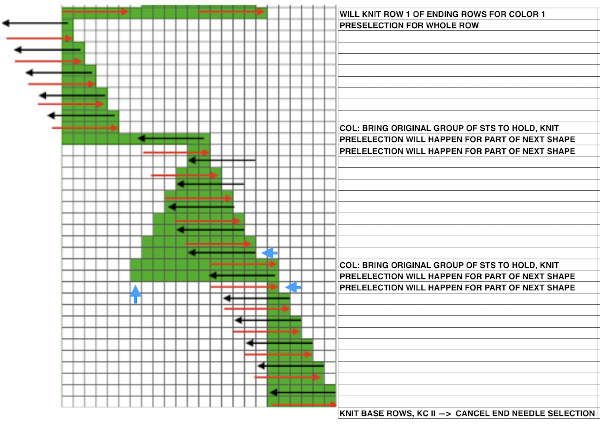
 Attempts to visualize holding can happen in spreadsheets, documents, image processing canvases, or even simply on graph paper, moving/ “drawing” back and forth across the cells mimicking carriage movements and marking them accordingly.
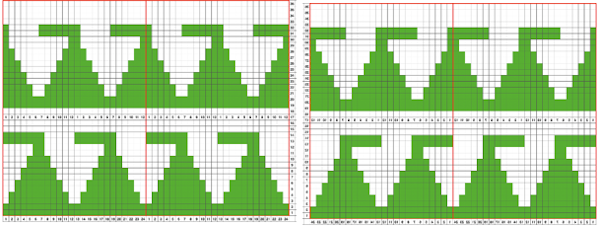 The 930 automatically mirrors downloaded motifs, if direction matters, as in these samples, either mirror the design horizontally prior to saving the PNG for download to the machine, or use the mirror button selection on the operation panel after the download.
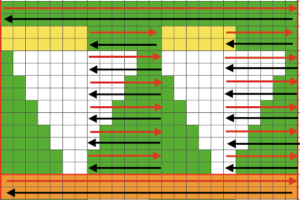
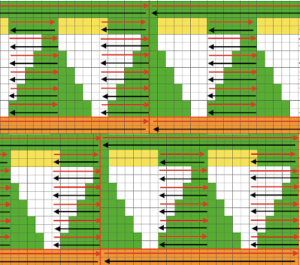
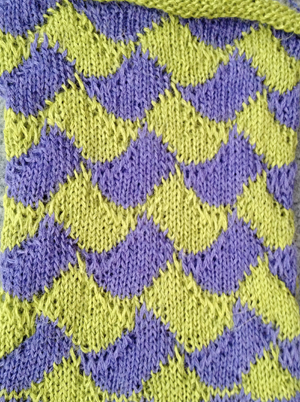
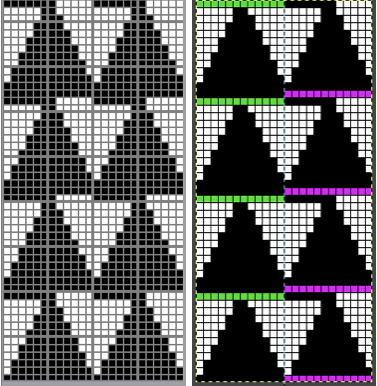


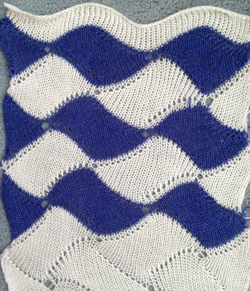

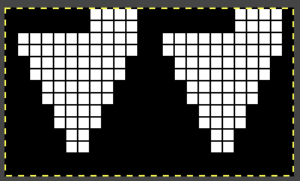 while here the repeat for all full-size shells is planned,
 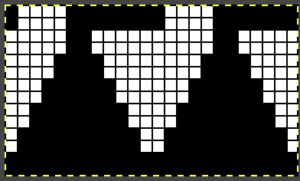 Marking up the needle bed with water-soluble markers or pencils helps track placements of repeats across the desired number of needles in work: dark lines indicate placement beginning with the mark for half a repeat to maintain straight side edges on the finished piece. Red lines mark the placement of the stitches when they are moved to the left to knit the full shells across the bed.
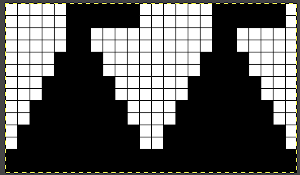

 Scaling the image to render it a bit more legible:
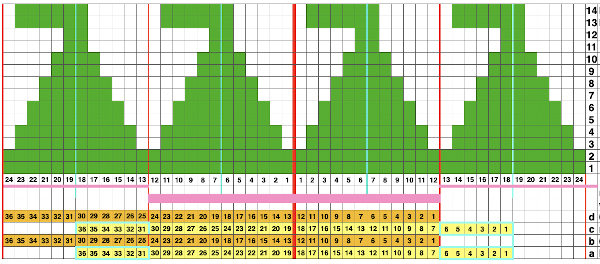
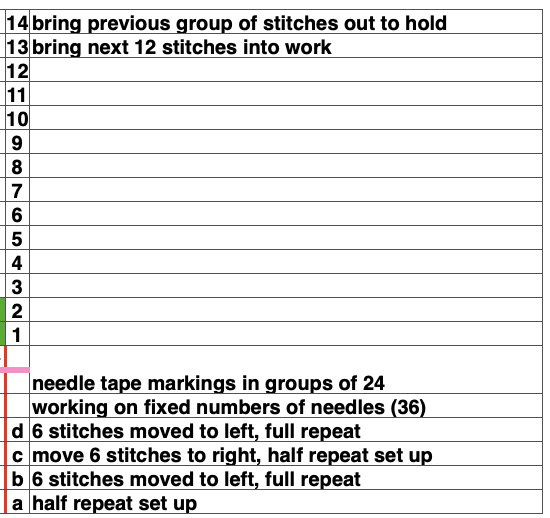 The machine will be set for slip stitch in both directions and holding. End needle selection is canceled.

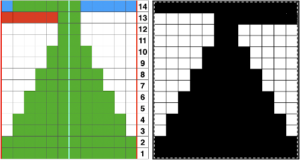
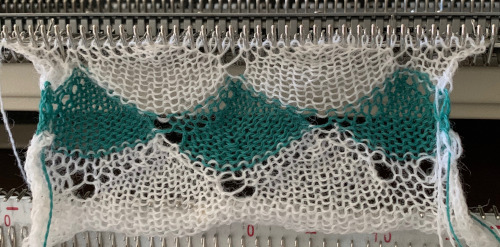 I used two repeats side by side to eliminate having to consider and choose the position option on the 930 needle bed, resulting in having the pattern centered in each 24-stitch fixed segment of needle selection.
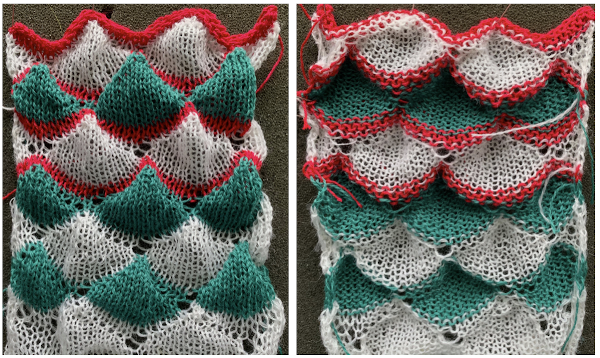 I was too aggressive with clipping yarn ends on the left side, especially while changing colors, not ever a good idea. Automating the pattern fully on electronic models using only slip-stitch patterning is possible. The length of such patterns grows exponentially in proportion to the size of the repeats. Reviewing errors in the beginning concept
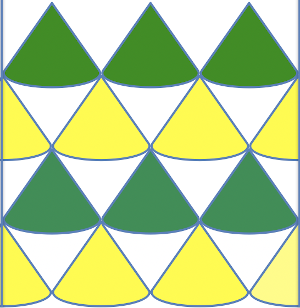
  An attempt to visualize the placement of the shape variations in the finished piece using the shell motifs beginning with the shapes created in order to create a straight side edge
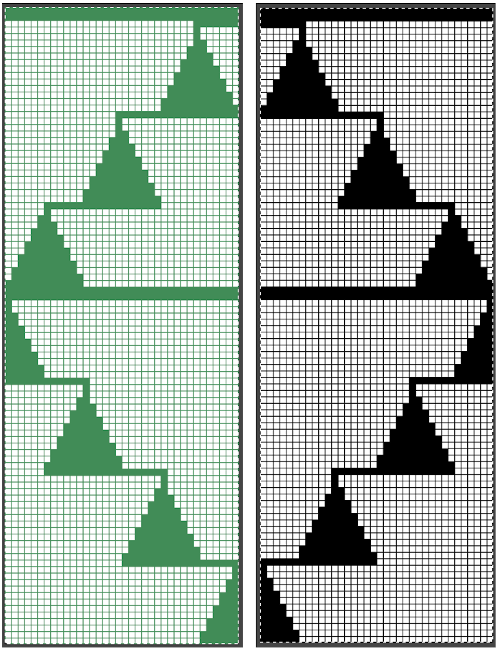 COR: knit a base row in color one from right to left
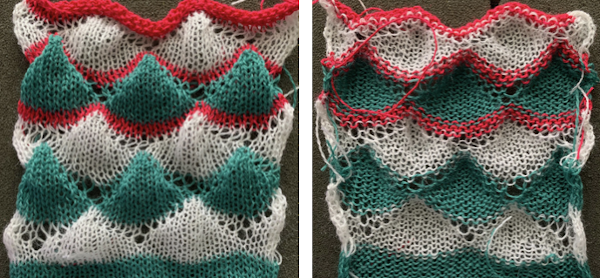 Preserving the 3D texture relies on using yarns with “memory”, ie wool and avoiding aggressive blocking. Using thinner yarns makes the stitch formation more evident. Hard pressing, in this case, knit using acrylic yarns, flattens the fabric considerably, and often, permanently. Both the hold/slip (top) and fully automated swatches (bottom) are shown.
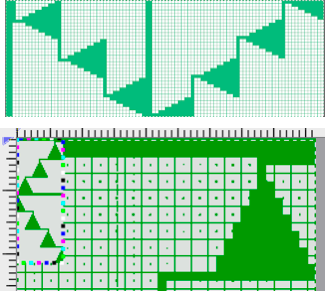
 2023: a screen grab from the shell charts was cropped to its outline, opened in ArahPaint, and using the program’s tool “

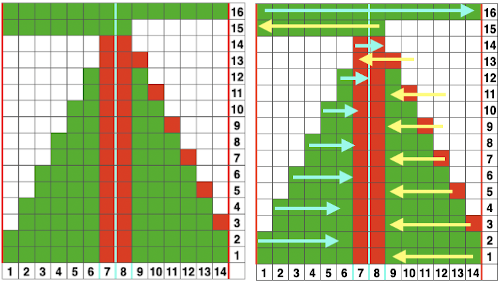
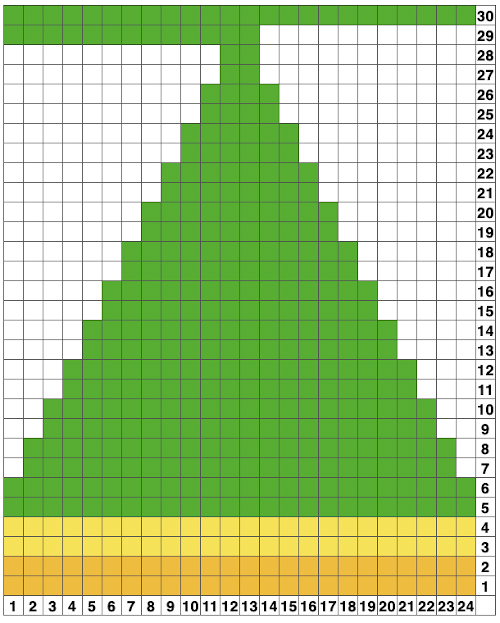 A return to the original 14 stitch repeat, illustrating a way to begin editing for an extra row in width at the bottom of the shape and ending on 2 stitches rather than a single stitch at the top
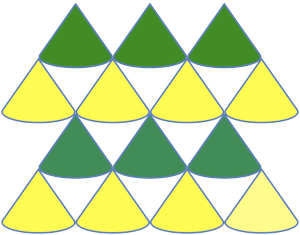
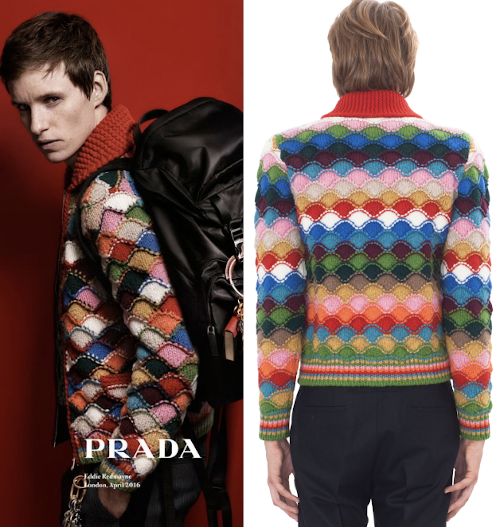
 A Prada sweater using similar shapes
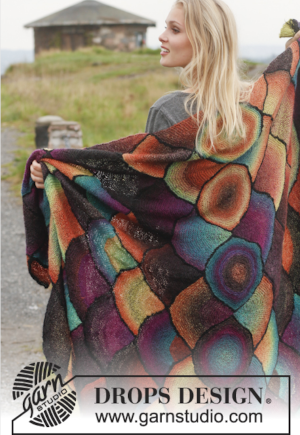
  If you are interested in any large size clamshells, and intarsia appeals to you whether in hand or machine knitting,
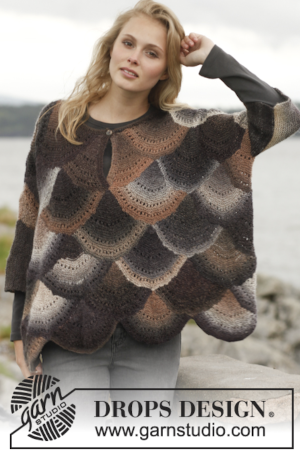
 the common illustration for shaping triangular shawls using such motifs
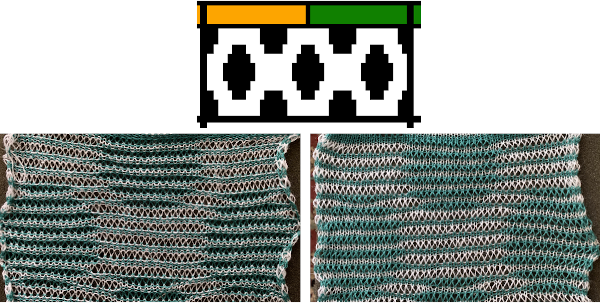
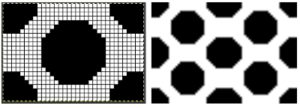 Increments in height need to happen at sequences of 2 rows each, so the design was then doubled in height, resulting in a scaled image now 33 stitches by 46 rows in height, with a planned horizontal repeat X2 = 66. Note: the sidebar offers start and end needles are given for pattern placement on the needle bed. Sampling may occur on fewer stitches than that. Since the number of repeats programmed to add up to an even number and center alignment is chosen, the number of needles is even on each side of 0.
  In my second series of swatches, I decided to try for a smaller “circular” shape, with the repeat now measuring 15 wide by 20 high, and a planned horizontal repeat X3 = 45. If centered, the software places the odd number of needles on the right-hand side of 0.
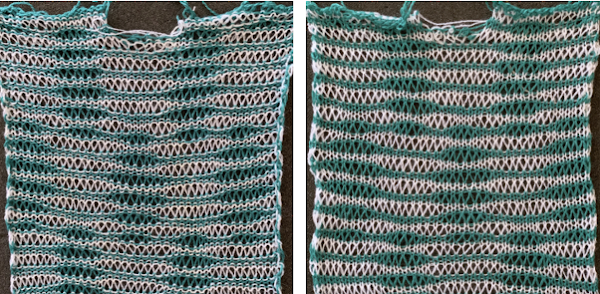
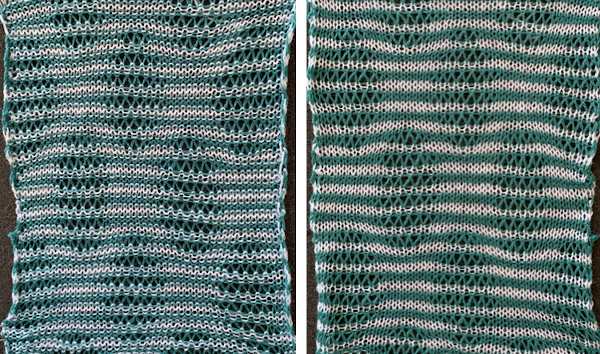
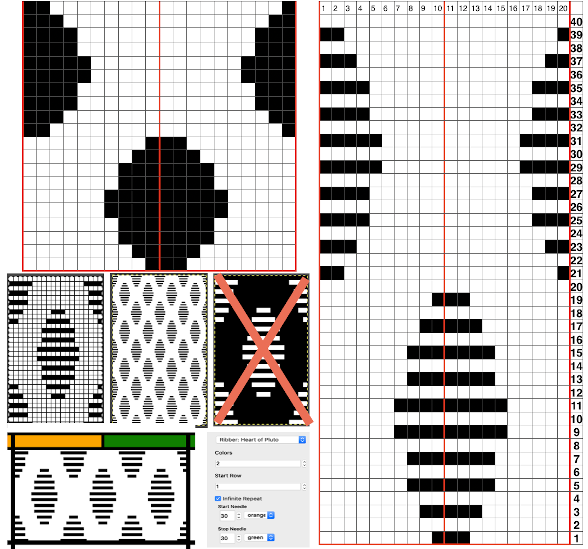
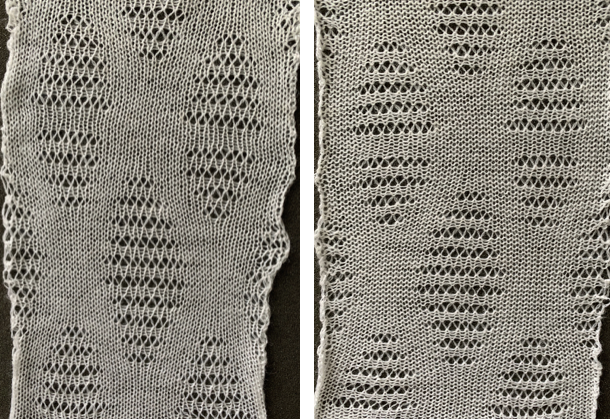 The wider horizontal band of all knit stitches was due to operator error, happened when I pushed back preselection an extra time, resulting in the ribber only knitting extra rows. For the sake of added clarity, I have added color to the chart below, assigning yellow and grey to all-white design areas in the pattern. The black squares are what I choose to drop. For illustration purposes, this is only a segment of the repeat.


 drop the loops, return needles to B position. At this point, since all needles are in B a modified stitch ditcher may be used for 2 passes, dropping the loops on the first pass and returning the whole series back to B on the second.
 COL: push all preselected needles back to B, as you knit back to the right the next group of white squares (yellow) in the next design row will be preselected
 COL: knit to the right in order to form loops on the main bed, continue for the desired number of repeats and end as suggested for the two-color version.