In the past few years, in many runway collections, knit pieces have featured slits that happen either/both horizontally or vertically, with some effects achieved by turning the fabric sideways.
My first post on horizontal slits was written in 2016.
This post will share published references describing additional various methods for creating them.
A review of grafting aka Kitchener stitch is illustrated here for hand knitting and used in some of the buttonholes/slits that follow. 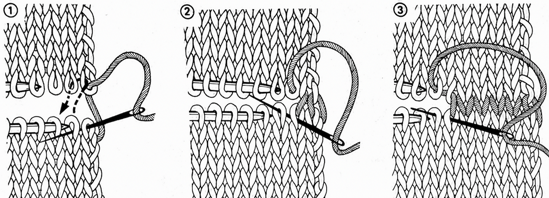 Some single-bed buttonholes were illustrated in the post. One of the many resources
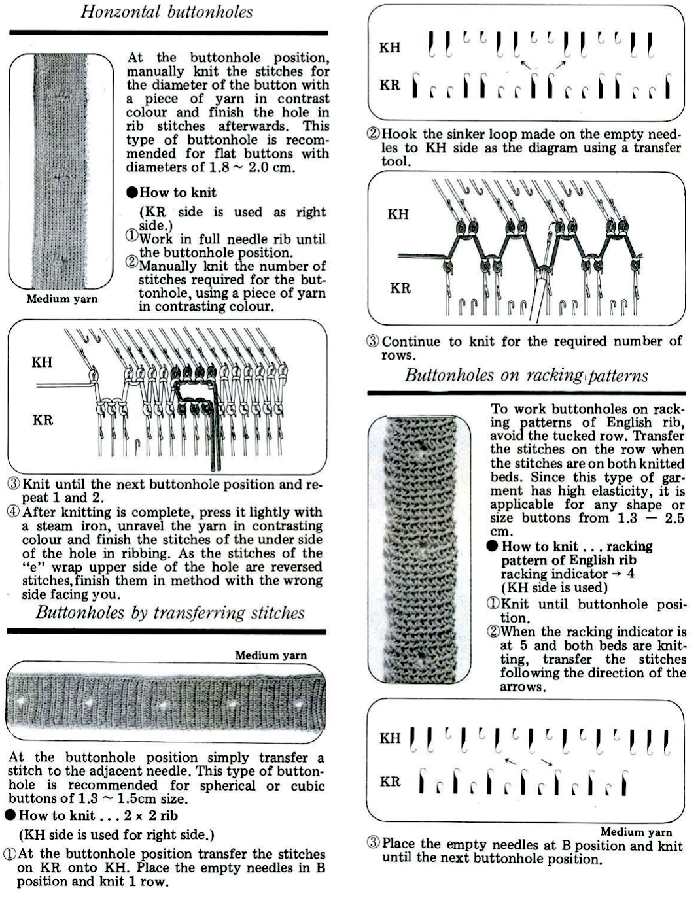
  Horizontal single-bed: using a ravel cord and tapestry needle
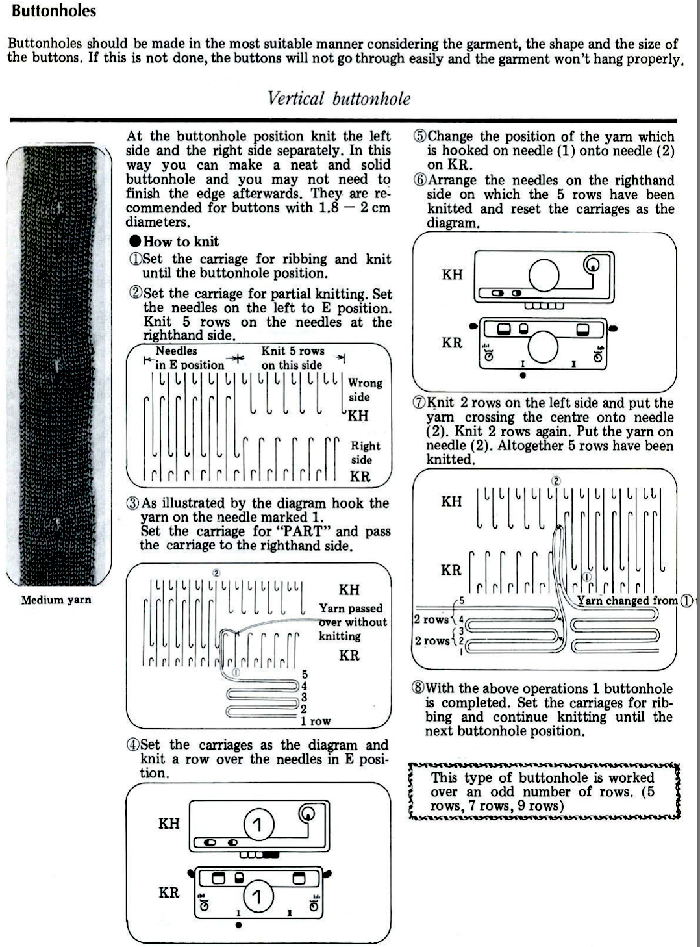
 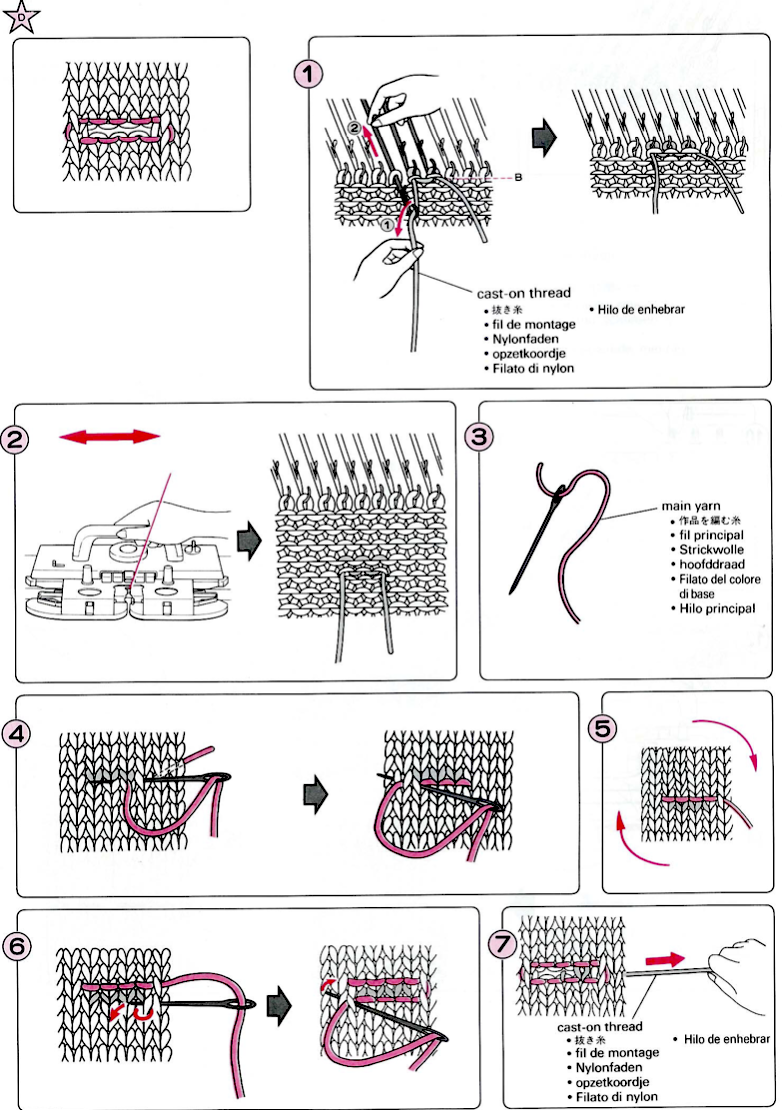 A vertical option
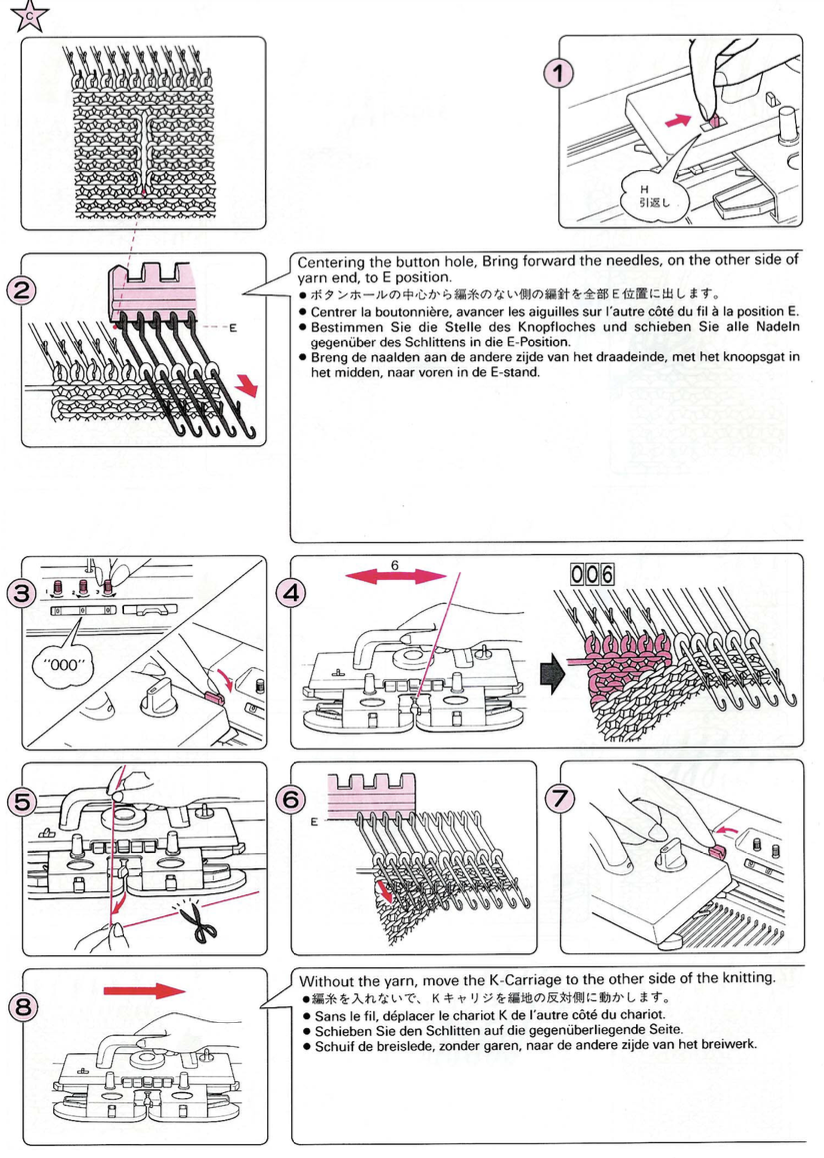
 Single stitch eyelet in knit one purl one rib, suitable only for small buttons
 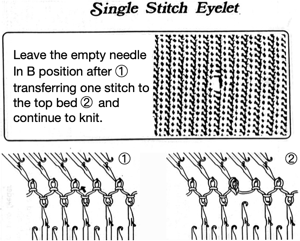 Another version: leave the needle in B position out of work for a few rows, slide latch tool under a couple of the resulting floats, pick up the next in the hook, and latch-up as shown.
 ![]() Using waste yarn/ ravel cord followed by sewn bind-off, possible on unfolded fabric bands
Using waste yarn/ ravel cord followed by sewn bind-off, possible on unfolded fabric bands 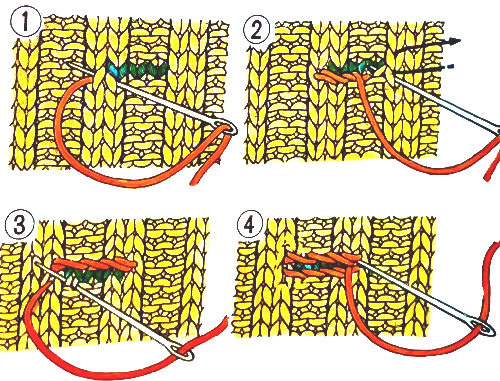 An interesting translation in the publication of horizontal 😉
 The published reference to waste yarn here implies the use of a contrasting color yarn in a fiber content that allows for it to easily be slipped out when the process indicates. Any smooth yarn that will not break easily and can be knit at the same tension as the knit piece for a comparable gauge may be used, ie crochet cotton or nylon. Although yarns that shed may function for this purpose, they may leave contrasting bits of fiber and color behind in the finished knit that will not be removable.
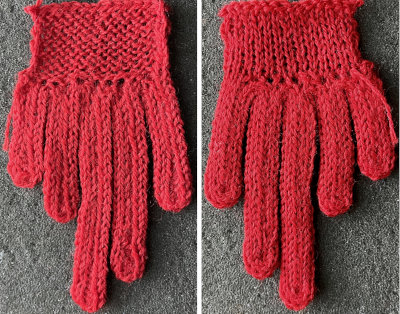
Double-layer buttonholes may be used in stocking stitch bands applied to the side edge of a garment ie cardigans upon completion of the piece or may be planned in hems if the piece is to be turned sideways. 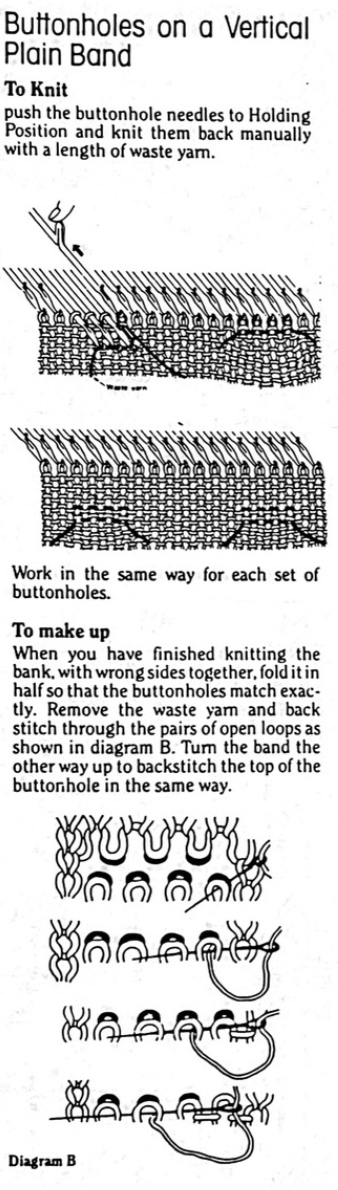 Here they are folded horizontally on a band that will be applied to the finished edge ie of a cardigan’s front
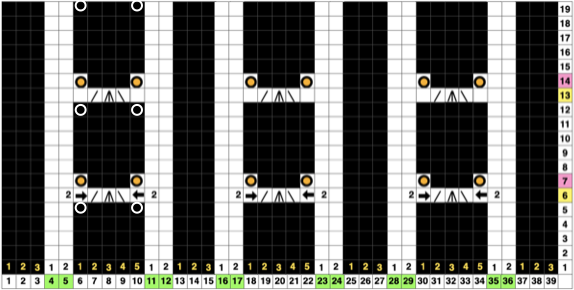
1: push the required needles to hold, knit them back with waste yarn
2: continue to the position for the next slit, and repeat
3: with a transfer-tool pick up the sinker loops of the first slit that were
created with waste yarn
4: place the sinker loops onto the needles in the holding position
5: push the needles back into the working position
6: knit loops through pre-existing stitches
7: to complete the lower edge of the buttonhole transfer the second
stitch to the first stitch of the buttonhole
8: transfer both stitches onto the empty needle
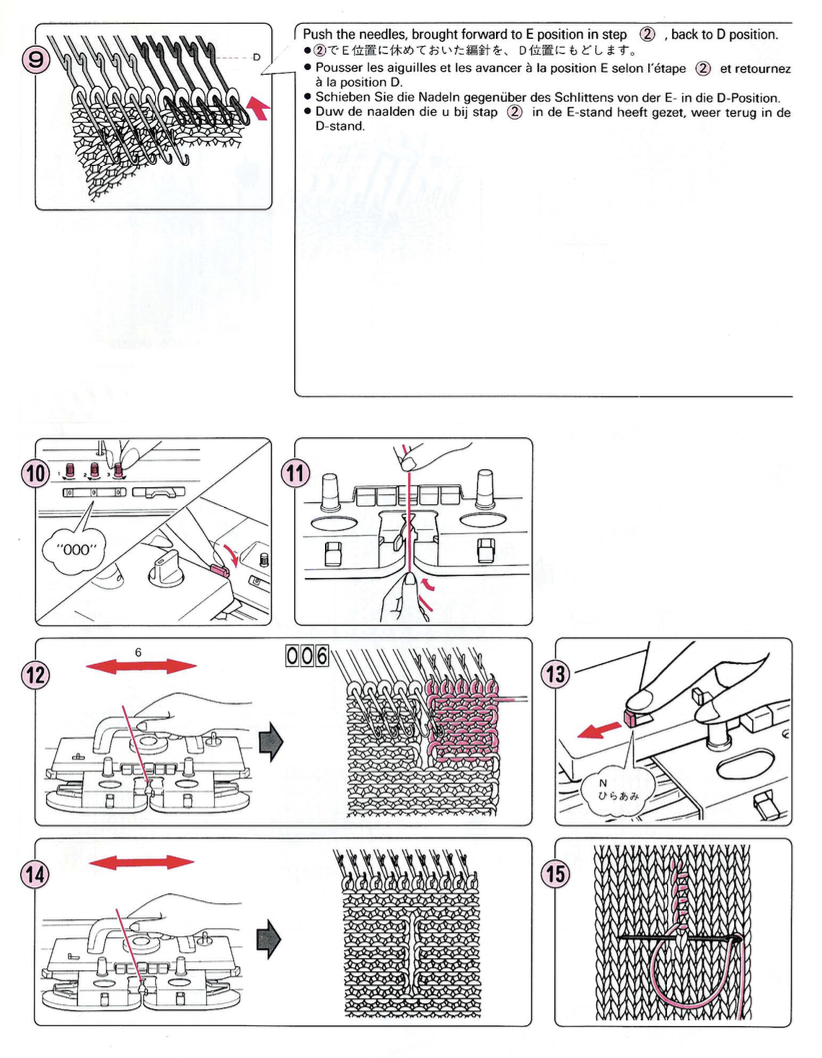
9-11: repeat the process
12: pick up the loop below the waste yarn
13: place the loops on their respective empty needles
14: continue to knit, and pull out waste yarn after a few rows to check for proper formation of the buttonholes 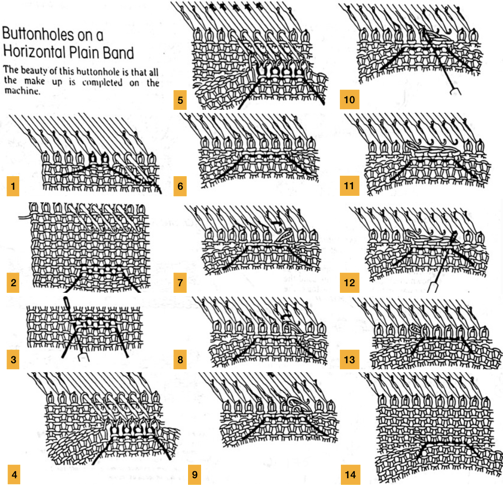 It is possible to work across a whole band, here the joining method uses a tapestry needle and is akin to grafting.
 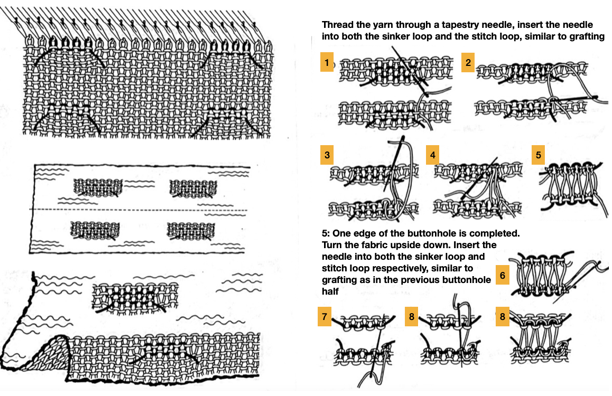 Buttonholes folded vertically are actually worked on live stitches. Pressing the fabric helps to set them.
 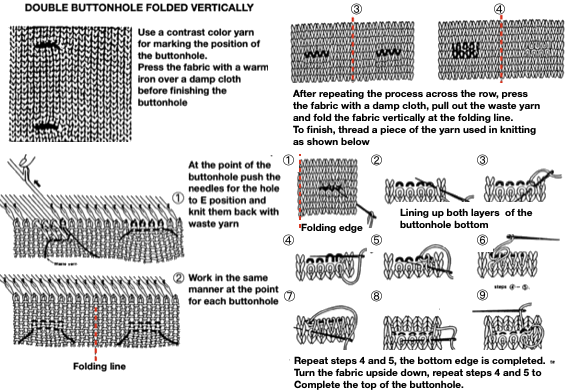 Another view:
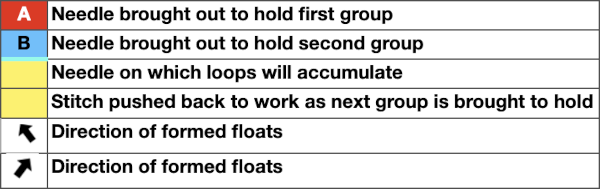
  This method uses holding on the ribber to create vertical openings tappet tool. The latter is the ancient term used for what has come to be known as a latch tool
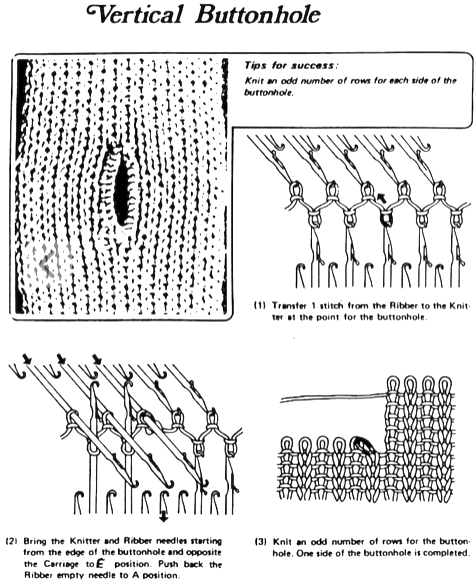

Building more textures in needles out of work spaces
A collection of previous posts exploring some variations on the topic:
Ladders with lace, (leaf) “making things work” 1 3/15
Ladders with lace, (leaf) “making things work” 2 3/15
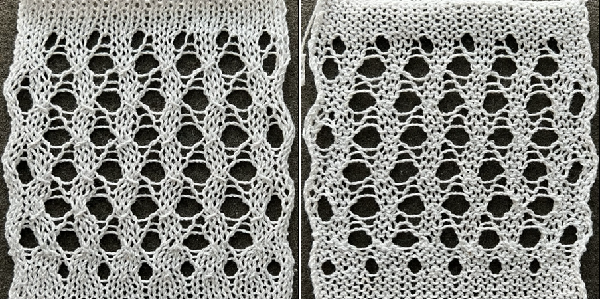
Ladder lace 8/13 Instructions reviewed in 2022, one of the accompanying swatches: 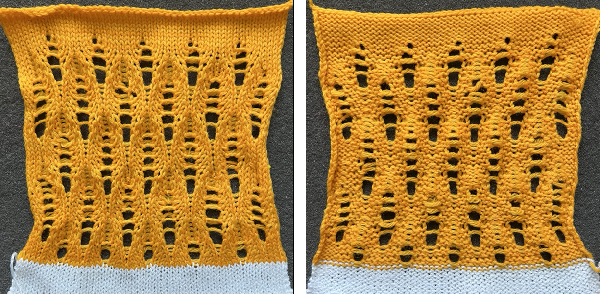 Ladders and Lace 8/13. MK ladders, and a bit of crochet 12/16
Tuck “lace” trims (and fabrics 1) 6/17
Tuck “lace” trims (and fabrics 2) 6/17
Tuck “lace” trims or fabrics 312/17
Automating tuck stitches combined with “lace” 2 6/17
Combining tuck stitches with “lace” 1 3/15
Many fabrics other than the traditional ones familiar to hand knitters and machine knitters that create eyelet patterns by transferring and combining stitches with yarnovers often include the term lace in their name, one such is ladder lace.
No matter what machine is in use, charts may be developed and followed that include row-by-row directions for needles out of work and any movement of stitches to alter the look of the floats created in the resulting spaces.
Knitology offers endless video inspiration for lovers of hand techniques including ones relying on patterns including ladders.
There are several aids in maintaining the desired repeat in NOOW (needles out of work). When establishing the initial needle configuration, punchcard knitters can punch a single row to match the required needle selection if the repeat works within the 24-stitch constraint, and use locked preselection to make transfers in base knitting.
Electronic knitters may use the same concept, I prefer if doing so to plan for programming the width of the stitches in use on the needle bed, adding pixels for knit borders on either side. Punchcard users may need to disregard some needle selections to form them.
Another option for hand technique tracking in addition to marking the needle tape or even the needle bed is to print custom needle tapes created in a spreadsheet.  They can be marked as needed to guide hand technique selections, with colors added if preferred, and are easily swapped out if corrected or additional tapes are needed for different segments of the same technique.
A variety of printable tapes for multiple gauge knitting machines is offered by Claudia Scarpa in her blog post.
A series of printable sheets for tracking row counts at even intervals may be found at the bottom of this post.
In laddered fabrics, the edge stitch on either side of the float may widen and grow in size over time.
The 8/13 swatch uses lace transfers that produce doubled-up stitches to help with stitch stability.
Adding hand techniques serves a similar purpose in wide or varying ladder space designs created on the knit bed.
The length of the item produced combined with the added weight in the finished piece as it is hung or worn may quicken any lengthening and narrowing of the piece, requiring blocking again or at the very least pressing and steaming.
The fiber used makes a difference in the retention of the blocked shapes, in this case, man-made fibers may serve better than wool with its spring back.
If a needle is emptied, if left forward or brought back to the B position, it will pick up a loop on the next pass, and when followed by a second knit row, an eyelet is formed in the loop location.
If a loop on a previously empty needle is dropped after it is formed, the resulting ladder grows in width.
Latching ladders while on the machine creates knit stitches on the purl ground.
Stitches may be removed and returned to the needle bed, cable crossings may be involved.
Picking up the heels of specific stitches on designated rows below and placing them on the knit stitches to the right or left of the ladder space is a way of adding non-vertical shaping.
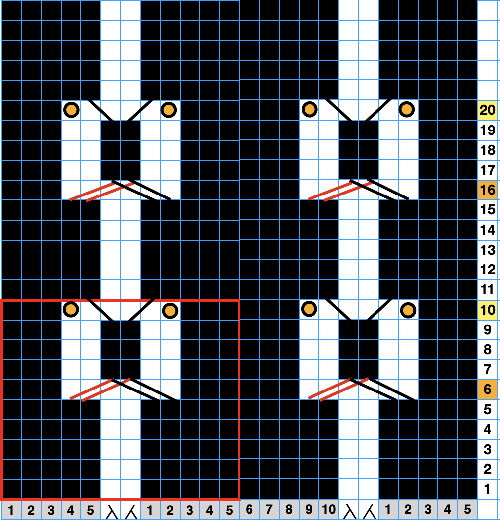
If experimenting with the number of rows knit before adding hand techniques, keep good notes in order to be able to reproduce segments in an all-over pattern. Beginning patterning with simple transfers in stocking stitch ground, here the needle configuration shifts but remains constant throughout. My proof of concept swatch is knit in 2/8 wool. 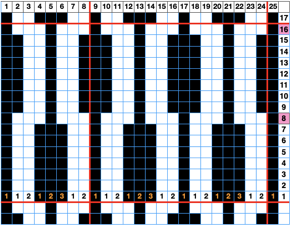 Visualizing the necessary actions:
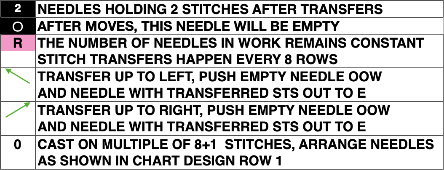
 The proof of concept:
 Adding 2X2 cable crossings: this repeat is 12 stitches wide.
A chain cast-on allows for dropping the 2 chains in the location of the starting ladders, with some weight applied to the starting rows one may proceed to the first cable crossing.
On row 6, and then again at 10-row intervals from there, the designated pairs of stitches are crossed consistently in the same direction. The needles aside from the crossing are pushed back to the A position.
Knit 4 rows.
On row 10, and then again at 10-row intervals from there move the left stitch of the pair of the center needles to its left, and the right stitch to its right, restoring the empty column at the center of the chart. Return the remaining empty needles to the B or E position
Knit 6 rows.
Repeat the process, ending with 6 knit rows. ![]()
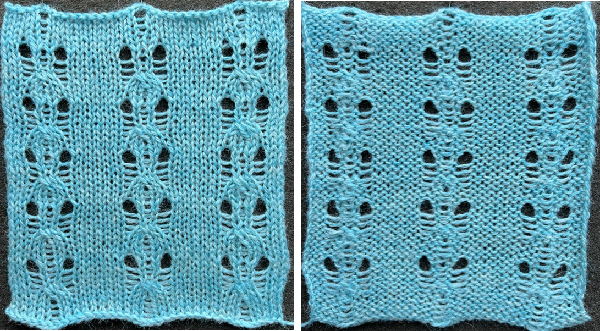 This variation uses transfer lace stitch crossings to produce larger eyelets than seen in the above swatch. Row counts for specific hand techniques can be tracked in a written or printed document if preferred.
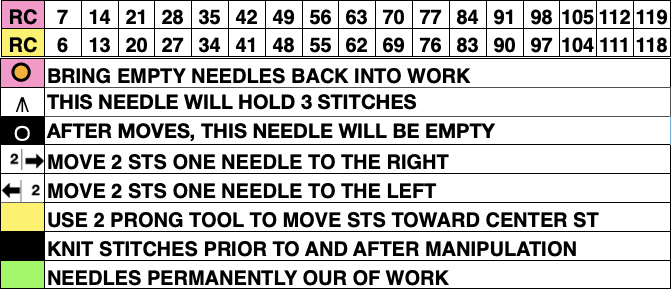
 The knitting in progress: the initial needle spacing:
 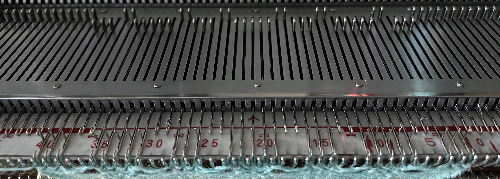 Emptied needles are in the process of being returned to work after the transfers to restore the initial setup, the first knit row will create loops on those needles, and the stitch is completed with the next knit pass from the opposite side
 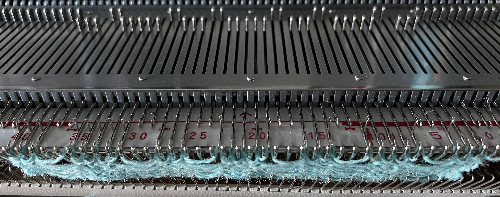 The growing pattern becoming apparent
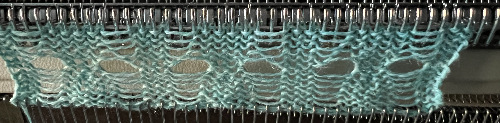
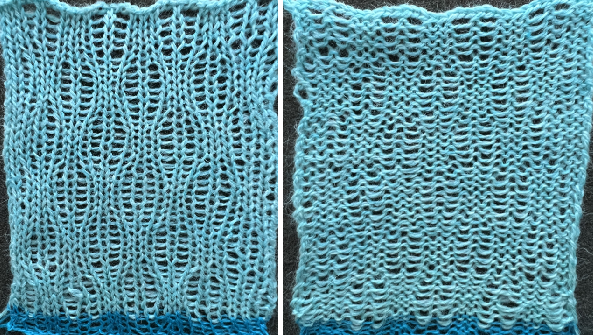
 After updating the 8/13 post, these experiments continue exploring the above concept. The yarn now used is a wool rayon, which appeared not to split, and retains blocking if it is used.
The samples use an 8-row repeat with different transfer methods. The first uses two-stitch transfers. The 24-stitch version is suitable for a punchcard, 48 rows in height. 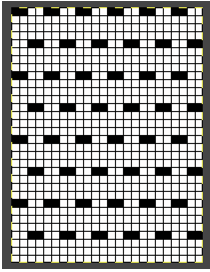 the smallest electronic repeat
 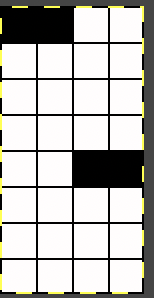 tiled to a 28-stitch repeat for the electronic, in the width of my planned swatch, only for the required 8-row height
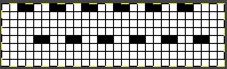
![]()
![]()
![]() The now familiar double loops
The now familiar double loops 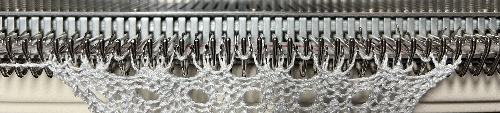 Beginning ladders
 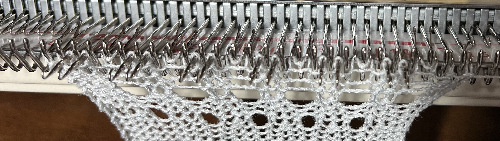 A partial row view of stitches moved 2 at a time toward the higher end stitch count, treating the loops as one would stitches
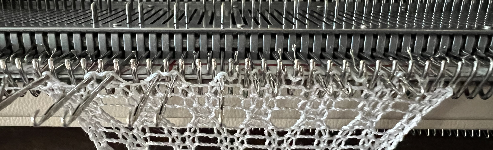
 e-wrapping one of the two loops consistently in the same direction at the top of the piece will form equal eyelets on the next pass
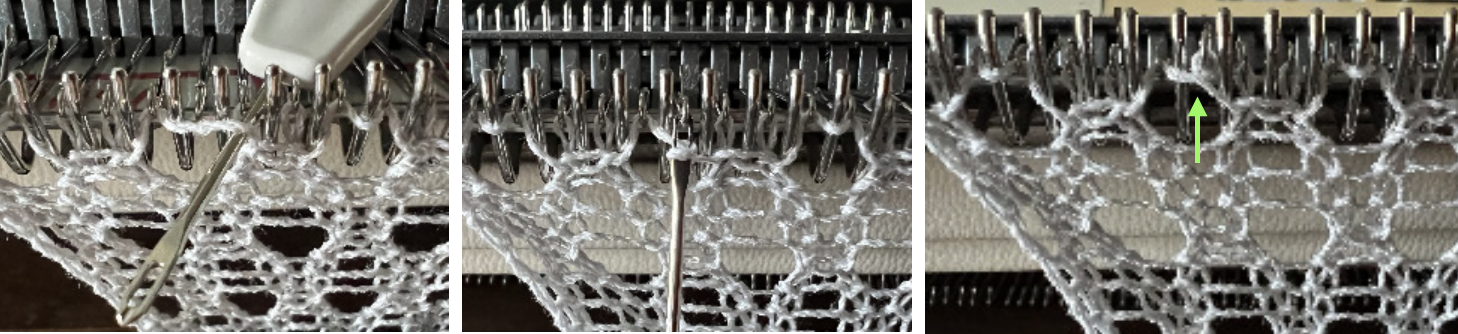
 Working with multiple loops held in hooks of specific needles: the following swatches were actually the beginning for what became the above thread
I tend to web surf in the early morning hours. Sometimes that includes coming across YouTube videos where contributors show fantastic dexterity at handling tools while developing complex fabrics using only hand techniques.
This is one example:
https://www.youtube.com/watch?v=IoJbbInlxck.
As usual, I attempted to automate as much as I could and failed to be able to execute a truly similar fabric.
In my first modified version, I introduced knit rows as seen below to make tracking of hand techniques easier and to facilitate knitting stitches/ loops groups.
The result is of course quite different from the swatch in the video.
To knit: begin with a permanent cast on over the planned number of needles. In this case, 2 needles are included to form vertical all-knit borders on both sides.
I knit most of my proof of concept swatches on an electronic machine and download a plain design repeat with a stitch count equal to the entire width of the number of needles in use on the bed.
On a punchcard model, the all-knit border needles would have to be brought out to E on every row for them to knit with each carriage pass.
Using provided repeat pngs as shared may require mirroring the repeat horizontally depending on the download program and the knitting machine model used, as well as changing the image mode back to indexed BW since downloaded designs from the posts may be converted to RGB mode as they are copied.
If working on a finished piece, knit several rows of waste yarn, followed by a row of ravel cord and a permanent cast-on, otherwise simply knit enough to hang a comb and some weights, required for most tuck knitting.
I happen to have a 2/20 wool as my go-to for most experiments that result in 4 or more loops building up in the needle hooks.
The beginning concept: hand transfers and automated tuck patterning

![]() The programmed repeat is planned for two rows of knit stitches between sets of loops
The programmed repeat is planned for two rows of knit stitches between sets of loops 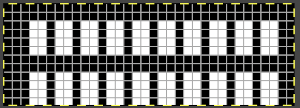
![]() After the cast-on and base knit rows, program the machine and preselect the first pattern row. The starting side does not matter unless the use of the color changer is planned, in which case, the first preselection row would need to move toward it.
After the cast-on and base knit rows, program the machine and preselect the first pattern row. The starting side does not matter unless the use of the color changer is planned, in which case, the first preselection row would need to move toward it.
Because some needles are taken out of work, end needle selection is canceled.
After the first preselection row, the machine is set to tuck in both directions.
My test repeat was programmed as a single motif on the 930, with the image mirrored horizontally.
Each pattern segment is 6 rows high, the full repeat is 12 rows tall. Color changes could be introduced every 6 rows.
Following the chart for the first segment, transfer the A marked nonselected location needles to the adjacent preselected ones on their left, push the emptied needles out to A position, OOW after each transfer, and its adjacent needle with the combined stitches/loops out to E position.
After 4 tuck stitch rows, push any needles previously placed out of work to A position out to E so they will knit appropriately on the next pass as part of an all-knit row.
As the carriage moves to the opposite side, the second all-knit row will preselect. As the carriage again moves once again to the previous side, it will knit the whole row, while preselecting for the first hand-technique row once more.
Prior to the next carriage pass, transfer each of the marked B location nonselected needles to the adjacent preselected ones on its right, push the emptied needles out to A, OOW after each transfer, and its adjacent needle with the combined stitches out to E.
Form loops for 4 more rows, and push any needles previously placed back to A position out to E so they will knit appropriately on the next pass, forming an all-knit row. As the carriage moves to the opposite side, the next all-knit row will preselect, followed by preselection for loops and transfers again as the carriage moves again to the previous side knitting every stitch.
Repeat the process for the desired length.
End the piece with at least 2 all-knit rows after a full or half design repeat. Cast off loosely to compensate for the widening due to the type of stitch formation. ![]() This fabric is executed as a hand technique/ short rows with no automated tuck patterning assistance. I have found when using the tuck automated setting in Brother models there is often a limit for accumulating no more than 4 strands in the hooks of the needles, while in using holding, manually pushing needles out to hold and back to work can be far more forgiving.
This fabric is executed as a hand technique/ short rows with no automated tuck patterning assistance. I have found when using the tuck automated setting in Brother models there is often a limit for accumulating no more than 4 strands in the hooks of the needles, while in using holding, manually pushing needles out to hold and back to work can be far more forgiving.
In this instance, loops are formed for 6 consecutive rows.
There are no all-knit rows. The color changes were made every 6 rows prior to knitting across the newly adjusted needle positions.
Pretend/ mock cables 4
The blog post Pretend/ mock cables 3 presented the concept of using tuck stitch patterning and needle preselection, a Brother feature, as a guide to creating a version of mock cable crossings.
These designs are from an ancient Japanese publication. Technically the results are not very cable-like for these three concepts, but they share the principles behind the technique.  I am offering this information as a way of interpreting and adapting the suggestions in the publication. There has been some editing of the originally shared repeat suggestions after testing them in proof of concept swatches.
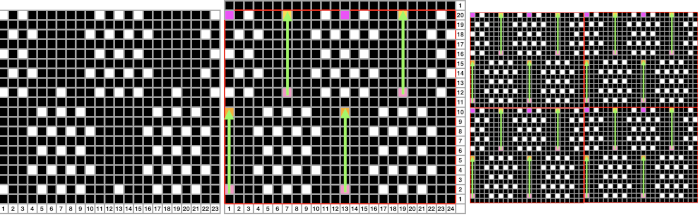
The scanned inspiration source:  The punchcard repeats: symbols are used in the above chart. The elongated short inverted U shapes, with some in bold type, represent the tuck stitch locations and needles that will hold loops in a pattern. The longer, thinner inverted Us suggest which tuck loop(s) will be raised and hooked up on new locations to create the desired textured effects.
Punchcards mirror the design horizontally when in use, so the texture will appear as shown in the swatch photos on the knit side when the design is worked based on the illustrated charts on the right.
When using the tuck setting, unpunched holes will create loops on nonselected needles, punched holes will create knit stitches. Electronic patterns will use black and white pixels to result in the same selections.
Deliberately not punching holes or adding white pixels may be used to provide a marker on all knit unpunched or black pixel rows for hand techniques to take place, ie in the repeat planned for 194.
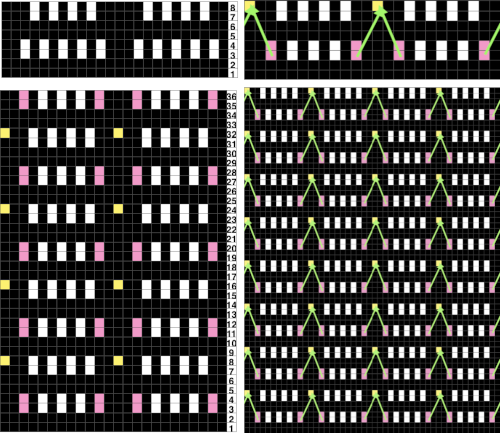
With the charts as guides, partial punchcard repeats for the three designs: 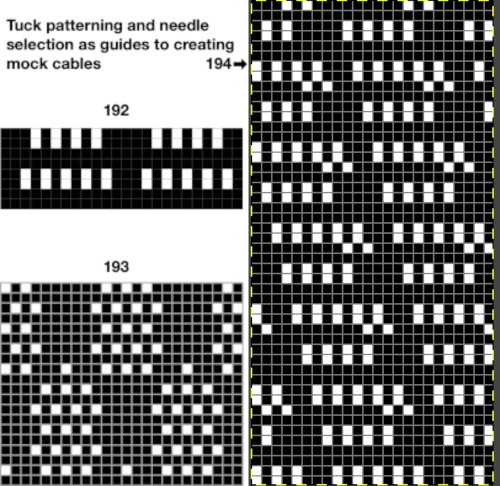 Punchcards ideally require a minimum of 36 punched pattern rows to roll accurately, the single, smallest repeat segment is adequate for knitting on electronic machines.
I knit primarily on a 930 and prefer to tile the repeats in width to the number of needles in my samples. The single motif button, default on the 930, need not then be reset and the design will be automatically centered. It is not a necessary step. Centering any single repeat across the needles in use or otherwise placing it may be achieved by programming its position. In punchcard machines, the selection is fixed across the 24 stitch markings on the needle tape, other positioning may be achieved by shifting the knitting in its position on the needle bed.
My illustrations are achieved by using both Mac Numbers and Gimp.
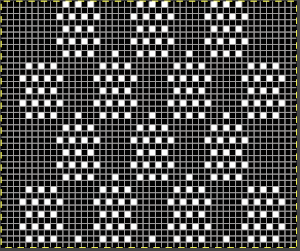
Adding color to help visualize hand techniques, and tiling to check alignments:
192 is 8 rows in height, more than that is needed to indicate the locations for hooking loops up. It appears this happens on white squares in the published original chart, which translate to knit stitch locations, the punched holes in the card.
For some transfer locations, no needle selection clues are provided, and they are made based on visual identification.
If the transfer is to be made onto a preselected needle, push the appropriate needle back to the B position.
Visually follow the rows down to locate the appropriate tuck loop(s),
lift them onto the needle just put it back to B,
and push that same needle out to the E position after the hook up in order to form a knit stitch with the next carriage pass.
The repeat with the most frequent hand technique is 192, with hookups every 8 rows 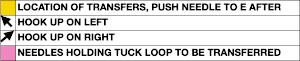
![]()
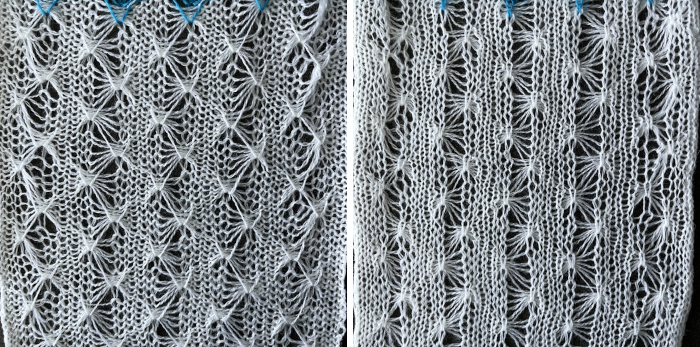
 Using light color yarn makes it easier to identify the closely packed stitch structures.
The tool used to pick up and rehang stitches can vary depending on personal preference.
Programming the design as an 8-row pattern allows for easier tracking in a design that requires actions to be taken at that specific interval.
Another view: 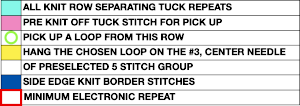
 I had a hard time finding the proper spot for picking up loops and needed extra magnification in addition to my bifocals to sort that out.
The wool used for the test swatches is a 2/8 weight.
Because transfers in the scanned publication are made on a tuck stitch row, these designs may be easier to execute on a Studio machine.
As Brother knits that last tuck row, it preselects every needle for the knit row that will happen with the next carriage pass from the opposite side. I found the location easier to track for the hand technique a row early, before the every-needle preselection.
The effect is subtle and time-consuming, a consideration if planning larger pieces of knitting. 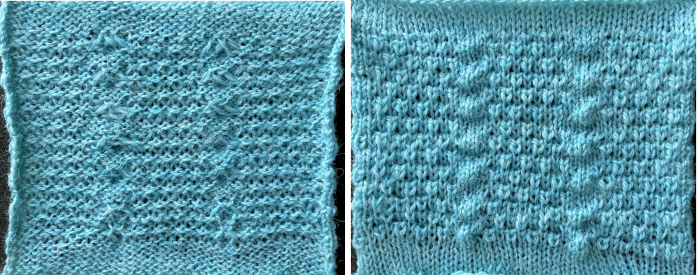 193 is 20 rows high, with hookups every 10.
 ![]()
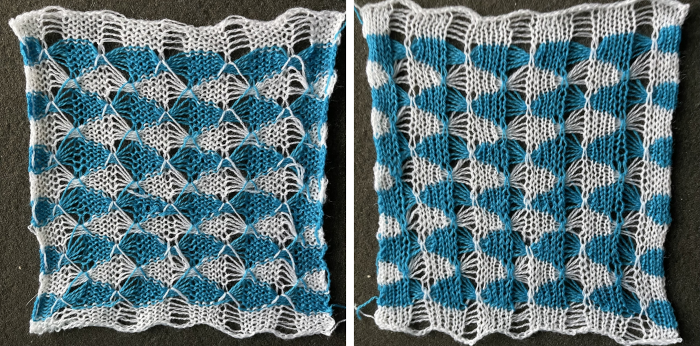
 In the concept swatch, some of the tuck stitches were eliminated, seen here in a 48 stitch wide repeat, allowing for a released edge on either side. The tiled X2 in height repeat checks its vertical alignment.
 ![]()
 This time as many of the compounded knit and tuck loops as possible were moved, producing more detailed surface textures on the knit side
 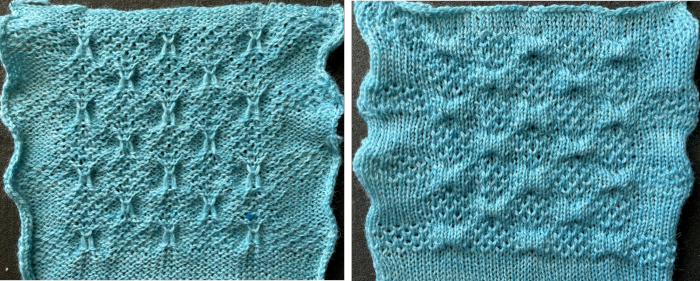 194 is 48 rows high, with hookups also every 8 rows. The single 24X 48 png is followed by the tiled 48 stitches wide version and the tiled Gimp alignment check
 ![]()
![]()
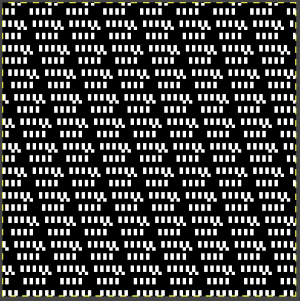 The visualization of stitch/loop movements
 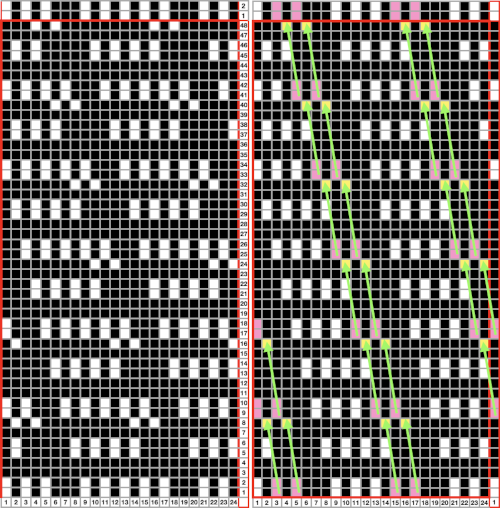 The hand technique occurs after an all-knit row, which in cards would be all punched, in electronics all black pixels.
In Brother kms, while the first all-knit row is made, the next with isolated pairs of preselected needles will occur.
Prior to moving the carriage to the opposite side, hook up from highlighted locations, and bring needles out to E after doing so. 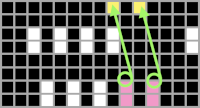 As the carriage travels across the bed again, all knit stitches will form while preselecting for the subsequent tuck stitch row. A rhythm will develop eventually.
Notes to self:
some days it is not good to be near a knitting machine
cables and intensive hand techniques are still on my avoid if at all possible list
keep an eye on broken ends of yarn in old cones at least periodically before knitting across whole rows
if knitting lengths of this technique, or even a large swatch, removing the ribber if it is in use will facilitate the process. Remember to check its balance when it is recoupled with the main bed
while you are busy keeping an eye out on what to pick up and which stitches did not form properly or are jumping off the main bed, remember to look up at the yarn mast periodically, especially if the tension appears to change suddenly 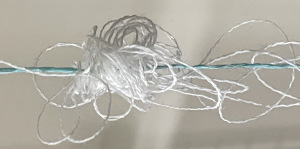 An improvement, however, over this masterpiece a decade ago when working in my attic supplementary studio space 😉
  Although all hooking up aka ruching is in the same direction, there is no apparent biasing. This fabric is quite compressed, not for someone without a lot of focus, patience, and good eyesight.
 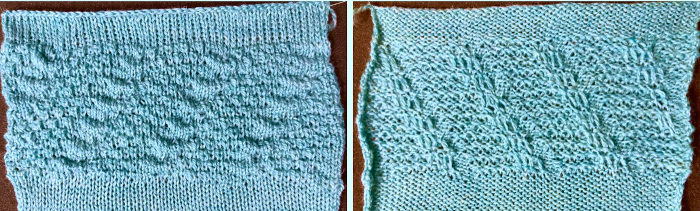 This pattern emulates the wishbone trim familiar to many knitters. It is the easiest in the series to execute, with the most textured result. The knit repeat used in the swatch is 26 stitches wide and can be trimmed easily to 24 stitches wide for use with punchcard machines.
The heels above the designated tucked stitches at the bottom of each repeat are lifted up and onto the single unselected needle of an all-knit row.
End needle selection is on, and the tuck setting in both directions is used after the initial preselection row.
Though initially an all-knit border was planned on each side, several knit stitches were eliminated on one side of the swatch. The difference is seen in the edges of the work, where all-knit stitches are allowed to roll, creating a very different “trim” than where tuck patterning was left uninterrupted. Such rolls can make satisfactory added details along accessories such as scarves, where a few rows of all knit stitches may also be allowed to roll to the purl side at the top and bottom of the piece as a finishing alternative.
The 26X16 single repeat. ![]() Tiled repeat, checking alignment
Tiled repeat, checking alignment 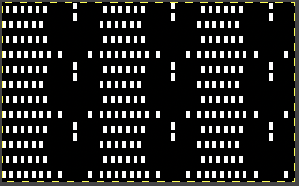 Charted information
 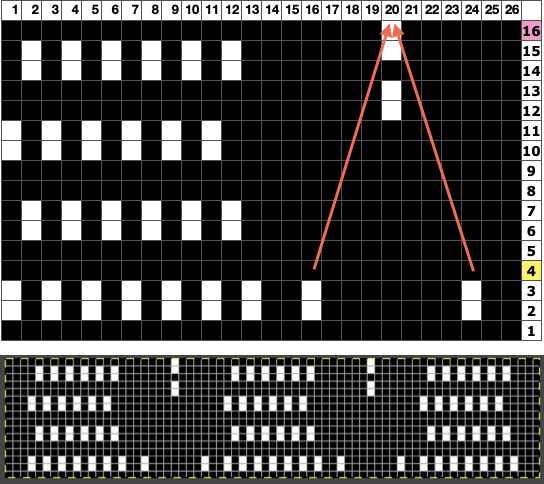 The proof of concept swatch
 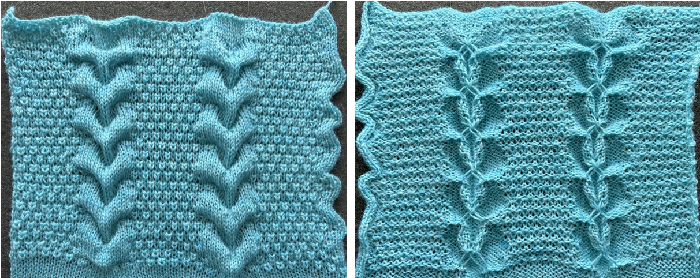 A mock cable trim may be knit separately, in any color or even multiple colors, and applied as you knit on a large piece or stitched on after the fact.
One variation as a hand technique: after a closed cast-on on 10 stitches, knit 10 rows.
Pick up the second stitch from each side of the original cast-on row, and hook up on needles 5 and 6 on each side of the center. Knit 10 rows.
Pick up the second stitch from each side 10 rows below, hang on needles 5 and 6 on each side of the center, and repeat to the desired length.
Color changes may be added every 10 rows when all knit selection is made.
The slip stitch setting in this case is used to track and facilitate the process.
End needle selection is on, with the knit carriage set to slip in both directions, with the first preselection row made after at least one base knit row.
Weight may not be necessary depending on how comfortable one is with managing the knit without them and the yarn being used.
The repeat, in turn, is tiled twice in height in the shared png 
![]() A short slip stitch float will form in the location of the white pixels at the bottom of the chart and when the selection is made to match the top row of the repeat, the single float is picked up and hung on the unselected needles,
A short slip stitch float will form in the location of the white pixels at the bottom of the chart and when the selection is made to match the top row of the repeat, the single float is picked up and hung on the unselected needles, 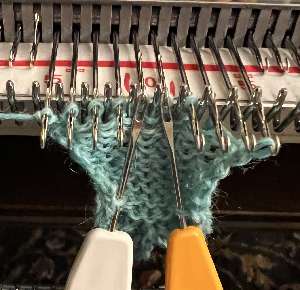 Those needles are brought out to E position after the transfers.
At that point, prior to the next carriage pass, the color may be changed. The short single skipped stitch floats are shown more clearly in this image. 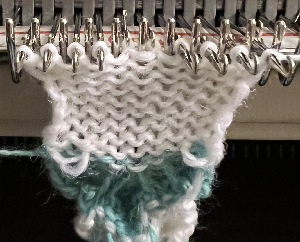 When changing colors it is best to use yarns of the same thickness that will knit easily at the same tension, not done in the first shape in this sample.
If using 2 carriages operating from opposite sides to carry different color(s) remember that extension rails will need to be used, as both will be selecting needles and will anchor onto the belt to do so.
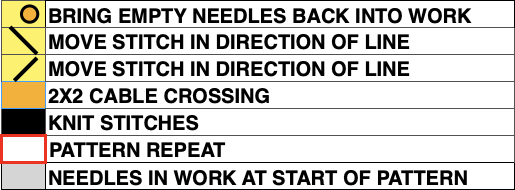
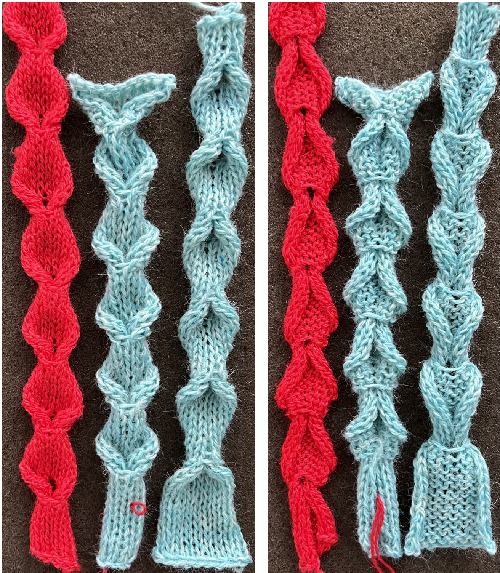
Floats will happen at the side(s) as colors are carried up, but they and cut yarn ends can be hidden when the trim is applied. 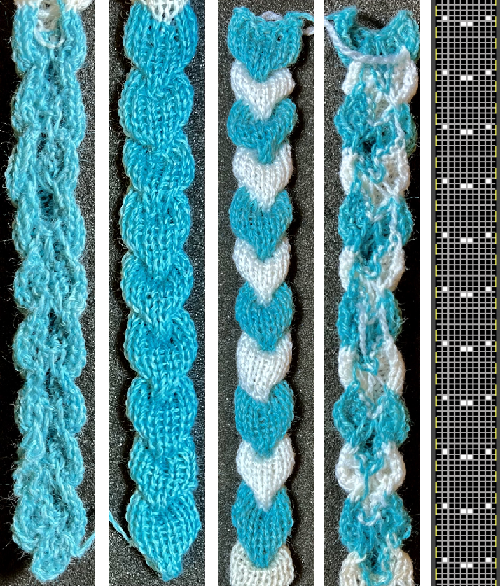 Here a fixed number of stitches +1=11 is knit for a fixed number of rows
an eyelet is created every 10 rows A
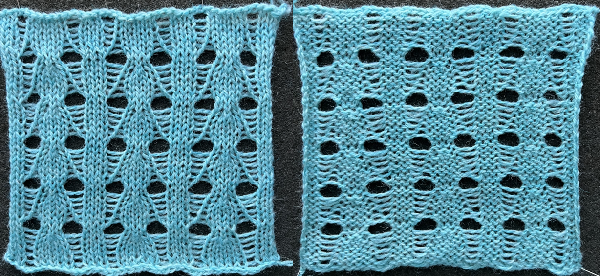
A single eyelet was sufficient to allow for feeding the trim through on the same side and from the bottom up, B and C, upon completion of the planned strip length. The red sample on the left is knit with 2/18 silk/wool, the blue is 2/wool. It is best to avoid any fiber that will pill easily.
The blue samples were knit for 65 rows each. 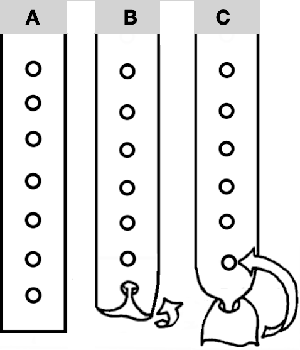 In DIY, begin a test by casting on an odd number of needles (11, chart row 0)
if all needles are not properly formed after a permanent cast-on, bring all needles out to E for the first 2 or 3 rows
insert a claw weight
knit the same number of rows as cast on -1 (10)
transfer a needle to the left or right so as to maintain an even number of needles on each side after the transfer, making certain the empty needle is in the work position before the next carriage pass (chart row 10)
as you knit to the opposite side a loop will form on the empty needle, the eyelet location (chart row 11)
a carriage pass to the opposite side will form the full stitch in the loop location (chart row 12)
The charted working repeat for the trims below is outlined in red 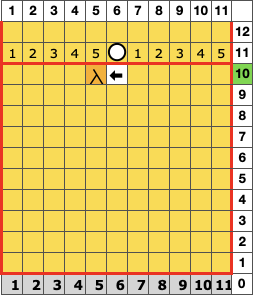
ArahPaint and Gimp in knit design 3
Previously published:
ArahPaint and Gimp in knit design 2
ArahPaint meets Gimp in knit design 1
Subsequent posts on using Gimp Layers to process images:
Using Layers in Gimp for color separations
Layer/Transparency/Color to Alpha Gimp Update for Mac 3_more on color separations
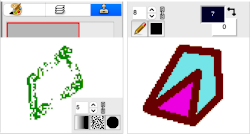
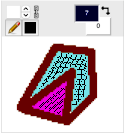
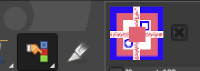
Gimp allows one to work on multiple images with only a single window open, left mouse clicking on any one of the images will bring it into view for editing. In the dark theme, it is hard to see the difference, but a lighter border actually surrounds the active image distinguishing it from the others, outlined here in yellow 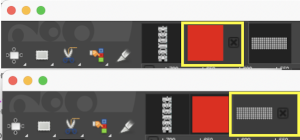 In Arah, multiple windows may be opened at any one time, and left-clicking on any one of them will bring it to the front for editing.
  When working using the same file in more than one window, the degree of magnification needs to match in each.
Spreadsheets and paint programs may be used to achieve color separations for designs intended for specialty fabrics, many worked on the double bed.
Two places to begin exploring them here are for knitting single-bed mosaics and double-bed jacquard in its form where each color in each design row knits twice.
It is unlikely to happen often in knitting that more than 6 colors are used in any one fabric except perhaps in an elaborate color-changing fair isle.
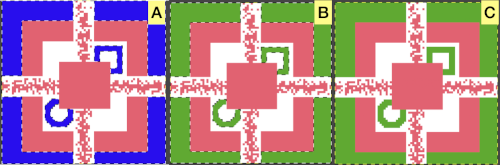
The palette that appears in Arah when opening a new file is random, as seen here when two new files of the same size are loaded 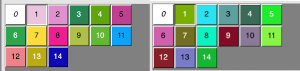 If one’s preference is to reduce the number of colors, the specific number may be set by choosing from the colors menu, editing the number identified as that for the working palette, changing it to the new value, in this case, 6, and the palette reduction occurs as seen in A. For most knit repeats a black color is handy, any one of the 6 colors or more may be adjusted as described in the previous post, seen in B, where black has been added, replacing the color in position 1.
 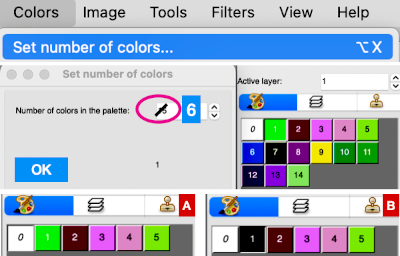 More Gimp information: https://docs.gimp.org/2.10/en/gimp-palette-dialog.html
Some of the related content in brief: the former versions of GIMP had a “Save palette” command. Palettes were stored in a specific folder via the preferences pane. Easy to do and manage. It no longer exists.
To save the palette of an image, indexed or not, you must now import it from the image.
The “Palettes” dialog is dockable: from the Image menu, select Window, Dockable Dialogues, Palettes.
A few dozen more or less randomly chosen palettes are supplied with GIMP.“Import Palette” allows you to create a new palette from the colors in a gradient, image, or palette file.
Right-click in the space to the right of the illustrated palettes to call up the import option, or for palette editing. 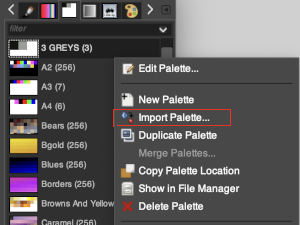 It is not necessary to index the image, this image was used in RGB mode.
 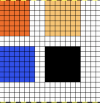 A palette name can be assigned, and if previously used, a number will be appended by the program.
The number of colors: the default is 256, you can set the number to any you choose. Gimp will try to create a palette by spacing the number of colors evenly across the range of the gradient or image. Each screengrab in the top row shows the initial selections for gradient or image, and the second row of screengrabs notes other changes made when choices were available and the results. White dots mark selections as seen while using the program. 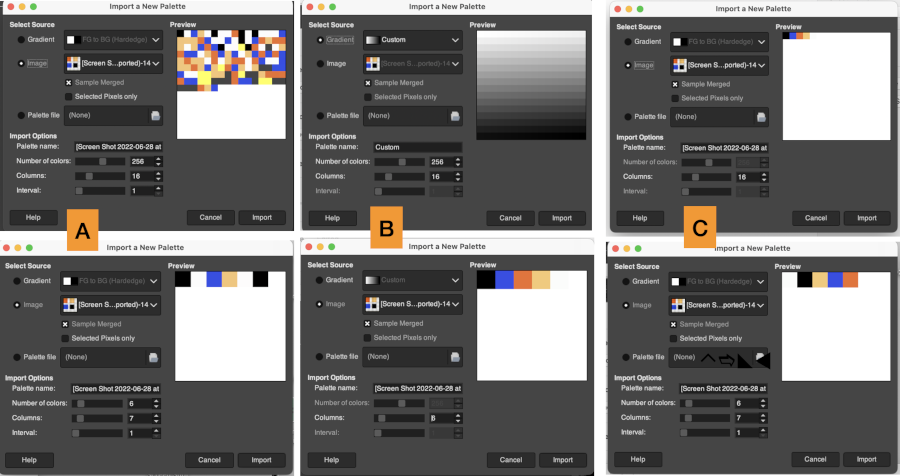 Using the same image, indexed to 5 colors, the custom palette is rendered in a one-step process. The gradient seen in the first position on the top left was randomly assigned by the program and does not influence the results.
 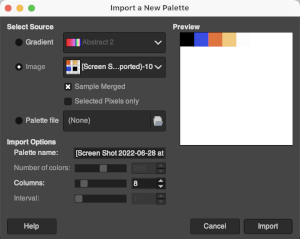 The Columns selection number settings only influence the way the palette is displayed and have no effect on the way the palette is used. The lower the number, the larger the display size of each color unit.
Double-clicking on any palette color will magnify the palette view on the theme color background. Left-clicking on any color makes it available for drawing, the selection will have a dotted bounding line and the selected color will be assigned to the foreground position, ![]()
 Right-clicking on a color results in these options.
  The imported palette will be added to the Palettes dialog and is automatically saved in your personal palettes folder when you quit GIMP so that it will be available in future sessions.
In Arah, the color palette will always display the colors of the active layer. The working image contains colors intended for use in my designs. In addition, please see the note from the developer in the comment at the end of the post. 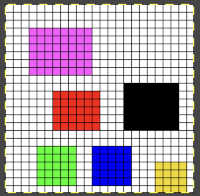 The palette tools:
  A: if you press this icon the program will underline the colors actually used in the image, since all colors are used in this case, each color is underlined in either white or black in this instance
 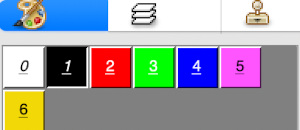 D: adds color(s) to the palette
  B: removes unused colors in the above palette, it would restore the original colors
C: removes duplicate colors, not applicable in this instance
E: removes the last unused color, will not work if all colors are used.
Changing color positions in the palette: to switch the position of two colors in the palette, click the chosen color in the palette, move the cursor to the color you want to switch the position with, and press the left mouse button while holding the Ctrl key on the keyboard. In this instance, the color was duplicated in the new position. 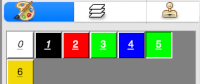 Knitters designing for dbj are likely to work with a limited range of colors, often 3 or 4 max, in specific palette ranges to ready images for download.
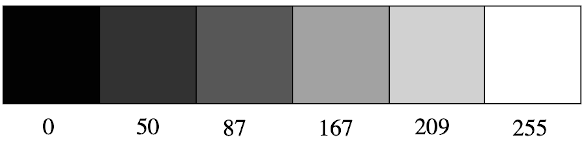
If color separations for 3 or more colors are done in shades of grey in terms of technical details, you need a pattern image that is 8-bit greyscale, with each color in a range of 8-bit values. So for 4 colors, it would be 0-63 color 1; 64-127 color 2; 128-195 color 3; 196-255 color 4.
Binary images have only 2 possible intensity values, normally displayed as black and white with values of either 1 or 255 for white, and often 0 for black.
That convention may have led to the selection of white as color 1 in automatic separations such as the KRC Japanese one, where white is selected first. In a greyscale or color image, a pixel can take on any value between 0 and 255. 
 Designing for fair isle, or when attempting to visualize and illustrate slip and tuck fabrics with frequent color changes, more colors may be required even though the final download will be in black and white. There is a quick way to add random colors assigned by the program and based on the initial palette:
 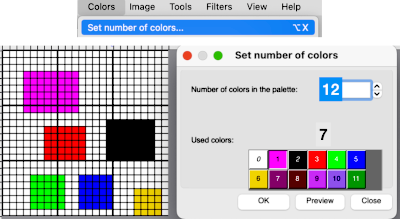 The magic wand tool allows you to work on consistently colored areas without having to select and outline each.
To alter a single color using the bucket tool, click on the wand, then on the color single color area you wish to change, it will become outlined by bounding lines.
Click on one of the colors in the expanded palette, and it will automatically appear in the foreground color position, and it may then be used to bucket fill the chosen area. 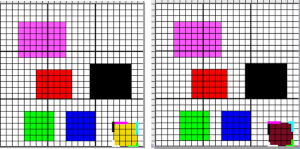 Flatten the image using the merge-down tool.
If the foreground color, in this case, white/0, needs to be changed, in order to choose all pixels in the foreground color, click on the wand, and use Tools > Select by color or Shift+W. This function works only on 8-bit pixel images. Click on the color you wish to use to replace the ground, and bucket fill with the newly selected color. 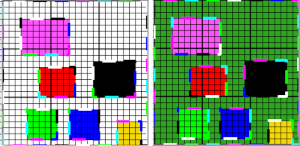 Flatten the image using the merge-down tool.
Changing multiple color blocks in the same color could be selected by the tool, but filling each of them one at a time was required. 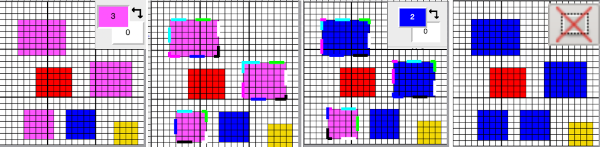 In Gimp a similar tool is the fuzzy select, which also allows for changing the color in a selected area or for selecting and changing all pixels in that color. Selected areas will also be outlined in dashed bounding lines. Bucket fill may then be used to replace color(s). The option is offered to choose either foreground or background for the fill.
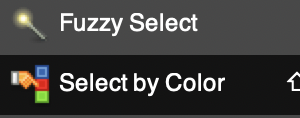
 2023 in Gimp 2.10.34 use and hold the shift key prior to selecting and using the bucket fill tool to change all the areas outlined by dashed lines. The bucket-fill tool itself now works again on any area with a defined boundary, no other, following action is necessary.
Click on the rectangle select tool and then on any spot in the work area or on the image to set the image. The dashed lines will disappear.
In terms of saving the palette in Arah for future use, I saw no specific directions in the manual.
The color palette displayed is always the one used in the active layer. As a workaround: open the image, and the associated palette will be displayed. The repeat begins drawn 24 pixels in width, by 24 in height.
Select clear from the edit menu, or bucket fill area with white
If the size of your intended drawing area is different, choose the option Resize Image from the Image menu. With the chain link intact, the new canvases are created keeping the aspect ratio. Enter a new value for width/height, hit return, or move the cursor to the alternate value, and its number will automatically change to a matching one. Click OK to use the new canvas, or reset if you wish to return to the original 24 by 24 pixel one for a different edit.
With a broken chain link as one of the two values is altered, a preview is available. If both values are to be changed, break the chain link, enter the two values in turn, and a preview appears for each step. Ok is used again prior to saving, or choose reset to return to the previously used setting. 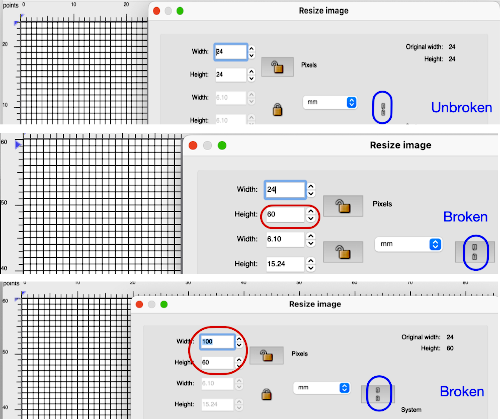
![]() Color separations can make specialty fabrics possible to knit which are outside the possibility of doing so simply by changing cam settings. Two instances are mosaics and DBJ where each color in each design row knits twice. Separating each may be done in two ways. The first method, convenient for longer repeats, requires that the result be elongated X 2, whether in the repeat design software or after download to the machine or using the elongation X2 function in the punchcard models. For illustration purposes here I will be working to create files that do not require elongation.
Color separations can make specialty fabrics possible to knit which are outside the possibility of doing so simply by changing cam settings. Two instances are mosaics and DBJ where each color in each design row knits twice. Separating each may be done in two ways. The first method, convenient for longer repeats, requires that the result be elongated X 2, whether in the repeat design software or after download to the machine or using the elongation X2 function in the punchcard models. For illustration purposes here I will be working to create files that do not require elongation.
Mosaics and Mazes are constructed in similar ways and are sometimes referred to as floatless fair-isle even though technically speaking usually 2 stitch floats do appear on the purl side in the alternate color used with each color change.
Many such repeats may be knit using both the slip and tuck settings, the latter is the more interesting of the two on the purl side.
When learning structures it may be worth beginning with a published design.
Kathleen Kinder decades ago published two books, one with 24 stitch repeats, the other with 40 stitch repeats, with the separations included as well  This, by Barbra Walker and intended for hand knitting, offers a huge library of designs for inspiration and conversion
 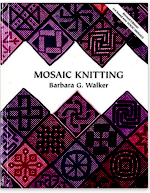 Following specific rules it is also possible to develop DIY repeats from scratch. That said, the repeat used in this blog post happens to have a known value of 12 pixels by 12
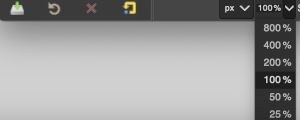
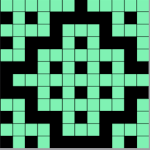 Magnification in Gimp is achieved by selecting or typing in new percentages at the bottom of the window.
 Entering and exiting the full screen may be controlled via the view menu
  To exit, it right-click at the very top of the window to expose menu options and select deselect full screen.
  In Arah, if you press any number from 0-9 on the keyboard, you will change the zoom directly to that level (1 means 100%, 6 means 600%, 0 means 1000%). The plus + and minus keys- as well as the magnifying lens icons, will zoom in and out
 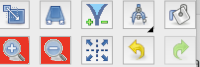 To use the entire space available in the window, choose Fit to Window from the view menu or select Ctrl+zero.
If working in more than one window this option makes repeats the most visible, scaling back can be done by counting the number of selections, helping to match the new picture magnification to the first.
Press the escape key on the keyboard to return to the original 100% view.
To work using the full screen, select the option from the view menu. To exit, right-click at the very top of the window to expose menu options, and select exit full screen  Separating the design: ultimately the planned final graphic repeat would be a BW png used for electronic download, programmed as a fair isle one, but knit using tuck or slip settings, it may be drawn initially using only in those 2 colors. Black may need to be added to the palette selections.
One may always draw on a large canvas and then crop as needed, but as a starting point, it may be easier to simply match canvas size to the published repeat being used.
It is handy to have an extra column to help track image processing during the separation, the repeat above is identified as being composed of 12X12 pixels, one could begin with a 13X12 canvas.
A second way to provide the 13th column is to work using 2 windows, matching magnification, and the second with a different, larger pixel measurement than the first. Copy the contents of the original work area and paste them into the larger canvas in the other window. Crop to new size if necessary.
To illustrate the two-window process, here the original BW repeat has already been drawn and elongated X2
A. Use the rectangle-select tool to capture the whole image in the first window, bounding lines in the colors of the palette in use will outline the selected area
B. Use the edit menu or command C to copy the selection, edit paste, or command V in the new window to place it.
When pasting on a different size ground, the bounding lines will also appear in the new image, the contents remain moveable,
C. Place the selection where desired on the new canvas, when satisfied use the X, merge down tool to flatten it.
 The quicker method begins with a canvas one pixel wider than the repeat, 13X12.
Adjust magnification, for comfortable viewing in the editing process.
View: show grid 2
Colors: set the number of colors to 6, and adjust the #1 color to black, white is in position 0 in the palette by default
Activate the pencil tool, and draw a vertical line on the far right in an easy-to-see color choice other than white or black
Using black, fill in pixels for your first draft of the pattern repeat
Image multiply YX2, resulting in 13X24
Using the pencil tool fill in the first 2 design rows followed by every other pair with white. 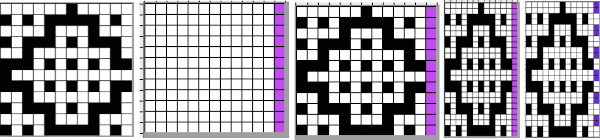 Magnify image A to a comfortable work viewing size.
B and C: using the rectangle select tool, with the left mouse button, place the pointer on the purple pixel, drag the mouse across each pair of marked rows,  release the mouse, and use Command I to color invert, and merge down
 to eliminate the bounding box.
The purple pixels will change color as well, making it easier to track what rows have been altered already.
D: crop the image, removing the row with colored cells for the final repeat
 If for some reason you are processing an image that is color reversed, the steps are identical, but tuck or slip stitch fabrics, black pixels or punched holes knit, white pixels or unpunched squares tuck or slip. For this reason, the cropped final result would need to be color inverted prior to knitting or punching holes.
 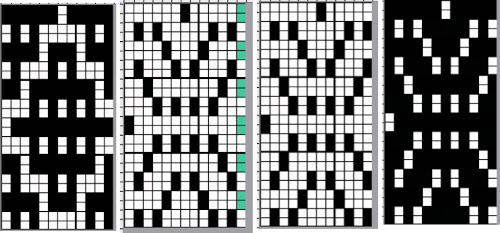 This separation for 2-color DBJ results in its potential use in many fabrics other than DBJ and may be performed by some programs used to download multiple color patterns to the machines prior to knitting the fabric. One such fabric is drop-stitch lace.
Punchcard machine users would need to separate the colors manually, or if Dak is available, the separation may be done using the program and a corresponding template may be printed as a guide to punching holes.
This method is the automatic default one for any 2-color DBJ knit on the Passap.
Each color in each design row will be knit with each pair of consecutive color passes. Completing one design row containing 3 colors will require 6 carriage passes, 4 colors 8, and so on.
The built-in color separation in electronic machines wherein each of only 2 colors in each design row knits only once does not apply when using more than two colors, though it is possible using Dak or by downloading a special card reader technique to program separately from the design when using the Passap E6000 in addition to the pattern repeat.
This separation of a 2 color pattern results in an elongated version of the design regardless of any dbj backing used.
Begin with a 2 color image, 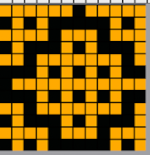 an extra column of pixels is added here as well:
A: multiply YX4 to 13X48
B: mark alternating pairs of rows in the extra column with a contrasting color
C: following the color cues on the far right column, on rows with no added color use the pencil tool to replace black pixels with white, leaving only the orange cells
D: on rows marked with the third color replace the orange pixels with white, leaving only the black pixels
E: crop the image eliminating the extra column
adjust the remaining orange color to black
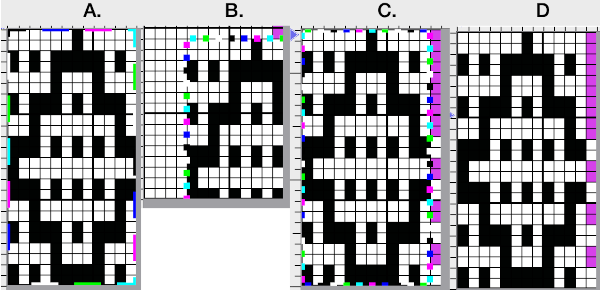
index the result to B/W, and the image is ready to save and use 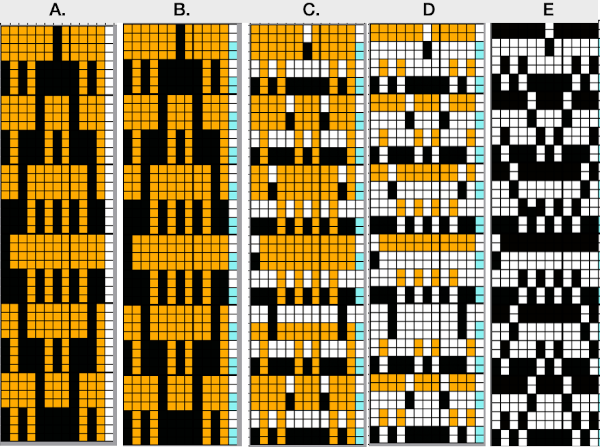 The difference between single repeats for each type of fabric, no further elongation is required. A: mosaic, B: DBJ
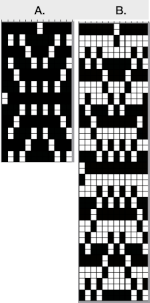 Using layers in Gimp opens up the possibility of several color separations for fabrics using only 2 colors.
Both img2track and Ayab are capable of opening 2 color images.
In img2track this is what would appear, after the download the KRC function needs to be activated in the knitting machine.  Ayab: the repeat should be programmed in width equal to the number of needles planned to be in use. The color change happens as the file is loaded into the program, the ribber classic option is used
  to render results that would match the KRC knitting machine selection after an img2track download. Here the repeat is also tiled in height.
  My personal preference is to work with images designed in black and white. With the 910 presently stored, my blog swatches are knit on a 930 using img2track.
A note for Mac users like myself using desktops with the M1 chip and Mac OS Monterey. Img2 track requires an FTDI driver for its download cable, on June 6 finally released a beta version of a more recent driver, I do not plan to install it at this moment, function in the upcoming Ventura OS would be unknown. ![]() Ayab does not launch automatically. These are the steps necessary to run the program, following suggestions by Adrienne Hunter via the Ayab FB group:
Ayab does not launch automatically. These are the steps necessary to run the program, following suggestions by Adrienne Hunter via the Ayab FB group:
open a Terminal window (Applications/Utilities/Terminal) and type these two lines:
cd /Applications/AYAB.app
./Contents/MacOS/AYAB
The app may also be found and then opened via using Spotlight search if you prefer  Once the program is quit unless you choose to keep the terminal icon
 in your dock, it will disappear and the above process will need to be repeated. Once the text has been entered, and Ayab has been launched, a message similar to this will appear, showing your last log in.
![]() To launch Ayab again, simply use the up arrow key and hit return to repeat the command
To launch Ayab again, simply use the up arrow key and hit return to repeat the command  Creating an AYAB desktop shortcut for Mac that will work without opening the terminal each time
Using Finder, open Applications and find AYAB. Right-click on AYAB and select “Show Package Contents”.
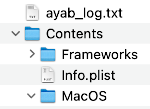 Locate “AYAB” under MacOS.
 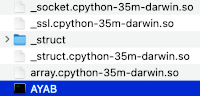 While holding down the command and option buttons, click and drag that icon to the desktop. This will create an ayab shortcut that does the terminal stuff for you
  you can change the icon by copying and pasting the icon image in “get info” but it works fine without it. These icons will appear in your dock after double clicking on the icon
  The ayab window opens with only the load image option highlighted
 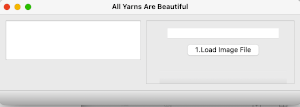 Click on the load image file to open an image, and the remaining features of the program will now be available
 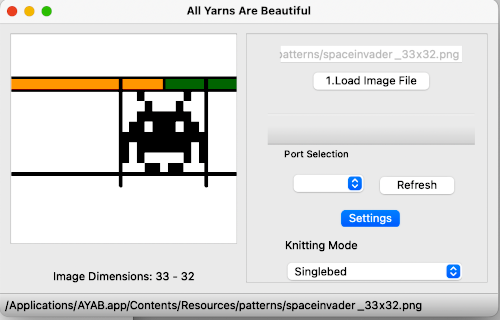 If you quit ayab, the terminal window remains active
 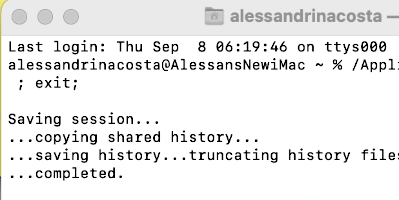 Quitting terminal called up this window for me only the first time I did so.
ArahPaint and Gimp in knit design 2
My previous post, ArahPaint meets Gimp in knit design 1, provided some information based on the assumption the reader had previous experience with a paint program, more specifically, Gimp, and an understanding of the development of knit repeats for various stitch types and techniques. At the time I had planned on expanding it. The information included some points on the following topics:
Magnification
Grids
Drawing in repeat
Image duplicate X
Drawing lines
Color exchange
Image scaling
Fill with custom brush repeat
Designing a tuck and a lace mesh repeat
Dividing large images
Returning to the topic now, I am including more information on designing repeats for knits that are by necessity limited in size and resolution, and am exploring some of the new features.
The updated program may be downloaded from https://www.arahne.si
The company provides a thorough manual that has been amended with the addition of 14 pages to include recently added features/ changes https://www.arahne.eu/pdf/apaint4-EN.pdf
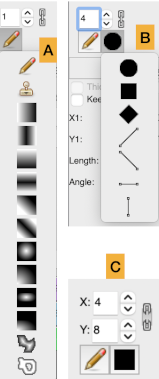
The present menu options in Arah: 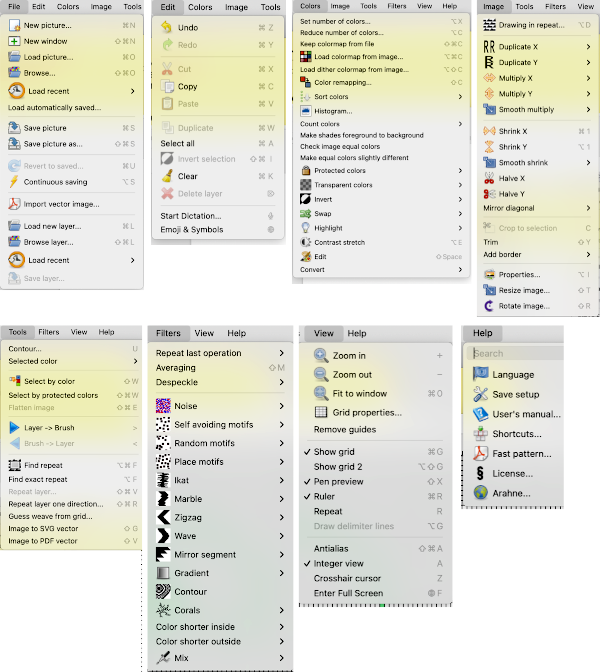 Examining the toolbox:
 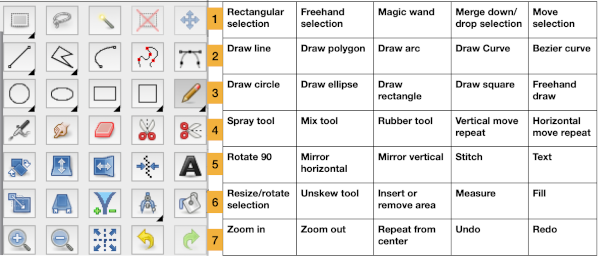 When positioning the mouse pointer over any tool and a brief period of hovering over it, the information on the tool becomes visible as a brightly colored rectangle. The name of the tool appears below its pointer, its keyboard shortcut is also displayed to its right.
  Selecting the tool changes the color of the box containing it to a darker grey as seen here for the draw circle tool on the left
 ![]() The “empty” shapes may also be used to highlight specific spots in pre-drawn charts or images while controlling the size of the line, seen here over the square tool.
The “empty” shapes may also be used to highlight specific spots in pre-drawn charts or images while controlling the size of the line, seen here over the square tool. ![]()
![]() Double-clicking on the shape drawing tools will fill shapes with color, enabling drawing each of them with color or fill
Double-clicking on the shape drawing tools will fill shapes with color, enabling drawing each of them with color or fill 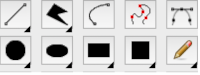 The foreground color in both programs determines the color used to draw. In Arah, the foreground color (black) is drawn with the left mouse button, and the background color is drawn with the right mouse button (white), making it possible to work with any chosen pair of colors without the need to constantly change the drawing color positions.
 ![]() There are other operations in the manual where the use of middle mouse clicks is suggested. In the magic mouse, Apple has eliminated it. There are some third-party downloads available for anyone wishing to restore it.
There are other operations in the manual where the use of middle mouse clicks is suggested. In the magic mouse, Apple has eliminated it. There are some third-party downloads available for anyone wishing to restore it.
Options for tools appear below the toolbox once a specific tool is chosen, they may apply to only one tool or to several.
Rectangle select in Arah will have a moving dashed colored lines bounding box formed around the selected area. 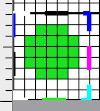 Placing the pointer inside the area will move the selection. Moving the pointer to a corner using the left mouse button on the dotted lines of the dashed rectangle will resize it.
Clicking on the merge down/drop selection tool will remove the dashed outline.  In the drawing mode, the default for standard drawing is indicated by a pencil. Clicking on it with the size set to one pixel brings up options shown in A. If you set the width of a line to be more than 1 pixel, then you can choose the shape of the pen, which influences the look of the starting and ending points of the line and the shape of a single-click drawn object.
Line width sets the width of lines, rectangles/squares, ellipses/circles, arcs, polygons, and brushes, B.
The options appear when a number greater than one is entered. If you break the chain’s link by clicking on the chain icon, you can set the width in the x and y direction independently, C.
 Gimp still fails to create square pencil brushes accurately in consistent increments in size, leaving the only option for using the desired shapes to be saved in preference folders for repeated use or to work temporarily from the clipboard.
The built-in circle brush may be used, with the following results for values entered from one to eight
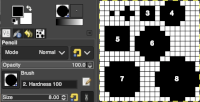 Other small shapes can be drawn by filling in individual pixels. Using the rectangle tool, and a variety of other means, patterns are saved for future use or from the clipboard (until one quits the program), or in the preferences pattern folder, becoming a handy feature for filling in backgrounds or pattern segments for specialty fabrics.
Both programs share chain links that may be kept closed to preserve aspect ratio in the designs, or broken to allow for disparate pixel settings.
In Arah, a personal brush library of pngs may be saved in a personal folder for repeated use.
Drawing in repeat makes for easy creation of a filled canvas including pattern shifts, for example, the punchcard repeats are a fixed 24 stitches wide and a minimum of 32 rows for the card to rotate continuously. An even number of repeats in height will produce a correct brick punchcard configuration. For any DIY pattern design, it is helpful to understand some of the rules for the specific knit fabric and how smaller repeats need to align in width and height.
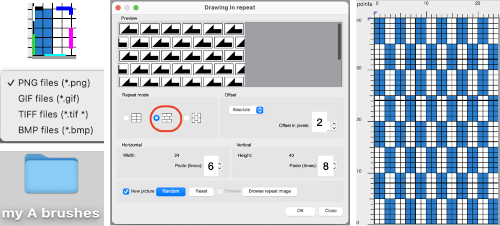
Users of electronic knitting machines can isolate the smallest repeat, use that, or tile it for use on a specific number of needles in work.
Line drawing may be set to preferred widths. The options associated with the chain link next to the line field allow for changing horizontal and vertical directions independently by breaking the chain link and typing in desired X and Y values. 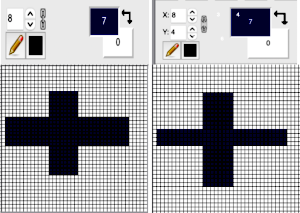
Each drawing tool can use the additional modes displayed for the pencil icon. The brush menu uses gradients in the direction of the gradient effect, which may be used to produce pixelated lines or borders, or set to apply to the whole image, here the polygon tool is used. It creates a series of straight lines that are connected. If solid-color pencils are used, coloring the shape will not leak out into the ground. To start and end lines, click the left mouse button, to end them release the mouse button, and press the right mouse button to stop drawing connected lines. The width is set at 5 
 At any point pattern fill may also be added in variable patterns, here using the stitch tool set at variable lengths
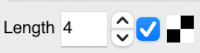
 Easy and fast dithering effects to part of an image or all of it, here an 80X80 pixel canvas is used along with gradient fill on what begins as a square filled with a solid colored ground
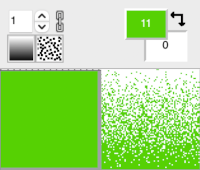
Freehand drawing is achieved by activating the pencil tool.
Rectangles, squares, and ellipses may be drawn from outlined to filled.
Double-clicking on the icon will activate the fill function, doing so again will return it to empty shapes, and one may easily toggle between them in the same design. Wider lines or filled shapes may be set to be solid or gradient fill. The process is easy and quick.
Keep in mind while having fun drawing that especially when you enter the territory of multiple colors per row in machine knitting the color separations for programming them in any machine become more complex, and are far easier in electronic machines if software such as Ayab, img2track (my preferred), or DAK with their respective cable connections for download are available. Dak allows for a print template of the separations which may be saved and in turn be pixel-redrawn or punched for use outside its universe.
This is an 80-stitch design, committing to it for knitting a scarf, 80 stitches are likely if knit on a 4.5 mm machine to yield somewhere between 7 and 10 inches in width. Tiling in Gimp, or drawing in repeat in Arah helps visualize the full piece and estimate the minimal number of rows to be knit based on the gauge while remembering that 6 carriage passes will be used to complete each design row unless using the heart of Pluto separation in Ayab or separation B in Dak are used. Here 800 design rows are represented. Changing colors in the image further helps one decide whether it is worth committing to knitting it.
The new color test image, also 80 pixels by 80: The paint bucket tool Gimp in the latest update no longer works on specific areas of the design, but rather, fills the whole canvas. The fuzzy select tool is now used to fill in isolated areas or switched to select by color to fill all areas drawn in that specific color. Selections will be outlined with a bounding line A, bucket fill is used to alter the selection B. Click on the rectangle tool and then in the working window outside the image to remove them and set the results prior to exporting them. Selections are filled with the foreground color.
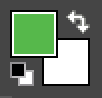

Rectangles, squares, and ellipses may be drawn from outlined to filled.
Double-clicking on the icon will activate the fill function, doing so again will return it to empty shapes, and one may easily toggle between them in the same design. Wider lines or filled shapes may be set to be solid or gradient fill. The process is easy and quick.
Keep in mind while having fun drawing that especially when you enter the territory of multiple colors per row in machine knitting the color separations for programming them in any machine become more complex, and are far easier in electronic machines if software such as Ayab, img2track (my preferred), or DAK with their respective cable connections for download are available. Dak allows for a print template of the separations which may be saved and in turn be pixel-redrawn or punched for use outside its universe.
This is an 80-stitch design, committing to it for knitting a scarf, 80 stitches are likely if knit on a 4.5 mm machine to yield somewhere between 7 and 10 inches in width. Tiling in Gimp, or drawing in repeat in Arah helps visualize the full piece and estimate the minimal number of rows to be knit based on the gauge while remembering that 6 carriage passes will be used to complete each design row unless using the heart of Pluto separation in Ayab or separation B in Dak are used. Here 800 design rows are represented.
Changing colors in the image further helps one decide whether it is worth committing to knitting it.The new color test image, also 80 pixels by 80:
The paint bucket tool Gimp in the latest update no longer works on specific areas of the design, but rather, fills the whole canvas. The fuzzy select tool is now used to fill in isolated areas or switched to select by color to fill all areas drawn in that specific color. Selections will be outlined with a bounding line A, bucket fill is used to alter the selection B. Click on the rectangle tool and then in the working window outside the image to remove them and set the results prior to exporting them. Selections are filled with the foreground color. Selecting and replacing all the red will also fill in individual, unconnected pixels in that color, which in the past may have required manual “cleanup” 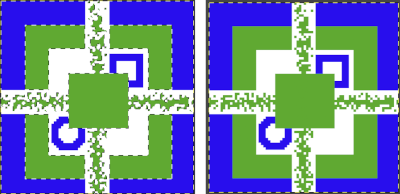 In Arah simply click on each area to be filled in with the new color sequentially. There are, in addition, other fill options in Arah:
Fill to border fills in all pixels in each area selected no matter which color they are until the background color is reached, in this case, white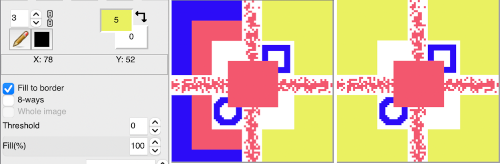
In Arah simply click on each area to be filled in with the new color sequentially. There are, in addition, other fill options in Arah: Fill to border fills in all pixels in each area selected no matter which color they are until the background color is reached, in this case, white
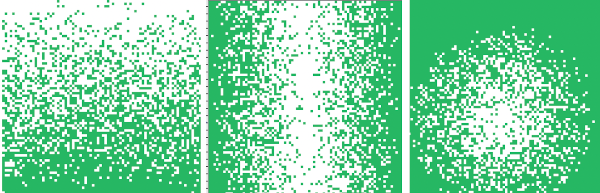
The whole image option works on foreground color selection including in those pixelated areas where pixels are not connected here as well. For 2 color knitting and downloading to knitting machines, depending on the software, the best files may be those created in BW indexed mode. Here a square is filled with a gradient to start with, and then the fill option is used again, taking the dither to the border of the image resulting in different densities. Note that threshold and fill % can be individually set to vary the results. 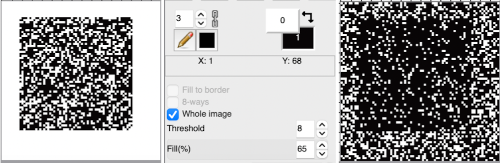
Changing single colors globally is easily done by adjusting the palette for the specific color. Double-clicking on either foreground or in this illustration the background color will load a palette window including it. There are 2 ways to alter the shade, one is by moving the cross-hair, outlined by a circle, and the second by using the slider, pointed to by an arrow. 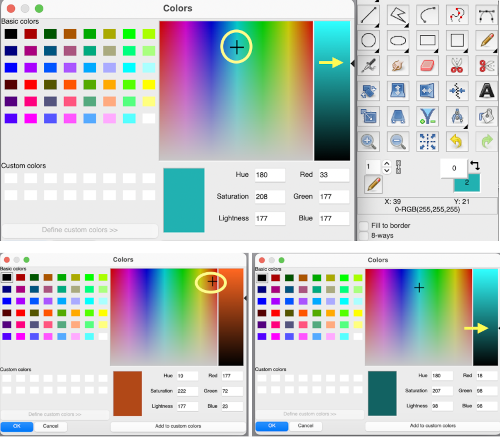 The new color is then changed after clicking OK, in this case altering the foreground color, no need for using the paint bucket.
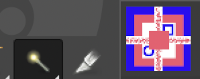
  The spray tool, on the left, may appear similar in appearance to the color picker in Gimp, shown on the right, but functions very differently, creating a spray in the foreground color. The shapes of the pixels and their size may be set in varied values, but the function is of limited use in small repeats.
 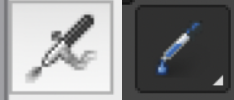 The way to activate the color picker in Arah is to press the Shift key, the mouse pointer will change to the familiar dropper and then click on the pixel in the desired color to select it.
The stitch-tool is an interesting new addition, is useful in drawing points to break up long floats, ie in fair isle knitting, where floats longer than 5 stitches are not recommended. 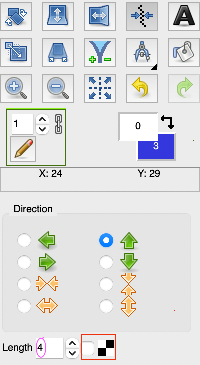 The provided repeat, intended for plain weave, is fixed in size, 2 stitches wide, and familiar to machine knitters as the one found in basic punchcards provided by manufacturers, with the card often numbered one in the packet. The repeat filled the card, with no breaks in the pattern. There was a whole publication on using CARD 1 in 100 fabric variations by Kate Armitage.
Using the tool: changing the pencil size or leaving it at 1 does not have any effect on the results, the pattern is a fixed alternating 1X1.
The arrows determine in which direction the stitch line will follow the shape. The length is set to the distance between the two points in any direction.
To enable the tool, click on the box to the left of its icon. The resulting effect depends on the base image size and may be used on more than one color. Here the effect was used on filled circles 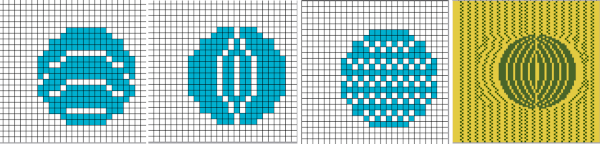 Using the options on full square canvases yields results that can easily be translated into knitting patterns. Note that the effect, however, does not extend to borders in all directions. The saved “stitched” image can in turn be cropped to meet knitting repeat needs.
Some effects: without enabling the plain weave repeat ![]() Engaging the repeat: the intermittent stripes may also be easily rotated
Engaging the repeat: the intermittent stripes may also be easily rotated 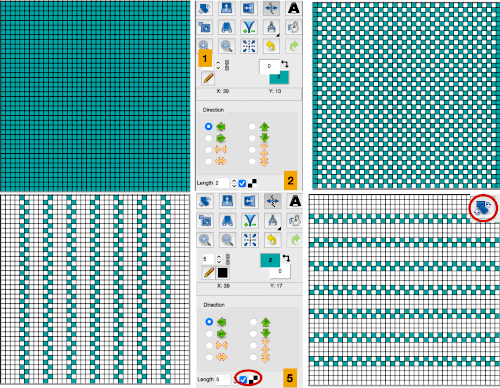 If no direction is highlighted, the bands form horizontally by default. After spaced bands are drawn, clicking in the horizontal spaces between them will form secondary motifs.
 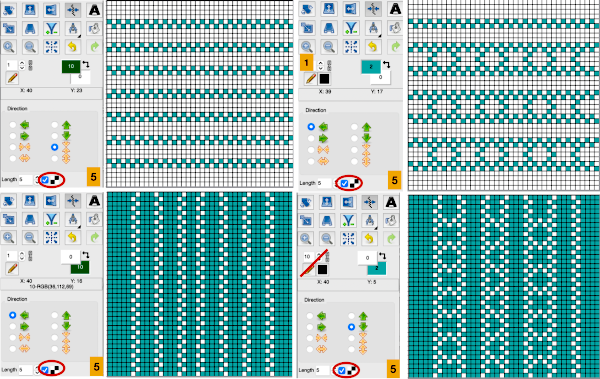 Square grids can appear to be suitable for tuck or slip stitch patterns,
  but the individual repeat would need to be isolated, and those horizontal lines would need to be converted to solid color as well, representing all-knit rows.
A workable reduced repeat:  Testing its alignment may be achieved by tiling in Gimp and drawing in repeat in Arah. There is another quick preview for doing so, the drawback is only that any repeat appears to be multiplied by a fixed X10 in height and width. Here the 4X5 original is repeated to 40X50 pixels
 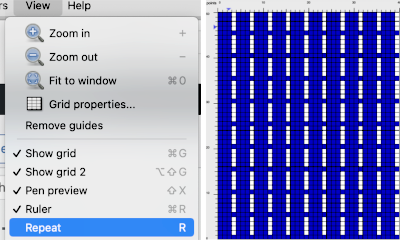 an 8X5 design repeats to 80X50 pixels
  If you prefer to work with colored shapes rather than black and white ones, whether intending to print punchcard repeats in black and white or to use the file for download to electronic machines as a BW png, the easiest way to create the repeat is to begin to do so using a single color on a white ground or the reverse, and then to use the select by color tool in Gimp to bucket fill the color with black, or adjusting the color palette in Arah.
Large image color reductions or steps for color separations for more advanced fabrics aside from the size of the repeat require their own post.
A beginning idea for future discussions on methods for performing them and the question as to whether the presence of white or specific hues in pattern palettes matter in downloads 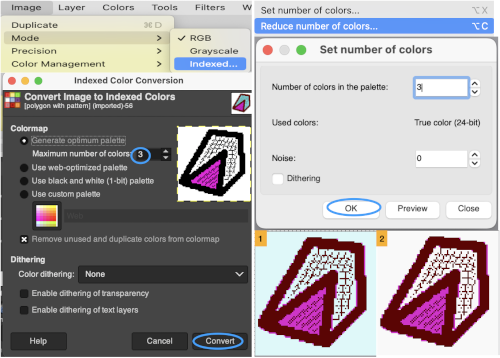
Knitting with “unusual” fibers/ elastic 3
There is always more to explore in any technique.
My blog is a living document, I often add new swatches to previous posts, but sometimes choose as here, to add a new post to a growing collection of information on specific topics.
I shared two previous posts on working with elastic: 1, and 2. Many of the same design repeats may be hand knit or using a G carriage to produce pleated knit and purl knits.
A sample of a pattern similar to the block ones executed below, knit on the machine using hand transfers between beds. 
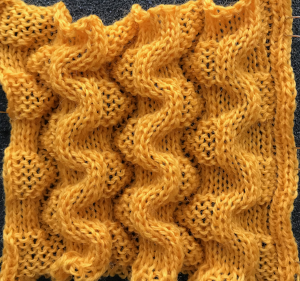 Changing yarns sometimes even simply using a different dye lot, tensions, or elastic manufacturer brands or colors can alter the appearance of the results significantly.
A previous post shared that the traditional yarn positions for the thick and thin yarns in the feeders need to be reversed when using the elastic for 3D effects. At times as I return to previous posts I find that explanations or reasons for the recommended directions are missing, especially if the steps appeared to be obvious at that moment in time.
I recently initially assessed the need for the position swap in thread lace using elastic as an “oddity” on my machine. It took a Ravelry response to remind me of the float formation in this fabric.
In review: the “lace holes” are formed by knitting a fine thread with a significantly thicker yarn as the “second color”. When the fine yarn knits, a larger stitch in it alone is formed on the knit face of the fabric, with the thicker yarn floating behind it. The thicker yarn goes in Brother’s A feeder, the thinner in B. The resulting effect, shown in a previous post 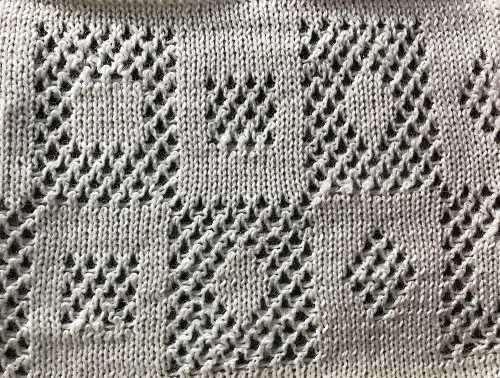 An ancient elastic sample and the corresponding punchcard using elastic as the “thin” yarn.
 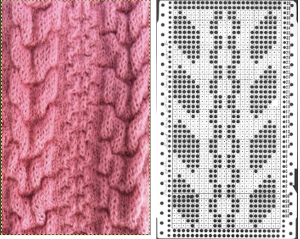 Using the traditional yarn positions: both yarns would knit on needles that are not selected, corresponding to the unpunched squares in the card. The thin yarn alone would knit on needles corresponding to the punched holes, with the thick yarn floating behind it. To create the punched shapes as puckers with the elastic floating behind them, if the yarn positions are switched in the feeders, both yarns still knit together where there are no punched holes (or pixels), and the thin yarn (elastic) will float behind the shapes in the other fiber, creating the resulting 3D textures.
My present elastic stash includes a small supply of 2 colors of recently purchased elastic and a purple cone of equal weight from my teaching days (UKI, no longer manufactured).
Another UK source for 2 thicknesses sold in varied size cones https://airedaleyarns.co.uk/index.php/yarns-fibres-for/knitting-machine/boomerang-2ply-3ply-lycra-yarn.html also lists international shipping rates https://airedaleyarns.co.uk/index.php/postage.html.
The blue yarn in these beginning tests is a 2/20 wool, the elastic a combination of the purple and blue threaded together in the tension unit.
When elastic is old, it loses the ability to spring back when used in knits though when tugged on manually it may appear to have a good recovery response to stretching. The result can be seen on the purl side of the swatches. When on the machine both threads appeared to be feeding evenly and smoothly with no contrast, while when off the machine, the purple does not recover and its floats are loose and droopy compared to the blue.
End needle selection is canceled. If for some reason end needles come out to the patterning position, they should be pushed back manually. The amount of weight used, if any, depends on the yarn and tension but also on the knitter’s preference.
The fabric shrinks considerably in width when off the machine. Any plain knitting above or below the rows worked in the pattern will ruffle, making end-use suitable in bands for that purpose.
These first tests explore evenly distributed black/white pixels planned first for a 50X24 repeat, A, with borders of white pixels on each side where both yarns will knit together. ![]() A shorter repeat, B, with smaller blocks, 51X16
A shorter repeat, B, with smaller blocks, 51X16 ![]() The charted repeats are shown in a single width, repeated twice in height, and are also suitable for punchcard machines.
The charted repeats are shown in a single width, repeated twice in height, and are also suitable for punchcard machines. 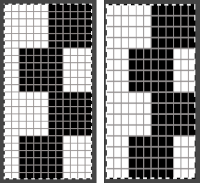 On the machine: when using the thread lace setting for these fabrics, generally the pattern is programmed so that the floats on the back of the fabric are created by the elastic yarns being used, intended to gather the results for the 3D texture on the knit side. The tool here is inserted beneath the elastic floats, the wrong yarn selection is shown below it, with the wool rather than the elastic forming the floats, the result if using standard yarn positions.
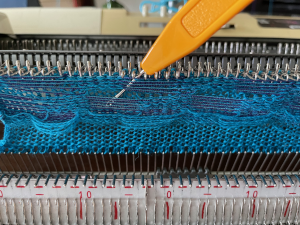 In patterns where positive and negative design spaces are equal, this is less of a factor.
Comparing results: A 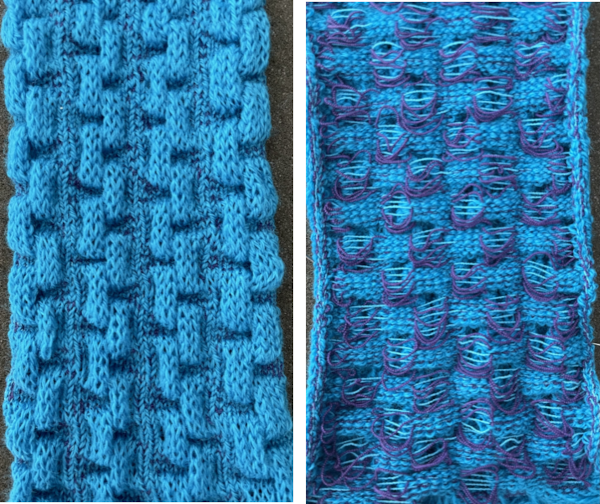 B:
B:  Notice the purple elastic droop. The fabric is similar to some of my racked samples such as this one, but it is knit single bed, far quicker and easier to produce, but the floats on the purl side are merit consideration when planning end-use.
 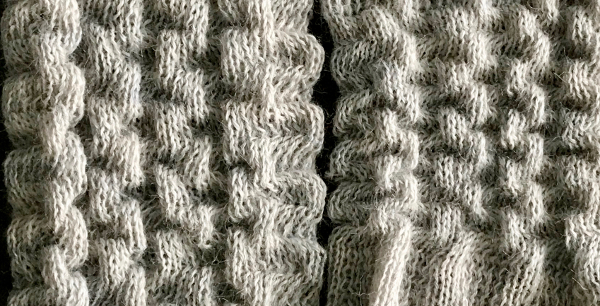 These zig-zag variations are equal in height but with balanced numbers of black and white pixels in each row, a single repeat of 12 stitches in width is charted on the left, for 8 stitches in width on the right, making them usable in punchcard machines as well. The fabric produced does not create crisp and immediately identifiable shapes on the knit side.
 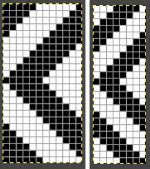 A 60X24 repeat including a 2 stitch border using the 12X24 repeat, one of the elastic strands was not feeding as evenly as the other
 ![]()
![]()
 A 60X24 repeat including a 2 stitch border using the 8X24 repeat
 ![]()
![]()
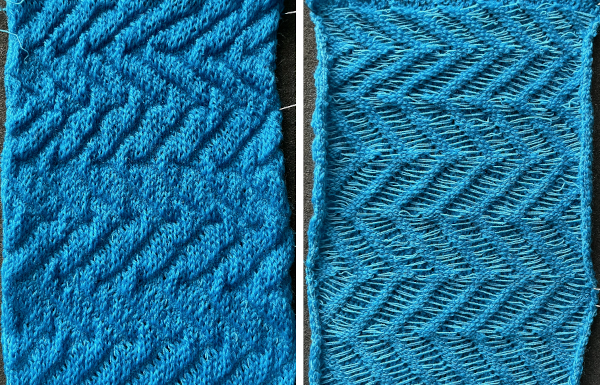
When working with larger repeats the floats for the elastic get proportionately wider. A 18X22 pixel repeat ![]() Color is reversed, so white pixels will knit both yarns together, and black pixels will pull on the white areas thus creating the 3D effect
Color is reversed, so white pixels will knit both yarns together, and black pixels will pull on the white areas thus creating the 3D effect 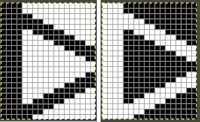 planned for knitting on a test on 58 stitches, with both yarns knitting a border on each side,
 ![]()
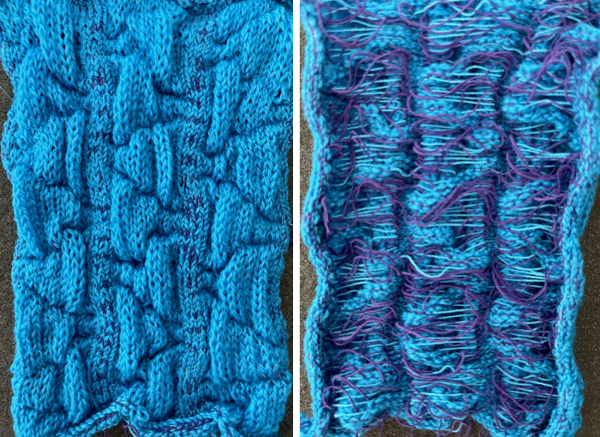
Combining shapes of different sizes, and mirroring them ![]()
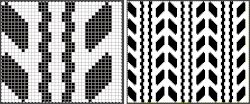
![]() The sample was knit on 75 stitches, off the machine, and relaxed it measured 5.25 inches in width, with pinning and the effort to stretch it, it reached an 8.5-inch width. A single strand of the elastic was not enough to obtain the desired effect, it was used double strand again in this final swatch.
The sample was knit on 75 stitches, off the machine, and relaxed it measured 5.25 inches in width, with pinning and the effort to stretch it, it reached an 8.5-inch width. A single strand of the elastic was not enough to obtain the desired effect, it was used double strand again in this final swatch.
The knit on the machine: the elastic is pulled tight across the fixed width between the needles, droops slightly as knitting progresses and it relaxes. 
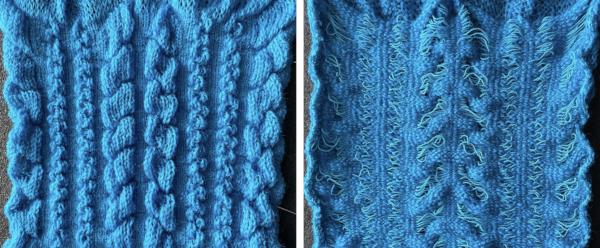 How it might begin to appear when stretched on the body or a form.
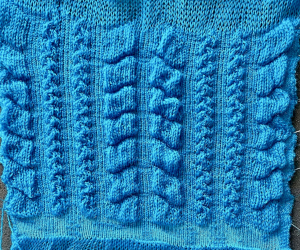
Some fair isle variations knit using one fiber that felts, the other that does not, achieve similar effects, but with far more recognizable shapes.
Here a leaf pattern is knit with UKI 3M elastic using the thread lace setting as in the above swatches. 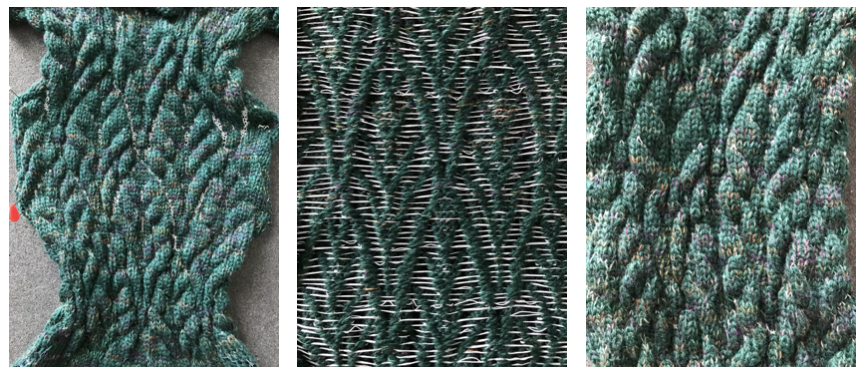 The same repeat now knit using the fair isle setting, exchanging yarn positions with wool forming the long floats on the left, rayon chainette on the right, and followed by felting.
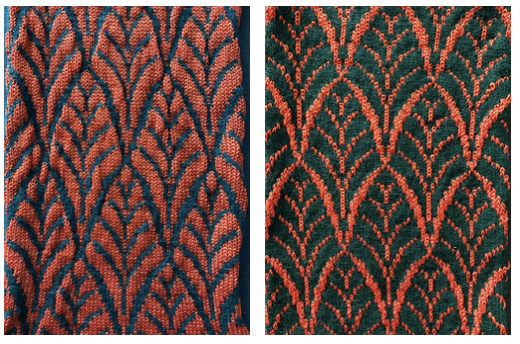
More mesh dragon scales, some striped and some not
A first look at Single bed scales made with stitch transfers: 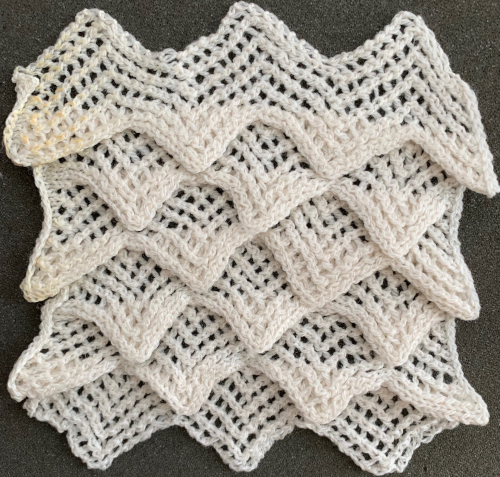 Another look at the repeat, here it is mirrored for use on my 930, and shown in for working over 72 needles knit border stitches on both sides.
  A reminder: when transitioning from spreadsheet-generated repeats to indexing and then scaling them in Gimp, check that the interpolation has not been changed in the program since the last time you used it, it needs to be set to none for good results with minimal if any cleanup required.
 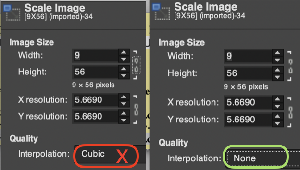 Analyzing what is happening: arrows on the left indicate the direction of the lace carriage moments. The LC makes 4 passes followed by two rows knit throughout with the exception when extra passes are required to place the lace carriage in the correct position for reversing the direction of the transfers.
The grey columns represent all knit vertical areas.
The 3 blank rows as opposed to the usual 2 in RC 27-29 and 52-54 respectively place the LC in position to reverse transfer directions, which begin to the left on the bottom half of the pattern, to to the right after the pattern midpoint is reached. The reversal helps to create a fabric that is not flat and produces scale-like projections. 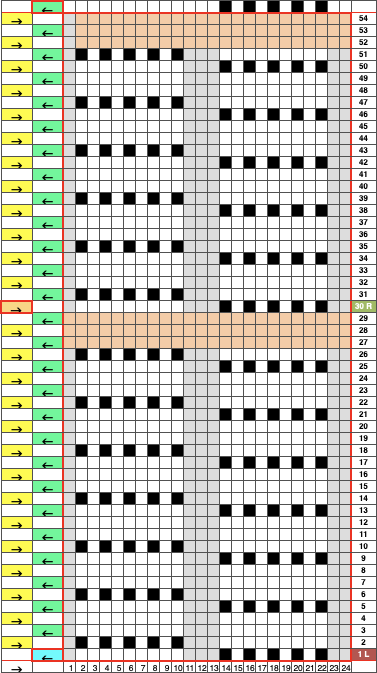 A reduced repeat before any mirroring or tiling:
 ![]()
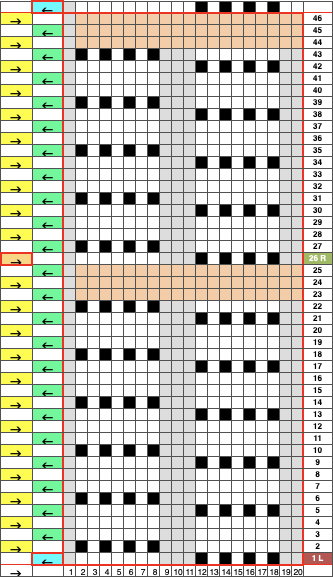 Whether the repeat requires mirroring or not depends on the machine used and the software used for downloads. The intention is to have the first row of transfers from left to right. Punchcard users, if the repeat is suitable, may punch and use it as given. The LC preselects on the first pass to the right, and transfers selected needles producing eyelets to the left with its second pass. In many electronic machine models, the pattern is actually opened as a FI repeat and the machine itself will automatically mirror the pattern horizontally so as to have lettering, motifs, etc. appear as drawn on the knit side. For lace and tuck patterns with needles out of work, the image may require mirroring horizontally, true on my 930.
My tests with thicker yarn resulted in a flatter knit, and the LC kept having difficulty making proper transfers. Having the width of each set of transfers set at 4 means that if necessary with the specific yarn, the 7 prong tool may be used to move each group of needles in turn.
The results with easy transfers using 2/20 wool at tension 4.2, meriting further consideration for color change placements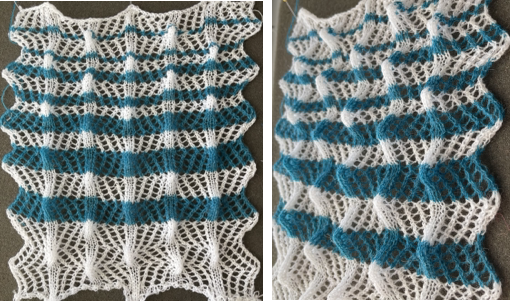 Another attempt, also shown after a light pressing and folding, pleats could be stitched to create other effects,
 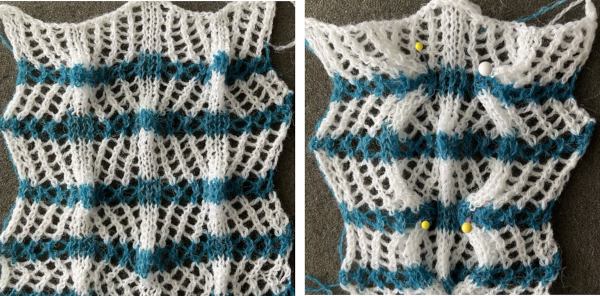 and then, seeking symmetry, finally realizing each of the above repeats has a missing pair of transfers in the top half, which may account for some of the color placements being “off”. This chart now, now 58 rows in height, appears to contain the correct number of pairs of transfers in each half repeat.
![]() Adding knit rows where transfers reverse directions, here 2 rows are knit in the base color at the end of each segment and prior to changing colors. At or immediately after design rows 28 and 56, the color in use knits for 2 rows. Color 2 follows and in turn knits for two rows, then LC use begins to select and transfer again.
Adding knit rows where transfers reverse directions, here 2 rows are knit in the base color at the end of each segment and prior to changing colors. At or immediately after design rows 28 and 56, the color in use knits for 2 rows. Color 2 follows and in turn knits for two rows, then LC use begins to select and transfer again. 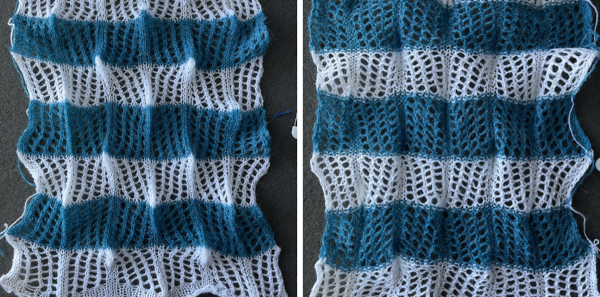 At the top of this swatch, two rows are knit in the white, followed by two in the blue, and two in the white again before continuing with transfers.
 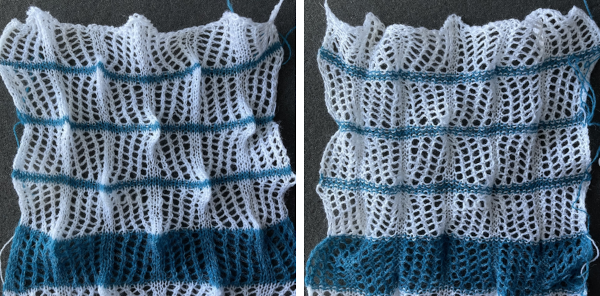 The white yarn is a 2/20 wool, knit at just under tension 5, which was the tightest possible for successful transfers on my machine. The blue is an acrylic of similar thickness, which, if pressing was planned for the scales, is a bad idea since it lacked the tolerance for adequate heat and steam.
The zig-zag effect may be enhanced by adding to the number of transfers in each half in the repeat’s length and on each row in width, but not necessarily in the stitch count in the knit columns. One is then committed to knitting broader test samples.
Extending the experiment to a broader repeat, 32X58![]()
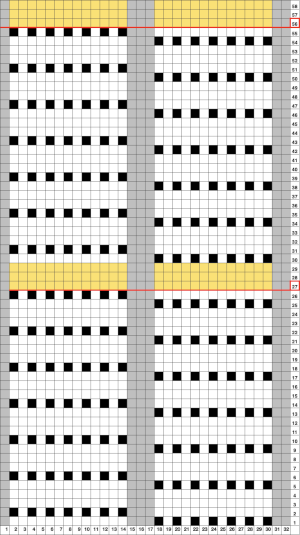 Both yarns used in the samples that follow are 2/20 wool.
Here this swatch is shown as it came off the machine, oriented sideways 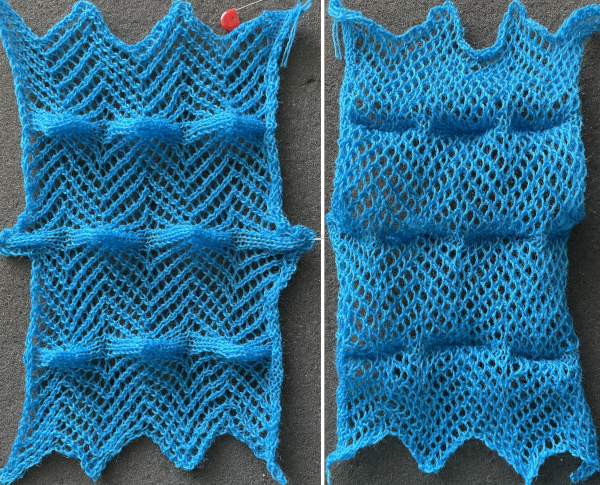 a change in perspective
 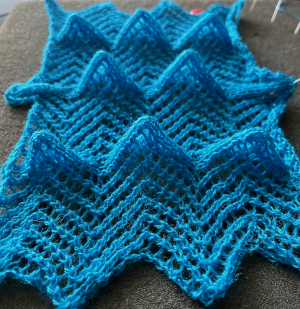 An attempt to shrink the size of the eyelets, this swatch was lightly hand felted. The issue with felting very open knits is having enough control to retain some of the openness in the structure, here the projections became rounder and flatter as well.
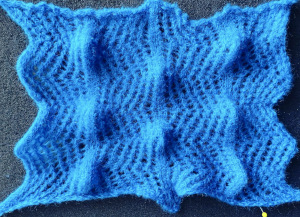 The white yarn is from a new cone and initially needed adjustments in weight and tension in order to transfer properly. The color changes were made with the extra knit rows after design rows 27 and 56, the result was lightly steamed and pressed.
  Bringing the scales closer together, with transfers occurring 5 times in each transfer row, as well as in height
 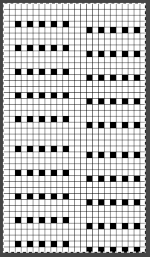 The repeat, now 24X42 is suitable for punchcard machines as well
![]()
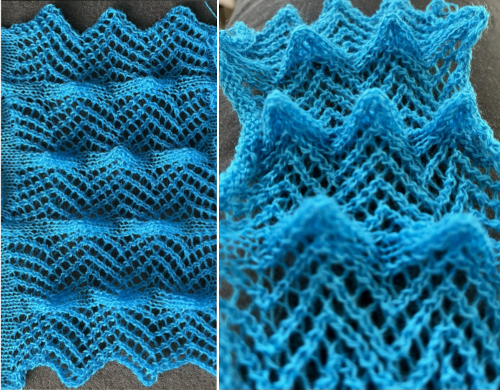 The scales in this fabric are permanent. To my eye, the fabric is best when relaxed. The smallest repeat in the series of my own tests, 16 stitches wide by 42 rows, is made up of only 3 transfers in each horizontal segment, and 5 transfer sequences before the reversal in direction.
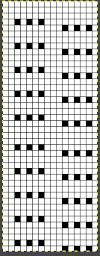
![]() On each side of the needles in work, there are 3 knit stitches, followed by a pair of eyelets, which fold over permanently when steamed lightly creating an edging, while the remaining knit is left undisturbed.
On each side of the needles in work, there are 3 knit stitches, followed by a pair of eyelets, which fold over permanently when steamed lightly creating an edging, while the remaining knit is left undisturbed. 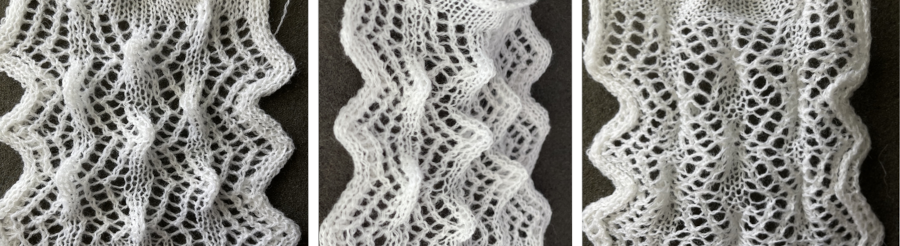 I can imagine the difference in the patterns a fine gauge machine might produce with far smaller eyelets and better definition of the 3D peaks, that said, a few more experiments may lead to developing future ideas to pursue.
If frequent color changes happen in any knit fabric, using a color changer facilitates the process. In the Brother system, color changers sit on the left side of the machine. If lace patterning is to be combined with the use of the single bed changer, the lace carriage will then need to operate to and from the right of the machine.
In order for correct needle selection to occur, when using a punch card machine, the card can be turned over horizontally, marked accordingly on the reverse, and used as-is. In electronic model machines or download software ie Ayab where lace patterns need to be mirrored for transfers to be correct, the repeats may be left and used as drawn for the first row of transfers to happen to the left.
The result of my first test combining chevrons and scales, and sorting out patterning transitions. The fabric is shown relaxed, shortly after its removal from the machine: 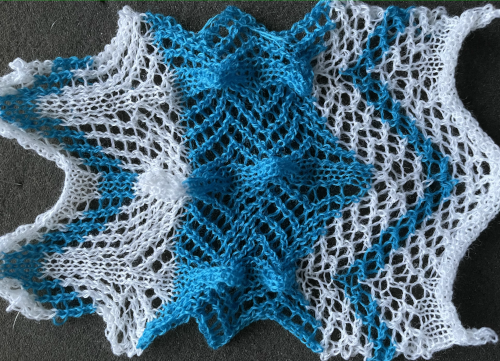 Realizing that in the scale repeat below any reversal of transfers in design works as a coordinating chevron repeat, this swatch was knit at the same tension and using the same yarns as the above, with one more added color.
As can happen in lace knitting, a couple of bad needles and other issues resulted in spots that have visual errors or show inadequate “fixes” and elongated yarn loops. The dark color especially liked to get hung up on gate pegs, a strong argument for regularly feeling the back of the knit.
Some steaming and light pressing was required to reduce the strong curl and make the shapes more visible, losing much of the 3D scale effects, still one can begin to get a sense of the appearance of more frequent color changes in this particular lace design along with the change in the quality of the knit, seen also in the side edges. The variations could be endless, each type of repeat here was programmed separately, but once the desired rotation is worked out, a single long repeat could be programmed instead. 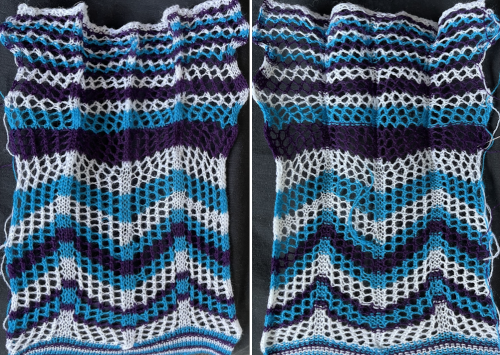 If the changes happen after even numbers of eyelet rows are to be formed, the count in the original repeat can be adjusted to reflect that. Committing to the above repeat, using a spreadsheet, and readjusting the number of eyelet rows in height, there are several choices.
One is to program two separate repeats, each in height required. In this case, the first could be kept continuous after programming, but the second would need to be adjusted in height for more transfer rows and reprogrammed accordingly. Making things work can be a drawn-out and convoluted process at times aside from any experience one has, and lace, in particular, can prove to be a challenge, it helps to take breaks and come back with fresh eyes. 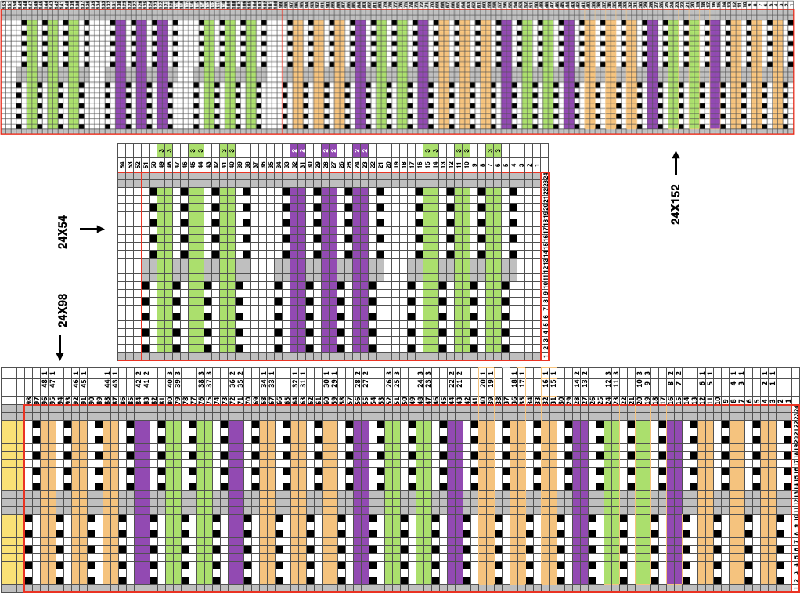 The first and last 3 rows in the 24X54 repeat in practice are not needed. A cheat sheet can be created and is handy and may be reduced in size to provide minimal information if there is no other way to keep track of color placements.
Testing the concepts using the narrower repeat of 16 stitches in width but the same in height, this sample is the result of the first try at the adjusted repeat. The fabric is steamed lightly to avoid too much stretching in width, the goal is to have the first set of scales appear across the row at the location pointed to the cyan arrow ![]() For that to happen, if the last row of chevrons ends with a transfer to the right, then the knitting for the scales should begin with transfers to the left. The reversal is commonly created by having 3 rows rather than 2 between repeat segments. Another in the series, with the intended goal being 3 scales, not 2, and playing with more color variations.
For that to happen, if the last row of chevrons ends with a transfer to the right, then the knitting for the scales should begin with transfers to the left. The reversal is commonly created by having 3 rows rather than 2 between repeat segments. Another in the series, with the intended goal being 3 scales, not 2, and playing with more color variations. 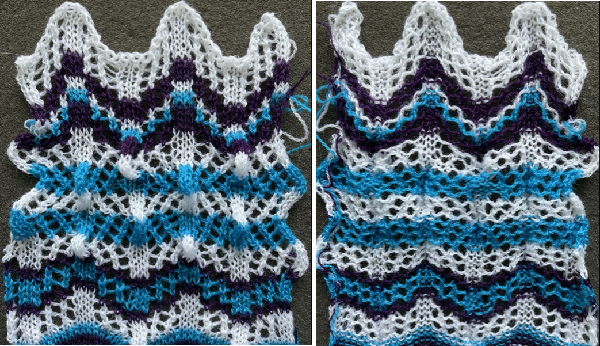 Another look at pattern intersections, seeking another scale
 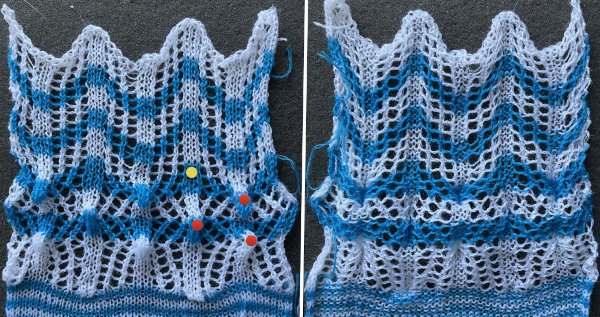 In developing one’s own designs with some practice what information is useful becomes more evident. Sometimes more is less, sometimes it is necessary to really sort out what is going on.
Back to charting: anyone with familiarity with lace knitting punchcard patterns is familiar with the arrows and other markings usually found on the left-hand side. 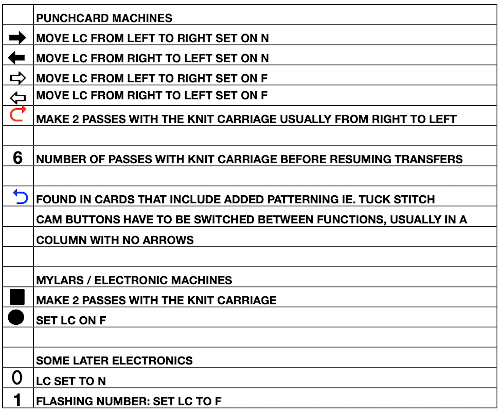 In this fabric, standard transfers are made to the left or to the right. As explained, the chart can be created with typical markings for standard transfer directions, and since the 930, in my case, mirrors repeats vertically, the resulting repeat may be used as drawn to operate the lace carriage from the right. Working in a spreadsheet with added column markings:
A: typical arrows on punchcard repeats, the first row preselects needles moving to the right, and no transfers are made
B: design row numbers
C: the locations for knit rows using the knit carriage, and attempt to visualize locations for color changes. Reset the row counter to 000 before making the first pass with the knit carriage. In the instance, that will take place from left to right and back to the color changer. Colored cells are added as well, reflecting color change locations.
D: the arrows indicate the direction of the transfers, and match those in column A. When transfers are reversed, the stitches will move in the same direction again, forming the projections that create the scales
E: the position of each color in the color changer, blue cells mark areas where extra LC passes occur so as to set up the reversal of the direction of the transfers.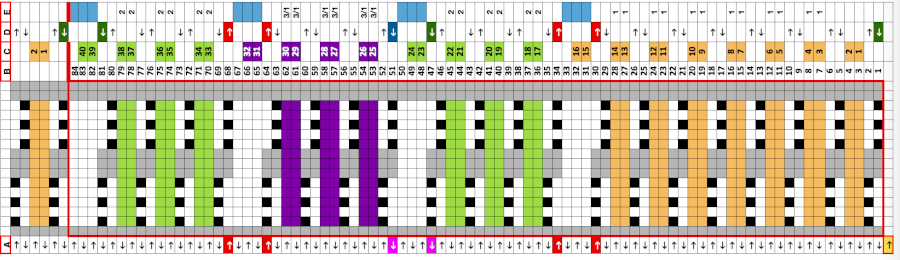 The 16X84 repeat
 ![]() is tiled to include equal borders on each side to 51X84, the chart is rotated counterclockwise.
is tiled to include equal borders on each side to 51X84, the chart is rotated counterclockwise. 
 A test changing the color change rotation in the diagram to get a sense of matching variations to the diagrams.
 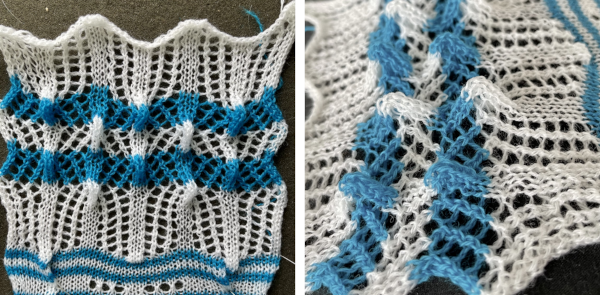 Working in single color once more, the lace carriage now returned to operating from the left, testing the continuous 84-row repeat
 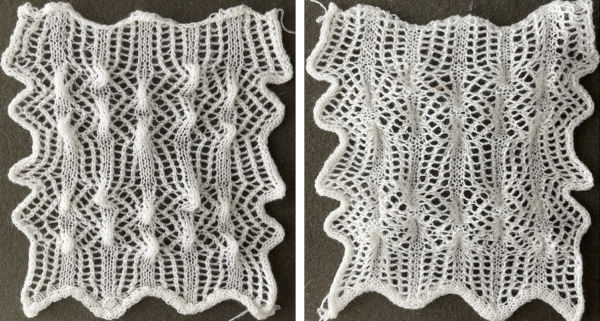 My spreadsheets are created using Numbers, here some of the tables are exported to an Excel document to possibly aid in DIY lace chevrons and scales Excel
Lastly, working multiple repeats in only one color helps assess whether the resulting fabric movement matches the specific design goal
A double bed version created with racking offers a different opportunity to explore scales with striping 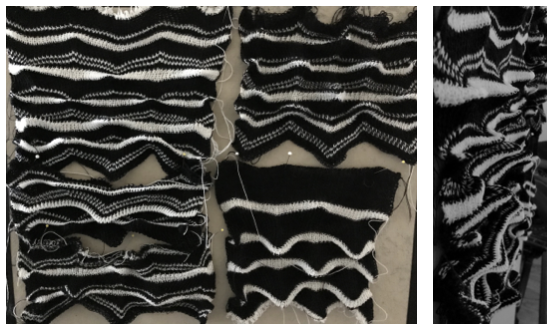 The chosen repeat in turn used in an accessory.
  If the striping zagging formations are what appeals and the 3D elevated scales do not matter, a flat version in a mesh lace may be of interest. The repeat is continuous with no reversal of the direction of transfers, and those vertical columns of knit stitches are eliminated. The yarns used in this swatch are cotton and rayon.
 ![]()
![]()
A ladder back dbj quest
The previous discussion on this topic: Ladderback double jacquard: backing variations
This backing technique has traditionally been used when the yarns are simply too thick to be worked in traditional dbj backing methods.
The majority of the needles will be knit on the main bed, so the tension should approximate that used for the same yarn worked in stocking stitch single bed.
The pattern will become a slip stitch one, with colors changed every two rows.
A FB Machine Knitting Group share led to a query on how this block type of ladder back might be duplicated on home knitting machines. 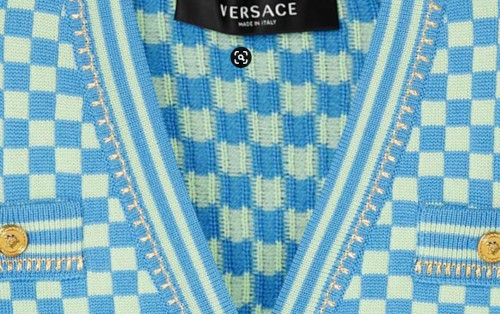
 My interpretation of the knit:
  the planned block repeat, in turn, needs to be color separated and scaled for use in dbj.
This chart was developed using Numbers:
A: each color in each row is represented only once
B: the same repeat in black and white
C: the repeat double length so that each color is changed every 2 rows
D: getting the pattern to shift for every other pair of blocks is actually achieved by knitting the last 2 rows and the first two rows of the next repeat using the same color for 4 consecutive rows.
If the repeat is downloaded and programmed to be 24 rows long, the reminder to knit with the same color again is easy, since the pattern will roll back to row 1 with a warning, in this case, not to change color. It is easy enough to alter the height of the repeat to use this particular reminder. 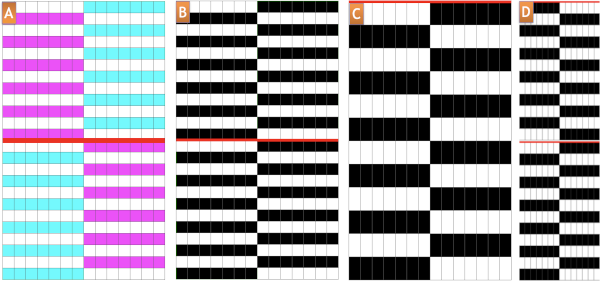 The motif used in the swatches is 14 stitches wide by 24 stitches high
 ![]() The machine set up: the main bed needles will need to continue to have weight evenly distributed on them, so the ribber comb placement needs to reflect that. The cast-on method can be one you prefer. I began with waste yarn, the ribber comb poked evenly through that, with the added use of ribber weights.
The machine set up: the main bed needles will need to continue to have weight evenly distributed on them, so the ribber comb placement needs to reflect that. The cast-on method can be one you prefer. I began with waste yarn, the ribber comb poked evenly through that, with the added use of ribber weights.
The pitch setting is for every needle rib.
End needle selection is used as in fair isle knitting to ensure that end stitches will be knit when either color is knit only on the top bed, resulting in the B feeder yarn being secured on the edge. If the end needle selection fails for any reason on the carriage side, push the needle forward manually.
The needle arrangement with red lines marking the location on the opposite bed.![]()
 COR: the first pass is made toward the color changer
COL: every other group of 7 needles is preselected, set both carriages to slip in both directions, change color if preferred, and bring up ribber needles in between those selected on the top bed to D position as shown here, on both the pass to the right and the return pass to the left. 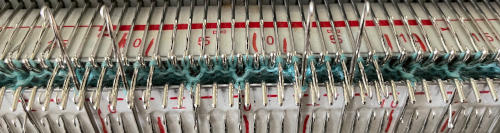 As the carriages make the pair of passes, floats will be created across the alternate group of 7 needles. Those floats will become secured as the next group of needles is selected and ribber stitches are brought up to form a line of knit stitches in the contrasting color in front of them.
 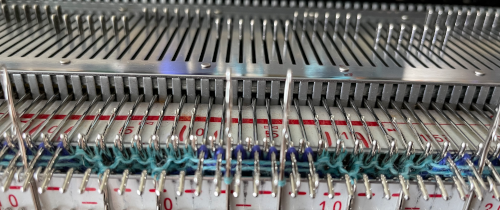 The yarn used here is 2/20 wool, really too thin for this type of backing, but I wanted to test the repeat and the concept.
 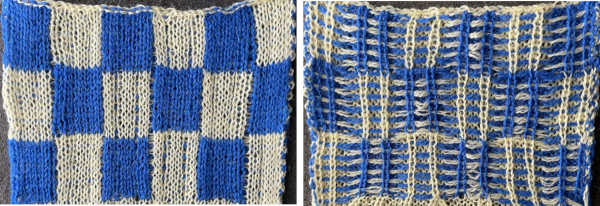 Using a 2/8 wool the result was optically the best, but I could not get any further than this without stitches jumping off needles in several places, regardless of tension adjustments
 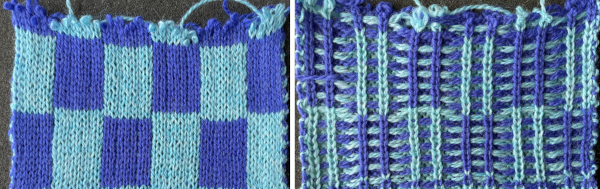 Using yarns in weight in between the 2, knitting was smooth, the tension on the top bed was set at tight as possible, this is the appearance of the knit on the machine
 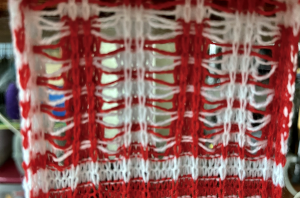 Off the machine, the bleed-through from the floats created on the top bed on the knit side begins to remind one of knit weaving as does the purl side. Not the intended effect and fabric, but perhaps worth pursuing intentionally.
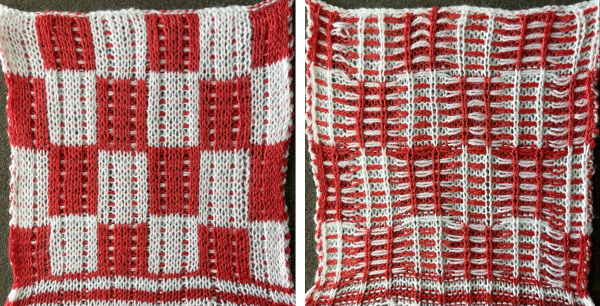
Adding fair isle patterning to short row patterns creating eyelets
In Brother knitting one of the issues encountered when combining fair isle patterning with short rows is that if the fair isle pattern is to be maintained, one must hand-select needles to the proper position prior to knitting across needles newly returned to work.
The short row method here is a modified version of that used in the “wisteria” post, with the addition of needles regularly left out of work.
Analyzing what is happening in fabrics in this group: the working repeats need not be symmetrical, but for the purposes of beginning to understand the moves required and developing an awareness of how the stitches on the needle bed behave, it is easier to begin by using hand selection that is rhythmic and consistent.
Avoiding dark colors is helpful in recognizing dropped stitches in time to pick them up.
With some exceptions, most machine-knitting short-row patterns are worked in two-row sequences with stitches brought out to hold opposite the carriage and into work on the carriage side.
Typically the first row of eyelets will be approximately half size, and the knitting may be stopped at the top of the piece to match that.
This chart begins to visualize a pattern composed of vertical columns with colors knit on every other needle, produced using the repeat.  The arrows indicate carriage movements.
The grey cells represent needles out of work.
The blocks of black and white columns represent the colors in the FI pattern selected and relate to the A and B yarn feeders. In this exercise, preselection is kept constant to facilitate maintaining proper patterning as needles are pushed back into work. Often, after an initial number of rows, all but the first group of stitches in the pattern are brought out to hold. In my swatch, the fair isle pattern had already been established across the needle bed for several rows.
Here one would begin with the knit carriage on the right, COR.
COR: the first group is knit for an even number of rows, ending COR.
COR: a number of needles are pushed back into work on the left, FI needle position is restored with needles placed in proper positions, knit on one row on the combined groups to the left
COL: bring the first group’s needles out to hold, knit an odd number of rows, ending COR.
Repeat moves and selections until the last group of stitches is reached, knit an even number of rows, and end COL.
COL: reverse the process, moving from left to right.
This method results in threads appearing between the short rowed shapes. 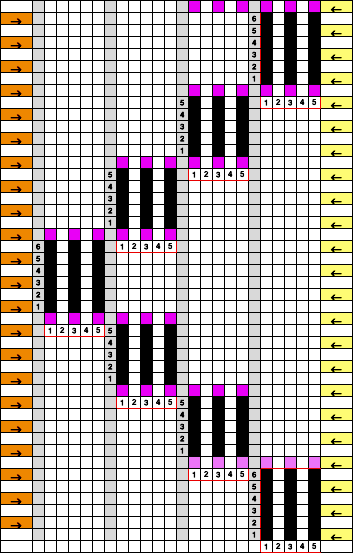 The first preselection row is made from left to right. End needle selection is canceled. Cast on is over a multiple of 6 stitches ie 36, with every 6th needle out of work. I began the sequence COR with 10 rows knit, returning COR, followed by 9 as the odd number of rows once the next group of needles is brought into work, and the last group worked is pushed out to hold, then reduced the even number to 8, the odd to 7 in the top half of the swatch.
Here the work is seen on the machine, on the left, COR, and the needle selection for the pattern in the next group to its left is restored. On the right: after knitting to the left, the initial group of needles worked is brought out to hold before continuing to knit.
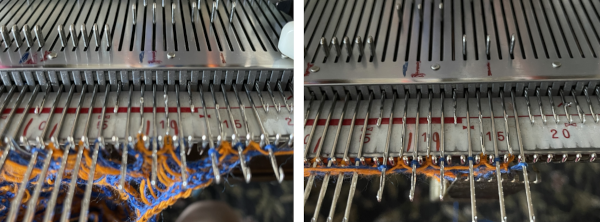
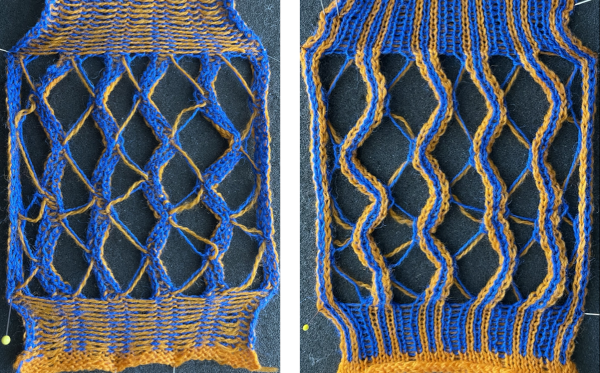 A mini version in a single color
 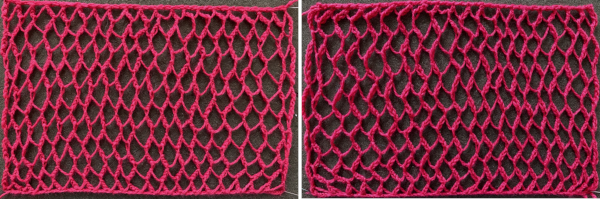 Changing the holding sequence to eliminate the long threads between held shapes, beginning once more to sort out the how-to before adding fair isle patterning: cast on 36 stitches, with every sixth out of work moving from left to right, knit several rows.
  To knit: each group of 5 stitches in work has a reference number, 1-6
first pattern row:
COR: Set the machine for hold, leaving only group 1 in work
COR: knit 8 rows on the first group of stitches on the right (1)
push second group (2) into work and knit 8 rows, returning to COR
COR: push the third group (3) into work and knit one row to the left
COL: push group (1) on its right out to hold, knit 7 rows across the remaining 10 stitches, returning to COR
COR: bring a new group on the left into work, knit one row to the left
COL: bring the group to its far right out of work, repeat the process across the row
when the second to last 2 groups on the left (6 and 7) are reached, knit 8 rows on both, returning to COL
COL: push the second to the last group out to hold (6)
COL knit 8 rows on the last group on the left (7)
COL, reverse the process repeating all selections moving from left to right for the second pattern row. Begin the process by knitting 8 rows first on the first group of five stitches on the left, which will now have been knit for 16 rows in order for the stitches to create the large eyelets that will now form.
In my swatch, I occasionally varied the odd number of rows knit between seven and 9. Even a couple of rows can make a noticeable difference depending on the color of the yarn, the tension used, and other usual suspects. Test out the idea in the swatch to help make the decision as to whether unraveling is required to keep a constant quality to the holes as the project grows, and to practice unraveling rows back to the proper location. If fair isle patterning is added, corrections become a bit more complicated.
The resulting proof of concept swatch: 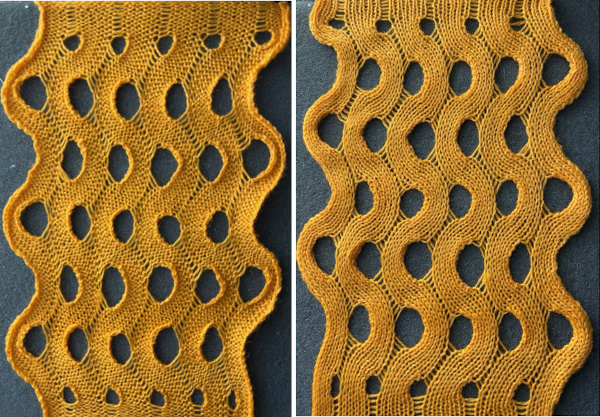 With the addition of the fair isle patterning: note that here, when the last set of needles was reached, they were not worked twice before reversing direction, so the edge eyelets are of a different size than those in the remainder of the row, forming smaller waves on each side.
 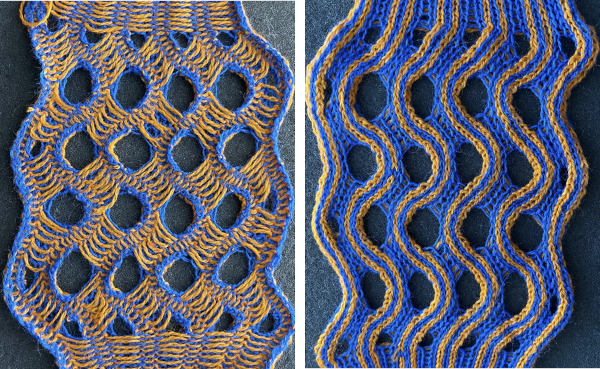 Any openwork fabric will likely be wider than that knit in stocking stitch or fair isle on the same number of needles, making it necessary to consider providing stretch in any rows knit at the bottom or the top of the planned project or using the contrast as part of the final design.
Adding hems to the above technique is also possible 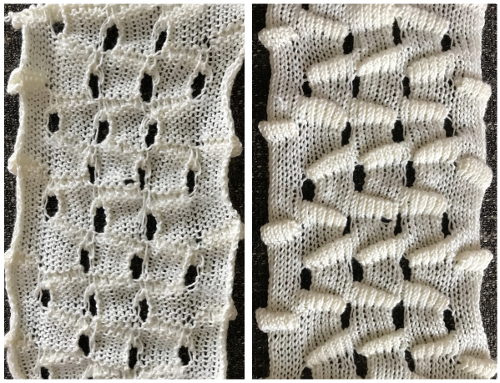
The short row repeat used here is a modified version of the “fern leaf” one in the post. The sequences are different, every needle is in work.
I began by casting on 36 stitches, knitting 12 rows for the even number, and 11 for the odd, with random variations.
Results need not be symmetrical either in the length of the shapes or in the direction of the knit, but rhythmic repetition can help one understand stitch formation, other changes that follow can then be deliberately planned rather than accidents or errors, keeping notes while the work is in progress, will help reproduce effects.  The knitting method, and tips: the fair isle repeat is 2 stitches wide by one row high, and the respective cells are bordered in red, it may be programmed to suit. When using a punchcard model, the card could simply be locked on any row with every other cell punched. The result will be vertical lines on every other needle, slanting in the direction in which short-rowed shapes are knit.
I chose to begin my design with the first needle on the right selected to pick up the color in the B feeder and used that as the basis for adjusting selections in subsequent groups of stitches.
Electronic machines have the option of mirroring the pattern to change that, punchcard knitters can move the knitting one needle to the right or to the left to get the selection they prefer.
As additional needles are brought into work, the A and B yarn feeders selections need to be restored so as to maintain proper FI patterning.
If you have not worked with this type of technique before, it is good to start using a light color and to work in small stitch groups, not adding added patterning until later.
Attempting to visualize the movement of the stitches across the needles in work: the colored cells illustrate the movement of stitches across the needle bed as they are brought in and out of work, and the number of held rows is altered to reduce the chart’s height, does not match the directions for the test swatch that follow it exactly. The black cells represent all knit rows. 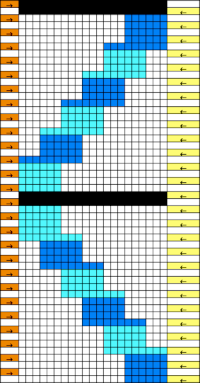 1. Cast on the desired number of stitches, in this case, 27, a multiple of 3, and knit several rows at tension appropriate for stocking stitch when using the same yarn
2. COR. Set the machine to not knit stitches brought out to the hold position.
3. Leave 6 needles (3X2, double the number in each working group) on the right in the work position, and push all the remaining stitches out to hold.
4. Knit 10 rows (an even number), ending COR.
5. Push back the first 3 needles on the left back into the work position
6. Knit one row from right to left (9 needles), end COL, and push the 3 needles on the right out to the holding position (6 needles will now be in work again).
7. Knit 9 rows (odd number) ending COR
8. Repeat steps 5-7 until you reach the last 6 stitches, knit 10 rows (even number) over these last 6 (3X2, double the number in each working group) needles, ending COL.
9. Set the machine to knit all needles out in the hold by pushing needles back or releasing the hold lever, and knit 4 rows over all the needles. It is possible to vary the number depending on one’s preference, but for me, only two rows simply were not aesthetically enough.
10. Holding lever on H, reverse shaping from left to right, beginning again on 3X2=6 needles, (double the number in each working group).
Reverse the process, moving in the opposite direction, beginning with knitting an even number of rows on the first chosen group of stitches on the left.
The difference in the edging of the swatch, marked by arrows, is due to a variation in the sequence for working on the specific group of stitches. If performed as an error, it will appear as an obvious deviation if not corrected while the work is in progress. The same action may also be performed deliberately as part of the overall design.
Color changes may be made easily where the 4 rows are knit in between segments on every needle used. End with 2 rows in the first color, knit with two rows with the second color before returning to the holding sequences.
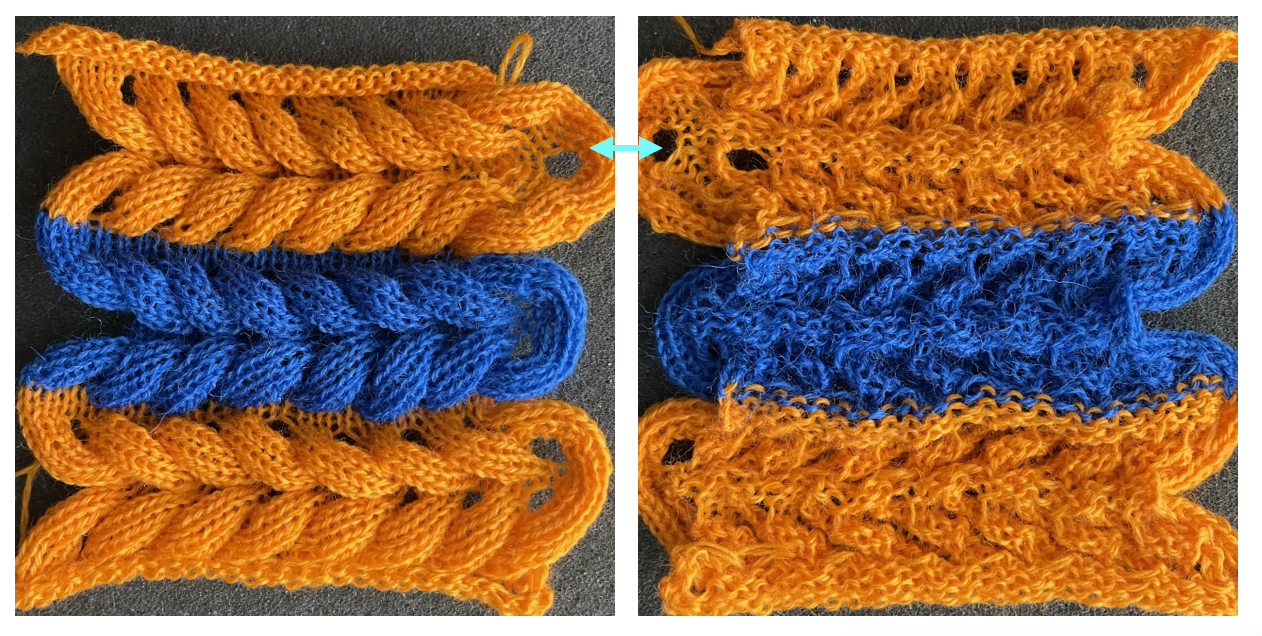 Worked on a significantly smaller scale in one color.
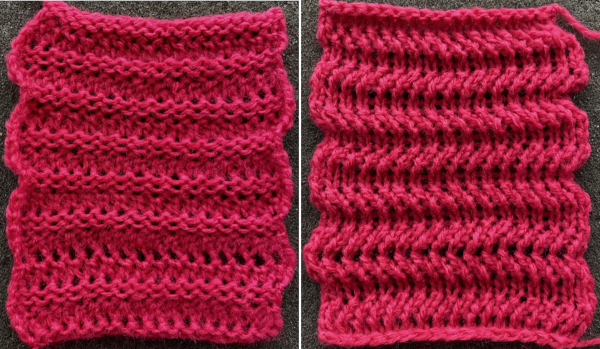 This far more symmetrical result than the first effort worked in the vertical stripe fair isle pattern on 40 stitches: begin with some FI patterning, end COR
COR: bring all but the first 8 needles closest to the carriage out to hold,
Proceed as described for the single color design, but this time 4 stitches are pushed into work and returned out of work rather than 3. Knit 12 rows when even numbers are required, 11 for the odd number.
Four rows of fair isle patterning are knit at the end of each repeating segment.
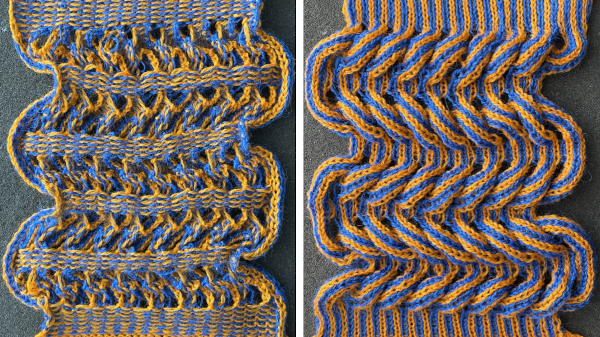 It is possible to work with far larger groups as well,
  thus providing an opportunity for adding larger fair isle patterns into the mix.
  Cast on 48 stitches.
In this sample various size eyelets were produced, using 12 rows, A, which did not seem to yield the degree of 3D texture I wanted. More rows were tried where larger holes appeared, B. Four rows of fair isle patterning separated each row of the held shapes.
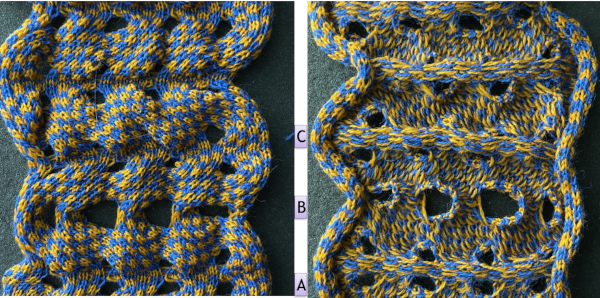 To produce a more symmetrical knit, begin working short rows COR with a group of 16 (8X2) stitches on the right, knit for 20 rows as the even number (in the range of 8X2X1.5), 19 for the odd, returning groups of 8 stitches into work knitting moves across the needle bed, ending the pattern with working 20 rows on the last 16 stitches in work on the left. Knit 4 rows restoring fair isle needle selection across the needle bed, returning COL. COL reverse shaping.
 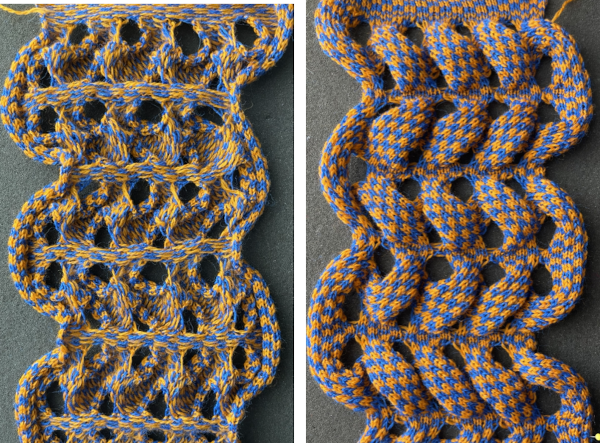 Knitting all the holding sequences in the same direction for multiple rows as in any eyelet fabric will result in a knit that biases to a degree proportionate to the number of stitches and rows in each unit. The start of yet another idea:
Machine knit fringes 4, long loop patterning
Related posts on creating loops:
long-loops-a-bit-on-method.
long-stitches-on-km/
some-long-stitch-swatches/
for double bed long loops in various designs in single or multiple colors see drop stitch lace
I became curious about creating long loop shapes on a knit ground using continuous strands of yarn, forming loops in the same direction, and allowing for knit rows between them resulting in returning the yarn to the starting loop formation side. My own preference is to make the loops with the knit carriage on the right, anchoring them with the following carriage pass to the left. To continue doing that, the yarn would either need to be cut leaving a yarn end, or it needs to travel back to the left, where it can form the next row of loops from left to right.
In these tests, the movement of the yarn back to the left was achieved by having it weave on every other needle from right to left.
Triangular shapes are easily recognized, and I began with a moderately large one, at first planning for loops on every other needle. Black cells on the right represent loop locations, and green the weaving pattern formed as the carriage knits right to left. 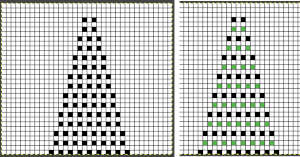
![]() The length of the loops determines end-use, long loops can become fringe, and short ones the macro version of pile knitting.
The length of the loops determines end-use, long loops can become fringe, and short ones the macro version of pile knitting.
Tools to aid loop formation that are fixed in height across the needle bed are needed if the pattern is not used as a single motif, but rather as a recurring one. Separate strands of yarn on bobbins or balls or cones would need to be used for each shape. The loops in this swatch are large, so there are extra knit rows between each set.
I use colors and yarns that are randomly on hand for swatches unless I am planning a specific finished item.
The first swatch is worked with loops on every other needle, the second with loops on every, as shown in the photos
Worked as a single motif:
KC II: preselection is made from left to right
COL: make loops moving from left to right using ribber gate pegs, I like to bring needles to be wrapped out to hold as I move across each row, wrapping frequency may be varied apart from needle preselection, 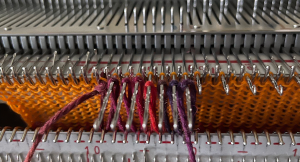 knit a row to left, anchoring them
 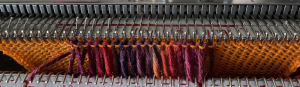 COL: knit to right, the needles for the weaving pattern to the left will preselect
 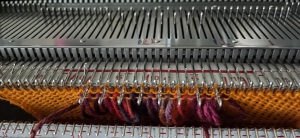 COR: check that weaving brushes are down, place yarn over preselected needles,
 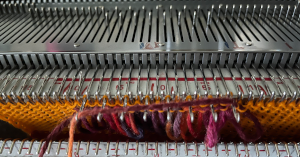 knit a row to the left, securing the weaving pattern, the yarn end will be on the left again
 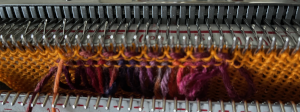 COL: knit a row to the right, needles for the next row of loops will be preselected
COR: use the yarn now on the left again to form loops from left to right, knit a row to the left to secure loops. Repeat the process. The resulting shape brings holiday knitting to mind.
The loops worked on every other needle 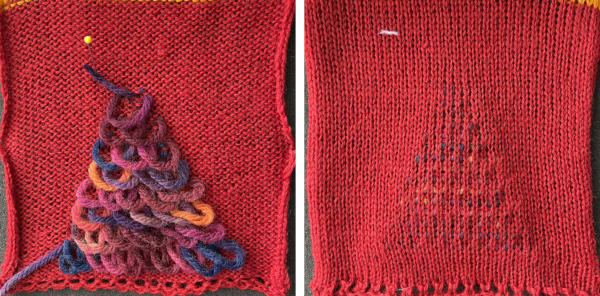 and on every needle. The original preselection repeat may be used. The only yarn ends that need to be dealt with are at the beginning and end of the shape, the reverse of the knit has the appearance typically seen in knit weaving, where the thicker yarn forces the stitches in the background one apart.
 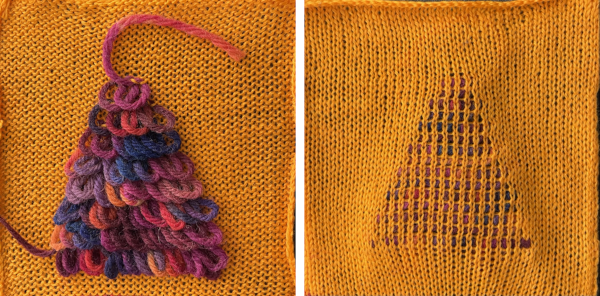 What of recurring shapes with reversing directions? It occurred to me plastic straws may prove to be handy tools for creating the loops and easier to manage than rulers. The maximum length of the straw is a limitation. Exploring the technique in a single motif gives one the opportunity to explore issues and limitations.
My straw is 10.25 inches wide, made of plastic, is not rigid, and can be squeezed flat easily. When using it as a loop guide, it was held low enough below the knitting on the top bed on the carriage side to allow some ease in the loops so the straw can have an easier time dropping below the sinker plate when the knit carriage passes over it, it can even partially collapse if needed.
I found managing the straw soon became rhythmic and easy.
The lengths of the straw on both sides of the loops serve as a handle on the left, and on the carriage, right side, the extra length can be guided down a bit to keep it from angling up and getting caught in the sinker plate.
Once the carriage begins to knit across I encountered no problems. The straw may get pushed slightly to the left with the carriage pass. 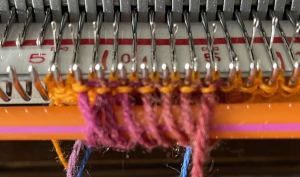 Planning possible actions and a starting repeat with single rows knit between loops. In this instance, loop formation happens when the carriage is on the right, and weaving when the carriage is on the left. The latter means the weaving yarn is laid over selected needles in the wrong direction, with the long end of the yarn away from the knit carriage. That said because weaving happens only on every other needle X3 and on a max of 7 on every other needle, the first selections were no problem, and the second was manageable with some caution. The arrows indicate the direction of the carriage movement after the loops are formed, and after the yarn is laid over the preselected needles for weaving.
The image on the right is the repeat tiled in Gimp to evaluate its vertical alignment. It is 14 pixels wide and 20 high, could be used in a punchcard and placed on the center of the card making it recur centered in each 24 stitch location on the needle bed.
If an attempt is to be made knitting several repeats, vertical columns of plain knit between the pile knit columns are desirable.
The needle preselection will begin on 14 stitches, so only for the first 2 rows, the needles preselected for the first 7 stitches of the 14, shown as grey cells, push the needles involved back to B.  Depending on the machine model and software used for the download, the repeat may need to be mirrored to achieve the result planned in the drawing, which is true in my 930. The starting png
 ![]() may be placed on a wider canvas in Gimp, here is a 30 stitch mirrored version for use on my 930.
may be placed on a wider canvas in Gimp, here is a 30 stitch mirrored version for use on my 930. ![]() The resulting design is quite dense but successful.
The resulting design is quite dense but successful. 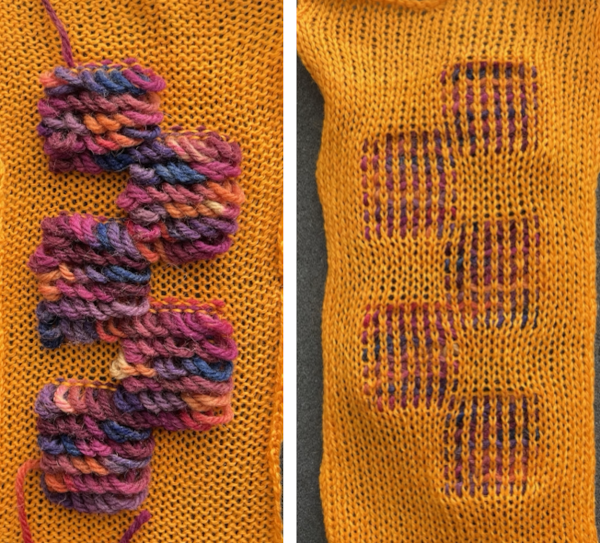 Planning moves on for weaving to happen with the yarn in the proper direction, particularly if more than one design is to be attempted horizontally, and to make the loops less dense. Extra rows of plain knitting are added between loop formation.
Here the design is placed once again on a 30 stitch ground but is now 40 rows high, drawn in the direction desired, not yet mirrored. It is expected the aspect ratio for the shapes will change, becoming elongated. Again, preselection for the first seven stitches on the right for the first two times selection occurs on those needles is canceled with needles pushed back to B.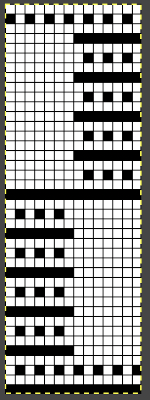
![]() Clothespins, as seen in the lower right, can come in handy to put slight weight on yarn ends to help hold them in place at the start of the piece or as it progresses.
Clothespins, as seen in the lower right, can come in handy to put slight weight on yarn ends to help hold them in place at the start of the piece or as it progresses. 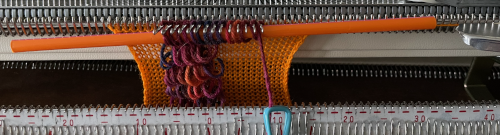 The proof of concept swatch shows a very different appearance in the distribution of the loops from the first sample.
 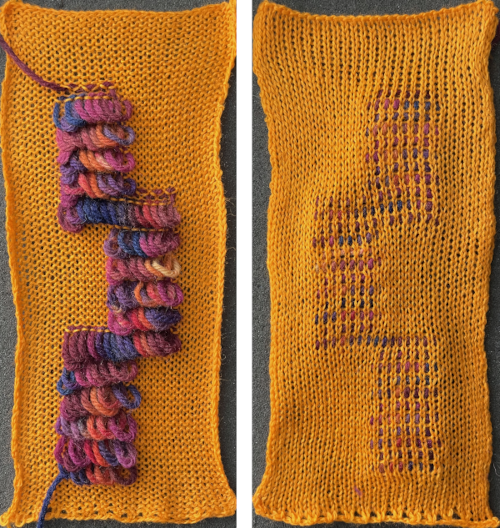 It is possible to knit more than multiple series of shapes. Enough spacing between the forms is required to allow for using of more than one straw.
I had the easiest result by leaving the straws uncut.
Each straw end on the carriage side again needs to be kept down until the sinker plate begins to pass above it.
It is a good idea to try the method first and practice some hand selections. 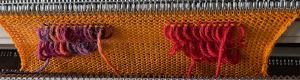 The rows where all 14 stitches in each group were worked required a bit of extra care, but knitting was quite manageable
 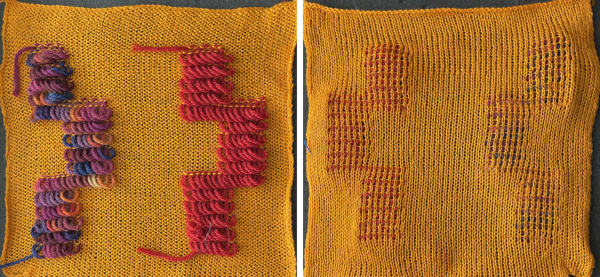 Long loops may also be created with i-cords, strips of knitting, or fabric, strung beads, and imagination is the limit depending on preference, available materials, and the specific design. Even tiny beads may be used to create loops as seen in this swatch. Dental floss may be used as the very strong “thread”, secured with e-wraps on the knit background where needed.
For threading the beads onto lengths of the chosen thread, a tool I have used (which also comes in handy for threading a serger) is an “EEZ-THRU” floss threader, recently available in this brand 
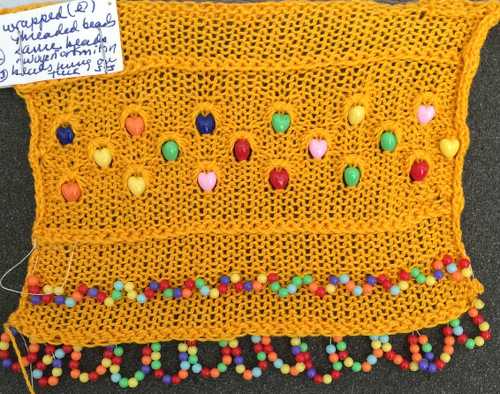 Here strips of knitting are used along the edge and knotted, strips are also applied to the body of the swatch during knitting for contrasting color interest
  I cords may be applied to the edges of a knit ie scarves, but there are a lot of ends to weave in. There are trade-offs if techniques are explored to use continuous strands with limited or no cutting.
There is a hand knitting pattern called foxpaw, for which some illustrations may be found in the photos related to the advertisement for this class https://stitches.events/shop/classes/west-2022/intro-to-stacked-stitches-6/.
A while ago I was interested in trying out a simplified version using the knitting machine, the project has remained a UFO (unfinished object) since then.
The graduated size cording here were created by knitting lengths of i-cord on 4 stitches, knitting X number of rows, folding the cord upon itself, and joining the second half to the first using seam as you knit, continuing with the next shape immediately after completing the join. When applied to a cast on edge, if the goal is to use the technique for a substitute fringe, the double cords are a bit dense compared to the body of this particular knit and too close together. Perhaps creating a trim by applying the double cord to a side edge of a vertical strip and then in turn to where needed would produce a better result, or limited numbers of graduated cord lengths might provide interest in the body of a knit.