Pintucks are in the family of ripple stitches. The size of both is limited by the number of rows that may be knitted before the stitches on the bed creating the ripples begin to ride up and off the needles. The number of rows possible for the rolls varies with the model knitting machine used and the type of yarn. The Passap strippers make their knitting easier. Generally, extra weight is required.
Basic pintucks are formed across the width of the fabric, no punchcard selection is required. For some basic instructions on forming them in a single color see the blog post on Shadow pleats knitting. Its follow-up, Shadow pleats with added patterning made me curious about the possibility of creating 2 colors, FI patterned pintucks.
For a very brief period of time, some designs were published creating similar effects by hooking up elongated fair isle patterns at regular intervals on the knitting bed. The preselection for the next row knit in Brother machines poses interesting issues in restoring and maintaining the proper pattern throughout the design.
A lot of changing cam button settings can make many fabrics almost possible but not practical on home knitting machines. Some of the constant switchings of functions may be achieved by knitting with separate pairs of carriages selecting the pattern, which in electronic models advances every row, making this an electronic “special”.
Ribber fabrics produced with 2 knit carriages selecting needles introduced the idea of using a KC with a modified sinker plate to make some fabrics easier and includes a knit sample of patterned ripple fabric.
The goal here is to try to create rolls evocative of the shadow pleated swatches in a double knit.
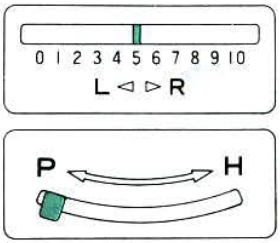
Because of the rolling on the knit surface, designs should be lengthed at least X2. The initial test used the same pattern as that in the shadow pleated samples with the number 4, double-length key selected on the 930. ![]() The carriage setups
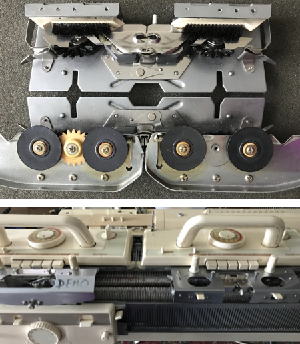
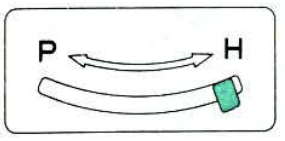
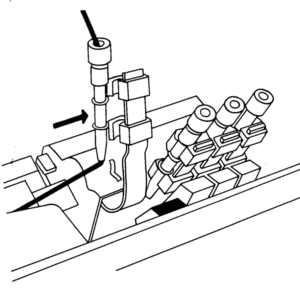
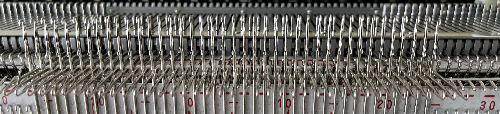
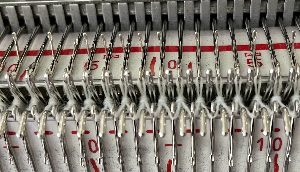
The carriage setups 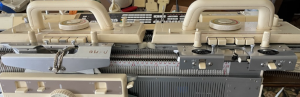 The width of the fabric is limited. Though the KC on the right may be moved off the machine if needed, the coupled carriages cannot be since the ribber and KC used on the left do not lock together in any way, and with the stops removed the ribber carriage could conceivably slip completely off its bed. The end of the belt still needs to be cleared, but this is about as far as one can safely move, with the KC just clear of the set mark on the left of the top bed.
  End needle selection is used in both knit carriages.
Extension rails are required.
The coupled carriages although selecting needles will be knitting on both beds to begin and end the fabric and to seal the folds setting the pleats.
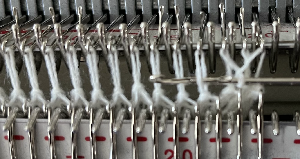
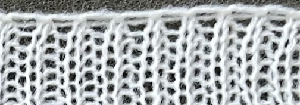
To begin, test the tolerance for the number of rows knit on the top bed only. It is possible to coax extra rows by pushing fabric down between the beds by inserting a thin knitting needle between the beds at the start of the pintuck or halfway through and weighing each end. Longer rolls and hems tend to flatten.
The main bed will be knitting on every needle and FI is essentially a slip stitch, so the tension needs to be at least that for the yarns used in single bed knitting. More pronounced rolls may be produced if the tension and stitch size are adjusted accordingly.
Normally the sealing row would be knit in the light FI color. In these samples, the yellow yarn is used to help assess how those knit rows interact with the folds and to what degree they are visible.
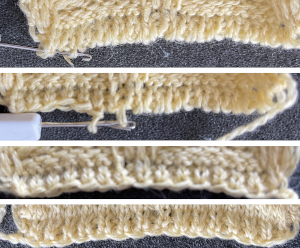
The first try:
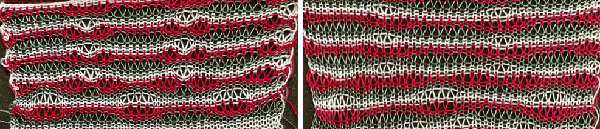
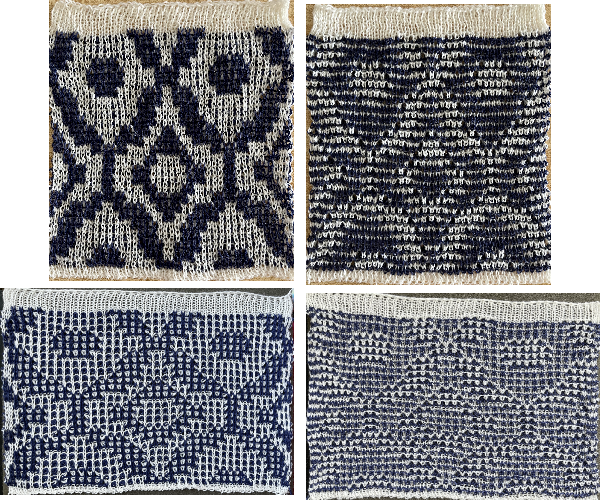
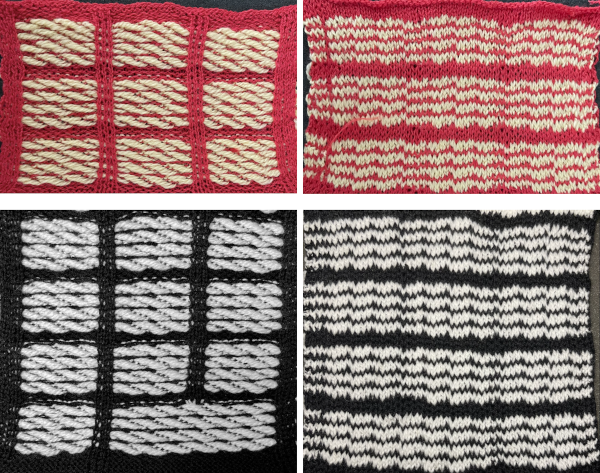
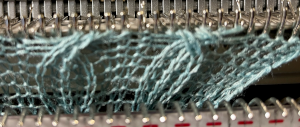
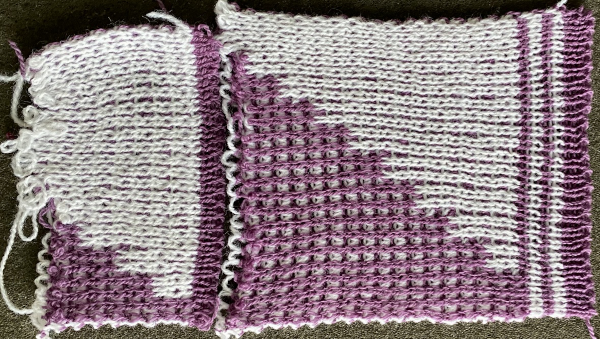
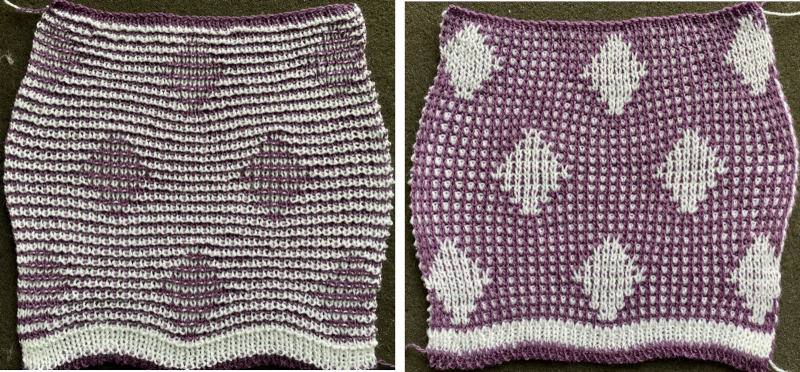
1. tested a solid color 8-row pintuck a single time, then switched to 6-row sequences and continued. Even though a contrasting color is used to seal the tucks, it is not immediately visible
2. the second carriage is set to FI and begins to operate from the right. Out of habit, I knit with weaving brushed down, a bad idea in this instance
3-4. this fair isle design is used double-length and forms some very long floats repeatedly, not the best choice even for single bed FI, definitely problematic here, time to regroup.
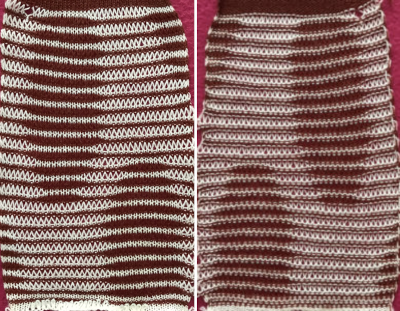
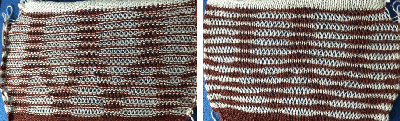
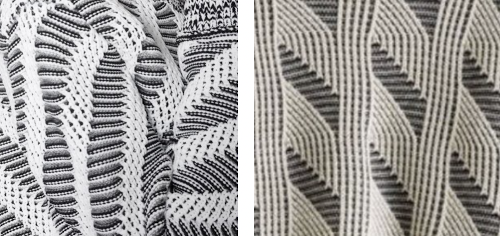
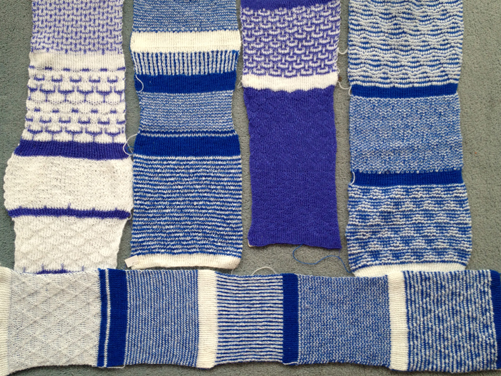
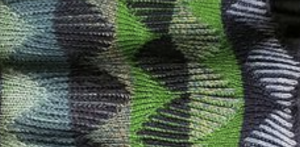
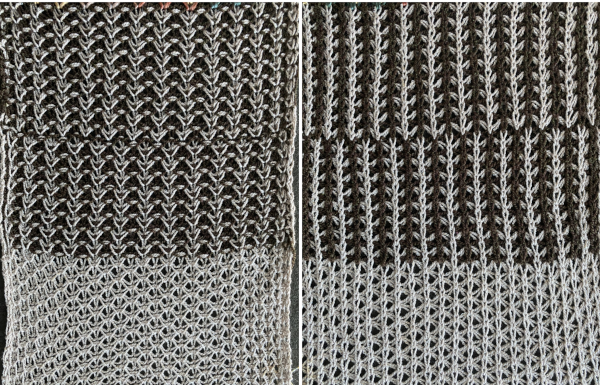
 Comparing the surface to the shadow pleat fabric
  For a different execution of the same design using a different main color on a different knitting day, see the bottom of the post.
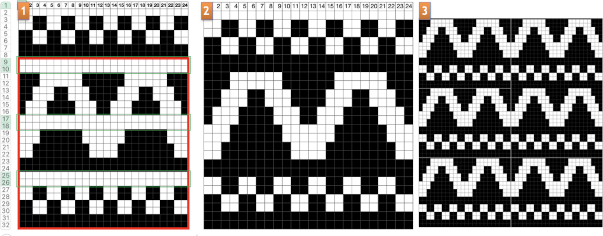
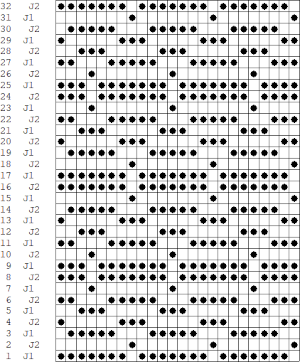
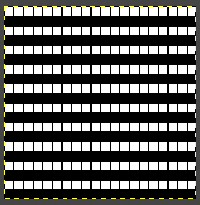
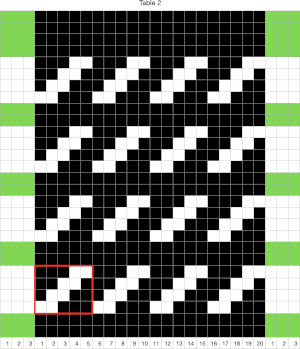
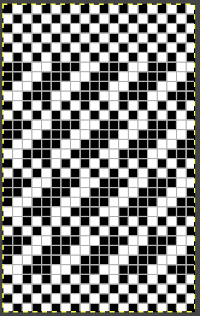
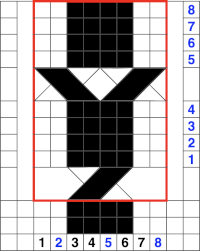
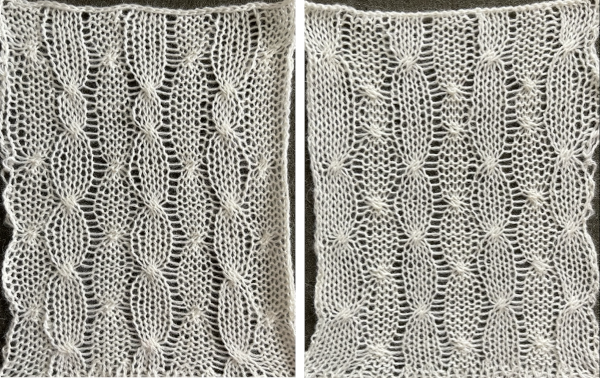
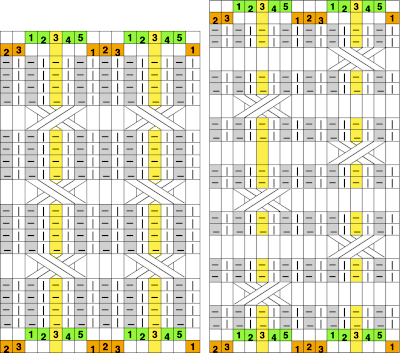
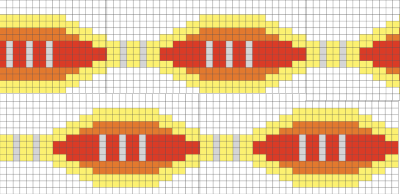
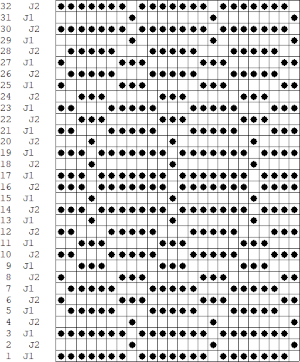
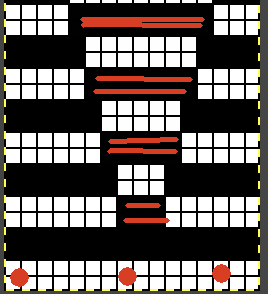
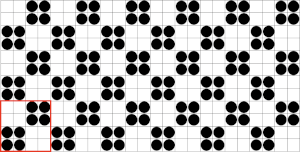
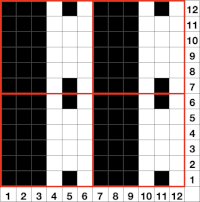
Moving on to a simpler, random, smaller, 12X10 repeat ![]() planned for knitting on a 33 stitch swatch and rendered double-height planning six-row pintucks,
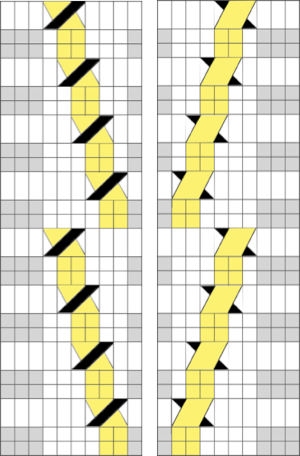
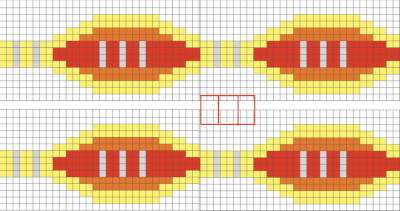
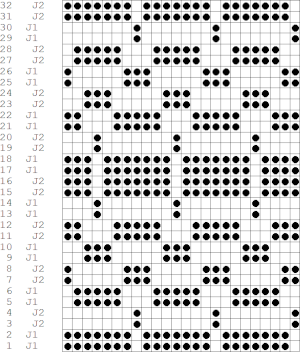
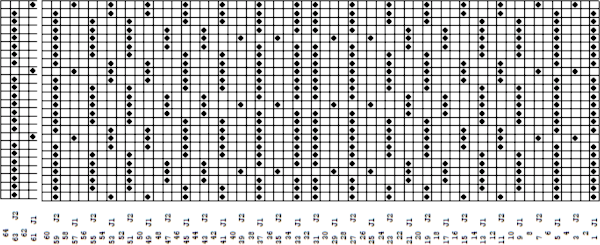
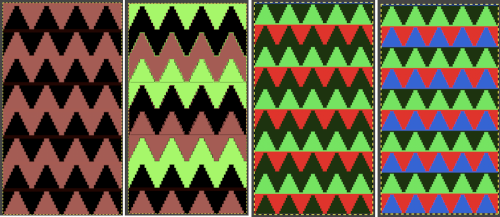
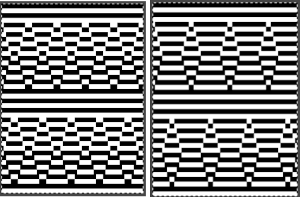
planned for knitting on a 33 stitch swatch and rendered double-height planning six-row pintucks, ![]() Visualizing the possible design along with placement of sealing rows represented by all-white pixel rows in the diagram. The single 8-row fold advances the remaining pattern by 2 rows, resulting in a subtle change in the design:
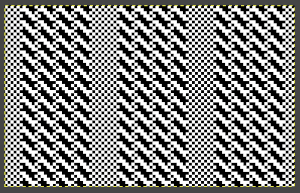
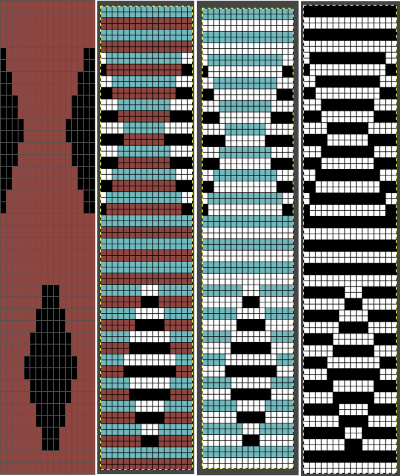
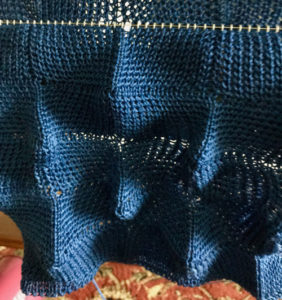
Visualizing the possible design along with placement of sealing rows represented by all-white pixel rows in the diagram. The single 8-row fold advances the remaining pattern by 2 rows, resulting in a subtle change in the design:  My swatch used white for the ground as in the above right, the 8-row transition is marked by the red arrow.
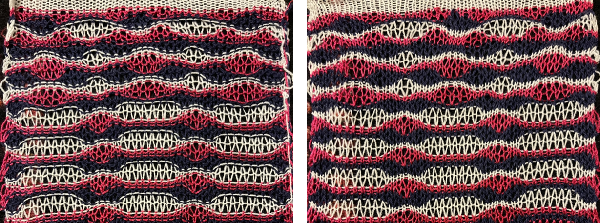
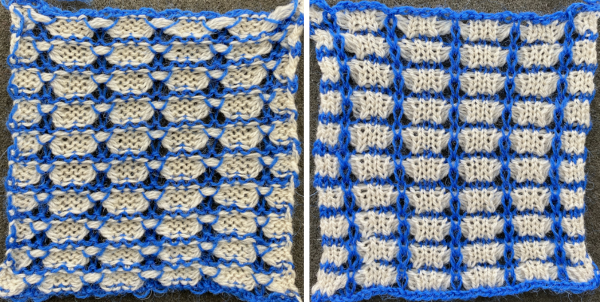
 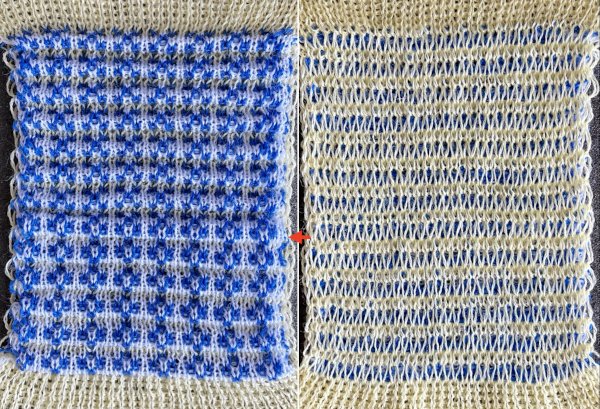 Knitting was easy and smooth, the 8-row tuck required a bit of coaxing. The fabric lies flat, does not have the drape of the single bed shadow pleats, it is not suitable for the same end-use.
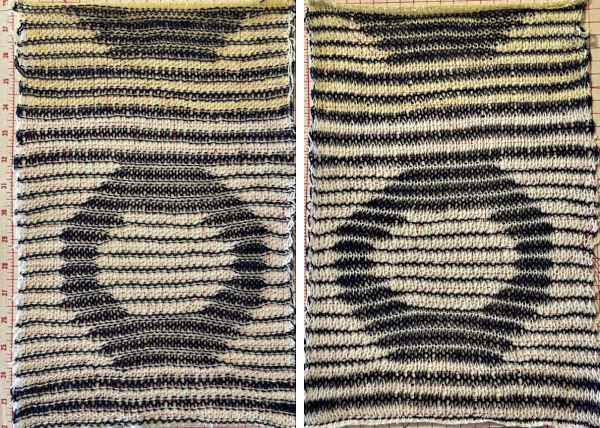
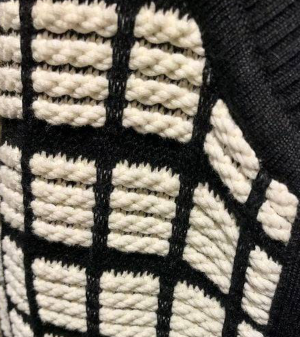
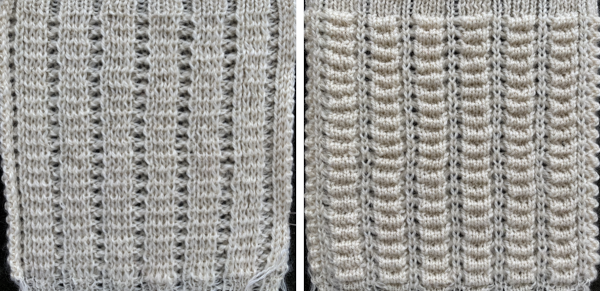
Plain every needle rib knit is quite a bit wider, a consideration for casting on and binding off or transitioning to another fabric if this technique is used as part of a different fabric. This file was also downloaded and lengthened X2 ![]() The pattern is not very pronounced, but the short floats make for easy knitting.
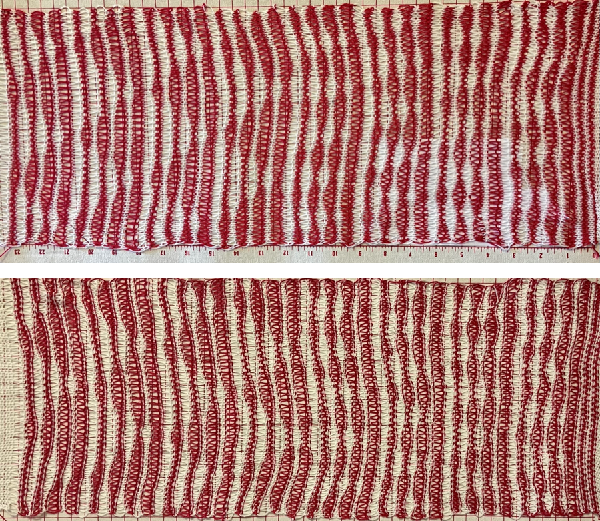
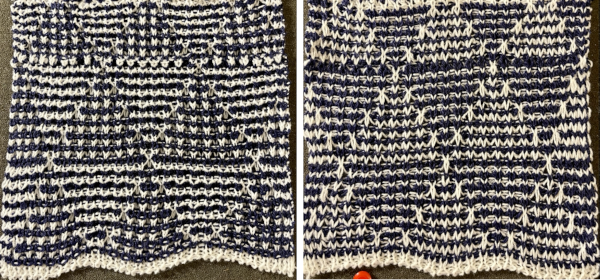
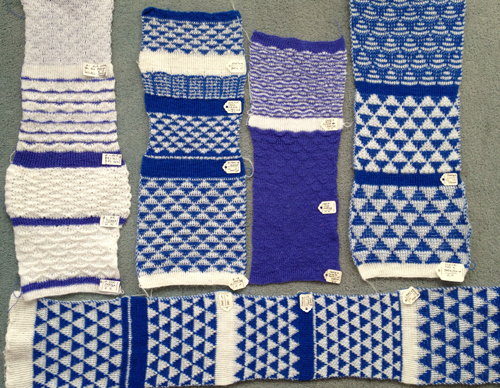
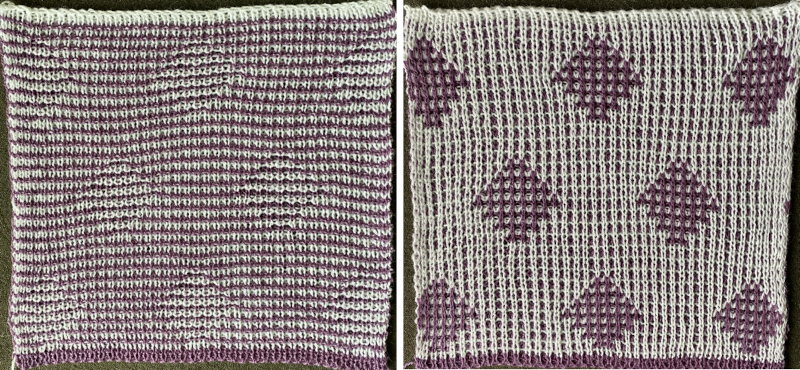
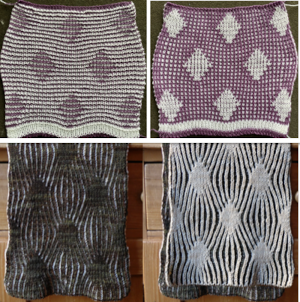
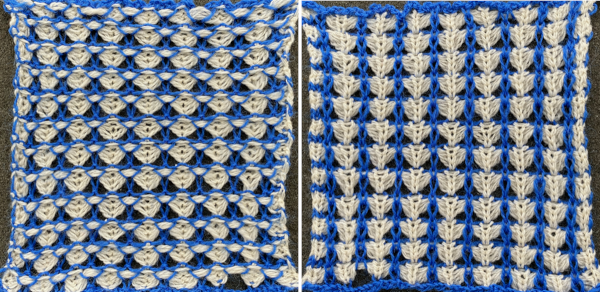
The pattern is not very pronounced, but the short floats make for easy knitting.  Comparing the fabric to the single bed shadow pleat using the same design
  The pintuck main bed FI yarn could be slightly thicker. Since the 6-row sequence appears to work well, if the fabric is to be pursued, the design could be planned and adjusted accordingly.
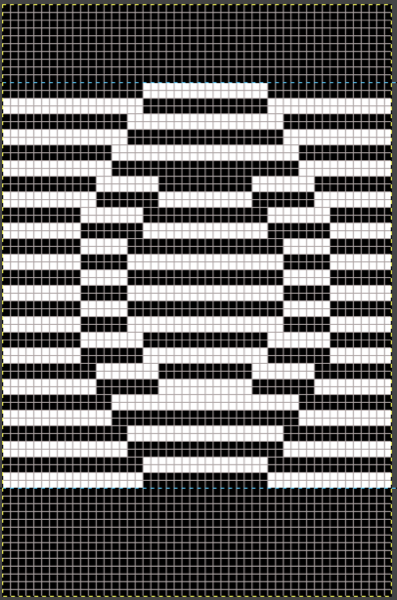
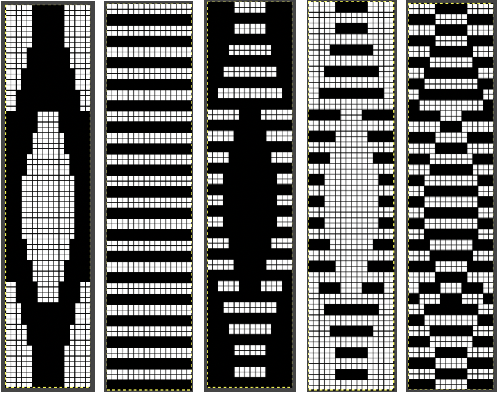
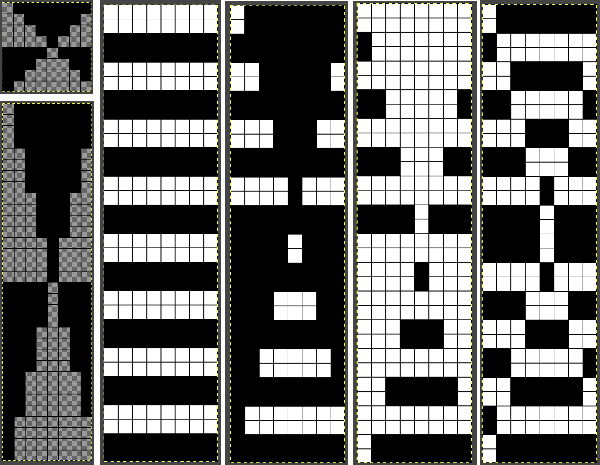
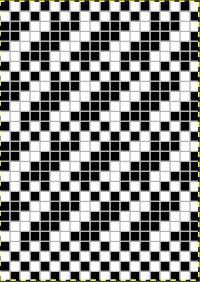
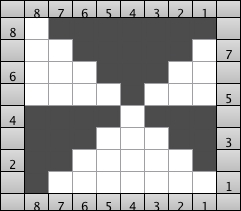
Issues encountered in DIY deliberate design planning: beginning in Numbers, a table is set up with enough rows to accommodate more than the height of the planned design. Since the fabric planned would knit 6 rows on the top bed, then followed by 2 rows on both beds not affecting the design, starting at the bottom of the table, use the command key and work on hiding 2 rows following groups of 6 for the height of the table 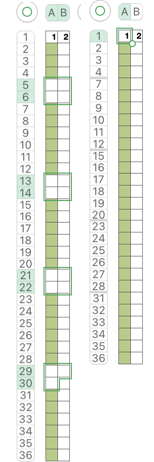 The theoretical design in beginning stages:
1: the rows marked in green are hidden
2. a design is drawn using 2-row blocks and shaping
3: it is tiled, appears worth pursuing.
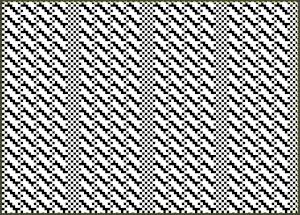
 The expected carriage actions, color reversing the repeat so that the dark color will knit in feeder A of the FI single bed sinker plate
 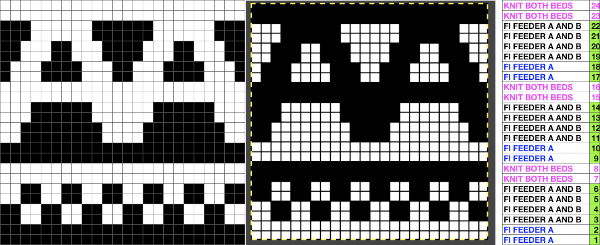 Points to consider while removing the use of the ribber from the equation:
both knit carriages are set for the end needles to select. When knitting fair isle this is necessary to keep the contrast color knitting from separating from the base color along the design edge. If at any point there are single-color stripes, the end needles if selected need to be pushed back to the B position, or the second color will catch the first and last needles in work, forming a float from side to side. If the yarn is removed from the B feeder and end needles are not pushed back to B, stitches on them will drop. My first try ![]() The transition to color reverse shown tiled
The transition to color reverse shown tiled 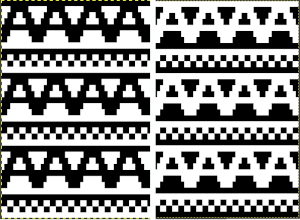 Leaving the contrast color in the B feeder on the all knit black pixel rows created the first mess. Because of preselection, the return to knit dark rows has every needle coming forward as the single bed KC is traveling back to the right, resulting in another mess.
Regrouping so the first pair of rows with no preselection will knit the dark color, the second pair of rows with no preselection will knit using the paired carriages, sealing the fabric, the larger geometric shape has 2 rows with no needle selection nearly at its halfway point. 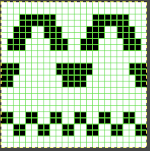
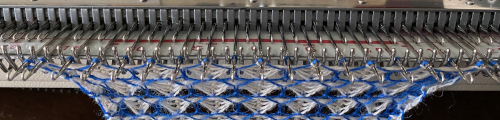
![]() The broken threads are due to stitches getting hung up on gate pegs, missed until more knitting had been completed. With more attention, knitting went more smoothly, and the planned design is identifiable.
The broken threads are due to stitches getting hung up on gate pegs, missed until more knitting had been completed. With more attention, knitting went more smoothly, and the planned design is identifiable. 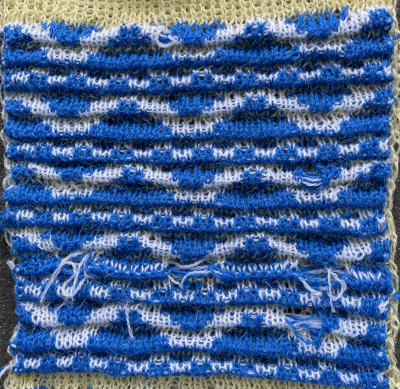 Perhaps as a farewell to the topic or out of sheer stubbornness now that the above had been knit and I have had some practice, I returned to the more straightforward knitting of that double-length flower pattern with far improved results. Some of the floats trapped behind the long stitches created on the ribber can be seen bleeding through on the right.
 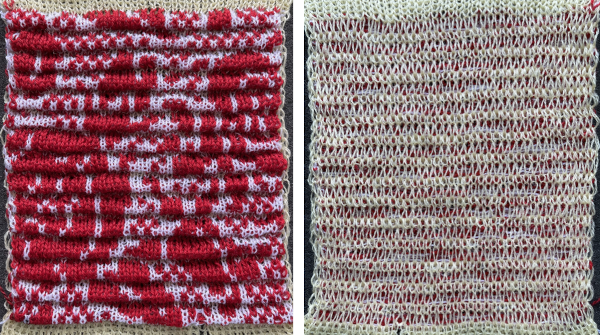 Comparing the scale once again to the shadow pleats
 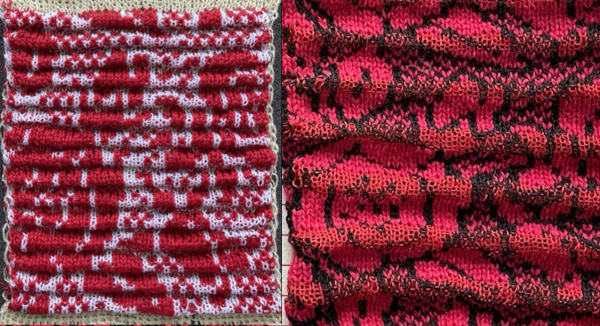 This fabric may fall in the category that need not be knit simply because one can. That said it may serve well in bands joined onto larger pieces, or any use for it may only be limited by patience and imagination.
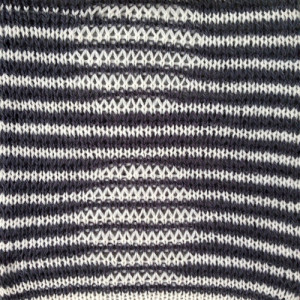
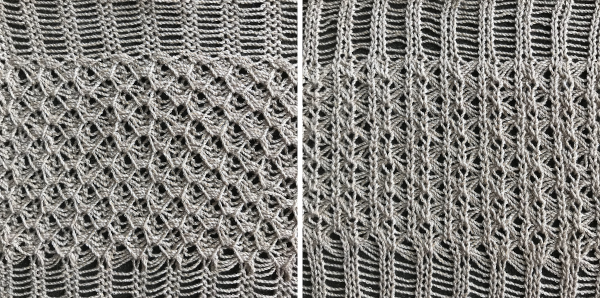
 Trying for a bit more detail, there is a see/peek-through quality.
  At first, I thought it might be a version of the stitch using 3 colors, but later, looking again, I came to believe it to be a 2 color
 I wanted to add solid color drop-stitch stripes, the solution being to add all black rows. Every needle will select every row in those areas, colors are changed every two rows, creating the desired effect when the corresponding stitches are dropped.
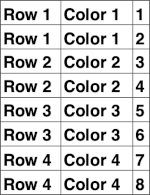
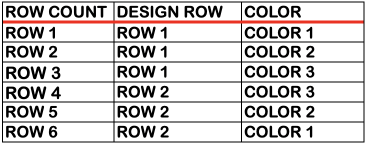
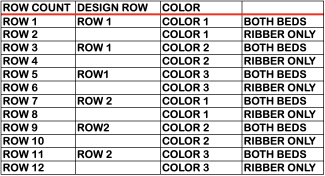
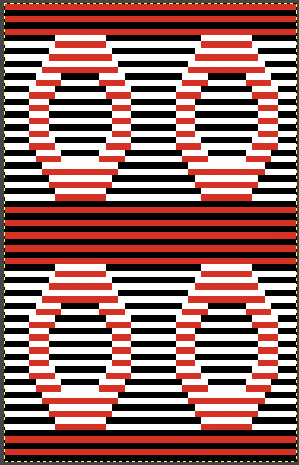 A visual summary with an added color change column and row numbers with rows on which dropping all loops can occur marked with different color numbers. In this case, the ground is in the dark color, the shape in the lighter one.
 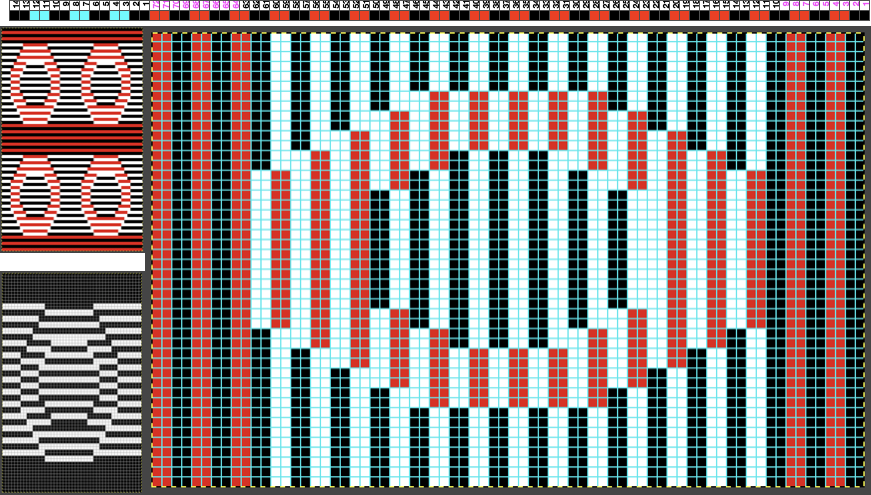 Determining whether the shape or the ground stripes knit the dark color is simply done by beginning the first all knit rows with the dark color or the light.
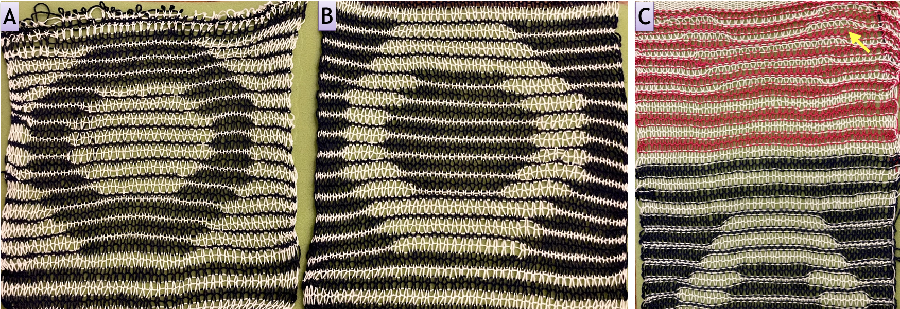
 but I would like to have stripes in the solid lighter colors as opposed to 2,

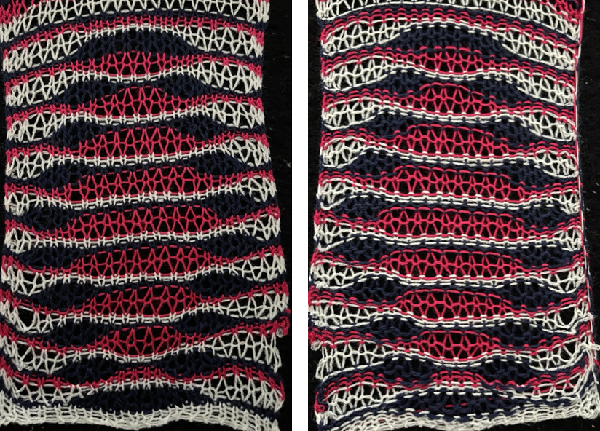
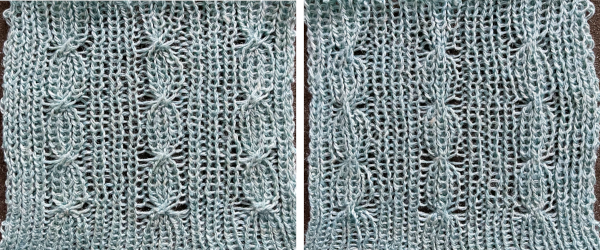
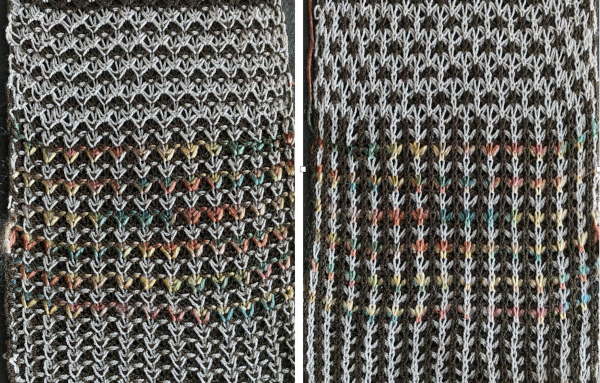
 Here some of the peek-through quality of the fabric is shown again. When any fabric is gathered sideways, it is likely the repeat will appear narrower and longer.
 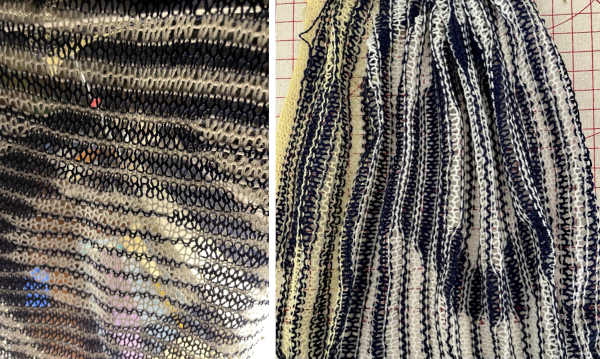 Using a 16/2 cotton at nearly the same tension produces a fabric that is even sheerer.
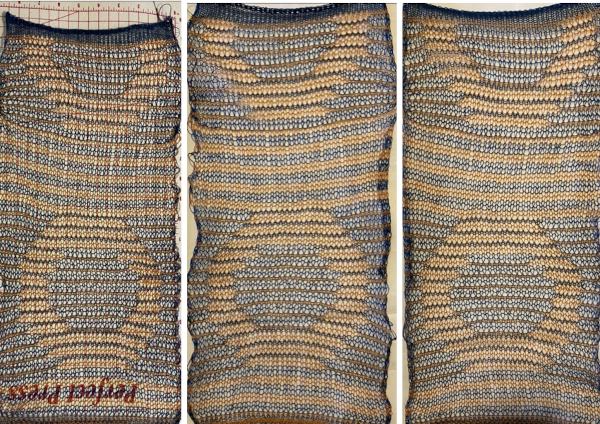
 And now those solid stripes in 2 rows knit are really bothering me, thinking they should be switched to only one row of loops, making the original repeat without those added black rows the better repeat?
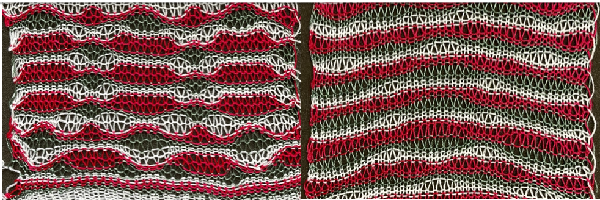
 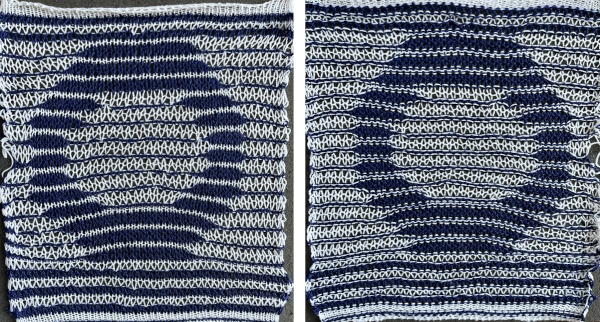 A potential use is for the thinner knit is for it to be used as a layer over a different pattern or the same design as seen here, in the thicker yarn
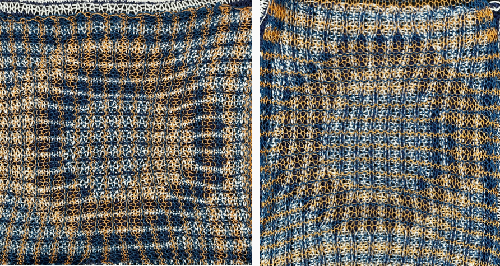
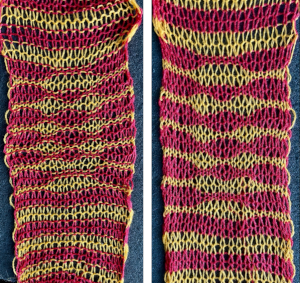
 seeking a rounder, smaller donut shape:
 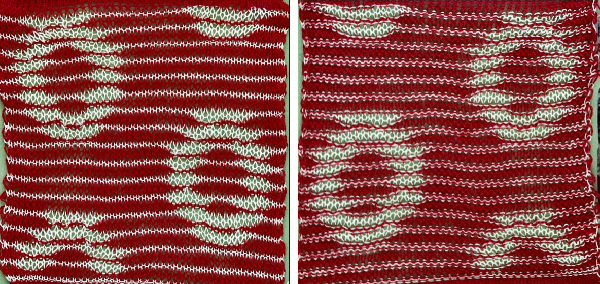 The red is a thicker yarn than the pale yellow, the fabric had an interesting slight curl evocative of shadow pleats. Other possible changes include the elimination of the top and bottom row in the original design.
 The repeats for designs may be self-separated to suit.
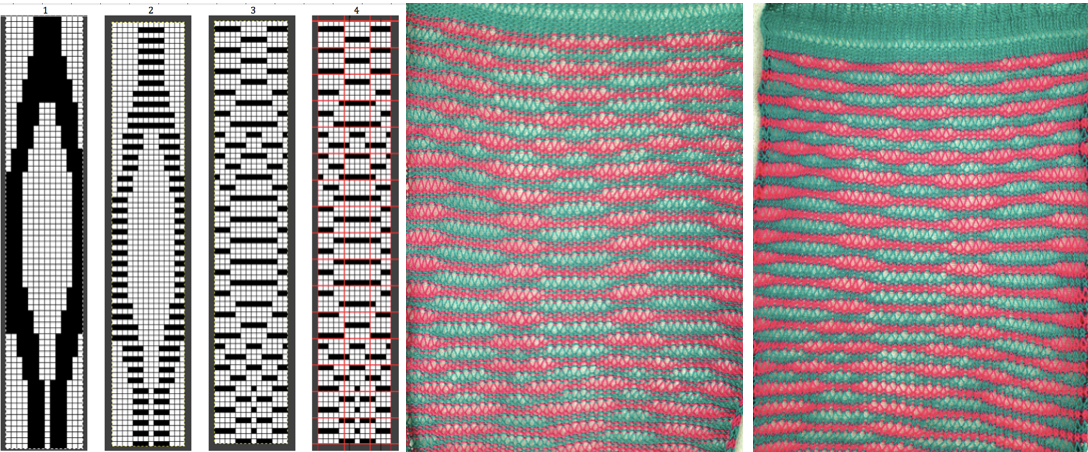
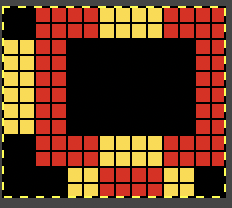
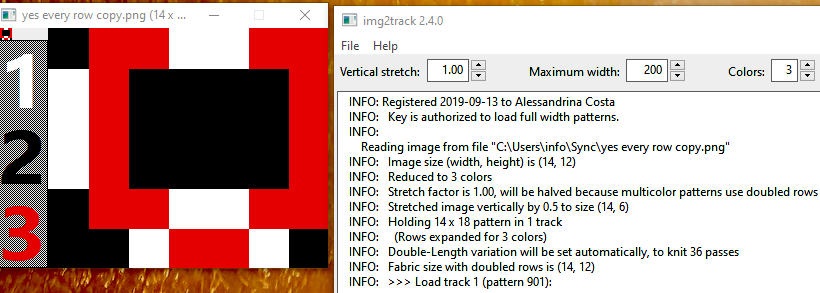
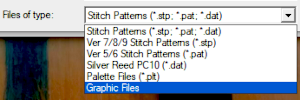
 Three variations of the final png files are shared
 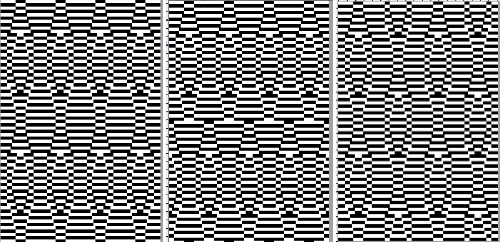 This is the appearance when a different design was entered in img2track. The separated file 3 color file in BW is not shared.
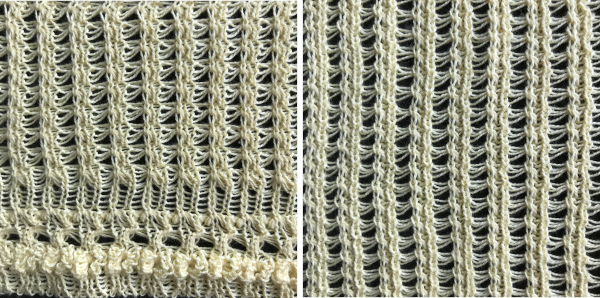
 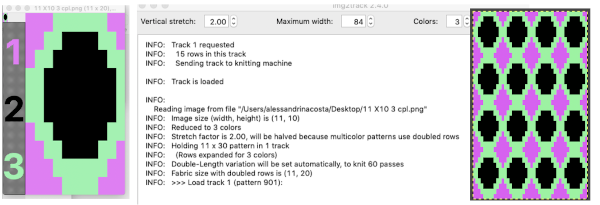 The method for knitting the pattern: the long stitches are formed by loops that are created on the top bed and dropped on the following row.

 The second carriage, C2 is set to KCII as well. It will be advancing the design with each pass as well and will drop loops on the first pass, preselect for the subsequent pattern row on the next
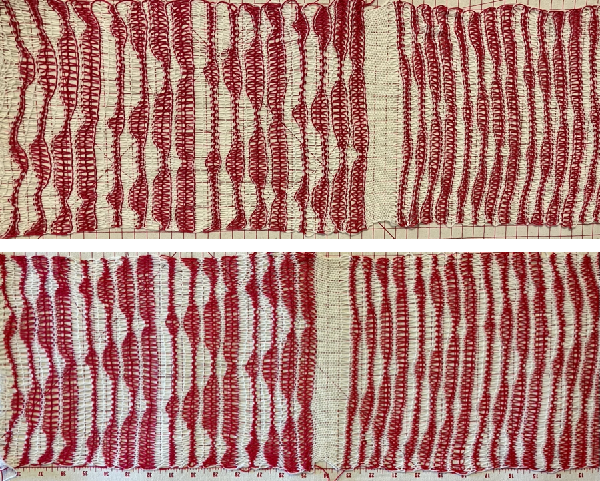
 The elongated stitches allow objects behind them to peek through
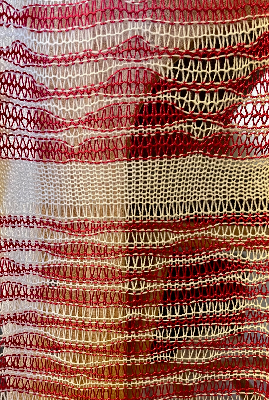
 Here the goal is to use the img2 track separation, maintaining the same color change rotation in each piece.
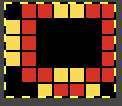
 The tiled potential appearance as a dbj fabric:
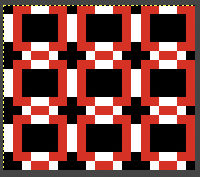 In the first sample three carriages are used:
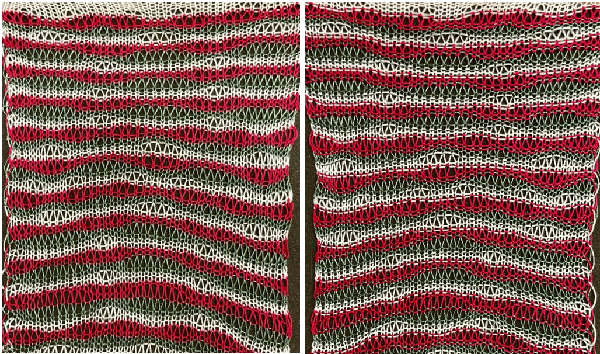 What of end release? because all 3 colors are present in every row, the design is suitable. The first preselection row is from right to left.
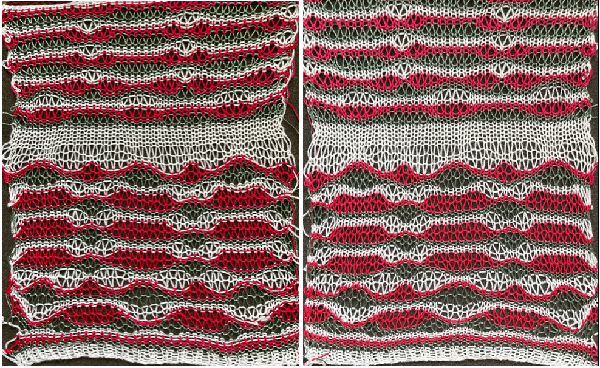
 Any published or self-drawn separation for 3 colors per row patterning including every color in every row of the original design may be used, programmed as a single bed design, and knit for end release.
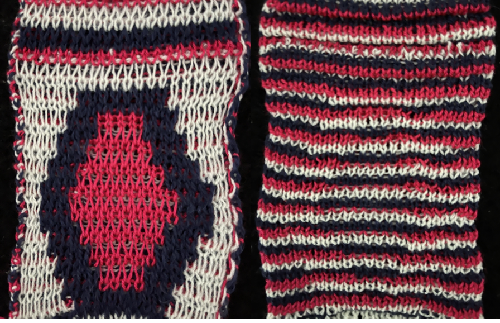


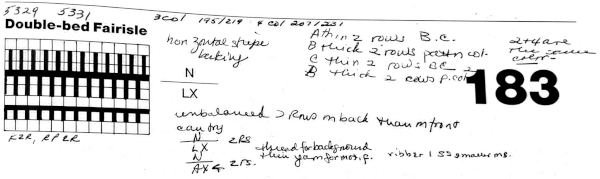
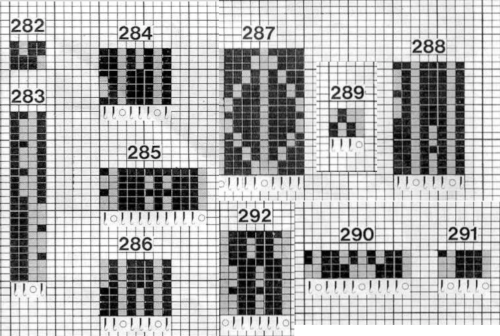
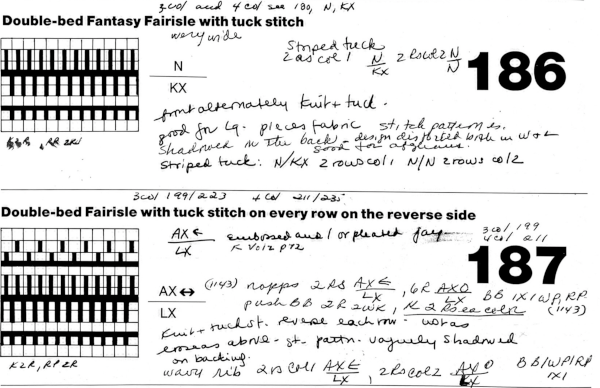 In Fantasy Fairisle knitting using 187 with alternating up and down pushers on the back bed and AX with 2 arrow keys would match Brother ribber knitting with lili buttons used on an even number of needles set to tuck.
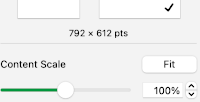
 For the 1-pixel grid in Gimp to be visible on an editable image, a magnification of at least 800 is required. The options offered by default
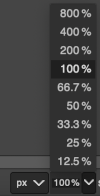 can be changed to suit by simply typing in a new number.
 the processed image
  the trimmed 98X182 png
 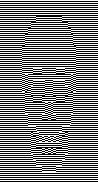 doubled in length once more to 98X364
 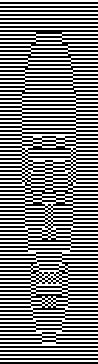 Knitting process on a 930 using img2track:
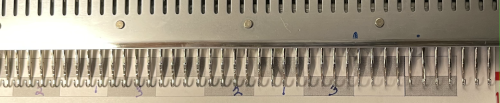
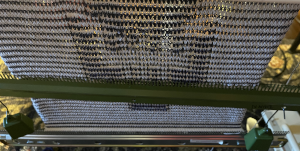 A reminder: in my experience, the Brother cast-on combs are usually chrome-colored, Studio grey, and Passap, and I believe Superba ones were traditionally green. The first 2 were designed for 4.5 mm machines, the latter for 5mm. The different mm spacing does not make the 5 mm combs suitable for casting on on Brother, but they can be poked through the knit in progress. I like to leave the first comb and weights on, insert the new comb closer to the beds, and then move the weight up, and then remove the lower position comb.
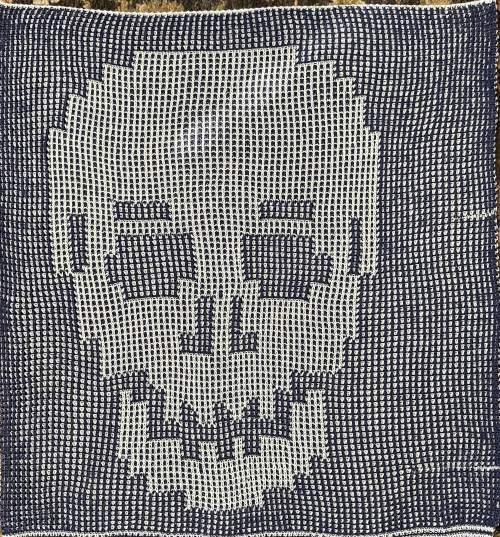
 In the Brother model, sometimes the yarn is left in the wrong place below eye level rather than its own individual one corresponding to its button, and both yarns are picked up with the next color change.
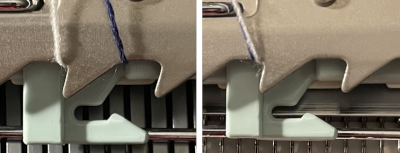
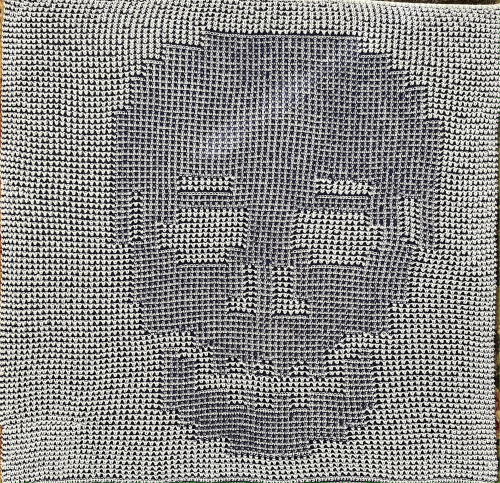 a close-up of the texture at an angle
  Claudia Scarpa developed a skull variation using only layers in Gimp
 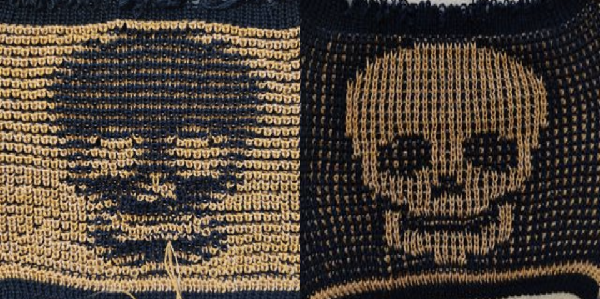 and has been kind enough to create a
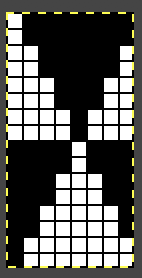
 It is possible to work some repeats on some machines with the ribber also set to tuck both ways with EON needle selection.
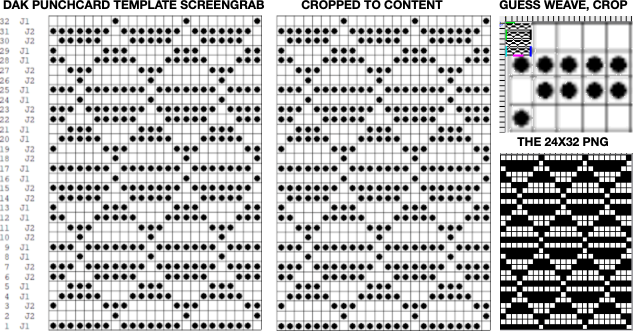
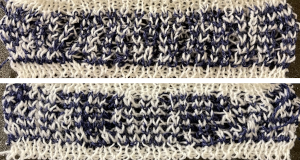 When using the Dak stitch design module, the color separation is automated. Choose any design repeat. This happens to be a 20X20 one, chosen from the thumbnail assortment, so not suitable for punchcard models. “Printing” the template using choosing the option of using dots rather than squares to represent knit stitches makes the resulting print screengrab easier to trace.
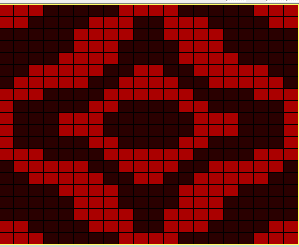 the 20X20 repeat as a BW png
 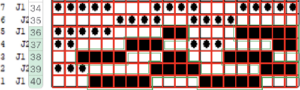 The result is screengrabbed, opened in Gimp, converted to BW mode, and scaled to the 20X40 expanded design size. Unless the double-length function in the machine is also used, it will need scaling again to double length prior to download.
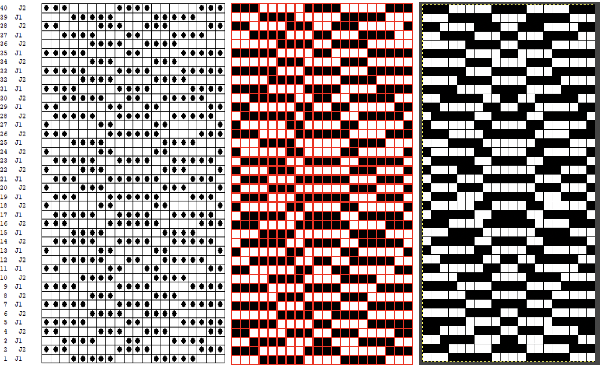 The final image double length, showing the difference between the separation using the template, and that using layers as in Claudia’s video, which appears different but is actually the same repeat, color reversed.
 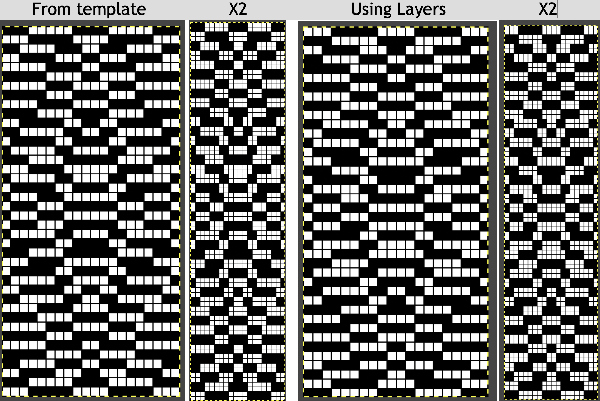 Using bucket fill for the ground in the second layer, as described in the video, the captured clipboard image can be very small
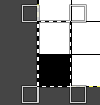
 Alternately, the initial design may be scaled X4 to 20 X 80 pixels
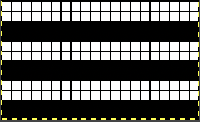
 drop the ribber


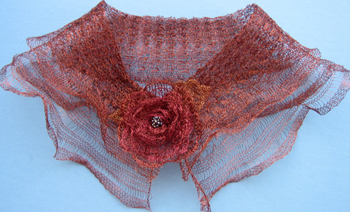
 A comparison to the mirrored original inspiration, likely knit in thicker yarns
 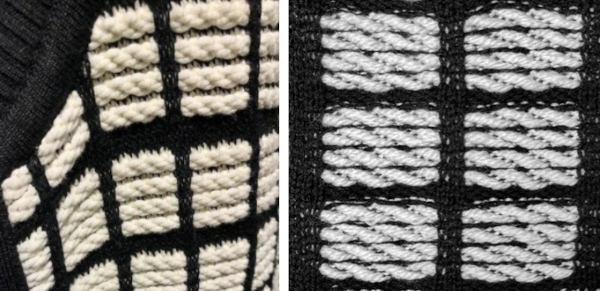 The knitting process: with any textured or very lacy knits casting on and binding off require special consideration.
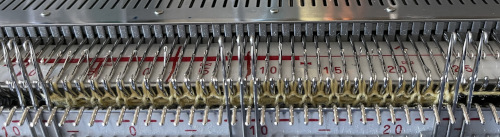 Read the first row of the pattern, cam set to KC1 to ensure end stitches are knit when patterning occurs only on the top bed.
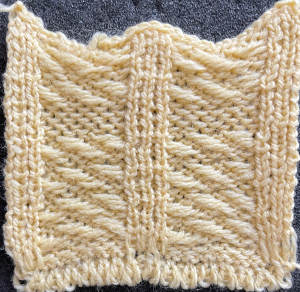
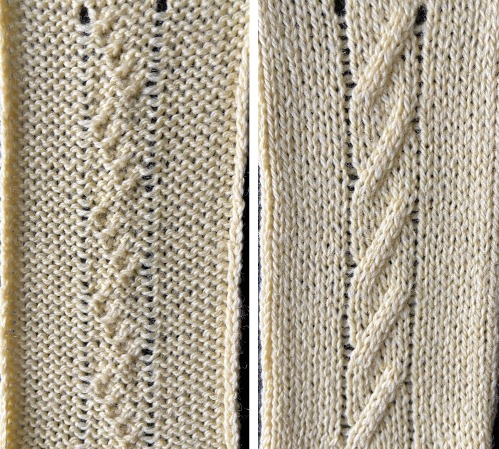
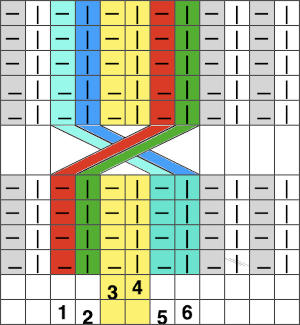
 The repeat is 8X8 and the above movement can be seen in the purl view.
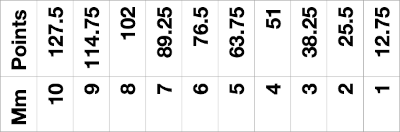
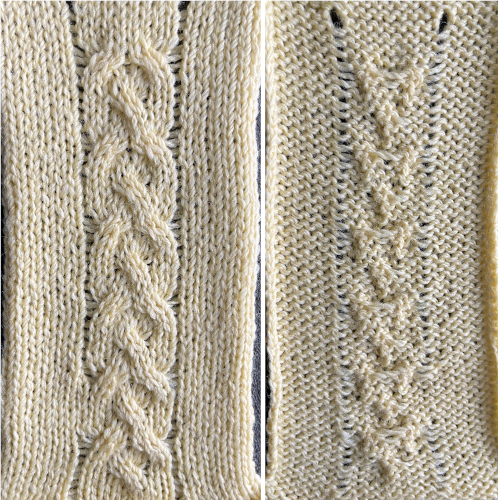 A spreadsheet table may be created to help with tracking multiple series of cables across a knit and their direction. It can contain as little or as much information as one wishes. Included here: the RC for possible crossings, and their direction on the purl side for machine knitting (reversed for hand knitting). Columns may be added including how many needles are left in or out of work between cable knit spaces or other info.
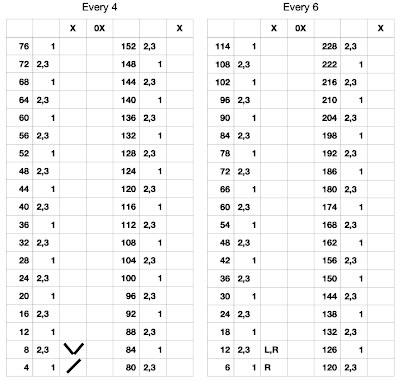
 Which leads to the topic of creating shapes by combining the repeats
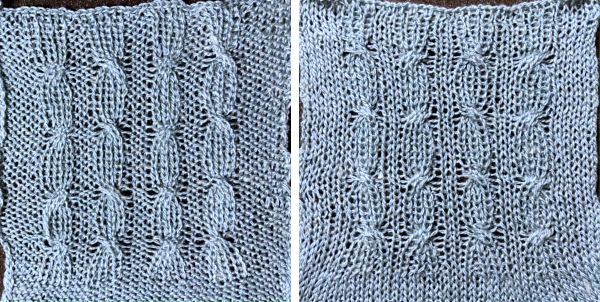
 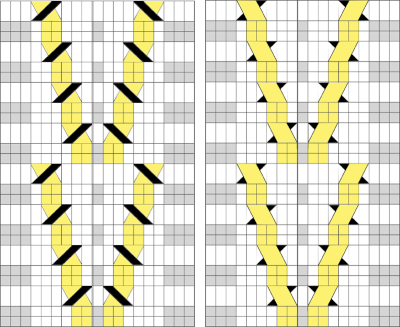 A brief effort containing at least 5 errors leads me to wonder about programming needle selection to help track crossings more easily and avoid mistakes. The center ladder here was latched up during knitting.
 If the start is on the top bed, stitches on the ribber may be created by picking up bars from the top bed
 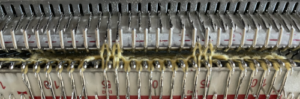 the yarn above was a 2/8 wool, which refused to cable on the ribber, and having the crossing was preferred to not
 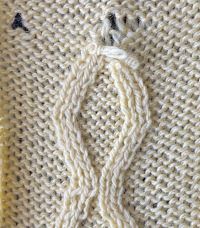 changing to a thinner wool-silk solved the problem.
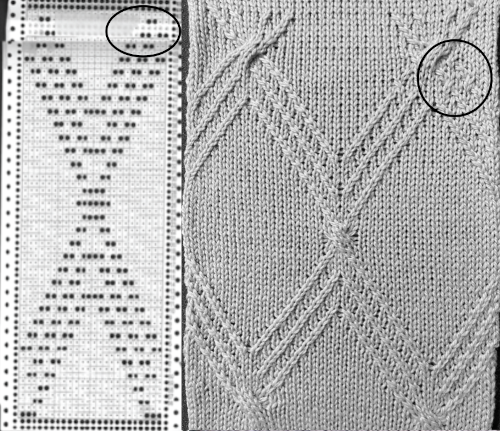 In reviewing the post after linking to it here I realized the now marked punchcard error at its top. The amended longer chart reworked in Numbers is also added to the older post. It is shown here aside from its tiled chart, checking for alignment, a habit developed as my skill and comfort in using spreadsheets grew,
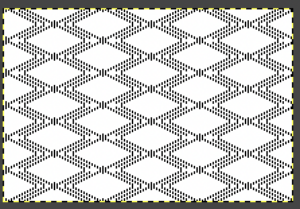 It is possible to use the repeat working 1 X 2 stitch crossings for a very different look.
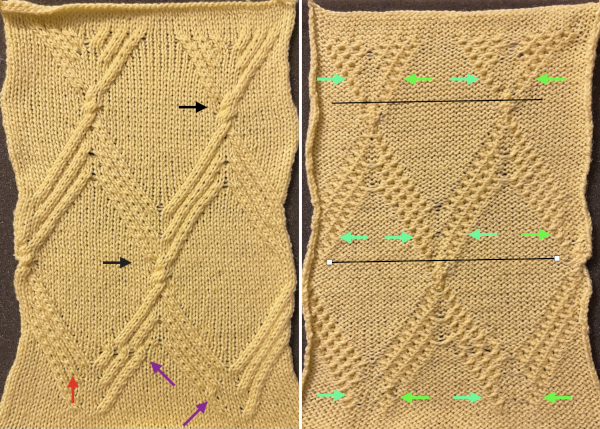 Assigning colors to crossings in a chart may be helpful or too much info depending on one’s perspective, the bottom of the repeat is on the right.
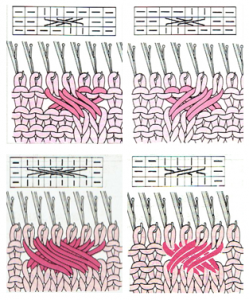
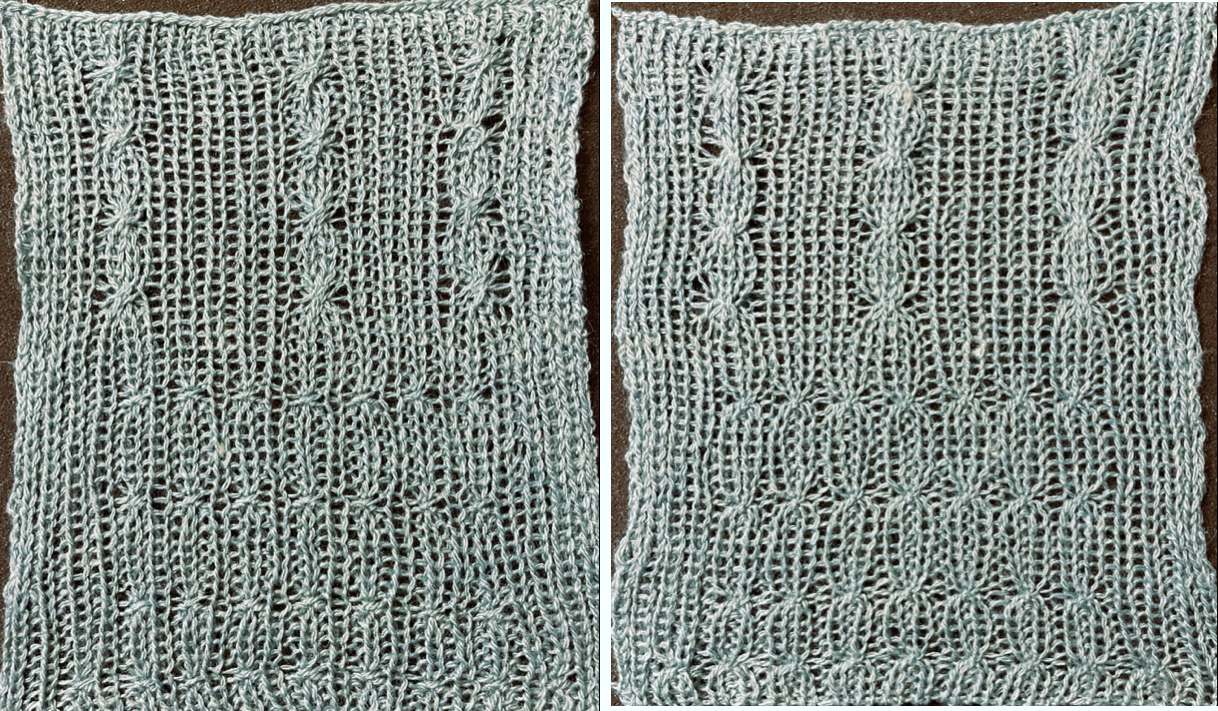
 In my first test crossings occur on both beds and on the same row. Even using the thinner blue yarn at maximum tension the transfers were hard to execute. I had more success when I added 2 empty needles between the vertical ribs and brought one on each side of each rib into work on the top bed prior to knitting the last row between transfers, creating a bit of extra yarn to ease the crossings.

 Trying out a simple repeat in smaller rib configurations will provide some idea as to whether the technique falls into the love of or not something to do simply because one can.
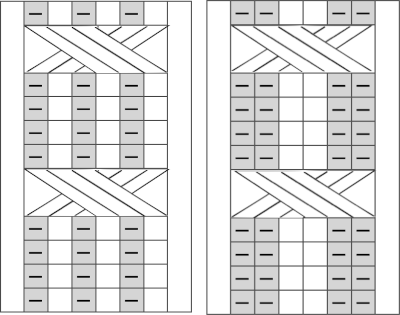
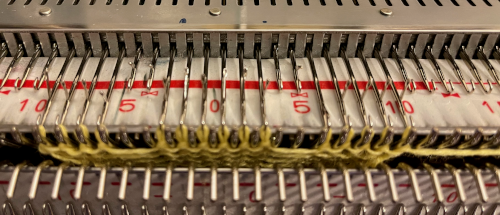 the rib configuration set up
 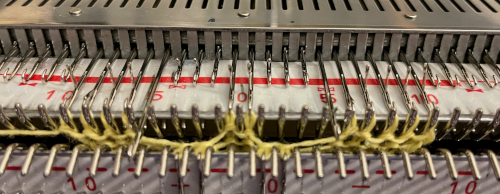 1. after 5 rows knit, bring an extra needle in work on the top bed to pick up extra yarn for the cross
 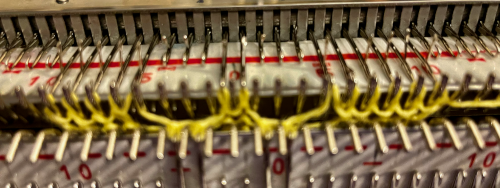 2. drop the extra loop, make certain the empty needle returns to A position
 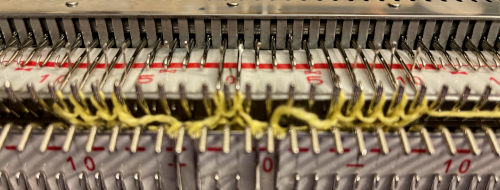 3. transfer all cable ribber needles to top bed
 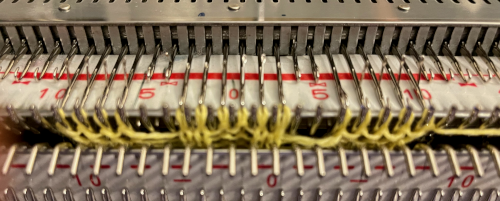 4. cross the stitches with two three-prong tools
 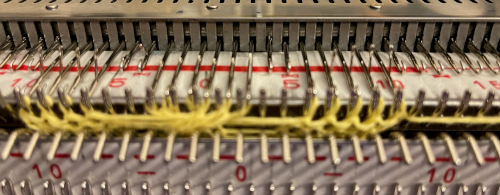 5. transfer stitches back down to the ribber
 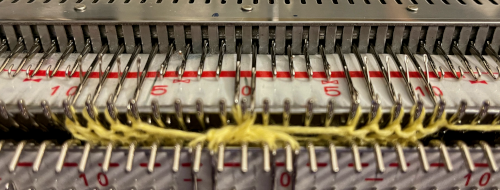 knit 5 rows, repeat steps 1 to 5.
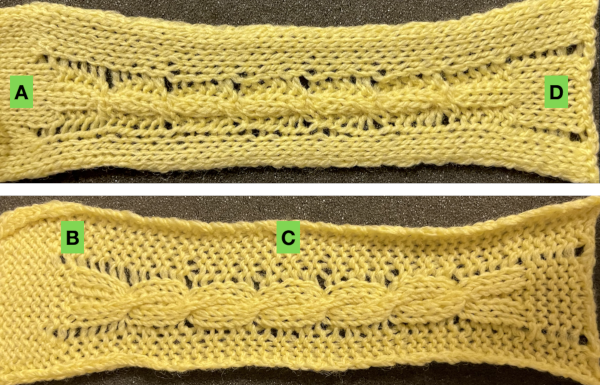 An attempt at a larger swatch using 1X1 ribs:
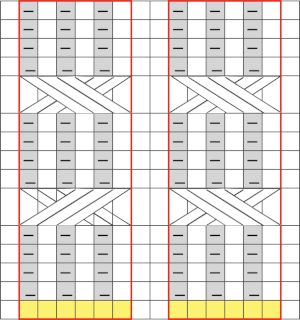

 the cable crossings using it were impossible, starting over with a thinner yarn at the same tension
 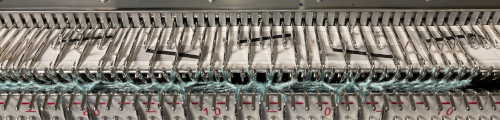 the ribber may be dropped after transfers up to the main bed, keeping stitches and crossings visible, making it possible to make corrections in any cables if they are needed before re-engaging the ribber and transferring stitches back down
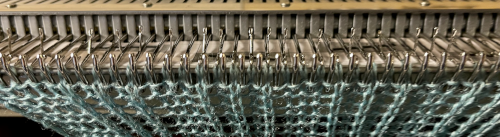
 In the above swatches, when any transfers were made to the top bed, after crossings, a row was knit before returning stitches to the ribber. The extra row may or may not be noticeable, depending on the yarn and colors used.
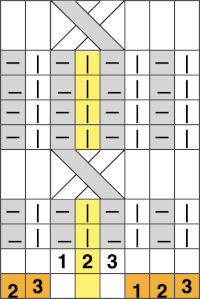
 The number of rows between crossings can vary. When the crossing row is reached:
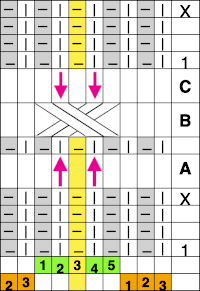

 Assigning colors to columns reveals that stitches are not moved onto the same stitch type when moved over a single, undisturbed, fixed center stitch.
  Shifting the needle arrangements when cabling, moving across a center column of two stitches that remain fixed on the main bed, the cable direction as it would appear on the purl side on the left, the knit side on the right is straightforward here:
 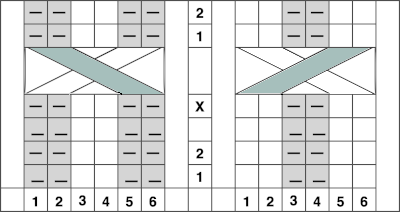 I found the above impossible to knit, even with ladders for extra slack, and the swatch stopped when the yarn broke
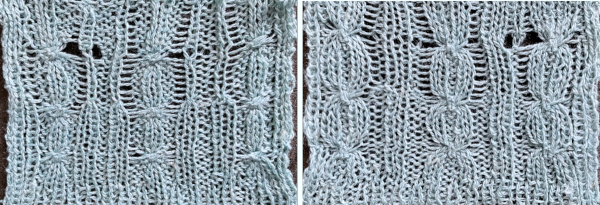
 There appears to be enough slack produced in the formation of stitches between beds to make the planned crossings possible.
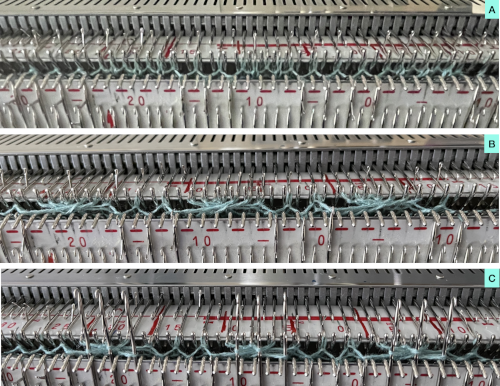
 From a Brother pub, small crossings for a smocked effect
 Adding and removing rows in the tables or even changing colors is easy and quick in a spreadsheet, tiling in repeat with scaled screengrabs provides a quick reference for possible improvements/corrections before any actual knitting takes place
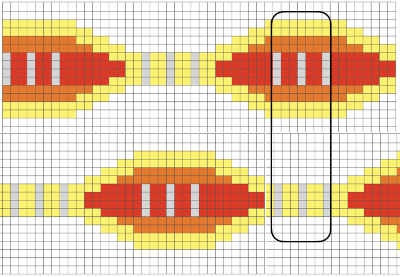
 As for more than 2 colors per row, performing the color separations may be achieved
 stitch and row counts should match, and save the stp
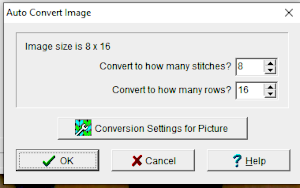
 The separation methods in DAK:
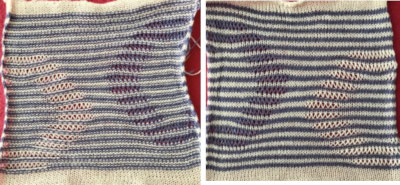
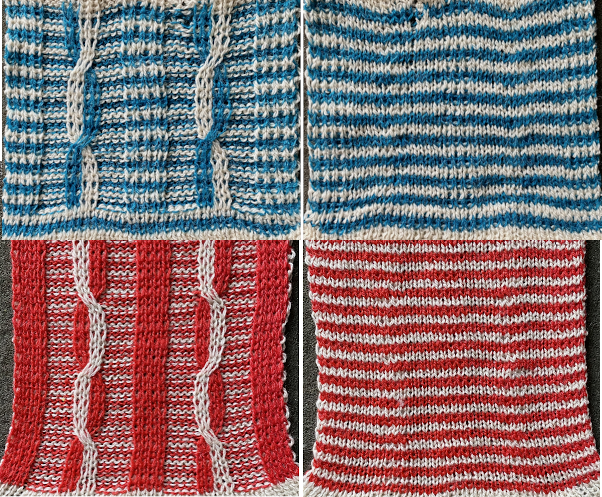
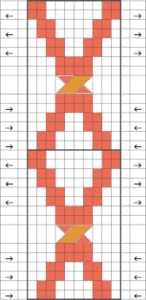
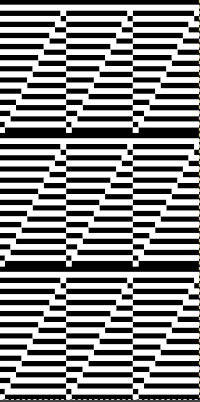
 Yarn choice and design make a big difference. Here the yarn is far too thin, and the repeat too narrow in width, but the possible result is illustrated. The main bed is set to slip in both directions throughout. The ribber setting needs to slip in both directions for every other pair of rows. When the ribber slips, the main bed will knit the color that will create the pockets, where there are many single stitches selected here, the KC was set to KC1. When the color is changed and the ribber is set to knit again, stitches in that color will knit on both beds, sealing the fabric in those areas and forming a solid color background on the reverse side. Here the white forms the pockets, and the floats after a pair of passes are seen in this photo.
 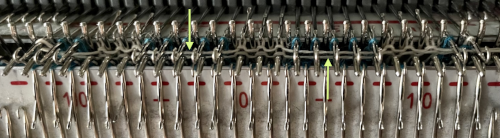 Because the yarn is so thin there is a considerable grin through on both sides, the areas marked with arrows indicate where the white pockets were lightly stuffed with yarn ends
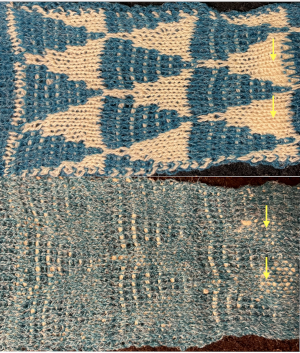
 If pngs are created outside the program, they may be doubled in length unless the repeat is designed that way.
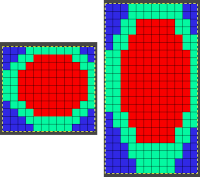
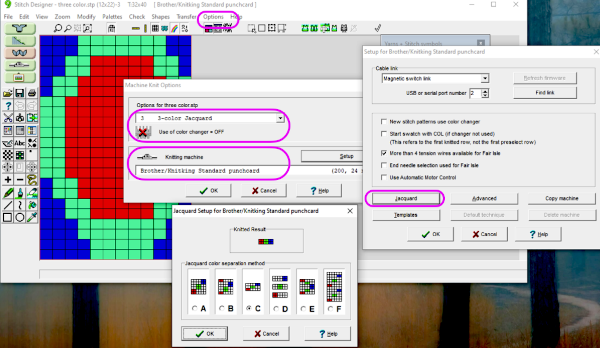 How the different jacquard setups process the specific repeats:
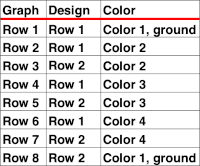
 Passap card reader techniques saved from long ago experiments.
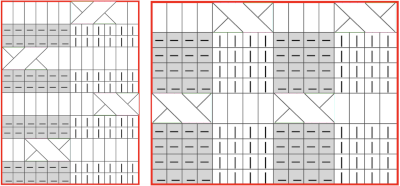
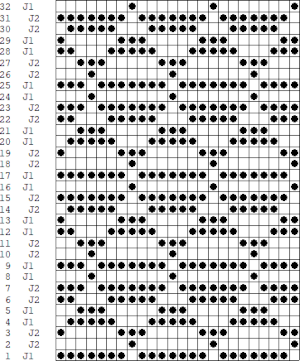
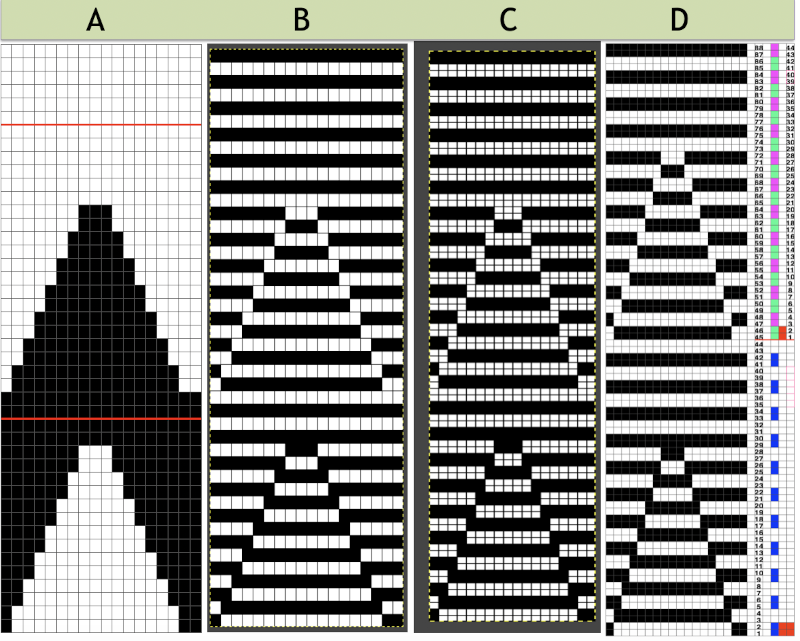
 Processing the template using numbers: a table is created twice the length of the 8X16 triangle repeat, followed by hiding the 32 odd-numbered rows, positioned in front of the scaled punchcard template, stitch markings are traced
 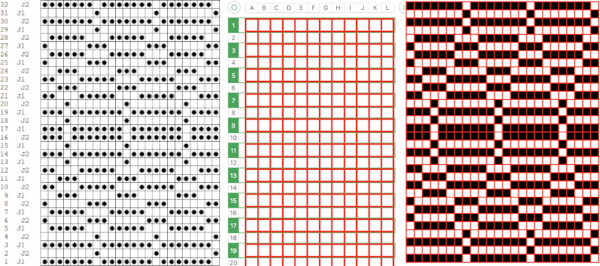 the rows are then unhidden, the repeat is checked, matched here to the F jacquard separation in Dak
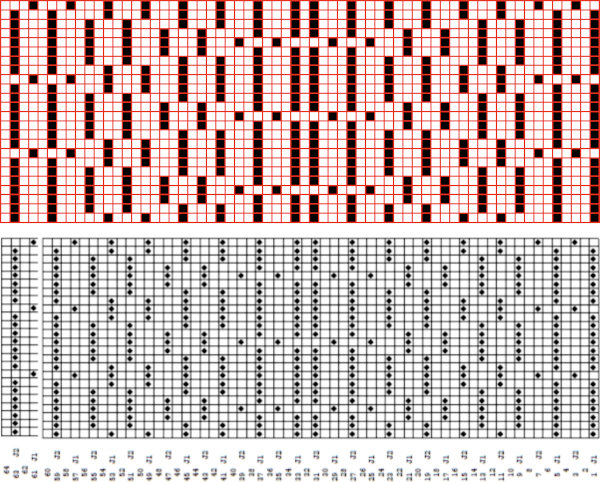 The numbers table is processed in Gimp to obtain the png for knitting the now 24X64 pattern
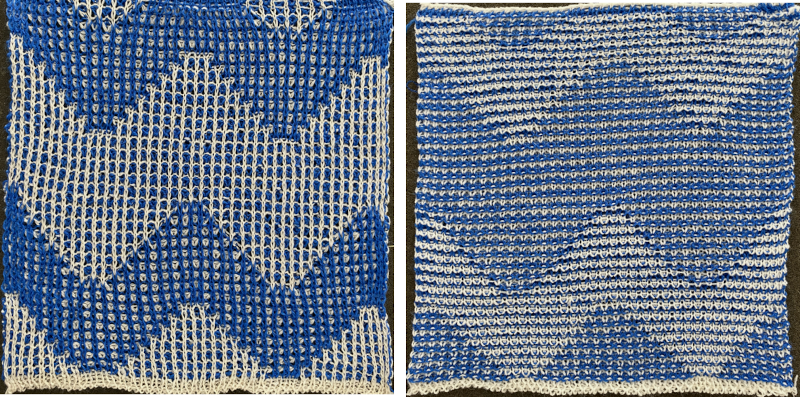
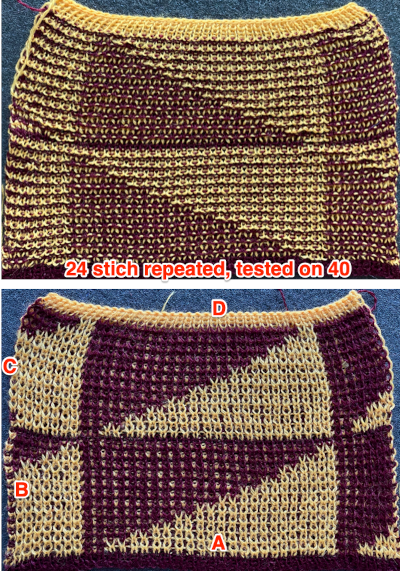
 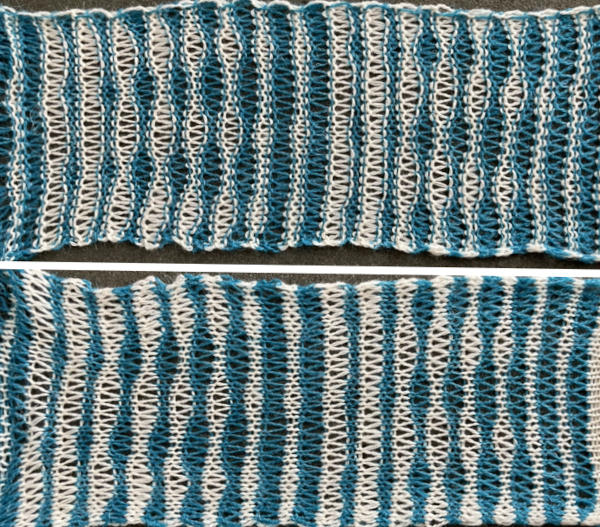 and the pattern executed as a tubular FI knit: I had yarn issues, hence the dropped stitches. Both swatches were knit to approximately the same point in the pattern repeats, there are obvious quality differences in width and length. In tubular knits, there are differences in the width and height of the knit on each side. The front is a slip stitch with floats, drawing the fabric in, while the ribber knits every stitch every other row. With a good choice of yarn and pattern, loosening the tension on the top bed may ease this problem. As often happens, casting on and binding off need special considerations ie to allow for any fabric stretch when off the machine or to leave a tubular knit open at either or both ends if that is the goal.
 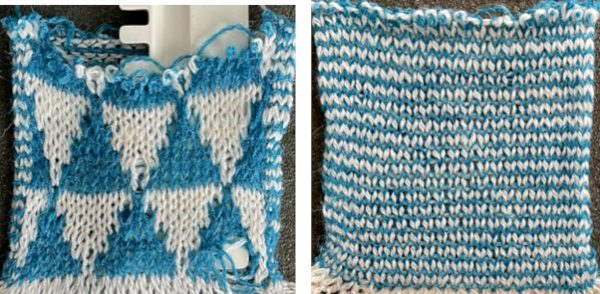 DAK has been a purchase made out of curiosity, and my use of it has been very limited since my designing needs are met by using other programs that are free to users and generate and accept files in multiple formats, while the Brother Knitleader or even simple use of the magic formula solves knitting any desired shape in any gauge.
 The plan is to create a repeat which may be knit using color changes every 2 rows. Each design row knits each color twice, so the standard built-in KRC separation is not a consideration, though the same cam settings may be used in those fabrics as well.
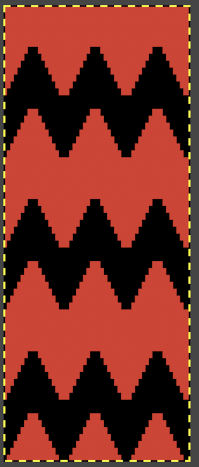
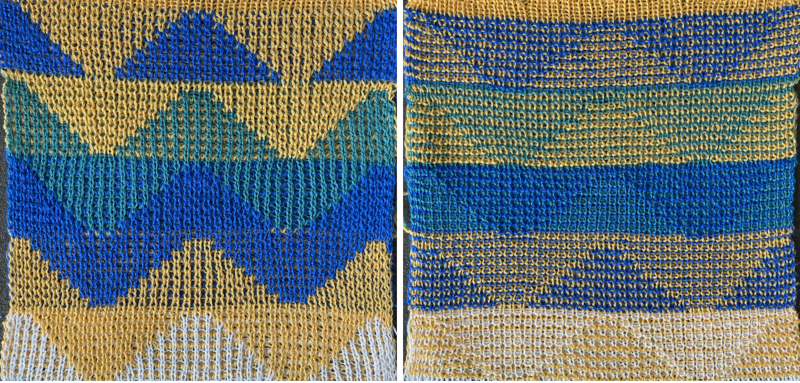
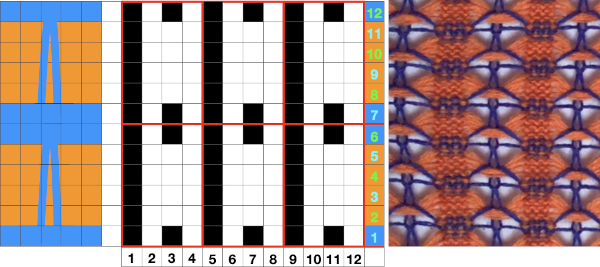
 Lock settings are easier to achieve on the Passap than switching out cam buttons in Brother machines. This was knit using 4 carriages. Color one knits with the main bed set to tuck both ways, color two knits with the main bed set to slip both ways. The slip stitch reduces the width of the fabric considerably
 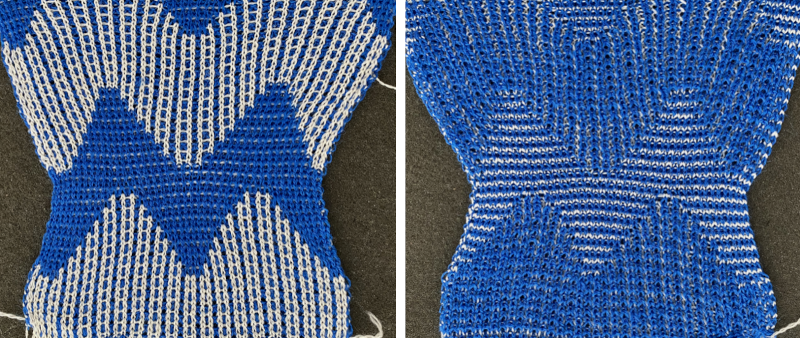 Here each color alternately tucks and slips. The choice of cam buttons matters, tucking first from left to right, slipping from right to left, with cam buttons set COL after the first preselection row
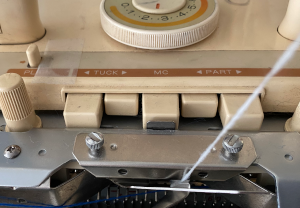
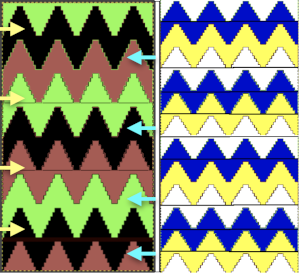
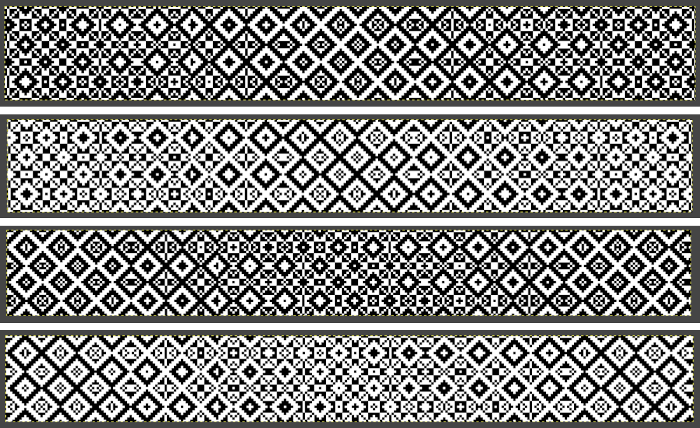
 This last cam setting appears to my eye to produce a texture “close enough” to the inspiration fabric. Attempting to add more colors: the repeat, D, is still 18 X 88 but is now shifted slightly.
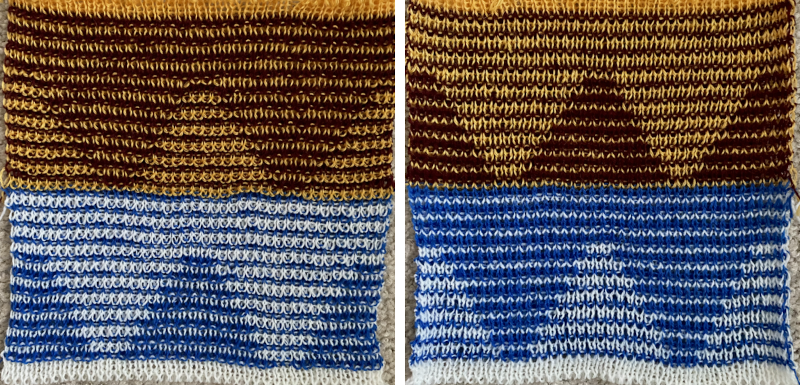
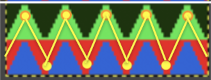
 The existing repeat may be reduced further to 18 X 64, eliminating some of those extra rows in the center of the chevron shape
 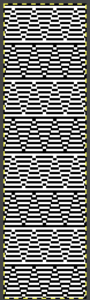 Whether or not the design is intended to retain chevron shapes in alternating textures, actions may be plotted pre knitting in any way that visually makes sense to the person designing the pattern and tools available to them.
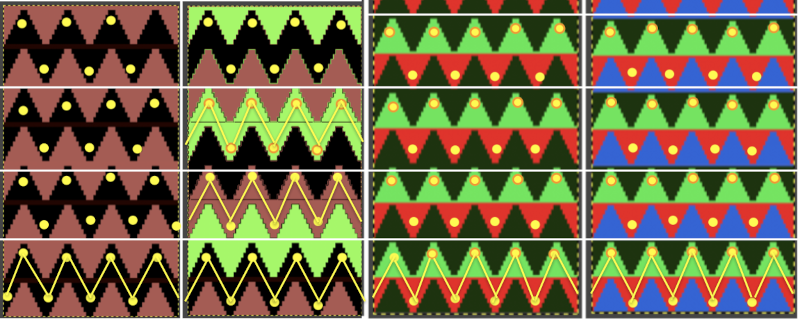
 Reversing the png so that the more textured stitches will begin with the color in yarn position 1
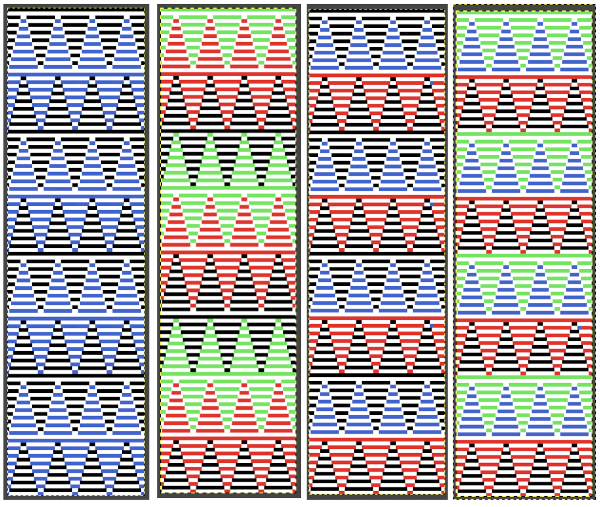
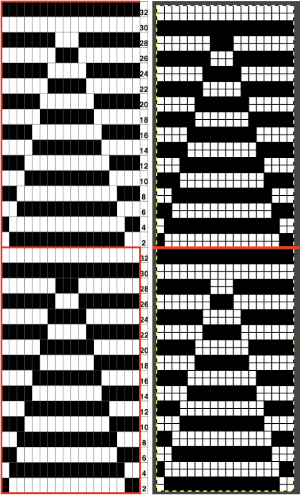 Adding colors can be planned cautiously or allowed to happen randomly depending on the preferences of the designer and end-use. Ribber fabric designs are not visible until several inches have been knit, too late to catch color sequence errors. Some machines allow for memo placements or sounds to help track color changes, but only within the initially programmed repeats. A quick spreadsheet can provide customizable checkboxes or added information. For an attempt to retain chevron shapes in different textures:
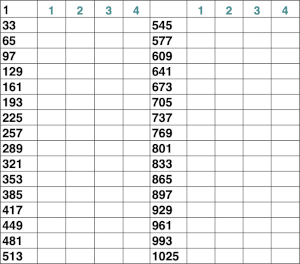

 A PDF including row numbers and space for notations
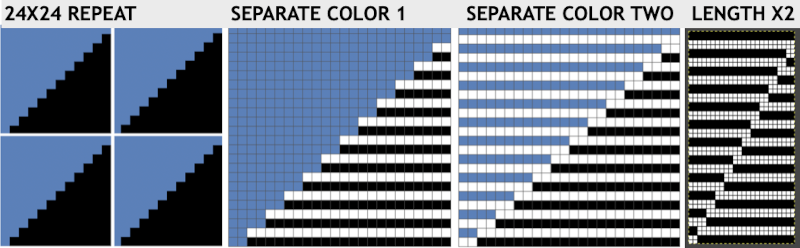
 Continuing on a 24 stitch repeat, the original design may be rendered at double height and separated once more, doubling the separation height to 96 rows
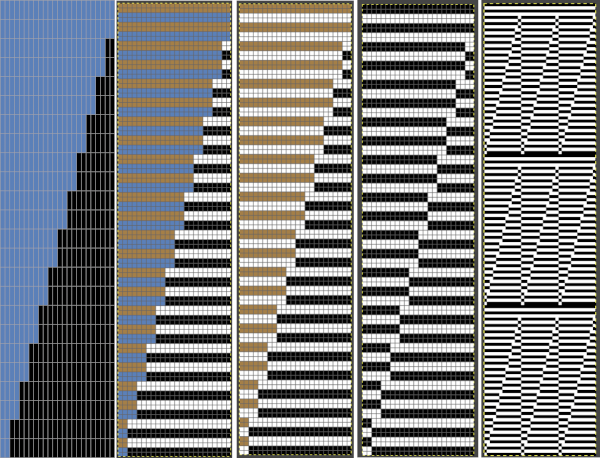
 Another even more complex inspiration from a sweater attributed to Falke, Spring 20 collection, using similar stitch structures, but in addition, also transferring stitches between beds exposing a purl striped ground.

 Adding needles out of work by simply choosing to cast on and working on every other needle it does not matter whether even or odd needles are in use, the pattern will be identical but simply shifted over by one needle. For frequent color changes, make the first preselection row toward the color changer to start with, keep notes as to where the repeat color selections happen as experiments are expanded, evaluate color choice as a third or even fourth color are introduced
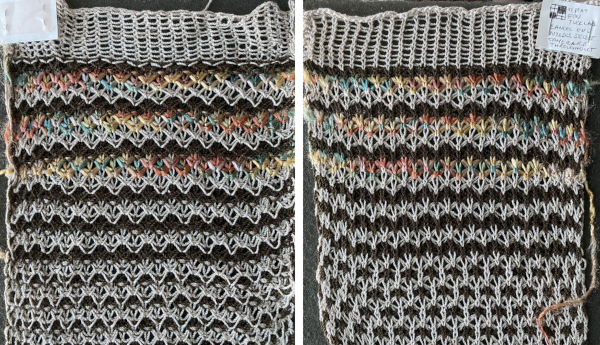
 the third tuck row on the machine
 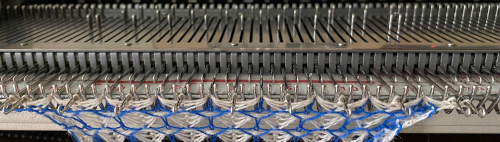 the fourth tuck row with needle preselection for the first all knit blue row
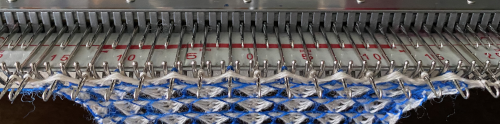
 Two from one: the same tuck repeat was altered by changing the needle out of work arrangements. Slub yarn may be used but changes the value of the lines formed by the floats created in the needles out of work gaps.
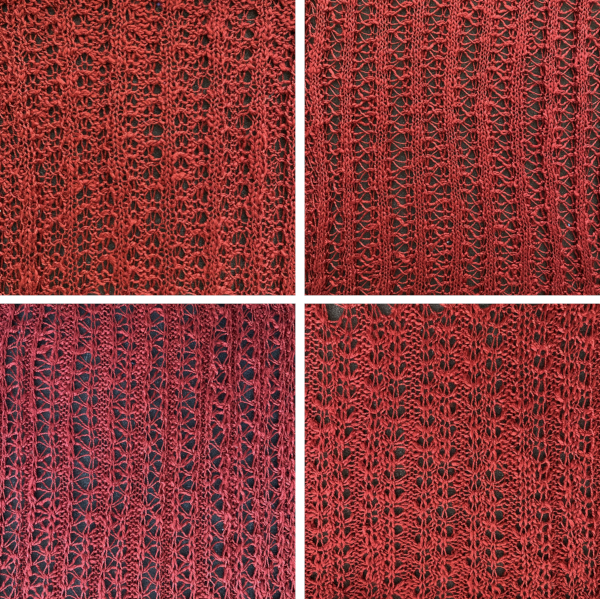

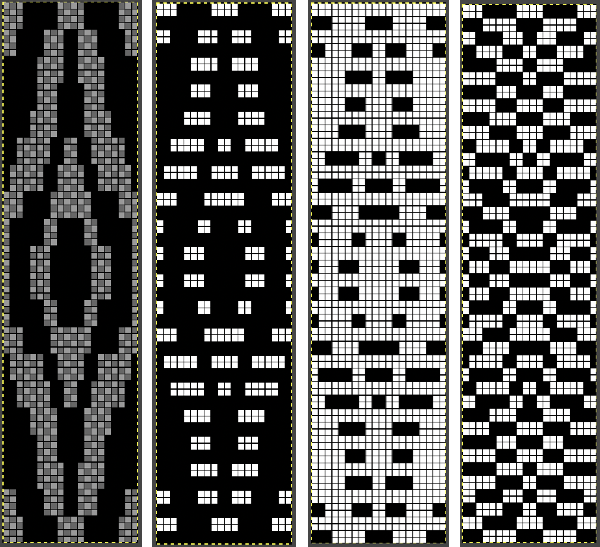
 Nearly all my previous dbj pieces have been knit on a Passap E6000. The 930 experience for such repeats is new to me. With some help from Tanya Cunnigham in reviewing the steps required when using img2track, I returned to cellular automata repeat saved years ago.
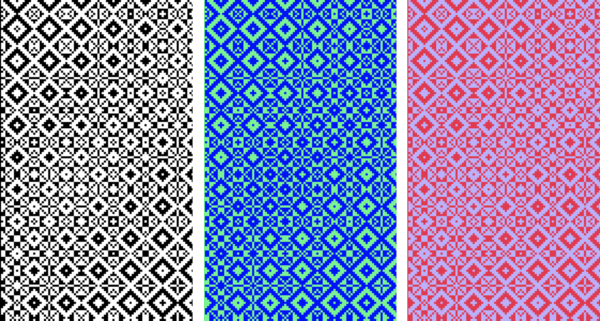
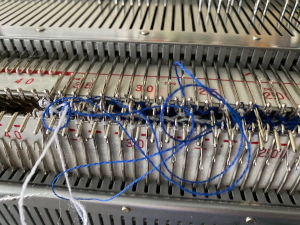 That provided an opportunity to decide I preferred the reverse color placement as well as wanting a thicker ply for the white, resulting in twice the fun with 2 colors, and another scrapped sample
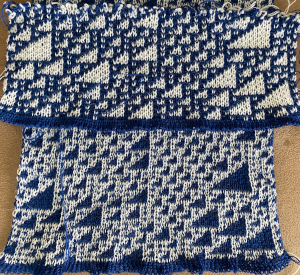
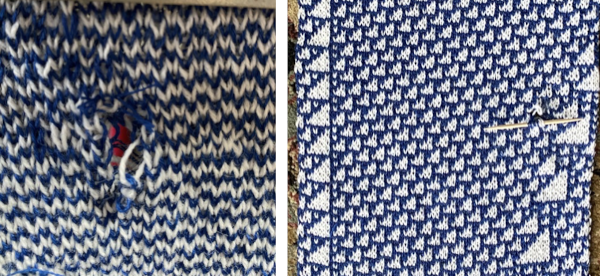 I was able to achieve a reasonable repair on the knit side, but the birdseye pattern on the reverse is a bit scrambled.
 There is also potential for exchanging colors to get a sense of how the pattern might appear in different colorways