Previously published:
ArahPaint and Gimp in knit design 2
ArahPaint meets Gimp in knit design 1
Subsequent posts on using Gimp Layers to process images:
Using Layers in Gimp for color separations
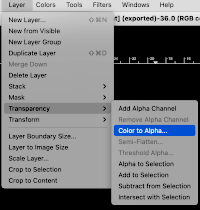
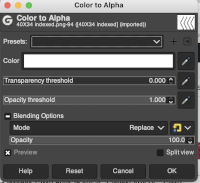
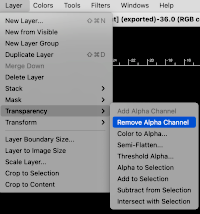
Layer/Transparency/Color to Alpha Gimp Update for Mac 3_more on color separations
Gimp allows one to work on multiple images with only a single window open, left mouse clicking on any one of the images will bring it into view for editing. In the dark theme, it is hard to see the difference, but a lighter border actually surrounds the active image distinguishing it from the others, outlined here in yellow 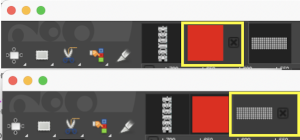 In Arah, multiple windows may be opened at any one time, and left-clicking on any one of them will bring it to the front for editing.
  When working using the same file in more than one window, the degree of magnification needs to match in each.
Spreadsheets and paint programs may be used to achieve color separations for designs intended for specialty fabrics, many worked on the double bed.
Two places to begin exploring them here are for knitting single-bed mosaics and double-bed jacquard in its form where each color in each design row knits twice.
It is unlikely to happen often in knitting that more than 6 colors are used in any one fabric except perhaps in an elaborate color-changing fair isle.
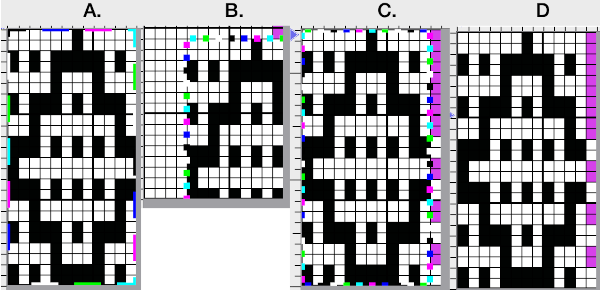
The palette that appears in Arah when opening a new file is random, as seen here when two new files of the same size are loaded 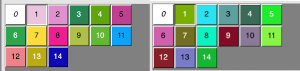 If one’s preference is to reduce the number of colors, the specific number may be set by choosing from the colors menu, editing the number identified as that for the working palette, changing it to the new value, in this case, 6, and the palette reduction occurs as seen in A. For most knit repeats a black color is handy, any one of the 6 colors or more may be adjusted as described in the previous post, seen in B, where black has been added, replacing the color in position 1.
 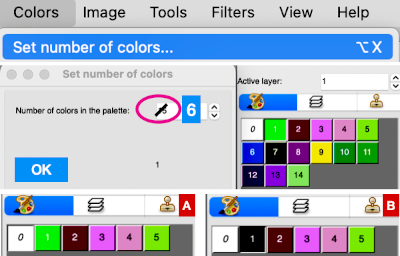 More Gimp information: https://docs.gimp.org/2.10/en/gimp-palette-dialog.html
Some of the related content in brief: the former versions of GIMP had a “Save palette” command. Palettes were stored in a specific folder via the preferences pane. Easy to do and manage. It no longer exists.
To save the palette of an image, indexed or not, you must now import it from the image.
The “Palettes” dialog is dockable: from the Image menu, select Window, Dockable Dialogues, Palettes.
A few dozen more or less randomly chosen palettes are supplied with GIMP.“Import Palette” allows you to create a new palette from the colors in a gradient, image, or palette file.
Right-click in the space to the right of the illustrated palettes to call up the import option, or for palette editing. 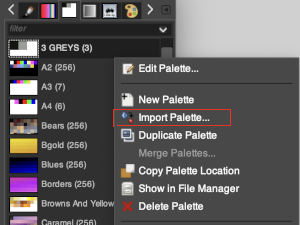 It is not necessary to index the image, this image was used in RGB mode.
 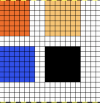 A palette name can be assigned, and if previously used, a number will be appended by the program.
The number of colors: the default is 256, you can set the number to any you choose. Gimp will try to create a palette by spacing the number of colors evenly across the range of the gradient or image. Each screengrab in the top row shows the initial selections for gradient or image, and the second row of screengrabs notes other changes made when choices were available and the results. White dots mark selections as seen while using the program. 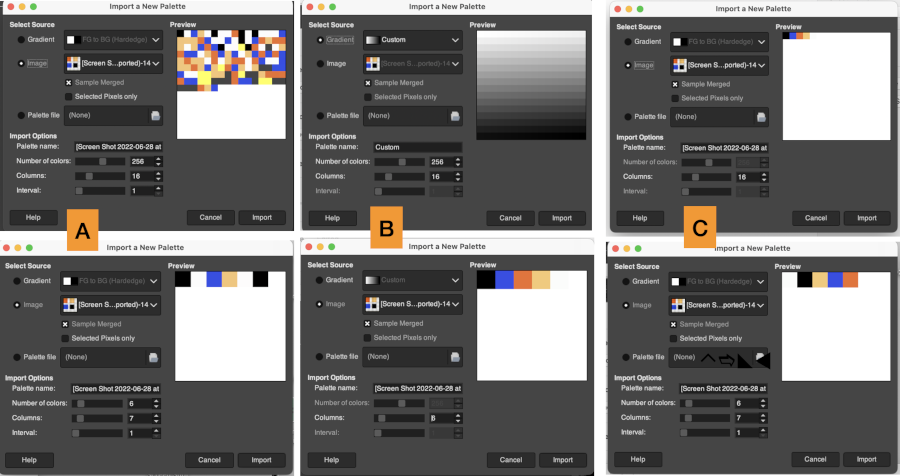 Using the same image, indexed to 5 colors, the custom palette is rendered in a one-step process. The gradient seen in the first position on the top left was randomly assigned by the program and does not influence the results.
 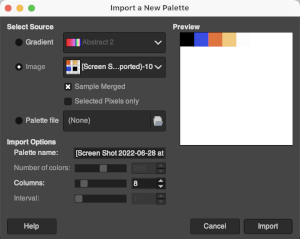 The Columns selection number settings only influence the way the palette is displayed and have no effect on the way the palette is used. The lower the number, the larger the display size of each color unit.
Double-clicking on any palette color will magnify the palette view on the theme color background. Left-clicking on any color makes it available for drawing, the selection will have a dotted bounding line and the selected color will be assigned to the foreground position, 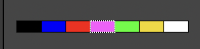
 Right-clicking on a color results in these options.
  The imported palette will be added to the Palettes dialog and is automatically saved in your personal palettes folder when you quit GIMP so that it will be available in future sessions.
In Arah, the color palette will always display the colors of the active layer. The working image contains colors intended for use in my designs. In addition, please see the note from the developer in the comment at the end of the post. 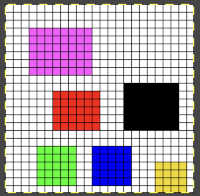 The palette tools:
  A: if you press this icon the program will underline the colors actually used in the image, since all colors are used in this case, each color is underlined in either white or black in this instance
 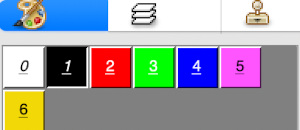 D: adds color(s) to the palette
  B: removes unused colors in the above palette, it would restore the original colors
C: removes duplicate colors, not applicable in this instance
E: removes the last unused color, will not work if all colors are used.
Changing color positions in the palette: to switch the position of two colors in the palette, click the chosen color in the palette, move the cursor to the color you want to switch the position with, and press the left mouse button while holding the Ctrl key on the keyboard. In this instance, the color was duplicated in the new position. 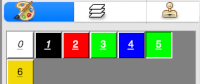 Knitters designing for dbj are likely to work with a limited range of colors, often 3 or 4 max, in specific palette ranges to ready images for download.
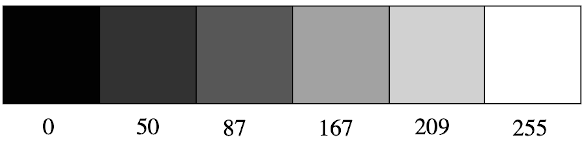
If color separations for 3 or more colors are done in shades of grey in terms of technical details, you need a pattern image that is 8-bit greyscale, with each color in a range of 8-bit values. So for 4 colors, it would be 0-63 color 1; 64-127 color 2; 128-195 color 3; 196-255 color 4.
Binary images have only 2 possible intensity values, normally displayed as black and white with values of either 1 or 255 for white, and often 0 for black.
That convention may have led to the selection of white as color 1 in automatic separations such as the KRC Japanese one, where white is selected first. In a greyscale or color image, a pixel can take on any value between 0 and 255. 
 Designing for fair isle, or when attempting to visualize and illustrate slip and tuck fabrics with frequent color changes, more colors may be required even though the final download will be in black and white. There is a quick way to add random colors assigned by the program and based on the initial palette:
 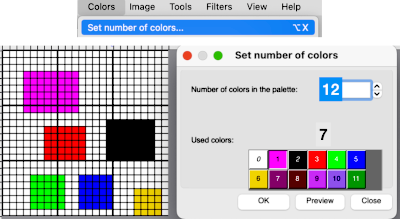 The magic wand tool allows you to work on consistently colored areas without having to select and outline each.
To alter a single color using the bucket tool, click on the wand, then on the color single color area you wish to change, it will become outlined by bounding lines.
Click on one of the colors in the expanded palette, and it will automatically appear in the foreground color position, and it may then be used to bucket fill the chosen area. 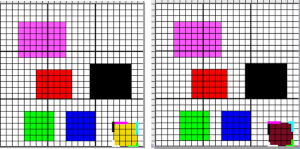 Flatten the image using the merge-down tool.
If the foreground color, in this case, white/0, needs to be changed, in order to choose all pixels in the foreground color, click on the wand, and use Tools > Select by color or Shift+W. This function works only on 8-bit pixel images. Click on the color you wish to use to replace the ground, and bucket fill with the newly selected color. 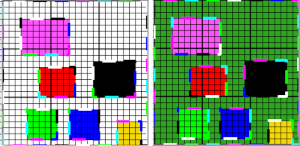 Flatten the image using the merge-down tool.
Changing multiple color blocks in the same color could be selected by the tool, but filling each of them one at a time was required. 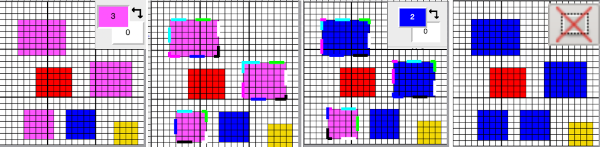 In Gimp a similar tool is the fuzzy select, which also allows for changing the color in a selected area or for selecting and changing all pixels in that color. Selected areas will also be outlined in dashed bounding lines. Bucket fill may then be used to replace color(s). The option is offered to choose either foreground or background for the fill.
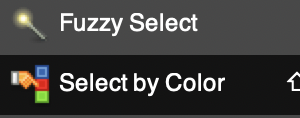
 2023 in Gimp 2.10.34 use and hold the shift key prior to selecting and using the bucket fill tool to change all the areas outlined by dashed lines. The bucket-fill tool itself now works again on any area with a defined boundary, no other, following action is necessary.
Click on the rectangle select tool and then on any spot in the work area or on the image to set the image. The dashed lines will disappear.
In terms of saving the palette in Arah for future use, I saw no specific directions in the manual.
The color palette displayed is always the one used in the active layer. As a workaround: open the image, and the associated palette will be displayed. The repeat begins drawn 24 pixels in width, by 24 in height.
Select clear from the edit menu, or bucket fill area with white
If the size of your intended drawing area is different, choose the option Resize Image from the Image menu. With the chain link intact, the new canvases are created keeping the aspect ratio. Enter a new value for width/height, hit return, or move the cursor to the alternate value, and its number will automatically change to a matching one. Click OK to use the new canvas, or reset if you wish to return to the original 24 by 24 pixel one for a different edit.
With a broken chain link as one of the two values is altered, a preview is available. If both values are to be changed, break the chain link, enter the two values in turn, and a preview appears for each step. Ok is used again prior to saving, or choose reset to return to the previously used setting. 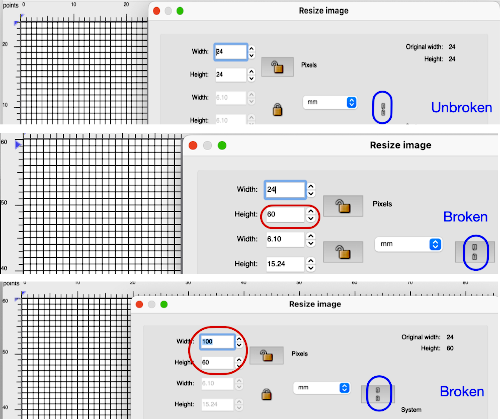
 Color separations can make specialty fabrics possible to knit which are outside the possibility of doing so simply by changing cam settings. Two instances are mosaics and DBJ where each color in each design row knits twice. Separating each may be done in two ways. The first method, convenient for longer repeats, requires that the result be elongated X 2, whether in the repeat design software or after download to the machine or using the elongation X2 function in the punchcard models. For illustration purposes here I will be working to create files that do not require elongation.
Mosaics and Mazes are constructed in similar ways and are sometimes referred to as floatless fair-isle even though technically speaking usually 2 stitch floats do appear on the purl side in the alternate color used with each color change.
Many such repeats may be knit using both the slip and tuck settings, the latter is the more interesting of the two on the purl side.
When learning structures it may be worth beginning with a published design.
Kathleen Kinder decades ago published two books, one with 24 stitch repeats, the other with 40 stitch repeats, with the separations included as well 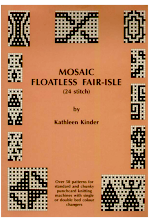 This, by Barbra Walker and intended for hand knitting, offers a huge library of designs for inspiration and conversion
 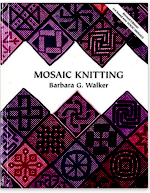 Following specific rules it is also possible to develop DIY repeats from scratch. That said, the repeat used in this blog post happens to have a known value of 12 pixels by 12
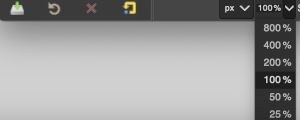
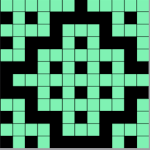 Magnification in Gimp is achieved by selecting or typing in new percentages at the bottom of the window.
 Entering and exiting the full screen may be controlled via the view menu
  To exit, it right-click at the very top of the window to expose menu options and select deselect full screen.
  In Arah, if you press any number from 0-9 on the keyboard, you will change the zoom directly to that level (1 means 100%, 6 means 600%, 0 means 1000%). The plus + and minus keys- as well as the magnifying lens icons, will zoom in and out
 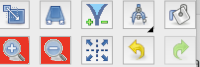 To use the entire space available in the window, choose Fit to Window from the view menu or select Ctrl+zero.
If working in more than one window this option makes repeats the most visible, scaling back can be done by counting the number of selections, helping to match the new picture magnification to the first.
Press the escape key on the keyboard to return to the original 100% view.
To work using the full screen, select the option from the view menu. To exit, right-click at the very top of the window to expose menu options, and select exit full screen  Separating the design: ultimately the planned final graphic repeat would be a BW png used for electronic download, programmed as a fair isle one, but knit using tuck or slip settings, it may be drawn initially using only in those 2 colors. Black may need to be added to the palette selections.
One may always draw on a large canvas and then crop as needed, but as a starting point, it may be easier to simply match canvas size to the published repeat being used.
It is handy to have an extra column to help track image processing during the separation, the repeat above is identified as being composed of 12X12 pixels, one could begin with a 13X12 canvas.
A second way to provide the 13th column is to work using 2 windows, matching magnification, and the second with a different, larger pixel measurement than the first. Copy the contents of the original work area and paste them into the larger canvas in the other window. Crop to new size if necessary.
To illustrate the two-window process, here the original BW repeat has already been drawn and elongated X2
A. Use the rectangle-select tool to capture the whole image in the first window, bounding lines in the colors of the palette in use will outline the selected area
B. Use the edit menu or command C to copy the selection, edit paste, or command V in the new window to place it.
When pasting on a different size ground, the bounding lines will also appear in the new image, the contents remain moveable,
C. Place the selection where desired on the new canvas, when satisfied use the X, merge down tool to flatten it.
 The quicker method begins with a canvas one pixel wider than the repeat, 13X12.
Adjust magnification, for comfortable viewing in the editing process.
View: show grid 2
Colors: set the number of colors to 6, and adjust the #1 color to black, white is in position 0 in the palette by default
Activate the pencil tool, and draw a vertical line on the far right in an easy-to-see color choice other than white or black
Using black, fill in pixels for your first draft of the pattern repeat
Image multiply YX2, resulting in 13X24
Using the pencil tool fill in the first 2 design rows followed by every other pair with white. 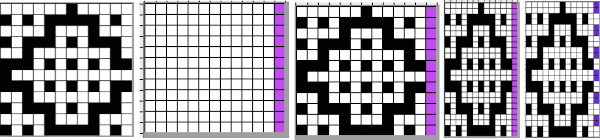 Magnify image A to a comfortable work viewing size.
B and C: using the rectangle select tool, with the left mouse button, place the pointer on the purple pixel, drag the mouse across each pair of marked rows, 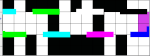 release the mouse, and use Command I to color invert, and merge down
 to eliminate the bounding box.
The purple pixels will change color as well, making it easier to track what rows have been altered already.
D: crop the image, removing the row with colored cells for the final repeat
 If for some reason you are processing an image that is color reversed, the steps are identical, but tuck or slip stitch fabrics, black pixels or punched holes knit, white pixels or unpunched squares tuck or slip. For this reason, the cropped final result would need to be color inverted prior to knitting or punching holes.
 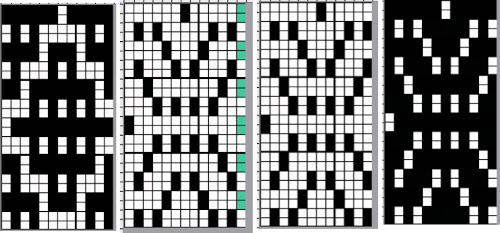 This separation for 2-color DBJ results in its potential use in many fabrics other than DBJ and may be performed by some programs used to download multiple color patterns to the machines prior to knitting the fabric. One such fabric is drop-stitch lace.
Punchcard machine users would need to separate the colors manually, or if Dak is available, the separation may be done using the program and a corresponding template may be printed as a guide to punching holes.
This method is the automatic default one for any 2-color DBJ knit on the Passap.
Each color in each design row will be knit with each pair of consecutive color passes. Completing one design row containing 3 colors will require 6 carriage passes, 4 colors 8, and so on.
The built-in color separation in electronic machines wherein each of only 2 colors in each design row knits only once does not apply when using more than two colors, though it is possible using Dak or by downloading a special card reader technique to program separately from the design when using the Passap E6000 in addition to the pattern repeat.
This separation of a 2 color pattern results in an elongated version of the design regardless of any dbj backing used.
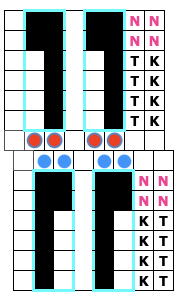
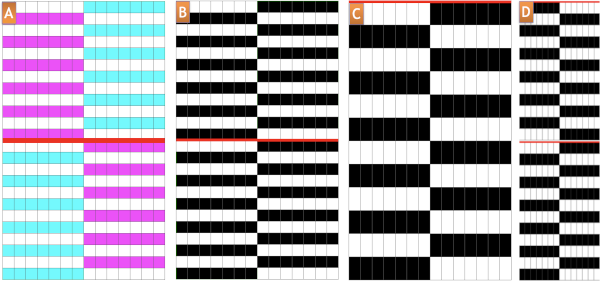
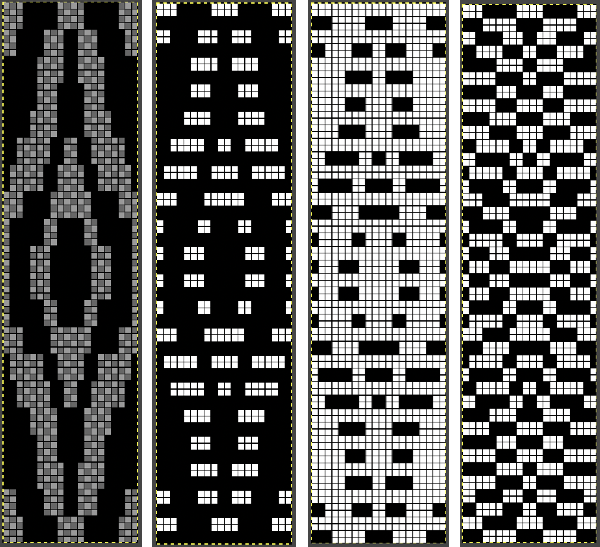
Begin with a 2 color image,  an extra column of pixels is added here as well:
A: multiply YX4 to 13X48
B: mark alternating pairs of rows in the extra column with a contrasting color
C: following the color cues on the far right column, on rows with no added color use the pencil tool to replace black pixels with white, leaving only the orange cells
D: on rows marked with the third color replace the orange pixels with white, leaving only the black pixels
E: crop the image eliminating the extra column
adjust the remaining orange color to black
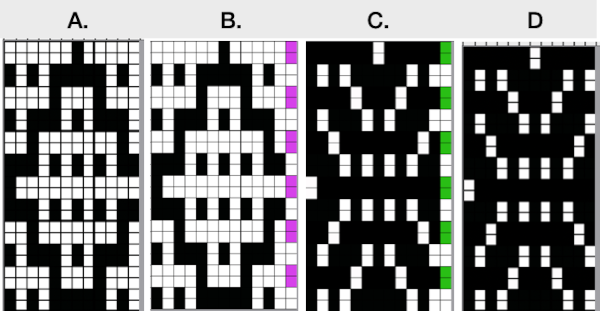
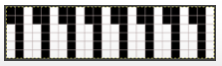
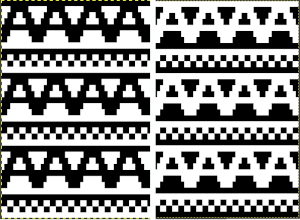
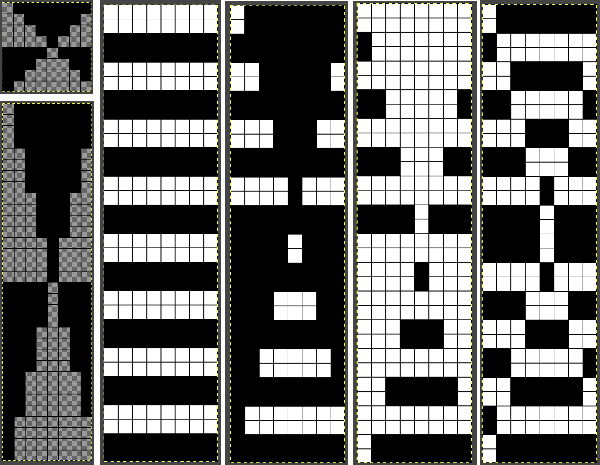
index the result to B/W, and the image is ready to save and use 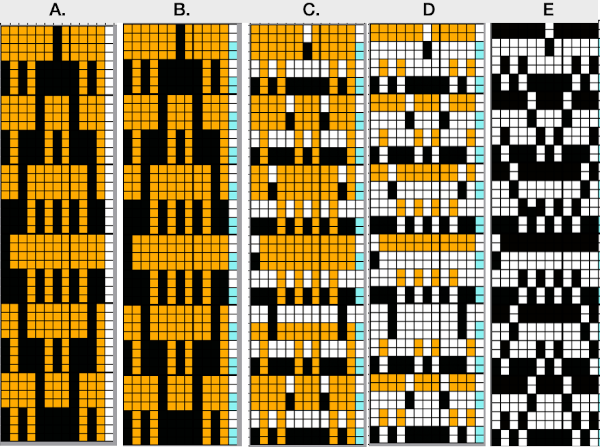 The difference between single repeats for each type of fabric, no further elongation is required. A: mosaic, B: DBJ
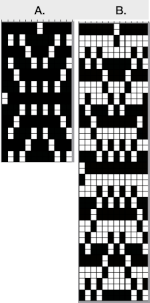 Using layers in Gimp opens up the possibility of several color separations for fabrics using only 2 colors.
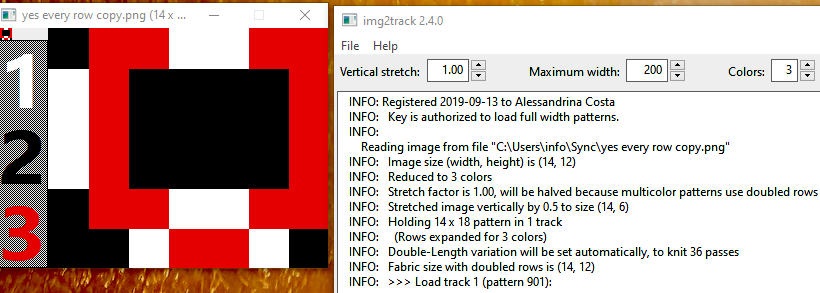
Both img2track and Ayab are capable of opening 2 color images.
In img2track this is what would appear, after the download the KRC function needs to be activated in the knitting machine.  Ayab: the repeat should be programmed in width equal to the number of needles planned to be in use. The color change happens as the file is loaded into the program, the ribber classic option is used
  to render results that would match the KRC knitting machine selection after an img2track download. Here the repeat is also tiled in height.
 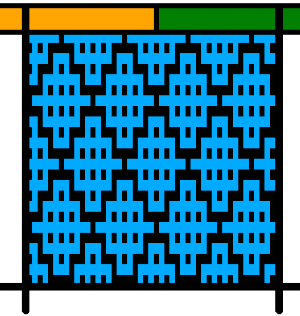 My personal preference is to work with images designed in black and white. With the 910 presently stored, my blog swatches are knit on a 930 using img2track.
A note for Mac users like myself using desktops with the M1 chip and Mac OS Monterey. Img2 track requires an FTDI driver for its download cable, on June 6 finally released a beta version of a more recent driver, I do not plan to install it at this moment, function in the upcoming Ventura OS would be unknown.  Ayab does not launch automatically. These are the steps necessary to run the program, following suggestions by Adrienne Hunter via the Ayab FB group:
open a Terminal window (Applications/Utilities/Terminal) and type these two lines:
cd /Applications/AYAB.app
./Contents/MacOS/AYAB
The app may also be found and then opened via using Spotlight search if you prefer  Once the program is quit unless you choose to keep the terminal icon
 in your dock, it will disappear and the above process will need to be repeated. Once the text has been entered, and Ayab has been launched, a message similar to this will appear, showing your last log in.
 To launch Ayab again, simply use the up arrow key and hit return to repeat the command
  Creating an AYAB desktop shortcut for Mac that will work without opening the terminal each time
Using Finder, open Applications and find AYAB. Right-click on AYAB and select “Show Package Contents”.
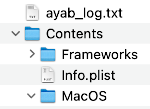 Locate “AYAB” under MacOS.
 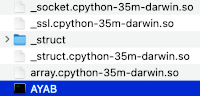 While holding down the command and option buttons, click and drag that icon to the desktop. This will create an ayab shortcut that does the terminal stuff for you
  you can change the icon by copying and pasting the icon image in “get info” but it works fine without it. These icons will appear in your dock after double clicking on the icon
 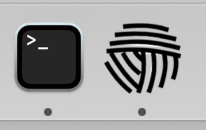 The ayab window opens with only the load image option highlighted
 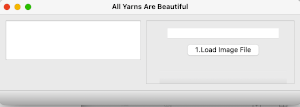 Click on the load image file to open an image, and the remaining features of the program will now be available
 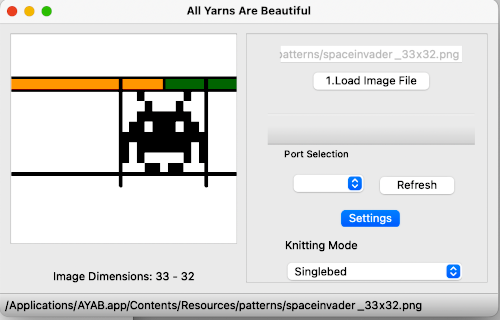 If you quit ayab, the terminal window remains active
 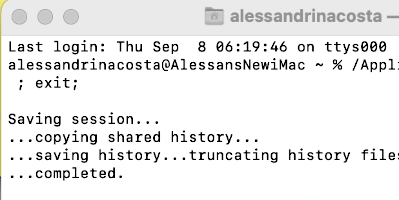 Quitting terminal called up this window for me only the first time I did so.
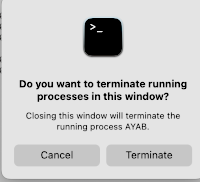
 There are many ways to yield math-based patterns, and nowadays online generators and reference sites abound, making it possible for nongeeks to use the resulting files to create knit suitable designs.
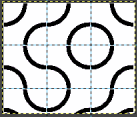
 Distinctions in naming the tiles are not often made. “Truchet” is the commonly used generic term.
 and search for your area of interest.
  Any demonstration may be saved for future use, most are customizable to varying degrees.
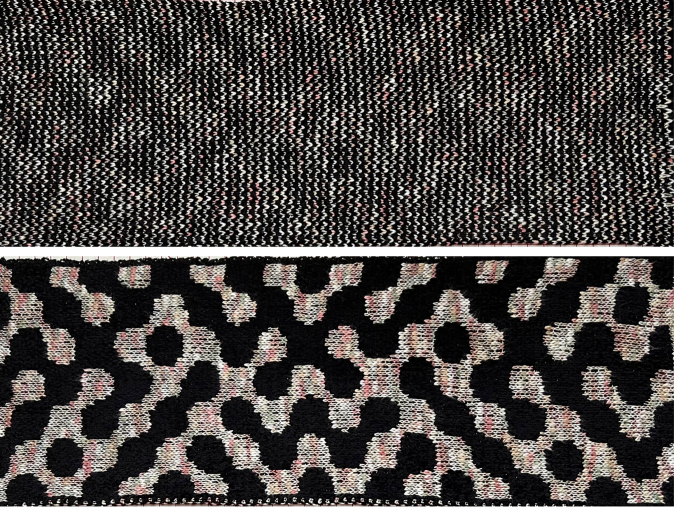
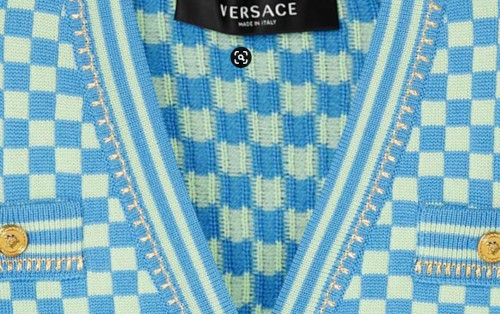
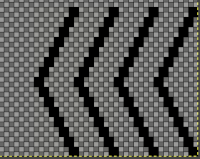
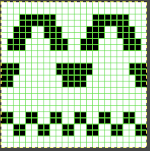
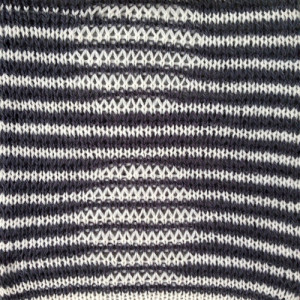
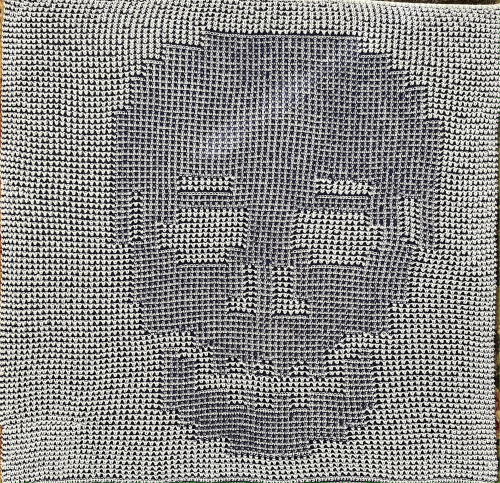
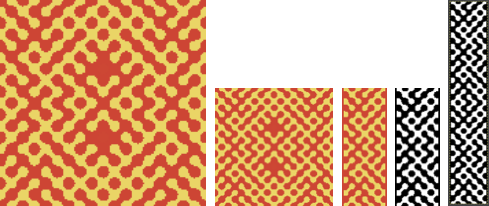 The swatch png, 58X150, includes 2 stitch vertical borders in the dark color. The machine was set to the built-in KRC color separation for DBJ. Some of the circular shapes have been already edited, but if I were to reuse the repeat, I would clean up more of the design shape edges
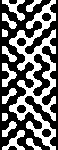
 Developing an added repeat:
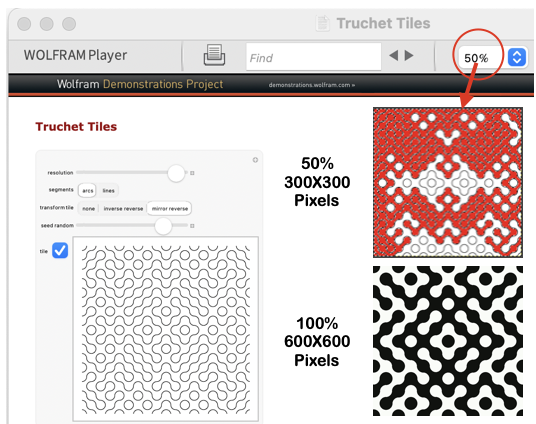 In this exercise, none of the other available parameters were changed. When the player is launched, click on the tile, it will be surrounded by an orange line,
  copy the image, and it can then be pasted directly into Gimp.
  Change the Image Mode to BW Indexed before proceeding further.
 click on any area in the design, it will be surrounded by dotted lines
 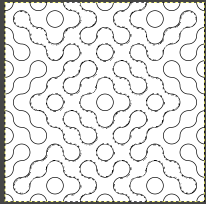 select bucket fill, to fill the selected area with black.
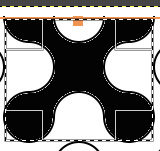 will allow its use for copying and pasting the outlined segment on a new canvas or cropping the area to the selection for saving while clicking anywhere in the Gimp work window fixes the results. The dotted lines disappear. Repeat the process on the remaining image.
 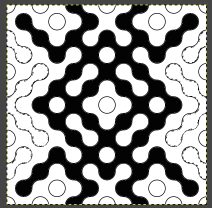 The processed file will measure 600X600 pixels.
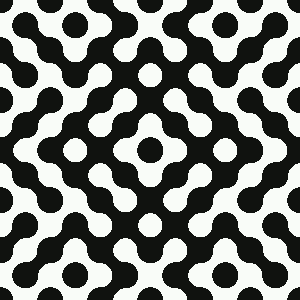 200X200 pixels
 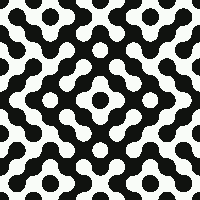 150X150 pixels
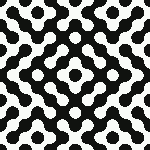
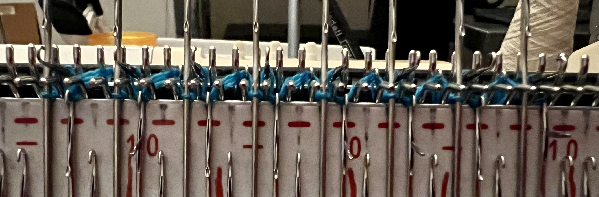
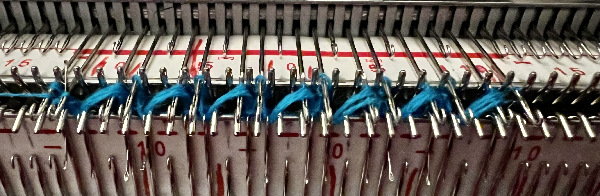
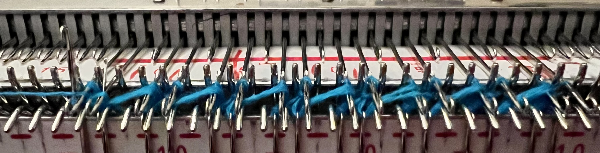
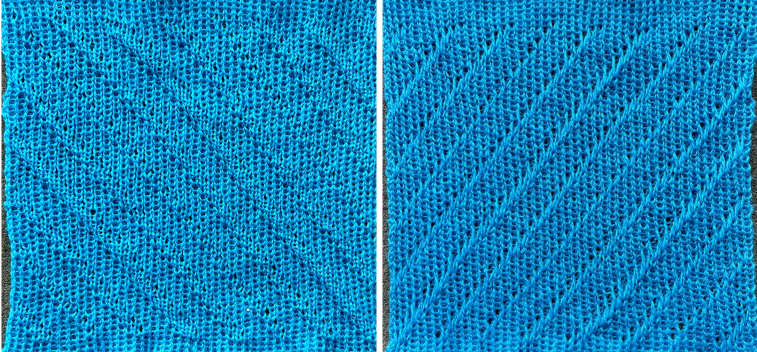
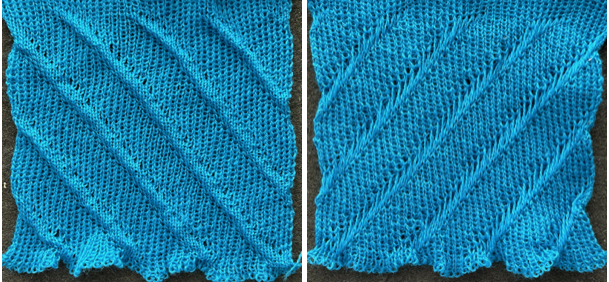
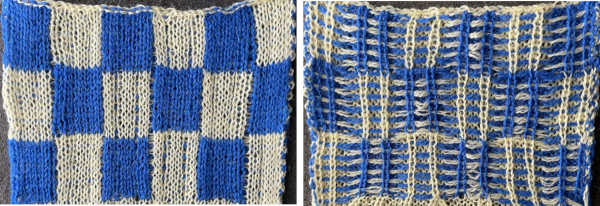
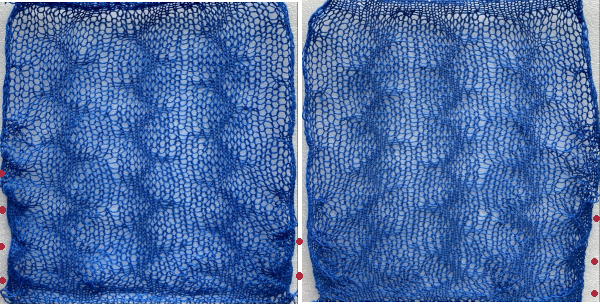
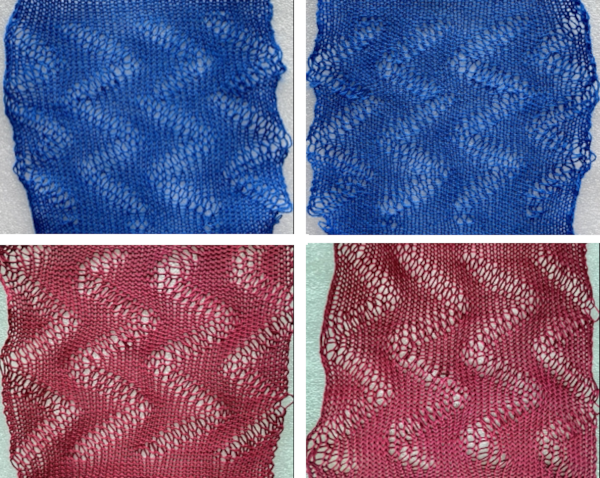
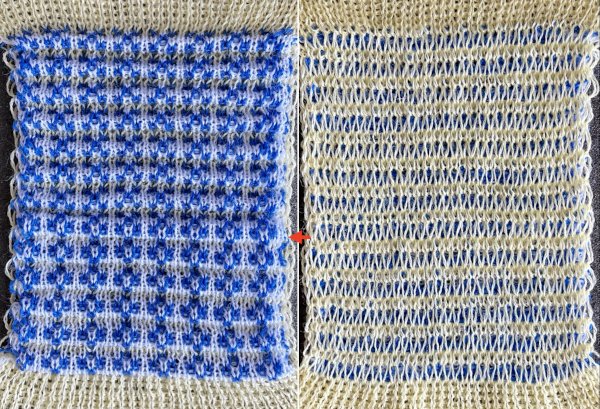
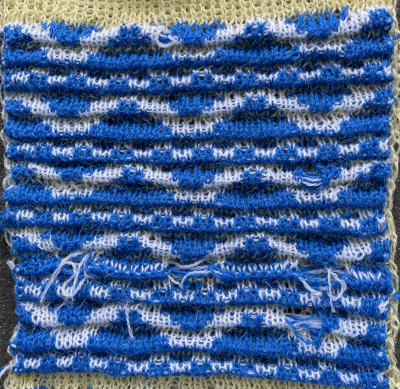
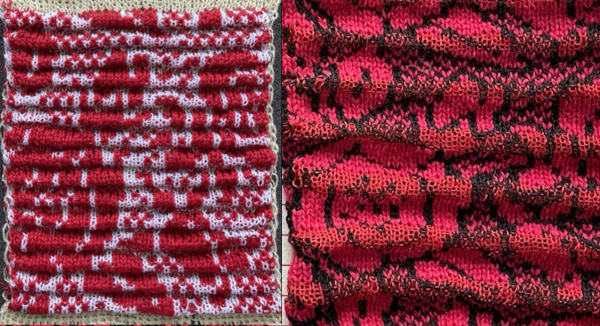
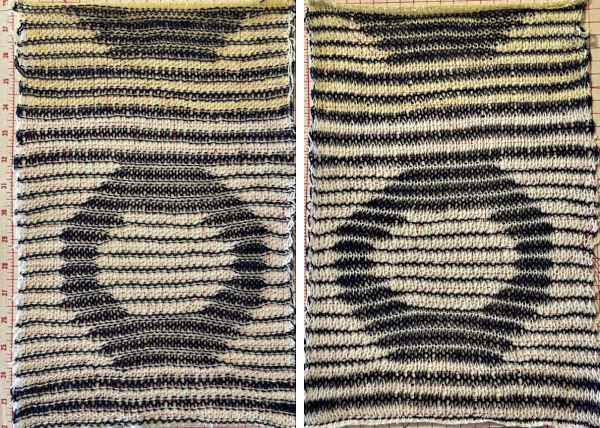
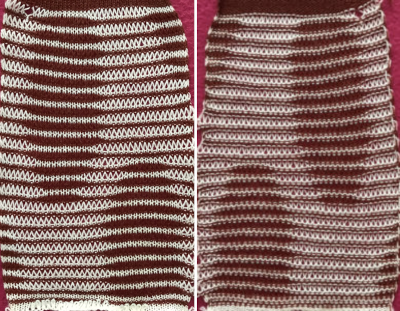
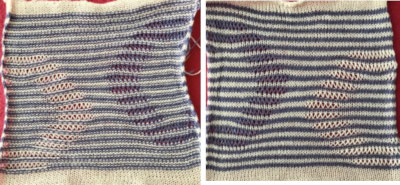
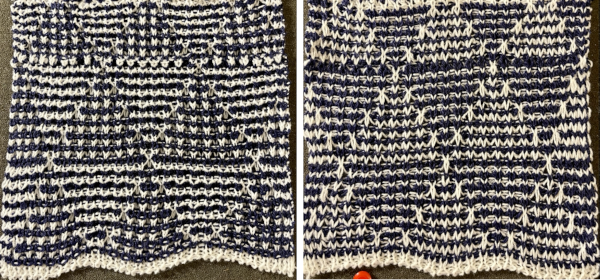
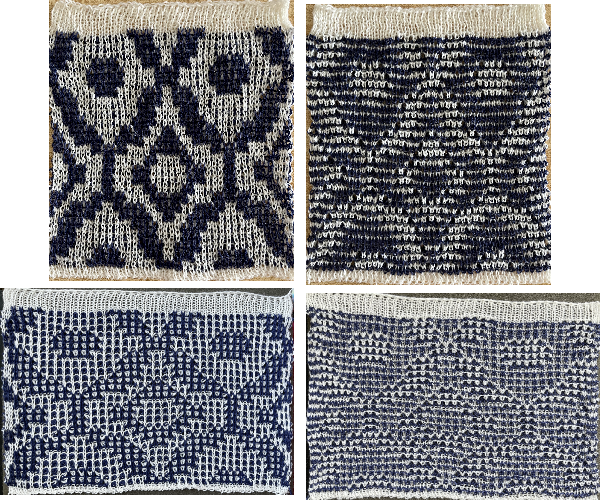
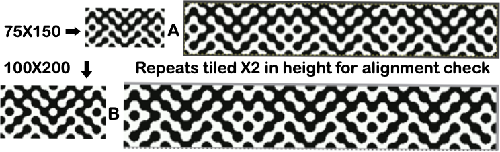 The proof of concept was knit using the 100X200 repeat without any pixel cleanup.
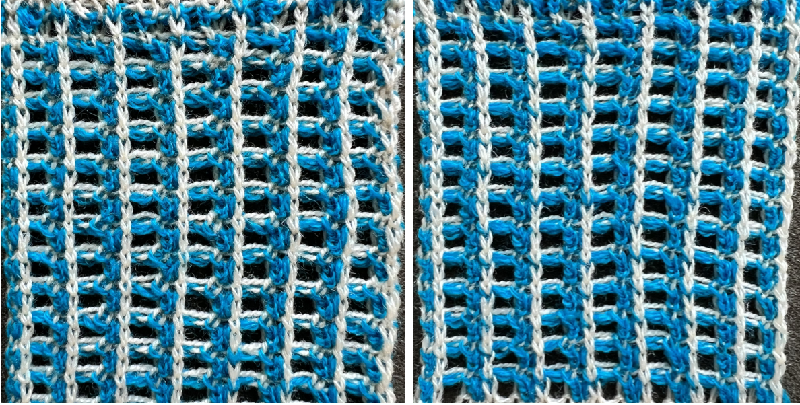
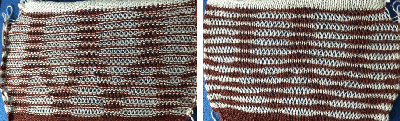
 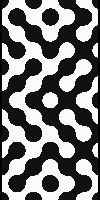 The blue yarn is a 2/20 wool, and the white is a 2/28 Italian yarn of unspecified fiber content from my stash. Both beds were set at 2/2. The KRC setting separated the colors so each color in each row knits only once, but it takes 2 passes to complete one row, so 100 design rows translate to 200 rows of knitting. In this instance, img2track used on the 930 broke up the design into 2 tracks, a 66-row first track, followed by a 134-row one.
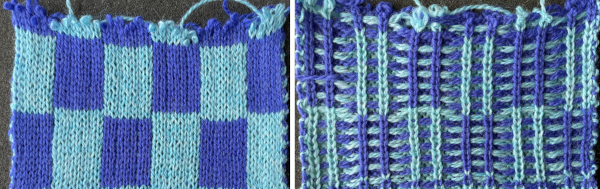
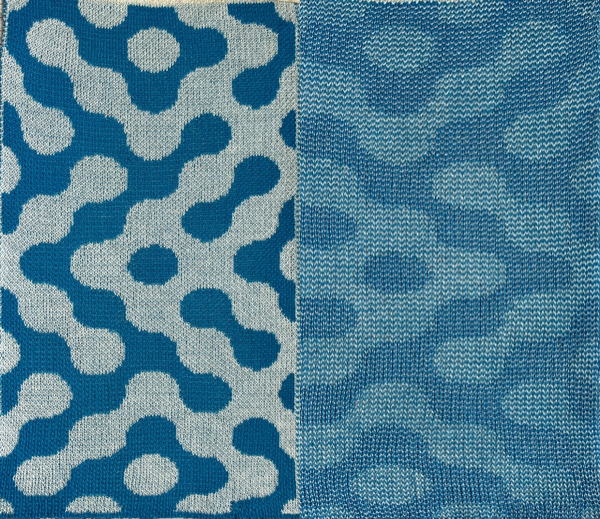 Comparing the two swatches:
 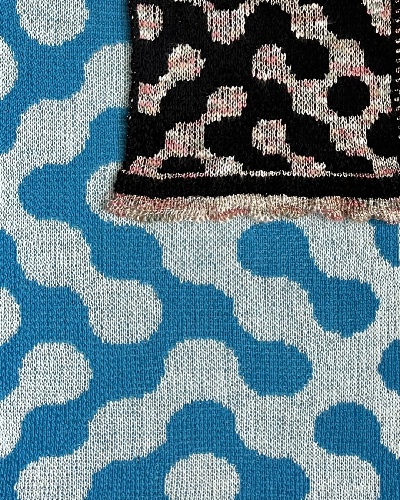 Variations in tiles made by changing variable view options
 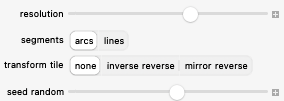 will still align when combined, easily producing a range of new designs at merging points. Use guides to help narrow down segments of interest, here they are placed at even 100-pixel intervals on two adjoining 600-pixel images.
 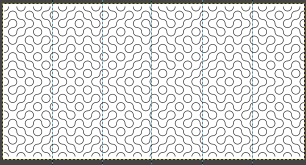 To remove a single guide after placing it, go to Edit, Undo Add the Horizontal or Vertical Guide. To remove all guides, go to View, and uncheck Show Guides.
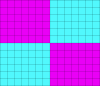
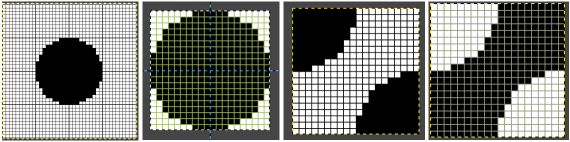 My original circle was placed on a 40X40 grid with outlines every 10 cells, the central circular 20X20 repeat was isolated and split into quarters, in turn generating these 2 tiles out of the 8 total required, also 20X20, with the second the color-reversed image of the first.
 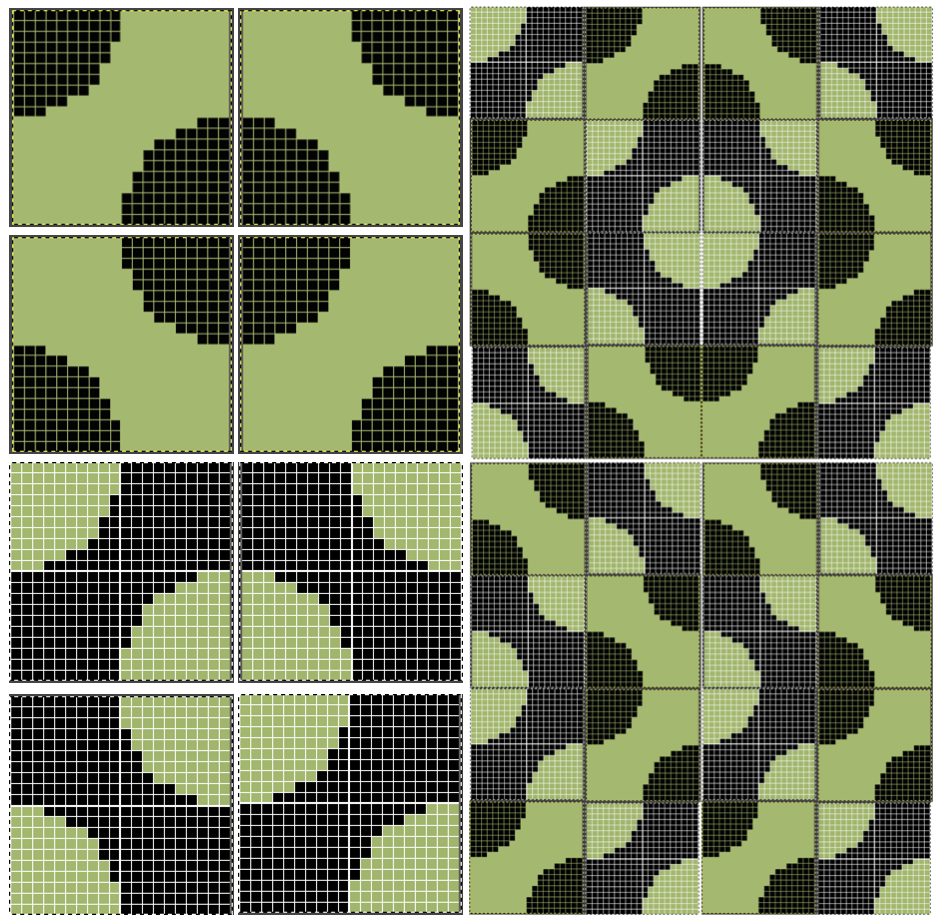 Facilitating and speeding up the process: in my post on using ArahPaint and Gimp in knit design, I briefly touched on the Drawing-in-repeat feature in Arah to produce random tiling.
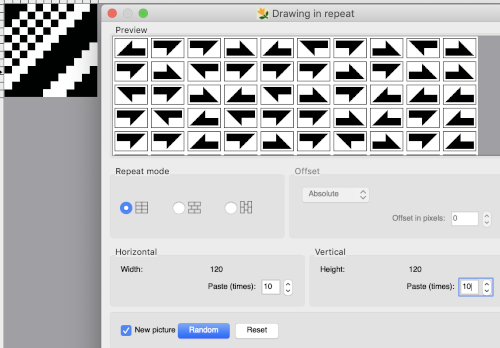 Thanks to the developer there now is a video, viewable on Instagram and Facebook, on how to use the feature for this type of tile, which allows for very quick DIY versions that can be trimmed as needed for knitting. This is my very first try, a how-to will follow in the next post.
 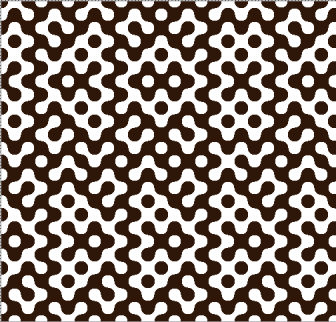 And the second, composed of triangular forms
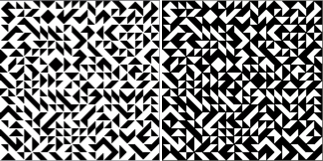 For spreadsheet users, this one generates the various tiles in Google Sheets and a related article.


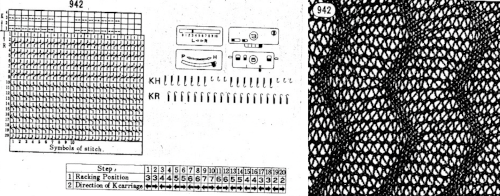
 Adding complexity with transfers from one bed to the other to racking
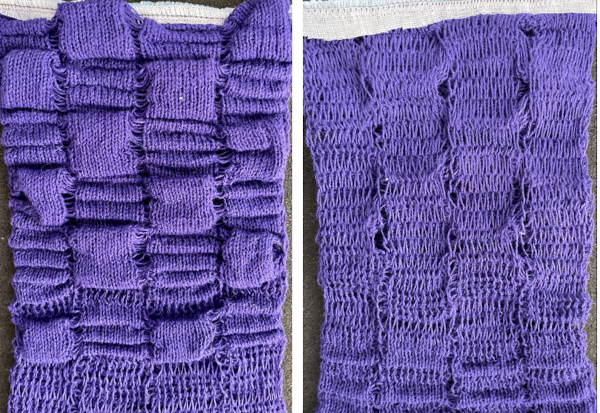


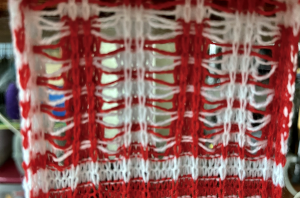


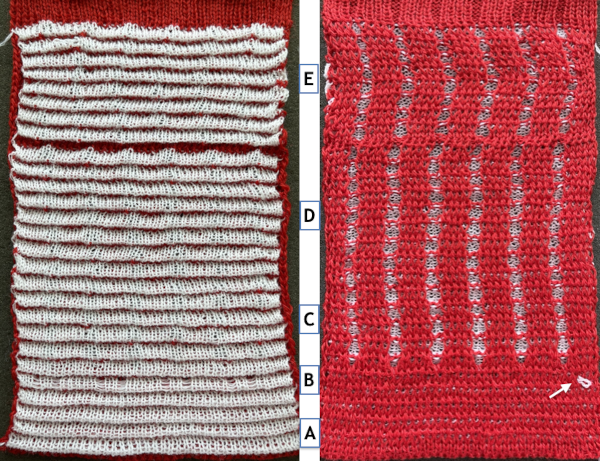
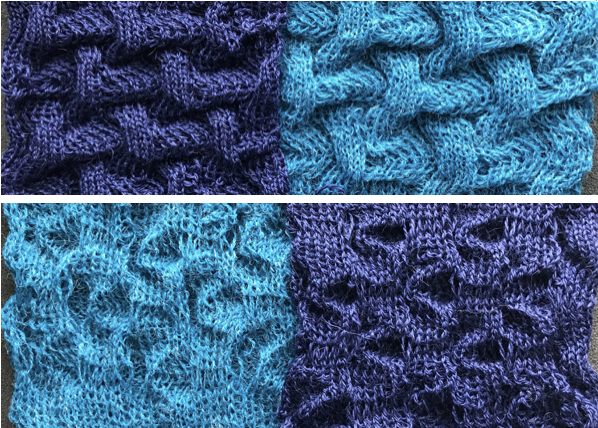
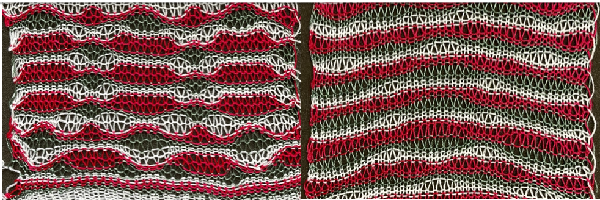
 Trying for a bit more detail, there is a see/peek-through quality.
  At first, I thought it might be a version of the stitch using 3 colors, but later, looking again, I came to believe it to be a 2 color
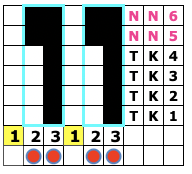
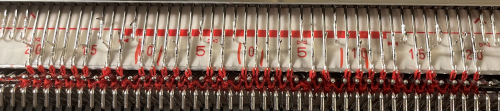
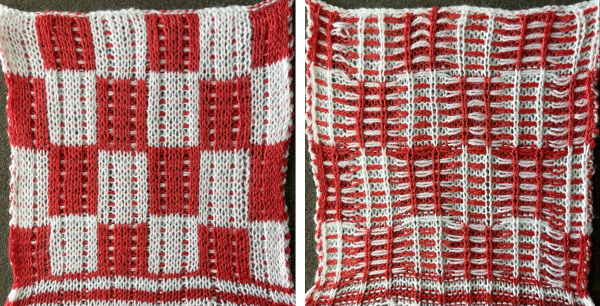
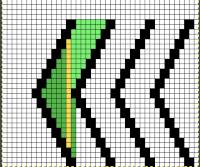
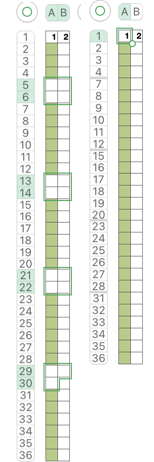
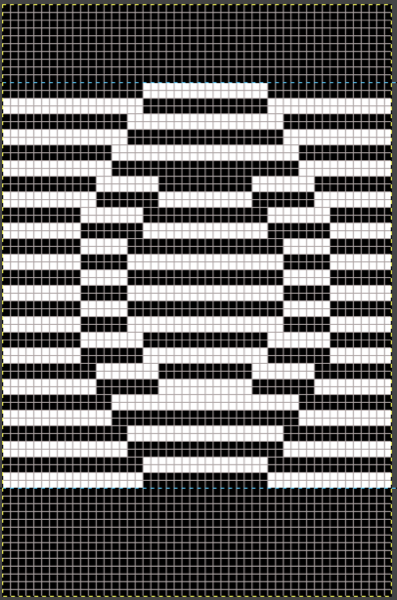
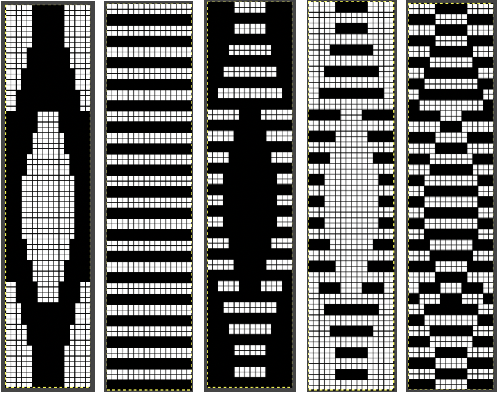
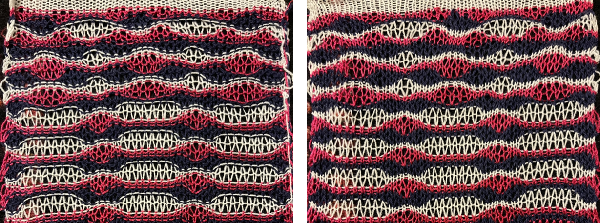
 I wanted to add solid color drop-stitch stripes, the solution being to add all black rows. Every needle will select every row in those areas, colors are changed every two rows, creating the desired effect when the corresponding stitches are dropped.
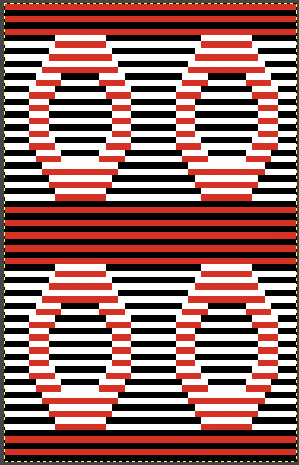 A visual summary with an added color change column and row numbers with rows on which dropping all loops can occur marked with different color numbers. In this case, the ground is in the dark color, the shape in the lighter one.
 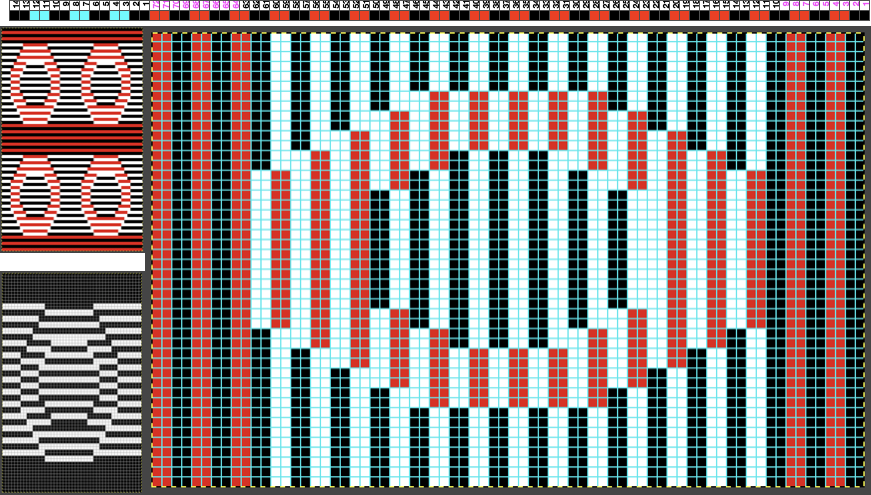 Determining whether the shape or the ground stripes knit the dark color is simply done by beginning the first all knit rows with the dark color or the light.
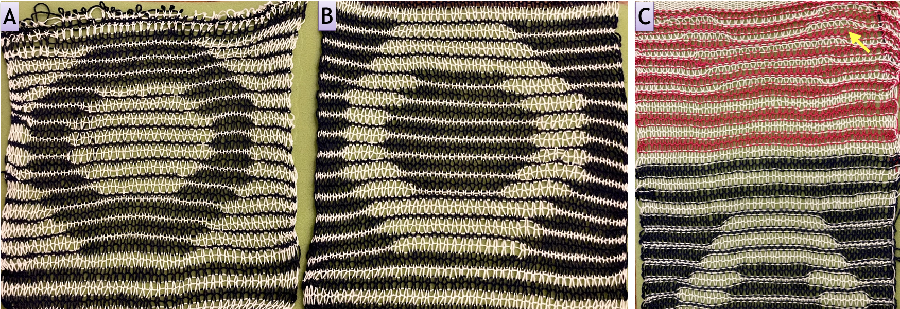
 but I would like to have stripes in the solid lighter colors as opposed to 2,

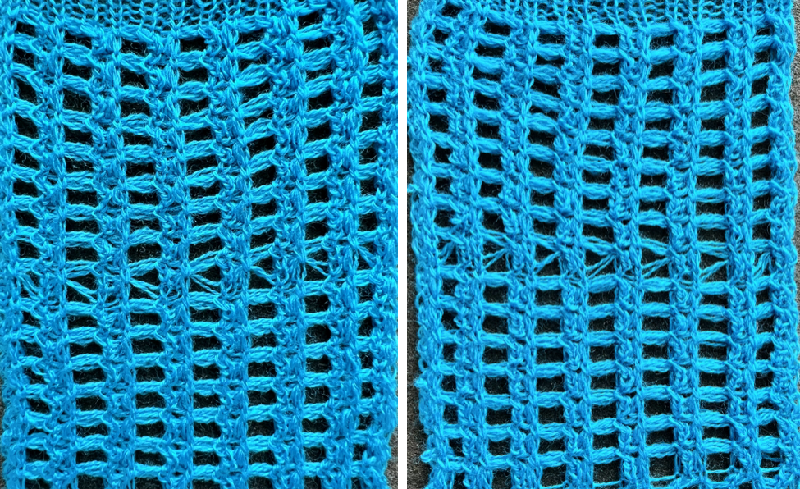
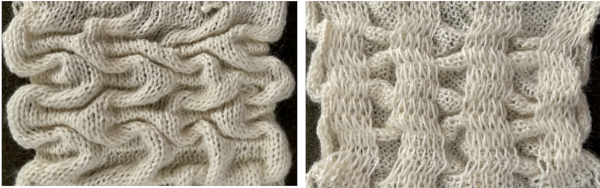
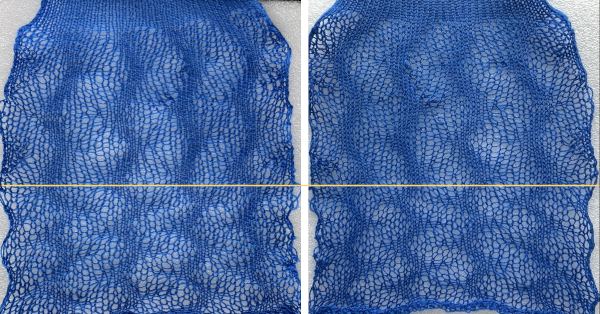
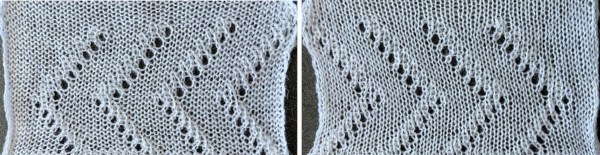
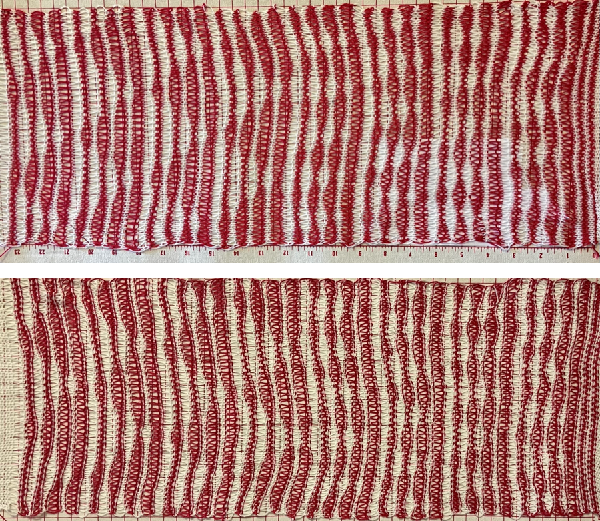
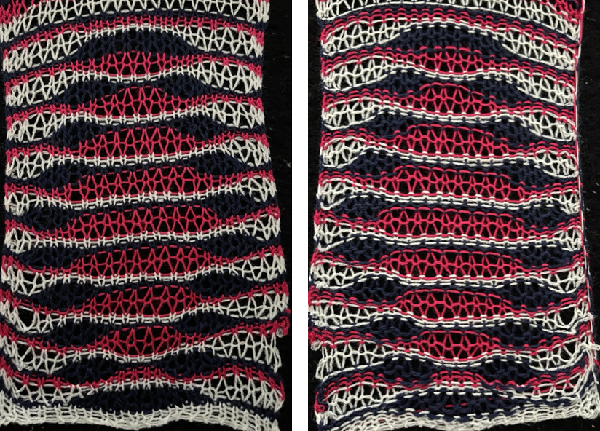
 Here some of the peek-through quality of the fabric is shown again. When any fabric is gathered sideways, it is likely the repeat will appear narrower and longer.
 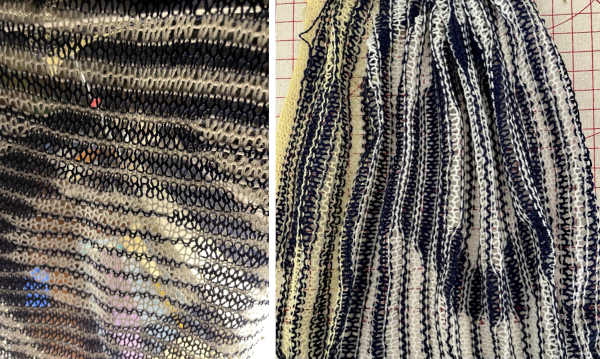 Using a 16/2 cotton at nearly the same tension produces a fabric that is even sheerer.
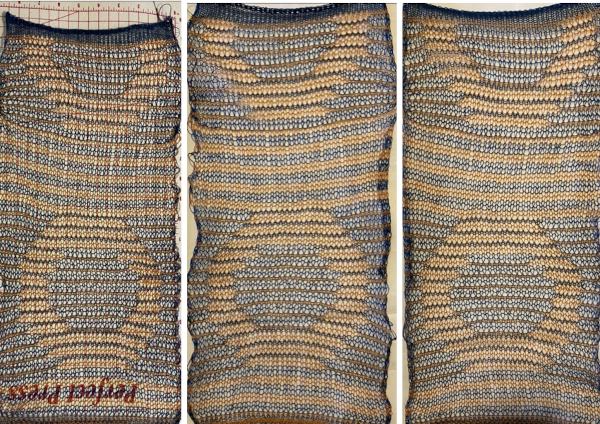
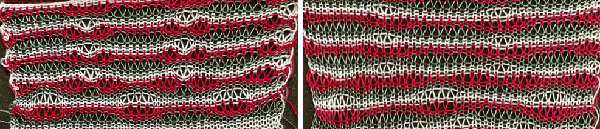
 And now those solid stripes in 2 rows knit are really bothering me, thinking they should be switched to only one row of loops, making the original repeat without those added black rows the better repeat?
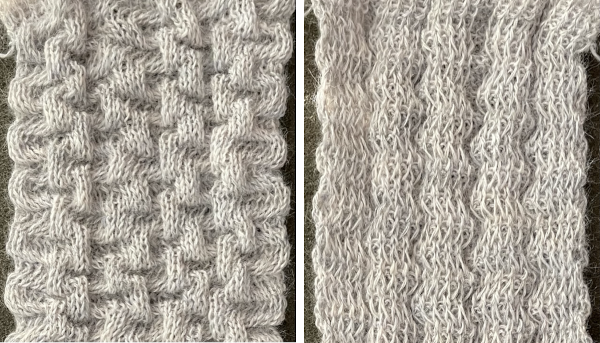
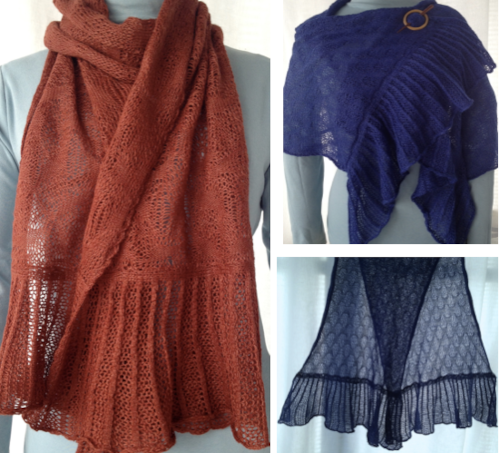
 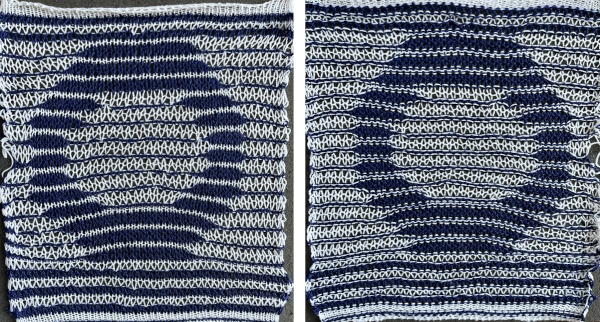 A potential use is for the thinner knit is for it to be used as a layer over a different pattern or the same design as seen here, in the thicker yarn
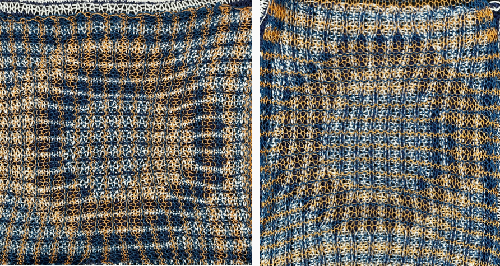
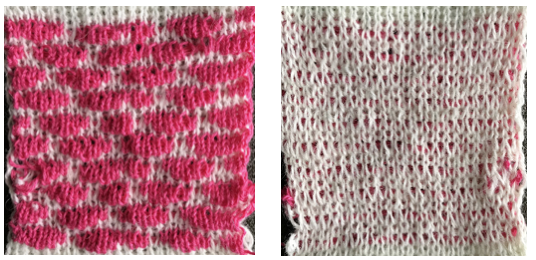
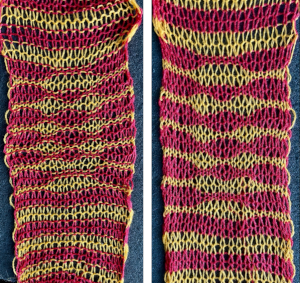
 seeking a rounder, smaller donut shape:
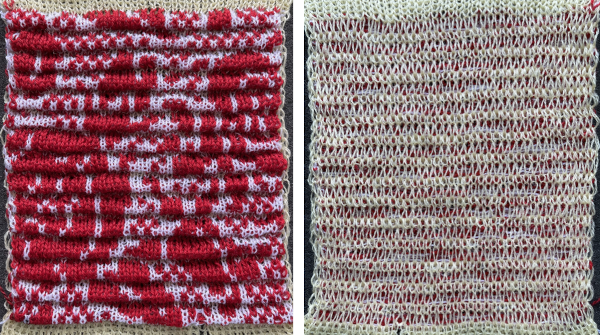
 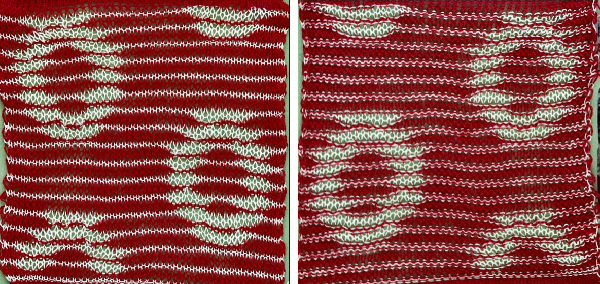 The red is a thicker yarn than the pale yellow, the fabric had an interesting slight curl evocative of shadow pleats. Other possible changes include the elimination of the top and bottom row in the original design.
 The repeats for designs may be self-separated to suit.
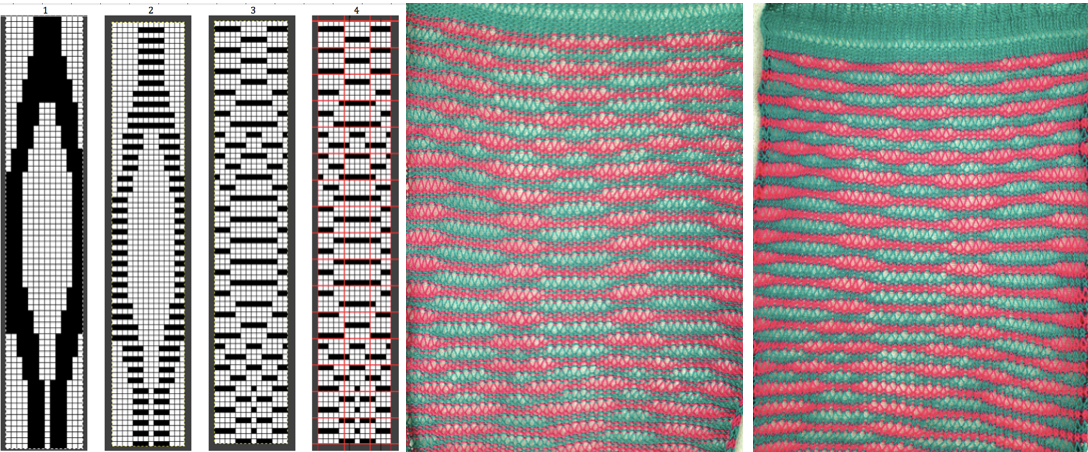
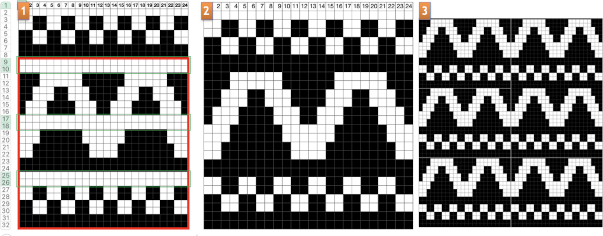
 Three variations of the final png files are shared
  This is the appearance when a different design was entered in img2track. The separated file 3 color file in BW is not shared.
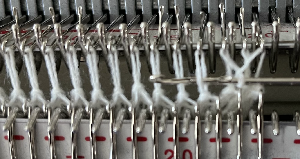
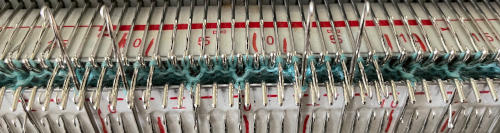
 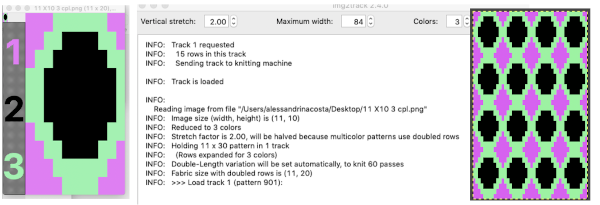 The method for knitting the pattern: the long stitches are formed by loops that are created on the top bed and dropped on the following row.
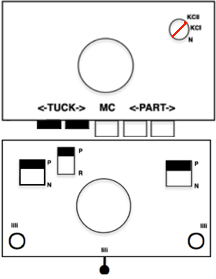
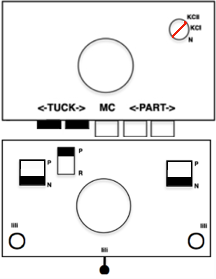
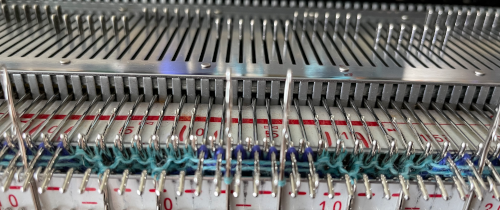

 The second carriage, C2 is set to KCII as well. It will be advancing the design with each pass as well and will drop loops on the first pass, preselect for the subsequent pattern row on the next
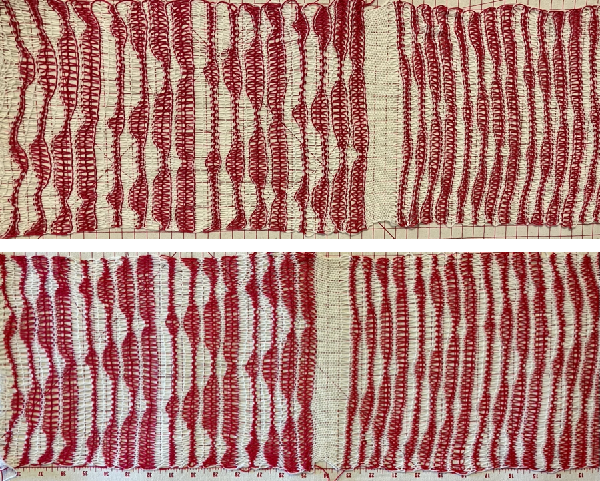
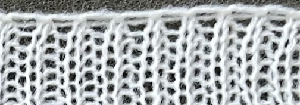
 The elongated stitches allow objects behind them to peek through
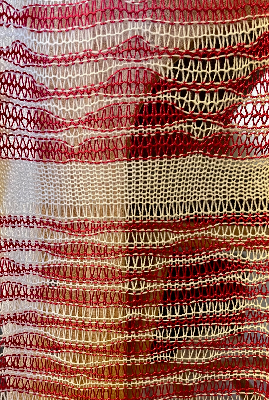
 Here the goal is to use the img2 track separation, maintaining the same color change rotation in each piece.
 The tiled potential appearance as a dbj fabric:
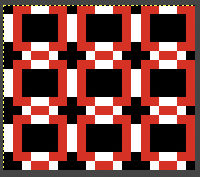 In the first sample three carriages are used:
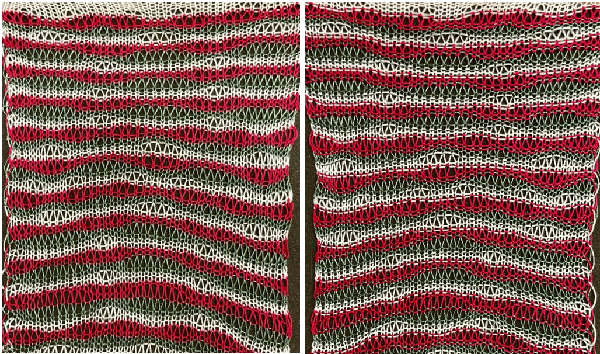 What of end release? because all 3 colors are present in every row, the design is suitable. The first preselection row is from right to left.
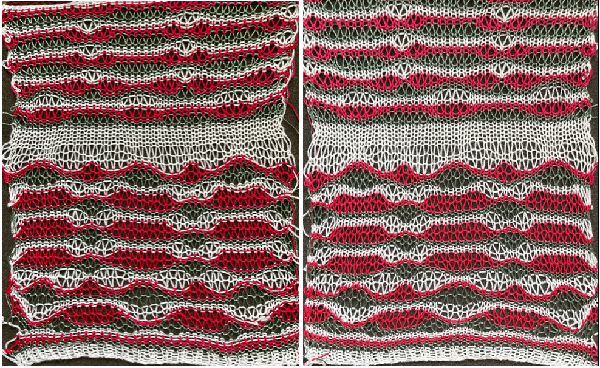
 Any published or self-drawn separation for 3 colors per row patterning including every color in every row of the original design may be used, programmed as a single bed design, and knit for end release.
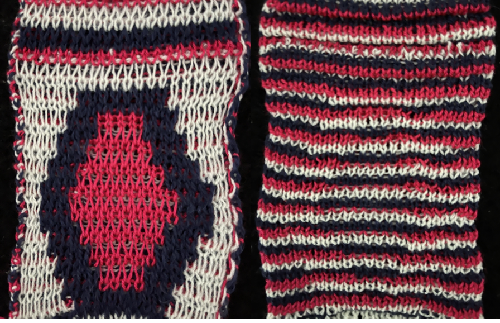


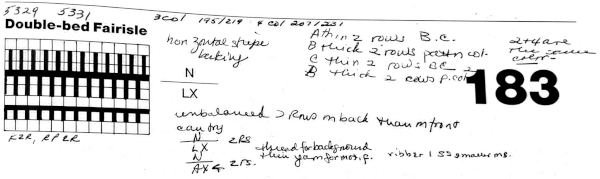
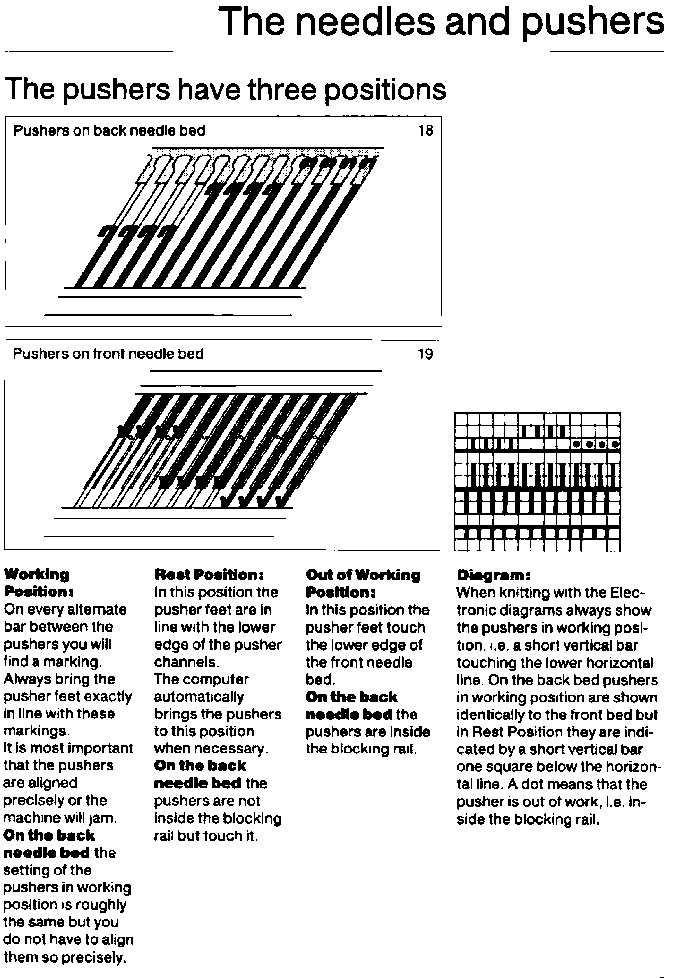
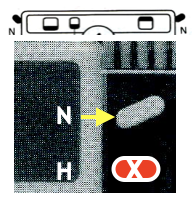
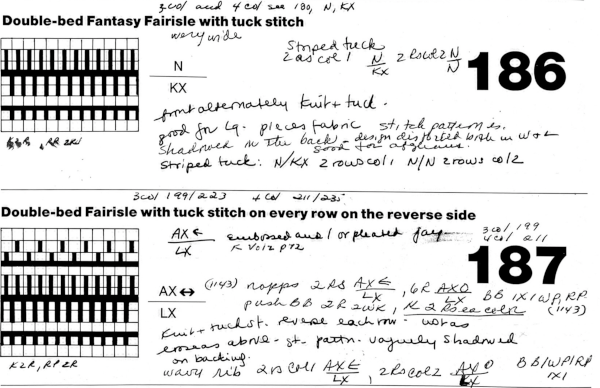 In Fantasy Fairisle knitting using 187 with alternating up and down pushers on the back bed and AX with 2 arrow keys would match Brother ribber knitting with lili buttons used on an even number of needles set to tuck.
 For the 1-pixel grid in Gimp to be visible on an editable image, a magnification of at least 800 is required. The options offered by default
 can be changed to suit by simply typing in a new number.
 the processed image
  the trimmed 98X182 png
  doubled in length once more to 98X364
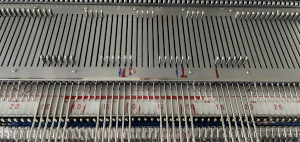
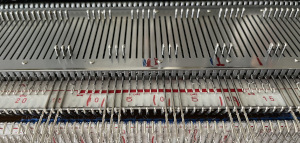
  Knitting process on a 930 using img2track:
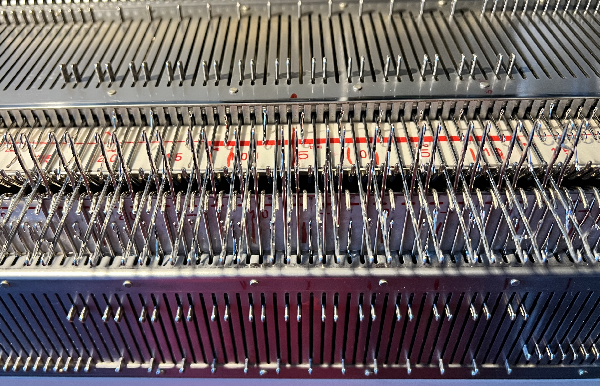
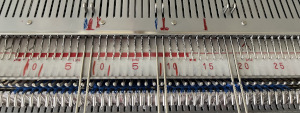
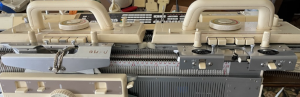
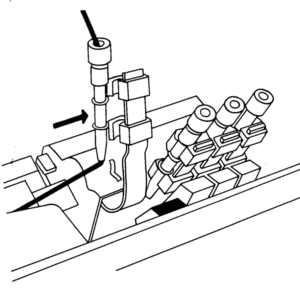
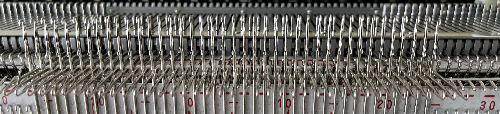
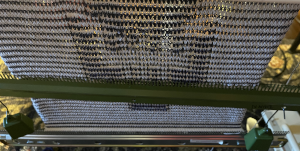 A reminder: in my experience, the Brother cast-on combs are usually chrome-colored, Studio grey, and Passap, and I believe Superba ones were traditionally green. The first 2 were designed for 4.5 mm machines, the latter for 5mm. The different mm spacing does not make the 5 mm combs suitable for casting on on Brother, but they can be poked through the knit in progress. I like to leave the first comb and weights on, insert the new comb closer to the beds, and then move the weight up, and then remove the lower position comb.
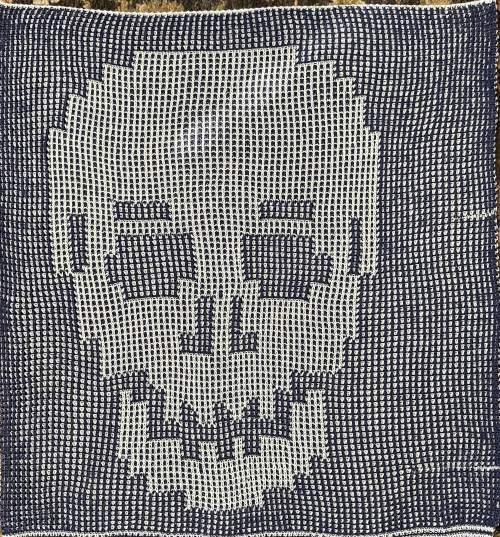
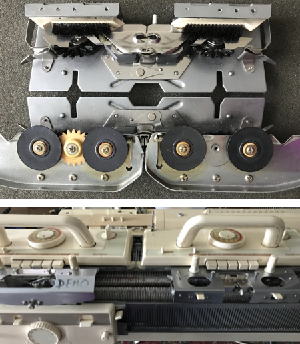
 In the Brother model, sometimes the yarn is left in the wrong place below eye level rather than its own individual one corresponding to its button, and both yarns are picked up with the next color change.
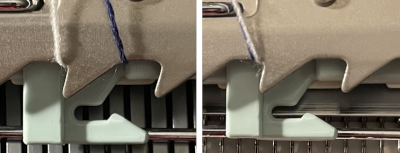
 a close-up of the texture at an angle
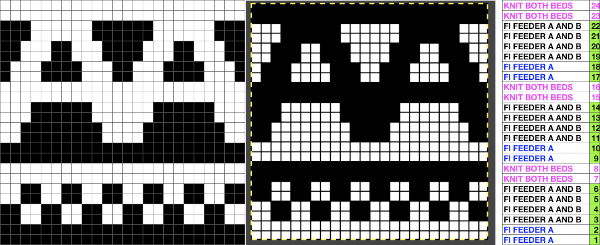
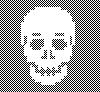
  Claudia Scarpa developed a skull variation using only layers in Gimp
 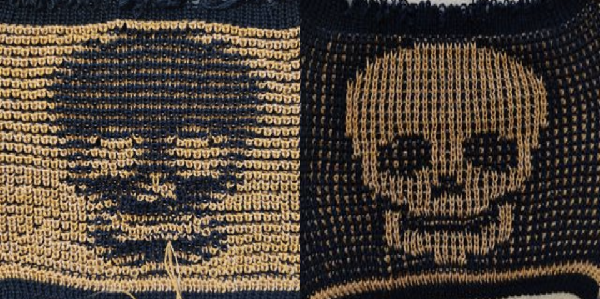 and has been kind enough to create a
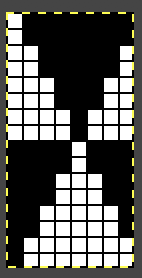
 It is possible to work some repeats on some machines with the ribber also set to tuck both ways with EON needle selection.
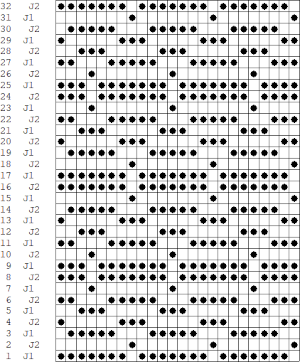
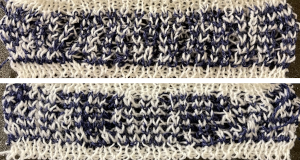 When using the Dak stitch design module, the color separation is automated. Choose any design repeat. This happens to be a 20X20 one, chosen from the thumbnail assortment, so not suitable for punchcard models. “Printing” the template using choosing the option of using dots rather than squares to represent knit stitches makes the resulting print screengrab easier to trace.
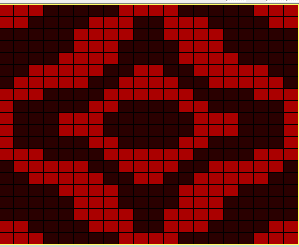 the 20X20 repeat as a BW png
 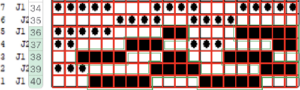 The result is screengrabbed, opened in Gimp, converted to BW mode, and scaled to the 20X40 expanded design size. Unless the double-length function in the machine is also used, it will need scaling again to double length prior to download.
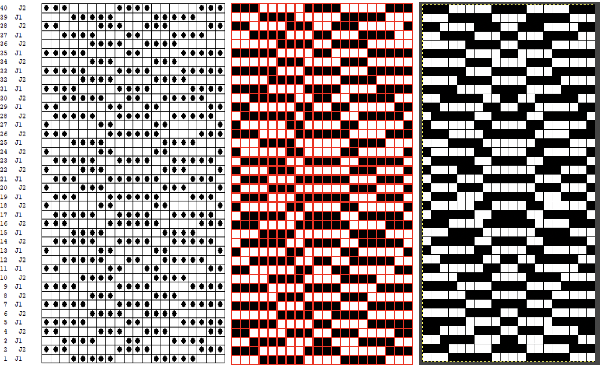 The final image double length, showing the difference between the separation using the template, and that using layers as in Claudia’s video, which appears different but is actually the same repeat, color reversed.
 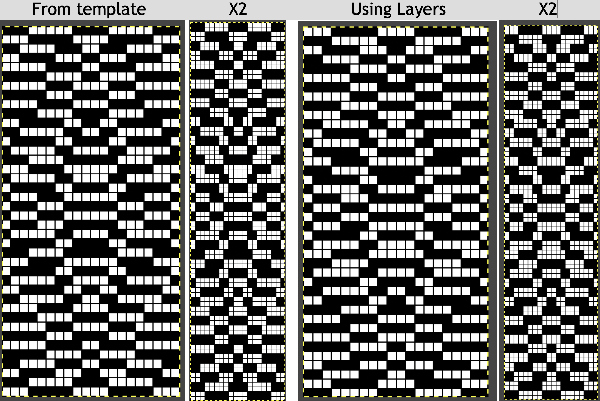 Using bucket fill for the ground in the second layer, as described in the video, the captured clipboard image can be very small
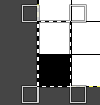
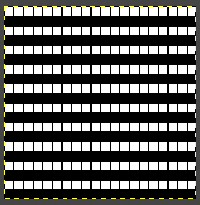 Alternately, the initial design may be scaled X4 to 20 X 80 pixels
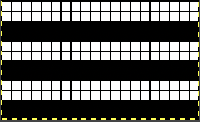
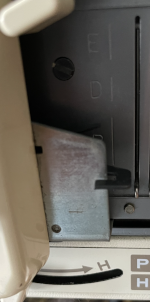
 drop the ribber