The term fringe may be used to describe a decorative border of hanging threads left loose or formed into tassels or twists, used to edge clothing or material. Samples in these posts can apply to that definition
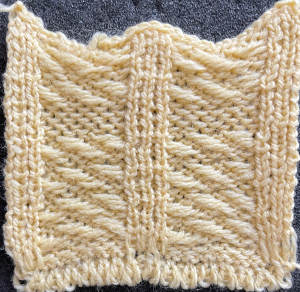
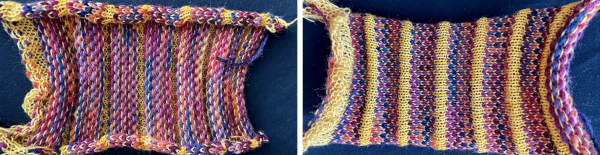
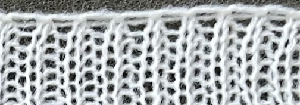
A collection of machine-knit fringes 1 9/19
Machine fringes 2: mock hairpin lace 10/19
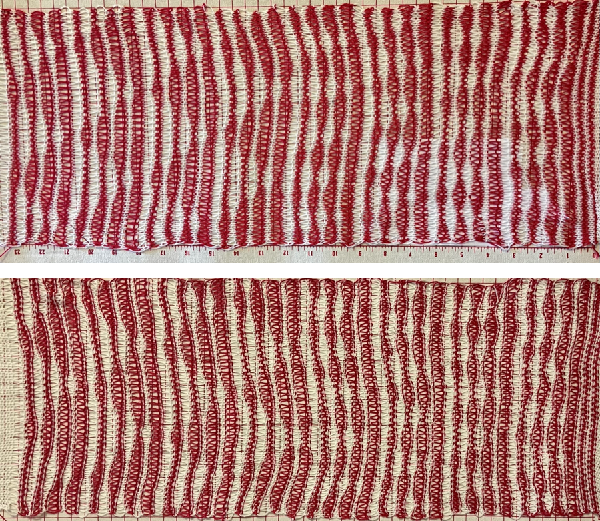
Some methods for creating the long loops 8/12
Present fashion has fringe as an element in mixed locations in finished pieces. For the traditional fringed appearance, lengths of trim may be knit ahead of time followed by its application where desired. Depending on the location(s) and frequency of the applique, a repeat could be programmed to preselect needles in needle locations for hooking up the pre-knit trim or even simply cut lengths of yarn.
Dropping the ribber to its lowest position and using the ribber gate pegs to create continuous loops may provide the desired effect in a fringe or cover the surface of any knit completely.
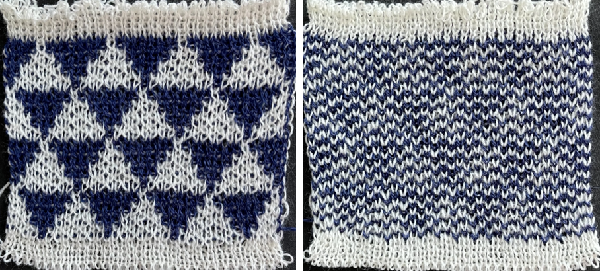
In these beginning samples, the number of plies changes, but not the needle selection.
Many variations are possible, experimentation will help determine personal preference.
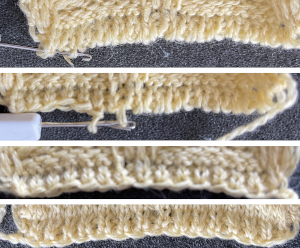
Images of loop formation in progress: 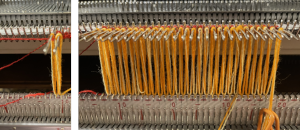 after a row is knit to the opposite side, needles may be brought forward again to ensure they will knit properly,
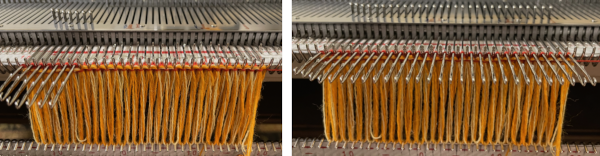 or to add a latch tool bind off in front
 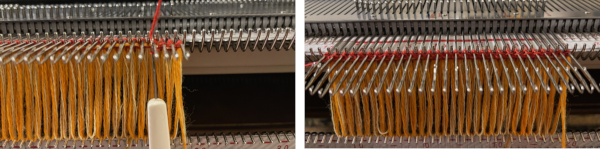 Latch tooling in back of the cast on to reduce roll to the purl side at the bottom of the knit or add color contrast, may also be added at any point in the knit, as surface interest or to serve as a horizontal line to add elements on the knit side on specific rows after the piece is completed.
 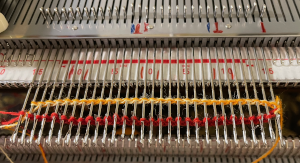 Possible applique use for varying lengths of narrow trim
 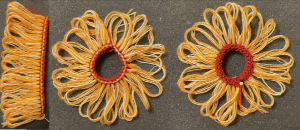 Leaving lengths of the yarns used in the project at each end rather than becoming enthusiastic about clipping them provides a good reference as to the number of plies used for the loops and the thickness of the background yarn.
Here 3 strands were used for the loops.
Crochet cast-on on every needle and knit a few rows, they will roll to the purl side. End on the side on which you find it easier to form loops.
COR: create a row of loops, I prefer to do so from left to right, bring all the needles forward, knit a row to the left securing them
COL: knit for a few rows in the ground yarn and bind off.
Turn the work over, with the roll away from you.
Rehang the trim using the hooked on a row with purl side facing as a horizontal guide, and continue to knit.
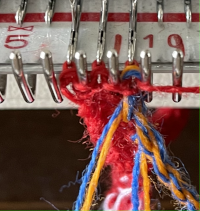
When the piece is completed, the roll will appear on the knit side and may be used as a decorative element. 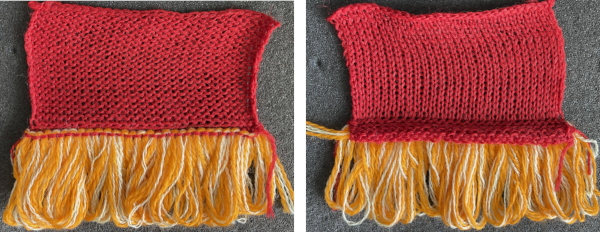 Method 2: uses two strands of yarn for the loops
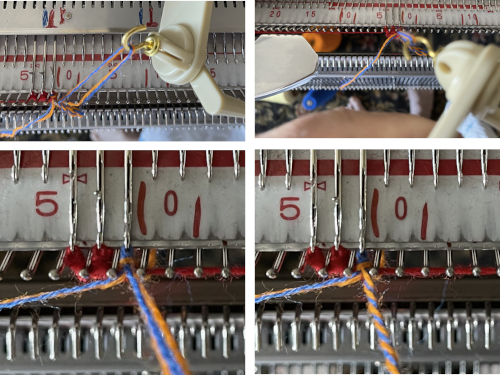
COL: crochet cast on with the ground yarn and knit a row to the right.
COR: knit a row to the left.
COL: move the knit forward, crochet cast on behind the stitches on the machine with the loop yarn. Knit a row to the right.
COR: create a row of loops, bring all the needles forward, a
knit a row to the left securing them
COL: knit for a few rows, lift loops off gate pegs, and position them between the beds
Continue knitting in the ground yarn until the piece is finished. There is a single row subtle roll to the purl side of the ground. 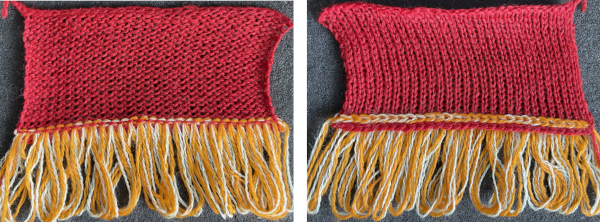 If the piece being knit is a scarf, the direction of the loops is a factor if the trim is added after turning the piece upside down
 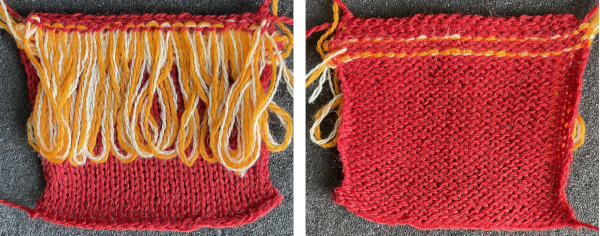 The solution is to produce the fringe as a separate trim which may be stitched upon completion or hung on the start of the piece and stitched on at the top with the piece off the machine after the bind off, or to knit 2 pieces with loops from the bottom up and graft them together at the center of the length of the accessory.
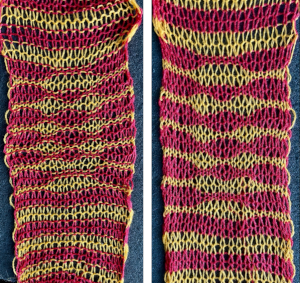
The method most likely to yield very long horizontal, even lengths of continuous loops or stitches as one knits at the bottom edge of the piece or in horizontal lines or patches as one continues up the piece is to remove the ribber if it is in use and use the cast on comb anchored with equal lengths of wire or something that will not stretch.
Add enough weight to it so it will not shift up as one moves across the row creating the loops, as shown in the 8/12 post. Here the yarn is fuzzy mohair wrapped on every other needle.  When wearables are trimmed with fringe, there can be a concern as to how the fringe will wear over time or how the yarn ends would behave if the piece is laundered. Twisting the plies provides an answer. The yarn thickness, number of plies, and the chosen color(s) can be varied to suit the piece.
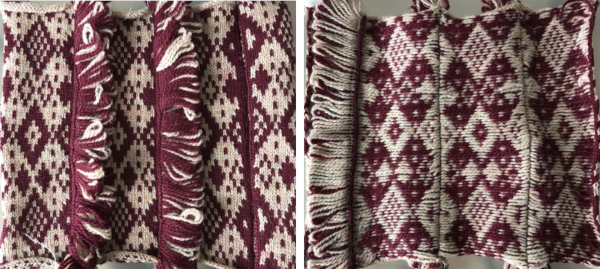
Bullion fringe is one where there are no cut ends or knots, often seen with the twisted elements equal in length. It is available commercially by the yard, and if fiber content or other features are compatible with the knit piece, the purchased fringe may be hooked on and knit in where desired with consideration as to how to best secure or hide any cut ends of edges on either side. Even in a commercial sample intended for sewing, note that there are slight differences between the width of the resulting twists and their very bottoms: 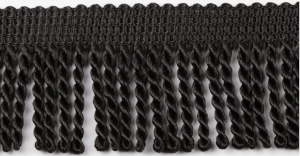 It is possible to produce fringe with a similar appearance on the knitting machine.
Playing with the number of plies, spacing of twists, whether the loops are added at the bottom edge or sides of the knit, and seeking a rhythm:  Note the long red loop in the background yarn occurred where the empty needle was not pushed back to the B position during working with sideways loops.
The first try at long loops across a horizontal knit: 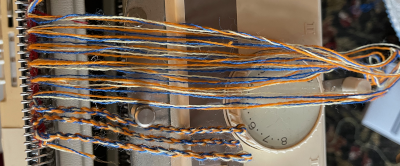 At present my ribber is set up, and since I am planning more double bed fabrics and fringes are a temporary distraction, I tried to form even loops around a quilting plastic ruler for more control of the process. Definitely clumsy and not a good idea for a wide piece. The handling of the loops remains the same.
COL: crochet cast on the width of the planned piece from left to right
COR: knit a row to the left
create a series of long loops on every other needle, done here by wrapping the large ruler  The plan was to knit loops through the stitches on the corresponding needles on the top bed, the ruler was removed, there was not enough slack in the loops, and some of the stitches created with the fringe yarn jumped forward
 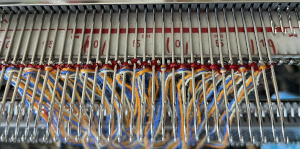 COL: to secure the row, knit a row to the right
COR: repeat a crochet cast on in front of all the stitches to the left 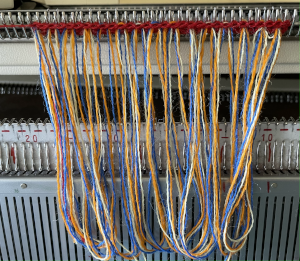 Twist the loops,
  to place them on the base knit, hang the small loop/eyelet formed at the end of the twist on the alternate needles between each of the stitches created by the original loops
 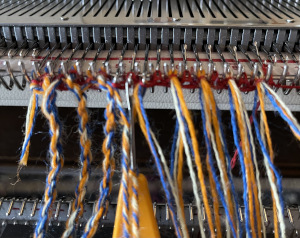 keep notes as to the number of twists in order to be able to replicate the effect, perhaps even try to twist pairs of loops together
 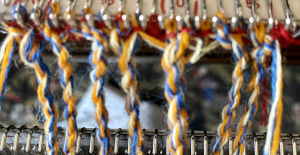 continue knitting the body of the knit.
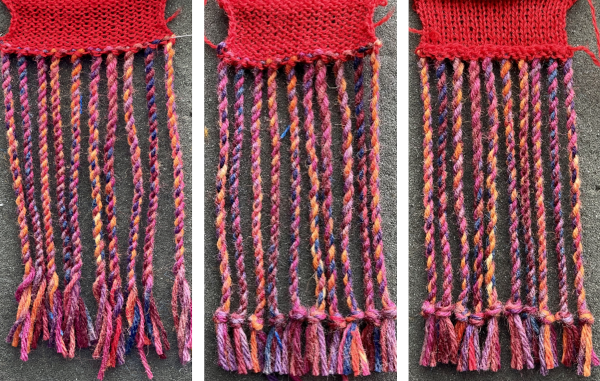
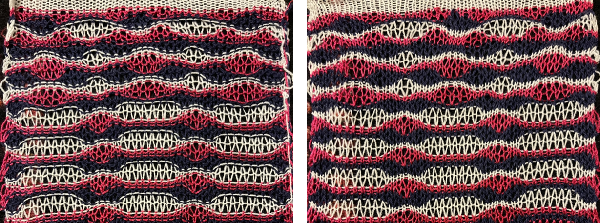
A completed swatch with methodical twists and wraps. 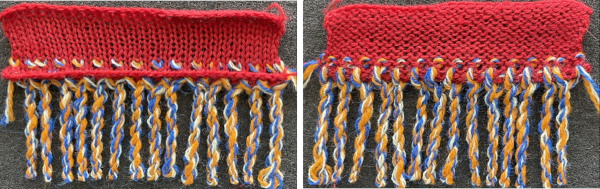 The quality of the braid, both in length and in its bottom edges is controlled by the number of twists and the tension applied when releasing the twist. It takes a bit of practice with the specific yarns and loops to keep fringe lengths and their appearance even. In a final piece, the stitch count needs to be considered so loops may need to be formed on each or a single end and hung on the first and/or last needle in use before continuing to knit.
The yarn ends on either side will need to be secured, adding them to the twist on each side will do that, but then the result is considerably thicker than the other bouillion.
The bottom of twists when their count is not adequate can form loose, little donuts.
What of creating those twists? the goal is to use a tool to turn the yarn in one direction, folding the result in half, securing it, and allowing it to twist. The method is different for hooked on pre-cut lengths of yarn.
Tools commonly used by weavers to twist fringes in any length, with cut lengths of yarn where the number of twists needs to remain controllable and even, with hand cranks allow for easy counting and achieving that goal: 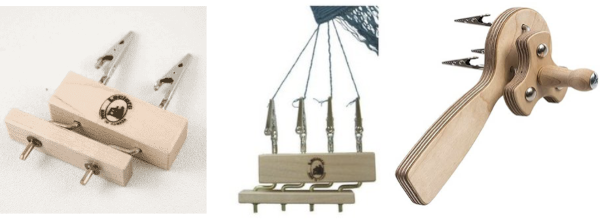 When applied cording is required and the number of twists does not necessarily influence the result, hair braiding tools may be used. They come in multiple configurations and the same model may be found in a huge range of prices.
There are 2 selections for twisting secured yarns, the first twists to the right, the second twists both yarns together to the left, resulting in the braid. Hair is attached in place, the twisted ends are secured with elastics often supplied with the twister or purchased separately. Yarn lengths would need to be knit in securely, knotted on the edge of the twisted lengths. Cording using the same tools would need to be secured with knots at both ends and may be used as trim, hooked onto knitting in progress, or stitched in place after completion of the piece. 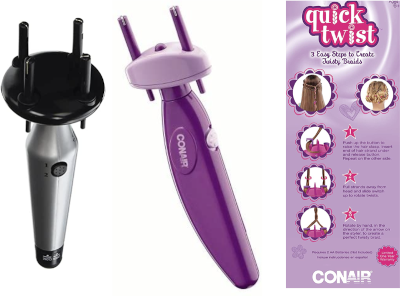 An easy, inexpensive DIY tool created with supplies I had on hand but it is also easily available for purchase.
A small cup hook was screwed and secured into a bobbin winder normally used for cross stitch. The body of the tool becomes a secure handle, the crank makes it easy to count twists and keep their number constant if a fringe with equal length and thickness elements is planned.  For fringe worked sideways, suitable for trims that can be placed anywhere on the body of the knit, the first sample is worked on a 3 stitch vertical base strip of knitting.
Crochet cast on from left to right and knit one row back to the left. Make a slip knot on the fringe yarn, knit it through the first stitch on the right 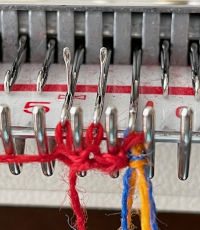 COL: knit to the right, thus securing the thicker knit stitch
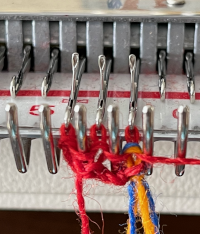 COR: wrap an empty needle further to the right to determine the length of the loop to be created. Its location can remain fixed throughout or varied if the intent is to experiment with different lengths of bullion.
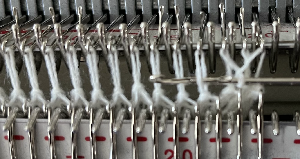
Wrap the yarn plies around the empty needle, apply a light tension twist and lift the end of the loop onto the first knit stitch on the needle on the left, 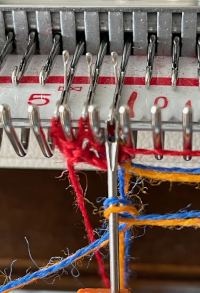 knit it through the stitch immediately above the wrap
  release the loop from the empty needle on the right, push it out of work so as not to pick up yarn a long loop of the ground yarn as the carriage knits a row to the left
 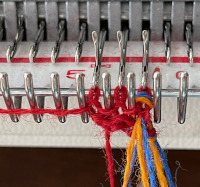 COL: twist cording and hang on the first needle on the right
 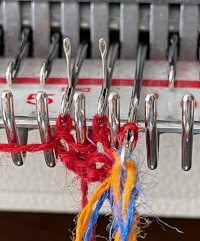 maintaining light tension on the twisted length, knit a row to the left, or knit the loop at the bottom of the twist through the stitch immediately above it before knitting to the right
 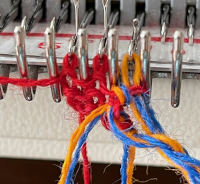 COL: knit to the right,
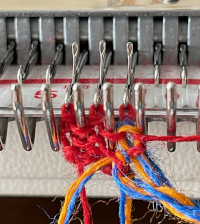
 repeat the process.
A closer look: insert the tool, and removed the loop onto it. Be sure to push the empty needle back to B until it is needed again. ![]() Tug the loop lightly forward, and begin to turn the handle to twist the yarn until the twist appears evenly distributed while keeping count, different counts may be tried in the same test swatch.
Tug the loop lightly forward, and begin to turn the handle to twist the yarn until the twist appears evenly distributed while keeping count, different counts may be tried in the same test swatch.
 insert a single eye tool into the loop on the hook of the twisted cord, lift it onto the last stitch on the right on the top bed, it may be knit through or simply laid in the hook,
 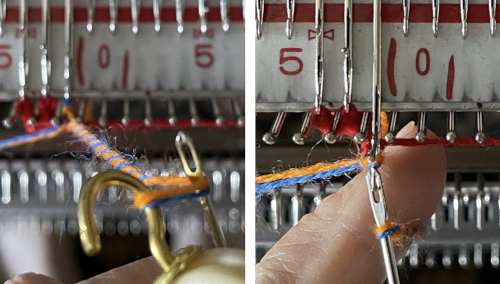 bring the needle with the multiple stitches forward, tug lightly on the bottom center of the twist, and release.
To complete the bouillion: knit a row to the left side.
Lift the twist away from the body of the trim, bring the plies up and in front of the twisted yarn, and use them to knit through any stitches on that needle.
Begin the process again. With some practice, you may find some different and preferred variations to the suggested sequences.  A variation: the first experiment was formed on a base of 3 stitches, here they are increased to 5
COL: crochet cast on 5 stitches, knit a row to the right
COR: knit a row to the left
COL: knit slip knot through the first stitch on the right as above
knit two rows
COL: wrap empty needle, knit through the first stitch on the left,
twist yarns and hang onto the needle,
bring needle forward,
knit two rows
COL: bring yarn ends in front of twisted yarns,
knit to the right securing the plies,
knit 2 rows,
continuing to form fringe bouillion as described. 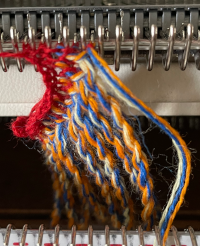
 If significant or even variable fringe length is required, cut lengths of yarn may be applied to the knitting, or make long loops and cut after they have been secured.
The lengths will be twisted two or more at a time, first in one direction, then in the opposite, and released.
This is a video for the tool sold by Lacis, which is very similar to my hair braiding tool. The twists are made clockwise on one setting, then counterclockwise and released. They can be overtwisted and when the twist is reversed and released, the results appear to find a common average for fairly consistent quality.
The knots to secure the yarns may be executed as you go or at the end of the twisting process, keeping the fringe length even or varied as needed.
My initial sample used loops with 2 plies in each
COL: begin with a crochet cast on from left to right
Knit a row to the left
COL: hang cut loops across the row, knitting each through the stitch previously on the needle
use the background yarn to repeat the crochet “cast on” in front of the loops to secure them, move the KC to the right
COR: continue knitting and bind off
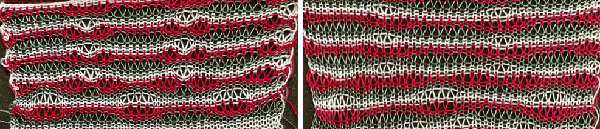
For the test, I used loops sized on the same ruler as for the bouillion sample and then cut. Later, below, the comparison is made between the different finished fringe lengths.
The yarns plies got combed and trimmed to even lengths.
Enough yarn needs to be secured in the twister hooks so the ends will not slip out during the process, which is very quick, and it soon becomes evident how long to twist in one direction before reversing the twist setting.
The couple of rough spots evident in my trim happened when the yarn split and was caught in the hooks of the twister, so the release was not clean.
I varied the number of plies, in each hook, beginning with 2 in each, then three, four, and mixing things up a bit more in a couple of the series. The plies in the cut end below the knots remain available for counting to verify the numbers of plies used if notes are lacking.
A crochet hook or latch tool may be a useful aid when pulling the ends through a fringe loop, forming the knots. 
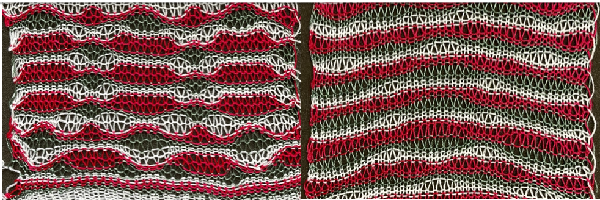
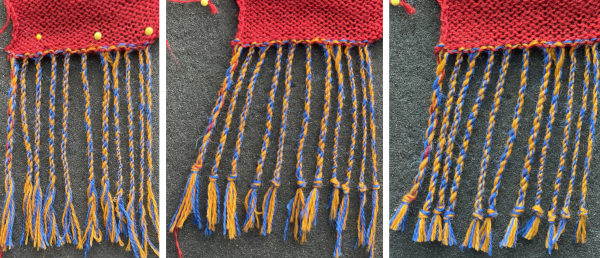 Comparing the bouillon fringe length to the above:
 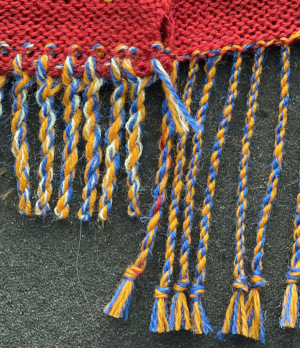 Here the loops are created using a factory 4 ply space-dyed wool. After a chain cast-on and a row knit in the ground yarn, the loops are knit through each stitch on the needle bed, then knitting continued for several rows and the piece was bound off.
The loops were cut open at their bottom, the hair twister was used to create the fringe, with 2 yarn thread lengths in each hook. 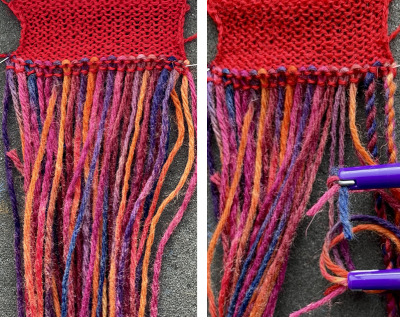
 The results are quick to produce, and worth some further experimentation. There are many other possible variations, including blending fiber content in the fringe lengths.
Knit tubes, i-cords, and simple knit strips that are allowed to twist in on themselves are all options for fringing, but be prepared to weave in lots of yarn ends. One of my slip stitch scarves, with attached i-cords fringe  Series of loops, twisted or not, can also be applied in pattern anywhere on the knit, and folks who do not like fringe can create a variety of alternative edgings, some ideas will be shared in a future post.


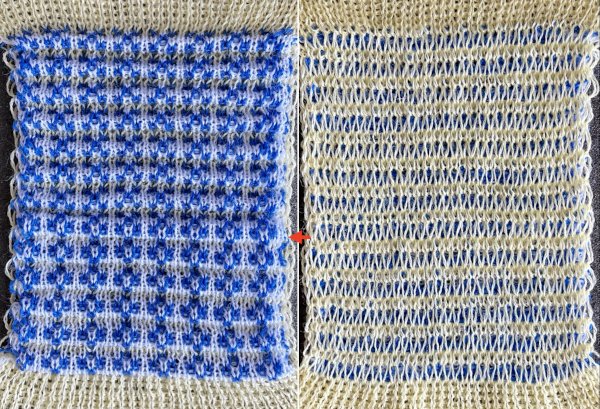


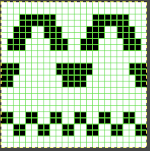


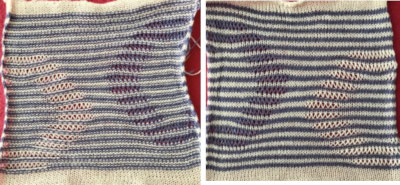
 Here it is shown modified, with rows containing fewer than 3 colors marked.
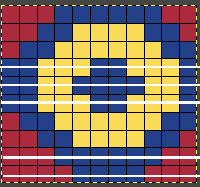


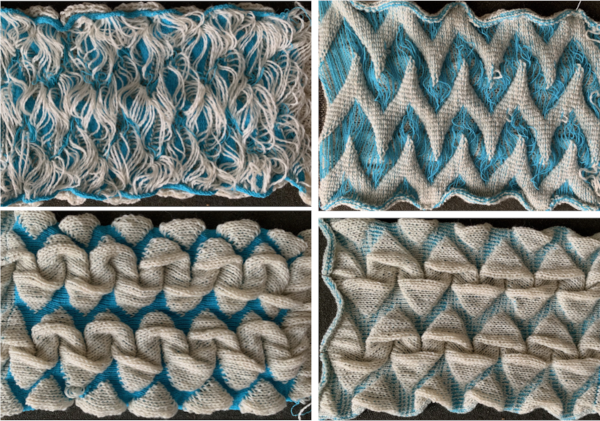
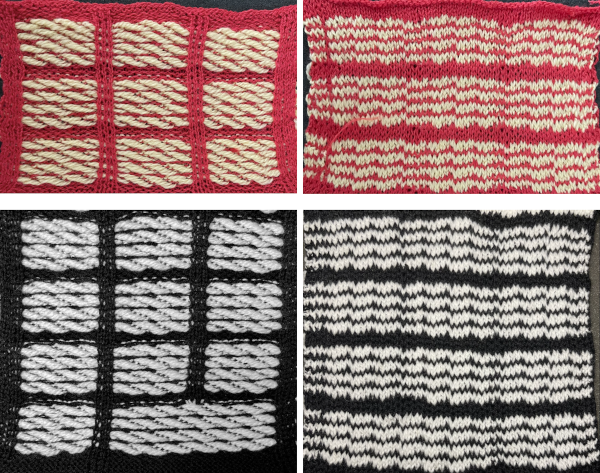
 A large variety of pleats may be knit on the single bed as well, one being shadow pleats. The resulting knits also need to be gathered on one of the 2 edges in items like skirts at waistlines, and the number of knit rows needed for the volume required can be daunting and a large commitment of time if not effort.
 Both yarns used are wool, a yarn that has memory and spring-back. In the potential fold rows, the red color was replaced with a thin ply with the same fiber content. The first folds were knit in an *8 with thin, 14 with thick, 8 with thin** color sequence. Watching the knit as it progressed showed the thicker fair isle areas folding inward, with the thinner areas folding outward. The remainder of the swatch used a 4 thin, 8 thick sequence. The knit was steamed and pressed, the folds are soft but permanently present with the lower edge of the piece lying quite flat after a considerable amount of time.
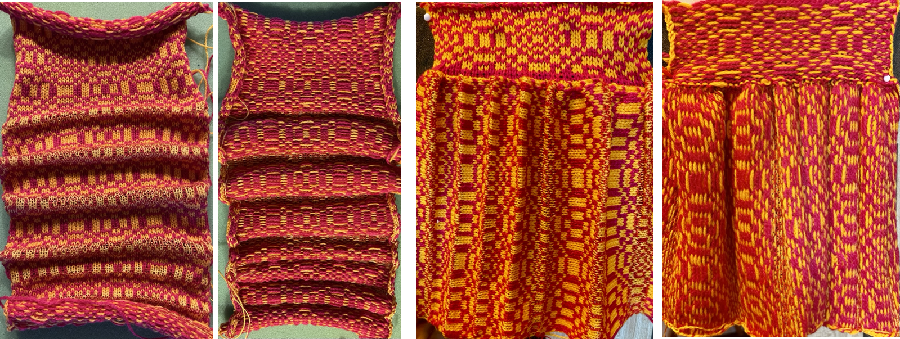
 The blocking saga: I do own blocking pins but honestly have only used them in demos, and on rare occasions such as this, or to cut them down when I needed a fast replacement for a ribber cast on comb lost wire.
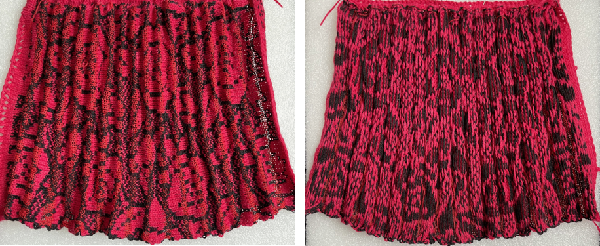

 after steaming and pressing
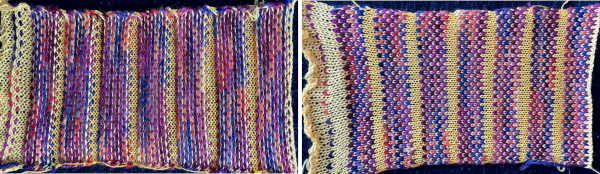

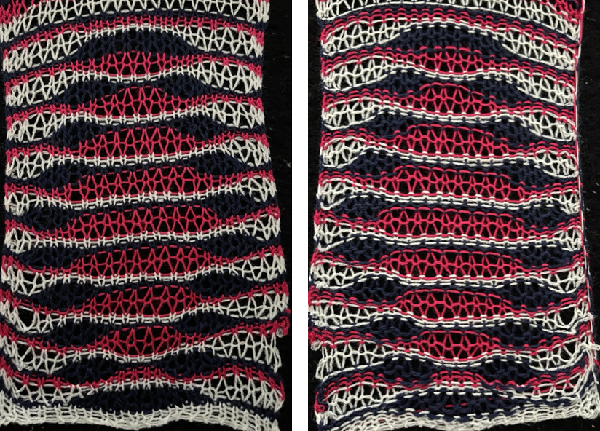
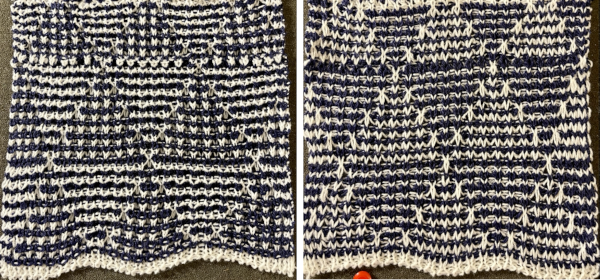
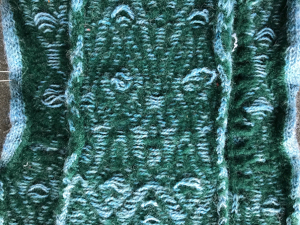
 Trying for a bit more detail, there is a see/peek-through quality.
 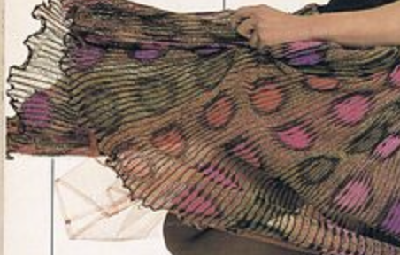 At first, I thought it might be a version of the stitch using 3 colors, but later, looking again, I came to believe it to be a 2 color
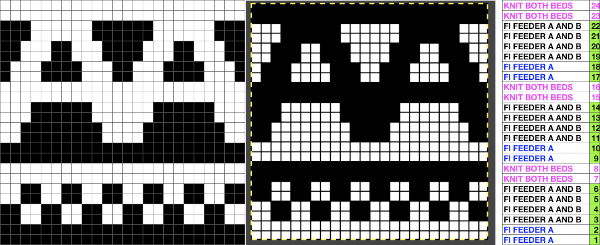
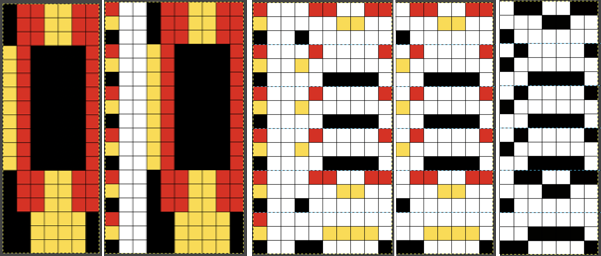
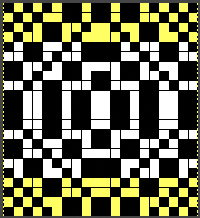
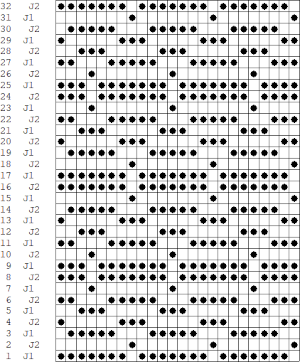
 I wanted to add solid color drop-stitch stripes, the solution being to add all black rows. Every needle will select every row in those areas, colors are changed every two rows, creating the desired effect when the corresponding stitches are dropped.
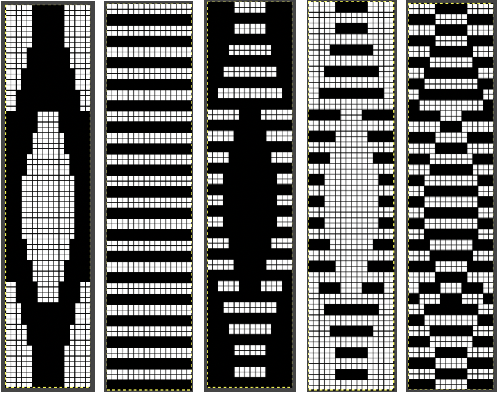
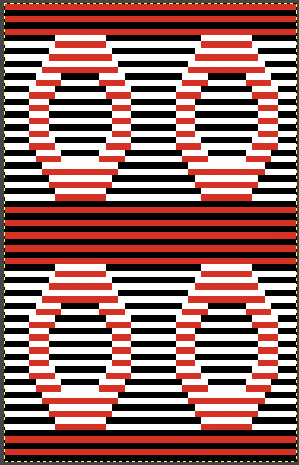 A visual summary with an added color change column and row numbers with rows on which dropping all loops can occur marked with different color numbers. In this case, the ground is in the dark color, the shape in the lighter one.
 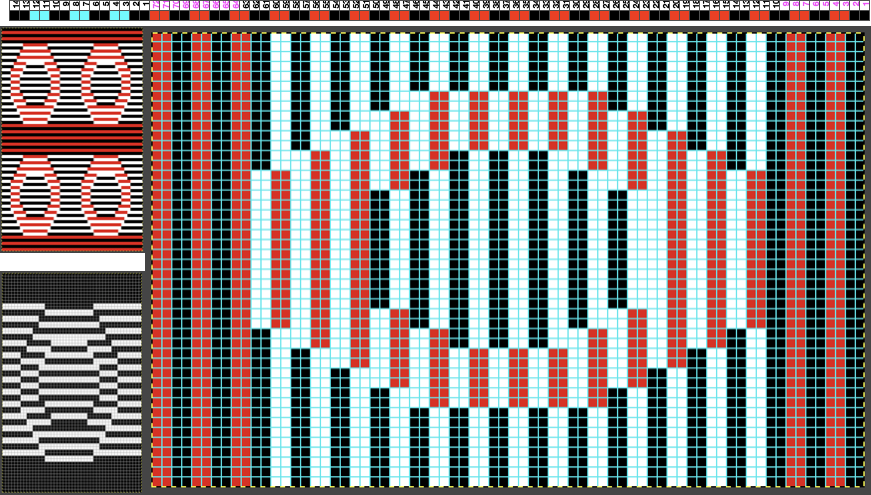 Determining whether the shape or the ground stripes knit the dark color is simply done by beginning the first all knit rows with the dark color or the light.
 but I would like to have stripes in the solid lighter colors as opposed to 2,

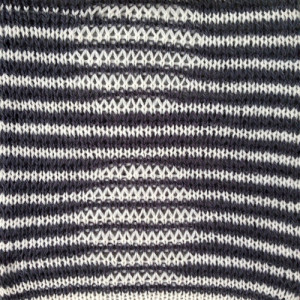
 Here some of the peek-through quality of the fabric is shown again. When any fabric is gathered sideways, it is likely the repeat will appear narrower and longer.
  Using a 16/2 cotton at nearly the same tension produces a fabric that is even sheerer.
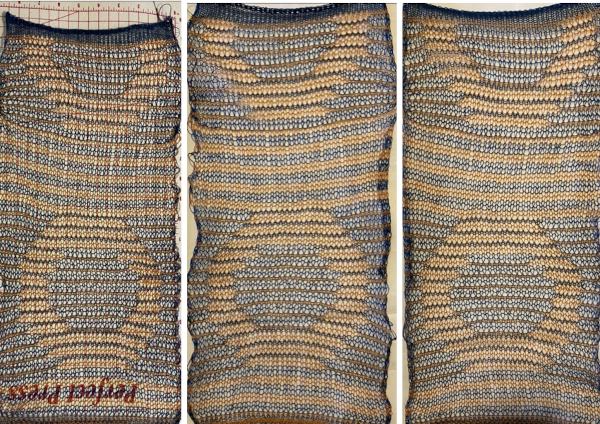
 And now those solid stripes in 2 rows knit are really bothering me, thinking they should be switched to only one row of loops, making the original repeat without those added black rows the better repeat?
  A potential use is for the thinner knit is for it to be used as a layer over a different pattern or the same design as seen here, in the thicker yarn
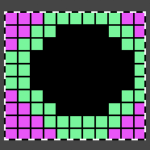
 seeking a rounder, smaller donut shape:
 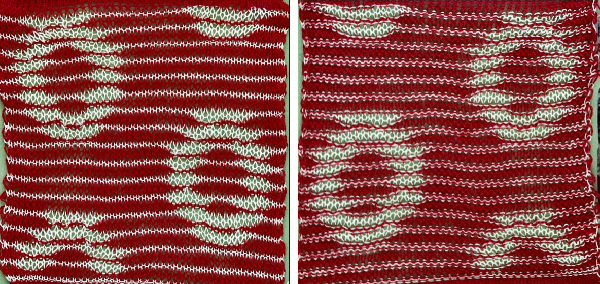 The red is a thicker yarn than the pale yellow, the fabric had an interesting slight curl evocative of shadow pleats. Other possible changes include the elimination of the top and bottom row in the original design.
 The repeats for designs may be self-separated to suit.
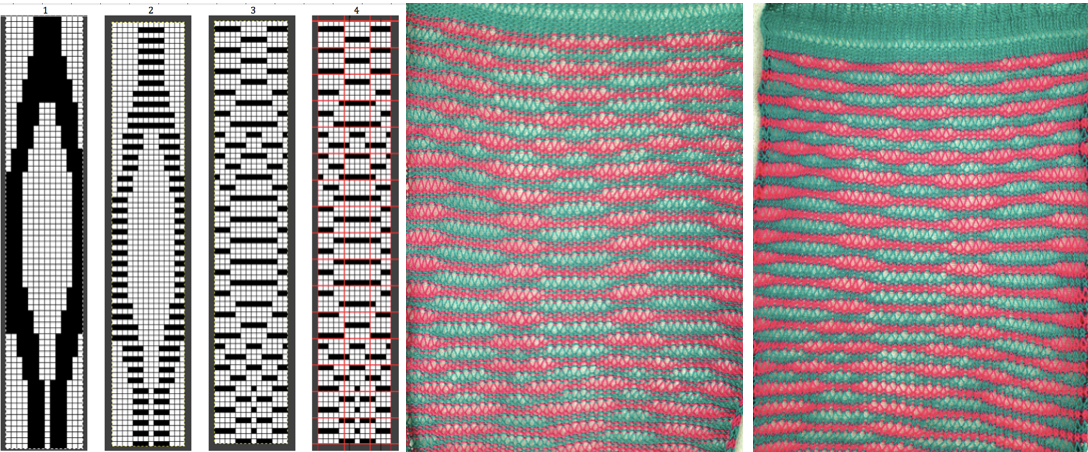
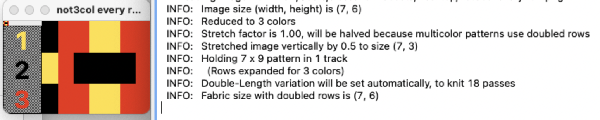
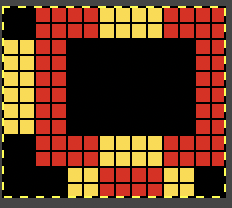
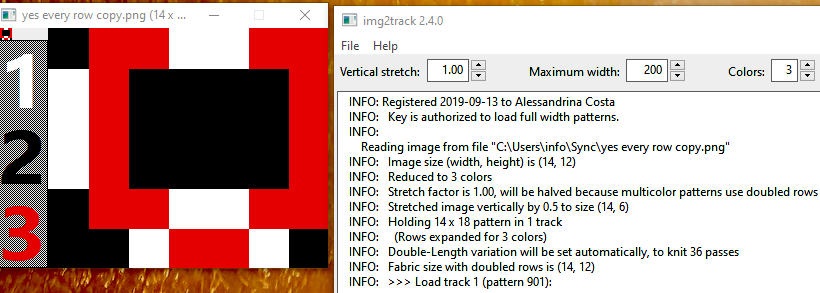
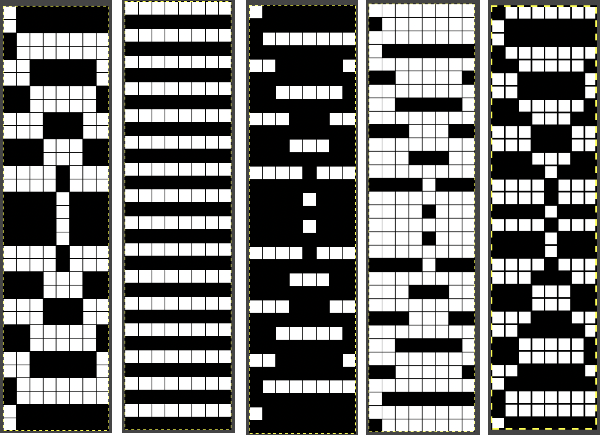
 Three variations of the final png files are shared
  This is the appearance when a different design was entered in img2track. The separated file 3 color file in BW is not shared.
 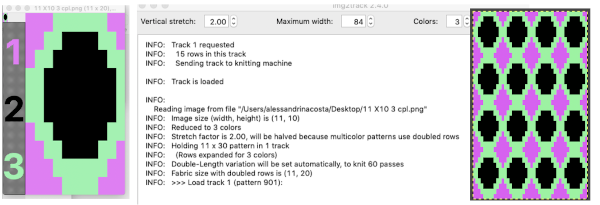 The method for knitting the pattern: the long stitches are formed by loops that are created on the top bed and dropped on the following row.

 The second carriage, C2 is set to KCII as well. It will be advancing the design with each pass as well and will drop loops on the first pass, preselect for the subsequent pattern row on the next
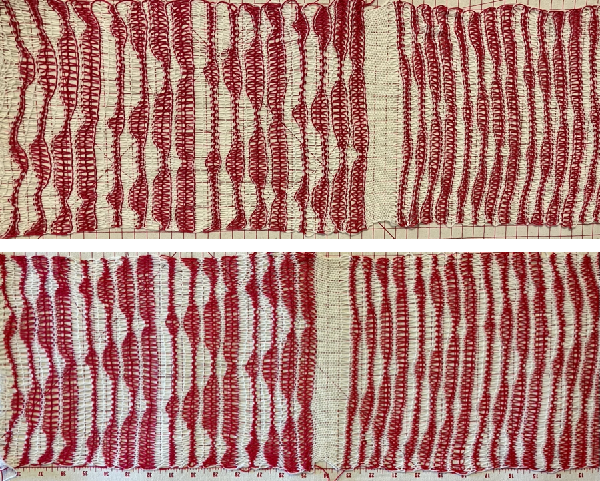
 The elongated stitches allow objects behind them to peek through
 Here the goal is to use the img2 track separation, maintaining the same color change rotation in each piece.
 The tiled potential appearance as a dbj fabric:
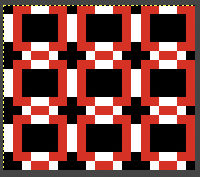 In the first sample three carriages are used:
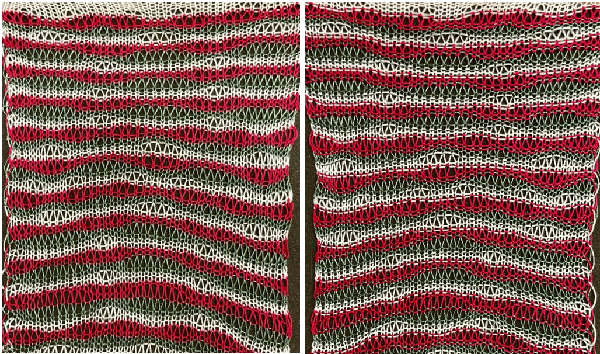 What of end release? because all 3 colors are present in every row, the design is suitable. The first preselection row is from right to left.
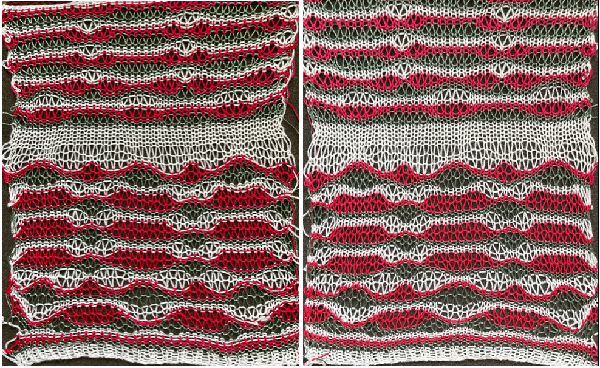
 Any published or self-drawn separation for 3 colors per row patterning including every color in every row of the original design may be used, programmed as a single bed design, and knit for end release.
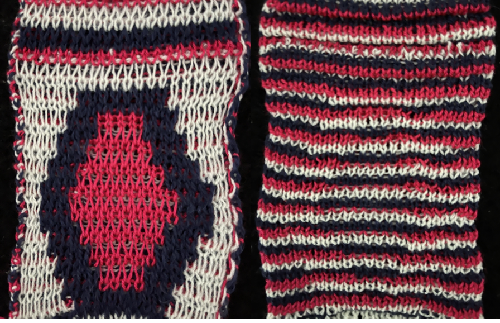
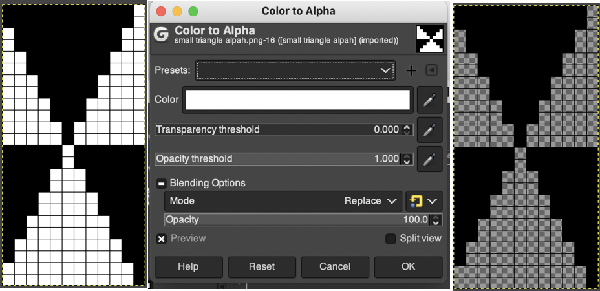
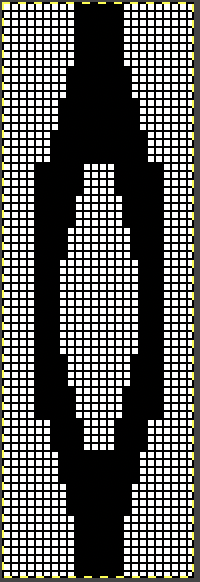
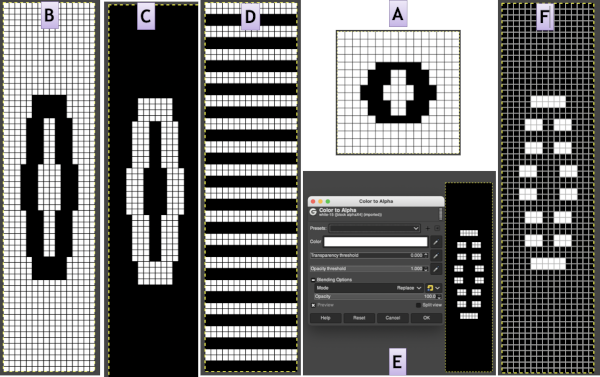
 the white ground of the resulting image is rendered transparent by using Color to Alpha
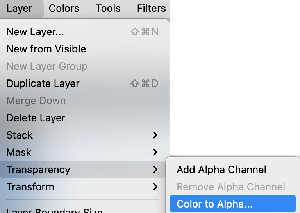
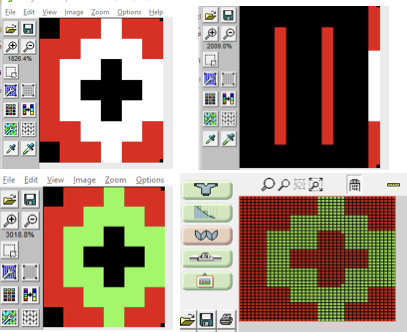
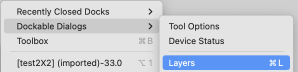
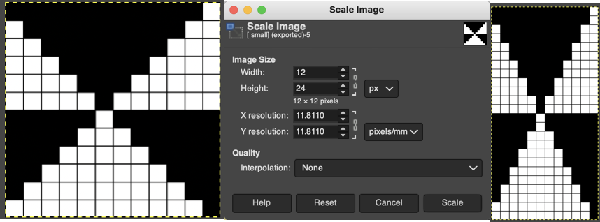
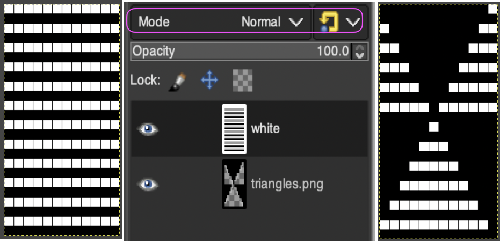
 Select New Layer from the Layers menu (see chart), choosing the background or foreground color to have a white screen. It will share properties with the alpha repeat such as pixel count, magnification, and the grid view if used.
 Copy the selection, and it will be saved to the clipboard and remain available for filling with the pattern unless the program is quit. It may also be
 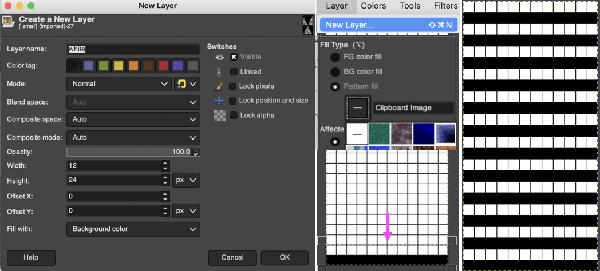 In the layers dialogue, use the mouse to drag and drop the alpha image icon for the triangle layer onto the newly created one. The selected icon will appear surrounded by a border when chosen, a new icon will appear during the step.
 Color invert the new image
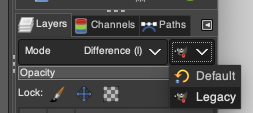
 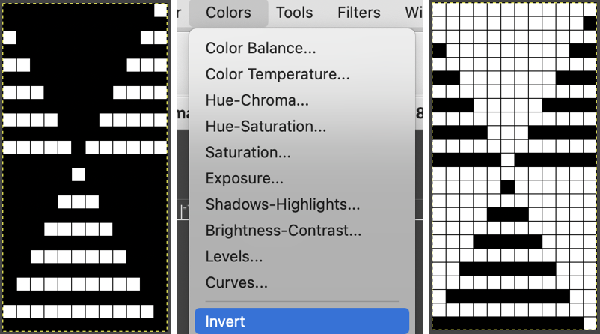 Click on the downward pointer to the right of Normal and select Difference. The result is a repeat that may then be saved and used doubled in height to knit DBJ in a variety of settings.
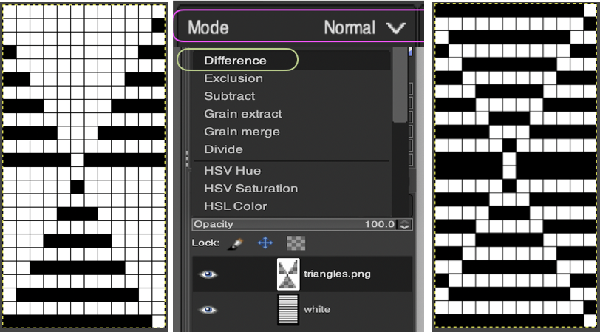 Elongation after download can be avoided by working with the same initial image scaled in height X4 and following the same process, saving and using the repeat on the far right.
 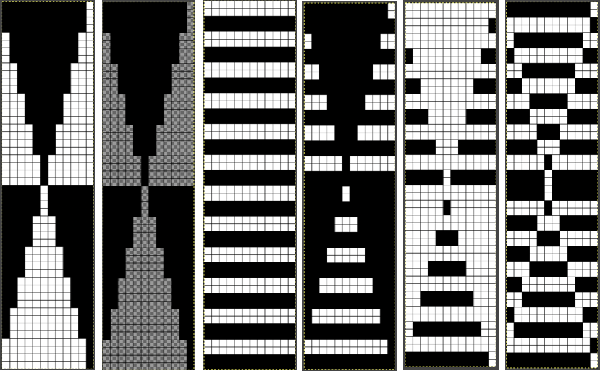 The same separation was achieved using other methods in the post on fantasy fair isle.
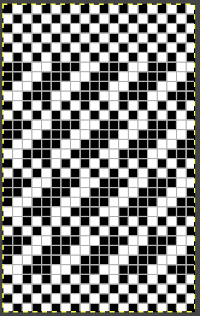
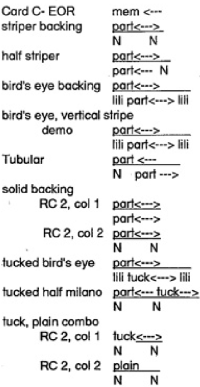 Are punchcard knitters left out? In the
 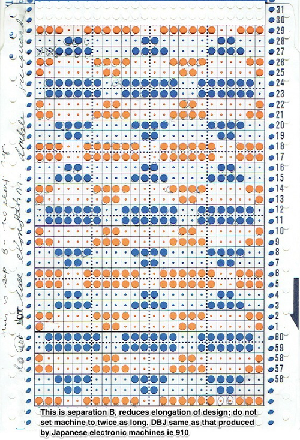 and the starting design shown with the color reversed repeat of the above.
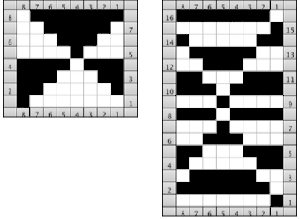
 When a color separation is downloaded it is used as one would a fair isle. If the motif is representational and direction on the knit side matters, any repeats may have to be mirrored horizontally if they are automatically reversed by either your software prior to download or your machine model after it.
 The image is processed as for the previous separation, the final png is exported. Open the saved in Gimp.
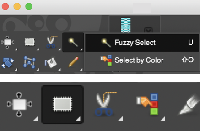 Using the rectangle tool, select a single blue row, after the selection, press and hold down the shift key and repeat selections of multiple rows in the same color. Each selection will be bordered by a dotted line.
 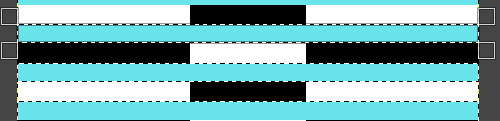 Release the shift key. Click on the rectangle select tool and then again in the work window outside the image to set it. The dotted lines will disappear. The same action is repeated if working on segments of the full file at a time.
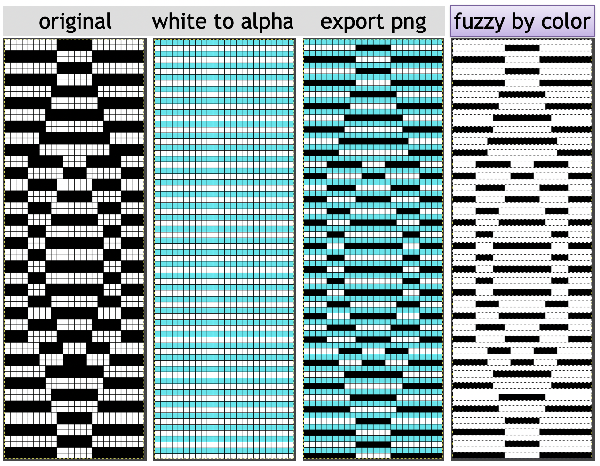 The 24X72 new png
 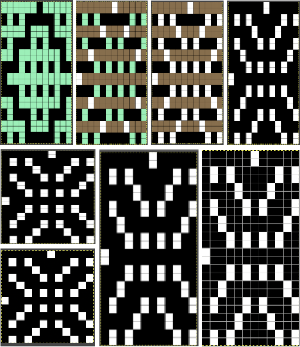 Both results require scaling X2 before knitting, whether by button setting changes in the repeat after download or in Gimp before.
 The process in Layers
 The very last file on the right is saved as a PNG. In turn, it is opened again in Gimp, scaled to twice its height
  Exclusion is the alternative Layer mode which when following the same process yields identical results.
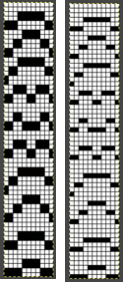
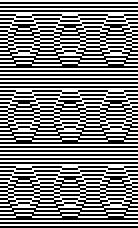
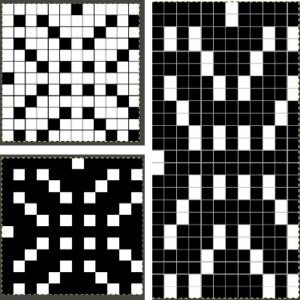
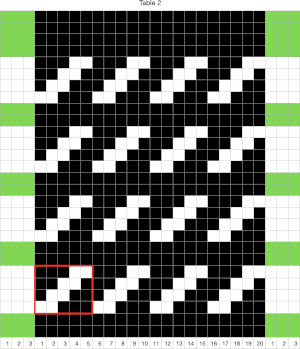
 A block slip stitch design from the


 In Fantasy Fairisle knitting using 187 with alternating up and down pushers on the back bed and AX with 2 arrow keys would match Brother ribber knitting with lili buttons used on an even number of needles set to tuck.
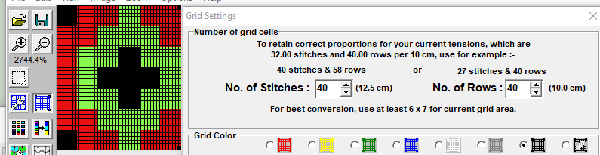
 For the 1-pixel grid in Gimp to be visible on an editable image, a magnification of at least 800 is required. The options offered by default
 can be changed to suit by simply typing in a new number.
 the processed image
 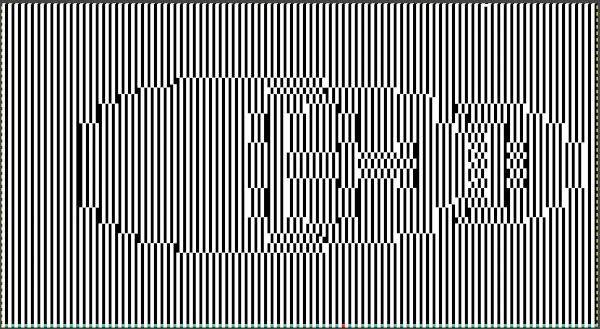 the trimmed 98X182 png
 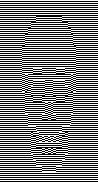 doubled in length once more to 98X364
 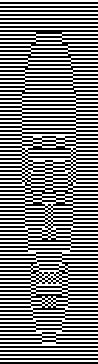 Knitting process on a 930 using img2track:
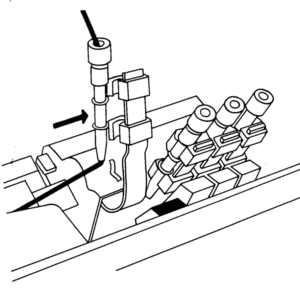
 A reminder: in my experience, the Brother cast-on combs are usually chrome-colored, Studio grey, and Passap, and I believe Superba ones were traditionally green. The first 2 were designed for 4.5 mm machines, the latter for 5mm. The different mm spacing does not make the 5 mm combs suitable for casting on on Brother, but they can be poked through the knit in progress. I like to leave the first comb and weights on, insert the new comb closer to the beds, and then move the weight up, and then remove the lower position comb.
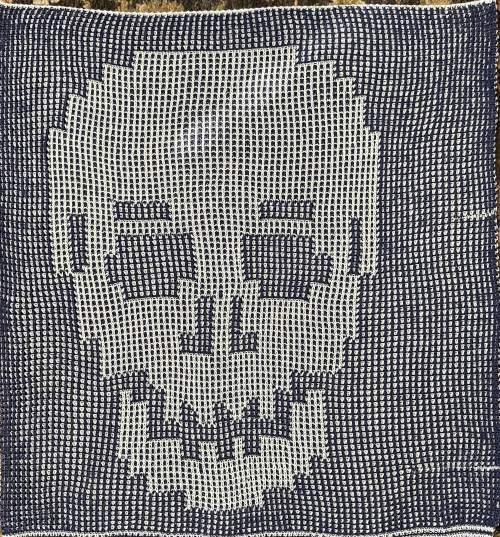
 In the Brother model, sometimes the yarn is left in the wrong place below eye level rather than its own individual one corresponding to its button, and both yarns are picked up with the next color change.
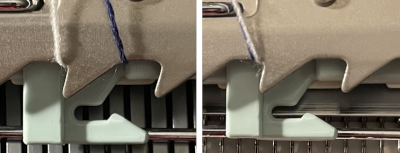
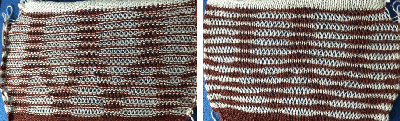
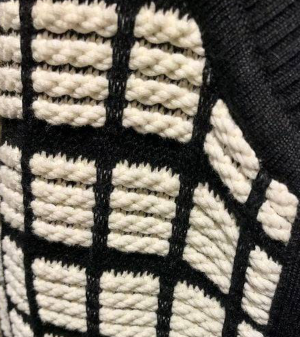
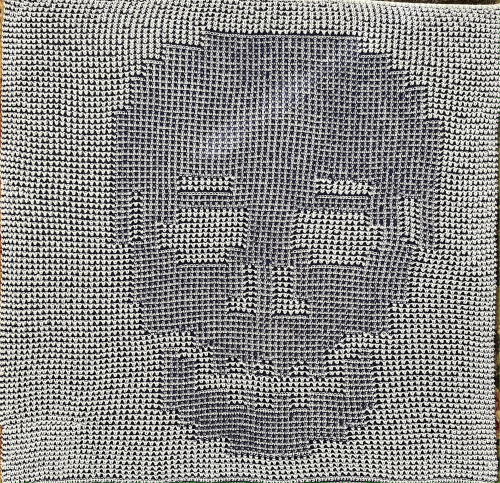 a close-up of the texture at an angle
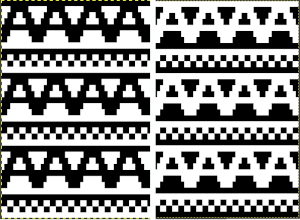
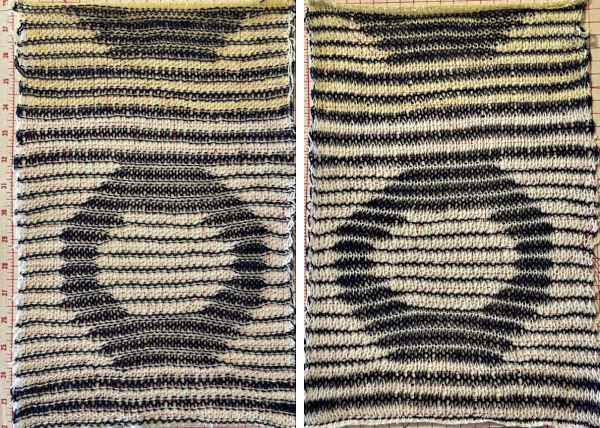
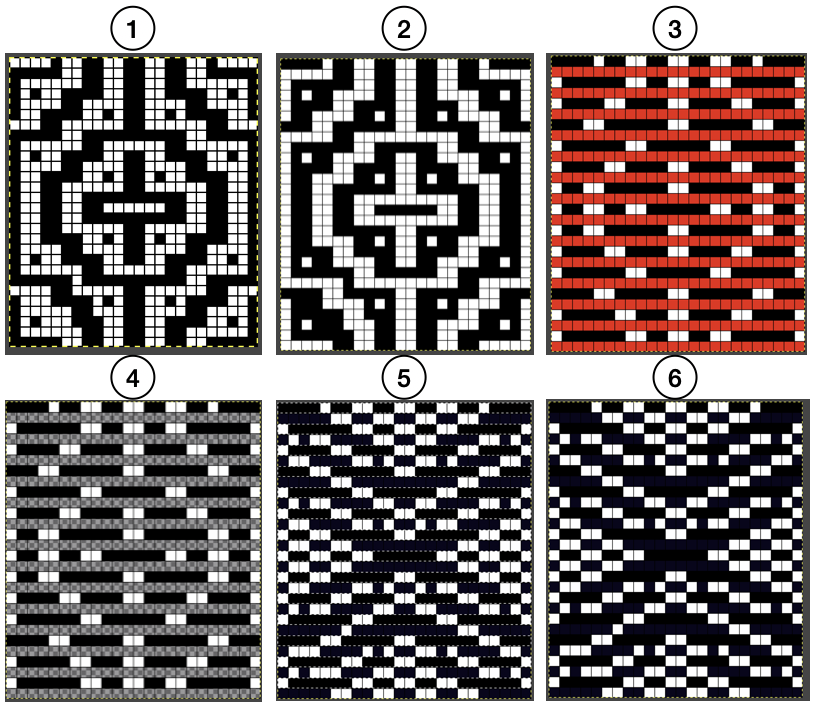
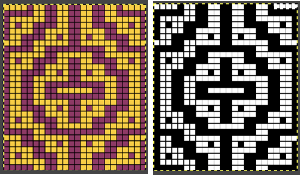
  Claudia Scarpa developed a skull variation using only layers in Gimp
 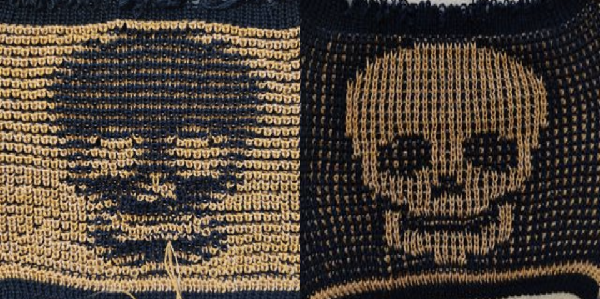 and has been kind enough to create a
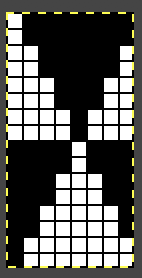
 It is possible to work some repeats on some machines with the ribber also set to tuck both ways with EON needle selection.
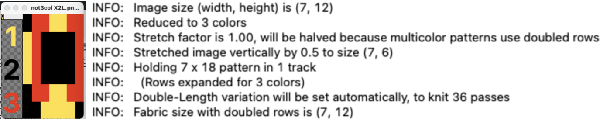
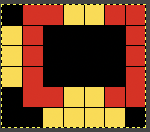
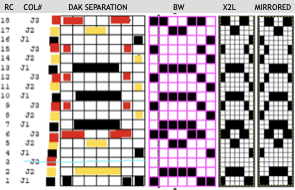
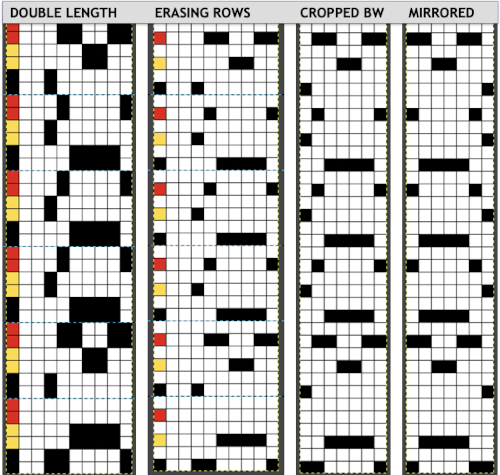
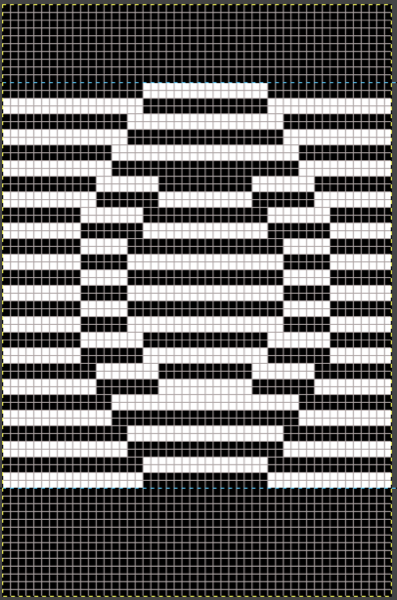
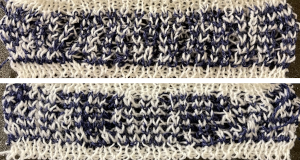 When using the Dak stitch design module, the color separation is automated. Choose any design repeat. This happens to be a 20X20 one, chosen from the thumbnail assortment, so not suitable for punchcard models. “Printing” the template using choosing the option of using dots rather than squares to represent knit stitches makes the resulting print screengrab easier to trace.
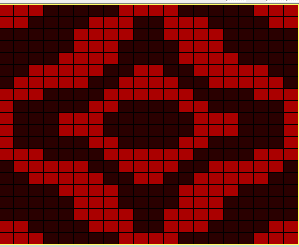 the 20X20 repeat as a BW png
 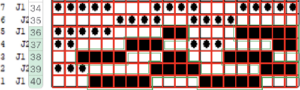 The result is screengrabbed, opened in Gimp, converted to BW mode, and scaled to the 20X40 expanded design size. Unless the double-length function in the machine is also used, it will need scaling again to double length prior to download.
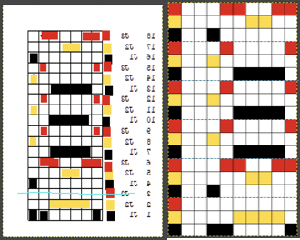
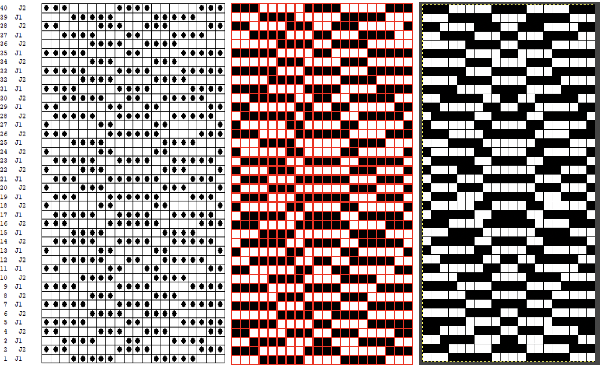 The final image double length, showing the difference between the separation using the template, and that using layers as in Claudia’s video, which appears different but is actually the same repeat, color reversed.
 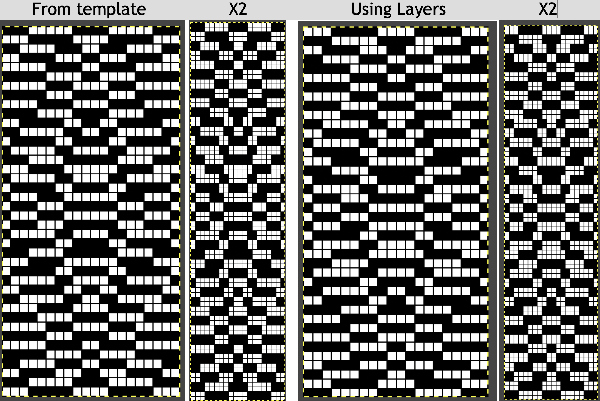 Using bucket fill for the ground in the second layer, as described in the video, the captured clipboard image can be very small
 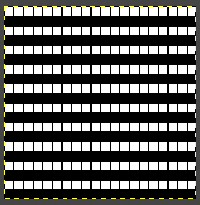 Alternately, the initial design may be scaled X4 to 20 X 80 pixels
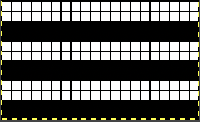
 drop the ribber


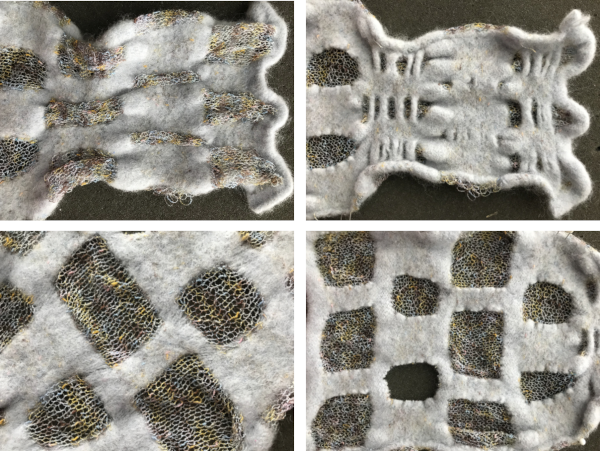
 What may be firing in one piece could provide a tube for insertions on either side of the knit.
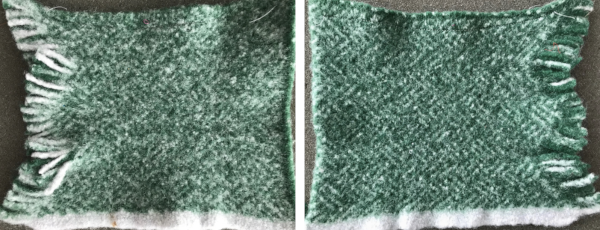 Creating blistered surfaces the easy way, leaf pattern variations: poly-cotton and raffia on the bottom, fishing line as the second yarn line on top. I have found the line for 6lb or fewer works best. The knit is flat.
 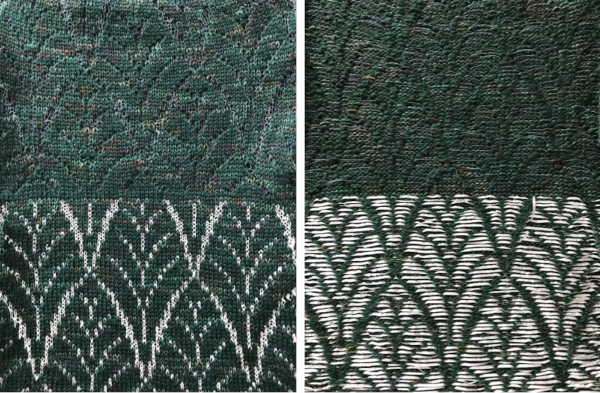 Felted rayon chainette and wool; when the main color is wool and the rayon renders the floats there is minimal blistering
 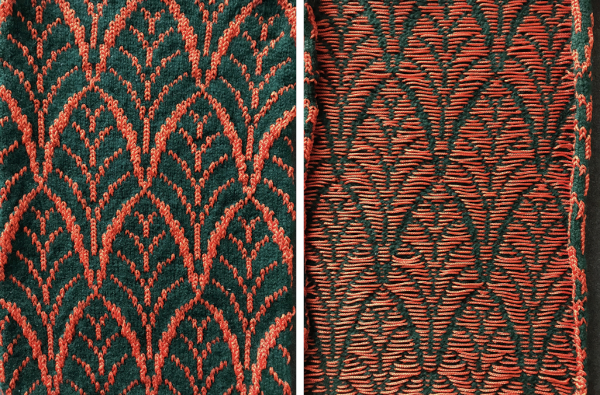 the result from reversing the yarn positions creates more bubbling
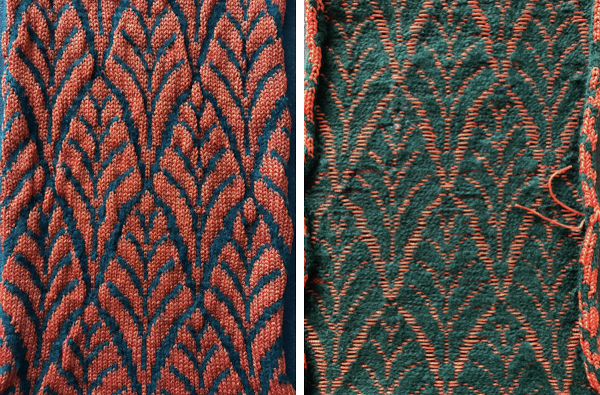 Here elastic is used as the second color in the thread lace setting.
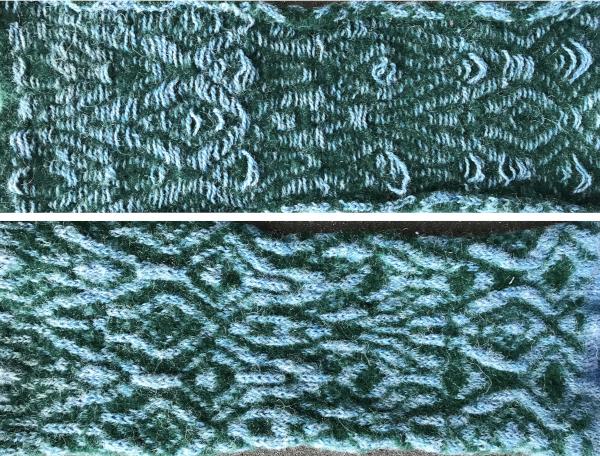
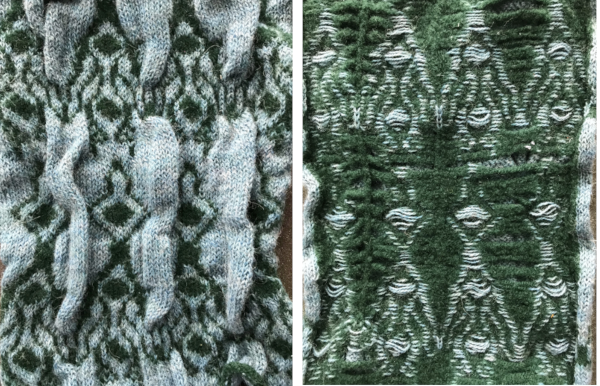
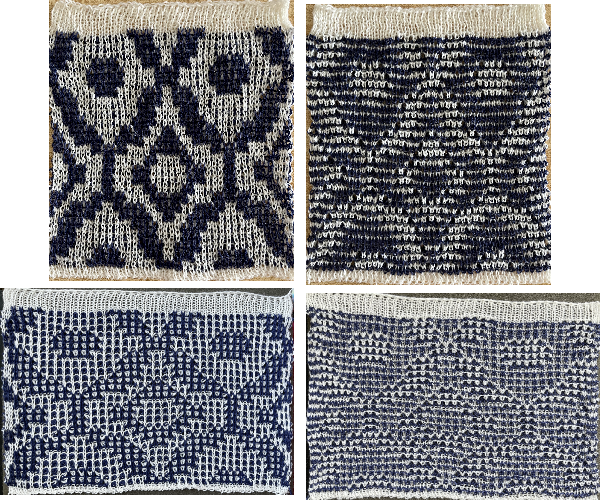
 The yarn positions in two color single-pass knitting, remain fixed in their relationship to punched holes. In fair isle patterning, the back feeder, usually labeled A, knits the ground on non-selected needles in the B position. The yarn (red) in the forward, B feeder, knits the stitches on needles selected to the D position which correspond to punched holes or black squares in a mylar, black pixels in a computer file for download. In thread lace, the back A position yarn knit both yarns together, while the forward B position yarn, red thread, knits the forward yarn/color, with the other yarn creating the single set of floats behind it.
 In addition, large thin fabric shapes can be stiffened over enclosures to create permanent effects in sculptural pieces.
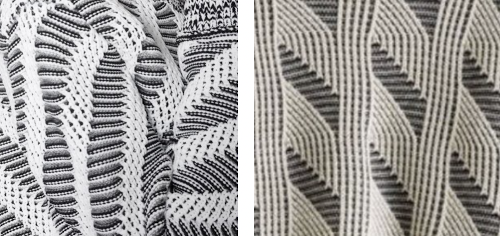

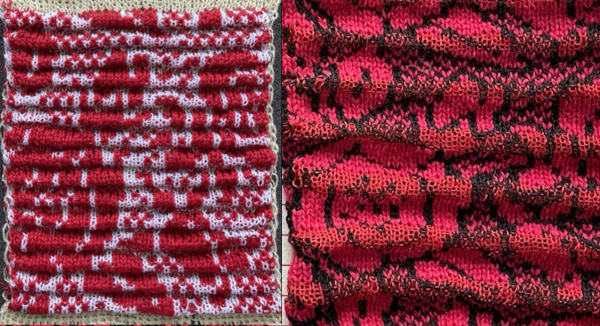
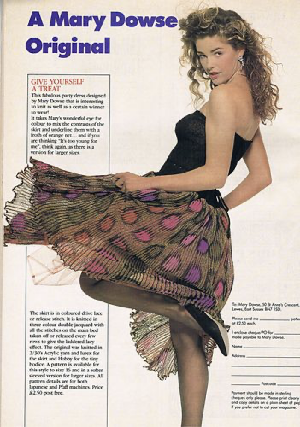
 A comparison to the mirrored original inspiration, likely knit in thicker yarns
 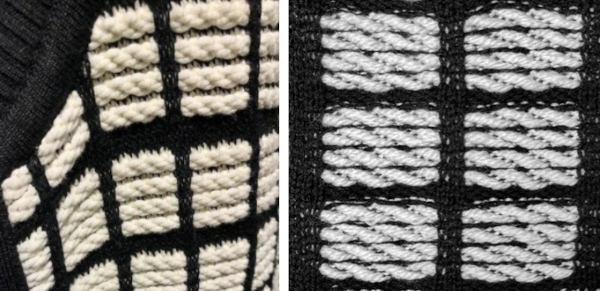 The knitting process: with any textured or very lacy knits casting on and binding off require special consideration.
 Read the first row of the pattern, cam set to KC1 to ensure end stitches are knit when patterning occurs only on the top bed.