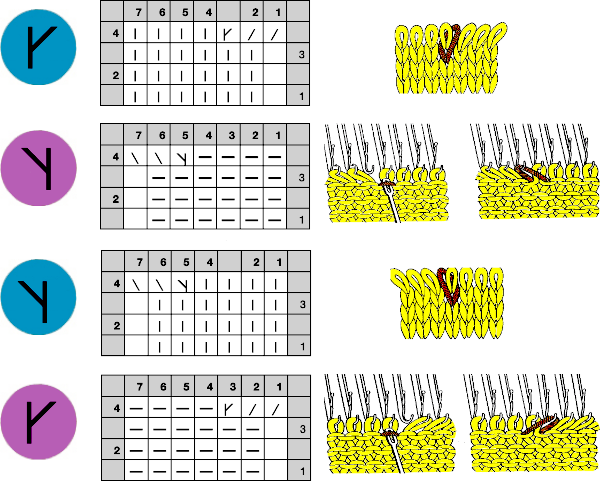
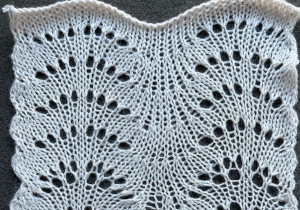
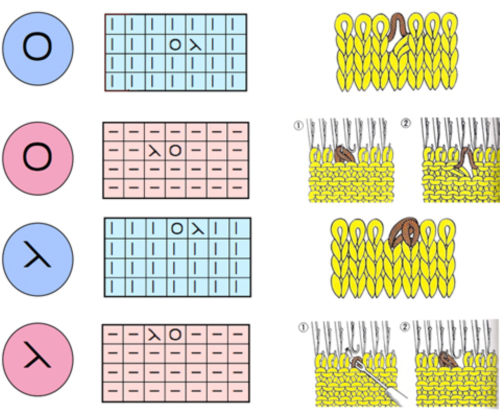
Working with lace designs: lace poses interesting challenges in machine knitting. The name is associated with a variety of fabrics, but transfer lace is the specific topic for the moment.
Reminders with respect to transfer lace knitting:
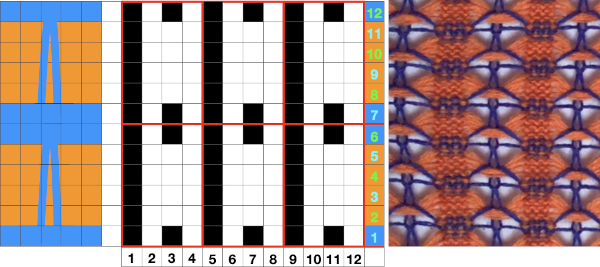
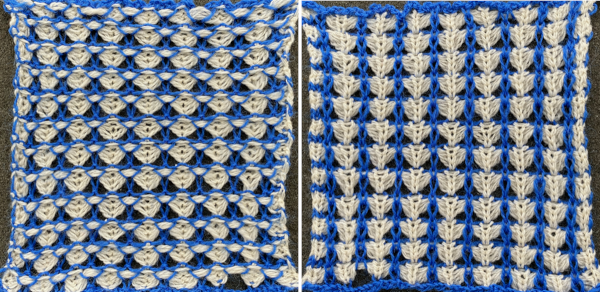
in Studio simple lace the transfers and knitting occur for each row of the design with each pass of the carriage
transfer lace patterns in Studio km begin with 2 blank rows and end with markings for transfers
Brother transfer lace begins with needle selection markings for transfers and ends with two blank rows. The knit carriage does not advance patterning rows unless the change knob is used to select needles as well.
Hand knitting charts typically illustrate the knit side, while in machine knitting the knitter is working looking at the purl side, so if charting for duplicating the same transfers, the HK pattern requires mirroring
The Brother lace carriages usually operate from the left, and Toyota from the right
Some download programs automatically flip patterns horizontally, great if you are working with texts in most cases, but a consideration if you wish to control the direction of other stitch-type formations, and lace patterns drawn in the program may need to be flipped as well in order to knit properly on Brother with the lace carriage operating from the left side
When I design, out of habit, I try if possible to work with repeats suitable for punchcard machines as well.
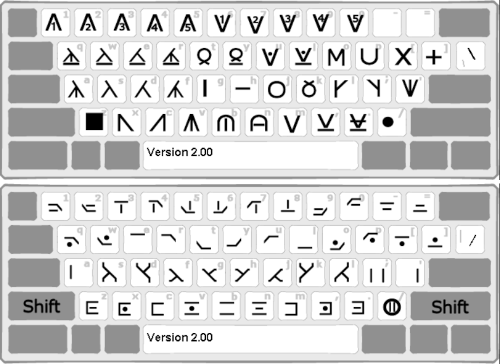
Facebook members who participate in machine knitting forums have access to the information generously shared by members. Sheila West published a video on drawing lace repeats on a DAK knit stitch symbols ground as opposed to the more traditional charting using lace symbols on a blank design grid, and there is also an associated downloadable PDF.
Softbyte support has been responsive and at times helpful in communicating with me, and reviewing issues I encountered.
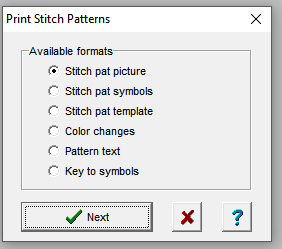
I prefer to download manuals for software when the option is available making it possible to review them when not running the program. In my enthusiasm to do so, it appears I downloaded the manual version offered in the last tab, which happens to be for section 5, graphic design studio, which by default was not helpful in using the lace module. When I initially looked for help, the information that became available was for the wrong module, 5. In using the program on Oct 21 I have not been able to replicate that issue when opening other modules.
When the program is first installed, the manuals are listed in a series of tabs, ending with that for section 5. For Stitch Designer, choose section 3, the manual appears and a way to download the associated PDF is also provided. There are 5 help files and 5 manual files. They don’t interact at all and work completely independently from each other, can be opened from DesignaKnit or from a file browser window.
Interactive choices using the help menu: Contents 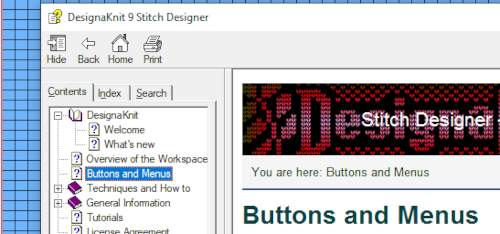 Manual:
  When manuals are chosen in any module, there is an option offered to download the associated pdf
 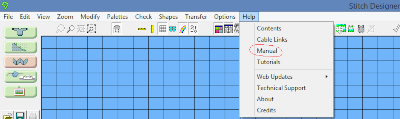 by clicking on the arrow key
  specific page numbers based on the index may be entered and jumped to.
Tutorials:  Update:
  The lace module is an extremely attractive solution for speeding up the lace design process whether from published charts or DIY. The left mouse button is used to draw as usual, but the right mouse button is used when drawing shared transfers in fine lace on Brother, or simple lace in Studio km.
My initial experiment and observations:
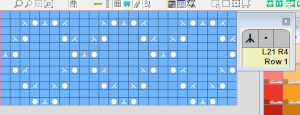
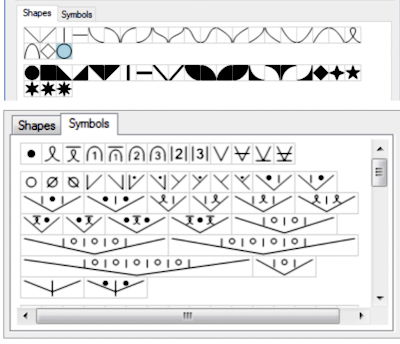
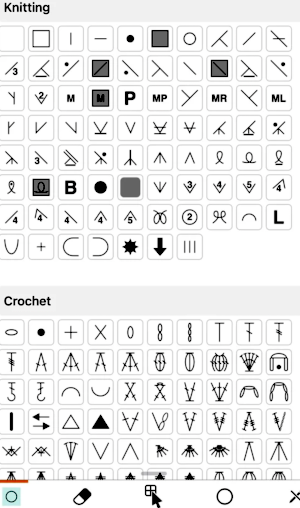
each time the program opens a new session, the normal drawing pattern appears. Selecting the Lace tool icon in the left menu bar will change the default palette to include the necessary symbols. In working with stitch symbols this is the range of available, 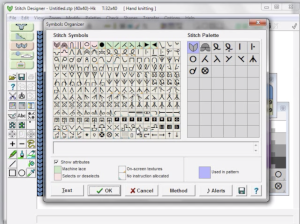 It is possible to show any repeat tiled as well. For lace the number of stitches and rows should be close to those required by the design, its overall size may be trimmed if needed when the design is completed.
The left mouse is used to apply the symbols, I have read the right mouse has a different function and is used to draw shared stitches in Brother fine lace or in filling in simple lace designs for Studio machine models.
To select the lace mode simply click on the small icon on the left menu bar, a grey border on its left and the upper edge will indicate it is active, the palette and cursor will change.  The designer may enter patterns on this view as well, but I prefer to work with symbols
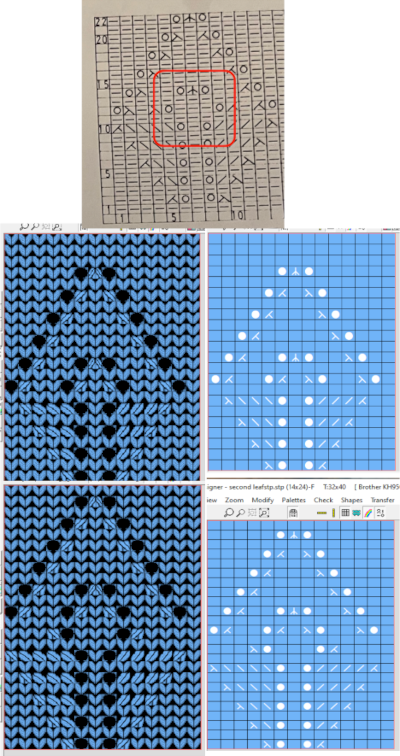
 It is best to begin testing with a small repeat when exploring new techniques, find his format easier to use than drawing on “stitches”. There are several options for the canvas ground color, the default is in blue. As a first step, saved as an stp, Dak opened my saved file as pictured in this view.
  Wrong approach: The pencil tool must be active to continue to draw, left mouse click to place symbol, right mouse click to erase, clicking on any symbol in any one row will call up pertinent information on its location in the repeat
Is there another way to draw symbols while working on a lace design file? use the lace tool, using the pencil tool with each type of lace symbol is not recommended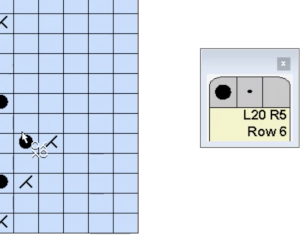
 DAK row numbers do not refer to design rows, they reference row counts as would be seen in any row counter registering carriage passes
Other views for the repeat: as yarn colors  and as stitch symbol palette
  If a symbol is missing from the drawing, the program alerts the knitter to the error. Here there are no eyelets represented.
 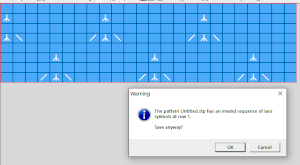 There was no warning for the error in the last row of the test stp, where in the last row two stitches were being moved in opposite directions on the same row. If the content is considered accurate, this window will appear, the safe button will be highlighted, click OK
 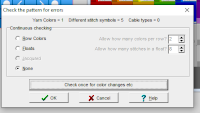 I found this lack of warning for some errors in later designs as well, it is a topic under review by the developer. When choosing machine knitting options lace is not offered as one, fair isle is used
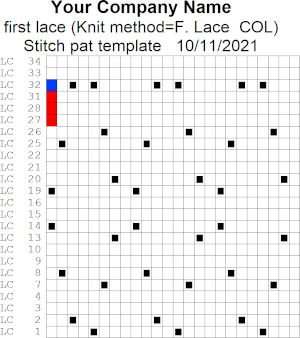
  To print a template for use on another machine the stp file may not be used for copying to clipboard and converting to stitches in another program. In the print menu, saves are possible for templates akin to graph paper references for working further on both electronic and punchcard machines. For the electronic printout, the choice of the machine appears to need to be set to 950i
 wrong side facing is chosen for the purl side view.
 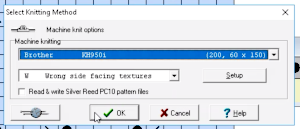 Stitch pattern print previews, using default settings for layout:
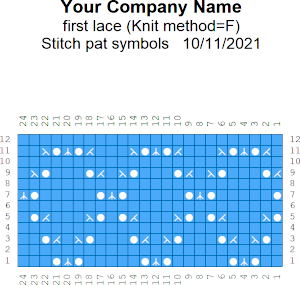
the stitch pattern picture was basically a numbered graph paper image with no content, pattern text, and not particularly useful
other previews:
 the suggested electronic repeat:
 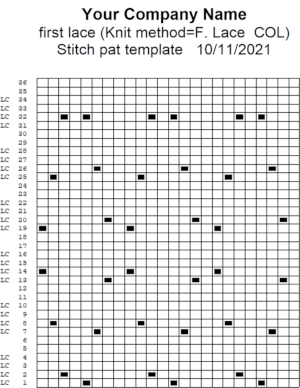 The templates for electronic models have 4 rows between transfer sequences rather than 2 as is usual for Brother. They are needed for interactive knitting where the KC passes are represented onscreen as well, Dak knitters likely set the knit carriage change knob to select needles on KCI or KCII.
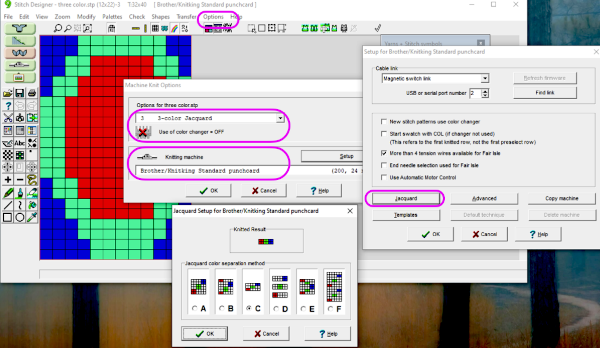
For punchcard end-use, change the machine setting for print preview to Brother/Knitking standard punchcard, and click ok. When you choose Fair Isle, DAK will reverse your design and that may mean that there will be two eyelets side by side or double stitches transferring because the transfers are being made in the wrong direction. DAK will invert the pattern from left to right if it has the knit method Fair Isle or Wrong Facing. If it has the Right Facing method it won’t be flipped. The knitter still needs to sort out whether right-side facing or wrong-side facing makes any difference in their particular brand machine outside the Dak environment. The need for added mirroring for correct transfers depends on the download program ie Ayab mirrors any programmed image automatically, or the specific brand machine ie punchcard vs. electronics may behave differently. An easy test is to use the repeat on a small swatch, if side by side empty needles appear on the needle bed, the pattern needs to be reversed. Any lace designs suitable for a punchcard machine, when they are knit on my 930 require mirroring unless the png is saved mirrored horizontally in the paint program used to create it prior to download to the machine. 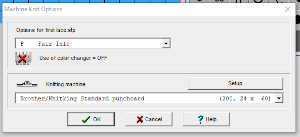 the repeat:
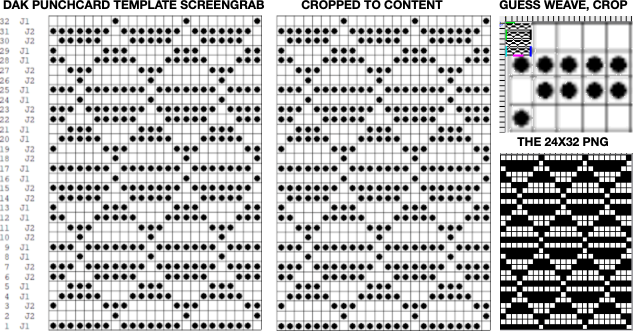
 The numbers on the left correspond to carriage passes, not design rows. While the electronic template represents the interactive kitting repeat and differentiates between rows for use of the LC and KC, leaving the KC rows unlabeled, that distinction is not made for punchcards in any way, and marked numbers are not in sequence. Published Brother punchcards contain additional symbol columns for added guidance on settings and carriage passes.
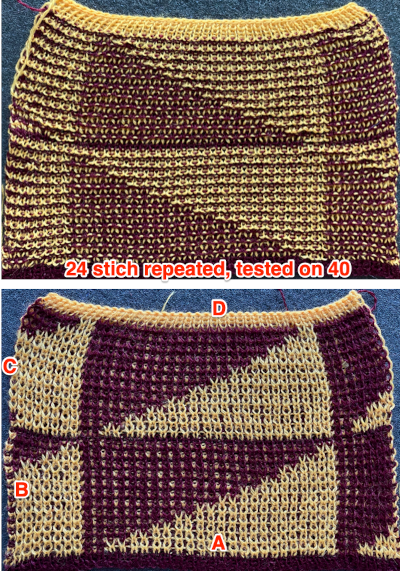
Assuming the knitter knows whether the programmed repeat will need to be mirrored or not to knit properly on their specific model knitting machine, the 24-stitch punchcard version should work on both model machines.
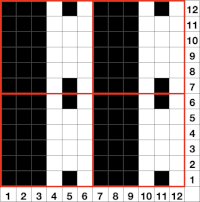
The numbering on this punchcard template skips 2 numbers for knit rows between transfer repeat segments as seen in the first sample, and in this later repeat, the number sequence interruptions are marked in red. In punching long cards especially, renumbering the whole would make the repeat easier to follow. 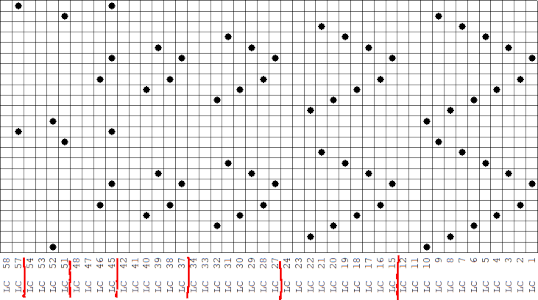 This stp pattern was also created using the pencil tool in combination with symbols. In the print preview, there were 2 errors in the Dak printouts, the three blank rows rather than 2 in the outlined section between transfers, and transfers in 2 different directions occurring on the same row with the same carriage pass. I have no way to test whether the same issue would occur in interactive knitting using my own stp file. My repeat, drawn in Numbers on the right, is numbered in design rows.
 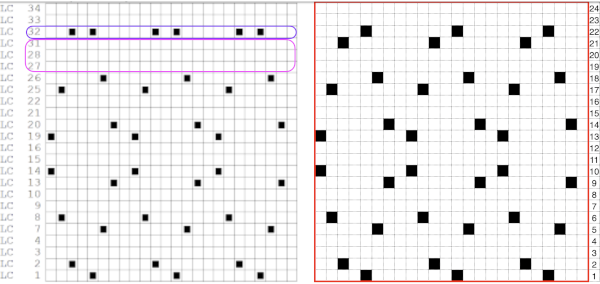 When choosing print, the global options allow for editing items out such as company name, date, and format by simply clicking in the associated boxes
 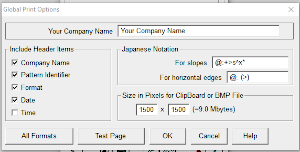 choices can also be made on how to represent stitch units If the plan is to create a punchcard template and the repeat is too wide, an error message appears
 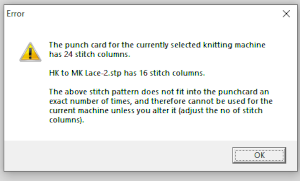 Paper size measurements in page set up other than US letter
 other associated menu choices
 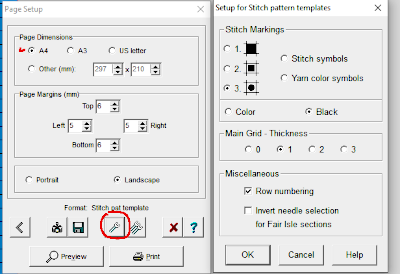 It is possible to save the template as a bmp of the full image. The size of the file is shown to the right of the pixel count number settings for the clipboard or bmp file, which will vary in proportion to the stitch and row count. Click on the floppy disk icon to save.
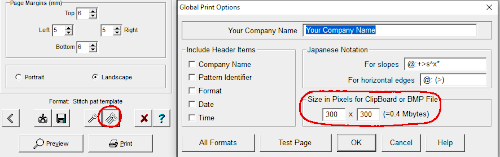
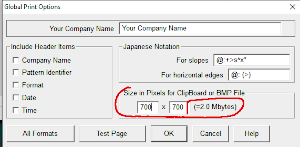 My hack for reducing the onscreen size of the templates for screengrabs I could trace in a spreadsheet was to use a 600 mm setting for punchcards, and 350mm for electronics instead of selecting a paper size. The actual printing to scale is not an issue at the moment, but it is possible to print templates to full size, involving a bit of trial and error with individual printer settings and math.
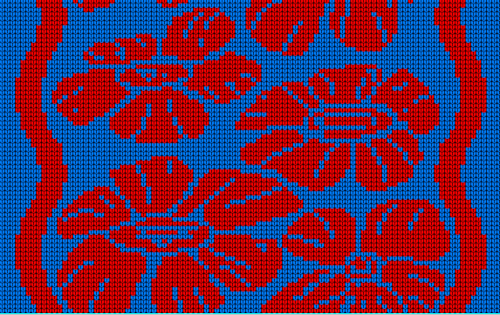
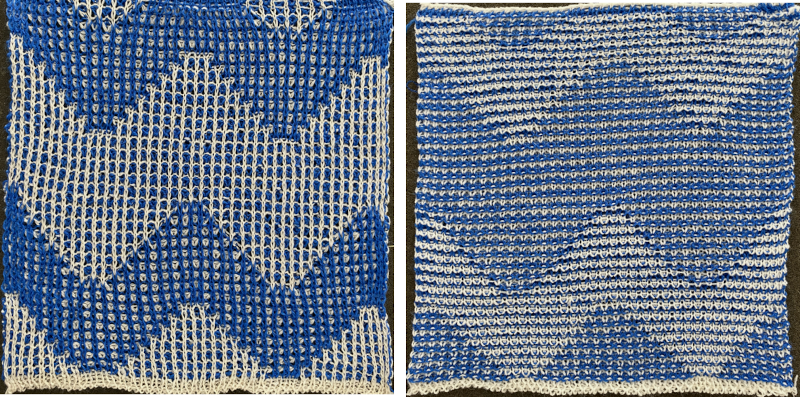
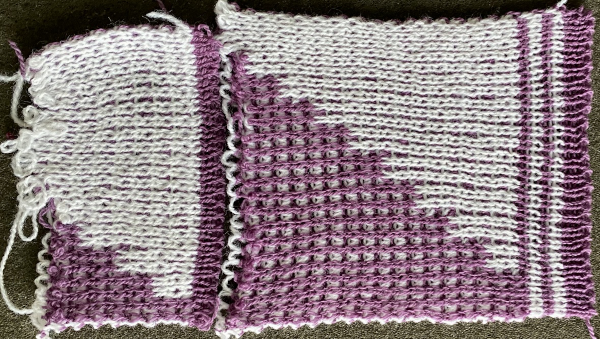
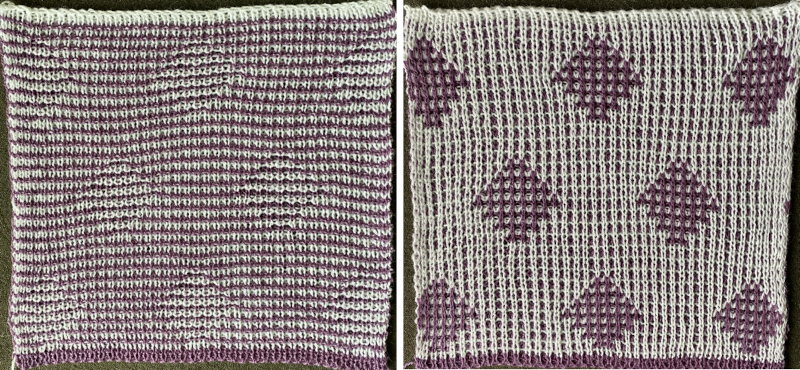
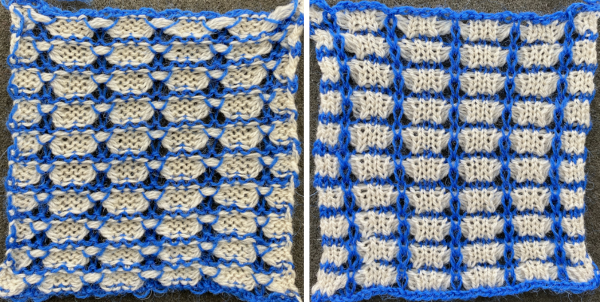
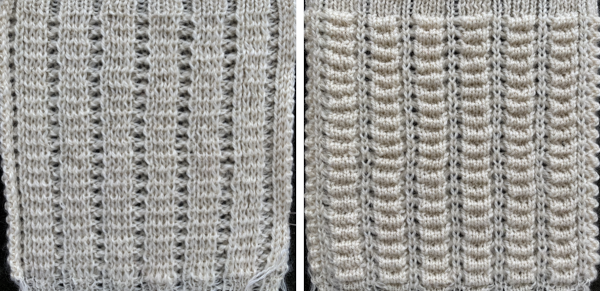
The proof of concept swatch, knit on a Brother 930 KM, mirroring the image was not necessary, the dropped stitch was a surprise design feature when the swatch was very lightly pressed 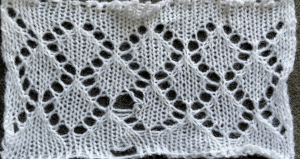 its.png
  Regrouping after a review of my pencil tool repeat by Softbyte support: the original stp has an error in it on row 11 where yours truly had eyelets being created by having the same stitches moved in opposite directions in the same row. It is interesting that I was able to save the stp without receiving an error message as seen in this instance below when the pattern was being redrawn with transfer symbols on the wrong row,
 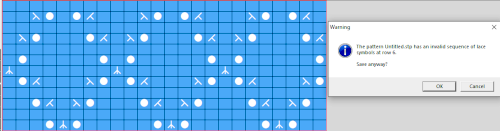 The amended final repeat,
  in turn, produced a correct punchcard template using the print preview
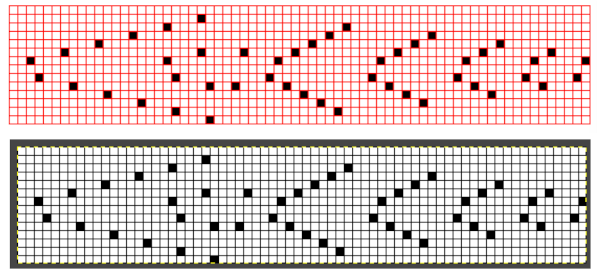
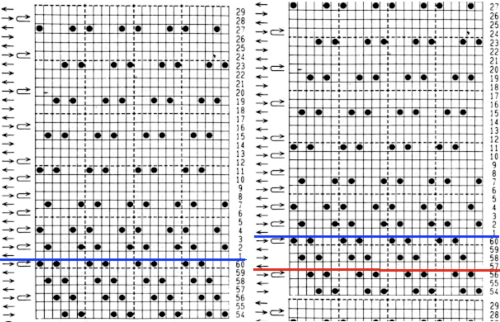
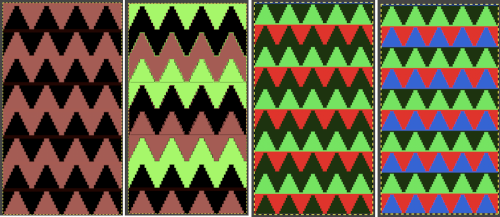
  As an additional lace template test, I repeated the process on a portion of an stp file shared generously shared by a DAK FB group knitter along with photos of a completed, lovely lace sweater using it. The results are shown sideways because of the repeat length. The 950i template places four rows at the end of each lace sequence, while as seen in the published repeat of a different lace beside it, there should only be 2. The carriage passes made by the KC in traditional lace knitting though they advance the row counter, do not advance the pattern unless it is selecting needles as well, ie in trims that combine lace with the slip stitch setting. Exceptions to the 2 blank rows rule occur when the lace shape reverses direction such as in zig-zags, or when plain knit or pattern rows are planned deliberately to mix and interact with the lace design.
  Please see the previous post for more on lace charting and explanations for those in-between added pairs of rows variations. Brother knitters outside the DAK environment may use the templates as they are, but set the knit carriage for pattern selection as well on KCI or KCII.
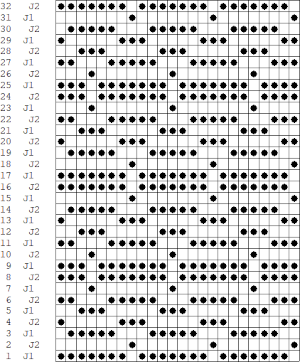
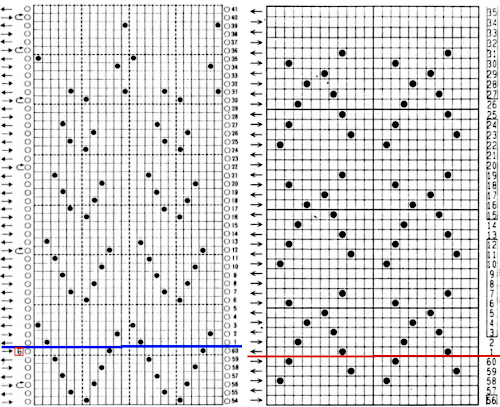
This is another lace stp pattern built using the pencil tool method. The charted symbol diagram was published in a Japanese magazine along with its published punchcard design. There is an intentional extra row at the bottom of the repeat, making it “wrong” if the intended use is on a Brother machine as a test for how the template might handle it in the print preview. Template previews were created using the setting for Brother standard punchcard bulky or Brother 950i Facilitating correct DIY designs, in addition to the warnings if there are missing symbols or any other problems with the design and their respective row locations, the module provides a warning about that extra row, explaining that if the generated pattern is used as is, the bottom row should be moved up or the LC should begin pattern selection from the right.
 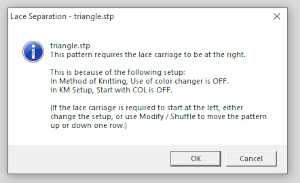 The electronic preview continues to have a series of 4 blank rows between transfer segments. The punchcard template has 2 blank rows between each transfer segment and matches the published pattern with a 3-row exception toward the top of the card. The renderings below begin with the DAK punchcard template on the left with its confused numbering, the extra empty row at the bottom of the repeat was eliminated. The overall repeat is mirrored. It is followed by the published pattern associated with the chart, pixels are then marked for left and right transfers, followed by my amended final repeat, which when knit on the 930 required mirroring.
 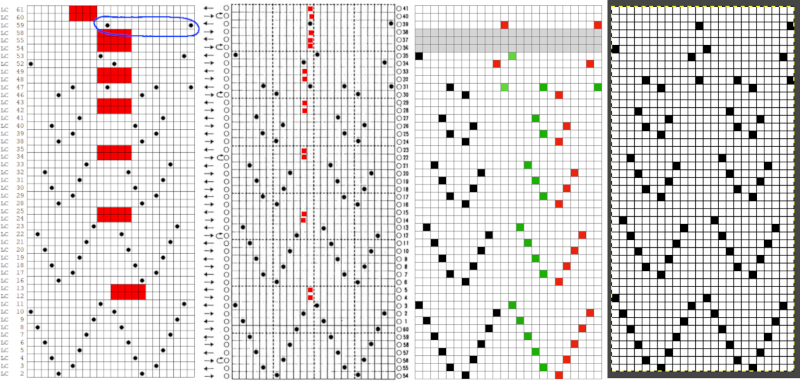 Lace tool use instructions begin on page 299 of the third module user manual, Stitch designer. From the manual: when the Lace tool is clicked, lace patterns can be created by using the LMB or RMB to click and hold on the stitch cell where the eyelet needs to be, after which the mouse can be dragged in the required transfer direction and let go on the stitch that needs the corresponding decrease. Intermediate transfer stitches will be added automatically where appropriate. If the button is clicked and the stitch pattern has a method that is incompatible with lace, the warning that is shown on the right will be displayed. The Wrong side facing texture is probably the most natural choice because this is generally considered the normal method of knitting on Japanese knitting machines. Sections of Lace and Fair Isle may be used in the same stitch pattern and either Fair Isle or Wrong side facing texture are good choices when working with lace patterns.
If either of the Right / Wrong side facing texture methods is used, and there is only one color per row, it can be transparent or opaque. If there are more colors per row, the opaque color is seen as the real yarn color, while the transparent colors are regarded for memo purposes.
The lace smart symbols have an associated ‘texture’ which is used to see a representation of the finished knitting. This representation is not entirely accurate as decreases have to be shown on a single stitch cell instead of over the two adjacent cells that are affected. However, the bias of the transferred stitches, as well as the lace eyelets are well represented to give a good idea of how the stitch pattern will look when knitted.
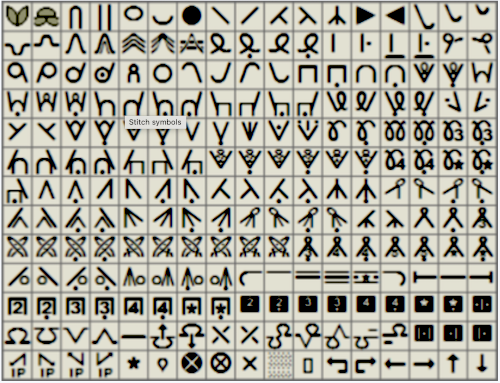
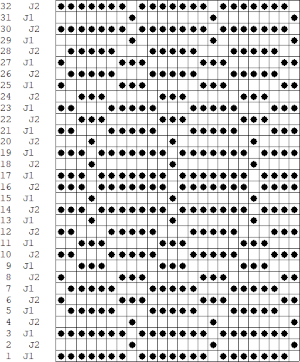
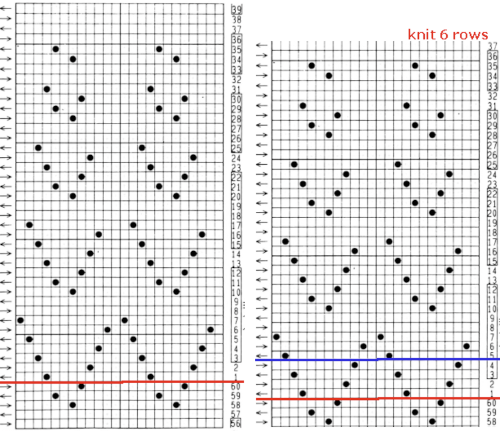
The symbols that are specifically used for machine lace knitting are displayed with a light green background in the Symbols Organizer.  The same repeat as above was redrawn, with that extra bottom row eliminated
 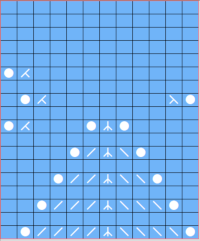 The associated template preview for the punchcard nearly matched the one that was obtained with the pencil tool chart, but had some differences: the previous image was mirrored although no dak settings were changed. As in all punchcard template numbering, the knit row numbers are skipped in the sequence on the left, so they will not match design row numbers, and the small flower motif is placed differently
 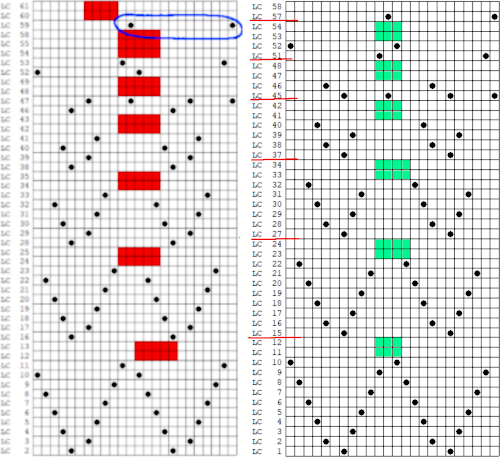 This sample was knit using the pattern drawn with the pencil tool, pre mirrored for use on the 930. The convention for lace designs is that they must contain an even number of rows, the one on the right is 47 rows, knits properly, but is suitable only for a border. Here a pair of extra rows were knit, followed by design row 1
 A wider swatch
 When attempting to use this repeat for a continuous one, unless the total number of rows is an even number, the second repeat will reverse the direction of the transfers, resulting in mispatterning and multiple side-by-side empty needles. Changing the total repeat to 48 rows by adding another blank row places all transfers properly. The 12X48 png
 Adding extra knit rows at the top of the repeat ie. 6 or 8 may make the alignment of the 2 shapes to each other more pleasant.
The challenges in DIY lace patterning are many.
The same design was redrawn using only the lace tools. The appearance was the same as in the previous draft, the print preview template was two rows shorter, 46 rows long, and no longer mirrored, with the flower shape slightly lower than in the other sample, it is shown here alongside the Gimp png draft for exporting the png used in the samples. 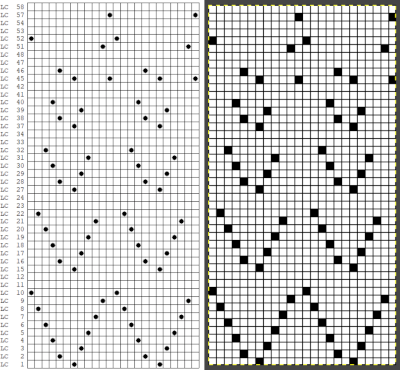
 Knit in continuous pattern with 6 knit rows added before restarting with pattern row 1 with LC on the left
 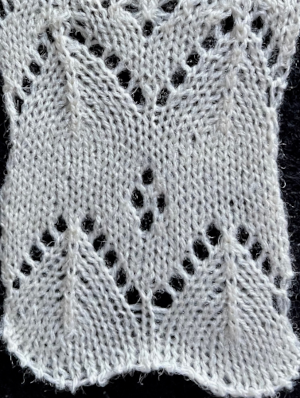 A half drop repeat is also possible. To achieve this test of a repeat drawn in a paint program, I knit 2 rows after the last “flower” eyelet and had to flip the repeat horizontally before continuing for the top half of the repeat, producing a very different look.
  There is a transfer error in the knit swatch on the right where I “repaired” a dropped stitch. Edits would be needed if one is determined to make this pattern automated as a continuous design.
Options for manipulating stitch designs in dak appear to be the following.  Interested in developing an automated brick repeat for the above design, this was produced outside dak as a guideline for entering the symbols in stitch designer
 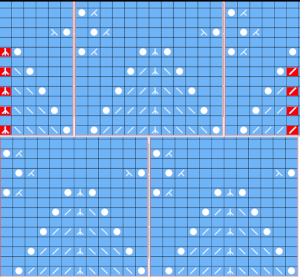 Using the lace tool, the areas marked in red highlight cells where wrong symbols for stitches in those areas were initially created using the lace tool. Use of the pencil tool was necessary to replace the incorrect symbols. The stp was saved with no error warning, but the resulting repeat was identical to my self-drawn one with the top half of the bricks knitting in the wrong direction resulting in mispatterning and double eyelets.
Saved stp files may be opened and further edited using either or both the lace tool and the pencil tool.
With respect to the use of the pencil tool, from the manual: “It is possible to place lace symbols onto the stitch pattern manually by activating the Pencil tool, then selecting and placing each symbol where required. However, this can easily lead to errors as the placement of each symbol needs to be well understood.
The “Check once for color changes etc.” option in the dialog can be clicked after which dak will either display “No errors found” or it will display error messages such as the ones shown here.
Clicking “OK” returns the program to the workspace where errors may be corrected. DesignaKnit does not mark the pattern when these errors occur. After correcting, “Check” can be run again to ensure all errors have been eliminated. Using the Lace tool to create lace will greatly diminish the chance of errors.”
I have encountered instances where no error messages were received, the stp was saved successfully for supposed knitting, have been told there are edits and future updates underway for both version 8 and version 9.
 the right mouse button is used when drawing fine lace designs, which is not part of my present explorations
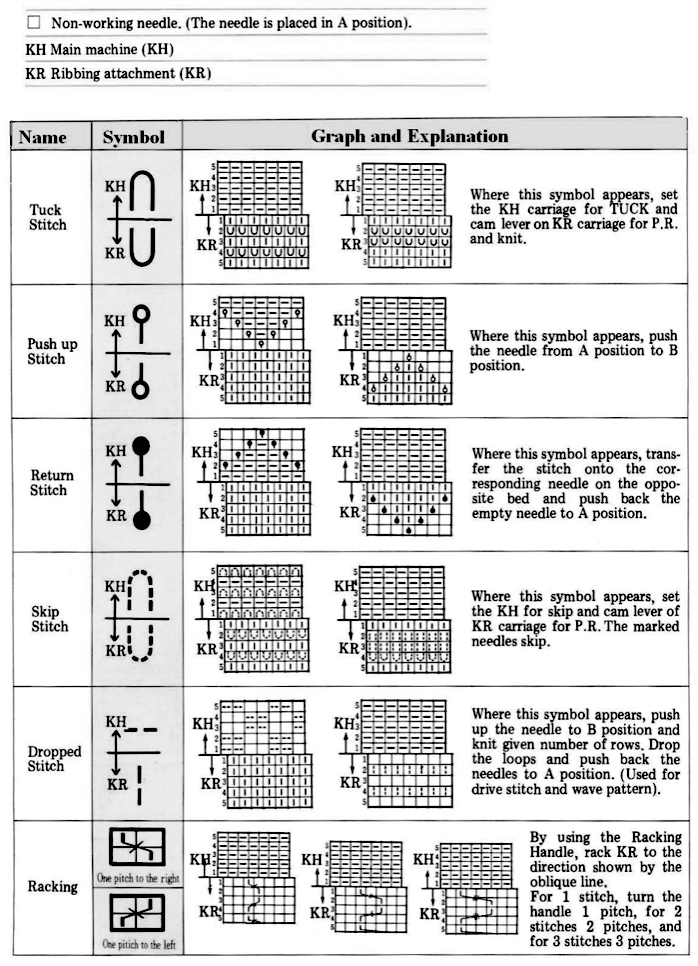
In theory, the Lace tool will:
insert the eyelet, transfer and decrease symbols in the direction of the drawing
insert a double decrease symbol where the lace transfers occur onto a single stitch from opposite directions
prevent the placement of eyelets on adjacent stitches within the same row
warn of invalid lace sequences when saving or checking the pattern
remove the eyelet, its matching decreases, and any transfers in that sequence with a single click of an eyelet symbol with either the right or left mouse buttons
Brother knitters need to keep this in mind when using the lace pattern in the dark environment, the knit carriage will need to be selecting needles as well. If using the templates to generate patterns for use with other download programs, the traditional use for Brother lace and punchcard machines is to have the knit carriage not selecting needles. To use the given template for the electronic in that manner, 2 out of the four blank rows between each series of transfers may be eliminated and the pattern from the electronic template if within the punchcard repeat restrictions, may be used on punchcards as well. Having plain knit rows not selecting, in my experience, makes for easier unraveling and returning to an all-knit row when rows need to be unraveled to correct errors or knitting falls off the machine.
All punchcard templates keep the number sequencing for the electronic repeats, removing the extra interactive knitting rows and their numbers from the electronic template, reducing the repeat to design rows, which results in the numbering sequence on the left not matching the actual total number of rows in the repeat, making it ineffective if following those numbers when punching cards.
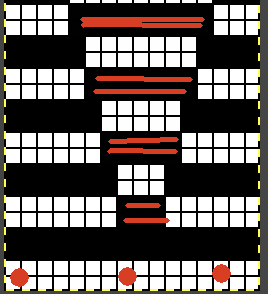
Making things work: the dak repeat for the brick arrangement, there are single blank rows before selection for the shifted pattern begins, 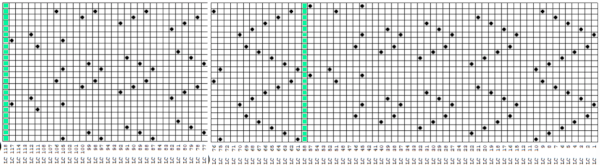 my edit in a spreadsheet, the yellow cells mark rows missing in order to get the lace carriage back to the left side before the next pair of all knit rows.
 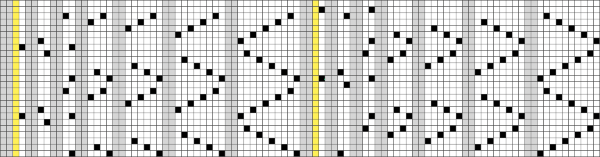 The full repeat was trimmed to 12 stitches in width, and 48 rows in height,
  opened in ArahPaint, and drawn in brick repeat, shifting the top by 6 cells. The green lines mark the original single blank rows followed by the pairs of added blank rows with no markings, the needed corrections
 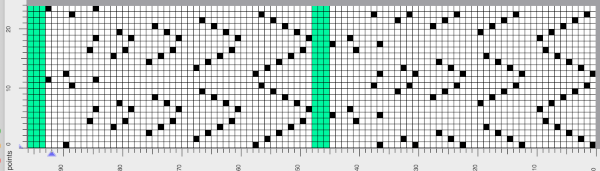 the Arah image was saved as a png, knit on my 930 using img2 track, and mirroring
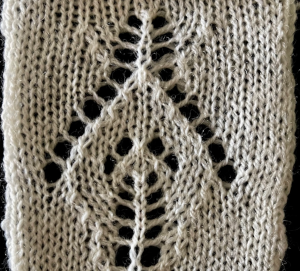
 The proof of concept swatch for the now fully automated pattern
 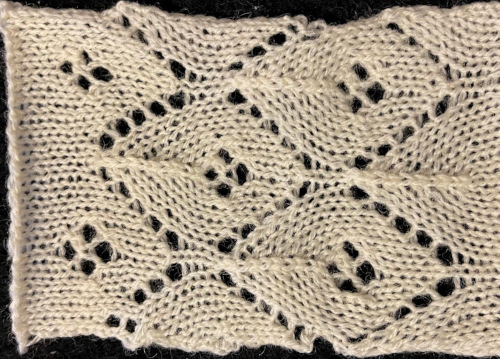 When a repeat is sorted out it is easily modified to create other variations. Here the small flower shape is eliminated, as well as the first transfer sequence to produce stacking triangular shapes. The repeat is now 10 stitches wide by 28 rows high, so suitable only for electronics.
 The swatch was lightly pressed, prior to that, there was actually an interesting 3D quality which can be common to many unblocked lace patterns. If the knitter wants to retain that quality, the quandary is then encountered as to whether one also may want the piece to lie flat, particularly at the sides and the top.
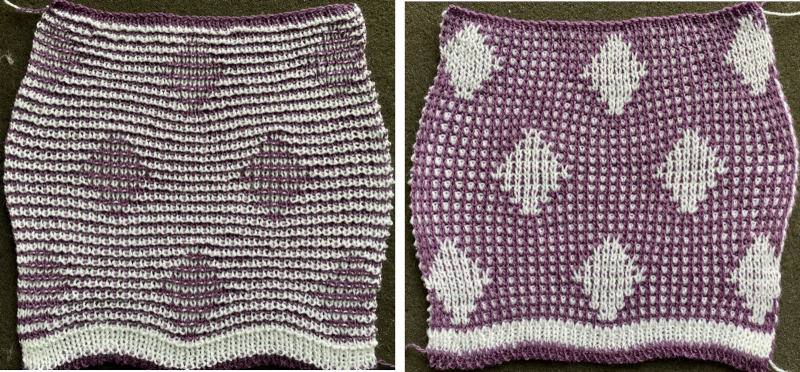
The above repeat was mirrored for use on the 930. With lace as with other fabrics, the repeat may be tiled and programmed to the width of your knitting, here for use in a 30-stitch swatch. While in other fabrics a plain knit border may be added by placing black cell vertical cells on each side of the wide repeats, this cannot be done in lace, because those selected needles will attempt to transfer multiple needles in a single pass, which is not possible. Brother offers edge-stitch plastic cams to help with that. The cast-on in this instance is a provisional one, with several rows knit prior to beginning the use of the lace carriage. 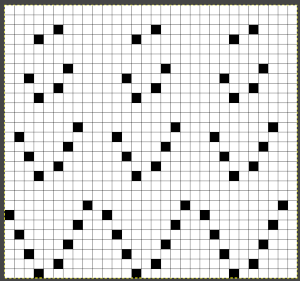
 To visualize cable crossing in the opposite direction, images can simply be mirrored horizontally
  More cable crossings including working double bed
 an alternative symbol for the same technique.
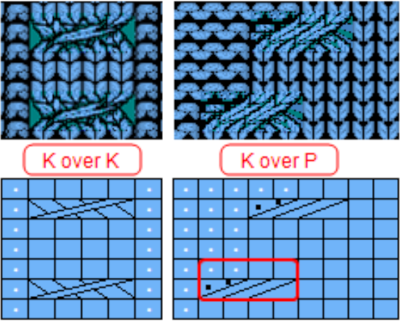
 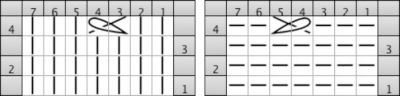 The techniques may be used in variations, using 3 or 4 stitches. Yarn and tension are significant factors when any number of stitches are moved across a fixed span on a metal bed machine.
 Tuck stitch groups of stitches are gathered in needle hooks, commonly with knit stitches on either side of the gathers.
 Tuck stitch with a twisted elongated stitch. The effect will depend on the yarn being used.
 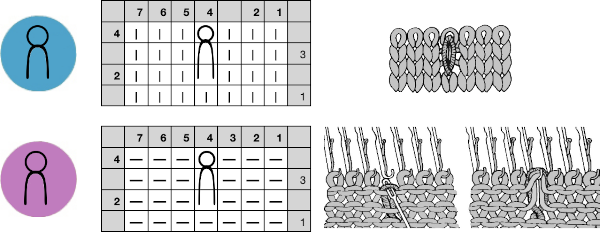 More on tuck and slip stitch /2020/09/13/single-bed-tuck-and-slip-stitch-fabrics-1/
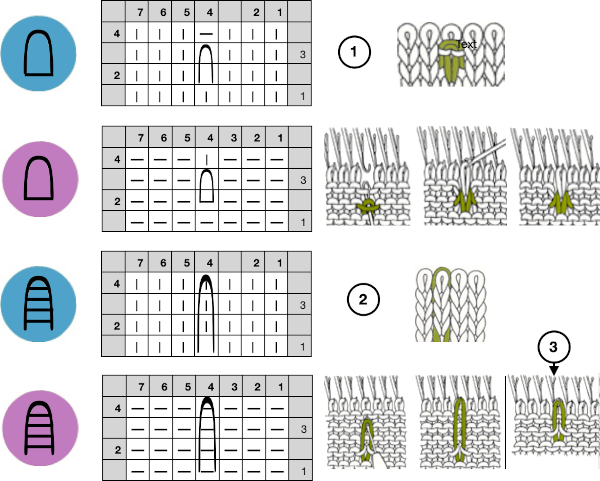
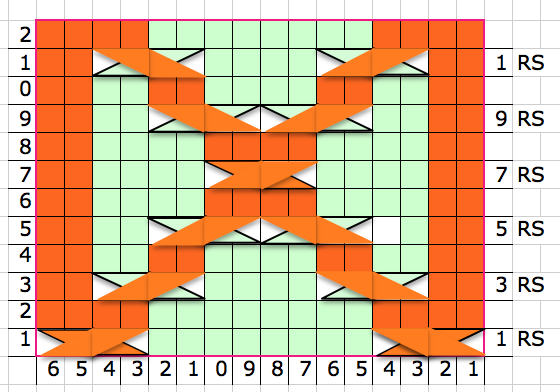
 Stitches may be twisted in the body of a knit on the machine by inserting a tool front to back through the stitch, twisting it to the right or left, rehanging the stitch in the same location.
 This technique may be used with multiple stitches to create mock cables, and patterning, whether electronic or punchcard may be used in machines with needle or pusher preselection to track the placement of the twists. E wraps may also be used to cast stitches on side edges of the knitting, whether the result is satisfactory is determined by the knitter’s preference.
 When a ladder needs to be eliminated, there are several ways to deal with returning any empty needles to work. If an empty needle is brought back into work, the first pass to the opposite side will create a loop on the empty needle, the second pass will complete the stitch on that needle, and an eyelet is created. If one wishes to minimize the eyelet, one method is to pick up the purl ridge from the row below on either the right or the left of the empty needle, as illustrated in the fully fashioned increase chart, another is to twist the last ladder and rehang the twisted loop. If multiple needles are out of work, then an e wrap cast on by twisting stitches on every other needle is needed unless needles are brought back into work one at a time, creating secondary eyelet patterns.
 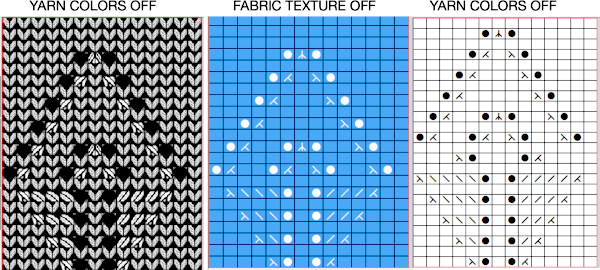 Cable illustration as from the DAK manual, with single bed and knit and purl stitches represented
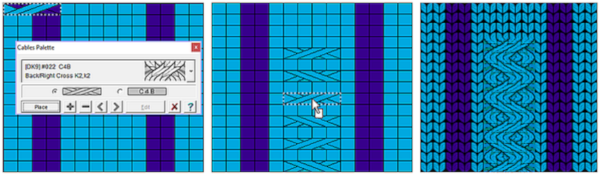
 Many cables that can be created in hand knitting are not executable on the knitting machine because the yarn needs to move across fixed widths on a metal bed and the moved stitches need to be large enough to allow the knit carriage to form new stitches properly as it travels back to the opposite side on the following pass. Some techniques can help to make wider cables possible, it is best to test crossing tolerance before planning or following full repeats whether published or self-drawn.
 Japan’s contributions to lace patterning
 A clue as to surface being represented is that it is a convention that vertical straight lines | represent knit stitches, horizontal ones — knit.
 Knitter’s symbol fonts by David Xenakis, were enclosed in frames, though extensive, I did not find them helpful, a sample:

 but other attractive features include illustrating crochet patterns in the round (done here using
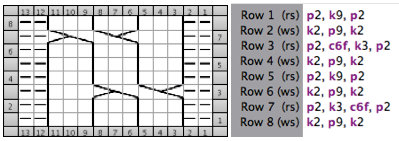
 Limitations are encountered when using symbols in any self-drawn chart if there are no bridging units between cell units both horizontally for cables, and vertically for stitches and textures worked between both beds.
 Long since then, I have no longer had access to Excel, the topic may merit a revisit using Numbers.
 From the
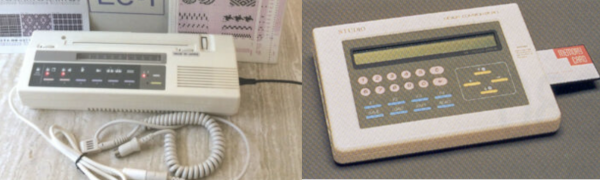
 For Superba machines, there are the
 Aside from connections to the machine, there was the issue of available software for drawing repeats and downloading in the proper format.
 and for solving the same issue in
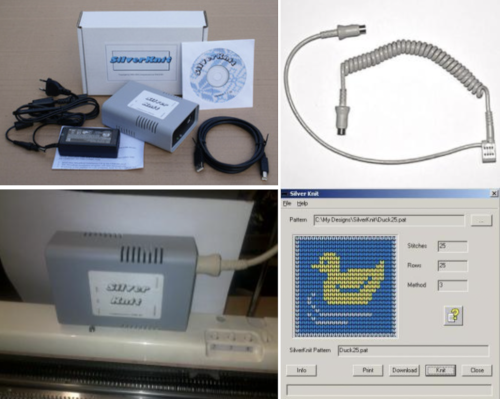
 The Softbyte
 DAK cable manuals published by Softbyte
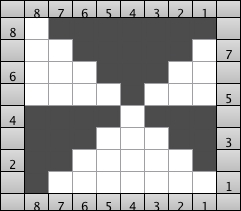
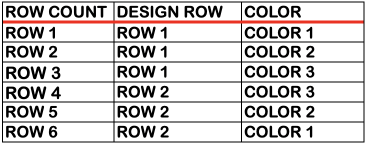
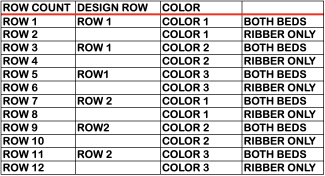
 As for more than 2 colors per row, performing the color separations may be achieved
 A “hack”
  stitch and row counts should match, and save the stp
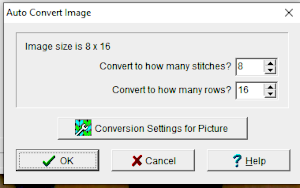
 The separation methods in DAK:
 Yarn choice and design make a big difference. Here the yarn is far too thin, and the repeat too narrow in width, but the possible result is illustrated. The main bed is set to slip in both directions throughout. The ribber setting needs to slip in both directions for every other pair of rows. When the ribber slips, the main bed will knit the color that will create the pockets, where there are many single stitches selected here, the KC was set to KC1. When the color is changed and the ribber is set to knit again, stitches in that color will knit on both beds, sealing the fabric in those areas and forming a solid color background on the reverse side. Here the white forms the pockets, and the floats after a pair of passes are seen in this photo.
 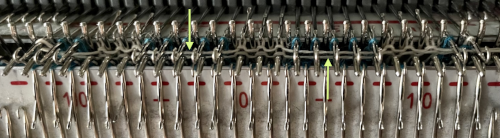 Because the yarn is so thin there is a considerable grin through on both sides, the areas marked with arrows indicate where the white pockets were lightly stuffed with yarn ends
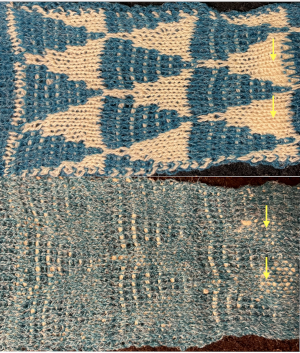
 If pngs are created outside the program, they may be doubled in length unless the repeat is designed that way.
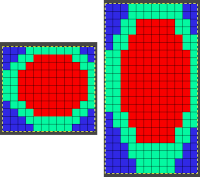
 How the different jacquard setups process the specific repeats:
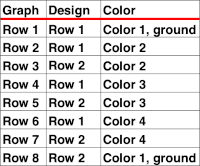
 Passap card reader techniques saved from long ago experiments.
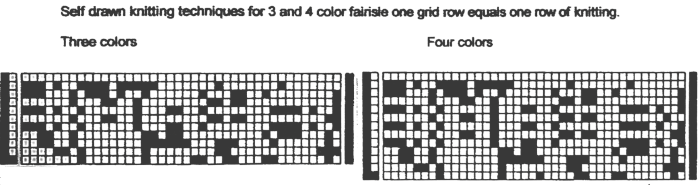
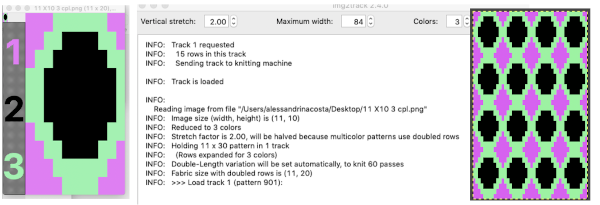
 Processing the template using numbers: a table is created twice the length of the 8X16 triangle repeat, followed by hiding the 32 odd-numbered rows, positioned in front of the scaled punchcard template, stitch markings are traced
 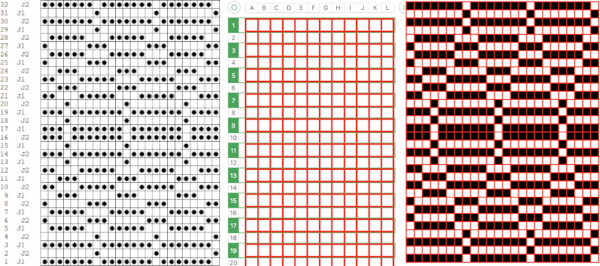 the rows are then unhidden, the repeat is checked, matched here to the F jacquard separation in Dak
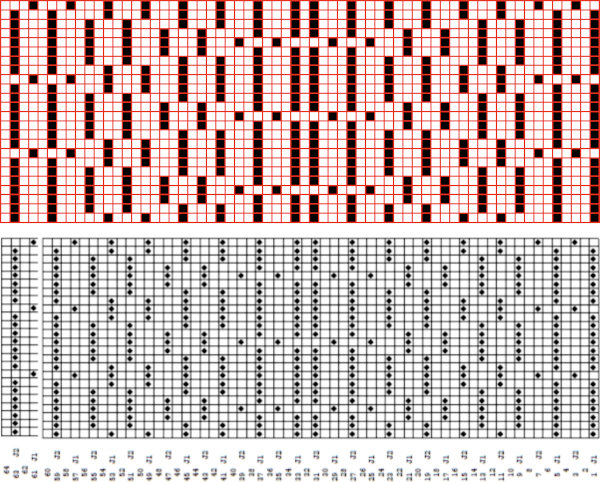 The numbers table is processed in Gimp to obtain the png for knitting the now 24X64 pattern
 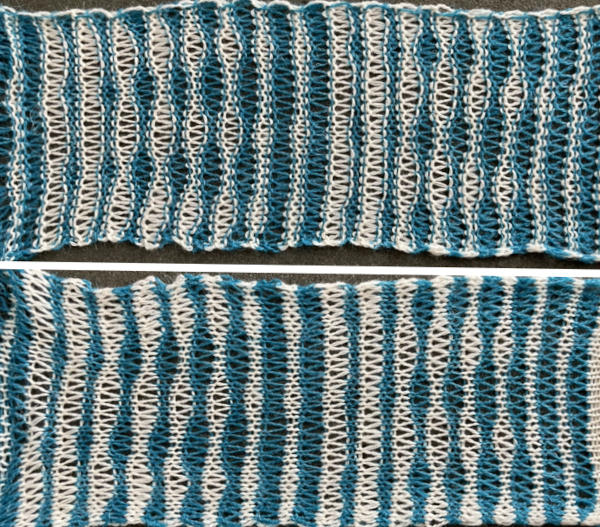 and the pattern executed as a tubular FI knit: I had yarn issues, hence the dropped stitches. Both swatches were knit to approximately the same point in the pattern repeats, there are obvious quality differences in width and length. In tubular knits, there are differences in the width and height of the knit on each side. The front is a slip stitch with floats, drawing the fabric in, while the ribber knits every stitch every other row. With a good choice of yarn and pattern, loosening the tension on the top bed may ease this problem. As often happens, casting on and binding off need special considerations ie to allow for any fabric stretch when off the machine or to leave a tubular knit open at either or both ends if that is the goal.
 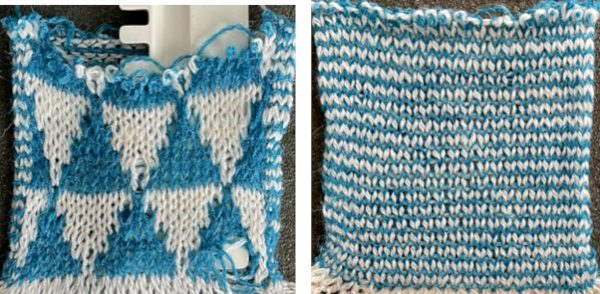 DAK has been a purchase made out of curiosity, and my use of it has been very limited since my designing needs are met by using other programs that are free to users and generate and accept files in multiple formats, while the Brother Knitleader or even simple use of the magic formula solves knitting any desired shape in any gauge.
 I have to admit the first time I tried to knit both the associated png, mirrored and not, I experienced patterning errors. Whether due to operator fatigue, static, or any other possible cause, on a different day both designs knit successfully, and my appreciation of the module is growing steadily. The results for this, a complex shape, are quick and awesome when compared to the amount of time it would take to draft the pattern outside the program.
 Numbers and Gimp reduced the template to a png 14 stitches wide by 52 rows long, needed to be mirrored using the number one button on the 930 for successful knitting,
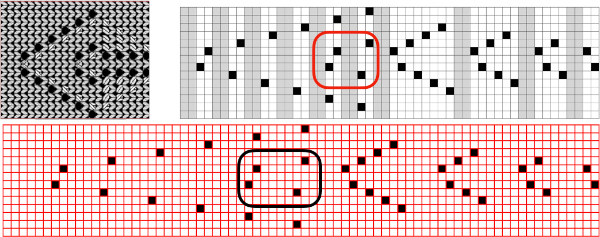
 matches the original illustration. Dak makes slight modifications very easy. The untested brick repeat, 28X104, developed using Arah followed by its png
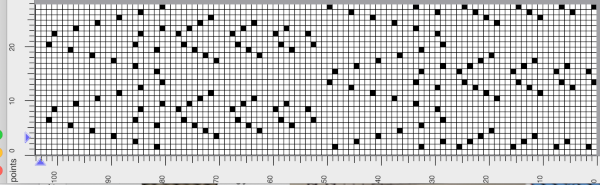
 The amended design drawn in repeat in dak visualizing the knit,
  The print preview template:
 the resulting png, 14 stitches by 68 rows, also knit using the number one button on the 930
  The brick repeat developed in Arah, now 28 stitches by 136 rows,
 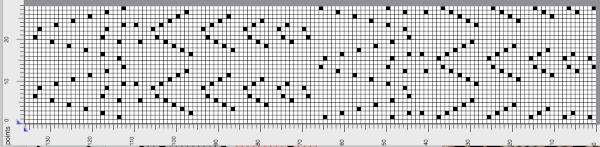 its png
 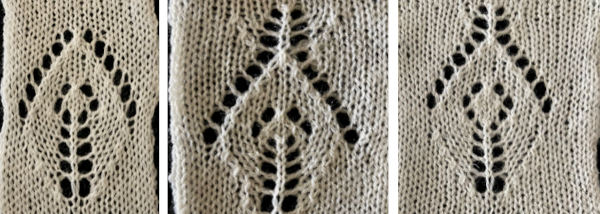 A test for the second brick repeat, here visualizing results with a screengrab of the stp.
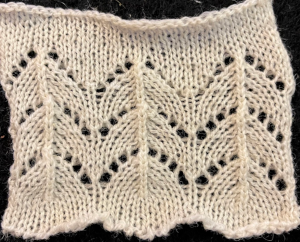
 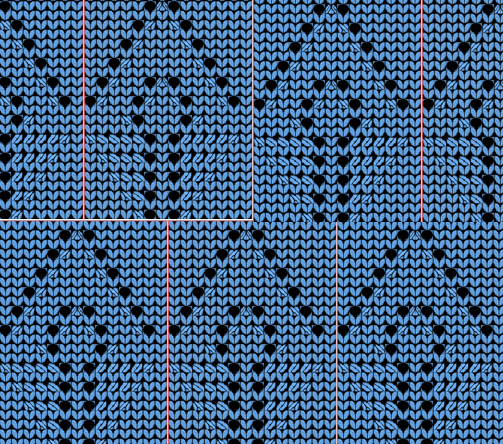 The test swatch is for a single repeat width, the initial yarn used ran out, hence the color change, the second yarn was thinner and broke, but there is enough to get a sense as to how the overall alignment of the knit shapes will appear, including that horizontal chevron between the shifting leaves. The png required mirroring when used on the 930.
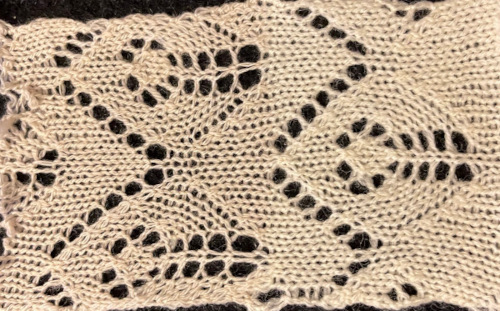
 it would need to be drawn eliminating the pairs of blank rows between transfers to match the original repeat because all those carriage passes are consecutive. Drafts with no blank rows between alternating transfers are not accepted by the program and ruled out in any template preview as well.
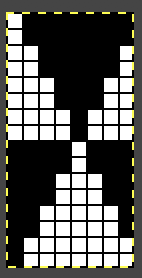
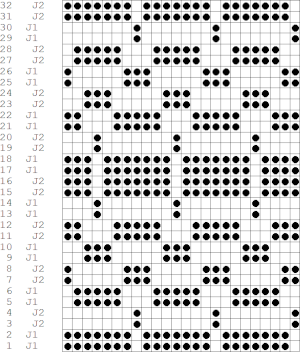
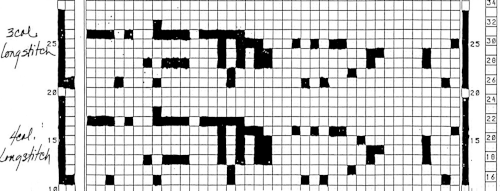
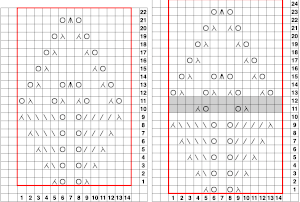
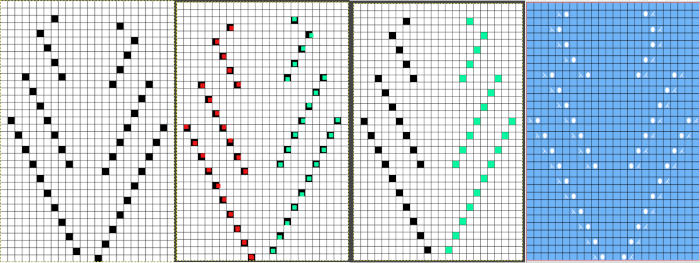
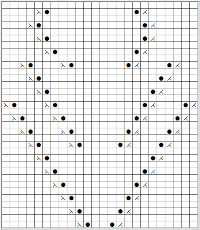
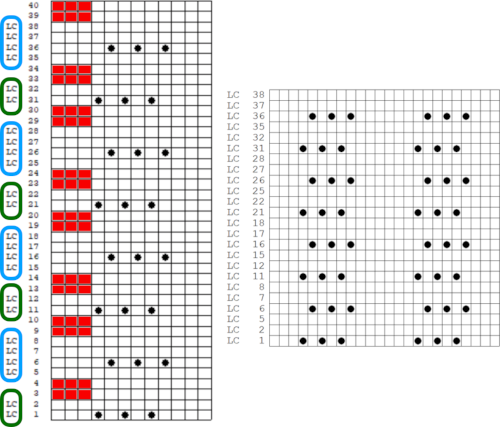
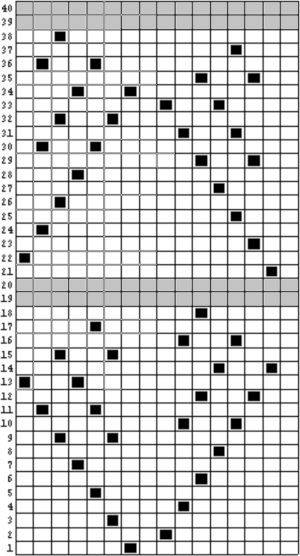
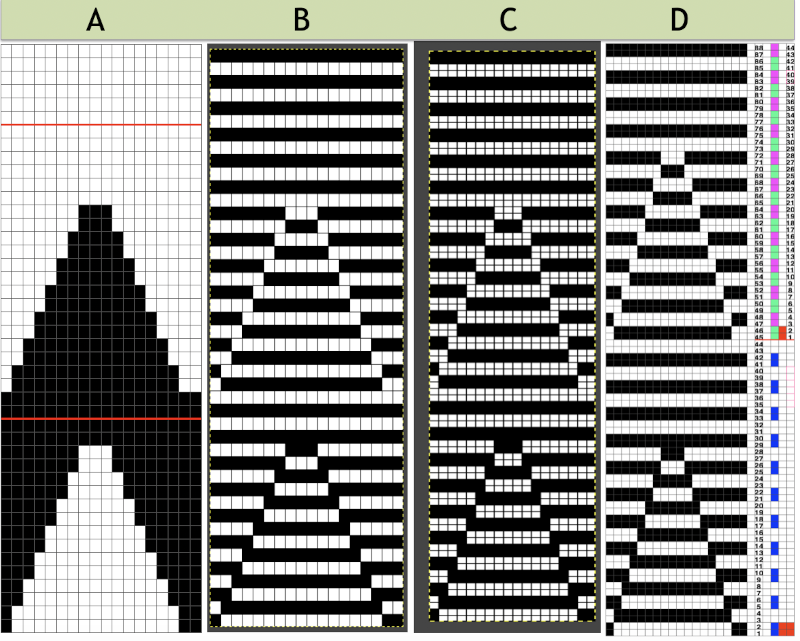
 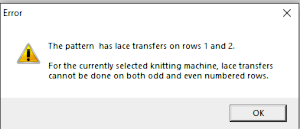 The complexity of working with a “simple” repeat: over the years I accumulated a notebook full of copies from Japanese magazine pages with what I believed to offer interesting potential, this repeat happened to be one. The markings for the knit rows on the right, and the two blank rows at the bottom identify it as suitable for Studio punchcard machines, and it would appear to be easy to translate for knitting on Brother thanks to those 2 blank rows between transfer cell markings.
 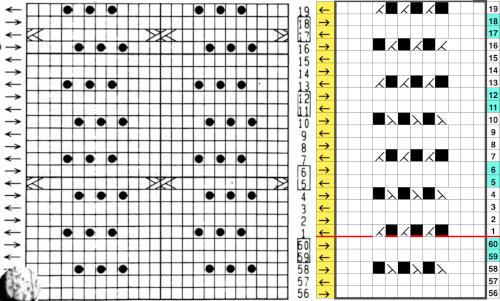 Developing the Brother repeat in Numbers for beginning with transfers to the left. The repeat is recognizable as a mesh variant, more information for mesh design repeats may be found in the
  the repeat on the right was created in Gimp.
 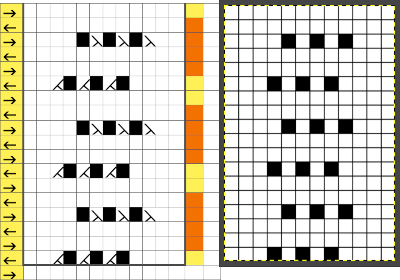 The 12X18 png
 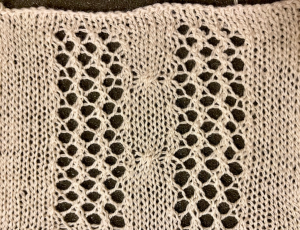 Creating the stp: the size of the png was used to create the image file, which required cropping, in Dak this would be the menu language after activating the proper tools. the stp size is 12X16,
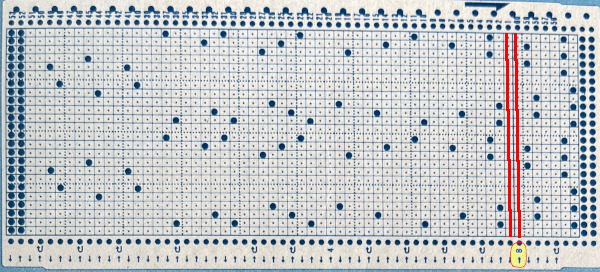
 The template generated for a Brother punchcard machine illustrates the problems and some of the confusion if the template repeat is used for actual knitting, especially on the punchcard machines. Drawing the eyelet and dragging the mouse one cell to the left is the intuitive way to draw for transfers to the left. The symbols appear to be right-side facing by default and if they are in turn mirrored by the program prior to saving, when the templates are generated, the intent for use of the design would match. The numbers on the left are in the punchcard template, adjusted by cropping the two extra rows in the Brother electronic template by the software, do not reflect the actual design row numbers. The starting row is wrong for the Brother lace carriage operation from the left to produce the first row transfers to the left in actual knitting. As far as determining sequences for knit row placement, that is left up to the punchcard knitter’s experimentation. The minimum repeat for a punchcard to roll continuously is 36 rows, that fact needs to be considered if punching cards. The repeat shift for the first transfers to happen toward the left is illustrated on the right.
 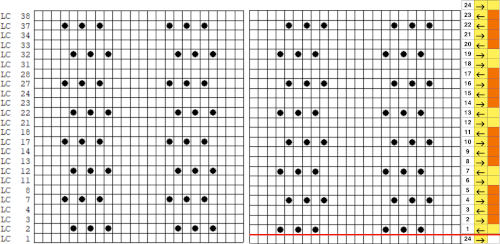 As initially given, with the lace carriage starting on the left, the first transfer row would be to the right. In many cases, this may not matter, but in this instance, where the knit rows happen after 2 or 4 LC passes respectively, the template offers another instance of the fact that the knitter using it needs to have previous understanding and experience in creating the particular stitch type. This version does not have an accompanying swatch.
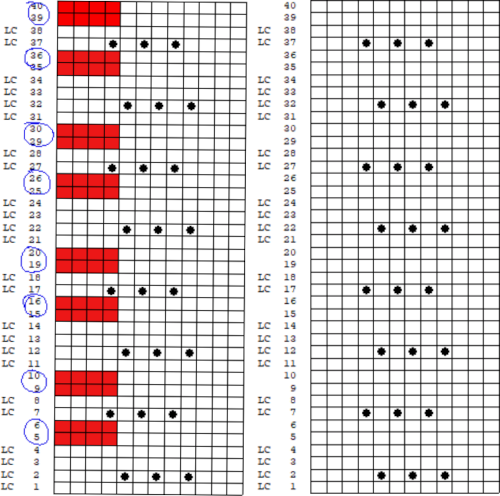
 For good measure, the repeat is also drawn as stitches and produced the punchcard template with a first blank row identical to that generated when using symbols
  Using the pencil tool to draw the transfers differently resulted in a series of error alerts, so not an option.


 A Studio repeat adjusted for use on Brother also illustrates that the number of knit rows is only two, the LC passes can vary in number between knit rows. Here LC passes are marked with outlines around pertinent row numbers on the right
 These samples are from Brother punchcard volume 4:
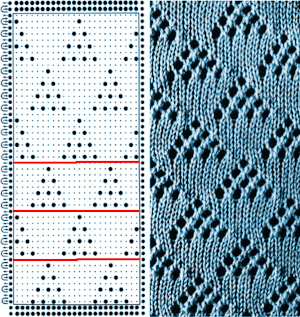
 a pattern published on a full Brother mylar sheet
  this is from a studio mylar, the same holds true in terms of the number of empty rows between transfers,
 The LC can move only one needle at a time, so when multiple needles need to move to place the eyelets properly, the options are to use a hand tool to perform the moves or to develop a pattern with multiple transfers in each segment of the final repeat. The full repeats are often very long.
 There is a handy option in Dak when thumbnails are chosen from the image menu, one can browse through saved folders containing compatible file-formats including the images in those Brother magazine downloads. The small preview will identify the specific file size. When you left-click on your choice, it will appear enlarged at the bottom left of the view window, it has been moved from its corner in my screengrab,
  left-click OK on the enlarged image, and it will open in the program window. Minimize the size until no further reduction is allowed by using the magnifying glass or the scroll function in the mouse. This is a different operation from scaling the original to a different size. The save-as option for the image offered at that point is:
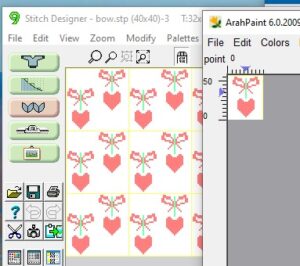
 For choices emulating export in other paint programs, right-click on the image, choose copy, open a paint program (Arahpaint is my favorite at this moment), and from its image menu choose paste.
 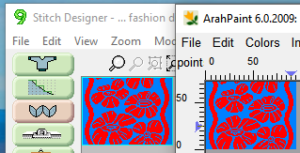 Using Arah’s color exchange, the image may then be converted to black and white for 2-color work and is saved in a format usable with other software and in other machines.

 but if the image needs to then be reduced to BW, Arah is the easier and predictable tool to use.
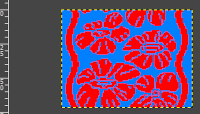
 It is useful to establish working history using the same design motif. In the first image, left-click on red, the from color, right-click on white, the to color, click on the double arrow to make and apply the change
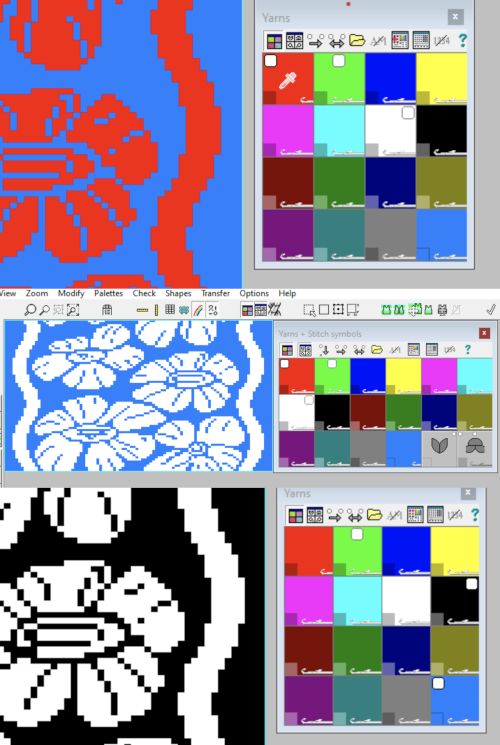 The print dialogue allows for saving patterns as bmps.
 choices may then be made about file name and the location for the save,
  If there are no “short” needles in the image being processed as in the last screengrab above, there will be an error message onscreen, pointing out problems in the numbers of colors present in rows ie more than 2 for FI. This is fixed by clicking on either the “needles” of one of the two active colors in the yarn palette to make one color the ground, and the other the contrast. The results from this process for printable bmp files are shown below, not for a bmp that may be used to knit the pattern on an electronic machine using a different download method. Here the resulting stitch pattern picture is shown in color reverse as well.

 At this time I am continuing to knit on my machines with punchcards and using Ayab, or img2track on my electronics, have no immediate plans to change that, hence my interest in using DAK software features while keeping in mind the possibility of using the final repeats on other machine models.
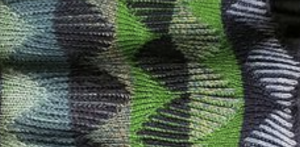 The plan is to create a repeat which may be knit using color changes every 2 rows. Each design row knits each color twice, so the standard built-in KRC separation is not a consideration, though the same cam settings may be used in those fabrics as well.
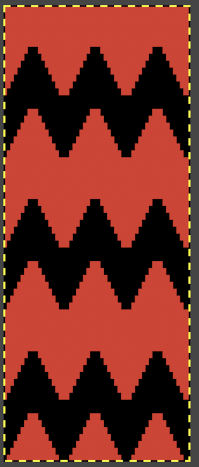
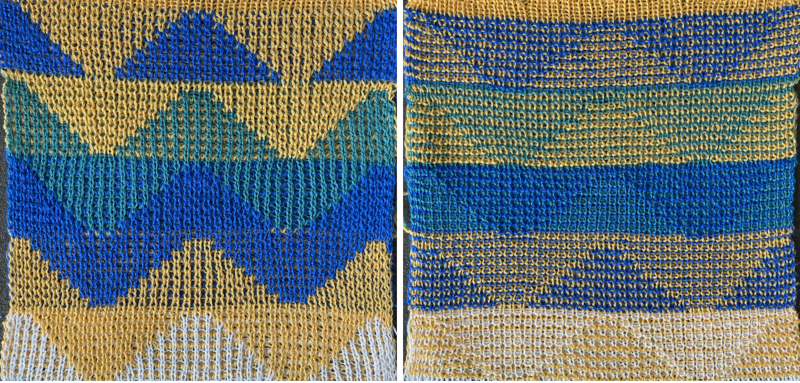
 Lock settings are easier to achieve on the Passap than switching out cam buttons in Brother machines. This was knit using 4 carriages. Color one knits with the main bed set to tuck both ways, color two knits with the main bed set to slip both ways. The slip stitch reduces the width of the fabric considerably
 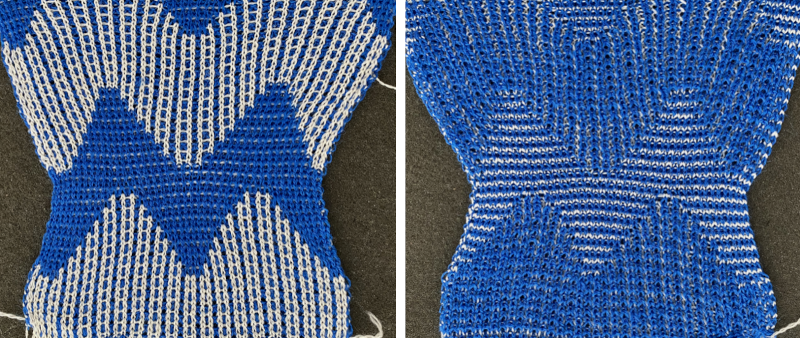 Here each color alternately tucks and slips. The choice of cam buttons matters, tucking first from left to right, slipping from right to left, with cam buttons set COL after the first preselection row
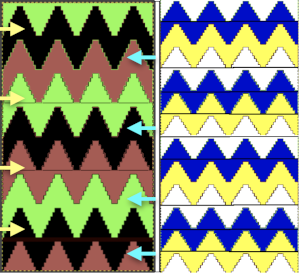
 This last cam setting appears to my eye to produce a texture “close enough” to the inspiration fabric. Attempting to add more colors: the repeat, D, is still 18 X 88 but is now shifted slightly.
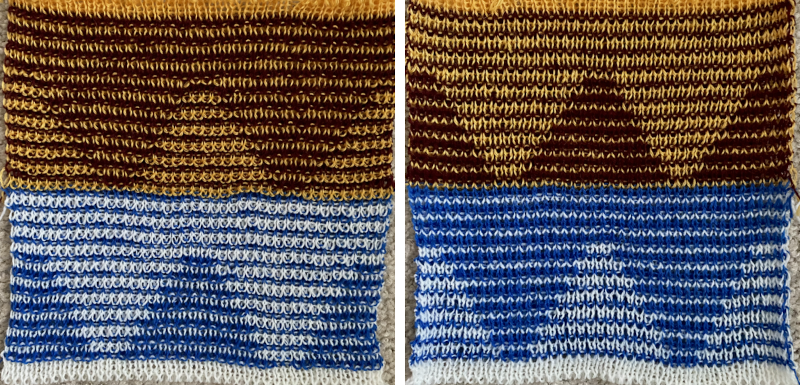
 The existing repeat may be reduced further to 18 X 64, eliminating some of those extra rows in the center of the chevron shape
  Whether or not the design is intended to retain chevron shapes in alternating textures, actions may be plotted pre knitting in any way that visually makes sense to the person designing the pattern and tools available to them.
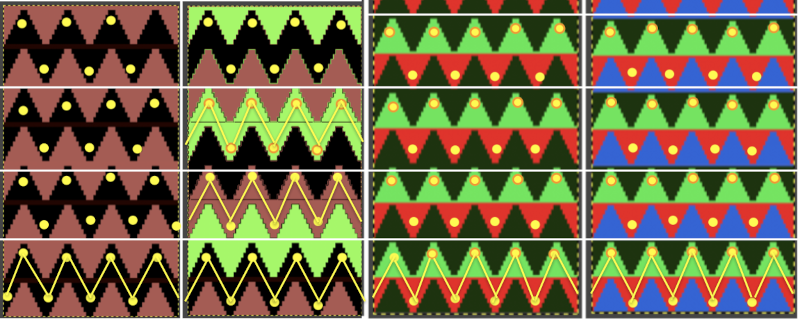
 Reversing the png so that the more textured stitches will begin with the color in yarn position 1
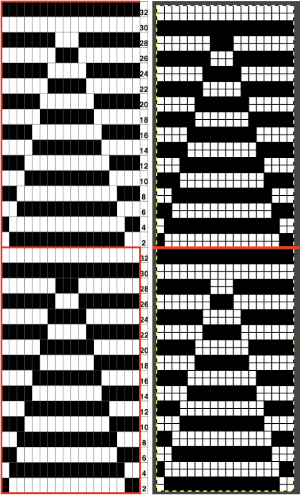 Adding colors can be planned cautiously or allowed to happen randomly depending on the preferences of the designer and end-use. Ribber fabric designs are not visible until several inches have been knit, too late to catch color sequence errors. Some machines allow for memo placements or sounds to help track color changes, but only within the initially programmed repeats. A quick spreadsheet can provide customizable checkboxes or added information. For an attempt to retain chevron shapes in different textures:

 A PDF including row numbers and space for notations
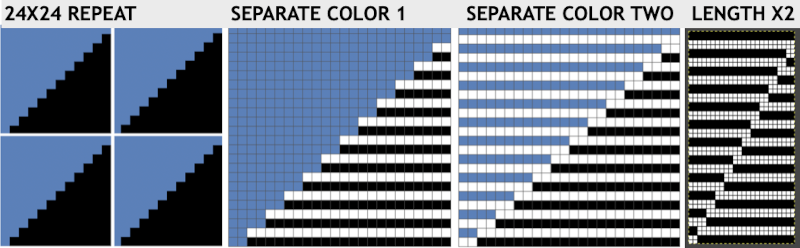
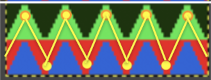
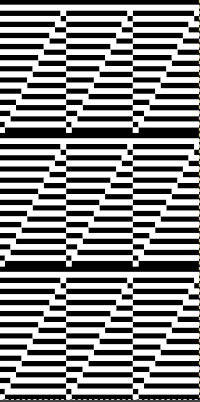 Continuing on a 24 stitch repeat, the original design may be rendered at double height and separated once more, doubling the separation height to 96 rows
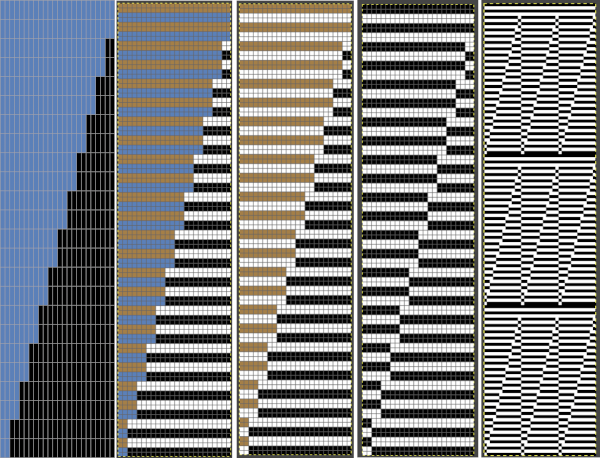
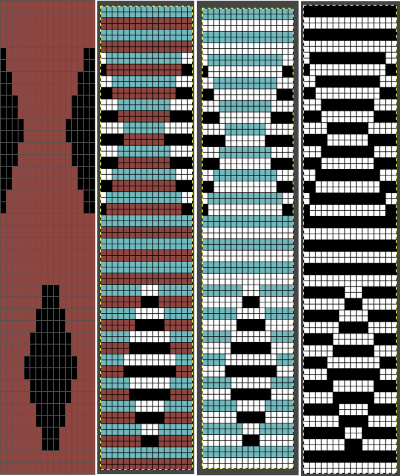
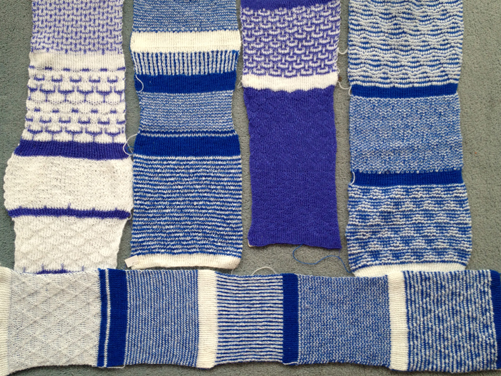
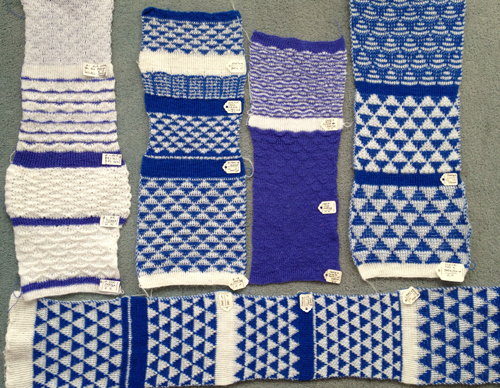
 Another even more complex inspiration from a sweater attributed to Falke, Spring 20 collection, using similar stitch structures, but in addition, also transferring stitches between beds exposing a purl striped ground.

 Adding needles out of work by simply choosing to cast on and working on every other needle it does not matter whether even or odd needles are in use, the pattern will be identical but simply shifted over by one needle. For frequent color changes, make the first preselection row toward the color changer to start with, keep notes as to where the repeat color selections happen as experiments are expanded, evaluate color choice as a third or even fourth color are introduced
 the third tuck row on the machine
  the fourth tuck row with needle preselection for the first all knit blue row
 Two from one: the same tuck repeat was altered by changing the needle out of work arrangements. Slub yarn may be used but changes the value of the lines formed by the floats created in the needles out of work gaps.
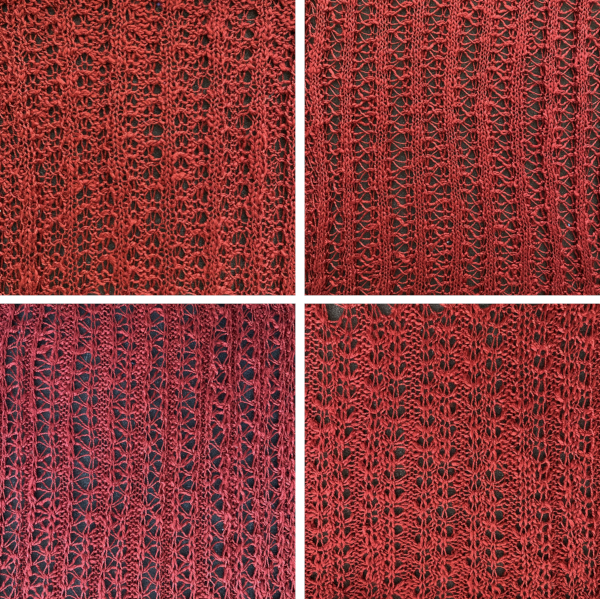
