I usually try to leave opinions out of my shares, but this post includes some along with “don’t do what I did” tips.
This was a pattern available for sale decades ago, sold directly to customers. At frequent intervals over time questions come up in forums as to possible DIY techniques and methods of design and execution to create the knit, or similar, followed by speculation.
The images from the ads online are small. 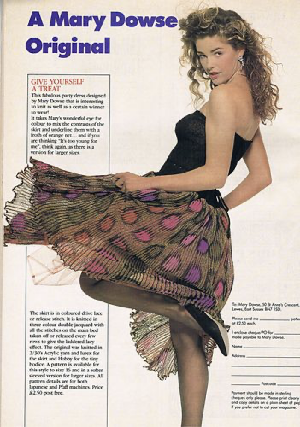 Trying for a bit more detail, there is a see/peek-through quality.
 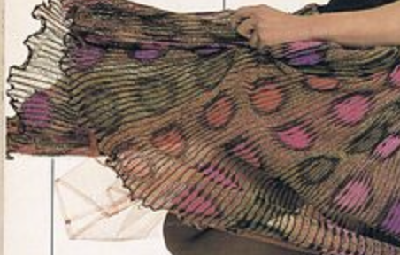 At first, I thought it might be a version of the stitch using 3 colors, but later, looking again, I came to believe it to be a 2 color drop stitch fabric with a dark constant motif color creating the donut-shaped designs with changes to three different colors in the background.
I am planning to execute the fabric as a modified end release, releasing stitches at intervals based on needle selection.
First flub: I was thinking of this as an addition to a prior post, and I got happy cleaning up and deleting stuff. Getting here I realized some of that stuff had to do with the original repeat used and the gimp layer images illustrating the steps used to obtain my repeat.
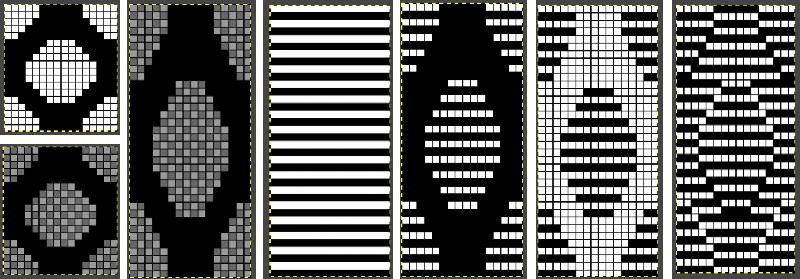
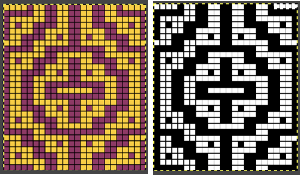
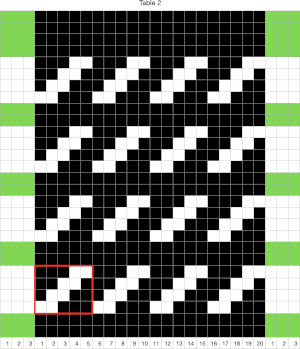
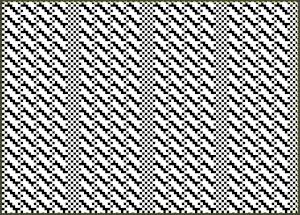
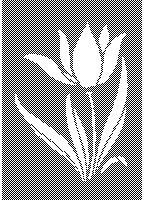
It is possible when that happens to reverse construct the images. That brought me back to this image, 20X16, drawn as less of a circle since the fabric technique will lengthen the design. ![]() It is scaled double length to 20X32 for processing in layers.
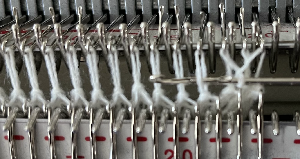
It is scaled double length to 20X32 for processing in layers. ![]() Though the image is far too small to help define the quality of the stripes between the circles, the goal here is to include areas of solid stripes in drop stitch in the alternating colors between the shapes. All white pixel rows will not create long stitches on the top bed, only all knit rows only on the ribber, not the intended fabric.
Though the image is far too small to help define the quality of the stripes between the circles, the goal here is to include areas of solid stripes in drop stitch in the alternating colors between the shapes. All white pixel rows will not create long stitches on the top bed, only all knit rows only on the ribber, not the intended fabric. 
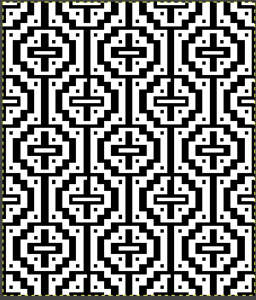
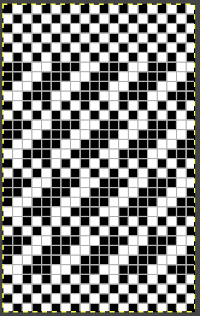
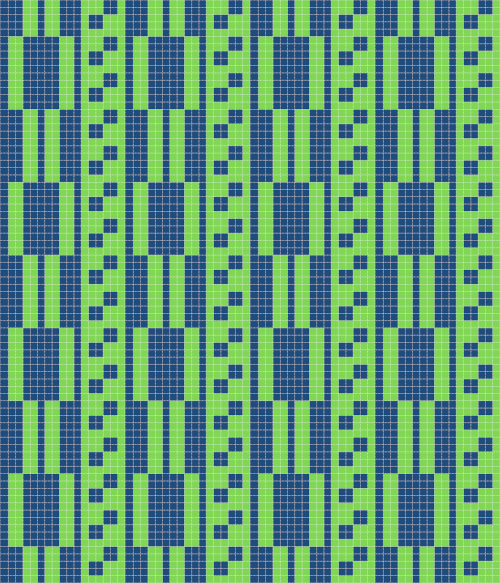
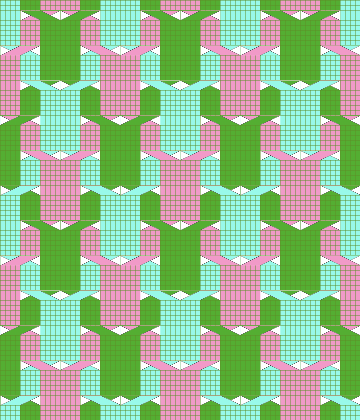
![]() The tiled repeat:
The tiled repeat: 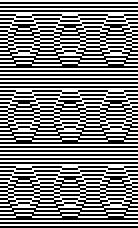 I wanted to add solid color drop-stitch stripes, the solution being to add all black rows. Every needle will select every row in those areas, colors are changed every two rows, creating the desired effect when the corresponding stitches are dropped.
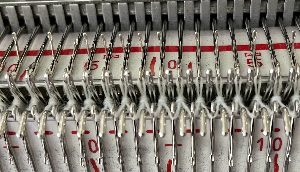
On any row where every needle is preselected, all needles can be pushed forward to E position dropping the whole row of stitches, and needles are pushed forward to E again after the release so that the second row of loops composing the stripe will be created on the top bed on the next pass to the opposite side.
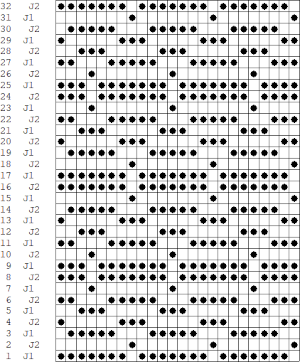
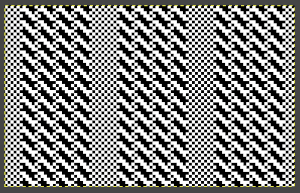
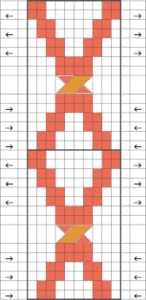
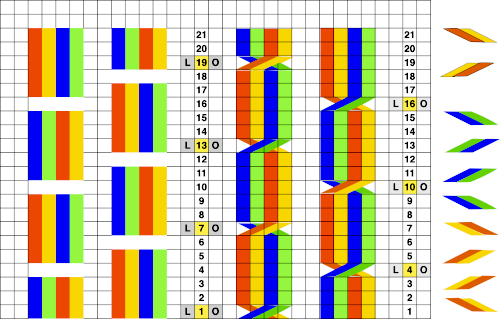
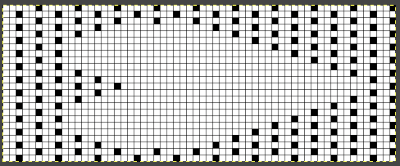
My final png planned as a single motif test on the 930 is modified to 46 stitches by 72 rows. ![]() Imagining the 2 colorwork in repeat, estimating if the pattern and ground fall in the proper place
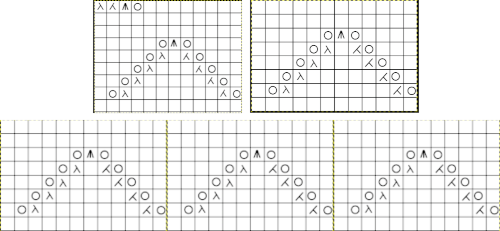
Imagining the 2 colorwork in repeat, estimating if the pattern and ground fall in the proper place 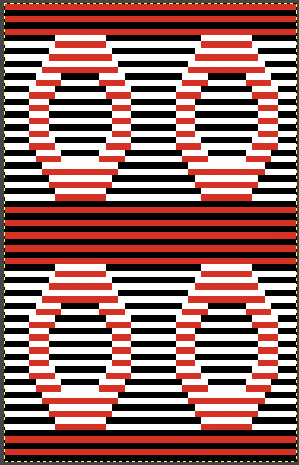 A visual summary with an added color change column and row numbers with rows on which dropping all loops can occur marked with different color numbers. In this case, the ground is in the dark color, the shape in the lighter one.
 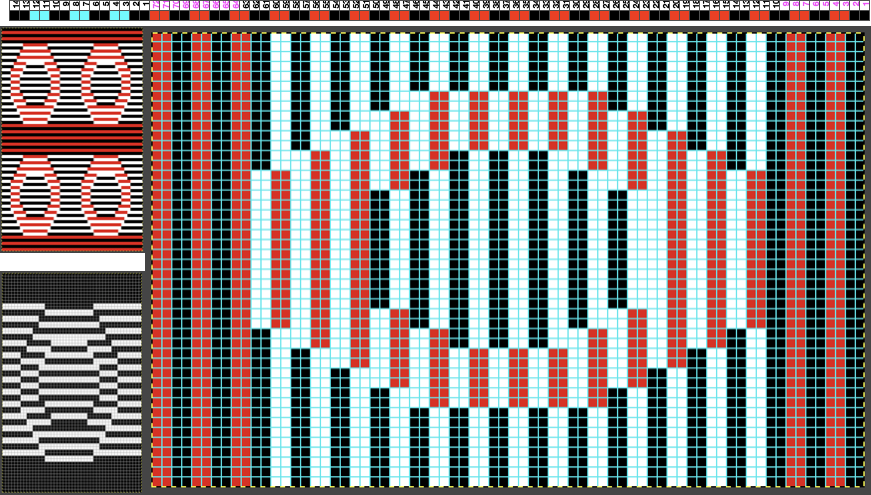 Determining whether the shape or the ground stripes knit the dark color is simply done by beginning the first all knit rows with the dark color or the light.
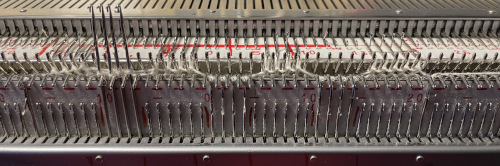
Getting to the knitting: the yarn I am using, knit at tension 4/5, is significantly thicker than that recommended in the ad for the pattern.
When every needle knits every stitch on either bed, adjustments need to be made in tensions used approaching that used for the yarn when knitting stocking stitch single bed. Brother ribbers also tend to knit tighter than the top bed.
When working every needle rib with sporadic needle selection on the top bed, it takes a bit of testing to find the ideal tension so that stitches are formed and knit off properly on either/both beds.
When lots of needles are being knit on the top bed, the carriages are likely to become harder to push.
A far thinner yarn would change the scale of the overall design even if using the same repeat.
The first swatch encountered aargh moments.
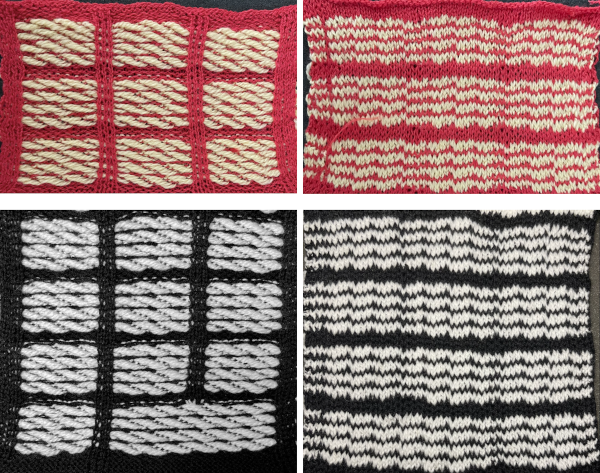
A: the color changer was frequently trying to share 2 colors at once. When I attempted to change the design color, the yarn got caught around a gate peg at the start of the row, and the knitting dropped to the floor.
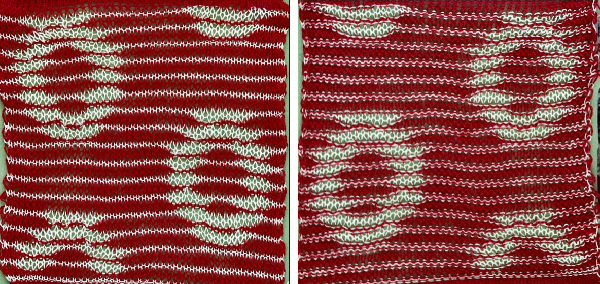
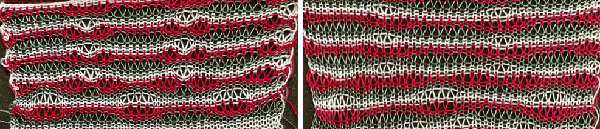
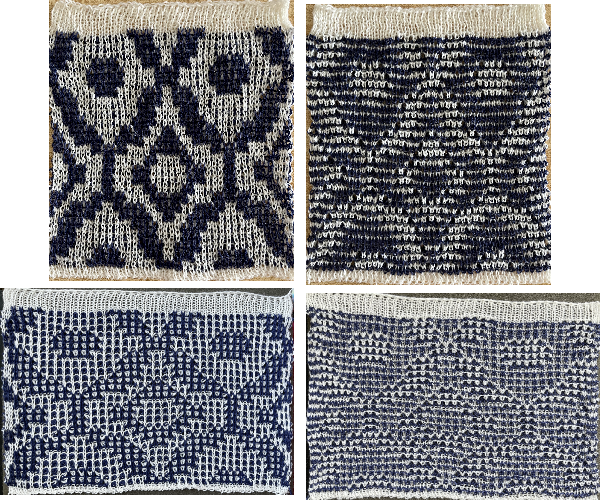
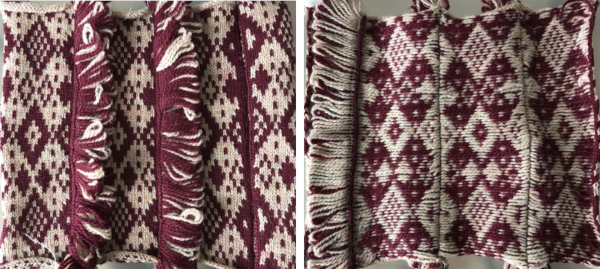
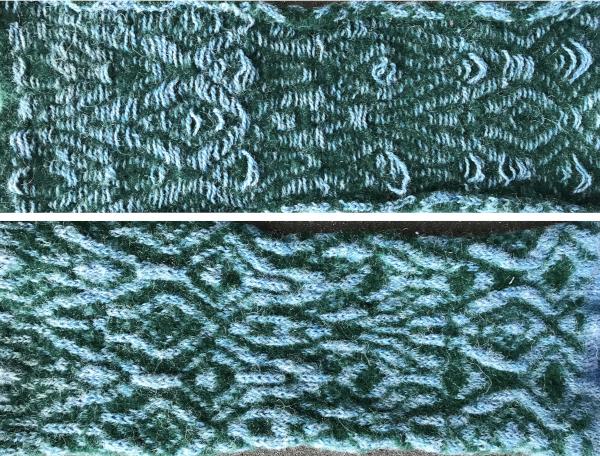
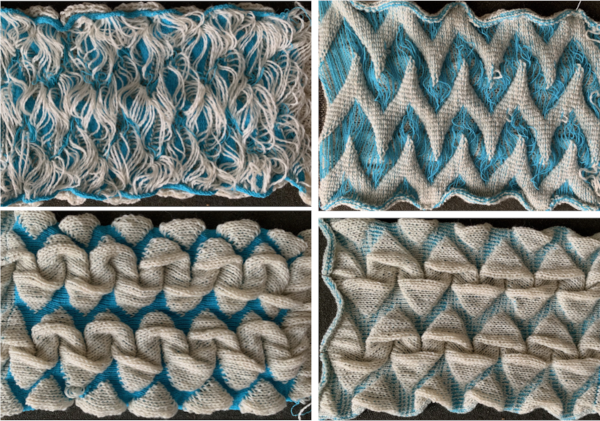
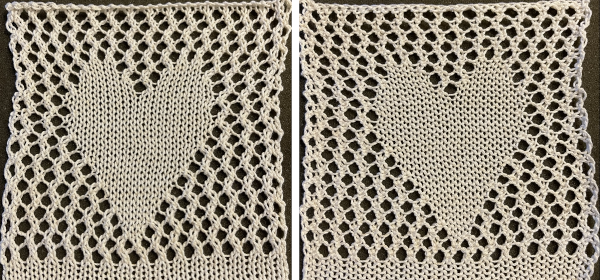
B: testing reversing the colors. When the dark color was switched to red, C, the contrast and definition of the newly forming “circle” was not enough to my taste. 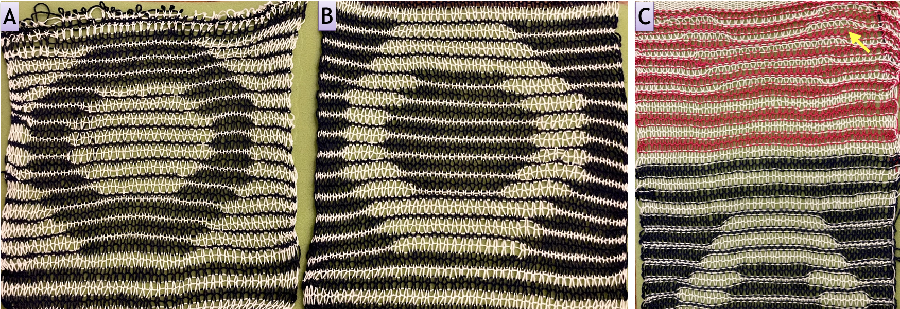 Giving it another go, the theory worked, the details in the fabric underneath the swatch can be seen peeking through,
 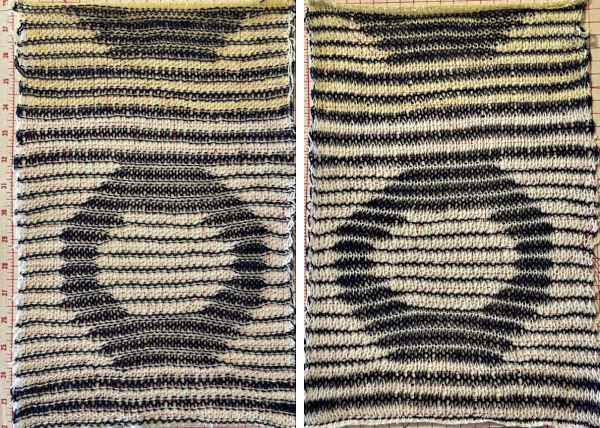 but I would like to have stripes in the solid lighter colors as opposed to 2,
  and more space between the shapes. A new, untested draft is now 50X76
  but those rows for the solid colors need to be rendered again with black pixels.
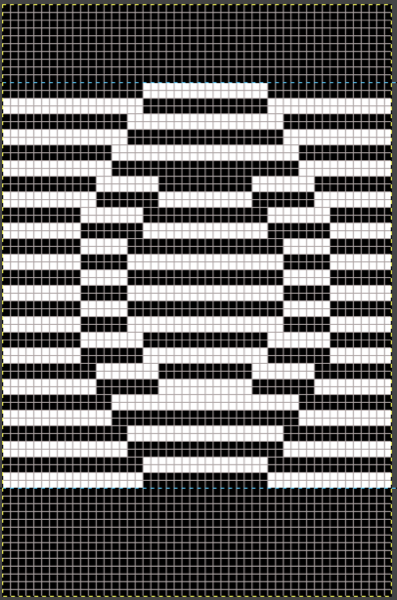
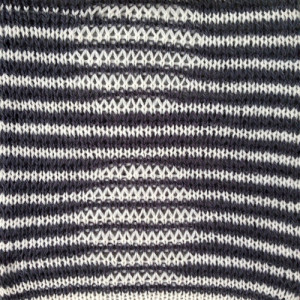
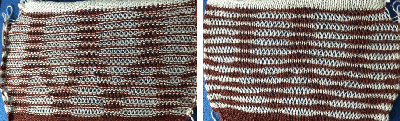
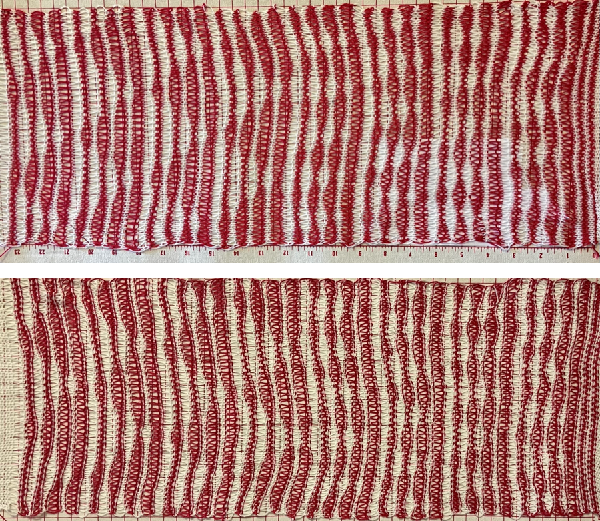
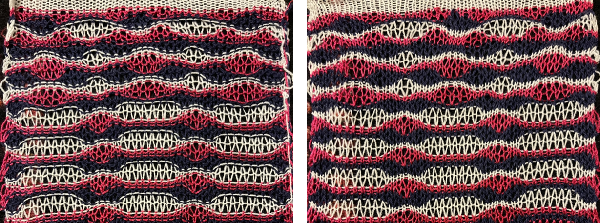
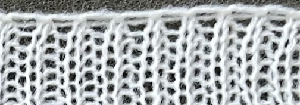
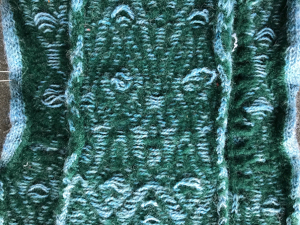
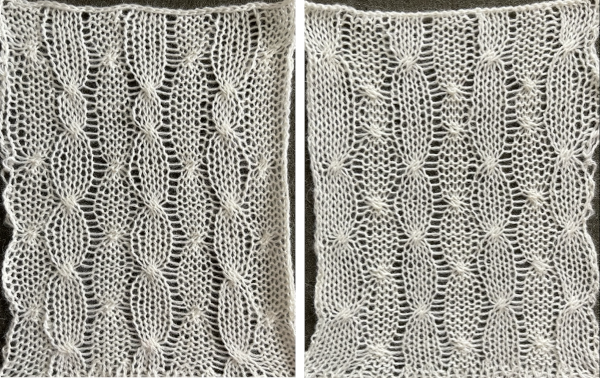
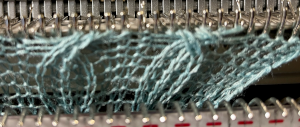
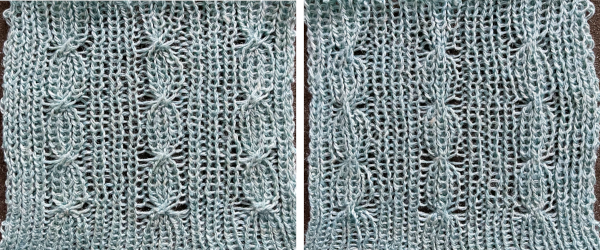
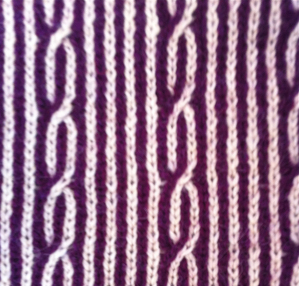
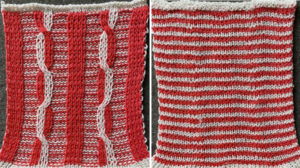
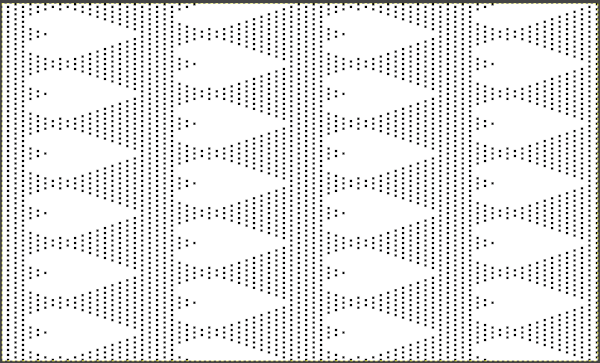
 Here some of the peek-through quality of the fabric is shown again. When any fabric is gathered sideways, it is likely the repeat will appear narrower and longer.
 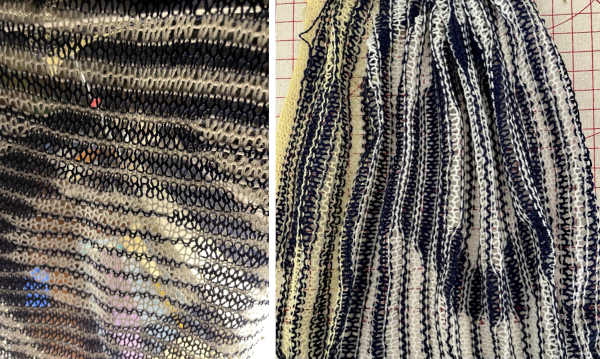 Using a 16/2 cotton at nearly the same tension produces a fabric that is even sheerer.
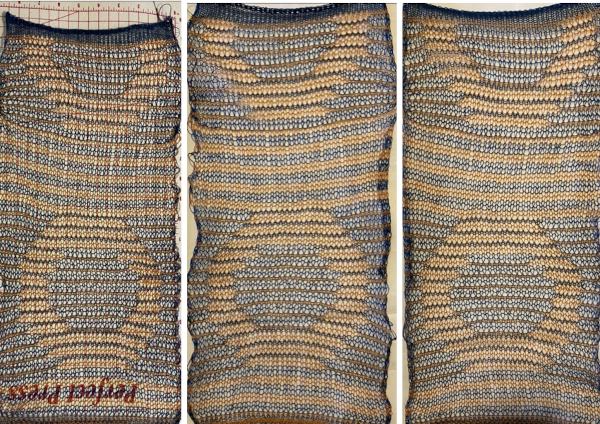
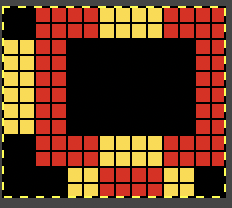
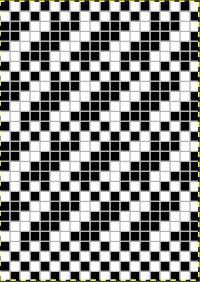
 And now those solid stripes in 2 rows knit are really bothering me, thinking they should be switched to only one row of loops, making the original repeat without those added black rows the better repeat?
 ![]() Only one of the two colors would pick up loops, with the second knitting 2 rows on the ribber only. Aaargh! So what of this?
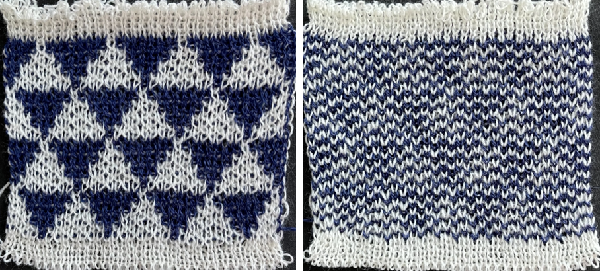
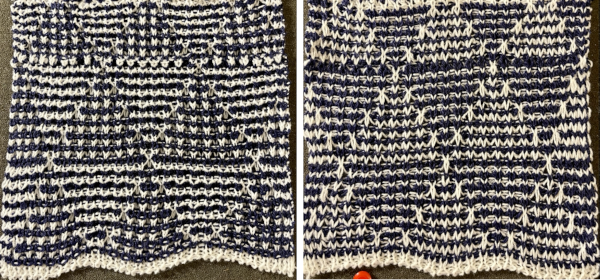
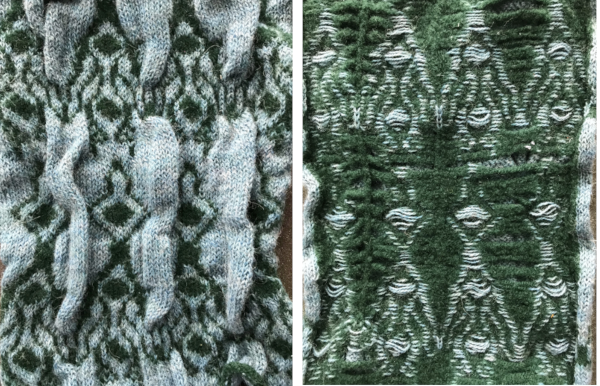
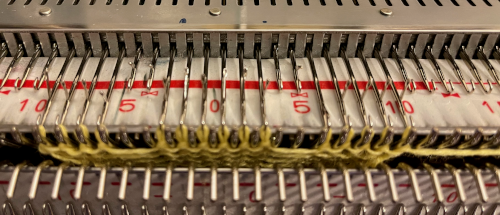
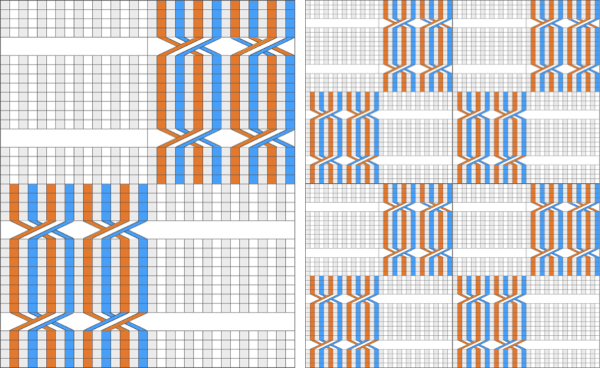
Only one of the two colors would pick up loops, with the second knitting 2 rows on the ribber only. Aaargh! So what of this? ![]() Different day, yarns used before, same tensions, a very different result. The colors look different because the sun is finally out and this photo is taken in natural light as opposed to weird artificial lighting. The navy color is slightly thicker than the white, the single dropped row is not immediately visible. Stitches were dropped on any rows after all needles flatlined, and they were returned to B position prior to the next carriage pass.
Different day, yarns used before, same tensions, a very different result. The colors look different because the sun is finally out and this photo is taken in natural light as opposed to weird artificial lighting. The navy color is slightly thicker than the white, the single dropped row is not immediately visible. Stitches were dropped on any rows after all needles flatlined, and they were returned to B position prior to the next carriage pass.
Lo and behold the joyful experience of having yarn break when the stitches are pulled in order to drop them! 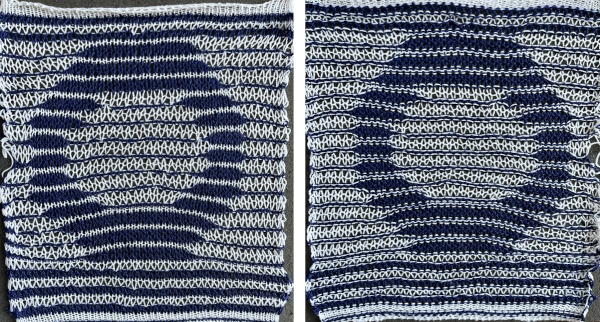 A potential use is for the thinner knit is for it to be used as a layer over a different pattern or the same design as seen here, in the thicker yarn
 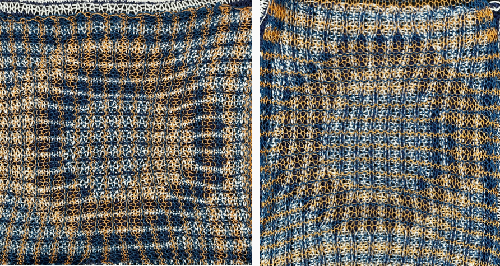 I have never been a fan of this fabric, and for a while.
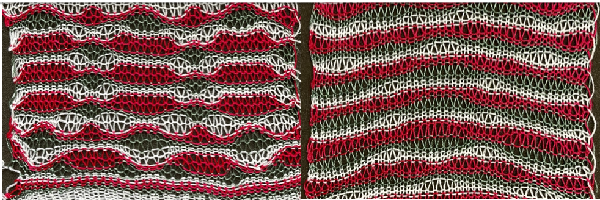
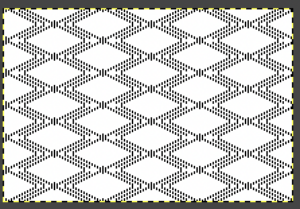
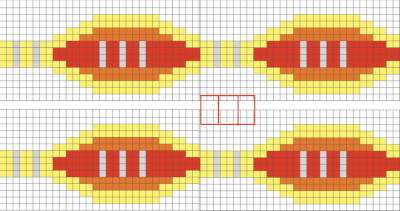
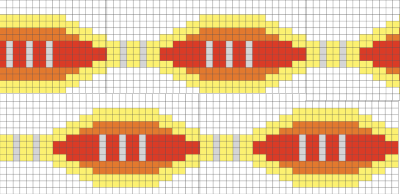
To my eye, all over geometrics rather than floating forms on solid ground are more attractive, one such sample: 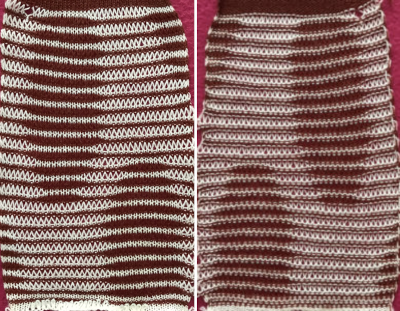 seeking a rounder, smaller donut shape:
 ![]()
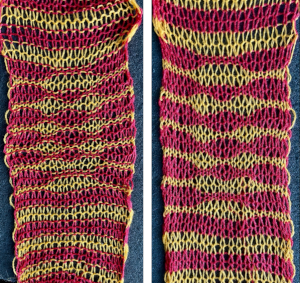
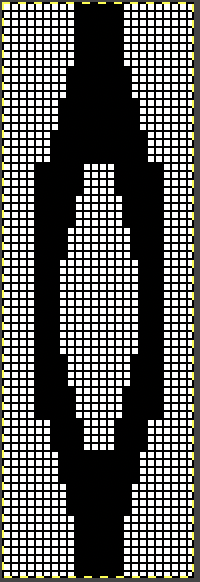
 The red is a thicker yarn than the pale yellow, the fabric had an interesting slight curl evocative of shadow pleats. Other possible changes include the elimination of the top and bottom row in the original design.
 What seems a possible easy fix is not. The above repeat knit creates an elliptical shape rather than a circular one
 ![]()
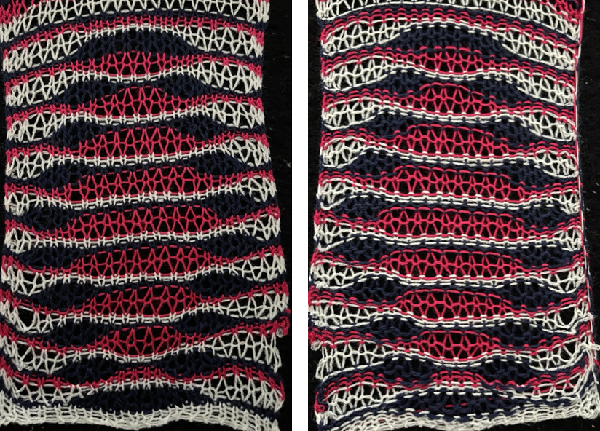
 A more stable fabric with areas of stitches dropped for a single row in each of the alternating colors.
 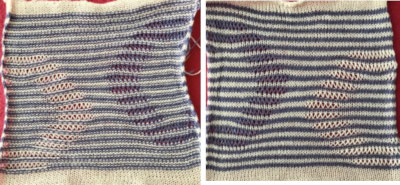 How to for both are found in the post.
I need a break from long stitches for a while, though this is yodeling. Never say never. ![]() It takes time and effort to develop any fabric to the point where it is considered a satisfactory one, let alone to write and publish accurate patterns using the technique. People who do both deserve to be paid for their time and effort, and are due respect, so no sharing if the pattern is copyrighted or is an original one available for sale presently online is proper.
It takes time and effort to develop any fabric to the point where it is considered a satisfactory one, let alone to write and publish accurate patterns using the technique. People who do both deserve to be paid for their time and effort, and are due respect, so no sharing if the pattern is copyrighted or is an original one available for sale presently online is proper.
That said, techniques or merely repeats are not subject to the same “restrictions” and certainly may be adapted for use in different, more personal, or new ways. If an item like a scarf is made using a particular needle arrangement and texture and someone else makes a dress using the same stitch type but shaping pieces, adding details, pattern instructions, the scarf maker, IMO, cannot really claim their work has been copied.
To my mind, credits when sharing anything if available are a matter of courtesy.
Another garment illustrated in the FB comments on the last search query for the Dowse pattern or similar fabric was created with FI shadow pleats. Shadow pleats rely on the contrast between thick and thin yarns to create folds. The double density in the traditional FI segments and the subsequent shift to using thinner yarn for the second color still have floats on the purl side of the knit and are unlikely to produce a sheer knit.
 The repeats for designs may be self-separated to suit.
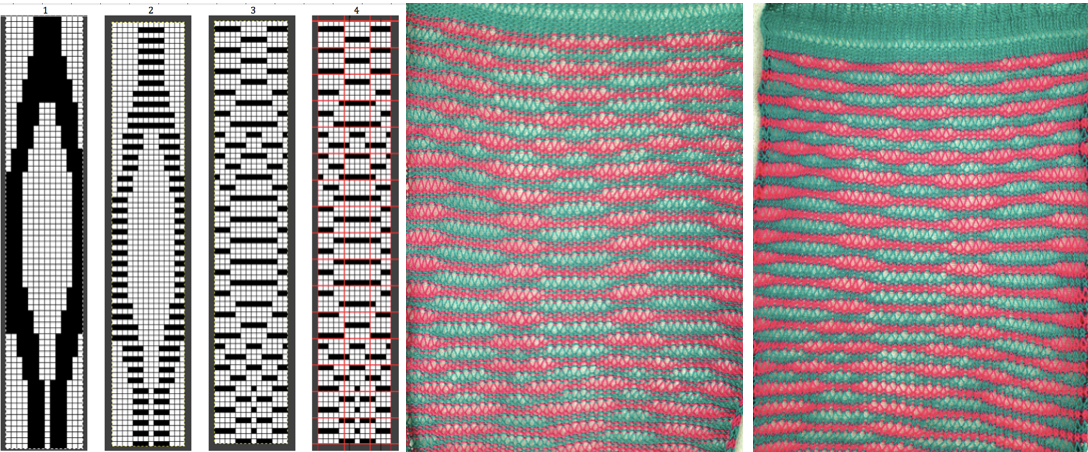
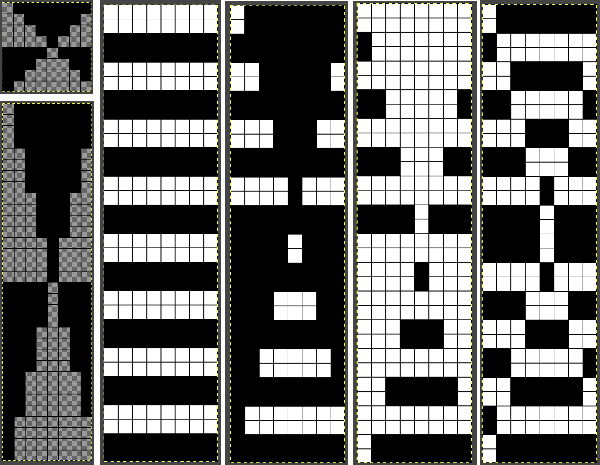
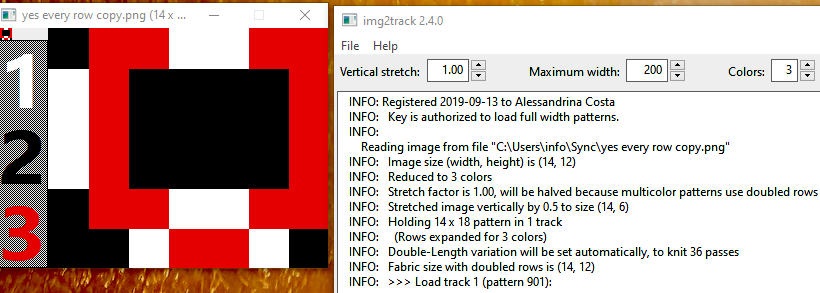
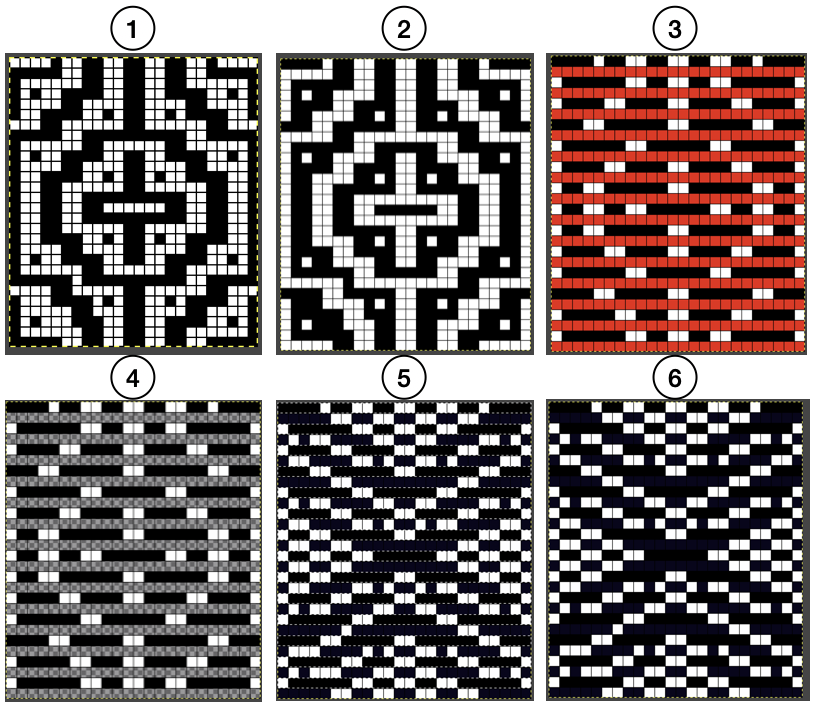
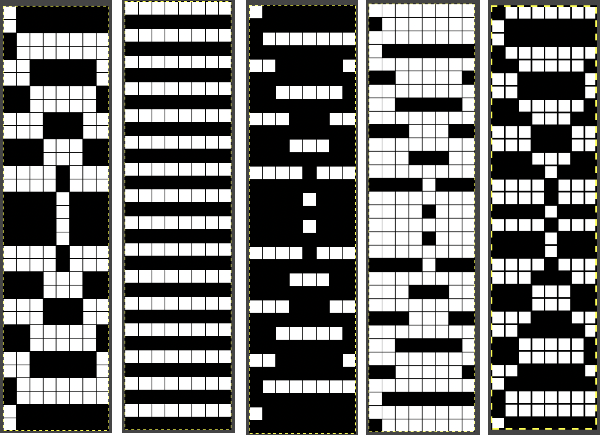
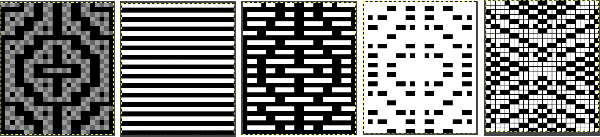
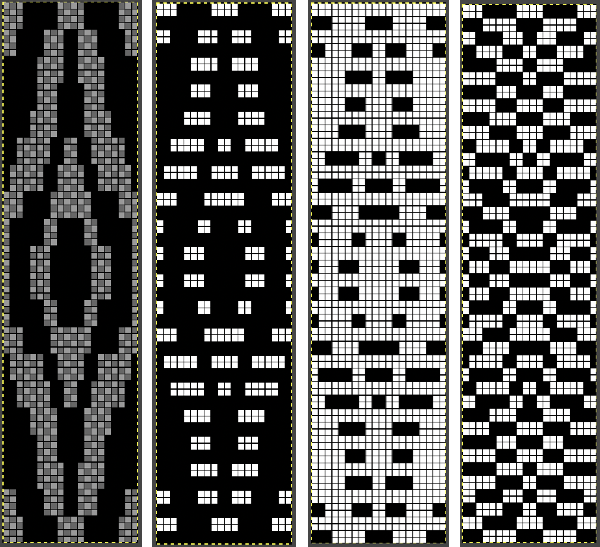
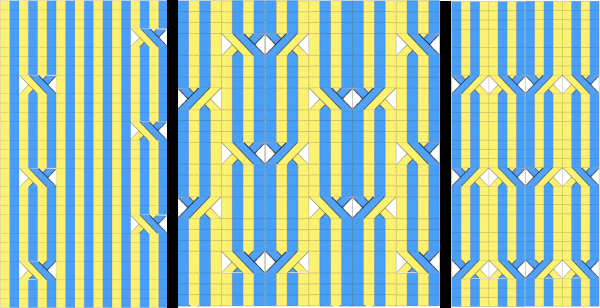
 Three variations of the final png files are shared
 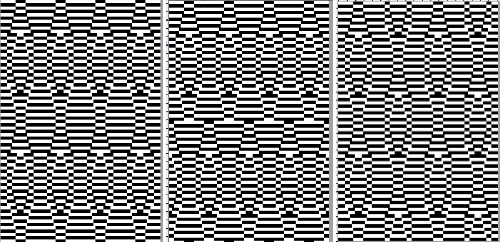 This is the appearance when a different design was entered in img2track. The separated file 3 color file in BW is not shared.
 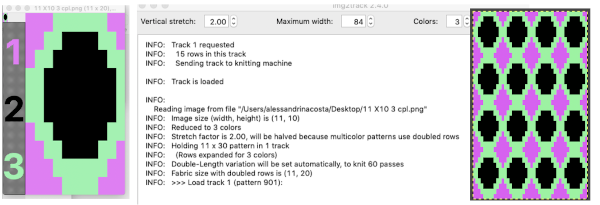 The method for knitting the pattern: the long stitches are formed by loops that are created on the top bed and dropped on the following row.

 The second carriage, C2 is set to KCII as well. It will be advancing the design with each pass as well and will drop loops on the first pass, preselect for the subsequent pattern row on the next
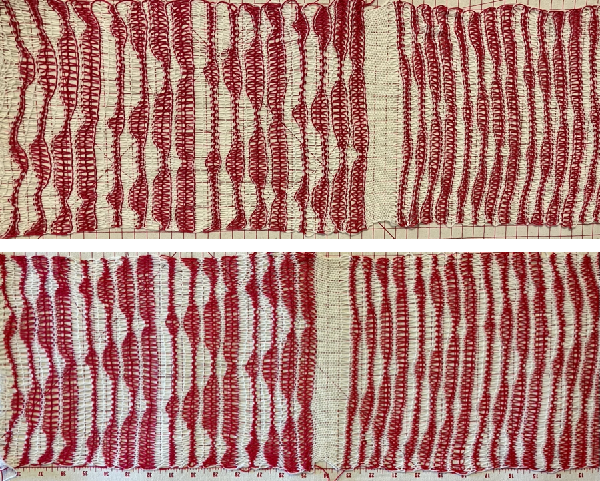
 The elongated stitches allow objects behind them to peek through
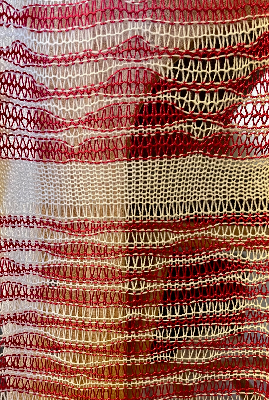
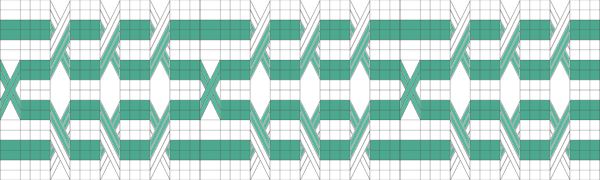
 Here the goal is to use the img2 track separation, maintaining the same color change rotation in each piece.
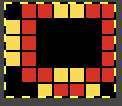
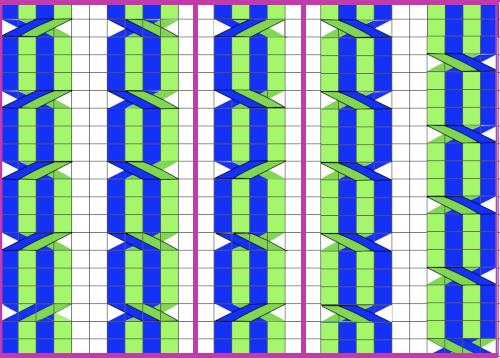
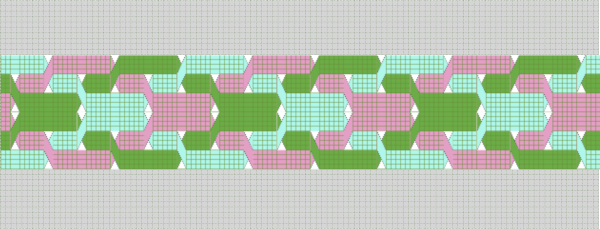
 The tiled potential appearance as a dbj fabric:
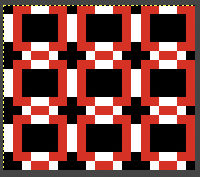 In the first sample three carriages are used:
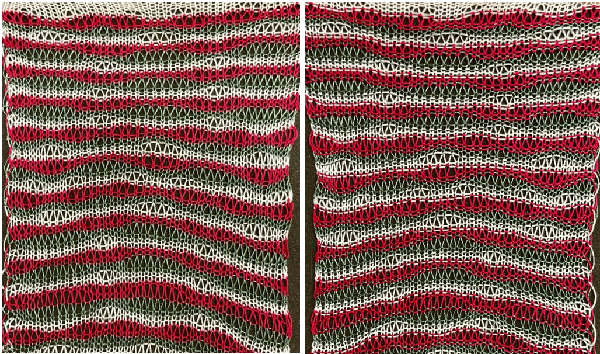 What of end release? because all 3 colors are present in every row, the design is suitable. The first preselection row is from right to left.
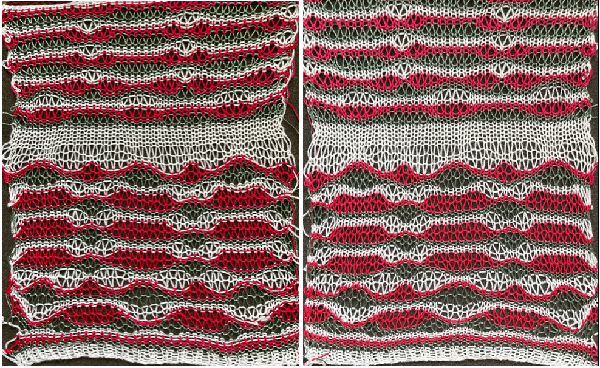
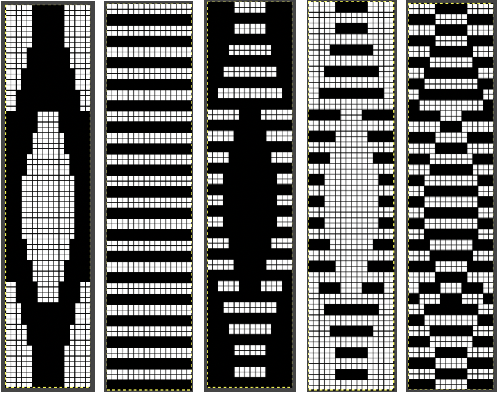
 Any published or self-drawn separation for 3 colors per row patterning including every color in every row of the original design may be used, programmed as a single bed design, and knit for end release.
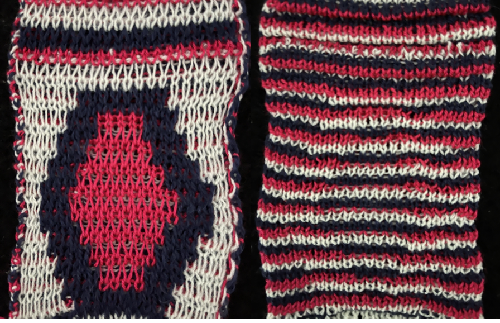
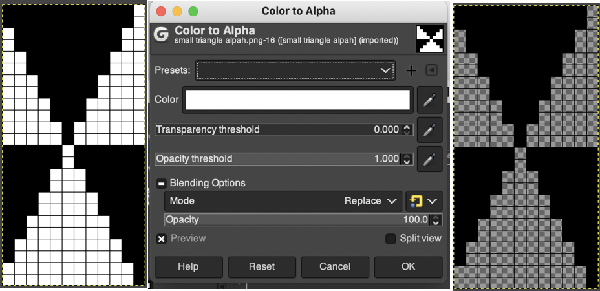
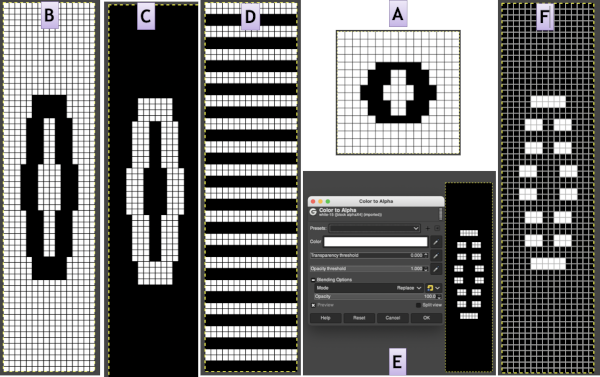
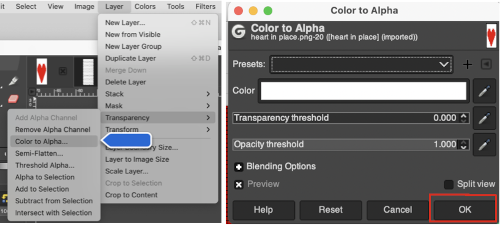
 the white ground of the resulting image is rendered transparent by using Color to Alpha
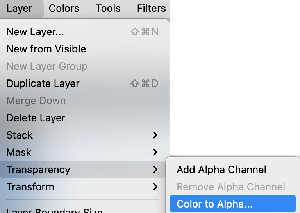
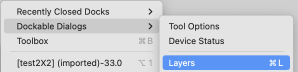
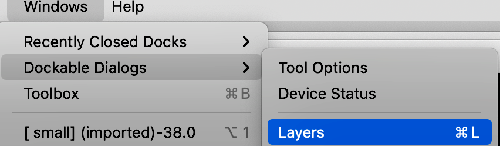
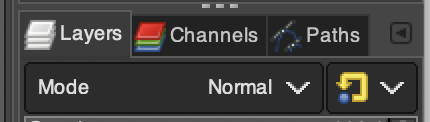
 Select New Layer from the Layers menu (see chart), choosing the background or foreground color to have a white screen. It will share properties with the alpha repeat such as pixel count, magnification, and the grid view if used.
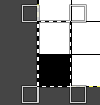 Copy the selection, and it will be saved to the clipboard and remain available for filling with the pattern unless the program is quit. It may also be
 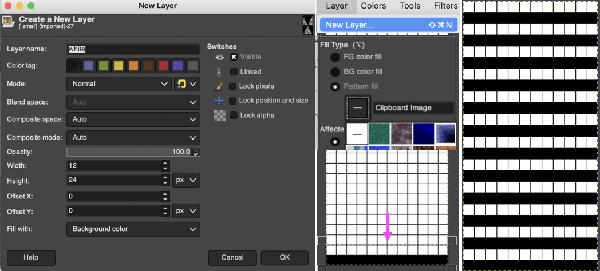 In the layers dialogue, use the mouse to drag and drop the alpha image icon for the triangle layer onto the newly created one. The selected icon will appear surrounded by a border when chosen, a new icon will appear during the step.
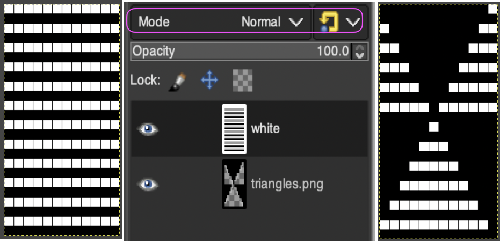 Color invert the new image
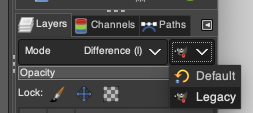
 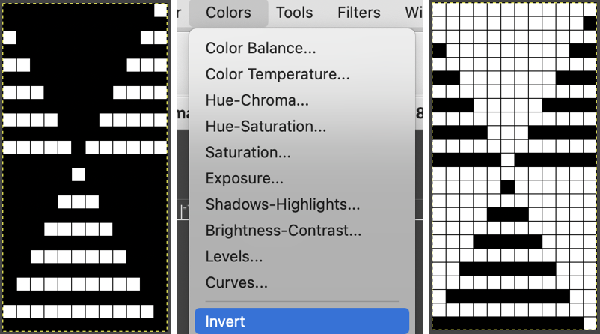 Click on the downward pointer to the right of Normal and select Difference. The result is a repeat that may then be saved and used doubled in height to knit DBJ in a variety of settings.
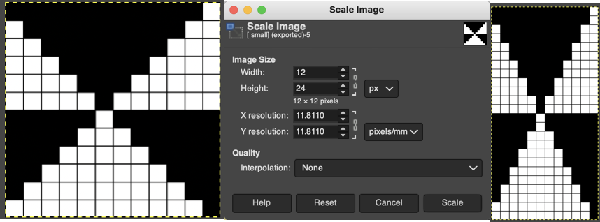
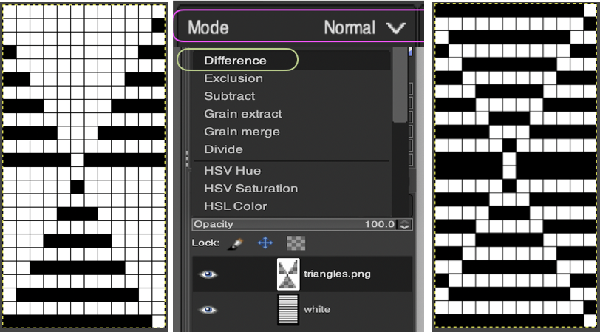 Elongation after download can be avoided by working with the same initial image scaled in height X4 and following the same process, saving and using the repeat on the far right.
 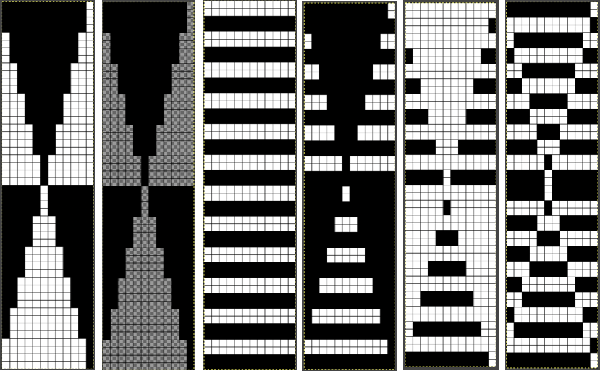 The same separation was achieved using other methods in the post on fantasy fair isle.
 Are punchcard knitters left out? In the
  and the starting design shown with the color reversed repeat of the above.
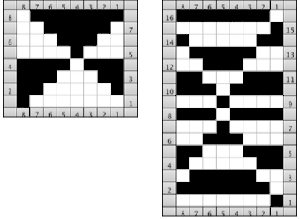
 When a color separation is downloaded it is used as one would a fair isle. If the motif is representational and direction on the knit side matters, any repeats may have to be mirrored horizontally if they are automatically reversed by either your software prior to download or your machine model after it.
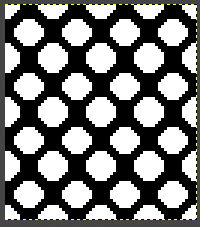
 The image is processed as for the previous separation, the final png is exported. Open the saved in Gimp.
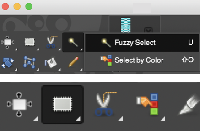 Using the rectangle tool, select a single blue row, after the selection, press and hold down the shift key and repeat selections of multiple rows in the same color. Each selection will be bordered by a dotted line.
 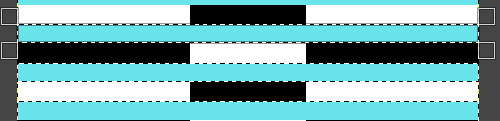 Release the shift key. Click on the rectangle select tool and then again in the work window outside the image to set it. The dotted lines will disappear. The same action is repeated if working on segments of the full file at a time.
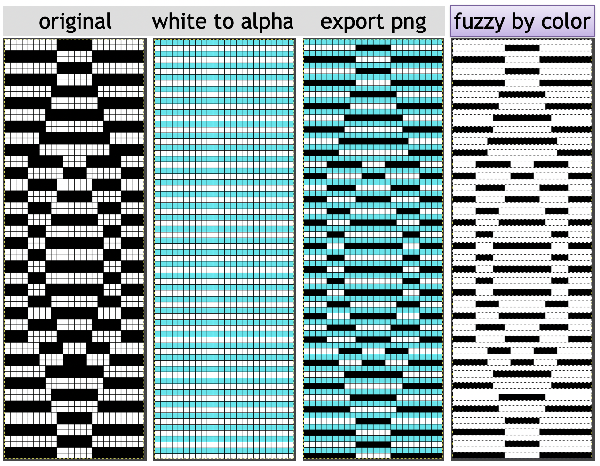 The 24X72 new png
 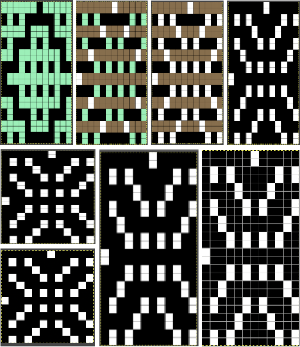 Both results require scaling X2 before knitting, whether by button setting changes in the repeat after download or in Gimp before.
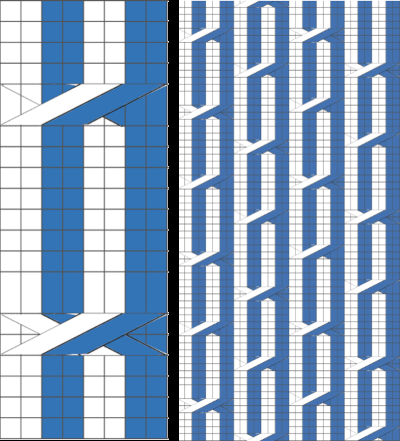
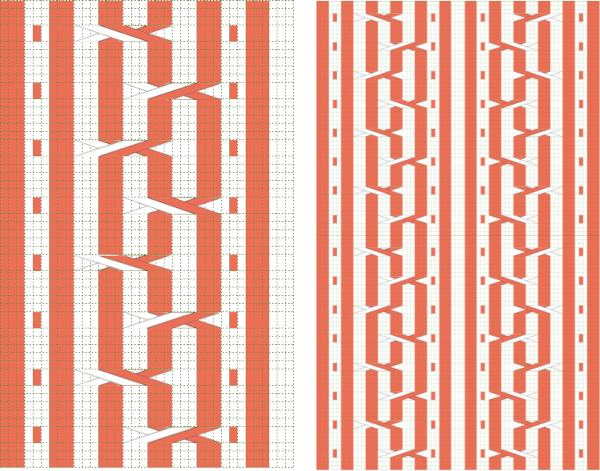
 The process in Layers
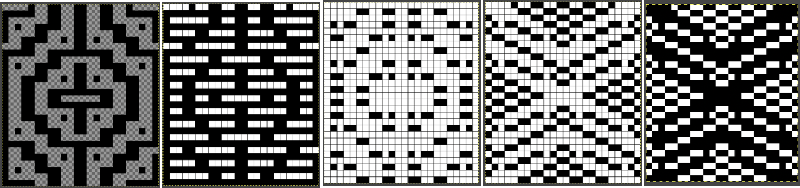 The very last file on the right is saved as a PNG. In turn, it is opened again in Gimp, scaled to twice its height
 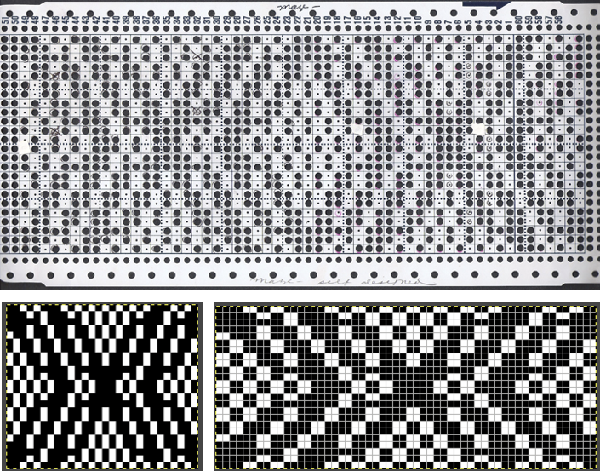 Exclusion is the alternative Layer mode which when following the same process yields identical results.
 A block slip stitch design from the


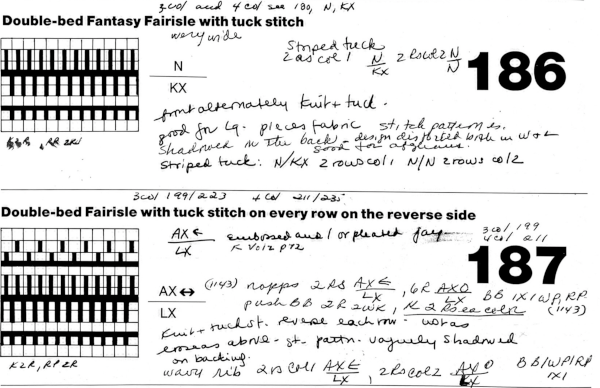 In Fantasy Fairisle knitting using 187 with alternating up and down pushers on the back bed and AX with 2 arrow keys would match Brother ribber knitting with lili buttons used on an even number of needles set to tuck.
 For the 1-pixel grid in Gimp to be visible on an editable image, a magnification of at least 800 is required. The options offered by default
 can be changed to suit by simply typing in a new number.
 the processed image
 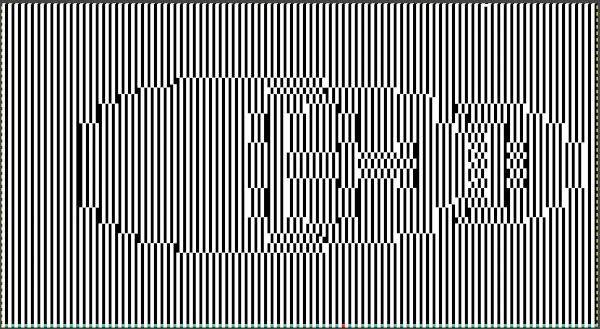 the trimmed 98X182 png
 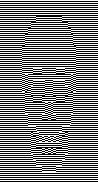 doubled in length once more to 98X364
 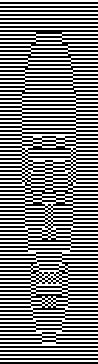 Knitting process on a 930 using img2track:
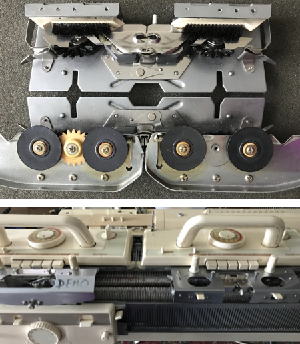
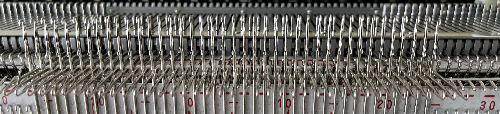
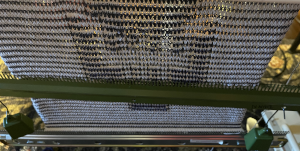 A reminder: in my experience, the Brother cast-on combs are usually chrome-colored, Studio grey, and Passap, and I believe Superba ones were traditionally green. The first 2 were designed for 4.5 mm machines, the latter for 5mm. The different mm spacing does not make the 5 mm combs suitable for casting on on Brother, but they can be poked through the knit in progress. I like to leave the first comb and weights on, insert the new comb closer to the beds, and then move the weight up, and then remove the lower position comb.
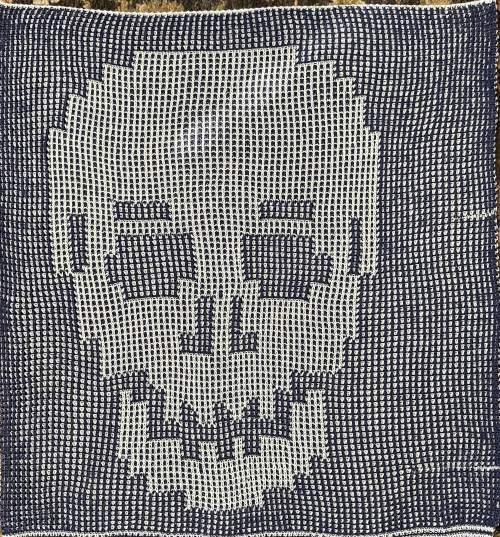
 In the Brother model, sometimes the yarn is left in the wrong place below eye level rather than its own individual one corresponding to its button, and both yarns are picked up with the next color change.
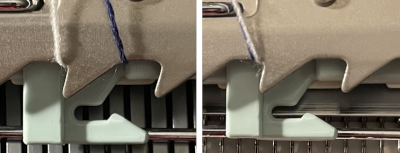
 a close-up of the texture at an angle
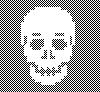
  Claudia Scarpa developed a skull variation using only layers in Gimp
 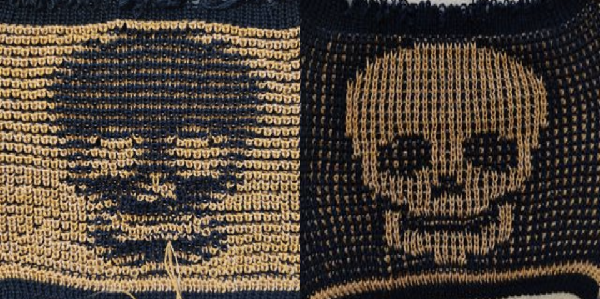 and has been kind enough to create a
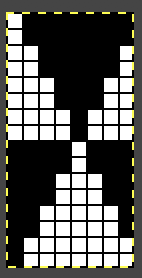
 It is possible to work some repeats on some machines with the ribber also set to tuck both ways with EON needle selection.
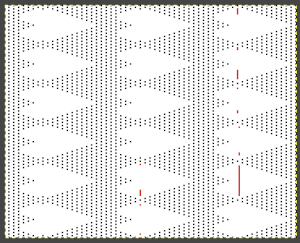
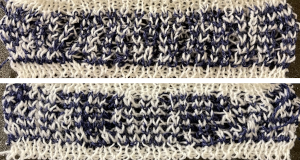 When using the Dak stitch design module, the color separation is automated. Choose any design repeat. This happens to be a 20X20 one, chosen from the thumbnail assortment, so not suitable for punchcard models. “Printing” the template using choosing the option of using dots rather than squares to represent knit stitches makes the resulting print screengrab easier to trace.
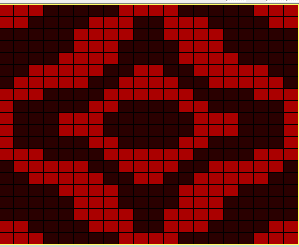 the 20X20 repeat as a BW png
 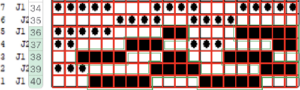 The result is screengrabbed, opened in Gimp, converted to BW mode, and scaled to the 20X40 expanded design size. Unless the double-length function in the machine is also used, it will need scaling again to double length prior to download.
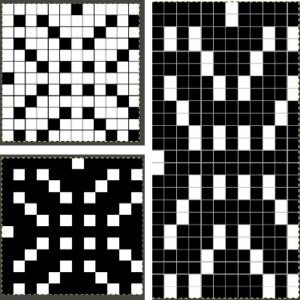
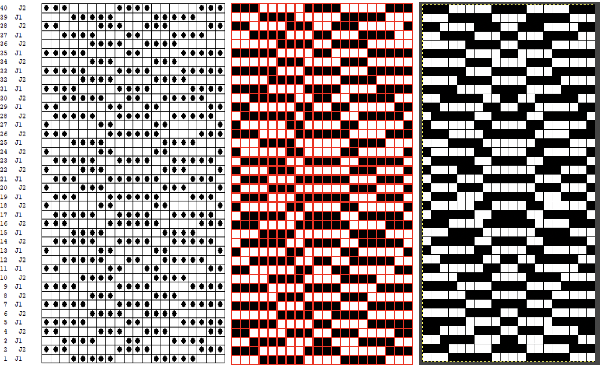 The final image double length, showing the difference between the separation using the template, and that using layers as in Claudia’s video, which appears different but is actually the same repeat, color reversed.
 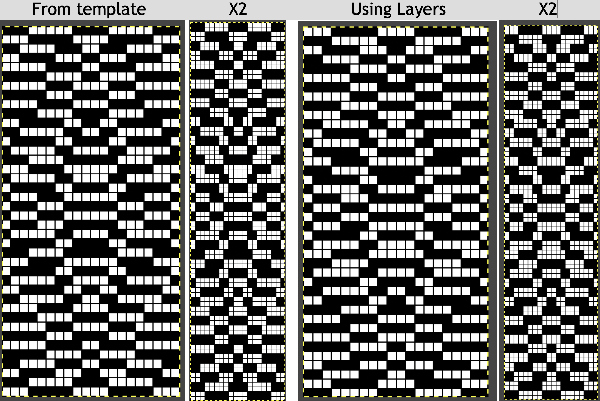 Using bucket fill for the ground in the second layer, as described in the video, the captured clipboard image can be very small
  Alternately, the initial design may be scaled X4 to 20 X 80 pixels
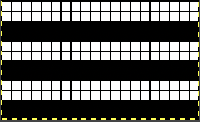
 drop the ribber


 What may be firing in one piece could provide a tube for insertions on either side of the knit.
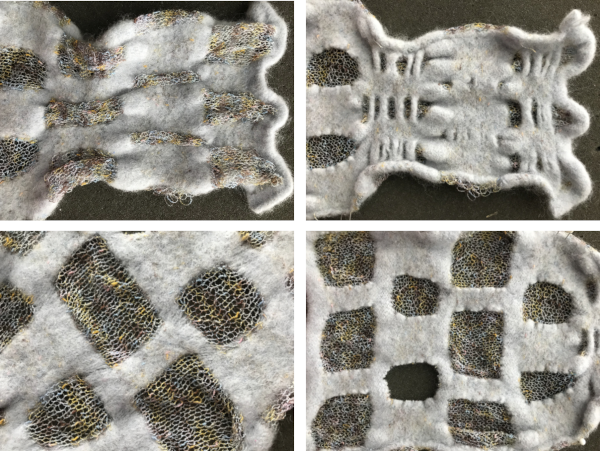
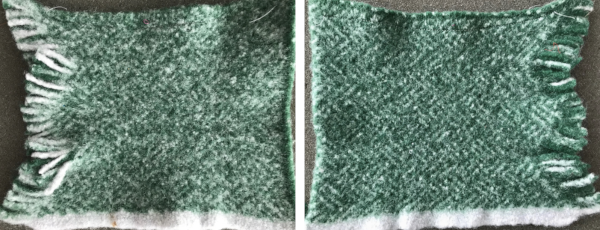 Creating blistered surfaces the easy way, leaf pattern variations: poly-cotton and raffia on the bottom, fishing line as the second yarn line on top. I have found the line for 6lb or fewer works best. The knit is flat.
 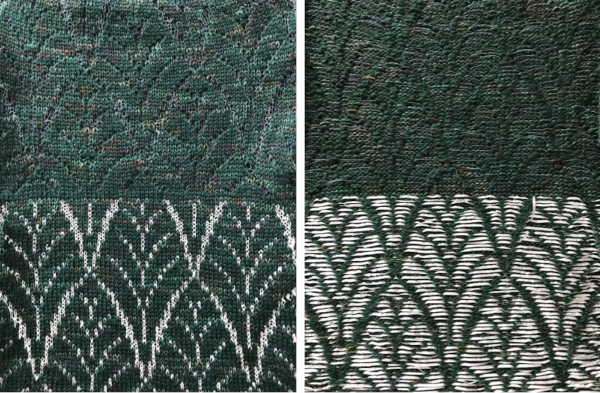 Felted rayon chainette and wool; when the main color is wool and the rayon renders the floats there is minimal blistering
 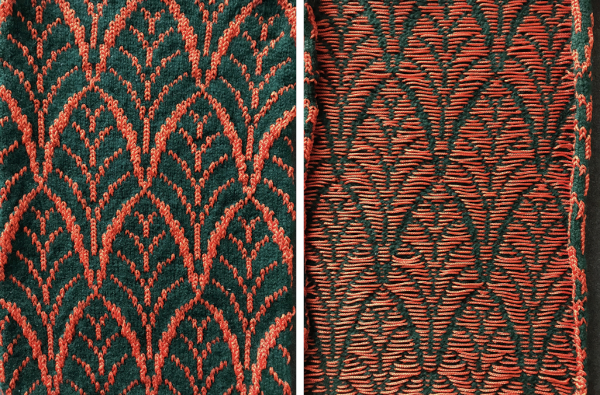 the result from reversing the yarn positions creates more bubbling
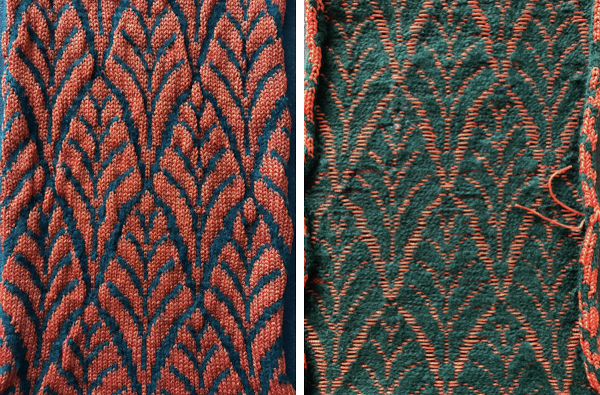 Here elastic is used as the second color in the thread lace setting.
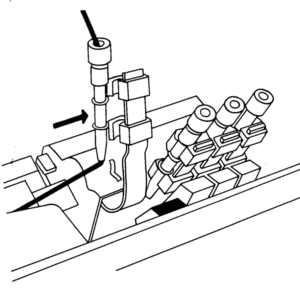
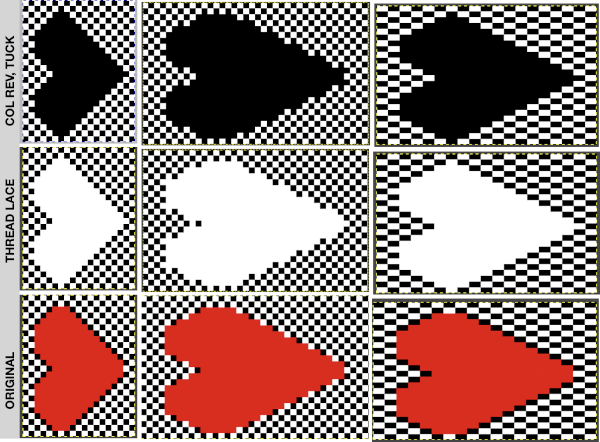
 The yarn positions in two color single-pass knitting, remain fixed in their relationship to punched holes. In fair isle patterning, the back feeder, usually labeled A, knits the ground on non-selected needles in the B position. The yarn (red) in the forward, B feeder, knits the stitches on needles selected to the D position which correspond to punched holes or black squares in a mylar, black pixels in a computer file for download. In thread lace, the back A position yarn knit both yarns together, while the forward B position yarn, red thread, knits the forward yarn/color, with the other yarn creating the single set of floats behind it.
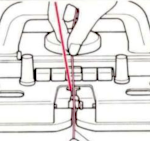
 In addition, large thin fabric shapes can be stiffened over enclosures to create permanent effects in sculptural pieces.
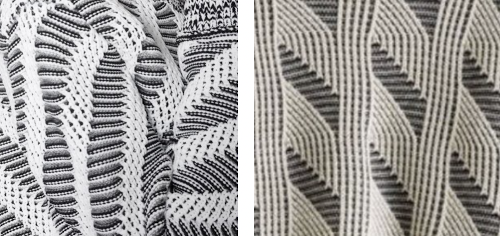

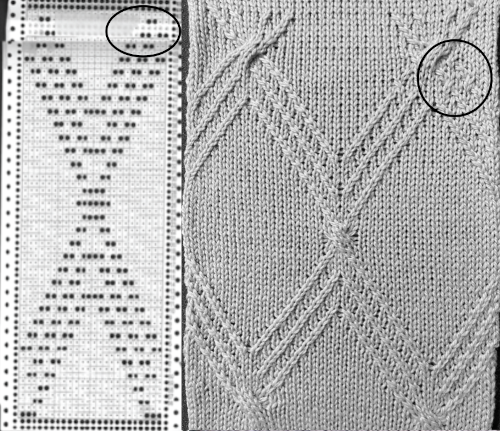
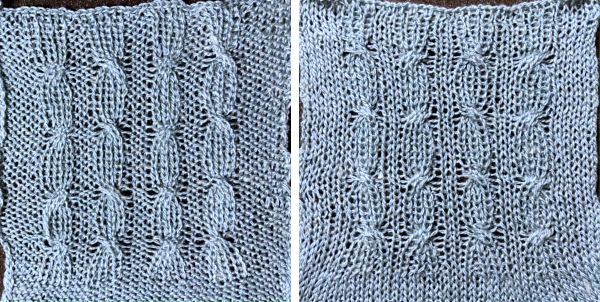
 A comparison to the mirrored original inspiration, likely knit in thicker yarns
 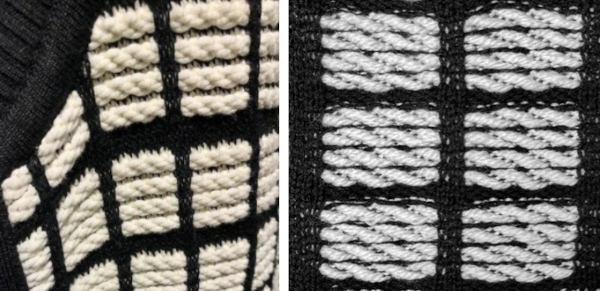 The knitting process: with any textured or very lacy knits casting on and binding off require special consideration.
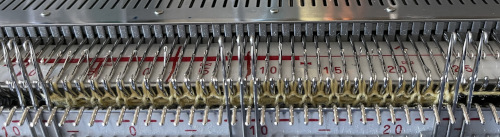 Read the first row of the pattern, cam set to KC1 to ensure end stitches are knit when patterning occurs only on the top bed.
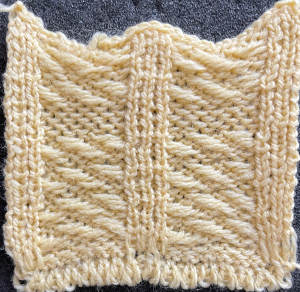
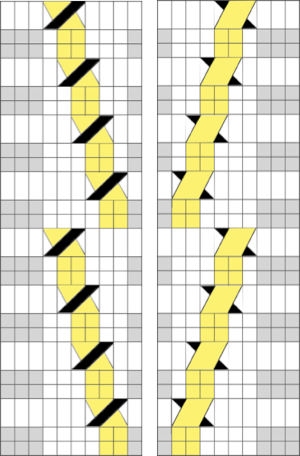
 The repeat is 8X8 and the above movement can be seen in the purl view.
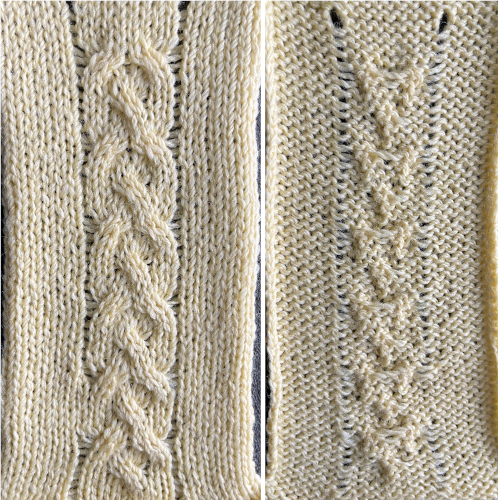 A spreadsheet table may be created to help with tracking multiple series of cables across a knit and their direction. It can contain as little or as much information as one wishes. Included here: the RC for possible crossings, and their direction on the purl side for machine knitting (reversed for hand knitting). Columns may be added including how many needles are left in or out of work between cable knit spaces or other info.
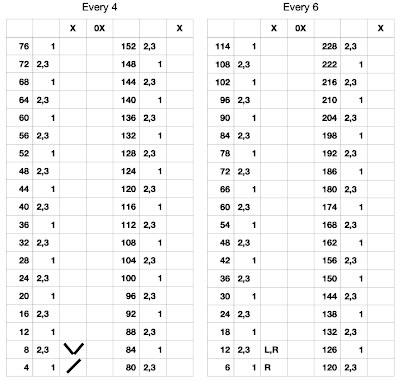
 Which leads to the topic of creating shapes by combining the repeats
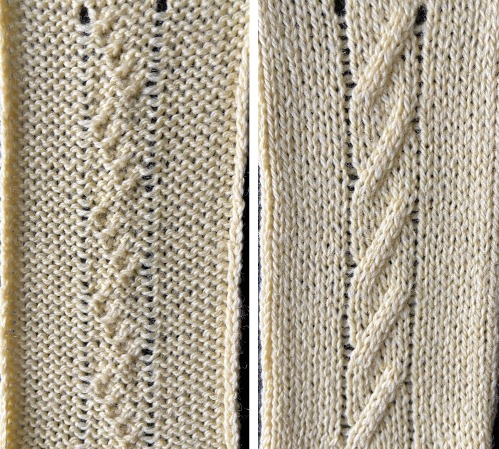
 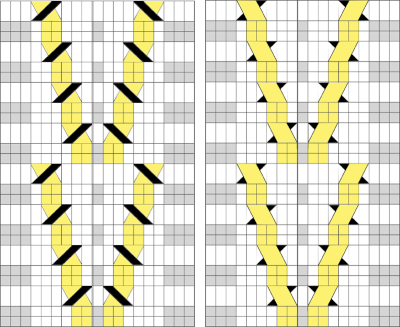 A brief effort containing at least 5 errors leads me to wonder about programming needle selection to help track crossings more easily and avoid mistakes. The center ladder here was latched up during knitting.
 If the start is on the top bed, stitches on the ribber may be created by picking up bars from the top bed
 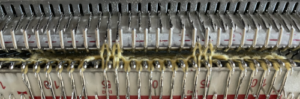 the yarn above was a 2/8 wool, which refused to cable on the ribber, and having the crossing was preferred to not
 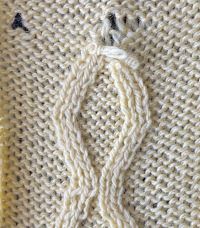 changing to a thinner wool-silk solved the problem.
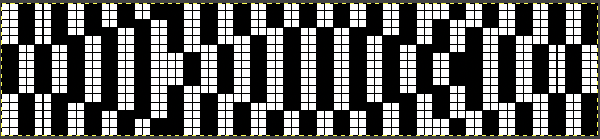
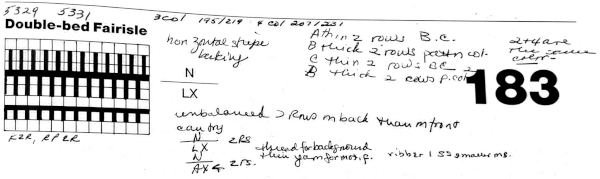
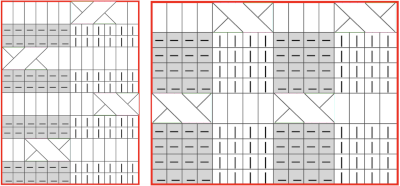
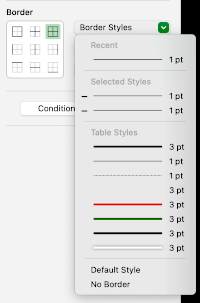
 In reviewing the post after linking to it here I realized the now marked punchcard error at its top. The amended longer chart reworked in Numbers is also added to the older post. It is shown here aside from its tiled chart, checking for alignment, a habit developed as my skill and comfort in using spreadsheets grew,
 It is possible to use the repeat working 1 X 2 stitch crossings for a very different look.
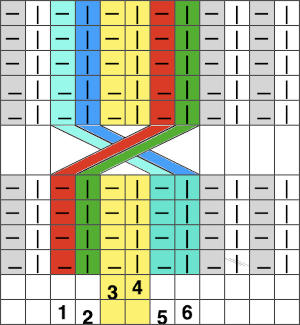
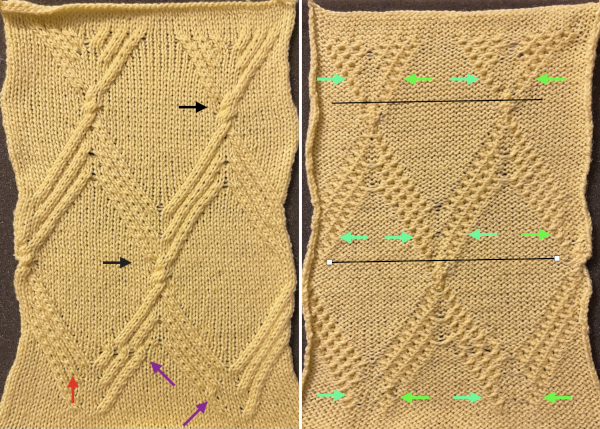 Assigning colors to crossings in a chart may be helpful or too much info depending on one’s perspective, the bottom of the repeat is on the right.
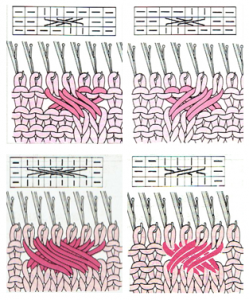
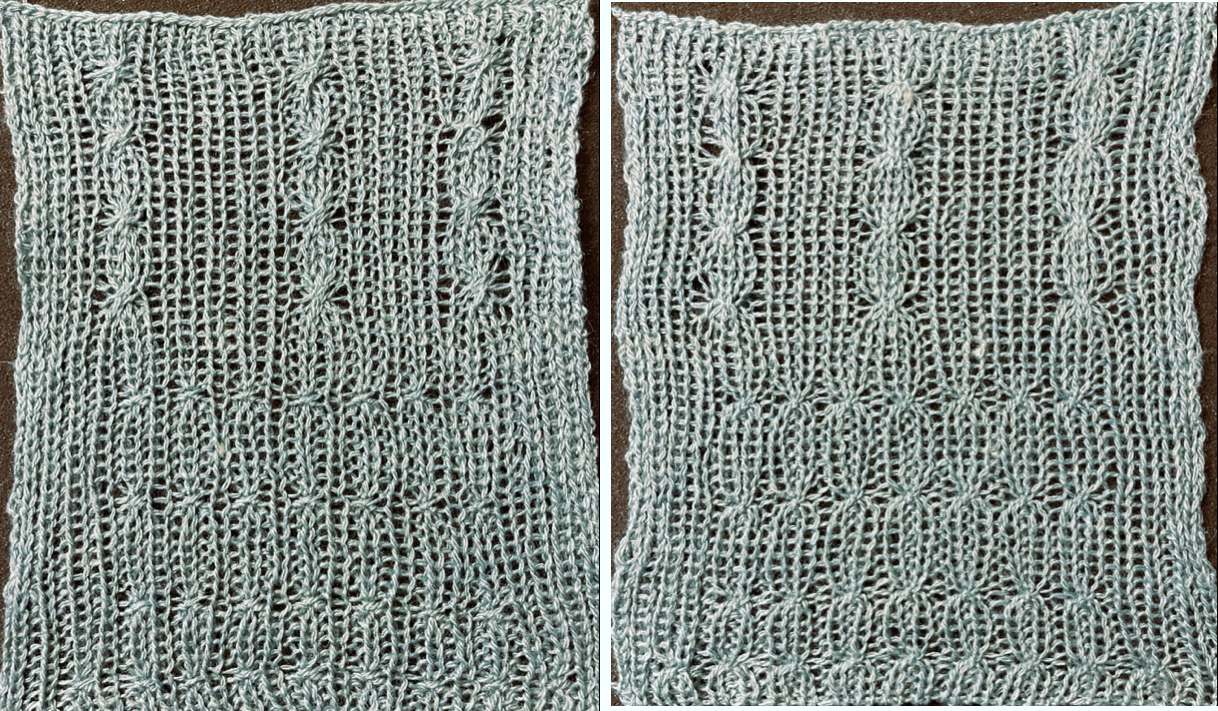
 In my first test crossings occur on both beds and on the same row. Even using the thinner blue yarn at maximum tension the transfers were hard to execute. I had more success when I added 2 empty needles between the vertical ribs and brought one on each side of each rib into work on the top bed prior to knitting the last row between transfers, creating a bit of extra yarn to ease the crossings.

 Trying out a simple repeat in smaller rib configurations will provide some idea as to whether the technique falls into the love of or not something to do simply because one can.
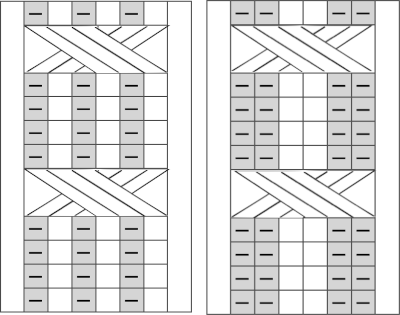
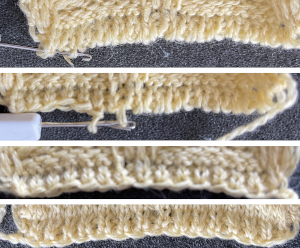
 the rib configuration set up
 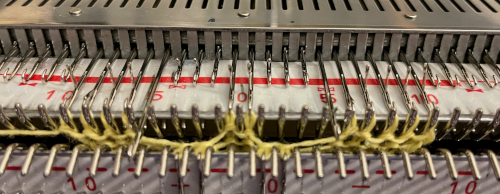 1. after 5 rows knit, bring an extra needle in work on the top bed to pick up extra yarn for the cross
 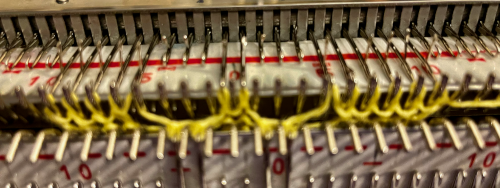 2. drop the extra loop, make certain the empty needle returns to A position
 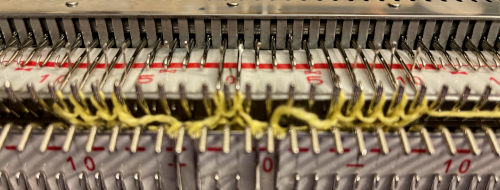 3. transfer all cable ribber needles to top bed
 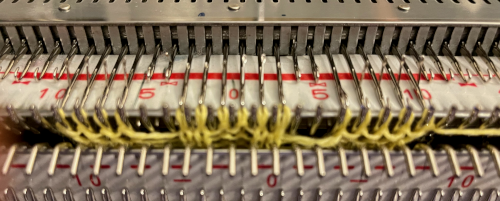 4. cross the stitches with two three-prong tools
 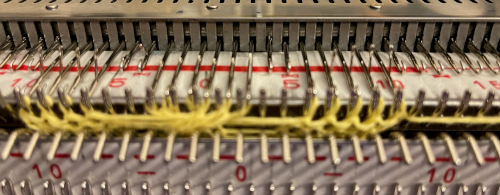 5. transfer stitches back down to the ribber
 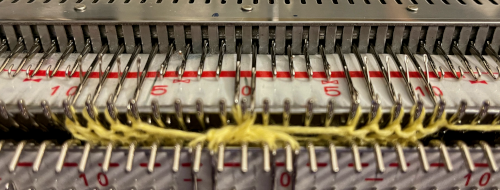 knit 5 rows, repeat steps 1 to 5.
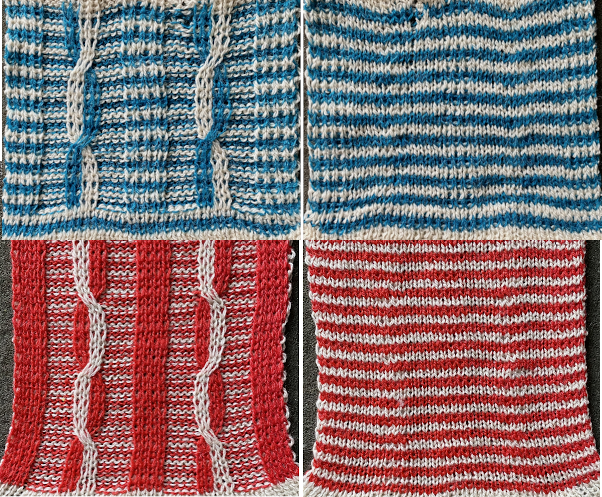
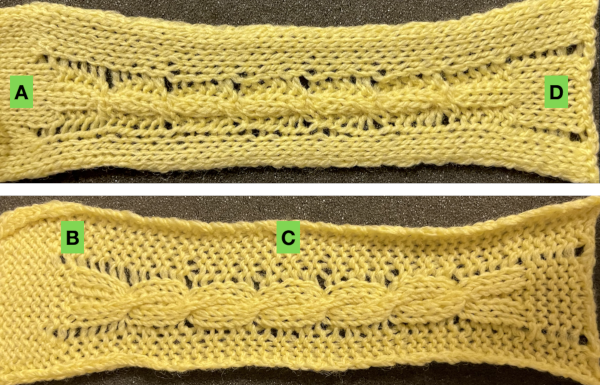 An attempt at a larger swatch using 1X1 ribs:
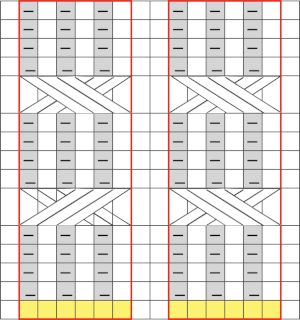

 the cable crossings using it were impossible, starting over with a thinner yarn at the same tension
 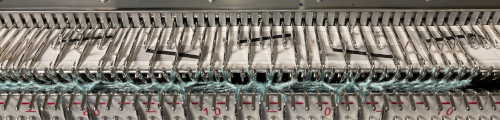 the ribber may be dropped after transfers up to the main bed, keeping stitches and crossings visible, making it possible to make corrections in any cables if they are needed before re-engaging the ribber and transferring stitches back down
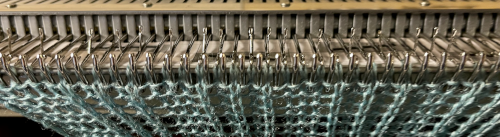
 In the above swatches, when any transfers were made to the top bed, after crossings, a row was knit before returning stitches to the ribber. The extra row may or may not be noticeable, depending on the yarn and colors used.
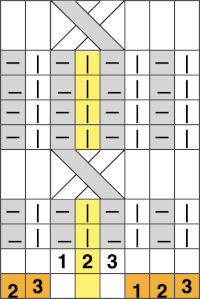
 The number of rows between crossings can vary. When the crossing row is reached:
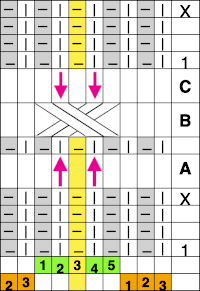

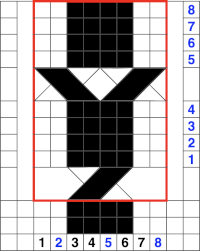
 Assigning colors to columns reveals that stitches are not moved onto the same stitch type when moved over a single, undisturbed, fixed center stitch.
  Shifting the needle arrangements when cabling, moving across a center column of two stitches that remain fixed on the main bed, the cable direction as it would appear on the purl side on the left, the knit side on the right is straightforward here:
 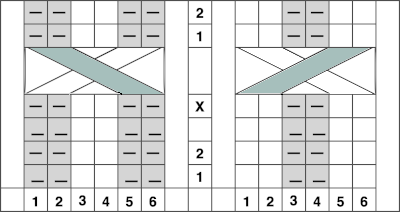 I found the above impossible to knit, even with ladders for extra slack, and the swatch stopped when the yarn broke
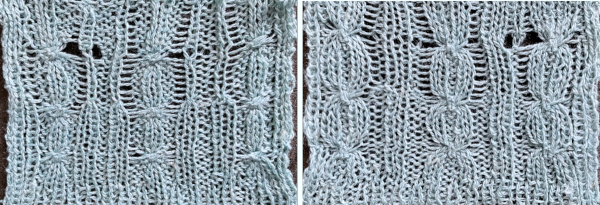
 There appears to be enough slack produced in the formation of stitches between beds to make the planned crossings possible.
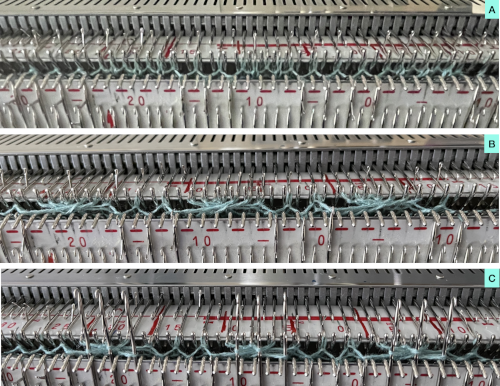
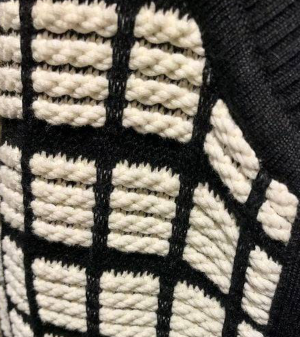
 From a Brother pub, small crossings for a smocked effect
 Adding and removing rows in the tables or even changing colors is easy and quick in a spreadsheet, tiling in repeat with scaled screengrabs provides a quick reference for possible improvements/corrections before any actual knitting takes place
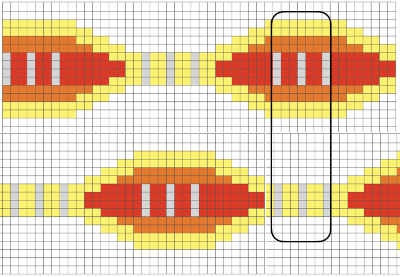
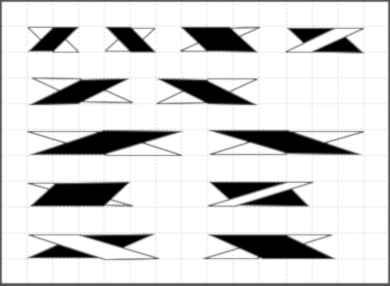
 A quick way to imagine variations of the same pattern is to choose segments of the swatch photo and alter their direction and/or placement
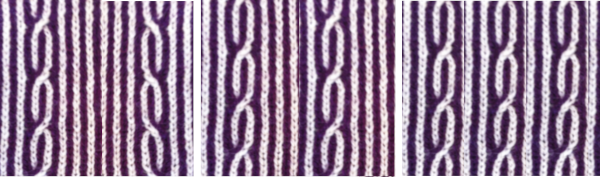
 In machine knitting, one is looking at the purl side, and the ability to move stitches is often limited by the fact that their placement on a metal bed is fixed distances apart. Simpler repeats can be executed as isolated vertical bands on solid color or striped or even FI grounds, adding the ribber for even more complexity in execution.
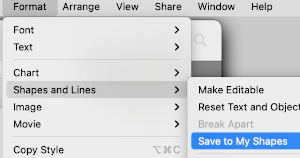
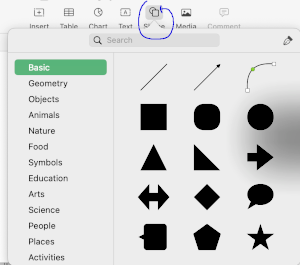 then click on the shape or drag one onto the sheet to add it.
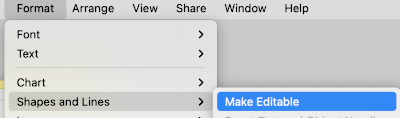
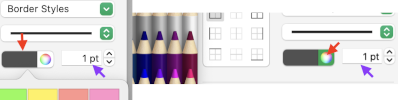
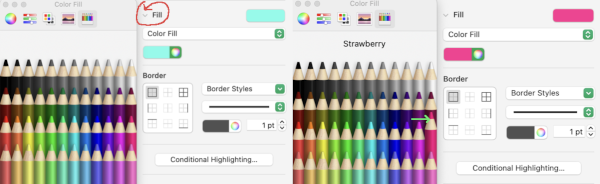 Creating the first cable crossing shape: choose the square from the basic shapes, if the first plan is to work across 3 cells, change its size to the width of 60 pixels, 20X3, and single height of 20 pixels, also changing colors if desired. To do so, left-click on it, uncheck constrain proportions, and change values to desired ones
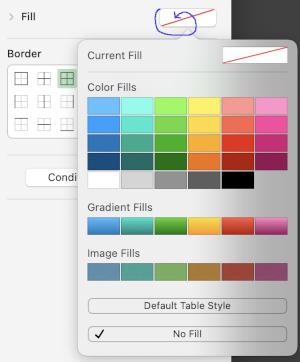
 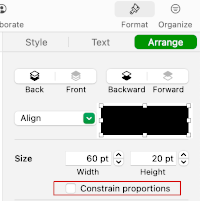 Change its color
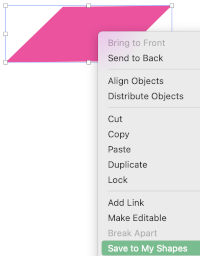
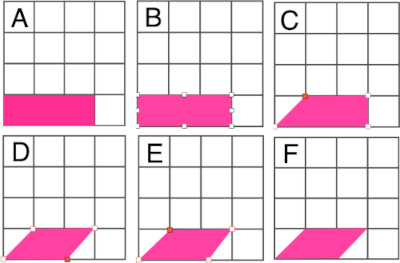 Right-click on the final shape, copy it, and paste it several times on the sheet away from the table.
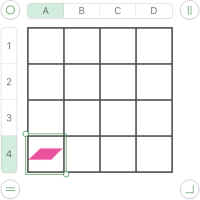 To use the shape, left-click on it, drag it into the desired position.
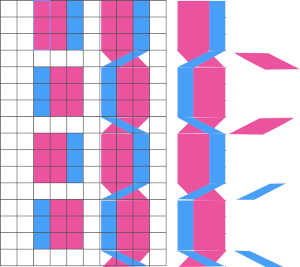
 The combined images may be created in a paint program such as Gimp and the resulting file, in turn, may be used in a spreadsheet. Pngs can be custom filled with any color of your choice in Gimp or its equivalent
 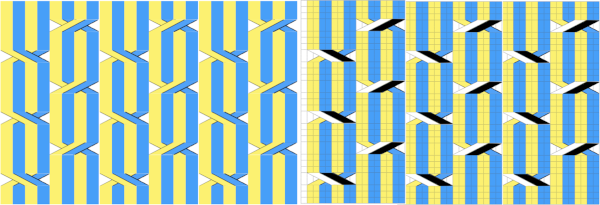 Fair isle repeats: when working cables in FI, in addition to tracking cable directions, the needles must be placed in the proper needle positions B and D for correct patterning to continue.
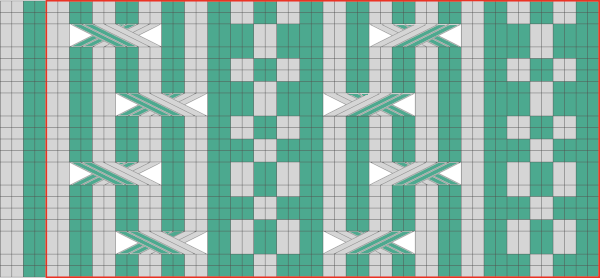 Fair isle on mixed striped ground
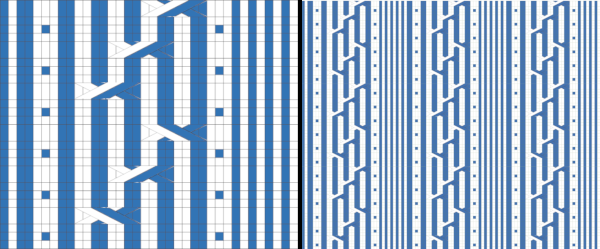

 An expanded MK illustration
 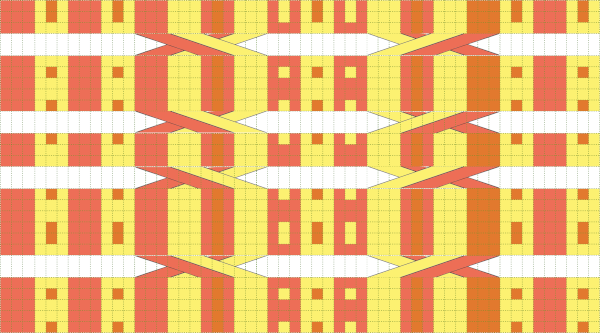 A FI sample shared in
 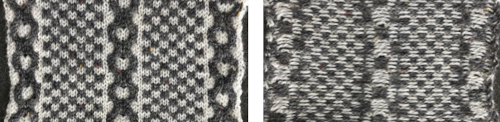 From
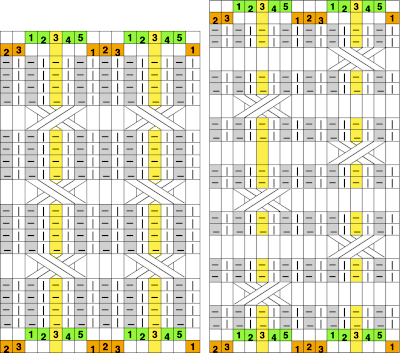
From 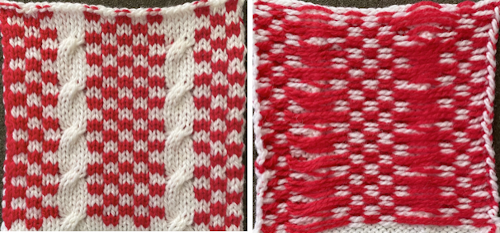 When using fair isle patterning as a guide to forming cables on the machine, crossing directions matter more since one is no longer simply placing color on like color: this chart transitions from the original idea to the placement of the crossings, a full repeat with their direction reversed based on which color is wanted to travel to the knit side is drawn, and on the far right, the look of the final FI repeat
 Adding a third color, possible intarsia knit as all over pattern or isolated as a panel. Even in hand-knit, the latter may be in a contrasting gauge and joined to pieces of the garment after their completion.
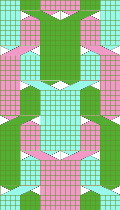
 These repeats may be worked as vertical panels between rows of plain knit or rib
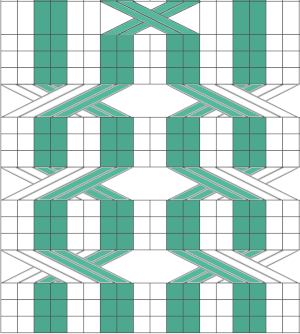
 Symmetry is not always needed,
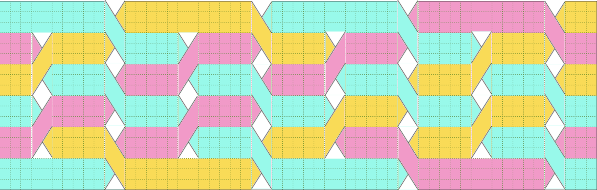
 MK, adding the ribber: one of the things that may lead to confusion is the use of the term every other needle knitting. If one is working on every needle on both beds, the needles on either bed are centered between those on the opposite one, thus patterning occurring on either bed that becomes EON. Colors are used to track the movement of stitches, not colorwork, which happens on the same needles, either bed, or the plaiting feeder may be used to produce the illusion of additional colors.
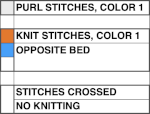
 Part of an experimental swatch
  In attempting brioche on the machine the color changes happen every 2 rows, so a minimum of 4 rows or a multiple of 4 rows are planned between moving any stitches. Although the same color will be used in the crossings each time, using 2 colors for cable segments may make the chart easier to follow
 This placement is tested and kept in mind in other explorations.
 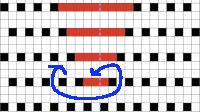 Using a spreadsheet: the same sort of chart may easily be created quickly in Numbers. In this instance, my table is still planned for 24 stitches in width, but 54 rows in height. An extra column is added and used on the far left to mark rows to be hidden. Beginning at the bottom left two rows were filled in a different color, the third row is left blank, all 3 cells are selected. When multiple cells are selected, depending on which side of the selection box one hovers over with the mouse, a yellow dot/ handle will appear.
 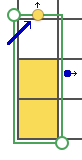 The tool acts on the selection. Clicking on it and dragging it with the mouse will, in this instance, repeat the selection until the mouse is released. This may be done in any direction and quickly fills in whole tables. It is not necessary to perform this extra step before hiding rows, but I find having that extra color makes it easier visually, especially when working on long repeats. It also makes for easy return to selection if hiding rows is done in shifts.
 continue to the bottom of the chart, and under the Table menu, choose to hide 36 rows. With rows hidden the mesh repeat shrinks from 6 rows to 2.
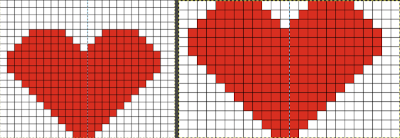
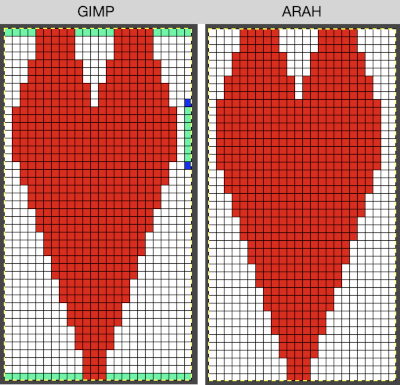
 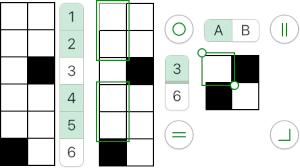 A new 4 cell table is created. The 4 interior cells were chosen, copied, and pasted in the lower-left corner of the reduced height table. Once pasted, selecting the repeat again will allow one to use those yellow handles to fill the contents first toward the top, then to the right. The image on the left shows the results, with only the numbers for the unhidden rows shown on the left. In turn, the heart was the pencil tool to draw it using a third color in the chosen location.
 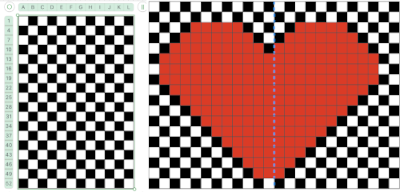 The unhiding rows function produces the expanded repeat with all knit stitches in red on the mesh grid ground. The column with the yellow cells is deleted before converting the Numbers repeat to an electronic or punchcard, the how-to discussed in other posts. Comparing the hand-drawn heart in Gimp alone on the left, to the spreadsheet results on the right, there appears to be a difference in the starting rows, and in only one other row, two black cells appear that can easily be altered in either repeat. Brother machine knitters would need to shift those 2 blank rows at the bottom of the repeat on the right to its top or to to start lace patterning on row 3.
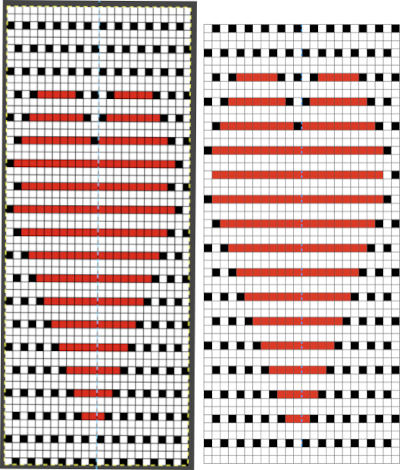
 More choices exist, continuing to place the heart 3 rows up from the bottom, and not using multiple layers.
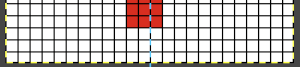
 The layer-to-alpha image may be saved as a png with transparent background for any future use.
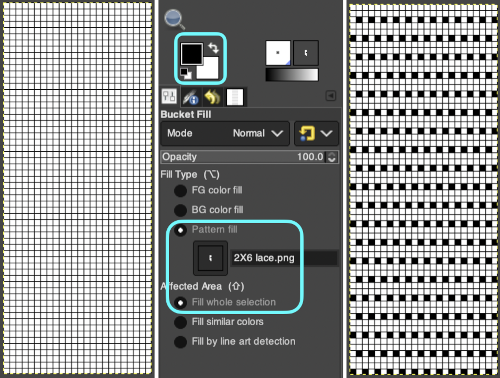
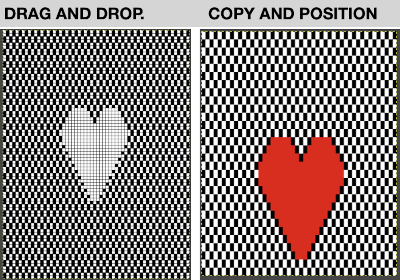
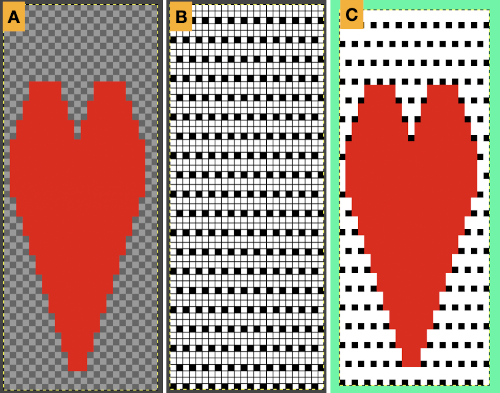 Even easier, working with the full-color, white ground heart repeat placed 3 rows up from the bottom, A, set red as the foreground color, and then use the bucket fill tool B to fill its ground with the mesh pattern, seen in C
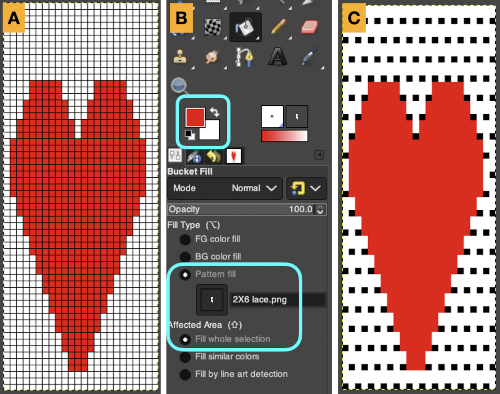 Comparing the all in Gimp Drawing to either of the last 2 patterns, two differences appear, an extra row of transfers before removing transfer stitches to start the heart shape, and those 2 extra black pixels/eyelets
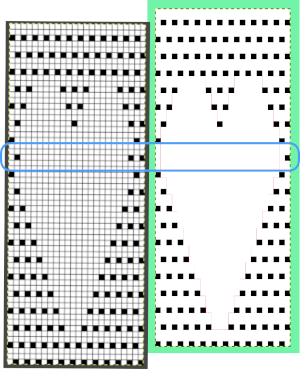
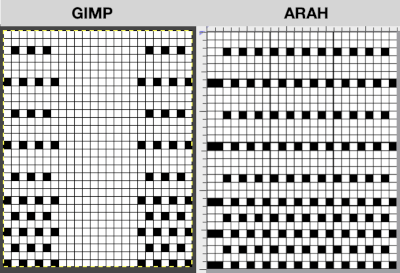
 Developing brick repeats or half drop is possible with offset and brushes in Gimp, but, to my mind, easier in Arah. Using the Arah drawing in repeat, the design is now 24 stitches wide by 120 rows high in a brick arrangement offset by 12 stitches.
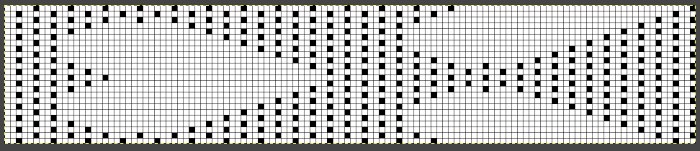
 The same heart, in half drop repeat, offset by 30 rows, now double wide, 48X60, suitable only for an electronic machine
 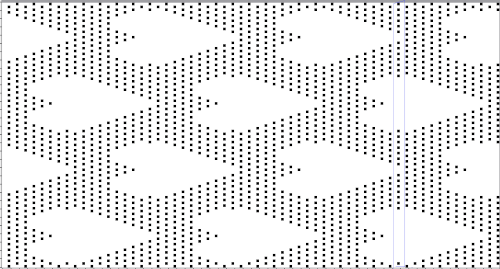 Changing the background grid for other stitch types: the heart is rescaled for use by 2 or 4 times in height. Again, the differences between Gimp’s incorrect scaling, A, and the Arah drawing in repeat, B
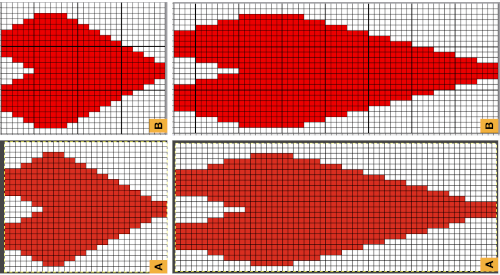
 Possible applications
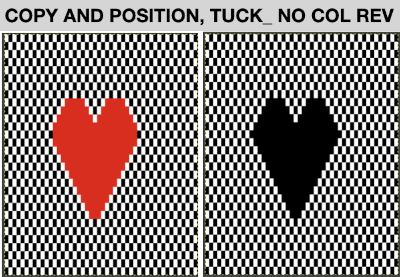
 This begs the question of working on larger images. For use on a lace mesh, simpler designs apart from overall size are best, but if a mesh base is not your favorite fabric or goal, tuck, slip stitch, thread lace or even fair isle patterns may be created with more overall flexibility, using the same principles on backgrounds.
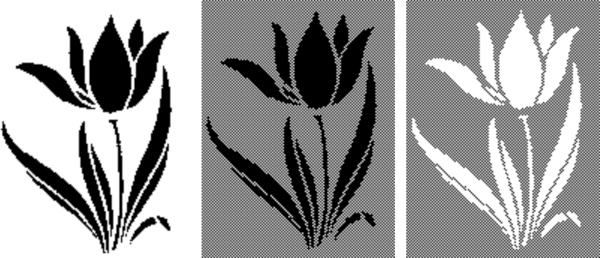
 This is the first attempt at a partial repeat test proof of concept. I have been telling people serger monofilament withstands ironing and light pressing, and periodically I test advice I have given formerly. To start with, the darn monofilament, which I even used in double bed garments, but nearly 2 decades ago, refused to feed properly or at all. Because it is nearly invisible, my knitting started with it pulling too tight, and I wiped out 12 needles out of 72 in different places on the needle bed in a single carriage pass. Determined, I sorted how to hand feed it, got the rhythm, complete a swatch. A marks an error I made in loading the second track in img2track, resulting in an added, wrong pattern row. The holes, B, C, and D were nonexistent until I tried flattening the fabric a bit with an iron, and the monofilament simply melted in various places.
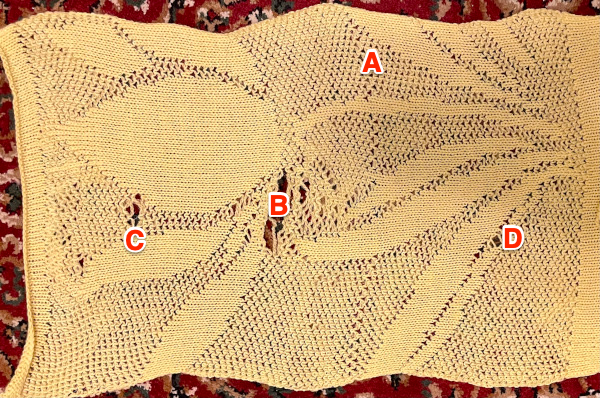
 I had interesting issues with having needle selection visually appear correct throughout, and the pattern itself appearing correct when checked at 1800 magnification. While the smaller sample was accurate until the filament began to melt, here I had 2 needles not knitting the yarns alternately but together, and an odd change in the center that looks as though yarn selection in those areas was reversed. The thicker yarn here is cotton, the thinner rayon. Troubleshooting is required. Unplanned tucking is a sign of damaged needles, but because the second yarn used herd is so thin, the effect was not obvious until the vertical pattern in the same area on the bed became apparent.
 The cam buttons and undercarriage were oiled. The first selection tests involved programming this
 The finished test swatch: because of the disparity between the number of all knit stitches vs patterned ones where one of the colors is slipped on every pattern row for every other stitch, the fabric shrinks dramatically when off the machine. The knit areas pop out a bit, and a lengthwise tug makes enhances the effect
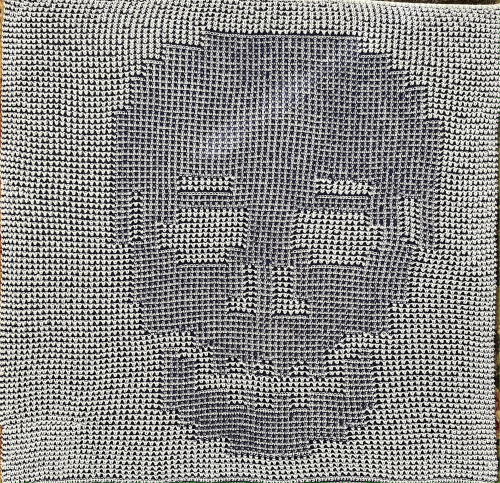
 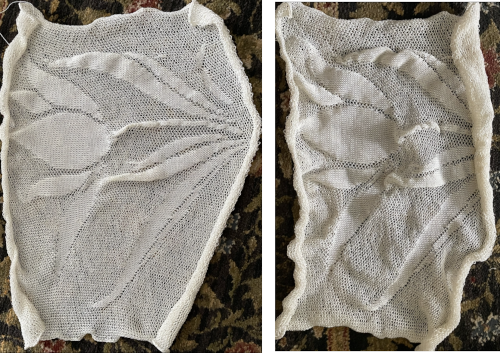 If the goal is a flat fabric panel, then blocking is a necessity. Here the piece is casually pressed, no pins, letters point out issues:
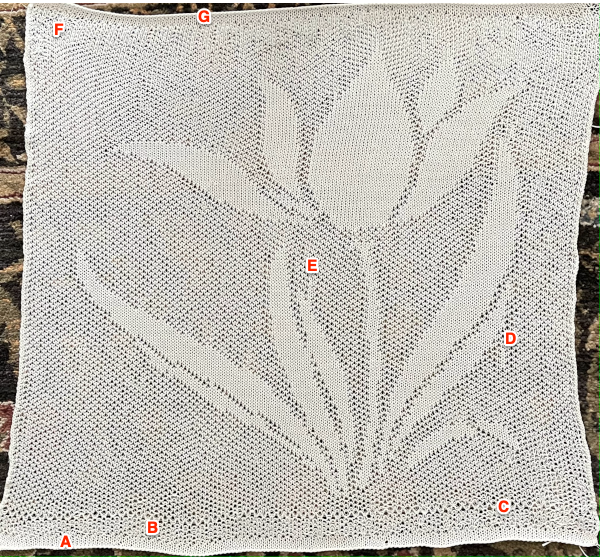 The mesh effect was noticeable after resting, the piece measures 25 inches in width by 25 inches in height.
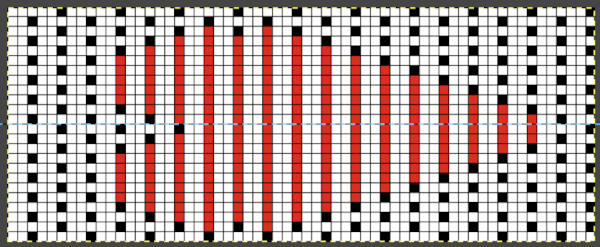
 a new file was opened, bucket-filled with the ground 2X2 pattern, the above was copied and pasted in the chosen position, resulting in this
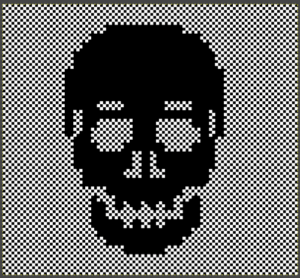 The 100X92 png
  which in turn needs to be color reversed for use as a thread lace pattern
  A grid of 50 pixels in width and height for the image can be configured and shown on top of the image to check the size and placement of the symbols.
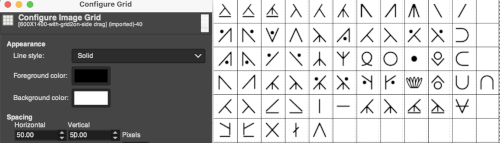
 A sample cable with knit columns added to each side, colors, more symbols, and widths of repeats can all be adjusted. If the images are saved in the full size as pngs, the grids are lost. To retain the grid, the image needs to be screengrabbed and in turn rescaled to the desired size.
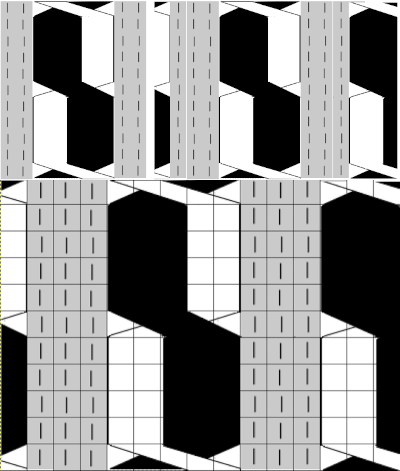 more copy and paste to visualize a larger repeat
 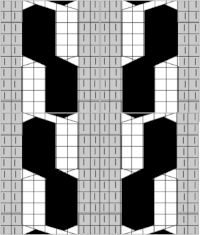 An added note on Gimp: my blog posts are now created on an iMac with OS12 and M1 chip. Rosetta needed to be installed for the program to run. I have found some issues with the pencil tool not working at all or properly or commands no longer working after several steps. Quitting the program did not eliminate the problem. What appears to solve the issue is to go to Preferences Folders, and then to choose the reset brush folder command.
 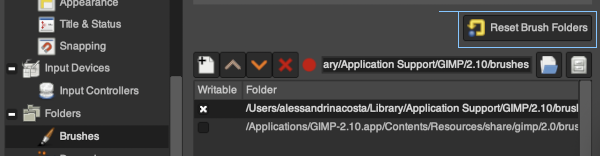 Of course, since the program is a new install, my previous collection of custom brushes will need to be recreated.